

Page 1

COLOUR TELEVISION
MODEL No.
DTE-28_
INSTRUCTION MANUAL
If you require any technical assistance or advice on this product, please
contact your catalogue help-line number.
Page 2

Page 3

CONTENTS
Features on the television 3
The remote control buttons
Television mode, Teletext mode 4
Setting up your television
5
Safety and care, Make the connections
5
Putting batteries in the remote control
5
Supply power, Switch on
5
Stand-by mode, switching off, Automatic power saving feature
6
T uning in the programmes (ATSS)
7
Picture interference from other equipment
8
Menus for controlling and setting up the television
Picture controls, Sound controls
9
The install menu - automatic tuning (A TSS), programme editing menu and
manual tuning
10
Manual tuning
10
Current programme number, TV system selection by country, T uning by broadcast or
cable channel number, Fine tuning, Tuning by frequency , Channel name, Programme
storage number Copying a programme to another number
10~12
Editing programmes
13
Move a channel, Delete a channel, Skip
13
The features menu
14
How to display the features menu, Language - for the on-screen menus,
Picture format - normal or wide-screen, Child lock, Clock
Wake time and wake-up programme number
14
How to use the wake-up timer
15
The sleep function
16
The mode button
16
T eletext
17~18
The scart and A V sockets
19
Selecting the scart channels, Video and RGB, S-video or S-VHS
NTSC and tint control
19
Automatic video switching, Equipment that can be connected.
19
Connecting other equipment-about various combinations of equipment
20
Using and caring for your television
22
Position
22
Use, Position, Moving the television ,coloured patches and magnetism
22
Use, Position, Ventilation, Water and Moisture, Stands and supports, Cleaning, Good advice
Electrical safety warnings 22
Specifications
23
Notice
Although we have made every effort to make these instructions are correct, we cannot
accept responsibility for errors and or missing information which are due to circumstances
beyond our control.
2
Page 4
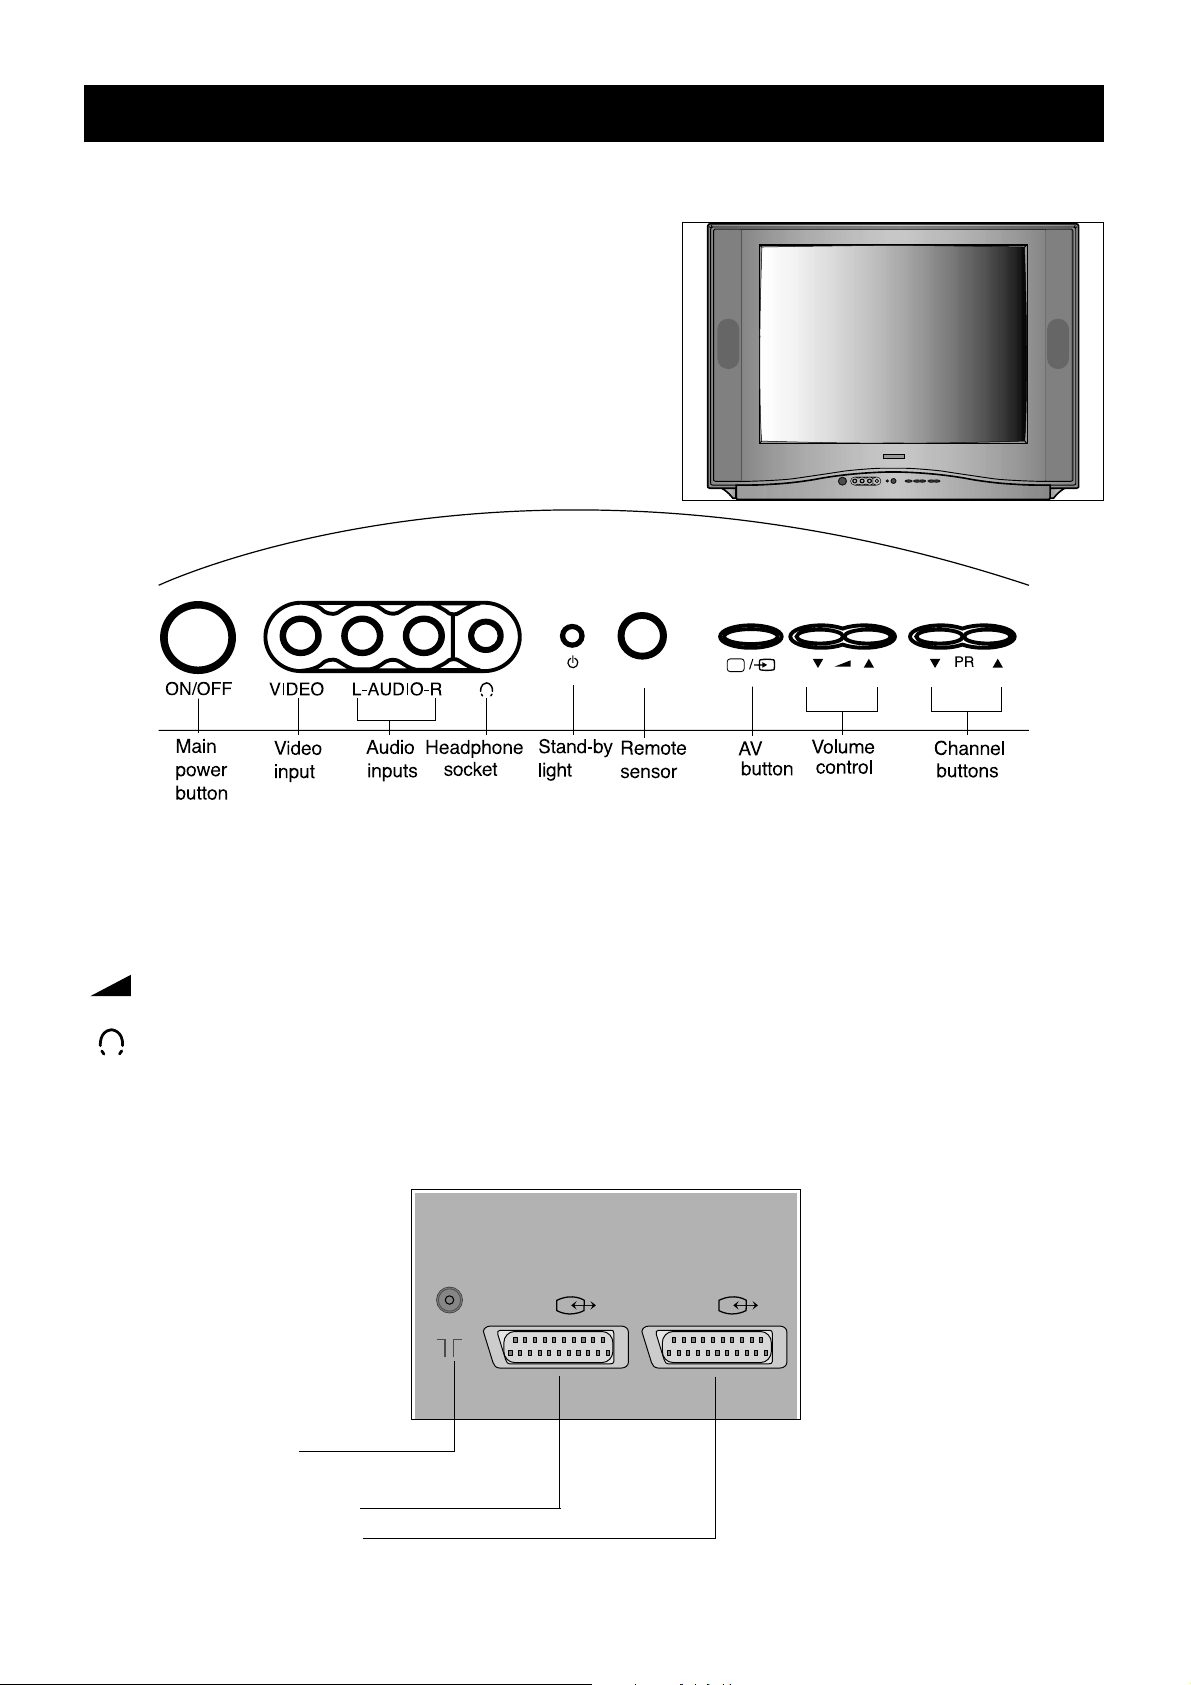
•You can get to the controls on the front of the television by pushing the triangle at the top centre of
the cover flap. The flap will fall open. Push the flap again to close it.
The channelVbutton increases the programme number and the channelWbutton decreases it.
The volume controlVbutton makes the sound louder and the volume controlWbutton makes the sound
quieter.
The headphone socket takes a 3.5mm diameter plug.
Warning! Prolonged listening through headphones at high volume may damage your hearing.
PR
Features on the television and the remote control
Features on the front of the television
Features on the back of the television
3
Aerial socket
Scart AV socket (1)
Scart AV socket (2)
AV1 AV2
ANT
Page 5
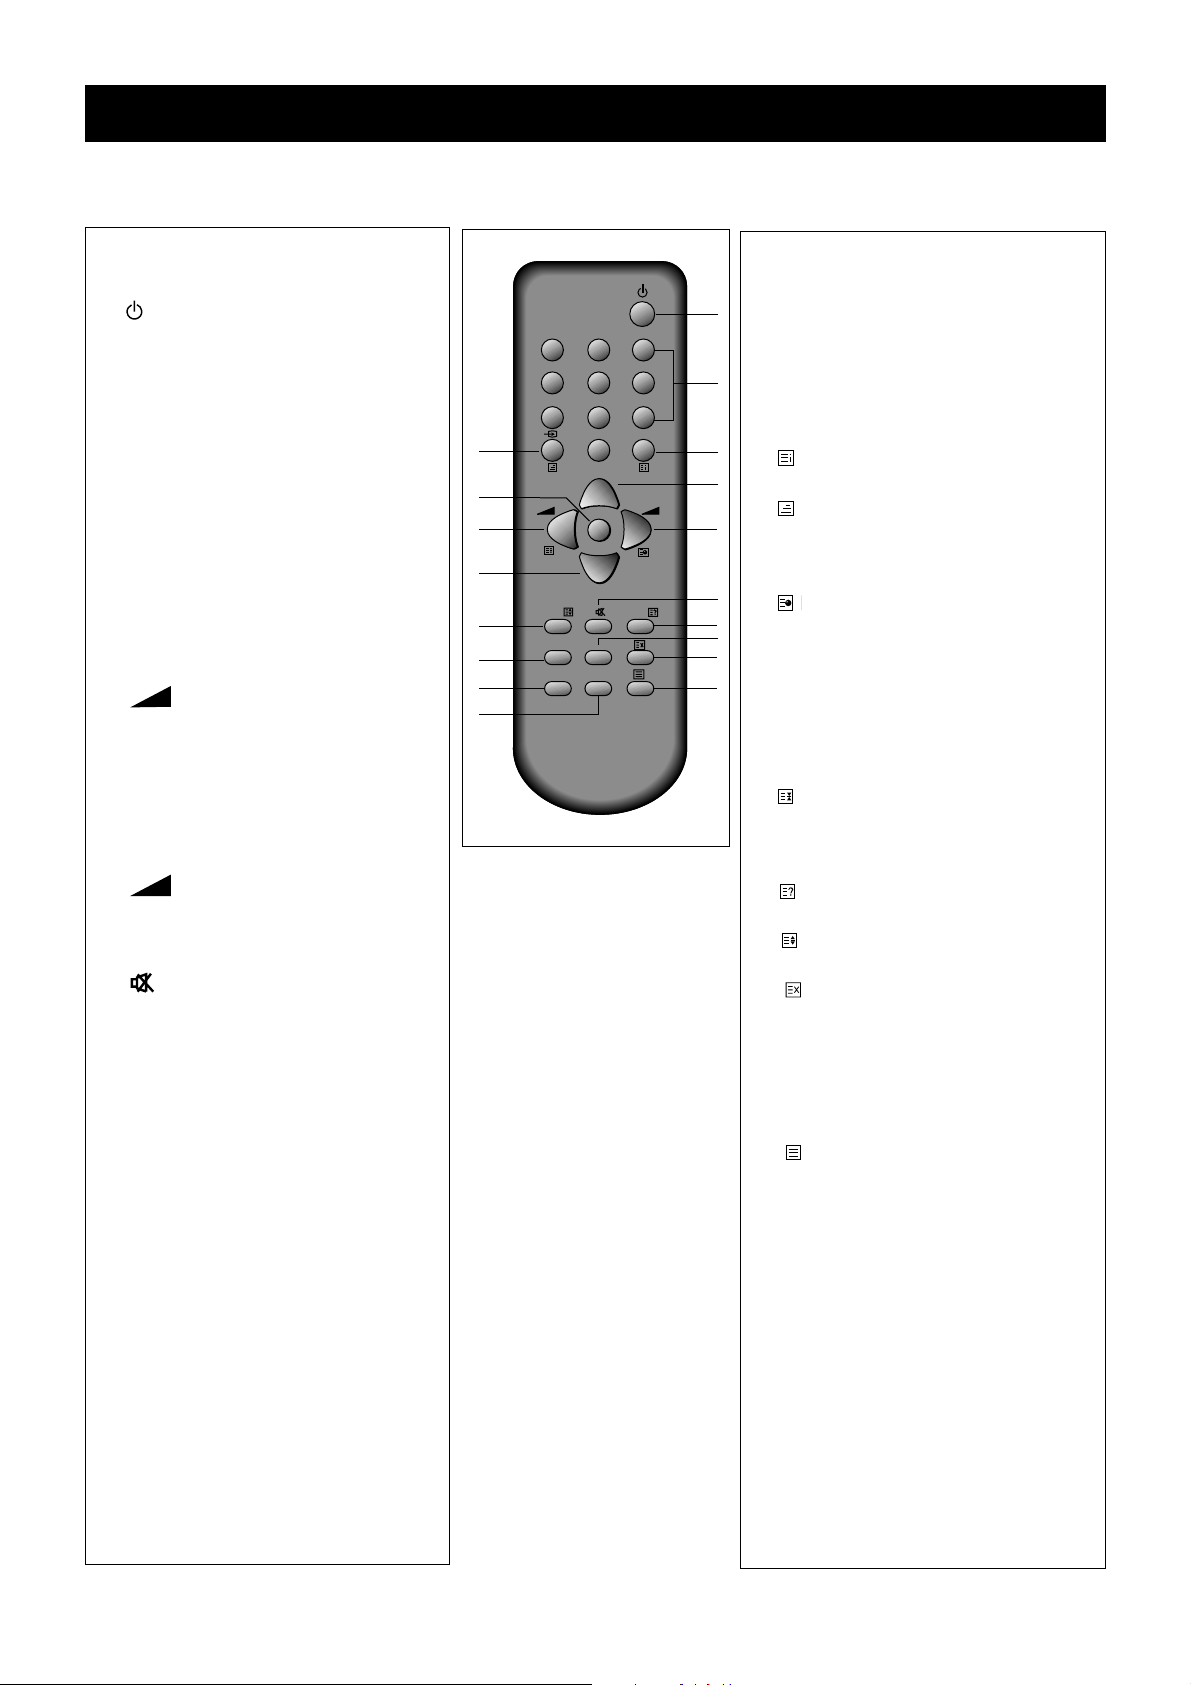
Teletext mode
Only the buttons listed below will work
when the television is in teletext mode.
1 Stand-by button.
2 The number buttons are used to
select teletext page numbers.
3 The index button displays the
teletext index page.
4 The mix button shows the
normal picture behind the text.
5 Each press of this PR button
increases the page number by one.
6 The sub-page button is for
selecting a particular sub-page.
7 The MENU button switches
between brightness and volume
controls and fast text headings
while you are reading teletext.
8 Each press of this PR button
decreases the page number by one.
9 The hold button prevents the
teletext page you are reading from
changing.
10 Sound mute button.
11 The reveal button reveals and
hides answers to quizzes.
12 The size button changes the
size of the text on the screen.
13 The cancel button displays the
normal picture but leaves teletext
mode working.
14, 15, 17 and 18 coloured buttons
select from a list of headings
which have the same colours as
the buttons.
16 The teletext button switches
between teletext and normal
television modes.
See pages 17 and 18 about
teletext.
The remote control buttons
The remote control buttons
4
Television mode
1 The stand-by button switches
the television on or puts it back on
stand-by (page 6).
2 The number buttons are mainly for
changing channels.
3 NORMAL means this button
selects different picture settings
(page 9), OK means it confirms
choices in the on-screen menus or
stores a setting (page 9).
4 b This button selects audio and
video (AV) inputs (page 19).
5, 8 The PR buttons change the
programme number up (button 5)
or down (button 8) and select
controls in the on-screen menus.
6 The volume increase button
makes sound louder or changes
settings in the on-screen menu
controls.
7 The menu button displays on-screen
menus for tuning in programmes
and adjusting sound, picture and
special feature controls (page 9).
9 The volume decrease button
makes sound quieter or changes
settings in the on-screen menu
controls.
10 The mute button turns the
sound on and off.
11
The recall button turns the programme
information display on and off.
12
The SLEEP button sets the television to
go on stand-by after a certain number
of minutes(see page 16).
14 MOVE, 15 SKIP and 17 DELETE
buttons are for editing the programme list.
18 The MODE button allows you to
choose the type of sound (see
page 16).
Buttons 13 and 16 are only used
for teletext
1
123
456
789
NORMAL/OK
MENU
SLEEP
0
PR
PR
PR
RECALL
MOVESKIP
MODEDELETE
4
7
9
8
12
15
17
18
2
3
5
6
10
11
14
13
16
Page 6
Setting up your television
5
1 Please read the safety and care information at the back of this booklet before you
connect this television to the electricity supply . Then follow steps 2 to 5 below.
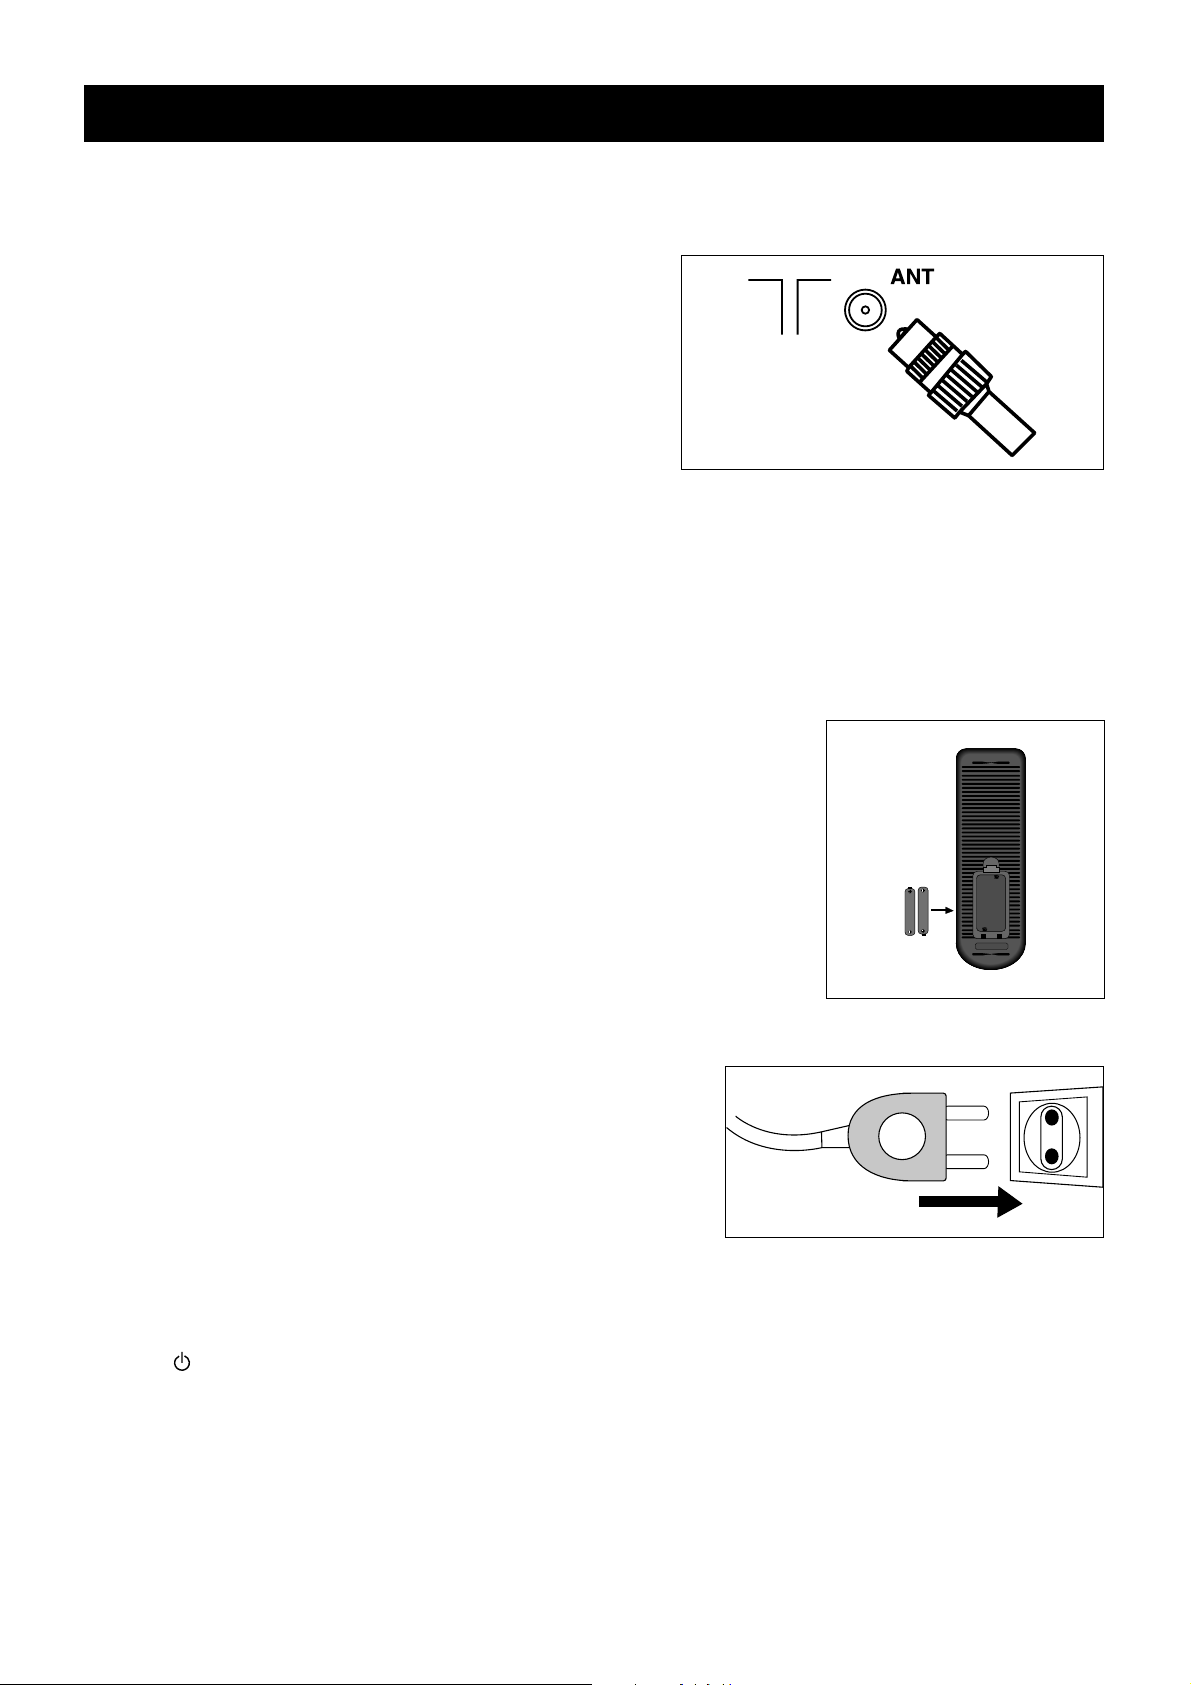
2 Make the connections
The aerial
Connect the aerial lead to the ANTg socket at the back of
the television. You will need a good-quality aerial to receive
teletext and nicam sound.
Other equipment
If you have a video recorder you will need to connect the aerial lead
to the video recorder and connect the aerial output lead from the video recorder to the television aerial socket.
Information about connecting aerials and other equipment is given in 'Connecting other equipment' on page 21.
The scart A V sockets
This television has two special interconnecting sockets called 'scart' (AV). You don't have to use these straight
away, but using scart cables gives you the best picture and sound quality and can cure some picture interference
problems. And you will only get stereo sound from other equipment if it is connected with a stereo scart cable. If
you have other equipment with scart sockets please read 'Connecting other equipment' on page 21.
3 Put the batteries in the remote control
Press the edge of the catch at the top of the battery cover towards the cover
and lift off the cover.
Put in the two batteries that came with your television (size AAA or LR3).
Make sure that the (+) and (-) marks on the batteries agree with the (+) and (-)
marks inside the battery compartment.
Replace the cover by engaging the two tabs at the bottom and pressing down
the end with the catch until it clicks into place.
• Throw away old batteries carefully. Do not put them on a fire.
• When you are using the remote control, keep within thirty degrees and seven
metres of the remote control sensor on the front of the television.
• Bright sunlight and some fluorescent light falling on the remote control
sensor may stop the remote control from working properly.
4 Supply power
Plug your television into the mains supply (220 to 240 volts, 50Hz).
5 Switch the television on
Switch the television on with the main power button (ON/OFF) on the television. After a few moments the
screen should light up.If it doesn’t, check the stand-by light on the front panel and if it is red press the stand-by
button once.
You are now ready to tune in the broadcasts you can receive, but please read 'Stand-by mode' and
'Switching the television off' on the next page before you turn to 'Tuning in the programmes'.
Page 7
6
Stand-by mode
Stand-by mode allows you to:
• turn the television on and off with the remote control;
• turn the television on with the wake-up timer; and
• turn the television off with the sleep timer.
When the television is on stand-by, the stand-by light comes on red.
The television uses little power when it is on stand-by, but you should
switch it off at the main power switch to save energy and be safe
when you are leaving the television for a long time.
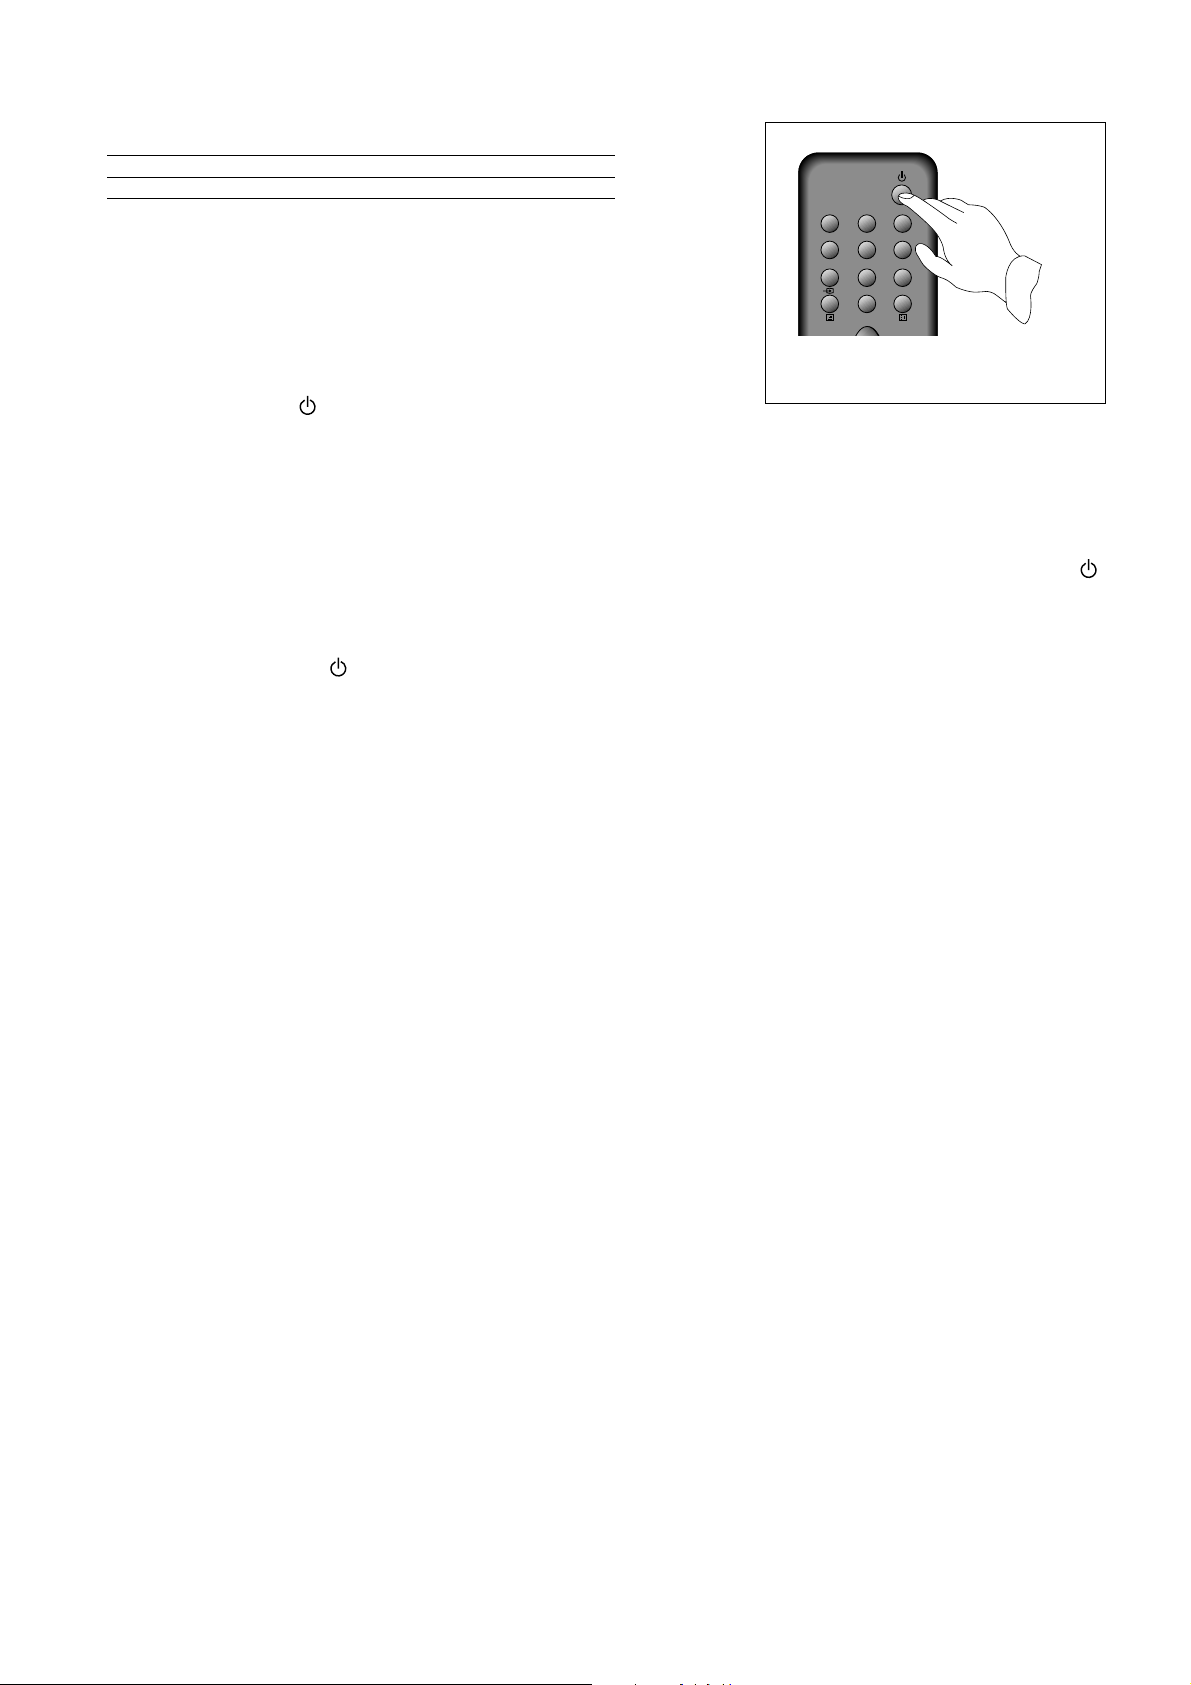
When the television is on stand-by you can switch it on by pressing
any of the following buttons.
The stand-by button .
One of the number buttons 0 to 9.
One of the PR buttons on the remote control.
The PRVor PRWbutton on the front panel of the television.
When you switch the television on, the stand-by light will change from red to green and after a few seconds
the screen will light up. If you want to put the television back on stand-by, press the red stand-by button
on the remote control again.
Switching the television off
Press the red stand-by button on the remote control to put the television back on stand-by, or press the
main power button to switch it off completely.
Automatic power-saving feature
If no signal is received through the aerial cable or from any external equipment, after about thirty minutes
the television will automatically go on stand-by.
123
456
789
NORMAL/OK
0
PR
Page 8
Press the OK button to display the INSTALL menu.
• Make sure the country listed against 'ATSS' is the
country you are in.
If you need to change the country, press one of the
volume
()
buttons until the correct abbreviation
shows.
1 Make sure you have followed steps 1 to 5 under 'Setting up your television' and read 'Stand-by mode'.
2 If you have a video recorder connected with the aerial lead, switch it on to produce a test picture, or play a
video tape.
3 If you have a satellite receiver (or any other piece of equipment as well as the video recorder) connected
with the aerial lead, make sure that it is plugged in and that it is on stand-by.
4 Switch on the television. If the screen does not light up, please check the previous sections 'Supply power',
‘Switch on the television’ and 'Stand-by mode'.
7
Tuning in the programmes
Before you start
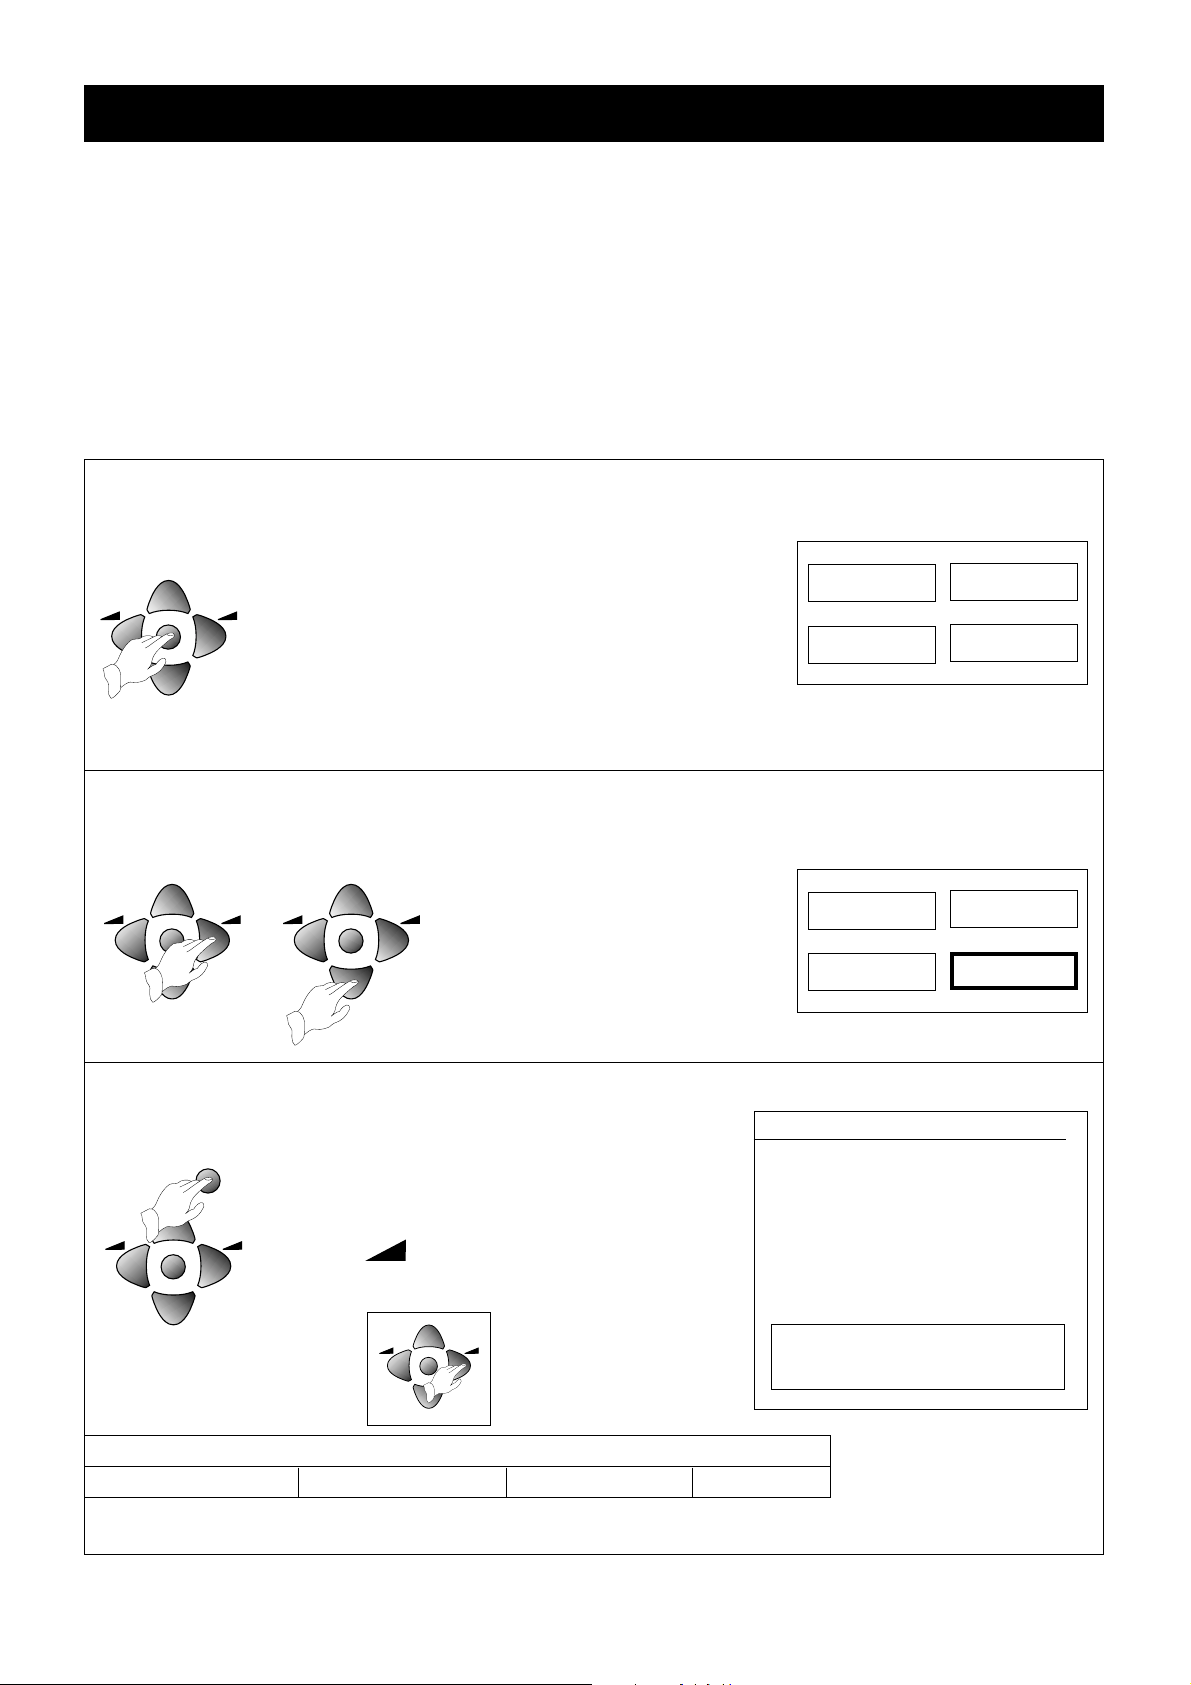
Press the MENU button to make the picture, sound,
features and install boxes appear on the screen.
• Whenever a menu is displayed, if you do not press a
button within 30 seconds the menu will go off.
• If you find a menu asking you to set the on-screen
menu language, press the volume increase button to
change the setting (GB stands for Great Britain).
Press the MENU button to finish.
Press the volume increase button and then the PR down button to move
the green highlight to 'INSTALL'.
PICTURE
SOUND
FEATURES
INSTALL
PICTURE
SOUND
FEATURES
INSTALL
INSTALL
ATSS GB
EDIT
SYSTEM GB
CHANNEL C55
FREQ 743.25
NAME BBC1
PROGRAM 01
STORE TO 01
V
Position CBAdjust
W
OK Access
MENU Exit
1 menu
3 OK
2 volume increase, PR down
Country abbreviations
PL - Poland H - Hungary CZ - Czecho Other
PR
PR
PR
PR
PR
PR
NORMAL/OK
PR
PR
PR
PR
Page 9

8
4 OK
The 'A TSS' line will be highlighted in green.
Press and hold the OK button for at least three
seconds to start the automatic tune, search and store
process (A TSS).
The on-screen display will ask you to wait and you will
see the frequency changing ('freq'). 'Program' and
'store to' numbers increase as each station is stored
in the television's memory.
When the ATSS process has finished, you will see the
edit menu which shows you what programme
numbers the stations have been stored under. If these
are correct, just press the MENU button or wait a few
seconds until the edit menu goes off. If you are not
happy with the order the programmes are in, you can
use the edit menu to re-arrange them.
• Your television might not name a satellite receiver or
video recorder properly, so you will need to use the
edit menu to change the name.
• Sometimes the ATSS process will not store the
best-quality signal on the programme number you
would like, so you will see a grainy picture or a
distorted picture. You will need to use the edit menu
to change the programme number.
•
If you need to change anything using the edit
menu, please read 'Editing programmes' on page 10.
•
If you have poor-quality pictures or interference,
please read 'Picture interference from other
equipment' below.
INSTALL
ATSS GB
EDIT
SYSTEM GB
CHANNEL C55
FREQ 743.25
NAME BBC1
PROGRAM 01
STORE TO 01
MENU Exit
PLEASE WAIT!
EDIT
PR NAME CH SKIP
05 CH5 C37
04 CH4 C64
03 ITV C59
02 BBC2 C62
01 BBC1 C55
00 ------ - --99 ------ - ---
V
Position Move
W
Delete
MENU Exit Skip
Picture interference from other equipment
If you have used the aerial lead to connect a video recorder, satellite receiver or other piece of equipment,
switch the equipment on one piece at a time and check the picture on all your programmes. The pieces of
equipment that are not switched on must be on stand-by. If any of your programmes have wavy lines on the
picture when the equipment is switched on, you will have to change the output frequency of that equipment.
Please read the instruction book for the equipment to find out how to do this. Change the output frequency a
little at a time (or in 8MHz steps) and keep checking all your programmes.
When there are no wavy lines (or other interference) on any of the pictures, re-tune the programme number
that you have chosen for your equipment (see 'Manual tuning'). Do the same for each piece of equipment ,
but after you've finished with each one, leave it switched on while you check the next piece of equipment.
Continue to do this until you have all the pieces of equipment working together without any interference. If you
cannot get rid of the interference, you may have to connect the equipment with a scart cable (see 'Connecting
other equipment') .
PR
PR
NORMAL/OK
Page 10

• Select and adjust brightness, contrast,colour • Select and adjust volume as described above.
and sharpness as described above.
When the speakers on the screen face
•
The values you select are automatically stored
outwards, the sound effect makes mono sound
and you can bring these back by pressing the
like stereo and it makes stereo sound as if the
NORMAL button during normal viewing.
speakers were further apart.
• If you keep pressing the normal button it
Bass and treble change the volume of low-frequency
brings back two other picture settings,
and high-frequency sounds. Balance shifts
‘Normal I’ and ‘Normal II’, which have different the sound between the left and right speakers.
fixed levels of brightness, contrast and colour
.
• For NTSC videos the ‘tint’ function appears.
See ‘NTSC and tint control’ on page 19.
Display the sub-menu as described Use the volume buttons to adjust the function.
in steps 1 and 2 in ‘Main menu’
above, then use the PR buttons to
select the function you want to change.
The install menu is slightly different. 3 Return to the main menu by pressing the MENU
button. Press it again to return to normal viewing.
In this menu you
press OK to enter the
programme editing
menu or store a
channel.
9
Menus for controlling and setting up the television
1 Press the remote control MENU button to display the main menu. A choice of several sub-menus appears
on the screen.
2 To select one of the sub-menus, press the 3 To get back to normal television, just keep pressing
PR or (volume) buttons to highlight the MENU button until all the menus have
the sub-menu you want, then press the gone from the screen.
OK button.
All the menus go off the screen within 30 seconds if you don’t press any buttons.
A box at the bottom of the screen reminds you what the buttons do.
Main menu
How to use sub - menus
PR
PR
PRPRPR
PR
PR
PR
PR
PR
PR
PR
Right
Up
Left
Down
Move up
Move down
Decrease Increase
PR
PR
NORMAL/OK
PR
PR
NORMAL/OK
Sound menu
Picture menu
PICTURE
SOUND
FEATURES
INSTALL
1
AdjustSelect
2
PICTURE
BRIGHT
CB
CONTRSAT
CB
COLOUR
CB
SARAP
CB
SOUND
VOLUME
CB
BASS
CB
TREBLE
CB
BALANCE
CB
EFFECT
CB
Page 11

The install menu lets you tune in broadcast channels and other equipment, automatically or manually, and
edit the list of stations stored under programme numbers. You can change the name given to a channel or
enter a name for a piece of equipment you have tuned in.
Select the install menu and select items
using the volume and PR buttons (see
'Menus for controlling and setting up the
television).
Remember, if you do not press a button
within 30 seconds, the menu will go off.
At any time, you can keep pressing the
MENU button to return to normal viewing.
Use the PR buttons to highlight a line in the menu.
Automatic tuning (ATSS)
The automatic tune, search and store process (ATSS) is described in 'Tuning in the programmes'.
Editing programmes
See this heading on page 13.
Manual tuning
• Use manual tuning to tune in any extra piece of equipment that is connected by the aerial lead.
• Manual tuning by frequency is very useful if you are trying to tune a non-standard frequency,
which some types of equipment might produce, for example an old video recorder or
analogue satellite receiver which has a simple output signal modulator with an adjustment
screw on the back.(This illustration shows a typical adjuster.) See ‘Tuning by frequency’
below.
Current programme number
Use this feature to check what has already been tuned in, or use a channel you have already tuned as a starting
point for manual tuning.
Use the PR buttons to highlight this line. Y ou can see the picture that goes
with the current programme
number as you change the number
with the volume buttons( ).
The install menu
10
INSTALL
ATSS GB
EDIT
SYSTEM GB
CHANNEL C55
FREQ 743.25
NAME BBC1
PROGRAM 01
STORE TO 01
V
Position CB Adjust
W
MENU Exit OK Access
TV system selection by country
Broadcast channel number
Frequency
Channel name
Current programme number
Programme storage number
CH
ADJ
Automatic tuning and sorting
system
Editing programmes
Country for automatic tuning.
Items in the dotted line are
described under ‘Manual tuning’.
The display you see may be
slightly different from this.
M
Press the menu button Select ‘INSTALL’
Press the OK button
PR
PR
PR
PR
PR
PR
NORMAL/OK
PR
PR
PR
PR
PR
PR
PR
PR
Page 12

TV system selection by country
You can use this television in most European countries. For manual tuning you need to tell the television which
television system to use by choosing the appropriate country. ‘GB’ stands for Great Britain, ‘E/EURO’ for Eastern
Europe and ‘EURO’ for other parts of Europe. Changing the country on the ‘system’ line affects the signal the tele-
vision is receiving, so if the country does not match the signal there will be no sound, no colour or the picture will
be distorted. When you store the broadcast channel to a programme number, the television remembers the country for that channel.
Use the PR buttons to highlight the ‘system’ line.
Use the volume buttons ( )
to change the country .
T uning by broadcast or cable channel number
• If you know the broadcast channel number used by the station or piece of equipment you want to tune in, you
can enter it by highlighting the ‘channel’ line with the PR buttons, then using the number buttons to enter the
broadcast channel number.
• Briefly press one of the volume buttons ( ) to change the channel number one at a time.
• Press and hold one of the volume buttons ( ) for a few seconds to make the television search until it finds
the next signal, then stop tuning. The television will only find a signal that uses a standard broadcast channel.
See ‘Tuning by frequency’ below to tune in older equipment.
• We've included a map of transmitters and broadcast channels in Great Britain at the end of this
booklet.
• You can change to special cable channels which start with an ’S’ on the screen, for example ‘S 01’, by pressing
the OK button. Press the OK button again to change back to broadcast channels, which start with a ’C’.
Tuning by frequency
• Use the PR buttons to highlight the ‘freq’ line. If you know the frequency used by the station or piece of
equipment you want to tune in, enter the first three digits by pressing the number buttons while the green
highlight is on the ‘freq’ line. Change the digits after the decimal point by pressing the left volume button ( )
to decrease them or the right volume button ( ) to increase them.
• If you don't know the frequency, press and hold one of the volume buttons ( ) for a few seconds to
make the television search until it finds the next signal, then stop tuning. Give the signal a programme
number by following 'Program storage number' below.
Channel name
1 Use the PR buttons to highlight the ’name’ line.
2 Press the right-hand volume button ( ) to highlight
the first character position in the name.
3 Change the character by pressing the PR buttons.
4 Repeat steps 2 and 3 for each character position. If you need a space you will
find it between ‘/ ’ and ‘0’.
5 After the last character position the green highlight will move back to 'name'.
Store the name to the programme number by pressing the OK button.
Program storage number
When you have tuned in a new station or some other equipment,
use the ‘store to’ line to give it a programme number .
Highlight the 'store to' line by pressing one of the PR buttons.
11
Fine tuning
If you tune by broadcast channel number and find there is a signal on a channel but it is tuning.
Change to tuning by frequency (see below). Then keep pressing the left or right volume button ( ) to fine tune.
Keep pressing the volume button on the side which improves the picture or sound until you are happy that the channel is tuned in properly.Then go to 'Program storage number' below.
B
PR
PR
PR
PR
PR
PR
PR
PR
PR
PR
NORMAL/OK
PR
PR
PR
PR
Page 13

12
Change the programme number by pressing the volume buttons ( ).
Store your choice by pressing the OK button.
Copying a programme to another number
1 Choose the programme you want to copy to another programme number.
2 Select the install menu as described under 'The install menu' on page 10.
3 Choose a different programme number by following ‘Programme storage number’.
PR
NORMAL/OK
PR
PR
PR
Page 14

• Remember, the menu will go off if you do not press a button within 30 seconds.
•You can keep pressing the MENU button at any time to return to normal viewing.
‘PR’ is the programme number you store a broadcast channel under.
‘NAME’ is either read automatically from the broadcast, or you create it.
‘CH’ is the broadcast channel number .
‘SKIP’ - see below.
Move a channel
When the channel is not on the programme number you want it on, you
can move it.
1 Use the PR buttons to highlight the channel you want to move.
The picture for that channel will show behind the menu.
2 Press the green MOVE button on the remote control, the highlight will
change to red, and the green block on the screen will be
labelled Confirm.
3 Use the PR buttons to move the red highlight onto the programme
number where you want to put the channel.
4 Press the green MOVE button to finish the move.
Delete a channel
1 Use the PR buttons to highlight the channel you want to delete. The picture for that channel will show behind
the menu.
2 Press the yellow DELETE button on the remote control. The highlight will change to red for a moment and the
programme list shifts down to get rid of the empty slot.
Skip
You set the tick mark under ‘SKIP’ so that you can’t select a programme with the PR buttons.
1 Use the PR buttons to highlight the programme number where you want to set or remove the tick mark. The
picture for channel will show behind the menu.
2 Press the red SKIP button on the remote control to set the tick mark or to remove it.
13
Editing programmes
INSTALL
ATSS GB
SYSTEM GB
CHANNEL C55
FREQ 743.25
NAME BBC1
PROGRAM 01
STORE TO 01
EDIT
PR NAME CH SKIP
07 -------- C37
06 -------- C64
05 CH5 C59
04 CH4 C62
03 ITV C55
O2 BBC2 - --01 BBC1 - ---
V
Position CBAdjust
W
MENU Exit
OK Access
V
Position Move
W
Delete
MENU Exit
Skip
Use the PR buttons to highlight
‘EDIT’.
Press the OK button and the
edit menu will appear.
EDIT
Press the menu button.
Use the volume buttons ( )
to select ‘INSTALL’.
Press the OK button.
PR
PR
PR
PR
PR
PR
PR
PR
NORMAL/OK
PR
PR
NORMAL/OK
PR
PR
Page 15

How to display the features menu
•
Remember, if you do not press a button within 30 seconds the menu will go off.
• You can keep pressing the MENU button at any time to return to normal viewing.
What's on the features menu?
Language changes the language used in the on-screen menus .
Format changes the picture size to suit wide-screen broadcasts.
Child lock stops children from turning on the television, as long as
you hide the remote control.
Clock is used by the wake-up timer.
Wake time is when the wake-up timer switches on the television.
Wake PR lets you choose the programme number you wake up to.
What does aspect ratio mean?
Aspect ratio is ratio of the width to the height of the picture. This television has a screen with 4:3 aspect ratio.
Wide-screen films normally give a 'letter-box' effect on a 4:3 screen, which means there is a black bar above and
below the picture. Selecting '4:3' picture format with a wide-screen film fills the screen but things in the picture look
tall and thin. Selecting 'zoom' makes them look normal again, although a bit of the film disappears off each side of
the screen.
Wide-screen film in 16:9 format Wide-screen film in 4:3 format Wide-screen film in zoom format
14
The features menu
FEATURES
GB
FORMAT 4:3
CHILD LOCK OFF
CLOCK 20:15
WAKE TIME OFF
WAKE PR 01
V
Position CBAdjust
W
MENU Exit
OK Access
The prompts change when some
lines are highlighted.
LANGUAGE
Picture format
Use the PR buttons to highlight 'format' and press the right volume button ( ) to select:
•
4 : 3 to suit pictures made in the same aspect ratio as the screen (see below);
•
16: 9 to suit pictures made in 16:9 wide-screen aspect ratio; or
•
Zoom to make pictures made in wide-screen fill more of the screen.
Child lock
• To set the 'child lock', use the PR buttons to highlight it, and use one of the volume buttons ( ) to switch it
on. Switch off the television. Now only the person who has the remote control can switch the television on,
although the stand-by light will come on when you switch on the main power. Switch the television on from
stand-by using the remote control.(See page 6 ‘Stand-by mode’.)
• To turn the child lock off, use the PR buttons to highlight it, and use one of the volume buttons ( ) to switch it
off. Keep pressing the MENU button to return to normal viewing.
Press the menu button.
Press the OK button
PRPRPR
PR
PR
PR
NORMAL/OK
Use the PR buttons to Press the volume
move the green highlight. buttons to change a
setting.
Use the PR buttons to
select ‘FEATURES’.
PR
PR
PR
PR
PR
PR
Page 16

To display the features menu follow 'How to display the features menu' on the previous page.
Set the clock
The clock only works when the main power is on. Normally, the clock will
set itself automatically from teletext, as long as it is receiving teletext. Be
careful with some satellite broadcasts as they may come from a different
time zone which does not agree with your local time. If you need to set the
clock manually , do the following.
1 Display the features menu and use the PR buttons to highlight the
'clock' line as described under 'The features menu'.
2 Use the 0 to 9 number buttons to enter the correct time. The numbers
fill in the clock from left to right.
Use the 24-hour clock (for example, for 7pm enter 19:00).
Set the wake-up timer
1 Display the features menu and use the PR buttons to highlight the 'wake time' line as described under 'The
features menu'.
2 Press one of the volume buttons ( ) to change 'off' on the wake-time line into a 24-hour clock.
3 Use the 0 to 9 number buttons to enter the wake time, just like setting the clock. The wake time is when the
television will switch on automatically.
4 Use the PR buttons to highlight ' wake pr' and use the volume buttons ( ) to choose the programme
number you want to wake you up.
5 Switch the television to stand-by by pressing the red button on the remote control.
How to turn the wake-up timer off
* Switch off the main power or do the following.
1 Display the features menu and use the PR buttons to highlight the 'wake time' line as described under 'The
features menu'.
2 Press one of the volume buttons ( ) to change the time on the wake-time line into 'off'.
3 Keep pressing the menu button to return to normal viewing.
The clock and wake timer settings will be lost if you use the main power switch, or if the power from the
mains is turned off.
FEATURES
LANGUAGE GB
FORMAT 4:3
CHILD LOCK OFF
WAKE TIME OFF
WAKE PR 01
CLOCK 20:15
How to use the wake-up timer
15
V
Position 0..9Adjust
W
MENU Exit
Page 17

The sleep function will switch the television to stand-by after a set period of time.
1 Press the sleep button on the remote control
once. 'Sleep 00' will appear on the screen with
some other information. The display will only
stay on the screen for about five seconds.
2 Press the sleep button again while the display is on the screen and the '00' will change to '30'.
This number is the number of minutes the television will stay on for before it will switch to stand-by.
3 Every time you press the sleep button the time the television will stay on for will increase by 30 minutes, up
to a maximum of 120 minutes (2 hours).
4 If you press the sleep button when the timer is set for 120 minutes, the display will return to '00'
and the sleep timer will be switched off.
5 After you have set the sleep timer, you can press the recall button to see how much sleep time is left before
the television will switch off. The information display goes off after about five seconds.
The sleep timer will be cancelled if you switch the television off or put it on stand-by.
The sleep function
This button allows you to choose the type of sound.
Which modes are available depend on the type of sound in the television broadcast you are watching.
Press the MODE button to switch between different modes, which are shown in the table below.
The sound mode will go back to stereo when you change channels.
Dual 1 means you hear the first sound channel and dual 2 means you hear the second sound channel.
T ype of broadcast The screen shows Effect of the mode button
FM mono mono ‘Mono’ will appear
NICAM stereo nicam stereo mono Change between languages or FM mono
NICAM bi-lingual (dual) nicam dual 1 nicam dual 2 mono Change between languages or FM mono
NICAM mono mono nicam mono Change between FM mono or nicam mono
The mode button
16
01 BBC1
NICAM STEREO
20: 27
SLEEP 00
SLEEP
MOVESKIP
Page 18

The layout of the teletext control buttons is shown in 'The remote control' on page 4.
The teletext service is an on-screen magazine that is carried on a television broadcast signal. Teletext information
can also be carried by a signal that is fed into the scart or AV input of the television.
Turning teletext on and off
1 Turn your television on and choose a programme.
2 Press the button to switch to teletext mode. As long as the programme you are watching carries teletext,
the main index page will soon be displayed.
3 To leave teletext, press the button again.
Selecting a teletext page
1 Press the button to switch to teletext mode.
2 Press the number buttons on the remote control to enter the number of the telext page you want to see.
You must enter the page number as a complete three-figure number. The page number you have chosen
will be displayed on the top left-hand side of the screen. As soon as you enter the third number, the page
number in the middle of the top line of the display will start changing, showing that the television is looking
for the new page. When the television finds the new page, the number in the middle will stop changing.
3 To choose a new page, simply use the number buttons on the remote control to enter a new page number.
4 If you enter the wrong number, press more buttons until you have entered three numbers, then enter the correct
page number.
5 To return to normal television viewing, press the button again.
Moving to the previous or next page
To go to the page above the one you are on, press the PR up button. To go to the page below the one you are
on, press the PR down button. This television has a page memory which stores a few pages above the one you
are reading. When you press the PR button, the next page will appear almost instantly , as long as the television
has had time to store it since you last changed the page.
News-flash and sub-title pages
These special pages are displayed as a small box of text on the television picture. The page numbers are given
by the service provider (for example, page 888 on BBC1 Ceefax provides sub-titles). Sub-titles let you read
what people in the picture are saying.
Fast text pages (the red, green, yellow and blue buttons)
The four coloured page headings at the bottom of the screen are associated with the displayed page. To see
the page which corresponds to one of these headings, press the matching coloured button on the remote
control. Each time you change the teletext page, while you are reading the page you just selected your
television is loading a new set of associated pages. Once it has done this, you can display any of these pages
almost instantly by pressing one of the coloured buttons on the remote control.
Sub-pages
Some teletext pages contain too much information to fit on the screen at once, so they are split up into sub-pages
and shown in order. The service provider usually displays a label in the top right-hand corner of the screen to show
which sub-page is being shown. For example '3/6' shows that you are looking at the third of six pages.
How to display a particular sub-page
1 Press the button to switch to teletext mode and choose a page with several sub-pages.
If there is no teletext on the programme you are watching, all you will see is '100' and a few other flashing
numbers. Leave teletext and try another programme.
17
Teletext
Upper
PR
PR
Lower
Page 19

18
2 Press the button on the remote control. The page number at the top left of the teletext display will change to
four dashes.
3
Enter the sub-page number by pressing four of the number buttons on the remote control. As you start pressing
the numbers the dashes change to stars. Y ou must enter the sub-page number as a complete four-figure number,
such as 0003.
As soon as you enter the fourth digit of the sub-page, the three-figure page number at the top left of the screen
will come back and the number in the centre of the top row will start changing until the television receives the
sub-page you have asked for. The sub-page will not change until you choose a new page or sub-page.
Page hold
When the information on one teletext page will not fit on the screen, sub-pages are shown in order (see 'Sub-pages' ).
To keep a sub-page on the screen for longer than usual, press the button. T o cancel page hold, press again.
The cancel button - how to watch television while you wait for a teletext page
Y ou can watch television while you wait for a teletext page or sub-page to arrive, then switch to the updated teletext
display when it is convenient. Remember the television is still in teletext mode, so don't try to change channels or
you will change the teletext page.
1 Press the button to turn teletext on.
2 Use the remote control to enter a page number (see 'Selecting a teletext page') or a sub-page number (see
'How to display a particular sub-page').
3 Press the button. The top row of the teletext display will stay on for a few seconds then the whole teletext
page will disappear except for a symbol at the top left of the screen. This symbol tells you whether or not the
television has found the page.
• means the television has not found the page yet.
• A page number like tells you the page or sub-page is ready .
4 Press the button again to see the teletext page or sub-page.
5 Press the button to change back to normal television viewing.
Size button
Keep pressing the button to change the character size. Press the button once to display the top half of the
page at twice its normal height. Press the button again to display the bottom half of the page at twice its normal
height. Press the button again to return the text to its normal size.
Reveal answer
Use this function on certain pages to reveal the solutions to quizzes and so on. Press the button once to reveal a
hidden answer, and press the button again to hide it.
Index
When you press the index button , a teletext index page will be displayed. Which index page is displayed depends
on how the service provider's teletext magazine is organised. Keep pressing the index button to move to different
index pages.
Mix
When teletext is turned on, you can see teletext with the normal television picture behind it by pressing the button.
Press the button again to go back to normal teletext, or press the button to go back to normal television viewing.
You can only enter four-figure sub-page numbers when the television is in sub-page mode. You can get
straight back to three-figure teletext page numbers by pressing the button again.
As long as you press the button, you can enter another page or sub-page number, even when the television
picture is displayed.
Some teletext pages are so big that it takes 20 minutes or so to show all the sub-pages. Holiday bargains
with around 50 to 70 sub-pages are a good example. These are really meant for specialist use.
515
!
Page 20

SVHS Rear scart 2 is the S-video input
Programme Back to normal television
information
19
The scart sockets at the back of the television are a convenient way of connecting audio and video (AV) signals to
and from the television. As the signals are in a more basic form than the signal at the aerial socket, they are less
likely to be affected by interference and other things that can reduce picture quality. This television has two scart
sockets on special channels called AV1 and AV2. As well as the scart sockets, the video and audio input sockets
behind the front control flap provide a different way of connecting to the AV2 channel, but you cannot use scart
socket 2 and these sockets at the same time.
Selecting the scart channels
Keep pressing the A V button
bb
on the remote control or on the front of the television ( /
bb
) to choose one
of three AV options or normal television mode. The display on the screen will follow the order in the table below,
which describes the facilities provided by the scart and AV connectors on your television.
Video and RGB
The sharpest and clearest possible picture is reproduced from separate red, green and blue signals (RGB) which
are usually produced by digital equipment. Digital equipment and other equipment also produces the video signal
which contains all the picture information in just one connection (CVBS for composite video, blanking and
synchronisation).
S-video or S-VHS
'S' stands for 'super' and 'VHS' is a type of video recording system. If a video recorder has the S-VHS feature, it
can be connected to the scart socket AV2 to get better-quality pictures than ordinary videos can give. You must
use a scart lead made for S-VHS (or S-video). Other equipment, like DVD players, may have a super-video
output.
NTSC and tint control
Imported video discs and cassettes may be recorded with the NTSC television system which is used in America
and Japan. This television can play NTSC videos as long as the video recorder is connected through the scart
socket and not the aerial cable. While reproducing NTSC video, the picture menu has a tint control on it which you
can adjust to get the best appearance of natural colours on the picture (see 'Menus for controlling and setting up
the television'). Other kinds of video do not need a tint control.
Automatic A V mode or 'video' switching
Some equipment provides an automatic switching signal, so that the video recorder (or other equipment) tells the
television to reproduce its video and audio signals. You can over-ride the automatic switching signal by pressing
the A V button
bb
until you get back to normal programme numbers.
Automatic switching signals do not always agree. If this happens you will have to buy a scart lead without the
video-switching signal connection.
Equipment you can connect to this television
You can use the scart sockets to connect video recorders, camcorders, satellite receivers, video disc players,
audio amplifiers and video games to this television. We cannot guarantee that all combinations of equipment will
work.
What is the second scart socket for ?
There are other possible combinations besides the ones we have given you. When you have some experience,
you might want to change the connections and use the extra socket. For example, you could feed sound signals
out to a surround-sound amplifier or connect a DVD player with S-video output.
The scart and AV sockets
What the Connector AV A V AV switch Where the AV NTSC RGB RGB
screen in out (pin 8) output comes A V blanking
shows from (pin 16)
AV1 Rear scart 1 Yes Yes Yes Tuner Yes Yes Yes
AV2 Rear scart 2 Yes No No ----- No No
AV2
The AV inputs on the front of the television.
You cannot use scart socket 2 and these sockets at the same time.
Page 21

How to connect a video recorder only
Connect the video recorder scart socket to the AV1 scart socket on your television set. If your video recorder
has two scart sockets, use the one marked TV . The television aerial should go to the video recorder, then to the
television.
How to connect a satellite receiver only
Connect the satellite receiver scart socket to the AV1 scart socket on your television. If your satellite receiver
has more than one scart socket, use the one marked TV. Your television aerial should go to the satellite receiver,
then to your television.
How to connect a satellite receiver with one scart socket and a video recorder with one scart socket
If your video recorder has only one scart socket, connect it to the AV1 scart socket on your television. Your
television aerial should go to the satellite receiver, then to the video recorder, then to your television. To be able to
record satellite broadcasts, you will have to tune one programme number on your video recorder to the satellite
receiver. (Please see your video and satellite instruction books for details of how to do this.) So that you can watch
satellite television while recording normal television, you should also tune one programme on your television to the
satellite receiver. (Please see 'Manual tuning'.)
How to connect a satellite receiver with one scart socket and a video recorder with two scart sockets
If your video recorder has two scart sockets, connect one (which may be marked TV) to the AV1 scart socket
on your television and connect the other to your satellite receiver. Your television aerial should go to the
satellite receiver, then to the video recorder, then to your television. You may need to read your
video recorder instructions to find out which is the best scart socket to connect to your television and how to
record from the scart socket you have connected to your satellite receiver. So that you can watch satellite
television while recording normal television, you should also tune one programme on your television to the
satellite receiver. (Please see 'Manual tuning'.)
How to connect a satellite receiver with three scart sockets and a video recorder with one or two scart
sockets
If your video recorder has two scart sockets, use only one of them. Connect your video recorder to the scart
socket marked VCR on the satellite receiver. You may need to read your video recorder instructions to find out
which is the best scart socket to use and how to record from the scart socket you have connected to your satellite
receiver. Connect the scart socket on the satellite receiver marked TV to the AV1 scart socket on your television. Y our
television aerial should go to the satellite receiver , then to the video recorder, then to your television.
With these connections you must put the satellite receiver on stand-by to send the audio and video signals from
the video recorder to your television. If you want to watch satellite while recording normal television, select a
channel on the satellite receiver and press the
bb
button on your television remote control.
If you decide to watch normal television while recording satellite, you may find you automatically get satellite
pictures and sound from your television. In this case, select the programme number you want to watch using
your television remote control.
Connecting other equipment
20
Page 22

T ypical connections for a satellite receiver with three scart sockets, a video recorder and other equipment
Television
21
This is a ‘scart’ socket
Arrows show the direction
the signal will flow through the wires.
Thick lines represent scart cables.
DVD player
Aerial in
Television aerial
Aerial cable
Aerial out
Aerial in
Aerial out
Aerial in
Scart AV1
SCART socket
Scart cable
Aerial cable
Scart cable
Scart AV2
Video recorder
VCR TV
Satellite or
digital receiver
Connect the scart cable
here for a television with
a video recorder only.
Connect the aerial here for
a television alone.
Connect the aerial here
for a television with a
video recorder and digital
or satellite receiver.
Connect the aerial here
for a television with a
video.
Satellite
dish
input
Page 23

22
We have designed and made this television to meet European safety standards. But like any television, you
must take care to get the best results. Here are a few tips to help you do this.
Use
This product is designed to be used in the home, and is not suitable for business use. Anything other than
household or similar general use according to these instructions may be dangerous and may mean the
guarantee is not valid.
Position
For best results, put the television in a position where light does not fall directly on the screen and away
from radiators or other sources of heat. Unless they are magnetically screened, do not put objects which
have magnets in them next to the television or it could affect the quality of the colour.
Moving the television, coloured patches and magnetism
If you move the television the earth's magnetic field can cause coloured patches on the picture. The same can
happen if you put a magnet close to the television or it you don't use the main power switch. To work the
automatic demagnetisation system and remove the coloured patches, the television must be cool and you
must switch it on with the main power switch. If the television is warm, leave it to cool for at least 15 minutes
before you switch it on.
Ventilation
Put the television on a hard flat surface where curtains and soft furnishings cannot stop the air from flowing
through the ventilation slots. If it is in a cabinet, allow at least a 10 centimetre gap all around.
Water and moisture
The apparatus shall not be exposed to dripping or splashing and no objects filled with liquids, such as vases,
shall be placed on the apparatus.
Stands and supports
Only use stands which are recommended for the television, and make sure that the fixings are properly tightened.
Never use a make-shift stand or legs fixed with wood screws.
Cleaning
Unplug the television and use only a lightly-dampened soft cloth to clean it. Do not use chemical solvents or
strong detergents as these may damage the cabinet finish.
Good advice
Read these instructions carefully before you try to use the television.
Protect the mains lead. You must make sure the mains lead cannot be walked on, crushed, chafed, cut, or so
on.
Don't continue to use your television if you have spilt liquids in it, if it is damaged in any way or if it does not
work normally. Unplug the television immediately and get expert advice.
Changing the mains plug. If you have to change the plug or remove it, or if the fuse in the mains plug needs
changing, read the instructions about wiring and replacing the mains plug or fuse which we have given in this
booklet.
Avoid harsh conditions such as wet or damp places, very humid places, places with extremely high or low
temperatures and places which have strong sunlight or are dusty.
Never let anyone, especially children, push objects into holes and ventilation slots.
Make sure that all electrical connections are properly made in line with the connection and wiring instructions
we have given.
Don't leave the television switched on when you are leaving the room for a long time, unless you have set the
timer.
Electrical safety warnings
To prevent electric shock, do not take the back cover off this television.
If anything goes wrong, don't try and fix it yourself, get a qualified service agent to look at it.
Protect this television from rain and moisture.
Unplug this television from the mains supply when you are not using it for a long period of time.
Pull the mains plug out of the wall socket and disconnect the aerial lead during thunderstorms.
Using and caring for your television
22
Page 24

23
Specifications
23
Television standards PAL/SECAM - B/G, D/K
Sound systems NICAM and FM 6MHz intercarrier
AV features AV input and AV output on scart 1 and scart 2
RGB input on scart 1
S-video input on scart 2
Mains voltage 230V~ 50Hz
Power consumption Stand-by3W, normal75W
Sound output power 7 W + 7 W rms
Headphone type Impedance 32 ohms or more, with 3.5mm stereo jack plug
Aerial impedance 75 ohms
Channel coverage VHF, UHF and cable channel bands
Programme presets 100
Diagonal screen size 71cm(visible)
Dimensions W746 x H583 x D465mm
Approximate weight 32.5kg
These specifications may change.
 Loading...