

Page 1
CONTENTS
SPECIFICA TIONS 1
IMPORTANT SAFEGUARDS 2
AERIAL CONNECTIONS 3
A V CONNECTIONS 4
BA TTER Y INSTALLATION 6
CONTROLS 7
OPERA TION OF CONTROLS 9
TELETEXT 19
TROUBLESHOOTING 21
INSTRUCTION MANUAL
COLOUR TELEVISION
DTC-29G1
P/N : 48586900E20G
Page 2
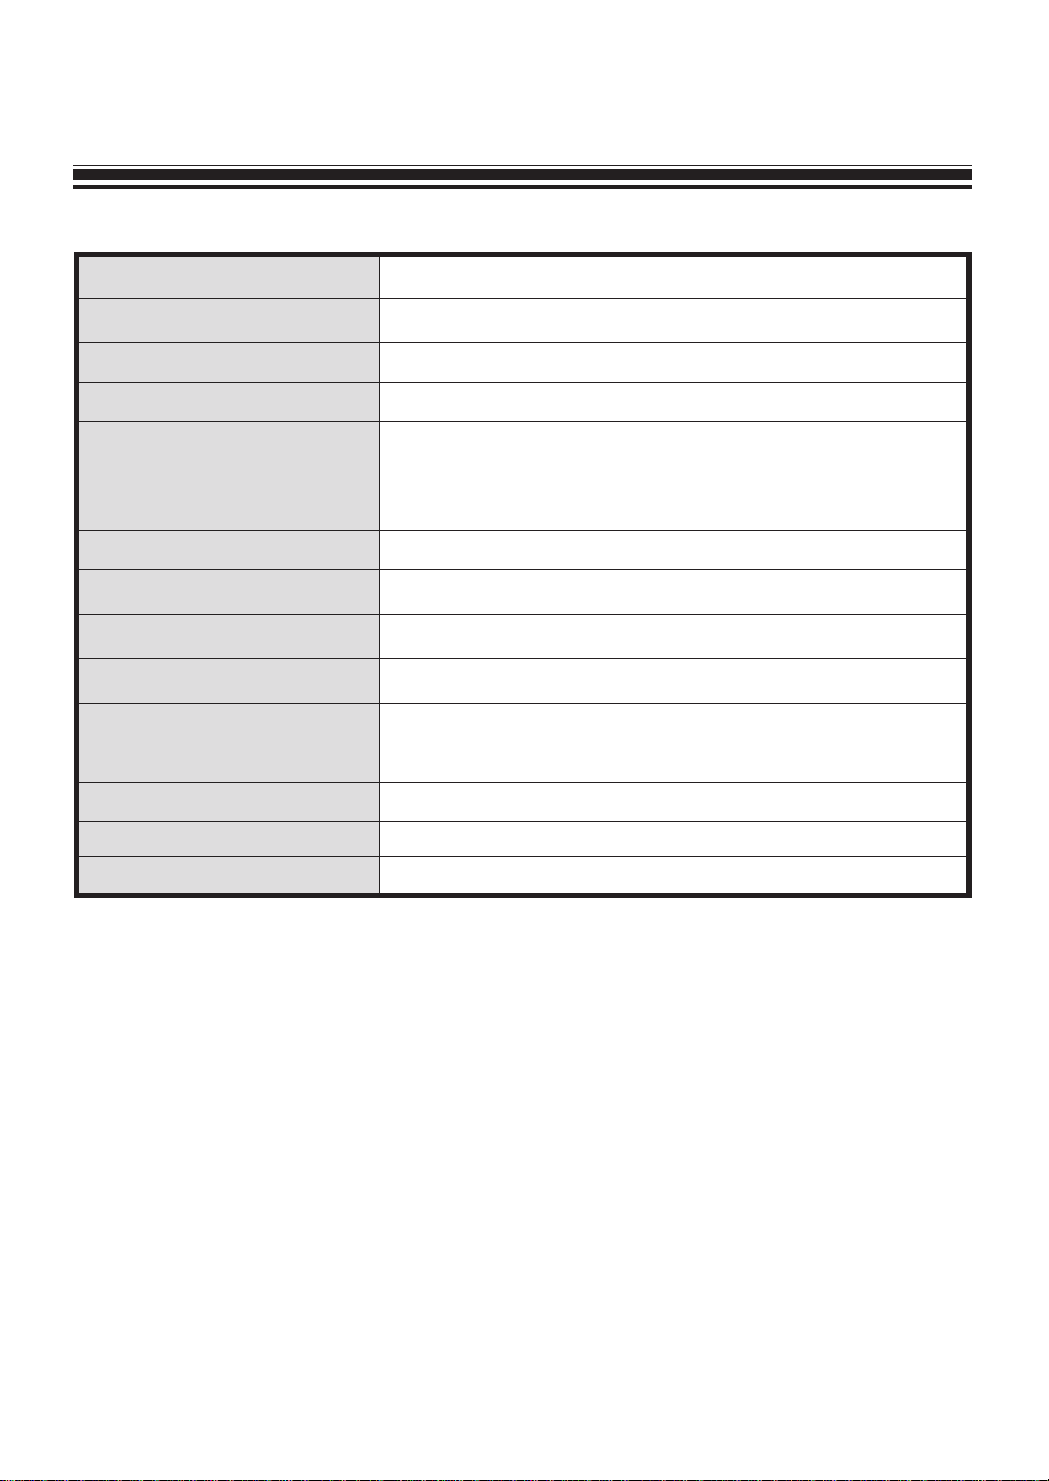
TV Standard P AL/SECAM-B/G, D/K, I, NTSC-3.58/4.43
Mains V oltage AC1 10~250V, 50/60 Hz
Power Consumption 145W approx.
Sound Output Power 10Wx2 (at 100% MOD. 10% THD)
Channel Coverage VHF-L : I1-S8CH (43.25-154.25MHz)
VHF-H : S9-S41CH (161.25-463.25MHz)
UHF : C13-C57CH (471.25-863.25MHz)
Tuning System V oltage Synthesizer T uning System
Channel Indication ON-Screen Display
Programme Selection 100 Programmes
Aux. Terminal A V input 1,2 , AV out 1.
Remote Control Unit R-22 (Required two 1.5V penlight batteries type with
AAA Size)
Dimension(W x H x D) 807 x 606 x 500mm
Weight 44.7kg approx.
Teletext System 4 Pages memory F AST TEXT (FLOF or LIST)
SPECIFICATIONS
1
Page 3
To operate your receiver at the peak performance, please read this Instruction
Manual carefully and retain it for the future reference.
• Place this unit on a flat, level surface and in a dry area free from dust and
moisture.
• Adequate ventilation must be provided to prevent heat building up inside of
the unit. Do not build this set into a bookcase or other enclosure in which it
would be poorly ventilated
• Do not place liquids including flower vases and vessels filled with chemicals
or water, etc. on the top of the unit. Keep the inside of the unit free from
foreign objects such as hairpins. If hazardous objects fall inside of the unit,
unplug it immediately and call a qualified technician for removal.
• Do not remove the back cover of the TV set. Accidental contact with high
voltage components could result in electric shock.
• If your set produces sound but no picture, or it emits smoke or produces a
strange sound or smell, continuous operation is very dangerous. Immediately
remove the power plug from the socket and contact your service centre.
• When you don't use the set for an extended period during vacation or other
occasions, always make sure of switching off the MAIN POWER SWITCH of
the TV set.
2
IMPORTANT SAFEGUARDS
NOTE :
If the receiver is moved or placed in a different direction, the MAIN
POWER SWITCH must be switched off for at least 15 minutes in
order to take out a colour strain on the screen.
Page 4
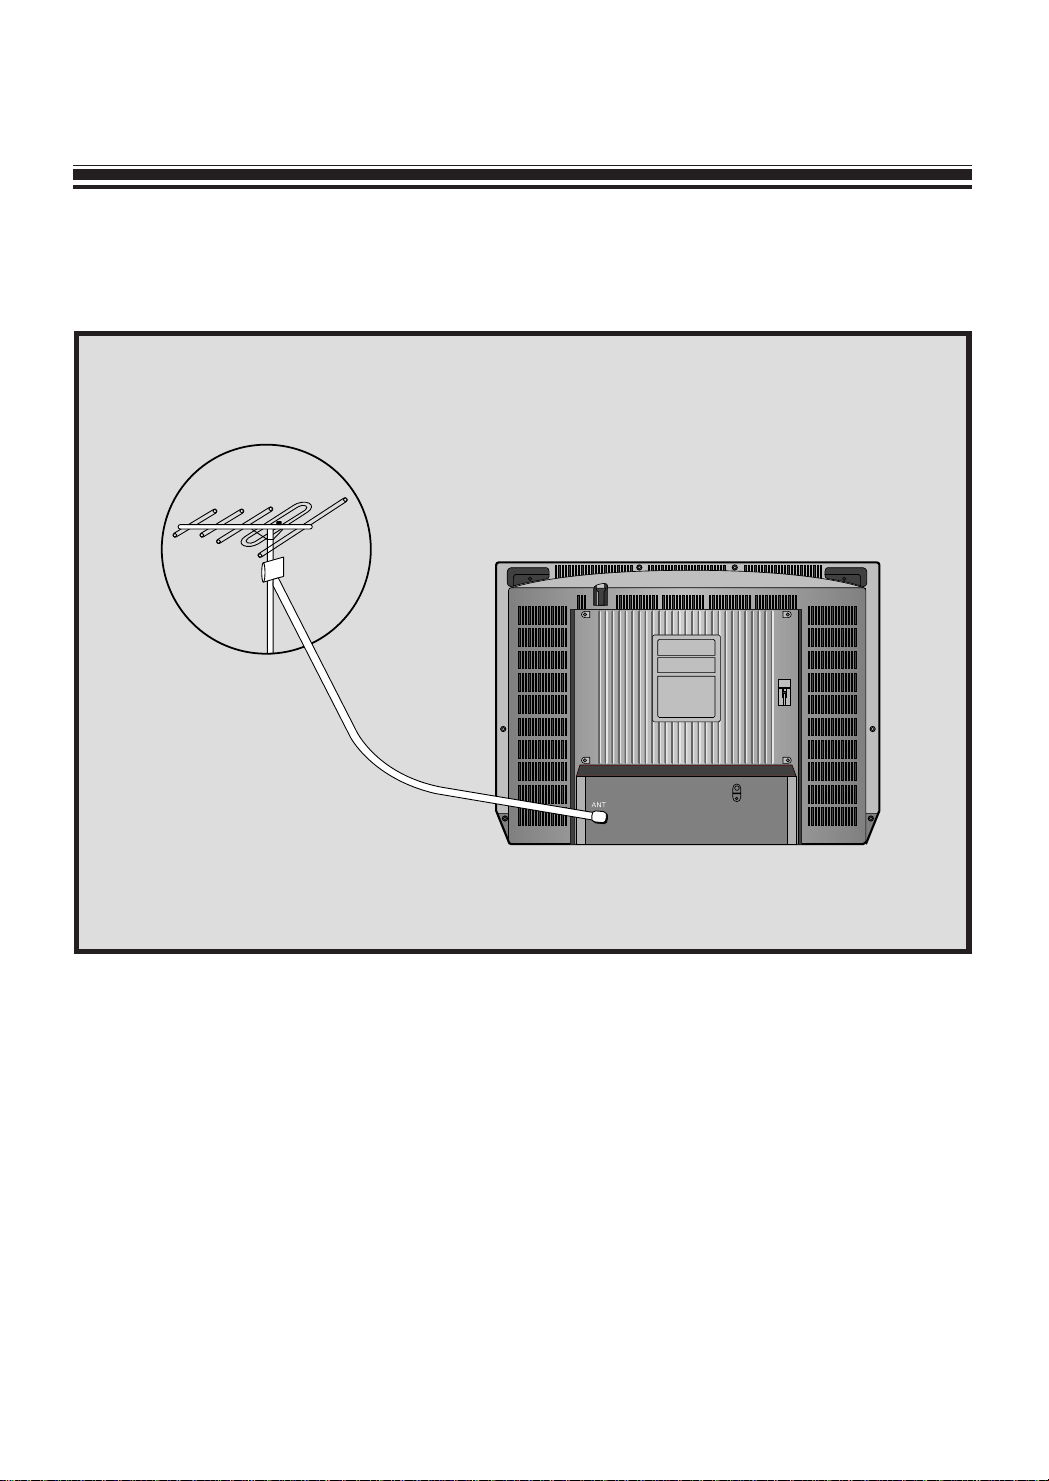
In order to receive a true colour reproduction, an effective antenna installation is the
most important. Please make sure that your antenna is correctly connected.
• When using an external antenna, the antenna is usually connected to the TV set by
means of 75 ohm coaxial antenna cable.
To make the connection, first attach a suitable coaxial plug to the antenna cable and
then insert the plug into the antenna terminal on the rear of the TV set.
If your antenna system is used with 300 ohm parallel feeder, connect the feeder to a
300 ohm
→ 75 ohm conversion plug and insert the plug into the TV set antenna
terminal.
3
AERIAL CONNECTIONS
Page 5
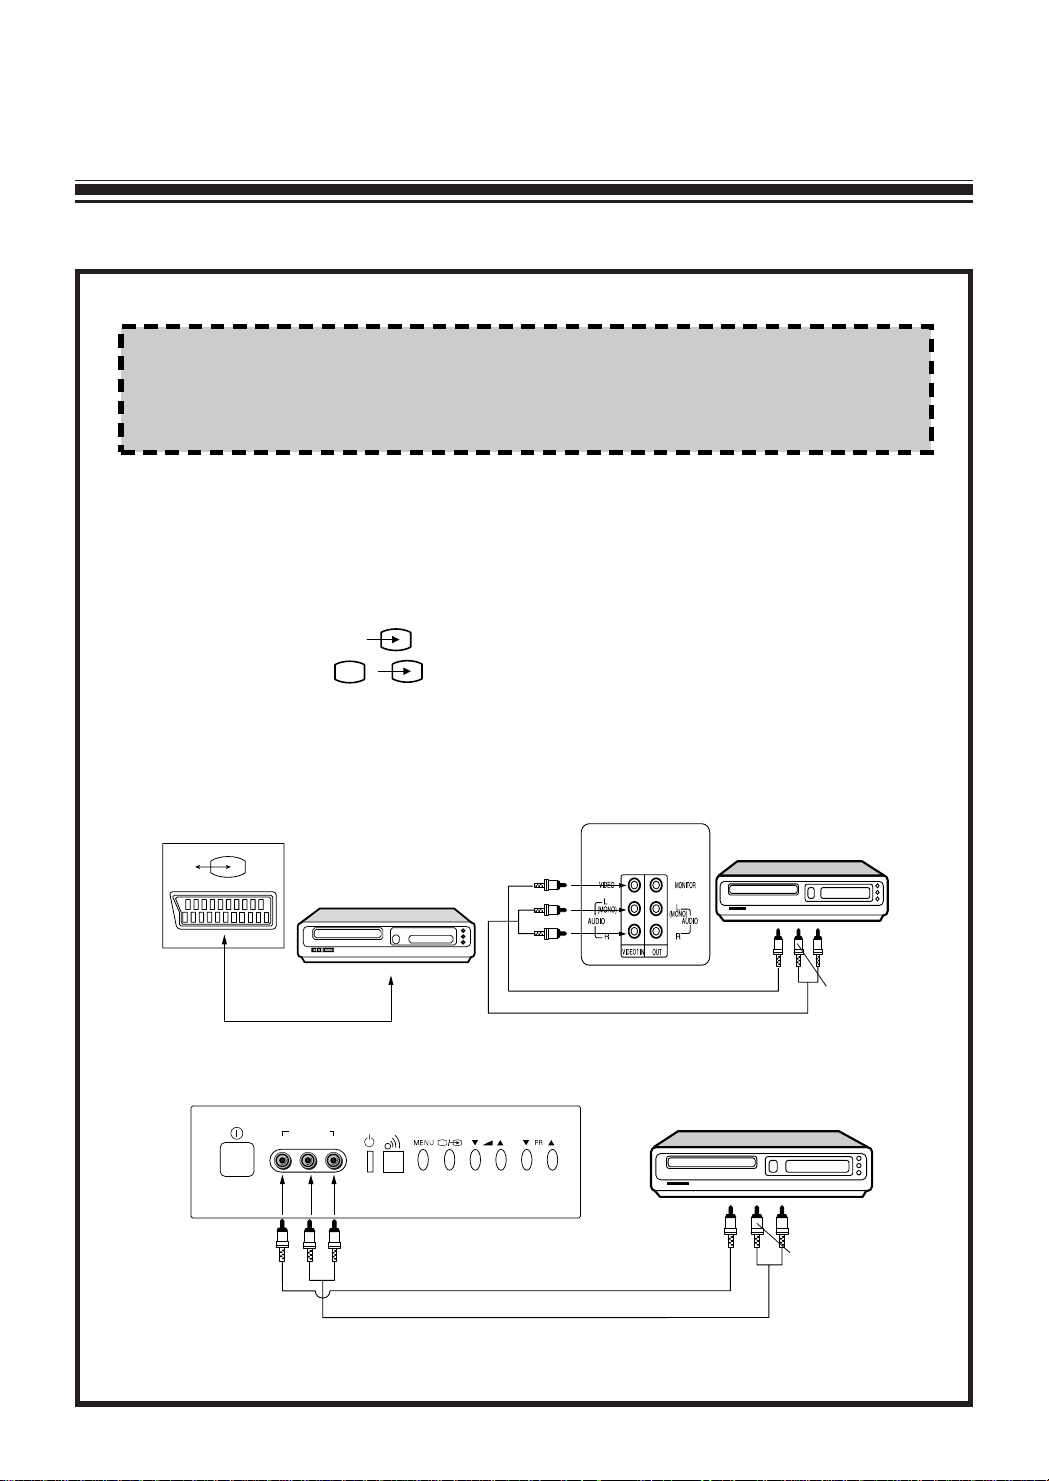
1. T o connect the TV to a stereo VCR for playback
• Connect the VCR to the AUDIO IN and VIDEO IN jacks on the back or
front of the TV as shown below. If you have a mono VCR, see the NOTE
on page 5.
• Press the VIDEO ( ) button on the remote control unit or TV/VIDEO
selector button ( / ) on the front of the receiver to select the Video 1
or Video 2 mode. "VIDEO 1" or "VIDEO 2" will appear on the screen.
• Operate the VCR for tape playback.
4
AV CONNECTIONS
AV1
VIDEO
VIDEO 2 IN
L(MONO)
-AUDIO-R
CAUTION :
Before making any connections, turn the power off on the TV and the
other components.
BACK OF TV (VIDEO 1)
FRONT OF TV (VIDEO 2)
AUDIO (R) OUT
AUDIO (L) OUT
VIDEO OUT
In case of SCART JACK
In case of RCA JACK
AUDIO (R) OUT
AUDIO (L) OUT
VIDEO
OUT
Page 6
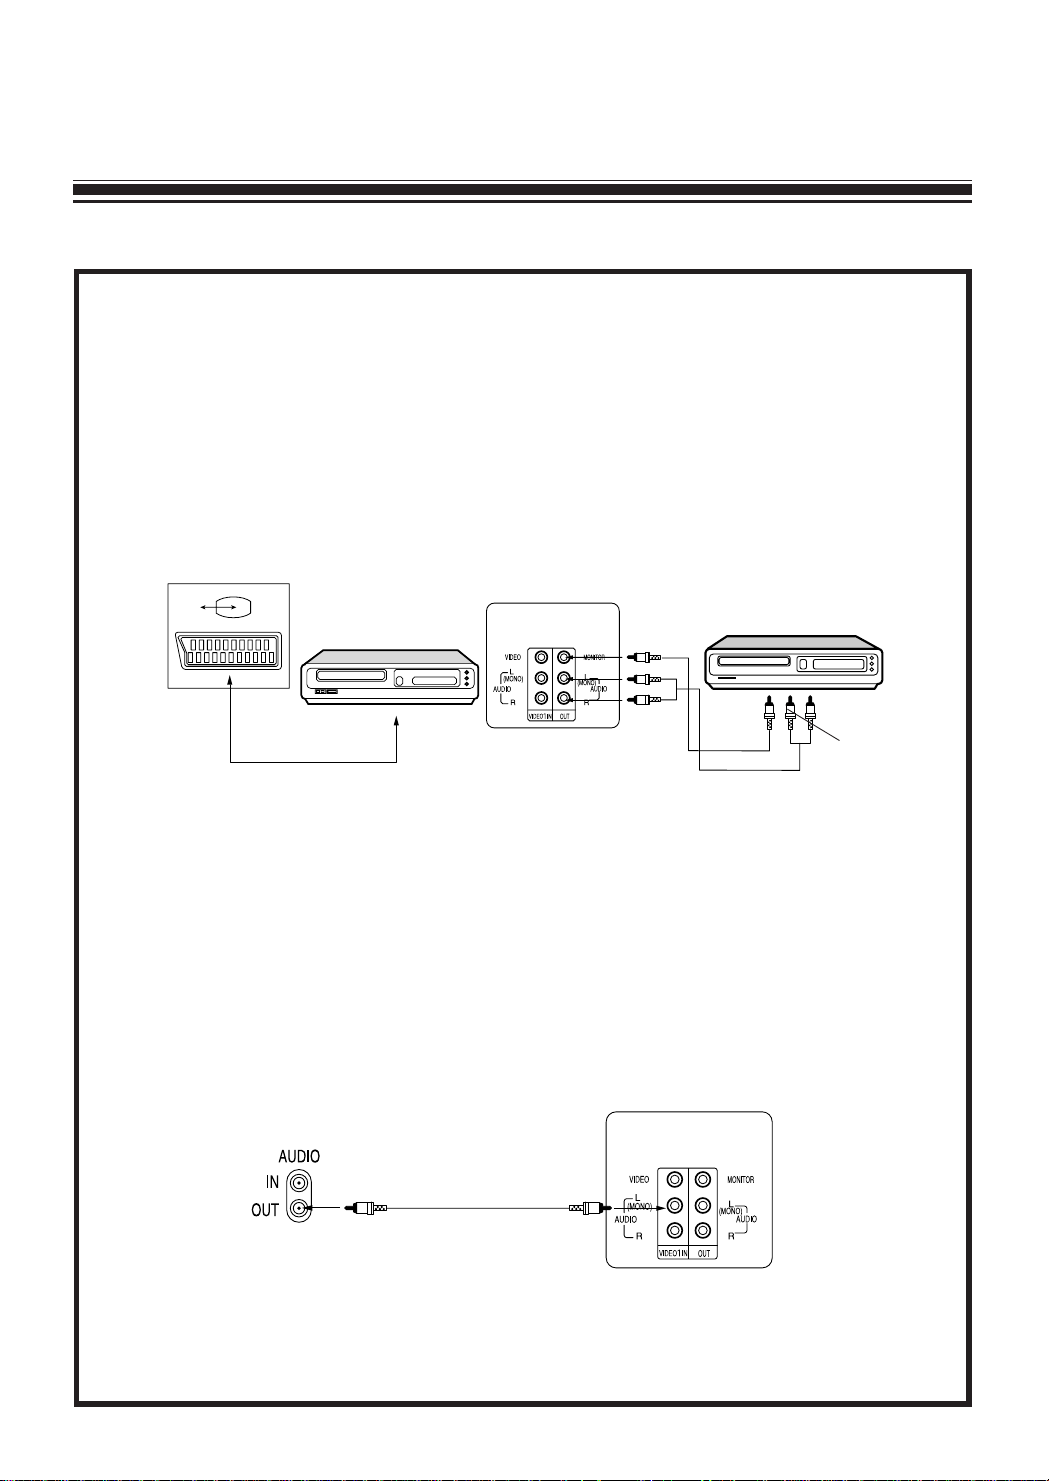
2. T o connect the TV to a VCR for recording
• To record programs you are watching, connect the VCR to the AUDIO OUT
and VIDEO OUT(MONITOR OUT) jacks on the back of the TV as shown
below.
• Operate the VCR normally for recording.
5
AV1
BACK OF TV
BACK OF TV
NOTE:
If you have a mono VCR, video disk player, video game or camcorder,
connect the TV to your other equipment as shown below.
In case of SCART JACK
In case of RCA JACK
AUDIO (R) IN
AUDIO (L) IN
VIDEO
IN
Page 7
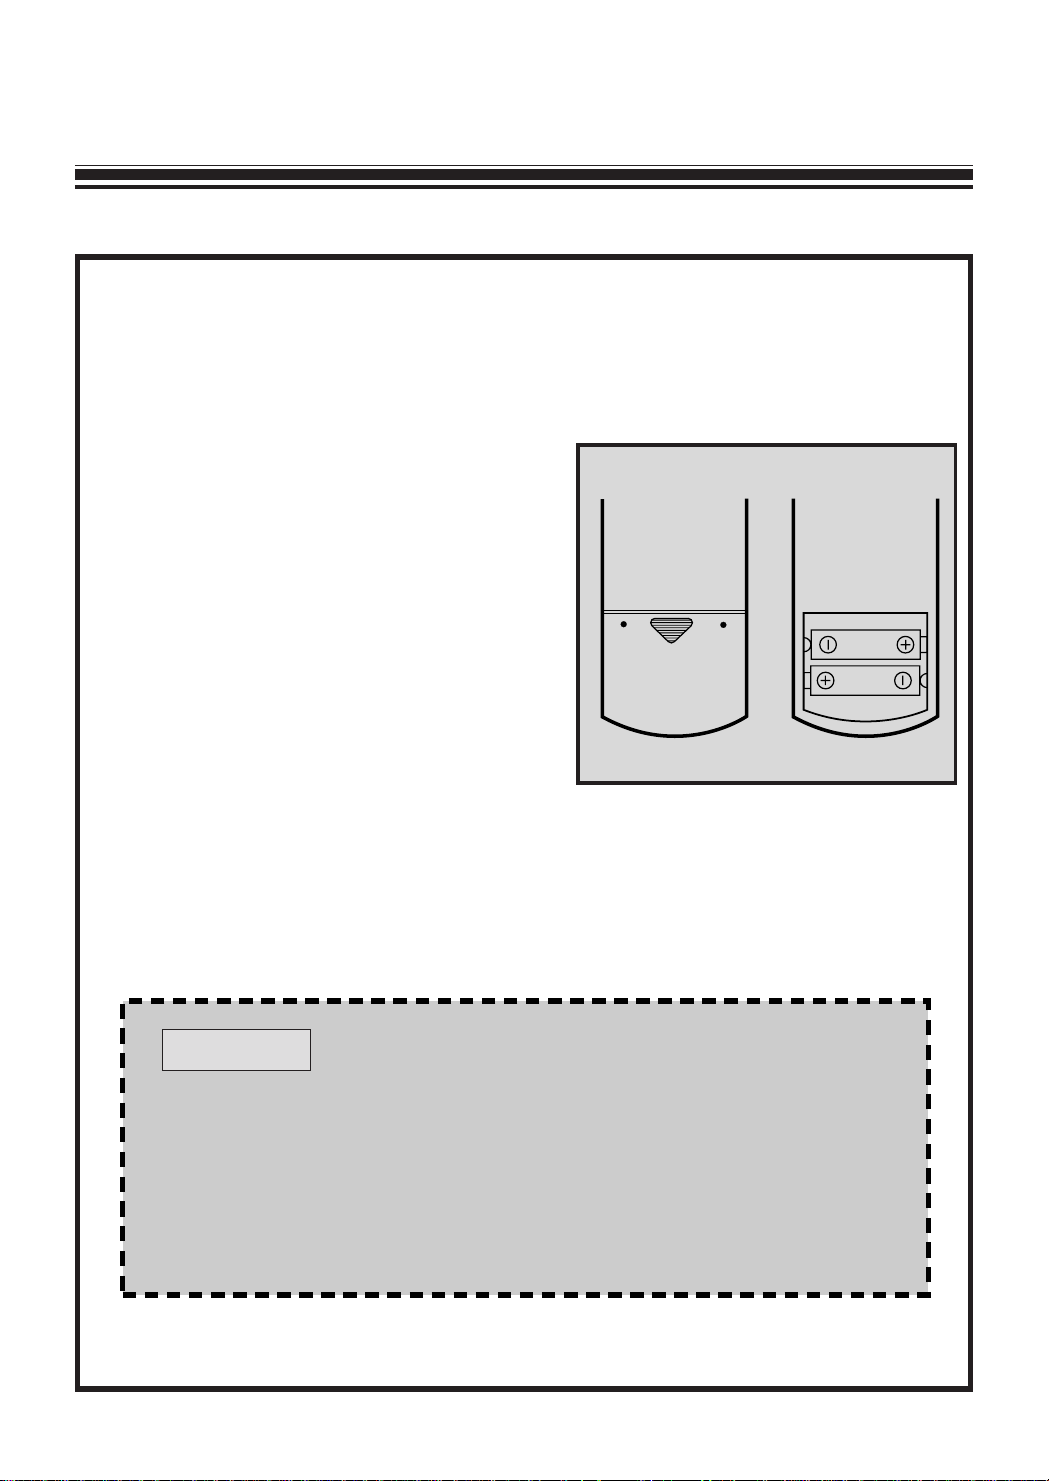
The remote control unit operates with two 1.5V size AAA (penlight) batteries
which are supplied from the factory .
1. Open the battery compartment cover
on the back of the remote control unit.
2. Install the two batteries making sure
that battery polarity matches with the
(+), (-) marks inside of the battery
compartment. Incorrect polarity could
damage to the unit.
3. Close the battery compartment cover.
6
BATTER Y INSTALLATION
• The remote control unit is designed to operate within a distance of
about 7 meters. If malfunction occur even though you are within the
effective operating range, batteries may be weak and required
replacement.
• Do not mix new and old batteries.
NOTE:
Page 8
7
CONTROLS
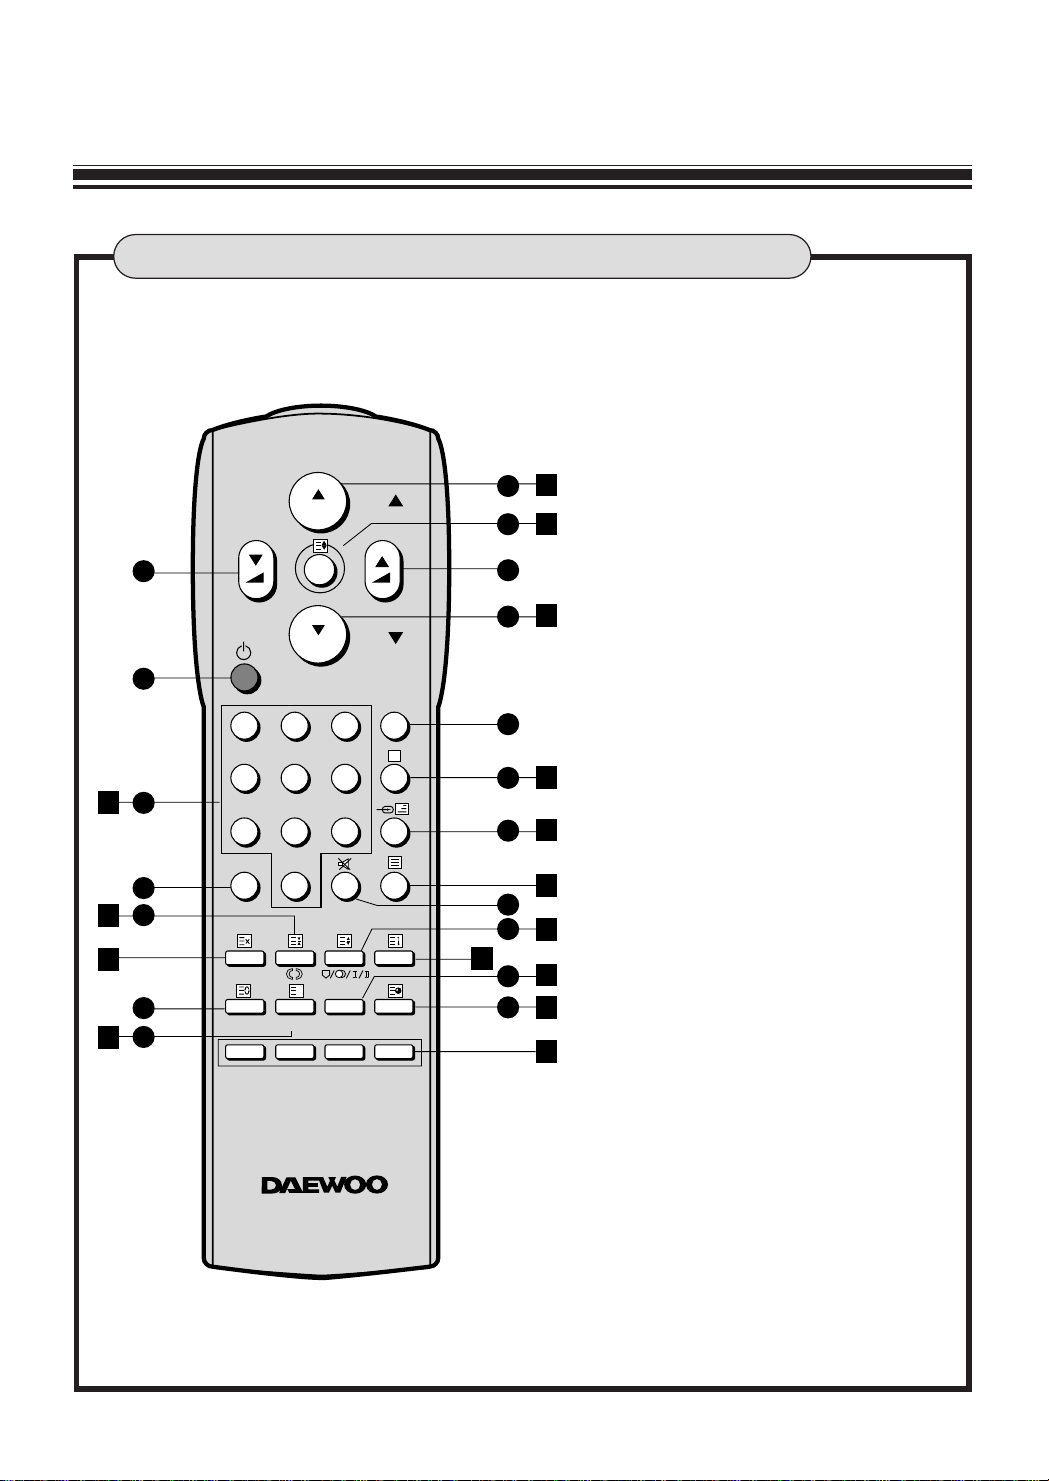
REMOTE CONTROL UNIT
?
PR
PR
PAGE
PAGE
MENU
SLEEP
L/F/T
NORMAL
REMOTE CONTROLLER R-22
RECALL SYSTEM
TIME
123
456
789
0
6
4
7
5
2
9
8
13
16
12
20
3
1
15
14
19
10
11
3
4
5
9
8
17
20
21
16
12
15
19
18
11
22
E
TV use identified by
1
1
Power
2
Menu
3
Enter
4
Up (PR Up)
5
Down (PR Down)
6
Left (V olume Down)
7
Right (V olume Up)
8
Audio Video
9
TV
A
Normal
B
Recall
C
System
D
Mute
E
Sleep
F
PR Selector 0-9
G
Time
TEXT Use identified by
a
c
Store
d
Page Up
e
Page Down
h
MIX
i
TV
k
Reveal
l
L/F/T
o
Page Selector 0-9
p
Subcode
q
TTX-T eletext
r
Cancel
s
Hold
t
Size
u
Index
v
Red, Green, Y ellow , Cyan
Page 9
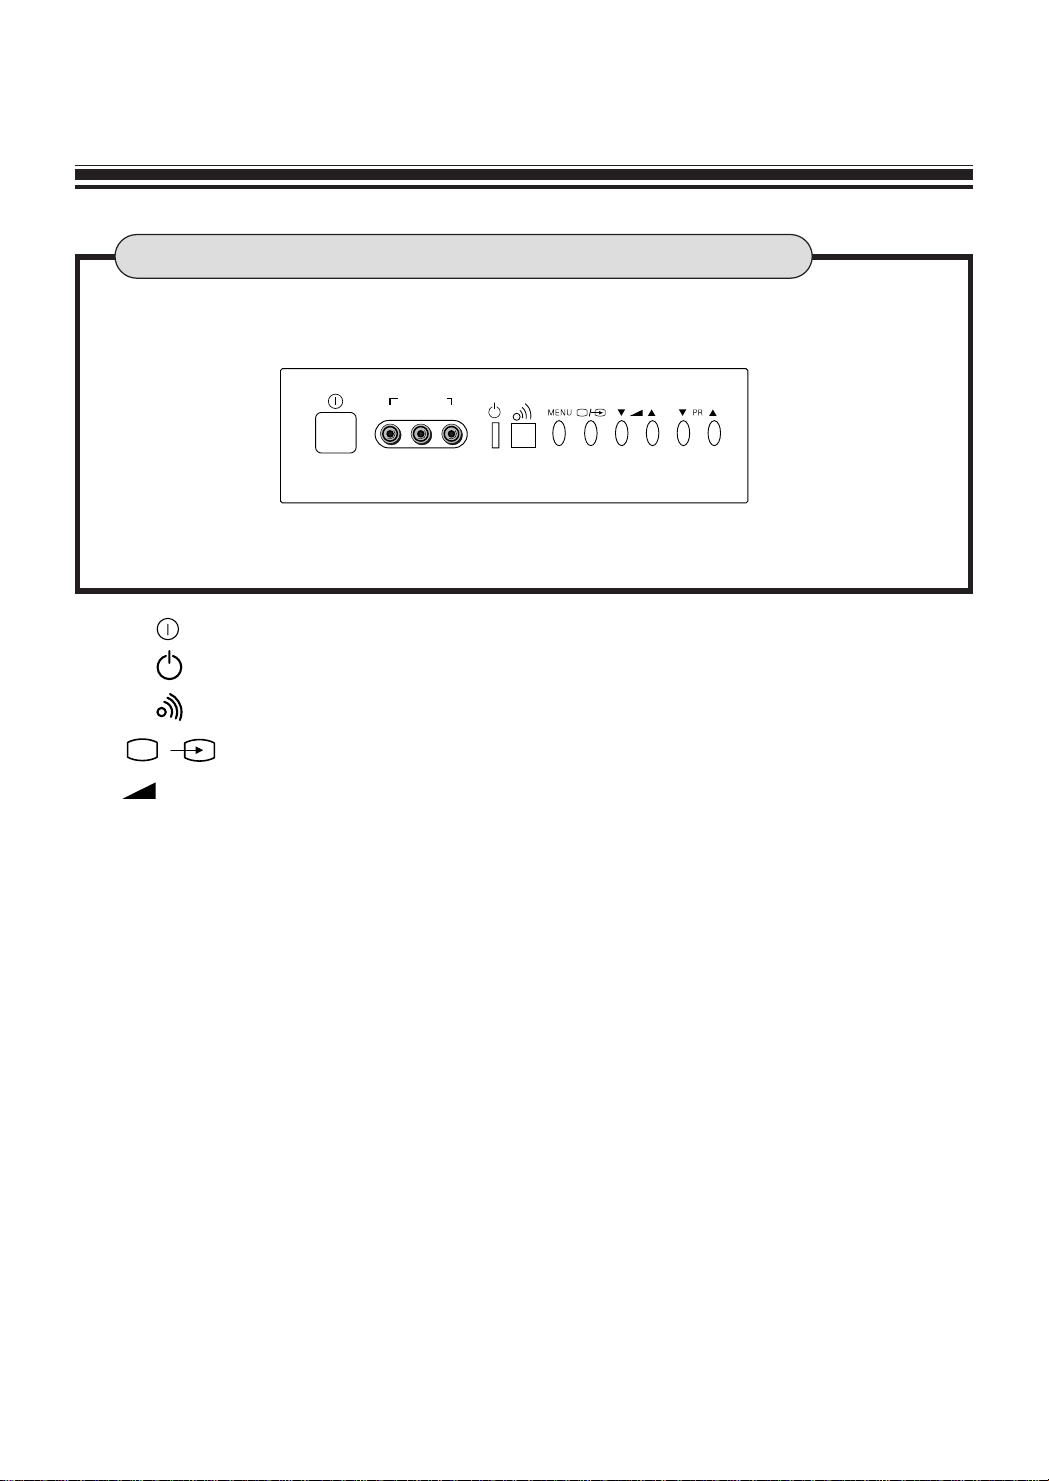
8
FRONT CONTROL
VIDEO
VIDEO 2 IN
L(MONO)
-AUDIO-R
1) : MAIN POWER SWITCH
2) : STAND-BY INDICAT OR
3) : INFRARED REMOTE SENSOR
4) / : TV/A V SELECTION BUTT ON
5)
W/V
: VOLUME DOWN/UP BUTTON
6) PRW/V: PROGRAMME DOWN/UP BUTTON
Page 10
• Before plugging in, confirm that your power supply is suitable. This receiver is
designed to operate with AC 1 10~250V, 50/60 Hz range.
Do not operate the receiver on DC power supplies or any other voltage.
• Plug the code into the main outlet.
• Switch the receiver on by pressing the MAIN POWER SWITCH ( ). In this
case the STAND-BY INDICATOR( ) will illuminate, then the TV will be in
Stand-by mode.
• Next press the PROGRAMME DOWN/UP button ("PRW/V") in front of the receiver
or POWER button ( ) or PROGRAMME DOWN/UP button ("PRW/V")on the
remote control unit.
The ST AND-BY INDICATOR will be turned of f and a picture appear.
First, the programme number appears on the upper right side of the screen
and then disappear after about 5 seconds.
• Press the POWER button ( ) on the remote control unit to return the set to
Stand-by mode.
9
OPERATION OF CONTROLS
POWER ON/OFF
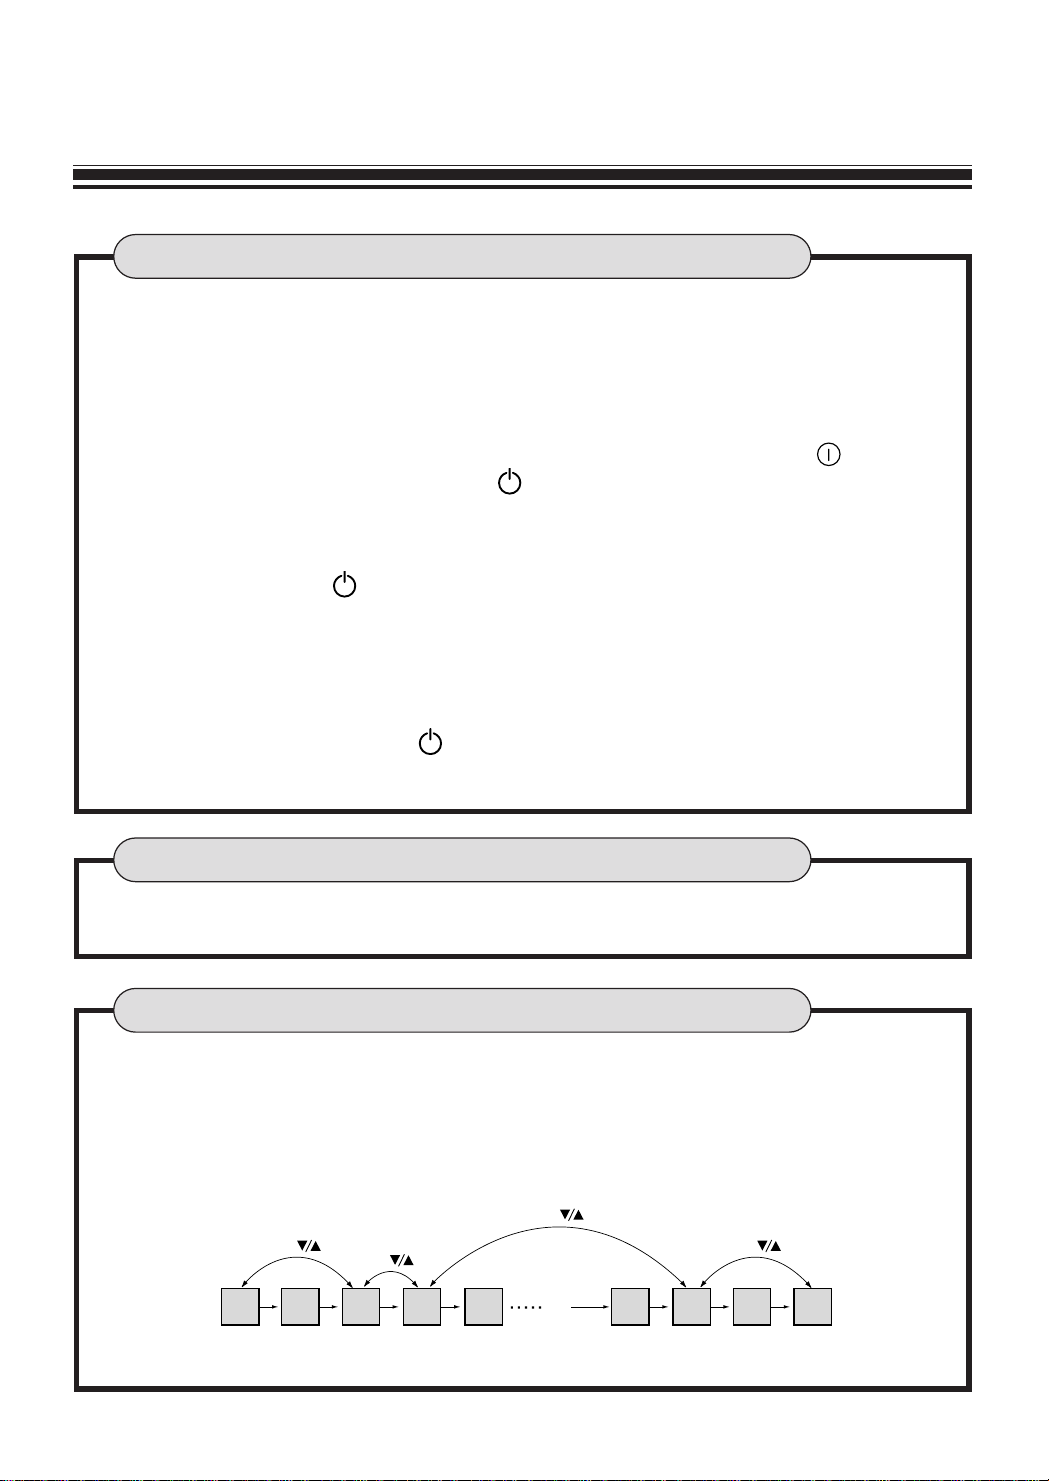
In normal TV mode, these are direct programme selection buttons.
PR SELECTION BUTTONS
In normal TV mode, these are sequential programme selection button, but
"SKIP ON" programme number cannot be selected.
On the screen, "POS. NO" indicates programme number.
(Refer to "SKIP ON/OFF" at page 15)
DOWN & UP ("PR
W/V
")
12345
98 99
01
SKIP ON SKIP ON SKIP ON
PR PR
PR
PR
Page 11
Pushing the RIGHT ( V) button increases the sound (SUB MENU) Volume
and the LEFT ( W) button decreases it.
When you push these buttons, the volume indication bar appears at the bottom
of the screen with green colour.
10
LEFT & RIGHT("
W/V
")
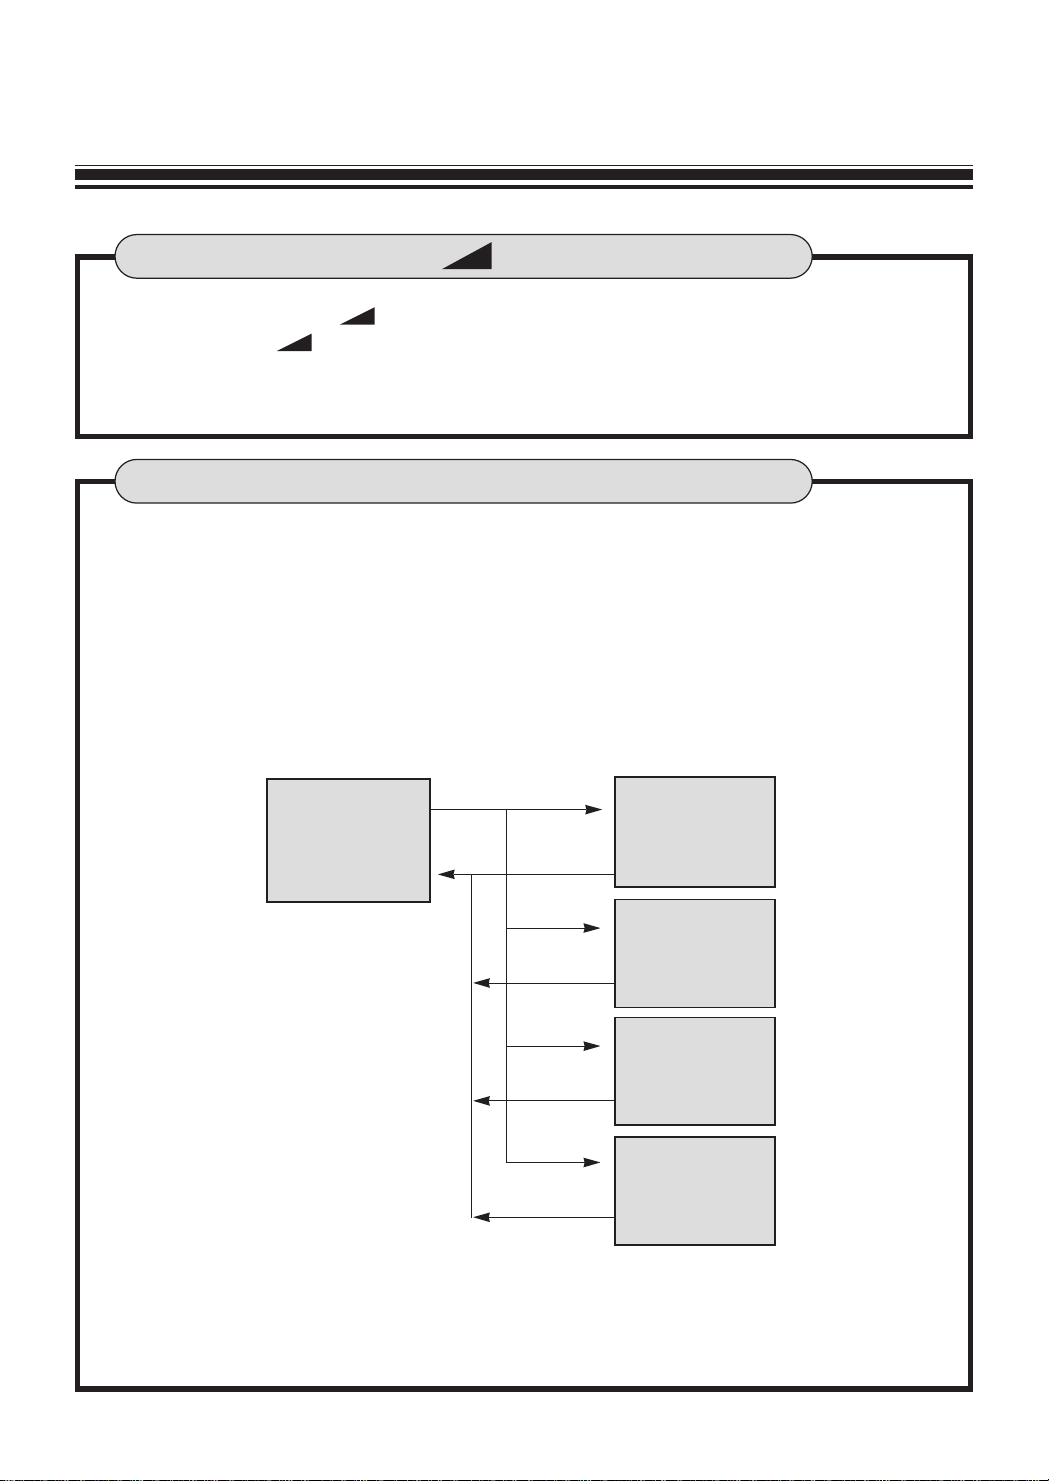
• Some functions that are not in use frequently are only accessible via a simple
menu.
• The 6 buttons (MENU, ENTER, DOWN/UP, LEFT/RIGHT) plus PR SELECTION
buttons 0-9 are used to control MENU.
• The main menu is activated by pressing the MENU button. From the main menu,
sub menu at which the cursor is positioned with red color is activated by pressing
LEFT/RIGHT or ENTER button. The cursor can be moved by pressing
DOWN/UP buttons.
• The MENU button is also used to return to the higher level in the menu tree.
MENU & ENTER
PICTURE FAVORITE
B
MENU
B PICTURE
SOUND
TIMER
POS. MEMORY
LANGUAGE
PICTURE
ENTER
MENU
(LEFT/RIGHT)
(LEFT/RIGHT)
SOUND
ENTER
MENU
MENU
(LEFT/RIGHT)
TIMER
ENTER
MENU
(LEFT/RIGHT)
POS. MEMORY
ENTER
BRIGHT 60
||||||||||||||||
. . . .
CONT 90
|||||||||||||||||||
.
COLOR 80
||||||||||||||||||
. .
SHARP 60
||||||||||||||||
. . . .
TINT 0
...........
||
. . . . . . . . . .
B/B ON
SOUND MEMORY
B
BASS 50
|||||||||||
. . . . . . . . . .
TREBLE 50
|||||||||||
. . . . . . . . . .
BALANCE 0
...........
||
. . . . . . . . . .
TIMER
B
CLOCK - - : - ON TIME OFF
- - : - POS. 01
OFF TIME OFF
- - : - -
POS. MEMORY
B
MANUAL MEMORY
AUTO MEMORY
Page 12
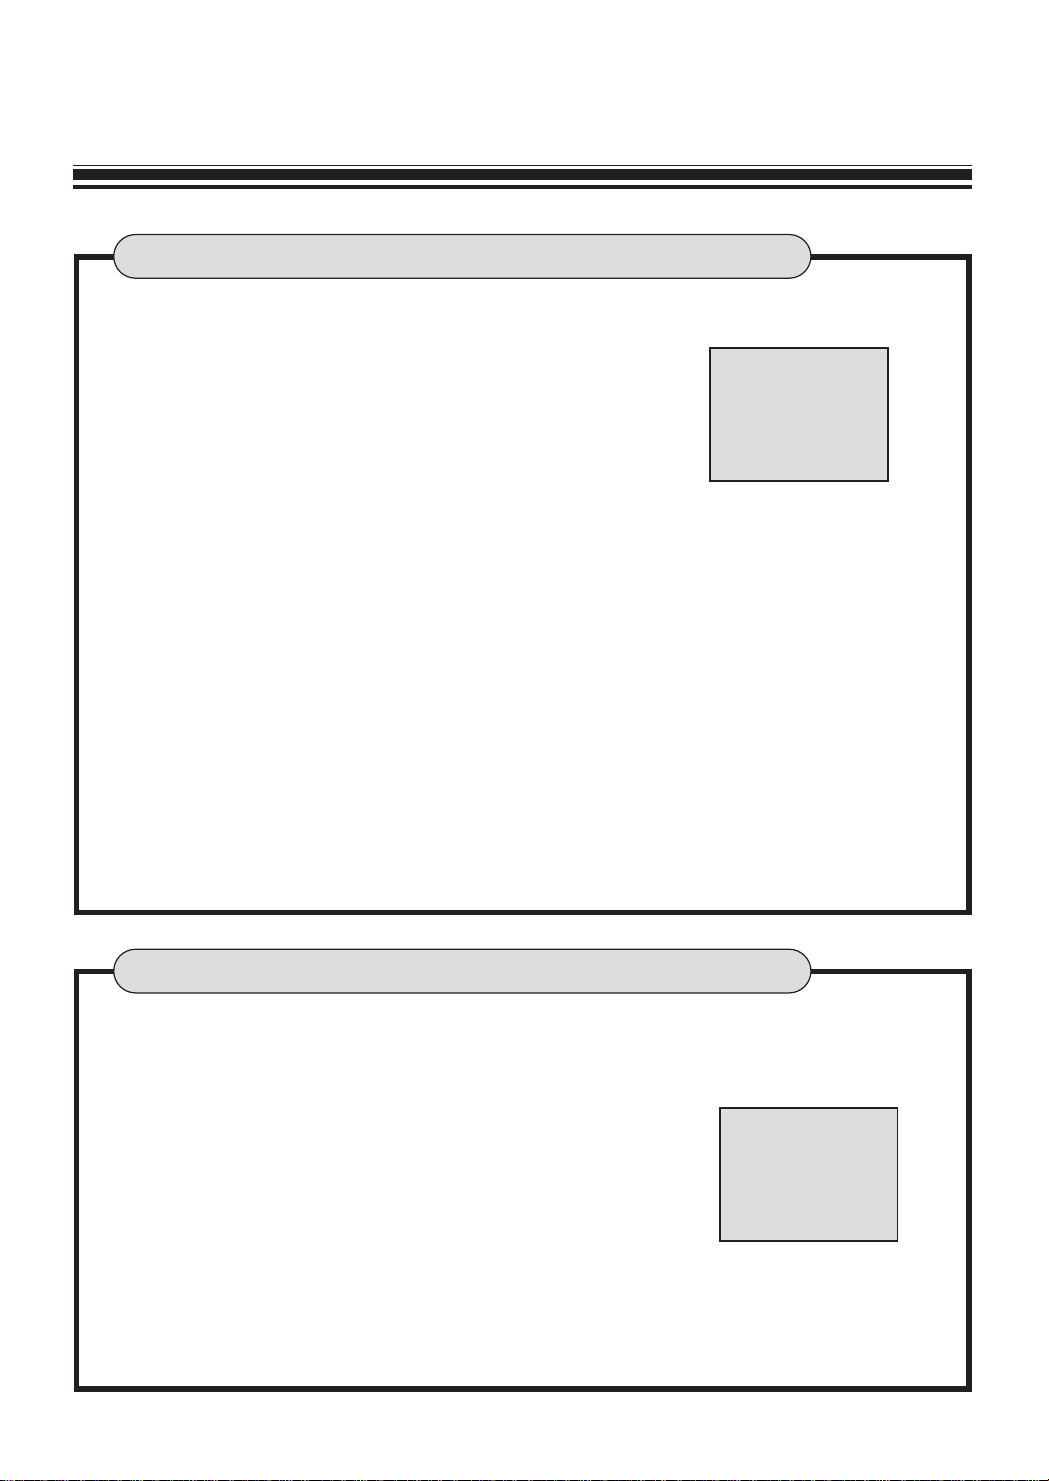
The wanted function is selected by moving the cursor with DOWN/UP button.
The LEFT/RIGHT button are used to adjust the analog level.
1. BRIGHTNESS
Adjust for natural brightness if the picture appear too dark or
light.
2. CONTRAST
This is used to obtain satisfactory range of the tone between black and white. A bright
room will need the higher contrast setting than a dark room.
3. COLOR
Adjust the strength of the colour as preferred.
4. SHARPNESS
This is used to change the sharpness degree of the picture. It is the most usable
when watching programmes from the external source such as a VCR.
5. TINT; ONLY NTSC
This is used to adjust tint of the NTSC color picture.
6. B/B (BACK BLUE)
When there is no signal and B/B is ON, the display is blue. In case that B/B is OFF by
pressing LEFT or RIGHT button, the noise signal will be displayed on the screen.
other content is upper.
11
PICTURE (SUB MENU)
PICTURE FAVORITE
B
BRIGHT 60
||||||||||||||||
. . . .
CONT 90
|||||||||||||||||||
.
COLOR 80
||||||||||||||||||
. .
SHARP 60
||||||||||||||||
. . . .
TINT 0
...........|| . . . . . . . . . .
B/B ON
1. BASS
Place the cursor at BASS by using DOWN/UP button
and adjust the sound of the low frequency band by
using LEFT/RIGHT button.
2. TREBLE
Place the cursor at TREBLE and adjust it as BASS mode.
It is used to adjust the high frequency band.
3. BALANCE
This is used to control the strength of left or right each SPEAKER by using
LEFT/RIGHT button.
SOUND (SUB MENU)
SOUND MEMORY
B
BASS 50
|||||||||||
. . . . . . . . . .
TREBLE 50
|||||||||||
. . . . . . . . . .
BALANCE 0
...........|| . . . . . . . . . .
Page 13
1. CLOCK
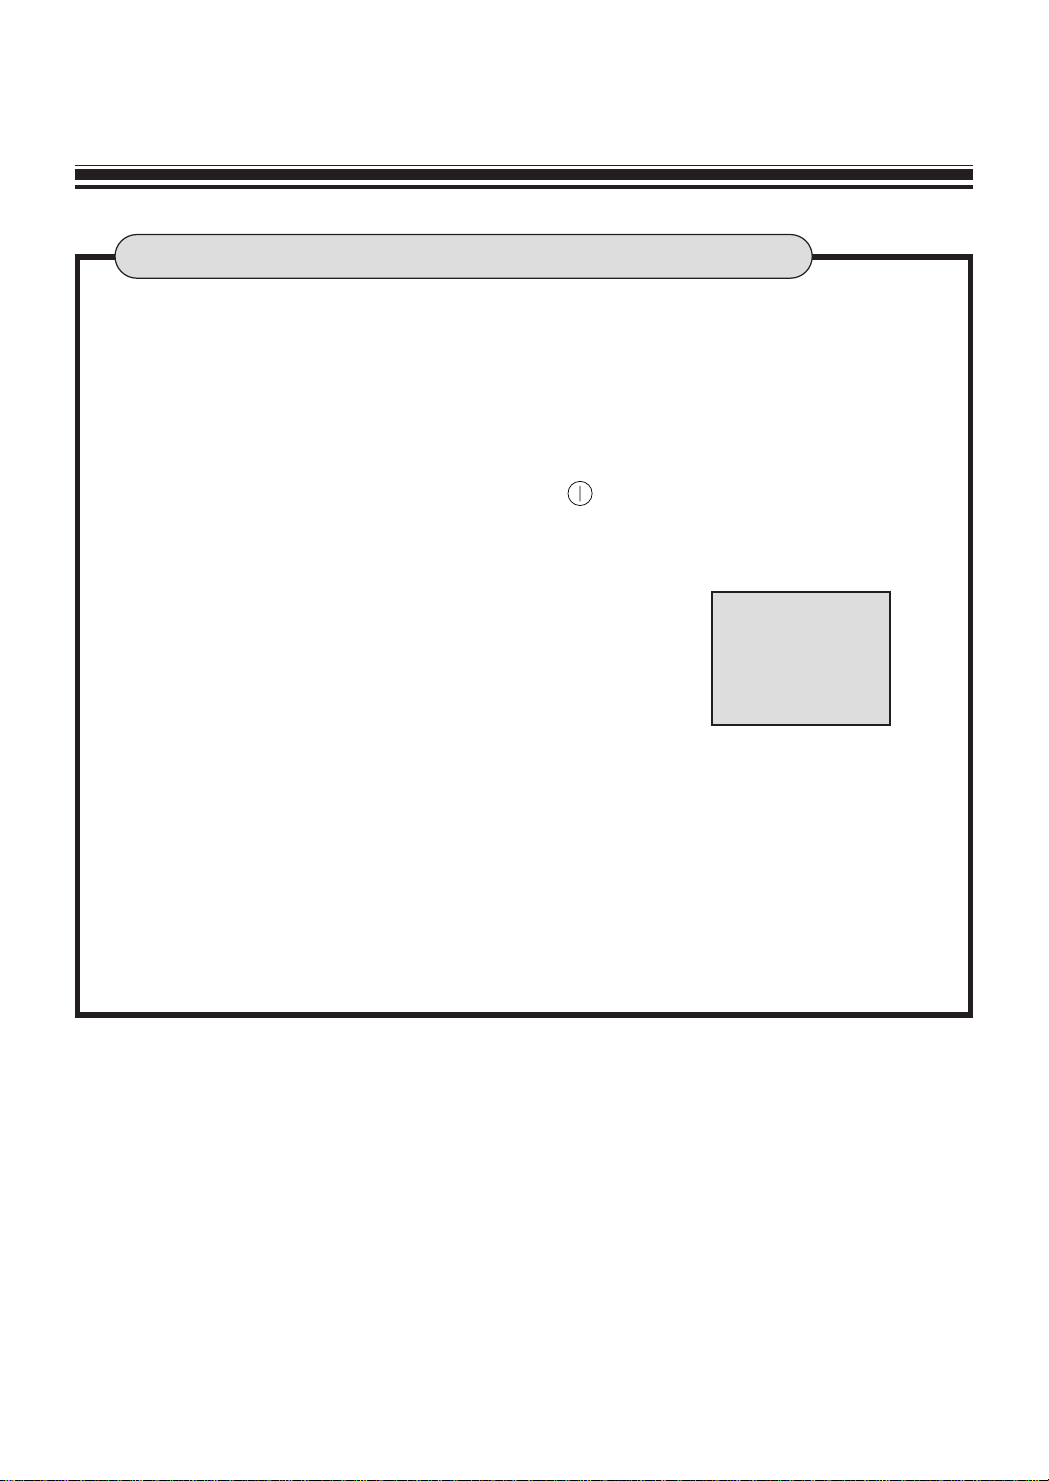
Place the cursor at CLOCK by using DOWN/UP button and the dash( - - ) of
CLOCK mode start to flicker. The CLOCK will be changed by pressing
LEFT/RIGHT button. Press the ENTER button after setting the hour , the dash( - - )
of the minute start to flicker. Continually pressing the ENTER button or DOWN/UP
button after setting the minute like the hour, the cursor will be place at ON TIME or
OFF TIME. If the MAIN POWER switch ( ) on the TV SET is turned off, it
becomes initial mode.
2. ON TIME
ON TIME mode is changed as like OFF
→
ONCE
→
EVERY whenever LEFT/RIGHT button is pressed. Set
ON TIME mode to ONCE or EVERY. After that, set ON
TIME by using LEFT/RIGHT button like CLOCK mode.
If ON TIME mode is OFF, then you can’t set ON TIME.
3.ON TIME POS. NO
Place the cursor at POS. No and select the programme number by using
LEFT/RIGHT button or PR SELECTION buttons 0-9. Then the TV will be
always switched on with this programme automatically on setting time.
4.OFF TIME
Place the cursor at OFF TIME and set the time as ON TIME mode.
Press the ENTER button after setting the hour and the minute.
12
TIMER (SUB MENU)
TIMER
B
CLOCK 09:00
ON TIME ONCE
09:30
POS. 03
OFF TIME OFF
- - : - -
Page 14
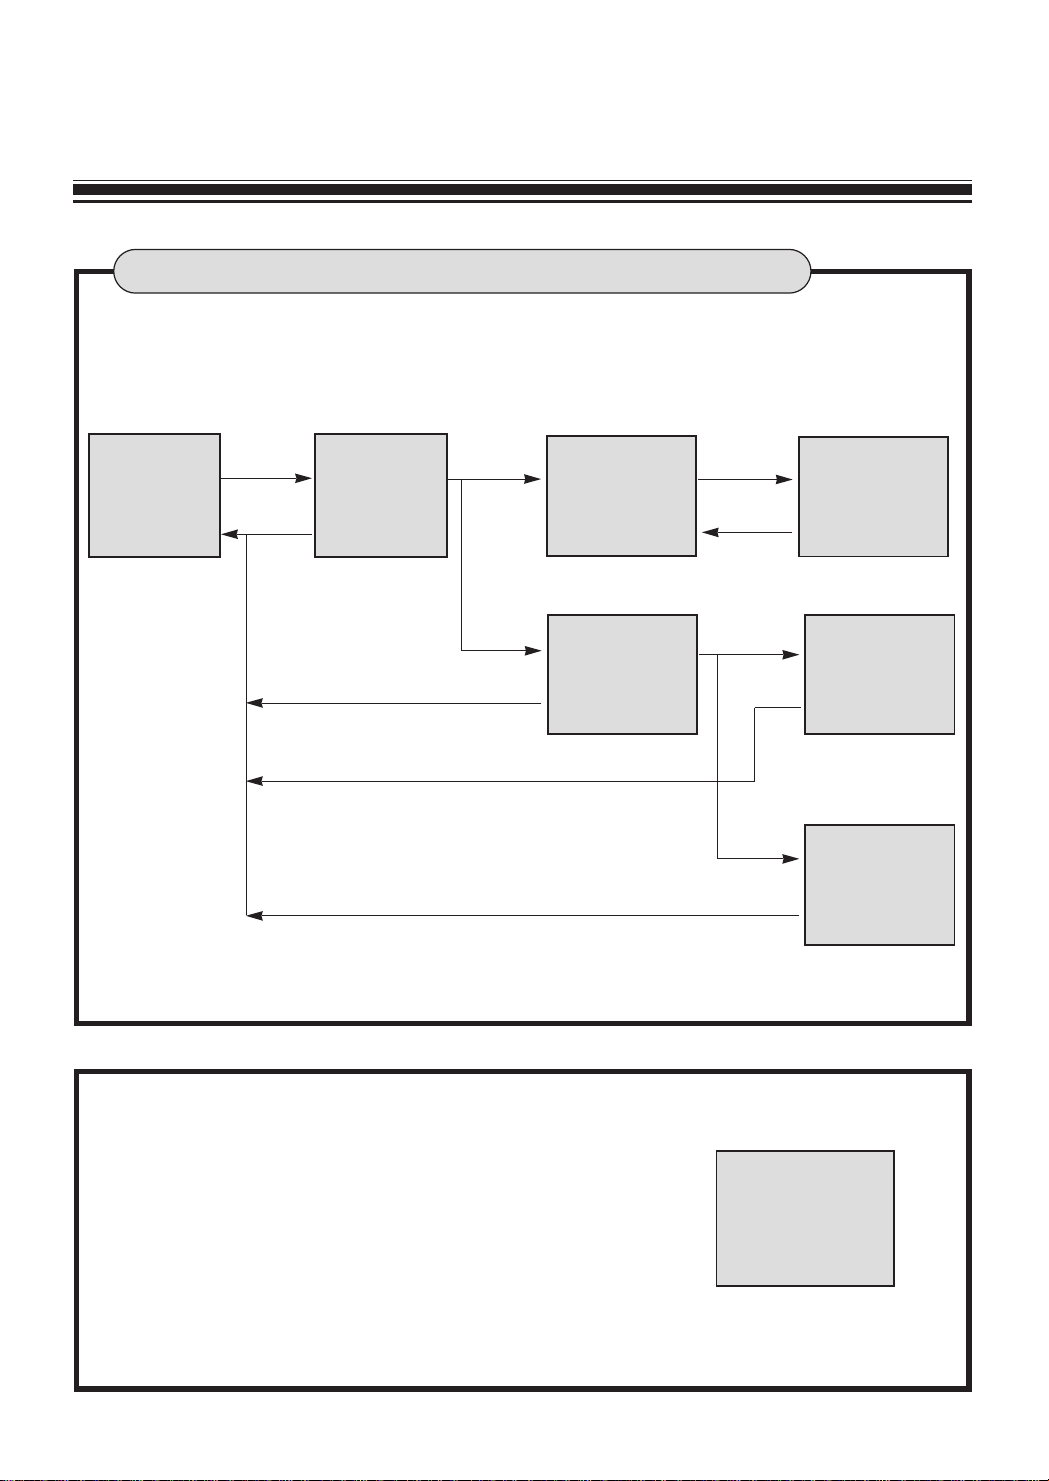
Tuning function is able to operate via POS. MEMORY menu. This mode
cannot be selected in A V mode.
AUTO MEMORY 11 UHF
||||||||
------------------
AUTO MEMORY
ENTER
(LEFT/RIGHT)
(LEFT/RIGHT)
POS.MEMORY
MANUAL MEMORY
AUTO MEMORY
B
SOUND : B/G
I
D/K
M
AUTO MEMORY
ENTER
(LEFT/RIGHT)
POS. MEMORY (SUB MENU)
13
MANUAL MEMORY
B POSITION 01
BAND VHF-L
SEARCH DOWN
STORE POS. 01
SKIP OFF
MFT DOWN
||||||||
------------------
MANUAL MEMORY
POSITION 01
BAND VHF-L
B SEARCH DOWN
STORE POS. 01
SKIP OFF
MFT DOWN
||||||||
------------------
MANUAL MEMORY
POSITION 01
BAND VHF-L
SEARCH DOWN
STORE POS. 01
SKIP OFF
B MFT DOWN
||||||||
------------------
MANUAL MEMORY
ENTER
(LEFT/RIGHT)
SEARCH
(LEFT/RIGHT)
MFT
(LEFT/RIGHT)
POS. MEMORY
ENTER
(LEFT/RIGHT)
MENU
MENU
MENU
MENU
MENU
PICTURE
SOUND
TIMER
B
POS. MEMORY
LANGUAGE
POS.MEMORY
MANUAL MEMORY
B
AUTO MEMORY
1. AUTO MEMORY
Auto Memory function will search and store all
availables station. Place the cursor at AU T O MEMOR Y
and press ENTER or LEFT/RIGHT button.
Then POS. MEMORY menu is displayed as shown in
the right figure.
SOUND(B/G, I, D/K, M) can be selected by pressing PR UP/DOWN button.
(B/G: Middle asia, D/K: China, Russia)
POS.MEMORY
MANUAL MEMORY
AUTO MEMORY
B SOUND : B/G
I
D/K
M
Page 15
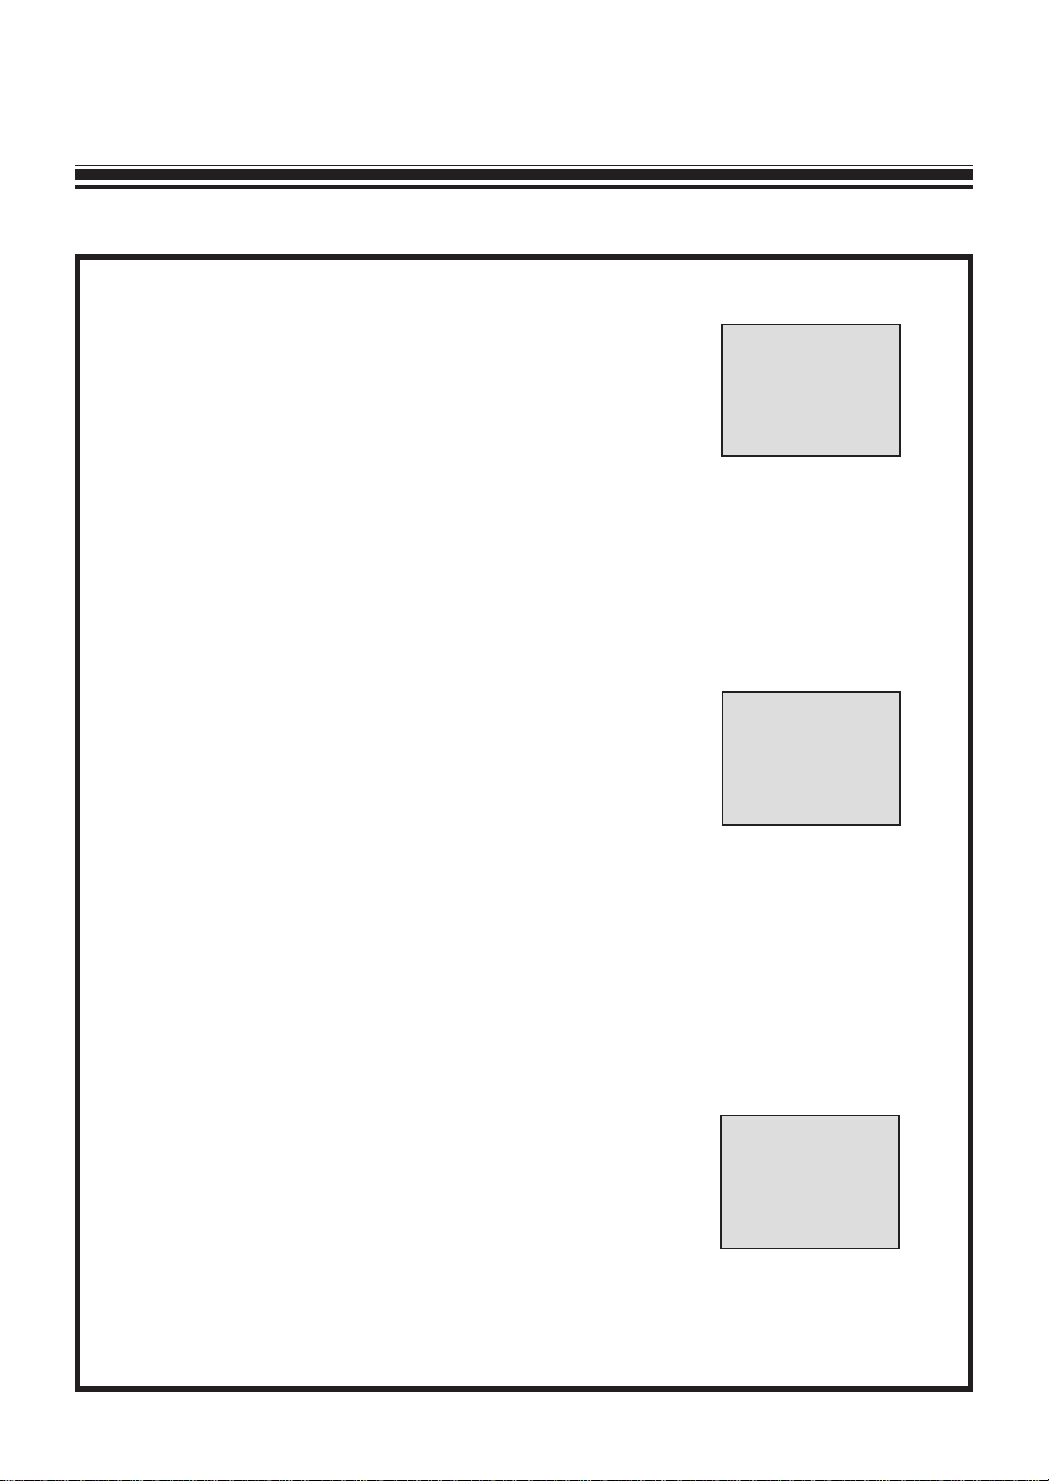
Press ENTER or LEFT/RIGHT button after selecting
the wanted SOUND.
The TV will automatically tune itself to all channels
from 0-99 and from
VHF L →VHF H → UHF
In case of having signal, it will be stored in programme number "1" first and
make programme number increase, then continue to search for next station.
When all 100 programmes are stored or the searching of the all available
stations is completed, it will be displayed nothing. AU T O MEMOR Y is
cancelled by LEFT/RIGHT or POWER button.
2. MANUAL MEMORY
Place the cursor at MANUAL MEMORY by using
DOWN/UP button and press ENTER or LEFT/RIGHT
button. Then, MANUAL MEMORY menu is displayed
as shown in the right figure.
To return to the previous menu, press MENU button.
2-1. POSITION. NO
The programme number is changed by using LEFT/RIGHT button or PR
SELECTION buttons 0-9..
2-2. BAND
Place the cursor at BAND by using DOWN/UP button and press
LEFT/RIGHT button, then channel band will be changed as follow:
VHF L →VHF H → UHF → VHF L
2-3. SEARCH DOWN/UP
Place the cursor at SEARCH mode by using
DOWN/UP button and press LEFT or RIGHT button,
then OSD bar goes to the left or right. During that
time, the letter of DOWN or UP start to flicker. When a
channel is found, this operation will be stop. After that,
if this is wanted channel, you must save this channel at STORE POS.
NO(Refer to 2-4). When the tuning reaches to the top of the band, it will be
changed to the next band.
14
MANUAL MEMORY
B POSITION 01
BAND VHF-L
SEARCH DOWN
STORE POS. 01
SKIP OFF
MFT DOWN
||||||||
------------------
MANUAL MEMORY
POSITION 01
BAND VHF-L
B SEARCH DOWN
STORE POS. 01
SKIP OFF
MFT DOWN
||||||||
------------------
AUTO MEMORY 11 UHF
||||||||
------------------
Page 16
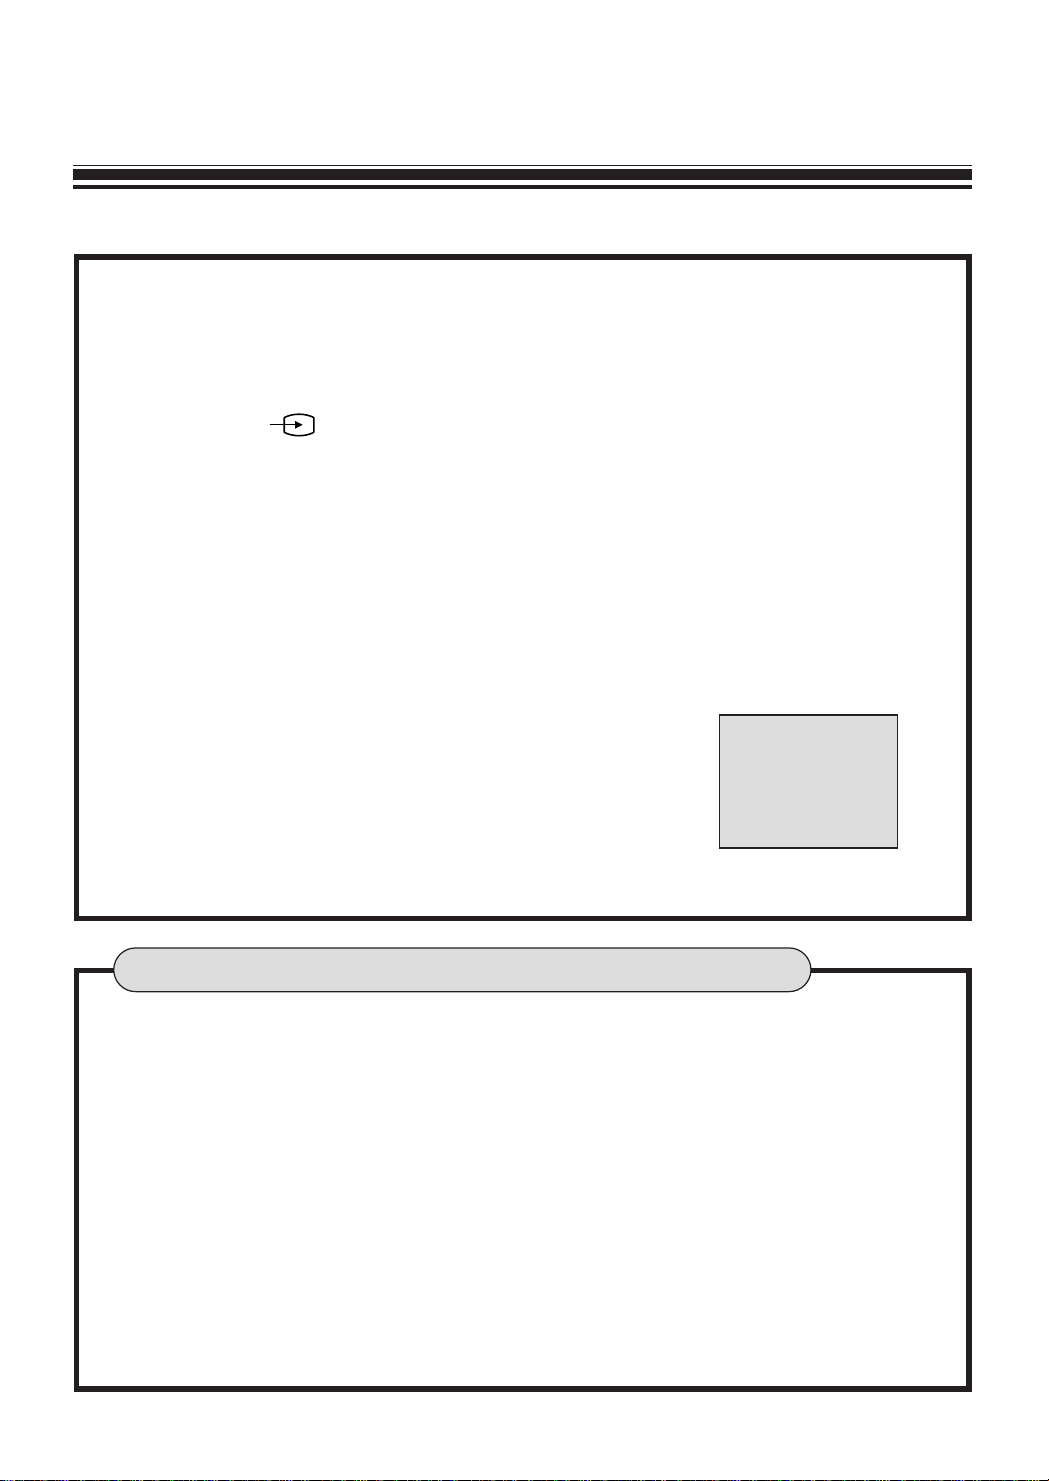
• This SUB MENU for language selection allows you to select language of ONScreen Display as required.
• English is preset at the factory. If you want to select another language, move
the cursor to LANGUAGE by using DOWN/UP button and press
LEFT/RIGHT or ENTER button. Then LANGUAGE sub menu will be
displayed. Place the cursor to the desired language by using DOWN/UP
button. After then, all messages and information on the screen changed to the
selected language.
15
LANGUAGE (SUB MENU)
2-4. STORE POS. NO
This is used to memorize things which are operated in MANUAL MEMORY
mode. Place the cursor at STORE POS. NO. The POS. NO can be selected
by pressing LEFT/RIGHT button or PR SELECTION buttons 0-9. Pressing
ENTER or ( ) button after selecting the wanted programme number, it
will be memorized. The cursor is moved to SEARCH mode automatically
after store operation.
2-5. SKIP ON/OFF
Skip on/off is toggled by LEFT/RIGHT buttons. Whenever toggled, it is
memorized immediately . The programme marked with "Skip On" are skipped
whenever the programme Down/Up function operate. The skipped
programme number selected by PR SELECTION buttons 0-9 is displayed
on the screen with red colour.
2-6. MFT DOWN/UP (FINE TUNING)
If you can't get a good picture or sound because of the
bad broadcasting signal, adjust MFT.
Placing the cursor at MFT DOWN/UP and pressing
LEFT/RIGHT button will be activated MFT DOWN/UP.
At the same time, this channel is saved automatically.
The Fine Tuning is activated only during pressing
LEFT/RIGHT buttons.
MANUAL MEMORY
POSITION 01
BAND VHF-L
SEARCH DOWN
STORE POS. 01
SKIP OFF
B MFT DOWN
||||||||
------------------
Page 17
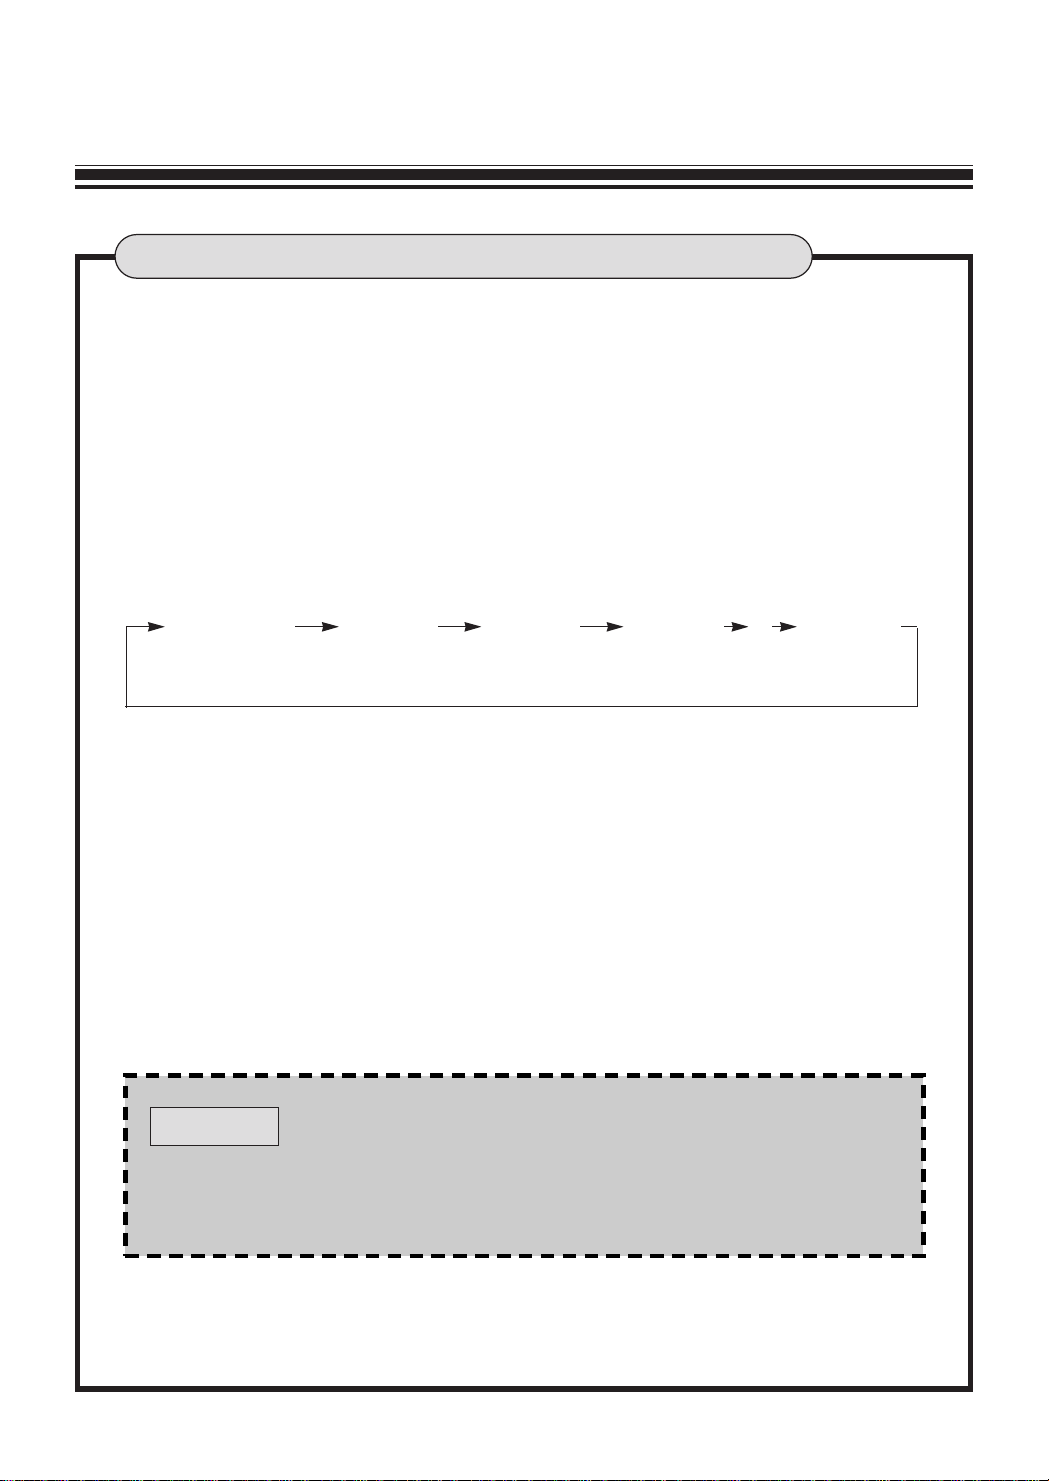
• With this button, up to 2 hours every 10 minutes can be set to the sleep timer .
• If you press the "SLEEP" button for the first time, "SLEEP OFF" sign of the
nonset sleep-timer appears on the bottom of the screen.
• When this button is pressed again, 10 minutes are set to the sleep-timer .
• This display appears for 5 seconds unless any button is pressed.
Whenever pressed again, the setting time is increased by 10 minutes.
• During the sleep-timer operation, if this button is pressed again, the remaining
time of the sleep-timer appears on the screen.
• In addition, if this button is pressed repeatedly, the setting time is increased by
10 minutes continuously .
• When the remaining time become "0", the TV receiver is turned off
automatically.
16
SLEEP
SLEEP OFF SLEEP 10 SLEEP 20 SLEEP 30 SLEEP 120
RESET OF THE
SLEEP-TIMER
In TV mode, if the broadcasting signal is not continuously
present for approx. 30 minutes, the TV receiver is automatically turned off. In AV mode or when the MENU is displayed on the screen in TV mode, however, this function
does not work.
NOTE :
...
Page 18
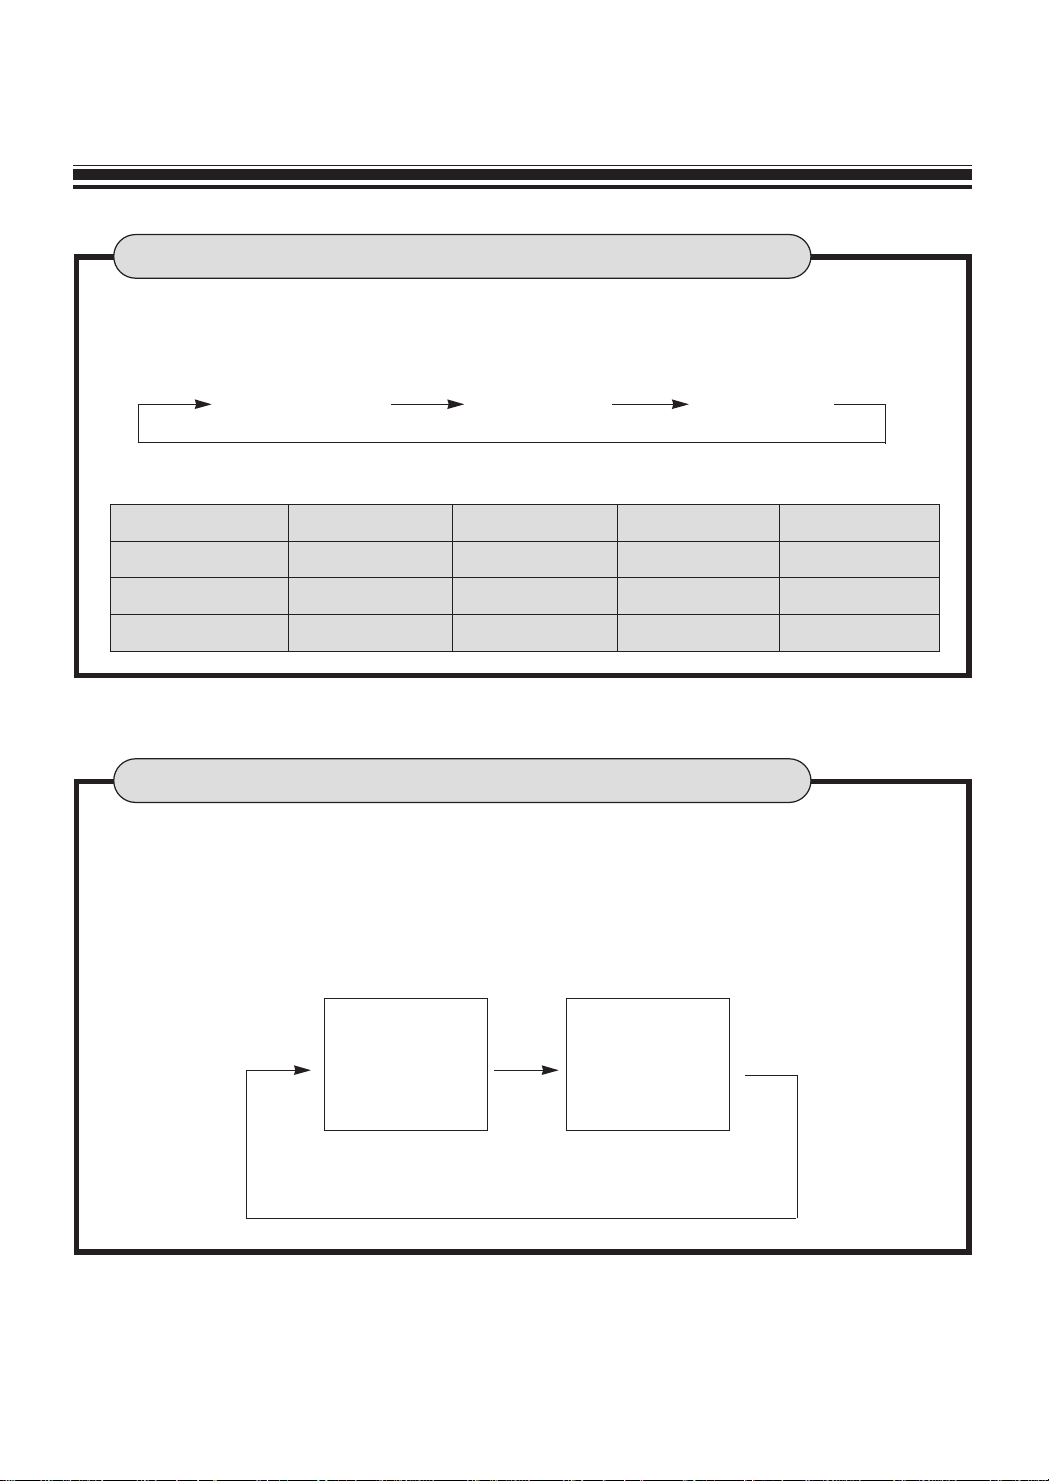
This is used to display the current state.
(POS. NO, SYSTEM, CLOCK)
This display appears for 5 seconds unless any button is pressed.
Whenever this button is pressed again, it is changed repeatedly .
• Select one of the three possible preferred analog video preset.
• The analog levels are as follows:
17
F AVORITE NORMAL
I
NORMAL
II
Preference Brightness Contrast Colour Sharpness
Favorite User store User store User store User store
Normal
I
60/100 90/100 80/100 60/100
Normal
II
80/100 70/100 80/100 50/100
NORMAL
RECALL
POS. NO
SYSTEM
CLOCK
11
PAL-B/G
12:00
Page 19
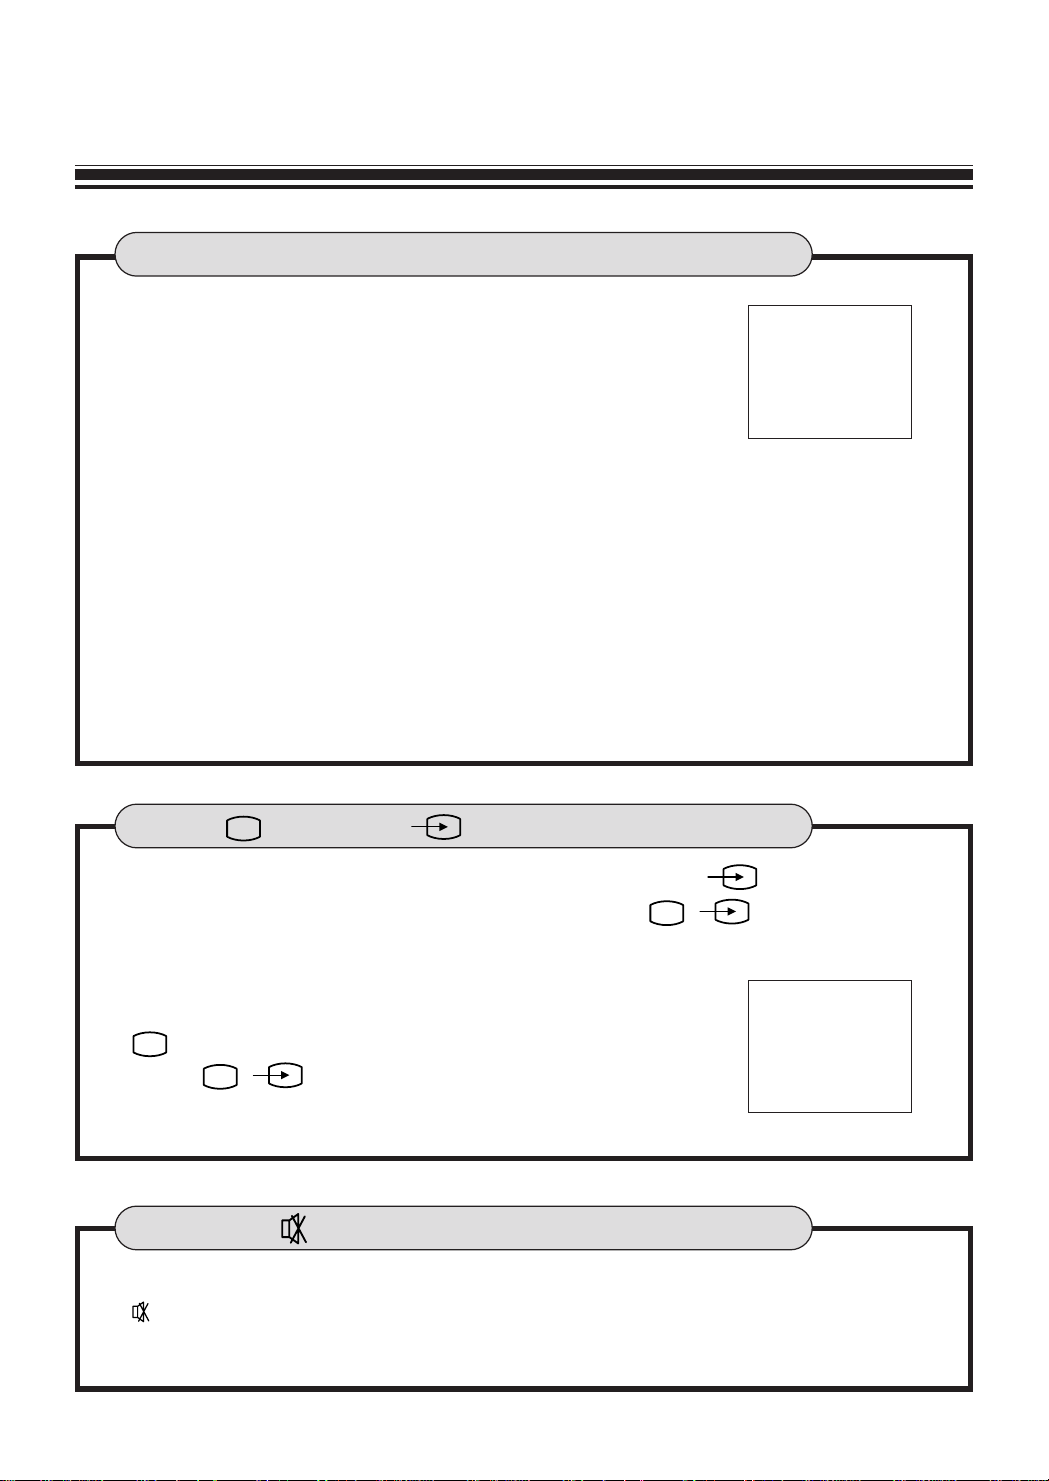
In order to change from TV mode to A V mode, press AV ( ) button on the
18
TV ( ) & AV ( )
Pushing this button cuts off the sound reproduced from the speaker and then
" " will be displayed on the screen with red colour. To return the sound, press
it again.
MUTE( )
●
This is used to switch the SYSTEM of the TV set.
●
Press the SYSTEM button, then the SYSTEM will be
displayed as shown in the right figure. The SYSTEM
consist of COLOR and SOUND.
●
At first, the SYSTEM is preset to COLOR: AUTO, SOUND:
B/G at the factory .
●
If you want another SYSTEM, place the cursor at the COLOR or SOUND by
using DOWN/UP button and press LEFT/RIGHT button. Whenever you press
this SYSTEM button, COLOR SYSTEM is changed as follow:
AUTO↔PAL↔SECAM↔NTSC 4.43↔NTSC 3.58↔AUTO
and SOUND SYSTEM is changed as follow:
B/G↔I↔D/K↔M↔B/G
●
If you get No color or Noise SOUND from this TV set, it is necessary to check
current COLOR and SOUND SYSTEM.
SYSTEM
SYSTEM
COLOR: AUTO
B SOUND: B/G
remote control unit or TV/AV SELECTION button ( / ) on the front of
the receiver. At this time, the AV(VIDEO 1 or VIDEO 2) is displayed on the
upper right side of the screen.
In case of changing from AV mode to TV mode, press TV
( ) button on the remote control unit or TV/AV select
button ( / ) on the front of the
receiver.
In A V mode, the main MENU is displayed as follow picture.
MENU
B PICTURE
SOUND
TIMER
LANGUAGE
Page 20
19
TELETEXT
The Teletext service is carried on a TV transmission signal, therefore it is only available when a
TV programme can be received on your TV. Your choice of TV programme also governs which
Teletext service you will receive (CEEF AX for BBC 1 and 2, Oracle 1TV and Channel 4).
First, turn on your TV and choose your TV programme. Then press the Text button q to
switch the receiver to Teletext mode.
T o select any other page, simply press the three
of the PAGE SELECT o buttons or PAGE
DOWN e or d UP button. The Page number
requested is displayed on the upper left hand
side of the screen and when the third digit (each
main page number consists of three digits) is
entered, the page header display changes
colour from white to green to indicate that the
page currently being displayed is not yet the
requested page. On receiving the new page the
header changes to white, and the rolling number in the centre is stationary .
T o return to normal TV operation, the TV i button is pressed.
In Teletext mode, the PAGE SELECTOR o
buttons are used to enter a page number or a
subcode.
During digit entry page, acquisition is stopped.
Page Number DOWN e and UP d buttons
decrease or increase the current page number
by 1.
When the Index u button is pressed in the
FLOF mode, the Teletext decoder is set up to
display the index page. Press once for Main
Index Page : press again for full index. When
the TV is in LIST mode, the teletext decoder is
set up to display the Red Rank.
In normal Teletext mode, TV picture and character data are not displayed simultaneously .
The MIX h button allows a combined display of
TV picture and character data.
By pressing the SIZE t button, either the top
half or the bottom half of the T ext display can be
expanded.
Press the Size button t once and the top half
of the display expanded.
Press again and the bottom half is expanded.
Press again and the display returns to normal
size characters.
Getting Started
Page Down/Page Up d/e
Index u
Mix h
Size t
Page Selector 0-9 o
Note that when Teletext is first selected,
Index page is automatically obtained when
the TV is in the FLOF mode. If the TV is in
LIST mode, then the Teletext page which is
stored in the RED rank is obtained.
Note that if the new page requested is a
newsflash or a subtitle page, the normal TV
picture is automatically turned on and the
news flash or subtitle displayed in a box
within the picture.
Page 21
Some Teletext pages play a role in concealing
part of the display in, for example, a quiz page
with concealed answers.
The REVEAL k button releases the concealed
text as long as the REVEAL k button is not
pressed again.
Some Teletext pages contain more information
than can be displayed simultaneously and are
therefore sub-divided into a series of two or
more pages.
The first sub-page of a series of four sub-pages
will, for example, be indicated by a 1/4 displayed
on the top right hand side of the text page.
These sub-pages are automatically rotated,
each page being displayed for a set time before
being replaced by the next page. If you need to
read a certain page for longer than is allowed, or
retain a particular subpage, then the HOLD s
button should be pressed. The HOLD symbol
will be displayed on the top left hand side
instead of the page number and page acquisition will be stopped.
Normal operation is restored by pressing the
HOLD s button again or by entering a new
page number.
The CANCEL r button suppresses the Text
display and restores the normal TV picture while
the receiver remains in the Teletext mode.
This function allows you to request Teletext
pages and alter Teletext controls without interrupting a TV programme.
If a new page is requested while teletext is cancelled, the page header is displayed in a box on
the screen for 5 seconds.
For Teletext information which is longer than
one page, it may take some time for the automatically changing of sub-pages to reach the
sub-page you require. It is possible, however, to
enter the sub-page you require and continue
watching a normal TV programme until the correct sub-page has been reached.
Press SUBCODE p button.
The character S0001 will be displayed on the
top left hand side of the Text screen.
Enter the desired sub-page number. EG. To
select sub-page 10, press 0, 0, 1, 0 buttons.
Press CANCEL r button to return to normal
TV programme. When the requested sub-page
is reached, the main page number will be superimposed on the normal TV picture.
Press the Teletext q button to display the
stored sub-page.
When the TV is in the LIST mode, the page
numbers available for the four coloured buttons
(R., G., Y., C.) are displayed in the Text status
row. Your selection is made by pressing the
coloured button v that corresponds with the
desired coloured number.
Press the L/F/T
l
button to select the Teletext
LIST mode. The letter “L” and four coloured
page numbers will appear at the bottom of the
screen. To see one of these pages, press the
matching coloured button v (R., G., Y., C.)
To change the favorite page numbers, press a
coloured button v and then three page selector o buttons on the remote control in
sequence. EG.
To select page 100 on the RED background,
press the R v button, then three digits o (1, 0,
0) in sequence. Page 100 will be shown on the
red background.
This can be repeated with other page numbers
and colours as required.
The STORE c button is used to store a list of
numbers. While the list is being stored the
coloured numbers turn to white for 3 seconds.
Reveal k
Hold s
Cancel r
Subcode p Store c
L/F/T l
R, G, Y, C v
20
Page 22
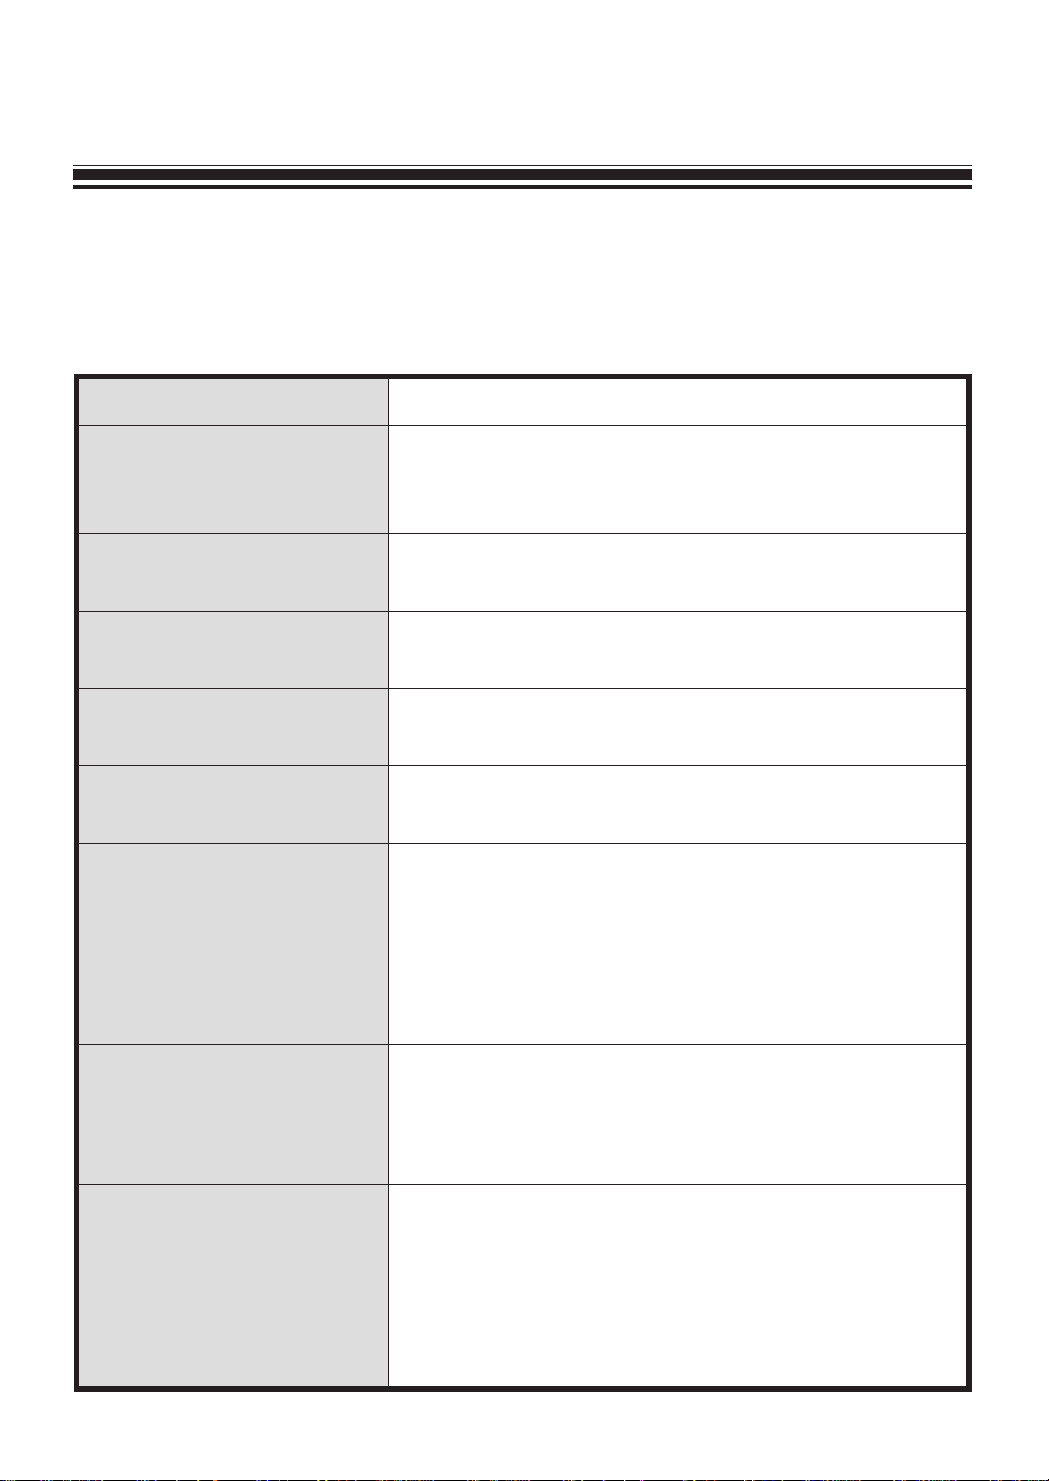
SYMPTOM CHECK
No picture or sound. • Check the TV set is plugged in.
• Check the volume, Brightness and Contrast controls
are set to the minimum positions.
Picture is OK, but No • Check the Volume control is set to the minimum
Sound position.
Sound is OK, but No • Check the Brightness and Contrast controls are
Picture set to the minimum position.
No Colour • Check the Colour control is set to the minimum
position.
Excessive noise in picture • Check the Antenna Cable is broken or
disconnected or damaged.
Diagonal stripes appear • It may be affected by interfering signal. (ex. from
on picture nearby amateur radio transmitter or another TV set.)
• The interference can be reduced to some extent by
adjusting the direction or height of the antenna.
(If the twin lead antenna cable is used, replace it
with a coaxial cable.)
Picture has "Snow" • Check the Antenna cable is broken or disconnected
or damaged.
• Small dot on the screen caused by a weak aerial
signal.
Ghost images appear. • Check the Antenna direction has changed after
storm or strong wind etc.
• Ghost images are caused by a signal reflected from
a hill or large building etc…
• The direction or height of the antenna should be
chosen well in order to minimize the ghost images.
Sometimes some performance problems can be easily solved by checking seemingly
apparent but often overlooked possibilities. Before asking for service, to check these
items could save your time and money .
21
TROUBLESHOOTING
 Loading...