

Page 1

S/M No.:SM21001A
p
Service Manual
Portable DVD Player
Model Name:DPC-11000PD
Certain specifications in this service
manual are subject to change without
notice to im
rove quality and function.
Nov. 2006
Page 2

.
.
.
.
.
.
.
.
.
.
.
1
G
e
n
e
r
a
l
D
e
s
c
r
i
p
t
i
o
n
s
.
.
.
.
.
.
.
.
.
.
.
.
.
.
.
.
.
.
.
.
.
.
.
.
.
.
.
.
.
.
.
.
1
G
e
n
e
r
a
l
D
e
s
c
r
i
p
t
i
1
G
e
n
e
r
a
l
D
e
s
c
r
1.1 Model Features..........................................................................................1
1.2 Information................................................................................................2
2
E
l
e
c
t
r
i
c
a
l
C
h
2
E
l
e
c
t
r
i
c
a
2
E
l
e
c
t
r
2.1 Optical Characteristics.............................................................................3
2.2 Electrical Characteristics.........................................................................3
2.3 System Block Diagram .............................................................................4
l
i
c
a
l
C
C
h
h
a
a
a
o
i
p
t
i
o
r
a
c
t
a
a
c
c
e
t
e
t
e
r
r
n
n
.
s
.
...
.
.
.
.
.
.
.
.
.
.
.
.
.
.
.
.
.
.
.
.
.
.
.
s
.
.
.
.
.
.
.
.
.
.
.
.
.
.
.
.
.
.
.
r
i
s
t
i
c
s
.
.
.
.
.
.
.
.
.
.
.
.
.
r
i
s
t
i
c
s
.
.
.
.
.
.
r
i
s
t
i
c
s
.
.
.
.
.
.
.
.
.
.
.
.
.
.
.
.
.
.
.
.
.
.
.
.
.
.
.
.
.
.
.
.
.
.
.
.
.
.
.
.
.
.
.
.
.
.
.
.
.
.
.
.
.
.
.
.
.
.
.
.
.
.
.
.
.
.
.
.
.
.
.
.
.
.
.
.
.
.
.
.
.
.
.
.
.
.
.
.
.
.
.
.
.
.
.
.
.
.
.
.
.
.
.
.
.
.
.
.
.
.
.
.
.
.
.
.
.
.
.
.
.
.
.
.
.
.
.
.
.
.
.
.
.
.
.
.
.
.
.
.
.
.
.
.
.
.
.
.
.
.
1
.
.
.
.
1
.
.
.
.
1
.
.
.
.
3
.
.
.
.
3
.
.
.
.
3
3
P
o
3
4
4
5
5
6
6
3
4
5
6
w
P
o
w
P
o
w
3.1 Power Supply.............................................................................................5
3.2 Rechargeable Battery ............................................................................... 5
D
i
m
D
i
m
D
i
m
4.1 Outline Dimension.....................................................................................7
S
p
a
S
p
a
S
p
a
5.1 Key Parts List............................................................................................ 8
R
e
g
R
e
g
R
e
g
6.1 Safety……………………………………………………………………20
6.2 EMI...……………………………………………………………………20
r
r
r
u
u
e
e
e
e
u
e
e
e
e
e
r
r
n
n
l
l
l
r
n
a
a
a
s
P
P
P
.
.
.
.
.
.
.
.
.
.
.
.
.
.
.
.
.
.
.
.
.
.
.
.
.
.
.
.
.
.
.
.
.
.
.
.
.
.
.
.
.
.
.
.
.
.
.
.
.
.
.
.
.
.
.
.
.
.
.
.
.
i
o
n
&
s
i
o
n
s
i
o
n
a
r
t
a
r
t
a
r
t
t
o
r
y
t
o
r
y
t
o
r
y
P
&
P
&
P
.
.
.
.
.
.
.
.
S
S
.
.
.
.
.
.
.
.
.
.
.
.
t
a
n
t
a
n
t
a
n
s
s
s
S
.
h
h
h
.
.
.
.
.
.
.
.
y
s
i
c
y
s
i
y
s
i
.
.
.
.
.
.
.
.
.
.
.
.
.
.
.
.
.
.
d
a
r
d
a
r
d
a
r
.
c
c
.
.
d
d
.
.
d
.
.
.
.
.
.
.
.
.
.
.
.
.
a
l
C
a
l
C
a
l
C
.
.
.
.
.
.
.
.
.
.
.
.
.
.
.
.
.
.
.
.
.
s
.
.
.
s
.
.
.
s
.
.
.
.
.
.
.
.
.
.
.
.
.
.
.
.
.
.
.
.
.
.
.
.
.
.
.
.
.
.
.
.
.
.
.
.
.
.
.
.
.
.
.
.
.
.
.
.
.
.
.
.
.
.
.
.
.
.
.
.
.
.
.
.
.
.
.
.
.
e
.
.
e
.
t
r
i
s
s
t
r
i
t
r
i
s
.
.
.
.
.
.
.
.
.
.
.
.
.
.
.
.
.
.
.
.
.
.
.
.
.
.
.
.
.
.
.
.
.
.
.
.
.
.
.
.
.
.
.
.
h
a
r
a
c
t
h
a
r
h
a
.
.
.
.
.
.
.
.
.
.
.
.
.
.
.
.
.
.
.
.
.
.
.
.
.
.
.
.
.
.
.
.
.
.
.
.
.
.
e
a
c
t
r
a
c
t
.
.
.
.
.
.
.
.
.
.
.
.
.
.
.
.
.
.
.
.
.
.
.
.
.
.
.
.
.
.
.
.
.
.
.
.
.
.
.
.
.
.
.
.
.
.
.
.
i
c
s
.
.
i
c
s
.
.
i
c
s
.
.
.
.
.
.
.
.
.
.
.
.
.
.
.
.
.
.
.
.
.
.
.
.
.
.
.
.
.
.
.
.
.
.
.
.
.
.
.
.
.
.
.
.
.
.
.
.
.
.
.
.
.
.
.
.
.
.
.
.
.
.
.
.
.
.
.
.
.
.
.
.
.
.
.
.
.
.
.
.
.
.
.
.
.
.
.
.
.
.
.
.
.
.
.
.
.
.
.
.
.
.
.
.
.
.
.
.
.
.
.
.
.
.
.
.
.
.
.
.
.
.
.
.
.
.
.
.
.
.
.
.
.
.
.
.
.
.
.
.
.
.
.
.
.
.
.
.
.
.
.
.
.
.
.
.
.
.
.
.
.
.
.
.
.
.
.
.
.
.
.
.
.
.
.
.
.
.
.
.
.
.
.
.
.
.
.
.
.
.
.
.
.
.
.
.
.
.
.
.
.
.
.
.
.
.
.
.
.
.
.
.
.
.
.
.
.
.
.
.
.
.
.
.
.
.
.
.
.
.
5
.
.
.
.
5
.
.
.
.
.
.
.
.
.
.
.
.
.
5
.
.
.
7
.
.
.
7
.
.
.
7
.
.
.
8
.
.
.
8
.
.
.
8
.
2
0
.
2
0
.
2
0
6.3 Ergonomics...……………………………………………………………20
7
T
r
o
u
b
l
e
S
h
o
o
7
T
r
o
u
b
l
e
S
7
T
r
o
u
b
7.1 Error Code Table.....................................................................................21
7.2 Debug & Trouble Shooting…………………………………………….22
h
l
e
S
h
o
o
o
o
t
t
t
.
.
.
.
.
.
.
.
.
.
.
.
.
.
i
n
g
.
.
.
.
.
.
.
i
n
g
.
i
n
g
.
.
.
.
.
.
.
.
.
.
.
.
.
.
.
.
.
.
.
.
.
.
.
.
.
.
.
.
.
.
.
.
.
.
.
.
.
.
.
.
.
.
.
.
.
.
.
.
.
.
.
.
.
.
.
.
.
.
.
.
.
.
.
.
.
.
.
.
.
.
.
.
.
.
.
.
.
.
.
.
.
.
.
.
.
.
.
.
.
.
.
.
.
.
.
.
.
.
.
.
.
.
.
.
.
.
.
.
.
.
.
.
.
.
.
.
.
.
.
.
.
.
.
.
.
.
.
.
2
.
.
.
.
.
.
2
.
.
.
.
.
.
2
1
1
1
Page 3

1 General Descriptions
1.1 Model Features
z Tablet display and ultra-slim portable DVD player
9”(10”) active-matrix TFT LCD panel with wide-screen aspect ratio
z
z Video: MPEG 4, DVD, VCD, Kodak picture CD, JPEG readable
z Audio: CD, CD-R, CD-RW, MP3, WMA
z Integrated SD / MMC memory card reader & USB Port, support Digital Photo Frame
z Dolby Digital output, support Digital Coaxial output
z Credit-card-size wireless remote control
z Build-In battery pack, 12-volt car cigarette lighter cable, Universal AC/DC power adapter
z Video signal input/output, Audio signal input/output
z Built-in stereo speakers
z Built-in two stereo headphone jack
z Anti-Shack Protection (A.S.P.)
z Progressive Scan / S-Video video output
z Portable DVD carry bag and car harness (option)
- 1 -
Page 4
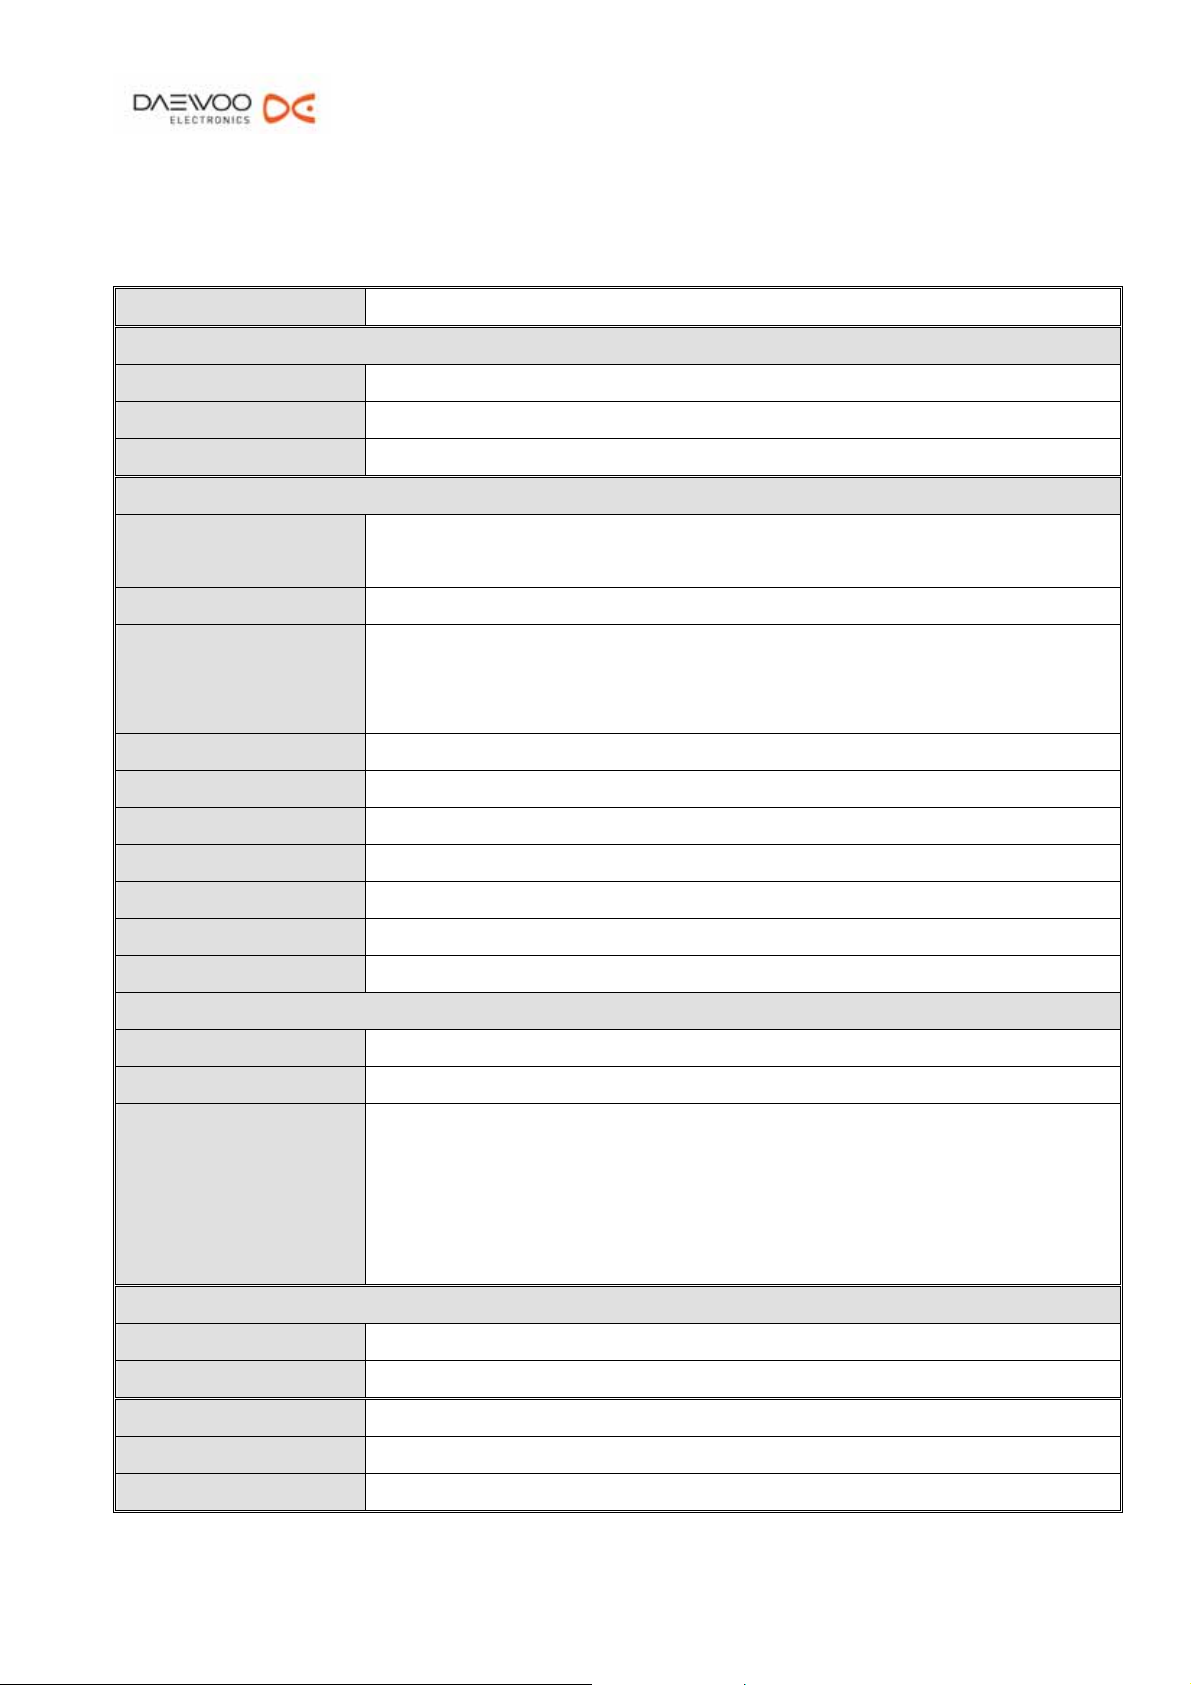
1.2 Information
Disk Format DVD, VCD, CD, CD-R, CD-RW, MP3, Kodak Picture CD
Video :
Video System NTSC(PAL)
Video Decompression MPEG-4 , MPEG-2 ( ISO / IEC – 13818 ) , MPEG - 1
Video Output
1.0 Vpp / 75Ω Sync , minus
Audio :
Audio Characteristic 2 – Channel Analog
5.1 – Channel Digital Output
Analog Output
Frequency Response
2.0 V / 10KΩ
DVD : 48 KHz sampling : 4Hz ~ 22 KHz
96 KHz Sampling : 4Hz ~ 44 KHz
CD : 4Hz ~ 20KHz
S / N ratio < = - 65 dB
Dynamic Range < = - 85 dB
Distortion < = 0.01 %
Digital Output SPDIF
Speaker Stereo speakers, 0.5W x 2
Headphone Jack
32Ω ( 30Mw ) > 8Ω
LCD Display 9"(10”) wide-screen active-matrix TFT type
Terminal :
Headphone Headphone Jack x2
Audio Section Digital Output: Coaxial x 1
Audio / Video Section Video input / output jack x1
Audio input / output jack x1
S-Video / P-scan output x1
SD / MMC card slot input x1
USB Port x1
Power Adaptor :
Line Voltage
AC 100 - 240 VAC ± 10% (50/60Hz) Adapter
Power Consumption 15W
Remote Control DC 3V , Infra – red
Dimension 195mm(L) x282mm(W) x 45.6mm(H)
Weight 1230 g ( w/o battery)
- 2 -
Page 5
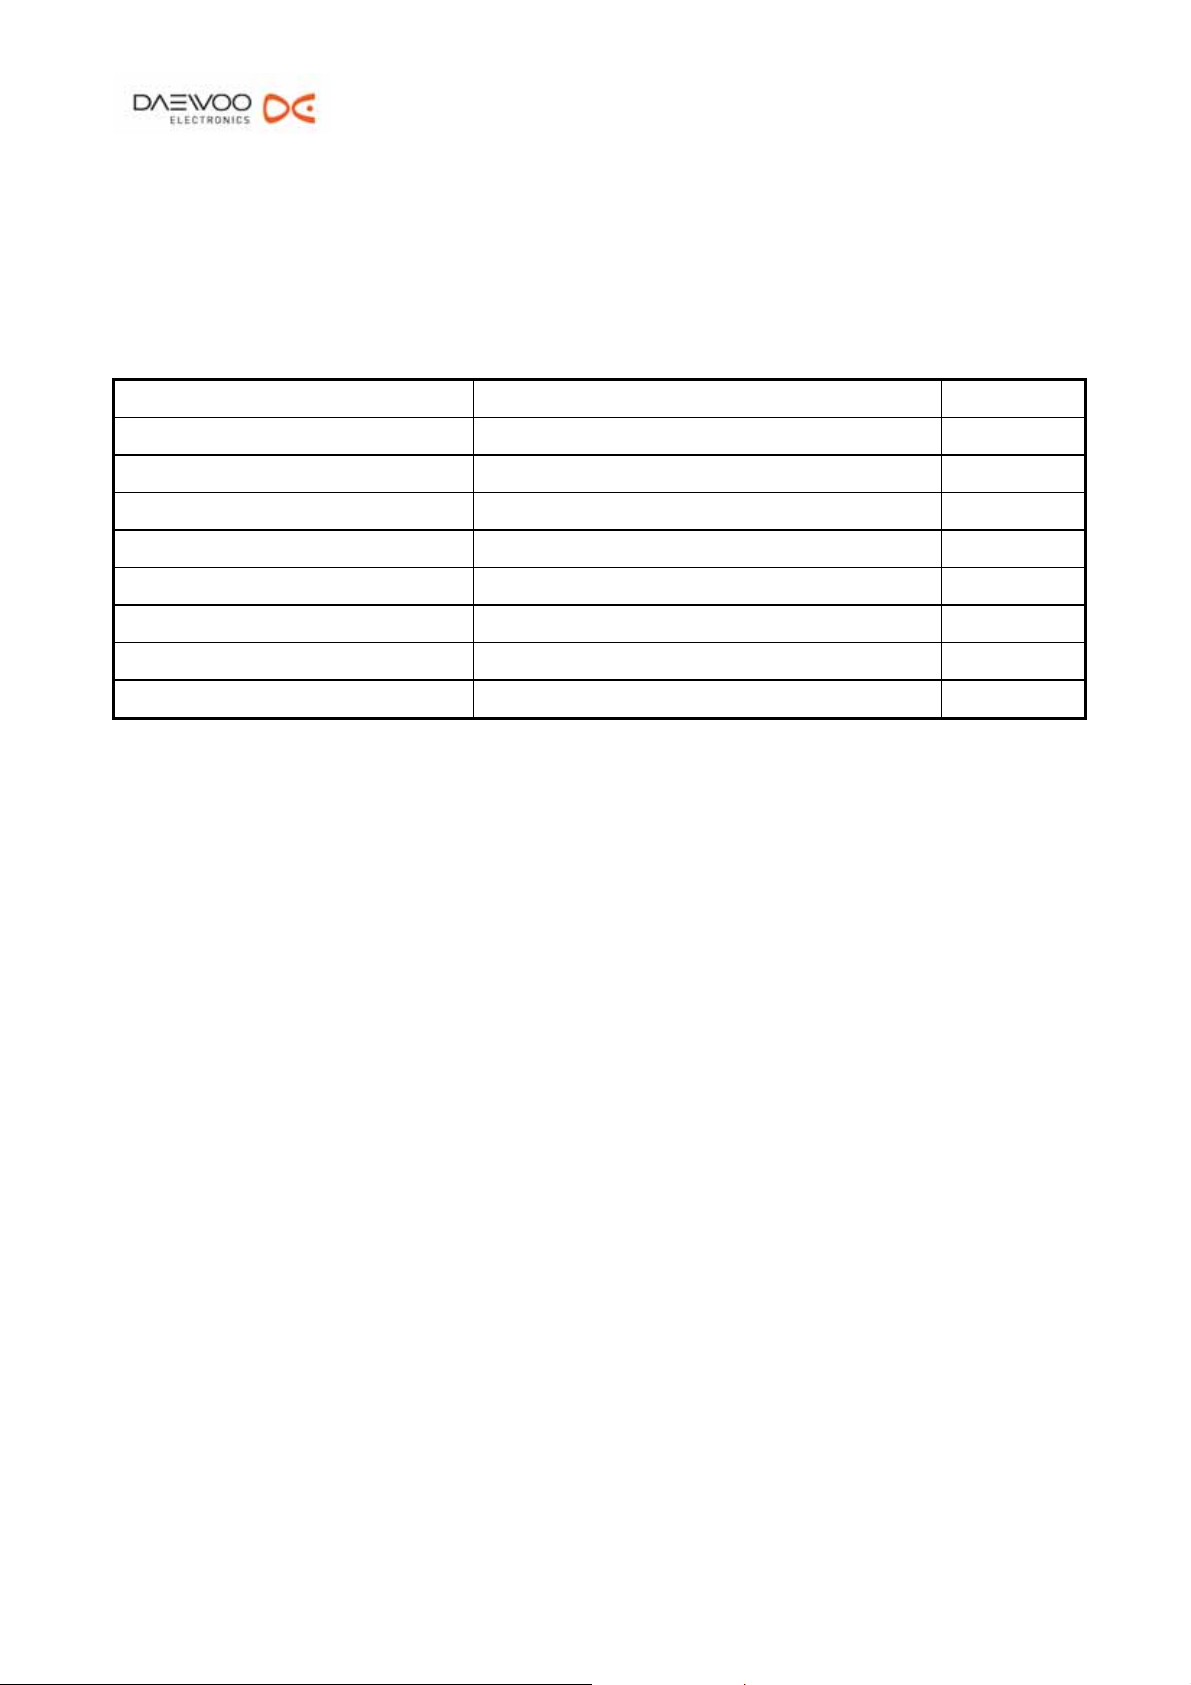
2 Electrical Characteristics
2.1 Optical Characteristics
Parameter Specifications Unit
Screen Size 9.0 (16:8.3 diagonal) inch
Display Format 1920 (H) x 220 (V) dot
Active Area 202.56 (H) x 105.27 (V) mm
Dot Pitch 0.1055 (H) x 0.4785 (V) mm
Pixel Configuration Stripe
Outline Dimension 219.4 (W) x 120.8 (H) x 6.9 (D)(typ.) mm
Surface Treatment Anti-Glare
Weight
300 ± 10
g
2.2 Electrical Characteristics
z DVD/ SVCD/ VCD/ CD system decoding, packeted element streams and audio, video element
streams.
z Fully digital servo processing (focusing, tracking, sledge and spindle servo control)
z Fully digital calibration (focusing/ tracking offset and balance)
z Digital phase lock loop with phase equalizer
z Support Audio/ Video/ Photograph decoding and programming
z TV signal encoding, interlace and progressive scan operation
z Programmable Y/C delay relationship
z Embedded micro-controller, up to 50MHz operating frequency
z Built in PLL to allow a single 27 MHz clock source input
z 1.8V and 3.3V dual power supply, 208 pin PQFP
- 3 -
Page 6
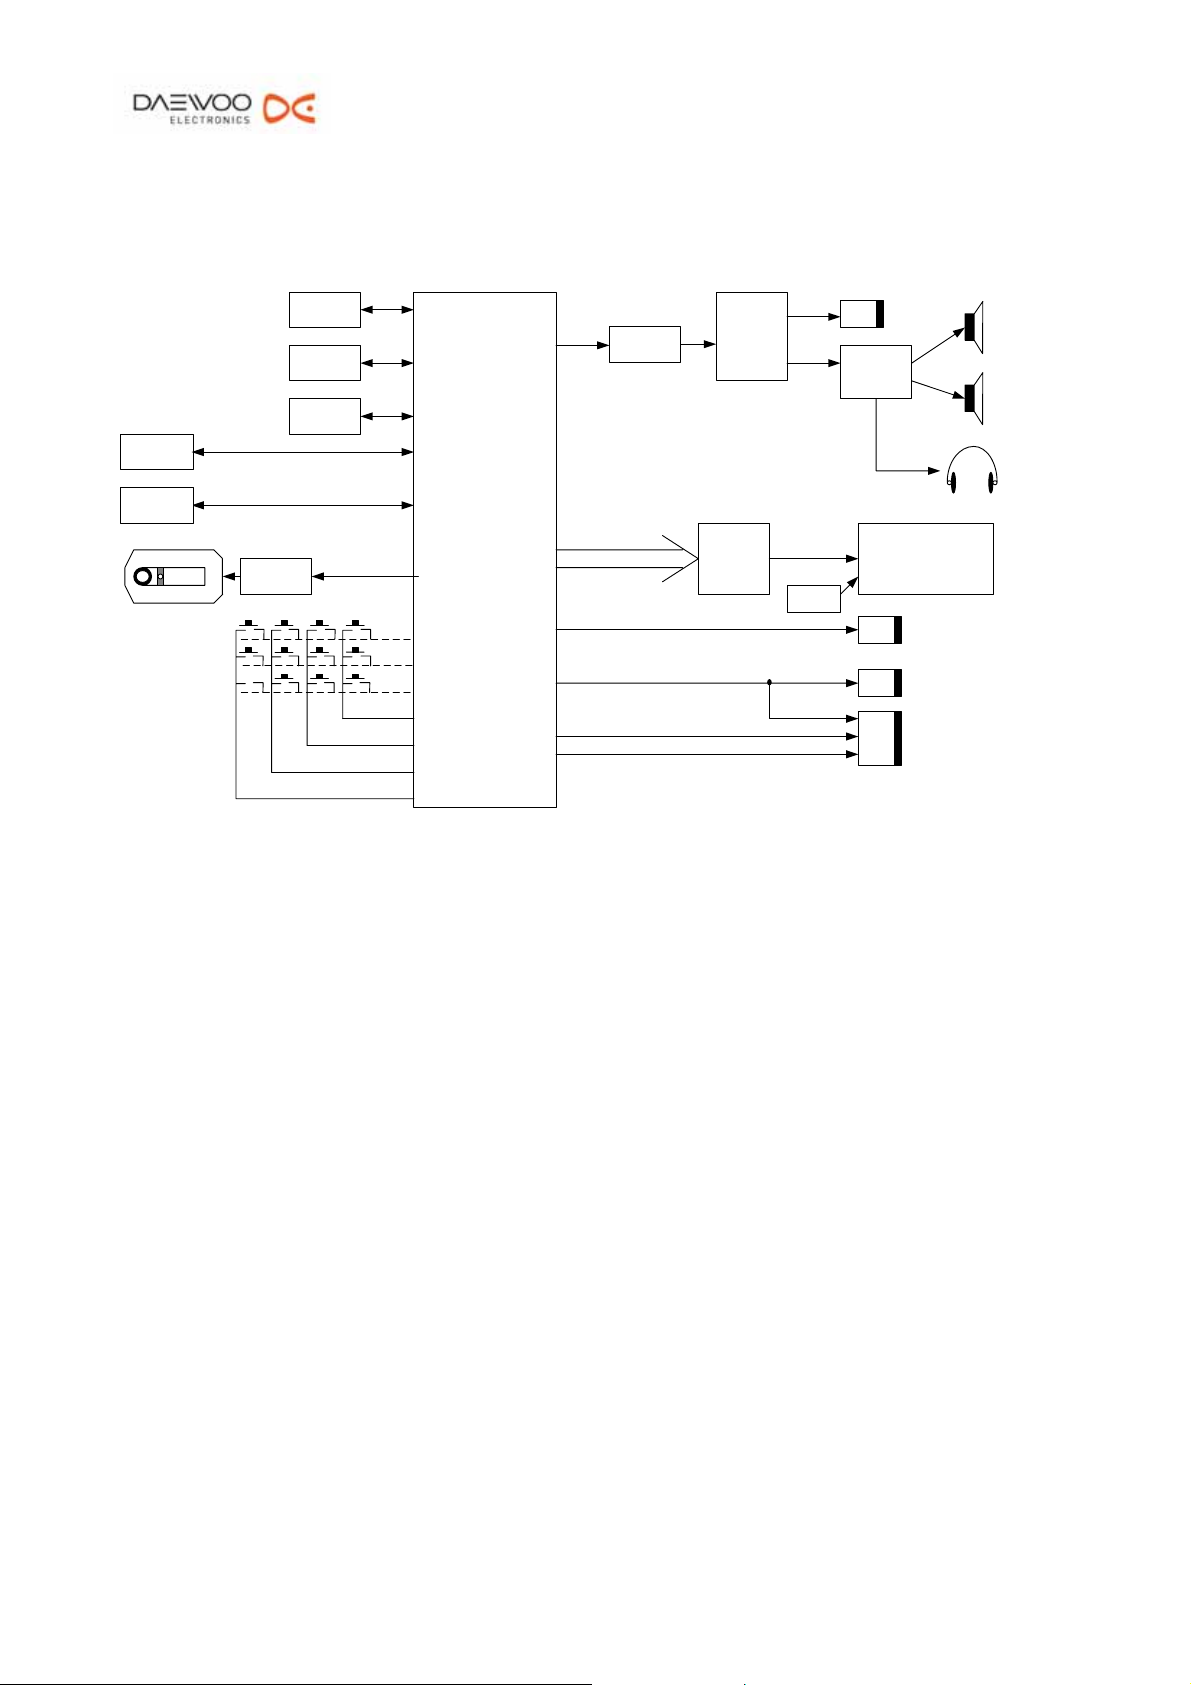
2.3 System Block Diagram
USB
SD/MMC
Samsung OPU
Flash
SDRAM
EEPROM
Sunplus 8202
AT5654r
MPEG4/DIVX
PCM1742
CCIR656
OP4558
VP77
CVBS/Y
Y/Pb
C/Pr
Audio
TPA0212
R G B
LM358
Speaker
Ear Phone
10.2' Panel
Coaxial
Video
Svideo/Pscan
- 4 -
Page 7

3 Power
3.1 Power Supply
z Input voltage:
Normal voltage: 100 to 240 Vac.
Variation range: 90 to 264 Vac.
z Input frequency:
Normal frequency: 50 to 60 Hz.
Variation range: 47 to 63 Hz.
z Input current: 0.6 arms max. at any input voltage and max. DC output rated load.
z Inrush current: 70 amps max. cold start at 240 Vaz. Input, with rated load and 25℃ ambient.
z AC leakage current: 0.25 mA max. at 240 Vac. Input.
3.2 Rechargeable Battery
z Output Voltage:8.4~6.0V
z Cut-off Voltage:5.7~6.0V
z Charge voltage:The Build-In battery should be charged when the input voltage is from11V to
15V
z Charger:a.) Mustek 12V/1.25A adaptor.
b.) Mustek 12V/1.25A adaptor and Portable DVD
z LED is in red color when the battery pack is in charging; and turns off when batter pack is full.
z If the battery pack is in Full status, no matter use adaptor charge directly or link DVD to
charge again, the LED must be turn off in 15 min.
z The cycle life of battery pack has more than 300 cycles.
z Charge: The battery pack must be able to charge when used the Mustek 12V/1.25A adaptor or
Mustek 12V/1.25A adaptor and portable DVD (power off status).
z Discharge: Using the battery pack as the power source for portable DVD that in DVD disc
playing mode, the discharging time must be exceed 2.5hrs.
3.2.1 Electrical Protection
z The Build-In battery pack shall be capable of withstanding a continuous short circuit
- 5 -
Page 8
output without damage.
z A thermal fuse must be added on the surface of cell body to protect the battery pack.
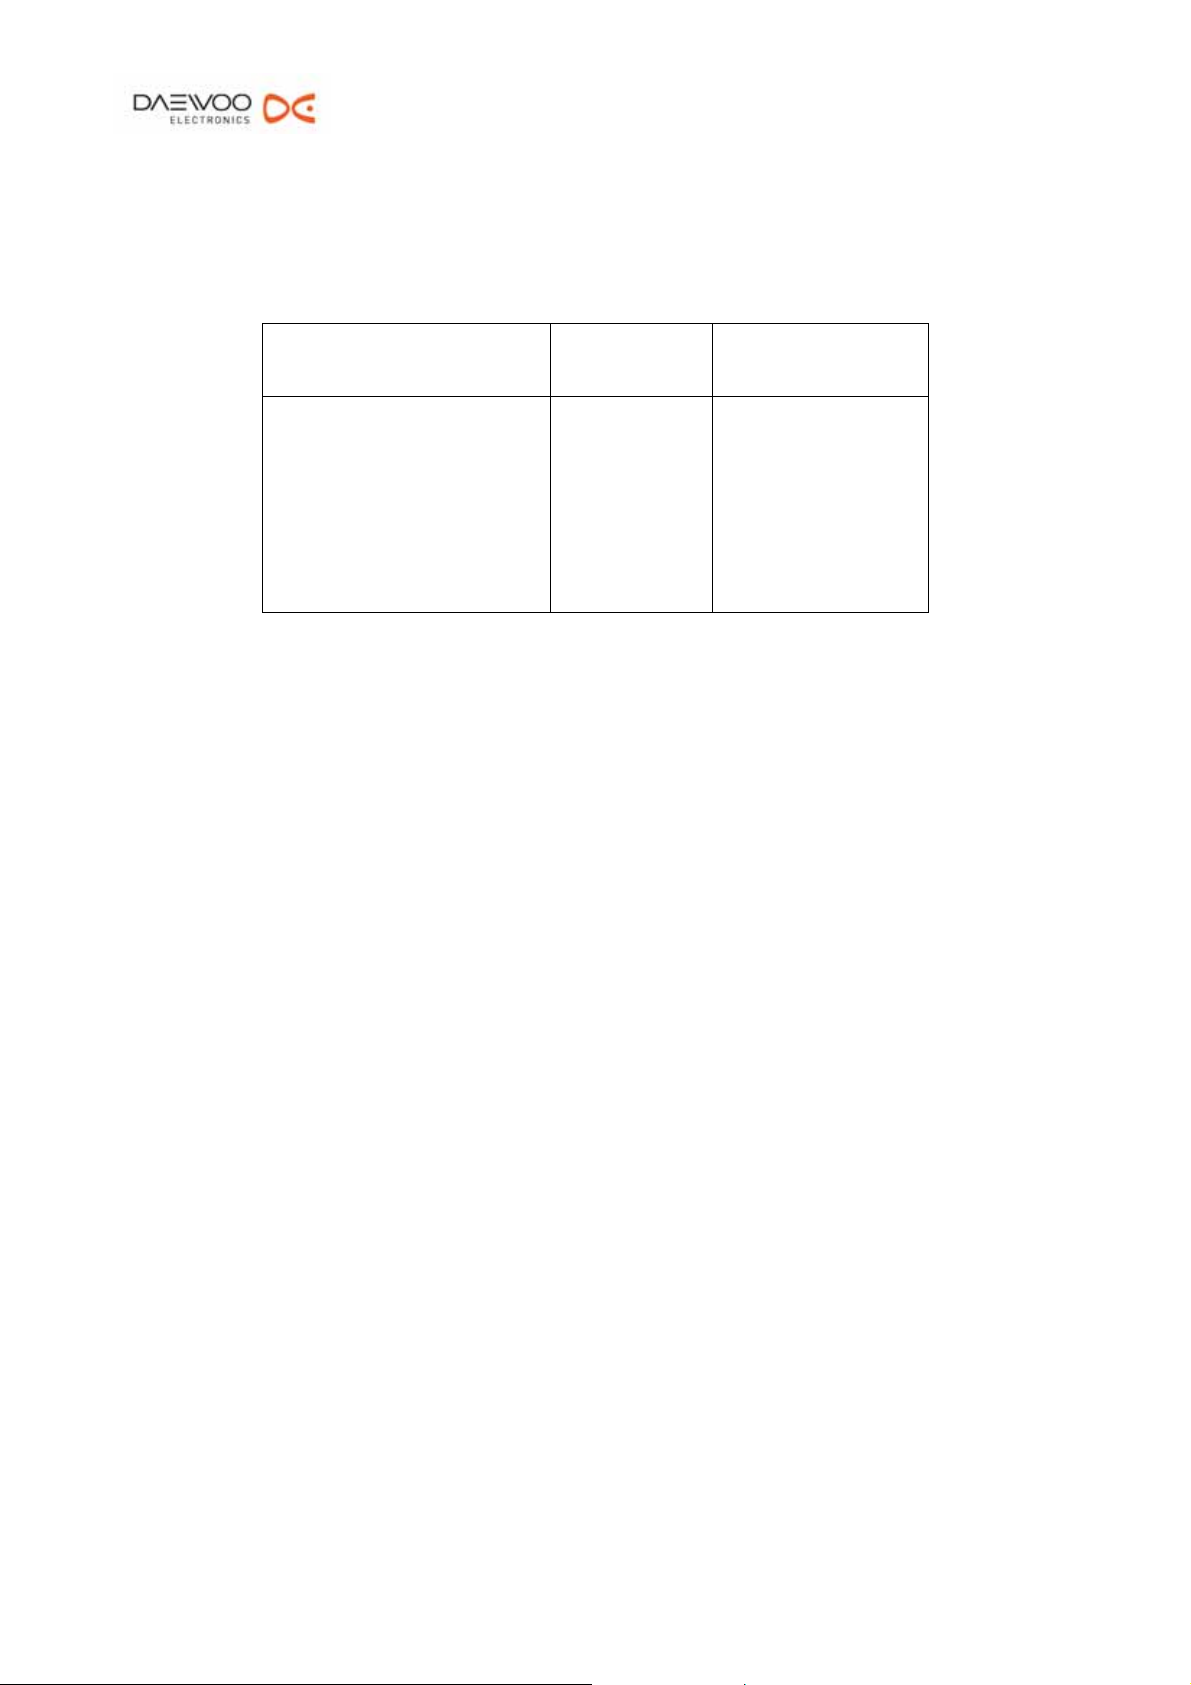
z Charge & Play Time of Battery Pack
Charge Time
(hr)
DVD Title
Play Time (hr)
NiMH 3800mAh 3.5 2.5
- 6 -
Page 9
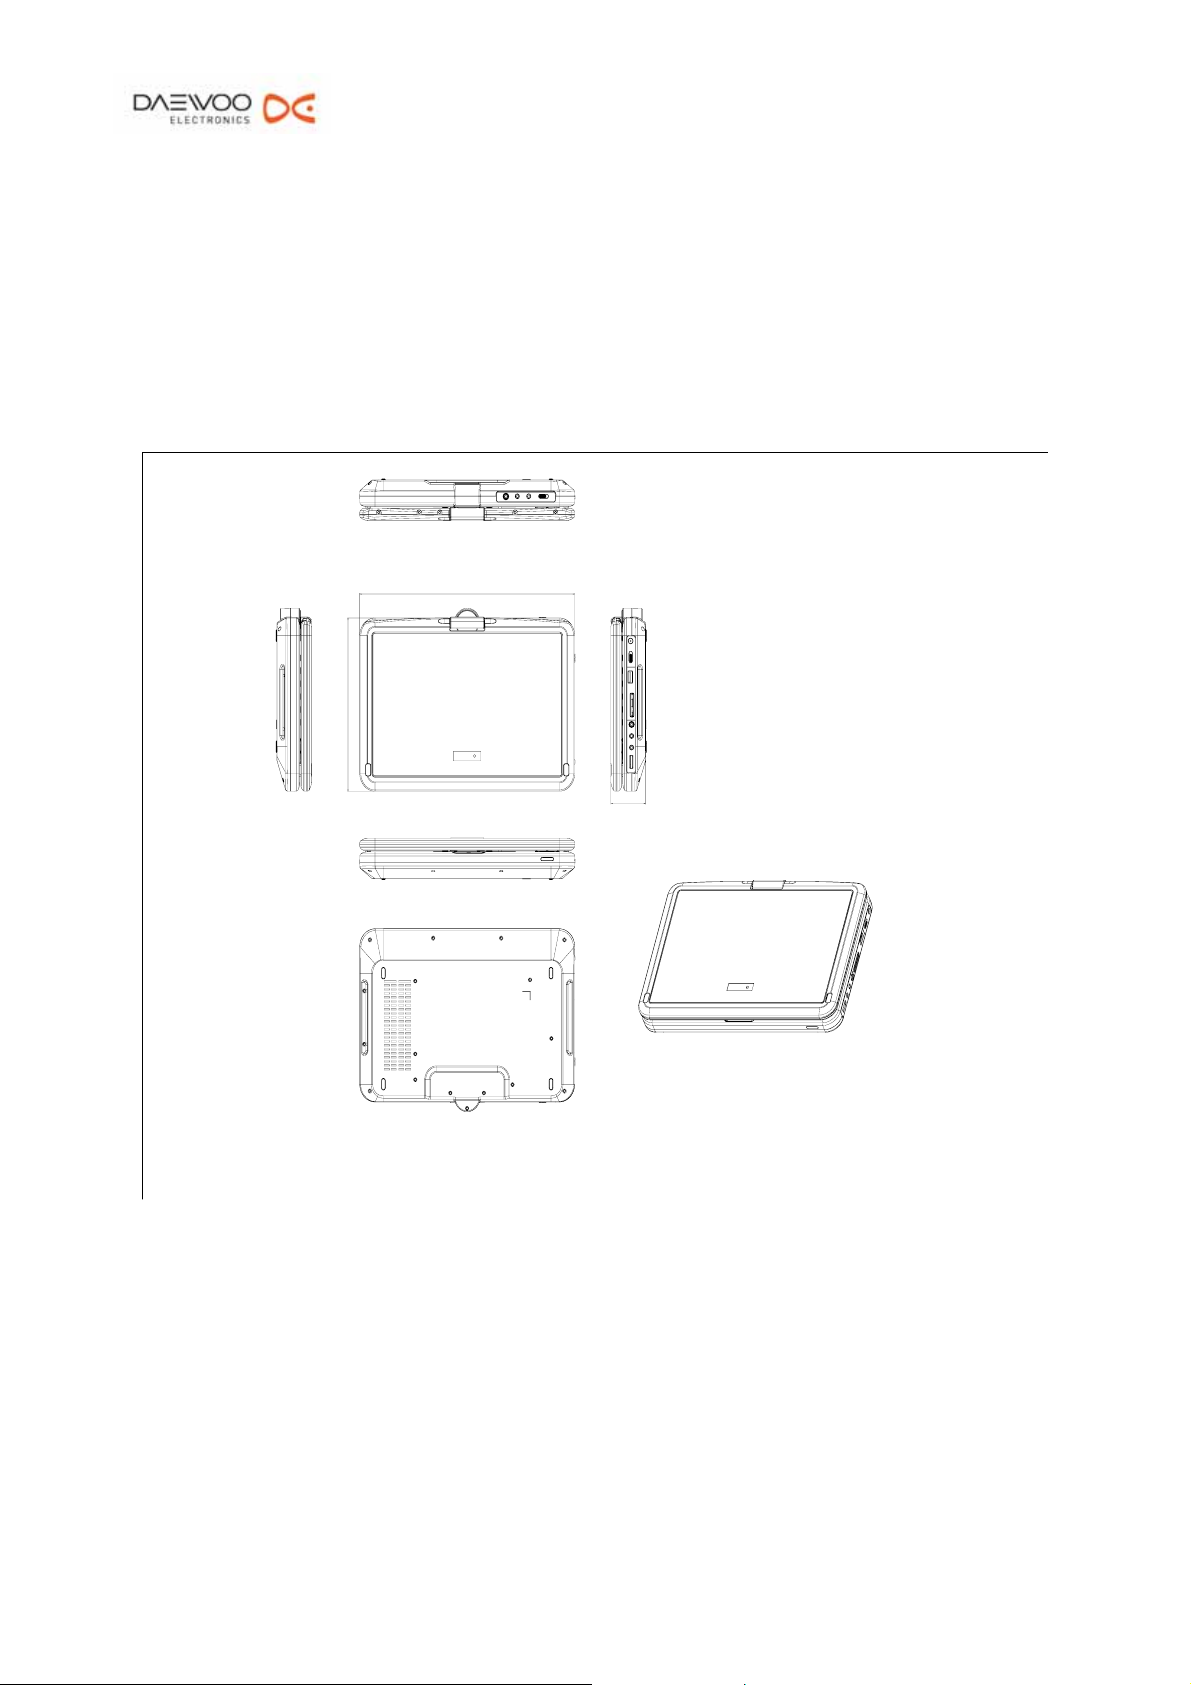
4 Dimension & Physical Characteristics
4.1 Outline Dimension
z 195mm(L) x282mm(W) x 45.6mm(H)
281.95
195.00
45.65
- 7 -
Page 10

5 Spare Parts
5.1 Key Parts List
97-210-01010 (E,10",F1SV,S8,SPMU,R2P,AD,ME) 97-210-02010 (E,9",F1SV,S8,SPMU,R2P,AD,ME)
│
├1─60-210-C0102 (A_P,F1,MC0102-3+MP0404-1 ) *1.00
├2─60-210-C0402 (D_P,F1,MC0508-1 ) *1.00
├3─60-210-C2601 (FOOT,RUBBER,MC0404-4,MP100 ) *4.00
├4─60-210-D0201 (MAGNET,STEEL,F1 ) *2.00
├8─63-200-FMZN1 (SCREW,M2*5.5L,FLAT,SPRING&WASHER ) *3.00
├9─64-200-DMFN1 (SCREW,M2*3.5L,FLAT ) *4.00
├10─64-200-52PN1 (SCREW,TAPPING,2.0*5 ) *7.00
├11─64-200-72BN1 (SCREW,2*7,TYPE2,BINDING,MFNI-3 ) *16.00
├12─90-210-01001 (PCBA,M/B,SPHE8281-U,MP100,ME ) *1.00
│ │
│ ├1─90-210-01000 (PCBA,M/B,SPHE8281-U,MP100 ) *1.00
│ │ │
│ │ ├1─13-117-00002 (LED,GREEN-ORANGE,204SURSYGW ) *1.00
│ │ ├2─21-121-10301 (VER RES.,10K,RN101GA-B10K ) *1.00
│ │ ├3─35-031-23002 (CRYSTAL,27MHZ(HC-49/S,10PPM),TXC ) *1.00
│ │ ├4─40-111-06011 (WAFER,CNNECTOR,M,6P,P:2.0m,R-ANGLE ) *1.00
│ │ ├5─40-230-04001 (USB-CONNECTOR,DIP,R-ANGLE,A-TYPE ) *1.00
│ │ ├6─41-024-03002 (DC POWER JACK,IDJ-D15-6T ) *1.00
│ │ ├7─46-030-00012 (SLIDE SW.,SST-6200(HCH) ) *1.00
│ │ ├8─46-030-00011 (SLIDE SW.,IS1260 ) *1.00
│ │ ├9─46-121-00007 (LIMIT SWITCH,DT009-P11AA-A ) *1.00
│ │ ├10─25-031-10617 (ELEC CAP.,16V 10UF D:4.0 H:5.0mm ) *19.00
│ │ ├11─25-031-47627 (ELEC CAP.,25V 47UF D:6.3 H:5.0mm ) *3.00
│ │ ├12─25-031-10717 (ELEC CAP.,16V 100UF D:5 H:5.4(DIP) ) *18.00
│ │ ├13─25-031-22717 (ELEC CAP.,16V 220UF D:8 H:9MM ) *1.00
│ │ └14─90-210-01200 (PCBA,SMD,M/B,SPHE8281-U,MP100 ) *1.00
│ │ │
│ │ ├1─01-012-00002 (DIODE,RLS4148,(MEF) ) *11.00
│ │ ├3─01-042-00001 (ZENER DIODE,3.3V,(MEF) ) *1.00
│ │ ├4─01-075-00019 (SCHOTTEY DIODE,B320A,SMA ) *4.00
│ │ ├5─01-075-00018 (SCHOTTKY DIODE,MBRS140T3 ) *1.00
- 8 -
Page 11

│ │ ├6─01-075-00020 (SCHOTTKY DIODE,MBR0530 ) *6.00
│ │ ├7─01-095-00002 (SUPPRESSERS DIODE,SMBJ12A ) *1.00
│ │ ├8─02-110-00007 (TRANSISTOR,NPN MMBT3904,(SMD) ) *1.00
│ │ ├9─02-107-00002 (TRANSISTOR,NPN 2SC2412KR(SMT) ) *10.00
│ │ ├10─02-210-00014 (TRANSISTOR,PNP,BC858B(SMD) ) *3.00
│ │ ├11─02-212-00001 (TRANSISTOR,PNP 2SB1132,(SMD) ) *3.00
│ │ ├12─02-613-00023 (P-MOSFET,AP4953M,SO8 ) *2.00
│ │ ├13─02-613-00015 (N-MOSFET,AM4936M,SO8 ) *1.00
│ │ ├15─02-510-00001 (N CHANNEL MOSFET 2N7002(SOT23) ) *2.00
│ │ ├16─04-122-00002 R(IC,74HC02,(SO) ) *1.00
│ │ ├17─05-016-00040 R(IC,REGLATOR,LD1117-1.8V-A,SOT-223 ) *1.00
│ │ ├19─05-026-00065 R(IC,O.P.,CO4558,AUDIO,(S08) ) *1.00
│ │ ├20─05-026-00045 R(IC,O.P.,MC34072,(SO8) ) *1.00
│ │ ├21─05-066-00071 (IC,D/A CONVERTER DA1142 ) *1.00
│ │ ├22─05-146-00036 R(IC,SWITCHING REGULATOR,MP1410ES,SO8) *1.00
│ │ ├23─05-146-00057 (IC,DC-DC,CONVERTER,NCP1580(SOIC-8) ) *1.00
│ │ ├24─05-146-00060 (IC,DC-DC,CONVERTER,AT1799,SOP-8 ) *1.00
│ │ ├25─05-146-00059 (IC,DC-DC,CONVERTER,NCP1403(TSOP-5) ) *1.00
│ │ ├26─05-156-00017 R(IC,AUDIO AMP.,G1428,TSSOP24,GMT ) *1.00
│ │ ├27─07-602-00018 R(IC,MOTOR DRIVER,A5954,AOTOM ) *1.00
│ │ ├28─07-605-00143 (IC,DVD CHIP SUNPLUS,SPHE8281-U,DIVX) *1.00
│ │ ├29─08-041-00012 R(IC,EEPROM,CERAMATE,24LLC02 ) *1.00
│ │ ├30─08-107-00085 R(IC,SDRAM,4M*16,P2V64S40DTP ) *1.00
│ │ ├31─20-112-00036 (CHIP RES.,0ohm,1/4W,1206 ) *34.00
│ │ ├32─20-111-00016 (CHIP RES.,0ohm,1/10W,(0805) ) *14.00
│ │ ├33─20-113-00006 (CHIP RES.,0 ohm,1/16W,(0603) ) *40.00
│ │ ├34─20-113-01004 (CHIP,RES.,1 ohm,1%,1/16W,(0603) ) *5.00
│ │ ├35─20-113-10004 (CHIP RES.,10ohm,1%,1/16W,0603 ) *4.00
│ │ ├36─20-113-10104 (CHIP RES.,100ohm,1%,1/16W,0603 ) *9.00
│ │ ├37─20-113-10204 (CHIP RES.,1K,1%,1/16W,(0603) ) *12.00
│ │ ├38─20-113-10504 (CHIP RES.,1M,1%,1/16W,(0603) ) *1.00
│ │ ├39─20-113-10304 (CHIP RES.,10K,1%,1/16W,(0603) ) *35.00
│ │ ├40─20-113-10404 (CHIP RES.,100K,1%,1/16W,0603 ) *7.00
│ │ ├41─20-111-10616 (CHIP RES.,10M,1/10W,(0805) ) *1.00
│ │ ├42─20-113-11403 (CHIP RES.,110K,1%,1/16W,(0603) ) *1.00
│ │ ├43─20-113-12204 (CHIP RES.,1.2K,1%,1/16W,(0603) ) *1.00
│ │ ├44─20-113-12404 (CHIP RES.,120K,1%,1/16W,(0603) ) *1.00
│ │ ├45─20-113-13404 (CHIP RES.,130K,1%1/16W,(0603) ) *1.00
│ │ ├46─20-113-14404 (CHIP RES,140K,1/16W,(0603),1% ) *1.00
- 9 -
Page 12

│ │ ├47─20-113-15204 (CHIP RES.,1.5Kohm,1%,1/16W,0603 ) *1.00
│ │ ├48─20-113-15306 (CHIP RES.,15K,1/16W,(0603) ) *4.00
│ │ ├49─20-113-15404 (CHIP RES.,150K,1%,1/16W,0603 ) *2.00
│ │ ├51─20-113-18504 (CHIP RES.,1.8M,1%,1/16W,(0603) ) *1.00
│ │ ├52─20-113-22004 (CHIP RES.,22ohm,1%,1/16W(0603) ) *2.00
│ │ ├54─20-113-20306 (CHIP RES.,20K,1/16W,(0603) ) *4.00
│ │ ├55─20-113-22204 (CHIP RES.,2.2K,1%,1/16W,0603 ) *3.00
│ │ ├56─20-113-22304 (CHIP RES.,22K,1%,1/16W,(0603) ) *2.00
│ │ ├57─20-113-24204 (CHIP RES.,2.4K,1%,1/16W,(0603) ) *1.00
│ │ ├58─20-113-24404 (CHIP RES.,240K,1%,1/16W,(0603) ) *1.00
│ │ ├60─20-113-27304 (CHIP RES.,27K,1%,1/16W,(0603) ) *1.00
│ │ ├61─20-113-30106 (CHIP RES.,300ohm,1/16W(0603) ) *2.00
│ │ ├62─20-113-33004 (CHIP RES.,33ohm,1/16W,1% ) *20.00
│ │ ├63─20-113-39106 (CHIP RES.,390ohm,5%,(0603) ) *1.00
│ │ ├64─20-113-33204 (CHIP RES.,3.3K,1%,1/16W,(0603) ) *1.00
│ │ ├65─20-113-33304 (CHIP RES.,33K,1%,1/16W,(0603) ) *2.00
│ │ ├66─20-113-39204 (CHIP RES.,3.9K,1%,1/16W,(0603) ) *3.00
│ │ ├67─20-113-39304 (CHIP RES.,39K,1%,1/16W,(0603) ) *1.00
│ │ ├68─20-113-43206 (CHIP RES.,4.3K,1/16W(0603) ) *2.00
│ │ ├70─20-113-47104 (CHIP RES.,470ohm,1%,1/16W,(0603) ) *2.00
│ │ ├71─20-113-47204 (CHIP RES.,4.7K,1%,1/16W,(0603) ) *9.00
│ │ ├72─20-113-47404 (CHIP RES.,470K,1%,1/16W,(0603) ) *3.00
│ │ ├73─20-113-51F06 (CHIP RES.,5.1ohm,1/16W,0603 ) *2.00
│ │ ├74─20-113-51204 (CHIP RES.,5.1K,1%,1/16W,(0603) ) *2.00
│ │ ├75─20-113-62204 (CHIP RES.,6.2K,1%,1/16W,(0603) ) *1.00
│ │ ├76─20-113-62304 (CHIP RES.,62K,1%,1/16W,(0603) ) *1.00
│ │ ├77─20-113-68204 (CHIP RES.,6.8K,1%,1/16W,0603 ) *1.00
│ │ ├79─20-113-75004 (CHIP RES.,75ohm,1%,1/16W,(0603) ) *6.00
│ │ ├80─20-113-75306 (CHIP RES.,75Kohm,1/16W,(0603) ) *2.00
│ │ ├81─24-303-1004E (CHIP CAP.,50V,10PF,(0603)5%,NPO ) *4.00
│ │ ├82─24-303-1014E (CHIP CAP.,50V,100PJ,(0603)5%,NPO ) *9.00
│ │ ├83─24-303-10247 (CHIP CAP.,50V,1000P,(0603),NPO ) *2.00
│ │ ├84─24-303-1034E (CHIP CAP.,50V 103KJ,(0603),10%,X7R ) *6.00
│ │ ├85─24-303-10445 (CHIP CAP.,0.1uF,5%,50V,(0603) ) *113.00
│ │ ├86─24-303-10516 (CHIP CAP.,16V 1UF,10%,X7R,(0603) ) *9.00
│ │ ├87─24-301-10645 (CHIP CAP.,10V,10UF,(0805) ) *2.00
│ │ ├88─26-100-107G6 (TANT CAP.,6.3V,100UFM,B-TYPE ) *2.00
│ │ ├89─24-303-1514E (CHIP CAP.,50V 150PJ,(0603) 5%,NPO ) *5.00
│ │ ├90─24-303-2204E (CHIP CAP.,50V,22PJ,(0603)5%,NPO ) *3.00
- 10 -
Page 13

│ │ ├91─24-303-22425 (CHIP CAP.,25V 224J,(0603) ) *3.00
│ │ ├92─24-303-22516 (CHIP CAP.,16V 2.2uF,(0603) ) *1.00
│ │ ├93─25-036-22717 (ELEC CAP.,16V 220UF D:6.3 H:7.7,SMD) *1.00
│ │ ├94─24-303-27245 (CHIP CAP.,50V 2700PJ,(0603),(NPO) ) *1.00
│ │ ├95─24-303-30145 (CHIP CAP.,50V 300PJ,(0603),(NPO) ) *1.00
│ │ ├96─24-303-3304E (CHIP CAP.,50V 33PF(0603)5%,NPO ) *36.00
│ │ ├97─24-303-3314E (CHIP CAP.,50V 330PFJ(0603)5%,NPO ) *14.00
│ │ ├98─24-303-4704E (CHIP CAP.,50V 47PK,(0603)5%,NPO ) *4.00
│ │ ├99─24-303-47226 (CHIP CAP.,25V,4700PK,(0603) ) *2.00
│ │ ├100─24-303-47326 (CHIP CAP.,25V 47NFK,(0603) ) *1.00
│ │ ├101─24-303-47416 (CHIP CAP.,16V 0.47UFZ,(0603),X7R ) *5.00
│ │ ├102─24-301-47518 (CHIP CAP.,16V 4.7U,(0805) ) *3.00
│ │ ├103─26-100-47606 (TANT CAP.,10V,47UFM,B-TYPE ) *2.00
│ │ ├105─24-303-68346 (CHIP CAP.,50V,68NF,(0603) ) *1.00
│ │ ├106─24-303-68145 (CHIP CAP.,50V 680PJ,(0603),(NPO) ) *11.00
│ │ ├107─24-303-82125 (CHIP CAP.,25V 820PJ,(0603),(NPO) ) *1.00
│ │ ├108─30-084-00008 (INDUCTOR,1uH,(0805) ) *3.00
│ │ ├110─30-012-00008 (INDUCTOR,10UH,SMD(0805) ) *4.00
│ │ ├111─30-012-00035 (POWER INDUCTOR,10UH,BC43 ) *3.00
│ │ ├112─30-022-00020 (FERRITE BEAD,80OHM(1206) ) *5.00
│ │ ├113─30-022-00024 (FERRITE BEAD,600ohm,(0603) ) *38.00
│ │ ├115─30-024-00007 (FERRITE BEAD,120ohm,4000mA,(0805) ) *2.00
│ │ ├116─30-024-00017 (FERRIT BEAD,600ohm,500mA,0805 ) *5.00
│ │ ├117─30-022-00027 (FERRITE BEAD,300ohm,MAG,(0603) ) *2.00
│ │ ├118─40-041-09003 (SD CARD CONNECTOR,2nd,SOURCE )
*1.00
│ │ ├119─40-082-06003 (FPC CONNECTOR,6P,M,P:1.25MM ) *1.00
│ │ ├120─40-082-24001 (FPC CONNECTOR,24P,P:0.5MM(BOTTOM) ) *1.00
│ │ ├121─40-111-06012 (WAFER,CNNECTOR,M,6P,P:1.0m ) *1.00
│ │ ├122─40-111-10006 (WAFER,CNNECTOR,M,10P,P:1.0m ) *2.00
│ │ ├123─40-111-04015 (WAFER,CONNECTOR,M,4P,P:1.0MM ) *1.00
│ │ ├124─41-022-04007 (MINI-PHONE JACK(HTJ-035-35H) ) *2.00
│ │ ├125─41-022-04008 (MINI-PHONE JACK(HTJ-035-35D) ) *3.00
│ │ ├126─41-022-04010 (MINI-PHONE JCAK(PJK-602) ) *1.00
│ │ ├127─46-080-00026 (TACT SW,STS-D5,H:7.0mm(SMD) ) *11.00
│ │ ├128─46-121-00010 (LIMIT SWITCH,MPU-101-80 ) *1.00
│ │ ├129─59-210-01000 (PCB,M/B,SPHE8281-U,MP100 ) *1.00
│ │ ├130─30-024-00016 (FERRITE BEAD,300ohm,600mA,0805,MAG ) *1.00
│ │ ├131─20-113-15104 (CHIP RES.,150ohm,1%,1/16W,0603 ) *3.00
- 11 -
Page 14

│ │ ├132─24-303-5604E (CHIP CAP.,50V,56PF,(0603) 5%,NPO ) *1.00
│ │ ├133─24-303-68045 (CHIP CAP.,50V 68PJ,(0603),(NPO) ) *4.00
│ │ ├134─24-302-10526 (CHIP CAP.,25V 1UF,(1206),(X7R) ) *1.00
│ │ ├136─30-024-00048 (FB,GSMA201209-U0300,2A 300ohm(0805)) *3.00
│ │ └137─24-303-33245 (CHIP CAP.,50V 3300PJ,(0603),(NPO) ) *1.00
│ │
│ └2─92-210-03010 (F/W,SP8281,MP100,ME ) *1.00
97-210-01010 (E,10",F1SV,S8,SPMU,R2P,AD,ME)
│
│ │
│ └1─08-047-00021 (IC,FLASH,M29W800DB-70N1 ) *1.00
│
├13─92-210-05010 (ASS'Y,HINGE,MC0411-1 ) *1.00
│ │
│ ├1─54-400-00482 (CABLE,P=1,10P,L,MAIN-DRIVER,MP100 ) *1.00
│ ├2─54-400-00483 (CABLE,P=1,10P,S,MAIN-DRIVER,MP100 ) *1.00
│ ├3─54-400-00484 (CABLE,P=1,6P,MAIN-DRIVER,MP100 ) *1.00
│ ├4─54-400-00485 (CABLE,P=1,4P,MAIN-INVERTER,MP100 ) *1.00
│ ├5─60-210-C0501 (HINGE,VERTICAL,F1,OC0204-1 ) *1.00
│ ├6─60-210-D0101 (HINGE,HORIZONTAL,MP100 ) *1.00
│ ├7─54-522-01003 (GROUND-WIRE,D1.6*115L,TERMINAL,0.3T) *1.00
│ └8─63-200-DMFN1 (SCREW,M2*3.5,FLAT ) *1.00
├14─92-210-06010 (ASS'Y,T/C,F1,MP0404-1,SPMU,AD ) *1.00
│ │
│ ├1─48-100-00100 (COIL-PACK,NIMH,6S1P,MP100,3800mA,OS) *1.00
│ ├2─54-400-00486 (CABLE,P=1.25,6P,MAIN-BATTERY,MP100 ) *1.00
│ ├3─60-179-D0901 (FRAME,MAGNET,PL500 ) *2.00
│ ├4─60-179-D1001 (MAGNET,CLOSE,S POLARITY,PL500 ) *2.00
│ ├5─60-179-S0101 (SPRING,OPEN,F1,PL500 ) *2.00
│ ├6─64-170-42FN1 (SCREW,1.7*4,TYPE2,FLAT,MFNI-3 ) *17.00
│ ├7─64-170-42YN1 (SCREW,1.7*4,TYPE2,PAN/FLANGE,MFNI-3) *3.00
│ ├8─64-200-DMFN1 (SCREW,M2*3.5L,FLAT ) *4.00
│ ├9─64-260-42YN1 (SCREW,M2.6*4,TYPE2,FLAT,MFNI-3 ) *4.00
│ ├10─60-210-C0312 (C_P,F1,MC0102-3+MP0404-1,SPMU,AP ) *1.00
│ ├11─60-210-C0801 (AXIS,DOOR,OC0108-1,F1 ) *2.00
│ ├12─60-210-C0901 (LOCK,DOOR,MC0508-1,F1 ) *1.00
│ ├13─60-210-C1002 (BUTTON,OPEN,F1,MC0102-2+MP0210 ) *1.00
│ ├14─60-210-C1102 (SWITCH,POWER,F1,MC0102-2+MP0210 ) *1.00
│ ├15─60-210-C1202 (SWITCH,AV IN/OUT,F1,MC0102-2+MP0210) *1.00
- 12 -
Page 15

│ ├16─60-210-C1302 (BUTTON FUNCTION,F1,MC0102-2+MP0210 ) *1.00
│ ├17─60-210-C1402 (COVER,LED,F1,TRANSPARENT,MC0311-1 ) *1.00
│ ├18─60-210-C1602 (COVER,PANEL SWITCH,MC0311-1,F1 ) *1.00
│ ├19─60-210-C1801 (RUBBER,C PART,MC0112-1 ) *2.00
│ ├20─60-210-S0101 (SPRING,LOCK,F1 ) *1.00
│ ├21─60-210-S0301 (SPRING,TWIST,DOOR ) *2.00
│ ├22─60-210-S0501 (SPONGE,BATTERY,MP100 ) *6.00
│ ├23─90-210-04000 (PCBA,CHARGER/B,MP100,HT ) *1.00
│ │ ├2─30-012-68002 (BATTERT INDUTOR-2,68uH,20%,3A,DIP ) *1.00
│ │ ├3─23-222-01001 (RES,THERMISTOR,10K,103AT,02(BLUE) ) *1.00
│ │ ├4─36-001-00023 (TUBE,SHRINKING,BLACK ) *2.00
│ │ ├5─25-021-47617 (ELEC CAP.,16V 47UFM D:5.0 H:7.0mm ) *1.00
│ │ ├6─25-011-3371M (ELEC CAP.,16V 330UF,D:8.0 H:11MM ) *1.00
│ │ ├7─90-210-04200 (PCBA,SMD,CHARGER/B,MP100,HT ) *1.00
│ │ │ │
│ │ │ ├1─05-016-00075 (IC,S-8241AAPMC,TSSOP,5P ) *1.00
│ │ │ ├2─05-026-00058 R(IC,O.P.,UTC LM358,SOP-8 ) *1.00
│ │ │ ├3─07-022-00004 (IC,SAMSUNG,S3F9454,ZHANGBSNID,SOP20) *1.00
│ │ │ ├4─01-075-00035 (SCHOTTKY,DIODE,SR24,40V,2A ) *1.00
│ │ │ ├5─02-613-00031 (N-MOSFET,APEC,AP9926M,SO8 ) *1.00
│ │ │ ├6─02-613-00023 (P-MOSFET,AP4953M,SO8 ) *1.00
│ │ │ ├7─02-107-00034 (TRANSISTOR,NPN,CHT9013(SOT-23) ) *4.00
│ │ │ ├8─02-210-00021 (TRANSISTOR,2N3906,PNP,SOT23 ) *1.00
│ │ │ ├9─49-500-00045 (FUSE,1812SMDP200TS(POLYSWITCH) ) *1.00
│ │ │ ├10─20-112-25E34 (CHIP RES.,0.25ohm,1%,1/4W,1206 ) *5.00
│ │ │ ├11─20-113-47104 (CHIP RES.,470ohm,1%,1/16W,(0603) ) *1.00
│ │ │ ├12─20-111-47116 (CHIP RES.,470ohm,1/10W,(0805) ) *1.00
│ │ │ ├13─20-112-47126 (CHIP RES.,470ohm,1/8W,(1206) ) *1.00
│ │ │ ├14─20-113-10206 (CHIP RES.,1K,1/16W,(0603) ) *2.00
│ │ │ ├15─20-112-10226 (CHIP RES.,1K,1/8W,(1206) ) *1.00
│ │ │ ├16─20-113-10006 (CHIP RES.,10ohm,1/16W,(0603) ) *1.00
│ │ │ ├17─20-113-10306 (CHIP RES.,10K,1/16W,(0603) ) *6.00
│ │ │ ├18─20-113-15306 (CHIP RES.,15K,1/16W,(0603) ) *2.00
│ │ │ ├19─20-113-47306 (CHIP RES.,47K,1/16W,(0603) ) *2.00
│ │ │ ├20─20-113-20304 (CHIP RES.,20K,1%,1/16W,(0603) ) *2.00
│ │ │ ├21─20-113-22406 (CHIP RES.,220K,1/16W,(0603) ) *1.00
│ │ │ ├22─20-113-33206 (CHIP RES.,3.3K,1/16W,(0603) ) *3.00
│ │ │ ├23─20-113-39404 (CHIP RES.,390K,1%,1/16W(0603) ) *1.00
│ │ │ ├24─20-113-33406 (CHIP RES.,330K,1/16W,(0603) ) *1.00
- 13 -
Page 16

│ │ │ ├25─20-113-12206 (CHIP RES.,1.2K,1/16W,(0603) ) *1.00
│ │ │ ├26─20-113-30304 (CHIP RES.,30K,1%,1/16W,(0603) ) *1.00
│ │ │ ├27─20-113-18304 (CHIP RES.,18K,1%,1/16W,(0603) ) *1.00
│ │ │ ├28─20-113-47206 (CHIP RES.,4.7K,1/16W,(0603) ) *1.00
│ │ │ ├29─20-113-30506 (CHIP RES.,3M,1/16W,(0603) ) *1.00
│ │ │ ├30─20-113-18506 (CHIP RES.,1.8M,1/16W,(0603) ) *1.00
│ │ │ ├31─24-303-10327 (CHIP CAP.,25V 103Z (0603) ) *2.00
│ │ │ ├32─24-303-10427 (CHIP CAP.,25V 104Z,(0603) ) *8.00
│ │ │ ├33─24-302-22525 (CHIP CAP.,25V 2.2u (1206) ) *1.00
│ │ │ ├34─24-303-47445 (CHIP CAP.,50V 0.47UFZ,(0603) 5% ) *3.00
│ │ │ ├35─24-302-47518 (CHIP CAP.,4.7uF/25V(1206) ) *2.00
│ │ │ ├36─40-082-06003 (FPC CONNECTOR,6P,M,P:1.25MM ) *1.00
│ │ │ ├37─59-210-04000 (PCB,CHARGER/B,MP100,HT,DS2L,T12 ) *1.00
│ │ │ ├38─05-171-00005 (VOLT REF,2.495V,0.4%,AZ431(SOT-23) ) *1.00
│ │ │ ├39─20-113-15304 (CHIP RES.,15.8K,1/16W,(0603),1% ) *1.00
│ │ │ └40─30-022-00027 (FERRITE BEAD,300ohm,MAG,(0603) ) *3.00
│ │ │
│ │ └8─02-107-00035 (TRANSISTOR,NPN,CHT9013(TO-92) ) *1.00
│ │
│ ├24─92-210-02010 (ASS'Y SAM-MECHA+DAMPER+CABLES,MP100) *1.00
│ │ │
│ │ ├1─92-210-01010 (ASS'Y MECHA(SAMSUNG),MP100 ) *1.00
│ │ ├2─54-324-00004 (FFC,P=0.5,24P,MAIN-MECHA,MP100 ) *1.00
│ │ ├3─54-400-00487 (CABLE,P=2,6P,MAIN-MOTER,MP100 ) *1.00
│ │ └4─60-210-S0401 (MECHA DAMPER,MP100 ) *4.00
│ │
│ ├25─92-210-04010 (ASS'Y DOOR,F1,MC0102-3+,MP0401-1 ) *1.00
│ │ │
│ │ ├1─60-210-C0602 (DOOR,F1,MC0102-3+MP0404-1 ) *1.00
│ │ └2─60-210-C0702 (WINDOW,DOOR,F1,MC0311-1 ) *1.00
│ │
│ ├26─60-210-C2401 (MYLAR,MAGNET,MP100 ) *2.00
│ ├27─60-210-D0501 (HINGE,MAIN,MP100 ) *1.00
│ └28─64-260-82PB1 (SCREW,2.6*8,TYPE2 PAN DYED BLACK 1 ) *8.00
│
├15─92-210-07010 (ASS'Y,F/P,F1,10IN,MP0405-1,MUSTEK ) *1.00
│ │
│ ├1─49-122-00027 (SPK,ψ:28mm,L:50mm,8ohm,PL200,JX ) *2.00
│ ├2─60-179-D0501 (FRAME,FRONT COVER,H,F1,PL500 ) *1.00
- 14 -
Page 17

│ ├3─60-179-D1501 (FRAME,FRONT COVER,V,F1,PL512 ) *2.00
│ ├4─60-210-C0203 (B_P,F1,10IN,PVI,MP0405-1,MUSTEK ) *1.00
│ ├5─60-210-C1502 (COVER,IR,F1,MC0311-1 ) *1.00
│ ├7─60-210-D0201 (MAGNET,STEEL,F1 ) *2.00
│ ├8─64-200-DMFN1 (SCREW,M2*3.5L,FLAT ) *20.00
│ ├9─64-170-92PB1 (SCREW,TAPPING,M1.7*9 ) *4.00
│ ├10─90-210-03004 (PCBA,I/B,BIT,IC,TRONIC100 ) *1.00
│ │ │
│ │ └1─90-210-03204 (PCBA,SMD,I/B,BIT,IC,TRONIC100 ) *1.00
│ │
│ │ │
│ │ ├1─24-301-100C5 (CHIP CAP.,3KV 10PF,(1808),(NPO) ) *1.00
│ │ ├2─24-302-10618 (CHIP CAP.,10U/16V,(1206) ) *1.00
│ │ ├3─24-302-10526 (CHIP CAP.,25V 1UF,(1206),(X7R) ) *1.00
│ │ ├4─24-303-10516 (CHIP CAP.,16V 1UF,10%,X7R,(0603) ) *2.00
│ │ ├5─24-303-10346 (CHIP CAP.,50V 103K ) *3.00
│ │ ├6─24-303-47145 (CHIP CAP.,50V 470PJ,(0603),(NPO) ) *1.00
│ │ ├7─24-303-47406 (CHIP CAP.,10V 0.47UF,(0603),(X5R) ) *1.00
│ │ ├8─24-303-22346 (CHIP CAP.,50V,22NFK,(0603) ) *1.00
│ │ ├9─24-303-33145 (CHIP CAP.,50V 330PFJ (0603) ) *1.00
│ │ ├10─24-303-22246 (CHIP CAP.,50V,220OPK,(0603) ) *2.00
│ │ ├11─01-028-00001 (DIODE,PAIR,BAV99,(SOT23) ) *2.00
│ │ ├12─01-042-00007 (ZENER DIOD,5.6V,(MEF) ) *1.00
│ │ ├13─49-500-00047 (FUSE,2A/32V,1206,FAST BLOW ) *1.00
│ │ ├14─40-111-02008 (WAFER CONNECT,2P,7.5*10*3.5mm ) *1.00
│ │ ├15─40-111-04015 (WAFER,CONNECTOR,M,4P,P:1.0MM ) *1.00
│ │ ├16─30-084-00055 (INDUCTOR,QPI5650,15UH,SMD ) *1.00
│ │ ├17─02-110-00007 (TRANSISTOR,NPN MMBT3904,(SMD) ) *1.00
│ │ ├18─20-113-47106 (CHIP RES.,470ohm,1/16W,(0603) ) *1.00
│ │ ├19─20-113-33106 (CHIP RES.,330ohm,1/16W,(0603) ) *1.00
│ │ ├20─20-113-00006 (CHIP RES.,0 ohm,1/16W,(0603) ) *2.00
│ │ ├21─20-113-20406 (CHIP RES.,200K,1/16W,(0603) ) *1.00
│ │ ├22─20-113-91106 (CHIP RES.,910ohm.1/16W,(0603) ) *1.00
│ │ ├23─20-112-33026 (CHIP RES.,33ohm,1/8W,(1206) ) *2.00
│ │ ├24─20-113-51306 (CHIP RES.,51K,1/16W,(0603) ) *1.00
│ │ ├25─20-113-68306 (CHIP RES.,68K,1/16W,(0603) ) *1.00
│ │ ├26─20-113-12406 (CHIP RES.,120K,1/16W,5%,(0603) ) *1.00
│ │ ├27─20-113-12404 (CHIP RES.,120K,1%,1/16W,(0603) ) *1.00
│ │ ├28─20-113-68406 (CHIP RES.,680K,1/16W,(0603) ) *1.00
- 15 -
Page 18

│ │ ├29─31-033-00005 (TRANSFORMER,M-U19.8B,MP100,SMD ) *1.00
│ │ ├30─02-513-00018 (MOSFET,DUAL,P5506HVG,SOP-8 ) *1.00
│ │ ├31─05-036-00018 (IC,PWM,BIT3193,SOP-16,P/S ) *1.00
│ │ └32─59-210-03004 (PCB,I/B,BIT,IC,DS2L,T10,TRONIC100 ) *1.00
│ │
│ ├11─90-210-05000 (PCBA,D/B,PVI10",MST79880M,MP100 ) *1.00
│ │ │
│ │ ├2─14-040-00022 (IR,RECEIVER,MIN-5383VIF,(90D) ) *1.00
│ │ ├3─35-031-40001 (CRYSTAL 12MHZ(49U/S SMD TYPE) ) *1.00
│ │ └4─90-210-05200 (PCBA,SMD,D/B,PVI10",MST79880M,MP100) *1.00
│ │
│ │ │
│ │ ├1─01-028-00001 (DIODE,PAIR,BAV99,(SOT23) ) *6.00
│ │ ├2─01-075-00032 (SCHOTTKY DIODE,B130LAW ) *1.00
│ │ ├3─01-075-00039 (SCHOTTKY,DIODE,SD103AWS,40V/1.5A ) *1.00
│ │ ├4─04-124-00074 (IC,74HC74,SSOP14 ) *1.00
│ │ ├5─05-146-00044 R(IC,SWITCHING REGULATOR,AAT1102 ) *1.00
│ │ ├6─05-189-00010 (IC,VIDEO,DECODER,MST79880M ) *1.00
│ │ ├7─05-026-00089 (IC,OP,NJM2137M ) *2.00
│ │ ├8─20-113-00006 (CHIP RES.,0 ohm,1/16W,(0603) ) *21.00
│ │ ├9─20-111-00016 (CHIP RES.,0ohm,1/10W,(0805) ) *2.00
│ │ ├10─20-113-10004 (CHIP RES.,10ohm,1%,1/16W,0603 ) *1.00
│ │ ├10─20-113-10004 (CHIP RES.,10ohm,1%,1/16W,0603 ) *1.00
│ │ ├11─20-113-10104 (CHIP RES.,100ohm,1%,1/16W,0603 ) *9.00
│ │ ├12─20-113-10204 (CHIP RES.,1K,1%,1/16W,(0603) ) *1.00
│ │ ├13─20-113-10304 (CHIP RES.,10K,1%,1/16W,(0603) ) *8.00
│ │ ├14─20-113-10504 (CHIP RES.,1M,1%,1/16W,(0603) ) *1.00
│ │ ├15─20-113-12304 (CHIP RES.,12K,1%,1/16W,(0603) ) *1.00
│ │ ├16─20-113-12404 (CHIP RES.,120K,1%,1/16W,(0603) ) *1.00
│ │ ├17─20-113-13404 (CHIP RES.,130K,1%1/16W,(0603) ) *1.00
│ │ ├18─20-113-14004 (CHIP RES.,14ohm,1/16W,0603 ) *1.00
│ │ ├19─20-113-15309 (CHIP RES.,15K,1%,1/16W,0603 ) *2.00
│ │ ├20─20-111-01026 (CHIP RES.,1ohm,1/8W,0805 ) *1.00
│ │ ├22─20-113-20404 (CHIP RES.,200K,1%,1/16W,(0603) ) *1.00
│ │ ├24─30-024-00065 (MLB-3216-0470M4-N2,FB470(8P4B) ) *4.00
│ │ ├25─20-113-33004 (CHIP RES.,33ohm,1/16W,1% ) *1.00
│ │ ├26─20-113-33104 (CHIP RES.,330ohm,1%,1/16W,(0603) ) *1.00
│ │ ├27─20-113-47104 (CHIP RES.,470ohm,1%,1/16W,(0603) ) *1.00
│ │ ├28─20-113-47204 (CHIP RES.,4.7K,1%,1/16W,(0603) ) *4.00
- 16 -
Page 19

│ │ ├29─20-113-51104 (CHIP RES.,510ohm,1%,1/16,(0603) ) *1.00
│ │ ├30─20-113-62004 (CHIP,RES.,62 ohm,1%,1/16W,(0603) ) *2.00
│ │ ├31─20-113-68204 (CHIP RES.,6.8K,1%,1/16W,0603 ) *1.00
│ │ ├32─21-312-10302 (SEMI-FIXED RES.,TMC3K B10K,(SMD) ) *2.00
│ │ ├34─24-303-10445 (CHIP CAP.,0.1uF,5%,50V,(0603) ) *49.00
│ │ ├35─24-303-10507 (CHIP CAP.,10V,1UF,(0603) ) *4.00
│ │ ├36─24-301-10645 (CHIP CAP.,10V,10UF,(0805) ) *5.00
│ │ ├37─24-302-10618 (CHIP CAP.,10U/16V,(1206) ) *5.00
│ │ ├38─24-301-10628 (CHIP CAP.,25V 10UF(1210) ) *1.00
│ │ ├39─24-303-18046 (CHIP CAP.,50V,18PK,(0603) ) *1.00
│ │ ├40─24-303-2204E (CHIP CAP.,50V,22PJ,(0603)5%,NPO ) *2.00
│ │ ├41─24-303-2214E (CHIP CAP.,50V,220PF,(0603) 5%,NPO ) *1.00
│ │ ├42─24-303-22425 (CHIP CAP.,25V 224J,(0603) ) *1.00
│ │ ├43─24-303-33045 (CHIP CAP.,50V 33PJ,(0603),(NPO) ) *4.00
│ │ ├44─24-303-4714E (CHIP CAP.,50V 470PJ,(0603),5%,NPO ) *1.00
│ │ ├45─24-303-47226 (CHIP CAP.,25V,4700PK,(0603) ) *1.00
│ │ ├46─30-024-00008 (FERRITE BEAD,MLB16080-012A-N2(0603)) *9.00
│ │ ├47─30-024-00017 (FERRIT BEAD,600ohm,500mA,0805 ) *3.00
│ │ ├48─30-012-00008 (INDUCTOR,10UH,SMD(0805) ) *1.00
│ │ ├49─30-014-00081 (INDUCTOR,27uH,SMD,BC43,TAI-TECH ) *1.00
│ │ ├50─40-081-32001 (FCC,CONNECTOR,32P,P:0.5M,TOP ) *1.00
│ │ ├51─40-082-02002 (FPC CONNECTOR,2P,M,P:1.25MM ) *2.00
│ │ ├52─40-111-06012 (WAFER,CNNECTOR,M,6P,P:1.0m ) *1.00
│ │ ├53─40-111-10006 (WAFER,CNNECTOR,M,10P,P:1.0m ) *2.00
│ │ ├54─59-210-05000 (PCB,D/B,PVI10",MST79880M,MP100 ) *1.00
│ │ ├55─02-613-00034 (P-CHANNEL MOSFET,SI2301DS,SOT-23 ) *1.00
│ │ ├56─24-303-82045 (CHIP CAP.,50V 82PJ,(0603),(NPO) ) *8.00
│ │ ├57─20-113-51204 (CHIP RES.,5.1K,1%,1/16W,(0603) ) *2.00
│ │ ├59─20-112-00036 (CHIP RES.,0ohm,1/4W,1206 ) *5.00
│ │ ├60─30-022-00024 (FERRITE BEAD,600ohm,(0603) ) *5.00
│ │ ├61─24-303-1514E (CHIP CAP.,50V 150PJ,(0603) 5%,NPO ) *5.00
│ │ ├62─24-303-22516 (CHIP CAP.,16V 2.2uF,(0603) ) *1.00
│ │ ├63─20-113-51F06 (CHIP RES.,5.1ohm,1/16W,0603 ) *2.00
│ │ └64─20-113-18F06 (CHIP RES.,1.8ohm,1/16W(0603) ) *1.00
│ ├12─92-179-01030 (LCD PANEL,A10",PVI,A,NWV,PW100XS1 ) *1.00
│ ├13─60-210-C2501 (MYLAR,102IN,LCD,MP100 ) *1.00
│ └14─60-210-C2701 (SPEAKER COVER,28mm,P100 ) *2.00
│
├16─60-210-D0601 (SHELTER,MB,MP100 ) *1.00
- 17 -
Page 20

├17─60-210-P0201 (TAPE,MATEL,EMI,MP100 ) *1.00
├18─60-210-C1702 (RUBBER,B PART,MC0404-4 ) *2.00
└19─54-522-00003 (GROUND WIRE,D1.6,TERMINAL0.3T,PL500) *1.00
│ ├11─90-210-07000 (PCBA,D/B,PVI 9",VP77,MP100 ) *1.00
│ │ │
│ │ ├1─14-040-00022 (IR,RECEIVER,MIN-5383VIF,(90D) ) *1.00
│ │ └2─90-210-07200 (PCBA,SMD,D/B,PVI 9",VP77,MP100 ) *1.00
│ │
│ │ │
│ │ ├1─01-078-00002 (SCHOTTKY DIODE,BAT54S(SOT23) ) *4.00
│ │ ├2─01-078-00004 (SCHOTTKY DIODE,BAT54C,30V,SOT23 ) *1.00
│ │ ├3─02-110-00014 (TRANSISTOR,NPN,BC848B(SMD) ) *3.00
│ │ ├4─05-026-00084 R(IC,SINGLE-SUPPLY DUAL OP,NJM3414AM ) *1.00
│ │ ├5─05-018-00019 R(IC,REGULATOR,LD1117-ADJ,SOT223,UTC ) *1.00
│ │ ├6─05-189-00009 (IC VIDEO DECODER,VP77 ) *1.00
│ │ ├7─02-110-00037 (TRANSISTOP,NPN,2SD965/SOT89 ) *1.00
│ │ ├8─20-111-00026 (CHIP RES.,0ohm,1/8W,0805 ) *11.00
│ │ ├9─20-113-00006 (CHIP RES.,0 ohm,1/16W,(0603) ) *22.00
│ │ ├10─20-113-10104 (CHIP RES.,100ohm,1%,1/16W,0603 ) *3.00
│ │ ├11─20-113-10204 (CHIP RES.,1K,1%,1/16W,(0603) ) *4.00
│ │ ├12─20-113-10304 (CHIP RES.,10K,1%,1/16W,(0603) ) *3.00
│ │ ├13─20-113-10504 (CHIP RES.,1M,1%,1/16W,(0603) ) *1.00
│ │ ├14─20-113-12304 (CHIP RES.,12K,1%,1/16W,(0603) ) *1.00
│ │ ├15─20-113-82304 (CHIP RES.,82K,1/16W,0603 ) *1.00
│ │ ├17─20-113-20304 (CHIP RES.,20K,1%,1/16W,(0603) ) *4.00
│ │ ├20─20-113-27304 (CHIP RES.,27K,1%,1/16W,(0603) ) *1.00
│ │ ├23─20-113-33204 (CHIP RES.,3.3K,1%,1/16W,(0603) ) *1.00
│ │ ├24─20-113-39304 (CHIP RES.,39K,1%,1/16W,(0603) ) *1.00
│ │ ├25─20-113-47104 (CHIP RES.,470ohm,1%,1/16W,(0603) ) *1.00
│ │ ├26─20-113-47204 (CHIP RES.,4.7K,1%,1/16W,(0603) ) *4.00
│ │ ├27─20-113-47304 (CHIP RES.,47K,1%,1/16W,(0603) ) *5.00
│ │ ├29─20-113-75004 (CHIP RES.,75ohm,1%,1/16W,(0603) ) *4.00
│ │ ├30─20-113-75104 (CHIP RES.,750 ohm,1%1/16W,(0603) ) *1.00
│ │ ├31─20-115-00006 (CHIP RES.,0ohm,5%,1/16W,(0402) ) *2.00
│ │ ├33─21-312-50301 (SEMI-FIXED RES.,TMC3K B50K,(SMD) ) *2.00
│ │ ├34─24-301-10528 (CHIP CAP.,25V 1UF,(0805) ) *9.00
│ │ ├35─24-301-10645 (CHIP CAP.,10V,10UF,(0805) ) *14.00
│ │ ├36─24-302-10618 (CHIP CAP.,10U/16V,(1206) ) *6.00
- 18 -
Page 21

│ │ ├37─24-302-10626 (CHIP CAP.,25V 10UF,(1206),(X5R) ) *2.00
│ │ ├38─24-303-10145 (CHIP CAP.,100PJ,50V,(0603) ) *1.00
│ │ ├39─24-303-10346 (CHIP CAP.,50V 103K ) *1.00
│ │ ├40─24-303-10427 (CHIP CAP.,25V 104Z,(0603) ) *36.00
│ │ ├41─24-303-22045 (CHIP CAP.,50V 22PJ,(0603),(NPO) ) *2.00
│ │ ├42─24-303-33045 (CHIP CAP.,50V 33PJ,(0603),(NPO) ) *4.00
│ │ ├43─24-303-33125 (CHIP CAP.,25V,330PJ,(0603) ) *3.00
│ │ ├44─24-303-39246 (CHIP CAP.,50V 3900P,(0603) ) *1.00
│ │ ├45─24-303-39346 (CHIP CAP.,50V,39NFK,(0603) ) *1.00
│ │ ├47─26-101-107G6 (POLYMER TANT CAP,6.3V,100UF,B-TYPE ) *1.00
│ │ ├48─30-014-00108 (INDUCTOR,CHIP1608W-101M,100UH,SMD ) *1.00
│ │ ├49─30-022-00020 (FERRITE BEAD,80OHM(1206) ) *1.00
│ │ ├50─30-022-00027 (FERRITE BEAD,300ohm,MAG,(0603) ) *1.00
│ │ ├51─30-024-00007 (FERRITE BEAD,120ohm,4000mA,(0805) ) *1.00
│ │ ├52─30-024-00049 (FB,GSMA201209-U0600,2A 600ohm(0805)) *2.00
│ │ ├53─35-031-24019 (CRYSTAL,20MHZ(49U/S,20PPM),SMD ) *1.00
│ │ ├54─40-082-30005 (FPC CONNECTOR,30P,M,P:0.5MM(TOP) ) *1.00
│ │ ├55─40-082-02002 (FPC CONNECTOR,2P,M,P:1.25MM ) *2.00
│ │ ├56─40-111-06012 (WAFER,CNNECTOR,M,6P,P:1.0m ) *1.00
│ │ ├57─40-111-10006 (WAFER,CNNECTOR,M,10P,P:1.0m ) *2.00
│ │ ├58─59-210-07000 (PCB,D/B,PVI 9",VP77,MP100 ) *1.00
│ │ ├59─20-112-00036 (CHIP RES.,0ohm,1/4W,1206 ) *1.00
│ │ ├60─24-303-5604E (CHIP CAP.,50V,56PF,(0603) 5%,NPO ) *1.00
│ │ ├62─30-024-00008 (FERRITE BEAD,MLB16080-012A-N2(0603)) *4.00
│ │ ├63─30-084-00059 (INDUCTOR,4.7uH,SMD,(0603) ) *1.00
│ │ ├64─20-113-33104 (CHIP RES.,330ohm,1%,1/16W,(0603) ) *3.00
│ │ ├65─30-024-00066 (MLB-100505-0600A-N2,FB600(0402) ) *4.00
│ │ ├67─24-307-68025 (CHIP CAP.,25V,68P,0402 ) *12.00
│ │ └68─30-024-00048 (FB,GSMA201209-U0300,2A 300ohm(0805)) *2.00
│ │
│ ├12─92-184-01010 R(LCD PANEL,9",PVI,PL800 ) *1.00
│ ├13─60-210-C2501 (MYLAR,102IN,LCD,MP100 ) *1.00
│ └14─60-210-C2701 (SPEAKER COVER,28mm,P100 ) *2.00
│
├16─60-210-D0601 (SHELTER,MB,MP100 ) *1.00
├17─60-210-P0201 (TAPE,MATEL,EMI,MP100 ) *1.00
├18─60-210-C1702 (RUBBER,B PART,MC0404-4 ) *2.00
└19─54-522-00003 (GROUND WIRE,D1.6,TERMINAL0.3T,PL500) *1.00
- 19 -
Page 22

6 Regulatory Standards
6.1 Safety
z ETL
z TUV-GS
z LVD
z CB
6.2 EMI
z CE
z FCC
6.3 Ergonomics
z Dolby
z Macrovision
- 20 -
Page 23
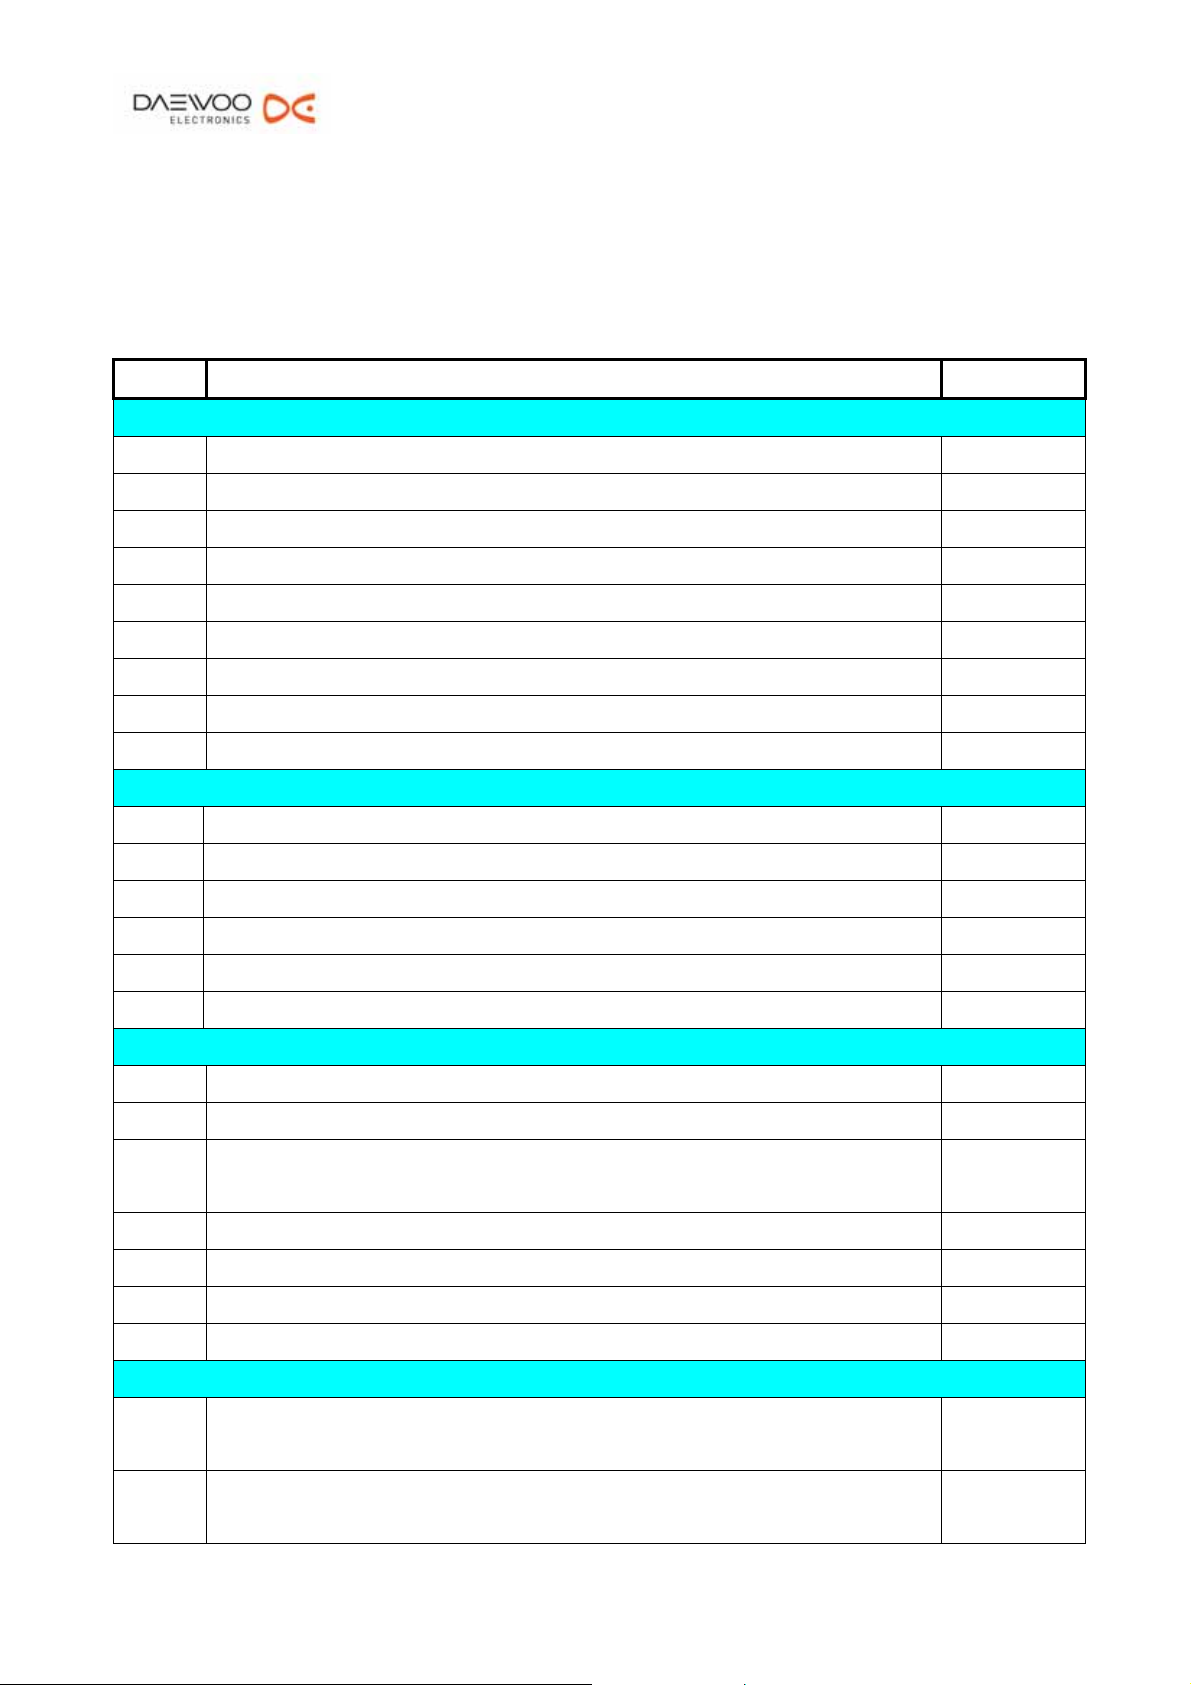
7 Trouble Shooting
7.1 Error Code Table
CODE Descriptions of Error Note
Power T est
T01 No power no action
T02 Power Led indicator is not on or insufficient brightness
T03 Loading time too long
T04 Remote control bad sensing or not functional
T05 System stays in the Run In condition after power on, can’t be tested
T06 System down at power on
T07 System down during playing
T08 Power on unstable
T09 Abnormal sound in the system
Disc Drive Test
T11 Can’t read the disc (No Disc)
T12 Disc drive no action or locked
T13 Disc drive scratches the disc
T14 Some discs can’t be played (can’t play CD or VCD or DVD)
T15 Head does not work
T16 Spindle does not work
V ideo Test
T21 No video / abnormal (Please indicate the abnormal condition)
T22 Video: no video / abnormal (Please indicate the abnormal condition)
T23 S-Video No video / abnormal or black & white (Please indicate the
abnormal condition)
T24 VCD picture abnormal (Please indicate the abnormal condition)
T25 DVD picture abnormal (Please indicate the abnormal condition)
T26 Picture subtitle display abnormal or no display
T27 Setting menu picture abnormal (Please indicate the abnormal condition)
Audio T est
T31 Audio / left sound channel (AOL) does not have waveform (sound) or
waveform (sound) abnormal
T32 Audio / right sound channel (AOR) does not have waveform (sound) or
waveform (sound) abnormal
- 21 -
Page 24
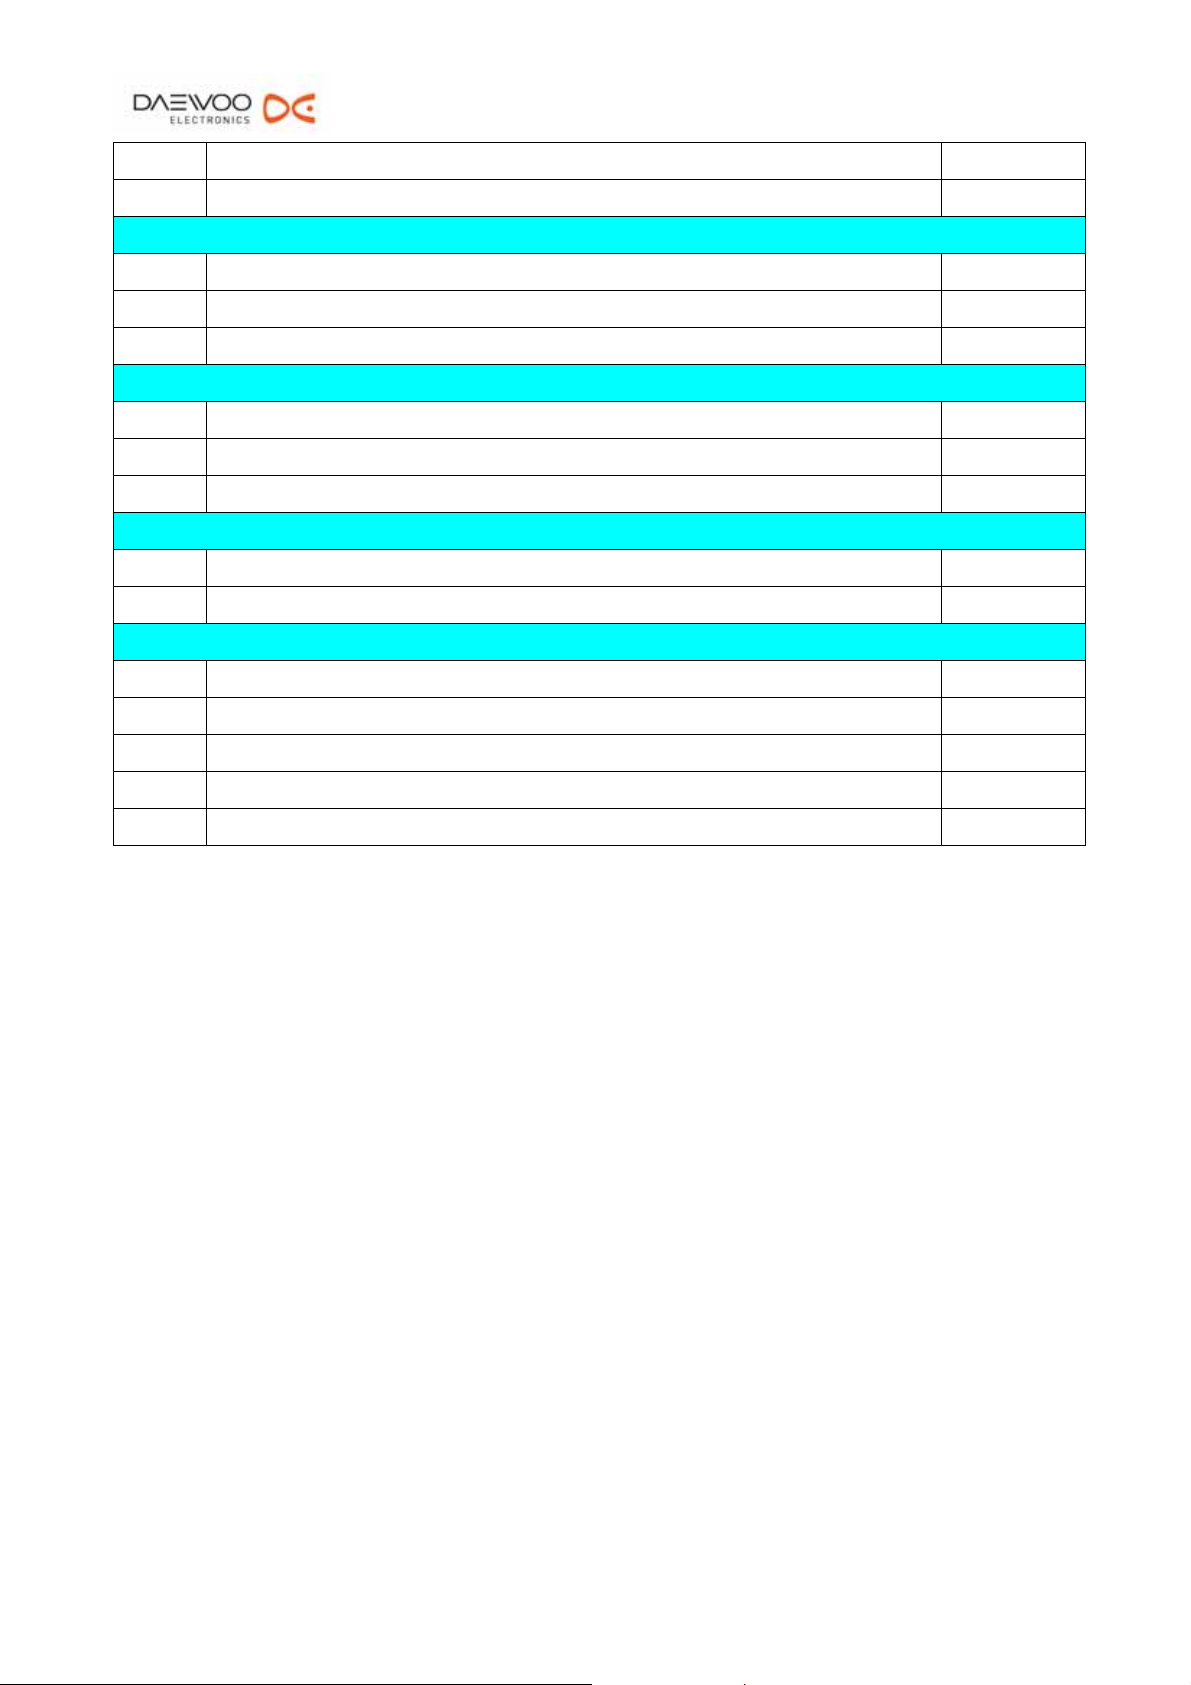
T33 MP3 abnormal sound
T34 Audio no waveform (sound) or waveform (sound) abnormal
Earphone T est
T41 Earphone no sound or the sound has pause, abnormal sound, noise, echo
T42 Earphone (right) no sound or the sound has pause, abnormal sound, noise
T43 Earphone (left) no sound or the sound has pause, abnormal sound, noise
Function Key Test
T51 Video can’t be still or stop
T52 Can’t execute fast forward or rewind
T53 Panel button
System Setting Test
T61 Can’t enter the system setting
T62 The system can not be played or it is down after the system is set
TFT Test
T71 TFT image and color error
T72 TFT image is black and white
T73 TFT image shakes and is distorted
T74 TFT PAL color strip
T75 TFT ripple
7.2 Debug & Trouble Shooting
z Please check the PCBA for any missing components and bad soldering
、
z T01
9 Main Board
No Power
A. Check for components U801、U82、U803 on the Main Board to see if there are
any short circuits.
B. Check the components Q803、L802、L804、L806 on the Main Board for any
burnt marks.
C. Check components EC820、EC805、EC806、EC808、EC814 on the Main Board
to see if there are any short circuits.
D. If none of the above actions is effective, please change Main Boards.
z T02
、
9 Main Board
A. Measure pin 188 on U201 to see if the voltage is high.
B. Disassemble F/W, replace with a good one or re-plug it to see if the LED lights
C. Check the U201 and U301 to see if there is any cold soldering, hollow soldering,
Power LED indicator not on or insufficient brightness or charge indicator not on
up when Power ON.
- 22 -
Page 25

misplaced soldering, or wrong part.
D. Measure D903 or D901 positive electrode on Main Board to see if the voltage is
high,if it’s,change the Diode(D903 or D901).
E. If the above actions are not working, replace the Main Board.
、
z T03
Loading time too long
9 Main Board
A. Remove the cover to see if the resistors or resistor-array adjacent to pin1~pin64
on U201 and U401or IC, to see if there is any cold soldering, hollow soldering,
misplaced soldering, or wrong part.
B. If the above actions are not working, replace the Main Board.
z T04、Remote control bad sensing or sensing not functional
9 Remote control
A. If the main body of the system works normally, then making sure that the
battery of the Remote control has sufficient power, if it is not, replace the
battery.
9 Main Board
A. Remove the top cover and the panel. Check to see if J702 pin 6 has short circuit,
broken circuit, hollow soldering, or other problems.
B. If the above actions are not working, replace the Main Board.
9 Driver Board
A. Check the U101 pin 3 have power(+5V) or not and check pin 1 on U101 have
signal or not, if it’s, replace the U101.
z T05、Stay in the Run In condition after power on, can’t be tested
9 Main Board
A. Remove the top cover and replace with another U301 F/W.
B. If the above actions are not working, replace the Main Board.
、
z T06
System down at power on
9 Main Board
A. Remove the top cover, check all flat cables in the system to see if they are
correctly plugged to the fixed positions, or re-plug them.
B. Disassemble U301 F/W, replace with a good one or re-plug it to see if the
symptom will disappear.
C. If the above actions are not working, replace the Main Board.
z T07、System down during play
- 23 -
Page 26

9 Main Board
A. Remove the top cover, check all flat cables in the system to see if they are
correctly plugged to the fixed positions, or re-plug them.
B. Disassemble U301 F/W, replace with a good one or re-plug it to see if the
symptom will disappear.
C. Check the resistors or capacitors of J701, J702, J703, or U201 on the main
board, or those adjacent to IC to see if there is any hollow soldering, cold
soldering, wrong part, or misplaced soldering.
D. If the above actions are not working, replace the Main Board.
9 DVD ROM
A. Check the loader to see if it is not stable (any condition that some of the discs
can’t be played). If so, replace the loader.
9 DVD DISC
A. Check the Test Disc to see if there is any serious scratch or ring shape, circular
shape scratches, if so, replace the Test Disc and test again.
、
z T08
Power on unstable
9 Main Board
A. Remove the top cover, check all flat cables in the system to see if they are
correctly plugged to the fixed positions, or re-plug them.
B. Disassemble U301F/W. Replace it with a good one or re-plug it to see if the
symptom will disappear.
C. If the above actions are not working, replace the Main Board.
z T09、Abnormal sound in the machine base (Power on abnormal sound)
9 DVD ROM
A. Check the loader to see if it is the source of the abnormal sound. If so, replace
the loader.
、
z T11
Disc drive can’t read (NO DISC)
9 Main Board
A. Check the resistors adjacent to U201 Pin85~151 to see if there is any hollow
soldering or cold soldering.
B. Check the resistors or capacitors of J401, J402, U401, or U302, or those
adjacent to IC to see if there is any hollow soldering, cold soldering, wrong part,
or misplaced soldering.
C. If the above actions are not working, replace the Main Board. If it is still not
working, replace the loader.
9 DVD ROM
- 24 -
Page 27

A. Check the loader to see if it can’t read. If so, replace the loader.
、
z T12
Disc drive no action or locked
9 Main Board
A. Remove the cover. Check to see if it is caused by mis-assembly.
B. Check the resistors or capacitors of J401, J401, or U401 on the main board, or
those adjacent to IC to see if there is any hollow soldering or cold soldering.
C. If the above actions are not working, replace the loader. If it is still not working,
replace the main board.
z T13、Disc drive scratches disc
9 Main Board
A. Check the resistors or capacitors of J402 or U401 on the main board, or those
adjacent to IC to see if there is any hollow soldering, cold soldering, wrong part,
or misplaced soldering.
B. If the above actions are not working, replace the loader. If it is still not working,
replace the main board.
9 DVD ROM
A. Check the loader to see if it is the cause of disc scratching. If so, replace the
loader.
z T14、Not every disc can be played
9 Main Board
A. Check the resistors or capacitors of J400 or U401 on the main board, or those
adjacent to IC to see if there is any hollow soldering, cold soldering, wrong part,
or misplaced soldering.
B. If the above actions are not working, replace the loader. If it is still not working,
replace the main board.
、
z T15
Head does not work
9 Main Board
A. Remove the top cover, check the 24-pin flat cable in the system to see if they
are correctly plugged to the fixed positions, or re-plug them.
B. Check the resistors or capacitors of J402 or U401 on the main board, or those
adjacent to IC to see if there is any hollow soldering, cold soldering, wrong part,
or misplaced soldering.
C. If the above actions are not working, replace the loader. If it is still not working,
replace the main board.
- 25 -
Page 28

z T16、Spindle does not work.
9 Main Board
A. Remove the top cover, check the 24-pin flat cable in the system to see if they
are correctly plugged to the fixed positions, or re-plug them.
B. Check the resistors or capacitors of J401 or J401 on the main board, or those
adjacent to IC to see if there is any hollow soldering, cold soldering, wrong part,
or misplaced soldering.
C. If the above actions are not working, replace the loader. If it is still not working,
replace the main board.
z T21、No video / abnormal
9 Main Board
A. Remove the top cover, check all flat cables in the system to see if they are
correctly plugged to the fixed positions, or re-plug them.
B. Check the resistors or resistor-array adjacent to U201 Pin164~193 on the main
board or IC to see if there is any short circuit, hollow soldering or cold
soldering. Rule out the problem if there is any.
C. Use oscilloscope to measure if YM201 generates 27MHz. If it does not generate
said frequency, and the problems such as cold or hollow soldering have been
ruled out, it could be YM201 NG. Replace YM201.
D. Check U201 to see if it has bad contact or if U301(F/W) IC has any problem.
E. Check if the 10pin connector (J701, J702 and J703) on the Main Board is well
soldered.
F. Check if switch J705 is normal; replace a new one if necessary.
G. If the above actions are not working, replace the Main Board.
9 Driver Board
A. Adjust VR404 and VR406 to the appropriate frequency.
B. Check if the component on U201 to see if there is any short circuit, hollow
soldering or cold soldering. Also check if it’s burnt marks.
9 DVD ROM (less likely to happen)
A. If it is useless to change the main board, then replace the loader.
、
z T22
Video no video / abnormal
9 Main Board
A. Remove the cover. Check J605 on the main board to see if there is any cold or
hollow soldering and rule out the problem.
B. Remove the top cover, check all flat cables in the system to see if they are
correctly plugged to the fixed positions, or re-plug them.
C. Check RLC following CVBS to see if there is any wrong parts, cold and hollow
- 26 -
Page 29

D. If the above actions do not work, then check U201Pin211 and Pin214-215 to
E. Check if the 10pin connector (J701 and J702) on the Main Board is well
F. Check Setup/Video setup/Video Output, the output type is cvbs or not.
G. If the above actions are not working, replace the Main Board.
z T23
、
9 Main Board
A. Remove the cover. Check J604 on the main board to see if there is any cold or
B. Remove the top cover, check all flat cables in the system to see if they are
C. Check RLC following Y and C to see if there is any wrong parts, cold and
soldering, short circuit, broken circuit, broken parts and rule out the problem.
see if there is any cold or hollow soldering and short circuit problem and rule
out the problem.
soldered.
S-Video no video / abnormal or black & white
hollow soldering and rule out the problem.
correctly plugged to the fixed positions, or re-plug them.
hollow soldering, short circuit, broken circuit, broken parts and rule out the
problem.
D. If the above actions do not work, then check U201Pin214 and Pin215 to see if
there is any cold or hollow soldering and short circuit problem and rule out the
problem.
E. Check if the 4pin connector (J704) on the Main Board is well soldered.
F. Check Setup/Video setup/Video Output, the output type is s-video or not.
G. If the above actions are not working, replace the Main Board.
z T24、VCD abnormal picture
9 Main Board
A. Check U201 and U302 to see if there is any cold or hollow soldering and short
circuit problem and rule out the problem.
B. Check the resistors or capacitors of J402, U401 or those adjacent to IC to see if
there is any hollow soldering, cold soldering, wrong part, or misplaced
soldering.
C. If the above actions are not working, replace the Main Board.
9 DVD ROM
A. If the abnormal picture is the problem of pause or skipping tracks, then making
z T25
、
sure if the disc has any scratches or dirt, if no such problems then replace the
loader.
DVD abnormal picture
- 27 -
Page 30

9 Main Board
A. Check U201 and U302 to see if there is any cold or hollow soldering and short
B. Check the resistors or capacitors of J402, U401 or those adjacent to IC to see if
C. If the above actions are not working, replace the Main Board.
9 DVD ROM
A. If the abnormal picture is the problem of pause or skipping tracks, then making
z T26
、
9 Main Board
A. Remove the top cover and dis-assemble F/W (U301). Replace it with a good
circuit problem and rule out the problem.
there is any hollow soldering, cold soldering, wrong part, or misplaced
soldering.
sure if the disc has any scratches or dirt, if no such problems then replace the
loader.
Picture subtitle abnormal display or no display
F/W or re-plug it, then check if the action is normal. Otherwise replace the F/W.
B. Check U201 and U302 to see if there is any cold or hollow soldering and short
circuit problem and rule out the problem.
C. If the above actions are not working, replace the Main Board.
z T27、Setting menu abnormal picture
9 Main Board
A. Check U201 to see if there is any cold or hollow soldering and rule out the
problem.
B. If the above actions are not working, replace the Main Board.
z T31、Audio /left channel (AOL) no sound or abnormal sound
9 Main Board
A. Remove the cover. Check J601、J602 on the I/O board to see if there is any cold
soldering, hollow soldering, or damage. Rule out the problem.
B. Check all parts following AOL to see if there is any cold or hollow soldering,
short circuit, broken circuit, parts missing, wrong parts and rule out the
problem.
C. If the above actions are not working, replace the Main Board.
z T32
、
9 Main Board
A. Remove the cover. Check J601、J602 on the I/O board to see if there is any cold
Audio /right channel (AOR) no sound or abnormal sound
soldering, hollow soldering, or damage. Rule out the problem.
- 28 -
Page 31

B. Check all parts following AOR to see if there is any cold or hollow soldering,
short circuit, broken circuit, parts missing, wrong parts and rule out the
problem.
C. If the above actions are not working, replace the Main Board.
、
z T33
MP3 abnormal sound
9 Main Board
A. Remove the top cover, check all flat cables in the system to see if they are
correctly plugged to the fixed positions, or re-plug them.
B. Check if Pin4 and Pin8 on U502 connected to -12V and +12V.
C. Check the resistors or capacitors of J601and J602 on the main board, or those
adjacent to IC to see if there is any hollow soldering or cold soldering.
D. If the above actions are not working, replace the main board. If it is still not
working, replace the loader.
z T34、Audio no waveform (sound) or waveform (sound) abnormal
9 Main Board
A. Remove the cover. Check J601、J602、J606 on the main board to see if there is
any cold or hollow soldering and rule out the problem.
B. Check all parts following AOL and AOR to see if there is any cold or hollow
soldering, short circuit, broken circuit, parts missing, or wrong parts. Rule out
the problem.
C. If the above actions are not working, replace the Main Board.
z T41、Earphone Audio no waveform (sound) or waveform (sound) abnormal
9 Main Board
A. Remove the top cover, check all flat cables in the system to see if they are
correctly plugged to the fixed positions, or re-plug them.
B. Check U501、U502、U503 and J601、J602 to see if there is any cold or hollow
soldering and rule out the problem.
C. If the above action does not work after the inspection, replace the main board.
、
z T42
Earphone Audio right no waveform (sound) or waveform (sound ) abnormal
9 Main Board
A. Check U501、U502、U503 and J601、J602 to see if there is any cold or hollow
soldering and rule out the problem.
B. If the above action does not work after the inspection, replace the main board.
z T43、Earphone Audio left no waveform (sound) or waveform (sound) abnormal
- 29 -
Page 32

9 Main Board
A. Check U501、U502、U503 and J601、J602 to see if there is any cold or hollow
B. If the above action does not work after the inspection, replace the main board.
、
z T51
Video can’t be still or stopped
9 Remote control
A. If the main body of the system works normally, then making sure that the
9 Main Board
A. Check to see if U201 pin155~pin167 and pin173~pin174 is damaged, and check
B. Check to see whether SW1~SW12 is damaged.
C. If the above actions are not working, replace the Main Board.
soldering and rule out the problem.
battery of the Remote control has sufficient power, if it is not, replace the
battery.
all parts following U201 see if there is any cold or hollow soldering, short
circuit, broken circuit, broken parts, parts missing and rule out the problem.
z T52、Can’t execute fast forward or rewind
9 Main Board
A. Check to see if U201 and SW1~SW12 is damaged, and check all parts
following U201 and SW1~SW12 to see if there is any cold or hollow soldering,
short circuit, broken circuit, broken parts, parts missing and rule out the
problem.
B. Check to see whether U301 is damaged.
C. If the above actions do not work after the inspection, it means the main board or
F/W is bad. Replace the main board or re-burn the F/W (U301).
z T53、Panel button
9 Main Board
A. Check to see if U201 and SW1~SW12 is damaged, and check all parts
following U201 and SW1~SW12 to see if there is any cold or hollow soldering,
short circuit, broken circuit, broken parts, parts missing and rule out the
problem.
B. If the above actions are not working, replace the Main Board.
z T61
、
9 Main Board
A. Check U201 to see if there is any cold or hollow soldering and reverse soldering
Can’t enter the system setting
of IC or parts missing.
- 30 -
Page 33

B. If the above actions do not work after the inspection, it means the main board or
F/W is bad.
C. Replace the main board or re-burn the F/W (U301).
、
z T62
System can’t play or system down after setting
9 Main Board
A. Check U201 to see if there is any cold or hollow soldering and reverse soldering
of IC or parts missing.
B. If the above actions do not work after the inspection, it means the main board or
F/W is bad. Replace the main board or re-burn the F/W (U301).
z T71、TFT image and color error
9 Main Board
A. Check the 10-pin cable connected to the driver board to see if there is any
problem of plugging. Rule out the problem.
B. Check devices after CCIR656 signal to see if there is any cold or hollow
soldering and reverse soldering of IC or parts missing.
C. Check U201 to see if there is any cold or hollow soldering and reverse soldering
of IC or parts missing.
D. If the above actions are not working, replace the Main Board.
9 Driver Board
A. Check VR404, VR406, U401 and U402 to see if there is any cold or hollow
soldering and reverse soldering of IC or parts missing.
B. If the above actions are not working, replace the Driver Board.
z T72、TFT image is black and white
9 Main Board
A. Check the 10-pin cable connected to the driver board to see if there is any
problem of plugging. Rule out the problem.
B. Check devices after CCIR656 signal to see if there is any cold or hollow
soldering and reverse soldering of IC or parts missing.
C. Check U201 to see if there is any cold or hollow soldering and reverse soldering
of IC or parts missing.
D. If the above actions are not working, replace the Main Board.
9 Driver Board
A. Measure the voltages of VR404 and VR406 to see if they are correct.
B. Check U401 and U402 to see if there is any cold or hollow soldering and
reverse soldering of IC or parts missing.
C. Check the devices surrounding Y1 to see if there is any cold or hollow soldering
- 31 -
Page 34

D. If the above actions are not working, replace the Driver Board.
、
z T73
TFT image shakes or is distorted
9 Main Board
A. Check the 10-pin FPC connected to the driver board to see if there is any
B. Check devices after CCIR656 signal to see if there is any cold or hollow
C. Check U201 to see if there is any cold or hollow soldering and reverse soldering
D. If the above actions are not working, replace the Main Board.
9 Driver Board
A. Measure the voltages of VR404 and VR406 to see if they are correct.
B. Check U401 and U402 to see if there is any cold or hollow soldering and
and reverse soldering of IC or parts missing.
problem of plugging. Rule out the problem.
soldering and reverse soldering of IC or parts missing.
of IC or parts missing.
reverse soldering of IC or parts missing.
C. Check the devices surrounding Y1 to see if there is any cold or hollow soldering
and reverse soldering of IC or parts missing.
D. If the above actions are not working, replace the Driver Board.
z T74、TFT PAL color strip
9 Driver Board
A. Measure the voltages VR404 and VR406 to see if they are correct.
B. Check U401 and U402 to see if there is any cold or hollow soldering and
reverse soldering of IC or parts missing.
C. Check the devices surrounding Y1 to see if there is any cold or hollow soldering
and reverse soldering of IC or parts missing.
D. If the above actions are not working, replace the Driver Board.
、
z T75
TFT ripple
9 Main Board
A. Check the 4-pin cable connector and 10-pin cable connected to the driver board
to see if there is any problem of plugging. Rule out the problem.
B. If the above actions are not working, replace the Main Board.
9 Driver Board
A. Measure the voltage EC101, EC102 and EC103 to see if it is correct.
B. Check J101, and J102 to see if there is any cold or hollow soldering and reverse
soldering of IC or parts missing.
C. Check the devices surrounding VR404 and VR406 to see if there is any cold or
- 32 -
Page 35

hollow soldering and reverse soldering of IC or parts missing.
D. Check the devices surrounding Y1 to see if there is any cold or hollow soldering
and reverse soldering of IC or parts missing.
E. If the above actions are not working, replace the Driver Board.
9 Inverter Board
A. Check the 4-pin cable connected to the inverter board to see if there is any
problem of plugging. Rule out the problem.
B. Check the sharing cable connected to the panel to see if there is any problem of
plugging. Rule out the problem.
C. Check the high-voltage cable connected to the panel to see if there is any
problem of plugging. Rule out the problem.
D. If the above actions are not working, replace the inverter board.
9 Panel
A. Check the sharing cable connected to the inverter board to see if there is any
problem of plugging. Rule out the problem.
B. Check the high-voltage cable connected to the panel to see if there is any
problem of plugging. Rule out the problem.
C. If the above actions are not working, replace the panel.
- 33 -
 Loading...