

Page 1

Use & Care
Millennia™ 24-in C h
BUilt -in Dishwasher
For Use With:
Model MDW24S
Part No. 100994 Rev. B
t a B l e o f C o n t e n t s
Important Safety InStructIonS .................................................1
ettInG to Know your DIShwaSher ..........................................4
G
LoaDInG your DIShwaSher ........................................................8
operatInG your DIShwaSher ...................................................12
LeanInG anD maIntenance ......................................................16
c
Before you caLL for ServIce .................................................19
noteS .....................................................................................24
arranty & ServIce ..............................................................25
w
warranty carD ....................................................... BacK cover
Page 2

To Our Valued Customer:
Congratulations on your purchase of the very latest in Dacor products! Our unique combination of features, style and
performance make us The Life of the Kitchen, and a great addition to your home.
Important Safety Instructions Section.
In order to familiarize yourself with the controls, functions, and full potential of your new distinctive appliance, we
suggest that you thoroughly read this use & care manual, beginning with the
All Dacor appliances are designed and manufactured with quality and pride, while working within the framework of our
company value. Should you ever experience a problem with your product, please first check the
Service
section of this manual for guidance. It provides useful suggestions and remedies prior to calling for service.
Valuable customer input helps us to continuously improve our products and services, so please feel free to contact
our Customer Service Team for assistance with any of your product support needs.
Dacor Customer Service
1440 Bridge Gate Drive
Diamond Bar, CA 91765
Telephone: (800) 793-0093
Fax:
Hours of Operation: Monday through Friday
Web Site:
Thank you for choosing Dacor for your home. We are a company built by families for families and we are dedicated
to serving yours. We are confident that your new Dacor product will deliver a high level of performance and
enjoyment for many years to come.
(626) 403-3130
6:00 A.M. to 5:00 P.M. Pacific Time
www.dacor.com
Before You Call for
Sincerely,
Cheryl Crowe
Director, Customer Satisfaction
Page 3
iMportant safety instrUCtions
INSTALLER: LEAVE THIS GUIDE WITH THIS APPLIANCE.
CUSTOMER: READ THIS USE & CARE MANUAL COMPLETELY
BEFORE USE AND KEEP IT FOR FUTURE REFERENCE.
THIS GUIDE PROVIDES PROPER USE AND MAINTENANCE
INFORMATION. KEEP THIS GUIDE AND THE SALES RECEIPT
AND/OR THE CANCELED CHECK IN A SAFE PLACE FOR
FUTURE REFERENCE. PROOF OF ORIGINAL PURCHASE
DATE IS NEEDED FOR WARRANTY SERVICE.
If you have any questions, call:
Dacor Customer Service
1-800-793-0093 (U.S.A. and Canada)
Monday — Friday 6:00 am to 5:00 pm Pacific Time
website: www.dacor.com
Have the complete model and serial number identification of
your dishwasher ready. The model and serial number labels are
located on the tub ceiling, inside the door, in front of the rubber
door seal (see diagram). Record these numbers below for easy
access.
Model Number ________________________________________
Serial Number ________________________________________
Date of Purchase______________________________________
For warranty and service information, see page xx.
In our continuing effort to improve the quality and performance
of our appliances, it may be necessary to make changes to the
appliance without revising this manual.
What You Need to Know About Safety
Instructions
Warnings and Important Safety Instructions appearing in this
guide are not meant to cover all possible conditions and situations
that may occur. Common sense, caution, and care must be
exercised when installing, maintaining, or operating an appliance.
Always contact the manufacturer about problems or conditions
you do not understand.
Safety Symbols, Words, and Labels:
DANGER
DANGER – Immediate hazards which WILL result in severe
personal injury or death.
WARNING
WARNING – Hazards or unsafe practices which COULD result
in severe personal injury or death.
CAUTION
CAUTION – Hazards or unsafe practices which COULD result
in minor personal injury or property damage.
SAVE THESE INSTRUCTIONS
1
Page 4

3
iMportant safety instrUCtions
To reduce the risk of fire, electric shock, serious injury, or death when installing and using your dishwasher, follow basic
safety precautions, including the following:
DANGER
IMPORTANT: Child entrapment and suffocation are not problems of the past. Junked or abandoned appliances are still dangerous,
even if they sit out for “just a few days.” If you are getting rid of your old dishwasher, please follow the instructions below to help
prevent accidents.
Before you throw away your old appliance:
Take off the door.
•
Leave the racks in place so that children cannot easily climb inside.
•
Cut the prongs off the power cable plug and discard them.
•
Cut the power cable off and discard it separately from the old appliance.
•
IMPORTANT: To avoid the possibility of explosion or fire, do not store or use combustible, flammable, or explosive liquids or
vapors (such as gasoline) inside or in the vicinity of this or any other appliance.
WARNING
If you receive a damaged product, immediately contact your dealer or builder. Do not install or use a damaged appliance.
1.
Make sure that this dishwasher has been properly installed and grounded by a qualified installer according to the accompany-
2.
ing installation instructions. The dishwasher must be installed in a completely enclosed cabinet. Have the installer show you the
location of the junction or fuse box so that you know where and how to turn off power to the dishwasher.
Keep packaging materials away from children. Plastic sheets and bags can cause suffocation.
3.
Do not install, repair, or replace any part of the appliance unless specifically recommended in the literature accompanying it. A
4.
qualified service technician should perform all other service.
Before performing any type of service, turn off power to the dishwasher at the junction or fuse box.
5.
Use this appliance only for its intended purpose, washing dishware and cookware. It is not intended for commercial use.
6.
Do not operate the dishwasher unless all access panels are installed and the toe kick is in place. See the installation instruc-
7.
tions accompanying the unit.
Do not tamper with the controls.
8.
Make sure individuals who use the dishwasher are able to operate it properly.
9.
Never allow anyone, including children, to sit, stand, or climb on any part of the appliance, including the door. Doing so may
10.
cause, damage, serious injury, or death.
Do not leave children alone or unattended in the area around the dishwasher. Do not allow children to play with the controls,
11.
pull on the handle, or touch other parts.
Store all detergents and rinse aids out of the reach of children.
12.
Many surfaces within the dishwasher achieve high temperatures. Do not touch interior surfaces or items inside the dishwasher
13.
during or immediately after use. Exercise caution when opening the door. Let hot air and steam escape before looking or reaching inside.
Exercise caution when opening the oven door. Let hot air or steam escape before looking or reaching into the wash compart-
14.
ment.
During loading, insert all sharp or pointed objects with the handles up. Locate these items where they will not damage the door
15.
seal or cause personal injury.
Use only the cleaning solutions specified in this manual to clean the dishwasher. Other cleaning solutions could produce dan-
16.
gerous fumes, cause corrosion of the metal parts, and could permanently damage the finishes.
Clean only those parts of the dishwasher listed in this manual. Clean them only in the manner specified.
17.
Under certain conditions hydrogen gas may be produced in a hot water system that has not been used for two weeks or more.
18.
Hydrogen gas is explosive. If the hot water system has not been used for a period of time, turn on all hot water faucets and let
the water flow for several minutes to release any accumulated hydrogen gas. Do not smoke or use an open flame during this
process.
2
Page 5

iMportant safety instrUCtions
CAUTION
Use only detergents and rinse aids designed for use with a residential dishwasher.
1.
Use the dishwasher to wash flatware and cookware only. Washing other items may damage or discolor the dishwasher. Wash
2.
only the types of dishes and cooking utensils indicated in this manual.
Do not wash plastic items unless they are marked “dishwasher safe”. Always check the manufacturer’s recommendation before
3.
washing plastic items that are not marked.
To prevent household mold and mildew damage, periodically check the inlet and drain hoses for leaks.
4.
If the dishwasher outlet is connected to a garbage disposal, make sure the disposal is completely empty before running the
5.
dishwasher.
Always place large or heavy items in the bottom rack.
6.
To avoid damage to the racks, do not let sharp edges come into contact with them.
7.
To avoid breakage, make sure all glassware is secure before starting the dishwasher.
8.
3
Page 6

5
GettinG to Know yoUr Dishwasher
the parts of yoUr Dishwasher
Control Panel Located on top of the door. The lighted buttons control your dishwasher. See page xx for
a description of the button functions. The display tells you important operating information. See page xx for a description of the symbols that appear on the display.
Detergent Dispenser Automatically releases the soap during the wash part of the cycle (see page xx).
Dishwashing Tub The compartment where tableware and cookware are loaded for washing.
Door Switch Located in the door. Automatically pauses dishwashing when the door is opened.
Filter System Traps food and debris that could damage or plug up the mechanical parts of your dish-
washer. See page xx for cleaning instructions.
Racks The racks are coated with a durable coating that protects the finish of the loaded table-
ware and cookware. They have fold down tines and shelves to allow you to load various
size dishes and flatware (see page xx).
Rinse Aid Dispenser Automatically releases rinse aid during the rinse part of the cycle. Rinse aid is a fluid
that helps the dishes dry properly and helps prevent water spots. The amount of rinse
aid dispensed is adjustable (see page xx).
Silverware Basket Use the silverware basket to hold silverware and kitchen utensils. It has 2 compartments
that snap closed to hold small items (see page xx).
Spray Arms The spray arms spray water on the dishes at high pressure to remove soil.
Toe Kick Panel Covers the internal mechanics of the dishwasher. It is located behind the bottom of the-
door. It must always be in place during operation.
4
Page 7

GettinG to Know yoUr Dishwasher
5
Page 8
7
GettinG to Know yoUr Dishwasher
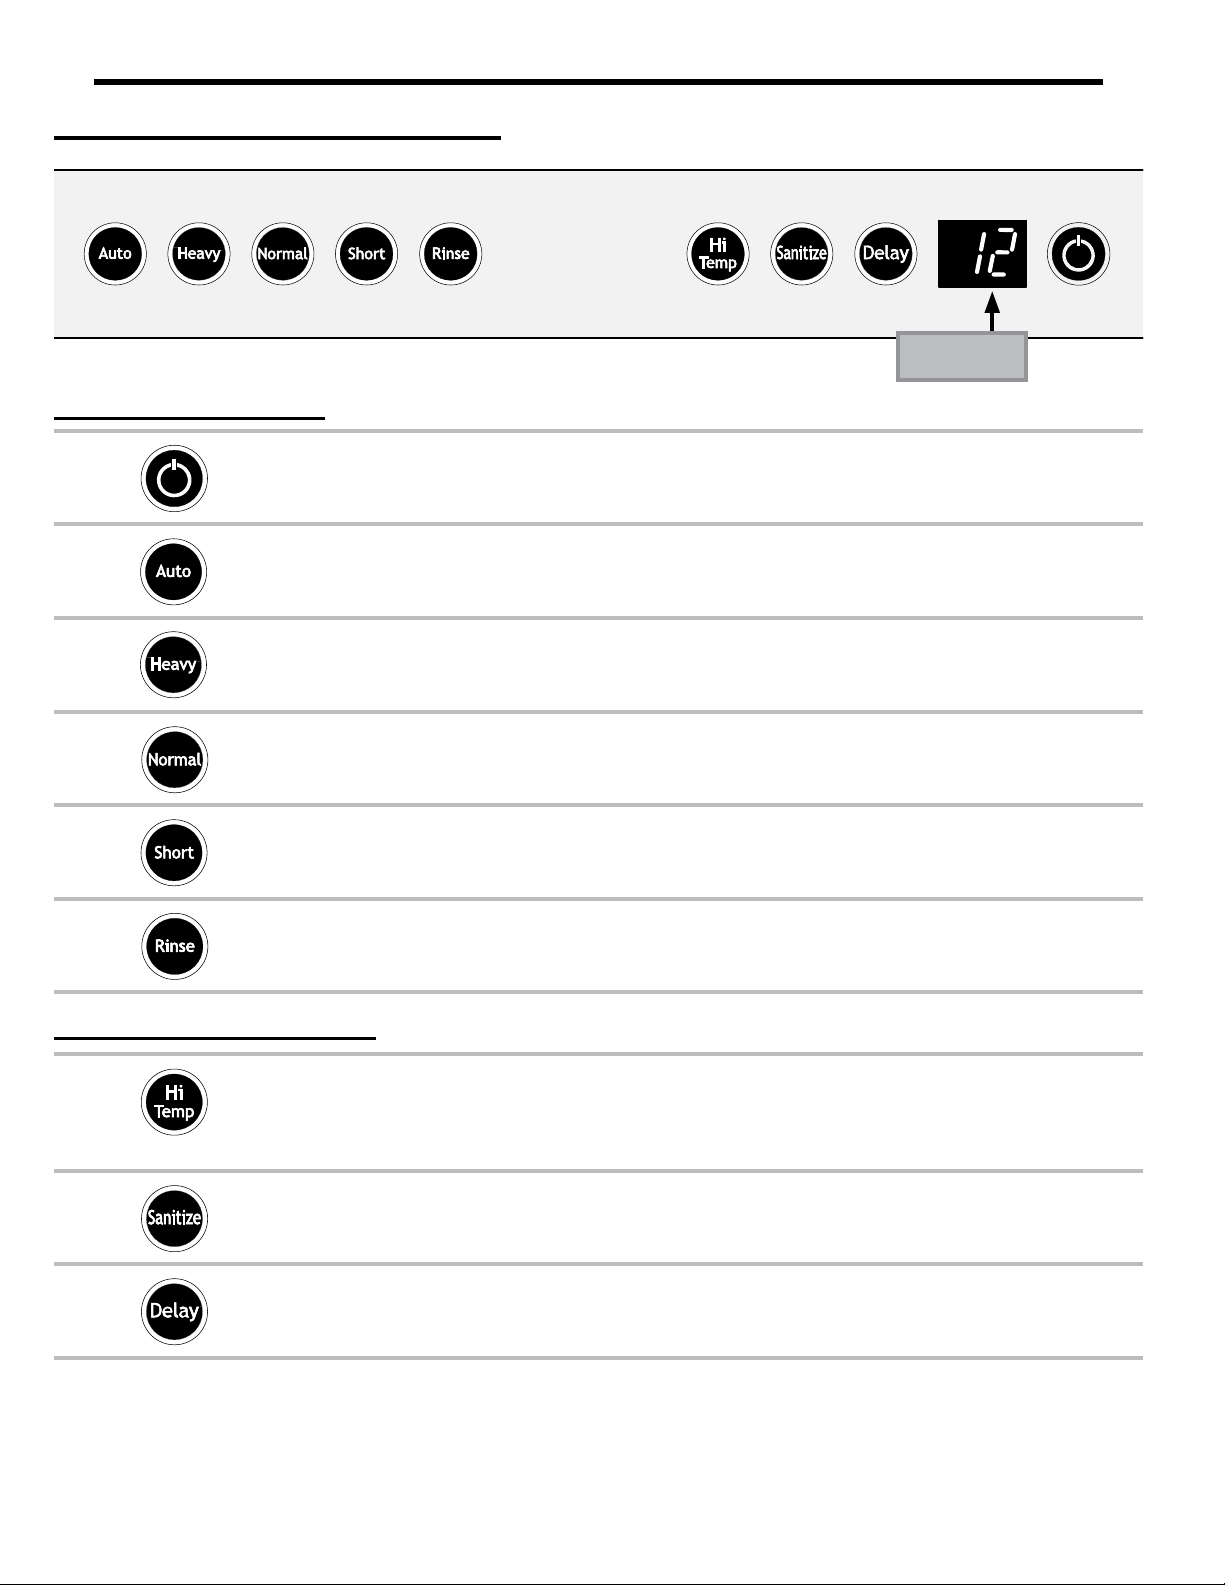
parts of the Control panel
DisplayDisplay
Wash Cycle Buttons
START/STOP button. Use this button to start the dishwasher after selecting a wash
cycle or the rinse cycle (see page xx). It can also be used to pause the dishwasher in
the middle of a wash or rinse cycle (see page xx).
The Auto-Wash setting senses the size of the load and the amount of soil, then auto-
matically selects the best wash cycle to clean the dishes and cookware properly. It takes
about 72 to 96 minutes to run.
The Heavy wash setting is best for very dirty tableware and cookware. It takes about 90
to 96 minutes to run.
The Normal wash setting is best for normal soil on dishes and silverware. It takes about
78 to 96 minutes to run.
The Short wash setting is best for lightly soiled or pre-rinsed dishes and silverware. It
is also good for lightly soiled items that have been pre-rinsed. It takes about 72 to 90
minutes to run.
Press the Rinse button if you want to run the rinse portion of the cycle only. The dry
cycle will not run. Also, use this setting to rinse tableware that you do not want to wash
right away. Cycle time is about 20 minutes.
Special Feature Buttons
When the Hi-Temp feature is selected, the water is heated to about 140°F (60°C) during
the wash portion of the cycle. Washing at a higher temperature helps the detergent dissolve grease and grime better and the dishes dry more efficiently. It can be selected with
any wash cycle, but not Rinse.
The Sanitize feature rinses the dishware with rinse water heated to a temperature of
155°F (68°C) for maximum sanitization and drying (see page xx). It can be selected with
any wash cycle, but not Rinse.
The Delay start feature allows you to set the dishwasher to start at a later time (see
page XX).
6
Page 9
GettinG to Know yoUr Dishwasher
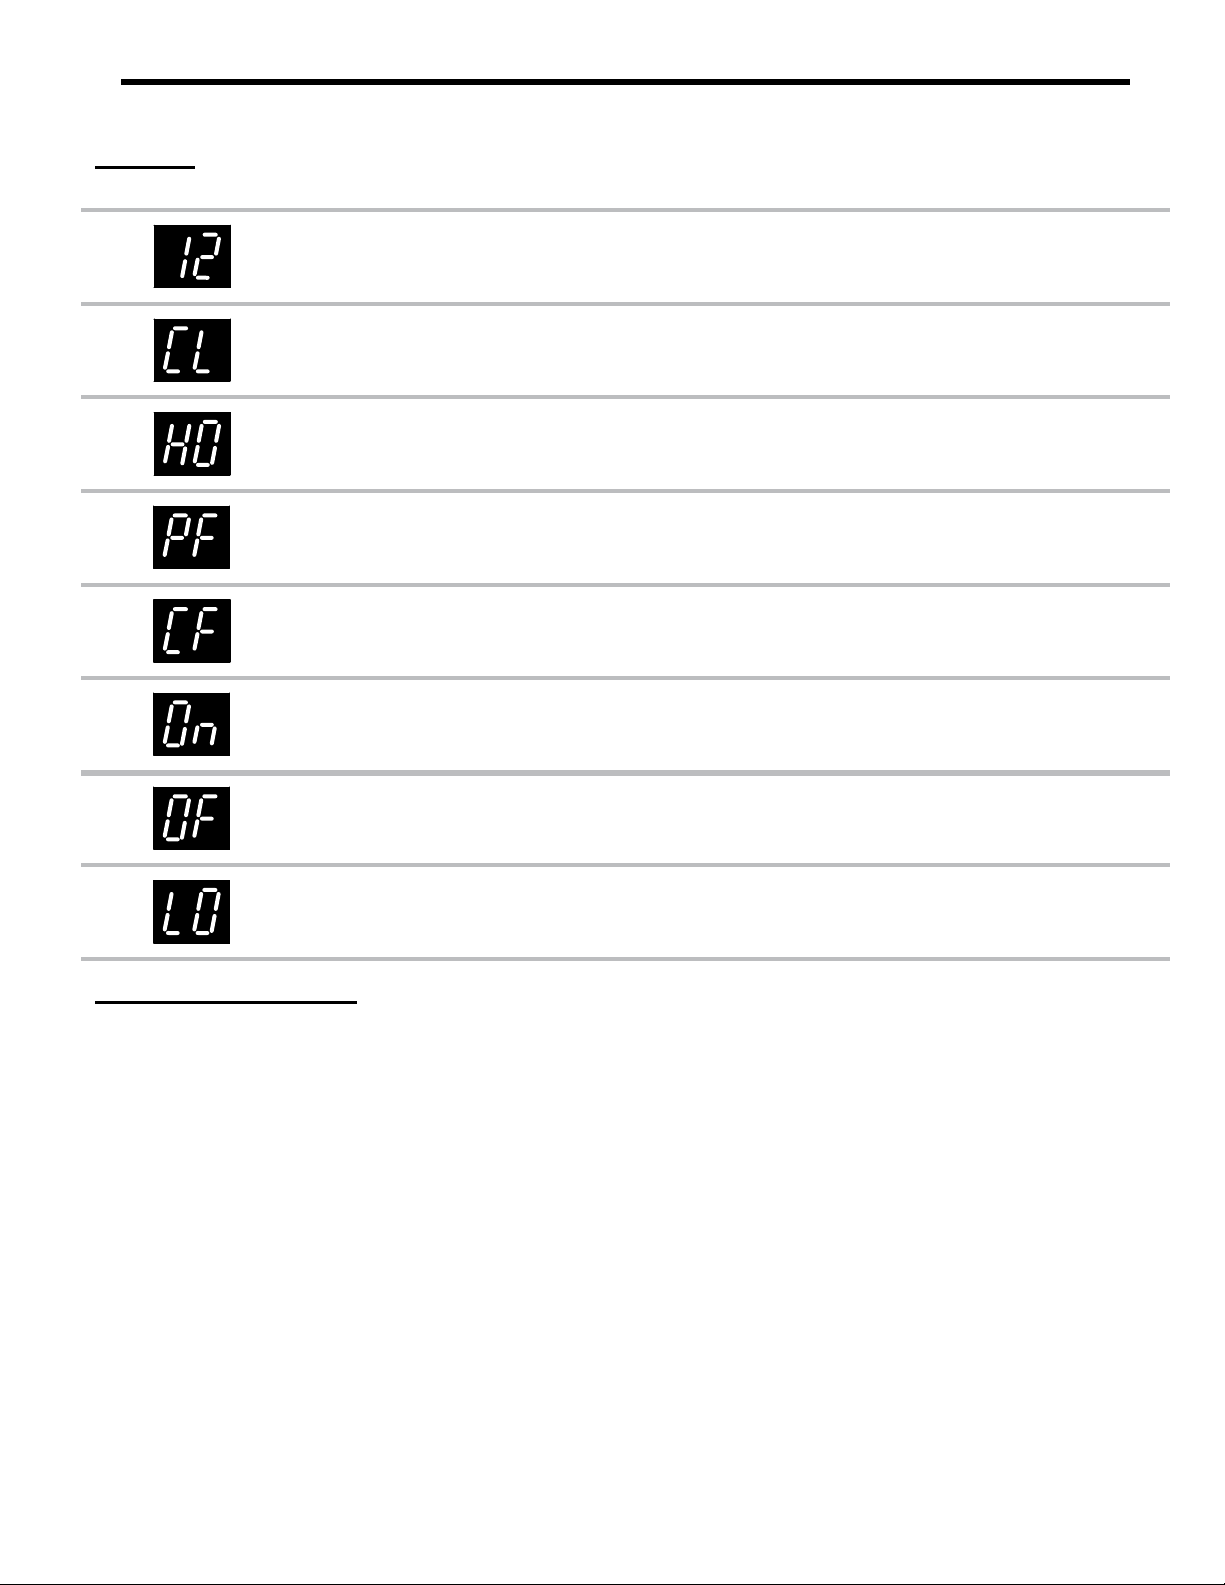
Display
The following symbols appear on the display during normal operation:
When the display shows a number between 1 and 24, it indicates the number of hours
before the dishwasher will start because the DELAY START feature is in use.
Stands for
and that you need to close the door to continue operation.
Stands tor HOT. Means that the water is heating in preparation for Hi-Temp or Sanitize
operations.
Stands for POWER FAIL. Means that power to the appliance has been interrupted. It
also appears when dishwasher is first installed. Push START/CANCEL to clear the dis-
play.
Stands for CLEAN FILTER. Means that you need to remove and clean the filters. Once
the filter is cleaned and replaced, the dishwasher will continue normal operation. (See
Cleaning and Maintenance, page xx.)
Chime feature is activated. Push the
the chime on and off.
Appears when the rinse aid level is
Chime feature is de-activated. Push the Short and Rinse buttons at the same time to
turn the chime on and off.
CLOSE. It means that a wash or rinse cycle has been started or is progress
Short and Rinse buttons at the same time to turn
LOW. Add rinse aid. (See Rinse Aid, page xx.)
Additional Features
Chime A chime sounds to confirm that you have selected a wash cycle on the control panel.
The chime also sounds when the cycle is complete.
Removable Utensil Self You dishwasher is equipped with a special removable self used to hold utensils during
the wash cycle. See page xx.
Turbidity Sensor: Automatically decreases or increases the wash and rinse time, as well as water usage,
for more consistent cleaning, and energy savings.
Temperature Sensor System: Continuously monitors and controls water temperature.
7
Page 10

9
loaDinG yoUr Dishwasher
WARNING
To avoid injury, load all sharp or pointed objects with the
handles up.
IMPORTANT: If the load will sit for a while before washing, run
the rinse cycle. Doing so will reduce the chance of food hardening
or staining and damaging your dishware and utensils.
What Can Be Washed
Items that you can safely wash in your dishwasher:
Aluminum (except for disposables)
•
China (except delicate china)
•
Cookware with non-stick coatings
•
Crystal (except antique crystal)
•
Glass
•
Plastic (dishwasher safe only)
•
Silver and silver plate
•
Stainless Steel
•
Stoneware
•
What Should Not Be Washed
For safety reasons, and to prevent damage, do not
wash the following items in your dishwasher:
Antique crystal
•
Brass
•
Bronze
•
Cast iron
•
Delicate china
•
Disposable aluminum
•
Disposable plastic items
•
Flatware with bonded handles
•
Gold
•
Pewter
•
Sharp kitchen carving knives
•
Tin
•
Wood
•
The Silverware Basket
Load the silverware basket first. Put it in the bottom rack near the
front, between the tines, as shown. You can load the silverware
basket while it is in the rack or you can load it before putting it in
place.
Open the hinged covers to load silverware and utensils.
IMPORTANT:
For the best results do not nest utensils.
•
Do not load silver next to stainless steel. Damage to the silver
•
may result.
To prevent small, light items from falling out of the rack
when sprayed with water:
Put small items, like corn cob holders, baby bottle caps, etc.
•
into a compartment and close the hinged cover.
IMPORTANT:
It is best to place sharp objects in the silverware basket to
•
prevent damage to the rack coating.
The spray arms must spin freely. Do not allow items sticking out
•
of the racks to block them. Raise the top rack to prevent objects
on the bottom rack from blocking the middle spray arm (see
below).
Do not load cookie sheets and large platters in the front of the
•
bottom rack. Doing so will prevent water from dissolving the
detergent in the detergent dispenser.
After loading, push in firmly on the top rack. If you do not push
•
the top rack completely into place, the middle spray arm will not
work properly.
Before You Load the Racks
Before loading the racks, scrape off leftover food items, and nonfood items like toothpicks and napkins.
Empty liquids in glasses, cups, and pitchers into the sink.
Adjusting the Top Rack
If there are large items in the bottom rack that could interfere with
the middle spray arm, move the top rack to the high position.
Otherwise, put the top rack in the low position.
To move the top rack from the low position to the high
position:
Grasp both sides of the rack and pull up until it stops.
•
Let go of the rack. It will rest in the high position.
•
To move the top rack from the high position to the low
position:
Grasp both sides of the rack and pull up until it stops. The
•
leveling mechanism will release.
Gently lower the rack to the low position.
•
During Loading
Always use the top rack for delicate items, such as glassware.
•
Damage may occur if you put delicate items in the bottom rack.
Large knives and utensils can be put in the removable utensil
•
shelf or the fold down shelves on the sides of the top rack. To
insert the removable utensil shelf, fit the hooks on the ends over
the bars on the front and back of the top rack.
Always load large or heavy items (such as pots, pans, and large
•
dishware) in the bottom rack.
Do not stack dishes, glasses, or pots and pans. Stacking will
•
prevent water from getting to soiled surfaces.
Load all items so that the open ends face down as much as
•
possible. Good drainage provides the best drying. It is not
necessary to rinse objects before loading them.
To minimize breakage and chipping, secure all glassware and
•
other breakables in the tines. Do not allow fragile items to touch
each other.
You may lower the tines, if necessary, to allow you to fit large
•
or bulky items into a rack. To lower a set of tines, pull up and
swivel to the side.
To minimize noise, do not allow pots and pans to touch and
•
keep large items from touching the sides of your dishwasher.
Loading the Racks
8
Page 11

loaDinG yoUr Dishwasher
The Detergent Dispenser
IMPORTANT:
Do not use hand dishwashing detergents. They will create
•
excessive foaming that interferes with proper operation.
To make sure the detergent dissolves properly, fill the detergent
•
dispenser just prior to starting your dishwasher. Detergent will
harden if it sits too long.
Store dry detergent in a cool dry place to prevent caking.
•
Use a liquid rinse aid for best results (See page xx).
•
The detergent dispenser has 3 compartments: The pre-wash
compartment on the outside lid, and 2 in the main wash
compartment. It dose not matter which main wash cup you load
first.
The pre-wash compartment empties into the dishwasher when the
door is closed. The main wash compartment releases detergent
automatically during the main wash cycle.
To Fill the Detergent Dispenser:
If the detergent dispenser lid is closed, press the release
1.
button to open it.
See the table below for the amount of detergent to use in the
2.
main wash cup. The amount of detergent required depends
on the hardness of the water in your area. Harder water
requires more detergent. Water hardness is measured in
grains per gallon (gpg). Do not use too little detergent for your
water hardness. Doing so can cause poorly cleaned dishes,
filming, or spotting. If you use too much detergent, you can
cause a permanent film called etching. To find out the water
hardness in your area, contact your water company.
Detergent Required
Detergent Required
Soft Water
Soft Water
(0-3 gpg)
(0-3 gpg)
2 teaspoons
2 teaspoons
After loading the main wash compartment, close the
3.
dispenser lid.
Fill the pre-wash cup (on the lid) to the top.
4.
Close the door.
5.
Medium
Medium
(4-8 gpg)
(4-8 gpg)
5 teaspoons 8 teaspoons
5 teaspoons 8 teaspoons
Hard Water
Hard Water
(9-12 gpg)
(9-12 gpg)
Very Hard Water
Very Hard Water
(12 gpg or more)
(12 gpg or more)
Fill main wash
Fill main wash
cup completely
cup completely
Adjusting the Rinse Aid Dispenser) at all times.
A rinse aid containing citric acid may be used to remove the white
or gray film caused by very hard water.
The rinse aid indicator on the dispenser turns dark when full and
clear when it is time to refill. Also, the display will have LO on it at
the end of the dishwashing cycle when it is time to refill.
To refill the rinse aid dispenser:
Turn the rinse aid cap counterclockwise 1/4 turn and lift it out.
1.
Slowly pour the rinse aid into the filler hole until the indicator
2.
turns dark. Do not overfill.
Wipe up any spillage with a damp rag.
3.
Replace the rinse aid cap and turn it clockwise to the closed
4.
position.
Adjusting the Rinse Aid Dispenser
The rinse aid dispenser must be properly adjusted. Too little rinse
aid will allow spotting and drying problems. Too much rinse aid will
cause foaming and streaking.
The rinse aid setting is located under the rinse aid cap.
To change the setting:
Remove the rinse aid cap.
1.
If you have spotty or improperly dried dishes, move the rinse
2.
aid setting a little higher. If you have streaks on your dishes,
move the rinse aid setting a little lower. The harder the water,
the more rinse aid required for acceptable results.
Replace the cap.
3.
Check the dishes after the next wash load. Continue
4.
adjusting the rinse aid dispenser up or down according to the
guidelines above until you have spot free, streak free, dry
dishes.
If you have very soft water and still experience streaking when the
dispenser is set to 1, you can dilute the rinse aid with water before
pouring it into the dispenser to get acceptable results.
If you have very hard water:
Detergent alone may not be enough for water hardness above 12.
For maximum cleanness you may need to use a water softener.
Or you may add additional detergent about 20 minutes after
starting your dishwasher. As a rule, add 1 teaspoon for each grain
above 12.
Open the door. The dishwasher will stop operating.
1.
Wait a moment for the steam to clear.
2.
Without touching any of the hot surfaces or racks, pour
3.
additional dishwashing detergent into the bottom of the
dishwashing tub.
Close the door. Push on the door handle to make sure that
4.
the door is completely shut. After a short pause, operation will
resume.
The Rinse Aid Dispenser
Rinse aid is important to the drying process of the dishware. Its
sheeting action also reduces spotting. Dacor recommends that
you keep the rinse aid dispenser full and properly adjusted (see
9
Page 12

11
loaDinG yoUr Dishwasher
10
Page 13

loaDinG yoUr Dishwasher
11
Page 14

13
operatinG yoUr Dishwasher
CAUTION
If the dishwasher drain line is connected to a garbage disposal,
run the disposal and make sure it is completely empty before
starting the dishwasher.
Starting Your Dishwasher
IMPORTANT: See the Getting to Know Your Dishwasher section
for a description of the various wash settings.
To wash or rinse the dishes:
Make sure you have loaded the dishwasher and that the
1.
detergent and rinse aid dispensers are filled according to the
previous pages.
For best operation, clear the house pipes of cold water by
2.
running a nearby faucet until the water is hot.
Open the door.
3.
Press one of the wash cycle buttons or the Rinse button on
4.
the control panel until it lights.
Press START/CANCEL. The START/CANCEL button will
5.
light and the display will show CL (meaning “close the door”).
Close the door.
6.
Push on the door handle to make sure that the door is
7.
completely shut. After a brief pause, the dishwasher will start.
When the wash or rinse cycle is completed, the chime will
8.
sound.
While the dishwasher is operating:
The dishwasher starts each cycle by draining any water at the
•
bottom of the wash tub.
You may hear the bottom of the tub fill with clean water and the
•
pulsating sound of water spraying on the dishes and the tub
walls.
The number of tub drains and fills and the amount of spraying
•
depends on the wash or rinse cycle selected. The dishwasher
may appear to pause from time to time while it is heating water
to a higher temperature.
During the wash/rinse cycle, the control panel buttons are not
•
lit.
If you open the door during the wash cycle, the dishwasher will
•
stop operating. When you close the door, it will continue with
the current cycle until it is done.
Adding a Dish After You Start
You can add a dish, if needed, after starting your dishwasher.
Dacor recommends that you only add items during the first 5
minutes of operation to make sure they get clean.
To add a dish:
Open the door. The dishwasher will stop operating.
1.
Wait a moment for the steam to clear.
2.
Without touching any of the hot surfaces or racks, insert
3.
the item into one of the racks, following normal loading
instructions.
Close the door.
4.
Push on the door handle to make sure that the door is
5.
completely shut. After a short pause, operation will resume.
Stopping Your Dishwasher During
Operation
To stop the current cycle and drain your
dishwasher:
1.
Open the door. The dishwasher will stop operating.
2.
Press START/CANCEL.
3.
Close the door. After a short pause, you will hear the water in
the dishwasher begin to drain. Once the water is drained, the
dishwasher will turn off.
The Hi-Temp Feature
If you want wash at a high temperature for maximum
grease and grime removal:
1.
Open the door.
2.
Press one of the wash cycle buttons on the control panel.
3.
Press Hi-Temp. The Hi-Temp button will light (Pressing Hi-
Temp a second time will turn it off again).
4.
Press START/CANCEL.
5.
Close the door. After a short pause, the dishwasher will start.
IMPORTANT: Hi-Temp cannot be selected with the Rinse cycle.
NOTES:
•
The Hi-Temp feature may increase the wash cycle time.
•
HO may appear on the display while the dishwasher heats the
water for the high temperature wash.
•
The Sanitize feature may also be selected by pushing the
Sanitize button before pushing START/CANCEL.
The Sanitize Feature
If you want a high temperature rinse after the wash
cycle for maximum sanitization:
1.
Open the door.
2.
Press one of the wash cycle buttons on the control panel.
3.
Press Sanitize. The Sanitize button will light (Pressing
Sanitize a second time will turn it off again).
4.
Press START/CANCEL.
5.
Close the door. After a short pause, the dishwasher will start.
IMPORTANT: Sanitize cannot be selected with the Rinse cycle.
NOTE:
•
The Sanitize feature increases the wash cycle time.
•
will appear on the display while the dishwasher heats the
HO
water for the high temperature rinse.
•
The Hi-Temp feature may also be selected by pushing the Hi-
Temp button before pushing START/CANCEL.
The Delay Feature
To set your dishwasher to start automatically at a later
time:
1.
Press one of the wash cycle buttons or the rinse button
2.
If you have selected a wash cycle, you may push the
Hi-Temp
temperature or maximum sanitization.
3.
Repeatedly press the Delay button until the number of hours
you want to delay operation appears on the display. You can
delay the start of your dishwasher up to 24 hours.
12
or Sanitize feature buttons for higher wash
Page 15

operatinG yoUr Dishwasher
After you select the delay time, press START/CANCEL.
4.
Close the door. The dishwasher will start after the selected
5.
number of hours.
To cancel the delay function:
Open the door.
1.
Push START/CANCEL once to make the dishwasher start
2.
when you close the door. Push START/CANCEL twice to turn
the dishwasher all the way off.
The Cycle Memory Feature
Your dishwasher remembers the settings for the last cycle it ran.
If you want your dishwasher to run the same cycle as it
ran the previous time:
Open the door.
1.
Press the START/CANCEL button (without pushing a wash/
2.
rinse cycle button first). The numeric display will show CL
telling you to close the door.
Close the door.
3.
Push on the door handle to make sure that the door is
4.
completely shut. After a brief pause, the dishwasher will begin
to operate.
NOTE: If the delay feature was used during the previous cycle,
your dishwasher will start after the number of hours originally
selected.
Turning the Chime On or Off
To turn the chime on or off:
Open the door.
1.
Push the Short and Rinse buttons at the same time.
2.
OF will appear on the display when you turn the chime off.
On will appear on the display when you turn the chime back
on.
Close the door.
3.
13
Page 16

15
operatinG yoUr Dishwasher
14
Page 17

operatinG yoUr Dishwasher
15
Page 18

17
CleaninG anD MaintenanCe
CAUTION
Exercise caution when cleaning around the control panel area.
Do not use spray cleaners of any kind on these surfaces.
Cleaning the Interior Surfaces
The dishwashing tub of your Dacor dishwasher is constructed of
•
high quality stainless steel. It remains clean during normal use.
The control panel, the racks, and areas where food particles
•
may become lodged, may be wiped clean, if necessary, with a
soft damp rag.
Food particles on the silverware basket can be rinsed clean
•
under a faucet with warm water.
Filters and Strainer Baskets
CAUTION
Do not operate the dishwasher without the strainer and the two
filters in place. The strainer and filter system is designed to
keep large food particles out of the mechanical parts.
Clean the filters and strainer periodically to keep your dishwasher
working efficiently. When the filters begin to clog, CF will appear
on the display. This warning indicates that the filters need to be
cleaned immediately.
To clean the filters:
Remove the strainer and small particle filter by turning the
1.
handle counterclockwise and lifting it straight up (see page
xx).
Push in on the tab on the strainer to remove it.
2.
Lift out the medium particle filter out of the floor of the wash
3.
tub.
Rinse off and clean the filters and strainer in the kitchen sink
4.
with a soft sponge and mild kitchen detergent under warm
water.
sink and can be inspected by removing the cover. To inspect the
drain air gap:
•
Remove the cover.
•
Check to make sure it is clean.
NOTE: The drain air gap is not part of your dishwasher and is not
covered by the warranty.
Winter Care
CAUTION
Freezing temperatures may cause water lines to rupture. To
avoid damage to the dishwasher and it’s surroundings make
sure all water lines to and within the dishwasher are protected.
To protect it from damage caused by freezing, winterize a
dishwasher left in an unheated place during cold weather.
NOTE: Only a qualified person should do the following.
To Disconnect Service:
Turn off electrical power to the dishwasher at the supply
1.
source by removing fuses or turning off the circuit breaker.
Shut off the water supply.
2.
Place a pan under the inlet valve. Disconnect the water line
3.
from the inlet valve and drain the water into a pan.
Disconnect the drain line from the pump and drain the water
4.
into a pan.
To Restore Service:
Reconnect the water, drain, and electrical power supply.
1.
Turn on the water and electrical power supply.
2.
Fill both detergent cups and run the dishwasher through a
3.
HEAVY WASH cycle.
See your installation instructions for more details.
To replace the filter system:
Put the medium particle filter on the floor of the tub. Fit it into
1.
the dimpled area.
Reconnect the strainer to the top of the small particle filter.
2.
Put the small particle filter and strainer into the hole in the
3.
bottom of the tub. Tighten clockwise.
Cleaning the Exterior Surfaces
CAUTION
Always wipe stainless steel surfaces with the grain.
Clean exterior surfaces with a solution of mild detergent and
•
warm water using the soft side of a sponge. Rinse and dry with
a soft, lint-free cloth.
You may also use Dacor Stainless Steel Cleaner on stainless
•
steel surfaces. Use it according to the directions on the
package.
Drain Air Gap
Some local building codes require the dishwasher to have a
drain air gap installed on the drain line. A drain air gap is usually
mounted on top of the sink. If it becomes plugged or dirty, the
dishwasher will not drain properly. Check it every time you clean
the filter and strainer. A drain air gap is usually mounted on the
16
Page 19

CleaninG anD MaintenanCe
17
Page 20

19
CleaninG anD MaintenanCe
18
Page 21

Before yoU Call for serviCe
proBleM solUtion GUiDe
Problem May be caused by What to do
Display: Unusual symbol
appears.
Spotting and filming Hard water Use maximum recommended amount of dishwasher
See Display section, page xx
detergent.
You may need a home water softener.
To remove hard water spots, try a vinegar rinse:
Wash and rinse load as usual.
•
Remove all metal items from dishwasher. Do not add
•
detergent.
Pour two cups of vinegar into a bowl and set it on bottom
•
rack.
Run dishes through an entire wash program. If the
•
vinegar rinse does not work, repeat process substituting
¼ cup of citric acid crystals (available at most drug stores)
for the vinegar.
Wiping metal items with a damp cloth should remove spots.
For sterling and silver plated flatware, rub with a towel, or
use a good cream silver polish.
Garbage disposal or sink trap full Run garbage disposal to eliminate food and obstructions in
sink. Make sure sink drains properly.
No rinse aid Make sure rinse aid dispenser is full.
Water not hot enough Check hot water supply temperature. Minimum
recommended incoming temperature to the dishwasher is
120ºF.
Too little water Make sure water valve is fully open. Make sure that water
pressure is between 20 and 120psi and flow rate is a
minimum of 1.0 gpm.
Incorrect use of dishwasher
detergent
Items not loaded properly or
overloaded
Spray arms do not rotate properly Make sure that both spray arms rotate freely. Make sure that
Strainer blocked Check strainer. Clean if necessary.
Excessive foam in machine Use only “dishwasher” detergent.
Flatware incorrectly loaded Make sure items are not nested (see page xx).
Use only correct amount of dishwasher detergent according
to water hardness (see page xx) and the wash program
selected. Fill dispenser only when ready to start the
dishwasher. Do not use old or caked detergent. Store
dishwasher detergent in dry place and in a closed container.
Change the dishwasher detergent if results are still poor.
Make sure dishwasher is loaded according to instructions
(see page xx). Do not overload. Make sure spray can reach
all soiled surfaces.
items do not obstruct movement of spray arms. If necessary,
clear any obstructions
Make sure holes in spray arms are not blocked. If
necessary, clear holes with a pointed object and rinse under
water.
Too much rinse aid in final rinse cycle. Adjust rinse aid
dispenser (see page xx).
Small particles deposited on
items
Spray arms do not rotate properly Make sure that both spray arms rotate freely. Make sure that
items do not obstruct movement of spray arms. If necessary,
clear any obstructions
Make sure holes in spray arms are not blocked. If
necessary, clear holes with a pointed object and rinse under
water.
19
Page 22

21
Before yoU Call for serviCe
Problem may be caused by What to do
Small particles deposited on
items (cont.)
Incorrect detergent use Use only correct amount of dishwasher detergent according
to water hardness (see page xx) and the wash program
selected. Fill dispenser only when ready to start the
dishwasher. Do not use old or caked detergent. Store
dishwasher detergent in dry place and in a closed container.
Change the dishwasher detergent if results are still poor.
Filter system Make sure filter system is clean and properly installed.
Low water pressure Check that water valve is fully open. Make sure water
pressure is between 20 and 120psi and flow rate is 1.0 gpm
minimum.
Water not hot enough Check hot water supply temperature. Minimum
recommended incoming temperature to the dishwasher is
120ºF.
Items not loaded properly or
overloaded
Incorrect wash cycle selected Select a wash cycle with a longer wash time.
Hard water See “Hard water” under Spotting and filming on page xx.
Make sure dishwasher is loaded according to instructions
(see page xx). Do not overload. Make sure spray can reach
all soiled surfaces.
Detergent left in detergent
compartment
Chipping or breaking of
glassware
Unusual noise Improper loading Utensils may not be secure or something small may have
Water in bottom of dishwasher
tub near filters.
Dishwasher does not drain
Properly
Detergent dispenser lid not
opening
Old detergent Do not use detergent that is hard or caked in the box. Use
Spray arms do not rotate properly Make sure that both spray arms rotate freely. Make sure that
Cycle not complete Close door, wait for cycle to complete.
Improper loading Do not overload. Load between rack prongs, not over them.
Dishwashing cycle not complete Close door. Allow cycle to finish.
Some water in strainer is normal Some water in strainer portion of filter at end of cycle is
See “Dishwasher does not drain
Properly” below
Air gap plugged Be sure the air gap is not blocked or plugged. The air gap
Drain hose kinked Check drain hoses. Make sure they are not kinked.
Filter(s) clogged Check and clean filter(s) if necessary. See page xx.
The lid may not be opening. Check for items blocking it.
only fresh detergent. Add detergent to dishwasher just
before starting it.
items do not obstruct movement of spray arms. If necessary,
clear any obstructions. Make sure top rack is pushed in all
the way so that spray arm on rack connects to nozzle on
back wall.
Make sure holes in spray arms are not blocked. If
necessary, clear holes with a pointed object and rinse under
water.
Glasses loaded over prongs will not be supported and may
chip or break. Always use the top rack for delicate items.
Dacor recommends that you wash fine china and crystal by
hand.
dropped from the rack. Water may cause utensils to rattle.
Make sure dishware is secure.
normal.
is a vent located on top of the sink. It is connected to the
dishwasher. It is required by some local codes.
20
Page 23

Before yoU Call for serviCe
proBleM solUtion GUiDe (ContinUeD)
Problem may be caused by What to do
Water backs up in sink when
dishwasher drains
Dishwasher won’t run Blown fuse or tripped circuit
Distortion of plastics Plastic item(s) not dishwasher safe Do not wash plastic items that are not labeled “dishwasher
Delay feature will not work Door not closed completely Push firmly in on door handle until it “clicks”.
Dishes not dry No rinse aid Fill rinse aid dispenser. Rinse aid helps dishes to dry faster.
Cycle takes a long time Cycle may be in water heating
Dishwasher has an undesirable
odor
Marks and Discoloration Aluminum utensils rubbing against
Yellow or brown marks Iron or manganese in water To remove spots, use a non-abrasive cleaner.
Garbage disposal or sink trap full Run garbage disposal to eliminate food and obstructions in
sink. Make sure sink drains properly.
Replace fuse or reset circuit breaker. Remove other
breaker
Door not completely closed. Push in on door handle until you hear a click.
Controls not set Make sure dishwasher is on (see page xx)
Delay feature is on Wait for cycle to start (see page xx) or push the START/
Water supply off Check water supply valve. Turn on if necessary.
Dishwasher not connected to
power.
Water supply line kinked. Make sure water inlet hose is not kinked.
No water in system Add 1/2 cup of water to bottom of the wash tub and start
Plastic items Certain plastic materials are difficult to dry. Plastics may
Improper loading or unloading Do not overload or nest items. Load according to
Water not hot enough Dishes washed with the Sanitize setting will dry the fastest.
Dry cycle interrupted Door opened too soon. Make sure dry portion of cycle is
Concave bottom cups Cups with a concave bottom will collect water.
delay
Delay feature is on Wait for cycle to start (see page xx) or push the START/
Sanitize feature is on Wait for Sanitize cycle to complete or push START/
Dirty dishes left in dishwasher too
long
Standing water in bottom of wash
tub
items during wash cycle
Washing copper with sterling silver Yellow film on sterling silver results when you wash copper
Tea or coffee (tannic acid) stains Remove tea or coffee stains by hand using a solution of ½
appliances from the circuit.
CANCEL button.
Have installer connect the dishwasher to electric power
according to the installation instructions.
again.
safe”.
need to be towel dried.
instructions. See page xx.
complete before opening door.
Wait for water to heat
CANCEL button.
CANCEL button.
Run rinse or wash cycle.
See water in bottom of dishwasher tub on page xx.
Be sure aluminum utensils, especially light weight, foil-type
pans, do not touch dishes.
Temporary solution: Pour a teaspoon to tablespoon of
citric acid crystals in place of the pre-wash detergent in
the detergent dispenser. Follow this pre-wash with a full
detergent wash. Use the heavy wash program.
Permanent solution: Install an iron removal system in the
water supply.
utensils in same load. Silver polish will usually remove this
type of stain.
cup bleach and 3 cups warm water. (Do not use on sterling
silver or silver plate.)
21
Page 24

23
Before yoU Call for serviCe
Problem may be caused by What to do
Discoloration of stainless steel or
silver plate
Marks on melamine and plastics Pourous material Use special cleaner for plastic
Cloudy film on glassware etching of glass
Sanitize button light does not
come on at the end of cycle
when Sanitize feature is
selected.
Allowing salty or acidic foods to
remain on flatware can damage
them
Stainless steel contacting silver Direct contact to stainless steel can cause permanent
Too much detergent, especially in
soft water
Rinse aid used with soft water Set rinse aid levels to minimum.
Water not hot enough Check hot water supply temperature. Minimum
Rinse flatware that is to stand several hours before washing.
damage to silver. Put silver and stainless steel in different
silverware basket compartments.
Do not put stainless steel and silver flatware in the same
Clean stained items with silver polish.
Do not use abrasives on stainless steel or silver.
Do not use bleach or scouring powder on these materials.
To remove cloudy film, try a vinegar rinse:
Wash and rinse load as usual.
•
Remove all metal items from dishwasher. Do not add
•
detergent.
Pour two cups of vinegar into a bowl and set it on bottom
•
rack.
Run dishes through an entire wash program. If the
•
vinegar rinse does not work, repeat process substituting
¼ cup of citric acid crystals (available at most drug stores)
for the vinegar.
If vinegar or citric acid rinse does not remove film, the
cloudiness is “etching”. This is permanent. To prevent
etching, if you have soft water, try using only one teaspoon
of recommended dishwasher detergent.
Use a good quality dishwasher detergent and rinse-aid. Do
not overload dishwasher. Water should circulate freely to
assure adequate rinsing and draining.
recommended incoming temperature to the dishwasher is
120ºF.
22
Page 25

notes
23
Page 26

25
notes
24
Page 27

warranty & serviCe
Product Maintenance
Do not perform any maintenance other than that instructed in
the CLEANING AND MAINTENANCE section of this manual. A
qualified service technician should perform all other service.
Getting Help
Before you obtain service, please review the Before You Call
for Service section of this manual starting on page XX. If you
have performed the checks in the Problem Solution Guide and
the problem has not yet been remedied, please visit our website
or contact our Customer Service Team for a listing of Dacor
authorized service agents. Prior to requesting service, it is helpful
to be familiar with the warranty terms and conditions on this page.
Contact us through our web site at:
www.dacor.com
Dacor Customer Service:
Tel: (800) 793-0093
Fax: (626) 403-3130
Business Hours: 6:00 a.m. - 5:00 p.m. Pacific Time
You may also write us at:
Dacor Customer Service
1440 Bridge Gate Drive
Diamond Bar, CA 91765
At Dacor, we believe that our quality of service equals that of
our product. Should your experience with our service network
or product be different, please contact our Customer Service
Team and share your encounter with us. We will do our utmost to
resolve the situation for you and deliver on our Dacor promise.
If you need anything clarified, just let us know.
What Is Not Covered
Service calls to educate the customer in the proper use and
•
care of the product.
Failure of the product when used for commercial, business,
•
rental, or any application other than for residential consumer
use. Replacement of house fuses or fuse boxes, or resetting of
circuit breakers.
Damage to the product caused by accident, fire, flood, or other
•
acts of God.
Breakage, discoloration, or damage to glass, metal surfaces,
•
plastic components, trim, paint, or other cosmetic finish, caused
by improper usage or care, abuse, or neglect.
THE REMEDIES PROVIDED FOR IN THE ABOVE EXPRESS
WARRANTIES ARE THE SOLE AND EXCLUSIVE REMEDIES.
THEREFORE, NO OTHER EXPRESS WARRANTIES ARE
MADE, AND OUTSIDE THE FIFTY STATES OF THE UNITED
STATES, THE DISTRICT OF COLUMBIA, AND CANADA, ALL
IMPLIED WARRANTIES, INCLUDING BUT NOT LIMITED
TO, ANY IMPLIED WARRANTY OF MERCHANTABILITY OR
FITNESS FOR A PARTICULAR USE OR PURPOSE, ARE
LIMITED IN DURATION TO ONE YEAR FROM THE DATE OF
ORIGINAL PURCHASE. IN NO EVENT SHALL DACOR BE
LIABLE FOR INCIDENTAL EXPENSE OR CONSEQUENTIAL
DAMAGES. NO WARRANTIES, EXPRESS OR IMPLIED, ARE
MADE TO ANY BUYER FOR RESALE.
Some states do not allow limitations on how long an implied
warranty lasts, or do not allow the exclusion or limitation of
inconsequential damages, so the above limitations or exclusions
may not apply to you. This warranty gives you specific legal rights,
and you may also have other rights that vary from state to state.
What Is Covered
CERTIFICATE OF WARRANTIES
DACOR DISHWASHERS
WITHIN THE FIFTY STATES OF THE U.S.A., THE
DISTRICT OF COLUMBIA, AND CANADA*:
FULL ONE-YEAR WARRANTY
If your DACOR product fails to function within one year of the
original date of purchase, due to a defect in material or workmanship, DACOR will remedy the defect without charge to you or
subsequent users. The owner must provide proof of purchase
upon request and have the appliance accessible for service.
TWENTY-FIVE YEAR WARRANTY
On rust-through of stainless steel tank and door.
* Warranty is null and void if non-CUL approved product is
transported from the U.S.L
OUTSIDE THE FIFTY STATES OF THE U.S.A., THE
DISTRICT OF COLUMBIA, AND CANADA:
LIMITED FIRST-YEAR WARRANTY
If your DACOR product fails to function within one year of
the original date of purchase, due to a defect in material or
workmanship, DACOR will furnish a new part, F.O.B. factory,
to replace the defective part. All delivery, installation, and labor
costs are the responsibility of the purchaser. The owner must
provide proof of purchase upon request and have the appliance
accessible for service.
25
Page 28

NO POSTAGE
NECESSARY
IF MAILED
IN THE
UNITED STATES
DACOR, INC.
ATTN: WARRANTY PROCESSING DEPT
1440 BRIDGE GATE DR STE 200
PO BOX 6532
DIAMOND BAR CA 91765-9861
BUSINESS REPLY MAIL
PERMIT NO. 4507
POSTAGE WILL BE PAID BY ADDRESSEE
FIRST-CLASS MAIL DIAMOND BAR CA
fold here
Page 29

Web Site: www.dacor.com
Corporate Phone: (800) 793-0093
WARRANTY INFORMATION
IMPORTANT:
Your warranty for this product CANNOT BE ACTIVATED until this form has been returned to Dacor. If you have
purchased more than one Dacor product, please return all forms in one envelope.
Please rest assured that under no conditions will Dacor sell your name or any of the information on this form for mailing list purposes. We
are very grateful that you have chosen Dacor products for your home and do not consider the sale of such information to be a proper way
of expressing our gratitude!
Place Serial Number Label Here
Your willingness to take a few seconds to fill in the section below will be sincerely appreciated. Thank you.
1. How were you first exposed to Dacor products? (Please check one only.)
A. T.V. Cooking Show F Builder
B. Magazine G. Architect/Designer
C. Appliance Dealer Showroom H. Another Dacor Owner
D. Kitchen Dealer Showroom I. Model Home
E. Home Show J. Other
2. Where did you buy your Dacor appliances?
A. Appliance Dealer D. Builder
B. Kitchen Dealer E. Other
C. Builder Supplier
3. For what purpose was the product purchased?
A. Replacement only C. New Home
B. Part of a Remodel D. Other
4. What is your household income?
A. Under $75,000 D. $150,000 – $200,000
B. $75,000 – $100,000 E. $200,000 – $250,000
C. $100,000 – $150,000 F. Over $250,000
5. What other brands of appliances do you have in your kitchen?
A. Cooktop C. Dishwasher
B. Oven D. Refrigerator
6. Would you buy or recommend another Dacor product?
Yes No
Comments:
Owner’s Name:
Street:
City: State: Zip:
Purchase Date: Email: Telephone:
Dealer:
City: State: Zip:
(Please Print or Type)
Last First Middle
cut here cut here
Please visit www.dacor.com to activate your warranty online.
Thank you very much for your assistance. The information you have
provided will be extremely valuable in helping us plan for the future
and giving you the support you deserve.
 Loading...