

Page 1
Use and Care Manual
42 Inch and 48 Inch
Built-in Refrigerators
For Use With Models:
EF42DBSS, EF42NBSS, EF48DBSS, EF48NBSS
IF42DBOL, IF42NBOL, IF48DBOL, IF48NBOL
Part No. 103674 Rev. B-1/W10159566
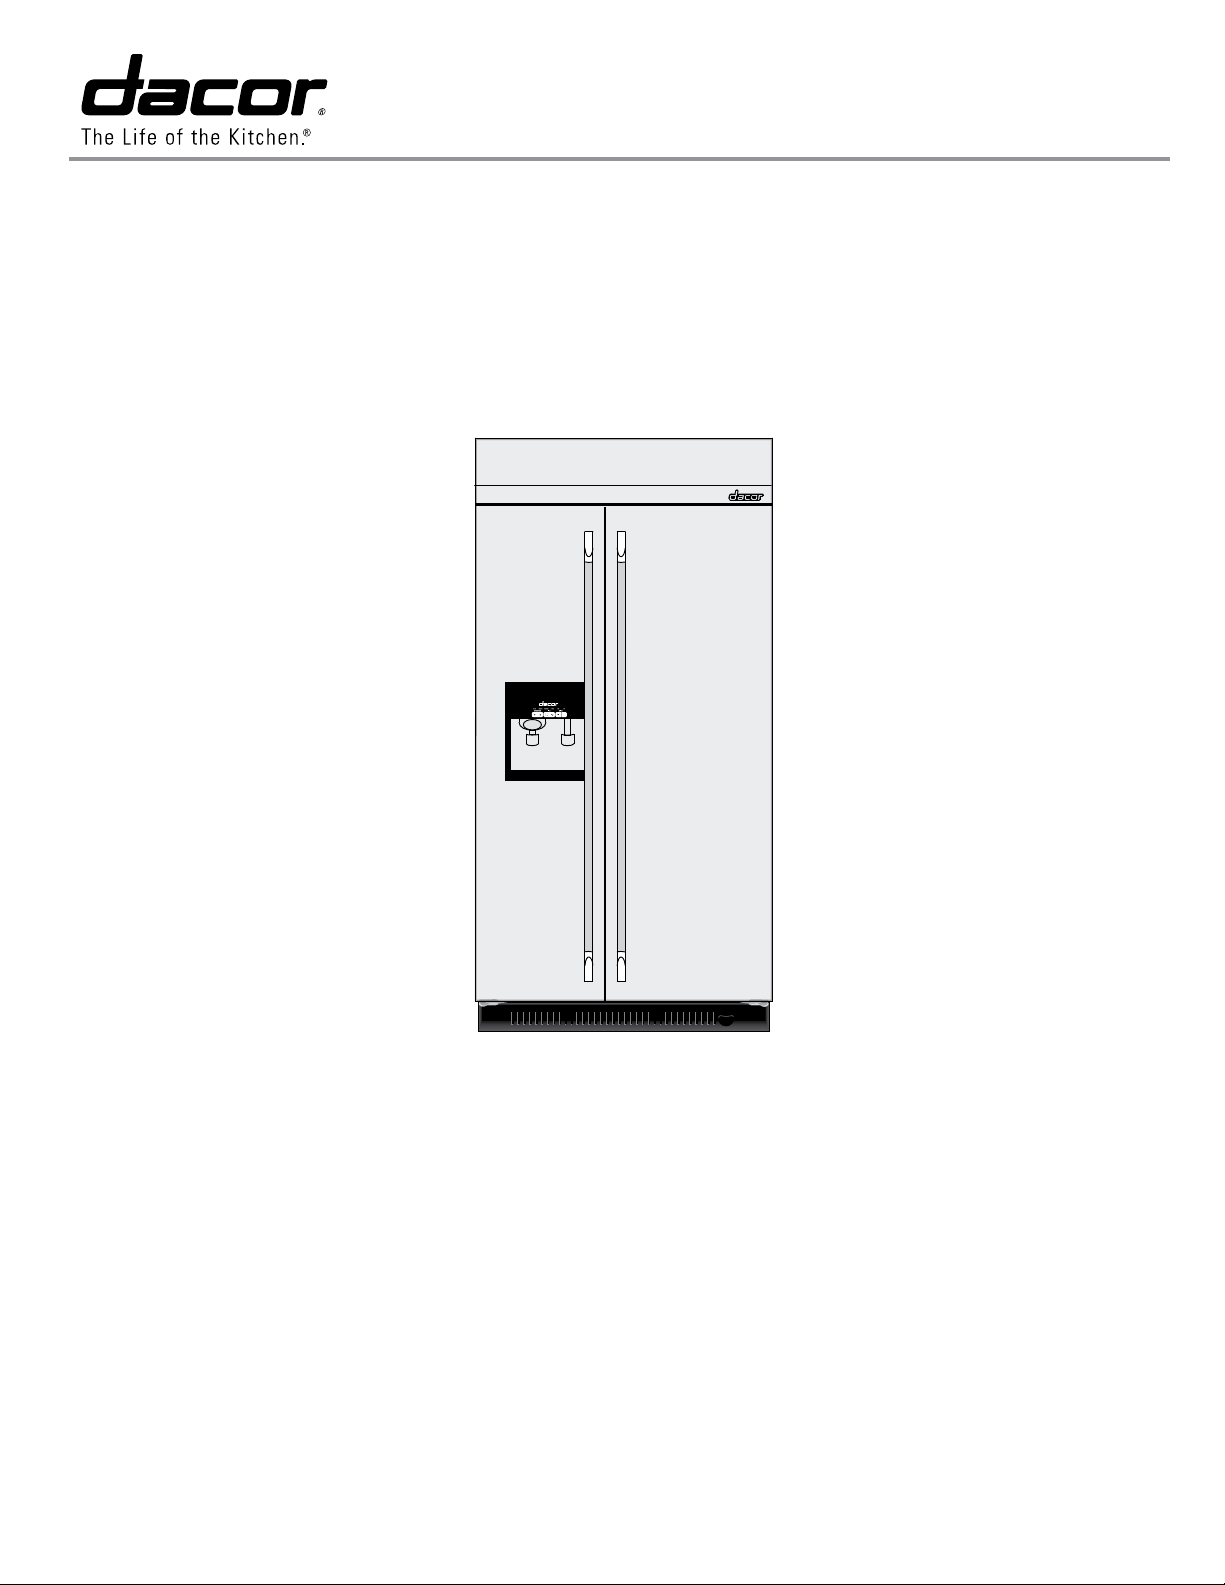
Style Varies
Model EF42DBSS Shown
Table of Contents
Important Safety Instructions ............................................1
Important Information .....................................................2
Model Identification .......................................................2
Before Use ....................................................................3
Refrigerator Operation .............................................. 3-12
Care and Cleaning ................................................. 13-14
Troubleshooting ...................................................... 15-17
Product Data Sheets .....................................................18
For CAV use only.
Warranty and Service ..................................................19
Notes ......................................................................... 20
Français............................................................... 21-44
No scheduled release date.
Page 2
To Our Valued Customer:
Congratulations on your purchase of the very latest in Dacor
®
products! Our unique combination of features, style and
performance make us The Life of the Kitchen
™
, and a great addition to your home.
In order to familiarize yourself with the controls, functions, and full potential of your new Distinctive Appliance, we
suggest that you thoroughly read this use and care manual, beginning with the Important Safety Instructions
section.
All Dacor appliances are designed and manufactured with quality and pride, while working within the framework of our
company value. Should you ever experience a problem with your product, please first check the Before You Call for
Service section of this manual for guidance. It provides useful suggestions and remedies prior to calling for service.
Valuable customer input helps us to continuously improve our products and services, so please feel free to contact
our Customer Service Team for assistance with any of your product support needs.
Dacor Customer Service Team
1440 Bridge Gate Drive
Diamond Bar, CA 91765
Telephone: (800) 793-0093
Fax: (626) 403-3130
Hours of Operation: Monday through Friday
6:00 A.M. to 5:00 P.M. Pacific Time
Web Site: www.Dacor.com
Thank you for choosing Dacor for your home. We are a company built by families for families and we are dedicated
to serving yours. We are confident that your new Dacor product will deliver a high level of performance and
enjoyment for many years to come.
Sincerely,
Cheryl Crowe
Director, Customer Satisfaction
© 2008 Dacor, all rights reserved
Page 3
Important Safety Instructions
You
can be killed or seriously injured if you don't
follow
WARNING
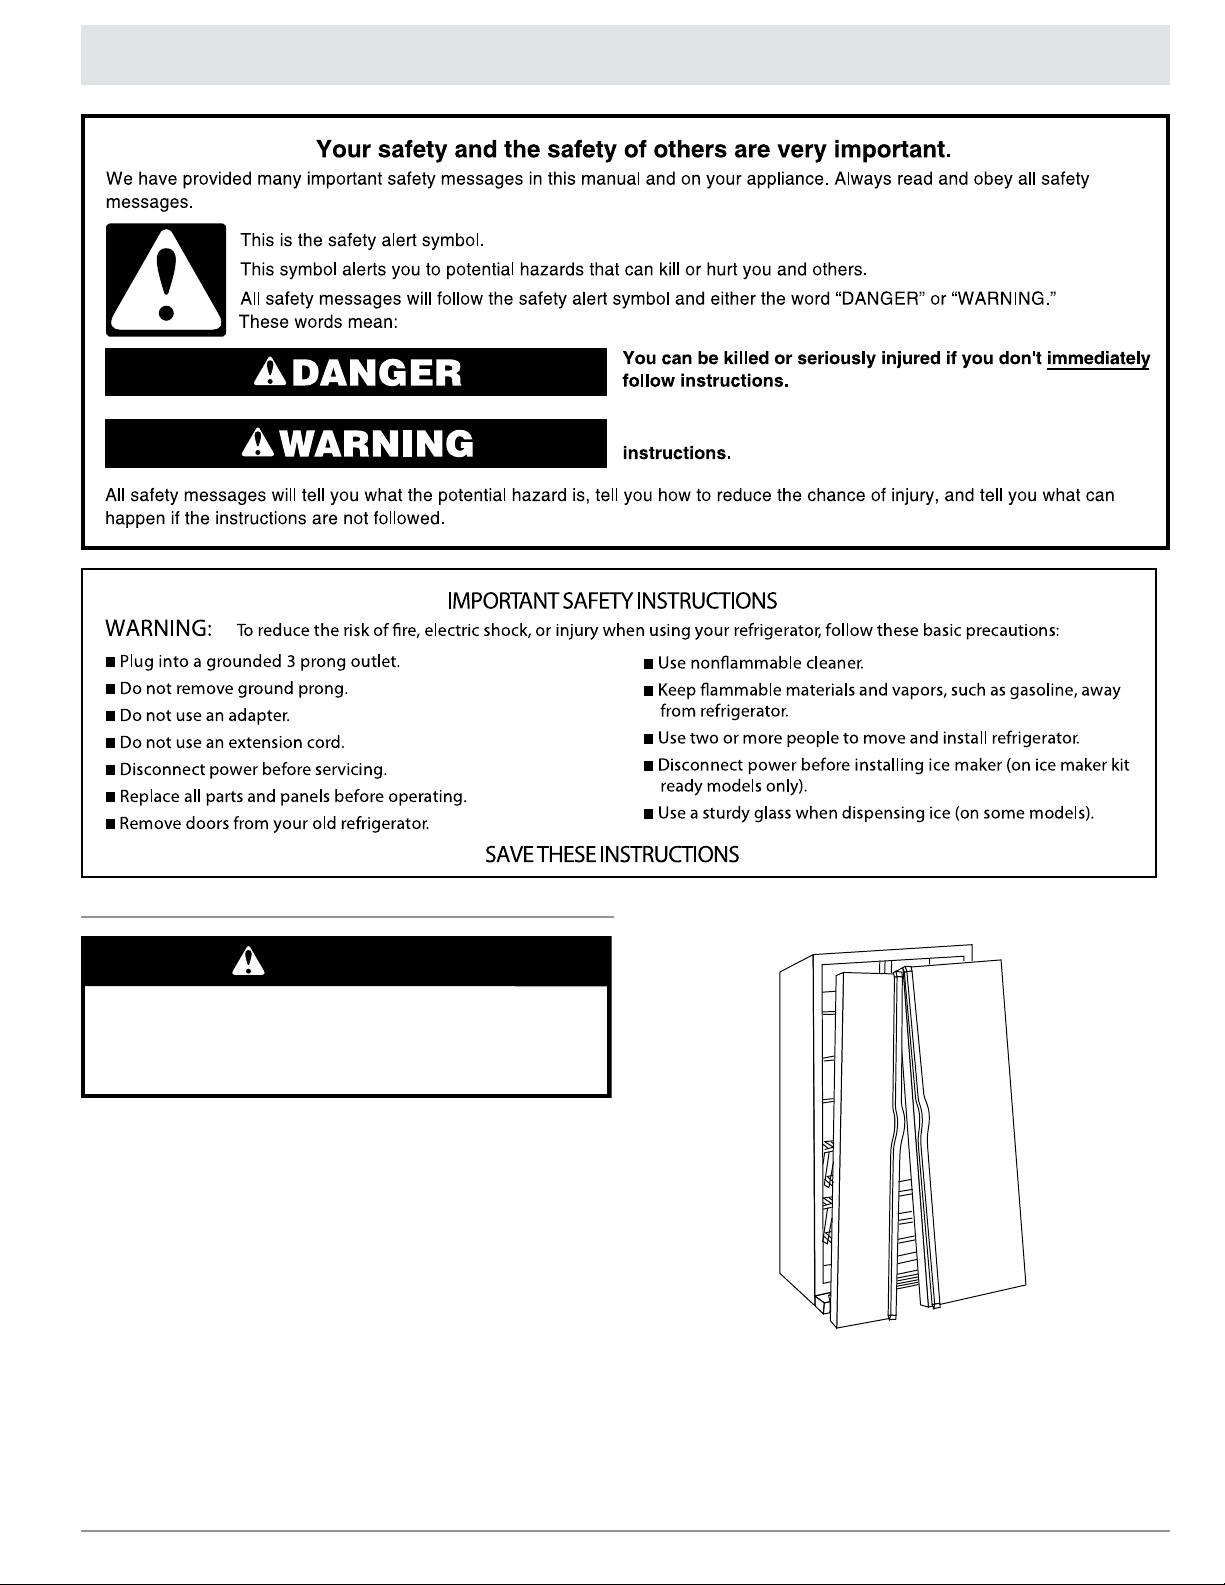
Suffocation Hazard
Remove doors from your old refrigerator.
Failure to do so can result in death or brain damage.
Proper Disposal of Your Refrigerator
IMPORTANT: Child entrapment and suffocation are not problems
of the past. Junked or abandoned refrigerators are still dangerous,
even if they sit out for “just a few days.” If you are getting rid of
your old refrigerator, please follow the instructions below to help
prevent accidents.
Before you throw away your old refrigerator or freezer:
Take off the doors.
Leave the shelves in place so children may not easily climb
inside.
1
Page 4
Important Information
Installer: Please leave this guide with this appliance.
Consumer: Please read and keep this use and care manual for
future reference. This guide provides proper use and maintenance
information. Keep this guide and the sales receipt and/or
cancelled check in a safe place for future reference. Proof of
original purchase date is needed for warranty service.
If you have any questions, call:
Dacor Customer Service Team
1-800-793-0093 (U.S.A. and Canada)
Monday — Friday 6:00
Web site: www.Dacor.com
a m to 5:00 p m Pacific Time
Model Identification
Have complete model and serial number identification of your
refrigerator ready. These numbers are found on a serial number
label, located on the right side of the refrigerator liner. Record
these numbers on this page for easy access.
Model Number ________________________________________
Serial Number ________________________________________
Date of Purchase______________________________________
For service and warranty information, see page 19.
Since Dacor constantly improves the quality and performance of
our products, we may need to make changes to the appliance
without revising this manual.
EF42DBSS and EF48DBSS:
42” and 48” dispenser models
with all stainless steel finish
EF42NBSS and EF48NBSS:
42” and 48” non-dispensing
models with all stainless steel
finish
IF42DBOL and IF48DBOL:
42” and 48” dispenser models
designed for installation of
custom panels and handles
IF42NBOL and IF48NBOL:
42” and 48” non-dispensing
models designed for
installation of custom panels
and handles
2
Page 5
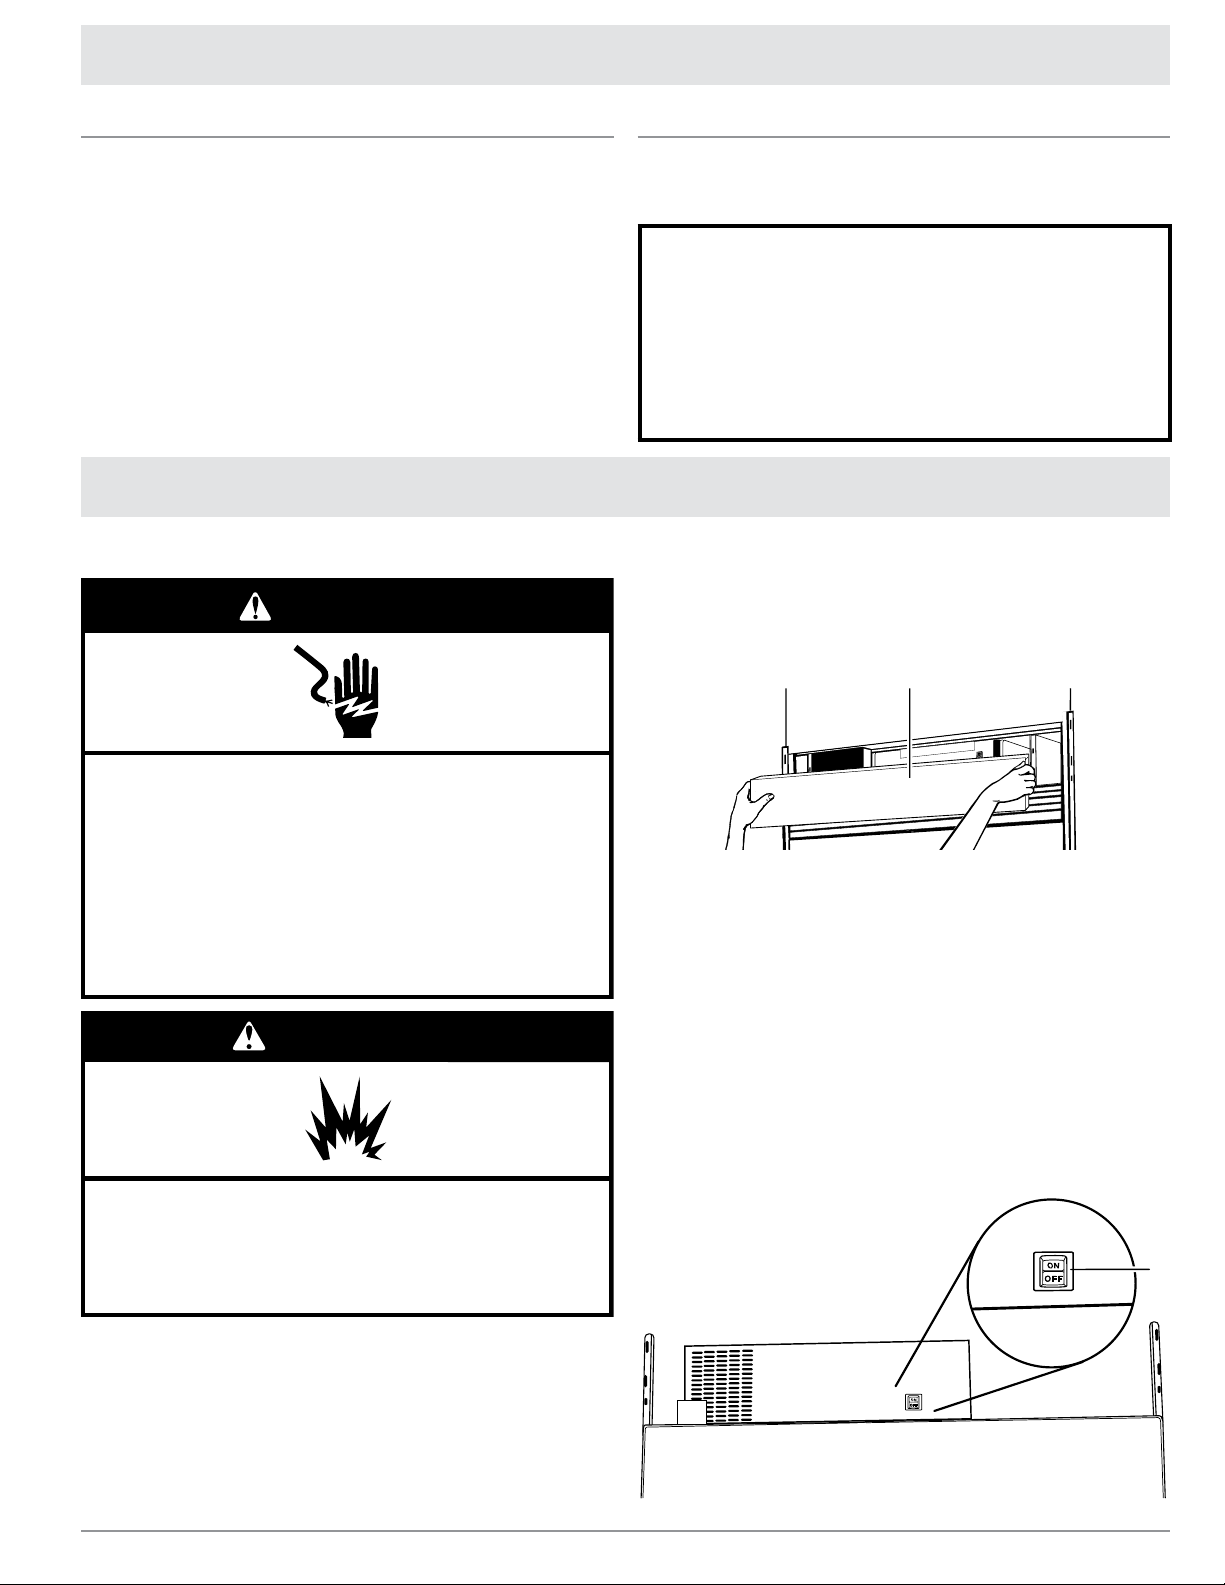
Before Use
A. Top grille
B. Cabinet side trim
B BA
A. Power switch
A
Electrical Shock Hazard
Plug into a grounded 3 prong outlet.
Do not remove ground prong.
Do not use an adapter.
Do not use an extension cord.
Failure to follow these instructions can result in death,
fire, or electrical shock.
WARNING
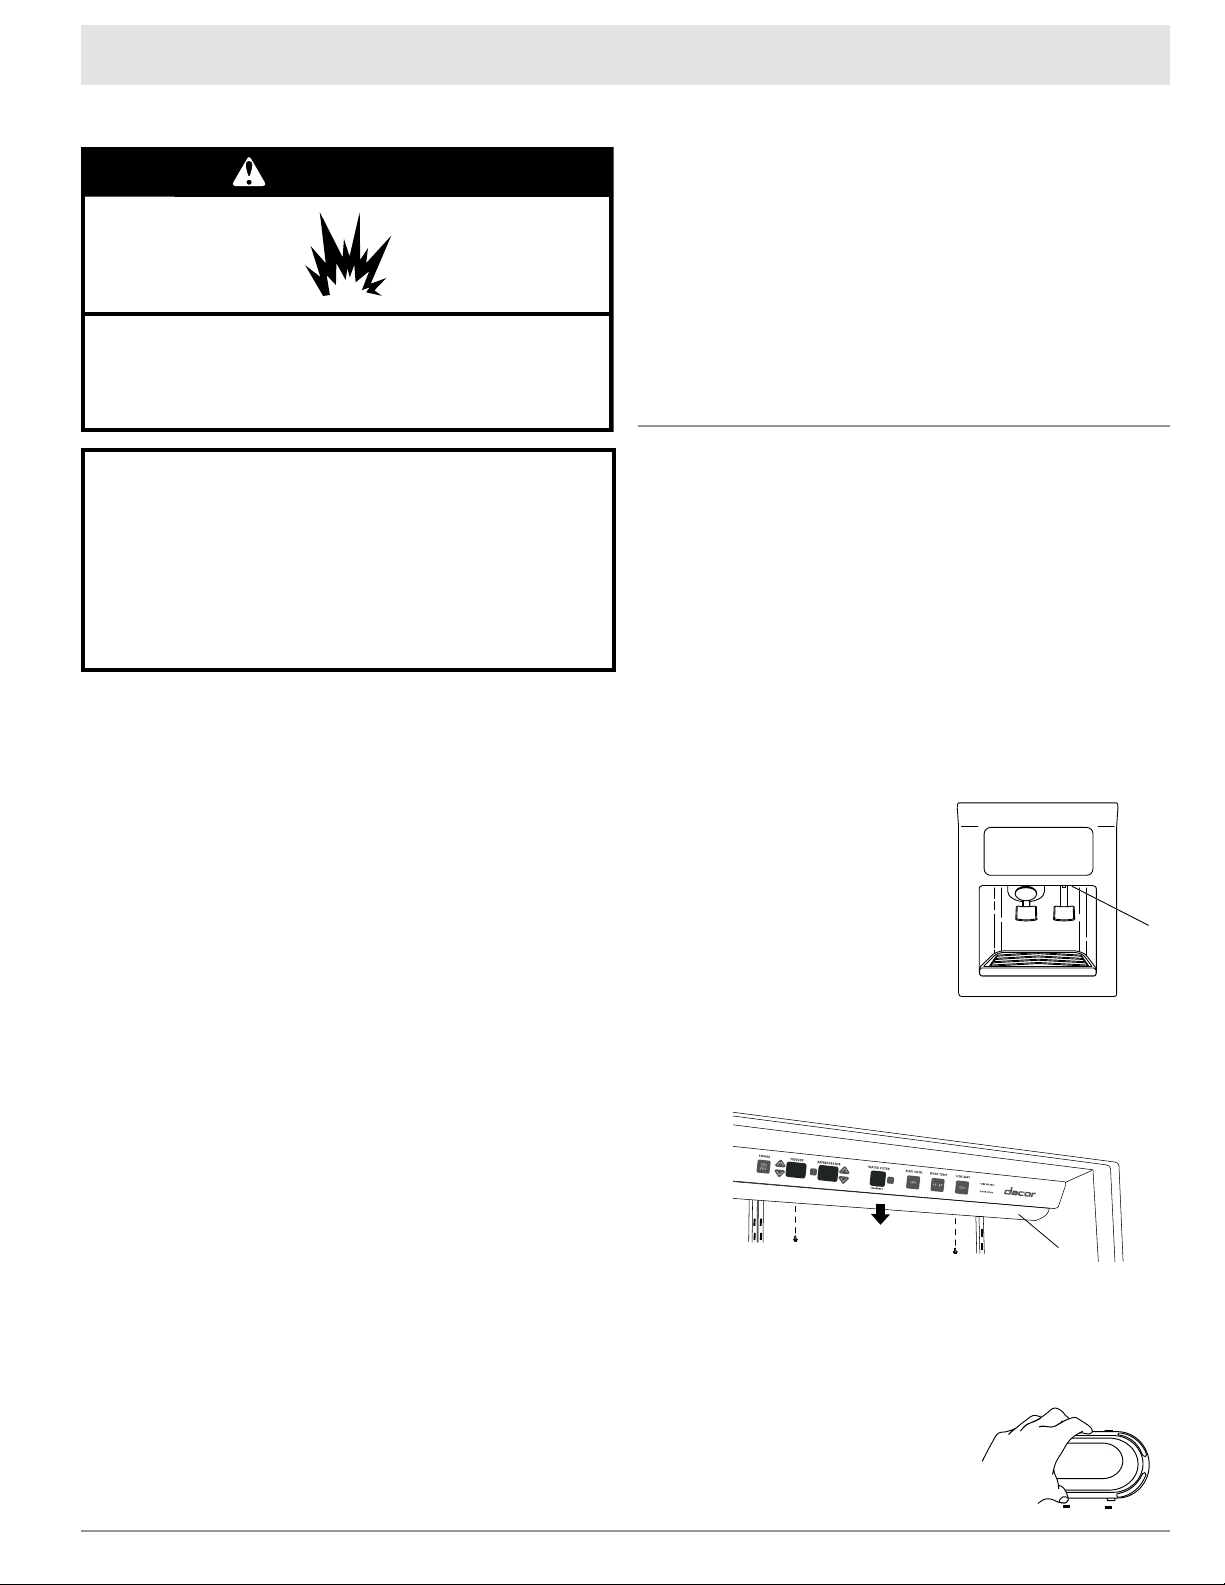
WARNING
Explosion Hazard
Keep flammable materials and vapors, such as
gasoline, away from refrigerator.
Failure to do so can result in death, explosion, or fire.
Remove the Packaging
If the ice storage bin is located on the door, remove the
temporary shield from underneath the ice storage bin. See Ice
Maker and Storage Bin.
Remove tape and glue residue from surfaces before turning on
the refrigerator. Rub a small amount of liquid dish soap over
the adhesive with your fingers. Wipe with warm water and dry.
Do not use sharp instruments, rubbing alcohol, flammable
fluids or abrasive cleaners to remove tape or glue. These
products can damage the surface of your refrigerator. For
more information, see Important Safety Instructions on page 1.
Dispose of/recycle all packaging materials.
Refrigerator Operation
Turning the Main Power Switch On/Off
Clean Before Using
After you remove all of the packaging materials, clean the inside
of your refrigerator before using it. See the cleaning instructions in
Care and Cleaning.
Important information to know about glass shelves and
covers:
Do not clean glass shelves or covers with warm water when
they are cold. Shelves and covers may break if exposed to
sudden temperature changes or impact, such as bumping.
For your protection, tempered glass is designed to shatter into
many small, pebble-size pieces. This is normal. Glass shelves
and covers are heavy. Use special care when removing them to
avoid impact from dropping.
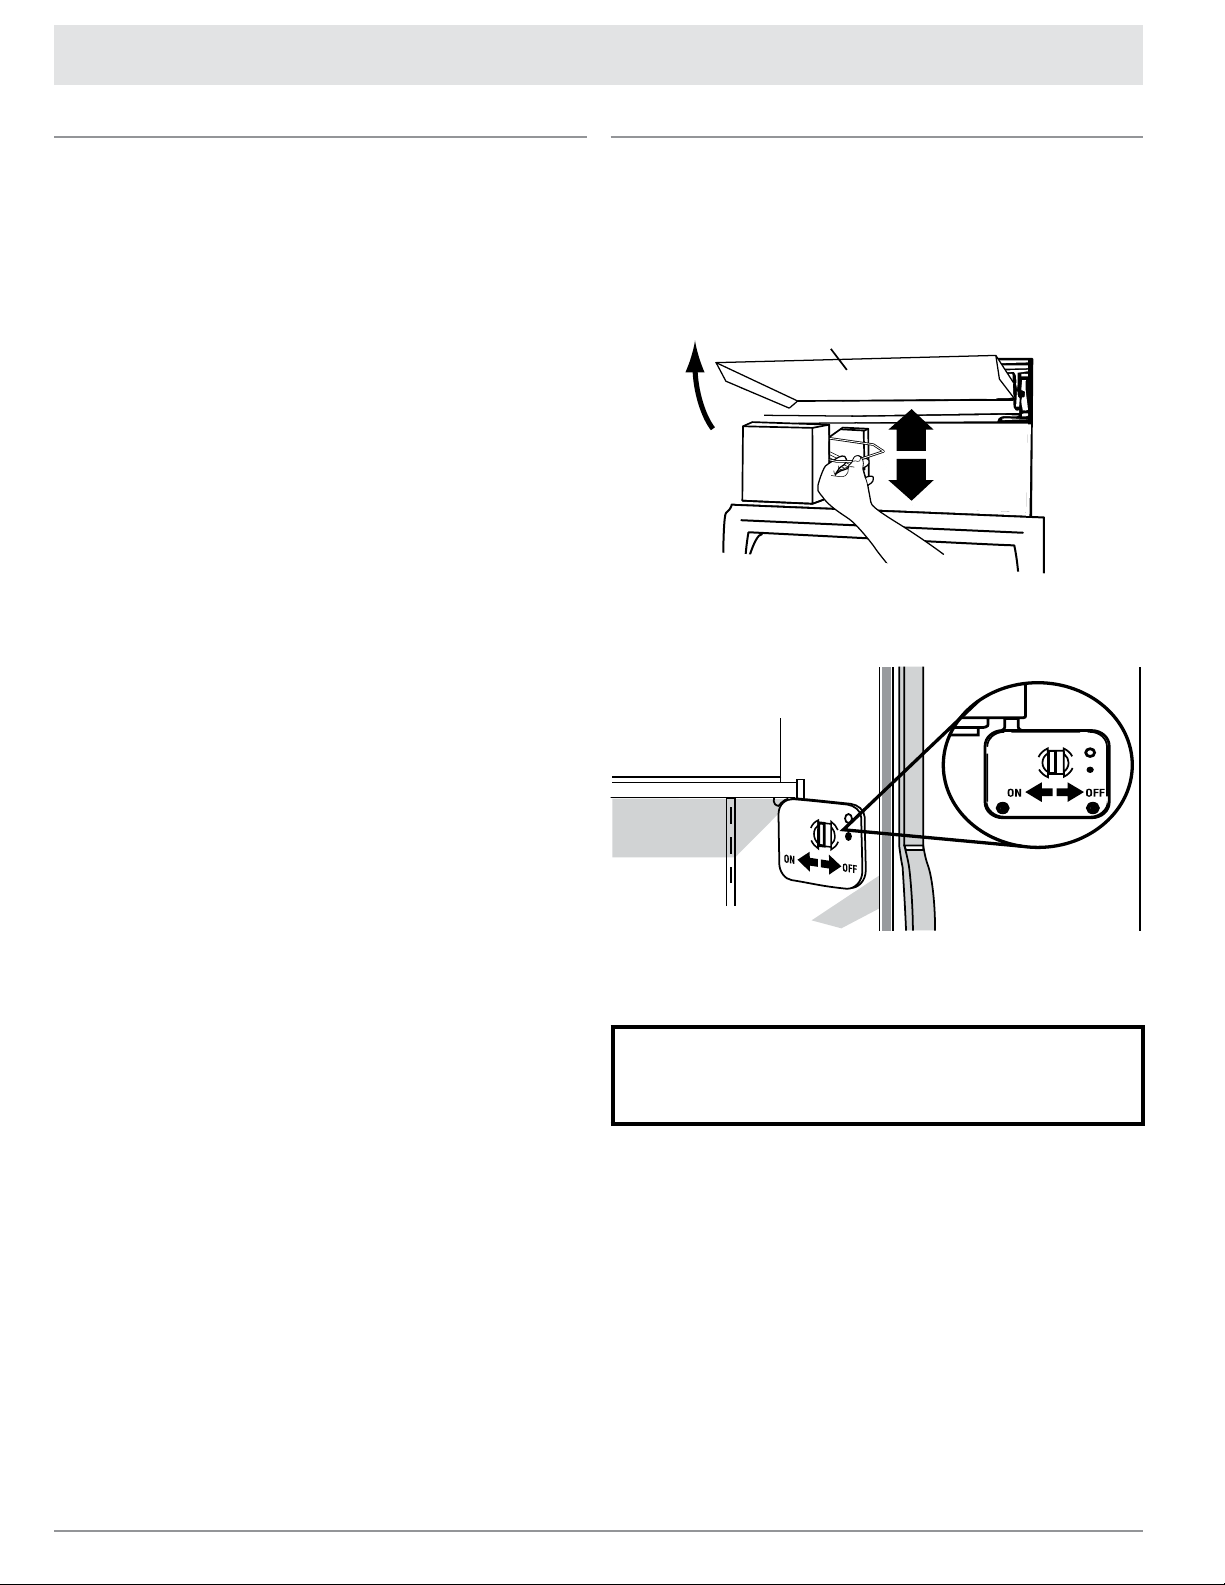
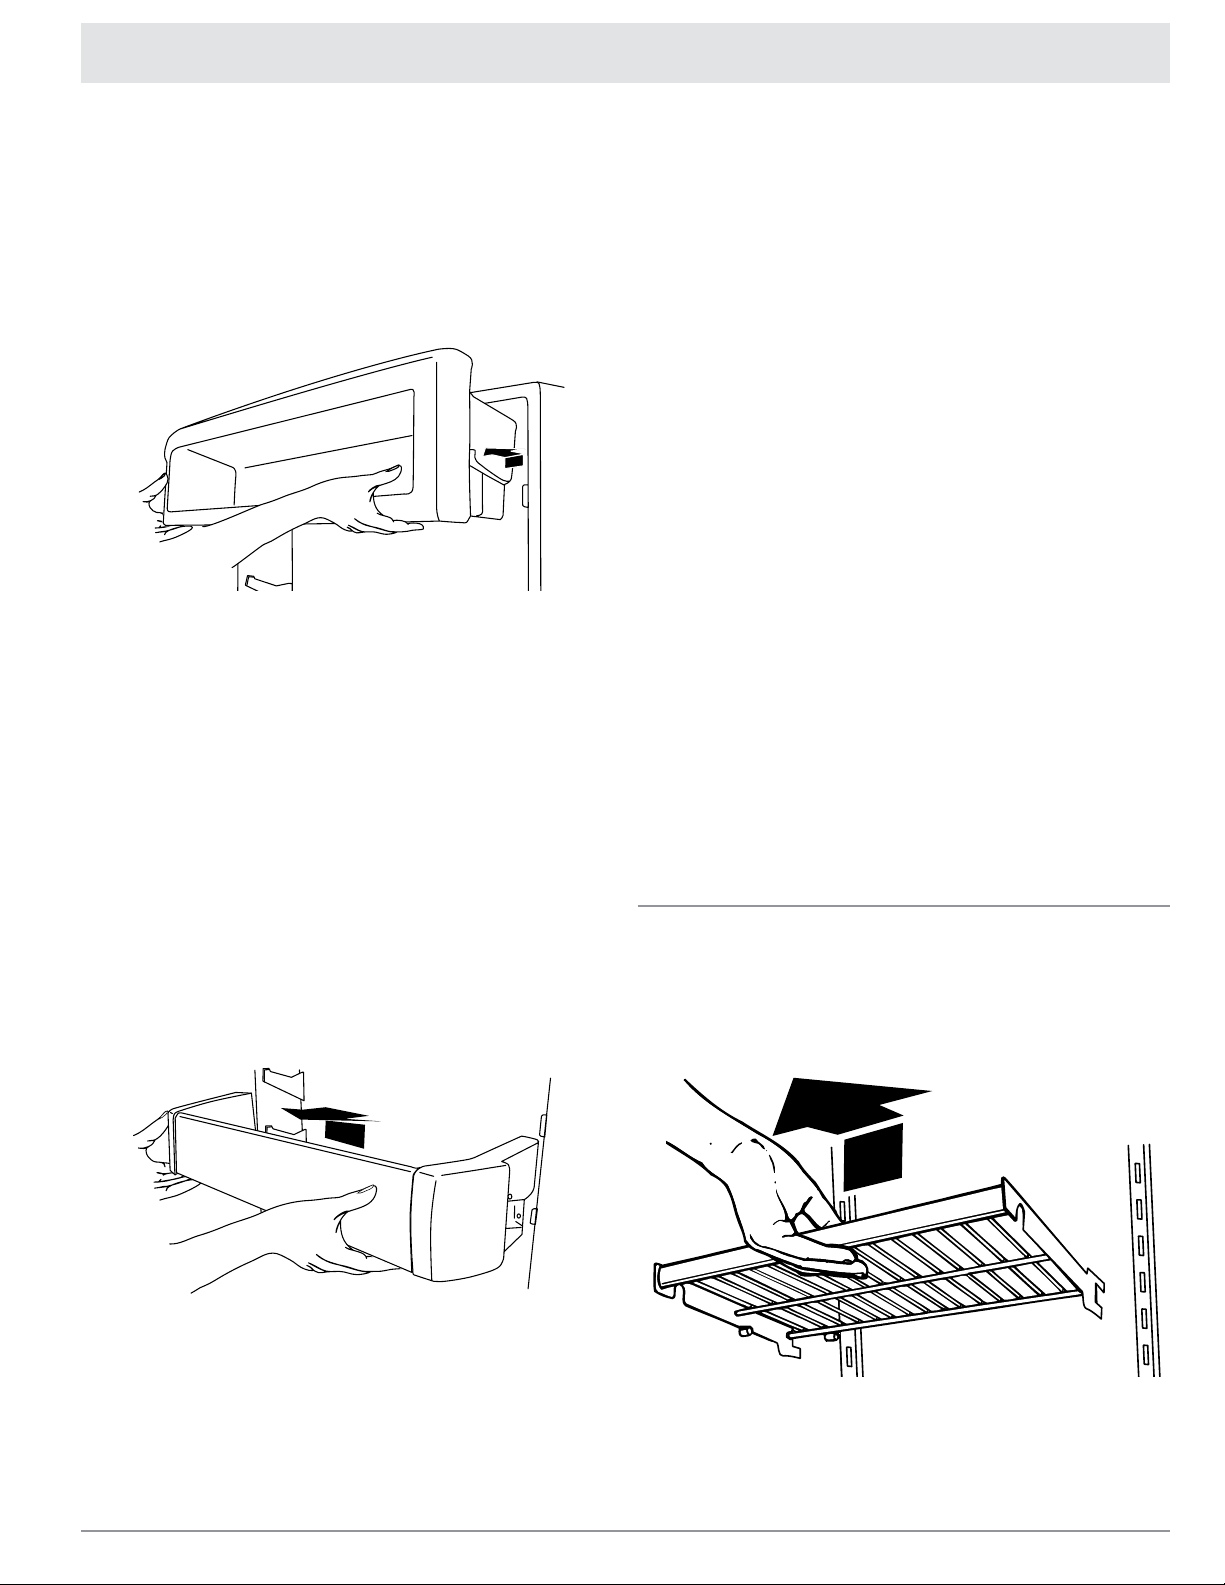
Removing the Top Grille
Grasp both ends of the top grille.1.
Push the top grille straight up, then pull straight out. Lay the 2.
grille on a soft surface.
If you need to turn the power to your refrigerator on or off,
you must remove the top grille assembly to access the power
switch. Turn the power to the refrigerator off when cleaning your
refrigerator or changing light bulbs.
Replacing the Top Grille
Insert the top grille hooks (located on the back of the top grille) 1.
into the slots on the side trim.
Pull the grille down slightly to lock into place.2.
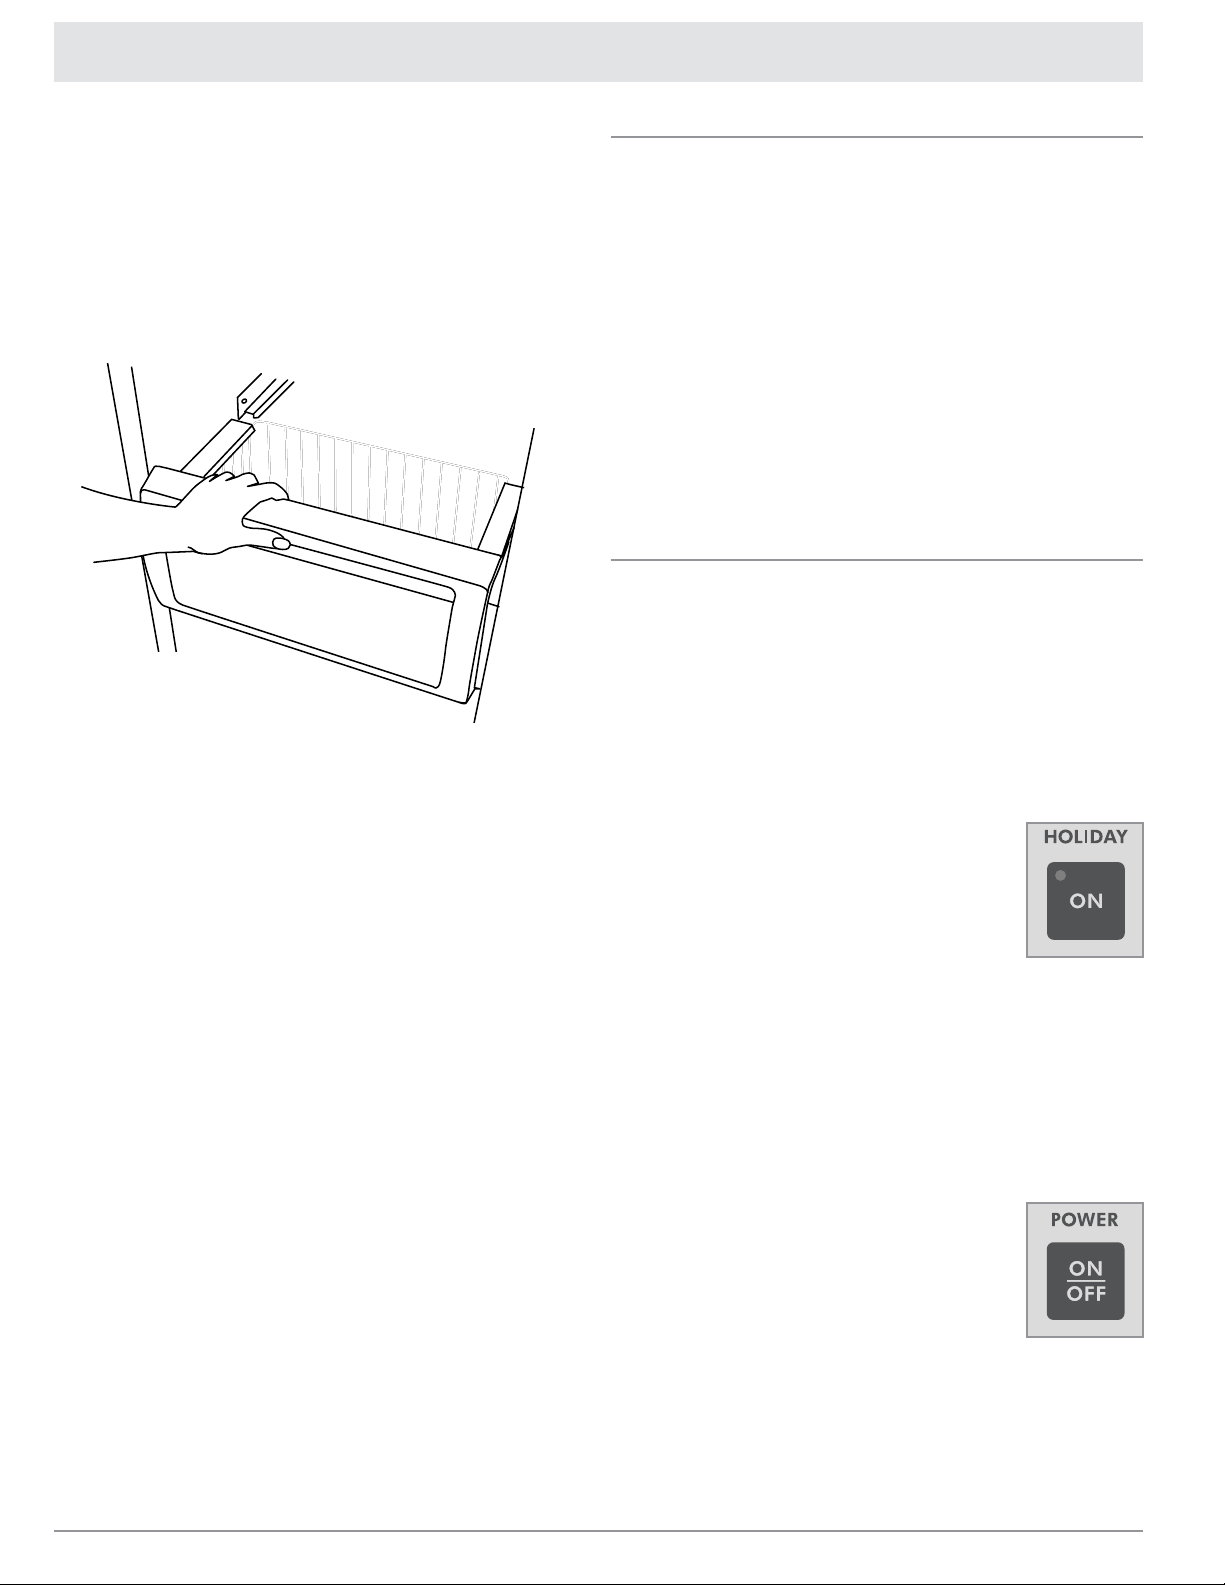
To Turn the Main Power Switch On or Off:
Remove the top grille.1.
Press the main power switch to the 2. ON or OFF position.
Replace the top grille.3.
IMPORTANT: Be sure the main
power switch is set to the On
position after cleaning refrigerator or
changing light bulbs.
3
Page 6
Refrigerator Operation
Ice maker cover
Ice Maker
Water Supply Requirements
Read all directions before you begin.
IMPORTANT:
When your refrigerator was installed, the water connection
from the water source should have been connected to your
refrigerator. If your refrigerator is not connected to a water
source, see Connect the Water Supply in the installation
instructions. If you have any questions about your water
connection, see the Troubleshooting section or call a licensed,
qualified plumber.
If you turn the refrigerator on before the water line is
connected, turn the ice maker OFF. See Ice Maker and
Storage Bin on page 8.
All installations must meet local plumbing code requirements.
Water Pressure
A cold water supply with water pressure between 30 and 120 psi
(207 and 827 kPa) is required to operate the water dispenser and
ice maker. If you have questions about your water pressure, see
Troubleshooting or call a licensed, qualified plumber.
Reverse Osmosis Water Supply
IMPORTANT: The pressure of the water supply coming out of
a reverse osmosis system going to the water inlet valve of the
refrigerator needs to be between 30 and 120 psi (207 and 827
kPa).
If a reverse osmosis water filtration system is connected to your
cold water supply, the water pressure to the reverse osmosis
system needs to be a minimum of 40 psi (276 kPa).
If the water pressure to the reverse osmosis system is less than
40 psi (276 kPa):
Check to see whether the sediment filter in the reverse
osmosis system is blocked. Replace the filter if necessary.
Allow the storage tank on the reverse osmosis system to refill
after heavy usage.
If your refrigerator has a water filter, it may further reduce
the water pressure when used in conjunction with a reverse
osmosis system. Remove the water filter. See Replacing the
Water Filter on page 14.
If you have questions about your water pressure, call a licensed,
qualified plumber.
Water System Preparation
Please read before using the water system.
Immediately after installation, follow the steps below to make
sure that the water system is properly cleaned.
Open the freezer door and turn off the ice maker. 1.
For non-dispensing models, lift the ice maker cover, then lift up
the wire shutoff arm as shown below.
For dispensing models, move the switch to the OFF (right)
setting as shown. The ON/OFF switch is located on the top
right side of the freezer compartment. See below.
NOTE: If your model has a base grille filter system, make sure
the base grille filter is properly installed and the cap is in the
horizontal position.
Do not use with water that is microbiologically unsafe or of
unknown quality without adequate disinfection before or after
the system. Systems certified for cyst reduction may be used on
disinfected waters that may contain filterable cysts.
Use a sturdy container to depress the water dispenser bar 2.
until the water begins to flow. Flush the water system by
dispensing and discarding 6 qt (5.7 L) of water. Cleaning the
system will take approximately 3 to 4 minutes and will help
clear air from the line. Additional flushing may be required in
some households.
NOTE: As air is cleared from the system, water may spurt out
of the dispenser.
Open the freezer door and turn on the ice maker. For 3.
non-dispensing models, lower the wire shutoff arm. For
dispensing models, move the switch to the ON (left) position.
Allow 24 hours to produce the first batch of ice.
Discard the first three batches of ice produced.
Depending on your model, you may want to select the
maximum ice feature to increase the production of ice.
4
Page 7
Refrigerator Operation
Normal Operating Sounds
Your new refrigerator may make sounds that your old one
didn’t make. Because the sounds are new to you, you might be
concerned about them. Most of the new sounds are normal. Hard
surfaces, such as the floor, walls and cabinets, can make the
sounds seem louder. The following describes the kinds of sounds
and what may be making them.
If your refrigerator is equipped with an ice maker, you will hear
a buzzing sound when the water valve opens to fill the ice
maker for each cycle.
Your refrigerator is designed to run more efficiently to keep
your food items at the desired temperatures and to minimize
energy usage. The high efficiency compressor and fans may
cause your refrigerator to run longer than your old one. You
may also hear a pulsating or high-pitched sound from the
compressor or fans adjusting to optimize performance.
You may hear the evaporator fan motor circulating air through
the refrigerator and freezer compartments. The fan speed may
increase as you open the doors or add warm food.
Rattling noises may come from the flow of refrigerant, the
water line or items stored on top of the refrigerator.
Water dripping on the defrost heater during a defrost cycle
may cause a sizzling sound.
As each cycle ends, you may hear a gurgling sound due to the
refrigerant flowing in your refrigerator.
Contraction and expansion of the inside walls may cause a
popping noise.
You may hear air being forced over the condenser by the
condenser fan.
You may hear water running into the drain pan during the
defrost cycle.
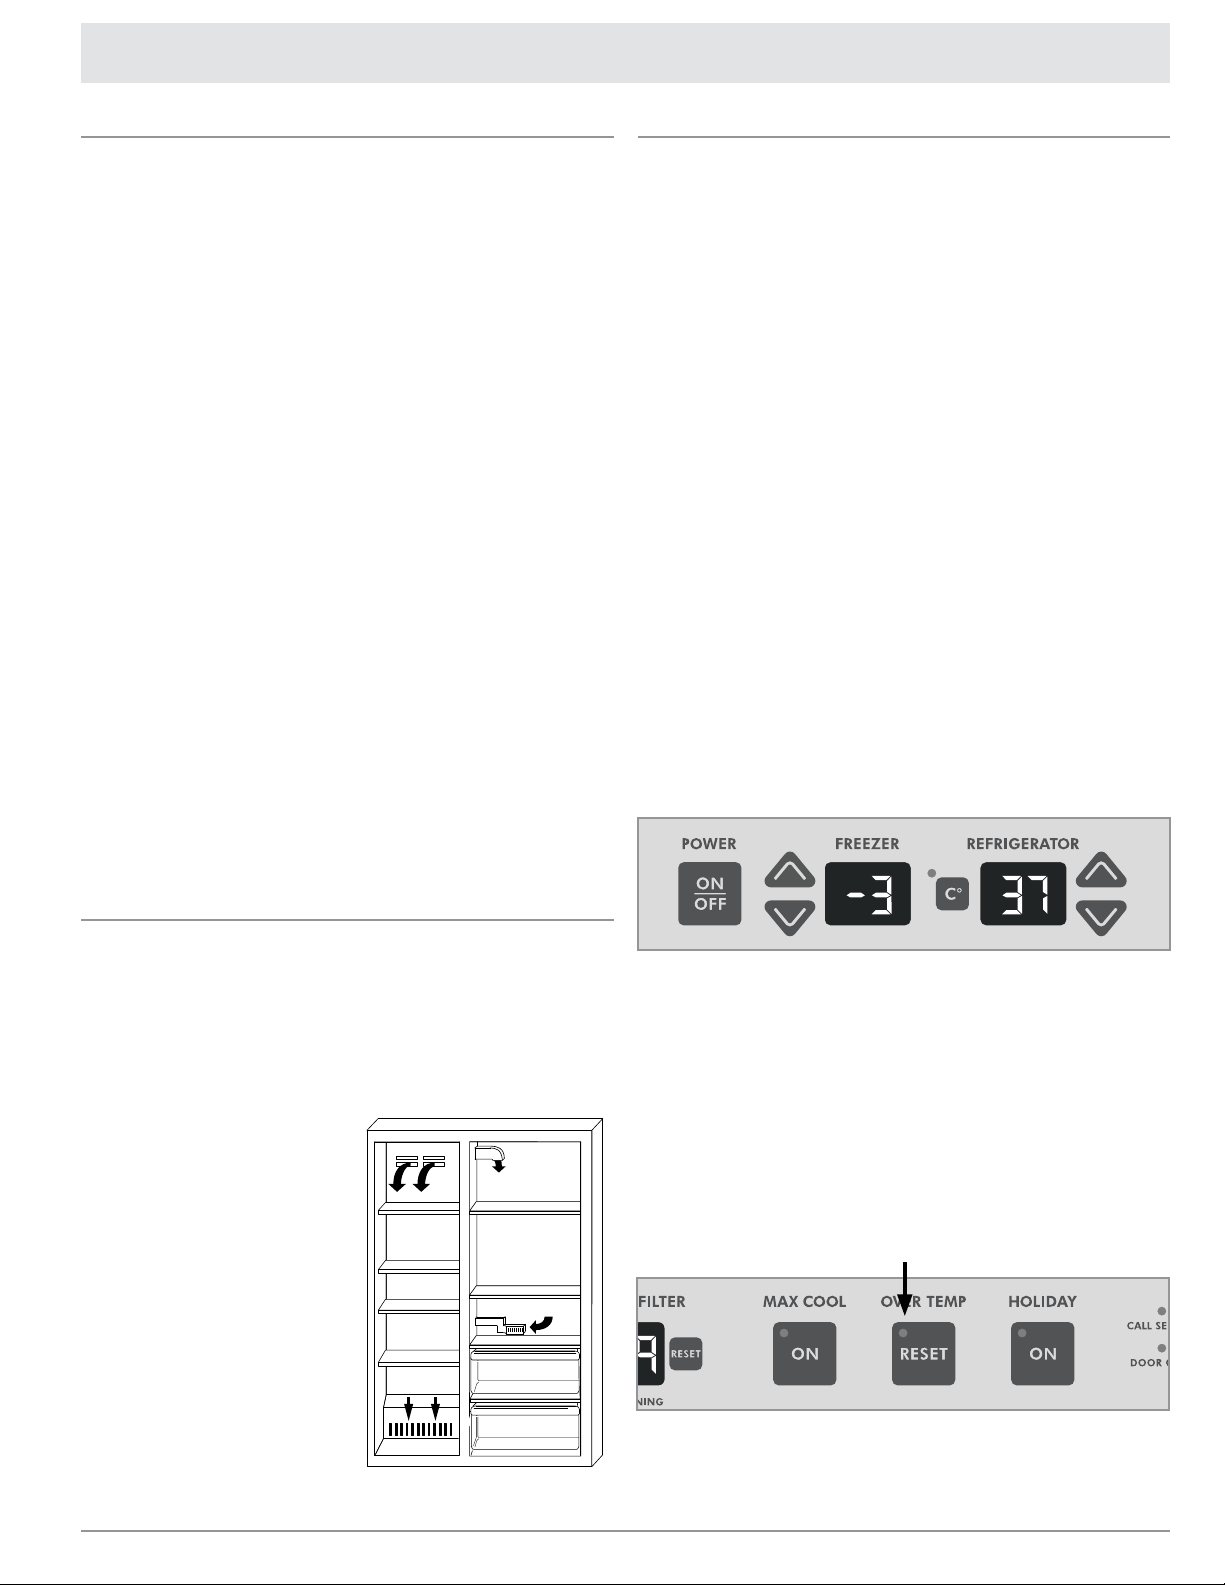
Setting the Controls
The control panel is located inside the refrigerator compartment
on the ceiling.
IMPORTANT:
The refrigerator control adjusts the refrigerator compartment
temperature. The freezer control adjusts the freezer
compartment temperature.
Wait 24 hours after you turn on the refrigerator before you put
food into it. If you add food before the refrigerator has cooled
completely, your food may spoil.
NOTE: Adjusting the refrigerator and freezer controls to a
lower (colder) setting will not cool the compartments any
faster.
If the temperature is too warm or too cold in the refrigerator
or freezer, first check the air vents to be sure they are not
blocked before adjusting the controls.
The preset settings should be correct for normal household
usage. The controls are set correctly when milk or juice is as
cold as you like and when ice cream is firm.
The actual temperature may differ from the display when a
door is open for an extended period of time.
NOTE: The factory recommended settings are 0°F (-18°C) for the
freezer and 37°F (3°C) for the refrigerator.
Turning the Refrigerator On or Off
Press and hold the POWER ON-OFF key for 2 seconds.
When the refrigerator comes on, the freezer and refrigerator
temperature displays will light.
Ensuring Proper Air Circulation
In order to ensure proper temperatures, you need to permit
airflow between the two sections. Cold air enters the bottom of
the freezer section and moves up. It then enters the refrigerator
section through the top vent. Air then returns to the freezer as
shown.
Do not block any airflow vents. If the vents are blocked, airflow
will be obstructed and temperature and moisture problems may
occur.
IMPORTANT: Because air
circulates between both sections,
any odors formed in one section
will transfer to the other. You
must thoroughly clean both
sections to eliminate odors. To
avoid odor transfer and drying
out of food, wrap or cover foods
tightly.
To turn the refrigerator off, press and hold the POWER
ON-OFF key for 2 seconds. The freezer and refrigerator
temperature displays will go dark when the refrigerator is off.
NOTE:
After the refrigerator is turned on, the Over Temperature Audio
Alarm and indicator light will activate every 1½ hours until the
refrigerator and freezer temperatures are below 48°F (9°C)
and 15°F (-9°C), respectively, or until the alarm is turned off.
To turn off the audio alarm and indicator light, see Master
Alarm Reset on page 7.
Over Temperature
Indicator Light
The Power ON-OFF key on the control panel shuts down the
cooling system, fans and compressors as well as the control
panel lights. To turn the power off completely, use the main
power switch located behind the top grille. See page 3.
5
Page 8
Refrigerator Operation
Setting the Controls (continued)
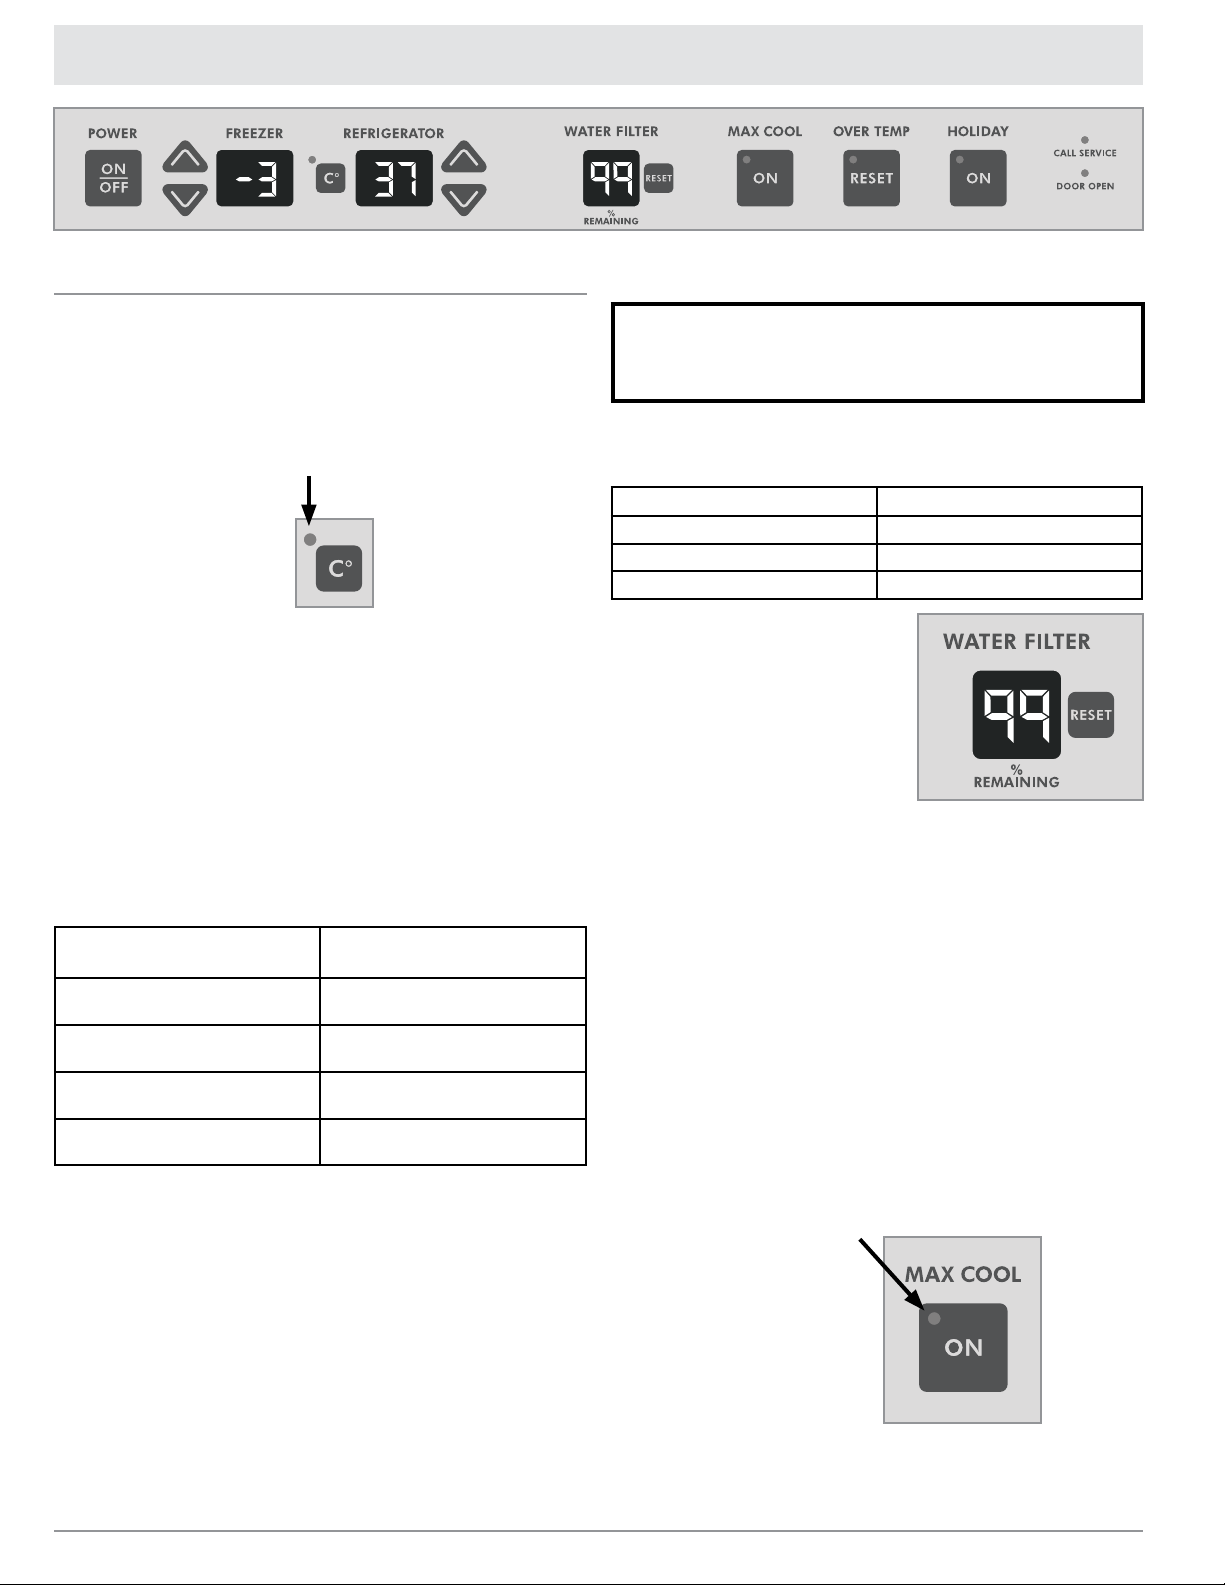
Setting the Temperature Scale
The indicator light, next to the C° button, is lit when the
temperature scale for the freezer and refrigerator displays is
set to Celsius. To change the displays to Celsius (or back to
Fahrenheit), press the C° button.
Celsius Indicator Light
Adjusting the Temperature Setting
NOTE: Wait at least 24 hours between adjustments. Re-check the
temperatures before other adjustments are made.
To adjust the temperature setting:
Press the refrigerator or freezer UP () or DOWN () key
until the desired temperature is reached.
NOTE: The adjustable temperature range for the freezer is -5°F
to 6°F (-21°C to -14°C). The adjustable temperature range for the
refrigerator is 34°F to 46°F (1°C to 8°C).
Use the table below for guidance if you need to change the
temperature.
CONDITION/
REASON:
REFRIGERATOR too cold
Not set correctly for conditions
REFRIGERATOR too warm
High use or room very warm
FREEZER too cold
Not set correctly for conditions
FREEZER too warm/too little ice.
High use or heavy ice use
TEMPERATURE
ADJUSTMENT:
REFRIGERATOR Control 1°
higher
REFRIGERATOR Control 1° lower
FREEZER Control 1° higher
FREEZER Control 1° lower
Water Filter Monitor
Do not use with water that is microbiologically unsafe or of
unknown quality without adequate disinfection before or after
the system. Systems certified for cyst reduction may be used on
disinfected waters that may contain filterable cysts.
The water filter monitor will help you know when it is time to
change your filter. To change the filter, see the Replacing the
Water Filter on page 14.
DISPLAY READING: STATUS:
99 percent New filter installed
10 percent Order replacement filter
0 percent or flow decreases Replace filter
A new water filter should display
a reading of 99%. The reading in
the display will decrease as the
filter life is used. When the display
reads 10%, it is time to order
a replacement water filter. It is
recommended that you replace the
filter when the filter display changes
to 0% OR when water flow to
your water dispenser or ice maker
decreases noticeably. See Replacing the Water Filter on page 14.
After replacing the water filter, press RESET and hold for 2
seconds to change the water filter display to 99 percent.
Max Cool
The Max Cool feature assists with periods of heavy ice usage, full
grocery loads or temporarily warm room temperatures.
Press the MAX COOL key to turn on the Max Cool feature.
The Max Cool indicator light will remain on for 24 hours unless
manually turned off.
NOTE: The refrigerator temperature display will remain at 34°F
(1°C) and the freezer temperature display will remain at -5°F
(-21°C) while the Max Cool feature is on. After 24 hours, the
refrigerator will automatically return to the previous temperature
settings.
Max Cool
Indicator Light
6
Page 9
Refrigerator Operation
Cut Hazard
Use a sturdy glass when dispensing ice.
Failure to do so can result in cuts.
WARNING
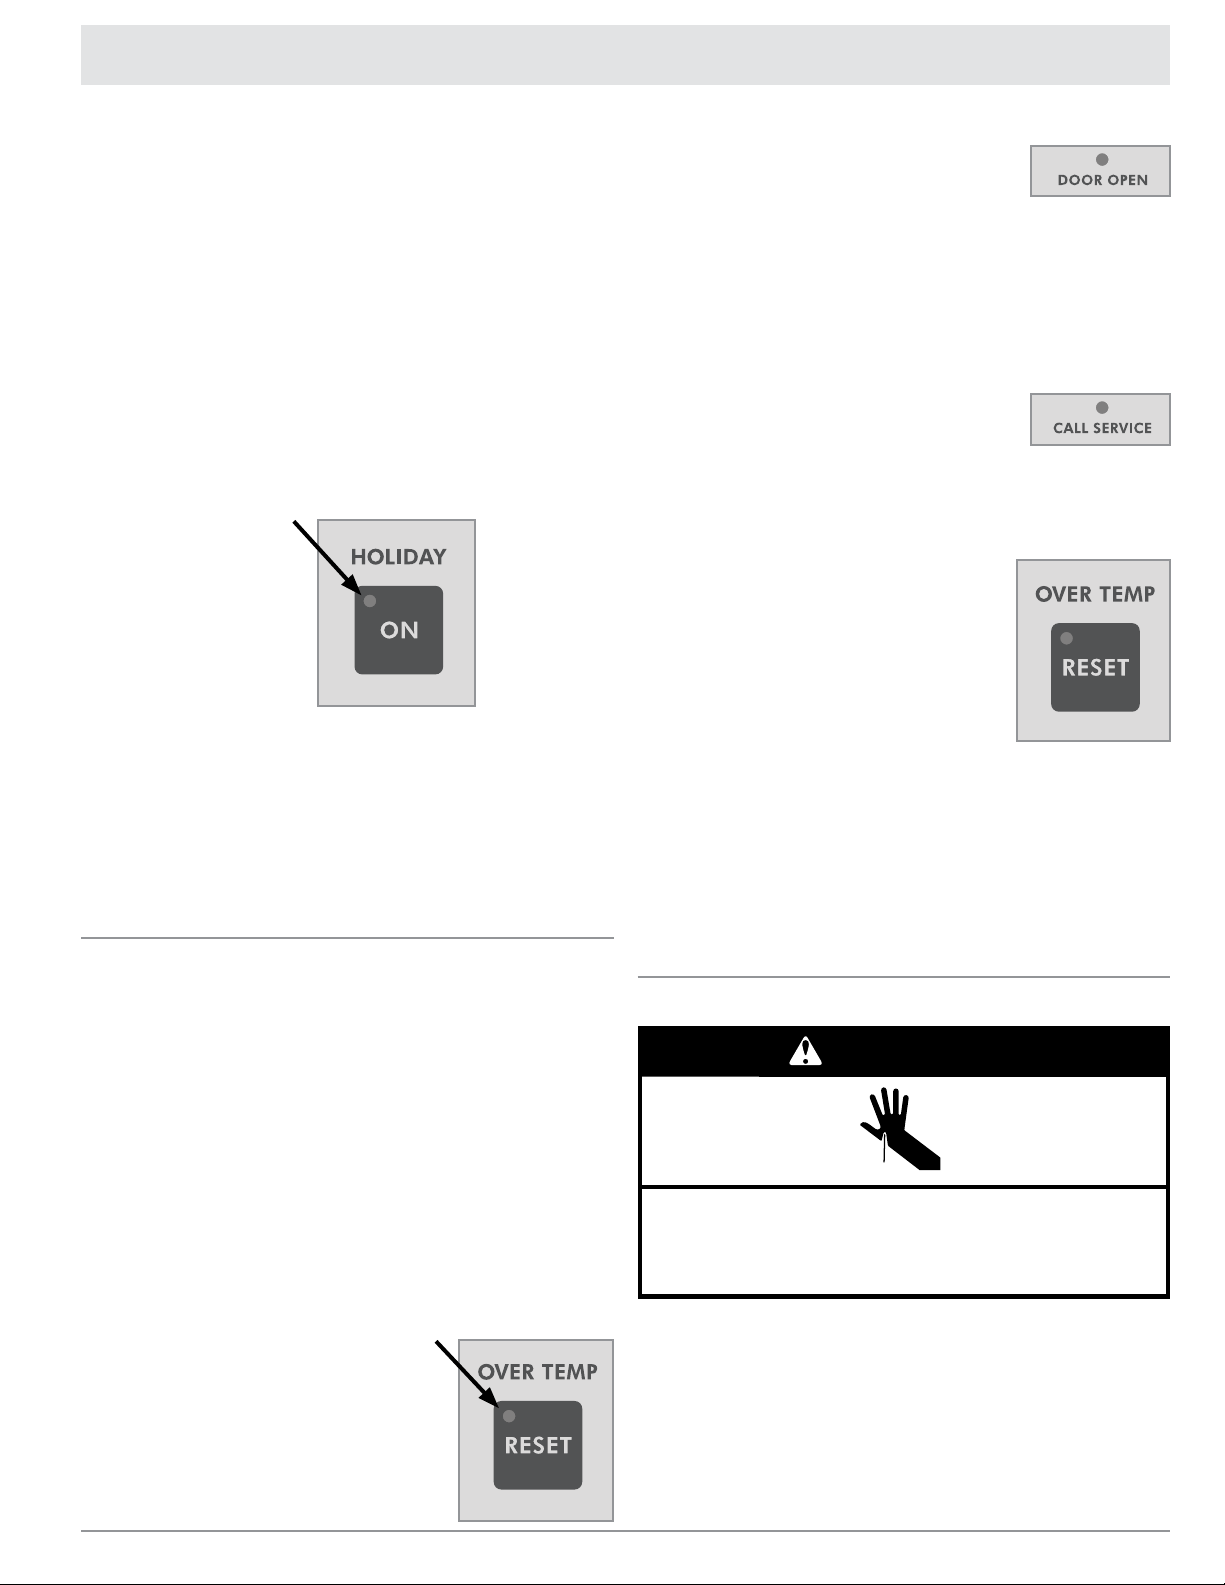
Holiday Mode
The Holiday Mode feature is designed for the traveler or for
those whose religious observances require turning off the lights
and ice maker. When you select this feature, the ice maker will
be disabled and the interior lights will turn off. The temperature
settings remain unchanged. On some models, the Holiday Mode
feature doesn’t disable the ice and water dispenser. For these
models the lock button can be used to disable the ice and water
functions, but depressing the ice or water lever will still turn on
the dispenser light. For most efficient refrigerator operation, it
is recommended to exit the Holiday Mode when it is no longer
required.
Press the HOLIDAY key to turn on the Holiday mode feature.
This feature will remain on until you press the HOLIDAY key
again.
Holiday Mode
Indicator Light
NOTE: If the Max Cool feature is selected prior to turning
on the Holiday mode, the temperature settings will remain
at 34°F (1°C) and -5°F (-21°C) for the refrigerator and
freezer compartments, until the Max Cool feature time (24
hours) is up. The refrigerator will then return to the previous
temperature settings chosen prior to turning on the Max Cool
feature, but the lights and ice maker will remain off until the
Holiday mode key is pressed again.
Alarms
Door Open
The Door Open indicator light will flash, an
alarm will sound and the interior lights will turn
off when a door has been open for longer than
10 minutes. When the door is closed, the audio alarm will reset
and turn off, but the Door Open indicator light will continue to flash
until the temperature is equal to or below 45°F (7°C) and 15°F
(-9°C) for the refrigerator and freezer compartments, respectively.
NOTE: To deactivate the audio alarm and indicator light, see
Master Alarm Reset.
Call Service
If the Call Service indicator light is flashing,
call for service. See the Warranty and Service
section for information.
NOTE: To deactivate the audio alarm and indicator light, see
Master Alarm Reset below.
Master Alarm Reset
Pressing the OVER TEMPERATURE RESET
key will shut off the audio alarm, but this
does not affect the indicator light the first time
OVER TEMPERATURE RESET is pressed.
The indicator light will shut off once OVER
TEMPERATURE RESET is pressed the
second time. The audio alarm will not sound
again for the current condition that caused
the alarm until a new condition occurs or until
a master alarm reset is performed.
A master alarm reset can be performed by pressing the POWER
ON-OFF key twice or by turning the power to the refrigerator
off and on again. See Turning the Main Power Switch On/Off
on page 3. The indicator light will reactivate after the OVER
TEMPERATURE RESET key is pressed if the condition that
caused the alarm is still present. See Over Temperature, Door
Open or Call Service above.
Over Temperature
The Over Temperature feature is designed to let you know when
either the refrigerator temperature rises above 48°F (9°C) or
the freezer temperature rises above 15°F (-9°C) for longer than
1½ hours. The audio alarm will shut off automatically when the
temperature returns to normal, but the indicator light will continue
to flash to let you know that an over temperature condition has
occurred.
If the over temperature condition is still present when an Over
Temperature Reset is performed, the indicator light will continue
to reactivate every 1½ hours until refrigerator and freezer
temperatures are below 48°F (9°C) and 15°F (-9°C), respectively.
IMPORTANT: If the Over Temperature Alarm activates, your
food may spoil. See the Power Interruption section on page 12.
Minimize door openings
until temperatures return
to normal.
NOTE: To deactivate the
audio alarm and indicator
light, see Master Alarm
Reset.
Over Temperature
Indicator Light
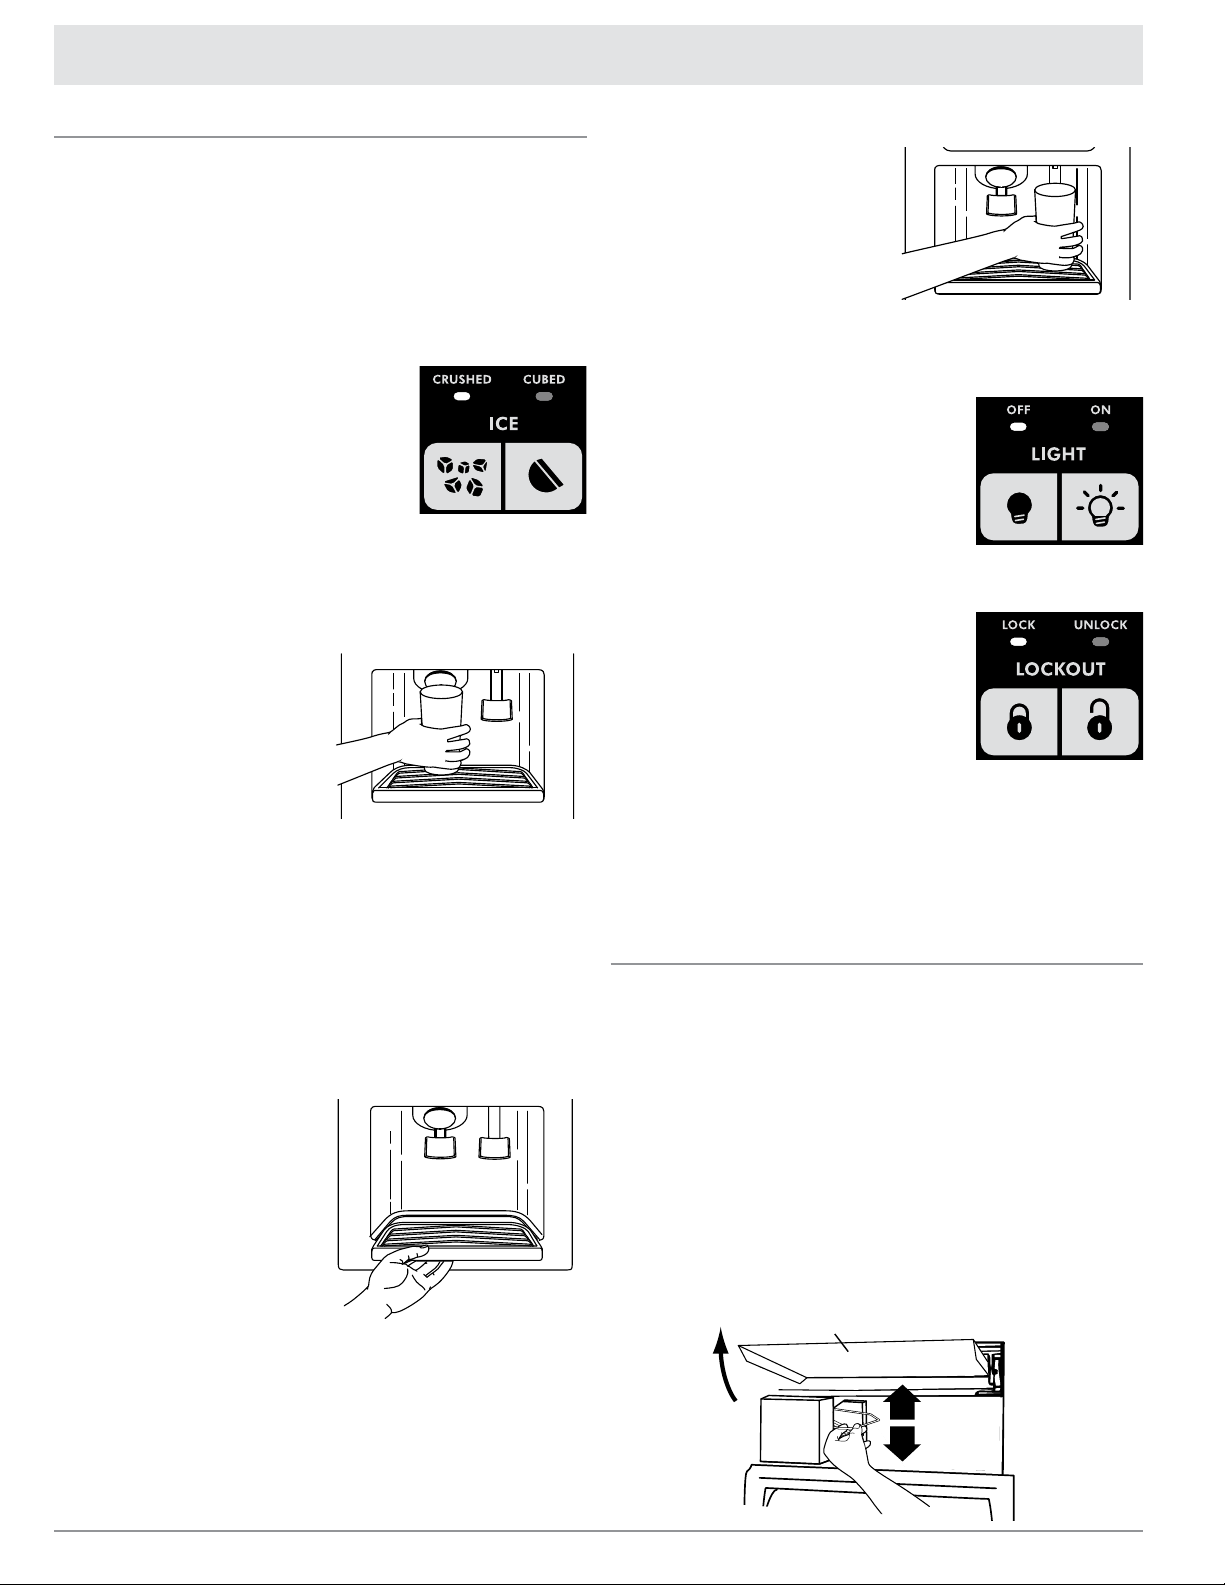
Water and Ice Dispensers
(Dispensing Models Only)
Depending on your model, you may have one or more of the
following options: the ability to select either crushed or cubed ice,
a special light that turns on when you use the dispenser, or a lock
option to avoid unintentional dispensing.
7
Page 10
Refrigerator Operation
Ice maker cover
Water and Ice Dispensers
The Ice Dispenser
Ice dispenses from the ice maker storage bin in the freezer. When
the dispenser lever is pressed:
A trap door opens in a chute between the dispenser and the
ice bin. Ice moves from the bin and falls through the chute.
When you release the dispenser lever, the trap door closes
and the ice dispensing stops. The dispensing system will not
operate when the freezer door is open.
Some models dispense both cubed and
crushed ice. Before dispensing ice, select
which type of ice you prefer. The key
controls are designed for easy use and
cleaning.
For crushed ice, cubes are crushed before
they are dispensed. This may cause a slight
delay when dispensing crushed ice. Noise from the ice crusher is
normal, and pieces of ice may vary in size. When changing from
crushed to cubed, a few ounces of crushed ice will be dispensed
along with the first cubes.
To Dispense Ice:
If the ice storage bin is 1.
located on the door, remove
the temporary shield from
underneath the ice storage
bin. See Ice Maker and
Storage Bin.
Press button for the desired 2.
type of ice.
Press a sturdy glass against the ice dispenser lever. Hold 3.
the glass close to the dispenser opening so ice does not fall
outside of the glass.
IMPORTANT: You do not need to apply a lot of pressure to the
lever in order to activate the ice dispenser. Pressing hard will
not make the ice dispense faster or in greater quantities.
Remove the glass to stop dispensing.4.
NOTE: The first few batches of ice may have an off-flavor from
new plumbing and parts. Throw the ice away. Also, take large
amounts of ice from the ice bin, not through the dispenser.
The Water Dispenser
If you did not flush the water
system when the refrigerator was
first installed, press the water
dispenser bar with a sturdy glass
or jar until you draw and discard
6 qt (5.7 L) or approximately 3
to 4 minutes of water after water
begins dispensing. It will take 2 to
3 minutes for the water to begin
dispensing. The water you draw and discard cleans the system
and helps clear air from the lines. Allow several hours for the
refrigerator to cool down and chill water.
IMPORTANT: Depending on your model, the small removable tray
at the bottom of the dispenser is designed to catch small spills
and allow for easy cleaning. There is no drain in the tray. The tray
can be removed from the dispenser and carried to the sink to be
emptied or cleaned.
To Dispense Water:
Press a sturdy glass against 1.
the water dispenser lever.
Remove the glass to stop 2.
dispensing.
NOTE: Water may have an
off-flavor if you do not use the
dispenser periodically. Dispense
enough water every week to
maintain a fresh supply.
Dispenser Light
The dispenser area has a light. It can be
turned on manually by pressing the ON key
(touch pad or rocker switch).
Whenever you use the dispenser, the lever
will automatically turn the light on also.
NOTE: See page 13 for information on
changing the dispenser light bulb.
Dispenser Lock
The dispenser can be turned off for easy
cleaning or to avoid unintentional dispensing
by small children and pets.
NOTE: The lock feature does not shut off
power to the refrigerator, to the ice maker, or
to the dispenser light. It simply deactivates
the dispenser levers.
To turn off the dispenser, press the LOCK key. The indicator
will appear above the LOCK key and the ice and water
dispensers will not work.
To unlock the dispenser, press the UNLOCK key until the
indicator appears. Then continue to dispense ice or water as
usual.
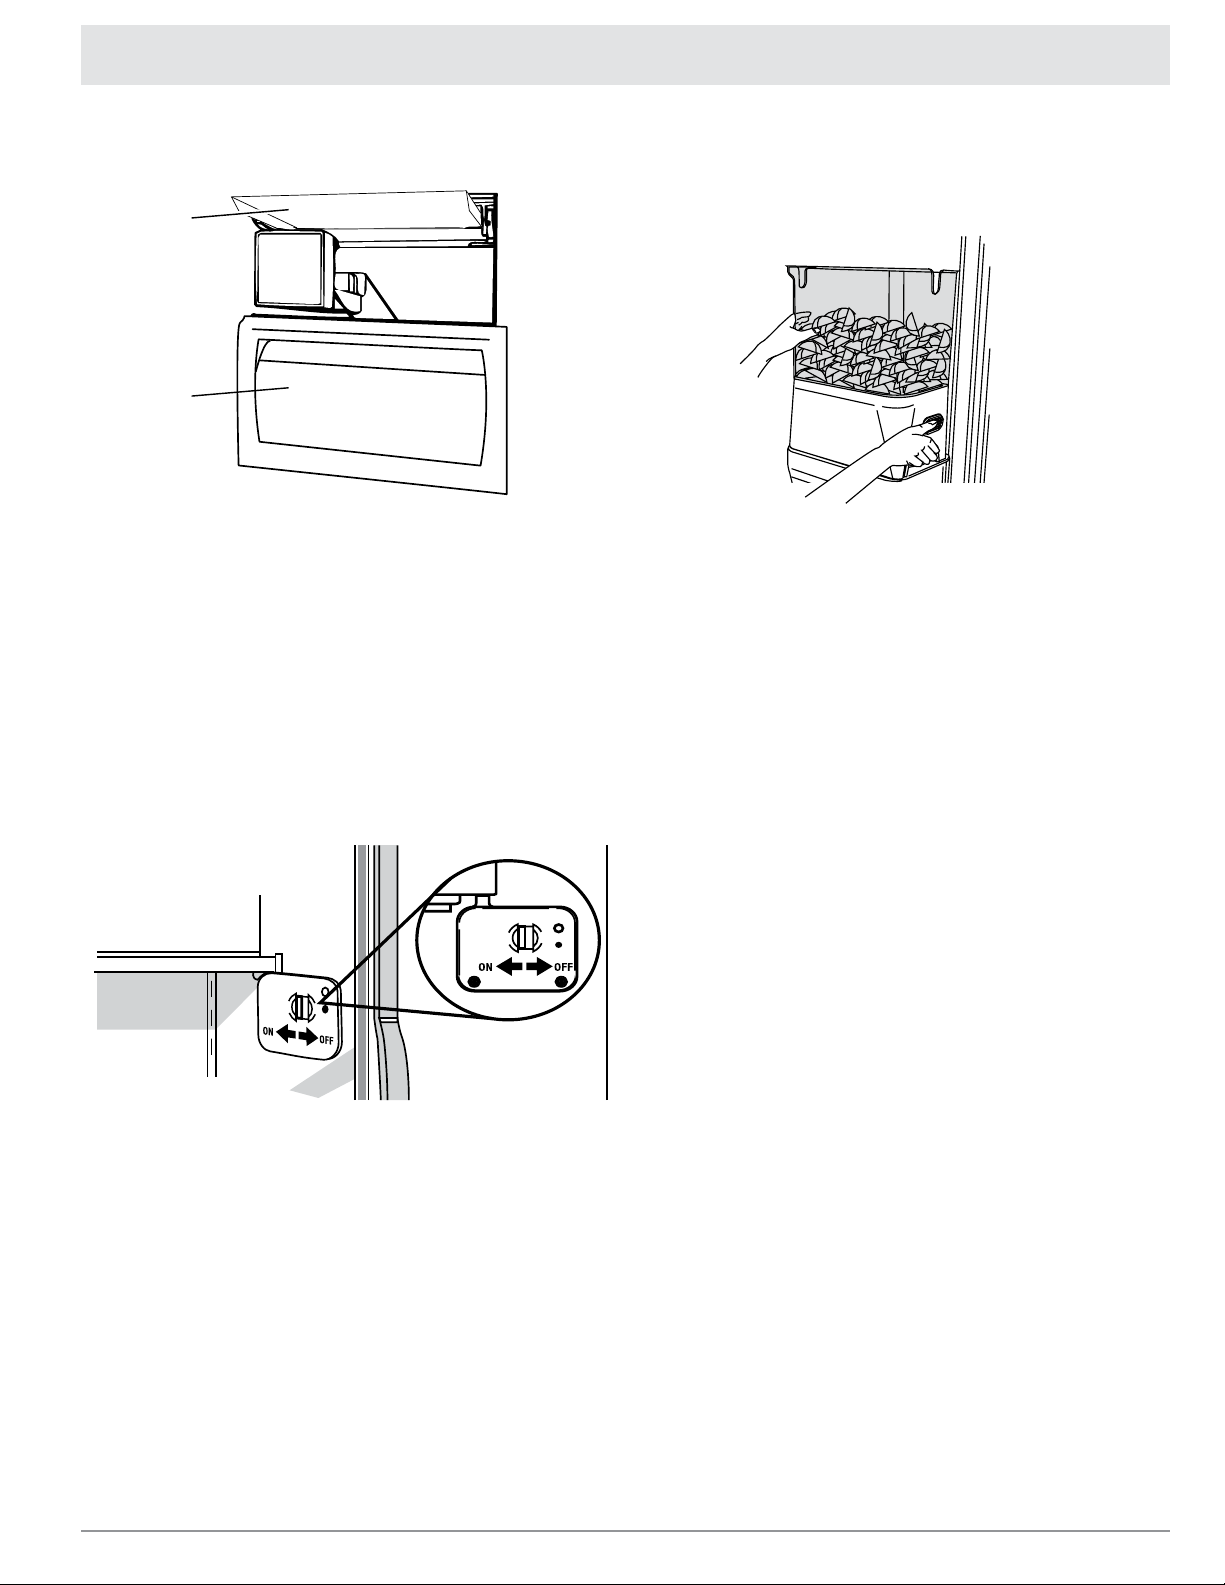
Ice Maker and Storage Bin
Non-Dispensing Models
To Turn the Ice Maker On or Off:
The On/Off switch for the ice maker is a wire shutoff arm located
on the side of the ice maker.
To turn the ice maker on, lift the ice maker cover, then lower 1.
the wire shutoff arm.
NOTE: Your ice maker has an automatic shutoff. As ice
is made, the ice cubes will fill the ice storage bin and the
ice cubes will raise the wire shutoff arm to the off (arm up)
position.
To manually turn the ice maker off, lift the wire shutoff arm to 2.
the off (arm up) position and listen for the click to make sure
the ice maker will not continue to operate.
8
Page 11
Refrigerator Operation
A
B
A. Ice maker cover
B. Ice bin
Ice Maker
To Remove and Replace the Ice Bin (non-dispensing
models):
Flip up the ice maker cover.1.
Lift the wire shutoff arm so it clicks into the off (up) position. 2.
Ice can still be dispensed, but no more can be made.
Lift up the front of the storage bin and pull the ice bin forward.3.
Replace the bin by pushing it in all the way or the dispenser 4.
will not work. Push the wire shutoff arm down to the on
position to restart ice production. Make sure the door is closed
tightly.
Dispensing Models
To Turn the Ice Maker On/Off:
The On/Off switch is located on the top right side of the freezer 1.
compartment.
To turn the ice maker on, slide the control to the 2. ON (left)
position.
NOTE: Your ice maker has an automatic shutoff. The ice
maker sensors will automatically stop ice production, but the
control will remain in the ON (left) position.
To manually turn the ice maker off, slide the control to the 3. OFF
(right) position.
To Remove and Replace the Ice Storage Bin
(dispensing models):
Hold the base of the storage bin (located on the back of the 1.
freezer door) with both hands and press the release button to
lift the storage bin up and out.
NOTE: It is not necessary to turn the ice maker control to
the OFF (right) position when removing the storage bin. The
sensor cover (“flipper door”) on the left wall of the freezer
stops the ice maker from producing ice if the door is open or
the storage bin is removed.
Replace the storage bin on the door and push down to make 2.
sure it is securely in place.
Clean the Ice Storage Bin
Empty the ice container. Use warm water to melt the ice if 1.
necessary.
NOTE: Do not use anything sharp to break up the ice in the
bin or bucket. This can cause damage to the ice container and
the dispenser mechanism.
Wash ice bin with a mild detergent, rinse well and dry 2.
thoroughly. Do not use harsh or abrasive cleaners or solvents.
IMPORTANT:
Allow 24 hours to produce the first batch of ice. Allow 3 days
to completely fill ice container. Discard the first three batches
of ice produced to avoid impurities that may be flushed out of
the system.
The quality of your ice will be only as good as the quality of
the water supplied to your ice maker.
Avoid connecting the ice maker to a softened water supply.
Water softener chemicals (such as salt) can damage parts of
the ice maker and lead to poor quality ice. If a softened water
supply cannot be avoided, make sure the water softener is
operating properly and is well maintained.
It is normal for the ice cubes to be attached at the corners.
They will break apart easily.
For non-dispensing models, do not force the ice maker wire
shutoff arm up or down.
Do not store anything on top of the ice maker or in the ice
storage bin/bucket.
9
Page 12
Refrigerator Operation
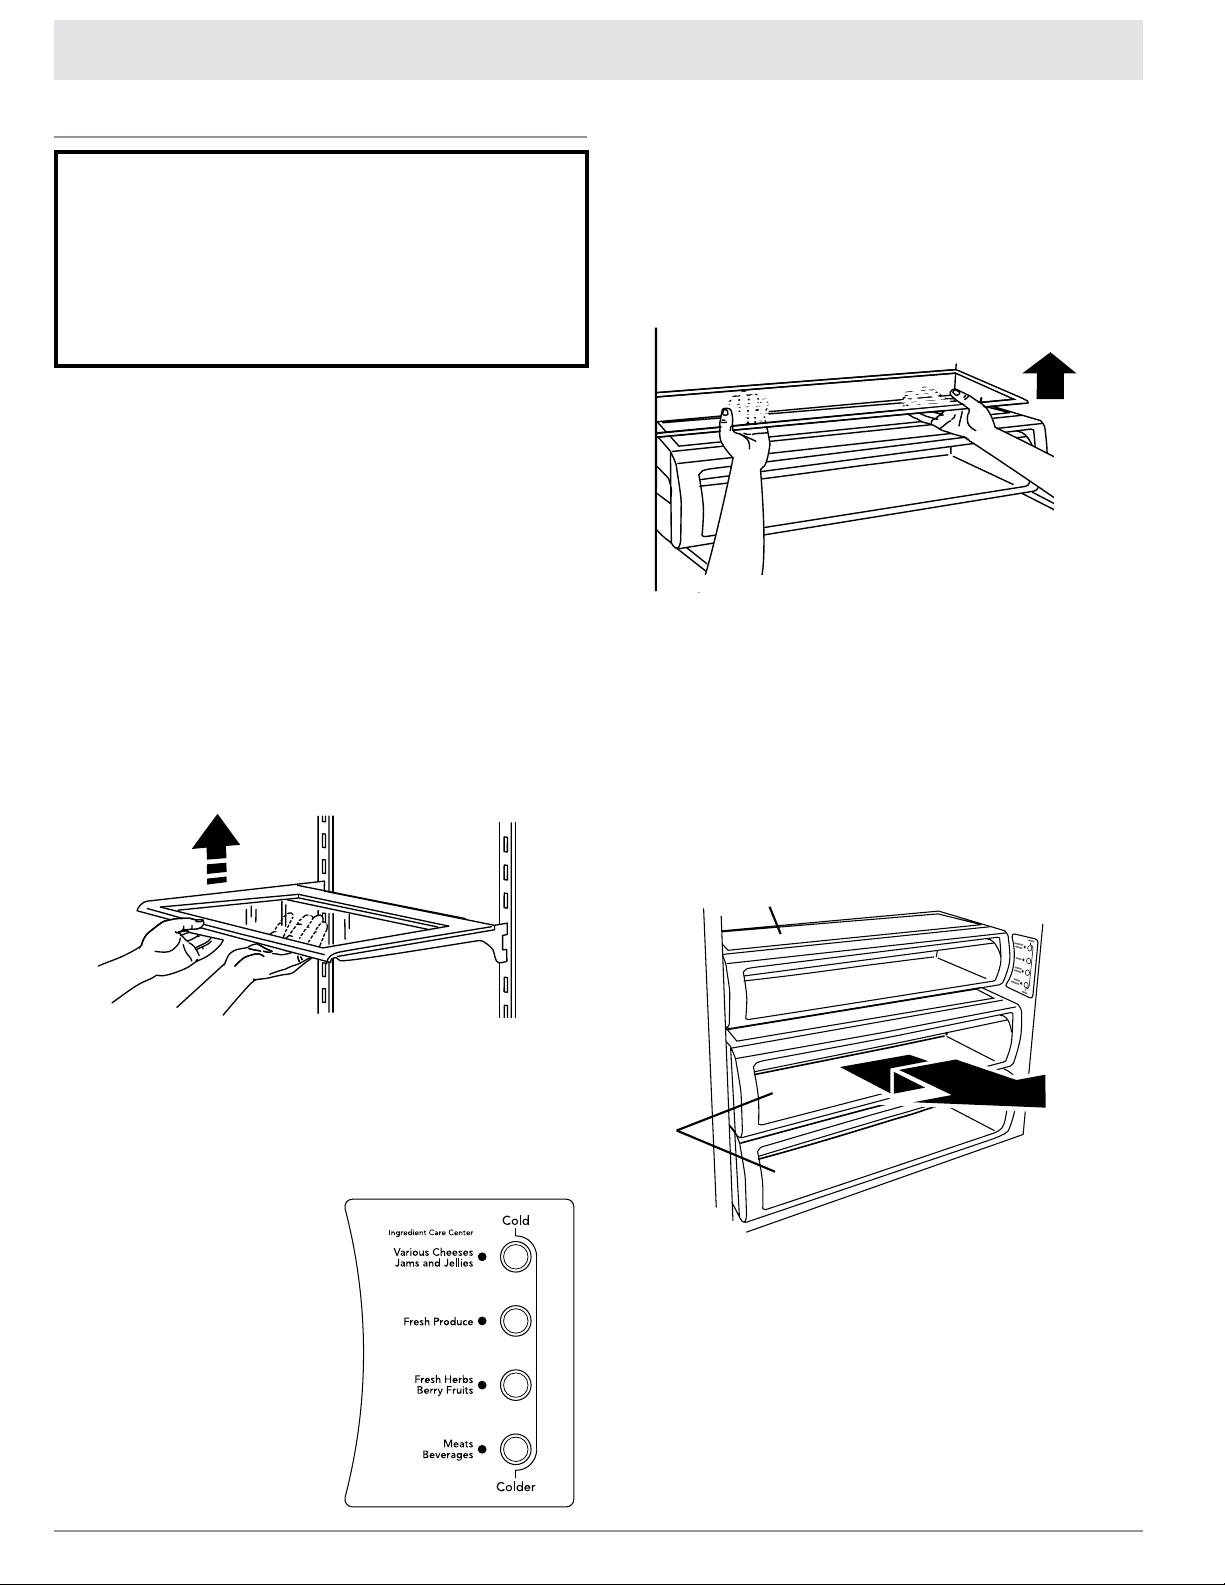
A. Ingredient care center
B. Crispers
B
A
Refrigerator Storage
Important information to know about glass shelves and
covers:
Do not clean glass shelves or covers with warm water when
they are cold. Shelves and covers may break if exposed to
sudden temperature changes or impact, such as bumping.
For your protection, tempered glass is designed to shatter into
many small, pebble-size pieces. This is normal. Glass shelves
and covers are heavy. Use special care when removing them to
avoid impact from dropping.
The shelves and compartments in your refrigerator are adjustable
and/or removable to meet your individual storage needs and to
make them easier to clean.
Storing similar food items together in your refrigerator and
adjusting the shelves compartments to fit different heights of
items will make finding the exact item you want easier. It will also
reduce the amount of time the refrigerator door is open, and help
save energy.
Shelves and Shelf Frames
To remove and replace a shelf/frame:
Remove the shelf/frame by tilting it up at the front and lifting it 1.
out of the shelf supports. Pull the shelf straight out.
Replace the shelf/frame by guiding the rear shelf hooks into 2.
the shelf supports. Tilt the front of the shelf up until the rear
shelf hooks drop into the shelf supports.
Lower the front of the shelf and check to make sure that the 3.
shelf is securely in position.
Remove and Replace the Ingredient Care Center Cover:
Remove food from ingredient care center cover. Pull drawer 1.
out about 4” (10.16 cm). Reach under the glass shelf with both
hands and lift gently upward until back of shelf is free. Tilt shelf
at an angle and remove shelf from refrigerator being careful
not to bump the glass.
Replace the cover by holding the glass shelf firmly with both 2.
hands, tilt the shelf at an angle and position it above the
support rails. Place shelf gently on support rails on side wall.
Crispers and Covers
To remove and replace the crispers:
Slide the crisper drawer straight out to the stop. Lift the front 1.
of the drawer with one hand while supporting the bottom of the
drawer with your other hand and slide the drawer out the rest
of the way.
To replace the crisper drawer, place the drawer onto slides 2.
and push the drawer back until securely in position.
Carefully test the crisper drawer to make sure it has been 3.
replaced properly.
Ingredient Care Center)
The control for the ingredient care center (see location in diagram
at right) adjusts the storage temperature of the ingredient care
center pan. Cold air flows into the pan through the air duct
between the freezer and the refrigerator. Setting the controls
allows more or less cold air through the air duct.
To Adjust the Ingredient
Care Center:
Choose a setting based on the 1.
item to be stored in the pan.
Push the button that 2.
corresponds to that setting.
The indicator light for that 3.
setting will illuminate to verify
that the pan is ready to be
loaded.
To clean the crisper covers:
To clean the top crisper cover, remove the ingredient care center
located above it.
To clean the bottom crisper cover, first remove the top crisper
drawer.
10
Page 13
Refrigerator Operation
Door Utility Bin
The utility bin can be placed in any position on the refrigerator
door.
To remove and replace the utility bin:
Remove the utility bin by grasping both ends and lifting 1.
compartment up and out.
Replace the bin by sliding it in above the desired support and 2.
pushing it down until it stops.
Gallon Door Bin
The adjustable gallon door bin can hold gallon size containers.
To install the gallon door bin:
NOTE: The gallon door bin can only be placed on the lower
support.
Position the gallon door bin above lowest door adjustment slot.1.
Push down to secure it.2.
Adjust other bins, as necessary to allow for milk or beverage 3.
container height.
Fresh Food Storage Information
The fresh food compartment of a refrigerator should be kept
between 34°-40°F (1°-4°C) with an optimum temperature of
37°F (3°C).
Avoid overcrowding the refrigerator shelves. This reduces
the circulation of air around the food and results in uneven
cooling.
Fruits and Vegetables
Storage in the crisper drawers traps humidity to help preserve
the fruit and vegetable quality for longer time periods.
Sort fruits and vegetables before storage and use bruised or
soft items first. Discard those showing signs of decay.
Always wrap odorous foods such as onions and cabbage so
the odor does not transfer to other foods.
While vegetables need a certain amount of humidity to remain
fresh, too much humidity can shorten storage times (especially
leafy vegetables). Drain vegetables well before storing.
Wait to wash fresh produce until right before use.
Meat and Cheese
Raw meat and poultry should be wrapped securely so leakage
and contamination of other foods or surfaces does not occur.
Occasionally mold will develop on the surface of hard cheeses
(Swiss, Cheddar, Parmesan). In the interest of safety, discard
cheese that is moldy.
Dairy Food
Most dairy foods such as milk, yogurt, sour cream and cottage
cheese have freshness dates on their cartons for appropriate
length of storage. Store these foods in the original carton and
refrigerate immediately after purchasing and after each use.
Standard Door Bins
The adjustable standard door bins can hold 2-liter bottles.
To remove and replace the door bins:
Remove the bin by lifting it up and pulling it out.1.
Replace the bin by sliding it in above the desired support and 2.
pushing it down until it stops.
Freezer Storage
Freezer Shelf
To remove and replace the shelf:
Remove the shelf by lifting it up and pulling it straight out.1.
Replace the shelf by putting it over the supports and lowering 2.
it into place.
11
Page 14
Refrigerator Operation
Freezer Baskets
The freezer baskets can be used to store bags of frozen fruits and
vegetables that may slide off freezer shelves.
To remove and replace a freezer basket:
Pull the basket straight out to the stop.1.
Lift the front of the basket and slide it out the rest of the way.2.
Replace the basket by positioning it on the side wall guide 3.
rails. Lift the basket front slightly while pushing it past the
guide rail stops and slide basket in the rest of the way.
Frozen Food Storage Information
The freezer compartment of a refrigerator should be kept at
approximately 0°F (-18°C).
A freezer operates more efficiently when it is at least two-thirds
full.
Packaging Foods for Freezing
To minimize dehydration and quality deterioration use
aluminum foil, freezer wrap, freezer bags or airtight containers.
Force as much air out of the packages as possible and be
sure they are tightly sealed. Trapped air can cause the food to
dry out, change color and develop an off-flavor (freezer burn).
Wrap fresh meats and poultry with suitable freezer wrap prior
to freezing.
Do not refreeze meat that has completely thawed.
Loading the Freezer
Avoid adding too much warm food to the freezer at one time.
This overloads the freezer, slows the rate of freezing and can
raise the temperature of frozen foods.
Leave space between the packages so cold air can circulate
freely, allowing food to freeze as quickly as possible.
Avoid storing hard-to-freeze foods such as ice cream and
orange juice on the freezer door shelves. These foods are
best stored in the freezer interior where the temperature varies
less with door openings.
Power Interruptions
If the power will be out for 24 hours or less, keep the door or
doors closed to help food stay cold and frozen.
If the power will be out for more than 24 hours, do one of the
following:
Remove all frozen food and store it in a frozen food locker.
Place 2 lbs (907 g) of dry ice in the freezer for every cubic foot
(28 L) of freezer space. This will keep the food frozen for 2 to
4 days.
If neither a food locker nor dry ice is available, consume or
can perishable food at once.
IMPORTANT: A full freezer stays cold longer than a partially filled
one. A freezer full of meat stays cold longer than a freezer full of
baked goods. If you see that food contains ice crystals, it may be
refrozen, although the quality and flavor may be affected. If the
condition of the food is poor, dispose of it.
Vacation Care
Your refrigerator is equipped with the Holiday mode, which is
designed for the traveler who wishes to turn off the lights and
ice maker. By selecting this feature, the temperature settings
remain unchanged, the ice maker will be disabled and the interior
lights will turn off. For most efficient refrigerator operation, it is
recommended to exit the Holiday mode when it is no longer
required.
If You Choose to Leave the Refrigerator On While
You’re Away:
Use up any perishables and freeze other items.1.
Press the 2. HOLIDAY key.
If your refrigerator has an automatic ice maker, 3.
shut off water supply to the ice maker.
Empty the ice bin.4.
When you return from vacation, press the 5.
HOLIDAY key to return to normal operation.
If You Choose to Turn the Refrigerator Off Before You
Leave:
Remove all food from the refrigerator.1.
If your refrigerator has an automatic ice maker:2.
Turn off the water supply to the ice maker at least one day
ahead of time.
When the last load of ice drops, raise the wire shutoff arm
to the OFF (up) position.
3. Turn the power off. See Turning the Refrigerator
On or Off on page 5.
4. Clean refrigerator, wipe it, and dry well.
5. Tape rubber or wood blocks to the tops of both
doors to prop them open far enough for air to get
in. This stops odor and mold from building up.
12
Page 15
Care and Cleaning
A. Dispenser Light
A
B. Light shield
B
WARNING
Explosion Hazard
Use nonflammable cleaner.
Failure to do so can result in death, explosion, or fire.
Cleaning
Important information to know about glass shelves and
covers:
Do not clean glass shelves or covers with warm water when
they are cold. Shelves and covers may break if exposed to
sudden temperature changes or impact, such as bumping.
For your protection, tempered glass is designed to shatter into
many small, pebble-size pieces. This is normal. Glass shelves
and covers are heavy. Use special care when removing them to
avoid impact from dropping.
Both the refrigerator and freezer sections defrost automatically.
However, clean both compartments about once a month to avoid
build-up of odors. Wipe up spills immediately.
To Clean Your Refrigerator:
Remove the top grille and turn off the main power switch. See 1.
Turning the Main Power Switch On/Off on page 3.
Remove all removable parts from inside, such as shelves, 2.
crispers, etc.
Hand wash, rinse, and dry removable parts and interior 3.
surfaces thoroughly. Use a clean sponge or soft cloth and a
mild detergent in warm water.
Do not use abrasive or harsh cleaners such as window
sprays, scouring cleansers, flammable fluids, cleaning
waxes, concentrated detergents, bleaches or cleansers
containing petroleum products on plastic parts, interior and
door liners or gaskets. Do not use paper towels, scouring
pads or other harsh cleaning tools. These items can scratch
or cause damage.
To help remove odors, you can wash interior walls with a
mixture of warm water and baking soda (2 tbs to 1 qt [26 g
to 0.95 L] of water).
Wash stainless steel and painted metal exteriors with a clean 4.
sponge or soft cloth and a mild detergent in warm water. Do
not use abrasive or harsh cleaners, or cleaners containing
chlorine. Dry thoroughly with a soft cloth. For additional
protection against damage to painted metal exteriors, apply
appliance wax (or auto paste wax) with a clean, soft cloth. Do
not wax plastic parts.
NOTE: To keep you stainless steel surfaces looking like new
and to remove minor scuffs or marks, you may use Dacor
Stainless Steel Cleaner. Use it according to the directions on
the bottle.
IMPORTANT: This cleaner is for stainless steel parts only!
Do not allow the Stainless Steel Cleaner and Polish to come
into contact with any plastic parts such as the trim pieces,
dispenser covers or door gaskets. If accidental contact does
occur, clean the plastic part with a sponge and mild detergent
in warm water. Dry thoroughly with a soft cloth.
Clean the condenser coils located behind the top grille 5.
ventilation panel regularly. Coils may need to be cleaned as
often as every other month. This may help save energy. Use
a vacuum cleaner with an extended attachment to clean the
condenser coils when they are dusty or dirty.
Turn the main power switch on and replace the top grille.6.
Changing the Light Bulbs
NOTE: Not all appliance bulbs will fit your refrigerator. Be sure
to replace the bulb with one of the same size and shape. The
dispenser light requires a heavy duty 10-watt bulb. All other lights
require a 40-watt maximum appliance bulb. Replacement bulbs
are available from your Dacor dealer or appliance store.
Remove the top grille and turn off the main power switch. See 1.
Turning the Main Power Switch On/Off on page 3.
Remove light shield when applicable as shown.2.
NOTE: To clean a light shield, wash it with warm water and a
liquid detergent. Rinse and dry the shield well.
Remove light bulb and replace with one of the same size, 3.
shape and wattage.
Replace light shield when applicable as shown.4.
Turn the main power switch on and replace the top grille.5.
Dispenser Light (dispensing
models only)
Reach through the dispenser area
to remove and replace light bulb.
Refrigerator Control Panel Lights
Use a ¼” hex nut-driver to remove and replace the light shield.
Freezer and Crisper Lights
Remove the light shield by grasping the top and bottom and
squeezing in toward the center. Once the hooks on the shield
are free from the freezer or crisper
lining, remove the shield.
Replace the light shield by
squeezing the top and bottom
toward the center and inserting the
hooks into the slotted holes.
13
Page 16

Care and Cleaning
WATER FILTER
CERTIFICATIONS
Replacing the Water Filter
Do not use with water that is microbiologically unsafe or of
unknown quality without adequate disinfection before or after
the system. Systems certified for cyst reduction may be used on
disinfected waters that may contain filterable cysts.
Locate the water filter cap in the front base grille. Rotate the 1.
cap counterclockwise to a vertical position and pull the cap
and filter cartridge out through the base grille.
NOTE: There will be water in the filter. Some spilling may
occur.
Remove the cap by sliding it off the end of the used filter. The 2.
cap will slide to the left or right.
IMPORTANT: Do not discard the cap. It is part of your
refrigerator. Keep the cap to use with the replacement filter.
Flushing the Water System After Replacing Filter
Use a sturdy container to depress the water dispenser bar until
the water begins to flow. Flush the water system by dispensing
and discarding 6 qt (5.7 L) of water. Cleaning the system will take
approximately 3 to 4 minutes and will help clear air from the line.
Additional flushing may be required in some households.
NOTE: As air is cleared from the system, water may spurt out of
the dispenser.
Take the new water filter out of its packaging and remove the 3.
protective cover from the O-rings. Discard the protective cover.
Slide the cap (removed in Step 2) onto the new filter. See 4.
illustration in Step 2.
With cap in the vertical position, push the new water filter into 5.
the base grille until it stops. Rotate the cap clockwise to a
horizontal position. Flush the water system. See Flushing the
Water System After Replacing Filter.
Using the Dispenser Without the Water Filter
You can run the dispenser without a water filter. Your water will
not be filtered.
Remove the water filter.1.
Slide the cap off the end of the filter.2.
With the cap in the vertical position, insert the cap into the 3.
base grille until it stops.
IMPORTANT: Do not discard the cap. It is part of your
refrigerator. Keep the cap to use with the replacement filter.
Rotate the cap to a horizontal position. The cap might not be 4.
even with the base grille.
14
Page 17

Troubleshooting
Electrical Shock Hazard
Plug into a grounded 3 prong outlet.
Do not remove ground prong.
Do not use an adapter.
Do not use an extension cord.
Failure to follow these instructions can result in death,
fire, or electrical shock.
WARNING
Try the solutions suggested here first in order to avoid the cost of an unnecessary service call.
Refrigerator will not operate
Is the power supply cord unplugged? Plug into a
grounded 3 prong outlet.
Has a household fuse or circuit breaker tripped? Replace
the fuse or reset the circuit breaker.
Is the refrigerator or freezer control turned to the OFF
position? See Setting the Controls on page 5.
Is the refrigerator defrosting? Re-check to see if the
refrigerator is operating in 30 minutes. Your refrigerator
will regularly run an automatic defrost cycle.
Temperature is too warm
Are the air vents blocked in either compartment? Blocked
air vents obstruct cold air movement between the
compartments. Remove any objects from in front of the air
vents. See Ensuring Proper Air Circulation on page 5.
Are the door(s) opened often? The refrigerator will warm
when this occurs. Keep the refrigerator cool by getting all
items out at one time, keeping food organized, and closing
the door as soon as possible.
Has a large amount of food just been added to the
refrigerator or freezer? Adding a large amount of food
warms the refrigerator. It can take several hours for the
refrigerator to return to the normal temperature.
Are the controls set correctly for the surrounding
conditions? See Setting the Controls on page 5.
Is the refrigerator not cooling? Turn the unit OFF then ON
again to reset. See Setting the Controls on page 5. If the
problem is not corrected, call for service.
The lights do not work
Is a light bulb loose in the socket or burned out? See
Changing the Light Bulbs on page 13.
Has the door been open more than 10 minutes? When
the door is held open for more than 10 minutes, the Door
Open indicator light will flash and the interior lights will
shut off. See Door Open on page 7.
Is the refrigerator in Holiday mode? See Holiday Mode on
page 7.
The refrigerator seems to make too much
noise
The sounds may be normal for your refrigerator. See
Normal Operating Sounds on page 5.
The motor seems to run too much
Is the room temperature hotter than normal? The motor
will run longer under warm conditions. At normal room
temperatures, expect your motor to run about 80% of the
time. Under warmer conditions, it will run even more.
Has a large amount of food just been added to the
refrigerator? Adding a large amount of food warms the
refrigerator. The motor normally will run longer to cool the
refrigerator back down.
Are the doors opened often? If so, the motor will run
longer. Conserve energy by getting all items out at one
time, keeping food organized, and closing the door as
soon as possible.
Are the controls not set correctly for the surrounding
conditions? See Setting the Controls on page 5.
Are the doors not closed completely? Close the doors
firmly. If they do not close completely, see The doors will
not close completely in this section.
Are the condenser coils dirty? This obstructs air transfer
and makes the motor work harder. Clean the condenser
coils. Refer to the Care and Cleaning section.
Are the door gaskets not sealed all the way around?
Contact a technician or other qualified person.
NOTE: Your new refrigerator will run longer than your old
one due to its high-efficiency motor.
There is interior moisture buildup
Are the air vents blocked in the refrigerator? Remove any
objects from in front of the air vents. See Ensuring Proper
Air Circulation on page 5.
Are the door(s) opened often? Avoid humidity buildup by
getting all items out at one time, keeping food organized,
and closing the door as soon as possible.
Is the room humid? It is normal for moisture to build up
inside the refrigerator when the room air is humid.
Is the food packaged correctly? Check that all food is
securely wrapped. Wipe off damp food containers before
placing in the refrigerator.
Are the controls set correctly for the surrounding
conditions? See Setting the Controls on page 5.
Was a self-defrost cycle completed? It is normal for
droplets to form after the refrigerator self-defrosts.
Off-taste, odor or gray color in the ice
Are the plumbing connections new, causing discolored or
off-flavored ice? Discard the first few batches of ice.
Have the ice cubes been stored too long? Throw old ice
away and make a new supply.
Does the freezer and ice bin need to be cleaned? See the
Care and Cleaning section or Ice Maker and Storage Bin
on page 8.
15
Page 18

Troubleshooting
Cut Hazard
Use a sturdy glass when dispensing ice.
Failure to do so can result in cuts.
WARNING
Has food in the freezer or refrigerator been wrapped
properly? Use airtight, moisture-proof packaging to avoid
odor transfer from stored food.
Does the water contain minerals (such as sulfur)? A filter
may need to be installed to remove the minerals.
Is there a water filter installed on the refrigerator? Gray or
dark discoloration in ice indicates that the water filtration
system needs additional flushing. Run additional water
through the water dispenser to flush the water filtration
system more thoroughly (at least 6 qt. [5.7 L] or 3 to 4
minutes initially). Discard discolored ice.
The ice maker is not producing ice or not
enough ice
Has the ice maker just been installed? The ice bin holds
14 to 17 lbs (6.4 to 7.7 kg) of ice. The ice bin can take
three to four days to completely fill, if no ice is used.
Is the freezer temperature cold enough to produce ice?
Wait 24 hours after ice maker hookup for ice production.
See Setting the Controls on page 5.
Is the ice maker wire shutoff arm in the off (arm up)
position (on non-dispensing models)? Lower the wire
shutoff arm to the on (arm down) position. See Ice Maker
and Storage Bin in the operation section.
Is the ice maker switch in the OFF (right) position (on
dispensing models)? Move ice maker switch to the
ON (left) position. See Ice Maker and Storage Bin in the
operation section.
Is the water line shutoff valve to the refrigerator turned
on? Turn on the water valve. See Connect Water Supply in
the installation instructions.
Does the ice maker mold have water in it or has no ice
been produced? Make sure your refrigerator has been
connected to a water supply and the supply shutoff valve
is turned on. See Connect Water Supply in the installation
instructions.
Is an ice cube jammed in the ice maker ejector arm? For
models with an interior ice bin, remove the ice from the
ejector arm with a plastic utensil. For models with an ice
bin located on the freezer door, access the ice maker by
depressing the ice sensor door on the upper left side of
the freezer interior. While depressing the sensor door, lift
the ice maker service door and remove the ice from the
ejector with a plastic utensil. See Ice Maker and Storage
Bin in the operation section.
Has a large amount of ice just been removed? Allow three
to four days for an empty ice bin to completely fill, if no
ice is used.
Are the controls set correctly? See Setting the Controls on
page 5.
Is there a water filter installed on the refrigerator? The
filter may be clogged or installed incorrectly. Check the
filter installation instructions to ensure that the filter
was installed correctly and is not clogged. If installation
or clogging is not a problem, call a qualified service
technician.
NOTE: If not due to any of the above, there may be a
problem with the water line. Call for service.
The ice dispenser will not operate properly
If the ice storage bin is located on the door, remove the
temporary shield from underneath the ice storage bin. See
Ice Maker and Storage Bin on page 8.
Is the freezer door closed completely? Push the door
firmly shut. If it will not shut all the way, see The doors will
not close completely in this section.
Is the ice bin installed correctly? For models with an
interior ice bin, push the ice bin in all the way. If the
ice bin does not go in all the way, it may not be put in
straight. Pull it out and try again. For models with an ice
bin located on the freezer door, the bin should sit level. To
remove the bin, press the release button on the right side
of the bin and lift straight up.
Replace the bin in the door making sure it is properly
aligned and snapped securely into place. See Ice Maker
and Storage Bin on page 8.
Has the wrong ice been added to the bin? Use only cubes
produced by the current ice maker. If other cubes have
been added, remove all cubes and check to see that none
have become stuck in the delivery chute.
Has the ice frozen in the ice bin? Shake the ice bin to
separate cubes. If cubes do not separate, empty bin and
wait 24 hours for ice to restock.
Has the ice melted around the auger (metal spiral) in
the ice bin? Dump the ice cubes and clean the ice bin
completely. Allow 24 hours for the ice maker to restock.
Do not try to remove the melted ice with a sharp object.
You could damage the ice bin.
Is ice stuck in the delivery chute? Clear the ice from the
delivery chute with a plastic utensil. Do not use anything
sharp to remove the ice. You could cause damage.
Is the ice dispenser stalling while dispensing “crushed”
ice? Stop dispensing ice. Change the ice button from
“crushed” to “cubed.” Depress the ice dispenser arm
using a sturdy glass. If cubed ice dispenses correctly,
depress the button for “crushed” ice and begin dispensing
again. See Water and Ice Dispensers on page 8.
Is there ice in the bin? See The ice maker is not producing
ice earlier in this section.
Has the dispenser arm been held in too long? Release
dispenser arm. Ice will stop dispensing when the arm is
held in too long. Wait three minutes for dispenser motor to
reset before using again. It is best to take large amounts
of ice directly from the ice bin, not through the dispenser.
16
Page 19

Troubleshooting
Cut Hazard
Use a sturdy glass when dispensing ice.
Failure to do so can result in cuts.
WARNING
The ice storage bin is difficult to remove
Is the ice storage bin difficult to remove (on some
models)? For models with an ice storage bin located on
the freezer door, select “cubed” ice. Using a sturdy glass,
quickly depress and release the ice dispenser lever. Open
the freezer door, depress the release button on the ice
storage bin and lift upward. See Ice Maker and Storage Bin
on page 8.
The water dispenser will not operate properly
Has the water system not filled? The water system needs
to be filled the first time it is used. Use a sturdy container
to depress the water dispenser bar until the water begins
to flow. Flush the water system by dispensing and
discarding 6 qt (5.7 L) of water. Cleaning the system will
take approximately 3 to 4 minutes and will help clear air
from the line. Additional flushing may be required in some
households. See Water and Ice Dispensers on page 8.
Is the water shutoff valve not turned on or the water line
connected at the source? Make sure the water shutoff
valve is turned on and the water source is connected
to the refrigerator. See Connect Water Supply in the
installation instructions.
Is the water shutoff valve clogged or incorrectly installed?
See Connect Water Supply in the installation instructions.
If clogging or installation is not a problem, call for service
or contact a plumber.
Is there a kink in the home water source line? If you find
or suspect a kink in the water line, call for service.
Is there a water filter installed on the refrigerator? The
filter may be clogged or incorrectly installed. First, check
the filter installation instructions to ensure that the filter
was installed correctly and is not clogged. If installation or
clogging is not a problem, call for service.
Water is leaking from the dispenser
Glass not being held under the dispenser long enough?
Hold the glass under the dispenser 2 to 3 seconds after
releasing the dispenser lever.
Is there a water filter installed on the refrigerator? The
water filtration system may have air in the lines, causing
water to drip. Additional flushing may help clear air from
the lines. Normal dispenser use should flush air from the
lines within 24 to 72 hours.
Water flow from the dispenser decreases
noticeably
Is there a water filter installed on the refrigerator? The
filter may be full or incorrectly installed. Remove the water
filter cartridge. See Replacing the Water Filter on page
14. Operate the dispenser. If the water flow increases
noticeably, replace the filter.
The doors will not close completely
Are food packages blocking the door open? Rearrange
containers so that they fit more tightly and take up less
space.
Is the ice bin out of position? For models with an interior
ice bin, push the ice bin in all the way. If the ice bin does
not go in all the way, it may not be put in straight. Pull it
out and try again. For models with an ice bin located on
the freezer door, the bin should sit level. To remove the
bin, press the release button on the right side of the bin
and lift straight up. Replace the bin in the door making
sure it is properly aligned and snapped securely into
place. See Ice Maker and Storage Bin on page 8.
Are the pans, shelves, bins, or baskets out of position?
Put the crisper cover and all pans, shelves, bins, and
baskets back into their correct positions. See Crisper and
Covers on page 10.
Does the refrigerator wobble or seem unstable? Level the
refrigerator. See Adjust Doors and Level Refrigerator in the
installation instructions.
The doors are difficult to open
Are the gaskets dirty or sticky? Clean gaskets according
to the directions in the Care and Cleaning section.
The dispenser water is not cool enough
Has the refrigerator been newly installed? Allow 24 hours
for the refrigerator to cool completely.
Has a large amount of water been recently dispensed?
Allow 24 hours for the water to cool completely.
Has water not been recently dispensed? The first glass of
water may not be cool. Discard the first glass of water.
The divider between the two compartments is warm.
The warmth is probably due to normal operation of the
automatic exterior moisture control. If still concerned, call
for service.
17
Page 20

Product Data Sheets
Base Grille Water Filtration System (Water Filter)
Model WF-LC400V/LC400V Capacity 400 Gallons (1514 Liters)
Tested and certified by NSF International against ANSI/NSF Standard 42 for
the reduction of Chlorine Taste and Odor, Particulate Class I*; and against
ANSI/NSF Standard 53 for the reduction of Lead, Mercury, Atrazine, Benzene,
Toxaphene, p-dichlorobenzene, 2, 4-D, Cysts, Turbidity and Asbestos.
This system has been tested according to ANSI/NSF 42/53 for the reduction of the substances listed below. The concentration of the
indicated substances in water entering the system was reduced to a concentration less than or equal to the permissible limit for water
leaving the system, as specified in ANSI/NSF 42/53.
Substance Reduction
Aesthetic Effects
Chlorine Taste/Odor
Particulate Class 1*
Contaminant
Reduction
Lead: @ pH 6.5
Lead: @ pH 8.5
Mercury: @ pH 6.5
Mercury: @ pH 8.5
Benzene 0.005 mg/L 0.0162 mg/L 0.015 ± 10% 0.0005 mg/L 0.001 mg/L 96.3% 96.3%
p-dichlorobenzene 0.075 mg/L 0.220 mg/L 0.225 ± 10% 0.0005 mg/L 0.0005 mg/L 99.7% 99.7%
Toxaphene 0.003 mg/L 0.014 mg/L 0.015 ± 10% 0.0014 mg/L 0.001 mg/L 90% 92.96%
Atrazine 0.003 mg/L 0.0086 mg/L 0.009 mg/L ± 10% 0.0005 mg/L 0.0005 mg/L 94.25% 94.25%
2, 4-D 0.07 mg/L 0.197 mg/L 0.210 ± 10% 0.058 mg/L 0.0137 mg/L 70.6% 93.06%
Asbestos 99% 26 x 107 107 to 108 fibers/L†† 0.18 x 10⁷ mg/L 0.18 x 10⁷ mg/L 99.93% 99.93%
Cysts‡
Turbidity
NSF Reduction
Requirements
≥50%
≥85%
NSF Reduction
Requirements
0.01mg/L
0.01mg/L
0.002 mg/L
0.002 mg/L
99.95%
0.5 NTU
Average
Influent
2.1 mg/L
5,366,667/mL
Average
Influent
0.152 mg/L†
0.143 mg/L†
0.0061 mg/L
0.0057 mg/L
111,000/mL
11.00 NTU
Influent Challenge
Concentration
2.0 mg/L ± 10%
At least 10,000
particles/mL
Influent Challenge
Concentration
0.15 mg/L ± 10%
0.15 mg/L ± 10%
0.006 mg/L ± 10%
0.0058 mg/L ± 10%
50,000/L min.
11 ± 1 NTU
Maximum
Effluent
0.06 mg/L
4,100/mL**
Maximum
Effluent
0.001 mg/L
0.001 mg/L
0.0004 mg/L
0.0008 mg/L
1 mg/L
0.40 NTU
Average
Effluent
0.05 mg/L
2,300/mL
Average
Effluent
0.001 mg/L
0.001 mg/L
0.0003 mg/L
0.00051 mg/L
1 mg/L
0.35 NTU
Minimum %
Reduction
97.1%
99.3%
Minimum %
Reduction
99.34%
99.30%
93.5%
85.8%
99.99%
96.4%
Average %
Reduction
97.6%
99.9%
Average %
Reduction
99.34%
99.30%
96.7%
91.2%
99.99%
96.8%
Test Parameters: pH = 7.5 ± 0.5 unless otherwise noted. Flow = 0.5 gpm (1.9 Lpm). Pressure = 60 psig (413.7 kPa). Temp. = 63°F
(17.2°C).
It is essential that operational, maintenance, and filter
replacement requirements be carried out for the product to
perform as advertised.
Model WF-LC400V The filter monitor system measures the
amount of water that passes through the filter and alerts you
to replace the filter. When 90% of the filter’s rated life is used,
the filter indicator light changes from green to yellow. When
Application Guidelines/Water Supply Parameters
Water Supply City or Well
Water Pressure 30 - 120 psi (207 - 827 kPa)
Water Temperature 33° - 100°F (0.6° - 37.8°C)
Service Flow Rate 0.5 GPM (1.89 L/min.) @ 60 psi.
100% of the filter’s rated life is used, the filter indicator light
changes from yellow to red, and it is recommended that you
replace the filter.
The product is for cold water use only.
Do not use with water that is microbiologically unsafe or of
unknown quality without adequate disinfection before or after
the system. Systems certified for cyst reduction may be used
on disinfected waters that may contain filterable cysts.
* Class I particle size: >0.5 to <1 um
** Test requirement is at least 100,000 particles/mL of AC Fine Test Dust.
† These contaminants are not necessarily in your water supply. Performance may vary based on local water conditions.
†† Fibers greater than 10 um in length
‡ Based on the use of Cryptosporidium parvum oocysts
® NSF is a registered trademark of NSF International.
18
Page 21

Warranty and Service
Product Maintenance
Do not perform any maintenance other than that instructed in the
Care and Cleaning section of this manual. A qualified service
technician should perform all other service.
Getting Help
Before you obtain service, please review the Troubleshooting
section of this manual. If you have performed the checks in the
Troubleshooting section and the problem has not yet been
remedied, please visit our web site or contact the Dacor Customer
Service Team for a listing of Dacor authorized service agents.
Before requesting service, become familiar with the warranty
terms and conditions on this page.
Contact us through our web site at:
www.Dacor.com
Dacor Customer Service Team:
Tel: (800) 793-0093
Fax: (626) 403-3130
Business Hours: 6:00 a.m. - 5:00 p.m. Pacific Time
You may also write us at:
Dacor Customer Service Team
1440 Bridge Gate Drive
Diamond Bar, CA 91765
At Dacor, we believe that our quality of service equals that of
our product. Should your experience with our service network
or product be different, please contact our Customer Service
Team and share your encounter with us. We will do our utmost to
resolve the situation for you and deliver on our Dacor promise. If
you need anything clarified, just let us know.
What is Covered
CERTIFICATE OF WARRANTIES DACOR REFRIGERATORS
WITHIN THE FIFTY STATES OF THE U.S.A., THE DISTRICT OF
COLUMBIA AND CANADA*:
FULL ONE YEAR WARRANTY
One (1) year - From the date of original retail purchase, any part
that fails in normal home use will be repaired or replaced free of
charge. Ice maker - When purchased with the refrigerator and
installed by the dealer the ice maker will be considered part of the
refrigerator for warranty purposes.
LIMITED WARRANTY
Major Refrigeration Components
Second Through Fifth Year - After the first year from the date
of original purchase, through the fifth year, Dacor will repair
or replace, at its option, free of charge for parts and labor
only, any part of the sealed refrigeration system (consisting of
the compressor, evaporator, condenser, drier and connecting
tubing) and the cabinet liner (exclusive of the door liner) which
fail in normal home use. All other costs, including mileage,
transportation, trip charge and diagnostic charge, if required, shall
be the responsibility of the owner.
LIMITED WARRANTY
Water Filter, if equipped
30 days - From the original retail purchase date, any part of the
water filter cartridge which fails due to a defect in workmanship or
materials will be replaced free of charge.
LIMITED WARRANTY
Other Parts
Second Year - Parts other than major refrigeration components
which fail in normal home use during the second year following
the date of original retail purchase will be repaired or provided
free of charge for the part itself, with the owner paying all other
costs, including labor, mileage, transportation, trip charge and
diagnostic charge, if required.
NOTE
The full warranty and the limited warranties apply when
the refrigerator is located in the United States or Canada.
Refrigerators located elsewhere are covered by the limited
warranties only including parts that fail during the first year.
CANADIAN RESIDENTS
The above warranties only cover an appliance installed in Canada
that has been certified or listed by appropriate test agencies
for compliance to a National Standard of Canada unless the
appliance was brought into Canada due to transfer of residence
from the United States to Canada.
LIMITATIONS OF LIABILITY
The warrantor shall not be liable for any incidental or
consequential damages, including food loss. Some states do not
allow the exclusion or limitation of consequential damages, so the
above limitation or exclusion may not apply to you.
What is Not Covered
Conditions and damages resulting from any of the following:1.
Improper installation, delivery, or maintenance.
Any repair, modification, alteration, or adjustment not
authorized by the manufacturer or an authorized servicer.
Misuse, abuse, accidents, or unreasonable use.
Incorrect electric current, voltage, or supply.
Improper setting of any control.
Warranties are void if the original serial numbers have been 2.
removed, altered or cannot be readily determined.
Light bulbs.3.
Products purchased for commercial or industrial use.4.
The cost of service or service call to:5.
Correct installation errors.
Instruct the user on the proper use of the product.
Transport the appliance to the servicer.
Consequential or incidental damages sustained by any person 6.
as a result of any breach of these warranties. Some states
do not allow the exclusion or limitation of consequential or
incidental damages, so the above exclusion may not apply.
19
Page 22

Notes
20
Page 23

MANUEL D’UTILISATION ET D’ENTRETIEN
RÉFRIGÉRATEURS ENCASTRÉS DE 42” ET 48”
Pour utilisation avec les modèles:
EF42DBSS, EF42NBSS, EF48DBSS, EF48NBSS
IF42DBOL, IF42NBOL, IF48DBOL, IF48NBOL
Le style varie
Modèle EF42DBSS illustré
Table des matières
Instructions importantes de sécurité ................................23
Renseignements importants ..........................................24
Identification du modèle ............................................... 24
Avant l’utilisation..........................................................25
Fonctionnement du réfrigérateur ................................ 25-35
Entretien et nettoyage .............................................. 36-38
Dépannage ............................................................ 39-41
Feuilles de données sur le produit ..................................42
Garantie et service .......................................................43
Notes ......................................................................... 44
Page 24

Chère cliente, cher client:
Félicitations pour votre achat de l’un des tout derniers produits Dacor
®
! Notre combinaison de caractéristiques, de
style et de rendement font de nous The Life of the Kitchen
™
(La vie de la cuisine) et un produit qui embellit votre
intérieur.
Afin de vous familiariser avec les commandes, les fonctions et tout le potentiel de votre nouvel appareil, nous vous
suggérons de lire attentivement le présent Manuel d’utilisation et d’entretien, en commençant par la section
Instructions importantes de sécurité.
Tous les appareils ménagers Dacor sont conçus et fabriqués avec qualité et fierté, deux mots qui caractérisent les
valeurs de notre compagnie. Pour tout problème avec votre produit, veuillez d'abord consulter la section Avant de
demander une réparation du présent guide. Vous y trouverez des suggestions et solutions utiles qui pourront vous
éviter une réparation.
Les commentaires de nos clients nous aident à constamment améliorer nos produits et services alors n’hésitez pas à
communiquer avec notre équipe du service à la clientèle pour tous vos besoins liés au support technique.
Équipe de service à la clientèle Dacor
1440 Bridge Gate Drive
Diamond Bar, CA 91765
Téléphone: (800) 793-0093
Télécopieur: (626) 403-3130
Heures d’ouverture: Du Lundi au Vendredi
De 6 h à 17 h, heure normale du Pacifique
Site Web: www.Dacor.com
Merci d’avoir choisi Dacor pour votre domicile. Nous sommes une compagnie construite par des familles pour les
familles et nous nous engageons à servir la vôtre. Nous sommes convaincus que votre nouveau produit Dacor
fournira un haut niveau de rendement et vous donnera entière satisfaction pour les nombreuses années à venir.
Sincères salutations,
Cheryl Crowe
Directrice, Satisfaction de la Clientèle
Page 25

Importantes instructions de sécurité
CONSERVEZ CES INSTRUCTIONS
Mise au rebut du réfrigérateur –
méthode appropriée
IMPORTANT: L’emprisonnement et l’étouffement des enfants
ne sont pas un problème du passé. Les réfrigérateurs jetés ou
abandonnés sont encore dangereux, même s’ils sont abandonnés
pendant «quelques jours seulement». Si vous vous débarrassez
de votre vieux réfrigérateur, veuillez suivre les instructions
ci-dessous pour aider à éviter les accidents.
Avant de jeter votre vieux réfrigérateur ou congélateur :
Enlever les portes.
Laisser les tablettes en place de sorte que les enfants ne
puissent pas y pénétrer facilement.
23
Page 26

Renseignements importants
Installateur: Veuillez laisser ce guide avec l’appareil.
Client: Veuillez lire et conserver ce manuel d’utilisation et
d’entretien pour référence ultérieure. Ce guide donne des
informations sur l’utilisation et l’entretien corrects. Conservez
ce guide et le reçu de vente et/ou un chèque annulé en lieu
sûr pour référence ultérieure. Une preuve de la date d’achat
original est nécessaire pour le service sous garantie.
Si vous avez des questions, appelez :
Équipe de service à la clientèle Dacor
1-800-793-0093 (É.-U. et Canada)
Du lundi au vendredi, de 6 h à 17 h, heure du Pacifique
Site web: www.Dacor.com
Identification du modèle
Gardez les numéros de modèle et de série au complet de votre
réfrigérateur à portée de la main. Ces numéros se trouvent sur
une plaque signalétique, située sur la paroi droite de l’intérieur
du réfrigérateur. Notez ces numéros sur cette page pour les avoir
sous la main.
Numéro de modèle ____________________________________
Numéro de série ______________________________________
Date d’achat__________________________________________
Pour plus de renseignements sur le service et la garantie,
voir page 43.
Dans notre effort continu d’améliorer la qualité et la performance
de nos produits, il peut être nécessaire d’apporter des
modifications à l’appareil sans révision de ce guide.
EF42DBSS et EF48DBSS :
Réfrigérateurs distributeur de
42" et 48" avec fini en acier
inoxydable
EF42NBSS et EF48NBSS :
Réfrigérateurs de 42" et 48"
sans distributeur, avec fini en
acier inoxydable
IF42DBOL et IF48DBOL :
Réfrigérateurs distributeur
de 42" et 48" conçus pour
l’installation de panneaux et
poignées personnalisés
IF42NBOL et IF48NBOL :
Réfrigérateurs de 42" et 48"
sans distributeur conçus pour
l’installation de panneaux et
poignées personnalisés
24
Page 27

Avant l’utilisation
A. Grille supérieure
B. Garniture latérale de la caisse
B BA
A
A. Commutateur de courant électrique
Déballage de l’appareil
Si le bac à glaçons est situé sur la porte, ôter le matériau
de protection temporaire au-dessous du bac à glaçons. Voir
Machine à glaçons et bac à glaçons.
Sur toutes les surfaces, enlever le ruban adhésif et tout résidu
d’adhésif avant la mise en marche du réfrigérateur. Avec les
doigts, frotter le résidu d’adhésif avec un peu de savon à
vaisselle liquide; essuyer avec de l’eau chaude et sécher.
Pour enlever le ruban adhésif ou résidu d’adhésif, ne pas
utiliser d’instrument acéré, ni d’alcool à friction, de fluides
inflammables ou de produits de nettoyage abrasifs; ces
produits peuvent endommager la surface du réfrigérateur.
Pour d’autres renseignements, voir Instructions importantes de
sécurité à la page 23.
Jeter ou recycler tous les matériaux d’emballage.
Fonctionnement du réfrigérateur
Allumer/éteindre le commutateur
principal de courant électrique
Nettoyage avant utilisation
Après avoir retiré tous les matériaux d’emballage, nettoyer
l’intérieur du réfrigérateur avant de l’utiliser. Voir les instructions
de nettoyage à la section Entretien et nettoyage.
Information importante au sujet des tablettes et des
couvercles en verre :
Ne pas nettoyer les tablettes ou couvercles en verre avec
de l’eau chaude alors que ces éléments sont froids. Le choc
thermique pourrait briser les tablettes et couvercles en verre
lors d’une brusque variation de la température ou d’un impact/
choc. Pour la protection des utilisateurs, ces articles en verre
trempé se brisent en nombreux petits fragments; ceci est
normal. Les couvercles et tablettes en verre sont très lourds;
prendre les précautions appropriées lors des manipulations
pour ne pas les faire tomber.
Dépose de la grille supérieure
Saisir la grille supérieure par les deux extrémités.1.
Pousser la grille supérieure vers le haut en ligne droite, puis 2.
tirer horizontalement pour l’extraire. Poser la grille sur une
surface souple.
S’il est nécessaire d’établir ou d’interrompre le courant électrique
du réfrigérateur, on doit retirer la grille supérieure pour pouvoir
accéder au commutateur. Interrompre le courant électrique
du réfrigérateur lors du nettoyage du réfrigérateur ou lors du
remplacement d’une ampoule.
Réinstallation de la grille supérieure
Insérer les crochets de la grille supérieure (à l’arrière de la 1.
grille supérieure) dans les fentes de la garniture latérale.
Abaisser légèrement la grille pour la fixer en place2.
Allumer/éteindre le commutateur principal de
courant électrique
Ôter la grille supérieure. 1.
Placer le commutateur principal de courant électrique à la 2.
position ON (marche) ou OFF (arrêt) selon le cas.
Réinstaller la grille supérieure.3.
IMPORTANT : Après le nettoyage
du réfrigérateur ou le remplacement
d’une ampoule, ne pas oublier de
remettre le commutateur principal
de courant électrique à la position
de marche (On).
25
Page 28

Fonctionnement du réfrigérateur
Couvercle de la machine à glaçons
Ice Maker
Alimentation en eau
Lire toutes les instructions avant de commencer.
IMPORTANT :
Lors de l’installation initiale du réfrigérateur, le réfrigérateur
devrait avoir été raccordé à un conduit d’alimentation en
eau. Si le réfrigérateur n’est pas raccordé à une source
d’alimentation en eau, voir Raccordement à l’alimentation en
eau dans les instructions d’installation. Pour toute question
au sujet du raccordement à l’alimentation en eau, consulter la
section Dépannage, ou contacter un plombier agréé qualifié.
Si le réfrigérateur doit être mis en marche avant qu’il ait
été raccordé à la canalisation d’eau, éteindre la machine à
glaçons. Voir Machine à glaçons et bac à glaçons à la page
30.
Toute installation doit être réalisée conformément aux
prescriptions du code local régissant les installations de
plomberie.
Pression de l’eau
Pour le fonctionnement approprié du distributeur d’eau et de la
machine à glaçons, une alimentation en eau froide sous pression
d’eau de 30 à 120 lb/po² (207 à 827 kPa) doit être disponible.
Pour toute question au sujet de la pression d’eau, voir Dépannage
ou contacter un plombier agréé qualifié.
Alimentation en eau purifiée par osmose inverse
IMPORTANT : La pression de l’alimentation en eau provenant du
système de purification d’eau par osmose inverse vers l’entrée
d’eau du réfrigérateur doit être comprise entre 30 et 120 lb/po²
(entre 207 et 827 kPa).
Si le système de purification d’eau par osmose inverse est
raccordé à l’alimentation en eau froide, la pression de l’eau à
l’entrée du système de purification d’eau par osmose inverse doit
être d’au moins 40 lb/po² (276 kPa).
Si la pression d’eau à l’entrée du système de purification d’eau
par osmose inverse est inférieure à 40 lb/po² (276 kPa) :
Déterminer si le filtre à sédiments incorporé au système de
purification d’eau par osmose inverse est obstrué. Remplacer
le filtre si nécessaire.
Laisser le réservoir de stockage du système de purification
d’eau par osmose inverse se remplir après une utilisation
intensive.
Si le réfrigérateur est doté d’un filtre à eau, ceci peut réduire
la pression de l’eau encore davantage s’il est utilisé en
conjonction avec un système de purification d’eau par osmose
inverse. Enlever ce filtre à eau. Voir Remplacement du filtre à
eau à la page 38.
Pour toute question au sujet de la pression de l’eau, contacter un
plombier agréé qualifié.
Préparation du système de distribution
d’eau
Lire ces instructions avant d’utiliser le système de distribution
d’eau.
Immédiatement après l’installation, exécuter les étapes ci-dessous
pour nettoyer correctement le système de distribution d’eau.
Ouvrir la porte du congélateur et éteindre la machine à 1.
glaçons.
Pour un modèle sans distributeur, relever le couvercle de
la machine à glaçons et soulever l’anse (fil métallique), voir
l’illustration ci-dessous.
Pour un modèle avec distributeur, placer le commutateur à la
position OFF (vers la droite) - voir l’illustration. Le commutateur
ON/OFF (marche/arrêt) est situé au sommet du compartiment de
congélation sur le côté droit – voir ci-dessous.
REMARQUE : Si votre modèle comporte un système de filtration
dans la grille de la base, vérifier que le filtre de la grille de la
base est correctement installé, et que le chapeau est à la position
horizontale.
Ne pas utiliser pour le filtrage d’une eau microbiologiquement
polluée ou de qualité inconnue en l’absence d’un dispositif de
désinfection adéquat avant ou après le système. Les systèmes
certifiés pour la réduction de kyste peuvent être utilisés pour
l’eau désinfectée qui peut contenir des kystes filtrables.
Utiliser un récipient robuste pour appuyer sur la barre 2.
de commande de distribution d’eau, jusqu’à ce que l’eau
commence à s’écouler. Rincer le circuit : puiser et jeter 6 ptes
(5,7 L) d’eau. Le processus de nettoyage du circuit prendra
approximativement 3 à 4 minutes et facilitera l’évacuation de
l’air de la canalisation. Pour certains domiciles, un processus
de rinçage/purge supplémentaire peut être nécessaire.
REMARQUE : Alors que l’air évacue du système, de l’eau
peut s’échapper du distributeur.
Ouvrir la porte du congélateur; mettre en marche la machine 3.
à glaçons. Pour un modèle sans distributeur, abaisser l’anse
de commande. Pour un modèle avec distributeur, placer le
commutateur à la position ON (vers la gauche).
Prévoir un délai de 24 heures pour la production du premier
lot de glaçons.
Jeter les trois premiers lots de glaçons produits.
Selon le modèle, il peut être utile de sélectionner la capacité
maximale de production de glaçons.
26
Page 29

Fonctionnement du réfrigérateur
Sons normaux durant le fonctionnement
Il est possible que ce nouveau réfrigérateur émette des sons
que le vieux réfrigérateur n’émettait pas. Ces bruits n’étant pas
familiers, ils peuvent être la cause de préoccupation. La plupart
de ces bruits sont normaux. Des surfaces dures, telles que les
planchers, les murs et les placards, peuvent parfois sembler
amplifier les sons émis. On décrit ci-dessous les types de sons
produits et leurs causes probables.
Si le réfrigérateur est doté d’une machine à glaçons, on peut
percevoir un bourdonnement lors de l’ouverture de la vanne
d’admission d’eau à chaque remplissage de l’appareil.
Le réfrigérateur est conçu pour fonctionner efficacement
et maintenir les articles qui y sont placés à la température
désirée avec une consommation d’énergie minimale. Le
compresseur à haute efficacité et les ventilateurs peuvent
parfois fonctionner plus longtemps que sur votre ancien
réfrigérateur. On peut également parfois percevoir un son de
pulsation ou aigu émanant du compresseur ou des ventilateurs
durant le processus d’ajustement pour l’optimisation de la
performance.
On peut parfois entendre le moteur du ventilateur de
l’évaporateur, qui fait circuler l’air dans les compartiments
de réfrigération et de congélation. La vitesse du ventilateur
peut augmenter lorsqu’on ouvre la porte ou après l’addition
d’aliments chauds.
Des bruits de cliquetis peuvent être imputables à la circulation
du fluide réfrigérant, à la canalisation d’eau ou à des articles
rangés sur le dessus du réfrigérateur.
La chute de gouttes d’eau sur l’élément chauffant de
dégivrage durant le processus de dégivrage peut susciter un
grésillement.
À la fin de chaque programme, on peut percevoir un bruit de
gargouillement produit par le fluide de réfrigérant qui s’écoule
dans le réfrigérateur.
Les phénomènes de contraction/dilatation des parois internes
peuvent susciter l’émission de bruits de claquement.
Le pulsage forcé d’air sur le condenseur par le ventilateur du
condenseur peut susciter l’émission de bruits.
On peut entendre de l’eau couler dans le plateau de
récupération lors du programme de dégivrage.
À la vidange du dégivrage, on peut entendre un bruit
d’écoulement d’eau après fermeture de la porte.
Circulation adéquate de l’air
Pour le maintien des températures appropriées, il est nécessaire
que l’air puisse circuler entre les deux compartiments de
l’appareil. L’air froid pénètre par le bas de la section de
congélation, et s’élève ensuite. Il pénètre alors dans le
compartiment de réfrigération par l’ouverture d’évacuation du
sommet, puis retourne vers le congélateur - voir l’illustration.
Ne pas obstruer les ouvertures de passage de l’air. Si les
ouvertures sont obstruées, la circulation de l’air sera entravée et
ceci peut entraîner des problèmes de température et d’humidité.
IMPORTANT : Comme l’air circule entre les deux compartiments,
toute odeur générée dans un compartiment sera transférée à
l’autre compartiment. Pour éliminer les odeurs, il est nécessaire
d’effectuer un nettoyage approfondi des deux sections. Pour
éviter un transfert d’odeur et l’assèchement des aliments, veiller à
bien envelopper ou recouvrir les aliments.
Réglage des commandes
Le tableau de commande est situé à l’intérieur du compartiment
de réfrigération, au plafond
IMPORTANT :
La commande du réfrigérateur permet de régler la température
du compartiment de réfrigération. La commande du
congélateur permet de régler la température du compartiment
de congélation.
Attendre 24 heures après la mise en marche du réfrigérateur
avant d’y placer des aliments; si on place des aliments dans le
réfrigérateur avant qu’il ait complètement refroidi, ces aliments
peuvent s’abîmer.
REMARQUE : La sélection d’une température de maintien
plus basse (plus froide) pour le compartiment de réfrigération
ou de congélation ne suscitera pas de refroidissement plus
rapide des compartiments.
Si la température dans le compartiment de réfrigération ou de
congélation est trop basse ou trop élevée, vérifier d’abord que
les ouvertures de passage d’air ne sont pas obstruées avant
de modifier la position des commandes.
Les préréglages devraient être corrects pour une utilisation
domestique normale. Les réglages sont faits correctement
lorsque la température d’un récipient de lait ou de jus est à la
température désirée, et lorsque la crème glacée est ferme.
La température réelle peut être différente de celle affichée
lorsqu’une porte est laissée ouverte pendant une période
prolongée
REMARQUE : Les points de réglage recommandés par l’usine
sont de 0°F (-18°C) pour le congélateur et de 37°F (3°C) pour
le réfrigérateur.
Mettre en marche/éteindre le réfrigérateur
Appuyer sur le bouton de commande marche/arrêt POWER
ON/OFF pendant 2 secondes. Lors de la mise en marche de
l’appareil, les affichages de température du congélateur et du
réfrigérateur s’allument.
Pour éteindre le réfrigérateur, appuyer pendant 2 secondes
sur le bouton de commande marche/arrêt POWER ON/
OFF. Lorsque le réfrigérateur est éteint, les affichages de
température du congélateur et du réfrigérateur s’éteignent.
Continué...
27
Page 30

Fonctionnement du réfrigérateur
Réglage des commandes (suite)
REMARQUE :
Après la mise en marche du réfrigérateur, le
signal d’alarme sonore et le témoin lumineux
de température excessive sont activés à
intervalles de 90 minutes jusqu’à ce que
la température soit inférieure à 48°F (9°C)
dans le réfrigérateur et à 15°F (-9°C) dans le
congélateur, ou jusqu’à ce qu’on arrête le signal
d’alarme. Pour arrêter le signal d’alarme et le témoin lumineux,
voir Réinitialisation du circuit d’alarme à la page 29.
La commande marche/arrêt sur le tableau de commande
commande l’arrêt du refroidissement, des ventilateurs et des
compresseurs, et des lampes du panneau de commande.
Pour interrompre totalement le courant électrique, utiliser le
commutateur principal situé derrière la grille supérieure. Voir à
la page 25.
Réglage de l’échelle de température
Le témoin lumineux, à côté du bouton °C, est
allumé lorsque l’échelle de température est affichée
en degrés Celsius pour le congélateur et le
réfrigérateur. Pour commander la permutation entre
l’échelle Celsius et l’échelle Fahrenheit, appuyer
sur le bouton °C.
Réglage de la température
REMARQUE : Attendre au moins 24 heures entre deux réglages.
Vérifier de nouveau la température avant d’effectuer un nouvel
ajustement.
Pour régler la température : Appuyer sur la touche HAUT
() ou BAS () du réfrigérateur ou du congélateur jusqu’à ce
que la température désirée s’affiche.
REMARQUE : La température du congélateur peut être réglée
entre -5°F et -6°F (entre -21°C et -14°C); celle du réfrigérateur
peut être réglée entre 34°F et 46°F (entre 1°C et 8°C).
Pour modifier la température, utiliser le tableau ci-dessous comme
guide.
CONDITION/
RAISON:
RÉFRIGÉRATEUR – température
trop basse, réglages incorrects
RÉFRIGÉRATEUR – température
excessive, utilisation intensive ou
température excessive dans la
pièce
CONGÉLATEUR – température
trop basse Réglages incorrects
CONGÉLATEUR – température
excessive/trop peu de glaçons.
Utilisation intensive ou forte
utilisation de glaçons
RÉGLAGE DE LA
TEMPÉRATURE :
Commande du RÉFRIGÉRATEUR
1° plus élevé
Commande du RÉFRIGÉRATEUR
1° plus bas
Commande du CONGÉLATEUR
1° plus élevé
Commande du CONGÉLATEUR
1° plus ba
Contrôle du filtre à eau
Ne pas utiliser pour le filtrage d’une eau microbiologiquement
polluée ou de qualité inconnue en l’absence d’un dispositif de
désinfection adéquat avant ou après le système. Les systèmes
certifiés pour la réduction de kyste peuvent être utilisés pour
l’eau désinfectée qui peut contenir des kystes filtrables.
Le dispositif de contrôle du filtre à eau permet de déterminer à
quel moment il devient nécessaire de remplacer le filtre. Pour le
remplacement du filtre, voir Remplacement du filtre à eau à la
page 38.
VALEUR AFFICHÉE : STATUT :
99 pour cent Filtre neuf installé
10 pour cent Commander un filtre de rechange
0 pour cent ou réduction du débit Remplacer le filtre
Lorsqu’un filtre neuf a été installé,
l’appareil doit afficher la valeur de
99 %. La valeur affichée diminuera
au fil de l’utilisation du filtre. Lorsque
l’afficheur indique 10 %, il est
temps de commander un filtre de
rechange. Il est recommandé de
remplacer le filtre lorsque l’afficheur
indique 0 % OU lorsqu’on constate
la diminution du débit d’alimentation
en eau du distributeur ou de la machine à glaçons. Voir
Remplacement du filtre à eau à la page 38.
Après le remplacement du filtre à eau, appuyer pendant 2
secondes sur RESET (réinitialiser) pour faire réapparaître la
valeur 99 pour cent sur l’afficheur.
Max Cool (refroidissement maximal)
La fonction Max Cool (refroidissement maximal) est utile en cas
de consommation intensive de glaçons, d’introduction d’une
grande quantité de produits alimentaires dans l’appareil, ou si la
température de la pièce augmente temporairement.
Appuyer sur la touche MAX COOL pour activer la fonction de
refroidissement maximal. Le témoin lumineux MAX COOL reste
allumé pendant 24 heures ou jusqu’à ce qu’on commande l’arrêt
manuel.
REMARQUE : Lorsque la fonction Max Cool est active, la
température affichée pour le réfrigérateur reste à 34°F (1°C) et
la température affichée pour le congélateur reste à -5°F (-21°C).
Au bout de 24 heures,
le réfrigérateur adopte
automatiquement
de nouveau les
températures de
réglage antérieures.
Témoin lumineux
Max Cool
28
Page 31

Fonctionnement du réfrigérateur
Mode Holiday (vacances)
Le mode vacances permet à l’utilisateur de commander
l’extinction des lampes et l’arrêt de la machine à glaçons dans
certaines circonstances (périodes de voyage ou respect de
pratiques religieuses). Lorsqu’on sélectionne cette fonction,
la machine à glaçons est désactivée et la lampe intérieure de
l’appareil s’éteint. Les réglages de température restent inchangés.
Sur certains modèles, le mode vacances ne désactive pas le
distributeur d’eau et de glaçons. Pour ces modèles, on peut
utiliser le bouton de verrouillage pour commander la désactivation
des fonctions de production de glace et de distribution d’eau,
mais le fait d’appuyer sur la manette de distribution de glace ou
d’eau commande encore l’allumage de la lampe du distributeur.
Pour le fonctionnement optimal du réfrigérateur, on recommande
de cesser l’emploi du mode vacances lorsque celui-ci n’est plus
nécessaire.
Pour activer le mode vacances,
appuyer sur la touche HOLIDAY. La
fonction demeure active jusqu’à ce que
l’on appuie de nouveau sur la touche
HOLIDAY.
REMARQUE : Si on a sélectionné
la fonction de Max Cool avant de
sélectionner le mode vacances, les
températures de maintien de 34°F
(1°C) et -5°F (-21°C) pour les compartiments de réfrigération
et de congélation sont maintenus jusqu’à l’expiration de
la période de refroidissement maximal (24 heures). Le
réfrigérateur adopte alors de nouveau les réglages de
température effectués avant l’activation de la fonction de MAX
COOL, mais les lampes et la machine à glaçons demeurent
désactivées jusqu’à ce qu’on appuie de nouveau sur la touche
du mode HOLIDAY (vacances).
Alarmes
Température excessive
La fonction de température excessive signale à l’utilisateur que la
température a augmenté pendant plus de 90 minutes au-delà de
48°F (9°C) à l’intérieur du réfrigérateur ou au-delà de 15°F (-9°C)
à l’intérieur du congélateur. Le signal d’alarme sonore cesse
automatiquement après le retour de la température au niveau
normal, mais le témoin lumineux continue à clignoter, ce qui
indique à l’utilisateur qu’un problème de température excessive
est survenu.
Si le problème de température excessive est toujours présent
lors de la réinitialisation du circuit, le témoin lumineux continue
à clignoter à intervalles de 90 minutes, jusqu’à ce que la
température soit descendue au-dessous de 48°F (9°C) dans le
réfrigérateur et au-dessous de 15°F (-9°C) dans le congélateur.
IMPORTANT : Si l’alarme de température excessive a été activée,
les aliments présents dans l’appareil peuvent être avariés. Voir
la section Pannes de courant à la page 35. Minimiser le nombre
d’ouvertures des portes jusqu’à ce que la température soit
revenue au degré normal.
REMARQUE: Pour désactiver le signal
d’alarme sonore et le témoin lumineux,
voir Réinitialisation du circuit d’alarme.
Témoin Door Open (porte ouverte)
Le témoin lumineux de porte ouverte clignote,
un signal d’alarme sonore est émis, et les
lampes internes s’éteignent lorsque la porte de
l’appareil est restée ouverte pendant plus de 10 minutes. Lors de
la fermeture de la porte, le circuit d’alarme sonore est réinitialisé
(l’émission du signal cesse) mais le témoin lumineux de porte
ouverte continue à clignoter jusqu’à ce que la température soit
descendue au-dessous de 45°F (7°C) dans le réfrigérateur et
au-dessous de 15°F (-9°C) dans le congélateur.
REMARQUE : TPour désactiver l’alarme sonore et le témoin
lumineux, veuillez consulter Réinitialisation du circuit d’alarme.
Intervention de service nécessaire
Si le témoin lumineux Call Service clignote,
faites une demande de service. Voir la
section Garantie et service pour plus de
renseignements.
REMARQUE : Pour désactiver l’alarme sonore et le témoin
lumineux, veuillez consulter Réinitialisation du circuit d’alarme.
Réinitialisation du circuit d’alarme
Une pression sur la touche OVER TEMPERATURE RESET
(température excessive – réinitialisation) commande l’arrêt du
signal sonore, mais ceci n’affecte pas le témoin lumineux lors
de la première pression sur la touche OVER TEMPERATURE
RESET. Le clignotement du témoin lumineux cesse après qu’on
a appuyé une seconde fois sur la touche OVER TEMPERATURE
RESET. Le signal d’alarme sonore ne va pas retentir de nouveau
pour le problème courant qui a provoqué son déclenchement;
il ne retentit de nouveau que lors de la détection d’un nouveau
problème ou après la réinitialisation du circuit d’alarme.
Pour la réinitialisation du circuit d’alarme, appuyer deux fois sur
la touche POWER ON/OFF ou éteindre/remettre en marche le
réfrigérateur. Voir Allumer/éteindre le commutateur principal de
courant électrique sur On/Off à la page 25. Si le problème qui
a provoqué l’émission du signal d’alarme n’a pas été éliminé,
le témoin lumineux clignote de nouveau après qu’on ait appuyé
sur la touche OVER TEMPERATURE RESET. Voir ci-dessus
Température excessive, Porte ouverte ou Intervention de service
nécessaire.
Distributeurs d’eau et de glaçons
(Seulement pour modèles avec distributeur)
Selon le modèle de l’appareil, il peut y avoir une ou plusieurs des
options suivantes : sélection de glace concassée ou de glaçons,
lampe spéciale qui s’allume lors de l’utilisation du distributeur,
ou fonction de verrouillage empêchant une distribution non
intentionnelle.
29
Page 32

Couvercle de la machine à glaçons
Fonctionnement du réfrigérateur
Distributeurs d’eau et de glaçons
Le distributeur de glace/glaçons
La glace est accumulée dans un réceptacle associé à une
machine à glaçons, à l’intérieur du congélateur. Lors d’une
pression sur la manette du distributeur :
Une trappe s’ouvre dans une goulotte de distribution entre le
distributeur et le réceptacle de glaçons. La glace est extraite
du bac et tombe dans la goulotte.
Lorsqu’on lâche la manette de distribution, la trappe se ferme
et la distribution de glace s’arrête. Le système de distribution
de glace ne fonctionne pas lorsque la porte du congélateur est
ouverte.
Sur certains modèles, on peut sélectionner
la distribution de glaçons ou de glace pilée.
Avant de commander la sortie de glace,
sélectionner le type désiré. La conception
des touches de commande en facilite
l’emploi et le nettoyage.
Pour la glace concassée, les glaçons sont
broyés avant la distribution. Ceci peut entraîner un bref délai
avant la distribution de la glace. L’émission de bruit par le broyeur
est un phénomène normal; la taille des fragments de glace sera
variable. Lorsqu’on permute entre glace concassée et glaçons,
une petite quantité de glace broyée se mêle aux premiers
glaçons.
Distribution de glaçons :
Si le bac à glaçons est situé dans 1.
la porte, retirer l’écran protecteur
temporaire sous le bac. Voir Machine
à glaçons et bac à glaçons.
Appuyer sur le bouton pour 2.
sélectionner le type de glace désiré.
Avec un verre robuste, appuyer contre la manette de 3.
distribution. Tenir le verre près de l’ouverture de distribution
pour que les glaçons ne tombent pas hors du verre.
IMPORTANT : Il n’est pas nécessaire d’exercer une forte
pression sur la manette pour activer le distributeur. Exercer
une forte pression n’entraîne pas une distribution plus rapide
ou plus importante de glaçons.
Retirer le verre pour mettre fin à la distribution.4.
REMARQUE : Les premiers lots de glaçons peuvent avoir
mauvais goût; ceci est dû aux composants neufs du circuit.
Jeter ces glaçons et prélever une grande quantité de glaçons
directement dans le bac à glaçons - et non pas par l’intermédiaire
du distributeur.
IMPORTANT : Selon le modèle de l’appareil, le petit plateau
amovible placé au fond du distributeur récupère les petites
quantités d’eau renversées et facilite le nettoyage. Le plateau ne
comporte pas d’ouverture de drainage. On peut retirer le plateau
du distributeur et le transporter jusqu’à un évier pour le vider ou le
nettoyer.
Distribution d’eau :
Avec un verre robuste, appuyer contre 1.
la manette de distribution.
Retirer le verre pour arrêter la 2.
distribution
REMARQUE : Si on ne puise pas de
l’eau régulièrement, l’eau puisée peut
présenter un goût inhabituel. Puiser suffisamment d’eau chaque
semaine pour toujours disposer d’eau fraîche.
Lampe du distributeur
Le distributeur est doté d’une lampe; on
peut commander manuellement l’allumage
en appuyant sur la touche ON (touche ou
commutateur).
Lors de chaque utilisation du distributeur,
la manette commande automatiquement
l’allumage de la lampe.
REMARQUE : Voir à la page 37 de l’information concernant le
remplacement de l’ampoule de la lampe du distributeur.
Verrouillage du distributeur
Il est possible de désactiver le distributeur
avant une opération de nettoyage, pour
éviter l’activation non intentionnelle d’une
distribution de glaçons ou d’eau (par de
jeunes enfants ou un animal domestique).
REMARQUE : La fonction de verrouillage
n’interrompt pas le courant électrique du réfrigérateur, de la
machine à glaçons ou de la lampe du distributeur; elle désactive
simplement les manettes de distribution.
Pour désactiver le distributeur, appuyer sur la touche LOCK
(verrouillage). Le témoin lumineux s’allume au-dessus de la
touche LOCK; les manettes de commande de la distribution
de glaçons et d’eau sont alors inactives.
Pour déverrouiller le distributeur, appuyer sur la touche
UNLOCK (déverrouillage) jusqu’à ce que le témoin lumineux
apparaisse; on peut alors de nouveau prélever de la glace ou
de l’eau.
Machine à glaçons et bac à glaçons
Le distributeur d’eau
Si le circuit d’eau n’a pas été rincé lors
de l’installation initiale du réfrigérateur,
appuyer sur la barre du distributeur
d’eau avec un verre robuste ou autre
récipient approprié pour puiser 6 ptes
(5,7 L) d’eau (puisage d’eau pendant
3 à 4 minutes après que l’eau ait
commencé à couler); jeter cette eau.
L’eau commencera à couler au bout de
2 à 3 minutes. L’eau de ce prélèvement initial, qu’on jette, rince le
circuit et le purge des résidus d’air. Prévoir un délai de plusieurs
heures pour que le réfrigérateur se refroidisse et refroidisse l’eau.
Modèles sans distributeur
Commande on/off (marche/arrêt) de la machine à
glaçons :
La commande marche/arrêt de
la machine à glaçons est une
anse métallique située sur le
côté de la machine à glaçons.
Pour mettre en marche 1.
de la machine à glaçons,
relever le couvercle et
abaisser le fil métallique;
voir l’illustration.
30
Page 33

A. Couvercle de la machine à glaçons
B. Bac à glaçons
A
B
Ice Maker
Fonctionnement du réfrigérateur
Bac à glaçons – dépose/réinstallation (modèles sans
distributeur) :
Modèles avec distributeur
Mise en marche/arrêt de la machine à glaçons
REMARQUE : La machine à glaçons comporte un dispositif
d’arrêt automatique. Lorsque les glaçons s’accumulent dans
le bac à glaçons, les glaçons provoquent le soulèvement de
l’anse métallique, jusqu’à la position d’arrêt (position élevée).
Pour arrêter manuellement la machine à glaçons, soulever 2.
l’anse métallique de commande jusqu’à la position d’arrêt
(élevée); on doit percevoir un déclic qui correspond à la
désactivation de la machine à glaçons; la machine cesse alors
de fonctionner.
Relever le 1.
couvercle de la
machine à glaçons.
Soulever l’anse de 2.
commande jusqu’à
l’émission d’un
déclic (position
d’arrêt – position
élevée). Les
glaçons restants
peuvent encore être
distribués, mais
la machine n’en
produit plus.
Soulever le 3.
panneau avant du
bac; tirer le bac vers l’avant.
Réinstaller le bac : pousser le bac complètement, sinon 4.
le distributeur ne peut pas fonctionner. Rabattre l’anse de
commande à la position de fonctionnement pour que la
production de glace puisse reprendre. Veiller à bien fermer la
porte.
Le commutateur On/Off (marche/arrêt) se trouve dans la partie 1.
supérieure droite du compartiment de congélation.
Pour mettre la machine à glaçons en marche, faire glisser la 2.
commande à la position ON (vers la gauche).
REMARQUE : La machine à glaçons comporte un
dispositif d’arrêt automatique. Des capteurs commanderont
automatiquement l’arrêt de la production de glace, mais le
bouton de commande restera à la position ON (à gauche).
Pour commander manuellement l’arrêt de la machine à 3.
glaçons, pousser le bouton du commutateur à la position OFF
(à droite).
Bac à glaçons – dépose/réinstallation (modèles avec
distributeur)
Tenir la base du bac avec 1.
(sur le dos de porte de
congélateur) les deux mains;
appuyer sur le bouton de
dégagement pour pouvoir
soulever le bac à glaçons et
l’extraire.
REMARQUE : Il n’est pas
nécessaire de placer le
commutateur de la machine
à glaçons à la position OFF
(droite) pour retirer le bac
à glaçons. Le couvercle à
capteur sur le côté gauche du congélateur commande l’arrêt
de la production de glace après l’ouverture de la porte ou
l’extraction du bac à glaçons.
Réinstaller le bac à glaçons sur la porte; pousser le bac vers 2.
le bas pour le placer correctement.
Nettoyage du bac à glaçons
Vider le bac à glaçons. Utiliser de l’eau tiède/chaude pour faire 1.
fondre la glace si nécessaire
REMARQUE : Ne pas utiliser d’objet acéré pour briser la
glace dans le bac; ceci pourrait endommager le bac à glaçons
et le mécanisme de distribution.
Laver le bac à glaçons avec un détergent doux; bien rincer 2.
et faire sécher parfaitement. Ne pas utiliser de solvant ou de
produit de nettoyage abrasif ou agressif.
IMPORTANT :
Prévoir un délai de 24 heures pour la production du premier
lot de glaçons. Prévoir un délai de 3 jours pour que le bac soit
complètement rempli de glace. Jeter les trois premiers lots de
glace produits pour éviter les impuretés qui peuvent sortir du
système.
La qualité de la glace dépendra de la qualité de l’eau
alimentant la machine à glaçons.
Éviter de raccorder la machine à glaçons à une alimentation
en eau adoucie.
Les composés chimiques utilisés pour l’adoucissement de
l’eau (tel que le sel) peuvent endommager des composants de
la machine à glaçons et entraîner la production de glaçons de
qualité médiocre. S’il n’est pas possible d’éviter l’emploi d’eau
adoucie, veiller à ce que l’adoucisseur fonctionne bien et soit
adéquatement entretenu.
Il est normal que des glaçons adhèrent les uns aux autres au
niveau des angles.
Ils se sépareront facilement.
Pour un modèle sans distributeur, ne pas forcer l’anse de
commande de la machine à glaçons vers le haut ou vers le
bas.
Ne jamais rien placer sur le dessus de la machine à glaçons
ou dans le bac/sceau à glaçons.
31
Page 34

Fonctionnement du réfrigérateur
Rangement dans le réfrigérateur
Information importante au sujet des tablettes et des
couvercles en verre :
Ne pas nettoyer les tablettes ou couvercles en verre avec de
l’eau chaude alors que ces composants sont froids. Le choc
thermique pourrait briser les tablettes et couvercles en verre
lors d’une brusque variation de la température, ou d’un impact/
choc. Pour la protection des utilisateurs, ces articles en verre
trempé se brisent en nombreux petits fragments; ceci est
normal. Les couvercles et tablettes en verre sont très lourds;
prendre les précautions appropriées lors des manipulations,
pour ne pas les laisser tomber..
Les tablettes et accessoires de rangement du réfrigérateur sont
réglables et/ou amovibles, ce qui facilite le nettoyage de l’appareil
et le rangement des articles à conserver dans l’appareil.
Pour pouvoir trouver rapidement un aliment qu’on recherche dans
le réfrigérateur, il est préférable de placer ensemble les produits
alimentaires similaires, et d’ajuster la position des tablettes en
fonction de la hauteur des articles qu’on y placera. Ceci permet
également de minimiser la durée d’ouverture de la porte du
réfrigérateur et par conséquent la consommation d’énergie.
Tablettes et cadres de tablettes
Tablette/cadre – dépose et réinstallation :
Pour enlever la tablette/le cadre, soulever à l’avant puis 1.
soulever l’ensemble pour dégager la tablette des supports.
Tirer la tablette en ligne droite.
Pour réinstaller la tablette/le cadre, introduire les crochets 2.
à l’arrière de la tablette dans les supports. Soulever l’avant
de la tablette pour faciliter l’insertion des crochets dans les
supports.
Abaisser l’avant de la tablette; vérifier que la tablette est 3.
solidement ancrée sur le support.
Centre de soins des ingrédients
Le réglage pour le centre de soins des ingrédients (voir
l’illustration à la droite) ajuste la température d’entreposage du
tiroir. L’air froid arrive dans le tiroir par le conduit d’air entre le
congélateur et le réfrigérateur. Le réglage des commandes permet
de laisser passer plus ou moins d’air froid dans le conduit.
Réglage du centre de soin des ingrédients
Choisir un réglage d’après l’article à remiser dans le tiroir.1.
Appuyer sur le bouton qui correspond à ce réglage.2.
Le témoin lumineux pour ce réglage s’allumera pour vérifier 3.
que le tiroir est prêt à être chargé.
Dépose et réinstallation du couvercle du centre de
soins des ingrédients
Enlever les aliments du couvercle du centre de soins des 1.
ingrédients. Tirer le tiroir d’environ 4» (10,16 cm). Placer
les deux mains sous la tablette en verre et la soulever
délicatement jusqu’à ce que l’arrière de l’étagère soit dégagé.
Incliner l’étagère et enlever l’étagère du réfrigérateur en
évitant soigneusement de ne pas heurter le verre.
Réinstaller le couvercle en tenant la tablette en verre 2.
fermement avec les deux mains, incliner la tablette et la placer
au-dessus de la glissière de support. Placer délicatement
l’étagère sur les glissières de support (sur la paroi).
32
Page 35

Fonctionnement du réfrigérateur
A. Centre de soins des ingrédients
B. Bac à légumes
B
A
Bacs à légumes et couvercles
Bacs à légumes – dépose et réinstallation :
Faire glisser le tiroir du bac à légumes vers l’extérieur jusqu’à 1.
la position de butée. Soulever l’avant du tiroir d’une main tout
en soutenant le fond du tiroir de l’autre main; retirer le tiroir
complètement en le faisant glisser.
Pour réinstaller le tiroir du bac à légumes, placer le tiroir sur 2.
les glissières; pousser le tiroir vers l’arrière jusqu’à la position
de fermeture.
Manœuvrer prudemment le tiroir pour vérifier qu’il a été 3.
correctement réinstallé.
Balconnet de porte pour gallon
Le balconnet de porte pour gallon est réglable; il peut recevoir
des récipients d’un gallon.
Installation du balconnet pour gallon :
REMARQUE : On ne peut placer le balconnet pour gallon que sur
le support inférieur.
Positionner le balconnet pour gallon au-dessus de la position 1.
d’installation la plus basse sur la porte.
Pousser vers le bas pour placer le balconnet en appui sur le 2.
support.
Ajuster la position des autres balconnets (si nécessaire) pour 3.
permettre l’insertion de contenants (lait ou boissons) plus
grands.
Balconnets de porte standard
On peut loger des bouteilles de 2 litres dans les balconnets de
porte standard.
Balconnets de porte standard–dépose et réinstallation :
Retirer le balconnet en le soulevant et en le tirant pour 1.
l’extraire.
Réinstallation – faire glisser le balconnet au-dessus des 2.
supports à utiliser et pousser vers le bas pour placer le
balconnet en appui sur le support.
Nettoyage des couvercles des bacs à légumes :
Pour nettoyer le couvercle du bac supérieur, enlever le module
(ingrédient) situé au-dessus.
Pour nettoyer le couvercle du bac inférieur, ôter d’abord le tiroir
du bac supérieur.
Balconnet de porte
Le balconnet de porte peut être placé à n’importe quelle position
sur la porte du réfrigérateur.
Balconnet de porte – dépose et réinstallation :
Saisir les deux extrémités et soulever le balconnet pour 1.
pouvoir l’extraire.
Réinstallation – faire glisser le balconnet au-dessus des 2.
supports désirés et pousser vers le bas jusqu’à la butée pour
placer le balconnet en appui sur le support.
33
Page 36

Fonctionnement du réfrigérateur
Conservation des aliments frais
Pour le compartiment des aliments frais, sélectionner une
température entre 34° et 40°F (entre 1° et 4°C); la température
optimale est de 37°F (3°C).
Éviter un encombrement excessif sur les tablettes du
réfrigérateur; ceci réduit la circulation de l’air autour des
aliments et entraîne un refroidissement non uniforme.
Fruits et légumes
Les tiroirs des bacs à légumes retiennent l’humidité, ce qui
permet de prolonger la période de conservation des fruits et
légumes.
Trier les fruits et légumes avant de les placer dans les bacs;
veiller à consommer d’abord les articles qui ont été abîmés
par des chocs, etc. Jeter tout article présentant des signes de
dégradation/pourrissement.
Veiller à toujours envelopper les produits odorants (oignon,
chou, etc.) pour que leur odeur ne soit pas transférée à
d’autres aliments.
La préservation de la fraîcheur des légumes nécessite la
présence d’une certaine quantité d’humidité; cependant,
un excès d’humidité peut réduire la durée de conservation
(particulièrement pour les légumes à feuilles). Bien égoutter
les légumes avant de les placer dans le réfrigérateur.
Laver les légumes frais de préférence juste avant de les
consommer.
Viande et fromage
Veiller à bien envelopper les viandes et la volaille crues pour
éviter toute fuite et la contamination d’autres aliments ou
surfaces.
Occasionnellement, une moisissure peut se développer à la
surface des fromages durs (suisse, cheddar, parmesan). Pour
la sûreté, rejeter du fromage moisi.
Produits laitiers
Une date de conservation est inscrite sur les contenants/
emballages de la plupart des produits laitiers tels que le
yaourt, la crème sure et le fromage cottage; conserver ces
aliments dans leur emballage d’origine et les réfrigérer le
plus rapidement possible après leur achat et après chaque
utilisation.
Rangement dans le congélateur
Tablette de congélateur
Tablette de congélateur – dépose et réinstallation :
Dépose – Soulever la tablette puis la tirer en ligne droite.1.
Réinstallation – incliner la tablette pour la déposer sur les 2.
supports puis l’abaisser.
Paniers de congélateur
Le panier coulissant du congélateur permet le rangement de sacs
de fruits et de légumes congelés, qui peuvent glisser des tablettes
du réfrigérateur.
Panier du congélateur– Dépose et réinstallation :
Dépose – Faire glisser le panier vers l’extérieur jusqu’à la 1.
position de butée.
Soulever l’avant du panier pour pouvoir poursuivre le 2.
coulissement vers l’extérieur.
Réinstallation – Positionner le panier sur les glissières 3.
latérales. Soulever légèrement l’avant du panier pour pouvoir
le faire glisser (pousser) au-delà de la butée sur les glissières;
pousser complètement le panier jusqu’à la position de
fermeture.
34
Page 37

Fonctionnement du réfrigérateur
Conservation des aliments congelés
Pour le compartiment du congélateur, on devrait sélectionner
une température d’environ 0°F (-18°C).
Le fonctionnement d’un congélateur est plus efficace lorsqu’il
est rempli au moins aux deux tiers.
Emballage des produits alimentaires pour la
congélation
Pour minimiser la déshydratation et la dégradation de la
qualité, utiliser des récipients hermétiques ou envelopper les
articles dans une feuille d’aluminium, une feuille de plastique,
des sacs pour congélation. Évacuer la plus grande quantité
d’air possible des emballages, et veiller à ce qu’ils soient
parfaitement fermés. L’air retenu au contact des aliments
peut susciter leur assèchement, changement de couleur et
dégradation de la saveur (brûlure de congélation).
Avant la congélation, envelopper les articles de volaille ou
la viande fraîche dans un film de plastique approprié pour la
congélation.
Ne pas congeler de nouveau de la viande qui a complètement
décongelé.
Chargement du congélateur
Éviter de placer dans le congélateur en une seule fois une
trop grande quantité d’aliments tièdes/chauds; ceci suscite
une surcharge du congélateur et ralentit le processus
de congélation et peut susciter une augmentation de
la température d’autres articles déjà présents dans le
congélateur.
Laisser un espace approprié autour des emballages pour
que l’air froid puisse circuler librement, permettant ainsi aux
aliments de congeler le plus vite possible.
Éviter de placer sur les balconnets de la porte du congélateur
des aliments difficiles à congeler, comme la crème glacée et
le jus d’orange; il est préférable de conserver ces articles à
l’intérieur du congélateur où la température subit moins de
variations lors des ouvertures de la porte.
Pannes de courant
Si le courant électrique doit être interrompu pendant 24 heures
ou moins, maintenir les portes de l’appareil fermées pour que les
produits alimentaires demeurent froids et congelés.
Si le courant électrique doit être interrompu pendant plus de 24
heures, choisir l’une des options suivantes :
Transférer tous les produits alimentaires congelés dans un
garde-manger pour aliments surgelés.
Placer 2 lb (907 g) de neige carbonique dans le congélateur
pour chaque pied cube (28 L) de volume; ceci permettra de
maintenir les produits alimentaires congelés pendant 2 à 4
jours.
Si aucune des deux options ci-dessus n’est disponible,
consommer ou mettre en conserve sans délai tous les
aliments périssables.
IMPORTANT : Un congélateur plein retient le froid plus longtemps
qu’un congélateur partiellement rempli. Un congélateur rempli
de viandes retient le froid plus longtemps qu’un congélateur
rempli de produits de boulangerie. Si l’on constate que les
produits alimentaires contiennent encore des cristaux de glace,
il est possible de les recongeler; mais leur qualité et leur saveur
pourraient être affectées. Si l’état des produits semble être de
piètre qualité, il est préférable de les jetert.
Entretien avant les vacances
Le mode vacances permet à l’utilisateur en période de voyage
de commander l’extinction des lampes et l’arrêt de la machine
à glaçons. Lorsqu’on sélectionne cette fonction, les réglages
de température demeurent inchangés, la machine à glaçons
est désactivée et la lampe intérieure de l’appareil s’éteindra.
Pour le fonctionnement le plus efficace du réfrigérateur, Dacor
recommande de cesser l’emploi du mode vacances lorsque
celui-ci n’est plus nécessaire.
Si l’on choisit de laisser le réfrigérateur en marche
pendant une période d’absence :
Consommer tous les aliments périssables et congeler tous les 1.
autres articles.
Appuyer sur la touche 2. HOLIDAY (vacances).
Si le réfrigérateur comporte une machine à 3.
glaçons automatique, fermer l’arrivée d’eau à
la machine à glaçons.
Vider le bac à glaçons. 4.
Lors du retour de vacances, appuyer sur la 5.
touche HOLIDAY (vacances) pour commander la reprise du
fonctionnement normal.
Si l’on choisit de commander l’arrêt du réfrigérateur
avant le départ :
Retirer tous les aliments du réfrigérateur.1.
Si le réfrigérateur comporte une machine à glaçons 2.
automatique :
Fermer l’arrivée d’eau à la machine à glaçons au moins un
jour avant le départ.
Après la fin de la production de glace, soulever l’anse de
commande pour la placer à la position d’arrêt OFF (vers le
bas).
Discontinuer le courant électrique. Voir Mise 3.
en marche/arrêt du réfrigérateur, à la page 27.
Nettoyer le réfrigérateur; bien essuyer/sécher 4.
les surfaces.
Fixer avec du ruban adhésif des blocs de 5.
bois ou de caoutchouc au sommet de chaque
porte pour les tenir ouvertes, afin que l’air puisse pénétrer
dans l’appareil; ceci empêchera la formation d’odeurs et de
moisissure.
35
Page 38

Entretien et nettoyage
Nettoyage
Information importante au sujet des tablettes et des
couvercles en verre :
Ne pas nettoyer les tablettes en verre ou couvercles avec de
l’eau chaude alors que ces composants sont froids. Le choc
thermique pourrait briser les tablettes et couvercles en verre
lors d’une brusque variation de la température ou d’un impact/
choc. Pour la protection des utilisateurs, ces articles en verre
trempé se brisent en nombreux petits fragments; ceci est
normal. Les couvercles et tablettes en verre sont très lourds;
prendre les précautions appropriées lors des manipulations
pour ne pas les laisser tomber.
L’appareil comporte un système de dégivrage automatique pour
les sections de réfrigération et de congélation. Cependant, il
convient de nettoyer chaque compartiment au moins une fois par
mois pour éviter la formation d’odeurs. En cas de renversement
d’un produit, essuyer immédiatement.
Laver les surfaces en acier inoxydable et les surfaces 4.
extérieures en métal peint avec une éponge ou un chiffon
propre et un mélange d’eau tiède et de détergent doux. Ne
pas utiliser de produit de nettoyage abrasif ou corrosif, ni de
produit contenant du chlore. Sécher parfaitement avec un
linge doux. Pour une protection supplémentaire des surfaces
extérieures en métal peint, effectuer une application de cire
pour appareil ménager (ou de cire pour automobile) avec
un chiffon doux et propre. Ne pas appliquer de cire sur les
composants en plastique
REMARQUE : Pour que les surfaces en acier inoxydable
conservent leur apparence de produit neuf, et pour éliminer
les marques ou éraflures mineures, on peut utiliser le produit
de nettoyage Dacor pour acier inoxydable. Utiliser le produit
conformément au mode d’emploi qui figure sur le flacon.
IMPORTANT: Ce produit de nettoyage est destiné à l’acier
inoxydable seulement! Ne pas laisser le nettoyant pour acier
inoxydable entrer en contact avec un composant de plastique,
comme les pièces de garniture, les couvercles du distributeur
ou les joints de porte. En cas de contact accidentel, nettoyer
la pièce de plastique avec une éponge et un mélange d’eau
tiède et de détergent doux. Sécher parfaitement avec un
chiffon doux.
Nettoyer régulièrement les serpentins du condenseur, situés 5.
derrière le panneau de ventilation de la grille supérieure. Il
peut être nécessaire de nettoyer les serpentins tous les deux
mois pour minimiser la consommation d’énergie. Utiliser un
aspirateur muni d’un accessoire approprié pour nettoyer les
serpentins lorsqu’ils sont souillés/poussiéreux.
Remettre le commutateur du courant électrique principal à la 6.
position de marche et réinstaller la grille supérieure.
Nettoyage du réfrigérateur :
Ôter la grille supérieure et commander l’arrêt de l’appareil 1.
avec le commutateur principal. Voir Allumer/éteindre le
commutateur principal de courant électrique à la page 25.
Retirer tous les composants amovibles de l’intérieur comme 2.
les tablettes, les bacs à légumes, etc.
Laver à la main, rincer et sécher complètement les 3.
composants amovibles et les surfaces intérieures. Utiliser une
éponge propre ou un chiffon doux et un détergent doux dans
de l’eau tiède.
Ne pas utiliser pour le nettoyage des pièces de plastique,
de surfaces intérieures ou de doublures de porte et joints,
des produits de nettoyage abrasifs ou corrosifs, tels que des
vaporisants à fenêtre, des produits de récurage, des fluides
inflammables, des cires de nettoyage, des détergents
concentrés, des agents chlorés ou produits de nettoyage
contenant des ingrédients pétroliers. Ne pas utiliser de
serviettes de papier, tampons de récurage ou autres outils
de nettoyage corrosifs car ces articles peuvent laisser des
égratignures ou provoquer des détériorations.
Pour aider à éliminer les odeurs, laver les parois internes
avec un mélange d’eau chaude et de bicarbonate de soude
(2 c. à soupe par pinte [26 g par 0,95 L] d’eau).
36
Page 39

Entretien et nettoyage
A. Ampoule du distributeur
A
B. Protège-ampoule
B
Remplacement des ampoules
REMARQUE : Toutes les ampoules pour appareil ménager
ne conviennent pas à votre réfrigérateur. Veiller à remplacer
l’ampoule par une ampoule de même taille et de même forme. Le
distributeur est doté d’une ampoule de 10 watts pour utilisation
intense. Toutes les autres ampoules sont des ampoules pour
appareil ménager (maximum de 40 watts). Les ampoules de
remplacement sont disponibles auprès du marchand Dacor ou
dans un magasin d’appareils ménagers.
Retirer la grille supérieure et éteindre le commutateur principal 1.
de courant électrique. Voir Allumer/éteindre le commutateur
principal de courant électrique à la page 25.
Le cas échéant, enlever l’écran de protection – voir 2.
l’illustration.
REMARQUE : Pour nettoyer l’écran de protection, utiliser un
mélange d’eau tiède et de détergent liquide. Rincer et bien
sécher.
Ôter l’ampoule et installer une ampoule de même taille, forme 3.
et puissance.
Réinstaller le protège-ampoule le cas échéant – voir 4.
l’illustration.
Commander la mise en marche de l’appareil et réinstaller la 5.
grille supérieure.
Lampe du tableau de commande du réfrigérateur
Pour démonter et réinstaller le protège-ampoule, utiliser un
tournevis à tête hexagonale de ¼".
Lampes du congélateur et des bacs à légumes
Pour enlever le protège-ampoule, exercer une pression
sur sommet et fond. Pour pouvoir dégager les crochets du
revêtement intérieur du congélateur ou du bac à légumes; tirer
pour enlever le protège-ampoule.
Pour réinstaller le protège-ampoule, exercer une pression sur
sommet et fond; insérer et positionner les crochets sur les
ouvertures dans le revêtement intérieur.
Lampe du distributeur (seulement sur les modèles
avec distributeur)
Dans la cavité du distributeur, ôter l’ampoule; installer une
ampoule neuve.
37
Page 40

Entretien et nettoyage
Remplacement du filtre à eau
Ne pas utiliser pour le filtrage d’une eau microbiologiquement
polluée ou de qualité inconnue en l’absence d’un dispositif de
désinfection adéquat avant ou après le système. Les systèmes
certifiés pour la réduction de kyste peuvent être utilisés pour
l’eau désinfectée qui peut contenir des kystes filtrables.
Identifier le bouchon du filtre à eau dans la grille avant de la 1.
base. Le faire pivoter dans le sens antihoraire pour le placer
verticalement et extraire le bouchon et le filtre de la grille de la
base.
REMARQUE : Il y aura de l’eau dans le filtre, ce qui peut
causer un renversement.
Ôter le bouchon en le faisant glisser hors de l’extrémité pour le 2.
dégager du filtre (glissement vers la gauche ou vers la droite).
IMPORTANT: Ne pas jeter le bouchon car il fait partie du
réfrigérateur. Conserver le bouchon pour l’utiliser avec le filtre
de rechange.
Purge du système d’eau après le remplacement du
filtre
Utiliser un récipient robuste pour appuyer sur la barre de
commande de distribution d’eau, jusqu’au point où l’eau
commence à couler. Rincer le circuit : puiser et jeter 6 ptes (5,7
L) d’eau. Le nettoyage du circuit prendra approximativement 3 à
4 minutes et facilitera l’évacuation de l’air de la canalisation. Pour
certains domiciles, un rinçage/une purge supplémentaire peut être
nécessair.
REMARQUE : Alors que l’air est purgé du système, de l’eau peut
gicler du distributeur.
Utilisation du distributeur sans filtre à eau
Si le distributeur est utilisé sans filtre à eau, l’eau ne sera pas
filtrée.
Ôter le filtre à eau.1.
Faire glisser le bouchon hors de l’extrémité du filtre.2.
Alors que le bouchon est en position verticale, l’insérer dans la 3.
grille de la base, jusqu’à la position de butée.
IMPORTANT : Ne pas jeter le bouchon. Il fait partie du
réfrigérateur. Conserver le bouchon pour l’utiliser avec le filtre
de rechange.
Retirer le filtre neuf de son emballage, enlever le bouchon de 3.
protection des joints toriques. Jeter ce bouchon.
Enfiler le bouchon (enlevé à l’étape 2) sur le filtre neuf. Voir 4.
l’illustration de l’étape 2.
Alors que le bouchon est en position verticale, pousser le filtre 5.
neuf dans la grille de la base, jusqu’à la position de butée.
Faire pivoter le bouchon dans le sens horaire pour le placer
à l’horizontale. Procéder à une purge du circuit d’eau. Voir
ci-après Purge du circuit d’eau après le remplacement du filtre.
Faire pivoter le bouchon pour le placer à l’horizontale. Le 4.
bouchon peut ne pas être aligné avec la grille de la base.
38
Page 41

Dépannage
Essayer d’abord les solutions suggérées ici afin d’éviter le coût d’une visite de service non nécessaire.
Le réfrigérateur ne fonctionne pas
Le cordon de courant électrique est-il débranché? Brancher sur
une prise à 3 alvéoles reliée à la terre.
Un fusible est-il grillé ou un disjoncteur s’est-il déclenché?
Remplacer le fusible ou réenclencher le disjoncteur.
La commande du réfrigérateur ou du congélateur est-elle à la
position OFF (arrêt)? Voir Réglage des commandes à la page 27.
Le réfrigérateur est-il en train de dégivrer? Vérifier de nouveau
30 minutes plus tard pour voir si le réfrigérateur fonctionne. Le
réfrigérateur exécute régulièrement le programme de dégivrage
automatique.
La température est trop élevée
Les ouvertures de circulation de l’air d’un des compartiments
sont-elles bloquées? Si les ouvertures de passage d’air sont
obstruées, le réfrigérateur et/ou le congélateur ne se refroidiront
pas. Enlever tout objet placé devant une ouverture de passage
d’air, qui entrave la circulation de l’air. Voir Circulation adéquate
de l’air à la page 27.
Ouverture fréquente des portes? Si ceci se produit, la
température augmente dans le réfrigérateur. Pour maintenir le
froid dans le réfrigérateur, retirer tous les articles nécessaires du
réfrigérateur en une seule fois; veiller à un bon rangement des
articles à l’intérieur et fermer la porte dès que possible.
Ajour récent d’une quantité importante d’aliments dans le
réfrigérateur ou le congélateur? L’ajout dans le réfrigérateur
d’une quantité importante d’aliments à la température ambiante
augmente la température et un délai de plusieurs heures
peut être nécessaire pour que le réfrigérateur retourne à la
température normale.
Les réglages sont-ils corrects pour les conditions existantes?
Voir Réglage des commandes à la page 27.
Les ampoules ne fonctionnent pas
Une ampoule est-elle desserrée dans la douille ou grillée? Voir
Remplacement des ampoules à la page 37.
La porte a-t-elle été ouverte plus de 10 minutes? Lorsque la porte
est ouverte pendant plus de 10 minutes, le témoin lumineux Porte
ouverte clignote et les lampes à l’intérieur s’éteignent. Voir Porte
ouverte à la page 29.
Le réfrigérateur est-il en mode vacances (Holiday)? Voir Mode
vacances à la page 29.
Le réfrigérateur semble faire trop de bruit
Les sons peuvent être normaux pour le réfrigérateur. Voir Sons
normaux durant le fonctionnement à la page 27.
Le moteur semble fonctionner excessivement
La température de la pièce est-elle plus élevée que d’habitude?
Le moteur fonctionnera plus longtemps si la température est
élevée. À des températures ambiantes normales, prévoir que
le moteur fonctionne à peu près 80 % du temps. En cas de
température élevée, il fonctionnera encore plus longtemps.
Vient-on d’ajouter une grande quantité d’aliments au
réfrigérateur? Ajouter une grande quantité d’aliments réchauffe
le réfrigérateur. Le moteur fonctionnera normalement plus
longtemps pour refroidir le réfrigérateur.
Les portes sont-elles ouvertes fréquemment? Dans ce cas, le
moteur fonctionnera plus longtemps. Économiser de l’énergie
en sortant tous les articles en une seule fois, en rangeant les
aliments de façon organisée et en fermant la porte le plus vite
possible.
Les réglages sont-ils incorrects pour les conditions existantes?
Voir Réglage des commandes à la page 27.
Les portes sont-elles fermées complètement? Bien fermer les
portes. Si elles ne ferment pas complètement, voir Les portes ne
ferment pas bien plus loin dans cette section.
Les serpentins du condenseur sont-ils sales? Cette situation
fait obstruction au transfert de l’air et fait travailler davantage
le moteur. Nettoyer les serpentins du condenseur. Consulter la
section Entretien et nettoyage.
Les joints de la porte sont-ils hermétiques sur tout le contour?
Contacter un technicien ou une autre personne qualifiée.
REMARQUE : Le nouveau réfrigérateur fonctionnera plus
longtemps que l’ancien à cause de son moteur à haute efficacité
Il y a une accumulation d’humidité à l’intérieur
Les ouvertures de circulation de l’air du réfrigérateur sont-elles
bloquées? Enlever tout objet placé devant les ouvertures
d’aération. Voir Circulation adéquate de l’air à la page 27 pour
connaître l’emplacement des ouvertures de passage d’air.
La/les porte(s) est/sont-elle(s) fréquemment ouverte(s)? Éviter
l’accumulation d’humidité en sortant tous les articles en une
seule fois, en rangeant les aliments de façon organisée et en
fermant la porte le plus vite possible.
La pièce est-elle humide? Il est normal que de l’humidité
s’accumule à l’intérieur du réfrigérateur lorsque l’air dans la
pièce est humide.
Les aliments sont-ils bien emballés? Vérifier que tous les
aliments sont bien emballés. Essuyer les contenants humides
avant de les placer dans le réfrigérateur.
Les réglages sont-ils corrects pour les conditions existantes?
Voir Réglage des commandes à la page 27.
Le programme de dégivrage automatique vient-il de se terminer?
Il est normal que des gouttelettes se forment après le programme
de dégivrage automatique du réfrigérateur.
Goût, odeur ou couleur grise des glaçons
Les raccords de plomberie sont-ils neufs et sont-ils à l’origine
d’une décoloration et un mauvais goût des glaçons? Jeter les
premiers lots de glaçons produits.
Les glaçons ont-ils été gardés trop longtemps? Jeter les vieux
glaçons et faire une nouvelle provision.
Le congélateur et le bac à glaçons ont-ils besoin d’être nettoyés?
Consulter la section Entretien et nettoyage ou Machine à glaçons
et bac à glaçons à la page 30.
Continué...
39
Page 42

Dépannage
Les aliments dans le congélateur ou le réfrigérateur sont-ils bien
enveloppés? Utiliser des emballages hermétiques, imperméables
à l’humidité pour éviter le transfert d’odeurs aux aliments
conservés.
L’eau contient-elle des minéraux (tel que du soufre)? L’installation
d’un filtre peut être requise afin d’enlever les minéraux.
Y a-t-il un filtre à eau installé sur le réfrigérateur? Une
décoloration grise ou foncée de la glace indique que le système
de filtration de l’eau a besoin d’une purge supplémentaire. Faire
couler de l’eau supplémentaire dans le distributeur d’eau pour
mieux nettoyer le système de filtration de l’eau (au moins 6
gallons [5,7 L] ou pendant 3 à 4 minutes initialement). Jeter les
glaçons décolorés.
La machine à glaçons ne produit pas ou pas
suffisamment de glaçons
La machine à glaçons vient-elle d’être installée? Le bac à glaçons
a une contenance de 14 à 17 lb (6,4 à 7,7 kg) de glace. Trois à
quatre jours peuvent être nécessaires au remplissage complet du
bac à glaçons, si aucun glaçon n’est utilisé.
La température du congélateur est-elle assez froide pour produire
de la glace? Attendre 24 heures après le raccordement de la
machine à glaçons avant qu’elle produise des glaçons. Voir
Réglage des commandes à la page 27.
L’anse métallique est-elle relevée en position off (arrêt) (sur
les modèles sans distributeur)? Abaisser l’anse métallique à la
position on (marche). Voir Machine à glaçons et bac à glaçons à la
section Fonctionnement.
Le commutateur de la machine à glaçons est-il à la position OFF
(arrêt) (vers la droite) (sur les modèles avec distribution)? Mettre
le commutateur à la position ON (marche) (vers la gauche). Voir
Machine à glaçons et bac à glaçons à la section Fonctionnement.
Le robinet d’arrêt de la canalisation d’eau du réfrigérateur est-il
ouvert? Ouvrir le robinet. Voir Raccordement de l’alimentation en
eau dans les instructions d’installation.
Y a-t-il de l’eau dans le moule de la machine à glaçons ou aucun
glaçon n’a été produit? S’assurer que le réfrigérateur a été
raccordé à une canalisation d’eau et que le robinet d’arrêt de la
canalisation est ouvert. Voir Raccordement de l’alimentation en
eau dans les instructions d’installation.
Un glaçon est-il coincé dans le bras éjecteur de la machine à
glaçons? Sur les modèles avec un bac à glaçons à l’intérieur,
enlever le glaçon du bras éjecteur avec un ustensile en plastique.
Sur les modèles avec le bac à glaçons situé dans la porte du
congélateur, accéder à la machine à glaçons en baissant la porte
du détecteur à glaçons sur le côté supérieur gauche de l’intérieur
du congélateur. Tout en baissant la porte du détecteur, soulever
la porte de service de la machine à glaçons et retirer le glaçon
du bras éjecteur avec un ustensile en plastique. Voir Machine à
glaçons et bac à glaçons à la section Fonctionnement.
Une grande quantité de glaçons vient-elle d’être enlevée?
Attendre trois à quatre jours pour que le bac à glaçons vide se
remplisse complètement, si on n’utilise pas de glaçons.
Les commandes sont-elles réglées correctement? Voir Réglage
des commandes à la page 27.
Y a-t-il un filtre à eau installé sur le réfrigérateur? Le filtre peut
être obstrué ou ne pas être installé correctement. Vérifier les
instructions d’installation du filtre pour s’assurer que le filtre a
été installé correctement et qu’il n’est pas obstrué. Si le problème
ne vient pas de l’installation ni d’une obstruction, faire appel à un
technicien qualifié.
REMARQUE : Si cette situation n’est pas attribuable à ce qui
précède, le problème peut venir de la canalisation d’eau. Faire un
appel de service.
Le distributeur de glaçons ne fonctionne pas
correctement
Si le bac à glaçons est situé dans la porte, retirer l’écran de
protection temporaire situé sous le bac. Voir Machine à glaçons et
bac à glaçons à la page 30.
La porte du congélateur est-elle complètement fermée? Bien
fermer la porte. Si elle ne ferme pas complètement, voir Les
portes ne ferment pas bien plus loin dans cette section.
Le bac à glaçons est-il installé correctement? Sur les modèles
avec un bac à glaçons à l’intérieur, pousser le bac jusqu’au
fond. Si le bac ne va pas jusqu’au fond, il n’est peut-être pas
droit. Le retirer et essayer de nouveau. Sur les modèles avec
un bac à glaçons dans la porte du congélateur, le bac devrait
être d’aplomb. Pour retirer le bac, appuyer sur le bouton de
dégagement du côté droit du bac et le soulever tout droit.
Replacer le bac dans la porte en vous assurant qu’il est bien
aligné et bien en place. Voir Machine à glaçons et bac à glaçons à
la page 30.
Les mauvais glaçons ont-ils été ajoutés au bac? Utiliser
seulement des glaçons produits par la machine à glaçons
courante. Si d’autres glaçons ont été ajoutés, enlever tous les
glaçons et vérifier pour voir si l’un d’eux s’est coincé dans la
goulotte.
Les glaçons ont-ils gelé dans le bac? Secouer le bac à glaçons
pour séparer les glaçons. S’ils ne se séparent pas, vider le bac et
attendre 24 heures pour que le stock de glaçons soit regarni.
La glace a-t-elle fondu autour de la tige (spirale en métal)
dans le bac à glaçons? Vider les glaçons et nettoyer le bac
complètement. Attendre 24 heures que la machine à glaçons
regarnisse le stock. Ne pas essayer d’enlever la glace fondue
avec un objet pointu. Vous pourriez endommager le bac à
glaçons.
Un glaçon est-il coincé dans la goulotte? Dégager le glaçon de
la goulotte à l’aide d’un ustensile en plastique. Ne pas utiliser
d’objet pointu pour enlever le glaçon. Vous pourriez endommager
le bac à glaçons.
Le distributeur de glaçons se bloque-t-il lorsqu’il distribue de
la glace «pilée»? Arrêter la distribution de glaçons. Passer du
réglage “crushed” (glace pilée) au réglage “cubed” (glaçons).
Baisser le bras du distributeur de glaçons avec un verre
robuste. Si les glaçons sont correctement distribués, enfoncer le
bouton “crushed” pour obtenir de la glace pilée et reprendre la
distribution. Voir Distributeurs d’eau et de glaçons à la page 30.
Y-a-t-il des glaçons dans le bac? Voir La machine à glaçons ne
produit pas de glaçons plus haut dans cette section.
L’anse de distribution a-t-elle été retenue trop longtemps?
Relâcher l’anse de distribution. La distribution de glace sera
interrompue si l’anse est retenue trop longtemps. Attendre trois
minutes que le moteur du distributeur se réinitialise pour l’utiliser
à nouveau. Il est préférable de prendre de grandes quantités
de glaçons directement du bac à glaçons, et non pas par le
distributeur.
40
Page 43

Dépannage
Le bac à glaçons est difficile à enlever
Le bac à glaçons est-il difficile à enlever (sur certains
modèles)? Sur les modèles avec un bac à glaçons dans la
porte du congélateur, sélectionner “cubed” (glaçons). Avec un
verre robuste, abaisser et relâcher rapidement la manette de
distribution de glaçons. Ouvrir la porte du congélateur, abaisser
le bouton de dégagement sur le bac à glaçons et soulever. Voir
Machine à glaçons et bac à glaçons à la page 30.
Le distributeur d’eau ne fonctionne pas
correctement
Le système d’eau s’est-il rempli? Le système d’eau doit être
rempli avant la première utilisation. Utiliser un récipient robuste
pour appuyer sur la barre de commande de distribution d’eau,
jusqu’au point où l’eau commence à s’écouler. Rincer le circuit :
puiser et jeter 6 ptes (5,7 L) d’eau. Le processus de nettoyage
du circuit prendra approximativement 3 à 4 minutes et facilitera
l’évacuation de l’air de la canalisation. Dans certaines situations,
un processus de rinçage/purge supplémentaire peut être
nécessaire. Voir Distributeurs d’eau et de glaçons à la page 30.
Le robinet d’arrêt est-il ouvert et l’alimentation d’eau est-elle
raccordée au réfrigérateur? S’assurer que le robinet d’arrêt
d’eau est ouvert et que l’alimentation d’eau est raccordée au
réfrigérateur. Voir Raccordement de l’alimentation en eau dans les
instructions d’installation.
Le robinet d’arrêt est-il obstrué ou installé incorrectement? Voir
Raccordement de l’alimentation en eau dans les instructions
d’installation. Si le problème ne vient pas de l’installation ni d’une
obstruction, demander une intervention de service ou faire appel
à un plombier.
La canalisation d’eau du domicile comporte-t-elle une
déformation? Si vous découvrez ou soupçonnez une
déformation dans la canalisation d’eau, demander une
intervention de service.
Y a-t-il un filtre à eau installé sur le réfrigérateur? Le filtre peut
être obstrué ou installé incorrectement. Vérifier d’abord les
instructions d’installation du filtre pour s’assurer que le filtre a
été installé correctement et n’est pas obstrué. Si le problème ne
vient pas de l’installation ni d’une obstruction, demander une
intervention de service.
De l’eau suinte du distributeur
Le verre n’a pas été maintenu sous le distributeur assez
longtemps? Maintenir le verre sous le distributeur 2 à 3 secondes
après avoir relâché la manette du distributeur.
Y a-t-il un filtre à eau installé sur le réfrigérateur? Il peut y avoir
de l’air dans les canalisations du système de filtration de l’eau,
ce qui cause des gouttes. Une purge supplémentaire pourrait
aider à faire sortir l’air des canalisations. L’utilisation normale du
distributeur devrait expulser l’air des canalisations dans un délai
de 24 à 72 heures.
Le débit d’eau du distributeur diminue de façon
notable
Y a-t-il un filtre à eau installé sur le réfrigérateur? Le filtre est
peut-être obstrué ou installé incorrectement. Enlever la cartouche
du filtre à eau. Voir Remplacement du filtre à eau à la page 38
Faire fonctionner le distributeur. Si le débit d’eau diminue de
façon notable, remplacer le filtre.
Les portes ne ferment pas bien
Les aliments emballés empêchent-ils la porte de fermer?
Réorganiser les récipients de sorte qu’ils soient plus rapprochés
et prennent moins d’espace.
Le bac à glaçons est-il bien en place? Sur les modèles avec un
bac à glaçons à l’intérieur, pousser le bac jusqu’au fond. Si le
bac ne va pas jusqu’au fond, il n’est peut-être pas droit. Le retirer
et essayer de nouveau. Sur les modèles avec un bac à glaçons
dans la porte du congélateur, le bac devrait être d’aplomb. Pour
retirer le bac, appuyer sur le bouton de dégagement du côté droit
du bac et le soulever tout droit. Replacer le bac dans la porte en
vous assurant qu’il est bien aligné et bien en place. Voir Machine
à glaçons et bac à glaçons à la page 30.
Les plats, tablettes, bacs ou paniers sont-ils bien en place?
Placer le couvercle du bac à légumes et tous les plats, tablettes,
bacs et paniers en position correcte. Voir Bac à légumes et
couvercles à la page 33.
Le réfrigérateur branle-t-il ou semble-t-il instable? Niveler le
réfrigérateur. Voir Ajuster les portes et niveler le réfrigérateur dans
les instructions d’installation.
Les portes sont difficiles à ouvrir
Les joints collent-ils ou sont-ils sales? Nettoyer les joints en
suivant les indications de la section Entretien et nettoyage.
L’eau du distributeur n’est pas assez froide
Le réfrigérateur vient-il d’être installé? Attendre 24 heures que le
réfrigérateur se refroidisse complètement.
Une grande quantité d’eau a-t-elle été récemment distribuée?
Attendre 24 heures que l’eau se refroidisse complètement.
A-t-on récemment distribué de l’eau? Le premier verre d’eau peut
ne pas être froid. Jeter le premier verre d’eau.
La cloison entre les deux compartiments est tiède
La température tiède est probablement attribuable à un
fonctionnement normal du réglage automatique de l’humidité de
l’extérieur. Si ceci vous inquiète, demander une intervention de
service.
41
Page 44

Feuilles de données sur le produit
Système de filtration d’eau de la grille de la base (Filtre à eau)
Modèle WF-LC400V/LC400V Capacité 400 gallons (1514 litres)
Produit testé et certifié par NSF International en vertu de la norme ANSI/NSF
42 (réduction du goût et de l’odeur du chlore, et particules de classe I*) et
en vertu de la norme ANSI/NSF 53 (réduction de plomb, mercure, atrazine,
benzène, toxaphène, p-dichlorobenzène, 2, 4-D, kystes, turbidité et amiante)
Ce produit a été testé selon les normes 42 et 53 ANSI/NSF pour la réduction des substances énumérées ci-dessous. La concentration
des substances indiquées dans l’eau entrant dans le système a été réduite à une concentration moindre ou égale à la limite
permissible pour l’eau qui quitte le système, tel que spécifié dans les normes 42 et 53 ANSI/NSF.
Réd. de substances
Effets esthétiques
Chlore goût/odeur
Particules (classe 1*)
Réduction des
contaminants
Plomb : à pH 6,5
Plomb : à pH 8,5
Mercure : à pH 6,5
Mercure : à pH 8,5
Benzene 0,005 mg/L 0,0162 mg/L 0,015 ± 10% 0,0005 mg/L 0,001 mg/L 96,3 96,3
p-dichlorobenzene 0,075 mg/L 0,220 mg/L 0,225 ± 10% 0,0005 mg/L 0,0005 mg/L 99,7 99,7
Toxaphene 0,003 mg/L 0,014 mg/L 0,015 ± 10% 0,0014 mg/L 0,001 mg/L 90 92,96
Atrazine 0,003 mg/L 0,0086 mg/L 0,009 mg/L ± 10% 0,0005 mg/L 0,0005 mg/L 94,25 94,25
2, 4-D 0,07 mg/L 0,197 mg/L 0,210 ± 10% 0,058 mg/L 0,0137 mg/L 70,6 93,06
Amiante 99 26 x 107 107 to 108 fibers/L†† 0,18 x 10⁷ mg/L 0,18 x 10⁷ mg/L 99,93 99,93
Kystes‡
Turbidité
Critères de
réduction NSF
≥50
≥85
Critères de
réduction NFS
0,01mg/L
0,01mg/L
0,.002 mg/L
0,002 mg/L
99,95 %
0,5 NTU
Affluent
moyen
2,1 mg/L
5,366,667/mL
Affluent
moyen
0,152 mg/L†
0,143 mg/L†
0,0061 mg/L
0,0057 mg/L
111,000/mL
11,00 NTU
Concentration
dans l’eau à traiter
2,0 mg/L ± 10 %
Au moins 10 000
particules/mL
Concentration
dans l’eau à traiter
0,15 mg/L ± 10%
0,15 mg/L ± 10%
0,006 mg/L ± 10%
0,0058 mg/L ± 10%
50,000/L min.
11 ± 1 NTU
Effluent
maximal
0,06 mg/L
4,100/mL**
Effluent
maximal
0,001 mg/L
0,001 mg/L
0,0004 mg/L
0,0008 mg/L
1 mg/L
0,40 NTU
Effluent
moy
0,05 mg/L
2,300/mL
Effluent moy
0,001 mg/L
0,001 mg/L
0,0003 mg/L
0,00051 mg/L
1 mg/L
0,35 NTU
% de réd.
minimale
97,1
99,3
% de réd.
minimale
99,34
99,30
93,5
85,8
99,99
96,4
% de réd.
moyenne
97,6
99,9
% de réd.
moyenne
99,34
99,30
96.7
91,2
99,99
96,8
Paramètres de test : pH = 7,5 ± 0,5 à moins d’indications contraires. Débit = 0,5 gpm (1,9 Lpm). Pression = 60 lb/po² (413,7 kPa).
Temp. = 63°F (17,2°C).
Il est essentiel que les exigences de fonctionnement,
d’entretien et de remplacement du filtre soient respectées
pour que ce produit donne le rendement annoncé.
Modèle WF-LC400V Le système de contrôle du filtre
mesure la quantité d’eau qui passe par le filtre et vous
signale lorsqu’il faut remplacer le filtre. Lorsque le filtre est
utilisé à 90 %, le témoin lumineux du filtre passe
Directives d’application / Paramètres d’alimentation en eau
Source d’eau Municipalité ou puits
Pression de l’eau 30 à 120 lb/po² (207 à 827 kPa).
Température de l’eau 33° à 100°F (0,6° à 37,8°C)
Débit nominal 0,5 GPM (1,89 L/min) à 60 lb/po2.
du vert au jaune. Lorsqu’il est utilisé à 100 %, le témoin
lumineux passe du jaune au rouge; il est alors recommandé
de changer le filtre.
Le produit doit être utilisé avec de l’eau froide seulement.
Ne pas utiliser pour le filtrage d’une eau
microbiologiquement polluée ou de qualité inconnue en
l’absence d’un dispositif de désinfection adéquat avant ou
après le système. Les systèmes certifiés pour la réduction
de kyste peuvent être utilisés pour l’eau désinfectée qui
peut contenir des kystes filtrables.
* Classe I – taille des particules : >0,5 à <1 µm
** Exigence de test : au moins 100 000 particules/mL (poussière de test fine AC).
† Ces contaminants ne sont pas nécessairement présents dans l’alimentation en eau. Le rendement peut varier en fonction des
conditions locales.
†† Fibres de longueur supérieure à 10 µm
‡ Cas de la filtration de kystes de Cryptosporidium parvum
® NSF est une marque de commerce déposée de NSF International
42
Page 45

Garantie et service
Entretien du produit
Aucun entretien, autre que les instructions de la section Entretien
et nettoyage de ce manuel d’utilisation et d’entretien, ne doit être
entrepris par le propriétaire/opérateur. Tout entretien et toute
réparation doivent être exécutés par un technicien qualifié.
Pour obtenir de l’aide
Tout d’abord, passer en revue la section Dépannage de ce
manuel. Si vous avez effectué les vérifications nécessaires
indiquées à la section Dépannage et que le problème n’est pas
résolu, visiter notre site Web ou contacter l’équipe du service à
la clientèle de Dacor pour obtenir une liste des agents de service
Dacor autorisés. Avant de demander une intervention de service,
prendre connaissance des conditions générales de la garantie
présentées sur cette page.
Pour nous contacter, veuillez consulter notre site Web à :
www.Dacor.com
Équipe de service à la clientèle Dacor :
Téléphone : (800) 793-0093
Télécopieur : (626) 403-3130
Heures d’ouverture : Du lundi au vendredi, De 6 h à 17 h,
heure normale du Pacifique
Vous pouvez aussi nous écrire à l’adresse suivante :
Équipe de service à la clientèle Dacor
1440 Bridge Gate Drive
Diamond Bar, CA 91765
DACOR déploie tous les efforts nécessaires pour vous apporter
satisfaction lorsque votre produit nécessite d’être réparé.
Cependant, si vous n’êtes pas complètement satisfait du service
fourni, communiquez avec notre équipe de service à la clientèle
et expliquez la raison de votre mécontentement. Notre personnel
fera de son mieux pour résoudre le problème et tenir ses
engagements. Si vous avez besoin d’explications, communiquez
simplement avec nous
Ce qui est couvert
CERTIFICAT DE GARANTIE DES RÉFRIGÉRATEURS DACOR
DANS LES CINQUANTE ÉTATS DES É.-U., LE DISTRICT DE
COLUMBIA ET AU CANADA* :
GARANTIE COMPLÈTE DE UN AN
Un (1) an – À compter de la date d’achat originale chez un détaillant,
tout article présentant un défaut dans le cadre d’une utilisation
domestique normale sera réparé ou remplacé sans frais. Machine à
glaçons - Lorsqu’elle a été achetée avec le réfrigérateur et installée
par le détaillant, la machine à glaçons est considérée comme faisant
partie du réfrigérateur aux fins de la garantie.
GARANTIE LIMITÉE
Principaux composants de réfrigération
De la deuxième à la cinquième année inclusivement – Après la
première année suivant la date d’achat originale, jusqu’à la cinquième
année inclusivement, Dacor réparera ou remplacera, à sa discrétion,
gratuitement pour les pièces et la main-d’œuvre uniquement, toute
pièce du système de réfrigération scellé (compresseur, évaporateur,
condenseur, déshydrateur et tube de raccordement) et le revêtement
intérieur (à l’exception du revêtement de la porte) qui s’avérerait
défectueuse dans le cadre d’une utilisation domestique normale. Tous
les autres frais, notamment le kilométrage, les frais de transport, de
déplacement, de diagnostic, le cas échéant, resteront à la charge du
propriétaire.
GARANTIE LIMITÉE
Filtre à eau, si le réfrigérateur en est équipé
30 jours – À partir de la date d’achat originale chez un détaillant, toute
pièce de la cartouche du filtre à eau défectueuse en raison d’un vice
de matériau ou de fabrication sera remplacée gratuitement.
GARANTIE LIMITÉE
Autres pièces
Deuxième année – Les pièces, autres que les principaux composants
de réfrigération, présentant un défaut dans le cadre d’une utilisation
domestique normale au cours de la deuxième année suivant la date
d’achat originale chez un détaillant, seront réparées ou remplacées
(gratuitement s’agissant de la pièce elle-même, les autres frais,
notamment le kilométrage et les frais de main-d’oeuvre, de transport,
de déplacement et de diagnostic, le cas échéant, restant à la charge
du propriétaire).
REMARQUE
La garantie complète et les garanties limitées s’appliquent lorsque
le réfrigérateur se trouve aux États-Unis ou au Canada. Les
réfrigérateurs situés en tout autre endroit ne sont couverts que par
les garanties limitées, et que pour les pièces défectueuses durant la
première année.
RÉSIDENTS CANADIENS
Les garanties ci-dessus ne couvrent que les appareils installés au
Canada ayant été certifiés ou agréés par les organismes de test
appropriés comme respectant les normes nationales du Canada,
sauf si l’appareil a été transporté au Canada à la suite d’un
déménagement des États-Unis vers le Canada.
LIMITATIONS DE RESPONSABILITÉ
Le garant décline toute responsabilité au titre des dommages indirects
ou consécutifs, notamment la perte d’aliments. Certains États ne
permettent pas l’exclusion ou la limitation des dommages indirects ou
consécutifs; les limitations ci-dessus peuvent par conséquent ne pas
s’appliquer à votre cas.
Ce qui n’est pas couvert
Tout préjudice découlant de l’une des situations suivantes :1.
Installation, livraison ou entretien inapproprié(e).
Toute réparation, modification, correction ou tout réglage non
autorisé(e) par le fabricant ou par un agent de réparation agréé.
Utilisation inappropriée ou abusive, accidents ou utilisation
déraisonnable.
Courant, tension ou courant électrique inadéquat(e).
Mauvais réglage des commandes.
Les garanties sont nulles si les numéros de série originaux ont été 2.
retirés, modifiés ou sont illisibles.
Les ampoules.3.
Les produits achetés pour une utilisation commerciale ou 4.
industrielle.
Les frais de réparation ou d’appels de service pour :5.
Corriger des erreurs d’installation.
Indiquer à l’utilisateur comment utiliser correctement le produit.
Transporter l’appareil jusqu’à l’agent d’entretien.
Les dommages indirects ou consécutifs subis par toute personne 6.
du fait du non-respect des termes des présentes garanties.
Certains États ne permettent pas l’exclusion ou la limitation des
dommages indirects ou consécutifs; les limitations ci-dessus
peuvent par conséquent ne pas s’appliquer à votre cas.
43
Page 46

Notes
44
Page 47

Page 48

Dacor ● 1440 Bridge Gate Drive, Diamond Bar, CA 91765 ● Tel: (800) 793-0093 ● FAX: (626) 403-3130 ● www.Dacor.com
 Loading...