

Page 1

USE & CARE
36” REFRIGERATORS
For Use With:
EF36 version P-A
IF36 version P-A
Part No. 100501/12828170 Rev. A
T ABLE OF CONTENTS
IMPORTANT SAFETY INSTRUCTIONS................................................1-2
E
LECTRONIC CONTROL CENTER ...................................................3-4
R
EFRIGERATOR COMPARTMENT.....................................................5-6
F
REEZER COMPARTMENT................................................................ 6
I
CE AND WATER............................................................................7
ATER FILTER ............................................................................. 8
W
P
ERFORMANCE DATA .....................................................................9
F
OOD STORAGE TIPS .............................................................10-12
C
ARE AND CLEANING..............................................................13-16
O
PERATING SOUNDS ...................................................................17
B
EFORE YOU CALL FOR SERVICE..................................................18
ARRANTY & SERVICE...........................................................19-20
W
Page 2

To Our Valued Customer:
Congratulations on your purchase of the very latest in Dacor products! Our unique combination of features, style and
performance make us the life of the kitchen™, and a great addition to your home.
In order to familiarize yourself with the controls, functions and full potential of your new distinctive appliance, we
suggest that you thoroughly read this Use & Care Manual, beginning with the Important Instructions Section.
All Dacor Appliances are designed and manufactured with quality and pride, while working within the framework of
our Company Value. Should you ever experience a problem with your product, please first check the Before You Call
for Service Section of this manual for guidance. It provides useful suggestions and remedies prior to calling for
service.
Valuable customer input helps us to continuously improve our products and services, so please feel free to contact
our Customer Service Team for assistance with any of your product support needs.
Dacor Customer Service
1440 Bridge Gate Drive
Diamond Bar, CA 91765
Telephone: (800) 793-0093
Fax: (626) 403-3130
Hours of Operation: Monday through Friday
6:00 A.M. to 5:00 P.M. Pacific Time
Web Site: www.dacor.com
Thank you for choosing Dacor for your home. We are a company built by families for families and we are dedicated
to serving yours. We are confident that your new Dacor product will deliver a high level of performance and
enjoyment for many years to come.
Sincerely,
Cheryl Crowe
Director, Customer Satisfaction
Page 3

IMPORTANT SAFETY INSTRUCTIONS
Installer: Please leave this guide with this appliance.
Consumer: Please read and keep this Use & Care Manual for
future reference. This guide provides proper use and maintenance
information. Keep this guide and the sales receipt and/or
cancelled check in a safe place for future reference. Proof of
original purchase date is needed for warranty service.
If you have any questions, call:
Dacor
Customer Service
®
1-800-793-0093 (U.S.A. and Canada)
Monday — Friday 6:00 am to 5:00 pm Pacific Time
website: www.dacor.com
Have complete model and serial number identification of your
refrigerator ready. These numbers are found on a serial plate,
located on the right side of the refrigerator liner. Record these
numbers below for easy access.
Model Number ________________________________________
Serial Number ________________________________________
Date of Purchase______________________________________
For service and warranty information, see page 19-20.
In our continuing effort to improve the quality and performance
of our appliances, it may be necessary to make changes to the
appliance without revising this guide.
What You Need to Know About
Safety Instructions
Warning and Important Safety Instructions appearing in this guide
are not meant to cover all possible conditions and situations that
may occur. Common sense, caution and care must be exercised
when installing, maintaining or operating an appliance.
DANGER
To reduce risk of injury or death, follow basic precautions,
including the following:
IMPORTANT: Child entrapment and
suffocation are not problems of the
past. Junked or abandoned
refrigerators are still dangerous –
even if they sit out for “just a few
days.” If you are getting rid of your
old refrigerator, please follow the
instructions below to help prevent
accidents.
Before you throw away your old
refrigerator or freezer:
Take off the doors.
•
Leave the shelves in place so
•
children may not easily climb inside.
This appliance is equipped with a three-prong grounding plug
for your protection against possible electrical shock hazards. It
must be plugged into a grounded receptacle. Where a standard
two-prong wall receptacle is encountered, it is the personal
responsibility and obligation of the customer to have it replaced
with a properly grounded three-prong wall receptacle. Do not
under any circumstances, cut or remove the third (ground)
prong from the power cord. Do not use an adapter plug. Do
not use an extension cord. Do not use a Ground Fault Circuit
Interrupter.
Power supply cord with
three-prong grounding plug
Always contact the manufacturer about problems or conditions
you do not understand.
Recognize Safety Symbols, Words, Labels
DANGER
DANGER – Immediate hazards which WILL result in severe
personal injury or death.
WARNING
WARNING – Hazards or unsafe practices which COULD result
in severe personal injury or death.
CAUTION
CAUTION – Hazards or unsafe practices which COULD result
in minor personal injury or property damage.
Grounded type wall
receptacle (gound fault
circuit not allowed)
1
Page 4

IMPORTANT SAFETY INSTRUCTIONS
WARNING
To reduce risk of fire, electric shock, serious injury or death when using your refrigerator, follow these basic precautions,
including the following:
1. Read all instructions before using the refrigerator.
2. Observe all local codes and ordinances.
3. Be sure to follow grounding instructions.
4. Check with a qualified electrician if you are not sure this appliance is properly grounded.
5. Do not ground to a gas line.
6. Do not ground to a cold-water pipe.
7. Refrigerator is designed to operate on a dedicated 115 volt, 15 amp., 60 cycle line.
8. Do not modify plug on power cord. If plug does not fit electrical outlet, have proper outlet installed by a qualified electrician.
9. Do not use a two-prong adapter, extension cord or power strip.
10. Do not remove warning tag from power cord.
11. Do not tamper with refrigerator controls.
12. Do not service or replace any part of refrigerator unless specifically recommended in Use & Care Manual or published user-repair
instructions. Do not attempt service if instructions are not understood or if they are beyond personal skill level.
13. Always disconnect refrigerator from electrical supply before attempting any service.
14. Install refrigerator according to Installation Instructions. All connections for water, electrical power and grounding must comply with
local codes and be made by licensed personnel when required.
15. Keep your refrigerator in good condition. Bumping or dropping refrigerator can damage refrigerator or cause refrigerator to
malfunction or leak. If damage occurs, have refrigerator checked by qualified service technician.
16. Replace worn power cords and/or loose plugs.
17. Always read and follow manufacturer’s storage and ideal environment instructions for items being stored in refrigerator.
18. Your refrigerator should not be operated in the presence of explosive fumes.
19. Children should not climb, hang or stand on any part of the refrigerator.
20. Clean up spills or water leakage associated with water installation.
SAVE AND KEEP THESE INSTRUCTIONS
2
Page 5
3
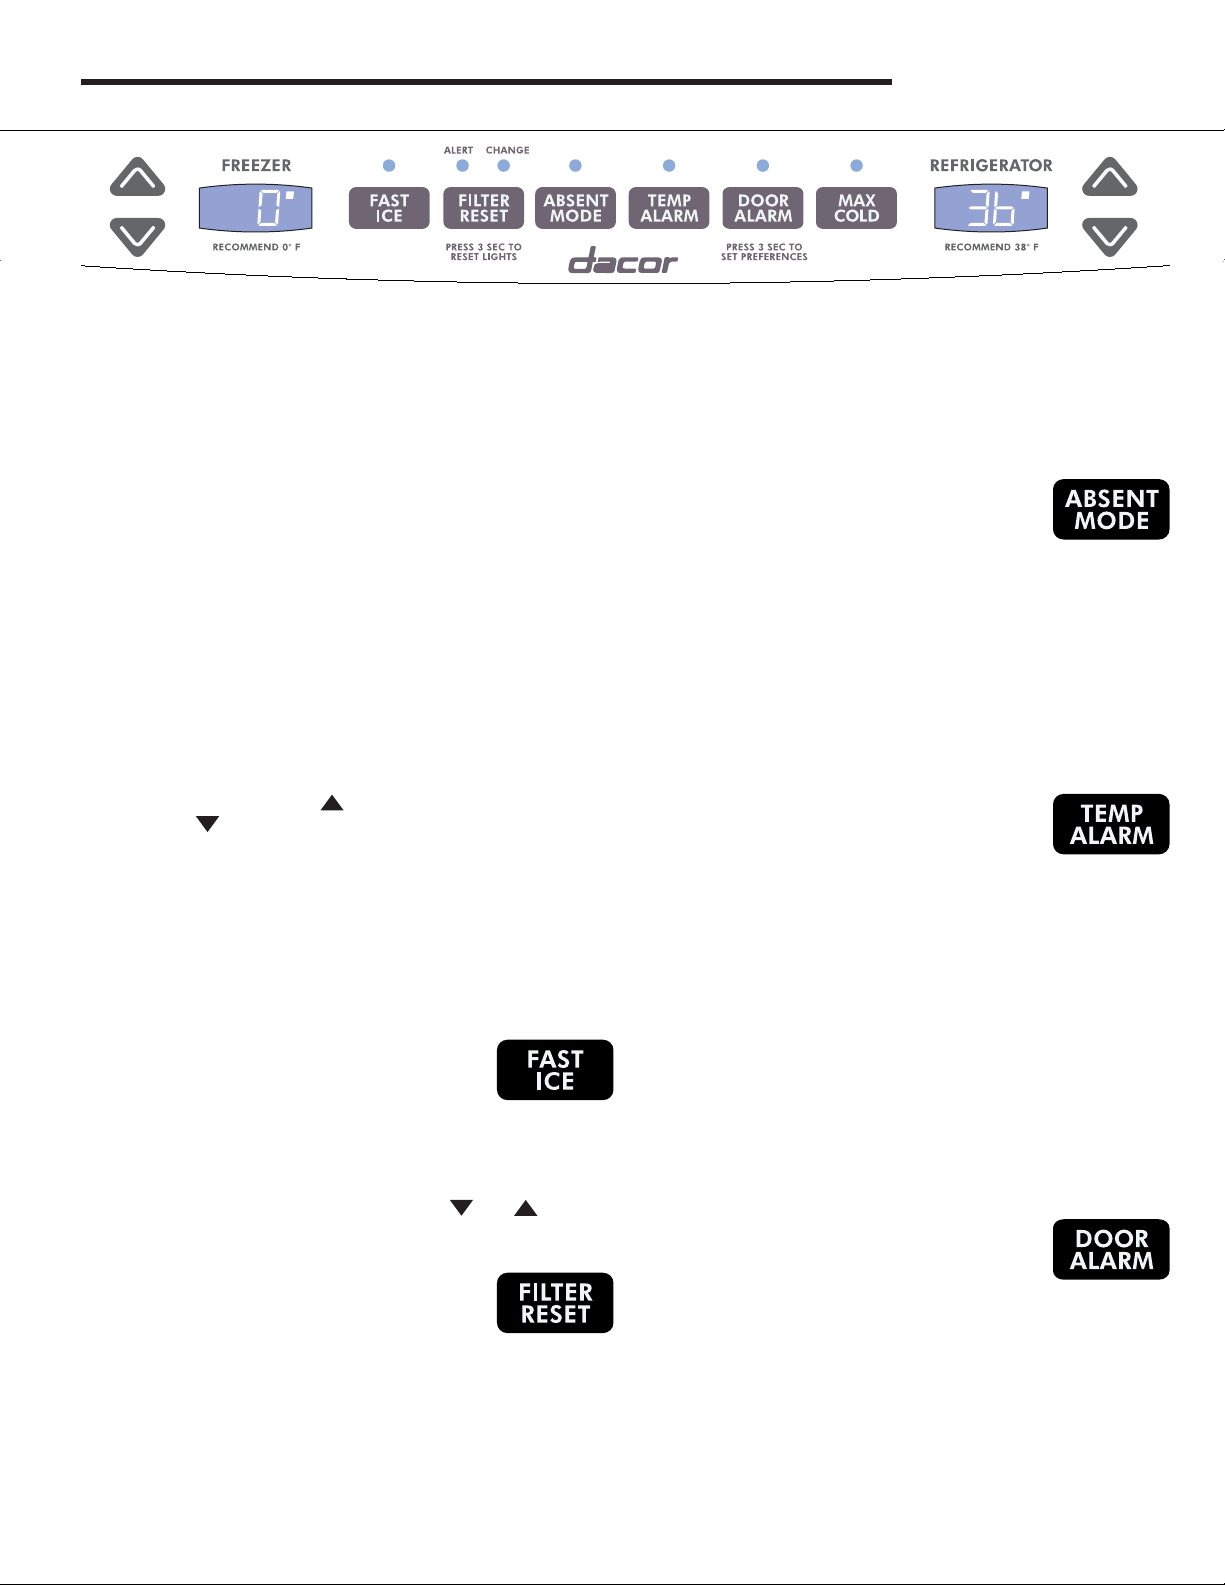
ELECTRONIC CONTROL CENTER
The control center is located at the top front of the fresh food compartment.
INITIAL TEMPERATURE SETTINGS
Temperatures are preset at 37° F (3° C) in the fresh food
compartment and 0° F (-18° C) in the freezer compartment. The
display will show the average compartment temperatures, based
on several measurement points within the compartment.
Note:
Temperatures displayed may vary from set point due to door
openings or during defrost. Thermometers placed in the
refrigerator may record a temperature slightly above or below
the displayed temperature. This is normal as the displayed
temperature is an average.
TEMPERATURE ADJUSTMENTS
• Allow the temperature to stabilize for 24 hours after loading the
refrigerator before making any temperature adjustments.
• The first touch of the up or down arrow shows the current
temperature set point.
• Subsequent touches of the
point or the
• The display will show the new set point for approximately three
seconds, then return to the actual temperature currently within
that compartment.
pad lowers the temperature set point.
pad raise the temperature set
The red Change light will illuminate when the rated volume of
water has passed through the filter OR 12 months have elapsed
since the filter was installed. A new filter should be installed
immediately when the Change light is illuminated.
After replacing the filter, press and hold the Reset Filter pad for
three seconds. The Alert and Change lights will go off.
ABSENT MODE
The Absent Mode feature causes the freezer to
defrost less frequently, conserving energy. The
Absent Mode indicator light will illuminate when the feature is
activated. To deactivate, press the Absent Mode pad again OR
open either door. The indicator light will go out.
Notes:
• Door openings will not deactivate Absence Mode for
approximately one hour after activation.
• If vacationing for more than a few days, see the Preparing for
Absent section, page 16.
TEMP ALARM
The Temp Alarm system will alert you if the
freezer or fresh food temperatures exceed normal
operating temperatures due to a power outage or other event.
When activated, the Temp Alarm light will illuminate.
• Limit temperature changes to one degree at a time. Allow the
new temperatures to stabilize for 24 hours before making a new
temperature adjustment.
FAST ICE
When activated, Fast Ice reduces the freezer
temperature to the optimum setting for 24 hours in
order to produce more ice.
Note:
When the Fast Ice feature is in operation, the and pads for
the freezer control will not operate.
RESET FILTER
When a water filter has been installed in the
refrigerator, the yellow Alert light will illuminate
when 90 percent of the volume of water for which the filter is rated
has passed through the filter OR 11 months have elapsed since
the filter has been installed.
If the freezer or fresh food temperatures have exceeded these
limits, the display will alternately show the current compartment
temperatures and the highest compartment temperatures reached
when the power was out. An audible alarm will sound repeatedly.
Press the Temp Alarm pad once to stop the audible alarm. The
Temp Alarm light will continue to flash and the temperatures will
alternate until the temperatures have stabilized.
To turn off Temp Alarm, press and hold the Temp Alarm pad for
three seconds. The indicator light will go off.
DOOR ALARM
The Door Alarm will alert you when one of the
doors has been left open for five continuous
minutes. When this happens, an audible alarm will sound every
few seconds until the door is closed OR press the Door Alarm pad
to deactivate the feature.
Page 6

ELECTRONIC CONTROL CENTER
MAX COOL
When activated, Max Cool causes the fresh food
and freezer temperatures to drop to the minimum
settings on the control. This cools down the refrigerator and
freezer after extended door openings or when loading the
refrigerator or freezer with warm food.
Note:
When the Max Cool feature is in operation, the and pads
for the refrigerator and freezer controls will not operate.
To activate, press the Max Cool pad. Max Cool will deactivate
automatically after 12 hours, OR press the Max Cool pad to
deactivate the feature.
USER PREFERENCES
Access the User Preferences menu to:
• Change the temperature display from °F to °C
• Enable or disable audible alarms.
• Activate the Sabbath Mode
To access the User Preferences menu, press and hold the Door
Alarm pad for three seconds. When in the User Preferences
mode, a short title for the feature will appear in the freezer
temperature display and the feature status will appear in the fresh
food display.
1. Use the freezer up and down control to scroll through the
features.
2. When the desired feature is displayed, use the fresh food
and control to change the status.
3. When changes are complete, press the Door Alarm pad for
three seconds OR close the fresh food door.
TEMPERATURE DISPLAY (F_C)
Change the display to show temperatures in degrees
Fahrenheit or degrees Celsius.
ALARM (AL)
When the Alarm mode is OFF, all audible alarms will
be disabled until the feature is turned on.
SABBATH MODE (SAB)
When the Sabbath Mode is ON, all control lights and the night
light will be disabled until the feature is turned OFF. This feature
does not disable the interior lights. Press any pad to restore the
control lights.
WARM CABINET SURFACES
At times, the front of the refrigerator cabinet may be warm to the
touch. This is a normal occurrence that helps prevent moisture
from condensing on the cabinet. This condition will be more
noticeable when the refrigerator is first started, during hot weather
and after excessive or lengthy door openings.
4
Page 7
5
REFRIGERATOR COMPARTMENT
SHELVES
CAUTION
To avoid personal injury or property damage, observe the
following:
• Never attempt to adjust a shelf that is loaded with food.
• Confirm shelf is secure before placing items on shelf.
• Handle tempered glass shelves carefully. Shelves may
break suddenly if nicked, scratched, or exposed to sudden
temperature change.
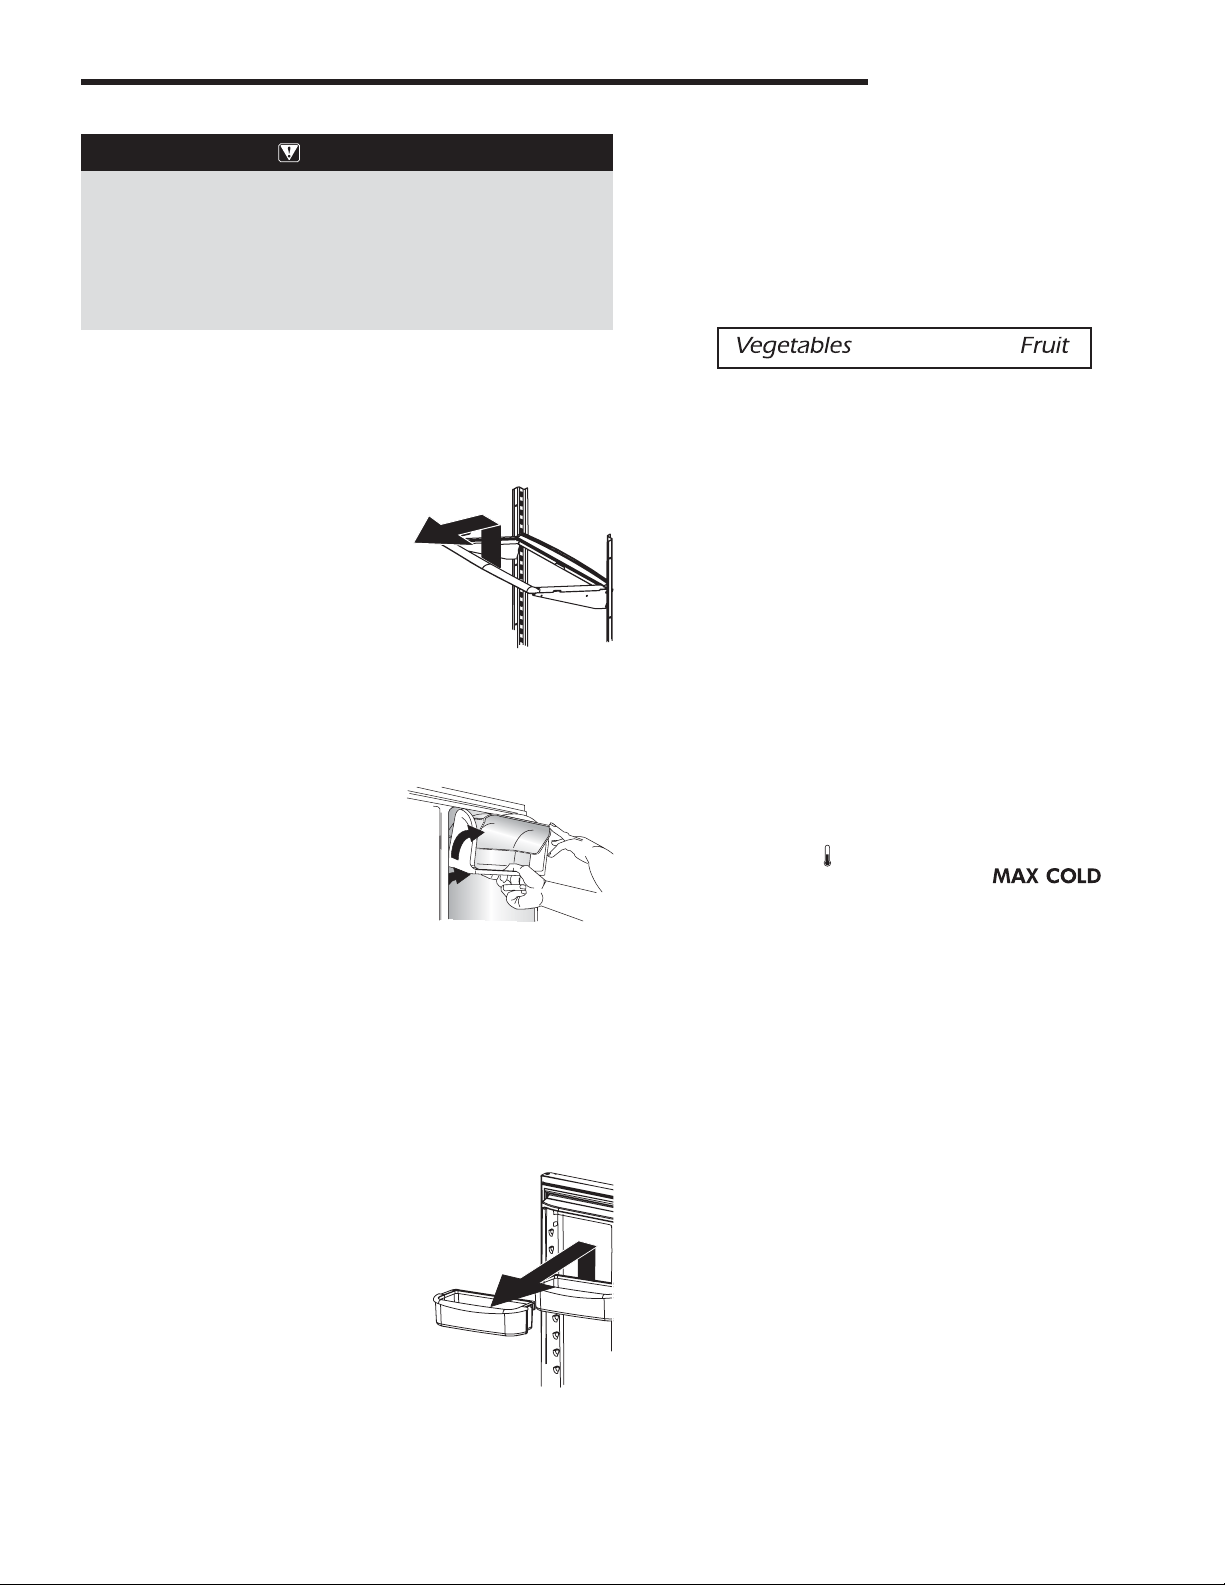
Your refrigerator has Spill-proof Glass Shelves. The Spill-proof
shelves have a spill retainer edge which allows for easier clean up
and are equipped with a slide out feature. To slide out, grasp the
front of the shelf and pull forward. Push in the shelf to return to
the original position.
To Remove a Shelf:
• Slightly tilt up the front and lift up the
rear of the shelf, then pull the shelf
straight out.
To Lock the Shelf Into Another
Position:
• Tilt up the front edge of the shelf.
• Insert the hook into the desired frame openings and let the shelf
settle into place.
• Be sure the shelf is securely locked at the rear.
DOOR STORAGE
Crisper Drawers
The Crisper Drawers provide a higher humidity environment for
fresh fruit and vegetable storage.
Controls
The Crisper Controls regulate the amount of humidity in the
crisper drawer. Slide the control toward the Fruit setting for
produce with outer skins. Slide the control toward the Vegetables
setting for leafy produce.
To Remove:
• Pull drawer out to full extension. Tilt up front of drawer and pull
straight out.
To Install:
• Insert drawer into frame rails and push back into place.
Note:
For best results, keep the crisper drawers tightly closed.
DELI DRAWER
The Deli Drawer is a full-width drawer with adjustable temperature
control. This drawer can be used for large party trays, deli items,
beverages or miscellaneous items. There is a divider to organize
the drawer into sections if desired.
There is a temperature control which adjusts the amount of cold
air allowed into the Deli Drawer. The control is located on the right
of the drawer, under the lid.
Dairy Center
The Dairy Center provides convenient
door storage for spreadable items
such as butter and margarine. This
compartment can be moved to different
locations to accommodate storage needs. To use the dairy center,
raise the cover.
To Remove:
• Raise the cover, pull upward and tilt out.
To Install:
• Slide the Dairy Center in and down until firmly seated in the
door liner.
Door Buckets
Door Buckets can be moved to meet
storage needs.
To Remove:
• Slide bucket up and pull straight out.
To Install:
• Slide bucket in and down until firmly
seated in the door liner.
Set the control to cold
temperature. Set the drawer on the coldest
setting when a temperature colder than the main refrigerator
compartment is desired. Use the coldest setting when storing
meats.
to provide a normal refrigerator
Notes:
• Cold air directed to the Deli Drawer can decrease refrigerator
temperature. Refrigerator control may need to be adjusted.
• Do not place leafy vegetables in the Deli Drawer. Colder
temperatures could damage leafy produce.
To Remove:
• Lift lid. Pull drawer out to full extension. Tilt the drawer front up
and pull straight out.
To Install:
• Push metal glide rails to the back of the refrigerator. Place
drawer onto rails and slide drawer back until it falls into place.
To Remove Divider:
• Pull drawer completely out and raise the front of the divider to
unhook it from the rear wall of the pantry and lift it out.
To Install Divider:
• Hook back of divider over rear wall of pantry and lower into
place.
Page 8

REFRIGERATOR COMPARTMENT
ACCESSORIES
Wine Trivet/Can Rack
The Wine Trivet/Can Rack accessory fits in the
Deli Drawer or on a shelf.
Bottles or cans can be laid crosswise, or
a single bottle may be laid in the center
depression.
Deli Drawer Tray
The Deli Drawer tray allows for a removable tray within the fullwidth storage drawer.
FREEZER COMPARTMENT
UPPER WIRE BASKET
DANGER
To prevent accidental child entrapment or suffocation risk, do
not remove the divider in the top freezer basket
To Remove:
• Turn off ice maker by rasing the ice maker arm (see page 7).
• Pull upper basket out to full extension and lift out to remove.
To Install:
• Slide upper basket into freezer. Make sure that rear of basket
hooks behind rail catch.
ACCESSORIES
Ice Bin
The ice bin provides storage for ice.
Lower Basket Divider
The lower basket divider allows the option to organize the basket
area into sections.
To remove and replace divider:
• To remove, pull divider straight up.
• To install, hook top corners of divider over top horizontal basket
rungs.
6
Page 9

7
ICE AND WATER
AUTOMATIC ICE MAKER
Connect the ice maker to the water supply as instructed in
the installation instructions. Proper water flow and a level
refrigerator are essential for optimal ice maker performance.
Operating Instructions
• Confirm ice bin is in place and ice
maker arm is down.
• After freezer section reaches
between 0° to 2° F (-18° to -17°
C), ice maker fills with water
and begins operating. You will
have a complete harvest of ice
approximately every three hours.
• Allow approximately 24 hours after installation to receive first
harvest of ice.
• Discard ice created within first 12 hours of operation to assure
system is flushed of impurities.
• Stop ice production by raising ice maker arm until click is heard.
• Ice maker will remain in the off position until arm is pushed
down.
CAUTION
To avoid personal injury or property damage, observe the
following:
• Do not place fingers or hands on the automatic ice making
mechanism while the refrigerator is plugged in. This will
help protect you from possible injury. It will also prevent
interference with moving parts of the ejector mechanism
and the heating element that releases the cubes.
• Under certain rare circumstances, ice cubes may be
discolored, usually appearing with a green-bluish hue. The
cause of this unusual discoloration can be a combination
of factors such as certain characteristics of local waters,
household plumbing and the accumulation of copper salts
in an inactive water supply line which feeds the ice maker.
Continued consumption of such discolored ice cubes may
be injurious to health. If such discoloration is observed,
discard the ice cubes and contact your dealer to purchase
and install a water line filter.
• Water damage due to improper water connection may
cause mold/mildew growth.
• Clean up water and ice spills to avoid personal injury and to
prevent mold/mildew growth.
• The first one or two batches will probably contain undersized
and irregular cubes because of air in the supply line.
• When the ice cubes are ejected it is normal for several cubes to
be joined together at the ends. They can easily be broken apart.
The ice maker will continue to make ice until the supply of ice
cubes raises the ice maker arm, shutting the ice maker off.
• Certain sounds may accompany the various cycles of the ice
maker. The motor may have a slight hum, the cubes will rattle
as they fall into an empty storage pan and the water valve may
click or “buzz” occasionally.
• If the ice is not used frequently, the ice cubes will become
cloudy, shrink, stick together and taste stale. Empty the ice
storage bin periodically and wash it in lukewarm water. Be sure
to dry the bin thoroughly before replacing it.
• Beverages and foods should not be placed in the ice storage
bin for quick chilling. These items can block the ice maker arm,
causing the ice maker to malfunction.
• Turn off (arm up) the ice maker when the water supply is to be
shut off for several hours.
To Remove the Ice Bin:
• Pull it forward, away from the ice maker. To avoid the ice maker
dumping ice while the bin is removed, turn the ice maker off by
raising the icemaker arm.
Water Dispenser
The Water Dispenser is located on the left
side wall of the fresh food section. This
design is for cold water dispensing only.
To Dispense Water:
• Hold container under spout and press
dispenser pad.
To Install the Ice Bin:
• Reverse the above procedure. Turn the ice maker on by
lowering the ice maker arm.
Page 10

WATER FILTER
REMOVAL AND INSTALLATION
WARNING
To avoid serious illness or death:
• Do not use refrigerator where water is unsafe or of
unknown quality without adequate disinfection before or
after use of filter.
• Systems certified for cyst reduction may be used on
disinfected waters that may contain filter able cysts.
CAUTION
After installing a new water filter, always dispense water for two
minutes before removing the filter for any reason. Air trapped
in system may cause water and cartridge to eject. Use caution
when removing.
• The bypass cap does not filter water. Be sure to have
replacement cartridge available when filter change is
required.
• If water filtration system has been allowed to freeze,
replace filter cartridge.
• If system has not been used for several months, or
water has an unpleasant taste or odor, flush system by
dispensing water for two to three minutes. If unpleasant
taste or odor persists, change filter cartridge.
Initial Installation
The water filter is located in the upper right hand corner of the
fresh food compartment.
1. Remove blue bypass cap and retain for later use.
2. Remove sealing label from end of filter and insert into filter
head.
4. Reduce water spurts by flushing air from system. Run water
continuously for two minutes through dispenser until water runs
steady. During initial use, allow about a one- to two-minute
delay in water dispersal to allow internal water tank to fill.
• Additional flushing may be required in some households
where water is of poor quality.
Replacing Water Filter
IMPORTANT:
cartridge to eject. Always dispense water for two minutes
before removing the filter for any reason. Use caution when
removing.
1. Turn filter counterclockwise until it releases from filter head.
2. Drain water from filter into sink, and dispose of filter in normal
household trash.
3. Wipe up excess water in filter cover and continue with Initial
Installation, steps 2 through 4.
The filter should be changed at least every 12 months.
Air trapped in system may cause water and
Important: Condition of water and amount used determines life
span of water filter cartridge. If water use is high, or if water is of
poor quality, replacement may need to take place more often.
To replacement filter cartridges or for service, contact your local
dealer or Dacor Customer Service, 1-800-793-0093. (U.S.A. and
Canada)
The dispenser feature may be used without a water filter cartridge.
If you choose this option, replace filter with blue bypass cap.
3. Rotate gently clockwise until filter stops. Snap filter cover
closed.
8
Page 11

9
PERFORMANCE DATA
Standard No. 42: Aesthetic Effects
Parameter
Cholorine – 2.0 mg/L ± 10% 1.88 mg/L <0.05136364 mg/L 0.06 mg/L >97.26 96.84 50%
Taste and Odor – – – – – – – –
Particulate** – at least 10,000 particles/ml 5,700,000 #/ml 30,583 #/ml 69,000 #/ml 99.52 98.94 85%
Parameter
Turbidity 1 NTU** 11 ± 1 NTU*** 10.7 NTU 0.31 NTU .049 NTU 97.09 95.20 0.5 NTU
Cysts
Asbestos
Lead at pH 6.5 0.015 mg/L 0.15 mg/L +10% 0.153 mg/L <.001 mg/L <.001 mg/L >99.35 >99.29 0.10 mg/L
Lead at pH 8.5 0.015 mg/L 0.15 mg/L +10% 0.150 mg/L <.001 mg/L <.001 mg/L >99.33 >99.29 0.10 mg/L
Mercury at pH 6.5 0.002 mg/L .006 mg/L ± 10% 0.006 mg/L 0.0003 mg/L 0.0005 mg/L 95.70 90.91 0.002 mg/L
Mercury at pH 8.5 0.002 mg/L .006 mg/L ± 10% 0.006 mg/L 0.0008 mg/L 0.0015 mg/L 86.22 75.93 0.002 mg/L
Atrazine 0.003 mg/L 0.009 mg/L + 10% 0.009 mg/L <0.002 mg/L 0.002 mg/L 76.99 75.31 0.003 mg/L
Benzene 0.005 mg/L 0.015 mg/L ± 10% 0.014 mg/L 0.0006 mg/L 0.0011 mg/L 95.71 92.14 0.005 mg/L
Carbofuran 0.04 mg/L 0.08 mg/L ± 10% 0.081 mg/L <0.001 mg/L <0.001 mg/L 98.74 98.46 0.04 mg/L
p-Dichlorobenzene 0.075 mg/L .225 mg/L ± 10% 0.208 mg/L <0.0005 mg/L <0.0005 mg/L 99.76 99.74 0.075 mg/L
Lindane
Toxaphene 0.003 mg/L 0.015 ± 10% 0.015 mg/L <0.001 mg/L <0.001 mg/L 92.97 91.67 0.003 mg/L
USEPA
MCL
USEPA
MCL
99.5%
Reduction Minimum 50,000/L 166,500 #/L <1 #/L <1 #/L >99.99 >99.99 >99.99%
99%
Reduction
0.0002
mg/L 0.002 mg/L ± 10% 0.002 mg/L 0.000 mg/L <0.0001 mg/L 98.72 96.50 0.0002 mg/L
7
10
Influent
Challenge Concentration
Standard No. 53: Health Effects
Influent
Challenge Concentration
108 fibers/L; fibers > micrometers
in length 155 MF/L <1 MF/L <1 MF/L >99.99 >99.99 99%
Influent
Average
Influent
Average
Effluent % Reduction
Effluent % Reduction
Min. Required
ReductionAverage Maximum Average Minimum
Min. Required
ReductionAverage Maximum Average Minimum
* Tested using a flow rate of 0.78 gpm; pressure of 60 psig; pH of 7.5 + 0.5; temp. of 68
** Measurement in Particules/ml. Particules used were 0.5 - 1 microns
*** NTU - Nephelometric Turbidity Units
° + 5°F (20° + 3°C)
SPECIFICATIONS
Rated Flow: .78 gpm (2.9 L/min)
Min. Op.Temp: 33° F (.6° C)
Max. Op.Temp: 100° F (38° C)
Min. Op. Press: 35 psi (241 kPA)
Max. Op. Press: 120 psi (827 kPA)
General Use Conditions
Read this Performance Data Sheet and compare the capabilities
of this unit with your actual water treatment needs.
DO NOT use this product where water is microbiologically
unsafe or of unknown quality without adequate disinfection
before or after the system. System certified for cyst reduction
may be used on disinfected water that may contain filterable
cysts.
USE ONLY WITH COLD WATER SUPPLY. CHECK FOR
COMPLIANCE WITH THE STATE AND LOCAL LAWS AND
REGULATIONS.
System tested and certified by NSF International
against NSF/ANSI Std 42 for the reduction of Chlorine
Taste and Odor, Particulate Class I and against NSF/
ANSI 53 for the reduction of Cysts, Turbidity,Asbestos,
Mercury, Lead, Benzene, p-Diclorobenzene,
Carbofuran
The AquaClean™ retractable water filtration system uses an AFF3
replacement cartridge. Timely replacement of filter cartridge is
essential for performance satisfaction from this filtration system.
Please refer to the applicable section of your Use and Care
Guide for general operation, maintenance requirements and
troubleshooting.
This system has been tested according to ANSI/NSF 42 and 53
for reduction of the substances listed above. The concentration
of the indicated substances in water entering the system was
reduced to a concentration less than or equal to the permissible
limit for water leaving the system, as specified in ANSI/NSF 42
and 53.
Page 12

FOOD STORAGE TIPS
FRESH FOOD STORAGE
• The fresh food compartment of a refrigerator should be kept
between 34°-40° F (1°-4° C) with an optimum temperature of
37° F (3° C). To check the temperature, place an appliance
thermometer in a glass of water and place in the center of the
refrigerator. Check after 24 hours. If the temperature is above
40° F (4° C) adjust the controls as explained on page 3.
• Avoid overcrowding the refrigerator shelves. This reduces
the circulation of air around the food and results in uneven
cooling.
Fruits and Vegetables
• Storage in the crisper drawers traps humidity to help preserve
the fruit and vegetable quality for longer time periods (see
page 5).
• Sort fruits and vegetables before storage and use bruised or
soft items first. Discard those showing signs of decay.
• Always wrap odorous foods such as onions and cabbage so
the odor does not transfer to other foods.
• While vegetables need a certain amount of humidity to
remain fresh, too much humidity can shorten storage times
(especially leafy vegetables). Drain vegetables well before
storing.
• Wait to wash fresh produce until right before use.
Meat and Cheese
• Raw meat and poultry should be wrapped securely so
leakage and contamination of other foods or surfaces does
not occur.
• Occasionally mold will develop on the surface of hard
cheeses (Swiss, Cheddar, Parmesan). Cut off at least an
inch around and below the moldy area. Keep your knife or
instrument out of the mold itself. Do not try to save individual
cheese slices, soft cheese, cottage cheese, cream, sour
cream or yogurt when mold appears.
FROZEN FOOD STORAGE
• The freezer compartment of a refrigerator should be kept at
approximately 0° F (-18° C). To check the temperature, place
an appliance thermometer between the frozen packages and
check after 24 hours. If the temperature is above 0° F (-18°
C), adjust the control as described on pages 3.
• A freezer operates more efficiently when it is at least twothirds full.
Packaging Foods for Freezing
• To minimize dehydration and quality deterioration use
aluminum foil, freezer wrap, freezer bags or airtight
containers. Force as much air out of the packages as
possible and be sure they are tightly sealed. Trapped air can
cause the food to dry out, change color and develop an offflavor (freezer burn).
• Overwrap fresh meats and poultry with suitable freezer wrap
prior to freezing.
• Do not refreeze meat that has completely thawed.
Loading the Freezer
• Avoid adding too much warm food to the freezer at one time.
This overloads the freezer, slows the rate of freezing and can
raise the temperature of frozen foods.
• Leave space between the packages so cold air can circulate
freely, allowing food to freeze as quickly as possible.
• Avoid storing hard-to-freeze foods such as ice cream and
orange juice on the freezer door shelves. These foods are
best stored in the freezer interior where the temperature
varies less with door openings.
Refer to the Food Storage Chart on pages 11-12 for approximate
storage times.
Dairy Food
• Most dairy foods such as milk, yogurt, sour cream and
cottage cheese have freshness dates on their cartons for
appropriate length of storage. Store these foods in the
original carton and refrigerate immediately after purchasing
and after each use.
10
Page 13

11
FOOD STORAGE TIPS
Food Storage Chart
Storage times are approximate and may vary depending on type of packaging, storage temperature, and the quality of the food when
purchased.
FOODS REFRIGERATOR FREEZER STORAGE TIPS
DAIRY PRODUCTS
Butter 1 month 6 to 9 months Wrap tightly or cover.
Milk and cream 1 week Not
recommended
Cream cheese, cheese spread
and cheese food
Cottage cheese 3 to 5 days Not
Sour cream 10 days Not
Hard cheese
(Swiss, Cheddar and Parmesan)
1 to 2 weeks Not
recommended
recommended
recommended
1 to 2 months 4 to 6 months
May become
crumbly
EGGS
Eggs in the shell 3 weeks Not
recommended
Leftover yolks or whites 2 to 4 days 9 to 12 months For each cup of yolks to be frozen, add 1 tsp. sugar for
FRUITS
Apples 1 month 8 months
(cooked)
Bananas 2 to 4 days 6 months (whole/
peeled)
Pears, plums, avocados 3 to 4 days Not
recommended
Berries, cherries, apricots 2 to 3 days 6 months Ripen at room temperature before refrigerating.
Grapes 3 to 5 days 1 month (whole) Ripen at room temperature before refrigerating.
Citrus fruits 1 to 2 weeks Not
recommended
Pineapples, cut 2 to 3 days 6 to 12 months Will not ripen after purchase. Use quickly.
VEGETABLES
Asparagus 1 to 2 days 8 to 10 months Do not wash before refrigerating. Store in crisper.
Brussels sprouts, broccoli,
cauliflower, green peas,
lima beans, onions, peppers
Cabbage, celery 1 to 2 weeks Not
Carrots, parsnips, beets and
turnips
Lettuce 7 to 10 days Not
3 to 5 days 8 to 10 months Wrap odorous foods. Leave peas in pods.
recommended
7 to 10 days 8 to 10 months Remove tops. Wrap odorous foods and refrigerate in
recommended
POULTRY and FISH
Chicken and Turkey, whole 1 to 2 days 12 months Keep in original packaging for refrigeration. Place in the
Chicken and Turkey, pieces 1 to 2 days 9 months
Fish 1 to 2 days 2 to 6 months
Check carton date. Close tightly. Don’t return unused
portions to original container. Don’t freeze cream
unless whipped.
Wrap tightly.
Store in original carton. Check carton date.
Store in original carton. Check carton date.
Wrap tightly. Cut off any mold.
Refrigerate small ends down.
use in sweet, or 1 tsp. salt for non-sweet dishes.
May also store unripe or hard apples at 60° to 70° F
(16° to 21° C).
Ripen at room temperature before refrigerating. Note:
Bananas will darken when refrigerated.
Ripen at room temperature before refrigerating. Note:
Avocados will darken when refrigerated.
May also store at 60° to 70° F (16° to 21° C). If
refrigerated, store uncovered.
Wrap odorous foods and refrigerate in crisper.
crisper.
Deli Drawer on coldest setting. When freezing longer
than two weeks, overwrap with freezer wrap.
continued...
Page 14

FOOD STORAGE TIPS
FOODS REFRIGERATOR FREEZER STORAGE TIPS
MEATS
Bacon 7 days 1 month
Beef or lamb, ground 1 to 2 days 3 to 4 months Fresh meats can be kept in original packaging for
refrigeration.
Beef or lamb, roast and steak 3 to 5 days 6 to 9 months Place in the Deli Drawer on coldest setting. When
freezing longer than two weeks, overwrap with freezer
wrap
Ham, full cooked, whole 7 days 1 to 2 months
half 5 days 1 to 2 months
slices 3 days 1 to 2 months
Luncheon meat 3 to 5 days 1 to 2 months Unopened, vacuum-packed luncheon meat may be
kept up to two weeks in the Deli Drawer on coldest
setting.
Pork, roasts 3 to 5 days 4 to 6 months
Pork, chops 3 to 5 days 4 months
Sausage, ground 1 to 2 days 1 to 2 months
Sausage, chops 7 days 1 to 2 months
Veal 3 to 5 days 4 to 6 months
Frankfurters 7 days 1 month Processed meats should be tightly wrapped and stored
in the Deli Drawer on coldest setting.
Sources: United States Department of Agriculture; Food Marketing Institute; Cooperative Extension Service, Iowa State University
12
Page 15

13
CARE AND CLEANING
WARNING
To avoid electrical shock which can cause severe personal
injury or death, disconnect power to refrigerator before cleaning.
After cleaning, reconnect power.
Refrigerator Cleaning Chart
PART DO NOT USE DO
Cabinet Interior Abrasive or harsh cleaners
Ammonia
Chlorine bleach
Concentrated detergents or solvents
Metal or plastic-textured
scouring pads
Stainless Steel Doors and
Exterior
IMPORTANT:
Damage to stainless steel finish
due to improper use of cleaning
products or non-recommended
products is not covered under this
product’s warranty.
Door Gaskets Metal or plastic-textured scouring pads Use warm, soapy water and a soft, clean cloth or
Condenser Coil
Remove base grille to access.
Condenser Fan Outlet Grille
See back of refrigerator.
Accessories
Shelves, buckets,
drawers, etc.
Abrasive or harsh cleaners
Ammonia
Chlorine bleach
Concentrated detergents or solvents
Metal or plastic-textured
scouring pads
Vinegar-based products
Citrus-based cleaners
Anything other than a vacuum cleaner Use a vacuum cleaner hose nozzle.
A dishwasher Follow removal and installation instructions from
To avoid personal injury or property damage, observe the
following:
• Read and follow manufacturer’s directions for all cleaning
products.
• Do not place buckets, shelves or accessories in
dishwasher. Cracking or warping of accessories may
result.
Use 4 tablespoons of baking soda dissolved in 1
quart (1 liter) warm soapy water.
Rinse surfaces with clean warm water and dry
immediately to avoid water spots.
Use warm, soapy water and a soft, clean cloth or
sponge.
Rinse surfaces with clean warm water and dry
immediately to avoid water spots.
sponge.
Use a vacuum cleaner hose nozzle with
brush attachment.
appropriate feature section.
Allow items to adjust to room temperature.
Dilute mild detergent and use a soft clean cloth or
sponge for cleaning.
Use a plastic bristle brush to get into crevices. Rinse
surfaces with clean warm water.
Dry glass and clear items immediately to avoid spots.
CAUTION
Page 16

CARE AND CLEANING
REMOVING ODORS FROM
REFRIGERATOR
WARNING
To avoid electrical shock which can cause severe personal
injury or death, disconnect power to refrigerator before cleaning.
After cleaning, reconnect power.
1. Remove all food and turn the refrigerator OFF.
2. Disconnect power to the refrigerator.
3. Clean the walls, floor, ceiling of cabinet interior, drawers,
shelves and gaskets according to the instructions on page
13.
4. Dilute mild detergent and brush solution into crevices using a
plastic bristle brush. Let stand for 5 minutes. Rinse surfaces
with warm water. Dry surfaces with a soft, clean cloth.
5. Wash and dry all bottles, containers and jars. Discard spoiled
or expired items.
6. Wrap or store odor-causing foods in tightly sealed containers
to prevent recurring odors.
• Clean door gaskets every three months according to cleaning
instructions. This will assure that the door seals properly and
refrigerator runs efficiently.
• Take time to organize items in refrigerator to reduce time that
door is open.
• Be sure your doors are closing securely by leveling
refrigerator as instructed in your installation instructions.
• Clean condenser coils as indicated in the cleaning
instructions every three months. This will increase energy
efficiency and cooling performance.
7. Reconnect power to refrigerator and return food to
refrigerator.
8. Allow the refrigerator to cool.
9. After 24 hours, check if odor has been eliminated.
If odor is still present:
1. Remove drawers and place on top shelf of refrigerator.
2. Pack refrigerator and freezer sections – including doors
– with crumpled sheets of black and white newspaper.
3. Place charcoal briquettes randomly on crumpled newspaper
in both freezer and refrigerator compartments.
4. Close doors and let stand 24 to 48 hours.
ENERGY SAVING TIPS
• Avoid overcrowding refrigerator shelves. Overcrowding
reduces air circulation around food and causes refrigerator to
run longer.
• Avoid adding too much warm food to refrigerator at one time.
This overloads compartments and slows rate of cooling.
• Do not use aluminum foil, wax paper, or paper toweling as
shelf liners. This decreases air flow and causes refrigerator to
run less efficiently.
• A freezer that is two-thirds full runs most efficiently.
• Locate refrigerator in coolest part of room. Avoid areas of
direct sunlight, or near heating ducts, registers or other heat
producing appliances. If this is not possible, isolate exterior
by using a section of cabinet or an added layer of insulation.
14
Page 17

15
CARE AND CLEANING
REPLACING LIGHT BULBS
WARNING
To avoid electrical shock which can cause severe personal
injury or death, disconnect power to refrigerator before replacing
light bulb. After replacing light bulb, reconnect power.
CAUTION
To avoid personal injury or property damage, observe the
following:
Allow light bulb to cool.
•
Wear gloves when replacing light bulb.
•
FRESH FOOD SECTION
1. Slide clear light shield toward back of compartment to release
from light assembly.
2. Remove light bulbs.
3. Replace with appliance bulbs no greater than 40 watts.
4. Replace light bulb cover by inserting tabs on light shield into
liner holes on each side of light assembly. Slide shield toward
front of refrigerator until it locks into place. Do not force shield
beyond locking point. Doing so may damage light shield.
FREEZER SECTION
1. Reach behind the light cover.
2. With firm pressure, press
forward on the notches at the
back of the cover and pull
down. The cover will open
from the back.
3. Remove the cover.
4. Remove light bulb.
5. Replace bulb with appliance
bulb no greater than 40
watts.
6. Insert front tabs of light cover
into slots in freezer liner
and snap rear portion over
light assembly until rear tab
engages.
Page 18

CARE AND CLEANING
PREPARING FOR VACATION/ABSENCE
CAUTION
If your refrigerator has a dispenser and there is any possibility
that the temperature can drop below freezing where the
refrigerator is located, the water supply system (including the
water tank and the water valve) must be drained by a qualified
servicer.
For short vacations or absences (three months or less):
1. Remove all perishables.
2. If no one will be checking in on the refrigerator during your
absence, remove all frozen items also.
3. If your refrigerator has an automatic ice maker:
• Shut off the water supply to the ice maker at least one
day ahead of time.
• After the last load of ice drops, raise the wire shut off
arm to the OFF position.
• Empty the ice bin.
4. If the room temperature will drop below 55° F (13° C), follow
the instructions for longer absences.
For long vacations, absences (more than three months) OR if
the room temperature will drop below 55º F (13° C):
1. Remove food.
2. If your refrigerator has an automatic ice maker:
• Shut off the water supply to the ice maker at least one
day ahead of time.
• After the last load of ice drops, raise the wire shut off
arm to the OFF position.
• Empty the ice bin.
3. If your refrigerator has a dispenser system with water filter,
remove the water filter cartridge and install the filter bypass.
Dispose of the used cartridge.
4. Turn the freezer control to OFF.
5. Unplug the refrigerator.
UPON YOUR RETURN
After a short vacation or absence:
For models with automatic ice makers or dispensers:
• Reconnect the water supply and turn on supply valve.
• Monitor water connection for 24 hours and correct leaks if
necessary.
• Run 10-15 glasses of water from the dispenser to flush out
the system.
• Restart the ice maker by lowering the ice maker arm.
• Discard at least the first three ice harvests.
After a long vacation or absence:
• Reconnect the water supply and turn on supply valve.
• Plug the refrigerator back in and reset controls (see page 3).
• Monitor water connection for 24 hours and correct leaks, if
necessary.
For dispenser models, run water through the dispenser for at least
three minutes with the filter bypass in place, then install water
filter (see page 8).
• After installing the water filter, run water through the
dispenser continuously for at least two minutes, or until water
runs steady. Initially you may notice a one to two minute
delay in water dispersal as the internal tank fills.
• Restart the ice maker by lowering the ice maker arm.
• Discard ice produced within the first 12 hours (at least the
first three harvests).
PREPARING TO MOVE
• Follow the above instructions for long vacations/absences,
through step 7.
• Secure all loose items such as shelves and drawers by taping
them securely in place to prevent damage.
• Tape the doors shut.
• Use an appliance dolly when moving the refrigerator. Always
truck the refrigerator from its side or back - never from its
front.
• Be sure the refrigerator stays in an upright position during
moving.
6. Thoroughly clean the interior of both compartments with a
baking soda solution and a clean soft cloth (four tablespoons
of baking soda in one quart of warm water).
7. Dry thoroughly.
8. Leave the doors open to prevent the formation of mold and
mildew.
16
Page 19

17
OPERATING SOUNDS
J
A
G
F
H
D
K
I
C
E
B
Improvements in refrigeration design may produce sounds in your new refrigerator that are different or were not present in an older
model. These improvements were made to create a refrigerator that is better at preserving food, is more energy efficient, and is quieter
overall. Because new refrigerators run quieter, sounds may be detected that were present in older refrigerators, but were masked by
higher sound levels. Many of these sounds are normal. Please note that the surfaces adjacent to a refrigerator, such as hard walls,
floors and cabinetry may make these sounds seem even louder. The following are some of the normal sounds that may be noticed in a
new refrigerator.
Sound Possible Cause Solution
Clicking
Air rushing or whirring
Gurgling or boiling
sound
Thumping
Vibrating noise
Buzzing
Humming
Hissing or popping
Freezer control
Motorized device
out.
Freezer fan
operating.
Evaporator
when flowing.
Ice cubes from ice maker drop into ice bucket
Compressor
Refrigerator is not level. See Installation Instructions
Ice maker water valve
water.
Ice maker
Compressor
Defrost heater
(A) clicks when starting or stopping compressor.
(B) sounds like an electric clock and snaps in and
(C) and condenser fan (D) make this noise while
(E) and heat exchanger (F) refrigerant makes this noise
(G).
(H) makes a pulsating sound while running.
(I) hookup buzzes when ice maker fills with
(J) is in the ‘ON’ position without water connection.
(H) can make a high-pitched hum while operating.
(K) hisses, sizzles or pops when operational.
Normal operation
Normal operation
Normal operation
Normal operation
Normal operation
Normal operation.
for details on how to level your
refrigerator
Normal operation
Stop sound by raising the ice
maker arm to ‘OFF’ position (see
page 7).
Normal operation
Normal operation
Page 20

BEFORE YOU CALL FOR SERVICE
FRESH FOOD OR FREEZER DOOR DIFFICULT TO OPEN.
• Due to air flow between the compartments, it may be difficult to
open the doors for several seconds after one of them is closed.
DISPENSER WILL NOT DISPENSE WATER OR ICE (SELECT
MODELS).
• A water filter, or the filter bypass plug must be in place.
• Door is open.
• Water supply turned off.
• Water pressure too low.
• Lock switch on.
• Ice jam in the dispenser.
• Icemaker not operating.
WILL NOT RUN.
• Power cord not plugged in.
• No power at the electrical outlet.
• Circuit breaker tripped or house fuse blown.
• Main power turned OFF (O).
• Touch the ON/OFF pad.
• Check Sabbath mode setting.
RUNS TOO LONG/TOO FREQUENTLY.
• Today’s energy efficient refrigerators are larger and require
more running time to maintain stable temperatures.
• Prolonged door openings.
• Too many door openings.
• Condenser needs cleaning.
• The door not sealing (due to a package or a container holding
door open).
• Warm room temperature.
REFRIGERATOR OR FREEZER COMPARTMENT TOO WARM.
• Refrigerator or freezer temperature set too warm.
• Prolonged door openings.
FREEZER NOT FREEZING PROPERLY.
• Products with high sugar content may not harden completely
when frozen (ice cream, concentrated juice, etc.) Do not store
in door.
• Adjust freezer temperature to a colder setting.
ICE CUBES EVAPORATE.
• Cold air moving over the ice cubes causes shrinkage, especially
with limited usage. This is normal.
AUTOMATIC ICE MAKER NOT OPERATING.
• Wire lever arm in up (OFF) position.
• Water supply turned off.
• Water pressure too low.
• Freezer too warm.
• Install filter or filter bypass.
FRONT CABINET SURFACE WARM TO THE TOUCH.
• Special design to limit condensation during periods of high
humidity.
NOISY OPERATION.
• Cabinet not level.
• Weak floor.
• See Normal Operating Sounds
ODOR IN CABINET.
• Odor producing foods should be covered or wrapped.
• Interior needs cleaning.
CABINET VIBRATES.
• Cabinet not level.
• Weak floor.
• Improper installation.
MOISTURE ON INSIDE CABINET WALLS.
• Can occur during hot, humid weather with frequent or prolonged
door openings.
• Door not closed properly.
EXCESSIVE MOISTURE IN OR AROUND DELI DRAWER.
• Food not wrapped properly.
• Hot, humid weather.
REFRIGERATOR COMPARTMENT TOO COLD.
• Refrigerator temperature set too cold.
18
Page 21

19
WARRANTY & SERVICE
Product Maintenance
No maintenance, other than the CARE AND CLEANING
INSTRUCTIONS identified in this Use & Care Manual, should
be attempted by the owner/operator. All other maintenance and
service must be performed by a qualified appliance technician.
If You Need Service...
First, review the recommended checks listed in the preceding
Before You Call for Service section. Then, be certain that the
appliance has been installed properly and is being operated
correctly. Familiarize yourself with the warranty terms and
conditions listed in the PRODUCT WARRANTY section.
If the above checks have been completed and the problem has
not yet been remedied, call your local authorized DACOR service
representative. Your dealer can normally provide the name and
telephone number of the nearest service company.
DACOR works diligently to ensure your satisfaction when service
is necessary. However, if you are not completely satisfied with the
service provided, contact the company that performed the service
and express why you are not pleased. Normally, they will be willing
and able to resolve the problem.
If the service agency is not able to respond effectively, call or write
the DACOR Customer Service.
Dacor Customer Service
1440 Bridge Gate Drive
Diamond Bar CA 91765
What is Covered
CERTIFICATE OF WARRANTIES
DACOR REFRIGERATORS
WITHIN THE FIFTY STATES OF THE U.S.A., THE DISTRICT OF
COLUMBIA AND CANADA*:
FULL ONE YEAR WARRANTY
One (1) year - From the date of original retail purchase, any art
that fails in normal home use will be repaired or replaced free of
charge. Ice Maker - When purchased with the refrigerator and
installed by the dealer the ice maker will be considered part of the
refrigerator for warranty purposes.
LIMITED WARRANTY
Major Refrigeration Components
Second Through Fifth Year - After the first year from the date
of original purchase, through the fifth year, Dacor will repair
or replace, at its option, free of charge for parts and labor
only, any part of the sealed refrigeration system (consisting of
the compressor, evaporator, condenser, drier and connecting
tubing) and the cabinet liner (exclusive of the door liner) which
fail in normal home use. All other costs, including mileage,
transportation, trip charge and diagnostic charge, if required, shall
be the responsibility of the owner.
LIMITED WARRANTY
AquaClean Water Filter, if equipped
30 days - From the original retail purchase date, any part of the
water filter cartridge which fails due to a defect in workmanship or
materials will be replaced free of charge.
Telephone: 800-793-0093
Fax: 626-403-3130
Hours of Operation: Monday through Friday
6:00 am - 5:00 pm Pacific Time
Web Site: www.dacor.com
Please include your telephone number if you choose to write. We
will then do our utmost to assure your happiness and satisfaction.
LIMITED WARRANTY
Other Parts
Second Year - Parts other than major refrigeration components
which fail in normal home use during the second year following
the date of original retail purchase will be repaired or provided
free of charge for the part itself, with the owner paying all other
costs, including labor, mileage, transportation, trip charge and
diagnostic charge, if required.
NOTE
The full warranty and the limited warranties apply when
the refrigerator is located in the United States or Canada.
Refrigerators located elsewhere are covered by the limited
warranties only including parts that fail during the first year.
CANADIAN RESIDENTS
The above warranties only cover an appliance installed in Canada
that has been certified or listed by appropriate test agencies
for compliance to a National Standard of Canada unless the
appliance was brought into Canada due to transfer of residence
from the United States to Canada.
LIMITATIONS OF LIABILITY
The warrantor shall not be liable for any incidental or
consequential damages, including food loss. Some states do not
allow the exclusion or limitation of consequential damages, so the
above limitation or exclusion may not apply to you.
Page 22

WARRANTY & SERVICE
What is Not Covered
1. Conditions and damages resulting from any of the following:
a. Improper installation, delivery, or maintenance.
b. Any repair, modification, alteration, or adjustment not
authorized by the manufacturer or an authorized servicer.
c. Misuse, abuse, accidents, or unreasonable use.
d. Incorrect electric current, voltage, or supply.
e. Improper setting of any control.
2. Warranties are void if the original serial numbers have been
removed, altered or cannot be readily determined.
3. Light bulbs.
4. Products purchased for commercial or industrial use.
5. The cost of service or service call to:
a. Correct installation errors.
b. Instruct the user on the proper use of the product.
c. Transport the appliance to the servicer.
6. Consequential or incidental damages sustained by any
person as a result of any breach of these warranties. Some
states do not allow the exclusion or limitation of consequential
or incidental damages, so the above exclusion may not apply.
20
Page 23

fold here
BUSINESS REPLY MAIL
FIRST-CLASS MAIL DIAMOND BAR CA
POSTAGE WILL BE PAID BY ADDRESSEE
ATTN: WARRANTY PROCESSING DEPT
DACOR
1440 BRIDGEGATE DR STE 200
PO BOX 6532
DIAMOND BAR CA 91765-9861
PERMIT NO. 4507
NO POSTAGE
NECESSARY
IF MAILED
IN THE
UNITED STATES
Page 24

Please visit www.dacor.com to activate your warranty online.
WARRANTY INFORMATION
IMPORTANT:
Your warranty for this product CANNOT BE ACTIVATED until this form has been returned to Dacor. If you have
purchased more than one Dacor product, Please return all forms in one envelope.
Please rest assured that under no conditions will Dacor sell your name or any of the information on this form for mailing list purposes. We
are very grateful that you have chosen Dacor products for your home and do not consider the sale of such information to be a proper way
of expressing our gratitude!
(Please Print or Type)
Owner’s Name:
Last First Middle
Street:
City: State: Zip:
Purchase Date: Email: Telephone:
Dealer:
City: State: Zip:
Your willingness to take a few seconds to fill in the section below will be sincerely appreciated. Thank you.
1. How were you first exposed to Dacor products? (Please check one only.)
A. T.V. Cooking Show F Builder
B. Magazine G. Architect/Designer
C. Appliance Dealer Showroom H. Another Dacor Owner
D. Kitchen Dealer Showroom I. Model Home
E. Home Show J. Other
cut here cut here
2. Where did you buy your Dacor appliances?
A. Appliance DealerD. Builder
B. Kitchen DealerE. Other
C. Builder Supplier
3. For what purpose was the product purchased?
A. Replacement only C. New Home
B. Part of a Remodeled D. Other
4. What is your household income?
A. Under $75,000 D. $150,000 – $200,000
B. $75,000 – $100,000 E. $200,000 – $250,000
C. $100,000 – $150,000 F. Over $250,000
5. What other brands of appliances do you have in your kitchen?
A. Cooktop C. Dishwasher
B. Oven D. Refrigerator
6. Would you buy or recommend another Dacor product?
Yes No
Comments:
Thank you very much for your assistance. The information you have
provided will be extremely valuable in helping us plan for the future
and giving you the support you deserve.
Web Site: www.dacor.com
Corporate Phone: (800) 793-0093
Place Serial Number Label Here
 Loading...