

Page 1

Use and Care Manual
Discovery® Induction Cooktop
DYTT305N and DYTT365N
Table of Contents
Important Safety Instructions ................................. 1
Before Using the Cooktop .................................... 4
Using the Cooktop .............................................. 7
Care and Cleaning ........................................... 13
Before You Call for Service .................................14
Parts and Accessories ........................................ 14
Warranty and Service ....................................... 15
Warranty Card .....................................Back Cover
Part No. 109375 Rev. A
Page 2
© 2016 Dacor, all rights reserved.
Page 3
Important Safety Instructions
Installer
• Leave this manual with the appliance.
• Before installing the unit, write the Model and Serial
numbers (see the data plate: chassis, right side) in the
spaces below.
Model # ______________________________________
Serial # ______________________________________
Purchase Date ________________________________
Consumer
• Before using the cooktop, read this manual completely,
and save it for future reference.
• For product Warranty and Service info, see Pg. 15.
• For product details/questions/other info, call:
Dacor Customer Service:
(800) 793-0093 (USA, Canada)
M–F 6:00 a.m. to 5:00 p.m. Pacific Time
or visit the Dacor website: www.dacor.com
Have your cooktop’s model and serial numbers ready.
(See the numbers written above or the data plate on the
right side of the cooktop chassis.)
Always contact the Dacor Customer Service Team about
problems or situations that you do not understand.
Important Safety Information
Be sure to thoroughly review the emergency instructions,
and safety alerts and warnings in this section and
throughout the manual.
Safety Symbols and Labels
DANGER
Immediate hazards that WILL cause severe personal injury or death.
WARNING
Hazards/unsafe practices that COULD cause severe personal injury or death.
CAUTION
Hazards/unsafe practices that COULD lead to minor personal injury or
property damage.
The section cannot describe all potential problems and
conditions. Be vigilant and cautious in maintaining/
operating this appliance.
Because Dacor regularly improves its products, this
appliance and corresponding literature may change without
notice. Visit www.dacor.com to download this manual.
READ AND SAVE THESE INSTRUCTIONS
DANGER
TO REDUCE THE RISK OF PERSONAL INJURY IN THE EVENT OF A COOKTOP GREASE FIRE:
• TAKING CARE NOT TO BURN YOURSELF, SMOTHER FLAMES with a close-fitting lid, cookie sheet, or metal tray, then turn OFF the cooktop. If the flames
do not extinguish immediately, EVACUATE, AND CALL THE FIRE DEPARTMENT.
• NEVER PICK UP A FLAMING PAN.
• DO NOT USE WATER (incl. wet dishclothes/towels) TO EXTINGUISH FLAMES–a violent steam explosion may result.
• Use a fire extinguisher ONLY if:
– you have a Class ABC extinguisher and know how to operate it
– the fire is small and contained in its area of origin
– the fire department is being called
– you can fight the fire with your back to an exit.
WARNING
• Persons with a pacemaker or other such medical device should be aware that the electromagnetic field generated by an operating induction cooktop may
affect these devices’ operation. Consult your doctor or medical-device manufacturer about your particular situation.
• To avoid the possibility of explosion/fire, do not store or use combustible/flammable/explosive vapors and liquids (e.g., gasoline) inside or near this or any other
appliance. Do not set or store flammable/explosive (e.g., aerosol cans, alcohol) items on/adjacent to the cooktop.
• NEVER use this appliance to heat the room.
• NEVER cover or obstruct any slots/holes/passages in the chassis with aluminum foil or similar material. Blocking air flow through the appliance traps heat,
which may create a fire hazard.
State Of California Proposition 65 Warnings:
This product contains one or more chemicals known to the State of California to cause cancer as well as birth
defects/other reproductive harm.
1
Page 4

Important Safety Instructions
General Safety Precautions
For safe operation/function and best outcomes concerning the use of this cooktop, learn and follow these precautions:
WARNING
• Concerning the cooktop in general:
- If you receive a damaged product, immediately contact your dealer/builder. Do not install/use a damaged appliance.
- Never leave the cooktop unattended when in use at high settings (level 5 and higher); boil-overs cause bursts of steam and
spatter hot liquid; greasy spill-overs cause smoke and may ignite.
- Use the cooktop only as intended by the manufacturer. If you have any questions, contact Dacor Customer Service. (See Pg. 1.)
- Ensure the cooktop is properly installed and grounded by a qualified installer as specified in the installation manual. Have the
installer show you your home’s circuit-breaker panel or fuse box so you know how to turn off power to the appliance.
- Install/repair/replace cooktop components only as specifically recommended in the accompanying manuals. A qualified
technician must perform all other service.
• Concerning cooktop handling/operation:
- The glass surface is impact-resistant but a pan or other object dropped on it with sufficient force will crack or pit it. Do not
operate the appliance if the glass top is broken or severely pitted. Cleaning solutions and spill-overs may penetrate a broken
cooktop, creating an electric-shock risk. Contact a qualified technician immediately to replace the damaged/pitted cooktop glass.
- Do not tamper with the cooktop controls.
- Do not touch the surface of a cooking element or surrounding areas. (Though dark in color, elements may still be hot. Areas
near surface units may be hot enough to cause burns. During/after use, do not touch or let clothing or flammable materials
contact cooking elements until you are sure the elements have cooled.)
- Do not let anyone use the cooktop unless they know how to operate it properly.
- When a self-cleaning oven is installed below the cooktop, you should not use the cooktop during the oven self-cleaning process.
• Concerning cooktop service/maintenance:
- Before performing any service, verify that power to the cooktop is turned OFF at the circuit-breaker panel or fuse box.
- Clean/maintain the cooktop regularly and only as instructed in this manual. Dirt and grease left on the cooktop, ventilation filters,
and range hood create a possible fire hazard.
• Concerning children/pets:
- To avoid cooktop damage and serious personal injury or death, never let children sit/stand/climb on the cooktop.
- Do not leave children/pets unattended around an operating cooktop.
- Do not let children play with any part of the cooktop.
- Do not store items of interest to children on/above the cooktop.
- Non-stick coatings, when heated, can harm pet birds. When using non-stick cookware/accessories, move birds to a separate,
well-ventilated room.
• Concerning cooking practices:
- Use the cooktop only for cooking tasks consistent with a home appliance as outlined in this manual. This cooktop is not
engineered for commercial/industrial use.
- Do not heat unopened canned/bottled food. (Pressure buildup may burst the container, causing personal injury.)
- When stirring/turning food, grasp the pan by its handle to prevent accidents due to unexpected movement.
- Use extreme caution when adding water to food in a hot pan; the resulting steam can cause serious burns.
- Do not let pans boil dry.
- Do not turn the cooktop ON with empty cookware on a cooking element. (Doing so can damage the pan/cooktop.)
- Do not use towels or bulky cloth as potholders.
- To prevent steam burns, do not remove cookware from the cooktop with wet potholders.
- Cook meat and poultry to internal temperatures of at least 160°F and 180°F respectively to minimize the possibility of
contracting a food-borne illness.
- Use high heat settings only as needed, and only if you are present; use low to medium settings to heat oil slowly.
- Use only “ferrous” (magnetic) cookware on this induction cooktop. Never use a steel plate/griddle to heat non-magnetic
cookware. Personal injury or appliance damage may result from using improper cookware.
- Use cookware of the proper size/material/construction for the particular cooking task; cookware must be able to contain the
desired quantity of food without boiling/spilling over. Choose pans with handles that are easily held and will stay cool while
cooking. Do not use cookware that is awkward/too heavy to lift safely or that has loose handles.
- To reduce the risk of injury/spillage due to unintentional contact with the cookware, TURN COOKWARE HANDLES SO THEY
DO NOT EXTEND OVER THE COUNTER FRONT EDGE OR ADJACENT COOKING ELEMENTS/COUNTERS.
2
Page 5

Important Safety Instructions
General Safety Precautions, cont.
For safe operation/function and best outcomes concerning the use of this cooktop, learn and follow these precautions:
WARNING
• Concerning foreign objects on the cooktop surface:
- Do not store cookware or other kitchen items on the cooktop.
- Do not place plastic items on the hot glass surface; the plastic can melt/burn and damage the glass surface.
- Keep flammable items (e.g., paper, cardboard, plastic, cloth) away from the hot cooktop.
- Do not place or cook with aluminum foil directly on the glass; the foil can melt and damage the glass.
- Do not place/store items that could melt or catch fire on the cooktop, even when it is not in use.
- Never leave food unattended on an operating cooking element. Boil-overs cause smoke; greasy spill-overs that may ignite.
- Do not lay decorative covers on the cooktop, as a fire or cooktop damage may result if an element is accidentally turned on.
- To avoid accidentally activating the cooking elements, do not place objects on/near the cooktop controls.
• Concerning foreign objects above/around the cooktop:
- Do not wear loose/hanging clothing while using the cooktop.
- Do not let clothing contact cooking elements or surrounding areas during and immediately after use.
- Do not hang flammable or heat-sensitive objects over the cooktop.
- If the cooktop is near a window, do not use window treatments that could blow over the cooktop and create a fire hazard.
• Concerning deep-fat frying:
- Never leave a deep-fat fryer or other cookware used for frying unattended.
- Do not add so much food that the bubbling oil/fat overflows the pot.
- Do not fry moist/frozen foods, as these will likely cause the oil/fat to spatter or spill.
- Stir together combinations of oil and fat before heating; heat the oil/fat slowly. Use a cooking thermometer to avoid heating the
oil/fat beyond its flashpoint.
- Turn on the range hood.
CAUTION
Concerning scratching or otherwise damaging the cooktop surface:
- Do not set cookware with sharp-edged bottoms, support legs, or lower corners on the cooktop.
- Do not let acidic (citrus, pineapple, tomato sauce, wine, cranberry, etc.) foods/juices or foods made with these items, linger on
the cooktop surface; remove cooked-on residue with a razor scraper.
- Do not use the cooktop surface as a cutting board.
- Do not use a sharp or sharp-edged object (e.g., knife or metal spatula) to clean up spills.
- Lift–do not slide–cookware across the cooktop surface.
- Do not place hot cookware on a cold cooktop.
IMPORTANT
Testing has proven this appliance to be within the limits for a Class B digital device, pursuant to Part 18 of FCC rules. These limits
are meant to minimize the likelihood of harmful interference to household radio/TV reception from radio-frequency energy, which this
appliance uses, generates, and radiates.
If the appliance is not installed/operated according to the accompanying instructions, harmful interference to household radio/TV
reception can occur. Prevention of such interference in a given situation is not guaranteed. If this appliance does cause harmful
interference to radio/TV reception (which can be determined by turning the appliance off and on), you can try to correct the
interference using one or more of these methods:
• Re-orient/relocate the receiving antenna.
• Increase the distance between the appliance and receiver/antenna.
• Connect the receiver to a different circuit.
3
Page 6
Before Using the Cooktop
About Induction Cooking
The induction cooktop does not use a gas flame or electric
heating coil to heat food; rather, the cooktop heats food via
a magnetic reaction between the metallic cookware and the
cooktop heating element. (See the graphic below.)
This electromagnetic heating field is confined to the point
of contact between the cookware and the cooktop cook
zone; thus making the induction format safer (only the part
of the cooktop directly beneath the cookware gets hot) and
more energy efficient (90% of induction energy is used to
cook your food compared to only 55% for gas and 65% for
electric cooking) than traditional thermal conduction.
Another advantage to induction cooking is the ability to
instantly and precisely change cooking levels. This is
especially desirable when heating foods that are ruined
if only slightly overheated (e.g., chocolate). Also, you can
keep food at a particular level over time; whereas, gas
and electric conduction settings cannot maintain constant
heating levels.
If you are unsure that a piece of cookware is made of
induction-compatible material, touch a refrigerator magnet
to its base. If the magnet sticks, the cookware is inductioncompatible.
Cookware made of these materials may be used with your
induction cooktop:
• Stainless steel (for induction)
• Enameled steel
• Cast iron
• Cookware labeled “Induction Compatible.”
Do not use cookware made of:
• thin, regular steel
• copper
• aluminum
• glass
• clay (ceramic).
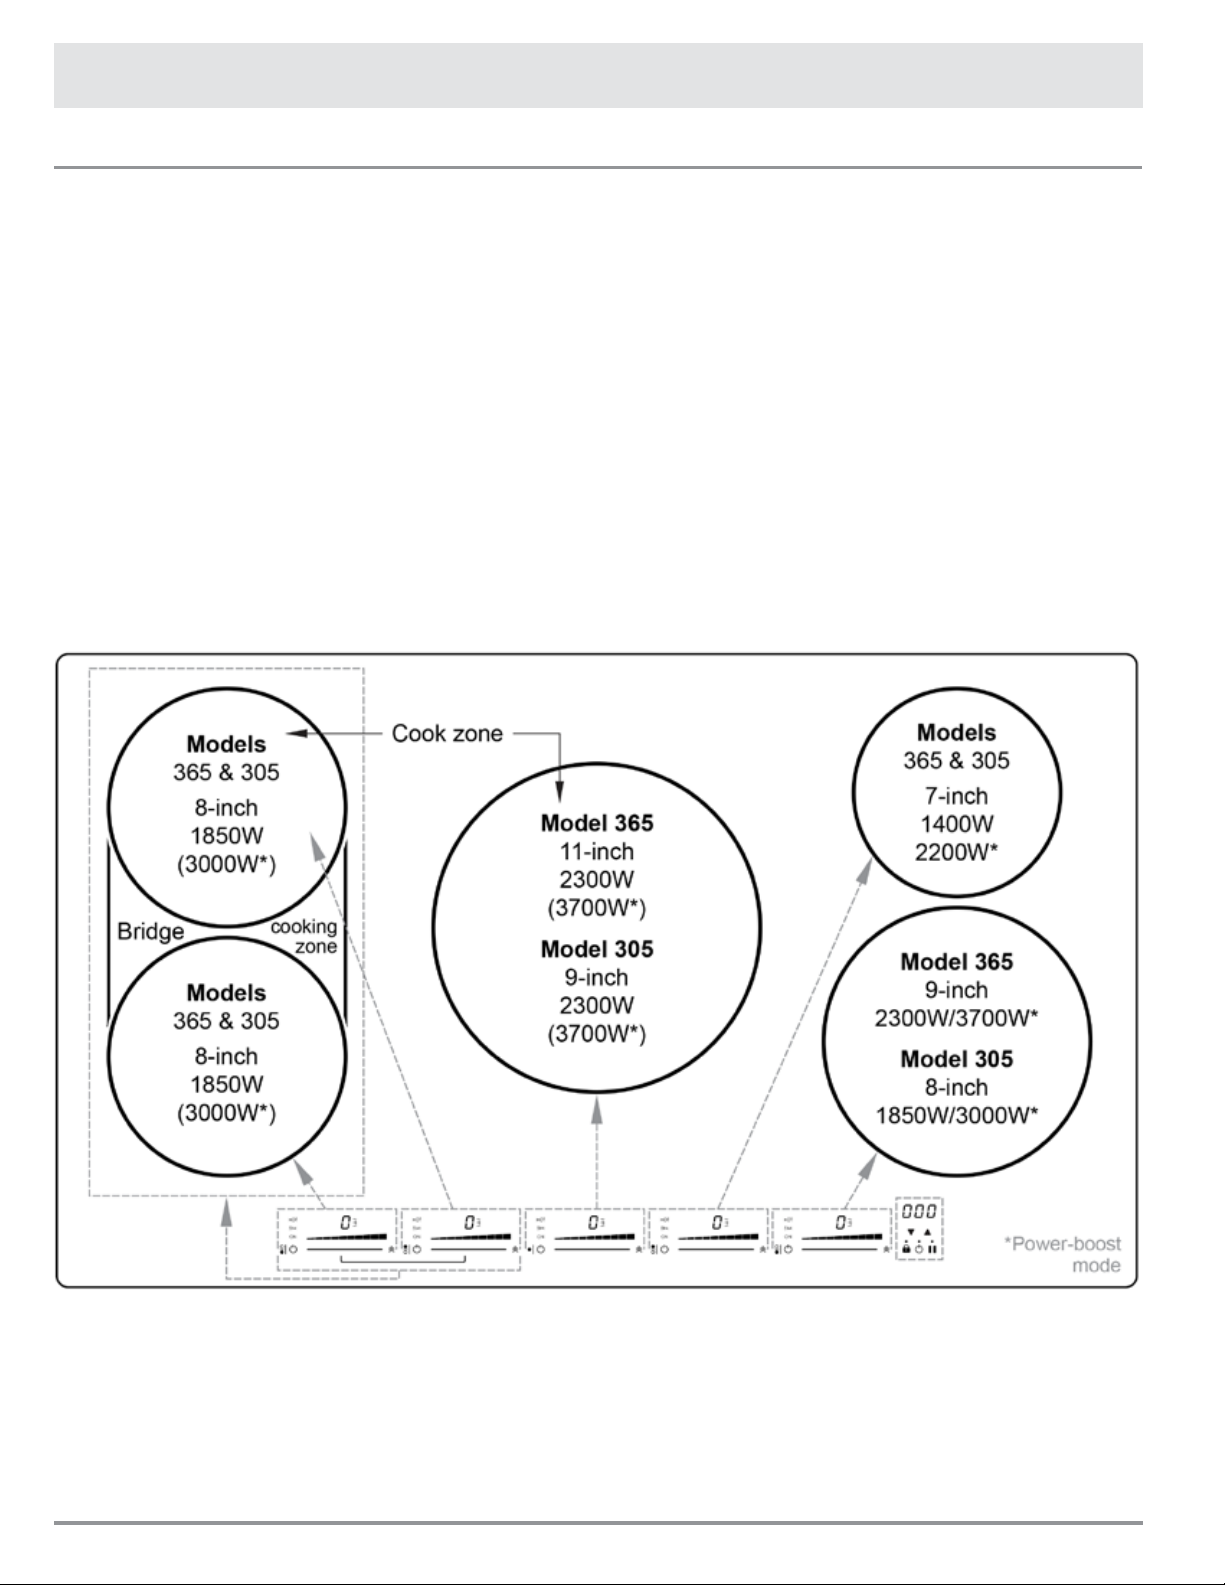
Induction Cooktop Layout
4
Page 7

Before Using the Cooktop
Cooktop Control Panels
This section explains the buttons/icons on the cooktop surface. For details about each feature, including instructions on
their use, see their respective sections.
Cook-Zone Control Panel (left); Main Control Panel (right)
Feature Name Description
Individual Cook-Zone Controls: Each zone operates independently with its own ON/OFF, power-level, and timer controls.
A Cook-Zone Icon Shows which cooking zone (front, middle, rear) pertains to a particular set of controls
B Cook-Zone ON/OFF Button Turns ON/OFF power to particular cook zone control
C
D Power-Level Ramp 10 power levels (Simmer; 1-9: low to high power); and Boost mode
E Multi-Functional Display
F Timed-Cooking Indicator Appears when cook-zone timer is used
G Power-Level Slide Bar Sets cook-zone power level; touch bar, and slide finger left/right to set power level
H Boost-Mode Icon Substantially boosts cook-zone power for rapid heating (no light indicator)
Cooktop Main Controls: Operate main system and override any/all individual cook-zone settings.
I Cook-Timer Display
J
Cook-Zone Status
Indicators
Cook-Time Increase/
Decrease Buttons
Appear(s) depending on conditional/functional status of cook zone; HOT: Zone retains
enough heat to cause a burn injury; SIM: Zone is set at Simmer (the first level on the
temp-level ramp); ON: The cook zone is active
Displays power-level number or mode status (b: boost; L: child lock; II: pause), or “pot”
icon or “error” code
Shows time remaining on active cook zone, or, for multiple active zones, shows time for
zone with least amount of time remaining
To set cook time: Press DOWN arrow to shorten cook-time setting; press UP arrow to
lengthen cook-time setting
K Function Indicators These lights turn on when their respective keys are active
L Key Lock
L, N Child Lock
M Main ON/OFF Button Turns ON main cooktop control; turns OFF all active cook zones
N Pause Button Stops power from reaching cook zones; while active, no heat transfers to cookware
Locks all active cook zones at their current statuses/levels; zones/cooktop can only be
turned off
Activates by pressing Key Lock (L) and Pause (N) buttons simultaneously; once activated,
only the Main control can be turned on; cook zones cannot be activated
5
Page 8

Before Using the Cooktop
About the Cookware
WARNING
Use correct pan sizes. The cooktop features four sizes of cook
zones (five, if you count the bridge feature). The cookware
diameter should be large enough to cover the cook zone. Using
undersized cookware exposes part of the heating element,
which reduces heating efficiency and may be a safety hazard.
• Improper cookware will not cook efficiently or evenly,
and in some cases is unsafe; therefore, it is important to
select cookware constructed of ferrous (i.e., magnetic)
material such as cast iron or cookware specifically
designed for induction cooking, which typically is marked
(on the bottom) with this universal symbol:
• Non-magnetic cookware will not heat food and may
cause vibration or activate the “No Pan Detected”
indicator: (See pan-detection description, this page.)
• Choose cookware that can accommodate the quantity of
food being prepared.
• Use tight-fitting lids to retain heat and avoid spills.
Do not use:
• cookware with round (bowed, convex) bottoms or rough
bottoms that could scratch the glass cooktop
• griddle plates that cover multiple cook zones (except
when using the bridge feature)
• greasy/grimy/dusty/damaged cookware.
Power Level 1 to Boost
If you set a cook zone power level from 1 to Boost but no
pan is present, a U-shaped symbol (representing the crosssection of a pan) alternates with the setting number (or
letter “b” when in boost mode) on the readout, signalling
that no cookware is detected.
Correctly Sizing/Placing the Cookware
A cook zone will shut itself off after 10 minutes if it cannot
detect cookware. To ensure your cookware is detected:
• Use a pan that is no larger/smaller than 1/2” of the
cook zone perimeter. (If the cookware is too small, the
cooktop might not detect it; if the pan is too large, heating
efficiency may be compromised.)
• Center your magnetic pan within the cook zone.
About Pan Detection
Active cook zones on your cooktop will not heat up unless
an induction-compatible pot/pan is placed within the zone.
If you turn ON a cook zone and set a heat level, but—
• no cookware is present
• the cookware is not properly placed within the zone
• you remove the cookware you placed in the cook zone
without turning OFF the zone
—a certain symbol (depending on the setting) appears in
the digital readout above the heat-level ramp, indicating
that no cookware is detected.
Simmer Level
If you set a cook zone heat level at Simmer but no pan
is present, a U-shaped symbol (representing the crosssection of a pan) “bobs” up and down on the digital
readout, signalling that no cookware is detected.
6
Page 9

Using the Cooktop
Getting Started
• Remove all packing material/labels/tape from the cooktop.
• Clean the cooktop with a damp sponge, then wipe it with
a soft, dry cloth or paper towel.
• Initially you may notice a slight burning odor or see light
smoke. These temporary conditions are normal for a new
glass ceramic cooktop.
Cooking Tips
• Experiment with power levels to determine the best level
for your cooking needs and style; take note of the setting
that works best for a particular food/recipe.
• Cookware distributes heat (via electro-magnetic energy)
based on material makeup and sturdiness, so there may
be slight variations in the time needed to cook the same
food in similar cookware from different manufacturers.
• The bridge feature (combined left-front/-rear cook zones)
is for griddles and rectangular/oblong cookware that is
too large for one zone. Using oversized cookware on any
other combination of zones results in uneven cooking
from inefficient power usage. (See Pg. 9 for details.)
seconds by pressing the main power button again.
• If a cook zone is on for an unusually long time* and
the control settings are unchanged, the cooktop shuts
itself off; the HOT indicator remains on until the cooktop
surface is no longer unsafe to touch.
*Depends on the power setting.
Turning a Cook Zone ON/OFF
This section instructs you how to activate a cook zone.
Always clean and dry the cooktop before cooking.
CAUTION
• Spills or cleaning solutions on a control panel may accidently
activate/de-activate a cook zone or change an active zone’s
heating level. If this happens, wipe the area with a dry cloth,
then restore the cook zone’s desired status.
• Do not touch the cook zone while the HOT indicator is lit.
1. Center your pan on a cook zone. (If needed, see About
Pan Detection.)
2. Press the cook zone power button.
The ON designator appears; remove your finger.
Turning the Cooktop ON/OFF
The cooktop can be turned on safely with or without
cookware placed on the cook zone. Power will only be
applied after you place cookware on the cook zone.
WARNING
• Metallic foreign objects (e.g., utensils, lids, cans) left on the
cooktop can heat to unsafe temperatures and may warp.
• The glass around the cook zones cannot be control heated;
however, it can still heat to an unsafe temperature from hot
cookware placed on it.
♦ Press the main power button (1-2 seconds) to turn ON
the cooktop.
• If you press the main power button but do not activate a
cook zone within 10 seconds, the cooktop shuts itself off.
• If you press the main power button and activate a cook
zone control but do not set a power level within 10 seconds,
the cook zone shuts itself off; if you take no further action
within 10 seconds, the cooktop shuts itself off.
• The main power button overrides all cook zones; push
this button to turn OFF all cook zones simultaneously.
• In case of accidental shut-off through the main power
button, all previous settings can be restored within five
3. Select the desired power level by touching/sliding your
finger along the power-level bar (right, to increase and
left, to decrease power).
NOTE
• If you do not select a power level within 10 seconds of
activating a cook zone control, the zone shuts itself off.
• While cooking, you can change the power level any time to
reconfigure the settings..
4. When finished, press the cook zone power button.
The cook zone is de-activated.
Instead of turning off the cook zone, you may remove
the pan, and the cook zone will shut itself off 10 minutes
later. (During this 10-minute span, the cook-zone control
remains on at the original power level.)
• After the cook zone shuts off, its HOT indicator remains
lit until the cook zone is safe to touch.
• All induction
temperature limiter under the glass. This safety feature
heating elements are equipped with a
7
Page 10

Using the Cooktop
manages cook zone power to prevent overheating.
• It is normal for an active cook-zone power element to
emit soft clicking sounds. The rhythm of these clicks
varies with the power-level setting and temperature
condition.
About Power Levels
Your induction cooktop cooks food based on power levels
(Simmer, Levels 1-9, and Boost), similar to gas and electric
cooktops. This section explains the various power levels
and how they relate to actual cooking temperatures.
The effectiveness of a particular power level varies slightly
depending on the brand/type/size of cookware, and even
its structure and ferrous content (degree of magnetism).
Experimentation and experience will help you determine
the best level at which to cook a particular food/dish with
your own cookware.
Recommended Settings
Type of Cooking Power Level(s) No. of Light Bars
Rapid heat up/rapid rolling
boil
Lower-level rolling boil 4 to 9 5 to 10
Boost 10
Using Power Levels 1 to 9
These levels represent a graduated increase in cooking
power from “low” to “medium” to “high” heat.
NOTE
Because so many factors (e.g., cookware type/quality/thickness,
presence of a lid) affect cooking temperatures, Dacor does not
provide temperature equivalents for each power level.
WARNING
Do not fry foods above Level 6; the temperatures generated at
these levels will likely cause cooking oils to smoke or catch fire.
Frying 5 and 6 6 or 7
General cooking or searing 3 to 9 4 to 10
Keep warm* Simmer to 2 1 to 3
Melting chocolate 1 2
Simmer Simmer 1
*CAUTION: To avoid bacterial growth, keep food temperatures
above 140ºF (60ºC).
Using Simmer Level
Simmering is a method by which food is cooked in hot
liquid at a level higher than poaching but below boiling. It is
often used for slow cooking (cooking over long timespans)
dishes such as soups, chilis, and stews.
On your cooktop, Simmer is the first (left-most) level on the
power-level ramp. To set Simmer level:
1. Press a cook-zone power button.
The cook zone’s control panel powers on.
2. Touch the left-most end of the cook-zone slider.
The first section of the power-level ramp appears; the
pot symbol (a U-shaped symbol representing the crosssection of a pot) appears on the digital display.
To set a power level:
1. Press a cook-zone power button.
The zone’s ON designator lights, indicating power is on.
2. Touch your finger anywhere along the control-panel
slider, and slide to the desired level.
Power levels appear digitally on the readout and as bars
on the ramp beneath it.
3. At the desired power level, remove your finger.
A soft clicking noise signals that the cook zone has
begun heating the food.
8
Page 11

Using the Cooktop
Using Boost Mode
This feature quickly maximizes the cook-zone power level,
which is convenient for quickly bringing liquids to a boil or
applying a rapid sear to meats, among other uses.
You can set Boost mode for three cook zones at a time
(one zone on the left side, the center zone, and one zone
on the right; you cannot set both zones on either side at
once).
NOTE
• Always clean and dry the cooktop surface before use.
• Boost mode raises the power about 60% above Level-9
power for 10 min. (You may then restart Boost mode if the
power condition allows.)
• The reduction in power level from Boost to “9” (after 10
minutes) is a programmed safety measure that prevents
overheating.
• You cannot use Boost mode when bridging (left-side zones).
1. Press a cook-zone power button.
The zone’s ON designator lights, indicating power is on.
2. Press the Power Boost button (previous graphic).
The multi-functional display changes to “b”; all powerlevel ramp bars are lit.
Using the Bridge Feature
You can combine (bridge) the left-hand front/rear cook zones into one tandem unit to accommodate a griddle or oblong
cookware. On the cooktop, a horizontal bracket indicates which control panels combine for bridge mode.
In bridge mode, the power level and timer for the two cook zones are shared, and the left-most cook-zone control panel
becomes the master control (i.e., the bridge power level is regulated/displayed on the left-most control panel).
This procedure assumes you have already turned on the cooktop.
1. Press the left-front and left-rear cook-zone power buttons.
2. Simultaneously touch-hold the left-front and left-rear slide bars.
The two cook zones enter bridge mode; bridge symbols appear on the control panel; the left-front control becomes
the master bridge control. (See the above graphic.)
3. Set the bridge power level by sliding your finger along the master bridge control (left-hand) slide bar.
• Pan detection is on the master bridge control (left-front control).
• The timer icon displays on both bridge zones.
• If no pan is detected on either zone for 10 minutes, bridge mode automatically de-activates.
• (During bridge mode) If only one cook zone has a pot, bridge mode de-activates in 10 minutes. (The cook zone with
the pot placed on it remains active at the same power level; the empty zone shuts off.)
• You cannot use the Boost mode while using the Bridge function.
9
Page 12

Using the Cooktop
About the Cooktop Timers
The cooktop has seven alarm timers: one for each of six
cook zones (left-front, left-rear, middle, right-front, right-rear,
bridge), and one independent countdown alarm timer not
associated with a cook zone.
WARNING
The alarm timer does not shut off cook-zone power.
• If timers are set for multiple cook zones, the main
control panel displays the timer that will go off first, and
that zone’s timer icon glows brightly. (The other timer
indicators are dim but visible.) When one cook-zone
timer goes off, its timer indicator goes out, and the timer
indicator for the next cook zone in line brightens.
• The up-arrow on the main control panel adds time; the
down-arrow subtracts time.
• Press the up/down arrow buttons simultaneously
to pause the timer display; countdown resumes
automatically in 5 seconds.
• When a cook zone reaches its set time, a double-beep
alarm sounds until you press the up or down arrow; or
the alarm shuts off automatically after two minutes.
About the Main Timer Display
This section explains the various types of readouts that
appear on the main control-panel timer display.
The “dot” (see the Image column) blinks to show time is
counting down. It divides minutes/seconds (Image column,
top row) and hours/minutes (Image column, bottom row).
For settings of 10 minutes and higher, seconds do not
appear on the timer display, and the MIN designator is lit.
Timer Display Readings
Image Time Description
Setting the Cooktop Timers
Once you set the desired time, a 5-second delay precedes
the countdown. The “dot” in the timer display starts blinking
as the countdown starts and blinks until the display goes
out as the alarm sounds.
Countdown continues even if the pan is removed. Press the
Pause button to stop/resume timer countdown if needed.
Setting a Cook-Zone Timer
Once you have turned on the cooktop, activated a cook
zone, set its power level, and placed a pan of food on the
cook zone, you can set the food’s cook time.
Cook-Zone Timer
Feature Name Description
A Timer Indicator Appears while timer is active
B Timer Display
C Blinking Dot
D MIN Indicator
E, F
Down-/
Up-Arrows
Shows time remaining (in this
case, 53 min.)
Blinks to indicate time is counting
down; separates hours from
minutes or minutes from seconds
Appears for all set times of 10
minutes and longer
Press simultaneously to activate
timer; press either arrow
repeatedly to set time
1 minute
to
9 minutes
10 minutes
to
59 minutes
1 hour
to
1 hour-59 minutes
Press the up-arrow 1 to 9
times; each press adds 1
minute
Press-hold to set longer
times
Press-hold the up-arrow to
set the time (max. time is
1 hr.-59 min.)
1. Press the cook zone ON/OFF button.
The zone’s control panel activates.
2. Set the cook-zone power level. (If needed, see Turning
a Cook Zone ON/OFF.)
3. On the main control panel, press-hold both arrow keys.
The timer display activates.
4. Press the up-arrow until the desired cook time appears.
Countdown starts five seconds after you stop pressing
the up-arrow.
10
Page 13

Using the Cooktop
Setting the Independent-Alarm Timer (Main Control)
This timer is for your convenience in timing general kitchen
tasks unrelated to cooktop use.
Independent-Alarm Timer
Feature Name Description
A Timer Display
B Blinking Dot
C MIN Indicator
D, F
1. Press the up-/down-arrow buttons simultaneously.
The timer display activates; the timer icon appears
between the up-/down-arrows.
2. Press the up-arrow repeatedly to set the desired time.
Adjusting the Timer
Once you set a timer (for a cook zone or independent
timing task), you can adjust the time as needed.
On the main display, you can press an arrow button repeatedly
(for small adjustments), or you can hold down an arrow button
(for large adjustments) to rapidly adjust the time. When holding
down the up-arrow, the numbers increase 1 minute at a time;
when holding down the down-arrow, the numbers decrease 10
seconds at a time.
Down-/
Up-Arrows
E Timer Indicator Appears while timer is active
Shows time remaining (in this case,
1 hr.-46 min.)
Blinks to indicate time is counting
down; separates hours from
minutes or minutes from seconds
Appears for all set times of 10
minutes and longer
Press simultaneously to activate
timer; press either arrow repeatedly
to set time
NOTE
1. On the main control panel, simultaneously press the
up-/down-arrows.
The displayed time changes to the cook zone with
the most recently set time; that zone’s timer indicator
brightens. (All other indicators are dimmed.)
2. Simultaneously press the up-/down-arrows again to
view the time for the next most recently set cook zone.
The displayed time changes to that zone, and its timer
indicator brightens while all others are dimmed.
Manually Turning OFF the Timer
There is no power button that immediately turns off the
timer. To turn off the timer before the set time runs out:
1. Simultaneously press the up-/down-arrows.
The timer countdown pauses.
2. Press-hold the down-arrow until the timer display runs
down to zero, and remove your finger.
In 5 seconds the timer countdown display turns off; the
timer indicator near the cook-zone power-level display
disappears.
About Pause Mode
After setting the power level on one or more cook zones,
you can interrupt cooktop operation if needed via the
Pause button on the main control panel. (This procedure
starts after you have set one or more cook zones.)
NOTE
• Pause mode is only active for 10 minutes at a time, after
which the cooktop shuts itself off. (Power settings established
before entering Pause mode are not retained.
• All alarm timers stop when you enter Pause mode and
resume when you manually leave Pause mode. (See
previous paragraph.)
♦ On the main control panel, press the Pause button.
The control panels of all cook zones (whether the
zones are active or not) display a Pause symbol
on their digital readouts; power to cook zones is
suspended; no heating occurs.
1. On the main control panel, simultaneously press the
up-/down-arrow buttons.
The timer-display countdown pauses.
2. Press the desired arrow repeatedly to adjust the time.
Countdown resumes from the newly set time.
Checking the Time On Another Cook Zone
If you have set the cook time on multiple cook zones, the
main control panel shows the time for the zone with the
least amount of time remaining. This procedure instructs
you how to check the time remaining on the other cook
zones.
To resume operations after pausing:
1. On the main control panel, press the Pause button.
The power-level ramp on the right-front cook zone
control panel cycles rapidly left to right.
11
Page 14

Using the Cooktop
2. Within 10 seconds, slide your finger left to right along
the control-panel slider as prompted by the ramp.
As your finger reaches the right end of the slider, a
click signals the exit from Pause mode. (If you do
not slide your finger within 10 seconds, Pause mode
remains in effect.)
About Hot Zones
Once a cook zone reachers an unsafe temperature, the
zone’s HOT designator lights and remains lit as long as the
cook zone is too hot to touch safely (even if you turn OFF
power to the cook zone).
To activate Key-Lock mode:
1. Turn on and set the power levels of one or more cook
zones.
2. Press the Key Lock button.
Key Lock mode is active; you cannot activate any cook
zones or change any settings on active zones.
To de-activate Key-Lock mode:
♦ Press the Key Lock button.
Key Lock mode is inactive; you can activate cook
zones and change settings on active zones.
About Child Lock Mode
Child Lock mode prevents unauthorized users from turning
on the cooktop. Activate Child Lock mode after turning on
the main control but before activating any cook zones.
NOTE
You can only activate the main alarm timer before setting Child
Lock mode.
In Child Lock mode, all cook-zone control panels display
an L (Locked) symbol for 10 seconds, and cook-zone HOT
indicators remain lit until the zones are safe to touch.
About the Cooktop Lock System
The cooktop lock system consists of Key Lock mode and
Child Lock mode.
About Key Lock Mode
Key Lock mode prevents unintential changes to active cook
zones.
In Key Lock mode, only the cook-zone power (OFF) button
and alarm (OFF) function are usable.
NOTE
You can activate any timer before setting Key Lock mode.
To activate Child-Lock mode:
1. De-activate all cook zones.
2. For 4 seconds, simultaneously press-hold the Lock and
Pause buttons.
Child Lock mode is active; all cook-zone controls are
inactive.
To de-activate Child-Lock mode:
♦ For 4 seconds, simultaneously press-hold the Lock and
Pause buttons.
Child Lock mode is inactive; you can activate cook
zones.
12
Page 15

Care and Cleaning
Cleaning the Cooktop Surface
WARNING
• (Unless otherwise specified) Before cleaning, verify that all
cook zones are sufficiently cool to the touch.
• To avoid dangerous fumes and cooktop damage, use only
the specified cleaners as instructed. Abrasive cleaners/
scrubbers may permanently damage your cooktop.
• When removing cooked-on spills, use only the included
razor-blade scraper or a plastic spatula. Utilizing a knife,
metal spatula, or other such tool may damage the cooktop.
Cleaners To Avoid
These types of cleaners can discolor, scratch, stain, etch,
or otherwise mar the cooktop glass or painted trim:
• Chlorine-/ammonia-based glass cleaners
• Caustic cleaners (e.g., oven cleaners)
• Abrasive pads (e.g., metal or nylon scouring pads,
Scotch Brite pads, SOS pads, certain sponges)
• Powder/liquid cleaners containing chlorine bleach or
abrasives/cleaners
• Flammable liquids (e.g., paint thinner, turpentine,
acetone, rubbing alcohol); some of these may not harm
the glass but are not wise to use on a cooktop.
Performing Special Cleaning Tasks
This section applies to the glass surface of the cooktop:
Sugar, syrup, tomato spills
Remove these WHILE THE COOKTOP SURFACE IS
HOT. Use only a plastic spatula or the included razor blade
scraper. After scraping, let the cooking surface cool, then
use a dry towel/sponge to wipe up the residue.
Using the Scraper to Clean Cooktop Spills
1. Remove the cookware from the surface, and via the
main power button, turn OFF the cooktop.
2. Holding the scraper at a slight angle WITH THE BLADE
ABSOLUTELY FLAT AGAINST THE COOKTOP
SURFACE, push the spill/residue out of the heated
cook zone. (Do not let the corner of the blade scratch/
gouge the cooktop surface.)
3. Let the surface cool, and remove any remnants of
residue.
4. Apply Dacor Cooktop Cleaning Creme according to
package instructions. (See also How to Use Dacor
Cooktop Cleaning Creme)
Burned-On Food
1. Lay a moist cloth or paper towel over the soiled area
for 20-30 minutes.
2. Once the char/crust has softened sufficiently, wipe the
area clean and dry.
3. Apply Dacor Cooktop Cleaning Creme to the cooktop.
(See the section below.)
Metal Marks
Cookware/pans will occasionally leave marks. If the
cleaning creme does not remove marks, try a mild cleanser
(e.g., Bon Ami).
1. Apply a light dusting of cleanser to the soiled area, and
gently scrub the area with a wet dishcloth.
2. Once clean, wipe the area with clean water.
3. Dry the cooktop surface, and apply Dacor Cooktop
Cleaning Creme.
NOTE
Magnetic stainless steel and porcelain coated steel/iron pans
are less likely to leave marks than other types of cookware.
Uncoated cast iron pans are more likely to cause marking on
the glass. Always avoid sliding cookware across the glass.
Water Spots
1. Apply undiluted white vinegar to the affected area.
2. Wipe the area with clean water.
3. Dry the cooktop surface, and apply Dacor Cooktop
Cleaning Creme.
Scratches
Surface scratches are unsightly but will not hinder the
appliance’s cooking ability.
Because scratches cannot be removed from the cooktop
glass surface, avoid scratches by using clean, smooth
cookware and removing gritty food spills quickly.
Keep the cooktop clean, and regularly apply Dacor Cooktop
Cleaning Creme.
Using Dacor Cooktop Cleaning Creme
Regularly applying Dacor Cooktop Cleaning Crème to your
cooktop protects the surface and eases food/stain removal.
1. (Once the cooktop is at room temperature) With a clean,
damp cloth, apply a small amount (±1/4 tsp) of cleaning
creme* to the glass.
(*See Parts and Accessories for ordering details.)
2. With a second clean, damp cloth, remove residual
cleaner.
3. With a clean, dry cloth, wipe the cooktop completely dry.
13
Page 16

Before You Call for Service
Problem—Solution Guide
Before calling for service, review the Problems, Possible Causes, and Solutions in this table:
Problem Possible Cause Solution
Cooktop not connected to power source Have a licensed electrician connect the cooktop to a working power supply
Nothing works.
Unexpected
cooktop operation
Cook zone cycles
on/off at quickerthan-normal rate
Cookware/cooktop
vibrates/buzzes
No Pan Detected
designator flashes
Power supply is off Verify that power is on at the circuit breaker/fuse box; check for tripped circuit breaker/blown fuse
Power failure Call your power company
Cooktop chassis interior overheating Ensure the cooktop vent holes are clear
Residue, fluid, etc on control panel
Power surge
Empty cookware may shut down cooktop Do not put empty cookware on cooktop or let pans boil dry
Cookware not centered in cook zone Reposition cookware
Bottom of cookware not flat Use flat-bottomed cookware
Cookware too small for cook zone Use smaller cook zone or larger cookware
Non-magnetic cookware Check for “induction” symbol; try different cookware
Non-magnetic cookware Ensure cookware meets requirements; (see Pg. 6)
Cooktop/cookware is wet/greasy Before use, ensure cooktop/cookware is clean/dry
• No cookware on cook zone
• Non-magnetic cookware
• Cookware bottom curved/warped
Cookware not centered on cook zone Center cookware on cook zone; (see Pg. 6)
Cookware too small for cook zone Move cookware to smaller cook zone
Spills on control panel can affect cooktop operation; dry area with clean cloth, reset control(s);
keep objects away from controls
A power surge from your home’s electricity source can shut down cooktop; reset controls to
resume operation
Use proper cookware; (see Pg. 6)
No power In this table, see Problem > Nothing Works
Non-magnetic cookware Check pot for “induction” symbol; try other cookware
Food does not
heat or heats too
slowly
E2 error code
appears
• Cookware on wrong cook zone
• Non-magnetic cookware
• Cookware bottom curved/warped
Cookware not centered on cook zone Center cookware on cook zone; (see Pg. 6)
Cookware too small for cook zone Move cookware to smaller cooking zone
Insufficient voltage Have a licensed electrician check voltage supply
Overheated element beneath cook zone
Spills or items on/near controls Clean up spills; move items away from controls
Reset cooktop Turn off power to cooktop, wait 10 seconds, restore power; if error code returns, call for service
Use proper cookware; (see Pg. 6)
Turn off cook zone, let element cool; ensure chassis vents are clear and no inappropriate items
cover cooktop; if element does not reset and start working after cooling, call for service
Parts and Accessories
To order parts and accessories, contact your Dacor dealer or visit www.everythingdacor.com.
Description Part No.
Dacor Cooktop Cleaning Creme A300
Razor blade scraper (Ceran scraper) 82499
14
Page 17

Warranty and Service
Getting Help
Before seeking assistance:
1. Review the Before You Call For Service section (previous page).
2. Learn the cooktop’s warranty terms/conditions (next page).
Contact Type Contact Info
Warranty Dacor Distinctive Service; US/Canada: (800) 793-0093 x2822; 6:00 a.m. to 5:00 p.m. Pacific Time
Non-warranty US/Canada (800) 793-0093 x2813; 6:00 a.m. to 5:00 p.m. Pacific Time
Website
www.dacor.com/contact-us
Notes
15
Page 18

Warranty and Service
Warranty
Review this section to learn the warranty and non-warranty terms and conditions concerning this product. For details/
clarifications, contact Dacor.
What Is Covered—Certificate of Warranties: Dacor Cooktops
Within the 50 States of the USA, District of Columbia, and Canada*
The warranty applies only to the Dacor appliance sold to the first-use purchaser, starting from the date of original
retail purchase or closing date for new construction, whichever period is longer. The warranty is valid on products
Full 1-Year
Warranty
Coverage
Limitations
purchased brand new from a Dacor Authorized Dealer or other Dacor authorized seller.
If your Dacor product fails to function within one year of the original date of purchase due to a defect in material or
workmanship, Dacor will remedy it without charging you.
All cosmetic damage (e.g., scratches on stainless steel, paint/porcelain blemishes, etc.) to the product or included
accessories must be reported to Dacor within 60 days of the original purchase date to qualify for warranty coverage.
Service will be provided by a Dacor-designated service company during regular business hours. (Service providers
are independent entities and are not agents of Dacor.)
These types of products carry a one-year parts warranty only:
• Dealer-display and model-home-display products with a production date greater than 5 years
• Products sold “As Is”
• Products installed for non-residential use (e.g., religious organizations, fire stations, bed and breakfast, spas, etc).
All delivery, installation, labor costs, and other service fees are the purchaser’s responsibility.
The warranty is null and void if the product’s serial numbers and/or tags are altered/defaced/missing.
The owner must provide proof of purchase or a closing statement for new construction upon request.
All Dacor products must be accessible for service.
Outside the 50 States of the USA, District of Columbia, and Canada*
Limited
1st-Year
Warranty
*The warranty is null and void if a non-UL-approved product is transported from the US; **(Free On Board at the Factory) Title (responsibility for the product) passes to the buyer
when the goods leave Dacor’s loading dock. Dacor pays the freight charges, but the buyer is responsible for claims against the product and for promptly notifying Dacor of product
shortages/damage/shipping errors. (For details/clarification on the subject of FOB Factory, contact Dacor Customer Service at the toll-free number provided.)
If your Dacor product fails to function within one year of the original date of purchase due to a defect in material or
workmanship, Dacor will furnish a new part, FOB Factory**, to replace the defective part.
All delivery, installation, labor costs, and other service fees are the buyer’s responsibility.
What Is Not Covered
• Slight color variations (due to differences in painted parts, kitchen lighting, product placement, etc)
• Service calls (to teach the user proper use and care of the product)
• Travel fees to islands/remote areas (ferries, toll roads, etc)
• Consequential/incidental damage (food/medicine loss, time away from work, restaurant meals, etc)
• Product failure (when product is used for commercial, business, rental, or any application other than residential use)
• Product failure (caused by improper product installation)
• Replacement of house fuses, fuse boxes, or resetting of circuit breakers)
• Product damage (caused by accident, fire, flood, power interruption, power surges, or other “acts of God”)
• Liability or responsibility for damage to surrounding property (cabinetry, floors, ceilings, and other structures/objects)
• Breakage, discoloration, or damage to glass, metal surfaces, plastic parts, trim, paint, or other cosmetic finish from improper use/abuse/care/neglect
• Consumable parts (e.g., filters, light bulbs).
Out of Warranty
Contact us if you experience a service issue beyond the standard warranty period. Dacor reviews each issue and customer concern to provide the best possible
solution under the circumstances.
THE REMEDIES PROVIDED IN THE ABOVE EXPRESS WARRANTIES ARE THE SOLE AND EXCLUSIVE REMEDIES; THEREFORE, NO OTHER EXPRESS
WARRANTIES ARE MADE, AND OUTSIDE THE FIFTY STATES OF THE UNITED STATES, THE DISTRICT OF COLUMBIA AND CANADA, ALL IMPLIED
WARRANTIES, INCLUDING BUT NOT LIMITED TO, ANY IMPLIED WARRANTY OF MERCHANTABILITY OR FITNESS FOR A PARTICULAR USE OR
PURPOSE, ARE LIMITED IN DURATION TO ONE YEAR FROM THE DATE OF ORIGINAL PURCHASE. IN NO EVENT SHALL DACOR BE LIABLE FOR
INCIDENTAL EXPENSE OR CONSEQUENTIAL DAMAGES. IN THE EVENT DACOR PREVAILS IN ANY LAWSUIT, DACOR SHALL BE ENTITLED TO
REIMBURSEMENT OF ALL COSTS AND EXPENSES, INCLUDING ATTORNEY’S FEES, FROM THE DACOR CUSTOMER. NO WARRANTIES, EXPRESS OR
IMPLIED, ARE MADE TO ANY BUYER FOR RESALE.
Some states do not limit the length of an implied warranty, or do not exclude/limit inconsequential damages; therefore, the above exclusions/limitations may not
apply to you. This warranty gives you specific legal rights. You may also have other/additional rights depending on the state in which you reside.
16
Page 19

fold here
BUSINESS REPLY MAIL
FIRST-CLASS MAIL CITY OF INDUSTRY CAPERMIT NO 1600
POSTAGE WILL BE PAID BY ADDRESSEE
DACOR
ATTN WARRANTY PROCESSING DEPT
PO BOX 90070
NO POSTAGE
NECESSARY
IF MAILED
IN THE
UNITED STATES
CITY OF INDUSTRY CA 91715-9907
Page 20

First Middle
Please visit www.dacor.com to activate your warranty online.
WARRANTY INFORMATION
IMPORTANT:
Your warranty will not be activated until you activate it online or return this form to Dacor. If you have purchased more
than one Dacor product, please return all forms in one envelope or activate the warranty for each product online.
Please rest assured that under no conditions will Dacor sell your name or any of the information on this form for mailing list purposes. We
are very grateful that you have chosen Dacor products for your home and do not consider the sale of such information to be a proper way
of expressing our gratitude!
Owner’s Name:
(Please Print or Type)
Street:
Last
City: State: Zip:
Purchase Date: Email: Telephone:
Dealer:
City: State: Zip:
Your willingness to take a few seconds to fill in the section below will be sincerely appreciated. Thank you.
1. How were you first exposed to Dacor products? (Please check one only.)
A. T.V. Cooking Show F Builder
B. Magazine G. Architect/Designer
C. Appliance Dealer Showroom H. Another Dacor Owner
D. Kitchen Dealer Showroom I. Model Home
E. Home Show J. Other
2. Where did you buy your Dacor appliances?
A. Appliance Dealer D. Builder
B. Kitchen Dealer E. Other
C. Builder Supplier
3. For what purpose was the product purchased?
A. Replacement only C. New Home
B. Part of a Remodel D. Other
cut here cut here
4. What is your household income?
A. Under $75,000 D. $150,000 – $200,000
B. $75,000 – $100,000 E. $200,000 – $250,000
C. $100,000 – $150,000 F. Over $250,000
5. What other brands of appliances do you have in your kitchen?
A. Cooktop C. Dishwasher
B. Oven D. Refrigerator
6. Would you buy or recommend another Dacor product?
Yes No
Comments:
Thank you very much for your assistance. The information you have
provided will be extremely valuable in helping us plan for the future
and giving you the support you deserve.
Web site: www.dacor.com
Corporate phone: (800) 793-0093
 Loading...