

Page 1

Quick Start Guide
Discovery ™ iQ Wall Oven
Models: DYO130, DYO230, DYOV130 and DYOV230
Thank you for purchasing the Dacor Discovery™ iQ wall oven. In order for you to get the
most from your oven and to take advantage of the Android operating system's capabilities,
we want to ensure that your oven has been properly set up and connected to your wireless
network.
These steps will help guide you through that process. Since there are many potential
screens that might be displayed on your oven after installation, we have described what
actions to take based on each screen. Of course, if you have any problems, please contact
the Dacor Customer Service Team at (800) 793-0093.
Instructions:
WARNING - This appliance must be installed and grounded according to the included
installation instructions prior to use.
STEP 1 When power to the oven is turned on for the rst time, the setup program will run. It
begins with WiFi setup. If the WiFi setup screen appears on the touch display, skip to
step 8 of this guide. If the oven home
screen appears, go to step 6 of this
guide to restart the setup process.
If any other screen appears on the
display, go to step 2, on the following
page, to restart the setup process.
Our Network
dacorworld
N Router
WiFi Setup Screen - Text in gray area will vary.
Go to step 8.
Oven Home Screen, Double Oven - Go to step 6.
Oven Home Screen, Single Oven - Go to step 6.
Part No. 107694 Rev. A
Page 2
Discovery iQ Wall Oven
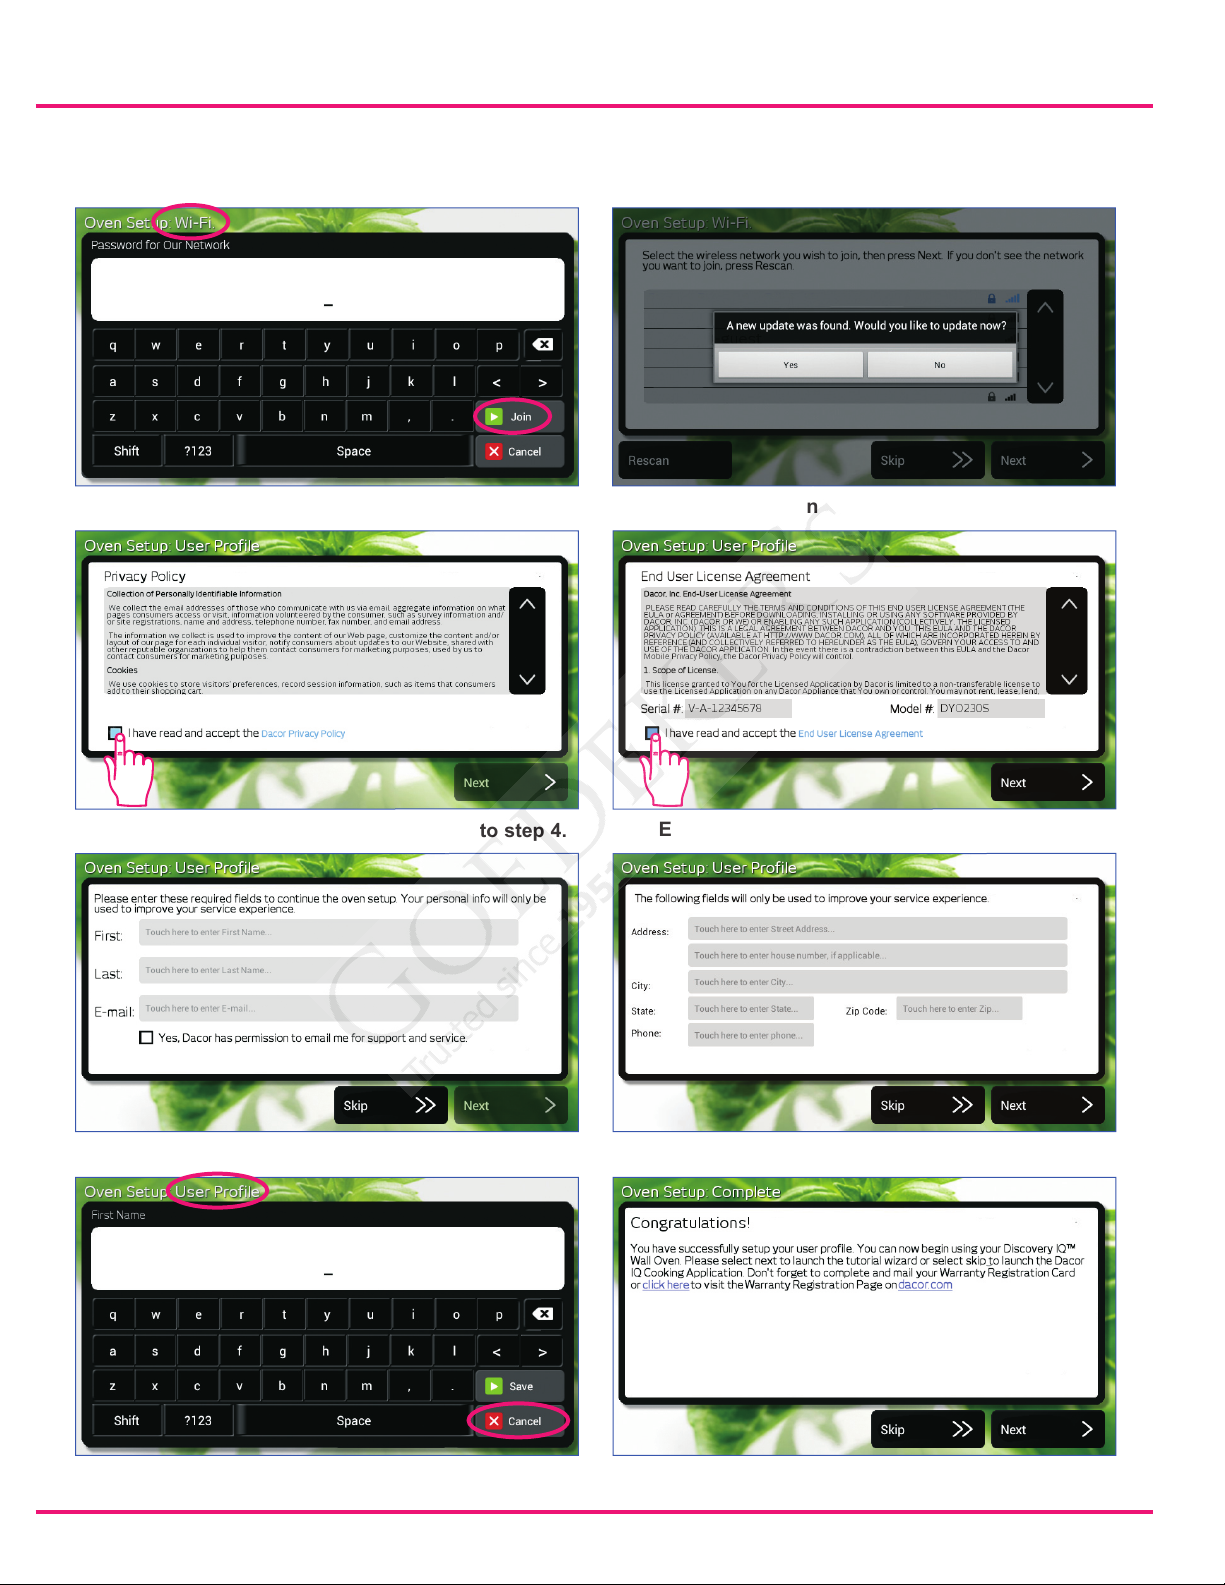
STEP 2 Select the screen that currently appears on the touch display from the pictures shown.
Perform the instructions below the picture to perform the setup restart process.
Our Network
dacorwo
N Route
WiFi keyboard - Touch cancel, go to step 8.
Privacy Policy - Touch box, Next, then go to step 4.
Upgrade Screen - Touch No, go to step 8.
EULA - Touch box, Next, then go to step 5.
Name Screen - Go to step 5.
Profile keyboard - Go to step 5.
Address Screen - Go to step 5.
Congratulations Screen - Go to step 5.
Page 2
Page 3
Quick Start Guide
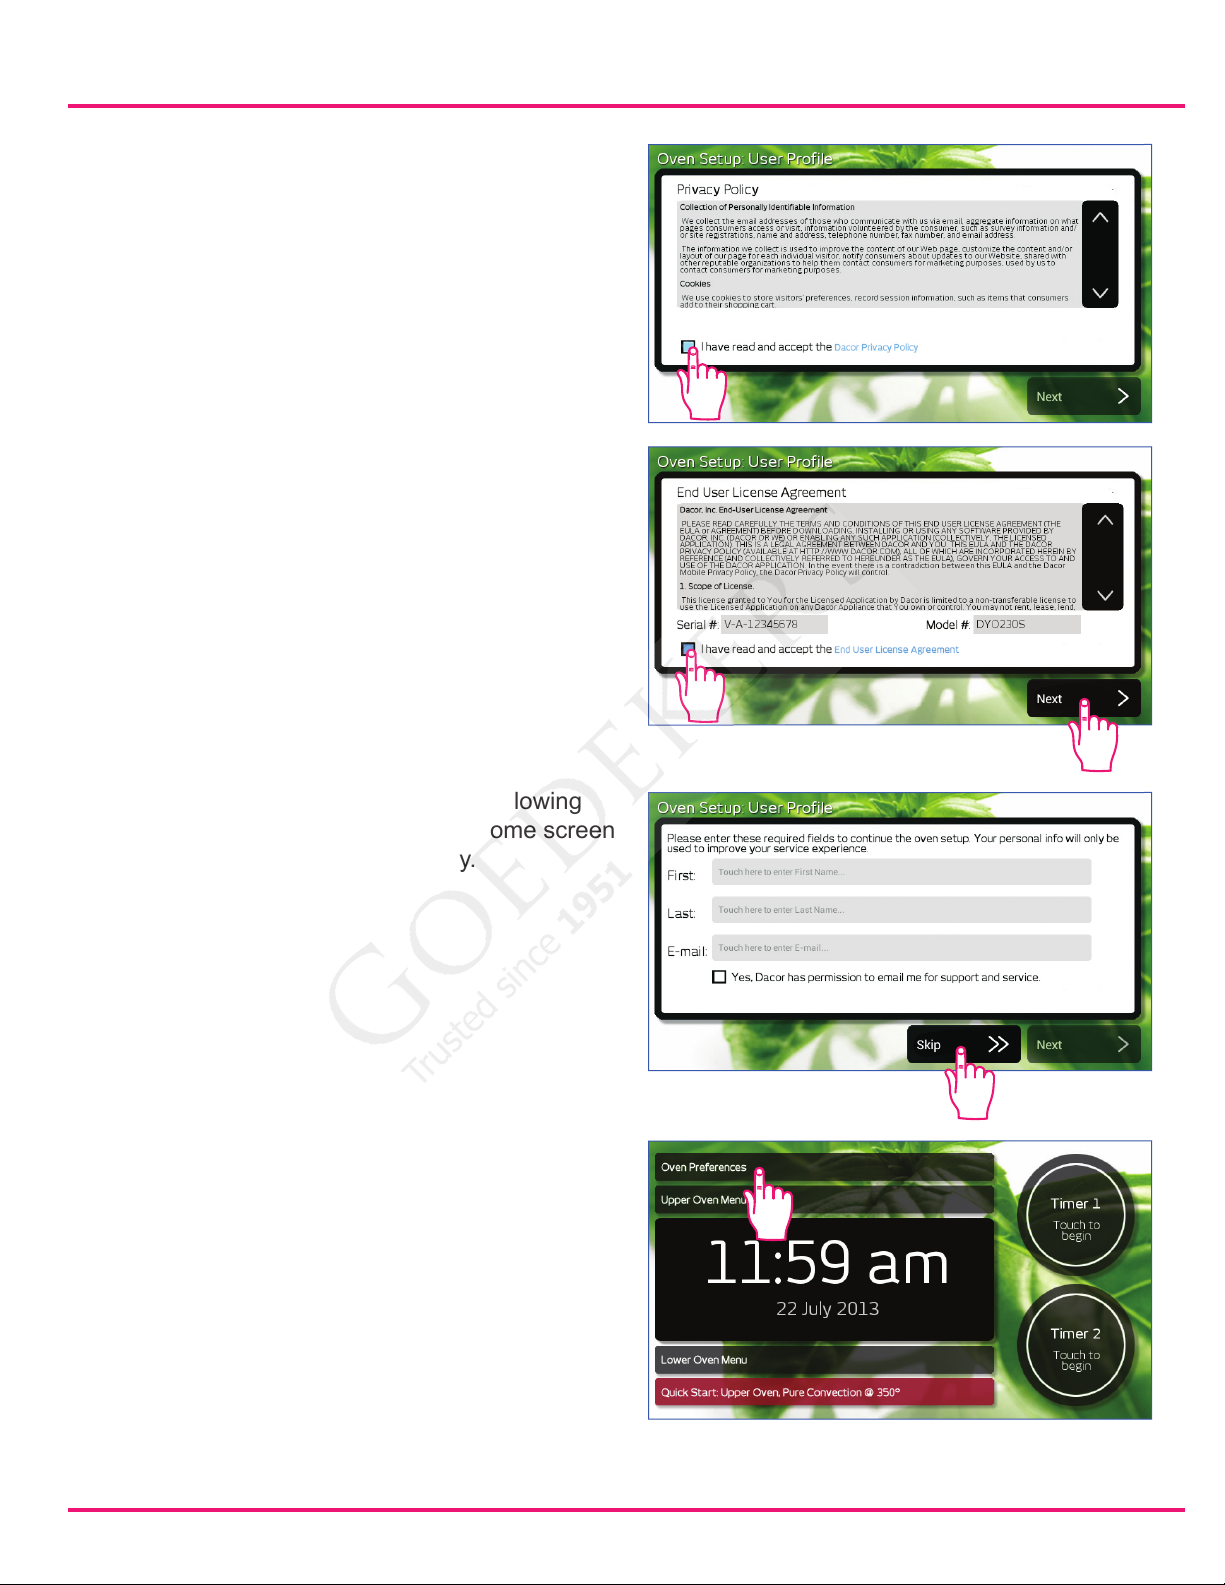
STEP 3 On the Privacy Policy screen, touch
the check box at the bottom left.
Touch Next.
STEP 4 On the End User License Agreement
screen, touch the check box at the
bottom left. Touch Next.
STEP 5 Touch Skip on all of the following
screens, until the oven home screen
appears on the display.
STEP 6 Touch Oven Preferences on the oven
home screen.
Page 3
Oven Home Screen Double Oven shown.
Page 4

Discovery iQ Wall Oven
STEP 7 The Oven Preferences menu will
appear. Use the down (∨) arrow until
Oven Setup appears on the display.
Touch Oven Setup. It may take 30
to 60 seconds for all of the available
wireless networks to appear on the
display.
STEP 8 Touch to select your wireless network,
then touch Next. If you do not have a
wireless network, touch Skip.
Our Network
dacorworld
N Router
STEP 9 If the wireless network selected has a
password, a keyboard will appear on
the display. Touch the keys on the dis-
play to enter the password, then touch
Join.
STEP 10 The oven will check for updates to the
system software. If the "Would you
like to update now?" prompt appears
on the display, touch Yes and wait
for the software to update. Follow
the prompts on the display. After the
update is completed, the display will
return to the Wi setup display (shown
in step 8).
STEP 11 Touch Next.
Our Network
dacorwo
N Route
Page 4
Page 5

Quick Start Guide
STEP 12 Read the Privacy Policy screen, then
touch the check box at the bottom left,
then touch Next.
STEP 13 Read the End User License Agree-
ment screen, then touch the check
box at the bottom left, then touch
Next.
STEP 14 Touch the gray area next to First on
the name screen.
STEP 15 The keyboard screen will appear. En-
ter your rst name using the keys on
the screen, then touch Save.
STEP 16 Repeat steps 14 and 15 for your last
name and E-mail sections on the
name screen, then touch Next. Note:
E-mail address is optional.
Page 5
Page 6

Discovery iQ Wall Oven
STEP 17 Touch the gray area next to Address
on the address screen.
STEP 18 Enter your address using the keys
on the keyboard screen, then touch
Save.
STEP 19 Repeat steps 17 and 18 for your
remaining sections on the address
screen, then touch Next.
STEP 20 When the Congratulations screen ap-
pears, Dacor recommends that you
touch Click here to register the war-
ranty for your oven.
STEP 21 Touch Next. Oven setup is complete.
Page 6
Page 7

Page 8

Dacor.com
Dacor ● 14425 Clark Avenue, City of Industry, CA 91745 ● Phone: (800) 793-0093 ● Fax: (626) 403-3130 ● www.dacor.com
 Loading...