

Page 1
Use and Care Manual
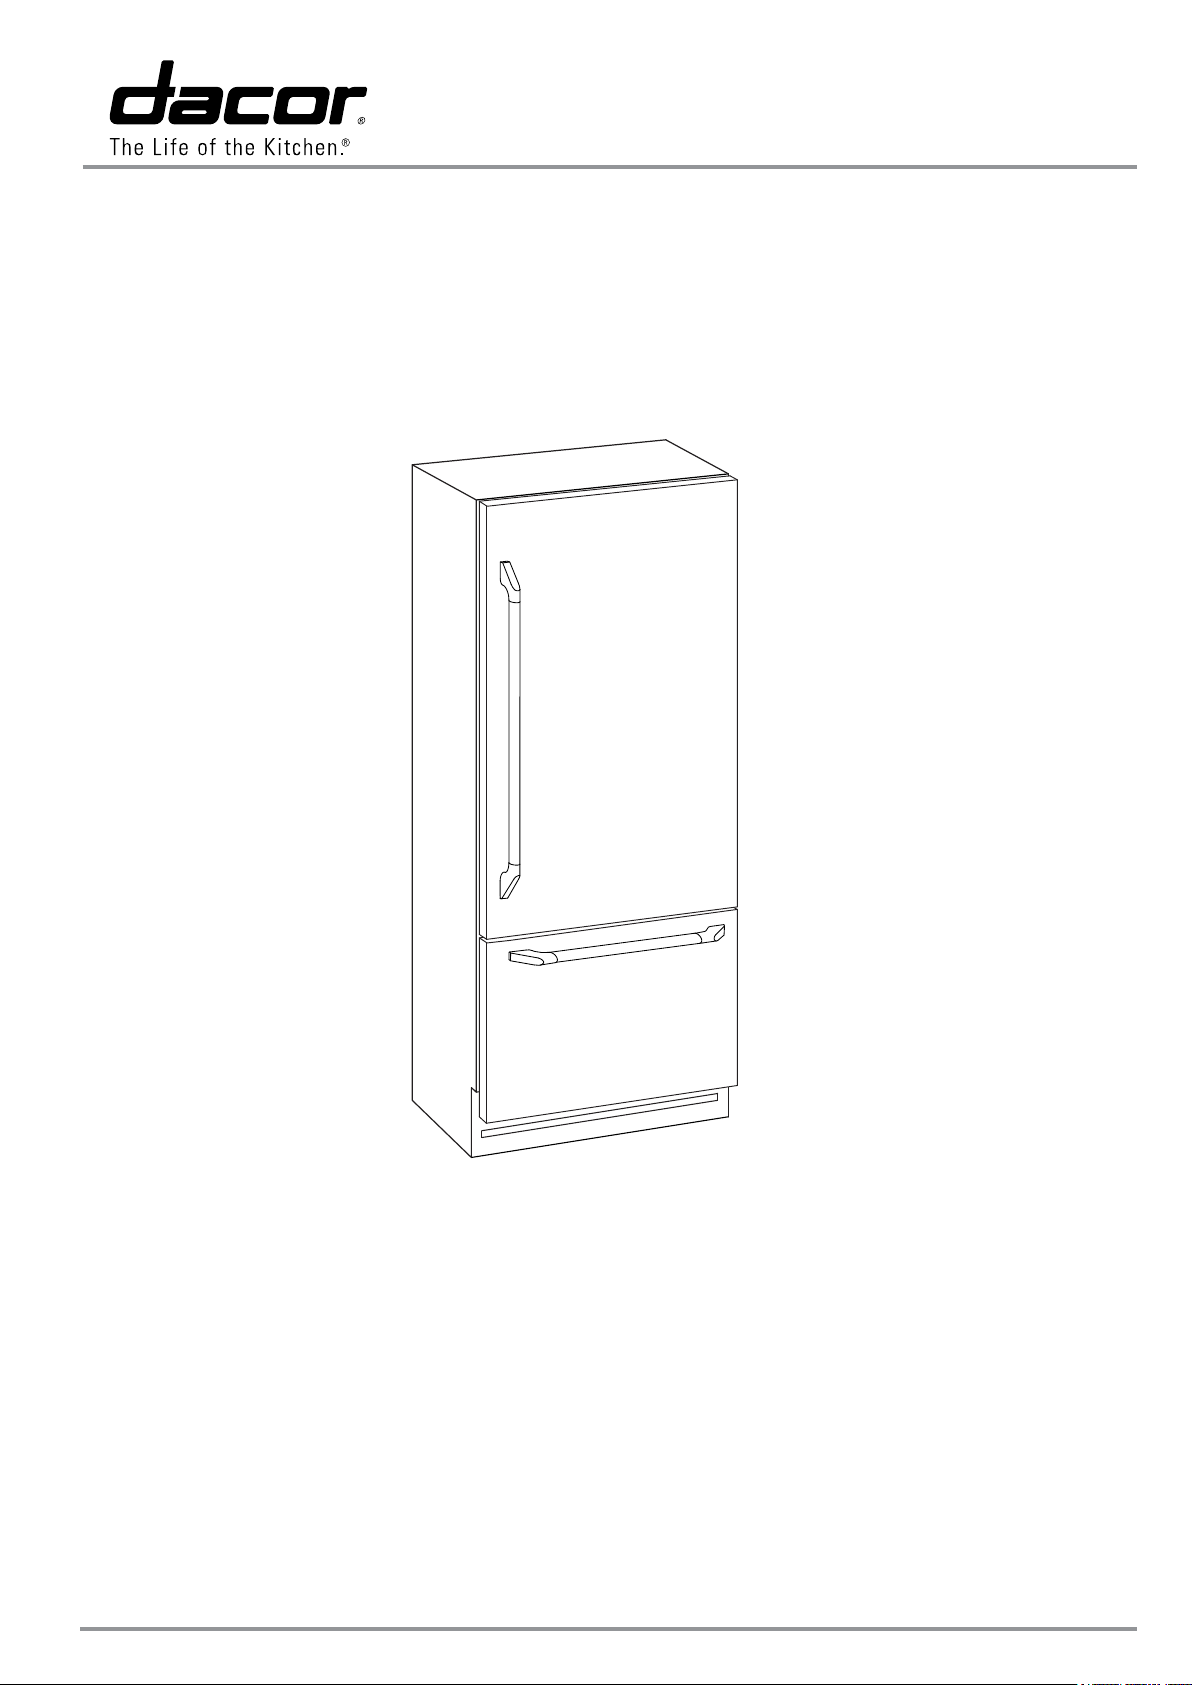
Discovery® Built-In Refrigerator
Models: DYF30BFBPL, DYF30BFBPR, DYF30BFBSL,
DYF30BFBSR, DYF30BFTSL, DYF30BFTSR,
DYF36BFBPL, DYF36BFBPR, DYF36BFBSL,
DYF36BFBSR, DYF36BFTSL, DYF36BFTSR
Style varies, model DYF36BFBSR shown
Table of Contents
Important Safety Instructions .................................. 1
Getting to Know Your Refrigerator.......................... 3
Operation .......................................................... 5
Care and Cleaning ........................................... 21
Before You Call for Service ................................ 24
Warranty and Service ........................................ 28
Warranty Card ...................................... Back Cover
Dacor Part No. 108791 Rev. A
Page 2
© 2015 Dacor, all rights reserved
Page 3
Important Safety Instructions
INSTALLER: Leave these instructions with the appliance.
CUSTOMER: Read this use and care manual completely before
using your appliance. Save it for future reference. Retain your
sales receipt or canceled check. Proof of original purchase date is
required for warranty service.
For warranty and service information, see page 10.
If you have any questions, call:
Dacor Customer Service
(800) 793-0093 (U.S.A. and Canada)
Monday — Friday 6:00 a.m. to 5:00 p.m. Pacic Time
Web site: www.dacor.com
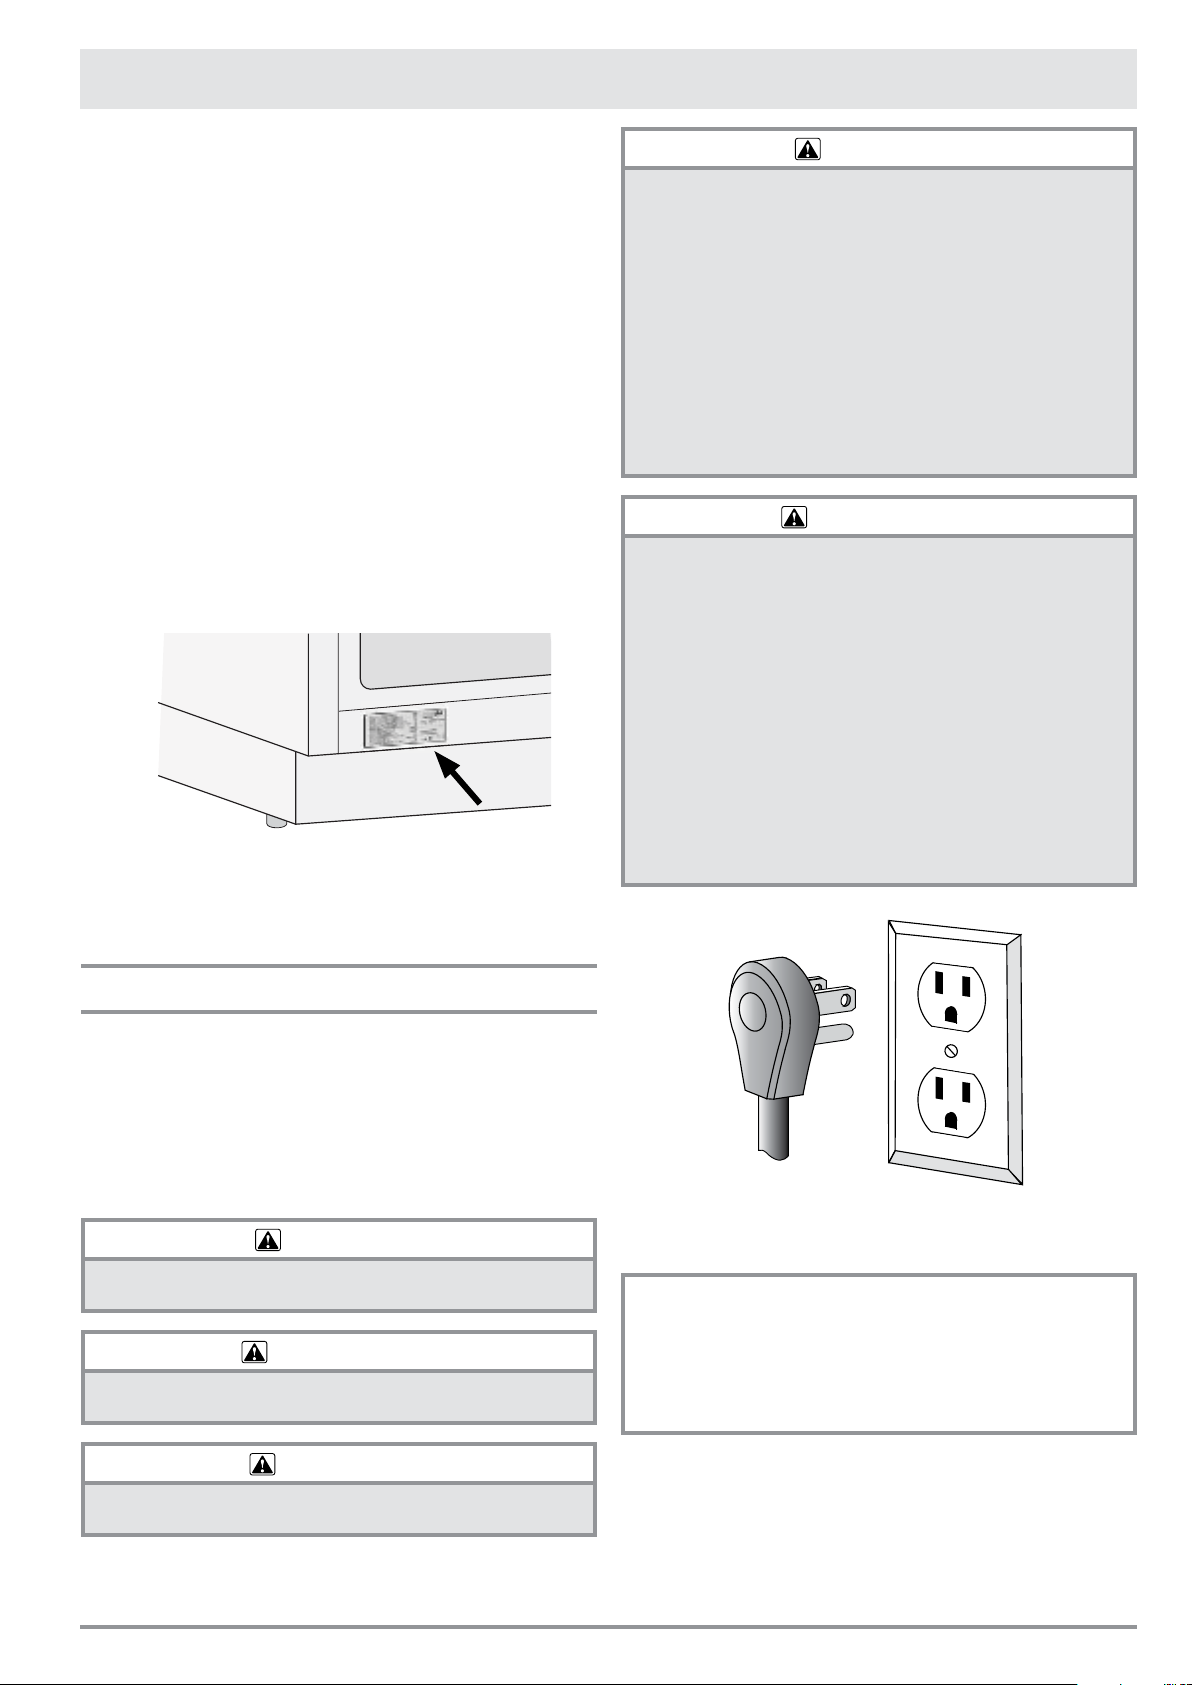
Have the complete model and serial number identication for your
appliance ready. These numbers are found on the label under the
freezer drawer face, at the bottom of the refrigerator, as shown.
Record these numbers below for easy access.
Model number _______________________________________
Serial number _______________________________________
Date of purchase _____________________________________
Label
Since we continually improve the quality and performance of
our products, we may make changes to the appliance without
updating this manual. Visit www.dacor.com to download the latest
version of this manual.
DANGER
IMPORTANT: To prevent child entrapment and suffocation
when discarding an old appliance:
• Take off the door(s).
• Leave the racks in place so children cannot easily climb
inside.
• Cut the prongs off the power plug and discard them.
• Cut the power cable off and discard it separately from the
old appliance.
IMPORTANT: To avoid the possibility of explosion or re, do
not store or use combustible, ammable or explosive vapors
and liquids (such as gasoline) inside or in the vicinity of this or
any other appliance.
WARNING
IMPORTANT: This appliance is equipped with a three prong
grounding electric plug for protection against possible electric
shock hazards. It must be plugged into a dedicated, grounded,
electrical outlet. If only a two prong electrical outlet is available,
it is the responsibility of the customer to have it replaced with a
dedicated, properly grounded three prong electrical outlet.
• DO NOT cut or remove the third (ground) prong from the
power cord.
• DO NOT use an adapter plug.
• DO NOT use a power cord that is frayed or damaged.
• DO NOT connect the appliance to an extension cord.
• Keep the power cord away from heated surfaces.
NOTE: Use of an electrical outlet with a ground fault interrupter
(GFI) is not recommended.
About Safety Instructions
The Important Safety Instructions and warnings in this manual
are not meant to cover all possible problems and situations that
can occur. Use common sense and caution when installing,
maintaining or operating this or any other appliance.
Always contact the Dacor Customer Service Team about
problems or situations that you do not understand.
Safety Symbols and Labels
DANGER
DANGER – Immediate hazards that WILL result in severe
personal injury or death.
WARNING
WARNING – Hazards or unsafe practices that COULD result in
severe personal injury or death.
CAUTION
CAUTION – Hazards or unsafe practices that COULD result in
minor personal injury or property damage.
Power cord with three
prong grounding plug
State of California Proposition 65 Warnings:
WARNING: This product contains one or more chemicals
known to the State of California to cause cancer.
WARNING: This product contains one or more chemicals
known to the State of California to cause birth defects or other
reproductive harm.
Grounded type
electrical outlet
READ AND SAVE THESE INSTRUCTIONS
1
Page 4
Important Safety Instructions
General Safety Precautions
WARNING - To reduce the risk of re, electric shock, serious injury or death when using your appliance, follow basic safety precautions,
including the following:
WARNING WARNING
• If you receive a damaged product, immediately contact
your dealer or builder. Do not install or use a damaged
appliance.
• Make sure that this appliance has been properly installed
according to the accompanying installation instructions.
Make sure you know the location of the electrical outlet so
that you know where and how to disconnect power. Making
sure the appliance is properly installed is the responsibility
of the customer.
• Refrigeration equipment must be properly disposed of in
a professional and appropriate way, in accordance with
the current local regulations and laws which protect the
environment. This applies to your old appliance and to your
new unit once it has reached the end of its service life. DO
NOT dispose of the appliance in a landfill or with urban
waste. Contact local waste disposal centers for information
on how to dispose of recyclable waste.
• Take care when handling, moving, using or disposing of
the appliance to avoid damaging the refrigerant tubing or
system.
• Do not install or use outdoors or in wet conditions. This
appliance is not designed for installation in a recreational
vehicle or boat.
• Keep packaging materials away from children. Plastic
sheets and bags can cause suffocation.
• Connect this appliance to a 115 Vac, 15 Amp. circuit that
is controlled by a circuit breaker or fuse. This appliance
should have its own separate grounded circuit.
• Do not kink or pinch the power supply cord of the
appliance. Never unplug the appliance by pulling on the
power cord. Always grip the plug firmly and pull straight out
from the electrical outlet.
• Disconnect this appliance when not in use.
• Do not install, repair, modify or replace any part of the
appliance unless specifically recommended in the literature
accompanying it. A qualified service technician should
perform all other service.
• Before installing or performing any type of service,
disconnect the unit from the electrical outlet or disconnect
power at the circuit breaker panel or fuse box.
• Use this appliance only for its intended purpose, the
storage of food and beverages. It is not intended for
commercial or industrial use.
• This appliance is not intended for use by persons
(including children) with reduced physical, sensory or lack
of experience and knowledge unless they are properly
supervised by a person responsible for their safety.
Children must be supervised to ensure that they do not play
with the appliance.
• Never allow anyone, including children to sit, stand or climb
on any part of the appliance, including the door. Doing so
may cause damage, serious injury or death.
• If the power cord is damaged, it must be replaced by the
manufacturer or a qualified service technician in order to
avoid a safety hazard.
• Do not tamper with the controls.
• Clean this appliance regularly as instructed in the Care and
Cleaning section of this manual. Clean the ice container
regularly.
• The appliance features a lighting system with high intensity
LED lamps. Do not stare into these lamps when they are on
to avoid possible eyesight damage.
• When the freezer is functioning, do not touch the inner
stainless steel surfaces with wet or damp hands, since skin
may stick to the very cold surfaces.
• Do not use any type of electrical equipment inside the
refrigerator or freezer compartments.
• When positioning the shelves, do not place fingers in the
shelf slides.
CAUTION
• In the event of a power outage, minimize opening the door.
• Do not obstruct any of the vents or openings on the
appliance.
2
Page 5
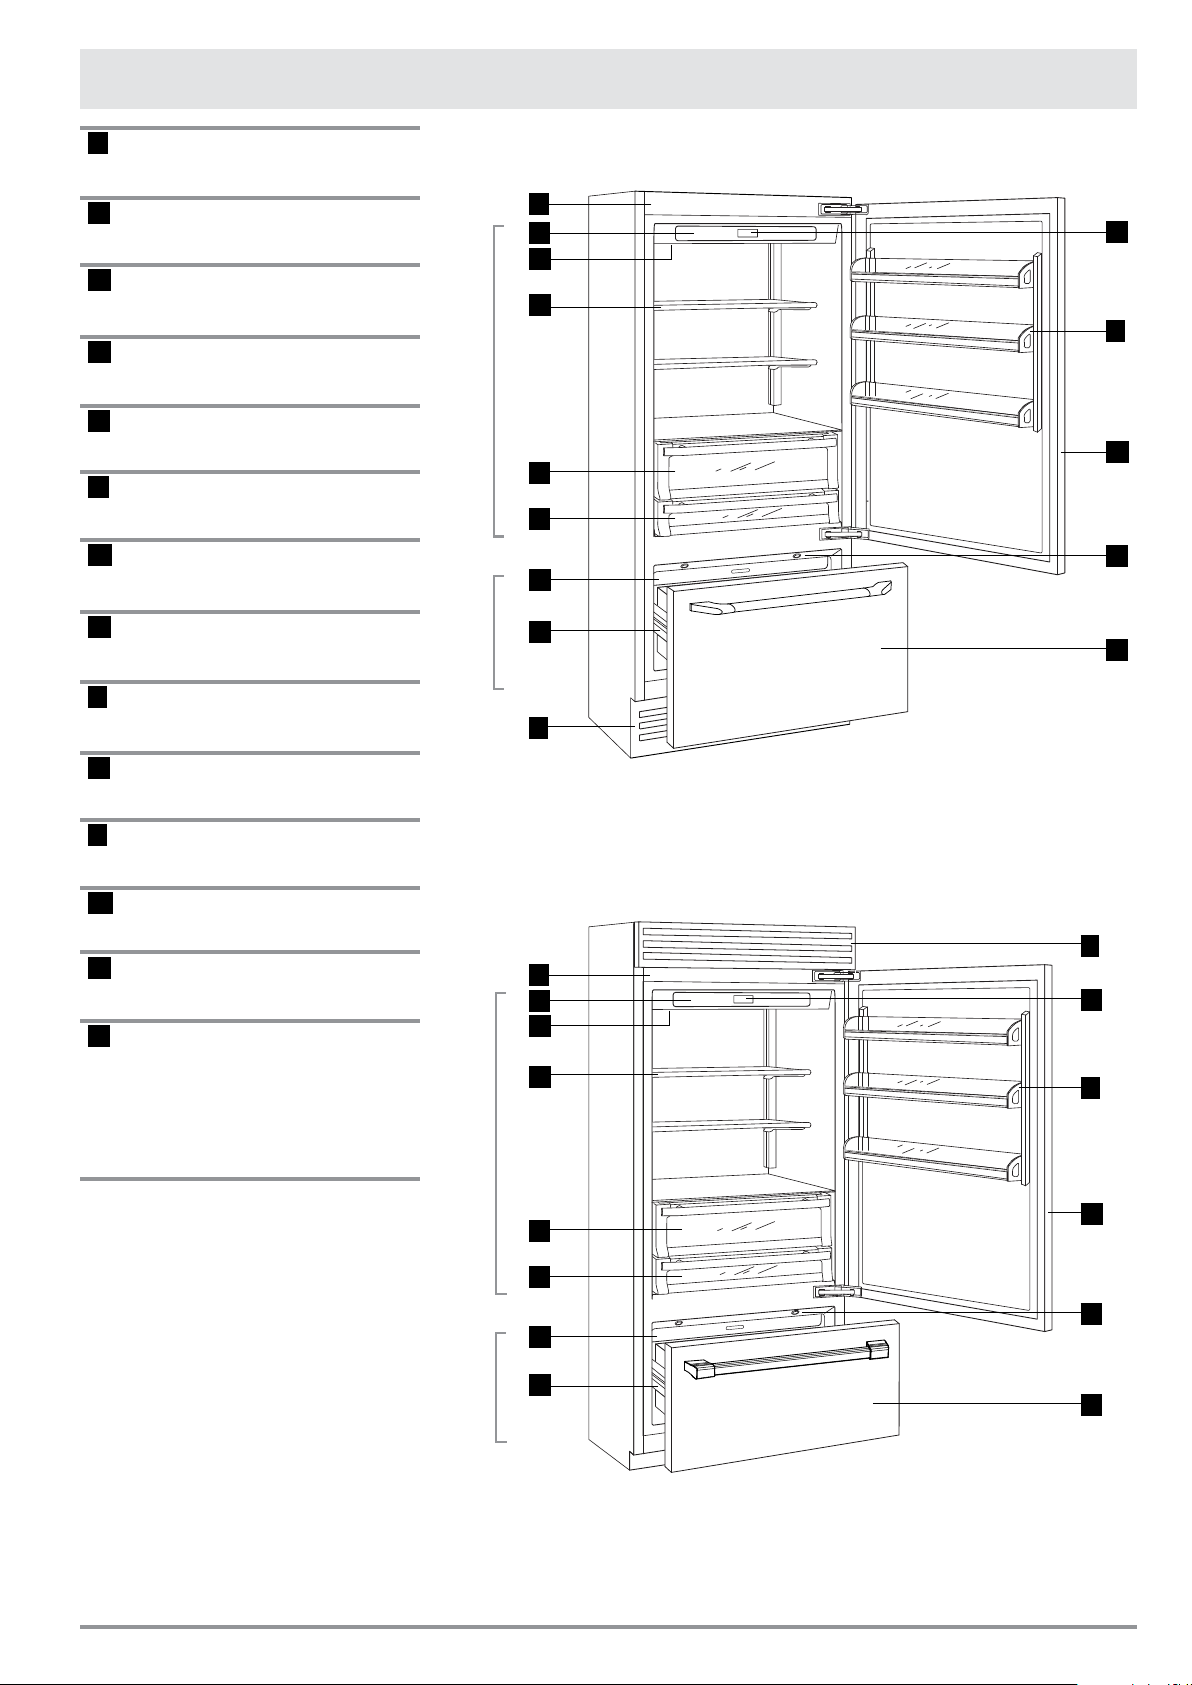
Getting to Know Your Refrigerator
Freezer
Refrigerator
Freezer
Refrigerator
A Stainless steel structure with
aluminum trim
B Control panel
C Water lter
D Adjustable shelves
E Vegetable drawer
F Deli drawer
G Automatic ice maker
H Automatic drawer closing system
J Dual refrigeration system
K Control panel display
A
B
C
D
E
F
G
H
J
K
L
M
N
P
L Adjustable door shelves
M Door with self closing hinges
N LED lighting
P FreshZone freezer compartment
that can also be set to act as a
refrigerator or “fresh” compartment;
see pages 5 and 15. When
the appliance is rst switched on
the FreshZone compartment is set
to the freezer mode.
A
B
C
D
E
F
G
H
Bottom Grill Models
J
K
L
M
N
P
Top Grill Models
3
Page 6
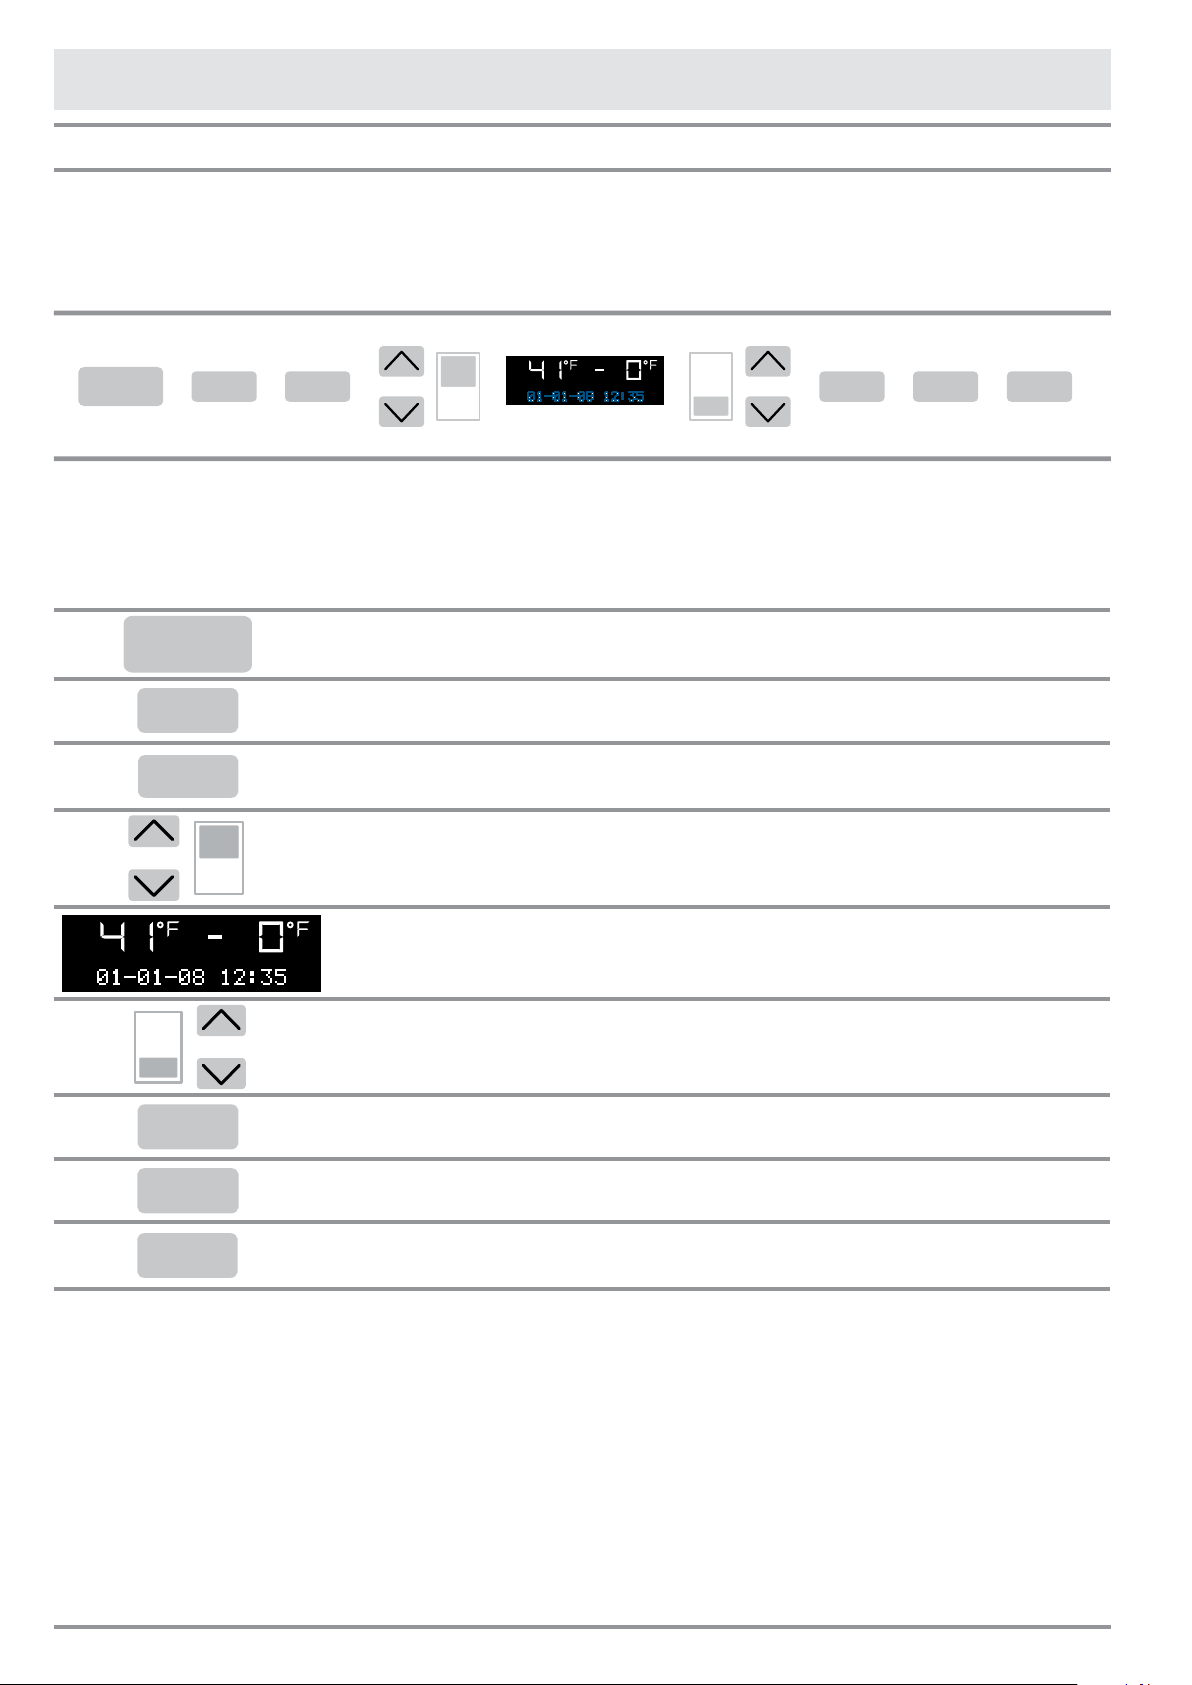
Getting to Know Your Refrigerator
UPPER
LOWER
SELECT
ICE
ALARM
MENU
FRIDGE
ON/OFF
UPPER
FRIDGE
ON/OFF
MENU
Control Panel
The electronic control system on your Dacor refrigerator maintains constant temperature in both compartments and displays the
measured temperature on the control panel. It also allows the user to personalize settings of the various functions and alerts the user
should a malfunction occur.
Switches the appliance (all compartments) between ON and Stand by (Tap for three
seconds).
LOWER
SELECT
ALARM
Allows you to switch off the refrigerator compartment and leave the FreshZone freezer
compartment on (Tap for three seconds).
Allows access to the control panel menu to change the appliances various settings. See page
7 for more details.
Up/Down - refrigerator: Tap the refrigerator Up and Down keys, to change the refrigerator
temperature setting or to navigate through the control panel menu.
Display: Shows the temperature of the refrigerator and freezer compartments, the date and
time, control panel menu and various other messages.*
Up/Down - freezer (FreshZone): Tap the freezer Up and Down keys, to change the
FreshZone freezer compartment temperature setting.
Tap to conrm selections made in the control panel menu.
Tap to turn the ice maker on or off.
ICE
Flashes to signal user alerts such as door being left open in combination with a warning tone.
Tap this key to deactivate the warning tone.
*During operation, various messages will appear on the display. See page 24 for a more complete description.
4
Page 7
Operation
ON/OFF
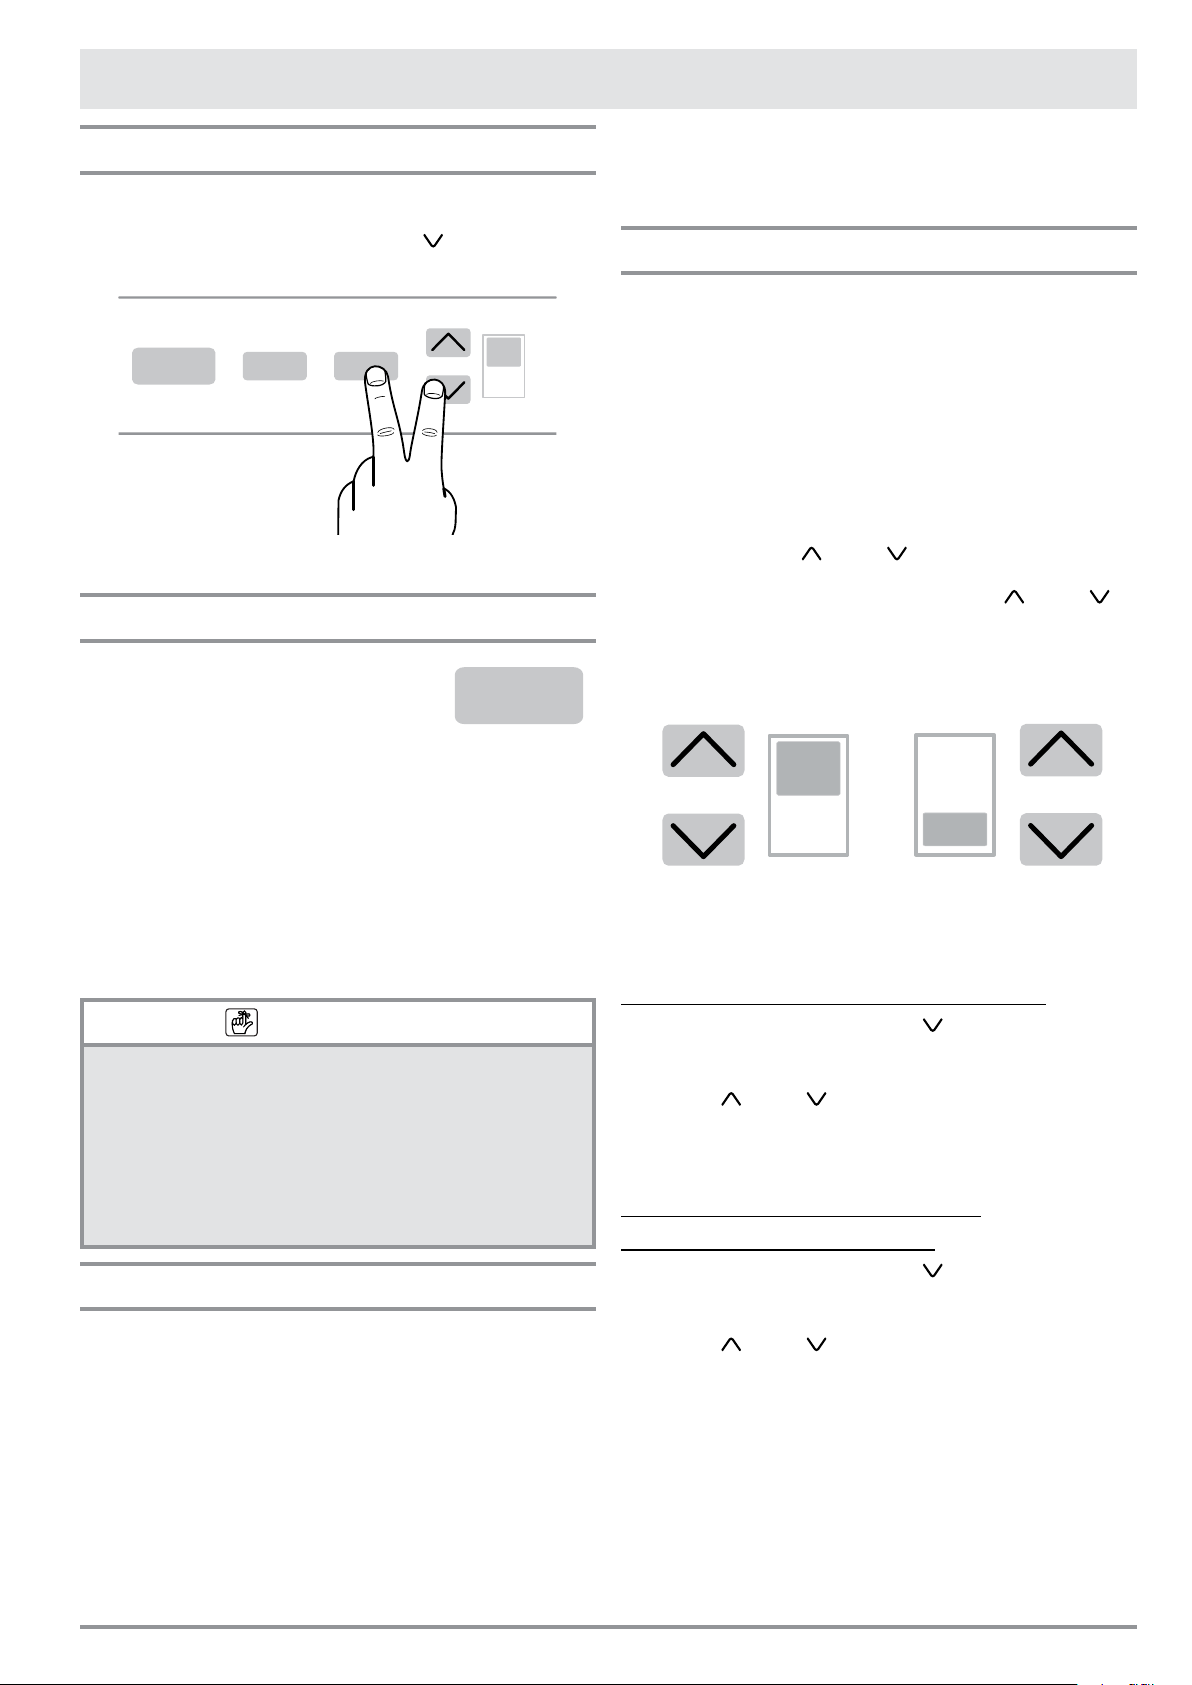
Unlocking the Keypad
Anytime the appliance is turned on and the control panel has not
been used for a while, the keypad locks automatically. To unlock
the keypad, Tap the MENU and refrigerator (down) keys
together for three seconds as shown below.
ON/OFF
FRIDGE
Keypad Unlock Procedure
MENU
Switching On and Off
When the appliance is connected to the
electrical outlet for the rst time, but has not
yet been switched on, Stand by appears
on the display. This is a safety message
indicating that the appliance is connected to power but is not
turned on.
• To turn on the appliance, Tap the ON/OFF key for three
seconds.
• To turn off the appliance, Tap the ON/OFF key for three
seconds again.
Each time the appliance is switched on (or experiences a power
failure) it goes trough an Initial Test procedure lasting
about three minutes. Following the initial test, Start Up Phase
may appear on the display as the unit begins to cool down.
IMPORTANT
After a prolonged interruption of electrical power, an audible
signal will indicate if the temperature is above normal levels.
In addition, the display will show for one minute the highest
temperature detected inside the compartments, to allow
the user to decide how to best to use the food inside. After
one minute the display will resume normal operation, while
the
ALARM key
sounding, Tap the
temperatures.
will continue to blink. After the alarm stops
ALARM key
to display the highest recorded
Switching Off Refrigerator Only
• The FRIDGE key allows you to switch off the refrigerator
compartment and leave the FreshZone™ freezer
compartment on. Touch the FRIDGE key for three seconds
to deactivate the refrigerator. The FreshZone freezer
compartment can only be switched off completely by
switching off the appliance completely using the ON/OFF key
(the refrigerator compartment will go off too).
• If the refrigerator compartment is switched off, the refrigerator
compartment lights will go off and the fan may continue to
operate to prevent the formation of unpleasant odors and
mold.
UPPER
• Touch the FRIDGE key again for three seconds to turn
the refrigerator compartment back on. Allow at least 6
hours for the refrigerator compartment to cool to operating
temperature.
Temperature Adjustment
• The refrigerator and FreshZone freezer sections are pre-set
at the factory to the optimal temperature settings. Usually, it
is not necessary to modify the settings. Allow at least 6 hours
to reach a new selected temperature.
• The refrigerator and freezer temperatures normally displayed
are the actual temperatures inside each compartment (unless
the actual temperature is out of range of the control panel’s
display). The temperature shown can vary slightly with
respect to the set temperature following frequent opening
of the doors or inserting room temperature foods or large
quantities of food.
• When you tap the (up) or (down) arrow key for the
refrigerator or FreshZone freezer compartment, the current
temperature setting will appear. Tapping the (up) or
(down) keys additional times will then increase or decrease
the temperature setting. The display will show the new
setting for a few seconds, then return to the current
temperature inside that compartment.
UPPER
LOWER
Refrigerator Compartment
Temperature Adjustment Keys
Setting the Refrigerator Temperature
1. Touch the MENU and refrigerator (down) keys together
for three seconds, as shown (above left), to unlock the
keypad.
2. Tap the (up) or (down) arrow key next to the
refrigerator (UPPER) symbol. The temperature range for the
refrigerator compartment is from 34°F to 46°F (+1°C to
+7°C).
Setting the FreshZone Freezer
Compartment Temperature
1. Touch the MENU and refrigerator (down) keys together
for three seconds, as shown (above left), to unlock the
keypad.
2. Tap the (up) or (down) arrow key next to the freezer
(LOWER) symbol.
• The temperature range for the FreshZone freezer
compartment is -11°F to 9°F (-23°C to -13°C), except when
the freezer is set to the “fresh” or refrigerator temperature
range using the FreshZone feature (see page 15).
• Temperature range when freezer section is set to “fresh”
using the FreshZone feature: 28°F to 36°F (-2°C to +2°C).
• Temperature range when freezer section is set to refrigerator
using the FreshZone feature: 36°F to 48°F (+2°C to +8°C).
FreshZone Freezer
Compartment
5
Page 8

Operation
FRIDGE
ON/OFF
Ice Maker Operation
WARNING
• Failure to follow instructions regarding sanitizing can
compromise the hygienic safety of the ice dispensed.
Do not connect the refrigerator to a water supply that is
microbiologically unsafe or of unknown quality without
adequate disinfection. Systems certified for cyst reduction
may be used on disinfected water that may contain filterable
cysts.
• Do not activate the ice maker unless the water supply line is
connected to the appliance and the water valve is on.
• Do not place hands or fingers near the ice maker when it is
turned on.
• The filter must be changed when indicated on the control
panel or when the ice maker has not been used for more
than 30 days.
• When using the appliance for the first time and every time
the filter is changed, discard the first container full of ice
produced.
• Do not place any bottles or food in the ice cube container.
The ice maker may become blocked or damaged.
Using the Ice Maker for the First Time
1. Make sure the ice maker is off (the ICE key is not lit). If the
ice maker is on, Tap the ICE key, located on the main control
panel, until the light goes off.
2. Perform a manual clean. See page 14.
3. Open the glass panel inside the top of the refrigerator
compartment by pushing up and back on both sides of the
plastic frame surrounding it, then lowering it down.
ON/OFF
FRIDGE
Filter head location
on models with door
hinge on right
4. Remove the packaging on the supplied water lter cartridge
and insert it into the lter head, located either to the right or
left of the lighting system. Gently rotate the lter clockwise
1/4 turn, until it locks into place.
UPPER
MENU
Glass panel
Glass panel
ALARM
SELECT
LOWER
ICE
2
Filter head location
on models with door
hinge on left
Insert lter into
lter head
1 1
5. Tap the SELECT and ICE keys at the same time until
Filter Reset OK appears on the display.
6. Reinstall the glass panel by pushing it up into place until it
stops, then pulling the plastic frame at the sides, toward you.
7. The ice container is located in the upper drawer of the
freezer compartment. After removal, make sure to reposition
it correctly, as shown.
Ice Maker Operation
Tap the ICE key to turn ON or OFF. The button is lit when the ice
maker is ON.
NOTES
• The ice maker will only produce ice with the FreshZone
freezer compartment set to freezer mode.
• 12 to 24 hours are required after activation before ice
production can begin. The ice maker normally produces 10
cubes per cycle, at approximately 10 cycles in 24 hours.
The ice maker produces ice until the ice container is full and
then stops. It restarts when ice cubes are removed.
• The yield may be reduced by a lower freezer temperature
setting, higher room temperature or frequent door opening.
• The size of the ice cubes produced is adjustable. See Set
Cube Size on page 12.
• Turn off the ice maker using the
water supply valve is turned off.
• It is normal for some ice cubes to stick to one another.
• If the ice is not used frequently, it is best to empty the ice
container once every 8-10 days. If the ice is not frequently
used, the older cubes can become cloudy, and will have a
strange flavor.
• Switch off the ice maker when removing the ice container.
• The ice maker automatically deactivates if Holiday Mode is
activated.
• If the appliance has been switched off for a month or more,
Dacor recommends performing a manual clean cycle (see
page 14).
• Ice cubes which have been in the ice cube container for a
long time may absorb odors. To prevent odors:
◊ Clean the ice container periodically (see page 13).
◊ Check the contents of the freezer for spoiled or
out-of-date food regularly. Wrap all odorous foods
thoroughly or store in airtight containers.
◊ Change the water filter at recommended intervals (see
page 23). Also check the quality of the water supply.
ICE key
whenever the
6
Page 9
Operation
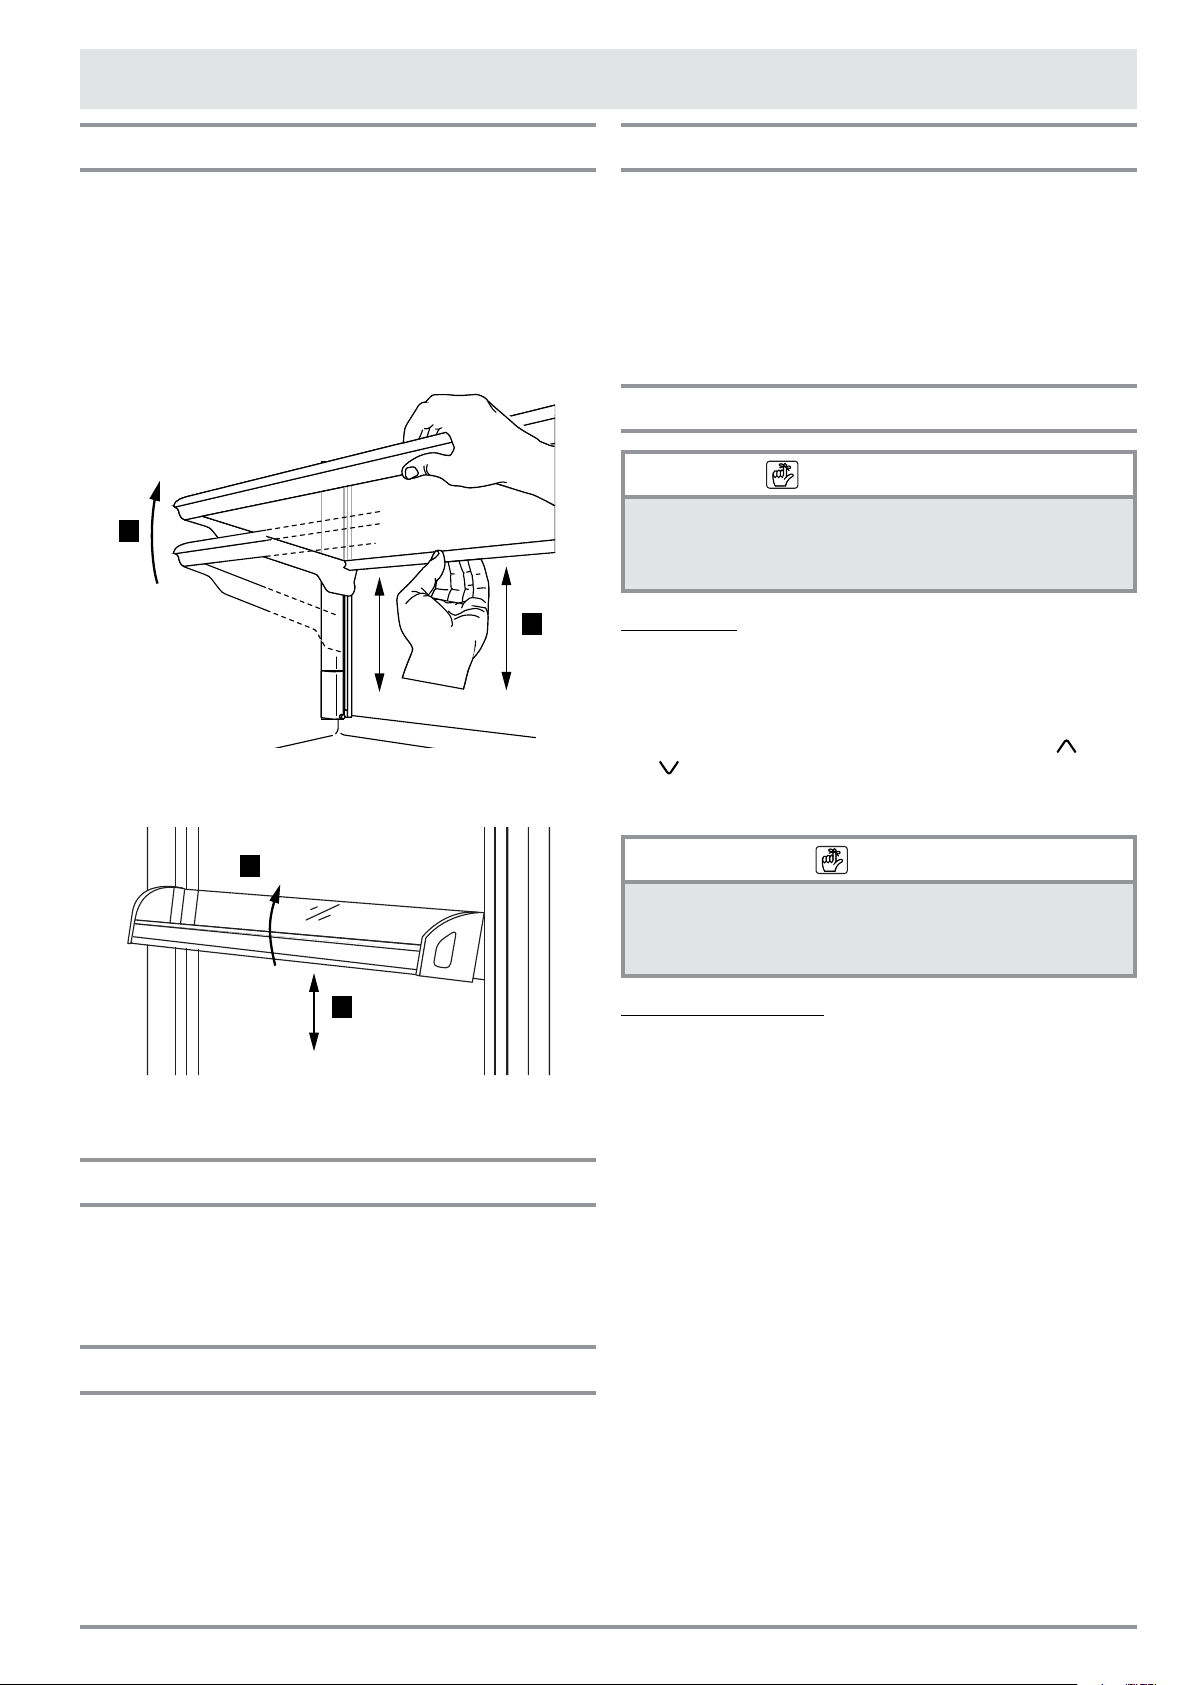
Shelf Adjustment
The two upper shelves in the refrigerator compartment and
all the shelves in the door can be easily moved up or down
as follows:
1. Lift the front of the shelf up.
2. While lifting the front up, push or pull the back of the shelf up
or down to the desired position.
3. Lower the front down to the level position.
1
2
Shelf Adjustment - Refrigerator Compartment
Vacation
• During long periods of absence, Dacor recommends that you
switch off the refrigerator (see page 5) and disconnect
the power cord or turn off power at the circuit breaker panel
or fuse box. Before switching off the appliance, remove all
of the items inside and leave the doors and drawers open to
prevent the formation of unpleasant odors and mold.
• During shorter absences, you can put the appliance in
Holiday Mode to save energy (see page 9).
Control Panel Functions/Settings
IMPORTANT
Adjustment of the control panel settings is not possible when
the refrigerator is starting up for the first time. Changes
made to the control panel settings may not be saved until the
compartments have reached operating temperature.
Overview
• After unlocking the keypad (see page 5), tapping the
MENU key activates the Functions / Settings adjustment
menu. The MENU key is lit while the control panel menu is
active.
• While the control panel menu is active, the MENU, (up) or
(down) and SELECT keys are used to navigate and set
(conrm) the various functions and settings as outlined in the
following sections.
1
2
Shelf Adjustment - Door
Alarm
The alarm key is used to silence the alarm that accompanies
certain messages that appear on the display. It can also be used
to clear some error messages that appear on the display. When
you tap the ALARM key, the tone will be silenced, but the key will
continue to ash until the cause of the alarm has been resolved.
Display Messages
Various messages will appear on the display from time to time for
various reasons. Messages that ash on and off indicate an error
condition or malfunction. See the Before You Call For Service
section on page 24 for a complete description of the various
messages.
NOTE
At any point in the menu, you can tap the
back one screen, or repeatedly tap to return to the main
display and exit the control panel menu. The MENU key light
will shut off when you have exited the menu.
MENU key to go
Max Cool Fridge
• The max cool function lowers the refrigerator compartment
temperature to 35°F (+2°C) for several hours. It provides
for more rapid cooling of large amounts of food that have
just been placed inside and avoids the resulting rise in
compartment temperature. The number of hours Max Cool
operates is adjustable.
• Max Cool can be set to operate for up to 12 hours. Once the
set number of hours has expired, the function deactivates,
returning the compartment to the previously set temperature.
In case of power failure, this function must be reactivated.
continued...
7
Page 10
Operation
To activate Max Cool Fridge:
Tap MENU and refrigerator
(down) to unlock keypad (if
locked)
Tap MENU
Tap SELECT
Tap SELECT
Tap SELECT
Tap (down)
Tap SELECT
Tap MENU repeatedly until it is
no longer lit.
Key-pad Unlocked
appears on display
Functions appears on
display
Max Cool Fridge appears
on display
Max Cool ON/OFF appears
on display
Max Cool Off appears on
display
Max Cool On appears on
display
Max Cool ON/OFF appears
on display
Main display appears
To deactivate Max Cool Fridge:
Tap MENU and refrigerator
(down) to un-lock keypad (if
locked)
Tap MENU
Tap SELECT
Tap SELECT
Tap SELECT
Tap (down)
Tap SELECT
Tap MENU repeatedly until it is
no longer lit.
Key-pad Unlocked
appears on display
Functions appears on
display
Max Cool Fridge appears
on display
Max Cool ON/OFF appears
on display
Max Cool On appears on
display
Max Cool Off appears on
display
Max Cool ON/OFF appears
on display
Main display appears
To set Max Cool Fridge duration:
Tap MENU and refrigerator
(down) to un-lock keypad (if
locked)
Tap MENU
Tap SELECT
Tap SELECT
Tap (down)
Tap SELECT
Tap (up) or (down)
repeatedly until...
Tap SELECT
Tap MENU repeatedly until it is
no longer lit.
Key-pad Unlocked
appears on display
Functions appears on
display
Max Cool Fridge appears
on display
Max Cool ON/OFF appears
on display
Max Cool Time appears
on display
Set Hours appears on
display
Desired Max Cool hours
appear on display
Max Cool Time appears
on display
Main display appears
Max Cool FreshZone
• The Max Cool FreshZone function lowers the temperature
of the FreshZone freezer compartment which provides for
more rapid freezing/cooling of large amounts of food that
have just been placed inside and avoiding the resulting rise
in compartment temperature. The compartment will remain at
this temperature for the number of hours set, then return to
the set temperature.
• The temperature to which the compartment is lowered
depends on the temperature range to which the FreshZone
freezer compartment is set:
-9°F (-22°C) when set to freezer mode
27°F (-2°C) when set to fresh mode
35°F (+2°C) when set to refrigerator mode
• When the FreshZone freezer compartment is set to freezer or
fresh, activate this function before inserting large amounts of
room temperature food for proper results.
• Max Cool can be set to operate for up to 12 hours. Once the
set number of hours have expired, the function deactivates,
returning the compartment to the previously set temperature.
In case of power failure, this function must be reactivated.
8
Page 11

Operation
To activate Max Cool FreshZone:
Tap MENU and refrigerator
(down) to un-lock keypad (if
locked)
Tap MENU
Tap SELECT
Tap (down) repeatedly
until...
Tap SELECT
Tap SELECT
Tap (down)
Tap SELECT
Tap MENU repeatedly until it is
no longer lit.
Key-pad Unlocked
appears on display
Functions appears on
display
Max Cool Fridge appears
on display
Max Cool FreshZone
appears on display
Max Cool ON/OFF appears
on display
Max Cool FreshZone Off
appears on display
Max Cool FreshZone On
appears on display
Max Cool ON/OFF appears
on display
Main display appears
To deactivate Max Cool FreshZone:
To set Max Cool FreshZone duration:
Tap MENU and refrigerator
(down) to un-lock keypad (if
locked)
Tap MENU
Tap SELECT
Tap (down) repeatedly
until...
Tap SELECT
Tap (down)
Tap SELECT
Tap (up) or (down)
repeatedly until...
Tap SELECT
Tap MENU repeatedly until the
light is off
Key-pad Unlocked
appears on display
Functions appears on
display
Max Cool Fridge appears
on display
Max Cool FreshZone
appears on display
Max Cool ON/OFF appears
on display
Max Cool Time appears
on display
Set Hours appears on
display
Desired Max Cool hours
appear on display
Max Cool Time appears
on display
Main display appears
Tap MENU and refrigerator
(down) to un-lock keypad (if
locked)
Tap MENU
Tap SELECT
Tap (down) repeatedly
until...
Tap SELECT
Tap SELECT
Tap (down)
Tap SELECT
Tap MENU repeatedly until it is
no longer lit.
Key-pad Unlocked
appears on display
Functions appears on
display
Max Cool Fridge appears
on display
Max Cool FreshZone
appears on display
Max Cool ON/OFF appears
on display
Max Cool FreshZone On
appears on display
Max Cool FreshZone Off
appears on display
Max Cool ON/OFF appears
on display
Main display appears
Holiday Fridge
• In case of prolonged absences, in conjunction with
the Holiday FreshZone function, this function allows
considerable energy savings by raising the refrigerator
compartment temperature to 57°F (+14°C), for the number of
days set.
• Holiday mode can be set to operate for up to 90 days. Once
the set number of days has expired, the function deactivates,
returning the compartment to the previously set temperature.
• It remains active even if there is a power interruption.
To activate the Holiday Fridge function:
Tap MENU and refrigerator
(down) to un-lock keypad (if
locked)
Tap MENU
Tap SELECT
Tap (down)
Tap SELECT
Tap SELECT
Key-pad Unlocked
appears on display
Functions appears on
display
Max Cool Fridge appears
on display
Holiday Fridge appears
on display
Holiday ON/OFF appears
on display
Holiday Fridge Off
appears on display
Tap (down)
Tap SELECT
Tap MENU repeatedly until it is
no longer lit.
9
Holiday Fridge On
appears on display
Holiday ON/OFF appears
on display
Main display appears
Page 12

Operation
To deactivate the Holiday Fridge function:
Tap MENU and refrigerator
(down) to un-lock keypad (if
locked)
Tap MENU
Tap SELECT
Tap (down)
Tap SELECT
Tap SELECT
Tap (down)
Tap SELECT
Tap MENU repeatedly until it is
no longer lit.
Key-pad Unlocked
appears on display
Functions appears on
display
Max Cool Fridge appears
on display
Holiday Fridge appears
on display
Holiday ON/OFF appears
on display
Holiday Fridge On
appears on display
Holiday Fridge Off
appears on display
Holiday ON/OFF appears
on display
Main display appears
To set Holiday Fridge duration:
Tap MENU and refrigerator
(down) to un-lock keypad (if
locked)
Tap MENU
Tap SELECT
Tap (down).
Tap SELECT
Tap (down)
Tap SELECT
Tap (up) or (down)
repeatedly until...
Tap SELECT
Key-pad Unlocked
appears on display
Functions appears on
display
Max Cool Fridge appears
on display
Holiday Fridge appears
on display
Holiday ON/OFF appears
on display
Holiday Time appears on
display
Set Days appears on
display
Desired number of days
appears on display
Holiday Time appears on
display
Holiday FreshZone
• In case of prolonged absences, in conjunction with the
Holiday Fridge function, this function allows considerable
energy savings by raising the FreshZone freezer
compartment temperature. The temperature to which the
compartment is raised depends on the temperature range to
which the FreshZone compartment is set:
5°F (-15°C) when set to freezer mode
35°F (2°C) when set to Fresh mode
57°F (+14°C) when set to refrigerator mode
• Holiday mode can be set to operate for up to 90 days.
Once the set number of days have expired, the function
deactivates, returning the compartment to the previously set
temperature.
• It remains active even if there is a power interruption.
To activate the Holiday FreshZone function:
Tap MENU and refrigerator
(down) to un-lock keypad (if
locked)
Tap MENU
Tap SELECT
Tap (down) repeatedly
until...
Tap SELECT
Tap SELECT
Tap (down)
Tap SELECT
Tap MENU repeatedly until it is
no longer lit.
Key-pad Unlocked
appears on display
Functions appears on
display
Max Cool Fridge appears
on display
Holiday FreshZone
appears on display
Holiday ON/OFF appears
on display
Holiday FreshZone Off
appears on display
Holiday FreshZone On
appears on display
Holiday ON/OFF appears
on display
Main display appears
Tap MENU repeatedly until it is
no longer lit.
Main display appears
10
Page 13

Operation
To deactivate the Holiday FreshZone
function:
Tap MENU and refrigerator
(down) to un-lock keypad (if
locked)
Tap MENU
Tap SELECT
Tap (down) repeatedly
until...
Tap SELECT
Tap SELECT
Tap (down)
Tap SELECT
Tap MENU repeatedly until it is
no longer lit.
Key-pad Unlocked
appears on display
Functions appears on
display
Max Cool Fridge appears
on display
Holiday FreshZone
appears on display
Holiday ON/OFF appears
on display
Holiday FreshZone On
appears on display
Holiday FreshZone Off
appears on display
Holiday ON/OFF appears
on display
Main display appears
To set Holiday FreshZone duration:
Tap MENU and refrigerator
(down) to un-lock keypad (if
locked)
Tap MENU
Tap SELECT
Tap (down) repeatedly
until...
Tap SELECT
Tap (down)
Tap SELECT
Tap (up) or (down)
repeatedly until...
Tap SELECT
Tap MENU repeatedly until it is
no longer lit.
Key-pad Unlocked
appears on display
Functions appears on
display
Max Cool Fridge appears
on display
Holiday FrshZone
appears on display
Holiday ON/OFF appears
on display
Holiday Time appears on
display
Set Days appears on
display
Desired number of days
appears on display
Holiday Time appears on
display
Main display appears
Beverage Cooler
This function can be activated when it is necessary to cool
beverages quickly, by placing them inside the FreshZone freezer
compartment. You can select a duration of 1 to 45 minutes. A tone
will indicate when the optimal temperature has been reached.
After removing the beverages, deactivate the tone by tapping the
ALARM key.
To activate the Beverage Cooler function:
Tap MENU and refrigerator
(down) to un-lock keypad (if
locked)
Tap MENU
Tap SELECT
Tap (down) repeatedly
until...
Tap SELECT
Tap (down)
Tap SELECT
Tap (down)
Tap SELECT
Tap MENU repeatedly until it is
no longer lit.
To deactivate Beverage Cooler function:
Tap MENU and refrigerator
(down) to un-lock keypad (if
locked)
Tap MENU
Tap SELECT
Tap (down) repeatedly
until...
Tap SELECT
Tap (down)
Tap SELECT
Key-pad Unlocked
appears on display
Functions appears on
display
Max Cool Fridge appears
on display
Beverage Cooler appears
on display
Set Cooling Time
appears on display
Cooler ON/OFF appears
on display
Beverage Cooler Off
appears on display
Beverage Cooler On
appears on display
Cooler ON/OFF appears
on display
Main display appears
Key-pad Unlocked
appears on display
Functions appears on
display
Max Cool Fridge appears
on display
Beverage Cooler appears
on display
Set Cooling Time
appears on display
Cooler ON/OFF appears
on display
Beverage Cooler On
appears on display
Tap (down)
Tap SELECT
Tap MENU repeatedly until it is
no longer lit.
continued...
11
Beverage Cooler Off
appears on display
Cooler ON/OFF appears
on display
Main display appears
Page 14

Operation
To set the Beverage Cooler duration:
Tap MENU and refrigerator
(down) to un-lock keypad (if
locked)
Tap MENU
Tap SELECT
Tap (down) repeatedly
until...
Tap SELECT
Tap SELECT
Tap (down) or (up) until
desired set time appears on
display
Tap SELECT
Tap MENU repeatedly until it is
no longer lit.
Key-pad Unlocked
appears on display
Functions appears on
display
Max Cool Fridge appears
on display
Beverage Cooler appears
on display
Set Cooling Time
appears on display
Current set time appears on
display, for example: Set
Time : 20
For example Set Time :
10 appears on display
Set Cooling Time
appears on display
Main display appears
Ice Maker - Cube Size Function
The Ice Maker Cube Size function permits selecting the size of
the ice cubes. Choose large (default setting) or medium size ice
cubes.
Ice Maker - Fast Ice Function
The Fast Ice function increases the quantity of ice produced. It
deactivates automatically after 24 hours.
To activate the Fast Ice function:
Tap MENU and refrigerator
(down) to un-lock keypad (if
locked)
Tap MENU
Tap SELECT
Tap (down) repeatedly
until...
Tap SELECT
Tap (down)
Tap SELECT
Tap (down)
Tap SELECT
Tap MENU repeatedly until it is
no longer lit.
Key-pad Unlocked
appears on display
Functions appears on
display
Max Cool Fridge appears
on display
Ice Maker appears on
display
Set Cube Size appears on
display
Fast Ice ON/OFF appears
on display
Fast Ice Off appears on
display
Fast Ice On appears on
display
Fast Ice ON/OFF appears
on display
Main display appears
To set ice cube size:
Tap MENU and refrigerator
(down) to un-lock keypad (if
locked)
Tap MENU
Tap SELECT
Tap (down) repeatedly
until...
Tap SELECT
Tap SELECT
Tap (down) to change size
Tap SELECT
Tap MENU repeatedly until it is
no longer lit.
Key-pad Unlocked
appears on display
Functions appears on
display
Max Cool Fridge appears
on display
Ice Maker appears on
display
Set Cube Size appears on
display
Size Large or Size Med
appears on display
New ice cube size appears on
display
Set Cube Size appears on
display
Main display appears
To deactivate the Fast Ice function:
Tap MENU and refrigerator
(down) to un-lock keypad (if
locked)
Tap MENU
Tap SELECT
Tap (down) repeatedly
until...
Tap SELECT
Tap (down)
Tap SELECT
Tap (down)
Tap SELECT
Tap MENU repeatedly until it is
no longer lit.
Key-pad Unlocked
appears on display
Functions appears on
display
Max Cool Fridge appears
on display
Ice Maker appears on
display
Set Cube Size appears on
display
Fast Ice ON/OFF appears
on display
Fast Ice Off appears on
display
Fast Ice On appears on
display
Fast Ice ON/OFF appears
on display
Main display appears
12
Page 15

Operation
Sabbath Mode
This function deactivates the lights and disables the door switches
so that the operation of the unit is not affected by opening and
closing of the door. The control panel keys remain active.
To activate the Sabbath mode:
Tap MENU and refrigerator
(down) to un-lock keypad (if
locked)
Tap MENU
Tap SELECT
Tap (down) repeatedly
until...
Tap SELECT
Tap (down)
Tap SELECT
Key-pad Unlocked
appears on display
Functions appears on
display
Max Cool Fridge appears
on display
Set Sabbath Mode
appears on display
Sabbath Mode Off
appears on display
Sabbath Mode On appears
on display
Sabbath Mode ON appears
on display
Water Filter Status
This function allows you to view the time left before the lter
needs to be replaced.
To view the lter status:
Tap MENU and refrigerator
(down) to un-lock keypad (if
locked)
Tap MENU
Tap SELECT
Tap (down) repeatedly
until...
Tap SELECT
Tap SELECT
Tap SELECT
Tap MENU repeatedly until it is
no longer lit.
Key-pad Unlocked
appears on display
Functions appears on
display
Max Cool Fridge appears
on display
Water Filter appears on
display
Status Filter appears on
display
View Status appears on
display
Amount of lter capacity
remaining appears on display
Main display appears
To deactivate the Sabbath mode:
Tap MENU and refrigerator
(down) to un-lock keypad (if
locked)
Tap MENU
Tap SELECT
Tap (down) repeatedly
until...
Tap SELECT
Tap (down)
Tap SELECT
Tap MENU repeatedly until it is
no longer lit.
Key-pad Unlocked
appears on display
Functions appears on
display
Max Cool Fridge appears
on display
Set Sabbath Mode
appears on display
Sabbath Mode On appears
on display
Sabbath Mode Off
appears on display
Set Sabbath Mode
appears on display
Main display appears
Water Filter Reset
The Water Filter Reset function sets the lter time remaining on
the Water Filter Status display to zero. Set the remaining lter
time back to zero each time the lter is replaced.
To reset the remaining lter time:
Touch and hold both the SELECT and ICE keys until
Filter Reset OK appears on the display, or perform the
following steps...
Tap MENU and refrigerator
(down) to un-lock keypad (if
locked)
Tap MENU
Tap SELECT
Tap (down) repeatedly
until...
Tap SELECT
Tap SELECT
Tap (down)
Tap SELECT
Tap SELECT
Tap MENU repeatedly until it is
no longer lit.
Key-pad Unlocked
appears on display
Functions appears on
display
Max Cool Fridge appears
on display
Water Filter appears on
display
Status Filter appears on
display
View Status appears on
display
Filter Reset appears on
display
Select to Conrm
appears on display
Filter Reset appears on
display
Main display appears
13
Page 16

Operation
Water Filter Bypass
Activate this function when good quality water is being supplied
to the refrigerator and the internal water lter is not necessary. An
example would be when a whole house water lter is in use.
To activate the lter bypass function:
Tap MENU and refrigerator
(down) to un-lock keypad (if
locked)
Tap MENU
Tap SELECT
Tap (down) repeatedly
until...
Tap SELECT
Tap (down) repeatedly
until...
Tap SELECT
Tap (down)
Tap SELECT
Tap MENU repeatedly until it is
no longer lit.
To deactivate the lter bypass function:
Tap MENU and refrigerator
(down) to un-lock keypad (if
locked)
Tap MENU
Tap SELECT
Key-pad Unlocked
appears on display
Functions appears on
display
Max Cool Fridge appears
on display
Water Filter appears on
display
Status Filter appears on
display
Filter Bypass appears on
display
Filter Bypass Off
appears on display
Filter Bypass On
appears on display
Filter Bypass appears on
display
Main display appears
Key-pad Unlocked
appears on display
Functions appears on
display
Max Cool Fridge appears
on display
Manual Clean - Water Filter
• If the ice maker has been turned off or unused for a long
period of time, or just before replacing the water lter,
perform a Manual Clean to ush out water in the system
before using the ice maker again.
• Before starting the process, make sure that the ice container
or another suitable container is placed under the ice maker
to collect the water, then close the drawer. At the end of the
operation, wash the ice container, then put it back in place.
To clean the ice maker’s internal water
supply:
Tap MENU and refrigerator
(down) to un-lock keypad (if
locked)
Tap MENU
Tap SELECT
Tap (down) repeatedly
until...
Tap SELECT
Tap (down)
Tap SELECT
When Select to Conrm
appears on display
When process is complete, Tap
MENU repeatedly until it is no
longer lit.
Key-pad Unlocked
appears on display
Functions appears on
display
Max Cool Fridge appears
on display
Water Filter appears on
display
Status Filter appears on
display
Manual Clean appears on
display
Please wait... appears
on display
Tap SELECT
Main display appears
Tap (down) repeatedly
until...
Tap SELECT
Tap (down) repeatedly
until...
Tap SELECT
Tap (down)
Tap SELECT
Tap MENU repeatedly until it is
no longer lit.
Water Filter appears on
display
Status Filter appears on
display
Filter Bypass appears on
display
Filter Bypass On
appears on display
Filter Bypass Off
appears on display
Filter Bypass appears on
display
Main display appears
14
Page 17

Operation
FreshZone Setting
The freezer compartment can, if required, be converted to the
refrigeration or “fresh” operation. See page 5 for refrigeration
and “fresh” temperature ranges.
To change the FreshZone freezer
compartment temperature range:
Tap MENU and refrigerator
(down) to un-lock keypad (if
locked)
Tap MENU
Tap (down)
Tap SELECT
Tap SELECT
Tap (down) repeatedly
until...
Tap SELECT
Tap SELECT
Tap MENU repeatedly until it is
no longer lit.
Key-pad Unlocked
appears on display
Functions appears on
display
Settings appears on
display
FreshZone Options
appears on display
The current FreshZone
compartment setting appears
on display
The desired compartment
setting appears on display
(Freezer/Fridge/Fresh)
Select to Conrm
appears on display
FreshZone Options
appears on display
Main display appears
Default Settings
Use this feature to change the appliance back to the settings
entered at the factory.
IMPORTANT
If the unit is restored to the factory default settings, the
FreshZone freezer compartment will be restored to freezer
mode. If the FreshZone compartment was previously being
used in fridge or “fresh” mode, be sure to set it back to the
desired setting.
Tap SELECT
Tap MENU repeatedly until it is
no longer lit.
Default Settings
appears on display
Main display appears
Date Setting
To set the date shown on the display:
Tap MENU and refrigerator
(down) to un-lock keypad (if
locked)
Tap MENU
Tap (down)
Tap SELECT
Tap (down) repeatedly
until...
Tap SELECT
Tap SELECT
Tap (up) or (down)
repeatedly until...
Tap (up) or (down)
repeatedly until...
Tap (up) or (down)
repeatedly until...
Tap SELECT
Tap MENU repeatedly until it is
no longer lit.
Key-pad Unlocked
appears on display
Functions appears on
display
Settings appears on
display
FreshZone Options
appears on display
Date appears on display
Set Date appears on
display
The current date setting
appears, for example DATE:
01-15-15 appears on
display
Desired month appears on
display, then Tap SELECT
Desired day appears on
display, then Tap SELECT
Desired year appears on
display
Set Date appears on
display
Main display appears
To change the appliance back to the
factory default settings:
Tap MENU and refrigerator
(down) to un-lock keypad (if
locked)
Tap MENU
Tap (down)
Tap SELECT
Tap (down)
Tap SELECT
Key-pad Unlocked
appears on display
Functions appears on
display
Settings appears on
display
FreshZone Options
appears on display
Default Settings
appears on display
Select to Conrm
appears on display
15
Page 18

Operation
Disable Date on Display
To set the display so that the date is not
shown:
Tap MENU and refrigerator
(down) to un-lock keypad (if
locked)
Tap MENU
Tap (down)
Tap SELECT
Tap (down) repeatedly
until...
Tap SELECT
Tap (down)
Tap SELECT
Tap (down)
Tap SELECT
Tap MENU repeatedly until it is
no longer lit.
Key-pad Unlocked
appears on display
Functions appears on
display
Settings appears on
display
FreshZone Options
appears on display
Date appears on display
Set Date appears on
display
Show Date appears on
display
DATE: 01-15-15 On
appears on display
DATE: 01-15-15 Off
appears on display
Show Date appears on
display
Main display appears
Time Setting
To set the time shown on the display:
Tap MENU and refrigerator
(down) to un-lock keypad (if
locked)
Tap MENU
Tap (down)
Tap SELECT
Tap (down) repeatedly
until...
Tap SELECT
Tap SELECT
Tap (up) or (down)
repeatedly until...
Tap (up) or (down)
repeatedly until...
Tap SELECT
Tap MENU repeatedly until it is
no longer lit.
Key-pad Unlocked
appears on display
Functions appears on
display
Settings appears on
display
FreshZone Options
appears on display
Time appears on display
Set Time appears on
display
The current time setting
appears, for example Time:
01:23 appears on display
Desired hour appears on
display, then Tap SELECT
Desired minute appears on
display
Set Time appears on
display
Main display appears
To reactivate the display date when it is
off:
Tap MENU and refrigerator
(down) to un-lock keypad (if
locked)
Tap MENU
Tap (down)
Tap SELECT
Tap (down) repeatedly
until...
Tap SELECT
Tap (down) repeatedly
until...
Tap SELECT
Tap (down)
Key-pad Unlocked
appears on display
Functions appears on
display
Settings appears on
display
FreshZone Options
appears on display
Date appears on display
Set Date appears on
display
Show Date appears on
display
DATE: 01-15-15 Off
appears on display
DATE: 01-15-15 On
appears on display
Tap SELECT
Tap MENU repeatedly until it is
no longer lit.
Show Date appears on
display
Main display appears
16
Page 19

Operation
Disable Time on Display
To set the display so that the time is not
shown:
Tap MENU and refrigerator
(down) to un-lock keypad (if
locked)
Tap MENU
Tap (down)
Tap SELECT
Tap (down) repeatedly
until...
Tap SELECT
Tap (down)
Tap SELECT
Tap (down)
Tap SELECT
Tap MENU repeatedly until it is
no longer lit.
To reactivate the display time when it is
off:
Tap MENU and refrigerator
(down) to un-lock keypad (if
locked)
Tap MENU
Tap (down)
Tap SELECT
Tap (down) repeatedly
until...
Tap SELECT
Tap (down)
Tap SELECT
Tap (down)
Tap SELECT
Tap MENU repeatedly until it is
no longer lit.
Key-pad Unlocked
appears on display
Functions appears on
display
Settings appears on
display
FreshZone Options
appears on display
Time appears on display
Set Time appears on
display
Show Time appears on
display
Time: 01:23 On appears
on display
Time: 01:23 Off appears
on display
Show Date appears on
display
Main display appears
Key-pad Unlocked
appears on display
Functions appears on
display
Settings appears on
display
FreshZone Options
appears on display
Time appears on display
Set Time appears on
display
Show Time appears on
display
Time: 01:23 Off appears
on display
Time: 01:23 On appears
on display
Show Time appears on
display
Main display appears
12/24HR Time Setting
The appliance is set to 12-hour (non-military) time at the factory.
24 hour time is also known as military time. 1:36 PM = 13:36
military time.
To change the 12/24HR time format:
Tap MENU and refrigerator
(down) to un-lock keypad (if
locked)
Tap MENU
Tap (down)
Tap SELECT
Tap (down) repeatedly
until...
Tap SELECT
Tap (down) repeatedly
until...
Tap SELECT
Tap (down) until
Tap SELECT
Tap MENU repeatedly until it is
no longer lit.
Key-pad Unlocked
appears on display
Functions appears on
display
Settings appears on
display
FreshZone Options
appears on display
Time appears on display
Set Time appears on
display
Set View appears on
display
Set 12 or Set 24 appears
on display
Desired setting appears on
display
Set View appears on
display
Main display appears
Setting the Language on the Display
To change the language:
Tap MENU and refrigerator
(down) to un-lock keypad (if
locked)
Tap MENU
Tap (down)
Tap SELECT
Tap (down) repeatedly
until...
Tap SELECT
Tap (down) repeatedly
until...
Tap SELECT
Tap MENU repeatedly until it is
no longer lit.
Key-pad Unlocked
appears on display
Functions appears on
display
Settings appears on
display
FreshZone Options
appears on display
Language appears on
display
Current language appears on
display
Desired language scale
appears on display
Language appears on
display
Main display appears
17
Page 20

Operation
Setting the Temperature Scale
You can select the temperature scale (Fahrenheit or Celsius) the
appliance uses to display the cooling temperatures. It is preset at
the factory to Fahrenheit.
To change the temperature scale:
Tap MENU and refrigerator
(down) to un-lock keypad (if
locked)
Tap MENU
Tap (down)
Tap SELECT
Tap (down) repeatedly
until...
Tap SELECT
Tap (down) repeatedly
until...
Tap SELECT
Key-pad Unlocked
appears on display
Functions appears on
display
Settings appears on
display
FreshZone Options
appears on display
Select °F/°C appears on
display
Current temperature scale
appears on display
Desired temperature scale
scale appears on display
Select °F/°C appears on
display
To re-enable the control panel keypad lock:
Tap MENU and refrigerator
(down) to un-lock keypad (if
locked)
Tap MENU
Tap (down)
Tap SELECT
Tap (down) repeatedly
until...
Tap SELECT
Tap (down)
Tap SELECT
Tap MENU repeatedly until it is
no longer lit.
Key-pad Unlocked
appears on display
Functions appears on
display
Settings appears on
display
FreshZone Options
appears on display
Keypad Lock appears on
display
Keypad Lock Off appears
on display
Keypad Lock On appears
on display
Keypad Lock appears on
display
Main display appears
Tap MENU repeatedly until it is
no longer lit.
Main display appears
Keypad Lock - Control Panel
To disable the control panel keypad lock:
Tap MENU and refrigerator
(down) to un-lock keypad (if
locked)
Tap MENU
Tap (down)
Tap SELECT
Tap (down) repeatedly
until...
Tap SELECT
Tap (down)
Tap SELECT
Key-pad Unlocked
appears on display
Functions appears on
display
Settings appears on
display
FreshZone Options
appears on display
Keypad Lock appears on
display
Keypad Lock On appears
on display
Keypad Lock Off appears
on display
Keypad Lock appears on
display
Tap MENU repeatedly until it is
no longer lit.
Main display appears
18
Page 21

Control Panel Menu Map
Functions Menu
Operation
Max Cool Fridge
Holiday Fridge
Max Cool FreshZone
Holiday FreshZone
Max Cool ON/OFF
Max Cool Off
Max Cool On
Max Cool Time Set Hours: 1
Holiday ON/OFF
Holiday Fridge Off
Holiday Fridge On
Holiday Time Set Days: 1
Max Cool ON/OFF
Max Cool FreshZone Off
Max Cool FreshZone On
Max Cool Time Set Hours: 1
Holiday ON/OFF
Holiday FreshZone Off
Holiday FreshZone On
Holiday Time Set Days: 1
FUNCTIONS
Beverage Cooler
Ice Maker
Set Sabbath Mode
Water Filter
Set Cooling Time Set Time: 20 min
Cooler ON/OFF
Set Cube Size
Fast Ice ON/OFF
Beverage Cooler Off
Beverage Cooler On
Size: LARGE
Size: MEDIUM
Fast Ice Off
Fast Ice On
Sabbath Mode Off
Sabbath Mode On
View Status
Status Filter
Reset Filter
Bypass Filter
Bypass Off
Bypass On
Manual Clean
19
Page 22

Operation
Control Panel Menu Map (cont.)
Settings Menu
FreshZone Options
Default Setting
Date
Freezer
Fresh
Fridge
Set Date DATE: 01-30-09
Show Date
DATE: 01-30-09 On
DATE: 01-30-09 Off
Set Time TIME: 01:01
SETTINGS
Time
Language
Select °F/°C
Keypad Lock
Show Time
Set View
English
Español
Français
Deutsch
Italiano
Set °F
Set °C
Keypad Lock On
Keypad Lock Off
TIME: 01:01 On
TIME: 01:01 Off
Set: 12
Set: 24
20
Page 23

Care and Cleaning
General Cleaning
WARNING
• Before performing any sort of cleaning, disconnect the
appliance from the electrical outlet.
• Clean this appliance only in the manner instructed.
• The edges of the condenser are sharp. Use adequate
protection for hands and arms when cleaning it.
• Use only nonflammable, non-corrosive cleaners. Failure to
do so can result in explosion, fire or death.
• Never use abrasive or metallic products which could scratch
and damage the finishes permanently.
• Make sure you do not damage the refrigeration system in
any way.
• Always wipe metallic finishes in the direction of the grain.
• Do not use the sponge on aluminium parts, such as the
edges of the glass shelves.
• Do not use water on the electrical parts, lights and control
panel.
• Do not bring cold glass parts into contact with boiling water.
• To prevent damage, do not wash any parts of the appliance
in a dishwasher.
• Do not use mechanical devices or other methods to speed
up defrosting.
Both the refrigerator and FreshZone freezer sections defrost
automatically. Clean both sections once a month to avoid odor
build-up. Wipe spills up immediately.
Cleaning the Exterior
1. To clean the parts made of steel use the micro-ber cloth and
the sponge provided with the appliance.
2. Every now and then, polish the steel, wipe with a slightly
damp micro-ber cloth.
3. Take special care to keep the ventilation openings in the
appliance or inside the cabinet free of obstructions.
Grill Removal - Bottom Grill Models
• The ventilation grill on bottom grill models is held in place
with magnets and is easy to remove. On some models, you
may need to pull out the freezer drawer for easier access. To
remove, grasp the grill and pull straight out.
Cleaning the Ventilation Grill
• To clean the grill, use a vacuum cleaner with a soft brush
attachment at maximum power, sweeping it along the vent
slits. While the grill is removed, check the condition of the
(nned) condenser and remove any dust, as instructed
below.
Cleaning the Condenser
1. After the appliance is switched off and the ventilation grill
removed, wait approximately 30 minutes for the (nned)
condenser to cool down to room temperature.
2. Remove any dust build-up as shown in the picture. Use a
vacuum cleaner with a soft brush attachment at maximum
power, sweeping it back and forth in the direction of the ns,
taking care not to bend any of them.
Ventilation Grill Cleaning/Removal
• Before cleaning and/or removing the ventilation grill, switch
off the appliance by tapping the ON/OFF key on the main
control panel for about 3 seconds. Removing the ventilation
grill allows you to clean the back side.
Grill Removal - Top Grill Models
• The ventilation grill on top grill models is hinged for easy
access, but cannot be completely removed. To access the
back of the grill (and the condenser), grasp the bottom on
both sides and pull out and up.
3. Start up the appliance again by tapping the ON/OFF key on
the control panel for approximately 3 seconds.
Cleaning the Interior
1. Clean the internal parts by washing them with a solution
of lukewarm water and a small amount of dishwashing
detergent. See the following sections for instructions on how
to disassemble removable parts.
2. Rinse and dry right away.
3. The ice cube container should be cleaned occasionally with
warm water. Make sure that you switch off the ice maker
before cleaning it. Rinse out and wipe dry.
21
Page 24

Care and Cleaning
Shelf Removal
The shelves in the refrigerator compartment can be easily
removed for cleaning as follows:
• To remove the two upper refrigerator compartment shelves,
lift the front of each shelf up 1 , then push the rear of the
shelf up in back 2 until it clears the shelf holders at the top.
1
2
Upper Shelf Removal - Refrigerator Compartment
• To remove the lower refrigerator compartment shelf (just
above the crisper drawer), lift it up, turn it at an angle 1 as
shown, then pull it straight out 2 .
• When replacing each drawer, make sure the back edge
of the drawer slides under the clips toward the rear of the
slides.
FreshZone Freezer Drawer Removal
• The freezer drawer is attached to the drawer slides with two
thumbscrews. Unscrew the thumbscrews and lift up on the
front of the drawer to remove.
2
1
Lower Shelf Removal - Refrigerator Compartment
Crisper Drawer Removal
• The crisper drawers are attached to the drawer slides with
two thumbscrews. To remove: unscrew the thumbscrews and
lift up on the front of the drawer.
• When replacing the freezer drawer, make sure the back edge
of the drawer slides under the clips toward the rear of the
slides.
Ice Container Removal
• The ice container is designed to sit below the ice maker, in
the freezer compartment, on the left side. Lift it up and out to
remove.
• After removal, reposition it correctly, on the left side of the
compartment.
22
Page 25

Care and Cleaning
FRIDGE
ON/OFF
Water Filter Replacement
• The water lter makes high-quality water for ice cubes.
• The lter has a capacity of up to 1060 gallons (4000 liters) of
water for a maximum time of twelve months. The Replace
lter message appears on the display when 30% of
lter capacity is left. You can also use the water lter status
feature (see page 13) to monitor lter usage
• Replace with Dacor lter # ABFF2 or 3M lter # AP2-C401-
SG, available at www.everythingdacor.com or through your
Dacor dealer.
• The lter is located inside the refrigerator compartment,
above the top glass panel.
To replace the water lter:
1. Switch off the ice maker by taping the ICE key.
2. Perform a manual clean function (see page 14). At the
end of the cleaning cycle, remove the water from the ice
container and wipe it dry, then replace it.
3. Open the glass panel inside the top of the refrigerator
compartment by pushing up and back on both sides of the
plastic frame surrounding it, then lowering it down.
4. Carefully rotate the old lter cartridge counter-clockwise 1/4
ON/OFF
FRIDGE
UPPER
MENU
LOWER
ALARM
SELECT
ICE
Lighting System
Your refrigerator is equipped with a long life LED lighting system.
If the lights do not work, rst check the “Lights do not work”
portion of the Before You Call for Service section of this
manual (page 25). If none of the suggestions listed remedy
the problem, call a qualied service technician. Do not attempt to
repair the lighting system yourself. It contains no user serviceable
parts.
Glass panel
2
1 1
Filter head location
on models with door
hinge on right
Filter head location
on models with door
hinge on left
turn, until it detaches from the lter head. It is normal for a
small quantity of water to come out.
Insert lter into
lter head
Glass panel
5. Remove the packaging on the new water lter cartridge and
insert it into the lter head, located either to the right or left of
the lighting system. Gently rotate the lter clockwise 1/4 turn,
until it locks into place.
6. Reset the water lter status monitor by touching and holding
both the SELECT and ICE keys until Filter Reset OK
appears on the display.
7. Reinstall the glass panel by pushing it up into place, then
pulling the plastic frame at the sides, toward you.
23
Page 26

Before You Call for Service
Common Display Messages
Below is a list of the possible messages that may appear on the display in some cases and the suggested action.
Message May Be Caused By What to Do
Check condenser Control panel displays this message
every six months to remind the user
to clean the condenser.
Check the Filter Water lter is not installed. Install water lter. See Using the Ice Maker for the First Time
Door Fridge OPEN Refrigerator door open for a long
period of time.
Error Code or malfunction
message
Fridge too cold Refrigerator compartment too cold. Wait for 12 hours: if malfunction persists call Dacor Customer
Fridge too warm Refrigerator compartment too warm. See Problem Solution Guide.
Initial Test Appliance has just been turned on. Normal operation. Message should clear by itself after a minute
Power Failure!! Prolonged interruption of electrical
Replace lter Message appears when only 30% of
Standby Appliance is turned off. To turn on, see instructions on page 5.
Start Up Phase Appliance has just been turned on. Normal operation. Message comes on after initial test. Message
FreshZone OPEN FreshZone freezer drawer open for a
FreshZone too cold FreshZone freezer compartment too
FreshZone too warm FreshZone freezer compartment too
Unlock Key-pad Control panel locked To access control panel, unlock keypad. See page 5.
Functional problems Call Dacor Customer Service to help you solve the problem or
power
lter capacity is left
long period of time.
cold.
warm.
Clean the grill and condenser as instructed on page xx. Clear the
message the SELECT key for ve seconds. Reset condenser
on will appear on display.
on page 6. If for some reason, you want to operate the ice
maker without the lter installed, for example, you have a whole
house water lter system, set the water lter to bypass. See
page 6.
Close door to prevent refrigerator compartment from becoming
too warm.
put you in contact with the nearest service agent. Some error
messages can be cleared by touching the ALARM key for three
seconds.
Service for advice.
or two, as appliance starts up.
Appliance will automatically resume operation. Display will show
warmest temperatures that have occurred inside unit. Minimize
door openings to allow unit to cool down faster.
Replace lter soon. See page 23.
should clear by itself after a few minutes, as appliance starts up.
Close drawer to prevent compartment from becoming too warm.
Wait for 12 hours: if malfunction persists call Dacor Customer
Service for advice.
See Problem Solution Guide.
24
Page 27

Before You Call for Service
Problem Solution Guide
Before you call for service, please review the Problem Solution Guide below and on the following pages.
Problem May Be Caused By What to Do
Nothing working - lights
do not come on, cooling
system not working.
Nothing working - lights
not working, refrigerator
and FreshZone freezer
compartments not
cooling, control panel
display is working
Refrigerator and freezer
compartments not cooling
- lights work
FreshZone/Freezer
compartment too warm,
refrigerator compartment
OK
No temperature displayed
for refrigerator.
Lights not working. Appliance in Sabbath mode. Check to see if appliance was accidently placed into Sabbath
continued...
Power is disconnected Make sure power is on at the circuit breaker panel and that the
power plug is properly connected to electrical outlet.
Blown fuse or tripped circuit breaker Replace fuse or reset circuit breaker.
Power failure Contact electric company.
Main power is off (Stand by
ashes periodically on display).
Control panel malfunction Look for error on control panel display. If one exists, call for
Temperature not adjusted correctly. Adjust temperature (see page 5). Allow at least 6 hours to
Door/drawer left open or opened
often, allowing cool air to escape.
Large amount of food recently
added.
FreshZone freezer compartment set
to different temperature range than
that desired.
Temperature not adjusted correctly. Adjust temperature (see page 5). Allow 12 hours to reach the
Drawer left open for a long time or
opened often, allowing cool air to
escape.
Large amount of food recently
added.
Refrigerator compartment turned off. Check to see if FRIDGE key is lit. If not, refrigerator
Appliance in stand by mode. Check to see if Stand by is ashing on display. If so, see
Appliance in initial test mode. Right after the appliance is switched on, the lights take several
Refrigerator compartment off. Check to see if FRIDGE key is lit. If not, refrigerator compartment
Open door and turn on main power using the ON/OFF key. See
page 5.
service.
reach the selected temperature
Keep door/drawer closed and allow several hours for
temperature to return to normal.
Keep door/drawer closed and allow several hours for
temperature to return to normal.
The FreshZone freezer compartment can be set to act as a
freezer compartment, refrigerator compartment or in between
(Fresh). See pages 5 and 15 for more information.
selected temperature.
Keep drawer closed and allow several hours for temperature to
return to normal.
Keep drawer closed and allow several hours for temperature to
return to normal.
compartment is off. See Switching Refrigerator Off Only on
page 5
mode. See page 18.
Switching On and Off on page 5.
seconds to come on while initial test is in process.
is off. See Switching Refrigerator Off Only on page 5
25
Page 28

Before You Call for Service
Problem Solution Guide (cont.)
Problem May Be Caused By What to Do
System seems to run all
the time
Control panel beeps Door left open too long, causes
Condensation inside and
outside of appliance.
Ice or frost build up
inside the refrigerator
or FreshZone (freezer)
compartment.
Door difcult to open. Door blocked open by food Move food away from door.
Door will not close
completely
Unusual noise Grumbling: May be caused by
The appliance is powered by two
independent compressors. One or
both may be running at any given
time.
Warm weather (warm room
temperature)
Appliance in Max Cool mode for
either the refrigerator or FreshZone
freezer compartment.
Door/drawer ajar or left open for a
long time or opened often, allowing
cool air to escape.
Large amount of food recently
added.
alarm to sound
After a prolonged interruption of
electrical power, alarm indicates
temperature has risen above normal
levels.
Humid climate. Formation of condensation normal in humid climates.
Door/drawer open or ajar for a long
time.
Door/drawer open or ajar for a long
time.
Door gaskets sticky or dirty. Clean door gaskets and contact surfaces with mild soap and
Drawer or shelf in the way. Check to make sure drawers are closed and bins are in proper
refrigerating unit when running or fan
in recirculating air system.
Bubbling, humming or gurgling
noises: Refrigerant owing through
the tubes.
Clicking: Motor switching on or
off. Solenoid valve on the water
connection is opening/closing.
Rumbling: Ice cubes falling into ice
cube container.
Normal operation.
It is normal for the system to run longer in warmer room
temperatures.
System runs longer due to additional cooling requirements of
Max Cool feature.
Keep door/drawer closed to reduce amount of time cooling
system runs.
Allow several hours for system to return to normal operation.
Close door. Alarm may be silenced by tapping ALARM key.
ALARM key will continue to ash.
Close door and wait for unit to cool down. Alarm may be silenced
by tapping ALARM key. ALARM key will continue to ash.
Door/drawer being ajar for a long time can cause condensation
to form. Keep door/drawer closed.
Door/drawer being ajar for a long time can cause ice to form
inside. Keep door/drawer closed.
warm water. Rinse and dry with soft cloth.
place.
Normal operation.
Normal operation.
Normal operation.
Normal operation.
26
Page 29

Before You Call for Service
Problem May Be Caused By What to Do
Ice maker does not work or not
producing enough ice.
Bad odor inside appliance. Inside of compartment is dirty.. Clean inside of appliance according to the Care and
Ice cubes have unusual odor or
avor
Ice cubes stick together Ice cubes that have been in ice cube
Ice cubes too small Ice maker set to medium size cubes Change ice maker setting to large size cubes. See page
Ice maker is off/disabled. Ice maker can be turned off one of two ways, using the ice
maker key and from the functions menu. First try activating
the ice maker using the ICE key (see Ice Maker section
on page 6). If ICE key does not light, try to enable ICE
key from the functions menu as instructed on page 11.
Water supply turned off or kink in
water line.
FreshZone freezer compartment set
to refrigerator or “fresh”
Ice maker has been turned off
previously or new installation
Freezer drawer ajar. Make sure freezer drawer is closed completely.
Large amount of ice removed
recently.
Water lter clogged or improperly
installed.
Food not properly covered. Make sure that all food is properly covered.
Old food inside appliance. Discard food that is old/out of date.
Impurities in water line If using ice maker for rst time, make sure you discard the
Ice cubes that have been in ice cube
container for a long time may absorb
odors
Ice cubes absorbing smell from food
stored in freezer compartment.
Water lter out of date. Replace water lter.
Water supply. Contact a plumber or a water treatment expert to make
container for a long time may stick
together
Make sure water supply is on and owing properly.
Ice maker will not work properly unless FreshZone
(freezer) compartment is set to freezer mode. See
FreshZone Setting on page 15.
12 to 24 hours are required after activation before ice
production can begin. The ice maker produces 10 cubes
per cycle, at approximately 10 cycles in 24 hours.
Allow time for production of additional ice.
Set lter to bypass (see page 13) and see if ice
production increases. If it does, lter may not be installed
properly or clogged (replace it).
Cleaning section.
rst bin of ice to make sure that any impurities have been
ushed from the water line. Follow this procedure also if
refrigerator has not been used for several days.
Empty ice cube container and clean. Allow it to rell.
Check the contents of the freezer for spoiled or out-ofdate food. Odorous foods should be wrapped thoroughly
or stored in airtight containers to prevent the build-up of
odors.
sure problem is not due to water supply.
Empty ice cube tray and allow it to rell.
12.
27
Page 30

Warranty and Service
Getting Help
Before you request service:
• Review the Before You Call for Service section.
• Use the helpful tips found in the Problem Solution Guide.
• Become familiar with the Warranty terms and conditions of
your product, below.
• If none of these tips or suggestions resolves your problem,
call our Customer Service center at one of the numbers
shown.
Dacor’s Customer Service center is available
6:00 a.m. - 5:00 p.m. Pacic Time.
For warranty repairs or questions and for Dacor Distinctive
Service (DDS) in the US and Canada:
Phone: (800) 793-0093, extension 2822
For non-warranty repairs or questions in the US and Canada:
Phone: (800) 793-0093, extension 2813
Contact us through our web site at:
www.dacor.com/contact-us
What Is Covered
CERTIFICATE OF WARRANTIES
DACOR REFRIGERATORS
WITHIN THE FIFTY STATES OF THE U.S.A., THE DISTRICT OF
COLUMBIA, AND CANADA:
FULL ONE YEAR WARRANTY
The warranty applies only to the Dacor appliance sold to the rst
use purchaser, starting from the date of original retail purchase
or closing date for new construction, whichever period is longer.
Warranty is valid on products purchased brand new from a Dacor
Authorized Dealer or other seller authorized by Dacor.
If your Dacor product fails to function within one year of
the original date of purchase due to a defect in material or
workmanship, Dacor will remedy it without charge to you.
Except as noted above, consumable parts such as lters are not
covered and are the responsibility of the purchaser.
LIMITATIONS OF COVERAGE
Service will be provided by a Dacor designated service company
during regular business hours. Please note service providers are
independent entities and are not agents of Dacor.
Dealer display and model home display products with a
production date greater than 5 years, products sold “As Is,” and
products installed for non-residential use, which include but
are not limited to religious organizations, re stations, bed and
breakfast, and spas carry a one year parts warranty only. All
delivery, installation, labor costs and other service fees are the
responsibility of the purchaser.
The owner must provide proof of purchase or closing statement
for new construction upon request. All Dacor products must be
accessible for service. All cosmetic damage (such as scratches
on stainless steel, paint/porcelain blemishes, etc.) to the product
or included accessories must be reported to Dacor within 60 days
of the original purchase date to qualify for warranty coverage.
Warranty will be null and void on product that has altered,
defaced, or missing serial numbers and tags.
OUTSIDE THE FIFTY STATES OF THE U.S.A., THE DISTRICT
OF COLUMBIA, AND CANADA:
LIMITED FIRST YEAR WARRANTY
If your Dacor product fails to function within one year of
the original date of purchase due to a defect in material or
workmanship, Dacor will furnish a new part, F.O.B. factory to
replace the defective part.
All delivery, installation, labor costs and other service fees are the
responsibility of the purchaser.
What Is Not Covered
• Slight color variations may be noticed because of differences
in painted parts, kitchen lighting, product placement and
other factors; this warranty does not apply to color variation.
• Service calls to educate the customer on proper use and care
of the product.
• Service fees for travel to islands and remote areas, which
include but are not limited to, ferries, toll roads or other travel
expenses.
• Consequential or incidental damage, including but not limited
to food or medicine loss, time away from work or restaurant
meals.
• Failure of the product when used for commercial, business,
rental or any application other than for residential consumer
use.
• Failure of the product caused by improper product
installation.
• Replacement of house fuses, fuse boxes or resetting of
circuit breakers.
• Damage to the product caused by accident, re, ood, power
interruption, power surges or other acts of God.
• Liability or responsibility for damage to surrounding property
including cabinetry, oors, ceilings and other structures or
objects around the product.
• Breakage, discoloration or damage to glass, metal surfaces,
plastic components, trim, paint or other cosmetic nish
caused by improper usage, care, abuse or neglect.
Out of Warranty
Should you experience a service issue beyond the standard
warranty period, please contact us. Dacor reviews each issue and
customer concern to provide the best possible solution based on
the circumstances.
THE REMEDIES PROVIDED FOR IN THE ABOVE EXPRESS
WARRANTIES ARE THE SOLE AND EXCLUSIVE REMEDIES.
THEREFORE, NO OTHER EXPRESS WARRANTIES ARE MADE,
AND OUTSIDE THE FIFTY STATES OF THE UNITED STATES, THE
DISTRICT OF COLUMBIA AND CANADA, ALL IMPLIED WARRANTIES,
INCLUDING BUT NOT LIMITED TO, ANY IMPLIED WARRANTY OF
MERCHANTABILITY OR FITNESS FOR A PARTICULAR USE OR
PURPOSE, ARE LIMITED IN DURATION TO ONE YEAR FROM THE
DATE OF ORIGINAL PURCHASE. IN NO EVENT SHALL DACOR
BE LIABLE FOR INCIDENTAL EXPENSE OR CONSEQUENTIAL
DAMAGES. NO WARRANTIES, EXPRESS OR IMPLIED, ARE MADE TO
ANY BUYER FOR RESALE.
Some states do not allow limitations on how long an implied
warranty lasts, or do not allow the exclusion or limitation of
inconsequential damages, so the above limitations or exclusions
may not apply to you. This warranty gives you specic legal rights,
and you may also have other rights that vary from state to state.
28
Page 31

fold here
DACOR
ATTN WARRANTY PROCESSING DEPT
PO BOX 90070
CITY OF INDUSTRY CA 91715-9907
NO POSTAGE
NECESSARY
IF MAILED
IN THE
UNITED STATES
BUSINESS REPLY MAIL
FIRST-CLASS MAIL CITY OF INDUSTRY CAPERMIT NO 1600
POSTAGE WILL BE PAID BY ADDRESSEE
Page 32

First Middle
Please visit www.dacor.com to activate your warranty online.
WARRANTY INFORMATION
IMPORTANT:
Your warranty will not be activated until you activate it online or return this form to Dacor. If you have purchased more
than one Dacor product, please return all forms in one envelope or activate the warranty for each product online.
Please rest assured that under no conditions will Dacor sell your name or any of the information on this form for mailing list purposes. We
are very grateful that you have chosen Dacor products for your home and do not consider the sale of such information to be a proper way
of expressing our gratitude!
Owner’s Name:
(Please Print or Type)
Last
Street:
City: State: Zip:
Purchase Date: Email: Telephone:
Dealer:
City: State: Zip:
Your willingness to take a few seconds to fill in the section below will be sincerely appreciated. Thank you.
1. How were you first exposed to Dacor products? (Please check one only.)
A. T.V. Cooking Show F Builder
B. Magazine G. Architect/Designer
C. Appliance Dealer Showroom H. Another Dacor Owner
D. Kitchen Dealer Showroom I. Model Home
E. Home Show J. Other
2. Where did you buy your Dacor appliances?
A. Appliance Dealer D. Builder
B. Kitchen Dealer E. Other
C. Builder Supplier
3. For what purpose was the product purchased?
A. Replacement only C. New Home
B. Part of a Remodel D. Other
cut here cut here
4. What is your household income?
A. Under $75,000 D. $150,000 – $200,000
B. $75,000 – $100,000 E. $200,000 – $250,000
C. $100,000 – $150,000 F. Over $250,000
5. What other brands of appliances do you have in your kitchen?
A. Cooktop C. Dishwasher
B. Oven D. Refrigerator
6. Would you buy or recommend another Dacor product?
Yes No
Comments:
Thank you very much for your assistance. The information you have
provided will be extremely valuable in helping us plan for the future
and giving you the support you deserve.
Web site: www.dacor.com
Corporate phone: (800) 793-0093
 Loading...