

Dacor DR30D, DRT304S, EG366, EG486 ER30D, ER30DSR, ER30G, ER30GI, ER36D, AGDRT14 Instructions Manual
Page 1

Cooktop and Range Models: DR30D, DRT304S, EG366, EG486
ER30D, ER30DSR, ER30G, ER30GI, ER36D and ER48D
Grill Models: AEGR30, AEGR3648,
INSTRUCTIONS
AGDRT14 and AGRG14
WARNING: Do not touch the grill when hot.
WARNING: Do not use water on grease res. A violent steam explosion may result. Smother any
ames with a lid, cookie sheet or at tray. Use baking soda or a foam extinguisher to extinguish aming grease. Be careful to avoid getting burned.
WARNING: Non-stick coatings, when heated, can be harmful to birds. Remove birds to a separate,
well-ventilated room during cooking.
CAUTION: Place the grill only in the position shown in these instructions. Do not turn the burners
under the grill higher than the MAX GRIDDLE setting. Setting the burner ames too high or putting
the grill in the wrong position may damage it permanently. Some appliances do not come with knobs
marked with the MAX GRIDDLE setting. The grill kit for these appliances comes with MAX GRIDDLE
knobs that must be installed prior to use.
Knob Installation
(Cooktop/Range Models DR30D, DRT304S, ER30G and ER30GI Only)
Grills for the above listed cooktops/ranges come with knobs with the words MAX GRIDDLE on them. Install them
before using the grill to prevent damage. All other models come with the MAX GRIDDLE knobs already installed.
CAUTION: Putting the knobs in the wrong position may result in damage to the grill.
STEP 1 Remove the existing two knobs on the right side of the control panel. Grasp each one and pull straight
back. Leave the other two knobs in place.
STEP 2 Put the new knobs from the kit, with the words MAX GRIDDLE on them, on the valve shafts in place
of the knobs removed in step 1. When installing the knobs, align the “D-shaped” opening on the back
of the knob with the end of the valve shaft. Carefully push in on each knob until it stops. The old knobs
may be discarded.
DRT304 Cooktop DR30D Range
ER30G[I] Range
Part No. 102331 Rev. F
Page 2
Grill Placement and Use
Instructions
STEP 1 Before using the grill for the rst time, wash it in hot soapy water. Rinse it and allow it to dry
thoroughly.
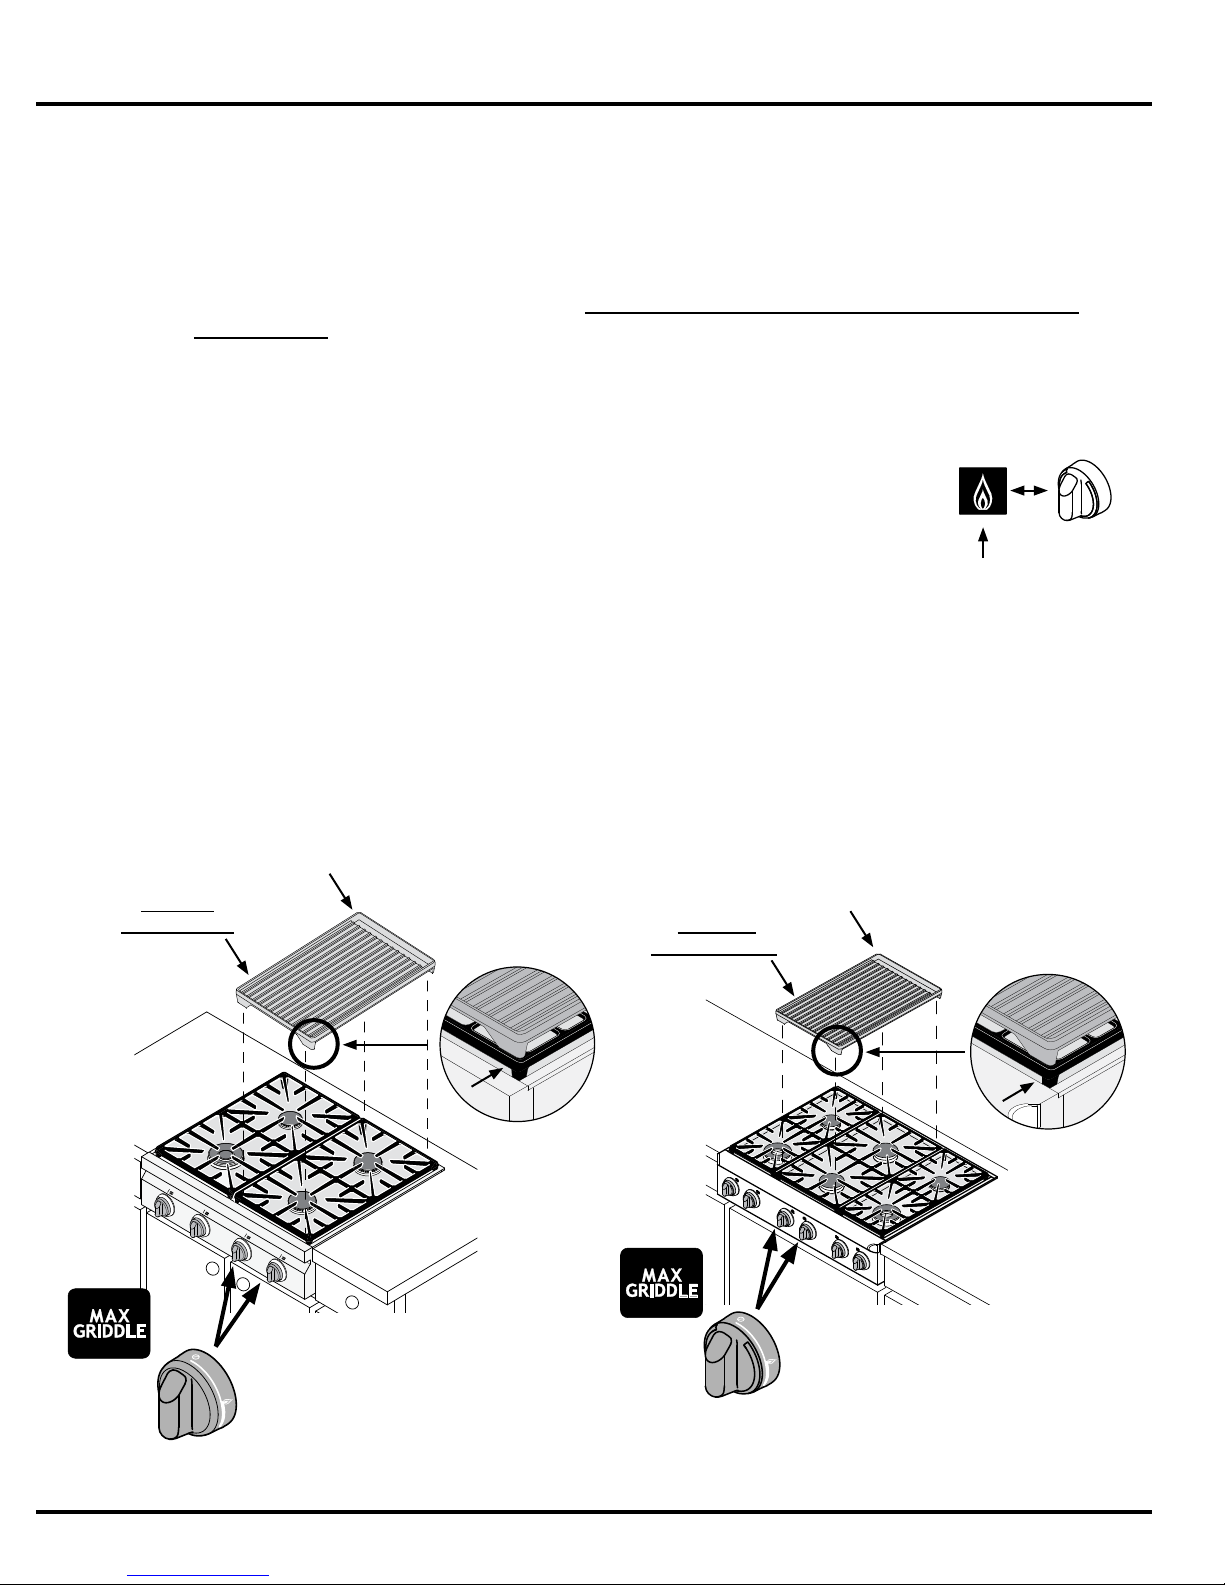
STEP 2 Make sure all burners are off and the cooktop or range is cool to the touch. Put the grill over the
top of the grates on the cooktop or range. The correct position varies with the cooktop or range
model number. To prevent damage to the grill, see the diagrams below and on the facing page to
determine the correct position according to model number. When putting the grill in place make
sure the grease trap is toward the back. Fit the tabs that stick out of the bottom of the feet into the
inside corners of the grate. When correctly installed, the grill will rest securely about 1/2” above the
top surface of the grate. It may rock back and forth slightly, which is normal.
STEP 3 Set one of the burners under the grill to the light (high) position. Once lit, turn
the knob to the MAX GRIDDLE position, or lower if desired. DO NOT keep the
burner knobs higher than the MAX GRIDDLE setting after they are lit!
STEP 4 Repeat step 3 for the other burner under the grill.
Light position
STEP 5 During cooking be careful with metal utensils on the surface because they can
scratch the non-stick coating.
Cleaning the Grill
After each use, wash the grill thoroughly in hot soapy water to avoid stains from grease build-up. The grill is
coated with a non-stick coating for easy cleaning. Warm water and liquid detergent are all that are needed for
cleaning. Remove stubborn spots with a non-abrasive plastic mesh pad. To prevent scratching, do not use
abrasives or abrasive cleaners.
Grease trap
Put over
right burners
toward back
Line up bottom
of grill with top
of grate
Put over
center burners
Grease trap
toward back
Line up bottom
of grill with top
of grate
DRT304 Cooktop
(right burners)
EG366 and EG486 Cooktops
(center burners)
Page 2
Page 3

Grill Placement and Use
Put over
right burners
Grease trap
toward back
Line up bottom of grill
with top of grate
Model ER30D
shown
Put over
right burners
Grease trap
toward back
Line up bottom of grill
with top of grate
DR30D and ER30D[SR] Ranges
(right burners)
Grease trap
toward back
Put over
center burners
ER30G[I] Range
(right burners)
Line up bottom
of grill with top
of grate
Model ER36D shown. Size and
style varies with model.
ER36D and ER48D
(center burners)
Page 3
Page 4

Dacor ● 600 Anton Blvd. Suite 1000 Costa Mesa, CA 92626 ● Phone: (800) 793-0093 ● Fax: (626) 403-3130 ● www.Dacor.com
 Loading...