

Page 1

Automatic Coffee System
Use and Care Manual
clean
Models: CM24P-1, CM24T-1
Read this manual completely before operating your appliance. Keep it for future reference.
Part No. 101335 Rev. D
Page 2

To Our Valued Customer:
Congratulations on your purchase of the very latest in Dacor
®
products! Our unique combination of features, style
and performance make us The Life of the Kitchen
®
, and a great addition to your home.
In order to familiarize yourself with the controls, functions, and full potential of your new Distinctive Appliance, we
suggest that you thoroughly read this use & care manual, beginning with the
Important Safety Instructions
section.
All Dacor
®
appliances are designed and manufactured with quality and pride, while working within the framework of
our company value. Should you ever experience a problem with your product, please first check the
Before You Call
for Service
section of this manual for guidance. It provides useful suggestions and remedies prior to calling for
service.
Valuable customer input helps us to continuously improve our products and services, so please feel free to contact
our Customer Service Team for assistance with any of your product support needs.
Dacor
®
Customer Service
1440 Bridge Gate Drive
Diamond Bar, CA 91765
Telephone: (800) 793-0093
Fax:
(626) 403-3130
Hours of Operation: Monday through Friday
6:00 A.M. to 5:00 P.M. Pacific Time
Web Site:
www.Dacor.com
Thank you for choosing Dacor
®
for your home. We are a company built by families for families and we are dedicated
to serving yours. We are confident that your new Dacor
®
product will deliver a high level of performance and
enjoyment for many years to come.
Sincerely,
Cheryl Crowe
Director, Customer Satisfaction
Page 3

Table of Contents
Important Safety Instructions .................2
About Safety Instructions ...........................2
Safety Symbols .........................................2
General Safety Precautions .........................3
Getting To Know Your Coffee System ......6
Parts of Your Coffee System .......................6
Exterior ........................................................ 6
Interior .........................................................8
Accessories ................................................... 8
Setting Up Your Coffee System ..............10
Basic Operation .....................................12
Things to Know Before You Start ...............12
The Light ...............................................13
Turning On Your Coffee System .................13
Loading Your Coffee System .....................14
Making Coffee and Other Hot Drinks ..........15
Espresso ..................................................... 15
Regular Coffee ............................................. 16
Decaffeinated and Ground Coffee ................... 17
Hot Water for Tea and Other Drinks ............... 18
Cappuccino ................................................. 19
Cafe Latte ................................................... 20
Latte .......................................................... 21
Opening and Closing the Front Panel .........22
Opening the Front Panel ............................... 22
Closing the Front Panel ................................. 23
Adjusting the Milk Foam Level ...................24
Adjusting the Coffee Grinder .....................25
Deluxe Features ....................................26
Custom Programming ..............................26
Programmable Features ................................ 26
How to Program the Coffee System ................ 27
Original Factory Programmed Settings ............ 33
Cleaning and Maintenance .....................34
Cleaning and Maintenance Schedule ..........34
Approved Cleaners ..................................35
Milk Cleaning Instructions ........................35
What to Use ................................................ 35
How to Clean the Milk Delivery System ........... 35
Cleaning the Water Tank (CM24T-1 Only) ...36
What to Use ................................................ 36
To Clean the Water Tank ............................... 36
Routine Cleaning Instructions ...................37
What to Use ................................................ 37
Cleaning the Inside of the Coffee System ........ 37
Cleaning the Outside Surfaces ....................... 38
Decalcification Instructions .......................39
What to Use ................................................ 39
To Decalcify the Coffee System ...................... 39
Flushing Out the Coffee System ..................... 41
Before You Call for Service ....................42
Problem Solution Guide ............................42
Warranty Information ...........................45
Product Maintenance .................................... 45
Getting Help ................................................ 45
What is Covered .......................................... 46
What is Not Covered .................................... 46
Keep this manual and your sales receipt or
canceled check in a safe place for future reference.
Proof of original purchase date is required for
warranty service.
Have the complete model and serial number
information for your coffee system ready. The
numbers are found on the data plate located inside
the brewing unit door. See page 9 for location.
Record the numbers below for easy access.
Model Number
Serial Number
Date of Purchase
Use and Care Manual
If you have any questions about this
product, call:
Dacor ® Customer Service
1-800-793-0093 (U.S.A. and Canada)
Monday — Friday 6:00 a.m. to 5:00 p.m. Pacific Time
Web site: www.Dacor.com
In our continuing effort to improve the quality
and performance of our appliances, it may be
necessary to make changes to the coffee system
without revising this guide.
1
Page 4

Important Safety Instructions
IMPORTANT
INSTALLER: PLEASE LEAVE THIS MANUAL WITH THIS APPLIANCE.
CUSTOMER: READ THIS USE & CARE MANUAL COMPLETELY BEFORE USING YOUR
APPLIANCE AND KEEP IT FOR FUTURE REFERENCE. IT PROVIDES PROPER USE AND
MAINTENANCE INFORMATION.
About Safety Instructions
IMPORTANT: Warnings and Important Safety Instructions appearing in this guide
are not meant to cover all possible conditions and situations that may occur. Common
sense, caution, and care must be exercised when installing, maintaining, or operating an
appliance.
Always contact the manufacturer about problems or conditions you do not understand.
DANGER
WARNING
CAUTION
IMPORTANT
NOTE
Safety Symbols
Instructions that if not followed immediately, will
result in serious injury, or death. Severe property
damage may also occur.
Instructions that if not followed could result in
serious injury, or death. Property damage, may also
occur.
Instructions that if not followed could result in
property damage.
Important things to know about your coffee system
or instructions that must be followed for it to work
properly.
Helpful tips that will make your coffee system
easier to use.
2
Automatic Coffee System
Page 5

Important Safety Instructions
DANGER
IMPORTANT: Before performing any type of service or installation, make sure that electric power to
•
the coffee system is turned off or that power is disconnected.
IMPORTANT: To avoid the possibility of explosion or fire, do not store or use combustible, flammable,
•
or explosive liquids or vapors (such as gasoline) inside or in the vicinity of this or any other appliance.
IMPORTANT: This appliance is equipped with a
•
three-prong grounding plug for your protection
against possible electric shock hazards. It must
be plugged into a dedicated, grounded receptacle.
Where a standard two-prong wall receptacle is
encountered, it is the personal responsibility and
obligation of the customer to have it replaced with
a dedicated, properly grounded three-prong wall
receptacle. Do not under any circumstances, cut or
remove the third (ground) prong from the power
cord. Do not use an adapter plug. Do not use an
extension cord. Do not use a power cord that is
frayed or damaged. The use of a ground fault
interrupter (GFI) is not recommended.
Power cord with
three-prong plug
Grounded type
wall receptacle
General Safety Precautions
To reduce the risk of fire, electric shock, serious injury, or death when using
your appliance, follow basic safety precautions, including the following:
WARNING
If you receive a damaged product,
•
immediately contact your dealer or builder.
Do not install or use a damaged appliance.
Do not use the coffee system until it has
•
been properly installed by a qualified installer
according to the accompanying installation
instructions. Have the installer show you the
location of the power connector and the fuse
or junction box so that you know where and
how to turn off power to the coffee system.
Do not install, repair, or replace any part
•
of the coffee system unless specifically
recommended in the literature accompanying
it. A qualified service technician should
perform all other service.
Keep packaging materials away from children.
•
Plastic sheets and bags can cause suffocation.
Use the coffee system only for tasks expected
•
of a home appliance as outlined in this
manual. This appliance is not intended for
commercial use.
DO NOT PUSH ANY BUTTONS ON THE
•
FRONT PANEL UNTIL ALL BODY PARTS AND
CLOTHING ARE CLEAR OF THE BREWING
COMPARTMENT. KEEP ALL BODY PARTS AWAY
FROM THE BREWING COMPARTMENT DURING
OR IMMEDIATELY AFTER DRINK DISPENSING.
HOT LIQUIDS AND STEAM CAN CAUSE
SEVERE BURNS.
Make sure individuals who use the coffee
•
system are able to operate it properly.
Use and Care Manual
3
Page 6

Important Safety Instructions
General Safety Precautions (continued)
WARNING
•
Never allow anyone, including children to
•
sit, stand, or climb on any part of the coffee
system. Doing so may cause damage, serious
injury, or death.
Do not leave children alone or unattended in
•
the area around the coffee system. Do not
allow children to play with the controls, or
touch other parts of it.
Do not store items of interest to children on
•
top of or above the coffee system. Children
could be burned or injured while climbing on
the appliance.
Do not tamper with the controls.
•
Clean the coffee system thoroughly according
•
to the Flushing Out the Coffee System section
on page 41 before operating it for the first
time.
Clean and maintain the coffee system
•
according to the maintenance schedule on
the facing page. Clean it only in the manner
indicated in the Cleaning and Maintenance
section of this manual. Use only the cleaning
agents specified.
Do not use a steam or pressure cleaner to
•
clean the coffee system or any part of it.
Damage caused by cleaning the unit in this
manner could result in electric shock, fire, or
explosion.
Allow the coffee system to cool before
cleaning.
To prevent sickness due to food poisoning,
•
perform a milk cleaning no more than two
hours after making the last milk drink. See
page 35.
On model CM24T-1: Change the water in the
•
tank daily to prevent sickness due to bacteria
growth.
When cleaning the mechanical parts of the
•
coffee system, exercise care with hands and
arms around the metal edges.
Many metal surfaces behind the front panel
•
and inside the brewing compartment are hot
when power is on. Exercise care around metal
surfaces in these areas when the power switch
is in the on position.
During normal operation, the person using the
•
coffee system must pull it out from the cabinet
to fill the coffee bins, etc. To prevent personal
injury, when pushing the coffee system back
into the cabinet, make sure body parts and
clothing are clear of the portion of the coffee
system behind the front panel.
CAUTION
To prevent jamming of the grinding
•
mechanism, use only the types of coffee beans
specified in this manual.
Remove the drip tray before closing the front
•
panel door. Closing the front panel door
without the drip tray removed could damage
parts of the coffee system.
To prevent clogging of the internal parts, use
•
only filtered water as specified on the facing
page. Do not used distilled water.
4
Automatic Coffee System
Do not put any part of your coffee system
•
in a dishwasher. Many of the parts are not
dishwasher safe.
Keep the coffee system keys in a safe place.
•
Replacement keys are not covered by the
warranty.
Page 7

Important Safety Instructions
IMPORTANT
Before operating your coffee system for the rst time:
1. Make sure you are using the right type of water.
2. Flush the system to remove bacteria that may have accumulated
during storage and shipping (See page 41).
Clean your coffee system regularly according to the chart below:
Call your local water company. Ask them for the water hardness level of the water supplied to
the building where the coffee system will be installed.
If the water hardness level is above four grains per gallon (4 gpg):
»
»
For model CM24P-1, contact a water treatment specialist and have a water treatment
system installed to reduce the water hardness level to 4 gpg or less.
For model CM24T-1, pour only filtered water with a hardness level of 4 gpg or less
into the water tank. Do not use distilled water.
Coffee System Maintenance Schedule
Milk
Cleaning*
Within two hours
after last drink
containing milk
Daily
Every 50 cycles
(about once a week)
Monthly
Every 4000 Cycles
(Approx. 2 Years)
* A milk cleaning is required if the cappuccino, cafe latte, or latte features are used.
Water Tank
(CM24T-1 Only)
Routine
Cleaning
Decalcification
See the Cleaning and Maintenance section for complete instructions (page 34).
Service
Call
Use and Care Manual
5
Page 8

Getting To Know Your Coffee System
Parts of Your Coffee System
NOTE: See the Basic Operation section for complete instructions on using the various features below.
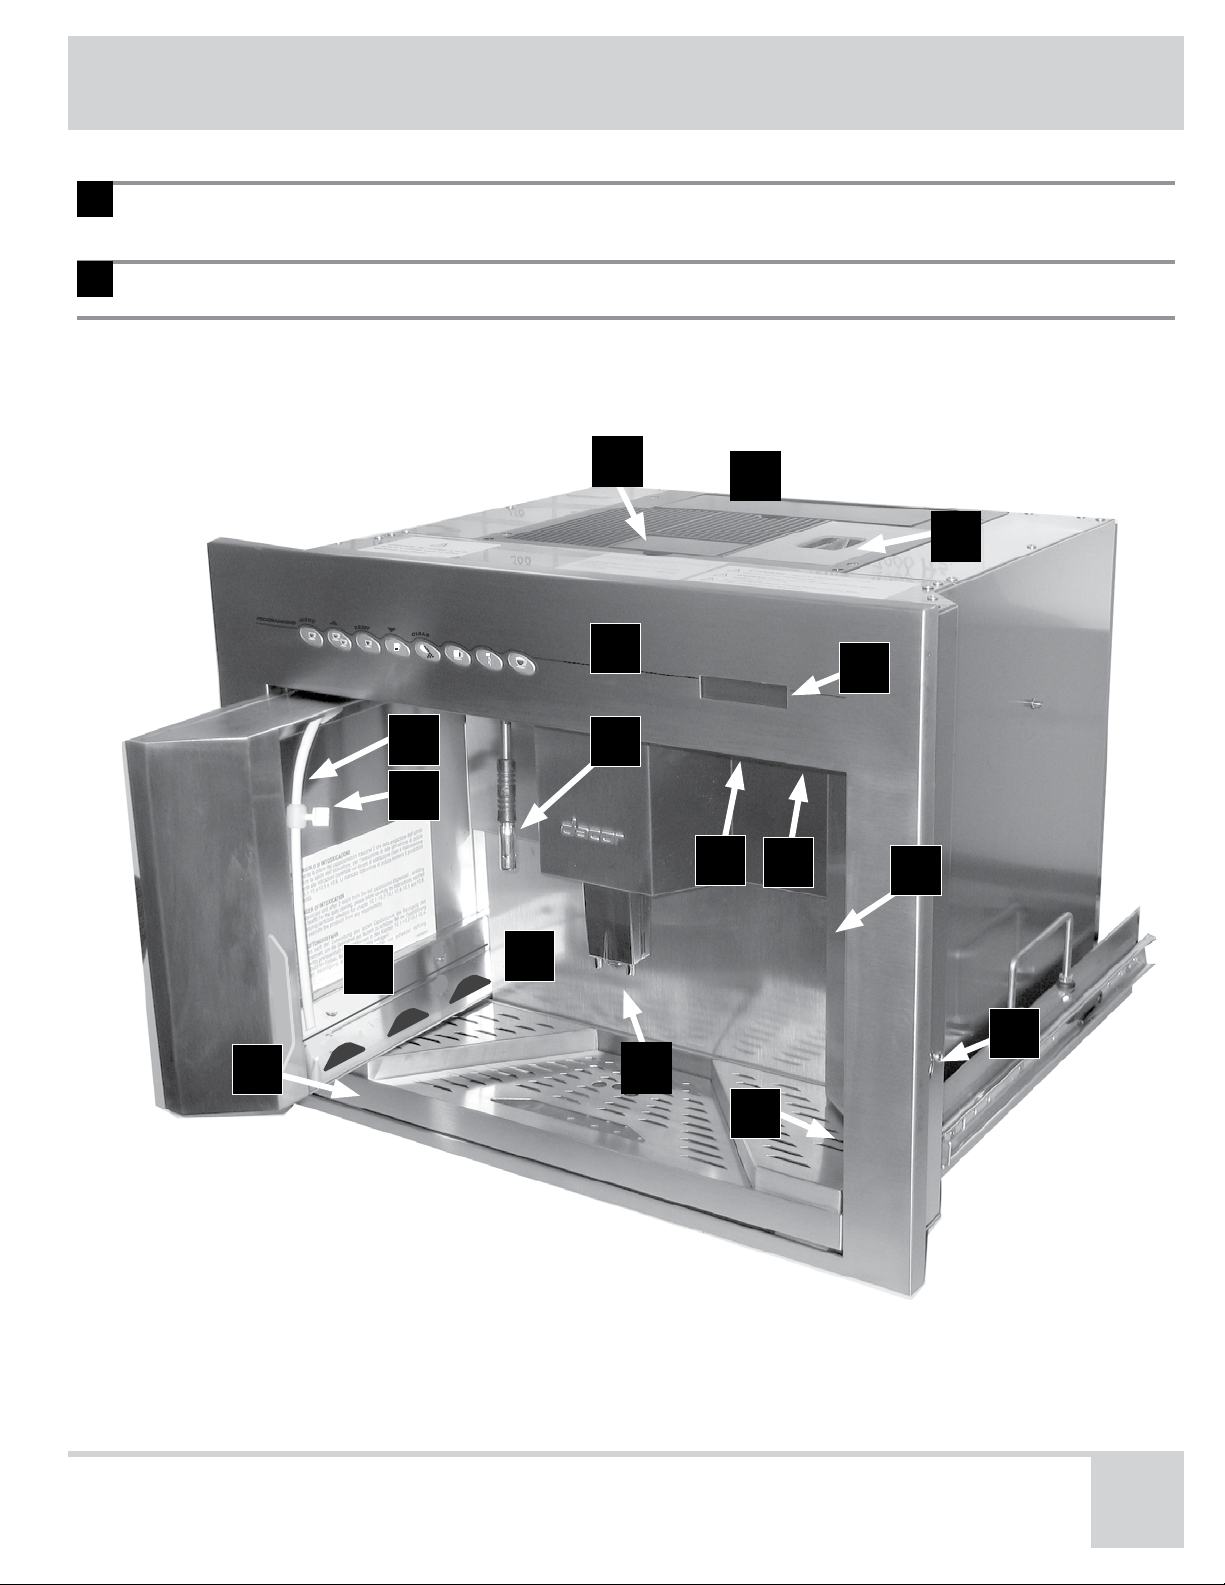
Exterior
Front Panel
1
Display
2
Brewing Compartment
3
Coffee and Milk Dispenser
4
Hot Water Dispenser
5
6
Power Switch
Light Switch
7
Milk Container Compartment
8
Milk Tube
9
10
Milk Pinch Screw
11
Drip Tray
Storage Compartment
12
Lock
13
Coffee Bean Container
14
Ground Coffee Chute
15
The front panel has buttons across it that are used to operate
your coffee system. The front panel also has a display which
provides useful information. The front panel opens up to allow
cleaning, maintenance, and programming.
The display tells you valuable information about your coffee
system when the power switch is turned on.
The brewing compartment is the area where drinks and water
are dispensed. It is equipped with a drip tray and slide out
compartments on both sides.
Coffee and milk drinks are dispensed from the coffee and milk
dispenser. You can adjust the nozzle on the dispenser up or
down.
The hot water dispensed from the hot water dispenser can be
used to make tea or other hot drinks.
Use the power switch to turn your coffee system on or off. It is
located on the ceiling of the brewing compartment, below the
display.
Use the light switch to turn the light in the brewing
compartment on or off. It is located on the ceiling of the
brewing compartment, below the display.
When you want to make a milk drink, open the milk container
compartment. It is located on the left side of the brewing
compartment.
The milk tube is located inside the milk container
compartment. Insert it into the milk container when you make
drinks with milk. The milk pinch screw is attached to it.
Use the milk pinch screw to control the temperature of the milk
that is dispensed.
The drip tray catches spills and water that the coffee system
purges during the process of making coffee.
The pullout storage compartment on the right side of the
brewing compartment can be used to store cups, saucers, and
the keys that come with your coffee system.
The front panel of the coffee system is equipped with a lock
to keep it from being easily opened. Remove the drip tray to
access it.
The coffee system grinds the roasted coffee beans put in the
coffee bean container.
When making a cup of coffee using pre-ground coffee, put the
coffee grounds in the ground coffee chute. The ground coffee
feature is good for making decaffeinated coffee or ground
flavored coffee.
6
Automatic Coffee System
Page 9
Getting To Know Your Coffee System
Water Tank
16
Door Release Button
17
Model CM24T-1 only. The water tank holds the filtered water used
to make coffee. Use only water with a hardness of four grains per
gallon (gpg) or less.
The door release button is used to open the front panel for
cleaning, maintenance, and programming.
15
16
14
1
2
9
5
11
10
6
8
3
7
12
17
4
13
Use and Care Manual
7
Page 10

Getting To Know Your Coffee System
Interior
Brewing Unit Door
A
Milk Foam Adjustment Knob
B
Piston Assembly
C
Coffee and Milk Dispenser
D
Coffee Grinder Adjustment Screw
E
Used Coffee Ground Bin
F
Accessories
Coffee Scoop
G
Coffee System Cleaning Brush
H
Coffee Grinder Adjustment Wrench
I
Piston Assembly O-ring (green)
J
Water Tank O-ring (orange)
K
Regulator Kit
L
Open the brewing unit door when cleaning the inside of
your coffee system. Also, open it when making certain
types of adjustments.
Use the milk foam adjustment knob to adjust the
consistency of the milk foam produced by the coffee
system.
The piston assembly is used by the coffee system to
help make coffee. It requires occasional cleaning.
The coffee dispenser is mounted to the back of the
brewing unit door. It requires occasional cleaning. See
the Cleaning and Maintenance section.
Use the grinder adjustment screw to make the coffee
system grind the coffee beans more fine or course.
The finer the coffee beans are ground, the stronger the
brewed coffee will be. The grinder is adjusted with the
adjustment wrench that comes with the unit.
The used coffee ground bin catches the used coffee
grounds after coffee has been made. It needs to be
emptied out occasionally.
Use the coffee scoop to poor pre-ground coffee into the
ground coffee chute.
Use the coffee system cleaning brush to clean the inside
of the brewing unit.
Use the coffee grinder adjustment wrench to turn the
coffee grinder adjustment screw.
A spare piston assembly O-ring is provided with the
coffee system should the grinder assembly ever require
service. Keep it in a safe place in case it is needed at a
later date.
Used on model CM24T-1 only. A spare water tank O-ring
is provided with model CM24T-1 should the O-ring on
the water tank wear out. Keep it in a safe place in case
it is needed at a later date.
Used with model CM24P-1 only. The installer uses this
kit to connect the coffee system to the household water
supply.
8
Automatic Coffee System
Page 11
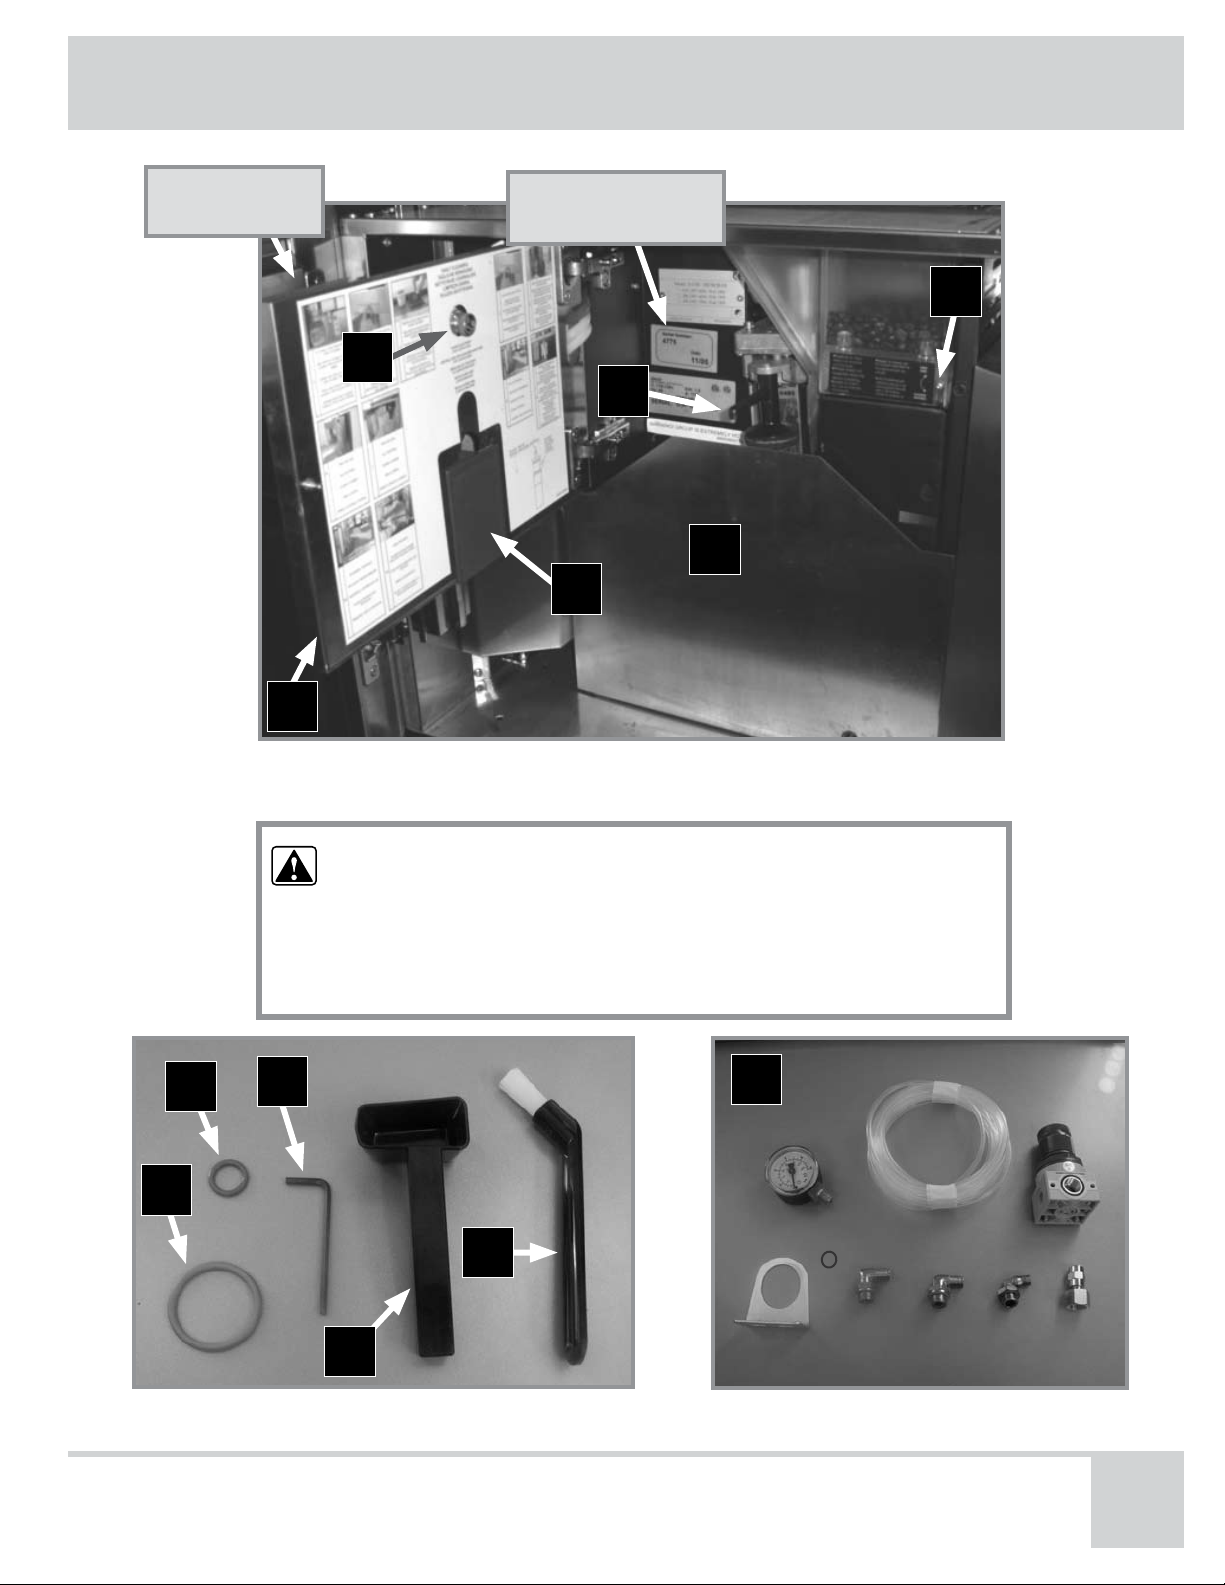
Getting To Know Your Coffee System
Front Panel
(open)
A
Serial Number
Label
E
B
C
F
D
Coffee System with Front Panel and Brewing Unit Door Open
CAUTION
See the Opening the Front Panel section for how to open the
•
front of the coffee system. See page 22.
Do not close the front panel door without first removing the
•
drip tray. Damage will result.
K
I
L
J
H
G
For Models CM24T-1 and CM24P-1
Use and Care Manual
For Model CM24P-1 Only
9
Page 12

Setting Up Your Coffee System
WARNING
To avoid sickness, flush the coffee system out before operating it
•
for the first time according to the Flushing Out the Coffee System
section on page 41. Doing so will remove any bacteria left in the
unit during shipping and storage.
This appliance is equipped with a three-prong grounding plug for
•
your protection against possible electric shock hazards. It must be
plugged into a dedicated, grounded power receptacle.
Make sure that the coffee system has been properly installed by
•
a qualified installer according to the accompanying installation
instructions. Have the installer show you the location of the power
connector and the fuse or junction box so that you know where
and how to turn off power to the coffee system.
Make sure the hardness of the water supplied to, or poured into
•
your coffee system does not exceed the maximum stated below.
Using water harder than that specified will eventually damage the
internal parts and void your warranty.
Before Your Coffee System is Installed
Call your local water company. Ask them for the water hardness level of the
1.
water supplied to the building where your coffee system will be installed.
If the water hardness level is above four grains per gallon (4 gpg):
2.
If you are installing model CM24P-1, contact a water treatment specialist
and have a water treatment system installed to reduce the water
hardness level to 4 gpg or less.
If you are installing model CM24T-1, pour only filtered water with a
hardness level of 4 gpg or less into the water tank. DO NOT use
distilled water.
Have a licensed electrician install a dedicated, grounded power receptacle
3.
near the coffee system, if one is not available.
Have a qualified installer install the coffee system in the desired location
4.
according to the accompanying installation instructions.
10
Automatic Coffee System
Page 13

Setting Up Your Coffee System
After Your Coffee System is Installed
Open the milk container compartment and remove the keys. Put
1.
them in a safe place.
IMPORTANT
The warranty on your coffee system
does not cover lost keys. Put your keys
in a safe place.
Gently move the coffee and milk dispenser up or
2.
down until it is at the desired height.
Turn on the power switch according to page 13,
3.
wait for the message “Machine Ready” to appear
on the display.
Flush the coffee system according to the Flushing
4.
Out the Coffee System section on page 41.
Use and Care Manual
11
Page 14

Basic Operation
Things to Know Before You Start
If you push the cafe latte, latte, or cappuccino button, the coffee
system will display a ”Please Milk Clean” message
about two hours after the last milk drink was dispensed.
The message will appear even if no milk was in the milk
compartment at the time the button was pushed.
“Clean Group” will appear on the display when the
coffee system needs a routine cleaning. The “Clean
Group” message will disappear after you follow the
Routine Cleaning Instructions on page 37.
A small amount of dripping from the dispensers is normal after
drinks are dispensed.
This coffee system is designed to make one (in some cases two) hot
drink(s) at a time.
Drink volume may vary due to coffee type, grind time, temperature,
tamping time, and pre-brewing time.
For proper operation, clean your coffee system regularly according to
the cleaning schedule on page 34.
When the coffee system makes coffee, it dumps the
used coffee grounds into the used coffee ground bin. You
must empty out the bin when it becomes full. “Drawer
Full” will appear on the display. See the Routine Cleaning
Instructions on page 37.
The coffee system purges water into the drip tray to
ensure that the water used for drink making is hot.
Empty out the drip tray when it starts to get full.
CAUTION
Use only filtered water with a
hardness of 4 gpg or lower. See
Before Your Coffee System is
Installed on page 10.
WARNING
On model CM24T-1, clean the water
tank daily to avoid sickness due to
bacteria growth.
12
Add Your Own Flair!
You can add “just a touch” of espresso or latte to any drink.
Make your favorite drink according to the instructions on the
•
following pages.
Push one of the espresso buttons, the latte button, or the hot
•
water button.
Push the espresso, latte, or hot water button again to make it
•
stop so that only the amount you want is dispensed.
You can experiment to come up with all sorts of drinks that suit
your personal preference!
Automatic Coffee System
Page 15

Basic Operation
The Light
The light can be turned on or off at any time, even
if the coffee system power switch is off. The light
switch is located to the right of the light, on the
ceiling of the brewing compartment, below the
display.
Push the light button in to turn it on or off.
Turning On Your Coffee System
Turn on the power switch. It is located on the
1.
ceiling of the brewing compartment, below the
display, to the left of the light. You will hear the
brewing motor prepare to make drinks.
“Please Wait..Heating” will appear on the
2.
display for a few minutes until the unit is ready to operate.
“Machine Ready” will appear on the display when the unit
3.
is ready to make drinks.
Switch Locations
Power Switch
Light
Light Switch
Use and Care Manual
13
Page 16

Basic Operation
Loading Your Coffee System
WARNING
To prevent personal injury, keep your hands out of the coffee
•
bean container and the ground coffee chute.
Some of the metal surfaces behind the front panel are
•
hot when the power switch is on. Avoid contact with these
surfaces.
Do not pour flavored, un-roasted, partial coffee beans, or
•
ground coffee into the coffee bean container. Doing so may
cause the coffee grinding mechanism to jam. Use flavored
coffee creamers or syrups after making the coffee to flavor it.
You may also make flavored coffee using the ground coffee
poured into the ground coffee chute. See the Decaffeinated
and Ground Coffee section on page 17 for directions.
Grasp both sides of the front panel and slide the unit out.
1.
On model CM24T-1, pour filtered water (with a water hardness of
2.
4 gpg or less) into the water tank. The tank holds 1 1/4 gallons of
water (5 liters). DO NOT use distilled water.
Open the coffee bean container lid. Fill it to 1/2” from the top with,
3.
whole, unflavored, roasted coffee beans. Do not over-fill!
Make sure the water tank, coffee bean container, and ground coffee
4.
chute lids are closed and push the coffee system into the cabinet.
Water Tank
CM24T-1 Only
Ground Coffee
Chute
Coffee Bean
Container
Top of Coffee System
14
Automatic Coffee System
Page 17

Basic Operation
Making Coffee and Other Hot Drinks
WARNING
DO NOT PUSH ANY BUTTONS ON THE FRONT PANEL UNTIL ALL
BODY PARTS AND CLOTHING ARE CLEAR OF THE BREWING
COMPARTMENT. KEEP ALL BODY PARTS AWAY FROM THE
BREWING COMPARTMENT DURING OR IMMEDIATELY AFTER
DRINK DISPENSING. HOT LIQUIDS AND STEAM CAN CAUSE
SEVERE BURNS.
Espresso
Your coffee system can make one or two cups of espresso at a time.
One “shot” of espresso is about one ounce of strong coffee.
For one cup of espresso, center a small cup under the coffee
1.
dispenser. For two cups, put two cups side by side under the coffee
dispenser.
One Cup of Espresso
Push one of the espresso buttons. If you push the one shot
2.
button, the coffee system will pour one shot (about one ounce)
of espresso. If you push the two shot button, the coffee system
will pour two shots (about two ounces) of espresso. You will hear
the coffee grinder grind and tamp down the coffee beans, and
the water pump hum as the espresso is made. Push the espresso
button again to make the coffee system stop before the normal
amount is dispensed.
If you want more espresso dispensed, wait
3.
until the display reads “Machine Ready”,
then push one of the espresso buttons again.
You can also program the coffee system to
dispense more espresso each time the button
is pushed. See page 26.
When the display reads “Machine Ready”,
4.
carefully remove the cup from under the
dispenser.
Two Cups of Espresso
NOTE
If you place two cups under the dispenser, the
amount of espresso dispensed will be shared
between the two cups. For example, if you
press the one shot button (about one ounce),
about 1/2 ounce of espresso will be dispensed
in each cup.
Use and Care Manual
One Shot
Two Shots
15
Page 18

Basic Operation
Regular Coffee
Your coffee system can make one or two cups of coffee at a time.
For one cup of coffee, center a coffee cup or mug under the
1.
coffee dispenser. For two cups, put two cups side by side under
the coffee dispenser.
One Cup of Coffee
Push the coffee button. The coffee system will pour about six
2.
ounces of coffee. You will hear the coffee grinder grind and
tamp down the coffee beans, and the water pump hum as the
coffee is made. Push the coffee button again to make the coffee
system stop before the normal amount is dispensed.
If you want more coffee dispensed, wait until the display reads
3.
“Machine Ready”, then push the coffee button again. You can
also program the coffee system to make more coffee each time
the button is pushed. See page 26.
When the display reads “Machine Ready”, carefully remove the
4.
cup from the brewing compartment.
Two Cups of Coffee
NOTE
If you place two cups under the dispenser, about six ounces
of coffee will be shared between the two cups.
Coffee Button
16
Automatic Coffee System
Page 19

Basic Operation
Decaffeinated and Ground Coffee
You can use your coffee system to make pre-ground coffee
drinks, one cup at a time. It is an ideal way to make
decaffeinated coffee or flavored coffee drinks.
Make sure the power switch is on.
1.
Pull the coffee system out from the cabinet.
2.
Use the provided coffee scoop to pour enough pre-
3.
ground coffee for one cup into the ground coffee chute.
Make sure the coffee goes down the chute into the
coffee system. Use a plastic spoon or stir sick to push
the coffee down the chute if necessary.
Close the coffee chute lid and push the coffee system
4.
back into the cabinet.
Put a coffee cup under the coffee and milk dispenser.
5.
Ground Coffee
Chute
Push the decaffeinated coffee button. Nothing will happen until you
6.
perform the next step.
Push the button for the type of beverage you want to make: espresso
7.
(one or two shots), coffee, cafe latte, or cappuccino.
If making a cafe latte or cappuccino, before pushing
the cappuccino or cafe latte button:
Open the milk container compartment. Put an
opened container of milk in the compartment.
Adjust the milk tube pinch screw. Tightening the
screw (clockwise) makes the milk warmer, opening it makes it cooler.
Put the milk tube into the container of milk.
The coffee system will make
the drink selected. You will
hear the coffee system tamp
down the ground coffee, and
the water pump hum as the
coffee is made. Push the drink
button again to make the
coffee system stop before the
normal amount is dispensed.
If you want additional coffee,
8.
wait until the display reads
“Machine Ready” and repeat
steps 1 to 7.
When the display reads
9.
“Machine Ready”, carefully
remove the cup from the
brewing compartment.
WARNING
To avoid sickness, perform a milk cleaning according to the
Cleaning and Maintenance section within two hours of the
last milk drink being dispensed. “Please Milk Clean” will
appear on the display. See page 35.
IMPORTANT
Using non-dairy creamers or half-and-half may cause poor
•
quality foam.
The fat content in milk varies according to region and
•
milk brand. For best results you may need to experiment
with different milk fat contents (whole, 2%, 1%), brand
names, milk pinch screw settings, and the milk foam level.
Decaffeinated
Coffee
Button
Use and Care Manual
17
Page 20

Basic Operation
Hot Water for Tea and Other Drinks
Use the hot water button to brew tea and other hot flavored drinks. The
coffee system makes about four ounces of hot beverage at a time.
Put the proper amount of tea or mix for your hot drink into a cup or
1.
glass.
Put the cup or glass under the hot water dispenser.
2.
Push the hot water button. You will hear the water pump hum as hot
3.
water is dispensed. Push the hot water button again to make the
coffee system stop before the normal amount is dispensed.
Hot Water Button
Hot water Dispenser
If you want more hot water dispensed, wait until the display reads
4.
“Machine Ready”, then push the hot water button again. You can also
program the coffee system to dispense more hot water each time the
button is pushed. See page 26.
When the display reads “Machine Ready”, carefully remove the cup
5.
or glass from the brewing compartment. Stir until the drink is properly
mixed.
NOTE
The hot water dispenser cannot be used for steam.
18
Automatic Coffee System
Page 21

Basic Operation
Cappuccino
Cappuccino is a coffee drink of about one ounce of espresso and
four ounces of foamed milk. To make cappuccino:
Open the milk container compartment.
1.
Adjust the milk tube pinch screw (see below for location).
2.
Tightening the screw (clockwise) makes the milk warmer,
opening it makes it cooler.
Put the milk tube into the container of milk.
3.
Put a cup or mug under the coffee and milk dispenser.
4.
Push the cappuccino button. Foamed milk will come out of the
5.
coffee and milk dispenser first. You will also hear the coffee
grinder grind and tamp down the coffee beans, and the water
pump hum as the cappuccino is made. Push the cappuccino
button again to make the coffee system stop before the normal
amount is dispensed.
If you want more cappuccino, wait until the display
6.
reads “Machine Ready”, then push the cappuccino
button again. You can also program the coffee system
to make more cappuccino each time the button is
pushed. See page 26.
When the display reads “Machine Ready”, carefully
7.
remove the cup from the brewing compartment.
Cappuccino Button
WARNING
To avoid sickness, perform a milk cleaning
according to the Cleaning and Maintenance
section within two hours of the last milk
drink being dispensed. “Please Milk
Clean” will appear on the display. See
page 35.
IMPORTANT
Using non-dairy creamers or half-and-half may
•
cause poor quality foam.
The fat content in milk varies according to
•
region and milk brand. For best results you
may need to experiment with different milk fat
contents (whole, 2%, 1%), brand names, milk
pinch screw settings, and the milk foam level.
Milk Tube and Pinch Screw
Use and Care Manual
19
Page 22

Basic Operation
Cafe Latte
Cafe latte is about two ounces of espresso and about four ounces of
foamed milk.
Open the milk container compartment.
1.
Adjust the milk tube pinch screw. See the diagram on the facing
2.
page. Tightening the screw (clockwise) makes the milk warmer,
opening it makes it cooler.
Put the milk tube into the container of milk.
3.
Put a cup or mug under the coffee and milk dispenser.
4.
Push the cafe latte button. You will hear the coffee grinder grind
5.
and tamp down the coffee beans, and the water pump hum as
the cafe latte is made. The foamed milk will dispense from the
coffee and milk dispenser after the espresso. Push the cafe latte
button again to make the coffee system stop before the normal
amount is dispensed.
If you want more cafe latte, wait until the display reads
6.
“Machine Ready”, then push the cafe latte button again. You
can also program the coffee system to make a larger cafe latte
each time the button is pushed. See page 26.
When the display reads “Machine Ready”, carefully remove the
7.
cup from the brewing compartment.
Cafe Latte Button
WARNING
To avoid sickness, perform a milk cleaning according to the
Cleaning and Maintenance section within two hours of the
last milk drink being dispensed. “Please Milk Clean” will
appear on the display. See page 35.
IMPORTANT
Using non-dairy creamers or half-and-half may cause poor
•
quality foam.
The fat content in milk varies according to region and milk
•
brand. For best results you may need to experiment with
different milk fat contents (whole, 2%, 1%), brand names,
milk pinch screw settings, and the milk foam level.
20
Automatic Coffee System
Page 23

Basic Operation
Latte
Latte is steamed milk. This feature is perfect for hot chocolate drinks. To
make a latte:
Open the milk container compartment.
1.
Adjust the milk tube pinch screw. Tightening the screw (clockwise)
2.
makes the milk warmer, opening it makes it cooler.
Put the milk tube into the container of milk.
3.
Put a cup or mug under the coffee and milk dispenser.
4.
Push the latte button. Foamed milk will dispense from the
5.
coffee and milk dispenser. Push the latte button again to
make the coffee system stop before the normal amount is
dispensed.
If you want to dispense more latte, wait until the display
6.
reads “Machine Ready”, then push the latte button again.
You can also program the coffee system to dispense a
larger latte each time the button is pushed. See page 26.
When the display reads “Machine Ready”, carefully
7.
remove the cup from the brewing compartment.
Latte Button
WARNING
To avoid sickness, perform a milk cleaning according to the
Cleaning and Maintenance section within two hours of the
last milk drink being dispensed. “Please Milk Clean” will
appear on the display. See page 35.
IMPORTANT
Using non-dairy creamers or half-and-half may cause poor
•
quality foam.
The fat content in milk varies according to region and milk
•
brand. For best results you may need to experiment with
different milk fat contents (whole, 2%, 1%), brand names,
milk pinch screw settings, and the milk foam level.
Milk Tube and Pinch Screw
Use and Care Manual
21
Page 24

Basic Operation
Opening and Closing the Front Panel
Opening the Front Panel
Turn off the power switch.
1.
Pull the coffee system out from the cabinet.
2.
Remove the drip tray to access the lock.
3.
Unlock the front panel.
4.
Drip Tray Removal
Lock Location
22
Automatic Coffee System
Page 25

Basic Operation
Front Panel
Push to open front panel
Opening the Front Panel Front Panel Button
Push the front panel release button to open the
5.
front panel.
If you need to open the brewing unit door, grasp it
6.
under the right side and pull it open.
Closing the Front Panel
Close the brewing unit door if it is open.
1.
Make sure the drip tray is removed.
2.
Close the front panel and lock it with the key.
3.
Replace the drip tray.
4.
Brewing Unit Door
CAUTION
Make sure the drip tray is removed before
closing the front panel. Otherwise damage
to the coffee system may occur.
Use and Care Manual
23
Page 26

Basic Operation
Adjusting the Milk Foam Level
The amount of milk foam created for lattes, cappuccinos, and cafe lattes
is pre-set at the factory. It is possible to adjust the size of the foam by
adjusting the milk foam adjustment knob.
Open the front panel and brewing unit door. See page 22.
1.
Turn the milk foam adjustment knob counter-clockwise to increase the
2.
size of the foam. Turn it clockwise to reduce the foam size.
Adjustment Knob
Milk Foam
Remove the drip tray and close the front panel. See the directions
3.
above.
Experiment with the milk foam level until the coffee system creates foam
to suit your personal preference.
24
Automatic Coffee System
Page 27

Basic Operation
Adjusting the Coffee Grinder
The mesh of the coffee grinder blades is pre-set at the factory.
Adjust the grinder blades only if the quality of the coffee changes.
The finer the coffee is ground, the stronger it will be.
The grinder is adjusted while it is running, using the adjustment
wrench supplied with your coffee system.
WARNING
Coffee will pour into a cup under the coffee dispenser
•
tube during the adjustment process. To avoid burns, keep
body parts and clothing clear of the dispenser tube and
drip tray areas.
Do not attempt to adjust the grinder when the grinder is
•
not on. Damage to the grinder blades may occur.
Open the front panel and brewing unit doors. See page 22.
1.
Install the drip tray on the floor of the brewing compartment.
2.
Put a coffee cup under the coffee dispenser tube.
3.
Pull out the white button on the back of the front panel.
4.
Insert the grinder adjustment tool into the end of the grinder
5.
adjustment screw.
Turn on the power switch and wait for “Machine Ready” to
6.
appear on the display.
Push the double espresso
7.
button and turn the grinder
adjustment wrench while you
hear the grinder motor running,
according to the label next
to it. Stop turning it when
the grinder motor stops. To
continue adjusting, push the
double espresso button again.
Experiment with the setting until
the coffee is suitable strength.
Remove the drip tray.
8.
Close the front panel according
9.
to the directions on page 23.
Coffee Dispenser
Tube
Grinder Adjustment
Screw
White Button
Put a coffee cup under
the dispenser tube
Use and Care Manual
Grinder Adjustment
Wrench
25
Page 28

Deluxe Features
Custom Programming
Your coffee system is programmed at the factory to offer the best performance under most conditions.
However, you can customize how hot drinks are prepared to suit your personal taste. In addition, you can
adjust certain general operation settings (see below).
Programmable Features
Button Assignment
❖
(Product Name)
Amount of Water
❖
(Water Volume)
Grind Time❖
Milk Time❖
Pre-brew❖
Tamping❖
Used Coffee Ground Bin
❖
Meter
Milk Cleaning Warning Time❖
Routine Cleaning Warning❖
Group Setting❖
Grinder Setting Warning❖
Coffee Temperature❖
Steam Temperature❖
Water Filter❖
You can change the type of drink prepared when you push a
button. In other words, you can change the button location for a
particular drink.
You can change the amount of water dispensed for each type of
drink.
For coffee drinks, you can change the coffee bean grind time to
make the coffee stronger or weaker. The longer the grind time,
the more coffee beans are ground and the stronger the coffee.
You can adjust the amount of milk dispensed for a particular
drink by lengthening the milk time.
Pre-brewing soaks the coffee grounds in water to help with
flavor extraction. You can turn it on or off.
You can turn the tamping feature on or off. Tamping compresses
the ground coffee beans to increase coffee strength.
You can change the amount of coffee that builds up in the used
coffee ground bin before the “Drawer Full” message appears on
the display.
Pre-set at the factory to 2 hours. Do not change.
Pre-set at the factory to 50 cycles. Do not change.
Set at the factory. Keep at 2.0.
Set to 250 drinks at the factory. It indicates that the coffee
grinder may need to be adjusted. Do not change this setting
unless coffee quality has changed.
Allows you to set the temperature of the brewed coffee. Dacor ®
recommends you leave it at the factory setting of 208°F.
Allows you to set the temperature of the steamed milk. Dacor ®
recommends you leave it at the factory setting of 257°F.
This feature is for model CM24P-1 only. If a water filter is
installed on the coffee system, you can set the unit to display a
message when the filter needs to be changed.
WARNING
Dacor ® takes no responsibility for any problems caused by changes to the factory default settings.
Changes to the settings may cause severe burns or sickness due to bacteria growth. If your
coffee system fails to operate properly after programming, return the unit to its original factory
programmed settings listed on page 33.
26
Automatic Coffee System
Page 29

Deluxe Features
How to Program the Coffee System
Accessing the Main Programming Menu
Remove the drip tray.
1.
Unlock the front panel door. See page 22 for directions. When
2.
the door is open, the buttons on the front of the unit will not
make drinks when pushed.
“Machine Off - Front Panel
3.
Open” should appear on the
display. If it does not, find the
white button on the back of the
front panel door. Push and release
the white button. Check to make
sure “Machine Off - Front Panel
Open” appears on the display.
With the front panel door open,
4.
push and release the far left
button on the front panel (the one
with “MENU” above it). Nothing
will appear to happen.
Pull out on the white button on
5.
the back of the front panel door.
You will hear the normal sound
of the tamping motor cycling. In
about 5 seconds “Cumulative”
will appear on the display.
The unit is now in the manual
programming mode. You will use
the four buttons on the left of the
front panel to program it. The drink functions on the buttons
are ignored during the programming process.
White Button
A
A) MENU button
B) (up) button
C) RESET button
D) (down) button
Change the feature settings according to
6.
the directions in the “Feature Menus”
section on the following pages.
Use and Care Manual
B C D
IMPORTANT
Take care when scrolling down in the menu.
If you scroll down past the “Water Filter”
setting, the unit will exit the programming
menu and the buttons will again function
as a coffee system. “Machine Ready”
will appear on the display when you leave
the programming menu. If you leave the
programming menu accidentally, re-enter it
according to Accessing the Main Programming
Menu, above.
27
Page 30

Deluxe Features
Feature Menus
Cumulative Total
The cumulative total feature allows you to view the total number
of drinks made by your coffee system and the number of individual
drinks made. It is not programmable. To view the number of drinks
made:
With “Cumulative Total” displayed on the main programming
1.
menu, push the MENU button.
To check each drink individually, repeatedly push the MENU
2.
button.
Push RESET to exit.
3.
Push the button repeatedly to select a feature to change or
4.
close the front panel door to exit the main programming menu.
Changing the Button Assignment
With the main programming menu accessed, push the
1.
or button repeatedly until “Product Name” appears on
the display. “Product Name” changes the type of drink
programmed for each button.
Push the MENU button.
2.
Repeatedly push the MENU button to see the drink assigned
3.
to each button. Each drink type shown has a number in the
upper right of the display. The number represents the button
programmed for this drink. 1 is the button on the far left, 2
is the next button to the right and so on. Stop on the button
number you want to change.
To select a drink for the button number shown, scroll using the
4.
or buttons until you find the desired beverage.
Push the RESET button to change to the new drink type.
5.
Push the or button repeatedly to select another feature
6.
to change or close the front panel door to exit the main
programming menu.
28
Automatic Coffee System
Page 31

Deluxe Features
Changing the Amount of Water
With the main programming menu accessed, push the or
1.
button repeatedly until “Water Volume” appears on the
display.
Push the MENU button.
2.
Repeatedly push the MENU button to see the amount of water
3.
(in CCs) dispensed with each drink. Stop on the drink for which
you want to change the amount of water dispensed.
To adjust the water amount, push the or buttons.
4.
Push the RESET button to change to the new water amount.
5.
Push the or button repeatedly to select another feature
6.
to change or close the front panel door to exit the main
programming menu.
Changing the Grind Time
With the main programming menu accessed, push the or
1.
button repeatedly until “Grind Time” appears on the display.
Push the MENU button.
2.
Repeatedly push the MENU button to see the grind time for
3.
each drink. Stop on the drink for which you want to change the
grind time.
To adjust the grind time, push the or buttons.
4.
Push the RESET button to change to the new grind time.
5.
Push the or button repeatedly to select another feature
6.
to change or close the front panel door to exit the main
programming menu.
Changing the Milk Time
With the main programming menu accessed, push the or
1.
button repeatedly until “Milk Time” appears on the display.
Push the MENU button.
2.
Repeatedly push the MENU button to see the milk time for
3.
each drink. Stop on the drink for which you want to change the
milk time.
To adjust the milk time, push the or buttons.
4.
Push the RESET button to change to the new milk time.
5.
Push the or button repeatedly to select another feature
6.
to change or close the front panel door to exit the main
programming menu.
Use and Care Manual
29
Page 32

Deluxe Features
Turning Pre-Brew On and Off
With the main programming menu accessed, push the or
1.
button repeatedly until “Pre-brew” appears on the display.
Push the MENU button.
2.
Repeatedly push the MENU button to see the pre-brew status
3.
for each drink. Stop on the drink for which you want to turn
pre-brew on or off.
Push the or buttons to select “Yes” or “No”.
4.
Push the RESET button to make the change.
5.
Push the or button repeatedly to select another feature
6.
to change or close the front panel door to exit the main
programming menu.
Turning Tamping On and Off
With the main programming menu accessed, push the or
1.
button repeatedly until “Tamping” appears on the display.
Push the MENU button.
2.
Repeatedly push the MENU button to see the tamping status
3.
for each drink. Stop on the drink for which you want to turn
tamping on or off.
Push the or buttons to select “Yes” or “No”.
4.
Push the RESET button to make the change.
5.
Push the or button repeatedly to select another feature
6.
to change or close the front panel door to exit the main
programming menu.
Changing the Used Coffee Ground Bin Meter
With the main programming menu accessed, push the or
1.
button repeatedly until “Grounds Number” appears on the
display.
Push the MENU button.
2.
To adjust the number of grounds detected in the bin before the
3.
“Drawer Full” message appears on the display, push the or
buttons. The default setting is 20.
Push the RESET button to change to the new ground number.
4.
Push the or button repeatedly to select another feature
5.
to change or close the front panel door to exit the main
programming menu.
30
Automatic Coffee System
Page 33

Deluxe Features
Milk Cleaning Warning Time
Pre-set at the factory to 2 hours. DO NOT change.
WARNING
Changes to the milk cleaning warning time setting may
result in sickness due to bacteria growth. Dacor ® takes
no responsibility for any changes to the factory default
settings.
Routine Cleaning Warning Time
WARNING
Changes to the routine cleaning warning time setting may
result in sickness due to bacteria growth or the coffee
system to malfunction. Dacor ® takes no responsibility for
any changes to the factory default settings.
Pre-set at the factory to 50 cycles. DO NOT change.
Group Setting
With the main programming menu accessed, push the or
1.
button repeatedly until “Group” appears on the display.
Push the MENU button.
2.
If the group number is not set to 2.0, push the or buttons
3.
until the display shows a group setting of 2.0. The coffee
system will not work properly set to any other value.
Push the RESET button.
4.
Push the or button repeatedly to select another feature
5.
to change or close the front panel door to exit the main
programming menu.
Changing the Grinder Setting Warning
With the main programming menu accessed, push the or
1.
button repeatedly until “Grinder Setting” appears on the
display.
Push the MENU button.
2.
To adjust the amount of drinks prepared before the “Grinder
3.
Setting” message appears on the display, push the or
buttons. The default is 250.
Push the RESET button to change the grinder setting warning.
4.
Push the or button repeatedly to select another feature
5.
to change or close the front panel door to exit the main
programming menu.
Use and Care Manual
31
Page 34

Deluxe Features
Changing the Coffee Temperature
With the main programming menu accessed, push the or
1.
button repeatedly until “Coffee Temperature” appears on the
display.
Push the MENU button.
2.
To adjust the coffee temperature, push the or buttons. The
3.
default is 208°F.
Push the RESET button to change the temperature setting.
4.
Push the or button repeatedly to select another feature
5.
to change or close the front panel door to exit the main
programming menu.
Changing the Steam Temperature
With the main programming menu accessed, push the or
1.
button repeatedly until “Steam Temperature” appears on the
display.
Push the MENU button.
2.
To adjust the coffee temperature, push the or buttons. The
3.
default is 257°F.
Push the RESET button to change the temperature setting.
4.
Push the or button repeatedly to select another feature
5.
to change or close the front panel door to exit the main
programming menu.
Changing the Water Filter Warning
If you install a water filter to lower the hardness of the water
supplied to your coffee system, you can program the system to
warn you when you need to change the filter cartridge. Check the
manufacturer instructions for the filter cartridge capacity. Enter the
filter capacity into the coffee system in liters (3.8 liters = 1 gallon).
With the main programming menu accessed, push the or
1.
button repeatedly until “Water Filter” appears on the display.
Push the MENU button.
2.
To adjust the number of liters used by the coffee system before
3.
the “Water Filter” message appears on the display, push the
or buttons.
Push the RESET button to accept the clean warning number
4.
entered.
Push the or button repeatedly to select another feature
5.
to change or close the front panel door to exit the main
programming menu.
32
Automatic Coffee System
Page 35

Deluxe Features
Original Factory Programmed Settings
Button
1 2 3 4 5 6 7 8
Drink Type
Amount of
Water in CCs*
Grinding Time
(seconds)
Milk Time
(seconds)
Pre-brewing
(seconds)
Tamping Yes Yes Yes Yes NA NA NA Yes
* Includes the water absorbed by the coffee.
Single
Espresso
42 66 300 60 NA NA 20 42
8.5 10.5 8 10.5 NA NA NA 8.5
NA NA NA 20 NA 30 NA 14
No No No Yes NA NA NA No
Double
Espresso
Coffee
Cafe
Latte
Ground
Coffee
Latte
Hot
Water
Cappuccino
Use and Care Manual
33
Page 36

Cleaning and Maintenance
Cleaning and Maintenance Schedule
Coffee System Maintenance Schedule*
Milk
Cleaning**
Within two hours
after last drink
containing milk
Daily
Every 50 cycles
(about once a week)
Monthly
Every 4000 Cycles
(Approx. 2 Years)
* The milk cleaning, and water tank cleaning processes take about five minutes. Decalcification takes
about ten minutes.
** A milk cleaning is required if the cappuccino, cafe latte, or latte features are used.
Water Tank
(CM24T-1 Only)
Routine
Cleaning
Decalcification
Service
Call
WARNING
Clean the coffee system thoroughly according to the Flushing Out
•
the Coffee System section on page 41 before operating it for the
first time.
Clean and maintain the coffee system regularly as instructed in
•
the table above. Clean it only in the manner indicated in this
manual. To prevent hazardous fumes and drink contamination,
use only the cleaning agents specified.
Do not use a steam or pressure cleaner to clean the coffee system
•
or any part of it. Damage caused by cleaning the unit in this
manner could result in electric shock, fire, or explosion.
To avoid burns from hot surfaces, turn off the power switch
•
and allow the coffee system to cool at least 30 minutes before
cleaning.
To prevent sickness due to food poisoning, perform a milk
•
cleaning no more than two hours after making the last milk drink.
On model CM24T-1, change the water in the tank daily to prevent
•
sickness due to bacteria growth.
When cleaning the mechanical parts of the coffee system, exercise
•
care with hands and arms around the metal edges.
Use only water with a hardness level of four grains per gallon
•
(gpg) or less when cleaning or making drinks with your coffee
system.
Do not put any part of your coffee system in a dishwasher. Many
•
of the parts are not dishwasher safe.
34
Automatic Coffee System
Page 37

Cleaning and Maintenance
Approved Cleaners
Approved Cleaners for the Coffee System*
Dacor ® Part
Number
ACDC10
ACCLKIT
A-302 Dacor ® Stainless Steel Cleaner
*Available from Dacor ® dealer or parts distributor.
IMPORTANT
In case of power loss, or if the appliance is accidentally
switched off during cleaning:
Turn the coffee system switch back on.
•
The appliance display will read “Please Wait Heating”.
•
When “Machine Ready” appears on the display, push
•
the CLEAN button (decaffeinated coffee) again to finish
the cleaning cycle.
Puly Decalcifying Powder for use with model CM24T-1
Kit containing Puly Detergent Tablets and Puly Liquid Detergent
Description
Milk Cleaning Instructions
Two hours after a milk drink has been dispensed, the “Please Milk
Clean” message will appear on the display. In the interest of safety,
clean the milk delivery system.
What to Use
Puly Liquid Detergent
❖
Filtered Water (4 gpg maximum water hardness...DO NOT use
❖
distilled water)
How to Clean the Milk Delivery System
Pour about 20 mL of Puly Liquid Detergent into a
1.
plastic water bottle about 16 ounces in size. Fill
the remainder of the bottle with filtered water.
Put the bottle in the milk container compartment
2.
and insert the milk tube into the water/detergent
solution.
Place a 2-quart container (or sauce pan) on the
3.
drip tray, under the coffee dispenser to collect
wash and rinse water.
Milk Cleaning Detergent Mixture
Use and Care Manual
35
Page 38

Cleaning and Maintenance
Push and hold the CLEAN (decaffeinated coffee) button until
4.
“Clean Insert Cleaner“ appears on the display.
Push the CLEAN button again to immediately start the cleaning
5.
cycle. If the CLEAN button is not pushed again, the cleaning
cycle will automatically start in about 20 seconds.
Meanwhile fill a second plastic water bottle with clean, filtered
6.
water. “Rinse” will appear on the display. Remove the first bottle
and put the second bottle in the milk container compartment.
Insert the milk tube into the water.
The coffee system will begin rinsing after the cleaning is done.
7.
When rinsing is complete, the display will say “Machine Ready”.
Remove the milk tube from the plastic bottle. Remove the plastic
8.
bottle and close the compartment.
The milk delivery system is now clean.
Cleaning the Water Tank (CM24T-1 Only)
In the interest of safety, clean the water tank daily to prevent
bacteria build-up.
What to Use
Filtered Water (4 gpg maximum water hardness...DO NOT use
❖
distilled water)
To Clean the Water Tank
Slide the coffee system out of the cabinet and remove the water
1.
tank from the top of the unit.
Empty and rinse out the water tank.
2.
Fill the tank with filtered water and put it
3.
back in the top of the unit.
The water tank is now clean.
Water Tank
36
Automatic Coffee System
Page 39

Cleaning and Maintenance
Routine Cleaning Instructions
The message “Clean Group” appears on the display every 50 cycles
to inform you that the system needs a routine cleaning. The routine
cleaning process involves cleaning the coffee dispenser, the milk
foamer, the drip tray and surrounding areas and a system flush. The
milk foamer should be cleaned even if milk drinks have not been
dispensed because it is used to brew coffee as well. The “Clean
Group” message will disappear after the cleaning is done.
What to Use
Solution of mild detergent and warm water
❖
Soft, lint-free cloth
❖
Coffee system cleaning brush (comes with unit)
❖
Cleaning the Inside of the Coffee System
Turn the power switch off.
1.
Pull the coffee system out from the cabinet.
2.
Open the ground coffee chute door on top of the
3.
unit. Pull out the ground coffee chute. Wipe out any
grounds sticking to it and replace it.
Remove the drip tray and open the front panel and
4.
brewing unit doors according to the instructions
starting on page 22.
Empty any water out of the drip tray and wipe it
5.
with a soft cloth dampened with mild detergent and
rinse with water.
Remove and empty the used coffee grounds bin.
6.
Use the provided cleaning brush to remove any
7.
residual coffee grounds from the piston assembly
and the inside of the brewing unit.
Ground Coffee
Chute
Coffee Chute Removal
Used Coffee Grounds Bin Removal
Use and Care Manual
Clean Piston
Assembly
WARNING: HOT!
Piston Assembly
37
Page 40

Cleaning and Maintenance
Remove the dispenser from the
8.
back of the brewing unit door. Pull
straight out on the back of the
dispenser to remove it. DO NOT
pull it down.
Pull the milk foamer out of the
9.
dispenser. Pull up to remove it.
Remove the red and white plastic
10.
tubes from the foamer.
Turn the top of the foamer
11.
counter-clockwise and remove it.
Gently pull the large part of the
foamer apart.
Rinse the dispenser and the three
12.
foamer parts carefully under
running water.
Reassemble the milk foamer. Turn
13.
the top clockwise to secure it.
Reattach the red tube to the top of the foamer.
14.
Reattach the white tube to the side.
Insert the foamer into the top of the dispenser.
15.
Insert the milk foamer/coffee dispenser back into
16.
the back of the brewing unit door. The grooves in
the side of the dispenser slide over the little shelf in
the brewing unit door. Close the brewing unit door.
Replace the used coffee grounds bin.
17.
Make sure the drip tray is removed. Close the front
18.
panel door and lock it. Remove the key.
Push the unit back into the cabinet and replace the drip tray.
19.
Flush the system out according to the instructions on page 41.
20.
The “Clean Group” message will disappear after the flush is done.
Dispenser Removal
Milk Foamer
Cleaning the Outside Surfaces
Wipe stainless steel surfaces with a damp,
soft cloth soaked with mild detergent to
remove beverage stains, fingerprints, and
other smudges. You may also use Dacor ®
stainless steel cleaner.
38
Automatic Coffee System
CAUTION
To prevent damage to stainless steel surfaces,
•
always wipe in the direction of the grain.
Use only the cleaners indicated. Chlorine or chlorine
•
compounds in some cleaners are corrosive to
stainless steel.
DO NOT use abrasives to clean stainless steel
•
surfaces.
Never allow beverage stains, creamers, or sugar to
•
remain on stainless steel for any length of time.
Page 41

Cleaning and Maintenance
Decalcification Instructions
The monthly decalcification and cleaning process cleans out
mineral deposits in the water and coffee delivery systems. If
the mineral deposits are allowed to build up, the coffee system
will eventually stop working properly.
What to Use
Model CM24P-1/CM24T-1: Puly Detergent Tablets
❖
Model CM24T-1: Puly Decalcifying Powder
❖
Model CM24T-1: Filtered Water (4 gpg maximum water hardness...DO
❖
NOT use distilled water)
To Decalcify the Coffee System
Decalcification for model CM24P-1
Put a 2-quart container or sauce pan on the drip tray, under the
1.
coffee dispenser to collect the wash and rinse water. Put one
detergent tablet in the ground coffee chute.
NOTE:
The decalcification process takes
about 10 minutes.
Ground Coffee
Chute
Pour about 20 mL of Puly Liquid Detergent into a
2.
plastic water bottle about 16 ounces in size. Fill the
remainder of the bottle with filtered water.
Put the bottle in the milk compartment and insert
3.
the milk tube into the water/detergent solution.
Push and hold the CLEAN (decaffeinated coffee)
4.
button until “Clean Insert Cleaner“ appears on
the display.
Push CLEAN again to immediately start the
5.
cleaning cycle. If the CLEAN button is not pushed
again, the cleaning cycle will automatically start in about 20 seconds.
Meanwhile fill a second plastic water bottle with clean, filtered water.
6.
“Rinse” will appear on the display. Put the second bottle in the milk
container compartment and insert the milk tube into the water.
Milk Cleaning Detergent Mixture
Use and Care Manual
39
Page 42

Cleaning and Maintenance
The coffee system will begin rinsing after the clean cycle is
7.
done. When rinsing is complete, the display will read “Machine
Ready”.
Remove the milk tube from the plastic bottle. Remove the
8.
plastic bottle and close the milk compartment. Remove the
container or sauce pan from the drip tray.
Decalcification for Model CM24T-1
Put a 2-quart sauce pan on the drip tray under the coffee
1.
dispenser to collect wash and rinse water.
Remove the water tank from the unit. Empty it, rinse it out, and
2.
put it back in the unit.
Pour a packet of Puly Decalcifying Powder into a 16 ounce
3.
bottle. Fill the bottle with warm filtered water and shake well
until the powder is dissolved.
Pour the mixture into the water tank.
4.
Fill the tank with filtered water until it is half
5.
full.
Pour about 20 mL of Puly Liquid Detergent
6.
into the 16 ounce water bottle again. Fill the
remainder of the bottle with filtered water.
Put the bottle in the milk compartment and
7.
insert the milk tube into the water/detergent
solution.
Push and hold the CLEAN (decaffeinated
8.
coffee) button until “Clean Insert Cleaner“
appears on the display.
Water Tank
Push CLEAN again to immediately start the
9.
cleaning cycle. Note that if the CLEAN button
is not pressed again, the cleaning cycle will
automatically start in about 20 seconds.
Meanwhile fill a second plastic water bottle with
10.
clean, filtered water. “Rinse” will appear on the
display. Remove the first bottle from the left
compartment and replace it with the second.
Put the milk tube into water.
When rinsing is complete, the display will read
11.
“Machine Ready”.
Push the hot water button to rinse out the
12.
water dispenser. Wait until water stops coming
out of the dispenser.
40
Automatic Coffee System
Detergent Mixture in Milk Compartment
Page 43

Cleaning and Maintenance
Repeat step 12, four more times.
13.
Remove the plastic bottle from the milk compartment and flush
14.
the residual detergent out of the system (see below).
Flushing Out the Coffee System
Remove the water tank from the unit. Empty it, rinse it out with
A.
filtered water, and put it back in the unit.
Fill the water tank with filtered water until full.
B.
Fill a 16 ounce plastic bottle with filtered water, and put it in the
C.
milk compartment and insert the milk tube into the water.
With a 2-quart container or
D.
saucepan on the drip tray to
catch the rinse water, push and
hold the CLEAN (decaffeinated
coffee) button until “Clean
Insert Cleaner“ appears on the
display.
Push CLEAN again to
E.
immediately start rinsing out the unit. Note that if the CLEAN
button is not pressed again, the rinse will automatically start in
about 20 seconds.
Meanwhile fill a second plastic water bottle with clean, filtered
F.
water. “Rinse” will appear on the display. Remove the first bottle
from the milk compartment and replace it with the second. Put
the milk tube into water.
When final rinse is complete, the display will say “Machine
G.
Ready”.
Push the hot water button to flush the hot water
H.
dispenser.
Remove the milk tube from the plastic bottle.
I.
Remove the plastic bottle and close the
compartment. Remove the container or saucepan
from the drip tray.
Use and Care Manual
41
Page 44

Before You Call for Service
Problem Solution Guide
Unnecessary service calls may be expensive, frustrating, and time consuming. Before you call for service,
please review this Problem Solution Guide.
Problem May be caused by What to do
Nothing works. Coffee system not
connected to electrical
power.
Power to receptacle is off. Turn power on at junction box. Check for
Power switch is off. Turn on power switch. See page 13.
Power outage. Contact power company.
Light not on. No power to coffee system. See Nothing works, above.
Light switch off. Turn on light switch. See page 13.
Lights burned out. Call for service.
Loud buzzing noise. No
coffee or water comes out
of nozzle.
Grinding noise while
coffee is being made.
Whining noise when
power switch is first
turned on or door is
opened and closed.
Water comes out with no
coffee or is pale brown.
Loud humming noise.
Coffee too strong or too
weak.
No water in water tank
(Model CM24T-1) or water
supply not connected or
turned on (Model CM24P-
1).
Pre-ground coffee button
has been pushed, but no
coffee is loaded in the
ground coffee chute.
Coffee system is grinding
coffee beans.
Coffee system is testing
the tamper motor for
proper operation.
Coffee grinder jammed. Coffee beans may be jammed in the dispenser.
Choice of beans affects
coffee strength.
Coffee Grinder out of
adjustment.
Connect coffee system power connector to
dedicated, grounded power receptacle.
tripped circuit breaker or blown fuse.
Pour water in tank (Model CM24T-1) or check
to make sure the water supply is connected
and turned on.
With power to the coffee system turned on,
pour ground coffee in ground coffee chute.
This is a normal sound during coffee brewing.
This is a normal sound when the unit is first
starting up.
Turn off power to the coffee system and
remove all coffee beans from the coffee
bean container. Check for beans that may be
jammed in the dispenser and remove them.
Replace the beans in the coffee bean container
and try grinding again.
Wrong type of coffee beans used (flavored,
un-roasted, or partial coffee beans). Call for
service if necessary.
Try changing to a different roast level of coffee
(light, medium, or dark roast coffee).
See Adjusting the Coffee Grinder on page 25.
42
continued...
Automatic Coffee System
Page 45

Before You Call for Service
Problem Solution Guide (continued)
Problem May be caused by What to do
Water goes into drip tray
when coffee is made.
Milk not hot enough. Milk pinch screw too lose. Tighten milk pinch screw. See page 21 (Latte
Milk too hot. Milk pinch screw too tight. Loosen milk pinch screw. See page 21 (Latte
No latte (milk) comes out
of nozzle.
Poor foam (milk)
consistency.
Water (or milk) drips
out of nozzle after
coffee, water, or milk is
dispensed.
Amount of coffee made is
too small.
Coffee system will not
make coffee drinks from
ground coffee.
Used coffee beans in used
coffee grounds bin are
not normal shape. Coffee
beans in bin normally
look like little ”hockey
pucks”.
Coffee system clears water
out of pipes after making
coffee.
Steam temperature
incorrectly programmed.
Steam temperature
incorrectly programmed.
No milk in coffee system. See page 21 (Latte section) for instructions on
Milk pinch screw too tight. Loosen milk pinch screw. See page 21 (Latte
Kinked milk tube. Check for and fix any kinks in the milk tube.
Wrong type of milk being
used or non-dairy creamer
used.
Milk pinch screw too lose. Tighten milk pinch screw. See page 21 (Latte
Foam milk knob out of
adjustment.
A small amount of water
or milk dripping after
dispensing is normal.
Using espresso button. Normal size of a cup of espresso is about
The pre-ground coffee was
put in ground coffee chute
before the power switch
was turned on.
Coffee system group
setting programmed
incorrectly.
Normal operation. The coffee system purges
water into the drip tray to make sure that the
water is hot for the next cup.
section).
Change steam temperature setting. See
Custom Programming on page 26.
section).
Change steam temperature setting. See
Custom Programming on page 26.
how to connect a milk container to the system.
section).
Clean the milk siphon tube (see page 35). Load
milk container compartment with whole milk
for best results. Do not use non-dairy creamer,
half-and-half, or non-fat milk.
section).
See Adjusting the Milk Foam Level, page 24.
one ounce. Push espresso or double espresso
button multiple times or program unit for
larger volume.
Coffee system cleans out ground coffee chute
when power switch is turned on. To make
coffee drinks from ground coffee, you must
turn on the power switch before you put the
grounds in the ground coffee chute.
Change group program setting. See Custom
Programming on page 26.
Use and Care Manual
continued...
43
Page 46

Before You Call for Service
Problem Solution Guide (continued)
Problem May be caused by What to do
Display reads: “Please Wait Heating”.
Display reads: “Drawer
Full” (buttons also don’t
work).
Display reads: “Machine
Ready - Drawer Out”
(buttons also don’t work).
Display reads: “System
Off - Front Panel Open”
(buttons also don’t work).
Display reads: “Please
Milk Clean”.
Display reads: “Clean
Group”.
Display reads: “Xxxxxx
Group Error” (buttons
also don’t work).
Display reads: “Timeout
Filling Up Broiler”
(buttons also don’t work).
Display reads: “Flow
Meter Error” (buttons
also don’t work).
Display reads: “Error
- Coffee Temperature“
or “Error - Steam
Temperature” (buttons
also don’t work).
Display reads: “Too
Much Coffee”. Coffee
system ejects the coffee
and does not make
drinks.
The appliance is still
heating up.
The used coffee grounds
bin is full.
The used coffee grounds
bin is not installed
properly.
The front panel door is not
closed.
The cafe latte, latte, or
cappuccino button has
been pushed within the last
two hours.
The coffee system needs to
be cleaned.
Operation problem
detected.
Operation problem
detected.
No water in water tank
(Model CM24T-1) or water
supply not connected or
turned on (Model CM24P-
1).
Operation problem
detected.
Too much coffee put in
ground coffee chute.
Grind time programmed
incorrectly.
Wait until display reads “Ready to Operate”
(3-5 minutes).
Empty used coffee grounds drawer (see
Routine Cleaning on page 37).
Check to make sure that the used coffee
grounds bin is pushed completely into place
(see Routine Cleaning on page 37).
Close the front panel and lock it. Call for
service if message repeats.
Perform a milk cleaning (see page 35). Note:
The coffee system detects when one of the
buttons that dispense milk was last pushed and
displays “Please Milk Clean” two hours later,
even if milk was not actually dispensed.
The “Clean Group” message appears every 50
cycles indicating the system needs a routine
cleaning (see page 37). The “Clean Group”
message will disappear after the routine
cleaning is complete.
Open and close the front panel flap. Call for
service if message repeats.
Turn the power switch off, then on. Call for
service if message repeats.
Pour water in tank (Model CM24T-1) or check
to make sure the water supply is connected
and turned on.
Call for service.
Reduce the amount of coffee you put in the
ground coffee chute.
Change grind time setting. See Custom
Programming on page 26.
44
Automatic Coffee System
Page 47

Warranty Information
Product Maintenance
Do not perform any maintenance other than that instructed in the
Cleaning and Maintenance section of this manual. A qualified
service technician should perform all other service.
Getting Help
Before you call for service, please review the Before You Call for
Service section of this manual, starting on page 42. If you have
performed the checks in the Problem Solution Guide and the
problem has not yet been remedied, please visit our web site
or contact our Customer Service Team for a listing of Dacor ®
authorized service agents. Prior to requesting service, it is helpful to
be familiar with the warranty terms and conditions on page 46.
Contact us through our web site at:
www.Dacor.com
Dacor ® Customer Service:
Tel: (800) 793-0093
Fax: (626) 403-3130
Business Hours: 6:00 a.m. - 5:00 p.m. Pacific Time
You may also write us at:
Dacor ® Customer Service
1440 Bridge Gate Drive
Diamond Bar, CA 91765
At Dacor ®, we believe that our quality of service equals that of
our product. Should your experience with our service network or
product be different, please contact our Customer Service Team and
share your encounter with us. We will do our utmost to resolve the
situation for you and deliver on our Dacor ® promise.
If you need anything clarified, just let us know.
Use and Care Manual
45
Page 48

Warranty Information
What is Covered
CERTIFICATE OF WARRANTIES
DACOR ® COFFEE SYSTEMS WITHIN THE FIFTY STATES OF THE U.S.A., THE DISTRICT OF COLUMBIA, AND
CANADA*:
FULL ONE-YEAR WARRANTY
If your DACOR ® product fails to function within one year of the original date of purchase, due to a defect
in material or workmanship, DACOR ® will remedy the defect without charge to you or subsequent users.
The owner must provide proof of purchase, upon request, and have the appliance accessible for service.
* Warranty is null and void if non-CSA approved product is transported from the U.S.
OUTSIDE THE FIFTY STATES OF THE U.S.A., THE DISTRICT OF COLUMBIA, AND CANADA:
LIMITED FIRST YEAR WARRANTY
If your DACOR ® product fails to function within one year of the original date of purchase, due to a defect
in material or workmanship, DACOR ® will furnish a new part, F.O.B. factory, to replace the defective part.
All delivery, installation and labor costs are the responsibility of the purchaser. The owner must provide
proof of purchase, upon request, and have the appliance accessible for service.
What is Not Covered
Failure of the product caused by faulty installation, improper usage, or neglect of required cleaning and
•
maintenance indicated in the use and care manual.
Service calls to educate the customer in the proper use and care of the product.
•
Failure of the product when used for commercial, business, rental, or any application other than for
•
residential consumer use.
Replacement of house fuses or fuse boxes, or resetting of circuit breakers.
•
Damage to the product caused by accident, re, ood, or other acts of God.
•
Breakage, discoloration or damage to glass, metal surfaces, plastic components, trim, paint, or other
•
cosmetic nish, caused by improper usage or care, abuse, or neglect.
Routine cleaning and maintenance as dened in these instructions.
•
Lost keys.
•
THE REMEDIES PROVIDED FOR IN THE ABOVE EXPRESS WARRANTIES ARE THE SOLE AND EXCLUSIVE
REMEDIES. THEREFORE, NO OTHER EXPRESS WARRANTIES ARE MADE, AND OUTSIDE THE FIFTY STATES
OF THE UNITED STATES, THE DISTRICT OF COLUMBIA AND CANADA, ALL IMPLIED WARRANTIES,
INCLUDING BUT NOT LIMITED TO, ANY IMPLIED WARRANTY OF MERCHANTABILITY OR FITNESS FOR A
PARTICULAR USE OR PURPOSE, ARE LIMITED IN DURATION TO ONE YEAR FROM THE DATE OF ORIGINAL
PURCHASE. IN NO EVENT SHALL DACOR ® BE LIABLE FOR INCIDENTAL EXPENSE OR CONSEQUENTIAL
DAMAGES. NO WARRANTIES, EXPRESS OR IMPLIED, ARE MADE TO ANY BUYER FOR RESALE.
Some states do not allow limitations on how long an implied warranty lasts, or do not allow the exclusion
or limitation of inconsequential damages, so the above limitations or exclusions may not apply to you. This
warranty gives you specific legal rights, and you may also have other rights that vary from state to state.
46
Automatic Coffee System
Page 49

Notes
Use and Care Manual
47
Page 50

NO POSTAGE
NECESSARY
IF MAILED
IN THE
UNITED STATES
DACOR®, INC.
ATTN: WARRANTY PROCESSING DEPT
1440 BRIDGE GATE DR STE 200
PO BOX 6532
DIAMOND BAR CA 91765-9861
BUSINESS REPLY MAIL
PERMIT NO. 4507
POSTAGE WILL BE PAID BY ADDRESSEE
FIRST-CLASS MAIL DIAMOND BAR CA
fold here
Notes
48
Automatic Coffee System
Page 51

fold here
BUSINESS REPLY MAIL
FIRST-CLASS MAIL DIAMOND BAR CA
POSTAGE WILL BE PAID BY ADDRESSEE
DACOR®, INC.
ATTN: WARRANTY PROCESSING DEPT
1440 BRIDGE GATE DR STE 200
PO BOX 6532
DIAMOND BAR CA 91765-9861
PERMIT NO. 4507
NO POSTAGE
NECESSARY
IF MAILED
IN THE
UNITED STATES
Page 52

Web Site: www.Dacor.com
Corporate Phone: (800) 793-0093
WARRANTY INFORMATION
IMPORTANT:
Your warranty for this product CANNOT BE ACTIVATED until this form has been returned to Dacor®. If you have
purchased more than one Dacor® product, please return all forms in one envelope.
Please rest assured that under no conditions will Dacor® sell your name or any of the information on this form for mailing list purposes. We
are very grateful that you have chosen Dacor® products for your home and do not consider the sale of such information to be a proper way
of expressing our gratitude!
Place Serial Number Label Here
Your willingness to take a few seconds to fill in the section below will be sincerely appreciated. Thank you.
1. How were you first exposed to Dacor® products? (Please check one only.)
A. T.V. Cooking Show F Builder
B. Magazine G. Architect/Designer
C. Appliance Dealer Showroom H. Another Dacor® Owner
D. Kitchen Dealer Showroom I. Model Home
E. Home Show J. Other
2. Where did you buy your Dacor® appliances?
A. Appliance Dealer D. Builder
B. Kitchen Dealer E. Other
C. Builder Supplier
3. For what purpose was the product purchased?
A. Replacement only C. New Home
B. Part of a Remodel D. Other
4. What is your household income?
A. Under $75,000 D. $150,000 – $200,000
B. $75,000 – $100,000 E. $200,000 – $250,000
C. $100,000 – $150,000 F. Over $250,000
5. What other brands of appliances do you have in your kitchen?
A. Cooktop C. Dishwasher
B. Oven D. Refrigerator
6. Would you buy or recommend another Dacor® product?
Yes No
Comments:
Owner’s Name:
Street:
City: State: Zip:
Purchase Date: Email: Telephone:
Dealer:
City: State: Zip:
(Please Print or Type)
Last First Middle
cut here cut here
Please visit www.Dacor.com to activate your warranty online.
Thank you very much for your assistance. The information you have
provided will be extremely valuable in helping us plan for the future
and giving you the support you deserve.
 Loading...