

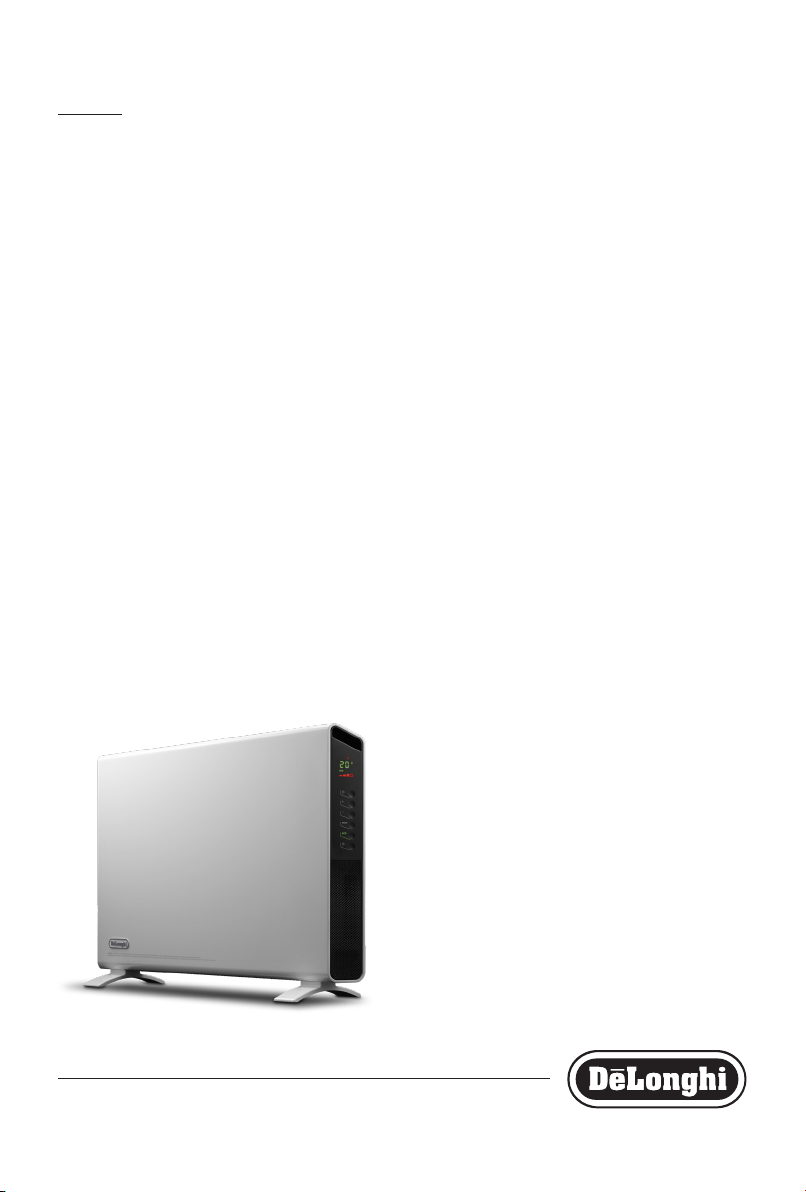
HCX9115E-6A AG - HCX9115E-6A WH - HCX9115ES
PORTABLE ELECTRIC PANEL HEATER
Instructions for use. Keep these instructions
Visit www.delonghiregistration.com to register your product
Visit www.delonghi.com for a list of service centers near you.
ELECTRIC CHARACTERISTICS
120 V~ 60 H z 1500 W
CALENTADOR ELÉCTRICO PORTÁTIL
Repase y guarde estas instrucciones.
Lea cuidadosamente este instructivo antes de usar su aparato.
Visite www.delonghiregistration.com para registrar su producto
en línea.
Visite www.delonghi.com para ver la lista de centros de servicios
cercanos a usted.
CARACTERISTICAS ELECTRICAS:
120 V~ 60 H z 1500 W
EN
ES
page 4 page 9
G
G
5
36
⁄
in
8
930 mm (min.)
H
I
22
560 mm
K
J
H
1 2
1
⁄
in
8
H
I
K
5
36
⁄
8
930 mm
(min.)
1
18
⁄
in
in
8
460 mm
(min.)
5
23
⁄
in
8
600 mm
(min.)
3
2
A
B
C
D
E
F
4 X
4 X
4 X
2 X
4 X
G 4.8X13PH
H
I 4.5X25PH
J M5
K 6x30
3
IMPORTANT
SAFEGUARDS
When using any electrical appliance, some basic safety
precautions should always be observed to reduce the risk
of re, electric shock, and/or injury to persons. Read all
instructions carefully before using the appliance. Specically:
Danger!
Failure to observe the warning may result in life
threatening injury by electric shock.
- Do not operate any heater with a
damaged cord or plug or after the
heater malfunctions, has been dropped
or damaged in any manner. Return
heater to authorized service facility for
examination, electrical or mechanical
adjustment, or repair.
- This heater is not intended for use in
bathrooms, laundry areas and similar indoor
locations. Never locate heater where it may
fall into a bath tub or other water container.
- Do not use this heater in the immediate
surroundings of a bath, a shower or a
swimming pool.
- Do not insert or allow foreign objects to enter
any ventilation or exhaust opening as this
may cause an electric shock, re, or damage
the heater.
- CAUTION: to prevent electric shock
match wide blade of plug to wide slot,
then fully insert.
- CAUTION: In order to avoid a hazard due to
inadvertent resetting of thermal cutout, this
appliance must not be supplied through an
external switching device, such as a timer,
or connected to a circuit that is regulary
switched on and o by the utility.
- This heater may include an visual alarm to warn
that parts of the heater are getting excessively
hot. If the alarm ashes, immediately turn
the heater o and inspect for any objects on
or adjacent to the heater that may cause high
temperatures. DO NOT OPERATE THE HEATER
WITH THE ALARM FLASHING.
Important!
Failure to observe the warning could result in
injury or damage to the appliance.
- The appliance is not intended for use by
persons (including children) with reduced
physical, sensory or mental capabilities, or
lack of experience and knowledge, unless they
have been given supervision or instruction
concerning use of the appliance by a person
responsible for their safety. Children should
be supervised to ensure that they do not play
with the appliance.
- Extreme caution is necessary when any heater
is used by or near children and whenever the
heater is left operating and unattended.
- Always unplug heater when not in use.
- Use this heater only as described in this
manual. Any other use not recommended
by the manufacturer may cause re, electric
shock, or injury to persons.
- The heater must not be located immediately
below a socket-outlet.
- To prevent overload and blown fuses, be
sure that no other appliance is plugged into
the same outlet (receptacle) or into another
outlet (receptacle) wired into the same circuit.
- Be sure that the plug is fully inserted into an
appropriate outlet. Please remember that
outlets also deteriorate due to aging and
continuous use: check periodically if signs of
overheating or deformations are evi-denced
by the plug. Do not use the outlet and CALL
your electrician.
Danger of burns!!
Failure to observe the warning could result in
burns or scalds.
- This heater is hot when in use. To avoid
burns, do not let bare skin touch hot surfaces.
Use handle when moving this heater. Keep
combustible materials, such as furniture,
pillows, bedding, papers, clothes, and
curtains at least 3 feet (0,9 m) from the front
4
and top of the heater and keep them away
from the sides and rear.
- Do not run cord under carpeting. Do not
cover cord with throw rugs, runners, or the
like. Arrange cord away from trac area and
where it will not be tripped over.
- To prevent a possible re, do not block air
intakes or exhaust in any manner. Do not use
on soft surfaces,like a bed, where openings
may become blocked.
- A heater has hot or arcing or sparking parts
inside. Do not use it in areas where gasoline,
paint, or ammable liquids are used or stored.
- It is normal for the heater’s plug and cord
to feel warm to the touch. A plug or cord
which becomes hot tothe touch or becomes
distorted in shape may be a result of a worn
electrical outlet. Worn outlets or receptacles
should be replaced prior to further use of the
heater. Plugging heater into a worn outlet /
receptacle/ may result in overheating of the
power cord or re.
- If the supply cord is damage, it must be
replaced by the manufacturer, its service
agent or similarly qualied person in order to
avoid a hazard.
- WARNING: Do not cover the appliance while
it is functioning in order to avoid overheating
which may cause risk of re.
Symbol meaning
This simbol indicates:
(If provided) Class II equipment
Please note:
This symbol indicates recommendations and
important information for the user.
- If your appliance is equipped with a polythene
tape used as carry handle, remove it before
connecting appliance to the outlet.
- Do not use outdoors.
- To disconnect heater, turn controls to o, then
remove plug from outlet.
- Connect to properly polarized outlets only.
- This heater is not intended for use with an
extension cord or outlet strip. Plug the cord
directly into an appropriate wall receptable.
- Check that neither the appliance nor the
power cable have been damaged in any way
during transportation.
- Make sure that no pieces of polystyrene or
other packaging material have been left on
the appliance. It may be necessary to pass
over the appliance with a vacuum cleaner.
- When switching on the appliance for the
rst time, allow it to run at full power for at
least two hours to get rid of the unpleasant
smell. Make sure that the room in which the
appliance is located is well ventilated during
this operation. It is normal for the appliance
to emit small cracking sounds when you turn
it on.
SAVE THESE
INSTRUCTIONS
THIS PRODUCT IS FOR HOUSEHOLD USE
ONLY
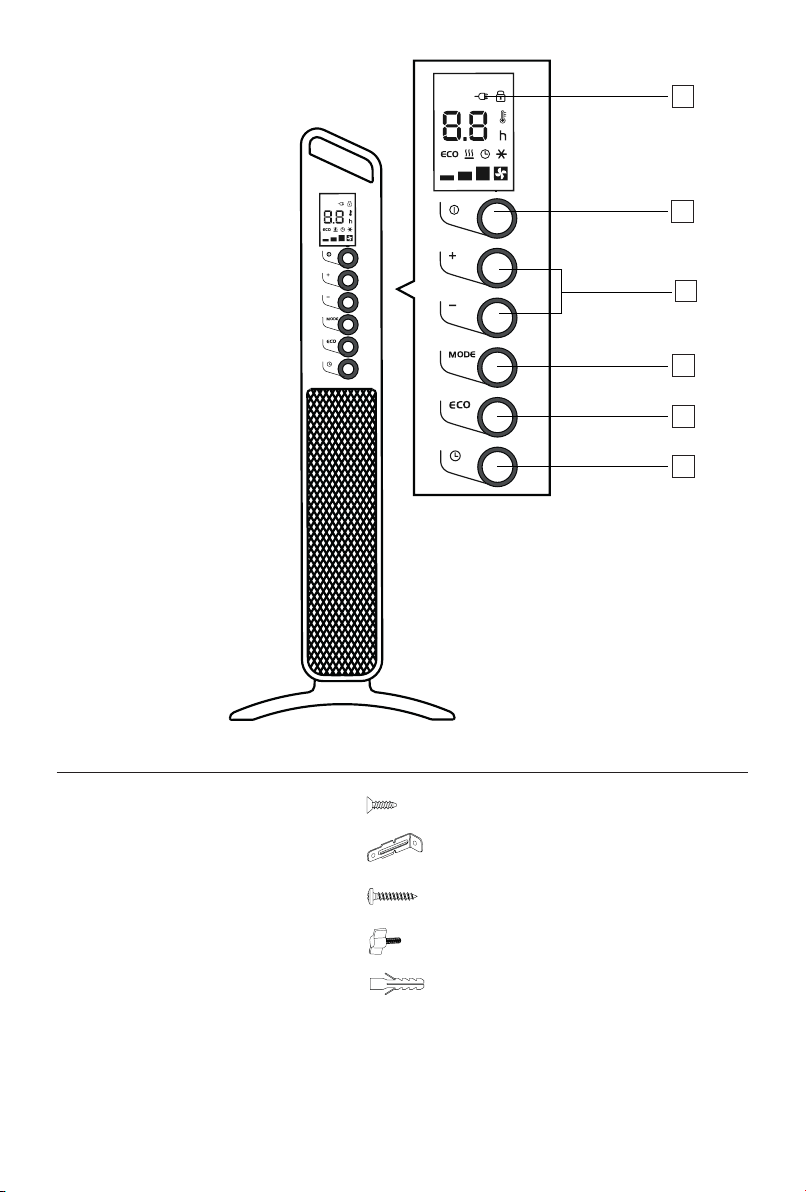
DESCRIPTION
A Power indicator light
B ON/OFF button
C +/- adjustment buttons
D MODE button (selects the operating mode)
E “ECO plus” button
F Timer button
General instructions
Remove the heater from the packaging. Check that neither
the heater nor the power cable has been damaged during
transport.
Do not operate the heater if damaged. Remove all publicity
material present on the appliance. The appliance is suitable
for free-standing or wall-mounted usage. Do not assemble
the feet if wall-mounted.
Electrical connection
- Before connecting the appliance to the current outlet,
check that the voltage indicated on the appliance rating
plate is the same as your electric plant and that it can
5

stand the power consumption (Watt) indicated by the
labelling.
- If more than one appliance is used at once, it is
important to ensure that the electric plant is able to
support the power required.
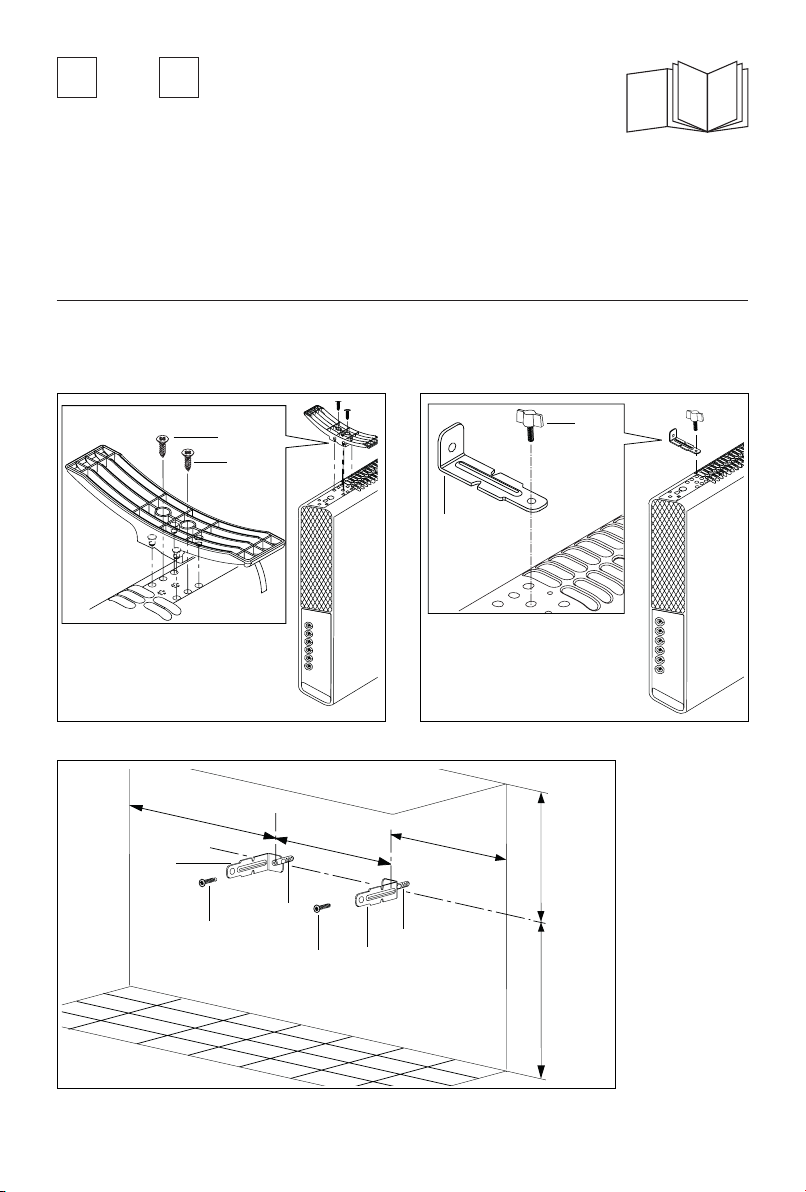
Mounting the feet
Turn the appliance upside down on a rug or soft surface in
order to prevent damaging the paint nish.
Fix the feet to the appliance with the nr. 4 screws 4.8x13 PH
G supplied (see g. 1), 2 screws for each foot.
Wall-Mounting Installation
The wall mounting kit contains:
4 metal brackets (H)
4 screws 4.5x25PH (I)
2 buttery screws M5 (J)
4 plastic anchors 6x30 (K)
Required tools for assembly and estimated assembly
time
Drill
Screwdriver PH 2 x 100 (Phillips type)
Estimated assembly time: 30 minutes
Before installing the unit , make sure of the following:
- The appliance must not be located directly
beneath a current outlet.
- The plug and outlet must be easy to reach after
installation.
- No electric cables or other pipes could be
damaged during the installation.
- Keep away from curtains or ammable materials.
To wall-mount, proceed as follows:
Turn the appliance upside down on a at stable surface. Fix
the 2 brackets H with the 2 buttery screws J as shown in
Fig. 2. For brick walls use a 6 mm concrete drill bit. For plaster
board or drywall, it is recommended to use appropriate
screws and anchors (not supplied).
- Before drilling the wall, mark the exact points,
respecting the minimum distances as shown in g. 3.
- Drill the wall where previously marked, and insert the
plastic anchors K.
- Fix the 2 metal brackets H using the two screws I
provided.
- Hang the appliance on the bracket.
- Mark out the 2 lower xing points. Remove the
appliance, drill the lower holes and insert the wall
anchors K.
- Now, you can hang back the heater on the bracket and
x the lower part of the appliance with the 2 remaining
screws I.
USE
Operation and use
- Plug into the outlet socket.
- The appliance emits a beep. The power indicator light
(A) comes on and remains lit while the appliance is
powered.
- The appliance switches to stand-by.
- Press the ON/OFF (B) to turn the appliance on. It begins
heating the room according to the current settings.
- Press the MODE (D) button to select one of the following
operating modes:
- Freeze prevention
In this mode, the appliance keeps the room at a
temperature of 45°F (7°C) to avoid freezing.
- Heating 1, 2, 3 and Heating 3 + Fan
In this mode, the desired temperature can be selected by
pressing the adjustment buttons + and –. By pushing
the + or - button once, the temperature (shown on the
display) will increase or decrease by 1 degree.
Heating 1
The appliance operates at low power.
Heating 2
The appliance operates at medium power.
Heating 3
The appliance operates at high power.
Heating 3 + Fan
The appliance operates at the maximum power with
the fan. The setting temperature range available is from
61°F to 90°F (16°C to 32°C).
“ECO plus” function
The “ECO plus” function is available in Heating 1, 2 3 and
3 + fan modes only. To activate the function, press the
“ECO plus” (E) button. When this function is active the
appliance automatically sets the most appropriate power
level to guarantee optimum comfort while reducing energy
consumption. While the “ECO plus” function is active, the
appliance may switch automatically to a lower heating power
than the one displayed.
Working indicator
The symbol indicates the heating status by means of its
colors.
RED: the unit is heating at the maximum power.
6

YELLOW: the unit is heating at the medium power.
GREEN: the unit is heating at the minimum power.
absent: the unit is not heating.
and °C (Celsius). To select the desired temperature scale,
when the unit is in standby position, press and hold the "+"
key for at least 10 seconds, then release.
The change of scale will be indicated by two short beeps.
Brightness of the display
The appliance allows two dierent brightness settings for the
display.
The highest is active when any key button is pressed.
After a few seconds of keyboard inactivity, the brightness will
decrease to the operating brightness level.
Key lock
In order to avoid accidental operation, you can lock the
keyboard using the keylock function. To activate this function
press buttons + and - (C) together for at least 3 seconds. The
display shows the symbol and a double acoustic signal
will be emitted. To deactivate the function proceed in the
same way.
Timer function
This function can be activated in two dierent ways.
Delayed start: With the appliance OFF press the timer
button (F) . The symbol is displayed ashing
together with the hours left before the appliance comes on.
Change the hours using the + and - (C) buttons, then wait
a few seconds for the program to be stored. The display will
return to o and the symbols remains on. When the
programmed time has elapsed, the appliance will come on
with the previous settings.
Delayed stop: with the appliance ON, press the timer button
(F). The symbol is displayed ashing together with
the hours left before the appliance goes on-standby. Change
the hours using the + and - (C) buttons, then wait a few
seconds for the program to be stored. The current settings
and symbol are displayed.
At the end of the set time the appliance switches on-standby
automatically. To go back to operating without the timer,
press the timer button twice.
The timer symbol disappears from the display.
SAFETY FUNCTIONS
- Safety device: The appliance is tted with a safety
cuto device which will switch the appliance o in case
of accidental overheating. To reset the cuto, disconnect
the plug from the power supply for a few minutes,
remove the cause of overheating, then reconnect the
appliance. If this abnormal situation happens several
times, contact customer service.
- Tip-over safety device: This device turns the appliance
o if it falls over or is positioned inappropriately in such
a way as to jeopardize safety. The appliance emits a
beep and a dot ashes on the display. The appliance
resumes operation a few seconds after being placed in
an upright position again.
Alarms
The appliance has a diagnostic system that makes it possible
to signal malfunctions.
In case of problems, the display will show an alarm message:
(Probe failure) and (High temperature), see
troubleshooting section.
MAINTENANCE
Before carrying out any maintenance, unplug the heater
from the outlet and wait for it to cool o completely.
This heater requires no particular maintenance. It is
sucient to remove the dust with a soft, dry cloth.
Never use abrasive powders or solvents. If necessary
remove concentrated areas of dirt with a vacuum cleaner.
WARNING: any other servicing should be performed by an
authorized representative.
Should the heater not be in use over a certain length of time,
roll the cable around the feet and store it in a dry place.
Please note: the time is settable from 0.5 to 24 hours.
Changing of the temperature scale
The display can show the temperature in both °F (Fahrenheit)
7

TROUBLESHOOTING
PROBLEM CAUSE SOLUTION
The appliance doesn't work
Be sure it is plugged in and that the electrical
outlet is working
Plug into the power outlet
The display shows a blinking
dot and you hear an intermittend
"beep"
The display shows "PF"
The display shows "Ht" blinking
The temperature may be set too low
The Key lock may be activated
The appliance could be tipped over or is
positioned in an improper way
The temperature sensor is malfunctioning
The internal temperature is too high.
The air intake or outlet grille is obstructed
Set the temperature to a higher
position
See the section "Key lock"
Make sure the appliance is standing
upright on a at surface. Position the
appliance correctly
Contact the De longhi toll free number
Check the appliance is correctly
positioned respecting the minum
distances from the wall, or objects, as
indicated on the instruction manual, if
not, position the appliance correctly
Remove the obstruction
Disconnect the plug from the outlet and
let the appliance cool down. After few
minutes plug the appliance again. If the
appliance doesn't work please contact
the De longhi toll free number
8

INSTRUCCIONES
IMPORTANTES
Cuando se utilizan aparatos eléctricos es oportuno adoptar
siempre algunas precauciones fundamentales para evitar
el riesgo de incendios, descargas eléctricas y/o lesiones.
Lea atentamente todas las instrucciones antes de utilizar el
aparato. Especícamente:
para advertir de que partes del calefactor
se están calentando excesivamente. Si la
alarma parpadea, apague inmediatamente
el calefactor y verique que no existan
objetos arriba o cerca del calefactor que
puedan causar altas temperaturas. NO HAGA
FUNCIONAR EL CALEFACTOR CON LA ALARMA
PARPADEANDO.
¡Peligro!
El incumplimiento puede ser o es la causa de
lesiones provocadas por descargas eléctricas con
peligro para la vida.
- No haga funcionar ningún calentador
con el cable o enchufe averiado o si
éste funcionara mal, por haberse
caído o averiado en algún modo. Lleve
el calentador a un centro de servicio
de asistencia autorizado para que lo
examinen, para los ajustes eléctricos o
mecánicos o para su reparación.
- EI calentador no se debe de usar en baños,
lavaderos y otros locales similares. Nunca
coloque el calentador en donde se pueda caer
en la bañera o en cualquier otro recipiente con
agua.
- No utilice este calefactor en el entorno
inmediato de un baño, una ducha o una
piscina.
- No introduzca ni permita que entre ningún
objeto extraño en la ventilación o salida de
aire, porque esto puede causar una descarga
eléctrica, incendio o avería del aparato.
- ATENCIÓN: para prevenir descargas
eléctricas haga coindicir la espiga plana
del enchufe con la entrada ancha e
introdúzcalo hasta el fondo.
- PRECAUCIÓN: Con el n de evitar situaciones
de peligro debido al reinicio accidental de
protección térmica, este aparato no debe
tener un dispositivo de conmutación externo,
como un temporizador, o conectarse a un
circuito que se encienda o apague desde
afuera.
- Este calefactor puede incluir una alarma visual
¡Atención!
El incumplimiento puede ser o es la causa de
lesiones o de desperfectos al aparato.
- No permita que personas (incluidos
niños) con capacidades psicofísicas
sensoriales disminuidas o con experiencia y
conocimientos insucientes usen el aparato
a no ser que estén vigilados atentamente o
instruidos por un responsable en relación a su
seguridad. Vigile a los niños para asegurarse
de que no jueguen con el aparato.
- Ponga extremo cuidado cuando use cualquier
calentador cerca de niños o inválidos y
cuando el calentador se deje funcionando sin
vigilancia.
- Siempre desconecte el calentador cuando no
lo esté usando.
- Use este calentador sólo como se indica en
este folleto. Todo otro uso que no sea aquel
recomendado por el fabricante puede causar
incendios, descarga eléctrica o lesiones a las
personas.
- El calefactor no debe estar situado
inmediatamente debajo de un tomacorriente.
- Para prevenir una sobrecarga de corriente
y que se quemen los fusibles, verique que
no haya otros aparato sconectados en el
mismo tomacorriente o en otro tomacorriente
conectado en el mismo circuito.
- Controle que el enchufe esté bien conectado y
que el tomacorriente sea adecuado. Recuerde
que los tomacorrientes se deterioran
con el tiempo y el uso continuo. Controle
periódicamente si el enchufe muestra signos
de recalentamiento o deformación. En tal
9

caso, no utilice el tomacorriente y llame
inmediatamente a un electricista.
¡Peligro de ustiones!
El incumplimiento de las advertencias puede ser la
causa de quemaduras o ustiones.
- Este calentador se calienta durante el uso.
Para evitar quemaduras, procure no tocar
supercies calientes con la piel sin protección.
Use la manija para desplazar este calentador.
Mantenga el material combustible, tal como
muebles, almohadas, ropa de cama, papeles,
prendas y cortinas, a una distancia de al
menos 90cm de la parte frontal y superior del
aparato, así como de los costados y de la parte
trasera del radiador.
- No pase el cable por debajo de la alfombra.
No cubra el cable con tapetes, alfombras
o similares. Ponga el cable lejos de zonas
transitadas y donde no pueda provocar
tropezones.
- Para evitar incendios, no cubra las entradas
o salidas de aire de ninguna manera. No use
el calentador sobre supercies blandas, como
una cama, en donde las aberturas se podrían
bloquear.
- Un calentador tiene adentro partes calientes o
que causan chispas. No lo use en zonas donde
seuse o almacene gasolina, pintura o líquidos
inamables.
- Es normal que el enchufe y el cable de
alimentación del aparato se sientan calientes
al tacto. Sin embargo, si el enchufe o el
cable están calientes o se deforman, puede
ser debido a un tomacorriente gastado. Los
tomacorrientes o enchufes gastados se deben
sustituir antes de seguir utilizando el aparato.
Si se conecta un aparato en un tomacorriente
deteriorado, el cable de alimentación podría
llegar a provocar un incendio.
- Si el cable de alimentación está dañado, debe
ser reemplazado por el fabricante, su agente
de servicio o persona calicada a n de evitar
un peligro.
- ADVERTENCIA: No cubra el aparato mientras
esté funcionando, a el n de evitar un
sobrecalentamiento, que puede provocar
riesgo de incendio.
Signicado del Símbolo
Este símbolo indica:
Equipo de Clase II (en caso de proveerse)
Nota:
Este símbolo indica sugerencias e información
importantes para el usuario.
- Si el aparato tiene una cinta de polietileno
que se usa como manija para trasladarlo,
quítela antes deconectar el aparato a un
tomacorriente.
- No use el aparato a la intemperie.
- Para desconectar el calentador, apague los
mandos y luego desenchúfelo.
- Conecte el aparato solamente en
tomacorrientes debidamente polarizados.
- No use nunca el aparato conectándolo a una
extensión o a una tira de terminales. Conecte
el aparato directamente al tomacorriente en
el muro.
- Controle que el aparato y el cable de
alimentación no hayan sufrido daños durante
el transporte.
- Controle que en el aparato no hayan quedado
residuos de poliestireno u otras materiales
de embalaje. Podría ser necesario pasar el
aspirador sobre el aparato
- Al encender el aparato por primera vez, déjelo
funcionar durante alrededor de dos horas
a la potencia máxima, para eliminar el olor
desagradable. Ventile muy bien el local donde
se encuentra el aparato durante tal operación.
Es normal que el aparato produzca ligeros
crujidos cuando usted lo encienda.
GUARDE ESTAS
INSTRUCCIONES
ÚNICAMENTE PARA USO DOMÉSTICO
10

DESCRIPCIÓN
A Indicador luminoso alimentación
B botón ON/OFF
C +/- botones ajustes
D botón MODO (selecciona el modo operativo)
E botón “ECO plus”
F Botón temporizador
Instrucciones generales
Saque el calentador del embalaje. Verique que ni el calentador ni el cable de alimentación se han dañado durante el
transporte. No manipule el calentador si está dañado. Quite
todo el material publicitario presente en el aparato. El aparato se puede usar tanto colocado en el suelo como jado a la
pared. No monte los pies si lo ja a la pared.
Conexión eléctrica
- Antes de conectar el aparato a la toma de corriente verique que la tensión indicada en la placa donde guran
las características del aparato sea la misma de su equipo
eléctrico y que el mismo sea capaz de soportar el consumo (Watt) indicado en las etiquetas.
- Si se utiliza más de un aparato a la vez es importante
asegurarse de que el equipo eléctrico es capaz de soportar la potencia requerida.
Montaje del pie
Gire el aparato de arriba abajo sobre una alfombra o supercie blanda para no dañar la pintura.
Fije el pie al aparato con los 4 tornillos 4.8x13 PH G suministrados (ver g. 1), 2 tornillos por cada pie.
Instalación en la pared
El kit de montaje en la pared contiene:
4 apliques metálicos (H)
4 tornillos 4.5x25PH (I)
2 tornillos de mariposa M5 (J)
4 sujeciones de plástico 6x30 (K)
Herramientas requeridas para el montaje y tiempo
estimado de montaje
Broca
Destornillador PH 2 x 100 (tipo Phillips)
Tiempo estimado de montaje: 30 minutos
Antes de instalar la unidad asegúrese de que:
a. El aparato no debe ser colocado justo debajo de
una toma de corriente.
b. La clavija y el enchufe de corriente deben ser fá-
cilmente accesibles después de la instalación.
c. Los cables eléctricos o tuberías no resultan daña-
dos durante la instalación.
d. Manténgalo alejado de las cortinas o de los mate-
riales inamables.
Para el montaje en la pared proceda de la siguiente forma:
Gire el aparato de arriba abajo en una supercie plana y estable. Fije los 2 apliques H con los 2 tornillos de mariposa J tal
y como aparece en la Fig. 2.
En caso de paredes de ladrillos use una broca para hormigón
de 6 mm. En caso de paredes de yeso se recomienda usar tornillos y jaciones adecuadas (no suministradas).
1. Antes de perforar la pared marque los puntos exactos
respetando las distancias mínimas, tal y como se muestra en la g. 3.
2. Perfore la pared en los puntos previamente marcados e
introduzca las jaciones de plástico K.
3. Fije los 2 apliques metálicos H usando los 2 tornillos I
suministrados.
4. Cuelgue el aparato en el aplique.
5. Marque los 2 puntos de jación más bajos. Quite el
aparato, haga los agujeros más bajos e introduzca las
jaciones de pared K.
6. Ahora puede colgar de nuevo el calentador en el aplique
y jar la parte inferior del aparato con los 2 tornillos I
restantes.
USO
Uso y funcionamiento
- Enchúfelo en la toma principal.
- El aparato emite un bip. El indicador luminoso alimentación (A) se enciende y permanece encendido mientras el
aparato está en funcionamiento.
- El aparato cambia a pausa.
- Pulse ON/OFF (B) para encender el aparato. Este empieza a calentar la habitación de acuerdo con los ajustes
efectuados.
- Pulse el botón MODO (D) para seleccionar uno de los
siguientes modos de funcionamiento:
- Prevención congelación
En este modo el aparato mantiene la habitación a una
temperatura de 45°F (7°C) para evitar la congelación.
- Calefacción 1, 2, 3 y calefacción 3 + ventilador
En este modo se puede seleccionar la temperatura de-
seada pulsando los botones de ajuste + y -. Pulsando
el botón + or - una vez la temperatura (mostrada en la
pantalla) aumentará de un grado.
Calefacción 1
El aparato funciona con baja potencia.
11

Calefacción 2
El aparato funciona con media potencia.
Calefacción 3
El aparato funciona con alta potencia.
Calefacción 3 + Ventilador
El aparato funciona al máximo de potencia con el venti-
lador. La temperatura de ajuste oscila entre 61°F y 90°F
(16°C y 32°C).
Función “ECO plus”
La función “ECO plus” solo está disponible en las calefacciones
modos 1, 2 3 y 3 + ventilador . Para activar esta función
pulse el botón “ECO plus” (E). Cuando esta función está activa
el aparato ajusta automáticamente el nivel más adecuado de
potencia para garantizar un confort óptimo a la vez que se
reduce el consumo de energía.
Mientras la función “ECO plus” está activa el aparato puede
cambiar automáticamente a una potencia más baja de calefacción que la desarrollada.
Indicador de funcionamiento
El símbolo indic a el estado de la calefacción mediante sus
colores.
ROJO: la unidad está calentando a potencia máxima.
AMARILLO: la unidad está calentando a potencia media.
VERDE: la unidad está calentando a potencia mínima.
ausente: la unidad no está calentando.
Brillo de la pantalla
El aparato presenta dos ajustes de brillo diferentes para la
pantalla. La más alta está activa cuando está pulsado cualquier botón. Al cabo de unos segundos de inactividad del teclado el brillo disminuirá al nivel de brillo de funcionamiento.
Bloqueo teclas
A n de evitar cualquier funcionamiento accidental puede
bloquear el teclado usando la función bloqueo de teclas. Para
activar esta función pulse los botones + y - (C) a la vez durante, al menos, 3 segundos. La pantalla muestra el símbolo
y se emite una doble señal acústica. Proceda de la misma
forma para desactivar la función.
Función temporizador
Esta función se puede activar de dos formas diferentes.
Inicio retrasado: Con el aparato en OFF, pulse el botón temporizador (F) . El símbolo parpadea a la vez que las
horas restantes antes de que el aparato se encienda. Cambie
las horas usando los botones + y - (C) espere unos segundos
a que el programa se salve.
La pantalla se apagará de nuevo y los símbolos permanecerán encendidos. Una vez transcurrido el tiempo programado el aparato se encenderá con las formulaciones previas.
Parada retrasado: Con el aparato encendido, pulse el botón
temporizador (F). El símbolo parpadea a la vez que
las horas restantes antes de que el aparato se enciende-pausa. Cambie las horas usando los botones + y - (C), y espere
unos segundos a que el programa se salve. Aparecen los ajustes actuales y el símbolo. Una vez transcurrido el tiempo
formulado el aparato cambia on-pausa automáticamente.
Para volver a operar sin el temporizador pulse la tecla temporizador dos veces.
El símbolo temporizador desaparece de la pantalla.
Nota: el tiempo se puede ajustar de 0.5 a 24 horas.
Cambio de la escala de temperatura
La pantalla puede mostrar la temperatura en ºF (Fahrenheit)
y ºC (Celsius). Para seleccionar la escala de temperatura deseada mientras la unidad está en pausa pulse y mantenga
pulsada la tecla “+” durante, al menos, 10 segundos, luego
suéltela. El cambio de escala se indica con dos breves bips.
FUNCIONES DE SEGURIDAD
- Dispositivo de seguridad: El aparato está equipado
con un dispositivo de corte de seguridad que apagará
el aparato en caso de sobrecalentamiento accidental.
Para reiniciar, desconecte el enchufe de la fuente de
alimentación durante unos minutos, elimine la causa
del sobrecalentamiento, y luego vuelva a conectar el
aparato. Si esta situación anormal ocurre varias veces,
contacte la atención al cliente.
- Consejo sobre el dispositivo de seguridad: Este
dispositivo apaga el aparato si se cae o si se coloca de
forma inapropiada de tal manera que comprometa
la seguridad. El aparato emite una señal sonora y un
punto parpadea en la pantalla. El aparato reanuda
el funcionamiento a los pocos segundos después de
colocarse en una posición vertical nuevamente.
Alarmas
El aparato tiene un sistema autodiagnóstico que permite
reconocer los malos funcionamientos. En caso de problemas,
la pantalla mostrará algunos mensajes de alarma:
12

(Sonda defectuosa) y (Alta temperatura), ver la sección de resolución de los problemas.
MANTENIMIENTO
Antes de efectuar cualquier operación de mantenimiento
desenchufe el calentador del enchufe principal y espere a que
se enfríe por completo. Este calentador no requiere un mantenimiento especial. Es suciente quitar el polvo con un paño
suave y seco. No use nunca polvos abrasivos o disolventes.
En caso de necesidad elimine la suciedad concentrada en
ciertas zonas con un aspirador. ADVERTENCIA: cualquier otro
servicio debe ser realizado por un representante autorizado.
Si el calefactor no se usa por un cierto período de tiempo,
enrolle el cable alrededor de los pies y guárdelo en un lugar
seco.
RESOLUCIÓN DE PROBLEMAS
PROBLEMA CAUSA SOLUCIÓN
El aparato no funciona
Asegúrese de que está enchufado y de
que la salida eléctrica funciona
Enchufe en la salida de potencia
La pantalla presenta un punto
intermitente y usted oye un "bip"
intermitente
La pantalla muestra "PF"
La pantalla muestra "Ht"
parpadeando
La temperatura puede estar ajustada
demasiado baja
El bloqueo del teclado puede haberse
activado
El aparato puede haberse volcado o estar
colocado de forma inadecuada
El sensor de temperatura funciona mal
La temperatura interna es demasiado
alta. La rejilla de entrada o salida de aire
está obstruida
Ajuste la temperatura en una posición
más elevada
Consulte la sección "bloqueo teclas"
Asegúrese de que el aparato está en
posición recta y en una supercie plana.
Coloque correctamente el aparato
Contacte el número de teléfono gratuito
Delonghi
Verique que el aparato está
correctamente colocado respetando las
distancias mínimas de la pared o de los
objetos, tal y como se indica en el manual
de instrucciones. En caso de que no sea
así coloque correctamente el aparato.
Elimine la obstrucción
Desenchúfelo de la toma principal y deje
que el aparato se enfríe. Pasados unos
minutos vuelva a encender el aparato.
Si el aparato no funciona contacte el
número de teléfono gratuito Delonghi
13

Printed in China
www.delonghi.com
5711310881_00_0618
 Loading...