

5712410051 / 05.14
De’Longhi Evaporative Cooler
Model
EV290
P.O. Box 4540 Casula Mall, NSW 2170
P.O. Box 58-056 Botany, MANUKAU 2163
© 2014 De’Longhi Australia Pty Ltd.
USER GUIDE
Please read this user guide carefully and retain for future reference
Contents
Parts and Features . . . . . . . . . . . . . . . . . . . . . . . . . . . . . . . . . . . . . . . . . . . . . . . . . 03
De’Longhi Safety Precautions . . . . . . . . . . . . . . . . . . . . . . . . . . . . . . . . . . . . . . . . . 05
Evaporative Cooler Safety Precautions . . . . . . . . . . . . . . . . . . . . . . . . . . . . . . . . . . 06
Using your Evaporative Cooler. . . . . . . . . . . . . . . . . . . . . . . . . . . . . . . . . . . . . . . . . 09
- Unpacking
- Using the Cooler
- Refilling the Water tank
- Using the Ice Box
- Using the Remote control
Care and Cleaning . . . . . . . . . . . . . . . . . . . . . . . . . . . . . . . . . . . . . . . . . . . . . . . . . 12
Help us Help You . . . . . . . . . . . . . . . . . . . . . . . . . . . . . . . . . . . . . . . . . . . . . . . . . . 13
Warranty Information . . . . . . . . . . . . . . . . . . . . . . . . . . . . . . . . . . . . . . . . . . . . . . . . 14
Notes
Page 15Page 2
Warranty Information
Parts and Features
The De’Longhi Evaporative Cooler is warranted
against faults resulting from manufacturing or
material defects. The warranty period for normal
domestic installation and use is three years from
the date of purchase. In non-domestic use
De’Longhi limits the voluntary warranty to 6
months.
De’Longhi undertakes to repair or replace the
Evaporative Cooler at our discretion if the
product is found to be defective due to a
manufacturing fault during the warranty period.
This warranty excludes any damage caused by
misuse, neglect, shipping accident, or incorrect
installation. Normal wear and tear is also
expressly excluded. The warranty claim is void if
no fault is found with the product or if work is
carried out by anyone other than an authorised
De’Longhi Service Agent.
In Australia, this warranty is additional to the
conditions and guarantees which are mandatory
as implied under the Trade Practices Act 1974
and State and Territory legislation.
How to contact us about a warranty claim
Talk to a De’Longhi representative for further
warranty or product information please call the
number in your country:
Australia
www.delonghi.com.au
Phone: 1800 126 659
New Zealand
www.delonghi.co.nz
Phone: 0508 200 300
1
2
3
4
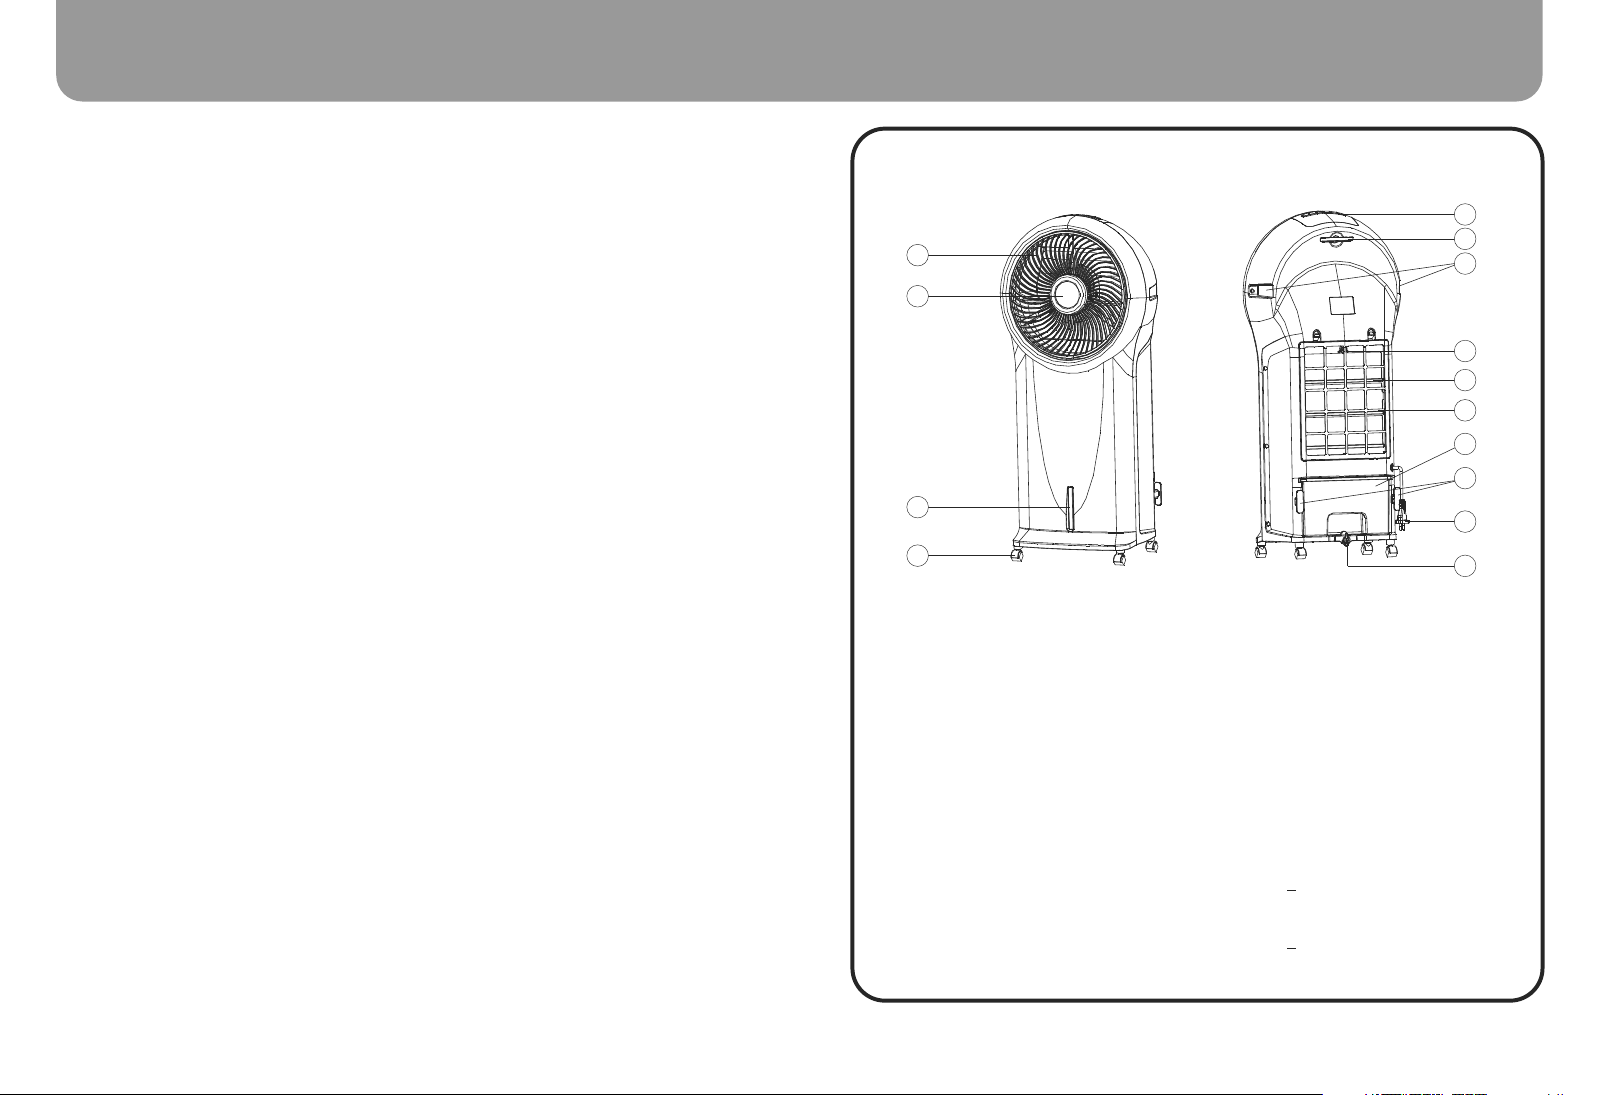
Components:
1. Rotating Vent
2. Display panel
3. Water level indicator
4. Caster
5. Control panel
6. Remote Control slot
7. Handle
Model: EV290
5
6
7
8
9
10
11
12
13
14
8. Cooling Pad knob
9. Cooling Pad holder
10. Dustproof filter
11. Water tank
12. Power cord bracket
13. Power cord
14. Water tank knob
NOTE: Warranty is determined by unit
serial number and date of purchase.
SPECIFICATIONS:
Dimensions
Height 890mm
Width 408mm
Depth 282mm
Voltage
Frequency 50 Hz
Input 110W
Noise <66dB
Air Flow Speed 10m/s, 550m³/h
Evap. Capacity 1100ml/h (room humidity 20-30%)
EER >9W/W
Appl. Environment 5-25°C, RH<95%
220-240V
Page 3Page 14

Parts and Features
Help us Help You
Read this guide carefully, it is intended to help
you operate and mainta in you r new
Evaporative Cooler properly.
Control Panel
Display Panel
SPEED
Remote Control
ON
COOLER
HUMIDIFIER
MODE
SWING
TIMER
Ice Pack (x2)
ON
OFF
SPEED
OFF
Keep it handy to answer your questions. If
you don't understand something or you need
more assistance, please call the De’Longhi
Helpline.
To help us provide prompt answers to your
queries, please record your Evaporative
Cooler model and serial numbers. You’ll find
them on a plate located on the rear outside
wall of the Evaporative Cooler.
Evaporative Cooler details
TIMER SWING
COOLER
MODE
HUMIDIFIER
Page 13Page 4

Care and Cleaning
De’Longhi’s Safety Precautions
Cleaning the Dustproof filter and
Cooling Pad.
To avoid clogging of the dustproof filter,
please clean the filter at least once a month.
No chemical cleaners are needed.
Take off the dustproof filter, turn the knob
Ÿ
of cooling pad as shown below.
Clean the dustproof filter with detergent
Ÿ
water and a soft brush.
Dip the cooling pad into detergent water
Ÿ
and then dry it.
Cleaning the Water Tank
Unplug the unit and pull out the water tank
Ÿ
according to the instructions.
Clean the water tank with a washrag &
Ÿ
detergent water, and then scour away any
buildup.
Cleaning the Appliance
First unplug the appliance to avoid electric
Ÿ
hazard.
Clean the surface of the unit with a damp
Ÿ
cloth, never use an abrasive scourer
directly on the outside surface as it might
scratch.
Do not use corrosive detergent or solvent
Ÿ
to clean. Pouring water on the unit is
strictly forbidden.
Re-Assembly
Reinstall the parts back in the opposite
Ÿ
sequence they were removed: Water
tank, Cooling pad and Dustproof filter
Plug the unit in to make sure it works.
Ÿ
Otherwise please check the installation of
Ÿ
the Water tank.
Maintenance
Unplug the power cord and pack the unit
Ÿ
away to prevent it gathering dust when not
being used for a long time.
Make sure the cooling pad, filter and water
Ÿ
tank are completely dry before packing.
Store the appliance in a dry and ventilated
Ÿ
place.
Disposal
To prevent possible harm to the environment
or human health from uncontrolled waste
disposal, please recycle this appliance
responsibly to promote the sustainable reuse
of material resources. Take the appliance to a
recycling station in your area for safe
disposal.
De’Lon ghi pri de themselves on their
innovative range of the highest quality
consumer products.
De’Longhi ensures all of its products are
100% safe through quality design and
manufacture. All products meet or exceed
s tri n g ent l ab o rat or y -te s t ed s afet y
requirements.
It is necessary for anyone using an electrical
appliance to be safety conscious. The
following precautions are essential for the
safe use of an electrical appliance. Carefully
read all of the instructions provided with your
appliance:
Always turn the power off at the power
Ÿ
outlet before you insert or remove a plug.
Remove by grasping the plug, do not pull
on the cord.
Do not use your appliance with an
Ÿ
extension cord unless this cord has been
checked and tested by a qualified
tec hnician or service person. The
extension cord must be a VDE-Listed, 3wire grounding extension cord that has a
grounding plug and outlet and that the
electrical rating of the cord is 220-240
volts and at least 10 amperes.
Always use your appliance from a power
Ÿ
outlet of the voltage (A.C. only) marked on
the appliance.
Do not use an appliance for any purpose
Ÿ
other than its intended use.
Do not attempt to repair an electrical
Ÿ
appliance. Return a damag ed or
malfunctioning appliance to a qualified
service centre for adjustment or repair if
required.
The appliance must be positioned so the
Ÿ
AC plug is accessible.
This appliance is designed exclusively for
Ÿ
household use. All other uses are strictly
forbidden.
The appliance is not intended for use by
Ÿ
persons (including children) with reduced
physical, sensory or mental capabilities, or
lack of experience and knowledge, unless
they have been given supervision or
instru cti on concerning u se of the
appliance by a person responsible for their
safety.
Children should be supervised to ensure
Ÿ
that they do not play with the appliance.
If the supply cord is damaged, it must be
Ÿ
replaced by the manufacturer, its service
agent or a similarly qualified person in
order to avoid a hazard.
Page 5Page 12

Evaporative Cooler Safety Precautions
Using your Evaporative Cooler
Your safety and the safety of others is very
important. Safety messages are displayed in
this manual and on your appliance.
Read and obey these safety messages as they
will alert you to potential hazards and tell you
how to reduce the chance of injury.
DANGER
Safety Alert Symbol
This symbol alerts you to potential hazards.
Danger
Danger indicates a high level of risk to yourself and
others. Ensure that care is taken to avoid severe
injury or even death.
Using the Ice Box
The added use of the ice-box in the water
tank allows the expelled air to come out
much cooler. It is able to absorb the heat in
th e w ater, wh ich make s th e w ater
te mperatu re below the environment
temperature (by about 8 degrees Celsius) for
around 4 hours.
Put the ice-box in your freezer until it is
Ÿ
completely frozen and solid.
Put the frozen ice-box into the water tank,
Ÿ
lock the water tank door, after 10
minutes, the temperature of the water
tank will be lower than the environment
temperature, and the water will remain
cooler for around 4 hours
There are two ice-boxes to ensure
Ÿ
continual use.
DO NOT open the ice box or swallow the
Ÿ
contents.
Using the Remote Control
Slide out the battery holder at the back of
Ÿ
the remote control as shown below. Install
a battery of type 3V CR2032 into the
holder and slide it into the remote control.
It is then ready for use.
There are 6 keys on the remote control.
Ÿ
Their functions are the same as the keys
on the main control panel.
Point the remote control at the infra-red
Ÿ
receiver. Ideal operating distance is within
6 meters of the receiver.
WARNING
CAUTION
Warning
Warning indicates a moderate level of risk to
yourself, others and the product. Ensure that care
is taken to avoid extensive product damage or
serious injury.
Caution
Caution indicates a level of risk to yourself, others
and the product. Ensure care is taken to avoid
moderate product damage or injuries.
Page 11Page 6

Using your Evaporative Cooler
Evaporative Cooler Safety Precautions
Refilling the Water
Refill the water tank before using the
Ÿ
Cooler/Humidifier.
Rotate the locking knob 90 degrees to the
Ÿ
horizontal position at the rear bottom of
the cooler.
Pull out the water tank and fill with water.
Ÿ
Pay attention to the water level when
refilling the tank with water .
Keep water LOWER than the Maximum
Ÿ
level indicated.
Use clean water.
Ÿ
After refilling the water, push the tank
Ÿ
back into the drawer and lock the water
tank by rotating the knob back to the
vertical locked position.
Please note: During the first usage, there
could be a scent and some discoloring in
the water. This is normal and is not
harmful.
1
Locked Open
MAX
MIN
Water Level Indication
Max
Min
2
3
4
Before the appliance is used, it
must be properly positioned
and installed as described in
this manual, so read the manual
carefully. To reduce the risk of fire, electrical
shock or injury when using the appliance,
follow basic precaution, including the
following:
Caution:
risk of fire
DANGER
Plug into a grounded 3-prong outlet, do
Ÿ
not remove grounding prong, do not use
an adapter, and do not use an extension
cord.
It is recommended that a separate circuit,
Ÿ
serving only your appliance be provided.
Use receptacles that cannot be turned off
by a switch or pull chain.
Never clean appliance parts with
Ÿ
flammable fluids. These fumes can create
a fire hazard or explosion. And do not
store or use gasoline or other flammable
vapours and liquids in the vicinity of this or
any other appliance. The fumes can
create a fire hazard or explosion.
Do not connect or disconnect the electric
Ÿ
plug when your hands are wet. There is a
potential hazard of electric shock.
Turn off and unplug the appliance before
Ÿ
cleaning or servicing. Failure to do so can
result in electrical shock or death.
Unplug the appliance during filling.
Ÿ
DO NOT insert any objects such as
Ÿ
wooden sticks or metal sticks into the
appliance. It may lead to leakage, short
circuit, or product damage.
If something is wrong with the product,
Ÿ
please send it to an authorised service
centre or call a De’Longhi representative.
Do not attempt to repair or replace any
part of your appliance unless it is
specifically recommended in this material.
All other servicing should be referred to a
qualified technician.
Unauthorised disassembly will affect the
Ÿ
safety of the product.
DO NOT spray pesticide or any other
Ÿ
flammable sprays near the product.
When cleaning or filling the appliance,
Ÿ
please turn it off and unplug the power
cord. Do not proceed until it has
completely stopped functioning.
If you notice an abnormal smell or sound
Ÿ
during use, please turn off the appliance
immediately and unplug the power.
DO NOT shower the appliance in water, it
Ÿ
may lead to electrical shock, leakage,
short circuit or product damage.
WARNING
To ensure proper ventilation for your
Ÿ
appliance, the front of the unit must be
completely unobstructed. This unit must
be installed in an area protected from the
element, such as wind, rain, water spray
or drips.
The appliance must be installed with all
Ÿ
electrical, water and drain connections in
accordance with state and local codes. A
standard electrical supply (240V AC only,
50 Hz), properly grounded in accordance
with the local codes and regulations.
Do not locate the appliance next to
Ÿ
ovens, grills or other sources of high heat.
Page 7Page 10

Evaporative Cooler Safety Precautions Using your Evaporative Cooler
The fuse (or circuit breaker) size should be
Ÿ
10 amperes.
Operate the appliance on a level surface.
Ÿ
Keep ventilation openings clear of
Ÿ
obstruction.
This appliance is intended to be used in
Ÿ
household and similar applications eg:
- staff kitchen areas in shops, offices and
other working environments;
- farm houses and by clients in hotels,
motel s a nd ot her re sidentia l t ype
environments;
- bed and breakfast type environments;
-Ca ter i ng a n d si m ila r non -re tai l
applications.
Electrical Connection
This applia nce should be properl y
Ÿ
grounded for your safety. The power cord
of this appliance is equipped with a threeprong plug which mates with standard
three prong wall outlets to minimise the
possibility of electrical shock.
Do not under any circumstances cut or
Ÿ
remove the third ground prong from the
power cord supplied. For personal safety,
th is applianc e must b e pr operly
grounded.
This appliance requires a standard 240
Ÿ
Volt AC ~/50Hz electrical ground outlet
with three-prong. Have the wall outlet and
circuit checked by a qualified electrician to
make sure the outlet is properly grounded.
When a standard 2-prong wall outlet is
encountered, it is your responsibility and
obligation to have it replaced with a
properly grounded 3-prong wall outlet.
The cord should be secured behind the
Ÿ
appliance and not left exposed or
dangling to prevent accidental injury.
The appliance should always be plugged
Ÿ
into its own individual electrical outlet
which has a voltage rating that matches
the rating label on the appliance. This
provides the best performance and also
prevent overloading house wiring circuits
that could cause a fire hazard from
overheated.
Never unplug the appliance by pulling the
Ÿ
power cord. Always grip the plug firmly
and pull straight out from the receptacle.
Repair or replace immediately all power
Ÿ
cords that have become frayed or
otherwise damaged. Do not use a cord
that shows cracks or abrasion damage
along its length or at either end.
When moving the appliance, be careful not
Ÿ
to damage the power cord.
If the supply cord is damaged, it must be
Ÿ
replaced by the manufacturer, its Service
agent or a similarly qualified person in
order to avoid a hazard.
Make sure that the plug is fully inserted into
Ÿ
the wall socket before use.
DO NOT fold or put kinks in the supply
Ÿ
cable or place heavy objects on it. It could
lead to cable damage.
Extension Cord
Because of potential safety hazards under
Ÿ
ce rt ai n conditio ns , it i s st ro ng ly
recommended that you do not use an
extension cord with this appliance.
However, if you must use an extension
cord it must be checked and tested by a
qualified technician or service person.
The extension cord must be a VDE-Listed,
3-wire grounding extension cord that has
a grounding plug and outlet and that the
electrical rating of the cord is 220-240
Volts and at least 10 amperes.
ON
COOLER
SPEED
HUMIDIFIER
Unpacking
Remove the packaging and dispose of the
packaging material carefully. Follow the
instructions below for using the appliance.
Using the Cooler
Explanation of the function keys.
Plug in the cooler and you will hear a beep
Ÿ
beep. The appliance is in standby mode,
you can only use the ON/SPEED button.
OFF key: Press this button to exit
Ÿ
functions and enter into Standby mode.
ON/SPEED key: In standby mode, press
Ÿ
this key and the appliance starts from
medium speed then changes to low
s p e e d w i t h i n 3 s ec onds, t h e
corresponding light will go on. The
appliance is under normal wind mode, the
corresponding low speed LED light is on.
Press the OFF key again to turn off the
appliance.
MODE key: Press the button once to
Ÿ
switch from normal to natural Mode, press
again to enter into sleep mode, Press for a
third time to exit wind mode selection. The
LED lights change accordingly.
MODE
TIMER
Ÿ
Ÿ
Ÿ
Ÿ
Ÿ
SWING
SWING: Press this button once to activate
the rotating vent. Press again to exit swing
mode. The corresponding LED turns on
and off accordingly.
COOLER/HUMIDIFIER: Press this button
to activate the Cooling/Humidifying
function, the corresponding LED will
come on. The wind speed automatically
switches to LOW speed;
Wind Mode will stop temporarily even
though the LED is still on. 5 minutes later,
the Wind Speed and Wind Mode will
automatically restart to the status before
turning on the Cooler/Humidifier function.
The Wind Speed and Wind Mode can
then be adjusted.
TIMER: Press this button to set timing
from 0.5~7.5 hours.
Wat er Shortage In dic ation: Unde r
Cooler/Humidifier function, when the
water level reaches below the lowest
water level allowed, the appliance will
warn you for 10 seconds and then shut off
t h e C ooler /H u m i d i fier f un ct io n
automatically.
The appliance will automatically cut off
power when the water tank is taken out.
OFF
Page 8 Page 9
 Loading...