

Page 1
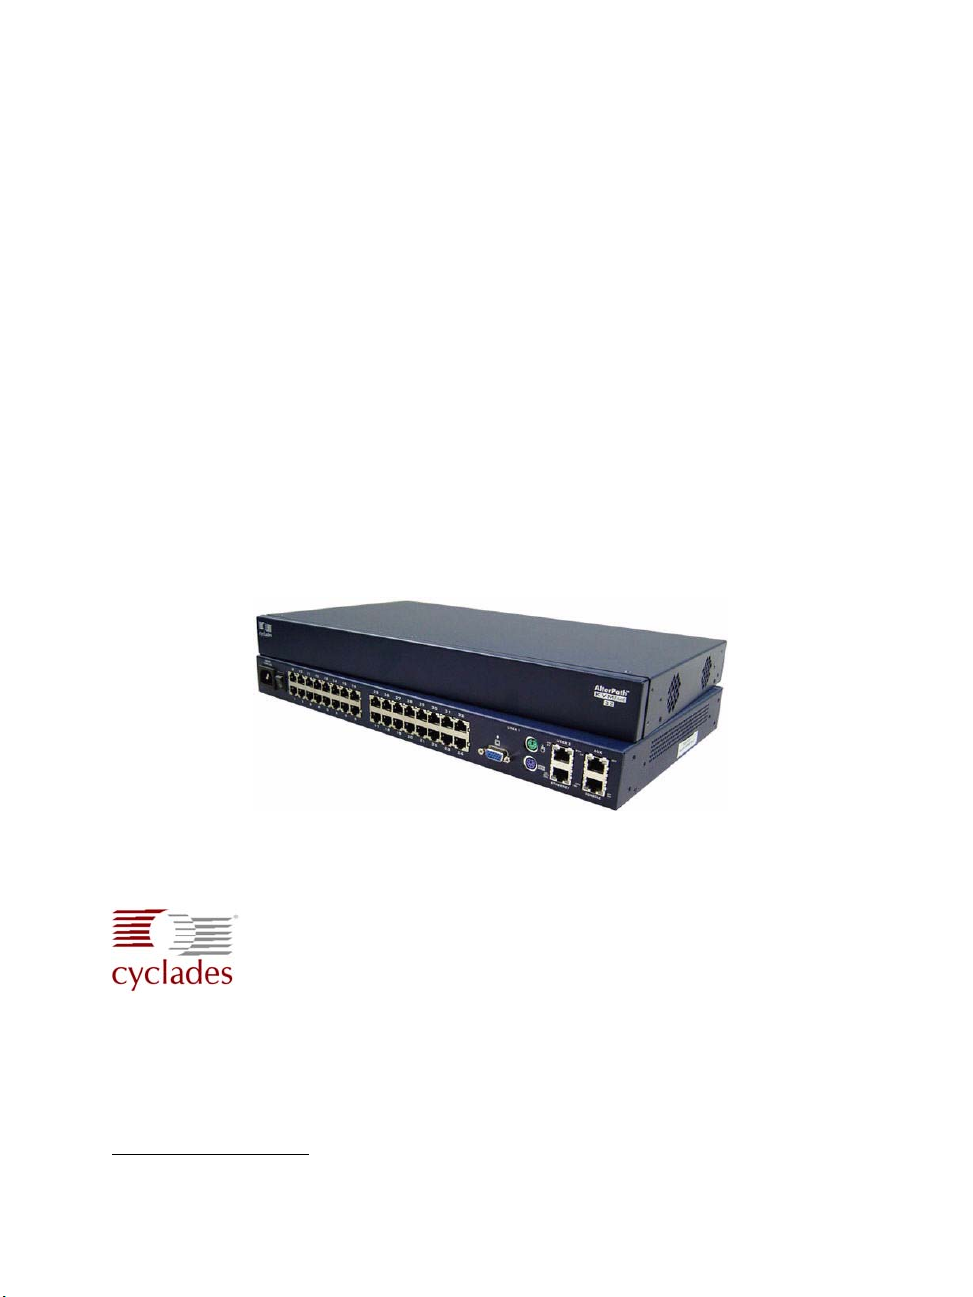
AlterPath KVM/net Installation,
Administration, and User’s Guide
Cyclades Corporation
3541 Gateway Boulevard
Fremont, CA 94538 USA
1.888.CYCLADES (292.5233)
1.510.771.6100
1.510.771.6200 (fax)
http://www.cyclades.com
Release Date: May 2006
Part Number: PAC0368
Software Version 2.1.1
Page 2

©2006 Cyclades Corporation
Information in this document is subject to change without notice.
The following are registered or registration-pending trademarks of Cyclades Corporation in the United
States and other countries: Cyclades and AlterPath.
All trademarks, trade names, logos and service marks referenced herein, even when not specifically
marked as such, belong to their respective companies and are not to be considered unprotected by law.
Page 3

Contents
Before You Begin ...................................................xiii
Chapter 1: Introduction.............................................1
Description ......................................................................................................2
Guidelines for Using the KVM/net .................................................................4
Connectors on the KVM/net ...........................................................................4
Types of Ports .............................................................................................4
Connectors on the Back ..............................................................................6
Power Connector and Power Switch .......................................................7
KVM Ports ................ .... ............................................................... ...........7
Management Ports (Console, Ethernet, User 1, User 2) .........................8
AUX Ports .............................................................................................10
Activity LEDs on the Back of the KVM/net ................................................10
AlterPath KVM/net Ordering Options ..........................................................13
Types of Users ..............................................................................................14
Simultaneous KVM/net Logins ................................................................15
Simultaneous Server Connections ............................................................16
Administration Options .................................................................................17
Cyclades Web Manager ................. ..... ..........................................................18
Prerequisites for Using the Web Manager ....................................................19
TCP Ports ......................................................................................................20
Cascaded Devices .........................................................................................21
Accessing Ports on Cascaded KVM Devices ...........................................24
KVM/net Port Permissions .......................................................................24
Understanding KVM Port Permissions .....................................................25
KVM Port Permissions Hierarchy ............................................................26
Page 4

Decision 1: Check User’s KVM Port Permissions ...............................26
Decision 2: Check Group’s KVM Port Permissions .............................27
Decision 3: Check Generic User’s KVM Port Permissions ..................27
Decision 4: Check User’s Default Permissions ....................................28
Decision 5: Check Group’s Default Permissions ..................................28
Decision 6: Check Generic User’s Default Permissions .......................29
Server Access: Inband and Out of Band .......................................................29
Determining the Connection Type and its Supported Functionality ........31
Administering Users of Connected Servers ..................................................33
Types of Access to Ports ...........................................................................33
Tasks Related to Access to Connected Devices .......................................33
Redefining Keyboard Shortcuts (Hot Keys) .................................................35
Redefining KVM Connection Hot Keys ...................................................35
Redefining Sun Keyboard Equivalent Hot Keys ......................................35
Summary of Tasks for Redefining Hot Keys ............................................36
Disabling Mouse Acceleration ......................................................................36
Screen Resolution and Refresh Rate .............................................................37
Packet Filtering on the KVM/net .............................................................. 38
Power Management ......................................................................................40
Options for Managing Power ....................................................................40
Controlling Power Through the Web Manager IPDU Power Management
Forms ....................................................................................................41
Controlling Power While Connected to KVM Ports ............................41
Setting Up and Configuring Power Management ..................................... 42
Security .........................................................................................................44
Security Profiles .................................................... ..... .... ...........................44
Encryption ................................................................................................. 45
Authentication ........................................................................................... 45
Choosing Among Authentication Methods ..........................................45
Tools for Specifying Authentication Methods ......................................48
Lockout Macro ........................................................... .... ..... ......................49
Notifications, Alarms, and Data Buffering ................................................... 53
Syslog Servers ...........................................................................................54
Prerequisites for Logging to Syslog Servers .........................................54
Facility Numbers for Syslog Messages .................................................54
Example of Using Facility Numbers .....................................................54
SNMP Traps ..............................................................................................55
Configuring Logging, Alarms, and SNMP Traps .....................................55
VPN and the KVM/net .................................................................................56
iv AlterPath KVM/net Installation, Administration, and User’s Guide
Page 5

Considerations When Choosing Whether to Enable DHCP .........................57
KVM Terminator Usage and Types ..............................................................58
Activity LEDs on the Terminator .............................................................58
KVM Expander .............................................................. .... ...........................59
KVM Expander Features ..........................................................................59
KVM Expander Models and Components ................................................60
Ports on the KVM Expander .....................................................................62
LEDs on the KVM Expander ....................................................................63
Power Outlets on the KVM Expander ......................................................63
Cascading a KVM Expander ....................................................................64
Adding the KVM Expander to the KVM/net Unit’s List
of Cascaded Devices ................................................................................. 67
Upgrading the Microcontroller Code ........................................................67
User Access ...............................................................................................68
AlterPath KVM RP .......................................................................................68
Connectors on the Back of the KVM RP ..................................................69
Chapter 2: Installation.............................................71
Shipping Box Contents KVM/net .................................................................73
Setting Up the KVM/net ...............................................................................75
Making an Ethernet Connection ...................................................................77
Connecting Servers to the KVM Ports .........................................................78
Making a Direct Connection for Network Configuration .............................82
Powering On the KVM/net and Connected Devices ....................................83
Performing Basic Network Configuration ....................................................84
Configuring Basic Networking Using the wiz Command ........................85
Configuring Basic Networking Using the OSD ........................................89
Completing Configuration Using the Web Manager ....................................98
Changing Default Passwords ........................................................................99
Enabling Access to the Web Manager without Making a Direct Connection ..
.....................................................................................................................101
Preconfiguring the KVM/net for Remote Installation ................................104
Additional Configuration Tasks ..................................................................105
Disabling Mouse Acceleration ...................................................................106
Required Security Settings For Internet Explorer .......................................109
Modify IE Security Settings ....................................................................109
v
Page 6

Chapter 3: Advanced Installation Procedures....115
Connecting an External Modem .................................................................116
Connecting AlterPath PMs to the KVM/net ............................................... 117
Installing the AlterPath KVM Expander ....................................................119
Shipping Box Contents KVM Expander .................................................120
Setting Up the KVM Expander ...............................................................121
Powering On the KVM Expander and Connected Devices .................... 124
Connecting Cascaded KVM Units to the Primary KVM/net ..................... 126
Installing the AlterPath KVM RP ...............................................................129
Shipping Box Contents AlterPath KVM RP ...........................................130
Options for Accessing the KVM RP .......................................................131
Supplying Power to the KVM RP ...........................................................132
Chapter 4: Web Manager for Administrators ......133
Common Tasks ...........................................................................................134
Common Features of Administrators’ Windows ........................................136
Administrators’ Control Buttons, Logout Button, and KVM/net Information
..................................................................................................................136
Obtaining More Information ...................................................................137
Logging In to the Web Manager and Saving Changes ...........................137
Administrative Modes .................................................................................141
Wizard Mode ..............................................................................................141
Procedures in Wizard Mode ....................................................................142
Steps in Wizard Mode [Wizard] .............................................................143
Step 1: Security Profile [Wizard] ............................................................143
Pre-defined Security Profiles ..............................................................143
Custom Security Profile ......................................................................144
Step 2: Network Settings [Wizard] .........................................................149
Step 3: Access [Wizard] ..........................................................................151
Step 4: System Log [Wizard] ..................................................................157
Expert Mode ..............................................................................................159
Access .........................................................................................................160
Connect to Server .................................................................................. ..161
IPDU Power Management .................................... ..... .... .........................161
Outlets Manager ..................................................................................162
View IPDUs Info ................................................................................164
Users Manager ....................................................................................165
vi AlterPath KVM/net Installation, Administration, and User’s Guide
Page 7

Configuration ...................................................................................... 167
Software Upgrade ...............................................................................169
Configuration .............................................................................................. 169
KVM .......................................................................................................170
General ................................................................................................ 171
General ................................................................................................ 172
Enabling Direct Access to KVM Ports ...............................................173
Redefining KVM Connection Keyboard Shortcuts (Hot Keys) .........173
Redefining Sun Keyboard Modifier Keys ..........................................175
Specifying Authentication for KVM Port Logins ...............................175
Local Users and IP Users ....................................................................176
Devices ................................................................................................ 182
Configuring Individual KVM Ports ....................................................183
Configuring Cascaded KVM Units .....................................................187
Users & Groups ...................................................................................191
Configuring Inband (RDP) Servers ........................................................199
Prerequisites for Inband Access to RDP Servers ....................................200
Security ...................................................................................................204
Configuring an Authentication Method ..............................................205
Configuring Authentication Servers for Logins to the KVM/net and
Connected Devices ..............................................................................208
Group Authorization ...........................................................................209
Group Authorization on TACACS+ ...................................................220
Security Profiles ......................................................................................221
Pre-defined Security Profiles ..............................................................221
Custom Security Profile ......................................................................222
Network ...................................................................................................226
Host Settings .......................................................................................228
Syslog .................................................................................................. 231
IP Filtering ..........................................................................................233
VPN .....................................................................................................250
SNMP .................................................................................................. 253
Notifications ........................................................................................ 258
Host Tables .........................................................................................262
Static Routes .......................................................................................264
AUX Port ................................................................................................266
System ..................................................................................................... 268
Time/Date ...........................................................................................269
vii
Page 8

Setting up Customized Timezone Configuration ................................271
Boot Configuration .............................................................................273
Online Help .............................................................................................277
Viewing System Information ...................................................................... 278
General .................................................................................................... 278
Station Status ..........................................................................................279
Management ................................................................................................281
Backup Configuration .............................................................................283
Firmware Upgrade ..................................................................................287
Microcode Upgrade ................................................................................290
Microcode Reset .......................................................................... .... ..... ..294
Active Sessions .......................................................................................296
Reboot ..................................................................................................... 298
Chapter 5: Web Manager for Regular Users........299
Web Manager for Regular Users ................................................................300
Prerequisites for Logging in to the Web Manager ......................................302
Connect to Server ........................................................................ ..... .... .......304
IPDU Power Management .................. .... ..... ...............................................304
Power Control of Any Device Plugged Into an AlterPath PM on the KVM/
net ............................................................................................................ 305
Changing Your KVM/net Password ...........................................................306
Chapter 6: Accessing Connected Devices..........307
Who Can Access Connected Devices .........................................................309
Server Connections: What You See ............................................................310
Viewing KVM Connections ...................................................................311
Viewing In-band Connections ................................................................313
Prerequisites for Accessing Servers With In-band Connections ................313
Prerequisites for Accessing Servers With KVM Connections ...................314
Disabling Mouse Acceleration ....................................................................314
Screen Resolution and Refresh Rate ...........................................................315
Web Manager Login Screen .......................................................................316
Login Screen: Direct Logins Not Enabled ..............................................318
Connect to Server Drop-down List .......... ...............................................318
Servers and Connection Types in the Connect to Server Drop-down List
viii AlterPath KVM/net Installation, Administration, and User’s Guide
Page 9

..............................................................................................................318
Port Numbers of Cascaded KVM Devices in the Connect to Server Drop-
down List ............................................................................................319
Login Screen: Direct Logins Enabled, Only IP Address Entered ...........320
Login Screen: Direct Logins Enabled, IP Address and Port Entered .....320
Connecting to Servers Remotely Through the Web Manager ....................321
Connecting to Servers Locally Through the OSD ......................................325
Controlling KVM Port Connections ...........................................................328
Hot Keys for KVM Connections ............................................................329
Hot Keys for Emulating Sun Keyboard Keys .........................................330
Cycling Between Servers ........................................................................332
Resetting the Keyboard and Mouse ........................................................334
Controlling Power of a KVM-connected Server ....................................335
Closing a KVM Connection ....................................................................336
Sharing KVM Port Connections .............................................................336
AlterPath Viewer Settings ..........................................................................339
Recommended Settings ...........................................................................339
Options Menu ..........................................................................................340
Setting the Viewer Options .....................................................................341
Connection Menu .................................................. ..... .... .........................342
Power Management ....................................................................................343
Modem Connections ...................................................................................346
Chapter 7: On Screen Display ..............................351
Navigating the OSD ....................................................................................352
Basic Navigation Keys ............................................................................352
Common Navigation Actions .................................................................353
Logging In Through the OSD .....................................................................353
OSD Main Menu .........................................................................................354
Invoking OSD Using [PrintScreen] Key ....................................................355
Connection Menu ........................................................................................356
Power Management Menu ..........................................................................357
Configure Menu Overview .........................................................................358
Understanding OSD Configuration Screen Series ..................................361
General Configuration Screens [OSD] ...................................................362
Network Configuration Menu Options [OSD] .......................................365
Network Configuration Screens [OSD] ..............................................366
ix
Page 10

SNMP Configuration Screens [OSD] .................................................369
VPN Configuration Screens [OSD] ....................................................373
IP Filtering Configuration Screens .....................................................377
Hosts Configuration Screens [OSD] ...................................................384
Static Routes Configuration Screens ..................................................386
Date/time Configuration Screens ............................................................389
User Station Screens ...............................................................................390
KVM Ports Screens .................................................................................394
AUX Port Screens ...................................................................................396
Cascade Devices .....................................................................................399
Users and Groups Screens ......................................................................403
Syslog Screens ........................................................................................410
Notification Screens ................................................................................411
Authentication Screens ...........................................................................413
Save/Load Configuration Screens ...........................................................421
System Info Menu .......................................................................................424
Reboot ......................................................................................................... 426
Controlling the OSD Through the AlterPath KVM RP ..............................428
Appendix A: Troubleshooting ..............................431
How to Replace the KVM/net’s Boot Image ..........................................431
How to Upgrade the Firmware on KVM/net .......................................... 437
How to Boot the KVM/net Over the Network. .......................................440
How to Boot the KVM/net in Single User Mode ...................................442
How to Disable Mouse Acceleration Using Windows Registry .............445
Appendix B: Technical Specifications.................447
Appendix C: Safety Guidelines.............................449
General Safety Precautions .........................................................................449
Rack or Cabinet Placement .........................................................................451
Table Placement ..........................................................................................451
Safety Guidelines for Rack-Mounting the KVM/net ..................................451
Safety Precautions for Operating the AlterPath KVM/net .........................453
x AlterPath KVM/net Installation, Administration, and User’s Guide
Page 11

Glossary .................................................................457
Index .......................................................................471
xi
Page 12

xii AlterPath KVM/net Installation, Administration, and User’s Guide
Page 13

Before You Begin
This installation, administration, and user’s guide provides background
information and procedures for installing, configuring, and administering the
Cyclades™ AlterPath family of KVM products including:
• AlterPath KVM/net
• AlterPath KVM Expander
• AlterPath KVM RP
• AlterPath KVM Terminators
In addition, this guide offers information and procedures for accessing
connected servers and other connected devices.
Audience
This manual is intended for installers and system administrators of the
AlterPath KVM/net and for users who may be authorized to connect to
devices and to manage power through the AlterPath KVM/net.
This document describes configuration, administration, and use of the
AlterPath KVM/net only. It does not describe how to set up and administer
other external services or servers that the AlterPath KVM/net may access for
authentication, system logging, SNMP notifications, data logging, file
sharing, or other purposes. This document assumes that users who are
authorized to connect to servers and other devices through the AlterPath
KVM/net already know how to use the connected devices.
Page 14

Document Organization
This document contains the following chapters:
Chapter 1: Introduction
Chapter 2: Installation
Chapter 3: Advanced Installation
Procedures
Chapter 4: Web Manager for
Administrators
Chapter 5: Web Manager for Regular
Users
Chapter 6: Accessing Connected
Devices
Defines and explains the overall product
features and uses of AlterPath KVM/net.
Explains the procedures for installing the
AlterPath KVM/net and setting up its basic
configuration.
Explains the procedures for installing the KVM
Expander and the KVM RP in addition to
explaining how to install an external modem,
an AlterPath PM and how to cascade KVM
units to the AlterPath KVM/net.
Explains how to use the Web Manager,
highlighting such procedures as how to
configure the AlterPath KVM/net, add or delete
users, define user access, add or delete server
connections, and other topics pertaining to
AlterPath KVM/net administration.
Presents the procedures for connecting to a port
and other operations related to using the web
user interface.
Explains how to connect to KVM ports and
inband servers and how to use the AlterPath
Viewer and control KVM connection sessions.
Chapter 7: On Screen Display
Describes how to use the On Screen display for
local connections to the User 1 port.
Appendix A: Troubleshooting
Explains how to troubleshoot
commonAlterPath KVM/net issues.
Appendix B: Technical Specifications
List the technical specifications for the KVM/
net
xiv AlterPath KVM/net Installation, Administration, and User’s Guide
Page 15

Appendix C: Safety Guidelines
Glossary
Related Documents
The following document for the AlterPath KVM/net is shipped with the
product.
• AlterPath KVM/net QuickStart Guide (hard-copy)
The documentation for Cyclades AlterPath products mentioned in this guide
such as AlterPath PM, and AlterPath KVM family of products are on the
Documentation CD shipped with the product and they are also available at:
http://www.cyclades.com/support/downloads.php
Updated versions of this document will be posted on the downloads section of
the Cyclades website in the “AlterPath KVM/net” section when Cyclades
releases new versions of the software.
A printed version of this document can be ordered under part number
PAC0368through your Cyclades sales representative.
List the general safety guidelines for Cyclades
products.
Glossary of terms and acronyms used in the
manual.
.
Typographic and Other Conventions
The following table describes the typographic conventions used in Cyclades
manuals.
Table P-1: Typographic Conventions
Typeface Meaning Example
Links
Hypertext links or URLs Go to:
http://www.cyclades.com
xv
Page 16

Table P-1: Typographic Conventions
Typeface Meaning Example
Emphasis Titles or emphasized or new words or
terms
Filename or
Command
Names of commands, files, and
directories; onscreen computer output.
User type What you type in an example, compared
See the AlterPath KVM/net
Quick Start
Edit the pslave.conf
file.
[kvm #] ifconfig eth0
to what the computer displays
The following table describes other terms and conventions.
Table P-2: Other Terms and Conventions
Term or Convention Meaning Examples
Hot keys When hot keys are shown, a plus
(+) appears between two keys
that must be pressed at the same
time, and a space appears
between two keys that must be
pressed sequentially.
Ctrl+k p entered while
the user is connected to a
KVM port brings up an
IPDU power management
screen. Ctrl and k must be
pressed at the same time
followed by p.
Navigation shortcuts Shortcuts use the “greater than”
symbol (>) to indicate how to
Go to Configuration>KVM>
General in Expert mode.
navigate to Web Manager forms
or OSD screens.
xvi AlterPath KVM/net Installation, Administration, and User’s Guide
Page 17

Chapter 1
Introduction
This chapter gives an overview of the features of the Cyclades AlterPath
KVM/net. This chapter describes how administrators and operators can use
the KVM/net features to securely manage connected computer systems and a
large variety of devices from anywhere on the local area network or on the
Internet. This chapter also provides important prerequisite information for
understanding the information and procedures in this manual.
The following table lists the topics in this chapter.
Description Page 2
Connectors on the KVM/net Page 4
Cyclades Web Manager Page 18
Prerequisites for Using the Web Manager Page 19
Cyclades Web Manager Page 18
Accessing Ports on Cascaded KVM Devices Page 24
TCP Ports Page 20
AlterPath KVM/net Ordering Options Page 13
Administering Users of Connected Servers Page 33
Power Management Page 40
Notifications, Alarms, and Data Buffering Page 53
Considerations When Choosing Whether to Enable DHCP Page 57
Page 18
Description
KVM Terminator Usage and Types Page 58
Description
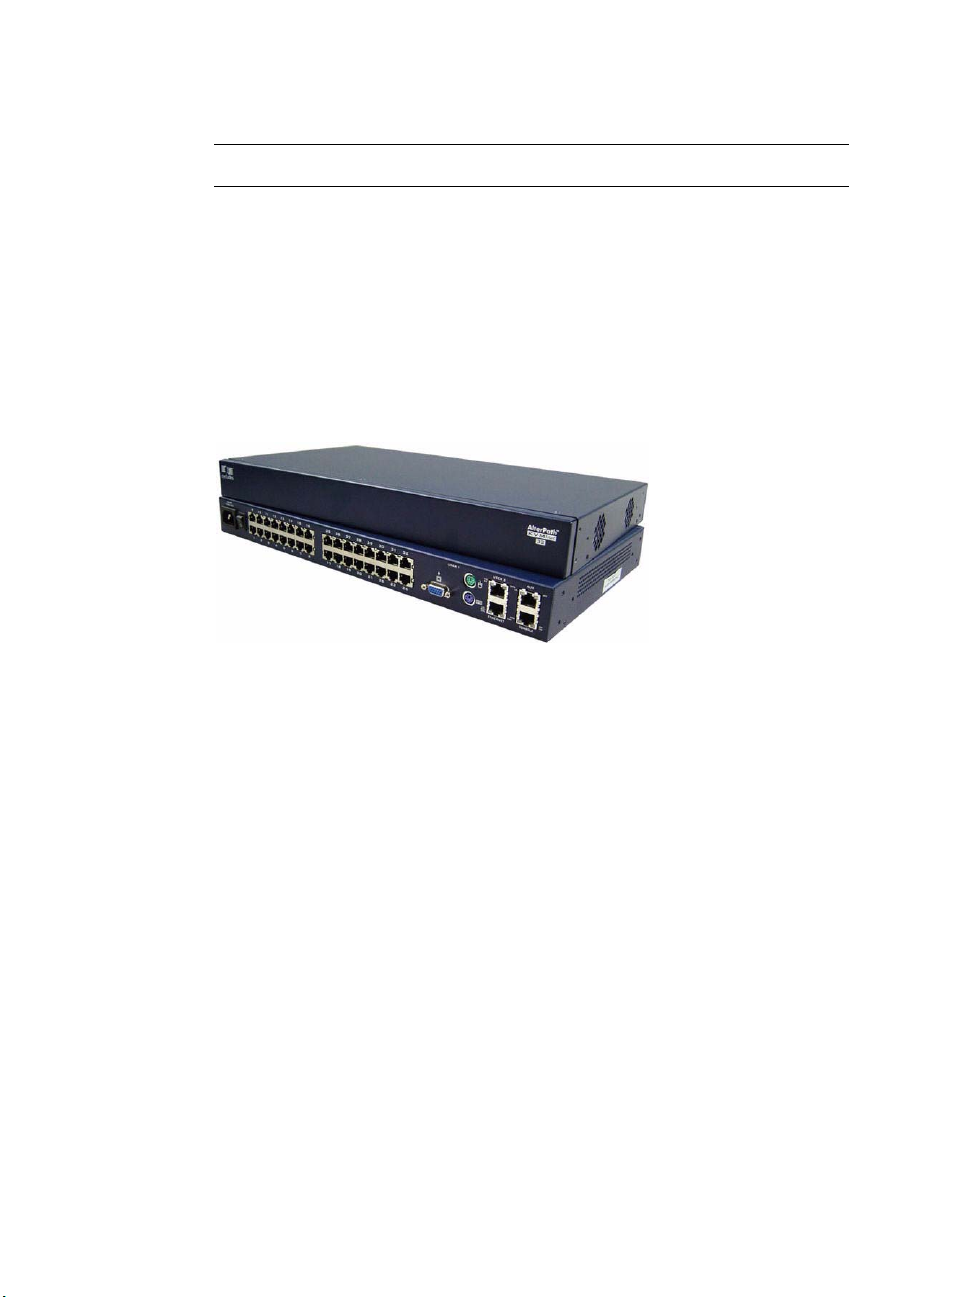
The KVM/net is a 1U rack-mountble device that serves as a single access
point for administering and using servers and other devices through inband
and out-of-band access methods.
The following figure shows the front and back of the KVM/net.
Figure 1-1: KVM/net Front and Back
You use the KVM ports on the left and middle back of the KVM/net to
connect servers. You can use the AUX port on the right back to connect
AlterPath PMs or an optional external modem. You use the management ports
on the right back to connect to the KVM/net and to its connected devices.
Depending on the model, the KVM/net comes with either 16- or 32-KVM
ports to connect from 16 to 32 servers with KVM connections.
The KVM/net can be used to manage power of up to 128 devices when the
devices are plugged into up to 32 daisy-chained AlterPath PM intelligent
power distribution units that are connected to the AUX port on the KVM/net.
KVM/net administrators and users who are authorized to access connected
devices can connect locally or remotely from LANs, WANs, or other dial-in
connections through the Ethernet po rt or through an optional external modem.
For extended local administration, administrators can connect the Cyclades
AlterPath KVM Expander (purchased separately) to the KVM/net with a
CAT5 cable of up to 500 feet in length.
2 AlterPath KVM/net Installation, Administration, and User’s Guide
Page 19

Description
Note: The 500-foot limit includes the distance of the User 2 from the KVM/net and
the distance of the most remote system connected to a KVM port.
Secondary KVM units such as the Cyclades AlterPath KVM Expander or an
AlterPath KVM can be cascaded for extended KVM server connections. A
maximum of 32 secondary KVM devices can be cascaded from the primary
KVM/net extending the number of KVM ports to a maximum of 512 for twouser configuration (i.e. two connections to each cascaded device), or 1024 for
a one-user configuration.
If multiple KVM/net units are installed in multiple remote locations, a
Cyclades AlterPath Manager (purchased separately) can manage all the
KVM/net units together with other Cyclades products and their connected
devices through a single IP address.
Access to the KVM/net for administration is separate from access to
connected devices. Only the KVM/net administrator can configure access to
the KVM/net and to the connected devices.
Both KVM/net administrators and users authorized to access connected
devices can use the W eb Manager from a browser . Authorized users can log in
to devices, manage power, and change their own passwords, but they do not
have access to the KVM/net screens for configuring users or ports.
All logins to the KVM/net are subject to authentication. The KVM/net
administrator can restrict access to each of the connected devices by choosing
among authentication methods for logins to the KVM/net and to its ports.
Authentication can be local to the KVM/net or through an authentication
server.
The KVM/net administrator can further control access by controlling which
ports are assigned to each user name.
The KVM/net administrator can configure event logging, alarms, and
notifications, set up encryption, and data buffering.
After initial network configuration is performed on the KVM/net, the
Cyclades Web Manager provides a real-time view of all the connected
equipment and makes it possible for administration to be done from a browser
on any computer on site or on the Internet.
Introduction 3
Page 20

Guidelines for Using the KVM/net
Guidelines for Using the KVM/net
Configuration of user accounts and access to the ports and all other
management of the connected devices is done through the Web Manager.
Troubleshooting in the event of network failure can be done using one of the
two direct-connect methods, or by using the Web Manager through a dial-up
connection to an external modem connected to the AUX port.
See “Accessing Connected Devices” on page 307 for instructions on how
users without KVM/net administration privileges can access computers and
AlterPath PMs that are connected to the KVM/net.
Connectors on the KVM/net
The following sections describe the connectors on the back and front of the
KVM/net, including ports, card slots, and plugs.
Types of Ports
The KVM/nets ports include KVM ports, which support server connections,
an AUX ports, and management ports including the User 1, User 2, Console,
and Ethernet ports, as described in the following table.
Table 1-1: Port Types
Port
Type
KVM Connect an RJ-45 CAT5 cable to a
AUX Connect an RJ-45 cable to an:
4 AlterPath KVM/net Installation, Administration, and User’s Guide
Connection Information Where Documented
• “KVM Ports” on page 7
Terminator, which is connected to a
server.
• AlterPath PM intelligent power
distribution unit (IPDU)
or
• external modem.
• “To Connect Computers to KVM
Ports” on page 80
• “AUX Ports” on page 10
• “To Connect an AlterPath PM to
the AUX Port” on page 117
• “To Connect an External Modem
to the AUX Port” on page 116
Page 21

Table 1-1: Port Types (Continued)
Connectors on the KVM/net
Port
Connection Information Where Documented
Type
Console Connect a CAT5 to DB-9 cable to a
COM port on a computer.
Ethernet Connect an Ethernet cable to the
local area network (LAN).
User 1
[PS/2 and
VGA]
Connect a keyboard, video, mouse
cable to a local station’s keyboard,
monitor, and mou s e.
User 2 Connect an RJ-45 cable of up to 500
feet to an AlterPath KVM RP. The
KVM RP can be ordered separately.
Note:The 500-foot limit includes
the distance of the User 2 from the
KVM/net and the distance of the
most remote system connected to a
KVM port.
• “Management Ports (Console,
Ethernet, User 1, User 2)” on page
8
• “To Connect to the Console Port”
on page 82
• “Management Ports (Console,
Ethernet, User 1, User 2)” on page
8
• “T o Make an Ethernet Connectio n”
on page 77
• “Management Ports (Console,
Ethernet, User 1, User 2)” on page
8
• “To Connect to the User 1
Management Port” on page 83
• “Management Ports (Console,
Ethernet, User 1, User 2)” on page
8
• “AlterPath KVM RP” on page 68
• “To Connect the KVM RP to the
KVM/net” on page 131
Introduction 5
Page 22
Connectors on the KVM/net
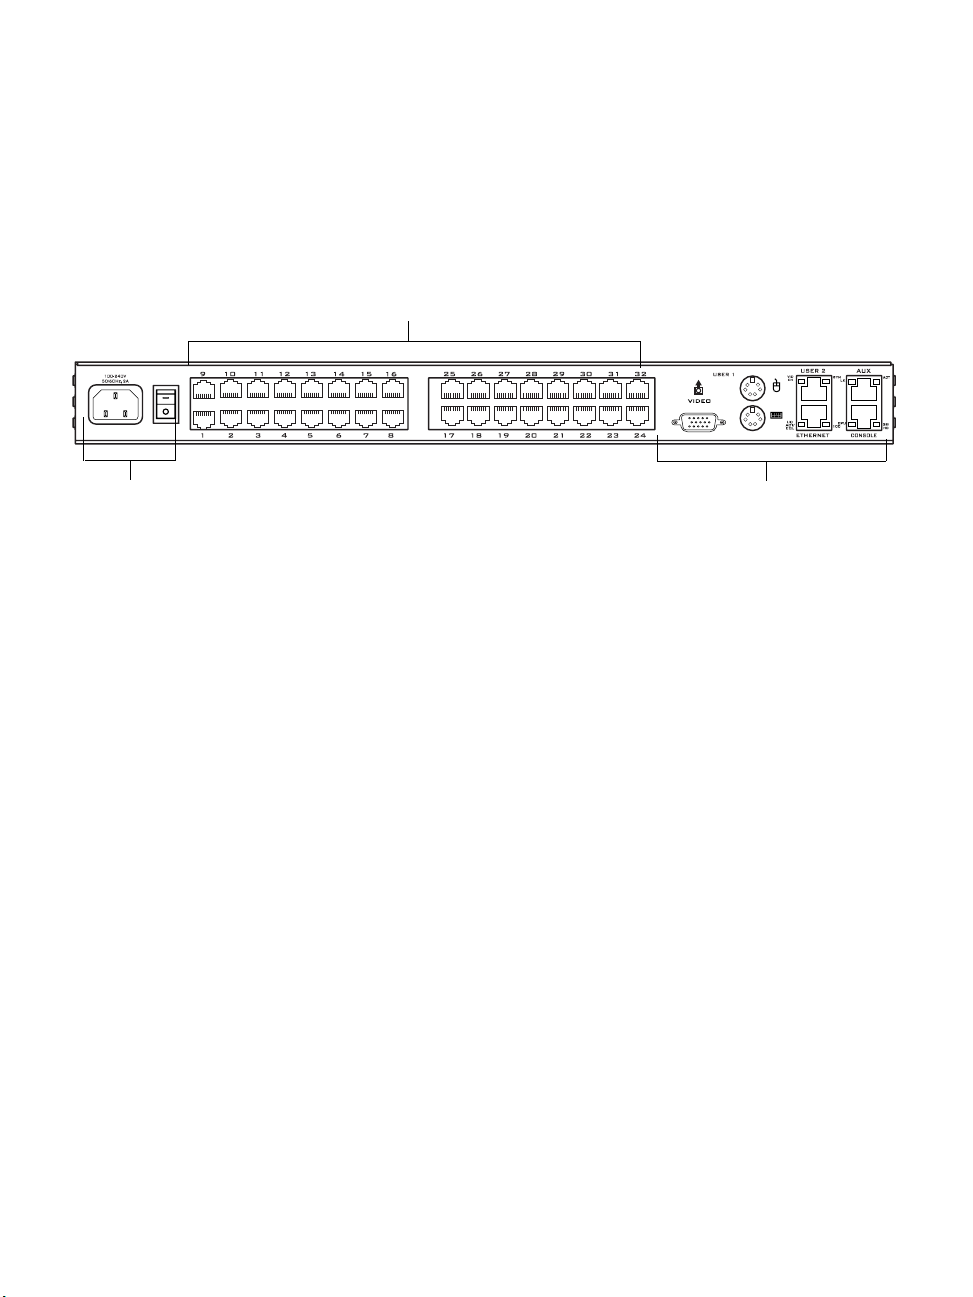
Connectors on the Back
The back of the KVM/net has KVM and management ports, a power cord
connector, a power switch, and an AUX port as illustrated in the following
figure.
Figure 1-2: KVM/net Back Panel
• On the left are the power connector and power switch and either 16- or 32KVM ports, which are used for connecting computing systems with KVM
connections.
See “Power Connector and Power Switch” on page 7 and “KVM Ports” on
page 7.
• On the right is the AUX port, which is used to connect to PMs or an
external modem, and the management ports, which are used for local
management of the KVM/net.
See “Management Ports (Console, Ethernet, User 1, User 2)” on page 8
and “AUX Ports” on page 10.
r
t
s
o
P
M
V
K
Management and AUX PortsPower Cord Connector and Switch
6 AlterPath KVM/net Installation, Administration, and User’s Guide
Page 23
Connectors on the KVM/net
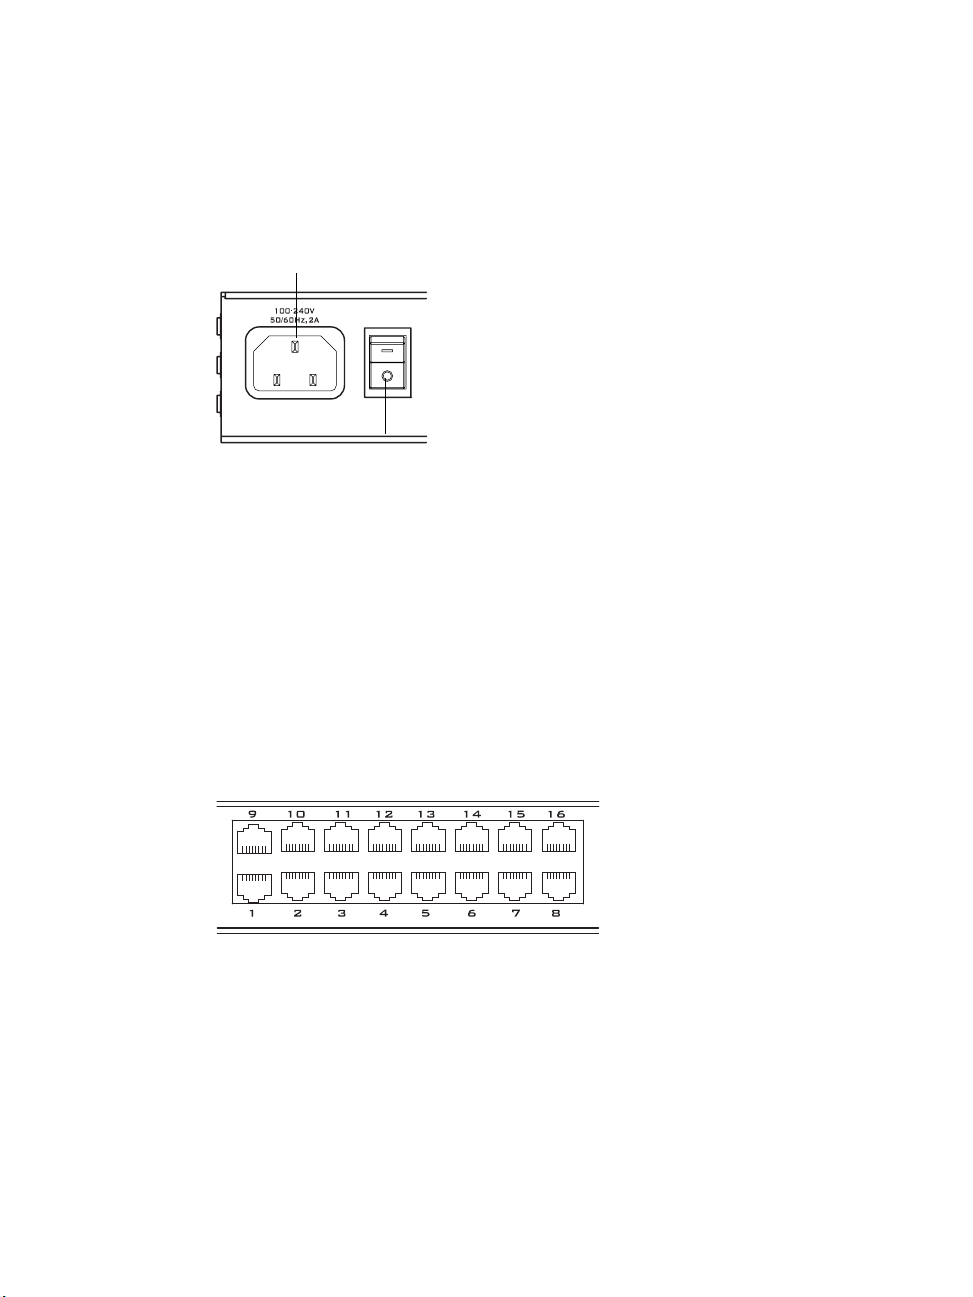
Power Connector and Power Switch
The following figure shows the power connector and power switch on the left
rear of a KVM/net.
Power Cord Connector
Power Switch
Figure 1-3: Power Connector on the Left Rear
The KVM/net is furnished with a power cord used to connect the power
connector to a power supply.
See “To Power On the KVM/net” on page 84 for instructions on supplying
power to the KVM/net.
KVM Ports
The following figure shows KVM (keyboard, video, mouse) ports on the
center rear of the KVM/net.
Figure 1-4: KVM Ports on the Center Rear
KVM ports provide remote access to the keyboard, monitor, and mouse of
PCs with USB or PS/2 connectors or Sun servers with USB connectors.
Connecting a computer to a KVM port allows use of a keyboard, video, and
mouse of a remote station as if it were the keyboard video and mouse on the
connected computer. KVM port connections, also called out-of-band
Introduction 7
Page 24
Connectors on the KVM/net
connections give access to information that is otherwise inaccessible through
in-band network interfaces.
For example, BIOS access, POST , and boot messages are inaccessible through
in-band connections. In some cases, the in-band network interfaces are not
available after the system boot is completed (for example, after a Windows
Safe Mode boot) without the kind of access these KVM connections provide.
Each connected computing system is identified in the management software
by the port number to which it is connected. The administrator can assign a
descriptive alias to each port to identify the connected computer. For example,
if a Sun E10K server is connected to port 3, the administrator might define the
port’s alias to be “Sun E10K.”
Customers order one of three T erminator types for connecting each KVM port
to a computer. See “KVM Terminator Usage and Types” on page 58 for more
details.
See “To Connect Computers to KVM Ports” on page 80 for instructions on
connecting servers to KVM ports.
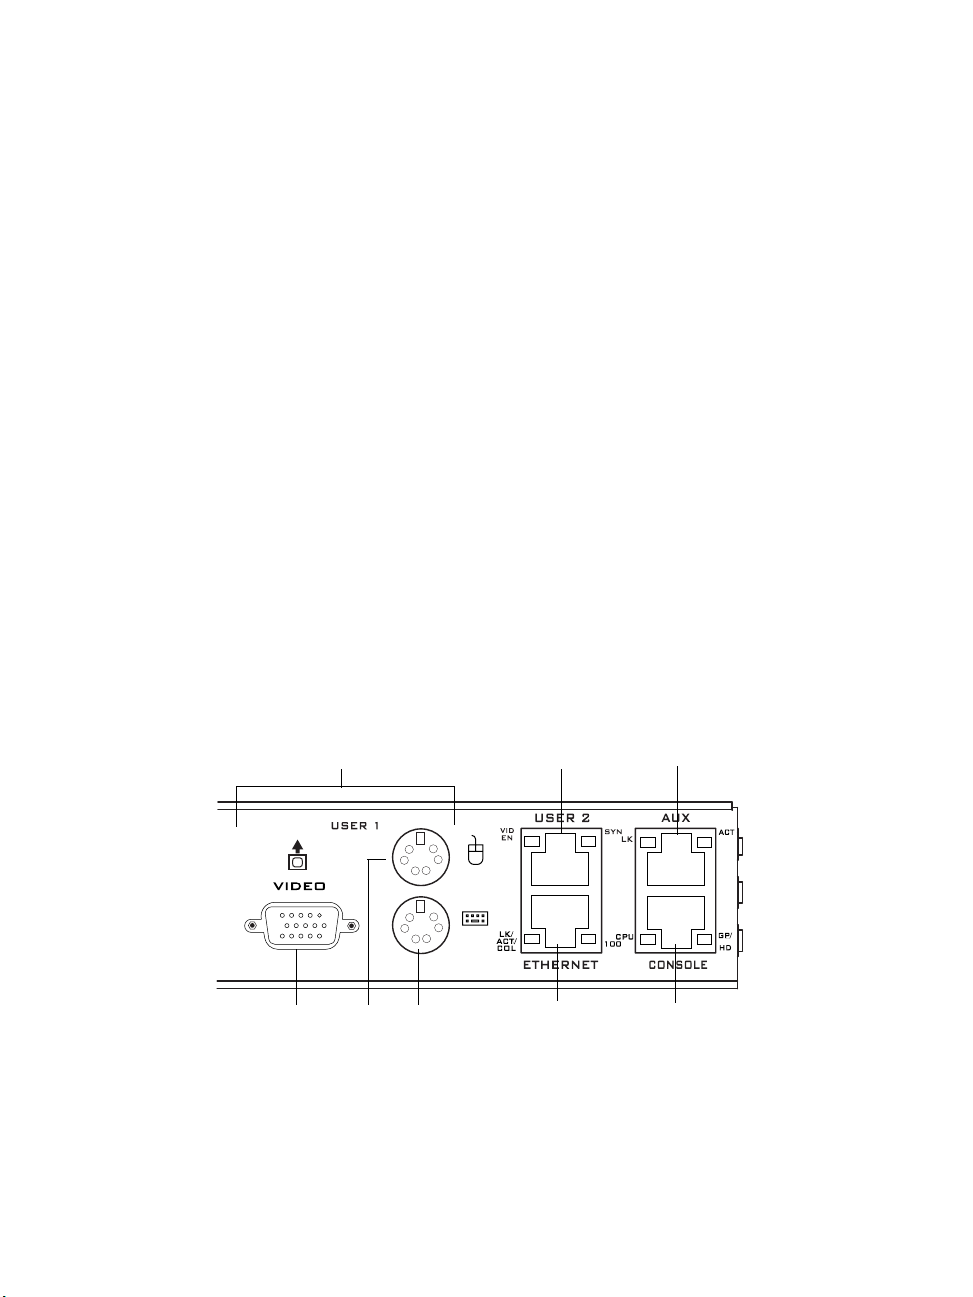
Management Ports (Console, Ethernet, User 1, User 2)
The following figure shows the management ports on the right back of the
KVM/net.
User 1 Port
VGA Port
[User 1]
PS/2 Ports
[User 1]
Figure 1-5: Management Ports
8 AlterPath KVM/net Installation, Administration, and User’s Guide
User 2 Port
Ethernet
Port
Serial Port
Console
Port
Page 25

Connectors on the KVM/net
The following list describes the management ports on the right back o f the
KVM/net.
• Console – Its RJ-45 connection can be connected by a CAT5 to DB-9
cable to a COM port on a computer. Administrators can use a terminal
emulation program to locally manage and troubleshoot the KVM/net. See
“To Connect to the Console Port” on page 82 and “Configuring Basic
Networking Using the wiz Command” on page 85 for more details.
• Ethernet – Use the Ethernet management port for connecting an Ethern et
cable for Intranet and Internet access. See “Making an Ethernet
Connection” on page 77 for instructions if needed.
• User 1 – The User 1 port includes two PS/2 ports and a VGA port, which
can be connected to a mouse, keyboard, and monitor. Once a local system
is connected to the User 1 port, administrators can use the OSD (On Screen
Display) interface to locally manage and use the KVM/net. See “To
Connect to the User 1 Management Port” on page 83 and Chapter 7: On
Screen Display for more details.
• User 2 – This port is used for extending the local administration by
connecting an RJ-45 cable of up to 500 feet to an AlterPath KVM RP. The
KVM RP can be ordered separately. Administrators can use the OSD (On
Screen Display) to locally manage and use the KVM/net without being in
the same room as the KVM/net. See “Installing the AlterPath KVM RP”
on page 129 and “Controlling the OSD Through the AlterPath KVM RP”
on page 428 for more details.
Introduction 9
Page 26
Activity LEDs on the Back of the KVM/net
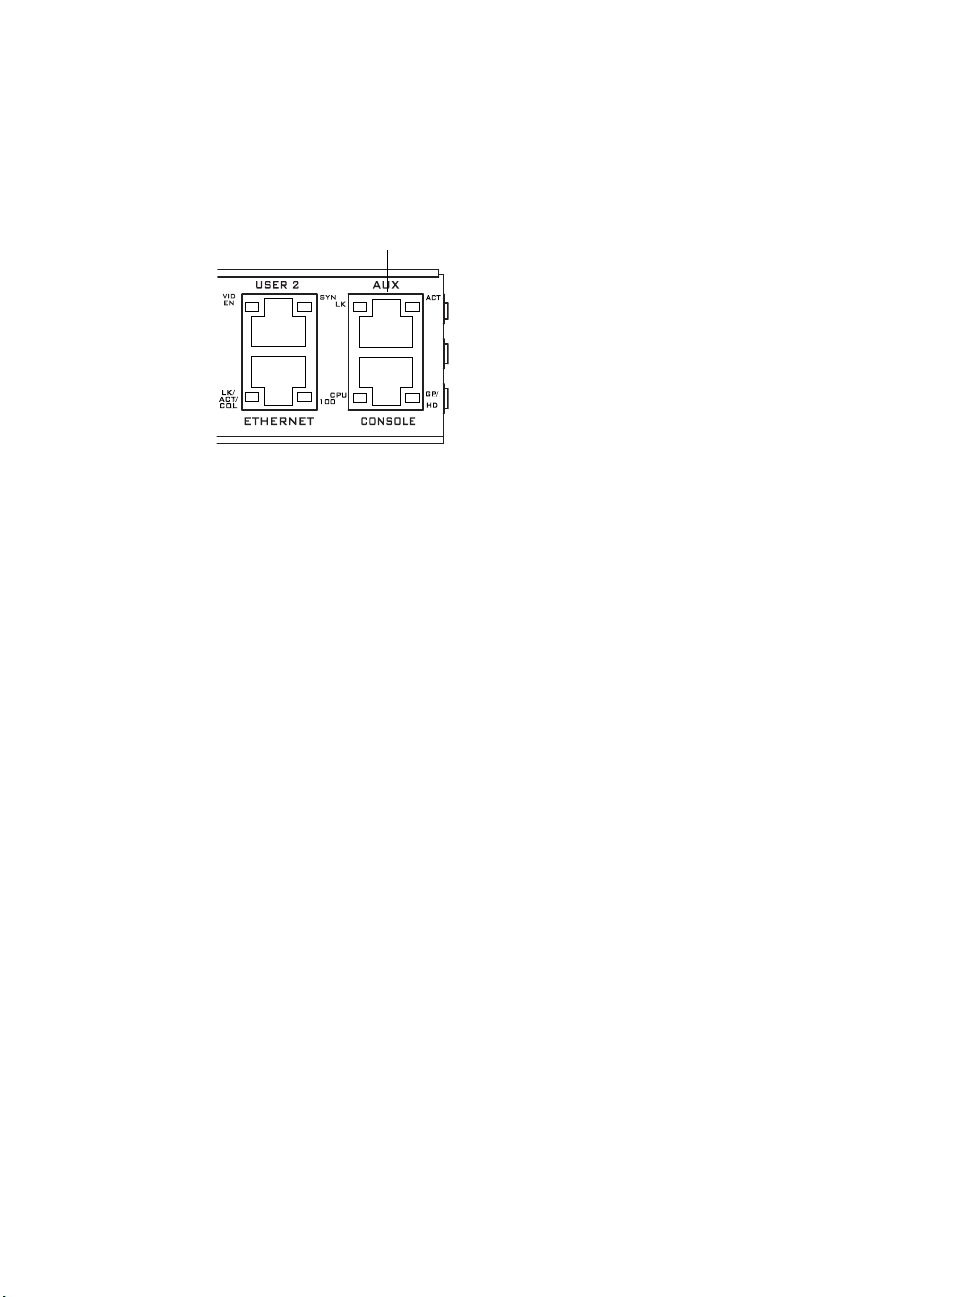
AUX Ports
The following figure shows the AUX port on the right back of the KVM/net.
AUX Port
Figure 1-6: AUX Ports
AUX – Serial port (RS-232) with RJ45 connector that can be used for the
following:
• Connecting to an optional AlterPath PM
Up to 32 PMs can be daisy-chained for a total of 120 outlets. See “Power
Management” on page 40 for background information of power
management and see “Connecting AlterPath PMs to the KVM/net” on
page 117 for installation instructions.
• Connecting to an optional external modem
See “Connecting an External Modem” on page 116
Activity LEDs on the Back of the KVM/net
The KVM/net comes with paired LEDs positioned on each side of the
following ports:
• User 2
•AUX
•Ethernet
• Console
10 AlterPath KVM/net Installation, Administration, and User’s Guide
Page 27
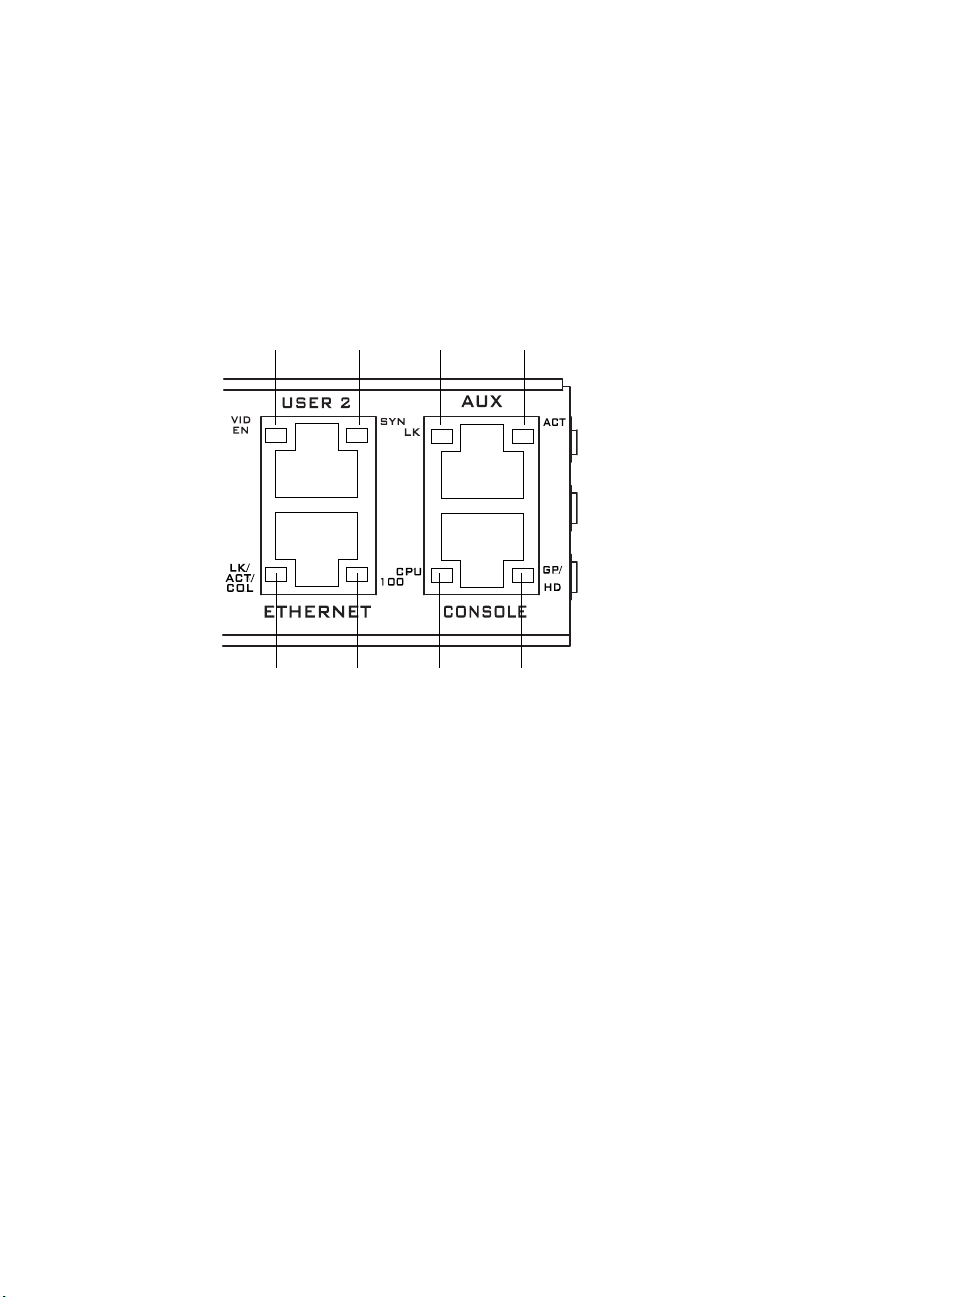
Activity LEDs on the Back of the KVM/net
The following figure shows the position of the LEDs as they appear on the
back of the KVM/net. The LEDs are designed to monitor the interface
connections as described in Table 1-2, “LED Descriptions,” on page 12.
The diagram below shows a close up view of the LEDs on the back of the
KVM/net. The LEDS monitor the AUX ports, ETHERNET, and CONSOLE
ports as described in Table 1-2.
12
56
34
78
Figure 1-7: LEDs on the KVM/net Management Ports
Introduction 11
Page 28

Activity LEDs on the Back of the KVM/net
The LED numbers in the tables below correspond to the numbers in the
previous figure.
Table 1-2: LED Descriptions
Number Label Function Color/Status
1VID
EN
Monitor KVM CAT5
video interface
2 SYN Monitor KVM CAT5
video interface
5, 3 LK Monitor RS-232 async
port status
Orange - Lights when an internallygenerated signal is used. This occurs
when the user is not connected to the
port and in the OSD, or when the user is
connected to a port, but a video signal is
not present from the server.
Green - Lights when the server's video
signal is used; this happens when the
server is presenting a valid signal.
Green - Lights when the user is
connected to port and a video signal is
detected and "synchronized". This
means that the KVM is presenting the
signal to the station.
Orange - Lights when the video signal
level is detected but not synchronized.
T ypically, this takes a very short amou nt
of time (less than 1/3 second) for the
KVM to synchronize to the server's
video signal upon first connection.
• OFF – Indicates the port is not open.
• Orange – Lights when DTR (data
terminal ready) signal is on (when the
port is open).
4, 5 ACT Monitor RS-232 async
activity
• OFF – Indicates no data activity.
• Green – Blinks when data is either
being received (RX) or transmitted
(TX).
12 AlterPath KVM/net Installation, Administration, and User’s Guide
Page 29

AlterPath KVM/net Ordering Options
Table 1-2: LED Descriptions (Continued)
Number Label Function Color/Status
5LK/
ACT/
COL
6 100 Monitor Ethernet speed • Off – Indicates the link is 10baseT or
7 CPU Monitor CPU (software
8GP/
HD
Monitor Ethernet line
status
operation)
Monitor compact flash
(HD) or other (GP)
• OFF – Indicates either link is not up or
cable is not connected.
• Green – Lights solid when the link is
up and blinks when data activity
occurs, with frequency proportional to
traffic.
• Orange – Blinks when collisions occur
no link is active.
• Green – Steady when 100baseT link is
active.
• Green or Orange – Blinks when
software is running properly.
• Off or solid Green/Orange – During
boot up, software crash, etc.
• Orange - Blinks when KVM/net is
accessing the compact flash after
bootup.
AlterPath KVM/net Ordering Options
Each AlterPath KVM/net comes with 16 or 32 KVM ports. The following
table lists the model and part numbers and number of KVM ports of each
KVM unit.
Table 1-3: AlterPath KVM/net Model Numbers and Port Options
Model Number Part Numbers KVM Ports
AlterPath KVM 16 16
AlterPath KVM 32 32
Introduction 13
Page 30

Types of Users
Types of Users
The KVM/net support three types of users:
• Predefined administrators who can administer the KVM/net and its
connected devices
• Optionally added users who can act as administrators of the KVM/net and
its connected devices
• Optionally added users who can act as administrators of connected devices
or regular users.
As summarized in the following table, two accounts, root and admin, are
configured by default and cannot be deleted. The default “admin” account can
add regular user accounts to allow other users to act as administrators of
connected devices. An administrator can also choose to add regular users to
the “admin” group, which enables the regular users to perform KVM/net
administrative functions. The following table lists the responsibilities of each
type of user and provides the default password for each.
Table 1-4: User Types, Responsibilities, and Default Password
Username Responsibilities Default Password
root Cannot be deleted. Only console logins
allowed. Runs the wiz command to do initial
network configuration, as described in
“Configuring Basic Networking Using the wiz
Command” on page 85. Access Privileges:
Full Read/Write/Delete.
admin Cannot be deleted. Has all access: through the
Web Manager in Wizard and Expert mode,
and through the OSD. Has full access to every
function of the Web Manager. Access
Privileges: Full Read/Write/Delete.
14 AlterPath KVM/net Installation, Administration, and User’s Guide
cyclades
cyclades
Page 31

Types of Users
Table 1-4: User Types, Responsibilities, and Default Password (Continued)
Username Responsibilities Default Password
administratively
assigned
Simultaneous KVM/net Logins
Only one KVM/net administrator can be logged in at a time. If a second
administrative user attempts to log in to the Web Manager, the following
prompt appears offering a choice of cancelling the attempt to log in or
terminating the other administrator’s login session.
User account configured by the administrator
to be able to access devices connected to the
ports of the KVM/net. Has access to the port
through the Web Manager and through the
OSD. Regular users can access and administer
only devices that are connected to ports to
which they are assigned. Default Access
Privileges for generic users: Read/Write only
for all ports. Administrators can restrict access
for individual users to Read only to specific
ports.
If an administrator assigns a regular user to
the “admin” group, that user can also perform
the same administrative functions on the Web
Manager as the “admin” user, as described
above.
administratively
assigned
Introduction 15
Page 32

Types of Users
Note: This feature applies to both Web Manager and OSD.
Figure 1-8: Simultaneous Administrator Login Prompt
Simultaneous Server Connections
The KVM/net supports a maximum of 6 concurrent server connections. Up to
two connections are supported either locally or remotely over Ethernet. Up to
4 connections can be inband depending on whether a KVM-over-IP
connection is being made. The types of user connections that can be made are
explained below:
• Local users include:
• One local user at the KVM/net (User 1).
• One remote user at the AlterPath KVM RP location (User 2).
• IP users include:
• KVM – The KVM/net supports two KVM-over-IP connections.
• Inband – KVM/net supports up to four concurrent in-band connections
depending on the number of KVM-over-IP connections being made.
Since the maximum total IP connections is four, if one KVM-over-IP
connection is being made, only three in-band connections can be made at
that time.
16 AlterPath KVM/net Installation, Administration, and User’s Guide
Page 33

Administration Options
The following table lists the number and types of server connections that can
be made over IP based on the number of local users connected to KVM ports.
Table 1-5: Number of Simultaneous Server Connections
Local Users
KVM-over-IP
Inband
Total
012
21234
456
Administration Options
The following sections summarize the KVM/net administration options:
• “Cyclades Web Manager” on page 17
• “On-Screen Display” on page 18
• “Guidelines for Using the KVM/net” on page 4
The administrator options require different types of log in credentials. For
more information on which types of users can perform administrative tasks
and access administrative options, see “Types of Users” on page 14.
Table 1-6: Administration Options
Cyclades Web
Manager
The Web Manager is the primary means of configuring the KVM/net
and administering its connected devices.
• See “Prerequisites for Using the Web Manager” on page 19 for an
introduction that includes prerequisites for using the Web Manager
and explanations about how the different types of user accounts use
the Web Manager.
• See “Web Manager for Administrators” on page 133 for more
details about how KVM/net administrators use the Web Manager.
Introduction 17
Page 34

Cyclades Web Manager
Table 1-6: Administration Options (Continued)
On-Screen
Display
Linux
Commands
and KVM/netspecific
Commands
The On Screen Display (OSD) can be used locally from a keyboard,
monitor and mouse that is directly connected to the KVM/net. When
the monitor and the KVM/net are on, the OSD login screen appears on
the monitor.
• See “To Connect to the User 1 Management Port” on page 83 for
instructions on how to make the hardware connection.
• See “On Screen Display” on page 351 for how KVM/net
administrators and regular users can use the OSD.
The KVM/net offers the following types of access allowing
administrators to log in and enter Linux commands and KVM/netspecific commands in a shell running on the KVM/net.
• A local administrator who has a direct connection to the console
port on the KVM/net, who is running a terminal or terminal
emulation program, and who knows the root password. The direct
login requires authentication using the root password. The default
shell defined for the root user is bash.
• A remote administrator who uses telnet or ssh to connect to the
KVM/net and log in as root.
See “To Connect to the Console Port” on page 82 and “Configuring
Basic Networking Using the wiz Command” on page 85.
Cyclades Web Manager
Administrators perform most tasks through the Cyclades Web Manager. The
Web Manager runs in a browser and provides a real-time view of all the
equipment that is connected to the KVM/net. The administrator or the regular
user who has administrative access can use the Web Manager to configure
users and ports, troubleshoot, maintain, cycle power, and reboot the connected
devices, either while on site or from a remote location. KVM/net also allows
regular users and administrators to use the Web Manager to access devices
that are connected to KVM ports.
18 AlterPath KVM/net Installation, Administration, and User’s Guide
Page 35

Prerequisites for Using the Web Manager
Web Manager uses forms and dialog boxes (which are pop-up windows) to
receive data input. See also, “Prerequisites for Using the Web Manager” on
page 19.
Administrators, see “Web Manager for Administrators” on page 133. Regular
users, see “Web Manager for Regular Users” on page 299.
Prerequisites for Using the Web Manager
The prerequisites described in this section must be complete before anyone
can access the Web Manager. If you have questions about any of the following
prerequisites, contact your site’s system or network administrator.
• An administrator needs to define basic network parameters on the KVM/
net so the Web Manager can be launched over the network.
See “Configuring Basic Networking Using the wiz Command” on page 85
for instructions on how to define network parameters on the KVM/net.
The administrator also needs the following to be able to connect to the KVM/
net through the Web Manager:
• A networked Windows computer that has access to the network where the
KVM/net is installed.
• A supported browser. Internet Explorer 5 and above, Netscape 8, Mozilla,
and Firefox browsers are supported for configuration and management of
KVM/net. Internet Explorer, Netscape 8, and Mozilla are recommended
browsers for accessing servers through a KVM-over-IP session.
• The IP address of the KVM/net.
Entering the IP address of the KVM/net in the address field of one of the
supported browsers listed in Table 1-14 is the first step required to access
the Web Manager.
When DHCP is enabled, a device’s IP address may change each time the
KVM/net is booted up. Anyone wanting to access the KVM/net must find
out the currently assigned IP address. If DHCP is enabled and you do not
know how to find out the current IP address of the KVM/net, contact your
Introduction 19
Page 36

TCP Ports
• A user account defined on the Web Manager
TCP Ports
The TCP port numbers for KVM ports are used by the AlterPath Viewer when
a user connects to a KVM port through the Web Manager. When a user
connects to a KVM port through the W eb Manager, the AlterPath Viewer uses
port 5900. Depending on your KVM model up to four IP modules may be
available. Subsequent port numbers 5901, 5902, and 5903 are used to launch
additional AlterPath Viewer sessions . You can assign a different port number
or numbers through the OSD or the Web Manager. Do not assign reserved
TCP port numbers 1 through 1024.
system administrator for help. For more information, see “Considerations
When Choosing Whether to Enable DHCP” on page 57.
By default, the admin has an account on the Web Manager. An
administrator can add regular user accounts to administer connected
devices using the Web Manager.
Special circumstances may require KVM/net administrators to specify
alternative TCP port numbers other than the defaults. For example, the
firewall may block TCP port 5900 or 5901.
The following table provides links to procedures for changing default TCP
port numbers.
Table 1-7: Tasks: Configuring TCP Port Numbers
Task Where Described
Change the TCP port number(s) assigned
to the AlterPath Viewer(s)
Change the TCP port number(s) assigned
to inband connections
20 AlterPath KVM/net Installation, Administration, and User’s Guide
“To Configure IP User (KVM Over IP)
Sessions [Expert]” on page 180
“To Add or Modify an inband (RDP) Server”
on page 201
Page 37

Cascaded Devices
The KVM/net supports cascading, which allows administrators to connect
secondary KVM units to a primary KVM/net. Cascading allows
administrators to increase the number of managed devices to up to 1024
servers with a centralized configuration and access interface.
A maximum of 32 secondary KVM devices can be cascaded from the primary
KVM/net extending the number of KVM ports to a maximum of 512 for twouser configuration (i.e. two connections to each cascaded device), or 1024 for
a one-user configuration.
The following diagram depicts a basic cascaded configuration of a primary
KVM/net with 32 ports and one KVM and one KVM Expander cascaded from
it.
Cascaded Devices
Introduction 21
Page 38

Cascaded Devices
Sun Server
(Mini-DIN)
AlterPath KVM 32
Up to 1024 servers
PC Server
PC Server
(USB)
(PS/2)
Primary AlterPath KVM/net 32
Sun Server
(Mini-DIN)
User1 User2 UserA UserB
PC Server
(USB)
AlterPath KVM
Expander 16
PC Server
(PS/2)
local user
IP user
Figure 1-9: Cascaded KVM Devices from a KVM/net
As depicted in the previous figure, the KVM/net supports one level of
cascading: The primary KVM/net controls the secondary level of KVM units
connected to it. A secondary KVM unit can be a KVM, a KVM Expander, a
KVM/net, or a KVM/netPlus.
22 AlterPath KVM/net Installation, Administration, and User’s Guide
Page 39

Cascaded Devices
Administrators can connect up to 32 KVM units to the master KVM/net. Each
cascaded KVM device has two management ports that can be connected to the
primary KVM/net.
Note: You must connect the master KVM/net’ KVM port to User 2 on the slave.
Optionally , you can add a second connection to User 1 on the slave by using a
terminator. If a KVM Expander is used then User A or User B management
ports on the KVM Expander can be used.
Note: In a cascaded configuration, the internal IP modules of the cascaded units are
not available.
The following table indicates which ports on each cascaded device can be
used for cascading and which cables need to be used in order to connect them.
Table 1-8: Connectors and Ports for Cascading KVM Units
KVM Unit Management Ports Connectors
KVM Expander
AlterPath KVM
User B primary
User A secondary
User 2 primary
User 1 secondary
CAT5 cable with RJ45
connectors
CAT5 cable
KVM Terminator (User1)
and CAT5 cable with RJ45
connectors
AlterPath
KVM/net
User 2 primary
User 1 secondary
CAT5 cable
KVM Terminator (User1)
and CAT5 cable with RJ45
connectors
AlterPath
KVM/netPlus
User 2 primary
User 1 secondary
CAT5 cable
KVM Terminator (User1)
and CAT5 cable with RJ45
connectors
Introduction 23
Page 40

Cascaded Devices
Note: In addition to a CAT5 cable, you need a KVM Terminator to connect to the
Accessing Ports on Cascaded KVM Devices
KVM/net Port Permissions
User 1 port of a cascaded KVM, KVM/net, or KVM/netPlus.
KVM/net users can use the master KVM/net to access all devices connected
to KVM ports on the master and slave KVM units.
KVM/net users can use the master KVM/net to access all devices connected
to KVM ports on the master and slave KVM units. However, only two port
connections can be made to each cascaded unit at any time. Each physical port
connection (for example to User 1 or User B) to the cascaded KVM devices
allows a user to connect to one KVM port on the secondary KVM unit. So any
user can connect to up to two KVM ports on a cascaded device at any time.
In the default configuration, only the “admin” user can access any port. The
KVM/net administrator configures access for regular users as desired.
The following table summarizes the default port access permissions and
default authentication types (Auth Type) and provides links to where the port
permissions are described in more detail.
Table 1-9: Default Port Access Permissions
Default
Access
None Local No access
24 AlterPath KVM/net Installation, Administration, and User’s Guide
Default
Auth Type
Access Types Where Documented
“Understanding KVM Port Permissions”
Read only
Read/Write
Full access (Read/
Write/Power
management)
on page 25
“To Assign KVM Port Access to a User
or Group” on page 196
Page 41

Cascaded Devices
The KVM administrator must take the actions described under “Where
Documented” to allow any other types of access than the defaults defined in
the previous table. See “Authentication” on page 45 for the tasks related to
setting up authentication.
Understanding KVM Port Permissions
KVM port permissions are defined in the Web Manager by assigning Default
Permissions that apply to all KVM ports and by optionally assigning specific
permissions to individual ports or groups of ports. The options for “Default
Permissions” are shown in the following list.
• No access [Default]
• Read only
• Read/Write
• Full access (Read/Write/Power management)
For individual users and groups, if desired, the KVM/net administrator can
construct lists of KVM ports with the following types of permissions:
• Ports with no permission
• Ports with read only permission
• Ports with read/write permission
• Ports with full permission
A Generic User account has a default set of permissions that apply to all
regular users and groups. The Generic User’s Default Permission is “No
access.”
To allow users to access KVM ports, the KVM/net administrator must do one
or both of the following:
• Change the permissions assigned to the Generic User
• Change the permissions assigned to individual users or to groups of users
Editing the Generic User allows you to change the KVM port permissions for
all regular users and groups at once.
The KVM/net administrator can specify different Default Permissions or
KVM port permissions for any user or group. “KVM Port Permissions
Hierarchy” on page 26 provides information that the KVM/net administrator
Introduction 25
Page 42

Cascaded Devices
needs to understand in order to perform advanced configuration of KVM
permissions.
The following table shows the tools that the KVM/net administrator can use to
set KVM port permissions and where in this manual to go for further details.
Table 1-10: Tools for Setting KVM Port Permissions
Tools Where Documented
Web Manager “To Assign KVM Port Access to a User or Group” on page 196
OSD “KVM Ports Screens” on page 394
KVM Port Permissions Hierarchy
If you specify individual KVM port permissions or default permissions for
users and groups, you need to understand the following inform ation about
how the system handles requests from a user who is trying to access a KVM
port. The following series of decisions is made.
Decision 1: Check User’s KVM Port Permissions
1. Does the user have specific KVM port permissions that allow or deny
access to the port?
• If yes, access is allowed or denied.
• If no, go to Decision 2.
Example for Decision 1
• If user john is trying to access KVM port 4 and his account has port 4 in
a list of ports with full permission, then john is given read/write and
power management access.
• If user jane is trying to access port 4 and her account has port 4 in a list of
ports with no permission, then jane is denied access.
• If users jim, joan, jerry, jill, joe, jennifer, jordan, jolanda, and jezebel are
trying to access port 4 and do not have port 4 listed for any types of
access, then their access requests are passed to decision 2.
26 AlterPath KVM/net Installation, Administration, and User’s Guide
Page 43

Cascaded Devices
Decision 2: Check Group’s KVM Port Permissions
2. Is the user included in a group with KVM port permissions that allow or
deny access to the port?
• If yes, access is allowed or denied.
• If no, skip to Decision 3.
Note: When a user is in more than one group, the most restrictive permission is
used.
Example for Decision 2
• If user jim is trying to access port 4 and he is a member of a group called
linux_ca2 that has port 4 in a list of ports with read/write permissions,
then jim is given read/write access.
• If user joan is trying to access port 4 and she is in a group called
linux_ca3 that has port 4 in a list of ports with no permission, then joan is
denied access.
• If jerry and jill are trying to access port 4 and are in a group called
linux_ca4 that has no specific port permissions defined, then their access
requests are passed to decision 3.
• If joe, jennifer, jordan, jolanda, and jezebel are trying to access port 4 and
are not in any group, then their access requests are passed to decision 3.
Decision 3: Check Generic User’s KVM Port Permissions
3. Does the Generic User have specific KVM port permissions that allow or
deny access the port?
• If yes, access is allowed or denied.
• If no, go to decision 4.
Example for Decision 3
• If user jerry is trying to access port 4 and the Generic User has port 4 in a
list of ports with full access permissions, then jerry is given read writer
and power management access.
Introduction 27
Page 44

Cascaded Devices
Decision 4: Check User’s Default Permissions
• If user jill is trying to access port 4 and the Generic User has port 4 in a
list of ports with no access permissions, then jill is denied access.
• If users joe, jennifer, jordan, jolanda, and jezebel are trying to access port
4 and the Generic User does not have port 4 listed for any type of access,
then their access request are passed to decision 4.
4. Does the user have a Default Permission that allows or denies access to the
port?
• If yes, access is allowed or denied.
• If the user has no Default Permission, the user is under the Generic
User’s default permission, and the request for access goes to decision 5.
Example for Decision 4
• If user joe is trying to access port 4 and he has a Default Permission that
allows read only access to ports, then joe is given read only access.
• If user jennifer is trying to access port 4 and she has a Default Permission
that allows no access to ports, then jennifer is denied access.
• If users jordan, jolanda, and jezebel are trying to access port 4 and their
Default Permissions are under the Generic User’s Default Permission,
then their access requests are passed to decision 5.
Decision 5: Check Group’s Default Permissions
5. Does the user belong to a group that has a Default Permission that allows or
denies access to the port?
• If yes, permission is granted or denied.
• If no, go to decision 6.
Example for Decision 4
• If user jordan trying to access port 4 is in a group called windows_ca1
that has a Default Permission of full, then jordan is given read/write and
power management access.
• If user jolanda trying to access port 4 is in a group called windows_ca2
that has a Default Permission of no access, then jolanda is denied access.
28 AlterPath KVM/net Installation, Administration, and User’s Guide
Page 45

Server Access: Inband and Out of Band
• If user jennifer is not a member of any group with a Default Permission
specified, then her access request is passed to decision 6.
Decision 6: Check Generic User’s Default Permissions
Note: If an access request gets this far, the Default Permission of the Generic User is
the only permission that could apply.
6. Does the Default Permission for the Generic User allow access to the port?
• If yes, access is granted.
• If no, access is denied.
Server Access: Inband and Out of Band
KVM/net users can access servers over the Ethernet using the following
methods:
• In-band access – An IP address is used to connect to and control Windows
(Win2000, 2003, XP, and NT) Terminal Servers.
• Out-of-band access – KVM ports are used to connect to PCs with USB or
PS/2 connectors or Sun servers with USB connectors.
The differences between the in-band and out-of-band connection methods are
briefly described in the following table. For a more detailed description of the
requirements and functionality of each connection method, see the following
section, “Determining the Connection Type and its Supported Functionality”
on page 31.
Table 1-11: In-band and Out of Band Connections
In-band Out-of-Band
Connection Type
Introduction 29
Remote Desktop Protocol
(RDP) over the Ethernet or PPP
Keyboard, video, mouse (KVM)
CAT5 connection to a KVM/net
and Ethernet or PPP access to
the KVM/net Web Manager
Page 46

Server Access: Inband and Out of Band
Table 1-11: In-band and Out of Band Connections
In-band Out-of-Band
Supported
Source
Computers
Supported T arget
Servers
Supported
Browsers
Direct Log In
Power
Management
While Connected
Client machine running a
All Windows clients
Windows operating system with
a valid IP address
Windows (Win2000, 2003, XP,
and NT) Terminal Servers
PCs with a USB or PS/2
connectors or Sun servers with
USB connectors
Internet Explorer 5, 6 Internet Explorer 6, Netscape 7,
Mozilla, Firefox
Not available Available if configured by the
KVM/net administrator
See “T o Enable Direct Access to
KVM Ports” on page 173.
Not available Available if configured by the
KVM/net administrator and if
the server is plugged into an
AlterPath PM that is connected
to the KVM/net.
See “Power Management” on
page 40.
Viewer
ActiveX viewer
See “Viewing In-band
Connections” on page 313
30 AlterPath KVM/net Installation, Administration, and User’s Guide
AlterPath Viewer
See “Viewing KVM
Connections” on page 311.
Page 47

Server Access: Inband and Out of Band
Determining the Connection Type and its Supported Functionality
When a user wants to connect to a server displayed on the Web Manager
Connect to Server form, the drop-down list indicates whether the server can
be accessed by a KVM connection, an in-band connection, or both. In the
connect list, all servers connected to KVM ports appear first followed by all
servers that are accessed through in-band connections and are not connected
to KVM ports; those servers that can be connected by both methods appear at
the bottom of the list.
The types of connections that can be made to each server is displayed in
parenthesis at the end of each server entry in the list. The following table
describes the functionality of each connection type.
Table 1-12: Available Functionality During KVM and In-band Connections
Server Connection
Labels
(KVM)
Description
Indicates that the server can be accessed only through an outof-band, KVM connection.
This server is connected to a KVM port on the KVM/net or on
a cascaded KVM unit.
Users can control all applications on the server, have BIOS
access, and can view POST, and boot messages. Users can
access this server even when the network is down or after a
system boot is completed.
Users can also control the power flow on this server if the
server is plugged into an AlterPath PM and the port is properly
configured for power management.
Introduction 31
Page 48

Server Access: Inband and Out of Band
Table 1-12: Available Functionality During KVM and In-band Connections
Server Connection
Labels
(In-band)
(KVM + In-band)
Description
Indicates that the Microsoft Terminal Server running RDP can
be accessed only through an in-band connection and is not
connected to a KVM port.
Users can access this server only to run applications once the
server is already running. The performance on in-band
connections is slightly better than that of KVM connections,
and no synchronization of keyboard and mouse is necessary.
Indicates that the server can be accessed through In-band and
out-of-band (KVM) connections.
The first time users select this server from the Connect dropdown list, an in-band connection is attempted. The connection
automatically switches to KVM only if the in-band connection
fails or if an in-band connection to this server already exists.
Users who want to access this server with a KVM connection,
must do one of the following:
• Make two connection attempts to the same server from the
Web Manager Connect to Server form.
The first connection is an in-band connection viewed
through an RDP ActiveX viewer. The second connection is a
KVM connection viewed through the KVM ActiveX Viewer .
See “To Connect to Servers Through The Web Manager’s
“Connect To Server” Form” on page 322.
• Make a direct login to the KVM port.
See “Login Screen: Direct Logins Enabled, Only IP Address
Entered” on page 320 and “Login Screen: Direct Logins
Enabled, IP Address and Port Entered” on page 320 for more
information.
32 AlterPath KVM/net Installation, Administration, and User’s Guide
Page 49

Administering Users of Connected Servers
Administering Users of Connected Servers
This section reviews the tasks that KVM/net administrators must do to enable
access to connected servers.
The “admin” account can add new regular user accounts to allow others to
connect to ports and administer or use connected devices.
Types of Access to Ports
The KVM/net administrator can restrict regular user accounts to allow them
only to manage specific servers and devices. Each account can have one of the
following types of access after login:
• Read only
•Read write
• Read write power
Note: The KVM/net offers access privileges to KVM ports only. Inband connections
are authenticated, and the access privileges are granted on the inband server
itself.
Tasks Related to Access to Connected Devices
Planning should include the following steps:
• Create a list of servers to connect to the KVM/net.
• Decide whether the servers need to be connected to ports for KVM access,
need to have RDP enabled for in-band access, or both.
• Create a list of user accounts with the type of access each user needs to
which ports.
• Obtain usernames and passwords with the proper permissions for
connected servers to give to the KVM/net users who will connect to these
servers.
• Create meaningful aliases to assign to port numbers and to inband
Windows Terminal Servers.
• List all the devices that need to be connected to PMs and the users who can
access them.
Introduction 33
Page 50

Administering Users of Connected Servers
During setup of the KVM/net, the installer connects the desired servers to the
ports as planned.
During configuration, the KVM/net administrator does the following, if
desired:
• Assigns aliases to ports to identify the connected servers.
• Assigns aliases to PMs to identify the location or types of devices being
managed.
• Creates accounts for users of connected devices.
• Specifies which ports each user can access and which type of access each
can have.
• Specifies an authentication method for access to the KVM/net and to all
KVM ports.
• Redefines keyboard shortcuts (hot keys) if desired.
• Redefines TCP port numbers used for accessing KVM ports, if desired.
See the following table for a list of related tasks and where they are
documented.
Task Where documented
Specify an alias for a KVM port. • “To Specify or Change the Alias for a
KVM Port” on page 186
Specify an alias for a PM. • “To Specify or Change the Alias of an
IPDU” on page 168
Assign permissions to access ports. • “T o Assign KVM Port Access to a User or
Group” on page 196
Assign permissions to PMs and outlets. • “To Configure Users to Manage Specific
Power Outlets” on page 166
34 AlterPath KVM/net Installation, Administration, and User’s Guide
Page 51

Redefining Keyboard Shortcuts (Hot Keys)
Redefining Keyboard Shortcuts (Hot Keys)
Predefined keyboard shortcuts (also called hot keys) allow users to do the
following:
• Perform common actions while connected through a KVM port
• Emulate Sun keyboard keys while connected through a KVM port to a S un
server.
If desired, the KVM/net administrator can redefine the default hot keys either
through the Web Manager or the OSD.
Redefining KVM Connection Hot Keys
The hot key sequences used while connected to KVM ports have two parts,
which are called the common escape sequence and the command key. The
default common escape sequence is
different for each command. For example, the
Ctrl+k to quit the login session as shown here: Ctrl+k q. See “Hot Keys for
KVM Connections” on page 329 for the defaults. Under Configure>KVM in
the Web Manager, the common escape sequence is defined separately from
the command keys. The KVM/net administrator can redefine two different
sets of command keys for users accessing KVM ports through the OSD (User
1 or User 2) and another set for connections made through the Web Manager.
Ctrl+k, and the command key is
q command key is entered after
Redefining Sun Keyboard Equivalent Hot Keys
The KVM/net provides a default set of hot keys for use while connected to
Sun servers through KVM ports to emulate keys that are present on Sun
keyboards but are not present on Wind ows keyb oards. Th e h ot k eys are made
up of a modifier key followed by a function key. See “Redefining Sun
Keyboard Modifier Keys” on page 175 for more details. The default modifier
key is the Windows
KVM/net administrators can redefine the default
Ctrl], [Shift],or [Alt].
[
Introduction 35
[WIN] key, which is labeled with the Windows logo.
[WIN] modifier key to
Page 52

Disabling Mouse Acceleration
Summary of Tasks for Redefining Hot Keys
See the following table for a summary of tasks for redefining keyboard
shortcuts with references to where they are documented.
Table 1-13: Tasks for Redefining Hot Keys
Part Web
Manager
Form
KVM Common
escape
sequence
KVM
Command keys
for the local
user session
KVM
Command keys
for IP user
sessions
Sun keyboard
emulation
escape key
Configuration>
KVM>General
> General
Configuration>
KVM>General
>User 1
Configuration>
KVM>General
>User 2
Configuration>
KVM>General
>IP Users
Configuration>
KVM>General
Where
Documented
“To Redefine
KVM Session
Keyboard
Shortcuts” on
page 174
“To Redefine
KVM Session
Keyboard
Shortcuts” on
page 174
“To Redefine
KVM Session
Keyboard
Shortcuts” on
page 174
OSD Form Where
Documented
Configure>
General
Configure>
User Station
N/A
Configure>
General
“General
Configuration
Screens
[OSD]” on
page 362
“User Station
Screens” on
page 390
“KVM Ports
Screens” on
page 394
Disabling Mouse Acceleration
In a KVM-over-IP session you should synchronize the mouse cursor on your
local PC or laptop with the mouse cursor of the remote server attached to a
36 AlterPath KVM/net Installation, Administration, and User’s Guide
Page 53

Screen Resolution and Refresh Rate
KVM port. The mouse acceleration should be disabled on the remote server’s
operating system.
Depending on your server’s operating system refer to one of the following
procedures.
• “To Disable Mouse Acceleration [Windows XP/Windows 2003]” on page
106
• “To Disable Mouse Acceleration [Windows 2000]” on page 106
• “To Disable Mouse Acceleration [Windows ME]” on page 107
• “To Disable Mouse Acceleration [Windows 95/98/NT]” on page 107
• “To Disable Mouse Acceleration [Linux]” on page 108
Screen Resolution and Refresh Rate
The following table summarizes the supported screen resolutions and refresh
rates for IP access and local KVM connections.
Table 1-14: Supported Screen Resolutions and Refresh Rates
Resolution Refresh Rates (Hz)
640 x 480
720 x 400 (standard text mode)
800 x 600
1024 x 768
1152 x 86 4
1150 x 90 0
1280 x 1024
1600 x 1200 (local KVM
connection)
Introduction 37
60, 72, 75, 85, 90, 100, 120
75
60, 70, 72, 75, 85, 90, 100, 120
60, 70, 72, 75, 85, 90, 100, 120
60, 70, 75, 85
66
60
60, 75
Page 54

Screen Resolution and Refresh Rate
Packet Filtering on the KVM/net
IP filtering refers to the selective blocking of the IP packets based on certain
characteristics. The KVM/net can be configured to filter packets as does a
firewall.
The IP Filtering form is structured in two levels:
• Chain – The IP Filtering form which contains a list of chains
• Rule – The chains which contain the rules that control filtering
IP filtering refers to the selective blocking of the passage of IP packets. The
filtering is based on rules that describe the characteristics of the packet (that
is, the contents of the IP header, the input/output interface, or the protocol).
This feature is used mainly in firewall applications to filter the packets that
could potentially crack the network system or generate unnecessary traffic in
the network.
The following table describes the different levels of IP filtering
Table 1-15: Levels of IP Filtering
Chain
38 AlterPath KVM/net Installation, Administration, and User’s Guide
The filter table contains a number of built-in chains and may include userdefined chains. The built-in chains are called according to the type of
packet. User-defined chains are called when a rule which is matched by the
packet points to the chain. Each table has a set of built-in chains classified
as follows:
• INPUT - For packets coming into the box itself.
• FORWARD - For packets being routed through the box.
• OUTPUT - For locally generated packets.
Page 55

Screen Resolution and Refresh Rate
Table 1-15: Levels of IP Filtering (Continued)
Rule
Each chain contains a sequence of rules that control filtering. The rules
address the following issues:
• How the packet should appear in order to match the rule
Some information about the packet is checked according to the rule, for
example, the IP header , th e input and output interfaces, the TCP flags and
the protocol.
• What to do when the packet matches the rule
The packet can be accepted, blocked, logged, or jumped to a user-defined
chain.
When a chain is analyzed, the rules of this chain are reviewed one-by-one
until the packet matches one rule. If no rule is found, the default action
for that chain will be taken.
Introduction 39
Page 56

Power Management
Power Management
The KVM/net enables users who have power management permissions to
power off, power on, and reboot remote devices connected to an AlterPath PM
intelligent power distribution unit (IPDU). By connecting one PM to the AUX
port and by daisy-chaining any combination of PM models, you can connect
up to 128 outlets to one KVM/net.
PC (USB)
AlterPath KVM/net
PC (PS/2)Sun (Mini-DIN)
Power
source
Figure 1-10: Connecting an AlterPath PM to the KVM/net
See “Setting Up and Configuring Power Management” on page 42 for
information about the procedures the KVM/net administrator must perform
before anyone can use the tools to manage power.
KVM/net users most commonly perform power management through the Web
Manager. See “Options for Managing Power” on page 40 for more
information.
Options for Managing Power
The sections listed below describe the different ways that users with power
management permissions (called authorized users) can perform power
management through the KVM/net and provide links to related information
and procedures.
40 AlterPath KVM/net Installation, Administration, and User’s Guide
Page 57

Power Management
Controlling Power Through the Web Manager IPDU Power Management Forms
Through the Web Manager’s IPDU Power Management form, users with
power management permissions can perform power management on any
device plugged into an PM connected to the AUX port. See “Use this form to
connect to servers with either an in-band or a KVM connection. See
“Connecting to Servers Remotely Through the Web Manager” on page 321.”
on page 304.
Administrators must configure users for IPDU power management. See “To
Configure Users to Manage Specific Power Outlets” on page 166. Or see
“Setting Up and Configuring Power Management” on page 42 for a list o f all
of the administration tasks involved in setting up power management.
Controlling Power While Connected to KVM Ports
Users who have power management permissions can do power management
while connected to servers through KVM ports by using a keyboard shortcut
that brings up a power management screen. The default keyboard shortcut is
Ctrl+k p.
Administrators must perform multiple configuration tasks in order to set up
and grant users permission for power management. See “Setting Up and
Configuring Power Management” on page 42 for a list of all of the
administration tasks involved in setting up power management.
Introduction 41
Page 58

Power Management
Setting Up and Configuring Power Management
Administrators most commonly assign power management permissions to
users and configure ports for power management using the Web Manager.
However, the OSD also offers menus for configuring power management on
local devices.
Two types of power management can be set up and configured on the KVM/
net:
• Power management of any device plugged into an PM connected to the
• Power management while accessing a server connected to a KVM port and
The following set up and configuration tasks must be performed for both
types of power management:
AUX port.
See “Controlling Power Through the Web Manager IPDU Power
Management Forms” on page 41.
plugged into an PM connected to the AUX port.
See “Controlling Power While Connected to KVM Ports” on page 41.
Table 1-16: Tasks: General Power Management Set Up
Task Where Documented/Notes
Install PM units. • “To Connect an AlterPath PM to the
1
AUX Port” on page 117
• “To Connect Multiple PMs to the KVM/
net” on page 118
See the section about installing PMs in the
AlterPath KVM/net Installation,
Configuration, and User’s Guide.
Configure the AUX port for use with
2
power management.
“T o Configure the AUX Port for Use With
an IPDU or an External Modem” on page
267
42 AlterPath KVM/net Installation, Administration, and User’s Guide
Page 59

Power Management
Table 1-16: Tasks: General Power Management Set Up (Continued)
Plug devices into outlets on the PM
3
connected to the AUX port.
Devices plugged into connected PMs can
be managed from the KVM/net Web
Manager Access Page.
Configure users to manage power. “To Configure Users to Manage Specific
4
Power Outlets” on page 166
The following additional configuration tasks must be performed for power
management while accessing a server connected to a KVM port and plugged
into an AlterPath PM connected to the AUX port:
Table 1-17: Tasks: KVM-connected Power Management
Task Where Documented/Notes
Plug servers connected to KVM ports into
5
outlets on the PM connected to the AUX
port.
This is the first step in allowing users to
control power not only from the Web
Manager Access page, but while
connected to KVM ports as well. Refer to
the documentation of your PM model for
more information if needed.
Associate the ports to which the servers
5
are connected with the power outlets to
“T o Configure a KVM Port for Power
Management” on page 183
which the servers are plugged in.
Give users full access (read, write, power)
6
permission on the KVM port(s).
Introduction 43
“T o Assign KVM Port Access to a User or
Group” on page 196
Page 60

Security
Security
Security Profiles
The KVM/net comes with the following configurable security features:
• Security Profiles
• Encryption
• Authentication
• Lockout Macro
A Security Profile consists of a set of parameters that can be configured in
order to have more control over the services that are active at any time. There
are three pre-defined security profiles with pre-set parameters. In addition, a
Custom profile is provided where an administrator can configure individual
protocols and services.
The first step in configuring your AlterPath KVM/net is to define a Security
Profile. One of the following situations is applicable when you boot up the
KVM/net unit.
1. KVM/net is starting for the first time or after a reset to factory default
parameters.
In this situation when you boot KVM/net up and login as an administrator
to the Web Manager, a security warning dialog box appears. The Web
Manager is redirected to “Step1: Security Profile”. Further navigation to
other sections of the Web Manager is not possible without selecting or
configuring a Security Profile. Once you select or configure a Security
Profile and save the changes, KVM/net restarts.
2. KVM/net firmware is upgraded and the system is restarting with the new
firmware.
In this situation the KVM/net was already in use and certain configuration
parameters were saved in the flash memory. In this case KVM/net
automatically retrieves the “Custom Security Profile” parameters saved in
the flash memory and behaves as it was a normal reboot.
3. KVM/net is restarting normally.
44 AlterPath KVM/net Installation, Administration, and User’s Guide
Page 61

In this situation the system detects the pre-defined security profile. You
can continue working in the Web Manager.
See “Step 1: Security Profile [Wizard]” on page 143 for detailed information
on security profiles and configuration procedures
Encryption
Administrators can specify that communications are encrypted between the
KVM/net and any computer attached to a KVM port. In the Web Manager, the
administrator chooses Expert>Configuration>KVM>IP Users to bring up the
IP security form.
See “Local Users and IP Users” on page 176 for instructions.
Authentication
Anyone accessing the KVM/net must log in by entering a username and
password. Controlling access by requiring users to enter names and passwords
is called authentication. Usernames and passwords entered during login
attempts are checked against a database that lists all the valid usernames along
with the encrypted passwords. Access is denied if the username or password is
not valid. The password database that is used for checking can reside either
locally (on the KVM/net) or on an authentication server on the network. The
selected authentication server must be already installed and configured in
order for authentication to work. Using one or more of the many types of
popular authentication methods supported on the KVM/net can reduce
administrator workload when a user account needs to be added, modified, or
deleted.
Security
Choosing Among Authentication Methods
The administrator can select among authentication methods to control logins
to the following components:
• For logins to the KVM/net
The authentication method chosen for the KVM/net is used for subsequent
access through Telnet, SSH, or the Web Manager.
• For logins to all KVM ports
Introduction 45
Page 62

Security
The following table describes the supported authentication methods and
indicates which methods are available for the KVM/net and which are
available for KVM ports. All authentication methods except “Local” require
an authentication server, which the administrator specifies while selecting the
authentication method. The KVM/net uses local authentication if any of the
authentication servers fails.
Table 1-18: Supported Authentication Types for KVM/net and Port Types
Authentication
Type Description KVM/net
None No login required N/A X
Local Uses user/password file
X [Default] X [Default]
for local authentication.
Local/Radius Authentication is
XN/A
performed locally first,
switching to Radius if
unsuccessful.
Local/TacacsPlus Authentication is
XN/A
performed locally first,
switching to T acacsPlus
if unsuccessful.
Local/NIS Authentication is
XN/A
performed locally first,
switching to NIS if
unsuccessful.
Kerberos Uses Kerberos network
XX
authentication protocol
All
KVM Ports
Kerberos/Local Uses local
XN/A
authentication if
Kerberos authentication
fails
46 AlterPath KVM/net Installation, Administration, and User’s Guide
Page 63

Security
Table 1-18: Supported Authentication Types for KVM/net and Port Types (Continued)
Authentication
Type Description KVM/net
KerberosDownlocal Uses local
XX
All
KVM Ports
authentication if
Kerberos server is down
LDAP Uses LDAP (Light-
XX
weight directory access
protocol)
LDAP/Local Uses local
XN/A
authentication if LDAP
authentication fails
LDAPDownlocal Uses local
XX
authentication if LDAP
server is down
NIS Uses NIS authentication X N/A
NIS/Local Uses local
XN/A
authentication if NIS
authentication fails
NISDownlocal Uses local
XN/A
authentication if NIS
server is down
RADIUS Uses RADIUS
XX
authentication
RADIUS/Local Uses local
XN/A
authentication if
RADIUS authentication
fails
Introduction 47
Page 64

Security
Table 1-18: Supported Authentication Types for KVM/net and Port Types (Continued)
Authentication
Type Description KVM/net
RADIUSDownlocal Uses local
XX
authentication if
RADIUS server is
down
TACACS+ Uses Terminal Access
XX
Controller Access
Control System
(TACACS+)
authentication.
TACACS+/Local Uses local
XN/A
authentication if
TACACS+
authentication fails
TACACS+Downlocal Uses local
XX
authentication if
TACACS+ server is
down
NTLM Uses SMB
XX
authentication for
Microsoft Windows
NT/2000/2003
All
KVM Ports
NTLM DownLocal Uses local
XX
authentication if NTLM
server is down
Tools for Specifying Authentication Methods
The administrator generally uses the Web Manager for specifying an
authentication method for the KVM/net and for all KVM ports, as described
in “Network” on page 226. Optionally, the administrator can use the OSD (on
48 AlterPath KVM/net Installation, Administration, and User’s Guide
Page 65

Security
screen display) for selecting an authentication method and specifying an
authentication server (when needed).
The following table lists the tasks necessary for specifying authentication
methods using the Web Manager and the OSD:
Table 1-19: Tasks: Specifying Authentication Methods
Task Where Documented/Notes
Choosing an authentication method
for the KVM/net
Choosing an authentication method
for the for all KVM ports
Configuring a remote authentication
server
Lockout Macro
This feature is configurable on each KVM port. It allows the KVM connected
servers to automatically switch to locked state when the AlterPath Viewer is
closed or an idle time-out occurs.
• Web Manager – “To Configure an
Authentication Method for KVM/net Logins”
on page 206
• OSD – “Notification Screens” on page 411
• Web Manager – “To Configure an
Authentication Method for KVM/net Logins”
on page 206
• OSD – “General Configuration Screens [OSD]”
on page 362
If configuring any authentication method other
than Local, an authentication server must be set up
for that method.
• Web Manager – “Configuring Authentication
Servers for Logins to the KVM/net and
Connected Devices” on page 208
• OSD – “Notification Screens” on page 411
In addition, when a user tries to access a KVM connected server with a full or
read-write permission, the lockout macro command is sent to the server to
lock the current user and display the new login window.
Introduction 49
Page 66

Security
Note: A lockout macro will not transmit if the connection is read-only.
If you switch between two KVM connected servers the lockout macro does
not lock your session unless in the meantime another user has taken over your
session.
The lockout macros are user-programmable. The following table shows the
default key sequences on major operating systems.
Table 1-20: Lockout Macro Key Sequences
Operating System Lockout Macro
Windows XP
Windows 2000
Windows 2003
Sun Solaris 10 - CDE
[WIN] + L
[Ctrl+Alt+Del] + K
K = Lock computer
L = Log out
[WIN] + L
[Ctrl+Alt+Del] + K
K = Lock computer
L = Log out
By default there is no hot key defined. Follow
the steps below to define a key sequence.
1. Go to Desktop Controls/Tools > Hot key
Editor > New Hotkey > Show Details
2. In Hot Key target's name or path enter:
/usr/dt/bin/dtaction
3. In Extra-Command-Line arguments select:
LockDisplay
4. In the "Enter Hot key" type a key sequence ,
for example, [Ctrl+Alt] +L
5. Save as and exit
6. Save and reload
50 AlterPath KVM/net Installation, Administration, and User’s Guide
Page 67

Table 1-20: Lockout Macro Key Sequences
Operating System Lockout Macro
Security
Sun Solaris 10 - JDS
By default there is no hot key defined. Follow
the steps below to define a key sequence.
1. Go to Launch > Preferences > Desktop
Preference > Keyboard > Shortcuts
2. Select “Lock Screen” and enter the desired
hot key sequence, for example, [Ctrl+Alt] +
L
3. Save the changes
Introduction 51
Page 68

Security
Table 1-20: Lockout Macro Key Sequences
Operating System Lockout Macro
SuSe 10 - KDE
SuSe 10 - Gnome
Default key sequence is [Ctrl+Alt] +L
If desired, follow the steps below to change the
default key sequence.
1. From the K Menu, go to Control Center >
Regional & Accessibility > Keyboard
Shortcuts > Shortcuts Scheme > Global
Shortcuts
2. Scroll down to “Desktop” to see the default
shortcuts key settings.
3. Select “Lock Session”
4. Click on the Custom button, and the button
which displays the current shortcut key
sequence.
A dialog box opens.
5. Click on “Advanced” and clear the x in the
default shortcut sequence.
6. Enter the desired shortcut key combination.
By default there is no defined key sequence.
Follow the steps below to define a key
combination.
1. Go to Desktop > Gnome Control Center >
Shortcuts
2. Select “Lock Screen” and enter the desired
key sequence, for example, [Ctrl+Alt] +L
You can use the escape sequence hot keys instead of the key combinations
shown in the previous table. For example, [Ctrl+Alt+Del] is equivalent to
“@” key.
The following table list the escape sequence hot key equivalent.
52 AlterPath KVM/net Installation, Administration, and User’s Guide
Page 69

Notifications, Alarms, and Data Buffering
Table 1-21: Escape Sequence Hot Key Equivalent
Shortcut Key Escape Hot Key
Ctrl
Alt
Shift
Win
Ctrl+Alt+Del
^
$
#
*
@
For configuration instructions using the Web Manager see “Configuring
Individual KVM Ports” on page 183, or “KVM Ports Screens” on page 394
for using OSD.
Notifications, Alarms, and Data Buffering
The KVM/net administrator can set up logging, notifications, and alarms to
alert remote administrators about problems. System-generated messages
about the KVM/net, any connected PMs, computers, or other devices can be
sent to syslog servers for handling.
The KVM/net administrator can also set up data buffering, so that data
communications with KVM-connected computers can be stored in files at the
following locations:
• Locally–stored in the flash memory of KVM/net.
• Remote files–stored in either of the two following types of servers:
• NFS servers
• Syslog servers
For more details about syslog servers see, “Syslog Servers” on page 54.
Introduction 53
Page 70

Notifications, Alarms, and Data Buffering
For more background about setting up logging, notifications, alarms, and for
links to all related procedures in this manual, see “Configuring Logging,
Alarms, and SNMP Traps” on page 55.
Syslog Servers
Messages about the KVM/net, its connected PMs, and other connected
devices can be sent to central logging servers, called syslog servers. Data from
KVM-connected computers can optionally be stored in files on syslog servers.
Syslog servers run operating systems that support system logging services,
usually UNIX-based servers with the syslogd configured.
Prerequisites for Logging to Syslog Servers
An already-configured syslog server must have a public IP address that is
accessible from the KVM/net. The KVM/net administrator must be able to
obtain the following information from the syslog server’s administrator.
• The IP address of the syslog server
• The facility number for messages coming from the KVM/net.
Facility numbers are used on the syslog server for handling messages
generated by multiple devices. See “Facility Numbers for Syslog
Messages” on page 54 for more background on how facility numbers are
used.
Facility Numbers for Syslog Messages
Each syslog server has seven local facility numbers available for its system
administrator to assign to different devices or groups of devices at different
locations. The available facility numbers are: Local 0 through Local 7.
Example of Using Facility Numbers
The syslog system administrator sets up a server called “syslogger” to handle
log messages from two KVM/net units. One KVM/net is located in São Paulo,
Brazil, and the other KVM/net is in Fremont, California. The syslog server’s
administrator wants to aggregate messages from the São Paulo KVM/net into
the
local1 facility, and to aggregate messages from Fremont KVM/net into
local2 facility.
the
54 AlterPath KVM/net Installation, Administration, and User’s Guide
Page 71

On “syslogger” the system administrator has configured the system logging
utility to write messages from the
saopaulo-config
var/log/fremont-config
the Web Manager, according to this example, you would select the facility
number Local 2 from the Facility Number drop-down list on the System Log
form.
SNMP Traps
SNMP traps enables system events to be monitored and a syslog
notification generated whenever they occur. The following is a list of generic
events.
• User Login
• User Log out
• Authentication failure
• Authentication success
• System reboot
System administrator can configure SNMP traps for various system events,
and can activate or deactivate monitoring of the events using the Web
Manager or OSD. For instructions using the W eb Manager see “Notifications”
on page 258, or for OSD see “Notification Screens” on page 411.
Notifications, Alarms, and Data Buffering
local1 facility to the /var/log/
file and the messages from the local2 facility to the /
file. While identifying the syslog server using
Configuring Logging, Alarms, and SNMP Traps
The following procedures can be used to configure logging, alarms, and data
buffering.
• “To Add a Syslog Server [Wizard]” on page 158
• “To Delete a Syslog Server [Wizard]” on page 159
• “T o Configure Syslogging for KVM Ports and Specify Message Filtering
[Expert]” on page 232
• “To Configure Creation of Alarms and Syslog Files for IPDUs” on page
168
Introduction 55
Page 72

VPN and the KVM/net
VPN and the KVM/net
The KVM/net administrator can set up VPN (Virtual Private Network)
connections to establish encrypted communications between the KVM/net
and an individual host or all the hosts on a remote subnetwork. The encryption
creates a security tunnel for communications through an intermediate network
which is untrustworthy.
A security gateway with the IPsec service enabled must exist on the remote
network. The IPsec gateway encrypts packets on their way to the KVM/net
and decrypts packets received from the KVM/net. A single host running IPsec
can serve as its own security gateway. The KVM/net takes care of encryption
and decryption on its end.
Connections between a machine like the KVM/net to a host or to a whole
network are usually referred to as host-to-network and host-to-host tunnel.
KVM/net host-to-network and host-to-host tunnels are not quite the same as a
VPN in the usual sense, because one or both sides have a degenerated subnet
consisting of only one machine.
The KVM/net is referred to as the Local or “Left” host, and the remote
gateway is referred to as the Remote or “Right” host.
In summary, you can use the VPN features on the KVM/net to create the two
following types of connections:
• Create a secure tunnel between the KVM/net and a gateway at a remote
location so every machine on the subnet at the remote location has a secure
connection with the KVM/net.
• Create a secure tunnel between the KVM/net and a single remote host
The gateway in the former example and the individual host in the second
example both need a fixed IP address.
To set up a security gateway, you can install IPsec on any machine that does
networking over IP, including routers, firewall machines, various application
servers, and end-user desktop or laptop machines.
The ESP and AH authentication protocols are supported. RSA Public Keys
and Shared Secret are also supported.
56 AlterPath KVM/net Installation, Administration, and User’s Guide
Page 73

Considerations When Choosing Whether to Enable DHCP
Considerations When Choosing Whether to
Enable DHCP
DHCP is enabled by default. It relies on a DHCP server known to the KVM/
net. Because a DHCP server may assign a different IP address every time the
KVM/net reboots, when DHCP is enabled, a user needs to take an additional
step to find out the dynamically assigned IP address before being able to bring
up the Web Manager. Following are three ways to find out the dynamically
assigned IP address:
• Make an inquiry to the DHCP server on the network where the KVM/net
resides, using the MAC address (a 12-digit hexadecimal number, which is
on a label at the bottom of the KVM/net).
• Connect to the KVM/net remotely using telnet or ssh.
• Connect directly to the KVM/net to find out the DHCP address using the
ifconfig command.
Introduction 57
Page 74

KVM Terminator Usage and Types
KVM Terminator Usage and Types
An AlterPath KVM 4000 Series Terminator converts the server’s keyboard
monitor and mouse signals. A KVM Terminator must be connected to the
monitor keyboard and mouse ports of a server before the server can be
connected to a KVM/net port. The KVM Terminator is connected to the
KVM/net port through a CAT-5 or greater cable with an RJ-45 connector.
Administrators or operators at remote stations who have access through the
KVM/net management software to a KVM port have the same kind of access
as if they were using the actual keyboard, mouse, and monit or of the computer
that is connected to the port.
The Terminator comes in three models shown in the following table:
Table 1-22: AlterPath KVM Terminators
Server Type Connection KVM Terminator Model Part
Number
PC VGA and PS/2 ports PS/2 APK4615
PC / Sun VGA and USB ports USB APK4635
Sun VGA and Mini-DIN ports Mini-DIN APK4645
See “To Connect Computers to KVM Ports” on page 80 for instruction on
using the KVM Terminators.
When a KVM/net is ordered, the customer selects a KVM Terminator for each
type of computer to be connected to the KVM ports.
Activity LEDs on the Terminator
There are two activity LEDs located on the terminator.
1. The “LNK” LED displays a solid amber light when the terminator connects
to the server. A quick blinking “LNK” LED indicates the Terminator
microcode failed to boot.
2. The “PWR” LED displays a blinking green light when the Terminator’s
power is on.
58 AlterPath KVM/net Installation, Administration, and User’s Guide
Page 75

KVM Expander
The AlterPath KVM Expander is designed to connect to the primary KVM/net
to increase the number of ports that a primary KVM/net can manage.
Note: The AlterPath KVM Expander is compatible with the KVM, the KVM/net,
and the KVM/netPlus. The term primary KVM unit refers to the three types of
KVM units.
Front view of the AlterPath KVM Expander:
Back view of the AlterPath KVM Expander 16:
KVM Expander
The following sections offer an introduction to the KVM Expander:
• “KVM Expander Features” on page 59
• “KVM Expander Models and Components” on page 60
• “Adding the KVM Expander to the KVM/net Unit’s List
of Cascaded Devices” on page 67
• “Upgrading the Microcontroller Code” on page 67
KVM Expander Features
The KVM Expander has no CPU, memory, or Flash; therefore, it relies on the
intelligence of the primary KVM unit to control its KVM ports, making for a
simple processing core as well as a cost-effective method of cascading a
KVM/net, a KVM/net, or a KVM/netPlus.
Introduction 59
Page 76

KVM Expander
The KVM Expander does support the following features:
• Allows the connection of 8 or 16 servers
See “KVM Expander Models and Components” on page 60 for more
details.
• Supports all existing Terminators
See “KVM Terminator Usage and Types” on page 58 for more details.
• Is compatible with the AlterPath KVM, KVM/net, and KVM/netPlus units
See “Cascaded Devices” on page 21 for more details.
• Operates with up to two input ports – User A and User B
See “Ports on the KVM Expander” on page 62 for more details.
• Supports horizontal or vertical rack mounting
See “Setting Up the KVM Expander” on page 121 for more details.
• Allows daisy-chaining of KVM Expander units through its AC power
outlet
See “T o Power On Devices Daisy Chained to the KVM Expander’s Power
Outlet” on page 125 for more details.
• Displays port status with LEDs.
See “LEDs on the KVM Expander” on page 63
KVM Expander Models and Components
The KVM Expander comes in two models, which differ only in number of
KVM ports:
Table 1-23: KVM Expander Model Numbers and Port Options
Model Number Part Numbers KVM Ports
8 ATP4208 8
16 ATP4216 16
60 AlterPath KVM/net Installation, Administration, and User’s Guide
Page 77

KVM Expander
o
r
P
t
s
M
V
K
Power Cord Connector
and Switch
Access Ports, LEDs,
and Power Outlet
Figure 1-11: KVM Expander Back Panel Components
The following sections explain the components of the KVM Expander:
• “Ports on the KVM Expander” on page 62
• “LEDs on the KVM Expander” on page 63
• “Power Outlets on the KVM Expander” on page 63
Introduction 61
Page 78

KVM Expander
Ports on the KVM Expander
The KVM Expander has two CAT5 access ports and either 8 or 16 KVM
ports.
o
r
t
s
p
M
V
K
U
U
Figure 1-12: Ports on the KVM Expander Back Panel
Table 1-24: KVM Expander Port Types
Port Type Use and Connection Information
o
s
s
r
e
r
p
A
r
p
B
o
e
r
t
t
User A and
User B
The access ports can be connected with an RJ-45 cable to KVM ports
on the primary KVM unit. Once the KVM Expander is configured as a
cascaded device on the master KVM unit, users can connect to one or
both ports. Each port allows one connection to a server plugged into the
KVM Expander, so a maximum of two server connections can be made
at one time.
See “Installing the AlterPath KVM Expander” on page 119.
KVM ports KVM ports on the KVM Expander work exactly as the KVM ports on
the KVM/net: They allow the connection of a CAT 5 cable to a
Terminator, which is connected to a server.
See “KVM Ports” on page 7 for more background information on KVM
ports.
See “Connecting Servers to the KVM Ports” on page 78 for information
on connecting servers to the KVM ports.
62 AlterPath KVM/net Installation, Administration, and User’s Guide
Page 79

KVM Expander
LEDs on the KVM Expander
The following table describes the LED activities on the KVM Expander.
Table 1-25: LED Activities on the KVM Expander
Number Label Function Color/Status
1, 3 User A & User B Connection Status • Green - Lights when a
connection is established and
operational.
• Orange - Lights when a
connection to a port is
attempted by the "master"
KVM switch.
• Off - When no connection is
active or attempted.
2, 4 User A & User B Power • Green and Orange - Blinks
when the KVM Expander is
powered on and operates
normally.
Power Outlets on the KVM Expander
The KVM Expander has a power connector for power input and a power
outlet for daisy chaining additional KVM Expanders or any other de vice.
Caution! The total amount of power consumed by devices daisy-chained to the KVM
Expander must not exceed seven amps.
Power connector Power outlet
Power switch
Figure 1-13: Power components on KVM Expander Back Panel
Introduction 63
Page 80

KVM Expander
Cascading a KVM Expander
The KVM Expander can support up to two users simultaneously accessing its
KVM ports. In a two-user configuration, a primary KVM switch uses two
connections for each KVM Expander-to-primary KVM switch configuration:
• User A port – One CAT5 cable between a KVM port on the primary KVM
unit and the User A port on the KVM Expander
• User B port – One CAT5 cable between a KVM port on the primary KVM
unit and the User B port on the KVM Expander
In a single user configuration, only one CAT5 cable is connected from a KVM
port on the primary KVM unit to either of the user ports on the KVM
Expander.
The following diagram displays a KVM Expander cascaded from a KVM/net.
64 AlterPath KVM/net Installation, Administration, and User’s Guide
Page 81

KVM Expander
Sun Server
(Mini-DIN)
AlterPath KVM Expander 16
AlterPath KVM/net 32
PC Server
(USB)
PC Server
(PS/2)
UserA UserB
local user
IP users
Figure 1-14: Connecting a KVM Expander to the KVM/net
Introduction 65
Page 82

KVM Expander
The following table shows the maximum number of servers a primary KVM,
KVM/net, or KVM/netPlus can support when cascaded with a KVM
Expander 8 or a KVM Expander 16.
Table 1-26: Maximum Number of Supported Servers
KVM Unit Model Number KVM Expander
Model Number
Maximum
Number of
Servers
KVM AlterPath KVM 16 KVM Expander 16 512
KVM AlterPath KVM 32 KVM Expander 8 256
KVM/net AlterPath KVM/net 16 KVM Expander 16 256
KVM/net AlterPath KVM/net 32 KVM Expander 8 128
KVM/netPlus AlterPath KVM/netPlus
KVM Expander 16 256
1601/1602/1604
KVM/netPlus AlterPath KVM/netPlus
KVM Expander 8 128
1601/1602/1604
KVM/netPlus AlterPath KVM/netPlus
KVM Expander 16 512
3201/3202/3204
KVM/netPlus AlterPath KVM/netPlus
KVM Expander 8 256
3201/3202/3204
66 AlterPath KVM/net Installation, Administration, and User’s Guide
Page 83

KVM Expander
Adding the KVM Expander to the KVM/net Unit’s List of Cascaded Devices
Once the administrator connects the KVM Expander to the primary KVM
unit, the administrator must add the Expander to the primary unit’s list of
cascaded devices. Using the KVM/net Web Manager in Expert Mode, go to:
Configuration>KVM>Devices to see the form displayed in the following
figure.
Figure 1-15: Devices Form on KVM/net Web Manager
See “Configuring Cascaded KVM Units” on page 187 for instructions on
adding, deleting, and modifying cascaded devices.
Upgrading the Microcontroller Code
Once a KVM switch is installed and configured, administrators can use the
Microcode Upgrade form on the primary KVM unit to upgrade the microcode
on a KVM terminator, switch, RP, Port Expander, or video compression
modules. Using the KVM/net Web Manager in Expert Mode, go to:
Management > Microcode Upgrade to see the form displayed in the following
figure.
Introduction 67
Page 84

AlterPath KVM RP
Figure 1-16: Microcode Upgrade Form on KVM/net Web Manager
See “Microcode Upgrade” on page 290 for instructions on updating the
microcode on a KVM Expander.
User Access
The primary KVM switch takes care to prevent the same server port from
being accessed by both user ports. If this happens, the last user to access the
server port will have read-only access.
AlterPath KVM RP
While using the AlterPath KVM RP, an administrator has full access to the
OSD menus, so all local administration tasks can be performed in an office or
at any other location up to 500 feet away from the KVM/net. In addition, you
do not need a dedicated monitor, keyboard, and mouse to use the RP; the RP
box allows you to use the monitor, keyboard, and mouse of your regular work
station and use keyboard shortcuts to toggle between the view at your local
work station and the view of the KVM/net. The RP also offers keyboard
shortcuts to manage the extended local access to the KVM/net. The following
diagram displays the connections between the RP, the KVM/net, and the local
68 AlterPath KVM/net Installation, Administration, and User’s Guide
Page 85

AlterPath KVM RP
keyboard, monitor, and mouse. The AlterPath KVM RP is available in one
model whose part number is ATP4710.
Local-Remote button
Power
Power LED
Local Remote
Select
Local-Remote LEDs
Figure 1-17: KVM RP Front
Connectors on the Back of the KVM RP
The RP has a power supply and a User, a PC, and a Remote User port as
displayed in the following figure.
Power Supply and Switch
100-240V
50/60Hz, 0.15A
USER
PC
User and PC ports
Figure 1-18: KVM RP Back Panel
The following table offers more details about the use of and cables for each
port on the back of the KVM RP.
Remote User port
REMOT E
KVM
Table 1-27: KVM RP Port Types
Port Type Use and Connection Information
Remote User Its RJ-45 connection can be connected by a CAT5 cable to the User 2
port on the KVM/net.
Introduction 69
Page 86

AlterPath KVM RP
Table 1-27: KVM RP Port Types (Continued)
Port Type Use and Connection Information
User
[PS/2 and VGA]
PC
[PS/2 and VGA]
Keyboard, video, and mouse (KVM) management port. Includes two
PS/2 ports and a VGA port, which can be connected with a KVM cable
to the PS/2 ports and a VGA port on the back of the computer at the
local work station.
Keyboard, video, and mouse (KVM) management port. Includes two
PS/2 ports and a VGA port, which can be connected to a local station’s
mouse, keyboard, and monitor.
70 AlterPath KVM/net Installation, Administration, and User’s Guide
Page 87

Chapter 2
Installation
This chapter outlines and described tasks for installing the KVM/net and
provides other important installation-related information.
The following table lists the basic installation tasks in the order in which they
should be performed and shows the page numbers where the tasks are
described in more detail.
Review the contents of the shipping box Page 73
1
Set up the KVM/net Page 75
2
Make an Ethernet connection Page 77
3
Connect servers to be managed through the KVM/net Page 78
4
Make a direct connection (terminal or local monitor, keyboard, and mouse)
5
to the KVM/net to prepare for basic network configuration
Power on the KVM/net and connected devices Page 83
6
Perform basic network configuration (using the wiz command or OSD
7
network screen)
Finish configuration and manage the connected devices using the Web
8
Manager
Page 82
Page 84
Page 98
Page 88

Also see the following instructions for setting up the KVM/net:
Changing Default Passwords Page 99
Enabling Access to the Web Manager without Making a
Page 101
Direct Connection
Preconfiguring the KVM/net for Remote Installation Page 104
Additional Configuration Tasks Page 105
Perform the optional procedures in “Advanced Installation Procedures” on
page 115 if you are installing an AlterPath PM, an external modem, an
AlterPath KVM RP, an AlterPath KVM Expander, or an other cascaded KVM
devices.
72 AlterPath KVM/net Installation, Administration, and User’s Guide
Page 89

Shipping Box Contents KVM/net
Shipping Box Contents KVM/net
The shipping box for the KVM/net contains the KVM/net along with the
items shown in Table 2-1. The entry for each part provides an illustration, its
part number (P/N), description, and purpose. You can use check boxes to
check off each item, and you can use the part numbers from this table to
reorder any of the parts.
Table 2-1: Shipping Box Contents, Part Numbers, and Description (Sheet 1 of 3)
5
Item P/N Description Purpose
PAC0226 Documentation CD PDF copies of this guide and
all other Cyclades product
documents.
PAC0303
CAB0010 3-pin power cord Use to plug into a grounded
AlterPath KVM/
net Quick Start
Guide
Basic installation guide for
experienced users in printed
format.
AC power outlet. For other
types of power sources,
contact Cyclades sales for
other cord options.
Installation 73
Page 90

Shipping Box Contents KVM/net
Table 2-1: Shipping Box Contents, Part Numbers, and Description (Sheet 2 of 3)
5
Item P/N Description Purpose
CAB0018 RJ-45 to RJ-45 7ft.
CAT5 cable
Use for the following:
• To connect a server to a
KVM port (with the
appropriate Te rminator
from Table 1-22 on
page 58). See “Connecting
Servers to the KVM Ports”
on page 78.
• T o connect an Ethernet port
to the LAN. See “To Make
an Ethernet Connection” on
page 77.
• To connect a terminal to a
console port. See “To
Connect to the Console
Port” on page 82.
• To connect an IPDU or
external modem to the
AUX port. See
“Connecting AlterPath
PMs to the KVM/net” on
page 117 and “Connecting
an External Modem” on
page 116.
ADB0036 RJ45 to DB9F
crossover adapter
74 AlterPath KVM/net Installation, Administration, and User’s Guide
To connect the console port
to a computer that has a DB-9
connector.
Page 91

Setting Up the KVM/net
Table 2-1: Shipping Box Contents, Part Numbers, and Description (Sheet 3 of 3)
5
Item P/N Description Purpose
HAR0220 2 - Mounting
brackets with 8 screws (2 spares
When ordering the KVM/net, customers also order one KVM Terminator for
each server to be connected to one of the KVM ports. The number and types
of KVM T erminators in each order are based on the number of KVM ports on
the KVM/net model that is being shipped and on the types of servers that are
to be connected to the KVM ports. For details, see “KVM Terminator Usage
and Types” on page 58.
Note: For more information about cabling, see “RS-232 Cabling Tutorial” at http://
www.cyclades.com/resources.” For ordering information, see “Cyclades
Product Guide,” available at: http://www.cyclades.com/common/www/pdf/
catalog.en.pdf.
Use to mount the KVM/net to
a rack or wall. See “To
Mount the KVM/net” on
page 76.
Setting Up the KVM/net
You can mount the KVM/net on a rack or place it on a desktop or other flat
surface. Two brackets are supplied with sixPhillips screws for attaching the
brackets to the KVM/net for mounting.
• If you are not mounting the KVM/net, place the KVM/net on a desk or
table.
• If you are mounting the KVM/net, obtain a Phillips screwdriver and
appropriate nuts and bolts before starting the following procedure.
The following graphics depict the orientation of the brackets for front
mounting the KVM/net.
Installation 75
Page 92

Setting Up the KVM/net
T To Mount the KVM/net
1. Decide whether you need to mount the KVM/net by the front or back and
Holes for front mounting Holes for back mounting
Bracket
locate the appropriate sets of holes on the KVM/net.
KVM/net side
Figure 2-1:Rack Mounting Holes on the KVM/net
2. Connect the two supplied brackets to the KVM/net, connecting one bracket
to each side of the box.
3. For each bracket, insert a screw through each of the three holes on the
bracket into the appropriate holes at either the front or back of the KVM/net.
The following figure shows the bracket flanges on the front of the KVM/net after the brackets
are installed.
Brackets
4. Use a Phillips screwdriver to tighten the screws.
76 AlterPath KVM/net Installation, Administration, and User’s Guide
Page 93

Making an Ethernet Connection
5. Use the mounting hardware recommended for your rack to mount the
KVM/net on a rack.
Making an Ethernet Connection
Make an Ethernet connection to the KVM/net in order to have Ethernet access
to the Web Manager and remote access to devices connected to the KVM/net.
T To Make an Ethernet Connection
1. Connect one end of an Ethernet cable to your local area network (LAN).
2. Connect the other end to the Ethernet port on the KVM/net.
Remote connections can also be made through an external modem connected
to the AUX port. See “Modem Connections” on page 346 for background
information and instructions.
Installation 77
Page 94

Connecting Servers to the KVM Ports
Connecting Servers to the KVM Ports
You need to connect a KVM Terminator to every server before connecting it
to a KVM port. Three Terminator types are available:
• APK4615 - PS/2 for PC servers
• APK4635 - USB for PC or Sun servers
• APK4645 - Sun Mini-DIN
Terminator
CAT5 cable (up to 500 ft.)
RJ-45 connector
Figure 2-2: Connecting Servers to KVM Ports
Note: The KVM/net components are hot pluggable, but components of connected
devices, such as the PS/2 keyboard and mouse ports on a computer, may not
be hot pluggable. Turn off power to all devices before connecting them.
Power on connected devices again only after the KVM/net is powered on.
78 AlterPath KVM/net Installation, Administration, and User’s Guide
Page 95

Connecting Servers to the KVM Ports
Follow the procedures below when connecting computers to KVM ports on
the KVM/net or on the KVM Expander. For connecting AlterPath PMs or
cascaded KVM units, see Chapter 3, “Advanced Installation Procedures.”
Note: KVM port connections rely on the CAT5 cable having all four pairs wired. If
you are connecting a KVM port to a server through a patch panel, make sure
that all cables in the path are CAT5 or better and that the patch panel has all
four pairs wired.
T To Prepare to Connect Servers to the
KVM/net
1. Ensure that all configuration is complete on servers to be connected.
Work with the administrator of the devices to ensure all the following
prerequisites are complete:
• All servers are installed and fully configured.
• User accounts with the appropriate permissions level exist on each server
and you have the computer’s root password for users who need root
access to manage the server through the KVM/net.
• On all computers to be connected to KVM server ports, the mouse
settings have been modified, as described in “Disabling Mouse
Acceleration” on page 106.
2. If a server is to use remote authentication, do the following steps:
a. Make sure that the following prerequisite configuration is complete:
• Authentication servers are installed and fully configured.
• You have the root password for all users who need root access to manage
the server through the KVM/net.
Note: Y ou may want to assign different passwords for a server’ s administrator on the
KVM/net and on the server’s remote authentication server. If the
administrator logs into the server using the password for the authentication
server and log in fails, the failure can indicate that the authentication server is
down and that the server’s administrator should be notified to take action.
Installation 79
Page 96

Connecting Servers to the KVM Ports
b. Obtain the information you need to identify the authentication server on
the KVM/net from the server’s administrator.
c. After the KVM/net is installed, make sure to specify the desired
authentication method for the ports that are connected to each server.
See “Security” on page 44 for background information and see
“Network” on page 226 for the procedure.
3. Because some components of connected equipment may not be hot
pluggable, make sure all servers are powered off.
T To Connect Computers to KVM Ports
Do these steps after completing “To Prepare to Connect Servers to the KVM/
net” on page 79.
1. Select the appropriate Terminator.
2. Connect the appropriate keyboard and mouse connectors.
Important: To avoid system conflicts connect the T erminator to the server in
the following order.
• On a PS/2 Terminator for a PC server, first connect the Terminator’s
green connector to the server’s mouse port, and then connect the
T erminator’ s purple keybo ard connector to the server’ s keyboard port.
• On a USB Terminator for a PC or a Sun server, connect the
Terminator’s USB connector to the USB port on the server.
80 AlterPath KVM/net Installation, Administration, and User’s Guide
Page 97

Connecting Servers to the KVM Ports
• On a Mini-DIN Terminator for a Sun server, connect the Terminator’s
Mini-DIN connector to the Mini-DIN port on the server.
3. Connect the T erminator’s VGA (HD-15 male) connector to the computer’ s
VGA (monitor) port. Tighten both screws firmly but do not over-tight
them.
Note: Two activity LEDs are located on the terminator. The “Link” LED displays a
solid amber light when the terminator connects to the server. The “On” LED
displays a blinking green light when the terminator is on.
4. To extend the connection from the computer to the KVM/net, connect an
RJ-45 to RJ-45 CAT5 cable up to 500 feet long to the Terminator.
Installation 81
Page 98

Making a Direct Connection for Network Configuration
5. Connect the RJ-45 connector on other end of the cable to a KVM port on
the KVM/net.
6. Repeat Step 1. through Step 5. for all computers to be connected to the
KVM ports.
7. If any user is using a PC with Windows XP server pack 2 installed and
Internet Explorer 5 or 6 to remotely administer a connected server, make
sure the procedure under “Required Security Settings For Internet
Explorer” on page 109 has been done on the PC.
8. If this is a first-time installation, go to “Making a Direct Connection for
Network Configuration” on page 82.
Making a Direct Connection for Network
Configuration
The system administrator must specify basic network settings on the KVM/
net before administrators can connect to and manage the unit and the
connected devices through a browser. To prepare to perform necessary basic
network configuration, make a direct connection to the KVM/net by doing
one of the following:
• Connect a terminal or computer to the
See “To Connect to the Console Port” on page 82.
• Connect a keyboard, monitor, and mouse to the keyboard, monito r, and
mouse connectors on the KVM/net.
See “To Connect to the User 1 Management Port” on page 83.
See “Enabling Access to the Web Manager without Making a Direct
Connection” on page 101, if desired, for other procedures that require
advanced system administration expertise.
CONSOLE port.
T To Connect to the Console Port
Perform the following steps to connect a computer to the console port of the
KVM/net. This procedure assumes that you know how to use a terminal
emulation program.
82 AlterPath KVM/net Installation, Administration, and User’s Guide
Page 99

Powering On the KVM/net and Connected Devices
On a PC, ensure that HyperT erminal or another terminal emulation program is
installed on the Windows operating system. On a computer running a UNIXbased operating system, such as Solaris or Linux, make sure that a compatible
terminal emulator such as Kermit or Minicom, is installed.
1. Connect an RJ-45 serial cable to the console port on the KVM/net.
2. Connect the other end to a USB serial adapter or DB-9 connection on the
computer.
3. Using a terminal emulation program installed on a computer, start a
session with the following console port settings:
Serial Speed: 9600 bps Stop Bits: 1
Data Length: 8 bits Flow Control: None
Parity: None ANSI emulation
4. Go to Chapter 2. “Powering On the KVM/net and Connected Devices” on
page 83.
T To Connect to the User 1 Management Port
1. Plug the station's monitor, keyboard, and mouse cables to the Keyboard,
Video, and Mouse connectors, labelled User 1, on the KVM/net.
2. Go to “Powering On the KVM/net and Connected Devices” on page 83.
Powering On the KVM/net and Connected
Devices
The KVM/net components are hot pluggable, but components of connected
devices, such as the PS/2 keyboard and mouse ports on a computer, may not
be hot pluggable. Turn off power to all devices before connecting them.
Power on connected devices again only after the KVM/net is powered on.
Installation 83
Page 100

Performing Basic Network Configuration
T To Power On the KVM/net
1. Make sure the KVM/net’s power switch is off.
The power is off when the side of the power switch with the circle is
pressed down.
2. Plug in the power cable.
3. Turn the KVM/net’s power switch on.
The KVM/net beeps once.
T To Power On Connected Devices
Do this after “Connecting Servers to the KVM Ports” on page 78.
• Turn on the power switches of the connected computers and devices.
Performing Basic Network Configuration
The administrator must specify basic network settings before regular users
can connect to and manage the KVM/net and the connected devices through a
browser. Do one of the following to assign a fixed IP address to the KVM/net,
and to specify the netmask and other networking parameters:
• Through a console connection, log in and use the wiz command.
See “Configuring Basic Networking Using the wiz Command” on page 85.
• Through a local KVM connection, log in to the OSD and configure
networking through the network screen.
See “Configuring Basic Networking Using the OSD” on page 89.
Before you start, collect the following network information from the
administrator of the network where the KVM/net is to reside.
Hostname:
KVM/net’s public IP address:
Domain name:
84 AlterPath KVM/net Installation, Administration, and User’s Guide
 Loading...