


Cybex Arc Trainer® 630A
Owner’s Manual
Cardiovascular Systems
Part Number 5630A-4 K
www.cybexinternational.com

Cybex Arc Trainer® 630A
Owner’s Manual
Cardiovascular Systems
Part Number 5630A-4 K
Cybex®and the Cybex logo are registered trademarks of Cybex International, Inc.
Arc Trainer® and its mark is a registered trademark of Cybex International, Inc.
Polaris® a registered trademark of Polar.
DISCLAIMER: Cybex International, Inc. makes no representations or warranties regarding the contents of this manual. We reserve the right to revise this document at any time or to make changes to the product described within it without notice or obligation to notify any person of such revisions or changes.
© 2008 Cybex International, Inc. All rights reserved. Printed in United States of America.
10 Trotter Drive Medway, MA 02053 • 888-426-9239 • 508-533-4300 • FAX 508-533-5183 www.cybexinternational.com • techhelp@cybexintl.com • techpubs@cybexintl.com • 630A-4 K • September 2008

Cybex Arc Trainer 630A Owner’s Manual
About This Manual
An Owner’s Manual is shipped with each unit. To purchase additional copies of this manual or any other Cybex manual, please do one of the following:
•fax orders to 508-533-5183 or contact Cybex Customer Service at 888-462-9239
•or contact Cybex Customer Service at 508-533-4300
Find information on the web at www.cybexinternational.com or by e-mail at techhelp@cybexintl.com.
FCC Compliance Information
! WARNING: Changes or modifications to this unit not expressly approved by the party responsible for compliance could void the user’s authority to operate the equipment.
This equipment has been tested and found to comply with the limits for a Class B digital device, pursuant to Part 15 of the FCC Rules. These limits are designed to provide reasonable protection against harmful interference in a residential installation. This equipment generates, uses and can radiate radio frequency energy and, if not installed and used in accordance with the instructions, may cause harmful interference to radio communications. However, there is no guarantee that interference will not occur in a particular installation. If this equipment does cause harmful interference to radio or television reception (which can be determined by turning the equipment off and on) the user is encouraged to try to correct the interference by one or more of the following measures:
•Reorient or relocate the receiving antenna.
•Increase the separation between the equipment and receiver.
•Connect the equipment into an outlet on a circuit different from that to which the receiver is connected.
•Consult the dealer or an experienced radio TV technician for help.
Page i

Cybex Arc Trainer 630A Owner’s Manual
Table of Contents
Front Pages
About this Manual . . . . . . . . . . . . . . . . . . i FCC Compliance Information . . . . . . . . . i Table of Contents . . . . . . . . . . . . . . . . . . iii
1 Safety
Important Voltage Information. . . . . . . . . 1-1 Grounding Instructions. . . . . . . . . . . . . . . 1-1 Important Safety Instructions . . . . . . . . . 1-2 Warning Decals . . . . . . . . . . . . . . . . . . . . 1-5 Warning Decals For Units with AC
Power Kit . . . . . . . . . . . . . . . . . . . . . . . . 1-7 Caution Decals . . . . . . . . . . . . . . . . . . . . 1-8 Explanation of Symbols Used . . . . . . . . . 1-9
2 Technical Specifications
Specifications . . . . . . . . . . . . . . . . . . . . . 2-1
3 Operation
Terms and Symbols Used . . . . . . . . . . . . 3-1
Intended Use . . . . . . . . . . . . . . . . . . . . . . 3-2
Quick Operation Guide . . . . . . . . . . . . . . 3-3
Detailed Operation Guide . . . . . . . . . . . . 3-3
Stopping the Arc Trainer 630A . . . . . . . . 3-7
Presence Detect . . . . . . . . . . . . . . . . . . 3-7
Control During Operation . . . . . . . . . . . . 3-7
Data Readouts . . . . . . . . . . . . . . . . . . . . . 3-8
Displaying Heart Rate . . . . . . . . . . . . . . . 3-9
Heart Rate LED . . . . . . . . . . . . . . . . . . . . 3-9
Use of Programs . . . . . . . . . . . . . . . . . . . 3-10
Manual Mode . . . . . . . . . . . . . . . . . . . . . . 3-11
The Workout Profile . . . . . . . . . . . . . . . . . 3-11
Range of Motion . . . . . . . . . . . . . . . . . . . 3-11
Hill Interval . . . . . . . . . . . . . . . . . . . . . . . . 3-13
Interval . . . . . . . . . . . . . . . . . . . . . . . . . . . 3-15
Weight Loss . . . . . . . . . . . . . . . . . . . . . . . 3-17
Cardio . . . . . . . . . . . . . . . . . . . . . . . . . . . 3-19
Strength . . . . . . . . . . . . . . . . . . . . . . . . . . 3-21
Manual . . . . . . . . . . . . . . . . . . . . . . . . . . . 3-23
4 Preventive Maintenance
Warnings . . . . . . . . . . . . . . . . . . . . . . . . . 4-1
Regular Maintenance Activities . . . . . . . . 4-1
Cleaning Your Arc Trainer 630A . . . . . . . 4-2
Drive Belt Maintenance . . . . . . . . . . . . . . 4-3
Lubrication . . . . . . . . . . . . . . . . . . . . . . . . 4-5
Environment . . . . . . . . . . . . . . . . . . . . . . . 4-5
Storage . . . . . . . . . . . . . . . . . . . . . . . . . . 4-5
Service Schedule . . . . . . . . . . . . . . . . . . . 4-6
Rechargeable Battery . . . . . . . . . . . . . . . 4-7
5 Setup and Assembly
Warnings/Cautions . . . . . . . . . . . . . . . . . 5-1
Choosing and Preparing a Site . . . . . . . . 5-1
Electrical Power Requirements . . . . . . . . 5-2
Assembling the Arc Trainer 630A . . . . . . 5-2
Testing the Operation . . . . . . . . . . . . . . . 5-11
Setting Operation Options . . . . . . . . . . . . 5-12
Cybex Personal Entertainment Monitor
- Optional . . . . . . . . . . . . . . . . . . . . . . 5-13
Total Access Arm Lock Assembly
- Optional . . . . . . . . . . . . . . . . . . . . . . 5-17
Side Handle - Optional . . . . . . . . . . . . . 5-18
6 Customer Service
Contacting Service . . . . . . . . . . . . . . . . . 6-1
Serial Number and Voltage . . . . . . . . . . . 6-1
Return Material Authorization (RMA). . . . 6-2
Damaged Parts . . . . . . . . . . . . . . . . . . . . 6-3
Ordering Parts . . . . . . . . . . . . . . . . . . . . . 6-3
PartList - Main Assembly. . . . . . . . . . . . . 6-4
Total Access Conversion . . . . . . . . . . . . 6-6
Heart Rate Grip . . . . . . . . . . . . . . . . . . . 6-6
Exploded View - Main Assembly. . . . . . . 6-7
Exploded View - Main Assembly. . . . . . . 6-8
Parts List - Console Assembly . . . . . . . . 6-10
Exploded View - Console Assembly. . . . 6-11
Parts List - Front End Assembly . . . . . . . 6-12
Exploded View - Front End Assembly. . . 6-13
Schematic . . . . . . . . . . . . . . . . . . . . . . . . 6-15
Page iii
Cybex Arc Trainer 630A Owner’s Manual
1 - Safety
IMPORTANT: Read all instructions and warnings before using the unit.
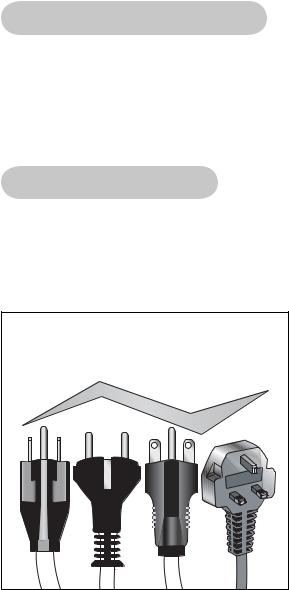
Important Voltage Information
NOTE: The power cord is available with the optional AC power kit.
! WARNING: Do not plug unit into wall outlet without an approved medical power cord.
Before plugging the power cord into an electrical outlet, verify that the voltage requirements for your area match the voltage of the unit that you have received.
Grounding Instructions
This unit must be grounded. If it should malfunction or break down, grounding provides a path of least resistance for electric current to reduce the risk of electric shock. This product is equipped with a cord having an equipment-grounding conductor and a grounding plug. The plug must be plugged into an appropriate outlet that is properly installed and grounded in accordance with all local codes and ordinances.
AW-19522 |
EW600005 AW-19587 AW-19521 |
||
115 VAC |
220 VAC |
100 VAC |
230 VAC |
! DANGER: Improper connection of the equipment grounding conductor can result in a risk of electric shock. Check with a qualified electrician or service provider if you are in doubt as to whether the unit is properly grounded. Seek a qualified electrician to perform any modifications to the cord or plug. Cybex is not responsible for injuries or damages as a result of cord or plug modification.
Make sure that the unit is connected to an outlet having the same configuration as the plug. Do not use a ground plug adapter to adapt the power cord to a non-grounded outlet.
Safety
Page 1-1

Cybex Arc Trainer 630A Owner’s Manual
Important Safety Instructions
(Save These Instructions)
!DANGER: To reduce the risk of electric shock, always unplug this unit from the electrical outlet immediately after using it and before cleaning it.
!WARNING: Serious injury could occur if these precautions are not observed. To reduce the risk
of burns, fires, electric shock, or injury:
User Safety Precautions
•Keep children away. Teenagers and disabled must be supervised.Tenez les enfants éloignés. Les adolescents et les handicapés doivent être surveilles.
•Obtain instruction before using. Lisez les instructions avant l’utilisation.
•Wait until foot plates come to a complete stop before dismounting. Attendre l’arret complet des reposes pieds avant de descendre.
•Obtain a medical exam before beginning any exercise program.
•Stop exercising if you feel faint, dizzy, or experience pain.
•Read and understand the Owner’s Manual and all warnings posted on the unit before using.
•DO NOT wear loose or dangling clothing while using.
•Keep all body parts, towels, and the like free and clear of moving parts.
•Use the handrails for support and to maintain balance.
•DO NOT use the unit if you exceed 400 lbs. (180 kg). This is the rated maximum user weight.
•Replace any warning labels if damaged, worn or illegible.
•Report any malfunctions, damage or repairs to the facility.
•Wait until foot plates come to a complete stop before dismounting.
•All maintenance activities shall be performed by qualified personnel. Failure to do so could result in serious injury.
•DISCONNECT POWER BEFORE SERVICING.
•Moving parts. Keep hands away when in use.
•For connection to a Medical Grade outlet only to ensure proper grounding. Rated 100-240 VAC~ 50/60 Hz 0.75 A.
Safety
Page 1-2
Cybex Arc Trainer 630A Owner’s Manual
Facility Safety Precautions
•Make sure all user and safety precautions are observed.
•Read and understand the Owner’s Manual completely before using the unit.
•Make sure all users are properly trained on how to use the equipment.
•Make sure that each machine is setup and operated on a solid level surface. Do not install equipment on an uneven surface.
•Make sure there is enough room for safe access and operation of the equipment.
•Perform regular maintenance checks on the equipment. Also pay close attention to all areas most susceptible to wear, including (but not limited to) cables, pulleys, belts and grips.
•Immediately replace worn or damaged components. If unable to immediately replace worn or damaged components then remove from service until the repair is made.
•Do not attempt repairs, electrical or mechanical. Seek qualified repair personnel when servicing. If you live in the USA, contact Cybex Customer Service at 888-462-9239. If you live outside the USA, contact Cybex Customer Service at 508-533-4300.
•Disconnect the optional power adapter before servicing the unit.
•Keep a repair log of all maintenance activities.
•Use only Cybex supplied components to maintain/repair the equipment.
•Do not use attachments unless recommended for the unit by Cybex.
•Do not use the unit if: the unit is plugged into an optional power adapter that has a damaged cord; (2) the unit is not working properly or (3) if the unit has been dropped or damaged. Seek service from a qualified technician.
•Do not use the optional power adapter in damp or wet locations.
•EQUIPMENT not suitable for use in the presence of a FLAMMABLE ANAESTHETIC MIXTURE WITH AIR or WITH OXYGEN OR NITROUS OXIDE.
•Do not use the unit outdoors.
•The 630A may generate electromagnetic or other forms of interference, or it may be affected by interference from other equipment nearby. If this is suspected, take precautions by separating the equipment or otherwise shielding it to avoid such interference.
NOTE: It is the sole responsibility of the user/owner or facility operator to ensure that regular maintenance is performed.
Arc Trainers containing the A/V options
•Devices connected to Cybex equipment must comply with appropriate safety standards. This includes but not limited to: (UL-60601, IEC/EN 60601-1) for medical equipment.
•There must be adequate mechanical mounting of the device in all combinations (configurations).
Safety
Page 1-3
Cybex Arc Trainer 630A Owner’s Manual
•The device must be stable on the unit in all configurations.
•Risk and leakage current of the final combinations must comply with IEC/EN 60601-1-1 and is the responsibility of the end user to ensure compliance.
•Electromagnetic emissions and immunity of all configurations must conform to IEC/EN 60601-1-2.
•All added devices must have a compatible interface.
•All devices must be used for their intended purpose.
•Signal or mains isolation devices and additional protective earth may be needed to assure compliance with IEC/EN 60601-1-1.
•Do not power the entire system from a single outlet or power strip. If the unit is used with the
optional power supply, ensure that this power supply is plugged in to a separate outlet than any connected device, to prevent exceeding the allowable leakage current of the system.
•End user of a system shall ensure that interruption and restoration of the power supply to any equipment or non-medical equipment of the system shall not result in a safety hazard other than interruption or cessation of its intended function.
Safety
Page 1-4
Cybex Arc Trainer 630A Owner’s Manual
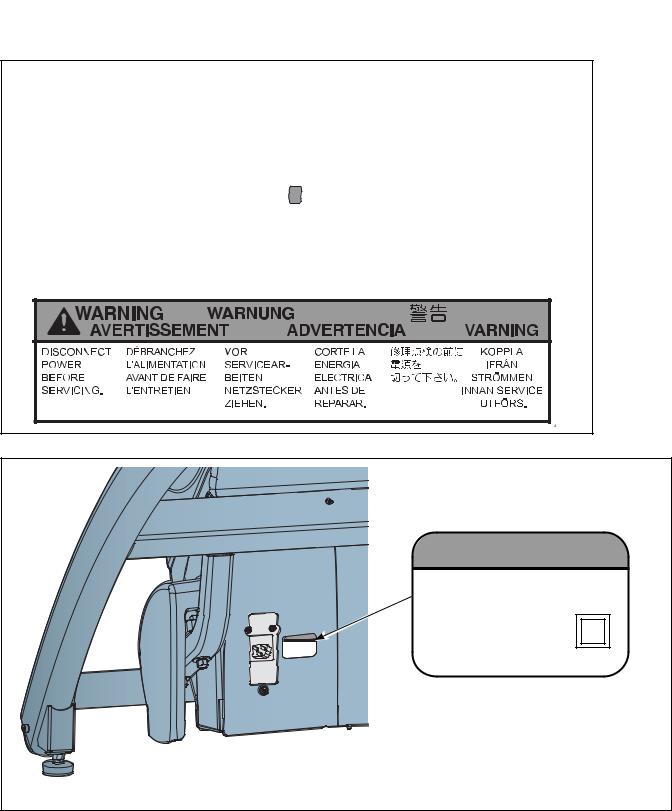
Warning Decals
Carefully read and understand the following before using the unit:
NOTE: To replace any worn or damaged decals do one of the following: Fax orders to 508-533-5183.or contact Cybex Customer Service at 888-462-9239. If you live outside of the USA, call 508-533-4300.
Warning decals indicate a potentially hazardous situation, which, if not avoided, could result in death or serious injury. The warning decals are shown below.
Warning decal part number |
610A-349-4 |
Safety
Page 1-5

Cybex Arc Trainer 630A Owner’s Manual
Underneath |
Access Cover |
Warning decal part number - DE-19592-4 |
SERIOUS INJURY COULD OCCUR
IF THESE PRECAUTIONS
ARE NOT OBSERVED
High voltage is present under this shield. This shield should only be removed by a qualified service technician.
Keep wet items away from inside parts.
High voltage may still be present even if the unit is unplugged.
Shield part number 630A-316
Warning battery DE-19586 Located on battery bracket
Warning decal part number DE-17155-4
 WARNING
Hot flywheel! Wait until it cools before servicing.
DE-17155-4
Safety
Page 1-6
Cybex Arc Trainer 630A Owner’s Manual
Warning Decals for Units with AC Power Kit
Warning decal part number |
CM000240 |
CM000240 |
|
|
|
NG |
WARNI |
|||
For connection |
to a Medical Grade |
||
|
proper grounding. |
||
outlet only to ensure |
|
|
|
Voltage: 100-240 VAC~ |
50/60Hz |
||
|
|||
Warning decal part number DE-19547-4
 WARNING
For connection to a Medical Grade outlet only to ensure proper grounding.
Voltage: 100-240 VAC~ 50/60Hz
0.75 Amps
1-Phase
DE-19547-4
Safety
Page 1-7
Cybex Arc Trainer 630A Owner’s Manual
Caution Decals
Caution decals indicate a potentially hazardous situation, which, if not avoided, may result in minor or moderate injury. The caution decals are shown below.
 CAUTION
Moving parts.
Keep hands away
when in use. |
Caution decal part number |
DE-17219-4 |
DE-17219-4 |
NOTE: This decal is located on both sides of the unit in a total of two locations.
Safety
Page 1-8

Cybex Arc Trainer 630A Owner’s Manual
Explanation of Symbols Used
|
Class II Equipment - Classifies equipment as Class II with double insulation. |
|
BF |
Type BF Applied Part - Classifies equipment as Type BF, providing protection |
|
against electric shock. |
||
|
CE - The CE (Conformitè Europèenne) mark is a European Union approval indicating that a product complies with a European Directive.
Pause/End - Press to pause program.
Quick Start - Press to skip Program Setup Mode and enter Manual Mode.
Up Triangle - This key adjusts Time, Level or Weight up.
Down Triangle - This key adjusts Time, Level or Weight down.
Up Arrow - This key adjusts Incline up.
Down Arrow - This key adjusts Incline down.
Level Plus - This key adjusts Level up.
Level Minus - This key adjusts Level down.
Safety
Page 1-9
Cybex Arc Trainer 630A Owner’s Manual
This page intentionally left blank
Safety
Page 1-10

Cybex Arc Trainer 630A Owner’s Manual
2 - Technical Specifications
Specifications
Length: |
82” (208 cm) NOTE: When highest incline is in use the length increases to |
|
93” (236 cm). |
Width: |
30” (76 cm) NOTE: Measurement is without the water bottle holder. |
|
Width with water bottle holder and arms attached is 37” (94cm). |
Height: |
59” (150cm). |
Weight of Product: |
450 lbs. (204 kg). |
Shipping Weight: |
475 lbs. (215 kg). |
Incline Levels: |
11 (Represented by 0-10% in increments of 1). |
Resistance Levels: |
101 (Represented by 0-100% in increments of 1). |
Stride Length: |
24” (61 cm) fixed length. |
Programs: |
Quick Start plus Manual, Weight Loss, Cardio, Interval, Hill and Strength. |
Console Features: |
Upper console: Dot Matrix of program, large 1” LED display of distance, |
|
calories, calories per hour, METS, Watts, strides per minute and heart rate. |
|
Lower Console: LED display of resistance and dual function display of time |
|
and incline. |
Heart Rate Features: |
Built-in wireless heart rate receiver (transmitter not included) and contact |
|
heart rate monitoring. |
Frame Colors: |
Standard: White texture, black texture, metaltone gold, black chrome, |
|
platinum sparkle. |
|
Custom: Unlimited colors available. |
Resistance Range: |
0-900 watt. |
Maximum User Weight: |
400 lbs. (181 kg). |
Power Rating: |
Self powered or 100 - 240 VAC~, 50/60 Hz, 0.75A, 1-phase. |
Other: |
Water bottle holder. |
Options: |
Channel and volume controls on lower switch membrane for embedded A/V |
|
and AC power kit. |
30” |
37” |
(76 cm) |
(94 cm) |
|
Water Bottle Holder |
|
82-93” (208-236 cm) |
Technical
Specifications
Page 2-1
Cybex Arc Trainer 630A Owner’s Manual
This page intentionally left blank
Technical
Specifications
Page 2-2
Cybex Arc Trainer 630A Owner’s Manual
3 - Operation
Read and understand all instructions and warnings prior to using the Unit. See all of the safety related information located in chapter 1.
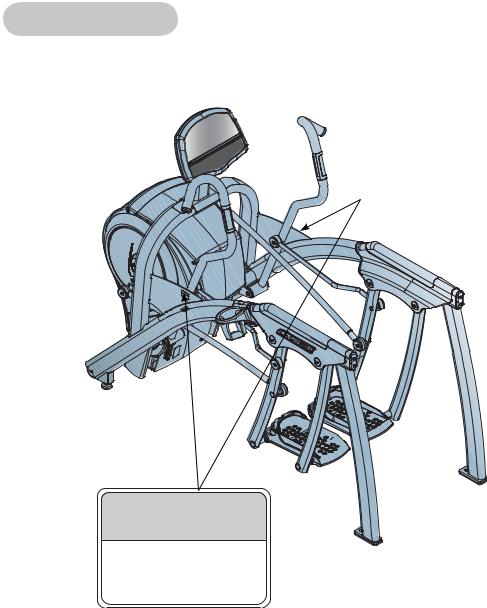
NOTE: Standard units contain a Pause/end key and a Resistance key. See Figure 1A.
Total access units contain a Stop key and a Load key. See Figure 1B.
Terms and Symbols Used
This section lists some of the common terms and symbols used in this chapter. Other terms and symbols are listed in this chapter as appropriate.
Dormant Mode - The Dormant Mode occurs when the unit is not in use. The control panel will display a beating heart when the unit is in Dormant Mode. NOTE: The Dormant Mode only accurs when the arc is used with the optional power adapter.
Program Setup Mode - This begins after pressing any program key. Upon entering a program the LEDs flash, prompting the user to adjust the appropriate settings.
Active Mode - This begins immediately after pressing the Quick Start key (Manual Mode), or after the Program Setup Mode. The beginning of Active Mode is marked by a long tone. Active Mode continues until you reach the end of a program, press the Pause/end (Stop) key or stop striding.
Quick Start - This begins by pressing the Quick Start key. Quick Start skips the Program Setup Mode and begins immediately in Manual Mode.
Manual Mode - This begins immediately after pressing the Quick Start key or after pressing the Manual program key. In Manual Mode you can customize your workout Resistance (Load) and Time and enter your Weight by pressing those keys. NOTE: Manual Mode features differ from the Manual Program. See the Manual section in this chapter.
Workout Review - This begins after pressing the Pause/end (Stop) key once, at the end of a program or when you stop striding for 25 seconds. The workout statistics accumulated during the previous workout session will display for 20 seconds (default setting) or until Pause/end (Stop) is pressed again. NOTE: You can change the 20 second default. See Setting Operation Options in chapter 5.
Pause Mode - This begins when the you stop striding for 25 seconds or when you press Pause/end (Stop) once. While in Workout Review you can press the Quick Start key to resume your workout in Manual Mode. The time, calories burned and other accumulated data is remembered and added to.
- These keys adjust Time, Level or Weight up or down.
-These keys adjust Incline higher or lower..
+- - These keys adjust Resistance (Load) up (+) or down (-).
channel + - (optional) - These keys adjust Channel up (+) or down (-).
volume + - (optional) - These keys adjust Volume up (+) or down (-).
Operation
Page 3-1
Cybex Arc Trainer 630A Owner’s Manual
Intended Use
The intended use of this exercise equipment is to aid or improve general physical fitness and exercise. For Household or Commercial use.
630A Arc Trainer
Operation
Page 3-2

Cybex Arc Trainer 630A Owner’s Manual
Quick Operation Guide
NOTE: Maximum user weight is 400 lbs. (181 kg).
The following is a quick overview of the operation of the unit. For more information read Detailed Operation Guide in this chapter. NOTE: Times specified in this chapter reflect the unit’s defaults. To change the defaults see Setting Operation Options in chapter 5.
1.Hold the handrails to steady yourself while you step into the foot plates and begin striding.
2.Press any program key or press Quick Start to skip the settings and begin Manual Mode immediately.
3.If you pressed a program key to select a program, you will now be prompted for workout Time, Weight, and Level as appropriate. Adjust these settings with the arrows and press Enter to proceed. IMPORTANT: Enter your actual weight. The Resistance (Load) + - keys calculate the proper resistance for your weight. Your workout may feel too easy or too difficult if you do not enter your actual weight.
4.The unit begins the workout session setting resistance to correspond to the program that you selected.
5.Press the Resistance (Load) + - keys to change the load at any time. The right display will show the current resistance setting.
6.Press the Incline 
 keys to change the incline at any time. The left display will show the current incline setting.
7.Press the Pause/End (Stop) key at any time or stop striding to end the program.
! WARNING: Wait until all moving parts come to a complete stop before dismounting.
8.Wait until foot plates come to a complete stop before dismounting the unit. Hold the handrails to steady yourself while you step off the unit.
Detailed Operation Guide
NOTE: Maximum user weight is 400 lbs. (181 kg).
1.If using the optional AC power kit, plug the power cord into a power outlet having the same configuration as the plug. NOTE: Coil up the remainder of the power cord and place it out of the way.
2.If using the optional AC power kit, observe that the control panel is illuminated.
3.Hold the handrails to steady yourself while you step into the foot plates.
Operation
Page 3-3
Cybex Arc Trainer 630A Owner’s Manual
4.You now have the option to select a program or to select Quick Start, skip Program Setup Mode, and enter Manual Mode.
To select a program, press a program key and follow the prompts. Upon entering a program the LEDs flash, prompting you to adjust the appropriate settings. This is referred to as Program Setup Mode. If the Quick Start key is pressed now, all defaults for that program will be accepted. After 10 seconds, if no key has been pressed, the first default will be accepted. After another 10 seconds the second default will be accepted and so on until the last default. The program will not enter Active Mode until you press the Enter or Quick Start key. If no key has been pressed for 20 seconds after displaying the last default, then the unit will return to the Dormant Mode.
If you press the Quick Start key instead of choosing a program, you will enter Manual Mode.
NOTE: No prompts will occur in Manual Mode. While in Manual Mode, customize your workout
Resistance (Load) and Incline and enter your Weight by pressing those keys.
IMPORTANT: Enter your actual weight. The Resistance (Load) + - keys calculate the proper resistance for your weight. Your workout may feel to easy or too difficult if you do not enter your actual weight. For the most accurate calorie count, you must set your correct weight before beginning your workout (including clothing).
NOTE: Press Enter after each adjustment.
5.Depending on which program and level you selected, the resistance may begin to increase and the incline may rise or fall.
6.Observe the four displays (See Figure 1A or 1B):
The lower left display flashes the actual incline until the desired incline is reached and then reverts to time. During your workout the time will show in the format of minutes:seconds. If your workout exceeds sixty minutes the time format will change to minutes only.
The lower right display shows the user’s current resistance.
The top center display begins showing your program profile at the left side.
The center display shows statistics or adjustable settings. This scans (every three seconds) through
Distance, Calories, Calories per Hour, Mets, Watts and Strides Per Minute. Press the Scan key to toggle this feature on or off.
NOTE: The charging battery LED will light only when the battery is being charged.
NOTE: Heart Rate is scanned only when you are holding the contact heart rate grips or using Polar compatible heart rate transmitter. See Figure 1A or 1B.
Operation
Page 3-4

Cybex Arc Trainer 630A Owner’s Manual
Statistics or Profile adjustable
settings
manual |
hill |
|
interval |
Heart Rate |
|
|
|
|
|
weight |
LED |
|
loss |
|
Pause/end |
|
strides |
|
|
minute |
|
|
Cybex International, Inc. Medway, MA USA (508) 533-4300 www.Cybexinternational.com |
resistance
Incline |
Keys |
|
|
Battery |
Resistance |
|
|
Charging LED |
|||
Time |
Channel and Volume |
+ - keys |
|||
|
|
|
Resistance |
|
|
|
|
|
keys (optional) |
|
Figure 1A (Standard)
Profile |
|
|
|
Statistics or |
|
|
|
adjustable |
|
|
|
|
|
|
|
|
|
|
settings |
|
|
|
|
Heart Rate |
|
|
|
|
LED |
Stop |
|
|
|
|
|
|
|
Battery |
Load |
Incline |
Keys |
Time |
Charging LED |
|
|
+ - keys |
|||
|
|
Channel and Volume |
Load |
|
|
|
|
||
|
|
keys (optional) |
|
|
Figure 1B (Total Access)
Operation
Page 3-5
Cybex Arc Trainer 630A Owner’s Manual
7.Press the Resistance (Load) + - keys to change the load at any time. Pressing the + key will make your workout harder. Pressing the - key will make your workout easier. The right display will show the current level in increments of 1 from 0 to 100.
8.Press the Incline 
 keys to change the incline at any time. The left display will show the current incline (only while it is adjusting), in increments of 1 from 0 to 10.
9.Press the Pause/end (Stop) key at any time to stop your workout. Press Pause/end (Stop) once to end your workout and begin your Workout Review. Press Pause/end (Stop) twice to clear the Workout Review and return to Dormant Mode.
10.When you complete a program the unit begins a countdown, “3...2...1” and sounds a tone for each count. Workout Review displays for 20 seconds (default setting) or until you press the Pause/end (Stop) key.
NOTE: Speeding up and slowing down is dependent on the user speeding up and slowing down.
! WARNING: Wait until foot plates come to a complete stop before dismounting.
11.Wait until foot plates come to a complete stop before dismounting the unit. Hold the handrails to steady yourself while you step off the unit.
12.The unit returns to Dormant Mode or powers off. (If used with optional power adapter, returns to
Dormant Mode).
Operation
Page 3-6

Cybex Arc Trainer 630A Owner’s Manual
Stopping the Arc Trainer 630A
Press Pause/End (Stop) once to pause your workout for 20 seconds (default setting) and to enter the Workout Review. All workout settings and data will remain in memory for the pre-selected time. Press the Quick Start key within the default setting to continue your workout. If the Quick Start key has not been pressed during the 20 second pause, workout data will be cleared and the display will either change to Dormant Mode or powers off.
Press Pause/end (Stop) a second time to interrupt workout data from cycling and to change the display to Dormant Mode.
NOTE: Speeding up and slowing down is dependent on the user speeding up and slowing down.
! WARNING: Wait until foot plates come to a complete stop before dismounting.
Emergency Dismount: Follow the steps listed below if you experience pain, feel faint or need to stop your unit in an emergency situation:
1.Grip handrails for support.
2.Stop striding.
3.Wait until the foot plates come to a complete stop.
4.Continue holding the handrails while you step off the unit.
Presence Detect
Presence Detect uses the movement of the foot plates and any input from the user (such as a key press or heartrate) to determine your presence. If you step off the Arc or stop moving during a workout, it may detect that you are not there. After the pre-selected waiting period “run?” will appear in the center window for a few seconds then Presence Detect will end your workout session. If you press Quick Start within the time selected you can resume your workout.
Control During Operation
Control keys on the display are usable during operation and may be pressed at any time to make adjustments in level, incline or data readouts.
Changing Level - You can change the level during a programmed workout. Press the Level key to display the current program and level status. Then press keys to change the level. The level will change immediately and will continue to accumulate performance data without interruption. NOTE: If you change the level during the Manual Mode the level and resistance will change at once.
Changing Resistance (Load) - Press the Resistance (Load) + - keys to change the load in increments of 1. Minimum to maximum resistance is from 0-100. NOTE: During a Manual Mode or
Quick Start workout the keys temporarily revert to resistance keys.
Changing Incline - Press the Incline
 keys to change the elevation in increments of 1 from 0-10. The elevation rises in the shape of an arc ranging from 12 to 34.5 degrees. See Range of Motion in this chapter.
Operation
Page 3-7
 Loading...