

Page 1

CYBEX Industrial Ltd.
1/F., Sunning Plaza | 10 Hysan Avenue | Causeway Bay | Hong Kong
CYBEX U.GO
info@cybex-online.com
/ www.cybex-online.com
USER GUIDE
DE / EN / FR / NL / SL / HU / IT / ES / PT
from birth up to approx. 5 years (18kg/40lbs)
www.cybex-online.com
CY_170-0353-C0910
Page 2

SEHR GEEHRTE KUNDIN, SEHR GEEHRTER KUNDE!
VIELEN DANK, DASS SIE SICH BEIM KAUF EINER TRAGEHILFE FÜ R DEN CYBEX u.GO ENTSCHIEDEN HABEN. EIN BABY
PROFITIERT IN VIELERLEI HINSICHT VOM GETRAGEN WERDEN. DIE KÖRPERLICHE NÄHE ZU DEN ELTERN STÄRKT DAS
URVERTRAUEN UND DIE POSITIVE SOZIALE ENTWICKLUNG WÄHREND EINE KORREKTE TRAGEHALTUNG DIE GESUNDE
NACHREIFUNG DER GELENKE FÖRDERT.
DEAR CUSTOMER!
THANK YOU FOR BUYING THE CYBEX u.GO SLING. IT IS VERY BENEFICIAL FOR THE BABY TO BE CARRIED IN THIS WAY.
THE CLOSE PHYSICAL CONTACT TO THE PARENT STRENGTHENS THE BABY’S BASIC SENSE OF TRUST AND
ENCOURAGES A POSITIVE SOCIAL BEHAVIOUR WHILE HELPING THE JOINTS DEVELOP IN A HEALTHY WAY.
CHER CLIENT!
NOUS VOUS REMERCIONS D‘AVOIR CHOISI L‘ÉCHARPE DE PORTAGE u.GO DE CYBEX. LE PORTAGE EST TRÈS
BÉNÉFIQUE POUR UN BÉBÉ. LE CONTACT PHYSIQUE AVEC SES PARENTS RENFORCE SA CONFIANCE ET ENCOURAGE
LES COMPORTEMENTS SOCIAUX POSITIFS, TOUT EN PERMETTANT À SES ARTICULATIONS DE SE DÉVELOPPER
SAINEMENT.
1
2
Page 3

DE
Abmessungen:
Länge: 540 cm, Breite: 60 cm
EN
Dimensions:
length: 540 cm, width: 60 cm
FR
Dimensions:
longuer: 540 cm, largeur: 60 cm
DE
CYBEX u.GO ist ein Tragetuch aus 100% elastischer Baumwolle, das
– abhängig vom Alter des Kindes – viele verschiedene Tragepositionen
ermöglicht. In dieser Bedienungsanleitung werden Ihnen die folgenden
sechs Tragepositionen vorgestellt:
1. Wiegeposition fü r Neugeborene (0 - 3 M)
2. Känguruposition fü r Neugeborene (0 - 3 M)
3. Sitzposition mit Gesicht zum Körper des Trägers (3 M +)
4. Hü ftposition (3 M +)
5. Rü ckenposition (3 M +)
6. Sitzposition mit Gesicht in Tragerichtung (6 M +)
EN FR
The CYBEX u.GO sling is made of 100% elastic cotton. A great number of
different go positions can be offered, depending on the age of the child. In
this manual we will show you the following six carrying positions:
1. Cradle position for newborns (0 - 3 M)
2. Kangaroo position for newborns (0 - 3 M)
3. Sitting position face to face (3 M +)
4. Hip position (3 M +)
5. Back position (3 M +)
6. Sitting position facing forward (6 M +)
L'écha rpe de porta ge u.GO de Cybex es t composée à 10 0% de coton so uple.
Elle offre un grand nombre de positions de portage en fonction de l'âge de
l'enfant. Dans ce manuel, nous vous montrerons les six positions suivantes:
1. Position berceau pour les nouveau-nés (de 0 à 3 mois)
2. Position kangourou pour les nouveau-nés (0 à 3 mois)
3. Position assise face au porteur (dès 3 mois)
4. Sur la hanche (dès 3 mois)
5. Sur le dos (dès 3 mois)
6. Position assise vers l'avant (dès 6 mois)
INHALT
I. Was sind die Vorteile des CYBEX u.GO Tragetuchs? ........................ 5
II. Vor dem ersten Gebrauch - Hinweise ...............................................5
III. Trageanleitung ....................................................................................7
1. Wiegeposition fü r Neugeborene (0 - 3 M) ........................................ 9
2. Känguruposition fü r Neugeborene (0 - 3 M) ................................... 11
3. Sitzposition mit Gesicht zum Körper des Trägers (3 M +) ................ 13
4. Hü ftposition (3 M +) ............................................................................ 15
5. Rü ckenposition (3 M +)
A) Mit Unterstützung einer zweiten Person ..................................................
B) Ohne Unterstützung einer zweiten Person ..............................................19
6. Sitzposition mit Gesicht in Tragerichtung (6 M +) ............................ 21
IV. Garantie ............................................................................................. 23
345
17
CONTENT
I. What are the advantages of the CYBEX u.GO sling? ....................... 6
II. Please note before fi rst use ................................................................. 6
III. Carrying instru ctions ........................................................................... 8
1. Cradle position for newborns (0 - 3 M) ............................................ 10
2. Kangaroo position for newborns (0 - 3 M) ....................................... 12
3. Sitting position face to face (3 M +) .................................................14
4. Hip position (3 M +) ............................................................................ 16
5. Back position (3 M +)
A) Tied with the help of an extra person ......................................................
B) Tied without the help of an extra person .................................................20
6. Sitting position facing forward (6 M +) .............................................22
IV. GUARANTEE ......................................................................................24
18
SOMMAIRE
I. Quels sont les avantages de l'écharpe u.GO de Cybex? ............... 6
II. A lire avant la première utilisation .....................................................6
III. Instructions de portage ...................................................................... 8
1. Position berceau pour les nouveau-nés (de 0 à 3 mois) ............... 10
2. Position kangourou pour les nouveau-nés (0 à 3 mois) ................ 12
3. Position assise face au porteur (dès 3 mois) .................................. 14
4. Sur la hanche (dès 3 mois) ............................................................... 16
5. Sur le dos (dès 3 mois)
A) Nouer l'écharpe avec l'aide de quelqu'un ............................................18
B) Nouer l'écharpe sans aide ........................................................................20
6. Position assise vers l'avant (dès 6 mois) ..........................................22
IV. GARANTIE ...........................................................................................24
Page 4

I. WAS SIND DIE VORTEILE DES CYBEX u.GO TRAGETUCHS?
– Bei richtiger Handhabung ist die Tragehaltung fü r Baby und Träger
ergonomisch optimal.
– Der Gebrauch eines Tragetuchs wirkt sich positiv auf die emotionale,
soziale und körperliche Entwicklung des Kindes aus.
– Die Gewichtsverteilung im CYBEX u.GO Tragetuch ist hervorragend und
belastet den Träger nicht – auch nicht bei stundenlangem Gebrauch.
– Ein Kind benötigt oft körperliche Nähe, schaukelnde Bewegung und
eine gewisse Enge, um sich zu beruhigen. Das Tragetuch bietet all diese
sensorischen Effekte gleichzeitig.
– Das CYBE X u.GO Tragetuch hat keine drü ckenden Schnallen und Knöpfe.
– Durch seine Kompaktheit ist das u.GO Tragetuch der perfekte Begleiter
auf Ausfl ü gen, Reisen oder auch beim Einkaufen.
II. VOR DEM ERSTEN GEBRAUCH - HINWEISE:
1. Bitte waschen Sie den u.GO vor dem ersten Gebrauch. Beachten Sie
hierzu die Pfl egehinweise.
2. Das Binden eines Tragetuchs ist denkbar einfach und erfordert nur wenig
Übung. Probieren Sie das Tuch zu Beginn in aller Ruhe zu Hause aus. Seien
Sie bei den ersten Versuchen nicht nervös und warten Sie einen gü nstigen
Zeitpunkt ab, an dem auch das Baby ruhig und gelassen ist (z.B. nach
einer Mahlzeit).
3. Wickeln Sie das Tragetuch eher etwas fester als zu locker.
4. Durch die Tuchbahnen und die körperliche Nähe zum Träger wird sehr
viel Wärme erzeugt. Achten Sie deshalb darauf, Ihr Kind nicht zu warm
anzuziehen und gewährleisten Sie eine ausreichende Luftzirkulation rund
um den Körper des Kindes. Sollte das Kind schwitzen, ist ihm zu warm.
5. Jedes Kind ist anders und hat eigene Vorlieben. Wenn eine Trageweise
dem Ki nd nicht gefäl lt, können Si e immer noc h eine ande re ausprob ieren.
6. Rechnen Sie immer mit spontanen Bewegungen des Kindes, sonst
könnten Sie aus dem Gleichgewicht geraten.
7. Halten Sie das Kind immer fest, wenn Sie sich nach vorne beugen.
8. Das CYBEX u.GO Tragetuch ist nicht fü r sportliche Aktivitäten mit Kind
geeignet!
I. WHAT ARE THE ADVANTAGES OF THE CYBEX u.GO SLING?
– When used correctly, carrying with the u.GO sling is ergonomically
optimal for both baby and user.
– The sling has positive effects on the emotional, social and physical
development of the child.
– When using the u.GO sling the weight distribution is excellent without
straining the user, even if used for longer periods.
– In order for babies to feel calm and secu re, they need clo se body contact
such as rocking movements or being swaddled. The sling offers all of
these sensory sensations simultaneously.
– Also as the CYBEX u.GO sling does not contain buckles or buttons there is
no chance of injury.
– Due to its compact nature the u.GO sling is a perfect for to take on
holidays, travelling or shopping.
II. PLEASE NOTE BEFORE FIRST USE:
1. Please wash the u.GO before fi rst use, following the care instructions.
2. The t ying of a sl ing is reall y simple a nd only requ ires a litt le bit of practi ce. In
the beginning please try the sling out in the comfort of your home. When
you have practised the tying try to be calm and wait for a convenient
moment when the baby is also calm and relaxed (e.g. after a meal).
3. Make sure the sling is rather tight, not loose.
4. Both the sling and the body contact with the carrying person produce
heat. Please make sure not to dress the child too warm and ensure there
is suffi cient air circulation around the child. If the child starts to sweat it is
too warm.
5. Different children prefer different things. If your child is not comfortable
with a carrying position you can always try a different one.
6. Always be prepared for sudden movements of the child in order not to
lose your balance.
7. Please hold on to your child whenever you bend forward.
8. The CYBEX u.GO sling is under no circumstances suitable for sporting
activities!
I. QUELS SONT LES AVANTAGES DE L'ÉCHARPE u.GO DE CYBEX?
– Utilisée correctement, l'écharpe u.GO offre un confort optimal à l'enfant
comme au porteur.
– Le portage en écharpe a des effets positifs sur le développement
émotionnel, social et physique de l'enfant.
– Elle permet une excellente distribution du poids, sans tension sur les
épaules et le dos du porteur, même lorsqu'elle est utilisée pendant de
longues périodes.
– Pour être calmes et se sentir en sécurité, les nouveau-nés ont besoin du
contact physique de leurs parents, d'être bercés et balancés. L'écharpe
offre simultanément toutes ces sensations.
– De plus, comme l'écharpe ne comporte ni boucles ni boutons, elle
supprime tout risque de blessure.
– Enfi n, elle permet une grande liberté de mouvement, ce qui la rend
idéale pour les vacances, les voyages ou shopping.
II. A LIRE AVANT LA PREMIÈRE UTILISATION:
1. Avant la permière utilisation, lavez l'écharpe de portage u.GO en suivant
les recommandations d'entretien.
2. Le nouage d'une écharpe est vraiment simple, et ne nécessite qu'un
peu de pratique. Au début, entraînez-vous tranquillement à la maison
à nouer votre écharpe. Une fois entraîné(e), soyez calme, et attendez le
moment où votre bébé est également calme et relaxé (par ex. après le
repas) pour l'essayer avec lui.
3. Assurez-vous que l'écharpe soit bien serrée, et non lâche.
4. L'écharpe, ainsi que le contact physique avec le porteur produisent de
la chaleur. N'habillez pas le bébé trop chaudement, et faites en sorte
que l'air circule suffi samment autour de lui. Si l'enfant transpire, il a trop
chaud.
5. Les préférences des bébés varient beaucoup. Si votre enfant n'est pas à
l'aise dans une position il suffi t d'en essayer une autre.
6. Gardez à l'esprit que votre bébé peut avoir des mouvements soudains,
soyez-y préparé(e) afi n de ne pas perdre l'équilibre.
7. Tenez votre enfant en permanence quand vous vous penchez vers
l’avant
8. L’écharpe u.GO de Cybex n’est en aucun cas adaptée aux activités
sportives !
6
Page 5
A
B/C D/E
F
III. TRAGEANLEITUNG:
GRUNDSCHRITTE:
A) Nehmen Sie das u.GO Tuch in beide Hände und halten Sie sich den
Tuchmittelpunkt mittig auf Höhe des Nabels vor den Bauch.
B) Bringen Sie beide Tuchenden nach hinten zum Rü cken und kreuzen Sie
diese.
C) Fü hren Sie die Bänder ü ber die Schultern zurü ck nach vorne.
D) Kreuzen Sie die Bänder wieder vor der Brust.
E) Fü hren Sie beide Tuchenden unter dem Bauchband durch.
F) Bringen Sie die Tuchenden nun wieder hinter den Rü cken, ü berkreuzen
Sie diese noch einmal und machen Sie vor dem Bauch einen Knoten.
III. CARRYING INSTRUCTIONS:
BASIC STEPS:
A) Take the u.GO sling in both hands and hold the midpoint of the sling in
front of your navel.
B) Bring both bands to the back and cross them over each other.
C) Bring them back to the front by leading them over the shoulders.
D) Cross the bands in front of the chest.
E) Thread both ends under the belly band.
F) Bring the ends to the back again cross them once more and tie a knot in
front of the navel.
III. INSTRUCTIONS DE PORTAGE:
NŒUD DE BASE:
A) Tenez l'écharpe u.GO des deux mains, et placez son point central devant
votre nombril.
B) Croisez les deux pans dans votre dos.
C) Ramenez les pans vers l'avant en les faisant passer au-dessus des
épaules.
D) Croisez les deux pans devant votre poitrine.
E) Faites passez les deux extrémités de l'écharpe sous la bande ventrale.
F) Ramenez à nouveau les deux pan s dans votre dos, croisez-les, et faites un
noeud au niveau de votre nombril.
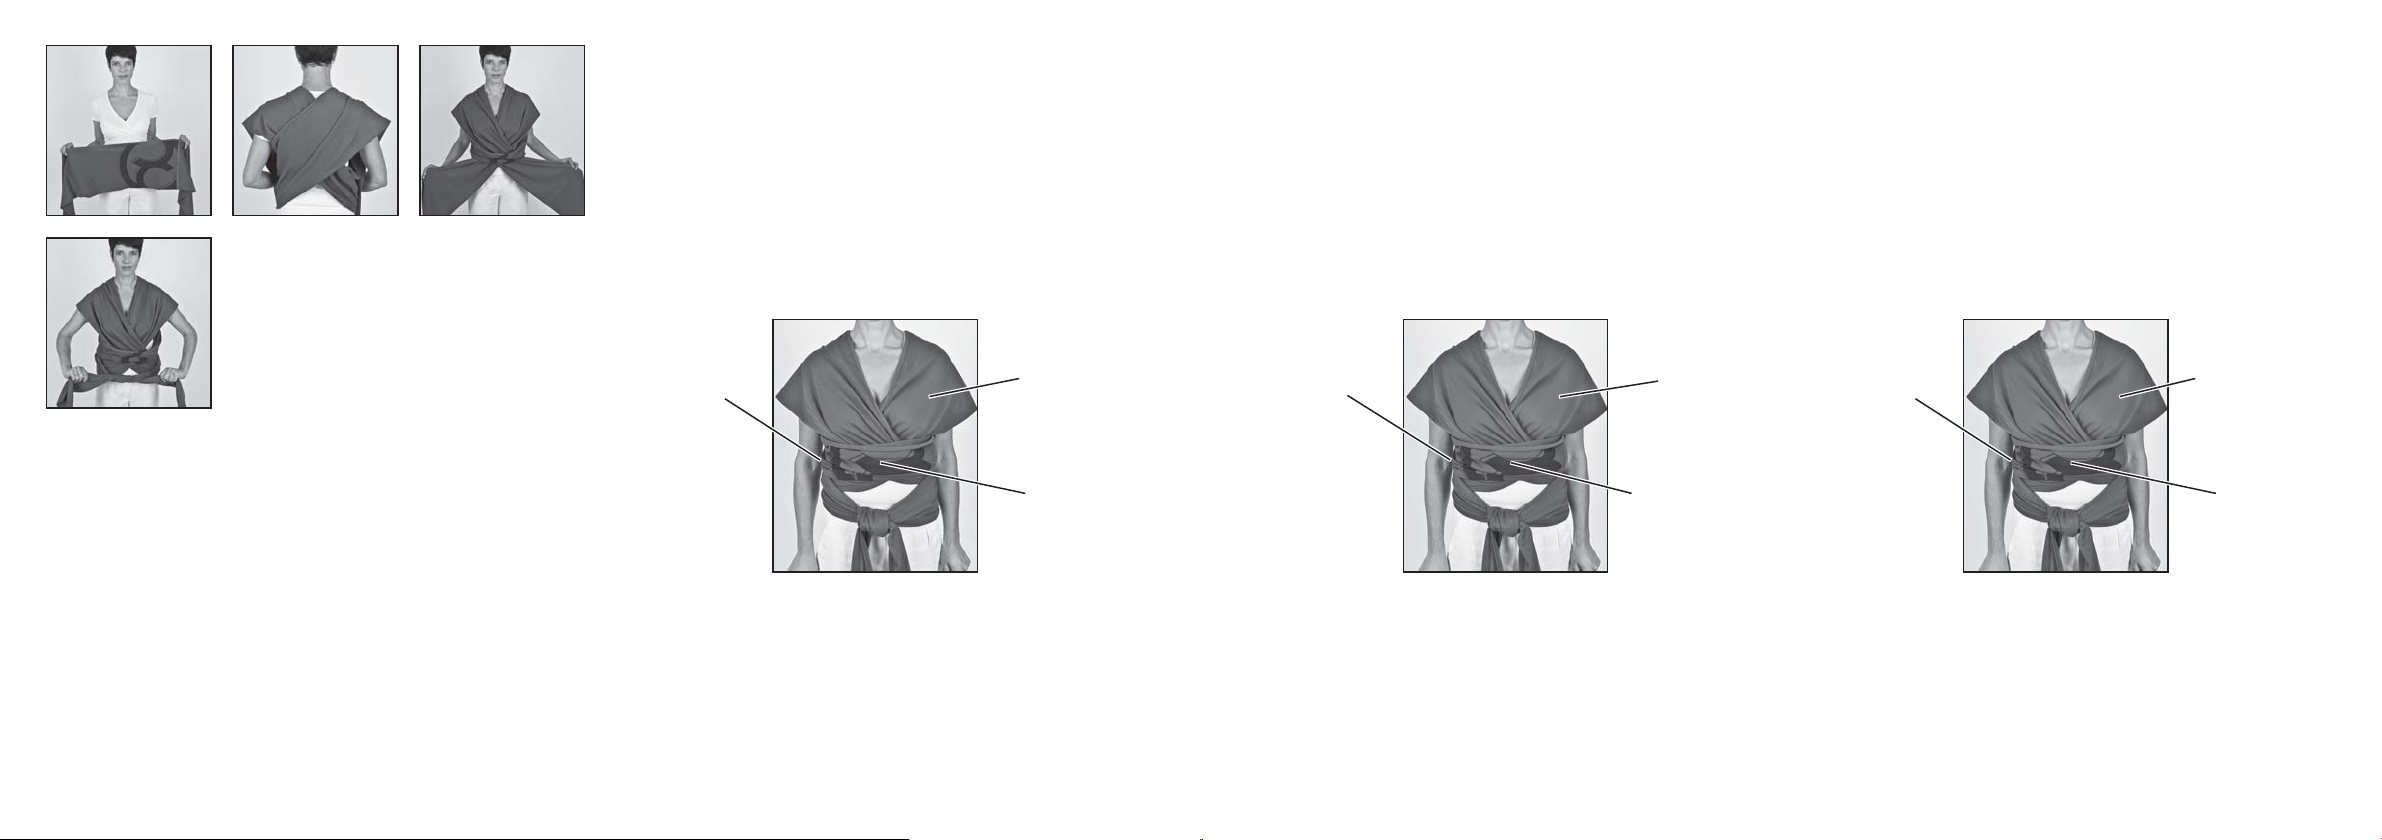
Rechte Seite des
Bauchbandes
Hinweise: Achten Sie bitte immer darauf, dass das Tuch nicht verdreht ist.
Um eine perfekte Gewichtsverteilung zu erreichen, ist es wichtig, dass das
Tragetuch weit ausgebreitet ist und sich das Kreuz am Rü cken des Trägers
möglichst weit unten befi ndet.
So lange Sie das Tuch binden, achten Sie unbedingtdarauf, dass sich das Kind
an einem sicheren Platz befi ndet (z.B. Laufstall).
7
Linkes Kreuzband Pan croisé gaucheLeft cross band
Tuchmittelpunkt Point central de
Right part of the
belly band
Sling’s middle point
Note: Please make sure that the sling is not twisted. In order to achieve a
perfect weight distribution it is crucial to unfold the sling as much as possible
and that the cross in the back is located as low as possible.
While tying the sling, please make sure that the child rests in a safe place (e.g.
crib).
Partie droite de la
bande ventrale
l'écharpe
NOTE: assurez-vous que l'écharpe ne soit pas enroulée sur elle-même. Pour
obtenir une parfaite distribution du poids, il est crucial de déplier l'écharpe
le plus possible, et que le point de croisement dans votre dos soit situé le plus
bas possible.
Assurez-vous que l'enfant est en sécurité pendant tout le temps où vous nouez
l'écharpe (par ex. dans son berceau).
8
Page 6
123
456
789
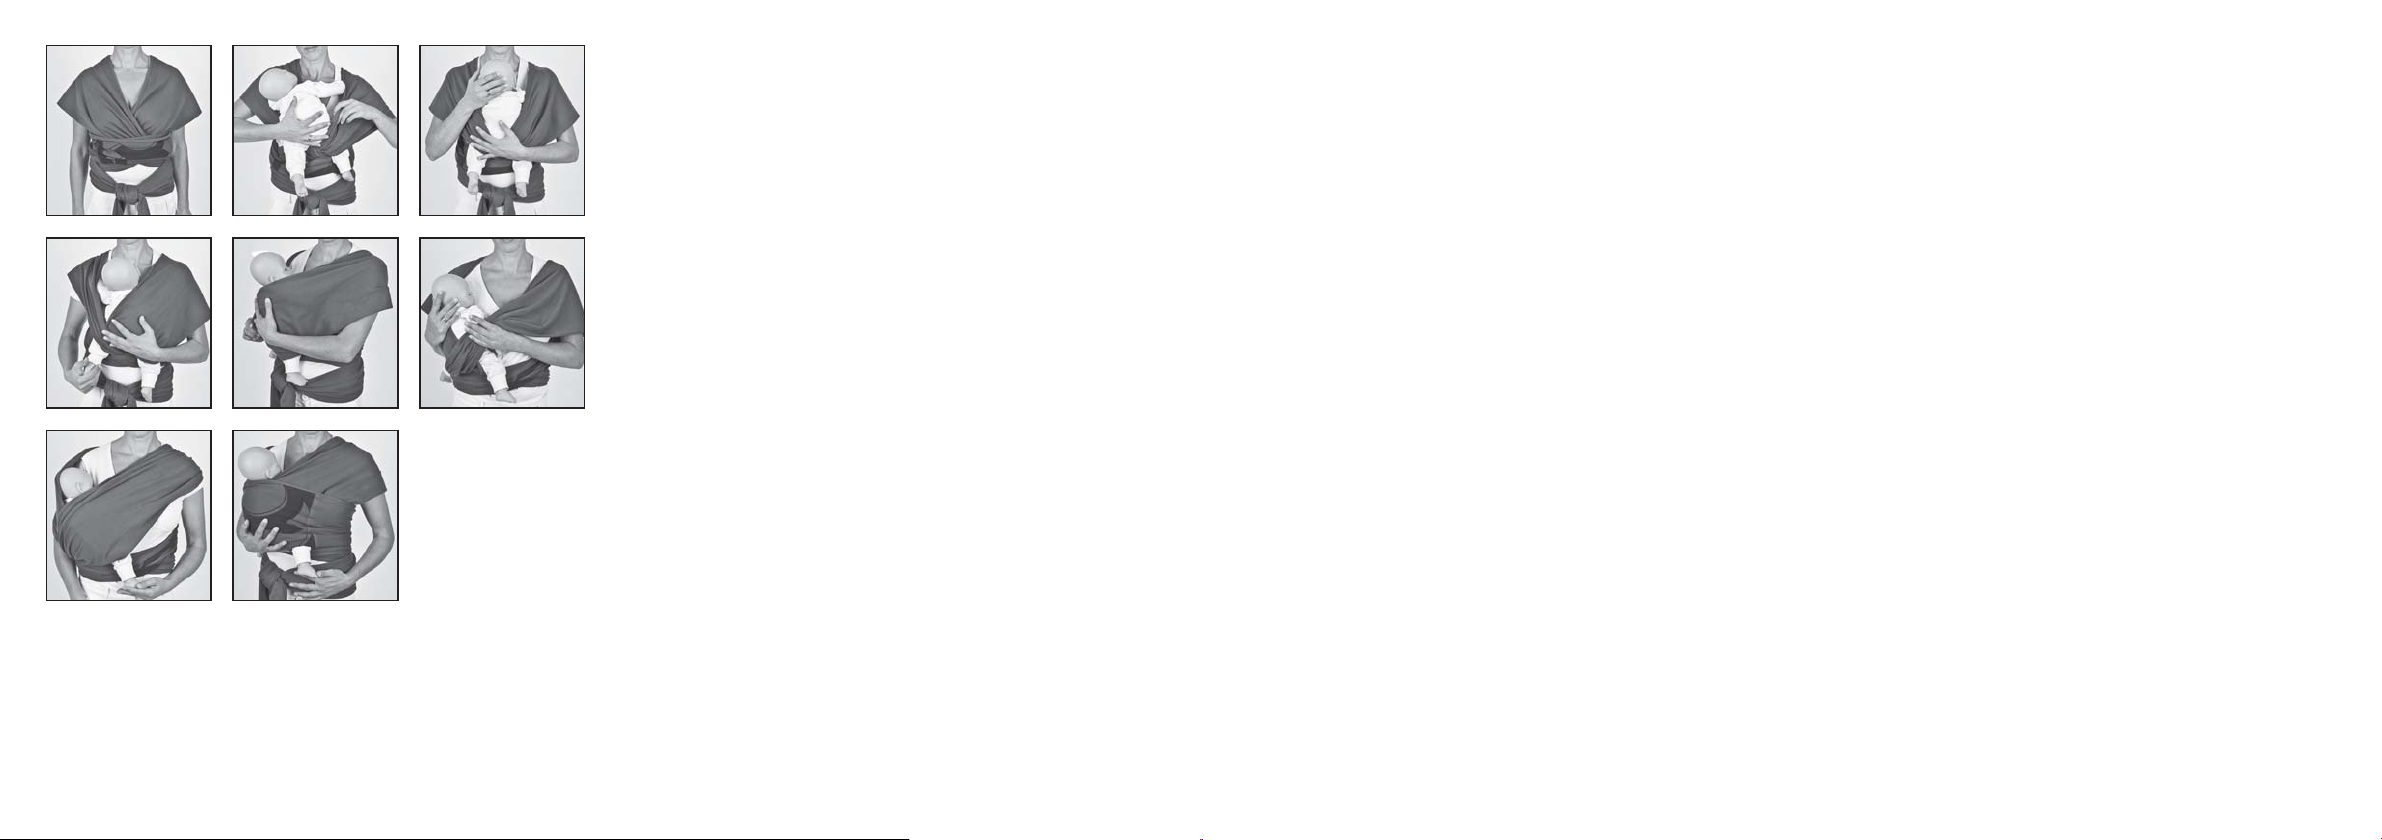
1. WIEGEPOSITION (FÜ R NEUGEBORENE BIS CA. 3 M)
Am wohlsten fü hlen sich Neugeborene nah am Herzen des Trägers, also links.
Trotzdem kann diese Trageposition auch auf der rechten Seite erfolgen.
1. Folgen Sie den Grundschritten A-F. Wenn der Kopf des Kindes auf der
Herzseite liegen soll, stellen Sie sicher, dass das innere (liegt direkt auf
Ihrem Brustkorb auf) Kreuzband ü ber die linke Schulter fü hrt. Schlü pfen
Sie mit dem Arm aus dem rechten Kreuzband.
2. Lockern Sie das linke Kreuzband, indem Sie es etwas an der Hü fte lösen.
3. Öffnen Sie das innere Kreuzband ein wenig, so dass eine Tuchwiege
entsteht.
4-5. Nehmen Sie nun das Baby in den linken Arm und legen Sie es – Kopf auf
Höhe des Herzens vorsichtig in die Tuchwiege.
6. Ziehen Sie das linke Kreuzband vorsichtig ü ber den Kopf des Kindes.
7. Nehmen Sie nun das rechte Kreuzband wieder auf die Schulter und
breiten Sie das Tuch etwas ü ber den Körper des Babys. Drehen Sie das
Kind leicht zu sich – achten Sie darauf, dass sich der rechte Arm des
Kindes bequem unterhalb seines Körpers befi ndet.
8. Ziehen Sie nun das äußere Kreuzband vollständig ü ber den Körper des
Babys.
9. Ziehen Sie nun noch das Bauchband ü ber die Kreuzbänder um das Kind
zu stabilisieren.
HERAUSNEHMEN DES KINDES:
Öffnen Sie die Kreuzbänder ein wenig, um das Kind aus der Wiegeposition zu
nehmen. Halten Sie das Kind zu jeder Zeit fest.
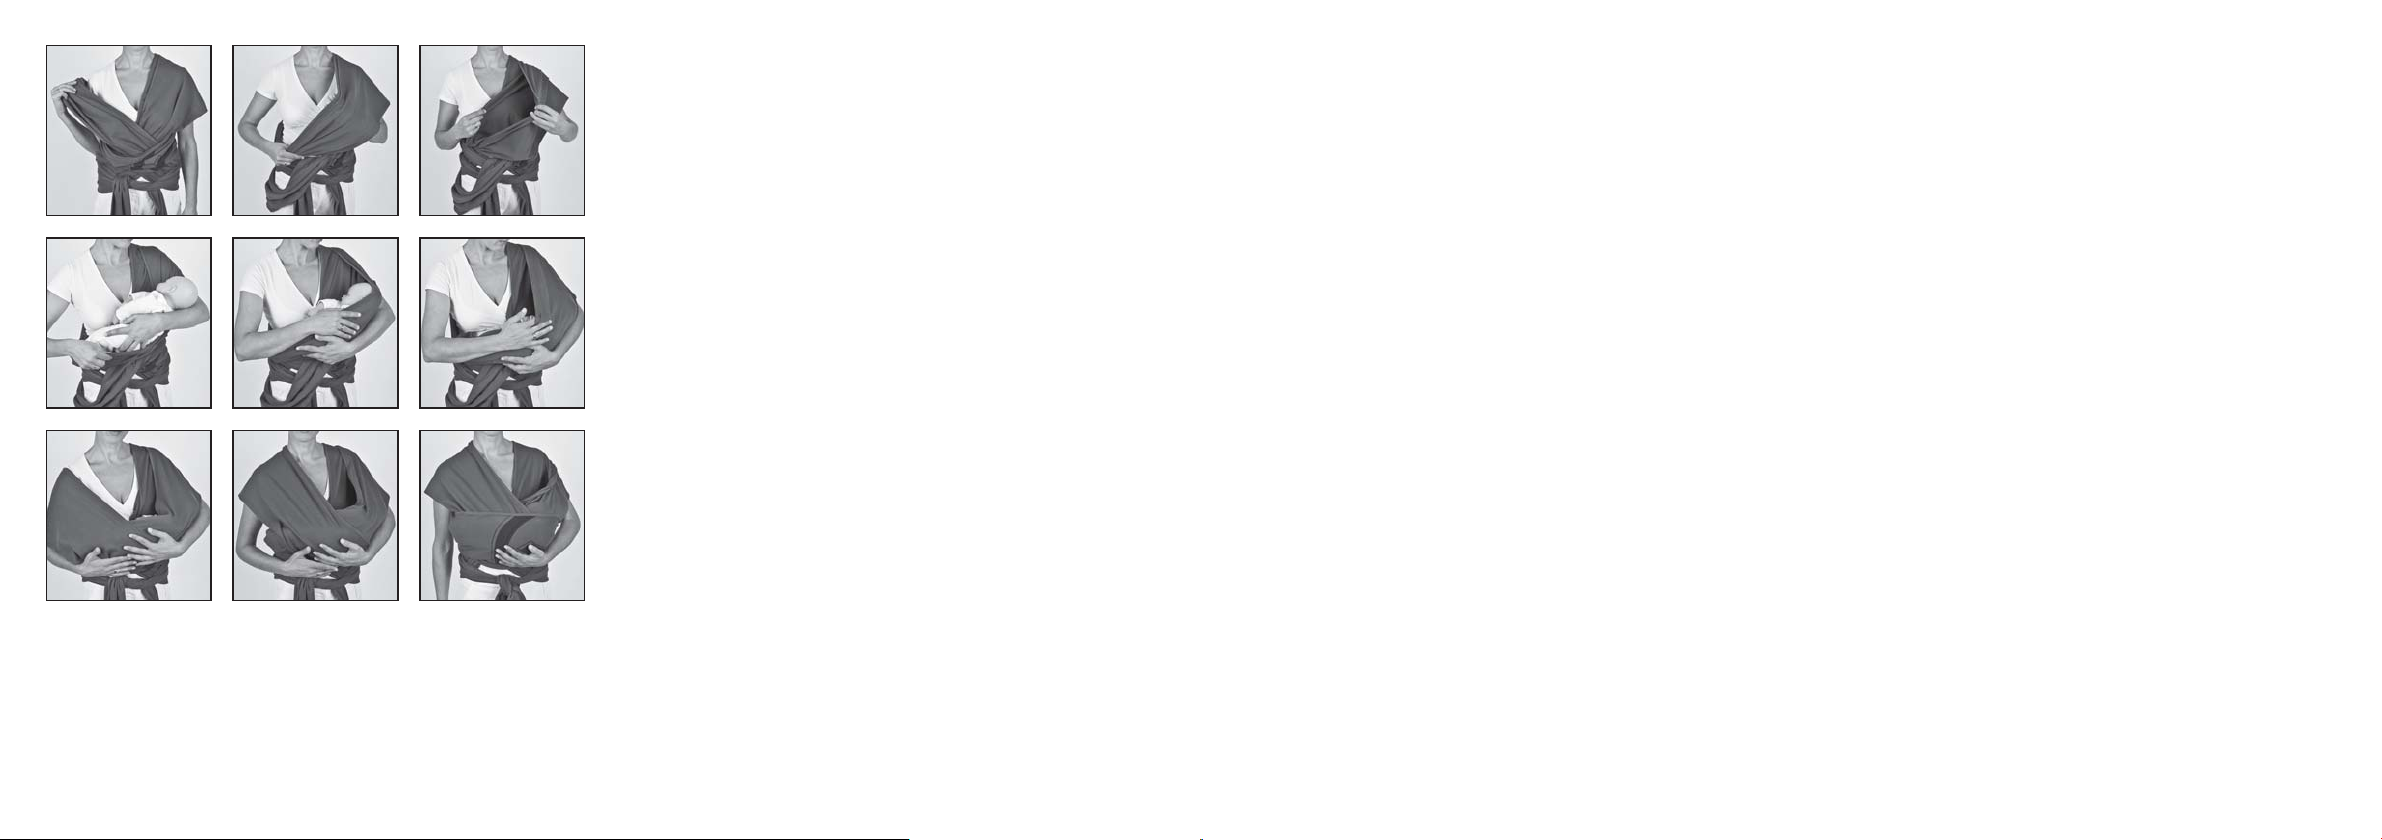
1. CRADLE POSITION (FOR NEWBORNS UP TO 3 M)
Newborns are most comfortable when they are carried close to the heart (i.e.
with the head on the left side of the chest). However, this carrying position
can also be conducted on the right side.
1. Follow the basic steps A-F. If you prefer to carry the child with its head
on the left please make sure that the inner cross band (the one directly
located on the chest) leads over the left shoulder. Slide the right cross
band from your right arm.
2. Loosen the left cross band by releasing it slightly from your hip.
3. Open the inner cross band in order to create some kind of cradle.
4-5. Pick the baby on your left arm and gently lay the child into the cradle
(with its head close to your heart)
6. Pull the left cross band carefully over the head of the child.
7. Put the right cross band back on your shoulder adjusting the sling slightly
over the baby’s body.
8. Slightly pull the child towards you – please make sure that the baby’s arm
rests comfortably underneath its body.
9. Now carefully pull the entire cross band over the baby’s body.
TAKING OUT THE CHILD:
Open the cross band slightly to take the child out of the cradle position. Hold
on to the child at all times.
1. POSITION BERCEAU (POUR LES NOUVEAU-NÉS JUSQU'À 3 MOIS)
Les nouveau-nés sont plus à l'aise quand ils sont portés près du cœur (la tête
du côté gauche de votre poitrine). Il est cependant possible d'utiliser cette
position du côté droit.
1. Suivez les étapes du nœud de base de A à F. Si vous préférez porter votre
bébé sur la gauche, assurez-vous que la bande située sur la poitrine
passe par-dessus votre épaule gauche. Faites glisser la bande droite le
long de votre bras droit.
2. Relâchez la bande gauche en tirant légèrement depuis votre hanche.
3. Ouvrez cette bande sur la poitrine pour créer une sorte de berceau.
4-5. Soulevez le bébé avec votre bras gauche, et placez-le doucement dans
le berceau ainsi créé (sa tête proche de votre coeur).
6. Tirez doucement la bande gauche au-dessus de la tête de votre bébé.
7. Replacez la bande droite sur votre épaule en ajustant légèrement
l'écharpe sur le corps de l'enfant.
8. Attirez doucement votre bébé contre vous, en vous assurant que son
bras soit confortablement placé sous son corps.
9. Tirez avec précaution toute la bande centrale par-dessus votre bébé
pour l'envelopper.
SO RTIR L'ENFANT DE L'ÉC HARPE:
Ouvrez légèrement la bande croisée pour sortir l'enfant de sa position
berceau. Tenez-bien l'enfant pendant toute la manœuvre.
9
10
Page 7
123
456
78
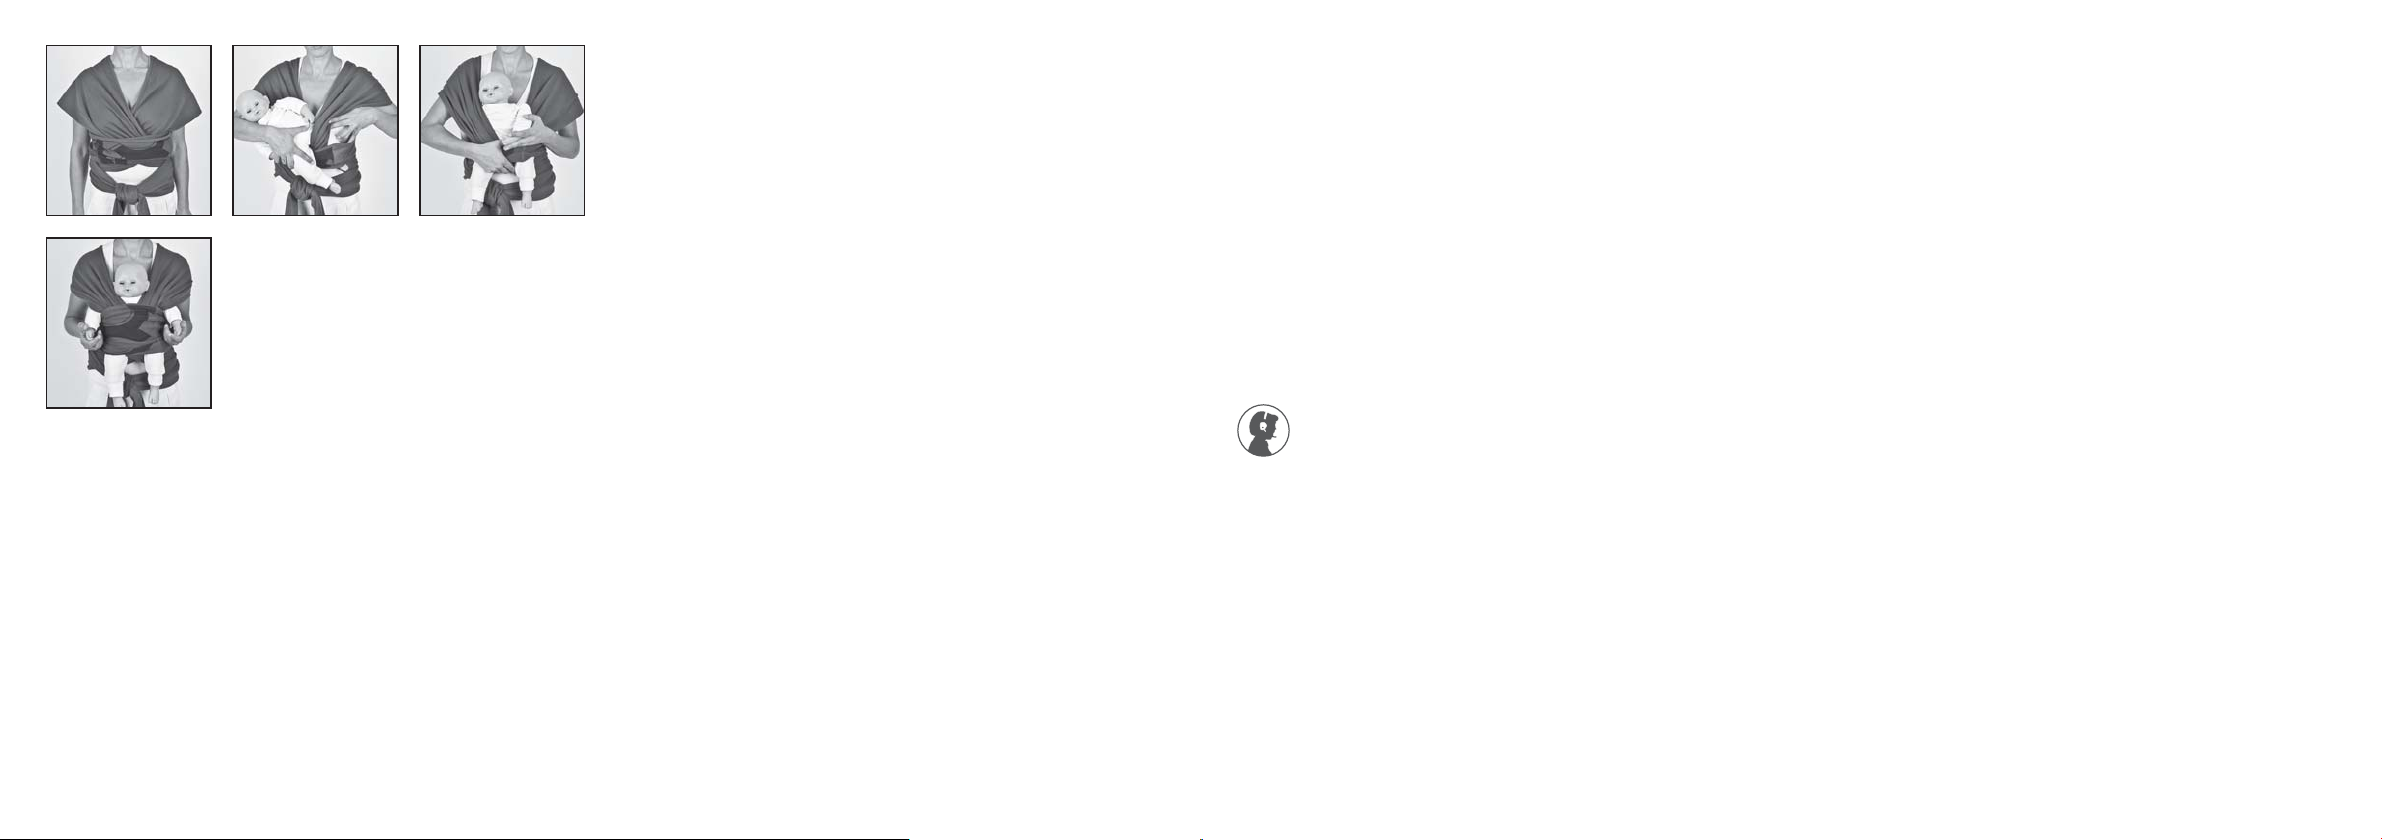
2. KÄNGURU POSITION (FÜ R NEUGEBORENE BIS CA. 3 M)
Die natü rliche Position der Beinchen bei einem neugeborenen Baby ist
angewinkelt. Die Känguru Position ist im Sitzen anzulegen, damit Sie Ihr Kind
jederzeit sichern können.
1. Folgen Sie den Grundschritten A-C , so dass die Bänder gerade und
ungekreuzt von den Schultern hängen.
2. Formen Sie einen Tuchbeutel aus dem Bauchband.
3. Nehmen Sie das Baby hoch und lassen Sie es von oben in den Beutel
gleiten – stü tzen Sie das Kind dabei immer am Po.
4. Ziehen Sie das Bauchband ü ber den kompletten Rü cken des Kindes, um
Wirbelsäule und Genick des Kindes Halt zu geben.
5-6. Legen Sie die beiden Brustbänder aufgebreitet und gekreuzt ü ber das
Kind.
7. Bringen Sie die beiden Enden nach hinten und kreuzen Sie diese hinter
dem Rü cken.
8. Bringen Sie die Tuchenden wieder nach vorne und verknoten Sie diese
gut vor dem Bauch.
Achtung: Halten Sie Ihr Kind während der Anlegens immer fest, da bei dieser
Position das Kind schon im Tuch sitzt noch bevor der erste Knoten gemacht
wird.
HERAUSNEHMEN DES KINDES:
Öffnen Sie die Kreuzbänder ein wenig, um das Kind aus dem Tuchbeutel zu
nehmen. Halten Sie das Kind zu jeder Zeit fest.
2. KANGAROO POSITION (FOR NEWBORNS UP TO 3 M)
The natural position of a newborn’s legs is squatted.
Practise this position sitting down, so your child is secure at all times.
1. Follow the basic steps A-C until both lengths hang straight and uncrossed
from your shoulders.
2. Form a pouch out of your belly band.
3. Pick up the child and let it gently glide into the pouch – always supporting
the child’s bottom.
4. Pull the belly band over the entire back of the child in order to support to
the neck and vertebrae.
5-6. Cross both breast bands unfolded over the child.
7. Bring both ends to the back and cross them behind the back.
8. Bring both ends to the front again and tie a knot in front of your belly.
Attention: Hold on to your child at all times while tying the sling, as in this
position the child already sits in the sling even before the fi rst knot is made.
TAKING OUT THE CHILD:
Open the cross band slightly to take the child out of the kangaroo position.
Hold on to the child at all times.
2. POSITION KANGOUROU (POUR LES NOUVEAU-NÉS JUSQU'À 3 MOIS)
La position „grenouille“ est la plus naturelle pour un nouveau-né. Préparez
cette position en étant assis(e) afi n que le bébé soit toujours en sécurité.
1. Suivez les étapes du nœud de base de A à C jusqu'à ce que les pans
tombent de vos épaules sans se croiser.
2. Formez une poche sur la bande centrale devant votre ventre.
3. Prenez votre bébé et, tout en soutenant ses fesses, laissez-le glisser
doucement dans la poche.
4. Tirez la bande ventrale sur toute la surface du dos de votre bébé pour
bien soutenir son cou et sa colonne vertébrale.
5-6. Croisez les deux pans à plat sur l'enfant.
7. Ramenez les deux pans dans votre dos et croisez-les.
8. Ramenez à nouveau les pans devant votre nombril et faites un noeud.
Attention: Tenez-bien votre enfant tout le temps où vous nouez l‘écharpe, car
il y est déjà assis avant que le premier nœud ne soit fait.
SO RTIR L'ENFANT DE L'ÉC HARPE:
Ouvrez légèrement la bande croisée pour sortir l'enfant de sa position
kangourou. Tenez-bien l'enfant pendant toute la manœuvre.
11
12
Page 8
123
456
3. SITZPOSITION MIT GESICHT ZUM KÖRPER DES TRÄGERS (3 M +)
Ab einem gewissen Alter möchte das Kind mehr Bewegungsfreiheit und ein
größeres Sichtfeld. Dafü r eignet sich diese Trageposition hervorragend. Die
Spreiz-Anhock Stellung unterstü tzt zudem die Gelenke bei der Entwicklung
optimal.
1. Folgen Sie den Grundschritten A-F.
2. Ziehen Sie das Baby zu sich an die rechte Schulter und fädeln Sie das
rechte Bein des Kindes in das linke Kreuzband.
3. Wiederholen Sie den Schritt mit der anderen Schulter und dem anderen
Bein des Kindes.
4. Breiten Sie erst das innere Kreuzband aus, dann das Äußere. Achten Sie
darauf, dass die Bänder von Kniekehle zu Kniekehle reichen.
HINWEIS: Eine optimale Spreiz Anhock Stellung ist nur gewährleistet, wenn das
Tuch von Kniekehle zu Kniekehle des Kindes reicht. Überprü fen Sie auch ab
und zu während des Tragens, ob Ihr Kind noch in der Spreiz Anhock Stellung
sitzt.
5-6. Ziehen Sie nun das Bauchband sanft ü ber die Beinchen des Babys.
Beginnen Sie mit der Seite, die Sie auch beim Kreuzband zuerst benutzt
haben. Ziehen Sie nun das Bauchband ü ber den Rü cken des Babys, um
es zusätzlich zu stü tzen.
Bei kleinen Kindern die den Kopf noch nicht selbstständig halten können
sollten Sie das Bauchband bis ü ber den Kopf des Babys ziehen um dessen
Nacken zu stü tzen.
HERAUSNEHMEN DES KINDES:
Öffnen Sie die Kreuzbänder ein wenig, um das Kind aus der Sitzposition zu
nehmen. Halten Sie das Kind zu jeder Zeit fest.
3. SITTING POSITION FACING THE CARRYING PERSON (3 M +)
At a certain age your child wants more freedom of movement and a better
view. Additionally, the spread-squat position is benefi cial for a healthy
development of the joints.
1. Follow the basic steps A-F.
2. Pick the baby up pulling it to your right shoulder and pull the left cross
band over the right leg of the child.
3. Repeat this step with the other shoulder and the child’s other leg.
4. First unfold the inner cross band then the outer one. Please make sure
that the sling goes from the back of one knee to the other.
Note: A spread-squat seat is only benefi ciary when the sling reaches from the
back of one knee to the other. While carrying please regularly check that the
baby sits in the desired spread-squat seat.
5- 6. Pull both si des of the belly band gently over the legs of the child. Star t with
the side that you used fi rst when pulling up the cross bands. Pull the belly
band over the back of the child to provide additional support.
For small children that are not able to hold their head independently, please
pull the belly band over the babys head in order to support its head.
TAKING OUT THE CHILD:
Open the cross band slightly to take the child out of the sitting position. Hold
on to the child at all times.
3. POSITION ASSISE FACE AU PORTEUR (DÈS 3 MOIS)
A partir d'un certain âge, votre bébé aura besoin d'une plus grande liberté
de mouvement, et d'une meilleure perspective sur le monde adulte. De plus,
la position "grenouille" est très bénéfi que pour le développement de ses
articulations.
1. Suivez les étapes du nœud de base de A à F.
2. Soulevez votre bébé en l'attirant sur votre épaule droite, et tirez la bande
de gauche sur la jambre droite de l'enfant.
3. Répétez l'opération avec la bande droite et la jambre droite de l'enfant.
4. Dénouez d'abord la bande intérieure, puis la bande extérieure. Assurezvous que l'écharpe soutienne bien les genoux du bébé à l'arrière.
Note: La position "grenouille" n'est bénéfi que que si l'écharpe est bien placée
sous les genoux du bébé. Vérifi ez régulièrement pendant le portage que la
position "grenouille" du bébé soit correcte.
5-6. Placez doucement les deux côtés de la bande ventrale par-dessus les
jambes de votre bébé. Commencez par le côté que vous avez utilisé en
premier en tirant les pans. Placez la bande ventrale sur le dos du bébé
pour lui donner plus d'appui.
Si votre bébé ne peut pas encore soutenir sa tête seul, faites remonter la
bande ventrale jusqu'à la base de son cou.
SO RTIR L'ENFANT DE L'ÉC HARPE:
Ouvrez doucement la bande ventrale pour dégager l'enfant de la position
assise. Tenez bien l'enfant en permanence.
13
14
Page 9
123
456
78
4. HÜ FTPOSITION (3 M +)
Diese Position kann auch schon frü her eingesetzt werden. Allerdings benötigt
das Kind dann immer eine unterstü tzende Hand. Ab einem gewissen Alter
möchte das Kind mehr Bewegungsfreiheit und ein größeres Sichtfeld. Dafü r
eignet sich diese Trageposition hervorragend. Die Spreiz-Anhock Stellung
unterstü tzt die Gelenke zudem bei der Entwicklung optimal.
1. Folgen Sie den Grundschritten A-F.
2. Heben Sie das Baby mit dem Bauch zu sich an die rechte Schulter und
fädeln Sie das rechte Bein des Babys in das linke Kreuzband.
3. Bringen Sie nun das Kind zur linken Schulter und fädeln Sie vorsichtig das
linke Bein in das rechte Kreuzband.
4. Breiten Sie nun das in nere Kreuzband, das sich direkt auf dem Rü cken des
Kindes befi ndet, aus, so dass es von Kniekehle zu Kniekehle reicht.
5-6. Schieben Sie nun das Baby vorsichtig auf die rechte Hü fte. Lassen Sie das
Kreuzband mit wandern.
7. Breiten Sie nun auch das äußere Kreuzband in den Kniekehlen aus.
8. Ziehen Sie anschließend das Bauchband zuerst ü ber die Beine und dann
ü ber den kompletten Rü cken des Kindes.
Hinweis: Je nach Größe und Vorliebe des Kindes können die Arme des Kindes
sich innerhalb oder außerhalb des Bauchbands befi nden.
HERAUSNEHMEN DES KINDES:
Öffnen Sie die Kreuzbänder ein wenig, um das Kind aus der Sitzposition zu
nehmen. Halten Sie das Kind zu jeder Zeit fest.
4. HIP POSITION (3 M +)
At a certain age your child wants more freedom of movement and a
better view. Additionally, the spread-squat position enhances a healthy
development of the joints.
1. Follow the basic steps A-F.
2. Pick up the baby and pull them to your right shoulder facing you and pull
the left cross band over the right leg of the child.
3. Shift the child to the left shoulder and gently pull the right cross band over
child’s left band.
4. Unfold the inner cross band (the one with immediate contact to the back
of the child) until it spreads from the back of one knee to the other.
5-6. Carefully shift the baby on to your right hip. Let the cross band follow.
7. Now unfold the outer cross band between the knees.
8. Pull the belly band over the legs fi rst and then over the entire back of the
child.
Note: Depending on the age and preference of the child the arms may be
inside or outside the belly band.
TAKING OUT THE CHILD:
Open the cross band slightly to take the child out of the sitting position. Hold
on to the child at all times.
4. POSITION SUR LA HANCHE (DÈS 3 MOIS)
A partir d'un certain âge, votre bébé aura besoin d'une plus grande liberté
de mouvement, et d'une meilleure perspective sur le monde adulte. De plus,
la position "grenouille" est très bénéfi que pour le développement de ses
articulations.
1. Suivez les étapes du nœud de base de A à F.
2. Soulevez votre bébé en l'attirant sur votre épaule droite, face à vous, et
tirez la bande de gauche sur la jambre droite de l'enfant.
3. Placez ensuite votre bébé sur votre épaule droite et tirez la bande de
droite sur sa jambe gauche.
4. Dépliez la bande croisée intérieure (celle qui en contact direct avec le
dos de l'enfant) jusqu'à ce qu'elle soutienne bien l'arrière de ses genoux.
5-6. Faites glisser l'enfant jusqu'à votre hanche droite. Laissez suivre la bande
croisée.
7. Dépliez maintenant la bande croisée extérieure entre les genoux de
l'enfant.
8. Tirez la bande ventrale d'abord sur les jambes puis sur tout le dos de
l'enfant.
NOTE: Selon l'âge et la préférence de l'enfant, ses bras peuvent être placés à
l'intérieur ou à l'extérieur de la bande ventrale
SO RTIR L'ENFANT DE L'ÉC HARPE:
Ouvrez légèrement la bande croisée pour dégager l'enfant de la position
assise. Tenez bien l'enfant en permanence.
15
16
Page 10

123
45
5. RÜ CKENPOSITION (3 M +)
Ab einem gewissen Alter möchte das Kind mehr Bewegungsfreiheit und ein
größeres Sichtfeld. Dafü r eignet sich diese Trageposition hervorragend. Die
Spreiz-Anhockstellung unterstü tzt die Gelenke zudem bei der Entwicklung
optimal.
A) MIT UNTERSTÜ TZUNG EINER ZWEITEN PERSON
1. Lassen Sie sich das Tuch binden wie in Grundschritten A-F beschrieben,
nur ist hier vom Rü cken als Mittelpunkt auszugehen. Die zweite Person
trägt das Kind und fü hrt die weiteren Schritte durch.
2. Fädeln Sie nun ein Bein des Kindes gleichzeitig in das Kreuz- und
Bauchband einer Seite.
3. Wiederholen Sie diesen Schritt mit dem anderen Beinchen.
4. Breiten Sie nun das innere Kreuzband, das sich direkt auf dem Rü cken
des Kindes befi ndet, aus, so dass es von Kniekehle zu Kniekehle reicht.
Wiederholen Sie den Schritt mit dem äußeren Kreuzband.
5. Ziehen Sie anschließend das Bauchband hoch ü ber den kompletten
Rü cken des Kindes.
HERAUSNEHMEN DES KINDES:
Lass en Sie sic h beim Herau snehmen d es Kindes h elfen. Die z weite Perso n kann
das Kind durch leichtes Öffnen der Kreuzbänder problemlos herausheben.
Das Kind muss zu jeder Zeit festgehalten werden.
5. BACK POSITION (3 M +)
At a certain age your child wants more freedom of movement and a better
view. Also, the spread-squat position enhances a healthy development of
the joints.
A) TIED WITH THE HELP OF AN EXTRA PERSON
1. Have somebody tie the sling following the basic steps A-F, but using the
lower back as the midpoint. Here, the second person holds the child and
leads the further steps.
2. Pull both cross and bellyband of one side over one leg of the child.
3. Repeat this step with the other leg.
4. Unfold the inner cross band (the one with direct contact with the back of
the child) until it spreads from the back of one knee to the other. Repeat
this step with the outer cross band.
5. Now pull up the belly band over the entire back of the child.
TAKING OUT THE CHILD:
Let somebody help you with taking the child out of the sling. The second
person can take the child out of the sling by slightly opening the cross bands.
Hold on to the child at all times.
5. POSITION SUR LE DOS (DÈS 3 MOIS)
A partir d'un certain âge, votre bébé aura besoin d'une plus grande liberté
de mouvement, et d'une meilleure perspective sur le monde adulte. De plus,
la position "grenouille" est très bénéfi que pour le développement de ses
articulations.
A) NOUER L'ÉCHARPE AVEC L'AIDE DE QUELQU'UN
1. Faites-vous aider pour suivre les étapes du nœud de base de A à F, mais
en positionnant le milieu de l'écharpe au bas de votre dos. La seconde
personne tient l'enfant et mène les étapes à venir.
2. Tirez la pan croisé et la bande ventrale d'un côté par-dessus la jambe de
l'enfant.
3. Répétez cette étape avec l'autre jambe.
4. Dépliez la bande croisée intérieure (celle qui en contact direct avec le
dos de l'enfant) jusqu'à ce qu'elle soutienne bien l'arrière de ses genoux.
Répétez cette étape avec la bande extérieure.
5. Tirez maintenant la bande ventrale sur tout le dos de l'enfant.
SO RTIR L'ENFANT DE L'ÉC HARPE:
Faites-vous aider pour sortir l'enfant de l'écharpe. La seconde personne peut
dégager l'enfant en ouvrant légèrement les bandes croisées.
17
18
Page 11

123
456
789
10 11
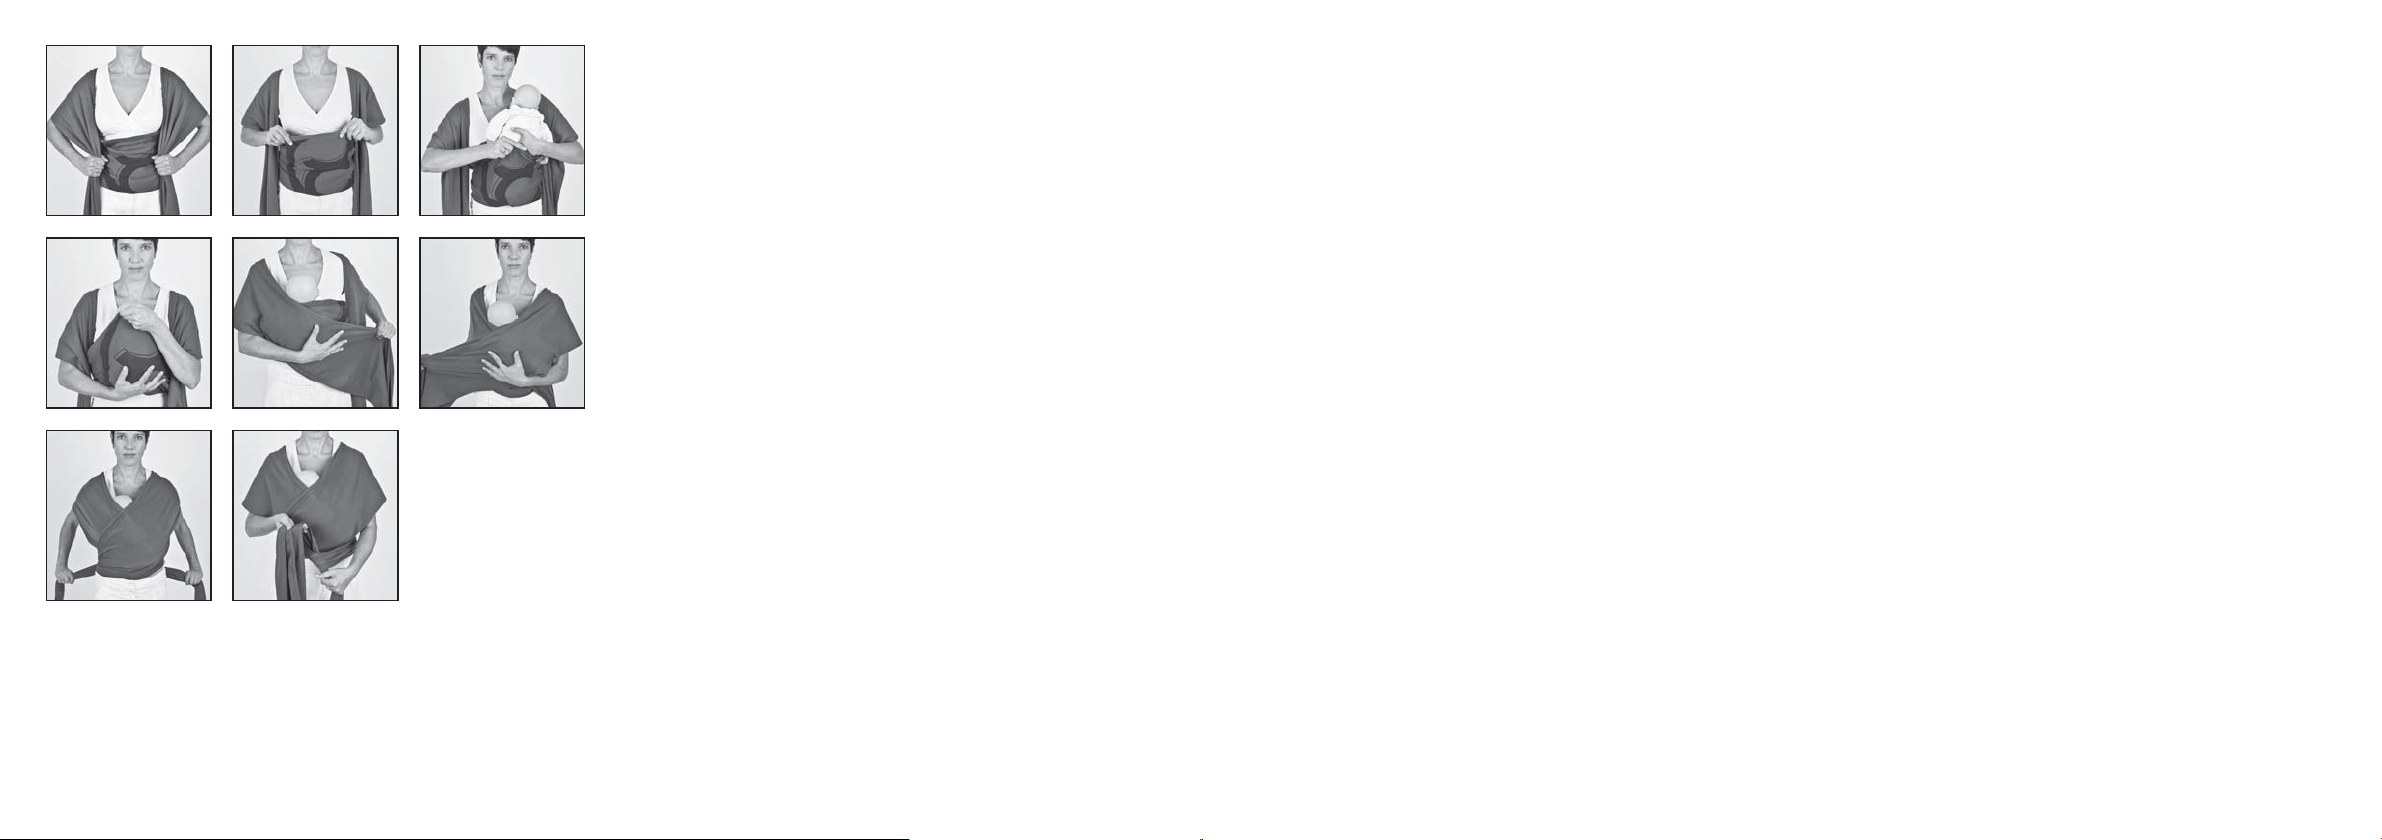
B) OHNE UNTERSTÜ TZUNG EINER ZWEITEN PERSON
1. Legen Sie das u.GO Tragetuch ausgebreitet auf eine sichere, gerade
Oberfl äche. Legen Sie nun das Baby auf den Tuchmittelpunkt, so dass
die Schultern des Kindes mit dem oberen Rand des Tragetuchs
abschließen.
2. Ziehen Sie den unteren Rand des Tuches ein wenig zwischen den
Beinchen des Kindes hoch.
3. Stellen Sie sich mit dem Rü cken zum Kind und nehmen Sie die beiden
Tuchenden in eine Hand. Stü tzen Sie mit der anderen Hand das Genick
des Kindes.
4. Bringen Sie das Kind zu sich auf den Rü cken. Beugen Sie sich dabei nach
vorne und ziehen Sie mit der einen Hand am Tuch während Sie mit der
anderen Hand den Po des Babys halten.
5. Verknoten Sie das Tuch unter der Brust. Bleiben Sie dabei nach vorne
gebeugt.
6. Bringen Sie ein Tuchende ü ber die Schulter nach hinten, fü hren Sie es
gekreuzt ü ber den Rü cken des Kindes und unter dem Beinchen wieder
nach vorne.
7. Klemmen Sie sich dieses Tuchende zwischen die Knie und fü hren Sie die
andere Bahn ü ber die Schulter nach hinten.
8. Kreuzen Sie auch dieses Band ü ber den Rü cken des Kindes und unter
dem anderen Bein nach vorne.
9. Richten Sie sich auf und ziehen Sie beide Enden fest an.
10-11. Kreuzen Sie die Bänder am Bauch, bringen Sie diese nach hinten und
verknoten Sie die Enden hinter Ihrem Rü cken (unterhalb des Kindes).
Hinweis: Bitte achten Sie darauf, dass die Bänder nicht verdreht und stets gut
ausgebreitet sind, vor allem am Rü cken des Kindes.
HERAUSNEHMEN DES KINDES:
Halten Sie das Kind gut fest, während Sie das Tuch bis zum ersten Knoten
(Schritt 5). Lockern Sie diesen Knoten, bis das Tuch lose genug ist, um das
Baby vorsichtig unter dem Arm durch auf die Hü fte zu ziehen. Sie können das
Kind nun herausnehmen.
ODER:
Beugen Sie sich nach vorne und halten Sie das Kind fest. Wickeln Sie das Tuch
ab bis Sie zum ersten Knoten kommen. Setzen Sie das Kind langsam auf einer
geeigneten Oberfl äche ab, indem Sie mit einer Hand dem Kind Halt geben,
während die andere Hand das Tuch immer weiter lockert.
B) TIED WITHOUT THE HELP OF AN EXTRA PERSON
1. Spread the u.GO sling unfolded on a safe and straight surface. Now
gently lay the child on the sling’s midpoint ,so the neck and shoulders are
in line with the upper rim of the sling.
2. Slightly pull the lower edge of the sling up between the legs of the child.
3. Stand with your back towards the child and take both ends of the sling in
one hand. With the other hand support the neck of your child.
4. Pull the child towards your back. Bend forward while pulling the sling with
one hand and holding the bottom of the child with the other.
5. Tie a single knot under your chest. Remain bent forward.
6. Bring one band to the back over the shoulder. Guide it diagonally across
the back of the child and lead it back to the front by pulling it under the
leg of the child.
7. Tuck this end between your knees and bring the other band to the back.
8. Again cross this band diagonally over the fi rst one, acros s the child’s back
and bring it forward by pulling it under the child’s leg.
9. Straighten up and pull at both ends of the sling.
10-11. Cross both bands at the belly, bring the back again and tie a knot
behind your back (below the child).
Note: Please make sure that the bands are not twisted and always unfolded
properly especially at the child’s back.
TAKING OUT THE CHILD:
Hold on tight to the child while loosening the sling until you reach the fi rst knot.
(step 5). Loosen this knot until you are able to pull the baby to the front from
under your arm. You can now take the child out of the sling.
OR:
Bend forward and hold on to the child. Untie the sling until you reach the fi rst
knot. Slowly lower the child onto a suitable surface by supporting the child
with one hand at all times while gradually loosening the sling with the other
hand.
B) NOUER L'ÉCHARPE SANS AIDE
1. Placez l'écharpe u.GO dépliée sur une surface plane et sûre. Placez
doucement l'enfant sur le point central de l'écharpe, son cou et ses
épaules alignés sur le bord supérieur de l'écharpe.
2. Tirez légèrement le bord inférieur de l'écharpe entre les jambes de
l'enfant.
3. Posit ionnez-vo us dos à l'enfa nt et tenez les deu x pans de l'écha rpe devant
vous dans une main. Soutenez la nuque de votre enfant de l'autre main.
4. Attirez l'enfant dans votre dos. Penchez-vous vers l'avant tout en tirant
l'écharpe d'une main et en soutenant les fesses de l'enfant de l'autre.
5. Faites un noeud simple sous votre poitrine. Restez penché(e) vers l'avant.
6. Faites passer l'un des pans sur votre dos par-dessus votre épaule. Guidezle en travers du dos de l'enfant et ramenez-le vers l'avant en le faisant
passer sous sa jambe.
7. Tenez ce pan entre vos genoux, et passez l'autre pan sur votre dos.
8. Guidez le second pan en travers du dos de l'enfant, et ramenez-le vers
l'avant en le faisant passer sous sa jambe.
9. Relevez-vous et tirez les deux pans de l'écharpe.
10-11. Croisez les pans sur votre ventre, ramenez-les à nouveau sur votre dos
et faites-un noeud (sous l'enfant).
NOTE: Assurez-vous que l'écharpe ne soit pas enroulée sur elle-même. Elle
doit être toujours à plat, en particulier sur le dos de l'enfant.
SO RTIR L'ENFANT DE L'ÉC HARPE:
Tenez-bien votre enfant pendant que vous relâchez l'écharpe jusqu'à
atteindre le premier noeud. (étape 5). Relâchez ce noeud jusqu'à pouvoir
faire glisser l'enfant vers l'avant en passant sous votre bras. Vous pouvez
maintenant sortir l'enfant de l'écharpe.
OU BIEN:
Penchez-vous vers l'avant, et tenez-bien l'enfant. Dénouez l'écharpe jusqu'à
atteindre le premier nœud. Placez lentement l'enfant sur une surface
adéquate tout en le soutenant d'une main et en relâchant le nœud de
l'autre main.
19
20
Page 12
123/4
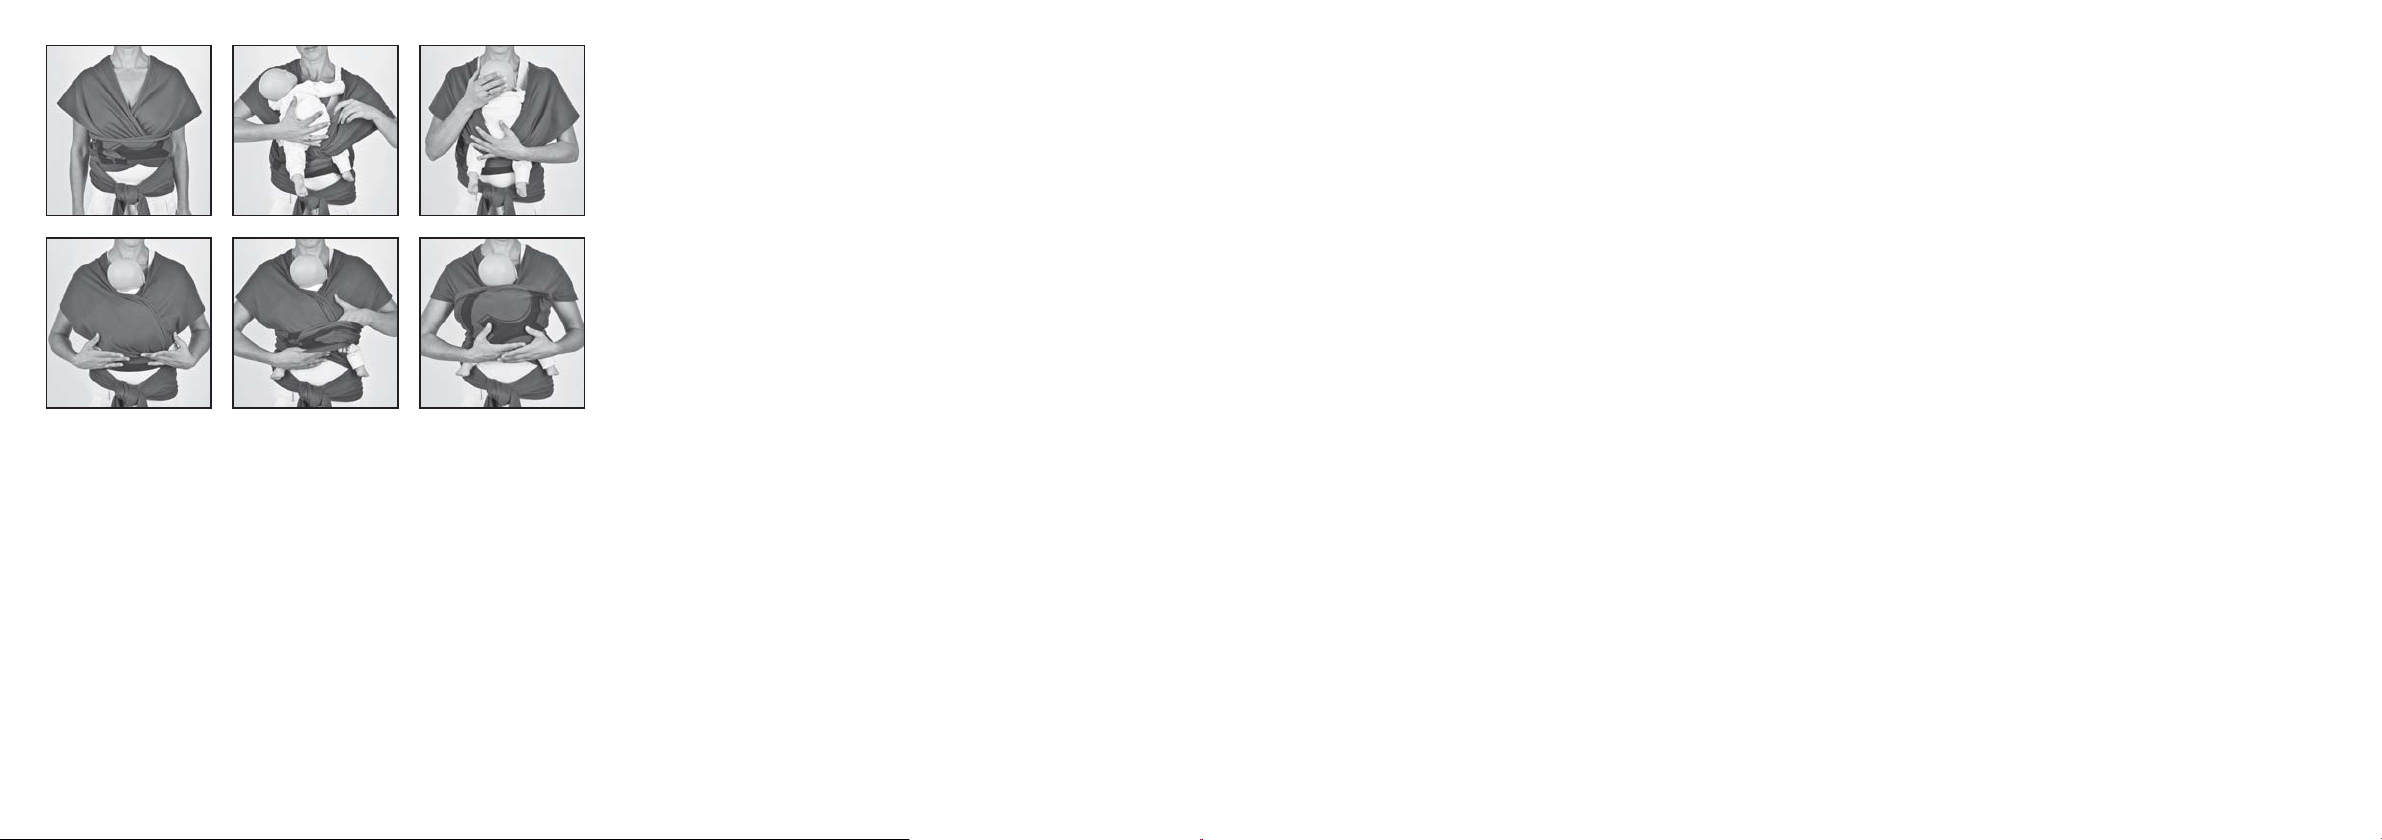
6. SITZPOSITION MIT GESICHT IN TRAGERICHTUNG (6 M +)
Manche Kinder werden unruhig, wenn Sie ein eingeschränktes Sichtfeld
haben. Probieren Sie zunächst die Hü ft- und Rü ckenposition aus. Warten Sie
unbe dingt mi t dieser Trag epositi on bis da s Kind 6 Mon ate alt is t. Vorher i st dies e
Trageposition ergonomisch nicht vertretbar. Auch ist die Überstimulation
ohne Rü ck zugsmöglichkeit ein Grund so lange wie möglich auf d iese Position
zu verzichten. So lange Sie das Tuch binden, achten Sie unbedingt darauf,
dass sich das Kind an einem sicheren Ort befi ndet (z.B. Laufstall).
1. Folgen Sie den Grundschritten A-F.
2. Heben Sie das Baby mit dem Rü cken zu sich an eine Schulter und fädeln
4
3. Ziehen Sie das Kind ein wenig zur anderen Schulter und fädeln Sie das
4. Breiten Sie nun das innere Kreuzband, das sich direkt auf dem Bauch des
5. Ziehen Sie anschließend das Bauchband ü ber den Bauch des Kindes.
HERAUSNEHMEN DES KINDES:
Öffnen Sie die Kreuzbänder ein wenig, um das Kind aus der Sitzposition zu
nehmen. Halten Sie dabei das Kind zu jeder Zeit fest.
KONTAKT
c/o COLUMBUS Trading-Partners GmbH,
Alte Forstlahmer Str. 22, 95326 Kulmbach, Germany
Tel.: +49(0)9221 - 973114, Fax.: +49(0)9221 - 973117
Sie nun das Bein des Babys gleichzeitig in das Kreuz- und Bauchband der
anderen Seite.
andere Bein in Kreuz- und Bauchband.
Kindes befi ndet, aus und wiederholen Sie diesen Schritt mit dem anderen
Kreuzband.
6. SITTING POSITION FACING FORWARD (6 M +)
Some children get restless when their view is restricted. The hip and back
position is useful especially for these cases. However, please wait with this
position until your child is at least 6 months old. Before that age this carrying
position should be avoided from an ergonomical point of view and to avoid
possible overstimulation.
1. Follow the basic steps A-F.
2. Pick up the child and bring them with their back towards one shoulder
and pull both cross and belly band of one side over one leg of the child.
3. Shift the child to the other shoulder and pull the other cross and belly
band over the other leg.
4. Unfold both cross bands starting with the inner one (the one with
immediate contact to the belly of the child).
5. Pull the belly band gently over the belly of the child.
TAKING OUT THE CHILD:
Open the cross band slightly to take the child out of the sitting position. Hold
on to the child at all times.
UK – AFTER SALES SERVICE:
If you need assistance, spare parts or you are unhappy with any aspect
of the goods please contact Customer Care on: +44 (0)845 268 2000,
or e-mail us at: customer.care@mamasandpapas.com.
Visit our website at www.mamasandpapas.com for the latest product
information.
6. POSITION ASSISE VERS L'AVANT (DÈS 6 MOIS)
Certains enfant s'agitent si leur perspective est restreinte. Les positions sur la
hanche et sur le dos sont particulièrement utiles dans ce cas. Cependant,
attendez que votre enfant atteigne au moins l'âge de 6 mois pour utiliser
cette position. Celle-ci est déconseillée avant cet âge d'un point de vue
ergonomique, et aussi pour éviter tout risque de sur-stimulation.
1. Suivez les étapes du nœud de base de A à F.
2. Soulevez votre bébé et placez son dos contre votre épaule. Faites passer
la bande croisée et la bande ventrale d'un côté sur l'une des jambes de
l'enfant.
3. Faites glisser l'enfant vers l'autre épaule, et passez bande croisée et
bande ventrale sur l'autre jambe.
4. Dépliez les deux bandes croisées en commençant par la bande intérieure
(celle en contact direct avec le ventre de l'enfant).
5. Tirez doucement la bande ventrale sur le ventre de l'enfant.
SO RTIR L'ENFANT DE L'ÉC HARPE:
Ouvrez légèrement la bande croisée pour dégager l'enfant de la position
assise. Tenez bien l'enfant en permanence.
21
22
Page 13

IV. GARANTIEBEDINGUNGEN
Die nachfolgenden Garantiebestimmungen gelten nur in dem Land,
in dem dieses Produkt erstmalig über den Einzelhandel an einen
Verbraucher verkauft wurde. Die Garantie deckt sämtliche Herstellungsund Materialfehler ab, die im Zeitpunkt des Kaufs bestanden haben oder
die innerhalb von zwei (2) Jahren nach dem Erstverkauf dieses Produkts
über den Einzelhandel an einen Verbraucher in Erscheinung getreten
sind (Herstellergarantie). Tritt während der Garantiezeit ein Herstellungsund Materialfehler auf, wird das Produkt kostenlos repariert oder – nach
unserem freien Ermessen– gegen ein neues ausgetauscht. Um Leistungen
im Rahmen dieser Garantie in Anspruch nehmen zu können, muss das
Produkt an den Einzelhändler zurückgegeben werden, der es erstmalig
verkauft hat und ein Nachweis über den Kauf (Kaufbeleg oder Rechnung)
im Original vorgelegt werden, welcher das Kaufdatum, den Namen des
Händlers sowie die Produktbezeichnung aufzeigt. Der Anspruch aus diesem
Garantieversprechen besteht nicht, wenn das Produkt an den Hersteller oder
irgendeine andere Person als den Einzelhändler, der es erstmalig verkauft
hat, zum Zweck der Inanspruchnahme der Garantieleistung geschickt wird.
Die Garantie gilt nur, wenn das Produkt nach dem Kauf umgehend auf
Vollständigkeit, Herstellungs- und Materialfehler überprüft wurde. Wurde
das Produkt im Versandhandel gekauft, ist es umgehend nach Erhalt
auf Vollständigkeit, Herstellungs- und Materialfehler zu überprüfen. Falls
Schäden vorhanden sind, darf das Produkt nicht mehr benutzt werden
und muss umgehend an den Händler, der es erstmalig verkauft hat, zurück
gegeben werden. Im Garantiefall muss das Produkt in einem vollständigen
und sauberen Zustand zurückgegeben werden. Bitte lesen Sie vor einer
Kontaktaufnahme mit dem Händler sorgfältig die Gebrauchsanleitung. Die
Garantie deckt keine Schäden ab, die durch Fehlgebrauch, äußere Einfl üsse
(Wasser, Feuer, Verkehrsunfälle o.ä.) oder normalen Verschleiß entstanden
sind. Die Garantie wird nur gewährt, wenn das Produkt in Übereinstimmung
mit der Gebrauchsanweisung behandelt und benutzt wurde, Reparaturen
oder Veränderungen ausschließlich durch Personen vorgenommen wurden,
die hierzu befugt waren und stets nur Original Bau- und Zubehörteile
verwendet wurden. Durch diese Garantie werden weder die auf Grundlage
der jeweils anwendbaren Gesetze bestehenden Verbraucherrechte noch
Rechte gegen den Verkäufer wegen der Vertragswidrigkeit des Produkts
ausgeschlossen, begrenzt oder in anderer Weise eingeschränkt.
IV. GUARANTEE
The following warranty applies solely in the country where this product was
initially sold by a retailer to a customer. The warrant y covers all manufacturing
and material defects, existing and appearing, at the date of purchase or
appearing within a term of two (2) years from the date of purchase from
the retailer who initially sold the product to a consumer (manufacturer’s
warranty). In the event that a manufacturing or material defect should
appear, we will – at our own discretion – either repair the product free of
charg e or replace it with a new prod uct. To obtain such warra nty it is required
to take or ship the product to the retailer, who initially sold this product to a
customer and to submit an original proof of purchase (sales receipt or invoice)
that contains the date of purchase, the name of the retailer and the type
designation of this product. This warranty shall not apply in the event that this
product is taken or shipped to the manufacturer or any other person other
than the retailer who initially sold this product to a consumer. Please check
the product with respect to completeness and manufacturing or material
defects immediately at the date of purchase or, in the event that the product
was purchased in distance selling, immediately after receipt. In case of a
defect stop using the product and take or ship it immediately to the retailer
who initially sold it. In a warranty case the product has to be returned in a
clean and complete condition. Prior to contacting the retailer, please read
this instruction manual carefully. This warranty does not cover any damages
caused by misuse, environmental infl uence (water, fi re, road accidents etc.)
or normal wear and tear. It does solely apply in the event that the use of the
product was always in compliance with the operating instructions, if any and
all modifi cations and services were performed by authorized persons and
if original components and accessories were used. This warranty does not
exclude, limit or otherwise affect any statutory consumer rights, including
claims in tort and claims with respect to a breach of contract, which the
buyer may have against the seller or the manufacturer of the product.
IV. GARANTIE
La garantie suivante s'applique uniquement dans le pays où ce produit a
été vendu la première fois par un détaillant à un client. La garantie couvre
tous les défauts matériels et de fabrication, existants ou apparaissants à
la date de l'achat ou dans un délai de deux (2) ans à compter de la date
d'achat au détaillant qui l'a vendu la première fois au consommateur
(garantie fabricant). Dans le cas où un défaut de fabrication ou de matériau
apparaîtrait, le produit sera, au choix du fabricant, soit réparé gratuitement
soit remplacé par un produit neuf. Pour obtenir cette garantie il est
nécessaire de retourner le produit au détaillant qui l'a initialement vendu au
consommateur et produire l'original de la preuve d'achat (facture ou reçu)
qui comporte la date d'achat, le nom du détaillant et la désignation du
produit. La garantie ne s'appliquera pas dans le cas où le produit est envoyé
au fabricant ou à toute personne autre que le détaillant ayant effectué la
première vente de ce produit.
23
24
Page 14

GEACHTE KLANT!
DANK U VOOR HET AANKOPEN VAN DE CYBEX u.GO BABYDRAAGDOEK. UW BABY ONDERVINDT VEEL
VOORDELEN VAN DEZE DRAAGMETHODE. HET DICHTE FYSISCHE CONTACT MET DE OUDERS VERGROOT HET
BASISVERTROUWEN VAN DE BABY EN STIMULEERT EEN POSITIEF SOCIAAL GEDRAG ALSOOK EEN GEZONDE
ONTWIKKELING VAN DE GEWRICHTEN.
SPOŠTOVANI KUPEC!
ZAHVALJUJEMO SE VAM ZA NAKUP CYBEX u.GO NARAMNE RUTE - ŠTORKLJE. PRENAŠANJE MALČKA NA TAK
NAČIN JE IZJEMNO UDOBNO. TESEN TELESNI STIK S STARŠI POVEČA MALČKOV OSNOVNI OBČUTEK ZAUPANJA IN
VZPODBUJA POZITIVEN SOCIALNI RAZVOJ, MEDTEM KO PRAVILEN NAČIN PRENAŠANJA POMAGA PRI ZDRAVEM
RAZVOJU MALČKOVIH SKLEPOV.
TISZTELT VÁSÁRLÓ!
25
25
KÖSZÖNJÜK, HOGY A CYBEX u.GO HORDOZÓKENDŐT VÁLASZTOTTA. A KISBABA SZÁMÁRA NAGYON ELŐNYŐS
AZ ILYEN ÚTON TÖRTÉNŐ HORDOZÁS. A SZÜLŐVEL VALÓ SZOROS FIZIKAI KONTAKTUS ERŐSÍTI A KISBABA BIZALMI
ÉRZETÉT ÉS POZITÍVAN HAT A SZOCIÁLIS FEJLŐDÉSÉRE, MÍG A HELYES HORDOZÁSI HELYZET ELŐSEGÍTI AZ ÍZÜLETEK
TOVÁBBI FEJLŐDÉSÉT.
26
26
Page 15

NL
Afmetingen:
lengte: 540 cm, breedte: 60 cm
SL
Dimenzije:
dolžina: 540 cm, širina: 60 cm
HU
Méretek:
hosszúság: 540 cm, szélesség: 60 cm
NL HU
De CYBEX u.GO babydraagdoek is gemaakt uit 100% elastische katoen.
Afhankelijk van de leeftijd van het kind zijn er verschillende draagposities
mogelijk. In deze handleiding beschrijven we de volgende 6 draagposities.
1. Wiegpositie voor pasgeborenen (0-3M)
2. Kangoeroepositie voor pasgeborenen (0-3M)
3. Zittende positie met zicht naar de moeder (vanaf 3M)
4. Heuppositie (vanaf 3M)
5. Rugpositie (vanaf 3M)
6. Zittende positie met zicht naar voren (vanaf 6M)
SL
CYBEX u.GO štorklja je izdelana iz 100% elastičnega bombaža. Odvisno do
malčkove starosti, ponuja številne različne položaje za prenašanje. V teh
navodilih vam bomo predstavili naslednjih šest položajev za prenašanje:
1. Zibelka za novorojenčke (0-3M)
2. Kengurujček za novorojenčke (0-3M)
3. Sedeč položaj - malček je obrnjen proti staršu (od 3M dalje)
4. Položaj na boku (od 3M dalje)
5. Hrbtni položaj (od 3M dalje)
6. Sedeč položaj - malček je obrnjen naprej (od 6M dalje)
A CYBEX u.GO hordozókendő 10 0% elasz tikus pamutból készül, és - a gyer mek
életkorától függően - sok különböző hordozási helyzetet tesz lehetővé. Ez a
kezelési utasítás az alábbi hat hordozási helyzetet mutatja be.
1. Bölcsőhelyzet újszülötteknek (1-3 hó),
2. kenguruhelyzet újszülötteknek (1-3 hó),
3. ülő helyzet arccal a hordozó teste felé (3 hónaptól),
4. csípőhelyzet (3 hónaptól),
5. háti helyzet (3 hónaptól),
6. ülő helyzet arccal a hordozási irányba (6. hónaptól).
27
INHOUD
I. Wat zijn de voordelen van de CYBEX u.GO babydraagdoek .....29
II. Gelieve te noteren vóór het eerste gebruik ..................................29
III. Draagaanwijzingen .........................................................................31
1. Wiegpositie voor pasgeborenen (0-3M) .......................................33
2. Kangoeroepositie voor pasgeborenen (0-3M) ............................ 35
3. Zittende positie met zicht naar de moeder (vanaf 3M) ............... 37
4. Heuppositie (vanaf 3M) ................................................................... 39
5. Rugpositie (vanaf 3M)
A) Vastgemaakt met behulp van een extra persoon ...............................41
B) Vastgemaakt met behulp van een extra persoon ...............................43
6. Zittende positie met zicht naar voren (vanaf 6M) ......................... 45
IV. Garantie ............................................................................................ 47
VSEBINA
I. Kakšne so prednosti CYBEX u.GO štorklje? ..................................... 30
II. Pred prvo uporabo ne pozabite na naslednje ...............................30
III. Navodila za prenašanje ...................................................................32
1. Zibelka za novorojenčke (0-3M) ...................................................... 34
2. Kengurujček za novorojenčke (0-3M) ............................................36
3. Sedeč položaj - malček je obrnjen proti staršu (od 3M dalje) ..... 38
4. Položaj na boku (od 3M dalje) .........................................................40
5. Hrbtni položaj (od 3M dalje)
A) Povezovanje s pomočjo druge osebe ....................................................
B) Povezovanje brez pomoči druge osebe .................................................44
6. Sedeč položaj - malček je obrnjen naprej (od 6M dalje) ............. 46
IV. GARANCIJA ......................................................................................................48
42
T A R T A L O M J E G Y Z É K
I. Mik a CYBEX u.GO hordozókendő előnyei? ................................... 30
II. Az első használat előtt - utasítások .................................................30
III. Hordozási utasítás ............................................................................. 32
1. Bölcsőhelyzet újszülötteknek (1-3 hó) ............................................. 34
2. Kenguruhelyzet újszülötteknek (1-3 hó) ......................................... 36
3. Ülő helyzet arccal a hordozó teste felé (3 hónaptól) ..................... 38
4. Csípőhelyzet (3 hónaptól) ................................................................ 40
5. Háti helyzet (3 hónaptól)
A) Második személy segítségével .................................................................42
B) Másik személy segítsége nélkül ................................................................44
6. Ülő helyzet arccal a hordozási irányba (6. hónaptól) .................... 46
IV. Garanzia ...........................................................................................................48
28
Page 16

I. WAT ZIJN DE VOORDELEN VAN DE CYBEX u.GO BABYDRAAGDOEK.
– Bij een juist gebruik, is de u.GO sling ergonomisch optimaal voor zowel de
baby als de drager.
– De draagzak heeft een positieve invloed op de emotionele, sociale en
fysische ontwikkeling van het kind.
– De u.GO babydraagdoek zorgt voor een uitstekende verdeling van het
gewicht zonder de drager te belasten, zelfs bij gebruik gedurende een
langere periode.
– Een ba by voelt zich r ustig en ve ilig bij d icht licha amscontact e n wiegend e
bewegingen.
– De draagzak biedt al deze zintuiglijke sensaties tegelijkertijd.
– Aangezien de CYBEX u.GO geen gespen of knoppen bevat, bestaat er
geen gevaar op kwetsuren.
II. GELIEVE TE NOTEREN VÓÓR HET EERSTE GEBRUIK:
1. Gelieve de u.GO te wassen vóór het eerste gebruik. Volg hiervoor de
gebruiksaanwijzing.
2. Het vastknopen van de draagzak is zeer eenvoudig en vergt enkel een
beetje oefening. Probeer de draagzak eerst rustig thuis uit. Wacht na het
inoefenen op een geschikt moment wanneer uzelf en uw kind rustig zijn
(bv. na een maaltijd).
3. Controleer dat de draagdoek eerder strak dan los zit.
4. Zowel de draagzak als het contact tussen drager en draagzak
produceren warmte. Let erop dat u het kind niet te warm aankleedt en
dat er voldoende luchtcirculatie rond het kind is. Het is te warm als het
kind begint te zweten.
5. Verschillende kinderen hebben verschillende voorkeuren. Indien uw kind
niet houdt van een bepaalde draagpositie, probeer dan een andere.
6. Wees steeds voorbereid op plotse bewegingen van het kind. Zoniet kan u
uw evenwicht verliezen.
7. Gelieve uw kind vast te houden wanneer u vooroverbuigt.
8. De CYBEX u.GO is in geen enkel geval geschikt voor sportactiviteiten!
I. KAKŠNE SO PREDNOSTI CYBEX u.GO ŠTORKLJE?
– Prenašanje malčka v štorklji je ob pravilni uporabi optimalno ergonomično
tako za malčka kot tudi za starša.
– Štorklja ima pozitivne učinke na malčkov emocionalni, socialni in fi zični
razvoj.
– Pri uporabi štorklje je malčkova teža enakomerno porazdeljena in ne
obremenjuje osebe, ki prenaša malčka, čeprav jo uporablja daljši čas.
– Da bi s e mal ček počutil pomirjenega in varnega, potrebuje tesen stik, kot
na primer pri zibanju ali povijanju.
– Štorklja istočasno poskrbi za vse te občutke.
– Čeprav CYBEX u.GO štorklja nima zaponk ali gumbov, ni nikakršne
možnosti za poškodbe malčka.
II. PRED PRVO UPORABO NE POZABITE NA NASLEDNJE:
1. Pred prvo uporabo štorkljo u.GO operite, sledite navodilom za nego.
2. Uporaba štorklje je resnično enostavna in potrebuje le nekaj prakse.
Prosimo, da jo na začetku preizkusite v udobju doma. Med privajanjem
na štorkljo poskusite biti čimbolj mirni in počakajte na ugoden trenutek,
ko bo pomirjen in sproščen tudi vaš malček (na primer po obedu).
3. Pazite, da bo štorklja bolj tesna kot pa zrahljana.
4. Tako štorklja kot tudi oseba, ki prenaša malčka, oddajata toploto. Pazite,
da malčka ne oblečete pretoplo in da je okrog njega dovolj prostora za
kroženje zraka.
5. Če se prične malček znojiti, pomeni, da mu je pretoplo. Različni malčki
imajo radi različne stvari. Če se vaš mal ček ne počuti u dobno v tren utnem
položaju za prenašanje, poskusite z drugim položajem.
6. Vedno bodite pripravljeni na malčkove nepričakovane gibe, sicer lahko
izgubite ravnotežje.
7. Ko se sklanjate naprej, dobro držite malčka.
8. CYBEX u.GO štorklje pod nobenim pogojem ne smete uporabljati med
športnimi aktivnostmi.
I. MIK A CYBEX u.GO HORDOZÓKENDŐ ELŐNYEI?
– Helyes használat esetén a hordozóhelyzet ergonómiai szempontból
optimális a baba és a hordozó számára is.
– A hordozókendő használata pozitívan hat a gyermek emocionális,
szociális és testi fejlődésére.
– A CYBEX u.GO hordozókendő súlyelosztása kiváló, és nem terheli a
hordozót, még órákon át tartó használat esetén sem.
– A gyermeknek gyakran testi közelségre, hintázó mozgásra és bizonyos
szorosan ölelő helyzetre van szüksége ahhoz, hogy meg tudjon ny ugodni.
A hordozókendő egyszerre biztosítja ezeket a szenzoros hatásokat.
– A CYBEX u.GO hordozókendő nem tartalmaz olyan csatokat és
gombokat, amelyek nyomást okozhatnának.
– A u.GO hordozókendő kis mérete miatt tökéletes kísérő kirándulások,
utazás vagy akár bevásárlás esetén is.
II. AZ ELSŐ HASZNÁLAT ELŐTT - UTASÍTÁSOK:
1. Kérjük, az első használat előtt mossa ki a u.GO-t. Ennek során tartsa be a
kezelési utasításokat.
2. A hordozókendő megkötése rendkívül egyszerű, és csak egy kevés
gyakorlást igényel. Először teljes nyugalomban, otthon próbálja ki a
kendőt. N e l eg ye n i de g es a z e l ső kís érleteknél , és várja meg az t a kedvező
időpontot, amikor a baba nyugodt és ellazult (pl. etetés után).
3. Inkább kicsit szorosan mint túl lazán csavarja maga köré a
hordozókendőt.
4. A kendő és a testi közelség révén nagyon sok hő keletkezik. Ezért ügyeljen
arra, hogy ne öltöztesse túl melegen a babát, és biztosítson megfelelő
légáramlást a gyermek teste körül. Ha a gyermek izzadni kezd, akkor túl
melege van.
5. Minden gyermek más és más dolgot kedvel. Ha az egyik hordozási mód
nem tetszik a gyermeknek, még mindig kipróbálhat egy másikat.
6. Mindig számítson a gyermek spontán mozgására, ami kibillentheti Önt az
egyensúlyából.
7. Kérjük tartsa stabilan a gyermekét ha előrehajol.
8. A CYBEX u.GO hordozókendő semmilyen körülmények között sem
alkalmas sportoláshoz!
29
30
Page 17

A
B/C D/E
III. DRAAGAANWIJZINGEN:
BASISHANDELINGEN:
A) Neem de u.GO draagzak vast met beide handen en houd het middelpunt
van de draagzak vóór uw navel.
B) Breng beide banden achter uw rug en kruis ze over mekaar.
C) Breng ze over de schouders heen opnieuw naar voren.
D) Kruis de banden voor uw borst.
E) Haal beide uiteinden onder de buikband door.
F) Breng de uiteinden opnieuw naar achteren, kruis ze nogmaals en knoop
ze vast voor de navel.
III. NAVODILA ZA PRENAŠANJE:
OSNOVNI KORAKI:
A) Štorkljo u.GO primite z obema rokama in središče štorklje držite pred
trebuhom v višini popka.
B) Oba pasova namestite na hrbet in ju prekrižajte.
C) Vrnite ju spet nazaj in sicer tako, da ju napeljete preko ramen .
D) Pasova pred prsmi prekrižajte.
E) Oba konca napeljite pod trebušni pas.
F) Nato oba konca ponovno napeljite na hrbet in ju znova prekrižajte ter
pred trebuhom naredite vozel.
III. HORDOZÁSI UTASÍTÁS:
ALAPVETŐ LÉPÉSEK:
A) Vegye a két kezébe a u.GO hordozókendőt és tartsa a kendő
középpontját a hasa előtt, a köldöke magasságában. B.) Vezesse hátra
a hátához és keresztezze meg a kendő két végét.
C) Vezesse vissza a pántokat előre a vállain át.
D) Keresztezze ismét a pántokat a melle előtt.
E) Bújtassa át a kendő két végét a hasán lévő sáv alá.
F) Vezesse ismét hátra a kendő két végét a háta mögé, ismét keresztezze
őket, és a hasa előtt kössön egy csomót.
F
31
Rechterkant van de
buikgordel
Het middelpunt
babydraagdoek
OPGELET: Let erop dat de draagdoek niet gedraaid is. Om een perfekte
verdeling van het gewicht te verkrijgen is het cruciaal dat de band zoveel
mogelijk ontvouwd is en dat het kruis zich zo laag mogelijk op de rug
bevindt.
Let erop dat het kind zich op een veilige plaats (bv. wieg) bevindt terwijl u de
draagdoek vastmaakt.
gordel
van de
Desni del trebušnega
pasu
OPOMBA: Pazite, da štorklja ni zasukana. Za čim bolj enakomerno
prerazporeditev teže je odločilnega pomena, da je štorklja povsem
razprostrta in na hrbtu prekrižana čim nižje.
Med tem ko zavezujete štorkljo, mora vaš ma lček ostati na varnem (na primer
v posteljici, stajici).
Levi prečni pas
Središče štorklje
a hasi sáv jobb oldalaLinkse kruisende
Utasítások: mindig ügyeljen arra, hogy a kendő ne csavarodjon meg. A
tökéletes súlyelosztás érdekében fontos, hogy a hordozókendőt szélesre
kisimítsa, és a háton lévő keresztezés a lehető legmélyebben helyezkedjen
el.
Amíg a kendőt köti, ügyeljen arra, ho gy a gyermek biztonságos helyen legyen
(pl. a járókában)..
bal oldali keresztsáv
a kendő közepe
32
Page 18

123
456
789
1. WIEGPOSITIE (VOOR PASGEBORENEN TOT 3M)
Pasgeboren ondervinden het meeste comfort wanneer ze dicht tegen het
hart gedragen worden (met het hoofd op de linkerkant van de borst). Deze
positie kan ook echter langs de rechterkant gebeuren.
1. Volg de basisstappen A-F. Indien u verkiest om het kind met zijn hoofdje
links te dragen, moet de binnenste kruisende band (de band die direct
op de schouder ligt) over de linkerschouder liggen. Glijd de rechtse
kruisende band over uw rechterarm.
2. Maak de linkse kruisende band los door hem lichtjes over uw heup te
lossen.
3. Open de binnenste kruisende band om een soort wiegje te creëren.
4-5. Til de baby op uw linkerarm en leg hem voorzichtig in het wiegje (met zijn
hoofd dichtbij uw hart)
6. Trek de linkse kruisende band voorzichtig over het hoofd van uw kind.
7. Leg de recht se krui sende ban d terug op uw sc houder en p as de draagza k
lichtjes aan over het lichaam van de baby.
8. Trek het kind lichtjes naar u toe - controleer dat de arm van de baby
komfortabel onder zijn lichaam rust.
9. Trek de hele kruisende band nu voorzichtig over het lichaam van de
baby.
HET KIND ERUIT NEMEN:
Open de kruisende band lichtjes om het kind uit de wiegpositie te nemen.
Houd het kind steeds goed vast.
1.POLOŽAJ ZA ZIBANJE (ZA NOVOROJENČKE DO 3M)
Novorojenčki se počutijo najbolj udobno, če jih prenašate tesno ob srcu (z
glavico na levi st rani prs i). Seveda pa la hko ta po ložaj u pora bite tudi na des ni
strani prsi.
1. Sledite osnovnim korakom od A-F. Če želite prenašati malčka tako, da
njegova glavica počiva na levi strani vaših prsi, pazite, da bo notranji
prečni pas (tisti, ki je nameščen direktno na prsi) potekal preko levega
ramena. Rahlo izvlecite roko iz desnega prečnega pasu.
2. Sprostite levi prečni pas, tako da ga malce zrahljajte na bokih.
3. Rahlo raztegnite notranji prečni pas, da iz rute oblikujete zibelko.
4- 5. Vzemite malčka v levo roko in ga previdno položite - z glavico v višini srca
- v štorkljo.
6. Desni prečni pas previdno potegnite preko malčkove glavice.
7. Desni prečni pas znova namestite na rame in rahlo razširite štorkljo preko
malčkovega telesa. Malčka rahlo obrnite k sebi - pri tem pazite, da bo
malčkova leva rokica udobno počivala pod njegovim telesom.
8. Zunanji prečni pas potegnite preko celega malčkovega telesa.
9. Preko prečnih p asov napel jite še trebu šni pas , da varno stab ilizira te malčka.
KAKO VZAMETE MALČKA IZ ŠTORKLJE:
Rahlo sprostite prečne pasove, da lahko malčka vzamete iz"zibelke". Pri tem
malčka ves čas trdno držite.
1. BÖLCSŐ POZÍCIÓ (ÚJSZÜLÖTTEKNEK, KB. 3 HÓNAPOS KORIG)
Az újszülöttek a hordozó szíve felett, azaz a bal oldalon érzik legjobban
magukat. Ennek ellenére a baba a jobb oldalon is hordozható.
1. Végezze el az A-F alaplépéseket. Ha azt szeretné, hogy a baba feje a
szíve felőli oldalon legyen, biztosítsa, hogy a belső (a közvetlenül az Ön
mellkasára felfekvő) keresztszalag a bal vállán át vezessen. Bújjon ki a
karjával a jobb oldali keresztszalagból.
2. Lazítsa meg a bal oldali keresztszalagot úgy, hogy a csípőjénél kicsit
megoldja.
3. Nyissa ki egy kicsit a belső keresztszalagot úgy, hogy a kendő egy bölcsőt
alkosson.
4-5.Vegye a babát a bal kezébe, és óvatosan helyezze a kendőből képzett
bölcsőbe úgy, hogy a feje az Ön szíve magasságában legyen.
6. Óvatosan húzza át a bal oldali keresztszalagot a gyermek feje felett.
7. Vegye ismét a vállára a jobb oldali keresztszalagot, és a baba teste körül
kicsit tágítsa ki a kendőt. Fordítsa kissé maga felé a gyermeket - ügyeljen
arra, hogy a baba jobb karja kényelmesen, a teste alatt helyezkedjen el.
8. Most teljesen húzza a gyermek köré a külső keresztszalagot.
9. A gyermek stabilizálása érdekében húzza a hasán lévő pántot a
keresztszalagok fölé.
A GYERMEK KIVÉTELE:
Kicsit nyissa ki a keresztszalagokat, hogy kivehesse a gyermeket a bölcső
pozícióból. Mindig tartsa fi xen a gyermeket.
33
34
Page 19

123
456
78
2. KANGOEROEPOSITIE (VOOR PASGEBORENEN TOT 3M)
Van nature uit, neemt een pasgborene een hurkende positie aan. Oefen
deze positie zittend zodat uw kind steeds veilig is.
1. Volg de basisstappen A-C tot beide lengtes recht en ongekruisd over uw
schouder hangen.
2. Vorm een buidel met uw buikband.
3. Hef uw kind op en glijd het voorzichtig in de buidel - ondersteun steeds
het zitvlak van het kind.
4. Trek de buikband helemaal over de rug van het kind zodat de nek en de
ruggegraat ondersteund worden.
5-6. Kruis beide borstbanden opengevouwen over het kind.
7. Breng beide uiteinden naar de rug en kruis ze achter de rug.
8. Breng beide uiteinden opnieuw naar voren en maak een knoop vóór uw
buik.
Opgelet:Houd uw kind steeds vast terwijl u de babydraagzak vastmaakt. Zo
zit uw kind reeds neer in de draagzak nog voor u de eerste knoop gelegd
heeft.
HET KIND ERUIT NEMEN:
Open de kruisende band lichtjes om het kind uit de kangoeroepositie te
nemen. Houd het kind steeds vast.
2. POLOŽAJ - KENGURUJČEK (ZA NOVOROJENČKE DO CCA 3M)
Naravni položaj nogic pri novorojenčku je skrčen (spodvit). Privajajte se na ta
položaj sede, da bo vaš malček ves čas na varnem.
1. Sledite osnovnim korakom od A-C, dokler oba pasova ne bosta ravna in
neprekrižana visela preko ramen.
2. Iz trebušnega pasu oblikujte vrečo.
3. Dvignite malčka in ga rahlo spustite v vrečo - pri tem ves čas podpirajte
malčkovo ritko.
4. Trebušni pas potegnite preko celega malčkovega hrbta, da bo služil za
dobro oporo malčkovi hrbtenici in vratu.
5-6. Oba razgrnjena prsna pasova prekrižajte preko malčka.
7. Konca pasov napeljite na hrbet in ju zadaj prekrižajte.
8. Nato ju ponovno potegnite naprej in pred vašim trebuhom naredite
vozel.
Pozor: Pri oblikovanju kengurujčka malčka ves čas držite, saj pri tem položaju
malček že sedi v kengurujčku še preden naredite prvi vozel.
KAKO VZAMETE MALČKA IZ KENGURUJČKA:
Rahlo raztegnite prečni p as, da lahk o ma lčka vzamete iz kengu rujčka. Pri tem
malčka ves čas dobro držite.
2. KENGURU POZÍCIÓ (ÚJSZÜLÖTTEKNEK, KB. 3 HÓNAPOS KORIG)
Egy újszülött baba felhúzva tartja a lábacskáit. A kenguru pozíciót ülve kell
kialakítani, hogy gyermeke mindig biztonságban legyen.
1. Kövesse az A-C alaplépéseket úgy, hogy a szalagok egyenesen,
keresztezés nélkül lógnak le a vállairól.
2. A hasán lévő pántból alakítson ki egy zsákot.
3. Emelje magasra a babát, és csúsztassa bele a zsákba - eközben mindig
támassza meg a baba fenekét.
4. Húzza át a hasi pántot a gyermek egész hátán, hogy megtámassza a
baba gerincét és nyakát.
5-6. Kisimítva és keresztezve helyezze a két mellpántot a gyerekre.
7. Vezesse a két végét hátra, és keresztezze őket a háta mögött.
8. Vezesse ismét előre a kendő végeit, és a hasa előtt csomózza össze őket.
Figyelem: A behelyezés közben mindig tartsa erősen a babát, mert ebben a
pozícióban a gyermek már akkor a kendőben van, mielőtt az első csomót
megkötötte volna.
A GYERMEK KIVÉTELE:
Kicsit nyissa ki a keresztszalagokat, hogy kivehesse a gyermeket a kendő
alkotta zsákból. Mindig tartsa fi xen a gyermeket.
35
36
Page 20

123
456
3. ZITTENDE POSITIE MET ZICHT NAAR DE DRAGER (VANAF 3M)
Vanaf een zeker leeftijd wil uw kind meer bewegingsvrijheid en een
grotere zichtbaarheid. De spreid-hurkpositie is voordelig voor een gezonde
ontwikkeling van de gewrichten.
1. Volg de basisstappen A-F.
2. Hef de baby omhoog naar uw rechterschouder toe en trek de linkse
kruisende band over het rechterbeen van het kind.
3. Herhaal dit met de andere schouder en met het andere been van het
kind.
4. Ontvouw eerst de binnenste kruisende band en dan de buitenste.
Controleer dat de draagzak van de achterkant van de ene knie naar de
andere gaat.
Opgelet: De spreid-hurk positie is alleen voordelig als de draagzak van de
achterkant van de ene knie naar de andere loopt. Controleer tijdens het
dragen regelmatig dat de baby in de gewenste spreid-hurkpositie zit.
5-6. Trek beide kanten van de buikband voorzichtig over de benen van het
kind. B egin met de kant die u eerst gebr uikte toen u de kruisende banden
optrok. Trek de buikband over de rug van het kind om het zo bijkomende
steun te bieden.
Bij kleine kinderen die nog niet in staat zijn hun hoofd alleen recht te houden,
moet de buikband over het hoofd van de baby getrokken worden aan de
basis van de nek.
HET KIND ERUIT NEMEN:
Open de kruisende band lichtjes om het kind uit de zittende positie te nemen.
Houd het kind steeds vast.
3. SEDEČ POLOŽAJ - MALČEK OBRNJEN PROTI OSEBI, KI GA NOSI (OD 3M DALJE)
Pri določeni starosti malček potrebuje večjo svobodo gibanja in boljši
razgled. Poleg tega je položaj z razširjenima in skrčenima nogicama odličen
za zdrav razvoj malčkovih sklepov.
1. Sledite osnovnim korakom od A-F.
2. Dvignite malčka na vaše desno rame. Levi prečni pas potegnite preko
malčkove desne nogice.
3. Ponovite isto še na drugem ramenu in z drugo malčkovo nogico.
4. Najprej raztegnite notranji prečni pas in nato še zunanjega. Pazite, da
trakova segata od enega kolenskega zgiba do drugega.
NASVET: Optimalen položaj z razširjenima in skrčenima nogicama je
zagotovljen le v primeru, če naramna ruta sega od enega malčkovega
kolenskega zgiba do drugega. Med prenašanjem večkrat preverite, če je
malček še v pravem položaju.
5-6. Trebušni pas nato nežno potegnite preko malčkovih nogic. Pričnite
s stranjo, ki ste jo najprej uporabili pri prečnem pasu. Nato potegnite
trebušni pas preko malčkovega hrbta, da ga še dodatno zaščitite.
Pri novorojenčkih, ki še ne znajo sami držati glavice pokonci, morate trebušni
pas potegniti preko malčkove glavice, da zavarujete še občutljivi vrat.
KAKO DVIGNETE MALČKA IZ SEDEČEGA POLOŽAJA:
Malce odmaknite prečna pa sova, da vzam ete malčka iz s edečega položaja.
Malčka pri tem ves čas dobro držite.
3. ÜLŐ POZÍCIÓ ARCCAL A HORDOZÓ TESTE FELÉ (3 HÓNAPOS KORTÓL)
A gyermeknek egy bizonyos életkortól kezdve nagyobb mozgásszabadságra
és nagyobb látómezőre van szüksége. Ez a hordozási pozíció kiválóan
megfelel ezeknek az igényeknek. A terpesz-felhúzott állás ezen kívül
optimálisan támasztja meg az ízületeket a fejlődés során.
1. Végezze el az alaplépéseket A-tól F-ig.
2. Húzza magához, a jobb vállához a babát, és tegye a baba jobb lábát a
3. Ismételje meg ezt a lépést a másik vállával és a baba másik lábával.
4. Először simítsa ki a belső keresztszalagot, majd a külsőt. Ügyeljen arra,
UTASÍTÁS: az optimális terpesztett-felhúzott helyzet csak akkor biztosítható,
ha a kendő a gyermek térdhajlatától a másik térdhajlatáig ér. Ezért hordás
közben is ellenőrizze időnként, hogy a gyermek még terpesztett-felhúzott
helyzetben van-e.
5-6. Húzza át kíméletesen a hasi pántot a gyermek lábai felett. Azon az
Kisebb gyermekeknél, akik még nem tudják önállóan tartani a fejüket, a hasi
szalagot fel kell húzni a baba feje fölé, hogy a nyakát megtámasszuk.
A GYERMEK KIVÉTELE:
Kicsit nyissa ki a keresztszalagokat, hogy kivehesse a gyermeket az ülő
pozícióból. Mindig tartsa fi xen a gyermeket.
bal oldali keresztszalagba.
hogy a szalagok térdhajlattól térdhajlatig érjenek.
oldalon kezdje, amelyiken először használta a keresztszalagot. Húzza át
a hasi szalagot a baba háta felett, hogy ezzel is megtámassza azt.
37
38
Page 21

123
456
78
4. HEUPPOSITIE (VANAF 3M)
Vanaf een zeker leeftijd verlangt uw kind meer vrijheid en een beter zicht.
De spreid-hurk positie verhoogt ook een gezonde ontwikkeling van de
gewrichten.
1. Volg de basisstappen A-F.
2. Til de baby op en breng hem naar uw rechterschouder, met zicht naar u.
Trek de linkse kruisende band over het rechterbeen van het kind.
3. Verplaats het kind naar de linkerschouder en trek de rechtse kruisende
band voorzichtig over het linkerbeen van het kind.
4. Ontvouw de binnenste kruisende band (de band die direct tegen de
rug van het kind komt) tot de band de achterkant van de beide knieën
bedekt.
5-6. Verplaats de baby voorzichtig naar uw rechterheup. Laat de kruisende
band volgen.
7. Ontvouw de buitenste kruisende band tussen de knieën.
8. Trek de buikband eerst over de benen en vervolgens over de hele rug
van het kind.
OPGELET: Afhankelijk van de leeftijd en voorkeur van het kind, zu llen de armen
binnen of buiten de buikband zitten.
HET KIND ERUIT NEMEN:
Open de kruisende band lichtjes om het kind uit de zittende positie te nemen.
Houd het kind steeds goed vast.
4. BOČNI POLOŽAJ (OD 3M DALJE)
Ta položaj lahko uporabite tudi že prej. Vendar pa malček potem vedno
potrebuje roko opore. Pri določeni starosti potrebuje malček večjo svobodo
gibanja in boljši razgled. Za to je odličen prav ta položaj. Poleg tega položaj
z razširjenima in skrčenima nogicama prispeva tudi k zdravemu razvoju
sklepov.
1. Sledite osnovnim korakom od A-F.
2. Dvignite malčka na vaše desno rame tako, da je obrnjen proti vam. Levi
prečni pas potegnite preko malčkove desne nogice.
3. Premestite malčka na levo rame in desni prečni pas nežno potegnite
preko malčkove leve nogice.
4. Raztegnite notranji prečni pas (ti sti, ki je v neposrednem stiku z malčkovim
hrbtom) tako, da sega od enega kolenskega zgiba do drugega.
5-6. Nato malčka previdno premaknite na desni bok. Pustite, da vam prečni
pas sledi.
7. Nato razširite tudi zunanji prečni pas do malčkovih kolenskih zgibov.
8. Na koncu potegnite še trebušni pas najprej preko malčkovih nogic in
nato še preko celega hrbta.
NASVET: Glede na velikost malčka in na njegov najljubši položaj so lahko
njegove rokice znotraj ali zunaj trebušnega pasu..
KAKO VZAMETE MALČKA IZ BOČNEGA POLOŽAJA:
Malce odmaknite prečna pasova, da lahko malčka dvignete iz sedečega
položaja. Pri tem ga ves čas dobro držite.
4. CSÍPŐ POZÍCIÓ (3 HÓNAPOS KORTÓL)
Ez a pozíció már korábban is alkalmazható, de a gyermeket kézzel mindig
meg kell támasztani. A gyermeknek egy bizonyos életkortól kezdve nagyobb
mozgásszabadságra és nagyobb látómezőre van szüksége. Ez a hordozási
pozíció kiválóan megfelel ezeknek az igényeknek. A terpesz-felhúzott állás
ezen kívül optimálisan támasztja meg az ízületeket a fejlődés során.
1. Végezze el az A-F. alaplépéseket. Emelje a babát hasával maga felé, a
jobb vállához, és tegye a baba jobb lábát a bal oldali keresztszalagba.
3. Vigye a babát a bal vállához, és óvatosan tegye a baba bal lábát a jobb
oldali keresztszalagba.
4. Először si mítsa ki úg y a belső keres ztszal agot, amely köz vetlenül a gye rmek
hátánál található, hogy az a térdhajlattól térdhajlatig érjen.
5-6. Óvatosan tolja a babát a jobb csípőjére. Hagyja vele együtt mozogni a
keresztszalagot.
7. Most simítsa ki a külső keresztszalagot a térdhajlatokban.
8. Ezután húzza át a hasi szalagot először a lábakon, majd a baba egész
hátán.
Utasítás: a gyermek nagyságától és attól függően, hogyan szereti, a gyermek
karjai hasi szalagon belül vagy kívül lehetnek.
A GYERMEK KIVÉTELE:
Nyissa ki kicsit a keresztszalagokat, hogy kivehesse a gyermeket az ülő
pozícióból. Mindig tartsa fi xen a gyermeket.
39
40
Page 22

123
45
5. RUGPOSITIE (VANAF 3M)
Vanaf een zeker leeftijd verlangt uw kind meer vrijheid en een beter zicht.
De spreid-hurk positie verhoogt ook een gezonde ontwikkeling van de
gewrichten.
A) VASTGEMAAKT MET BEHULP VAN EEN EXTRA PERSOON
1. Vraag iemand om de draagzak vast te maken volgens de stappen A-F.
Gebruik de onderrug als middelpunt. De tweede persoon houdt het kind
vast en volgt de volgende stappen.
2. Trek zowel de kruisende als de buikband van één kant over een been van
het kind.
3. Herhaal dit met het andere been.
4. Ont vouw de binnenste kruisende band (de band die direct tegen de rug
van het kind ligt) tot hij zicht uistrekt over de achterkant van beide knieën.
Herhaal deze stap met de andere kruisende band.
5. Trek de buikband nu over de volledige rug van het kind.
HET KIND ERUIT HALEN:
Vraag hulp wanneer u het kind uit de draagzak neemt. De tweede persoon
kan het kind uit de draagzak nemen door de kruisende banden lichtjes te
openen.
5. HRBTNI POLOŽAJ (OD 3M DALJE)
Pri določeni starosti potrebuje malček več svobode gibanja in boljši razgled.
Temu odlično služi hrbtni položaj. Poleg tega položaj z razširjenima in
skrčenima nogicama prispeva tudi k zdravemu razvoju malčkovih sklepov.
A) POVEZOVANJE S POMOČJO DRUGE OSEBE
1. S pomočjo nekoga bližnjega zavežite štorkljo in pri tem sledite osnovnim
korakom od A-F, vendar kot središče tokrat uporabite spodnji del hrbta.
2. Pri tem druga oseba drži malčka in izpelje nadaljnje korake. Tako prečni
kot trebušni pas z ene strani potegnite preko ene malčkove nogice.
3. Isto storite še z drugo nogico.
4. Razgrinjajte notranji prečni pas (tis ti, ki je v nepo srednem s tiku z malčkovim
hrbtom) toliko časa, dokler ne sega od enega malčkovega kolenskega
zgiba do drugega. Ponovite ta korak še pri zunanjem prečnem pasu.
5. Nato trebušni pas dvignite preko celotnega malčkovega hrbta.
KAKO DVIGNTE MALČKA IZ HRBTNEGA POLOŽAJA:
Poprosite nekoga, da vam pomaga vzeti malčka z štorklje. Druga oseba
lahko dvigne malčka iz štorklje tako, da rahlo odmakne prečna pasova.
5. HÁTI POZÍCIÓ (3 HÓNAPOS KORTÓL)
A gyermeknek egy bizonyos életkortól kezdve nagyobb mozgásszabadságra
és nagyobb látómezőre van szüksége. Ez a hordozási pozíció kiválóan
megfelel ezeknek az igényeknek. A terpesztett-felhúzott állás ezen kívül
optimálisan támasztja meg az ízületeket a fejlődés során.
A) MÁSODIK SZEMÉLY SEGÍTSÉGÉVEL
1. Köttesse meg a kendőt az A-F alaplépéseknek megfelelően, de
középpon tként a hátától k iindul va. A másodi k személy ta rtja a gye rmeket,
és végzi el a további lépéseket.
2. Bújtassa be a gyermek lábát egyszerre az egyik oldali kereszt- és hasi
pántba.
3. Ismételje meg ezt a lépést a másik lábbal is.
4. Most szélesítse ki a belső keresztszalagot, amely közvetlenül a gyermek
hátán található, úgy, hogy az a térdhajlattól térdhajlatig érjen. Ismételje
meg ezt a lépést a másik keresztszalaggal is.
5. Ezután húzza fel a hasi szalagot úgy, hogy a baba egész hátát befedje.
A GYERMEK KIVÉTELE:
Vegyen igénybe segítséget a gyermek kivételéhez. A másik személy
a keresztszalagok kis mértékű megnyitásával egyszerűen kiveheti a
gyermeket.
41
42
Page 23

123
456
789
10 11
B) VASTGEMAAKT MET BEHULP VAN EEN EXTRA PERSOON
1. Spreid de u.GO draagzak ontvouwd op een veilig en recht oppervlak.
Leg het kind nu op het middelpunt van de draagzak. De nek en de
schouders komen ter hoogte van de bovenste rand van de draagdoek.
2. Trek de onderkant van de draagdoek omhoog tussen de benen van het
kind.
3. Sta met u w rug naar het kind en n eem beide ui teinden van d e draagdoek
voor het lichaam in één hand. Ondersteun de nek van uw kind met de
andere hand.
4. Trek net kind naar uw rug toe. Buig naar voren terwijl u met één hand
aan de draagdoek trekt en met de andere hand het zitvlak van de baby
ondersteunt.
5. Maak één knoop onder uw borst. Blijf naar voren buigen.
6. Breng één band naar achteren over de schouder. Leid hem diagonaal
over de rug van het kind en leid hem terug naar voren door hem onder
het been van het kind door te trekken.
7. Knel dit uiteinde vast tussen uw knieën en breng de andere band naar
achteren.
8. Kruis deze band opnieuw diagonaal over de eerste, over de rug van het
kind en leid hem terug naar voren door hem onder het been van het kind
door te trekken.
9. Houd u terug recht en trek aan beide uiteinden van de draagdoek.
10-11. Kruis beide banden op de buik, breng ze terug naar achteren en maak
een knoop achter uw rug (onder het kind).
OPGELET: Controleer dat de banden niet verstrengeld zitten en altijd goed
uitgevouwd zijn, vooral op de rug van het kind.
HET KIND ERUIT NEMEN:
Houd het kind goed vast terwijl u de band losmaakt tot u de eerste knoop
bereikt. (stap 5). Maak deze knoop los tot u de baby van onder uw arm naar
voren kan trekken. U kan het kind nu uit de draagzak nemen.
OF:
Buig naar voren en houd het kind vast. Maak de draagdoek los tot u aan de
eerste knoop komt. Leg het kind langzaam op een geschikt oppervlak. Blijf
het kind steeds met één hand vasthouden terwijl u de draagdoek geleidelijk
losser maakt met de andere hand.
B) POVEZOVANJE BREZ POMOČI DRUGE OSEBE
1. Razgrnite u.GO štorkljo na varno in ravno površino. Nato nežno položite
malčka v sredino štorklje tako, da so malčkov vrat in ramena uravnani z
zgornjim robom štorklje.
2. Spodnji rob štorklje nežno potegnite med malčkovi nogici.
3. Postavite se s hrbtom proti malčku, primite oba konca štorklje in ju držite
pred seboj z eno roko. Z drugo roko podpirajte malčkov vrat.
4. Upognite se naprej in pri tem z eno roko potegnite štorkljo, z drugo pa
držite malčkovo ritko.
5. Pod svojimi prsmi naredite enojen vozel. Še naprej ostanite upognjeni.
6. En konec štorklje napeljite preko ramena na hrbet. Vodite ga diagonalno
preko malčkovega hrbta in nato nazaj predse tako, da ga potegnete
pod malčkovo nogico.
7. Stisnite ta konec med koleni in drug pas napeljite preko ramena na hrbet.
8. Tudi ta pas napeljite diagonalno preko malčkovega hrbta in pod drugo
malčkovo nogico nazaj predse.
9. Poravnajte se in čvrsto potegnite oba konca.
10-11. Prekrižajte pasova na trebuhu, ju nato napeljite nazaj in zavozlajte
konca za vašim hrbtom (pod malčkom).
Nasvet: Pazite, da pasova nista zasukana in da sta vedno dovolj razširjena,
predvsem na malčkovem hrbtu.
KAKO DVIGNETE MALČKA IZ HRBTNEGA POLOŽAJA:
Čvrsto držite malčka in počasi odvezujte štorkljo, dokler ne pridete do prvega
vozla (korak 5). Sproščajte vozel, dokler malčka pod roko ne potegnete
predse. Sedaj ga lahko vzamete iz štorklje.
ALI:
Upognite se naprej in držite malčka. Počasi odvezujte štorkljo, dokler ne
pridete do prvega vozla. Nežno spustite malčka na ustrezno površino.in
pri tem z eno roko ves čas podpirajte malčka, z drugo roko pa postopoma
rahljajte štorkljo.
B) MÁSIK SZEMÉLY SEGÍTSÉGE NÉLKÜL
1. Helyez ze a u.GO hordozókend őt egy biztonságos, sima felületre. Fektesse
a babát a kendő közepére úgy, hogy a válla egy vonalba essen a kendő
felső szélével.
2. Kicsit húzza fel a kendő alsó szélét a baba lábai között.
3. Álljon háttal a gyermekhez, és vegye a kezébe a kendő két végét a teste
előtt. A másik kezével támassza meg a baba nyakát.
4. Húzza magához, a hátára a gyermeket. Eközben hajoljon előre, és az
egyik kezével húzza a kendőt, a másik kezével tartsa a baba popsiját.
5. Kösse meg a kendőt a melle előtt. Eközben maradjon előre hajolva.
6. Vezesse hátra a válla felett a kendő egyik végét, keresztezze a baba
hátán, és a baba lábai között vezesse ismét előre.
7. Fogja a térdei közé a kendőnek ezt a végét, és a másik szalagot vezesse
a vállai felett hátra.
8. Ezt a szalagot is keresztezze a baba hátán, és a másik lába alatt vezesse
előre.
9. Egyenesedjen fel, és húzza meg erősen a kendő két végét.
10-11. Keresztezze a szalagokat a hasán, vezesse hátra és a háta alatt kösse
meg (a gyermek alatt).
Utasítás: ügyeljen arra, hogy a szalagok ne csavarodjanak meg, és mindig jól
ki legyenek simítva, főként a gyermek hátán.
A GYERMEK KIVÉTELE:
Tar tsa e rősen a gyermeket, míg az első csomóig nem ér (5. lépés). Lazítsa meg
ezt a csomót, míg a kendő elég laza lesz ahhoz, hogy a babát óvatosan a
karja alatt a csípőre tudja húzni. Most kiveheti a gyermeket.
VAGY:
Hajoljon előre és tartsa szilárdan a gyermeket. Tekerje le a kendőt, míg az
első csomóig nem jut. Lassan helyezze a gyermeket egy megfelelő felületre,
m
iközben az egyik kezével tartja, a másik kezével pedig tovább lazítja a
kendőt.
43
44
Page 24

123/4
4
6. DE ZITTENDE POSITIE, MET ZICHT NAAR VOREN (VANAF 6M)
Sommige kinderen worden rusteloos wanneer hun zicht beperkt is. De heupen rugpositie zijn in dit geval nuttig. Wacht toch met deze positie tot uw kind
minstens 6 maanden oud is. Vóór deze leeftijd, moet deze positie vanuit
een ergonomisch oogpunt en ter voorkoming van overstimulatie vermeden
worden.
1. Volg de basisstappen A-F.
2. Til het kind op en breng het met zijn rug ter hoogte van één schouder en
3. Verplaats het kind naar de andere schouder en trek de kruisende en
4. Ontvouw beide kruisende banden. Start met de binnenste band (de
5. Trek de buikband voorzichtig over de buik van het kind.
HET KIND ERUIT NEMEN:
Open de kruisende band lichtjes om het kind uit de zittende positie te halen.
Houd het kind steeds vast.
trek zowel de kruisende als de buikband van één kant over een been van
het kind.
buikband over het andere been.
band die direct de buik van het kind raakt).
6. SEDEČ POLOŽAJ - MALČEK JE OBRNJEN NAPREJ (OD 6M DALJE)
Nekateri otroci postanejo nemirni, če imajo omejen razgled. V takih primerih
sta še posebej primerna bočni in hrbtni položaj malčka. Vendar pa vas
prosimo, da s tem položajem počakate, dokler malček ne dopolni najmanj
6 mesecev starosti. Pred to starostjo se z ergonomičnega vidika in da bi
se izognili prekomerni stimulaciji, izogibajte tega položaja pri prenašanju
malčka.
1. Sledite osnovnim korakom od A-F.
2. Dvignite malčka, ga s hrbtom namestite na eno rame ter prečni in
trebušni pas na eni strani potegnite preko ene malčkove nogice.
3. Premestite malčka na drugo rame in drugi prečni in trebušni pas potenite
preko druge nogice.
4. Raztegnite oba prečna pasova, začnite z notranjim (to je pas, ki je v
neposrednem stiku z malčkovim trebuščkom).
5. Trebušni pas nežno potegnite preko malčkovega trebuščka.
KAKO VZAMETE MALČKA IZ TEGA POLOŽAJA:
Rahlo odmaknite prečni pas, da lahko malčka dvignete iz sedečega
položaja. Pri tem malčka ves čas dobro držite.
6. ÜLŐ POZÍCIÓ ARCCAL A HORDÁSI IRÁNYBAN (6 HÓNAPOS KORTÓL)
Egyes gyermekek nyugtalanok lesznek, ha a látómezőjük korlátozott. Először
próbálja ki a csípő és a háti pozíciót. Ezzel a hordozási pozícióval feltétlenül
várja meg, míg a gyermek 6 hónapos lesz. Ez előtt a kor előtt ez a pozíció
ergonómiai szempontból nem alkalmazható. A visszavonulási lehetőség
nélküli túlstimulálás is egy olyan ok, ami miatt a lehető legtovább le kell
mondani erről a pozícióról. Üg yeljen arra, h ogy amíg a kendőt köti, a gyerm ek
biztonságos helyen legyen (pl. a járókában).
1. Végezze el az alaplépéseket A-tól F-ig.
2. Emelje fel a babát háttal maga elé, az egyik vállához, és bújtassa be a
baba egyik lábát egyszerre a másik oldali kereszt- és hasi pántba.
3. Húz za kicsit a má sik válla felé a babát, és bújtassa a másik láb át a keresztés a hasi pántba.
4. Sim ítsa ki a belső keres ztpántot, amel yik közvetle nül a baba ha sán fekszi k,
és ismételje meg ezt a lépést a másik keresztpánttal is.
5. Ezután húzza át a hasi szalagot a baba hasán.
A GYERMEK KIVÉTELE:
Nyissa ki kicsit a keresztszalagokat, hogy kivehesse a gyermeket az ülő
pozícióból. Mindig tartsa fi xen a gyermeket.
Forgalmazó
Brendon Kft., Váci út 168., H-1138 Budapest,
45
46
Page 25

IV. GARANTIE
Deze gara ntie gel dt enkel i n het land wa ar dit p roduk t door ee n hande laar aa n
een klant verkocht werd. De garantie dekt alle fabrikage- en materiaalfouten,
die bestaan of zichtbaar worden op de datum van aankoop of die zichtbaar
worden binnen een periode van twee (2) jaar vanaf de datum van aankoop
door de klant bij een handelaar. Indien een fabrikage- of materiaalfout op
zou duiken, zullen wij -met uw toestemming- het produkt gratis herstellen of
vervangen. Deze garantie kan enkel toegepast worden indien u het produkt
naar de handelaar, die hem intitieel aan een u verkocht, brengt of verstuurt
en mits voorlegging van een origineel aankoopbewijs (kasticket of faktuur)
dat de aankoopdatum, de naam van de handelaar en de omschrijving
van het produkt bevat. Deze garantie geldt niet indien het produkt naar
de fabrikant of naar een andere persoon dan de handelaar die het initieel
verkocht, gestuurd of gebracht wordt. Controleer het produkt onmiddellijk
bij aankoop op volledigheid en fabrikage- of materiaalfouten. Indien u het
produkt via postorder ontvangt, dient u het bij ontvangst onmiddellijk te
controleren. In geval van een defekt moet het produkt onmiddellijk naar de
handelaar die het initieel verkocht, teruggestuurd of teruggebracht worden.
Als u een beroep op de garantie wilt doen, moet het produkt gereinigd en
kompleet naar de handelaar teruggebracht worden. Lees deze handleiding
aandachtig alvorens de handelaar te contacteren. Deze garantie dekt geen
schade die voortkomt uit verkeerdelijk gebruik, invloeden uit de omgeving
(water, vuur, auto -ongelukken, enz.) of normale slijtage. Ze geldt enkel indien
het produkt in overeenstemming met de gebruiksaanwijzingen gebruikt
werd, indien wijzigingen en onderhoud uitgevoerd werden door toegelaten
personen en indien originele onderdelen en accessoires gebruikt werden.
Deze garantie vormt geen uitsluiting, beperking of énige andere invloed op
wettelijke consumentenrechten, inclusief claims inzake contractbreuk van
de koper tegen de verkoper of fabrikant van het produkt.
IV. GARANCIJA
Naslednja garancija velja le v državi, v kateri je bil izdelek prvotno kupljen
(prodan kupcu). Garancija zajema vse proizvodne napake in pomanjkljivosti
na materialu, ki so se pojavile ali nastale v času nakupa ali v obdobju dveh
let od datuma nakupa (garancija proizvajalca). V primeru, da se pojavijo
proizvodne napake ali napake na materialu, bomo - po naši lastni presoji ali brezplačno popravili izdelek ali pa ga nadomestili z novim. Za uveljavitev
garancije je potrebno izdelek vrniti ali poslati trgovcu, pri katerem je bil
prvotno kupljen in predložiti originalno dokazilo o nakupu (blagajniški listek ali
račun), ki vsebuje datum nakupa, ime prodajalca in opis izdelka. Garancija
ne velja v primerih, če je bil izdelek vrnjen ali poslan proizvajalcu ali katerikoli
drugi osebi in ne prodajalcu, ki je kupcu prvotno prodal ta izdelek. Prosimo,
da takoj po nakupu preverite , če je izdelek popoln, brez tovarniških napak ali
napak na materialu. V primeru, če ste izdelek kupili preko kataloške prodaje,
morate popolnost izdelka in morebitne napake ugotoviti takoj po prejemu.
V primeru poškodb, izdelka ne smete uporabljati ampak ga morate takoj
vrniti prodajalcu, pri katerem je bil prvotno kupljen. V primeru garancije
morate izdelek vrniti v čistem in kompletnem stanju. Preden se obrnete na
prodajalca, skrbno preberite navodila za uporabo. Garancija ne pokriva
poškodb, nastalih zaradi nepravilne uporabe, vplivov okolja (voda, ogenj,
prometne nesreče itd.) ali običajne obrabe. Garancija velja le v primeru, če
je bil izdelek uporabljen v skladu z navodili, če je vse in vsakršne spremembe
opravila in odpravila pooblaščena oseba in če so bili uporabljeni originalni
deli in dodatki. Ta garancija ne izključuje, omejuje ali kako drugače vpliva
na zakonske pravice potrošnika, vključno s terjatvami za odškodninsko
odgovornost in zahtevki glede kršitev pogodbe, sklenjene med kupcem in
prodajalcem ali proizvajalcem izdelka.
IV. JÓTÁLLÁS
Az alábbiakban ismertetett jótállási feltételek kizárólag abban az országban
alkal mazhatók , ahol ezt a term éket a fogyasz tó kiskereske delmi forga lomban
megvásárolta (első értékesítés). A jótállás kiterjed minden gyártási és
anyaghibára, függetlenül attól, hogy azok a vásárlás időpontjában már
megvoltak vagy később jelentkeztek. A jótállás időtartama a fogyasztó
kiskereskedelmi forgalomban történő vásárlását követő 2 (kettő) év (gyártói
jótállás). Abban az esetben, ha a termék gyártási vagy anyaghibára
visszavezethető okból meghibásodik, úgy a gyártó – saját döntése alapján –
a terméket ingyenesen javítja vagy a terméket új termékre cseréli. A jótállási
igény érvényesítéséhez kérjük, hogy a terméket vigye vagy küldje vissza
ahhoz a kereskedőhöz, ahol a terméket vásárolta. A termék átadásával
egyidejűleg mutassa be a vásárlást igazoló bizonylatot (blokk vagy számla),
mely tartalmazza a vásárlás időpontját, az értékesítő cég nevét és a jelen
termék típusmegnevezését. A jótállási igény kizárólag az eredeti értékesítés
helyén érvényesíthető, amennyiben oda a terméket a fogyasztó visszaviszi
vagy visszaküldi. Kérjük, hogy már a vásárlás időpontjában alaposan
ellenőrizze a termék alkatrészeit és az esetleges gyártási vagy anyaghibákat.
Amennyiben a terméket távollévők közötti értékesítés keretében vásárolta,
kérjük, hogy ezt az ellenőrzést a kézhezvételt követően végezze el.
Amennyiben meghibásodást észlel, ne használja tovább a terméket, hanem
vigye vagy küldje vissza az elsődleges értékesítési helyre. A jótállási igény
érvényesítéséhez a terméket tiszta állapotban, annak minden alkatrészével
együtt kell visszajuttatni a kiskereskedőhöz. Mielőtt a jótállási igény
érvényesítését megkezdené, kérjük, alaposan olvassa át a jelen tájékoztatót.
A jótállás nem terjed ki a nem rendeltetésszerű használatból vagy környezeti
hatásokra (víz, tűz, közlekedési baleset sttb.) bekövetkező illetve a rendes
elhasználódás okán bekövetkező hibákra.A gyártói jótállás csak abban
az esetben érvényesíthető, amennyiben a terméket a teljes használat
időtartamában a használati útmutatónak megfelelően használták és a
terméken esetlegesen elvégzett módosításokat vagy javításokat a gyártó
által jóváhagyott személy végezte, illetve amennyiben a terméket eredeti
alkatrészekkel és kiegészítőkkel használták.A jelen gyártói jótállás nem érinti
a fogyasztókat a jogszabályok alapján megillető jogokat, így különösen a
szerződésen kívül vagy szerződésszegéssel okozott kár okán a fogyasztót a
gyártóval vagy a kiskereskedővel szemben megillető jogokat.
47
48
Page 26

GENTILE CLIENTE!
GRAZIE PER AVERE ACQUISTATO LA FASCIA CYBEX u.GO. PORTARE IL BAMBINO OFFRE NUMEROSI BENEFICI. LO
STRETTO CONTATTO FISICO CON IL GENITORE RAFFORZA IL SENSO DI FIDUCIA DEL PICCOLO CHE TENDE A
SVILUPPARE UN ATTEGGIAMENTO SOCIALE POSITIVO. DAL LATO FISICO SI PRODUCE ANCHE UN SANO SVILUPPO
DELLE ARTICOLAZIONI.
APRECIADO CLIENTE!
GRACIAS POR COMPRAR LA BANDOLERA CYBEX u.GO. ES MUY BENEFICIOSO PARA EL BEBÉ LLEVARLO EN ESTA
POSICIÓN. EL CONTACTO FÍSICO CON LOS PADRES REFUERZA EL SENTIMIENTO BÁSICO DE CONFIANZA, FAVORECE
UNA CONDUCTA SOCIAL POSITIVA Y AL MISMO TIEMPO AYUDA A QUE LAS ARTICULACIONES SE DESARROLLEN DE
UNA FORMA SALUDABLE.
CARO CLIENTE !
49
OBRIGADO POR TER ADQUIRIDO O PANO PORTA BEBÉS CYBEX U.GO. É MUITO BENÉFICO PARA O BEBÉ SER
TRANSPORTADO DESTA FORMA. O CONTACTO FÍSICO COM OS PAIS FORTALECE O BEBÉ E O SENTIMENTO BÁSICO
DE CONFIANÇA. ESTIMULA UM COMPORTAMENTO SOCIAL POSITIVO, AJUDANDO O DESENVOLVIMENTO DAS
ARTICULAÇÕES DE FORMA SAUDÁVEL.
50
Page 27

IT
Dimensioni:
lunghezza: 540 cm, larghezza: 60 cm
ES
Dimensiones:
Largo: 540 cm, Ancho: 60 cm
PT
Dimensões:
Altura: 540 cm, Largura: 60 cm
IT
La fascia CYBEX u.GO è realizzata interamente in cotone 10 0% elastico. Offre
la possibilità di molteplici posizioni diverse, secondo l`età del bambino. I
questo manuale sono illustrate le seguenti 6 posizioni:
1. Posizione "culla" per neonati (da 0 a 3 mesi)
2. Posizione "canguro" per neonati (da 0 a 3 mesi)
3. Posizione seduta verso l`interno (dai 3 mesi)
4. Posizione sul fi anco (dai 3 mesi)
5. Posizione sulla schiena (dai 3 mesi)
6. Posizione seduta verso l`esterno (dai 6 mesi)
ES PT
La bandolera CYBEX u.GO está hecha con algodón 100% elástico. Puede
utilizarse de múltiples formas, dependiendo de la edad del bebé. En este
manual le enseñaremos las siguientes seis formas de llevar al bebé:
1. Posición de cuna para recién nacidos (de 0 a 3 meses)
2. Posición de canguro para recién nacidos (de 0 a 3 meses)
3. Posición sentado cara a cara (desde los 3 meses)
4. Posición de cadera (desde los 3 meses)
5. Posición de espalda (desde los 3 meses)
6. Posición sentado mirando hacia adelante (desde los 6 meses)
O pano porta bebés CYBEX u.GO é fabricado em 100% Algodão elástico.
Pode ser utilizado de várias formas, dependendo da idade do bebé. Neste
manual mostramos as 6 formas de transportar o bebé.
1. Posição de Berço: para recém-nascidos (de 0 a 3 Meses)
2. Posição Canguru: para recém-nascidos (de 0 a 3 Meses)
3. Posição Sentado: face a face (de 2,5 a 24 Meses)
4. Posição de Cintura: ( de 3 a 24 Meses)
5. Posição Costas: (de 3 a 24 Meses)
6. Posição sentado virado para a frente: (de 6 m a 24 Meses)
51
ARGOMENTI
I. Quali sono i vantaggi della fascia CYBEX u.GO? .......................... 53
II. Primo utilizzo ...................................................................................... 53
III. Istruzioni ............................................................................................. 55
1. Posizione "culla" per neonati (da 0 a 3 mesi) ................................. 57
2. Posizione "canguro" per neonati (da 0 a 3 mesi) ........................... 59
3. Posizione seduta verso l`interno (dai 3 mesi) ................................. 61
4. Posizione sul fi anco (dai 3 mesi) ...................................................... 63
5. Posizione sulla schiena (dai 3 mesi)
A) Tied with the help of an extra person ......................................................65
B) Allacciata senza aiuto .............................................................................. 67
6. Posizione seduta verso l`esterno (dai 6 mesi) .................................. 39
IV. Garanzia ........................................................................................................... 71
CONTENIDO
I. Cuáles son las ventajas de la bandolera u.GO? ...........................54
II. Importante antes del primer uso ..................................................... 54
III. Instrucciones para llevar al bebé....................................................56
1. Posición de cuna para recién nacidos (de 0 a 3 meses) .............. 58
2. Posición de canguro para recién nacidos (de 0 a 3 meses) ........ 60
3. Posición sentado cara a cara (desde los 3 meses) ....................... 62
4. Posición de cadera (desde los 3 meses) ........................................64
5. Posición de espalda (desde los 3 meses)
A) Atado con la ayuda de otra persona .....................................................66
B) Atado sin la ayuda de otra persona ........................................................68
6. Posición sentado mirando hacia adelante (desde los 6 meses) . 70
IV. GARANTIA .........................................................................................................72
CONTEÚDO
I. Quais são as vantagens do sling CYBEX u.GO? .............................54
II. Importante antes da primeira utilização ........................................ 54
III. Instruções para transportar o seu bebé ......................................... 56
1. Posição de Berço: para recém-nascidos (de 0 a 3 Meses) ........... 58
2. Posição Canguru: para recém-nascidos (de 0 a 3 Meses) ...........60
3. Posição Sentado: face a face (de 2,5 a 24 Meses)......................... 62
4.Posição de Cintura: ( de 3 a 24 Meses) .............................................64
5. Posição Costas: (de 3 a 24 Meses)
A) Amarrar o sling com ajuda de outra pessoa .........................................66
B) Amarrar o sling sem ajuda de outra pessoa ...........................................68
6. Posição sentado virado para a frente: (de 6 m a 24 Meses) ........ 70
IV. GARANTIA .........................................................................................................72
52
Page 28

I. QUALI SONO I VANTAGGI DELLA FASCIA CYBEX u.GO?
– Se indossata correttamente la fascia CYBEX u.GO è ergonomicamente
perfetta sia per il bambino che per chi porta e il portare produce effetti
positivi sullo sviluppo fi sico, sociale ed emotivo del bambino.
– La distribuzione dei pesi con la fascia u.GO è eccellente e permette
lunghi periodi di utilizzo senza stancare.
– Per sentirsi calmo e sicuro, il bambino ha bisogno di uno stretto contatto
fi sico, di essere cullato e di sentirsi avvolto e protetto.
– La fascia offre contemporaneamente tutte queste necessità sensoriali.
– Inoltre la fascia CYBEX u.GO non contiene parti rigide come fi bbie o
bottoni pertanto è estremamente sicura, nessun rischio di ferite.
II. PRIMO UTILIZZO:
1. Raccomandiamo di lavare la fascia u.GO seguendo le istruzioni per il
lavaggio.
2. Indossare e allacciare la fascia in realtà è semplice ma richiede un po`
di pratica. Suggeriamo di provare ad indossarla le prime volte in casa.
Dopo avere imparato come si allaccia scegliere un momento in cui il
bambino è calmo e rilassato (ad esempio dopo il pasto) per introdurlo.
3. La fascia dev`essere allacciata abbastanza stretta.
4. Sia la fascia che il corpo del genitore producono calore, tenetene conto
per l`abbigliamento del bambino che non dovrà mai essere troppo
pesante. Verifi care che ci sia sempre una buona circolazione dell'aria
attorno al bambino. Controllare che non sudi.
5. Ogni bambino ha le sue preferenze, provare le varie posizioni per trovare
quella più adatta al vostro bambino.
6. Nel portare tenere una posizione stabile che tenga sempre conto di
eventuali movimenti bruschi del bambino.
7. Tenere sempre saldamente il bambino nel caso di piegamenti in avanti.
8. CYBEX u.GO non è adatta per l'uso durante attività sportive!
I. CUÁLES SON LAS VENTAJAS DE LA BANDOLERA u.GO?
– Cuando se usa correctamente, llevar al bebé en la bandolera u.GO es
óptimo desde el punto de vista ergonómico tanto para el bebé como
para el usuario.
– La bandolera tiene efectos positivos en el desarrollo emocional, social y
físico del bebé.
– Cuando se utiliza la bandolera u.GO la distribución del peso es
excelente y no presiona al usuario, incluso si se utiliza durante un tiempo
prolongado.
– Para que el bebé se sienta tranquilo y seguro necesita un contacto
cercano, movimientos de balanceo y sentirse envuelto.
– La bandolera proporciona todos estas sensaciones sensoriales al mismo
tiempo.
– Además, como la bandolera CYBEX u.GO no tiene cierres o botones no
hay ninguna posibilidad de herir al bebé.
II. IMPORTANTE ANTES DEL PRIMER USO:
1. Por favor, lave el u.GO antes del primer uso, siguiendo las instrucciones
de lavado.
2. El atado de la bandolera es realmente simple y sólo requiere un poco
de práctica. Al principio pruebe la bandolera tranquilamente en casa.
Cuando haya practicado el anudado de la bandolera, espere a que
usted y el bebé se encuentren relajados (por ejemplo, después de
comer).
3. Asegúrese de que la bandolera está ajustada fi rmemente, mejor
apretada que suelta.
4. Tanto la bandolera como el contacto físico producen calor. Asegúrese
de no abrigar demasiado al bebé y de que hay una circulación de aire
sufi ciente alrededor del niño. Si el niño suda signifi ca que está pasando
demasiado calor.
5. Cada bebé prefi ere una cosa diferente. Si su bebé no se siente cómodo
en una determinada posición, siempre puede probar otra diferente.
6. Esté siempre atento por si el bebé hace movimientos bruscos, ya que
podrían hacerle perder el equilibrio.
7. Por favor, sujete al niño siempre que se incline hacia adelante
8. ¡La bandolera CYBEX u.GO no debe utilizarse en actividades deportivas
bajo ninguna circunstancia!
I. QUAIS SÃO AS VANTAGENS DO PANO CYBEX U.GO?
– Quando usado correctamente, levando consigo o pano u.GO é
ergonomicamente ideal para ambos, tanto para o bebé como para o
utilizador.
– O pano tem efeitos positivos sobre o desenvolvimento emocional, social
e físico da criança.
– Ao usar o pano u.GO a distribuição do peso é excelente, sem forçar o
utilizador, mesmo se usado por períodos mais longos.
– Para qu e o bebé se sinta c almo e segu ro, é necessár io contacto cor poral,
comomovimentos de balanço ou sendo enrolado.
– O pano oferece todas estas sensações simultaneamente.
– Além disso, como o sling CYBEX u.GO não contém fi velas oubotões não
há nehuma possibilidade de lesão no bebé.
II. IMPORTANTE ANTES DA PRIMEIRA UTILIZAÇÃO:
1. Por favor, lave o pano u.GO antes da primeira utilização, seguindo as
instruções de lavagem.
2. A utilização do pano é realmente simples, requere só um pouco de
prácti ca. No iníci o experim ente o pano no con forto da su a casa. Qua ndo
tiver praticado a colocação do pano, espere pelo momento que voçê e
o seu bebé estejam relaxados(por exemplo, após uma refeição).
3. Certifi que-se que o pano está bem apertado, melhor apertado do que
solto.
4. Tanto o pano como o corpo produzem calor. Por favor certifi que-se de
não vestir muita roupa à criança e garantir que há circulação de ar
sufi ciente ao redor da criança. Se a criança começa a suar, é porque
está muito quente.
5. Cada criança prefere uma coisa diferente. Se seu fi lho não se
sente confortável com uma determinada posição, poderá sempre
experimentar outra.
6. Esteja sempre preparado para movimentos bruscos da criança, caso
contrário poderá perder o seu equilíbrio.
7. Por favor, segure o seu fi lho sempre que se dobre para a frente.
8. O pano CYBEX u.GO não é aconselhado em nenhuma circunstância
desportiva.
53
54
Page 29

A
B/C D/E
III. ISTRUZIONI:
PROCEDIMENTO DI BASE:
A) Prendere la fascia con entrambe le mani, il punto mediano deve trovarsi
all'altezza dell'ombelico.
B) Portare i due lembi dietro di voi ed incrociarli.
C) Riportarli davanti facendoli passare sopra le spalle.
D) Incrociare nuovamente i lembi davanti al torace.
E) Far passare le due estremità sotto la parte di fascia ventrale.
F) Riportare dietro i due lembi, incrociarli ancora una volta e poi allacciare
le estremità al centro, davanti.
III. IMPORTANTE ANTES DEL PRIMER USO:
PASOS BÁSICOS:
A) Tome la bandolera u.GO con ambas manos y sujete el punto medio de la
bandolera frente a su ombligo.
B) Lleve ambas bandas hacia la espalda y crúcelas una sobre la otra.
C) Tráigalas de nuevo al frente pasándolas por encima de los hombros.
D) Cruce las bandas frente el pecho.
E) Pase ambos extremos bajo la banda de la barriga.
F) Lleve los fi nales hacia la espalda de nuevo, crúcelos una vez más y
anúdelos frente al ombligo.
F
INSTRUÇÕES PARA TRANSPORTAR O SEU BEBÉ:
ETAPAS BÁSICAS:
A) Pegue no pano u.GO com ambas as mãos e mantenha o ponto médio
do sling na frente de seu umbigo.
B) Levar as duas bandas para as costas e cruze uma sobre a outra.
C) Passe de novo as bandas para a frente passando-as por cima dos
ombros.
D) Cruze as faixas em frente ao peito.
E) Passe ambas as extremidades por debaixo da banda da barriga.
F) Traga as pontas para trás novamente cruzando-as mais uma vez e faça
um nó na frente do umbigo.
55
Parte destra della
fascia ventrale
N.B.: Il tessuto non deve mai essere attorcigliato. Per ottenere la migliore
distribuzione dei pesi è fondamentale allargare la fascia il più possibile ed è
indispensabile che l`incrocio dietro sia il più basso possibile.
Mentre indossate e allacciate la fascia il bambino dovrà restare in una
posizione sicura (per esempio nella culla).
Parte diagonale
sinistra
Punto mediano
Parte derecha de la
banda de la
barriga
NOTA: Por favor, asegúrese de que la bandolera no está retorcida. Para
conseguir una óptima distribución d el peso es crucial desplegar la bandolera
tanto como sea posible y que el cruce de la espalda esté situado tan bajo
como sea posible.
Mientras anude la bandolera asegúrese de que el niño está en un sitio seguro
(por ejemplo en una cuna)
Banda cruzada
izquierda
Punto medio de la
bandolera
Parte direita da banda
da barriga
Nota: Por favor, certifi que-se que o pano não está torcido.Para conseguir
alcançar uma perfeita distribuição de peso é fundamental abrir o pano,
tanto quanto seja possível e que a cruz nas costas fi que tão baixa quanto
seja possível.
Enquanto aperta o pano, certifi que-se que a criança está num lugar seguro
(por exemplo: num berço).
Banda transversal
esquerda
Ponto do meio do
pano u.GO
56
Page 30

123
456
789
1. POSIZIONE "CULLA" (DALLA NASCITA FINO AI 3 MESI)
I neonati preferiscono essere portati vicino al cuore (meglio con la
testa sulla parte sinistra del petto) , ma la posizione culla si può utilizzare
indifferentemente anche nella parte destra.
1. Seguire il procedimento di base dal A a F. Se preferite portare il bambino
con la testa a sinistra verifi cate che il lembo diagonale interno (quello
direttamente appoggiato al vostro busto) passi sopra la spalla sinistra.
Far scivolare la fascia diagonale destra dal braccio destro.
2. Allentare la fascia diagonale sinistra recuperando leggermente dal
fi anco.
3. Formare con la fascia diagonale sinistra una sorta di "culla".
4-5. Prendere il bambino con il braccio sinistro ed adagiarlo delicatamente
nella culla creata (la sua testa appoggiata al vostro cuore).
6. Tirare delicatamente la fascia diagonale sinistra sopra la testa del
bambino.
7. Rimettere la diagonale destra sulla spalla e sistemare il tessuto sopra il
corpo del bambino.
8. Tirate delicatamente il bambino verso di voi, avendo cura che tenga le
braccia comode sotto il corpo.
9. A questo punto coprire tutto il corpo del bambino allargando la fascia
diagonale.
TOGLIERE IL BAMBINO:
Aprire leggermente la fascia diagonale per togliere il bambino dalla "culla".
Tenere il bambino sempre molto saldamente.
2. POSICIÓN DE CUNA (PARA RECIÉN NACIDOS HASTA 3 MESES)
Los recién nacidos están más cómodos cuando se les lleva cerca del
corazón (por ejemplo, con la cabeza a la izquierda del pecho). En cualquier
caso, esta posición puede también ser adoptada hacia el lado derecho.
1. Siga los pasos básicos A-F. Si prefi ere llevar al niño con la cabeza hacia
la izquierda por favor asegúrese de que la banda cruzada interna (la
situada directamente en el pecho) se dirige sobre el hombro izquierdo.
Quítese la banda cruzada derecha del brazo derecho deslizándola
hacia abajo.
2. Afl oje la banda cruzada izquierda soltándola ligeramente de la cintura.
3. Abra la banda cruzada interna para crear una especie de cuna.
4-5. Sujete al bebé con su brazo izquierdo y acueste al niño suavemente en la
cuna (con la cabeza cerca de su corazón).
6. Tire cuidadosamente de la banda cruzada izquierda sobre la cabeza
del bebé.
7. Coloque de nuevo la banda cruzada derecha sobre su hombro,
ajustando ligeramente la bandolera sobre el cuerpo del bebé.
8. Coloque cuidadosamente al bebé hacia usted, asegurándose de que
el brazo del bebé permanece confortablemente bajo su cuerpo.
9. Ahora, con cuidado, cubra completamente el cuerpo del bebé con la
banda cruzada.
COGER AL BEBÉ:
Abra ligeramente la banda cruzada para coger al niño desde la posición de
cuna. Sujete al niño durante todo el proceso.
1. POSIÇÃO DE BERÇO: PARA RECÉM-NASCIDOS (DE 0 A 3 MESES)
Os recém-nascidos sentem-se mais confortáveis quando estão perto do
coração (ou seja, com a cabeça do lado esquerdo do peito). No entanto,
esta posição também pode ser adoptada no lado direito.
1. Siga os passos básicos A-F. Se preferir levar a criança com a cabeça
à esquerda, por favor certifi que-se que a banda transversal interior
(aquela localizada directamente sobre o peito)se dirige sobre o ombro
esquerdo. Deslize a banda direita pelo seu braço direito.
2. Solte ligeiramente a banda transversal esquerda para aliviar um pouco
a cintura.
3. Abra a banda transversal interior para criar uma espécie de berço.
4-5. Segure o bebé com o seu braço esquerdo e delicadamente coloque a
criança no berço (com a cabeça perto de seu coração)
6. Puxe a faixa transversal esquerda cuidadosamente sobre a cabeça da
criança.
7. Coloque de novo a banda cruzada direi ta sobre o seu ombro, regulando
ligeiramente o sling sobre o corpo do bebé.
8. Coloque cuidadosamente o bebé até s í, certifi cando-se que o braço do
bebé permanece confortável por debaixo do seu corpo
9. Agora, com cuidado, cubra completamente o corpo do bebé com a
banda transversal.
RETIRAR O BEBÉ:
Abra ligeiramente a banda cruzada para tirar a criança da posição de
berço. Segure a criança durante todo o processo.
57
58
Page 31

123
456
2. POSIZIONE "CANGURO" (DALLA NASCITA AI 3 MESI)
La posizione naturale delle gambe del neonato è piegata-divaricata.
Esercitatevi a questa posizione stando seduti, così il vostro bimbo è più sicuro.
1. Seguire il procedimento base dal punto A a C, a quel punto le due
estremità della fascia sono appoggiate alle vostre spalle.
2. Formare una "sacca" nella fascia ventrale.
3. Sollevare il bambino e farlo delicatamente scivolare nella sacca,
sostenendolo sempre.
4. Allargare la fascia ventrale tirandola a coprire tutta la schiena del
bambino, in modo che possa sostenere il collo e la spina dorsale.
5-6. Incrociare i due lembi che passano sulle spalle sopra al bambino.7.
Portare dietro le due estremità ed incrociarle.
8. Riportare i due lembi davanti ed allacciarli davanti all`ombelico.
Attenzione: Tenere sempre molto saldamente il bambino mentre indossate la
fascia perché con questa tecnica il bimbo viene posto al suo interno prima
del primo nodo.
TOGLIERE IL BAMBINO:
Aprire leggermente la fascia diagonale per togliere il bambino dalla
posizione "canguro". Tenere il bambino sempre molto saldamente.
78
2. POSICIÓN DE CANGURO (PARA RECIÉN NACIDOS HASTA 3 MESES)
La posición natural de las piernas de un recién nacido es abierta. Practique
esta posición sentado, de forma que el bebé esté siempre seguro.
1. Siga los pasos básicos A-C hasta que ambos extremos cuelguen rectos y
sin cruzar desde sus hombros.
2. Forme una bolsa con la banda de la barriga.
3. Coja al niño y deslícelo cuidadosamente en la bolsa, sujetando siempre
el culo del bebé.
4. Tire de la banda de la barriga sobre toda la espalda del bebé para
sujetar así el cuello y las vértebras.
5-6. Cruce ambas bandas desplegadas sobre el bebé.
7. Lleve los dos extremos hacia la espalda y crúcelas por detrás.
8. Lleve los dos extremos hacia el frente de nuevo y anúdelos a la altura de
la barriga.
Atención: Sujete al niño en todo momento mientras ata la bandolera, ya
que en esta posición el niño está sentado en la bandolera antes de hacer el
primer nudo.
COGER AL BEBÉ:
Abra ligeramente la banda cruzada para coger al niño desde la posición de
canguro. Sujete al niño en todo momento.
2. POSIÇÃO CANGURU: PARA RECÉM-NASCIDOS (DE 0 A 3 MESES)
A posição natural das pernas de um recém nascido é aberta. Pratique esta
posição sentado, de forma a que o bebé esteja sempre seguro.
1. Siga os passos básicos A-C até que ambos os extremos fi quem em linha
recta e não cruzada nos seus ombros.
2. Forme uma bolsa com a banda da barriga.
3. Pegue na criança e deixe-o deslizar suavemente na bolsa - apoiando
sempre a criança no rabo.
4. Puxe a banda da barriga sobre as costas do bebé para segurar o
pescoço e vertebras.
5-6. Cruze ambas as bandas sobre o bebé.
7. Leve os dois extremos até às costas e cruze-as por detrás.
8. Traga as duas extremidades para a frente de novo e faça um nó na
frente da sua barriga.
Atenção: Segure a criança em todo o momento enquanto amarra o pano,
nesta posição a criança está sentada antes de fazer o primeiro nó.
RETIRAR O BEBÉ:
Abra li geiramente a b anda cruza da para tira r a criança da p osição ca nguru.
Segure a criança durante todo o processo.
59
60
Page 32

123
456
3. POSIZIONE SEDUTA VERSO L`INTERNO (DAI 3 MESI)
Quando il bambino crescendo comincia a desiderare una maggiore libertà
di movimenti ed una maggiore visuale, potrete adottare questa posizione.
Inoltre la posizione a gambe piegate-divaricate favorisce il sano sviluppo
delle articolazioni.
1. Seguire il procedimento base da A a F.
2. Sollevare il bambino tirando verso la spalla destra e tirare la diagonale
sinistra sopra la gamba destra del bimbo.
3. Ripetere lo stesso con l`altra spalla e la gamba sinistra del bambino.
4. Allargare prima la fascia diagonale interna e poi quella esterna. Fate
attenzione che il tessuto passi dalla parte posteriore di un ginocchio alla
parte posteriore dell`altro.
N.B.: La seduta a gambe piegate-divaricate ha effetto benefi co soltanto se
la fascia passa da un ginocchio all`altro. Verifi care di tanto in tanto che la
seduta sia sempre corretta.
5-6. Allargare delicatamente entrambi i lati della fascia ventrale tirandoli
sopra le gambe del bambino. Iniziare dal lato da cui avete iniziato ad
alzare le bande diagonali. Allargare la fascia ventrale sulla schiena del
bambino per un migliore supporto.
Per i piccoli che non sono ancora in grado di sostenere bene la testa da soli,
sollevare il tessuto fi no alla base del collo.
3. POSICIÓN SENTADO CARA A CARA (DESDE LOS 3 MESES)
A una cierta edad el bebé desea tener más libertad de movimientos y
una mejor visión del entorno. Adicionalmente, la posición de la rana es
benefi ciosa para un saludable desarrollo de las articulaciones.
1. Siga los pasos básicos A-F.
2. Coja al bebé, colóquelo sobre su hombro derecho y tire de la cinta
cruzada izquierda hasta que cubra la pierna derecha del bebé.
3. Repita este paso con el otro hombro y la otra pierna del bebé.
4. Despliegue primero la banda cruzada interna y a continuación la
externa. Asegúrese de que la bandolera va desde la parte trasera de
una rodilla a la otra.
Nota: La posición de la rana es sólo benefi ciosa cuando la bandolera va de
la parte trasera de una rodilla a la otra. Cuando lleve al niño verifi que que el
bebé está sentado en la posición correcta.
5-6. Tire suavemente de ambos lados de la cinta de la barriga sobre las
pier nas del bebé. Em piece con el la do que util izó en primer l ugar cuando
tiró hacia arriba de las bandas cruzadas. Tire de la banda de la barriga
sobre la espalda del bebé para proporcionarle un soporte adicional.
Para los bebés que todavía no pueden sujetar solos la cabeza, la cinta de
la barriga debería colocarse sobre la cabeza del bebé hacia la base del
cuello.
3. POSIÇÃO SENTADO: FACE A FACE (DESDE OS 3 MESES)
Chegando a uma certa idade o seu fi lho quer mais liberdade de movimento
e uma melhor visão. Adicionalmente, a posição de cócoras ou de rã é
benéfi ca para um desenvolvimento saudável das articulações.
1. Siga os passos básicos A-F.
2. Pegue no bebé, coloque-o no seu ombro direito e puxe a banda
transversal esquerda até que cubra a perna direita da criança.
3. Repita esta etapa com o outro ombro e a outra perna da criança.
4. Desdobre primeiro a banda transversal interior e depois a seguir a
exterior. Por favor, certifi que-se que osling vai da parte de trás de um
joelho ao outro.
Nota: A posição de rã só é benéfi ca quando o pano vai da parte traseira de
um joelho ao outro. Quando transportar a criança, certifi que-se que o bebé
está sentado na posição correcta.
5-6. Puxe os dois lados da banda de barriga suavemente sobre as pernas da
criança. Comece com o lado que você usou em primeiro lugar quando
puxou para cima as bandas tranversais. Puxe a banda de barriga ao
longo das costas da criança para apoio suplementar.
Para as crianças pequenas que aínda não são capazes demanter a
cabeça de forma independente, deverá colocar a banda de barriga sobre
a cabeça do bebé até à base do pescoço.
61
TOGLIERE IL BAMBINO:
Aprire leggermente la fascia diagonale per togliere il bambino dalla
posizione seduta. Tenere il bambino sempre molto saldamente.
EXTRAER AL BEBÉ:
Abra ligeramente la banda cruzada para extraer al bebé de la posición
sentada. Sujete al bebé en todo momento.
RETIRAR O BEBÉ:
Abra ligeiramente a banda transversal para retirar o bebé da posição
sentada. Segure sempre o bebé durante todo o processo.
62
Page 33

123
456
78
4. POSIZIONE SUL FIANCO (DAI 3 MESI)
Q uand o i l b am bi no, cres ce nd o, c om in ci a a d es id er are u na ma gg io re l ib er tà
di movimenti ed una maggiore visuale, potrete adottare questa posizione.
Inoltre la posizione a gambe piegate-divaricate favorisce il sano sviluppo
delle articolazioni.
1. Seguire il procedimento base da A a F.
2. Sollevare il bambino verso la spalla destra, tenendolo rivolto verso di voi.
Tirare la diagonale sinistra sopra la gamba destra del bambino.
3. Spostare il bambino verso la spalla sinistra e tirare delicatamente la
diagonale destra sopra la sua gamba sinistra.
4. Allargare il tessuto della diagonale interna (quella a diretto contatto
con la schiena del bambino) fi no a quando si estende da un ginocchio
all`altro.
5-6. Portare delicatamente il bambino verso il fi anco destro lasciando che la
fascia segua il movimento.
7. A questo punto allargare il tessuto della diagonale esterna tra le sue
ginocchia.
8. Allargare la fascia ventrale facendo passare il tessuto prima sopra le
gambe e poi su tutta la schiena del bimbo.
N.B. : Secondo l`età e le preferenze del bambino, le braccia potranno stare
sia all`interno che all`esterno della fascia ventrale.
TOGLIERE IL BAMBINO:
Aprire leggermente la fascia diagonale per togliere il bambino dalla
posizione seduta. Tenere il bambino sempre molto saldamente.
4. POSICIÓN DE CADERA (DESDE LOS 3 MESES)
A una cierta edad el bebé desea tener más libertad de movimientos y
una mejor visión del entorno. Adicionalmente, la posición de la rana es
benefi ciosa para un saludable desarrollo de las articulaciones.
1. Siga los pasos básicos A-F.
2. Coja al bebé, sitúelo sobre su hombro derecho (de cara a usted) y tire
de la banda cruzada izquierda hasta que cubra la pierna derecha del
bebé.
3. Levante al bebé hacia el hombro izquierdo y tire cuidadosamente de la
banda cruzada derecha hasta que cubra la pierna izquierda del bebé.
4. Despliegue la banda cruzada interna (la que está en contacto directo
con la espalda del bebé) hasta que se extienda desde la parte trasera
de una rodilla hacia la otra.
5- 6. Levante cuidad osamente al b ebé hacia s u cadera derec ha. Acompañ e
la banda cruzada.
7. Ahora despliegue la banda cruzada externa entre las rodillas.
8. Tire de la banda de la barriga sobre las piernas primero y sobre toda la
espalda del bebé a continuación.
NOTA: Dependiendo de la edad y las preferencias del bebé los brazos
pueden colocarse dentro o fuera de la cinta de la barriga.
COGER AL BEBÉ:
Abra ligeramente la banda cruzada para coger al bebé desde la posición
de cadera. Sujete al bebé en todo momento.
4. POSIÇÃO CINTURA (DESDE OS 3 MESES)
Chegando a uma certa idade o seu fi lho quer mais liberdade de movimento
e uma melhor visão. Além disso, a posição de rã é benéfi ca para um
desenvolvimento saudável das articulações.
1. Siga os passos básicos A-F.
2. Pegue no bebé e coloque-o sobre o seu ombro direito voltado para
si e puxe a banda transversal esquerda até cobrir a perna direita da
criança.
3. Levante a criança até o ombro esquerdo e puxe cuidadosamente da
banda transversal direita até que cobrir a perna esquerda do bebé.
4. Desdobre a banda transversal interior (a que está em contacto directo
com as costas do bebé), até que se estenda desde a parte traseira de
um joelho ao outro.
5-6. Levante cuidadosamente o bebé até ao lado direito da sua cintura.
Acompanhe a banda transversal.
7. Agora desdobre a faixa transversal exterior entre os joelhos.
8. Puxe a banda barriga sobre as pernas e depois sobre as costas da
criança.
NOTA: Dependendo da idade e da preferência da criança os braços podem
ser colocadosdentro ou fora da faixa de barriga.
RETIRAR A CRIANÇA:
Abra ligeiramente a banda transversal para retirar o bebé da posição
sentada. Segure sempre o bebé durante todo o processo.
63
64
Page 34

123
45
5. POSIZIONE SULLA SCHIENA (DAI 3 MESI)
Quando il bambino, crescendo, inizia a desiderare una maggiore libertà
di movimenti ed una maggiore visuale, potrete adottare questa posizione.
Inoltre la posizione a gambe piegate-divaricate favorisce il sano sviluppo
delle articolazioni.
A) ALLACCIATA CON L`AIUTO DI UNA SECONDA PERSONA.
1. Una persona dovrà allacciare la fascia seguendo il procedimento dai
punti A a F, ma nella direzione opposta, utilizzando la base della schiena
come punto centrale. In questo caso la seconda persona sorregge il
bambino e guida i passaggi successivi.
2. Tirare entrambe le diagonali e la fascia ventrale di un lato sopra una
gamba del bambino.
3. Ripetere sull`altra gamba.
4. Allargare la diagonale interna (quella a diretto contatto con la schiena
del bambino) fi no ad estendere il tessuto da un ginocchio all`altro.
Ripetere l`operazione con l`altra diagonale.
5. Ora allargare il tessuto della fascia ventrale fi no a coprire tutta la schiena
del bambino.
TOGLIERE IL BAMBINO:
Fatevi aiutare. La seconda persona potrà allargare leggermente le fasce
diagonali per estrarre il bambino
5. POSICIÓN DE ESPALDA (DESDE LOS 3 MESES)
A una cierta edad el bebé desea tener más libertad de movimientos y
una mejor visión del entorno. Adicionalmente, la posición de la rana es
benefi ciosa para un saludable desarrollo de las articulaciones.
A) ATADO CON LA AYUDA DE OTRA PERSONA
1. Solicite la ayuda de otra persona para atar la bandolera siguiendo los
paso s básicos A- F pero toman do la parte ba ja de la espa lda como punto
medio. Aquí la segunda persona sujeta al bebé y dirige los siguientes
pasos.
2. Tire de la cinta cruzada y de la de barriga por un lado sobre una pierna
del bebé.
3. Repita este paso con la otra pierna.
4. Despliegue la banda cruzada interna (la que está en contacto directo
con la espalda del bebé) hasta que vaya de la parte trasera de una
rodilla hacia la otra. Repita este paso con la banda cruzada externa.
5. Ahora tire de la cinta de la barriga hasta que cubra la espalda del
bebé.
COGER AL BEBÉ:
Solicite la ayuda de otra persona para coger al bebé de la bandolera. Esta
persona puede coger al bebé abriendo ligeramente las bandas cruzadas.
5. POSIÇÃO COSTAS (DESDE OS 3 MESES)
Chegando a uma certa idade o seu fi lho quer mais liberdade de movimento
e uma melhor visão. Adicionalmente, a posição de cócoras ou de rã é
benéfi ca para um desenvolvimento saudável das articulações.
A) AMARRAR O PANO COM AJUDA DE OUTRA PESSOA
1. Solicite a ajuda de outra pessoa para amarrar o pano u.GO seguindo os
passo básicos A-F, mas tomando a parte baixa das costas como ponto
médio.
2. Puxe a banda transversal e a da barriga por um lado sobre uma perna
do bebé
3. Repita este passo com a outra perna.
4. Desdobre a banda transversal interior (o que tem contato directo com
as costas da criança)até que se estenda da parte traseira de um joelho
ao outro. Repita este passo com a banda transversal exterior.
5. Agora puxe a banda da barriga até que cubra as costas do bebé.
RETIRAR O BEBÉ:
Solicite a ajuda de outra pessoa para retirar o bebé do pano u.GO. Esta
pessoa pode pegar no bebé abrindo ligeiramente as bandas transversais.
65
66
Page 35

123
456
789
10 11
B) ALLACCIATA SENZA AIUTO
1. Stendere la fascia u.GO sopra una superfi cie piana e sicura. Adagiare
il bambino sopra il punto mediano in modo che collo e spalle siano
allineati al bordo superiore.
2. Tirare leggermente la parte inferiore del tessuto verso l`alto, tra le gambe
del bambino.
3. In piedi, con la schiena rivolta verso il bambino, portare i due lembi della
fascia davanti al vostro corpo e trattenerli con una mano. con l`altra
sostenere il colo del bambino.
4. Avvicinare il bimbo alla vostra schiena. Inclinatevi in avanti mentre con
una mano tirate la fascia e con l`altra sorreggete il bambino.
5. Fare un nodo sotto il petto e rimanere inclinati in avanti.
6. Portare dietro un lembo facendolo passare sopra la spalla e poi in
diagonale sopra la schiena del bambino. Quindi farlo tornare davanti
tirandolo sotto la gamba del bambino.
7. Sistemare l`estremità tra le vostre ginocchia e procedere con l`altra.
8. Por tatela dietro e i n diagona le sopra la s chiena de l bambin o incorcian do
la precedente e di nuovo davanti, passando sotto la gamba del
bambino.
9. A questo punto potete rialzarvi e tirare bene entrambe le estremità della
fascia.
10-11. Incrociare davanti al ventre le due estremità e quindi portarle dietro.
Annodare al centro, sotto al bambino.
N.B.: Controllate sempre che la fascia non sia attorcigliata e che sia sempre
allargata in modo corretto, soprattutto sulla schiena del bambino.
TOGLIERE IL BAMBINO:
Tenere saldamente il bambino e allentare la fascia fi no al primo nodo (punto
5). Slacciare questo nodo e tirare il bambino davanti, facendolo passare
sotto il vostro braccio. A questo punto potrete sfi larlo dalla fascia.
OPPURE:
Piegatevi in avanti sempre tenendo saldamente il bambino. Slacciare la
fascia fi no al primo nodo. Abbassare lentamente il bambino s u una super fi cie
adatta sorreggendolo con una mano, mentre con l`altra slacciate la fascia.
B) ATADO SIN LA AYUDA DE OTRA PERSONA
1. Despliegue la bandolera u.GO en una superfi cie segura y lisa. Ahora
acueste al bebé en el punto medio de la bandolera, de forma que
el cuello y los hombros estén alineados con el borde superior de la
bandolera.
2. Tire cuidadosamente del extremo inferior da la bandolera entre las
piernas del bebé.
3. Colóquese con su espalda hacia el bebé y tome ambos extremos de
la bandolera con una sola mano. Con la otra mano sujete el cuello del
bebé.
4. Tire del bebé hacia su espalda. Inclínese hacia adelante mientras tira de
la bandolera con una mano y sujeta el culo del bebé con la otra.
5. Ate un nudo sencillo bajo su pecho. Permanezca inclinado hacia
adelante.
6. Lleve un extremo hacia la espalda por encima del hombro. Llévela en
diagonal a través de la espalda del bebé y condúzcala de nuevo hacia
el frente tirando de ella por debajo de la pierna del bebé.
7. Sujete este extremo con sus rodillas y lleve el otro extremo hacia la
espalda.
8. Cruce esta banda en diagonal sobre la otra, a través de la espalda del
bebé y tráigala al frente tirando de ella bajo la pierna del bebé.
9. Enderécese y tire de ambos extremos de la bandolera.
10-11. Cruce ambas bandas sobre la barriga, llévelas hacia atrás de nuevo y
anúdelas tras su espalda (por debajo del bebé).
NOTA: Asegúres e de que las cin tas no están reto rcidas y sie mpre despl egadas,
especialmente sobre la espalda del bebé.
COGER AL BEBÉ:
Sujete fi rmemente al bebé mientras va soltando la bandolera hasta llegar al
primer nudo (paso 5). Suelte este nudo has ta que s ea capaz de tirar del bebé
desde la parte frontal y bajo su brazo. Ahora ya puede coger al bebé.
O BIEN:
Inclínese hacia adelante y sujete al bebé. Vaya soltando la bandolera hasta
que llegue al primer nudo. Haga descender al bebé lentamente sobre una
superfi cie adecuada, sujetando al bebé con una mano en todo momento
mientras va soltando gradualmente la bandolera con la otra mano.
B) AMARRAR O PANO u.GO SEM AJUDA DE OUTRA PESSOA
1. Estenda o pano u.GO numa superfície segura e lisa. Agora deite
cuidadosamente o bebé no ponto médio do pano, de forma a que o
pescoço e os ombros estejam alinhados com o bordo superior do pano.
2. Puxe cuidadosamente o extremo inferior do pano entre as pernas do
bebé.
3. Coloque-se de costas para o seu fi lho e agarre ambos os extremos do
sling com uma só mão. Com a outra mão segure o pescoço do bebé.
4. Puxe a criança para as suas costas. Incline-se para a frente, puxando o
pano com uma mão e segurando o rabo da criança com a outra.
5. Faça um nó simples no seu peito. Permaneça inclinado para a frente.
6. Leve um extremo até às costas por cima do ombro. Leve-o em diagonal
através das costas do bebé e conduza-o de novo para a frente
puxando-a por debaixo da perna do bebé.
7. Prenda este extremo com os seus joelhos e leve o outro extremo até às
costas.
8. Cruze esta banda na diagonal sobre a outra através das costas do bebé
e leve-a até à frente puxando-a por debaixo da perna do bebé.
9. Endireite-se e puxe ambos os extremos do pano u.GO.
10-11. Cruze ambas as bandas sobre a barriga, léve-as até atrás de novo e
amarre-as nas suas costas (por debaixo do bebé).
Nota: certifi que-se que as bandas não estão torcidas nem dobradas,
especialmente sobre a coluna do bebé.
RETIRAR O BEBÉ:
Segure fi rmemente o bebé enquanto vai soltando o pano até chegar ao
primeiro nó (passo 5). Solte este nó até ser capaz de puxar o bebé desde a
parte frontal e debaixo do seu braço. Agora já pode tirar o seu bebé.
OU ENTÃO:
Incline-se para a frente e segure a criança. Desamarre o pano até chegar
ao primeiro nó.Lentamente, vá descendo o bebé sobre uma superfície
adequada segurando sempre o bebé com uma mão enquanto solta
gradualmente o pano com a outra mão.
67
68
Page 36

123/4
4
6. POSIZIONE SEDUTA VERSO L`ESTERNO (DAI 6 MESI)
Alcuni bambini diventano irrequieti quando hanno la visuale ridotta. In quel
caso potranno essere utili le posizioni sul fi anco e sulla schiena. Sconsigliamo
di utilizzare questa posizione per bambini di età inferiore ai 6 mesi perché
ergonomicamente inadatta e per non correre il rischio di sovrastimolazione.
1. Seguire il procedimento base da A a F.
2. Sollevare il bambino portandolo verso la spalla e tirare sia le fasce
3. Spostare il bambino verso l`altra spalla e portare le fasce sull`altro lato
4. Allargare il tessuto delle fasce diagonali, iniziando da quella interna
5. Allargare la fascia ventrale delicatamente tirandola sopra il ventre del
diagonali che quella ventrale sopa una gamba.
sopra l`altra gamba.
(quella a diretto contatto con il busto del bambino.
bambino.
6. POSICIÓN SENTADO MIRANDO HACIA ADELANTE (DESDE LOS 6 MESES)
Algunos niños se muestran inquietos cuando su campo de visión está
limitado. Las posiciones de cadera y de espalda son especialmente útiles en
estos casos. En cualquier caso, no ponga al bebé en esta posición hasta que
tenga 6 meses. Antes de esta edad esta posición debe evitarse desde un
punto de vista ergonómico y para evitar una posible sobreestimulación.
1. Siga los pasos básicos A-F.
2. Coja al bebé, colóquelo con la espalda hacia un hombro y tire de un
lado de las bandas cruzadas y de barriga sobre una pierna del bebé.
3. Levante al bebé hacia el otro hombro y tire de la otra banda cruzada
sobre la otra pierna.
4. Despliegue ambas bandas cruzadas empezando por la de más adentro
(la que está en contacto directo con la barriga del bebé).
5. Tire de la banda de la barriga suavemente sobre la barriga del bebé.
6. POSIÇÃO SENTADO VIRADO PARA A FRENTE: (DESDE OS 6 MESES)
Algumas crianças fi cam inquietas quando o seu campo de visão está
limitado. As posições de cintura e de costas são especialmente úteis nestes
casos. Em qualquer dos casos, não ponhao bebé nesta posição antes dos
5 meses. Antes desta idade, esta posição deverá ser evitada desde o ponto
de vista ergonomico e também para evitar a hiper-estimulação.
1. Siga os passos básicos A-F.
2. Pegue no bebé, coloque-o com as costas até ao ombro e puxe um dos
lados das bandas transversais e da barriga sobre uma perna do bebé.
3. Levante o bebé até o outro ombro e puxe a outra banda transversal
sobre a outra perna.
4. Desdobre ambas as bandas transversais começando pelas de dentro
(as que estão em contacto com a barriga do bebé).
5. Puxe a banda da barriga suavemente sobre a barriga do bebé.
69
TOGLIERE IL BAMBINO:
Allargare leggermente la fascia diagonale per togliere il bambino dalla
posizione seduta. Tenere il bambino sempre molto saldamente.
KONTAKT
c/o COLUMBUS Trading-Partners GmbH,
Alte Forstlahmer Str. 22, 95326 Kulmbach, Germany
Tel.: +49(0)9221 - 973114, Fax.: +49(0)9221 - 973117
COGER AL BEBÉ:
Abra ligeramente la banda cruzada para poder coger al bebé desde la
posición de sentado. Sujete al bebé en todo momento.
RETIRAR O BEBÉ:
Abra ligeiramente a banda transversal para poder tirar o bebé desde a
posição de sentado. Segure sempre o bebé durante todo o processo.
70
Page 37

IV. GARANZIA
La seguente garanzia vale unicamente nella nazione in cui il prodotto è
stato inizialmente venduto da un rivenditore al consumatore. La garanzia
copre eventuali difetti di fabbricazione e di materiali riscontrati all'acquisto
o entro un periodo di due (2) anni dalla data di acquisto presso il rivenditore
(garanzia del produttore). Nel caso venga riscontrato o appaia un difetto
di fabbricazione o di materiali provvederemo - a nostra discrezione - a
riparare il prodotto senza costi o a sostituirlo. Per accedere alla garanzia è
necessario riportare o spedire il prodotto al rivenditore presso il quale è stato
acquistato ed è' indispensabile fornire la prova d'acquisto (scontrino fi scale,
fattura, ecc.) in originale. La prova d'acquisto dovrà contenere indicati la
data di acquisto, il nome del rivenditore e le caratteristiche del prodotto
(tipo/modello). Nessun intervento in garanzia se il prodotto verrà inviato al
produttore o a qualsiasi altra persona diversa dal rivenditore presso il quale
si è effettuato l'acquisto. Raccomandiamo di sottoporre il prodotto ad un
accurato controllo di completezza, funzionalità all'acquisto per segnalare
immediatamente eventuali manchevolezze di produzione o di materiali. Per
acquisti a distanza, raccomandiamo di effettuare un controllo completo
al ricevimento del prodotto. In caso si riscontri qualsiasi danneggiamento
invitiamo a NON utilizzare il prodotto e a restituirlo immediatamente al
rivenditore da cui è stato acquistato. I diritti di garanzia sono validi soltanto
se il prodotto è reso pulito e completo. Prima di contattare il rivenditore Vi
preghiamo di leggere con attenzione le istruzioni contenute nel manuale. La
garanzia non copre danni provocati da utilizzo improprio o cause ambientali
(acqua, fuoco, incidenti stradali, ecc) e dal normale deperimento d’uso.
La garanzia è valida soltanto per prodotti usati in conformità a quanto
stabilito nel manuale istruzioni e se eventuali modifi che o riparazioni sono
state effettuate da personale autorizzato e se sono state utilizzate solo parti
ed accessori originali. Questa garanzia non esclude, limita o comunque
pregiudica i diritti legali dei consumatori, compresi istanze in caso di torto e in
caso di una violazione di contratto, che l'acquirente può avere nei confronti
del venditore o del produttore del prodotto.
IV. GARANTIA
La pre sente garantía sól o es de apl icació n en el país en el que el consumidor
adquirió inicialmente el producto a un detallista. La garantía cubre todos los
defectos de materiales y fabricación, existentes o que puedan aparecer,
por un período de dos (2) años desde la fecha de compra inicial (garantía
del fabricante). En caso de que aparezca cualquier defecto de materiales
o de fabricación, nosotros decidiremos, según nuestro criterio, reparar el
producto sin coste o entregar un producto nuevo. Para obtener esta garantía
es preciso entregar o enviar el producto al detallista que vendió inicialmente
el producto y aportar una prueba de compra (recibo o factura) que muestre
la fecha de compra, el nombre del detallista y el modelo del producto. Esta
garantía no es de aplicación en caso de que el producto sea enviado o
entregado al fabricante o a cualquiera otra persona que no sea el detallista
que ven dió el produ cto inicial mente al cons umidor. Por fa vor, veri fi que que el
producto está completo y que no presenta ningún defecto de materiales ni
de fa bri cac ión en el mom ento de la comp ra o, si se ha a dqu iri do a di sta nci a,
en el mismo momento de recibirlo. En caso de apreciar cualquier defecto,
deje de utilizar el producto y entréguelo o envíelo al detallista. El producto
debe entregarse limpio y completo. Antes de contactar con la tienda lea
este manual detenidamente. La garantía no cubre ningún daño causado
por un mal uso, la infl uencia del entorno (agua, fuego, irregularidades del
terreno, etc.) o el desgaste normal del producto. Sólo es de aplicación en
caso de que el uso del producto sea acorde al manual de instrucciones y
si cualquiera modifi cación o reparación ha sido efectuada por personas
autorizadas y se han utilizado piezas y accesorios originales. La garantía
no excluye, limita o afecta de ningún modo a los derechos del consumidor
establecidos por ley, incluyendo reclamaciones por responsabilidad civil o
quejas por incumplimiento de contrato que el comprador quiera interponer
contra el vendedor, el fabricante o el producto.
IV. GARANTIA
A presente garantia só é aplicada no País em que o consumidor adequiriu
inicialmente o produto a um retalhista. A garantia cobre todos os defeitos de
materiais e fabricação, existentes ou que possam aparecer, por um periodo
de (2) anos desde a data de compra inicial (garantia do fabricante). No
caso de aparecer qualquer defeito de materiais ou de fabricação, a
CYBEX decidirá, segundo o nosso critério, reparar o produto sem custo ou
entregar um produto novo. Para obter esta garantia é preciso entregar ou
enviar o produto ao retalhista que vendeu inicialmente o produto e juntar
uma prova de compra (recibo ou factura) que indique a data de compra, o
nome do retalhista e o modelo do produto. Esta garantia não é aplicada em
caso de que o produto seja enviado por outra pessoa, que não o retalhista
que vendeu o produto inicialmente. Por favor, verifi que que o produto
está completo e que não apresenta nenhum defeito de materiais nem de
fabricação na altura da compra, ou se adequiriu o produto num sistema de
venda à distância , verifi que o produto no momento em que o recebe. No
caso de verifi car qualquer defeito envie o produto ao retalhista. O produto
deverá ser entregue limpo e completo. Antes de contactar com a loja leia
este ma nual detal hadamen te. A garantia nã o cobre nenh um dano cau sado
por má utilização, infl uência do ambiente (água, fogo, irregularidades do
terreno, etc...) ou desgaste normal do produto. Só é aplicada no caso do
produto ser usado de acordo com o manual de instruções e se qualquer
modifi cação ou reparação tenha sido feita por pessoas autorizadas e se se
utilizou peças e acessórios originais. A garantia não exclui, imita ou afecta
de nenhum modo os direitos do consumidor estabelecidos pela lei, incluíndo
reclamações por responsabilidade civil ou queixas por incumprimento de
contrato que o comprador queira interpôr contra o vendedor, o fabricante
ou o produto.
71
72
Page 38

73
74
 Loading...