

Page 1

C233_051-3_01A
Riedinger Str. 18 | 95448 Bayreuth | Germany
CYBEX GmbH
info@cybex-online.com
www.cybex-online.com
www.facebook.com/cybex.online
GO TO WWW.CYBEX-ONLINE.COM
TO WATCH AN INSTRUCTIONAL VIDEO
Page 2
EETR LV ENRULT
UA
USER GUIDE
PALLAS
M-FIX
ECE R44/04, Gr. 1 | 9-18 kg
CYBEX PALLAS M-FIX
ECE R44/04, Gr. 2–3 | 15-36 kg
CYBEX SOLUTION M-FIX
Page 3

2
1
6
9 10
7 8
2
Brief instructions Group 1 (9-18 kg) Brief instructions Group 1 (9-18 kg) Brief instructions Group 1 (9-18 kg)EN – | RU – | UA –
Brief instructions Group 1 (9-18 kg)TR –
Brief instructions Group 1 (9-18 kg)Brief instructions Group 1 (9-18 kg) | LT –| LV –Brief instructions Group 1 (9-18 kg)EE –
3 4
!
CLICK!
2
1
3
> 24 M
EN
5
RU
WARNING! Without the approval of the certification office, the child seat may not be modified or added to in any way. Repairs may only be performed by person authorised
to this effect. Only original parts and accessories may be used for repairs. Failure to comply with the above will result in the protective function of the child seat no longer
being guaranteed.
WARNING! The child seat only offers optimum protection for your child if you follow the usage instructions precisely.
UA
WARNING! Without the approval of the certification office, the child seat may not be modified or added to in any way. Repairs may only be performed by person authorised
to this effect. Only original parts and accessories may be used for repairs. Failure to comply with the above will result in the protective function of the child seat no longer
being guaranteed.
WARNING! The child seat only offers optimum protection for your child if you follow the usage instructions precisely.
EE
WARNING! Without the approval of the certification office, the child seat may not be modified or added to in any way. Repairs may only be performed by person authorised
to this effect. Only original parts and accessories may be used for repairs. Failure to comply with the above will result in the protective function of the child seat no longer
being guaranteed.
WARNING! The child seat only offers optimum protection for your child if you follow the usage instructions precisely.
Page 4

3
1 2 5
6 109
Brief instructions Group 2/3 (15-36 kg) Brief instructions Group 2/3 (15-36 kg) Brief instructions Group 2/3 (15-36 kg)EN – | RU – | UA –
Brief instructions Group 2/3 (15-36 kg)TR –
Brief instructions Group 2/3 (15-36 kg)Brief instructions Group 2/3 (15-36 kg) | LT –| LV –Brief instructions Group 2/3 (15-36 kg)EE –
CLICK!
2
1
3
7 8
3 4
LT
WARNING! Without the approval of the certification office, the child seat may not be modified or added to in any way. Repairs may only be performed by person authorised
to this effect. Only original parts and accessories may be used for repairs. Failure to comply with the above will result in the protective function of the child seat no longer
being guaranteed.
WARNING! The child seat only offers optimum protection for your child if you follow the usage instructions precisely.
LV
WARNING! Without the approval of the certification office, the child seat may not be modified or added to in any way. Repairs may only be performed by person authorised
to this effect. Only original parts and accessories may be used for repairs. Failure to comply with the above will result in the protective function of the child seat no longer
being guaranteed.
WARNING! The child seat only offers optimum protection for your child if you follow the usage instructions precisely.
TR
WARNING! Without the approval of the certification office, the child seat may not be modified or added to in any way. Repairs may only be performed by person authorised
to this effect. Only original parts and accessories may be used for repairs. Failure to comply with the above will result in the protective function of the child seat no longer
being guaranteed.
WARNING! The child seat only offers optimum protection for your child if you follow the usage instructions precisely.
Page 5

Page 6

Thank you for choosing the CYBEX Pallas M-fix child seat. Safety, comfort and ease of use were the foremost principles
applied to the development of the CYBEX Pallas M-fix child seat. This product is manufactured subject to special quality
assurance measures and satisfies the most stringent of safety requirements.
Dear customer,
Page 7

6
PALLAS M-fix
ECE-R44-04
UNIVE RSAL
SEM I-UNIVE RSAL
9 – 18 kg
CYBEX GmbH
Riedinger Str. 18, 95448 Bayreuth
Germany
04301315
SOLUTION M-fix
ECE-R44-04
UNIVE RSAL
SEM I-UNIVE RSAL
15 – 36 kg
CYBEX GmbH
Riedinger Str. 18, 95448 Bayreuth
Germany
04301314
Warning! To ensure optimum protection for your child, the CYBEX PALLAS
M-fix must be used as described in these instructions.
Note! Country-specic regulations (e.g. regarding colour-coding on child seats) may
mean that product features may vary in appearance. This will, however, not affect
the product in its correct function.
Note! Always keep these instructions to hand (e.g. in the designated compartment
on the rear of the back rest).
Contents
09/2014
Approval
Cybex PALLAS M-x
Seat elevator with back rest and head rest on an
adjustable base frame with height-adjustable safety
cushions.
Recommended for:
Age: Approx. 9 months to 4 years
Weight: 9-18 kg
Only suitable for vehicle seats with automatic
three-point belts approved in accordance with ECE
regulation R16 or a comparable standard
ECE R-44/04,
CYBEX PALLAS M-x - group 1, 9 to 18 kg
CYBEX SOLUTION M-x - group 2/3, 15 to 36 kg
EN
Brief instructions Group 1 (9-18 kg) ........................................................................................ 2
Brief instructions Group 2/3 (15-36 kg) ................................................................................... 3
Approval ...................................................................................................................................6
Positioning the seat correctly in the vehicle ...........................................................................8
Securing the child seat using the ISOFIX CONNECT system ............................................10
Activating the L.S.P. ...............................................................................................................12
Removal of the CYBEX PALLAS M-fix .................................................................................12
Placing the seat in the vehicle ..............................................................................................14
Adapting to body size ...........................................................................................................16
Removing the additional seat insert ......................................................................................16
Adjusting the safety cushion – ECE group 1 (9-18 kg) ........................................................16
Seated and lying position – ECE group 1 (9-18 kg) .............................................................18
Inclinable head rest ..............................................................................................................18
Strapping in using the safety cushion – ECE group 1 (9-18 kg) ..........................................20
Switching from Pallas M-fix to Solution M-fix (ECE group 1 to ECE group 2/3) .................20
Strapping in without the safety cushion – ECE group 2/3 (15-36 kg) ..................................22
Is your child correctly secured? .............................................................................................24
Care & maintenance ..............................................................................................................26
Removing the seat cover ......................................................................................................26
Removing the cover from the headrest flap .........................................................................26
Removing the cover from the head support .........................................................................26
Removing the cover from the shoulder part .........................................................................28
Removing the cover from the seat surface ...........................................................................28
Removing the cover from the safety cushion .......................................................................28
Cleaning .................................................................................................................................28
How to act following an accident ...........................................................................................30
Product service life ................................................................................................................30
Disposal .................................................................................................................................30
Warranty conditions ...............................................................................................................32
Page 8

7
Contents Contents
Warning! To ensure optimum protection for your child, the CYBEX PALLAS
M-fix must be used as described in these instructions.
Warning! To ensure optimum protection for your child, the CYBEX PALLAS
M-fix must be used as described in these instructions.
Note! Country-specic regulations (e.g. regarding colour-coding on child seats) may
mean that product features may vary in appearance. This will, however, not affect the
product in its correct function.
Note! Country-specic regulations (e.g. regarding colour-coding on child seats) may
mean that product features may vary in appearance. This will, however, not affect the
product in its correct function.
Note! Always keep these instructions to hand (e.g. in the designated compartment
on the rear of the back rest).
Note! Always keep these instructions to hand (e.g. in the designated compartment
on the rear of the back rest).
RU
Brief instructions Group 1 (9-18 kg) ........................................................................................ 2
Brief instructions Group 2/3 (15-36 kg) ................................................................................... 3
Approval ...................................................................................................................................6
Positioning the seat correctly in the vehicle ...........................................................................9
Securing the child seat using the ISOFIX CONNECT system ............................................11
Activating the L.S.P. ...............................................................................................................13
Removal of the CYBEX PALLAS M-fix .................................................................................13
Placing the seat in the vehicle ..............................................................................................15
Adapting to body size ...........................................................................................................17
Removing the additional seat insert ......................................................................................17
Adjusting the safety cushion – ECE group 1 (9-18 kg) ........................................................17
Seated and lying position – ECE group 1 (9-18 kg) .............................................................19
Inclinable head rest ..............................................................................................................19
Strapping in using the safety cushion – ECE group 1 (9-18 kg) ..........................................21
Switching from Pallas M-fix to Solution M-fix (ECE group 1 to ECE group 2/3) .................21
Strapping in without the safety cushion – ECE group 2/3 (15-36 kg) ..................................23
Is your child correctly secured? .............................................................................................25
Care & maintenance ..............................................................................................................27
Removing the seat cover ......................................................................................................27
Removing the cover from the headrest flap .........................................................................27
Removing the cover from the head support .........................................................................27
Removing the cover from the shoulder part .........................................................................29
Removing the cover from the seat surface ...........................................................................29
Removing the cover from the safety cushion .......................................................................29
Cleaning .................................................................................................................................29
How to act following an accident ...........................................................................................31
Product service life ................................................................................................................31
Disposal .................................................................................................................................31
Warranty conditions ...............................................................................................................33
UA
Brief instructions Group 1 (9-18 kg) ........................................................................................ 2
Brief instructions Group 2/3 (15-36 kg) ................................................................................... 3
Approval ...................................................................................................................................6
Positioning the seat correctly in the vehicle ...........................................................................9
Securing the child seat using the ISOFIX CONNECT system ............................................11
Activating the L.S.P. ...............................................................................................................13
Removal of the CYBEX PALLAS M-fix .................................................................................13
Placing the seat in the vehicle ..............................................................................................15
Adapting to body size ...........................................................................................................17
Removing the additional seat insert ......................................................................................17
Adjusting the safety cushion – ECE group 1 (9-18 kg) ........................................................17
Seated and lying position – ECE group 1 (9-18 kg) .............................................................19
Inclinable head rest ..............................................................................................................19
Strapping in using the safety cushion – ECE group 1 (9-18 kg) ..........................................21
Switching from Pallas M-fix to Solution M-fix (ECE group 1 to ECE group 2/3) .................21
Strapping in without the safety cushion – ECE group 2/3 (15-36 kg) ..................................23
Is your child correctly secured? .............................................................................................25
Care & maintenance ..............................................................................................................27
Removing the seat cover ......................................................................................................27
Removing the cover from the headrest flap .........................................................................27
Removing the cover from the head support .........................................................................27
Removing the cover from the shoulder part .........................................................................29
Removing the cover from the seat surface ...........................................................................29
Removing the cover from the safety cushion .......................................................................29
Cleaning .................................................................................................................................29
How to act following an accident ...........................................................................................31
Product service life ................................................................................................................31
Disposal .................................................................................................................................31
Warranty conditions ...............................................................................................................33
Page 9

8
o
f
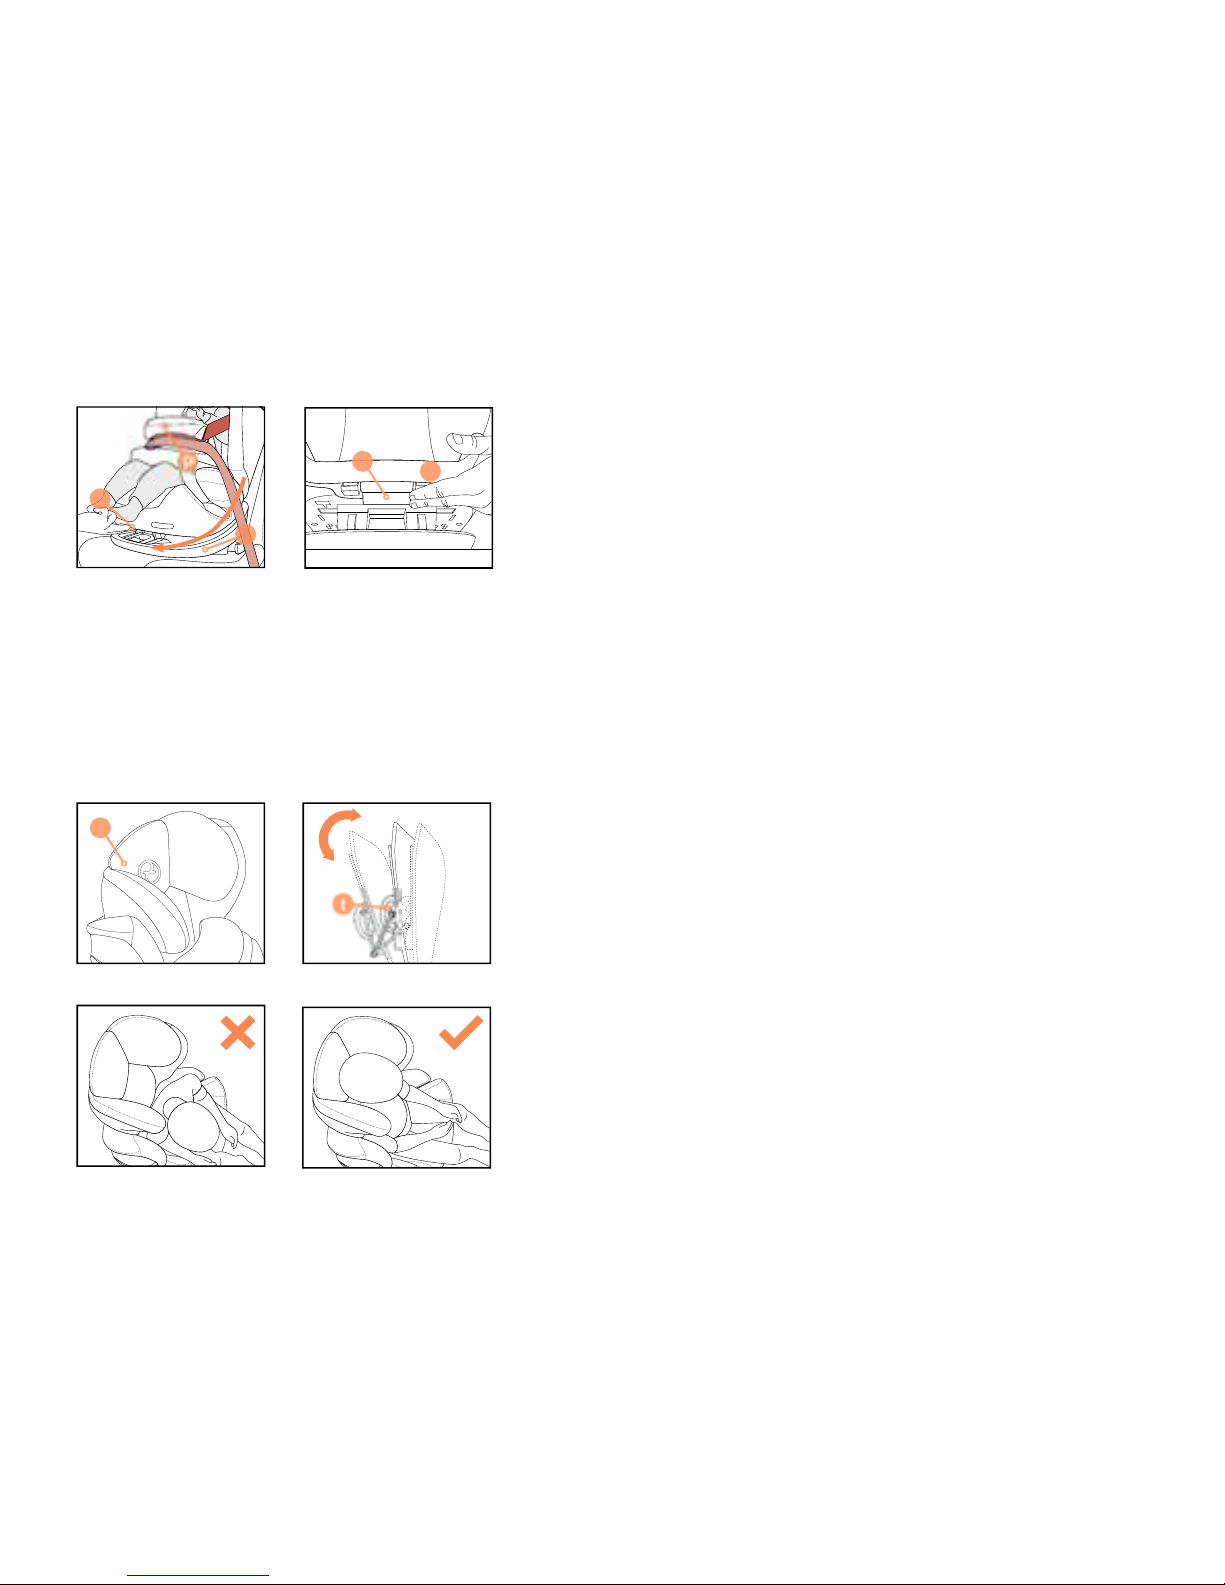
POSITIONING THE SEAT CORRECTLY IN THE VEHICLE
The CYBEX PALLAS M- x with retracted ISOFIX CONNECT system
can be used on all vehicle seats with automatic three-point safety belts
approved for the transport of adult persons.
A ‘semi-universal’ approval is provided for xtures using ISOFIX CONNECT
locking arms (o). For this reason, ISOFIX CONNECT can only be used in
certain vehicles. Please refer to the enclosed vehicle type list for approved
vehicles. You can obtain the most up-to-date version from
www.cybex-online.com.
In exceptional cases, the child seat may also be used on the front passenger seat.
Please note the following in this case:
• In cars with airbags, you should push the passenger seat back as far as possible.
When doing so, however, ensure that the upper pivot point of the safety belt is
behind the belt feed point of the child seat.
• Always comply with the recommendations of the vehicle manufacturer.
WARNING! The seat is not suitable for use with a two-point or lap belt. If the
seat is secured using a two-point belt, an accident may result in severe or
even fatal injuries to the child.
WARNING! The diagonal belt (f) must run back at an incline and must never
run forward to the upper belt point in your vehicle. If it is not possible to adjust
the seat in this way, e.g. by pushing the car seat forward or using it on another
seat, this child seat is not suitable for your vehicle.
Luggage or other objects present in the vehicle that may cause injury in the event of
an accident must always be rmly secured. Otherwise, they may be thrown, causing
fatal injuries.
Note! Never leave your child unattended in the vehicle.
WARNING! The child seat may not be used on car seats facing to the side of
the direction of travel. Use of the child seat is permitted on rear-facing seats,
e.g. in a van or minibus, provided that the seat is permitted for transporting
an adult. Please note that the vehicle head rest must not be removed when
fitting on a rear-facing seat! Even if not in use, the child seat must always be
secured with the safety belt. This applies even if the child set has already been
secured to the vehicle using the ISOFIX CONNECT system. An unsecured
child seat can injure other passengers and yourself even when just performing
an emergency brake or in the event of a minor collision.
Page 10

9
ENRU
UA
POSITIONING THE SEAT CORRECTLY IN THE VEHICLE POSITIONING THE SEAT CORRECTLY IN THE VEHICLE
The CYBEX PALLAS M-x with retracted ISOFIX CONNECT system
can be used on all vehicle seats with automatic three-point safety belts
approved for the transport of adult persons.
The CYBEX PALLAS M-x with retracted ISOFIX CONNECT system
can be used on all vehicle seats with automatic three-point safety belts
approved for the transport of adult persons.
A ‘semi-universal’ approval is provided for xtures using ISOFIX CONNECT
locking arms (o). For this reason, ISOFIX CONNECT can only be used in
certain vehicles. Please refer to the enclosed vehicle type list for approved
vehicles. You can obtain the most up-to-date version from
www.cybex-online.com.
In exceptional cases, the child seat may also be used on the front passenger seat.
Please note the following in this case:
• In cars with airbags, you should push the passenger seat back as far as possible.
When doing so, however, ensure that the upper pivot point of the safety belt is
behind the belt feed point of the child seat.
• Always comply with the recommendations of the vehicle manufacturer.
• In cars with airbags, you should push the passenger seat back as far as possible.
When doing so, however, ensure that the upper pivot point of the safety belt is
behind the belt feed point of the child seat.
• Always comply with the recommendations of the vehicle manufacturer.
WARNING! The seat is not suitable for use with a two-point or lap belt. If the
seat is secured using a two-point belt, an accident may result in severe or
even fatal injuries to the child.
WARNING! The seat is not suitable for use with a two-point or lap belt. If the
seat is secured using a two-point belt, an accident may result in severe or
even fatal injuries to the child.
WARNING! The diagonal belt (f) must run back at an incline and must never
run forward to the upper belt point in your vehicle. If it is not possible to adjust
the seat in this way, e.g. by pushing the car seat forward or using it on another
seat, this child seat is not suitable for your vehicle.
WARNING! The diagonal belt (f) must run back at an incline and must never
run forward to the upper belt point in your vehicle. If it is not possible to adjust
the seat in this way, e.g. by pushing the car seat forward or using it on another
seat, this child seat is not suitable for your vehicle.
Luggage or other objects present in the vehicle that may cause injury in the event of
an accident must always be rmly secured. Otherwise, they may be thrown, causing
fatal injuries.
Luggage or other objects present in the vehicle that may cause injury in the event of
an accident must always be rmly secured. Otherwise, they may be thrown, causing
fatal injuries.
Note! Never leave your child unattended in the vehicle. Note! Never leave your child unattended in the vehicle.
WARNING! The child seat may not be used on car seats facing to the side of
the direction of travel. Use of the child seat is permitted on rear-facing seats,
e.g. in a van or minibus, provided that the seat is permitted for transporting
an adult. Please note that the vehicle head rest must not be removed when
fitting on a rear-facing seat! Even if not in use, the child seat must always be
secured with the safety belt. This applies even if the child set has already been
secured to the vehicle using the ISOFIX CONNECT system. An unsecured
child seat can injure other passengers and yourself even when just performing
an emergency brake or in the event of a minor collision.
Page 11
10
u
j
c
y
b
y
o
c
b
w
y
d
CLICK!
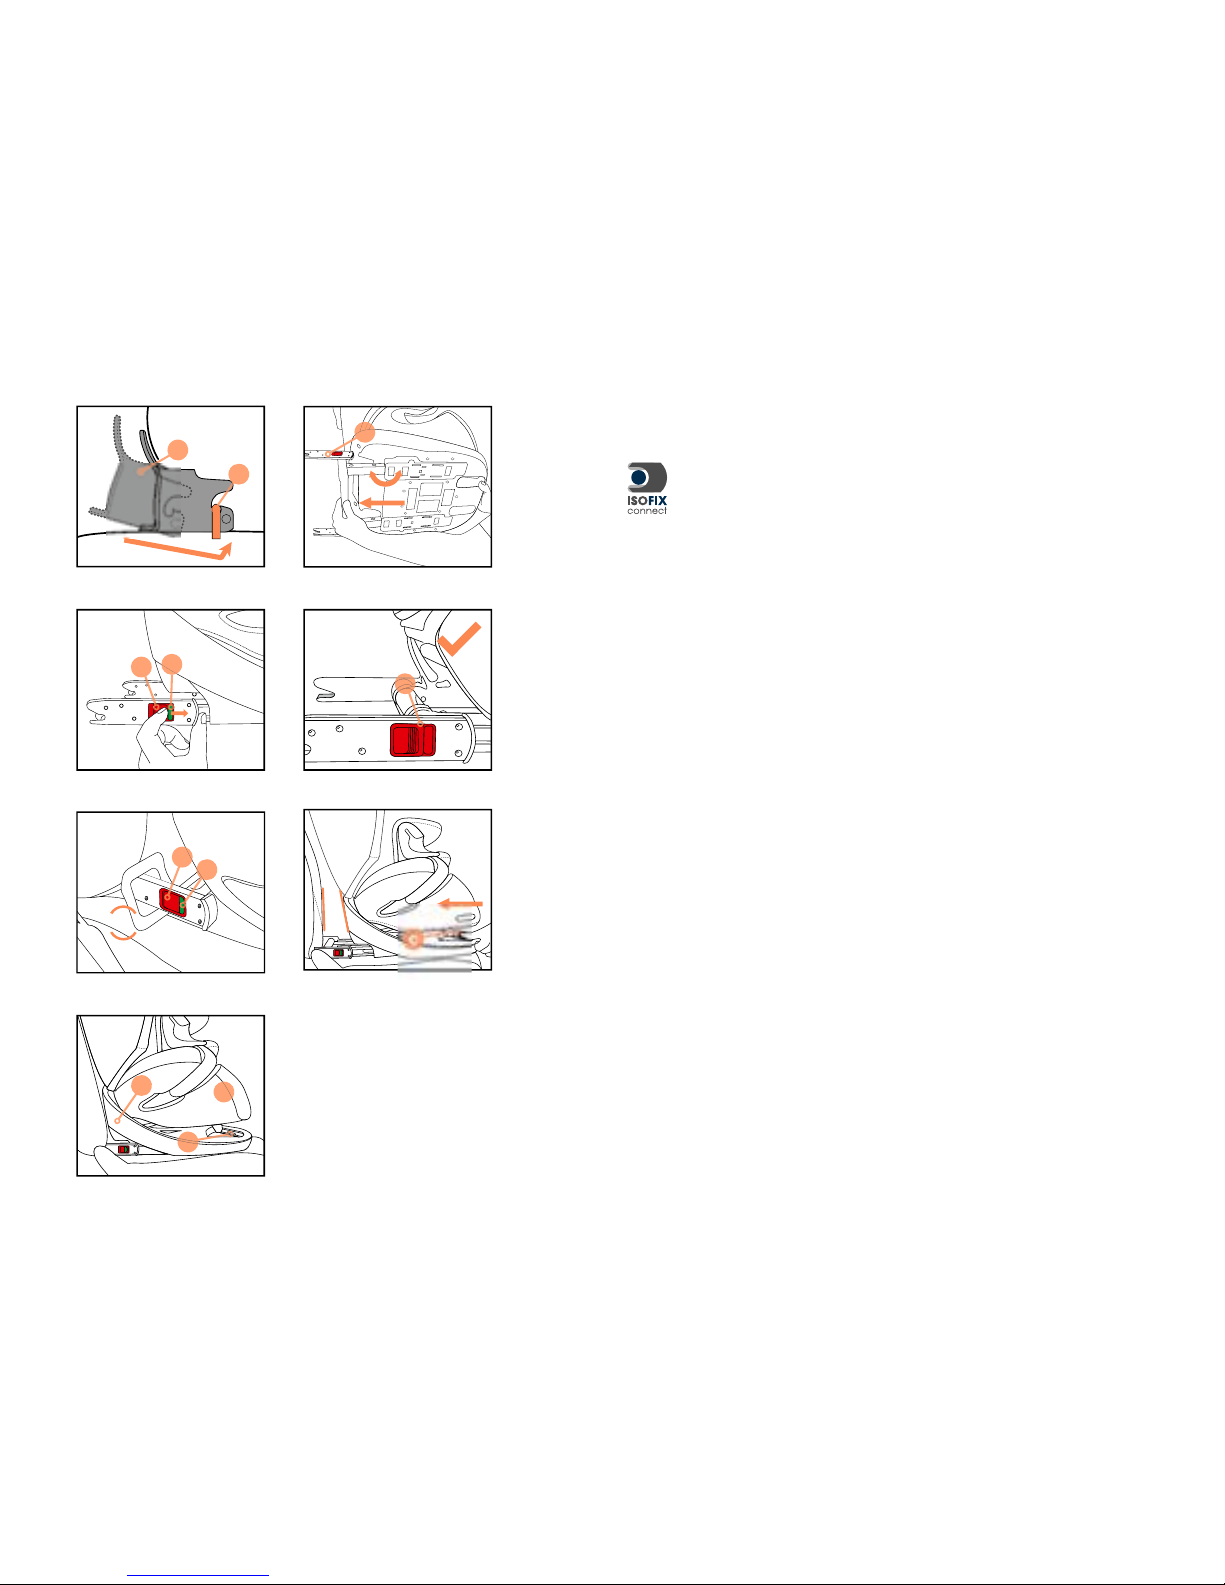
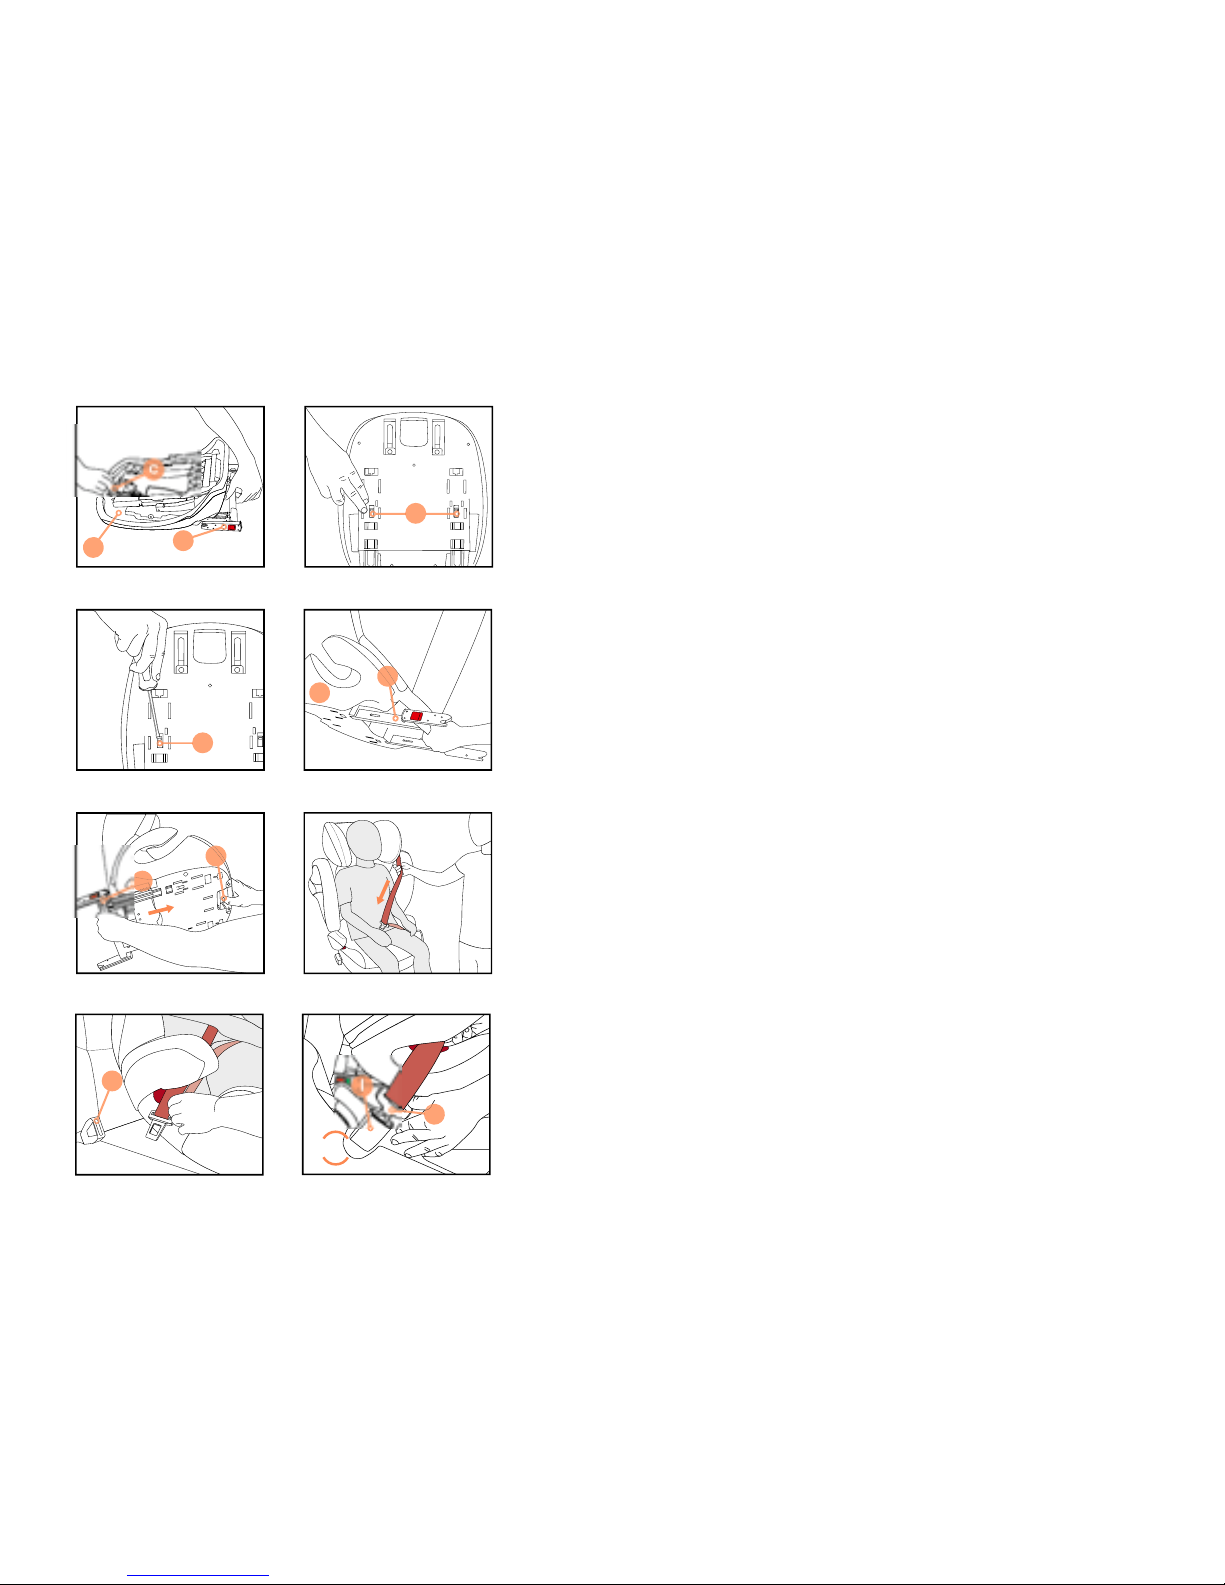
SECURING THE CHILD SEAT USING THE ISOFIX CONNECT
SYSTEM
Note! The ISOFIX xture points (j) are two metallic clips for each seat and are
positioned between the back rest and the seating surface of the vehicle seat. In case
of doubt, please refer to the driver’s manual of your vehicle.
Note! Before joining the ISOFIX-CONNECT locking arms (o) with the ISOFIX xture
points (j), check the release buttons (y). If the green safety indicators (b) are visible,
you must rst release the ISOFIX-CONNECT locking arms before joining by pressing
and pulling back the release button. Repeat the process if necessary with the second
locking arm.
A perceptible click will be heard when the ISOFIX-CONNECT locking arm correctly
locks in place with ISOFIX xture points.
Note! Note the information in the section “Placing the seat in the vehicle”.
• Push the two locking arms (o) into the feed-in aids (u) until these lock into place in
the ISOFIX xture points with an audible ‘click’.
• Ensure that the seat is secure by trying to pull it out of the feed-in aids (u).
• The green safety indicator (b) must now be clearly visible on the two red release
buttons (y).
• You can now use the adjustment lever (c) on the frame (w) of the CYBEX PALLAS
M- x child seat position.
• You can now strap in your child; refer to the section “STRAPPING IN USING
SAFETY CUSHION”.
• Insert the supplied feed-in aids (u) with the longer strap upwards into the two
ISOFIX xture points (j). In some vehicles, it is better to mount the feed-in aids (u)
in the opposite direction.
• Use the adjustment lever (c) under the seat cushion (d) on the frame (w) of the
CYBEX PALLAS M- x child seat.
• Pull the two ISOFIX-CONNECT locking arms (o) as far as they will go.
• Now twist the ISOFIX-CONNECT locking arms (o) 180° so that they are facing the
direction of the feed-in aids (u).
Using the ISOFIX-CONNECT system, you can x the CYBEX PALLAS M- x
to the vehicle, thereby increasing your child’s safety. Your child will still be
secured using the three-point belt of your vehicle.
Page 12
11
ENRU
UA
SECURING THE CHILD SEAT USING THE ISOFIX CONNECT
SYSTEM
SECURING THE CHILD SEAT USING THE ISOFIX CONNECT
SYSTEM
Note! The ISOFIX xture points (j) are two metallic clips for each seat and are
positioned between the back rest and the seating surface of the vehicle seat. In case
of doubt, please refer to the driver’s manual of your vehicle.
Note! The ISOFIX xture points (j) are two metallic clips for each seat and are
positioned between the back rest and the seating surface of the vehicle seat. In case
of doubt, please refer to the driver’s manual of your vehicle.
Note! Before joining the ISOFIX-CONNECT locking arms (o) with the ISOFIX xture
points (j), check the release buttons (y). If the green safety indicators (b) are visible,
you must rst release the ISOFIX-CONNECT locking arms before joining by pressing
and pulling back the release button. Repeat the process if necessary with the second
locking arm.
A perceptible click will be heard when the ISOFIX-CONNECT locking arm correctly
locks in place with ISOFIX xture points.
Note! Note the information in the section “Placing the seat in the vehicle”. Note! Note the information in the section “Placing the seat in the vehicle”.
• Push the two locking arms (o) into the feed-in aids (u) until these lock into place in
the ISOFIX xture points with an audible ‘click’.
• Ensure that the seat is secure by trying to pull it out of the feed-in aids (u).
• The green safety indicator (b) must now be clearly visible on the two red release
buttons (y).
• You can now use the adjustment lever (c) on the frame (w) of the CYBEX PALLAS
M-x child seat position.
• You can now strap in your child; refer to the section “STRAPPING IN USING
SAFETY CUSHION”.
• You can now strap in your child; refer to the section “STRAPPING IN USING
SAFETY CUSHION”.
• Insert the supplied feed-in aids (u) with the longer strap upwards into the two
ISOFIX xture points (j). In some vehicles, it is better to mount the feed-in aids (u)
in the opposite direction.
• Insert the supplied feed-in aids (u) with the longer strap upwards into the two
ISOFIX xture points (j). In some vehicles, it is better to mount the feed-in aids (u)
in the opposite direction.
• Use the adjustment lever (c) under the seat cushion (d) on the frame (w) of the
CYBEX PALLAS M-x child seat.
• Pull the two ISOFIX-CONNECT locking arms (o) as far as they will go.
• Now twist the ISOFIX-CONNECT locking arms (o) 180° so that they are facing the
direction of the feed-in aids (u).
• Use the adjustment lever (c) under the seat cushion (d) on the frame (w) of the
CYBEX PALLAS M-x child seat.
• Pull the two ISOFIX-CONNECT locking arms (o) as far as they will go.
• Now twist the ISOFIX-CONNECT locking arms (o) 180° so that they are facing the
direction of the feed-in aids (u).
Using the ISOFIX-CONNECT system, you can x the CYBEX PALLAS M-x
to the vehicle, thereby increasing your child’s safety. Your child will still be
secured using the three-point belt of your vehicle.
Using the ISOFIX-CONNECT system, you can x the CYBEX PALLAS M-x
to the vehicle, thereby increasing your child’s safety. Your child will still be
secured using the three-point belt of your vehicle.
Page 13

12
PRESS!
L.S.P.
y
2
1
3
o
A
ACTIVATING THE L.S.P.
The “Linear Side Protection” system (L.S.P.) can be extended in two steps by
pressing the L.S.P. button(s). Together with the initial position, this provides a total of
three different L.S.P. settings.
To push the L.S.P. back into the housing, press the L.S.P. button again and push the
L.S.P. back into the starting position.
Note! Always activate the L.S.P. on the side of the seat facing the car door (see
illustration).
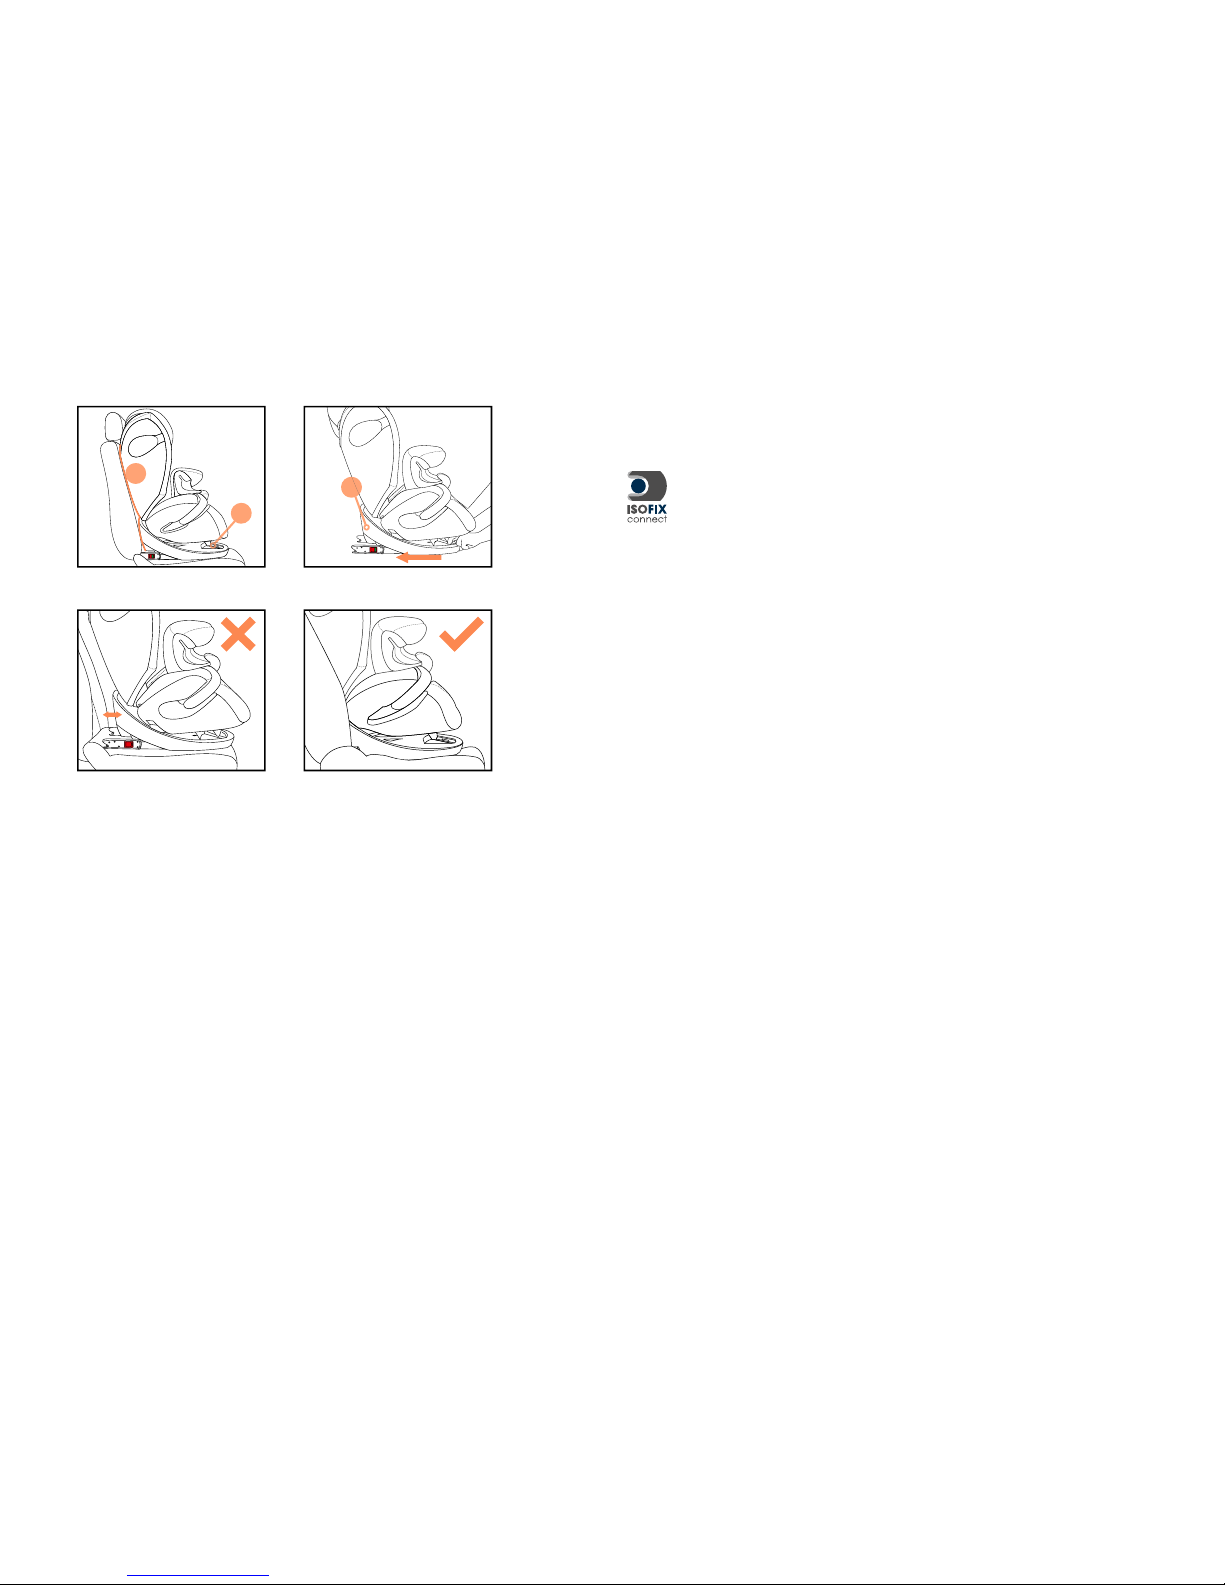
REMOVAL OF THE CYBEX PALLAS M-FIX
Perform the installation steps in the reverse order.
Note! By folding in the locking arms (o), you are not just protecting the vehicle seat
but also the locking arms of the ISOFIX CONNECT system from dirt and damage.
• Unlock the ISOFIX locking arms (o) on both sides by pushing the red
release buttons (y) and pulling them back simultaneously.
• Pull the seat out of the feed-in aids (u).
• Rotate the locking arms (o) 180°.
• Operate the adjustment lever (c) on the frame (w) of the CYBEX PALLAS M- x and
push the locking arms in as far as they will go.
Page 14

13
ENRU
UA
ACTIVATING THE L.S.P. ACTIVATING THE L.S.P.
The “Linear Side Protection” system (L.S.P.) can be extended in two steps by
pressing the L.S.P. button(s).Together with the initial position, this provides a total of
three different L.S.P. settings.
The “Linear Side Protection” system (L.S.P.) can be extended in two steps by
pressing the L.S.P. button(s). Together with the initial position, this provides a total of
three different L.S.P. settings.
To push the L.S.P. back into the housing, press the L.S.P. button again and push the
L.S.P. back into the starting position.
To push the L.S.P. back into the housing, press the L.S.P. button again and push the
L.S.P. back into the starting position.
Note! Always activate the L.S.P. on the side of the seat facing the car door (see
illustration).
Note! Always activate the L.S.P. on the side of the seat facing the car door (see
illustration).
REMOVAL OF THE CYBEX PALLAS M-FIX REMOVAL OF THE CYBEX PALLAS M-FIX
Perform the installation steps in the reverse order. Perform the installation steps in the reverse order.
Note! By folding in the locking arms (o), you are not just protecting the vehicle seat
but also the locking arms of the ISOFIX CONNECT system from dirt and damage.
Note! By folding in the locking arms (o), you are not just protecting the vehicle seat
but also the locking arms of the ISOFIX CONNECT system from dirt and damage.
• Unlock the ISOFIX locking arms (o) on both sides by pushing the red
release buttons (y) and pulling them back simultaneously.
• Pull the seat out of the feed-in aids (u).
• Rotate the locking arms (o) 180°.
• Operate the adjustment lever (c) on the frame (w) of the CYBEX PALLAS M-x and
push the locking arms in as far as they will go.
Page 15
14
w
c
a
PLACING THE SEAT IN THE VEHICLE
Note! On some car seats made of sensitive materials (e.g. suede, leather etc.), the
use of child seats may leave marks and/or cause discolouration. To prevent this, you
can place a blanket or towel underneath it, for example. Please also refer to in this
connection to our cleaning instructions in these usage instructions; these cleaning
instructions must be observed prior to using the seat for the rst time.
Place the child seat on the appropriate seat in the car.
• Always ensure that the entire surface of the back rest (a) of the CYBEX
PALLAS M- x is placed fully against the back rest of the vehicle seat.
The child seat must never be in a lying position. If necessary, you can
adjust the distance using the adjustment lever (c) on the frame (w) of the
CYBEX PALLAS M- x child seat.
• If the head rest of the vehicle is in the way, pull it out all the way, turn it away
or remove it completely (for exceptions to this, please refer to the section
“POSITIONING THE SEAT CORRECTLY IN THE VEHICLE”) The back rest (a) will
perfectly adapt to practically any incline of the vehicle seat.
WARNING! The full surface of the back rest of the CYBEX child seat must be
against the back rest of the vehicle. To ensure maximum protection for your
child, the seat must be in a normal upright position!
Page 16

15
ENRU
UA
PLACING THE SEAT IN THE VEHICLE PLACING THE SEAT IN THE VEHICLE
Note! On some car seats made of sensitive materials (e.g. suede, leather etc.), the
use of child seats may leave marks and/or cause discolouration. To prevent this, you
can place a blanket or towel underneath it, for example. Please also refer to in this
connection to our cleaning instructions in these usage instructions; these cleaning
instructions must be observed prior to using the seat for the rst time.
Place the child seat on the appropriate seat in the car. Place the child seat on the appropriate seat in the car.
• Always ensure that the entire surface of the back rest (a) of the CYBEX
PALLAS M-x is placed fully against the back rest of the vehicle seat.
The child seat must never be in a lying position. If necessary, you can
adjust the distance using the adjustment lever (c) on the frame (w) of the
CYBEX PALLAS M-x child seat.
• If the head rest of the vehicle is in the way, pull it out all the way, turn it away
or remove it completely (for exceptions to this, please refer to the section
“POSITIONING THE SEAT CORRECTLY IN THE VEHICLE”) The back rest (a) will
perfectly adapt to practically any incline of the vehicle seat.
WARNING! The full surface of the back rest of the CYBEX child seat must be
against the back rest of the vehicle. To ensure maximum protection for your
child, the seat must be in a normal upright position!
WARNING! The full surface of the back rest of the CYBEX child seat must be
against the back rest of the vehicle. To ensure maximum protection for your
child, the seat must be in a normal upright position!
Page 17

16
z
p
w
d
d
i
h
e
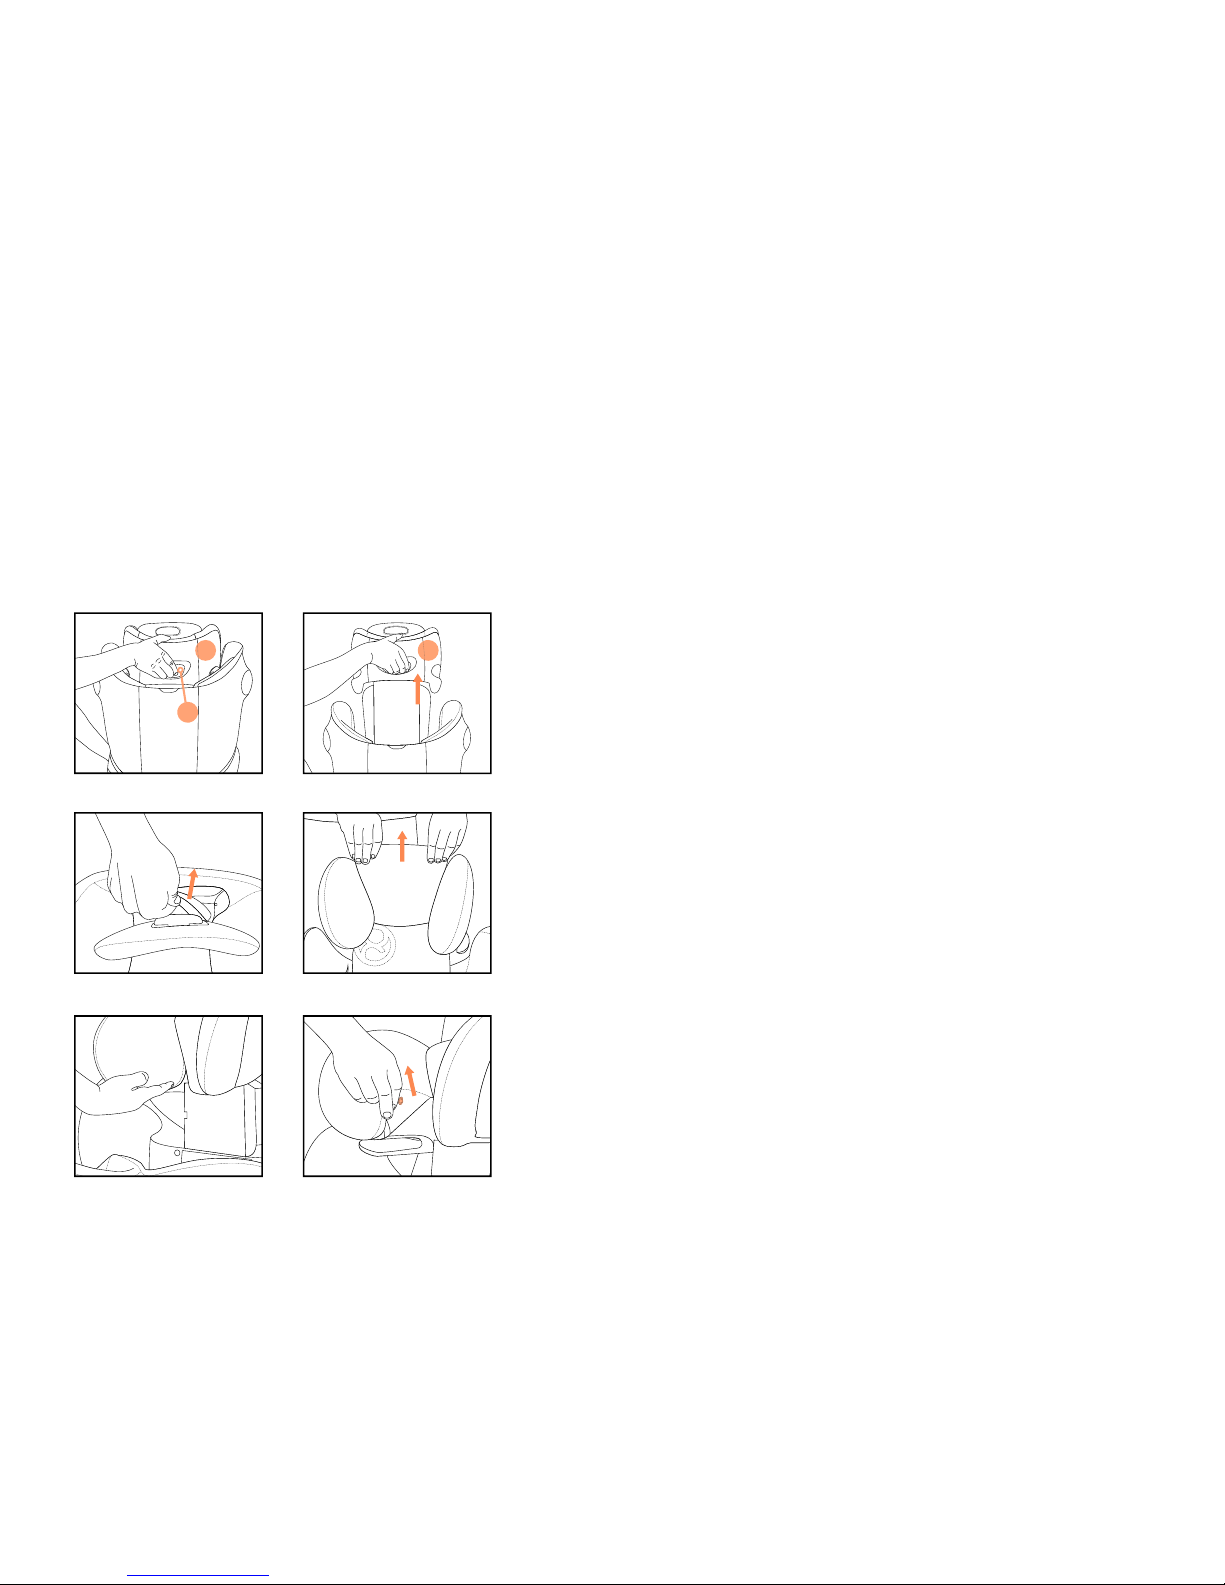
In order to optimally adapt the CYBEX PALLAS M- x to your child’s body size, a seat
insert (i) has been provided as standard and is already inserted under the seat cover.
Note! Only an optimally adjusted head rest (e) can offer your child maximum
protection and comfort while ensuring that the diagonal belt can be tted smoothly (f).
The height of the CYBEX PALLAS M- x can be adjusted to one of twelve positions.
ADAPTING TO BODY SIZE
REMOVING THE ADDITIONAL SEAT INSERT
• We recommend using this additional seat insert (i) for children aged 9 to 24
months.
• From the age of 2 onwards, the seat insert (i) is no longer necessary.
• The seat can then be adjusted to your child’s body simply by using the adjustable
head rest (e). To do this, pull the adjustment level (h) upwards to unlock the head
rest (e).
• Adjust it so that there is space for two ngers between the lower edge of the head
rest (e) and the shoulder of the child.
1. Release the front push buttons of the seat cover from the seat cushion (d).
2. Pull the fabric cover from the cover guides up and forward until you can pull out
the seat insert.
3. The seat insert must be removed in accordance with the age specifications stated
above.
4. Pull the seat cover to its original state and fix it in place again.
By pushing the central adjustment button (z), you can adapt the safety cushion to
your child. Hold down the central adjustment button (z) while you adapt the safety
cushion to your child.
The side aps of the safety cushion (p) t exactly between the arm rests and seat
surface (d) and are used to support the safety cushion (p) on the seat.
Adjust the safety cushion (p) so that it is against the child but is not pushing against
the child’s body.
WARNING! The safety cushion (p) may only be used in conjunction with the
frame (w) up to a maximum of 18 kg!
ADJUSTING THE SAFETY CUSHION – ECE GROUP 1 (9-18 KG)
Page 18

17
ENRU
UA
In order to optimally adapt the CYBEX PALLAS M-x to your child’s body size, a seat
insert (i) has been provided as standard and is already inserted under the seat cover.
In order to optimally adapt the CYBEX PALLAS M-x to your child’s body size, a seat
insert (i) has been provided as standard and is already inserted under the seat cover.
Note! Only an optimally adjusted head rest (e) can offer your child maximum
protection and comfort while ensuring that the diagonal belt can be tted smoothly (f).
The height of the CYBEX PALLAS M-x can be adjusted to one of twelve positions.
Note! Only an optimally adjusted head rest (e) can offer your child maximum
protection and comfort while ensuring that the diagonal belt can be tted smoothly (f).
The height of the CYBEX PALLAS M-x can be adjusted to one of twelve positions.
ADAPTING TO BODY SIZE ADAPTING TO BODY SIZE
REMOVING THE ADDITIONAL SEAT INSERT REMOVING THE ADDITIONAL SEAT INSERT
• We recommend using this additional seat insert (i) for children aged 9 to 24
months.
• From the age of 2 onwards, the seat insert (i) is no longer necessary.
• The seat can then be adjusted to your child’s body simply by using the adjustable
head rest (e). To do this, pull the adjustment level (h) upwards to unlock the head
rest (e).
• Adjust it so that there is space for two ngers between the lower edge of the head
rest (e) and the shoulder of the child.
1. Release the front push buttons of the seat cover from the seat cushion (d).
2. Pull the fabric cover from the cover guides up and forward until you can pull out
the seat insert.
3. The seat insert must be removed in accordance with the age specifications stated
above.
4. Pull the seat cover to its original state and fix it in place again.
By pushing the central adjustment button (z), you can adapt the safety cushion to
your child. Hold down the central adjustment button (z) while you adapt the safety
cushion to your child.
By pushing the central adjustment button (z), you can adapt the safety cushion to
your child. Hold down the central adjustment button (z) while you adapt the safety
cushion to your child.
The side aps of the safety cushion (p) t exactly between the arm rests and seat
surface (d) and are used to support the safety cushion (p) on the seat.
The side aps of the safety cushion (p) t exactly between the arm rests and seat
surface (d) and are used to support the safety cushion (p) on the seat.
Adjust the safety cushion (p) so that it is against the child but is not pushing against
the child’s body.
Adjust the safety cushion (p) so that it is against the child but is not pushing against
the child’s body.
WARNING! The safety cushion (p) may only be used in conjunction with the
frame (w) up to a maximum of 18 kg!
WARNING! The safety cushion (p) may only be used in conjunction with the
frame (w) up to a maximum of 18 kg!
ADJUSTING THE SAFETY CUSHION – ECE GROUP 1 (9-18 KG) ADJUSTING THE SAFETY CUSHION – ECE GROUP 1 (9-18 KG)
Page 19
18
w
p
v
v
t
r
d
To bring the CYBEX PALLAS M- x to a lying position, the vehicle’s own belt system
does not need to be opened.
The inclinable head rest helps to prevent the child’s head from dangerously
tipping forward during sleep. In the event of a collision, the head rest will follow the
movement of your child’s head forwards, lock into place and absorb the subsequent
backwards motion of your child’s head.
The incline angle of the head rest can be set to one of three positions. It can be
moved forward without moving the lever to the second or third position until the rest
locks into position. To return it to the original position, the lever must be operated and
the head rest pulled back.
Note! Ensure that your child’s head is always in contact with the inclinable head rest
(r), as this is the only way that the head rest can provide optimum protection from
side collisions.
Note! Ensure that the lap belt (n) and diagonal belt (f) are always tight.
WARNING! An adjustment of the lying position by the driver is prohibited while
travelling!
WARNING! Always ensure that the adjustment button (v) gives an audible
click when locking into the lying or seated position. The lying position is only
available for group 1 (9-18 kg) in the Pallas configuration with safety cushion
(p) and base frame (w).
WARNING! Never block the locking mechanism (t) using objects! In the event
of an accident, the incline adjustment mechanism must move smoothly, or
else your child may be injured!
SEATED AND LYING POSITION – ECE GROUP 1 (9-18 KG)
INCLINABLE HEAD REST
• If your child falls asleep during travel, simply press the adjustment button (v) on
the underside of the seat cushion (d), and the CYBEX PALLAS M- x will slide
downwards using your child’s weight.
• To restore the upright seat position from the lying position once the child is out of
the seat, press the adjustment button (v) again and apply light pressure against the
seat cushion (d) to guide the child seat back up.
Page 20

19
ENRU
UA
To bring the CYBEX PALLAS M-x to a lying position, the vehicle’s own belt system
does not need to be opened.
To bring the CYBEX PALLAS M-x to a lying position, the vehicle’s own belt system
does not need to be opened.
The inclinable head rest helps to prevent the child’s head from dangerously
tipping forward during sleep. In the event of a collision, the head rest will follow the
movement of your child’s head forwards, lock into place and absorb the subsequent
backwards motion of your child’s head.
The inclinable head rest helps to prevent the child’s head from dangerously
tipping forward during sleep. In the event of a collision, the head rest will follow the
movement of your child’s head forwards, lock into place and absorb the subsequent
backwards motion of your child’s head.
The incline angle of the head rest can be set to one of three positions. It can be
moved forward without moving the lever to the second or third position until the rest
locks into position. To return it to the original position, the lever must be operated and
the head rest pulled back.
The incline angle of the head rest can be set to one of three positions. It can be
moved forward without moving the lever to the second or third position until the rest
locks into position. To return it to the original position, the lever must be operated and
the head rest pulled back.
Note! Ensure that your child’s head is always in contact with the inclinable head rest
(r), as this is the only way that the head rest can provide optimum protection from
side collisions.
Note! Ensure that your child’s head is always in contact with the inclinable head rest
(r), as this is the only way that the head rest can provide optimum protection from
side collisions.
Note! Ensure that the lap belt (n) and diagonal belt (f) are always tight. Note! Ensure that the lap belt (n) and diagonal belt (f) are always tight.
WARNING! An adjustment of the lying position by the driver is prohibited while
travelling!
WARNING! An adjustment of the lying position by the driver is prohibited while
travelling!
WARNING! Always ensure that the adjustment button (v) gives an audible
click when locking into the lying or seated position. The lying position is only
available for group 1 (9-18 kg) in the Pallas configuration with safety cushion
(p) and base frame (w).
WARNING! Always ensure that the adjustment button (v) gives an audible
click when locking into the lying or seated position. The lying position is only
available for group 1 (9-18 kg) in the Pallas configuration with safety cushion
(p) and base frame (w).
WARNING! Never block the locking mechanism (t) using objects! In the event
of an accident, the incline adjustment mechanism must move smoothly, or
else your child may be injured!
WARNING! Never block the locking mechanism (t) using objects! In the event
of an accident, the incline adjustment mechanism must move smoothly, or
else your child may be injured!
SEATED AND LYING POSITION – ECE GROUP 1 (9-18 KG) SEATED AND LYING POSITION – ECE GROUP 1 (9-18 KG)
INCLINABLE HEAD REST INCLINABLE HEAD REST
• If your child falls asleep during travel, simply press the adjustment button (v) on
the underside of the seat cushion (d), and the CYBEX PALLAS M-x will slide
downwards using your child’s weight.
• If your child falls asleep during travel, simply press the adjustment button (v) on
the underside of the seat cushion (d), and the CYBEX PALLAS M-x will slide
downwards using your child’s weight.
• To restore the upright seat position from the lying position once the child is out of
the seat, press the adjustment button (v) again and apply light pressure against the
seat cushion (d) to guide the child seat back up.
• To restore the upright seat position from the lying position once the child is out of
the seat, press the adjustment button (v) again and apply light pressure against the
seat cushion (d) to guide the child seat back up.
Page 21

20
f
f
f
x
x
x
x
n
n
n
p
p
m
w
d
l
q
q
CLICK!
v
STRAPPING IN USING THE SAFETY CUSHION – ECE GROUP 1
(9-18 KG)
SWITCHING FROM PALLAS M-FIX TO SOLUTION M-FIX (ECE
GROUP 1 TO ECE GROUP 2/3)
1. Now insert the previously adjusted safety cushion (p) (refer to the section
“ADJUSTING THE SAFETY CUSHION”).
2. Pull the entire length of the vehicle’s three-point belt out. Take the lap belt (n) and
place it in the designated belt guide (x) in the safety cushion (p).
3. Insert the belt tongue (m) into the belt buckle (l). It must lock into place with an
audible “CLICK”.
4. Tighten the lap belt by pulling the diagonal belt.
5. Now feed the diagonal belt (f) in parallel with the lap belt (n) back into the belt
guide (x).
6. Pull the diagonal belt (f) tight and ensure that both parts of the belt cover the entire
width of the safety cushion (p) in the belt guide (x).
7. Feed the diagonal belt (f) either between the head and shoulder rests (see
illustration) or outside along the shoulder rest, depending on how much of the belt
length is available. Please always choose the option that uses the least amount of
belt length.
WARNING! Never twist the belt!
1. Remove the safety cushion (p).
2. Press the two release buttons (q) on the underside of the seat cushion (d) and pull
it away from the frame until there is some resistance.
3. Press the adjustment button (v) and pull the seat away from the frame (w)
completely.
WARNING! The three-point belt may only be inserted into the guides
designated for that purpose. The belt guides are described precisely in this
manual and are also marked red on the child seat.
Page 22

21
ENRU
UA
STRAPPING IN USING THE SAFETY CUSHION – ECE GROUP 1
(9-18 KG)
STRAPPING IN USING THE SAFETY CUSHION – ECE GROUP 1
(9-18 KG)
SWITCHING FROM PALLAS M-FIX TO SOLUTION M-FIX (ECE
GROUP 1 TO ECE GROUP 2/3)
SWITCHING FROM PALLAS M-FIX TO SOLUTION M-FIX (ECE
GROUP 1 TO ECE GROUP 2/3)
1. Now insert the previously adjusted safety cushion (p) (refer to the section
“ADJUSTING THE SAFETY CUSHION”).
2. Pull the entire length of the vehicle’s three-point belt out. Take the lap belt (n) and
place it in the designated belt guide (x) in the safety cushion (p).
1. Now insert the previously adjusted safety cushion (p) (refer to the section
“ADJUSTING THE SAFETY CUSHION”).
2. Pull the entire length of the vehicle’s three-point belt out. Take the lap belt (n) and
place it in the designated belt guide (x) in the safety cushion (p).
3. Insert the belt tongue (m) into the belt buckle (l). It must lock into place with an
audible “CLICK”.
4. Tighten the lap belt by pulling the diagonal belt.
5. Now feed the diagonal belt (f) in parallel with the lap belt (n) back into the belt
guide (x).
6. Pull the diagonal belt (f) tight and ensure that both parts of the belt cover the entire
width of the safety cushion (p) in the belt guide (x).
7. Feed the diagonal belt (f) either between the head and shoulder rests (see
illustration) or outside along the shoulder rest, depending on how much of the belt
length is available. Please always choose the option that uses the least amount of
belt length.
WARNING! Never twist the belt! WARNING! Never twist the belt!
1. Remove the safety cushion (p).
2. Press the two release buttons (q) on the underside of the seat cushion (d) and pull
it away from the frame until there is some resistance.
3. Press the adjustment button (v) and pull the seat away from the frame (w)
completely.
1. Remove the safety cushion (p).
2. Press the two release buttons (q) on the underside of the seat cushion (d) and pull
it away from the frame until there is some resistance.
3. Press the adjustment button (v) and pull the seat away from the frame (w)
completely.
WARNING! The three-point belt may only be inserted into the guides
designated for that purpose. The belt guides are described precisely in this
manual and are also marked red on the child seat.
WARNING! The three-point belt may only be inserted into the guides
designated for that purpose. The belt guides are described precisely in this
manual and are also marked red on the child seat.
Page 23
22
A
c
o
w
A
o
d
o
v
l
l
m
CLICK!
ISOFIX CONNECT modi cation
4. Operate the adjustment lever (c) on the frame (w) and pull the two ISOFIX
CONNECT locking arms (o) until there is some resistance.
5. Keep the adjustment lever held (c) and release the two snap clips (A) on the
underside of the seat elevator (d), one after the other. If necessary, use a
screwdriver.
7. Operate the adjustment button (v) on the underside of the seat elevator (d) and
push the locking arms (o) in as far as they will go.
8. For further information on correct installation, please refer to the section
“SECURING THE CHILD SEAT USING THE ISOFEX CONNECT SYSTEM”
6. Now push the ISOFIX CONNECT locking arms (o) into the designated openings
on the underside of the seat elevator (d) until there is some resistance.
Note! If this is done correctly, the ISOFIX CONNECT locking arms (o) will easily
release from the frame (w).
Note! Keep removed parts together in a safe and secure place.
WARNING! Note the minimum drop height of the ISOFIX CONNECT locking
arms. Failure to note this may result in damage to components or injury to
yourself or other persons nearby.
WARNING! Ensure that the locking arms are installed the right way around and
that the teeth of the locking arms are up when inserting them into the seat.
WARNING! When reassembling the seat, proceed in precisely the reverse
order. Use the instructions to check beforehand if all parts are present.
STRAPPING IN WITHOUT THE SAFETY CUSHION – ECE GROUP
2/3 (15-36 KG)
1. Place your child in the child seat. Pull the three-point belt right out and feed it
along the belt buckle (l) in front of your child.
WARNING! Never twist the belt.
2. Insert the belt tongue (m) into the belt buckle (l). It must lock into place with an
audible “CLICK”.
Page 24

23
ENRU
UA
ISOFIX CONNECT modication ISOFIX CONNECT modication
4. Operate the adjustment lever (c) on the frame (w) and pull the two ISOFIX
CONNECT locking arms (o) until there is some resistance.
5. Keep the adjustment lever held (c) and release the two snap clips (A) on the
underside of the seat elevator (d), one after the other. If necessary, use a
screwdriver.
7. Operate the adjustment button (v) on the underside of the seat elevator (d) and
push the locking arms (o) in as far as they will go.
8. For further information on correct installation, please refer to the section
“SECURING THE CHILD SEAT USING THE ISOFEX CONNECT SYSTEM”
7. Operate the adjustment button (v) on the underside of the seat elevator (d) and
push the locking arms (o) in as far as they will go.
8. For further information on correct installation, please refer to the section
“SECURING THE CHILD SEAT USING THE ISOFEX CONNECT SYSTEM”
6. Now push the ISOFIX CONNECT locking arms (o) into the designated openings
on the underside of the seat elevator (d) until there is some resistance.
6. Now push the ISOFIX CONNECT locking arms (o) into the designated openings
on the underside of the seat elevator (d) until there is some resistance.
Note! If this is done correctly, the ISOFIX CONNECT locking arms (o) will easily
release from the frame (w).
Note! If this is done correctly, the ISOFIX CONNECT locking arms (o) will easily
release from the frame (w).
Note! Keep removed parts together in a safe and secure place. Note! Keep removed parts together in a safe and secure place.
WARNING! Note the minimum drop height of the ISOFIX CONNECT locking
arms. Failure to note this may result in damage to components or injury to
yourself or other persons nearby.
WARNING! Note the minimum drop height of the ISOFIX CONNECT locking
arms. Failure to note this may result in damage to components or injury to
yourself or other persons nearby.
WARNING! Ensure that the locking arms are installed the right way around and
that the teeth of the locking arms are up when inserting them into the seat.
WARNING! Ensure that the locking arms are installed the right way around and
that the teeth of the locking arms are up when inserting them into the seat.
WARNING! When reassembling the seat, proceed in precisely the reverse
order. Use the instructions to check beforehand if all parts are present.
WARNING! When reassembling the seat, proceed in precisely the reverse
order. Use the instructions to check beforehand if all parts are present.
STRAPPING IN WITHOUT THE SAFETY CUSHION – ECE GROUP
2/3 (15-36 KG)
STRAPPING IN WITHOUT THE SAFETY CUSHION – ECE GROUP
2/3 (15-36 KG)
1. Place your child in the child seat. Pull the three-point belt right out and feed it
along the belt buckle (l) in front of your child.
1. Place your child in the child seat. Pull the three-point belt right out and feed it
along the belt buckle (l) in front of your child.
WARNING! Never twist the belt. WARNING! Never twist the belt.
2. Insert the belt tongue (m) into the belt buckle (l). It must lock into place with an
audible “CLICK”.
2. Insert the belt tongue (m) into the belt buckle (l). It must lock into place with an
audible “CLICK”.
Page 25

24
f
k
f
l
k
k
f
k
n
n
n
n
g
g
f
s
e
f
d
WARNING! The lap belt (n) must run as low as possible on both sides along
your child’s groin to have optimum effect in the event of an accident.
6. Now feed the diagonal belt (f) through the upper belt guide (g) in the shoulder rest
(e) until it is inside the belt guide.
Ensure that the diagonal belt (f) runs between the outside of the shoulder and the
neck of your child. If necessary, adjust the height of the head rest to change the
position of the belt. The height of the head rest (e) can still be adjusted while in the
car.
3. Next, place the lap belt (n) in the lower belt guides (k) of the child seat.
4. Now pull the diagonal belt (f) firmly to tighten the lap belt (n). The tighter the belt
sits, the better it provides protection from injury. On the side of the belt buckle (l),
the diagonal belt (f) and the lap belt (n) must be inserted together in the lower belt
guide (k).
WARNING! The vehicle belt buckle (l) must never cross the arm rest. If the belt
system is too long, the child seat is not suitable for use in this position in the
vehicle. In case of doubt, please consult the manufacturer of your vehicle.
5. The lap belt (n) should have been fed through the lower belt guides (k) on both
sides of the seat cushion (d).
Note! Teach your child from the start to always ensure that the belt is tight and, if
necessary, how to tighten the belt themselves.
To ensure optimum safety for your child, please always check before commencing
travel that
• the lap belt (n) has been fed through the lower belt guides (k) on both sides of the
seat cushion (d).
• the diagonal belt (f) on the belt buckle side has also been fed through the lower belt
guide (k) of the seat.
• the diagonal belt (f) has been fed through the belt guide (g) marked red in the
shoulder rest (e).
• the diagonal belt (f) is at an incline downwards.
• the entire belt is tightly against your child’s body and is not twisted.
IS YOUR CHILD CORRECTLY SECURED?
Page 26

25
ENRU
UA
WARNING! The lap belt (n) must run as low as possible on both sides along
your child’s groin to have optimum effect in the event of an accident.
WARNING! The lap belt (n) must run as low as possible on both sides along
your child’s groin to have optimum effect in the event of an accident.
6. Now feed the diagonal belt (f) through the upper belt guide (g) in the shoulder rest
(e) until it is inside the belt guide.
6. Now feed the diagonal belt (f) through the upper belt guide (g) in the shoulder rest
(e) until it is inside the belt guide.
Ensure that the diagonal belt (f) runs between the outside of the shoulder and the
neck of your child. If necessary, adjust the height of the head rest to change the
position of the belt. The height of the head rest (e) can still be adjusted while in the
car.
Ensure that the diagonal belt (f) runs between the outside of the shoulder and the
neck of your child. If necessary, adjust the height of the head rest to change the
position of the belt. The height of the head rest (e) can still be adjusted while in the
car.
3. Next, place the lap belt (n) in the lower belt guides (k) of the child seat.
4. Now pull the diagonal belt (f) firmly to tighten the lap belt (n). The tighter the belt
sits, the better it provides protection from injury. On the side of the belt buckle (l),
the diagonal belt (f) and the lap belt (n) must be inserted together in the lower belt
guide (k).
WARNING! The vehicle belt buckle (l) must never cross the arm rest. If the belt
system is too long, the child seat is not suitable for use in this position in the
vehicle. In case of doubt, please consult the manufacturer of your vehicle.
WARNING! The vehicle belt buckle (l) must never cross the arm rest. If the belt
system is too long, the child seat is not suitable for use in this position in the
vehicle. In case of doubt, please consult the manufacturer of your vehicle.
5. The lap belt (n) should have been fed through the lower belt guides (k) on both
sides of the seat cushion (d).
5. The lap belt (n) should have been fed through the lower belt guides (k) on both
sides of the seat cushion (d).
Note! Teach your child from the start to always ensure that the belt is tight and, if
necessary, how to tighten the belt themselves.
Note! Teach your child from the start to always ensure that the belt is tight and, if
necessary, how to tighten the belt themselves.
To ensure optimum safety for your child, please always check before commencing
travel that
To ensure optimum safety for your child, please always check before commencing
travel that
• the lap belt (n) has been fed through the lower belt guides (k) on both sides of the
seat cushion (d).
• the diagonal belt (f) on the belt buckle side has also been fed through the lower belt
guide (k) of the seat.
• the diagonal belt (f) has been fed through the belt guide (g) marked red in the
shoulder rest (e).
• the diagonal belt (f) is at an incline downwards.
• the entire belt is tightly against your child’s body and is not twisted.
IS YOUR CHILD CORRECTLY SECURED? IS YOUR CHILD CORRECTLY SECURED?
Page 27
26
e e
h
To ensure that your child seat provides maximum protection, it is imperative that you
note the following:
CARE & MAINTENANCE
• All major parts of the child seat should be checked regularly for damage. The
mechanical components must be free of defects.
• It is absolutely necessary to ensure that the child seat is not jammed between hard
elements such as the vehicle door or seat rail, which could potentially damage it.
• When exposed to extreme shock, e.g. after a crash, the child seat must be
checked by the manufacturer.
REMOVING THE SEAT COVER
REMOVING THE COVER FROM THE HEADREST FLAP
REMOVING THE COVER FROM THE HEAD SUPPORT
The cover of the infant seat consists of four parts (Headrest ap, headrest, shoulder
part cover, booster cover and/or seat surface cover).This is complemented by the
safety cushion cover.
The four covers of the seat are tted into the cover attachment channels on the edge
of the infant seat and are held in position at several places by press-studs (see
image).
Once all studs have been released, the single parts of the cover can be removed
from the cover attachment channels.
Pull the opening of the cover over the adjustment lever so that the cover does not get
jammed on the lever when pulling it up to remove it.
Release the two press-studs at each side of the rear of the shoulder area. Pull the
cover out of the cover attachment channel.
In order to put the covers back on the seat, proceed in the reversed order as
removing them.
Warning! The child seat must never be used without the cover.
Ensure that only an original CYBEX seat cover is used, as the cover is a key element
of the seat’s function. Spare covers can be obtained from a specialist retailer.
Page 28

27
ENRU
UA
To ensure that your child seat provides maximum protection, it is imperative that you
note the following:
To ensure that your child seat provides maximum protection, it is imperative that you
note the following:
CARE & MAINTENANCE CARE & MAINTENANCE
• All major parts of the child seat should be checked regularly for damage. The
mechanical components must be free of defects.
• It is absolutely necessary to ensure that the child seat is not jammed between hard
elements such as the vehicle door or seat rail, which could potentially damage it.
• When exposed to extreme shock, e.g. after a crash, the child seat must be
checked by the manufacturer.
REMOVING THE SEAT COVER REMOVING THE SEAT COVER
REMOVING THE COVER FROM THE HEADREST FLAP REMOVING THE COVER FROM THE HEADREST FLAP
REMOVING THE COVER FROM THE HEAD SUPPORT REMOVING THE COVER FROM THE HEAD SUPPORT
The cover of the infant seat consists of four parts (Headrest ap, headrest, shoulder
part cover, booster cover and/or seat surface cover).This is complemented by the
safety cushion cover.
The four covers of the seat are tted into the cover attachment channels on the edge
of the infant seat and are held in position at several places by press-studs (see
image).
Once all studs have been released, the single parts of the cover can be removed
from the cover attachment channels.
Pull the opening of the cover over the adjustment lever so that the cover does not get
jammed on the lever when pulling it up to remove it.
Pull the opening of the cover over the adjustment lever so that the cover does not get
jammed on the lever when pulling it up to remove it.
Release the two press-studs at each side of the rear of the shoulder area. Pull the
cover out of the cover attachment channel.
Release the two press-studs at each side of the rear of the shoulder area. Pull the
cover out of the cover attachment channel.
In order to put the covers back on the seat, proceed in the reversed order as
removing them.
In order to put the covers back on the seat, proceed in the reversed order as
removing them.
Warning! The child seat must never be used without the cover. Warning! The child seat must never be used without the cover.
Ensure that only an original CYBEX seat cover is used, as the cover is a key element
of the seat’s function. Spare covers can be obtained from a specialist retailer.
Ensure that only an original CYBEX seat cover is used, as the cover is a key element
of the seat’s function. Spare covers can be obtained from a specialist retailer.
Page 29

28
Note! The cover may only be washed at 30°C with a delicate wash program.
Washing at more than 30°C may result in discolouration of the cover fabric. Please
wash the cover separately from other laundry and do not dry in the dryer! Never dry
the cover in direct sunlight! The plastic parts can be cleaned with a mild cleaning
agent and warm water.
Warning! Never use harsh cleaning agents or bleaches!
CLEANING
REMOVING THE COVER FROM THE SEAT SURFACE
REMOVING THE COVER FROM THE SAFETY CUSHION
Release the four press-studs of the seat cover at the front and the back. Now, pull off
the cover over the armrests and along the seat surface.
First, release the two press-studs of the safety cushion cover. Then pull off the cover
around the cushion towards the third attachment around the central adjustment
button and release the cover at the rubber eyelet of the adjustment button.
REMOVING THE COVER FROM THE SHOULDER PART
Pull the cover out of the cover attachment channel.
Page 30

29
ENRU
UA
Note! The cover may only be washed at 30°C with a delicate wash program.
Washing at more than 30°C may result in discolouration of the cover fabric. Please
wash the cover separately from other laundry and do not dry in the dryer! Never dry
the cover in direct sunlight! The plastic parts can be cleaned with a mild cleaning
agent and warm water.
Warning! Never use harsh cleaning agents or bleaches! Warning! Never use harsh cleaning agents or bleaches!
CLEANING CLEANING
REMOVING THE COVER FROM THE SEAT SURFACE REMOVING THE COVER FROM THE SEAT SURFACE
REMOVING THE COVER FROM THE SAFETY CUSHION REMOVING THE COVER FROM THE SAFETY CUSHION
Release the four press-studs of the seat cover at the front and the back. Now, pull off
the cover over the armrests and along the seat surface.
Release the four press-studs of the seat cover at the front and the back. Now, pull off
the cover over the armrests and along the seat surface.
First, release the two press-studs of the safety cushion cover. Then pull off the cover
around the cushion towards the third attachment around the central adjustment
button and release the cover at the rubber eyelet of the adjustment button.
First, release the two press-studs of the safety cushion cover. Then pull off the cover
around the cushion towards the third attachment around the central adjustment
button and release the cover at the rubber eyelet of the adjustment button.
REMOVING THE COVER FROM THE SHOULDER PART REMOVING THE COVER FROM THE SHOULDER PART
Pull the cover out of the cover attachment channel. Pull the cover out of the cover attachment channel.
Page 31

30
• If the vehicle is directly exposed to sunlight for a longer time, the child seat must be
removed from the vehicle or covered with a bright cloth.
• Regularly check all plastic and metal parts of the seat for damage, deformation or
change of colour. If you discover any changes, the child seat must be disposed or
checked and possibly replaced by the manufacturer.
• Changes to fabric, especially bleaching, are perfectly normal when used in a
vehicle and do not impair the seat’s function.
PRODUCT SERVICE LIFE
WARNING! An accident may cause damage to the child seat that is not
identifiable with the naked eye. Please replace the seat after an accident. In
case of doubt, please consult your dealer or the manufacturer.
HOW TO ACT FOLLOWING AN ACCIDENT
At the end of the child seat’s service life, it must be disposed of correctly. The
separation of waste may be handled differently from place to place. To ensure that
the child seat is disposed of in accordance with regulations, please contact your
local waste disposal institution or local council. Always observe the waste disposal
regulations of your country.
DISPOSAL
The CYBEX PALLAS M-x is designed to meet its specications for the entire
service life of approximately 11 years. However, as there can be very large
temperature uctuations and unpredictable strains in vehicles, the following points
must be observed:
Page 32

31
ENRU
UA
• If the vehicle is directly exposed to sunlight for a longer time, the child seat must be
removed from the vehicle or covered with a bright cloth.
• Regularly check all plastic and metal parts of the seat for damage, deformation or
change of colour. If you discover any changes, the child seat must be disposed or
checked and possibly replaced by the manufacturer.
• Changes to fabric, especially bleaching, are perfectly normal when used in a
vehicle and do not impair the seat’s function.
PRODUCT SERVICE LIFE PRODUCT SERVICE LIFE
WARNING! An accident may cause damage to the child seat that is not
identifiable with the naked eye. Please replace the seat after an accident. In
case of doubt, please consult your dealer or the manufacturer.
WARNING! An accident may cause damage to the child seat that is not
identifiable with the naked eye. Please replace the seat after an accident. In
case of doubt, please consult your dealer or the manufacturer.
HOW TO ACT FOLLOWING AN ACCIDENT HOW TO ACT FOLLOWING AN ACCIDENT
At the end of the child seat’s service life, it must be disposed of correctly. The
separation of waste may be handled differently from place to place. To ensure that
the child seat is disposed of in accordance with regulations, please contact your
local waste disposal institution or local council. Always observe the waste disposal
regulations of your country.
DISPOSAL DISPOSAL
The CYBEX PALLAS M-x is designed to meet its specications for the entire
service life of approximately 11 years. However, as there can be very large
temperature uctuations and unpredictable strains in vehicles, the following points
must be observed:
The CYBEX PALLAS M-x is designed to meet its specications for the entire service
life of approximately 11 years. However, as there can be very large temperature
uctuations and unpredictable strains in vehicles, the following points must be
observed:
Page 33

32
CYBEX GmbH
Riedinger Str. 18, 95448 Bayreuth, Germany
Tel.: 0921 78 511-511, Fax.: 0921 78 511- 888
The following warranty conditions only apply to the country in which this product
was rst sold through retail channels to a consumer. This warranty covers all
manufacturing and material defects that existed at the time of purchase or which
manifest themselves within three (3) years of rst sale of this product via retail
channels to a consumer (manufacturer warranty). If a manufacturing or material
defect arises during the warranty period, the product will be repaired at no charge
or – at our discretion – may be replaced by a new one. In order to make a claim on
this warranty, the product must be returned to the retailer that rst sold it and the
original proof of purchase (receipt or invoice), containing the date of purchase, name
and address of the retailer, and the product name, must be presented. No claims
may be made on this warranty if the product is sent to the manufacturer or any other
person than the retailer having rst sold it for the purpose of making a claim on the
warranty. The warranty only applies is the product was checked for completeness,
manufacturing defects and material defects immediately upon purchase. If the
product was purchase by way of a mail order outlet, it must be checked for
completeness, manufacturing defects and material defects immediately upon receipt.
If damage arises, the product may no longer be used and must be returned to the
retailer that original sold it. When claiming on the warranty, the product must be
returned in a complete and clean state. Please read the usage instructions carefully
before contacting the retailer. The warranty does not cover damage caused by
misuse, external inuences (water, re, trafc accidents etc.) or normal wear and
tear. Claims on the warranty will only be honoured if the product is treated and
used in accordance with the usage instructions, repairs and modications are only
performed by persons authorised to do so, and only original parts and accessories
are used. This warranty does not nullify or limit in any way any consumer rights or
rights against the seller based on infringement of the purchase agreement granted
by applicable legislation.
WARRANTY CONDITIONS
Page 34

33
ENRU
UA
The following warranty conditions only apply to the country in which this product
was rst sold through retail channels to a consumer. This warranty covers all
manufacturing and material defects that existed at the time of purchase or which
manifest themselves within three (3) years of rst sale of this product via retail
channels to a consumer (manufacturer warranty). If a manufacturing or material
defect arises during the warranty period, the product will be repaired at no charge
or – at our discretion – may be replaced by a new one. In order to make a claim on
this warranty, the product must be returned to the retailer that rst sold it and the
original proof of purchase (receipt or invoice), containing the date of purchase, name
and address of the retailer, and the product name, must be presented. No claims
may be made on this warranty if the product is sent to the manufacturer or any other
person than the retailer having rst sold it for the purpose of making a claim on the
warranty. The warranty only applies is the product was checked for completeness,
manufacturing defects and material defects immediately upon purchase. If the
product was purchase by way of a mail order outlet, it must be checked for
completeness, manufacturing defects and material defects immediately upon receipt.
If damage arises, the product may no longer be used and must be returned to the
retailer that original sold it. When claiming on the warranty, the product must be
returned in a complete and clean state. Please read the usage instructions carefully
before contacting the retailer. The warranty does not cover damage caused by
misuse, external inuences (water, re, trafc accidents etc.) or normal wear and
tear. Claims on the warranty will only be honoured if the product is treated and
used in accordance with the usage instructions, repairs and modications are only
performed by persons authorised to do so, and only original parts and accessories
are used. This warranty does not nullify or limit in any way any consumer rights or
rights against the seller based on infringement of the purchase agreement granted
by applicable legislation.
WARRANTY CONDITIONS WARRANTY CONDITIONS
Page 35

Page 36

Thank you for choosing the CYBEX Pallas M-fix child seat. Safety, comfort and ease of use were the foremost principles
applied to the development of the CYBEX Pallas M-fix child seat. This product is manufactured subject to special quality
assurance measures and satisfies the most stringent of safety requirements.
Dear customer,
Page 37

36
09/2014
Contents
PALLAS M-fix
ECE-R44-04
UNIVE RSAL
SEM I-UNIVE RSAL
9 – 18 kg
CYBEX GmbH
Riedinger Str. 18, 95448 Bayreuth
Germany
04301315
SOLUTION M-fix
ECE-R44-04
UNIVE RSAL
SEM I-UNIVE RSAL
15 – 36 kg
CYBEX GmbH
Riedinger Str. 18, 95448 Bayreuth
Germany
04301314
Approval
Cybex PALLAS M-x
Seat elevator with back rest and head rest on an
adjustable base frame with height-adjustable safety
cushions.
Recommended for:
Age: Approx. 9 months to 4 years
Weight: 9-18 kg
Only suitable for vehicle seats with automatic
three-point belts approved in accordance with ECE
regulation R16 or a comparable standard
ECE R-44/04,
CYBEX PALLAS M-x - group 1, 9 to 18 kg
CYBEX SOLUTION M-x - group 2/3, 15 to 36 kg
Warning! To ensure optimum protection for your child, the CYBEX PALLAS
M-fix must be used as described in these instructions.
Note! Country-specic regulations (e.g. regarding colour-coding on child seats) may
mean that product features may vary in appearance. This will, however, not affect the
product in its correct function.
Note! Always keep these instructions to hand (e.g. in the designated compartment
on the rear of the back rest).
EE
Brief instructions Group 1 (9-18 kg) ........................................................................................ 2
Brief instructions Group 2/3 (15-36 kg) ................................................................................... 3
Approval .................................................................................................................................36
Positioning the seat correctly in the vehicle .........................................................................38
Securing the child seat using the ISOFIX CONNECT system ............................................40
Activating the L.S.P. ...............................................................................................................42
Removal of the CYBEX PALLAS M-fix .................................................................................42
Placing the seat in the vehicle ..............................................................................................44
Adapting to body size ...........................................................................................................46
Removing the additional seat insert ......................................................................................46
Adjusting the safety cushion – ECE group 1 (9-18 kg) ........................................................46
Seated and lying position – ECE group 1 (9-18 kg) .............................................................48
Inclinable head rest ..............................................................................................................48
Strapping in using the safety cushion – ECE group 1 (9-18 kg) ..........................................50
Switching from Pallas M-fix to Solution M-fix (ECE group 1 to ECE group 2/3) .................50
Strapping in without the safety cushion – ECE group 2/3 (15-36 kg) ..................................52
Is your child correctly secured? .............................................................................................54
Care & maintenance ..............................................................................................................56
Removing the seat cover ......................................................................................................56
Removing the cover from the headrest flap .........................................................................56
Removing the cover from the head support .........................................................................56
Removing the cover from the shoulder part .........................................................................58
Removing the cover from the seat surface ...........................................................................58
Removing the cover from the safety cushion .......................................................................58
Cleaning .................................................................................................................................58
How to act following an accident ...........................................................................................60
Product service life ................................................................................................................60
Disposal .................................................................................................................................60
Warranty conditions ...............................................................................................................62
Page 38

37
Contents Contents
Warning! To ensure optimum protection for your child, the CYBEX PALLAS
M-fix must be used as described in these instructions.
Warning! To ensure optimum protection for your child, the CYBEX PALLAS
M-fix must be used as described in these instructions.
Note! Country-specic regulations (e.g. regarding colour-coding on child seats) may
mean that product features may vary in appearance. This will, however, not affect the
product in its correct function.
Note! Country-specic regulations (e.g. regarding colour-coding on child seats) may
mean that product features may vary in appearance. This will, however, not affect the
product in its correct function.
Note! Always keep these instructions to hand (e.g. in the designated compartment
on the rear of the back rest).
Note! Always keep these instructions to hand (e.g. in the designated compartment
on the rear of the back rest).
LV
Brief instructions Group 1 (9-18 kg) ........................................................................................ 2
Brief instructions Group 2/3 (15-36 kg) ................................................................................... 3
Approval .................................................................................................................................36
Positioning the seat correctly in the vehicle .........................................................................39
Securing the child seat using the ISOFIX CONNECT system ............................................41
Activating the L.S.P. ...............................................................................................................43
Removal of the CYBEX PALLAS M-fix .................................................................................43
Placing the seat in the vehicle ..............................................................................................45
Adapting to body size ...........................................................................................................47
Removing the additional seat insert ......................................................................................47
Adjusting the safety cushion – ECE group 1 (9-18 kg) ........................................................47
Seated and lying position – ECE group 1 (9-18 kg) .............................................................49
Inclinable head rest ..............................................................................................................49
Strapping in using the safety cushion – ECE group 1 (9-18 kg) ..........................................51
Switching from Pallas M-fix to Solution M-fix (ECE group 1 to ECE group 2/3) .................51
Strapping in without the safety cushion – ECE group 2/3 (15-36 kg) ..................................53
Is your child correctly secured? .............................................................................................55
Care & maintenance ..............................................................................................................57
Removing the seat cover ......................................................................................................57
Removing the cover from the headrest flap .........................................................................57
Removing the cover from the head support .........................................................................57
Removing the cover from the shoulder part .........................................................................59
Removing the cover from the seat surface ...........................................................................59
Removing the cover from the safety cushion .......................................................................59
Cleaning .................................................................................................................................59
How to act following an accident ...........................................................................................61
Product service life ................................................................................................................61
Disposal .................................................................................................................................61
Warranty conditions ...............................................................................................................63
LT
Brief instructions Group 1 (9-18 kg) ........................................................................................ 2
Brief instructions Group 2/3 (15-36 kg) ................................................................................... 3
Approval .................................................................................................................................36
Positioning the seat correctly in the vehicle .........................................................................39
Securing the child seat using the ISOFIX CONNECT system ............................................41
Activating the L.S.P. ...............................................................................................................43
Removal of the CYBEX PALLAS M-fix .................................................................................43
Placing the seat in the vehicle ..............................................................................................45
Adapting to body size ...........................................................................................................47
Removing the additional seat insert ......................................................................................47
Adjusting the safety cushion – ECE group 1 (9-18 kg) ........................................................47
Seated and lying position – ECE group 1 (9-18 kg) .............................................................49
Inclinable head rest ..............................................................................................................49
Strapping in using the safety cushion – ECE group 1 (9-18 kg) ..........................................51
Switching from Pallas M-fix to Solution M-fix (ECE group 1 to ECE group 2/3) .................51
Strapping in without the safety cushion – ECE group 2/3 (15-36 kg) ..................................53
Is your child correctly secured? .............................................................................................55
Care & maintenance ..............................................................................................................57
Removing the seat cover ......................................................................................................57
Removing the cover from the headrest flap .........................................................................57
Removing the cover from the head support .........................................................................57
Removing the cover from the shoulder part .........................................................................59
Removing the cover from the seat surface ...........................................................................59
Removing the cover from the safety cushion .......................................................................59
Cleaning .................................................................................................................................59
How to act following an accident ...........................................................................................61
Product service life ................................................................................................................61
Disposal .................................................................................................................................61
Warranty conditions ...............................................................................................................63
Page 39

38
o
f
POSITIONING THE SEAT CORRECTLY IN THE VEHICLE
The CYBEX PALLAS M- x with retracted ISOFIX CONNECT system
can be used on all vehicle seats with automatic three-point safety belts
approved for the transport of adult persons.
A ‘semi-universal’ approval is provided for xtures using ISOFIX CONNECT
locking arms (o). For this reason, ISOFIX CONNECT can only be used in
certain vehicles. Please refer to the enclosed vehicle type list for approved
vehicles. You can obtain the most up-to-date version from
www.cybex-online.com.
In exceptional cases, the child seat may also be used on the front passenger seat.
Please note the following in this case:
• In cars with airbags, you should push the passenger seat back as far as possible.
When doing so, however, ensure that the upper pivot point of the safety belt is
behind the belt feed point of the child seat.
• Always comply with the recommendations of the vehicle manufacturer.
WARNING! The seat is not suitable for use with a two-point or lap belt. If the
seat is secured using a two-point belt, an accident may result in severe or
even fatal injuries to the child.
WARNING! The diagonal belt (f) must run back at an incline and must never
run forward to the upper belt point in your vehicle. If it is not possible to adjust
the seat in this way, e.g. by pushing the car seat forward or using it on another
seat, this child seat is not suitable for your vehicle.
Luggage or other objects present in the vehicle that may cause injury in the event of
an accident must always be rmly secured. Otherwise, they may be thrown, causing
fatal injuries.
Note! Never leave your child unattended in the vehicle.
WARNING! The child seat may not be used on car seats facing to the side of
the direction of travel. Use of the child seat is permitted on rear-facing seats,
e.g. in a van or minibus, provided that the seat is permitted for transporting
an adult. Please note that the vehicle head rest must not be removed when
fitting on a rear-facing seat! Even if not in use, the child seat must always be
secured with the safety belt. This applies even if the child set has already been
secured to the vehicle using the ISOFIX CONNECT system. An unsecured
child seat can injure other passengers and yourself even when just performing
an emergency brake or in the event of a minor collision.
Page 40

39
EELVLT
POSITIONING THE SEAT CORRECTLY IN THE VEHICLE POSITIONING THE SEAT CORRECTLY IN THE VEHICLE
The CYBEX PALLAS M-x with retracted ISOFIX CONNECT system
can be used on all vehicle seats with automatic three-point safety belts
approved for the transport of adult persons.
The CYBEX PALLAS M-x with retracted ISOFIX CONNECT system
can be used on all vehicle seats with automatic three-point safety belts
approved for the transport of adult persons.
A ‘semi-universal’ approval is provided for xtures using ISOFIX CONNECT
locking arms (o). For this reason, ISOFIX CONNECT can only be used in
certain vehicles. Please refer to the enclosed vehicle type list for approved
vehicles. You can obtain the most up-to-date version from
www.cybex-online.com.
In exceptional cases, the child seat may also be used on the front passenger seat.
Please note the following in this case:
A ‘semi-universal’ approval is provided for xtures using ISOFIX CONNECT
locking arms (o). For this reason, ISOFIX CONNECT can only be used in
certain vehicles. Please refer to the enclosed vehicle type list for approved
vehicles. You can obtain the most up-to-date version from
www.cybex-online.com.
In exceptional cases, the child seat may also be used on the front passenger seat.
Please note the following in this case:
• In cars with airbags, you should push the passenger seat back as far as possible.
When doing so, however, ensure that the upper pivot point of the safety belt is
behind the belt feed point of the child seat.
• Always comply with the recommendations of the vehicle manufacturer.
• In cars with airbags, you should push the passenger seat back as far as possible.
When doing so, however, ensure that the upper pivot point of the safety belt is
behind the belt feed point of the child seat.
• Always comply with the recommendations of the vehicle manufacturer.
WARNING! The seat is not suitable for use with a two-point or lap belt. If the
seat is secured using a two-point belt, an accident may result in severe or
even fatal injuries to the child.
WARNING! The seat is not suitable for use with a two-point or lap belt. If the
seat is secured using a two-point belt, an accident may result in severe or
even fatal injuries to the child.
WARNING! The diagonal belt (f) must run back at an incline and must never
run forward to the upper belt point in your vehicle. If it is not possible to adjust
the seat in this way, e.g. by pushing the car seat forward or using it on another
seat, this child seat is not suitable for your vehicle.
WARNING! The diagonal belt (f) must run back at an incline and must never
run forward to the upper belt point in your vehicle. If it is not possible to adjust
the seat in this way, e.g. by pushing the car seat forward or using it on another
seat, this child seat is not suitable for your vehicle.
Luggage or other objects present in the vehicle that may cause injury in the event of
an accident must always be rmly secured. Otherwise, they may be thrown, causing
fatal injuries.
Luggage or other objects present in the vehicle that may cause injury in the event of
an accident must always be rmly secured. Otherwise, they may be thrown, causing
fatal injuries.
Note! Never leave your child unattended in the vehicle. Note! Never leave your child unattended in the vehicle.
WARNING! The child seat may not be used on car seats facing to the side of
the direction of travel. Use of the child seat is permitted on rear-facing seats,
e.g. in a van or minibus, provided that the seat is permitted for transporting
an adult. Please note that the vehicle head rest must not be removed when
fitting on a rear-facing seat! Even if not in use, the child seat must always be
secured with the safety belt. This applies even if the child set has already been
secured to the vehicle using the ISOFIX CONNECT system. An unsecured
child seat can injure other passengers and yourself even when just performing
an emergency brake or in the event of a minor collision.
WARNING! The child seat may not be used on car seats facing to the side of
the direction of travel. Use of the child seat is permitted on rear-facing seats,
e.g. in a van or minibus, provided that the seat is permitted for transporting
an adult. Please note that the vehicle head rest must not be removed when
fitting on a rear-facing seat! Even if not in use, the child seat must always be
secured with the safety belt. This applies even if the child set has already been
secured to the vehicle using the ISOFIX CONNECT system. An unsecured
child seat can injure other passengers and yourself even when just performing
an emergency brake or in the event of a minor collision.
Page 41

40
u
j
c
y
b
y
o
c
b
w
y
d
CLICK!
SECURING THE CHILD SEAT USING THE ISOFIX CONNECT
SYSTEM
Note! The ISOFIX xture points (j) are two metallic clips for each seat and are
positioned between the back rest and the seating surface of the vehicle seat. In case
of doubt, please refer to the driver’s manual of your vehicle.
Note! Before joining the ISOFIX-CONNECT locking arms (o) with the ISOFIX
xture points (j), check the release buttons (y). If the green safety indicators (b) are
visible, you must rst release the ISOFIX-CONNECT locking arms before joining by
pressing and pulling back the release button. Repeat the process if necessary with
the second locking arm.
A perceptible click will be heard when the ISOFIX-CONNECT locking arm correctly
locks in place with ISOFIX xture points.
Note! Note the information in the section “Placing the seat in the vehicle”.
• Push the two locking arms (o) into the feed-in aids (u) until these lock into place in
the ISOFIX xture points with an audible ‘click’.
• Ensure that the seat is secure by trying to pull it out of the feed-in aids (u).
• The green safety indicator (b) must now be clearly visible on the two red release
buttons (y).
• You can now use the adjustment lever (c) on the frame (w) of the CYBEX PALLAS
M- x child seat position.
• You can now strap in your child; refer to the section “STRAPPING IN USING
SAFETY CUSHION”.
• Insert the supplied feed-in aids (u) with the longer strap upwards into the two
ISOFIX xture points (j). In some vehicles, it is better to mount the feed-in aids (u)
in the opposite direction.
• Use the adjustment lever (c) under the seat cushion (d) on the frame (w) of the
CYBEX PALLAS M- x child seat.
• Pull the two ISOFIX-CONNECT locking arms (o) as far as they will go.
• Now twist the ISOFIX-CONNECT locking arms (o) 180° so that they are facing the
direction of the feed-in aids (u).
Using the ISOFIX-CONNECT system, you can x the CYBEX PALLAS M- x
to the vehicle, thereby increasing your child’s safety. Your child will still be
secured using the three-point belt of your vehicle.
Page 42

41
EELVLT
SECURING THE CHILD SEAT USING THE ISOFIX CONNECT
SYSTEM
SECURING THE CHILD SEAT USING THE ISOFIX CONNECT
SYSTEM
Note! The ISOFIX xture points (j) are two metallic clips for each seat and are
positioned between the back rest and the seating surface of the vehicle seat. In case
of doubt, please refer to the driver’s manual of your vehicle.
Note! The ISOFIX xture points (j) are two metallic clips for each seat and are
positioned between the back rest and the seating surface of the vehicle seat. In case
of doubt, please refer to the driver’s manual of your vehicle.
Note! Before joining the ISOFIX-CONNECT locking arms (o) with the ISOFIX xture
points (j), check the release buttons (y). If the green safety indicators (b) are visible,
you must rst release the ISOFIX-CONNECT locking arms before joining by pressing
and pulling back the release button. Repeat the process if necessary with the second
locking arm.
A perceptible click will be heard when the ISOFIX-CONNECT locking arm correctly
locks in place with ISOFIX xture points.
Note! Note the information in the section “Placing the seat in the vehicle”. Note! Note the information in the section “Placing the seat in the vehicle”.
• Push the two locking arms (o) into the feed-in aids (u) until these lock into place in
the ISOFIX xture points with an audible ‘click’.
• Ensure that the seat is secure by trying to pull it out of the feed-in aids (u).
• The green safety indicator (b) must now be clearly visible on the two red release
buttons (y).
• You can now use the adjustment lever (c) on the frame (w) of the CYBEX PALLAS
M-x child seat position.
• Push the two locking arms (o) into the feed-in aids (u) until these lock into place in
the ISOFIX xture points with an audible ‘click’.
• Ensure that the seat is secure by trying to pull it out of the feed-in aids (u).
• The green safety indicator (b) must now be clearly visible on the two red release
buttons (y).
• You can now use the adjustment lever (c) on the frame (w) of the CYBEX PALLAS
M-x child seat position.
• You can now strap in your child; refer to the section “STRAPPING IN USING
SAFETY CUSHION”.
• You can now strap in your child; refer to the section “STRAPPING IN USING
SAFETY CUSHION”.
• Insert the supplied feed-in aids (u) with the longer strap upwards into the two
ISOFIX xture points (j). In some vehicles, it is better to mount the feed-in aids (u)
in the opposite direction.
• Insert the supplied feed-in aids (u) with the longer strap upwards into the two
ISOFIX xture points (j). In some vehicles, it is better to mount the feed-in aids (u)
in the opposite direction.
• Use the adjustment lever (c) under the seat cushion (d) on the frame (w) of the
CYBEX PALLAS M-x child seat.
• Pull the two ISOFIX-CONNECT locking arms (o) as far as they will go.
• Now twist the ISOFIX-CONNECT locking arms (o) 180° so that they are facing the
direction of the feed-in aids (u).
• Use the adjustment lever (c) under the seat cushion (d) on the frame (w) of the
CYBEX PALLAS M-x child seat.
• Pull the two ISOFIX-CONNECT locking arms (o) as far as they will go.
• Now twist the ISOFIX-CONNECT locking arms (o) 180° so that they are facing the
direction of the feed-in aids (u).
Using the ISOFIX-CONNECT system, you can x the CYBEX PALLAS M-x
to the vehicle, thereby increasing your child’s safety. Your child will still be
secured using the three-point belt of your vehicle.
Using the ISOFIX-CONNECT system, you can x the CYBEX PALLAS M-x
to the vehicle, thereby increasing your child’s safety. Your child will still be
secured using the three-point belt of your vehicle.
Page 43

42
PRESS!
L.S.P.
y
2
1
3
o
A
ACTIVATING THE L.S.P.
The “Linear Side Protection” system (L.S.P.) can be extended in two steps by
pressing the L.S.P. button(s). Together with the initial position, this provides a total of
three different L.S.P. settings.
To push the L.S.P. back into the housing, press the L.S.P. button again and push the
L.S.P. back into the starting position.
Note! Always activate the L.S.P. on the side of the seat facing the car door (see
illustration).
REMOVAL OF THE CYBEX PALLAS M-FIX
Perform the installation steps in the reverse order.
Note! By folding in the locking arms (o), you are not just protecting the vehicle seat
but also the locking arms of the ISOFIX CONNECT system from dirt and damage.
• Unlock the ISOFIX locking arms (o) on both sides by pushing the red
release buttons (y) and pulling them back simultaneously.
• Pull the seat out of the feed-in aids (u).
• Rotate the locking arms (o) 180°.
• Operate the adjustment lever (c) on the frame (w) of the CYBEX PALLAS M- x and
push the locking arms in as far as they will go.
Page 44

43
EELVLT
ACTIVATING THE L.S.P. ACTIVATING THE L.S.P.
The “Linear Side Protection” system (L.S.P.) can be extended in two steps by
pressing the L.S.P. button(s). Together with the initial position, this provides a total of
three different L.S.P. settings.
The “Linear Side Protection” system (L.S.P.) can be extended in two steps by
pressing the L.S.P. button(s). Together with the initial position, this provides a total of
three different L.S.P. settings.
To push the L.S.P. back into the housing, press the L.S.P. button again and push the
L.S.P. back into the starting position.
To push the L.S.P. back into the housing, press the L.S.P. button again and push the
L.S.P. back into the starting position.
Note! Always activate the L.S.P. on the side of the seat facing the car door (see
illustration).
Note! Always activate the L.S.P. on the side of the seat facing the car door (see
illustration).
REMOVAL OF THE CYBEX PALLAS M-FIX REMOVAL OF THE CYBEX PALLAS M-FIX
Perform the installation steps in the reverse order. Perform the installation steps in the reverse order.
Note! By folding in the locking arms (o), you are not just protecting the vehicle seat
but also the locking arms of the ISOFIX CONNECT system from dirt and damage.
Note! By folding in the locking arms (o), you are not just protecting the vehicle seat
but also the locking arms of the ISOFIX CONNECT system from dirt and damage.
• Unlock the ISOFIX locking arms (o) on both sides by pushing the red
release buttons (y) and pulling them back simultaneously.
• Pull the seat out of the feed-in aids (u).
• Rotate the locking arms (o) 180°.
• Operate the adjustment lever (c) on the frame (w) of the CYBEX PALLAS M-x and
push the locking arms in as far as they will go.
• Unlock the ISOFIX locking arms (o) on both sides by pushing the red
release buttons (y) and pulling them back simultaneously.
• Pull the seat out of the feed-in aids (u).
• Rotate the locking arms (o) 180°.
• Operate the adjustment lever (c) on the frame (w) of the CYBEX PALLAS M-x and
push the locking arms in as far as they will go.
Page 45

44
w
c
a
PLACING THE SEAT IN THE VEHICLE
Note! On some car seats made of sensitive materials (e.g. suede, leather etc.), the
use of child seats may leave marks and/or cause discolouration. To prevent this, you
can place a blanket or towel underneath it, for example. Please also refer to in this
connection to our cleaning instructions in these usage instructions; these cleaning
instructions must be observed prior to using the seat for the rst time.
Place the child seat on the appropriate seat in the car.
• Always ensure that the entire surface of the back rest (a) of the CYBEX
PALLAS M- x is placed fully against the back rest of the vehicle seat.
The child seat must never be in a lying position. If necessary, you can
adjust the distance using the adjustment lever (c) on the frame (w) of the
CYBEX PALLAS M- x child seat.
• If the head rest of the vehicle is in the way, pull it out all the way, turn it away
or remove it completely (for exceptions to this, please refer to the section
“POSITIONING THE SEAT CORRECTLY IN THE VEHICLE”) The back rest (a) will
perfectly adapt to practically any incline of the vehicle seat.
WARNING! The full surface of the back rest of the CYBEX child seat must be
against the back rest of the vehicle. To ensure maximum protection for your
child, the seat must be in a normal upright position!
Page 46

45
EELVLT
PLACING THE SEAT IN THE VEHICLE PLACING THE SEAT IN THE VEHICLE
Note! On some car seats made of sensitive materials (e.g. suede, leather etc.), the
use of child seats may leave marks and/or cause discolouration. To prevent this, you
can place a blanket or towel underneath it, for example. Please also refer to in this
connection to our cleaning instructions in these usage instructions; these cleaning
instructions must be observed prior to using the seat for the rst time.
Note! On some car seats made of sensitive materials (e.g. suede, leather etc.), the
use of child seats may leave marks and/or cause discolouration. To prevent this, you
can place a blanket or towel underneath it, for example. Please also refer to in this
connection to our cleaning instructions in these usage instructions; these cleaning
instructions must be observed prior to using the seat for the rst time.
Place the child seat on the appropriate seat in the car. Place the child seat on the appropriate seat in the car.
• Always ensure that the entire surface of the back rest (a) of the CYBEX
PALLAS M-x is placed fully against the back rest of the vehicle seat.
The child seat must never be in a lying position. If necessary, you can
adjust the distance using the adjustment lever (c) on the frame (w) of the
CYBEX PALLAS M-x child seat.
• If the head rest of the vehicle is in the way, pull it out all the way, turn it away
or remove it completely (for exceptions to this, please refer to the section
“POSITIONING THE SEAT CORRECTLY IN THE VEHICLE”) The back rest (a) will
perfectly adapt to practically any incline of the vehicle seat.
• Always ensure that the entire surface of the back rest (a) of the CYBEX
PALLAS M-x is placed fully against the back rest of the vehicle seat.
The child seat must never be in a lying position. If necessary, you can
adjust the distance using the adjustment lever (c) on the frame (w) of the
CYBEX PALLAS M-x child seat.
• If the head rest of the vehicle is in the way, pull it out all the way, turn it away
or remove it completely (for exceptions to this, please refer to the section
“POSITIONING THE SEAT CORRECTLY IN THE VEHICLE”) The back rest (a) will
perfectly adapt to practically any incline of the vehicle seat.
WARNING! The full surface of the back rest of the CYBEX child seat must be
against the back rest of the vehicle. To ensure maximum protection for your
child, the seat must be in a normal upright position!
WARNING! The full surface of the back rest of the CYBEX child seat must be
against the back rest of the vehicle. To ensure maximum protection for your
child, the seat must be in a normal upright position!
Page 47

46
z
p
w
d
d
i
h
e
In order to optimally adapt the CYBEX PALLAS M- x to your child’s body size, a seat
insert (i) has been provided as standard and is already inserted under the seat cover.
Note! Only an optimally adjusted head rest (e) can offer your child maximum
protection and comfort while ensuring that the diagonal belt can be tted smoothly (f).
The height of the CYBEX PALLAS M- x can be adjusted to one of twelve positions.
ADAPTING TO BODY SIZE
REMOVING THE ADDITIONAL SEAT INSERT
• We recommend using this additional seat insert (i) for children aged 9 to 24
months.
• From the age of 2 onwards, the seat insert (i) is no longer necessary.
• The seat can then be adjusted to your child’s body simply by using the adjustable
head rest (e). To do this, pull the adjustment level (h) upwards to unlock the head
rest (e).
• Adjust it so that there is space for two ngers between the lower edge of the head
rest (e) and the shoulder of the child.
1. Release the front push buttons of the seat cover from the seat cushion (d).
2. Pull the fabric cover from the cover guides up and forward until you can pull out
the seat insert.
3. The seat insert must be removed in accordance with the age specifications stated
above.
4. Pull the seat cover to its original state and fix it in place again.
By pushing the central adjustment button (z), you can adapt the safety cushion to
your child. Hold down the central adjustment button (z) while you adapt the safety
cushion to your child.
The side aps of the safety cushion (p) t exactly between the arm rests and seat
surface (d) and are used to support the safety cushion (p) on the seat.
Adjust the safety cushion (p) so that it is against the child but is not pushing against
the child’s body.
WARNING! The safety cushion (p) may only be used in conjunction with the
frame (w) up to a maximum of 18 kg!
ADJUSTING THE SAFETY CUSHION – ECE GROUP 1 (9-18 KG)
Page 48

47
EELVLT
In order to optimally adapt the CYBEX PALLAS M-x to your child’s body size, a seat
insert (i) has been provided as standard and is already inserted under the seat cover.
In order to optimally adapt the CYBEX PALLAS M-x to your child’s body size, a seat
insert (i) has been provided as standard and is already inserted under the seat cover.
Note! Only an optimally adjusted head rest (e) can offer your child maximum
protection and comfort while ensuring that the diagonal belt can be tted smoothly (f).
The height of the CYBEX PALLAS M-x can be adjusted to one of twelve positions.
Note! Only an optimally adjusted head rest (e) can offer your child maximum
protection and comfort while ensuring that the diagonal belt can be tted smoothly (f).
The height of the CYBEX PALLAS M-x can be adjusted to one of twelve positions.
ADAPTING TO BODY SIZE ADAPTING TO BODY SIZE
REMOVING THE ADDITIONAL SEAT INSERT REMOVING THE ADDITIONAL SEAT INSERT
• We recommend using this additional seat insert (i) for children aged 9 to 24
months.
• From the age of 2 onwards, the seat insert (i) is no longer necessary.
• The seat can then be adjusted to your child’s body simply by using the adjustable
head rest (e). To do this, pull the adjustment level (h) upwards to unlock the head
rest (e).
• Adjust it so that there is space for two ngers between the lower edge of the head
rest (e) and the shoulder of the child.
• We recommend using this additional seat insert (i) for children aged 9 to 24
months.
• From the age of 2 onwards, the seat insert (i) is no longer necessary.
• The seat can then be adjusted to your child’s body simply by using the adjustable
head rest (e). To do this, pull the adjustment level (h) upwards to unlock the head
rest (e).
• Adjust it so that there is space for two ngers between the lower edge of the head
rest (e) and the shoulder of the child.
1. Release the front push buttons of the seat cover from the seat cushion (d).
2. Pull the fabric cover from the cover guides up and forward until you can pull out
the seat insert.
3. The seat insert must be removed in accordance with the age specifications stated
above.
4. Pull the seat cover to its original state and fix it in place again.
1. Release the front push buttons of the seat cover from the seat cushion (d).
2. Pull the fabric cover from the cover guides up and forward until you can pull out
the seat insert.
3. The seat insert must be removed in accordance with the age specifications stated
above.
4. Pull the seat cover to its original state and fix it in place again.
By pushing the central adjustment button (z), you can adapt the safety cushion to
your child. Hold down the central adjustment button (z) while you adapt the safety
cushion to your child.
By pushing the central adjustment button (z), you can adapt the safety cushion to
your child. Hold down the central adjustment button (z) while you adapt the safety
cushion to your child.
The side aps of the safety cushion (p) t exactly between the arm rests and seat
surface (d) and are used to support the safety cushion (p) on the seat.
The side aps of the safety cushion (p) t exactly between the arm rests and seat
surface (d) and are used to support the safety cushion (p) on the seat.
Adjust the safety cushion (p) so that it is against the child but is not pushing against
the child’s body.
Adjust the safety cushion (p) so that it is against the child but is not pushing against
the child’s body.
WARNING! The safety cushion (p) may only be used in conjunction with the
frame (w) up to a maximum of 18 kg!
WARNING! The safety cushion (p) may only be used in conjunction with the
frame (w) up to a maximum of 18 kg!
ADJUSTING THE SAFETY CUSHION – ECE GROUP 1 (9-18 KG) ADJUSTING THE SAFETY CUSHION – ECE GROUP 1 (9-18 KG)
Page 49

48
w
p
v
v
t
r
d
To bring the CYBEX PALLAS M- x to a lying position, the vehicle’s own belt system
does not need to be opened.
The inclinable head rest helps to prevent the child’s head from dangerously
tipping forward during sleep. In the event of a collision, the head rest will follow the
movement of your child’s head forwards, lock into place and absorb the subsequent
backwards motion of your child’s head.
The incline angle of the head rest can be set to one of three positions. It can be
moved forward without moving the lever to the second or third position until the rest
locks into position. To return it to the original position, the lever must be operated and
the head rest pulled back.
Note! Ensure that your child’s head is always in contact with the inclinable head rest
(r), as this is the only way that the head rest can provide optimum protection from
side collisions.
Note! Ensure that the lap belt (n) and diagonal belt (f) are always tight.
WARNING! An adjustment of the lying position by the driver is prohibited while
travelling!
WARNING! Always ensure that the adjustment button (v) gives an audible
click when locking into the lying or seated position. The lying position is only
available for group 1 (9-18 kg) in the Pallas configuration with safety cushion
(p) and base frame (w).
WARNING! Never block the locking mechanism (t) using objects! In the event
of an accident, the incline adjustment mechanism must move smoothly, or
else your child may be injured!
SEATED AND LYING POSITION – ECE GROUP 1 (9-18 KG)
INCLINABLE HEAD REST
• If your child falls asleep during travel, simply press the adjustment button (v) on
the underside of the seat cushion (d), and the CYBEX PALLAS M- x will slide
downwards using your child’s weight.
• To restore the upright seat position from the lying position once the child is out of
the seat, press the adjustment button (v) again and apply light pressure against the
seat cushion (d) to guide the child seat back up.
Page 50

49
EELVLT
To bring the CYBEX PALLAS M-x to a lying position, the vehicle’s own belt system
does not need to be opened.
To bring the CYBEX PALLAS M-x to a lying position, the vehicle’s own belt system
does not need to be opened.
The inclinable head rest helps to prevent the child’s head from dangerously
tipping forward during sleep. In the event of a collision, the head rest will follow the
movement of your child’s head forwards, lock into place and absorb the subsequent
backwards motion of your child’s head.
The inclinable head rest helps to prevent the child’s head from dangerously
tipping forward during sleep. In the event of a collision, the head rest will follow the
movement of your child’s head forwards, lock into place and absorb the subsequent
backwards motion of your child’s head.
The incline angle of the head rest can be set to one of three positions. It can be
moved forward without moving the lever to the second or third position until the rest
locks into position. To return it to the original position, the lever must be operated and
the head rest pulled back.
The incline angle of the head rest can be set to one of three positions. It can be
moved forward without moving the lever to the second or third position until the rest
locks into position. To return it to the original position, the lever must be operated and
the head rest pulled back.
Note! Ensure that your child’s head is always in contact with the inclinable head rest
(r), as this is the only way that the head rest can provide optimum protection from
side collisions.
Note! Ensure that your child’s head is always in contact with the inclinable head rest
(r), as this is the only way that the head rest can provide optimum protection from
side collisions.
Note! Ensure that the lap belt (n) and diagonal belt (f) are always tight. Note! Ensure that the lap belt (n) and diagonal belt (f) are always tight.
WARNING! An adjustment of the lying position by the driver is prohibited while
travelling!
WARNING! An adjustment of the lying position by the driver is prohibited while
travelling!
WARNING! Always ensure that the adjustment button (v) gives an audible
click when locking into the lying or seated position. The lying position is only
available for group 1 (9-18 kg) in the Pallas configuration with safety cushion
(p) and base frame (w).
WARNING! Always ensure that the adjustment button (v) gives an audible
click when locking into the lying or seated position. The lying position is only
available for group 1 (9-18 kg) in the Pallas configuration with safety cushion
(p) and base frame (w).
WARNING! Never block the locking mechanism (t) using objects! In the event
of an accident, the incline adjustment mechanism must move smoothly, or
else your child may be injured!
WARNING! Never block the locking mechanism (t) using objects! In the event
of an accident, the incline adjustment mechanism must move smoothly, or
else your child may be injured!
SEATED AND LYING POSITION – ECE GROUP 1 (9-18 KG) SEATED AND LYING POSITION – ECE GROUP 1 (9-18 KG)
INCLINABLE HEAD REST INCLINABLE HEAD REST
• If your child falls asleep during travel, simply press the adjustment button (v) on
the underside of the seat cushion (d), and the CYBEX PALLAS M-x will slide
downwards using your child’s weight.
• If your child falls asleep during travel, simply press the adjustment button (v) on
the underside of the seat cushion (d), and the CYBEX PALLAS M-x will slide
downwards using your child’s weight.
• To restore the upright seat position from the lying position once the child is out of
the seat, press the adjustment button (v) again and apply light pressure against the
seat cushion (d) to guide the child seat back up.
• To restore the upright seat position from the lying position once the child is out of
the seat, press the adjustment button (v) again and apply light pressure against the
seat cushion (d) to guide the child seat back up.
Page 51

50
f
f
f
x
x
x
x
n
n
n
p
p
m
w
d
l
q
q
CLICK!
v
STRAPPING IN USING THE SAFETY CUSHION – ECE GROUP 1
(9-18 KG)
SWITCHING FROM PALLAS M-FIX TO SOLUTION M-FIX (ECE
GROUP 1 TO ECE GROUP 2/3)
1. Now insert the previously adjusted safety cushion (p) (refer to the section
“ADJUSTING THE SAFETY CUSHION”).
2. Pull the entire length of the vehicle’s three-point belt out. Take the lap belt (n) and
place it in the designated belt guide (x) in the safety cushion (p).
3. Insert the belt tongue (m) into the belt buckle (l). It must lock into place with an
audible “CLICK”.
4. Tighten the lap belt by pulling the diagonal belt.
5. Now feed the diagonal belt (f) in parallel with the lap belt (n) back into the belt
guide (x).
6. Pull the diagonal belt (f) tight and ensure that both parts of the belt cover the entire
width of the safety cushion (p) in the belt guide (x).
7. Feed the diagonal belt (f) either between the head and shoulder rests (see
illustration) or outside along the shoulder rest, depending on how much of the belt
length is available. Please always choose the option that uses the least amount of
belt length.
WARNING! Never twist the belt!
1. Remove the safety cushion (p).
2. Press the two release buttons (q) on the underside of the seat cushion (d) and pull
it away from the frame until there is some resistance.
3. Press the adjustment button (v) and pull the seat away from the frame (w)
completely.
WARNING! The three-point belt may only be inserted into the guides
designated for that purpose. The belt guides are described precisely in this
manual and are also marked red on the child seat.
Page 52

51
EELVLT
STRAPPING IN USING THE SAFETY CUSHION – ECE GROUP 1
(9-18 KG)
STRAPPING IN USING THE SAFETY CUSHION – ECE GROUP 1
(9-18 KG)
SWITCHING FROM PALLAS M-FIX TO SOLUTION M-FIX (ECE
GROUP 1 TO ECE GROUP 2/3)
SWITCHING FROM PALLAS M-FIX TO SOLUTION M-FIX (ECE
GROUP 1 TO ECE GROUP 2/3)
1. Now insert the previously adjusted safety cushion (p) (refer to the section
“ADJUSTING THE SAFETY CUSHION”).
2. Pull the entire length of the vehicle’s three-point belt out. Take the lap belt (n) and
place it in the designated belt guide (x) in the safety cushion (p).
1. Now insert the previously adjusted safety cushion (p) (refer to the section
“ADJUSTING THE SAFETY CUSHION”).
2. Pull the entire length of the vehicle’s three-point belt out. Take the lap belt (n) and
place it in the designated belt guide (x) in the safety cushion (p).
3. Insert the belt tongue (m) into the belt buckle (l). It must lock into place with an
audible “CLICK”.
4. Tighten the lap belt by pulling the diagonal belt.
5. Now feed the diagonal belt (f) in parallel with the lap belt (n) back into the belt
guide (x).
6. Pull the diagonal belt (f) tight and ensure that both parts of the belt cover the entire
width of the safety cushion (p) in the belt guide (x).
7. Feed the diagonal belt (f) either between the head and shoulder rests (see
illustration) or outside along the shoulder rest, depending on how much of the belt
length is available. Please always choose the option that uses the least amount of
belt length.
WARNING! Never twist the belt! WARNING! Never twist the belt!
1. Remove the safety cushion (p).
2. Press the two release buttons (q) on the underside of the seat cushion (d) and pull
it away from the frame until there is some resistance.
3. Press the adjustment button (v) and pull the seat away from the frame (w)
completely.
1. Remove the safety cushion (p).
2. Press the two release buttons (q) on the underside of the seat cushion (d) and pull
it away from the frame until there is some resistance.
3. Press the adjustment button (v) and pull the seat away from the frame (w)
completely.
WARNING! The three-point belt may only be inserted into the guides
designated for that purpose. The belt guides are described precisely in this
manual and are also marked red on the child seat.
WARNING! The three-point belt may only be inserted into the guides
designated for that purpose. The belt guides are described precisely in this
manual and are also marked red on the child seat.
Page 53

52
A
c
o
w
A
o
d
o
v
l
l
m
CLICK!
ISOFIX CONNECT modi cation
4. Operate the adjustment lever (c) on the frame (w) and pull the two ISOFIX
CONNECT locking arms (o) until there is some resistance.
5. Keep the adjustment lever held (c) and release the two snap clips (A) on the
underside of the seat elevator (d), one after the other. If necessary, use a
screwdriver.
7. Operate the adjustment button (v) on the underside of the seat elevator (d) and
push the locking arms (o) in as far as they will go.
8. For further information on correct installation, please refer to the section
“SECURING THE CHILD SEAT USING THE ISOFEX CONNECT SYSTEM”
6. Now push the ISOFIX CONNECT locking arms (o) into the designated openings
on the underside of the seat elevator (d) until there is some resistance.
Note! If this is done correctly, the ISOFIX CONNECT locking arms (o) will easily
release from the frame (w).
Note! Keep removed parts together in a safe and secure place.
WARNING! Note the minimum drop height of the ISOFIX CONNECT locking
arms. Failure to note this may result in damage to components or injury to
yourself or other persons nearby.
WARNING! Ensure that the locking arms are installed the right way around and
that the teeth of the locking arms are up when inserting them into the seat.
WARNING! When reassembling the seat, proceed in precisely the reverse
order. Use the instructions to check beforehand if all parts are present.
STRAPPING IN WITHOUT THE SAFETY CUSHION – ECE GROUP
2/3 (15-36 KG)
1. Place your child in the child seat. Pull the three-point belt right out and feed it
along the belt buckle (l) in front of your child.
WARNING! Never twist the belt.
2. Insert the belt tongue (m) into the belt buckle (l). It must lock into place with an
audible “CLICK”.
Page 54

53
EELVLT
ISOFIX CONNECT modication ISOFIX CONNECT modication
4. Operate the adjustment lever (c) on the frame (w) and pull the two ISOFIX
CONNECT locking arms (o) until there is some resistance.
5. Keep the adjustment lever held (c) and release the two snap clips (A) on the
underside of the seat elevator (d), one after the other. If necessary, use a
screwdriver.
4. Operate the adjustment lever (c) on the frame (w) and pull the two ISOFIX
CONNECT locking arms (o) until there is some resistance.
5. Keep the adjustment lever held (c) and release the two snap clips (A) on the
underside of the seat elevator (d), one after the other. If necessary, use a
screwdriver.
7. Operate the adjustment button (v) on the underside of the seat elevator (d) and
push the locking arms (o) in as far as they will go.
8. For further information on correct installation, please refer to the section
“SECURING THE CHILD SEAT USING THE ISOFEX CONNECT SYSTEM”
7. Operate the adjustment button (v) on the underside of the seat elevator (d) and
push the locking arms (o) in as far as they will go.
8. For further information on correct installation, please refer to the section
“SECURING THE CHILD SEAT USING THE ISOFEX CONNECT SYSTEM”
6. Now push the ISOFIX CONNECT locking arms (o) into the designated openings
on the underside of the seat elevator (d) until there is some resistance.
6. Now push the ISOFIX CONNECT locking arms (o) into the designated openings
on the underside of the seat elevator (d) until there is some resistance.
Note! If this is done correctly, the ISOFIX CONNECT locking arms (o) will easily
release from the frame (w).
Note! If this is done correctly, the ISOFIX CONNECT locking arms (o) will easily
release from the frame (w).
Note! Keep removed parts together in a safe and secure place. Note! Keep removed parts together in a safe and secure place.
WARNING! Note the minimum drop height of the ISOFIX CONNECT locking
arms. Failure to note this may result in damage to components or injury to
yourself or other persons nearby.
WARNING! Note the minimum drop height of the ISOFIX CONNECT locking
arms. Failure to note this may result in damage to components or injury to
yourself or other persons nearby.
WARNING! Ensure that the locking arms are installed the right way around and
that the teeth of the locking arms are up when inserting them into the seat.
WARNING! Ensure that the locking arms are installed the right way around and
that the teeth of the locking arms are up when inserting them into the seat.
WARNING! When reassembling the seat, proceed in precisely the reverse
order. Use the instructions to check beforehand if all parts are present.
WARNING! When reassembling the seat, proceed in precisely the reverse
order. Use the instructions to check beforehand if all parts are present.
STRAPPING IN WITHOUT THE SAFETY CUSHION – ECE GROUP
2/3 (15-36 KG)
STRAPPING IN WITHOUT THE SAFETY CUSHION – ECE GROUP
2/3 (15-36 KG)
1. Place your child in the child seat. Pull the three-point belt right out and feed it
along the belt buckle (l) in front of your child.
1. Place your child in the child seat. Pull the three-point belt right out and feed it
along the belt buckle (l) in front of your child.
WARNING! Never twist the belt. WARNING! Never twist the belt.
2. Insert the belt tongue (m) into the belt buckle (l). It must lock into place with an
audible “CLICK”.
2. Insert the belt tongue (m) into the belt buckle (l). It must lock into place with an
audible “CLICK”.
Page 55

54
f
k
f
l
k
k
f
k
n
n
n
n
g
g
f
s
e
f
d
WARNING! The lap belt (n) must run as low as possible on both sides along
your child’s groin to have optimum effect in the event of an accident.
6. Now feed the diagonal belt (f) through the upper belt guide (g) in the shoulder rest
(e) until it is inside the belt guide.
Ensure that the diagonal belt (f) runs between the outside of the shoulder and the
neck of your child. If necessary, adjust the height of the head rest to change the
position of the belt. The height of the head rest (e) can still be adjusted while in the
car.
3. Next, place the lap belt (n) in the lower belt guides (k) of the child seat.
4. Now pull the diagonal belt (f) firmly to tighten the lap belt (n). The tighter the belt
sits, the better it provides protection from injury. On the side of the belt buckle (l),
the diagonal belt (f) and the lap belt (n) must be inserted together in the lower belt
guide (k).
WARNING! The vehicle belt buckle (l) must never cross the arm rest. If the belt
system is too long, the child seat is not suitable for use in this position in the
vehicle. In case of doubt, please consult the manufacturer of your vehicle.
5. The lap belt (n) should have been fed through the lower belt guides (k) on both
sides of the seat cushion (d).
Note! Teach your child from the start to always ensure that the belt is tight and, if
necessary, how to tighten the belt themselves.
To ensure optimum safety for your child, please always check before commencing
travel that
• the lap belt (n) has been fed through the lower belt guides (k) on both sides of the
seat cushion (d).
• the diagonal belt (f) on the belt buckle side has also been fed through the lower belt
guide (k) of the seat.
• the diagonal belt (f) has been fed through the belt guide (g) marked red in the
shoulder rest (e).
• the diagonal belt (f) is at an incline downwards.
• the entire belt is tightly against your child’s body and is not twisted.
IS YOUR CHILD CORRECTLY SECURED?
Page 56

55
EELVLT
WARNING! The lap belt (n) must run as low as possible on both sides along
your child’s groin to have optimum effect in the event of an accident.
WARNING! The lap belt (n) must run as low as possible on both sides along
your child’s groin to have optimum effect in the event of an accident.
6. Now feed the diagonal belt (f) through the upper belt guide (g) in the shoulder rest
(e) until it is inside the belt guide.
6. Now feed the diagonal belt (f) through the upper belt guide (g) in the shoulder rest
(e) until it is inside the belt guide.
Ensure that the diagonal belt (f) runs between the outside of the shoulder and the
neck of your child. If necessary, adjust the height of the head rest to change the
position of the belt. The height of the head rest (e) can still be adjusted while in the
car.
Ensure that the diagonal belt (f) runs between the outside of the shoulder and the
neck of your child. If necessary, adjust the height of the head rest to change the
position of the belt. The height of the head rest (e) can still be adjusted while in the
car.
3. Next, place the lap belt (n) in the lower belt guides (k) of the child seat.
4. Now pull the diagonal belt (f) firmly to tighten the lap belt (n). The tighter the belt
sits, the better it provides protection from injury. On the side of the belt buckle (l),
the diagonal belt (f) and the lap belt (n) must be inserted together in the lower belt
guide (k).
WARNING! The vehicle belt buckle (l) must never cross the arm rest. If the belt
system is too long, the child seat is not suitable for use in this position in the
vehicle. In case of doubt, please consult the manufacturer of your vehicle.
WARNING! The vehicle belt buckle (l) must never cross the arm rest. If the belt
system is too long, the child seat is not suitable for use in this position in the
vehicle. In case of doubt, please consult the manufacturer of your vehicle.
5. The lap belt (n) should have been fed through the lower belt guides (k) on both
sides of the seat cushion (d).
5. The lap belt (n) should have been fed through the lower belt guides (k) on both
sides of the seat cushion (d).
Note! Teach your child from the start to always ensure that the belt is tight and, if
necessary, how to tighten the belt themselves.
Note! Teach your child from the start to always ensure that the belt is tight and, if
necessary, how to tighten the belt themselves.
To ensure optimum safety for your child, please always check before commencing
travel that
To ensure optimum safety for your child, please always check before commencing
travel that
• the lap belt (n) has been fed through the lower belt guides (k) on both sides of the
seat cushion (d).
• the diagonal belt (f) on the belt buckle side has also been fed through the lower belt
guide (k) of the seat.
• the diagonal belt (f) has been fed through the belt guide (g) marked red in the
shoulder rest (e).
• the diagonal belt (f) is at an incline downwards.
• the entire belt is tightly against your child’s body and is not twisted.
IS YOUR CHILD CORRECTLY SECURED? IS YOUR CHILD CORRECTLY SECURED?
Page 57

56
e e
h
To ensure that your child seat provides maximum protection, it is imperative that you
note the following:
CARE & MAINTENANCE
• All major parts of the child seat should be checked regularly for damage. The
mechanical components must be free of defects.
• It is absolutely necessary to ensure that the child seat is not jammed between hard
elements such as the vehicle door or seat rail, which could potentially damage it.
• When exposed to extreme shock, e.g. after a crash, the child seat must be
checked by the manufacturer.
REMOVING THE SEAT COVER
REMOVING THE COVER FROM THE HEADREST FLAP
REMOVING THE COVER FROM THE HEAD SUPPORT
The cover of the infant seat consists of four parts (Headrest ap, headrest, shoulder
part cover, booster cover and/or seat surface cover).This is complemented by the
safety cushion cover.
The four covers of the seat are tted into the cover attachment channels on the edge
of the infant seat and are held in position at several places by press-studs (see
image).
Once all studs have been released, the single parts of the cover can be removed
from the cover attachment channels.
Pull the opening of the cover over the adjustment lever so that the cover does not get
jammed on the lever when pulling it up to remove it.
Release the two press-studs at each side of the rear of the shoulder area. Pull the
cover out of the cover attachment channel.
In order to put the covers back on the seat, proceed in the reversed order as
removing them.
Warning! The child seat must never be used without the cover.
Ensure that only an original CYBEX seat cover is used, as the cover is a key element
of the seat’s function. Spare covers can be obtained from a specialist retailer.
Page 58

57
EELVLT
To ensure that your child seat provides maximum protection, it is imperative that you
note the following:
To ensure that your child seat provides maximum protection, it is imperative that you
note the following:
CARE & MAINTENANCE CARE & MAINTENANCE
• All major parts of the child seat should be checked regularly for damage. The
mechanical components must be free of defects.
• It is absolutely necessary to ensure that the child seat is not jammed between hard
elements such as the vehicle door or seat rail, which could potentially damage it.
• When exposed to extreme shock, e.g. after a crash, the child seat must be
checked by the manufacturer.
• All major parts of the child seat should be checked regularly for damage. The
mechanical components must be free of defects.
• It is absolutely necessary to ensure that the child seat is not jammed between hard
elements such as the vehicle door or seat rail, which could potentially damage it.
• When exposed to extreme shock, e.g. after a crash, the child seat must be
checked by the manufacturer.
REMOVING THE SEAT COVER REMOVING THE SEAT COVER
REMOVING THE COVER FROM THE HEADREST FLAP REMOVING THE COVER FROM THE HEADREST FLAP
REMOVING THE COVER FROM THE HEAD SUPPORT REMOVING THE COVER FROM THE HEAD SUPPORT
The cover of the infant seat consists of four parts (Headrest ap, headrest, shoulder
part cover, booster cover and/or seat surface cover).This is complemented by the
safety cushion cover.
The four covers of the seat are tted into the cover attachment channels on the edge
of the infant seat and are held in position at several places by press-studs (see
image).
Once all studs have been released, the single parts of the cover can be removed
from the cover attachment channels.
The cover of the infant seat consists of four parts (Headrest ap, headrest, shoulder
part cover, booster cover and/or seat surface cover).This is complemented by the
safety cushion cover.
The four covers of the seat are tted into the cover attachment channels on the edge
of the infant seat and are held in position at several places by press-studs (see
image).
Once all studs have been released, the single parts of the cover can be removed
from the cover attachment channels.
Pull the opening of the cover over the adjustment lever so that the cover does not get
jammed on the lever when pulling it up to remove it.
Pull the opening of the cover over the adjustment lever so that the cover does not get
jammed on the lever when pulling it up to remove it.
Release the two press-studs at each side of the rear of the shoulder area. Pull the
cover out of the cover attachment channel.
Release the two press-studs at each side of the rear of the shoulder area. Pull the
cover out of the cover attachment channel.
In order to put the covers back on the seat, proceed in the reversed order as
removing them.
In order to put the covers back on the seat, proceed in the reversed order as
removing them.
Warning! The child seat must never be used without the cover. Warning! The child seat must never be used without the cover.
Ensure that only an original CYBEX seat cover is used, as the cover is a key element
of the seat’s function. Spare covers can be obtained from a specialist retailer.
Ensure that only an original CYBEX seat cover is used, as the cover is a key element
of the seat’s function. Spare covers can be obtained from a specialist retailer.
Page 59

58
Note! The cover may only be washed at 30°C with a delicate wash program.
Washing at more than 30°C may result in discolouration of the cover fabric. Please
wash the cover separately from other laundry and do not dry in the dryer! Never dry
the cover in direct sunlight! The plastic parts can be cleaned with a mild cleaning
agent and warm water.
Warning! Never use harsh cleaning agents or bleaches!
CLEANING
REMOVING THE COVER FROM THE SEAT SURFACE
REMOVING THE COVER FROM THE SAFETY CUSHION
Release the four press-studs of the seat cover at the front and the back. Now, pull off
the cover over the armrests and along the seat surface.
First, release the two press-studs of the safety cushion cover. Then pull off the cover
around the cushion towards the third attachment around the central adjustment
button and release the cover at the rubber eyelet of the adjustment button.
REMOVING THE COVER FROM THE SHOULDER PART
Pull the cover out of the cover attachment channel.
Page 60

59
EELVLT
Note! The cover may only be washed at 30°C with a delicate wash program.
Washing at more than 30°C may result in discolouration of the cover fabric. Please
wash the cover separately from other laundry and do not dry in the dryer! Never dry
the cover in direct sunlight! The plastic parts can be cleaned with a mild cleaning
agent and warm water.
Warning! Never use harsh cleaning agents or bleaches! Warning! Never use harsh cleaning agents or bleaches!
CLEANING CLEANING
REMOVING THE COVER FROM THE SEAT SURFACE REMOVING THE COVER FROM THE SEAT SURFACE
REMOVING THE COVER FROM THE SAFETY CUSHION REMOVING THE COVER FROM THE SAFETY CUSHION
Release the four press-studs of the seat cover at the front and the back. Now, pull off
the cover over the armrests and along the seat surface.
Release the four press-studs of the seat cover at the front and the back. Now, pull off
the cover over the armrests and along the seat surface.
First, release the two press-studs of the safety cushion cover. Then pull off the cover
around the cushion towards the third attachment around the central adjustment
button and release the cover at the rubber eyelet of the adjustment button.
First, release the two press-studs of the safety cushion cover. Then pull off the cover
around the cushion towards the third attachment around the central adjustment
button and release the cover at the rubber eyelet of the adjustment button.
REMOVING THE COVER FROM THE SHOULDER PART REMOVING THE COVER FROM THE SHOULDER PART
Pull the cover out of the cover attachment channel. Pull the cover out of the cover attachment channel.
Page 61

60
• If the vehicle is directly exposed to sunlight for a longer time, the child seat must be
removed from the vehicle or covered with a bright cloth.
• Regularly check all plastic and metal parts of the seat for damage, deformation or
change of colour. If you discover any changes, the child seat must be disposed or
checked and possibly replaced by the manufacturer.
• Changes to fabric, especially bleaching, are perfectly normal when used in a
vehicle and do not impair the seat’s function.
PRODUCT SERVICE LIFE
WARNING! An accident may cause damage to the child seat that is not
identifiable with the naked eye. Please replace the seat after an accident. In
case of doubt, please consult your dealer or the manufacturer.
HOW TO ACT FOLLOWING AN ACCIDENT
At the end of the child seat’s service life, it must be disposed of correctly. The
separation of waste may be handled differently from place to place. To ensure that
the child seat is disposed of in accordance with regulations, please contact your
local waste disposal institution or local council. Always observe the waste disposal
regulations of your country.
DISPOSAL
The CYBEX PALLAS M-x is designed to meet its specications for the entire
service life of approximately 11 years. However, as there can be very large
temperature uctuations and unpredictable strains in vehicles, the following points
must be observed:
Page 62

61
EELVLT
• If the vehicle is directly exposed to sunlight for a longer time, the child seat must be
removed from the vehicle or covered with a bright cloth.
• Regularly check all plastic and metal parts of the seat for damage, deformation or
change of colour. If you discover any changes, the child seat must be disposed or
checked and possibly replaced by the manufacturer.
• Changes to fabric, especially bleaching, are perfectly normal when used in a
vehicle and do not impair the seat’s function.
PRODUCT SERVICE LIFE PRODUCT SERVICE LIFE
WARNING! An accident may cause damage to the child seat that is not
identifiable with the naked eye. Please replace the seat after an accident. In
case of doubt, please consult your dealer or the manufacturer.
WARNING! An accident may cause damage to the child seat that is not
identifiable with the naked eye. Please replace the seat after an accident. In
case of doubt, please consult your dealer or the manufacturer.
HOW TO ACT FOLLOWING AN ACCIDENT HOW TO ACT FOLLOWING AN ACCIDENT
At the end of the child seat’s service life, it must be disposed of correctly. The
separation of waste may be handled differently from place to place. To ensure that
the child seat is disposed of in accordance with regulations, please contact your
local waste disposal institution or local council. Always observe the waste disposal
regulations of your country.
At the end of the child seat’s service life, it must be disposed of correctly. The
separation of waste may be handled differently from place to place. To ensure that
the child seat is disposed of in accordance with regulations, please contact your
local waste disposal institution or local council. Always observe the waste disposal
regulations of your country.
DISPOSAL DISPOSAL
The CYBEX PALLAS M-x is designed to meet its specications for the entire
service life of approximately 11 years. However, as there can be very large
temperature uctuations and unpredictable strains in vehicles, the following points
must be observed:
The CYBEX PALLAS M-x is designed to meet its specications for the entire service
life of approximately 11 years. However, as there can be very large temperature
uctuations and unpredictable strains in vehicles, the following points must be
observed:
Page 63

62
The following warranty conditions only apply to the country in which this product
was rst sold through retail channels to a consumer. This warranty covers all
manufacturing and material defects that existed at the time of purchase or which
manifest themselves within three (3) years of rst sale of this product via retail
channels to a consumer (manufacturer warranty). If a manufacturing or material
defect arises during the warranty period, the product will be repaired at no charge
or – at our discretion – may be replaced by a new one. In order to make a claim on
this warranty, the product must be returned to the retailer that rst sold it and the
original proof of purchase (receipt or invoice), containing the date of purchase, name
and address of the retailer, and the product name, must be presented. No claims
may be made on this warranty if the product is sent to the manufacturer or any other
person than the retailer having rst sold it for the purpose of making a claim on the
warranty. The warranty only applies is the product was checked for completeness,
manufacturing defects and material defects immediately upon purchase. If the
product was purchase by way of a mail order outlet, it must be checked for
completeness, manufacturing defects and material defects immediately upon receipt.
If damage arises, the product may no longer be used and must be returned to the
retailer that original sold it. When claiming on the warranty, the product must be
returned in a complete and clean state. Please read the usage instructions carefully
before contacting the retailer. The warranty does not cover damage caused by
misuse, external inuences (water, re, trafc accidents etc.) or normal wear and
tear. Claims on the warranty will only be honoured if the product is treated and
used in accordance with the usage instructions, repairs and modications are only
performed by persons authorised to do so, and only original parts and accessories
are used. This warranty does not nullify or limit in any way any consumer rights or
rights against the seller based on infringement of the purchase agreement granted
by applicable legislation.
WARRANTY CONDITIONS
Page 64

63
EELVLT
The following warranty conditions only apply to the country in which this product
was rst sold through retail channels to a consumer. This warranty covers all
manufacturing and material defects that existed at the time of purchase or which
manifest themselves within three (3) years of rst sale of this product via retail
channels to a consumer (manufacturer warranty). If a manufacturing or material
defect arises during the warranty period, the product will be repaired at no charge
or – at our discretion – may be replaced by a new one. In order to make a claim on
this warranty, the product must be returned to the retailer that rst sold it and the
original proof of purchase (receipt or invoice), containing the date of purchase, name
and address of the retailer, and the product name, must be presented. No claims
may be made on this warranty if the product is sent to the manufacturer or any other
person than the retailer having rst sold it for the purpose of making a claim on the
warranty. The warranty only applies is the product was checked for completeness,
manufacturing defects and material defects immediately upon purchase. If the
product was purchase by way of a mail order outlet, it must be checked for
completeness, manufacturing defects and material defects immediately upon receipt.
If damage arises, the product may no longer be used and must be returned to the
retailer that original sold it. When claiming on the warranty, the product must be
returned in a complete and clean state. Please read the usage instructions carefully
before contacting the retailer. The warranty does not cover damage caused by
misuse, external inuences (water, re, trafc accidents etc.) or normal wear and
tear. Claims on the warranty will only be honoured if the product is treated and
used in accordance with the usage instructions, repairs and modications are only
performed by persons authorised to do so, and only original parts and accessories
are used. This warranty does not nullify or limit in any way any consumer rights or
rights against the seller based on infringement of the purchase agreement granted
by applicable legislation.
WARRANTY CONDITIONS WARRANTY CONDITIONS
Page 65

Page 66

Thank you for choosing the CYBEX Pallas M-fix child seat. Safety, comfort and ease of use were the foremost principles
applied to the development of the CYBEX Pallas M-fix child seat. This product is manufactured subject to special quality
assurance measures and satisfies the most stringent of safety requirements.
Dear customer,
Page 67

66
09/2014
Contents
PALLAS M-fix
ECE-R44-04
UNIVE RSAL
SEM I-UNIVE RSAL
9 – 18 kg
CYBEX GmbH
Riedinger Str. 18, 95448 Bayreuth
Germany
04301315
SOLUTION M-fix
ECE-R44-04
UNIVE RSAL
SEM I-UNIVE RSAL
15 – 36 kg
CYBEX GmbH
Riedinger Str. 18, 95448 Bayreuth
Germany
04301314
Warning! To ensure optimum protection for your child, the CYBEX PALLAS
M-fix must be used as described in these instructions.
Note! Country-specic regulations (e.g. regarding colour-coding on child seats) may
mean that product features may vary in appearance. This will, however, not affect the
product in its correct function.
Note! Always keep these instructions to hand (e.g. in the designated compartment
on the rear of the back rest).
Approval
Cybex PALLAS M-x
Seat elevator with back rest and head rest on an
adjustable base frame with height-adjustable safety
cushions.
Recommended for:
Age: Approx. 9 months to 4 years
Weight: 9-18 kg
Only suitable for vehicle seats with automatic
three-point belts approved in accordance with ECE
regulation R16 or a comparable standard
ECE R-44/04,
CYBEX PALLAS M-x - group 1, 9 to 18 kg
CYBEX SOLUTION M-x - group 2/3, 15 to 36 kg
TR
Brief instructions Group 1 (9-18 kg) ........................................................................................ 2
Brief instructions Group 2/3 (15-36 kg) ................................................................................... 3
Approval .................................................................................................................................66
Positioning the seat correctly in the vehicle .........................................................................68
Securing the child seat using the ISOFIX CONNECT system ............................................70
Activating the L.S.P. ...............................................................................................................72
Removal of the CYBEX PALLAS M-fix .................................................................................72
Placing the seat in the vehicle ..............................................................................................74
Adapting to body size ...........................................................................................................76
Removing the additional seat insert ......................................................................................76
Adjusting the safety cushion – ECE group 1 (9-18 kg) ........................................................76
Seated and lying position – ECE group 1 (9-18 kg) .............................................................78
Inclinable head rest ..............................................................................................................78
Strapping in using the safety cushion – ECE group 1 (9-18 kg) ..........................................80
Switching from Pallas M-fix to Solution M-fix (ECE group 1 to ECE group 2/3) .................80
Strapping in without the safety cushion – ECE group 2/3 (15-36 kg) ..................................82
Is your child correctly secured? .............................................................................................84
Care & maintenance ..............................................................................................................86
Removing the seat cover ......................................................................................................86
Removing the cover from the headrest flap .........................................................................86
Removing the cover from the head support .........................................................................86
Removing the cover from the shoulder part .........................................................................88
Removing the cover from the seat surface ...........................................................................88
Removing the cover from the safety cushion .......................................................................88
Cleaning .................................................................................................................................88
How to act following an accident ...........................................................................................90
Product service life ................................................................................................................90
Disposal .................................................................................................................................90
Warranty conditions ...............................................................................................................92
Page 68

67
Page 69

68
o
f
POSITIONING THE SEAT CORRECTLY IN THE VEHICLE
The CYBEX PALLAS M- x with retracted ISOFIX CONNECT system
can be used on all vehicle seats with automatic three-point safety belts
approved for the transport of adult persons.
A ‘semi-universal’ approval is provided for xtures using ISOFIX CONNECT
locking arms (o). For this reason, ISOFIX CONNECT can only be used in
certain vehicles. Please refer to the enclosed vehicle type list for approved
vehicles. You can obtain the most up-to-date version from
www.cybex-online.com.
In exceptional cases, the child seat may also be used on the front passenger seat.
Please note the following in this case:
• In cars with airbags, you should push the passenger seat back as far as possible.
When doing so, however, ensure that the upper pivot point of the safety belt is
behind the belt feed point of the child seat.
• Always comply with the recommendations of the vehicle manufacturer.
WARNING! The seat is not suitable for use with a two-point or lap belt. If the
seat is secured using a two-point belt, an accident may result in severe or
even fatal injuries to the child.
WARNING! The diagonal belt (f) must run back at an incline and must never
run forward to the upper belt point in your vehicle. If it is not possible to adjust
the seat in this way, e.g. by pushing the car seat forward or using it on another
seat, this child seat is not suitable for your vehicle.
Luggage or other objects present in the vehicle that may cause injury in the event of
an accident must always be rmly secured. Otherwise, they may be thrown, causing
fatal injuries.
Note! Never leave your child unattended in the vehicle.
WARNING! The child seat may not be used on car seats facing to the side of
the direction of travel. Use of the child seat is permitted on rear-facing seats,
e.g. in a van or minibus, provided that the seat is permitted for transporting
an adult. Please note that the vehicle head rest must not be removed when
fitting on a rear-facing seat! Even if not in use, the child seat must always be
secured with the safety belt. This applies even if the child set has already been
secured to the vehicle using the ISOFIX CONNECT system. An unsecured
child seat can injure other passengers and yourself even when just performing
an emergency brake or in the event of a minor collision.
Page 70

69
TR
Page 71

70
u
j
c
y
b
y
o
c
b
w
y
d
CLICK!
SECURING THE CHILD SEAT USING THE ISOFIX CONNECT
SYSTEM
Note! The ISOFIX xture points (j) are two metallic clips for each seat and are
positioned between the back rest and the seating surface of the vehicle seat. In case
of doubt, please refer to the driver’s manual of your vehicle.
Note! Before joining the ISOFIX-CONNECT locking arms (o) with the ISOFIX
xture points (j), check the release buttons (y). If the green safety indicators (b) are
visible, you must rst release the ISOFIX-CONNECT locking arms before joining by
pressing and pulling back the release button. Repeat the process if necessary with
the second locking arm.
A perceptible click will be heard when the ISOFIX-CONNECT locking arm correctly
locks in place with ISOFIX xture points.
Note! Note the information in the section “Placing the seat in the vehicle”.
• Push the two locking arms (o) into the feed-in aids (u) until these lock into place in
the ISOFIX xture points with an audible ‘click’.
• Ensure that the seat is secure by trying to pull it out of the feed-in aids (u).
• The green safety indicator (b) must now be clearly visible on the two red release
buttons (y).
• You can now use the adjustment lever (c) on the frame (w) of the CYBEX PALLAS
M- x child seat position.
• You can now strap in your child; refer to the section “STRAPPING IN USING
SAFETY CUSHION”.
• Insert the supplied feed-in aids (u) with the longer strap upwards into the two
ISOFIX xture points (j). In some vehicles, it is better to mount the feed-in aids (u)
in the opposite direction.
• Use the adjustment lever (c) under the seat cushion (d) on the frame (w) of the
CYBEX PALLAS M- x child seat.
• Pull the two ISOFIX-CONNECT locking arms (o) as far as they will go.
• Now twist the ISOFIX-CONNECT locking arms (o) 180° so that they are facing the
direction of the feed-in aids (u).
Using the ISOFIX-CONNECT system, you can x the CYBEX PALLAS M- x
to the vehicle, thereby increasing your child’s safety. Your child will still be
secured using the three-point belt of your vehicle.
Page 72

71
TR
Page 73

72
PRESS!
L.S.P.
y
2
1
3
o
A
ACTIVATING THE L.S.P.
The “Linear Side Protection” system (L.S.P.) can be extended in two steps by
pressing the L.S.P. button(s). Together with the initial position, this provides a total of
three different L.S.P. settings.
To push the L.S.P. back into the housing, press the L.S.P. button again and push the
L.S.P. back into the starting position.
Note! Always activate the L.S.P. on the side of the seat facing the car door (see
illustration).
REMOVAL OF THE CYBEX PALLAS M-FIX
Perform the installation steps in the reverse order.
Note! By folding in the locking arms (o), you are not just protecting the vehicle seat
but also the locking arms of the ISOFIX CONNECT system from dirt and damage.
• Unlock the ISOFIX locking arms (o) on both sides by pushing the red
release buttons (y) and pulling them back simultaneously.
• Pull the seat out of the feed-in aids (u).
• Rotate the locking arms (o) 180°.
• Operate the adjustment lever (c) on the frame (w) of the CYBEX PALLAS M- x and
push the locking arms in as far as they will go.
Page 74

73
TR
Page 75

74
w
c
a
PLACING THE SEAT IN THE VEHICLE
Note! On some car seats made of sensitive materials (e.g. suede, leather etc.), the
use of child seats may leave marks and/or cause discolouration. To prevent this, you
can place a blanket or towel underneath it, for example. Please also refer to in this
connection to our cleaning instructions in these usage instructions; these cleaning
instructions must be observed prior to using the seat for the rst time.
Place the child seat on the appropriate seat in the car.
• Always ensure that the entire surface of the back rest (a) of the CYBEX
PALLAS M- x is placed fully against the back rest of the vehicle seat.
The child seat must never be in a lying position. If necessary, you can
adjust the distance using the adjustment lever (c) on the frame (w) of the
CYBEX PALLAS M- x child seat.
• If the head rest of the vehicle is in the way, pull it out all the way, turn it away
or remove it completely (for exceptions to this, please refer to the section
“POSITIONING THE SEAT CORRECTLY IN THE VEHICLE”) The back rest (a) will
perfectly adapt to practically any incline of the vehicle seat.
WARNING! The full surface of the back rest of the CYBEX child seat must be
against the back rest of the vehicle. To ensure maximum protection for your
child, the seat must be in a normal upright position!
Page 76

75
TR
Page 77

76
z
p
w
d
d
i
h
e
In order to optimally adapt the CYBEX PALLAS M- x to your child’s body size, a seat
insert (i) has been provided as standard and is already inserted under the seat cover.
Note! Only an optimally adjusted head rest (e) can offer your child maximum
protection and comfort while ensuring that the diagonal belt can be tted smoothly (f).
The height of the CYBEX PALLAS M- x can be adjusted to one of twelve positions.
ADAPTING TO BODY SIZE
REMOVING THE ADDITIONAL SEAT INSERT
• We recommend using this additional seat insert (i) for children aged 9 to 24
months.
• From the age of 2 onwards, the seat insert (i) is no longer necessary.
• The seat can then be adjusted to your child’s body simply by using the adjustable
head rest (e). To do this, pull the adjustment level (h) upwards to unlock the head
rest (e).
• Adjust it so that there is space for two ngers between the lower edge of the head
rest (e) and the shoulder of the child.
1. Release the front push buttons of the seat cover from the seat cushion (d).
2. Pull the fabric cover from the cover guides up and forward until you can pull out
the seat insert.
3. The seat insert must be removed in accordance with the age specifications stated
above.
4. Pull the seat cover to its original state and fix it in place again.
By pushing the central adjustment button (z), you can adapt the safety cushion to
your child. Hold down the central adjustment button (z) while you adapt the safety
cushion to your child.
The side aps of the safety cushion (p) t exactly between the arm rests and seat
surface (d) and are used to support the safety cushion (p) on the seat.
Adjust the safety cushion (p) so that it is against the child but is not pushing against
the child’s body.
WARNING! The safety cushion (p) may only be used in conjunction with the
frame (w) up to a maximum of 18 kg!
ADJUSTING THE SAFETY CUSHION – ECE GROUP 1 (9-18 KG)
Page 78

77
TR
Page 79

78
w
p
v
v
t
r
d
To bring the CYBEX PALLAS M- x to a lying position, the vehicle’s own belt system
does not need to be opened.
The inclinable head rest helps to prevent the child’s head from dangerously
tipping forward during sleep. In the event of a collision, the head rest will follow the
movement of your child’s head forwards, lock into place and absorb the subsequent
backwards motion of your child’s head.
The incline angle of the head rest can be set to one of three positions. It can be
moved forward without moving the lever to the second or third position until the rest
locks into position. To return it to the original position, the lever must be operated and
the head rest pulled back.
Note! Ensure that your child’s head is always in contact with the inclinable head rest
(r), as this is the only way that the head rest can provide optimum protection from
side collisions.
Note! Ensure that the lap belt (n) and diagonal belt (f) are always tight.
WARNING! An adjustment of the lying position by the driver is prohibited while
travelling!
WARNING! Always ensure that the adjustment button (v) gives an audible
click when locking into the lying or seated position. The lying position is only
available for group 1 (9-18 kg) in the Pallas configuration with safety cushion
(p) and base frame (w).
WARNING! Never block the locking mechanism (t) using objects! In the event
of an accident, the incline adjustment mechanism must move smoothly, or
else your child may be injured!
SEATED AND LYING POSITION – ECE GROUP 1 (9-18 KG)
INCLINABLE HEAD REST
• If your child falls asleep during travel, simply press the adjustment button (v) on
the underside of the seat cushion (d), and the CYBEX PALLAS M- x will slide
downwards using your child’s weight.
• To restore the upright seat position from the lying position once the child is out of
the seat, press the adjustment button (v) again and apply light pressure against the
seat cushion (d) to guide the child seat back up.
Page 80

79
TR
Page 81

80
f
f
f
x
x
x
x
n
n
n
p
p
m
w
d
l
q
q
CLICK!
v
STRAPPING IN USING THE SAFETY CUSHION – ECE GROUP 1
(9-18 KG)
SWITCHING FROM PALLAS M-FIX TO SOLUTION M-FIX (ECE
GROUP 1 TO ECE GROUP 2/3)
1. Now insert the previously adjusted safety cushion (p) (refer to the section
“ADJUSTING THE SAFETY CUSHION”).
2. Pull the entire length of the vehicle’s three-point belt out. Take the lap belt (n) and
place it in the designated belt guide (x) in the safety cushion (p).
3. Insert the belt tongue (m) into the belt buckle (l). It must lock into place with an
audible “CLICK”.
4. Tighten the lap belt by pulling the diagonal belt.
5. Now feed the diagonal belt (f) in parallel with the lap belt (n) back into the belt
guide (x).
6. Pull the diagonal belt (f) tight and ensure that both parts of the belt cover the entire
width of the safety cushion (p) in the belt guide (x).
7. Feed the diagonal belt (f) either between the head and shoulder rests (see
illustration) or outside along the shoulder rest, depending on how much of the belt
length is available. Please always choose the option that uses the least amount of
belt length.
WARNING! Never twist the belt!
1. Remove the safety cushion (p).
2. Press the two release buttons (q) on the underside of the seat cushion (d) and pull
it away from the frame until there is some resistance.
3. Press the adjustment button (v) and pull the seat away from the frame (w)
completely.
WARNING! The three-point belt may only be inserted into the guides
designated for that purpose. The belt guides are described precisely in this
manual and are also marked red on the child seat.
Page 82

81
TR
Page 83

82
A
c
o
w
A
o
d
o
v
l
l
m
CLICK!
ISOFIX CONNECT modi cation
4. Operate the adjustment lever (c) on the frame (w) and pull the two ISOFIX
CONNECT locking arms (o) until there is some resistance.
5. Keep the adjustment lever held (c) and release the two snap clips (A) on the
underside of the seat elevator (d), one after the other. If necessary, use a
screwdriver.
7. Operate the adjustment button (v) on the underside of the seat elevator (d) and
push the locking arms (o) in as far as they will go.
8. For further information on correct installation, please refer to the section
“SECURING THE CHILD SEAT USING THE ISOFEX CONNECT SYSTEM”
6. Now push the ISOFIX CONNECT locking arms (o) into the designated openings
on the underside of the seat elevator (d) until there is some resistance.
Note! If this is done correctly, the ISOFIX CONNECT locking arms (o) will easily
release from the frame (w).
Note! Keep removed parts together in a safe and secure place.
WARNING! Note the minimum drop height of the ISOFIX CONNECT locking
arms. Failure to note this may result in damage to components or injury to
yourself or other persons nearby.
WARNING! Ensure that the locking arms are installed the right way around and
that the teeth of the locking arms are up when inserting them into the seat.
WARNING! When reassembling the seat, proceed in precisely the reverse
order. Use the instructions to check beforehand if all parts are present.
STRAPPING IN WITHOUT THE SAFETY CUSHION – ECE GROUP
2/3 (15-36 KG)
1. Place your child in the child seat. Pull the three-point belt right out and feed it
along the belt buckle (l) in front of your child.
WARNING! Never twist the belt.
2. Insert the belt tongue (m) into the belt buckle (l). It must lock into place with an
audible “CLICK”.
Page 84

83
TR
Page 85

84
f
k
f
l
k
k
f
k
n
n
n
n
g
g
f
s
e
f
d
WARNING! The lap belt (n) must run as low as possible on both sides along
your child’s groin to have optimum effect in the event of an accident.
6. Now feed the diagonal belt (f) through the upper belt guide (g) in the shoulder rest
(e) until it is inside the belt guide.
Ensure that the diagonal belt (f) runs between the outside of the shoulder and the
neck of your child. If necessary, adjust the height of the head rest to change the
position of the belt. The height of the head rest (e) can still be adjusted while in the
car.
3. Next, place the lap belt (n) in the lower belt guides (k) of the child seat.
4. Now pull the diagonal belt (f) firmly to tighten the lap belt (n). The tighter the belt
sits, the better it provides protection from injury. On the side of the belt buckle (l),
the diagonal belt (f) and the lap belt (n) must be inserted together in the lower belt
guide (k).
WARNING! The vehicle belt buckle (l) must never cross the arm rest. If the belt
system is too long, the child seat is not suitable for use in this position in the
vehicle. In case of doubt, please consult the manufacturer of your vehicle.
5. The lap belt (n) should have been fed through the lower belt guides (k) on both
sides of the seat cushion (d).
Note! Teach your child from the start to always ensure that the belt is tight and, if
necessary, how to tighten the belt themselves.
To ensure optimum safety for your child, please always check before commencing
travel that
• the lap belt (n) has been fed through the lower belt guides (k) on both sides of the
seat cushion (d).
• the diagonal belt (f) on the belt buckle side has also been fed through the lower belt
guide (k) of the seat.
• the diagonal belt (f) has been fed through the belt guide (g) marked red in the
shoulder rest (e).
• the diagonal belt (f) is at an incline downwards.
• the entire belt is tightly against your child’s body and is not twisted.
IS YOUR CHILD CORRECTLY SECURED?
Page 86

85
TR
Page 87

86
e e
h
To ensure that your child seat provides maximum protection, it is imperative that you
note the following:
CARE & MAINTENANCE
• All major parts of the child seat should be checked regularly for damage. The
mechanical components must be free of defects.
• It is absolutely necessary to ensure that the child seat is not jammed between hard
elements such as the vehicle door or seat rail, which could potentially damage it.
• When exposed to extreme shock, e.g. after a crash, the child seat must be
checked by the manufacturer.
REMOVING THE SEAT COVER
REMOVING THE COVER FROM THE HEADREST FLAP
REMOVING THE COVER FROM THE HEAD SUPPORT
The cover of the infant seat consists of four parts (Headrest ap, headrest, shoulder
part cover, booster cover and/or seat surface cover).This is complemented by the
safety cushion cover.
The four covers of the seat are tted into the cover attachment channels on the edge
of the infant seat and are held in position at several places by press-studs (see
image).
Once all studs have been released, the single parts of the cover can be removed
from the cover attachment channels.
Pull the opening of the cover over the adjustment lever so that the cover does not get
jammed on the lever when pulling it up to remove it.
Release the two press-studs at each side of the rear of the shoulder area. Pull the
cover out of the cover attachment channel.
In order to put the covers back on the seat, proceed in the reversed order as
removing them.
Warning! The child seat must never be used without the cover.
Ensure that only an original CYBEX seat cover is used, as the cover is a key element
of the seat’s function. Spare covers can be obtained from a specialist retailer.
Page 88

87
TR
Page 89

88
Note! The cover may only be washed at 30°C with a delicate wash program.
Washing at more than 30°C may result in discolouration of the cover fabric. Please
wash the cover separately from other laundry and do not dry in the dryer! Never dry
the cover in direct sunlight! The plastic parts can be cleaned with a mild cleaning
agent and warm water.
Warning! Never use harsh cleaning agents or bleaches!
CLEANING
REMOVING THE COVER FROM THE SEAT SURFACE
REMOVING THE COVER FROM THE SAFETY CUSHION
Release the four press-studs of the seat cover at the front and the back. Now, pull off
the cover over the armrests and along the seat surface.
First, release the two press-studs of the safety cushion cover. Then pull off the cover
around the cushion towards the third attachment around the central adjustment
button and release the cover at the rubber eyelet of the adjustment button.
REMOVING THE COVER FROM THE SHOULDER PART
Pull the cover out of the cover attachment channel.
Page 90

89
TR
Page 91

90
• If the vehicle is directly exposed to sunlight for a longer time, the child seat must be
removed from the vehicle or covered with a bright cloth.
• Regularly check all plastic and metal parts of the seat for damage, deformation or
change of colour. If you discover any changes, the child seat must be disposed or
checked and possibly replaced by the manufacturer.
• Changes to fabric, especially bleaching, are perfectly normal when used in a
vehicle and do not impair the seat’s function.
PRODUCT SERVICE LIFE
WARNING! An accident may cause damage to the child seat that is not
identifiable with the naked eye. Please replace the seat after an accident. In
case of doubt, please consult your dealer or the manufacturer.
HOW TO ACT FOLLOWING AN ACCIDENT
At the end of the child seat’s service life, it must be disposed of correctly. The
separation of waste may be handled differently from place to place. To ensure that
the child seat is disposed of in accordance with regulations, please contact your
local waste disposal institution or local council. Always observe the waste disposal
regulations of your country.
DISPOSAL
The CYBEX PALLAS M-x is designed to meet its specications for the entire
service life of approximately 11 years. However, as there can be very large
temperature uctuations and unpredictable strains in vehicles, the following points
must be observed:
Page 92

91
TR
Page 93

92
The following warranty conditions only apply to the country in which this product
was rst sold through retail channels to a consumer. This warranty covers all
manufacturing and material defects that existed at the time of purchase or which
manifest themselves within three (3) years of rst sale of this product via retail
channels to a consumer (manufacturer warranty). If a manufacturing or material
defect arises during the warranty period, the product will be repaired at no charge
or – at our discretion – may be replaced by a new one. In order to make a claim on
this warranty, the product must be returned to the retailer that rst sold it and the
original proof of purchase (receipt or invoice), containing the date of purchase, name
and address of the retailer, and the product name, must be presented. No claims
may be made on this warranty if the product is sent to the manufacturer or any other
person than the retailer having rst sold it for the purpose of making a claim on the
warranty. The warranty only applies is the product was checked for completeness,
manufacturing defects and material defects immediately upon purchase. If the
product was purchase by way of a mail order outlet, it must be checked for
completeness, manufacturing defects and material defects immediately upon receipt.
If damage arises, the product may no longer be used and must be returned to the
retailer that original sold it. When claiming on the warranty, the product must be
returned in a complete and clean state. Please read the usage instructions carefully
before contacting the retailer. The warranty does not cover damage caused by
misuse, external inuences (water, re, trafc accidents etc.) or normal wear and
tear. Claims on the warranty will only be honoured if the product is treated and
used in accordance with the usage instructions, repairs and modications are only
performed by persons authorised to do so, and only original parts and accessories
are used. This warranty does not nullify or limit in any way any consumer rights or
rights against the seller based on infringement of the purchase agreement granted
by applicable legislation.
WARRANTY CONDITIONS
Page 94

93
TR
Page 95

94
Page 96

95
 Loading...