

Page 1

CYBEX GmbH
Riedinger Str. 18 | 95448 Bayreuth | Germany
info@cybex-online.com
www.cybex-online.com
www.facebook.com/cybex.online
GO TO WWW.CYBEX-ONLINE.COM
TO WATCH AN INSTRUCTIONAL VIDEO
C233_041-1_01B
Page 2
PALLAS M
FR
NL DEUKCZES PLSKPT IT
CYBEX PALLAS M
ECE R44/04, Gr. 1 | 9-18 kg
CYBEX SOLUTION M
ECE R44/04, Gr. 2–3 | 15-36 kg
USER GUIDE
HU
Page 3
Kurzanleitung Gruppe 1 (9-18 kg)
Rövid használati utasítás I csoport (9-18 kg) Stručné instrukce Sk. 1 (9-18 kg)
HU – | CZ – | SK –
Instrucciones abreviadas Grupo 1 (9-18 kg) Instruções breves Gr. 1 (9-18 kg)ES – | PT –
Brief instructions Group 1 (9-18 kg) Istruzioni brevi Gruppo 1 (9-18 kg)DE – | EN – | IT –
Skrócona instrukcja Grupa 1 (9-18 kg)Korte handleiding Groep 1 (9-18 kg) | PL –| NL –Instructions en bref Groupe 1 (9-18 kg)FR –
Stručné inštrukcie Skupina 1 (9-18 kg)
1
2
3
!
> 24 M
1
6
Warnung! Ohne Genehmigung der Zulassungsstelle dürfen keine Veränderungen am Kindersitz vorgenommen und keine Ergänzungen hinzugefügt werden. Reparaturen
DE
UK
IT
FR
NL
2
dürfen ausschließlich durch Personen vorgenommen werden, die hierfür autorisiert sind. Dabei dürfen stets nur original Bau- und Zubehörteile verwendet werden. Die
Schutzfunktion des Kindersitzes ist sonst nicht mehr gewährleistet.
Warnung! Der Kindersitz bietet nur dann den bestmöglichen Schutz für ihr Kind, wenn Sie die Gebrauchsanweisung genau befolgen.
Warning! Without the approval of the certification office, the child car seat may not be modified or added to in any way. Repairs may only be performed by person authorised
to this effect. Only original parts and accessories may be used for repairs. Failure to comply with the above will result in the protective function of the child car seat no longer
being guaranteed.
Warning! The child car seat only offers optimum protection for your child if you follow the usage instructions precisely.
ATTENZIONE! Senza l'approvazione dell'ufficio di certificazione il seggiolino non può subire modifiche o aggiunte di alcun genere. Le riparazioni possono essere
eseguite solo da persone autorizzate in tal senso. Per le riparazioni possono essere usati solo ricambi e accessori originali. Il mancato rispetto di quanto sopra avrà come
conseguenza la terminazione della garanzia della funzione protettiva del seggiolino.
ATTENZIONE! Il seggiolino offre la protezione ottimale per il bambino solo qualora vengano seguite precisamente le istruzioni per l'uso.
Attention! Le siège auto pour enfant ne saurait être modifié ou complété sans l’autorisation préalable de l’organisme de certification compétent. Seule une personne
autorisée est habilitée à procéder à des réparations. Seuls des pièces ou accessoires originaux peuvent être employés pour les réparations. Toute entorse aux règles
précitées compromettra la fonction de protection du siège auto pour enfant.
Attention! Le siège auto pour enfant n’offre une protection optimale que si vous suivez précisément les instructions d’utilisation.
Waarschuwing! Zonder de goedkeuring van het certificeringsinstelling mag het kinderzitje niet worden aangepast en mag er niets aan worden toegevoegd. Reparaties mogen
alleen worden uitgevoerd door personen die daartoe bevoegd zijn. Er mogen uitsluitend originele onderdelen en accessoires worden gebruikt voor reparaties. Niet-naleving
van het bovenstaande resulteert erin dat de beschermende functie van het kinderzitje niet langer gegarandeerd is.
Belangrijk! Het kinderzitje biedt uw kind alleen optimale bescherming als u de handleiding precies volgt.
2
7
3
8 9
CLICK!
4
5
Page 4

Kurzanleitung Gruppe 2/3 (15-36 kg) Brief instructions Group 2/3 (15-36 kg) Istruzioni brevi Gruppo 2/3 (15-36 kg)DE – | EN – | IT –
Rövid használati utasítás 2/3 csoport (15-36 kg) Stručné instrukce Sk. 2/3 (15-36 kg) Stručné inštrukcie Sk. 2/3 (15-36 kg)HU – | CZ – | SK –
Instrucciones abreviadas Grupo 2/3 (15-36 kg) Instruções breves Gr. 2/3 (15-36 kg)ES – | PT –
1
2
3
3 4
Skrócona instrukcja Grupa 2/3 (15-36 kg)Korte handleiding Groep 2/3 (15-36 kg) | PL –| NL –Instructions en bref Groupe 2/3 (15-36 kg)FR –
CLICK!
5
66
PL
HU
CZ
SK
ES
PT
7
Uwaga! Bez zgody instytucji certyfikującej produkt, fotelik nie może być w żaden sposób modyfikowany lub zmieniany. Naprawy może dokonywać tylko autoryzowany
serwis. Tylko oryginalne części i akceoria mogą być użyte do naprawy. Niezastosowanie się do powyższego może powodować utratę funkcji ochronnych.
Uwaga! Fotelik zapewni maksimum bezpieczeństwa tylko wtedy jeśli przestrzegana będzie instrukcja obsługi
Figyelem! A hitelesítő intézet jóváhagyása nélkül a terméken semmilyen módosítás nem végezhető. Javítást csak szakképzett személy végezhet ennek betartásával.
Javításhoz csak eredeti alkatrészeket és kiegészítőket szabad felhasználni. A fentiek be nem tartása esetén a gyermekülés biztonságossága nem garantálható.
Figyelem! A gyermekülés csak abban az esetben nyújt optimális védelmet, ha pontosan betartják a használati utasításokat.
varování! Bez povolení certifikačního úřadu nesmí být autosedačka jakkoliv upravována. Opravy smí provádět pouze k tomu oprávněná osoba. K opravám lze používat
pouze originální díly a příslušenství. Při nedodržení výše uvedených podmínek není zaručena ochranná funkce dětské autosedačky.
varování! Dětská autosedačka nabízí optimální ochranu pro vaše dítě pouze pokud postupujte podle návodu k použití.
varovanie! Bez povolenia certifikačného úradu nesmie byť autosedačka akokoľvek upravovaná. Opravy smie vykonávať len k tomu oprávnená osoba. K opravám možno
používať len originálne diely a príslušenstvo. Pri nedodržaní vyššie uvedených podmienok nie je zaručená ochranná funkcia detskej autosedačky.
varovanie! Detská autosedačka ponúka optimálnu ochranu pre vaše dieťa len ak postupujte podľa návodu na použitie.
¡Atención! Queda prohibida toda modificación de la silla infantil que no haya sido homologada previamente por el organismo de certificación. Las reparaciones sólo deben
ser realizadas por personas autorizadas para ello, empleando exclusivamente repuestos y accesorios originales. No será posible garantizar el nivel de protección de la silla
infantil en caso de incumplimiento de estas normas.
¡Atención! Siga las instrucciones de uso para que la silla infantil ofrezca un nivel óptimo de protección.
Atenção! Sem expressa autorização , a cadeira infantil não poderá ser modificada de nenhuma maneira. As reparações deverão ser efectuadas por pessoal autorizado. Só
peças originais e acessórios da marca poderão ser utilizadas nas reparações ou trocas. Em caso de que não se cumpram com as especificações descritas em cima, não se
poderá assegurar a total proteção da cadeira.
ATENÇÃO! A cadeira só poderá oferecer a máxima proteção em caso de que siga expressamente as instruções deste manual.
8
109
3
Page 5
Page 6

Sehr geehrte Kundin, sehr geehrter Kunde,
Vielen Dank, dass Sie sich bei der Wahl eines Kindersitzes für den CYBEX PALLAS M entschieden haben. Bei
der Entwicklung des CYBEX Kindersitzes PALLAS M haben Sicherheit, Komfort und Bedienfreundlichkeit im
Vordergrund gestanden. Das Produkt wird unter besonderer Qualitätsüberwachung hergestellt und erfüllt strengste
Sicherheitsanforderungen.
Dear customer,
Thank you for choosing the CYBEX PALLAS M child car seat. Safety, comfort and ease of use were the foremost principles
applied to the development of the CYBEX PALLAS M child car seat. This product is manufactured subject to special quality
assurance measures and satisfies the most stringent of safety requirements.
Gentile cliente,
grazie per aver scelto il seggiolino CYBEX PALLAS M. La sicurezza, il comfort e la facilità d'uso hanno rappresentato i principi
fondanti nello sviluppo del seggiolino CYBEX PALLAS M. Questo prodotto è realizzato nel rispetto di speciali misure di
garanzia della qualità e soddisfa i requisiti di sicurezza più severi.
Page 7
PALLAS M
ECE-R44-04
UNIVE RSAL
SEM I-UNIVE RSAL
04301315
Riedinger Str. 18, 95448 Bayreuth
SOLUTION M
ECE-R44-04
UNIVE RSAL
SEM I-UNIVE RSAL
Riedinger Str. 18, 95448 Bayreuth
08/2014
6
9 – 18 kg
CYBEX GmbH
Germany
15 – 36 kg
04301314
CYBEX GmbH
Germany
Zulassung
CYBEX PALLAS M
Sitzerhöher mit Rückenlehne und Kopfstütze auf einem
verstellbaren Grundrahmen mit tiefenverstellbarem
Sicherheitskissen.
Empfohlen für:
Alter: ca. 9 Monate bis 4 Jahre
Gewicht: 9-18 kg
nur geeignet für Fahrzeugsitze mit DreipunktAutomatik-Gurt, der nach ECE Regelung Nr. R16 oder
gleichwertigem Standard zugelassen ist
ECE R-44/04,
CYBEX PALLAS M - Gruppe 1, 9 bis 18 kg
CYBEX SOLUTION M - Gruppe 2/3, 15 bis 36 kg
Certication
CYBEX PALLAS M
Seat elevator with backrest and headrest on an
adjustable base frame with height-adjustable safety
cushions.
Recommended for:
Age: Approx. 9 months to 4 years
Weight: 9-18 kg
Only suitable for vehicle seats with automatic three-point
belts approved in accordance with ECE regulation R16
or a comparable standard
ECE R-44/04,
CYBEX PALLAS M - group 1, 9 to 18 kg
CYBEX SOLUTION M - group 2/3, 15 to 36 kg
Approvazione
CYBEX PALLAS M
Elevatore del seggiolino con schienale e poggiatesta
su un telaio di base regolabile con cuscini di sicurezza
regolabili in altezza.
Raccomandato per:
Età: da 9 mesi a 4 anni circa
Peso: 9-18 kg
Adatto solo ai sedili dei veicoli con cinture automatiche a
tre punti approvate ai sensi del regolamento ECE R16 o
di uno standard equivalente
ECE R-44/04,
CYBEX PALLAS M ‒ Gruppo 1, da 9 a 18 kg
CYBEX SOLUTION M ‒ Gruppo 2/3, da 15 a 36 kg
DE
WARNUNG! Um den optimalen Schutz für Ihr Kind zu gewährleisten, muss der
CYBEX PALLAS M unbedingt so verwendet werden, wie es in dieser Anleitung
beschrieben wird.
Hinweis! Bewahren Sie die Anleitung immer griffbereit auf (z.B. im dafür
vorgesehenen Fach an der Rückseite der Rückenlehne).
Hinweis! Durch länderspezische Anforderungen (z.B. Farbkennzeichnungen am
Kindersitz) können Produktmerkmale in ihrer äußeren Erscheinung variieren. Die
korrekte Funktionsweise des Produktes wird davon jedoch nicht beeinusst.
Kurzanleitung Gruppe 1 (9-18 kg) ................................................................................2
Kurzanleitung Gruppe 2/3 (15-36 kg) ...........................................................................3
Zulassung ......................................................................................................................6
Der richtige Platz im Fahrzeug ..................................................................................... 8
L.S.P. aktivieren ...........................................................................................................10
Den Sitz ins Fahrzeug stellen ....................................................................................10
Anpassen an die Körpergröße ...................................................................................12
Entnehmen der zusätzlichen Sitzeinlage....................................................................12
Einstellen des Sicherheitskissens – ECE Gruppe 1 (9-18 kg) ...................................12
Sitz- und Liegeposition – ECE Gruppe 1 (9-18 kg) ....................................................14
Neigungsverstellbare Kopfstütze ...............................................................................14
Anschnallen mittels Sicherheitskissen – ECE Gruppe 1 (9-18 kg) ............................ 16
Wechsel von PALLAS M auf SOLUTION M (ECE Gruppe 1 zu ECE Gruppe 2/3) ..16
Anschnallen ohne Sicherheitskissen – ECE Gruppe 2/3 (15-36 kg) ......................... 18
Ist Ihr Kind richtig gesichert? .......................................................................................20
Pflege ...........................................................................................................................20
Entfernen des Bezuges ...............................................................................................22
Entfernen des Bezugs von der Kopfstützenklappe ....................................................22
Entfernen des Bezugs von der Kopfstütze .................................................................22
Entfernen des Bezugs vom Schulterteil ......................................................................22
Entfernen des Bezugs von der Sitzfläche...................................................................24
Entfernen des bezugs vom Sicherheitskissen ...........................................................24
Reinigung .....................................................................................................................24
Verhalten nach einem Unfall .......................................................................................26
Produktlebensdauer ....................................................................................................26
Entsorgung ..................................................................................................................26
Garantiebedingungen ..................................................................................................28
Inhalt
Page 8

EN
Contents Indice
IT
WARNING! To ensure optimum protection for your child, the CYBEX PALLAS
M must be used as described in these instructions.
Note! Always keep these instructions to hand (e.g. in the designated compartment
on the rear of the backrest).
Note! Country-specic regulations (e.g. regarding colour-coding on child car seats)
may mean that product features may vary in appearance. This will, however, not
affect the product in its correct function.
Brief instructions Group 1 (9-18 kg) .............................................................................. 2
Brief instructions Group 2/3 (15-36 kg) ......................................................................... 3
Certification .................................................................................................................... 6
Positioning the seat correctly in the vehicle ................................................................. 9
Activating the L.S.P. ..................................................................................................... 11
Placing the seat in the vehicle .................................................................................... 11
Adapting to body size .................................................................................................13
Removing the additional seat insert ............................................................................13
Adjusting the safety cushion – ECE group 1 (9-18 kg) ..............................................13
Seated and lying position – ECE group 1 (9-18 kg) ...................................................15
Reclining headrest ......................................................................................................15
Securing the child with the safety cushion – ECE group 1 (9-18 kg) ........................17
Switching from PALLAS M to SOLUTION M (ECE group 1 to ECE group 2/3) .......17
Securing the child without the safety cushion – ECE group 2/3 (15-36 kg) .............. 19
Is your child correctly secured? ...................................................................................21
Care & maintenance ....................................................................................................21
Removing the seat cover ............................................................................................23
Removing the cover from the headrest flap ...............................................................23
Removing the cover from the head support ...............................................................23
Removing the cover from the shoulder part ...............................................................23
Removing the cover from the booster ........................................................................25
Removing the cover from the safety cushion .............................................................25
Cleaning .......................................................................................................................25
How to act following an accident .................................................................................27
Product service life ......................................................................................................27
Disposal .......................................................................................................................27
Warranty conditions .....................................................................................................29
ATTENZIONE! Per assicurare la protezione ottimale per il bambino il CYBEX
PALLAS M deve essere usato come descritto nelle presenti istruzioni.
Nota bene! Tenere sempre a portata di mano queste istruzioni (ad esempio
nell'apposito scomparto sul retro dello schienale).
Nota bene! Le norme nazionali (ad esempio rispetto alla codica cromatica dei
seggiolini) possono implicare che le caratteristiche esteriori del prodotto possano
variare. Questo non avrà ricadute sul funzionamento corretto del prodotto.
Istruzioni brevi Gruppo 1 (9-18 kg) ...............................................................................2
Istruzioni brevi Gruppo 2/3 (15-36 kg) .......................................................................... 3
Approvazione ................................................................................................................. 6
Posizione corretta del seggiolino nel veicolo ............................................................... 9
Attivazione del L.S.P. ................................................................................................... 11
Collocazione del seggiolino nel veicolo ..................................................................... 11
Adattamento alla taglia corporea ...............................................................................13
Rimozione dell'inserto per sedili aggiuntivo ................................................................13
Regolare il cuscino di sicurezza, gruppo ECE 1 (9-18 KG) .......................................13
Posizione seduta e sdraiata, gruppo ECE 1 (9-18 KG) .............................................15
Poggiatesta inclinabile ................................................................................................15
Allacciamento usando il cuscino di sicurezza, gruppo ECE 1 (9-18 kg) ................... 17
Passaggio da pallas m a SOLUTION M (dal gruppo ECE 1 al gruppo ECE 2/3).....17
Allacciamento senza cuscino di sicurezza, gruppo ECE 2/3 (15-36 kg) ................... 19
Il bambino è messo in sicurezza correttamente? .......................................................21
Cura e manutenzione ..................................................................................................21
Rimozione della fodera del seggiolino ........................................................................23
Rimozione della fodera dall'aletta del poggiatesta .....................................................23
Rimozione della fodera dal poggiatesta .....................................................................23
Rimozione della fodera dall'area della spalla .............................................................23
Rimozione della fodera dalla superficie di seduta ......................................................25
Rimozione della fodera dal cuscino di sicurezza .......................................................25
Pulizia ...........................................................................................................................25
Come procedere in seguito a un incidente .................................................................27
Vita utile del prodotto ...................................................................................................27
Smaltimento .................................................................................................................27
Condizioni di garanzia .................................................................................................29
7
Page 9
DER RICHTIGE PLATZ IM FAHRZEUG
Der CYBEX PALLAS M-FIX/PALLAS M ist mit eingeklapptem ISOFIX
Connect System auf allen Fahrzeugplätzen mit Dreipunkt-Automatikgurt
verwendbar, die für die Beförderung von erwachsenen Personen
zugelassen sind.
WARNUNG! Der Sitz ist nicht für die Verwendung mit einem 2-Punkt- oder
Beckengurt geeignet. Wird der Sitz mit einem 2-Punkt-Gurt gesichert, kann
es bei einem Unfall zu schweren oder gar tödlichen Verletzungen des Kindes
kommen.
• Bei Fahrzeugen mit Airbag sollten Sie den Beifahrersitz so weit wie möglich
nach hinten schieben. Beachten Sie jedoch, dass der obere Anlenkpunkt des
Fahrzeuggurtes hinter der Gurtführung des Kindersitzes bleibt.
• Die Empfehlungen des Fahrzeugherstellers sind unbedingt zu befolgen.
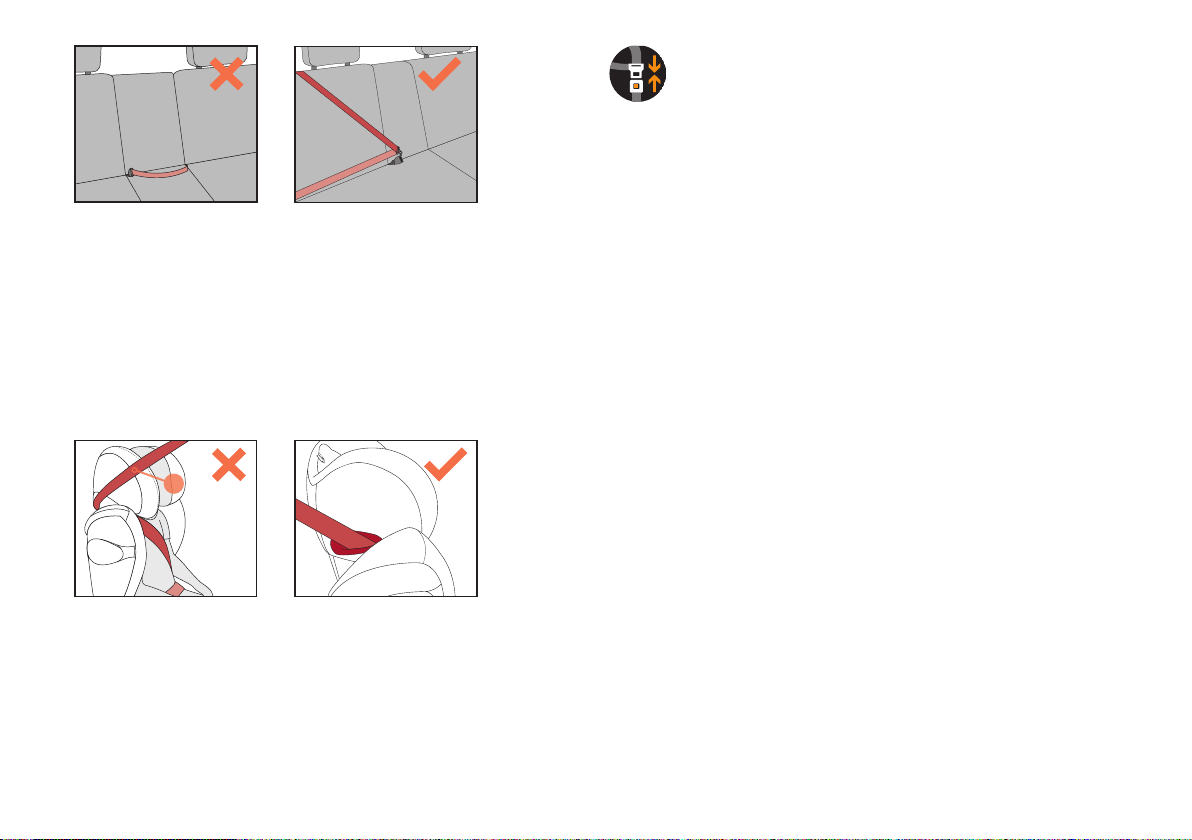
WARNUNG! Der Diagonalgurt (f) muss schräg nach hinten verlaufen und
darf nie nach vorn zum oberen Gurtpunkt in Ihrem Fahrzeug führen. Sollte
dies nicht einzustellen sein z.B. durch Vorschieben des Autositzes oder
Verwendung auf einem anderen Sitzplatz, so ist der Kindersitz für dieses
Fahrzeug nicht geeignet.
Gepäckstücke oder andere Gegenstände im Fahrzeug, welche bei einem Unfall
Verletzungen verursachen können, müssen immer gut befestigt werden. Sie können
zu tödlichen Geschossen im Fahrzeug werden.
WARNUNG! Auf Fahrzeugplätzen, die quer zur Fahrtrichtung angeordnet
f
sind, ist die Verwendung des Sitzes nicht zulässig. Auf rückwärtsgerichteten
Fahrzeugsitzen, wie z.B. in einem Van oder Minibus, ist die Verwendung
zulässig, sofern der Fahrzeugsitz für die Beförderung eines Erwachsenen
zugelassen ist. Zu beachten ist, dass die Fahrzeugkopfstütze bei
rückwärtsgerichtetem Einbau nicht entfernt werden darf! Der Kindersitz muss
auch dann, wenn er nicht benutzt wird, immer mit dem Fahrzeuggurt befestigt
sein. Dies gilt auch, wenn der Kindersitz bereits über das ISOFIX Connect
System mit dem Fahrzeug verbunden ist. Bereits bei einer Notbremsung oder
einem geringen Aufprall kann ein unbefestigter Sitz andere Mitfahrer und Sie
selbst verletzen.
Hinweis! Bitte lassen Sie Ihr Kind nie unbeaufsichtigt im Fahrzeug zurück.
8
Page 10

POSITIONING THE SEAT CORRECTLY IN THE VEHICLE POSIZIONE CORRETTA DEL SEGGIOLINO NEL VEICOLO
The CYBEX PALLAS M-FIX/PALLAS M with retracted ISOFIX Connect
system can be used on all vehicle seats with automatic three-point safety
belts approved for the transport of adult persons.
WARNING! The seat is not suitable for use with a two-point or lap belt. If the
seat is secured using a two-point belt, an accident may result in severe or
even fatal injuries to the child.
• In cars with airbags, you should push the passenger seat back as far as possible.
When doing so, however, ensure that the upper pivot point of the safety belt is
behind the belt feed point of the child car seat.
• Always comply with the recommendations of the vehicle manufacturer.
WARNING! The diagonal belt (f) must run back at a recline and must never run
forward to the upper belt point in your vehicle. If it is not possible to adjust the
seat in this way, e.g. by pushing the car seat forward or using it on another
seat, this child car seat is not suitable for your vehicle.
Luggage or other objects present in the vehicle that may cause injury in the event of
an accident must always be rmly secured. Otherwise, they may be thrown, causing
fatal injuries.
WARNING! The child car seat may not be used on car seats facing to the
side of the direction of travel. Use of the child car seat is permitted on rearfacing seats, e.g. in a van or minibus, provided that the seat is permitted
for transporting an adult. Please note that the vehicle headrest must not be
removed when fitting on a rear-facing seat! Even if not in use, the child car
seat must always be secured with the safety belt. This applies even if the child
set has already been secured to the vehicle using the ISOFIX Connect system.
An unsecured child car seat can injure other passengers and yourself even
when just performing an emergency brake or in the event of a minor collision.
Note! Never leave your child unattended in the vehicle.
DEUKIT
Il CYBEX PALLAS M-FIX/PALLAS M con sistema ISOFIX Connect ritirato
è utilizzabile su tutti i sedili veicolari con cinture di sicurezza automatiche
a tre punti approvate per il trasporto di adulti.
ATTENZIONE! Il seggiolino è inadatto all'uso con una cintura subaddominale o
a due punti. Gli incidenti possono causare lesioni gravi o mortali al bambino in
caso di messa in sicurezza con una cintura a due punti.
• Nelle auto dotate di airbag il sedile del passeggero va spinto il più indietro possibile.
Nel fare ciò accertare però che il punto di snodo superiore della cintura di sicurezza
sia dietro alla guida della cintura del seggiolino.
• Rispettare sempre le raccomandazioni del costruttore del veicolo.
ATTENZIONE! La cintura diagonale (f) deve scorrere indietro inclinata e non
deve mai scorrere in avanti verso il punto superiore della cintura nel veicolo.
Il seggiolino sarà inadatto al veicolo ove sia impossibile regolare il sedile in
questo modo, ad esempio spingendo avanti il sedile o usando un altro sedile.
Bagagli o altri oggetti presenti nel veicolo che possono causare lesioni in caso di
incidente devono essere ssati saldamente. In caso contrario potrebbero essere
scagliati e causare lesioni mortali.
ATTENZIONE! Il seggiolino non è utilizzabile sui sedili rivolti lateralmente
rispetto alla direzione di marcia. L'uso del seggiolino è ammesso sui sedili
rivolti indietro, ad esempio nei minibus, a patto che il sedile sia abilitato al
trasporto di adulti. Notare che il poggiatesta veicolare non va rimosso in caso
di montaggio su un sedile rivolto indietro! Il seggiolino deve sempre essere
assicurato con la cintura di sicurezza, anche quando non è usato. Questo
vale anche se il seggiolino è già assicurato al veicolo con il sistema ISOFIX
Connect. Un seggiolino non assicurato può ferire gli altri passeggeri anche
solo in caso di frenata d'emergenza o di collisione non grave.
Nota bene! Non lasciare mai il bambino incustodito nel veicolo.
9
Page 11

L.S.P.
L.S.P. AKTIVIEREN
Der lineare Seitenaufprallschutz (L.S.P. System) lässt sich per Druck auf den L.S.P.
A
1
2
3
PRESS!
Knopf (A) in zwei Stufen ausfahren. Mit der Ausgangsposition sind somit insgesamt
drei unterschiedliche L.S.P. Einstellungen möglich.
Hinweis! Aktivieren Sie immer das L.S.P. auf der Sitzseite, die zur Autotür zeigt.
Um das L.S.P. wieder in das Gehäuse zu schieben, drücken Sie erneut den L.S.P.
Knopf und schieben Sie das L.S.P. manuell wieder in die Ausgangsposition.
DEN SITZ INS FAHRZEUG STELLEN
Stellen Sie den Kindersitz auf den entsprechenden Fahrzeugsitz im Auto.
• Achten Sie unbedingt darauf, dass die Rückenlehne (a) des CYBEX PALLAS M
vollächig an der Rückenlehne des Fahrzeugsitzes anliegt. Der Kindersitz darf sich
auf keinen Fall in einer Liegeposition benden.
• Sollte die Kopfstütze des Fahrzeuges störend sein, ziehen Sie diese ganz heraus,
drehen Sie sie um oder nehmen Sie diese ganz ab (Ausnahme siehe Abschnitt
„DER RICHTIGE PLATZ IM FAHRZEUG“). Die Rückenlehne (a) passt sich optimal
stufenlos nahezu jeder Neigung des Fahrzeugsitzes an.
WARNUNG! Die Rückenlehne des CYBEX Kindersitzes muss an der Lehne des
a
w
Fahrzeuges flächig aufliegen. Um den größtmöglichen Schutz für das Kind
zu gewährleisten, muss sich der Sitz in einer normalen aufrechten Position
befinden!
Hinweis! An einigen Autositzen aus empndlichem Material (z.B. Velours, Leder,
etc.) können durch die Benutzung von Kindersitzen mögliche Gebrauchsspuren und/
oder Abfärbungen auftreten. Um das zu vermeiden, können Sie z.B. eine Decke
oder ein Handtuch unterlegen. Ferner weisen wir in diesem Zusammenhang auf
unsere Reinigungshinweise in dieser Gebrauchsanleitung hin, die vor der ersten
Verwendung des Sitzes unbedingt beachtet werden sollten.
10
Page 12

ACTIVATING THE L.S.P. ATTIVAZIONE DEL L.S.P.
The “Linear Side-impact Protection” system (L.S.P.) can be extended in two steps by
pressing the L.S.P. button(s).Together with the initial position, this provides a total of
three different L.S.P. settings.
Note! Always activate the L.S.P. on the side of the seat facing the car door. Nota bene! Attivare sempre il L.S.P. sul lato del seggiolino rivolto verso la portiera.
Il sistema “Linear Side-impact Protection” (L.S.P.) è estendibile in due passi
premendo il/i pulsante/i L.S.P. Unitamente alla posizione iniziale, questo offre un
totale di tre diverse posizioni L.S.P.
DEUKIT
To push the L.S.P. back into the housing, press the L.S.P. button again and push the
L.S.P. back into the starting position.
Premere nuovamente il pulsante L.S.P. e spingere il L.S.P. in posizione iniziale per
fare rientrare il L.S.P. nell'alloggiamento.
PLACING THE SEAT IN THE VEHICLE COLLOCAZIONE DEL SEGGIOLINO NEL VEICOLO
Place the child car seat on the appropriate seat in the car. Collocare il seggiolino sul sedile dell'auto appropriato.
• Always ensure that the entire surface of the backrest (a) of the CYBEX PALLAS
M is placed fully against the backrest of the vehicle seat. The child car seat must
never be in a lying position.
• If the headrest of the vehicle is in the way, pull it out all the way, turn it away
or remove it completely (for exceptions to this, please refer to the section
“POSITIONING THE SEAT CORRECTLY IN THE VEHICLE”) The backrest (a) will
perfectly adapt to practically any recline of the vehicle seat.
WARNING! The full surface of the backrest of the CYBEX child car seat must
be against the backrest of the vehicle. To ensure maximum protection for your
child, the seat must be in a normal upright position!
Note! On some car seats made of sensitive materials (e.g. suede, leather etc.), the
use of child car seats may leave marks and/or cause discolouration. To prevent this,
you can place a blanket or towel underneath it, for example. Please also refer in
this connection to our cleaning advises in these usage instructions; these cleaning
instructions must be observed prior to using the seat for the rst time.
• Accertare sempre che l'intera supercie dello schienale (a) del CYBEX PALLAS
M poggi completamente contro lo schienale del sedile veicolare. Il seggiolino non
deve mai trovarsi in posizione sdraiata.
• Se il poggiatesta del veicolo è d'intralcio, estrarlo completamente, allontanarlo o
rimuoverlo del tutto (per le eccezioni in merito vedere “POSIZIONE CORRETTA
DEL SEGGIOLINO NEL VEICOLO”). Lo schienale (a) si adatterà perfettamente a
praticamente qualsiasi inclinazione del sedile veicolare.
ATTENZIONE! L'intera superficie dello schienale del seggiolino CYBEX deve
poggiare contro lo schienale del veicolo. Per assicurare la massima protezione
per il bambino il sedile deve trovarsi nella normale posizione eretta!
Nota bene! L'uso del seggiolino su alcuni sedili veicolari realizzati in materiali delicati
(come pelle scamosciata, pelle, ecc.) può lasciare tracce e/o causare scoloriture.
Questo è evitabile utilizzando ad esempio una coperta o un asciugamano come
appoggio. Al riguardo vedere anche le istruzioni di pulizia nelle presenti istruzioni
per l'uso; le istruzioni di pulizia devono essere consultate prima del primo uso del
seggiolino.
11
Page 13
e
h
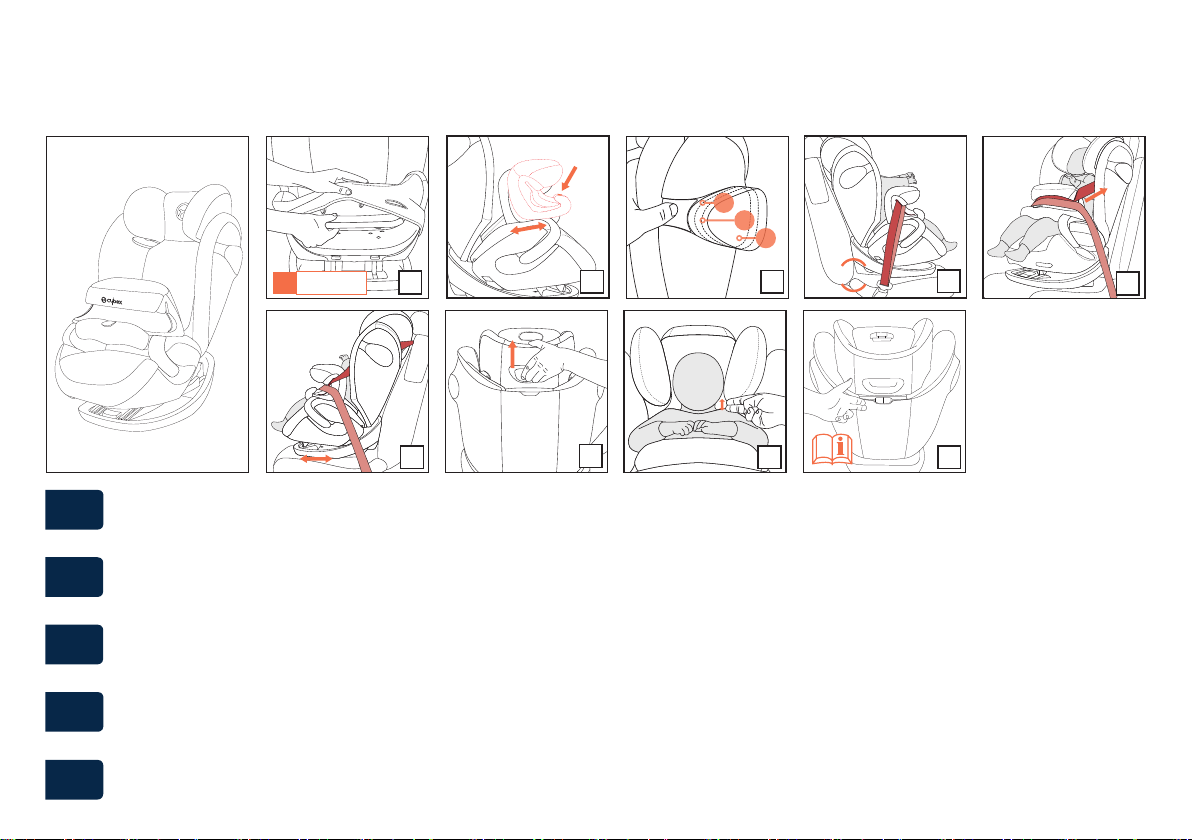
Um den CYBEX PALLAS M optimal an die Körpergröße anzupassen ist werkseitig
eine Sitzeinlage (i) mitgeliefert und bereits unter dem Bezug eingelegt.
• Wir empfehlen diese zusätzliche Sitzeinlage (i) für Kinder vom 9. bis zum 24.
Lebensmonat zu verwenden.
• Ab dem 25. Lebensmonat ist keine Sitzeinlage (i) mehr notwendig.
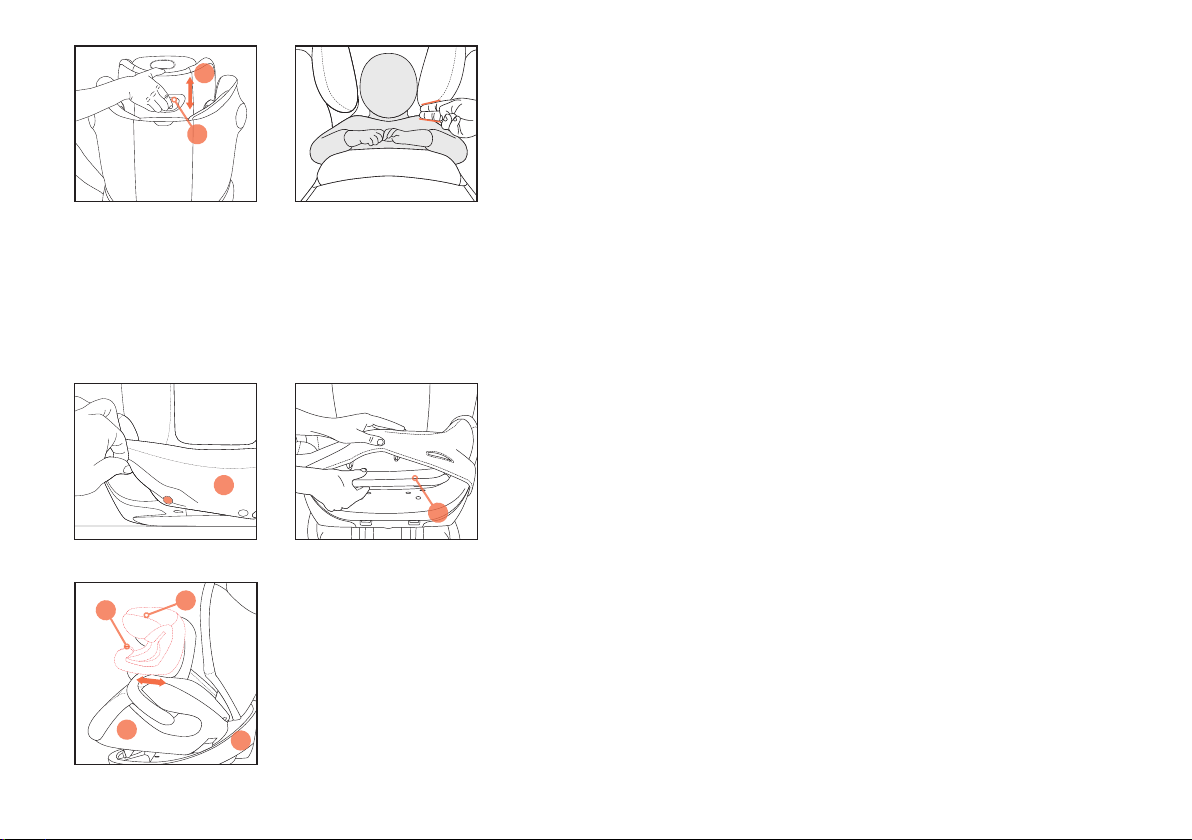
• Danach ist die Größenanpassung ausschließlich über die verstellbare Kopfstütze
(e) vorzunehmen. Ziehen Sie dazu den Verstellgriff (h) nach oben, um die
Kopfstütze (e) zu entriegeln.
• Die Anpassung hat so zu erfolgen, dass zwischen der unteren Kante der
Kopfstütze (e) und der Schulter des Kindes noch 2 ngerbreit Platz ist.
Hinweis! Nur eine in optimaler Höhe eingestellte Kopfstütze (e) bietet den
größtmöglichen Schutz und Komfort für Ihr Kind und gewährleistet außerdem den
optimalen Verlauf des Diagonalgurtes (f). Die Höhenverstellung kann beim CYBEX
PALLAS M in 12 Positionen erfolgen.
ENTNEHMEN DER ZUSÄTZLICHEN SITZEINLAGE
ANPASSEN AN DIE KÖRPERGRÖSSE
1. Lösen Sie die vorderen Druckknöpfe des Sitzbezuges vom Sitzkissen (d).
2. Ziehen Sie den Stoffbezug aus den Bezugsführungen vorn hoch, bis Sie die
Sitzeinlage herausziehen können.
d
i
3. Die Entnahme des Sitzeinlage hat entsprechend der obigen Altersangabe zu
erfolgen.
4. Bringen Sie den Sitzbezug wieder in den ursprünglichen Zustand und befestigen
Sie diesen anschließend wieder.
EINSTELLEN DES SICHERHEITSKISSENS – ECE GRUPPE 1 (9-18 KG)
z
d
p
w
Durch Betätigen des zentralen Verstellknopfes (z) können Sie das Sicherheitskissen
an Ihr Kind anpassen. Halten Sie den Verstellknopf (z) gedrückt, während Sie das
Sicherheitskissen an Ihr Kind anpassen.
Die seitlichen Flügel des Sicherheitskissens (p) passen exakt zwischen Armlehnen
und Sitzäche (d) und dienen der Abstützung des Sicherheitskissens (p) am Sitz.
Stellen Sie das Sicherheitskissen (p) so ein, dass es am Kind anliegt, jedoch ohne
auf den Körper des Kindes zu drücken.
WARNUNG! Das Sicherheitskissen (p) darf nur in Verbindung mit dem Rahmen
(w) und bis maximal 18 kg verwendet werden!
12
Page 14

ADAPTING TO BODY SIZE ADATTAMENTO ALLA TAGLIA CORPOREA
In order to optimally adapt the CYBEX PALLAS M to your child’s body size, a seat
insert (i) has been provided as standard and is already inserted under the seat cover.
• We recommend using this additional seat insert (i) for children aged 9 to 24
months.
• From the age of 25 month, the seat insert (i) is no longer necessary.
• The seat can then be adjusted to your child’s body simply by using the adjustable
headrest (e). To do this, pull the adjustment level (h) upwards to unlock the
headrest (e).
• Adjust it so that there is space for two ngers between the lower edge of the
headrest (e) and the shoulder of the child.
Note! Only an optimally adjusted headrest (e) can offer your child maximum
protection and comfort while ensuring that the diagonal belt can be tted smoothly (f).
The height of the CYBEX PALLAS M can be adjusted to one of twelve positions.
Per adattare al meglio il CYBEX PALLAS M alla taglia corporea del bambino deve
essere fornito come standard ed essere già inserito sotto la fodera del sedile un
inserto per sedili (i).
• Si raccomanda di usare questo inserto per sedili (i) aggiuntivo per i bambini da 9 a
24 mesi.
• Dall'età di 25 messi in poi l'inserto per sedili (i) non sarà più necessario.
• Il seggiolino sarà quindi adattabile al corpo del bambino usando semplicemente
il poggiatesta (e) regolabile. A tale ne tirare in alto la leva di regolazione (h) per
sbloccare il poggiatesta (e).
• Regolare in modo che vi siano due dita di spazio tra il bordo inferiore del
poggiatesta (e) e le spalle del bambino.
Nota bene! Solo un poggiatesta (e) regolato al meglio offre al bambino il massimo
in fatto di protezione e comfort e assicura allo stesso tempo lo scorrimento ottimale
della cintura diagonale (f). L'altezza del CYBEX PALLAS M è regolabile in una delle
dodici posizioni.
REMOVING THE ADDITIONAL SEAT INSERT RIMOZIONE DELL'INSERTO PER SEDILI AGGIUNTIVO
1. Release the front push buttons of the seat cover from the seat cushion (d).
2. Pull the fabric cover from the cover guides up and forward until you can pull out
the seat insert.
3. The seat insert must be removed in accordance with the age specifications stated
above.
4. Restore the seat insert to its original state and fix it in place again.
1. Sganciare i bottoni automatici anteriori della fodera del sedile dal cuscino (d).
2. Sollevare in avanti la fodera di tessuto dalle rispettive guide fino a poter estrarre
l'inserto per sedili.
3. L'inserto per sedili deve essere rimosso in linea con le specifiche relative all'età
indicate sopra.
4. Riposizionare correttamente la fodera e fissarla nuovamente.
ADJUSTING THE SAFETY CUSHION – ECE GROUP 1 (9-18 KG) REGOLARE IL CUSCINO DI SICUREZZA, GRUPPO ECE 1 (9-18 KG)
By pushing the central adjustment button (z), you can adapt the safety cushion to
your child. Hold down the central adjustment button (z) while you adapt the safety
cushion to your child.
The side aps of the safety cushion (p) t exactly between the arm rests and booster
(d) and are used to support the safety cushion (p) on the seat.
Adjust the safety cushion (p) so that it rests against the child without pushing against
the child’s body.
WARNING! The safety cushion (p) may only be used in conjunction with the
frame (w) up to a maximum of 18 kg!
Premendo il pulsante di regolazione centrale (z) è possibile adattare il cuscino di
sicurezza al bambino. Tenere premuto il pulsante di regolazione centrale (z) mentre
si adatta il cuscino di sicurezza al bambino.
Le alette laterali del cuscino di sicurezza (p) entrano precisamente tra i braccioli e la
supercie di seduta (d) e supportano il cuscino di sicurezza (p) sul seggiolino.
Regolare il cuscino di sicurezza (p) in modo che poggi contro il bambino senza
comprimerne il corpo.
ATTENZIONE! Il cuscino di sicurezza (p) è utilizzabile solo unitamente al telaio
(w) fino a 18 kg al massimo!
DEUKIT
13
Page 15

SITZ- UND LIEGEPOSITION – ECE GRUPPE 1 (9-18 KG)
p
v
d
v
w
Um den CYBEX PALLAS M in die Liegeposition zu bringen, muss das
fahrzeugeigene Gurtsystem nicht geöffnet werden.
• Wenn ihr Kind während der Fahrt einschläft, betätigen Sie die Einstelltaste (v) an
der Unterseite des Sitzkissens (d) und der CYBEX PALLAS M gleitet automatisch,
mit Hilfe des Körpergewichtes des Kindes, nach unten.
WARNUNG! Eine Einstellung der Liegeposition durch den Fahrzeugführer ist
während der Fahrt zu unterlassen!
• Um nach dem Aussteigen des Kindes den Sitz von der Liege- in die aufrechte
Sitzposition zurückzubringen, betätigen Sie erneut die Einstelltaste (v) und führen
Sie den Kindersitz mit einem leichten Druck gegen das Sitzkissen (d) wieder nach
oben.
WARNUNG! Achten Sie immer darauf, dass die Verstelltaste (v) in Liege- sowie
in Sitzposition hörbar einrastet. Die Liegeposition steht nur für Gruppe 1 (9-18
kg) in der Pallas Konfiguration mit Sicherheitskissen (p) und Grundrahmen (w)
zur Verfügung.
Note! Achten Sie darauf, dass der Beckengurt (n) und der Diagonalgurt (f) immer gut
gespannt sind.
14
r
NEIGUNGSVERSTELLBARE KOPFSTÜTZE
Die neigungsverstellbare Kopfstütze hilft, das gefährliche Nach-Vorne-Kippen
t
des Kopfes im Schlaf zu verhindern. Bei einem Aufprall folgt die Kopfstütze
der Kopfbewegung Ihres Kindes nach vorne, rastet ein und fängt somit die
anschließende Rückwärtsbewegung des Kopfes ab.
Hinweis! Achten Sie bitte darauf, dass der Kopf des Kindes immer in Kontakt mit der
neigungsverstellbaren Kopfstütze (r) bleibt, da die Kopfstütze nur so ihre optimierte
Seitenaufprall-Schutzfunktion erfüllen kann.
Die Neigung der Kopfstütze lässt sich in drei Positionen verstellen. Nach vorne lässt
sie sich ohne Betätigen des Hebels in die zweite bzw. dritte Position verstellen, bis
diese jeweils einrastet. Zum Zurückstellen in die Ausgangsposition, muss der Hebel
betätigt und die Kopfstütze nach hinten gezogen werden.
WARNUNG! Auf keinen Fall darf die Einrastvorrichtung (t) mit Gegenständen
blockiert werden! Im Falle eines Unfalls muss die Leichtgängigkeit der
Neigungsverstellung gewährleistet sein, da es sonst eventuell zu Verletzungen
Ihres Kindes kommen kann.
Page 16

SEATED AND LYING POSITION – ECE GROUP 1 (9-18 KG) POSIZIONE SEDUTA E SDRAIATA, GRUPPO ECE 1 (9-18 KG)
To bring the CYBEX PALLAS M to a lying position, the vehicle’s own belt system
does not need to be opened.
• If your child falls asleep during travel, simply press the adjustment button (v) on the
underside of the seat cushion (d), and the CYBEX PALLAS M will slide downwards
using your child’s weight.
WARNING! An adjustment of the lying position by the driver is prohibited while
travelling!
• To restore the upright seat position from the lying position once the child is out of
the seat, press the adjustment button (v) again and apply light pressure against the
seat cushion (d) to guide the child car seat back up.
WARNING! Always ensure that the adjustment button (v) gives an audible
click when locking into the lying or seated position. The lying position is only
available for group 1 (9-18 kg) in the Pallas configuration with safety cushion
(p) and base frame (w).
Note! Ensure that the lap belt (n) and diagonal belt (f) are always tight. Nota bene! Accertare che la cintura subaddominale (n) e la cintura diagonale (f)
Per porre il CYBEX PALLAS M in posizione sdraiata non è necessario aprire il
sistema di cinture del veicolo.
• Se il bambino si addormenta in viaggio, premere semplicemente il pulsante di
regolazione (v) sul lato inferiore del cuscino di seduta (d): il CYBEX PALLAS M
scorrerà in basso sfruttando il peso del bambino.
ATTENZIONE! Al guidatore è vietata la regolazione della posizione sdraiata
durante la guida!
• Per tornare alla posizione seduta dalla posizione sdraiata una volta che il bambino
non siede più nel seggiolino, premere nuovamente il pulsante di regolazione (v) e
applicare una leggera pressione al cuscino di seduta (d) per spingere il seggiolino
in posizione eretta.
ATTENZIONE! Accertare sempre che il pulsante di regolazione (v) emetta
uno scatto udibile al momento del bloccaggio in posizione sdraiata o seduta.
La posizione sdraiata è disponibile solo per il gruppo 1 (9-18 kg) nella
configurazione Pallas con cuscino di sicurezza (p) e telaio di base (w).
siano sempre tese.
RECLINING HEADREST POGGIATESTA INCLINABILE
The reclining headrest helps to prevent the child’s head from dangerously tipping
forward during sleep. In the event of a collision, the headrest will follow the
movement of your child’s head forwards, lock into place and absorb the subsequent
backwards motion of your child’s head.
Note! Ensure that your child’s head is always in contact with the reclining headrest
(r), as this is the only way that the headrest can provide optimum protection in case
of side collisions.
The recline angle of the headrest can be set to one of three positions. It can be
moved forward without moving the lever to the second or third position until the rest
locks into position. To return it to the original position, the lever must be operated and
the headrest pulled back.
WARNING! Never block the locking mechanism (t) ! In the event of an accident,
the recline adjustment mechanism must move smoothly, or else your child
may be injured!
Il poggiatesta inclinabile aiuta a impedire che la testa del bambino si rovesci
pericolosamente in avanti nel sonno. In caso di collisione, il poggiatesta seguirà il
movimento in avanti della testa del bambino, si bloccherà in posizione e assorbirà il
successivo movimento indietro della testa del bambino.
Nota bene! Accertare che la testa del bambino sia sempre a contatto con il
poggiatesta inclinabile (r): questa è la condizione indispensabile afnché il
poggiatesta offra la protezione ottimale dalle collisioni laterali.
L'angolo d'inclinazione del poggiatesta è regolabile in una delle tre posizioni. È
spostabile in avanti senza azionare la leva nella seconda o terza posizione, no
a che il poggiatesta scatta in posizione. Per tornare alla posizione originale è
necessario azionare la leva e tirare indietro il poggiatesta.
ATTENZIONE! Non bloccare mai il meccanismo di bloccaggio (t) con
degli oggetti! Il meccanismo di regolazione dell'inclinazione deve operare
scorrevolmente in caso d'incidente per evitare il ferimento del bambino!
DEUKIT
15
Page 17

ANSCHNALLEN MITTELS SICHERHEITSKISSEN – ECE GRUPPE 1
(9-18 KG)
x
p
l
m
n
CLICK!
1. Legen Sie nun das bereits eingestellte Sicherheitskissen (p) ein (siehe Abschnitt
„EINSTELLEN DES SICHERHEITSKISSENS“).
2. Ziehen Sie die gesamte Gurtlänge des Fahrzeug-Dreipunktgurtes heraus.
Nehmen Sie den Beckengurt (n) und legen Sie diesen in die dafür vorgesehene
Gurtführung (x) des Sicherheitskissens (p) ein.
WARNUNG! Den Gurt auf keinen Fall verdrehen!
16
f
x
f
n
n
e
p
x
f
WARNUNG! Der Dreipunktgurt darf nur in den dafür vorgesehenen Führungen
verlaufen. Die Gurtführungen werden in diesem Handbuch genau beschrieben
und sind zudem am Kindersitz rot markiert.
3. Stecken Sie die Gurtzunge (m) in das Gurtschloss (l). Dieses muss mit einem
hörbaren „KLICK“ einrasten.
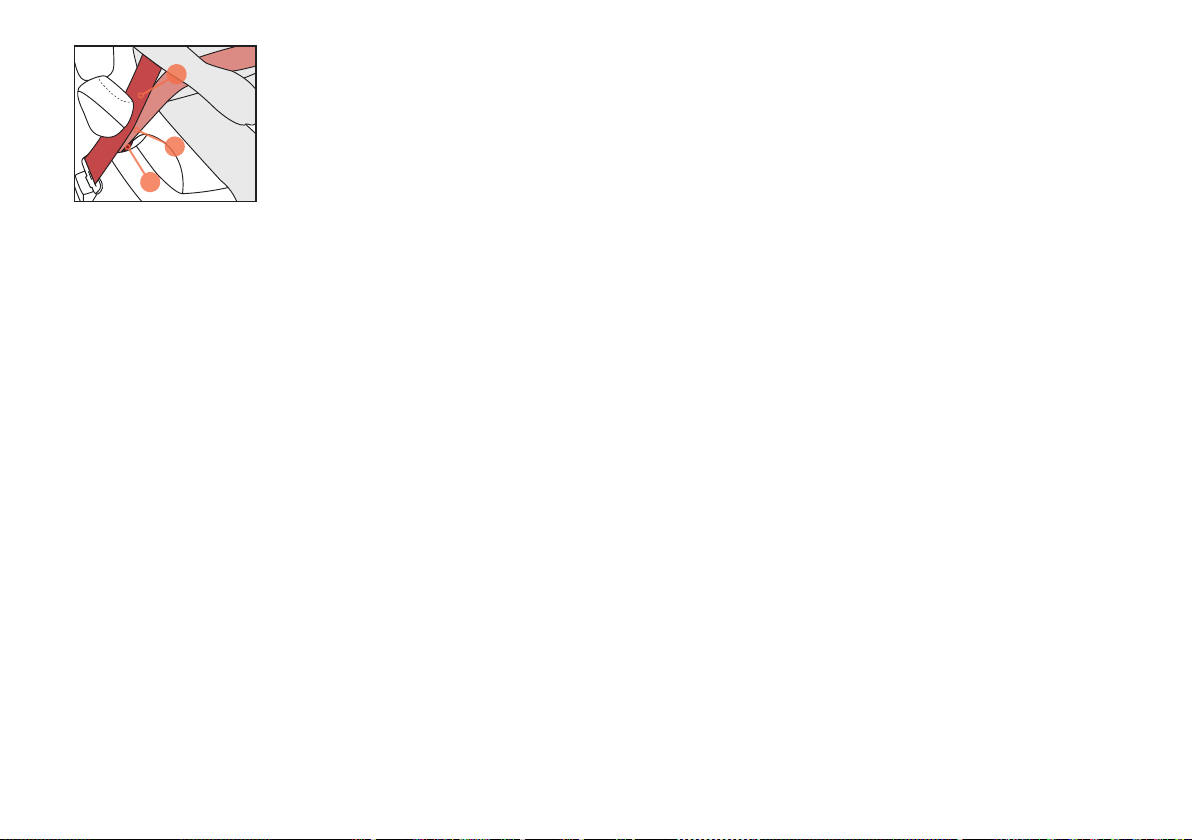
4. Spannen Sie den Beckengurt (n) vor, indem Sie am Diagonalgurt (f) ziehen.
5. Führen Sie nun den Diagonalgurt (f) parallel zum Beckengurt (n) in der
Gurtführung (x) zurück.
6. Ziehen Sie den Diagonalgurt (f) straff und achten Sie dabei darauf, dass beide
Gurtteile, über die gesamte Breite des Sicherheitskissens (p), innerhalb der
Gurtführung (x) verlaufen.
7. Ziehen sie nun den Diagonalgurt (f) nach oben fest in die Gurtführung (x) des
Sicherheitskissens (p), damit dieser sich festklemmt. Legen sie danach den
Diagonalgurt zwischen Kopfstütze (e) und Schulterstütze. Der Diagonalgurt muss
nicht in die Gurtführung für die Gruppe 2/3 an der Kopfstütze eingelegt werden.
WECHSEL VON PALLAS M AUF SOLUTION M (ECE GRUPPE 1 ZU
ECE GRUPPE 2/3)
1. Entfernen Sie das Sicherheitskissen (p).
2. Drücken Sie die beiden Entriegelungstasten (q) an der Unterseite des Sitzkissens
v
d
q
q
w
(d) und ziehen Sie dieses bis zum ersten Widerstand vom Rahmen (w) weg.
3. Betätigen Sie nun die Einstelltaste (v) und ziehen Sie den Sitz komplett vom
Rahmen (w) ab.
Hinweis! Bewahren Sie die demontierten Teile gut geschützt und gemeinsam auf.
WARNUNG! Beim Wiederzusammenbau gehen Sie genau in umgekehrter
Reihenfolge vor. Überprüfen Sie zuvor anhand der Anleitung, ob alle Teile
vorhanden sind.
Page 18

SECURING THE CHILD WITH THE SAFETY CUSHION – ECE
GROUP 1 (9-18 KG)
1. Now insert the previously adjusted safety cushion (p) (refer to the section
“ADJUSTING THE SAFETY CUSHION”).
2. Pull out the entire length of the vehicle’s three-point belt. Take the lap belt (n) and
place it in the designated belt guide (x) in the safety cushion (p).
WARNING! Never twist the belt! ATTENZIONE! Non torcere mai la cintura!
ALLACCIAMENTO USANDO IL CUSCINO DI SICUREZZA, GRUPPO
ECE 1 (9-18 KG)
1. Inserire ora il cuscino di sicurezza (p) precedentemente regolato (vedere
“REGOLARE IL CUSCINO DI SICUREZZA”).
2. Estrarre per tutta la lunghezza la cintura a tre punti del veicolo. Collocare la cintura
subaddominale (n) nell'apposita guida della cintura (x) nel cuscino di sicurezza (p).
DEUKIT
WARNING! The three-point belt may only be inserted into the guides
designated for that purpose. The belt guides are described precisely in this
manual and are also marked red on the child car seat.
3. Insert the belt tongue (m) into the belt buckle (l). It must lock into place with an
audible “CLICK”.
4. Tighten the lap belt (n) by pulling the diagonal belt (f).
5. Now feed the diagonal belt (f) in parallel with the lap belt (n) back into the belt
guide (x).
6. Pull the diagonal belt (f) tight and ensure that both parts of the belt cover the entire
width of the safety cushion (p) in the belt guide (x).
7. Now feed the diagonal belt (f) tightly through the belt guide (x) of the safety
cushion (p) until it is clamped inside the belt guide. Then put the diagonal belt
between headrest (e) and shoulder rest. The diagonal belt does not need to be
guided through the headrest belt guide for group 2/3.
SWITCHING FROM PALLAS M TO SOLUTION M (ECE GROUP 1 TO
ECE GROUP 2/3)
1. Remove the safety cushion (p).
2. Press the two release buttons (q) on the underside of the seat cushion (d) and pull
it away from the frame until there is some resistance.
3. Press the adjustment button (v) and pull the seat away from the frame (w)
completely.
Note! Keep removed parts together in a safe and secure place.
WARNING! When reassembling the seat, proceed in precisely the reverse
order. Use the instructions to check beforehand if all parts are present.
ATTENZIONE! La cintura a tre punti può essere inserita solo nelle apposite
guide. Le guide della cintura sono descritte precisamente nel presente
manuale e sono inoltre contrassegnate in rosso sul seggiolino.
3. Inserire la linguetta della cintura (m) nel fermaglio della cintura (l). Il blocco in
posizione deve essere segnalato da uno scatto udibile.
4. Tendere la cintura subaddominale tirando la cintura diagonale.
5. Inserire ora nuovamente la cintura diagonale (f) nella guida della cintura (x) in
parallelo alla cintura subaddominale (n).
6. Tendere la cintura diagonale (f) e accertare che entrambe le parti della cintura
coprano l'intera larghezza del cuscino di sicurezza (p) nella guida della cintura (x).
7. Serri la cintura diagonale (f) in alto nella guida della cintura del cuscino di
sicurezza (p) afnché si incastri. Dopo metta la cintura diagonale tra il poggiatesta
(e) e l`appoggio spalla. Non bisogna mettere la cintura diagonale nella guida della
cintura per il gruppo 2/3 accanto al poggiatesta
PASSAGGIO DA PALLAS M A SOLUTION M (DAL GRUPPO ECE 1
AL GRUPPO ECE 2/3)
1. Rimuovere il cuscino di sicurezza (p).
2. Premere i due pulsanti di rilascio (q) sul lato inferiore del cuscino di seduta (d) e
tirare via quest'ultimo dal telaio fino a percepire una certa resistenza.
3. Premere il pulsante di regolazione (v) e tirare via completamente il seggiolino dal
telaio (w).
Nota bene! Conservare le parti rimosse riunite in un luogo sicuro.
ATTENZIONE! Procedere esattamente in ordine inverso nel riassemblaggio del
seggiolino. Usare le istruzioni per verificare preliminarmente che tutte le parti
siano presenti.
17
Page 19

ANSCHNALLEN OHNE SICHERHEITSKISSEN – ECE GRUPPE 2/3
(15-36 KG)
l
f
l
m
n
k
f
f
l
n
k
s
g
e
f
1. Setzen Sie ihr Kind in den Kindersitz. Ziehen Sie den Dreipunktgurt weit heraus
und führen Sie diesen vor Ihrem Kind entlang zum Gurtschloss (l).
WARNUNG! Den Gurt auf keinen Fall verdrehen.
2. Stecken Sie die Gurtzunge (m) in das Gurtschloss (l). Dieses muss mit einem
hörbaren „KLICK“ einrasten.
3. Als nächstes legen Sie den Beckengurt (n) in die unteren Gurtführungen (k) des
Kindersitzes ein.
4. Ziehen Sie nun kräftig am Diagonalgurt (f), um den Beckengurt (n) zu straffen. Je
enger der Gurt anliegt, desto besser kann er vor Verletzungen schützen. Auf der
Seite des Gurtschlosses (l) müssen der Diagonalgurt (f) und der Beckengurt (n)
zusammen in die untere Gurtführung (k) eingelegt sein.
WARNUNG! Das Fahrzeuggurtschloss (l) darf keinesfalls über die Armlehne
reichen. Ist die Gurtpeitsche zu lang, ist der Kindersitz für eine Verwendung
auf dieser Position im Fahrzeug nicht geeignet. Bitte wenden Sie sich im
Zweifelsfall an den Hersteller Ihres Fahrzeugs.
5. Der Beckengurt (n) sollte auf beiden Seiten des Sitzkissens (d) in den unteren
Gurtführungen (k) liegen.
Hinweis! Bringen Sie Ihrem Kind von Anfang an bei, immer auf eine straffe
Gurtführung zu achten und bei Bedarf, selbst den Gurt festzuziehen.
WARNUNG! Der Beckengurt (n) muss auf beiden Seiten so tief wie möglich
über der Leistenbeuge Ihres Kindes verlaufen, um im Falle eines Unfalls
optimal wirken zu können.
6. Nun führen Sie den Diagonalgurt (f) durch die obere Gurtführung (g) in der
Kopfstütze (e) bis er sich innerhalb der Gurtführung bendet.
Achten Sie darauf, dass der Diagonalgurt (f) zwischen Schulteraußenkante und
Hals Ihres Kindes verläuft. Falls erforderlich, passen Sie durch Verstellen der
Kopfstützenhöhe den Gurtverlauf an. Die Höhe der Kopfstütze (e) kann auch im
eingebauten Zustand im Auto eingestellt werden..
18
Page 20

SECURING THE CHILD WITHOUT THE SAFETY CUSHION – ECE
GROUP 2/3 (15-36 KG)
1. Place your child in the child car seat. Pull the three-point belt right out and feed it
along the belt buckle (l) in front of your child.
WARNING! Never twist the belt. ATTENZIONE! Non torcere mai la cintura.
2. Insert the belt tongue (m) into the belt buckle (l). It must lock into place with an
audible “CLICK”.
3. Next, place the lap belt (n) in the lower belt guides (k) of the child car seat.
4. Now pull the diagonal belt (f) rmly to tighten the lap belt (n). The tighter the belt
sits, the better it provides protection from injury. On the side of the belt buckle (l),
the diagonal belt (f) and the lap belt (n) must be inserted together in the lower belt
guide (k).
WARNING! The vehicle belt buckle (l) must never cross the arm rest. If the belt
system is too long, the child car seat is not suitable for use in this position in
the vehicle. In case of doubt, please consult the manufacturer of your vehicle.
5. The lap belt (n) should have been fed through the lower belt guides (k) on both
sides of the seat cushion (d).
Note! Teach your child from the start to always ensure that the belt is tight and, if
necessary, how to tighten the belt themselves.
WARNING! The lap belt (n) must run as low as possible on both sides along
your child’s groin to have optimum effect in the event of an accident.
6. Now feed the diagonal belt (f) through the upper belt guide (g) in the headrest (e)
until it is inside the belt guide.
Ensure that the diagonal belt (f) runs between the outside of the shoulder and the
neck of your child. If necessary, adjust the height of the headrest to change the
position of the belt. The height of the headrest (e) can still be adjusted while in the
car.
ALLACCIAMENTO SENZA CUSCINO DI SICUREZZA, GRUPPO ECE
2/3 (15-36 KG)
1. Collocare il bambino nel seggiolino. Estrarre ampiamente la cintura a tre punti e
farla scorrere fino al fermaglio della cintura (l) davanti al bambino.
2. Inserire la linguetta della cintura (m) nel fermaglio della cintura (l). Il blocco in
posizione deve essere segnalato da uno scatto udibile.
3. Collocare successivamente la cintura subaddominale (n) nelle guide della cintura
inferiori (k) del seggiolino.
4. Tirare ora saldamente la cintura diagonale (f) per tendere la cintura
subaddominale (n). Maggiormente tesa è la sede della cintura e maggiore è la
protezione dalle lesioni. Cintura diagonale (f) e cintura subaddominale (n) vanno
inserite assieme nella guida della cintura inferiore (k) a lato del fermaglio della
cintura (l).
ATTENZIONE! Il fermaglio della cintura (l) del veicolo non deve mai
attraversare il bracciolo. Se il sistema di cinture è troppo lungo il seggiolino
non è adatto all'uso in questa posizione nel veicolo. In caso di dubbio
consultare il costruttore del proprio veicolo.
5. La cintura subaddominale (n) dovrebbe passare attraverso le guide della cintura
inferiori (k) su ambo i lati del cuscino di seduta (d).
Nota bene! Insegnare al bambino n dall'inizio a controllare sempre che la cintura
sia tesa e a tenderla autonomamente se necessario.
ATTENZIONE! La cintura subaddominale (n) deve scorrere più bassa possibile
su ambo i lati lungo l'inguine del bambino per avere l'effetto ottimale in caso di
incidente.
6. Far passare ora la cintura diagonale (f) attraverso la guida della cintura superiore
(g) nel poggiatesta (e) no a che si trova nella guida della cintura.
Accertare che la cintura diagonale (f) scorra tra l'esterno della spalla e il collo del
bambino. Se necessario regolare l'altezza del poggiatesta per cambiare la posizione
della cintura. L'altezza del poggiatesta (e) è regolabile anche in auto.
DEUKIT
19
Page 21
IST IHR KIND RICHTIG GESICHERT?
f
n
k
Um die bestmögliche Sicherheit Ihres Kindes zu gewährleisten, prüfen Sie bitte
immer vor Beginn der Fahrt, ob…
• der Beckengurt (n) auf beiden Seiten des Sitzkissens (d) in den unteren
Gurtführungen (k) verläuft.
• der Diagonalgurt (f) auf der Gurtschlossseite auch in der unteren Gurtführung (k)
des Sitzes verläuft.
• der Diagonalgurt (f) durch die rot markierte Gurtführung (g) der Schulterstütze (e)
verläuft.
• der Diagonalgurt (f) schräg nach hinten verläuft.
• der gesamte Gurt straff ist und nicht verdreht am Körper des Kindes anliegt.
PFLEGE
Um die größtmögliche Schutzwirkung Ihres Kindersitzes zu gewährleisten, ist es
unbedingt notwendig, dass Sie Folgendes beachten:
• Alle wichtigen Teile des Kindersitzes sollten regelmäßig auf Beschädigungen
kontrolliert werden. Die mechanischen Bauteile müssen einwandfrei funktionieren.
• Es ist unbedingt notwendig darauf zu achten, dass der Kindersitz nicht zwischen
harten Teilen wie Fahrzeugtür, Sitzschiene usw. eingeklemmt wird und dadurch
beschädigt werden könnte.
• Der Kindersitz muss z.B. nach einem Sturz unbedingt vom Hersteller überprüft
werden.
Es ist darauf zu achten, dass nur ein original CYBEX Sitzbezug verwendet wird, da
auch der Bezug ein wesentlicher Bestandteil der Funktion ist. Ersatzbezüge erhalten
Sie im Fachhandel.
20
Page 22

IS YOUR CHILD CORRECTLY SECURED? IL BAMBINO È MESSO IN SICUREZZA CORRETTAMENTE?
To ensure optimum safety for your child, please always check before commencing
travel that
• the lap belt (n) has been fed through the lower belt guides (k) on both sides of the
seat cushion (d).
• the diagonal belt (f) on the belt buckle side has also been fed through the lower belt
guide (k) of the seat.
• the diagonal belt (f) has been fed through the belt guide (g) marked red in the
shoulder rest (e).
• the diagonal belt (f) is at a recline backwards.
• the entire belt is tightly against your child’s body and is not twisted.
Per garantire la sicurezza ottimale del bambino, prima di iniziare il viaggio controllare
sempre che
• la cintura subaddominale (n) passi attraverso le guide della cintura inferiori (k) su
ambo i lati del cuscino di seduta (d).
• anche la cintura diagonale (f) sul lato del fermaglio della cintura passi attraverso la
guida inferiore della cintura (k) del seggiolino.
• la cintura diagonale (f) passi attraverso la guida della cintura (g) marcata di rosso
nel poggia-spalla (e).
• la cintura diagonale (f) scorra verso il basso inclinata.
• l'intera cintura poggi tesa contro il corpo del bambino e non sia attorcigliata.
CARE & MAINTENANCE CURA E MANUTENZIONE
To ensure that your child car seat provides maximum protection, it is imperative that
you note the following:
• All major parts of the child car seat should be checked regularly for damage. The
mechanical components must be free of defects.
• It is absolutely necessary to ensure that the child car seat is not jammed between
hard elements such as the vehicle door or seat rail, which could potentially damage
it.
• When exposed to extreme shock, e.g. after a crash, the child car seat must be
checked by the manufacturer.
Ensure that only an original CYBEX seat cover is used, as the cover is a key element
of the seat’s function. Spare covers can be obtained from a specialist retailer.
Per garantire che il seggiolino offra la massima protezione è imperativo osservare
quanto segue:
• Tutte le parti principali del seggiolino dovrebbero essere controllate regolarmente
alla ricerca di danni. I componenti meccanici devono essere privi di difetti.
• È assolutamente necessario assicurare che il seggiolino non sia incastrato tra
elementi duri, quali la portiera o le guide dei sedili, che potrebbero potenzialmente
danneggiarlo.
• Se esposto a colpi estremi, ad esempio in caso di incidente, il seggiolino deve
essere controllato dal produttore.
Accertarsi di utilizzare solo una fodera del sedile CYBEX, in quanto la fodera
rappresenta un elemento chiave di funzionamento del seggiolino. Le fodere di
ricambio sono ottenibili presso i rivenditori specializzati.
DEUKIT
21
Page 23

e e
h
ENTFERNEN DES BEZUGES
Der Bezug am Kindersitz besteht aus vier Teilen (Kopfstützenklappe, Kopfstütze,
Schulterteil, Sitzkissen). Dazu kommt beim PALLAS M der Bezug des
Sicherheitskissens.
Die Sitzbezüge sind in den am Rand des Kindersitzes verlaufenden Bezugführungen
versenkt und/oder an mehreren Stellen mit Druckknöpfen am Kindersitz befestigt.
Sobald Sie alle Befestigungen lösen, können die Einzelteile aus den
Bezugführungen gezogen werden.
Um den Bezug wieder zu befestigen, verfahren Sie in umgekehrter Reihenfolge.
WARNUNG! Der Kindersitz darf keinesfalls ohne Bezug verwendet werden.
ENTFERNEN DES BEZUGS VON DER KOPFSTÜTZENKLAPPE
Ziehen sie die Kopfstütze (e) mit Hilfe des Verstellhebels (h) in die höchste Position.
Ziehen die Aussparung des Bezugs über den Verstellhebel, sodass der Bezug beim
Abziehen nach oben hin nicht am Hebel hängen bleibt.
ENTFERNEN DES BEZUGS VON DER KOPFSTÜTZE
Lösen Sie beidseitig die Druckknöpfe am hinteren Schulterbereich. Ziehen Sie den
Bezug aus dem Stoffkanal heraus.
22
ENTFERNEN DES BEZUGS VOM SCHULTERTEIL
Ziehen Sie den Bezug aus dem Stoffkanal heraus.
Page 24

REMOVING THE SEAT COVER RIMOZIONE DELLA FODERA DEL SEGGIOLINO
The cover of the infant seat consists of four parts (Headrest ap, headrest, shoulder
part cover, booster cover and/or seat surface cover).This is complemented by the
safety cushion cover.
The four covers of the seat are tted into the cover attachment channels on the
edge of the infant seat and are held in position at several places by press-studs (see
image).
Once all studs have been released, the single parts of the cover can be removed
from the cover attachment channels.
In order to put the covers back on the seat, proceed in the reversed order as
removing them.
WARNING! The child car seat must never be used without the cover. ATTENZIONE! Il seggiolino non deve mai essere usato senza la fodera.
La fodera del seggiolino è composta da quattro parti (aletta del poggiatesta,
poggiatesta, fodera dell'area della spalla, fodera dell'elevatore e/o fodera della
supercie di seduta). Il tutto è completato dalla fodera del cuscino di sicurezza.
Le quattro fodere del seggiolino sono inserite nelle guide di attacco della fodera sui
bordi del seggiolino e sono tenute in posizione in vari punti da bottoni automatici
(vedere gura).
Una volta sbloccati tutti gli automatici, le singole parti della fodera possono essere
rimosse dalle guide di attacco della fodera.
Procedere in ordine inverso rispetto alla rimozione al ne di ricollocare le fodere sul
seggiolino.
DEUKIT
REMOVING THE COVER FROM THE HEADREST FLAP
Pull the opening of the cover over the adjustment lever so that the cover does not get
jammed on the lever when pulling it up to remove it.
RIMOZIONE DELLA FODERA DALL'ALETTA DEL POGGIATESTA
Tirare l'apertura della fodera oltre la leva di regolazione, in modo che la fodera non
resti incastrata sulla leva al momento dell'estrazione.
REMOVING THE COVER FROM THE HEAD SUPPORT RIMOZIONE DELLA FODERA DAL POGGIATESTA
Release the two press-studs at each side of the rear of the shoulder area. Pull the
cover out of the cover attachment channel.
Rilasciare i due bottoni automatici su ogni lato del retro dell'area della spalla. Estrarre
la fodera dalla guida di attacco della fodera.
REMOVING THE COVER FROM THE SHOULDER PART RIMOZIONE DELLA FODERA DALL'AREA DELLA SPALLA
Pull the cover out of the cover attachment channel. Estrarre la fodera dalla guida di attacco della fodera.
23
Page 25

ENTFERNEN DES BEZUGS VON DER SITZFLÄCHE
Lösen Sie die vier Druckknöpfe des Sitzbezugs vorder- und rückseitig. Ziehen Sie
nun den Bezug über die Armlehnen und entlang der Sitzäche ab.
ENTFERNEN DES BEZUGS VOM SICHERHEITSKISSEN
Öffnen Sie zuerst die beiden Druckknöpfe des Sicherheitskissenbezugs. Ziehen Sie
dann den Bezug um das Kissengehäuse hin zur dritten Befestigung am zentralen
Verstellknopf ab und lösen Sie den Bezug an der Gummiöse des zentralen
Verstellknopfes.
REINIGUNG
Hinweis! Der Bezug darf nur bei 30°C im Schonwaschgang gewaschen werden.
Sollten Sie mit mehr als 30°C waschen, kann es zu Ausfärbungen des Bezugstoffes
kommen. Bitte den Bezug gesondert von anderer Wäsche waschen und nicht
im Trockner trocknen! Den Bezug keinesfalls in der prallen Sonne trocknen! Die
Kunststoffteile können mit einem milden Reinigungsmittel und warmen Wasser
gereinigt werden.
WARNUNG! Bitte auf keinen Fall scharfe Reinigungs- oder Bleichmittel
verwenden!
24
Page 26

REMOVING THE COVER FROM THE BOOSTER RIMOZIONE DELLA FODERA DALLA SUPERFICIE DI SEDUTA
Release the four press-studs of the seat cover at the front and the back. Now, pull off
the cover over the armrests and along the seat surface.
Sbloccare i quattro bottoni automatici anteriori e posteriori della fodera del sedile.
Estrarre ora la fodera oltre i braccioli e lungo la supercie di seduta.
REMOVING THE COVER FROM THE SAFETY CUSHION RIMOZIONE DELLA FODERA DAL CUSCINO DI SICUREZZA
First, release the two press-studs of the safety cushion cover. Then pull off the cover
around the cushion towards the third attachment around the central adjustment
button and release the cover at the rubber eyelet of the adjustment button.
Sbloccare prima i due bottoni automatici della fodera del cuscino di sicurezza.
Estrarre quindi la fodera attorno al cuscino verso il terzo attacco attorno al pulsante
di regolazione centrale e sbloccare la fodera sull'occhiello in gomma del pulsante di
regolazione.
CLEANING PULIZIA
Note! The cover may only be washed at 30°C with a delicate wash program.
Washing at more than 30°C may result in discolouration of the cover fabric. Please
wash the cover separately from other laundry and do not dry in the dryer! Never dry
the cover in direct sunlight! The plastic parts can be cleaned with a mild cleaning
agent and warm water.
WARNING! Never use harsh cleaning agents or bleaches! ATTENZIONE! Non usare mai detergenti aggressivi o candeggine!
Nota bene! La fodera è lavabile solo a 30 °C con un programma di lavaggio delicato.
Il lavaggio oltre i 30 °C può causare lo scolorimento del tessuto della fodera. Lavare
la fodera separatamente dagli altri capi e non asciugare in asciugatrice! Non fare mai
asciugare la fodera alla luce solare diretta! Le parti in plastica possono essere pulite
con un detergente delicato e dell'acqua tiepida.
DEUKIT
25
Page 27

VERHALTEN NACH EINEM UNFALL
WARNUNG! Aufgrund eines Unfalles können am Kindersitz Beschädigungen
auftreten, die mit bloßem Auge nicht erkennbar sind. Bitte tauschen Sie nach
einem Unfall unbedingt den Sitz aus. Im Zweifelsfall wenden Sie sich bitte an
den Händler oder Hersteller.
PRODUKTLEBENSDAUER
Der CYBEX PALLAS M ist so ausgelegt, dass er für den gesamten
Verwendungszeitraum von ca. 11 Jahren seine Eigenschaften erfüllt. Da jedoch
in Fahrzeugen sehr große Temperaturschwankungen und unvorhersehbare
Belastungen auftreten können, ist es notwendig folgende Punkte zu beachten:
• Wenn das Fahrzeug längere Zeit der prallen Sonne ausgesetzt ist, muss der
Kindersitz aus dem Fahrzeug entfernt werden oder mit einem hellen Tuch
abgedeckt werden.
• Prüfen Sie regelmäßig alle Kunststoff- und Metallteile des Sitzes auf Beschädigung
oder Veränderung von Form oder Farbe. Stellen Sie eine Veränderung fest, ist
der Kindersitz unbedingt zu entsorgen oder er muss vom Hersteller geprüft und
gegebenenfalls ausgetauscht werden.
• Veränderungen des Stoffes, insbesondere das Ausbleichen, sind bei Verwendung
in einem Fahrzeug normal und stellen keine Beeinträchtigung dar.
ENTSORGUNG
Am Ende der Produktlebensdauer des Kindersitzes ist eine sachgemäße
Entsorgung vorzunehmen. Die Abfalltrennung kann kommunal unterschiedlich sein.
Um eine vorschriftsgemäße Entsorgung des Kindersitzes zu gewährleisten, setzen
Sie sich mit Ihrer kommunalen Abfallentsorgung bzw. Verwaltung Ihres Wohnortes
in Verbindung. Beachten Sie auf jeden Fall die Entsorgungsbestimmungen Ihres
Landes.
26
Page 28

HOW TO ACT FOLLOWING AN ACCIDENT COME PROCEDERE IN SEGUITO A UN INCIDENTE
WARNING! An accident may cause damage to the child car seat that is not
identifiable with the naked eye. Please replace the seat after an accident. In
case of doubt, please consult your dealer or the manufacturer.
ATTENZIONE! Un incidente può causare danni al seggiolino non identificabili
a occhio nudo. Sostituire il seggiolino dopo un incidente. In caso di dubbio
consultare il proprio rivenditore o il produttore.
PRODUCT SERVICE LIFE VITA UTILE DEL PRODOTTO
The CYBEX PALLAS M is designed to meet its specications for the entire service
life of approximately 11 years. However, as there can be very large temperature
uctuations and unpredictable strains in vehicles, the following points must be
observed:
• If the vehicle is directly exposed to sunlight for a longer time, the child car seat must
be removed from the vehicle or covered with a light cloth.
• Regularly check all plastic and metal parts of the seat for damage, deformation or
change of colour. If you discover any changes, the child car seat must be disposed
or checked and possibly replaced by the manufacturer.
• Changes to fabric, especially bleaching, are perfectly normal when used in a
vehicle and do not impair the seat’s function.
Il CYBEX PALLAS M è progettato per soddisfare le proprie speciche per l'intera
vita utile, pari a circa 11 anni. Tuttavia, alla luce delle possibili uttuazioni massicce
di temperatura e degli sforzi imprevedibili nei veicoli, devono essere tenuti in
considerazione i punti seguenti:
• Se il veicolo è esposto direttamente alla luce solare per un periodo di tempo
prolungato, il seggiolino deve essere rimosso dal veicolo o coperto con un panno
chiaro.
• Controllare regolarmente tutte le parti di plastica e metallo del seggiolino alla
ricerca di danni, deformazioni o cambiamenti di colore. Qualora si scopra qualsiasi
cambiamento, il seggiolino dovrà essere smaltito o controllato e, possibilmente,
sostituito dal produttore.
• Le variazioni del tessuto, in particolare la scoloritura, sono perfettamente normali in
caso di uso in un veicolo e non intaccano il funzionamento del seggiolino.
DISPOSAL SMALTIMENTO
At the end of the child car seat’s service life, it must be disposed of correctly. The
separation of waste may be handled differently from place to place. To ensure that
the child car seat is disposed of in accordance with regulations, please contact your
local waste disposal institution or local council. Always observe the waste disposal
regulations of your country.
Al termine della vita utile del seggiolino, questo deve essere smaltito correttamente.
La differenziazione dei riuti potrebbe avvenire con modalità diverse da luogo
a luogo. Per accertare che il seggiolino sia smaltito nel rispetto delle norme si
raccomanda di contattare l'autorità locale responsabile dello smaltimento dei riuti
o l'amministrazione locale. Rispettare sempre le norme di smaltimento dei riuti del
proprio paese.
DEUKIT
27
Page 29

GARANTIEBEDINGUNGEN
Die nachfolgenden Garantiebestimmungen gelten nur in dem Land, in dem
dieses Produkt erstmalig über den Einzelhandel an einen Verbraucher verkauft
wurde. Die Garantie deckt sämtliche Herstellungs- und Materialfehler ab, die im
Zeitpunkt des Kaufs bestanden haben oder die innerhalb von drei (3) Jahren nach
dem Erstverkauf dieses Produkts über den Einzelhandel an einen Verbraucher in
Erscheinung getreten sind (Herstellergarantie). Tritt während der Garantiezeit ein
Herstellungs- und Materialfehler auf, wird das Produkt kostenlos repariert oder –
nach unserem freien Ermessen – gegen ein neues ausgetauscht. Um Leistungen
im Rahmen dieser Garantie in Anspruch nehmen zu können, muss das Produkt
an den Einzelhändler zurückgegeben werden, der es erstmalig verkauft hat und
ein Nachweis über den Kauf (Kaufbeleg oder Rechnung) im Original vorgelegt
werden, welcher das Kaufdatum, Namen und Adresse des Händlers, sowie die
Produktbezeichnung aufzeigt. Der Anspruch aus diesem Garantieversprechen
besteht nicht, wenn das Produkt an den Hersteller oder irgendeine andere
Person als den Einzelhändler, der es erstmalig verkauft hat, zum Zweck der
Inanspruchnahme der Garantieleistung geschickt wird. Die Garantie gilt nur, wenn
das Produkt nach dem Kauf umgehend auf Vollständigkeit, Herstellungs- und
Materialfehler überprüft wurde. Wurde das Produkt im Versandhandel gekauft, ist
es umgehend nach Erhalt auf Vollständigkeit, Herstellungs- und Materialfehler zu
überprüfen. Falls Schäden vorhanden sind, darf das Produkt nicht mehr benutzt
werden und muss umgehend an den Händler, der es erstmalig verkauft hat,
zurückgegeben werden. Im Garantiefall muss das Produkt in einem vollständigen
und sauberen Zustand zurückgegeben werden. Bitte lesen Sie vor einer
Kontaktaufnahme mit dem Händler sorgfältig die Gebrauchsanleitung. Die Garantie
deckt keine Schäden ab, die durch Fehlgebrauch, äußere Einüsse (Wasser, Feuer,
Verkehrsunfälle o.ä.) oder normalen Verschleiß entstanden sind. Die Garantie wird
nur gewährt, wenn das Produkt in Übereinstimmung mit der Gebrauchsanweisung
behandelt und benutzt wurde, Reparaturen oder Veränderungen ausschließlich
durch Personen vorgenommen wurden, die hierzu befugt waren und stets nur
Original Bau- und Zubehörteile verwendet wurden. Durch diese Garantie werden
weder die auf Grundlage der jeweils anwendbaren Gesetze bestehenden
Verbraucherrechte noch Rechte gegen den Verkäufer wegen der Vertragswidrigkeit
des Produkts ausgeschlossen, begrenzt oder in anderer Weise eingeschränkt.
28
CYBEX GmbH
Riedinger Str. 18, 95448 Bayreuth, Germany
Tel.: 0921 78 511-511, Fax.: 0921 78 511- 888
Page 30

WARRANTY CONDITIONS CONDIZIONI DI GARANZIA
The following warranty conditions only apply to the country in which this product
was rst sold through retail channels to a consumer. This warranty covers all
manufacturing and material defects that existed at the time of purchase or which
manifest themselves within three (3) years of rst sale of this product via retail
channels to a consumer (manufacturer warranty). If a manufacturing or material
defect arises during the warranty period, the product will be repaired at no charge
or – at our discretion – may be replaced by a new one. In order to make a claim on
this warranty, the product must be returned to the retailer that rst sold it and the
original proof of purchase (receipt or invoice), containing the date of purchase, name
and address of the retailer, and the product name, must be presented. No claims
may be made on this warranty if the product is sent to the manufacturer or any other
person than the retailer having rst sold it for the purpose of making a claim on the
warranty. The warranty only applies is the product was checked for completeness,
manufacturing defects and material defects immediately upon purchase. If the
product was purchase by way of a mail order outlet, it must be checked for
completeness, manufacturing defects and material defects immediately upon receipt.
If damage arises, the product may no longer be used and must be returned to the
retailer that original sold it. When claiming on the warranty, the product must be
returned in a complete and clean state. Please read the usage instructions carefully
before contacting the retailer. The warranty does not cover damage caused by
misuse, external inuences (water, re, trafc accidents etc.) or normal wear and
tear. Claims on the warranty will only be honoured if the product is treated and
used in accordance with the usage instructions, repairs and modications are only
performed by persons authorised to do so, and only original parts and accessories
are used. This warranty does not nullify or limit in any way any consumer rights or
rights against the seller based on infringement of the purchase agreement granted
by applicable legislation.
Le seguenti condizioni di garanzia si applicano solo al paese nel quale questo
prodotto è stato venduto al cliente per la prima volta attraverso i canali di vendita al
dettaglio. Questa garanzia copre tutti i difetti di produzione e dei materiali esistenti al
momento dell'acquisto o manifestatisi entro tre (3) anni dalla prima vendita di questo
prodotto al cliente attraverso i canali di vendita al dettaglio (garanzia del produttore).
Qualora, durante il periodo di garanzia, si presenti un difetto di produzione o dei
materiali, il prodotto verrà riparato gratuitamente o sostituito con uno nuovo a nostra
discrezione. Al ne di sfruttare la presente garanzia il prodotto dovrà essere reso al
dettagliante che lo ha venduto per la prima volta, dietro presentazione della prova
d'acquisto originale (ricevuta o fattura) contenente la data di acquisto, il nome e
l'indirizzo del dettagliante e il nome del prodotto. Non sono ammesse richieste
relative a questa garanzia qualora il prodotto, allo scopo di effettuare una richiesta di
garanzia, sia inviato al produttore o a qualsiasi altra persona diversa dal dettagliante
che lo ha venduto per la prima volta. La garanzia si applica solo se il prodotto è
stato controllato immediatamente rispetto alla completezza, ai difetti di produzione
e ai difetti dei materiali al momento dell'acquisto. Se il prodotto è stato acquistato
tramite un canale di vendita postale, dovrà essere controllato immediatamente
rispetto alla completezza, ai difetti di produzione e ai difetti dei materiali al momento
del ricevimento. Al presentarsi di un difetto il prodotto non dovrà più essere utilizzato
e dovrà essere reso al dettagliante che lo ha venduto in origine. In occasione della
richiesta di garanzia il prodotto deve essere reso in condizioni complete e pulite.
Leggere attentamente le istruzioni per l'uso prima di contattare il dettagliante. La
garanzia non copre i danni causati dall'uso improprio, dagli inussi esterni (acqua,
fuoco, incidenti stradali, ecc.) o dalla normale usura e lacerazione. Le richieste
di garanzia saranno onorate solo se il prodotto è trattato e usato in linea con le
istruzioni per l'uso, se le riparazioni e le modiche sono eseguite esclusivamente da
persone autorizzate a tale scopo e solo se sono usati ricambi e accessori originali.
Questa garanzia non annulla o limita in alcun modo i diritti del consumatore o i
diritti contro il venditore basati sulle violazioni dell'accordo di acquisto garantiti dalla
legislazione applicabile.
DEUKIT
CYBEX GmbH
Riedinger Str. 18, 95448 Bayreuth, Germany
Tel.: 0921 78 511-511, Fax.: 0921 78 511- 888
CYBEX GmbH
Riedinger Str. 18, 95448 Bayreuth, Germany
Tel.: 0921 78 511-511, Fax.: 0921 78 511- 888
29
Page 31

30
Page 32

Chère cliente, cher client,
Merci d’avoir choisi le siège auto CYBEX PALLAS M. Le siège auto pour enfant CYBEX PALLAS M a été développé selon
les principes essentiels de sécurité, confort et aisance. Tout au long de sa fabrication, ce produit a été soumis à des mesures
d’assurance de qualité et satisfait aux exigences de sécurité les plus strictes.
Beste klant,
Het verheugt ons dat u de CYBEX PALLAS M hebt gekocht. Bij de ontwikkeling van het CYBEX PALLAS M-kinderzitje
is alle aandacht besteed aan de veiligheid, het comfort en de gebruiksvriendelijkheid. Het product werd aan een speciale
kwaliteitscontrole onderworpen en voldoet aan de strengste veiligheidseisen.
Drogi Kliencie,
Dziękujemy za wybór fotelika samochodowego CYBEX PALLAS M. Pragniemy zapewnić, że poświęciliśmy szczególna uwagę
bezpieczeństwu, wygodzie i funkcjonalności. Produkt ten jest wytwarzany z zachowaniem najwyższych standardów jakości i
spełnia najbardziej rygorystyczne wymogi bezpieczeństwa.
31
Page 33

PALLAS M
ECE-R44-04
UNIVE RSAL
SEM I-UNIVE RSAL
04301315
Riedinger Str. 18, 95448 Bayreuth
SOLUTION M
ECE-R44-04
UNIVE RSAL
SEM I-UNIVE RSAL
15 – 36 kg
04301314
Riedinger Str. 18, 95448 Bayreuth
09/2014
32
9 – 18 kg
CYBEX GmbH
Germany
CYBEX GmbH
Germany
Agrément
CYBEX PALLAS M
Réhausseur de siège avec dossier et appuie-tête
sur un châssis réglable avec des boucliers d’impact
réglables en hauteur.
Recommandé pour :
Âge : De 9 mois à 4 ans env.
Poids : 9-18 kg
Ne convient que pour les sièges de véhicules équipés
de ceintures à trois points automatiques conformes au
règlement CEE R16 ou une norme comparable
CEE R-44/04,
CYBEX PALLAS M - groupe 1, de 9 à 18 kg
CYBEX SOLUTION M - groupe 2/3, de 15 à 36 kg
Goedkeuring
CYBEX PALLAS M
Verhoging met rug- en hoofdsteun op een verstelbaar
frame met in hoogte verstelbaar veiligheidskussen.
Aanbevolen voor:
Leeftijd: Ongeveer 9 maanden tot 4 jaar
Gewicht: 9-18 kg.
Alleen geschikt voor autostoelen met automatische
driepuntsgordels die zijn goedgekeurd conform ECE
R16 of een vergelijkbare norm.
ECE R-44/04,
CYBEX PALLAS M - groep 1, 9 – 18 kg
CYBEX SOLUTION M - groep 2/3, 15 – 36 kg
Aprobata
CYBEX PALLAS M
Siedzisko z podnoszonym oparciem i zagłówkiem
na regulowanej bazie z poduszką bezpieczeństwa z
regulacją wysokości.
Zalecany do:
Wiek: ok. 9 miesięcy do 4 lat
Waga: 9-18 kg
Przystosowany do aut z trzypunktowymi pasami
bezpieczeństwa, certyaktem ECE R16 lub
porównywalnym standardem
ECE R-44/04,
CYBEX PALLAS M grupa 1, 9 do 18 kg
CYBEX SOLUTION M - grupa 2/3, 15 do 36 kg
FR
ATTENTION! Le siège CYBEX PALLAS M doit être utilisé conformément aux
présentes instructions afin de garantir une protection optimale de votre enfant.
Remarque! Gardez toujours ces instructions à portée de main (p. ex. dans le
compartiment prévu à cet effet à l’arrière du dossier du siège).
Remarque! Les règlements spéciques à chaque pays (concernant notamment les
codes de couleurs sur les sièges auto pour enfants) peuvent faire que l’apparence
des produits varie. Cela dit, cela n’affecte en rien le bon fonctionnement du produit.
Instructions en bref Groupe 1 (9-18 kg) ........................................................................ 2
Instructions en bref Groupe 2/3 (15-36 kg) ...................................................................3
Agrément .....................................................................................................................32
Positionnement correct du siège dans le véhicule ....................................................34
Activation du L.S.P. ......................................................................................................36
Positionnement du siège dans le véhicule ................................................................ 36
Adaptation à la taille corporelle ..................................................................................38
Retrait de l’insert pour siège supplémentaire ............................................................. 38
Réglage du bouclier d’impact – groupe CEE 1 (9-18 kg) ..........................................38
Position assise et allongée – groupe CEE 1 (9-18 kg) ..............................................40
Appuie-tête inclinable .................................................................................................40
Attache à l’aide du bouclier d’impact – groupe CEE 1 (9-18 kg) ............................... 42
Passage du modèle PALLAS M à la SOLUTION M (groupe CEE 1 au groupe CEE
2/3) ...............................................................................................................................42
Attache sans le bouclier d’impact – groupe CEE 2/3 (15-36 kg) ............................... 44
Votre enfant est-il attaché correctement ? ..................................................................46
Entretien et maintenance ............................................................................................46
Retrait de la housse du siège ......................................................................................48
Retrait de la housse du rabat de l’appuie-tête ............................................................48
Retrait de la housse de l’appuie-tête ..........................................................................48
Retrait de la housse du support d’épaule ................................................................... 48
Retrait de la housse de la surface d’assise ................................................................50
Retrait de la housse du bouclier d’impact ...................................................................50
Nettoyage .....................................................................................................................50
Recommandations suite à un accident.......................................................................52
Longévité du produit ....................................................................................................52
Traitement des déchets ...............................................................................................52
Conditions de garantie ................................................................................................54
Contenu
Page 34

NL
Inhoud Zawartość
PL
BELANGRIJK! Voor optimale bescherming van uw kind moet u de CYBEX
PALLAS M gebruiken volgens deze handleiding.
Let op! Houd deze handleiding altijd bij de hand (bijvoorbeeld in het daarvoor
bestemde vakje aan de achterzijde van rugsteun).
Let op! Nationale regelgeving (bijvoorbeeld over de kleurcodering op kinderzitjes)
kan ertoe leiden dat productkenmerken er anders uitzien. Dat heeft echter geen
gevolgen voor het goed functioneren van het kinderzitje.
Korte handleiding Groep 1 (9-18 kg) ............................................................................2
Korte handleiding Groep 2/3 (15-36 kg) ....................................................................... 3
Goedkeuring ................................................................................................................32
Het zitje goed in de auto plaatsen ..............................................................................35
Het L.S.P. activeren .....................................................................................................37
Het zitje in de auto plaatsen .......................................................................................37
Aanpassing aan de lichaamslengte ...........................................................................39
Het inlegkussen verwijderen .......................................................................................39
Het veiligheidskussen aanpassen – ECE-groep 1 (9-18 kg) ..................................... 39
Zittende en liggende positie – ECE-groep 1 (9-18 kg) ...............................................41
Kantelbare hoofdsteun ...............................................................................................41
Vastmaken bij gebruik van het veiligheidskussen – ECE-groep 1 (9-18 kg) .............43
Van PALLAS M naar SOLUTION M (ECE-groep 1 naar ECE-groep 2/3) ................43
Vastmaken zonder het veiligheidskussen – ECE-groep 2/3 (15-36 kg) ....................45
Is uw kind goed vastgemaakt?....................................................................................47
Reiniging & onderhoud ................................................................................................47
De bekledingshoes verwijderen ..................................................................................49
De bekleding van de inleg in de hoofdsteun verwijderen ..........................................49
De bekleding van de hoofdsteun verwijderen ............................................................49
De bekleding van het schouderdeel verwijderen .......................................................49
De bekleding van de zitting verwijderen .....................................................................51
De bekleding van het veiligheidskussen verwijderen .................................................51
Reiniging ......................................................................................................................51
Wat te doen na een ongeval .......................................................................................53
Levensduur van het zitje .............................................................................................53
Verwijdering .................................................................................................................53
Garantie .......................................................................................................................55
OSTRZEŻENIE! PALLAS M musi być używany zgodnie z instrukcją, aby w
pełni chronił Twoje dziecko.
Uwaga! Przechowuj instrukcję z fotelikiem (np.w przeznaczonym do tego miejscu z
tyłu fotelika).
Uwaga! Przepisy krajowe (na przykład w zakresie oznaczenia kolorów na fotelikach
dziecięcych) mogą mieć wpływ, że cechy produktu mogą odbiegać wyglądem..
Niema to wpływu na prawidłowe funkcjonowanie produktu.
Skrócona instrukcja Grupa 1 (9-18 kg) ......................................................................... 2
Skrócona instrukcja Grupa 2/3 (15-36 kg) .................................................................... 3
Aprobata ......................................................................................................................32
Prawidłowe umieszczenie fotelika .............................................................................35
Ochrona boczna L.s.p. ................................................................................................37
Zabezpieczanie dziecka .............................................................................................37
Dostosowanie fotelika do wzrostu dziecka ................................................................39
Wyjmowanie wkładki z siedziska ................................................................................39
Regulacja osłony tułowia - ECE grupa 1 (9-18 kg) ....................................................39
Pozycja siedząca i odchylona – ECE group 1 (9-18 kg) ............................................41
Regulacja zagłówka ...................................................................................................41
Zabezpieczanie dziecka z osłoną tułowia - ECE grupa 1 (9-18 kg) ..........................43
Zmiana fotelika zgodnego z ECE grupa 1 (9-18 kg) w ECE grupę 2/3 (15-36 kg) ... 43
Zabezpieczanie dziecka bez osłony tułowia - ECE grupa 2/3 (15-36 kg) .................45
Czy twoje dziecko jest dobrze zabezpieczone? .........................................................47
Konserwacja ................................................................................................................47
Zdejmowanie tapicerki .................................................................................................49
Zdejmowanie tapicerki z klapki zagłówka ...................................................................49
Zdejmowanie tapicerki z zagłówka .............................................................................49
Zdejmowanie tapicerki z osłon barkowych .................................................................49
Zdejmowanie tapicerki z siedziska .............................................................................51
Zdejmowanie tapicerki z osłony tułowia .....................................................................51
Czyszczenie .................................................................................................................51
Postępowanie po wypadku drogowym .......................................................................53
Trwałość produktu .......................................................................................................53
Utylizacja ......................................................................................................................53
Warunki gwarancji .......................................................................................................55
33
Page 35

POSITIONNEMENT CORRECT DU SIÈGE DANS LE
VÉHICULE
Le siège CYBEX PALLAS M-FIX/ PALLAS M, si son système ISOFIX
Connect est rétracté, peut être utilisé sur tous les sièges de véhicules
équipés de ceintures de sécurité à trois points approuvées pour le
transport de personnes adultes.
ATTENTION! Le siège ne convient pas pour une ceinture à deux points ou
ceinture sous-abdominale. L’utilisation du siège en conjonction avec une
ceinture à deux points risque de blesser gravement, voire mortellement l’enfant.
• dans les véhicules équipés d’air-bags, vous devez reculer le siège passager avant
autant que faire se peut. Veuillez cependant vous assurer que le point de pivot
supérieur de la ceinture de sécurité se trouve à l’arrière du point d’attache du siège
auto.
• Conformez-vous toujours aux recommandations du fabricant du véhicule.
ATTENTION! La ceinture diagonale (f) doit être à l’arrière en position inclinée et
ne doit jamais être positionnée en direction du point le plus haut de la ceinture
de votre véhicule. S’il est impossible de positionner le siège de cette manière,
en poussant le siège auto vers l’avant ou en l’utilisant sur un autre siège, cela
signifie que ce siège auto pour enfant ne convient pas à votre véhicule.
Les bagages ou autres objets présents dans le véhicule peuvent provoquer des
blessures en cas d’accident et doivent toujours être bien attachés. Sinon, ils
risqueraient d’être projetés, provoquant des blessures mortelles.
f
ATTENTION! Le siège auto ne doit pas être utilisé sur des sièges de véhicules
faisant face au côté de la route. L’utilisation de ce siège auto est permise
sur les sièges de véhicules orientés dos à la route, notamment dans un van
ou un minibus, à condition que le siège du véhicule en question soit prévu
pour transporter une personne adulte. Veuillez noter que l’appuie-tête ne doit
pas être retiré, même sur un siège orienté dos à la route ! Le siège auto pour
enfant doit toujours être attaché à la ceinture de sécurité, même s’il est vide.
Ce principe s’applique même si le set pour enfant a déjà été fixé au véhicule en
employant le système ISOFIX Connect. Un siège auto pour enfant non attaché
peut blesser d’autres passagers et vous-même, rien qu’en freinant dans
l’urgence ou en cas de collision minime.
Remarque! Ne laissez jamais votre enfant seul dans la voiture.
34
Page 36

HET ZITJE GOED IN DE AUTO PLAATSEN PRAWIDŁOWE UMIESZCZENIE FOTELIKA
De CYBEX PALLAS M-FIX/ PALLAS M, met intrekbaar ISOFIX
Connect-systeem is te gebruiken in alle autostoelen met automatische
driepuntsgordels, goedgekeurd voor het vervoer van volwassenen.
BELANGRIJK! Het zitje is niet geschikt voor gebruik met een tweepuntsgordel
of heupgordel. Als het zitje met behulp van een tweepuntsgordel wordt
vastgezet, kan een ongeval resulteren in ernstig of zelfs fataal letsel van het
kind.
• In auto’s met airbags moet u de passagiersstoel zo ver mogelijk naar achteren
zetten. Zorg er daarbij echter voor dat het hoogste punt van de veiligheidsgordel
achter de gordelgeleider van het kinderzitje blijft.
• Volg altijd de aanbevelingen van de autofabrikant op.
BELANGRIJK! De borstriem (f) moet altijd schuin naar achteren lopen en mag
nooit voorwaarts naar het hoogste punt van de gordel in uw auto lopen. Als
het niet mogelijk is om het zitje op deze manier te plaatsen, bijvoorbeeld door
de autostoel naar voren te schuiven of door het zitje op een andere autostoel
te gebruiken, is dit kinderzitje niet geschikt voor uw auto.
Bagage en andere objecten die in de auto liggen en letsel kunnen veroorzaken
tijdens een ongeval, moeten altijd goed worden opgeborgen. Rondvliegende
voorwerpen kunnen fataal letsel veroorzaken.
BELANGRIJK! Het kinderzitje mag niet worden gebruikt op autostoelen die
haaks op de rijrichting staan. Gebruik van het kinderzitje is wel toegestaan op
achterwaarts gerichte stoelen, bijvoorbeeld in een busje, vooropgesteld dat de
stoel bedoeld is voor het vervoer van een volwassene. De hoofdsteun van de
autostoel mag niet verwijderd worden als het kinderzitje op een achterwaarts
gerichte stoel wordt geplaatst! Ook als het kinderzitje niet wordt gebruikt,
dient het altijd met de veiligheidsgordel te zijn vastgemaakt. Dat geldt ook als
het kinderzitje met de auto is verbonden met behulp van het ISOFIX Connectsysteem. Een niet-vastgemaakt kinderzitje kan andere passagiers en uzelf
verwonden, zelfs al voert u slechts een noodstop uit of tijdens een kleine
aanrijding.
Let op! Laat uw kind nooit alleen in de auto achter.
CYBEX PALLAS M-FIX/ PALLAS M, można używać bez zaczepów
ISOFIX na dowolnym siedzeniu samochodu z 3-punktowymi pasami
bezpieczeństwa oraz automatyczną blokadą, dopuszczonymi do użytku
przez osoby dorosłe.
OSTRZEŻENIE! Fotelik nie jest komaptybilny z dwupunktowymi pasami
bezpieczeństwa. Używanie tego typu pasów bezpieczeństwa może skutkować
poważne lub śmiertelne obrażenia dziecka w razie wypadku.
• Jeżeli pojazd posiada poduszkę powietrzną pasażera, odsuń siedzenie do tyłu
najdalej, jak to możliwe. Zwróć uwagę, aby górny zaczep pasa pojazdu zawsze
znajdował się za fotelikiem.
• Ściśle przestrzegaj zaleceń producenta pojazdu.
OSTRZEŻENIE! Pas barkowy pojazdu (f) musi przebiegać skośnie od tyłu i nie
może przebiegać do przodu do górnego zaczepu pasa przedniego siedzenia.
Jeżeli nie można zamontować fotelika w taki sposób na żadnym siedzeniu (np.
przesuwając je do przodu), to fotelik nie jest kompatybilny z pojazdem.
Bagaże i inne przedmioty znajdujące się w samochodzie, które mogą zranić
pasażerów w czasie wypadku powinny zostać dokładnie zabezpieczone.
Pozostawione luzem przedmioty mogą spowodować obrażenia w czasie wypadku
OSTRZEŻENIE! Montowanie fotelika na siedzeniach samochodowych
ustawionych bokiem do kierunku jazdy jest niedozwolone. Na fotelach
samochodowych tyłem do kierunku jazdy, np. w autach van, minibus, można
montować fotelik, pod warunkiem że siedzenia są do przewożenia osób
dorosłych. Montując fotelik na siedzeniu tyłem do kierunku jazdy zagłówek nie
może zdjęty! Fotelik zawsze musi być zapięty pasami, nawet jeśli jest pusty
Dotyczy to również sytuacji kiedy fotelik zabezpieczony jest przez system
ISOFIX Connect. Fotelik pozostawiony luzem może spowodować obrażenia
kierowcy i pasażerów w przypadku gwałtownego hamowania czy kolizji.
UWAGA! Nigdy nie zostawiaj dziecka bez opieki w samochodzie.
FRNLPL
35
Page 37

L.S.P.
ACTIVATION DU L.S.P.
Le système de protection latérale linéaire, « Linear Side-impact Protection » (L.S.P.)
A
1
2
3
PRESS!
peut être déployé en deux étapes, en appuyant sur le(s) bouton(s) L.S.P. Couplé à la
position initiale, cela permet d’obtenir trois réglages L.S.P. différents.
Remarque! Activez toujours le L.S.P. sur le côté du siège face à la porte de la
voiture.
Pour rentrer le L.S.P. dans le boîtier, appuyez sur le bouton L.S.P. et poussez le
L.S.P. dans la position de démarrage.
POSITIONNEMENT DU SIÈGE DANS LE VÉHICULE
Placez le siège auto pour enfant sur un siège du véhicule convenant à cet effet.
• Assurez-vous toujours que la surface entière du dossier (a) du siège CYBEX
PALLAS M soit bien en contact avec le dossier du siège du véhicule. Le siège auto
pour enfant ne doit jamais se trouver en position allongée.
• Si l’appuie-tête du véhicule gêne, tirez-le ou retirez-le complètement (les
exceptions à cette règles gurent au chapitre « POSITIONNEMENT CORRECT
DU SIÈGE DANS LE VÉHICULE »). Le dossier (a) s’adaptera parfaitement à
pratiquement toutes les inclinaisons du siège du véhicule.
ATTENTION! La surface entière du dossier du siège auto pour enfant CYBEX
a
w
c
doit reposer sur le dossier du siège du véhicule. Le siège doit se trouver en
position verticale pour garantir la sécurité optimale de votre enfant.
Remarque! Certains sièges de véhicules recouverts de matériaux sensibles (p. ex.
nubuck, cuir, etc.) risquent d’être endommagés par les traces ou les décolorations
laissées par les sièges auto pour enfants. An d’éviter cela, vous pouvez placer une
couverture ou une serviette en dessous, par exemple. Veuillez également combiner
ces précautions à nos instructions de nettoyage ; ces dernières doivent être
appliquées avant d’utiliser le siège pour la première fois.
36
Page 38

HET L.S.P. ACTIVEREN OCHRONA BOCZNA L.S.P.
Het “Linear Side-impact Protection”-systeem (L.S.P.) kan in twee stappen worden
uitgebreid door de L.S.P.-knoppen in te drukken. Samen met de uitgangspositie biedt
dat in totaal drie verschillende L.S.P.-instellingen.
Let op! Activeer het L.S.P. altijd aan de portierzijde van het zitje. UWAGA! L.S.P. powinno być zawsze wysunięte od strony drzwi.
System ochrony bocznej (L.S.P.) można dostosować w dwóch krokach poprzez
naciśnięcie przycisków (jednego lub dwóch) L.S.P. L.S.P. może byż użyte w trzech
pozycjach
Om de L.S.P. weer in de behuizing te duwen, drukt u weer op de L.S.P.-knop en
duwt u de L.S.P. terug naar de uitgangspositie.
Aby schować L.S.P., naciśnij klawisz L.S.P. i wciśnij do środka do pozycji wyjściowej.
HET ZITJE IN DE AUTO PLAATSEN ZABEZPIECZANIE DZIECKA
Plaats het kinderzitje op de juiste stoel in de auto. Umieść fotelik na odpowiednim siedzeniu samochodu
• Zorg altijd dat de hele rugleuning (a) van de CYBEX PALLAS M goed op de
rugleuning van de autostoel aansluit. Het kinderzitje mag nooit in een liggende
positie staan.
• Als de hoofdsteun van de auto in de weg zit, trek die dan helemaal uit en draai
hem weg of verwijder hem geheel (zie voor uitzonderingen hierop onder het kopje
“HET ZITJE GOED IN DE AUTO PLAATSEN”). De rugsteun (a) past zich volledig
aan aan vrijwel elke hoek van de autostoel.
BELANGRIJK! De hele rugleuning (a) van het CYBEX-kinderzitje moet goed op
de rugleuning van de autostoel aansluiten. Om verzekerd te zijn van maximale
bescherming van uw kind, moet het zitje normaal rechtop staan!
Let op! Op sommige kwetsbare autostoelbekledingen (zoals suède of leer) kan het
gebruik van kinderzitjes sporen achterlaten en/of tot verkleuring leiden. Om dit te
voorkomen kunt u er bijvoorbeeld een deken of handdoek onder leggen. In verband
hiermee verwijzen we u ook naar de reinigingsinstructies in deze handleiding; die
reinigingsinstructies moeten in acht worden genomen alvorens het zitje voor het
eerst te gebruiken.
• Należy zwrócić uwagę, żeby oparcie fotelika (a) CYBEX PALLAS M ściśle
przylegało do oparcia siedzenia samochodowego. Podczas montażu fotelik nie
może być ustawiony w pozycji odchylonej.
• Jeżeli zagłówek siedzenia samochodu przeszkadza w zamontowaniu
fotelika,należy go wyjąć i obrócić albo zdjąć (z wyjątkiem sytuacji opisanej w
punkcie „WŁAŚCIWE MIEJSCE W SAMOCHODZIE“). Oparcie fotelika (a) łatwo
dopasowuje się do siedzenia samochodowego o prawie każdym nachyleniu.
OSTRZEŻENIE Oparcie fotelika powinno dokładnie przylegać do oparcia fotela
samochodowego. Dla zapewnienia jak najlepszej ochrony dziecku fotelik
powinien być ustawiony w normalnej, pionowej pozycji.
UWAGA! Niektóre tapicerki samochodu są wykonane z miękkiego materiału (np.
weluru lub skóry itp.) i mogą się wykazywać oznaki zużycia lub przebarwienia. W
celu zabezpiecznia należy podożyć ręcznik lub kocyk pod fotelikiem. Zapoznaj się
również z instrukcja czyszczenia, którą należy przejrzeć przed pierwszym użyciem
fotelika.
FRNLPL
37
Page 39

38
e
h
An d’adapter le siège CYBEX PALLAS M de manière optimale à la taille de votre
enfant, un insert pour siège (i) est désormais fourni d’ofce et est déjà inséré sous la
housse du siège.
• Nous recommandons d’utiliser cet insert pour siège supplémentaire (i) pour les
enfants d’un âge compris entre 9 et 24 mois.
• À partir de l’âge de 2 ans, l’insert pour siège (i) n’est plus nécessaire.
• Le siège peut ensuite être adapté au corps de votre enfant en réglant tout
simplement l’appuie-tête (e). Pour cela, tirez le levier de réglage (h) vers le haut
pour déverrouiller l’appuie-tête (e).
• Réglez-le de manière à ce qu’il reste un espace équivalent à la largeur de deux
doigts entre le rebord inférieur de l’appuie-tête (e) et l’épaule de l’enfant.
Remarque! Seul un appuie-tête bien réglé (e) permettant également à la ceinture
diagonale de passer aisément (f) peut garantir à votre enfant une protection
maximale. La hauteur du siège CYBEX PALLAS M peut être réglée sur l’une des
douze positions disponibles.
RETRAIT DE L’INSERT POUR SIÈGE SUPPLÉMENTAIRE
ADAPTATION À LA TAILLE CORPORELLE
1. Retirez les boutons avant situés sur la housse du coussin du siège (d).
2. Tirez sur la housse en tissu pour l’extraire de ses guides et vers l’avant jusqu’à ce
que vous puissiez retirer l’insert de siège.
d
i
3. L’insert de siège doit être retiré conformément aux particularités des groupes
d’âge indiqués précédemment.
4. Remettez la housse du coussin du siège dans sa position d’origine et fixez-le à
nouveau.
RÉGLAGE DU BOUCLIER D’IMPACT – GROUPE CEE 1 (9-18 KG)
z
d
p
w
Vous pouvez ajuster le bouclier d’impact à votre enfant en poussant le bouton de
réglage central (z). Maintenez le bouton de réglage central (z) enfoncé pendant que
vous ajustez le bouclier d’impact à votre enfant.
Les rabats latéraux du bouclier d’impact (p) ont une position parfaitement adaptée,
entre les accoudoirs et la surface du siège (d) et servent à maintenir le bouclier
d’impact (p) sur le siège.
Ajustez le bouclier d’impact (p) de manière à ce qu’il soit proche de l’enfant, sans
toutefois le conner.
ATTENTION! Le bouclier d’impact (p) ne peut être utilisé qu’en conjonction
avec le châssis (w) pour un poids maximum de 18 kg.
Page 40

AANPASSING AAN DE LICHAAMSLENGTE DOSTOSOWANIE FOTELIKA DO WZROSTU DZIECKA
Om de CYBEX PALLAS M optimaal aan te passen aan de lengte van uw kind
wordt standaard een inlegkussen (i) bijgeleverd dat al onder de bekledingshoes is
geplaatst.
• We adviseren dit extra inlegkussen (i) te gebruiken voor kinderen van 9 tot 24
maanden.
• Vanaf 2 jaar is het inlegkussen (i) niet langer nodig.
• Het zitje is eenvoudig aan het lichaam van uw kind aan te passen door de
verstelbare hoofdsteun (e) te gebruiken. Trek de hendel (h) omhoog om de
hoofdsteun (e) te ontgrendelen.
• Stel deze zo in dat er ruimte is voor twee vingers tussen de onderkant van de
hoofdsteun (e) en de schouder van het kind.
Let op! Alleen een optimaal ingestelde hoofdsteun (e) kan uw kind maximaal
bescherming en comfort bieden en tegelijkertijd zorgen dat de borstriem (f) goed kan
worden versteld. De hoogte van de CYBEX PALLAS M kan in twaalf standen worden
ingesteld.
HET INLEGKUSSEN VERWIJDEREN
1. Maak de drukknopen aan de voorkant van de bekledingshoes van het zitkussen
(d) los.
2. Trek de bekleding naar voren en omhoog totdat u het inlegkussen eruit kunt
trekken.
3. Het inlegkussen moet worden verwijderd volgens de hiervoor genoemde
leeftijdscategorieën.
4. Trek de bekleding weer over de zitting en maak de drukknopen vast.
W momencie zakupu, w foteliku CYBEX PALLAS M pod tapicerką siedziska,
znajduje się wkładka podwyższająca (i) gwarantująca możliwość prawidłowego
dopasowania jego wysokośc
• Zaleca się stosowanie wkładki podwyższającej (i) dla dziecka w wieku między 9 a
24 miesięcy.
• Dla dziecka w wieku powyżej 2 lat wkładkę można wyjąć.
• Po wyjęciu wkładki wysokość fotelika powinna być regulowana poprzez ustawienie
zagłówka (e) w odpowiedniej pozycji Aby zwolnić zagłówek, pociągnij uchwyt (h).
• Wysokość zagłówka należy ustawić tak, aby pomiędzy ramieniem dziecka a dolną
krawędzią zagłówka (e) mieściły się dwa palce.
UWAGA! Tylko prawidłowe dostosowanie wysokości zagłówka i zabezpieczenia
barkowego (e) zapewni optymalne bezpieczeństwo i wygodę dziecku. Gwarantuje to
również najlepsze położenie barkowego pasa bezpieczeństwa (f). Zabezpieczenie
barkowe można ustawić w 12 pozycjach.
WYJMOWANIE WKŁADKI Z SIEDZISKA
1. Rozepnij zatrzaski z przodu tapicerki siedziskan (d).
2. Podnieś tapicerkę, tak by wkładkę (i) można łatwo wyjąć od przodu
3. Wyjmij wkładkę, stosując się do powyższych rekomendacji wiekowych.
4. Z powrotem naciągnij tapicerkę na siedzisko i zapnij zatrzaski
HET VEILIGHEIDSKUSSEN AANPASSEN – ECE-GROEP 1 (9-18 KG)
Door op de centrale aanpassingsknop (z) te drukken, kunt u het veiligheidskussen
aanpassen aan uw kind. Houd de centrale aanpassingsknop (z) ingedrukt terwijl u
het veiligheidskussen aanpast aan uw kind.
De zijappen van het veiligheidskussen (p) passen precies tussen de armleuning
en de zitting (d) en worden gebruikt om het veiligheidskussen (p) met de zitting te
verbinden.
Pas het veiligheidskussen (p) zo aan dat het kussen het kind raakt, maar niet tegen
het lichaam van uw kind duwt.
BELANGRIJK! Het veiligheidskussen (p) mag alleen samen met het frame (w)
worden gebruikt tot een maximum van 18 kg!
REGULACJA OSŁONY TUŁOWIA - ECE GRUPA 1 (9-18 KG)
iedy naciśniesz przyciski (z), osłonę (p) można przesunąć do przodu. Kiedy zwolnisz
przyciski (z), osłona (p) zatrzaśnie się w wybranej pozycji.
Boczne części osłony (p) dokładnie pasują do podpórek na ręce siedziska. Łączą
one osłonę (p) z siedziskiem (d).
Osłona tułowia powinna być tak ustawiona, aby dotykała klatki piersiowej dziecka.
Nie może jednak uciskać ciała dziecka.
OSTRZEŻENIE! Osłona tułowia (p) i podstawa (w) muszą być zawsze używane
w komplecie i tylko dla dzieci o wadze do 18 kg!
FRNLPL
39
Page 41

POSITION ASSISE ET ALLONGÉE – GROUPE CEE 1 (9-18 KG)
p
v
d
v
w
Pour régler le siège CYBEX PALLAS M en position allongée, il n’est pas nécessaire
d’ouvrir le système de ceinture du véhicule.
• Si votre enfant s’endort au cours du voyage, il vous suft d’appuyer sur le bouton
de réglage (v) situé sur le dessous du coussin du siège (d) et le siège CYBEX
PALLAS M glissera vers le bas en se servant du poids de votre enfant.
ATTENTION! Tout réglage de la position allongée par le conducteur en route
est strictement interdit.
• Pour rétablir la position droite du siège à partir de la position allongée une fois que
l’enfant est sorti du siège, appuyez une nouvelle fois sur le bouton de réglage (v)
et appliquez une légère pression contre le coussin du siège (d) an de relever le
siège auto pour enfant.
ATTENTION! Assurez-vous toujours que le bouton de réglage (v) émette un
clic audible au moment de s’enclencher en position allongée ou assise. La
position allongée n’est disponible que pour le groupe 1 (9-18 kg) du modèle
Pallas équipé du bouclier d’impact (p) et du châssis de base (w).
Remarque! Assurez-vous que la ceinture sous-abdominale (n) et la ceinture
diagonale (f) soient toujours bien serrées.
40
r
APPUIE-TÊTE INCLINABLE
L’appuie-tête inclinable permet d’empêcher la tête de l’enfant de tomber
t
dangereusement vers l’avant pendant son sommeil. En cas de collision, l’appuietête suivra le mouvement de la tête de votre enfant, se verrouillera et absorbera le
mouvement vers l’arrière consécutif au choc de la tête de votre enfant.
Remarque! Assurez-vous que la tête de votre enfant est toujours en contact avec
l’appuie-tête inclinable (r), puisque c’est la seule manière de garantir une protection
maximale des collisions latérales.
L’angle d’inclinaison de l’appuie-tête peut être réglé sur l’une de trois positions. Il
peut être déplacé vers l’avant sans bouger le levier vers la deuxième ou la troisième
position jusqu’à ce qu’il s’enclenche dans la position souhaitée. Pour revenir à la
position d’origine, il faut actionner le levier pour faire reculer l’appuie-tête.
ATTENTION! N’utilisez jamais d’objet pour bloquer le mécanisme de
verrouillage (t). En cas d’accident, le mécanisme de réglage de l’inclinaison
doit rester souple, sans quoi votre enfant risque d’être blessé.
Page 42

ZITTENDE EN LIGGENDE POSITIE – ECE-GROEP 1 (9-18 KG) POZYCJA SIEDZĄCA I ODCHYLONA – ECE GROUP 1 (9-18 KG)
Om de CYBEX PALLAS M in een liggende positie te brengen, hoeft het
gordelsysteem van de auto niet te worden losgemaakt.
• Als uw kind tijdens de reis in slaap valt, kunt u eenvoudigweg op de
aanpassingsknop (v) aan de onderkant van het zitkussen (d) drukken, waarna de
CYBEX PALLAS M onder het gewicht van uw kind naar beneden glijdt.
BELANGRIJK! Aanpassing in de liggende positie door de bestuurder tijdens
het rijden is verboden!
• Om de stoel weer rechtop te krijgen vanuit de liggende positie als het kind eenmaal
uit het zitje is, drukt u weer op de aanpassingsknop (v) en duwt u rustig tegen de
zitting (d) tot het kinderzitje rechtop staat.
BELANGRIJK! Controleer altijd of de aanpassingsknop (v) een duidelijke
klik laat horen als het zitje in ligstand of rechtop wordt gezet. De liggende
positie is alleen mogelijk voor groep 1 (9-18 kg) in de Pallas-configuratie met
veiligheidskussen (p) en basisframe (w).
Let op! Zorg dat de buikriem (n) en borstriem (f) altijd strak zijn.
Odchylenie oparcia PALLAS M nie wymaga odpinania pasów bezpieczeństwa.
• Jeśłi Twoje dziecko zaśnie podczas podróży, wciśnij klawisz regulacji (v) pod
siedziskiem (d) a CYBEX PALLAS M osunie się leeko pod ciężarem dziecka.
OSTRZEŻENIE! Zabronione jest regulowanie oparcia przez kierowcę podczas
prowadzeniea auta!
• Przywrócenie pozycji siedzącej, kiedy dziecko jest poza fotelikiem, naciśnij przycisk
regulacji (v) poniownie, popchnij siedzisko (d), aby powróciło do pozycji pionowej.
OSTRZEŻENIE! Upewnij się, że uchwyt (v) za pomocą którego odchyla się
fotelik, zatrzaskuje się
w miejscu z głośnym kliknięciem. Odchylanie dozwolone jest wyłącznie dla
grupy 1 (9-18kg), zawsze w połączeniu z podstawą (w) i osłoną tułowia (p).
UWAGA! Zawsze sprawdzaj, czy pas biodrowy (n) i barkowy (f) są mocno
naprężone.
KANTELBARE HOOFDSTEUN REGULACJA ZAGŁÓWKA
De kantelbare hoofdsteun helpt voorkomen dat het hoofd van uw kind gevaarlijk naar
voren valt tijdens het slapen. Tijdens een botsing volgt de hoofdsteun de beweging
van het hoofd van uw kind naar voren, klikt vast en vangt de daaropvolgende
achterwaartse beweging van het hoofd van uw kind op.
Let op! Zorg dat het hoofd van uw kind altijd contact heeft met de kantelbare
hoofdsteun (r), omdat de hoofdsteun alleen zo optimale bescherming kan bieden
tijdens een botsing van opzij.
De kantelhoek van de hoofdsteun kan in drie standen worden ingesteld. Hij kan naar
voren worden ingesteld zonder de hendel in de tweede of derde stand te zetten
totdat de hoofdsteun vastklikt. Om deze in de uitgangspositie terug te brengen, dient
u de hendel te gebruiken en de hoofdsteun naar achteren te trekken.
BELANGRIJK! Zorg dat het vergrendelingsmechanisme (t) nooit door
iets wordt geblokkeerd! Tijdens een ongeval moet het kantelmechanisme
ongestoord kunnen werken, anders kan uw kind letsel oplopen!
Fotelik CYBEX PALLAS M posiada odchylany zagłówek (r), który zabezpiecza
główkę dziecka przed opadaniem do przodu, podczas snu. W przypadku kolizji,
zagłówek będzie podążać za ruchem głowy Twojego dziecka do przodu, utrzymuje ją
i absorbuje wsteczne uderzenie głowy.
UWAGA! Należy zwracać uwagę, żeby główka dziecka zawsze znajdowała się
wewnątrz zagłówka (r). W przeciwnym razie zagłówek nie spełnia swojej funkcji
ochronnej w przypadku bocznego zderzenia
Zagłówek może byc regulowany wtrzech pozycjach. Unosząc lekko do góry
zagłówek można go ustawić w żądanej pozycji Aby powrócić do popprzedniej
poprzedniej należy ponownie pociągnąć zagłówek do góry i ustawić.
OSTRZEŻENIE! Nigdy nie blokuj mechanizmu zagłówka (t) żadnymi
przedmiotami(t)! Ruch zagłówka nie może być niczym ograniczony podczas
kolizji, w przeciwnym razie może to narazić dziecko na urazy.
FRNLPL
41
Page 43

42
ATTACHE À L’AIDE DU BOUCLIER D’IMPACT – GROUPE CEE 1
(9-18 KG)
x
p
l
m
n
CLICK!
f
x
f
n
n
e
p
x
f
1. Insérez le bouclier d’impact ajusté (p) (consultez le chapitre « RÉGLAGE DU
BOUCLIER D’IMPACT »).
2. Sortez la ceinture à trois points du véhicule de toute sa longueur. Prenez la
ceinture sous-abdominale (n) et insérez-la dans la glissière prévue à cet effet (x)
du bouclier d’impact (p).
ATTENTION! N’entortillez jamais la ceinture.
ATTENTION! La ceinture à trois points ne peut être insérée que dans les
glissières prévues à cet effet. Les glissières sont décrites précisément dans le
présent manuel et présentent la couleur rouge sur le siège auto pour enfant.
3. Insérez la languette de la ceinture de sécurité (m) dans sa boucle (l). Elle doit
s’enclencher et émettre un « CLIC » audible.
4. Serrez la ceinture sous-abdominale en tirant sur la ceinture diagonale.
5. Faites repasser la ceinture diagonale (f) parallèlement à la ceinture sousabdominale (n) dans la glissière (x).
6. Serrez la ceinture diagonale (f) et assurez-vous que les deux parties de la
ceinture couvrent bien toute la largeur du bouclier d’impact (p) et qu’elles sont bien
positionnées dans la glissière (x).
7. Vous pouvez maintenant placer la ceinture de sécurité (f) à travers le guide
ceinture (x) du bouclier (p) jusqu’ à ce qu’elle soit encastrée à l’intérieur du guide
ceinture. Ensuite, vous pouvez placer la ceinture diagonale entre la têtière et
l’épaulière. La ceinture diagonale n’a pas besoin d’être placée à travers du guide
ceinture de la têtière pour le groupe 2/3.
PASSAGE DU MODÈLE PALLAS M À LA SOLUTION M (GROUPE
CEE 1 AU GROUPE CEE 2/3)
1. Retirez le bouclier d’impact (p).
2. Appuyez sur les deux boutons déclencheurs (q) situés sur le dessous du coussin
du siège (d) et tirez-les en direction de l’extérieur du châssis jusqu’à ce que vous
v
d
q
q
w
ressentiez une légère résistance.
3. Appuyez sur le bouton de réglage (v) et extrayez complètement le siège du
châssis (w).
Remarque! Gardez les pièces que vous avez retirées dans un endroit sûr.
ATTENTION! Au moment de remonter le siège, procédez dans l’ordre inverse.
Servez-vous des instructions pour vérifier au préalable que vous disposez
bien de toutes les pièces.
Page 44

VASTMAKEN BIJ GEBRUIK VAN HET VEILIGHEIDSKUSSEN –
ECE-GROEP 1 (9-18 KG)
1. Plaats het eerder aangepaste veiligheidskussen (p) (zie onder het kopje “HET
VEILIGHEIDSKUSSEN AANPASSEN”).
2. Trek de driepuntsgordel van uw auto helemaal uit. Neem de buikriem (n) en voer
die door de daarvoor bedoelde geleiders (x) in het veiligheidskussen (p).
BELANGRIJK! Draai de gordel nooit! OSTRZEŻENIE! Nigdy nie skręcaj pasa!
BELANGRIJK! De driepuntsgordel mag alleen door de daarvoor bestemde
geleiders worden gevoerd. De gordelgeleiders worden precies beschreven in
deze handleiding en zijn met rood aangegeven op het kinderzitje.
3. Steek de tong van de gordel (m) in het gordelslot (l). Die moet met een hoorbare
“KLIK” vergrendelen.
4. Trek de buikriem strak door aan de borstriem te trekken.
5. Voer nu de borstriem (f) parallel met de buikriem (n) terug door de gordelgeleiders
(x).
6. Trek de borstriem (f) strak en controleer of beide delen van de gordel over de hele
breedte van het veiligheidskussen (p) door de gordelgeleiders (x) lopen.
7. Voer nu de diagonal gordel strak door de gordelgeleiders van het
veiligheidskussen totdat de gordel zich vastklempt. Voer vervolgens de diogonale
gordel tussen de hoofdsteun en de schoudersteun. Het is niet noodzakelijk om de
diagonale gordel bij een groep 2/3 door de gordelgeleider van de hoofdsteun te
voeren.
ZABEZPIECZANIE DZIECKA Z OSŁONĄ TUŁOWIA - ECE GRUPA 1
(9-18 KG)
1. Przymocuj wcześniej wyregulowaną osłonę (p) do fotelika. (Patrz rozdział
„REGULACJA OSŁONY TUŁOWIA“).
2. Wyciągnij całą długość pasa samochodowego. rzełóż pas biodrowy (n)
przezszczeliny (x) (zaznaczone na czerwono) w osłonie tułowia (p).
OSTRZEŻENIE! Pas 3-punktowy musi przechodzić przez przeznaczone do
tego prowadnice . Prowadnice są dokładnie oznaczone w tej instrukcji jak
również wyszczególnione czerwonym kolorem na foteliku.
3. Włóż końcówkę pasa (m) w zapięcie (l). Musisz usłyszeć głośne kliknięcie.
4. Napręż pas biodrowy przez dociągnięcie pasem barkowym.
5. Przełóż pas barkowy (f) równolegle do pasa biodrowego przez te same szczeliny
(x).
6. Napręż pas (f) i upewnij się, że pasy (f) i (n) przechodzą całkowicie wewnątrz (na
całej szerokości) szczelin (x)
7. Przeciągnij pas barkowy (f) ściśle przez prowadnicę pasa (x) w poduszce
bezpieczeństwa (p), tak aby pas umieszczony dokładnie wewnątrz prowadnicy
pasa. Następnie umieścić pas barkowy pomiędzy zagłówkiem (E) i osłoną
barkową. Pas barkowy nie musi być przeciągany przez prowadnicę pasa w
zagłówku w grupie 2/3.
FRNLPL
VAN PALLAS M NAAR SOLUTION M (ECE-GROEP 1 NAAR ECEGROEP 2/3)
1. Haal het veiligheidskussen (p) weg.
2. Druk de twee ontgrendelingsknoppen (q) onder op de basis (d) in en trek het uit
het frame totdat u enige weerstand voelt.
3. Druk de aanpassingsknop (v) in en trek de zitting helemaal los van het frame (w).
Let op! Bewaar verwijderde onderdelen bij elkaar op een veilige plek. UWAGA! Przechowuj wszystkie części razem, w odpowiednich warunkach
BELANGRIJK! Als u de stoel weer in elkaar zet, volg dan precies de
omgekeerde volgorde. Gebruik de handleiding om vooraf te controleren of u
alle onderdelen hebt.
ZMIANA FOTELIKA ZGODNEGO Z ECE GRUPA 1 (9-18 KG) W ECE
GRUPĘ 2/3 (15-36 KG)
1. Zdejmij osłonę tułowia (p).
2. Naciśnij przyciski (q) na spodzie (d) i ściągaj siedzisko z podstawy (w), aż do
blokady.
3. Pociągnij za uchwyt do odchylania fotelika (v) i ściągnij siedzisko z podstawy (w)
OSTRZEŻENIE! Aby ponownie przekształcić fotelik wykonuj czynności w
odwrotnej kolejności. prawdź wcześniej w instrukcji użytkowania, czy nie
brakuje żadnej części.
43
Page 45

ATTACHE SANS LE BOUCLIER D’IMPACT – GROUPE CEE 2/3 (15-
36 KG)
l
f
l
m
n
k
f
f
l
n
k
s
g
e
f
1. Placez votre enfant dans le siège auto. Tirez la ceinture à trois points et passez-la
le long de la boucle de ceinture (l) devant votre enfant.
ATTENTION! N’entortillez jamais la ceinture.
2. Insérez la languette de la ceinture de sécurité (m) dans sa boucle (l). Elle doit
s’enclencher et émettre un « CLIC » audible.
3. Ensuite, placez la ceinture sous-abdominale (n) dans les glissières inférieures (k)
du siège auto pour enfant.
4. Tirez la ceinture diagonale (f) fermement pour serrer la ceinture sous-abdominale
(n). Plus la ceinture est serrée, meilleure est la protection offerte contre les
blessures. Sur le côté de la boucle de ceinture (l), la ceinture diagonale (f) et la
ceinture sous-abdominale (n) doivent être insérées ensemble dans la glissière
inférieure (k).
ATTENTION! La boucle de la ceinture du véhicule (l) ne doit jamais croiser
l’accoudoir. Si le système de ceinture est trop long, ce siège auto pour enfant
n’est pas adapté pour cette position dans le véhicule. En cas de doute, veuillez
contacter le fabricant de votre véhicule.
5. La ceinture sous-abdominale (n) doit passer par les deux glissières inférieures (k)
situées des deux côtés du coussin du siège (d).
Remarque! Apprenez dès le début à votre enfant à s’assurer que la ceinture est bien
serrée et, le cas échéant, à s’attacher tout seul.
ATTENTION! La ceinture sous-abdominale (n) doit passer aussi bas que
possible le long de l’aine de votre enfant pour assurer un effet optimal en cas
d’accident.
6. Ensuite, faites passer la ceinture diagonale (f) par la glissière supérieure (g) du
repose-tête (e) jusqu’à ce qu’elle se trouve dans la glissière.
Assurez-vous que la ceinture diagonale (f) passe entre l’extérieur de l’épaule et le
cou de votre enfant. Si nécessaire, ajustez la hauteur de l’appuie-tête pour modier
la position de la ceinture. La hauteur de l’appuie-tête (e) peut être ajustée dans la
voiture.
44
Page 46

VASTMAKEN ZONDER HET VEILIGHEIDSKUSSEN – ECE-GROEP
2/3 (15-36 KG)
1. Zet uw kind in het zitje. Trek de driepuntsgordel uit en voer die langs het gordelslot
(l), dat zich voor het kind bevindt.
BELANGRIJK! Draai de gordel nooit. OSTRZEŻENIE! Nigdy nie skręcaj pasa!
2. Steek de tong van de gordel (m) in het gordelslot (l). Die moet met een hoorbare
“KLIK” vergrendelen.
3. Voer vervolgens de buikriem (n) door de onderste gordelgeleiders (k) van het
kinderzitje.
4. Trek nu stevig aan de borstriem (f) om de buikriem (n) strak te trekken. Hoe
strakker de gordel zit, hoe beter deze bescherming biedt tegen letsel. Aan de kant
van het gordelslot (l) moeten de borstriem (f) en de buikriem (n) samen door de
onderste gordelgeleider (k) gevoerd worden.
BELANGRIJK! Het slot van de autogordel (l) mag nooit over de armleuning
lopen. Als het gordelsysteem te lang is, is het kinderzitje ongeschikt voor
gebruik in die positie in uw auto. Als u twijfelt, neem dan contact op met de
fabrikant van uw auto.
5. De buikriem (n) dient aan beide zijden van het zitkussen (d) door de onderste
gordelgeleiders te worden gevoerd.
Let op! Leer uw kind vanaf het begin dat het controleert of de gordel strak genoeg is
en leer het, indien nodig, hoe het zelf de gordel strak moet trekken.
BELANGRIJK! De buikriem (n) moet aan beide zijden zo laag mogelijk over de
lies van uw kind lopen om optimaal effect te hebben tijdens een ongeval.
6. Voer nu de borstriem (f) door de bovenste gordelgeleider (g) in de hoofdsteun (e)
totdat deze in de gordelgeleider valt.
Zorg dat de borstriem (f) tussen de buitenkant van de schouder en de hals van uw
kind loopt. Pas de hoogte van de hoofdsteun indien nodig aan om de positie van
de gordel te veranderen. De hoogte van de hoofdsteun (e) kan ook in de auto nog
steeds worden aangepast.
ZABEZPIECZANIE DZIECKA BEZ OSŁONY TUŁOWIA - ECE GRUPA
2/3 (15-36 KG)
1. Posadź dziecko w foteliku. Przeprowadź 3-punktowy pas wokół dziecka w
kierunku klamry zamykającej (l).
2. Włóż zapięcie pasa (m) do klamry (l). Musisz usłyszeć, jak pas zatrzaskuje się w
klamrze z głośnym „KLIKNIĘCIEM“.
3. Wsuń pas biodrowy (n) w szczeliny boczne (k) siedziska.
4. Napręż pas biodrowy (n),pociągając za pas barkowy (f). m ciaśniej zapięty pas,
tym lepiej chroni przed obrażeniami. Pasy: barkowy (l) i biodrowy (f) należy
przeprowadzić przez szczelinę boczną siedziska od strony klamry zamykającej
(k).
OSTRZEŻENIE Zapięcie pasa samochodowego (l) nigdy nie może dosięgać
szczeliny szczeliny bocznej fotelika Jeżeli pas klamry jest zbyt długi, fotelik
nie nadaje się do tego typu samochodu W razie wąptliwości skontaktuj się z
producentem samochodu
5. Pas biodrowy (n) powinien się znajdować w bocznych szczelinach (k) z obu stron
siedziska (d).
Uwaga! Od początku ucz swoje dziecko, aby zwracało uwagę, czy pas jest ciasno
zapięty i samo naprężało go w razie potrzeby.
OSTRZEŻENIE! Aby zapewnić dziecku maksymalną ochronę w razie wypadku,
pas
biodrowy powinien przebiegać jak najniżej, tuż nad pachwiną.
6. Teraz przeprowadź pas barkowy (f) przez boczną czerwoną szczelinę (g) w
zagłówek (e), tak aby cały pas znajdował się wewnątrz klamry.
Upewnij się, że pas barkowy (f) przechodzi pomiędzy szyją dziecka a zewnętrzną
krawędzią ramienia. Jeśli to konieczne dostosuj wysokość zagłówka. Wysokość
zagłówka można także regulować, kiedy fotelik jest już umieszczony w samochodzie
FRNLPL
45
Page 47

VOTRE ENFANT EST-IL ATTACHÉ CORRECTEMENT ?
f
n
k
Pour assurer la sécurité optimale de votre enfant, veuillez toujours procéder aux
vérications suivantes avant le départ :
• la ceinture sous-abdominale (n) doit passer par les deux glissières inférieures (k)
situées des deux côtés du coussin du siège (d).
• la ceinture diagonale (f) du côté de la boucle de ceinture passe également dans la
glissière inférieure (k) du siège.
• la ceinture diagonale (f) passe bien dans la glissière (g) présentant la couleur rouge
sur le support d’épaule (e).
• la ceinture diagonale (f) est inclinée vers le bas.
• la ceinture est bien ajustée contre le corps de votre enfant et n’est pas entortillée.
ENTRETIEN ET MAINTENANCE
An que le siège auto pour enfant offre tout son potentiel de protection, il est
impératif que vous teniez compte des éléments suivants :
• Toutes les pièces principales du siège auto pour enfant doivent faire l’objet d’un
contrôle régulier vériant qu’elles ne sont pas endommagées. Les composants
mécaniques ne doivent pas présenter de défauts.
• Il est absolument nécessaire de vérier que le siège auto pour enfant n’est pas
coincé entre deux éléments rigides tels que la porte du véhicule et le rail pour
siège, qui seraient susceptibles de l’endommager.
• En cas d’exposition à un choc extrême, p. ex. suite à une collision, le siège auto
pour enfant doit être vérié par le fabricant.
Veillez à utiliser uniquement une housse de siège CYBEX, celle-ci étant un élémentclé de la fonction du siège. Des housses de rechange sont disponibles auprès d’un
revendeur spécialisé.
46
Page 48

IS UW KIND GOED VASTGEMAAKT? CZY TWOJE DZIECKO JEST DOBRZE ZABEZPIECZONE?
Controleer voordat u op weg gaat voor optimale veiligheid van uw kind of: Aby mieć pewność, że Twoje dziecko jest dobrze zabezpieczone, przed
• de buikriem (n) aan beide zijden van het zitkussen (d) door de onderste
gordelgeleiders (k) is gevoerd;
• de borstriem (f) aan de kant van het gordelslot ook door de onderste gordelgeleider
(k) van het zitje is gevoerd;
• de borstriem (f) door de met rood gemarkeerde gordelgeleider (g) in de
schoudersteun (e) is gevoerd;
• de borstriem (f) neerwaarts verloopt;
• de hele gordel strak tegen het lichaam van uw kind valt en niet gedraaid is.
uruchomieniem samochodu sprawdź, czy:
• pas biodrowy (n) przechodzi przez boczne szczeliny (k) po obu stronach siedziska.
(d)
• pas barkowy (f) również przechodzi przez boczną szczelinę siedziska (e) od strony
klamry zamykającej (e)
• ppas barkowy (f) przechodzi przez czerwoną szczelinę (g) w zabezpieczeniu
barkowym. (e)
• pas przebiega ukośnie do tyłu.
• pas na całej swojej długości jest naprężony i nie jest skręcony.
REINIGING & ONDERHOUD KONSERWACJA
Om te garanderen dat uw kinderzitje maximale bescherming biedt, is het uiterst
belangrijk dat u het volgende in acht neemt:
• Alle belangrijke onderdelen van het kinderzitje dienen regelmatig op schade
gecontroleerd te worden. De mechanische onderdelen mogen geen defecten
vertonen.
• Het kinderzitje mag absoluut niet tegen iets hards worden gestoten, zoals een
portier of stoelrail, omdat het daardoor beschadigd kan raken.
• Zodra het kinderzitje heeft blootgestaan aan een extreme schok, bijvoorbeeld een
botsing, moet het worden gecontroleerd door de fabrikant.
Zorg dat alleen een originele CYBEX-bekledingshoes wordt gebruikt, omdat
de bekleding een belangrijk element van de werking van de stoel is. Reserveonderdelen kunnen bij een gespecialiseerde detailhandelaar worden gekocht.
Aby zagwarantować jak najwyższy poziom bezpieczeństwa fotelika, należy stosować
się do poniższych zaleceń:
• Wszystkie ważne części fotelika powinny być regularnie sprawdzane. Części
mechaniczne powinny działać bez zarzutu.
• Zwracaj szczególną uwagę, aby fotelik nie został uszkodzony poprzez
zaklinowanie pomiędzy drzwiami i siedzeniem samochodowym lub innymi
twardymi elementami.
• Jeżeli fotelik upadnie lub zostanie uszkodzony, powinien zostać oddany do
przeglądu.
Tylko oryginalna tapicerka CYBEX zapewni maksymalny komfort i bezpieczeństwo
Twojemu dziecku Tapicerki można nabyć u autoryzowanych partnerów.
FRNLPL
47
Page 49

e e
h
RETRAIT DE LA HOUSSE DU SIÈGE
La housse du siège pour nourrisson consiste en quatre éléments (rabat d’appuietête, appuie-tête, housse pour épaule, housse pour renfort et/ou housse pour surface
d’assise). La housse pour bouclier d’impact vient compléter le tout.
Les quatre housses du siège sont insérées dans les canaux d’attache situés sur
les rebords du siège pour nourrisson et sont maintenus en place par des boutonspressions (voir illustration).
Une fois les boutons-pressions détachés, les différentes pièces de la housse
peuvent être extraites des canaux d’attache de la housse.
Pour remettre les housses sur le siège, procédez dans l’ordre inverse.
ATTENTION! Le siège auto pour enfant ne doit jamais être utilisé sans la
housse.
RETRAIT DE LA HOUSSE DU RABAT DE L’APPUIE-TÊTE
Tirez l’orice de la housse pour la rabattre par-dessus le levier de réglage de
manière à ce que la housse ne s’entremêle pas dans le levier au moment de son
retrait.
RETRAIT DE LA HOUSSE DE L’APPUIE-TÊTE
Détachez les deux boutons-pressions situés sur chaque côté de l’arrière du siège,
au niveau des épaules. Extrayez la housse de son canal d’attache.
48
RETRAIT DE LA HOUSSE DU SUPPORT D’ÉPAULE
Extrayez la housse de son canal d’attache.
Page 50

DE BEKLEDINGSHOES VERWIJDEREN ZDEJMOWANIE TAPICERKI
De bekleding van het kinderzitje bestaat uit vier delen (inleg in de hoofdsteun,
hoofdsteun, schoudergedeelte, bekleding voor het inlegkussen en/of de zitting).
Voorts is er de bekleding voor het veiligheidskussen.
De vier hoezen van het zitje worden ingevoerd in de bekledinggeleiders aan de rand
van het kinderzitje en worden op verschillende plaatsen op hun plek gehouden met
drukknopen (zie afbeelding).
Als alle drukknopen zijn losgemaakt, kunnen de afzonderlijke delen van de bekleding
uit de geleiders worden getrokken.
Om de hoezen weer op de stoel te bevestigen, volgt u de omgekeerde volgorde van
de verwijdering.
BELANGRIJK! Het kinderzitje mag nooit worden gebruikt zonder bekleding. OSTRZEŻENIE! Fotelik nie może być używany bez tapicerki
Tapicerka fotelika składa się z czterech części plus tapicerka osłony tułowia.
Każda część tapicerki jest zaczepiona do fotelika za pomocą rzepów, zatrzasków lub
guzików (patrz rysunek)
Po odpięciu wszystkich zapięć tapicerkę można zdjąć.
Aby założyć tapicerkę z powrotem, wykonaj te same czynności w odwrotnej
kolejności.
FRNLPL
DE BEKLEDING VAN DE INLEG IN DE HOOFDSTEUN
VERWIJDEREN
Trek de opening van de bekleding over de aanpassingshendel, zodat de bekleding
niet daarachter blijft haken als u eraan trekt om die te verwijderen.
DE BEKLEDING VAN DE HOOFDSTEUN VERWIJDEREN
Maak de twee drukknopen op de achterzijde van beide schouderstukken los. Trek de
bekleding uit de bekledinggeleiders.
ZDEJMOWANIE TAPICERKI Z KLAPKI ZAGŁÓWKA
Przeciągnij otwór w tkaninie przez regulację, tak aby tkanina nie utkwiła w dźwigni
podczas ściagania.
ZDEJMOWANIE TAPICERKI Z ZAGŁÓWKA
Odepnij napy po obu stronach z tyłu przy zabezpieczeniach barkowych. Zdejmij
pokrowiec z mocowań.
DE BEKLEDING VAN HET SCHOUDERDEEL VERWIJDEREN ZDEJMOWANIE TAPICERKI Z OSŁON BARKOWYCH
Trek de bekleding uit de bekledinggeleiders. Wyciągnij tapicerkę ze szczelin mocujących
49
Page 51

RETRAIT DE LA HOUSSE DE LA SURFACE D’ASSISE
Détachez les quatre boutons-pressions de la housse situé à l’avant et à l’arrière du
siège. Retirez la housse des accoudoirs et le long de la surface du siège.
RETRAIT DE LA HOUSSE DU BOUCLIER D’IMPACT
Tout d’abord, détachez les deux boutons-pressions de la housse du bouclier
d’impact. Ensuite, retirez la housse autour du bouclier en tirant vers la troisième
attache située autour du bouton de réglage central et détachez la housse au niveau
de l’orice en caoutchouc du bouton de réglage.
NETTOYAGE
Remarque! La housse ne peut être lavée qu’à 30 °C, en programme délicat. Tout
lavage de la housse à une température supérieure à 30 °C peut provoquer une
décoloration du tissu. Veuillez laver la housse séparément et ne la passez pas au
sèche-linge. Ne faites jamais sécher la housse en l’exposant à la lumière directe du
soleil. Vous pouvez nettoyer les éléments en plastique à l’aide d’un détergent doux
et à l’eau tiède.
ATTENTION! N’utilisez jamais de détergents agressifs ou d’eau de javel.
50
Page 52

DE BEKLEDING VAN DE ZITTING VERWIJDEREN ZDEJMOWANIE TAPICERKI Z SIEDZISKA
Maak de vier drukknopen van de zittingbekleding aan de voor- en achterkant los.
Trek nu de bekleding over de armleuningen en het zitoppervlak.
Odepnij 4 napy siedziska znajdujące się z przodu i z tyłu siedziska Następnie
sciągnij tapicerkę podłokietników i dalej siedziska.
DE BEKLEDING VAN HET VEILIGHEIDSKUSSEN VERWIJDEREN ZDEJMOWANIE TAPICERKI Z OSŁONY TUŁOWIA
Maak eerst de twee drukknopen van de bekleding van het veiligheidskussen los.
Trek de bekleding dan over het kussen naar het derde bevestigingspunt rond de
centrale aanpassingsknop en maak de bekleding los van het rubberen oog van de
aanpassingsknop.
Najpierw odepnij dwie napy z osłony tułowia. Następnie ściągnij pokrowiec dookoła
poduszki w kierunku trzeciego zaczepu wokół przycisku regulacji.
REINIGING CZYSZCZENIE
Let op! De bekleding mag alleen op 30°C worden gewassen met een
jnwasprogramma. Wassen op hogere temperaturen dan 30°C kan verkleuring van
de bekleding veroorzaken. Was de bekleding apart en droog deze niet in de droger!
Droog de bekleding ook niet in de felle zon! De plastic onderdelen kunnen worden
schoongemaakt met een mild reinigingsmiddel en warm water.
BELANGRIJK! Gebruik nooit agressieve reinigingsmiddelen of bleekmiddel! Uwaga! W żadnym wypadku nie stosować chemicznych środków do
Uwaga! Tapicerka może być prana w 30°C, program do tkanin delikatnych. Wyższa
temperatura prania może spowodować wyblaknięcie koloru. apicerkę należy prać
oddzielnie i nigdy nie należy suszyć jej w suszarce! Nie należy także suszyć tapicerki
w pełnym słońcu! Plastikowe części fotelika można przecierać ciepłą wodą z
delikatnym detergentem.
czyszczenia ani wybielaczy!
FRNLPL
51
Page 53

RECOMMANDATIONS SUITE À UN ACCIDENT
ATTENTION! Tout accident peut provoquer des dégâts sur le siège auto
pour enfant non identifiables à l’œil nu. Veuillez remplacer le siège après un
accident. En cas de doute, veuillez contacter votre revendeur ou le fabricant.
LONGÉVITÉ DU PRODUIT
Le siège CYBEX PALLAS M a été conçu pour répondre à ses engagements et une
longévité d’environ 11 ans. Cela dit, étant donné la vraisemblance de variations de
températures très importantes et de sollicitations imprévues dans les véhicules, il
convient d’observer les points suivants :
• Si le véhicule est exposé à la lumière directe du soleil pendant une période
prolongée, le siège auto pour enfant doit être retiré du véhicule ou recouvert d’un
linge clair.
• Vériez régulièrement que toutes les pièces en plastique ou en métal du siège ne
présentent pas de dommages, déformation ou changement de couleur. Si vous
constatez un changement quelconque, le siège pour enfant doit être remis, faire
l’objet d’une vérication par le fabricant, voire être remplacé par celui-ci.
• Les changements de couleur, surtout la décoloration, sont parfaitement normaux
lors de l’utilisation du siège dans un véhicule, et ces mêmes changements de
couleur n’en affecte pas l’efcacité.
TRAITEMENT DES DÉCHETS
À la n de la durée de vie du siège, veillez à le mettre au rebut correctement. Le tri
des déchets peut fortement varier d’un endroit à un autre. An de veiller à respecter
la législation en vigueur en matière de tri des déchets, veuillez contacter l’organisme
ou le conseil local compétent. Veuillez toujours respecter la législation relative à
l’élimination des déchets de votre pays.
52
Page 54

WAT TE DOEN NA EEN ONGEVAL POSTĘPOWANIE PO WYPADKU DROGOWYM
BELANGRIJK! Een ongeval kan schade aan het kinderzitje veroorzaken die
niet met het blote oog zichtbaar is. Vervang het zitje na een ongeval. Neem bij
twijfel contact op met uw detailhandelaar of de fabrikant van uw auto.
OSTRZEŻENIE! Po wypadku drogowym uszkodzenia fotelika mogą nie być
widoczne gołym okiem. Mimo to fotelik powinien zostać wymieniony na nowy.
W razie wątpliwości skontaktujsię ze sprzedawcą lub producentem
LEVENSDUUR VAN HET ZITJE TRWAŁOŚĆ PRODUKTU
De CYBEX PALLAS M is ontworpen om gedurende de gehele levensduur
van ongeveer 11 jaar aan de specicaties te voldoen. Omdat er grote
temperatuurschommelingen en onvoorspelbare krachten in auto’s kunnen optreden,
moeten de volgende punten echter in acht worden genomen:
• Als het voertuig langere tijd in direct zonlicht staat, moet het kinderzitje uit de auto
worden verwijderd dan wel met een lichte doek worden afgedekt.
• Controleer regelmatig alle plastic en metalen onderdelen van het zitje op schade,
vervorming of verkleuring. Als u veranderingen constateert, moet u het kinderzitje
wegdoen of laten controleren en mogelijk laten vervangen door de fabrikant.
• Verkleuring in de bekledingsstof, met name verbleken, is normaal bij gebruik in een
auto en vermindert het functioneren van het zitje niet.
Fotelik CYBEX PALLAS M stworzono tak, aby spełniał swoją funkcję prze
okres,wktórym może być używany - czyli ok. 11 lat. Jednakże z uwagi na możliwe
duże różnice temperatur oraz inne nieprzewidziane okoliczności należy wziąć pod
uwagę:
• Wyjmuj fotelik z samochodu lub przykrywaj go, jeżeli wiesz, że będzie wystawiony
na działanie promieni słonecznych przez dłuższy czas. .
• Raz do roku sprawdzaj, czy plastikowe elementy fotelika nie są uszkodzone lub
czy nie zmienił się ich kształt lub kolor. Przy stwierdzeniu zmian fotelik powinien
zostać wymieniony, sprawdzony przez producenta i w razie potrzeby wymieniony.
• Zmiany wyglądu tapicerki, szczególnie blaknięcie kolorów, nie są wadą wyrobu, ale
normalnym efektem wieloletniej eksploatacji fotelika
VERWIJDERING UTYLIZACJA
Aan het eind van de levensduur van het kinderzitje moet u het correct verwijderen.
Afvalscheiding kan van plaats tot plaats verschillen. Om te zorgen dat u het
kinderzitje overeenkomstig de regelgeving verwijdert, kunt het best contact opnemen
met uw lokale afvalverwerkingsbedrijf of de gemeente. Houd u in ieder geval aan de
afvalregelgeving van uw land.
Po zakończeniu użytkowania fotelika należy go wyrzucić, stosując się do właściwych
przepisów. Sposoby usuwania odpadów mogą różnić się w zależności od kraju.
Skontaktuj się z lokalną rmą zajmującą się gospodarką odpadami, aby we
właściwy sposób zutylizować fotelik. Zawsze stosuj się do przepisów dotyczących
postępowania z odpadami w swoim kraju
FRNLPL
53
Page 55

CONDITIONS DE GARANTIE
Les conditions de garantie suivantes s’appliquent uniquement au pays dans lequel
le présent produit a été vendu par des voies de distribution commerciale à un
consommateur. La présente garantie couvre tous les défauts de fabrication et de
matériaux existant au moment de l’achat ou se présentant dans les trois (3) années
suivant la première vente de ce produit par des voies de distribution commerciale
à un consommateur (garantie du fabricant). Si un défaut de fabrication ou de
matériau se manifeste au cours de la période de garantie, le produit sera réparé
sans frais ou pourra, à notre discrétion, être remplacé par un produit neuf. An de
faire valoir une réclamation portant sur la présente garantie, le produit doit être
renvoyé au détaillant qui a procédé à sa première vente, accompagné de la preuve
d’achat originale présentant la date de l’achat, le nom et l’adresse du détaillant,
ainsi que le nom du produit. Aucune réclamation ne peut être faite au titre de la
présente garantie si le produit est renvoyé au fabricant par toute autre personne
que le détaillant ayant vendu le produit en premier lieu, avec l’intention de faire une
réclamation au titre de la garantie. La garantie ne s’applique que si le produit a fait
l’objet d’un contrôle visant à vérier son intégralité, d’éventuels défauts de fabrication
ou des défauts matériels constatés immédiatement lors de l’achat. Si le produit a
été acheté par commande et livré par voie postale, il doit être soumis à un contrôle
immédiat après réception visant à vérier son intégralité, d’éventuels défauts de
fabrications ou défauts matériels. Si le produit présent des défauts, il faut cesser de
l’utiliser et le renvoyer au détaillant ayant effectué la vente. Toute réclamation au titre
de la garantie implique que le produit soit renvoyé propre et dans son intégralité.
Veuillez lire attentivement les instructions d’emploi avant de contacter le détaillant.
La garantie ne couvre pas les dommages provoqués par une utilisation erronée,
des inuences extérieures (eau, feu, accidents de la route, etc.) ou usure normale.
Les réclamations au titre de la présente garantie seront honorées uniquement
si le produit a été traité et utilisé conformément aux instructions d’emploi, si les
réparations et modications ont été effectuées par des personnes autorisées et si les
pièces et accessoires employés sont d’origine. En aucun cas la présente garantie
ne saurait invalider ou limiter les droits du consommateur ou les droits de recours
contre le revendeur sur la base dune infraction au contrat d’achat tel qu’autorisé par
la législation en vigueur.
54
CYBEX GmbH
Riedinger Str. 18, 95448 Bayreuth, Germany
Tel.: 0921 78 511-511, Fax.: 0921 78 511- 888
Page 56

GARANTIE WARUNKI GWARANCJI
De volgende garantievoorwaarden gelden alleen in het land waar het product
voor het eerst via de detailhandel is verkocht aan een consument. Deze garantie
dekt alle fabricagefouten en materiaaldefecten die bestaan op het moment van
verkoop of die zich binnen drie (3) jaar na eerste verkoop van het product via de
detailhandel hebben gemanifesteerd aan de consument (fabrieksgarantie). Als er
zich een fabricagefout of materiaaldefect voordoet in de garantieperiode, wordt
het product kosteloos gerepareerd of – naar ons goeddunken – vervangen door
een nieuw product. Om aanspraak te maken op deze garantie dient u het product
te retourneren aan de detailhandelaar die het oorspronkelijk heeft verkocht en er
dient een origineel aankoopbewijs (kassabon of factuur) te worden overlegd met
de aankoopdatum, de naam en het adres van de detailhandelaar en de naam van
het product. Er kunnen geen aanspraken worden gedaan op deze garantie als
het product aan de fabrikant wordt verstuurd of naar een andere persoon dan de
detailhandelaar die het oorspronkelijk heeft verkocht ten behoeve van het doen van
een aanspraak op de garantie. De garantie geldt alleen als het product direct na
aankoop is gecontroleerd op volledigheid, fabricagefouten en materiaaldefecten.
Als het product per postorder is gekocht, moet het direct na ontvangst worden
gecontroleerd op volledigheid, fabricagefouten en materiaaldefecten. Als er
schade ontstaat, mag het product niet langer worden gebruikt en moet het worden
geretourneerd naar de detailhandelaar die het oorspronkelijk heeft verkocht. Als
u aanspraak maakt op de garantie, moet het product in complete en schone staat
worden geretourneerd. Lees de gebruikshandleiding zorgvuldig voordat u contact
opneemt met de detailhandelaar. Deze garantie dekt geen schade veroorzaakt door
verkeerd gebruik, omgevingsfactoren (zoals water, brand, aanrijdingen) of normale
slijtage. Aanspraken op de garantie worden slechts gehonoreerd als het product
wordt behandeld en gebruikt overeenkomstig de gebruikshandleiding, als reparaties
en aanpassingen uitsluitend zijn uitgevoerd door daartoe bevoegde personen, en als
alleen originele onderdelen en accessoires zijn gebruikt. Deze garantie vernietigt of
beperkt op geen enkele wijze de consumentenrechten of rechten jegens de verkoper
vanwege schending van de koopovereenkomst die zijn toegekend krachtens
toepasselijk recht.
Niniejsza gwarancja obowiązuje wyłącznie w kraju, w którym produkt został po raz
pierwszy sprzedany klientowi przez sklep detaliczny. Gwarancja obejmuje wszelkie
wady materiałowe i produkcyjne istniejące w momencie zakupu czy wykryte w ciągu
trzech (3) lat od daty zakupu produktu w sklepie detalicznym przez pierwszego
właściciela (gwarancja producenta). eśli wada materiałowa czy produkcyjna
zostanie wykryta, producent, według własnego uznania, bezpłatnie naprawi produkt
lub wymieni go na nowy. by skorzystać z warunków niniejszej gwarancji, należy
zanieść lub wysłać produkt do sklepu, w którym został po raz pierwszy zakupiony
oraz przedłożyć oryginalny dowód zakupu (paragon lub fakturę) zawierający datę
zakupu, nazwę sklepu oraz nazwę towaru. Warunki gwarancji nie obowiązują, jeśli
produkt zostanie odesłany do producenta lub innego podmiotu, a nie do sklepu,
w którym został po raz pierwszy zakupiony. Prosimy o sprawdzenie produktu pod
kątem jego kompletności czy jakichkolwiek wad w momencie jego zakupu, a w
przypadku sprzedaży wysyłkowej - natychmiast po jego otrzymaniu. W przypadku
stwierdzenia wady należy zaprzestać użytkowania produktu i odesłać go do sklepu,
w którym został po raz pierwszy zakupiony Reklamowany w ramach gwarancji
produkt powinien zostać dostarczony czysty i kompletny. Jednakże przed kontaktem
ze sklepem należy uważnie przeczytać instrukcję użytkowania. Niniejsza gwarancja
nie obejmuje żadnych uszkodzeń wynikających z nieprawidłowego użytkowania,
warunków zewnętrznych (woda, ogień, wypadki drogowe i inne) oraz normalnego
zużycia Gwarancja obowiązuje wyłącznie wtedy, jeśli produkt był użytkowany
zgodnie z instrukcją użytkowania, jeśli był naprawiany/modykowany przez
uprawnione osoby i użyto do tego celu wyłącznie oryginalnych części i akcesoriów.
Niniejsza gwarancja nie wyłącza, nie ogranicza ani nie zawiesza uprawnień
kupującego wynikających z niezgodności towaru z umową konsumencką.
FRNLPL
CYBEX GmbH
Riedinger Str. 18, 95448 Bayreuth, Germany
Tel.: 0921 78 511-511, Fax.: 0921 78 511- 888
CYBEX GmbH
Riedinger Str. 18, 95448 Bayreuth, Germany
Tel.: 0921 78 511-511, Fax.: 0921 78 511- 888
55
Page 57

56
Page 58

Kedves Vásárló,
Köszönjük, hogy a CYBEX PALLAS M gyermekülést választotta. A CYBEX PALLAS M gyermekülés kifejlesztése során
a biztonság, a kényelem és az egyszerű használhatóság voltak a legfontosabb szempontok. Ez a termék speciális
minőségbiztosítási szabályok betartásával készült és megfelel a legszigorúbb biztonsági követelményeknek.
Vážený zákazníku,
děkujeme, že jste si vybrali dětskou autosedačku CYBEX PALLAS M. Bezpečnost, pohodlí a snadné používání jsou hlavní
zásady, použité při vývoji dětské autosedačky CYBEX PALLAS M. Tento produkt je vyrobený za přísného kvalitativního
dohledu a splňuje nejpřísnější bezpečnostní požadavky.
Vážený zákazník,
ďakujeme, že ste si vybrali detskú autosedačku CYBEX PALLAS M. Bezpečnosť, pohodlie a jednoduché používanie sú hlavné
zásady, použité pri vývoji detskej autosedačky CYBEX PALLAS M. Tento produkt je vyrobený za prísneho kvalitatívneho
dohľadu a spĺňa najprísnejšie bezpečnostné požiadavky.
57
Page 59
PALLAS M
ECE-R44-04
UNIVE RSAL
SEM I-UNIVE RSAL
04301315
Riedinger Str. 18, 95448 Bayreuth
SOLUTION M
ECE-R44-04
UNIVE RSAL
SEM I-UNIVE RSAL
15 – 36 kg
04301314
Riedinger Str. 18, 95448 Bayreuth
08/2014
58
9 – 18 kg
CYBEX GmbH
Germany
CYBEX GmbH
Germany
Jóváhagyás
CYBEX PALLAS M
Ülésmagasító háttámlával, állítható fejtámlával és
biztonsági pajzzsal.
Javasolt:
Kor: kb. 9 hónapos kortól 4 éves korig
Súly: 9-18 kg
Kizárólag olyan autóüléseken használható, amelyek 3
pontos automata biztonsági övvel vannak felszerelve
és megfelelnek az ECE R16 vagy más ezzel
egyenértékű szabványnak.
ECE R-44/04,
CYBEX PALLAS M - 1 csoport, 9-18 kg
CYBEX SOLUTION M- 2/3 csoport, 15-36 kg
Schválení
CYBEX PALLAS M
Sedák s opěrkou zad a opěrkou hlavy na nastavitelné
základně s nastavitelným bezpečnostním pultem.
Doporučené pro:
Věk: Cca 9 měsíců až 4 roky
Váha: 9 - 18 kg
Vhodné pouze pro sedadla s automatickým
3-bodovým bezpečnostním pásem, splňujícím ECE
předpis R16 nebo srovnatelný standard
ECE R-44/04,
CYBEX PALLAS M - skupina 1, 9 až 18 kg
CYBEX SOLUTION M - skupina 2/3, 15 až 36 kg
Schválenie
CYBEX PALLAS M
Sedák s opierkou chrbta a opierkou hlavy na
nastaviteľné základni s nastaviteľným bezpečnostným
pultom.
Odporúčané pre:
Vek: Cca 9 mesiacov až 4 roky
Váha: 9 -18 kg
Vhodné iba pre sedadlá s automatickým 3-bodovým
bezpečnostným pásom, spĺňajúcim ECE predpis R16
alebo porovnateľný štandard
ECE R-44/04,
CYBEX PALLAS M- skupina 1, 9 až 18 kg
CYBEX SOLUTION M - skupina 2/3, 15 až 36 kg
HU
FIGYELEM! Hogy gyermekének a legoptimálisabb védelmet biztosítsa, a
CYBEX PALLAS M ülést az útmutatóban leírt módon használja.
Fontos! Mindig legyen kéznél ez az utasítás (pl. az erre a célra szolgáló tárolóban a
háttámla hátoldalán).
Fontos! Az ország-specikus (pl. a gyermekülések színkódjaira vonatkozó)
szabályok miatt a termékek megjelenése változhat. Ez nem érinti a termékek
megfelelő működését.
Rövid használati utasítás I csoport (9-18 kg) ...............................................................2
Rövid használati utasítás 2/3 csoport (15-36 kg) ......................................................... 3
Jóváhagyás ..................................................................................................................58
Az ülés helyes beszerelése a járműbe ...................................................................... 60
Az L.S.P. aktiválása .....................................................................................................62
Az ülés behelyezése a gépjárműbe ...........................................................................62
Testmérethez igazítás ................................................................................................64
Az ülésbetét eltávolítása .............................................................................................64
A védőpajzs beállítása - ECE 1. korcsoport (9-18 kg) ...............................................64
Ülő és döntött pozíció - ECE 1. korcsoport (9-18 kg) .................................................66
A dönthető fejtámla ..................................................................................................... 66
A védőpajzs rögzítése - ECE 1. korcsoport (9-18 kg) ................................................68
Átalakítás PALLAS M-ről SOLUTION M -re (ECE 1. 9-18 kg korcsoportról ECE 2/3.
korcsoportra 15-36 kg) ................................................................................................68
Rögzítés védőpajzs nélkül – ECE group 2/3. (15-36 kg) ...........................................70
Megfelelően rögzítette gyermekét? ............................................................................72
Tisztítás & karbantartás ...............................................................................................72
Az ülélshuzat eltávolítása ............................................................................................74
A huzat eltávolítása a fejtámlaszárnyról .....................................................................74
A huzat eltávolítása a fejtámláról ................................................................................74
A huzat eltávolítása a vállvédőkről ..............................................................................74
Vegye le a huzatot az ülőfelületről. .............................................................................76
A huzat eltávolítása a védőpajzsról.............................................................................76
Tisztítás ........................................................................................................................76
Mi a teendő baleset után .............................................................................................78
A termék élettartama ................................................................................................... 78
Ártalmatlanítás .............................................................................................................78
Garanciális feltételek ...................................................................................................80
Tartalom
Page 60

CZ
Obsah Obsah
SK
VAROVÁNÍ! Pro zajištění maximální ochrany vašeho dítěte, musí být
autosedačka CYBEX PALLAS M používána podle těchto instrukcí.
Upozornění! Vždy mějte tyto instrukce po ruce (tj. v k tomu určené přihrádce na
zadní straně opěrky zad).
Upozornění! Předpisy jednotlivých států (tj. ohledně barevného označení na
dětských autosedačkách) mohou způsobit, že se prvky produktu budou vizuálně lišit.
To však nemá žádný vliv na jeho správnou funkčnost.
Stručné instrukce Sk. 1 (9-18 kg) ..................................................................................2
Stručné instrukce Sk. 2/3 (15-36 kg) ............................................................................3
Schválení .....................................................................................................................58
Správné umístění autosedačky ve vozidle ................................................................ 61
Používání L.S.P. ..........................................................................................................63
Umístění autosedačky ve vozidle ..............................................................................63
Přizpůsobení velikosti těla ..........................................................................................65
Vyjmutí dodatečné vložky sedáku...............................................................................65
Nastavení bezpečnostního pultu - ece sk. 1 (9-18 kg) ...............................................65
Poloha vsedě a vleže - ece sk. 1 (9-18 kg) ................................................................67
Naklápěcí opěrka hlavy ..............................................................................................67
Zajištění dítěte pomocí bezpečnostního pultu - ece sk. 1 (9-18 kg) ..........................69
Přeměna z pallas na solution m (ece skupina 1 na ece skupinu 2/3) ....................... 69
Zajištění dítěte bez bezpečnostního pultu - ece sk. 2/3 (15-36 kg) ...........................71
Je vaše dítě správně zajištěno? ..................................................................................73
Péče & údržba .............................................................................................................73
Sundání potahu ...........................................................................................................75
Sundání potahu z naklápěcí opěrky hlavy ..................................................................75
Sundání potahu z opěrky hlavy...................................................................................75
Sundání potahu z ramenní části .................................................................................75
Sundání potahu ze sedáku .........................................................................................77
Sundání potahu z bezpečnostního pultu ....................................................................77
Čištění ..........................................................................................................................77
Co dělat po nehodě .....................................................................................................79
Životnost produktu .......................................................................................................79
Likvidace ......................................................................................................................79
Záruční podmínky ........................................................................................................81
W Pre zabezpečenie maximálnej ochrany vášho dieťaťa, musí byť
autosedačka CYBEX PALLAS M používaná podľa týchto inštrukcií.
Upozornenie! Vždy majte tieto inštrukcie po ruke (tj. v k tomu určenej priehradke na
zadnej strane opierky chrbta).
Upozornenie! Predpisy jednotlivých štátov (tj. ohľadom farebného označenia na
detských autosedačkách) môžu spôsobiť, že sa prvky produktu budú vizuálne líšiť.
To však nemá žiadny vplyv na jeho správnu funkčnosť.
Stručné inštrukcie Skupina 1 (9-18 kg) ......................................................................... 2
Stručné inštrukcie Sk. 2/3 (15-36 kg) ............................................................................3
Schválenie ...................................................................................................................58
Správne umiestnenie autosedačky vo vozidle .......................................................... 61
Používanie L.S.P..........................................................................................................63
Umiestnenie autosedačky vo vozidle ........................................................................63
Prispôsobenie veľkosti tela ........................................................................................65
Vybratie dodatočné vložky sedáku ............................................................................. 65
Nastavenie bezpečnostného pultu - ece sk. 1 (9-18 kg) ............................................65
Poloha v sede a poležiačky - ECE sk. 1 (9-18 kg) .....................................................67
Naklápacie opierka hlavy ...........................................................................................67
Zaistenie dieťaťa pomocou bezpečnostného pultu - ECE sk. 1 (9-18 kg) ................69
Premena z PALLAS M na SOLUTION M (ECE skupina 1 na ECE skupinu 2/3) .....69
Zaistenie dieťaťa bez bezpečnostného pultu - ECE sk. 2/3 (15-36 kg) ....................71
Je vaše dieťa správne zaistené? ................................................................................73
Starostlivosť & Údržba.................................................................................................73
Odobratie poťahu ........................................................................................................75
Odobratie poťahu z naklápacie opierky hlavy ............................................................ 75
Odobratie poťahu z opierky hlavy ...............................................................................75
Odobratie poťahu z ramennej časti ............................................................................75
Odobratie poťahu zo sedáku ......................................................................................77
Odobratie poťahu z bezpečnostného pultu ................................................................77
Čistenie ........................................................................................................................77
Čo robiť po nehode ......................................................................................................79
Životnosť produktu .......................................................................................................79
Likvidàcia .....................................................................................................................79
Záručné podmienky .....................................................................................................81
59
Page 61

AZ ÜLÉS HELYES BESZERELÉSE A JÁRMŰBE
A visszahúzható ISOFIX CSATLAKOZÓVAL rendelkező CYBEX
PALLAS M-FIX/ PALLAS M rendszer minden olyan felnőttek szállítására
is alkalmas autóülésen használható, amely rendelkezik automata
FIGYELEM! Az ülés nem használható kétpontos vagy medenceövvel. Ha az
ülést kétpontos övvel használják, baleset esetén a gyermek súlyos vagy akár
halálos sérülést is szenvedhet.
• A légzsákkal rendelkező autókban tolja hátra az autó ülését amennyire csak lehet.
Ebben az esetben ügyeljen arra, hogy biztonsági öv felső csatlakozási pontja
mindig hátrébb legyen a gyermekülés övvezetőjénél.
• Mindig vegye gyelembe a jármű gyártójának ajánlásait.
FIGYELEM! A felső övszárnak (f) mindig ívesen kell futnia, soha nem futhat
a öv felső rögzítési pontja mögött. Ha az ülést nem lehet így beállítani pl. az
autóülést előrenyomva vagy a gyermekülést egy másik ülésen használva,
akkor ez a gyermekülés nem használható az Ön autójában.
Az autóban lévő csomagokat vagy más tárgyakat, amelyek baleset esetén sérülést
okozhatnak, mindig rögzíteni kell. Ellenkező esetben ezek „elrepülhetnek” és akár
halálos sérülést okozhatnak.
FIGYELEM! A gyermekülés nem használható olyan üléseken, amelyek oldalra
néznek. A menetiránynak háttal elhelyezkedő ülések esetébe, pl. furgonban
f
vagy minibuszban a gyermekülés használata akkor megengedett, ha az
ülés felnőttek szállítására is engedélyezett. Kérjük, ügyeljen arra, hogy a
menetiránynak háttal történő beszerelés esetén nem szabad leszerelni a
fejtámlát! A gyermekülést a biztonsági övvel rögzíteni kell még akkor is, amikor
nincs használatban. Ez akkor is érvényes, ha a gyermekülést ISOFIX-szel már
rögzítették a járműben. A rögzítetlen ülés már egy vészfékezés vagy egy kis
ütközés során is az utasok vagy a vezető sérülését okozhatja.
Fontos! Soha ne hagyja gyermekét a gépkocsiban felügyelet nélkül.
hárompontos biztonsági övvel.
60
Page 62

SPRÁVNÉ UMÍSTĚNÍ AUTOSEDAČKY VE VOZIDLE SPRÁVNE UMIESTNENIE AUTOSEDAČKY VO VOZIDLE
Autosedačku CYBEX PALLAS M-FIX/ PALLAS M se zasouvacím
ISOFIX Connect systémem lze ve vozidle použít na všech sedadlech
schválených pro transport dospělých osob a s automatickým 3-bodovým
bezp. pásem.
VAROVÁNÍ! Sedačka není vhodná pro použití s 2-bodovým nebo pouze
břišním pásem. Pokud je autosedačka zajištěná 2-bodovým pásem, může dítě
při nehodě utrpět vážná nebo dokonce smrtelná zranění.
• Ve vozidlech s airbagy byste měli sedadlo spolujezdce zasunout co nejvíce
dozadu. Ujistěte se však, že je horní otočný bod bezpečnostního pásu za vedením
pásu dětské autosedačky.
• Vždy dodržujte doporučení výrobce vozidla.
VAROVÁNÍ! Diagonální pás (f) musí vést směrem dozadu v náklonu a nikdy
nesmí směřovat dopředu k hornímu uchycení pásu ve vašem vozidle. Pokud
toho nelze dosáhnout, např. zatlačením sedačky dopředu nebo využitím jiného
sedadla, není autosedačka vhodná pro vaše vozidlo.
Zavazadla a ostatní objekty ve vozidle, které mohou při nehodě způsobit zranění,
musí být pevně zajištěny. V opačném případě mohou způsobit smrtelná zranění.
VAROVÁNÍ! Autosedačka se nesmí používat na sedadlech vozidla, otočených
bokem ke směru jízdy. Použití dětské autosedačky na sedadlech v pozici
proti směru jízdy, tj. v dodávce nebo minibusu, je povoleno pouze pokud je
sedadlo schváleno pro transport dospělé osoby. Při montáži autosedačky na
sedadlo v pozici proti směru jízdy nesmí být sundaná opěrka hlavy sedadla
vozidla. Autosedačka musí být vždy zajištěna bezpečnostním pásem. To platí
i v případě, že je již autosedačka ve vozidle zajištěna pomocí systému ISOFIX
Connect. Nezajištěná autosedačka může vám a ostatním pasažérům způsobit
zranění i v případě nouzového zabrždění nebo slabého nárazu.
Upozornění! Nikdy nenechávejte vaše dítě ve vozidle bez dozoru.
CYBEX PALLAS M-FIX/ PALLAS M so zasúvacím ISOFIX Connect
systémom možno vo vozidle použiť na všetkých sedadlách schválených
pre transport dospelých osôb a s automatickým 3-bodovým bezp. pásom.
VAROVANIE! Sedačka nie je vhodná pre použitie s 2-bodovým alebo len
brušným pásom. Ak je autosedačka zabezpečená 2-bodovým pásom, môže
dieťa pri nehode utrpieť vážne alebo dokonca smrteľné zranenia.
• Vo vozidlách s airbagmi by ste mali sedadlo spolujazdca zasunúť čo najviac
dozadu. Uistite sa však, že je horný otočný bod bezpečnostného pásu za vedením
pásu detskej autosedačky.
• Vždy dodržiavajte odporúčania výrobca vozidla.
VAROVANIE! Diagonálny pás (f) musí viesť smerom dozadu v náklone a nikdy
nesmie smerovať dopredu k hornému uchytenie pásu vo vašom vozidle. Ak
sa to nedá dosiahnuť, napr. zatlačením sedačky dopredu alebo využitím iného
sedadla, nie je autosedačka vhodná pre vaše vozidlo.
Batožinu a ostatné objekty vo vozidle, ktoré môžu pri nehode spôsobiť zranenie,
musí byť pevne zaistené. V opačnom prípade môžu spôsobiť smrteľné zranenie.
VAROVANIE! Autosedačka sa nesmie používať na sedadlách vozidla,
otočených bokom k smeru jazdy. Použitie detskej autosedačky na sedadlách
v pozícii proti smeru jazdy, tj. v dodávke alebo minibusu, je povolené len ak je
sedadlo schválené pre transport dospelé osoby. Pri montáži autosedačky na
sedadlo v pozícii proti smeru jazdy nesmie byť vybratá opierka hlavy sedadla
vozidla! Autosedačka musí byť vždy zaistená bezpečnostným pásom. To
platí aj v prípade, že je už autosedačka vo vozidle zaistená pomocou systému
ISOFIX Connect. Nezaistená autosedačka môže vám a ostatným pasažierom
spôsobiť zranenie aj v prípade núdzového zabrzdenia alebo slabého nárazu.
Upozornenie! Nikdy nenechávajte vaše dieťa vo vozidle bez dozoru.
HU
CZSK
61
Page 63

L.S.P.
AZ L.S.P. AKTIVÁLÁSA
A “Linear Side-impact Protection” rendszer (L.S.P.) - Lineáris Oldalvédelem - az
A
1
2
3
PRESS!
L.S.P. gomb(ok) megnyomásával két lépésben állítható. Az alap pozícióval együtt ez
három különböző L.S.P. beállítási lehetőséget jelent.
FIGYELEM! Az ajtó felőli oldalon mindig aktiválja az L.S.P.-t.
Hogy az L.S.P.-t visszanyomja a foglalatba, nyomja meg újra az L.S.P. állító gombot
és nyomja vissza az L.S.P. alaphelyzetbe.
AZ ÜLÉS BEHELYEZÉSE A GÉPJÁRMŰBE
Helyezze az ülést alkalmas helyre a gépjárműben.
• Kérjük bizonyosodjon meg arról, hogy a CYBEX PALLAS M (a) háttámlája
megfelelően illeszkedik az autóülés háttámlájához. A gyermekülés semmi esetre
sem lehet fekvő pozícióban.
• Amennyiben az autó ülésének fejtámlája zavaró, úgy azt teljesen húzza ki, fordítsa
el vagy távolítsa el (kivételes eset, tanulmányozza a „LEGJOBB POZÍCIÓ A
KOCSIBAN“ részt.) A háttámla (a) optimálisan majdnem minden típusú autós
üléshez megfelelően illeszthető.
FIGYELEM! Az autó háttámlájának teljesen illeszkednie kell a CYBEX autós
a
w
ülés háttámlájához. Gyermeke maximális védelme érdekében a legjobb, ha a
gyermekülés normál függőleges pozícióban van!
c
Fontos! Néhány speciális, érzékenyebb anyagú autós ülésnél (velúr, bőr, stb.)
a biztonsági gyermekülés használata kopást/elszíneződést eredményezhet. Ezt
elkerülendő, helyezzen például takarót vagy törölközőt a gyermekülés alá. Kérjük,
ezzel kapcsolatban olvassa el a további tisztítási javaslatokat is, melyek ebben a
használati utasításban találhatók; ezeket a tisztítási utasításokat is gyelembe kell
venni, mielőtt az ülést első alkalommal használná.
62
Page 64

POUŽÍVÁNÍ L.S.P. POUŽÍVANIE L.S.P.
Systém „Lineární ochrany při bočním nárazu“ (L.S.P.) lze stisknutím L.S.P. tlačítka
(tlačítek) vytáhnout do dvou pozic. Společně s počáteční pozicí, nabízí L.S.P. celkem
tři různá nastavení.
Upozornění! Vždy vysuňte L.S.P. na straně směřující k bližším dveřím vozidla. Upozornenie! Vždy vysuňte L.S.P. na strane smerujúcej k bližším dverám vozidla.
Systém „Lineárne ochrany pri bočnom náraze“ (LSP) možno stlačením LSP tlačidla
(tlačidiel) vytiahnuť do dvoch pozícií. Spoločne s počiatočnou pozíciou, ponúka
L.S.P. celkom tri rôzne nastavenia.
Pro zasunutí L.S.P. zpět do krytu, prosíme opět stiskněte L.S.P. tlačítko a zatlačte
L.S.P. do počáteční pozice.
Pre zasunutie L.S.P. späť do krytu, prosíme opäť stlačte L.S.P. tlačidlo a zatlačte
L.S.P. do počiatočnej pozície.
UMÍSTĚNÍ AUTOSEDAČKY VE VOZIDLE UMIESTNENIE AUTOSEDAČKY VO VOZIDLE
Umístěte dětskou autosedačku na vhodné sedadlo ve vozidle. Umiestnite detskú autosedačku na vhodné sedadlo vo vozidle.
• Vždy se ujistěte, že se celá zadní plocha opěrky zad (a) autosedačky CYBEX
PALLAS M opírá o opěrku zad sedadla ve vozidle. Dítě nikdy nesmí být v pozici
vleže.
• Pokud překáží opěrka hlavy sedadla ve vozidle, vytáhněte ji, sklopte ji nebo ji zcela
vyjměte (výjimečné případy viz. sekce „SPRÁVNÉ NASTAVENÍ AUTOSEDAČKY
VE VOZIDLE“). Opěrka zad (a) se perfektně přizpůsobí téměř jakémukoliv sklonu
sedadla ve vozidle.
VAROVÁNÍ! Celá zadní plocha opěrky zad autosedačky CYBEX musí být v
kontaktu s opěrkou zad sedadla ve vozidle. Pro zajištění maximální ochrany
vašemu dítěti musí být sedadlo v běžné vzpřímené pozici!
Upozornění! Na sedadlech, vyrobených z choulostivých materiálů (např. velur, kůže,
atd.), může používání dětských autosedaček zanechat viditelné stopy opotřebení a/
nebo ztráty barvy. K vyvarování se tomuto problému doporučujeme pod autosedačku
vložit deku nebo ručník. Také bychom vás rádi upozornili na pokyny pro čištění,
které jsou součástí tohoto návodu a které by měly být přečteny před prvním použitím
autosedačky.
• Vždy sa uistite, že sa celá zadná plocha opierky chrbta (a) autosedačky CYBEX
PALLAS M opiera o opierku chrbta sedadla vo vozidle. Dieťa nikdy nesmie byť v
pozícii ľahu.
• Ak prekáža opierka hlavy sedadla vo vozidle, vytiahnite ju, sklopte ju alebo ju
úplne vytiahnite (výnimočné prípady viď. Sekcia „SPRÁVNE NASTAVENIE
AUTOSEDAČKY VOZIDLA“). Opierka chrbta (a) sa perfektne prispôsobí takmer
akémukoľvek sklonu sedadla vo vozidle.
VAROVANIE! Celá zadná plocha opierky chrbta autosedačky CYBEX musí byť
v kontakte s opierkou chrbta sedadla vo vozidle. Pre zaistenie maximálnej
ochrany vášmu dieťaťu musí byť sedadlo v bežnej vzpriamenej pozícii!
Upozornenie! Na sedadlách, vyrobených z chúlostivých materiálov (napr. velúr,
koža, atď.), Môže používanie detských autosedačiek zanechať viditeľné stopy
opotrebovania a / alebo straty farby. K vyvarovanie sa tomuto problému, odporúčame
pod autosedačku vložiť deku alebo uterák. Tiež by sme vás radi upozornili na pokyny
pre čistenie, ktoré sú súčasťou tohto návodu a ktoré by mali byť prečítané pred
prvým použitím autosedačky.
HU
CZSK
63
Page 65

e
h
A megfelelő magassághoz történő beállításhoz rendelkezésre áll egy ülésbetét (i),
amely az üléshuzat alá van behelyezve.
• Az ülésbetét használata (i) 9 és 24 hónapos kor között ajánlott.
• 2 éves kor felett az ülésbetét (i) használata már nem szükséges.
• A megfelelő magasság a fejtámla (e) megfelelő pozícióba történő mozgatásával
állítható be. Húzza meg az állító fogantyút (h), hogy kioldja a fejtámlát (e).
• A beállítás akkor megfelelő, ha 2 ujjunk befér a fejtámla alulsó pereme (e) és a
gyermek válla közé.
Fontos! Csak az optimálisan beállított fejtámla (e) nyújt maximális védelmet és
kényelmet gyermekének, valamint biztosítja az átlós öv (f) optimális pozícióját. A
CYBEX PALLAS M magassága 12 pozícióba állítható.
AZ ÜLÉSBETÉT ELTÁVOLÍTÁSA
TESTMÉRETHEZ IGAZÍTÁS
1. Nyissa ki a patentokat a huzat elején (d).
2. Emelje fel a huzatot mindaddig, amíg az ülésbetétet el nem tudja távolítani.
3. Az ülésbetétet a fent meghatározottak szerint aklalmazza.
4. Tegye vissza a huzat az eredeti pozíciójába, és rögzítse a helyére.
d
i
A VÉDŐPAJZS BEÁLLÍTÁSA - ECE 1. KORCSOPORT (9-18 KG)
z
d
p
w
A központi állító gomb (z) megnyomásával a védőpajzs gyermekéhez állítható.
Tartsa lenyomva a központi állító gombot (z) miközben a védőpajzsot a gyermekhez
igazítja.
A védőpajzs (p) oldalsó részei pontosan illeszkedjenek a karfa és az ülőrész közé
(d), a pajzs (p) ezekkel támaszkodik az ülésre.
A védőpajzsot (p) megfelelően be kell állítani, úgy, hogy a gyermek előtt legyen, de
anélkül hogy a gyermeket nyomná, szorítaná.
FIGYELEM! A védőpajzsot (p) a vázzal (w) együtt szabad csak használni, és
maximum 18 kg-ig!
64
Page 66

PŘIZPŮSOBENÍ VELIKOSTI TĚLA PRISPÔSOBENIE VEĽKOSTI TELA
Pro optimální přizpůsobení autosedačky CYBEX PALLAS M velikosti těla vašeho
dítěte je k dispozici vložka sedáku (i), která je již umístěná pod potahem sedáku
autosedačky.
• Tuto dodatečnou vložku sedáku (i) doporučujeme používat pro děti ve věku 9 až
24 měsíců.
• Od dvou let věku dítěte již není vložka sedáku (i) nadále nezbytná.
• Autosedačku lze poté jednoduše přizpůsobit velikosti těla vašeho dítěte pomocí
polohovací opěrky hlavy (e). Pro její nastavení zatáhněte směrem nahoru za
nastavovací páčku (h) a odjistěte tak opěrku hlavy (e).
• Nastavte ji tak, aby byl prostor mezi spodní hranou opěrky hlavy (e) a rameny
dítěte o šířce dvou prstů.
Upozornění! Pouze optimálně nastavená opěrka hlavy (e) může vašemu dítěti
zajistit maximální ochranu a pohodlí a zároveň zaručuje, že lze správně použít
diagonální pás (f). Výšku autosedačky CYBEX PALLAS M lze nastavit do 12 pozic.
Pre optimálne prispôsobenie autosedačky CYBEX PALLAS M veľkosti tela vášho
dieťaťa je k dispozícii vložka sedadla (i), ktorá je už umiestnená pod poťahom
sedáka autosedačky.
• Túto dodatočnú vložku sedadla (i) odporúčame používať pre deti vo veku 9 až 24
mesiacov.
• Od dvoch rokov veku dieťaťa už nie je vložka sedadla (i) naďalej nevyhnutná.
• Autosedačku možno potom jednoducho prispôsobiť veľkosti tela vášho dieťaťa
pomocou polohovacie opierky hlavy (e). Pre jej nastavenie zatiahnite smerom
nahor za nastavovaciu páčku (h) a odistite tak opierku hlavy (e).
• Nastavte ju tak, aby bol priestor medzi spodnou hranou opierky hlavy (e) a
ramenami dieťaťa o šírke dvoch prstov.
Upozornenie! Iba optimálne nastavená opierka hlavy (e) môže vášmu dieťaťu
zabezpečiť maximálnu ochranu a pohodlie a zároveň zaručuje, že možno správne
použiť diagonálny pás (f). Výšku autosedačky CYBEX PALLAS M možno nastaviť do
12 pozícií.
VYJMUTÍ DODATEČNÉ VLOŽKY SEDÁKU
1. Uvolněte přední patentky na potahu autosedačky od sedáku (d).
2. Vytáhněte potah z krycího vedení směrem nahoru a dopředu tak, aby bylo možné
vytáhnout vložku sedáku.
3. Vložka sedáku musí být vyjmuta podle věkového rozhraní, uvedeného výše.
4. Vraťte potah sedáku do původního stavu a opět jej zajistěte.
VYBRATIE DODATOČNÉ VLOŽKY SEDÁKU
1. Uvoľnite predné patentky na poťahu autosedačky od sedadla (d).
2. Vytiahnite poťah z krycieho vedenia smerom hore a dopredu tak, aby bolo možné
vytiahnuť vložku sedadla.
3. Vložka sedadla musí byť vybratá podľa vekového rozhrania, uvedeného vyššie.
4. Vráťte potah sedadla do pôvodného stavu a opäť ju zaistite.
NASTAVENÍ BEZPEČNOSTNÍHO PULTU - ECE SK. 1 (9-18 KG) NASTAVENIE BEZPEČNOSTNÉHO PULTU - ECE SK. 1 (9-18 KG)
Stisknutím středového nastavovacího tlačítka (z), můžete přizpůsobit bezpečnostní
pult vašemu dítěti. Při nastavování bezpečnostního pultu podle vašeho dítěte držte
středové nastavovací tlačítko (z) stisknuté.
Boční křídla bezpečnostního pultu (p) přesně pasují mezi opěrky rukou a sedák (d) a
slouží jako podpěra bezpečnostního pultu (p) na autosedačce.
Bezpečnostní pult (p) nastavte tak, aby těsně přiléhal k vašemu dítěti, ale netlačil
příliš na jeho tělo.
VAROVÁNÍ! Bezpečnostní pult (p) lze používat pouze společně se základnou
(w), do max. 18 kg váhy dítěte!
Stlačením stredového nastavovacieho tlačidla (z), môžete prispôsobiť bezpečnostný
pult vášmu dieťaťu. Pri nastavovaní bezpečnostného pultu podľa vášho dieťaťa držte
stredové nastavovacie tlačidlo (z) stlačené.
Bočné krídla bezpečnostného pultu (p) presne pasujú medzi opierky rúk a sedák (d)
a slúži ako podpera bezpečnostného pultu (p) na autosedačke.
Bezpečnostný pult (p) nastavte tak, aby tesne priliehal k vášmu dieťaťu, ale netlačil
príliš na jeho telo.
VAROVANIE! Bezpečnostný pult (p) možno používať len spoločne so
základňou (w), do max. 18 kg váhy dieťaťa!
HU
CZSK
65
Page 67

ÜLŐ ÉS DÖNTÖTT POZÍCIÓ - ECE 1. KORCSOPORT (9-18 KG)
p
v
d
v
Nem szükséges a biztonsági öv kicsatolása ahhoz, hogy a CYBEX PALLAS M-et
döntött pozícióba állítsuk.
• Amikor a gyermek utazás közben elalszik, nyomja meg a gombot (v) az ülőrész
aljánál (d) és a CYBEX PALLAS M a gyermek súlyát kihasználva lejjebb csúszik.
w
FIGYELEM! Amíg az autó mozgásban van, a vezető nem állíthat a gyermekülés
pozícióján!
• Amikor a gyermeket már kivettük az ülésből, a gyermekülést fekvő pozícióból
függőleges pozícióba állíthatjuk úgy, hogy újra megnyomjuk az állító gombot (v) és
addig nyomjuk a ülőrészt (d) amíg ismét függőleges pozícióba kerül.
FIGYELEM! Minden esetben bizonyosodjon meg arról, hogy az állító gomb
(v) jól hallhatóan rögzül az ülő vagy fekvő pozícióban. A döntött pozíció csak
az 1. korcsoportban (9-18 kg) alkalmazható, a védőpajzzsal (p) és a vázzal (w)
együtt.
Fontos! Bizonyosodjon meg arról, hogy a derék öv (n) és az átlós öv (f) mindig
szorosra meg van húzva.
66
r
A DÖNTHETŐ FEJTÁMLA
A dönthető fejtámla segít megvédeni a gyermeket attól, hogy a feje veszélyesen
t
előrebillenjen alvás közben. Ütközés esetén a fejtámla követi a gyermek fejének
mozgását, megtartja azt, és elnyeli a gyermek fejének későbbi visszafele
csapódásának erejét.
Fontos! Figyeljen arra, hogy a gyermek feje folyamatosan érintkezzen a dönthető
fejtámlával (r), máskülönben a fejtámla nem tudja teljes mértékben betölteni az oldal
ütközés elleni védelmi funkcióját.
A fejtámla 3 különböző pozícióba dönthető. A kar mozgatása nélkül előre lehet
hajtani a második vagy a harmadik pozícióba, amíg a helyére kattan. Az eredeti
pozíció visszaállításához húzza meg a kart és húzza vissza a fejtámlát .
FIGYELEM! A záró szerkezetet (t) sosem szabad akadályoztatni semmilyen
tárggyal sem! Baleset esetén az állító mechanizmust óvatosan kell mozgatni ,
máskülönben a gyermek megsérülhet.
Page 68

POLOHA VSEDĚ A VLEŽE - ECE SK. 1 (9-18 KG) POLOHA V SEDE A POLEŽIAČKY - ECE SK. 1 (9-18 KG)
Pro uvedení autosedačky CYBEX PALLAS M do pozice vleže není potřeba
rozepnout bezpečnostní pás vozidla.
• Pokud vaše dítě během cesty usne, jednoduše stiskněte nastavovací tlačítko (v)
vespod sedáku (d) a autosedačka CYBEX PALLAS M se pomocí váhy vašeho
dítěte posune níže.
VAROVÁNÍ! Nastavování pozice vleže řidičem vozidla je za jízdy zakázáno! VAROVANIE! Nastavovanie pozície ľahu vodičom vozidla je za jazdy zakázané!
Pre uvedenie autosedačky CYBEX PALLAS M do pozície ľahu nie je potreba
rozopnúť bezpečnostný pás vozidla.
• Ak vaše dieťa počas cesty zaspí, jednoducho stlačte nastavovacie tlačidlo (v)
naspodu sedadla (d) a autosedačka CYBEX PALLAS M sa pomocou váhy vášho
dieťaťa posunie nižšie.
• Jakmile není dítě v autosedačce, lze autosedačku navrátit z pozice vleže do
vzpřímené pozice stisknutím nastavovacího tlačítka (v) a mírným zatlačení proti
sedáku (d) autosedačky.
VAROVÁNÍ! Vždy se ujistěte, že při uzamčení autosedačky v pozici vleže či
vsedě slyšitelně cvakne nastavovací tlačítko (v). Pozici vleže je možné použít
pouze ve skupině 1 (9-18 kg) v Pallas sestavě s bezpečnostním pultem (p) a
základnou (w).
Upozornění! Vždy se ujistěte, že jsou břišní (n) a diagonální (f) pás utaženy. Upozornenie! Vždy sa uistite, že sú brušny (n) a diagonálny (f) pás utiahnuté.
• Akonáhle nie je dieťa v autosedačke, možno autosedačku navrátiť z pozície ľahu
do vzpriamenej pozície stlačením nastavovacieho tlačidla (v) a miernym zatlačenie
proti sedáku (d) autosedačky.
VAROVANIE! Vždy sa uistite, že pri uzamknutí autosedačky v pozícii v ľahu
alebo v sede počuteľne cvakne nastavovacie tlačidlo (v). Pozíciu v ľahu je
možné použiť iba v skupine 1 (9-18 kg) v Pallas zostave s bezpečnostným
pultom (p) a základným rámom (w).
NAKLÁPĚCÍ OPĚRKA HLAVY NAKLÁPACIE OPIERKA HLAVY
Naklápěcí opěrka hlavy napomáhá zabraňovat nebezpečnému přepadávání hlavy
dítěte během spánku. V případě kolize následuje opěrka hlavy pohyb hlavy vašeho
dítěte, uzamkne se a absorbuje následný zpětný pohyb hlavy dítěte.
Upozornění! Ujistěte se, že je hlava vašeho dítěte vždy v kontaktu s naklápěcí
opěrkou hlavy (r), jelikož pouze v takovém případě může opěrka hlavy poskytnout
optimální ochranu při bočních nárazech.
Opěrku hlavy lze nastavit do tří pozic. Dopředu do druhé a třetí pozice lze opěrku
hlavy nastavit bez použití páčky. Pro navrácení opěrky hlavy do původní pozice je
potřeba použít páčku a zatlačit opěrku dozadu.
VAROVÁNÍ! Žádnými předměty nikdy neblokujte zamykací mechanismus (t).
V případě kolize se musí naklápěcí mechanismus hladce pohybovat, jinak se
může vaše dítě zranit.
Naklápacie opierka hlavy napomáha zabraňovať nebezpečnému prepadávanie hlavy
dieťaťa počas spánku. V prípade kolízie nasleduje opierka hlavy pohyb hlavy vášho
dieťaťa, uzamkne sa a absorbuje následný spätný pohyb hlavy dieťaťa.
Upozornenie! Uistite sa, že je hlava vášho dieťaťa vždy v kontakte s naklápacie
opierkou hlavy (r), pretože len v takom prípade môže opierka hlavy poskytnúť
optimálnu ochranu pri bočných nárazoch.
Opierku hlavy možno nastaviť do troch pozícií. Dopredu do druhej a tretej pozície
možno opierku hlavy nastaviť bez použitia páčky. Pre navrátenie opierky hlavy do
pôvodnej pozície je potreba použiť páčku a zatlačiť opierku dozadu.
VAROVANIE! Žiadnymi predmetmi nikdy neblokujte blokovací mechanizmus
(t). V prípade kolízie sa musí naklápací mechanizmus hladko pohybovať, inak
sa môže vaše dieťa zraniť!
HU
CZSK
67
Page 69

A VÉDŐPAJZS RÖGZÍTÉSE - ECE 1. KORCSOPORT (9-18 KG)
1. Csatlakoztassa a megfelelően beállított védőpajzsot (p). (Lásd „A VÉDŐPAJZS
x
p
l
m
n
CLICK!
f
x
f
n
n
e
p
BEÁLLÍTÁSA“ fejezet.)
2. Húzza ki a gépjármű 3 pontos biztonsági övét teljes hosszúságában. Fogja az
alsó övszárat (n) és csúsztassa be a kijelölt övvezetőn keresztül (x) a védőpajzsba
(p).
FIGYELEM! Az öv soha ne legyen megcsavarodva!
FIGYELEM! A hárompontos biztonsági övet csak az erre a célra szolgáló
övvezetőkbe szabad beilleszteni. Az övekre vonatkozó utasítások pontosan
leírásra kerültek ebben a kézikönyvben, ezenkívül az ülésen piros színnel is
jelölve vannak.
3. Helyezze az öv nyelvet (m) az öv csatba (l). Figyelje, hogy a jól hallható KLIKK-kel
záródjon.
4. Most fogja meg az övet átlós részét és húzza feszesre.
5. Vezesse az átlós övet (f) is párhuzamosan az alsó övszárral (n) ugyanabba az öv
vezetőbe (x).
6. Húzza szorosra az átlós övet (f) és bizonyosodjon meg, hogy az öv mindkét része
lefedi a biztonsági pajzs teljes szélességét (p) az övvezetőben (x).
7. Húzza jelenleg az átlós (f) állandó felfelé az öv bekötése (x) a Biztonsági párna (p)
úgy, hogy saját maga bilincsek. Tedd után a Átlós a fejtámla (ek) és válltámasz. Az
átlós must nem illeszthető be a szalag útmutató a csoport 2/3 a fejtámla.
68
x
f
v
d
q
q
w
ÁTALAKÍTÁS PALLAS M-RŐL SOLUTION M -RE (ECE 1. 9-18 KG
KORCSOPORTRÓL ECE 2/3. KORCSOPORTRA 15-36 KG)
1. Távolítsa el a védőpajzsot (p).
2. Nyomja meg a két kioldó gombot (q) az ülőrész (d) alulsó részén és ezzel
egyidejűleg húzza le a vázról mindaddig, amíg érzi az ellenállást.
3. Nyomja meg az állító gombot (v), és húzza le teljesen a gyermekülést a vázról (w).
Fontos! Az eltávolított alkatrészeket biztonságos helyen együtt tárolja.
FIGYELEM! Amikor az ülést újra összeszereli, végezze el ezeket a lépéseket
fordított sorrenben. Olvassa el a használati utasítást és győződjön meg arról,
hogy nincs hiányzó alkatrész.
Page 70

ZAJIŠTĚNÍ DÍTĚTE POMOCÍ BEZPEČNOSTNÍHO PULTU - ECE SK.
1 (9-18 KG)
1. Vložte předem nastavený bezpečnostní pult (p) (viz sekce „NASTAVENÍ
BEZPEČNOSTNÍHO PULTU“).
2. Co nejvíce vytáhněte 3-bodový bezpečnostní pás vozidla. Vezměte břišní pás (n)
a umístěte jej do určeného vedení (x) v bezpečnostním pultu (p).
VAROVÁNÍ! Nikdy pás nepřekrucujte! VAROVANIE! Nikdy pás neprekrúcajte!
VAROVÁNÍ! 3-bodový pás musí vést pouze skrze vedení, určené k tomuto
účelu. Vedení pásu jsou podrobně popsána v tomto návodu a také jsou
červeně označena na autosedačce.
3. Zasuňte jazyk pásu (m) do spony pásu (l). Pás se musí zajistit se slyšitelným
cvaknutím.
4. Zatažením za diagonální pás utáhněte břišní pás.
5. Nyní zasuňte diagonální pás (f) souběžně s břišním pásem (n) do vedení pásu (x).
6. Utáhněte diagonální pás (f) a ujistěte se, že obě části pásu kryjí celou šířku
bezpečnostního pultu (p) uvnitř vedení pásu (x).
7. Nyní vložte diagonální (F) pás do vedení pásu(x) na polštáři (p) tak, aby byl
těsně umístěn do úzké drážky. Poté věďte diagonální pás mezi ramenní opěrkou
a opěrkou hlavy (y). Diagonální pás nemusí být umístěn ve vedení pásu u opěrky
hlavy pro skupinu 2/3
PŘEMĚNA Z PALLAS NA SOLUTION M (ECE SKUPINA 1 NA ECE
SKUPINU 2/3)
1. Sundejte bezpečnostní pult (p).
2. Stiskněte dvě uvolňovací tlačítka (q) na spodní straně sedáku (d) a vytahujte jej
pryč ze zakládny, dokud neucítíte odpor.
3. Stiskněte nastavovací tlačítko (v) a zcela vytáhněte sedák pryč ze základny (w).
ZAISTENIE DIEŤAŤA POMOCOU BEZPEČNOSTNÉHO PULTU ECE SK. 1 (9-18 KG)
1. Vložte vopred nastavený bezpečnostný pult (p) (viď sekcia „NASTAVENIE
BEZPEČNOSTNÉHO PULTU“).
2. Čo najviac vytiahnite 3-bodový bezpečnostný pás vozidla. Vezmite brušný pás (n)
a umiestnite ho do určeného vedenia (x) v bezpečnostnom pulte (p).
VAROVANIE! 3-bodový pás musí viesť iba skrze vedenie, určené na tento
účel. Vedenie pásu sú podrobne uvedené v tomto návode a tiež sú červeno
označená na autosedačke.
3. Zasuňte jazyk pásu (m) do spony pásu (l). Pás sa musí zabezpečiť s počuteľným
cvaknutím.
4. Zatiahnutím za diagonálny pás utiahnite brušný pás.
5. Teraz zasuňte diagonálny pás (f) súbežne s brušným pásom (n) do vedenia pásu
(x).
6. Utiahnite diagonálny pás (f) a uistite sa, že obe časti pásu kryjú celú šírku
bezpečnostného pultu (p) vnútri vedenie pásu (x).
7. Teraz krmivá diagonálny pás (f) tesne cez vedenie pásu (x) bezpečnosti vankúš
(p), kým je upnutá do vodidla pásu. Potom dal diagonálny pás medzi opierkou
hlavy (e) a ramenné opierkou. Uhlopriečka nesmie byť vkladaný do vedenia pásu
pre skupinu 2/3 na opierky hlavy.
PREMENA Z PALLAS M NA SOLUTION M (ECE SKUPINA 1 NA ECE
SKUPINU 2/3)
1. Zložte bezpečnostný pult (p).
2. Stlačte dve uvoľňovacie tlačidlá (q) na spodnej strane sedáku (d) a vyťahujte ho
preč zo základne, kým nepocítite odpor.
3. Stlačte nastavovacie tlačidlo (v) a úplne vytiahnite sedák preč zo základne (w).
HU
CZSK
Upozornění! Sundané části uchovávejte pohromadě na zabezpečeném místě. Upozornenie! Odobraté časti uchovávajte pohromade na zabezpečenom mieste.
VAROVÁNÍ! Pro opětovnou montáž autosedačky postupujte přesně podle
návodu v opačném pořádí. Předem si podle návodu zkontrolujte, zda máte
všechny součásti.
VAROVANIE! Pre opätovnú montáž autosedačky postupujte presne podľa
návodu v opačnom poradí. Vopred si podľa návodu skontrolujte, či máte
všetky súčasti.
69
Page 71

RÖGZÍTÉS VÉDŐPAJZS NÉLKÜL – ECE GROUP 2/3. (15-36 KG)
1. Tegye gyermekét a biztonsági gyermekülésbe. Húzza ki a 3-pontos biztonsági
l
f
l
m
n
k
f
f
l
n
k
s
g
övet és csatolja be a gyermek mellett lévő csatba (l).
FIGYELEM! Az öv soha ne legyen megcsavarodva.
2. Helyezze az öv nyelvet (m) az öv csatba (l). Ha hallja a KLIKK-et, akkor ez
megfelelően rögzült.
3. Ezután az alsó övszárat (n) vezesse át az ülés alsó övvezetőin (k).
4. Most húzza meg erősen az átlós övet (f), hogy megfeszítse az alsó övszárat (n).
Minél szorosabb az öv, annál inkább véd a sérüléstől. Az övcsat felőli oldalon (l)
az átlós övet (f) és az alsó övszárat (n) együtt kell az alsó övvezetőbe (k) vezetni.
FIGYELEM! A jármű övcsatja (l) soha nem mehet keresztül a karfán. Ha az
öv túl hosszú, a biztonsági germekülés nem alkalmas ehhez a gépjárműhöz.
Kétség esetén forduljon a jármű gyártójához.
5. Az alsó övszárat (n)át kell vezetni az alulsó övvezetőn (k) az ülés mindkét oldalán
(d).
Fontos! Tanítsa meg gyermekét, hogy mindig gyeljen arra, hogy az öve mindig
feszes legyen és ha szükséges, arra is, hogy ő maga megfeszítse az övet.
FIGYELEM! Az alsó övszárnak (n) a lehető legalacsonyabban kell futnia
mindkét oldalon a gyermek csípőjénél, csak így tud optimális védelmet
biztosítani egy esetleges baleset esetén.
6. Most vezesse át az átlós övet (f) a fejtámla (e) nél lévő felső övvezetőn (g).
Bizonyosodjon meg arról, hogy az átlós öv (f) a vállrész külső pereme és és a
gyermek nyaka között fut. Ha szükséges, igazítsa az öv futását úgy, hogy a fejtámla
magasságát állítja. A fejtámla (e) magassága állítható az autóban.
70
e
f
Page 72

ZAJIŠTĚNÍ DÍTĚTE BEZ BEZPEČNOSTNÍHO PULTU - ECE SK. 2/3
(15-36 KG)
1. Posaďte dítě do autosedačky. Vytáhněte 3-bodový bezpečnostní pás, veďte jej
před vaším dítětem směrem ke sponě (l).
VAROVÁNÍ! Nikdy pás nepřekrucujte. VAROVANIE! Nikdy pás neprekrúcajte.
2. Zasuňte jazyk pásu (m) do pásové spony (l). Ten se musí zajistit se slyšitelným
cvaknutím.
3. Poté umístěte břišní pás (n) do spodních vedení pásu (k) dětské autosedačky.
4. Nyní zatáhněte za diagonální pás (f) a utáhněte tak pás břišní (n). Čím pevněji je
pás utažený, tím lepší poskytuje ochranu před zraněním. Na straně pásové spony
(l) musí být diagonální (f) i břišní pás (n) společně vloženy do spodního vedení
pásu (k).
VAROVÁNÍ! Pásová spona (l) nesmí nikdy křížit opěrku ruky. Pokud je pás
příliš dlouhý, není autosedačka vhodná pro použití na této pozici ve vozidle. V
případě pochybností, se prosíme poraďte s výrobcem vašeho vozidla.
5. Břišní pás (n) by měl být veden skrze spodní vedení pásu (k) na obou stranách
sedáku (d) autosedačky.
Upozornění! Již od začátku naučte vaše dítě, aby se samo ujistilo, že je pás
dostatečně utažený a v případě nutnosti jej utáhlo.
VAROVÁNÍ! Pro optimální účinek v případě nehody musí břišní pás (n) vést na
obou stranách co nejníže přes rozkrok dítěte.
ZAISTENIE DIEŤAŤA BEZ BEZPEČNOSTNÉHO PULTU - ECE SK.
2/3 (15-36 KG)
1. Posaďte dieťa do autosedačky. Vytiahnite 3-bodový bezpečnostný pás, veďte ho
pred vaším dieťaťom smerom k spone (l).
2. Zasuňte jazyk pásu (m) do pásovej spony (l). Ten sa musí sa zabezpečiť s
počuteľným cvaknutím.
3. Potom umiestnite brušný pás (n) do spodných vedenia pásu (k) autosedačky.
4. Teraz zatiahnite za diagonálny pás (f) a utiahnite tak pás brušný (n). Čím
pevnejšie je pás utiahnutý, tým lepšie poskytuje ochranu pred zranením. Na
strane pásové spony (l) musí byť diagonálny (f) aj brušny pás (n) spoločne
vložené do spodného vedenia pásu (k).
VAROVANIE! Pásová spona (l) nesmie nikdy krížiť opierku ruky. Ak je pás
príliš dlhý, nie je autosedačka vhodná pre použitie na tejto pozícii vo vozidle. V
prípade pochybností, sa prosíme poraďte s výrobcom vášho vozidla.
5. Brušný pás (n) by mal byť vedený skrz spodné vedenie pásu (k) na oboch
stranách sedáku (d) autosedačky.
Upozornenie! Už od začiatku naučte vaše dieťa, aby sa samo ubezpečilo, že je pás
dostatočne utiahnutý a v prípade nutnosti ho utiahlo.
VAROVANIE! Pre optimálny účinok v prípade nehody musí brušný pás (n)
viesť na oboch stranách čo najnižšie cez rozkrok dieťaťa.
HU
CZSK
6. Nyní protáhněte diagonální pás (f) skrze horní vedení pásu (g) v opěrka hlavy (e). 6. Teraz pretiahnite diagonálny pás (f) skrz horné vedenie pásu (g) v opierka hlavy
Ujistěte se, že diagonální pás (f) vede mezi ramenem a krkem vašeho dítěte. V
případě potřeby změňte pozici pásu nastavením výšky opěrky hlavy. Výšku opěrky
hlavy (e) lze nastavit i ve vozidle.
(e).
Uistite sa, že diagonálny pás (f) vedie medzi ramenom a krkom vášho dieťaťa. V
prípade potreby zmeňte pozíciu pásu nastavením výšky opierky hlavy. Výšku opierky
hlavy (e) možno nastaviť aj vo vozidle.
71
Page 73

MEGFELELŐEN RÖGZÍTETTE GYERMEKÉT?
f
n
k
Hogy gyermeke számára az optimális biztonságot garantálja, még az utazás
megkezdése előtt ellenőrizze, hogy...
• az alsó övszár (n) átfut-e az alulsó övvezetőkön (k), az ülőrész (d) mindkét oldalán.
• a csat felőli oldalon az átlós öv (f) szintén átfut-e az alulsó övvezetőkön (k).
• az átlós öv (f) átfut-e a vállvédő (e) övvezetőjén, pirossal jelölve.
• az átlós öv (f) ívesen fut-e lefelé.
• az egész öv megfelelően feszes-e, és nincs-e megtekeredve.
TISZTÍTÁS & KARBANTARTÁS
Ahhoz, hogy a legjobb védelmet garantálhassuk a gyermekülésnek, fontos, hogy
gyeljen az alábbiakra:
• A biztonsági gyermekülés minden fontos részét rendszeresen ellenőrizni kell. A
mechanikus részeknek hibátlanul működniük kell.
• Alapvető, hogy a gyermekülés ne szoruljon be nehéz tárgyak közé, mint pl. a kocsi
ajtaja, üléssín stb, mert ez komoly sérülést okozhat az ülésben.
• Ha bármilyen extrém hatás éri az ülést pl. baleset, az ülést meg kell vizsgáltatni a
gyártóval.
Fontos, hogy mindig eredeti CYBEX huzatot használjon, mivel a huzat is fontos
része a funkciónak. Tartalék huzatot a kereskedőjétől igényelhet.
72
Page 74

JE VAŠE DÍTĚ SPRÁVNĚ ZAJIŠTĚNO? JE VAŠE DIEŤA SPRÁVNE ZAISTENÉ?
Pro zajištění optimální ochrany vašeho dítěte se před jízdou ujistěte, že: Pre zaistenie optimálnej ochrany vášho dieťaťa sa pred jazdou uistite, že:
• břišní pás (n) je veden skrze spodní vedení pásu (k) na obou stranách sedáku (d)
autosedačky.
• diagonální pás (f) je na straně pásové spony také veden skrze spodní vedení pásu
(k) autosedačky.
• diagonální pás (f) vede skrze červeně označené vedení pásu (g) v opěrce ramen
(e).
• diagonální pás (f) je nakloněný směrem dolů.
• celý pás je pevně utažený k tělu dítěte a není překroucený.
• brušný pás (n) je vedený skrz spodné vedenie pásu (k) na oboch stranách sedáku
(d) autosedačky.
• diagonálny pás (f) je na strane pásovej spony tiež vedený skrz spodné vedenie
pásu (k) autosedačky.
• diagonálny pás (f) vedie skrz červeno označené vedenie pásu (g) v opierke ramien
(e).
• diagonálny pás (f) je naklonený smerom nadol.
• celý pás je pevne utiahnutý k telu dieťaťa a nie je prekrútený.
PÉČE & ÚDRŽBA STAROSTLIVOSŤ & ÚDRŽBA
Pro zajištění maximální ochrany, poskytované vaší autosedačkou, je důležité brát v
potaz následující:
• Všechny hlavní části dětské autosedačky by měly být pravidelně kontrolovány.
Mechanické části musí být bez vad.
• Je velice nezbytné ujistit se, že dětská autosedačka není zaseknutá mezi tvrdými
objekty, jako např. dveře vozidla nebo kolejnice sedadla, které ji mohou poškodit.
• Při vystavení velkému nárazu, tj. po nehodě, musí být autosedačka zkontrolována
jejím výrobcem.
Ujistěte se, že je používaný pouze originální CYBEX potah, jelikož potah je klíčovým
prvkem funkce autosedačky. Náhradní potahy lze zakoupit u specializovaného
prodejce.
Pre zaistenie maximálnej ochrany, poskytovanej vašej autosedačkou, je dôležité brať
do úvahy nasledovné:
• Všetky hlavné časti detskej autosedačky by mali byť pravidelne kontrolované.
Mechanické časti musia byť bez vád.
• Je veľmi dôležité uistiť sa, že detská autosedačka nie je zaseknutá medzi tvrdými
objektmi, ako napr. dvere vozidla alebo koľajnice sedadlá, ktoré ju môžu poškodiť.
• Při vystavení velkému nárazu, tj. po nehodě, musí být autosedačka zkontrolována
jejím výrobcem.
Uistite sa, že je používaný iba originálny CYBEX poťah, pretože poťah je kľúčovým
prvkom funkcie autosedačky. Náhradné poťahy možno zakúpiť u špecializovaného
predajca.
HU
CZSK
73
Page 75

e e
h
AZ ÜLÉLSHUZAT ELTÁVOLÍTÁSA
A gyermekülés huzata négy részből áll (fejtámlaszárny, fejtámla, vállrész huzata,
ülőrész huzat).Ezt kiegészíti a védőpajzs huzata.
Az a négy huzatrész a gyermekülés oldalánál csatlakozó csatornában vannak
rögzítve és több helyen patenttal rögzülnek (ld az ábrán).
Ha minden patentet kioldottunk, akkor a részek egyenként eltávolíthatóak.
Ha a huzatot vissza szeretnénk tenni, fordított sorrendben végezzük el a műveletet.
FIGYELEM! Az ülést tilos huzat nélkül használni.
A HUZAT ELTÁVOLÍTÁSA A FEJTÁMLASZÁRNYRÓL
A huzat nyitott részét húzza át az állítókaron úgy, hogy ne akadjon bele.
A HUZAT ELTÁVOLÍTÁSA A FEJTÁMLÁRÓL
Oldja ki a két patentet a vállrész hátsó oldalán mindkét oldalon. Húzza ki a huztatot a
csatlakozó csatornából.
74
A HUZAT ELTÁVOLÍTÁSA A VÁLLVÉDŐKRŐL
Húzza ki a huztatot a csatlakozó csatornából.
Page 76

SUNDÁNÍ POTAHU ODOBRATIE POŤAHU
Potah autosedačky se skládá ze čtyř částí (naklápěcí opěrka hlavy, opěrka hlavy,
ramenní část, sedák). Ty jsou doplněny potahem bezpečnostního pultu.
Čtyři části potahu jsou vloženy do krycích vedení potahu na okraji dětské
autosedačky a na několika místech jsou upevněny pomocí patentek (viz obrázek).
Jakmile jsou rozepnuté všechny patentky, lze jednotlivé části potahu vyjmout z
krycích vedení potahu.
Pro navrácení potahů zpět na sedačku, proveďte postup sundavání v obráceném
pořadí. Pre navrátenie poťahov späť na sedačku, vykonajte postup odnímanie v obrátenom
VAROVÁNÍ! Dětskou autosedačku nikdy nepoužívejte bez potahu.
Poťah autosedačky sa skladá zo štyroch častí (naklápacie opierka hlavy, opierka
hlavy, ramenná časť, sedadlo). Tie sú doplnené poťahom bezpečnostného pultu.
Štyri časti poťahu sú vložené do krycích vedenia poťahu na okraji detskej
autosedačky a na niekoľkých miestach sú upevnené pomocou patentiek (pozri
obrázok).
Akonáhle sú rozopnuté všetky patentky, možno jednotlivé časti poťahu vyňať z
krycích vedenia poťahu.
poradí.
VAROVANIE! Detskú autosedačku nikdy nepoužívajte bez poťahu.
SUNDÁNÍ POTAHU Z NAKLÁPĚCÍ OPĚRKY HLAVY ODOBRATIE POŤAHU Z NAKLÁPACIE OPIERKY HLAVY
Přetáhněte otvor potahu přes nastavovací páčku tak, aby se za ní při sundavání
nezachytil.
Pretiahnite otvor poťahu cez nastavovaciu páčku tak, aby sa za ňou pri odnímanie
nezachytil.
SUNDÁNÍ POTAHU Z OPĚRKY HLAVY ODOBRATIE POŤAHU Z OPIERKY HLAVY
Rozepněte dvě patentky umístěné na každé straně zadní části oblasti ramen.
Vytáhněte potah z krycího vedení potahu.
Rozopnite dve patentky umiestnené na každej strane zadnej časti oblasti ramien.
Vytiahnite poťah z krycieho vedenia poťahu.
SUNDÁNÍ POTAHU Z RAMENNÍ ČÁSTI ODOBRATIE POŤAHU Z RAMENNEJ ČASTI
Vytáhněte potah z krycího vedení potahu. Vytiahnite poťah z krycieho vedenia poťahu.
HU
CZSK
75
Page 77

VEGYE LE A HUZATOT AZ ÜLŐFELÜLETRŐL.
Oldja ki a négy patentet az ülés elején és hátulján. Most húzza le a huzatot a karfáról
és az ülőrészről.
A HUZAT ELTÁVOLÍTÁSA A VÉDŐPAJZSRÓL
Először nyissa ki a pajzson lévő patenteket. Körben vegye le a huzatot a pajzsról
és húzza a harmadik csatlakozási pont felé, ami a központi állító gombnál található,
majd húzza ki a huzatot az állító gomb pereme alól is.
TISZTÍTÁS
Fontos! A huzat max. 30°C fokon nom gépi mosással mosható. Ha magasabb
hőmérsékleten mossa, az anyag elvesztheti a színét. Kérjük, a huzatot külön mossa,
és soha ne szárítsa gépben! Soha ne szárítsa közvetlen napsütésben! Enyhén
mosószerrel benedvesített ruhával és langyos vízzel törölje át a műanyag részeket.
FIGYELEM! Soha ne használjon durva tisztítószert vagy fehérítőt!
76
Page 78

SUNDÁNÍ POTAHU ZE SEDÁKU ODOBRATIE POŤAHU ZO SEDÁKU
Rozepněte čtyři patentky na potahu sedáku na jeho přední a zadní straně. Nyní
potah přetáhněte přes opěrky rukou a podél povrchu sedáku.
Rozopnite štyri patentky na poťahu sedáku na jeho prednej a zadnej strane. Teraz
poťah pretiahnite cez opierky rúk a pozdĺž povrchu sedáku.
SUNDÁNÍ POTAHU Z BEZPEČNOSTNÍHO PULTU ODOBRATIE POŤAHU Z BEZPEČNOSTNÉHO PULTU
Nejdříve na potahu bezpečnostního pultu rozepněte dvě patentky. Poté potah
stáhněte kolem pultu směrem ke třetímu upevnění kolem středového nastavovacího
tlačítka a uvolněte potah pomocí gumového poutka nastavovacího tlačítka.
Najskôr na poťahu bezpečnostného pultu rozopnite dve patentky. Potom poťah
stiahnite okolo pultu smerom k tretiemu upevnenie okolo stredového nastavovacieho
tlačidla a uvoľnite poťah pomocou gumového pútka nastavovacieho tlačidla.
ČIŠTĚNÍ ČISTENIE
Upozornění! Potah lze prát pouze při 30°C na mírný prací program. Praní při teplotě
vyšší než 30°C může vést ke ztrátě barvy látky. Prosíme perte potah odděleně a
nesušte jej v sušičce! Nikdy potah nesušte na přímém slunečním světle! Plastové
části lze čistit pomocí teplé vody a mírného čistícího prostředku.
VAROVÁNÍ! Nikdy nepoužívejte silné čistící prostředky nebo bělidla! VAROVANIE! Nikdy nepoužívajte silné čistiace prostriedky alebo bielidlá!
Upozornenie! Poťah možno prať iba pri 30°C na mierny prací program. Pranie
pri teplote vyššej ako 30°C môže viesť k strate farby látky. Prosíme perte poťah
oddelene a nesušte ho v sušičke! Nikdy poťah nesušte na priamom slnečnom svetle!
Plastové časti možno čistiť pomocou teplej vody a mierneho čistiaceho prostriedku.
HU
CZSK
77
Page 79

MI A TEENDŐ BALESET UTÁN
FIGYELEM! Baleset esetén az ülésen szabad szemmel nem látható sérülések
is keletkezhetnek. Ezért ilyen esetben az ülést le kell cserélni. Kétség esetén
vegye fel a kapcsolatot a gyártóval vagy a forgalmazóval.
A TERMÉK ÉLETTARTAMA
A CYBEX PALLAS M úgy lett megtervezve, hogy az elvárt kb. 11 éves használati
időtartamnak megfelejen. Azonban, a járművekben a hőmérséklet meglehetősen
nagy ingadozása előre nem látható következményekkel járhat, ezért fontos, hogy
gyeljen az alábbiakra:
• Ha autója hosszabb ideig tűző napsütésnek van kitéve, a biztonsági gyermekülést
el kell távolítani az autóból, vagy le kell takarni egy világos ruhával.
• Rendszeresen ellenőrizze a gyermekülés műanyag és fém alkatrészeit,
azok színét, alakját. Ha bármiféle változást tapasztal, ne használja tovább a
gyermekülsét, illetve vegye fel a kapcsolatot a gyártóval, és vizsgáltassa meg,
cserélje ki, ha szükséges.
• A textil anyagon történt változás, kopás, fakulás teljesen természetes a járműben
való használat után, nem befolyásolja az ülés működését.
ÁRTALMATLANÍTÁS
A termék élettartamának lejártával a terméket megfelelően ártalmatlanítani kell.
Régiónként különböző lehet a hulladék kezelési szabályzat. A megfelelő eljárás
érdekében érdeklődjön a helyi hatóságoknál. Minden esetben tartsa be országa
hulladékkezelési szabályzatát.
78
Page 80

CO DĚLAT PO NEHODĚ ČO ROBIŤ PO NEHODE
VAROVÁNÍ! Při nehodě může autosedačka utrpět poškození, která nejsou
pouhým okem vidět. Po nehodě, prosíme, autosedačku vyměňte. Při
pochybnostech, se prosíme, poraďte s vaším prodejcem nebo výrobcem
produktu.
VAROVANIE! Pri nehode môže autosedačka utrpieť poškodenia, ktoré nie
sú voľným okom vidieť. Po nehode, prosíme, autosedačku vymeňte. Pri
pochybnostiach, sa prosíme, poraďte s vaším predajcom alebo výrobcom
produktu.
ŽIVOTNOST PRODUKTU
Autosedačka CYBEX PALLAS M je navržena tak, aby splňovala všechny svoje
funkce po celou dobu její životnosti, cca 11 let. Avšak kvůli velmi velkému kolísání
teplot a nepředvídatelnému přetížení ve vozidlech, musí být dodrženo následující:
• Pokud je vozidlo vystaveno přímému slunečnímu světlu po delší dobu, musí být
autosedačka vyjmuta z vozidla nebo přikryta světlou látkou.
• Pravidelně kontrolujte všechny plastové a kovové části na přítomnost poškození,
deformace nebo změny barvy. Pokud zaznamenáte jakékoliv změny, musí být
autosedačka zlikvidována nebo zkontrolována a případně vyměněna výrobcem.
• Změny na látkách, především vyblednutí, jsou při používání ve vozidle naprosto
normální a neovlivňují funkčnost autosedačky.
ŽIVOTNOSŤ PRODUKTU
Autosedačka CYBEX PALLAS M je navrhnutá tak, aby spĺňala všetky svoje funkcie
po celú dobu jej životnosti, cca 11 rokov. Avšak kvôli veľmi veľkému kolísanie teplôt a
nepredvídateľnému preťaženie vo vozidlách, musí byť dodržané nasledujúce:
• Ak je vozidlo vystavené priamemu slnečnému svetlu po dlhšiu dobu, musí byť
autosedačka odstránená z vozidla alebo prikrytá svetlou látkou.
• Pravidelne kontrolujte všetky plastové a kovové časti na prítomnosť poškodenia,
deformácie alebo zmeny farby. Ak spozorujete akékoľvek zmeny, musí byť
autosedačka zlikvidovaná alebo skontrolovaná a prípadne vymenená výrobcom.
• Zmeny na látkach, predovšetkým vyblednutie, sú pri používaní vo vozidle úplne
normálne a neovplyvňujú funkčnosť autosedačky.
LIKVIDACE LIKVIDÀCIA
Na konci její životnosti musí být dětská autosedačka řádně zlikvidována. Dělení
odpadu se může lišit podle oblasti. Pro zajištění řádné likvidace dětské autosedačky
podle předpisů, prosíme, kontaktujte vaší místní správu odpadu nebo místní úřad.
Vždy dodržujte předpisy o likvidaci odpadu ve vaší zemi.
Na konci jej životnosti musí byť detská autosedačka náležite zlikvidovaná.
Delenie odpadu sa môže líšiť podľa oblasti. Pre zaistenie riadnej likvidácie detské
autosedačky podľa predpisov, prosíme, kontaktujte vašej miestnu správu odpadu
alebo miestny úrad. Vždy dodržiavajte predpisy o likvidácii odpadu vo vašej krajine.
HU
CZSK
79
Page 81

GARANCIÁLIS FELTÉTELEK
Az alábbiakban ismertetett jótállási feltételek kizárólag abban az országban
alkalmazhatók, ahol ezt a terméket a fogyasztó kiskereskedelmi forgalomban
először megvásárolta. A jótállás kiterjed minden gyártási és anyaghibára, amelyek
a vásárlás időpontjában már megvoltak vagy a fogyasztó első kiskereskedelmi
forgalomban történő vásárlását követő három (3) éven belül keletkeztek (gyártói
jótállás). Ha a termék gyártási vagy anyaghibára visszavezethető okból jótállási
időn belül meghibásodik, a gyártó – saját döntése alapján – a terméket ingyenesen
javítja vagy a terméket új termékre cseréli. A jótállási igény érvényesítéséhez
kérjük, hogy a terméket vigye vagy küldje vissza ahhoz a kereskedőhöz, ahol
a terméket vásárolta, mutassa be a vásárlást igazoló bizonylatot (blokk vagy
számla), mely tartalmazza a vásárlás időpontját, az értékesítő cég nevét és a
jelen termék típusmegnevezését. A jótállási igény kizárólag az eredeti értékesítés
helyén érvényesíthető, amennyiben oda a terméket a fogyasztó visszaviszi
vagy visszaküldi. A jótállási igény csak akkor érvényesíthető, ha már a vásárlás
időpontjában alaposan ellenőrizte a termék alkatrészeit és az esetleges gyártási
vagy anyaghibákat. Amennyiben a terméket házhozszállítással rendelte, kérjük, hogy
ezt az ellenőrzést a kézhezvételt követően végezze el. Amennyiben meghibásodást
észlel, ne használja tovább a terméket, hanem vigye vagy küldje vissza az első
értékesítés helyére. A jótállási igény érvényesítéséhez a terméket tiszta állapotban,
annak minden alkatrészével együtt kell visszajuttatni a kiskereskedőhöz. Mielőtt
a jótállási igény érvényesítését megkezdené, kérjük, alaposan olvassa át a jelen
tájékoztatót. A jótállás nem terjed ki a nem rendeltetésszerű használatból vagy
környezeti hatások miatt (víz, tűz, közlekedési baleset stb.) bekövetkező illetve a
rendes elhasználódás okán bekövetkező hibákra. A gyártói jótállás csak abban az
esetben érvényesíthető, amennyiben a terméket a teljes használat időtartamában a
használati útmutatónak megfelelően használták és a módosításokat vagy javításokat
a gyártó által jóváhagyott személy végezte, illetve amennyiben a terméket eredeti
alkatrészekkel és kiegészítőkkel használták. A jelen gyártói jótállás nem érinti a
fogyasztókat a jogszabályok alapján megillető jogokat, így különösen a szerződésen
kívül vagy szerződésszegéssel okozott kár okán a fogyasztót a gyártóval vagy a
kiskereskedővel szemben megillető jogokat.
80
CYBEX GmbH
Riedinger Str. 18, 95448 Bayreuth, Germany
Tel.: 0921 78 511-511, Fax.: 0921 78 511- 888
Page 82

ZÁRUČNÍ PODMÍNKY ZÁRUČNÉ PODMIENKY
Následující záruka platí pouze v zemi, kde byl tento výrobek původně prodán od
prodejce zákazníkovi. Záruka se vztahuje na všechny výrobní a materiálové vady,
které existují a které se objeví v den nákupu nebo se objevily v období tří (3) let
od data nákupu od prodejce, který původně prodal výrobek spotřebiteli (výrobní
záruka). V případě objevení se výrobní nebo materiálové chyby, výrobek - dle
vlastního uvážení - buď zdarma opravíme nebo jej nahradíme novým produktem.
Chcete-li získat takovou záruku, je nutné přinést nebo odeslat výrobek k prodejci,
který původně prodal tento produkt zákazníkovi a předložit originál dokladu o
nákupu (účtenka nebo faktura), který obsahuje datum nákupu, jméno prodejce a
typové označení tohoto produktu. Tato záruka neplatí v případě, že je tento výrobek
přivezen nebo odeslán výrobci nebo jiné osobě, než je prodejce, který původně
prodal tento výrobek spotřebiteli. Záruka platí pouze pokud byl výrobek ihned po
nákupu zkontrolován na případné materiálové vady, výrobní defekty a úplnost.
V případě nákupu na dálku, prosíme ihned po obdržení zkontrolujte, zda je daný
výrobek kompletní a zda na něm nejsou přítomné žádné výrobní nebo materiálové
vady. V případě poruchy přestaňte produkt používat a přineste nebo odešlete
jej ihned prodejci, který Vám výrobek původně prodal. V případě uplatňování
záruky musí být výrobek vrácen v čistém a kompletním stavu. Než se obrátíte
na prodejce, přečtěte si pozorně návod k použití. Tato záruka se nevztahuje na
škody způsobené nesprávným používáním, vlivem prostředí (voda, oheň, dopravní
nehody apod.) nebo běžným opotřebením. Záruka také platí jen v případě, že byl
výrobek používaný vždy v souladu s návodu na obsluhu, všechny úpravy a opravy
byly vykonávané oprávněnými osobami a byly používané originální komponenty
a příslušenství. Tato záruka nevylučuje, neomezuje ani jinak neovlivňuje zákonná
práva spotřebitelů, včetně nároků z porušení práva a nároků s ohledem na porušení
smlouvy, které kupující může mít vůči prodávajícímu nebo výrobci výrobku.
Nasledujúci záruka platí len v krajine, kde bol tento výrobok pôvodne predaný od
predajcu zákazníkovi. Záruka sa vzťahuje na všetky výrobné a materiálové chyby,
ktoré existujú a ktoré sa objaví v deň nákupu alebo sa objavili v období troch (3)
rokov od dátumu nákupu od predajca, ktorý pôvodne predal výrobok spotrebiteľovi
(výrobná záruka). V prípade objavenia sa výrobné alebo materiálne chyby, výrobok
- podľa vlastného uváženia - buď zadarmo opravíme alebo ho nahradíme novým
produktom. Ak chcete získať takúto záruku, je nutné priniesť alebo odoslať výrobok
k predajcovi, ktorý pôvodne predal tento produkt zákazníkovi a predložiť originál
dokladu o nákupe (účtenka alebo faktúra), ktorý obsahuje dátum nákupu, meno
predajca a typové označenie tohto produktu. Táto záruka neplatí v prípade, že je
tento výrobok privezený alebo odoslaný výrobcovi alebo inej osobe, než je predajca,
ktorý pôvodne predal tento výrobok spotrebiteľovi. Záruka platí iba pokiaľ bol výrobok
ihneď po nákupe skontrolovaný na prípadné materiálové chyby, výrobné defekty
a úplnosť. V prípade nákupu na diaľku, prosíme ihneď po obdržaní skontrolujte,
či je daný výrobok kompletný a ak nie sú na ňom prítomné žiadne výrobné alebo
materiálne vady. V prípade poruchy prestaňte produkt používať a prineste alebo
odošlite ho ihneď predajcovi, ktorý Vám výrobok pôvodne predal. V prípade
uplatňovania záruky musí byť výrobok vrátený v čistom a kompletnom stave. Než
sa obrátite na predajca, prečítajte si pozorne návod na použitie. Táto záruka sa
nevzťahuje na škody spôsobené nesprávnym používaním, vplyvom prostredia
(voda, oheň, dopravné nehody a pod.) alebo bežným opotrebovaním. Záruka tiež
platí len v prípade, že bol výrobok používaný vždy v súlade s návodom na obsluhu,
všetky úpravy a opravy boli vykonávané oprávnenými osobami a boli používané
originálne komponenty a príslušenstvo. Táto záruka nevylučuje, neobmedzuje
ani inak neovplyvňuje zákonné práva spotrebiteľov, vrátane nárokov z porušenia
práva a nárokov s ohľadom na porušenie zmluvy, ktoré kupujúci môže mať voči
predávajúcemu alebo výrobcovi výrobku.
HU
CZSK
CYBEX GmbH
Riedinger Str. 18, 95448 Bayreuth, Germany
Tel.: 0921 78 511-511, Fax.: 0921 78 511- 888
CYBEX GmbH
Riedinger Str. 18, 95448 Bayreuth, Germany
Tel.: 0921 78 511-511, Fax.: 0921 78 511- 888
81
Page 83

Page 84

Estimado cliente,
muchas gracias por comprar la CYBEX PALLAS M. Le aseguramos que en el desarrollo de la CYBEX PALLAS M se han
tenido en cuenta la seguridad, el confort y la practicidad. El producto se ha desarrollado bajo un estricto control de calidad y
teniendo en cuenta todos los estándares de seguridad.
Caro cliente,
agradeçemos-lhe a sua escolha em adquirir a cadeira auto CYBEX Pallas M. Segurança, conforto e facilidade de uso foram
os princípios fundamentais na criação e elaboração da CYBEX Pallas M. Este produto passou por inúmeros testes de
qualidade e segurança, oferecendo o máximo conforto, segurança e proveito.
Page 85

PALLAS M
ECE-R44-04
UNIVE RSAL
SEM I-UNIVE RSAL
04301315
Riedinger Str. 18, 95448 Bayreuth
SOLUTION M
ECE-R44-04
UNIVE RSAL
SEM I-UNIVE RSAL
15 – 36 kg
04301314
Riedinger Str. 18, 95448 Bayreuth
11/2014
84
9 – 18 kg
CYBEX GmbH
Germany
CYBEX GmbH
Germany
Homologación
CYBEX PALLAS M
Elevador de asiento con respaldo y reposacabezas
sobre una base ajustable con cojines de seguridad
regulables en altura..
Recomendado para:
Edad: De 9 meses a 4 años aproximadamente
Peso: De 9 a 18 kg
Indicado únicamente para vehículos con asientos
dotados de cinturones de seguridad automáticos de tres
puntos de anclaje, homologados de conformidad con
el reglamento ECE R16 u otra normativa similar.ECE
R-44/04,
CYBEX PALLAS M - Grupo 1, 9 -18 kg
CYBEX SOLUTION M - Grupo 2/3, 15 - 36 kg
Homologação
CYBEX PALLAS M
Cadeira auto com costas e encosto de cabeça, com
base de reclinação e almofada regulável.
Uso recomendado:
Idade: Dos 9 meses até aos 4 anos aproximadamente
Peso: 9-18 kg
Só é compatível com automóveis equipados com cintos
de segurança de três pontos homologados de acordo
com a norma ECE R16 ou equivalente.
ECE R-44/04,
CYBEX PALLAS M - Grupo 1, 9 -18 kg
CYBEX SOLUTION M - Grupo 2/3, 15 - 36 kg
ES
¡ATENCIÓN! To ensure optimum protection for your child, the CYBEX PALLAS
M must be used as described in these instructions.
Nota: Guarde siempre el manual de instrucciones a mano (p.ej. en el compartimento
designado detrás del respaldo)
Nota: De acuerdo con las especicaciones locales, las características del producto
pueden cambiar Esto sin embargo, no afectará al correcto funcionamiento del
procuto.
Instrucciones abreviadas Grupo 1 (9-18 kg) ................................................................ 2
Instrucciones abreviadas Grupo 2/3 (15-36 kg) ........................................................... 3
Homologación ..............................................................................................................84
Posición correcta de la silla en el vehículo ................................................................86
Activación del sistema L.S.P. ...................................................................................... 88
Colocación de la silla en el vehículo ..........................................................................88
Adaptación al tamaño del cuerpo .............................................................................. 90
Desmontaje del alzador...............................................................................................90
Ajuste del cojín de seguridad – ECE Grupo 1 (9-18 kg) ............................................90
Posición sentada y recostada – ECE Grupo 1 (9-18 kg) ...........................................92
Ajuste del reposacabezas ..........................................................................................92
Asegurar al niño con el cojín de seguridad – ECE grupo 1 (9-18 kg) ....................... 94
Cambio de PALLAS M a SOLUTION M (ECE grupo 1 a ECE grupo 2/3) ................94
Asegurar al niño sin el cojín de seguridad - ECE grupo 2/3 (15-36 kg) .................... 96
¿Está bien sujeto su hijo? ...........................................................................................98
Conservación y mantenimiento ..................................................................................98
Retirar la vestidura .....................................................................................................100
Extracción de la funda del protector de reposacabezas ..........................................100
Extracción de la funda del reposacabezas ............................................................... 100
Extracción de la funda del protector de hombros .....................................................100
Extraer la funda del asiento.......................................................................................102
Extracción de la funda del cojín de seguridad ..........................................................102
Limpieza .....................................................................................................................102
Comportamiento tras un accidente ...........................................................................104
Duración del producto ...............................................................................................104
Eliminación .................................................................................................................104
Garantia .....................................................................................................................106
Índice
Page 86

PT
ATENÇÃO! Para assegurar a máxima proteção, a CYBEX Pallas M deverá ser
usada de acordo com as instruções deste manual.
Aviso Tenha sempre o manual de instruções à mão (ex: no compartimento
devidamente designado nas costas da cadeira)
Aviso! Regulações especícas de cada país(ex. código de cores) poderão modicar
alguma funcionalidade e/ou aparência do produto. Isto, no entanto, não afecta o seu
correto funcionamento.
Instruções breves Gr. 1 (9-18 kg) .................................................................................2
Instruções breves Gr. 2/3 (15-36 kg) ............................................................................3
Homologação ..............................................................................................................84
Colocar corretamente a cadeira no automóvel ......................................................... 87
Activação do sistema l.S.P ..........................................................................................89
Instalação da cadeira ao automóvel .......................................................................... 89
Adaptar ao tamanho da criança ................................................................................. 91
Remover o reforço de altura .......................................................................................91
Regular almofada de segurança- ECE grupo 1 (9-18 kg) .........................................91
Posição sentada e reclinada – ECE group 1 (9-18 kg) ..............................................93
Encosto de cabeça reclinável ....................................................................................93
Instalação da almofada de segurança – ECE grupo 1 (9-18 kg) ..............................95
Mudança de grupo: PALLAS M a SOLUTION M (ECE grupo 1 para ECE grupo 2/3) .. 95
Instalação sem a almofada de segurança – ECE grupo 2/3 (15-36 kg) ...................97
Viaja a criança em segurança? ...................................................................................99
Cuidados & manutenção .............................................................................................99
Remover a forra .........................................................................................................101
Remover a forra das abas do encosto de cabeça ...................................................101
Remover a forra do suporte de cabeça ....................................................................101
Remover a forra da parte dos ombros ......................................................................101
Remover a forra do assento .....................................................................................103
Remover a forra da almofada de segurança ............................................................103
Limpeza .....................................................................................................................103
Como actuar após um acidente ................................................................................105
Vida útil do produto ....................................................................................................105
Eliminação .................................................................................................................105
Garantia .....................................................................................................................107
Conteúdo
85
Page 87

POSICIÓN CORRECTA DE LA SILLA EN EL VEHÍCULO
La CYBEX PALLAS M puede usarse sin los conectores ISOFIX en todos
los asientos del coche que tengan un cinturón de seguridad de 3 puntos,
siempre y cuando el asiento esté homologado para una persona adulta.
¡ATENCIÓN! No utilice la silla con un cinturón de seguridad con dos puntos de
anclaje o cinturón abdominal. Si se utilizara un cinturón de dos puntos para
sujetar la silla, el niño podría sufrir lesiones graves o incluso mortales en caso
de accidente.
• En vehículos con airbags, retrase el asiento del acompañante tanto como sea
posible, Pero teniendo en cuenta que el punto de anclaje superior del cinturón de
seguridad debe estar por detrás de la entrada del cinturón en la silla.
• Siga siempre las recomendaciones del fabricante del vehículo.
¡ATENCIÓN! El cinturón de seguridad (f) debe llegar en diagonal desde la parte
trasera y nunca debe sobrepasar el punto más alto del cinturón de seguridad
por la parte frontal. Si no pudiese realizar este ajuste, por ejemplo moviendo el
asiento hacia adelante o instalando la silla en otro asiento del vehículo, la silla
no es apta para este coche.
Mantenga bien sujeto el equipaje y otros objetos presentes en el vehículo que
puedan causar lesiones en caso de accidente. De lo contrario podrían salir
despedidos, con el consiguiente riesgo.
86
f
¡ATENCIÓN! Para aquellos vehículos en los que los asientos están situados
lateralmente, el uso de esta silla infantil no está permitido. Para asientos
que están situados en contra del sentido de la marcha, por ejemplo en un
monovolumen o minibus, el uso de la silla infantil está permitido siempre
que el asiento esté homologado para un adulto. Por favor, asegúrese de que
el reposacabezas está colocado cuando instale la silla infantil en un asiento
que esté situado en contra del sentido de la marcha! La silla infantil debe
asegurarse con el cinturón de seguridad, incluso cuando el niño no está en
ella. Esto se aplica incluso si el niño ha sido asegurado al vehículo con el
Sistema de conectores ISOFIX Esto es necesario para evitar que el conductor
o el copiloto puedan resultar heridos por una silla suelta en caso de tener que
frenar bruscamente o en caso de colisión.
Nota: Por favor nunca deje sin la vigilancia de un adulto a su hijo en el vehículo.
Page 88

COLOCAR CORRETAMENTE A CADEIRA NO AUTOMÓVEL
A CYBEX PALLAS M com os xadores ISOFIX guardados pode ser
utilizados em todos os veículos com cinto automático de três pontos
aprovado no transporte de adultos.
ATENÇÃO! Não se pode utilizar um cinto de dois pontos na instalação desta
cadeira. Ao instalar a cadeira com um cinto de dois pontos; na eventualidade
de um acidente a criança poderá sofrer ferimentos graves ou mesmo fatais.
• Em automóveis com airbags deverá colocar a cadeira o mais atrás possivel. Ao
fazê-lo, deverá vericar que o pino superior do cinto de segurança está por trás do
ponto de entrada do cinto da cadeira.
• Siga sempre as indicações e recomendações do fabricante.
ATENÇÃO! O cinto diagonal (f) deverá passar por trás e nunca pela frente até
ao ponto superior do cinto do seu veículo. Se não é possível regular a cadeira
desta maneira a cadeira não está apta para o veículo.
Bagagem e outros objectos soltos dentro do automóvel poderão ser a causa de
ferimentos na eventualidade de um acidente. Deverá prender ou guardar estes
objectos, caso contrário, poderão causar ferimentos graves ou mortais.
ATENÇÃO! A cadeira auto não pode ser usada em veículos onde o assento
está posicionado de lado. O uso da cadeira é permitido em bancos que estão
no sentido contrário à marcha, por exemplo, numa carrinha ou camioneta,
desde que o assento permita o transporte de um adulto. Por favor, tenha
em conta que o encosto de cabeça do assento do automóvel não deve ser
removido ao colocar uma cadeira no sentido contrário à marcha. Mesmo
quando não estiver em uso, deverá sempre colocar o cinto de segurança na
cadeira. Isto aplica-se independentemente de que a cadeira esteja instalada
com os fixadores ISOFIX. Uma cadeira auto não segura pode ferir o condutor
e os outros passageiros mesmo em caso de uma travagem brusca ou um
impacto menor.
ESPT
Aviso! Nunca deixe a criança sozinha no automóvel.
87
Page 89

L.S.P.
ACTIVACIÓN DEL SISTEMA L.S.P.
El sistema "Linear Side-Impact Protection" (L.S.P.) puede extenderse en dos
A
1
posiciones pulsando los botones contiguos. En total, con la primera, ofrece un total
de tres posiciones.
2
3
PRESS!
Nota: Active siempre el L.S.P. del lado de la silla que mira a la puerta del coche.
Para desactivar el sistema L.S.P., vuelva a presionar el botón L.S.P. y empuje el
L.S.P. hasta la posición inicial.
COLOCACIÓN DE LA SILLA EN EL VEHÍCULO
Sitúe la slla de auto en el asiento del coche apropiado.
• Asegúrese siempre de que el respaldo de la silla (a) CYBEX PALLAS M está
completamente apoyado contra el respaldo del asiento del vehículo. La silla de
auto nunca debe quedar recostada.
• Si el reposacabezas del asiento entorpece, desplácelo, muévalo o retírelo
completamente (Para excepciones en ello, por favor, acuda a la sección
"POSICIÓN CORRECTA DE LA SILLA EN EL VEHÍCULO"). El respaldo (a) se
a
w
adaptará practicamente a cualquier ángulo de inclinación del asiento del vehículo.
¡ATENCIÓN! La superficie del respaldo de la silla CYBEX debe contactar
completamente con el respaldo del asiento del vehículo. La silla tiene que
estar en una posición vertical normal para garantizar un nivel óptimo de
seguridad.
Nota: En algunos coches cuya tapicería sea de un material sensible (p.ej. ante,
cuero, etc...) el uso de la silla de auto puede dejar marcas y/o causar decoloración.
Para evitar esto, puede poner una manta o toalla debajo de ella, por ejemplo. Por
favor, en esta situación, acuda también a nuestras instrucciones de limpieza en este
manual; estas instrucciones de limpieza deben conocerse antes de utilizar la silla.
88
Page 90

ACTIVAÇÃO DO SISTEMA L.S.P
O sistema linear em impactos laterais (L.S.P.) pode ser estendido em duas etapas,
pressionando o L.S.P. (s) .Contanto com a posição inicial, o L.S.P. tem um total de
três congurações.
Aviso! Active sempre o L.S.P que se situa do lado da porta.
Para voltar a colocar o L.S.P na posição inicial, pressione o botão e empurre o L.S.P
para trás.
INSTALAÇÃO DA CADEIRA AO AUTOMÓVEL
Coloque a cadeira no assento apropriado para a correta instalação.
• Assegure-se sempre que toda a superfície do encosto (a) da CYBEX PALLAS
M está totalmente encostada ao banco do veículo. A cadeira nunca deverá estar
tombada ou horizontal.
• Se o encosto de cabeça do automóvel atrapalha na instalação, vire-o ao contrário
ou remova-lo completamente (para excepções consulte a seção “Instalação
da cadeira ao automóvel”) O encosto da cadeira (a) adapta-se perfeitamente a
qualquer inclinação do assento do veículo.
ATENÇÃO! A superfície total do encosto da cadeira CYBEX deverá estar em
contacto com o assento do automóvel. De maneira a assegurar a máxima
segurança à criança, a cadeira deverá estar num posição recta!
Aviso! Em alguns assentos de automóveis de materiais sensíveis (como por
exemplo, camurça, couro, etc), o uso de cadeiras de segurança poderá deixar
marcas e / ou causar descoloração nos tecidos. De maneira a prevenir que isto
aconteça poderá colocar uma toalha ou um lençol em baixo. Consulte também as
nossas instruções de limpeza expressas neste manual; estas instruções de limpeza
devem ser tidas em conta antes da primeira utilização.
ESPT
89
Page 91

e
h
Con el n de adaptar óptimamente la CYBEX PALLAS M al tamaño del cuerpo de su
hijo, se ha insertado en la silla un elevador (i) como estandard y viene ya instalado
debajo de la vestidura de la silla.
• Se recomienda usar este elevador adicional (i) en niños de 9 a 24 meses.
• A partir de los 25 meses, el elevador (i) no será necesario.
• Entonces la silla se puede ajustar al cuerpo de su hijo simplemente usando el
reposacabezas ajustable (e) Para ello, tire de la palanca (h) hacia arriba para
desbloquear el reposacabezas (e).
• Ajústelo de manera que quede un espacio de dos dedos entre la parte baja del
reposacabezas (e) y el hombro del niño.
Nota: Solo el óptimo ajuste del respaldo (e) asegurará una protección máxima y una
correcta colocación del cinturón sobre el cuerpo del niño. La altura de la CYBEX
SOLUTION M-FIX puede ajustarse en 12 posiciones.
DESMONTAJE DEL ALZADOR
1. Abra los broches delanteros de la funda en el cojín del asiento (d).
2. Levante la funda de tela desde las guías y tire de ella hacia delante hasta que
ADAPTACIÓN AL TAMAÑO DEL CUERPO
d
i
pueda retirar el alzador.
3. El alzador se debe retirar cuando se cumplan las especificaciones de edad
mencionadas anteriormente.
4. Reestablezca el elevador a su estado original y fíjelo en su sitio de nuevo.
90
z
d
p
w
AJUSTE DEL COJÍN DE SEGURIDAD – ECE GRUPO 1 (9-18 KG)
Presione el botón de ajuste central (z) para adaptar el cojín de seguridad a su hijo.
Mantenga presionado el botón de ajuste central (z) mientras adapta el cojín de
seguridad.
Las aletas laterales del cojín de seguridad (p) encajan exactamente entre los
reposabrazos y el asiento (d) y sirven para apoyar el cojín (p) en el asiento.
Ajuste el cojín de seguridad (p) de manera que repose contra el niño sin que haga
presión contra él.
¡ATENCIÓN! El cojín de seguridad (p) sólo se debe usar en combinación con el
bastidor (w) hasta un peso máximo de 18 kg.
Page 92

ADAPTAR AO TAMANHO DA CRIANÇA
Ao adquirir a cadeira poderá encontrar um reforço de altura removível (i), que à
medida que a criança cresce poderá retirar.
• Recomendamos o uso deste reforço de altura (i) em crianças com as idades
compreendidas entre os 9 e os 24 meses.
• A partir dos 25 meses não deverá ser necessário o uso do reforço de altura (i).
• A cadeira poderá ser ajustada ao tamanho da criança usando simplesmente
o encosto de cabeça regulável (e). Para tal, puxe a patilha (h) para cima para
desbloquear o encosto de cabeça (e).
• Ajuste o encosto de cabeça (e) de tal maneira que haja um espaço de dois dedos
entre ele e os ombros da criança.
Aviso! Apenas um encosto de cabeça perfeitamente ajustado (e) poderá oferecer
a máxima proteção e conforto à criança, garantindo ao mesmo tempo que o cinto
diagonal pode ser instalado sem problemas (f). Possui 12 posições de altura.
REMOVER O REFORÇO DE ALTURA
1. Solte os botões da frente da forra da cadeira do assento (d).
2. Puxe a forra da cadeira para cima e para frente até que consiga retirar o reforço
de altura.
3. O reforço de altura deverá ser removido de acordo com as especificações
indicadas.
4. Caso o deseje volte a colocar o reforço de altura no seu lugar original
assegurando-se que está fixo.
REGULAR ALMOFADA DE SEGURANÇA- ECE GRUPO 1 (9-18 KG)
Ao apertar o botão de ajuste central (z), poderá adaptar a almofada de segurança
para o seu lho. Aperte o botão central de ajuste (z) enquanto regula a almofada
para o tamanho desejado.
As partes laterais da almofada (p) encaixam-se entre o apoio de braços e o assento
(d) e são utilizados para aguentar a almofada de segurança (p) na cadeira.
Regule a almofada de segurança (p) de maneira que segure a criança sem apertá-
la.
ATENÇÃO! A almofada de segurança (p) só pode ser usado em conjunto com
a estrutura (w) até um máximo de 18 kg!
ESPT
91
Page 93

POSICIÓN SENTADA Y RECOSTADA – ECE GRUPO 1 (9-18 KG)
p
v
d
v
w
Para reclinar la CYBEX PALLAS M, no hace falta que se retire el cinturón de
seguridad del coche.
• Si su niño se queda dormido durante el viaje, simplemente pulse el botón de ajuste
(v) debajo del asiento (d), y la CYBEX PALLAS M reclinará usando el peso de su
niño.
¡ATENCIÓN! El conductor no debe ajustar la posición del asiento mientras el
vehículo esté en movimiento.
• Para volver a ajustar la silla a la posición más elevada, pulse el botón de ajuste (v)
una vez el niño esté fuera de la silla y aplique una ligera presión contra el asiento
(d) para guiar la silla de nuevo hacia arriba.
¡ATENCIÓN! Compruebe que el botón de ajuste (v) emite un clic cuando la
silla se coloca en posición recostada o sentada. La posición recostada sólo
se ofrece para el Grupo 1 (9-18 kg) en la configuración Pallas con cojín de
seguridad (p) y base (w).
Nota: Compruebe que las correas abdominal (n) y diagonal (f) del cinturón de
seguridad están siempre tensas.
92
r
t
AJUSTE DEL REPOSACABEZAS
El reposacabezas reclinable evita que la cabeza del niño caiga hacia deltante
cuando se queda dormido. En caso de impacto, el reposacabezas avanza con
la incercia del choque y se mantiene en la posición más recta, haciendo que el
retroceso del cuello del niño hacia atrás no sea tan duro.
Nota: Asegúrese de que la cabeza del niño está siempre en contacto con el
reposacabezas reclinable (r), ya que esta es la única forma de que el reposacabezas
ofrezca la máxima protección en caso de impacto lateral.
El ángulo de reclinado del reposacabezas se puede ajustar en tres posiciones Es
posible moverlo hacia delante sin desplazar la palanca a la posición segunda o
tercera hasta que el reposacabezas quede en posición. Para devolverlo a la posición
original, debe activar la palanca y tirar del reposacabezas hacia atrás.
¡ATENCIÓN! ¡Nunca bloquee el mecanismo de reclinado (t)! En caso de
accidente, el ajuste de reclinado debe moverse libremente, ¡en caso contrario
su hijo puede recibir daños!
Page 94

POSIÇÃO SENTADA E RECLINADA – ECE GROUP 1 (9-18 KG)
Para reclinar a CYBEX Pallas M-x não é necessário desapertar o cinto de
segurança.
• Se a criança adormecer durante a viagem, pressione o botão de ajuste (v) na parte
inferior do assento (d), para que a CYBEX PALLAS M deslize para baixo usando o
peso da própria criança.
ATENÇÃO! Este ajuste não poderá ser realizada pelo condutor enquanto
conduz.
• Para voltar à posição vertical e quando a criança esteja fora da cadeira, pressione
o botão de ajuste (v) novamente e aplique uma leve pressão contra o assento (d)
para guiar a cadeira de volta ao sítio.
ATENÇÃO! Assegure-se sempre que o botão de ajuste (v) produz um “click”
ao bloquear na posição reclinada ou sentada. A posição reclinada só está
disponível para o grupo 1 (9-18 kg) com a configuração com almofada de
segurança (p) e a base de reclinação (w).
Aviso! Assegure-se de que o cinto abdominal (n) e diagonal (f) estão devidamente
tensos.
ENCOSTO DE CABEÇA RECLINÁVEL
O encosto de cabeça reclinável ajuda a evitar que a cabeça da criança caia para a
frente ao adormecer. Em caso de impacto, o encosto de cabeça segue o movimento
da cabeça do seu lho, mantendo-a sempre a uma zona de segurança anulando o
movimento para trás posterior da cabeça da criança.
Aviso! Certique-se de que a cabeça da criança está sempre em contacto com o
encosto de cabeça reclinável (r), pois só assim poderá fornecer a máxima proteção
em impactos laterais.
O ângulo de inclinação do encosto de cabeça pode ser ajustado em três posições.
O encosto de cabeça pode mover-se para a frente, sem necessidade de mover
a patilha, para a segunda ou terceira posição até bloquear Para voltar à posição
original, puxe a patilha e o encosto de cabeça para trás.
ATENÇÃO! Não coloque nenhum objecto que possa obstruir o mecanismo de
bloqueio (t)! Em caso de acidente, o mecanismo de regulação deverá moverse
suavemente, caso contrário a criança poderá magoar-se!
ESPT
93
Page 95

ASEGURAR AL NIÑO CON EL COJÍN DE SEGURIDAD – ECE
GRUPO 1 (9-18 KG)
x
p
l
m
n
CLICK!
f
1. Coloque el cojín de seguridad (p) previamente ajustado (consulte la sección
“AJUSTE DEL COJÍN DE SEGURIDAD”).
2. Extienda al completo el cinturón de tres puntos de anclaje del vehículo. Introduzca
la correa abdominal (n) en la guía (x) indicada en el cojín de seguridad (p).
¡ATENCIÓN! No retuerza el cinturón.
¡ATENCIÓN! El cinturón de seguridad de tres puntos sólo se puede introducir
en las guías designadas a tal efecto. Las guías para el cinturón están descritas
con precisión en este manual y también marcadas en rojo
94
x
n
n
e
p
x
f
f
3. Introduzca el extremo metálico (m) del cinturón en la hebilla (l) hasta que se
escuche un clic.
4. Ahora tense el cinturón horizontal (n) tirando del diagonal (f)
5. Vuelva a introducir la correa diagonal (f), en paralelo con la abdominal (n), en la
guía del cinturón (x).
6. Tense la correa diagonal (f) y asegúrese de que ambas partes del cinturón cubren
toda la anchura del cojín de seguridad (p) en la guía del cinturón (x).
7. Sacar el cinturón diagonal (f) bien a través de la guía de la correa (x) del cojín de
seguridad (p) hasta que se sujete dentro de la guía de la correa. A continuación,
poner el cinturón diagonal entre reposacabezas (e) y el resto del hombro. El
cinturón diagonal no necesita ser guiado a través de la guía del cinturón de apoyo
para la cabeza para el grupo 2/3.
CAMBIO DE PALLAS M A SOLUTION M (ECE GRUPO 1 A ECE
GRUPO 2/3)
1. Extraiga el cojín de seguridad (p).
2. Presione los dos botones de apertura (q) en la parte inferior del cojín de seguridad
v
d
q
q
w
(d) y extráigalo del bastidor hasta que encuentre resistencia.
3. Presione el botón de ajuste (v) y tire del asiento para extraerlo por completo del
bastidor (w).
Nota: Guarde juntas y en un lugar seguro todas las piezas desmontadas.
¡ATENCIÓN! Proceda en orden inverso cuando vuelva a montar la silla. Antes
de empezar, consulte las instrucciones para comprobar que no falta ninguna
pieza.
Page 96

INSTALAÇÃO DA ALMOFADA DE SEGURANÇA – ECE GRUPO 1
(9-18 KG)
1. Coloque a almofada de segurança previamente ajustada (p) (consulte a secção
“Instalação da almofada de segurança”).
2. Puxe todo o comprimento do cinto de segurança de três pontos para fora.
Coloque o cinto de segurança (n) pela correta guia do cinto (x) na almofada de
segurança (p).
ATENÇÃO! Nunca use o cinto de segurança torcido!
ATENÇÃO! O cinto de segurança de três pontos apenas poderá ser colocado
através das guias designadas para esse efeito. As guias dos cintos estão
descritas neste manual e marcadas a vermelho na própria cadeira.
3. Insira a lingueta (m) na fivela do cinto (l). Deverá ouvir-se um “click” ao bloquear.
4. Aperte mais o cinto abdominal (n) puxando pelo cinto diagonal (f).
5. Insira novamente o cinto diagonal (f), em paralelo com o cinto de segurança (n)
na guia de cinto (x).
6. Puxe o cinto diagonal (f), aperte e assegure-se que as duas partes do cinto
cobrem toda a largura da almofada de segurança (p) na guia do cinto (x).
7. Insira agora o cinto diagonal (f) firmemente através da guia de cinto (x) da
almofada de segurança (p) até que esta fique presa no interior da guia. Coloque
o cinto diagonal entre o encosto de cabeça (e) e os ombros. O cinto diagonal não
necessita ser guiado através através dos guias do encosto de cabeça no Grupo
2/3.
MUDANÇA DE GRUPO: PALLAS M A SOLUTION M (ECE GRUPO 1
PARA ECE GRUPO 2/3)
1. Retira a almofada de segurança (p).
2. Pressione os dois botões (q) situados na parte inferior do assento (d) e puxe-os
para fora da armação até que sinta alguma resistência.
3. Pressione os botões (v) e puxe a cadeira para fora da base de reclinação (w).
ESPT
Aviso! Guarde todas as peças removidas com cuidado e no mesmo sítio.
ATENÇÃO! Ao voltar a montar a cadeira, proceda exatamente da mesma
maneira em ordem inversa. Use as instruções e verifique de antemão se estão
todas as peças.
95
Page 97

ASEGURAR AL NIÑO SIN EL COJÍN DE SEGURIDAD - ECE GRUPO
2/3 (15-36 KG)
l
f
l
m
n
k
f
f
l
n
k
s
g
e
1. Coloque al niño en la silla de seguridad. Tire del cinturón de seguridad por delante
del niño y abróchelo en la hebilla (l).
¡ATENCIÓN! Nunca retuerza el cinturón
2. Introduzca el extremo metálico (m) del cinturón en la hebilla (l) hasta que se
escuche un clic.
3. Ponga el cinturón ventral (n) en las guías inferiores del cinturón (k) de la silla de
seguridad.
4. Tire con fuerza de la correa diagonal (f) para apretar la correa abdominal (n).
Cuanto más tenso esté el cinturón, mayor será su eficacia para prevenir lesiones.
En el lado de la hebilla del cinturón (l), la correa diagonal (f) y la correa abdominal
(n) se deben pasar juntas por la guía inferior (k).
¡ATENCIÓN! La hebilla del cinturón del vehículo (l) nunca debe cruzar el
reposabrazos. Si el cinturón es demasiado largo, entonces la silla no es
apropiada para usar en esta posición del vehículo. En caso de duda, por favor
consulte al fabricante de su vehículo.
5. La correa abdominal (n) tiene que pasar por las guías inferiores (k) en ambos
lados del cojín del asiento (d).
Nota: Enseñe al niño desde el principio que el cinturón tiene que estar tenso y, si es
necesario, explíquele como apretarlo por sí mismo.
¡ATENCIÓN! La correa abdominal (n) debe estar lo más baja posible en ambos
lados a lo largo de la ingle del niño para que sea más eficaz en caso de
accidente.
6. Ahora pase el cinturón de seguridad diagonal (f) por la ranura del hombro (g)
situada en el reposacabezas (e) hasta que quede dentro de la guía.
96
f
La correa diagonal (f) debe pasar entre la parte externa del hombro y el cuello del
niño. Si es necesariom ajuste la altura del reposacabezas para cambiar la posición
del cinturón. La altura del reposacabezas (e) se puede ajustar mientras está en el
coche.
Page 98

INSTALAÇÃO SEM A ALMOFADA DE SEGURANÇA – ECE GRUPO
2/3 (15-36 KG)
1. Coloque a criança na cadeira. Puxe o cinto de três pontos e passe-o pela fivela (l)
que se encontra à frente da criança.
ATENÇÃO! Não torça ou dê voltas ao cinto.
2. Inserte o cinto (m) na fivela (l). Ao apertar o cinto dever-se-à ouvir um “CLICK”.
3. De seguida, coloque o cinto ventral (n) nas guias de cinto inferiores (k) da cadeira.
4. Agora puxe o cinto diagonal (f) firmemente de maneira a que tense o cinto ventral
(n). Quanto mais justo estiver o cinto mais proteção proporcionará. Do lado da
fivela (l), o cinto diagonal (f) e o ventral (n) deverão ser colocados juntos na guia
inferior do cinto (k).
ATENÇÃO! A fivela do veículo (l) nunca deve de cruzar com o apoio de braços.
Se o sistema de cinto é demasiado longo, a cadeira não é compatível nesta
posição dentro do automóvel. Em caso dúvida, contacte com o fabricante do
automóvel.
5. O cinto ventral (n) deverá ser colocado na guia inferior do cinto (k) em ambos os
lados (d).
Aviso! Ensine aos seus lhos, desde a primeira vez, a vericarem se o cinto está
bem apertado ou mesmo, em caso veja necessário, ensine-os como apertá-lo.
ATENÇÃO! O cinto ventral (n) deverá ser colocado o mais abaixo possível em
ambos os lados de maneira em que em caso de aciente este proporcione a
máxima proteção.
6. De seguida, coloque o cinto diagonal (f) através dos guias (g) situados no encosto
de cabeça (e) até que esteja dentro da guia.
Assegure-se de que o cinto diagonal (f) está colocado pela parte exterior do ombro
e o pescoço da criança. Caso seja necessário, ajuste a altura do encosto de cabeça
de maneira a mudar a posição do cinto. A altura do encosto de cabeça (e) pode ser
regulada dentro do automóvel.
ESPT
97
Page 99

¿ESTÁ BIEN SUJETO SU HIJO?
f
n
k
Con el n de garantizar la máxima seguridad para su hijo, antes de iniciar un viaje
compruebe que:
• La correa abdominal (n) pasa por las guías inferiores (k) en ambos lados del cojín
del asiento (d).
• La correa diagonal (f) en el lado de la hebilla del cinturón también pasa por la guía
inferior (k) del asiento.
• La correa diagonal (f) pasa por la guía (g) marcada en rojo en el protector de
hombros (e).
• El cinturón diagonal (f) llega en diagonal desde detrás.
• Todo el cinturón se ajusta al cuerpo del niño y no está retorcido.
CONSERVACIÓN Y MANTENIMIENTO
Para garantizar que su silla de seguridad proporciona la maxima protección, es
necesario que tome nota de lo siguiente:
• Todas las partes importantes de la silla deben ser revisadas regularmente en
busca de daños. Los componentes mecánicos deben estar en perfecto estado.
• Es absolutamente necesario asegurarse de que la silla de seguridad no ha sido
presionada con elementos rígidos como la puerta del coche o el asiento. Lo que
podría dañarla potencialmente.
• La silla de seguridad debe ser revisada por el fabricante cuando se vea expuesta a
un golpe, p.ej. después de un accidente
98
Utilice exclusivamente fundas originales CYBEX, ya que la funda es un
elemento básico para la función de la silla. Puede adquirir fundas de repuesto en
establecimientos especializados.
Page 100

VIAJA A CRIANÇA EM SEGURANÇA?
De maneira a assegurar a máxima segurança à criança, assegure-se sempre de
que:
• O cinto ventral (n) foi colocado nas guias inferiores (k) em ambos od lados do
assento (d).
• O cinto diagonal (f) do lado da vela tembém foi colocado nas guias inferiores (k).
• O cinto diagonal (f) foi inserido na guia (g) marcada a vermelho na zona do ombro
(e).
• O cinto diagonal (f) está inclinado para baixo.
• O cinto está tenso e apertado ao alrededor do corpo da criança e não está torcido.
CUIDADOS & MANUTENÇÃO
De maneira a assegurar que a cadeira oferece a máxima proteção é imperativo que
siga as seguintes notas:
• Todas as partes importantes da cadeira deverão ser revisadas com regularidade.
Os componentes mecânicos não deverão apresentar qualquer defeito.
• É absolutamente necessário comprovar que a cadeira de segurança não se
encontra pressionada entre objectos duros, tais como a porta do automóvel ou
outra parte do veículo que possa provocar-lhe danos.
• Em caso de que a cadeira seja exposta a um impacto, em caso de um acidente, a
cadeira infantil deverá ser revisada pelo fabricante.
ESPT
Assegure-se que apenas utiliza forras CYBEX originais, uma vez que estas são
essenciais e funcionais para a cadeira. Poder-se-ão obter forras extra nos pontos de
venda especializados.
99
 Loading...