

Page 1
PALLAS B - F IX
UN R44/0 4, Gr. 1-2-3 | 9 -36 kg
User guide
DEENITFRNLPLHUCZSKPT ES
Page 2

DE - WARNUNG! Ohne Genehmigung der Zulassungsstelle dürfen keine Veränderungen am Kindersitz
vorgenommen und keine Ergänzungen hinzugefügt werden. Reparaturen dürfen ausschließlich durch
Personen vorgenommen werden, die hierfür autorisiert sind. Dabei dürfen stets nur original Bau- und
Zubehörteile verwendet werden. Die Schutzfunktion des Kindersitzes ist sonst nicht mehr gewährleistet.
Warnung! Der Kindersitz bietet nur dann den bestmöglichen Schutz für ihr Kind, wenn Sie die
Gebrauchsanweisung genau befolgen.
EN - WARNING! Without the approval of the Type Approval Authority, the child seat may not be modied or
added to in any way. Repairs may only be performed by person authorised to this eect. Only original parts
and accessories may be used for repairs. Failure to comply with the above will result in the protective function
of the child seat no longer being guaranteed. Warning! The child seat only oers optimum protection for your
child if you follow the usage instructions precisely.
IT - ATTENZIONE! Senza l'approvazione dell'ucio di certicazione il seggiolino non può subire modiche o
aggiunte di alcun genere. Le riparazioni possono essere eseguite solo da persone autorizzate in tal senso.
Per le riparazioni possono essere usati solo ricambi e accessori originali. Il mancato rispetto di quanto sopra
avrà come conseguenza la terminazione della garanzia della funzione protettiva del seggiolino. Attenzione! Il
seggiolino ore la protezione ottimale per il bambino solo qualora vengano seguite precisamente le istruzioni
per l‘uso.
FR - ATTENTION! Le siège auto pour enfant ne saurait être modié ou complété sans l’autorisation préalable de
l’organisme de certication compétent. Seule une personne autorisée est habilitée à procéder à des réparations.
Seuls des pièces ou accessoires originaux peuvent être employés pour les réparations. Toute entorse aux règles
précitées compromettra la fonction de protection du siège auto pour enfant. Attention! Le siège auto pour enfant
n’ore une protection optimale que si vous suivez précisément les instructions d’utilisation.
NL - BELANGRIJK! Zonder de goedkeuring van het certiceringsinstelling mag het kinderzitje niet worden
aangepast en mag er niets aan worden toegevoegd. Reparaties mogen alleen worden uitgevoerd door
personen die daartoe bevoegd zijn. Er mogen uitsluitend originele onderdelen en accessoires worden gebruikt
voor reparaties. Niet-naleving van het bovenstaande resulteert erin dat de beschermende functie van het
kinderzitje niet langer gegarandeerd is. Belangrijk! Het kinderzitje biedt uw kind alleen optimale bescherming
als u de handleiding precies volgt.
PL - OSTRZEŻENIE! Bez zgody instytucji certykującej produkt, fotelik nie może być w żaden sposób
modykowany lub zmieniany. Naprawy może dokonywać tylko autoryzowany serwis. Tylko oryginalne
części i akceoria mogą być użyte do naprawy. Niezastosowanie się do powyższego może powodować
utratę funkcji ochronnych. UWAGA! Fotelik zapewni maksimum bezpieczeństwa tylko wtedy jeśli
przestrzegana będzie instrukcja obsługi.
2
Page 3

HU - FIGYELEM! A Típust Jóváhagyó Hatóság jóváhagyása nélkül a gyermekülést semmilyen módon
nem lehet módosítani vagy kiegészíteni. A javításokat csak az arra felhatalmazott személy végezheti. Csak
eredeti alkatrészek és kiegészítők használhatók. A fentiek gyelmenkívül hagyása esetén a gyermekülés
védőfunkciója hosszú távon nem garantálható. Figyelem! A gyermekülés csak akkor nyújt optimális védelmet,
ha pontosan követi a felhasználói utasításokat.
CZ - VAROVÁNÍ! Bez předchozího svolení schvalovacího orgánu je dětskou sedačku zakázané jakýmkoliv
způsobem upravovat nebo k ní přidávat součásti. Opravy může provádět pouze oprávněná osoba. K opravě
používejte výhradně originální součásti a příslušenství. Pokud nebudou výše uvedené body dodržené,
nemůžeme nadále zaručit bezpečnostní funkce dětské sedačky. Varování! Dětská sedačka poskytuje
optimální ochranu pro dítě pouze v případě, že dodržujete pokyny k použití.
SK - VAROVANIE! Bez predchádzajúceho súhlasu schvaľovacieho orgánu je zakázané detskú sedačku
akýmkoľvek spôsobom upravovať alebo k nej pridávať súčasti. Opravy môže vykonávať len oprávnená osoba.
Na opravu používajte výhradne originálne náhradné diely a príslušenstvo. Ak nebudú hore uvedené pokyny
dodržané, nemôžeme naďalej zaručiť bezpečnostné funkcie detskej sedačky. Varovanie! Detská sedačka
poskytuje optimálnu ochranu pre dieťa len v prípade, že boli dodržané pokyny na použitie.
ES - ¡ATENCIÓN! La silla de auto no puede ser modicada ni se le pueden añadir componentes sin la
aprobación de la ocina de certicación. Las reparaciones las realizará únicamente una persona autorizada
para ello. Sólo se utilizarán recambios y accesorios originales en las reparaciones. El incumplimiento de lo
expuesto anteriormente resultará en la pérdida de cobertura por garantía sobre la silla. ¡Atención! La silla de
coche solo ofrece una protección óptima para su hijo si sigue las instrucciones de uso de forma precisa.
PT - ATENÇÃO! Sem expressa autorização, a cadeira infantil não poderá ser modicada de nenhuma
maneira. As reparações só podem ser feitas por pessoas autorizadas para este efeito. Apenas partes e
acessórios originais devem ser utilizados nas reparações. Não ir de encontro ao descrito anteriormente irá
fazer com que a proteção da criança não possa ser assegurada. Atenção! A cadeira auto só oferece proteção
ótima para a criança quando segue todas as instruções corretamente.
10 | INHALT
11 | CONTENTS
11 | ARGOMENTI
56 | TABLE DES
MATIÈRES
57 | INHOUD
57 | SPIS TREŚCI
102 | TARTALOM
103 | OBSAH
103 | OBSAH
146 | CONTENIDO
147 | CONTEÚDO
DEENIT
FRNLPLHUCZSK
ESPT
3
Page 4

4
Page 5
2
31
DE: Kurzanleitung Gruppe 1 (9-18 kg)
EN: Brief instructions Group 1 (9-18 kg)
IT: Istruzioni brevi Gruppo 1 (9-18 kg)
FR: Instructions en bref Groupe 1 (9-18 kg)
NL: Korte handleiding Groep 1 (9-18 kg)
PL: Skrócona instrukcja Grupa 1 (9-18 kg)
ES: Instrucciones abreviadas Grupo 1 (9-18 kg)
PT: Instruções breves Gr. 1 (9-18 kg)
DK: Kort vejledning gruppe 1 (9–18 kg)
NO: Kort instruksjon gruppe 1 (9–18 kg)
SE: Korta instruktioner grupp 1 (9–18 kg)
FI: Lyhyet ohjeet, ryhmä 1 (9–18 kg)
4
7
10
5
8
11
6
MAX
9
12
5
Page 6

6
Page 7
1
2
3
DE: Kurzanleitung Gruppe 2/3 (15-36 kg)
EN: Brief instructions Group 2/3 (15-36 kg)
IT: Istruzioni brevi Gruppo 2/3 (15-36 kg)
FR: Instructions en bref Groupe 2/3 (15-36 kg)
NL: Korte handleiding Groep 2/3 (15-36 kg)
PL: Skrócona instrukcja Grupa 2/3 (15-36 kg)
ES: Instrucciones abreviadas Grupo 2/3 (15-36 kg)
PT: Instruções breves Gr. 2/3 (15-36 kg)
DK: Kort vejledning gruppe 2/3 (15–36 kg)
NO: Kort instruksjon gruppe 2/3 (15-36 kg)
SE: Korta instruktioner grupp 1 (15-36 kg)
FI: Lyhyet ohjeet, ryhmä 2/3 (15-36 kg)
4
7
10
5
8
11
6
MAX
9
12
7
Page 8
8
PALLAS B-FIX
UN-R44-04
UNIVERSAL
SEMI-UNIVERSAL
9 - 18 kg
04301395
CYBEX GmbH
Riedingerstr. 18, 95448 Bayreuth
Germany
SOLUTION B-FIX
UN-R44-04
UNIVERSAL
SEMI-UNIVE RSAL
15 – 36 kg
04301395
CYBEX GmbH
Riedingerstr. 18, 95448 Bayreuth
Germany
ZULASSUNG
UN R-44/04
CYBEX Pallas B-x - Gruppe 1, 9 bis 18 kg
CYBEX Solution B-x - Gruppe 2/3, 15
bis 36 kg
Sitzerhöher mit Rückenlehne und Kopfstütze,
mit Fangkörper in Gruppe 1.
Empfohlen für:
Alter: ab ca. 9 Monate bis 12 Jahre
Gewicht: 9-36 kg
nur geeignet für Fahrzeugsitze mit DreipunktAutomatik-Gurt, die nach UN Regelung
Nr. R16 oder gleichwertigem Standard
zugelassen sind.
CERTIFICATION
UN R-44/04
CYBEX Pallas B-x - group 1, 9 to 18 kg
CYBEX Solution B-x - group 2/3, 15 to 36 kg
Seat elevator with backrest and headrest,
with impact shield in group 1.
Recommended for:
Age: from approx. 9 months to 12 years
Weight: 9-36 kg
Only suitable for vehicle seats with automatic
three-point belts approved in accordance with
UN regulation 16 or a comparable standard.
APPROVAZIONE
UN R-44/04
CYBEX Pallas B-x - Gruppo 1, da 9 a 18 kg
CYBEX Solution B-x - Gruppo 2/3, da 15
a 36 kg
Elevatore del seggiolino con schienale e
poggiatesta su un telaio di base regolabile
con cuscini di sicurezza regolabili in altezza.
Raccomandato per:
Età: da 9 mesi a 12 anni circa
Peso: 9-36 kg
Adatto solo ai sedili dei veicoli con cinture
automatiche a tre punti approvate ai sensi
del regolamento UN R16 o di uno standard
equivalente.
SEHR GEEHRTE KUNDIN, SEHR GEEHRTER KUNDE!
Vielen Dank, dass Sie sich bei der Wahl eines Kinder-
sitzes für den Pallas B-x entschieden haben. Bei der
Entwicklung des Kindersitzes standen Sicherheit, Komfort
und Bedienfreundlichkeit im Vordergrund. Das Produkt wird
unter besonderer Qualitätsüberwachung hergestellt und erfüllt
strengste Sicherheitsanforderungen.
WARNUNG! Damit Ihr Kind richtig geschützt werden
!
kann, ist es unbedingt notwendig, den Kindersitz so zu
verwenden, wie es in dieser Anleitung beschrieben wird.
HINWEIS! Durch länderspezische Anforderungen
(z.B. Farbkennzeichnungen am Kindersitz) können
Produktmerkmale in ihrer äußeren Erscheinung variieren. Die
korrekte Funktionsweise des Produktes wird davon jedoch nicht
beeinusst.
HINWEIS! Bewahren Sie die Anleitung immer gribereit in dem
dafür vorgesehenen Fach am Kindersitz auf.
Page 9
DEAR CUSTOMER
Thank you for buying the Pallas B-x. We can assure you that
safety, comfort and ease of use were our highest priorities
when developing the child seat. This product is manufactured
under exceptional quality control and meets the strictest safety
requirements.
GENTILE CLIENTE
Grazie per aver acquistato Pallas B-x. Le assicuriamo che nel
progettare il seggiolino auto i nostri principali obiettivi sono stati
la sicurezza, il comfort e la facilità di utilizzo. Il prodotto è stato
elaborato sotto uno stretto controllo qualitativo e risponde ai più
severi standard di sicurezza.
DEENIT
WARNING! In order to keep your child properly
!
protected it is absolutely essential that you use the
child seat as described in this manual.
NOTE! Due to country-specic requirements (e.g. colour
labelling on the child seat), the product features may vary in their
external appearance. This, however, does not aect the correct
functioning of the product.
NOTE! Always keep this Instruction Manual at hand in the
compartment that has been provided for that purpose on the
child seat.
ATTENZIONE! Per mantenere il bambino
!
adeguatamente protetto è indispensabile utilizzare il
seggiolino come descritto in questo manuale.
NOTA: a causa dei requisiti specici per ciascun Paese
(ad esempio, l’etichettatura dei colori sul seggiolino), le
caratteristiche del prodotto possono variare nel loro aspetto
esterno. Ciò tuttavia non inuisce sul corretto funzionamento
del prodotto.
NOTA: raccomandiamo di tenere il manuale sempre a
portata di mano e di conservarlo nell’apposito alloggiamento
del seggiolino.
9
Page 10

DE INHALT
ERSTMONTAGE ...................................................................................12
DER RICHTIGE PLATZ IM FAHRZEUG ...........................................14
SICHERHEIT IM FAHRZEUG ............................................................. 18
DEN SITZ INS FAHRZEUG STELLEN ............................................. 18
BEFESTIGEN DES KINDERSITZES MITTELS
LATCH-CONNECT SYSTEM .............................................................. 22
AUSBAU DES KINDERSITZES..........................................................24
ANPASSEN AN DIE KÖRPERGRÖSSE ..........................................26
EINSTELLEN DES FANGKÖRPERS – GRUPPE 1 (9-18 KG) ...... 26
ANSCHNALLEN MIT FANGKÖRPER – GRUPPE 1(9-18 KG) ...... 28
IST IHR KIND RICHTIG GESICHERT?
- FANGKÖRPER GRUPPE 1 (9-18KG) ..............................................30
WECHSEL VON PALLAS B-FIX AUF SOLUTION B-FIX
(GRUPPE 1 ZU GRUPPE 2/3) .............................................................32
ANSCHNALLEN DES KINDES GRUPPE 2/3 (15-36 KG) ..............34
IST IHR KIND RICHTIG GESICHERT?
- FAHRZEUGGURT GRUPPE 2/3 (15-36 KG) ..................................38
ENTFERNEN DES BEZUGES ............................................................40
REINIGUNG ........................................................................................... 42
PFLEGE .................................................................................................. 44
VERHALTEN NACH EINEM UNFALL ................................................46
PRODUKTLEBENSDAUER ................................................................ 46
ENTSORGUNG ..................................................................................... 48
GARANTIEBEDINGUNGEN ............................................................... 50
10
Page 11

FIRST INSTALLATION .........................................................................13
POSITIONING THE SEAT CORRECTLY IN THE VEHICLE..........15
SAFETY IN THE VEHICLE ..................................................................19
PLACING THE SEAT IN THE VEHICLE ............................................19
SECURING THE CHILD SEAT USING THE LATCH-CONNECT
SYSTEM ................................................................................................. 23
REMOVAL OF THE CHILD SEAT .......................................................25
ADAPTING TO BODY SIZE ................................................................ 27
ADJUSTING THE IMPACT SHIELD – GROUP 1 (9-18 KG) ...........27
STRAPPING WITH THE IMPACT SHIELD – GROUP 1
(9-18 KG) ................................................................................................. 29
IS YOUR CHILD CORRECTLY SECURED? - IMPACT SHIELD
GROU P (9-18KG) .................................................................................. 31
SWITCHING FROM PALLAS B-FIX TO SOLUTION B-FIX
(GROUP 1 TO GROUP 2/3) ................................................................. 33
FASTENING YOUR CHILD´S SEATBELT GROUP 2/3
(15-36 KG) ............................................................................................... 35
IS YOUR CHILD CORRECTLY SECURED? - VEHICLE BELT
GROU P 2/3 (15-36 KG) ......................................................................... 39
REMOVING THE SEAT COVER ........................................................41
CLEANING ............................................................................................. 43
CARE & MAINTENANCE .....................................................................45
HOW TO ACT FOLLOWING AN ACCIDENT ....................................47
PRODUCT LIFESPAN .......................................................................... 47
DISPOSAL ..............................................................................................49
WARRANTY CONDITIONS .................................................................51
IT ARGOMENTIEN CONTENTS
PRIMA INSTALLAZIONE ..................................................................... 13
POSIZIONE CORRETTA DEL SEGGIOLINO NEL VEICOLO ....... 15
SICUREZZA NEL VEICOLO ............................................................... 19
COLLOCAZIONE DEL SEGGIOLINO NEL VEICOLO .................... 19
FISSAGGIO DEL SEGGIOLINO CON IL SISTEMA
LATCH-CONNECT SYSTEM .............................................................. 23
DISINSTALLARE IL SEGGIOLINO .................................................... 25
REGOLAZIONE IN BASE ALLA CORPORATURA ..........................27
REGOLARE IL CUSCINO DI SICUREZZA – GRUPPO 1
(9-18 KG) ................................................................................................. 27
ALLACCIARE CON IL CUSCINO DI SICUREZZA – GRUPPO 1
(9-18 KG) ................................................................................................. 29
IL BAMBINO È MESSO IN SICUREZZA CORRETTAMENTE?
- CUSCINO DI SICUREZZA GRUPPO (9-18KG) ............................. 31
PASSAGGIO DA PALLAS B-FIX A SOLUTION B-FIX
(DAL GRUPPO 1 AL GRUPPO 2/3) ....................................................33
ALLACCIARE IL BAMBINO CON LA CINTURA GRUPPO 2/3
(15-36 KG) ............................................................................................... 35
IL BAMBINO È MESSO IN SICUREZZA CORRETTAMENTE?
- CINTURA DELL’AUTOMOBILE GRUPPO 2/3 (15-36 KG) ...........39
RIMOZIONE DELLA FODERA DEL SEGGIOLINO .........................41
PULIZIA...................................................................................................43
CURA E MANUTENZIONE ..................................................................45
COME PROCEDERE IN SEGUITO A UN INCIDENTE .................. 47
VITA UTILE DEL PRODOTTO ............................................................ 47
SMALTIMENTO .....................................................................................49
CONDIZIONI DI GARANZIA................................................................ 51
DEENIT
11
Page 12

ERSTMONTAGE
17
1
7
16
1
7
Der Kindersitz besteht aus einem Sitzkissen (7), einer Rücken lehne (1) mit höhen verstellbare Kopfstütze und einem
Fangkörper (6). Nur die Kombination der drei Teile bietet Ihrem
Kind den bestmöglichen Schutz und Komfort.
WARNUNG! Die Bestandteile des CYBEX Pallas
!
B-x dürfen weder einzeln noch in Verbindung mit
Sitzkissen, Rückenlehnen, Kopfstützen oder Fang-
körper anderer Hersteller oder anderer Baureihen
verwendet werden. Die Zulassung würde in solch
einem Fall sofort erlöschen.
Die Rückenlehne (1) wird mit der Führungsnase (16) auf der
Achse (17) des Sitzkissens (7) eingehakt. Schieben sie den
Fangkörper (6) auf das Sitzkissen.
WARNUNG! Achten Sie immer darauf, dass die
!
Einzelteile des Kindersitzes niemals gestaucht oder
eingeklemmt werden (z.B. beim Schließen der Fahrzeugtür oder beim Verstellen der Rückbank).
HINWEIS! Bewahren Sie die Anleitung immer gribereit auf
(z. B. im dafür vorgesehenen Fach an der Unterseite des
Sitzes).
6
12
Page 13
FIRST INSTALLATION
The child seat consists of a booster seat (7), a backrest (1) and
an impact shield (6). Only the combination of these three parts
provides best protection and comfort to your child.
WARNING! The parts of the CYBEX Pallas B-x must
!
not be used alone or in combination with boosters,
backrests, impact shield or headrests from other manufacturers or from dierent product series. In such
instances, the certication expires immediately.
Connect the backrest (1) to the booster (7) by hooking the guide
lug (16) on the axis (17) of the booster (7). Place the impact
shield (6) on the booster.
WARNING! Always ensure that the individual com-
!
ponents of the child seat are never compressed or
jammed (e.g. by jamming in the car door or when adjusting the back seat).
PRIMA INSTALLAZIONE
Il sedile per bambini consta di un seggiolino (7), di uno schienale
(1) e di un cuscino di protezione (6). Solo la combinazione di
questi tre componenti fornisce migliore protezione e comfort al
vostro bambino.
ATTENZIONE! I componenti di CYBEX Pallas B-x
!
non devono essere utilizzati da soli o in combinazione con sollevatori, schienali, cuscini di protezione o
poggiatesta di altri produttori o di altri modelli. In tali
circostanze, l’omologazione perderà validità automaticamente.
Collegare lo schienale (1) alla seduta (7) agganciando la guida
(16) all’asse (17) del sollevatore del sedile (7). Posizionare il
cuscino di protezione (6) sul sollevatore del sedile.
ATTENZIONE! Assicurarsi sempre che i singoli com-
!
ponenti del seggiolino non siano mai bloccati o compressi (ad esempio nella portiera dell’auto o durante
la regolazione del sedile posteriore).
DEENIT
NOTE! Always keep these instructions to hand (e.g. in the
designated compartment on the bottom of the booster seat).
NOTA! Tenere sempre a portata di mano le istruzioni (ad
esempio nell’apposito scomparto sul retro del seggiolino).
13
Page 14
DER RICHTIGE PLATZ IM FAHRZEUG
Der Kindersitz ist mit verstautem Latch-Connect
System auf allen Fahrzeugplätzen mit DreipunktAutomatikgurt verwendbar, die im Fahrzeughandbuch
für die „universelle“ Verwendung zugelassen sind.
WARNUNG! Der Sitz ist nicht für die Verwendung
!
mit einem 2-Punkt- oder Beckengurt geeignet. Wird
der Sitz mit einem 2-Punkt-Gurt gesichert, kann es
bei einem Unfall zu schweren oder gar tödlichen Verletzungen des Kindes kommen.
Für die Befestigung mit dem Latch-Connect-System besteht
eine „semi-universale“ Genehmigung. Aus diesem Grund kann
das Latch-Connect System nur in bestimmten Fahrzeugen
eingesetzt werden. Die zugelassenen Fahrzeuge entnehmen Sie
bitte der beigelegten Fahrzeugtypenliste. Die aktuelle Version
erhalten Sie auf www.cybex-online.com.
In Ausnahmefällen kann der Kindersitz auch vorne am
Beifahrersitz verwendet werden. Beachten Sie dabei die
folgenden Punkte:
• Bei Fahrzeugen mit Airbag sollten Sie den Beifahrersitz so
weit wie möglich nach hinten schieben. Beachten Sie jedoch,
dass der obere Gurtpunkt des Fahrzeuggurtes hinter der
Gurtführung des Kindersitzes bleibt, damit der Fahrzeuggurt
ordnungsgemäß aufrollt.
• Die Empfehlungen des Fahrzeugherstellers sind unbedingt
zu befolgen.
14
Page 15
POSITIONING THE SEAT CORRECTLY IN THE VEHICLE
The child seat with stored Latch-Connect System
system can be used on all vehicle seats with automatic
three-point safety belts approved in the vehicle manual
for “universal” use.
POSIZIONE CORRETTA DEL SEGGIOLINO NEL VEICOLO
Il seggiolino, con Latch-Connect System rientrato nella
base, può essere utilizzato su tutti i sedili con cinture
di sicurezza automatiche a tre punti approvate dal
manuale della vettura per uso ‘universale’.
DEENIT
WARNING! The seat is not suitable for use with a
!
two-point or lap belt. If the seat is seacured using a
two-point belt, an accident may result in severe or
even fatal injuries to the child.
A “semi-universal” certication is given to restraint systems that
are connected to the car through the Latch-Connect-System.
For this reason, the Latch-Connect System can only be used in
certain vehicles. Please refer to the enclosed vehicle type list for
approved vehicles. You can obtain the most up-to-date version
from www.cybex-online.com.
In exceptional cases, the child seat may also be used on the
front passenger seat. Please note the following in this case:
• In cars with airbags, you should push the passenger seat back
as far as possible. When doing so, however, ensure that the
upper pivot point of the safety belt is behind the belt feed point
of the child seat, that the belt can retract correctly.
• Always comply with the recommendations of the vehicle
manufacturer.
ATTENZIONE! Il seggiolino è inadatto all’uso con
!
una cintura subaddominale o a due punti. Gli incidenti possono causare lesioni gravi o mortali al
bambino in caso di messa in sicurezza con una cin-
tura a due punti.
Ai sistemi di ritenuta collegati alla vettura mediante sistema
Latch-Connect-System è data una omologazione ‘semi-
universale’. Gli Latch-Connect System sono perciò utilizzabili
solo in alcuni veicoli. Consultare la lista di tipi di veicoli allegata
per conoscere i veicoli approvati. La versione sempre aggiornata
della lista è disponibile nel nostro sito al link: www.cybex-online.
com.
In casi eccezionali, il seggiolino può essere utilizzato anche sul
sedile del passeggero anteriore. In questo caso tenere conto di
quanto segue:
• Nelle auto dotate di airbag il sedile del passeggero va spinto il
più indietro possibile. Nel fare ciò accertarsi però che il punto
di snodo superiore della cintura di sicurezza si trovi dietro alla
guida della cintura del seggiolino.
• Rispettare sempre le raccomandazioni del costruttore
del veicolo.
15
Page 16
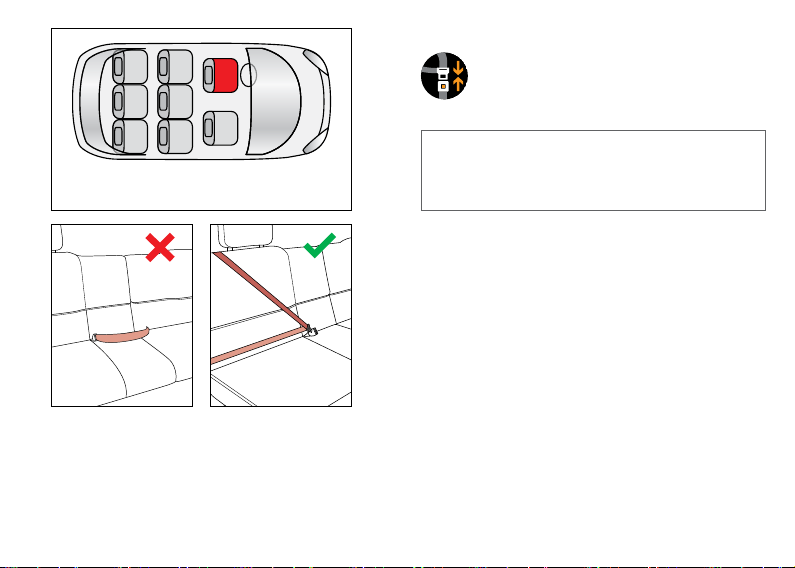
WARNUNG! Der Diagonalgurt muss schräg nach
!
hinten verlaufen und darf nie nach vorn zum oberen Gurtpunkt in Ihrem Fahrzeug führen. Sollte dies
nicht einzustellen sein z.B. durch Vorschieben des
Autositzes oder Verwendung auf einem anderen Sitzplatz, so ist der Kindersitz für dieses Fahrzeug nicht
geeignet.
WARNUNG! Gepäckstücke oder andere Gegen-
!
stände im Fahrzeug, welche bei einem Unfall Verletzungen verursachen können, müssen immer
gut befestigt werden. Sie können zu tödlichen Geschossen im Fahrzeug werden.
WARNUNG! Auf Fahrzeugplätzen, die quer zur Fahrt-
!
richtung angeordnet sind, ist die Verwendung des
Sitzes nicht zulässig. Auf rückwärtsgerichteten Fahrzeugsitzen, wie z.B. in einem Van oder Minibus, ist
die Verwendung zulässig, sofern der Fahrzeugsitz
für die Beförderung eines Erwachsenen zugelassen
ist. Zu beachten ist, dass die Fahrzeugkopfstütze
bei rückwärtsgerichtetem Einbau nicht entfernt werden darf!
HINWEIS! Bitte lassen Sie Ihr Kind nie unbeaufsichtigt im
Fahrzeug zurück.
16
Page 17

WARNING! The diagonal belt must run back at a rec-
!
line and must never run forward to the upper belt
point in your vehicle. If it is not possible to adjust
the seat in this way, e.g. by pushing the child seat
forward or using it on another seat, this child seat is
not suitable for your vehicle.
WARNING! Luggage or other objects present in the
!
vehicle that may cause injury in the event of an accident must always be rmly secured. Otherwise, they
may be thrown, causing fatal injuries.
WARNING! The child seat may not be used on child
!
seats facing to the side of the direction of travel. Use
of the child seat is permitted on rear-facing seats,
e.g. in a van or minibus, provided that the seat is
permitted for transporting an adult. Please note that
the vehicle headrest must not be removed when tting on a rear-facing seat! Even if not in use, the
child seat must always be secured with the safety belt.
NOTE! Never leave your child unattended in the vehicle. NOTA BENE! Non lasciare mai il tuo bambino incustodito
Attenzione! La cintura diagonale deve sempre scor-
!
rere indietro inclinata e non deve mai scorrere in
avanti verso il punto superiore della cintura nel veicolo. Nel caso non sia possibile regolare il sedile in
questo modo, ad esempio spingendo avanti il sedile
o usando un altro sedile, il seggiolino non sarà adat-
to all’uso in questo veicolo.
Attenzione! Bagagli o altri oggetti presenti nel veico-
!
lo che possono causare lesioni in caso di incidente
devono essere ssati saldamente. In caso contrario
potrebbero essere scagliati e causare lesioni mortali.
Attenzione! Il seggiolino non è utilizzabile sui sedi-
!
li rivolti lateralmente rispetto alla direzione di marcia. L‘utilizzo del seggiolino auto è consentito nei
sedili rivolti contrari al senso di marcia, ad esempio
nei furgoncini o nei minibus, a condizione che il sedile sia omologato per il trasporto dell‘adulto. Non
rimuovere il poggiatesta del sedile del veicolo durante l’installazione del seggiolino nei sedili rivolti contrari al senso di marcia. Anche quando non si
trasporta il bambino il seggiolino auto va assicurato
con la cintura.
all’interno dell’auto
DEENIT
17
Page 18
SICHERHEIT IM FAHRZEUG
WARNUNG! Der Kindersitz muss, auch dann wenn er
!
nicht benutzt wird, immer korrekt mit dem Fahrzeug-
gurt im Fahrzeug befestigt sein. Bereits bei einer
Notbremsung oder einem geringen Aufprall können
unbefestigte Teile andere Mitfahrer und Sie selbst
verletzen.
Achten Sie zum Schutz aller Fahrzeuginsassen stets darauf,
dass...
• die umklappbaren Rückenlehnen der Fahrzeugsitze
eingerastet sind und sich in einer aufrechten Position
benden.
• bei Einbau des Kindersitzes auf dem Beifahrersitz, dieser in
der hintersten Position steht.
• im Fahrzeug alle beweglichen Gegenstände gesichert sind.
1
• alle Personen im Fahrzeug angeschnallt sind.
2
18
DEN SITZ INS FAHRZEUG STELLEN
Stellen Sie den Kindersitz auf den entsprechenden Fahrzeugsitz
im Auto.
• Achten Sie unbedingt darauf, dass die Rückenlehne (1)
des CYBEX Pallas B-x ächig an der Rückenlehne des
Fahrzeugsitzes anliegt. Bei Verwendung des Latch-Connect
Systems können Sie den Abstand mit dem Versteller (2) einstellen.
• Sollte die Kopfstütze des Fahrzeuges störend sein, ziehen
Sie diese ganz heraus oder nehmen Sie diese ganz ab
(Ausnahme siehe Abschnitt „DER RICHTIGE PLATZ IM
FAHRZEUG“).
Page 19
SAFETY IN THE VEHICLE SICUREZZA NEL VEICOLO
WARNING! The child seat must always be secured
!
correctly with the vehicle belt in the vehicle even
when not in use. In case of an emergency brake or
accident, an unsecured child seat may injure other
passengers or you.
In order to guarantee the best possible safety for all passengers
make sure that...
• the foldable backrests in the vehicle are locked in their upright
position.
• when installing the child seat on the front passenger seat,
adjust the vehicle seat in rearmost position.
• you properly secure all objects likely to cause injury in the
case of an accident.
• all passengers in the vehicle are buckled up.
ATTENZIONE! Il seggiolino deve sempre assicura-
!
to correttamente con la cintura presente nel veicolo anche quando il veicolo non è in uso. Nel caso di
una frenata di emergenza o di uno scontro, un seggiolino assicurato male puo ferire voi o altri passeggeri.
Per garantire la maggiore sicurezza per tutti i passeggeri
assicuratevi che:
• gli schienali regolabili dei sedili del veicolo sono bloccati in
posizione eretta.
• quando il seggiolino viene installato sul sedile anteriore,
regolare il sedile nella posizione più arretrata possibile.
• assicurate adeguatamente tutti gli oggetti presenti nel veicolo
in quanto possono diventare proiettili pericolosi in caso
di incidente.
• assicuratevi che tutti i passeggieri abbiano le cinture allacciate.
DEENIT
PLACING THE SEAT IN THE VEHICLE
Place the child seat on the appropriate seat in the car.
• Always ensure that the entire surface of the backrest (1) of
the CYBEX Pallas B-x is placed against the backrest of the
vehicle seat. When using the Latch-Connect System, you can
adjust the distance using the adjuster (2).
• If the headrest of the vehicle is in the way, pull it out all the
way or remove it completely (for exceptions to this, please
refer to the section (“POSITIONING THE SEAT CORRECTLY
IN THE VEHICLE”).
COLLOCAZIONE DEL SEGGIOLINO NEL VEICOLO
Posizionare il seggiolino sul sedile veicolare adatto.
• Accertare sempre che l‘intera supercie dello schienale (1) del
CYBEX Pallas B-x poggi completamente contro lo schienale
del sedile veicolare. Se necessario è possibile regolare la
distanza agendo sul regulatore (2).
• Se il poggiatesta del veicolo è di ingombro, alzarlo del tutto
o rimuoverlo completamente (per eccezioni, si prega di
consultare la sezione „POSIZIONAMENTO CORRETTO DEL
SEGGIOLINO NEL VEICOLO“).
19
Page 20

WARNUNG! Die Rückenlehne des CYBEX Kinder-
!
sitzes muss an der Lehne des Fahrzeuges ächig
auiegen. Um den größtmöglichen Schutz für das
Kind zu gewährleisten, muss sich der Sitz in einer
normalen aufrechten Position benden!
HINWEIS! An einigen Autositzen aus empndlichem Material
(z.B. Velours, Leder, etc.) können durch die Benutzung von
Kindersitzen mögliche Gebrauchsspuren und/oder Abfärbungen
auftreten. Um das zu vermeiden, können Sie z.B. eine Decke
oder ein Handtuch unterlegen. Ferner weisen wir in diesem
Zusammenhang auf unsere Reinigungshinweise in dieser
Gebrauchsanleitung hin, die vor der ersten Verwendung des
Sitzes unbedingt beachtet werden sollten.
WARNUNG! Benutzen Sie niemals andere als die in
!
der Bedienungsanleitung beschriebenen und am Sitz
markierten Punkte, um den Kindersitz zu befestigen.
20
Page 21
WARNING! The full surface of the backrest of the
!
CYBEX child seat must be against the backrest of
the vehicle. To ensure maximum protection for your
child, the seat must be in a normal upright position!
ATTENZIONE! L‘intera supercie dello schienale del
!
seggiolino CYBEX deve poggiare contro lo schienale del veicolo. Per assicurare la massima protezione
per il bambino il sedile deve trovarsi nella normale
posizione eretta!
DEENIT
NOTE! On some car seats made of sensitive materials (e.g.
suede, leather etc.), the use of child seats may leave marks
and/or cause discolouration. To prevent this, you can plac e a
blanket or towel underneath it, for example. Please also refer
in this connection to our cleaning advises in these usage instructions; these cleaning instructions must be observed prior
to using the seat for the rst time.
WARNING! Do not use any load bearing contact
!
points other than those described in the instructions
and marked on the child restraint.
NOTA BENE! Su alcuni sedili veicolari realizzati in materiali
delicati (come pelle scamosciata, pelle, ecc.) l'uso di seggiolini
può lasciare tracce e/o causare scoloriture. Questo è evitabile
utilizzando ad esempio una coperta o un asciugamano come
appoggio. Al riguardo vedere anche le istruzioni di pulizia nelle
presenti istruzioni per l‘uso; le istruzioni di pulizia devono essere
consultate prima del primo uso del seggiolino.
ATTENZIONE! Non utilizzare i punti di contatto di ca-
!
rico diversi da quelli descritti nelle istruzioni e codicato il sistema di ritenuta.
21
Page 22
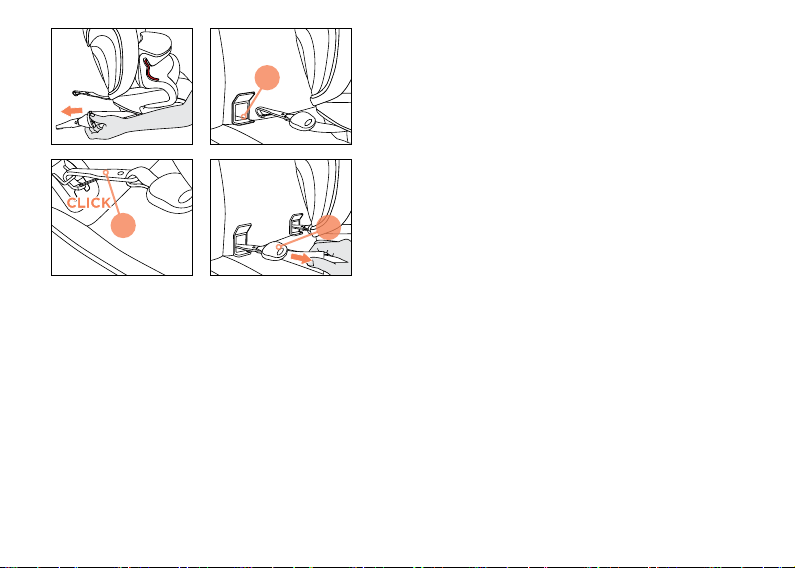
BEFESTIGEN DES KINDERSITZES MITTELS LATCHCONNECT SYSTEM
3
4
22
2
Mit dem Latch-Connect System können Sie den CYBEX Pallas
B-x mit dem Fahrzeug verbinden und so die Sicherheit Ihres
Kindes erhöhen. Ihr Kind muss weiterhin mit dem 3-PunktGurt Ihres Fahrzeuges und dem Fangkörper in Gruppe 1
angeschnallt werden.
HINWEIS! Die ISOFIX Befestigungspunkte (3) sind zwei
Metalllaschen pro Sitzplatz und benden sich zwischen
Rückenlehne und Sitzäche des Fahrzeugsitzes. Im Zweifelsfall
nehmen Sie die Bedienungsanleitung Ihres Fahrzeuges zu Hilfe.
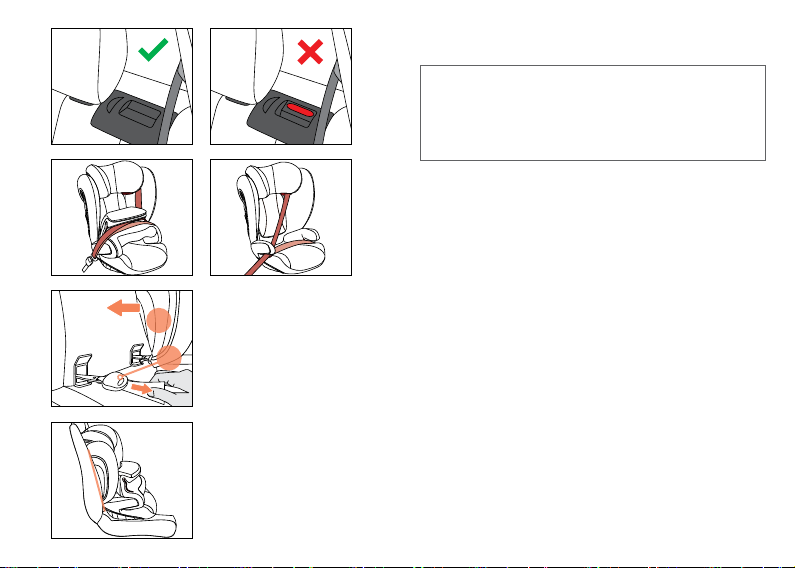
• Verlängern sie den Gurt des Latch-Connect-Systems durch
Betätigen des Verstellers (2).
• Befestigen sie die Latch-Connect Haken (4) an den ISOFIX
Befestigungspunkten (3) des Fahrzeugs.
• Straen sie das Latch-Connect System durch Ziehen am
freien Ende des Gurtes, bis die Position des Kindersitzes
korrekt eingestellt ist.
• Vergewissern Sie sich, dass der Sitz gut hält, indem Sie
versuchen ihn aus den ISOFIX Befestigungspunkten (3)
herauszuziehen.
HINWEIS! Beachten Sie dazu den Abschnitt „DEN SITZ INS
FAHRZEUG STELLEN“.
Page 23

SECURING THE CHILD SEAT USING THE LATCHCONNECT SYSTEM
FISSAGGIO DEL SEGGIOLINO CON IL SISTEMA LATCHCONNECT SYSTEM
DEENIT
Using the Latch-Connect System system, you can x the CYBEX
Pallas B-x to the vehicle, thereby increasing your child’s safety.
The child still needs to be secured with the three-point belt of
your vehicle and the impact shield for Group 1.
NOTE! The ISOFIX xture points (3) are two metallic clips for
each seat and are positioned between the backrest and the
seating surface of the vehicle seat. In case of doubt, please refer
to the driver’s manual of your vehicle.
• Elongate the straps of the Latch-Connect System by using the
adjuster (2).
• Attach the Latch-Connect hooks (4) to the ISOFIX attachment
points (3).
• Tighten the Latch-Connect System by pulling the strap on the
adjuster until the position of the child seat is adjusted correctly.
• Ensure that the seat is secure by trying to pull it out of the
ISOFIX xture points (3).
NOTE! Note the information in the section “PLACING THE SEAT
IN THE VEHICLE”.
Con il sistema Latch-Connect System è possibile ssare il
CYBEX Pallas B-x al veicolo, aumentando così la sicurezza del
bambino. Il bambino deve essere allacciato utilizzando la cintura
a tre punti del veicolo.
NOTA BENE! I punti di ancoraggio ISOFIX (3) sono due clip
metalliche per ogni sedile, posizionate tra lo schienale e la
seduta del sedile del veicolo. In caso di dubbio consultare il
manuale istruzioni del proprio veicolo.
• Allungare le cinture del Latch-Connect System utilizzando il
regolatore (2).
• Fissare il Latch-Connect System ai punti di ancoraggio
ISOFIX (3).
• Serrare il Latch-Connect System tirando la cintura sul
regolatore no a quando la posizione del seggiolino auto non
è stata regolata correttamente.
• Accertare che il seggiolino sia in sicurezza tentando di tirarlo
fuori dai punti di ancoraggio ISOFIX (3).
NOTA BENE! Consultare la sezione “COLLOCAZIONE DEL
SEGGIOLINO NEL VEICOLO”.
23
Page 24
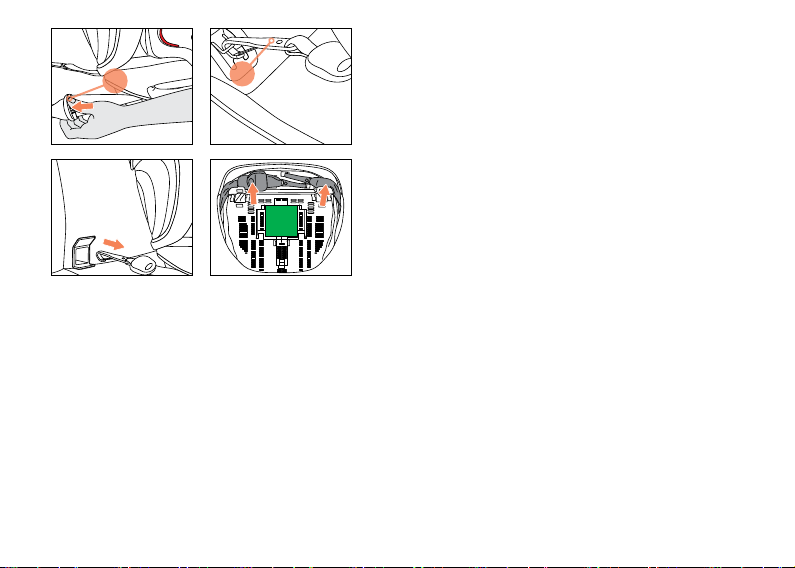
AUSBAU DES KINDERSITZES
2
24
4
Führen Sie die Einbauschritte in umgekehrter Reihenfolge durch.
• Die gestraten Gurte mit Hilfe des Verstellers (2) lockern.
• Die Haken (4) auf beiden Seiten von den ISOFIX
Befestigungspunkten lösen.
• Entfernen Sie den Kindersitz.
• Das Latch-Connect System kann im unteren Teil des
Kindersitzes verstaut werden.
Page 25

REMOVAL OF THE CHILD SEAT DISINSTALLARE IL SEGGIOLINO
Perform the installation steps in the reverse order. Seguire il procedimento per l’installazione nell’ordine inverso.
• Release the tightened straps using the adjuster (2).
• Disconnect the latches (4) on both sides.
• Remove the child seat.
• You can store the Latch-Connect system in the booster of
the child seat.
• Rilasciare i connettori (4) agendo sul regolatore (2).
• Sganciare i connettori (4) su entrambi i lati.
• Estrarre il seggiolino.
• Ritirare i connettori (4) nella posizione di trasporto agendo
sul regolatore (2).
DEENIT
25
Page 26

ANPASSEN AN DIE KÖRPERGRÖSSE
Einstellen der Kopfstütze
5
MAX
6
7
26
• Die Kopfstütze muss so eingestellt werden, dass der Abstand
zwischen den Schultern des Kindes und der Kopfstütze nicht
breiter als 2cm (ca. 2 Finger) ist.
• Ziehen Sie den Verstellhebel (5) an der Rückseite der
Kopfstütze, und führen Sie die Kopfstütze in die gewünschte
Position.
HINWEIS! Nur eine in optimaler Höhe eingestellte Kopfstütze
bietet den größtmöglichen Schutz und Komfort für Ihr Kind
und gewährleistet außerdem den optimalen Verlauf des
Diagonalgurtes. Die Höhenverstellung kann beim CYBEX Pallas
B-x in 12 Positionen erfolgen.
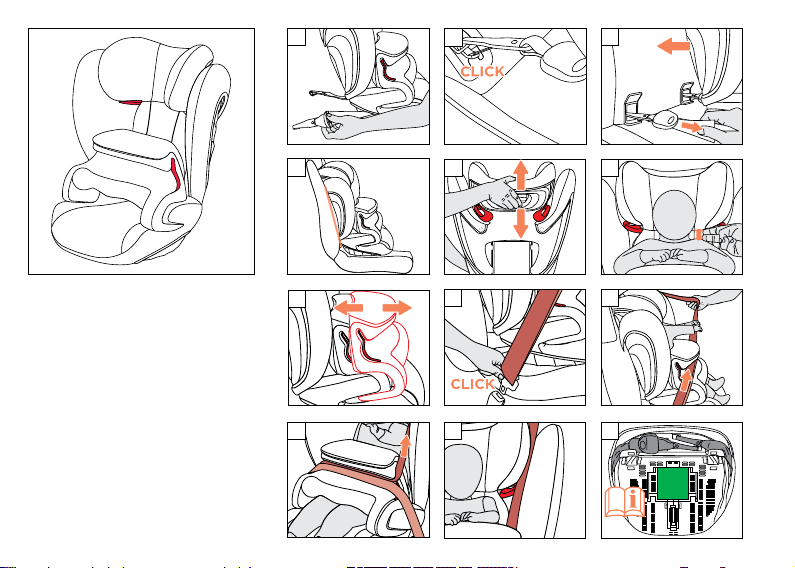
EINSTELLEN DES FANGKÖRPERS – GRUPPE 1 (9-18 KG)
Die seitlichen Flügel des Fangkörpers (6) passen exakt
zwischen Armlehnen und Sitzäche (7) und dienen der
Abstützung des Fangkörpers (6) am Sitz.
Stellen Sie den Fangkörper (6) so ein, dass er am Kind anliegt,
jedoch ohne auf den Körper des Kindes zu drücken.
WARNUNG! Der Fangkörper (6) darf nur in Ver-
!
bindung mit dem Kindersitz und bis maximal 18 kg
verwendet werden!
Page 27
ADAPTING TO BODY SIZE REGOLAZIONE IN BASE ALLA CORPORATURA
Adjustment of the headrest Regolazione del poggiatesta
• The headrest must be adjusted so that max. 2cm (ca. two
nger‘s width) or less remains free between the child’s
shoulder and the headrest.
• Push the adjustment button (5) on the rear side of the
headrest and move it into the desired position.
• Il poggiatesta deve essere regolato in modo che ci siano 2cm
(ca. due dita) liberi tra le spalle del bambino e il poggiatesta.
• Tirare la leva di regolazione (5) sulla parte bassa del
poggiatesta e muovere no alla posizione desiderata.
DEENIT
NOTE! Only an optimally adjusted headrest can oer your
child maximum protection and comfort while ensuring that the
diagonal belt can be tted smoothly. The height of the CYBEX
Pallas B-x can be adjusted to one of twelve positions.
ADJUSTING THE IMPACT SHIELD – GROUP 1 (9-18 KG) REGOLARE IL CUSCINO DI SICUREZZA – GRUPPO 1
The side aps of the impact shield (6) t exactly between the
arm rests and seating surface of the booster (7) and are used to
support the impact shield (6) on the seat.
Adjust the impact shield (6) so that it rests against the child
without pushing against the child’s body.
WARNING! The impact shield (6) may only be used
!
in conjunction with the child seat up to a maximum
of 18 kg!
NOTA BENE! Soltanto se regolato correttamente il poggiatesta
è in grado di orire al vostro bambino la massima sicurezza ed
il massimo comfort e nello stesso tempo garantire che la cintura
diagonale sia nella posizione corretta. CYBEX Pallas B-x può
essere regolato in altezza in dodici posizioni.
(9-18 KG)
Le alette laterali del cuscino di sicurezza (6) entrano
precisamente tra i braccioli e la supercie di seduta (7) e
supportano il cuscino di sicurezza (6) sul seggiolino.
Regolare il cuscino di sicurezza (6) in modo che poggi contro il
bambino senza comprimerne il corpo.
ATTENZIONE! Il cuscino di sicurezza (6) è utilizzabi-
!
le solo unitamente al telaio no a 18 kg al massimo!
27
Page 28
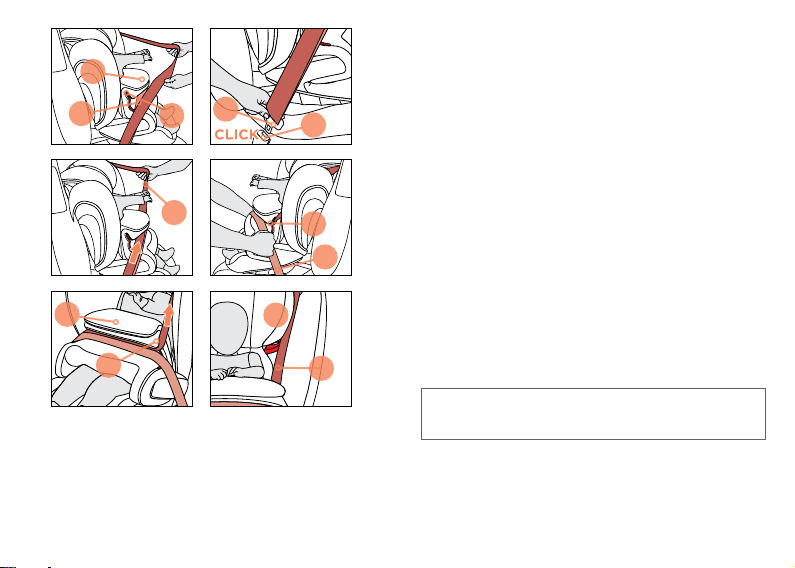
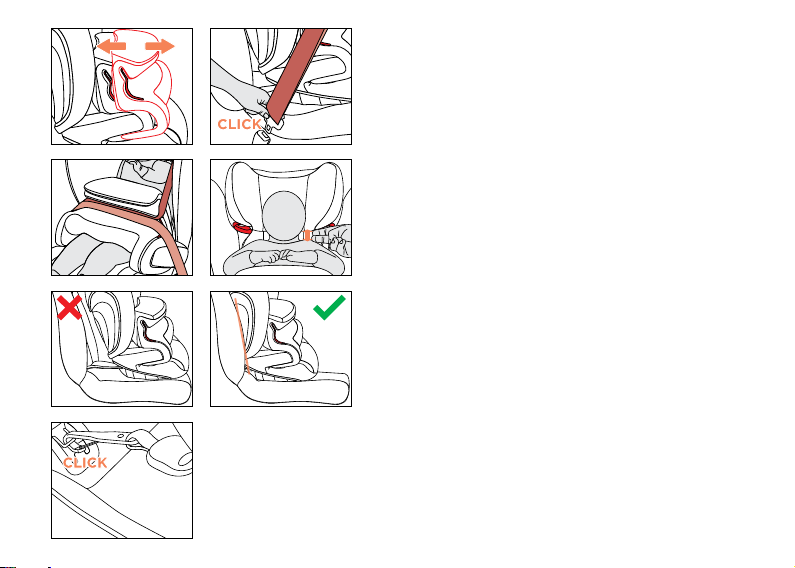
ANSCHNALLEN MIT FANGKÖRPER – GRUPPE 1
(9-18 KG)
6
8
9
12
10
11
9
8
6
9
28
13
12
• Legen Sie den Fangkörper (6) ein
(siehe Abschnitt „EINSTELLEN DES FANGKÖRPERS“).
• Ziehen Sie die gesamte Gurtlänge des Fahrzeug-
Dreipunktgurtes heraus. Nehmen Sie den Beckengurt (8) und
legen Sie diesen über die dafür vorgesehene rot markierte
Gurtführung (9) des Fangkörpers (6) ein.
• Stecken Sie die Fahrzeug-Gurtzunge (10) in das Gurtschloss
(11). Diese muss mit einem hörbaren „KLICK“ einrasten.
• Spannen Sie den Beckengurt (8) vor, indem Sie am
Diagonalgurt (12) ziehen.
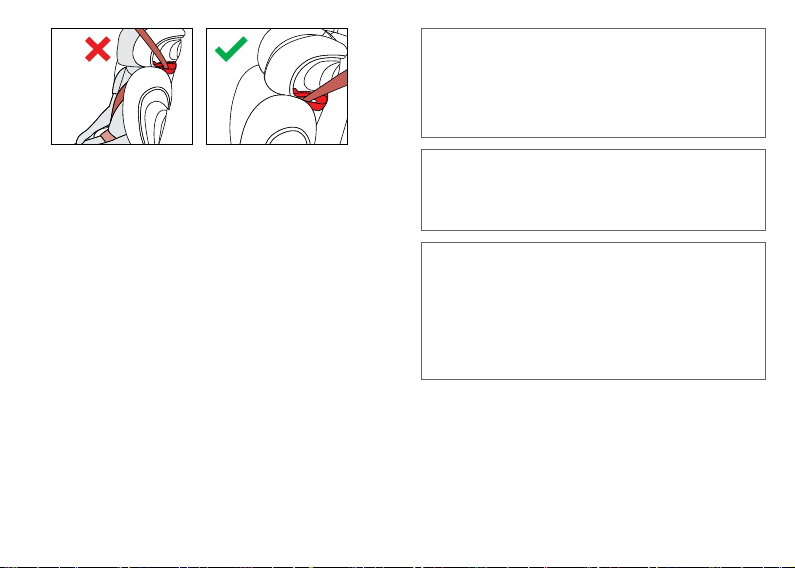
• Führen Sie nun den Diagonalgurt (12) parallel zum Beckengurt
(8) in der Gurtführung (9) zurück.
• Ziehen Sie den Diagonalgurt (12) stra und achten Sie dabei
darauf, dass beide Gurtteile, über die gesamte Breite des
Fangkörpers (6), innerhalb der Gurtführung (9) verlaufen.
• Ziehen sie nun den Diagonalgurt (12) nach oben fest in
die Gurtführung (9) des Fangkörpers (6), damit dieser sich
festklemmt. Legen sie danach den Diagonalgurt zwischen
Kopfstütze (13) und Schulterstütze. Der Diagonalgurt muss
nicht in die Gurtführung für die Gruppe 2/3 an der Kopfstütze
eingelegt werden.
WARNUNG! Stellen Sie stets sicher, dass das Rück-
!
haltesystem korrekt eingestellt ist und stra am Körper anliegt. Den Gurt auf keinen Fall verdrehen!
Page 29
STRAPPING WITH THE IMPACT SHIELD – GROUP 1
(9-18 KG)
• Insert the impact shield (6) (refer to the section “ADJUSTING
THE IMPACT SHIELD”).
• Pull out the entire length of the vehicle seat belt. Take the lap
belt (8) and place it over the designated red belt routing (9) on
the impact shield (6).
• Lock the vehicle seat belt (10) into the belt buckle (11). It must
lock into place with an audible “CLICK”.
• Tighten the lap belt (8) by pulling the diagonal belt (12).
• Now feed the diagonal belt (12) in parallel with the lap belt (8)
back into the belt routing (9).
• Pull the diagonal belt (12) tight and ensure that both parts of
the belt cover the entire width of the impact shield (6) in the
belt routing (9).
• Now feed the diagonal belt (12) tightly through the belt routing
(9) of the impact shield (6) until it is clamped inside the belt
guide. Then put the diagonal belt between headrest (13) and
shoulder rest. The diagonal belt does not need to be guided
through the headrest belt guide for group 2/3.
ALLACCIARE CON IL CUSCINO DI SICUREZZA –
GRUP PO 1 (9-18 KG)
• Inserire ora il cuscino di sicurezza (6) precedentemente
regolato (vedere “REGOLARE IL CUSCINO DI SICUREZZA”).
• Estrarre per tutta la lunghezza la cintura a tre punti del veicolo.
Collocare la cintura subaddominale (8) nell‘apposita guida
rossa della cintura (9) nel cuscino di sicurezza (6).
• Inserire la linguetta (10) della cintura nella bbia (11). Il
blocco in posizione corretta deve essere segnalato da uno
scatto udibile.
• Tendere la cintura subaddominale (8) tirando la cintura
diagonale (12).
• Inserire ora nuovamente la cintura diagonale (12) nella guida
della cintura (9) in parallelo alla cintura subaddominale (8).
• Tendere la cintura diagonale (12) e accertare che entrambe
le parti della cintura coprano l‘intera larghezza del cuscino di
sicurezza (6) nella guida della cintura (9).
• Ora far passare la cintura diagonale (12) ben tesa attraverso
la guida cintura (9) del cuscino di sicurezza (6) no a quando
viene bloccata all‘interno della guida. Quindi far passare la
cintura diagonale tra il poggiatesta (13) e la protezione per
le spalle.
DEENIT
WARNING! Always check the tightness and the right
!
adjustment of the restraint system to the child‘s
body. Never twist the belt!
ATTENZIONE! Controllare sempre la larghezza e il
!
corretto posizionamento del sistema di ritenuta sul
corpo del bambino. Non torcere mai la cintura!
29
Page 30
IST IHR KIND RICHTIG GESICHERT? -
FANGKÖRPER GRUPPE 1 (9-18KG)
Um die bestmögliche Sicherheit Ihres Kindes zu gewährleisten,
prüfen Sie bitte vor Beginn der Fahrt, ob…
• der Fangkörper ordnungsgemäß eingestellt ist.
• die Gurtschlosszunge im Gurtschloss eingerastet ist.
• der Beckengurt und der Diagonalgurt stra und nicht verdreht
durch die Gurtführung des Fangkörpers verlaufen.
• die Kopfstütze richtig eingestellt ist.
• die Rückenlehne des Kindersitzes vollächig an der
Rückenlehne des Fahrzeugsitzes anliegt.
• bei Verwendung des Latch-Connect Systems: dass
MAX
30
der Sitz beidseitig mit den Konnektoren in den ISOFIX
Befestigungspunkten eingerastet ist und der Latch-Gurt gut
gestrat ist.
Page 31

IS YOUR CHILD CORRECTLY SECURED? -
IMPACT SHIELD GROUP (9-18KG)
To ensure optimum safety for your child, please always check
before commencing travel that…
• the impact shield is correctly adjusted.
• the belt tongue has locked into place in the belt buckle.
• the lap belt and the shoulder belt are running taut through the
belt routing of the impact shield and are not twisted.
• the headrest is adjusted correctly.
• the backrest of the child seat lies completely ush with the
backrest of the child seat.
• if the Latch-Connect System is used: the seat has locked
into place on both sides with the latches into the ISOFIX
anchorage points and the system is tightened.
IL BAMBINO È MESSO IN SICUREZZA
CORRETTAMENTE? - CUSCINO DI SICUREZZA GRUPPO
(9-18KG)
Per garantire la sicurezza ottimale del bambino, prima di iniziare
il viaggio controllare sempre che
• il cuscino di sicurezza sia regolato correttamente.
• le linguette delle cinture siano saldamente ssate all‘interno
della bbia.
• la cintura ventrale e quella diagonale passino correttamente
all‘interno della guida del cuscino di sicurezza, e che non
siano attorcigliate. Il poggiatesta sia regolato correttamente.
• lo schienale del seggiolino sia perfettamente aderente a
quello del sedile dell‘auto.
• Se si utilizza is sistema Latch-Connect System: che il
seggiolino sia bloccato in posizione corretta da entrambi i
lati, con i connettori inseriti nei punti di ancoraggio ISOFIX.
DEENIT
31
Page 32

WECHSEL VON PALLAS B-FIX AUF SOLUTION B-FIX
6
32
(GRUPPE 1 ZU GRUPPE 2/3)
• Entfernen Sie den Fangkörper (6).
• Beachten Sie dazu den Abschnitt „ANSCHNALLEN DES
KINDES GRUPPE 2/3“
HINWEIS! Bewahren Sie den Fangkörper gut geschützt auf.
WARNUNG! Bei Verwendung in der Gruppe 1 (9-18
!
kg) ist der Fangkörper zwingend zu verwenden.
Page 33

SWITCHING FROM PALLAS B-FIX TO SOLUTION B-FIX
(GROUP 1 TO GROUP 2/3)
• Remove the impact shield (6).
• Note the information in the section “FASTENING YOUR
CHILD‘S SEATBELT GROUP 2/3 (15-36 KG)“
NOTE! Keep the impact shield in a safe and secure place. NOTA BENE! Conservare le parti rimosse riunite in un
WARNING! For usage in Group 1 (9-18 kg) the im-
!
pact shield must be used.
PASSAGGIO DA PALLAS B-FIX A SOLUTION B-FIX
(DAL GRUPPO 1 AL GRUPPO 2/3)
• Rimuovere il cuscino di sicurezza (6).
• ALLACCIARE IL BAMBINO CON LA CINTURA GRUPPO 2/3
(15-36 KG)
luogo sicuro.
ATTENZIONE! Procedere esattamente in ordine in-
!
verso nel riassemblaggio del seggiolino. Usare le istruzioni per vericare preliminarmente che tutte le
parti siano presenti.
DEENIT
33
Page 34

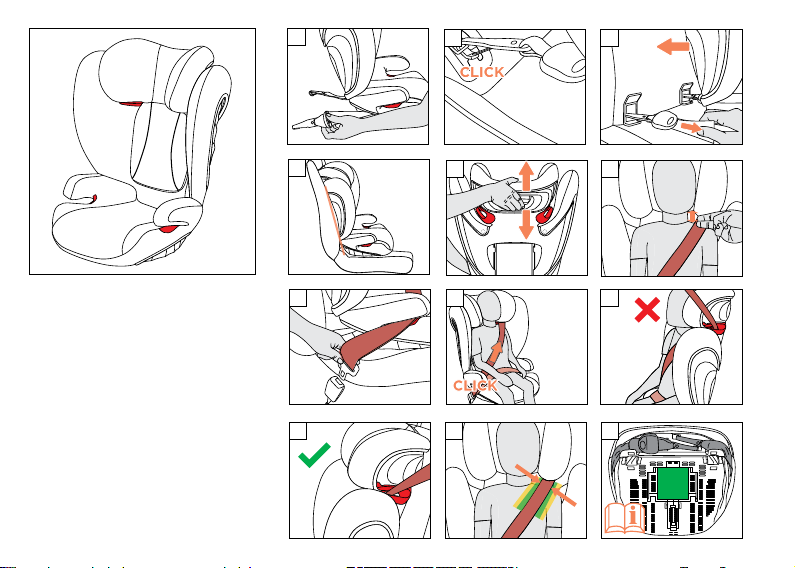
ANSCHNALLEN DES KINDES GRUPPE 2/3 (15-36 KG)
• Setzen Sie Ihr Kind in den Kindersitz. Ziehen Sie den
Dreipunktgurt weit heraus und führen Sie diesen vor Ihrem
Kind entlang zum Gurtschloss (11).
HINWEIS! Der Dreipunktgurt darf nur über die dafür
vorgesehenen Führungen verlaufen. Die Gurtführung wird
in diesem Handbuch genau beschrieben und ist zudem am
Kindersitz rot markiert.
12
11
10
12
8
14
5
12
15
34
WARNUNG! Den Gurt auf keinen Fall verdrehen.
!
• Stecken Sie die Gurtzunge (10) in das Gurtschloss (11).
Dieses muss mit einem hörbaren „KLICK“ einrasten.
• Als nächstes legen Sie den Beckengurt (8) in die rot
gekennzeichneten unteren Gurtführungen (14) des
Kindersitzes ein.
• Ziehen Sie nun kräftig am Diagonalgurt (12), um den
Beckengurt (8) zu straen. Je enger der Gurt anliegt, desto
besser kann er vor Verletzungen schützen. Auf der Seite des
Gurtschlosses (11) müssen der Diagonalgurt (12) und der
Beckengurt (8) zusammen in die untere Gurtführung (14)
eingelegt sein.
• Der Beckengurt (8) sollte auf beiden Seiten des Sitzkissens in
den rot gekennzeichneten unteren Gurtführungen (14) liegen.
• Nun führen Sie den Diagonalgurt (12) durch die obere
Gurtführung (15) in der Kopfstütze (5) bis er sich innerhalb der
Gurtführung bendet.
HINWEIS! Bringen Sie Ihrem Kind von Anfang an bei, immer auf
eine strae Gurtführung zu achten und bei Bedarf, selbst den
Gurt festzuziehen.
Page 35

FASTENING YOUR CHILD´S SEATBELT GROUP 2/3
(15-36 KG)
• Place your child in the child seat. Pull the three-point belt right
out and feed it along the belt buckle (11) in front of your child.
NOTE! The three-point belt must only be passed through the
designated routings. The belt routings are described in detail in
this manual and are marked in red on the child seat.
ALLACCIARE IL BAMBINO CON LA CINTURA GRUPPO
2/3 (15-36 KG)
• Collocare il bambino nel seggiolino. Estrarre ampiamente la
cintura a tre punti e farla scorrere no al fermaglio della cintura
(11) davanti al bambino.
NOTA BENE! La cintura a tre punti deve passare solo tra i
passaggi designati Il passaggio per le cinture sono descritte nel
dettaglio in questo manuale ed evidenziate nel seggiolino auto
DEENIT
WARNING! Never twist the belt.
!
• Insert the belt tongue (10) into the belt buckle (11). It must lock
into place with an audible “CLICK”.
• Next, place and tighten the lap belt (8) in the red colored lower
belt guides (14) of the child seat.
• Now pull the diagonal belt (12) rmly to tighten the lap belt
(8). The tighter the belt sits, the better it provides protection
from injury. On the side of the belt buckle (11), the diagonal
belt (12) and the lap belt (8) must be inserted together in the
lower belt guide (14).
• The lap belt (8) should have been fed through the lower belt
guides (14) on both sides of the booster seat.
• Now feed the diagonal belt (12) through the upper belt guide
(15) in the headrest (5) until it is inside the belt guide.
NOTE! Teach your child from the start to always ensure that the
belt is tight and, if necessary, how to tighten the belt themselves.
ATTENZIONE! Non torcere mai la cintura.
!
• Inserire la linguetta della cintura (10) nel fermaglio della
cintura (11). Il blocco in posizione deve essere segnalato da
uno scatto udibile.
• Collocare successivamente la cintura subaddominale (8) nelle
guide rosse inferiori della cintura (14) del seggiolino.
• Ora tirare saldamente la cintura diagonale (12) per tendere
la cintura subaddominale (8). Maggiormente tesa è la sede
della cintura e maggiore è la protezione dalle lesioni. Cintura
diagonale (12) e cintura subaddominale (8) vanno inserite
assieme nella guida cintura inferiore (14) a lato del fermaglio
della cintura (11).
• La cintura subaddominale (8) dovrebbe passare attraverso
le guide della cintura inferiori (14) su ambo i lati del cuscino
di seduta.
• Far passare ora la cintura diagonale (12) attraverso la guida
della cintura superiore (15) nel poggiatesta (5) no a che si
trova nella rossa guida della cintura.
NOTA BENE! Insegnare al bambino n dall’inizio a controllare
sempre che la cintura sia tesa e a tenderla autonomamente
se necessario.
35
Page 36

WARNUNG! Der Beckengurt (8) muss auf beiden
5
12
8
12
MAX
36
!
Seiten so tief wie möglich über der Leistenbeuge
Ihres Kindes verlaufen, um im Falle eines Unfalls
optimal wirken zu können.
Achten Sie darauf, dass der Diagonalgurt (12) zwischen
Schulteraußenkante und Hals Ihres Kindes verläuft. Falls
erforderlich, passen Sie durch Verstellen der Kopfstützenhöhe
den Gurtverlauf an. Die Höhe der Kopfstütze (5) kann auch im
eingebauten Zustand im Auto eingestellt werden.
Page 37

WARNING! The lap belt (8) must run as low as pos-
!
sible on both sides along your child’s groin to have
optimum eect in the event of an accident.
ATTENZIONE! La cintura subaddominale (8) deve
!
scorrere più bassa possibile su ambo i lati lungo l’in-
guine del bambino per avere l’eetto ottimale in caso di incidente.
DEENIT
Ensure that the diagonal belt (12) runs between the outside of
the shoulder and the neck of your child. If necessary, adjust the
height of the headrest to change the position of the belt. The
height of the headrest (5) can still be adjusted while in the car.
Accertare che la cintura diagonale (12) scorra tra l’esterno della
spalla e il collo del bambino. Se necessario regolare l’altezza del
poggiatesta per cambiare la posizione della cintura. L’altezza del
poggiatesta (5) è regolabile anche in auto.
37
Page 38

IST IHR KIND RICHTIG GESICHERT? - FAHRZEUGGURT
GRUP PE 2/3 (15-36 KG)
Um die bestmögliche Sicherheit Ihres Kindes zu gewährleisten,
MAX
38
prüfen Sie bitte immer vor Beginn der Fahrt, ob…
• die Kopfstütze richtig eingestellt ist.
• der Beckengurt auf beiden Seiten des Sitzkissens in den rot
gekennzeichneten unteren Gurtführungen verläuft und stra
und tief sitzt.
• der Diagonalgurt auf der Gurtschlossseite auch in der unteren
Gurtführung des Sitzes verläuft.
• der Diagonalgurt durch die rot markierte obere Gurtführung
der Kopfstütze verläuft.
• der Diagonalgurt schräg nach hinten verläuft.
• der gesamte Gurt stra ist und nicht verdreht am Körper des
Kindes anliegt.
• bei Verwendung des Latch-Connect Systems: dass
der Sitz beidseitig mit den Konnektoren in den ISOFIX
Befestigungspunkten eingerastet ist und der Latch-Gurt gut
gestrat ist.
WARNUNG! Das Fahrzeuggurtschloss darf keines-
!
falls über die Armlehne reichen. Ist die Gurtpeitsche
zu lang, ist der Kindersitz für eine Verwendung auf
dieser Position im Fahrzeug nicht geeignet. Bitte
wenden Sie sich im Zweifelsfall an den Hersteller.
WARNUNG! Bitte lassen Sie Ihr Kind nie unbeauf-
!
sichtigt im Fahrzeug zurück. Die Kunststoteile des
Kindersitzes heizen sich in der Sonne auf. Ihr Kind
kann sich daran verbrennen. Schützen Sie Ihr Kind
und den Kindersitz vor intensiver Sonneneinstrahlung
(z.B. indem Sie ein helles Tuch über den Sitz legen).
Page 39

IS YOUR CHILD CORRECTLY SECURED? - VEHICLE
BELT GROUP 2/3 (15-36 KG)
To ensure optimum safety for your child, please always check
before commencing travel that...
• the headrest is adjusted correctly
• the lap belt has been fed through the lower red belt guides on
both sides of the booster seat.
• the diagonal belt on the belt buckle side has also been fed
through the lower red belt guide of the seat.
• the diagonal belt has been fed through the upper belt guide
marked red in the headrest.
• the diagonal belt is at a recline backwards.
• the entire belt is tightly against your child’s body and is not
twisted.
• if the Latch-Connect System is used: the seat has locked
into place on both sides with the latches into the ISOFIX
anchorage points and the system is tightened.
IL BAMBINO È MESSO IN SICUREZZA CORRETTAMENTE?
- CINTURA DELL’AUTOMOBILE GRUPPO 2/3 (15-36 KG)
Per garantire la sicurezza ottimale del bambino, prima di iniziare
il viaggio controllare sempre che...
• la cintura subaddominale passi attraverso le guide della
cintura inferiori su ambo i lati del cuscino di seduta.
• la cintura diagonale sul lato del fermaglio della cintura passi
attraverso la guida inferiore della cintura del seggiolino auto.
• la cintura diagonale passi attraverso la guida della cintura
colorata di rosso nel poggia-spalla.
• la cintura diagonale scorra verso il basso inclinata.
• l’intera cintura poggi tesa contro il corpo del bambino e non
sia attorcigliata.
• Se si utilizza Latch-Connect System: Il seggiolino sia
bloccato da entrambi i lati con i connettori inseriti nei punti di
ancoraggio ISOFIX e che il sistema sia ben saldo.
DEENIT
WARNING! The vehicle belt buckle must never cross
!
the arm rest. If the belt whip is too long, the child
seat is not suitable for use in this position in the vehicle. In case of doubt, please consult the manufacturer.
WARNING! Never leave your child unattended in the
!
car. The plastic parts in the child restraint system
heat up in sun and the child may sustain burns. Pro-
tect your child and the child seat from direct sun exposure (e.g. by covering it with a light colored cloth).
ATTENZIONE! La cintura dell’automobile non deve
!
mai incrociarsi sulle braccia del bambino. Se il sistema di cinture è troppo lungo il seggiolino non è adat-
to all’uso in questa posizione nel veicolo. In caso di
dubbi, consultare il rivenditore autorizzato.
ATTENZIONE! Non lasciare mai il bambino incusto-
!
dito nell’auto. Le parti in plastica del sistema di ritenuta per bambini si riscaldano al sole e il bambino
può riportare ustioni. Proteggere il seggiolino auto
dall’esposizione diretta del sole (ad es. con una copertura in tessuto dai colori chiari).
39
Page 40

ENTFERNEN DES BEZUGES
Der Bezug am Kindersitz besteht aus vier Teilen (Kopfstütze,
Schulterteil, Sitzkissen, Fangkörper).
Die Sitzbezüge sind an mehreren Stellen mit Druckknöpfen am
Kindersitz befestigt.
Sobald Sie alle Befestigungen gelöst haben, können die
Einzelteile abgezogen werden.
Um den Bezug wieder zu befestigen, verfahren Sie in
umgekehrter Reihenfolge.
WARNUNG! Der Kindersitz darf keinesfalls ohne
!
Bezug verwendet werden.
Entfernen des Bezugs von der Kopfstütze
Entfernen Sie den Bezug, indem Sie ihn nach vorne ziehen.
Entfernen des Bezugs vom Schulterteil
Lösen Sie die vier Druckknöpfe auf der Rückseite des
Kindersitzes. Entfernen Sie den Bezug.
40
Page 41

REMOVING THE SEAT COVER RIMOZIONE DELLA FODERA DEL SEGGIOLINO
The cover of the child seat consists of four parts (headrest,
shoulder part, booster, impact shield).
The four covers of the seat are held in position at several places by
press-studs (see image).
Once all studs have been released, the single parts of the cover
can be removed.
In order to put the covers back on the seat, proceed in the
reversed order as removing them.
La fodera del seggiolino è composta da cinque parti
(poggiatesta, fodera dell’aera della spalla, fodera della supercie
di seduta, cuscino di sicurezza).
Le quattro fodere del seggiolino sono tenute in posizione da
bottoni automatici (vedere gura).
Una volta sbloccati tutti gli automatici, le singole parti della
fodera possono essere rimosse.
Procedere in ordine inverso rispetto alla rimozione al ne di
ricollocare le fodere sul seggiolino.
DEENIT
WARNING! The child seat must never be used wit-
!
hout the cover.
Removing the cover from the head support
Remove the cover by pulling it forwards.
Removing the cover from the shoulder part
Release the four press-studs on the rear side of the child seat.
Remove the cover.
ATTENZIONE! Il seggiolino non deve mai essere
!
usato senza la fodera.
Rimozione della fodera dal poggiatesta
Rimuovere la fodera tirandola in avanti.
Rimozione della fodera dall’area della spalla
Rilasciare i quattro bottoni automatici sul retro. Rimuovere
la fodera.
41
Page 42

Entfernen des Bezugs von der Sitzäche
Lösen Sie die 2 Druckknöpfe des Sitzbezugs an der Rückseite.
Ziehen Sie nun den Bezug über die Armlehnen und entlang der
Sitzäche ab.
Entfernen des Bezugs vom Fangkörper
Ziehen Sie den Bezug um das Kissengehause ab.
REINIGUNG
HINWEIS! Bitte den Bezug vor der ersten Verwendung
waschen. Der Bezug darf nur bei 30 °C im Schonwaschgang
gewaschen werden. Sollten Sie mit mehr als 30°C waschen,
kann es zu Ausfärbungen des Bezugstoes kommen. Bitte
den Bezug gesondert von anderer Wäsche waschen und nicht
im Trockner trocknen! Den Bezug keinesfalls in der prallen
Sonne trocknen! Die Kunststoteile können mit einem milden
Reinigungsmittel und warmen Wasser gereinigt werden.
WARNUNG! Bitte auf keinen Fall scharfe Reini-
!
gungs- oder Bleichmittel verwenden!
42
Page 43

Removing the cover from the booster
Release the 2 press-studs of the seat cover at the front and the
back. Now, pull o the cover over the armrests and along the
seat surface.
Rimozione della fodera dalla supercie di seduta
Sbloccare i due bottoni automatici anteriori e posteriori della
fodera del sedile. Estrarre ora la fodera oltre i braccioli e lungo la
supercie di seduta.
DEENIT
Removing the cover from the impact shield
Pull o the cover around the cushion.
CLEANING PULIZIA
NOTE! Please wash the cover before you use it the rst
time. The cover may only be washed at 30 °C with a delicate
wash program. Washing at more than 30°C may result in
discolouration of the cover fabric. Please wash the cover
separately from other laundry and do not dry in the dryer! Never
dry the cover in direct sunlight! The plastic parts can be cleaned
with a mild cleaning agent and warm water.
WARNING! Never use harsh cleaning agents or
!
bleaches!
Rimozione della fodera dal cuscino di sicurezza
Estrarre la fodera dalla guida di attacco della fodera.
NOTA BENE! Consigliamo il lavaggio prima del primo utilizzo.
La fodera è lavabile solo a 30 °C con un programma di lavaggio
delicato. Il lavaggio oltre i 30 °C puo causare lo scolorimento del
tessuto della fodera. Lavare la fodera separatamente dagli altri
capi e non asciugare in asciugatrice! Non fare mai asciugare
la fodera alla luce solare diretta! Le parti in plastica possono
essere pulite con un detergente delicato e dell’acqua tiepida.
ATTENZIONE! Non usare mai detergenti aggressivi
!
o candeggine!
43
Page 44

PFLEGE
Um die größtmögliche Schutzwirkung Ihres Kindersitzes zu
gewährleisten, ist es unbedingt notwendig, dass Sie Folgendes
beachten:
• Alle wichtigen Teile des Kindersitzes sollten regelmäßig auf
Beschädigungen kontrolliert werden. Die mechanischen
Bauteile müssen einwandfrei funktionieren.
• Es ist unbedingt notwendig darauf zu achten, dass der
Kindersitz nicht zwischen harten Teilen wie Fahrzeugtür,
Sitzschiene usw. eingeklemmt wird und dadurch beschädigt
werden könnte.
• Der Kindersitz muss z.B. nach einem Sturz unbedingt vom
Hersteller überprüft werden.
Es ist darauf zu achten, dass nur ein original CYBEX Sitzbezug
verwendet wird, da auch der Bezug ein wesentlicher Bestandteil
der Funktion ist. Ersatzbezüge erhalten Sie im Fachhandel.
44
Page 45

CARE & MAINTENANCE CURA E MANUTENZIONE
To ensure that your child seat provides maximum protection, it is
imperative that you note the following:
Per garantire che il seggiolino ora la massima protezione è
imperativo osservare quanto segue:
DEENIT
• All major parts of the child seat should be checked regularly
for damage. The mechanical components must be free of
defects.
• It is absolutely necessary to ensure that the child seat is not
jammed between hard elements such as the vehicle door or
seat rail, which could potentially damage it.
• When exposed to extreme shock, e.g. after a crash, the child
seat must be checked by the manufacturer.
Ensure that only an original CYBEX seat cover is used, as the
cover is a key element of the seat’s function. Spare covers can
be obtained from a specialist retailer.
• Tutte le parti principali del seggiolino dovrebbero essere
controllate regolarmente alla ricerca di danni. I componenti
meccanici devono essere privi di difetti.
• E’ assolutamente necessario assicurare che il seggiolino non
sia incastrato tra elementi duri, quali la portiera o le guide dei
sedili, che potrebbero potenzialmente danneggiarlo.
• Se esposto a colpi estremi, ad esempio in caso di incidente, il
seggiolino deve essere controllato dal produttore.
Accertarsi di utilizzare solo una fodera del sedile CYBEX,
in quanto la fodera rappresenta un elemento chiave di
funzionamento del seggiolino. Le fodere di ricambio sono
ottenibili presso i rivenditori specializzati.
45
Page 46

VERHALTEN NACH EINEM UNFALL
WARNUNG! Aufgrund eines Unfalles können am
!
Kindersitz Beschädigungen auftreten, die mit bloßem Auge nicht erkennbar sind. Bitte tauschen
Sie nach einem Unfall unbedingt den Sitz aus. Im
Zweifelsfall wenden Sie sich bitte an den Händler
oder Hersteller.
PRODUKTLEBENSDAUER
Dieser Kindersitz ist so ausgelegt, dass er bei gewöhnlicher
Nutzung für die gesamte Produktlebensdauer von ca. 11
Jahren seine Eigenschaften erfüllt. Durch den langsamen
Verschleiß des Kunststos, beispielsweise durch
Sonneneinstrahlung (UV), können sich die Eigenschaften
des Produkts geringfügig verschlechtern. Da in Fahrzeugen
sehr große Temperaturschwankungen herrschen und andere
unvorhersehbare Belastungen auftreten können, ist es
notwendig, folgende Punkte zu beachten:
• Wenn das Fahrzeug längere Zeit der prallen Sonne
ausgesetzt ist, muss der Kindersitz aus dem Fahrzeug entfernt
oder mit einem hellen Tuch abgedeckt werden.
• Prüfen Sie regelmäßig alle Kunststo- und Metallteile des
Kindersitzes auf Beschädigung oder Veränderung von
Form oder Farbe. Stellen Sie eine Veränderung fest, ist der
Kindersitz zu entsorgen oder muss vom Hersteller geprüft und
gegebenenfalls ausgetauscht werden.
• Veränderungen des Stoes, insbesondere das Ausbleichen,
sind normal und stellen keine Beeinträchtigung dar.
46
Page 47

HOW TO ACT FOLLOWING AN ACCIDENT COME PROCEDERE IN SEGUITO A UN INCIDENTE
WARNING! An accident may cause damage to the
!
child seat that is not identiable with the naked eye.
Please replace the seat after an accident. In case
of doubt, please consult your dealer or the manufacturer.
PRODUCT LIFESPAN VITA UTILE DEL PRODOTTO
This child seat has been designed to be able to fulll its intended
functions by ordinary use for a product life span of approx.
11 years. Gradual wear of the plastic, for example caused by
exposure to sunlight (UV), can cause slight deterioration of the
product’s properties. Since very high temperature uctuations
and other unforeseeable stresses are common in vehicles, it is
necessary to observe the following points:
• If the vehicle is directly exposed to strong sunlight for long
periods, the child seat must be removed from the vehicle or
covered with a light cloth.
• Check all plastic and metal parts of the seat regularly for
damage or change of shape or colour. If you notice any
change in the child seat, the seat must be disposed or
checked and possibly replaced by the manufacturer.
• Changes to the fabric, especially fading, are normal when
used in a vehicle and do not impair the seat’s function.
ATTENZIONE! Un incidente può causare danni al
!
seggiolino non identicabili a occhio nudo. Sostituire il seggiolino dopo un incidente. In caso di dubbio,
consultare il proprio rivenditore o il produttore.
Questo seggiolino è progettato per soddisfare le proprie
speciche durante la sua intera vita utile, pari a circa 11 anni.
Nel tempo le parti in plastica tendono ad usurarsi, es. per
l’esposizione al sole (UV) e le caratteristiche del prodotto
possono subire leggere variazioni. Alla luce delle possibili
uttuazioni massicce di temperatura e degli sforzi imprevedili nei
veicoli, devono essere tenuti in considerazione i punti seguenti:
• Se il veicolo viene lasciato al sole per un periodo di tempo
prolungato, il seggiolino deve essere rimosso dall’abitacolo o
coperto con un panno chiaro.
• Controllare regolarmente tutte le parti di plastica e metallo del
seggiolino alla ricerca di danni, deformazioni o cambiamenti di
colore. Qualora si scopra qualsiasi cambiamento, il seggiolino
dovrà essere smaltito o controllato e, possibilmente, sostituito
dal produttore.
• Le variazioni del tessuto, in particolare la scoloritura, sono
perfettamente normali in caso di uso di un veicolo e non
intaccano il funzionamento del seggiolino.
DEENIT
47
Page 48

ENTSORGUNG
Am Ende der Produktlebensdauer des Kindersitzes ist eine
sachgemäße Entsorgung vorzunehmen. Die Abfalltrennung kann
kommunal unterschiedlich sein. Um eine vorschriftsgemäße
Entsorgung des Kindersitzes zu gewährleisten, setzen Sie sich
mit Ihrer kommunalen Abfallentsorgung bzw. Verwaltung Ihres
Wohnortes in Verbindung. Beachten Sie auf jeden Fall die
Entsorgungsbestimmungen Ihres Landes.
48
Page 49

DISPOSAL SMALTIMENTO
At the end of the child seat’s service life, it must be disposed of
correctly. The separation of waste may be handled dierently
from place to place. To ensure that the child seat is disposed of
in accordance with regulations, please contact your local waste
disposal institution or local council. Always observe the waste
disposal regulations of your country.
Al termine della sua vita utile il seggiolino dovrà essere
smaltito correttamente. La dierenziazione dei riuti potrebbe
avvenire con modalità diverse da luogo a luogo. Per garantire
lo smaltimento corretto preghiamo di contattare l’ucio di
competenza della vostra città. Seguire sempre le normative
vigenti nella vostra nazione.
DEENIT
49
Page 50

GARANTIEBEDINGUNGEN
Die nachfolgenden Garantiebestimmungen gelten nur in dem
Land, in dem dieses Produkt erstmalig über den Einzelhandel
an einen Verbraucher verkauft wurde. Die Garantie deckt
sämtliche Herstellungs- und Materialfehler ab, die im Zeitpunkt
des Kaufs bestanden haben oder die innerhalb von drei (3)
Jahren nach dem Erstverkauf dieses Produkts über den
Einzelhandel an einen Verbraucher in Erscheinung getreten
sind (Herstellergarantie). Tritt während der Garantiezeit ein
Herstellungs- und Materialfehler auf, wird das Produkt kostenlos
repariert oder – nach unserem freien Ermessen – gegen
ein neues ausgetauscht. Um Leistungen im Rahmen dieser
Garantie in Anspruch nehmen zu können, muss das Produkt
an den Einzelhändler zurückgegeben werden, der es erstmalig
verkauft hat und ein Nachweis über den Kauf (Kaufbeleg
oder Rechnung) im Original vorgelegt werden, welcher das
Kaufdatum, Namen und Adresse des Händlers, sowie die
Produktbezeichnung aufzeigt. Der Anspruch aus diesem
Garantieversprechen besteht nicht, wenn das Produkt an den
Hersteller oder irgendeine andere Person als den Einzelhändler,
der es erstmalig verkauft hat, zum Zweck der Inanspruchnahme
der Garantieleistung geschickt wird. Die Garantie gilt nur, wenn
das Produkt nach dem Kauf umgehend auf Vollständigkeit,
Herstellungs- und Materialfehler überprüft wurde. Wurde das
Produkt im Versandhandel gekauft, ist es umgehend nach
Erhalt auf Vollständigkeit, Herstellungs- und Materialfehler zu
überprüfen. Falls Schäden vorhanden sind, darf das Produkt
nicht mehr benutzt werden und muss umgehend an den
Händler, der es erstmalig verkauft hat, zurückgegeben werden.
Im Garantiefall muss das Produkt in einem vollständigen und
sauberen Zustand zurückgegeben werden. Bitte lesen Sie
vor einer Kontaktaufnahme mit dem Händler sorgfältig die
Gebrauchsanleitung. Die Garantie deckt keine Schäden ab,
50
die durch Fehlgebrauch, äußere Einüsse (Wasser, Feuer,
Page 51

WARRANTY CONDITIONS CONDIZIONI DI GARANZIA
The following warranty conditions only apply to the country in
which this product was rst sold through retail channels to a
consumer. This warranty covers all manufacturing and material
defects that existed at the time of purchase or which manifest
themselves within three (3) years of rst sale of this product
via retail channels to a consumer (manufacturer warranty). If
a manufacturing or material defect arises during the warranty
period, the product will be repaired at no charge or – at our
discretion – may be replaced by a new one. In order to make
a claim on this warranty, the product must be returned to the
retailer that rst sold it and the original proof of purchase (receipt
or invoice), containing the date of purchase, name and address
of the retailer, and the product name, must be presented. No
claims may be made on this warranty if the product is sent to
the manufacturer or any other person than the retailer having
rst sold it for the purpose of making a claim on the warranty.
The warranty only applies if the product was checked for
completeness, manufacturing defects and material defects
immediately upon purchase. If the product was purchase by
way of a mail order outlet, it must be checked for completeness,
manufacturing defects and material defects immediately upon
receipt. If damage arises, the product may no longer be used
and must be returned to the retailer that original sold it. When
claiming on the warranty, the product must be returned in a
complete and clean state. Please read the usage instructions
carefully before contacting the retailer. The warranty does not
cover damage caused by misuse, external inuences (water,
re, trac accidents etc.) or normal wear and tear. Claims on
the warranty will only be honoured if the product is treated
and used in accordance with the usage instructions, repairs
and modications are only performed by persons authorised
to do so, and only original parts and accessories are used.
This warranty does not nullify or limit in any way any consumer
La seguente garanzia vale unicamente nella nazione in cui il
prodotto è stato originariamente venduto da un rivenditore al
consumatore. La garanzia copre eventuali difetti di fabbricazione
e di materiali riscontrati all’acquisto o entro un periodo di tre (3)
anni dalla data di acquisto presso il rivenditore (garanzia del
produttore). Qualora, durante il periodo di garanzia, si presenti
un difetto di produzione o dei materiali, il prodotto verrà riparato
gratuitamente o sostituito con uno nuovo a nostra discrezione.
Per avere diritto alla garanzia è necessario riportare o spedire
il prodotto al rivenditore presso il quale è stato acquistato ed
è indispensabile fornire la prova di acquisto (scontrino scale,
fattura, ecc.) in originale. La prova d’acquisto dovrà contenere
indicati la data di acquisto, il nome e indirizzo del rivenditore e
identicativo del prodotto. Non sono ammesse richieste relative
a questa garanzia qualora il prodotto, allo scopo di eettuare
una richiesta di garanzia, sia inviato al produttore o a qualsiasi
altra persona diversa dal dettagliante che lo ha venduto per la
prima volta. La garanzia è valida soltanto se il prodotto è stato
sottoposto ad un accurato controllo di completezza e funzionalità
all’acquisto e se eventuali manchevolezze di produzione o
di materiali sono state prontamente segnalate. Se il prodotto
è stato acquistato tramite un canale di vendita a distanza,
dovrà essere controllato immediatamente al momento del
ricevimento per vericarne la completezza ed eventuali difetti
di produzione o di materiali. In caso si riscontri qualsiasi difetto/
danneggiamento del prodotto invitiamo a non utilizzarlo e a
restituirlo imediatamente al rivenditore presso il quale è stato
acquistato. I diritti di garanzia sono validi soltanto se il prodotto è
reso pulito e completo in ogni sua parte. Leggere attentamente
le istruzioni per l’uso prima di contattare il dettagliante. La
garanzia non copre danni provocati da utilizzo improprio o
da eventi fortuiti e cause ambientali (acqua, fuoco, incidenti
stradali, ecc.) o dal normale deperimento d’uso. La garanzia è
DEENIT
51
Page 52

Verkehrsunfälle o.ä.) oder normalen Verschleiß entstanden
sind. Die Garantie wird nur gewährt, wenn das Produkt in
Übereinstimmung mit der Gebrauchsanweisung behandelt und
benutzt wurde, Reparaturen oder Veränderungen ausschließlich
durch Personen vorgenommen wurden, die hierzu befugt waren
und stets nur Original Bau- und Zubehörteile verwendet wurden.
Durch diese Garantie werden weder die auf Grundlage der
jeweils anwendbaren Gesetze bestehenden Verbraucherrechte
noch Rechte gegen den Verkäufer wegen der Vertragswidrigkeit
des Produkts ausgeschlossen, begrenzt oder in anderer Weise
eingeschränkt.
52
Page 53

rights or rights against the seller based on infringement of the
purchase agreement granted by applicable legislation.
valida soltanto per prodotti usati in conformità a quanto stabilito
nel manuale istruzioni, se eventuali modiche o riparazioni
sono state eettuate da personale autorizzato e se sono state
utilizzate solo parti ed accessori originali. Questa garanzia non
esclude, limita o comunque pregiudica eventuali diritti legali dei
consumatori, comprese istanze in caso di torto e in caso di una
violazione del contratto, che l’acquirente può avere nei confronti
del rivenditore.
DEENIT
53
Page 54

54
PALLAS B-FIX
UN-R44-04
UNIVERSAL
SEMI-UNIVERSAL
9 - 18 kg
04301395
CYBEX GmbH
Riedingerstr. 18, 95448 Bayreuth
Germany
SOLUTION B-FIX
UN-R44-04
UNIVERSAL
SEMI-UNIVE RSAL
15 – 36 kg
04301395
CYBEX GmbH
Riedingerstr. 18, 95448 Bayreuth
Germany
HOMOLOGATION
UN R-44/04
CYBEX Pallas B-x - Groupe 1, 9 à 18 kg
CYBEX Solution B-x - Groupe 2/3, 15 à
36 kg
Élévateur de siège avec dossier et appui-tête,
avec bouclier d’impact dans le Groupe 1.
Recommandé pour :
Âge : d'environ 9 mois à 12 ans
Poids : 9 à 36 kg
Convient uniquement aux sièges de véhicules
munis de ceintures trois points automatiques
agréées conformément au règlement NU R16
ou à une norme comparable.
CERTIFICAAT
UN R-44/04
CYBEX Pallas B-x - groep 1, 9 tot 18 kg
CYBEX Solution B-x - groep 2/3, 15 tot
36 kg
Zittingverhoger met rug- en hoofdsteun, met
botsscherm in groep 1
Aanbevolen voor:
Leeftijd: van ongeveer 9 maanden tot 12 jaar
Gewicht: 9-36 kg
Alleen geschikt voor autostoelen met
automatische driepuntsgordels goedgekeurd
volgens VN-reglement 16 of een vergelijkbare
standaard.
CERTYFIKACJA
UN R-44/04
CYBEX Pallas B-x – grupa 1, 9 do 18 kg
CYBEX Solution B-x – grupa 2/3, 15 do
36 kg
Podstawka samochodowa z oparciem i
zagłówkiem,
w grupie 1 wyposażona w osłonę
przeciwuderzeniową.Zalecana dla:Wiek: od
około 9 miesięcy do 12 lat
Ciężar: 9-36 kg
Przeznaczona wyłącznie do siedzeń w pojazdach
z automatycznymi pasami trzypunktowymi,
zatwierdzonymi zgodnie z regulaminem nr 16
ONZ lub innym porównywalnym standardem.
CHER CLIENT
Nous vous remercions pour votre achat d’un Pallas B-x. Nous
pouvons vous assurer que sécurité, confort et facilité d’emploi
ont été nos plus hautes priorités lors du développement du
siège auto pour enfant. Ce produit est fabriqué sous un contrôle
de qualité exceptionnel et est conforme aux exigences de
sécurité les plus strictes.
ATTENTION ! An d’assurer une protection adéquate
!
de votre enfant, il est absolument essentiel d’utiliser
le siège auto pour enfant comme décrit dans ce
manuel.
REMARQUE ! Remarque ! En raison des exigences spéciques
de chaque pays (par ex. couleur de l'étiquetage du siège auto
pour enfant), l’aspect extérieur des fonctionnalités du produit
peut varier. Toutefois, ceci n'aecte pas le fonctionnement
correct du produit.
REMARQUE ! Toujours garder ce Manuel d’instructions sous
la main dans le compartiment qui a été fourni à cet eet sur le
siège auto pour enfant.
Page 55

BESTE KLANT
Hartelijk dank voor uw aankoop van de Pallas B-x. We garanderen u dat veiligheid, comfort en gebruiksgemak voorop heb-
ben gestaan bij het ontwikkelen van het kinderzitje. Dit product
is gemaakt onder uitzonderlijke kwaliteitscontrole en voldoet aan
de strengste veiligheidsvoorwaarden.
WAARSCHUWING! Het is van het grootste belang dat
!
u het kinderzitje gebruikt zoals in deze handleiding
wordt beschreven zodat uw kind goed beschermd
blijft.
LET OP! Vanwege landspecieke voorwaarden (bijv. kleurlabelling op het kinderzitje), kunnen de productkenmerken in hun
externe uiterlijk verschillen. Dit heeft echter geen invloed op de
correcte werking van het product.
SZANOWNI PAŃSTWO
Dziękujemy za zakup fotelika Pallas B-x. Chcemy Państwa
zapewnić, że bezpieczeństwo, komfort i prostota użytkowania
były wartościami, którymi kierowaliśmy się podczas tworzenia
fotelika dla dziecka. Produkt ten jest produkowany z zastosowaniem nadzwyczajnej kontroli jakości i spełnia najsurowsze
wymagania bezpieczeństwa.
OSTRZEŻENIE! Aby dziecko było odpowiednio chro-
!
nione, bezwzględnie konieczne jest używanie fotelika dla dziecka w sposób opisany w niniejszym
podręczniku.
UWAGA! Ze względu na wymagania specyczne dla danego
kraju (np. kolorowe oznaczenia na foteliku dla dziecka), cechy
produktu mogą różnić się wyglądem zewnętrznym. Jednakże nie
wpływa to na prawidłowe funkcjonowanie produktu.
FRNLPL
OPMERKING! Bewaar deze gebruikshandleiding altijd in het
gedeelte dat voor dit doel op het kinderzitje aanwezig is.
UWAGA! Niniejszy podręcznik należy przechowywać zawsze
pod ręką, w przeznaczonym do tego schowku w foteliku dla
dziecka.
55
Page 56

FR TABLE DES MATIÈRES
PREMIÈRE INSTALLATION ...........................................................56
PLACEMENT CORRECT DU SIÈGE DANS LE VÉHICULE.......58
SÉCURITÉ DANS LE VÉHICULE ..................................................62
PLACEMENT DU SIÈGE DANS LE VÉHICULE ...........................62
FIXATION DU SIÈGE AUTO POUR ENFANT
À L'AIDE DU LATCH-CONNECT-SYSTEM ...................................66
DÉPOSE DU SIÈGE AUTO POUR ENFANT ................................68
ADAPTATION À LA TAILLE DU CORPS .......................................70
RÉGLAGE DU BOUCLIER D’IMPACT - GROUPE 1
(9 À 18 KG) ........................................................................................70
FIXATION AVEC LE BOUCLIER D’IMPACT
- GROUPE 1 (9 À 18 K G) .................................................................72
VOTRE ENFANT EST-IL CORRECTEMENT ATTACHÉ ?
- GROUPE BOUCLIER D’IMPACT (9 À 18 KG) ............................74
PASSAGE DE PALLAS B-FIX À SOLUTION B-FIX
(GROUPE 1 À GROUPE 2/3) ..........................................................76
FIXATION DE L’ENFANT, GROUPE 2/3 (15 À 36 KG) .................78
VOTRE ENFANT EST-IL CORRECTEMENT ATTACHÉ ?
- CEINTURE DU VÉHICULE GROUPE 2/3 (15 À 36 KG) ............82
DÉPOSE DE LA HOUSSE DU SIÈGE ...........................................84
NETTOYAGE ....................................................................................86
SOIN ET ENTRETIEN .....................................................................88
COMMENT AGIR À LA SUITE D'UN ACCIDENT .........................90
DURÉE DE VIE DU PRODUIT .......................................................90
ÉLIMINATION ...................................................................................92
56
CONDITIONS DE LA GARANTIE ..................................................94
Page 57

NL INHOUD PL SPIS TREŚCI
EERSTE INSTALLATIE ...................................................................57
PLAATS HET KINDERZITJE CORRECT IN HET VOERTUIG ...59
VEILIGHEID IN DE AUTO ...............................................................63
PLAATS HET KINDERZITJE IN DE AUTO ...................................63
HET KINDERZITJE VASTZETTEN MET HET
LATCH-CONNECT SYSTEM ..........................................................67
VERWIJDEREN VAN HET KINDERZITJE ....................................69
AANPASSEN AAN LICHAAMSLENGTE .......................................71
HET BOTSSCHERM AANPASSEN - GROEP 1 (9-18 KG) ..........71
VASTMAKEN MET HET BOTSSCHERM - GROEP 1
(9-18 KG) ...........................................................................................73
IS UW KIND VEILIG GEPLAATST?
- BOTSSCHERM GROEP (9-18KG) ...............................................75
WISSELEN VAN PALLAS B-FIX NAAR SOLUTION B-FIX
(VAN GROEP 1 NAAR GROEP 2/3) ...............................................77
VASTZETTEN VAN HET KIND GROEP 2/3 (15-36 KG) ...............79
IS UW KIND VEILIG GEPLAATST? -
VEILIGHEIDSGORDEL GROEP 2/3 (15-36 KG) ...........................83
DE BEKLEDING VERWIJDEREN ..................................................85
REINIGING .......................................................................................87
VERZORGING & ONDERHOUD ....................................................89
HOE TE HANDELEN NA EEN ONGELUK ....................................91
LEVENSDUUR VAN HET PRODUCT ............................................91
WEGGOOIEN ...................................................................................93
GARANTIEVOORWAARDEN .........................................................95
PIERWSZY MONTAŻ ....................................................................57
PRAWIDŁOWY SPOSÓB USTAWIANIA FOTELIKA W
POJEŹDZIE....................................................................................59
BEZPIECZEŃSTWO W POJEŹDZIE ..........................................63
UMIESZCZANIE FOTELIKA W POJEŹDZIE .............................63
MOCOWANIE FOTELIKA DLA DZIECKA
ZA POMOCĄ SYSTEMU LATCH-CONNECT ............................. 67
DEMONTAŻ FOTELIKA DLA DZIECKA ......................................69
DOSTOSOWANIE DO ROZMIARU CIAŁA ................................71
REGULACJA OSŁONY PRZECIWUDERZENIOWEJ
– GRUPA 1 (9-18 KG) .................................................................... 71
MOCOWANIE PASÓW Z OSŁONĄ PRZECIWUDERZENIOWĄ
– GRUPA 1 (9-18 KG) ................................................................... 73
CZY DZIECKO JEST PRAWIDŁOWO ZAPIĘTE?
– GRUPA WYMAGAJĄCA STOSOWANIA OSŁONY
PRZECIWUDERZENIOWEJ (9-18 KG) ...................................... 75
ZMIANA FOTELIKA Z MODELU PALLAS B-FIX
NA SOLUTION B-FIX (Z GRUPY 1 DO GRUPY 2/3) .................77
MOCOWANIE FOTELIKA DLA DZIECKA
W GRU PIE 2/3 (15-36 KG) ............................................................79
CZY DZIECKO JEST PRAWIDŁOWO ZAPIĘTE?
– PASY BEZPIECZEŃSTWA POJAZDU DLA GRUPY 2/3
(15-36 KG) ...................................................................................... 83
ZDEJMOWANIE POKROWCA FOTELIKA .................................85
CZYSZCZENIE ..............................................................................87
PIELĘGNACJA I KONSERWACJA ..............................................89
PRAWIDŁOWE ZACHOWANIE PO WYPADKU ........................91
OKRES UŻYTKOWANIA PRODUKTU ........................................91
UTYLIZACJA .................................................................................93
WARUNKI GWARANCJI ..............................................................95
FRNLPL
57
Page 58

PREMIÈRE INSTALLATION
17
1
7
16
1
Le siège pour enfant se compose d'un siège rehausseur
(7), d'un dossier (1) et d'un bouclier d'impact (6). Seule la
combinaison de ces trois éléments ore la meilleure protection
et le meilleur confort à votre enfant.
ATTENTION ! Les pièces du CYBEX Pallas B-x ne
!
doivent pas être utilisées seules ou en combinaison
avec des rehausseurs, dossiers, boucliers d'impact
ou appui-têtes d'autres fabricants ou de diérentes
gammes de produits. Dans de tels cas, l’homologation expire immédiatement.
Connecter le dossier (1) au rehausseur (7) en accrochant l'ergot
de guidage (16) sur l'axe (17) du rehausseur (7). Placer le
bouclier d'impact 6 sur le rehausseur.
7
ATTENTION ! S'assurer que les diérents compo-
!
sants du siège pour enfant ne sont jamais coincés
ou comprimés (p. ex. coincés dans la porte de la voiture ou lors d’un réglage du siège arrière).
NOTE ! Toujours garder ces instructions sous la main (p. ex.
dans le compartiment désigné à la partie inférieure du siège
rehausseur).
6
58
Page 59

EERSTE INSTALLATIE
Het kinderzitje bestaat uit een booster zitting (7), een rugleuning
(1) en een veiligheidskussen (6). Alleen de combinatie van deze
drie delen biedt de beste bescherming en comfort voor uw kind.
PIERWSZY MONTAŻ
Na fotelik samochodowy dla dziecka składają się podnośnik
fotela (7), oparcie (1) i zderzak (6). Tylko połączenie tych trzech
części zapewnia dziecku najlepszą ochronę i komfort.
WAARSCHUWING! De onderdelen van de CYBEX
!
Pallas B-x mogen niet alleen of in combinatie met
zitverhogers, rugsteunen, veiligheidskussen of
hoofdsteunen van andere fabrikanten of andere productseries gebruikt worden. De certicering vervalt
in deze gevallen onmiddellijk.
Sluit de rugsteun (1) aan op de zitverhoger (7) met behulp van
het geleiderlipje (16) op de as (17) van de zitverhoger (7). Plaats
het veiligheidskussen (6) op de zitverhoger.
WAARSCHUWING! Zorg er altijd voor dat de afzon-
!
derlijke onderdelen van het kinderzitje nooit samengedrukt worden of vast komen te zitten (bijv. door
het dichtslaan van de autodeur of door de stoel naar
achteren te zetten).
OPMERKING!Zorg dat u deze instructies altijd bij de hand
heeft (bijv. in het gedeelte dat voor dit doel op de booster zitting
aanwezig is).
OSTRZEŻENIE! Części fotelika CYBEX Pallas B-x
!
nie wolno stosować pojedynczo lub w połączeniu
z podnośnikami fotela, oparciami, zderzakiem lub
zagłówkami innych producentów lub produktów innych serii. Taka sytuacja automatycznie unieważnia
certykat.
Połączyć oparcie (1) z podnośnikiem fotela (7), zahaczając
uchwyt wprowadzający (16) o oś (17) siedziska (7). Umieścić
zderzak (6) na podnośniku fotela.
OSTRZEŻENIE! Należy zawsze upewnić się, że po-
!
szczególne elementy fotelika dla dziecka nie zostały
ściśnięte lub zablokowane (np. poprzez zablokowa-
nie w drzwiach samochodowych lub podczas regu-
lacji tylnego siedzenia).
UWAGA! Należy zawsze mieć ten podręcznik pod ręką (np.
przeznaczonym do tego schowku w spodzie podnośnika fotela).
FRNLPL
59
Page 60

PLACEMENT CORRECT DU SIÈGE DANS LE VÉHICULE
Le siège auto pour enfant avec Latch-Connect
System rangé peut être utilisé sur tous les sièges
de véhicules munis de ceintures de sécurité trois
points automatiques, qui sont agréés pour utilisation
« universelle » dans le manuel du véhicule.
ATTENTION ! Le siège n'est pas conçu pour être utili-
!
sé avec une ceinture à deux points ou une ceinture abdominale. Si le siège est xé à l'aide d'une ceinture à
deux points, un accident peut entraîner des blessures
graves, voire mortelles pour l'enfant.
Une homologation « semi-universelle » est accordée aux
systèmes de retenue qui sont connectés à la voiture par le biais
du Latch-Connect-System. Pour cette raison, le Latch-Connect-
System peut seulement être utilisé dans certains véhicules.
Veuillez vous référer à la liste incluse de types de véhicules pour
les véhicules autorisés. Vous pouvez en obtenir la version la
plus récente sur www.cybex-online.com.
Dans des cas exceptionnels, le siège auto pour enfant peut
aussi être utilisé sur le siège du passager avant. Veuillez noter
dans un tel cas :
• Dans les voitures avec airbags, pousser le siège du passager
aussi loin que possible vers l’arrière. À cet eet, s'assurer
néanmoins que le point de pivot supérieur de la ceinture
de sécurité se trouve derrière le point d'alimentation de la
ceinture du siège auto pour enfant, et que cette ceinture
puisse se rétracter normalement.
• Toujours se conformer aux recommandations du constructeur
du véhicule.
60
Page 61

PLAATS HET KINDERZITJE CORRECT IN HET VOERTUIG
Het kinderzitje met opgeborgen Latch-Connect
System-systeem kan gebruikt worden op alle
autostoelen met automatische driepuntsgordels die in
de handleiding van het voertuig goedgekeurd zijn voor
“universeel” gebruik.
WAARSCHUWING! Het zitje is niet geschikt voor ge-
!
bruik met een tweepunts- of schootgordel. Als het zitje
met een tweepuntsgordel wordt vastgezet, dan kan een
ongeluk leiden tot ernstig of fataal letsel voor het kind.
Een “semi-universeel” certicaat wordt uitgegeven aan
bevestigingssystemen die aangesloten zijn op de auto via
het Latch-Connect-System. Daarom kan het Latch-Connect
System alleen in bepaalde voertuigen gebruikt worden. Kijk
in de bijgesloten lijst met voertuigtypen voor goedgekeurde
voertuigen. Kijk voor de meest up-to-date versie op
www.cybex-online.com.
In uitzonderlijke gevallen mag het kinderzitje ook op de stoel van
de bijrijder worden gebruikt. Let in dit geval op het volgende:
• Bij auto's met een airbag moet de bijrijdersstoel zover mogelijk
naar achteren geplaatst worden. Let er in dit geval wel op dat
het bovenste scharnierpunt van de veiligheidsriem achter het
ingangspunt van de riem van het kinderzitje geplaatst is zodat
de riem weer correct kan oprollen.
• Volg de aanbevelingen van de autofabrikant altijd op.
PRAWIDŁOWY SPOSÓB USTAWIANIA FOTELIKA W
POJEŹDZIE
Fotelik dla dziecka, wyposażony w system LatchConnect, można używać we wszystkich pojazdach
z automatycznymi pasami trzypunktowymi,
zatwierdzonymi wg podręcznika obsługi pojazdu do
„uniwersalnego” użytkowania.
OSTRZEŻENIE! Fotelika nie należy używać z dwu-
!
punktowym lub biodrowym pasem bezpieczeństwa.
Jeżeli fotelik jest zamocowany dwupunktowym pasem,
wypadek może skutkować poważnymi lub nawet śmiertelnymi obrażeniami dziecka.
Certykacja „półuniwersalna” jest przeznaczona do systemów
przytrzymujących, które są podłączone do samochodu
systemem Latch-Connect. Z tego powodu system Latch-
Connect można stosować wyłącznie w niektórych pojazdach.
Należy odnieść się do załączonej listy typów pojazdów, w której
znajdują się pojazdy zatwierdzone. Najnowsza wersja tego
dokumentu znajduje się na stronie www.cybex-online.com.
W wyjątkowych przypadkach z fotelika dla dziecka można
również korzystać na przednim fotelu pasażera. W takim
przypadku należy zwrócić uwagę na następujące kwestie:
• W samochodach wyposażonych w poduszki powietrzne
należy odsunąć fotel pasażera do końca. W takiej
sytuacji należy upewnić się, że górny punkt obrotu pasa
bezpieczeństwa znajduje się za punktem podawania pasa
fotelika dla dziecka, tak aby pas odciągał się prawidłowo.
• Należy zawsze przestrzegać zaleceń producenta pojazdu.
FRNLPL
61
Page 62

ATTENTION ! La ceinture diagonale doit passer in-
!
clinée vers l’arrière et ne doit jamais passer inclinée
vers l’avant au point d’ancrage supérieur de la ceinture dans votre véhicule. S'il est impossible de régler le siège de cette manière, par ex. en poussant le
siège auto pour enfant vers l'avant ou en l'utilisant
sur un autre siège, ce siège auto pour enfant ne convient pas à votre véhicule.
ATTENTION ! Des valises ou autres objets présents
!
dans le véhicule, qui peuvent causer des blessures
en cas d'accident, doivent toujours être solidement
attachés. Autrement, ils peuvent être projetés et causer des blessures mortelles.
ATTENTION ! Si les sièges du véhicule sont dispo-
!
sés transversalement au sens de la marche, l'utilisation du siège auto pour enfant n’est pas permise.
L’utilisation du siège auto pour enfant est permise sur les sièges faisant face vers l’arrière, par ex.
dans une camionnette ou minibus, à condition que
le transport d'un adulte soit autorisé sur ce siège.
Noter que l'appui-tête du véhicule ne doit pas être retiré lors d’une installation sur un siège faisant face
vers l’arrière ! Même s’il n'est pas utilisé, le siège
auto pour enfant doit toujours être attaché à l’aide
de la ceinture de sécurité.
REMARQUE ! Ne jamais laisser votre enfant sans surveillance
dans le véhicule.
62
Page 63

WAARSCHUWING! De diagonale gordel moet ao-
!
pend teruggaan en mag nooit naar voren, naar het
bovenste gordelpunt in uw auto lopen. Als het niet
mogelijk is om het zitje op deze manier aan te pas-
sen, bijv. door het kinderzitje naar voren te duwen of
op een andere stoel te gebruiken, dan is dit kinder-
zitje wellicht niet geschikt voor uw auto.
OSTRZEŻENIE! Pas skośny musi przebiegać z tyłu
!
pod kątem, nigdy nie może przebiegać z przodu do
górnego punktu pasa. Jeżeli fotelika dla dziecka nie
można dostosować w taki sposób, np. przesuwając
go do przodu lub używając na innym fotelu, oznacza to, że fotelik dla dziecka nie jest przeznaczony do
użytku z danym pojazdem.
WAARSCHUWING! Bagage of andere voorwerpen
!
in de auto kunnen bij een ongeluk letsel veroorzaken
en moeten dus altijd goed vastgezet worden. Anders
kan uw kind uit het zitje geworpen worden, en dit
kan resulteren in dodelijk letsel.
WAARSCHUWING! Het kinderzitje mag niet gebru-
!
ikt worden als het zitje naar voren, richting verkeer,
geplaatst is. Het gebruik van het kinderzitje is toegestaan op stoelen die naar achteren zijn gekeerd, bijv.
in een busje of minibus, vooropgesteld dat gebruik van de stoel is toegestaan voor volwassenen. Let
op, de hoofdsteun van de auto mag niet verwijderd
worden bij het plaatsen van een naar achteren gekeerde stoel! Het kinderzitje moet altijd met de veiligheidsgordel vastgezet worden, ook als het niet in
gebruik is.
OPMERKING! Laat uw kind nooit alleen achter in de auto.
OSTRZEŻENIE! Bagaż lub inne przedmioty obec-
!
ne w pojeździe, które mogą powodować urazy w
razie wypadku, powinny być zawsze zabezpieczone. W przeciwnym razie mogą zostać wyrzucone,
powodując śmiertelne obrażenia.
OSTRZEŻENIE! Fotelika dla dziecka nie wolno
!
używać na siedzeniach przeznaczonych dla dzieci,
zwróconych w kierunku jazdy. Korzystanie z fotelika dla dziecka dozwolone jest wyłącznie na siedzeniach skierowanych tyłem do kierunku jazdy, np. w
vanach lub minibusach, pod warunkiem, że miejsce
dozwolone jest do przewozu osoby dorosłej. Należy
zwrócić uwagę na fakt, że nie wolno zdejmować
zagłówka pojazdu podczas mocowania fotelika
zwróconego tyłem do kierunku jazdy! Fotelik dla
dziecka musi być zawsze zabezpieczony pasem
bezpieczeństwa, również gdy nie jest w użyciu.
UWAGA! Pod żadnym pozorem nie wolno zostawiać dziecka w
pojeździe bez opieki.
FRNLPL
63
Page 64

SÉCURITÉ DANS LE VÉHICULE
ATTENTION ! Même lorsqu'il n'est pas utilisé, le
!
siège auto pour enfant doit toujours être correctement attaché avec la ceinture de sécurité du véhicule. En cas de freinage d'urgence ou d'accident, un
siège auto pour enfant non attaché peut vous blesser ou blesser d'autres passagers.
An de garantir la meilleure sécurité possible pour tous les
passagers, s'assurer que ...
• les dossiers rabattables dans le véhicule sont verrouillés dans
leur position verticale.
• lors de l'installation du siège auto pour enfant sur le siège du
passager avant, reculer au maximum le siège du passager.
• vous avez correctement attaché tous les objets susceptibles
de causer des dommages en cas d'accident.
1
• tous les passagers du véhicule ont attaché leurs ceintures
de sécurité.
2
64
PLACEMENT DU SIÈGE DANS LE VÉHICULE
Placer le siège auto pour enfant sur le siège approprié dans la
voiture.
• Veiller à ce que toute la surface du dossier (1) du CYBEX
Pallas B-x soit placée contre le dossier du siège du véhicule.
Lorsque vous utilisez le Latch-Connect-System, vous pouvez
régler la distance à l'aide du dispositif de réglage (2).
• Si l'appui-tête du véhicule est un obstacle, le tirer jusqu’en
haut ou le retirer complètement (pour les exceptions
aérentes,se reporter à la section (« PLACEMENT CORRECT
DU SIÈGE DANS LE VÉHICULE »).
Page 65

VEILIGHEID IN DE AUTO
BEZPIECZEŃSTWO W POJEŹDZIE
WAARSCHUWING! Het kinderzitje moet altijd cor-
!
rect met de veiligheidsgordel van de auto vastgezet
worden, ook als het niet in gebruik is. Bij een noodstop of een ongeluk kan een kinderzitje dat niet goed
vast zit letsel veroorzaken voor andere passagiers
of uzelf.
Om op de beste manier de veiligheid van alle passagiers te
garanderen, zorgt u dat...
• de opvouwbare rugsteunen in de auto in rechtopstaande
positie zijn geplaatst.
• bij het plaatsen van het kinderzitje op de bijrijdersstoel, de
autostoel in de achterste positie is geplaatst.
• u alle objecten die letsel kunnen veroorzaken bij ongelukken
goed heeft vastzet.
• alle passagiers in de auto hun veiligheidsgordel dragen.
PLAATS HET KINDERZITJE IN DE AUTO
Plaats het kinderzitje op de juiste stoel in de auto.
• Zorg ervoor dat het gehele oppervlakte van de rugsteun (1)
van de CYBEX Pallas B-x geplaatst is tegen de rugsteun van
de autostoel. Bij het gebruik van het Latch-Connect System
kunt u de afstand aanpassen met de regelaar (2).
• Als de hoofdsteun van de auto in de weg zit, trek deze
dan helemaal uit of verwijder de hoofdsteun volledig (voor
uitzonderingen hierop, zie het hoofdstuk “PLAATS HET
KINDERZITJE CORRECT IN HET VOERTUIG.")
OSTRZEŻENIE! Fotelik dla dziecka musi być zawsze
!
prawidłowo zabezpieczony pasem bezpieczeństwa,
nawet gdy nie jest użytkowany. W przypadku hamowania awaryjnego lub wypadku niezapięty fotelik dla
dziecka może spowodować obrażenia pasażerów
lub kierowcy.
Aby zagwarantować największe bezpieczeństwo wszystkich
pasażerów, należy upewnić się, że...
• składane oparcia w pojeździe są zablokowane w pozycji
wyprostowanej.
• podczas montażu fotelika dla dziecka na przednim siedzeniu
pasażera, należy wyregulować siedzenie pojazdu, ustawiając
je w położeniu najbardziej odsuniętym do tyłu.
• prawidłowo zabezpieczono wszystkie przedmioty, które
mogłyby spowodować urazy w razie wypadku.
• wszyscy pasażerowie mają zapięte pasy.
UMIESZCZANIE FOTELIKA W POJEŹDZIE
Umieścić fotelik dla dziecka na odpowiednim fotelu/siedzeniu w
samochodzie.
• Należy zawsze upewnić się, że cała powierzchnia oparcia (1)
fotelika CYBEX Pallas B-x leży na oparciu siedzenia pojazdu.
Stosując system Latch-Connect, użytkownik może dostosować
regulatorem odległość (2).
• Gdy zagłówek pojazdu jest wsunięty do końca, należy go
całkowicie wysunąć lub zdjąć (wyjątki od tej reguły podano w
rozdziale „PRAWIDŁOWY SPOSÓB USTAWIANIA FOTELIKA
W POJEŹDZIE”).
FRNLPL
65
Page 66

ATTENTION ! Toute la surface complète du dossier
!
du siège auto pour enfant CYBEX doit être adossée
au dossier du siège du véhicule. An d'assurer une
protection maximale pour votre enfant, le siège du
véhicule doit être en position verticale normale !
REMARQUE ! Sur cer tains sièges de véhicules faits de
matériaux sensibles (par ex., cuir, daim, etc.), l’utilisation de
sièges pour enfant peut laisser des marques et/ou causer
des décolorations. Pour empêcher cela, vous pouvez par
exemple placer une couverture ou une ser viette en dessous
du siège auto pour enfant. En outre, se référer à cet égard à
nos instructions de nettoyage dans ce manuel, qui doivent être
suivies avant la première utilisation du siège.
ATTENTION ! Ne pas utiliser de point de contact
!
porteur autres que ceux qui sont décrits dans les
instructions et marqués sur le dispositif de retenue
de l'enfant.
66
Page 67

WAARSCHUWING! Het volledige oppervlakte van de
!
rugsteun van het CYBEX kinderzitje moet geplaatst
zijn tegen de rugsteun van de auto. Om uw kind maximaal te beschermen, moet het zitje in een normale,
rechte stand geplaatst zijn!
OSTRZEŻENIE! Cała powierzchnia oparcia fotelika
!
dla dziecka CYBEX musi opierać się o oparcie pojazdu. Aby zapewnić maksymalną ochronę dziecka,
siedzenie musi być ustawione w pozycji pionowej!
OPMERKING! Bij sommige autostoelen die van gevoelige
materialen gemaakt zijn (bijv. suède, leer, etc.) kan het
gebruik van een kinderzitje markeringen en/of ver kleuringen
achterlaten. Om dit te voorkomen kunt u er bijvoorbeeld
een deken of handdoek onder leggen. Kijk voor meer
informatie hierover bij onze reinigingsadviezen in deze
gebruiksinstructies; lees de reinigingsinstructies voordat het
zitje voor de eerste keer gebruikt wordt.
WAARSCHUWING! Gebruik geen contactpunten
!
voor het dragen van de lading anders dan de contactpunten die in de instructies worden beschreven
en op het beveiligingssysteem zijn gemarkeerd.
UWAGA! Na niektórych siedzeniach samochodowych
wykonanych z materiałów wra żliwyc h (np. zamsz, skóra itp.),
używanie fotelików dla dziecka może pozostawiać ślady i/lub
powodować przebarwienia. Aby temu zapobiec, można na
przykład położyć pod fotelikiem kocyk lub ręcznik. W związku
z tym należy również zapoznać się z naszymi wskazówkami
dotyczącymi cz yszczenia zawart ymi w niniejszej instrukcji
obsługi; przed pierwszym użyciem fotelika należy zapoznać
się z niniejszą instrukcją czyszczenia i stosować do niej.
OSTRZEŻENIE! Nie używać żadnych nośnych punk-
!
tów styczności innych niż opisane w instrukcji i oznaczone na urządzeniu przytrzymującym dla dzieci.
FRNLPL
67
Page 68

FIXATION DU SIÈGE AUTO POUR ENFANT À L'AIDE DU
LATCH-CONNECT-SYSTEM
3
4
68
2
À l'aide du Latch-Connect-System, vous pouvez xer le CYBEX
Pallas B-x sur le véhicule, augmentant ainsi la sécurité de votre
enfant. L'enfant a encore besoin d’être attaché à l’aide de la
ceinture à trois points de votre véhicule et du bouclier d’impact
pour le Groupe 1.
REMARQUE ! Les points de xation ISOFIX (3) comportent
deux clips métalliques pour chaque siège, qui sont placés entre
le dossier et la surface d'assise du siège du véhicule. En cas de
doute, se reporter au manuel du conducteur du véhicule.
• Rallonger la sangle du Latch-Connect-System à l’aide du
dispositif de réglage (2).
• Fixer les crochets (4) du Latch-Connect-System sur les points
d'attache ISOFIX (3).
• Serrer le Latch-Connect-System en tirant sur l’extrémité libre
de la ceinture jusqu'à ce que la position du siège auto pour
enfant soit correctement réglée.
• S'assurer que le siège est bien attaché en essayant de le
sortir des points d’attache ISOFIX (3).
REMARQUE ! Prendre note des informations dans la section
« PLACEMENT DU SIÈGE DANS LE VÉHICULE ».
Page 69

HET KINDERZITJE VASTZETTEN MET HET LATCHCONNECT SYSTEM
MOCOWANIE FOTELIKA DLA DZIECKA ZA POMOCĄ
SYSTEMU LATCH-CONNECT
U kunt met behulp van het Latch-Connect System de CYBEX
Pallas B-x vastzetten aan de auto en zo de veiligheid van uw
kind vergroten. Het kind moet nog steeds vastgezet worden met
de driepuntsgordel van uw auto en met het botsscherm voor
Groep 1.
OPMERKING! De ISOFIX bevestigingspunten (3) zijn twee
metalen clips voor elke zitje en worden geplaatst tussen de
rugsteun en het zitoppervlak van de autostoel. Kijk bij twijfel in
de gebruikershandleiding van uw auto.
• Verleng de riemen van het Latch-Connect System met behulp
van de regelaar (2).
• Bevestig de Latch-Connect haken (4) aan de
bevestigingspunten van de ISOFIX (3).
• Zet het Latch-Connect System vast door aan het riempje op
de regelaar te trekken totdat de plaats van het kinderzitje
correct is aangepast.
• Zorg dat het zitje goed vast zit door te trekken aan de ISOFIX
bevestigingspunten (3).
OPMERKING! Lees de informatie in het hoofdstuk “HET ZITJE
IN DE AUTO PLAATSEN".
Systemem Latch-Connect można przymocować fotelik CYBEX
Pallas B-x do pojazdu, zwiększając bezpieczeństwo dziecka.
Dziecko nadal musi być zabezpieczone trzypunktowym pasem
bezpieczeństwa pojazdu oraz osłoną przeciwuderzeniową w
przypadku Grupy 1.
UWAGA! Punktami mocowania systemu ISOFIX (3) są dwa
metalowe klipsy przy każdym siedzeniu, są położone między
oparciem i powierzchnią siedziska siedzenia pojazdu. W razie
wątpliwości należy skonsultować się z podręcznikiem kierowcy
pojazdu.
• Wydłużyć pasy systemu Latch-Connect za pomocą regulatora
(2).
• Przymocować haki system Latch-Connect (4) do punktów
mocowania ISOFIX (3).
• Napiąć system Latch-Connect, pociągając za pas na
regulatorze, aż fotelik dla dziecka zostanie prawidłowo
ustawiony.
• Upewnić się, że fotelik jest zabezpieczony, próbując
wyciągnąć go z punktów mocowania ISOFIX (3).
OSTRZEŻENIE! Należy zapoznać się z informacjami zawartymi
w rozdziale „UMIESZCZANIE FOTELIKA W POJEŹDZIE”.
FRNLPL
69
Page 70

DÉPOSE DU SIÈGE AUTO POUR ENFANT
2
70
4
Eectuer les étapes de l'installation dans l'ordre inverse.
• Libérer les sangles serrées à l'aide du dispositif de
réglage (2).
• Débrancher les crochets (4) des deux côtés.
• Retirer le siège auto pour enfant.
• Vous pouvez ranger le Latch-Connect-System dans le siège
rehausseur du siège auto pour enfant.
Page 71

VERWIJDEREN VAN HET KINDERZITJE
Volg de installatiestappen in omgekeerde volgorde op.
• Maak de vastgezette riempjes los met behulp van de
regelaar (2).
• Maak de sluitingen (4) aan beide kanten los.
• Verwijder het kinderzitje.
• U kunt het Latch-Connect-systeem in de zitting van het
kinderzitje opbergen.
DEMONTAŻ FOTELIKA DLA DZIECKA
Wykonać kroki montażowe w odwrotnej kolejności.
• Zwolnić regulatorem (2).
• Odłączyć zatrzaski (4) po obu stronach.
• Wyjąć fotelik dla dziecka.
• System Latch-Connect można przechowywać w siedzisku
fotelika dla dziecka.
FRNLPL
71
Page 72

ADAPTATION À LA TAILLE DU CORPS
Réglage de l'appui-tête
5
MAX
6
7
72
• L'appui-tête doit être réglé de sorte qu’un maximum de 2 cm
(environ la largeur de deux doigts) reste libre entre l'épaule de
l'enfant et l'appui-tête.
• Tirer sur le levier de réglage (5) du côté arrière de l'appui-tête
et le mettre à la position désirée.
REMARQUE ! Seul un appui-tête réglé de manière optimale
peut orir à votre enfant protection et confort tout en veillant à ce
que la ceinture diagonale puisse être adaptée sans problème. La
hauteur du CYBEX Pallas B-x peut être réglée sur l'une de douze
positions.
RÉGLAGE DU BOUCLIER D’IMPACT - GROUPE 1 (9 À 18 KG)
Les volets latéraux du bouclier d’impact (6) s’ajustent
exactement entre les accoudoirs et la surface d'assise du siège
rehausseur (7) et sont utilisés pour soutenir le bouclier d’impact
(6) sur le siège.
Régler le bouclier d’impact (6) pour qu'il repose contre l'enfant
sans pousser contre le corps de l'enfant.
AVERTISSEMENT ! Le bouclier d’impact (6) peut
!
seulement être utilisé en combinaison avec le siège
auto pour enfant jusqu'à un maximum de 18 kg !
Page 73

AANPASSEN AAN LICHAAMSLENGTE
Afstellen van de hoofdsteun
• De hoofdsteun moet zo afgesteld worden dat er maximaal
2cm (ongeveer de breedte van twee vingers) of minder ruimte
is tussen de schouder van het kind en de hoofdsteun.
• Trek aan de verstelhendel (5) aan de achterkant van de
hoofdsteun en zet deze in de gewenste positie.
OPMERKING! Alleen een maximaal aangepaste hoofdsteun
kan uw kind optimale bescherming en comfort bieden en ervoor
zorgen dat de diagonale gordel goed geplaatst kan worden. De
hoogte van de CYBEX Pallas B-x kan afgesteld worden op één
van de twaalf standen.
DOSTOSOWANIE DO ROZMIARU CIAŁA
Regulacja zagłówka
• Zagłówek musi być tak wyregulowany, aby pomiędzy
ramieniem dziecka a zagłówkiem pozostało nie więcej niż 2
cm (szerokość ok. dwóch palców).
• Pociągnij dźwignię regulacji (5) z tyłu zagłówka i przesunąć go
na pożądaną wysokość.
UWAGA! Tylko optymalnie wyregulowany zagłówek zapewni
dziecku maksymalną ochronę i komfort, jednocześnie
gwarantując bezproblemowe ułożenie pasa skośnego.
Wysokość CYBEX Pallas B-x można regulować do jednej z
dwunastu pozycji.
FRNLPL
HET BOTSSCHERM AANPASSEN - GROEP 1 (9-18 KG)
De zijappen van het botsscherm (6) past precies tussen de
armleuningen en het zittoppervlak van de zitting (7) en worden
gebruikt om het botsscherm (6) op de zitting te ondersteunen.
Pas het botsscherm (6) zo aan dat het tegen het kind rust
zonder dat het tegen het lichaam van het kind wordt gedrukt.
WAARSCHUWING! Het botsscherm (6) mag alleen
!
in combinatie met het kinderzitje worden gebruikt tot
maximaal 18 kg!
REGULACJA OSŁONY PRZECIWUDERZENIOWEJ –
GRUPA 1 (9-18 KG)
Klapy boczne osłony przeciwuderzeniowej (6) są wpasowane
dokładnie między podłokietnikami i powierzchnią siedziska
przeznaczoną do siedzenia (7) oraz są wykorzystywane do
wsparcia osłony przeciwuderzeniowej (6) na siedzeniu.
Wyregulować osłonę przeciwuderzeniową (6) tak, aby
spoczywała na dziecku nie napierając na nie.
OSTRZEŻENIE! Z osłony przeciwuderzeniowej (6)
!
wolno korzystać wyłącznie tylko w połączeniu z fotelikiem dla dziecka ważącego maksymalnie do 18 kg!
73
Page 74

FIXATION AVEC LE BOUCLIER D’IMPACT - GROUPE 1
(9 À 18 KG)
6
8
9
12
10
11
9
8
6
9
74
13
12
• Insérer le bouclier d’impact (6) (se reporter à la section
« RÉGLAGE DU BOUCLIER' D’IMPACT »).
• Tirer pour sortir toute la longueur de la ceinture de siège du
véhicule. Prendre la ceinture abdominale (8) et la placer sur
le routage désigné de la ceinture rouge (9) sur le bouclier
d’impact (6).
• Insérer la ceinture de sécurité (10) du véhicule dans la boucle
(11) de la ceinture. Elle se verrouille en faisant entendre
un déclic.
• Tirer sur la ceinture diagonale (12) pour serrer la ceinture
abdominale (8).
• Faire maintenant passer la ceinture diagonale (12) en
parallèle avec la ceinture abdominale (8) dans le routage de
la ceinture (9).
• Tirer fermement sur la ceinture diagonale (12) et s'assurer que
les deux parties de la ceinture couvrent toute la largeur du
bouclier d’impact (6) dans le routage (9) de la ceinture.
• Faire maintenant passer la ceinture diagonale (12) à travers
le routage (9) de la ceinture du bouclier d’impact (6) jusqu'à
ce qu'elle soit xée à l'intérieur du guide de la ceinture. Puis
mettre la ceinture diagonale entre l'appui-tête (13) et l'appui
d’épaule. La ceinture diagonale n'a pas besoin d'être guidée à
travers le guide de ceinture de l'appui-tête pour le groupe 2/3.
ATTENTION ! Toujours vérier le serrage et l'ajuste-
!
ment du système de retenue au corps de l'enfant. Ne
jamais tordre la ceinture !
Page 75

VASTMAKEN MET HET BOTSSCHERM - GROEP 1
(9-18 KG)
• Plaats het botsscherm (6) (zie de sectie “AANPASSEN VAN
HET BOTSSCHERM").
• Trek de hele lengte van de veiligheidsgordel van de auto uit.
Neem de schootgordel (8) en plaats deze over de aangegeven
rode gordelroute (9) op het botsscherm (6).
• Vergrendel de veiligheidsgordel (10) in de gordelhouder (11).
Deze wordt vergrendeld met een hoorbare “KLIK".
• Zet de schootgordel (8) vast door aan de diagonale gordel te
trekken (12).
• Trek nu de diagonale gordel (12) parallel met de schootgordel
(8) terug in de gordelroute (9).
• Trek de diagonale gordel (12) vast en zorg dat beide delen
van de gordel de hele breedte van het botsscherm bedekken
(6) in de gordelroute (9).
• Trek nu de diagonale gordel (12) stevig door de gordelroute
(9) van het botsscherm (6) totdat deze vast geklemd zit in de
gordelgeleider. Plaats vervolgens de diagonale gordel tussen
de hoofdsteun (13) en de schoudersteun. Voor groep 2/3 geldt
dat de diagonale gordel niet geleid hoeft te worden door de
gordelgeleider van de hoofdsteun.
WAARSCHUWING! Controleer altijd de spanning en
!
de juiste afstelling van het bevestigingssysteem op
het lichaam van het kind. Draai de gordel nooit!
MOCOWANIE PASÓW Z OSŁONĄ
PRZECIWUDERZENIOWĄ – GRUPA 1 (9-18 KG)
• Włożyć osłonę przeciwuderzeniową (6) (patrz rozdział
„REGULACJA OSŁONY PRZECIWUDERZENIOWEJ”).
• Wyciągnąć pas bezpieczeństwa na całkowitą długość.
Pociągnąć biodrowy pas bezpieczeństwa (8), umieszczając go
nad przewidzianą do tego celu czerwoną prowadnicą pasa (9)
na osłonie przeciwuderzeniowej (6).
• Zapiąć pas bezpieczeństwa (10) w klamrze (11). Musi
zaskoczyć, wydając dźwięk „kliknięcia”.
• Dociągnąć biodrowy pas bezpieczeństwa (8), ciągnąc za pas
skośny (12).
• Teraz należy przeciągnąć pas skośny (12) równolegle z pasem
biodrowym (8) z powrotem do prowadnicy pasa (9).
• Dociągnąć pas skośny (12) i upewnić się, że obie części pasa
pokrywają całą szerokość osłony przeciwuderzeniowej (6) w
prowadnicy pasa (9).
• Teraz należy przeciągnąć ciasno pas skośny (12) przez
prowadnicę pasa (9) osłony przeciwuderzeniowej (6), aż
zostanie zaciśnięty wewnątrz prowadnicy pasa. Następnie
przesunąć pas skośny między zagłówkiem (13) i podparciem
ramion. Pas skośny nie musi przechodzić przez prowadnicę
zagłówka dla grupy 2/3.
OSTRZEŻENIE! Należy zawsze sprawdzić napięcie
!
i prawidłową regulację systemu przytrzymującego
względem ciała dziecka. Nie wolno skręcać pasa!
FRNLPL
75
Page 76

VOTRE ENFANT EST-IL CORRECTEMENT ATTACHÉ ? GROUPE BOUCLIER D’IMPACT (9 À 18 KG)
Pour assurer la meilleure sécurité possible de votre enfant,
toujours vérier avant de vous mettre en route que...
• le bouclier d’impact est correctement réglé.
• la languette est verrouillée dans la boucle de la ceinture.
• la ceinture abdominale et la ceinture diagonale passent
tendues et non tordues à travers le guide de ceinture du
bouclier d’impact.
• l'appui-tête est correctement ajusté
• Le dossier du siège auto pour enfant repose complètement
sur le dossier du siège du véhicule.
MAX
76
• si le Latch-Connect-System est utilisé : les connecteurs
du siège sont enclenchés des deux côtés dans les points
d'ancrage ISOFIX et la ceinture est bien tendue.
Page 77

IS UW KIND VEILIG GEPLAATST? -
BOTSSCHERM GROEP (9-18KG)
Om de optimale veiligheid van uw kind te garanderen,
controleert u voordat u gaat rijden altijd of...
• het botsscherm correct is afgesteld.
• de vergrendelingsslip goed vastzit, zit in de gordelhouder.
• de schootgordel en de schouderriem stak door de
gordelroute van het botsscherm lopen en niet gedraaid zijn.
• de hoofdsteun correct is afgesteld.
• de rugsteun van het kinderzitje volledig in lijn zit met de
rugsteun van het autostoeltje.
• als het Latch-Connect System gebruikt wordt: de zitting aan
beide kanten goed vastzit met de vergrendelingen in de
ISOFIX bevestigingspunten en het systeem goed vastzit.
CZY DZIECKO JEST PRAWIDŁOWO ZAPIĘTE? –
GRUPA WYMAGAJĄCA STOSOWANIA OSŁONY
PRZECIWUDERZENIOWEJ (9-18 KG)
Aby zapewnić optymalne bezpieczeństwo dziecka, przed
rozpoczęciem podróży należy zawsze sprawdzić, czy...
• osłona przeciwuderzeniowa jest odpowiednio wyregulowana.
• pas bezpieczeństwa jest prawidłowo zablokowany w klamrze.
• biodrowy pas bezpieczeństwa i pas barkowy są napięte w
prowadnicy pasa osłony przeciwuderzeniowej oraz czy nie
są skręcone.
• zagłówek jest prawidłowo wyregulowany.
• oparcie fotelika dla dziecka przylega równo do oparcia
siedzenia pojazdu.
• gdy używany jest system Latch-Connect: fotelik został
zablokowany po obu stronach za pomocą zatrzasków w
punktach mocowania ISOFIX i system jest naprężony.
FRNLPL
77
Page 78

PASSAGE DE PALLAS B-FIX À SOLUTION B-FIX
6
78
(GROUPE 1 À GROUPE 2/3)
• Déposer le bouclier d’impact (6).
• Noter les informations dans la section « FIXATION DE
L’ENFANT DANS LE GROUPE 2/3 »
REMARQUE ! Garder le bouclier d’impact dans un lieu sûr.
ATTENTION ! Pour l'utilisation dans le Groupe 1
!
(9 à 18 kg) le bouclier d’impact doit être employé.
Page 79

WISSELEN VAN PALLAS B-FIX NAAR SOLUTION B-FIX
(VAN GROEP 1 NAAR GROEP 2/3)
• Verwijder het botsscherm (6).
• Lees de informatie in het hoofdstuk “VASTZETTEN VAN HET
KIND IN GROEP 2/3”
OPMERKING! Bewaar het botsscherm op een veilige plek.
WAARSCHUWING! Bij gebruik in Groep 1 (9-18 kg)
!
moet het botsscherm gebruikt worden.
ZMIANA FOTELIKA Z MODELU PALLAS B-FIX NA
SOLUTION B-FIX (Z GRUPY 1 DO GRUPY 2/3)
• Zdjąć osłonę przeciwuderzeniową (6).
• Zwrócić uwagę na informacje zawarte w rozdziale
„MOCOWANIE FOTELIKA DLA DZIECKA W GRUPIE 2/3”
UWAGA! Osłonę przeciwuderzeniową należy przechowywać w
bezpiecznym miejscu.
OSTRZEŻENIE! Gdy fotelik jest stosowany dla dzie-
!
ci grupy 1 (9-18 kg) należy obowiązkowo stosować
osłonę przeciwuderzeniową.
FRNLPL
79
Page 80

FIXATION DE L’ENFANT, GROUPE 2/3 (15 À 36 KG)
• Placez votre enfant dans le siège auto pour enfant. Tirez sur
la ceinture à trois points et la conduire sur la boucle (11) de la
ceinture devant votre enfant.
REMARQUE ! La ceinture à trois points doit seulement passer
à travers les routages désignés. Les routages de la ceinture
sont décrits en détail dans ce manuel et sont marqués en rouge
sur le siège auto pour enfant.
12
11
80
10
12
ATTENTION ! Ne jamais tordre la ceinture.
!
• Insérer la languette (10) de la ceinture dans la boucle (11). de
8
14
5
12
15
la ceinture jusqu’à entendre un déclic.
• Ensuite, placer et serrer la ceinture abdominale (8) dans les
guides inférieurs (14) de couleur rouge de la ceinture du siège
auto pour enfant.
• Tirer maintenant fermement sur la ceinture diagonale
(12) pour tendre la ceinture abdominale (8). Plus cette
ceinture est tendue, meilleure est la protection contre les
blessures. Sur le côté de la boucle (11) de la ceinture, la
ceinture diagonale (12) et la ceinture abdominale (8) doivent
être insérées ensemble dans le guide inférieur (14) de la
ceinture.
• La ceinture abdominale (8) devrait avoir été passée par les
guides inférieurs (14) de la ceinture des deux côtés du siège
rehausseur.
• Faire maintenant passer la ceinture diagonale (12) à travers le
guide supérieur (15) de la ceinture dans l'appui-tête (5) jusqu'à
ce qu'elle soit à l'intérieur du guide de la ceinture.
REMARQUE ! Apprendre à votre enfant dès le début de
toujours s'assurer que la ceinture est tendue et, si nécessaire,
comment tendre la ceinture lui-même.
Page 81

VASTZETTEN VAN HET KIND GROEP 2/3 (15-36 KG)
• Plaats uw kind in het kinderzitje. Trek de driepuntsgordel
helemaal uit en plaats deze in de gordelhouder (11) dat zich
voor uw kind bevindt.
LET OP! De driepuntsgordel mag alleen door de aangewezen
routes worden gevoerd. De gordelroutes worden in deze
handleiding in detail beschreven en zijn op het kinderzitje met
rood gemarkeerd.
MOCOWANIE FOTELIKA DLA DZIECKA W GRUPIE 2/3
(15-36 KG)
• Posadzić dziecko w foteliku dla dziecka. Wyciągnąć
trzypunktowy pas bezpieczeństwa i przesunąć do klamry (11)
przed dzieckiem.
UWAGA! Pas trzypunktowy musi przechodzić przez
wyznaczone prowadnice. Są one szczegółowo opisane w tym
podręczniku i oznaczone na czerwono na foteliku dla dziecka.
FRNLPL
WAARSCHUWING! Draai de gordel nooit!
!
• Plaats de vergrendelingsslip (10) in de gordelhouder (11).
Deze wordt vergrendeld met een hoorbare “KLIK".
• Plaats vervolgens de schootgordel (8) in de rood gekleurde
gordelgeleiders (14) van het kinderzitje.
• Trek nu stevig aan de diagonale riem (12) om de
schootgordel aan te trekken (8). Hoe strakker de riem
zit, hoe beter de riem beschermt tegen letsel. Aan de
kant van de gordelhouder (11), de diagonale riem (12)
en de schootgordel (8) moeten samen in de onderste
gordelgeleider geplaatst worden (14).
• De schootgordel (8) moet door de onderste gordelgeleiders
worden gevoerd (14) aan beide kanten van de zitting.
• Trek nu de diagonale gordel (12) door de bovenste
gordelgeleider (15) in de hoofdsteun (5) totdat deze in de
gordelgeleider geplaatst is.
LET OP! Leer uw kind van meet af aan om te controleren of de
riem strak zit en, indien noodzakelijk, om de riem zelf strakker
te zetten.
OSTRZEŻENIE! Nie wolno skręcać pasa.
!
• Wsunąć pas (10) w klamrę (11). Musi zaskoczyć, wydając
dźwięk „kliknięcia”.
• Następnie zapiąć biodrowy pas bezpieczeństwa (8) w dolnych
prowadnicach pasa (14) fotelika dla dziecka, oznaczonych na
czerwono i docisnąć.
• W następnej kolejności należy pociągnąć mocno pas skośny
(12), aby naprężyć biodrowy pas bezpieczeństwa (8). Im
ciaśniej przylega pas, tym lepszą zapewnia ochronę przed
obrażeniami. Z boku klamry (11) należy włożyć pasy skośny
(12) i biodrowy (8) w dolną prowadnicę pasa (14).
• Biodrowy pas bezpieczeństwa (8) należy najpierw
poprowadzić przez dolną prowadnicę (14) po obu stronach
siedziska.
• Teraz należy przeprowadzić pas skośny (12) przez górną
prowadnicę pasa (15) zagłówka (5), aż pas znajdzie się
w prowadnicy.
UWAGA! Dziecko należy od samego początku uczyć, aby
zawsze upewniało się, że ma prawidłowo zapięte pasy i aby w
razie potrzeby samo umiało je dociągnąć.
81
Page 82

ATTENTION ! La ceinture abdominale (8) doit passer
5
12
8
12
MAX
82
!
aussi bas que possible sur les deux côtés le long de
l'aine de votre enfant an d'avoir un eet optimal en
cas d'accident.
S'assurer que la ceinture diagonale (12) passe entre l'extérieur
de l'épaule et le cou de votre enfant. Si nécessaire, régler la
hauteur de l'appui-tête pour changer la position de la courroie.
La hauteur de l'appui-tête (5) installé peut encore être réglée
une fois dans la voiture.
Page 83

WAARSCHUWING! De schootgordel (8) moet aan
!
beide kanten zo laag mogelijk langs het middel van
uw kind lopen voor een maximaal eect in geval van
ongeluk.
OSTRZEŻENIE! Biodrowy pas bezpieczeństwa (8)
!
musi przebiegać jak najniżej po obu stronach pachwiny dziecka, aby zapewnić optymalny efekt w razie
wypadku.
Zorg dat de diagonale gordel (12) tussen de buitenkant van de
schouder en de nek van uw kind loopt. Indien noodzakelijk past
u de hoogte van de hoofdsteun aan om de positie van de gordel
aan te passen. De hoogte van de hoofdsteun (5) kan aangepast
worden terwijl u zich al in de auto bevindt.
Upewnić się, że pas skośny (12) biegnie między zewnętrzną
częścią ramienia i szyją dziecka. W razie potrzeby wyregulować
wysokość zagłówka, aby zmienić ułożenia pasa. Wysokość
zagłówka (5) można regulować będąc już w samochodzie.
FRNLPL
83
Page 84

VOTRE ENFANT EST-IL CORRECTEMENT ATTACHÉ ? CEINTURE DU VÉHICULE GROUPE 2/3 (15 À 36 KG)
Pour assurer la meilleure sécurité possible de votre enfant,
MAX
84
toujours vérier avant de partir que...
• l'appui-tête est correctement ajusté
• la ceinture abdominale passe dans les guides inférieurs
rouges de la ceinture des deux côtés du siège rehausseur.
• la ceinture diagonale du côté de la boucle de la ceinture
passe également dans le guide inférieur rouge de la ceinture
du siège.
• la ceinture diagonale passe dans le guide supérieur de la
ceinture marqué en rouge dans l'appui-tête.
• la ceinture diagonale passe inclinée vers l'arrière.
• la ceinture est bien entièrement tendue contre le corps de
votre enfant et n'est pas tordue.
• si le Latch-Connect-System est utilisé : les connecteurs
du siège sont enclenchés des deux côtés dans les points
d'ancrage ISOFIX et la ceinture est bien tendue.
ATTENTION ! La boucle de la ceinture de sécurité
!
du véhicule ne doit jamais croiser l'accoudoir. Si la
ceinture est trop longue, le siège auto pour enfant ne
doit pas être utilisé dans cette position dans le véhicule. En cas de doute, consulter le fabricant.
ATTENTION ! Ne jamais laisser votre enfant sans
!
surveillance dans le véhicule. Les pièces en plastique dans le système de retenue de l'enfant sont
chauées par le soleil et l'enfant pourrait subir des
brûlures. Protéger votre enfant et le siège auto pour
enfant contre l'exposition directe au soleil (par ex. en
le recouvrant d’un tissu de couleur claire).
Page 85

IS UW KIND VEILIG GEPLAATST? VEILIGHEIDSGORDEL GROEP 2/3 (15-36 KG)
Om de optimale veiligheid van uw kind te garanderen, controleert
u voordat u gaat rijden altijd of...
• de hoofdsteun correct is afgesteld
• de schootgordel door de onderste rode gordelgeleiders aan
beide kanten van de zitting is gevoerd.
• de diagonale gordel aan de kant van de gordelhouder ook
door de onderste rode gordelgeleider van de zitting, loopt.
• de diagonale gordel door de bovenste, met rood gemarkeerde,
gordelgeleider loopt.
• de diagonale gordel schuin aoopt naar achteren.
• de hele gordel strak tegen het lichaam van uw kind zit en niet
gedraaid is.
• als het Latch-Connect System gebruikt wordt: de zitting aan
beide kanten goed vastzit met de vergrendelingen in de
ISOFIX bevestigingspunten en het systeem goed vastzit.
CZY DZIECKO JEST PRAWIDŁOWO ZAPIĘTE? – PASY
BEZPIECZEŃSTWA POJAZDU DLA GRUPY 2/3 (15-36 KG)
Aby zapewnić optymalne bezpieczeństwo dziecka, przed
rozpoczęciem podróży należy zawsze sprawdzić, czy...
• zagłówek jest prawidłowo wyregulowany
• biodrowy pas bezpieczeństwa poprowadzono przez dolną,
czerwoną prowadnicę po obu stronach siedziska.
• pas skośny po stronie klamry również został poprowadzony
przez dolną, czerwoną prowadnicę fotelika.
• pas skośny został poprowadzony przez górną prowadnicę
oznaczoną na zagłówku kolorem czerwonym.
• pas skośny jest z tyłu pochylony.
• cały pas przylega ciasno do ciała dziecka i nie jest skręcony.
• gdy używany jest system Latch-Connect: fotelik został
zablokowany po obu stronach za pomocą zatrzasków w
punktach mocowania ISOFIX i system jest naprężony.
FRNLPL
WAARSCHUWING! De punt van de veiligheids-
!
gordel van de auto mag nooit de armleuning kruisen. Als de gordel te lang is, dan kan het kinderzitje
niet in deze positie in het voertuig gebruikt worden.
Neem bij twijfel contact op met de fabrikant.
WAARSCHUWING! Laat uw kind nooit alleen ach-
!
ter in de auto. De plastic onderdelen van het beveiligingssysteem kunnen opwarmen in de zon en tot
brandwonden bij uw kind leiden. Bescherm uw kind
en het kinderzitje tegen directe blootstelling aan de
zon (dek het bijv. af met een lichtgekleurde doek).
OSTRZEŻENIE! Klamra pasów w pojeździe nie może
!
krzyżować się z podłokietnikiem. Jeżeli pas jest zbyt
luźny, fotelik dla dziecka nie nadaje się do użycia w
tej pozycji w pojeździe. W razie wątpliwości należy
skonsultować się z producentem.
OSTRZEŻENIE! Pod żadnym pozorem nie wolno zos-
!
tawiać dziecka w samochodzie bez opieki. Plastikowe
części w systemie przytrzymującym dla dzieci nagrzewa się na słońcu i dziecko może doznać poparzeń.
Należy chronić dziecko i fotelik dla dziecka przed bezpośrednim działaniem promieni słonecznych (np. poprzez używanie pokrowca z jasnej tkaniny).
85
Page 86

DÉPOSE DE LA HOUSSE DU SIÈGE
La housse du siège auto pour enfant se compose de quatre
parties (appui-tête, partie de l’épaule, siège rehausseur et
bouclier d’impact).
Les housses du siège sont maintenues en place à plusieurs endroits
par des boutons-pression.
Une fois que toutes les xations ont été libérées, les diérentes
parties de la housse peuvent être retirées.
Pour réattacher les housses, procéder dans l'ordre inverse
de la dépose.
ATTENTION ! Le siège auto pour enfant ne doit ja-
!
mais être utilisé sans la housse.
Dépose de la housse de l'appui-tête
Retirer la housse en la tirant vers l'avant.
Dépose de la housse de la partie de l’épaule
Libérer les quatre boutons-pression qui se trouvent à l’arrière du
siège auto pour enfant. Retirer la housse.
86
Page 87

DE BEKLEDING VERWIJDEREN
De bekleding van het kinderzitje bestaat uit vier onderdelen
(hoofdsteun, schoudergedeelte, zitting, botsscherm).
De vier stukken bekleding van het zitje worden op verschillende
plaatsen vastgezet met drukknopen (zie afbeelding).
Nadat u alle drukknopen heeft losgemaakt, kunt u die delen van
de bekleding verwijderen.
Ga in omgekeerde volgorde te werk om de bekleding weer terug
te plaatsen.
ZDEJMOWANIE POKROWCA FOTELIKA
Pokrowiec fotelika dla dziecka składa się z czterech
części (zagłówka, podłokietnika, siedziska i osłony
przeciwuderzeniowej).
Cztery pokrowce fotelika są przytrzymywane na miejscu kilkoma
zatrzaskami (patrz rysunek).
Gdy wszystkie zaczepy zostaną zwolnione, można zdjąć
pojedyncze elementy pokrowca.
Aby założyć pokrowiec na miejsce, należy postępować w
kolejności odwrotnej do jej zdejmowania.
FRNLPL
WAARSCHUWING! Het kinderzitje mag nooit zonder
!
bekleding gebruikt worden.
De bekleding van de hoofdsteun verwijderen
Verwijder de bekleding door deze naar voren te trekken.
De bekleding van het schoudergedeelte verwijderen
Maak de vier drukknopen aan de achterkant van het kinderzitje
los. Verwijder de bekleding.
OSTRZEŻENIE! Fotelika dla dziecka nie wolno
!
używać bez pokrowca.
Zdejmowanie pokrowca z zagłówka
Zdjąć pokrowiec, ciągnąc ją do przodu.
Zdejmowanie pokrowca z podłokietnika
Zwolnić cztery zatrzaski z tyłu fotelika dla dziecka. Zdjąć
pokrowiec.
87
Page 88

Dépose de la housse du siège rehausseur
Relâcher les 2 boutons-pression de la housse du siège à l'avant
et l'arrière. Tirer la housse par-dessus les accoudoirs et le long
de la surface du siège.
Dépose de la housse du bouclier d’impact
Retirer la housse autour du coussin.
NETTOYAGE
REMARQUE ! Veuillez laver la housse avant de l'utiliser pour
la première fois. Le couvercle doit seulement être lavé à 30 °C
avec le programme de lavage délicat. Un lavage à plus de 30 °C
peut entraîner la décoloration du tissu de la housse. Laver la
housse séparément des autres vêtements et ne pas sécher
dans le sèche-linge ! Ne jamais sécher la housse à la lumière
directe du soleil ! Les pièces en plastique peuvent être nettoyées
avec un agent de nettoyage doux et de l'eau chaude.
ATTENTION ! Ne jamais utiliser des produits de net-
!
toyage puissants ou à base d'eau de Javel !
88
Page 89

De bekleding van de zitting verwijderen
Maak de 2 drukknopen van de bekleding aan de voor- en
achterkant los. Trek de bekleding nu over de armleuningen en
over het zitoppervlak.
Zdejmowanie pokrowca z siedziska
Odczepić 2 zaczepy pokrowca fotelika z przodu i z tyłu.
Następnie zdjąć pokrowiec z podłokietników i wzdłuż
powierzchni fotelika.
De bekleding van het botsscherm verwijderen
Trek de bekleding over het kussen.
REINIGING
LET OP! Was de bekleding vóór het eerste gebruik. De
bekleding mag op maximaal 30 °C met een jnwasprogramma
gewassen worden. Wassen op hogere temperaturen dan
30 °C kan resulteren in verkleuring van de bekleding. Was
de bekleding apart van ander wasgoed en plaats niet in de
droger! Droog de bekleding nooit in direct zonlicht! De plastic
onderdelen kunt u reinigen met een mild reinigingsmiddel en
warm water.
WAARSCHUWING! Gebruik nooit agressieve reinig-
!
ingsmiddelen of bleekmiddel!
Zdejmowanie pokrowca z osłony przeciwuderzeniowej
Zdjąć osłonę wokół poduszki.
CZYSZCZENIE
UWAGA! Przed pierwszym użyciem pokrowiec należy umyć.
Pokrowiec można prać wyłącznie w temperaturze 30°C
programem do mycia rzeczy delikatnych. Pranie w temperaturze
powyżej 30°C może spowodować odbarwienie materiału.
Pokrowca nie należy prać razem z innym praniem, nie wolno go
suszyć w suszarce! Nigdy nie suszyć pokrywy w bezpośrednim
świetle słonecznym! Elementy plastikowe można czyścić
łagodnym środkiem czyszczącym i ciepłą wodą.
OSTRZEŻENIE! Nie wolno stosować żrących środ-
!
ków czyszczących ani wybielaczy!
FRNLPL
89
Page 90

SOIN ET ENTRETIEN
An d’assurer que votre siège auto pour enfant ore une
protection maximale, il est impératif de noter ce qui suit :
• Vérier régulièrement le bon état de toutes les pièces
principales du siège auto pour enfant. Les composants
mécaniques doivent être exempts de défauts.
• Il est absolument nécessaire de s'assurer que le siège auto
pour enfant n'est pas coincé entre des éléments durs tels que
les portes du véhicule ou les rails de siège, qui pourraient
l'endommager.
• Suite par ex. à un accident, le siège auto pour enfant doit être
absolument vérié par le fabricant.
Veiller à ce que seule une housse originale de CYBEX soit
utilisée, étant donné que la housse est un élément clé de la
fonction du siège. Des housses de rechange sont disponibles
auprès d'un détaillant spécialisé.
90
Page 91

VERZORGING & ONDERHOUD
Om ervoor te zorgen dat uw kinderzitje de maximale beveiliging
biedt, dient u het volgende op te merken:
PIELĘGNACJA I KONSERWACJA
Aby zagwarantować, że fotelik dla dziecka zapewni maksymalną
ochronę, należy pamiętać o następujących kwestiach:
• Alle belangrijke onderdelen van het kinderzitje moeten
regelmatig op beschadigingen gecontroleerd worden. De
mechanische onderdelen moet vrij van gebreken zijn.
• Het is absoluut noodzakelijk om ervoor te zorgen dat het
kinderzitje niet vast komt te zitten tussen harde onderdelen
zoals een autodeur of stoel rails, aangezien dit kan leiden tot
beschadigingen aan het zitje.
• Na blootstelling aan extreme impact, bijv. na een ongeluk,
moet het kinderzitje door de fabrikant gecontroleerd worden.
Zorg dat alleen originele CYBEX-bekleding gebruikt wordt,
aangezien de bekleding een uitermate belangrijk onderdeel
vormt van de werking van het zitje. U kunt reserve bekleding
kopen bij een specialist.
• Wszystkie główne elementy fotelika dla dziecka należy
regularnie sprawdzać pod względem uszkodzeń. Elementy
mechaniczne muszą być wolne od uszkodzeń.
• Fotelik dla dziecka absolutnie nie może być zakleszczony
między elementami twardymi, takimi jak drzwi pojazdu lub
szyna siedziska, ponieważ może to doprowadzić do jego
uszkodzenia.
• W przypadku narażenia na wstrząs ekstremalny, np. po
wypadku, konieczne jest sprawdzenie fotelika dla dziecka
przez producenta.
Należy upewnić się, że stosowany jest oryginalny pokrowiec
fotelika CYBEX, ponieważ jest on kluczowym elementem
funkcjonowania fotelika. Zamienne pokrowce można uzyskać w
specjalistycznej placówce handlowej.
FRNLPL
91
Page 92

COMMENT AGIR À LA SUITE D'UN ACCIDENT
ATTENTION ! Un accident peut endommager le
!
siège auto pour enfant, et l’endommagement peut
ne pas être identiable à l'œil nu. Veuillez remplacer
le siège après un accident. En cas de doute, veuillez
consulter votre revendeur ou le fabricant.
DURÉE DE VIE DU PRODUIT
Ce siège auto pour enfant a été conçu pour être en mesure
de s'acquitter de ses fonctions pendant une durée de vie
d’environ 11 ans dans des conditions normales d’utilisation.
L'usure progressive du plastique, par exemple provoquée
par son exposition à la lumière du soleil (UV), peut causer
une légère dégradation de ses caractéristiques. Étant donné
que des uctuations importantes de température et d'autres
contraintes imprévisibles sont communes dans les véhicules, il
est nécessaire de respecter les points suivants :
• Si le véhicule est directement exposée à la lumière directe du
soleil pendant de longues périodes, le siège auto pour enfant
doit être sorti du véhicule ou recouvert d'un tissu léger.
• Vérier régulièrement toutes les pièces métalliques et en
plastique du siège pour la présence de dommages ou de
changement de forme ou de couleur. Si vous constatez un
changement quelconque dans le siège auto pour enfant, il doit
être éliminé ou contrôlé, ou, le cas échéant, remplacé par le
fabricant.
• Des changements dans le tissu, en particulier une
décoloration, sont normaux lorsqu'il est utilisé dans un
véhicule et ne portent pas atteinte à la fonction du siège.
92
Page 93

HOE TE HANDELEN NA EEN ONGELUK
PRAWIDŁOWE ZACHOWANIE PO WYPADKU
WAARSCHUWING! Een ongeluk kan resulteren in
!
beschadigingen aan het kinderzitje die u niet met het
blote oog kunt zien. Vervang het zitje na een ongeluk. Vraag bij twijfel advies aan uw winkelier of de
fabrikant.
LEVENSDUUR VAN HET PRODUCT
Dit kinderzitje is ontworpen voor het daarvoor bestemde
gebruik en bij normaal gebruik is de levensduur van het
product ongeveer 11 jaar. Geleidelijke slijtage van het plastic,
bijvoorbeeld door blootstelling aan zonlicht (UV) kan de kwaliteit
van producteigenschappen licht aantasten. Aangezien zeer
grote temperatuurverschillen en andere onvoorziene factoren
vaak in auto's voorkomen, is het noodzakelijk om de volgende
punten in acht te nemen:
• Als de auto gedurende langere tijd wordt blootgesteld aan
fel zonlicht, dan moet het kinderzitje uit de auto gehaald of
afgedekt worden met een lichte doek.
• Controleer alle plastic en metalen onderdelen van het zitje
regelmatig op beschadigingen of veranderingen in kleur of
vorm. Als u veranderingen aan het kinderzitje opmerkt, dan
moet het zitje of weggegooid worden of door de fabrikant
worden gecontroleerd en mogelijk worden vervangen.
• Veranderingen aan de stof, met name vervagen, zijn normaal
bij gebruik in een auto, en hebben geen gevolgen voor de
werking van het zitje.
OSTRZEŻENIE! Wypadek może spowodować usz-
!
kodzenie fotelika dla dziecka, co nie będzie widoczne
gołym okiem. Po wypadku należy wymienić fotelik.
W razie wątpliwości należy skonsultować się z dostawcą lub producentem.
OKRES UŻYTKOWANIA PRODUKTU
Ten fotelik dla dziecka został zaprojektowany w taki sposób, aby
mógł spełniać swoje funkcje podczas normalnej eksploatacji
przez cały okres użytkowania, wynoszący ok. 11 lat. Stopniowe
zużycie plastiku, spowodowane na przykład wystawieniem
na działanie światła słonecznego (UV) może nieco pogorszyć
właściwości produktu. Ponieważ w pojazdach często
dochodzi do bardzo dużych wahań temperatury oraz innych
nieprzewidywalnych naprężeń, należy przestrzegać poniższych
punktów:
• Jeżeli pojazd jest bezpośrednio narażony na działanie silnego
światła słonecznego w długich okresach czasu, fotelik dla
dziecka należy koniecznie usunąć z pojazdu lub przykryć
jasną tkaniną.
• Regularnie sprawdzać wszystkie części plastikowe i metalowe
pod kątem uszkodzeń lub zmian kształtu lub koloru. W
przypadku zauważenia jakichkolwiek zmian w foteliku dla
dziecka, należy się go pozbyć lub sprawdzić możliwość
wymiany u producenta.
• Zmiany w materiale, szczególnie spłowienie, są normalne,
gdy fotelik jest użytkowany w pojeździe i nie ograniczają jego
funkcjonalności.
FRNLPL
93
Page 94

ÉLIMINATION
À la n de la durée de vie du siège auto pour enfant, il doit être
éliminé de façon appropriée. La séparation des déchets peut
être traitée diéremment d'un endroit à l'autre. Pour s'assurer
que le siège auto pour enfant est mis au rebut conformément
à la réglementation, veuillez contacter votre administration
municipale de collecte des déchets ou l'administration
communale de votre lieu de résidence. Toujours respecter la
réglementation de votre pays relative à l'élimination des déchets.
94
Page 95

WEGGOOIEN
Gooi het kinderzitje aan het einde van de levensduur op de
correcte manier weg. De regelgeving voor het scheiden van
afval kan per regio verschillen. Om te garanderen dat het
kinderzitje verwijderd wordt volgens geldende richtlijnen,
neemt u contact op met uw gemeente of lokale instantie voor
afvalverwerking. Houdt u altijd aan de regelgeving inzake
afvalverwerking van uw land.
UTYLIZACJA
Na koniec okresu użytkowania, fotelik dla dziecka należy w
prawidłowy sposób zutylizować. Oddzielanie odpadów może
odbywać się w różny sposób w zależności od lokalizacji. Aby
upewnić się, że fotelik dla dziecka zostanie zutylizowany zgodnie
z przepisami prawa, należy skontaktować się z lokalną instytucją
usuwania odpadów lub samorządem lokalnym. Należy zawsze
przestrzegać przepisów utylizacji odpadów obowiązujących w
danym kraju.
FRNLPL
95
Page 96

CONDITIONS DE LA GARANTIE
Les conditions de garantie suivantes ne s'appliquent qu'au
pays dans lequel ce produit a commencé à être vendu par
des détaillants aux consommateurs. Cette garantie couvre
tous les défauts de fabrication et de matériau qui existaient
au moment de l'achat ou qui se manifestent dans un délai de
trois (3) ans à compter de la première vente de ce produit à un
consommateur par le biais de détaillants (garantie du fabricant).
Si un défaut de fabrication ou de matériau se produit pendant
la période de garantie, le produit sera réparé sans frais ou - à
notre discrétion - remplacé par un nouveau produit. An de faire
une réclamation sur la garantie, le produit doit être retourné au
premier détaillant qui l’a vendu et la preuve d'achat originale
(reçu ou facture) doit être présentée, contenant la date d'achat,
le nom et l’adresse du détaillant et le nom du produit.. Aucune
réclamation au titre de la garantie ne peut être faite si le produit
est envoyé au fabricant ou à toute personne autre que le
premier détaillant l’ayant vendu. La garantie n’est valide que si
la complétude, les vices de fabrication et les défauts de matériau
du produit ont été vériés immédiatement à l'achat. Si le produit
a été acheté par le biais d'une vente par correspondance, la
complétude, les vices de fabrication et les défauts de matériau
du produit doivent être vériés immédiatement à la réception..
En cas de dommages, le produit ne peut plus être utilisé et
doit être retourné au premier détaillant qui l’a vendu. En cas
de réclamation sur la garantie, le produit doit être retourné
complet et propre. Veuillez lire les instructions d'utilisation
avant de contacter le détaillant. La garantie ne couvre pas
les dommages causés par une mauvaise utilisation, par des
événements externes (eau, incendie, accidents de la circulation,
etc.) ou par l’usure normale. Les réclamations au titre de la
garantie ne seront honorées que si le produit est traité et utilisé
conformément aux instructions d'utilisation, si les réparations et
96
les modications sont eectuées uniquement par des personnes
Page 97

GARANTIEVOORWAARDEN
De volgende garantievoorwaarden zijn alleen van toepassing
op het land waarin het product de eerste keer in een winkel
aan een consument is verkocht. Deze garantie dekt alle
defecten in productie en materialen die aanwezig waren op
het moment van verkoop of die zijn ontstaan binnen drie (3)
jaar na de eerste verkoop van dit product in een winkel aan
een consument (fabrieksgarantie). Indien een productiefout
of materiaalgebrek tijdens de garantieperiode optreedt, zal
het product gratis gerepareerd worden of, naar ons eigen
goeddunken, vervangen worden door een nieuwe. Om een
claim volgens deze garantie te kunnen indienen, moet het
product geretourneerd worden naar de winkel die het als eerste
heeft verkocht en het originele aankoopbewijs (kassabon of
factuur) met de aankoopdatum, naam en adres van de winkel,
en de productnaam, moet getoond worden. Er kunnen geen
claims ingediend worden inzake de garantie als het product
naar de fabrikant wordt gestuurd of naar een andere persoon
dan de winkel die het als eerste heeft verkocht met als doel
het indienen van een garantieclaim. De garantie is alleen van
toepassing als het product direct na de aankoop is gecontroleerd
op volledigheid, productiefouten en materiaalgebreken. Indien
het product via een postorderbedrijf werd gekocht, dan moet
het direct na ontvangst gecontroleerd worden op volledigheid,
productiefouten en materiaalgebreken. Indien schade wordt
geconstateerd, dan mag het product niet meer gebruikt
worden en moet het geretourneerd worden aan de winkel die
het oorspronkelijk heeft verkocht. Het product moet bij het
indienen van een garantieclaim in een volledige en schone staat
geretourneerd worden. Lees de gebruiksinstructies zorgvuldig
door voordat u contact opneemt met de winkel. De garantie
dekt geen schade veroorzaakt door verkeerd gebruik, externe
invloeden (water, brand, verkeersongelukken, etc.) of normale
slijtage. Garantieclaims worden alleen ingewilligd als het product
WARUNKI GWARANCJI
Poniższe warunki gwarancji dotyczą wyłącznie kraju, w którym
produkt został po raz pierwszy sprzedany konsumentowi za
pośrednictwem kanałów sprzedaży detalicznej. Niniejsza
gwarancja obejmuje wszystkie wady produkcyjne i materiałowe,
które istniały w momencie zakupu lub które ujawniły się w
ciągu trzech (3) lat od pierwszej sprzedaży tego produktu
poprzez kanały sprzedaży detalicznej konsumentowi
(gwarancja producenta). Jeśli w okresie gwarancji wystąpi wada
produkcyjna lub materiałowa, produkt zostanie naprawiony
bezpłatnie lub – według naszego uznania – może zostać
wymieniony na nowy. W celu zgłoszenia roszczenia z tytułu
niniejszej gwarancji, produkt musi zostać zwrócony sprzedawcy,
który jako pierwszy go sprzedał oraz musi zostać przedstawiony
oryginalny dowód zakupu (paragon lub faktura), zawierający
datę zakupu, nazwę i adres sprzedawcy oraz nazwę produktu.
Żadne roszczenia z tytułu niniejszej gwarancji nie mogą być
zgłaszane, jeżeli produkt został wysłany w celu zgłoszenia
roszczenia z tytułu gwarancji do producenta lub innej osoby z
pominięciem sprzedawcy, który sprzedał go po raz pierwszy.
Gwarancja obowiązuje tylko wtedy, gdy produkt został
sprawdzony pod względem kompletności, wad produkcyjnych
i materiałowych natychmiast po zakupie. Jeżeli produkt
został zakupiony w punkcie sprzedaży wysyłkowej, należy
go sprawdzić pod kątem kompletności, wad produkcyjnych
i materiałowych natychmiast po otrzymaniu. W przypadku
powstania uszkodzenia, produkt nie może być dłużej używany
i musi zostać zwrócony sprzedawcy detalicznemu, który
go sprzedał. W przypadku reklamacji gwarancyjnej produkt
musi być zwrócony w stanie kompletnym i czystym. Przed
skontaktowaniem się ze sprzedawcą należy dokładnie
przeczytać instrukcję obsługi. Gwarancja nie obejmuje szkód
spowodowanych niewłaściwym użytkowaniem, czynnikami
zewnętrznymi (woda, pożar, wypadki drogowe itp.) lub
FRNLPL
97
Page 98

autorisées, et si seules des pièces et accessoires d'origine sont
utilisées. Cette garantie n'annule ou ne limite en aucune façon
les droits des consommateurs ou les droits contre le vendeur
basés sur la violation de l'accord d'achat, accordés par la
législation applicable.
98
Page 99

behandeld en gebruikt wordt volgens de gebruiksinstructies,
reparaties en aanpassingen mogen alleen door hiervoor
bevoegde personen worden uitgevoerd, en alleen originele
onderdelen mogen worden gebruikt. Deze garantie vernietigt
of beperkt op geen enkele manier consumentenrechten of
rechten tegen de verkoper op basis van schending van de
koopovereenkomst toegekend door toepasselijke wetgeving.
normalnym zużyciem. Roszczenia z tytułu gwarancji będą
honorowane jedynie, gdy produkt jest traktowany i użytkowany
zgodnie z instrukcją obsługi, a naprawy i modykacje są
wykonywane wyłącznie przez osoby do tego upoważnione
oraz używane są tylko oryginalne części i akcesoria. Niniejsza
gwarancja nie unieważnia ani nie ogranicza w żaden sposób
żadnych praw konsumentów ani praw przysługujących
sprzedawcy w związku z naruszeniem umowy kupna przyznanej
przez obowiązujące przepisy prawa.
FRNLPL
99
Page 100

100
PALLAS B-FIX
UN-R44-04
UNIVERSAL
SEMI-UNIVERSAL
9 - 18 kg
04301395
CYBEX GmbH
Riedingerstr. 18, 95448 Bayreuth
Germany
SOLUTION B-FIX
UN-R44-04
UNIVERSAL
SEMI-UNIVE RSAL
15 – 36 kg
04301395
CYBEX GmbH
Riedingerstr. 18, 95448 Bayreuth
Germany
TANÚSÍTVÁNY
UN R-44/04
CYBEX Pallas B-x - 1. csoport, 9-től 18 kg-ig
CYBEX Solution B-x - 2/3. csoport, 15-től
36 kg-ig
Ülés emelő háttámlával és fejtámlával,
ütközésvédővel az 1. csoportban
Ajánlott:
Életkor: kb. 9 hónapostól 12 évesig
Súly: 9-36 kg
Csak automatikus hárompontos övvel
rendelkező járműülésekhez alkalmas,
melyeket a 16. UN szabályozás vagy hasonló
szabvány szerint hagytak jóvá.
CERTIFIKACE
UN R-44/ 04
CYBEX Pallas B-x – skupina 1, 9 až 18 kg
CYBEX Solution B-x – skupina 2/3, 15
až 36 kg
Sedačka s opěradlem a opěrkou hlavy, se
štítem proti nárazu skupiny 1.
Doporučeno pro:
Věk: od přibližně 9 měsíců do 12 let
Hmotnost: 9–36 kg
Vhodné pouze pro použití se sedadly s
tříbodovým automatickým bezpečnostním
pásem, která byla schválena podle nařízení
16 UN nebo podobného standardu.
CERTIFIKÁCIA
UN R-44/ 04
CYBEX Pallas B-x – skupina 1, 9 až 18 kg
CYBEX Solution B-x – skupina 2/3, 15
až 36 kg
Zvýšené sedadlo s operadlom a opierkou
hlavy, so štítom proti nárazu skupiny 1.
Odporučené pre:
Vek: približne od 9 mesiacov do 12 rokov
Hmotnosť: 9–36 kg
Vhodné len pre použitie so sedadlami s
trojbodovým automatickým bezpečnostným
pásom, ktoré boli schválené podľa nariadenia
16 UN alebo podobné.
KEDVES VÁSÁRLÓ!
Köszönjük, hogy a Pallas B-x-t választotta. Biztosítjuk Önt, hogy a gyermekülés fejlesztésekor a biztonságot, a kényelmet és a
könnyű használatot tartottuk a legfontosabbnak. Ezt a terméket
különleges minőségi ellenőrzés mellett gyártottuk, és megfelel a
legszigorúbb biztonsági követelményeknek.
FIGYELEM! A gyermek megfelelő védelme érdekében
!
alapvetően fontos, hogy Ön a gyermekülést az útmutatónak megfelelően használja.
MEGJEGYZÉS: Az ország-specikus követelményeknek (pl.
színes címke a gyermekülésen) miatt a termék jellemzői külső
megjelenésükben eltérhetnek. Ez azonban nem befolyásolja a
termék helyes működését.
MEGJEGYZÉS: Mindig tartsa kéznél ezt a Kezelési Útmutatót
a gyermekülésen, az erre a célra kijelölt rekeszben.
 Loading...