

Page 1
JUNO M-FIX
ECE R44/04, Gr. 1 | 9-18 kg (ca. 9M - 4Y)
Instruction Manual
NL DEENCZ
PL
HU
SK IT
ESPT FR
ESPT
Page 2
PL: IInstrukcja skróconaNL: Korte handleidingFR: Instructions résuméesIT: SommarioEN: Short instructionDE: Kurzanleitung
PT: Manual reduzidoES: Resumen de instruccionesSK: Stručný návodCZ: Zkrácený návodHU: Rövid tájékoztató
1
6 7
11
12
2
3
CLICK!
8
13
4
5
PRESS!
9
10
2
Page 3

FR
HU
NL DEENCZ PLSK ITESPT
DE - WARNUNG! Die Kurzanleitung dient nur der Übersicht. Um maximale Sicherheit und maximalen Komfort für Ihr Kind zu erreichen, ist
es unbedingt notwendig, die gesamte Gebrauchsanleitung aufmerksam zu lesen.
6 | INHALT
EN - WARNING! The short instruction is intended to provide only an overview. In order to achieve maximum security and comfort for your
child it is absolutely imperative that you read the whole instruction manual carefully.
IT - ATTENZIONE! Le istruzioni a lato sono soltanto un sommario generale. Per garantire massima sicurezza e comfort al vostro bambino è
indispensabile leggere attentamente ed interamente il manuale d'uso.
FR - ATTENTION ! Ces brèves instructions ne sont qu´un aperçu. Afin d’assurer la sécurité et le confort maximum pour votre enfant, il est
absolument impératif de lire la totalité du manuel d’instructions.
NL - BELANGRIJK! De volgende korte handleiding is uitsluitend bedoeld als overzicht. Voor optimale veiligheid en maximaal comfort voor
uw kind is het absoluut noodzakelijk dat u de gehele handleiding zorgvuldig doorleest.
PL - OSTRZEŻENIE Niniejsza krótka instrukcja ma na celu zapewnienie jedynie wstępnej informacji o zakupionym foteliku. Tylko
zapoznanie się z całą instrukcją daje pewność, że Twoje dziecko będzie podróżowało bezpiecznie i komfortowo.
EN - FIGYELEM! A következő rövid utasítás csak áttekintésül szolgál. Gyermeke maximális biztonsága és kényelme érdekében szükséges,
hogy a teljes használati utasítást alaposan áttanulmányozza.
CZ - VAROVÁNÍ! Následující krátký návod slouží pouze jako přehled. Pro dosažení maximální ochrany a pohodlí pro vaše dítě je naprosto
nezbytné, abyste si řádně přečetli celý návod k použití.
SK - VAROVANIE! Nasledujúci krátky návod slúži iba ako prehľad. Pre dosiahnutie maximálnej ochrany a pohodlie pre vaše dieťa je
absolútne nevyhnutné, aby ste si riadne prečítali celý návod na použitie.
ES - ¡ATENCIÓN! Estas breves instrucciones solo tienen por objetivo proporcionar una visión general. Para obtener la máxima protección y
seguridad para su hijo es esencial que lea todo el manual de instrucciones en las páginas sucesivas.
PT - ATENÇÃO! Estas breves indicações tem como objectivo dar apenas uma visão geral. Para que a criança tenha o máximo de conforto
e segurança possível é essencial que leia cuidadosamente todo o manual de instruções.
7 | CONTENT
7 | ARGOMENTI
30 | SOMMAIRE
31 | INHOUD
31 | SPIS TREŚCI
58 | TARTALOM
59 | OBSAH
59 | OBSAH
84 | CONTENIDO
85 | ÍNDICE
3
Page 4

JUNO M-F IX
ECE R 44/04
UNIVERSAL
SEMI-UNIVERSAL
9 - 18 kg
CYBEX GmbH
Riedingerstr. 18, 95448 Bayreuth
Germany
04301342
CYBEX JUNO M-FIX – Kindersitz
ECE R44/04 Gruppe 1
Gewicht: 9 - 18 kg
Alter: ca. 9 Monate bis 4 Jahre
Nur geeignet für Fahrzeugsitze mit DreipunktAutomatik-Gurt, zugelassen nach ECE R16 oder
gleichwertigem Standard.
CYBEX JUNO M-FIX – car seat
ECE R44/04 age group 1
Weight: 9 - 18 kg
Age: app. 9 months - 4 years
Only suitable for use in the listed vehicles fitted
with 3 point retractor safety-belts, approved to ECE
Regulation No. 16 or other equivalent standards.
SEHR GEEHRTE KUNDIN, SEHR GEEHRTER KUNDE!
Vielen Dank, dass Sie sich bei der Wahl eines Kindersitzes für den CYBEX
JUNO M-FIX entschieden haben. Bei der Entwicklung des Kindersitzes
standen Sicherheit, Komfort und Bedienfreundlichkeit im Vordergrund. Das
Produkt wird unter besonderer Qualitätsüberwachung hergestellt und erfüllt
strengste Sicherheitsanforderungen.
HINWEIS! Bewahren Sie die Anleitung immer griffbereit in dem dafür
vorgesehenen Fach am Kindersitz auf.
HINWEIS! Durch länderspezifische Anforderungen (z.B. Farbkennzeichnungen
am Kindersitz) können Produktmerkmale in ihrer äußeren Erscheinung variieren.
Die korrekte Funktionsweise des Produktes wird davon jedoch nicht beeinflusst.
HINWEIS! Der Dreipunktgurt darf nur durch die dafür vorgesehenen
Führungen verlaufen. Die Gurtführung wird in diesem Handbuch genau
beschrieben und ist zudem am Kindersitz rot markiert.
4
CYBEX JUNO M-FIX – seggiolino auto
ECE R44/04 età gruppo 1
Peso: DA 9 A 18 KG
ETA': da 9 mesi a 4 anni circa
Solo per veicoli con sedili dotati di cinture di
sicurezza automatiche a 3 punti omologate ECE R16
o standard equivalente
!
WARNING! Damit Ihr Kind richtig geschützt werden kann, ist es
unbedingt notwendig, den Kindersitz so zu verwenden, wie es in dieser
Anleitung beschrieben wird.
Page 5
DEENIT
DEAR CUSTOMER! GENTILE CLIENTE,
Thank you for buying the CYBEX JUNO M-FIX. We can assure you that safety,
comfort and ease of use were our highest priorities when developing the car
seat. This product is manufactured under exceptional quality control and meets
the strictest safety requirements.
Grazie per aver scelto CYBEX JUNO M-FIX. Le assicuriamo che nel progettare
il seggiolino auto i nostri principali obiettivi sono stati la sicurezza, il comfort
e la facilità di utilizzo. Il prodotto è stato elaborato sotto uno stretto controllo
qualitativo e risponde ai più severi standard di sicurezza.
NOTE! Always keep this Instruction Manual at hand in the compartment that
has been provided for that purpose on the car seat.
NOTE! Due to country-specific requirements (e.g. colour labelling on the car
seat), the product features may vary in their external appearance. This, however,
does not affect the correct functioning of the product.
NOTE! The three-point belt must only be passed through the designated
routings. The belt routings are described in detail in this manual and are marked
in red on the car seat.
!
WARNING! In order to keep your child properly protected it is absolutely
essential that you use the car seat as described in this manual.
NOTE! Raccomandiamo di tenere il manuale sempre a portata di mano e di
conservarlo nell'apposito alloggiamento del seggiolino.
NOTE! In base alle diverse normative nazionali l'aspetto di alcune
caratteristiche del prodotto potrebbe differire (es. colori delle etichette sul
seggiolino). Ciò tuttavia non influisce sul corretto funzionamento del prodotto.
NOTE! La cintura automatica a tre punti deve passare attraverso le guide
designate. Le guide per la cintura sono descritte in dettaglio nel manuale e sul
seggiolino sono contrassegnate nel colore rosso.
!
ATTENZIONE! Per la massima sicurezza del bambino è essenziale usare
CYBEX Juno M-fix secondo quanto descritto in questo manuale.
5
Page 6

INHALT
KURZANLEITUNG ........................................................................................................................ 2
ZULASSUNG ................................................................................................................................. 4
ERSTMONTAGE ............................................................................................................................8
ZUM SCHUTZ DES FAHRZEUGS ......................................................................................... 8
DER RICHTIGE PLATZ IM FAHRZEUG .............................................................................. 10
SICHERHEIT IM FAHRZEUG .................................................................................................12
EINBAU DES KINDERSITZES INS FAHRZEUG .............................................................12
EINBAU DES KINDERSITZES MIT ISOFIX CONNECT SYSTEM ..............................14
AUSBAU DES KINDERSITZES AUS DEM FAHRZEUG................................................16
EINSTELLEN DER SEITENPROTEKTOREN ..................................................................... 16
ANPASSEN AN DIE KÖRPERGRÖSSE .............................................................................18
EINSTELLEN DES FANGKÖRPERS ....................................................................................18
ANSCHNALLEN MIT FANGKÖRPER ..................................................................................20
RICHITIGES SICHERN DES KINDES ................................................................................20
ENTFERNEN DES SITZBEZUGES ......................................................................................22
REINIGUNG .................................................................................................................................22
PFLEGE ..........................................................................................................................................24
VERHALTEN NACH EINEM UNFALL ...................................................................................24
PRODUKTINFORMATION .......................................................................................................24
PRODUKTLEBENSDAUER .....................................................................................................26
ENTSORGUNG ...........................................................................................................................26
GARANTIEBEDINGUNGEN ................................................................................................... 28
6
Page 7

DEENIT
CONTENT CONTENUTI
SHORT INSTRUCTION .............................................................................................................. 2
HOMOLOGATION ........................................................................................................................4
FIRST INSTALLATION .................................................................................................................. 9
PROTECTING THE VEHICLE ................................................................................................... 9
THE CORRECT POSITION IN THE VEHICLE ..................................................................11
SAFETY IN THE VEHICLE .......................................................................................................13
INSTALLING THE CAR SEAT IN THE VEHICLE ...............................................................13
INSTALLING THE CAR SEAT WITH ISOFIX CONNECT SYSTEM ............................15
REMOVING THE CAR SEAT FROM THE VEHICLE .......................................................17
ADJUSTING THE SIDE PROTECTORS ..............................................................................17
ADJUSTING TO THE BODY SIZE .........................................................................................19
ADJUSTING THE IMPACT SHIELD ......................................................................................19
STRAPPING WITH THE IMPACT SHIELD ......................................................................... 21
SECURING THE CHILD CORRECTLY ...............................................................................21
REMOVING THE SEAT COVER ............................................................................................23
CLEANING ....................................................................................................................................23
PRODUCT CARE ........................................................................................................................25
WHAT TO DO AFTER AN ACCIDENT .................................................................................25
PRODUCT INFORMATION .....................................................................................................25
PRODUCT DURABILITY ..........................................................................................................27
DISPOSAL ....................................................................................................................................27
WARRANTY ..................................................................................................................................29
SOMMARIO ..................................................................................................................................... 2
OMOLOGAZIONE ......................................................................................................................... 4
PRIMA INSTALLAZIONE ............................................................................................................ 9
PROTEGGERE IL VEICOLO..................................................................................................... 9
LA POSIZIONE MIGLIORE ALL'INTERNO DELL'AUTO ................................................11
SICUREZZA NELL'AUTO .........................................................................................................13
INSTALLAZIONE DEL SEGGIOLINO ..................................................................................13
INSTALLAZIONE CON IL SISTEMA ISOFIX CONNECT .............................................. 15
RIMOZIONE DEL SEGGIOLINO DALL'AUTO ..................................................................17
COME REGOLARE LE PROTEZIONI LATERALI .............................................................17
ADATTAMENTO ALLA TAGLIA CORPOREA .....................................................................19
REGOLAZIONE DEL CUSCINO DI SICUREZZA ..........................................................19
ALLACCIARE CON IL CUSCINO DI SICUREZZA .........................................................21
ALLACCIARE CORRETTAMENTE IL BAMBINO .............................................................21
RIMOZIONE DEL RIVESTIMENTO .......................................................................................23
PULIZIA ..........................................................................................................................................23
CURA DEL PRODOTTO ...........................................................................................................25
COSA FARE A SEGUITO DI UN INCIDENTE ...................................................................25
INFORMAZIONI SUL PRODOTTO .......................................................................................25
VITA UTILE DEL PRODOTTO ..................................................................................................27
SMALTIMENTO ............................................................................................................................27
GARANZIA .................................................................................................................................... 29
7
Page 8

ERSTMONTAGE
Der Kindersitz besteht aus einem Sitzkissen (1) und einer Rückenlehne (2) mit
höhenverstellbarer Kopfstütze sowie dem tiefenverstellbarem Fangkörper (3).
1
2
3
Nur die Kombination aller Teile bietet Ihrem Kind den bestmöglichen Schutz
und Komfort.
Die Rückenlehne (2) wird mit der Führungsschiene auf der Achse des Sitzkissens
(1) eingehakt.
!
WARNUNG! Stellen Sie sicher, dass Sie diese Gebrauchsanweisung
sorgfältig lesen, verstehen und befolgen.
!
WARNUNG! Die Bestandteile des CYBEX Kindersitzes dürfen weder
modifiziert werden, noch einzeln oder in Verbindung mit Sitzkissen,
Rückenlehnen oder Kopfstützen anderer Hersteller oder anderer
Baureihen verwendet werden. Die Zulassung würde in einem solchen
Fall sofort erlöschen. Eine Fehlanwendung kann zu ernsthaften bis hin
zu tödlichen Verletzungen des Kindes führen. Bitte bewahren Sie diese
Gebrauchsanweisung zur zukünftigen Verwendung auf.
!
WARNUNG! Achten Sie immer darauf, dass die Einzelteile des
Kindersitzes niemals gestaucht oder eingeklemmt werden (z.B. durch die
Fahrzeugtür oder durch Verstellen der Rückbank).
ZUM SCHUTZ DES FAHRZEUGS
An einigen Autositzen aus empfindlichem Material (z.B. Alcantara, Leder, etc.)
können durch die Benutzung von Kindersitzen mögliche Gebrauchsspuren und/
oder Abfärbungen auftreten. Um das zu vermeiden, können Sie z.B. eine Decke
oder ein Handtuch unterlegen. Ferner weisen wir in diesem Zusammenhang
auf unsere Reinigungshinweise hin, die vor der ersten Verwendung des Sitzes
unbedingt beachtet werden sollten.
8
Page 9
DEENIT
FIRST INSTALLATION PRIMA INSTALLAZIONE
The child seat consists of a seat cushion (1) and a backrest (2) with a headrest,
which adjusts to suit the child‘s height, as well as a impact shield (3), which
is adjustable for depth. Your child will benefit from maximum protection and
comfort only when all components are used together.
The backrest (2) is hooked onto the axis of the seat cushion (1) by means of
the guide lug.
Il seggiolino auto comprende una seduta (1), uno schienale (2) con poggiatesta
regolabile per adattarsi all'altezza del bambino, e un cuscino di sicurezza (3)
con ampiezza regolabile. Il bambino beneficierà della massima protezione e
comfort solo quando tutte le componenti sono utilizzate insieme.
Lo schienale (2) si aggancia all'asse del cuscino seduta (1) con la guida.
!
WARNING! Make sure to read, understand and follow the instruction manual.
!
WARNING! The components of the CYBEX child seat must not be
modified, used on their own or in combination with seat cushions,
backrests or headrests from other manufacturers or other model ranges.
In any such cases the child seat will no longer be certified for use.
Misapplication can lead to serious injury or death of your child. Please
keep these instructions for future reference.
!
WARNING! Always ensure that the individual components of the child
seat are never compressed or jammed (e.g. by the car door or while
adjusting the back seat.)
PROTECTING THE VEHICLE
Traces of use and/or discolouration can appear on some vehicle seats made
from delicate materials (e.g. alcantara, leather, etc.) if car seats are used. You
can avoid this by putting, e.g. a blanket or a towel underneath the car seat.
In this context also see our cleaning directions. It is essential that these are
followed before the first use of the car seat.
!
ATTENZIONE! Assicuratevi di leggere, capire e seguire
scrupolosamente le istruzioni contenute in questo manuale.
!
ATTENZIONE! Le parti del seggiolino CYBEX non devono essere
modificate, usate da sole o in combinazione con cuscini di sicurezza,
schienali o poggiatesta di altri produttori o di altri modelli. In tali casi il
seggiolino non sarà più certificato per l'uso. Un uso scorretto del prodotto
può portare a gravi lesioni, anche fatali, per il bambino. Tenere le istruzioni
a portata di mano per riferimento futuro
!
ATTENZIONE! Verificare sempre che le singole parti del seggiolino non
siano mai bloccatie o compresse (ad esempio tra la portiera dell'auto o
durante la regolazione del sedile).
PROTEGGERE IL VEICOLO
I sedili con rivestimenti particolarmente delicati (velluto, pelle, ecc.) potrebbero
essere danneggiati dall'uso di seggiolini di sicurezza. Per prevenire questo
consigliamo di porre un telo sotto al seggiolino a protezione del sedile. A
riguardo, vedere anche le istruzioni per la pulizia: è essenziale seguire quanto
indicato prima dell'uso del seggiolino.
9
Page 10
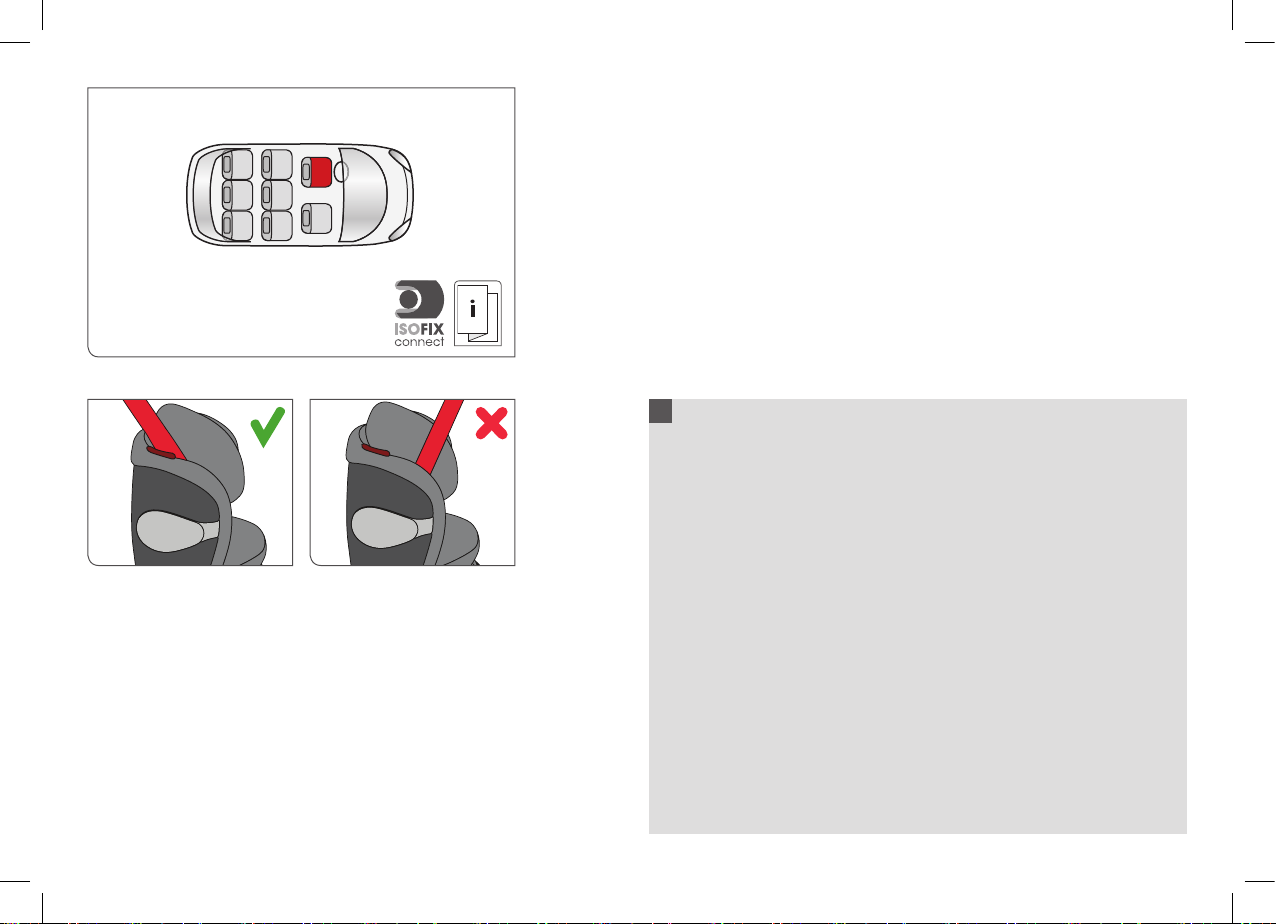
DER RICHTIGE PLATZ IM FAHRZEUG
Der Kindersitz ist mit eingeklapptem ISOFIX Connect System auf
allen Fahrzeugplätzen mit Dreipunkt-Automatikgurt verwendbar, die im
Fahrzeughandbuch für die „universelle“ Verwendung zugelassen sind.
Für die Befestigung mit den ISOFIX Rastarmen besteht eine „semi-universelle“
Genehmigung. Aus diesem Grund kann ISOFIX Connect nur in bestimmten
Fahrzeugen eingesetzt werden. Die zugelassenen Fahrzeuge entnehmen Sie
bitte der beigelegten Fahrzeugtypenliste. Die aktuelle Version erhalten Sie auf
www.cybex-online.de.
In Ausnahmefällen kann der Kindersitz auch vorne am Beifahrersitz verwendet
werden. Beachten Sie dabei die folgenden Punkte:
• Bei Fahrzeugen mit Airbag sollten Sie den Beifahrersitz so weit wie möglich
nach hinten schieben. Beachten Sie jedoch, dass der obere Umlenkpunkt
des Fahrzeuggurtes hinter der Gurtführung des Kindersitzes bleibt.
• Die Empfehlungen des Fahrzeugherstellers sind unbedingt zu befolgen.
!
WARNUNG! Der Sitz ist nicht für die Verwendung mit einem 2-Punkt- oder
Beckengurt geeignet. Wird der Sitz mit einem 2-Punkt-Gurt gesichert, kann
es bei einem Unfall zu schweren oder gar tödlichen Verletzungen des Kindes
kommen.
WARNUNG! Der Diagonalgurt muss schräg nach hinten verlaufen und
darf nie nach vorn zum oberen Gurtpunkt in Ihrem Fahrzeug führen.
Sollte dies nicht einzustellen sein z.B. durch Vorschieben des Autositzes
oder Verwendung auf einem anderen Sitzplatz, so ist der Kindersitz für
dieses Fahrzeug nicht geeignet. Im Zweifelsfall wenden Sie sich an den
Kindersitzhersteller.
Gepäckstücke oder andere Gegenstände im Fahrzeug, welche bei einem
Unfall Verletzungen verursachen können, müssen immer gut befestigt werden.
Sie können zu tödlichen Geschossen im Fahrzeug werden.
WARNUNG! Auf Fahrzeugplätzen, die quer zur Fahrtrichtung angeordnet
sind, ist die Verwendung des Sitzes nicht zulässig. Auf rückwärtsgerichteten
Fahrzeugsitzen, wie z.B. in einem Van oder Minibus, ist die Verwendung
zulässig, sofern der Fahrzeugsitz für die Beförderung eines Erwachsenen
zugelassen ist. Zu beachten ist, dass die Kopfstütze
bei rückwärtsgerichtetem Einbau nicht entfernt werden darf!
WARNUNG! Bitte lassen Sie Ihr Kind nie unbeaufsichtigt im Fahrzeug zurück.
Die Kunststoffteile des Kindersitzes heizen sich in der Sonne auf. Ihr Kind kann
sich daran verbrennen. Schützen Sie Ihr Kind und den Kindersitz vor intensiver
Sonneneinstrahlung (z.B. indem Sie ein helles Tuch über den Sitz legen).
10
Page 11
DEENIT
THE CORRECT POSITION IN THE VEHICLE LA POSIZIONE MIGLIORE ALL'INTERNO DELL'AUTO
The car seat with retracted ISOFIX Connect system can be used on all vehicle
seats with automatic three-point safety belts approved in the vehicle manual for
‚universal‘ use.
A ‘semi-universal’ certification is given to restraint systems that are connected
to the car through ISOFIX Connect. For this reason, ISOFIX Connect can only
be used in certain vehicles. Please refer to the enclosed vehicle type list for
approved vehicles. You can obtain the most up-to-date version from
www.cybex-online.com.
In exceptional cases, the car seat may also be used on the front passenger
seat. Please note the following in this case:
• In cars with airbags, you should push the passenger seat back as far as
possible. When doing so, however, ensure that the upper pivot point of the
safety belt is behind the belt feed point of the car seat.
• Always comply with the recommendations of the vehicle manufacturer.
Il CYBEX JUNO M-fix con sistema ISOFIX CONNECT estraibile può essere
utilizzato su tutti i sedili con cinture di sicurezza automatiche a tre punti
approvate dal manuale della vettura, con uso universale.
Ai sistemi di ritenuta collegati alla vettura mediante sistema ISOFIX Connect è
data una omologazione ‘semi-universale’. Gli ISOFIX CONNECT sono perciò
utilizzabili solo in alcuni veicoli. Consultare la lista di tipi di veicoli allegata per
conoscere i veicoli approvati. Potrete trovare l'elenco sempre aggiornato anche
sul nostro sito al link: www.cybex-online.com.
In casi eccezionali, il seggiolino può essere utilizzato anche sul sedile del
passeggero anteriore. In questo caso tenere conto di quanto segue:
• Nelle auto dotate di airbag il sedile del passeggero va spinto il più indietro
possibile. Nel fare ciò accertarsi però che il punto di snodo superiore della
cintura di sicurezza sia dietro alla guida della cintura del seggiolino.
• Rispettare sempre le raccomandazioni del costruttore del veicolo.
!
WARNING! The car seat is not suitable for use with a two-point or lap
belt. If the seat is secured using a two-point belt, an accident may result
in severe or even fatal injuries to the child.
WARNING! The diagonal belt must run back at a recline and must never
run forward to the upper belt point in your vehicle. If it is not possible to
adjust the seat in this way, e.g. by pushing the car seat forward or using it
on another seat, this car seat is not suitable for your vehicle. Contact the
car seat manufacturer if in doubt.
Luggage or other objects present in the vehicle that may cause injury in
the event of an accident must always be firmly secured. Otherwise, they
may be thrown, causing fatal injuries.
WARNING! The car seat may not be used on vehicle seats facing
to the side of the direction of travel. Use of the car seat is permitted
on rearfacing seats, e.g. in a van or minibus, provided that the seat is
permitted for transporting an adult. It is essential to ensure that the
vehicle headrest is not removed when the child seat is installed in a
rearward facing vehicle seat.
WARNING! Never leave your child unattended in the car. The plastic
parts in the child restraint system heat up in sun and the child may
sustain burns. Protect your child and the car seat from direct sun
exposure (e.g. by covering it with a light colored cloth).
!
ATTENZIONE! Il seggiolino NON può essere installato con cinture a due punti
o soltanto con quella ventrale. Gli incidenti possono causare lesioni gravi o
mortali al bambino in caso di messa in sicurezza con una cintura a due punti.
ATTENZIONE! La cintura diagonale deve scorrere all'indietro e mai in avanti
rispetto al punto di aggancio superiore del veicolo. Il seggiolino sarà inadatto
al veicolo ove sia impossibile regolare il sedile in questo modo, ad esempio
spingendo avanti il sedile o usando un altro sedile. Se in dubbio, contattare il
rivenditore o il produttore.
Bagagli o altri oggetti presenti nel veicolo che possono causare lesioni in caso
di incidente devono essere fissati saldamente. In caso contrario potrebbero
essere scagliati e causare lesioni mortali.
ATTENZIONE! Il seggiolino non è utilizzabile sui sedili rivolti lateralmente
rispetto alla direzione di marcia. L'uso del seggiolino è ammesso sui sedili
rivolti contro il senso di marcia, ad esempio nei minibus, a patto che il sedile
sia abilitato al trasporto di adulti. è essenziale assicurarsi che il poggiatesta
non sia stato rimosso in caso di installazione su sedile contro il senso di
marcia.
ATTENZIONE! Non lasciare mai il bambino incustodito nel veicolo. Le parti
in plastica del seggiolino tendono a riscaldarsi se esposte al sole diretto con
pericolo di scottature per il bambino. Proteggere il bambino ed il seggiolino da
un'eccessiva esposizione al sole diretto (per esempio stendendo un telo chiaro
sopra il seggiolino).
11
Page 12

SICHERHEIT IM FAHRZEUG
!
WARNUNG! Der Kindersitz muss, auch dann wenn er nicht benutzt wird,
immer korrekt mit dem Fahrzeuggurt im Fahrzeug befestigt sein. Bereits
bei einer Notbremsung oder einem geringen Aufprall können unbefestigte
Teile andere Mitfahrer und Sie selbst verletzen.
Achten Sie zum Schutz aller Fahrzeuginsassen stets darauf, dass...
• die umklappbaren Rückenlehnen der Fahrzeugsitze eingerastet sind und sich
in einer aufrechten Position befinden.
• bei Einbau des Kindersitzes auf dem Beifahrersitz, dieser in der hintersten
Position steht.
• im Fahrzeug alle beweglichen Gegenstände gesichert sind.
• das Fahrzeug-Gurtschloss nicht in den Bereich des Fangkörpers reicht.
Im Zweifelsfall wenden Sie sich an den Händler oder Hersteller.
• alle Personen im Fahrzeug angeschnallt sind.
EINBAU DES KINDERSITZES INS FAHRZEUG
Stellen Sie den Kindersitz auf den entsprechenden Fahrzeugsitz im Auto.
• Achten Sie unbedingt darauf, dass die Rückenlehne des Kindersitzes
vollflächig an der Rückenlehne des Fahrzeugsitzes anliegt. Der Kindersitz darf
sich auf keinen Fall in einer Liegeposition befinden.
• Sollte die Kopfstütze des Fahrzeuges störend sein, ziehen Sie diese ganz
heraus oder nehmen Sie diese ganz ab (Ausnahme siehe Abschnitt „DER
RICHTIGE PLATZ IM FAHRZEUG“). Die Rückenlehne passt sich optimal
stufenlos nahezu jeder Neigung des Fahrzeugsitzes an.
!
WARNUNG! Die Rückenlehne des Kindersitzes muss an der Lehne des
Fahrzeuges flächig aufliegen. Um den größtmöglichen Schutz für das
Kind zu gewährleisten, muss sich der Sitz in einer normalen aufrechten
Position befinden!
12
!
WARNUNG! Benutzen Sie niemals andere als die in der
Bedienungsanleitung beschriebenen und am Sitz markierten Punkte, um
den Kindersitz zu befestigen.
Page 13

DEENIT
SAFETY IN THE VEHICLE SICUREZZA NELL'AUTO
!
WARNING!
belt in the vehicle even when not in use. In case of an emergency brake or
accident, an unsecured car seat may injure other passengers or yourself.
In order to guarantee the best possible safety for all passengers make sure
that...
• foldable backrests in the vehicle are locked in their upright position.
• when installing the car seat on the front passenger seat, adjust the vehcile
seat in rearmost position.
• you properly secure all objects likely to cause injury in the case of an accident.
• that the car buckle is not reaching all the way to the impact shield.
In case of doubt contact the retailer or manufacturer.
• all passengers in the vehicle are buckled up.
The car seat must always be secured correctly with the vehicle
!
ATTENZIONE! Il seggiolino deve SEMPRE essere allacciato con la cintura di
sicurezza dell'auto, anche quando non utilizzato. In caso di brusche frenate o di
incidente, un seggiolino non fissato potrebbe ferire altri passeggeri o il guidatore.
Per garantire la massima protezione di tutti i passeggeri è necessario osservare
quanto segue:
• verificare che tutti gli schienali reclinabili siano ben fissati nella posizione eretta
• nel caso il seggiolino sia installato sul sedile passeggero anteriore, verificare
che questo si trovi nella posizione più arretrata
• assicurare in modo appropriato tutti gli oggetti che potrebbero costituire pericolo
in caso di incidente
• che la fibbia di fissaggio della cintura dell'auto non raggiunga l'altezza del
cuscino di sicurezza. Se in dubbio, contattare il rivenditore o il produttore.
• che tutti i passeggeri del veicolo abbiano le cinture allacciate
INSTALLING THE CAR SEAT IN THE VEHICLE INSTALLAZIONE DEL SEGGIOLINO
Place the car seat on the appropriate seat in the vehicle.
• Always ensure that the entire surface of the backrest of the car seat is
placed fully against the backrest of the vehicle seat. The car seat must never
be in a lying position.
• If the headrest of the vehicle is in the way, pull it out all the way or remove
it completely (for exceptions to this, please refer to the section “CORRECT
POSITION IN THE VEHICLE”). The backrest will perfectly adapt to
practically any recline of the vehicle seat.
!
WARNING! The full surface of the backrest of the car seat must be
against the backrest of the vehicle. To ensure maximum protection for
your child, the car seat must be in a normal upright position!
Collocare il seggiolino sul sedile dell'auto appropriato.
• Accertare sempre che l'intera superficie dello schienale del CYBEX JUNO
M-fix poggi completamente contro lo schienale del sedile dell'auto. Il
seggiolino non deve mai trovarsi in posizione sdraiata.
• Se il poggiatesta del veicolo è d'intralcio, estrarlo completamente,
allontanarlo o rimuoverlo del tutto (per le eccezioni in merito vedere
“POSIZIONE CORRETTA DEL SEGGIOLINO NEL VEICOLO”). Lo
schienale si adatterà perfettamente a praticamente qualsiasi inclinazione del
sedile veicolare.
!
ATTENZIONE! L'intera superficie dello schienale del seggiolino CYBEX deve
poggiare contro lo schienale del veicolo. Per assicurare la massima protezione
per il bambino il sedile deve trovarsi nella normale posizione eretta!
!
WARNING! Do not use any load bearing contact points other than those
described in the instructions and marked in the child restraint.
!
ATTENZIONE! Non utilizzare punti di contatto portanti diversi da quelli
descritti nelle istruzioni e contrassegnati sul sistema di ritenuta.
13
Page 14

EINBAU DES KINDERSITZES MIT ISOFIX CONNECT SYSTEM
6
1
5
Mit dem ISOFIX Connect System können Sie den Kindersitz mit dem Fahrzeug
verbinden und so die Sicherheit Ihres Kindes erhöhen. Ihr Kind muss weiterhin
mit dem Fangkörper und 3-Punkt-Gurt Ihres Fahrzeuges angeschnallt werden.
HINWEIS! Die ISOFIX Befestigungspunkte (4) sind zwei Metalllaschen
pro Sitzplatz und befinden sich zwischen Rückenlehne und Sitzfläche des
Fahrzeugsitzes. Im Zweifelsfall nehmen Sie die Bedienungsanleitung Ihres
Fahrzeuges zu Hilfe.
14
7
8
CLICK!
4
6
9
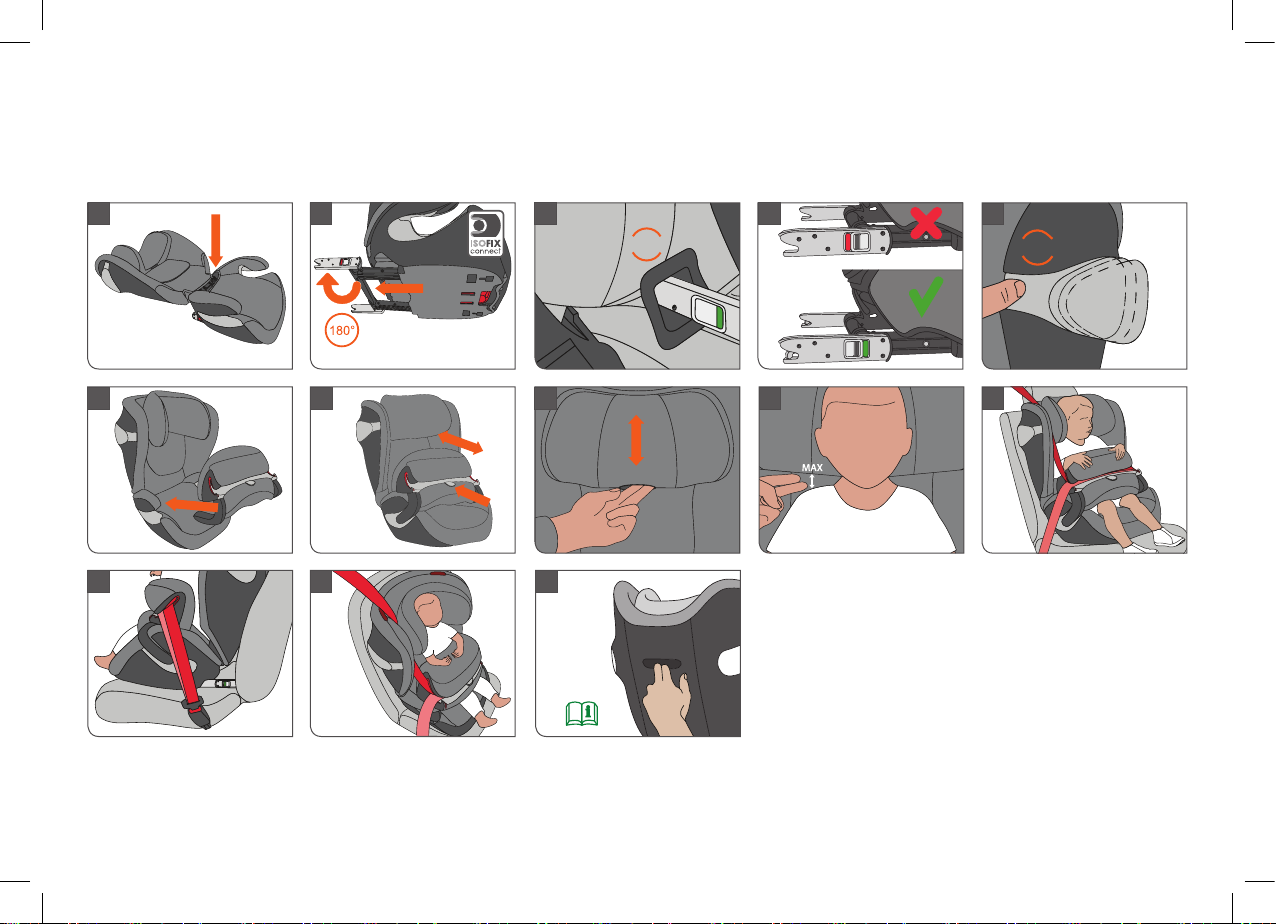
• Betätigen Sie den Verstellgriff (5) unter dem Sitzkissen (1) des Kindersitzes.
• Ziehen Sie die beiden ISOFIX Connect Rastarme (6) bis zum Endanschlag aus.
• Drehen Sie nun die ISOFIX Connect Rastarme (6) um 180°, damit diese in
Richtung der ISOFIX Befestigungspunkte zeigen.
HINWEIS! Überprüfen Sie vor dem Verbinden der ISOFIX Connect Rastarme
(6) mit den ISOFIX Befestigungspunkten (4) deren Entriegelungstasten (7).
Sind die grünen Sicherheitsindikatoren (8) zu sehen, müssen Sie vor dem
Verbinden zunächst die ISOFIX Connect Rastarme entriegeln, indem Sie die
Entriegelungstasten (7) drücken und zurückziehen.
• Schieben Sie die beiden Rastarme (6) in die ISOFIX Befestigungspunkte (4)
bis diese mit einem hörbaren „KLICK“ einrasten.
• Vergewissern Sie sich, dass der Sitz gut hält, indem Sie versuchen ihn
herauszuziehen.
• Der grüne Sicherheitsindikator (8) muss nun an den beiden Entriegelungstasten
(7) gut sichtbar sein.
• Mit dem Verstellgriff (5) des Kindersitzes können Sie nun die Position des
Sitzes einstellen.
HINWEIS! Sind die ISOFIX Befestigungspunkte in ihrem Fahrzeug schwer zu
erreichen, können Sie die mitgelieferten Einführhilfen verwenden.
• Hängen Sie die mitgelieferten Einführhilfen (9) mit der längeren Lasche
nach oben in den beiden ISOFIX Befestigungspunkten (4) ein. In manchen
Fahrzeugen eignet sich eine entgegengesetzte Einbaurichtung der
Einführhilfen (9) besser.
Page 15

DEENIT
INSTALLING THE CAR SEAT WITH ISOFIX CONNECT SYSTEM
Using the ISOFIX Connect system, you can fix the car seat to the vehicle,
thereby increasing your child’s safety. The child still needs to be secured with
the impact shield and the three-point belt of your vehicle.
INSTALLAZIONE CON IL SISTEMA ISOFIX CONNECT
Con il sistema ISOFIX CONNECT è possibile fissare il CYBEX JUNO M-fix al
veicolo, aumentando così la sicurezza del bambino. Il bambino deve tuttavia essere
allacciato utilizzando il cuscino di sicurezza e la cintura a tre punti del veicolo.
NOTE! The ISOFIX anchorage points (4) are two metallic clips for each seat
and are positioned between the backrest and the seating surface of the vehicle
seat. In case of doubt, please refer to the driver’s manual of your vehicle.
• Use the adjustment button (5) under the seat cushion (1) of the car seat.
• Pull the two ISOFIX Connect locking arms (6) as far as they will go.
• Now twist the ISOFIX Connect locking arms (6) 180° so that they are facing
the direction of the ISOFIX anchorage points.
NOTE! Before clicking the ISOFIX Connect locking arms (6) into the ISOFIX
anchorage points (4), check the release buttons (7). If the green safety
indicator (8) is visible, you must first release the ISOFIX Connect locking arms
before joining by pressing and pulling back the release button (7).
• Push the two ISOFIX Connect locking arms (6) into the ISOFIX anchorage
points (4) until these lock into place with an audible ‘CLICK’.
• Ensure that the car seat is secure by trying to pull it out.
• The green safety indicator (8) must now be clearly visible on the two red
release buttons (7).
• You can now use the adjustment button (5) of the car seat to position it.
NOTE! Are the ISOFIX anchorage points hard to reach in your vehicle, you can
use the supplied ISOFIX guides.
• Insert the supplied ISOFIX guides (9) with the longer strap upwards into the
two ISOFIX anchorage points (4). In some vehicles, it is better to mount the
ISOFIX guides (9) in the opposite direction.
NOTE! I punti di ancoraggio ISOFIX (4) sono due clip metalliche per ogni
sedile, posizionate tra lo schienale e la seduta del sedile del veicolo. In caso di
dubbio consultare il manuale del guidatore del proprio veicolo.
• Usare la leva di regolazione (5) situata sotto alla seduta del seggiolino (1).
• Tirare fino al limite i due bracci di ancoraggio ISOFIX CONNECT (6).
• Ruotare ora di 180° i bracci di bloccaggio ISOFIX CONNECT (6), in modo
che siano rivolti in direzione degli ausili di inserimento.
NOTE! Controllare i pulsanti di rilascio (7) prima di unire i bracci di bloccaggio
ISOFIX CONNECT (6) ai punti di fissaggio ISOFIX (4). Se gli indicatori di
sicurezza verdi (8) sono visibili, prima dell'unione è necessario rilasciare i bracci
di bloccaggio ISOFIX CONNECT premendo e tirando indietro il pulsante di
rilascio (7).
• Premere i connettori ISOFIX (6) verso i punti di ancoraggio ISOFIX (4) fino a
sentire un sonoro "click".
• Accertare che il seggiolino sia in sicurezza provando a tirarlo fuori.
• L'indicatore di sicurezza verde (8) deve essere ora chiaramente visibile sui
due pulsanti di rilascio rossi (7).
• Usare ora il pulsante di regolazione centrale (5) per posizionare il seggiolino.
NOTE! Se i punti di ancoraggio ISOFIX della vettura sono difficili da
raggiungere, preghiamo utilizzare le guide in dotazione per evitare di
danneggiare i rivestimenti dei sedili.
• Inserire le guide in dotazione (9) con la linguetta più lunga in alto nei due
punti di fissaggio ISOFIX (4). In alcuni veicoli è preferibile montare le guide in
dotazione (9) in direzione opposta.
15
Page 16

AUSBAU DES KINDERSITZES AUS DEM FAHRZEUG
4
7
6
5
Führen Sie die Einbauschritte in umgekehrter Reihenfolge durch.
• Entriegeln Sie die ISOFIX Connect Rastarme (6) beidseitig, indem Sie die
Entriegelungstasten (7) drücken und gleichzeitig zurückziehen.
• Ziehen Sie den Sitz aus den ISOFIX Befestigungspunkten (4).
• Drehen Sie die ISOFIX Connect Rastarme (6) um 180°.
• Betätigen Sie den Verstellgriff (5) des Kindersitzes und schieben Sie die
ISOFIX Connect Rastarme (6) bis zum Anschlag hinein.
HINWEIS! Durch das Einklappen der ISOFIX Connect Rastarme (6)
schonen Sie nicht nur den Fahrzeugsitz, sondern schützen auch die ISOFIX
Connect Rastarme des ISOFIX Connect Systems vor Verunreinigung und
Beschädigung.
EINSTELLEN DER SEITENPROTEKTOREN
Im Kindersitz ist das „Linear Side-Impact Protection“ Systems (L.S.P.) verbaut.
Dieses System erhöht die Sicherheit ihres Kindes im Falle eines seitlichen Aufpralls.
16
PRESS!
10
a
b
c
Das L.S.P. verfügt über 3 Positionen. Um die bestmögliche Schutzwirkung
zu erzielen, fahren Sie das L.S.P. der dem Kindersitz nähesten zugewandten
Fahrzeugtür soweit wie möglich heraus. Zum Ausfahren drücken Sie die
Entriegelungstaste (10).
Sollte das L.S.P. in der längsten Position (c) an der Türe anstehen, müssen
Sie die Zwischenposition (b) verwenden. Dazu müssen Sie zuerst das L.S.P.
komplett ausfahren. Anschließend betätigen Sie die Entriegelungstaste
(10) und schieben das L.S.P. in die Zwischenposition. Das L.S.P. lässt sich
wieder komplett in den Sitz einschieben, indem Sie die Entriegelungstaste
(10) drücken und gleichzeitig mit leichtem Druck den ausgefahrenen Teil zum
Kindersitz hin bewegen.
HINWEIS! Beim Einbau des Kindersitzes auf einem mittleren Sitzplatz dürfen
Sie den linearen Seitenaufprallschutz (L.S.P.) nicht herausfahren.
!
WARNUNG! Der ausgefahrene Seitenaufprallschutz (L.S.P.) dient nicht
als Tragegriff oder zur Befestigung des Kindersitzes.
Page 17

DEENIT
REMOVING THE CAR SEAT FROM THE VEHICLE RIMOZIONE DEL SEGGIOLINO DALL'AUTO
Perform the installation steps in the reverse order.
• Unlock the ISOFIX Connect locking arms (6) on both sides by pushing the
red release buttons (7) and pulling them back simultaneously.
• Pull the car seat out of the ISOFIX anchorage points (4).
• Rotate the connecotrs (6) 180°.
• Operate the adjustment button (5) of the car seat and push the ISOFIX
Connect locking arms (6) in as far as they will go.
Eseguire i passi d'installazione in ordine inverso.
• Sbloccare i connettori ISOFIX (6) su ambo i lati premendo il pulsante di
rilascio rosso e contemporaneamente tirando il seggiolino all'indietro.
• Estrarre il seggiolino dai punti di ancoraggio ISOFIX (4).
• Ruotare di 180° i connettori (6).
• Azionare il pulsante di regolazione (5) del seggiolino e spingere all'interno i
bracci di bloccaggio(6), fino al limite.
NOTE! By folding in the ISOFIX connecotrs (6), you are not just protecting the
vehicle seat but also the ISOFIX connecotrs of the ISOFIX Connect system
from dirt and damage.
NOTE! Ripiegando i bracci di bloccaggio ISOFIX (6), proteggete dai possibili
danni e dallo sporco sia il sedile dell'auto, sia i connettori ISOFIX.
ADJUSTING THE SIDE PROTECTORS COME REGOLARE LE PROTEZIONI LATERALI
The car seat is equipped with the „Linear Side-Impact Protection“ System
(L.S.P.). This system increases the safety of your child in case of an side impact.
The L.S.P. disposes of 3 positions. For best protection, extend the L.S.P. out as
much as possible towards the nearest car door to the car seat. To do so press
the release button (10).
In case the L.S.P. exceeds its designated space and touches the door in its
longest position (c), the inclined position (b) has to be used. This can be done
by extending the L.S.P. completely and subsequently by pressing the release
button (10) and moving the L.S.P. into the inclined position. In order to push
back the L.S.P. into the seat press the release button (10) and at the same time
push the L.S.P. towards the car seat.
NOTE! When using the car seat on a middle position in the vehicle, it’s
prohibited to extend the (L.S.P.) device.
!
WARNING! Using the (L.S.P.) device to carry or to fasten the car seat is
prohibited.
Il seggiolino è dotato del sistema "Linear Side-Impact Protection" (L.S.P.).
Questo sistema migliora la sicurezza del bambino in caso di incidente con
impatto laterale.
Il braccetto L.S.P. ha tre posizioni. Per ottenere la migliore protezione possibile,
estrarre al massimo la protezione L.S.P. sul lato del seggiolino più vicino alla
portiera dell'auto. Per sbloccare, premere il pulsante di rilascio (10).
Se la protezione L.S.P.arriva a toccare l'interno della portiera quando esteso
al massimo nella posizione (c), è necessario ricorrere alla posizione inclinata
(b). Per fare questo estrarre al massimo la protezione L.S.P. quindi premere
il pulsante di rilascio (10) e spostare l'L.S.P. in posizione inclinata. Per
riportare l'L.S.P. nella posizione iniziale premere il pulsante di sblocco (10) e
contemporaneamente spingere l'L.S.P verso il seggiolino.
NOTE! Quando il seggiolino è installato nel sedile centrale del veicolo gli L.S.P.
NON devono essere estratti.
!
ATTENZIONE! E' assolutamente vietato utilizzare i braccetti (LSP)per
trasportare o fissare il seggiolino.
17
Page 18
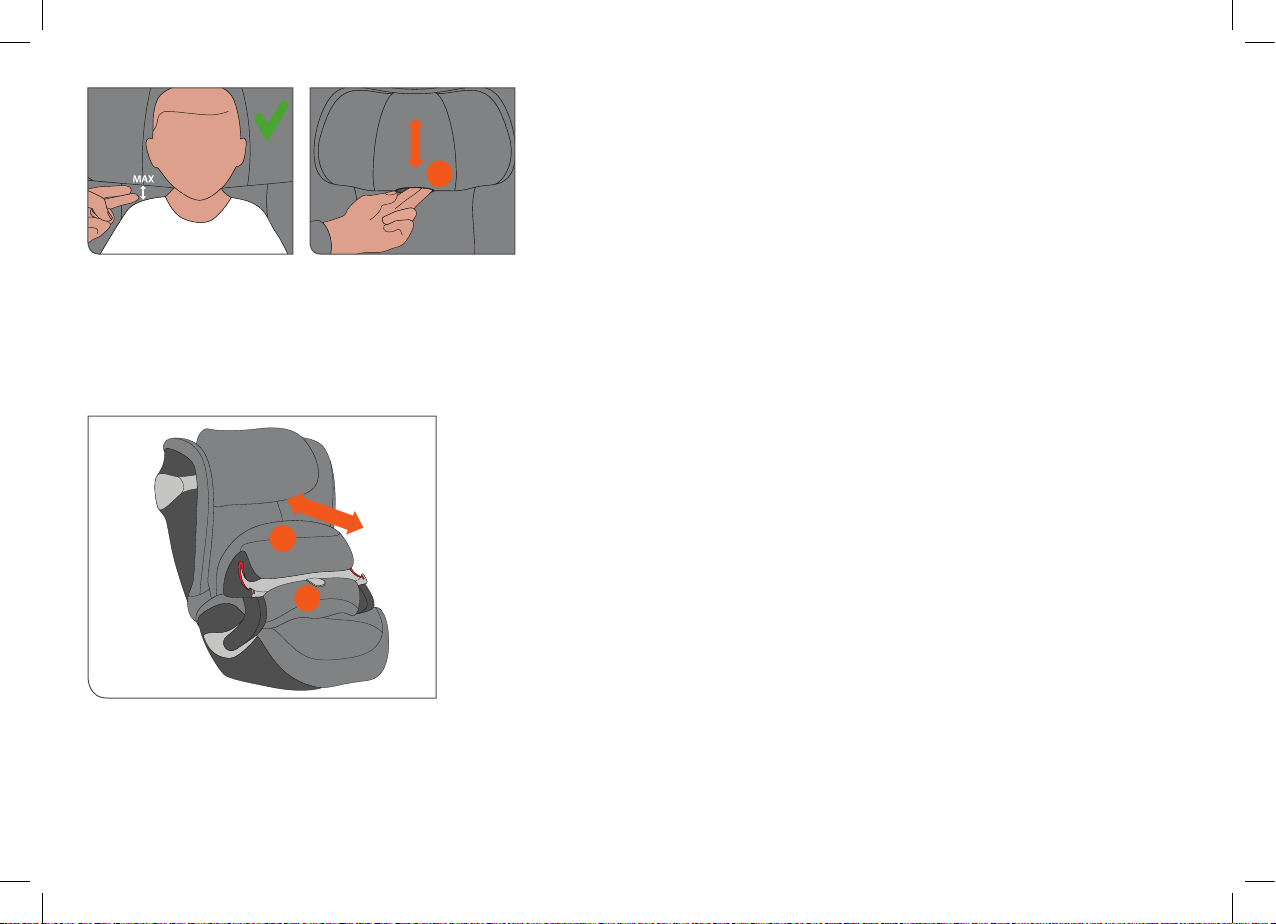
ANPASSEN AN DIE KÖRPERGRÖSSE
Anpassen der Kopfstütze
HINWEIS! Nur eine in optimaler Höhe eingestellte Kopfstütze gewährt ihrem
11
Kind größtmöglichen Schutz und Komfort. Die Höhenverstellung kann in 8
Positionen erfolgen.
• Die Kopfstütze muss so eingestellt werden, dass der Abstand zwischen den
Schultern des Kindes und der Kopfstütze nicht breiter als 2cm (ca. 2 Finger) ist.
• Ziehen Sie den Verstellhebel (11) an der Unterseite der Kopfstütze, und
führen Sie die Kopfstütze in die gewünschte Position.
EINSTELLEN DES FANGKÖRPERS
Durch Betätigen des zentralen Verstellknopfes (12) können Sie den Fangkörper
an Ihr Kind anpassen.
Halten Sie den Verstellknopf (12) gedrückt, während Sie den Fangkörper an Ihr
Kind anpassen.
3
Die seitlichen Flügel des Fangkörpers (3) passen exakt zwischen Armlehnen
und Sitzfläche und dienen der Abstützung des Fangkörpers (3) am Sitz.
Stellen Sie den Fangkörper (3) so ein, dass er am Kind anliegt, jedoch ohne auf
den Körper des Kindes zu drücken.
12
18
Page 19

DEENIT
ADJUSTING TO THE BODY SIZE ADATTAMENTO ALLA TAGLIA CORPOREA
Adjusting the headrest
NOTE! The headrest ensures the best possible protection for your child only if it
is adjusted to the optimum height. There are 8 height positions that can be set.
Regolazione del poggiatesta
NOTE! Il poggiatesta offre protezione ottimale per il bambino soltanto se
regolato all'altezza corretta. Ci sono 8 regolazioni possibili.
• The headrest must be adjusted so that max. 2cm (ca. two finger‘s width) or
less remains free between the child’s shoulder and the headrest.
• Push the adjustment button (11) on the lower end of the headrest and move
it into the desired position.
ADJUSTING THE IMPACT SHIELD
By pushing the central adjustment button (12), you can adapt the impact shield
to your child.
Hold down the central adjustment button (12) while you adapt the impact
shield to your child.
The side flaps of the impact shield (3) fit exactly between the arm rests and
booster and are used to support the impact shield (3) on the seat.
Adjust the impact shield (3) so that it rests against the child without pushing
against the child’s body.
• Il poggiatesta deve essere regolato in modo che ci siano 2cm (ca. due dita)
liberi tra le spalle del bambino e il poggiatesta.
• Premere il pulsante di regolazione (11) sulla parte bassa del poggiatesta e
muovere fino alla posizione desiderata.
REGOLAZIONE DEL CUSCINO DI SICUREZZA
Premendo il pulsante di regolazione centrale (12) è possibile adattare il cuscino
di sicurezza al bambino.
Tenere premuto il pulsante di regolazione centrale (12) mentre si adatta il
cuscino di sicurezza al bambino.
Le alette laterali del cuscino di sicurezza (3) entrano precisamente tra i braccioli
e la superficie di seduta e supportano il cuscino di sicurezza (3) sul seggiolino.
Regolare il cuscino di sicurezza (3) in modo che poggi contro il bambino senza
comprimerne il corpo.
19
Page 20

20
3
14
16
15
CLICK!
13
17
ANSCHNALLEN MIT FANGKÖRPER
1. Legen Sie nun den bereits eingestellten Fangkörper (3) ein (siehe Abschnitt
„EINSTELLEN DES FANGKÖRPERS“).
2. Ziehen Sie die gesamte Gurtlänge des Fahrzeug-Dreipunktgurtes heraus.
Nehmen Sie den Beckengurt (13) und legen Sie diesen in die dafür
vorgesehene rot markierte Gurtführung (14) des Fangkörpers (3) ein.
3. Stecken Sie die Fahrzeug-Gurtzunge in das Gurtschloss (15). Diese muss
mit einem hörbaren „KLICK“ einrasten.
4. Spannen Sie den Beckengurt (13) vor, indem Sie am Diagonalgurt (16) ziehen.
5. Führen Sie nun den Diagonalgurt (16) parallel zum Beckengurt (13) in der
Gurtführung (14) zurück.
6. Ziehen Sie den Diagonalgurt (16) straff und achten Sie dabei darauf, dass
beide Gurtteile, über die gesamte Breite des Fangkörpers (3), innerhalb der
Gurtführung (14) verlaufen.
7. Ziehen sie nun den Diagonalgurt (16) nach oben fest in die Gurtführung
(14) des Fangkörpers (3), damit dieser sich festklemmt. Legen sie danach
den Diagonalgurt zwischen Kopfstütze (17) und Schulterstütze.
!
WARNUNG!
korrekt eingestellt ist und straff am Körper anliegt. Den Gurt auf keinen
Fall verdrehen!
!
WARNUNG! Der Dreipunktgurt darf nur in den dafür vorgesehenen
Führungen verlaufen. Die Gurtführungen werden in diesem Handbuch
genau beschrieben und sind zudem am Kindersitz rot markiert.
Stellen Sie stets sicher, dass das Rückhaltesystem
RICHITIGES SICHERN DES KINDES
Um die bestmögliche Sicherheit Ihres Kindes zu gewährleisten, prüfen Sie bitte
vor Beginn der Fahrt, ob…
• der Fangkörper ordnungsgemäß eingestellt ist.
• die Gurtschlosszunge im Gurtschloss eingerastet ist.
• der Beckengurt und der Diagonalgurt straff und nicht verdreht durch die
Gurtführung des Fangkörpers verlaufen.
• die Rückenlehne des Kindersitzes vollflächig an der Rückenlehne des
Fahrzeugsitzes anliegt.
• Bei Verwendung von ISOFIX Connect: dass der Sitz beidseitig mit den
Konnektoren in den ISOFIX Befestigungspunkten eingerastet ist und die
beiden grünen Sicherheitsindikatoren deutlich zu sehen sind.
Page 21
DEENIT
STRAPPING WITH THE IMPACT SHIELD ALLACCIARE CON IL CUSCINO DI SICUREZZA
1. Now insert the previously adjusted impact shield (3) (refer to the section
“ADJUSTING THE IMPACT SHIELD”).
2. Pull out the entire length of the vehicle seat belt. Take the lap belt (13) and
place it in the designated red belt routing (14) in the impact shield (3).
3. Lock the vehicle seat belt into the belt buckle (15). It must lock into place
with an audible “CLICK”.
4. Tighten the lap belt (13) by pulling the diagonal belt (16).
5. Now feed the diagonal belt (16) in parallel with the lap belt (13) back into
the belt routing (14).
6. Pull the diagonal belt (16) tight and ensure that both parts of the belt cover
the entire width of the impact shield (3) in the belt routing (14).
7. Now feed the diagonal belt (16) tightly through the belt routing (14) of
the impact shield (3) until it is clamped inside the belt guide. Then put the
diagonal belt between headrest (17) and shoulder rest.
1. Inserire ora il cuscino di sicurezza (3) precedentemente regolato (vedere
“REGOLARE IL CUSCINO DI SICUREZZA”).
2. Estrarre per tutta la lunghezza la cintura a tre punti del veicolo. Collocare la
cintura subaddominale (13) nell'apposita guida rossa della cintura (14) nel
cuscino di sicurezza (3).
3. Inserire la lingueta della cintura nella fibbia (15). Il blocco in posizione
corretta deve essere segnalato da uno scatto udibile.
4. Tendere la cintura subaddominale (13) tirando la cintura diagonale(16).
5. Inserire ora nuovamente la cintura diagonale (16) nella guida della cintura
(14) in parallelo alla cintura subaddominale (13).
6. Tendere la cintura diagonale (16) e accertare che entrambe le parti della
cintura coprano l'intera larghezza del cuscino di sicurezza (3) nella guida
della cintura (14).
7. Ora far passare la cintura diagonale (16) ben tesa attraverso la guida cintura
(14) del cuscino di sicurezza (3) fino a quando viene bloccata all'interno
della guida. Quindi far passare la cintura diagonale tra il poggiatesta (17) e
la protezione per le spalle.
!
WARNING! Always check the tightness and the right adjustment of the
restraint system to the child‘s body. Never twist the belt!
!
WARNING! The three-point belt may only be inserted into the routings
designated for that purpose. The belt routings are described precisely in
this manual and are also marked red on the car seat.
!
ATTENZIONE! Controllare sempre la larghezza e il corretto
posizionamento del sistema di ritenuta sul corpo del bambino. Non
torcere mai la cintura!
!
ATTENZIONE! La cintura a tre punti deve essere inserita solo nelle
apposite guide. Le guide della cintura sono descritte precisamente nel
presente manuale e sono inoltre contrassegnate in rosso sul seggiolino.
SECURING THE CHILD CORRECTLY ALLACCIARE CORRETTAMENTE IL BAMBINO
To ensure optimum safety for your child, please always check before
commencing travel that…
• the impact shield is correctly adjusted.
• the belt tongue has locked into place in the belt buckle.
• the lap belt and the shoulder belt are running taut through the belt routing of
the impact shield and are not twisted.
• the backrest of the child seat lies completely flush with the backrest of the
car seat.
• If ISOFIX Connect is used: the seat has locked into place on both sides
with the connectors into the ISOFIX anchorage points and both green safety
indications can be seen clearly.
Per garantire la sicurezza ottimale del bambino, prima di iniziare il viaggio controllare
sempre che
• che il cuscino di sicurezza sia regolato correttamente.
• che le linguette delle cinture siano saldamente fissate all'interno della fibbia.
• che la cintura ventrale e quella diagonale passino correttamente all'interno della
guida del cuscino di sicurezza, e che non siano attorcigliate.
• che lo schienale del seggiolino sia perfettamente aderente a quello del sedile
dell'auto.
• Se si utilizza is sistema ISOFIX connect: che il seggiolino sia bloccato in posizione
corretta da entrambi i lati, con i connettori inseriti nei punti di ancoraggio ISOFIX,
e che entrambi gli indicatori siano chiaramente diventati verdi.
21
Page 22

ENTFERNEN DES SITZBEZUGES
Der Bezug am Kindersitz besteht aus 4 Teilen (Kopfstützenbezug,
Rückenlehnenbezug, Sitzkissenbezug, Fangkörperbezug). Die Sitzbezüge
sind in den am Rand des Kindersitzes verlaufenden Bezugführungen
versenkt und an manchen Stellen mit Druckknöpfen am Kindersitz befestigt.
Sobald Sie alle Befestigungen lösen, können die Einzelteile aus den
Bezugführungen gezogen werden.
Entfernen des Bezugs von der Kopfstütze
Ziehen Sie den Bezug nach vorne über die Kopfstütze ab.
Entfernen des Bezugs von der Rückenlehne
Ziehen Sie den Bezug nach vorne über die Kopfstütze ab.
Entfernen des Bezugs vom Sitzkissen
Ziehen Sie den Bezug nach oben von der Sitzfläche und anschließend von den
Armlehnen ab.
Entfernen des Bezugs vom Fangkörper
Ziehen Sie den Bezug vom Verstellknopf startend nach hinten vom Fangkörper ab.
Anbringen des Bezugs
Führen Sie die zuvor beschriebenen Handgriffe in umgekehrter Reihenfolge
aus, um den Bezug wieder zu befestigen.
REINIGUNG
Es ist darauf zu achten, dass nur ein original Sitzbezug verwendet wird, da auch
der Bezug ein wesentlicher Bestandteil der Funktion ist. Ersatzbezüge erhalten
Sie im Fachhandel.
HINWEIS! Bitte den Bezug vor der ersten Verwendung waschen.
Der Bezug darf bei 30°C im Schonwaschgang gewaschen werden. Sollten
Sie mit mehr als 30°C waschen, kann es zu Ausfärbungen kommen. Bitte
den Bezug gesondert von anderer Wäsche waschen und keinesfalls
maschinell trocknen! Den Bezug keinesfalls in der prallen Sonne trocknen! Die
Kunststoffteile können mit einem milden Reinigungsmittel und warmen Wasser
gewaschen werden.
22
!
WARNUNG! Bitte auf keinen Fall chemische Reinigungs- oder
Bleichmittel verwenden!
Page 23
DEENIT
REMOVING THE SEAT COVER RIMOZIONE DEL RIVESTIMENTO
The cover of the car seat consists of 4 parts (headrest cover, backrest cover,
booster cover, impact shield cover). The covers are fitted into the cover
attachment channels on the edge of the car seat and are held in position at
several places by press-studs. Once all studs have been released, the single
parts of the cover can be removed from the cover attachment channels.
Removing the cover from the headrest
Pull the cover from back to front over the headrest.
Removing the cover from the backrest
Pull the cover from back to front over the headrest.
Removing the cover from the booster
Pull the cover from the booster and afterwards from the armrests.
Removing the cover from the impact shield
Pull the cover backwards from the impact shield starting at the adjustment
button.
Attaching the cover
Perform the steps above in the reverse order to attach the cover.
La fodera del seggiolino è composta da quattro parti (fodera del poggiatesta,
fodera dello schienale, fodera della seduta e fodera del cuscino di sicurezza).
Le quattro fodere del seggiolino sono inserite nelle guide di attacco della
fodera sui bordi del seggiolino e sono tenute in posizione in vari punti da
bottoni automatici. Una volta sbloccati tutti gli automatici, le singole parti della
fodera possono essere rimosse dalle guide di attacco della stessa.
Rimozione della fodera dal poggiatesta
Tirare il rivestimento del poggiatesta verso il bordo superiore.
Rimozione della fodera dallo schienale
Tirare il rivestimento dello schienale verso il bordo superiore.
Rimozione della fodera dalla seduta
Tirare il rivestimento dal booster verso l'alto e poi rimuoverlo dai braccioli.
Rimozione della fodera dal cuscino di sicurezza
Rimuovere il rivestimento dal cuscino di sicurezza partendo dal pulsante di
regolazione.
Fissare il rivestimento
Per riposizionare il rivestimento ripetere le operazioni sopra descritte nell'
ordine inverso.
CLEANING PULIZIA
It is important to use an original seat cover only since the cover is an essential
part of the function. You may obtain spare covers at your retailer.
NOTE! Please wash the cover before you use it the first time.
Seat covers are machine washable at max. 30°C on delicate cycle. If you wash
it at higher temperature, the cover fabric may lose colour. Please wash the
cover separately and never dry it mechanically! Do not dry the cover in direct
sunlight! You can clean the plastic parts with a mild detergent and warm water.
Il rivestimento è una parte importante per la funzionalità del seggiolino ed è
indispensabile utilizzare solo rivestimenti originali. Rivestimenti di ricambio
originali sono disponibili su ordinazione presso i nostri rivenditori.
NOTA BENE! Consigliamo il lavaggio prima del primo utilizzo.
I rivestimenti sono lavabili in lavatrice, cliclo delicato a max 30°. L'uso di
temperature più elevate può scolorire i tessuti. Lavare separatamente e non
asciugare mai a macchina. Non fare asciugare alla luce solare diretta! Le parti
in plastica possono essere pulite con un detergente neutro e acqua tiepida.
!
WARNING! Please do not use chemical detergents or bleaching agents
under any circumstances!
!
ATTENZIONE! Raccomandiamo di non usare detergenti chimici o agenti
sbiancanti.
23
Page 24

PFLEGE
Um die größtmögliche Schutzwirkung Ihres Kindersitzes zu gewährleisten, ist es
unbedingt notwendig, dass Sie Folgendes beachten:
• Alle wichtigen Teile des Kindersitzes sollten regelmäßig auf Beschädigungen
kontrolliert werden. Die mechanischen Bauteile müssen einwandfrei funktionieren.
• Es ist unbedingt notwendig darauf zu achten, dass der Kindersitz nicht
zwischen harten Teilen wie Fahrzeugtür, Sitzschiene usw. eingeklemmt wird
und dadurch beschädigt werden könnte.
• Der Kindersitz muss nach einem Sturz, Unfall oder einer anderen Form der
direkten Beeinträchtigung unbedingt vom Hersteller überprüft werden.
!
WARNUNG!
Sicherheitskonzeptes. Der Kindersitz darf aus diesem Grund keinesfalls ohne
Bezug oder mit dem Bezug eines anderen Kindersitzes verwendet werden.
Der Bezug ist integraler Bestandteil des Kindersitz-
VERHALTEN NACH EINEM UNFALL
!
WARNUNG! Aufgrund eines Unfalls können am Kindersitz
Beschädigungen auftreten, die mit bloßem Auge nicht erkennbar
sind. Bitte tauschen Sie nach einem Unfall unbedingt den Sitz aus. Im
Zweifelsfall wenden Sie sich an den Händler oder Hersteller.
PRODUKTINFORMATION
Bei Fragen wenden Sie sich zuerst an Ihren Händler. Folgende Angaben sollten
Ihnen vorliegen:
• Seriennummer (siehe Aufkleber)
• Marke und Typ des Autos und die Position des Sitzes, auf dem der Kindersitz
benutzt wird
• Gewicht, Alter und Größe des Kindes
Weitere Informationen zu unseren Produkten finden Sie auch unter
www.cybex-online.de.
24
Page 25
DEENIT
PRODUCT CARE CURA DEL PRODOTTO
To guarantee that your car seat provides the maximum protection, it is essential
to comply with the following points:
• All major components of the car seat must be regularly checked for damage.
The mechanical parts must work without problems.
• Make sure that the car seat is not jammed between hard parts such as the
car door, seat rails etc., which can damage it.
• If e.g. the car seat is dropped, it must be tested by the manufacturer before
being used again.
Perchè il seggiolino continui ad offrire la massima protezione è necessario
tenere presente quanto segue:
• Tutte le parti principali del seggiolino dovrebbero essere controllate
regolarmente alla ricerca di eventuali danni. I componenti meccanici devono
essere privi di difetti.
• È assolutamente necessario assicurare che il seggiolino non sia incastrato
tra elementi duri, quali la portiera o le guide dei sedili, che potrebbero
potenzialmente danneggiarlo.
• Nel caso il seggiolino dovesse cadere, dovrà essere controllato dal
produttore prima di poter essere riutilizzato.
!
WARNING! The cover is an integral component of the car seat‘s safety
design. The car seat must therefore never be used without the cover or
with a cover of a different car seat.
!
ATTENZIONE! La fodera è parte integrante e un componente essenziale
per il design di sicurezza del seggiolino auto. Il seggiolino quindi non deve
mai essere usato senza il rivestimento o con un rivestimento non originale.
WHAT TO DO AFTER AN ACCIDENT COSA FARE A SEGUITO DI UN INCIDENTE
!
WARNING! An accident may cause damage to the car seat that is not
visible to the naked eye. Please exchange the seat without fail after an
accident. In case of doubt contact the retailer or manufacturer.
!
ATTENZIONE! Un incidente può causare danni al seggiolino non
identificabili a occhio nudo. Dopo un incidente il seggiolino dovrebbe
essere subito sostituito. Se in dubbio vi preghiamo di contattare il
rivenditore o il produttore.
PRODUCT INFORMATION INFORMAZIONI SUL PRODOTTO
If you have any questions contact your retailer first. You should have the
following details ready:
• Serial number (see sticker)
• Make and model of the vehicle and the position of the vehicle seat on which
the car seat is used
• Weight, age and height of the child
Further information about our products can be found at www.cybex-online.com.
Per qualsiasi dubbio o informazione rivolgersi prima al rivenditore. Accertandovi
di avere questi dati:
• Numero di serie (vedi adesivo).
• Marca e modello dell'auto e posizione in cui viene normalmente installato.
• Peso (età, altezza) del bambino.
Per ulteriori informazioni sui nostri prodotti, visitare il nostro sito www.cybexonline.com
25
Page 26
PRODUKTLEBENSDAUER
Der Kindersitz ist so ausgelegt, dass er für den gesamten Verwendungszeitraum
von ca. 4 Jahren seine Eigenschaften erfüllt. Da jedoch in Fahrzeugen sehr große
Temperaturschwankungen und unvorhersehbare Belastungen auftreten können, ist
es notwendig, folgende Punkte zu beachten:
• Wenn das Fahrzeug längere Zeit der prallen Sonne ausgesetzt ist, muss der
Kindersitz aus dem Fahrzeug entfernt werden oder mit einem hellen Tuch
abgedeckt werden.
• Prüfen Sie regelmäßig alle Kunststoff- und Metallteile des Sitzes auf
Beschädigung oder Veränderung von Form oder Farbe. Stellen Sie eine
Veränderung fest, ist der Kindersitz unbedingt zu entsorgen oder er muss
vom Hersteller geprüft und gegebenenfalls ausgetauscht werden.
• Veränderungen des Stoffes, insbesondere das Ausbleichen, sind bei Verwendung
in einem Fahrzeug normal und stellen keine Beeinträchtigung dar.
ENTSORGUNG
Aus Umweltschutzgründen bitten wir den Benutzer zu Beginn (Verpackung)
und am Ende (Produktteile) der Lebensdauer des Kindersitzes, den anfallenden
Abfall zu trennen und zu entsorgen. Die Abfallentsorgung kann kommunal
unterschiedlich geregelt sein. Um eine vorschriftsmäßige Entsorgung
des Kindersitzes zu gewährleisten, setzen Sie sich mit Ihrer kommunalen
Abfallentsorgung bzw. Verwaltung lhres Wohnortes in Verbindung. Beachten
Sie auf jeden Fall die Entsorgungsbestimmungen lhres Landes.
!
WARNUNG! Bewahren Sie Verpackungsmaterial aus Kunststoff außer
Reichweite Ihres Kindes auf, da Erstickungsgefahr besteht!
26
Page 27
DEENIT
PRODUCT DURABILITY VITA UTILE DEL PRODOTTO
The car seat is designed to meet its specifications for the entire service life
of approximately 4 years. However, as there can be very large temperature
fluctuations and unpredictable strains in vehicles, the following points must be
observed:
• If the vehicle is directly exposed to sunlight for a longer time, the car seat
must be removed from the vehicle or covered with a light cloth.
• Regularly check all plastic and metal parts of the seat for damage,
deformation or change of colour. If you discover any changes, the car seat
must be disposed or checked and possibly replaced by the manufacturer.
• Changes to fabric, especially bleaching, are perfectly normal when used in a
vehicle and do not impair the seat’s function.
Il seggiolino auto è progettato per soddisfare le proprie specifiche per l'intera
vita utile, pari a circa 4 anni. Tuttavia, alla luce delle possibili fluttuazioni
massicce di temperatura e degli sforzi imprevedibili nei veicoli, devono essere
tenuti in considerazione i punti seguenti:
• Se il veicolo è esposto direttamente alla luce solare per un periodo di tempo
prolungato, il seggiolino deve essere rimosso dal veicolo o coperto con un
panno chiaro.
• Controllare regolarmente tutte le parti di plastica e metallo del seggiolino alla
ricerca di danni, deformazioni o cambiamenti di colore. Qualora si scopra
qualsiasi cambiamento, il seggiolino dovrà essere smaltito o controllato e,
possibilmente, sostituito dal produttore.
• Le variazioni del tessuto, in particolare la scoloritura, sono perfettamente
normali in caso di uso in un veicolo e non intaccano il funzionamento del
seggiolino.
DISPOSAL SMALTIMENTO
To protect the environment we ask the user to separate and dispose the
waste arising at the start (packaging) and the end (product parts) of the car
seat’s lifespan. Waste removal is arranged differently depending on the local
authorities. In order to ensure that the car seat is disposed off in accordance
with regulations, contact your area’s waste removal agency or local authority.
Always observe your country’s waste disposal regulations.
Per ragioni di natura ambientale chiediamo a tutti i nostri clienti di provvedere
allo smaltimento appropriato di ogni parte dall'inizio (imballo) alla fine
dell'utilizzo (seggiolino ed ogni sua parte). Le norme per lo smaltimento variano
localmente. Al fine di garantire lo smaltimento corretto preghiamo contattare gli
uffici competenti della vostra città per le informazioni necessarie. In ogni caso,
seguire sempre le normative vigenti nella zona di residenza.
!
WARNING! Keep plastic packaging material out of your child’s reach:
danger of suffocation!
!
ATTENZIONE! Tenere tutte le parti in plastica dell'imballo lontane dalla
portata dei bambini: pericolo di soffocamento!
27
Page 28

GARANTIEBEDINGUNGEN
Die nachfolgenden Garantiebestimmungen gelten nur in dem Land, in dem dieses
Produkt erstmalig über den Einzelhandel an einen Verbraucher verkauft wurde.
1) Die Garantie deckt sämtliche Herstellungs- und Materialfehler ab, die im Zeit-
punkt des Kaufs bestanden haben oder die innerhalb von drei (3) Jahren nach
dem Erstverkauf dieses Produkts über den Einzelhandel an einen Verbraucher
in Erscheinung getreten sind (Herstellergarantie). Bitte überprüfen Sie das
Produkt nach dem Kauf oder wenn es im Versandhandel gekauft wurde nach
Erhalt umgehend auf Vollständigkeit, Herstellungs- und Materialfehler.
2) Falls Schäden vorhanden sind, darf das Produkt nicht mehr benutzt wer-
den. Um Leistungen im Rahmen dieser Garantie in Anspruch nehmen zu
können, muss das Produkt in einem vollständigen und sauberen Zustand
an den Einzelhändler zurückgegeben werden, der es erstmalig verkauft hat
und ein Nachweis über den Kauf (Kaufbeleg oder Rechnung) im Original
vorgelegt werden. Bitte bringen oder schicken sie das Produkt nicht direkt
zum Hersteller!
3) Die Garantie deckt keine Schäden ab, die durch Fehlgebrauch, äußere Ein-
flüsse (Wasser, Feuer, Unfälle o.ä.), normalen Verschleiß oder durch Behandlung und Benutzung entstanden sind, die im Gegensatz zu den Instruktionen
dieser Gebrauchsanweisung stehen. Die Garantie wird nur gewährt, wenn
Reparaturen oder Veränderungen ausschließlich durch Personen vorgenommen wurden, die hierzu befugt waren und stets nur originale Bau- und
Zubehörteile verwendet wurden.
4) Durch diese Garantie werden weder bestehende Verbraucherrechte noch Rech-
te gegen den Verkäufer wegen Vertragswidrigkeit des Produkts beeinflusst.
28
Page 29

DEENIT
WARRANTY GARANZIA
The following warranty applies solely in the country where this product was
initially sold by a retailer to a customer.
1) The warranty covers all manufacturing and material defects, existing and appearing, at the date of purchase or appearing within a term of three (3) years
from the date of purchase from the retailer who initially sold the product to a
consumer (manufacturer’s warranty). Please check the product with respect
to completeness and manufacturing or material defects immediately at the
date of purchase or immediately after receipt. Please always keep your dated
proof of purchase.
2) In case of a defect, stop using the product immediately. To obtain the warranty please take or ship the product to the original retailer, who initially sold
this product to you in a clean and complete condition and submit an original
proof of purchase (sales receipt or invoice). Please do not take or ship the
product to the manufacturer directly.
3) This warranty does not cover any damages which result from misuse, environmental influence (water, fire, accidents etc.), normal wear and tear or failure to comply with the instructions provided in this user manual. The warranty
does not apply if modifications and services were performed by unauthorized
persons or if non-original components and accessories were used.
4) This warranty does not affect any statutory consumer rights, including claims
in tort and claims with respect to a breach of contract, which the buyer may
have against the seller or the manufacturer of the product.
La seguente garanzia vale unicamente nella nazione in cui il prodotto è stato
inizialmente venduto da un rivenditore al consumatore.
1) La garanzia copre eventuali difetti di fabbricazione e di materiali riscontrati
all’acquisto o entro un periodo di tre (3) anni dalla data di acquisto presso
il rivenditore (garanzia del produttore). La garanzia è valida soltanto se
il prodotto è stato sottoposto ad un accurato controllo di completezza,
funzionalità all’acquisto e se eventuali manchevolezze di produzione o di
materiali sono state prontamente segnalate dopo il ricevimento del prodotto.
Conservare accuratamente la prova di acquisto con la data.
2) In caso si riscontri qualsiasi danneggiamento smettere di utilizzare il prodotto
Per avere diritto alla garanzia è necessario riportare o spedire il prodotto
pulito e completo al rivenditore presso il quale è stato acquistato ed è
indispensabile fornire la prova di acquisto (scontrino fiscale, fattura, ecc.)
in originale. Preghiamo di non riportare o spedire il prodotto direttamente al
produttore.
3) La garanzia non copre danni provocati da utilizzo improprio o cause
ambientali (acqua, fuoco, incidenti stradali, ecc.), dal normale deperimento
d’uso o dall'innosservanza delle indicazioni fornite in questo manuale d'uso.
La garanzia non è valida in caso di modifiche o riparazioni effettuate da
personale non autorizzato e se non sono state utilizzate parti ed accessori
originali.
4) Questa garanzia non esclude, limita o comunque pregiudica eventuali
diritti legali dei consumatori, comprese istanze in caso di torto e in caso
di una violazione del contratto che l'acquirente può avere nei confronti del
rivenditore o del produttore.
29
Page 30
JUNO M-F IX
ECE R 44/04
UNIVERSAL
SEMI-UNIVERSAL
9 - 18 kg
CYBEX GmbH
Riedingerstr. 18, 95448 Bayreuth
Germany
04301342
CYBEX JUNO M-FIX – siège auto
ECE R44/04 groupe 1
Poids: 9 - 18 kg
Age: De 9 mois à 4 ans env.
Ne convient que pour les véhicules équipés d’une
ceinture automatique trois points norme ECE R16 ou
équivalent
CYBEX JUNO M-FIX – autostoeltje
ECE R44/04 leeftijdsgroep 1
Gewicht: 9 - 18 kg
Leeftijd: Ongeveer 9 maanden tot 4 jaar
Alleen geschikt voor gebruik in de genoemde
voertuigen uitgerust met 3-puntsgordel, goedgekeurd
conform ECE-verordening nr. 16 of vergelijkbare
norm.
CHER CLIENT !
Merci d´avoir choisi le CYBEX Juno M-fix. Lors du développement du CYBEX
Juno M-fix, nous nous sommes focalisés sur la sécurité, le confort et la facilité
d’utilisation. Ce produit est fabriqué selon un contrôle qualité exceptionnel et
répond aux exigences les plus strictes en matière de sécurité.
NOTE ! Toujours garder ce mode d’emploi à portée de main dans le
compartiment prévu à cet effet situé sur le siège auto.
NOTE ! En raison des législations locales (ex. coloris de l’étiquette sur le siège
auto), l’apparence du produit peut varier. Ceci n’affecte cependant pas le
fonctionnement du produit.
NOTE ! La ceinture de sécurité trois points ne doit passer que dans les guides
dédiés. Les guides de ceinture sont décrits en détail dans ce manuel et sont de
couleur rouge sur le siège auto.
30
CYBEX JUNO M-FIX – fotelik samochodowy
ECE R44/04 grupa wiekowa 1
Waga: 9 - 18 kg
Wiek: ok. 9 miesięcy do 4 lat
Fotelik ten można używać wyłącznie w
wyszczególnionych pojazdach posiadających
3-punktowe pasy bezpieczeństwa, zgodny z
regulacją ECE nr 16 lub równorzędną.
!
ATTENTION ! Pour une protection optimale de votre enfant, il est
essentiel d’installer et d’utiliser ce siège auto conformément au manuel.
Page 31

FRNLPL
BESTE KLANT! DROGI KLIENCIE!
Hartelijk dank voor uw aanschaf van de CYBEX JUNO M-FIX. Wij verzekeren
u dat veiligheid, comfort en gebruiksgemak bij de ontwikkeling van het
autostoeltje de hoogste prioriteit hebben gekregen. Dit product is aan een
uitzonderlijk strenge kwaliteitscontrole onderworpen en voldoet aan de
strengste veiligheidseisen.
Dziękujemy za zakup fotelika samochodowego CYBEX JUNO M-FIX. Możemy
Państwa zapewnić, że opracowując ten model fotelika, najwięcej uwagi
poświęciliśmy bezpieczeństwu, komfortowi oraz łatwości użytkowania. Produkt
ten wyprodukowano w oparciu o system ścisłej kontroli jakości i spełnia on
najsurowsze wymogi bezpieczeństwa.
LET OP! Bewaar deze handleiding zorgvuldig in het daarvoor bestemde vakje
van het autostoeltje.
LET OP! Vanwege nationale regelgeving (bijvoorbeeld betreffende kleurlabels
op het autostoeltje) kunnen de productkenmerken er anders uitzien. Dit is
echter niet van invloed op het correct functioneren van het product.
LET OP! De driepuntsgordel mag uitsluitend in de daarvoor bedoelde geleiders
worden geplaatst. De gordelgeleiders worden in deze handleiding precies
beschreven en zijn op het autostoeltje rood gemarkeerd.
!
BELANGRIJK! Voor de goede bescherming van uw kind is het van
belang dat u bij het gebruik van het autostoeltje de instructies in deze
handleiding volgt.
UWAGA! Instrukcję przechowuj zawsze pod ręką, w specjalnie przygotowanym
w tym celu kieszonce/schowku fotelika.
UWAGA! Ze względu na wymagania poszczególnych krajów (np. oznakowanie
kolorystyczne na foteliku) cechy produktów mogą różnić się pod względem
wyglądu zewnętrznego. Nie wpływa to na poprawne funkcjonowanie fotelika.
UWAGA! Trzypunktowy pas bezpieczeństwa należy przeprowadzić wyłącznie
przez wyznaczone w tym celu prowadnice. Prowadnice pasa zostały
szczegółowo opisane w niniejszej instrukcji. Są oznaczone czerwonym kolorem
na foteliku samochodowym.
!
OSTRZEŻENIE! W celu zapewnienia dziecku bezpieczeństwa należy
używać fotelika w sposób opisany w instrukcji obsługi.
31
Page 32

SOMMAIRE
BREVES INSTRUCTIONS ......................................................................................................... 2
HOMOLOGATION ......................................................................................................................30
PREMIERE INSTALLATION .....................................................................................................34
PROTECTION DU VÉHICULE ................................................................................................34
LA BONNE POSITION EN VOITURE ...................................................................................36
SÉCURITÉ EN VOITURE ..........................................................................................................38
INSTALLATION DU SIÈGE AUTO ..........................................................................................38
INSTALLATION DU SIÈGE AVEC ISOFIX CONNECT ...................................................40
RETIRER LE SIÈGE AUTO DU VÉHICULE ........................................................................42
RÉGLAGE DES PROTECTIONS LATÉRALES ..................................................................42
RÉGLAGE DU SIÈGE ...............................................................................................................44
RÉGLAGE DU BOUCLIER ......................................................................................................44
FIXER LE BOUCLIER ................................................................................................................46
SÉCURISER CORRECTEMENT VOTRE ENFANT .........................................................46
RETRAIT DE LA HOUSSE .......................................................................................................48
NETTOYAGE .................................................................................................................................48
ENTRETIEN DU PRODUIT.......................................................................................................50
EN CAS D´ACCIDENT ..............................................................................................................50
INFORMATIONS PRODUIT .....................................................................................................50
DURÉE DE VIE DU PRODUIT ................................................................................................52
ÉLIMINATION ...............................................................................................................................52
GARANTIE .....................................................................................................................................54
32
Page 33

FRNLPL
INHOUD SPIS TREŚCI
KORTE INSTRUCTIE ................................................................................................................... 2
GOEDKEURING .........................................................................................................................30
EERSTE INSTALLATIE ............................................................................................................... 35
HET VOERTUIG BESCHERMEN..........................................................................................35
DE JUISTE PLAATS IN HET VOERTUIG .............................................................................37
VEILIGHEID IN DE AUTO.........................................................................................................39
HET AUTOSTOELTJE IN HET VOERTUIG PLAATSEN ...................................................39
HET AUTOSTOELTJE MET HET ISOFIX CONNECTSYSTEEM PLAATSEN ..........41
HET AUTOSTOELTJE UIT HET VOERTUIG VERWIJDEREN ........................................43
AANPASSEN VAN DE ZIJBESCHERMERS ...................................................................... 43
AANPASSEN AAN DE LICHAAMSOMVANG ....................................................................45
HET VEILIGHEIDSKUSSEN VERSTELLEN ......................................................................45
VASTMAKEN MET HET VEILIGHEIDSKUSSEN ..............................................................47
HET KIND JUIST VASTMAKEN ...............................................................................................47
DE BEKLEDINGSHOES VERWIJDEREN ..........................................................................49
REINIGING ...................................................................................................................................49
ONDERHOUD .............................................................................................................................51
NA EEN ONGEVAL ....................................................................................................................51
PRODUCTINFORMATIE ...........................................................................................................51
DUURZAAMHEID VAN HET PRODUCT .............................................................................53
VERWIJDERING .........................................................................................................................53
GARANTIE .....................................................................................................................................55
SKRÓCONA INSTRUKCJA OBSŁUGI ..................................................................................2
HOMOLOGATION ......................................................................................................................30
PIERWSZY MONTAŻ FOTELIKA ...........................................................................................35
OCHRONA TAPICERKI SAMOCHODOWEJ ...................................................................35
WYBÓR ODPOWIEDNIEGO MIEJSCA W SAMOCHODZIE ....................................37
BEZPIECZEŃSTWO W SAMOCHODZIE .........................................................................39
MONTAŻ FOTELIKA SAMOCHODOWEGO W POJEŹDZIE ......................................39
MONTAŻ FOTELIKA PRZY POMOCY SYSTEMU ISOFIX CONNECT .....................41
WYJMOWANIE FOTELIKA Z SAMOCHODU ....................................................................43
REGULACJA OSŁON BOCZNYCH .....................................................................................43
DOSTOSOWANIE FOTELIKA DO ROZMIARÓW DZIECKA .......................................45
REGULACJA OSŁONY TUŁOWIA.........................................................................................45
ZAPINANIE OSŁONY TUŁOWIA............................................................................................47
ZAPINANIE DZIECKA ...............................................................................................................47
ZDEJMOWANIE TAPICERKI FOTELIKA .............................................................................49
CZYSZCZENIE ............................................................................................................................49
KONSERWACJA .........................................................................................................................51
POSTĘPOWANIE PO WYPADKU DROGOWYM ...........................................................51
INFORMACJA O PRODUKCIE...............................................................................................51
TRWAŁOŚĆ PRODUKTU ........................................................................................................53
UTYLIZACJA ..................................................................................................................................53
GWARANCJA ...............................................................................................................................55
33
Page 34

PREMIERE INSTALLATION
Le siège auto est composé d’une assise (1) et d’un dossier (2) avec un appuietête réglable selon la taille de l’enfant ainsi que d’un bouclier (3) ajustable.
1
2
3
Votre enfant bénéficie d’une protection maximale uniquement si tous les
composants sont utilisés ensemble.
Le dossier (2) est fixé dans l’axe de l’assise (1) au moyen de crochets.
!
ATTENTION ! Assurez-vous de lire, comprendre et suivre cette notice.
!
ATTENTION ! Les composants du siège auto CYBEX ne doivent pas
être modifiés, utilisés seuls ou en association avec un siège d’un autre
modèle ou d’un autre fabricant. Dans ce cas le siège auto n’est plus
homologué. La mauvaise utilisation peut provoquer des blessures ou le
décès de votre enfant. Garder ces instructions pour référence.
!
ATTENTION ! Assurez-vous toujours que les composants individuels du
siège auto ne sont jamais compressés ou bloqués (par exemple, par la
porte de la voiture ou lors du réglage du siège).
PROTECTION DU VÉHICULE
Des traces d’utilisation et/ou de décoloration peuvent apparaître sur certaines
banquettes en matériaux délicats (velours, cuir, etc) si des sièges auto sont
utilisés. Afin d’éviter cela, mettre une serviette ou une couverture entre la
banquette et le siège auto. Dans ce contexte, voir aussi nos instructions de
nettoyage. Il est essentiel des les suivre avant la première utilisation du siège
auto.
34
Page 35

FRNLPL
EERSTE INSTALLATIE PIERWSZY MONTAŻ FOTELIKA
Het autostoeltje bestaat uit een zitkussen (1) en een rugleuning (2)
met hoofdsteun, die zich aanpast aan de lengte van het kind, en een
veiligheidskussen (3), dat in diepte verstelbaar is. Uw kind profiteert alleen van
een maximale bescherming en het meeste comfort als alle onderdelen samen
worden gebruikt.
De rugleuning (2) wordt met behulp van een geleiderail aan de as van het
zitkussen (1) bevestigd.
Fotelik składa się z siedziska (1) i oparcia (2) z zagłówkiem, którego regulacja
umożliwia dopasowanie fotelika do wzrostu dziecka, jak również z regulowanej
osłony tułowia (3), którą reguluje się na głębokość. Twoje dziecko będzie
prawidłowo zabezpieczone wyłącznie wtedy, gdy korzysta z kompletnego
fotelika.
Oparcie fotelika (2) jest zahaczone o oś siedziska (1) za pomocą mocowania.
!
BELANGRIJK! Zorg dat u de handleiding leest, begrijpt en opvolgt.
!
BELANGRIJK! De onderdelen van het CYBEX-autostoeltje mogen
niet worden aangepast of afzonderlijk of in combinatie met zitkussens,
rugleuningen of hoofdsteunen van andere fabrikanten of andere modellen
worden gebruikt. In dergelijke gevallen is het autostoeltje niet langer
goedgekeurd voor gebruik. Verkeerd gebruik kan tot ernstig letsel of de
dood van uw kind leiden. Bewaar deze handleiding voor toekomstig gebruik.
!
BELANGRIJK! Zorg altijd dat de afzonderlijke onderdelen van het
autostoeltje niet in de knel komen (bijvoorbeeld tussen een portier of bij
het verstellen van de achterbank).
!
OSTRZEŻENIE! Upewnij się, że zapoznałeś się z instrukcją fotelika i ją
rozumiesz. Postępuj zgodnie ze wskazówkami opisanymi w instrukcji.
!
OSTRZEŻENIE! Elementów fotelika CYBEX nie należy modyfikować,
używać w połączeniu z siedziskami, oparciami lub zagłówkami innych
producentów lub foteli samochodowych z innej grupy produktowej. W
każdym z takich przypadków fotelik nie będzie certyfikowany do dalszego
korzystania. Niepoprawne użytkowanie fotelika może nieść za sobą
krytyczne skutki. Zachowaj instrukcję na przyszłość.
!
OSTRZEŻENIE! Należy zawsze zwracać uwagę, aby żadne części
fotelika nie zaklinowały się w wyniku codziennego użytkowania pojazdu
(np. podczas przesuwania fotela samochodowego lub zamykania drzwi).
HET VOERTUIG BESCHERMEN OCHRONA TAPICERKI SAMOCHODOWEJ
Het gebruik van autostoeltjes kan op sommige autozittingen met een kwetsbare
bekleding (zoals alcantara of leer) sporen nalaten en/of deze doen verkleuren.
U kunt dit voorkomen door bijvoorbeeld een deken of een handdoek onder
het autostoeltje op de stoel te leggen. Raadpleeg in dit verband ook onze
reinigingsinstructies. Het is van groot belang dat u die opvolgt voordat u het
autostoeltje voor het eerst gebruikt.
Na niektórych tapicerkach samochodowych wykonanych z delikatnego
materiału jak (np. welur, skóra) z czasem korzystania fotelika samochodowego
mogą pojawić się oznaki zużycia/przetarcia lub wytarcia. Aby uniknąć
zniszczenia tapicerki, zabezpiecz ją podkładając pod fotelik pokrowiec lub
ręcznik. Zachęcamy do zapoznania się z zaleceniami dotyczącymi czyszczenia
fotelika oraz jego tapicerki. Należy ich bezwzględnie przestrzegać przed
pierwszym skorzystaniem z fotelika.
35
Page 36

LA BONNE POSITION EN VOITURE
Ce siège auto, si son système ISOFIX Connect est rétracté, peut être utilisé
sur tous les sièges de véhicules équipés de ceintures de sécurité à trois points
approuvées dans le manuel du véhicule pour une utilisation universelle.
Un autorisation «semi-universelle» est fournie pour les équipements utilisant
les connecteurs ISOFIX Connect. C’est pour cette raison que le système
ISOFIX Connect ne peut être utilisé que dans certains véhicules. Veuillez
consulter la liste ci-jointe des véhicules approuvés. Vous pouvez consulter la
dernière version ici: www.cybex-online.com
Dans des cas exceptionnels, le siège auto peut également être installé sur
le siège passager avant. Dans ce cas, veuillez tenir compte des remarques
suivantes:
• Dans les véhicules équipés d’airbags, vous devez reculer le siège autant que
possible. Veuillez cependant vous assurer que le point de pivot supérieur de
la ceinture de sécurité se trouve à l’arrière du point d’attache du siège auto.
• Conformez-vous toujours aux recommandations du fabricant du véhicule.
!
ATTENTION ! Ce siège ne doit pas être utilisé avec une ceinture ventrale
deux points. L’utilisation du siège en conjonction avec une ceinture à deux
points risque de blesser gravement, voire mortellement l’enfant.
ATTENTION ! La ceinture diagonale doit être à l’arrière en position inclinée et
ne doit jamais être positionnée en direction du point le plus haut de la ceinture
de votre véhicule. S’il est impossible de positionner le siège de cette manière,
en poussant le siège auto vers l’avant ou en l’utilisant sur un autre siège, cela
signifie que ce siège auto ne convient pas à votre véhicule. En cas de doute,
contactez le fabricant du siège auto.
Les bagages ou autres objets présents dans le véhicule peuvent provoquer
des blessures en cas d’accident et doivent toujours être bien attachés. Sinon,
ils risqueraient d’être projetés, provoquant des blessures mortelles.
ATTENTION ! Le siège auto ne doit pas être utilisé sur des sièges de
véhicules faisant face au côté de la route. L’utilisation de ce siège auto est
permise sur les sièges de véhicules orientés dos à la route, notamment dans
un van ou un minibus, à condition que le siège du véhicule en question soit
prévu pour transporter une personne adulte. Assurez-vous que l’appuie-tête
n’est pas retiré si le siège auto est installé sur une banquette dos à la route.
ATTENTION ! Ne laissez jamais votre enfant sans surveillance dans la voiture.
Les pièces en plastique du siège auto se réchauffent en plein soleil et l’enfant
peut subir des brûlures. Protégez votre enfant et le siège auto de l’exposition
directe au soleil (en couvrant le siège avec un linge par exemple).
36
Page 37

FRNLPL
DE JUISTE PLAATS IN HET VOERTUIG WYBÓR ODPOWIEDNIEGO MIEJSCA W SAMOCHODZIE
Het autostoeltje is met ingeklapt ISOFIX Connect-systeem te gebruiken op alle
autostoelen met automatische driepuntsgordels die in de autohandleiding zijn
goedgekeurd voor ‘universeel’ gebruik.
Als het beveiligingssysteem uitsluitend met ISOFIX Connect aan de auto wordt
bevestigd, geldt een ‘semi-universele’ goedkeuring. Dat betekent dat ISOFIX
Connect alleen in bepaalde voertuigen mag worden gebruikt. U kunt op de
bijgevoegde lijst van voertuigtypen controleren of uw auto hier geschikt voor is.
Het meest actuele overzicht kunt u downloaden op www.cybex-online.com.
In uitzonderlijke gevallen mag het autostoeltje ook op de passagiersstoel voorin
gebruikt worden. Let daarbij dan op het volgende:
• In auto’s met airbags moet u de passagiersstoel zo ver mogelijk naar
achteren zetten. Zorg er daarbij echter voor dat het hoogste punt van de
veiligheidsgordel achter de gordelgeleider van het autostoeltje blijft.
• Volg altijd de aanbevelingen van de autofabrikant op.
Fotelik samochodowy ze złożonym systemem ISOFIX Connect można używać
na wszystkich siedzeniach samochodowych posiadających trzypunktowy pas
bezpieczeństwa, które zostały zatwierdzone przez producenta pojazdu do
„uniwersalnego” użytku.
„Półuniwersalna” certyfikacja jest nadana fotelikom samochodowym, które
montuje się w samochodzie poprzez ISOFIX Connect. Z tego powodu ISOFIX
CONNECT może być używany tylko w niektórych modelach samochodów.
Prosimy sprawdzić, czy na liście dopuszczonych pojazdów znajduje się Państwa
samochód. Aktualną listę znajdą Państwo na stronie: www.cybex-online.com.
W pewnych wyjątkach fotelik samochodowy może zostać zamontowany na
przednim fotelu pasażera. Należy wtedy przestregać poniższych wskazówek:
• Jeżeli pojazd posiada poduszkę powietrzną pasażera, odsuń siedzenie
do tyłu najdalej, jak to możliwe. Czyniąc to jednak upewnić się, że górny
punkt obrotu pasa bezpieczeństwa jest za punktem zasilającym pas fotela
samochodowego.
• Ściśle przestrzegaj zaleceń producenta pojazdu.
!
BELANGRIJK! Het stoeltje is niet geschikt voor gebruik met een
tweepuntsgordel of heupgordel. Als het stoeltje met behulp van een
tweepuntsgordel wordt vastgezet, kan een ongeval resulteren in ernstig of zelfs
fataal letsel van het kind.
BELANGRIJK! De borstriem moet schuin naar achteren lopen en mag
nooit voorwaarts naar het bovenste gordelpunt in uw auto lopen. Als het niet
mogelijk is om het stoeltje op deze manier te plaatsen, bijvoorbeeld door de
autostoel naar voren te schuiven of door het stoeltje op een andere autostoel
te gebruiken, is dit autostoeltje niet geschikt voor uw auto. Neem bij twijfel
contact op met de fabrikant van het autostoeltje.
Bagage en andere objecten die in de auto liggen en letsel kunnen veroorzaken
tijdens een ongeval, moeten altijd goed worden vastgezet. Rondvliegende
voorwerpen kunnen fataal letsel veroorzaken.
BELANGRIJK! Het autostoeltje mag niet worden gebruikt op autostoelen die
haaks op de rijrichting staan. Gebruik van het autostoeltje is wel toegestaan op
achterwaarts gerichte stoelen, bijvoorbeeld in een busje, vooropgesteld dat de
stoel bedoeld is voor het vervoer van een volwassene. Het is essentieel dat u
zorgt dat de hoofdsteun niet wordt verwijderd als het autostoeltje achterwaarts
gericht wordt geplaatst.
BELANGRIJK! Laat uw kind nooit alleen in de auto achter. De kunststof
onderdelen van het kinderbeveiligingssysteem kunnen warm worden in de zon
en het kind brandwonden bezorgen. Bescherm uw kind en het autostoeltje
tegen directe blootstelling aan de zon (bijvoorbeeld door er een lichte doek
overheen te leggen).
!
OSTRZEŻENIE! Fotelik samochodowy nie jest przeznaczony do
montażu na siedzeniu, gdzie znajduje się 2-punktowy pas bezpieczeństwa
lub pas biodrowy. Używanie tego typu pasów bezpieczeństwa może
skutkować poważne lub śmiertelne obrażenia dziecka w razie wypadku.
OSTRZEŻENIE! Pas piersiowy musi przebiegać zawsze za fotelik (w
tylnym kierunku) i nigdy nie może być montowany w sposób, w którym
jest skierowany do przodu (patrz ilustracja na 36 str.). Jeśli nie ma
możliwości zamontowania fotelika pomimo odsunięca do przodu fotela
samochodowego lub montażu na innym siedzeniu w samochodzie,
oznacza to, że fotelik ten nie pasuje do Państwa pojazdu. W razie
wątpliwości skontaktuj się z producentem samochodu.
Bagaże i inne przedmioty znajdujące się w samochodzie, które mogą
zranić pasażerów w czasie wypadku powinny zostać dokładnie
zabezpieczone. Pozostawione luzem przedmioty mogą spowodować
obrażenia w czasie wypadku
OSTRZEŻENIE! Montowanie niniejszego fotelika samochodowego
na fotelach samochodowych ustawionych bokiem do kierunku jazdy
jest niedozwolone. Na fotelach samochodowych umieszczonych tyłem
do kierunku jazdy np. w samochodach typu van czy minibus, można
zamontować niniejszy fotelik, pod warunkiem że fotele samochodowe
przeznaczone są do przewożenia osób dorosłych. Montując fotelik
samochodowy na siedzieniu, które jest tyłem do kierunku jazdy, upewnij
się, że zagłówek fotela samochodowego nie został zdjęty.
OSTRZEŻENIE! Nigdy nie zostawiaj dziecka w samochodzie bez
opieki. Plastikowe elementy fotelika nagrzewają się pozostawione w
nasłonecznionym miejscu. Uważaj, gdyż mogą oparzyć dziecko. Chroń
swoje dziecko jak i fotelik przed bezpośrednim przebywaniem na słońcu
(np. przykrywając fotelik tkaniną.
37
Page 38

SÉCURITÉ EN VOITURE
!
ATTENTION !
sécurité du véhicule, même lorsqu’il n’est pas utilisé. En cas de freinage
d‘urgence ou d‘accident, un siège auto non attaché peut causer des
blessures aux autres passagers et à vous même.
• Afin de garantir la meilleure sécurité possible pour tous les passagers,
assurez-vous que:
• Les dossiers inclinables des banquettes soient relevés dans leur position
initiale droite.
• En installant le siège auto sur le siège passager avant, reculer le siège au
maximum.
• Tous les objets susceptibles de causer des blessures en cas d’accident
soient correctement rangés dans l’habitacle.
• La boucle de ceinture n‘atteint pas le bouclier. En cas de doute, contactez
votre revendeur.
• Tous les passagers de la voiture attachent leur ceinture.
Le siège auto doit toujours être attaché avec la ceinture de
INSTALLATION DU SIÈGE AUTO
Placez le siège auto sur un siège approprié du véhicule.
• Assurez-vous toujours que la surface entière du dossier du siège auto soit bien
en contact avec le dossier du siège du véhicule. Le siège auto ne doit jamais
se trouver en position allongée.
• Si l‘appuie-tête du véhicule gêne, tirez-le ou retirez-le complètement (les
exceptions à cette règle figurent au chapitre «POSITIONNEMENT CORRECT
DU SIÈGE DANS LE VÉHICULE»). Le dossier (a) s‘adaptera parfaitement à
pratiquement toutes les inclinaisons de la banquette du véhicule.
38
!
ATTENTION ! La surface entière du dossier du siège auto doit reposer
sur le dossier du siège du véhicule. Le siège doit se trouver en position
verticale pour garantir la sécurité optimale de votre enfant.
!
ATTENTION ! Ne pas utiliser de points de contact autres que ceux
décrits dans les instructions.
Page 39

FRNLPL
VEILIGHEID IN DE AUTO BEZPIECZEŃSTWO W SAMOCHODZIE
!
BELANGRIJK! Het autostoeltje moet altijd juist zijn geïnstalleerd in
het voertuig, ook als het niet wordt gebruikt. Door plotseling remmen
of tijdens een ongeval kan een niet vastgemaakt autostoeltje andere
passagiers of uzelf verwonden.
Om de hoogst mogelijke veiligheid van alle passagiers te garanderen is het
nodig dat...
• neerklapbare rugleuningen in het voertuig rechtop staan en zijn vergrendeld.
• de passagiersstoel zo ver mogelijk naar achteren staat als u de het
autostoeltje op deze stoel installeert.
• u alle voorwerpen die letsel kunnen veroorzaken tijdens een ongeval goed
opbergt.
• het gordelslot niet helemaal tot het veiligheidskussen komt. Als u twijfelt,
neem dan contact op met het verkooppunt of de fabrikant.
• alle passagiers in het voertuig vastgegordeld zijn.
!
OSTRZEŻENIE!
samochodowym pasem bezpieczeństwa. Nawet kiedy dziecko nie jest w nim
przewożone. W razie nagłego hamowania lub wypadku nieprzypięty fotelik
samochodowy może spowodować obrażenia u pasażerów lub kierowcy.
W celu zapewnienia możliwie najlepszego
bezpieczeństwa wszystkim pasażerom upewnij się,że:
• składane oparcia w samochodzie są zablokowane w pozycji pionowej;
• montując fotelik na przednim siedzeniu samochodu, na fotelu pasażera,
odsuń fotel samochodowy maksymalnie do tyłu;
• wszystkie przedmioty znajdujące się wewnątrz samochodu zostały
zabezpieczone w należyty sposób i nie spowodują uszkodzeń/nie zranią
pasażerów w razie wypadku;
• zapięcie pasa bezpieczeństwa nie sięga do osłony tułowia. W razie
wątpliwości skontaktuj się ze sprzedawcą lub producentem.
• wszyscy pasażerowie mają zapięte pasy bezpieczeństwa.
Fotelik samochodowy musi zawsze być przypięty
HET AUTOSTOELTJE IN HET VOERTUIG PLAATSEN MONTAŻ FOTELIKA SAMOCHODOWEGO W POJEŹDZIE
Plaats het autostoeltje op de juiste stoel in het voertuig.
• Zorg altijd dat de hele rugleuning van het autostoeltje goed op de rugleuning van
de autostoel aansluit. Het autostoeltje mag nooit in een liggende stand staan.
• Als de hoofdsteun van de auto in de weg zit, trek die dan helemaal uit of
verwijder hem geheel (zie voor uitzonderingen hierop onder het kopje “HET
ZITJE GOED IN DE AUTO PLAATSEN”). De rugsteun (a) past zich volledig
aan aan vrijwel elke hoek van de autostoel.
!
BELANGRIJK! Zorg altijd dat de hele rugleuning van het autostoeltje
goed op de rugleuning van de autostoel aansluit. Om verzekerd te zijn van
maximale bescherming van uw kind, moet het stoeltje normaal rechtop staan!
Umieść fotelik samochodowy na przeznaczonym do tego miejscu w pojeździe.
• Upewnij się, że oparcie fotelika samochodowego w pełni przylega do oparcia
fotela/kanapy w samochodzie. Oparcie fotela samochodowego nie może być
w pozycji leżącej.
• Jeśli zagłówek fotela samochodowego (pojazdu) przeszkadza w
poprawnym Jeżeli zagłówek siedzenia samochodowego przeszkadza w
zamontowaniu fotelika, należy go ustawić w możliwie jak najwyższej pozycji
lub zdemontować całkowicie (z wyjątkiem sytuacji opisanej w punkcie
„WŁAŚCIWE MIEJSCE W SAMOCHODZIE“). Oparcie fotelika (a) łatwo
dopasowuje się do siedzenia samochodowego o prawie każdym nachyleniu.
!
OSTRZEŻENIE! Powierzchnia oparcia fotelika musi w pełni przylegać
do oparcia fotela samochodowego. Chcąc zapewnić twemu dziecku
maksymalne bezpieczeństwo, fotelik samochodowy musi znajdować się
w normalnej pozycji prostej!
!
BELANGRIJK! Gebruik geen andere dragende contactpunten dan de in
de handleiding beschreven en op het autostoeltje aangegeven punten.
!
OSTRZEŻENIE! Nie używaj żadnych punktów kontaktowych nośnych
innych niż opisane w instrukcji i oznaczone na foteliku.
39
Page 40

INSTALLATION DU SIÈGE AVEC ISOFIX CONNECT
6
1
5
7
8
Le système ISOFIX Connect vous permet de fixer le siège auto au véhicule,
augmentant ainsi la sécurité de votre enfant. L‘enfant doit toujours être sécurisé
avec le bouclier et la ceinture de sécurité trois points du véhicule.
NOTE ! Les points d’ancrage ISOFIX (4) sont deux clips métalliques et sont
positionnés entre le dossier et la surface d’assise du siège du véhicule. En cas
de doute, veuillez consulter le manuel de votre véhicule.
• Utilisez la poignée de réglage (5) sous l’assise (1) du siège auto.
• Tirez les deux connecteurs ISOFIX Connect (6) autant que possible.
• Faites maintenant pivoter les connecteurs ISOFIX Connect (6) à 180° de
manière à ce qu’ils soient face aux point d’ancrage ISOFIX.
40
CLICK!
4
6
9
NOTE ! Avant de fixer les connecteurs ISOFIX Connect (6) dans les point
d’ancrage ISOFIX (4), vérifiez les boutons déclencheurs (7). Si les indicateurs
de sécurité verts (8) sont visibles, vous devez tout d’abord libérer les
connecteurs ISOFIX Connect avant de les replier en appuyant et en reculant le
bouton déclencheur (7).
• Poussez les deux connecteurs ISOFIX Connect (6) dans les point d’ancrage
ISOFIX (4) jusqu’à ce que ceux-ci s’emboîtent en émettant un «clic» audible.
• Assurez-vous que le siège auto est bien fixé en essayant de l’extraire.
• L’indicateur de sécurité vert (8) doit désormais être clairement visible au
niveau des deux boutons déclencheurs (7).
• Vous pouvez désormais utiliser la poignée de réglage (5) du siège auto pour
le positionner.
NOTE ! Si les points d’ancrage ISOFIX de votre voiture sont difficiles d’accès,
utilisez les guides de fixation fournis.
• Insérez les guides ISOFIX fournis (9), côté le plus long vers le haut, dans les
points d’ancrage ISOFIX (4). Dans certains véhicules, il est préférable de
guides ISOFIX (9) dans la direction opposée.
Page 41

FRNLPL
HET AUTOSTOELTJE MET HET ISOFIX CONNECTSYSTEEM PLAATSEN
De veiligheid van uw kind neemt toe dankzij het ISOFIX Connect-systeem
waarmee u het autostoeltje kunt bevestigen in het voertuig. Uw kind moet nog
wel met het veiligheidskussen en de driepuntsgordel van uw voertuig worden
vastgemaakt.
MONTAŻ FOTELIKA PRZY POMOCY SYSTEMU ISOFIX CONNECT
Dzięki użyciu systemu ISOFIX Connect możesz dodatkowo przymocować
fotelik samochodowy do pojazdu, dzięku czemu podnosisz bezpieczeństwo.
Dziecko musi być zapięte przy pomocy osłony tułowia oraz samochodowego
trzypunktowego pasa bezpieczeństwa.
LET OP! De ISOFIX-ankerpunten (4) zijn twee metalen beugels per stoel, die
geplaatst zijn tussen de rugleuning en zitting van de autostoel. Als u twijfelt, kijk
dan in de handleiding van uw voertuig.
• Gebruik de instellingsknop (5) onder het zitkussen (1) van het autostoeltje.
• Trek de twee ISOFIX CONNECT-grijparmen (6) zo ver mogelijk uit.
• Draai de ISOFIX CONNECT-grijparmen (6) nu 180°, zodat ze in de richting
van de ISOFIX-ankerpunten wijzen.
LET OP! Voordat u de ISOFIX Connect-grijparmen (6) in de ISOFIXankerpunten (4) klikt dient u de ontgrendelingsknoppen (7) te controleren.
Als de groene veiligheidsindicator (8) zichtbaar is, moet u de ISOFIX
Connect-grijparmen eerst ontgrendelen voordat u ze vastmaakt door de
ontgrendelingsknop (7) in te duwen en terug te trekken.
• Duw de twee ISOFIX Connect-grijparmen (6) in de ISOFIX-ankerpunten (4)
tot ze met een hoorbare KLIK vergrendelen.
• Controleer of het autostoeltje goed vastzit door te proberen het weg te
trekken.
• De groene veiligheidsindicator (8) moet nu goed zichtbaar zijn op de twee
rode ontgrendelingsknoppen (7).
• U kunt nu de instellingsknop (5) van het autostoeltje gebruiken om het goed
te positioneren.
LET OP! Als de ISOFIX-ankerpunten in uw voertuig lastig te bereiken zijn, kunt
u de bijgeleverde ISOFIX-geleidehulzen gebruiken.
• Voer de twee bijgeleverde ISOFIX-geleidehulzen (9) met de lange kant naar
boven in de twee ISOFIX-ankerpunten (4). In sommige auto’s is het beter om
de ISOFIX-geleidehulzen (9) omgekeerd aan te brengen.
UWAGA! Punkty wczepu ISOFIX (4) to dwa metalowe elementy zlokalizowane
pomiędzy oparciem a siedziskiem fotela samochodowego. W razie wątpliwości
należy zajrzeć do instrukcji obsługi samochodu
• Skorzystaj z guzika regulującego (5) znajdującego się pod osłoną tułowia (1)
fotelika samochodowego.
• Wyciągnij zaczepy ISOFIX (6) najdalej jak to możliwe.
• Obróć zaczepy ISOFIX Connect (6) o 180°, tak aby były zwrócone w
kierunku samochodowych uchwytów ISOFIX.
UWAGA! Przed wpięciem ISOFIX Connect (6) w zaczepy ISOFIX (4), sprawdź
przyciski zwalniające (7). Jeśli widoczny jest zielony wskaźnik (8) najpierw
musisz zwolnić ISOFIX Connect przed ponownym wpięciem (7). Wciśnij i
odciągnij do tyłu.
• Wsuń dwie prowadnice ISOFIX Connect (6) w zaczepy ISOFIX (4) aż
usłyszysz wyraźne kliknięcie.
• Pociągnij za fotelik, aby sprawdzić czy jest prawidłowo zamocowany.
• Zielone wskaźniki bezpieczeństwa (8) powinny być widoczne z obu stron i
powinny wystawać z czerwonych przycisków zwalniających (7).
• Za pomocą uchwytu (5) znajdującego się w podstawie fotelika możesz teraz
ustawić jego pozycję.
UWAGA! Jeśli zaczepy ISOFIX w Twoim samochodzie są trudno dostępne,
należy użyć dołączonych osłon/prowadnic.
• Wsuń dołączone prowadnice ISOFIX (9) w zaczepy ISOFIX (4). Dłuższa
część powinna znajdować się w górze. W niektórych samochodach lepiej
użyć osłon (9) w odwrotnym kierunku.
41
Page 42

RETIRER LE SIÈGE AUTO DU VÉHICULE
4
7
6
5
PRESS!
a
b
c
10
Procédez en inversant les étapes d’installation.
• Déverrouillez les connecteurs ISOFIX (6) des deux côtés en appuyant sur les
boutons déclencheurs rouges (7) et en les reculant simultanément.
• Retirer le siège des points d’ancrage ISOFIX (4).
• Faites pivoter les connecteurs (6) à 180°.
• Actionnez la poignée de réglage (5) du siège auto et repoussez les
connecteurs ISOFIX (6) aussi loin que possible.
NOTE ! En repliant les connecteurs ISOFIX (6), vous ne vous contentez pas de
protéger le siège du véhicule, mais vous protégez également les connecteurs
du système ISOFIX CONNECT de la saleté et des dommages.
RÉGLAGE DES PROTECTIONS LATÉRALES
Le siège auto est équipé du système de «Protection Linéaire contre les Impacts
Latéraux» (L.S.P.). Ce système améliore la sécurité de votre enfant en cas
d’impact latéral.
Le L.S.P. dispose de 3 positions. Pour une meilleure protection, tirer le L.S.P.
le plus possible du côté de la portière la plus proche du siège auto. Pour celà,
pressez le bouton (10).
Si le L.S.P. dépasse de l’espace prévu et est en contact avec la portière dans
sa position la plus longue (c), il doit être mis en position intermédiaire (b).
Ceci peut être réalisé en sortant complètement le L.S.P., puis en appuyant sur
le bouton (10) et en le plaçant en position intermédiaire. Afin de repousser le
L.S.P. vers le siège, appuyez sur le bouton (10) tout en appuyant vers le siège
sur le L.S.P.
NOTE ! Lorsque vous utilisez le siège auto sur la position centrale arrière, il est
interdit de déplier le dispositif (L.S.P.).
42
!
ATTENTION ! Il est interdit d’utiliser le système L.S.P. pour porter ou
attacher le siège auto.
Page 43

FRNLPL
HET AUTOSTOELTJE UIT HET VOERTUIG VERWIJDEREN WYJMOWANIE FOTELIKA Z SAMOCHODU
Voer de stappen van het plaatsen in omgekeerde volgorde uit.
• Ontgrendel de ISOFIX Connect-grijparmen (6) aan beide zijden door op de
rode ontgrendelingsknoppen (7) te drukken en ze tegelijk terug te trekken.
• Trek het stoeltje uit de ISOFIX-ankerpunten (4).
• Draai de grijparmen (6) 180°.
• Gebruik de instellingsknop (5) van het autostoeltje en duw de ISOFIX
Connect-grijparmen (6) zo ver mogelijk in.
LET OP! Door de ISOFIX-grijparmen (6) weg te klappen beschermt u niet
alleen de autostoel, maar ook de ISOFIX-grijparmen van het ISOFIX Connectsysteem tegen vuil en beschadiging.
W celu zamontowania fotelika w samochodzie, wykonaj czynności w odwrotnej
kolejności
• Rozłącz zaczepy ISOFIX Connect (6) po obu stronach wciskając czerwony
przycisk zwalniający (7) i jednocześnie ciągnąc je ku sobie.
• Wyciągnij fotelik z zaczepów ISOFIX (4).
• Obróć zaczepy (6) o 180°.
• Pociągnij za uchwyt do regulacji (5) wciśnij zaczepy ISOFIX Connect (6) do
końca.
UWAGA! Składając zaczepy ISOFIX (6) nie tylko zabezpieczasz fotel
samochodowy przed porysowaniem, ale również zaczepy ISOFIX przed
dostaniem się do nich brudu i uszkodzeniem.
AANPASSEN VAN DE ZIJBESCHERMERS
Het autostoeltje is uitgerust met het Linear Side-Impact Protection-systeem
(L.S.P.). Dit systeem vergroot de veiligheid van uw kind bij een zijdelingse
botsing.
De L.S.P. kent 3 standen. Voor de beste bescherming trekt u de L.S.P. zo ver
mogelijk uit in de richting van het portier vlak bij het autostoeltje. Druk daarvoor
op de ontgrendelingsknop (10).
Als de L.S.P. breder is dan de tussenruimte en in de langste stand (c) het
portier raakt, moet u de scheve stand (b) gebruiken. Die bereikt u door de
L.S.P. helemaal uit te trekken en vervolgens de ontgrendelingspal (10) in te
drukken en de L.S.P. in de scheve stand brengen. Om de L.S.P. terug te duwen
in het stoeltje drukt u op de ontgrendelingspal (10) en duwt u tegelijkertijd de
L.S.P. naar het stoeltje.
LET OP! Als u het stoeltje op de middenstoel in het voertuig gebruikt, is het
verboden om de L.S.P. uit te klappen.
!
BELANGRIJK! De L.S.P. mag niet worden gebruikt om het autostoeltje
te dragen of te installeren.
REGULACJA OSŁON BOCZNYCH
Fotelik samochodowy jest wyposażony w „liniowy system ochrony przed
zderzeniem bocznym” (L.S.P.). System ten zwiększa bezpieczeństwo dziecka w
przypadku wystąpienia kolizji bocznej.
Osłonę L.S.P. Można ustawić w jednej z trzech pozycji. Dla zapewnienia
najlepszej ochrony wyciągnij osłonę L.S.P. najbardziej jak to możliwe po stronie
fotelika, która znajduje się jak najbliżej drzwi. W celu wysunięcia osłony wciśnij
przycisk zwalniający (10).
W przypadku, gdy osłona L.S.P. rozłożona w najdłuższej pozycji (c) dotyka drzwi
samochodu, złóż ją do długości (b). Można to zrobić całkowicie wysuwając
L.S.P. jednocześnie wciskając przycisk zwalniający (10) i przesuwając L.S.P. do
pochyłej pozycji. W celu wsunięcia osłony L.S.P. Wciśnij przycisk zwalniający
(10) i wciskając go wsuwaj osłonę w kierunku fotelika.
UWAGA! Osłon L.S.P. nie wolno używać, jeśli fotelik zamontowany jest na
środkowym siedzeniu w samochodzie.
!
OSTRZEŻENIE! Korzystanie z osłony L.S.P. w celu przenoszenia lub
przypięcia fotelika jest niedozwolone!
43
Page 44

RÉGLAGE DU SIÈGE
Réglage de l’appuie-tête
NOTE ! La têtière n’offre une protection et une sécurité optimales à votre
11
enfant que lorsqu‘elle est correctement réglée. Elle peut être réglée sur huit
positions différentes.
• L’appuie-tête doit être ajusté de sorte que un espace de 2 cm max. (c’est à
dire deux doigts en largeur) ou moins reste vide entre les épaules de l’enfant
et le bas de l’appuie-tête.
• Appuyer sur le bouton de réglage (11) situé la partie inférieure de l’appuietête et le déplacer jusqu’à la position désirée.
RÉGLAGE DU BOUCLIER
Vous pouvez ajuster le bouclier à votre enfant en poussant le bouton de réglage
central (12).
Maintenez le bouton de réglage central (12) enfoncé pendant que vous ajustez
3
12
le bouclier à votre enfant.
Les rabats latéraux du bouclier (3) ont une position parfaitement adaptée entre
les accoudoirs et la surface du siège et servent à maintenir le bouclier (3) sur
le siège.
Ajustez le bouclier (3) de manière à ce qu’il soit proche de l’enfant sans
toutefois le confiner.
44
Page 45

FRNLPL
AANPASSEN AAN DE LICHAAMSOMVANG DOSTOSOWANIE FOTELIKA DO ROZMIARÓW DZIECKA
De hoofdsteun verstellen
LET OP! De hoofdsteun biedt uw kind alleen optimale bescherming indien
deze in de optimale stand is gezet. De hoofdsteun kan in 8 hoogtestanden
worden gezet.
Regulacja zagłówka
UWAGA! Zagłówek fotelika zapewni dziecku najlepszą ochronę wyłącznie, jeśli
jest ustawiony w optymalnej wysokości. Zagłówek można ustawić w jednej z 8
wysokości.
• De stand van de hoofdsteun moet zodanig zijn dat de ruimte tussen de
schouder van het kind en de hoofdsteun maximaal 2 cm. (ongeveer twee
vingers breed) is.
• Duw op het verstellipje (11) aan de onderkant van de hoofdsteun en zet de
hoofdsteun in de gewenste stand.
• Zagłówek musi być ustawiony w sposób, gdzie pomiędzy ramieniem dziecka
a dolną częścia zagłówka będzie 2 cm lub (mniej więcej na dwa złączone
palce) mniejszy odstęp.
• Wcisnij przycisk regulacji (11) znajdujący się w dolnej części zagłówka i
ustaw w odpowiedniej pozycji.
HET VEILIGHEIDSKUSSEN VERSTELLEN REGULACJA OSŁONY TUŁOWIA
Door op de centrale aanpassingsknop (12) te drukken kunt u het
veiligheidskussen aanpassen aan uw kind.
Houd de centrale aanpassingsknop (12) ingedrukt terwijl u het
veiligheidskussen aanpast aan uw kind.
De zijflappen van het veiligheidskussen (3) passen precies tussen de
armleuning en de zitting en worden gebruikt om het veiligheidskussen (3) met
de zitting te verbinden.
Pas het veiligheidskussen (3) zo aan dat het kussen uw kind raakt, maar niet
tegen het lichaam van uw kind duwt.
Wciskając przycisk (12) możesz dostosować osłonę tułowia do dziecka.
Przytrzymaj centralny przycisk (12) trzymając go dostosuj osłonę tułowia do
dziecka.
Boczne części osłony tułowia (3) mieszczą się pomiędzy podłokietnikami i
siedziskiem i służą do przytrzymania osłony tułowia (3) na foteliku.
Dosuń osłonę tułowia (3) w taki sposób, aby dotykała dziecka, ale nie wciskała
się w jego ciało.
45
Page 46

46
3
14
16
15
CLICK!
13
17
FIXER LE BOUCLIER
1. Insérez le bouclier d’impact ajusté (3) (consultez le chapitre «RÉGLAGE DU
BOUCLIER»).
2. Tirez la ceinture du véhicule sur toute sa longueur. Prenez la ceinture ventrale
(13) et insérez-la dans le guide prévu à cet effet (14) sur le bouclier (3).
3. Vérouillez la ceinture de sécurité dans la boucle (15). Elle doit s’enclencher
et émettre un «CLIC» audible.
4. Serrez la ceinture ventrale (13) en tirant sur la ceinture d’épaule (16).
5. Faites repasser la ceinture d’épaule (16) parallèlement à la ceinture ventrale
(13) dans le guide de ceinture (14).
6. Serrez la ceinture d’épaule (16) et assurez-vous que les deux parties de la
ceinture couvrent bien toute la largeur du bouclier (3) et qu’elles soient bien
positionnées dans le guide (14).
7. Faites ensuite passer la ceinture d’épaule (16) dans le guide de ceinture
(14) du bouclier (3) jusqu’à ce qu’elle soit fixe dans le guide. Passez ensuite
la ceinture d’épaule (17) entre l’appuie-tête et le dossier.
!
ATTENTION ! Toujours vérifier le bon ajustement du système de retenue
au corps de l’enfant. Ne vrillez jamais la ceinture.
!
ATTENTION ! La ceinture de sécurité trois points ne peut être insérée
que dans les guides prévus à cet effet. Les guides sont décrits
précisément dans le présent manuel et sont de couleur rouge.
SÉCURISER CORRECTEMENT VOTRE ENFANT
Pour assurer la sécurité optimale de votre enfant, veuillez toujours procéder aux
vérifications suivantes avant le départ:
• que le bouclier soit correctement ajusté.
• que la ceinture de sécurité soit bien bouclée.
• que les ceintures ventrale et diagonale passent dans le guide du bouclier et
ne soient pas vrillées.
• que toute la surface du dossier du siège auto repose sur le dossier de la
banquette du véhicule.
• Si utilisation du système ISOFIX Connect: que les connecteurs soient
vérouillés de chaque coôté dans les points d’ancrage ISOFIX et que les
deux indicateurs verts soient visibles.
Page 47

FRNLPL
VASTMAKEN MET HET VEILIGHEIDSKUSSEN ZAPINANIE OSŁONY TUŁOWIA
1. Plaats het eerder aangepaste veiligheidskussen (3) (zie onder het kopje
“HET VEILIGHEIDSKUSSEN AANPASSEN”).
2. Trek de driepuntsgordel van uw auto helemaal uit. Neem de buikriem (13) en
voer die door de daarvoor bedoelde geleiders (14) in het veiligheidskussen (3).
3. Maak de autogordel vast in het gordelslot (15). Die moet met een hoorbare
“KLIK” vergrendelen.
4. Trek de buikriem (13) strak door aan de borstriem (16) te trekken.
5. Voer nu de borstriem (16) parallel met de buikriem (13) terug door de
gordelgeleiders (14).
6. Trek de borstriem (16) strak en controleer of beide delen van de gordel over de
hele breedte van het veiligheidskussen (3) door de gordelgeleiders (14) lopen.
7. Voer nu de borstriem (16) strak door de gordelgeleider (14) van het
veiligheidskussen (3) zodat die zich vastklemt. Trek dan de borstriem tussen
de hoofdsteun (17) en schoudersteun door.
1. Teraz włóż wcześniej już wyregulowaną osłonę tułowia (3) (o regulacji
przeczytasz w sekcji “REGULACJA OSŁONY TUŁOWIA”).
2. Wyciągnij całą długość pasa samochodowego. Pas biodrowy (13) umieść w
przeznaczonych do tego czerwonych prowadnicach (14) znajdujących się na
osłonie tułowia (3).
3. Zapnij pas (15). Jeśli pas zostanie poprawnie wpięty będzie słychać kliknięcie.
4. Zaciśnij biodrową część pasa (13) poprzez pociągnięcie pasa piersiowego (16).
5. Teraz wprowadź pas piersiowy (16) równolegle z pasem biodrowym (13) z
powrotem w prowadnice pasa (14).
6. Naciągnij pas piersiowy (16) mocno i upewnij się, że obydwie części pasa
zakrywają całą szerokość osłony tułowia (3) w prowadnicy pasa (14).
7. Teraz wprowadź piersiową część pasa (16) ciasno przez prowadnice pasa
(14) osłony tułowia (3) do momentu aż zostanie zaciśnięta w prowadnicy
pasa. Następnie poprowadź piersiową część pasa pomiędzy zagłówkiem
(17) a oparciem ramion.
!
BELANGRIJK! Controleer altijd hoe strak het beveiligingssysteem rond
het lichaam van het kind zit en of het goed aansluit. Draai de gordel nooit!
!
BELANGRIJK! De driepuntsgordel mag alleen door de daarvoor
bestemde geleiders worden gevoerd. De gordelgeleiders worden precies
beschreven in deze handleiding en zijn met rood aangegeven op het
autostoeltje.
!
OSTRZEŻENIE! Zawsze sprawdź czy osłona tułowia dobrze przylega do
ciała dziecka. Nigdy nie skręcaj pasa!
!
OSTRZEŻENIE! Trzy punktowy pas może zostać również
przeprowadzony przeznaczonymi do tego prowadnicami pasa.
Prowadnice pasa są dokładnie opisane w tej instrukcji oraz zostały
oznaczone na foteliku samochodowym kolorem czerwonym.
HET KIND JUIST VASTMAKEN ZAPINANIE DZIECKA
Controleer voordat u op weg gaat voor optimale veiligheid van uw kind of:
• het veiligheidskussen juist is afgesteld.
• de gordeltongen vastzitten in het gordelslot.
• de buikriem en schouderriem strak door de gordelgeleiders van het
veiligheidskussen lopen en niet gedraaid zijn.
• de hele rugleuning van het autostoeltje volledig op de rugleuning van de
autostoel aansluit.
• Als u ISOFIX Connect gebruikt: moet het stoeltje aan beide zijden aan de
ISOFIX-ankerpunten vergrendeld zijn met de grijparmen en beide groene
veiligheidsindicatoren moeten duidelijk zichtbaar zijn.
Chcąć zapewnić dziecku maksymalne bezpieczeństwo, przed rozpoczęciem
jazdy proszę sprawdzić czy:
• osłona tułowia jest poprawnie założona.
• klamra pasa bezpieczeństwa została poprawnie wpięta.
• biodrowa i barkowa część pasa bezpieczeństwa przebiega ściśle przez
prowadnicę pasa wzdłuż osłony tułowia i nie jest skręcona.
• oparcie fotelika samochodowego dziecka przylega do oparcia fotela/kanapy
samochodowej.
• Jeśli korzystają Państwo z ISOFIX Connect należy sprawdzić, czy: fotelik
samochodowy został poprawnie wpięty po obu stronach w zaczepy ISOFIX i
czy wyraźnie widać dwa zielone wskaźniki znajdujące się po bokach fotelika.
47
Page 48

RETRAIT DE LA HOUSSE
La housse du siège auto est composée de 4 parties (appuie-tête, dossier,
assise et bouclier). Les housses sont insérées dans les canaux d’attache
situés sur les rebords du siège et sont maintenus en place par des boutonspressions. Une fois les boutons-pressions détachés, les différentes pièces de
la housse peuvent être extraites des canaux d’attache.
Retrait de la housse de l’appuie-tête
Tirez la housse de l’arrière vers l’avant sur l’appuie-tête.
Retrait de la housse du dossier
Tirez le couvercle de l’arrière vers l’avant sur le dossier.
Retrait de la housse de l’assise
Tirez la housse de l’assise puis des accoudoirs.
Retrait de la housse du bouclier
Tirez la housse vers l’arrière du bouclier en partant du bouton de réglage.
remettre la housse
Procédez en inversant les étapes d’installation.
NETTOYAGE
Il est important d’utiliser uniquement une housse originale, partie intégrante du
siège auto. Vous pouvez obtenir des housses supplémentaires auprès de votre
revendeur.
REMARQUE! Merci de laver la housse avant la première utilisation.
Les housses sont lavables en machine à 30°C maximum, cycle délicat. Si vous
lavez à température plus élevée, le tissu peut être endommagé. Veuillez laver
la housse séparément et ne jamais la passer au sèche-linge ! Ne pas sécher
directement au soleil ! Les parties plastiques peuvent être nettoyées avec un
détergent doux et de l’eau tiède.
48
!
ATTENTION ! Ne jamais utiliser de détergents, d’eau de javel ou
d’agents blanchissants !
Page 49
FRNLPL
DE BEKLEDINGSHOES VERWIJDEREN ZDEJMOWANIE TAPICERKI FOTELIKA
De bekleding van het stoeltje bestaat uit 4 onderdelen (een hoes voor de
hoofdsteun, de rugleuning, het zitkussen en het veiligheidskussen). De vier
hoezen worden ingevoerd in de bekledinggeleiders aan de rand van het
autostoeltje en worden op verschillende plaatsen op hun plek gehouden met
drukknopen. Als alle drukknopen zijn losgemaakt, kunnen de afzonderlijke delen
van de bekleding uit de geleiders worden getrokken.
Tapicerka fotelika składa się z czterech części. Tapicerki: zagłówka, oparcia,
siedziska i osłony tułowia. Tapicerka fotelika jest przypinana w kilku miejscach
na zatrzaski. Po odpięciu wszystkich zapięć tapicerkę można zdjąć.
Zdejmowanie tapicerki z zagłówka.
Przeciągnij tapicerkę od tyłu do przodu przez zagłówek.
De bekleding van de hoofdsteun verwijderen
Trek de bekleding van achteren naar voren over de hoofdsteun.
De bekleding van de rugleuning verwijderen
Trek de bekleding van achteren naar voren over de hoofdsteun.
De bekleding van het zitkussen verwijderen
Trek de bekleding van het zitkussen en daarna van de armleuningen.
De bekleding van het veiligheidskussen verwijderen
Trek de bekleding naar achteren van het veiligheidskussen, te beginnen bij de
instellingsknop.
De bekleding vastmaken
Voer de stappen hierboven in omgekeerde volgorde uit om de bekleding aan te
brengen.
REINIGING
Het is van belang alleen een originele zittinghoes te gebruiken, omdat de hoes
essentieel is voor het functioneren. U kunt losse hoezen bij uw verkooppunt
kopen.
LET OP! Was de bekleding voordat u deze voor de eerste keer gaat gebruiken.
De zittinghoezen zijn wasbaar op maximaal 30° C met een fijnwasprogramma.
Als u op een hogere temperatuur wast, kan de stof van de hoes zijn kleur
verliezen. Was de hoes apart en doe deze nooit in de droger! Laat de hoes ook
niet drogen in de zon! De kunststof onderdelen kunnen worden schoongemaakt
met een zacht schoonmaakmiddel en warm water.
!
BELANGRIJK! Gebruik nooit chemische schoonmaakmiddelen of
bleekmiddel!
Zdejmowanie tapicerki z oparcia.
Przeciągnij tapicerkę od tyłu do przodu przez zagłówek.
Zdejmowanie tapicerki z siedziska.
Ściągnij tapicerkę z siedziska a następnie z podłokietników.
Zdejmowanie tapicerki z osłony tułowia.
Ściągnij tapicerkę do tyłu z osłony tułowia zaczynając od guzika regulacji.
Zakładanie tapicerki.
W celu założenia tapicerki na fotelik samochodowy wykonaj powyższe kroki
zaczynając od ostatniego a kończąc na pierwszym.
CZYSZCZENIE
Tapicerka jest istotną częścią fotelika samochodowego i ma istotny wpływ
na bezpieczeństwo. Dlatego ważne jest, aby używać wyłącznie oryginalnej
tapicerki przeznaczonej do tego modelu fotelika. Dodatkowy pokrowiec można
zakupić w sklepie, w którym dokonano zakupu fotelika.
UWAGA! Przed pierwszym użyciem tapicerkę należy wyprać.
Pokrowiec można uprać w pralce, maksymalnie w temperaturze 30°C,
delikatny cykl prania. Piorąc pokrowiec w wyższej temperaturze, narażasz go
na utratę koloru. Pokrowiec należy prać osobno. Nigdy nie susz pokrowca przy
pomocy suszarki elektrycznej do ubrań. Nie susz pokrowca na bezpośrednim
słońcu! Plastikowe elementy można czyścić przy użyciu delikatnego środka
czyszczącego i ciepłej wody.
!
OSTRZEŻENIE! Nie stosować chemicznych środków do czyszczenia
ani wybielaczy!
49
Page 50

ENTRETIEN DU PRODUIT
Afin de protéger au maximum votre enfant, il est primordial de respecter les
points suivants:
• Tous les principaux composants du siège auto doivent être régulièrement
contrôlés pour vous assurer qu’ils ne sont pas endommagés. Les pièces
mécaniques doivent fonctionner sans problème.
• Il est essentiel de vérifier que le siège auto n’est pas coincé contre des
parties dures, comme la porte de la voiture, etc., qui risqueraient de
l’endommager.
• Par exemple, si le siège auto est tombé, il doit être testé par le fabricant
avant d’être utilisé à nouveau.
!
ATTENTION ! La housse est un composant à part entière du dispositif
de sécurité du siège auto. Le siège auto ne doit donc jamais être utilisé
sans sa housse.
EN CAS D´ACCIDENT
!
ATTENTION ! Un accident peut provoquer des dégâts sur le siège auto
non visibles à l’œil nu. Veuillez remplacer le siège après un accident. En
cas de doute, contactez votre revendeur.
INFORMATIONS PRODUIT
Si vous avez des questions, contactez d’abord votre revendeur. Les
informations suivantes sont nécessaires:
• Numéro de série (voir sticker).
• Marque, Type et nom du véhicule ainsi que la position dans l’habitacle où est
habituellement installé le siège auto.
• Poids, âge et taille de l’enfant.
Pour plus d’informations sur nos produits, consultez notre site web www.cybexonline.com
50
Page 51

FRNLPL
ONDERHOUD KONSERWACJA
Om te garanderen dat uw autostoeltje de maximale bescherming biedt, is het
uiterst belangrijk dat u het volgende in acht neemt:
• Alle hoofdonderdelen van het autostoeltje moeten regelmatig worden
gecontroleerd op schade. De mechanische onderdelen moeten probleemloos
functioneren.
• Het autostoeltje mag absoluut niet klem komen tussen harde onderdelen,
zoals een portier of stoelrail, omdat het daardoor beschadigd kan raken.
• Als het stoeltje bijvoorbeeld is gevallen, dient het getest te worden door de
fabrikant voordat het verder wordt gebruikt.
Aby zagwarantować jak najwyższy poziom bezpieczeństwa fotelika, należy
stosować się do poniższych zaleceń:
• Wszystkie ważne części fotelika powinny być regularnie sprawdzane. Części
mechaniczne powinny działać bez zarzutu.
• Zwracaj szczególną uwagę, aby fotelik nie został uszkodzony poprzez
zaklinowanie pomiędzy drzwiami i siedzeniem samochodowym lub innymi
twardymi elementami.
• Jeżeli fotelik upadnie powinien zostać sprawdzony przez producenta.
!
BELANGRIJK! De bekledinghoes maakt onlosmakelijk deel uit van het
veiligheidsontwerp van het autostoeltje. Het autostoeltje mag daarom
nooit worden gebruikt zonder bekleding of met een hoes van een ander
autostoeltje.
!
OSTRZEŻENIE! Pokrowiec fotelika jest jego integralną częścią
zapewniającą bezpieczeństwo oraz wygląd końcowy. Fotelik
samochodowy należy używać wyłącznie z pokrowcem CYBEX. Nigdy nie
należy korzystać z fotelika samochodowego bez pokrowca.
NA EEN ONGEVAL POSTĘPOWANIE PO WYPADKU DROGOWYM
!
BELANGRIJK! Een ongeval kan schade aan het autostoeltje
veroorzaken die niet voor het blote oog zichtbaar is. Vervang het stoeltje
onmiddellijk na een ongeval. Als u twijfelt, neem dan contact op met het
verkooppunt of fabrikant.
!
OSTRZEŻENIE! Po kolizji lub wypadku drogowym uszkodzenia fotelika
mogą nie być widoczne gołym okiem. Mimo to fotelik powinien zostać
wymieniony na nowy. W razie wątpliwości skontaktuj się ze sprzedawcą
lub producentem.
PRODUCTINFORMATIE INFORMACJA O PRODUKCIE
Als u vragen hebt, neem dan eerst contact op met uw verkooppunt. Zorg
daarbij dat u de volgende gegevens bij de hand hebt:
• Serienummer (zie sticker)
• Merk en model van het voertuig en de plaats in de auto waar het autostoeltje
wordt gebruikt
• Gewicht, leeftijd en lengte van het kind
Nadere informatie over onze producten is te vinden op www.cybex-online.com.
Jeśli masz pytania dotyczące zakupionego produktu w pierwszej kolejności
skontaktuj się bezpośrednio ze sklepem, w którym dokonano zakupu. Wcześniej
przygotuj informacje:
• numer seryjny (patrz naklejka na foteliku);
• marka i model pojazdu oraz miejsce na którym jest używany fotelik;
• waga, wiek oraz wzrost dziecka krozystającego z fotelika;
Szczegółowe informacje o naszych produktach znajdują się na stronie: www.
cybex-online.com.
51
Page 52

DURÉE DE VIE DU PRODUIT
Ce siège auto a été conçu pour répondre à ses exigences d’utilisation pendant
4 ans environ. Ceci dit, étant donné les variations de températures importantes
et les sollicitations imprévues dans les véhicules, il convient d’observer les
points suivants:
• Si le véhicule est exposé à la lumière directe du soleil pendant une période
prolongée, le siège auto doit être retiré du véhicule ou couvert à l’aide d’un linge.
• Vérifiez régulièrement que toutes les pièces en plastique ou en métal du
siège ne présentent pas de dommages, déformation ou changement de
couleur. Si vous constatez un changement quelconque, le siège doit être
retiré ou faire l’objet d’une vérification par le fabricant, voire être remplacé
par celui-ci.
• Les changements de couleur, surtout la décoloration, sont parfaitement
normaux lors de l’utilisation du siège dans un véhicule, et n’en affectent pas
l’efficacité.
ÉLIMINATION
Pour des raisons environnementales et écologiques, nous vous demandons
d’évacuer emballages et pièces du siège en fin de vie, selon les normes
en vigueur dans votre pays. L’élimination des déchets est différentes selon
les autorités locales. Afin d’assurer que le siège auto est mis au rebut
conformément à la réglementation, vérifier avec l’agence d’enlèvement des
déchets de votre région ou les autorités locales. Toujours respecter les
consignes d’élimination des déchets de votre pays.
!
ATTENTION ! Tenir les matériaux d’emballage en plastique hors de
portée de votre enfant: risque d’asphyxie !
52
Page 53

FRNLPL
DUURZAAMHEID VAN HET PRODUCT TRWAŁOŚĆ PRODUKTU
Het autostoeltje is ontworpen om gedurende de gehele levensduur
van ongeveer 4 jaar aan de specificaties te voldoen. Omdat er grote
temperatuurschommelingen en onvoorspelbare krachten in auto’s kunnen
optreden, moeten de volgende punten echter in acht worden genomen:
• Als het voertuig langere tijd in direct zonlicht staat, moet het autostoeltje uit
de auto worden verwijderd dan wel met een lichte doek worden afgedekt.
• Controleer regelmatig alle kunststof en metalen onderdelen van het stoeltje
op schade, vervorming of verkleuring. Als u veranderingen constateert, moet
u het autostoeltje wegdoen of laten controleren en mogelijk laten vervangen
door de fabrikant.
• Verkleuring van de bekledingsstof, met name verbleken, is normaal bij gebruik
in een auto en vermindert het functioneren van het stoeltje niet.
Fotelik zaprojektowano tak, aby spełniał swoją funkcję tak długo, ile wynosi
przedział wiekowy, w którym może być używany - czyli do ok. 4 lat Jednakże
z uwagi na możliwe duże różnice temperatur oraz inne nieprzewidziane
okoliczności należy wziąć pod uwagę:
• Wyjmuj fotelik z samochodu lub przykrywaj go, jeżeli wiesz, że będzie
pozostawiony na działanie promieni słonecznych przez dłuższy czas.
• Raz do roku sprawdzaj, czy plastikowe elementy fotelika nie są uszkodzone
lub czy nie zmienił się ich kształt lub kolor. Przy stwierdzeniu jakichkolwiek
zmian fotelik powinien zostać zutylizowany lub sprawdzony przez producenta
i w razie potrzeby wymieniony.
• Zmiany wyglądu tapicerki, szczególnie blaknięcie kolorów, nie są wadą
wyrobu, ale normalnym efektem wieloletniej eksploatacji fotelika
VERWIJDERING UTYLIZACJA
Ter bescherming van het milieu vragen wij de gebruiker afval te scheiden en aan
het begin (verpakking) en einde (productonderdelen) van de levensduur van het
autostoeltje te verwijderen. Afvalverwijdering vindt op verschillende manieren
plaats, afhankelijk van de lokale verordeningen die op dat gebied gelden. Om
te zorgen dat u het autostoeltje conform de geldende regelgeving verwijdert,
kunt het best contact opnemen met uw lokale afvalverwerkingsbedrijf of de
gemeente. Neem in elk geval de afvalregelgeving van uw land in acht.
Chcąc chronić środowisko, prosimy aby zutylizowali Państwo opakowanie
oraz fotelik i jego elementy po zakończeniu użytkowania produktu. Przepisy
regulujące sposoby utylizacji mogą się różnić w zależności od kraju. Skontaktuj
się z lokalną firmą zajmującą się gospodarką odpadami, aby we właściwy
sposób zutylizować fotelik. Zawsze stosuj się do przepisów dotyczących
postępowania z odpadami w swoim kraju. Zawsze stosuj się do przepisów
dotyczących postępowania z odpadami w swoim kraju.
!
BELANGRIJK! Houd plastic verpakkingsmateriaal buiten het bereik van
kinderen: bij dit materiaal bestaat het risico van verstikking!
!
OSTRZEŻENIE! Plastikowe opakowanie trzymaj poza zasięgiem
dziecka: Istnieje ryzyko uduszenia
53
Page 54

GARANTIE
Les conditions de garantie suivantes ne sont valables que dans le pays dans
lequel, ce produit a été vendu à l’origine par un détaillant à un consommateur.
1) La garantie couvre tous les défauts de fabrication et de matériaux, qui exis-
taient au moment de l’achat ou survenus dans les trois (3) ans suivant l’achat
initial auprès d’un détaillant par un consommateur (la garantie du fabricant).
Vous devez vérifier sans délai à réception que le produit est complet et qu‘il
ne présente aucun défaut de fabrication ni aucun défaut matériel. Vous devez
toujours conserver votre preuve d’achat.
2) En cas de défaut, arrêtez immédiatement d’utiliser le produit. Pour obtenir
la garantie, veuillez rendre ou expédier le produit au détaillant d’origine vous
ayant initialement vendu ce produit dans une condition propre et complète
et présenter une preuve d’achat originale (reçu ou facture de vente). Ne pas
expédier le produit directement au fabricant.
3) Cette garantie ne couvre pas les dommages résultant d’une mauvaise utili-
sation, de l’influence de l’environnement (eau, incendies, accidents, etc.), de
l’usure normale ou du manquement à se conformer aux instructions figurant
dans le présent manuel. La garantie ne s´applique pas si des réparations ou
modifications ont été effectuées par des personnes non-autorisées ou si des
pièces et accessoires employés ne sont pas d’origine.
4) La présente garantie ne saurait en aucun cas invalider ou limiter les droits du
consommateur ou les droits de recours contre le revendeur sur la base dune
infraction au contrat d’achat tel qu’autorisé par la législation en vigueur.
54
Page 55

FRNLPL
GARANTIE GWARANCJA
Deze garantie is uitsluitend van toepassing in het land waar dit product
oorspronkelijk door een verkooppunt is verkocht aan een klant.
1) De garantie dekt alle fabricage- en materiaalfouten die bestaan of zichtbaar
worden op de aankoopdatum of zichtbaar worden binnen een periode van
drie (3) jaar na de datum van aankoop bij het verkooppunt dat het product
oorspronkelijk aan een consument heeft verkocht (fabrieksgarantie). U dient
het product onmiddellijk op de aankoopdatum of onmiddellijk na ontvangst
te controleren op compleetheid en fabrieks- of materiaalfouten. Bewaar altijd
uw gedateerde aankoopbewijs.
2) In geval van een defect dient u het gebruik van het product te staken. Om
voor garantie in aanmerking te komen, dient u het product in schone en
volledige toestand te retourneren aan het verkooppunt dat het oorspronkelijk
aan u heeft verkocht en een origineel aankoopbewijs (kassabon of factuur) te
overleggen. Verstuur het product niet rechtstreeks naar de fabrikant en lever
het niet daar af.
3) Deze garantie dekt geen schade veroorzaakt door verkeerd gebruik,
omgevingsfactoren (zoals water, brand, aanrijdingen) of normale slijtage of
nalatigheid om de instructies in de handleiding op te volgen. De garantie
geldt niet als er aanpassingen of onderhoudswerkzaamheden zijn uitgevoerd
door onbevoegde personen of als niet-originele onderdelen en accessoires
zijn gebruikt.
4) De wettelijke rechten van de consument, inclusief vorderingen uit onrechtmatige daad en vorderingen inzake contractbreuk die de koper kan hebben
jegens de verkoper of fabrikant van het product worden niet beïnvloed door
deze garantie.
Niniejsza gwarancja obowiązuje wyłącznie w kraju, w którym produkt został
po raz pierwszy sprzedany klientowi przez sklep detaliczny.
1) Gwarancja obejmuje wszelkie wady materiałowe i produkcyjne istniejące w
momencie zakupu czy wykryte w ciągu trzech (3) lat od daty zakupu produktu
w sklepie detalicznym przez pierwszego właściciela (gwarancja producenta).
Prosimy o sprawdzenie produktu pod kątem jego kompletności czy jakichkolwiek wad w momencie jego zakupu, a w przypadku sprzedaży wysyłkowej natychmiast po jego otrzymaniu. Zachowaj dowód zakupu.
2) W przypadku stwierdzenia wady należy zaprzestać użytkowania produktu.
Reklamowany w ramach gwarancji produkt powinien zostać dostarczony
czysty i kompletny. Prosimy nie wysyłać produktu do producenta.
3) Niniejsza gwarancja nie obejmuje żadnych uszkodzeń wynikających z nieprawidłowego użytkowania, warunków zewnętrznych (woda, ogień, wypadki
drogowe i inne) oraz normalnego zużycia. Gwarancja obowiązuje wyłącznie
wtedy, jeśli produkt był użytkowany zgodnie z instrukcją użytkowania, jeśli
był naprawiany/modyfikowany przez uprawnione osoby i użyto do tego celu
wyłącznie oryginalnych części i akcesoriów.
4) Niniejsza gwarancja nie wyłącza, nie ogranicza ani
nie zawiesza uprawnień kupującego wynikających z
niezgodności towaru z umową konsumencką.
55
Page 56

JUNO M-F IX
ECE R 44/04
UNIVERSAL
SEMI-UNIVERSAL
9 - 18 kg
CYBEX GmbH
Riedingerstr. 18, 95448 Bayreuth
Germany
04301342
CYBEX JUNO M-FIX – gyremekülés
ECE R44/04 I. korcsoport
Súly: 9 - 18 kg
Kor: kb. 9 hónapos kortól 4 éves korig
Csak a listában szereplő, hárompontos, önvisszahúzó
biztonsági övvel felszerelt járművekben használható,
melyek megfelelnek az ECE No. 16 vagy azzal
egyenértékű szabványnak.
CYBEX JUNO M-FIX – autosedačka
ECE R44/04 věková skupina 1
Váha: 9 - 18 kg
Věk: Cca 9 měsíců až 4 roky
Vhodné pouze pro použití v uvedených vozidlech s
3bodovými samonavíjecími bezpečnostními pásy,
schválenými dle předpisu ECE č. 16 nebo dle jiných
odpovídajících standardů.
KEDVES VÁSÁRLÓ!
Köszönjük, hogy a CYBEX JUNO M-FIX-et vásárlota meg. Az ülés fejlesztése
során a biztonság, a kényelem és a könnyű használhatóság voltak legfőbb
szempontjaink. A termék gyártása során különleges minőségi ellenőrzést
alkalmaztunk, ezért megfelel a legszigorúbb biztonsági elvárásoknak.
FIGYELEM! Ezt a használati útmutatót mindig tartsa elérhető helyen, az
ülésnek erre a célra szolgáló rekeszében.
FIGYELEM! Az országonként eltérő igények miatt (pl. színes címkézés az
ülésen) a termék külső megjelenése eltérhet. Ez azonban nem érinti a termék
hibátlan működését.
FIGYELEM! A 3-pontos biztonsági övet a jelzett pontokon keresztül kell
vezetni. A helyes övbekötést részletesen leírjuk ebben az útmutatóban, az
ülésen az övvezetési pontok pirossal vannak jelölve.
56
CYBEX JUNO M-FIX – autosedačka
ECE R44/04 veková skupina 1
Váha: 9 - 18 kg
Vek: Cca 9 mesiacov až 4 roky
Vhodné len na použitie v uvedených vozidlách s
3bodovými samonavíjacími bezpečnostnými pásmi,
schválenými podľa predpisu ECE č. 16 alebo podľa
iných zodpovedajúcich štandardov.
!
FIGYELMEZTETÉS! Gyermeke tökéletes védelme érdekében
elengedhetetlen, hogy a gyermekülést az útmutatóban leírtak szerint
használja.
Page 57

HU
CZSK
VÁŽENÝ ZÁKAZNÍKU! VÁŽENÝ ZÁKAZNÍK!
Děkujeme vám za nákup autosedačky CYBEX JUNO M-FIX. Můžeme vás ujistit,
že při vývoji autosedačky byly našimi hlavními prioritami bezpečnost, pohodlí
a snadné používání. Tento produkt je vyroben pod výjimečným kvalitativním
dohledem a splňuje nejpřísnější bezpečnostní předpisy.
Ďakujeme vám za nákup autosedačky CYBEX JUNO M-FIX. Môžeme vás
uistiť, že pri vývoji autosedačky boli našimi hlavnými prioritami bezpečnosť,
pohodlie a jednoduché používanie. Tento produkt je vyrobený pod výnimočným
kvalitatívnym dohľadom a spĺňa najprísnejšie bezpečnostné predpisy.
UPOZORNĚNÍ! Vždy si tento návod k použití uschovejte v k tomu určené
přihrádce na autosedačce.
UPOZORNĚNÍ! Z důvodu odlišných požadavků v jednotlivých zemích (např.
barevné štítky na autosedačce) se mohou části produktu vizuálně lišit. To ovšem
neovlivňuje správnou funkčnost produktu.
UPOZORNĚNÍ! 3bodový pás musí vést pouze skrze určená vedení. Vedení
pásu jsou podrobně popsána v tomto návodu a na autosedačce jsou označena
červeně.
!
VAROVÁNÍ! Pro řádné zajištění bezpečnosti vašeho dítěte je naprosto
nezbytné používat dětskou autosedačku dle pokynů v tomto návodu.
UPOZORNENIE! Vždy si tento návod na použitie uschovajte v na to určenej
priehradke na autosedačke.
UPOZORNENIE! Z dôvodu odlišných požiadaviek v jednotlivých krajinách
(napr. farebné štítky na autosedačke) sa môžu časti produktu vizuálne líšiť. To
však neovplyvňuje správnu funkčnosť produktu.
UPOZORNENIE! 3bodový pás musí viesť iba skrze určená vedenia. Vedenia
pásu sú podrobne uvedená v tomto návode a na autosedačke sú označená
červenou farbou.
!
VAROVANIE! Pre riadne zaistenie bezpečnosti vášho dieťaťa je
absolútne nevyhnutné používať detskú autosedačku podľa pokynov v
tomto návode.
57
Page 58

TARTALOM
RÖVID TÁJÉKOZTATÓ ................................................................................................................. 2
MEGFELELŐSÉG.......................................................................................................................56
ELSŐ BESZERELÉS .................................................................................................................60
A JÁRMŰ VÉDELME ..................................................................................................................60
A HELYES POZÍCIÓ A JÁRMŰBEN .....................................................................................62
BIZTONSÁG AZ AUTÓBAN ....................................................................................................64
A GYERMEKÜLÉS BESZERELÉSE AZ AUTÓBA ...........................................................64
A GYERMEKÜLÉS RÖGZÍTÉSE ISOFIX RENDSZERREL ..........................................66
A GYERMEKÜLÉS ELTÁVOLÍTÁSA A JÁRMŰBŐL ..........................................................68
AZ OLDALVÉDELEM BEÁLLÍTÁSA .......................................................................................68
MÉRETRE ÁLLÍTÁS ....................................................................................................................70
A VÉDŐPAJZS RÖGZÍTÉSE ..................................................................................................70
BEKÖTÉS VÉDŐPAJZZSAL ...................................................................................................72
A GYERMEK HELYES RÖGZÍTÉSE .....................................................................................72
AZ ÜLÉSHUZAT ELTÁVOLÍTÁSA ............................................................................................ 74
TISZTÍTÁS ...................................................................................................................................... 74
KARBANTARTÁS .........................................................................................................................76
MI A TEENDŐ BALESET UTÁN ..............................................................................................76
TERMÉKINFORMÁCIÓ ............................................................................................................ 76
A TERMÉK ÉLETTARTAMA ......................................................................................................78
MEGSEMMISÍTÉS......................................................................................................................78
JÓTÁLLÁS ......................................................................................................................................80
58
Page 59

HU
CZSK
OBSAH OBSAH
KRÁTKÝ NÁVOD ............................................................................................................................ 2
HOMOLOGACE ..........................................................................................................................56
PRVNÍ MONTÁŽ ..........................................................................................................................61
OCHRANA VOZIDLA ................................................................................................................61
SPRÁVNÉ UMÍSTĚNÍ VE VOZIDLE ......................................................................................63
BEZPEČNOST V AUTĚ ............................................................................................................65
MONTÁŽ AUTOSEDAČKY VE VOZIDLE .............................................................................65
MONTÁŽ AUTOSEDAČKY SE SYSTÉMEM ISOFIX CONNECT ................................67
VYJMUTÍ AUTOSEDAČKY Z VOZIDLA ................................................................................69
NASTAVENÍ BOČNÍCH PROTEKTORŮ ..............................................................................69
NASTAVENÍ DLE TĚLA ..............................................................................................................71
NASTAVENÍ BEZPEČNOSTNÍHO PULTU ..........................................................................71
ZABEZPEČENÍ BEZPEČNOSTNÍM PÁSEM ....................................................................73
SPRÁVNÉ ZABEZPEČENÍ DÍTĚTE ....................................................................................... 73
SUNDÁNÍ POTAHU ....................................................................................................................75
ČIŠTĚNÍ .........................................................................................................................................75
PÉČE O PRODUKT ....................................................................................................................77
CO DĚLAT PO NEHODĚ .........................................................................................................77
INFORMACE O PRODUKTU .................................................................................................. 77
ŽIVOTNOST PRODUKTU .........................................................................................................79
LIKVIDACE ....................................................................................................................................79
ZÁRUKA .........................................................................................................................................81
KRÁTKY NÁVOD ............................................................................................................................ 2
HOMOLOGÁCIA .........................................................................................................................56
PRVÁ MONTÁŽ ............................................................................................................................ 61
OCHRANA VOZIDLA ................................................................................................................61
SPRÁVNE UMIESTNENIE VO VOZIDLE ............................................................................ 63
BEZPEČNOSŤ V AUTE ............................................................................................................65
MONTÁŽ AUTOSEDAČKY VO VOZIDLE ............................................................................65
MONTÁŽ AUTOSEDAČKY SO SYSTÉMOM ISOFIX CONNECT ...............................67
VYBRATIE AUTOSEDAČKY Z VOZIDLA .............................................................................69
NASTAVENIE BOČNÝCH PROTEKTOROV .......................................................................69
NASTAVENIE PODĽA TELA .....................................................................................................71
NASTAVENIE BEZPEČNOSTNÉHO PULTU .....................................................................71
ZABEZPEČENIE BEZPEČNOSTNÝM PÁSOM ...............................................................73
SPRÁVNE ZABEZPEČENIE DIEŤAŤA ..................................................................................73
VYTIAHNUTIE POŤAHOV .........................................................................................................75
ČISTENIE .......................................................................................................................................75
STAROSTLIVOSŤ O PRODUKT ............................................................................................. 77
ČO ROBIŤ PO NEHODE .........................................................................................................77
INFORMÁCIE O PRODUKTE ................................................................................................. 77
ŽIVOTNOSŤ PRODUKTU .........................................................................................................79
LIKVIDÁCIA ...................................................................................................................................79
ZÁRUKA .........................................................................................................................................81
59
Page 60

ELSŐ BESZERELÉS
A gyermekülés részei: ülésmagasító (1), háttámla (2) fejtámasszal, amely
a gyermek magassának megfelelően állítható, ütközés elleni védőpajzs (3),
1
2
3
melynek mélysége állítható. A gyermek maximális védelme és kényelme csak
akkor biztosított, ha az ülés minden részét együtt használják.
A háttámla (2) csatlakozókampók segítségével kacsolható az ülőrészen (1).
!
FIGYELMEZTETÉS! Olvassa el, értse meg és kövesse a használati
útmutatót.
!
FIGYELMEZTETÉS! A Cybex gyermekülést tilos módosítani, elemeit
külön vagy más modellekkel ill.más gyártók ülésmagasítóival, háttámláival,
fejtámláival együtt használni. Ilyen esetben a gyermekülés további
használata már nem hitelesített. A helytelen használat komoly sérüléshez
vagy akár a gyermek halálához is vezethet. Kérjük, őrizze meg az útmutatót
későbbi használatra.
!
FIGYELMEZTETÉS! Mindig figyeljen arra, hogy az ülés egyes részei
ne nyomódjanak össze vagy ne sérüljenek meg (pl. ajtócsukás vagy az
autóülések beállítása közben).
A JÁRMŰ VÉDELME
A finom anyagból készült járműüléseken (pl. alcantara, bőr stb) foltok és/vagy
elszíneződések jelenhetnek meg a gyermekülés használatakor. Ezt elkerülheti,
ha pl. egy takarót vagy törölközőt tesz a gyermekülés alá. Ezzel kapcsolatban ld
a tisztításra vonatkozó utasításokat. Fontos, hogy kövesse az utasításokat már
az első használat előtt.
60
Page 61

HU
CZSK
PRVNÍ MONTÁŽ PRVÁ MONTÁŽ
Dětská autosedačka se skládá z podsedáku (1), opěrky zad (2) s opěrkou hlavy,
kterou lze nastavit dle výšky dítěte a hloubkově nastavitelného bezpečnostního
pultu (3). Vaše dítě bude v maximálním bezpečí a pohodlí pouze pokud jsou
všechny části používány společně.
Opěrka zad (2) je k ose podsedáku (1) připevněna pomocí úchytu. Opierka chrbta (2) je k osi podsedáku (1) pripevnená pomocou úchytu.
Detská autosedačka sa skladá z podsedáku (1), opierky chrbta (2) s opierkou
hlavy, ktorú možno nastaviť podľa výšky dieťaťa a hĺbkovo nastaviteľného
bezpečnostného pultu (3). Vaše dieťa bude v maximálnom bezpečí a pohodlí len
ak sú všetky časti používané dohromady.
!
VAROVÁNÍ! Pozorně si návod k použití přečtěte a postupujte podle něj.
!
VAR OVÁN Í! Části dětské autosedačky CYBEX nesmí být jakkoliv
modifikovány, používány samostatně nebo v kombinaci s podsedáky
a opěrkami zad nebo hlavy od jiných výrobců nebo modelů z jiné
produktové řady. V takových případech není autosedačka nadále
certifikovaná k používání. Nesprávné použití může vést k vážným zraněním
nebo smrti dítěte. Prosíme, ponechte si tyto instrukce pro budoucí použití.
!
VAR OVÁN Í! Vždy se ujistěte, že jednotlivé části dětské autosedačky
nejsou zaseknuté nebo skřípnuté (např. ve dveřích vozidla nebo při
nastavování zadního sedadla).
!
VAROVANIE! Pozorne si návod na použitie prečítajte a postupujte
podľa neho.
!
VAR OVAN I E! Časti detské autosedačky CYBEX nesmie byť akokoľvek
modifikované, používané samostatne alebo v kombinácii s podsedáky
a opierkami chrbta alebo hlavy od iných výrobcov alebo modelov z inej
produktovej rady. V takýchto prípadoch nie je autosedačka naďalej
certifikovaná na používanie. Nesprávne použitie môže viesť k vážnym
zraneniam alebo smrti dieťaťa. Prosíme, ponechajte si tieto inštrukcie pre
budúce použitie.
!
VAR OVAN I E! Vždy sa uistite, že jednotlivé časti detskej autosedačky
nie sú zaseknuté alebo priškripnuté (napr. vo dverách vozidla alebo pri
nastavovaní zadného sedadla).
OCHRANA VOZIDLA OCHRANA VOZIDLA
Na některých sedadlech z jemných materiálů (např. alcantara, kůže atd.) se
mohou při používání dětské autosedačky objevit stopy opotřebování a/nebo
ztráty barvy. Vložením např. deky nebo ručníku pod dětskou autosedačku se
tomuto problému vyvarujete. V souvislosti s tím si přečtěte také naše pokyny
k čištění. Je důležité podle nich postupovat ještě před prvním použitím dětské
autosedačky.
Na niektorých sedadlách z jemných materiálov (napr. alcantara, kože atď.) sa
môžu pri používaní detskej autosedačky objaviť stopy opotrebovania a/alebo
straty farby. Vložením napr. deky alebo uteráka pod detskú autosedačku sa
tomuto problému vyvarujete. V súvislosti s tým si prečítajte tiež naše pokyny na
čistenie. Je dôležité podľa nich postupovať ešte pred prvým použitím detskej
autosedačky.
61
Page 62

A HELYES POZÍCIÓ A JÁRMŰBEN
Azok a gyermekülések, amelyek visszahúzható ISOFIX rendszerrel vannak
ellátva, használhatók minden automata 3 pontos biztonsági övvel felszerelt
ülésen, amelyet a jármű használati utasítása univerzálisnak jelöl.
A „fél-univerzális” megjelölés olyan gyermekülésekre vonatkozik, amelyek
ISOFIX csatlakozókkal kapcsolódnak a járműhöz. Ezért az ISOFIX
CSATLAKOZÓK csak bizonyos járművekben használhatóak. Kérjük, a mellékelt
típuslistában nézze át a jóváhagyott járműveket. A legfrissebb verziót letöltheti a
www.cybex-online.com oldalról.
Kivételes esetekben a gyermekülés az első utasülésen is használható. Ebben az
esetben vegye figyelembe az alábbiakat:
• A légzsákkal rendelkező autókban tolja hátra az autó ülését amennyire csak
lehet. Eközben figyeljen arra, hogy a biztonsági öv felső csatlakozási pontja a
gyermekülés övvezetője mögött legyen.
• Mindig vegye figyelembe a jármű gyártójának ajánlásait.
!
FIGYELMEZTETÉS! A gyermekülés nem használható 2-pontos vagy
csípőövvel. Ha az ülést kétpontos övvel használják, baleset esetén a
gyermek súlyos vagy akár halálos sérülést is szenvedhet.
FIGYELMEZTETÉS! A felső övszárnak mindig hátrafelé kell állnia, soha
ne fusson előbbre, mint a biztonsági öv felső csatlakozási pontja. Ha nem
lehet így rögzíteni az ülést, pl. az autóülése előbbre tolásával vagy egy
másik ülésen bekötve, akkor ez a gyermekülés nem használható az Ön
autójában. Kétség esetén érdeklődjön a jármű gyártójánál.
Az autóban lévő csomagokat vagy más tárgyakat, amelyek baleset
esetén sérülést okozhatnak, mindig rögzíteni kell. Ellenkező esetben ezek
„elrepülhetnek” és akár halálos sérülést okozhatnak.
FIGYELMEZTETÉS! A gyermekülés nem használható oldalra néző
járműüléseken. A gyermekülés használata engedélyezett a menetiránnyal
ellentétsen beszerelt üléseken, pl. furgonban vagy minibuszban, abban az
esteben, ha az ülés felnőttek számára hitelesítve van. Lényeges, hogy a
fejtámlát ne távolítsák el, amikor a gyermekülést rögzítik a menetiránnyal
ellentétesen.
FIGYELMEZTETÉS! Soha ne hagyja a gyermeket felügyelet nélkül az
autóban. A gyermekülés műanyag részei felmelegedhetnek a napon égési
sérülést okozhatnak a gyermeknek. Védje gyermekét és a gyermekülést a
közvetlen napsütéstől (pl. takarja le az ülést világos színű ruhával).
62
Page 63

HU
CZSK
SPRÁVNÉ UMÍSTĚNÍ VE VOZIDLE SPRÁVNE UMIESTNENIE VO VOZIDLE
Dětskou autosedačku se zasunutým ISOFIX Connect systémem lze používat na
všech sedadlech s automatickými bezpečnostními pásy, schválenými v příručce
vozidla pro „univerzální“ použití.
„Semi-univerzální“ schválení je udělováno zádržným systémům, které jsou ve
vozidle připevněny pomocí připojení ISOFIX Connect. Z tohoto důvodu lze
ISOFIX Connect používat pouze v určitých vozidlech. Prosíme nahlédněte do
přiloženého seznamu vhodných vozidel. Nejaktuálnější verzi můžete získat na
www.cybex-online.com.
Ve výjimečných případech lze dětskou autosedačku používat také na předním
sedadle spolujezdce. V takovém případě prosíme berte na vědomí následující:
• Ve vozidlech s airbagy byste měli sedadlo spolujezdce zasunout co nejvíce
dozadu. Přitom ovšem zajistěte, aby byl horní otočný bod bezpečnostního
pásu za vedením pásu dětské autosedačky.
• Vždy dodržujte doporučení výrobce vozidla.
!
VAROVÁNÍ! Dětská autosedačka není vhodná pro použití s
dvoubodovým nebo pouze s břišním pásem. Pokud je autosedačka
zajištěná dvoubodovým pásem, může dítě při nehodě utrpět vážná nebo
dokonce smrtelná zranění.
VAROVÁNÍ! Diagonální pás musí vést v náklonu směrem dozadu a nikdy
nesmí vést dopředu směrem k hornímu bodu bezpečnostního pásu ve
vozidle. Pokud toho není možné dosáhnout např. posunutím sedadla
dopředu nebo přesunutím autosedačky na jiné místo, není tato dětská
autosedačka vhodná pro vaše vozidlo. V případě pochybností kontaktujte
výrobce vašeho vozidla.
Zavazadla a ostatní objekty ve vozidle, které mohou při nehodě způsobit
zranění, musí být pevně zajištěny. V opačném případě mohou způsobit
smrtelná zranění.
VAROVÁNÍ! Autosedačka se nesmí používat na sedadlech, směřujících
bokem ke směru jízdy. Používání dětské autosedačky na sedadlech v proti
směru jízdy (např. v dodávce nebo minibusu) je možné, pouze pokud jsou
sedadla schválená pro dospělé osoby. Při montáži dětské autosedačky na
sedadlo v pozici proti směru jízdy nesmí být ze sedadla sundaná opěrka
hlavy.
VAR OVÁN Í! Nikdy dítě nenechávejte ve vozidle bez dozoru. Plastové
části dětské autosedačky se mohou na slunci zahřát a dítě se o ně může
spálit. Chraňte vaše dítě a dětskou autosedačku před přímým slunečním
světlem (např. zakrytím světlou látkou).
Detskú autosedačku so zasunutým ISOFIX Connect systémom je možné
používať na všetkých sedadlách s automatickými bezpečnostnými pásmi,
schválenými v príručke vozidla pre „univerzálne“ použitie.
„Semi-univerzálne“ schválenie je udeľované zadržiavacím systémom, ktoré sú
vo vozidle pripevnené pomocou pripojenia ISOFIX Connect. Z tohto dôvodu
možno ISOFIX CONNECT používať len v niektorých vozidlách. Prosíme
nahliadnite do priloženého zoznamu vhodných vozidiel. Najaktuálnejšiu verziu
môžete získať na www.cybex-online.com.
Vo výnimočných prípadoch je možné detskú autosedačku používať tiež na
prednom sedadle spolujazdca. V takom prípade prosíme berte na vedomie
nasledujúce:
• Vo vozidlách s airbagmi by ste mali sedadlo spolujazdca zasunúť čo najviac
dozadu. Pritom však zaistite, aby bol horný otočný bod bezpečnostného pásu
za vedením pásu detskej autosedačky.
• Vždy dodržiavajte odporúčania výrobca vozidla.
!
VAROVANIE! Detská autosedačka nie je vhodná pre použitie
s dvojbodovým alebo iba s brušným pásom. Ak je autosedačka
zabezpečená 2bodovým pásom, môže dieťa pri nehode utrpieť vážne
alebo dokonca smrteľné zranenia.
VAROVANIE! Diagonálny pás musí viesť v náklone smerom dozadu a
nikdy nesmie viesť dopredu smerom k hornému bodu bezpečnostného
pásu vo vozidle. Ak toho nie je možné dosiahnuť napr. posunutím sedadla
dopredu alebo presunutím autosedačky na iné miesto, nie je táto detská
autosedačka vhodná pre vaše vozidlo. V prípade pochybností kontaktujte
výrobca vášho vozidla.
Batožinu a ostatné objekty vo vozidle, ktoré môžu pri nehode spôsobiť
zranenie, musí byť pevne zaistené. V opačnom prípade môžu spôsobiť
smrteľné zranenie.
VAROVANIE! Autosedačka sa nesmie používať na sedadlách,
smerujúcich bokom k smeru jazdy. Používanie detskej autosedačky na
sedadlách v proti smere jazdy (napr. v dodávke alebo minibuse) je možné,
iba ak sú sedadlá schválená pre dospelé osoby. Pri montáži detskej
autosedačky na sedadlo v pozícii proti smeru jazdy nesmie byť zo sedadla
odobratá opierka hlavy.
VAR OVAN I E! Nikdy dieťa nenechávajte vo vozidle bez dozoru. Plastové
časti detskej autosedačky sa môžu na slnku zahriať a dieťa sa o ne môže
spáliť. Chráňte vaše dieťa a detskú autosedačku pred priamym slnečným
svetlom (napr. zakrytím svetlú látkou).
63
Page 64

BIZTONSÁG AZ AUTÓBAN
!
FIGYELMEZTETÉS!
a jármű biztonsági övével, még akkor is, ha épp nincs használatban.
Vészfékezés avyg baleset esetén a be nem csatolt gyermekülés sérülés
okozhat Önnek vagy más utasoknak.
Minden utas lehető legnagyobb biztonsága érdekében gondoskodjon róla,
hogy...
• a járműben lévő dönthető háttámlák függőlegesen rögzítve legyenek.
• amikor az első utasülésre szereli be a gyermekülést, a jármű ülését a lehető
leghátsó pozícióba állítsa.
• rögzítsen minden olyan tárgyat, amley baleset esetén sérülést okozhat.
• az övcsat nem éri el a védőpajzsot. Kétség esetén keresse kiskereskedőjét
vagy a gyártót.
• az autó minden utasa legyen becsatolva.
A gyermekülést mindig megfelelően be kell csatolni
A GYERMEKÜLÉS BESZERELÉSE AZ AUTÓBA
Helyezze a gyermekülést a jármű megfelelő ülésére.
• Mindig ügyeljen arra, hogy a gyermekülés háttámlájának teljes felülete
támaszkodjon az autóülés háttámlájának. Az autóülés soha nem lehet fekvő
pozícióban.
• Ha a jármű fejtámlája útban van, húzza teljesen ki és távolítsa el (ez alól
kivételeket „AZ ÜLÉS HELYES POZÍCIONÁLÁSA A JÁRMŰBEN” című
fejezetben talál). A háttámla (a) tökéletesen illeszkedik bármilyen dőlésszögű
járműüléshez.
!
FIGYELMEZTETÉS! A gyermekülés háttámlájának teljes felülete
támaszkodjon az autóülés háttámlájának. Gyermeke maximális védelme
érdekében az ülésnek függőleges helyzetben kell állnia.
64
!
FIGYELMEZTETÉS! Nem alkalmazzon más rögzítési pontot azon kívül,
amit az útmutatóban leírtunk és a gyermekülésen jelöltünk.
Page 65
HU
CZSK
BEZPEČNOST V AUTĚ BEZPEČNOSŤ V AUTE
!
VAROVÁNÍ!
bezpečnostním pásem, dokonce i pokud se zrovna nepoužívá. V případě
nouzového zabrždění nebo nehody může nezajištěná autosedačka zranit vás
nebo ostatní spolujezdce.
Pro zajištění nejvyšší možné ochrany pro všechny spolujezdce se ujistěte,
že...
• sklápěcí opěrky zad ve vozidle jsou zajištěné ve vzpřímené pozici.
• při instalaci autosedačky na přední sedadlo spolujezdce je sedadlo v nejzazší
možné pozici.
• jste řádně zajistili všechny objekty, které by při nehodě mohly způsobit zranění.
• spona pásu nedosahuje až k bezpečnostnímu pultu autosedačky. V případě
pochybností kontaktujte prodejce nebo výrobce.
• jsou všichni pasažéři ve vozidle připoutaní.
Autosedačka musí být ve vozidle vždy řádně zajištěná
!
VAROVANIE!
bezpečnostným pásom, dokonca aj ak sa práve nepoužíva. V prípade
núdzového zabrzdenia alebo nehody môže nezaistená autosedačka zraniť vás
alebo ostatné spolujazdce.
Pre zaistenie najvyššej možnej ochrany pre všetky spolujazdce sa uistite,
že...
• sklápacie opierky chrbta vo vozidle sú zaistené vo vzpriamenej polohe.
• pri inštalácii autosedačky na predné sedadlo spolujazdca je sedadlo v
najzadnejšej možnej pozícii.
• ste riadne zaistili všetky objekty, ktoré by pri nehode mohli spôsobiť zranenie.
• spona pásu nedosahuje až k bezpečnostnému pultu autosedačky. V prípade
pochybností kontaktujte predajca alebo výrobca.
• sú všetci pasažieri vo vozidle pripútaní.
Autosedačka musí byť vo vozidle vždy riadne zaistená
MONTÁŽ AUTOSEDAČKY VE VOZIDLE MONTÁŽ AUTOSEDAČKY VO VOZIDLE
Umístěte dětskou autosedačku na vhodné místo ve vozidle.
• Vždy se ujistěte, že se celá zadní strana opěrky zad autosedačky opírá o
opěrku zad sedadla ve vozidle. Autosedačka nesmí nikdy být v pozici vleže.
• Pokud při instalaci překáží hlavová opěrka sedadla ve vozidle, prosíme, co
nejvíce ji vytáhněte nebo ji sundejte (výjimky viz kapitola „SPRÁVNÁ POZICE
AUTOSEDAČKY VE VOZIDLE“). Opěrka zad (a) se dokonale přizpůsobí
prakticky jakémukoliv náklonu sedadla ve vozidle.
!
VAROVÁNÍ! Celá zadní strana opěrky zad autosedačky se musí opírat o
opěrku zad sedadla ve vozidle. Pro zajištění maximální ochrany pro vaše
dítě musí být autosedačka v normální vzpřímené pozici!
Umiestnite detskú autosedačku na vhodné miesto vo vozidle.
• Vždy sa uistite, že sa celá zadná strana opierky chrbta autosedačky opiera o
opierku chrbta sedadla vo vozidle. Autosedačka nesmie nikdy byť v pozícii ľahu.
• Ak pri inštalácii prekáža hlavová opierka sedadla vo vozidle, prosíme, čo
najviac ju vytiahnite alebo ju zložte (výnimky viď kapitola „SPRÁVNA POZÍCIA
AUTOSEDAČKY VO VOZIDLE“). Opierka chrbta (a) sa dokonale prispôsobí
prakticky akémukoľvek náklonu sedadla vo vozidle.
!
VAROVANIE! Celá zadná strana opierky chrbta autosedačky sa musí
opierať o opierku chrbta sedadla vo vozidle. Pre zaistenie maximálnej ochrany
pre vaše dieťa musí byť autosedačka v normálnej vzpriamenej pozícii!
!
VAROVÁNÍ! Pro upevnění autosedačky nepoužívejte jiné body než ty,
které jsou popsány v návodu a označeny na autosedačce.
!
VAROVANIE! Pre upevnenie autosedačky nepoužívajte iné body ako tie,
ktoré sú popísané v návode a označené na autosedačke.
65
Page 66

A GYERMEKÜLÉS RÖGZÍTÉSE ISOFIX RENDSZERREL
6
1
5
7
8
Ha a gyermekülést ISOFIX rendszerrel rögzíti a járműben, ezzel gyermeke
biztonságát növeli. A gyermeket rögzíteni kell a védőpajzzsal és a jármű
hárompontos biztonsági övével.
FIGYELEM! Az ISOFIX rögzítők (4) ülésenként két fém rögzítőpontból állnak,
melyek a jármű ülésének háttámlája és ülőrésze között helyezkednek el. Kétség
esetén tanulmányozza az autója használati utasítását.
• Használja az állító gombot (5), amely a gyermekülés ülőrésze (1) alatt található.
• Húzza ki a két ISOFIX csatlakozókart (6) ameddig csak lehet.
• Ezután fordítsa el az ISOFIX csatlakozókarokat (6) 180°-kal, hogy az ISOFIX
csatlakozópontok felé mutassanak.
66
CLICK!
4
6
9
FIGYELEM! Mielőtt az ISOFIX karokat (6) az ISOFIX csatlakozókra (4)
rögzítené, ellenőrizze a kioldógombokat (7). Ha a zöld biztonsági jelzés (8)
látható, akkor először ki kell oldania az ISOFIX csatlakozó karokat, úgy, hogy
megnyomja és hátrahúzza a kioldógombot (7).
• Nyomja a két ISOFIX kart (6) az ISOFIX csatlakozópontokra (4), amíg
hallhatóan a helyükre kattannak.
• Győződjön meg róla, hogy a gyermekülés megfelelően rögzült, próbálja meg,
kihúzni.
• A zöld biztonsági jelzés (8) most tisztán látható kell, hogy legyen a két
kioldógombon (7).
• Most a megfelelő pozícióba állíthatja a gyermekülést az állítógombbal (5).
FIGYELEM! Ha az Ön járművében az ISOFIX csatlakozópontok nehezen
elérhetőek, használhatja a mellékelt ISOFIX vezetőket.
• Helyezze az ISOFIX vezetőket (9) hosszabbik oldalukkal felfelé az ISOFIX
csatlakozópontokra (4). Néhány jármű esetében az ISOFIX vezetőket (9)
fordítva kell felhelyezni.
Page 67

HU
CZSK
MONTÁŽ AUTOSEDAČKY SE SYSTÉMEM ISOFIX CONNECT MONTÁŽ AUTOSEDAČKY SO SYSTÉMOM ISOFIX CONNECT
Pomocí systému ISOFIX Connect můžete autosedačku připevnit k vozidlu
a zvýšit tak bezpečí pro vaše dítě. Dítě je stále potřeba zajistit 3bodovým
bezpečnostním pásem ve vozidle.
Pomocou systému ISOFIX Connect môžete autosedačku pripevniť k
vozidlu a zvýšiť tak bezpečie pre vaše dieťa. Dítě je stále potřeba zabezpečit
bezpečnostním pultem a 3bodovým bezpečnostním pásem ve vozidle.
UPOZORNĚNÍ! Ukotvovací body ISOFIX (4) jsou dvě kovová oka na jedno
sedadlo, umístěná mezi opěrkou zad a sedákem sedadla ve vozidle. V případě
pochybností, prosíme nahlédněte do uživatelského manuálu vašeho vozidla.
• Použijte nastavovací tlačítko (5) pod sedákem (1) dětské autosedačky.
• Co nejvíce vytáhněte ISOFIX Connect konektory (6).
• Nyní otočte ISOFIX Connect konektory (6) o 180 ° tak, aby směřovaly k
ISOFIX ukotvovacím bodům.
UPOZORNĚNÍ! Před zacvaknutím ISOFIX Connect konektorů (6) do
ISOFIX ukotvovacích bodů (4) zkontrolujte uvolňovací tlačítka (7). Pokud je
viditelný zelený bezpečnostní ukazatel (8), je před spojením nejdříve potřeba
ISOFIX Connect konektory uvolnit. Toho dosáhnete stisknutím a zatažením
uvolňovacího tlačítka směrem dozadu.
• Zasuňte oba ISOFIX Connect konektory (6) do ISOFIX ukotvovacích bodů
(4) tak, aby se zajistily se slyšitelným „CVAKNUTÍM“.
• Zkontrolujte zajištění autosedačky pokusem o její vytažení.
• Na obou uvolňovacích tlačítkách (7) musí být nyní viditelný zelený
bezpečnostní ukazatel (8).
• Pro úpravu pozice autosedačky nyní můžete použít nastavovací tlačítko (5).
UPOZORNĚNÍ! Pokud jsou ISOFIX ukotvovací body ve vašem vozidle těžko
dostupné, můžete použít dodávané ISOFIX zaváděcí plasty.
• Vložte dodávané ISOFIX zaváděcí plasty (9) delší částí vzhůru do ISOFIX
ukotvovacích bodů (4). V některých vozidlech je lepší vložit ISOFIX zaváděcí
plasty (9) otočené.
UPOZORNENIE! Ukotvovací body ISOFIX (4) sú dve kovové oká na jedno
sedadlo, umiestnená medzi opierkou chrbta a sedákom sedadla vo vozidle. V
prípade pochybností, prosíme nahliadnite do užívateľského manuálu vášho vozidla.
• Použite nastavovacie tlačidlo (5) pod sedákom (1) detské autosedačky.
• Čo najviac vytiahnite ISOFIX Connect konektory (6).
• Teraz otočte ISOFIX Connect konektory (6) o 180 ° tak, aby smerovali k
ISOFIX kotviacim bodom.
UPOZORNENIE! Pred zacvaknutím ISOFIX Connect konektorov (6) do
ISOFIX ukotvovacích bodov (4) skontrolujte uvoľňovacie tlačidlá (7). Ak je
viditeľný zelený bezpečnostný ukazovateľ (8), je pred spojením najskôr potreba
ISOFIX Connect konektory uvoľniť. Toho dosiahnete stlačením a zatiahnutím
uvoľňovacieho tlačidla smerom dozadu.
• Zasuňte oba ISOFIX Connect konektory (6) do ISOFIX ukotvovacích bodov
(4) tak, aby sa zabezpečili s počuteľným „CVAKNUTÍM“.
• Skontrolujte zaistenie autosedačky pokusom o jej vytiahnutie.
• Na oboch červených uvoľňovacích tlačidlách (7) musí byť teraz viditeľný
zelený bezpečnostný ukazovateľ (8).
• Pre úpravu pozície autosedačky teraz môžete použiť nastavovacie tlačidlo (5).
UPOZORNENIE! Ak sú ISOFIX ukotvovacie body vo vašom vozidle ťažko
dostupné, môžete použiť dodávané ISOFIX zavádzacie plasty.
• Vložte dodávané ISOFIX zavádzacie plasty (9) dlhšou častí hore do ISOFIX
ukotvovacích bodov (4). V niektorých vozidlách je lepšie vložiť ISOFIX
zavádzacie plasty (9) otočené.
67
Page 68

A GYERMEKÜLÉS ELTÁVOLÍTÁSA A JÁRMŰBŐL
4
7
6
5
Végezze el fordított sorrendben a beszerelés lépéseit.
• Oldja ki az ISOFIX zárókarokat (6) mindkét oldalon úgy, hogy nyomja meg a
piros kioldógombokat (7) és egyidejűleg húzza őket hátra.
• Húzza le az ülést az ISOFIX csatlakozópontokról (4).
• Fordítsa el a csatlakozókat (6) 180°-kal.
• Nyomja meg a z ülés állítógombját (5) és tolja be az ISOFIX
csatlakozókarokat (6) amennyire csak lehet.
FIGYELEM! Az ISOFIX csatlakozók (6) behajtásával nemcsak a jármű ülését
védi meg, de az egész ISOFIX csatlakozórendszert is a szennyeződéstől és
károsodástól.
AZ OLDALVÉDELEM BEÁLLÍTÁSA
A gyermekülést oldalütközés elleni védőrendszerrel (L.S.P.) szereltük fel. Ez a
rendszer oldalütközés esetén növeli gyermeke biztonságát.
68
PRESS!
10
a
b
c
Az L.S.P. 3 fokozatba állítható. A legnagyobb védelem érdekében húzza ki az
L.S.P.-t a gyermeküléshez legközelebbi ajtó felé, amennyire csak lehet. Ehhez
nyomja meg a kioldógombot (10).
Ha az L.S.P. a leghosszabb pozíciójában (c.) túl hosszú és eléri az ajtót, a
behajtott pozícióban (b) kell használni. Ezt úgy érheti el, hogy teljesen kihúzza az
L.S.P.-t, majd megnyomja a kioldógombot (10) és behajtja az L.S.P.-t. Az L.S.P.-t
úgy nyomhatja vissza az ülésbe, hogy megnyomja a kioldógombot (10) és ezzel
egyidőben nyomja az L.S.P.-t az ülés felé.
FIGYELEM! Ha a gyermekülést a jármű középső ülésén használja, tilos az
L.S.P.-t kihúzni.
!
FIGYELEM! Tilos az L.S.P.-t a gyermekülés hordozására vagy
rögzítésére használni.
Page 69

HU
CZSK
VYJMUTÍ AUTOSEDAČKY Z VOZIDLA VYBRATIE AUTOSEDAČKY Z VOZIDLA
Proveďte postup instalace v opačném pořadí.
• Současným stisknutím a zatažením uvolňovacích tlačítek (7) směrem dozadu
na obou stranách uvolněte ISOFIX Connect konektory (6).
• Vytáhněte autosedačku z ISOFIX ukotvovacích bodů (4).
• Otočte konektory (6) o 180 °.
• Pomocí nastavovacího tlačítka (5) na autosedačce co nejvíce zasuňte ISOFIX
Connect konektory (6).
Vykonajte postup inštalácie v opačnom poradí.
• Súčasným stlačením a zatiahnutím uvoľňovacích tlačidiel (7) smerom dozadu
na oboch stranách uvoľnite ISOFIX Connect konektory (6).
• Vytiahnite autosedačku z ISOFIX ukotvovacích bodov (4).
• Otočte konektory (6) o 180°.
• Pomocou nastavovacieho tlačidla (5) na autosedačke čo najviac zasuňte
ISOFIX Connect konektory (6).
UPOZORNĚNÍ! Složením ISOFIX konektorů (6) nechráníte pouze potah
sedadla, ale také samotné konektory ISOFIX Connect systému před špínou a
poškozením.
UPOZORNENIE! Zložením ISOFIX konektorov (6) nechránite iba poťah
sedadla, ale tiež samotné konektory ISOFIX Connect systému pred špinou a
poškodením.
NASTAVENÍ BOČNÍCH PROTEKTORŮ NASTAVENIE BOČNÝCH PROTEKTOROV
Autosedačka je vybavená systémem „Lineární ochrany při bočním nárazu“
(L.S.P.). Tento systém zvyšuje bezpečí pro vaše dítě v případě nárazu z boku.
L.S.P. lze nastavit do 3 pozic. Pro nejlepší ochranu co nejvíce vysuňte L.S.P. k
nejbližším dveřím vozidla. Provedete tak stisknutím uvolňovacího tlačítka (10).
Pokud L.S.P. přesahuje určený prostor a dotýká se ve své nejzazší pozici (c)
dveří vozidla, je nutné použít nižší pozici (b). Tu nastavíte maximálním vytažením
L.S.P. a následovným stisknutím uvolňovacího tlačítka (10) a současným
uvedením L.S.P. do snížené pozice. Pro zasunutí L.S.P. zpět do autosedačky
stiskněte uvolňovací tlačítko (10) a současně zatlačte L.S.P. směrem k
autosedačce.
UPOZORNĚNÍ! Při používání autosedačky na prostředním sedadle je
zakázané používat vysunuté L.S.P. protektory.
!
VAROVÁNÍ! Nepoužívejte L.S.P. protektory pro přenášení nebo
upevňování autosedačky.
Autosedačka je vybavená systémom „Lineárne ochrany pri bočnom náraze“
(L.S.P.). Tento systém zvyšuje bezpečie pre vaše dieťa v prípade nárazu z boku.
L.S.P. je možné nastaviť do 3 pozícií. Pre najlepšiu ochranu čo najviac vysuňte L.S.P.
k najbližším dverám vozidla. Urobíte tak stlačením uvoľňovacieho tlačidla (10).
Ak L.S.P. presahuje určený priestor a dotýka sa vo svojej najvzdialenejšej pozícii
(c) dverí vozidla, je nutné použiť nižšiu pozíciu (b). Tú nastavíte maximálnom
vytiahnutím L.S.P. a nasledovným stlačením uvoľňovacieho tlačidla (10) a
súčasným uvedením L.S.P. do zníženej pozície. Pre zasunutie L.S.P. späť do
autosedačky stlačte uvoľňovacie tlačidlo (10) a súčasne zatlačte L.S.P. smerom
k autosedačke.
UPOZORNENIE! Pri používaní autosedačky na prostrednom sedadle je
zakázané používať vysunuté L.S.P. protektory.
!
VAROVANIE! Nepoužívajte L.S.P. protektory pre prenášanie alebo
upevňovanie autosedačky.
69
Page 70

MÉRETRE ÁLLÍTÁS
A fejtámla beállítása
FIGYELEM! A fejtámla csak akkor biztosítja a lehető legnagyobb védelmet, ha
11
az optimális magasságra van beállítva. 8 magassági fokozat állítható.
• A fejtámlát úgy kell beállítani, hogy max. 2 cm (kb. kétujjnyi hely) vagy ennél
kevesebb maradjon szabadon a gyermek válla és a fejtámla között.
• Nyomja meg a fejtámla alján lévő állítógombot (11) és állítsa a kívánt
pozícióba.
A VÉDŐPAJZS RÖGZÍTÉSE
A központi állítógomb (12) megnyomásával a védőpajzsot beállíthatja gyermeke
méretére.
Tartsa nyomva a központi állítógombot (12) miközben gyermeke méretére állítja
a védőpajzsot.
A védőpajzs oldalsó szárnyai (3) pontosan illeszkednek a karfa és az ülőrész
3
közé és ezek segítségéval támaszkodik a pajzs (3) az ülőrészre.
Állítsa be a védőpajzsot (3) úgy, hogy a gyermek előtt legyen, de ne nyomja a
gyermek testét.
12
70
Page 71

HU
CZSK
NASTAVENÍ DLE TĚLA NASTAVENIE PODĽA TELA
Nastavení opěrky hlavy
UPOZORNĚNÍ! Opěrka hlavy poskytuje vašemu dítěti optimální ochranu
pouze pokud je nastavená do správné výšky. Opěrku lze nastavit do 8
výškových pozic.
Nastavenie opierky hlavy
UPOZORNENIE! Opierka hlavy poskytuje vášmu dieťaťu optimálnu ochranu
iba pokiaľ je nastavená do správnej výšky. Opierku možno nastaviť do 8
výškových pozícií.
• Opěrka hlavy musí být nastavená tak, aby mezi ramenem dítěte a opěrkou
hlavy zůstal prostor max 2 cm (cca šířka dvou prstů) nebo méně.
• Stiskněte nastavovací tlačítko (11) na spodní straně opěrky hlavy a nastavte
opěrku do požadované pozice.
NASTAVENÍ BEZPEČNOSTNÍHO PULTU
Stisknutím prostředního nastavovacího tlačítka (12) můžete bezpečnostní pult
přizpůsobit vašemu dítěti.
Při nastavování bezpečnostního pultu držte prostřední nastavovací tlačítko (12)
stisknuté.
Boční části bezpečnostního pultu (3) přesně pasují do prostoru mezi
opěrkami rukou a sedákem a slouží jako podpěra bezpečnostního pultu (3) na
autosedačce.
Nastavte bezpečnostní pult (3) tak, aby se dotýkal těla dítěte ale netlačil na něj.
• Opierka hlavy musí byť nastavená tak, aby medzi ramenom dieťaťa a opierkou
hlavy zostal priestor max 2 cm (cca šírka dvoch prstov) alebo menej.
• Stlačte nastavovacie tlačidlo (11) na spodnej strane opierky hlavy a nastavte
opierku do požadovanej pozície.
NASTAVENIE BEZPEČNOSTNÉHO PULTU
Stlačením prostredného nastavovacieho tlačidla (12) môžete bezpečnostný pult
prispôsobiť vášmu dieťati.
Pri nastavovaní bezpečnostného pultu držte prostredné nastavovacie tlačidlo
(12) stlačené.
Bočné časti bezpečnostného pultu (3) presne pasujú do priestoru medzi
opierkami rúk a sedákom a slúži ako podpera bezpečnostného pultu (3) na
autosedačke.
Nastavte bezpečnostný pult (3) tak, aby sa dotýkal tela dieťaťa ale netlačil na neho.
71
Page 72

3
14
16
15
CLICK!
13
17
BEKÖTÉS VÉDŐPAJZZSAL
1. Most helyezze fel az előzőleg beállított védőpajzsot (3) (további információ
“A VÉDŐPAJZS RÖGZÍTÉSE” fejezetben).
2. Húzza ki a jármű biztonsági övét teljes hosszában. Fogja meg az öv alsó részét
(13) és vezesse végig a pirossal jelzett útvonalon (14) a védőpajzson át (3).
3. Csatolja be a biztonsági övet (15). Hallható kattanással kell rögzülnie.
4. Szorítsa meg az öv alsó részét (13) úgy, hogy meghúzza a felső övszárat (16).
5. Most vezesse a felső övszárat (16) az alsó övszárral (13) párhuzamosan
vissza az övvezetőn (14) át.
6. Húzza a felső övszárat (16) szorosra és győződjön meg róla, hogy az öv
mindkét része végigfut a védőpajzs (3) övvezetőjében (14).
7. Most vezesse tovább a felső övszárat (16) szorosan a védőpajzs (3)
övvezetőjébe (14) amíg szorosan illeszkedik. Azután vezesse át a felső
övszárat a fejtámla (17) és a vállvédő között.
!
FIGYELEM! Mindig ellenőrizze, hogy elég szorosan-e az öv és hogy
jól állította-e be az ülést a gyermek testéhez. Az öv soha ne legyen
megcsavarodva!
!
FIGYELEM! A hárompontos övet csak az erre a célra kialakított
övvezetőkön keresztül szabad vezetni. A bekötési útvonalat pontosan
leírjuk a használati útmutatóban és pirossan jelöljük az ülésen.
A GYERMEK HELYES RÖGZÍTÉSE
Gyermeke optimális védelme érdekében az utazás megkezdése előtt mindig
ellenőrizze, hogy …
• a védőpajzs jól van-e beállítva.
• a biztonsági öv nyelve megfelelően rögzült-e az övcsatban.
• az alsó és a felső övszár szorosan a védőpajzs övvezetőjében fut-e és
nincs-e megcsavarodva.
• a gyermekülés háttámlája teljesen egy síkban van-e az autóülés háttámlájával.
• Ha ISOFIX csatlakozót használ: az ülés mindkét oldalon a helyére rögzült-e az
ISOFIX csatlakozópontokon és tisztán látszik-e mindkét zöld biztonsági jelzés.
72
Page 73

HU
CZSK
ZABEZPEČENÍ BEZPEČNOSTNÍM PÁSEM ZABEZPEČENIE BEZPEČNOSTNÝM PÁSOM
1. Nyní vložte předem nastavený bezpečnostní pult (3) (viz sekce „NASTAVENÍ
BEZPEČNOSTNÍHO PULTU“).
2. Co nejvíce vytáhněte bezpečnostní pás vozidla. Vezměte břišní pás (13) a
vložte jej do příslušného vedení pásu (14) na bezpečnostním pultu (3).
3. Zasuňte bezpečnostní pás do spony pásu (15). Pás se musí zajistit se
slyšitelným „CVAKNUTÍM“.
4. Zatažením za diagonální pás (16) utáhněte břišní pás (13).
5. Nyní zasuňte diagonální pás (16) do vedení pásu (14) souběžně s břišním
pásem (13).
6. Pevně diagonální pás (16) utáhněte a ujistěte se, že oba pásy zakrývají ve
vedení pásu (14) celou šířku bezpečnostního pultu (3).
7. Nyní zasuňte diagonální pás (16) pevně do vedení pásu (14) na bezpečnostním
pultu (3) tak, aby pás ve vedení držel. Poté vložte diagonální pás mezi opěrku
hlavy (17) a opěrku ramen.
1. Teraz vložte vopred nastavený bezpečnostný pult (3) (viď sekcia
„NASTAVENIE BEZPEČNOSTNÉHO PULTU“).
2. Čo najviac vytiahnite bezpečnostný pás vozidla. Vezmite brušný pás (13) a
vložte ho do príslušného vedenia pásu (14) na bezpečnostnom pulte (3).
3. Zasuňte bezpečnostný pás do spony pásu (15). Pás sa musí zaistiť s
počuteľným „cvaknutím“.
4. Zatiahnutím za diagonálny pás (16) utiahnite brušný pás (13).
5. Teraz zasuňte diagonálny pás (16) do vedenia pásu (14) súbežne s brušným
pásom (13).
6. Pevne diagonálny pás (16) utiahnite a uistite sa, že oba pásy zakrývajú vo
vedení pásu (14) celú šírku bezpečnostného pultu (3).
7. Teraz zasuňte diagonálny pás (16) pevne do vedenia pásu (14) na
bezpečnostnom pulte (3) tak, aby pás vo vedení držal. Potom vložte
diagonálny pás medzi opierku hlavy (17) a opierku ramien.
!
VAROVÁNÍ! Vždy zkontrolujte řádné utažení zádržného systému a jeho
správné nastavení dle těla dítěte. Nikdy pás nepřekrucujte!
!
VAROVÁNÍ! 3bodový pás musí vést pouze skrze k tomu určená
vedení pásu. Vedení pásu jsou podrobně popsána v této příručce a na
autosedačce jsou označena červenou barvou.
!
VAROVANIE! Vždy skontrolujte riadne utiahnutie zádržného systému a
jeho správne nastavenie podľa tela dieťaťa. Nikdy pás neprekrúcajte!
!
VAROVANIE! 3bodový pás musí viesť iba skrze na to určená vedenia
pásu. Vedenia pásu sú podrobne uvedená v tejto príručke a na
autosedačke sú označená červenou farbou.
SPRÁVNÉ ZABEZPEČENÍ DÍTĚTE SPRÁVNE ZABEZPEČENIE DIEŤAŤA
Pro zajištění optimálního bezpečí pro vaše dítě, prosíme před každou jízdou
zkontrolujte, že...
• je správně nastavený bezpečnostní pult.
• se jazyk bezpečnostního pásu zajistil ve sponě pásu.
• diagonální a bříšní pás vedou skrze vedení pásu bezpečnostního pultu, jsou
napnuté a nejsou překroucené.
• se opěrka zad dětské autosedačky zcela opírá o opěrku zad sedadla ve
vozidle.
• V případě použítí ISOFIX Connect: autosedačka se pomocí konektorů
na obou stranách zajistila do upevňovacích bodů ISOFIX a oba zelené
bezpečnostní indikátory jsou jasně viditelné.
Pre zaistenie optimálneho bezpečie pre vaše dieťa, prosíme pred každou jazdou
skontrolujte, že...
• je správne nastavený bezpečnostný pult.
• sa jazyk bezpečnostného pásu zaistil v spone pásu.
• diagonálny a brušný pás vedú skrze vedenie pásu bezpečnostného pultu, sú
napnuté a nie sú prekrútené.
• sa opierka chrbta detské autosedačky úplne opiera o opierku chrbta sedadla
vo vozidle.
• V prípade použitia ISOFIX Connect: autosedačka sa pomocou konektorov
na oboch stranách zaistila do upevňovacích bodov ISOFIX a obaja zelené
bezpečnostné indikátory sú jasne viditeľné.
73
Page 74

AZ ÜLÉSHUZAT ELTÁVOLÍTÁSA
A gyermekülés uzata 4 részből áll (fejtámlahuzat, háttámlahuzat, ülőrészhuzat,
védőpajzshuzat). A huzatok az ülés szélén végigfutó rögzítőcsatornákba
illeszkednek és több helyen patentek rögzítik. Ha minden patentet kioldottunk,
akkor a részek egyenként eltávolíthatóak.
A fejtámla huzatának eltávolítása
Húzza a huzatot hátulról előre át a fejtámlán.
A háttámla huzatának eltávolítása
Húzza a huzatot hátulról előre át a fejtámlán.
Az ülőrész huzatának eltávolítása
Húzza le a huzatot az ülőrészről majd a karfáról.
Az védőpajzs huzatának eltávolítása
A patenttől kiindulva húzza a huzatot hátrafelé.
A huzat visszahelyezése
A huzat visszahelyezéséhez végezze el a fenti lépéseket fordított sorrendben.
TISZTÍTÁS
Mivel a huzat fontos a megfelelő működéshez, fontos, hogy csak eredeti huzatot
használjon. Póthuzatot a hivatalos márkakerskedőknél vásárolhat.
FONTOS! Kérjük, mossa ki a huzatot az első használat előtt.
A huzatok mosógéppel moshatóak max. 30°C-on kímélő programmal.
Magasabb hőmérsékletű mosásnál az anyag engedheti a színét. Kérjük, a
huzatot elkülönítve mossa és ne szárítsa gépben! Soha ne szárítsa tűző napon a
huzatot. A műanyag részeket egyhe tisztítószerrel, meleg vízzel tisztítsa.
74
!
FIGYELMETETÉS! Soha, semmilyen körülmények között ne alkalmazzon
vegyszereket vagy fehérítőszereket!
Page 75

HU
CZSK
SUNDÁNÍ POTAHU VYTIAHNUTIE POŤAHOV
Potah autosedačky se skládá ze 4 částí (potah opěrky hlavy, potah opěrky
zad, potah sedáku a potah bezpečnostního pultu). Potahy jsou vloženy do
příslušných upevňovacích drážek na hraně autosedačky a na několika pozicích
jsou připevněny patentkami. Jakmile jsou rozepnuté všechny patentky, lze
jednotlivé části potahu vyjmout z upevňovacích drážek.
Poťah autosedačky sa skladá zo 4 častí (poťah opierky hlavy, poťah opierky
chrbta, poťah sedadla a poťah bezpečnostného pultu). Poťahy sú vložené
do príslušných upevňovacích drážok na hrane autosedačky a na niekoľkých
pozíciách sú pripevnené patentkami. Akonáhle sú rozopnuté všetky patentky,
možno jednotlivé časti poťahu vyňať z upevňovacích drážok.
Sundání potahu opěrky hlavy
Odzadu směrem dopředu přetáhněte potah přes opěrku hlavy.
Sundání potahu opěrky zad
Odzadu směrem dopředu přetáhněte potah opěrky zad.
Sundání potahu ze sedáku
Stáhněte potah ze sedáku a poté z područek.
Sundání potahu z bezpečnostního pultu
Od nastavovacího tlačítka směrem dozadu stáhněte potah z bezpečnostního pultu.
NASAZENÍ POTAHU
Pro nasazení potahu opakujte všechny předešlé kroky v opačném pořadí.
Odobraní poťahu opierky hlavy
Odzadu smerom dopredu pretiahnite poťah cez opierku hlavy.
Odobraní poťahu opierky chrbta
Odzadu smerom dopredu pretiahnite poťah opierky chrbta.
Odobraní poťahu zo sedadla
Stiahnite poťah zo sedadla a potom z podrúčiek.
Zložení poťahu z bezpečnostného pultu
Od nastavovacieho tlačidla smerom dozadu stiahnite poťah z bezpečnostného pultu.
PRIPEVNENIE POŤAHU
Pre nasadenie poťahu opakujte všetky predošlé kroky v opačnom poradí.
ČIŠTĚNÍ ČISTENIE
Jelikož je jednou z klíčových částí autosedačky, je důležité používat pouze
originální potah. Náhradní potahy můžete získat u svého prodejce.
UPOZORNĚNÍ! Před prvním použitím potah prosíme vyperte.
Potahy lze prát v pračce při max. 30 °C na mírný program. Praní při vyšší teplotě
může vést ke ztrátě barvy látky. Prosíme, perte potah odděleně a nikdy jej
nesušte v sušičce! Nesušte potah na přímém slunečním světle! Plastové části
můžete očistit teplou vodou a mírným čistícím prostředkem.
!
VAROVÁNÍ! Prosíme, za žádných okolností nepoužívejte chemické čistící
prostředky nebo bělidla.
Keďže je jednou z kľúčových častí autosedačky, je dôležité používať iba
originálny poťah. Náhradné poťahy môžete získať u svojho predajca.
UPOZORNENIE! Pred prvým použitím poťah prosíme vyperte.
Poťahy možno prať v práčke pri max. 30 °C na mierny program. Pranie pri
vyššej teplote môže viesť k strate farby látky. Prosíme, perte poťah oddelene
a nikdy ho nesušte v sušičke! Nesušte poťah na priamom slnečnom svetle!
Plastové časti môžete očistiť teplou vodou a miernym čistiacim prostriedkom.
!
VAROVANIE! Prosíme, za žiadnych okolností nepoužívajte chemické
čistiace prostriedky alebo bielidlá.
75
Page 76

KARBANTARTÁS
Azért, hogy gyermekülése maximális védelmet nyújtson, fontos, hogy
megfeleljen az alábbiaknak:
• A gyermekülés minden főbb alkatrészét rendszeresen ellenőrizni kell, hogy
nem hibásodott-e meg. A mechanikus részeknek tökéletesen kell működniük.
• Figyeljen rá, hogy a gyermekülés ne szoruljon be kemény tárgyak közé, mint
pl. az autó ajtaja, az üléssínhez stb., amelyek károsíthatják.
• Ha a gyermekülést pl. leejtik, a gyártónak meg kell vizsgálnia, mielőtt újra
használják.
!
FIGYELMEZTETÉS! A huzat gyermekülés biztonsági rendszerének
integrált része. Ezért a gyermekülést soha nem szabad huzat nélkül vagy
más üléshez való huzattal használni.
MI A TEENDŐ BALESET UTÁN
!
FIGYELEM! Baleset során a gyermekülésben szabad szemmel nem
látható sérülések keletkezhetnek. Kérjük, mindenképpen baleset után.
Kétség esetén keresse kiskereskedőjét vagy a gyártót.
TERMÉKINFORMÁCIÓ
Ha kérdése van, forduljon kereskedőjéhez először. Ehhez készítse elő az
alábbaiakat:
• Szériaszám (ld a matricán)
• A jármű márkája és modellneve és az üléspozíció, amelyen a gyermekülést
használták.
• A gyermek súlya, kora és magassága.
További információk: www.cybex-online.com.
76
Page 77
HU
CZSK
PÉČE O PRODUKT STAROSTLIVOSŤ O PRODUKT
Pro zajištění maximální ochrany, poskytované vaší autosedačkou, je nezbytné
splňovat následující:
• Všechny hlavní části autosedačky musí být pravidelně kontrolovány.
Mechanické části musí fungovat bezproblémově.
• Ujistěte se, že není autosedačka nikde jakkoliv zaseknutá, např. ve dveřích
vozidla, v kolejnicích sedadla.
• Pokud vám autosedačka např. upadne, je potřeba ji před dalším použitím
otestovat výrobcem.
Pre zaistenie maximálnej ochrany, poskytovanej vašou autosedačkou, je
nevyhnutné spĺňať nasledovné:
• Všetky hlavné časti autosedačky musia byť pravidelne kontrolované.
Mechanické časti musia fungovať bezproblémovo.
• Uistite sa, že nie je autosedačka nikde akokoľvek zaseknutá, napr. vo dverách
vozidla, v koľajniciach sedadla.
• Ak vám autosedačka napr. spadne, je potrebné ju pred ďalším použitím
otestovať výrobcom.
!
VAR OVÁN Í! Potah je součástí bezpečnostní funkce dětské autosedačky.
Autosedačku proto nikdy nelze používat bez potahu nebo s potahem jiné
autosedačky.
!
VAR OVAN I E! Poťah je súčasťou bezpečnostnej funkcie detskej
autosedačky. Autosedačku preto nikdy nemožno používať bez poťahu
alebo s poťahom iné autosedačky.
CO DĚLAT PO NEHODĚ ČO ROBIŤ PO NEHODE
!
VAR OVÁN Í! Při nehodě může na autosedačce vzniknout poškození,
které není pouhým okem viditelné. Po nehodě autosedačku vyměňte. V
případě pochybností kontaktujte prodejce nebo výrobce.
!
VAR OVAN I E! Pri nehode môže na autosedačke vzniknúť poškodenie,
ktoré nie je voľným okom viditeľné. Po nehode autosedačku vymeňte. V
prípade pochybností kontaktujte predajca alebo výrobca.
INFORMACE O PRODUKTU INFORMÁCIE O PRODUKTE
V případě otázek kontaktujte nejdříve vašeho prodejce. Měli byste mít
připraveny následující podrobnosti:
• Sériové číslo (viz nálepka)
• Značka a model vozidla a místo, na kterém se autosedačka používá
• Váha, věk a výška dítěte
Více informací o našich produktech lze nalézt na www.cybex-online.com.
V prípade otázok kontaktujte najskôr vášho predajca. Mali by ste mať pripravené
nasledujúce podrobnosti:
• Sériové číslo (viď nálepka)
• Značka a model vozidla a miesto, na ktorom sa autosedačka používa
• Váha, vek a výška dieťaťa
Viac informácií o našich produktoch možno nájsť na www.cybex-online.com.
77
Page 78

A TERMÉK ÉLETTARTAMA
A gyermekülést úgy tervezték, hogy megfeleljen az előírásoknak teljes
élettartama során, amely kb. 4 év. Azonban, a járművekben a hőmérséklet
meglehetősen nagy ingadozása előre nem látható következményekkel járhat,
ezért fontos, hogy figyeljen az alábbiakra:
• Ha a jármű hosszabb időn át közvetlen napsütésnek van kitéve, a
gyermekülést ki kell venni a járműből vagy le kell takarni egy világos anyaggal.
• Rendszeresen ellenőrizze a gyermekülés műanyag és fém alkatrészeit,
azok színét, alakját. Ha bármilyen változást észlel, a gyermekülést meg
kell semmisíteni vagy a gyártónak meg kell vizsgálnia és szükség esetén
kicserélheti.
• A textil anyagon történt változás, kopás, fakulás teljesen természetes a
járműben való használat után, nem befolyásolja az ülés működését.
MEGSEMMISÍTÉS
Környezetvédelmi okokból kérjük, hogy különítsék el és semmisítsék meg
az ülés élettartamának elején (csomagolás) és végén (termék alkatrészek)
keletkező szemetet. A szemétkezelést a helyi hatóságok különbözőképpen
végzik. A gyermekülés szabályszerű ártalmatlanításának biztosítása érdekében,
vegye fel a kapcsolatot a helyileg illetékes ártalmatlanítási hatósággal. Mindig
vegye figyelembe országa hulladékkezelési szabályait.
!
FIGYELMEZTETÉS! A műanyag csomagolóanyagot tartsa távol
gyermekektől. fulladásveszély!
78
Page 79
HU
CZSK
ŽIVOTNOST PRODUKTU ŽIVOTNOSŤ PRODUKTU
Autosedačka je navržena tak, aby splňovala všechny své funkce po celou
dobu své životnosti, cca 4 roky. Kvůli velmi velkému kolísání teplot a
nepředvídatelnému přetížení ve vozidlech, musí být ale dodrženo následující:
• Pokud je vozidlo po delší dobu vystaveno přímému slunečnímu záření, musí
být autosedačka z vozidla vyjmuta nebo přikryta světlou látkou.
• Pravidelně kontrolujte všechny plastové a kovové části na přítomnost
poškození, deformace nebo změny barvy. Při objevení jakýchkoliv změn musí
být autosedačka zlikvidována nebo zkontrolována výrobcem a případně
vyměněna.
• Změny na látkách, především vyblednutí, jsou při používání ve vozidle
naprosto normální a neovlivňují funkčnost autosedačky.
Autosedačka je navrhnutá tak, aby spĺňala všetky svoje funkcie po celú
dobu svojej životnosti, cca 4 roky. Kvôli veľmi veľkému kolísanie teplôt a
nepredvídateľnému preťaženie vo vozidlách, musí byť ale dodržané nasledujúce:
• Ak je vozidlo po dlhšiu dobu vystavené priamemu slnečnému žiarenie, musí
byť autosedačka z vozidla vytiahnutá alebo prikrytá svetlú látkou.
• Pravidelne kontrolujte všetky plastové a kovové časti na prítomnosť
poškodenia, deformácie alebo zmeny farby. Pri objavení akýchkoľvek zmien
musí byť autosedačka zlikvidovaná alebo skontrolovaná výrobcom a prípadne
vymenená.
• Zmeny na látkach, predovšetkým vyblednutie, sú pri používaní vo vozidle
úplne normálne a neovplyvňujú funkčnosť autosedačky.
LIKVIDACE LIKVIDÁCIA
Z důvodu ochrany životního prostředí žádáme uživatele o roztřídění a likvidaci
odpadu, vznikajícího na začátku (obaly) a na konci (části produktu) životnosti
dětské autosedačky. Likvidace odpadu se na různých místech liší dle místních
předpisů. Pro zajištění správné likvidace dětské autosedačky dle předpisů,
prosíme kontaktujte vaše místní příslušné orgány. Vždy dodržujte předpisy pro
likvidaci odpadu ve vaší zemi.
!
VAROVÁNÍ! Udržujte plastové obaly mimo dosah dětí: nebezpečí
zadušení!
Z dôvodu ochrany životného prostredia žiadame používateľov o roztriedenie a
likvidáciu odpadu, vznikajúceho na začiatku (obaly) a na konci (časti produktu)
životnosti detské autosedačky. Likvidácia odpadu sa na rôznych miestach
líšia podľa miestnych predpisov. Pre zaistenie správnej likvidácie detskej
autosedačky podľa predpisov, prosíme kontaktujte vaše miestne príslušné
orgány. Vždy dodržujte predpisy pre likvidáciu odpadu vo vašej krajine.
!
VAROVANIE! Udržujte plastové obaly mimo dosahu detí:
nebezpečenstvo zadusenia!
79
Page 80

JÓTÁLLÁS
Az alábbi garancia kizárólag abban az országban érvényes, ahol a terméket egy
forgalmazó egy vásárló részére először értékesítette.
1) A jótállás kiterjed minden gyártási és anyaghibára, függetlenül attól, hogy
azok a vásárlás időpontjában már megvoltak vagy a kiskereskedelmi forgalomban történő első értékesítést követő három (3) éven belül keletkeztek
(gyártói jótállás). Kérjük, hogy már a vásárlás időpontjában vagy a kézhezvételt követően azonnal alaposan ellenőrizze a termék épségét és az esetleges
gyártási vagy anyaghibákat. Kérjük, mindig őrizze meg az időponttal ellátott,
vásárlást bizonyító blokkot.
2) Amennyiben meghibásodást észlel, ne használja tovább a terméket. A ga-
rancia érvényesítéséhez a terméket megtisztított és hiánytalan állapotban kell
visszaküldeni az eredeti kereskedőhöz, aki a terméket először értékesítette és
be kell mutatni az erdeti vásárlást igazoló bizonylatot (blokkot vagy számlát).
Kérjük, hogy a terméket ne közvetlenül a gyártónak vigye vagy küldje vissza.
3) A jótállás nem vonatkozik a nem rendeltetésszerű használatra, környe-
zeti károkra (víz, tűz, baleset stb.) vagy a normál elhasználódásra vagy a
használati útmutatóban foglaltak be nem tartásából eredő károkra. A jótállás
nem érvényesíthető, ha a terméken arra nem jogosult személyek módosítást
vagy javítást végeztek vagy ha nem eredeti alkatrészeket és kiegészítőket
használtak.
4) Jelen garancia nem érinti a hatályban lévő jogszabályokban lefektetett
fogyasztói jogokat, beleértve a károkozással és a vásárlónak az eladóval vagy
a termék gyártójával szemben felmerülő szerződésszegéssel kapcsolatos
panaszait.
80
Page 81

HU
CZSK
ZÁRUKA ZÁRUKA
Následující záruka platí pouze v zemi, kde byl tento produkt původně prodán
prodejcem zákazníkovi.
1) Záruka se vztahuje na všechny výrobní a materiálové vady, které existují a
které se objeví v den nákupu nebo se objevily v období dvou (2) let od data
nákupu od prodejce, který výrobek původně prodal spotřebiteli (výrobní záruka). Prosíme, ihned po pořízení nebo po obdržení produkt zkontrolujte, zda
je kompletní a zcela nepoškozený. Prosíme, vždy si ponechejte váš datovaný
doklad o nákupu.
2) V případě poruchy přestaňte výrobek okamžitě používat. Pro uplatnění záruky
přivezte nebo zašlete produkt původnímu prodejci, který vám jej prodal, v čistém a kompletním stavu a předložte originál dokladu o nákupu (účtenka nebo
faktura). Prosíme nevozte nebo neposílejte produkt přímo výrobci.
3) Tato záruka nezahrnuje jakákoliv poškození, způsobená nesprávným používáním, vlivem okolního prostředí (voda, oheň, nehody atd.), běžným obnošením
a opotřebováním nebo nesplněním pokynů v tomto uživatelském manuálu.
Záruka také neplatí, pokud byly úpravy a servis prováděny neautorizovanými
osobami nebo byly použity neoriginální díly a příslušenství.
4) Tato záruka nevylučuje, neomezuje ani jinak neovlivňuje zákonná práva
spotřebitelů, včetně nároků z porušení práva a nároků s ohledem na porušení
smlouvy, které kupující může mít vůči prodávajícímu nebo výrobci výrobku.
Nasledujúca záruka platí len v krajine, kde bol tento produkt pôvodne predaný
predajcom zákazníkovi.
1) Záruka sa vzťahuje na všetky výrobné a materiálové chyby, ktoré existujú a
ktoré sa objaví v deň nákupu alebo sa objavili v období dvoch (2) rokov od
dátumu nákupu od predajca, ktorý výrobok pôvodne predal spotrebiteľovi
(výrobná záruka). Prosíme, ihneď po nadobudnutí alebo po obdržaní produkt
skontrolujte, či je kompletný a úplne nepoškodený. Prosíme vždy si ponechajte váš datovaný doklad o nákupe.
2) V prípade poruchy prestaňte výrobok okamžite používať. Pre uplatnenie
záruky prineste alebo pošlite produkt pôvodnému predajcovi, ktorý vám ho
predal, v čistom a kompletnom stave a predložte originál dokladu o nákupe
(účtenka alebo faktúra). Prosíme nevozte alebo neposielajte produkt priamo
výrobcovi.
3) Táto záruka nezahŕňa akákoľvek poškodenia spôsobená nesprávnym používaním, vplyvom okolitého prostredia (voda, oheň, nehody atď.), bežným
obnošením a opotrebovaním alebo nesplnením pokynov v tomto užívateľskom
manuáli. Záruka neplatí tiež ak boli úpravy a opravy vykonávané neautorizovanými osobami alebo pri použití neoriginálnych dielov a príslušenstva.
4) Táto záruka nevylučuje, neobmedzuje ani inak neovplyvňuje zákonné práva
spotrebiteľov, vrátane nárokov z porušenia práva a nárokov s ohľadom na porušenie zmluvy, ktoré kupujúci môže mať voči predávajúcemu alebo výrobcovi
výrobku.
81
Page 82

JUNO M-F IX
ECE R 44/04
UNIVERSAL
SEMI-UNIVERSAL
9 - 18 kg
CYBEX GmbH
Riedingerstr. 18, 95448 Bayreuth
Germany
04301342
CYBEX JUNO M-FIX – silla de seguridad
infantil
ECE R44/04 Grupo 1
peso: 9 - 18 kg
Edad: De 9 meses a 4 años aproximadamente
Para vehículos equipados con asientos dotados
de cinturón retráctil de tres puntos que cumplan
con la normativa ECE R16 u otras homologaciones
equivalentes.
APRECIADO CLIENTE,
Muchas gracias por comprar CYBEX JUNO M-FIX. Le aseguramos que, en
el desarrollo de la Juno M-Fix, nuestra mayor prioridad ha sido la seguridad,
el confort y la practicidad de la silla. El producto se ha desarrollado bajo un
estricto control de calidad y teniendo en cuenta todos los estándares de
seguridad.
¡AVISO! Guarde siempre el manual de instrucciones en el compartimento de
la silla de seguridad previsto para ello.
82
CYBEX JUNO M-FIX – cadeira auto
ECE R44/04 Grupo 1
Peso: 9 - 18 kg
Idade: Dos 9 meses até aos 4 anos aproximadamente
Pode ser utilizada apenas em automóveis com cinto
de segurança retrátil de 3 pontos que estejam de
acordo com a homologação ECE nº 16 ou outras
homologações equivalentes.
¡AVISO! Debido a los requisitos específicos de cada país (por ejemplo, color
del etiquetado en la silla de seguridad), las características de los productos
pueden variar en apariencia externa. A pesar de ello, estos requerimientos no
afectan al correcto funcionamiento del producto.
¡AVISO! El cinturón de tres puntos solamente se debe pasar a través de la ruta
indicada. La ruta del cinturón de seguridad está descrita en este manual de
instrucciones y está marcada en rojo en la silla de seguridad.
!
¡ATENCIÓN! Con el fin de mantener a su hijo correctamente protegido,
es absolutamente esencial que se utilice la silla de seguridad como se
describe en este manual.
Page 83

ESPT
CARO CLIENTE!
Muito obrigado por ter adquirido a CYBEX JUNO M-FIX. Asseguramos-lhe
que durante o processo de desenvolvimento deste produto concentrámonos na segurança, no conforto e na facilidade de utilização. Este produto é
fabricado sob controlo de qualidade exepcional e de acordo com os mais
elevados critérios de segurança.
AVISO! Por favor,tenha sempre à mão este manual de instruções e guarde-o
no compartimento destinado para o efeito
AVISO! Devido aos requisitos especificos de cada pais(ex cor da etiqueta
presente na cadeira auto) as características a nivel visual poderão variar.
Contudo estas situações não afectam o correto funcionamento do produto.
AVISO! O cinto de segurança só deverá passar através dos pontos
designados. Os pontos de passagem do cinto de segurança estão descritos
detalhadamente neste manual e estão marcados a vermelho na cadeira auto.
!
ATENÇÃO! Para manter a criança em segurança é essencial que utilize a
cadeira auto como descrito neste manual.
83
Page 84

ÍNDICE
MANUAL ABREVIADO ................................................................................................................. 2
HOMOLOGACIÓN ......................................................................................................................82
PRIMERA INSTALACIÓN .........................................................................................................86
PROTECCIÓN DEL VEHÍCULO ............................................................................................ 86
LA MEJOR POSICIÓN EN EL VEHÍCULO ......................................................................... 88
SEGURIDAD EN EL VEHÍCULO ...........................................................................................90
INSTALACIÓN DE LA SILLA DE SEGURIDAD .................................................................90
INSTALACIÓN DE LA SILLA CON EL SISTEMA DE CONECTORES ISOFIX .......92
RETIRAR LA SILLA DE SEGURIDAD DEL VEHÍCULO .................................................94
AJUSTAR LOS PROTECTORES LATERALES ...................................................................94
AJUSTE AL CUERPO DEL NIÑO ..........................................................................................96
AJUSTE DEL COJÍN DE SEGURIDAD ................................................................................96
ASEGURAR AL NIÑO CON EL COJÍN DE SEGURIDAD .............................................98
ASEGURAR AL NIÑO ADECUADAMENTE .......................................................................98
EXTRAER LA VESTIDURA .....................................................................................................10 0
LIMPIEZA .....................................................................................................................................100
CUIDADO DEL PRODUCTO ................................................................................................102
¿QUÉ HACER DESPUÉS DE UN ACCIDENTE? ..........................................................102
INFORMACIÓN DEL PRODUCTO .....................................................................................102
VIDA ÚTIL DEL PRODUCTO .................................................................................................104
RECICLADO ...............................................................................................................................104
GARANTÍA ...................................................................................................................................106
84
Page 85

ESPT
INDICE
MANUAL RESUMIDO .................................................................................................................2
HOMOLOGAÇÃO ......................................................................................................................82
PRIMEIRA INSTALAÇÃO..........................................................................................................87
PROTEÇÃO DO AUTOMÓVEL...............................................................................................87
A POSIÇÃO CORRETA NO AUTOMÓVEL ........................................................................89
SEGURANÇA NO AUTOMÓVEL ...........................................................................................91
INSTALAR A CADEIRA AUTO NO AUTOMÓVEL .............................................................91
INSTALAÇÃO COM SISTEMA DE CONECTORES ISOFIX .........................................93
RETIRAR A CADEIRA AUTO DO AUTOMÓVEL ...............................................................95
AJUSTAR PROTETORES LATERAIS ....................................................................................95
ADAPTAR À CRIANÇA ..............................................................................................................97
ADJUSTE DA ALMOFADA DE SEGURANÇA ....................................................................97
INSTALAÇÃO DA ALMOFADA DE SEGURANÇA ............................................................99
PRENDER A CRIANÇA CORRETAMENTE .......................................................................99
REMOVER A FORRA ...............................................................................................................101
LIMPEZA ......................................................................................................................................101
CUIDADOS A TER COM O PRODUTO ............................................................................10 3
PROCEDIMENTOS APÓS UM ACIDENTE .....................................................................103
INFORMAÇÃO DO PRODUTO ............................................................................................10 3
VIDA ÚTIL DO PRODUTO ......................................................................................................105
ELIMINAÇÃO ..............................................................................................................................105
GARANTIA ...................................................................................................................................107
85
Page 86

PRIMERA INSTALACIÓN
La silla de seguridad se compone de un alzador (1) con respaldo (2) y
reposacabezas, que se adapta a la estatura del niño. También cuenta con un
1
2
3
cojín de seguridad ajustable (3). Para la máxima seguridad y confort de su hijo,
estos componentes deben usarse en combinación.
El respaldo (2) se ancla con el eje del cojín de seguridad (1) mediante la guía
de arrastre.
!
¡ATENCIÓN! Asegúrese de leer, comprender y seguir el manual de
instrucciones.
!
¡ATENCIÓN! Los componentes de la silla de seguridad CYBEX no
deben ser modificados, utilizados por separado ni en combinación
con otros elevadores, respaldos o reposacabezas de otras marcas o
modelos. En cualquiera de estos casos, la silla de seguridad perdería la
certificación para su uso. La incorrecta utilización puede provocar graves
lesiones o la muerte de su hijo. Guarde estas instrucciones para futuras
consultas.
!
¡ATENCIÓN! Asegúrese de que los componentes de la silla no se
dañan al presionarla o se atascan (por ejemplo, por la puerta del coche o
mientras se ajusta el asiento de atrás).
PROTECCIÓN DEL VEHÍCULO
Las huellas de uso y/o decoloración pueden aparecer en algunos asientos de
vehículos fabricados con materiales delicados (por ejemplo, cuero, alcantara,
etc) si se utilizan las sillas de seguridad. Esto se evita poniendo una manta o
una toalla debajo de la silla de seguridad. En este manual también encontrará
nuestras instrucciones de limpieza. Es esencial que estos pasos se sigan antes
de la primera utilizanción de la silla de seguridad.
86
Page 87

ESPT
PRIMEIRA INSTALAÇÃO
A Cadeira auto é composta por assento alcochoado (1) e encosto (2) com
encosto de cabeça ajustável à altura da criança, assim como almofada de
seguança (3) que é ajustável em profundidade. A criança só beneficiará de
máxima proteção e conforto quando estes componentes forem utilizados juntos.
O encosto (2) é encaixado na estrutura do assento (1) através da patilha guia.
!
ATENÇÃO! Assegure-se que lê, compreende e segue as instruções.
!
ATE NÇÃO! Os componentes da cadeira auto não devem ser
modificadas ou utilizadas em combinação com assentos, costas ou
encostos de cabeça de outros fabricantes ou de outras gamas de
produtos. Nestes casos a cadeira auto já não terá uso certificado. A
utilização incorreta poderá levar a lesões graves ou mesmo à morte da
criança. Por favor guarde estas instruções para consultar futuramente.
!
ATE NÇÃO! Assegure sempre que os componentes da cadeira não
sofrem danos ao ficarem pressionados ou presos (ex. na porta ou
enquanto se ajusta as costas da cadeira)
PROTEÇÃO DO AUTOMÓVEL
Alguns automóveis com assentos feitos de material delicado (ex alcantra, pele
etc)poderão revelar vestigios de uso e/ou descoloração caso utilize sistemas
de retenção para crianças. Poderá evitar esta situação colocando um cobertor
ou toalha por baixo da cadeira auto. Poderá encontrar direções de limpeza
neste manual. É essencial que siga as indicações antes da primeira utilização.
87
Page 88

LA MEJOR POSICIÓN EN EL VEHÍCULO
La silla de seguridad con sistema ISOFIX retráctil se puede usar en todos
los asientos de los vehículos con cinturones de seguridad de tres puntos
aprobado en el manual del vehículo, uso universal.
La certificación "semi-universal" se da a las silla de seguridad infantil que están
conectadas a través de conectores ISOFIX. Por esta razón, la conexión ISOFIX
puede utilizarse solamente en ciertos vehículos. Consulte la lista de vehículos
adjunta para ver en cuáles se puede utilizar. Puede obtener la información más
actualizada en www.cybex-online.com.
En casos excepcionales, la silla de seguridad puede utilizarse en el asiento del
copiloto. En tal caso, deberá tener en cuenta lo siguiente:
• En vehículos con airbags, retrase el asiento del acompañante tanto como
sea posible. Sin embargo, al hacerlo, asegúrese de que el punto superior de
salida del cinturón de seguridad está detrás del extremo de la silla de auto
por donde empieza su recorrido el mismo.
• Siga siempre las recomendaciones del fabricante del vehículo.
!
¡ATENCIÓN! La silla de seguridad no es adecuada para su uso con
cinturones de seguridad de dos puntos o horizontales. Si se utiliza este
tipo de cinturón, el niño podría sufrir lesiones graves o incluso mortales
en caso de accidente.
¡ATENCIÓN! El cinturón vertical debe deslizarse desde atrás con cierta
reclinación y no debe caer hacia delante, llegando hacia el punto de
salida superior del cinturón del vehículo. Si no es posible ajustar la silla
de seguridad de esta manera, por ejemplo, empujándola hacia delante
o usándola en otro asiento, esta silla de seguridad no es adecuada para
su vehículo. Contácte con el fabricante del vehículo en caso de duda.
Mantenga bien sujeto el equipaje y otros objetos presentes en el vehículo
que puedan causar lesiones en caso de accidente. De lo contrario
podrían salir despedidos, con el consiguiente riesgo.
¡ATENCIÓN! La silla de seguridad no puede utilizarse en asientos
ubicados en sentido contrario a la marcha. Se permite el uso de la silla
de seguridad en sentido contrario a la marcha, por ejemplo, en una
furgoneta o minibús, siempre que el asiento permita transportar a un
adulto. Es esencial garantizar que el reposacabezas no se retire cuando
la silla de seguridad se instale en sentido contrario a la marcha.
¡ATENCIÓN! No deje nunca al niño solo en el coche. Las partes de
plástico de la silla de seguridad se pueden calentar en verano al sol y
pueden provocar quemaduras. Proteja al niño y a la silla de seguridad de
una exposición directa al sol (por ejemplo, usando una tela ligera de color
claro para cubrir la silla).
88
Page 89

ESPT
A POSIÇÃO CORRETA NO AUTOMÓVEL
A CYBEX Juno M-fix com os fixadores ISOFIX amovível podem ser utilizados
em todos os veículos com cinto automático de três pontos referido no manual
como aprovado para aprovado para uso universal
A homologação “semi-universal “é fornecida para equipamentos que utilizam
fixadores ISOFIX Por esta razão, os fixadores ISOFIX só poderão ser
usados em determinados veículos. Verifique a lista da compatibilidade com o
automóvel. Obtenha a lista mais actualizada em www.cybex-online.com.
Como exceção também poderá instalar a cadeira no assento dianteiro. Nesse
caso tenha atenção ao seguinte:
• Em automóveis com airbags deverá colocar a cadeira o mais atrás possivel.
Assegure que o cinto diagonal passa por trás e nunca pela frente até ao
ponto superior da cadeira onde começa a guia do mesmo.
• Siga sempre as indicações e recomendações do fabricante automóvel.
!
ATENÇÃO! A cadeira auto não pode ser utilizada com cintos abdominais
ou com apenas 2 pontos. Ao instalar a cadeira com um cinto de dois
pontos; na eventualidade de um acidente a criança poderá sofrer
ferimentos graves ou mesmo fatais.
ATENÇÃO! O cinto diagonal deverá passar por trás e nunca pela
frente até ao ponto superior do cinto do seu veículo. Se não for possível
regular a cadeira por ex. colocar a cadeira para a frente ou noutro
assento significa que a cadeira não está apta para o veículo. Em caso
de duvida contactar o fabricante do automóvel. Bagagem e outros
objectos soltos dentro do automóvel poderão ser a causa de ferimentos
na eventualidade de um acidente. Deverá prender ou guardar estes
objectos, caso contrário, poderão causar ferimentos graves ou mortais.
ATENÇÃO! A cadeira auto não pode ser usada em veículos onde o
assento está posicionado de lado para a marcha. O uso da cadeira
é permitido em bancos que estão no sentido contrário à marcha, por
exemplo, numa carrinha ou camioneta, desde que o assento permita o
transporte de um adulto. Por favor, tenha em conta que o encosto de
cabeça do assento do automóvel não deve ser removido ao colocar uma
cadeira no sentido contrário à marcha
ATE NÇÃO! Nunca deixe a criança sem vigilância. Os materiais de
plástico do sistema de retenção para crianças podem aquecer ao sol. A
criança poderá queimar-se. Proteja o bebé e a cadeira de uma exposição
direta e intensa do sol (ex: coloque um pano claro sobre a cadeira).
89
Page 90

SEGURIDAD EN EL VEHÍCULO
!
¡ATENCIÓN!
cinturón de seguridad, incluso cuando no está siendo utilizada. En caso de
frenado de emergencia o accidente, una silla de seguridad no asegurada
puede lesionar a otros pasajeros o a usted mismo.
Con el fin de garantizar la mejor seguridad posible para todos los pasajeros,
asegúrese de que...
• Los respaldos plegables del vehículo están bloqueados en posición vertical.
• Cuando instale la silla de seguridad en el asiento del copiloto, ajuste el
asiento del coche lo más hacia atrás posible.
• Guarde debidamente todos los objetos que puedan causar lesiones en caso
de accidente.
• La hebilla del cinturón coche no está alcanzando todo el recorrido del cojín
de seguridad. Si tiene cualquier duda, por favor contacte con el distribuidor
o el fabricante.
• Todos los pasajeros van debidamente asegurados.
La silla de seguridad siempre debe ir asegurada con el
INSTALACIÓN DE LA SILLA DE SEGURIDAD
Coloque la silla de seguridad en el asiento correspondiente del vehículo.
• Asegúrese siempre de que el respaldo de la silla de seguridad reposa contra
el respaldo del coche completamente. La silla de seguridad nunca debe
estar en posición reclinada.
• Si el reposacabezas del asiento del vehículo entorpece, desplácelo, gírelo
o retírelo (para excepciones sobre esto, consulte el apartado POSICIÓN
CORRECTA DE LA SILLA EN EL VEHÍCULO). El respaldo (a) se adaptará
perfectamente a prácticamente cualquier ángulo del respaldo del asiento del
vehículo.
!
¡ATENCIÓN! El respaldo de la silla de seguridad debe estar totalmente
apoyado en el asiento del vehículo. Para garantizar la máxima seguridad
para su hijo, la silla de seguridad debe de estar en una posición vertical.
90
!
¡ATENCIÓN! No utilice ningun otro punto de contacto excepto los que
están descritos en el manual de instrucciones y marcados en la silla de
seguridad.
Page 91

ESPT
SEGURANÇA NO AUTOMÓVEL
!
ATENÇÃO!
o cinto de segurança na cadeira. Em caso de travagem de emergência ou
acidente uma cadeira mal instalada poderá causar ferimentos ferindo o
condutor ou outros passageiros.
Para garantir a máxima proteção para todos os passageiros deverá assegurar
que:
• O encosto dos assentos reclináveis estão na posição vertical.
• Quando instalar a cadeira no lugar do copiloto, ajuste o assento do
automóvel na posição mais para trás possivel.
• Todos os objectos que podem provocar danos em caso de acidente estão
acondicionados de forma segura
• que a patilha do cinto não está a alcançar a passagem para a almofada de
segurança. Em caso de dúvida contacte o ponto de venda ou o fabricante.
• Todos os passageiros estão seguros com o cinto de segurança.
Mesmo quando não estiver em uso, deverá sempre colocar
INSTALAR A CADEIRA AUTO NO AUTOMÓVEL
Coloque a cadeira auto no assento do automóvel correspondente.
• Assegure sempre que toda a superficie do encosto da cadeira está
completamente encostada ao encosto do assento do automóvel. A cadeira
nunca deverá ser colocada de forma reclinada.
• Se o encosto de cabeça do automóvel estiver a estorvar, coloque na posição
mais elevada ou retire completamente (para exceções, consulte a secção
“COLOCAR A CADEIRA AUTO CORRETAMENTE NO AUTOMÒVEL”) O
encosto da cadeira (a) adapta-se praticamente a todas as inclinações dos
assentos automóveis.
!
ATENÇÃO! Toda a superficie do encosto da cadeira auto deverá estar
encostada ao encosto do assento do automóvel. Para assegurar máxima
proteção para o seu filho a cadeira auto deverá estar numa posição vertical.
!
ATENÇÃO! Não utilize outros pontos de contacto sem ser os descritos
nas instruções e marcados na própria cadeira auto.
91
Page 92

INSTALACIÓN DE LA SILLA CON EL SISTEMA DE CONECTORES ISOFIX
6
1
Utilizando el sistema de conexión ISOFIX, usted puede fijar la silla al vehículo,
con lo que la seguridad de su hijo aumenta. El niño todavía necesita ser
asegurado con el cojín de seguridad y el cinturón de tres puntos de su
vehículo.
5
7
8
CLICK!
4
6
9
¡AVISO! Los puntos de anclaje ISOFIX (4) son dos anillas de metal situadas
entre el respaldo y la base del asiento del vehículo En caso de duda, consulte
el manual de su vehículo.
• Utilice el botón de ajuste (5) de debajo del asiento (1) de la silla de
seguridad.
• Extraiga los conectores ISOFIX (6) tanto como pueda.
• Gire los conectores ISOFIX (6) 180° para encararlos hacia los anclajes ISOFIX.
¡AVISO! Antes de conectar los anclajes ISOFIX (6) en las guías ISOFIX (4),
compruebe los botones de seguridad (7). Si el indicador de seguridad verde
(8) es visible, primero debe soltar los conectores ISOFIX antes de unirlos
presionando y tirando hacia atrás el botón de liberación (7).
• Presione los dos conectores ISOFIX (6) a través de las bocas ISOFIX (4)
hasta que queden bloqueados en los anclajes con un "click" audible.
• Asegúrese de que la silla está totalmente fijada tratando de estirar de ella.
• El botón verde de seguridad (8) debe quedar claramente visible en ambos
botones de liberación rojos (7).
• Ahora puede utilizar el botón de ajuste (5) de la silla de seguridad para
posicionarla.
¡AVISO! Si el acceso a los puntos de anclaje ISOFIX es complejo en su
vehículo, puede utilizar las bocas ISOFIX incluidas.
• Inserte las bocas ISOFIX incluidas (9) extendidas al máximo, encaradas hacia
arriba en los puntos de anclaje de los dos ISOFIX (4). En muchos vehículos
es mejor instalar las bocas ISOFIX (9) al revés.
92
Page 93

ESPT
INSTALAÇÃO COM SISTEMA DE CONECTORES ISOFIX
Ao usar o sistema ISOFIX pode fixar a cadeira auto ao automóvel aumentando
a segurança da criança. A criança ainda necessita de ser segura com a
almofada de segurança e com o cinto de três pontos do automóvel.
AVISO! Os pontos de encaixe do ISOFIX (4) são duas patilhas metálicas por
assento e estão posicionadas entre as costas e o assento do automóvel. Em
caso de dúvida consulte o manual do automóvel.
• Use a a patilha de ajuste (5) sob o assento (1) do automóvel.
• Puxe para fora ao máximo os dois conectores ISOFIX (6)
• Gire os conectores ISOFIX (6) a 180º de maneira que fiquem alinhados com
as guias.
AVISO! Antes de instalar os fixadores ISOFIX (6) nos pontos de fixação
ISOFIX (4),verifique os botões (7). Se, se conseguever os indicadores de
segurança a verde (8) deverá libertar os fixadores ISOFIX antes de colocá-los
pressionando-os e puxando para trás o botão de bloqueio (7).
• Empurre os dois braços (6) para os pontos de ancoragem (4) até que estes
se encaixem nestes pontos de fixação ISOFIX. Quando a instalação é
correta ouvir-se-à um “CLICK”.
• .Certifique-se de que o assento está seguro, tentando puxá-lo para fora das
guias (4).
• O indicador de segurança verde (8) deverá estar agora claramente visível
nos dois botões de desboqueio vermelhos (7).
• Poderá agora usar a patilha de ajuste (5) da cadeira auto para a posicionar.
AVISO! Caso os pontos de fixação do seu automóvel forem dificeis de
alcançar poderá utilizar as guias ISOFIX.
• Insira as guias ISOFIX (9) com a parte mais largas viradas para os pontos
de fixação do ISOFIX (4). Em alguns automóveis é melhor instalar as guias
ISOFIX (9) na direção oposta.
93
Page 94

RETIRAR LA SILLA DE SEGURIDAD DEL VEHÍCULO
4
7
6
5
PRESS!
a
b
c
10
Realice todos los pasos de la instalación en el orden inverso.
• Desbloquee los conectores ISOFIX de ambos lados (6), presionando los
botones de liberación rojos situados a izquierda y derecha (7) y tire de ellos
hacia atrás simultáneamente.
• Tire de la silla de seguridad para retirarla de las guías ISOFIX (4).
• Gire los conectores (6) 180°.
• Presione el botón de ajuste (5) de la silla de seguridad y empuje el conector
ISOFIX (6) hasta el final.
¡AVISO! Plegando los conectores ISOFIX (6), no solo protege el asiento del
coche, sino que también los conectores de suciedad y/o daños.
AJUSTAR LOS PROTECTORES LATERALES
La silla de seguridad está equipada con Protección Lineal en Impactos
Laterales (L.S.P.) Este sistema aumenta la seguridad y la protección de su niño
en caso de impacto lateral.
El L.S.P. tiene 3 posiciones. Para una mayor protección, extienda el L.S.P. lo
máximo posible hacia el lado de la puerta del coche más cercana. Para ello,
pulse el botón de extensión (10).
En caso de que el L.S.P. toque la puerta (c), colocarlo en la posición intermedia
(b). Puede hacerlo colocando el L.S.P.en su posición más extendida y,
posteriormente, pulsando el botón de liberación (10). Para volver a colocar
el L.S.P. en su posición original, pulse el botón de liberación (10) y, al mismo
tiempo, empuje el L.S.P. hacia dentro, en dirección al respaldo de la silla.
¡AVISO! Cuando se utilice la silla de seguridad en el asiento central, está
prohibido extender el sistema (L.S.P).
94
!
¡ATENCIÓN! Esta prohibido utilizar el dispositivo (L.S.P.) para
transportar o para asegurar la silla de seguridad con el cinturón.
Page 95

ESPT
RETIRAR A CADEIRA AUTO DO AUTOMÓVEL
Iverta os passos de instalação da cadeira
• Desbloqueie o sistema ISOFIX (6) em ambos os lados pressionando o botão
vermelho de encaixe (7) e puxe simultaneamente.
• Puxe o assento para fora dos pontos de fixação (4).
• Rode os conectores ISOFIX (6) a 180°.
• Pressione a patilha de regulação (5) da cadeira auto e feche os conectores
(6) na posição mais recolhida possível.
NOTE! Ao guardar os braços do ISOFIX (6), para além de proteger o assento
do automóvel estará também a proteger os conectores ISOFIX para que não
entre sujidade ou se provoquem estragos ao sistema ISOFIX.
AJUSTAR PROTETORES LATERAIS
A cadeira auto está equipada com Sistema de proteção contra impacto lateral
(L.S.P) Este sistema aumenta a proteção em caso de impacto lateral.
Os L.S.P. possuem 3 posições. Active sempre o L.S.P que se situa do lado da
porta o mais encostado possível para maior proteção. Para o fazer pressione o
botão (10).
Caso o L.S.P exceda o espaço e toque já na porta na posição maior (c), deverá
ser utilizada a posição inclinada (b) que será a intermédia. Para colocar o L.S.P
nesta posição, deverá colocar na posição mais aberta e depois carregar no
botão (10) e empurrar ligeiramente para dentro o L.S.P para ficar na posição
intermédia. Para colocar o L.S.P na posição inicial pressione o botão (10) e ao
mesmo tempo empurre o L.S.P na direção da cadeira.
NOTE! Quando utilizar a cadeira na posição central do automóvel é proibido
abrir o sistema L.S.P
!
ATENÇÃO! É proibido utilizar o sistema (L.S.P) para tranportar ou
segurar a cadeira auto.
95
Page 96

AJUSTE AL CUERPO DEL NIÑO
Ajuste del reposacabezas
¡AVISO! El reposacabezas garantiza la mejor protección posible para el niño
11
solo si está colocado a la altura adecuada. El reposacabezas cuenta con 8
posiciones de ajuste.
• El reposacabezas debe ajustarse dejando un máximo de 2 cm (el ancho de
dos dedos) o menos entre el reposacabezas y el hombro del niño.
• Pulse el botón de ajuste (11) hasta la posición más baja del reposacabezas
y ajústelo hasta la posición deseada.
AJUSTE DEL COJÍN DE SEGURIDAD
Al pulsar el botón de ajuste central (12), usted puede adaptar el cojín de
seguridad al cuerpo de su hijo.
Mantenga pulsado el botón central de ajuste (12) mientras adapta el cojín de
seguridad.
3
12
Los laterales del cojín de seguridad (3) se ajustan perfectamente al
reposabrazos del asiento de la silla y se utilizan para apoyar el cojín de
seguridad (3).
Ajuste el cojín de seguridad (3) de modo que repose en el cuerpo del niño,
pero sin estar en pleno contacto.
96
Page 97

ESPT
ADAPTAR À CRIANÇA
Ajustar o encosto de cabeça
AVISO! O encosto de cabeça só assegura proteção ótima caso esteja
ajustada à altura perfeita. Pode ser ajustado em 8 posições.
• O encosto de cabeça deve ser ajustado de forma a ficarem apenas 2 cm
(dois dedos de altura) entre o encosto de cabeça e os ombros da criança.
• Carregue na patilha por baixo do encosto de cabeça (11) e regule o encosto
de cabeça para a posição desejada.
ADJUSTE DA ALMOFADA DE SEGURANÇA
Ao apertar o botão de ajuste central (12), poderá adaptar a almofada de
segurança ao seu filho.
Aperte o botão central de ajuste (12) enquanto regula a almofada para o
tamanho desejado.
As partes laterais da almofada (3) encaixam-se entre o apoio de braços e o
assento estes são utilizados para aguentar a almofada de segurança (3) na
cadeira.
Regule a almofada de segurança (3) de maneira a que segure a criança sem a
apertar.
97
Page 98

98
3
14
16
15
CLICK!
13
17
ASEGURAR AL NIÑO CON EL COJÍN DE SEGURIDAD
1. Coloque el cojín de seguridad préviamente ajustado (3) (comprobar sección
"AJUSTAR EL COJÍN DE SEGURIDAD“).
2. Extraiga el cinturón de seguridad totalmente. Pase el cinturón ventral (13) a
través de las guías del cojín de seguridad (3) marcadas en rojo (14).
3. Abroche el cinturón de seguridad en la hebilla (15). Se debe bloquear con
un "click" audible.
4. Tense el cinturón ventral (13) estirando del cinturón diagonal (16).
5. Ahora, coloque el cinturón diagonal (16) a través de las guías (13) del cojín
de seguridad (14).
6. Estire del cinturón diagonal (16), teniendo en cuenta que ambas partes del
cinturón de seguridad deben pasar por el cojín (3) sin tener ningún giro por
la ruta del cinturón (14).
7. Posteriormente, deslice firmemente el cinturón diagonal (16) a través del
recorrido del cinturón (14) del cojín de seguridad (3) hasta que quede
sujeto dentro de la guía del cinturón. A continuación, pase el cinturón de
seguridad entre el reposacabezas (17) y el resto del hombro.
!
¡ATENCIÓN! Revise siempre que el ajuste del cojín de seguridad al
cuerpo del niño es el correcto. No retuerza el cinturón.
!
¡ATENCIÓN! El cinturón de tres puntos sólo puede deslizarse por
las guías designadas para tal fin. La ruta del cinturón de seguridad se
describe en este manual de instrucciones. También está indicada en rojo
en la silla de seguridad.
ASEGURAR AL NIÑO ADECUADAMENTE
Para garantizar la mayor seguridad, por favor, compruebe los siguientes puntos
antes de poner el vehículo en marcha:
• El cojín de seguridad está correctamente ajustado.
• El anclaje del cinturón está bien ajustado en la hebilla
• El cinturón ventral y el diagonal pasan a través del cojín de seguridad y no
están girados.
• El respaldo de la silla reposa completamente sobre el respaldo del coche.
• Si se utiliza la conexión ISOFIX: el asiento queda en su lugar en ambos lados
con los conectores instalados correctamente en el anclaje ISOFIX y los dos
indicadores verdes de seguridad se ven claramente.
Page 99

ESPT
INSTALAÇÃO DA ALMOFADA DE SEGURANÇA
1. Coloque a almofada de segurança previamente ajustada (3) (consulte a
secção “Instalação da almofada de segurança”).
2. Puxe todo o comprimento do cinto de segurança de três pontos para
fora. Passe o cinto de segurança (13) pela guia correta do cinto (14) e
posteriormente pela almofada de segurança (3).
3. Insira a lingueta na fivela do cinto (15). Deverá ouvir-se um “CLICK” ao
bloquear.
4. Aperte mais o cinto abdominal puxando pelo cinto diagonal(16)
5. Insira novamente o cinto diagonal (16), em paralelo com o cinto de
segurança abdominal (13) na guia de cinto (14).
6. Puxe o cinto diagonal (16), aperte e assegure-se que as duas partes do cinto
cobrem toda a largura da almofada de segurança (3) na guia do cinto (14).
7. Insira agora o cinto diagonal (16) firmemente através da guia do cinto (14)
da almofada de segurança (3) até que esta fique presa no interior da guia.
Depois coloque o cinto diagonal entre o encosto de cabeça (17) e a
proteção de ombros.
!
ATENÇÃO! Averigue sempre se o sistema de retenção está justo e
ajustado à criança. Nunca use o cinto de segurança torcido!
!
ATENÇÃO! O cinto de três pontos deve ser apenas inserido nos
locais designados para o efeito. Os locais de passagem do cinto estão
descritas neste manual e estão também marcadas a vermelho na cadeira.
PRENDER A CRIANÇA CORRETAMENTE
Para assegurar uma ótima segurança para o seu filho, verifique sempre antes
do inicio da viagem se:
• A almofada de segurança está corretamente ajustada
• A patilha do cinto está encaixada na fívela.
• O cinto abdominal e diagonal passam através do compartimento da
almofada de segurança e não estão torcidos
• O encosto da cadeira auto está completamente encostado ao encosto do
assento do automóvel.
• Se o ISOFIX for utilizado: os conectores ISOFIX estão encaixados nos dois
pontos de fixação do automóvel para o ISOFIX e os indicadores de encaixe
estão verdes.
99
Page 100

EXTRAER LA VESTIDURA
La vestidura se compone de 4 piezas: reposacabezas, respaldo, asiento y cojín
de seguridad. Las vestiduras se fijan gracias a los corchetes situados en la
lo largo de los bordes de la estructura de la silla de seguridad. Las distintas
partes de la funda se pueden extraer tras abrir todos los corchetes.
Extraer la vestidura del reposacabezas
Tire de la vestidura de atrás hacia delante a lo largo del reposacabezas.
Extraer la vestidura del respaldo
Tire de la vestidura de atrás hacia delante a lo largo del reposacabezas.
Extraer la vestidura del asiento
Tire de la vestidura desde el asiento y después a través de los apoyabrazos.
Extraer la vestidura del cojín de seguridad
A partir del botón de ajuste, tire de la vestidura hacia atrás desde el cojín de
seguridad.
Colocación de la vestidura
Realice los pasos anteriores en el orden inverso para colocar la vestidura.
LIMPIEZA
Es importante utilizar únicamente las vestiduras originales, ya que son una parte
fundamental para el correcto funcionamiento de la silla de seguridad. Puede
conseguir fundas adicionales en su tienda habitual.
NOTA! Se debe lavar la vestidura antes de usarla por primera vez.
La funda es lavable a máquina a 30ºC con programa para textiles delicados.
Si se lava a una temperatura superior a 30ºC el tejido puede perder color.
Por favor, lave la vestidura por separado y no la seque a máquina. No seque
la vestidura directamente con la luz del sol. Las partes de plástico se pueden
lavar con agua caliente y un detergente suave.
100
!
¡ATENCIÓN! Por favor, ¡no use detergentes químicos o blanqueadores
bajo ninguna circunstancia!
 Loading...