

Page 1
JUNO-FIX
USER GUIDE
ECE R-44/04, Gr. 1 | 9-18 kg (ca. 9M - 4Y)
FR
NL DEUKCZ PLSK ITESPT
HU
Page 2

Kurzanleitung
DE Short manual/ UK Sommario/ IT Sommaire/ FR Beknopte handleiding/ NL
Instrucciones abreviadas/ ES Instruções abreviadas/ PTStručný návod/ SKStručný návod/ CZRövid útmutatóHU
Instrukcja skrócona/ PL
1
10 1311 129
2
65 7
3 4
8
1
Page 3

WARNUNG! DIESE KURZANLEITUNG DIENT NUR DER ÜBERSICHT. FÜR MAXIMALEN SCHUTZ UND
KOMFORT IHRES KINDES IST ES UNBEDINGT NOTWENDIG DIE GESAMTE GEBRAUCHSANLEITUNG
AUFMERKSAM ZU LESEN.
WARNING! THIS SHORT MANUAL SERVES AS AN OVERVIEW ONLY. FOR MAXIMUM PROTECTION AND BEST
COMFORT OF YOUR CHILD, IT IS ESSENTIAL TO READ AND FOLLOW THE ENTIRE INSTRUCTION MANUAL
CAREFULLY.
ATTENZIONE! QUESTE ISTRUZIONI SONO SOLO UN SOMMARIO. PER GARANTIRE LA MASSIMA SICUREZZA
E COMFORT AL VOSTRO BAMBINO E‘ INDISPENSABILE LEGGERE ATTENTAMENTE ED INTERAMENTE IL
MANUALE ISTRUZIONI E SEGUIRNE SCRUPOLOSAMENTE LE INDICAZIONI.
ATTENTION! LE SOMMAIRE EST UNE SYNTHÈSE. AFIN QUE VOTRE ENFANT BÉNÉFICIE D‘UN MAXIMUM DE
PROTECTION ET DE CONFORT, IL EST ESSENTIEL DE LIRE ATTENTIVEMENT, L‘INTÉGRALITÉ DU MANUEL
D‘INSTRUCTION.
OPGELET! DEZE KORTE HANDLEIDING DIENT ENKEL ALS OVERZICHT. VOOR EEN MAXIMALE
BESCHERMING EN HET GROOTSTE KOMFORT VAN UW KIND, IS HET NOODZAKELIJK OM DE VOLLEDIGE
HANDLEIDING ZORGVULDIG TE LEZEN.
OSTRZEŻENIE! INSTRUKCJA TA JEST TYLKO OBRAZKOWYM STRESZCZENIEM. ABY ZAGWARANTOWAĆ
SWOJEMU DZIECKU MAKSYMALNE BEZPIECZEŃSTWO I WYGODĘ, NALEŻY UWAŻNIE PRZECZYTAĆ CAŁĄ
INSTRUKCJĘ.
FIGYELMEZTETÉS! EZ A RÖVID ÚTMUTATÓ KIZÁRÓLAG ÁTTEKINTŐ JELLEGŰ! GYERMEKE MAXIMÁLIS
VÉDELME ÉS OPTIMÁLIS KÉNYELME BIZTOSÍTÁSA ÉRDEKÉBEN, FIGYELMESEN OLVASSA EL ÉS TARTSA
BE A HASZNÁLATI UTASÍTÁS MINDEN EGYES UTASÍTÁSÁT!
VAROVANIE! TENTO STRUČNÝ NÁVOD SLÚŽI IBA AKO PREHĽAD. PRE MAXIMÁLNU OCHRANU A NAJLEPŠIE
POHODLIE PRE VAŠE DIEŤA JE NEVYHNUTNÉ PREČÍTAŤ A DODRŽIAVAŤ STAROSTLIVO VŠETKY POKYNY V
NÁVODE NA POUŽITIE.
VAROVANIE! TENTO STRUČNÝ NÁVOD SLÚŽI IBA AKO PREHĽAD. PRE MAXIMÁLNU OCHRANU A NAJLEPŠIE
POHODLIE PRE VAŠE DIEŤA JE NEVYHNUTNÉ PREČÍTAŤ A DODRŽIAVAŤ STAROSTLIVO VŠETKY POKYNY V
NÁVODE NA POUŽITIE.
¡ADVERTENCIA! ESTAS INSTRUCCIONES SÓLO SON UN RESUMEN. PARA GARANTIZAR LA MÁXIMA
SEGURIDAD Y CONFORT PARA SU HIJO, ES MUY IMPORTANTE LEER COMPLETA Y ATENTAMENTE EL
MANUAL DE INSTRUCCIONES.
ATENÇÃO! ESTAS INSTRUÇÕES SÃO UM RESUMO. PARA GARANTIR A SEGURANÇA E O MÁXIMO
CONFORTO DA CRIANÇA, É MUITO IMPORTANTE LER CUIDADOSAMENTE TODO O MANUAL DE
INSTRUÇÕES.
3 | INHALT
4 | CONTENT
4 | ARGOMENTI
25 | SOMMAIRE
26 | INHOUD
26 | SPIS TREŚCI
47 | TARTALOM
48 | OBSAH
48 | OBSAH
69 | CONTENIDO
70 | ÍNDICE
FR
NL DEUKCZ PLSK ITPT ES
HU
2
Page 4

JUNO-fix
ECE R 44/04
SEMI-UNIVERSAL
9 - 18 kg
04301317
CYBEX GmbH
Riedinger Str. 18, 95448 Bayreuth
Germany
CYBEX JUNO-FIX
Sitzerhöher mit Rückenstütze, Kopfstütze und
tiefenverstellbarem Sicherheitskissen.
EMPFOHLEN FÜR
Alter: ca. 9 Monate bis 4 Jahre
Gewicht: 9 - 18 kg
Für Fahrzeuge mit Dreipunkt-Automatikgurt nach ECE
R16 und ISOFIX
ZULASSUNG
ECE R44/04, Gruppe 1, 9 - 18 kg
SEHR GEEHRTE KUNDIN, SEHR GEEHRTER KUNDE!
VIELEN DANK, DASS SIE SICH BEI DER WAHL EINES KINDERSITZES FÜR
DEN CYBEX JUNO-FIX ENTSCHIEDEN HABEN. BEI DER ENTWICKLUNG
DES CYBEX JUNO-FIX KINDESITZES HABEN SICHERHEIT, KOMFORT UND
BEDIENFREUNDLICHKEIT IM VORDERGRUND GESTANDEN. DAS PRODUKT WIRD
UNTER BESONDERER QUALITÄTSÜBERWACHUNG HERGESTELLT UND ERFÜLLT
STRENGSTE SICHERHEITSANFORDERUNGEN.
DE
INHALT
02/2015
3
CYBEX JUNO-FIX
Booster seat with backrest, headrest and adjustable
safety cushion
RECOMMENDED FOR
Age: from approx. 9 months to 4 years
Weight: 9 - 18 kg
For vehicle seats with three-point automatic retractor
belt according to ECE R16 and ISOFIX
HOMOLOGATION
ECE R44/04, Group 1, 9 - 18 kg
CYBEX JUNO-FIX
un sistema di ritenuta per bambini composto da base
seduta con schienale e poggiatesta, e cuscino di
sicurezza ad ampiezza regolabile.
RACCOMANDATO PER
Età: dai 9 mesi ai 4 anni circa
Peso: dai 9 ai 18 kg
Per autoveicoli con sedili dotati di sistema di cinture di
sicurezza automatiche a tre punti et ISOFIX
OMOLOGATE SECONDO LA NORMATIVA
ECE R16
ECE R44/04, Gruppo 1 , 9-18 kg
KURZANLEITUNG .............................................................................................................. 1
ZULASSUNG .......................................................................................................................3
ERSTMONTAGE .................................................................................................................5
ANPASSEN AN DIE KÖRPERGRÖSSE ...........................................................................7
ENTNEHMEN DES SITZERHÖHERS ..............................................................................7
DER RICHTIGE PLATZ IM FAHRZEUG ...........................................................................9
BEFESTIGEN DES KINDERSITZES MIT ISOFIX CONNECT SYSTEM .....................11
LÖSEN DER ISOFIX KONNEKTOREN ...........................................................................13
DEN SITZ INS FAHRZEUG STELLEN ............................................................................13
EINSTELLEN DES SICHERHEITSKISSENS .................................................................15
ANSCHNALLEN DES KINDES ........................................................................................ 17
IST IHR KIND RICHTIG GESICHERT? ........................................................................... 17
PFLEGE ..............................................................................................................................19
REINIGUNG .......................................................................................................................19
ENTFERNEN DES SITZBEZUGES ................................................................................. 19
VERHALTEN NACH EINEM UNFALL .............................................................................21
PRODUKTLEBENSDAUER .............................................................................................21
ENTSORGUNG .................................................................................................................21
GARANTIEBEDINGUNGEN ............................................................................................23
Page 5

DEAR CUSTOMER!
THANK YOU FOR PURCHASING THE CYBEX JUNO-FIX. WE ASSURE YOU THAT IN
THE PROCESS OF DEVELOPING THE CYBEX JUNO-FIX WE FOCUSED ON SAFETY,
COMFORT AND FUNCTIONALITY. THE PRODUCT IS MANUFACTURED UNDER
SPECIAL QUALITY SURVEILLANCE AND COMPLIES WITH THE STRICTEST SAFETY
REQUIREMENTS.
GENTILE CLIENTE!
GRAZIE PER AVERE SCELTO UN PRODOTTO CYBEX. LE ASSICURIAMO CHE NEL
PROGETTARE CYBEX JUNO-FIX I NOSTRI PRINCIPALI OBIETTIVI SONO STATI
LA SICUREZZA, IL COMFORT E LA MANEGGEVOLEZZA. IL PRODOTTO È STATO
ELABORATO SOTTO UNO STRETTO CONTROLLO QUALITATIVO E RISPONDE AI
PIÙ SEVERI STANDARD DI SICUREZZA.
DEUKIT
UK
SHORT MANUAL ................................................................................................................1
HOMOLOGATION ..............................................................................................................3
FIRST INSTALLATION ........................................................................................................ 6
ADJUSTING TO THE CHILD’S HEIGHT ........................................................................... 8
REMOVAL OF THE BOOSTER INLAY .............................................................................8
THE BEST POSITION IN THE CAR ................................................................................10
INSTALLATION OF THE CHILD SEAT WITH ISOFIX CONNECT SYSTEM ............... 12
RELEASING THE ISOFIX CONNECTORS .................................................................... 14
PLACING THE CHILD SEAT IN THE CAR .....................................................................14
ADJUSTING THE SAFETY CUSHION ...........................................................................16
SECURING THE CHILD ................................................................................................... 18
IS YOUR CHILD PROPERLY SECURED? .....................................................................18
PRODUCT CARE .............................................................................................................. 20
CLEANING .........................................................................................................................20
REMOVING THE SEAT COVER ......................................................................................20
WHAT TO DO AFTER AN ACCIDENT ............................................................................22
DURABILITY OF THE PRODUCT ...................................................................................22
DISPOSAL .........................................................................................................................22
WARR ANTY ......................................................................................................................24
CONTENT ARGOMENTI
IT
SOMMARIO .........................................................................................................................1
OMOLOGATE SECONDO LA NORMATIVA ECE R16 ....................................................3
PRIMA INSTALLAZIONE....................................................................................................6
REGOLAZIONE IN BASE ALL‘ALTEZZA DEL BAMBINO ...............................................8
RIMOZIONE DELL‘INSERTO NELLA BASE SEDUTA ....................................................8
LA POSIZIONE PIÙ CORRETTA ALL‘INTERNO DEL VEICOLO .................................10
INSTALLAZIONE DEL SEGGIOLINO CON IL SISTEMA ISOFIX CONNECT ............ 12
RILASCIO DEI CONNETTORI ISOFIX ...........................................................................14
POSIZIONARE IL SEGGIOLINO NELLA VETTURA ..................................................... 14
REGOLAZIONE DEL CUSCINO DI SICUREZZA ..........................................................16
ALLACCIARE IL BAMBINO .............................................................................................. 18
IL BAMBINO È ALLACCIATO CORRETTAMENTE? ..................................................... 18
MANUTENZIONE ..............................................................................................................20
PULIZIA ..............................................................................................................................20
RIMOZIONE DEL RIVESTIMENTO .................................................................................20
COSA FARE A SEGUITO DI UN INCIDENTE ................................................................22
DUREVOLEZZA DEL PRODOTTO .................................................................................22
SMA LTIM ENT O .................................................................................................................22
GARANZIA .........................................................................................................................24
4
Page 6
!
b
a
d
a
Warnung! Um den optimalen Schutz für Ihr Kind zu gewährleisten,
muss der Kindersitz unbedingt so verwendet werden, wie es in der
Gebrauchsanleitung beschrieben wird.
c
p
e
L.S.P.
z
Hinweis! Bewahren Sie die Gebrauchsanleitung immer griffbereit in dem dafür
vorgesehenen Fach, unter dem Bezug, an der Rückseite der Rückenlehne auf.
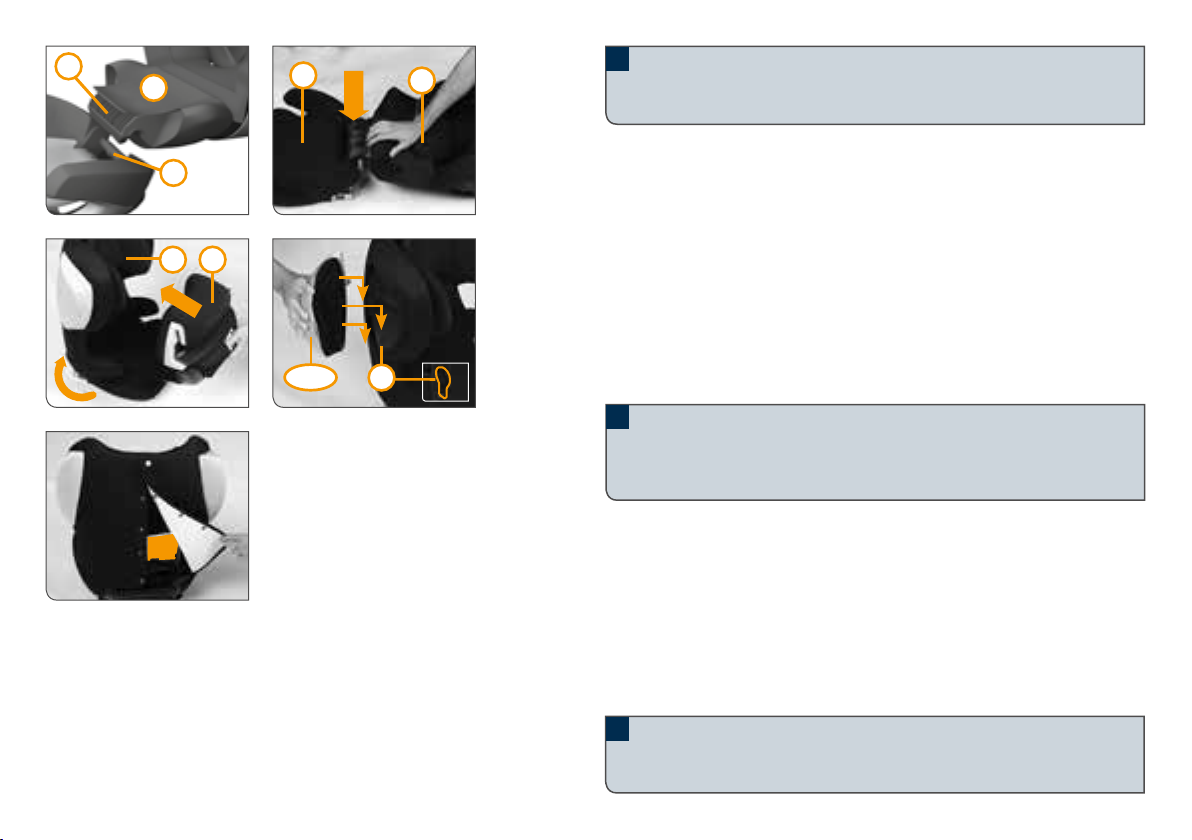
ERSTMONTAGE
Der Kindersitz besteht aus einem Sitzkissen (d) und einer Rückenlehne (a) mit
höhenverstellbarer Kopfstütze (e) sowie dem tiefenverstellbarem Sicherheitskissen
(p). Nur die Kombination aller Teile bietet Ihrem Kind den bestmöglichen Schutz und
Komfort.
!
Warnung: Die Bestandteile des CYBEX Kindersitzes dürfen weder einzeln
noch in Verbindung mit Sitzkissen, Rückenlehnen oder Kopfstützen anderer
Hersteller oder anderer Baureihen verwendet werden. Die Zulassung würde
in einem solchen Fall sofort erlöschen.
Die Rückenlehne (a) wird mit der Führungsschiene (b) auf der Achse (c) des
Sitzkissens (d) eingehakt. Schieben Sie die beiden mitgelieferten Seitenprotektoren
des „Linear Side-impact Protection“ Systems (L.S.P) in die dafür vorgesehenen
Montageöffnungen (z), außen an den Schulterstützen. Durch leichten Druck nach
unten rasten diese mit einem hörbaren „KLICK“ ein.
Hinweis! Bitte bewahren Sie die Gebrauchsanleitung immer in dem dafür
vorgesehenen Fach, unter dem Sitzbezug, an der Rückseite der Rückenlehne
auf.
!
Warnung: Achten Sie immer darauf, dass die Einzelteile des Kindersitzes
niemals gestaucht oder eingeklemmt werden (z. B. durch die Fahrzeugtür
oder durch Verstellen der Rückbank).
5
Page 7

!
Warning! For your child’s maximum protection, it is essential to use and
install the child seat according to the instructions in this User Guide.
!
Attenzione! Per garantire la massima protezione del Vostro bambino è
molto importante che l‘uso e l‘installazione del seggiolino siano effettuati
seguendo scrupolosamente le istruzioni contenute in questo manuale.
DEUKIT
Note! Please keep the User Guide handy in the slot under the cover at the back
of the backrest.
Nota Bene! Raccomandiamo di tenere sempre il manuale a portata di mano
per ogni riferimento futuro (ad es. nell’alloggiamento sotto il rivestimento nella
parte posteriore dello schienale)
FIRST INSTALLATION PRIMA INSTALLAZIONE
The child seat consists of a seat cushion (d) and a backrest (a) with a headrest
(e), which adjusts to suit the child‘s height, as well as a safety cushion (p), which is
adjustable for depth. Your child will benefit from maximum protection and comfort
only when all components are used together.
!
Warning! The components of the CYBEX child seat must not be used either
on their own or in combination with seat cushions, backrests or headrests
from other manufacturers or other model ranges. In any such cases the
child seat will no longer be certied for use.
The backrest (a) is hooked onto the axis (c) of the seat cushion (d) by means of the
guide lug (b). Push the two side protectors provided with the „Linear Side-impact
Protection“ System (L.S.P.) into the installation holes (z) provided for this purpose,
on the outer edges of the shoulder brackets. These will lock into place with an
audible „CLICK“.
Note! Please always keep the User Guide in the slot provided for it under the
seat cover, on the back of the backrest.
!
Warning! Always ensure that the individual components of the child seat are
never compressed or jammed (e.g. by the car door or while adjusting the
back seat.)
Il seggiolino è composto da una seduta (d) con schienale (a) e poggiatesta
(e), regolabile in base all’altezza del bambino, e di un cuscino di sicurezza (p),
regolabile in ampiezza secondo la corporatura del bambino. Il bambino godrà della
massima protezione e della massima confortevolezza soltanto se tutte le parti sono
utilizzate insieme.
!
Attenzione! Le parti del seggiolino CYBEX non possono essere utilizzate
singolarmente o in abbinamento con sedute, schienali o poggiatesta
di altri produttori o di altri modelli della gamma. Tale utilizzo pregiudica
l’omologazione del seggiolino.
Lo schienale (a) è agganciato nell’asse (c) della seduta (d) con il binario di
ancoraggio (b). Inserire i cuscinetti del sistema L.S.P. Plus (Protezione Lineare
nell’impatto laterale ottimizzato) negli appositi alloggiamenti (z) da ambo i lati e
spingere verso il basso fino a sentire il “click” di collegamento avvenuto.
Nota Bene! Raccomandiamo di tenere sempre il manuale a portata di mano
per ogni riferimento futuro (ad es. nell’alloggiamento sotto il rivestimento nella
parte posteriore dello schienale).
!
Attenzione! Fare sempre molta attenzione a non danneggiare il seggiolino
o le singole parti durante l’uso quotidiano , regolando lo schienale o nel
chiudere le porte del veicolo.
6
Page 8

ANPASSEN AN DIE KÖRPERGRÖSSE
g
e
h
Um den CYBEX Juno-fix optimal an die Körpergröße anzupassen ist werkseitig ein
Sitzerhöher (g) mitgeliefert und bereits unter dem Bezug eingelegt.
Wir empfehlen diesen Sitzerhöher (g) für Kinder vom 9. bis zum 18. Lebensmonat
zu verwenden. Ab dem 19. Lebensmonat ist kein Sitzerhöher (g) mehr notwendig.
Danach ist die Größenanpassung ausschließlich über die verstellbare Kopfstütze
(e) vorzunehmen. Ziehen Sie dazu den Verstellgriff (h) nach oben, um die Schulterund Kopfstütze (e) zu entriegeln. Die Anpassung hat so zu erfolgen, dass zwischen
der unteren Kante der Kopfstütze (e) und der Schulter des Kindes noch 2 fingerbreit
Platz ist.
g
Hinweis! Nur eine in optimaler Höhe eingestellte Schulter- und Kopfstütze (e) bietet
den größtmöglichen Schutz und Komfort für Ihr Kind und gewährleistet außerdem
den optimalen Verlauf des Diagonalgurtes. Die Höhenverstellung kann beim CYBEX
d
Juno-fix in 8 Positionen erfolgen. Die Schulterstütze ist mit der Kopfstütze fest
verbunden und muss nicht separat eingestellt werden.
ENTNEHMEN DES SITZERHÖHERS
• Lösen Sie die vorderen Druckknöpfe des Sitzbezuges vom Sitzkissen (d).
• Ziehen Sie den Stoffbezug vorne hoch, bis Sie den Sitzerhöher (g) herausziehen
können.
• Die Entnahme des Sitzerhöhers (g) hat entsprechend der zuvor genannten
Altersangabe zu erfolgen.
• Bringen Sie den Sitzbezug wieder in den ursprünglichen Zustand und befestigen
Sie diesen anschließend wieder.
7
Page 9

ADJUSTING TO THE CHILD’S HEIGHT REGOLAZIONE IN BASE ALL‘ALTEZZA DEL BAMBINO
For a proper height adjustment of the CYBEX Juno-fix a booster inlay (g) is
included and already inserted under the seat cover when purchased.
It is recommended to use this height adjustment inlay (g) between the age of 9
and 18 months. For children over 19 months the height adjustment inlay (g) may
be removed. Afterwards the height adjustment should be regulated by moving
the headrest (e) into the correct position. Pull the adjustment handle (h) in order
to release the headrest (e). The seat is correctly adjusted if you can fit 2 fingers
between the bottom edge of the headrest (e) and the shoulder of the child. Pull the
adjustment handle (h) in order to unlock the shoulder and headrest.
Il seggiolino è dotato di un inserto (g) per la corretta regolazione dell‘altezza.
L’inserto si trova sotto il rivestimento della seduta ed è premontato all‘acquisto.
L‘uso dell‘inserto (g) per la regolazione dell‘altezza è raccomandato per bambini di
età compresa tra 9 e 18 mesi. Dopo il 19 mo mese l‘inserto (i) può essere rimosso.
In seguito la regolazione dell’altezza avverrà mediante il corretto posizionamento
dello schienale/appoggiatesta (e). Tirare verso l‘alto la maniglia di regolazione
(h) per sbloccare il meccanismo. La posizione corretta prevede che la distanza
tra la parte inferiore dell’appoggiatesta (e) e la spalla del bambino permetta il
passaggio di 2 dita. Tirare verso l‘alto la maniglia di regolazione (h) per sbloccare il
meccanismo.
DEUKIT
Note! Shoulder and headrest (e) need to be perfectly adjusted in height to provide
the best protection and comfort for your child and to also guarantee the optimal
position of the diagonal belt. The height of the shoulder and headrest can be
adjusted in 8 positions. The shoulder part is attached to the headrest and does not
have to be adjusted separately.
Nota Bene! Solo quando le protezioni per le spalle e l’appoggiatesta (e) sono
regolati nella posizione corretta si ottiene la massima protezione ed il massimo
comfort per il bambino. La corretta regolazione assicura altresì il posizionamento
ideale della cintura di sicurezza diagonale. L‘altezza dell‘appoggiatesta (e) può
essere regolata in 8 posizioni. Le protezioni per le spalle e l’appoggiatesta formano
un blocco unico che non necessita di regolazioni separate.
REMOVAL OF THE BOOSTER INLAY RIMOZIONE DELL‘INSERTO NELLA BASE SEDUTA
• Open the press buttons at the front of the booster cover (d).
• Lift the booster cover until the height adjusting inlay (g) can be easily removed
from the front.
• Remove the height adjustment inlay (g) according to the above age
recommendation.
• Put the seat cover back in its original position and fasten the press buttons.
• Staccare i bottoni a pressione del rivestimento nella parte anteriore del seggiolino
(d).
• Sollevare il rivestimento fino a vedere l‘inserto (g).
• In base alla fascia d‘età raccomandata, come sopra indicato, togliere l‘inserto (g).
• Riposizionare il rivestimento e fissare i bottoni a pressione..
8
Page 10

w
DER RICHTIGE PLATZ IM FAHRZEUG
Der CYBEX Juno-fix darf nur mit ISOFIX-CONNECT System im Fahrzeug
installiert werden.
Für die Befestigung mit den ISOFIX Konnektoren (w) besteht eine „semiuniversale“ Genehmigung. Aus diesem Grund darf der CYBEX Juno-fix mit
dem ISOFIX CONNECT System nur in bestimmten Fahrzeugen eingesetzt
werden. Die zugelassenen Fahrzeuge und Positionen entnehmen Sie bitte
der beigelegten Kfz-Typenliste. Eine ständig aktualisierte Typenliste finden Sie auf
www.cybex-online.com. Gepäckstücke oder andere Gegenstände im Fahrzeug,
welche bei einem Unfall Verletzungen verursachen können, müssen immer gut
befestigt werden. Sie können zu tödlichen Geschossen im Fahrzeug werden.
!
Warnung: Auf Fahrzeugplätzen die quer zur Fahrtrichtung angeordnet
sind, ist die Verwendung des Kindersitzes nicht zulässig. Auf
rückwärtsgerichteten Fahrzeugsitzen, wie z. B. in einem Van oder Minibus,
ist die Verwendung zulässig, sofern der Fahrzeugsitz für die Beförderung
eines Erwachsenen zugelassen ist. Zu beachten ist, dass die Kopfstütze
bei rückwärtsgerichtetem Einbau nicht entfernt werden darf! Der Kindersitz
muss auch dann, wenn er nicht benutzt wird, immer mit dem Fahrzeuggurt
befestigt sein. Bereits bei einer Notbremsung oder einem geringen Aufprall
kann ein unbefestigter Kindersitz andere Mitfahrer und Sie selbst verletzten.
Auf dem Beifahrersitz ist Ihr Kind bei einem Unfall in den meisten Fällen höheren
Gefahren ausgesetzt. In Ausnahmefällen kann der Kindersitz jedoch auch vorne am
Beifahrersitz verwendet werden. Beachten Sie dabei folgende Punkte:
• Bei Fahrzeugen mit Front-Airbag müssen Sie den Beifahrersitz so weit wie
möglich nach hinten schieben.
• Die Empfehlungen des Fahrzeugherstellers sind unbedingt zu befolgen.
!
Warnung: Der Kindersitz ist nicht für die Verwendung mit 2-Punkt- oder
Beckengurt geeignet. Wird der Sitz mit einem 2-Punkt-Gurt gesichert, kann
es bei einem Unfall zu schweren oder gar tödlichen Verletzungen kommen.
Hinweis! Bitte lassen Sie Ihr Kind nie unbeaufsichtigt im Fahrzeug zurück.
9
Page 11

THE BEST POSITION IN THE CAR LA POSIZIONE PIÙ CORRETTA ALL‘INTERNO DEL VEICOLO
The installation of CYBEX Juno-fix is only permitted by using the ISOFIXCONNECT System.
There is a „semi-universal“ homologation for securing the child seat with
ISOFIX connectors. For this reason the CYBEX Juno-fix with ISOFIX
CONNECT system may be installed only in certain types of cars. Please
see the details of authorised vehicles and positions on the enclosed list of
approved cars. A constantly updated list of authorised cars can be found on www.
cybex-online.com. Items of luggage and other loose objects in the car, which could
cause injury in an accident, must always be safely secured. Such items and objects
can become deadly projectiles inside the car.
L'installazione di CYBEX Juno-fix è ammessa soltanto con l'utilizzo del
sistema ISOFIX-CONNECT.
Per l’utilizzo del seggiolino con i connettori ISOFIX l’omologazione è “semiuniversale”. Pertanto il seggiolino CYBEX Juno-fix con sistema ISOFIX
CONNECT potrà essere utilizzato soltanto in alcuni tipi di autoveicoli.
Preghiamo verificare l’elenco dei veicoli approvati e delle relative posizioni di
utilizzo nell’elenco allegato. L’elenco viene regolarmente aggiornato e può essere
consultato e/o scaricato dal nostro sito www.cybex-online.com. Attenzione. Bagagli
o altri oggetti presenti nell’abitacolo dovranno sempre essere ben fissati e disposti
in modo da non costituire pericolo in caso di incidente. Oggetti liberi e pesanti si
trasformano in proiettili pericolosissimi in caso di impatto!
DEUKIT
!
Warning! The child seat must not be used on vehicle seats which are
installed at right angles to the direction of travel. On rear-facing seats
in vehicles, as for example, in a van or minibus, use of the child seat is
authorised, provided that the vehicle seat is authorised for the carriage of
an adult. It is essential to ensure that the headrest is not removed when
the child seat is installed in a rearward-facing direction. The child seat must
always be secured in place with the vehicle seat belt, even when not in use.
If you have to perform an emergency stop or if you are involved in a minor
collision an unsecured child seat can injure you and other passengers.
There is greater danger in most accidents of injury to your child, if the child seat is
installed on the front passenger seat. In exceptional cases, however, the child seat
can be used on the front passenger seat. Please note the following points:
• In cars with front airbags the passenger seat must be pushed as far back as
possible.
• The recommendations of the vehicle manufacturer must be followed.
!
Warning! The child seat is not suitable for use with 2-point or lap belts. If you
are involved in an accident and the seat is secured with a 2-point seat belt,
the child may be severely injured or killed.
Note! Never leave your child unattended in the car.
!
La percentuale di traumi a seguito d’incidente è maggiore nel caso di seggiolini
installati nella posizione centrale. In casi eccezionali il seggiolino potrà essere usato
anche sul sedile passeggero as anteriore. In tali casi preghiamo di notare quanto
segue:
• Nelle autovetture dotate di airbag, raccomandiamo di arretrare al massimo il
sedile passeggero.
• E’ indispensabile seguire le raccomandazioni del costruttore del veicolo.
!
Nota Bene! Non lasciare MAI il bambino incustodito nell’autovettura.
Attenzione! Il seggiolino NON è utilizzabile su sedili orientati lateralmente.
Per sedili orientati contro il senso di marcia, per es. van o minibus, l’uso è
possibile soltanto se tali sedili sono omologati per il trasporto di un adulto.
Nei sedili orientati contro il senso di marcia NON togliere l’appoggiatesta
quando viene montato il seggiolino. Allacciare SEMPRE il seggiolino con la
cintura di sicurezza anche quando non in uso. In caso di frenata improvvisa
o di incidente, anche minore, il seggiolino non ssato può costituire un grave
pericolo per il conducente o altri passeggeri.
Attenzione! Il seggiolino non può essere utilizzato con cinture di sicurezza a
due punti di ancoraggio o soltanto con cinture ventrali. Il bambino sarebbe
esposto a lesioni letali in caso di incidente.
10
Page 12
v
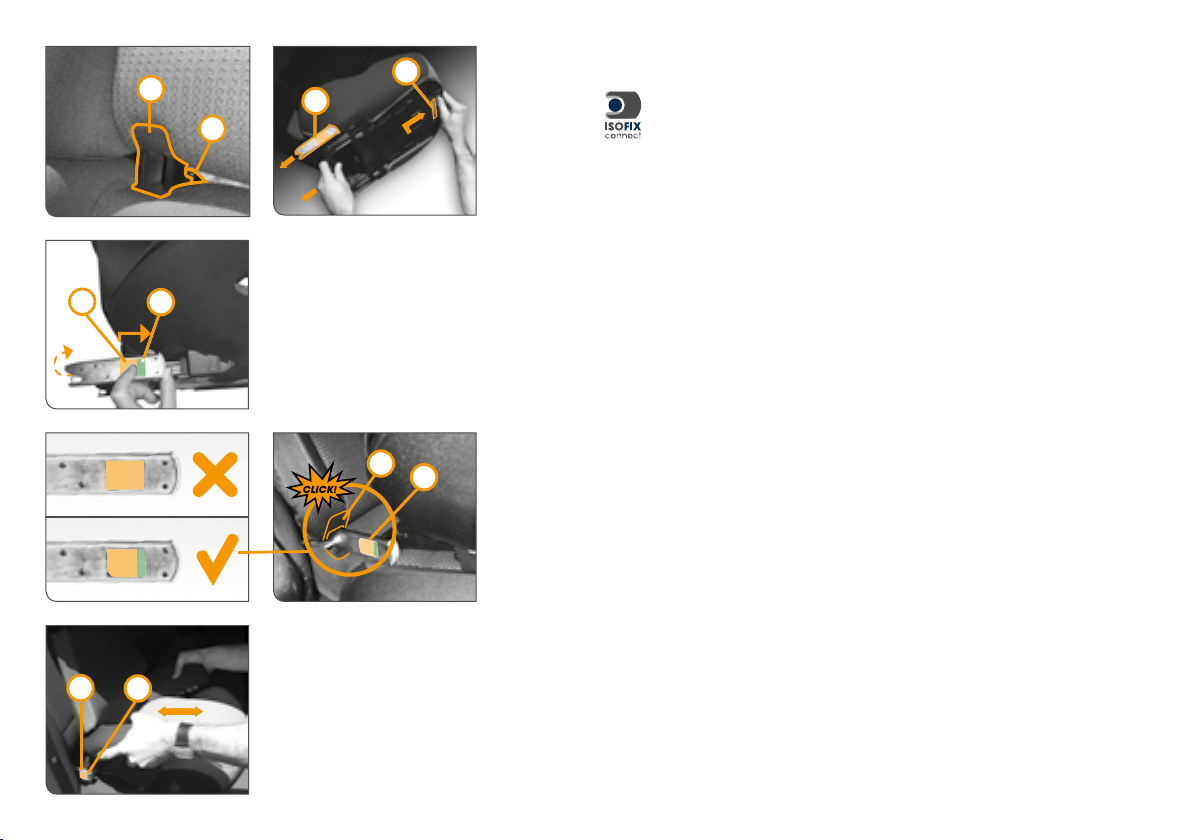
BEFESTIGEN DES KINDERSITZES MIT ISOFIX CONNECT SYSTEM
u
w
i
y
y
x
u
w
x
Mit dem ISOFIX CONNECT System können Sie den Kindersitz fest mit
dem Fahrzeug verbinden und so die Sicherheit Ihres Kindes erhöhen. Ihr
Kind wird weiterhin mit dem Dreipunkt-Automatikgurt Ihres Fahrzeuges
angeschnallt.
Hinweis! Die ISOFIX Befestigungspunkte (i) sind zwei Metalllaschen pro
Sitzplatz und be nden sich zwischen Rückenlehne und Sitzfl äche des
Fahrzeugs. Im Zweifelsfall nehmen Sie die Bedienungsanleitung Ihres
Fahrzeugs zur Hilfe.
Sind die ISOFIX Befestigungspunkte (i) ihres Fahrzeugs schwer zugänglich, so
können Sie zur Schonung des Sitzbezuges die mitgelieferten ISOFIX Einführhilfen
(u) in den beiden Befestigungspunkten (i) dauerhaft einhängen. In manchen
Fahrzeugen eignet sich eine entgegengesetzte Einbaurichtung der ISOFIX
Einführhilfen (u) besser.
Zur ordnungsgemäßen Befestigung des CYBEX Juno-fix, beachten Sie bitte
folgendes:
• Betätigen Sie die Einstelltaste (v) an der Unterseite des Kindersitzes.
• Ziehen Sie die ISOFIX Konnektoren (w) bis zum Endanschlag heraus.
• Drehen Sie die Konnektoren um 180°, damit sie in Richtung der ISOFIX
Einführhilfen (u) zeigen.
Hinweis! Achten Sie darauf, dass die beiden grünen Sicherheitsindikatoren
(x), an den ISOFIX Konnektoren (w), nicht sichtbar sind. Entriegeln Sie
gegebenenfalls die Konnektoren (w), indem Sie die rote Entriegelungstaste (y)
drücken und zurückziehen. Wiederholen Sie den Vorgang
• Schieben Sie die beiden ISOFIX Konnektoren (w) in die Einführhilfen (u) bis diese
mit einem hörbaren „KLICK“ an den Befestigungspunkten (i) einrasten.
• Vergewissern Sie sich, dass der Kindersitz gut hält, indem Sie versuchen ihn
herauszuziehen.
• Der grüne Sicherheitsindikator (x) muss an den beiden roten Entriegelungstasten
(y) gut sichtbar sein.
• Mit der Einstelltaste (v) an der Unterseite des Kindersitzes können Sie nun die
Position des Sitzes einstellen.
Hinweis! Beachten Sie dazu den Abschnitt „DEN SITZ INS FAHRZEUG
STELLEN“.
• Jetzt können Sie Ihr Kind anschnallen; siehe „ANSCHNALLEN DES KINDES“
11
Page 13

INSTALLATION OF THE CHILD SEAT WITH ISOFIX CONNECT
SYSTEM
With the ISOFIX CONNECT System you can secure the child seat safely in
the car and thus make your child safer. Your child is further protected by the
security of your car‘s three-point automatic seat belt.
Note! The ISOFIX anchorage points (i) are two metal rings per seat and are
located between the backrest and the seat of the car. If you are in any doubt,
consult your car’s instruction manual for assistance.
If it is difficult to access the ISOFIX anchorage points (i) of your car, and to protect
the seat cover you can permanently fit the ISOFIX guides (u) provided in both
anchorage points. In many cars it is more effective to install the ISOFIX guides (u)
in an opposing direction.
To secure the CYBEX Juno-fix correctly, observe the following instructions:
• Activate the handle (v) on the underside of the child seat.
• Pull out the ISOFIX connectors (w) as far as possible.
• Turn the connectors 180°, so that they show in the direction of the ISOFIX
GUIDES (u).
Note! Take care that the two green safety indicators (x) on the ISOFIX
connectors (w) are not visible. If necessary, release the connectors (w) by
pressing and pulling back the red release button (y). Repeat the process as
appropriate for the second connector
• Push the two ISOFIX connectors (w) into the GUIDES (u) until they lock into place
on the anchorage points (i) with an audible „CLICK“.
• Make certain that the child seat is securely fixed in place by trying to pull it out.
• The green safety indicator (x) must be clearly visible on both red release buttons
(y).
• You can now use the handle (v) on the underside of the child seat to adjust the
position of the seat.
Note! Please refer to the section „PLACING THE CHILD SEAT IN THE CAR“. Nota Bene! Per maggiori informazioni vedere il capitolo „POSIZIONAMENTO
• You can now secure your child in the child seat; see „SECURING THE CHILD“
INSTALLAZIONE DEL SEGGIOLINO CON IL SISTEMA ISOFIX
CONNECT
Con il Sistema ISOFIX Connect, grazie ai connettori che consentono un
fissaggio ottimale del seggiolino al veicolo, la sicurezza del Vostro bambino
sarà superiore. Il bambino sarà fissato al seggiolino ed ulteriormente protetto
dalla cintura di sicurezza automatica a 3 punti di ancoraggio della vettura.
Nota Bene! I punti di ancoraggio ISOFIX (i) della vettura sono rappresentati da
due anelli metallici posti tra lo schienale e la seduta di ogni sedile. In caso di
dubbi, fare riferimento al manuale dell’autovettura.
Nel caso i punti di ancoraggio ISOFIX (j) dell’auto fossero difficili da raggiungere,
per facilitare l’installazione ed anche per proteggere i sedili da eventuali graffi,
consigliamo di fissare le guide ISOFIX (u) fornite in dotazione con il seggiolino.
Secondo la conformazione dei sedili, le guide possono essere fissate in entrambe
le direzioni.
Consigli per una corretta installazione del seggiolino CYBEX Juno-fix:
• Usare la maniglia (v) posta alla base del seggiolino.
• Estrarre al massimo i connettori ISOFIX.
• Ruotare i connettori di 180° dirigendo le punte verso le guide ISOFIX-CONNECT
(u).
Nota Bene! Vericare che i due indicatori di sicurezza di colore verde (x),
posti sui connettori ISOFIX (w), non siano visibili. Se necessario sganciare
i connettori (w), premendo e tirando all’indietro il bottone di rilascio (y), di
colore rosso. Ripetere da ambo i lati.
• Spingere entrambi i connettori ISOFIX (w) nelle guide per l’installazione (u) fino a
quando non sentite lo scatto di connessione nei punti di ancoraggio ISOFIX (i).
• Verificare che il seggiolino sia fissato saldamente provando a tirarlo con forza.
• I due pulsanti di sicurezza (x) devono a questo punto risultare chiaramente visibili
su ambo i lati dei pulsanti di rilascio (y) di colore rosso.
• Ora è possibile regolare la posizione del seggiolino utilizzando la maniglia (v)
posta alla sua base.
DEL SEGGIOLINO NELL’AUTO“.
• Ora è possibile accomodare ed allacciare il bambino. Preghiamo di fare
riferimento alla sezione “ALLACCIARE IL BAMBINO”
DEUKIT
12
Page 14

LÖSEN DER ISOFIX KONNEKTOREN
w
y
x
v
Führen Sie die Einbauschritte in umgekehrter Reihenfolge durch.
• Entriegeln Sie die ISOFIX Konnektoren (w) beidseitig, indem Sie die
roten Entriegelungstasten (y) drücken und gleichzeitig zurückziehen.
• Ziehen Sie den Sitz aus den ISOFIX Einführhilfen (u) heraus.
• Drehen Sie die ISOFIX Konnektoren (w) um 180°.
• Betätigen Sie die Einstelltaste (v) an der Unterseite des Kindersitzes und
schieben Sie die Konnektoren (w) bis zur Endposition hinein.
DEN SITZ INS FAHRZEUG STELLEN
• Stellen Sie den Kindersitz auf den entsprechenden Fahrzeugsitz im
Auto.
• Um eine aufrechte Sitzposition für das Kind einzustellen achten Sie
unbedingt darauf, dass die Rückenlehne (a) des Kindersitzes flächig an
• Den Abstand können Sie mit der Einstelltaste (v) an der Unterseite des
Kindersitzes einstellen.
a
• Sollte die Kopfstütze des Fahrzeugsitzes störend sein, ziehen Sie diese ganz
heraus, drehen Sie sie um oder nehmen Sie sie ganz ab (Ausnahme siehe
Abschnitt „DER RICHTIGE PLATZ IM FAHRZEUG“). Die Rückenlehne (a) passt
sich stufenlos fast jeder Neigung des Fahrzeugsitzes an.
!
der Rückenlehne des Fahrzeugsitzes anliegt.
Warnung! Die Rückenlehne des CYBEX Juno- x muss an der Lehne des
Fahrzeugsitzes ächig au iegen. Um den größtmöglichen Schutz für das
Kind zu gewährleisten, muss sich der Sitz in einer normalen, aufrechten
Position be nden.
13
Hinweis! An einigen Autositzen aus emp ndlichem Material (z.B. Velours,
Leder, etc.) können durch die Benutzung von Kindersitzen mögliche
Gebrauchsspuren und/oder Abfärbungen auftreten. Um das zu vermeiden,
können Sie z.B. eine Decke oder ein Handtuch unterlegen. Ferner weisen wir in
diesem Zusammenhang auf unsere Reinigungshinweise hin, die vor der ersten
Verwendung des Sitzes unbedingt beachtet werden sollten.
Page 15

RELEASING THE ISOFIX CONNECTORS RILASCIO DEI CONNETTORI ISOFIX
Carry out the installation steps in reverse order. Eseguire tutte le operazioni di installazione nell‘ordine inverso.
• Release the ISOFIX connectors (w) on both sides, by pressing and
pulling back the red release buttons (y).
• Pull the seat out of the ISOFIX guides (u).
• Turn the ISOFIX connectors (w) 180°.
• Activate the handle (v) on the underside of the child seat and push the connectors
in until they reach the end position.
• Sganciare i connettori ISOFIX (w) su entrambi i lati, premendo e tirando
all’indietro il bottone di rilascio (y), di colore rosso.
• Sfilare il seggiolino dalle guide ISOFIX (u).
• Ruotare i connettori ISOFIX (w) di 180°.
• Con la maniglia (v) posta alla base della seduta rilasciare i connettori e spingerli
fino in fondo, all’interno dell’apposito alloggiamento.
PLACING THE CHILD SEAT IN THE CAR POSIZIONARE IL SEGGIOLINO NELLA VETTURA
• Place the child seat on the appropriate seat in the car.
• To install the seat in an upright position for the child it is essential to take
care that the backrest (a) of the child seat lies flush against backrest of
• You can adjust this distance with the handle (v) on the underside of the child seat.
• If the headrests of the car seats get in the way, pull these completely out, turn
them round, or detach them completely (exception see section „THE BEST
POSITION IN THE CAR“). The backrest (a) adjusts itself in one movement to
almost every position of the car seat.
!
Note! It is possible that some car seats that are made of soft material (e.g.
velours, leather, etc.) may show signs of usage and/or discolouration. In order
to avoid this, you could, for example, place a cover or towel underneath it. In
this context, we would also like to refer to you to our cleaning instructions,
which must absolutely be followed before the rst use of the seat.
the car seat.
Warning! The CYBEX Juno-x backrest must lie ush with the back of the
car seat. In order to guarantee maximum protection for the child, the seat
must be in a normal, upright position.
• Collocare il seggiolino di sicurezza sul sedile dell‘auto.
• Per installare il seggiolino in posizione di seduta per il bambino è
necessario fare attenzione che lo schienale (a) del seggiolino appoggi
perfettamente allo schienale del sedile. Spingere quindi il seggiolino il
• La distanza si regola con la maniglia (v) che si trova nella parte inferiore della
seduta.
• Se il poggiatesta del sedile dell’auto impedisce un corretto contatto con lo
schienale, alzarlo o rimuoverlo completamente (fatta eccezione per i casi indicati
nella sezione “LA POSIZIONE PIÙ CORRETTA ALL‘INTERNO DEL VEICOLO”).
Lo schienale (a) si adatta in un semplice movimento a quasi qualsiasi posizione
del sedile dell’auto.
!
Nota Bene! Nel caso di sedili in materiali particolarmente delicati (per esempio
velluto, pelle, ecc.) per evitare danneggiamenti consigliamo di di stendere
un telo protettivo sotto il seggiolino. Con l‘occasione ricordiamo di fare
riferimento anche alle istruzioni per il lavaggio, che devono essere seguite
scrupolosamente prima dell‘utilizzo.
più possibile verso lo schienale dell’auto.
Attenzione! Lo schienale di CYBEX Juno-x deve aderire perfettamente allo
schienale del sedile. Per la massima sicurezza del bambino, il sedile deve
trovarsi nella normale posizione eretta!
DEUKIT
14
Page 16

EINSTELLEN DES SICHERHEITSKISSENS
Durch das gleichzeitige Betätigen der beiden Verstelltasten (q) gleitet das
p
q
d
Sicherheitskissen (p) automatisch in seine vorderste Position. Durch Loslassen der
Verstelltasten (q) wird das Sicherheitskissen (p) in seiner Position fixiert.
Die Seitenteile des Sicherheitskissens (p) mit den beiden Verstelltasten (q) passen
exakt in die Armlehnen des Sitzkissens (d) und dienen zur Abstützung am Sitz.
Stellen Sie das Sicherheitskissen (p) so ein, dass dieses am Kind anliegt, jedoch
ohne dass das Sicherheitskissen (p) auf den Körper des Kindes drückt.
!
Warnung: Das Sicherheitskissen (p) darf nur mit dem Sitz und für Kinder mit
einem maximalen Körpergewicht von 18 kg verwendet werden.
15
Page 17
ADJUSTING THE SAFETY CUSHION REGOLAZIONE DEL CUSCINO DI SICUREZZA
Activating both adjustment handles (q) simultaneously causes the safety cushion
(p) to glide automatically into its furthest forward position. Releasing the adjustment
handles (q) fixes the safety cushion (p) in place. The side parts of the safety
cushion (p) fit exactly into the arm rests of the seat cushion (d) and provide support
for the seat. Adjust the safety cushion (p) so that it lies against the child‘s chest
without excerting any pressure on the childs body.
Premendo entrambi i pulsanti (q) il cuscino di sicurezza (p) scorre automaticamente
in avanti nella posizione di massima ampiezza. Rilasciando i pulsanti (q) il cuscino
(p) viene bloccato in posizione. Le parti laterali del cuscino di sicurezza (p) si
connettono perfettamente nei braccioli della base seduta (d). Regolare l’ampiezza
del cuscino di sicurezza (p) in base alla corporatura del bambino. Abbastanza vicino
da proteggerlo, ma non tanto da opprimerlo.
DEUKIT
!
Warning! The safety cushion (p) must be used only with the seat and only
for children weighing not more than 18 kg.
!
Attenzione! Il cuscino di sicurezza (p) può essere utilizzato soltanto in
congiunzione con il seggiolino e soltanto no a quando il bambino non
raggiunge il peso di 18 kg.
16
Page 18

ANSCHNALLEN DES KINDES
r
n
l
m
• Setzen Sie Ihr Kind in den Kindersitz.
• Legen Sie nun das bereits eingestellte Sicherheitskissen (p) ein (siehe Abschnitt
„EINSTELLEN DES SICHERHEITSKISSENS“).
• Ziehen Sie die gesamte Gurtlänge des Dreipunkt-Automatikgurtes heraus.
Nehmen Sie den Beckengurt (n) und legen Sie diesen in die dafür vorgesehene
rot markierte Gurtführung (r) des Sicherheitskissens (p) ein.
!
Warnung: Den Gurt auf keinen Fall verdrehen!
17
f
n
• Stecken Sie die Gurtschlosszunge (m) in das Gurtschloss (l). Dieses muss mit
einem hörbaren „KLICK“ einrasten.
• Spannen Sie den Beckengurt (n) vor, indem Sie am Diagonalgurt (f) ziehen.
• Führen Sie nun den Diagonalgurt (f) parallel zum Beckengurt (n) durch die
Gurtführung (r) des Sicherheitskissens (p) zurück.
• Ziehen Sie den Diagonalgurt (f) straff und achten Sie dabei darauf, dass beide
Gurtteile, über die gesamte Breite des Sicherheitskissens (p), innerhalb der
Gurtführung (r) verlaufen.
IST IHR KIND RICHTIG GESICHERT?
Um die bestmögliche Sicherheit Ihres Kindes zu gewährleisten, prüfen Sie bitte vor
Beginn der Fahrt, ob …
• das Sicherheitskissen (p) ordnungsgemäß eingestellt ist.
• die Gurtschlosszunge (m) im Gurtschloss (l) eingerastet ist.
• der Beckengurt (n) und der Diagonalgurt (f) straff und nicht verdreht durch die
Gurtführung des Sicherheitskissens (p) verlaufen.
• das Sitzkissen (d) beidseitig mit den Konnektoren (w) in den ISOFIX
Befestigungspunkten (i) eingerastet ist und die beiden grünen
Sicherheitsindikatoren (x) deutlich zu sehen sind.
• die Rückenlehne (a) des Kindersitzes vollflächig an der Rückenlehne des
Fahrzeugsitzes anliegt.
Page 19
SECURING THE CHILD ALLACCIARE IL BAMBINO
• Put the child in the child seat.
• Put the previously adjusted safety cushion (p) in place (see section „ADJUSTING
THE SAFETY CUSHION“)
• Draw out the three-point automatic belt to its fullest extent. Take the lap belt (n)
and insert it into the belt routing marked in red (r) of the safety cushion (p).
• Fare accomodare il bambino sul seggiolino.
• Fissare il cuscino di sicurezza (p), precedentemente regolato, al seggiolino. (Vedi
sezione „REGOLAZIONE DEL CUSCINO DI SICUREZZA“)
• Estrarre completamente la cintura di sicurezza. Far passare la parte ventrale
(n) della cintura nell’apposita guida (r), contrassegnata con il colore rosso, del
cuscino di sicurezza (p).
DEUKIT
!
Warning! Do not twist the belt!
• Push the belt tongue (m) into the belt buckle (l). This must lock into place with an
audible „CLICK“.
• Pre-tension the lap belt (n) by pulling on the shoulder belt (f).
• Now guide the shoulder belt (f) back through the belt routing (r) of the safety
cushion (p).
• Pull the shoulder belt (f) taut, taking care that both parts of the belt run over the
total width of the safety cushion (p), within the belt routing (r).
!
Attenzione! La cintura non deve MAI essere attorcigliata!
• Sistemare la guida della cintura (m) nel dispositivo di chiusura (l). Spingere verso
il basso fino a sentire il “click” di collegamento avvenuto.
• Tirare la parte diagonale della cintura (f) per stringere al massimo la parte ventrale
(n).
• Quindi fare passare la parte diagonale della cintura (f) all’interno della stessa
scanalatura guida (r) del cuscino di sicurezza (p).
• Tirare la cintura (f) per ottenere la massima tensione e verificare che entrambe
le parti scorrano completamente all’interno della scanalatura guida (r) per tutta la
sua lunghezza.
IS YOUR CHILD PROPERLY SECURED? IL BAMBINO È ALLACCIATO CORRETTAMENTE?
To guarantee the maximum safety for your child, please test the following before
departure:
• the safety cushion (p) is correctly adjusted.
• the belt tongue (m) has locked into place in the belt buckle (l).
• the lap belt (n) and the shoulder belt (f) are running taut through the belt routing of
the safety cushion (p) and are not twisted.
• the seat cushion (d) has locked into place on both sides with the connectors (w)
into the ISOFIX anchorage points (i) and both green safety indications (x) can be
seen clearly.
• the backrest (a) of the child seat lies completely flush with the backrest of the car
seat.
Per garantire la massima sicurezza del bambino è necessario verificare i seguenti
punti prima di avviare il veicolo:
• l’ampiezza del cuscino di sicurezza (p) deve essere regolata correttamente in
base alla corporatura del bambino.
• la linguetta di fissaggio (m) della cintura di sicurezza dev’essere correttamente
allacciata nella fibbia (l).
• la parte ventrale della cintura (n) e la parte diagonale (f) devono scorrere
all’interno della scanalatura guida del cuscino di sicurezza (p), devono essere ben
tese e non attorcigliate.
• il cuscino seduta (d) deve essere ben fissato: i connettori (w) da ambo i lati
devono essere correttamente agganciati ai punti di ancoraggio ISOFIX (i) della
vettura ed entrambi gli indicatori di sicurezza di colore verde (x) devono essere
chiaramente visibili.
• lo schienale (a) del seggiolino deve aderire perfettamente allo schienale del sedile
dell’autovettura.
18
Page 20

19
PFLEGE
Um die größtmögliche Schutzwirkung Ihres Kindersitzes zu gewährleisten, ist es
unbedingt notwendig folgendes zu beachten:
• Alle sichtbaren Teile des Kindersitzes sollten regelmäßig auf Beschädigungen
kontrolliert werden. Die mechanischen Bauteile müssen einwandfrei funktionieren.
• Es ist unbedingt darauf zu achten, dass der Kindersitz nicht zwischen harten
Teilen wie Fahrzeugtür, Sitzschiene usw. eingeklemmt wird und dadurch
beschädigt werden kann.
• Der Kindersitz muss z. B. nach einem Sturz unbedingt vom Hersteller vor einer
weiteren Verwendung überprüft werden.
REINIGUNG
Es ist darauf zu achten, dass nur ein Original CYBEX Sitzbezug verwendet wird,
da auch der Bezug ein wesentlicher Bestandteil der Funktion ist. Ersatzbezüge
erhalten Sie im Fachhandel.
Hinweis! Bitte den Bezug vor der ersten Verwendung waschen. Der Bezug darf
bei 30 °C im Schonwaschgang gewaschen werden. Sollten Sie mit mehr als 30
°C waschen, kann es zu Ausfärbungen kommen. Bitte den Bezug gesondert
von anderer Wäsche waschen und keinesfalls maschinell trocknen! Den Bezug
keinesfalls in der prallen Sonne trocknen! Die Kunststoffteile können mit
einem milden Reinigungsmittel und warmen Wasser gereinigt werden.
!
Warnung: Keine chemischen Reinigungs- oder Bleichmittel verwenden!
ENTFERNEN DES SITZBEZUGES
Der Bezug besteht aus insgesamt drei Hauptbestandteilen für Kopfstütze,
Rückenlehne und Sitzkissen, die entweder mit Klettband, Druckknöpfen oder
elastischen Bändern am Kindersitz befestigt sind. Sobald Sie alle Befestigungen
lösen, können die Einzelteile zum Waschen abgenommen werden. Zum Abziehen
der Einzelteile des Bezuges führen Sie folgende Schritte durch:
• Durch Öffnen der Druckknöpfe an der Rückseite des Rückenlehne können Sie
dieses nach vorne hin abziehen.
• Zum Entfernen des Sitzkissenbezuges lösen Sie bitte die beiden Gurtbänder
sowie die Druckknöpfe an der Unterseite und ziehen Sie diesen nach vorne hin
ab.
• Den Bezug der Kopfstütze können Sie einfach nach vorne hin abziehen.
Um den Bezug wieder zu befestigen, verfahren Sie in umgekehrter Reihenfolge.
Page 21

PRODUCT CARE MANUTENZIONE
To guarantee that your child seat provides the maximum protection, it is essential to
comply with the following points:
• All visible parts of the child seat must be regularly checked for damage. The
mechanical parts must function faultlessly.
• It is essential to make sure that the child seat is not jammed between hard parts
such as the car door, seat rails etc., which can damage it.
• If the child seat is dropped it must be tested by the manufacturer before being
used again.
CLEANING
Care must be taken that only an Original CYBEX Seat Cover is used, because the
cover is also a fundamental component of the good functioning of the child seat.
Replacement covers may be obtained from a specialist shop.
Note! Please wash the cover before using it for the rst time. The cover should
be washed at 30 °C in a delicate wash cycle. Washing it at temperatures higher
than 30 °C may result in the colours running. Wash separately from other
items and never dry in the tumble dryer! Never dry in strong sunlight! The
plastic parts can be cleaned with a mild cleaning agent.
!
Warning! Never use chemical cleaning or bleaching agents!
REMOVING THE SEAT COVER
The cover consists of three main components for headrest, backrest and seat
cushion, which are secured to the child seat either by velcro, press-studs or elastic
bands. Once you have released all the fastenings, you can remove the individual
components for washing. To detach the individual components of the cover carry
out the following steps:
• Once the press-studs on the back of the backrest have been undone, the cover
can be removed by drawing it forwards.
• To remove the seat cushion cover, release both belt straps and also undo the
press-studs on the underside and draw the cover forward.
• The headrest cover can simply be pulled forward to remove it.
To replace the cover, carry out the same steps in the reverse order.
Per garantire i massimi standard di sicurezza del seggiolino è necessario prendere
nota dei seguenti accorgimenti:
• Tutte le parti importanti del seggiolino di sicurezza per auto devono essere
sottoposte ad un regolare controllo per verificare eventuali danni. Le parti
meccaniche devono funzionare correttamente.
• E’ essenziale che il seggiolino non venga danneggiato a causa di un eventuale
schiacciamento tra il sedile dell’auto e la portiera o da altri ostacoli solidi.
• Il seggiolino dovrà essere inviato al produttore per un controllo in caso di caduta o
di altri eventi similari.
PULIZIA
Il rivestimento è una parte essenziale del seggiolino ed è indispensabile utilizzare
soltanto rivestimenti originali CYBEX. Rivestimenti di ricambio originali sono
disponibili presso i nostri rivenditori autorizzati.
Nota Bene! E‘ consigliato il lavaggio prima del primo utilizzo. I rivestimenti
sono lavabili in lavatrice con ciclo delicato max 30°. Il lavaggio a temperature
superiori può provocare lo scolorimento dei tessuti. Raccomandiamo di lavare
separatamente e di non asciugare meccanicamente. Non asciugare alla luce
diretta del sole! Le parti in plastica possono essere pulite con un detergente
neutro.
!
Attenzione! Non usare mai prodotti chimici o sbiancanti per la pulizia!
RIMOZIONE DEL RIVESTIMENTO
Il rivestimento è costituito di tre parti, per poggiatesta, schienale e seduta, unite al
seggiolino tramite strisce di velcro, bottoni a pressione o fasce elastiche. Una volta
sganciati tutti i punti di fissaggio, la parti del rivestimento possono essere rimosse
per il lavaggio. Per slacciare ogni singola parte procedere come segue:
• Una volta slacciati i bottoni a pressione sul retro dello schienale, sfilare in avanti il
rivestimento.
• Per togliere il rivestimento della seduta, staccare le fascette indicate nell‘immagine
a sinistra, slacciare i bottoni a pressione nella parte inferiore e sollevare il tessuto.
• Il rivestimento del poggiatesta può essere rimosso semplicemente sfilandolo in
avanti.
Per riposizionare il rivestimento, eseguire le operazioni sopra descritte nell’ordine
inverso.
DEUKIT
20
Page 22

VERHALTEN NACH EINEM UNFALL
Sollten Sie einen Unfall gehabt haben, können am Kindersitz Beschädigungen
auftreten, welche nicht unbedingt offensichtlich erkennbar sind. In diesem
Fall muss der Kindersitz unbedingt vom Hersteller geprüft und gegebenenfalls
ausgetauscht werden.
PRODUKTLEBENSDAUER
Der Kindersitz ist so ausgelegt, dass er für die gesamte maximale Verwendungszeit
von ca. 4 Jahren seine Eigenschaften erfüllt. Da jedoch in Fahrzeugen sehr große
Temperaturschwankungen und unvorhersehbare Belastungen auftreten können, ist
es notwendig, folgende Punkte zu beachten.
• Wenn das Fahrzeug längere Zeit der prallen Sonne ausgesetzt ist, muss der
Kindersitz aus dem Fahrzeug entfernt oder mit einem hellen Tuch abgedeckt
werden.
• Prüfen Sie regelmäßig alle Kunststoff- und Metallteile des Sitzes auf
Beschädigung oder Veränderung von Form oder Farbe. Stellen Sie eine
Veränderung fest, ist der Kindersitz unbedingt zu entsorgen oder er muss vom
Hersteller geprüft und gegebenenfalls ausgetauscht werden.
• Veränderungen des Stoffes, insbesondere das Ausbleichen, sind nach jahrelanger
Verwendung in einem Fahrzeug normal und stellen keine Beeinträchtigung dar.
21
ENTSORGUNG
Am Ende der Produktlebensdauer des Kindersitzes ist eine sachgemäße
Entsorgung vorzunehmen. Die Abfallentsorgung kann kommunal unterschiedlich
geregelt sein. Um eine vorschriftsmäßige Entsorgung des Kindersitzes zu
gewährleisten, setzen Sie sich mit Ihrer kommunalen Abfallentsorgung bzw.
Verwaltung Ihres Wohnortes in Verbindung. Beachten Sie auf jeden Fall die
Entsorgungsbestimmungen Ihres Landes.
Page 23

WHAT TO DO AFTER AN ACCIDENT COSA FARE A SEGUITO DI UN INCIDENTE
If you are involved in a collision, the seat may sustain damage that is not
visible to the naked eye. If this is the case, the child seat must be examined by
the manufacturer and replaced if necessary.
In caso d‘incidente il seggiolino potrebbe subire danni non immediatamente
visibili. In tali eventualità il seggiolino dovrà essere assolutamente inviato al
produttore per un controllo e, se necessario, sostituito.
DURABILITY OF THE PRODUCT DUREVOLEZZA DEL PRODOTTO
The child seat is designed to fulfil its purpose for its expected service life of up to 4
years. However, since cars can be exposed to high fluctuations in temperature and
unforeseeable stresses, please take note of the following points:
• If the car is exposed to direct sunlight for a longer period of time, the child seat
must be taken out of the car or covered with a cloth.
• Examine all plastic and metal parts of the seat for any damage or changes to their
shape or colour at least once a year. Should you notice any changes, the child
seat should either be discarded or examined by the manufacturer and replaced if
necessary.
• Changes to the fabric in general and fading colours in particular are normal after
long periods of use in a car and do not constitute a fault.
Il seggiolino è progettato per l‘intera durata del periodo di utilizzo raccomandato,
ovvero circa 4 anni. Tuttavia, poiché il seggiolino può essere sottoposto a forti
sbalzi di temperatura o a circostanza imprevedibili all‘interno del veicolo è in ogni
caso importante prendere nota di quanto segue:
• Nel caso l‘automobile venga lasciata al sole per un lungo periodo di tempo
consigliamo di estrarre il seggiolino o di ripararlo con un telo di copertura.
• Controllare accuratamente almeno ogni anno tutte le parti in plastica per
verificarne eventuali danni o modifiche di forma o di colore. In caso di evidenti
modifiche consigliamo di eliminarlo o di inviarlo al produttore per un controllo e, se
necessario, sostituirlo.
• Modifiche al tessuto di rivestimento, in particolare lo sbiadimento, è considerato
normale con l‘utilizzo negli anni e non costituisce un difetto.
DEUKIT
DISPOSAL SMALTIMENTO
At the end of the life of the child safety seat, it must be disposed of properly. Waste
disposal regulations may vary from region to region. In order to guarantee proper
disposal, please contact your local waste management office or your local council.
Please be sure to observe the waste disposal regulations in your country.
Alla fine dell‘utilizzo è necessario provvedere allo smaltimento del seggiolino nel
modo appropriato. Le norme per lo smaltimento variano localmente. Preghiamo
di contattare l‘ufficio di competenza della vostra area di residenza per istruzioni
dettagliate in merito. In ogni caso, seguire sempre le normative dello stato di
residenza.
22
Page 24

GARANTIEBEDINGUNGEN
Die nachfolgenden Garantiebestimmungen gelten nur in dem Land, in dem
dieses Produkt erstmalig über den Einzelhandel an einen Verbraucher verkauft
wurde. Die Garantie deckt sämtliche Herstellungs- und Materialfehler ab,
die im Zeitpunkt des Kaufs bestanden haben oder die innerhalb von drei (3)
Jahren nach dem Erstverkauf dieses Produkts über den Einzelhandel an einen
Verbraucher in Erscheinung getreten sind (Herstellergarantie). Tritt während
der Garantiezeit ein Herstellungs- und Materialfehler auf, wird das Produkt
kostenlos repariert oder – nach unserem freien Ermessen – gegen ein neues
ausgetauscht. Um Leistungen im Rahmen dieser Garantie in Anspruch nehmen
zu können, muss das Produkt an den Einzelhändler zurückgegeben werden,
der es erstmalig verkauft hat und ein Nachweis über den Kauf (Kaufbeleg
oder Rechnung) im Original vorgelegt werden, welcher das Kaufdatum, den
Namen des Händlers sowie die Produktbezeichnung aufzeigt. Der Anspruch
aus diesem Garantieversprechen besteht nicht, wenn das Produkt an den
Hersteller oder irgendeine andere Person als den Einzelhändler, der es
erstmalig verkauft hat, zum Zweck der Inanspruchnahme der Garantieleistung
geschickt wird. Die Garantie gilt nur, wenn das Produkt nach dem Kauf
umgehend auf Vollständigkeit, Herstellungs- und Materialfehler überprüft
wurde. Wurde das Produkt im Versandhandel gekauft, ist es umgehend nach
Erhalt auf Vollständigkeit, Herstellungs- und Materialfehler zu überprüfen. Falls
Schäden vorhanden sind, darf das Produkt nicht mehr benutzt werden und
muss umgehend an den Händler, der es erstmalig verkauft hat, zurückgegeben
werden. Im Garantiefall muss das Produkt in einem vollständigen und sauberen
Zustand zurückgegeben werden. Bitte lesen Sie vor einer Kontaktaufnahme
mit dem Händler sorgfältig die Gebrauchsanleitung. Die Garantie deckt
keine Schäden ab, die durch Fehlgebrauch, äußere Einflüsse (Wasser,
Feuer, Verkehrsunfälle o.ä.) oder normalen Verschleiß entstanden sind.
Die Garantie wird nur gewährt, wenn das Produkt in Übereinstimmung mit
der Gebrauchsanweisung behandelt und benutzt wurde, Reparaturen oder
Veränderungen ausschließlich durch Personen vorgenommen wurden, die
hierzu befugt waren und stets nur Original Bau- und Zubehörteile verwendet
wurden. Durch diese Garantie werden weder die auf Grundlage der jeweils
anwendbaren Gesetze bestehenden Verbraucherrechte noch Rechte gegen den
Verkäufer wegen der Vertragswidrigkeit des Produkts ausgeschlossen, begrenzt
oder in anderer Weise eingeschränkt.
23
Page 25

The following warranty applies solely in the country where this product was
initially sold by a retailer to a customer. The warranty covers all manufacturing
and material defects, existing and appearing, at the date of purchase or
appearing within a term of three (3) years from the date of purchase from the
retailer who initially sold the product to a consumer (manufacturer’s warranty).
In the event that a manufacturing or material defect should appear, we will – at
our own discretion – either repair the product free of charge or replace it with a
new product. To obtain such warranty it is required to take or ship the product
to the retailer, who initially sold this product to a customer and to submit an
original proof of purchase (sales receipt or invoice) that contains the date of
purchase, the name of the retailer and the type designation of this product. This
warranty shall not apply in the event that this product is taken or shipped to the
manufacturer or any other person other than the retailer who initially sold this
product to a consumer. Please check the product with respect to completeness
and manufacturing or material defects immediately at the date of purchase or,
in the event that the product was purchased in distance selling, immediately
after receipt. In case of a defect stop using the product and take or ship it
immediately to the retailer who initially sold it. In a warranty case the product
has to be returned in a clean and complete condition. Prior to contacting the
retailer, please read this instruction manual carefully. This warranty does not
cover any damages caused by misuse, environmental influence (water, fire, road
accidents etc.) or normal wear and tear. It does solely apply in the event that the
use of the product was always in compliance with the operating instructions, if
any and all modifications and services were performed by authorized persons
and if original components and accessories were used. This warranty does not
exclude, limit or otherwise affect any statutory consumer rights, including claims
in tort and claims with respect to a breach of contract, which the buyer may have
against the seller or the manufacturer of the product.
GARANZIAWARRANTY
La seguente garanzia vale unicamente nella nazione in cui il prodotto è stato
originariamente venduto da un rivenditore al consumatore. La garanzia copre
eventuali difetti di fabbricazione e di materiali riscontrati all‘acquisto o entro un
periodo di tre (3) anni dalla data di acquisto presso il rivenditore (garanzia del
produttore). Nel caso venga riscontrato o appaia un difetto di fabbricazione o di
materiali nel corso di validità della garanzia provvederemo - a nostra discrezione
- a riparare il prodotto senza costi o a sostituirlo. Per avere diritto alla garanzia
è necessario riportare o spedire il prodotto al rivenditore presso il quale è stato
acquistato ed è indispensabile fornire la prova d‘acquisto (scontrino fiscale,
fattura, ecc.) in originale. La prova d‘acquisto dovrà contenere indicati la data di
acquisto, il nome del rivenditore e le caratteristiche del prodotto (tipo/modello).
Nessun intervento in garanzia se il prodotto verrà inviato al produttore o a
qualsiasi altra persona diversa dal rivenditore presso il quale si è effettuato
l‘acquisto. La garanzia è valida soltanto se il prodotto è stato sottoposto ad
un accurato controllo di completezza, funzionalità all‘acquisto e eventuali
manchevolezze di produzione o di materiali sono state prontamente segnalate.
Per acquisti a distanza, raccomandiamo di effettuare un controllo completo al
ricevimento del prodotto. In caso si riscontri qualsiasi danneggiamento invitiamo
a NON utilizzare il prodotto e a restituirlo immediatamente al rivenditore da cui
è stato acquistato. I diritti di garanzia sono validi soltanto se il prodotto è reso
pulito e completo di ogni parte. Prima di contattare il rivenditore Vi preghiamo
di leggere con attenzione le istruzioni contenute nel manuale. La garanzia non
copre danni provocati da utilizzo improprio o eventi fortuiti e cause ambientali
(acqua, fuoco, incidenti stradali, ecc) o dal normale deperimento d‘uso. La
garanzia è valida soltanto per prodotti usati in conformità a quanto stabilito nel
manuale istruzioni, se eventuali modifiche o riparazioni sono state effettuate
da personale autorizzato e se sono state utilizzate solo parti ed accessori
originali. Questa garanzia non esclude, limita o comunque pregiudica eventuali
diritti legali dei consumatori, comprese istanze in caso di torto e in caso di una
violazione del contratto, che l‘acquirente può avere nei confronti del rivenditore
o del produttore.
DEUKIT
CYBEX GmbH
Riedinger Str. 18, 95448 Bayreuth, Germany
Tel. +39 0444 602721, fax +39 0444 1876734
24
Page 26
JUNO-fix
ECE R 44/04
SEMI-UNIVERSAL
9 - 18 kg
04301317
CYBEX GmbH
Riedinger Str. 18, 95448 Bayreuth
Germany
02/2015
25
CYBEX JUNO-FIX
siège-auto avec dossier, appuie-tête et bouclier de
protection ajustable.
RECOMMANDÉ POUR
Âge: d‘environ 9 mois à 4 ans
Poids : de 9 à 18 kg
Pour sièges de voiture équipés d’une ceinture de
sécurité 3-points à enrouleur conforme à ECE R16 et
ISOFIX
HOMOLOGATION
ECE R44/04, Groupe 1, 9 - 18 kg
CYBEX JUNO-FIX
Booster met rugsteun, hoofdsteun en aanpasbaar
veiligheidskussen.
AANBEVOLEN VOOR
Leeftijd: van ongeveer 9 maanden tot 4 jaar.
Gewicht: 9-18 kg
Voor autozetels met drie-punts automatische gordel,
conform ECE R16 en ISOFIX
HOMOLOGATIE
ECE R44/04, Groep 1, 9-18 kg
CYBEX JUNO-FIX
0składa się z siedziska z oparciem oraz regulowanej
osłony tułowia.
ZALECANY DLA
Wiek: od ok. 9 miesięcy do 4 lat
Waga: 9 - 18 kg
Do foteli samochodowych z 3-punktowymi pasami
bezpieczeństwa z automatyczną blokadą według
normy ECE R16 i ISOFIX
DOPUSZCZENIE DO UŻYTKU
Zgodny z normą ECE R44/04, Grupa 1, 9 - 18 kg
CHER CLIENT!
MERCI D‘AVOIR CHOISI D‘ACHETER LE CYBEX JUNO-FIX. LORS DE SON
DÉVELOPPEMENT, NOUS NOUS SOMMES FOCALISÉS SUR LA SÉCURITÉ, LE
CONFORT ET LA FACILITÉ D‘UTILISATION. CE PRODUIT DE QUALITÉ RÉPOND AUX
NORMES ACTUELLES LES PLUS STRICTES.
FR
SOMMAIRE..........................................................................................................................1
HOMOLOGATION .............................................................................................................25
PREMIÈRE INSTALLATION .............................................................................................27
AJUSTEMENT A LA TAILLE DE L‘ENFANT ...................................................................29
RETRAIT DE L‘INSERT ....................................................................................................29
LA MEILLEURE POSITION DANS LA VOITURE...........................................................31
INSTALLATION DU SIEGE AVEC SYSTEME ISOFIX CONNECT ...............................33
LIBERATION DES CONNECTEURS ISOFIX .................................................................35
PLAÇEMENT DU SIÈGE ENFANT DANS LA VOITURE ..............................................35
AJUSTEMENT DU COUSSIN DE SÉCURITÉ ...............................................................37
SÉCURISATION DE L‘ENFANT ....................................................................................... 39
VOTRE ENFANT EST CORRECTEMENT SÉCURISÉS? .............................................39
ENTRETIEN ....................................................................................................................... 41
NE TTOYAGE .....................................................................................................................41
ENLEVER LA HOUSSE ....................................................................................................41
QUE FAIRE APRES UN ACCIDENT ...............................................................................43
LA DUR ABILITÉ DU PRODUIT .......................................................................................43
RECYCLAGE .....................................................................................................................43
GARANTIE .........................................................................................................................45
SOMMAIRE
Page 27

BESTE KLANT!
DANK U VOOR HET AANKOPEN VAN DE CYBEX JUNO-FIX. WIJ GARANDEREN
U DAT WIJ BIJ DE ONTWIKKELING VAN DE CYBEX JUNO-FIX VEEL AANDACHT
BESTEED HEBBEN AAN VEILIGHEID, KOMFORT EN FUNCTIONALITEIT. HET
PRODUKT WERD ONDER SPECIALE KWALITEITSCONTROLE VERVAARDIGD EN
BEANTWOORDT AAN DE MEEST STRIKTE VEILIIGHEIDSNORMEN.
DRODZY KLIENCI!
DZIĘKUJEMY ZA ZAKUP FOTELIKA SAMOCHODOWEGO CYBEX JUNO-FIX.
MOŻEMY PAŃSTWA ZAPEWNIĆ, ŻE OPRACOWUJĄC FOTELIK CYBEX JUNOFIX, NAJWIĘCEJ UWAGI POŚWIĘCILIŚMY BEZPIECZEŃSTWU, WYGODZIE ORAZ
PROSTOCIE UŻYTKOWANIA. PRODUKT TEN WYPRODUKOWANO W OPARCIU O
SYSTEM ŚCISŁEJ KONTROLI JAKOŚCI I SPEŁNIA ON NAJSUROWSZE WYMOGI
BEZPIECZEŃSTWA.
NL
BEKNOPTE HANDLEIDING ..............................................................................................1
HOMOLOGATIE ................................................................................................................25
EERSTE INSTALLATIE .....................................................................................................28
AANPASSEN AAN DE LENGTE VAN HET KIND ..........................................................30
VERWIJDEREN VAN HET INLEGKUSSEN ...................................................................30
DE BESTE POSITIE IN DE AUTO ...................................................................................32
INSTALLATIE VAN HET KINDERZITJE MET HET ISOFIX CONNECT SYSTEEM ....34
DE ISOFIX CONNECTOREN ONTGRENDELEN ..........................................................36
HET KINDERZITJE IN DE AUTO PLAATSEN ................................................................36
HET VEILIGHEIDSKUSSEN AANPASSEN ....................................................................38
HET KIND VEILIG VASTMAKEN .....................................................................................40
IS UW KIND VEILIG VASTGEMAAKT? ..........................................................................40
ONDERHOUD ...................................................................................................................42
REINIGING .........................................................................................................................42
DE BEKLEDING VERWIJDEREN ...................................................................................42
WAT MOET U DOEN NA EEN ONGEVAL ......................................................................44
DUURZAAMHEID VAN HET PRODUCT ........................................................................44
AFVALVERWIJDERING ...................................................................................................44
GARANTIE .........................................................................................................................46
INHOUD
PL
INSTRUKCJA SKRÓCONA................................................................................................1
DOPUSZCZENIE DO UŻYTKU ......................................................................................25
PIERWSZY MONTAŻ FOTELIKA .................................................................................... 28
DOSTOSOWANIE FOTELIKA DO WZROSTU DZIECKA .............................................30
WYJMOWANIE WKŁADKI PODWYŻSZAJĄCEJ Z SIEDZISKA ..................................30
NAJLEPSZE MIEJSCE W SAMOCHODZIE ...................................................................32
MOCOWANIE FOTELIKA ZA POMOCĄ ZACZEPÓW ISOFIX ....................................34
CHOWANIE ZACZEPÓW ISOFIX ...................................................................................36
UMIESZCZANIE FOTELIKA W SAMOCHODZIE ..........................................................36
REGULACJA OSŁONY TUŁOWIA ..................................................................................38
ZABEZPIECZANIE DZIECKA ..........................................................................................40
CZY TWOJE DZIECKO JEST DOBRZE ZABEZPIECZONE? ...................................... 40
KONSERWACJA ...............................................................................................................42
CZYSZCZENIE ..................................................................................................................42
ZDEJMOWANIE TAPICERKI ........................................................................................... 42
POSTĘPOWANIE PO WYPADKU DROGOWYM..........................................................44
TRWAŁOŚĆ PRODUKTU ................................................................................................44
UTYLIZACJA .....................................................................................................................44
WARUNKI GWARANCJI ..................................................................................................46
SPIS TREŚCI
FRNLPL
26
Page 28

b
a
d
a
c
!
Attention ! Pour une protection optimale de votre enfant, il est essentiel
d’installer et d’utiliser le siège conformément aux instructions de ce manuel.
Note! Merci de toujours conserver le manuel d‘instructions sous la housse
elastique a l‘arriere du dossier du siege, de facon a ce qu‘elle soit toujours a
portee de main.
27
p
e
L.S.P.
z
PREMIÈRE INSTALLATION
Le siège est constitué d‘une assise (d) d‘un dossier (a) avec une têtière (e) qui
s‘ajuste à la taille de l‘enfant, ainsi qu‘un bouclier de sécurité (p), ajustable en
profondeur. Votre enfant benéficiera d‘une protection et d‘un confort maximum
seulement si tous les composants sont assemblés.
!
Avertissement! Les composants du siège pour enfant CYBEX ne doivent
pas être utilisés seuls ou en combinaison avec des coussins de siège, des
dossiers ou des appuie-tête à d‘autres fabricants ou autres modèles . Dans
ces cas le siège enfant ne sera plus certié pour une utilisation.
Le dossier (a) est clipsé dans l‘axe (c) de l‘assise (d) grâce à la fixation (b). Clipser
les deux protections latérales fournies avec le „Linear Side-impact Protection“
System (L.S.P.) dans les trous correspondants (z) sur les côtés extérieurs des
protections d‘épaules jusqu‘à entendre un „CLICK“ audible.
Note! Merci de toujours conserver le manuel d‘instructions sous la housse
elastique a l‘arriere du dossier du siege, de facon a ce qu‘elle soit toujours a
portee de main.
!
Attention! Merci de faire attention à ne pas endommager le siège auto en
insérant la ceinture ou en fermant la porte du véhicule.
Page 29

! !
Opgelet! Voor een maximale bescherming van uw kind, is het essentieel
het kinderzitje te gebruiken en te installeren volgens de richtlijnen in deze
handleiding.
Ostrzeżenie! Aby zapewnić bezpieczeństwo dziecku, bardzo ważne jest,
aby zmontować fotelik CYBEX Juno-x oraz używać go zgodnie z niniejszą
instrukcją użytkowania.
Opgelet! Gelieve deze handleiding onder de bekleding aan de achterkant van
de rugsteun van het zitje te bewaren.
Uwaga! Instrukcję przechowuj w kieszeni pod tapicerką z tyłu oparcia fotelika,
aby była zawsze pod ręką.
EERSTE INSTALLATIE PIERWSZY MONTAŻ FOTELIKA
Het kinderzitje bestaat uit een zitting (d) en een rugsteun (a) met een hoofdsteun
(e) die aan de grootte van het kind aangepast kan worden, alsook een in de diepte
regelbaar veiligheidskussen (p). Uw kind zal pas van maximale bescherming en
komfort kunnen genieten wanneer alle onderdelen samen gebruikt worden.
! !
Opgelet! De onderdelen van het CYBEX kinderzitje mogen niet apart of in
combinatie met zitjes, rugleuningen of hoofdsteunen van andere fabrikanten
of modellen gebruikt worden. In dat geval vervalt de garantie onmiddellijk.
De rugsteun (a) wordt aan de as (c) van de zitting (d) bevestigd met behulp van
de geleideschoen (b). Duw de beide zijdelingse beschermstukken die bij het
„zijdelingse impaktbeschermingsysteem (L.S.P) geleverd worden in de hiervoor
voorziene installatieopeningen (z). Deze openingen bevinden zich aan de
buitenkant van de schouderhaakjes. Deze zullen met een duidelijk hoorbare ‚KLIK‘
op hun plaats vergrendelen.
Opgelet! Bewaar de handleiding steeds in de daarvoor voorziene gleuf onder
de bekleding van het zitje aan de achterkant van de rugsteun.
! !
Opgelet! Controleer steeds dat de individuele onderdelen van het kinderzitje
nooit samengedrukt of geklemd raken (bijv.tussen de deur van de auto of
door verstelling van de achterbank.
Fotelik składa się z siedziska (d) i oparcia (a) z zagłówkiem (e), których regulacja
umożliwia dopasowanie fotelika do wzrostu dziecka, jak również z regulowanej na
głębokość osłony tułowia (p). Twoje dziecko będzie prawidłowo zabezpieczone
wyłącznie wtedy, gdy korzysta z kompletnego fotelika.
Ostrzeżenie! Poszczególnych części fotelika CYBEX Juno-x nie wolno
łączyć i używać razem z częściami innych modeli fotelików CYBEX ani
częściami fotelików innych producentów. W każdym takim przypadku
dopuszczenie do użytkowania fotelika staje się nieważne.
Oparcie fotelika (a) zahacz o oś (c) siedziska (d) za pomocą mocowania (b). Włóż
dodatkowe nakładki zabezpieczające przed zderzeniem bocznym (systemu L.S.P.)
w otwory montażowe (z) znajdujące się na zewnętrznej części osłon barkowych, a
następnie wciśnij je, aż się zatrzasną z głośnym „KLIKNIĘCIEM“.
Uwaga! Zawsze przechowuj instrukcję użytkowania w przeznaczonej do tego
kieszeni pod tapicerką z tyłu oparcia.
Ostrzeżenie! Należy zawsze zwracać uwagę, aby żadne części fotelika nie
zaklinowały się gdzieś w wyniku codziennego użytkowania pojazdu (np.
podczas przesuwania fotela samochodowego lub zamykania drzwi).
FRNLPL
28
Page 30

AJUSTEMENT A LA TAILLE DE L‘ENFANT
g
e
h
Pour un réglage correct du CYBEX Juno-fix, un réducteur (g) est inclus, et déjà
installé sous le tissu de l‘assise lors de l’achat.
Il est recommandé d‘utiliser ce réducteur (g) pour les enfants âgés de 9 à 18
mois. Le réducteur (g) peut être retiré dès que l‘enfant atteint l‘âge de 19 mois Par
la suite, le réglage de la taille pourra se faire en ajustant la position de l’appuietête (e). Tirez la réglette (h) pour relâcher l‘appuie-tête. L’ajustement doit se faire
de façon à vous permettre de placer deux doigts entre le bas de l’appuie-tête
et l’épaule de votre enfant. Saisir la poignée de règlage en hauteur (h) pour
dévérouiller les protèges épaules et repose tête.
g
Note! seul un ajustement optimal de l’appuie-tête (e) et des protections latérales
apportera à votre enfant la meilleure protection et le plus grand confort. il garantit
également une position optimale de la ceinture diagonale (f). il existe 11 positions
d
de réglages possibles en hauteur. la protection latérale est solidaire de l’appuie-tête
et n’a pas besoin d’être ajustée séparément.
RETRAIT DE L‘INSERT
29
• Détachez les boutons-pressions situés sur la housse de l’assise.
• Soulevez la housse de l’assise jusqu’à ce que le réducteur puisse être retiré par
l’avant.
• Retirez les réducteurs du siège selon l’âge de l’enfant en suivant les
recommandations ci-dessus.
• Replacez la housse du siège en position initiale, et refermez les boutons.
Page 31

AANPASSEN AAN DE LENGTE VAN HET KIND DOSTOSOWANIE FOTELIKA DO WZROSTU DZIECKA
Om u toe te laten het CYBEX Juno-fix zitje korrekt in hoogte aan te passen, is een
inlegkussen (g) ingesloten. Dit inlegkussen (g) bevindt zich bij aankoop onder de
hoes van het zitje.
Het gebruik van het inlegkussen (g) wordt aanbevolen tussen de leeftijd van 9
en 18 maanden. Het inlegkussen mag verwijderd worden wanneer het kind 19
maanden oud is. Nadien moet de hoogte geregeld worden door de hoofdsteun (e)
in de juiste positie te brengen. Trek aan hendel (h) om de hoofdsteun los te maken.
De afstand tussen de onderkant van de hoofdsteun (e) en de schouders van het
kind moet een breedte van 2 vingers bedragen. Trek aan de aanpassingshendel (h)
om de schouders en hoofdsteun vrij te maken.
W momencie zakupu, w foteliku CYBEX Juno-fix pod tapicerką siedziska,
znajduje się wkładka podwyższająca (g) gwarantująca możliwość prawidłowego
dopasowania jego wysokości.
Zaleca się stosowanie wkładki podwyższającej (g) dla dziecka w wieku między 9
a 18 miesięcy. Dla dziecka w wieku powyżej 19 miesięcy wkładkę można wyjąć.
Po wyjęciu wkładki wysokość fotelika powinna być regulowana poprzez ustawienie
zagłówka (e) w odpowiedniej pozycji. Aby zwolnić zagłówek, pociągnij uchwyt (h).
Wysokość zagłówka należy ustawić tak, aby pomiędzy ramieniem dziecka a dolną
krawędzią zagłówka (e) mieściły się dwa palce. Pociągnij za uchwyt do regulacji (h),
aby odblokować zabezpieczenie barkowe i zagłówek.
FRNLPL
Opgelet! Enkel een optimaal aangepaste schouder- en hoofdsteun bieden uw
kind maximale bescherming en komfort en garanderen de optimale positie van
de diagonale gordel (f). U kan de hoogte (e) in 11 posities aanpassen. Het
schoudergedeelte is verbonden met de hoofdsteun en dient niet apart aangepast te
worden.
Uwaga! Tylko prawidłowe dostosowanie wysokości zagłówka i zabezpieczenia
barkowego (e) zapewni optymalne bezpieczeństwo i wygodę dziecku. Gwarantuje
to również najlepsze położenie barkowego pasa bezpieczeństwa (f). Zagłówek i
zabezpieczenie barkowe można ustawić w 11 pozycjach. Zabezpieczenie barkowe
jest połączone z zagłówkiem, więc nie trzeba regulować go osobno.
VERWIJDEREN VAN HET INLEGKUSSEN WYJMOWANIE WKŁADKI PODWYŻSZAJĄCEJ Z SIEDZISKA
• Open de drukknoppen aan de voorkant van de bekleding van het zitje.
• Hef de bekleding omhoog totdat het inlegkussen makkelijk van de voorkant
verwijderd kan worden.
• Verwijder het inlegkussen als het kind de hierboven aanbevolen leeftijd bereikt.
• Breng de bekleding terug in haar originele positie en maak de drukknoppen vast.
• Rozepnij zatrzaski z przodu tapicerki siedziska.
• Podnieś tapicerkę, tak by wkładkę można łatwo wyjąć od przodu.
• Wyjmij wkładkę stosując się do powyższych rekomendacji wiekowych.
• Z powrotem naciągnij tapicerkę na siedzisko i zapnij zatrzaski.
30
Page 32

31
w
LA MEILLEURE POSITION DANS LA VOITURE
L’installation du CYBEX Juno-fix est uniquement autorisée avec le Système
ISOFIX CONNECT.
Il ya une homologation „semi-universel“ pour fixer le siège enfant ISOFIX
avec des connecteurs. Pour cette raison, le CYBEX Juno-fix avec ISOFIX
CONNECT système peut être installé que dans certains types de voitures.
S‘il vous plaît voir les détails de véhicules autorisés et les positions sur
la liste jointe des véhicules homologués. Une liste constamment actualisée des
voitures autorisées peuvent être trouvées sur www.cybex-online.com. Articles
de bagages et autres objets en vrac dans la voiture, ce qui pourrait causer des
blessures dans un accident, doit toujours être bien arrimé. Ces objets et les objets
peuvent devenir des projectiles mortels à l‘intérieur du véhicule.
!
Attention! Le siège enfant ne doit pas être utilisé sur les sièges du véhicule
qui sont installés à angle droit avec la direction du déplacement. À l‘arrière
les sièges dans les véhicules, comme par exemple, dans un fourgon ou
minibus, l‘utilisation du siège enfant est autorisé, à condition que le siège
du véhicule est autorisé pour le transport d‘un adulte. Il est essentiel de
s‘assurer que l‘appuie-tête n‘est pas supprimé lorsque le siège enfant est
installé dans une direction face à l‘arrière. Le siège enfant doit toujours être
maintenu en place avec la ceinture du véhicule, même lorsqu‘il n‘est pas
utilisé. Si vous avez à effectuer un arrêt d‘urgence ou si vous êtes impliqué
dans une collision mineure un siège enfant non garantis peuvent vous
blesser et d‘autres passagers.
Installer un siège-auto à l’avant d’un véhicule expose votre enfant à de sérieux
risques en cas d’accident. Dans certains cas exceptionnels, le siège-auto peut
être placé sur le siège passager. Dans de tels cas, veuillez noter les directives
suivantes:
• dans les véhicules équipés d‘airbags, le siège passager doit être repoussé en
arrière au maximum.
• Il est impératif de se conformer aux recommandations du fabricant du véhicule.
!
Avertissement! Le siège pour enfant n‘est pas adapté pour une utilisation
avec 2 points ou ceinture abdominale. Si vous êtes impliqué dans un
accident et que le siège est xé avec une ceinture à 2 points, l‘enfant peut
être gravement blessé ou tué.
Note: Ne jamais laisser l‘enfant sans surveillance dans la voiture.
Page 33

DE BESTE POSITIE IN DE AUTO NAJLEPSZE MIEJSCE W SAMOCHODZIE
Installatie van de CYBEX Juno-fix is uitsluitend toegestaan met behulp van
het ISOFIX-CONNECT-systeem.
Er bestaat een „semi-universele“ homologatie om een kinderzitje met
ISOFIX connectoren te beveiligen. Hierdoor mag de CYBEX Juno-fix met
ISOFIX CONNECT systeem enkel in bepaalde types auto‘s geïnstalleerd
worden. Gelieve de ingesloten lijst met goedgekeurde auto‘s en posities te
raadplegen. U kan steeds een regelmatig aangepaste lijst vinden op www.cybexonline.com. Baggage en andere losse objekten die bij een ongeval, verwondingen
zouden kunnen veroorzaken, dienen steeds veilig opgeborgen te worden. Zo‘n
voorwerpen kunnen in de auto dodelijke projektielen worden.
!
Opgelet! Het kinderzitje mag niet geplaatst woren op autozetels die
loodrecht op de rijrichting staan. Het mag wel op autozetels die met
de rug naar de rijrichting staan, zoals bijvoorbeeld een minibus, en die
goedgekeurd zijn voor vervoer van een volwassene, geplaatst worden. Het
is essentieel dat de hoofdsteun niet verwijderd wordt wanneer het kinderzitje
op een autostoel die tegen de rijrichting in staat, geplaatst wordt. Het
kinderzitje moet steeds met de autogordel vastgemaakt zijn, ook wanneer
het niet gebruikt wordt. In geval van een noodstop of een ongeluk kan een
losstaand kinderzitje u of andere passagiers verwonden.
Voorin wordt uw kind doorgaans blootgesteld aan hogere risico’s in geval van
een ongeval. In uitzonderlijke gevallen kan het zitje op de passagiersstoel worden
vastgezet. Let in dergelijke gevallen op het volgende:
• in auto‘s met een airbag vooraan, dient de autozetel zo ver mogelijk naar
achteren geduwd te worden.
• U dient in elk geval rekening te houden met de richtlijnen van uw autofabrikant.
!
Opgelet! Het kinderzitje is niet geschikt voor gebruik met een 2-puntsgordel
of een heupgordel. Indien het zitje met een 2-puntsgordel vastgemaakt werd
kan het kind tijdens een ongeval ernstig gekwetst raken of overlijden.
Opgelet! Laat uw kind nooit alleen in de auto.
regularnie uaktualniana i jej najnowsza wersja znajduje się na stronie internetowej
www.cybex-online.com. Bagaże i inne przedmioty znajdujące się w samochodzie,
które mogą zranić pasażerów w czasie wypadku powinny zostać dokładnie
zabezpieczone. Pozostawione luzem przedmioty mogą spowodować śmiertelne
obrażenia w czasie zderzenia.
!
Generalnie zalecamy wybór tylnego siedzenia samochodu, ponieważ na przednim
dziecko jest narażone na większe niebezpieczeństwo w razie wypadku. W
wyjątkowych przypadkach fotelik można umieścić na przednim siedzeniu. Należy
przy tym przestrzegać następujących zaleceń:
• Jeżeli pojazd posiada poduszkę powietrzną od strony pasażera, odsuń siedzenie
do tyłu najdalej, jak jest to możliwe.
• Ściśle przestrzegaj zaleceń producenta pojazdu.
!
Uwaga! Nigdy nie zostawiaj dziecka w samochodzie bez opieki!
Montaż CYBEX Juno-fix dopuszczone jest tylko przy użyciu systemu
ISOFIX-CONNECT.
Gdy fotelik CYBEX Juno-fix jest mocowany za pomocą systemu ISOFIX,
należy wtedy do kategorii „półuniwersalnej“, co oznacza, że może być
używany tylko w pewnego typu pojazdach. Prosimy sprawdzić, czy na liście
dopuszczonych pojazdów znajduje się Państwa samochód. Lista ta jest
FRNLPL
Ostrzeżenie! Montowanie niniejszego dziecięcego fotelika samochodowego
na fotelach samochodowych ustawionych bokiem do kierunku jazdy
jest niedozwolone. Na fotelach samochodowych umieszczonych tyłem
do kierunku jazdy np. w samochodach typu van czy minibus, można
zamontować niniejszy fotelik, pod warunkiem że fotele samochodowe
przeznaczone są do przewożenia osób dorosłych. Montując fotelik
samochodowy tyłem do kierunku jazdy, upewnij się, że zagłówek nie jest
zdjęty. Dziecięcy fotelik zawsze musi być przypięty pasami, nawet jeśli jest
pusty.Fotelik pozostawiony luzem może spowodować obrażenia kierowcy i
pasażerów w przypadku kolizji czy gwałtownego hamowania.
Ostrzeżenie! Fotelika CYBEX Juno-x nie wolno używać na siedzeniu, gdzie
znajdują się 2-punktowe pasy bezpieczeństwa lub pas biodrowy. Używanie
tego typu pasów bezpieczeństwa może narazić dziecko na śmiertelne
obrażenia w razie wypadku.
32
Page 34

33
v
INSTALLATION DU SIEGE AVEC SYSTEME ISOFIX CONNECT
u
w
i
y
y
x
u
w
x
Avec le système ISOFIX Connect, vous pouvez fixer le siège enfant en toute
sécurité dans la voiture et donc rendre votre enfant plus sûr. Votre enfant est
en outre protégé par la sécurité de trois points de votre voiture la ceinture de
sécurité automatique.
Remarque! Les points d‘ancrage ISOFIX (i) sont deux anneaux en métal par
siège et sont situés entre le dossier et le siège de la voiture. Si vous avez
le moindre doute, consultez le manuel d‘instructions de votre voiture pour
l‘assistance.
S‘il est difficile d‘accéder aux points d‘ancrage ISOFIX (i) de votre voiture, et pour
protéger la housse vous pouvez définitivement ajustement des guides ISOFIX (u)
fournis dans les deux points d‘ancrage. Dans de nombreuses voitures, il est plus
efficace pour installer les guides ISOFIX (u) dans une direction opposée.
Pour sécuriser le CYBEX Juno-fix correctement, respecter les instructions
suivantes:
• Activer la poignée (v) sur le dessous du siège pour enfant.
• Retirez les connecteurs ISOFIX aussi loin que possible. .
• Tourner les connecteurs 180 °, de sorte qu‘ils montrent dans la direction des
guides ISOFIX (u).
Remarque! Prenez soin que les deux indicateurs de sécurité verte (x) sur
les connecteurs ISOFIX (w) ne sont pas visibles. Si nécessaire, libérer les
connecteurs (w) en appuyant et en retirant le bouton de déverrouillage rouge
(y). Répétez le processus comme il convient pour le deuxième connecteur.
• Pousser les deux connecteurs ISOFIX (w) dans les guides (u) jusqu‘à ce qu‘ils se
verrouillent en place sur les points d‘ancrage (i) avec un „clic“ sonore.
• Assurez-vous que le siège enfant est solidement fixé en place en essayant de la
retirer.
• L‘indicateur de sécurité verte (x) doit être clairement visible sur les deux boutons
de déverrouillage rouge (y).
• Vous pouvez maintenant utiliser la poignée (v) sur le dessous du siège pour
enfant pour ajuster la position du siège.
Remarque! S‘il vous plaît se référer à la section «plaçant le siège enfant dans
la voiture“.
• Vous pouvez maintenant attacher votre enfant dans le siège enfant, voir
„sécurisation de l‘enfant“
Page 35

INSTALLATIE VAN HET KINDERZITJE MET HET ISOFIX CONNECT
SYSTEEM
Met het ISOFIX CONNECT Systeem kan u het kind veilig in de auto
vastmaken en de veiligheid van uw kind dus verhogen. Uw kind wordt
bijkomend beschermd door de 3-punts automatische gordel van de auto.
MOCOWANIE FOTELIKA ZA POMOCĄ ZACZEPÓW ISOFIX
Dzięki zaczepom ISOFIX, które umożliwiają stabilne zamocowanie fotelika
w samochodzie, zwiększa się bezpieczeństwo Twojego dziecka. Dziecko
powinno mieć nadal zapięte 3-punktowe pasy bezpieczeństwa.
Opgelet! De ISOFIX verankeringspunten (i) zijn twee metalen ringen per zijte
en bevinden zich tussen de rugsteun en het zitkussen van de auto. Raadpleeg
in geval van twijfel de handleiding van uw auto.
Indien u moeilijk bij de ISOFIX verankeringspunten (i) van uw auto kan, en
ter bescherming van de bekleding kan u de ISOFIX geleiders (u) permanent
vastmaken in beide verankeringspunten. In vele auto‘s is het efficiënter om de
ISOFIX geleiders (u) in tegenovergestelde positie te installeren.
Volg de volgende richtlijnen om de CYBEX Juno-fix korrekt vast te maken: Aby prawidłowo zamontować fotelik CYBEX Juno-fix należy postępować w
• Activeer de hendel (v) aan de onderkant van het kinderzitje.
• Trek de ISOFIX connectoren zo ver mogelijk uit.
• Draai de connectoren 180°, zodat ze in de richting van de ISOFIX GELEIDERS
(u) wijzen.
Opgelet! Controleer dat de twee groene veiligheidsindicatoren (x) van de
ISOFIX connectoren (w) niet zichtbaar zijn. Ontgrendel indien nodig de
connectoren (w) door de rode ontgrendelingsknop (y) achteruit te duwen. Doe
hetzelfde voor de tweede connector.
• Duw de twee ISOFIX connectoren (w) in de GELEIDERS (u) tot u de
verankeringspunten (i) hoort vergrendelen met een duidelijke „KLIK“.
• Controleer dat het autozitje goed vast zit door er aan te trekken.
• De groene veiligheidsindicatoren (x) moeten duidelijk zichtbaar zijn op beide rode
ontgrendelingsknoppen (y).
• U kan nu de hendel (v) aan de onderkant van het kinderzitje gebruiken om de
positie van het zitje in de auto aan te passen.
Opgelet! Gelieve hoofdstuk „UW KIND IN DE AUTO PLAATSEN“ te raadplegen. Uwaga! Zajrzyj do punktu „UMIESZCZANIE FOTELIKA W SAMOCHODZIE“.
Uwaga! Uchwyty ISOFIX (i) to dwa metalowe haki znajdujące się w szczelinie
pomiędzy oparciem a siedziskiem fotela samochodowego. W razie wątpliwości
należy zajrzeć do instrukcji obsługi samochodu.
Jeśli dostęp do uchwytów ISOFIX (i) w Twoim samochodzie jest utrudniony lub
chcesz chronić tapicerkę, możesz na stałe włożyć znajdujące się w komplecie
elementy pomocnicze (u), w oba uchwyty ISOFIX. W wielu samochodach wygodniej
jest włożyć elementy pomocnicze ISOFIX (u) do góry nogami.
następujący sposób:
• Pociągnij za uchwyt (v) znajdujący się pod spodem fotelika.
• Wyciągnij zaczepy ISOFIX najdalej jak to możliwe.
• Obróć zaczepy o 180°, tak by były zwrócone w kierunku elementów
pomocniczych (u).
Uwaga! Upewnij się, że oba zielone przyciski zabezpieczające (x) na zaczepach
ISOFIX (w) nie są wyciśnięte. W razie potrzeby zwolnij zaczep (w) wciskając
zielony przycisk, a następnie wyciągając z powrotem czerwony przycisk
zwalniający. Powtórz te same czynności dla drugiego zaczepu.
• Wsuń oba zaczepy ISOFIX (w) do elementów pomocniczych ISOFIX, aż
usłyszysz, że zatrzasnęły się w uchwytach ISOFIX (i).
• Pociągnij za fotelik, aby sprawdzić, czy jest prawidłowo zamocowany.
• Zielone przyciski zabezpieczające (x) powinny być widoczne z obu stron i powinny
wystawać z czerwonych przycisków zwalniających (y).
• Za pomocą uchwytu (v) znajdującego się od spodu fotelika możesz teraz ustawić
położenie fotelika.
FRNLPL
• U kan uw kind nu in het autozitje vastmaken; zie „HET KIND VEILIG
VASTMAKEN“
• Możesz teraz zabezpieczyć dziecko pasem - patrz punkt „ZABEZPIECZANIE
DZIECKA“.
34
Page 36

LIBERATION DES CONNECTEURS ISOFIX
w
y
x
v
Effectuer les étapes d‘installation dans l‘ordre inverse.
• Relacher les connecteurs ISOFIX (w) sur les deux côtés, en appuyant et
en retirant les boutons de déverrouillage rouge (y).
• Retirez le siège du guide ISOFIX (u).
• Tourner les connecteurs ISOFIX (w) 180 °.
• Activer la poignée (v) sur le dessous du siège pour enfant et pousser les
connecteurs jusqu‘à ce qu‘ils atteignent la position finale.
PLAÇEMENT DU SIÈGE ENFANT DANS LA VOITURE
• Placez le siège enfant sur le siège approprié dans la voiture.
• Pour installer le siège en position verticale pour l‘enfant, il est essentiel
de prendre soin que le dossier (a) du siège pour enfant affleure contre le
• Vous pouvez ajuster la distance en utilisant la manette (v) située sous le siège.
• Si l‘appuie-tête des sièges de voiture gênent, retirez les complètement, retournez
a
les, ou détacher les complètement (exception, voir la section „la meilleure position
dans la voiture“). Le dossier (a) s‘adapte en un seul mouvement à presque toutes
les positions du siège d‘auto.
!
Remarque! Il est possible que certains siège de voiture faits en matière fragile
(par ex. velours, cuir, etc.) montrent des signes d’usure et/ou de décoloration.
A n d’éviter ce problème, vous pouvez, par exemple, mettre un couverture ou
une serviette sous le siège auto. Dans cette situation, merci de vous reporter
à votre notice de nettoyage, qui doit absolument être respectée avant la
première utilisation du siège auto.
dossier du siège d‘auto.
Attention! Le Juno- x CYBEX dossier doit af eurer avec le dos du siège
d‘auto. A n de garantir une protection maximale pour l‘enfant, le siège doit
être dans une position normale verticale.
35
Page 37

DE ISOFIX CONNECTOREN ONTGRENDELEN CHOWANIE ZACZEPÓW ISOFIX
Herhaal de installatiestappen in omgekeerde volgorde. Wykonaj wszystkie czynności konieczne w celu montażu fotelika w samochodzie w
• Ontgrendel de ISOFIX connectoren (w) aan beide kanten, door de rode
ontgrendelknoppen (y) in te drukken.
• Trek het zitje uit de ISOFIX geleiders (u).
• Draai de ISOFIX connectoren (w) 180°.
• Activeer de hendel (v) aan de onderkant van het kinderzitje en duw de
connectoren tot het einde in.
odwrotnej kolejności.
• Zwolnij zaczepy ISOFIX (w) z obu stron, wciskając i przesuwając
pomarańczowe przyciski zwalniające (y).
• Wyjmij fotelik z elementów pomocniczych (u).
• Obróć zaczepy (w) o 180°.
• Pociągnij za uchwyt do regulacji (v) znajdujący się od spodu fotelika i wciśnij
zaczepy do końca.
HET KINDERZITJE IN DE AUTO PLAATSEN UMIESZCZANIE FOTELIKA W SAMOCHODZIE
• Plaats het kinderzitje op de gepaste plaats in de auto.
• Wanneer u het zitje in rechtopstaande positie in de auto installeert is het
belangrijk dat de rugsteun (a) van het kinderzitje tegen de rugleuning
• U kunt deze afstand aanpassen met de hendel (v) aan de onderkant van het
kinderstoeltje.
• Indien de hoofdsteun van de autozetel in de weg zit, dient u deze volledig te
verwijderen, om te draaien of los te maken. (uitzondering, zie hoofdstuk „DE
BESTE POSITIE IN DE WAGEN“). De rugsteun (a) kan met één beweging aan
zowat elke positie van de autozetel aangepast worden.
!
Opgelet! Het is mogelijk dat sommige autostoelen van zacht materiaal (bijv.
velours, leer, etc.) tekenen van gebruik en / of verkleuringen kunnen vertonen.
Om dit te voorkomen, kunt u een deken of handdoek eronder plaatsen. Graag
verwijzen we u ook naar onze schoonmaakinstructies, die absoluut moeten
worden gevolgd voor het eerste gebruik van de stoel.
van de autozetel aansluit.
Opgelet! De rugsteun van de CYBEX Juno-x moet aansluiten tegen de
rugsteun van de autozetel. Uw kind is maximaal beschermd wanneer het
zitje zich in normale, rechtopstaande positie bevindt.
• Umieść fotelik na odpowiednim siedzeniu samochodu.
• Aby zamocować fotelik w pozycji pionowej, należy zwrócić uwagę, żeby
• Dopasowanie odległości za pomocą przycisku (v) pod spodem siedziska.
• Jeżeli zagłówek siedzenia samochodu przeszkadza w zamontowaniu fotelika,
należy go wyjąć i obrócić albo zdjąć całkowicie (z wyjątkiem sytuacji opisanej w
punkcie „WŁAŚCIWE MIEJSCE W SAMOCHODZIE“). Oparcie fotelika (a) łatwo
dopasowuje się do siedzenia samochodowego o prawie każdym nachyleniu.
!
Uwaga! Niektóre tapicerki samochodu są wykonane z miiękkiego materiału
(np. weluru lub skóry itp.) i mogą się wykazywać oznaki zużycia lub
przebarwienia. W celu zabezpiecznia należy podożyć ręcznik lub kocyk
pod fotelikiem. Zapoznaj się również z instrukcja czyszczenia, którą należy
przejrzeć przed pierwszym użyciem fotelika.
oparcie fotelika (a) ściśle przylegało do oparcia fotela samochodowego.
Ostrzeżenie! Oparcie fotelika CYBEX Juno-x musi ściśle przylegać do
oparcia fotela samochodowego. Aby zagwarantować dziecku maksymalną
ochronę, fotelik musi się znajdować w normalnej, pionowej pozycji.
FRNLPL
36
Page 38

AJUSTEMENT DU COUSSIN DE SÉCURITÉ
Activer les deux poignées de réglage (q) entraîne simultanément le coussin de
p
q
d
sécurité (p) de glisser automatiquement dans sa position plus en avant. Libérer
les poignées de réglage (q) fixe le coussin de sécurité (p) en place. Les parties
latérales du coussin de sécurité (p) correspondent exactement dans les accoudoirs
du coussin du siège (d) et fournir un soutien pour le siège. Ajustez le coussin
de sécurité (p) de sorte qu‘elle repose contre l‘enfant sans laisser le coussin de
sécurité (p) entrent en contact avec le corps de l‘enfant.
!
Attention! Le coussin de sécurité (p) doit être utilisé uniquement avec le
siège et seulement pour les enfants pesant moins de 18 kg.
37
Page 39

HET VEILIGHEIDSKUSSEN AANPASSEN REGULACJA OSŁONY TUŁOWIA
Activeer beide aanpassingshendels (q) gelijktijdig zodat het veiligheidskussen (p)
automatisch naar de verste voorste positie glijdt. Wannerer u de aanpassingshendel
(q) los laat, wordt het veiligheidskussen (p) vergrendeld. De zijkanten van het
veiligheidskussen (p) passen perfekt in de armsteunen van het zitkussen (d) en
bieden steun aan het zitje. Pas het veiligheidskussen (p) aan zodat het tegen het
kind aanligt zonder dat het in contact komt met het lichaam van het kind.
Kiedy naciśniesz oba przyciski regulacji (q), osłona (p) automatycznie przesunie się
maksymalnie do przodu. Kiedy zwolnisz przyciski (q), osłona (p) zatrzaśnie się w
wybranej pozycji. Boczne części osłony (p) dokładnie pasują do podpórek na ręce
siedziska (d). Łączą one osłonę (p) z siedziskiem (d). Osłona tułowia powinna być
tak ustawiona, aby znajdowała się jak najbliżej dziecka, ale żeby dziecko jej nie
dotykało.
!
Opgelet! Het veiligheidskussen (p) mag enkel met het zitje gebruikt worden
en is enkel geschikt voor kinderen tot maxi. 18 kg.
!
Ostrzeżenie! Osłona tułowia (p) musi być zawsze używana w komplecie z
siedziskiem i tylko dla dzieci o wadze do 18 kg!
FRNLPL
38
Page 40

SÉCURISATION DE L‘ENFANT
r
n
l
m
• Mettre l‘enfant dans le siège enfant.
• Mettre le coussin de sécurité précédemment ajusté (p) en place (voir la section
„REGLAGE DU coussin de sécurité»)
• Tirez la ceinture à trois points automatiques dans toute son étendue. Prenez la
ceinture abdominale (n) et l‘insérer dans la ceinture de routage marqués en rouge
(r) du coussin de sécurité (p).
!
Attention! Ne tordez pas la ceinture!
39
f
n
• Poussez la langue la courroie (m) dans la boucle de ceinture (l). Cela doit
verrouiller en place avec un „clic“ sonore.
• Pré-tension de la ceinture abdominale (n) en tirant sur la ceinture d‘épaule (f).
• Maintenant, guider la courroie d‘épaule (f) en arrière à travers l‘acheminement de
la courroie (r) du coussin de sécurité (p).
• Tirer la ceinture d‘épaule (f) tend, en prenant soin que les deux parties de la
ceinture de courir sur la largeur totale du coussin de sécurité (p), au sein de
l‘acheminement de la courroie (r).
VOTRE ENFANT EST CORRECTEMENT SÉCURISÉS?
Pour garantir la sécurité maximale pour votre enfant, s‘il vous plaît tester les
paramètres suivants avant le départ:
• Le coussin de sécurité (p) est correctement réglé.
• La langue la courroie (m) a verrouillé en place dans la boucle de ceinture (l).
• La ceinture abdominale (n) et la ceinture d‘épaule (f) en cours d‘exécution tendue
à travers la ceinture de routage du coussin de sécurité (p) et ne sont pas tordues.
• Le coussin du siège (d) a verrouillé en place des deux côtés avec les connecteurs
(w) dans les points d‘ancrage ISOFIX (i) et les deux indications de sécurité verte
(x) peut être vu clairement.
• Le dossier (a) du siège pour enfant se trouve complètement au ras du dossier du
siège auto.
Page 41

HET KIND VEILIG VASTMAKEN
• Plaats het kind in het kinderzitje.
• Breng het vooraf aangepaste veiligheidskussen (p) aan (zie hoofdstuk „HET
VEILIGHEIDSKUSSEN AANPASSEN“)
• Trek de 3-punts automatische gordel zo ver mogelijk uit. Neem de heupgordel (n)
en leidt hem door de rode gordelgeleider (r) van het veiligheidskussen (p).
ZABEZPIECZANIE DZIECKA
• Posadź dziecko w foteliku.
• Przymocuj wcześniej wyregulowaną osłonę (p) do fotelika. (Patrz rozdział
„REGULACJA OSŁONY TUŁOWIA“).
• Wyciągnij całą długość pasa samochodowego. Przełóż pas biodrowy (n) przez
szczelinę (r) (zaznaczoną na czerwono) w osłonie tułowia (p).
!
Opgelet! Controleer dat de gordel niet gedraaid is!.
• Duw de gordeltong (m) in de gesp (l). Deze moet vastklikken met een duidelijk
hoorbare „KLIK“.
• Span de heupgordel (n) aan door aan de schoudergordel (f) te trekken.
• Leid de schoudergordel (f) nu terug door de gordelgeleider (r) van het
veiligheidskussen (p).
• Span de schoudergordel (f) aan en controleer dat beide delen van de gordel over
de volledig breedte van het.
IS UW KIND VEILIG VASTGEMAAKT?
Om de maximale veiligheid van uw kind te garanderen, dient u het volgende te
controleren vóór vertrek:
• het veiligheidskussen (p) is korrekt aangepast.
• de tong van de gordel (m) zit veilig vastgemaakt in de gordelgesp (l).
• de heupgordel (n) en de schoudergordel (f) lopen door de gordelgeleiders van het
veiligheidskussen (p) en zijn niet gedraaid.
• Het zitkussen (d) zit langs beide kanten op de juiste plaats in de ISOFIX
verankeringspunten (i) vergrendeld door middel van de connectoren (w) en beide
groene veiligheidsindicatoren (x) zijn duidelijk zichtbaar.
• De rugsteun (a) van het kinderzitje sluit nauw aan tegen de rugsteun van de
autozetel.
!
• Włóż końcówkę pasa (m) w zapięcie (l). Musisz usłyszeć głośne kliknięcie.
• Następnie weź pas barkowy (f) i pociągnij go, aby naprężyć pas biodrowy (n).
• Przełóż pas barkowy (f) z powrotem przez szczelinę (r) w osłonie tułowia (p).
• Napręż pas barkowy (f) i upewnij się, że pasy (f) i (n) przechodzą całkowicie
wewnątrz szczeliny (r) na całej szerokości osłony (p).
CZY TWOJE DZIECKO JEST DOBRZE ZABEZPIECZONE?
Aby mieć pewność, że Twoje dziecko jest dobrze zabezpieczone, przed
uruchomieniem samochodu sprawdź, czy:
• osłona tułowia jest odpowiednio dostosowana.
• pas biodrowy (n) i barkowy (f) przechodzą przez szczelinę (r) w osłonie tułowia (p)
i nie są skręcone.
• jeżeli siedziska (d) zatrzasnęły się z obu stron w uchwytach ISOFIX (i)
samochodu a zielone przyciski zabezpieczające (x) są wyciśnięte.
• oparcie (a) fotelika ściśle przylega do oparcia fotela samochodowego.
Uwaga! Nie skręcaj pasa!
FRNLPL
40
Page 42

41
ENTRETIEN
Pour garantir que votre siège enfant offre une protection maximale, il est essentiel
de respecter les points suivants:
• Toutes les parties visibles du siège pour enfant doit être vérifiée régulièrement
pour des dommages. Les pièces mécaniques doivent fonctionner parfaitement.
• Il est essentiel de s‘assurer que le siège enfant n‘est pas coincé entre les
parties dures comme la porte de la voiture, le siège des rails etc, ce qui peut
l‘endommager.
• Si le siège enfant est tombé il doit être testé par le fabricant avant d‘être
réutilisés.
NETTOYAGE
Vérifiez que seulement une housse originale CYBEX est utilisé, car la housse est
également un élément fondamental du bon fonctionnement du siège pour enfant.
Des housses de rechange peuvent être obtenus à partir d‘un magasin spécialisé.
Note! Veuille laver la housse avant de l‘utiliser pour la première fois. Les
housses sont lavables en machine à30°C maximum, cycle délicat. Si vous
lavez à température plus élevée, le tissu peut passer. Veuillez laver la housse
séparément et ne jamais sécher mécaniquement! Ne pas sécher au soleil
directement! Les parties plastiques peuvent être nettoyées au savon doux et à
l‘eau tiède.
!
Attention! Ne jamais utiliser d‘agents chimiques ou blanchissants.
ENLEVER LA HOUSSE
La housse se compose de trois éléments principaux pour coussin appui-tête,
dossier et assise, qui sont fixés au siège enfant, soit par velcro, boutons-pression
ou de bandes élastiques. Une fois que vous avez libéré tous les éléments de
fixation, vous pouvez supprimer des composants individuels pour le lavage. Pour
détacher les différentes composantes de la housse:
• Une fois les boutons-pression sur l‘arrière du dossier du ont été annulés, la
housse peut être retiré en le tirant vers l‘avant.
• Pour enlever la housse du coussin de siège, la libération sangles de ceinture à la
fois et également annuler les boutons-pression sur le dessous et tirer le couvercle
vers l‘avant.
• La housse de l‘appui-tête peut être simplement tiré vers l‘avant de l‘enlever. Pour
replacer la housse effectuer les mêmes étapes dans l‘ordre inverse.
Page 43

ONDERHOUD KONSERWACJA
Om de maximale veilige werking van uw kinderzitje te verzekeren is eht belangrijk
de volgende punten in acht te nemen:
• Alle zichtbare onderdelen van het zitje moeten regelmatig op schade
gecontroleerd worden. De mechanische onderdelen moeten foutloos funktioneren.
• Het is belangrijk te controleren dat het kinderzitje niet gekneld raakt tussen harde
delen zoals de autodeuren, zetelrails, enz. Hierdoor kan het zitje beschadigd
worden.
• Een kinderzitje dat gevallen is, dient door de fabrikant gecontroleerd te worden
alvorens te hergebruiken.
REINIGING
Het is belangrijk om enkel de originele CYBEX bekleding te gebruiken omdat de
bekleding ook een essentieel onderdeel van de goede werking van het kinderzitje
is. Niieuwe bekledingen kunnen bij een gespecialiseerde winkel verkregen worden.
Opgelet! Gelieve de bekleding te wassen alvorens ze de eerste keer te
gebruiken. De bekleding dient op 30°C op zacht programma gewassen te
worden. Bij het wassen op meer dan 30°C kunnen kan de kleur uitlopen. Was
de bekleding apart en droog ze nooit in de droogtrommel! Laat nooit in direkt
zonlicht drogen! De plastieken onderdelen kunnen met een milde detergent
gereinigd worden.
!
Opgelet! Gebruik nooit een chemisch reinigingsmiddel of een bleekmiddel.
Aby zagwarantować jak najwyższy poziom bezpieczeństwa fotelika, należy
stosować się do poniższych zaleceń:
• Wszystkie ważne części fotelika powinny być regularnie sprawdzane. Części
mechaniczne powinny działać bez zarzutu.
• Zwracaj szczególną uwagę, aby fotelik nie został uszkodzony poprzez
zaklinowanie pomiędzy drzwiami i siedzeniem samochodowym lub innymi
twardymi elementami.
• Jeżeli fotelik upadnie i zostanie poważnie uszkodzony, powinien zostać
wymieniony na nowy.
CZYSZCZENIE
Należy używać tylko oryginalnej tapicerki CYBEX, ponieważ jest ona niezbędna
dla sprawnego działania fotelika. Zapasowe tapicerki dostępne są w sklepach
oferujących produkty CYBEX.
Uwaga! Przed pierwszym użyciem tapicerkę należy wyprać. Można ją prać w
pralce w temperaturze maks. 30°C, wybierając program dla tkanin delikatnych.
Wyższa temperatura prania może spowodować wyblaknięcie koloru. Tapicerkę
należy prać oddzielnie i nigdy nie należy suszyć jej w suszarce! Nie należy
także suszyć tapicerki w pełnym słońcu! Plastikowe części fotelika można
przecierać ciepłą wodą z delikatnym detergentem.
!
Ostrzeżenie! W żadnym wypadku nie stosować chemicznych środków do
czyszczenia ani wybielaczy!
DE BEKLEDING VERWIJDEREN
De bekleding bestaat uit drie hoofdonderdelen voor de hoofdsteun, rugsteun en
zitkussen die aan het autozitje vastgemaakt zijn door velco-strips, drukknoppen
of elastische strips. Eens alle bevestigingen losgemaakt zijn, kan u de individuele
onderdelen verwijderen en reinigen. De verschillende onderdelen kan u losmaken
op de volgende manier:
• Maak de drukknoppen op de achterkant van de rugsteun los en verwijder de
bekleding door ze naar voren te trekken.
• De bekleding van het zitkussen verwijdert u door beide strips en ook de
drukknoppen aan de onderkant los te maken en de bekleding naar voren te
trekken. De bekleding van de hoofdsteun dient u enkel naar voren te trekken en
te verwijderen.
• U kan de bekleding opnieuw aanbrengen door de zelfde stappen in omgekeerde
volgorde te herhalen.
ZDEJMOWANIE TAPICERKI
Tapicerka fotelika składa się z trzech części (do zagłówka, oparcia i siedziska),
które przytwierdza się do fotelika za pomocą rzepów, zatrzasków lub elastycznych
pętelek. Po odpięciu wszystkich zapięć tapicerkę można zdjąć do prania. Aby zdjąć
poszczególne części tapicerki, wykonaj następujące czynności:
• Po odpięciu zatrzasków z tyłu oparcia pokrycie można ściągnąć do przodu.
• Aby zdjąć pokrycie siedziska, odepnij oba paski, a następnie zatrzaski od spodu
siedziska i zdejmij pokrycie do przodu.
• Pokrycie zagłówka można po prostu ściągnąć do przodu. Aby założyć tapicerkę z
powrotem, wykonaj te same czynności w odwrotnej kolejności.
FRNLPL
42
Page 44

QUE FAIRE APRES UN ACCIDENT
Lors d‘un accident, même mineur, un siège-auto peut subir des dégâts
invisibles à l‘oeil nu. Il est donc très important de remplacer immédiatement
un siège accidenté. En cas de doute, contactez votre revendeur ou le
fabricant.
LA DURABILITÉ DU PRODUIT
Le siège enfant est conçu pour remplir son objectif pour sa durée de vie prévue
de 4 ans. Cependant, puisque les voitures peuvent être exposés à de fortes
fluctuations de température et de contraintes imprévisibles, s‘il vous plaît prendre
note des points suivants:
• Si la voiture est exposée directement au soleil pendant une longue période de
temps, le siège enfant doit être pris hors de la voiture ou recouvert d‘un linge.
• Examiner toutes les pièces plastiques et métalliques du siège pour tous
dommages ou des changements à leur forme ou de couleur d‘au moins une fois
par an. Si vous remarquez des changements, le siège enfant doit être soit jetés
ou examinés par le fabricant et remplacés si nécessaire.
• Changements à la structure générale de couleurs et à la décoloration en
particulier, sont normales après de longues périodes d‘utilisation dans une voiture
et ne constituent pas un défaut.
43
RECYCLAGE
A la fin de la durée de vie du produit, les mesures de recyclage des matériaux
varient d‘un pays à un autre. De façon à ne pas polluer, approchez vous de votre
service d‘évacuation des déchets de votre commune ou de votre région.
Page 45

WAT MOET U DOEN NA EEN ONGEVAL
Indien u betrokken bent bij een aanrijding, kan het zitje schade oplopen die
niet zichtbaar is met het blote oog. In dit geval moet het kinderzitje onderzocht
en indien nodig door de fabrikant vervangen worden.
POSTĘPOWANIE PO WYPADKU DROGOWYM
Po wypadku drogowym uszkodzenia fotelika mogą nie być widoczne gołym
okiem. Mimo to fotelik powinien zostać wymieniony na nowy. W razie
wątpliwości skontaktuj się ze sprzedawcą lub producentem.
DUURZAAMHEID VAN HET PRODUCT
Het kinderzitje is ontworpen om gedurende 4 jaar gebruikt te worden. Aangezien
auto‘s echter aan hoge temperatuurschommelingen en onvoorzienbare
omstandigheden onderworpen kunnen worden, gelieve de volgende punten in acht
te nemen:
• indien de auto gedurende een langere periode aan direkt zonlicht blootgesteld
wordt, moet het autozitje uit de auto genomen of met een doek bedekt worden.
• controleer alle plastieken en metalen onderdelen van het zitje minstens één
maal per jaar op schade of vorm- en kleureranderingen. Indien u veranderingen
opmerkt moet u stoppen met het zitje te gebruiken of moet u het naar de fabrikant
terugsturen ter controle of vervanging.
• Veranderingen in de bekleding, met name het verschieten van kleuren, zijn
normaal na jarenlang gebruik in de auto en vormen geen defekt.
AFVALVERWIJDERING
Aan het einde van de levensduur van het kinderzitje, dient dit op de korrekte
manier te worden verwijderd.De regelgeving omtrend afvalverwerking kan regionaal
verschillen. Om een korrekte verwijdering van het kinderzitje te waarborgen, kunt
u contact opnemen met de afvalverwerkingsdiens in uw regio. Leef in elk geval de
wetgeving inzake afvalverwerking in uw land na.
TRWAŁOŚĆ PRODUKTU
Fotelik stworzono tak, aby spełniał swoją funkcję tak długo, ile wynosi przedział
wiekowy, w którym może być używany - czyli do ok. 4 lat. Jednakże z uwagi na to,
że samochody narażone są na duże różnice temperatur oraz inne nieprzewidziane
okoliczności, należy wziąć pod uwagę następujące wskazówki:
• Wyjmuj fotelik z samochodu lub przykrywaj go, jeżeli wiesz, że będzie wystawiony
na działanie promieni słonecznych przez dłuższy czas.
• Przynajmniej raz do roku sprawdzaj, czy plastikowe elementy fotelika nie są
uszkodzone lub czy nie zmienił się ich kształt lub kolor.
• Przy stwierdzeniu jakichkolwiek zmian fotelik powinien zostać wyrzucony lub
sprawdzony przez producenta i w razie potrzeby wymieniony.
• Zmiany wyglądu tapicerki, szczególnie blaknięcie kolorów, nie są wadą wyrobu,
ale normalnym efektem długotrwałej eksploatacji fotelika.
UTYLIZACJA
Po zakończeniu użytkowania fotelika należy go wyrzucić, stosując się do
właściwych przepisów. Sposoby usuwania odpadów mogą różnić się w zależności
od kraju. Skontaktuj się z lokalną firmą zajmującą się gospodarką odpadami,
aby we właściwy sposób zutylizować fotelik. Zawsze stosuj się do przepisów
dotyczących postępowania z odpadami w swoim kraju.
FRNLPL
44
Page 46

GARANTIE
Les conditions de garantie suivantes ne sont valables que dans le pays dans
lequel, ce produit a été vendu à l‘origine par un détaillant à un consommateur.
La garantie couvre tous les défauts de fabrication et de matériaux, qui
existaient au moment de l‘achat ou qui sont devenus apparents dans les trois
(3) ans suivant l‘achat initial auprès d‘un détaillant par un consommateur (la
garantie du fabricant). Dans le cas où des défauts de fabrication et de matériel
apparaîtraient au cours de la période de garantie, le produit sera réparé ou
remplacé, à notre entière discrétion. Pour toute réclamation concernant des
services couverts par cette garantie, le produit doit être retourné au détaillant
auprès duquel le produit a été acheté et l‘original de la preuve d‘achat (ticket
de caisse ou facture) doit être présenté, mentionnant la date d‘achat, le nom
du détaillant, le nom du produit et sa description. Aucune réclamation n‘est
possible directement auprès du fabricant ou de toute autre personne autre
que le détaillant chez qui le produit a été initialement acheté. La garantie est
valable uniquement si sans délai après l‘achat il a été vérifié que le produit
était complet et qu‘il ne présentait aucun défaut de fabrication ni aucun défaut
matériel. Si le produit a été acheté par correspondance, vous devez vérifier
sans délai à réception que le produit est complet et qu‘il ne présente aucun
défaut de fabrication ni aucun défaut matériel. Si le produit est endommagé,
il ne doit pas être utilisé et doit être renvoyé sans délai au détaillant chez qui
il a été acheté. Pour toute réclamation dans le cadre de la garantie, le produit
doit être retourné complet et propre. Avant de contacter le détaillant, veuillez
lire attentivement le manuel de l‘utilisateur. La garantie ne couvre pas les
dommages causés par une mauvaise utilisation, des facteurs externes (eau, feu,
accidents de la circulation ou autres) ou par l‘usure normale. Toute réclamation
dans le cadre de la garantie ne sera autorisée que si le produit a été manipulé
et utilisé conformément aux instructions d‘utilisation, si des réparations ont été
effectuées par des personnes autorisées à le faire et si des pièces détachées
et des accessoires d‘origine ont été utilisés. Cette garantie n‘exclut, ne limite
et ne restreint en rien les droits actuels des consommateurs conformément à
l‘ensemble des lois actuellement en vigueur, ni les droits contre les vendeurs en
cas de violation du contrat de produit.
45
Page 47

GARANTIE
Deze garantie is alleen van toepassing in het land van aankoop, en verkocht
door een retailer direct aan een consument. De garantie dekt alle productie
en matreriaal fouten. Bestaande op datum aankoop of verschijnende in de
periode van 3 jaar na aankoop bij de retailer. ( Fabrieksgarantie )In het geval
dat een fabricagefout of een materiaalfout verschijnt zullen wij het product
kosteloos repareren of vervangen voor een gelijkwaardig product. Om van
dergelijke garantie gebruik te maken dient u het product in de winkel van
aankoop aan te bieden voorzien van aankoopsbewijs met datum aankoop en
naam retailer. Deze garantie vervalt bij doorverkoop aan derden. Gelieve het
product direct na aankoop / ontvangst controleren op eventuele gebreken.
In geval van gebreken, gebruik het artikel niet maar breng deze in nette en
originele staat naar de winkel van aankoop om zo verzekerd te zijn van de
garantie. Voorafgaand aan contact met de retailer, lees deze gebruiksaanwijzing
aandachtig door. Deze garantie dekt geen schade veroorzaakt door verkeerd
gebruik, milieu-invloed (water, vuur, verkeersongevallen, of normale slijtage.)
Het is uitsluitend van toepassing in het geval dat het gebruik van het product
altijd in overeenstemming was met de gebruiksaanwijzing, en alle reparaties of
wijzigingen aan het product door daar toe aangewezen personen is uitgevoerd,
en alleen originele onderdelen zijn gebruikt. Deze garantie sluit niet uit, beperkt
of heeft anderszins invloed op enige wettelijke rechten van de consument,
waaronder begrepen vorderingen uit onrechtmatige daad en claims met
betrekking tot een schending van het contract, welke de koper jegens verkoper
of de fabrikant van het product heeft.
WARUNKI GWARANCJI
Niniejsza gwarancja obowiązuje wyłącznie w kraju, w którym produkt został
po raz pierwszy sprzedany klientowi przez sklep detaliczny. Gwarancja
obejmuje wszelkie wady materiałowe i produkcyjne istniejące w momencie
zakupu czy wykryte w ciągu trzech (3) lat od daty zakupu produktu w sklepie
detalicznym przez pierwszego właściciela (gwarancja producenta). Jeśli wada
materiałowa czy produkcyjna zostanie wykryta, producent, według własnego
uznania, bezpłatnie naprawi produkt lub wymieni go na nowy. Aby skorzystać
z warunków niniejszej gwarancji, należy zanieść lub wysłać produkt do sklepu,
w którym został po raz pierwszy zakupiony oraz przedłożyć oryginalny dowód
zakupu (paragon lub fakturę) zawierający datę zakupu, nazwę sklepu oraz
nazwę towaru. Warunki gwarancji nie obowiązują, jeśli produkt zostanie
odesłany do producenta lub innego podmiotu, a nie do sklepu, w którym został
po raz pierwszy zakupiony. Prosimy o sprawdzenie produktu pod kątem jego
kompletności czy jakichkolwiek wad w momencie jego zakupu, a w przypadku
sprzedaży wysyłkowej - natychmiast po jego otrzymaniu. W przypadku
stwierdzenia wady należy zaprzestać użytkowania produktu i odesłać go do
sklepu, w którym został po raz pierwszy zakupiony. Reklamowany w ramach
gwarancji produkt powinien zostać dostarczony czysty i kompletny. Jednakże
przed kontaktem ze sklepem należy uważnie przeczytać instrukcję użytkowania.
Niniejsza gwarancja nie obejmuje żadnych uszkodzeń wynikających z
nieprawidłowego użytkowania, warunków zewnętrznych (woda, ogień, wypadki
drogowe i inne) oraz normalnego zużycia. Gwarancja obowiązuje wyłącznie
wtedy, jeśli produkt był użytkowany zgodnie z instrukcją użytkowania, jeśli
był naprawiany/modyfikowany przez uprawnione osoby i użyto do tego celu
wyłącznie oryginalnych części i akcesoriów. Niniejsza gwarancja nie wyłącza, nie
ogranicza ani nie zawiesza uprawnień kupującego wynikających z niezgodności
towaru z umową konsumencką.
FRNLPL
CYBEX GmbH
Riedinger Str. 18, 95448 Bayreuth, Germany
Tel.: +49 921 78 511-0, Fax.: +49 921 78 511- 999
46
Page 48

JUNO-fix
ECE R 44/04
SEMI-UNIVERSAL
9 - 18 kg
04301317
CYBEX GmbH
Riedinger Str. 18, 95448 Bayreuth
Germany
CYBEX JUNO-FIX
A háttámlával, fejtámasszal és beállítható biztonsági
párnával felszerelt CYBEX Juno-fix ülésmagasító
használata a kb. 9 hónapostól 4 éves korig terjedő,
9 - 18 kg testsúlyú gyermekek esetében ajánlott.
Hárompontos automatikus övvisszahúzóval rendelkező,
az ECE előírásainak megfelelően és ISOFIX
ECE R16 HOMOLOGIZÁCIÓ
ECE R44/04, 1. csoport, 9 - 18 kg
KEDVES VÁSÁRLÓNK!
KÖSZÖNJÜK, HOGY A CYBEX JUNO-FIX GYERMEKÜLÉST VÁLASZTOTTA.
BIZTOSÍTHATJUK AFELŐL, HOGY A CYBEX JUNO-FIX MEGTERVEZÉSEKOR
A BIZTONSÁGRA, A KÉNYELEMRE ÉS A MŰKÖDŐKÉPESSÉGRE
ÖSSZPONTOSÍTOTTUNK. A TERMÉK GYÁRTÁSA SPECIÁLIS
MINŐSÉGELLENŐRZÉSI FOLYAMATOK ALKALMAZÁSÁVAL TÖRTÉNT, A TERMÉK
MAGA MEGFELEL A LEGSZIGORÚBB BIZTONSÁGI KÖVETELMÉNYEKNEK.
HU
TARTALOMJEGYZÉK
02/2015
47
CYBEX JUNO-FIX
podsedák se zádovou opěrkou, opěrkou hlavy a
nastavitelným bezpečnostním pultem
DOPORUČEN PRO
Věk: cca od 9 měsíců do 4 let
váha: 9 - 18 kg
pro sedadla vozidel s tříbodovými automaticky
navíjecími pásy podle a ISOFIX
SCHVÁLENÍ ECE R16
ECE R44/04, Skupina 1, 9 - 18 kg
CYBEX JUNO-FIX
podsedák s chrbtovou opierkou, opierkou hlavy a
nastaviteľnými bezpečnostnými chráničmi
DOPORUČENÁ PRE
Vek: cca od 9 mesiacov do 4 rokov
Váha: 9 - 18 kg
Pre sedačky vozidiel s trojbodovými automaticky
navíjacím pásy podľa a ISOFIX
SCHVÁLENÍ ECE R16
ECE R44/04 , Skupina 1, 9 - 18 kg
RÖVID ÚTMUTATÓ .............................................................................................................1
ECE R16 HOMOLOGIZÁCIÓ ..........................................................................................47
ELSŐ BESZERELÉS ........................................................................................................49
A TESTMÉRET BEÁLLÍTÁSA .......................................................................................... 51
A MAGASÍTÓ BETÉT ELTÁVOLÍTÁSA............................................................................51
A LEGOPTIMÁLISABB POZÍCIÓ A GÉPKOCSIBAN ....................................................53
A GYERMEKÜLÉS BESZERELÉSE ISOFIX RÖGZÍTÉSI RENDSZERREL ...............55
SOFIX CSATLAKOZÓK FELENGEDÉSE .......................................................................57
A GYERMEKÜLÉS BEHELYEZÉSE A GÉPKOCSIBA ..................................................57
A BIZTONSÁGI PÁRNA BEÁLLÍTÁSA ............................................................................59
A GYERMEK RÖGZÍTÉSE ...............................................................................................61
MEGFELELŐEN RÖGZÍTETTE A GYERMEKET? ........................................................61
A TERMÉK ÁPOLÁSA ...................................................................................................... 63
TISZTÍTÁS ..........................................................................................................................63
AZ ÜLÉSHUZ AT ELTÁVOLÍTÁSA ....................................................................................63
MI A TEENDŐ BALESET ESETÉN? ...............................................................................65
A TERMÉK ÉLETTARTAMA ............................................................................................65
ÁR TALMATL ANÍTÁS .........................................................................................................65
GARANCIA ........................................................................................................................67
Page 49

VÁŽENÝ ZÁKAZNÍKU! VÁŽENÝ ZÁKAZNÍK!
DĚKUJEME ZA ZAKOUPENÍ AUTOSEDAČKY CYBEX JUNO-FIX. UJIŠŤUJEME VÁS,
ŽE PŘI PROCESU VYVÍJENÍ AUTOSEDAČKY CYBEX JUNO-FIX JSME SE ZAMĚŘILI
NA BEZPEČNOST, KOMFORT A FUNKČNOST. TENTO PRODUKT JE VYROBEN POD
SPECIÁLNÍM DOHLEDEM KVALITY A SPLŇUJE TY NEJPŘÍSNĚJŠÍ BEZPEČNOSTNÍ
POŽADAVKY.
ĎAKUJEME ZA ZAKÚPENIE SEDAČKY CYBEX JUNO-FIX. UISŤUJEME VÁS, ŽE
PRI PROCESE VYVÍJANIE SEDAČKY CYBEX JUNO-FIX SME SA ZAMERALI NA
BEZPEČNOSŤ, KOMFORT A FUNKČNOSŤ. TENTO PRODUKT JE VYROBENÝ POD
ŠPECIÁLNYM DOHĽADOM KVALITY A SPĹŇA TY NAJPRISNEJŠIE BEZPEČNOSTNÉ
POŽIADAVKY.
CZ
STRUČNÝ NÁVOD ..............................................................................................................1
SCHVÁLENÍ ECE R16 .....................................................................................................47
PRVNÍ INSTALACE ........................................................................................................... 50
NASTAVENÍ VÝŠKY DÍTĚTE ...........................................................................................52
VYJMUTÍ VLOŽKY PODSEDÁKU ................................................................................... 52
NEJLEPŠÍ POLOHA V AUTĚ ...........................................................................................54
INSTALACE DĚTSKÉ AUTOSEDAČKY SE SYSTÉMEM ISOFIX CONNECT ...........56
UVOLNĚNÍ KONEKTORŮ ISOFIX ..................................................................................58
UMÍSTĚNÍ DĚTSKÉ AUTOSEDAČKY V AUTĚ .............................................................58
NASTAVENÍ BEZPEČNOSTNÍHO PULTU......................................................................60
ZAJIŠTĚNÍ DÍTĚTE ...........................................................................................................62
JE VAŠE DÍTĚ SPRÁVNĚ ZAJIŠTĚNO? ........................................................................ 62
PÉČE O PRODUKT ..........................................................................................................64
ČIŠTĚNÍ ..............................................................................................................................64
VYJMUTÍ POTAHU AUTOSEDAČKY ..............................................................................64
CO DĚLAT PO NEHODĚ ..................................................................................................66
TRVANLIVOST PRODUKTU ............................................................................................66
LIKVIDACE .........................................................................................................................66
ZÁRUKA .............................................................................................................................68
OBSAH OBSAH
SK
STRUČNÝ NÁVOD ..............................................................................................................1
SCHVÁLENÍ ECE R16 .....................................................................................................47
PRVÁ INŠTALÁCIA ...........................................................................................................50
NASTAVENIE VÝŠKY DIEŤAŤA ......................................................................................52
VYBRATIE VLOŽKY PODSEDÁKU ................................................................................52
NAJLEPŠIE POLOHA V AUTE ........................................................................................54
INŠTALÁCIA DETSKÉ SEDAČKY SA SYSTÉMOM ISOFIX CONNECT ....................56
UVOĽNENIE KONEKTOROV ISOFIX .............................................................................58
UMIESTNENIE DETSKÉ SEDAČKY V AUTE ................................................................58
NASTAVENIE BEZPEČNOSTNÉHO PULTU .................................................................60
ZABEZPEČENIE DIEŤAŤA ............................................................................................... 62
JE VAŠE DIEŤA SPRÁVNE ZAPNUTÉ? .........................................................................62
STAROSTLIVOSŤ O PRODUKT......................................................................................64
ČISTENIE ...........................................................................................................................64
VYBRATIE POŤAHU SEDAČKY......................................................................................64
ČO ROBIŤ PO NEHODE ..................................................................................................66
TRVANLIVOSŤ PRODUKTU ............................................................................................66
LIKVIDÁCIA........................................................................................................................66
ZÁRUKA .............................................................................................................................68
HU
CZSK
48
Page 50

!
b
a
d
a
c
Figyelmeztetés! Gyermeke maximális védelme érdekében a Használati
útmutató utasításainak megfelelően kell beszerelni és használni a
gyermekülést!
Figyelem! Kérjük, a Használati útmutatót tartsa könnyen hozzáférhető helyen,
a háttámla hátoldalán, a huzat alatt található nyílásban.
49
p
e
L.S.P.
z
ELSŐ BESZERELÉS
A gyermekülés egy üléspárnából (d), egy háttámlából (a), egy a gyermek
testmagasságához igazítható fejtámaszból (e) és egy állítható mélységű biztonsági
párnából (p) áll. Gyermeke csak abban az esetben élvezheti a maximális
biztonságot és kényelmet, ha minden tartozékot együttesen használ.
!
Figyelmeztetés! A CYBEX gyermekülés tartozékait tilos külön-külön vagy
más gyártók üléspárnáival, háttámláival vagy fejtámaszaival, illetve más
modellek hasonló tartozékaival együttesen használni. Ilyen esetekben a
gyártó garanciavállalása érvényét veszti.
A háttámla (a) az üléspárna (d) tengelyére (c) van rácsatlakoztatva a vezetőfül
(b) segítségével. Az oldalirányú ütközés elleni védelemmel, azaz LSP (Linear
Side-impact Protection) rendszerrel felszerelt két oldalvédőt nyomja be az erre
acélra szolgáló szerelőfuratokba (z), a vállrögzítők külső peremén. Jól hallható
hangjelzéssel be kell kattannia a megfelelő pozícióba.
Figyelem! Kérjük, a Használati útmutatót mindig tartsa könnyen hozzáférhető
helyen, a háttámla hátoldalán, a huzat alatt található nyílásban.
!
Figyelmeztetés! Mindig győződjön meg róla, hogy a gyermekülés egyes
részei nincsenek összenyomva vagy valahová beszorítva (pl. a gépkocsi
ajtóba vagy a hátsó ülés beállításakor).
Page 51

! !
Varování! Pro maximální ochranu Vašeho dítěte je nezbytné používat a
instalovat dětskou autosedačku podle pokynů v tomto návodě k použití.
Varovanie! Pre maximálnu ochranu Vášho dieťaťa je nevyhnutné používať
a inštalovať detskú sedačku podľa pokynov v tomto návode na obsluhu.
Pozor! Prosím uchovávejte návod k použití při ruce v otvoru pod krytem na
zadní straně zádové opěrky.
Pozor! Prosím uchovávajte návod na obsluhu pri ruke v otvore pod krytom na
zadnej strane chrbtovej opierky.
PRVNÍ INSTALACE PRVÁ INŠTALÁCIA
Dětská autosedačka se skládá ze sedáku (d) a zádové opěrky (a) s opěrkou hlavy
(e), která se upravuje tak, aby vyhovovala výšce dítěte stejně jako bezpečnostní
pult (p), který je nastavitelný do hloubky. Vaše dítě bude mít prospěch z maximální
ochrany a komfortu pouze tehdy, když všechny komponenty budou používány
společně.
! !
Varování! Součástky dětské autosedačky CYBEX nesmějí být používány
buď samostatně nebo v kombinaci se sedáky, zádovými opěrkami a
opěrkami hlavy od jiných výrobců nebo z jiných modelových řad. V
takových případech dětská autosedačka již není certifikována pro použití.
Zádová opěrka (a) je zaháknutá na ose (c) sedáku (d) pomocí vodícího oka (b).
Zatlačte na dva boční chrániče opatřeny systémem lineární ochrany proti bočnímu
nárazu (LSP) do montážních otvorů (z) na vnějších okrajích opěrky ramen. Ty se
zamknou na místo se zřetelným kliknutím.
Pozor! Prosím vždy uchovávejte návod k použití v otvoru pod krytem
autosedačky na zadní straně zádové opěrky.
! !
Varování! Vždy zajistěte, aby jednotlivé součástky dětské autosedačky
nikdy nebyly stlačené nebo zaseknuté (např. ve dveřích auta nebo v
nastavení zadního sedadla).
Detská sedačka sa skladá zo sedadla (d) a chrbtové opierky (a) s opierkou
hlavy (e), ktorá sa upravuje tak, aby vyhovovala výške dieťaťa, rovnako ako
bezpečnostný pult (p), ktorý je nastaviteľný do hĺbky. Vaše dieťa bude mať
prospech z maximálnej ochrany a komfortu iba vtedy, keď všetky komponenty budú
používané spoločne.
Varovanie! Súčiastky detské sedačky CYBEX nesmú byť používané
buď samostatne alebo v kombinácii so sedákmi, chrbtovými opierkami
a opierkami hlavy od iných výrobcov alebo iných modelových radov. V
takýchto prípadoch detskej sedačky už nie sú certifikované pre použitie.
Chrbtová opierka (a) je zaháknutie na osi (c) sedadla (d) pomocou vodiaceho oka
(b). Zatlačte na dva bočné chrániče opatrené systémom lineárne ochrany proti
bočnému nárazu (LSP) do montážnych otvorov (z) na vonkajších okrajoch opierky
ramien. Tie sa zamknú na miesto so zreteľným kliknutím.
Pozor! Prosím vždy uchovávajte návod na použitie v otvore pod krytom
sedačky na zadnej strane chrbtovej opierky.
Varovanie! Vždy zaistite, aby jednotlivé súčiastky detskej sedačky nikdy
neboli stlačené alebo zaseknuté (napr. vo dverách auta alebo v nastavení
zadnej sedačky).
HU
CZSK
50
Page 52

A TESTMÉRET BEÁLLÍTÁSA
g
e
h
g
A megfelelő magassághoz történő beállításhoz rendelkezésre áll egy ülésbetét (i),
amely vásárláskor a az üléshuzat alá van behelyezve.
Ajánlatos az ülésbetét használata (i) 9 és 18 hónapos kor között. 19 hónapos
kor felett az ülésbetét (i) eltávolítható. Eztán a megfelelő magasság a fejtámla
(e) megfelelő pozícióba történő mozgatásával állítható be. Húzza meg az állító
fogantyút (h), hogy kioldja a fejtámlát. Az ülés megfelelőán állítható, ha 2 ujjunk
befér a fejtámla alulsó pereme (e) és a gyermek válla közé. Húzza meg az állító
fogantyút (h) hogy kioldja a váll és fejtámlát.
Figyelem! A váll és fejtámlát tökéletesen a megfelelő magasságúra kell állítani,
hogy a legmagasabb fokú védelmet és kényelmet nyújthassa gyermekének,
valamint hogy a diagonális öv (f) optimális pozícióját garantálja. A váll és fejtámla
11 pozícióba állítható. A vállrész kapcsolódik a fejtámla részhez, ezt nem kell külön
állítani.
d
A MAGASÍTÓ BETÉT ELTÁVOLÍTÁSA
• Nyissa ki a patentokat a huzat elején.
• Emelje fel a huzatot mindaddig, amíg az ülésbetétet (i) el nem tudja távolítani.
• Vegye ki az ülésbetétet (i) az imént említett kor meghatározásnak megfelelően.
• Tegye vissza a huzatot az eredeti pozíciójába, és csatolja vissza a patentokat.
51
Page 53

NASTAVENÍ VÝŠKY DÍTĚTE NASTAVENIE VÝŠKY DIEŤAŤA
U autosedačky Cybex Juno-fix je k dosažení optimálního nastavení velikosti
autosedačky pro dítě dodávaná z výroby vložka pod potah sedáku (i).
Ttuto vložku doporučujeme pro dítě ve věku od 9. do 18. měsíců.Od 19. měsíce
věku dítěte již není potřebná žádná vložka. Potom je optimální velikost sedačky
nastavovaná pomocí výškově přestavitelné opěrky hlavy (e). Přizpůsobení sedačky
by mělo být provedeno tak, aby mezi okrajem opěrky hlavy a rameny dítěte bylo
místo na 2 prsty.
Upozornění! Pouze správně nastavená výška opěrky ramen a hlavy nabízí nejvyšší
možnou ochranu a komfort pro Vaše dítě a zajišťuje mimo jiné optimální vedení
diagonálního pásu (f). Nastavení výšky nabízí 11 pozic. Opěrka ramen a opěrka
hlavy jsou pevně spojené a není možné je nastavovat samostatně.
Pre správne nastavenie výšky autosedačky CYBEX Juno-fix je pri jej obstaranie
priložená a už vložená pod poťah, vložka sedadla (i).
Je odporúčané používať vložku pre nastavenie výšky (i) vo veku medzi 9 a 18
mesiacmi.Pre deti staršie ako 19 mesiacov by mala byť vložka pre nastavenie výšky
(i) vybratá.Potom by mala byť výška nastavovaná presúvaním opierky hlavy (e)
do správnej pozície. K uvoľneniu opierky hlavy zatiahnite za nastavovacie madlo
(h).Sedačka je správne nastavená ak môžete strčiť 2 prsty medzi spodný okraj
opierky hlavy a rameno dieťaťa. Pre odomknutie opierky hlavy ramien potiahnite
nastavovacím madlo (h).
Upozornenie! Pre poskytnutie najlepšej ochrany a pohodlie vášmu dieťati a
zaručenie optimálnej pozície diagonálneho pásu (f) musí byť opierka hlavy a ramien
(e) dokonale výškovo nastavená. Výška opierky ramien a hlavy môže byť nastavená
do 11 pozícií. Opierka ramien a opierka hlavy sú pevne spojené a nie je možné ich
nastavovať samostatne.
VYJMUTÍ VLOŽKY PODSEDÁKU VYBRATIE VLOŽKY PODSEDÁKU
HU
CZSK
• Rozepněte oba druky potahu na přední straně sedáku (d).
• Přetáhněte potah sedáku na přední straně směrem nahoru.
• Vyjměte vložku ze sedačky při odpovídajícím věku dítěte.
• Dejte potah zpět na původní místo na sedače a znovu ho upevněte v této pozici.
• Rozopnite oba cvoky poťahu na prednej strane sedadla.
• Presuňte poťah sedadla na prednej strane smerom nahor, tak aby bolo možné
vložku pre nastavenie výšky (i) vybrať.
• Pri zodpovedajúcom veku dieťaťa vložku vyberte zo sedačky.
• Dajte poťah späť na pôvodné miesto na sedačke a znovu ho upevnite v tejto
pozícii.
52
Page 54

53
w
A LEGOPTIMÁLISABB POZÍCIÓ A GÉPKOCSIBAN
A CYBEX Juno-fix-et kizárólag ISOFIX csatlakozó rendszerrel szabad
rögzíteni.
A gyermekülés ISOFIX csatlakozókkal történő rögzítéséhez egy
féluniverzális homologizáció van érvényben. Ezért a CYBEX Juno-fix
ISOFIX CONNECT rendszerrel felszerelt gyermekülés csak bizonyos
gépjármű típusokban használható. A jóváhagyott járművekre és pozíciókra
vonatkozó részletes információkat lásd a mellékelt listán! A jóváhagyott gépkocsi
típusok rendszeresen frissített listája a www.cybex-online.com oldalon érhető el. A
poggyász vagy egyéb nem rögzített tárgyak baleset esetén sérülést okozhatnak,
ezért azokat elindulás előtt rögzíteni kell! Az ilyen tárgyak életveszélyes lövedékké
válhatnak a gépkocsi utasterében.
!
Figyelmeztetés! A gyermekülést tilos olyan ülésekre felszerelni, amelyek
derékszögben és menetirányban vannak beszerelve. A gépjárműben a
menetiránynak háttal elhelyezkedő üléseken, például furgonban vagy
mikrobuszban, a gyermekülés használat megengedett abban az esetben,
ha a gépjármű ülése alkalmas felnőtt utas szállítására. Amennyiben a
gyermekülést a menetiránynak háttal szerelik be, nagyon fontos, hogy a
gépjármű ülésének fejtámasza a helyén legyen! A gyermekülést mindig
rögzíteni kell a gépjármű biztonsági övével, még abban az esetben is, ha
az használaton kívül van. Amennyiben vészleállítást kell végrehajtania vagy
kisebb ütközést szenvedett, a nem rögzített gyermekülés az Ön és a jármű
utasainak sérülését okozhatja.
Elől a gyermek baleset esetén nagyobb veszélynek van kitéve. A gyerekülés
kivételesen az utas-ülésen is elhelyezhető. Ebben az esetben a következőket kell
figyelembe venni:
• Az elülső légzsákokkal felszerelt gépkocsikban az utas ülést amennyire csak
lehetséges, hátra kell tolni.
• A gépjármű gyártójának vonatkozó ajánlásait minden esetben kötelező betartani!
!
Figyelmeztetés! A gyermekülés kétpontos biztonsági övekkel nem
használható! Amennyiben balesetet szenved, és a gyermekülés kétpontos
biztonsági övvel van rögzítve, gyermek súlyos sérülést szenvedhet vagy
elhalálozhat az ütközés következtében!
Figyelem! Soha ne hagyja gyermekét felügyelet nélkül a gépkocsiban!
Page 55

NEJLEPŠÍ POLOHA V AUTĚ NAJLEPŠIE POLOHA V AUTE
Montáž autosedačky CYBEX Juno-fix je povolena pouze pomocí systému
ISOFIX-CONNECT.
Existuje „semi-univerzální“ schválení pro zajištění dětské autosedačky
ISOFIX konektory. Z tohoto důvodu CYBEX Juno-fix se systémem ISOFIX
CONNECT může být instalován jen v určitých typech vozů. Podrobné
informace o povolených vozidel a polohách naleznete na přiloženém
seznamu schválených vozidel. Neustále aktualizovaný seznam povolených vozidel
lze nalézt na www.cybex-online.com. Zavazadla a další volné předměty v autě,
které by mohly způsobit zranění při nehodě, musí být vždy bezpečně zajištěny. Tyto
předměty a položky se mohou stát smrtícími střelami uvnitř vozu.
!
Varování! Dětská autosedačka nesmí být použita na sedadlech vozidel,
které jsou umístěné v pravém úhlu ve směru jízdy. Na zadních sedadlech
směřujících vzad ve vozidlech, jako například, v dodávce nebo minibuse,
použití dětské sedačky je oprávněno za předpokladu, že sedadlo je
oprávněné k přepravě pro dospělé. Je nezbytné zajistit, aby opěrka hlavy
nebyla odstraněna, je-li dětská autosedačka instalována směrem dozadu.
Dětská autosedačka musí být vždy zajištěna na sedadle pásem sedadla
vozidla, i když není používána. Máte-li provést nouzové zastavení nebo
pokud se jste účastníci menší kolize, nezajištěná dětská autosedačka může
ublížit Vám i ostatním cestujícím.
Vpředu je dítě obvykle vystaveno většímu riziku v případě nehody. Ve výjimečných
případech se sedačka může připevnit k sedadlu s polucestujícího. V takových
případech berte na vědomí následující:
• V autech s airbagy musí být sedadlo spolujezdce zastrčeno co nejdále dozadu.
• Je naprosto nezbytné, abyste splňovali doporučení výrobce Vašeho vozidla.
schválených vozidiel. Neustále aktualizovaný zoznam povolených vozidiel možno
nájsť na www.cybex-online.com.
Batožina a ďalšie voľné predmety v aute, ktoré by mohli spôsobiť zranenia pri
nehode, musí byť vždy bezpečne zaistené. Tieto predmety a položky sa môžu stať
smrtiacimi strelami vo vnútri vozidla.
!
Vpredu je dieťa obvykle vystavené väčšiemu riziku v prípade nehody. Vo
výnimočných prípadoch môže byť detská autosedačka použitá aj na prednom
sedadle spolujazdca. V takýchto prípadoch berte na vedomie nasledujúce:
• v autách s airbagmi, musí byť sedadlo spolujazdca zastrčený o čo najďalej
dozadu.
• Je absolútne nevyhnutné, aby ste spĺňali odporúčania výrobcu Vášho vozidla.
Montáž autosedačky CYBEX Juno-fix je povolená iba pomocou systému
ISOFIX-CONNECT.
Existuje „semi-univerzálna“ homologácia pre zaistenie detskej sedačky
ISOFIX konektory. Z tohto dôvodu CYBEX Juno-fix so systémom ISOFIX
CONNECT môže byť inštalovaný len v určitých typoch vozidiel. Podrobné
informácie o povolených vozidiel a polohách nájdete na priloženom zozname
Varovanie! Detská sedačka nesmie byť použitá na sedadlách vozidiel,
ktoré sú umiestnené v pravom uhle v smere jazdy. Na zadných sedadlách
smerujúcich dozadu vo vozidlách, ako napríklad, v dodávke alebo minibus,
použitie detskej sedačky je oprávnené za predpokladu, že sedadlo je
oprávnené k preprave pre dospelých. Je potrebné zabezpečiť, aby opierka
hlavy nebola odstránená, ak je detská sedačka inštalovaná smerujúce
dozadu. Detská sedačka musí byť vždy zaistená na sedadle pásom
sedadla vozidla, aj keď nie je používaná. Ak máte vykonať núdzové
zastavenie alebo ak sa ste účastníci menšie kolízie, nezaistené detská
sedačka môže ublížiť Vám aj ostatným cestujúcim.
HU
CZSK
!
Varování! Dětská autosedačka není vhodná pro použití s dvoubodovými
nebo břišními bezpečnostními pásy. Pokud jste účastníkem nehody a
autosedačka je zajištěna dvoubodovými bezpečnostní pásy, může být dítě
těžce zraněno nebo zabito.
Pozor! Nikdy nenechávejte Vaše dítě v autě bez dozoru.
!
Varovanie! Detská sedačka nie je vhodná pre použitie s dvojbodovými
alebo brušnými bezpečnostnými pásmi. Ak ste účastníkom nehody a
sedačka je zaistená dvojbodovými bezpečnostné pásy, môže byť dieťa
ťažko zranene alebo zabite.
Pozor! Nikdy nenechávajte Vaše dieťa bez dozoru v aute.
54
Page 56

u
w
i
v
y
y
x
u
w
x
RENDSZERREL
Az ISOFIX CONNECT rendszerrel biztonságosan rögzítheti gyermekét a
gépkocsiban és ily módon nagyobb biztonságba helyezheti gyermekét.
Gyermeke biztonságát a gépjármű hárompontos automatikus biztonsági öve
tovább fokozza.
Figyelem! Az ISOFIX rögzítési pontok (i) ülésenként két fémgyűrűből állnak,
és a háttámla és a gépkocsi ülés között helyezkednek el. Kétséges esetekben
olvassa el a gépjármű gépkönyvét!
Amennyiben nehezen fér hozzá a gépkocsiban az ISOFIX rögzítési pontokhoz
(i), valamint az üléshuzat védelmére, tartósan rögzítheti az ISOFIX vezetősíneket
(u) mindkét rögzítési ponton. Bizonyos gépkocsikban hatékonyabb az ISOFIX
vezetősíneket (u) ellentétes irányban beszerelni
A CYBEX Juno-fix megfelelő rögzítéséhez, tartsa be a következő utasításokat:
• Nyomja le a gyermekülés alsó részén található kart (v).
• Húzza ki az ISOFIX csatlakozókat, amennyire csak lehet.
• Fordítsa el a csatlakozókat 180°-ban, oly módon hogy azok az ISOFIX
VEZETŐSÍNEK (u) irányába mutassanak.
Figyelem! Győződjön meg róla, az ISOFIX csatlakozókon (w) található
zöld biztonsági jelölések (x) nem láthatók. Szükség esetén, kapcsolja ki a
csatlakozókat (w) a piros kioldó gomb (y) lenyomásával és visszahúzásával.
Ismételje meg a műveletet a másik csatlakozón is!
• Nyomja az ISOFIX csatlakozókat (w) a VEZETŐSÍNEKBE (u) míg a rögzítési
pontokon (i) hangjelzés adva be nem kattannak.
• Győződjön meg róla, hogy a gyermek biztosan rögzítve van az ülésben, oly
módon, hogy megpróbálja kihúzni onnan.
• A zöld biztonsági jelzésnek (x) jól láthatónak kell lennie mindkét piros kioldó
gombon (y).
• Ezt követően a gyermekülés alsó részén található kar (v) lenyomásával
beállíthatja a megfelelő üléspozíciót.
Figyelem! Kérjük, olvassa el a „GYERMEKÜLÉS BEHELYEZÉSE A
GÉPKOCSIBA“ című részt!
• Ezt követően rögzítheti a gyermeket a gyermekülésben, lásd „A GYERMEK
RÖGZÍTÉSE“ című részt!
A GYERMEKÜLÉS BESZERELÉSE ISOFIX RÖGZÍTÉSI
55
Page 57

INSTALACE DĚTSKÉ AUTOSEDAČKY SE SYSTÉMEM ISOFIX
CONNECT
Se systémem ISOFIX CONNECT můžete zajistit dětskou autosedačku
bezpečně v autě a tudíž je Vaše dítě zabezpečenější. Vaše dítě je dále
chráněno tříbodovým automatickým bezpečnostním pásem Vašeho auta.
INŠTALÁCIA DETSKÉ SEDAČKY SA SYSTÉMOM ISOFIX
CONNECT
So systémom ISOFIX CONNECT môžete zaistiť detskú sedačku bezpečne
v aute a teda je Vaše dieťa bezpečnejšie. Vaše dieťa je ďalej chránené
trojbodovým automatickým bezpečnostným pásom Vášho auta.
Pozor! Ukotvení ISOFIX (i) jsou dvě kovová oka na každém sedadle a
jsou umístěné mezi zádovou opěrkou a sedadlem vozu. Máte-li jakékoli
pochybnosti, obraťte se pro pomoc na návod k použití Vašeho auta.
Pokud je obtížné získat přístup k ukotvovacím bodům ISOFIX (i) Vašeho vozu a
ochránit autopotah, můžete trvale umístit zástrčky ISOFIX (u) poskytnutých v obou
kotevních bodech. V mnoha autech je efektivnější instalovat zástrčky ISOFIX (u) v
opačném směru.
Pro správné zajištění autosedačky CYBEX Juno-fix dodržujte následující pokyny: Pre správne zabezpečenie sedačky CYBEX Juno-fix dodržujte nasledujúce pokyny:
• Aktivujte páku (v) na spodní straně dětské autosedačky.
• Vytáhněte konektory ISOFIX co nejvíce je možné.
• Otočte konektory o 180°, takže se zobrazí ve směru zástrček ISOFIX (u).
Pozor! Dbejte na to, aby dva zelené bezpečnostní indikátory (x) na
konektorech ISOFIX (w) nebyly vidět. Pokud to je nutné, uvolněte konektory
(w) stlačením a vytažením zpět červeného uvolňovacího tlačítka (y). Opakujte
tento postup podle potřeby pro druhý konektor.
• Zamáčkněte dva konektory ISOFIX (w) do ZÁSTRČEK (u), dokud nejsou
zamknuté do místa kotevních bodů (i) s zřetelným „KLIKNUTÍM“.
• Ujistěte se, že dětská autosedačka je bezpečně na svém místě pokusem ji
vytáhnout.
• Zelený bezpečnostní indikátor (x) musí být jasně viditelný na obou červených
uvolňovacích tlačítkách (y).
• Nyní můžete použít páku (v) na spodní straně dětské autosedačky pro nastavení
polohy sedačky.
Pozor! Prosím nahlédněte do sekce „UMÍSTĚNÍ DĚTSKÉ SEDAČKY V AUTĚ“. Pozor! Prosím nahliadnite do sekcie „UMIESTNENIE DETSKÉ sedačky v aute“.
• Nyní můžete zajistit Vaše dítě do dětské autosedačky; viz „ZAJIŠTĚNÍ DÍTĚTE“ • Teraz môžete zaistiť Vaše dieťa do detskej sedačky; pozri „ZABEZPEČENIE
Pozor! Pozor! Ukotvenie ISOFIX (i) sú dva kovové oká na každej sedačke
a sú umiestnené medzi operadlom a sedadlom auta. Ak máte akékoľvek
pochybnosti, obráťte sa pre pomoc na návod na obsluhu auta.
Ak je ťažké získať prístup k ukotvovacím bodom ISOFIX (i) Vášho auta a chrániť
poťah, môžete trvalo umiestit zástrčky ISOFIX (u) opatrených v oboch kotviacich
bodoch. V mnohých autách je efektívnejšie inštalovať zástrčky ISOFIX (u) v
opačnom smere.
• Aktivujte páku (v) na spodnej strane detskej sedačky.
• Vytiahnite konektory ISOFIX čo najviac je možné.
• Otočte konektory o 180 °, takže sa zobrazí v smere zástrčiek ISOFIX (u).
Pozor! Dbajte na to, aby dva zelené bezpečnostné indikátory (x) na konektory
ISOFIX (w) neboli vidieť. Ak je to potrebné, uvoľnite konektory (w) stlačením a
vytiahnutím späť červeného uvoľňovacieho tlačidla (y). Opakujte tento postup
podľa potreby pre druhý konektor.
• Zatlačte dva konektory ISOFIX (w) do zástrčiek (u), kým nie sú zamknuté do
miesta kotevných bodov (i) s zreteľným „KLIKNUTÍM“.
• Uistite sa, že detská sedačka je bezpečne na svojom mieste a pokuste sa ju
vytiahnuť.
• Zelený bezpečnostný indikátor (x) musí byť jasne viditeľný na oboch červených
uvoľňovacích tlačidlách (y).
• Teraz môžete použiť páku (v) na spodnej strane detskej sedačky pre nastavenie
polohy sedadla.
DIEŤAŤA“.
HU
CZSK
56
Page 58

SOFIX CSATLAKOZÓK FELENGEDÉSE
w
y
x
v
Hajtsa végre a beszerelési lépéseket fordított sorrendben!
• Oldja ki az ISOFIX csatlakozókat (w) mindkét oldalon, kioldó gomb (y)
lenyomásával és visszahúzásával.
• Húzza ki az ülést az ISOFIX vezetősínekből (u).
• Fordítsa el az ISOFIX csatlakozókat (w) 180°-ban.
• A gyermekülés alsó részén található kart (v) nyomja le, és a csatlakozókat
ütközésig tolja előre, míg végső pozíciójukat el nem érték.
A GYERMEKÜLÉS BEHELYEZÉSE A GÉPKOCSIBA
• Helyezze be a gyermekülést a gépkocsi megfelelő ülésére!
• Az ülés függőleges helyzetben való beszereléséhez, gondoskodjon
róla, hogy a gyermekülés háttámlája (a) teljesen egy síkban legyen a
• Ezt a távolságot a (v) karral állíthatja be, amely az ülés alján található.
• Amennyiben a gépkocsi ülés fejtámasza útban van, húzza ki azt teljesen, fordítsa
el vagy vegye ki teljesen (kivételt lásd „A LEGJOBB POZÍCIÓ A GÉPKOCSIBAN“
a
című részt!). A háttámla (a) automatikusan beállítódik egy mozdulattal szinte
minden pozícióba.
!
Figyelem! Előfordulhat, hogy a kényesebb anyagból (pl. velúr vagy bőr)
készült ülések elszíneződhetnek vagy kikophatnak. Ennek elkerülése
érdekében kérjük helyezzen ülésvédőt vagy pl. egy törölközőt a gyermekülés
alá. Itt szeretnénk felhívni gyelmét arra, hogy a tisztításra vonatkozó
utasításokat az első használat előtt olvassa el és minden esetben tartsa be!
gépkocsi ülés háttámlájával.
Figyelmeztetés! A CYBEX Juno-fix háttámlának egy síkban kell
elhelyezkednie a gépkocsi ülés háttámlájával. A gyermek maximális
biztonságának biztosítására a gyermekülésnek normális, függőleges
pozícióban kell elhelyezkednie.
57
Page 59

UVOLNĚNÍ KONEKTORŮ ISOFIX UVOĽNENIE KONEKTOROV ISOFIX
Instalaci proveďte kroky v opačném pořadí. Inštaláciu vykonajte kroky v opačnom poradí.
• Uvolněte konektory ISOFIX (w) na obou stranách stisknutím a táhnutím
zpět červeného uvolňovacího tlačítka (y).
• Vytáhněte autosedačku z konektorů ISOFIX (u).
• Otočte konektory ISOFIX (w) o 180 °.
• Stiskněte páku (v) na spodní straně dětské autosedačky a zatlačte konektory,
dokud se nedostanou do koncové polohy.
• Uvoľnite konektory ISOFIX (w) na oboch stranách stlačením a ťahaním
späť červeného uvoľňovacieho tlačidla (y).
• Vytiahnite sedačku z konektorov ISOFIX (u).
• Otočte konektory ISOFIX (w) o 180 °.
• Stlačte páku (v) na spodnej strane sedačky a zatlačte konektory, kým sa
nedostanú do koncovej polohy.
UMÍSTĚNÍ DĚTSKÉ AUTOSEDAČKY V AUTĚ UMIESTNENIE DETSKÉ SEDAČKY V AUTE
• Umístěte dětskou autosedačku na příslušné místo v autě.
• Při instalaci autosedačky ve svislé poloze pro dítě je velmi důležité dbát
na to, aby zádová opěrka (a) dětské autosedačky ležela v rovině proti
zádové opěrce sedadla.
• Vzdálenost můžete nastavit pomocí páčky (v) na spodní straně dětské
autosedačky.
• Pokud opěrka hlavy autosedačce překáží, vytáhněte ji úplně, otočte ji nebo ji
úplně oddělte (výjimka viz bod „NEJLEPŠÍ POLOHA V AUTĚ“). Zádovou opěrku
(a) lze nastavit jedním pohybem do téměř každé polohy sedadla.
!
Varování! Zádová opěrka autosedačky CYBEX Juno-fix musí ležet v rovině
se zády sedadla auta. Pro zaručení maximální ochrany pro Vaše dítě,
sedadlo musí být v normální vzpřímené poloze.
• Umiestnite detskú sedačku na príslušné miesto v aute.
• Pri inštalácii sedačky vo zvislej polohe pre dieťa je veľmi dôležité dbať
na to, aby chrbtová opierka (a) detské sedačky ležala v rovine proti
chrbtovej opierke sedadla.
• Vzdialenosť môžete nastaviť pomocou páčky (v) na spodnej strane detskej
autosedačky.
• Ak opierka hlavy autosedačke prekáža, vytiahnite ju úplne, otočte ju alebo ju
úplne oddeľte (výnimka pozri časť „NAJLEPŠIA POLOHA V AUTE“). Chrbtovú
opierku (a) je možné nastaviť jedným pohybom do takmer každej polohy sedadla.
!
Varovanie! Chrbtová opierka sedačky CYBEX Juno-fix musí ležať v rovine
s chrbtom sedadla auta. Pre zaručenie maximálnej ochrany pre Vaše dieťa,
sedačka musí byť v normálnej vzpriamenej polohe.
HU
CZSK
Pozor! Pokud jsou potahy sedadel ve vozidle vyrobeny z jemného materiálu
(např. velur, kůže, apod.), mohou se na nich objevit stopy opotřebování a/
nebo ztráty barvy. K vyvarování se tomuto jevu doporučujeme pod dětskou
autosedačku vložit např. ručník. V této souvislosti bychom vás chtěli odkázat
na naše pokyny pro čištění, které musí být dodrženy před prvním použitím
autosedačky.
Pozor! Ak sú poťahy sedadiel vo vozidle vyrobené z jemného materiálu
(napr. velúr, koža, apod), môžu sa na nich objaviť stopy opotrebovania a/
alebo straty farby. K vyvarovanie sa tomuto javu doporučujeme pod detskú
autosedačku vložiť napr. uterák. V tejto súvislosti by sme vás chceli odkázať
na naše pokyny pre čistenie, ktoré musia byť dodržané pred prvým použitím
autosedačky.
58
Page 60

A BIZTONSÁGI PÁRNA BEÁLLÍTÁSA
Mindkét beállító kar (q) egyidejű lenyomásával a biztonsági párna (p) automatikusan
p
q
a legtávolabbi elülső pozícióba csúszik. A beállító karok (q) felengedésével a
biztonsági párna (p) rögzül a helyén. A biztonsági párna (p) oldalsó részei pontosan
az üléspárna kartámaszába (d) illeszkednek, és biztosítják az ülés alátámasztását.
Állítsa be a biztonsági párnát (p) oly módon, hogy az a gyermekkel szemben
legyen, és a biztonsági párna (p) ne érintkezzen a gyermek testével.
d
!
Figyelmeztetés! A biztonsági párna (p) kizárólag az üléssel együtt
használható és a gyermek súlya nem haladhatja meg a 18-kg-ot.
59
Page 61

NASTAVENÍ BEZPEČNOSTNÍHO PULTU NASTAVENIE BEZPEČNOSTNÉHO PULTU
Aktivování obou nastavovacích pojistek (q) současně způsobuje, že bezpečnostní
pult (p) sklouzne automaticky do polohy vpřed. Uvolnění nastavovacích pojistek (q)
zajistí bezpečnostní pult (p) na místě. Boční části bezpečnostního pultu (p) přesně
sedí do ramenních opěrek na podsedáku (d) a poskytují podporu pro sedadlo.
Nastavte bezpečnostní pult (p) tak, aby ležel proti dítěti, aniž by bezpečnostní pult
(p) přišel do styku s tělem dítěte.
! !
Varování! Bezpečnostní pult (p) musí být používán pouze s autosedačkou a
pouze pro děti vážící ne více než 18 kg.
Aktivovanie oboch nastavovacích poistek (q) súčasne spôsobuje, že bezpečnostný
pult (p) skĺzne automaticky do polohy vpred. Uvoľnenie nastavovacie poistky (q)
zabezpečí bezpečnostné pult (p) na mieste. Bočné časti bezpečnostného pultu
(p) presne sedí do ramenných opierok na podsedáku (d) a poskytujú podporu pre
sedadlo. Nastavte bezpečnostný pult (p) tak, aby ležal proti dieťati, bez toho, aby
bezpečnostný pult (p) přišelt do styku s telom dieťaťa.
Varování! Podsedák (p) musí byť používaný len so sedadlom a len pre deti
vážiace nie viac ako 18 kg.
HU
CZSK
60
Page 62

A GYERMEK RÖGZÍTÉSE
r
n
l
m
• Helyezze a gyermeket a gyermekülésbe.
• Tegye a helyére az előzőleg beállított biztonsági párnát (p) (lásd „A BIZTONSÁGI
PÁRNA BEÁLLÍTÁSA“ című részt)
• Teljesen húzza ki a hárompontos automatikus biztonsági övet. Fogja meg
a kétpontos övet (n) és helyezze be a biztonsági párna (p) pirossal jelölt
övterelőjébe (r).
!
Figyelmeztetés! Ne csavarja meg az övet!
61
f
n
• Nyomja be az öv nyelvét (m) az övcsatba (l). Jól hallható hangjelzéssel be kell
kattannia a megfelelő pozícióba.
• Húzza meg a kétpontos biztonsági övet (n) a vállöv (f) meghúzásával.
• Most vezesse vissza a vállövet (f) a biztonsági párna (p) övterelőjén (r)!
• Húzza feszesre a vállövet (f), ügyelve arra, hogy az öv mindkét része a biztonsági
párna (p) teljes szélességén fusson, az övterelőn (r) belül.
MEGFELELŐEN RÖGZÍTETTE A GYERMEKET?
Gyermeke maximális biztonságának biztosítása érdekében, kérjük, elindulás előtt
mindig ellenőrizze, hogy:
• a biztonsági párna megfelelően be van-e állítva!
• az öv nyelve (m) rögzült a helyén az övcsatban (l).
• a kétpontos öv (n) és a vállöv (f) feszesen fut a biztonsági párna (p) övterelőjén
keresztül, és nincs megcsavarodva.
• az üléspárna (d) mindkét oldalon rögzítve van a helyén a csatlakozókkal (w) az
ISOFIX rögzítési pontokon (i) és mindkét zöld biztonsági jelölés (x) jól látható.
• a gyermekülés háttámlája (a) teljesen egy síkban van a gépkocsi ülés
háttámlájával.
Page 63

ZAJIŠTĚNÍ DÍTĚTE ZABEZPEČENIE DIEŤAŤA
• Dejte dítě do dětské autosedačky.
• Nasaďte předešle nastavený bezpečnostní pult (ú) na místo (viz sekce
„NASTAVENÍ BEZPEČNOSTNÍHO CHRÁNIČE“)
• Vytáhněte tříbodový automatický pás v plném rozsahu. Vezměte si bezpečnostní
pás (n) a vložte jej do červeně označené trasy pásu (r) bezpečnostního pultu (p).
! !
Varování! Nepřekruťte pás! Varovanie! Nepřekruťte pás!
• Dajte dieťa do detskej sedačky.
• Dajte predišlo nastavený bezpečnostný pult (ú) na miesto (pozri sekcia
„NASTAVENIE BEZPEČNOSTNÉHO CHRÁNIČE“).
• Vytiahnite trojbodový automatický pás v plnom rozsahu. Vezmite si bezpečnostný
pás (n) a vložte ho do červeno označenej trasy pásu (r) bezpečnostného chrániče
(p).
• Vložte část spony pásu (m) do spony pásu (l). To musí zapadnout na místo se
zřetelným „kliknutím“.
• Napněte bezpečnostní pás (n), tahem na ramenní pás (f).
• Nyní veďte ramenní pás (f) zpět do vedení pásu (r) bezpečnostního pultu (p).
• Vytáhněte ramenní pás (f) a napněte jej, postarejte se, aby obě části pásu běželi
přes celou šířku bezpečnostního pultu (p) v rámci vedení pásu (r).
• Vložte časť spony pásu (m) do spony pásu (l). To musí zapadnúť na miesto so
zreteľným „kliknutím“.
• Napnite bezpečnostný pás (n), ťahom na ramenný pás (f).
• Teraz veďte ramenný pás (f) späť do vedenia pásu (r) bezpečnostného chrániče
(p).
• Vytiahnite ramenný pás (f) a napnite ho, postarajte sa, aby obe časti pásu bežali
cez celú šírku bezpečnostného pultu (p) v rámci vedenia pásu (r).
JE VAŠE DÍTĚ SPRÁVNĚ ZAJIŠTĚNO? JE VAŠE DIEŤA SPRÁVNE ZAPNUTÉ?
by byla zajištěna maximální bezpečnost pro Vaše dítě, prosím, vyzkoušejte před
jízdou následující:
• bezpečnostní pult (p) je správně nastavený.
• Část spony pásu (m) je zapojená do spony pásu (l).
• břišní bezpečnostní pás (n) a ramenní pás (f) běží napnuté přes vedení pásu
bezpečnostního pultu (p) a nejsou zkroucené.
• podsedák (d) je upevněný na obou stranách konektory (w) do kotevních úchytů
ISOFIX (i) a zelené bezpečnostní indikátory (x) jsou jasně vidět
• zádová opěrka (a) autosedačky spočívá úplně v jedné rovině se zádovou opěrkou
sedadla auta.
Aby bola zaistená maximálna bezpečnosť pre Vaše dieťa, prosím, vyskúšajte pred
jazdou nasledovné:
• bezpečnostný pult (p) je správne nastavený.
• Časť spony pásu (m) je zapojená do spony pásu (l).
• Brušný bezpečnostný pás (n) a ramenný pás (f) beží napnuté cez vedenie pásu
bezpečnostným pultom (p) a nie sú skrútené.
• Podsedák (d) je upevnený na oboch stranách konektory (w) do kotvových
úchytiek ISOFIX (i) a zelené bezpečnostné indikátory (x) sú jasne vidieť.
• Chrbtová opierka (a) autosedačky spočíva úplne v jednej rovine s chrbtovou
opierkou autosedačky.
HU
CZSK
62
Page 64

63
A TERMÉK ÁPOLÁSA
A gyermekülés által nyújtott maximális védelem biztosítására, a következők
betartása elengedhetetlen:
• A gyermekülés minden látható részét rendszeresen ellenőrizni kell, nem
találhatók-e rajtuk sérülésnyomok. A mechanikus részeknek kifogástalanul kell
működniük!
• Nagyon fontos, hogy meggyőződjön róla, hogy a gyermekülés nincs kemény
részek közé szorítva, mint pl. a gépkocsi ajtó, az ülésállító sínek stb., amelyek a
sérülését okozhatják.
• Amennyiben az ülést leejtették, a gyártónak meg kell vizsgálnia azt az újbóli
használat előtt.
TISZTÍTÁS
Gondoskodnia kell róla, hogy kizárólag eredeti CYBEX üléshuzatot használjon,
mivel az üléshuzat is alapvető része a gyermekülés kifogástalan működésének. A
póthuzatok külön szakáruházban szerezhetők be.
Figyelem! Első használat előtt, kérjük, mossa ki a huzatot! A huzatot 30
°C-on kímélő programon mossa ki! Ha 30 °C feletti hőmérsékleten mossa ki
a huzatot, a textília engedheti a színét. A huzatot külön mossa ki, soha ne
szárítsa szárítógépben! Ne szárítsa erős napsugárzásnak kitéve! A műanyag
részek enyhe tisztítószerrel megtisztíthatók.
!
Figyelmeztetés! Soha ne használjon vegyi tisztítószert vagy fehérítőszert a
tisztításhoz!
AZ ÜLÉSHUZAT ELTÁVOLÍTÁSA
Az üléshuzat három főrészből áll a fejtámasz, a háttámla és az üléspárna
borítására, ami tépőzár, patentok vagy gumiszalagok segítségével vannak rögzítve
a gyermekülésre. Ha minden rögzítő elemet kioldott, mosási célból leveheti az
egyes részeket. A huzat egyes részeinek levételéhez hajtsa végre a következő
lépéseket:
• Ha kikapcsolta a háttámla hátoldalán található patentokat előrefelé lehúzva
leveheti az üléshuzatot.
• Az üléspárna huzat levételéhez csatolja ki mindkét övszíjat, majd - majd kapcsolja
ki az alsó patentokat, és húzza le előrefelé a huzatot!
• A fejtámasz huzata előrefelé lehúzva egyszerűen eltávolítható.
A huzat cseréjéhez kövesse a fenti utasításokat fordított sorrendben!
Page 65

PÉČE O PRODUKT STAROSTLIVOSŤ O PRODUKT
Aby bylo zajištěno, že Vaše dětská autosedačka poskytuje maximální ochranu, je
nezbytné dodržet následující body:
• všechny viditelné části dětské autosedačky se musí pravidelně kontrolovat nejsouli poškozené. Mechanické části musí fungovat bezchybně.
• Je důležité, abyste se ujistili, že dětská autosedačka není zaseknutá mezi
pevnými částmi, jako jsou dveře, kolejnice sedadla apod., které ji mohou poškodit.
• Pokud je dětská autosedačka upuštěná na zem, musí být testována výrobcem
před opětovným použitím.
ČIŠTĚNÍ
Používejte pouze originální potah CYBEX, protože potah je také základní složkou
dobrého fungování dětské autosedačky. Náhradní potahy je možné získat ve
specializovaném obchodě.
Pozor! Prosím, vyperte potah před prvním použitím. Potahy sedadel lze prát na
30 °C na jemný prací cyklus. Pokud je budete prát při vyšší teplotě než je 30°C,
látky mohou ztratit barvu. Prosím, perte potah odděleně a nikdy ho nedávejte
do sušičky! Nesušte potah na přímém slunci! Plastové díly můžete vyčistit
jemným saponátem a teplou vodou.
!
Varování! Nikdy nepoužívejte chemická čistidla nebo bělící prostředky.
Aby sa zabezpečilo, že Vaše detská sedačka poskytuje maximálnu ochranu, je
nevyhnutné dodržať nasledovné body:
• všetky viditeľné časti detskej sedačky sa musí pravidelne kontrolovať na
poškodenie. Mechanické časti musí fungovať bezchybne.
• Je dôležité, aby ste sa uistili, že detská sedačka nie je zaseknutá medzi pevnými
časťami, ako sú dvere, sedačková koľajnice a pod, ktoré ju môžu poškodiť.
• Ak je detská sedačka upustena na zem, musí byť testovaná výrobcom pred
opätovným použitím.
ČISTENIE
Používajte len originálny poťah CYBEX, pretože poťah je tiež základnou zložkou
dobrého fungovania detskej sedačky. Náhradné poťahy je možné získať v
špecializovanom obchode.
Pozor! Prosím, vyperte poťah pred prvým použitím. Poťahy sedadiel možno
prať na 30 ° C na jemný prací cyklus. Ak ich budete prať pri vyššej teplote
ako je 30 ° C, látky môžu stratiť farbu. Prosím, perte poťah oddelene a nikdy
ho nedávajte do sušičky! Nesušte poťah na priamom slnku! Plastové diely
môžete vyčistiť jemným saponátom a teplou vodou.
!
Varovanie! Nikdy nepoužívajte chemické čistidlá alebo bieliace prostriedky.
VYJMUTÍ POTAHU AUTOSEDAČKY VYBRATIE POŤAHU SEDAČKY
Potah se skládá ze tří hlavních částí: opěrka hlavy, zádová opěrka a podsedák,
které jsou zajištěné k dětské autosedačce suchými zipy, cvočky nebo elastickými
pásy. Nejprve uvolněte všechna zapínání, můžete odstranit jednotlivé části pro
umytí. Pro odpojení jednotlivých částí potahu proveďte následující kroky:
• Rozepněte cvočky vzadu na zádové opěrce, potah může být odstraněn stáhnutím
dopředu.
• Pro odstranění potahu podsedáku, uvolněte oba pásy jako na obrázku vlevo a
také rozepněte cvočky na spodní straně a stáhněte potahu dopředu.
• Potah opěrky hlavy lze jednoduše vytáhnout vpřed pro odstranění.
Pro znovu připnutí potahu proveďte tyto kroky v opačném pořadí. Pre znovu pripnutie poťahu vykonajte tieto kroky v opačnom poradí.
Poťah sa skladá z troch hlavných častí: opierka hlavy, chrbtová opierka a podsedák,
ktoré sú zabezpečené k detskej sedačke suchými zipsami, cvočky alebo elastickými
pásmi. Najprv uvoľnite všetky zapínania, môžete odstrániť jednostlivé časti pre
umytí. Pre odpojenie jednotlivých častí poťahu vykonajte nasledujúce kroky:
• Rozopnite cvočky vzadu na chrbtovej opierke, poťah môže byť odstránený
stiahnutím dopredu.
• Pre odstránenie poťahu podsedáku, uvoľnite oba pásy ako na obrázku vľavo a
tiež rozopnite cvočky na spodnej strane a stiahnite poťah dopredu.
• Poťah opierky hlavy sa dá jednoducho vytiahnuť vpred pre odstránenie.
HU
CZSK
64
Page 66

MI A TEENDŐ BALESET ESETÉN?
Amennyiben Ön is érintett az ütközésben, a gyermekülés is megsérülhet,
ami szabad szemmel esetlegesen nem látható. Ezért ütközést követően a
gyártónak meg kell vizsgálnia a gyermekülést, és szükség esetén ki kell
cserélni azt!
A TERMÉK ÉLETTARTAMA
A gyermekülés várható élettartama rendeltetésszerű használata esetén max. 4
év. Azonban mivel a gépjárművek nagy hőmérsékletingadozásnak és váratlan
stresszhelyzeteknek lehetnek kitéve, kérjük, vegye figyelembe a következő
utasításokat:
• Amennyiben a gépjárművet hosszabb ideig közvetlen napsugárzásnak teszik ki, a
gyermekülést ki venni a járműből vagy egy ruhával letakarni!
• Legalább évente egyszer ellenőrizni kell a gyermekülés minden műanyag és fém
alkatrészét, hogy nem tapasztalhatók-e rajtuk sérülések, nem deformálódtak-e
ill. nem színeződtek-e el. Amennyiben bármilyen jellegű változást észlel, a
gyermekülést ártalmatlanítani kell vagy a gyártónak meg kell vizsgálnia, és
szükség esetén ki kell cserélni azt!
• A huzat anyagának elváltozása, különösen a színek kifakulása hosszabb
használat után normális jelenségnek minősül, nem jeleznek meghibásodást.
65
ÁRTALMATLANÍTÁS
A biztonsági gyermekülés élettartamának lejártával a gyermekülést a vonatkozó
előírásoknak megfelelően kell ártalmatlanítani. A hulladék ártalmatlanítására
vonatkozó előírások országonként és településenként eltérhetnek. A helyes
ártalmatlanítási eljárás biztosítására, vegye fel a kapcsolatot a helyi illetékes
hulladékártalmatlanítási szervvel! A hulladékártalmatlanításra vonatkozó helyi
előírások betartása kötelező!
Page 67

CO DĚLAT PO NEHODĚ ČO ROBIŤ PO NEHODE
Pokud jste účastníkem dopravní nehody, autosedačka může utrpět škody oku
neviditelné. A proto v takových případech autosedačka musí být prohlídnuta
výrobcem a v případě nutnosti vyměněna.
Ak ste účastníkom dopravnej nehody, sedačka môže utrpieť škody oku
neviditeľné. A preto v takýchto prípadoch sedačka musí byť prohlídnuta
výrobcom a v prípade potreby vymenena.
TRVANLIVOST PRODUKTU TRVANLIVOSŤ PRODUKTU
Dětská autosedačka je určena pro splnění účelu ve své očekávané životnosti až
4 roky. Nicméně, protože auta mohou být vystavena vysokým výkyvům teplot a
nepředvídatelným jevům, prosím, vezměte v úvahu následující body:
Detská sedačka je určená pre splnenie účelu pre svoje očakávanej životnosti
až 4 roky. Avšak, pretože autá môžu byť vystavené vysokým výkyvom teplôt a
nepredvídateľným javom, prosím, vezmite do úvahy nasledujúce body:
• Pokud je auto vystaveno přímému slunečnímu záření po delší dobu, musí být
dětská autosedačka z auta vyjmuta nebo přikryta látkou.
• Zkontrolujte alespoň jednou za rok všechny plastové a kovové části sedačky, zdali nejsou poškozeny nebo se nezměnil jejich tvar nebo barvy. Pokud si všimnete
jakékoli změny, dětskou autosedačku buď zlikvidujte nebo ji nechte prohlédnout
výrobcem a nahraďte ji v případě potřeby.
• Změny na látkách obecně a blednutí barvy jsou normální, zejména po
dlouhodobém užívání v autě a nepředstavují závadu.
• Ak je auto vystavené priamemu slnečnému žiareniu po dlhšiu dobu, musí byť
detská sedačka z auta vybratá alebo prikrytá látkou.
• Skontrolujte všetky plastové a kovové časti sedačky pre škody alebo zmeny v
ich tvaru alebo farby aspoň raz za rok. Ak si všimnete akékoľvek zmeny, detskú
sedačku buď zlikvidujte alebo nechajte ju prezrieť výrobcom a nahraďte ju v
prípade potreby.
• Zmeny na látkach všeobecne a blednutie farby sú normálne, najmä po dlhodobom
užívaní v aute a nepredstavujú závadu.
LIKVIDACE LIKVIDÁCIA
Na konci svého životního cyklu by dětská autosedačka měla být správně
zlikvidována. Předpisy o likvidaci odpadů se mohou regionálně lišit. S cílem zajistit
řádnou likvidaci dětské autosedačky, obraťte se prosím na správu komunálních
odpadů nebo správu Vašeho města. Ve všech případech, prosím, berte na vědomí
směrnice pro likvidaci odpadů ve Vaší zemi.
Na konci svojho životného cyklu by detská sedačka mala byť správne zlikvidovaná.
Predpisy o likvidácii odpadov sa môžu regionálne líšiť. S cieľom zabezpečiť riadnu
likvidáciu detskej sedačky, obráťte sa prosím na správu komunálnych odpadov
alebo správu Vášho mesta. Vo všetkých prípadoch, prosím, berte na vedomie
smernice pre likvidáciu odpadov vo Vašej krajine.
HU
CZSK
66
Page 68

GARANCIA
Az alábbi garancia feltételek kizárólag abban az országban érvényesek, ahol
egy forgalmazó egy ügyfél részére először értékesítette. A garancia minden
gyártási és anyaghibára kiterjed, amely a vásárláskor már fennállt, illetve a
termék a forgalmazó által az ügyfél részére történő első értékesítésétől számított
három (3) éven belül jelentkezett (gyártói garanciavállalás). Abban az eseteben,
ha gyártási vagy anyaghiba jelentkezik, a gyártó saját megítélése szerint
megjavítja vagy kicseréli. A garanciális szolgáltatásokat érintő reklamáció esetén
a terméket vissza kell juttatni annak a forgalmazónak, akitől a terméket a vevő
eredetileg megvásárolta a vásárlást igazoló elismervénnyel együtt (nyugta vagy
számla), amelyen szerepel a vásárlás időpontja, a forgalmazó neve és a termék
pontos megnevezése is. A garancia nem érvényesíthető abban az esetben,
ha a terméket reklamációs céllal a gyártónak vagy bármely más személynek
küldik vissza, és nem annak a forgalmazónak, aki a terméket eredetileg
értékesítette. Kérjük, ellenőrizze a termék épségét és az esetleges gyártási
vagy anyaghibára utaló jeleket rögtön a vásárlás után illetve rendelés esetén
a kézhezvétel után azonnal. Amennyiben a termék megsérül, ne használja
tovább, haladéktalanul juttassa vissza annak a forgalmazónak, akitől eredetileg
vásárolta. A garancia érvényesítéséhez a terméket megtisztított és hiánytalan
állapotban kell visszaküldeni. Mielőtt a terméket visszaküldené a forgalmazóhoz,
kérjük, figyelmesen olvassa el a Használati útmutatót. A garancia nem terjed
ki a termék nem rendeltetésszerű használatából, külső befolyásoló tényezők
(vízkár, tűzkár, közúti balesetek stb.) hatására keletkező vagy normál kopásból
és elhasználódásból eredő károkra. A garancia csak abban az esetben
érvényesíthető, ha a terméket a használati útmutatónak megfelelően kezelték
és használták, az esetleges javításokat kizárólag az arra jogosult személyek
végezték, továbbá eredeti alkatrészeket és tartozékokat használtak. Jelen
garanciát a hatályban lévő jogszabályokban lefektetett fogyasztói jogok illetve
a termékre vonatkozó szerződések megszegése miatt a beszállítóval szemben
érvényesíthető jogok semmilyen módon nem zárják ki, korlátozzák vagy
kényszerítik.
67
Page 69

ZÁRUKA ZÁRUKA
Následující záruka platí pouze v zemi, kde byl tento produkt původně prodán
od prodejce zákazníkovi. Záruka se vztahuje na všechny výrobní a materiálové
vady, které existují a které se objeví v den nákupu nebo se objevily v období tří
(3) let od data nákupu od prodejce, který původně prodal výrobek spotřebiteli
(výrobní záruka). V případě objevení se výrobní nebo materiální vady, výrobek
- podle vlastního uvážení - buď zdarma opravíme nebo jej nahradíme novým
produktem. Chcete-li získat takovouto záruku, je nutné přinést nebo odeslat
výrobek k prodejci, který původně prodal tento produkt zákazníkovi a předložit
originál dokladu o nákupu (účtenky nebo faktury), který obsahuje datum nákupu,
jméno prodejce a typové označení tohoto produktu. Tato záruka neplatí v
případě, že je tento výrobek přivezen nebo odeslán výrobci nebo jiné osobě, než
je prodejce, který původně prodal tento výrobek spotřebiteli. Zkontrolujte prosím,
zda je daný výrobek úplný a nejsou na něm přítomny žádné výrobní vady v den
nákupu, nebo v případě, že výrobek byl zakoupen v prodeji na dálku, ihned po
obdržení. V případě závady přestaňte produkt používat a přivezte nebo odešlete
jej ihned prodejci, který Vám výrobek původně prodal. V případě uplatňování
záruky musí být výrobek vrácen v čistém a kompletním stavu. Než se obrátíte
na prodejce, přečtěte si pečlivě návod k použití. Tato záruka se nevztahuje
na škody způsobené nesprávným používáním, vlivem prostředí (voda, oheň,
dopravní nehody apod.) nebo běžným opotřebením. Záruka také platí pouze
v případě, že byl výrobek používán vždy v souladu s návodem k obsluze, v
případě potřeby byly veškeré úpravy a služby prováděny oprávněnými osobami
a byly používány originální komponenty a příslušenství. Tato záruka nevylučuje,
neomezuje ani jinak neovlivňuje zákonná práva spotřebitelů a to včetně nároků
z porušení práva a nároků s ohledem na porušení smlouvy, které kupující může
mít vůči prodávajícímu nebo výrobci výrobku.
Nasledujúci záruka platí iba v krajine, kde bol tento produkt pôvodne predaný
od predajcu zákazníkovi. Záruka sa vzťahuje na všetky výrobné a materiálové
vady, ktoré existujú a ktoré sa objavia v deň nákupu alebo sa objavili v
období troch (3) rokov od dátumu nákupu od predajcu, ktorý pôvodne predal
výrobok spotrebiteľovi (výrobné záruka). V prípade objavenia sa výrobné alebo
materiálne chyby, výrobok - podľa vlastného uváženia - buď zadarmo opravíme
alebo ho nahradíme novým produktom. Ak chcete získať takúto záruku, je nutné
priniesť alebo odoslať výrobok k predajcovi, ktorý pôvodne predal tento produkt
zákazníkovi a predložiť originál dokladu o nákupe (účtenky alebo faktúry), ktorý
obsahuje dátum nákupu, meno predajcu a typové označenie tohto produktu.
Táto záruka neplatí v prípade, že je tento výrobok privezený alebo odoslaný
výrobcovi alebo inej osobe, než je predajca, ktorý pôvodne predal tento výrobok
spotrebiteľovi. Skontrolujte prosím, či je daný výrobok úplný a nie sú na ňom
prítomné žiadne výrobné chyby v deň nákupu, alebo v prípade, že výrobok bol
zakúpený v predaji na diaľku, ihneď po obdržaní. V prípade poruchy prestaňte
produkt používať a prineste alebo pošlite ho ihneď predajcovi, ktorý Vám
výrobok pôvodne predal. V prípade uplatňovania záruky musí byť výrobok
vrátený v čistom a kompletnom stave. Než sa obrátite na predajcu, prečítajte
si pozorne návod na použitie. Táto záruka sa nevzťahuje na škody spôsobené
nesprávnym používaním, vplyvom prostredia (voda, oheň, dopravné nehody a
podobne) alebo bežným opotrebovaním. Záruka tiež platí len v prípade, že bol
výrobok používaný vždy v súlade s návodom na obsluhu, v prípade potreby
boli všetky úpravy a služby vykonávané oprávnenými osobami a boli používané
originálne komponenty a príslušenstvo. Táto záruka nevylučuje, neobmedzuje
ani inak neovplyvňuje zákonné práva spotrebiteľa a to vrátane nárokov z
porušenia práva a nárokov s ohľadom na porušenie zmluvy, ktoré kupujúci môže
mať voči predávajúcemu alebo výrobcovia výrobku.
HU
CZSK
CYBEX GmbH
Riedinger Str. 18, 95448 Bayreuth, Germany
Tel.: +49 921 78 511-0, Fax.: +49 921 78 511- 999
68
Page 70

JUNO-fix
ECE R 44/04
SEMI-UNIVERSAL
9 - 18 kg
04301317
CYBEX GmbH
Riedinger Str. 18, 95448 Bayreuth
Germany
CYBEX JUNO-FIX
Alzador con respaldo y reposacabezas sobre una
base ajustable y con cojín de seguridad regulable.
RECOMENDADO PARA
Edad: Desde 9 meses a 4 años aproximadamente.
Peso: 9 a 18 kg. Para vehículos equipados con
asientos dotados de cinturón retráctil de tres puntos
que cumplan con la normativa ECE R16 y ISOFIX.
HOMOLOGACIÓN
ECE R44/04, Grupo 1, 9-18 kg.
APRECIADO CLIENTE!
MUCHAS GRACIAS POR COMPRAR LA CYBEX JUNO-FIX. LE ASEGURAMOS
QUE EN EL DESARROLLO DE LA CYBEX JUNO-FIX SE HAN TENIDO EN CUENTA
LA SEGURIDAD, EL CONFORT Y LA PRACTICIDAD. EL PRODUCTO SE HA
DESARROLLADO BAJO UN ESTRICTO CONTROL DE CALIDAD Y TENIENDO EN
CUENTA TODOS LOS ESTÁNDARES DE SEGURIDAD.
ES
CONTENIDO
02/2015
69
CYBEX JUNO-FIX
Encosto com reforço e apoio de cabeça ajustável
com almofada de segurança.
RECOMENDADO PARA
Idades: Desde os 9 meses aos 4 anos
aproximadamente
Peso: de 9 a 18 kg. Para veículos equipados com
assentos que possuam cintos de segurança de três
pontos e que cumpram a norma ECE R16 e ISOFIX.
HOMOLOGAÇÃO
ECE R44/04, Grupo 1, 9-18 kg.
INSTRUCCIONES ABREVIADAS .....................................................................................1
HOMOLOGACIÓN ............................................................................................................69
PRIMERA INSTALACIÓN .................................................................................................71
AJUSTE DE ALTURA........................................................................................................73
EXTRAER EL ALZADOR DEL ASIENTO .......................................................................73
LA MEJOR POSICIÓN EN EL COCHE ........................................................................... 75
INSTALACIÓN DE LA SILLA CON EL SISTEMA DE CONECTORES ISOFIX ...........77
EXTRAER LOS CONECTORES ISOFIX ........................................................................79
COLOCAR LA SILLA EN EL AUTOMÓVIL .....................................................................79
AJUSTE DEL COJÍN DE SEGURIDAD ...........................................................................81
ASEGURAR AL NIÑO .......................................................................................................83
¿ESTÁ SU HIJO ADECUADAMENTE ASEGURADO? .................................................83
CUIDADO DEL PRODUCTO ............................................................................................85
LIMPIEZA ...........................................................................................................................85
EXTRAER LA VESTIDURA .............................................................................................85
QUÉ HACER TRAS UN ACCIDENTE .............................................................................87
VIDA ÚTIL DEL PRODUCTO ...........................................................................................87
RECICLADO ...................................................................................................................... 87
GARANTÍA .........................................................................................................................89
Page 71

CARO CLIENTE
AGRADECEMOS A SUA DECISÃO EM ADQUIRIR A JUNO-FIX DA CYBEX.
ASSEGURAMOS QUE A SEGURANÇA, O CONFORTO E O FÁCIL MANUSEAMENTO
FORAM O FOCO PRINCIPAL NA ELABORAÇÃO DESTA CADEIRA. O PRODUTO FOI
DESENVOLVIDO SOB UM CONTROLO DE QUALIDADE SUPERIOR QUE CUMPRE
AS NORMAS DE SEGURANÇA MAIS EXIGENTES DO MERCADO
PT
INSTRUÇÕES ABREVIADAS ............................................................................................1
HOMOLOGAÇÃO ..............................................................................................................69
PRIM EI RA INSTAL AÇÃO .................................................................................................72
REGULAÇÃO DE ALTURA ............................................................................................. 74
RETIRAR O REFORÇO DE ALT URA DO ASSENTO .................................................. 74
A MELHOR POSIÇÃO DENTRO DO AUTOMÓVEL......................................................76
INSTALAÇÃO DA CADEIRA COM O SISTEMA DE FIXAÇÃO ISOFIX .......................78
RETIRAR OS FIXADORES ISOFIX ................................................................................80
INSTALAÇÃO DA CADEIRA AO AUTOMÓVEL .............................................................80
REGULAÇÃO A ALMOFADA DE SEGURANÇA ...........................................................82
POSICIONAR A CRIANÇA ...............................................................................................84
ESTÁ A CRIANÇA REALMENTE SEGURA? .................................................................84
MANUTENÇÃO DO PRODUTO ......................................................................................86
LIMPEZA ............................................................................................................................86
REMOVER A FORRA .......................................................................................................86
COMO PROCEDER DEPOIS DE UM ACIDENTE .........................................................88
VIDA ÚTIL DO PRODUTO ................................................................................................88
RECICLAGEM ...................................................................................................................88
GARANTIA .........................................................................................................................90
ÍNDICE
PT ES
70
Page 72

!
b
a
d
a
¡Advertencia! Para garantizar que su hijo se encuentre seguro, es
muy importante usar e instalar la silla de acuerdo con el manual de
instrucciones.
c
p
e
L.S.P.
z
¡AVISO! Guarde siempre el manual de instrucciones bajo la funda elástica que
encontrará en la parte trasera del respaldo para que pueda tenerlo a mano
siempre que precise consultar cualquier duda.
PRIMERA INSTALACIÓN
La silla se compone de un alzador (d) con respaldo (a) y reposacabezas (e),
que se adapta a la estatura del niño. También cuenta con un cojín de seguridad
ajustable (p). Para la máxima seguridad y confort de su hijo, estos componentes
deben usarse en combinación.
!
¡Atención! Los componentes de la silla de seguridad no se deben utilizar
por separado ni en combinación con otros elevadores, respaldos o
reposacabezas de otras marcas o modelos puesto que la silla perdería la
certicación
El respaldo (a) se ancla con el eje (c) del asiento (d) mediante la guía de
arrastre (b). Coloque los dos protectores laterales del sistema de doble
L.S.P. en los agujeros (z) de las partes exteriores del respaldo de la silla. Se
bloquearán con un „click“ audible.
¡AVISO! Guarde siempre el manual de instrucciones bajo la funda elástica que
encontrará en la parte trasera del respaldo para que pueda tenerlo a mano
siempre que precise consultar cualquier duda.
!
¡Atención! Asegúrese de que los componentes de la silla no se dañan al
presionarla entre la puerta y el asiento del coche u otros objetos sólidos.
71
Page 73

!
Atenção! Para garantir que a criança viaja segura, é muito importante
instalar a cadeira de acordo com o manual de instruções.
AVISO! Guarde este manual de instruções debaixo da capa elástica, situada
na parte traseira do encosto de costas. Tenha o manual sempre à mão para
futuras consultas.
PRIMEIRA INSTALAÇÃO
A cadeira é composta por um assento (d) com encosto de costas (a) e apoio
de cabeça (e), que se adapta à estatura da criança. Vem também equipado
com uma almofada de segurança regulável (p). Para optimizar a segurança da
criança,todos estes componentes deverão ser utilizados em conjunto.
!
Atenção! Os componentes da cadeira CYBEXnão deverão ser utilizados
por separado ou em combinação com outras partes de diferente modelos e/
ou marcas de cadeiras. Em qualquer um destes casos a cadeira não estará
certicada para uso.
O encosto (a) encaixa-se com o eixo (c) do assento (d) mediante a guia
de arrasto (b). Coloque os dois protetores laterais do sistema L.S.P. nos
dois orifícios (z) das partes exteriores do encosto da cadeira. Ao colocá-los
corretamente ouvir-se-á um “click”.
AVISO! Guarde sempre o manual de instruções debaixo da capa elástica
que se encontra na parte traseira do encosto da cadeira. Desta form poderá
sempre localizá-lo em caso de dúvidas.
!
Atenção! Assegure-se de que os componentes da cadeira não foram
danicados ao serem pressionados entre a porta, o assento do carro e/ou
outros objectos sólidos.
PT ES
72
Page 74

AJUSTE DE ALTURA
g
e
h
Para un adecuado ajuste en altura de la silla infantil CYBEX Juno-fix se incluye un
alzador (g) que ya viene montado bajo la tela del asiento de la silla. Se recomienda
utilizar este alzador (g) entre los 9 y los 18 meses de edad. Para niños de más de
19 meses el alzador (g) debe retirarse.
Posteriormente, la altura debe regularse moviendo el protector de cabeza y
hombros (e) a la posición adecuada. Presione la palanca que regula la altura (h)
para desplazarlo. La altura debe ajustarse de forma que queden 2 dedos entre la
parte baja delprotector de cabeza y los hombros del niño. Tire de la palanca que
regula la altura (h) para desbloquear el protector de hombros y cabeza.
73
g
d
¡Aviso! La mejor protección y confort se obtiene sólo si el protector de hombros y
cabeza (e) está ajustado adecuadamente en altura, hecho que asegura además
que el cinturón diagonal (f) quede adecuadamente situado. la altura (e) puede
ajustarse en 8 posiciones. El protector de hombros está unido al protector de
cabeza y no debe ajustarse separadamente.
EXTRAER EL ALZADOR DEL ASIENTO
• Abra los botones de presión que encontrará en la parte frontal del asiento.
• Levante la funda hasta que el alzador pueda extraerse fácilmente desde la parte
frontal.
• Extraiga el alzador de acuerdo con las recomendaciones según la edadexpuestas
anteriormente.
• Coloque la funda en su posición inicial y abroche los cierres de presión.
Page 75

REGULAÇÃO DE ALTURA
Para uma adequada regulação de altura da cadeira de segurança infantil CYBEX
Juno-fix, está incluído um reforço de altura (g) que já vem montado por debaixo do
forro do assento da cadeira. Recomenda-se a utilização deste reforço de altura (g)
entre os 9 e os 18 meses de idade.
Para crianças com mais de 19 meses o reforço de altura (g) deve ser retirado.
Posteriormente, a altura deverá ser regulada e ajustada à posição mais adequada
(e). Pressione a patilha para deslizar a cadeira (h). A regulação depende sempre
um pouco do tamanho da criança, o importante
é que a regulação seja feita de forma a que sobrem cerca de 2 dedos entre a parte
inferior do repousa cabeças e os ombros da criança
Aviso! A melhor protecção e conforto são obtidos se a regulação do repousa
cabeças e protectores de ombros (e) for adequada na altura, assegurando também
que o cinto diagonal (f) fique correctamente colocado. A altura (e) pode ser
regulada em 8 posições. O protector de ombros está unido ao repousa cabeças e
não deverá ser regulado separadamente.
RETIRAR O REFORÇO DE ALT URA DO ASSENTO
• Abra os botões da parte frontal do forro.
• Levante o forro da cadeira até que os reforços de altura possam ser retirados
fácilmente pela parte frontal.
• Retire um ou dois reforços de altura seguindo as recomendações das idades
assinaladas.
• Coloque o forro na sua posição inicial e aperte os botões.
PT ES
74
Page 76

LA MEJOR POSICIÓN EN EL COCHE
La instalación de CYBEX JUNO 2 fix solo es posible usando el Sistema de
Conectores ISOFIX.
Las sillas con conectores ISOFIX tienen una homologación „semi-
universal“. Por este motivo, usando la CYBEX Juno-fix con conectores,
deberá tener en cuenta que es posible que existan algunos vehículos
en los que no se pueda instalar. La silla debe utilizarse únicamente en
aquellos automóviles incluidos dentro de la categoría „semi universal“, y que
estén dentro de la lista adjunta de automóviles homologados. Esta lista se
actualiza periódicamente, y la última versión puede obtenerse a través nuestro
o bien accediendo a www.cybex-online.com. El equipaje u otros objetos que
se coloquen en el interior del vehículo y puedan causar lesiones en caso de
accidente deben estar fijados correctamente en todo momento.
75
w
!
¡Atención! Para aquellos vehículos en los que los asientos están situados
lateralmente, el uso de esta silla infantil no está permitido. Para asientos
que están situados en contra del sentido de la marcha, por ejemplo en un
monovolumen o minibus, el uso de la silla infantil está permitido siempre
que el asiento esté homologado para un adulto. Por favor, asegúrese
de que el reposacabezas está colocado cuando instale la silla infantil en
un asiento que está situado en contra del sentido de la marcha. La silla
infantil debe atarse con el cinturón de seguridad, incluso cuando el niño no
está en ella. Esto es necesario para evitar que el conductor o el copiloto
puedan resultar heridos por una silla suelta en caso de tener que frenar
bruscamente o en caso de colisión.
Por favor, tenga en cuenta las siguientes excepciones cuando la silla vaya a
utilizarse en el asiento del copiloto.
• Si el asiento del copiloto tiene airbag, debe mover el asiento hacia atrás lo más
lejos posible.
• Se deben seguir las instrucciones del fabricante del vehículo.
!
¡Atención! La silla no es compatible con cinturones de seguridad de 2
puntos anclaje. Si utiliza este tipo de cinturón, su hijo podría sufrir graves
daños en caso de accidente.
¡AVISO! Por favor nunca deje sin la vigilancia de un adulto a su hijo en el
vehículo.
Page 77

A MELHOR POSIÇÃO DENTRO DO AUTOMÓVEL
A instalação da CYBEX Juno-fix só é possível mediante o Sistema de
fixadores ISOFIX.
As cadeiras com sistema de fixação ISOFIX têm uma homologação
“semi-universal“. Assim sendo, poderá haver alguns veículos em que
a cadeira Juno-fix da CYBEX seja imcompatível. A cadeira deverá ser
utilizada única e exclusivamente nos automovéis incluídos dentro da
categoria “semi universal“ e que estejam na lista de automóveis compatíveis.
Esta lista é actualizada regularmente. Consiga a última versão directamente
através da CYBEX ou no site: www.cybex-online.com. A bagagem ou qualquer
outro objecto que se possa colocar no interior do veículo deverá ir sempre bem
preso de forma a evitar qualquer dano em caso de acidente.
!
Atenção! A utilização desta cadeira está proibida para todos e aqueles
veículos em que os assentos estão situados lateralmente. Para viajar com
a cadeira de costas (voltada para trás), como no monovolume ou minibus, a
utilização da cadeira é permitida a partir do momento que o assento esteja
homologado para um adulto. Ao viajar com a cadeira de costas assegurese de que o encosto de cabeça está bem colocado. Dever-se-á colocar
sempre o cinto de seguraça na cadeira infantil, mesmo quando esta se
encontre vazia. Este procedimento poderá evitar acidentes em caso de
colisão ou travagem brusca.
Por favor, tenha em conta as seguintes excepções quando a cadeira for utilizada
no assento do copiloto.
• Em caso de que o assento dianteiro esteja equipado com airbag, deverá puxar o
assento o mais atrás possível, afastando-se deste o mais possível.
• Dever-se-á respeitar as instruções do fabricante do veículo.
!
Atenção! Não deverá utilizar a cadeira instalada com cintos de segurança
de 2 pontos ou de ventre. A utilização deste tipo de cintos poderá causar
ferimentos graves ou fatais à criança em caso de acidente.
AVISO! Nunca deixe a criança no automóvel sem a supervisão de um adulto.
PT ES
76
Page 78

u
w
i
v
y
x
ISOFIX
La seguridad de su hijo aumentará con los conectores ISOFIX, que
permiten unir la silla al vehículo firmemente. Su hijo debe continuar
utilizando el cinturón de seguridad de 3 puntos del vehículo.
¡AVISO! Los puntos de anclaje ISOFIX (i) son dos anillas de metal situadas
entre el respaldo y la base del asiento del vehículo. En caso de duda, por favor
consulte el manual de su vehículo.
Si es difícil acceder a los puntos de anclaje ISOFIX de su vehículo, y para
proteger la tapicería de su coche, puede colocar las bocas ISOFIX (u) en ambos
anclajes. En muchos vehículos es mejor instalar las bocas ISOFIX (u) al revés.
Para asegurar la CYBEX Juno-fix correctamente, tome nota de las siguientes
instrucciones:
• Active el asa de ajuste (v) de la parte baja de su silla.
• Extraiga los conectores ISOFIX tanto como pueda.
• Gire los conectores 180 º para encararlos hacia los anclajes ISOFIX (u).
INSTALACIÓN DE LA SILLA CON EL SISTEMA DE CONECTORES
77
u
w
y
x
¡AVISO! Los botones verdes de seguridad (x) de los conectores ISOFIX (w)
no deben sobresalir. Si fuese necesario, EXTRAIGA LOS ANCLAJES DE LOS
CONECTORES (w) presionando y arrastrando los botones rojos (y). Repita
este proceso con el otro conector.
• Presione los dos conectores ISOFIX (w) a través de las bocas ISOFIX (u) hasta
que queden bloqueados en los anclajes (i) con un „click“ audible.
• Asegúrese de que la silla está totalmente fijada tratando de estirar de ella.
• El botón verde de seguridad (x) debe quedar claramente visible en ambos
botones de soltado rojos (y).
• Ahora puede ajustar el asa para colocar la silla a la posición deseada.
¡AVISO! Si desea información adicional por favor consulte la sección
„COLOCAR LA SILLA EN EL VEHÍCULO“.
• Ahora ya puede abrochar el cinturón de seguridad de su hijo. Por favor, consulte
„ASEGURAR AL NIÑO“.
Page 79

INSTALAÇÃO DA CADEIRA COM O SISTEMA DE FIXAÇÃO ISOFIX
A segurança da criança aumenta com a instalação dos fixadores ISOFIX,
que permitem unir firmemente a cadeira ao veículo. Igualmente a criança
deverá continuar a usar o cinto de segurança de 3 pontos do veículo.
AVISO! Os pontos de xação ISOFIX (i) consistem em dois ganchos de metal
por assento, situados entre as costas e a base do assento do seu veículo. Em
caso de dúvida, por favor consulte o manual de utilizador do automóvel.
Em caso de dificuldade em aceder aos pontos de fixação ISOFIX do seu
automóvel e de forma a proteger os estofos do seu carro, poderá colocar as
guias ISOFIX (u) em ambos os pontos. Em muitos veículos é melhor instalar as
guias ISOFIX de maneira inversa.
Para assegurar-se que a Juno-fix da CYBEX está bem instalada, tenha atenção
às seguintes instruções:
• Pressione o manípulo de ajuste (v) situada na parte de baixo da cadeira infantil
• Puxe os fixadores ISOFIX para fora o máximo possível.
• Rode os fixadores 180º de forma a que apontem na direcção das guias de
instalação (u).
AVISO! Certique-se de que os botões verdes de segurança (x) dos xadores
ISOFIX não sobressaem. Se for necessário, solte os xadores pressionando
e puxando para trás o botão de soltar vermelho (y). Repita este procedimento
com o outro xador.
• Pressione ambos os fixadores ISOFIX (w) nas guias de instalação até ouvir um
“click”, o que significa que estes estão corretamente fixos nos pontos de fixação
ISOFIX (i).
• Certifique-se de que a cadeira ficou bem instalada puxando-a para fora.
• O botão verde de segurança (x) deve ser claramente visível em ambos os lados e
deverão sobressair dos botões vermelhos (y).
• Ajuste o manípulo e coloque a cadeira na posição desejada.
AVISO! Se deseja mais informação em como instalar a cadeira, por favor
consulte “INSTALAÇÃO DA CADEIRA AO AUTOMÓVEL“.
• A partir deste momento já poderá colocar o cinto de segurança à criança. Por
favor, consulte: “POSICIONAR A CRIANÇA“.
PT ES
78
Page 80

EXTRAER LOS CONECTORES ISOFIX
w
y
x
v
Lleve a cabo los pasos de instalación en orden inverso.
• Suelte los conectores ISOFIX (w) tirando y presionando ambos botones
de soltado rojos (y).
• Suelte la silla de los anclajes (u).
• Rote los conectores 180°.
• Active el asa de ajuste situada en la base de la silla de seguridad infantil y ajuste
los conectores hasta el final.
COLOCAR LA SILLA EN EL AUTOMÓVIL
• Coloque la silla en la posición deseada.
• Para instalar la silla correctamente, es necesario que el respaldo (a)
de la silla repose completamente sobre el respaldo del coche. Para
• Puede ajustar esta distancia con la palanca (v) debajo del asiento de la silla.
• Si el reposacabezas del coche interfiere en este proceso, dele la vuelta o quítelo
a
completamente. (Para excepciones, por favor, consulte el apartado „LA MEJOR
POSICIÓN EN EL VEHÍCULO).
!
conseguir esto, ajuste la silla contra el respaldo del coche.
¡Atención! El respaldo de la CYBEX Juno- x debe reposar contra el
respaldo del coche. Para garantizar la máxima protección a su hijo, la silla
debe estar en una posición recta.
79
¡AVISO! En algunos asientos de coche hechos de materiales sensibles
(p.ej. cuero, terciopelo, etc.), el uso de la silla puede dejar marcas de uso y
desgaste. Para evitarlo, debería poner debajo de la silla una sábana o toalla
como protección. En este contexto, también nos gustaría referirle a las
instrucciones de limpieza, que se deben seguir desde el primer uso de la silla.
Page 81

RETIRAR OS FIXADORES ISOFIX
Proceda da mesma maneira invertendo os passos.
• Liberte os xadores ISOFIX (w) puxando e pressionado ambos os
botões vermelhos (y).
• Solte as guias de instalação (u).
• Rode os fixadores 180°.
• Pressione o manípulo de ajuste situado na base da cadeira e empurre os
fixadores até ao final.
INSTALAÇÃO DA CADEIRA AO AUTOMÓVEL
• Coloque a cadeira na posição desejada.
• Para instalar a cadeira numa posição reta é necessário que o encosto
(a) da cadeira assente perfeitamente no encosto do automóvel. Para
• Para ajustar a distância entre a cadeira e o encosto do automóvel pressiona a
patilha (v) que se situa debaixo da cadeira.
• Se na instalação o encosto de cabeça do automóvel interfere, dê-lhe a volta
ou retire-o de todo. (Para excepções ou mais informação consulte “A MELHOR
POSIÇÃO DENTRO DO AUTOMÓVEL“).
!
conseguir este resultado pressione a cadeira contra o encosto do carro.
Atenção! O encosto da CYBEX Juno-x deverá assentar no encosto do
carro. Para garantir a máxima proteção à criança a cadeira deverá estar
reta.
AVISO! É possível que alguns assentos de automóvel de material mais
sensível (ex: veludo, pele, etc.) demonstrem sinais de descoloração e
desgaste. De forma a evitar este desgaste poderá, por exemplo, colocar uma
toalha debaixo da cadeira. Neste contexto referimo-nos também às instruções
de limpeza, que deverão ser consultadas antes da primeira utilização.
PT ES
80
Page 82

AJUSTE DEL COJÍN DE SEGURIDAD
Active los botones de ajuste (q) simultáneamente para ajustar el cojín (p). Si
suelta los botones de ajuste (q) el cojín quedará fijo. Las partes laterales del
p
q
cojín de seguridad (p) se ajustan perfectamente a los reposabrazos del elevador
(d). Ajuste el cojín (p) de tal forma que repose en el cuerpo del niño, pero sin
estar en pleno contacto.
d
!
¡Atención! El cojín de seguridad (p) se puede utilizar únicamente con niños
de no más de 18 Kg.
81
Page 83

REGULAÇÃO A ALMOFADA DE SEGURANÇA
Para regular a almofada (p) deverá pressionar, simultaneamente, os botões
de regulação (q). Ao soltar os botões de regulação (q) a almofada xar-se-á.
As partes laterais da almofada de segurança (p) ajustam-se perfeitamente
ao assento (d). Coloque a almofada (p) sem estar em contacto direto com a
criança.
!
Atenção! A almofada de segurança (p) só deverá ser usada em conjunto
com a cadeira e com crianças até aos 18 kg.
82
PT ES
Page 84

ASEGURAR AL NIÑO
r
n
l
m
• Coloque a su hijo en la silla.
• Coloque el cojín de seguridad previamente ajustado (p) (comprobar sección
„AJUSTAR EL COJÍN DE SEGURIDAD“)
• Extraiga el cinturón de seguridad totalmente. Pase el cinturón ventral (n) a través
de las guías del cojín de seguridad (p) marcadas en rojo (r).
!
¡Atención! No permita que el cinturón se gire.
83
f
n
• Abroche el cinturón (m) en la hebilla (l). Se debe bloquear con un „click“ audible.
• Tense el cinturón ventral (n) estirando del cinturón diagonal (f).
• Ahora coloque el cinturón diagonal (f) a través de las guías (r) del cojín de
seguridad (p).
• Estire del cinturón diagonal (f), teniendo en cuenta que ambas partes del cinturón
de seguridad deben pasar por el cojín sin tener ningún giro.
¿ESTÁ SU HIJO ADECUADAMENTE ASEGURADO?
Para garantizar la mayor seguridad del niño, por favor compruebe los siguientes
pasos antes de poner el vehículo en marcha:
• El cojín de seguridad (p) está correctamente ajustado.
• El anclaje del cinturón (m) está bien ajustado en la hebilla (l).
• El cinturón ventral y el diagonal pasan a través del cojín de seguridad (p) y no
están girados.
• El asiento (d) está ajustado a ambos lados con los conectores (w) en los anclajes
(i) y los indicadores verdes (x) sobresalen claramente.
• El respaldo de la silla (a) reposa completamente sobre el respaldo del coche.
Page 85

POSICIONAR A CRIANÇA
• Coloque a criança na cadeira.
• Coloque a almofada de segurança previamente regulada (p) (consulte:
“REGULAÇÃO DA ALMOFADA DE SEGURANÇA“)
• Passe o cinto abdominal (n) através das guias da almofada de segurança (p)
marcadas em vermelho (r).
!
Atenção! Não permita que o cinto se torça ou estê mal colocado
• Aperte o cinto (m) na fivela (l). Dever-se-à ouvir um “click“ quando bloqueado.
• Regule o cinto abdominal (n) puxando do cinto diagonal (f).
• Coloque o cinto diagonal (f) através das guias (r) da almofada de segurança (p).
• Puxe o cinto diagonal (f), tendo em conta que ambas as partes do cinto de
segurança deverão passar pela almofada sem que estas se torçam.
ESTÁ A CRIANÇA REALMENTE SEGURA?
De forma a garantir a máxima segurança à criança comprove sempre os
seguintes passos antes de viajar:
• A almofada de segurança (p) está correctamente regulada.
• O cinto de segurança está corretamente colocado na fivela (l).
• O cinto abdominal e diagonal passam através da almofada de segurança (p) e
nenhum deles está torcido.
• O assento (d) está ajustado em ambos os lados com os fixadores (w) nos
encaixes (i) e os indicadores verdes (x) sobressaem claramente.
• O encosto da cadeira (a) repousa sobre o encosto do assento do automóvel.
84
PT ES
Page 86

CUIDADO DEL PRODUCTO
Para garantizar la máxima seguridad de su silla de seguridad, es necesario que
tome nota de lo siguiente:
• Todas las partes importantes de la silla de seguridad deben ser revisadas de
daños periódicamente. Las partes mecánicas deben funcionar perfectamente.
• Asegúrese de que la silla no ha sido dañada al presionarla entre la puerta y el
asiento del coche u otros objetos sólidos.
• La silla de seguridad debe ser comprobada por el fabricante en caso de que
caiga al suelo o en casos similares.
LIMPIEZA
Es importante utilizar únicamente los tapizados originales, ya que el tapizado
es una parte fundamental para el correcto funcionamiento de la silla de
seguridad. Usted puede conseguir tapizados adicionales en los puntos de venta
correspondientes
¡Atención! Lave el producto separadamente antes del primer uso. La funda
es lavable a máquina a 30ºC y con ciclo de ropa delicada. Si lo lava a una
temperatura mayor la funda podría decolorarse. Por favor, lave la funda
separadamente y nunca la seque en secadora. No seque la funda bajo la luz
directa del sol. Puede limpiar las piezas de plástico con detergente suave y
agua templada.
!
¡Atención! Nunca utilice productos de limpieza químicos ni productos con
agentes blanqueantes.
EXTRAER LA VESTIDURA
La vestidura se compone de tres piezas para el respaldo, el reposacabezas y
el cojín de seguridad, que se ajustan con velcros, cintas elásticas o botones
de presión a la silla de seguridad. Una vez haya desanclado todos los
componentes, puede extraer individualmente las piezas tirando de ellas para
poder lavarlas.
• Una vez que los corchetes de la parte trasera del respaldo estén abiertos, se
puede quitar la vestidura.
• Para quitar la funda del cojín, suelte ambas gomas a los lados, abra los corchetes
de la parte inferior y sáquela hacia adelante.
• La vestidura del reposacabezas puede ser retirada tan sólo tirando de ella.
85
Para volver a colocar la vestidura, siga los mismos pasos en orden inverso.
Page 87

MANUTENÇÃO DO PRODUTO
Para garantir a máxima segurança e a melhor prestação da cadeira, é
necessário ter em conta:
• Todas as partes importantes da cadeira de segurança devem ser revistas
periodicamente. As partes mecânicas deverão funcionar corretamente.
• Assegure-se que a cadeira não tenha sofrido danos ao pressioná-la entre a porta
e o assento do carro ou outros objectos sólidos.
• Em caso de queda ou casos semelhantes a cadeira de segurança deve ser
comprovada e revisada pelo fabricante.
LIMPEZA
É importante utilizar, exclusivamente, os tecidos originais, uma vez que estes
são uma parte fundamental para o funcionamento correcto da cadeira de
segurança. É possível adquirir tecidos e capas adicionais nos pontos de venda
correspondentes.
ATENÇÃO! Lave por separado o produto antes da primeira utilização. A forra
é lavável à máquina a 30º num programa de roupa delicada. Ao lavar a forra a
uma temperatura mais elevada poderá provocar descoloramento. Lave a forra
por separado e não seque na máquina. Não coloque a forra com luz directa do
sol. Limpe as peças de plástico com detergente suave e água morna.
!
Atenção! Nunca utilize produtos de limpeza químicos, nem produtos com
agentes branqueadores.
REMOVER A FORRA
A forra é composta por três peças: o encosto, o encosto de cabeça e a
almofada de segurança, que estão unidas através de velcro, bandas elásticas
ou molas de pressão, à cadeira de segurança. Uma vez toda desmontada,
poderá extrair-se peça por peça, para lavagem.
• Uma vez que os botões da parte traseira do encosto estejam desapertados
poderá remover a forra puxando-a para fora.
• Para remover a forra da almofada de segurança, solte ambas as alças dos cintos
e desaperte os botões da parte inferior e puxe-a para fora.
• Para remover a forra do encosto de cabeça deverá simplesmente puxar para fora.
PT ES
Para voltar a colocar a forra deverá inverter este procedimento.
86
Page 88

QUÉ HACER TRAS UN ACCIDENTE
En caso de accidente la silla puede sufrir daños que pueden no ser
apreciables a simple vista. Por este motivo, la silla debe ser inmediatamente
sustituida en este caso. Si tiene cualquiera duda, por favor contacte con el
distribuidor o el fabricante.
VIDA ÚTIL DEL PRODUCTO
La silla de seguridad está diseñada para durar hasta que el niño no la necesite,
esto es un plazo de 4 años aproximadamente. Debido a los grandes cambios de
temperatura y a circunstancias excepcionales dentro de un coche, es necesario
tomar nota de lo siguiente:
• Quite o cubra con una prenda su CYBEX Juno-fix si sabe que el coche va a estar
expuesto al sol durante un largo periodo de tiempo.
• Revise la silla de vez en cuando por si aparecen daños en las partes de plástico
o cambios en la forma y el color. Si nota algún cambio la silla debe ser revisada
por el fabricante.
• Los cambios en el tapizado del asiento, especialmente colores desteñidos o el
desgaste natural, no afectan a la efectividad del producto.
87
RECICLADO
Cuando ya haya usado la silla infantil y no la necesite más es importante una
correcta eliminación de la silla. El sistema de reciclaje de residuos es diferente
en cada comunidad. Por favor, contacte con su Ayuntamiento o con la compañía
local de reciclaje para asegurar un correcto reciclado.
Page 89

COMO PROCEDER DEPOIS DE UM ACIDENTE
Em caso de acidente a cadeira pode car danicada mas sem aparentalo à primeira vista. Por este motivo, a cadeira deve ser substituída
imediatamemente. Em caso de dúvida, por favor contacte com o distribuidor
ou fabricante.
VIDA ÚTIL DO PRODUTO
A cadeira de segurança está desenhada para durar até que a criança a
necessite, que serão aproximadamente uns 4 anos. Mas há que ter em conta
que os automóveis, podem muitas vezes, estar expostos a grandes câmbios de
temperatura e a circunstâncias excepcionais. Neste caso:
• Retire a cadeira, ou cubra-a com uma peça de roupa, se sabe de antemão que
esta vai estar exposta ao sol durante muito tempo.
• Verifique a cadeira de vez em quando para ver se esta aparece danificada nas
partes de plástico ou se a sua forma ou cor da cadeira mudaram. Em caso de
alguma diferença a cadeira deverá ser revista pelo fabricante.
• As alterações na forra da cadeira especialmente cores descoloridas e o desgaste
natural não afetam a efetividade do produto.
RECICLAGEM
Quando já não necessitar mais da cadeira é importante proceder a uma
correcta eliminação da mesma. O sistema de reciclagem de resíduos é
diferente em cada município. Por favor, contacte com a sua Freguesia ou com
a companhia local de reciclagem para assegurar-se de uma correcta eliminação
da cadeira.
PT ES
88
Page 90

GARANTÍA
La presente garantía sólo es de aplicación en el país en el que el consumidor
adquirió inicialmente el producto a un detallista. La garantía cubre todos los
defectos de materiales y fabricación, existentes o que puedan aparecer, por
un período de tres (3) años desde la fecha de compra inicial (garantía del
fabricante). En caso de que aparezca cualquier defecto de materiales o de
fabricación, nosotros decidiremos, según nuestro criterio, reparar el producto
sin coste o entregar un producto nuevo. Para obtener esta garantía es preciso
entregar o enviar el producto al detallista que vendió inicialmente el producto
y aportar una prueba de compra (recibo o factura) que muestre la fecha de
compra, el nombre del detallista y el modelo del producto. Esta garantía no
es de aplicación en caso de que el producto sea enviado o entregado al
fabricante o a cualquiera otra persona que no sea el detallista que vendió el
producto inicialmente al consumidor. Por favor, verifique que el producto está
completo y que no presenta ningún defecto de materiales ni de fabricación
en el momento de la compra o, si se ha adquirido a distancia, en el mismo
momento de recibirlo. En caso de apreciar cualquier defecto, deje de utilizar el
producto y entréguelo o envíelo al detallista. El producto debe entregarse limpio
y completo. Antes de contactar con la tienda lea este manual detenidamente.
La garantía no cubre ningún daño causado por un mal uso, la influencia del
entorno (agua, fuego, irregularidades del terreno, etc.) o el desgaste normal
del producto. Sólo es de aplicación en caso de que el uso del producto sea
acorde al manual de instrucciones y si cualquiera modificación o reparación ha
sido efectuada por personas autorizadas y se han utilizado piezas y accesorios
originales. La garantía no excluye, limita o afecta de ningún modo a los
derechos del consumidor establecidos por ley, incluyendo reclamaciones por
responsabilidad civil o quejas por incumplimiento de contrato que el comprador
quiera interponer contra el vendedor, el fabricante o el producto.
89
CYBEX GmbH
Riedinger Str. 18, 95448 Bayreuth, Germany
Tel.: +49 921 78 511-0, Fax.: +49 921 78 511- 999
Page 91

GARANTIA
A presente garantia só se aplica no país em que o consumidor adquiriu a
cadeira. A garantia cobre todos os defeitos de material e/ou de fabrico que
possam existir ou surgir num período de três (3) anos desde a data da compra
inicial (garantia do fabricante). Em caso de que apareça qualquer defeito, a
Cybex decidirá reparar o produto sem gastos extra ou, em caso de que o veja
necessário, entregar um produto novo. Para obter esta garantia é preciso
entregar ou enviar o produto em questão ao vendedor que inicialmente lhe
vendeu o produto apresentando, ao mesmo tempo, a fatura ou recibo de
compra que mostra a data, o nome do vendedor e o modelo em questão. Esta
garantia não será aplicada em caso de que não envie o produto directamente
ao vendedor. No momento da compra, ou se o compra à distância, njo momento
em que o receba, faça o favor de revisar se o produto está completo e que
não apresenta qualquer tipo de defeito. Em caso de que encontre algum
defeito não utilize o produto e entregue-o ou envie-o de novo ao vendedor.
O produto dever-se-á entregar limpo e completo. Antes de contactar com a
loja leia este manual até ao final. Esta garantia não cobre estragos causados
pelo mau uso, das condições externas (água, fogo, irregularidades do terreno,
etc.) ou o desgaste normal do produto. Esta garantia só é válida em caso
de que use o produto tendo em conta o seu manual de instrucções e se
qualquer modificação ou reparação foi feita por pessoal autorizado e se foram
utilizadas peças e acessórios originais. A garantia não exluiu, limita ou afecta
os direitos dos consumidores esatabelecidos por lei, incluindo reclamações
por responsabillidade civil ou queixas por inconprimento do contracto entre o
consumidor e vendedor, o fabricante e o produto.
CYBEX GmbH
Riedinger Str. 18, 95448 Bayreuth, Germany
Tel.: +49 921 78 511-0, Fax.: +49 921 78 511- 999
PT ES
90
Page 92

CYBEX GmbH
Riedinger Str. 18 | 95448 Bayreuth | Germany
INFO@CYBEX-ONLINE.COM
WWW.CYBEX-ONLINE.COM
WWW.FACEBOOK.COM/CYBEX.ONLINE
C111_056-1_01G
 Loading...