

Page 1
MANUFACTURED BY:
Version 1.0 2017 IC-CYIC1B1-01 Copyright by Indoor Cycling Group GmbH 2017 | www.indoorcycling.com
ENG
ENG
IC1
MODEL NO:IC-CYIC1B1-01
Indoor Cycling Group GmbH
Happurger Str. 86
90482 Nuremberg | Germany
info@indoorcycling.com
www.indoorcycling.com
Phone: +49(0)911 / 54 44 50
CAUTION!
READ ALL PRECAUTIONS AND INSTRUCTIONS IN THIS MANUAL BEFORE YOU START
USING THIS EQUIPMENT. PLEASE KEEP THIS MANUAL FOR FUTURE REFERENCE.
IMPROPER ASSEMBLY, USE OR MAINTENANCE CAN VOID THE WARRANTY TERMS.
Page 2

Version 1.0 2017 IC-CYIC1B1-01 Copyright by Indoor Cycling Group GmbH 2017 | www.indoorcycling.com
TABLE OF CONTENTS
IMPORTANT PRECAUTIONS P.3-4
GETTING STARTED P.5
HOW TO ASSEMBLE THE INDOOR CYCLE P.6-8
HOW TO ADJUST THE INDOOR CYCLE P.9-11
RESISTANCE ADJUSTMENT P.12
HOW TO MOVE THE INDOOR CYCLE P.12
PREVENTIVE MAINTENANCE P.14-16
MAINTENANCE ACTIVITY PLAN P.16
SECURING THE INDOOR CYCLE FROM UNAUTHORIZED USE P.17
COMPUTER CONSOLE P.18
SPARE PARTS P.19-21
LIMITED WARRANTY P. 22-23
The Cybex IC1 Bike is according to EN 957/EN ISO 20957 a Class H product and is built to
highest standards for home tness use. It was designed especially for lower body workout and
FOOT PRINT: 53 X 115 CM / 20.9 X 45.3 INCH
WEIGHT OF BIKE: 59 KG / 130 LBS
MAX SADDLE HEIGHT: 103 CM / 40,5 INCH
MAX HANDLEBAR HEIGHT: 116 CM / 45,8 INCH
MAX USER WEIGHT: 130 KG / 287 LBS
Designed to accommodate most users from 150 cm to 190 cm (4’11’’ to 6’ 2’’) body height. This
Product is not designed or warranted for commercial or semi/light commercial use.
TECHNICAL SPECIFICATIONS:
cardiovascular training.
Page 3

IMPORTANT
PRECAUTIONS
WARNING!
To reduce the risk of serious injury due to improper use of the equipment, carefully
read and adhere to the following important precautions and information before
operating the Indoor Cycle!
1. It is the sole responsibility of the owner to ensure that all users
of the Indoor Cycle are informed and aware of all warnings
and precautions.
2. Operate and maintain the indoor cycle only as
described in this manual and after proper assembly and
functionality check as described in this manual.
3. Keep the indoor cycle indoors, away from moisture and dust. Do not
place the indoor cycle outdoors in a garage or covered patio or near
water or pools. Operating temperature of the indoor cycle has to be
between 15°C~ 40°C Celsius (59°~104°F) at max. humidity of 65%.
ENG
4. Place the Indoor Cycle on a horizontal and stable surface. To
protect the oor or carpet from damage, place a mat beneath the
Indoor Cycle. Make sure that there is adequate room (27 inches/0,6m)
around the Indoor Cycle to assemble, disassemble and operate it.
5. Regularly inspect and properly tighten all parts of the indoor
cycle as recommended in this manual. Please replace defective
parts immediately and do not use the bike until repair is
performed. Only use original parts from the manufacturer.
6. This Indoor Cycle can be used by children aged from 14 years and
above and persons with lack of experience and knowledge if they
have been given supervision or instruction concerning use of the
appliance in a safe way and understand the hazards involved.
Persons with reduced physical, sensory or mental capabilities
are prohibited from using the indoor cycle. Children shall not
play with the Indoor Cycle. Cleaning and user maintenance
shall not be made by children without supervision.
7. The Indoor Cycle should not be used by persons
exceeding weight of 287 lbs/130 kg.
3
Page 4

Version 1.0 2017 IC-CYIC1B1-01 Copyright by Indoor Cycling Group GmbH 2017 | www.indoorcycling.com
IMPORTANT
PRECAUTIONS
8. Always wear appropriate tight-tting cycling or athletic attire and sturdy
shoes, while operating the bike. Unfastened shoelaces may become caught
in the drive system and lead to injury.
9. Before using the Indoor Cycle, make sure you are familiar with the setup/
10. The Indoor Cycle does have a direct driven ywheel (wheel); the pedals
will continue to move along with the ywheel until the ywheel stops.
11. The Indoor Cycle does not have an independently-moving ywheel.
The pedals will continue to move with the ywheel until the ywheel stops.
The movement can only be stopped by using the emergency brake or by
reducing the pedaling frequency in a controlled manner. Always ride with
resistance load to ensure that your pedaling motion is controlled. Do not
adjust handlebar or saddle during workout.
12. Keep your back straight while using the Indoor Cycle;
13. If you feel pain or dizziness while exercising, stop immediately. It is
recommended that you consult a doctor if the pain does not subside for an
14. If replacement parts are needed, use only manufacturer supplied parts.
If you have pre-existing health problems or a disability, it is recommended that
you consult your physician, in order to find the training method which is best
suited to you. Incorrect or extensive training can result in serious health injuries.
operation of the Indoor Cycle.
Do not pedal backwards.
do not arch your back.
extended period of time.
WARNING!
The manufacturer expressly assumes no responsibility for health risks, personal
injury, property damage or consequential damages sustained by or through
the use of this device, unless it is a case of consequential damage which can be
traced back to faulty material and/or manufacturing, and which come under
the responsibility of the manufacturer.
Page 5
GETTING STARTED
DEAR CUSTOMER,
Congratulations for selecting the CYBEX IC1 Indoor Cycle. The CYBEX IC1 Indoor Cycle oers
an impressive array of features designed to enhance your cardiovascular tness, tone muscles,
and develop endurance. Whether you´re a beginner or an experienced athlete, the indoor cycle
oers workouts which will help you to reach your individual tness goals.
IMPORTANT: Read this manual carefully before assembling or using the Indoor Cycle.
If you have questions after reading this manual, please contact your local distributor or
refer to the website www.indoorcycling.com. Before reading further, please familiarize
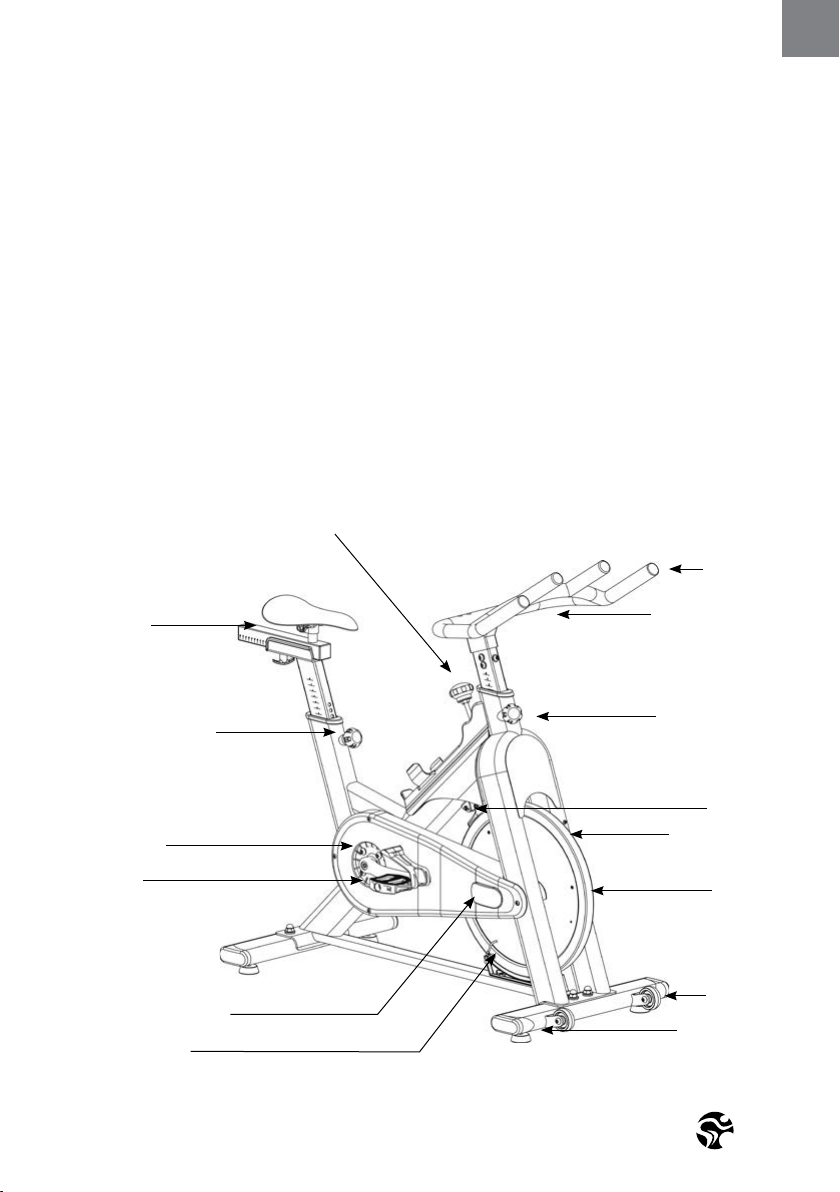
yourself with the parts that are labeled in the drawing below.
EMERGENCY BRAKE & RESISTANCE KNOB
HANDLEBAR
ENG
SADDLE
ADJUSTMENT KNOB
CHAIN GUARD
PEDAL
MAINTENANCE COVER
FLYWHEEL LOCK
YOU WILL FIND THE PRODUCTION CODE ON THE LEFT SIDE OF THE INDOOR
CYCLE WITHIN THE LOWER RANGE OF THE FRAME.
COMPUTER CONSOLE
ADJUSTMENT KNOB
BRAKE PAD
CADENCE SENSOR
FLYWHEEL
TRANSPORT
WHEEL
LEVELING FEET
5
Page 6
Version 1.0 2017 IC-CYIC1B1-01 Copyright by Indoor Cycling Group GmbH 2017 | www.indoorcycling.com
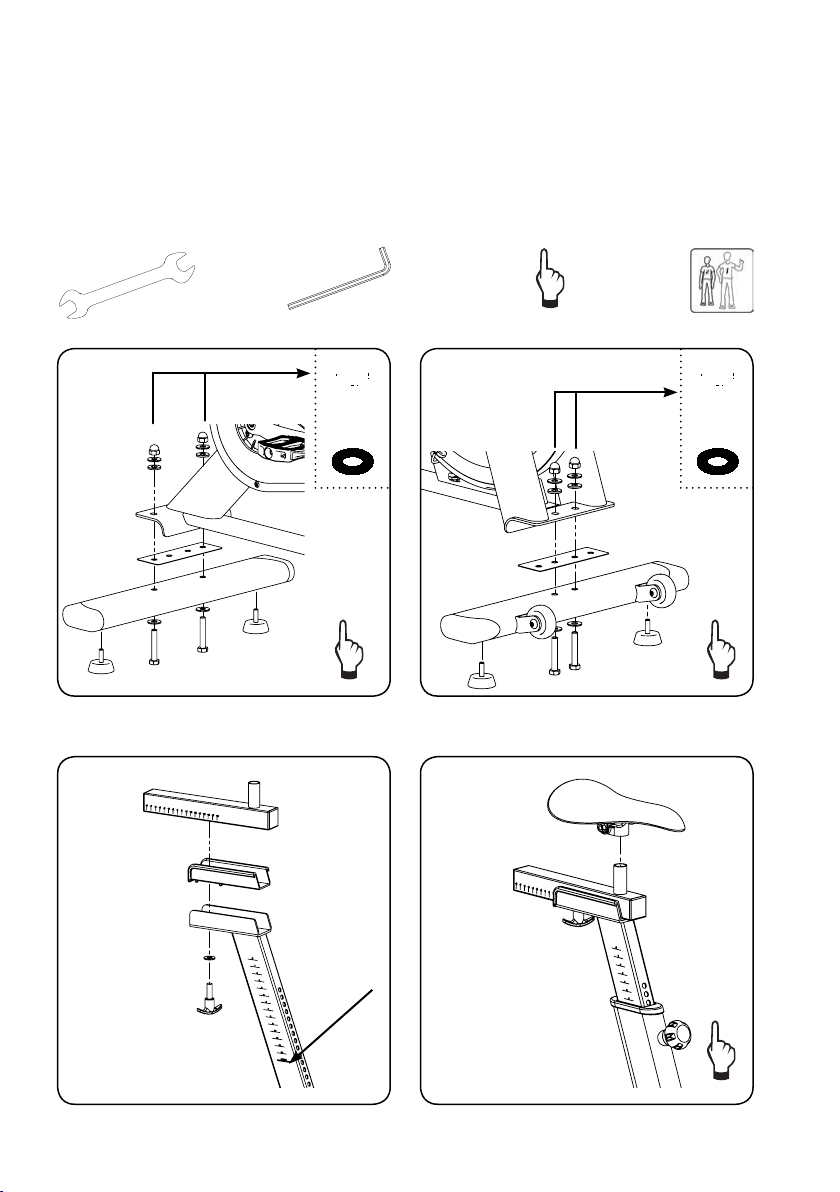
HOW TO ASSEMBLE THE
INDOOR CYCLE
SW 17/19MM
SW 13/15MM
3MM
6MM
HAND
TIGHT
1. 2.
Important!
Make sure the seat is xed in a LEVEL HORIZONTAL AND VERTICAL position.
Seat clamp must be tightened securely from both sides to minimize loosening during use.
4.3.
2
PEOPLE
STOP
MARK
Page 7
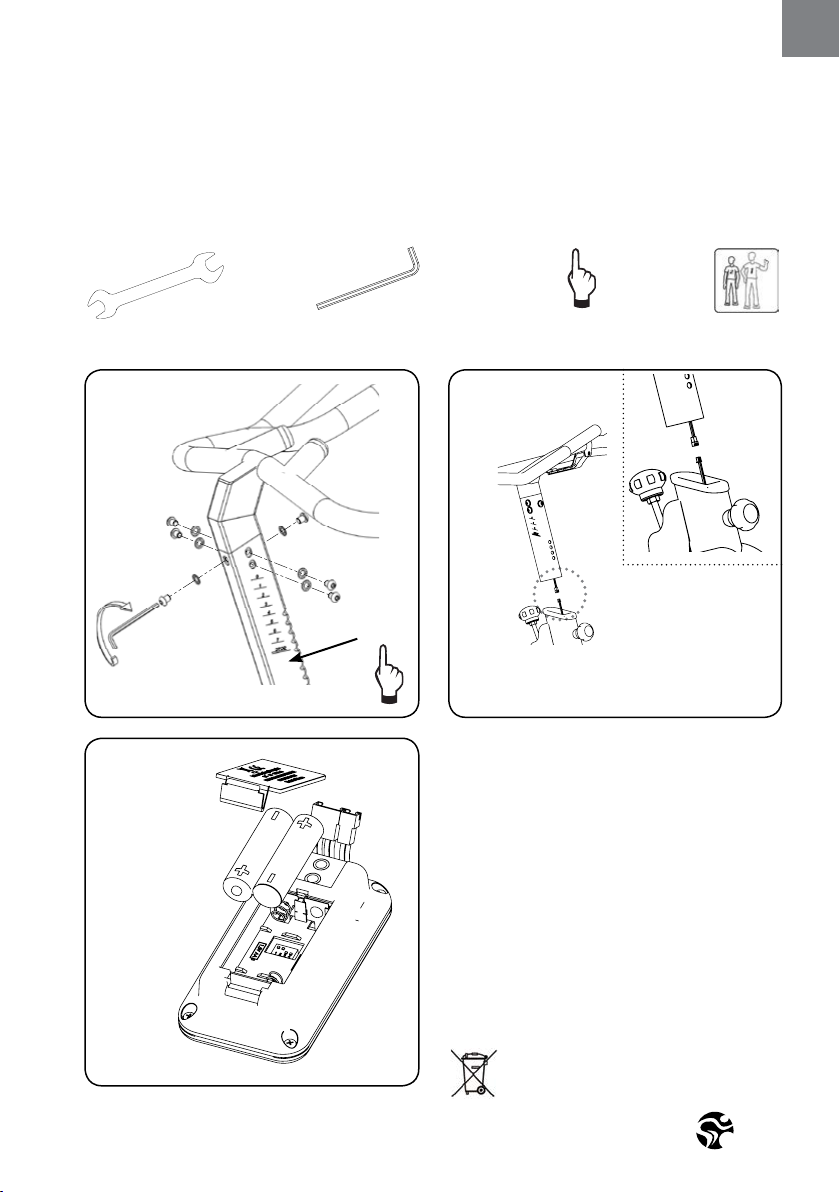
HOW TO ASSEMBLE THE
INDOOR CYCLE
ENG
SW 17/19MM
SW 13/15MM
3MM
6MM
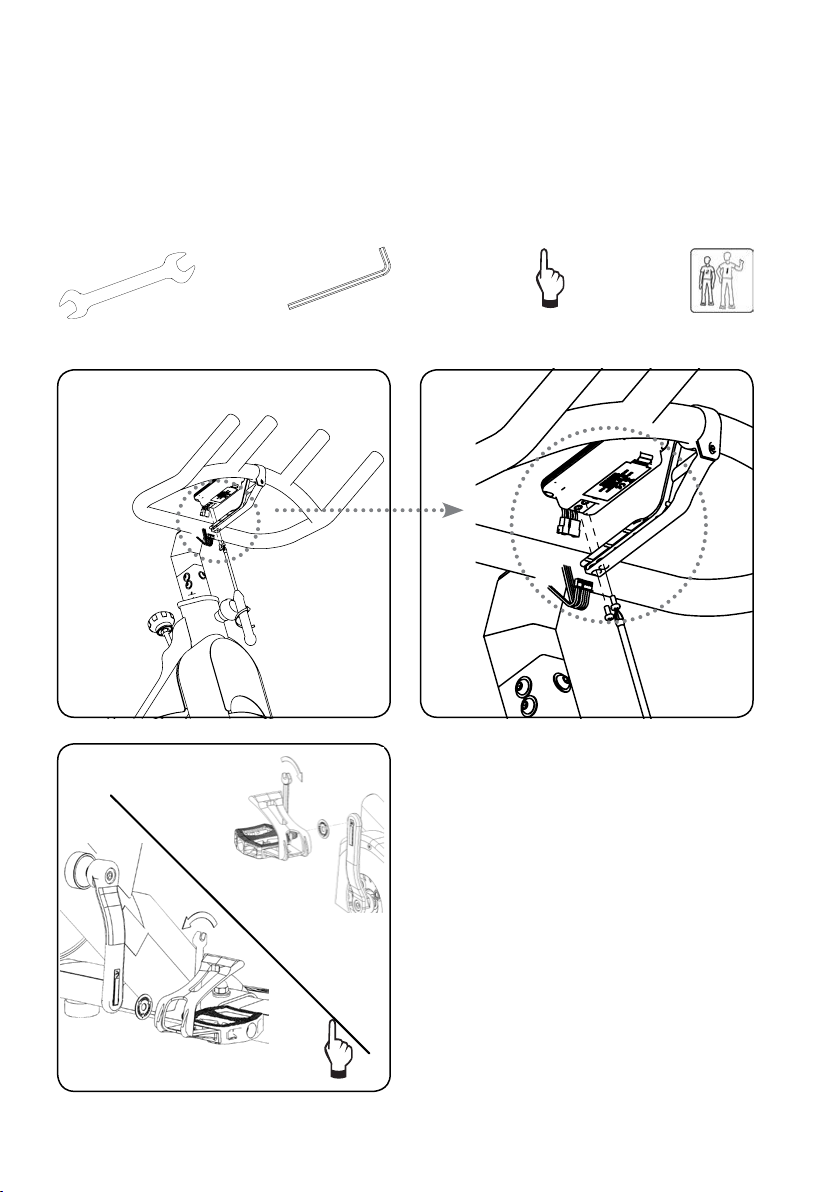
5. 6.
STOP MARK
THE BATTERIES MAY NOT:
7.
2 X LR6 / AA / 1.5V
• Be exploited to re
• Get in contact with coins or other metal objects
• Be used in combination with older batteries
• Be used with other makes of dierent types.
Only use LR6 (Alkaline) batteries. If you don´t
use the equipment for a longer period of time,
please remove the batteries to avoid any damage
by leaking or corroding batteries. If batteries
have are discharged, insert new batteries into
the computer. If the batteries have leaked,
remove all residue immediately. Avoid contact
with eyes and if you come in contact with
residue, wash thoroughly. Before scrapping,
please take the batteries out of the computer.
HAND
TIGHT
Marked products or batteries with this symbol may
not be disposed of in normal domestic disposal. For
a professional disposal please consider relevant laws
or defaults for the disposal of electrical devices and
batteries locally and act accordingly.
2
PEOPLE
7
Page 8
Version 1.0 2017 IC-CYIC1B1-01 Copyright by Indoor Cycling Group GmbH 2017 | www.indoorcycling.com
HOW TO ASSEMBLE THE
INDOOR CYCLE
SW 17/19MM
SW 13/15MM
3MM
6MM
8. 9.
Pedal marked R installed on right crank (clock-
10.
wise), Pedal marked L installed on left crank
(counterclockwise).
Pedals must be fastened with signicant
strength to avoid loosening with use of the
Indoor Cycle.
HAND
TIGHT
2
PEOPLE
Page 9

HOW TO ADJUST THE
INDOOR CYCLE
The CYBEX IC1 Indoor Cycle can be adjusted for maximum comfort and exercise eectiveness. The
instructions below describe an approach to adjusting the Cybex IC1 Indoor Cycle to ensure optimal
user comfort and ideal body positioning; you may choose to adjust the Indoor Cycle dierently.
ENG
To prevent injury, always adjust seat and handlebar to your personal requirements and tighten all
adjustment knobs before beginning your training. Adjustment levers and knobs left projecting
could interfere with users movements during use or the Indoor Cycle.
PEDAL STRAP ADJUSTMENT:
Sit on the saddle and position your feet on the pedals, with the bale of your feet directly
above the spindles of the pedals (see the drawing below). Adjust the pedal straps so the
toe clips (cages) are snug but not too tight.
Please do not adjust
saddle height
beyond the stop
mark on the stem.
WARNING:
Please do not adjust
handlebar height beyond the
stop mark on the stem.
Sit on the saddle and slowly pedal until the right pedal is in the lowest position. Your knees
should be slightly bent without a dropping of the hips. To avoid hyper extending your knees,
make sure that your legs are not completely straight.
SADDLE HEIGHT ADJUSTMENT:
9
Page 10

Version 1.0 2017 IC-CYIC1B1-01 Copyright by Indoor Cycling Group GmbH 2017 | www.indoorcycling.com
HOW TO ADJUST THE
INDOOR CYCLE
Proper horizontal adjustment of the saddle is very important in avoiding injury to the knees.
Sit on the saddle and move the pedals until the crank arms are in horizontal position.
Using your forward most leg as a marker, your kneecap should be directly above the center of
the pedal so that a straight line is created between knee and center of the pedal (see the dotted
line in image below). To adjust the horizontal position of the saddle, loosen the rear adjustment
knob, slide the saddle forward or backward as required, and then retighten the knob.
SADDLE HORIZONTAL ADJUSTMENT:
Page 11

HOW TO ADJUST THE
INDOOR CYCLE
ENG
Begin with the top of the handlebar at relatively the same height or just slightly higher than
the top of the saddle (dotted horizontal line A in the drawing below) and at a neutral fore/aft
position (see dotted vertical line B in drawing below).
HANDLEBAR ADJUSTMENT:
B.
A.
If your knees touch the handlebars or if you experience back discomfort while pedalling
for extended periods of time, the height of the handlebars can be adjusted. Turn the front
adjustment knob counter clockwise, slide the handle-bar post up or down, and then retighten
the adjustment knob.
Changing your hand position can change the angle of your back, neck, and arms. To minimize
the stress on your muscles during your workouts, change your hand position frequently.
Allow a minimum safety distance away from the
nearest equipment, objects or walls as illustrated.
4“ (10 CM)
27“ (60 CM)
27“ (60 CM)
11
Page 12

Version 1.0 2017 IC-CYIC1B1-01 Copyright by Indoor Cycling Group GmbH 2017 | www.indoorcycling.com
HOW TO OPERATE THE
INDOOR CYCLE
The preferred level of diculty in pedalling (resistance) can be regulated in ne increments
by use of the resistance knob. To increase the resistance, turn the resistance knob
clockwise. To decrease the resistance, turn the knob counter clockwise.
IMPORTANT: To stop the ywheel (wheel) while pedalling, push down on the red brake
knob. The ywheel should quickly come to a complete stop. Please make sure your shoes
are xed into the toe clip. Please apply full resistance load when bike is not in
use to prevent from injuries due to moving drive gear components.
WARNING! The Cybex IC1 Indoor Cycle has a direct driven ywheel (wheel); the pedals will continue to move
together with the ywheel until the ywheel stops. Reducing speed in a controlled manner is required. To stop the
ywheel immediately, push down the red emergency break knob. Always pedal in a controlled manner and adjust
RED RESISTANCE KNOB
EMERGENCY BRAKE
Due to the weight of the Cybex IC1 Indoor Cycle, it is recommended that two persons move
it. While one person lifts the back of the Indoor Cycle, the second person rmly holds the
handlebar and tips the Indoor Cycle forward until it rolls on the wheels. Carefully move the
Indoor Cycle to the desired location and then lower it. CAUTION: To reduce the risk of injury,
use extreme caution while moving the Cybex IC1 Indoor Cycle. Do not attempt to move it over
uneven surfaces and make sure there’s a safety space of 27 inch (minimum) to the nearest
equipment is (recommended).
RESISTANCE ADJUSTMENT
your desired cadence according to your own abilities.
PUSH THE RED KNOB DOWN = EMERGENCY STOP
HOW TO MOVE THE INDOOR CYCLE:
If the Indoor Cycle rocks on the oor after
being set down, turn the leveling feet
underneath the front or rear stabilizer
until the rocking motion is eliminated.
Important: Please do not unscrew the
leveling feet more then 1⁄2 inch.
LEVELING FEET
FLYWHEEL LOCK
Page 13

WORKOUT
ENG
We strongly recommended that you consult a physician before starting any exercise program.
If at any time while exercising, the user experiences faintness, dizziness, pain, or shortness of
breath, he or she must stop immediately.
Health-related injuries may result from improper or excessive use of exercise equipment. Consult
a tness professional for advice on correct product use. Furthermore, a tness professional can
provide workout advice in regards to bike resistance settings, workout intensity and duration
best suited for you to help you reach your tness goals.
A basic Indoor Cycling workout structure.
Make yourself familiar with the bike features, functions and operation before getting on the bike
Adjust the seat, handlebar and pedal straps to t your body size before you start. Consult your
physician before beginning this or other exercise routines. Stop your work out and consult your
physician if any exercise causes discomfort.
The purpose of warming up is to increase your heart rate, lift body temperature, increase blood
ow, stimulate muscles and prepare your body for physical activity. Sit on the bike with your
hands placed on the handlebar and your feet secured in the pedal straps and slowly start
pedaling with low resistance. Once your breathing rate has increased and you begin to sweat
slightly, you should be ready to proceed to your workout after approx. 5 – 10 minutes.
For an aerobic workout, slowly adjust resistance and cadence to achieve
60% - 75% of your maximum heart rate.
WARNING!
TRAINING INFORMATION
TRAINING PREPARATION:
for the rst time.
WARM-UP:
WORK-OUT:
Lower cadence and resistance to allow the body to cool down for approx.
5 - 10 minutes before ending your workout.
The Indoor Cycle does not have an independently-moving ywheel. The pedals will continue
to move with the ywheel until the ywheel stops. To end your training, reduce the pedaling
frequency in a controlled manor or push the emergency brake knob until the pedals come to a
complete stop and dismount the bike
COOL-DOWN:
END TRAINING:
.
13
Page 14

Version 1.0 2017 IC-CYIC1B1-01 Copyright by Indoor Cycling Group GmbH 2017 | www.indoorcycling.com
PREVENTATIVE
MAINTENANCE
WARNING!
THE SAFETY OF THE INDOOR CYCLE CAN ONLY BE ENSURED IF THE BIKE IS CHECKED FOR
WEAR AND DAMAGE SADDLE, DRIVE TRAIN, BRAKE AND PEDALS ON A REGULAR BASIS.
REGULAR MAINTENANCE MUST ALSO BE PERFORMED ON THE INDOOR CYCLE FOR OPTIMAL
Please read and follow all instructions below. If the Indoor Cycle is not maintained as described,
components may wear excessively and the Indoor Cycle may become damaged. Improper
maintenance will void the warranty terms. If you have questions about maintenance, contact
your local distributor.
PERFORMANCE AND LONGEVITY.
NOTE: MANY MAINTENANCE PROCEDURES REQUIRE LUBRICANT SPRAY. MANUFACTURER
1. Make sure that the Indoor Cycle is leveled. If the Indoor Cycle rocks on your oor, turn the
leveling feet underneath the front or rear stabilizer until the rocking motion is eliminated.
2. After exercising, the indoor cycle should be disinfected and cleaned to maintain a
hygienic environment. First, apply a disinfectant spray to the handlebars and the saddle. Using
a lint-free cloth, dry the handlebars and the saddle. Next, apply a small amount of disinfectant
to a lint-free cloth and clean the adjustment knobs and the adjustment handles. Avoid using
strong detergents on the Indoor Cycle frame.
1. Apply a small amount of the lubrication spray to a lint-free cloth, and thoroughly clean
the frame, the handlebar slider and seat sliders the ywheel and the plastic parts of
the Indoor Cycle.
2. For optimal performance of the resistance
system, and to minimize wear on the
brake pad, the solvent free lubricant spray
should be applied to the brake pad using
the lubrication holes on the plastic part
of the brake pad. If fuzz or lint appears on
the brake pad, the brake pad has become
too dry - lubricant spray should be applied
more frequently. Make sure the brake pad
is thoroughly soaked from end to end with
lubricant spray. Then, wipe the excess o.
RECOMMENDS TO USE ONLY A SOLVENT AND ACID FREE LUBRICANT.
DAILY MAINTENANCE:
WEEKLY MAINTENANCE:
Page 15

PREVENTATIVE
MAINTENANCE
1. BI-WEEKLY MAINTENANCE:
The Indoor Cycle should not be used if the
emergency brake system is not working
properly. While sitting on the saddle and
pedalling, test the brake by pushing down
the brake knob. The ywheel should come to
a quick and complete stop.
2. MONTHLY MAINTENANCE:
BELT DRIVEN BIKE
IMPORTANT: A loose belt as well as an
over-tightened belt will cause damage to
the belt and drive system.
CHECKING BELT TENSION:
To check for a loose belt, sit on the saddle,
place your feet on the pedals, move the
pedals until the crank arms are horizontal.
Next, push down the emergency brake
handle and hold it. Then, stand on the pedals
and rock forward and backward. There
should be no more than 1/8th inch (2–3 mm)
of play in the belt. If there is too much play in
the belt, this indicates that the belt
is too loose.
1.
2.
ENG
A
B
CORRECTING BELT TENSION:
To correct a loose belt: To adjust the belt, pull
o the right and the left maintenance covers
(A).Loosen the axle nut (B) on both ends of
the y-wheel axle two full turns. Loosen the
outer adjustment nut (C) facing the head of
the allen bolt on each side of the ywheel.
Then, turn both (right and left sides) of the
inner adjustment nuts (D) on the inside of
the ywheel bracket 1/4 of a turn at a time
(upward on the R side and downward on L
side) until the belt is properly adjusted. Make
sure to turn both adjustment screws exactly
the same amount to avoid misalignment
of the ywheel.
C
D
15
Page 16

Version 1.0 2017 IC-CYIC1B1-01 Copyright by Indoor Cycling Group GmbH 2017 | www.indoorcycling.com
PREVENTATIVE
MAINTENANCE
Re-check the amount of play in the belt
as described at the beginning of this
step. If necessary, readjust the belt.
Finally, retighten the two outer adjustment
nuts (C) and the two axle nuts (B), and
reattach the maintenance covers. To avoid
damage to the ywheel bearings, do not
over tighten the axle nuts (B). Unusual
noises or vibrations are indications that
the belt has been over tightened or
that the ywheel is at a wrong angle.
3.
C
D
ABOVE GRAPHICS SHOWS THE
RIGHT SIDE OF THE BIKE
(RIDING POSITION)
MAINTENANCE ACTIVITY REQUIRED SCHEDULE
ACTIVITY ROTATION PAGE
FEET LEVELING, DISINFECTION & CLEANING OF THE BIKE DAILY PAGE 14
SERVICING BRAKE PADS,
DETAILED CLEANING OF THE ENTIRE BIKE WEEKLY PAGE 14
CHECK EMERGENCY BRAKE FUNCTION BI-WEEKLY PAGE 15
CHECK BELT TENSION MONTHLY PAGE 15-16
Page 17

SECURING THE
INDOOR CYCLE FROM
UNAUTHORIZED USE
Align the through hole in the ywheel with
the ywheel protective cover. Turn the
brake knob (A) clockwise until the brake has
completely immobilized the ywheel. Use
the wired cable and key lock provided in
the packaging to then lock the ywheel to
prevent minors from using the product.
ENG
A
17
Page 18

Version 1.0 2017 IC-CYIC1B1-01 Copyright by Indoor Cycling Group GmbH 2017 | www.indoorcycling.com
COMPUTER CONSOLE
SPECIFICATIONS:
TECHNICAL FEATURES: • Heart Rate reading only via hand sensors on the handlebar
• Two button easy control
• Premium design
• Special handlebar bracket
• Miles or kilometers reading
TRAINING FEATURES: • Heart Rate reading (actual)
• Cadence / RPM reading (actual)
• Training time
• Distance
• Calorie Consumption (the shown calorie consumption is based
on average values & should only be used for reference purposes)
BUTTON FUNCTION: • Press “reset” button for 5 sec to enter setup mode for
miles/km changing
• Press “reset” button for 2-3 sec to reset time, distance and kcal
• Press “ow” button for 1 sec to activate scan function automatically
to monitor, time, distance, kcal
RESET BUTTON FLOW BUTTON
WARNING!
Heart rate monitoring systems may be inaccurate. Over exercise may result
in serious injury or death. If you feel faint stop exercising immediately
Page 19

SERVICE/SPARE PARTS
If you require assistance or are experiencing any problems with your Indoor Cycle, contact our
service and technical support:
Indoor Cycling Group GmbH
Happurger Str. 86
90482 Nuremberg | Germany
service@indoorcycling.com
Phone: +49 (0)911 / 544450
ENG
19
Page 20

Version 1.0 2017 IC-CYIC1B1-01 Copyright by Indoor Cycling Group GmbH 2017 | www.indoorcycling.com
SPARE PARTS
FRONT STABILIZER
B
F
A
HANDLEBAR
G
H
REAR STABILIZER
B
C
D
D
A
E
SADDLE SUPPORT
J
K
L
I
N
M
Page 21

PEDALS
ENG
SPARE PARTS
P
0
DESCRIPTION
A LEVELING FEET
B STABILIZER FASTENING BOLTS
C STABILIZER END CAPS
D STABILIZER GASKET
E REAR STABILIZER COMPLETE
F FRONT STABILIZER COMPLETE
G COMPUTER CONSOLE
H COMPUTER BRACKET
DESCRIPTION
I HANDLEBAR & STEM
J SADDLE
K SEATPOST SLIDER
L CLAMPING PROFILE FOR SEATPOST SLIDER
M SEATPOST ASSEMBLY
N T-HANDLE
O PEDALS
P STRAP
21
Page 22

Version 1.0 2017 IC-CYIC1B1-01 Copyright by Indoor Cycling Group GmbH 2017 | www.indoorcycling.com
LIMITED WARRANTY
CYBEX IC1 INDOOR CYCLE
The CYBEX IC1 Indoor Cycle is not developed for the use in professional groupclass
environments. The use in commercial environment voids the warranty terms. All wear items are
excluded from warranty for example saddle, pedals and pedal straps, brake pad.
Page 23

LIMITED WARRANTY
2 YEARS WARRANTY: FRAME, HORIZONTAL SADDLE SUPPORT,
DRIVE GEAR PARTS INCL. BELT, BRAKE SYSTEM,
ADJUSTMENT KNOBS, CRANKS BALL- AND FLYWHEEL
BEARING INCL. AXELS, POWDER COATING,
INSERT SLEEVES FOR HANDLEBAR AND SADDLE POST
ENG
23
Page 24

CAUTION.
READ ALL PRECAUTIONS AND INSTRUCTIONS IN THIS MANUAL
BEFORE YOU BEGIN USING THIS EQUIPMENT. PLEASE KEEP
THIS MANUAL FOR FUTURE REFERENCE. IMPROPER ASSEMBLY,
SET UP, USE OR MAINTENANCE MAY VOID THE WARRANTY.
EMAIL: INFO@INDOORCYCLING.COM
WEBSITE: WWW.INDOORCYCLING.COM
© 2017 Indoor Cycling Group
Manufactured by: Indoor Cycling Group® GmbH
Happurger Str. 86 90482 Nuernberg Germany
 Loading...