

Page 1

Displays
CYRAQ 21A Series
21" NEMA 4X Flat Panel Monitors
For Rack, Panel, and VESA Mounting
Systems with Optional AR Bonding™
Technology
Screen Rotation Software Included
USER’S MANUAL
VER. 2.5 • OCT 2005
No part of this manual may be reproduced without permission
CyberResearch®, Inc.
www.cyberresearch.com
25 Business Park Dr., Branford, CT 06405 USA
®
203-483-8815 (9am to 5pm EST) FAX: 203-483-9024
Page 2

Page 3

Page 4

Page 5

CyberResearch
®
Displays CYRAQ™ 21
©Copyright 2005
All Rights Reserved.
October 20, 2005
The information in this document is subject to change without prior notice
in order to improve reliability, design, and function and does not represent
a commitment on the part of CyberResearch, Inc.
In no event will CyberResearch, Inc. be liable for direct, indirect, special,
incidental, or consequential damages arising out of the use of or inability
to use the product or documentation, even if advised of the possibility of
such damages.
This document contains proprietary information protected by copyright.
All rights are reserved. No part of this manual may be reproduced by any
mechanical, electronic, or other means in any form without prior written
permission of CyberResearch, Inc.
Trademarks
“CyberResearch,” and “CYRAQ 21,” are trademarks of CyberResearch, Inc.
Other product names mentioned herein are used for identification
purposes only and may be trademarks and/or registered trademarks of
their respective companies.
• NOTICE •
CyberResearch, Inc. does not authorize any CyberResearch product for
use in life support systems, medical equipment, and/or medical devices
without the written approval of the President of CyberResearch, Inc. Life
support devices and systems are devices or systems which are intended
for surgical implantation into the body, or to support or sustain life and
whose failure to perform can be reasonably expected to result in injury.
Other medical equipment includes devices used for monitoring, data
acquisition, modification, or notification purposes in relation to life
support, life sustaining, or vital statistic recording. CyberResearch
products are not designed with the components required, are not subject
to the testing required, and are not submitted to the certification required
to ensure a level of reliability appropriate for the treatment and diagnosis of
humans.
CyberResearch, Inc. iii
25 Business Park Drive P: (203) 483-8815; F: (203) 483-9024
Branford, CT USA www.cyberresearch.com
Page 6

CYRAQ™ 21 CyberResearch
Intentionally Blank
®
Displays
iv ©Copyright 2005 CyberResearch, Inc
Page 7

CyberResearch
®
Displays CYRAQ™ 21
Table of Contents
1 Introduction................................................................................................................. 1
1.1 Why the C
1.2 CyberResearch
1.3 Product Safety and Regulatory Information ....................................................... 4
1.4 Specifications...................................................................................................... 5
1.5 Features............................................................................................................... 9
1.5.1 Overview..................................................................................................... 9
1.5.2 System Requirements.................................................................................. 9
1.5.3 Recommended Video Cards ....................................................................... 9
2 Setup ......................................................................................................................... 10
2.1 Unpacking the CYRAQ 21................................................................................ 10
2.1.1 Your Package Contains:............................................................................ 10
2.1.2 Optional Accessories: ............................................................................... 11
2.1.3 Ordering Information................................................................................ 11
2.2 Rack Mounting: CRxF/CRxR 21...................................................................... 12
2.2.1 Rack-Mount Gasket Installation ............................................................... 13
2.2.2 Landscape Orientation .............................................................................. 14
2.2.3 Portrait Orientation ................................................................................... 15
2.3 Panel Mounting: CRxF/CRxR 21 ..................................................................... 16
2.3.1 Panel-Mount Gasket Installation............................................................... 16
2.3.2 Panel Mounting the Monitor..................................................................... 17
2.4 Flush Panel-Mounting: CPxF/CPxR 21A......................................................... 18
2.4.1 Panel Mounting the Monitor..................................................................... 18
2.5 VESA Mounting: CVBF/CVBR 21.................................................................. 20
2.6 Connecting the Display..................................................................................... 22
2.7 Display Driver Installation................................................................................ 24
2.8 Screen Rotation Software ................................................................................. 28
2.8.1 MagicRotation™ Installation.................................................................... 28
2.8.2 MagicRotation™ Operation...................................................................... 34
2.8.3 Pivot® Pro Installation............................................................................... 35
2.8.4 Pivot® Pro Operation ................................................................................ 38
3 Using the CYRAQ 21................................................................................................ 39
3.1 User Controls .................................................................................................... 39
3.2 Adjusting the Display ....................................................................................... 40
3.2.1 Auto Adjustment....................................................................................... 40
3.2.2 Brightness ................................................................................................. 40
3.2.3 Accessing the OSD ................................................................................... 41
3.2.4 Adjusting Contrast Level .......................................................................... 42
3.2.5 Adjusting the Image Levels ...................................................................... 42
3.2.6 Color Control ............................................................................................ 44
3.2.7 Select Language ........................................................................................ 45
3.2.8 Customize OSD Menu .............................................................................. 45
3.2.9 Source Select............................................................................................. 46
4 Touchscreen .............................................................................................................. 47
YRAQ 21?.......................................................................................... 2
®
AR Bonding™ Technology..................................................... 3
CyberResearch, Inc. v
25 Business Park Drive P: (203) 483-8815; F: (203) 483-9024
Branford, CT USA www.cyberresearch.com
Page 8

CYRAQ™ 21 CyberResearch
®
Displays
4.1 Installation......................................................................................................... 47
4.1.1 Serial Cable Connection ........................................................................... 47
4.1.2 USB Cable Connection ............................................................................. 48
4.1.3 Touchscreen Driver Installation................................................................ 48
4.2 Calibration......................................................................................................... 52
4.2.1 Calibration Options:.................................................................................. 52
4.2.2 Configure Calibration Settings ................................................................. 52
4.2.3 Calibration Routine................................................................................... 54
4.2.4 Calibration Test......................................................................................... 55
4.2.5 Drawing Test............................................................................................. 56
4.2.6 Right Click Emulation .............................................................................. 58
4.2.7 Touch Settings .......................................................................................... 59
5 Product Care.............................................................................................................. 60
5.1 Cleaning ............................................................................................................ 60
5.1.1 Touchscreen .............................................................................................. 60
5.1.2 LCD........................................................................................................... 60
5.1.3 Fan Filters ................................................................................................. 61
6 Mechanical Drawings ............................................................................................... 62
vi ©Copyright 2005 CyberResearch, Inc
Page 9

CyberResearch
®
Displays CYRAQ™ 21
Table of Figures
Figure 1: Installation Assembly........................................................................................ 12
Figure 2: Gasket Installation............................................................................................. 13
Figure 3: Rack-Mount Landscape Installation.................................................................. 14
Figure 4: Rack-Mount Portrait Installation....................................................................... 15
Figure 5: Panel Mount Gasket Installation ....................................................................... 16
Figure 6: Panel-Mount Landscape Installation................................................................. 17
Figure 7: Flush Panel-Mount Landscape Installation ....................................................... 19
Figure 8: 100 x 100mm VESA Mounting Holes .............................................................. 20
Figure 9: VESA Arm Clamp............................................................................................. 20
Figure 10: Affix Clamp to Benchtop ................................................................................ 20
Figure 11: SWC 100 Adapter Mounting Plate.................................................................. 20
Figure 12: Remove Screw................................................................................................. 21
Figure 13: Mounting Arm to Display ............................................................................... 21
Figure 14: Mounting Arm Base to Clamp ........................................................................ 21
Figure 15: Adjust Weight Capacity .................................................................................. 21
Figure 16: CYRAQ Connection Layout............................................................................ 22
Figure 17: Splash Screen .................................................................................................. 24
Figure 18: Screen Rotation Software Icon........................................................................ 34
Figure 19: Screen Rotation Program Menu ...................................................................... 34
Figure 20: Pivot Pro Icon.................................................................................................. 38
Figure 21: Pivot Pro Option Menu.................................................................................... 38
Figure 22: Auto Adjustment Progress Bar........................................................................ 40
Figure 23: Brightness........................................................................................................ 40
Figure 24: View of Initial OSD ........................................................................................ 41
Figure 25: Contrast Tab .................................................................................................... 42
Figure 26: Image Tab........................................................................................................ 42
Figure 27: Fine Adjustment .............................................................................................. 43
Figure 28: Color Control................................................................................................... 44
Figure 29: Gamma Adjustment......................................................................................... 44
Figure 30: Language Menu............................................................................................... 45
Figure 31: OSD Menu....................................................................................................... 46
Figure 32: Source Select Menu......................................................................................... 46
Figure 33: Touchscreen Cable Layout.............................................................................. 47
Figure 34: Splash Screen .................................................................................................. 48
Figure 35: Install Products................................................................................................ 49
Figure 36: Calibration Target............................................................................................ 54
Figure 37: Calibration Target............................................................................................ 55
Figure 38: Click Settings Tab ........................................................................................... 58
Figure 39: Touch Settings Tab......................................................................................... 59
Figure 40: Cleaning Fan Filters ........................................................................................ 61
Figure 41: Display and Enclosure Dimensions................................................................. 62
Figure 42: Landscape Mounting Plate Dimensions.......................................................... 63
Figure 43: Portrait Mounting Plate Dimensions ............................................................... 64
CyberResearch, Inc. vii
25 Business Park Drive P: (203) 483-8815; F: (203) 483-9024
Branford, CT USA www.cyberresearch.com
Page 10

CYRAQ™ 21 CyberResearch
®
Displays
viii ©Copyright 2005 CyberResearch, Inc
Page 11

CyberResearch
®
Displays CYRAQ™ 21
1 Introduction
Congratulations on your purchase of the most innovative and versatile Industrial
LCD monitor available today—the C
YRAQ
™
21. The CyberResearch CYRAQ 21 uses
a groundbreaking raised bezel design allowing the installation of a rugged 21.3″ flat
panel display in a standard EIA 19″ rack! The engineers at CyberResearch have also
designed mounting plates that allow the CYRAQ 21 to be rack or panel-mounted in either
landscape or portrait orientation. The accompanying screen rotation software rotates the
desktop 90°, 180°, or 270° to provide a suitable viewing angle for any display orientation.
YRAQ 21 complies with the power management regulations of VESA DPMS,
The C
making it extremely energy efficient—75W while active and 3W in power-saving mode.
The C
YRAQ 21 LCD monitor emits very low radiation levels and virtually no
electromagnetic field. Fully compatible with the PC and Macintosh, the CYRAQ 21
provides dual inputs (VGA and DVI) is “Plug & Play” compatible and also complies with
DDC1/DDC2B. The On Screen Display menu provides users with an intuitive interface
making it simple to quickly adjust the display.
The CYRAQ 21 is the first ever 21.3″ 1600 x 1200 flat-panel display capable of panel,
swivel-arm or rack mounting. It sets a new standard for clear, bright, flicker-free images
and its NEMA 4X front bezel makes it ideal for use in industrial environments.
CyberResearch, Inc. 1
25 Business Park Drive P: (203) 483-8815; F: (203) 483-9024
Branford, CT USA www.cyberresearch.com
Page 12

CYRAQ™ 21 CyberResearch
®
Displays
1.1 Why the CYRAQ 21?
The CYRAQ concept was conceived in the Engineering Department at CyberResearch as
we began to examine how the recent advances in LCD technology and image quality
could potentially affect our market and customer base. The LCD monitor today provides
viewing angles comparable to CRTs with no discernable loss of picture quality; a LCD
resultantly provides crisp, clean, deep images WITHOUT screen glare. Coupled with a
flat screen, slim design, extremely low radiation and almost no electromagnetic
emissions, an LCD monitor can provide some very distinct advantages to users in
manufacturing, commercial and scientific applications.
Put simply, the innovation of the C
Never before have the industrial and scientific markets been able to utilize large LCD
monitors versatile enough to be rack, panel or VESA arm mounted yet robust and capable
enough to perform in harsh environments. The C
provides an unmatched degree of protection to the unit’s components, it dually helps
achieve a NEMA 4X rating capable of sustaining normal operation (when installed
correctly) while enduring screen washdown and other procedures commonly practiced in
a harsh environment.
The CyberResearch, Inc. CYRAQ series displays have been engineered to couple with a
revolutionary new mounting plate system that allows a user to install the CYRAQ display
into a rack, or a panel without retrofitting disparate hardware, drilling holes, or welding
mounting studs. The mounting plate systems make it a snap to install a CYRAQ into a
standard 19″ rack, or panel-mount in any orientation.
Currently, the CYRAQ family is comprised of many, many models including displays
featuring rear controls only, VESA mounting, choice of color and touchscreen (serial or
USB available). CyberResearch has also expanded the CYRAQ family to include the
YRAQ 12 (12″), CYRAQ 15 (15″), CYRAQ 17 (17″), (in addition to 19″, 21″ &
C
24″) models—please call us or visit our website for more information.
YRAQ series is derived from its size and applications.
YRAQ stainless steel enclosure not only
2 ©Copyright 2005 CyberResearch, Inc
Page 13

CyberResearch
®
Displays CYRAQ™ 21
1.2 CyberResearch® AR Bonding™ Technology
Standard LCDs used in bright ambient light may appear “washed out” due to excessive
reflection from these lighting conditions. CyberResearch has developed a manufacturing
technique that reduces ambient light reflection inside the display case, making our LCDs
appear brighter—even in direct sunlight.
CyberResearch now offers AR Bonding™ Technology on our entire line of signature
CYRAQ LCDs, which dually seals the display while significantly reducing the
transmission of reflected light to it. We’ve accomplished this by utilizing a high-quality
bond that optically couples the front cover glass to the face of the display. This technique
practically eliminates internal light reflection, which directly improves viewing quality.
Additionally, sealing the display with AR Bonding™ Technology greatly enhances its
structural integrity, providing superior shock protection and dually eliminating the
possibility of trapped moisture between the LCD and cover glass. This not only reduces
troublesome fogging in humid and moist conditions, it keeps condensation and wetness
away from your LCD.
Reducing the effect of ambient light reflection on your display can dramatically improve
its performance! When AR Bonding™ Technology is applied to a 250 nit display, it can
increase the effective contrast and provide the enhanced daylight viewing equivalent to
that of a 500 or 600 nit display without AR Bonding™ Technology. Minimizing refracted
ambient sunlight to the LCD yields a discernable increase in display performance.
`
CyberResearch, Inc. 3
25 Business Park Drive P: (203) 483-8815; F: (203) 483-9024
Branford, CT USA www.cyberresearch.com
Page 14

CYRAQ™ 21 CyberResearch
®
Displays
1.3 Product Safety and Regulatory Information
To prevent fire or shock hazard, do not expose the unit to rain or moisture.
Dangerously high voltages are present inside this unit. Do not disassemble the unit—
there are no user-serviceable components inside the monitor’s enclosure. Please
contact CyberResearch, Inc. for repair.
This equipment is not intended for use in critical applications where its failure to operate
would create immediate life threatening circumstances. Applications including, but not
limited to nuclear reactor control, aerospace navigation systems and life support systems
are not appropriate for this product.
The CYRAQ 21 should be mounted in a suitable cabinet or enclosure. The NEMA rating
for this product is applicable only when the product is properly set up and installed.
FCC Notice:
The Federal Communications Commission Radio Frequency Interference Statement
includes the following warning:
This equipment has been tested and found to comply with the limits for a Class B digital
device, pursuant to Part 15 of the FCC Rules. These limits are designed to provide
reasonable protection against harmful interference in a residential installation. This
equipment generates, uses, and can radiate radio frequency energy and, if not installed
and used in accordance with the instructions, may cause harmful interference to radio
communications. However, there is no guarantee that interference will not occur in a
particular installation. If this equipment does cause harmful interference to radio or
television receptions, which can be determined by turning the equipment off and on, the
user is encouraged to try to correct the interference by one or more of the following
measures:
• Reorient or relocate the receiving antenna.
• Increase the separation between the equipment and receiver.
• Connect the equipment into an outlet on a circuit different from that to which the
receiver is connected.
• Consult the dealer or an experienced radio/TV technician for help.
European Notice
Products with the CE marking comply with the EMC Directive (89/336/EEC),
(92/31/EEC), (93/68/EEC) and the Low Voltage Directive (73/23/EEC) issued by the
Commission of the European Community.
Compliance with these directives implies conformity to the following European Norms:
• EN55022:1998+A1:2000 - Radio Frequency Interference
• EN55024:1998 - Electromagnetic Immunity of Information Technology
Equipment
• EN61000-3-2:1995+A1/A2:1998 - Power Line Harmonics
• EN61000-3-3:1995 - Voltage Fluctuations
4 ©Copyright 2005 CyberResearch, Inc
Page 15

CyberResearch
®
Displays CYRAQ™ 21
1.4 Specifications
Display
Display Type LCD flat panel
Video Input Types
Screen Size (viewable area, diagonal) 21.3"
Display Filter Screen Size 20" and larger
Display Brightness 250 nits (High-Bright)
Display Filter Brightness High-bright (250 to 340 nits)
Resolution, max. 1600 x 1200 pixels
Display Special Features
Maximum Number of Colors 16 million colors
Maximum Color Depth in Bits 24-bit color
Contrast Ratio 500:1
Auto-Sizing to Fill Screen Yes
Viewing Angle
Scanning
Frequency
Dot Pitch 0.27mm
Backlight Type CCFT
° Horizontal 170°
° Vertical 170°
Vertical 56Hz....75Hz
Horizontal 30KHz....93KHz
Vertical (digital signals) 56Hz....75Hz
Horizontal (digital signals) 30KHz....81KHz
Standard analog VGA (15-pin)
DVI (Digital Visual Interface)
• Optimum Resolution: 1600x1200 @
60Hz
• Max. Resolution: 1600x1200 @ 60Hz
• Supports: 1280x1024, 1024x768,
800x600, and 640x480
CyberResearch, Inc. 5
25 Business Park Drive P: (203) 483-8815; F: (203) 483-9024
Branford, CT USA www.cyberresearch.com
Page 16

CYRAQ™ 21 CyberResearch
Chassis
Rack-mount (EIA 19")
Panel-mount
Mounting Configuration
Protection Rating
Display Filter Protection Water-Resistant (NEMA 4/12, IP65)
Front Panel Material Stainless steel
Chassis Material Stainless steel
Height, Rack Units 9U (15.75")
Front Panel Color Stainless steel
Custom Color Options Custom color available (min. qty: 50)
Desktop / benchtop
Wall-mount
Swivel-arm mount
NEMA 4 sealed front panel
IP65 (dustproof, most low-pressure jets of
water)
Features an ultra-compact, corrosion-resistant
enclosure of heavy-duty stainless steel (304
SS). All models come with a water-resistant
sealed front panel suitable for washdown. Builtin Poron® gasket seals between rear of display
and user panel or rack-mounting plate. When
properly mounted in an appropriate enclosure,
these displays meet NEMA 4X standards for
watertightness.
®
Displays
Models CVSF 21A and CVBF 21A, designed for
Chassis Special Features
VESA swivel-arm mounting, do not include rear
studs, gasket, or a mounting plate, but CVxx
customers receive a $75 credit toward purchase
of a swivel arm on request.
The glass front panel is of high light
transmission tempered glass. Units without
touchscreen feature antireflection, antiglare,
hard-coat glass screens.
May be ordered with user controls for OSD and
display power on the front or rear.
Mounting
VESA Mounting Hole Pattern 100x100mm VESA mounting holes
• Enclosure can be rack, panel, wall, or
swivel arm mounted
• Universal mounting plate facilitates
mounting in a standard EIA 19" rack, or
can be used behind panel for secure
Stand Features
panel mounting
• Optional portrait rack-mounting plate
(substituted on request) lets you rackmount display in portrait orientation
(screen rotation software included)
6 ©Copyright 2005 CyberResearch, Inc
Page 17

CyberResearch
®
Displays CYRAQ™ 21
Indicators, Switches, & Controls
OSD Controls OSD controls for menu navigation (5 buttons)
Brightness Via OSD controls
Contrast Via OSD controls
Front Panel
Controls
Other Controls/Features
• Auto Button: One-touch automatic
screen adjustment
• Exit Button: Quits OSD menu (switches
between analog or digital signal inputs
when the OSD menu is off)
• +/- Button: Increase/decrease item
selected in OSD menu
• Order models CRSF 21A, CRBF 21A,
CVSF 21A, or CVBF 21A for sealed
front-access OSD control buttons
• Order models CRSR 21A or CRBR 21A
for rear-access OSD control buttons
Rear Panel
Controls
Indicators Power On/Off LED indicates power on
Power On/Off Switch
1 on/off switch
Signal Connectors
Video Input Connectors
HD15 (standard VGA) connector
DVI-D (24-pin) connector
Cables
Video Cable Length (included) 6 feet
Cabling Details
15-pin D-sub VGA, DVI-D, and AC power cables
included (6-ft each)
Power Supply
Power Supply Form Factor Built-in (integral)
Nominal Input Voltage(s) 115/230VAC
Input Voltage Range(s) 90...264VAC
Input Frequency 50/60Hz
Power Supply Input Connector
On rear panel
NEMA standard male PC cord socket w/ 6-ft USA
power cord
Power Consumption
Power Consumption Details 75W active, 3W in power-saving mode
Cooling
Cooling Summary 3 cooling fans
Number of Fans of This Type 3
Cooling Fans
Air Filter Location Rear
Fan Size 60mm X 60mm
Fan Location(s) Rear
Environmental Specifications
Operating Temperature 50°F....113°F (10°C....45°C)
Storage Temperature -4°F....122°F (-20°C....50°C)
Relative Humidity, non-condensing 10%....80%
Shock Resistance Operating 30g half-sine for 11ms
Vibration
Resistance
Altitude, Max. 1.89mi (3.05km)
Operating
15 to 57Hz: 0.006" peak-to-peak; 57 to 640Hz
sine: 1.0g peak-to-peak
Safety & Standards Compliance
Power Management
EPA Energy Star compliant
DPMS (Display Power Management Signaling)
CyberResearch, Inc. 7
25 Business Park Drive P: (203) 483-8815; F: (203) 483-9024
Branford, CT USA www.cyberresearch.com
Page 18

CYRAQ™ 21 CyberResearch
Dimensions
Width 19.02" (483 mm)
Height 15.71" (399 mm)
Depth 3.1" (79 mm)
Width, Rack-Mount EIA standard 19 inches at flanges
Height, Rack Units 9U (15.75")
Depth Behind Panel 1.5" (38 mm)
Depth In Front of Panel 1.6" (41 mm)
Max Protrusion from Panel (w/installed gasket) 1.7" (43 mm)
Panel-Mount Cutout, Width
Panel-Mount Cutout, Height 14.0" (356 mm)
Maximum Panel-Mount Cutout Depth .55" (14 mm)
17.3" (440 mm)
• Bezel Depth in Front of Panel: 1.6" +
gasket thickness
• Gasket Depth: 0.125" uncompressed.
Dimension Details
• Mounting Adapter Plate Depth: 0.1"
• Rack Height in Portrait View: 19.2"
(11U)
Weight
Weight 24.03 lbs (10.9kg )
Display Filter Weight Under 30 lbs.
®
Displays
8 ©Copyright 2005 CyberResearch, Inc
Page 19

CyberResearch
®
Displays CYRAQ™ 21
1.5 Features
1.5.1 Overview
The CyberResearch CYRAQ 21 is a 21.3-inch analog/digital LCD monitor that offers the
highest quality images possible with dual analog and digital source input. Its Dual input
(VGA and DVI) allow users to connect two different input sources simultaneously. The
YRAQ 21 offers a 500:1 contrast ratio, 1600 x 1200 resolution, pixel pitch of 0.270mm
C
H/V, Xtrawide™ 170°/170° viewing angle, Analog/Digital video inputs, a scanning
frequency of 30-93 kHz horizontal and 56-85 Hz vertical, and advanced image scaling.
¾ 21.3" Viewable Screen Size
¾ 1600 x 1200 @ 67 Hz
¾ Breakthrough Universal Mounting Plate Allows the 21.3″ C
19″ Rack
¾ 0.27 MM Dot Pitch
¾ Connects Via VGA (15-Pin) and Digital (DVI)
¾ Source Button Allows User to Toggle Between Inputs
¾ NEMA 4X Rating
¾ Rack, Panel, or Swivel-Arm Mounted
YRAQ to Mount in a
1.5.2 System Requirements
To achieve optimum response time the CYRAQ requires a computer with CPU speeds of
486 or higher. The CYRAQ is compatible with Windows and Macintosh operating
systems. To operate the display at its highest resolution a video card that supports 1600 x
1200 pixels is required. See 1.4.3 for CyberResearch video cards that meet this
requirement.
1.5.3 Recommended Video Cards
The CyberResearch video cards listed below support the C
YRAQ 21 maximum video
resolution of 1600 x 1200 (most of the cards listed exceed this specification). Given the
nature of the video card market, one or more of the cards listed below may be replaced by
a card with superior technology and capabilities at a more reasonable price point. Please
reference our web site for the latest and most complete details on each card.
Single Output
1. GRI AGP64: AGP VGA Graphics card with 64MB DDR VRAM
2. GRI PCI32: PCI SVGA Graphics Card with 32MB VRAM
3.
Dual Output
GRI AGPD128: VGA AGP Graphics Card with Dual DVI or VGA, 128MB DDR
SDRAM
4. GRI AGPT128: AGP Parhelia™ Triple VGA Graphics Card with 3 RGB Outputs, 2
Triple Output
DVI Outputs, TV Output, 128MB DDR VRAM
5. GRI AGPT256: AGP Parhelia™ Triple VGA Graphics Card with 3 RGB Outputs, 2
DVI Outputs, TV Output, 256MB DDR VRAM
CyberResearch, Inc. 9
25 Business Park Drive P: (203) 483-8815; F: (203) 483-9024
Branford, CT USA www.cyberresearch.com
Page 20

CYRAQ™ 21 CyberResearch
®
Displays
2 Setup
2.1 Unpacking the CYRAQ 21
Before unpacking it is very important to locate the CYRAQ monitor in a suitable
environment. Make sure the installation location has good ventilation, is out of direct
sunlight, away form excessive dust, dirt, heat, water, moisture and vibration. Please see
Specifications section for environmental details.
2.1.1 Your Package Contains:
1) A CYRAQ Series Display
2) CYRAQ Series Drivers & Manuals CD
3) Pivot®Pro Installation CD (optional)
4) 6-ft. Power Cable
5) 6-ft VGA and DVI cables
6) User’s Manual
7) Universal Mounting Plate CRMS UNL (applies to landscape Rack-Mount and
Panel-Mount Applications only) or Portrait Mounting plate CRMS POR (applies
to portrait Rack-Mount applications)
-OR-
CPBF, CPBR, CPSF & CPSR 21A come with one Compression Mounting
Plate lieu of CRMS UNL or CRMS POR
8) Eight Button Head Mounting 10-32 1/2″ Bolts
9) Fourteen 10-32 Mounting Nuts.
10 ©Copyright 2005 CyberResearch, Inc
Page 21

CyberResearch
®
Displays CYRAQ™ 21
2.1.2 Optional Accessories:
1) Longer VGA and DVI cables (call for available lengths)
2) Touchscreens are available for all models
3) SWC 100 VESA mounting plate for VESA mount models
3
NOTE: If any of these items are missing or damaged contact
CyberResearch, Inc. immediately
2.1.3 Ordering Information
BRUSHED STAINLESS STEEL BEZEL BLACK COLOR STAINLESS STEEL BEZEL
CYRAQ™ 24 Series: 24″ LCD Display, 1920 x 1200, 300 nits*
#CRSR 24C ........................Universal Mount; Rear Controls #CRBR 24C ....................... Universal Mount; Rear Controls
#CRSF 24C ...................... Universal Mount; Front Controls #CRBF 24C ...................... Universal Mount; Front Controls
CYRAQ™ 21 Series: 21.3″ LCD Display, 1600 x 1200, 250 nits*
#CRSF 21A ...................... Universal Mount; Front Controls #CRBF 21A ...................... Universal Mount; Front Controls
#CRSR 21A ....................... Universal Mount; Rear Controls #CRBR 21A ....................... Universal Mount; Rear Controls
#CVSF 21A ................... VESA Mount Only, Front Controls #CVBF 21A .................. VESA Mount Only, Front Controls
#CVSR 21A .................... VESA Mount Only, Rear Controls #CVBR 21A ................. VESA Mount Only, Front Controls
#CPSF 21A............................... Panel Mount, Front Controls #CPBF 21A............................... Panel Mount, Front Controls
#CPSR 21A ..................... Flush Panel Mount, Rear Controls #CPBR 21A .....................Flush Panel Mount, Rear Controls
CYRAQ™ 19 Series: 19″ LCD Display, 1280 x 1040, 250 nits*
#CRSR 19C ........................Universal Mount; Rear Controls #CRBR 19C ....................... Universal Mount; Rear Controls
#CVSR 19C .................... VESA Mount Only; Rear Controls #CVSR 19C ................... VESA Mount Only; Rear Controls
#CPSR 19C ....................Flush Panel Mount; Rear Controls #CPBR 19C ....................Flush Panel Mount; Rear Controls
CYRAQ™ 17 Series: 17″ LCD Display, 1280 x 1024, 1000 nits*
#CPSF 17SA ..................Flush Panel Mount; Front Controls #CPBF 17SA ................. Flush Panel Mount; Front Controls
#CPSR 17SA...................Flush Panel Mount; Rear Controls #CPBR 17SA ...................Flush Panel Mount; Rear Controls
#CFSF 17SA .................. Flush Rack Mount; Front Controls #CFBF 17SA .................. Flush Rack Mount; Front Controls
* Please see our web site for the latest additions and updates to the CYRAQ™ family
CyberResearch, Inc. 11
25 Business Park Drive P: (203) 483-8815; F: (203) 483-9024
Branford, CT USA www.cyberresearch.com
Page 22

CYRAQ™ 21 CyberResearch
®
Displays
2.2 Rack Mounting: CRxF/CRxR 21
IMPORTANT! Ask yourself these questions before beginning installation:
1. Is sufficient power is available?
2. Is sufficient space is available to allow for proper airflow both inside and around
the display?
3. Is there a possibility the air temperature inside the rack will exceed the CYRAQ
21’s rated specification? (Operating temperature: 50°F....113°F ((10°C....45°C).)
3
NOTE: Though this product is designed to operate up to 113°F (45°C) with proper
ventilation, the life span of any electronic device is shortened when it is consistently
operated at high temperatures—keep rack temperature as low possible
4. Is there a possibility that the ambient humidity around the display will exceed its
rated specification? (Relative Humidity, non-condensing: 10%....80%.)
CYRAQ Mounting Nuts
(Supplied)
3
NOTE: CRMS Universal
Mounting Plates Affixed Directly to
Server Rack’s Mounting Holes
Server Rack
(Cutaway)
Mounting
Plate Bolt
(Supplied)
CYRAQ
Display
CRMS UNL
Universal Mounting
Plate
Figure 1: Installation Assembly
12 ©Copyright 2005 CyberResearch, Inc
Page 23

CyberResearch
A
®
Displays CYRAQ™ 21
2.2.1 Rack-Mount Gasket Installation
Installing the CYRAQ in the landscape orientation requires 9U (15.5″) free rack space.
Prior to installing the CYRAQ into a rack, the included gasket must be affixed to the
mounting plate.
IMPORTANT! Unless requested at the time of purchase, the display is shipped with
gasket applied. Skip to section 2.2.2.
However, in certain instances the mounting gasket may be shipped loose to allow for
increased installation flexibility in the case of custom applications. This permits
customers to then choose which mounting application best suits their environment—
panel- or rack-mount. Affixing the gasket to the back of the CYRAQ’s enclosure is
recommended for panel mounting applications; while adhering directly to the mounting
plate is recommended for rack-mount applications.
The mounting gasket is a critical component to this monitor’s NEMA 4X rating for
watertightness—it must be installed correctly to meet this standard. It is also important to
note that the rack-mount installation procedure differs from the panel mount procedure.
Please read the instructions below carefully before installing the gasket.
1. On a flat surface, orientate the mounting plate
as depicted in Figure 2.
2. Arrange the gasket to match mounting plate.
3. Remove adhesive backing from Section A of
the gasket.
3
NOTE: It’s important to focus on aligning the
holes of gasket and mounting plate rather than
their respective edges.
4. Align center hole in gasket with center hole on
mounting plate, take care not to let other
portions of the gasket in Section A touch
mounting plate until aligned properly.
5. Carefully align and place the rest of Section A
holes, working out from center.
Center Hole
Figure 2: Gasket Installation
6. When done, firmly press down and smooth gasket in Section A.
7. Repeat process for each of the other three sides.
CyberResearch, Inc. 13
25 Business Park Drive P: (203) 483-8815; F: (203) 483-9024
Branford, CT USA www.cyberresearch.com
Page 24

CYRAQ™ 21 CyberResearch
®
Displays
2.2.2 Landscape Orientation
3
NOTE: Portrait mounting orientation requires 11U (19.2″) free rack space.
3
NOTE: Follow Section 2.2.1 Rack-Mount Gasket Installation procedure prior to
beginning the steps below.
1. Align mounting plate rack-mount holes with server rack mounting holes; see Figure 3
for correct mounting orientation. Ensure gasket faces outward.
2. Install the eight 10-32 1/2″ button head bolts into rack-mounting holes to secure
mounting plate to the server rack.
3
NOTE: Steps 3 & 4 require two people.
3. Align studs with the monitor mounting holes in mounting plate and install the
YRAQ
C
TM
until the gasket is flush with rear of enclosure.
Important!
Do not exceed 30 in/lbs when tightening mounting nuts.
4. From inside rack, a second person must install and tighten the fourteen 10-32
mounting nuts.
Figure 3: Rack-Mount Landscape Installation
14 ©Copyright 2005 CyberResearch, Inc
Page 25

CyberResearch
®
Displays CYRAQ™ 21
2.2.3 Portrait Orientation
Note: Follow Rack-Mount Gasket Installation procedure (if necessary) prior to beginning
the steps below.
1. Align mounting plate rack-mount holes with server rack mounting holes; see
Figure 4 for correct mounting orientation. Ensure gasket faces outward.
2. Install the eight 10-32 1/2″ button head bolts into rack-mounting holes to secure
mounting plate to the server rack.
Note: Steps 3 & 4 require two people.
3. Align studs with the monitor mounting holes in mounting plate and install the
CYRAQTM until the gasket is flush with rear of enclosure.
Important!
Do not exceed 30 in/lbs when tightening mounting nuts.
4. From inside rack, a second person must install and tighten the fourteen 10-32
mounting nuts.
Figure 4: Rack-Mount Portrait Installation
CyberResearch, Inc. 15
25 Business Park Drive P: (203) 483-8815; F: (203) 483-9024
Branford, CT USA www.cyberresearch.com
Page 26

CYRAQ™ 21 CyberResearch
®
Displays
2.3 Panel Mounting: CRxF/CRxR 21
Prior to performing subsequent steps, ensure the panel-mounting location (including
panel thickness) is suitable for the C
Specifications section.
3
NOTE: Panel thickness should not exceed: .55" (14.1mm) if the unit has the standard
3.2mm (1/8") Poron™ gasket installed. Suggested panel thickness is calculated based on
standard CYRAQ 21 parts and dimensions, custom units may not meet these
specifications. Prior to panel mounting a CYRAQ, the included gasket must be affixed to
the rear of the enclosure.
2.3.1 Panel-Mount Gasket Installation
IMPORTANT! Unless requested at the time of purchase, the display is shipped with
gasket applied. Skip to section 2.3.2.
However, in certain instances the mounting gasket may be shipped loose to allow for
increased installation flexibility in the case of custom applications. This permits
customers to then choose which mounting application best suits their environment—
panel- or rack-mount. Affixing the gasket to the back of the CYRAQ’s enclosure is
recommended for panel mounting applications; while adhering directly to the mounting
plate is recommended for rack-mount applications.
The mounting gasket is a critical component to this monitor’s NEMA 4X rating for
watertightness—it must be installed correctly to meet this standard. It is also important to
note that the rack-mount installation procedure differs from the panel mount procedure.
Please read the instructions below carefully before installing the gasket.
YRAQ 21, and meets Environmental requirements in
1. Place the monitor face down on a flat surface with bottom of the monitor closest
to you; take care not to damage or scratch the screen.
2. Arrange the gasket to match monitor orientation; align Section D with bottom of
monitor’s enclosure.
3. Remove adhesive backing of Section A on gasket.
3
NOTE: It’s important to focus on aligning the holes of gasket and studs on the rear of
the enclosure rather than their respective edges.
4. Align center hole (in Section A) of gasket
with center stud on rear of monitor; take
A
care not to let other portions of the gasket
touch mounting plate until aligned
properly.
5. Carefully align and place the rest of
B C
Section A, working out from center.
6. When done, firmly press down and
smooth gasket in Section A.
7. Repeat process for each of the other three
D
sides.
Figure 5: Panel Mount Gasket Installation
16 ©Copyright 2005 CyberResearch, Inc
Page 27

CyberResearch
®
Displays CYRAQ™ 21
2.3.2 Panel Mounting the Monitor
1. Panel cutout is 356mm H x 440mm W for landscape installation (Figure 6).
2. Install CYRAQ in panel cutout. Ensure all studs clear cutout opening and Poron™
gasket on the rear of the unit is flush against panel (critical for NEMA
compliance).
3
NOTE: Steps 3 & 4 require a second person
3. Align studs on the CYRAQ with the holes in mounting plate from the rear of
panel (as seen in Figure 6).
Important!
Do not exceed 30 in/lbs when tightening mounting nuts.
4. Also from rear of the panel, second person must install and tighten the fourteen
10-32 mounting nuts.
Figure 6: Panel-Mount Landscape Installation
CyberResearch, Inc. 17
25 Business Park Drive P: (203) 483-8815; F: (203) 483-9024
Branford, CT USA www.cyberresearch.com
Page 28

CYRAQ™ 21 CyberResearch
®
Displays
2.4 Flush Panel-Mounting: CPxF/CPxR 21A
Prior to performing subsequent steps, ensure the panel-mounting location (including
panel thickness) is suitable for the C
Specifications section.
3
NOTE: Panel thickness should not exceed: .55" (14.1mm) Suggested panel thickness
is calculated based on standard CYRAQ 21 parts and dimensions, custom units may not
meet these specifications. Poron™ gasket is installed by CyberResearch, Inc. on CPBF &
CPBR 21 models.
2.4.1 Panel Mounting the Monitor
1. Panel cutout is 405mm H x 489mm W for landscape installation (Figure 7).
2. Install the display in panel cut out. Ensure all studs clear cutout opening and
Poron™ gasket on the rear of the unit is flush against panel (critical for NEMA
compliance).
3
NOTE: Steps 3 & 4 require a second person
3. Align studs on the rear of display with the holes in mounting plate from the rear
of panel (as seen in Figure 7).
Important!
Do not exceed 30 in/lbs when tightening mounting nuts.
4. Also from rear of the panel, second person must install and tighten the fourteen
10-32 mounting nuts.
YRAQ 21, and meets Environmental requirements in
See Next Page For Illustration
18 ©Copyright 2005 CyberResearch, Inc
Page 29

CyberResearch
®
Displays CYRAQ™ 21
Figure 7: Flush Panel-Mount Landscape Installation
CyberResearch, Inc. 19
25 Business Park Drive P: (203) 483-8815; F: (203) 483-9024
Branford, CT USA www.cyberresearch.com
Page 30

CYRAQ™ 21 CyberResearch
2.5 VESA Mounting: CVBF/CVBR 21
3
NOTE: These are “Quick Install”
instructions for a popular style bench-top
mount VESA arm. This VESA arm style
MAY NOT be the mounting choice you’ve
selected for your CYRAQ. Check the
documentation accompanying your VESA
arm.
1) Disconnect the power, video and
touchscreen cables.
2) Secure cranking unit (#1) to bracket
(#2) with at least two bolts (Figure 9).
The use of bolts and bolt position
depends on thickness of desk. Fully
secure bolts with included “T” type
hex key.
3) Secure the clamp to the desk/bench
top Figure 10). This will make
subsequent installation easier. The
clamp is capable of securing the arm
to surfaces 15-100mm thick (30mm
and up is ideal).
4) Before continuing, remove the screw
from the arm’s base using a Philips
head screw driver (Figure 12).
5) Carefully place display on the bench
top with screen facing down, as seen
in Figure 13.
3
NOTE: The SWC 100 permits 100 x
100mm VESA monitors and 75 x 75mm
VESA arms to be used jointly.
6) Secure the SWC 100 adapter (Figure
11) to the VESA arm.
Figure 8: 100 x 100mm VESA Mounting Holes
Figure 9: VESA Arm Clamp
Figure 10: Affix Clamp to Benchtop
®
Displays
o
100 x
100
VESA
n
Figure 11: SWC 100 Adapter Mounting Plate
20 ©Copyright 2005 CyberResearch, Inc
Page 31

CyberResearch
®
Displays CYRAQ™ 21
7) Secure the arm/adapter plate
assembly to the display.
8) Secure arm to the clamp with 4 flat head
screws (Figure 14); tighten using the “L”
shaped hex key.
Figure 12: Remove Screw
VESA
Arm
SWC 100
Rear of
CYRAQ 21
3
NOTE: Check arm capacity setting prior to
installation.
9) Use the “T” hex key provided to
adjust the weight capacity (Figure 15).
a. Carefully support the main
body of arm while gently
pushing downward
b. Turn hex key
counterclockwise
(toward ‘-’) to decrease
capacity
c. Clockwise (toward ‘+’) to
increase capacity
Figure 13: Mounting Arm to Display
Figure 14: Mounting Arm Base to Clamp
Figure 15: Adjust Weight Capacity
CyberResearch, Inc. 21
25 Business Park Drive P: (203) 483-8815; F: (203) 483-9024
Branford, CT USA www.cyberresearch.com
Page 32

CYRAQ™ 21 CyberResearch
®
Displays
2.6 Connecting the Display
IMPORTANT! Before connecting the power cable to the display, connect all the other
cables first.
Figure 16: CYRAQ Connection Layout
Power
Switch
Power
3
NOTE: Turn off the computer before connecting the display
DVI Video
Port
Analog
Video Port
USB Port Serial Port
1. After connecting all other cables, connect the power cable to the power jack on
the back of the display; refer to Figure 16.
2. Flip the Power Switch on the rear of the display (Figure 16) to the “On” position.
3. Press the On/Off Button on the front of the display, the status light will
illuminate.
4. Start the computer.
5. If the computer is running, restart.
6. The display should now function normally.
3
NOTE: See section 4 Touchscreen for connection and driver instruction
3
NOTE: If the CYRAQ’s screen remains blank or displays the error message
“Out of Range” or “No Input Signal,” there may be a connection or
signal problem. One or a combination of the possibilities listed below
may be the cause:
¾ Windows resolution is set either too high or two low for the display;
check the resolution by reinstalling the old monitor
¾ The refresh rate may be set too high. The refresh rate of an LCD
monitor doesn’t need to be set as high as a CRTs refresh rate; set the
refresh rate @ 60Hz.
22 ©Copyright 2005 CyberResearch, Inc
Page 33

CyberResearch
®
Displays CYRAQ™ 21
¾ The power source isn’t 115VAC.
¾ The video cable isn’t tightly connected at one or both ends; reconnect
and tighten the cable adapter screws.
¾ The analog and DVI cables are both connected to the display and the
same computer.
¾ The display is reading the wrong video input; push the Exit/Source
button to toggle between the VGA and DVI inputs.
¾ The unit is malfunctioning.
CyberResearch, Inc. 23
25 Business Park Drive P: (203) 483-8815; F: (203) 483-9024
Branford, CT USA www.cyberresearch.com
Page 34

CYRAQ™ 21 CyberResearch
2.7 Display Driver Installation
1. Insert the driver CD into the computer’s CD drive.
2. When the splash screen appears, select Install Drivers.
®
Displays
Figure 17: Splash Screen
3. When the Install Products window appears, click Display Drivers.
24 ©Copyright 2005 CyberResearch, Inc
Page 35

CyberResearch
®
Displays CYRAQ™ 21
4. Then click on your operating system
5. Select CYRAQ 21 and click OK
CyberResearch, Inc. 25
25 Business Park Drive P: (203) 483-8815; F: (203) 483-9024
Branford, CT USA www.cyberresearch.com
Page 36

CYRAQ™ 21 CyberResearch
6. Read the monitor warning, “Select the monitor name that exactly matches the
name printed on the front of your monitor or on the back label. If you select the
wrong monitor, restart Windows in “Safe Mode” and use this CD-ROM (or
diskette) again to select the correct monitor.
®
Displays
7. Then Click Install
8. When the Digital Signature window appears, click Yes
9. When the driver has been installed a Monitor Setup message will appear, click
OK
26 ©Copyright 2005 CyberResearch, Inc
Page 37

CyberResearch
3
®
Displays CYRAQ™ 21
NOTE: If the CYRAQ doesn’t display an image immediately, move the mouse
to awaken it from “Suspend” mode.
3
NOTE: If an image still isn’t displayed, toggle the Exit/Source button to ensure
the correct input is being used.
CyberResearch, Inc. 27
25 Business Park Drive P: (203) 483-8815; F: (203) 483-9024
Branford, CT USA www.cyberresearch.com
Page 38

CYRAQ™ 21 CyberResearch
®
Displays
2.8 Screen Rotation Software
The CYRAQ Series of displays comes with software that allows users to rotate their
desktop to 0, 90, 180 and 270 degrees. This software is essential if mounting the C
in a position other than landscape.
YRAQ
If you package contains just one CD, the C
YRAQ Series Drivers & Manuals CD,
MagicRotation™ software has been bundled with your product; please proceed with
MagicRotation™ Installation instructions.
Important!
If your package includes a Pivot® Pro Installation CD, skip to 2.8.3 Pivot® Pro
Installation
2.8.1 MagicRotation™ Installation
3
NOTE: Close all unnecessary applications before continuing; at the end of this
procedure you will be prompted to restart your computer.
1. Insert the Drivers & Manuals CD into your CD drive.
2. When the splash screen appears, choose “Install Drivers”.
28 ©Copyright 2005 CyberResearch, Inc
Page 39

CyberResearch
®
Displays CYRAQ™ 21
3. Choose Magic Rotation.
4. Then choose your operating system.
CyberResearch, Inc. 29
25 Business Park Drive P: (203) 483-8815; F: (203) 483-9024
Branford, CT USA www.cyberresearch.com
Page 40

CYRAQ™ 21 CyberResearch
5. Choose the setup language for the installation
®
Displays
6. Then click Next to continue.
30 ©Copyright 2005 CyberResearch, Inc
Page 41

CyberResearch
®
Displays CYRAQ™ 21
7. When the license agreement appears, click one of the radio buttons to accept or
reject the terms of the agreement, and then click Next.
8. Choose the location for Setup to install the files. You can accept the default
location C\Program Files, or choose an alternate location via the Change button.
When done, click Next.
CyberResearch, Inc. 31
25 Business Park Drive P: (203) 483-8815; F: (203) 483-9024
Branford, CT USA www.cyberresearch.com
Page 42

CYRAQ™ 21 CyberResearch
9. Before the installation begins, you’re given the opportunity to go back to any of
the configuration choices you’ve made and make changes. When done, click the
Install button to begin the installation process.
®
Displays
10. A progress bar appears as the installation is configured
32 ©Copyright 2005 CyberResearch, Inc
Page 43
CyberResearch
®
Displays CYRAQ™ 21
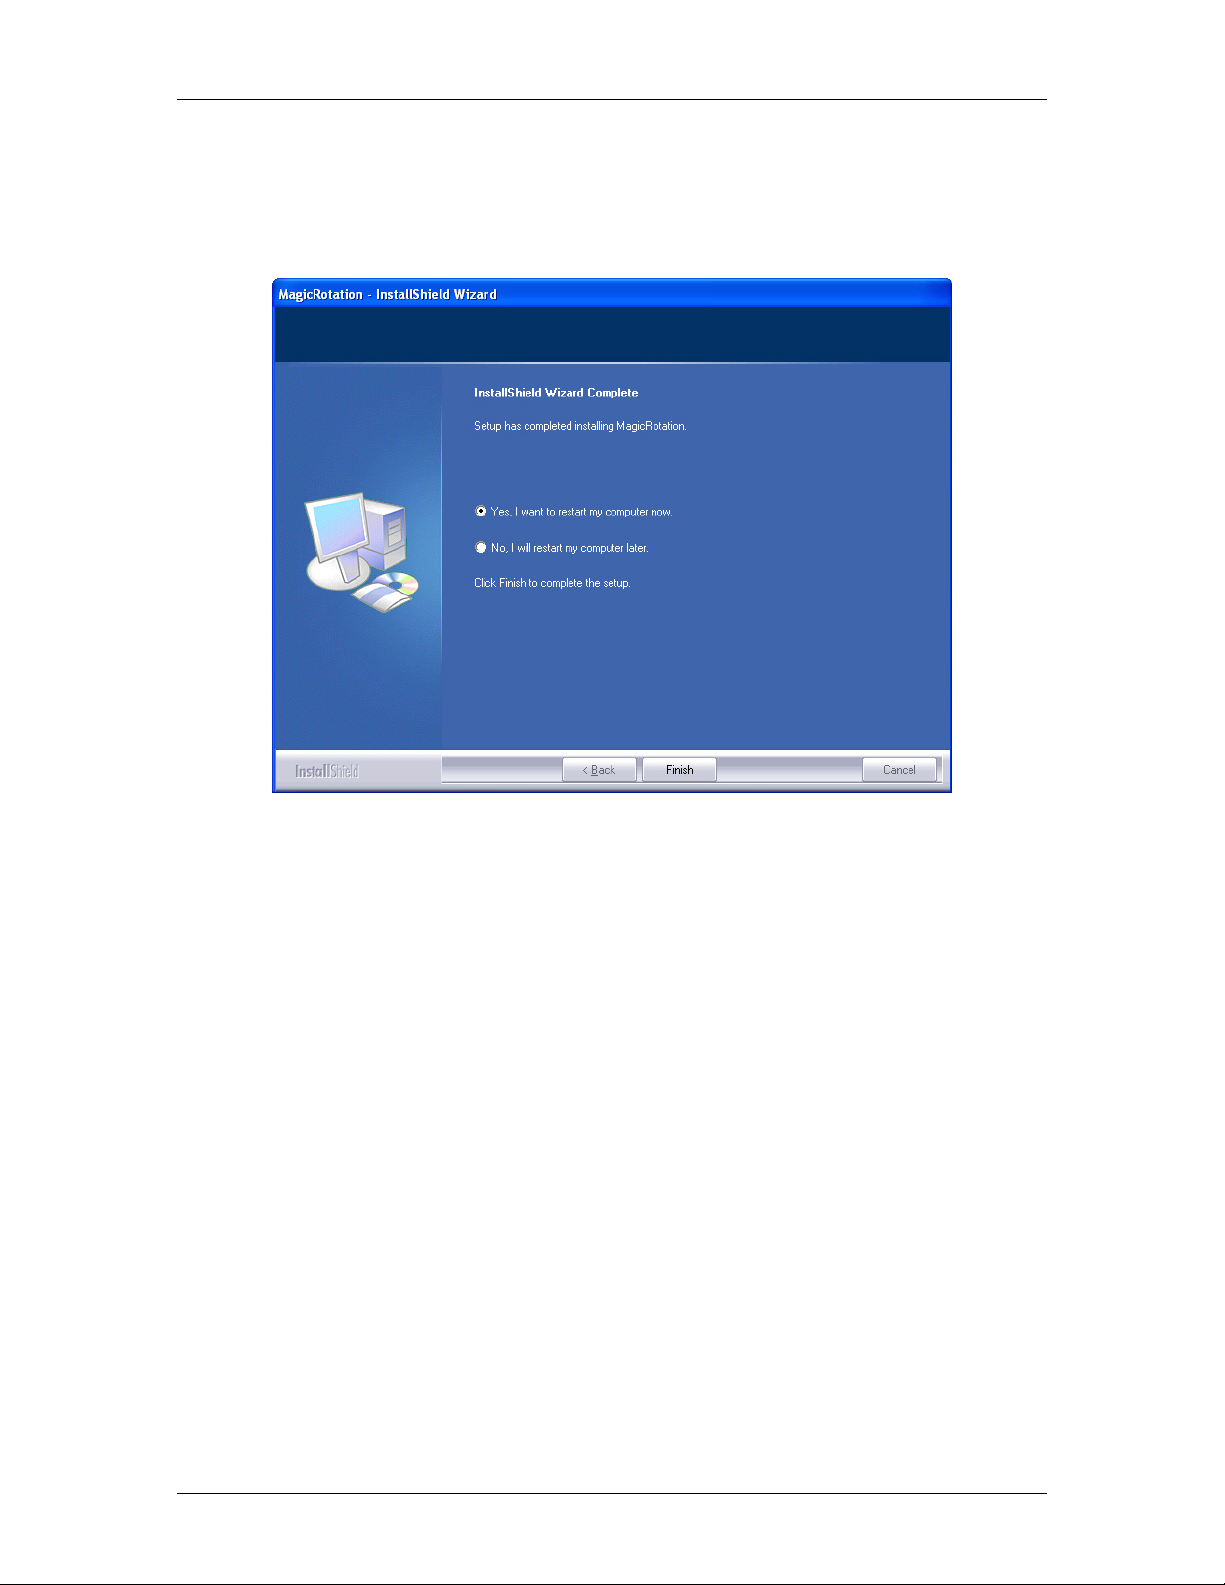
11. When the Installation Wizard completes the installation, the option is given to
restart (recommended) your computer. Click one of the radio buttons, then click
Finish.
CyberResearch, Inc. 33
25 Business Park Drive P: (203) 483-8815; F: (203) 483-9024
Branford, CT USA www.cyberresearch.com
Page 44
CYRAQ™ 21 CyberResearch
2.8.2 MagicRotation™ Operation
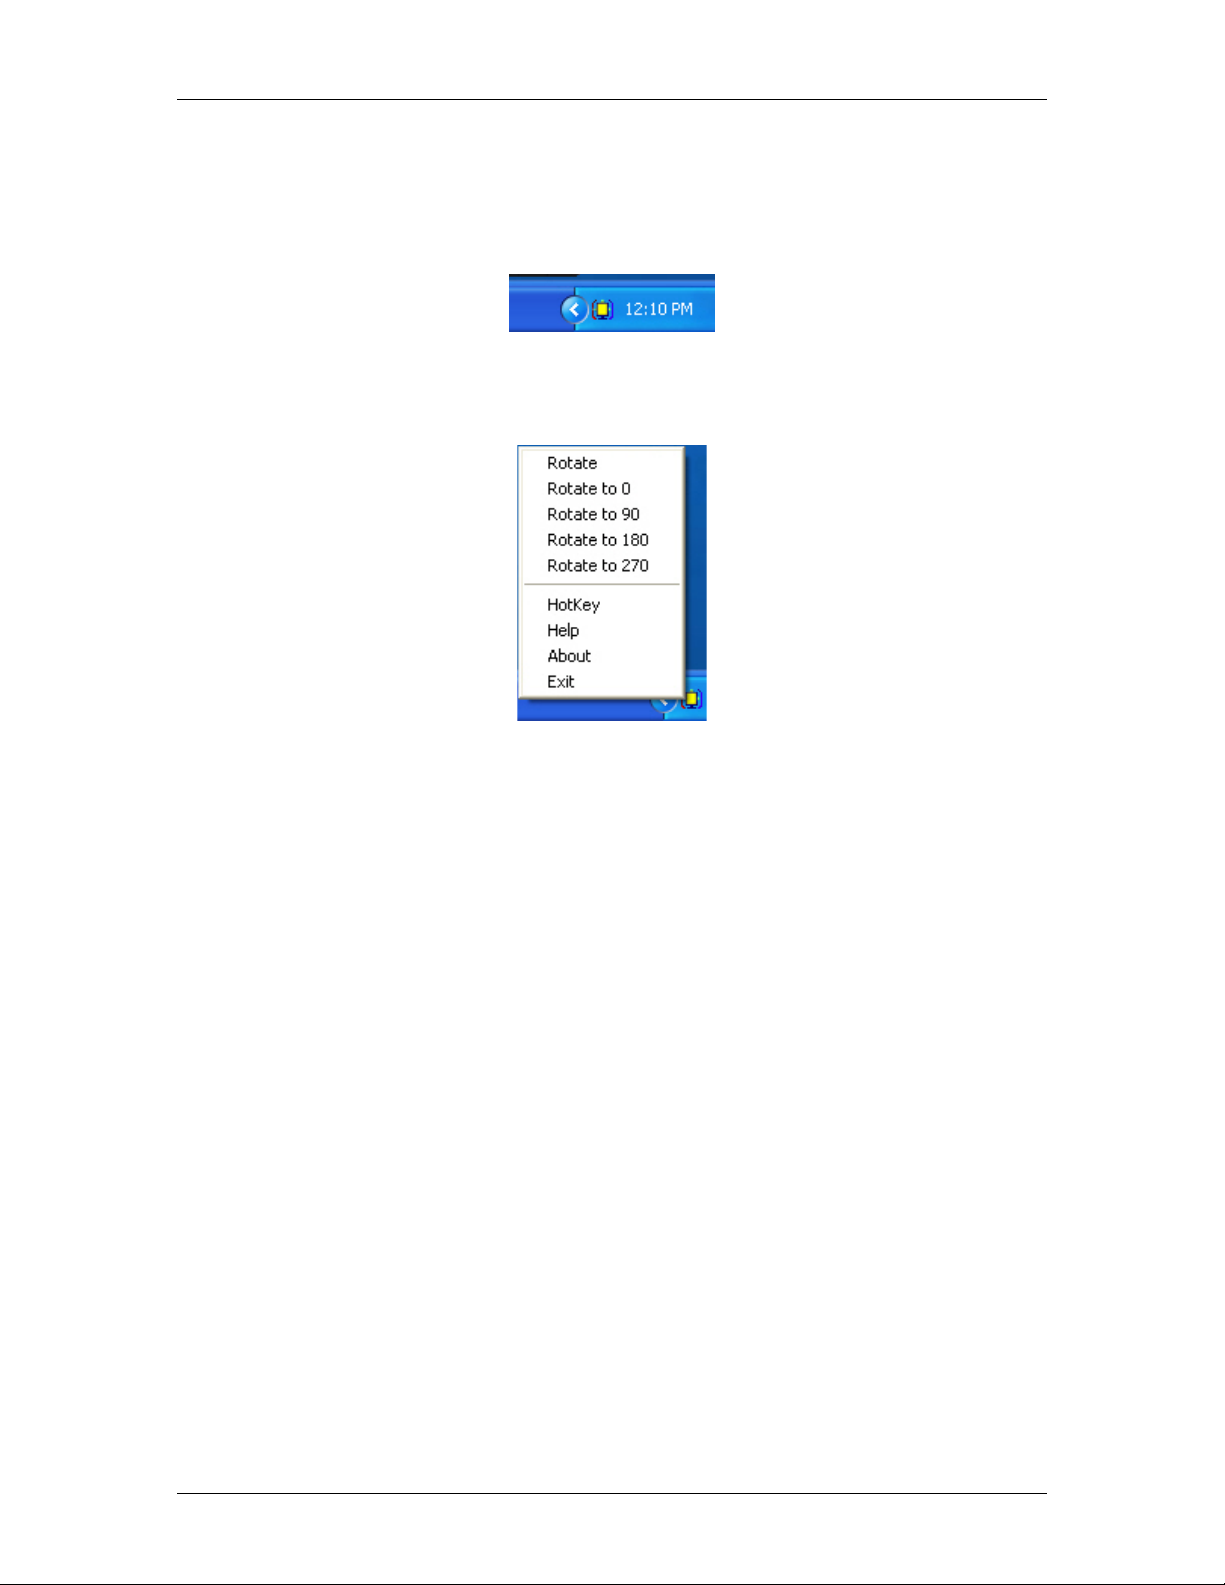
1. After completing the installation (restarting your computer is recommended), an
icon appears in your taskbar tray, like the one below.
Figure 18: Screen Rotation Software Icon
2. To access the screen rotation program menu, right-click on the icon shown in
Figure 18.
®
Displays
Figure 19: Screen Rotation Program Menu
From the menu, you can choose to rotate your desktop several different ways, assign
hotkeys, or view online help.
34 ©Copyright 2005 CyberResearch, Inc
Page 45
CyberResearch
®
Displays CYRAQ™ 21
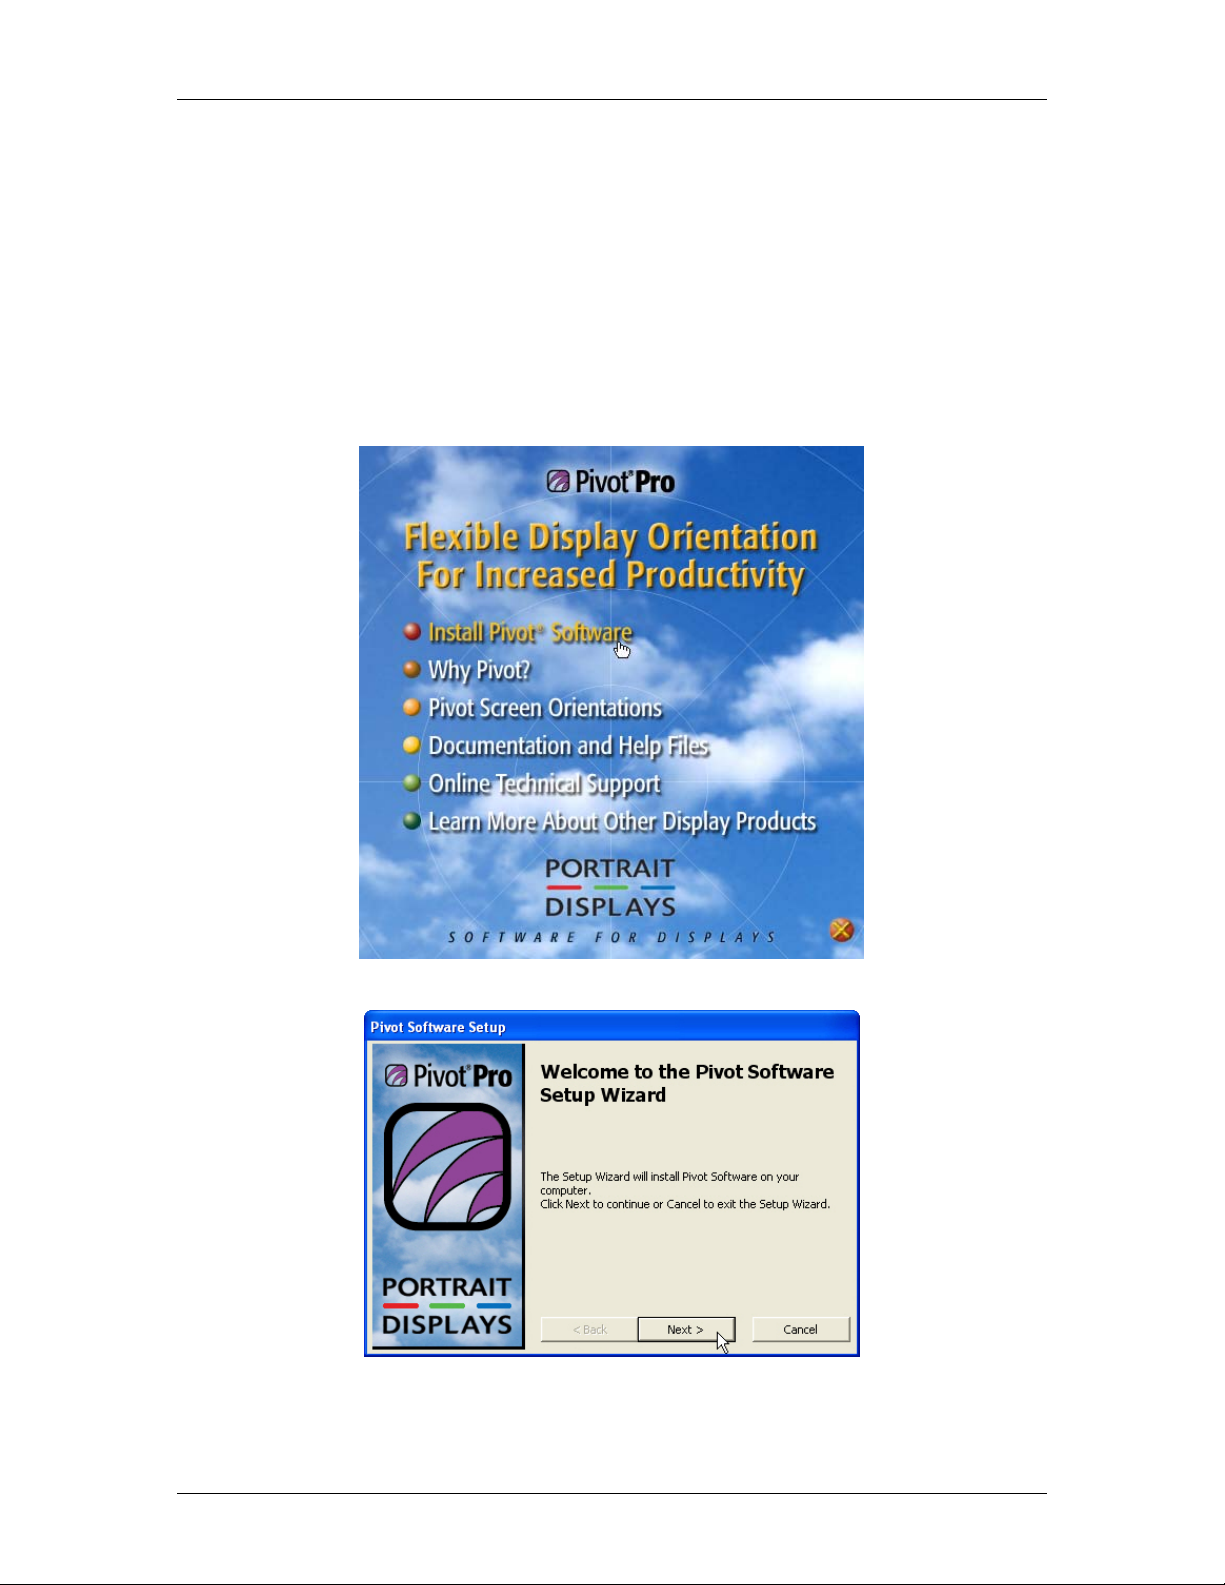
2.8.3 Pivot® Pro Installation
®
Pivot
Pro screen rotation software is not included in all CYRAQ packages (see 2.8.1
MagicRotation™ Installation if your packaging doesn’t contain a Pivot® Pro CD). If your
®
package does contain a Pivot
3
NOTE: Close all unnecessary applications before continuing; at the end of this
Pro software CD, proceed with the following instruction:
procedure you will be prompted to restart your computer.
1. Insert the Pivot® Pro CD into your CD drive.
2. When the splash screen appears, choose “Install Pivot® Software.”
3. When the Setup Wizard appears, click Next.
CyberResearch, Inc. 35
25 Business Park Drive P: (203) 483-8815; F: (203) 483-9024
Branford, CT USA www.cyberresearch.com
Page 46

CYRAQ™ 21 CyberResearch
4. To continue, click the “I accept” radio button, then click Next.
5. Enter the appropriate information, then click Next.
®
Displays
6. To install the Pivot® Pro software, click Next.
36 ©Copyright 2005 CyberResearch, Inc
Page 47

CyberResearch
®
Displays CYRAQ™ 21
7. When done, click Next.
8. Then click Finish.
9. You must restart your computer to begin using Pivot® Pro.
CyberResearch, Inc. 37
25 Business Park Drive P: (203) 483-8815; F: (203) 483-9024
Branford, CT USA www.cyberresearch.com
Page 48

CYRAQ™ 21 CyberResearch
®
Displays
2.8.4 Pivot
®
Pro Operation
1. After completing the installation (restarting your computer is necessary), an icon
appears in your taskbar tray, like the one below.
Figure 20: Pivot Pro Icon
2. To access the Pivot® Pro program menu, click on the icon shown in Figure 20.
3. From the menu, you can choose to rotate your desktop several different ways,
view online help, or choose from other options.
4. To access Pivot® Pro options, right-click on your desktop and choose:
a. Properties
b. Settings
c. Advanced
d. Pivot Software
Figure 21: Pivot Pro Option Menu
38 ©Copyright 2005 CyberResearch, Inc
Page 49

CyberResearch
A
®
Displays CYRAQ™ 21
3 Using the CYRAQ 21
3.1 User Controls
Function Button
ction
Menu
¾ Turns the monitor on and off
Auto
Exit
Source
OSD Off:
¾ Launches the OSD menu and highlights
function displayed
OSD On:
¾ Selects menu items
¾ Works in conjunction with the Status light
o Solid Green light indicates monitor is
on
o Blinking Green indicates power but
no signal
OSD Off:
¾ Automatically adjust image quality to
optimum level
OSD On:
¾ Automatically adjust image quality to
optimum level
OSD Off:
¾ Toggles the display’s input between VGA
and DVI
OSD On:
¾ Backs out of currently selected menu item
- ☼ +
CyberResearch, Inc. 39
25 Business Park Drive P: (203) 483-8815; F: (203) 483-9024
Branford, CT USA www.cyberresearch.com
OSD Off:
¾ Adjusts the brightness settings
OSD On:
¾ Selects tabs on the OSD menu, adjusts
settings on the OSD menu
Page 50

CYRAQ™ 21 CyberResearch
A
®
Displays
3.2 Adjusting the Display
3.2.1 Auto Adjustment
The Auto Adjustment feature allows users to quickly adjust the display’s settings to
optimum level.
1. To initiate the Auto Adjust feature, press the Auto button.
3
NOTE: Expect the display to darken while a progress bar appears, see Figure 22. The
process will take approximately 15 seconds.
uto Adjustment
62
Figure 22: Auto Adjustment Progress Bar
3.2.2 Brightness
Adjusting the Brightness level can be accomplished without actually prompting the full
OSD (using the Menu button). To adjust the display’s brightness:
1. Press either the Plus or Minus button on the front of the display.
¾ The Brightness indicator bar appears, see Figure 23.
2. Press either the Plus or Minus button to adjust the setting.
3. When done, press Exit.
Brightness
81
Figure 23: Brightness
40 ©Copyright 2005 CyberResearch, Inc
Page 51

CyberResearch
®
Displays CYRAQ™ 21
3.2.3 Accessing the OSD
The OSD is the GUI used to adjust the display settings. The OSD contains a menu with
Brightness, Contrast, Color Control, Language, Menu Position, and Source Select
options.
1. To access the OSD menu, press the Menu button on the front of the display.
%
OSD Operation Tip: When the Indicator Bar and its corresponding number are
blue, they can be adjusted using the + and – buttons on the front of the display; when
the Indicator Bar appears black, press the Menu button to activate the adjustment
feature, then adjust level using the + and – buttons on the front of the display
2. The OSD will appear, see Figure 24.
3. Press Menu button to activate the Brightness menu; Indicator Bar will turn blue.
4. Brightness can now be adjusted using the + and – buttons.
5. When done, press Exit.
Brightness
81
Figure 24: View of Initial OSD
CyberResearch, Inc. 41
25 Business Park Drive P: (203) 483-8815; F: (203) 483-9024
Branford, CT USA www.cyberresearch.com
Page 52

CYRAQ™ 21 CyberResearch
3.2.4 Adjusting Contrast Level
To adjust the Contrast level:
1. Press the Menu button to access the OSD.
2. Using the + or – button, choose the Contrast tab, see Figure 25.
3. Press the menu button to activate the Contrast menu.
4. Contrast can now be adjusted using the + and – buttons.
5. When done, press Exit.
Contrast
81
®
Displays
Figure 25: Contrast Tab
3.2.5 Adjusting the Image Levels
To adjust the Image Levels:
1. Press the Menu button to access the OSD.
2. Using the + or – button, choose Image, see Figure 26.
3. Press the menu button to activate the Image menu.
4. Choose an item on the Image submenu using the + or – button, and then press
Menu (for example, the Fine adjustment).
Image
Coarse
Fine
H-Position
V-Position
Image Effect
Figure 26: Image Tab
42 ©Copyright 2005 CyberResearch, Inc
Page 53

CyberResearch
®
Displays CYRAQ™ 21
5. When the submenu choice appears, use the + or – button to adjust.
6. When done, press Exit.
Image
Fine
77
Figure 27: Fine Adjustment
CyberResearch, Inc. 43
25 Business Park Drive P: (203) 483-8815; F: (203) 483-9024
Branford, CT USA www.cyberresearch.com
Page 54

CYRAQ™ 21 CyberResearch
®
Displays
3.2.6 Color Control
The Color control menu allows the user to automatically add red and blue screen color,
adjust the gamma setting, or manually adjust the red, green and blue color levels. To
access the Color Control menu,
1. Press the Menu button to access the OSD.
2. Using the + or – button, choose Color Control, see Figure 28.
3. Press the menu button to activate the Color Control menu.
4. Choose an item on the Color Control submenu using the + or – button, and then
press Menu (for example, the Gamma adjustment).
Color Control
Bluish
Reddish
User Mode
Gamma
Reset
Figure 28: Color Control
5. When the submenu choice appears, use the + or – button to select adjustment, see
Figure 29.
6. When done, press Exit.
Color Control
Gamma
1 23
Figure 29: Gamma Adjustment
44 ©Copyright 2005 CyberResearch, Inc
Page 55

CyberResearch
y
®
Displays CYRAQ™ 21
3.2.7 Select Language
The OSD can appear in a variety of different languages: English Dutch, Spanish, French,
and several others. To choose a language:
1. Press the Menu button to access the OSD.
2. Using the + or – button, choose the Language tab, see Figure 28.
3. Press the menu button to activate the Language menu.
4. Using the + or – button to choose desired OSD language.
5. When done, press Exit.
Language
English
Deutch
Espanol
Francois
Italiano
Svenska
P
cckлл
Figure 30: Language Menu
3.2.8 Customize OSD Menu
The OSD itself can be customized. It can be set to appear anywhere on your display. The
menu color and tone can be adjusted along with the setting for how long the OSD appears
onscreen. As an example of how to use one of the customizing features of the OSD menu,
follow these steps to adjust the vertical position of the menu:
1. Press the Menu button to access the OSD.
2. Using the + or – button, choose the OSD tab, see Figure 31.
3. Press the menu button to activate the OSD menu.
% OSD Operation Tip: When the Horizontal or Vertical position of the OSD is
changed, it becomes the default location for the menu to appear.
CyberResearch, Inc. 45
25 Business Park Drive P: (203) 483-8815; F: (203) 483-9024
Branford, CT USA www.cyberresearch.com
Page 56

CYRAQ™ 21 CyberResearch
To adjust the position of the OSD:
4. Use the + or – button to select the H-Position (horizontal) adjustment.
5. Press Menu to select.
6. When the H-Position submenu appears, use the + or – button to move the menu to
the desired location.
7. When done, press Exit.
Language
H-Position
V-Position
Halftone
Duration
Color
®
Displays
Figure 31: OSD Menu
3.2.9 Source Select
The Source button on the display is controlled by two choices that reside within the
Source Select tab on the OSD menu (Auto and Manual). Users have the option of
allowing their display to search for an input automatically, or to manually choose the
input via the Source button on the display. To set the action for the Source button:
1. Press the Menu button to access the OSD.
2. Using the + or – button, choose the Source select tab, see Figure 32.
3. Press Menu to select.
4. Use the + and – button to toggle between Auto and Manual.
5. When done, press Exit.
Source Select
Auto Manual
74.8kHz 60Hz PP
1600 x 1200
Analog
Figure 32: Source Select Menu
46 ©Copyright 2005 CyberResearch, Inc
Page 57

CyberResearch
r
®
Displays CYRAQ™ 21
4 Touchscreen
Touchscreens are the ultimate human/machine interface. In a touchscreen system,
touching what you see onscreen makes the computer respond. The touchscreen system is
logical, intuitive and simple. Using touchscreens, workers can precisely control
complicated processes without being tethered to a keyboard and mouse. People who have
never used a computer before can immediately interact successfully with a touchscreenbased computer system allowing airline customers to access flight information, CNC
machinists to quickly change programs, and wait staff can instantly send your order to the
kitchen—all with the touch of their finger.
4.1 Installation
The Touchscreen and internal controller board inside your CYRAQ display have already
been installed for you by the engineers at CyberResearch, Inc. You should never need to
open the case of this unit to install/change any of the internal connections or for any other
reason. If you think there is an internal connection problem, contact CyberResearch Inc.
immediately.
4.1.1 Serial Cable Connection
1. Shutdown your computer.
2. Plug the DB9 male end of the supplied serial cable into the DB9 female connector
on the back of the CYRAQ enclosure.
3. Plug the DB9 female end of this cable into the computer's DB9 serial port. If you
have a 25-pin serial port, use the optional DB9 male to DB25 female adapter.
CyRAQ
21
DB9
M
Touchscreen
Cable
PC Bus
Controlle
Video
Cable
DB9
F
To Computer’s Video Card
Figure 33: Touchscreen Cable Layout
CyberResearch, Inc. 47
25 Business Park Drive P: (203) 483-8815; F: (203) 483-9024
Branford, CT USA www.cyberresearch.com
Page 58

CYRAQ™ 21 CyberResearch
4.1.2 USB Cable Connection
1. Shutdown your computer.
2. Plug the USB cable into the CYRAQ’s USB connector on the back of the
enclosure.
3. Plug the other end of the USB cable into a free USB port on the back of the
computer.
4.1.3 Touchscreen Driver Installation
1. Reboot your computer.
2. After Windows loads, put the CyberResearch Software and Utilities CD into the
CD drive.
®
Displays
Figure 34: Splash Screen
3. When the splash screen appears (Figure 34) click on Install Drivers
48 ©Copyright 2005 CyberResearch, Inc
Page 59

CyberResearch
®
Displays CYRAQ™ 21
4. Then click TouchScreen (Figure 35)
Figure 35: Install Products
5. After the Welcome window appears, click Next to continue
CyberResearch, Inc. 49
25 Business Park Drive P: (203) 483-8815; F: (203) 483-9024
Branford, CT USA www.cyberresearch.com
Page 60

CYRAQ™ 21 CyberResearch
6. After accepting the license agreement, click Next
®
Displays
7. Select controller type, interface, and then click Next
50 ©Copyright 2005 CyberResearch, Inc
Page 61

CyberResearch
®
Displays CYRAQ™ 21
8. Click Finish to install touch screen driver
9. After touch screen driver is installed, you will be prompted to restart the computer
10. The driver you are installing is compatible with Windows. Click Continue
Anyway (you may need to do this more than once).
CyberResearch, Inc. 51
25 Business Park Drive P: (203) 483-8815; F: (203) 483-9024
Branford, CT USA www.cyberresearch.com
Page 62

CYRAQ™ 21 CyberResearch
11. Click OK
®
Displays
12. Restart your computer before continuing with section
4.2.
4.2 Calibration
4.2.1 Calibration Options:
Three point calibration: Quick calibration of a known good touchscreen overlay. May
be used to evaluate, test or verify actual touchscreen linearity.
No correction.
Four Point Calibration (Default): Will compensate for skew, and some edge linearity
anomalies.
Best for general calibration.
Seven Point Calibration: More accurate than 3 point calibration. Helps calibrate screen
to the edges.
No correction.
Twenty Point Calibration: Provides the highest level of touchscreen linearization and
skew correction. Should be used to get the best possible calibration
May be used to extend the life of a failing touchscreen.
Calibration Offset: Because of the varied linearity that exists between touchscreen
types, you may want to calibrate the edges of the touchscreen more precisely. Experiment
with this setting to find the best result.
Default is 20%.
Select the large target to calibrate.
4.2.2 Configure Calibration Settings
Generally speaking, the default setting of 4 Point Calibration is quite accurate for most
applications. It is recommended the user try this default setting before configuring
calibration with a different setting. If adjustments need to be made, use the procedure on
the next page:
52 ©Copyright 2005 CyberResearch, Inc
Page 63

CyberResearch
®
Displays CYRAQ™ 21
1. Open the Hampshire TSHARC Control Panel (Start\All Programs\ Hampshire
TSHARC Control Panel). Click the Calibration tab.
2. Click/touch on the Configure button.
3. When the Calibration Options window appears:
a. Click/touch on a Calibration Type icon
-AND-
b. Choose an Offset radio button.
4. Then click/touch OK.
CyberResearch, Inc. 53
25 Business Park Drive P: (203) 483-8815; F: (203) 483-9024
Branford, CT USA www.cyberresearch.com
Page 64

CYRAQ™ 21 CyberResearch
4.2.3 Calibration Routine
1. Click/touch the calibration target seen in Figure 36 to begin calibration routine.
®
Displays
Figure 36: Calibration Target
2. Follow the on-screen prompts to complete calibration process.
Once you have selected the large calibration target from the control panel, the
calibration program will begin.
3. As each target is displayed on the screen TOUCH and hold the center of each
target as directed by the text located adjacent to each target.
4. Touch the center of each target as accurately as possible.
Hampshire calibration targets have been specially developed to assist you in calibrating
your touchscreen as accurately as possible.
5. As each target is displayed, touch and hold the center of each calibration target
until it shrinks and the “Hold” text changes to “Release”.
The calibration screen will automatically time out and return you to the control panel if
the first point is not touched within 10 seconds. This time-out feature has been added to
the calibration program to insure that you can exit the calibration screen in the event that
you have a damaged our disconnected touchscreen. This time-out feature may also be
configured for other time-out values.
54 ©Copyright 2005 CyberResearch, Inc
Page 65

CyberResearch
®
Displays CYRAQ™ 21
4.2.4 Calibration Test
This is the last screen displayed in the calibration process.
1. Touch the screen and notice if the calibration target is displayed under your finger
or stylus. If the target appears directly under your finger, select the “Accept”
button.
2. If the target does not appear directly beneath your finger or stylus, select the
“Cancel” button, reconfigure your calibration options and recalibrate until you get
an acceptable calibration. You may adjust the “Offset”, or try a different
calibration scheme.
3. Select “Accept” to apply and record your calibration data.
4. Select “Cancel” to return to the calibration tab. Once you return to the calibration
tab, select, “OK” or “Apply” to save your settings.
5. If you have multiple monitors return to the “Screen Selection” tab and select
another monitor to calibrate.
Figure 37: Calibration Target
CyberResearch, Inc. 55
25 Business Park Drive P: (203) 483-8815; F: (203) 483-9024
Branford, CT USA www.cyberresearch.com
Page 66

CYRAQ™ 21 CyberResearch
®
Displays
4.2.5 Drawing Test
Use the Test Feature to ensure calibration is accurate. Once you have calibrated your
touchscreen, you may select the “Test” button located on the calibration tab of the control
panel. This is a simple drawing program that you may use to determine if you
touchscreen is working properly.
1. Open the Hampshire TSHARC Control Panel (Start\All Programs\ Hampshire
TSHARC Control Panel).
2. Click/touch the Calibration Tab, then click/touch the Test button
56 ©Copyright 2005 CyberResearch, Inc
Page 67

CyberResearch
®
Displays CYRAQ™ 21
3. Tap some points on the screen, or, write a word to ensure the program renders the
contact points correctly.
4. When done, click/touch Quit.
CyberResearch, Inc. 57
25 Business Park Drive P: (203) 483-8815; F: (203) 483-9024
Branford, CT USA www.cyberresearch.com
Page 68

CYRAQ™ 21 CyberResearch
®
Displays
4.2.6 Right Click Emulation
The TSHARC Control Panel permits users to enable Right Click Emulation, which
simulates functionality (where applicable) of a right mouse click. It works by touching
the same point on the touchscreen for a specific amount of time predetermined on the
Click Settings tab of the TSHARC Control Panel. You can enable this functionality and
define the amount of time necessary on the Click Settings tab, as seen in Figure 38.
Figure 38: Click Settings Tab
1. Click the Enable right click emulation checkbox to activate this feature.
2. The slider below the checkbox is used to determine the amount of time necessary
when holding down a touchpoint to generate the right click event.
Event Area Settings:
Since it may be difficult to touch and hold an exact point on any touchscreen for a length
of time, an event area is used to establish the size of the area in which a “hold” is
acceptable.
3. The even area should be set to at least the same size as your finger tip.
4. Click or touch “Apply” to apply your selection. “OK” to apply and exit the
control panel
58 ©Copyright 2005 CyberResearch, Inc
Page 69

CyberResearch
®
Displays CYRAQ™ 21
4.2.7 Touch Settings
Touch Sound: Check “Enable touch sound” to enable a beep when the touchscreen is
touched.
Normal: Emulates a standard mouse. Selecting “Normal” will allow for singleclick,
double click, drawing, dragging and right click option (if right click is enabled).
Touch down: Touch down will allow for a click event to take place at touch
down. You will not be able to draw or drag if this option is selected.
Touch up: Touch sent only at touch up. Disables right click and double click
functions. Click or touch “Apply” to apply your selection. “OK” to apply and exit the
control
Figure 39: Touch Settings Tab
CyberResearch, Inc. 59
25 Business Park Drive P: (203) 483-8815; F: (203) 483-9024
Branford, CT USA www.cyberresearch.com
Page 70

CYRAQ™ 21 CyberResearch
®
Displays
5 Product Care
The CYRAQ unit is basically a maintenance-free product. It does require occasional
cleaning to keep it looking and performing its best. Additionally, please make sure the
unit is placed with consideration for environmental temperature, humidity shock and
vibration tolerances noted in the Specifications section of this manual. Those
specifications are listed again below for your convenience.
Environmental Specifications
Operating Temperature 50°F....113°F (10°C....45°C)
Storage Temperature -4°F....122°F (-20°C....50°C)
Relative Humidity, non-condensing 10%....80%
Shock Resistance Operating 30g half-sine for 11ms
Vibration
Resistance
Altitude, Max. 1.89mi (3.05km)
Operating
5.1 Cleaning
Prior to cleaning the CYRAQ unit, disconnect power to the device.
15 to 57Hz: 0.006" peak-to-peak; 57 to 640Hz
sine: 1.0g peak-to-peak
5.1.1 Touchscreen
Clean the touchscreen with household glass cleaner or just plain water, and soft cloth.
¾ We do not recommend using paper products to clean the touchscreen.
¾ Always dampen the towel first, and then clean the touchscreen to reduce
abrasion from the cleaning applicator.
¾ Glass cleaner sprayed directly onto the CYRAQ’s screen could possibly
be over sprayed leak into the back of a unit if not mounted correctly, and
cause damage.
5.1.2 LCD
Clean the LCD screen with household glass cleaner or just plain water, and soft cloth
¾ Do not spray cleaner or water directly on any part of the unit—front or
back.
¾ We do not recommend using paper products to clean your display screen
¾ Always dampen a soft cloth first, and then clean the LCD screen to
reduce abrasion from the cleaning applicator.
¾ Do not use or store flammable substances near the monitor.
60 ©Copyright 2005 CyberResearch, Inc
Page 71

CyberResearch
®
Displays CYRAQ™ 21
5.1.3 Fan Filters
Periodically, you may find it necessary to clean fan filters built into the back of the
CYRAQ’s enclosure. Cleaning frequency is largely based on environmental and other
conditions immediately surrounding the unit. Since most applications require the C
YRAQ
to be rack or panel-mounted, the engineers at CyberResearch, Inc. designed a filter
system users can maintain without dismounting the display, disassembling the unit, or
removing the fan filters from the enclosure.
!
Disconnect power to the unit before beginning the subsequent steps
To clean the fan filters:
1. Power off the unit using the On/Off switch.
2. Unplug the unit’s AC power.
3. Gain access to the rear of the unit.
4. Carefully run a vacuum hose (using a crevice attachment is ideal) over the
protective fan filter screens (
Figure 40) to remove dust and debris from the
protective covers and underlying fan filters themselves.
5. When done, restore power to unit.
Fan Filter
Screens
Figure 40: Cleaning Fan Filters
CyberResearch, Inc. 61
25 Business Park Drive P: (203) 483-8815; F: (203) 483-9024
Branford, CT USA www.cyberresearch.com
Page 72

CYRAQ™ 21 CyberResearch
6 Mechanical Drawings
®
Displays
Figure 41: Display and Enclosure Dimensions
62 ©Copyright 2005 CyberResearch, Inc
Page 73

CyberResearch
®
Displays CYRAQ™ 21
Figure 42: Landscape Mounting Plate Dimensions
CyberResearch, Inc. 63
25 Business Park Drive P: (203) 483-8815; F: (203) 483-9024
Branford, CT USA www.cyberresearch.com
Page 74

CYRAQ™ 21 CyberResearch
®
Displays
Figure 43: Portrait Mounting Plate Dimensions
64 ©Copyright 2004 CyberResearch, Inc
Page 75

CyberResearch
®
Displays CYRAQ™ 21
Intentionally Blank
CyberResearch, Inc. 65
25 Business Park Drive P: (203) 483-8815; F: (203) 483-9024
Branford, CT USA www.cyberresearch.com
Page 76

CYRAQ™ 21 CyberResearch
.
®
Displays
66 ©Copyright 2004 CyberResearch, Inc
Page 77

CyberResearch
®
Displays CYRAQ™ 21
Product Service
Diagnosis and Debug
CyberResearch, Inc. maintains technical support lines staffed by experienced
Applications Engineers and Technicians. There is no charge to call and we will
return your call promptly if it is received while our lines are busy. Most problems
encountered with data acquisition products can be solved over the phone. Signal
connections and programming are the two most common sources of difficulty.
CyberResearch support personnel can help you solve these problems, especially
if you are prepared for the call.
To ensure your call’s overall success and expediency:
1) Have the phone close to the PC so you can conveniently and quickly take
action that the Applications Engineer might suggest.
2) Be prepared to open your PC, remove boards, report back-switch or
jumper settings, and possibly change settings before reinstalling the
modules.
3) Have a volt meter handy to take measurements of the signals you are
trying to measure as well as the signals on the board, module, or power
supply.
4) Isolate problem areas that are not working as you expected.
5) Have the source code to the program you are having trouble with available
so that preceding and prerequisite modes can be referenced and
discussed.
6) Have the manual at hand. Also have the product’s utility disks and any
other relevant disks nearby so programs and version numbers can be
checked.
Preparation will facilitate the diagnosis procedure, save you time, and avoid
repeated calls. Here are a few preliminary actions you can take before you call
which may solve some of the more common problems:
1) Check the PC-bus power and any power supply signals.
2) Check the voltage level of the signal between SIGNAL HIGH and SIGNAL
LOW, or SIGNAL+ and SIGNAL– . It CANNOT exceed the full scale range
of the board.
3) Check the other boards in your PC or modules on the network for address
and interrupt conflicts.
4) Refer to the example programs as a baseline for comparing code.
CyberResearch, Inc. 67
25 Business Park Drive P: (203) 483-8815; F: (203) 483-9024
Branford, CT USA www.cyberresearch.com
Page 78

CYRAQ™ 21 CyberResearch
Intentionally Blank
®
Displays
68 ©Copyright 2004 CyberResearch, Inc
Page 79

CyberResearch
®
Displays CYRAQ™ 21
Warranty Notice
CyberResearch, Inc. warrants that this equipment as furnished will be free from
defects in material and workmanship for a period of one year from the confirmed
date of purchase by the original buyer and that upon written notice of any such
defect, CyberResearch, Inc. will, at its option, repair or replace the defective item
under the terms of this warranty, subject to the provisions and specific exclusions
listed herein.
This warranty shall not apply to equipment that has been previously repaired or
altered outside our plant in any way which may, in the judgment of the manufacturer,
affect its reliability. Nor will it apply if the equipment has been used in a manner
exceeding or inconsistent with its specifications or if the serial number has been
removed.
CyberResearch, Inc. does not assume any liability for consequential damages as a
result from our products uses, and in any event our liability shall not exceed the
original selling price of the equipment.
The equipment warranty shall constitute the sole and exclusive remedy of any Buyer
of Seller equipment and the sole and exclusive liability of the Seller, its successors
or assigns, in connection with equipment purchased and in lieu of all other
warranties expressed implied or statutory, including, but not limited to, any implied
warranty of merchant ability or fitness and all other obligations or liabilities of seller,
its successors or assigns.
The equipment must be returned postage prepaid. Package it securely and insure it.
You will be charged for parts and labor if the warranty period has expired.
Returns and RMAs
If a CyberResearch product has been diagnosed as being non-functional, is visibly
damaged, or must be returned for any other reason, please call for an assigned
RMA number. The RMA number is a key piece of information that lets us track and
process returned merchandise with the fastest possible turnaround time.
PLEASE CALL FOR AN RMA NUMBER!
Packages returned without an RMA number will be refused!
In most cases, a returned package will be refused at the receiving dock if its
contents are not known. The RMA number allows us to reference the history of
returned products and determine if they are meeting your application’s requirements.
When you call customer service for your RMA number, you will be asked to provide
information about the product you are returning, your address, and a contact person
at your organization.
Please make sure that the RMA number is prominently
displayed on the outside of the box.
• Thank You •
CyberResearch, Inc. 69
25 Business Park Drive P: (203) 483-8815; F: (203) 483-9024
Branford, CT USA www.cyberresearch.com
Page 80

CYRAQ™ 21 CyberResearch
Intentionally Blank
®
Displays
70 ©Copyright 2004 CyberResearch, Inc
Page 81

Page 82

CyberResearch, Inc.
25 Business Park Drive
Branford, CT 06405 USA
P: (203) 483-8815; F: (203) 483-9024
www.cyberresearch.com
 Loading...