

Page 1

CyberLink
YouCam
User's Guide
Page 2

Copyright and Disclaimer
All rights reserved.
To the extent allowed by law, YouCam IS PROVIDED “AS IS”, WITHOUT
WARRANTY OF ANY KIND, EITHER EXPRESS OR IMPLIED, INCLUDING
WITHOUT LIMITATION ANY WARRANTY FOR INFORMATION, SERVICES,
OR PRODUCTS PROVIDED THROUGH OR IN CONNECTION WITH
YouCam AND ANY IMPLIED WARRANTIES OF MERCHANTABILITY,
FITNESS FOR A PARTICULAR PURPOSE, EXPECTATION OF PRIVACY, OR
NON-INFRINGEMENT.
BY USING THIS SOFTWARE, YOU AGREE THAT CYBERLINK WILL NOT BE
LIABLE FOR ANY DIRECT, INDIRECT, OR CONSEQUENTIAL LOSS
ARISING FROM THE USE OF THIS SOFTWARE OR MATERIALS
CONTAINED EITHER IN THIS PACKAGE.
The terms and conditions here under shall be governed and
construed in accordance with the laws of Taiwan.
YouCam is a registered trademark along with other company and
product names mentioned in this publication, used for identification
purposes and remain the exclusive property of their respective
owners.
International Headquarters
Mailing Address CyberLink Corporation
15F., No. 100, Minquan Rd., Xindian Dist.
New Taipei City 231, Taiwan (R.O.C.)
Web Site http://www.cyberlink.com
Telephone 886-2-8667-1298
Fax 886-2-8667-1385
Copyright © 2015 CyberLink Corporation. All rights reserved.
Page 3

Contents
..............................................................1
Introduction
.................................................................................................1Welcome
...............................................................................................1Key Features
...............................................................................................2YouCam Versions
.................................................................................................3System Requirements
..............................................................5
YouCam Overview
.................................................................................................6Enabling YouCam for Instant Messaging
.................................................................................................6Launching YouCam
.................................................................................................6Display Modes
.................................................................................................7YouCam Modules
.................................................................................................9Program Interface
.................................................................................................10YouCam Settings
..............................................................11
Webcam Effects
.................................................................................................11Using Visual Effects
...............................................................................................11Visual Effects Overview
...............................................................................................14Adding and Applying Visual Effects
...............................................................................................15Using Avatars
...............................................................................................19Augmented Reality
.................................................................................................21Using the Drawing Tool
..............................................................23
Capturing Media
.................................................................................................23Using Face Beautify on Live Image
.................................................................................................23Enhancing the Video Image
.................................................................................................24Taking Photo Snapshots
...............................................................................................25Taking Snapshots
...............................................................................................25Using the Burst Feature
i
Page 4

CyberL ink Yo uCam
...............................................................................................26Applying the HDR Effect to Photos
.................................................................................................26Capturing Video
...............................................................................................27Capturing a Webcam Video
.................................................................................................27Captured Content
..............................................................29
YouCam Media Library
.................................................................................................29Viewing Media in the Library
.................................................................................................30Sharing Media in the Library
...............................................................................................30Uploading Videos to YouTube
...............................................................................................31Uploading Photos to Facebook
...............................................................................................32Uploading Videos to Facebook
...............................................................................................33E-mailing Photos and Videos
..............................................................35
Editing Captured Media
.................................................................................................35Editing Photo Snapshots
...............................................................................................37Face Beautify
...............................................................................................39Tagging Faces in Photos
.................................................................................................40Playing Videos
..............................................................41
Panoramas
.................................................................................................41Creating a Panorama Image
..............................................................43
Full Screen Mode
.................................................................................................43Features in Full Screen Mode
..............................................................45
Presentations
.................................................................................................45Desktop Capture
.................................................................................................46Creating Video Presentations
.................................................................................................49Enabling Dual Webcam Videos
..............................................................51
YouCam Utilities
.................................................................................................51YouCam Mirror Mode
...............................................................................................51Mirror Settings
.................................................................................................52Video Surveillance
...............................................................................................52Motion Detection Recording
...............................................................................................53Continuous Recording
ii
Page 5

...............................................................................................53Time-lapse Recording
...............................................................................................54Auto E-mailing Surveillance Videos
.................................................................................................55Face Login
...............................................................................................55Setting Up and Enabling Face Login
...............................................................................................56Adding a Web Site to the Sign In List
...............................................................................................58Editing Face Login Settings
.................................................................................................58Face-out
...............................................................................................58Setting Up and Enabling Face-out
..............................................................61
Configuring YouCam Settings
.................................................................................................61Camera Settings
.................................................................................................62Capture & Snapshot Settings
.................................................................................................63Other Settings
.................................................................................................64DirectorZone Settings
..............................................................65
Technical Support
.................................................................................................65Before Contacting Technical Support
.................................................................................................66Web Support
.................................................................................................66Help Resources
iii
Page 6

CyberL ink Yo uCam
iv
Page 7

In tro du ctio n
Note: this document is for reference and informational use only. Its content
and the corresponding program are subject to change without notice. Please
go to http://www.cyberlink.com for additional information and product support.
Chapter 1:
Introduction
This section introduces CyberLink YouCam and its key features. It also outlines the
available versions and reviews the minimum system requirements for the program.
Welcome
Welcome to the CyberLink family of software programs. CyberLink YouCam is a
creative little program that provides you with some fun and interesting effects for
your webcam. It also includes some useful features and add-ons that will help you
get the most out of your webcam.
Key Features
This section outlines some of the key features available in the latest version of
CyberLink YouCam.
Face Beautify* on Live Video
Smoothen the skin of the people in the live webcam video.
Face Beautify* on Captured Photos
Beautify captured photos in the Edit window with the nine available options.
Panoramas*
Create panorama images with your webcam.
Face Tagging*
Tag the faces in your captured webcam photos.
HDR Effect*
Apply an HDR effect instantly to photos taken with your webcam.
1
Page 8

CyberL ink Yo uCam
Note: * this feature is not available in some versions of CyberLink YouCam.
Note: you must connect to the Internet to use this feature.
YouCam Media Library
Browse through a library of the photos and videos you captured with your
webcam in a calendar view, or by the faces* tagged in the photos.
Full Screen Capture Mode*
Use all of CyberLink YouCam's capture and effect features in a full screen
mode that's optimized for touch screens.
YouCam Versions
The features that are available in CyberLink YouCam are completely dependent on
the version you have installed on your computer. To determine the version of
CyberLink YouCam you are using, select on the YouCam logo on the title bar, and
then select About.
To view the YouCam version table, please go to our web site: http://www.cyberlink.
com/products/youcam/compare_en_US.html
Updating Your Software
Software upgrades and updates (patches) are periodically available from CyberLink.
CyberLink YouCam automatically prompts you when either is available.
To update your software, do this:
1. Select the button to open the Notification Center.
2. Check the New Updates section.
3. Select an item in this section to open your web browser, where you can
purchase product upgrades or download the latest patch update.
2
Page 9
In tro du ctio n
Note: * this feature is not available in some versions of CyberLink YouCam.
Minimum System Requirements
OS
Microsoft Windows 10/8.1/8/7/Vista.
Memory
1 GB (2 GB recommended).
CPU
Intel Pentium D 3.0 GHz.
AMD Athlon 64 3200+ or above.
HDD Space
1 GB required.
VGA Card
Intel 945 (Independent graphics card recommended).
Screen
Resolution
1024x768.
Device
Webcam (built-in or external USB).
DirectorZone
You can enhance your version of CyberLink YouCam by downloading more visual
effects* from DirectorZone.
DirectorZone is a free web service that lets you search for, download, and import
additional effects into CyberLink YouCam. You can also upload custom avatars you
create to DirectorZone, or share the details of the effects you used in captured
videos uploaded to YouTube.
Also, be sure to periodically select the button to check out the New Activities
and view the Popular templates on DirectorZone. Just select an item in either of
these sections in the Notification Center window to view the activities or download
these templates. Go to DirectorZone Settings to sign in, or directly to the
DirectorZone web site (www.directorzone.com) to view more information on the
available features and benefits.
System Requirements
The system requirements listed below are recommended as minimums for running
CyberLink YouCam.
3
Page 10

CyberL ink Yo uCam
Other
Software
Instant messaging software with video communication
functions, such as Skype, Yahoo Messenger, AOL Instant
Messenger.
Windows Internet Explorer 7 or above to use the Face
Login sign in to web sites feature.
Note: to ensure you can enjoy all the features in CyberLink YouCam, make
sure your computer meets or exceeds the minimum system requirements.
Recommended System Requirements for Full HD effect (1080p)
OS
Microsoft Windows 10/8.1/8/7 (with DirectX 9 or above).
Memory
4 GB.
CPU
Intel(R) Core(TM) i5-3360M CPU @ 2.80GHz (4 CPUs),
~2.8GHz.
AMD A8-5600K APU with Radeon(tm) HD Graphics (4
CPUs), ~3.6GH.
HDD Space
1 GB required.
VGA Card
Intel HD Graphics 4000.
AMD Radeon HD 7560D.
Device
Webcam (built-in or external USB).
Other
Software
Instant messaging software with video communication
functions, such as Skype, Yahoo Messenger, AOL Instant
Messenger.
Windows Internet Explorer 7 or above to use the Face
Login sign in to web sites feature.
The system requirements listed below are the recommendations for running
CyberLink YouCam with full HD effects (1080p).
4
Page 11
Yo uC am Overview
Chapter 2:
YouCam Overview
This section will help familiarize you with the CyberLink YouCam and give you an
overview of some of the features. CyberLink YouCam consists of a number of
different modes, modules, and windows. The YouCam interface can vary, but many
of the options stay consistent.
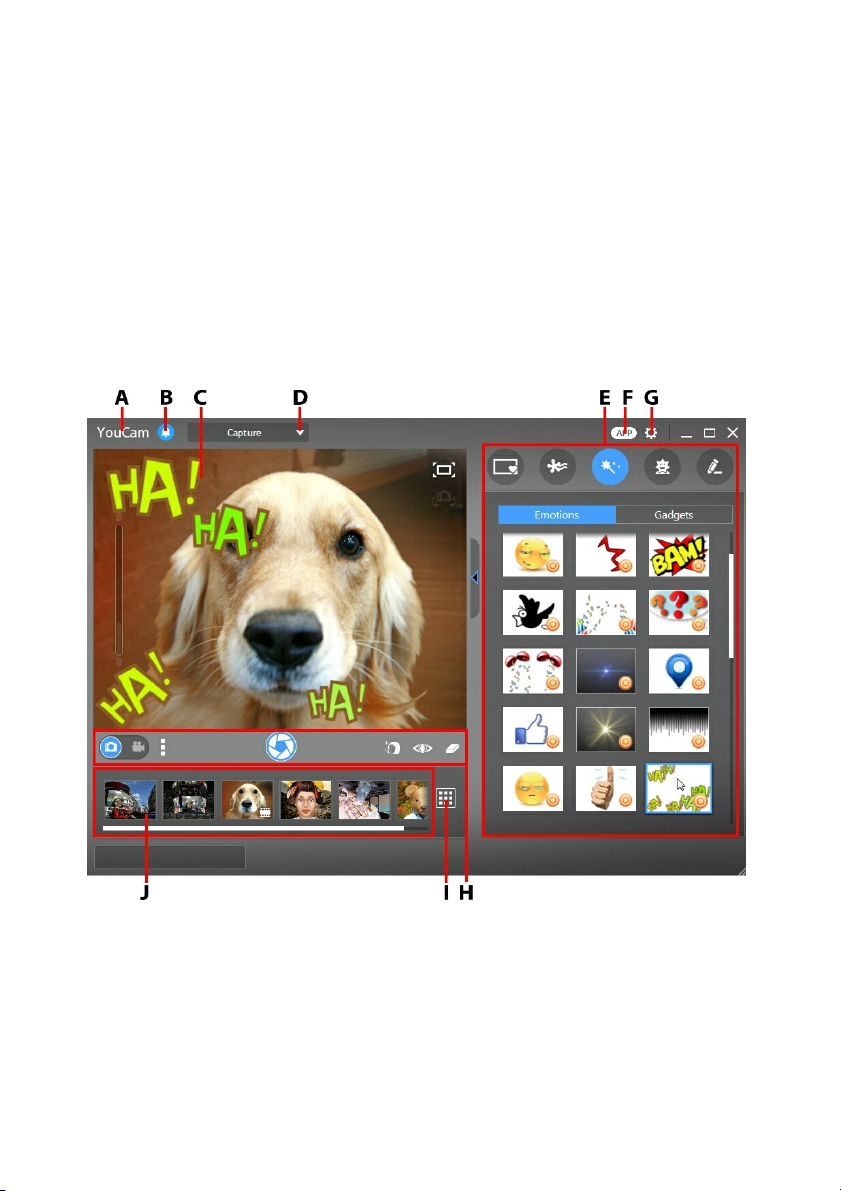
When in the Capture window, the program displays as below.
A - Y ouCa m M enu , B - N otifi ca tion Cen ter, C - W ebca m Preview Windo w, D - Selec t Yo uCa m
M odule/ Wi ndow, E - Effec ts/Fea tures P anel, F - Downloa d M obile Apps, G - Yo uCa m Settin gs, H Ca pture Co ntrols, I - Go to Libra ry W in dow , J - Ca ptured Co nten t
5
Page 12

CyberL ink Yo uCam
Note: depending on the type of instant messaging software you are using, the
procedure to enable CyberLink YouCam will differ. Consult the help for the
instant messaging software you are using and see the section on selecting a
webcam, video settings, or something similar.
Note: you don't need to start a webcam video call to take photo snapshots,
capture live webcam video, or to start a desktop capture. Just simply launch
CyberLink YouCam manually in stand alone mode.
Enabling YouCam for Instant Messaging
Once CyberLink YouCam is installed on your computer, you may have to enable it
before you can use it with your instant messaging software. The following example
demonstrates how to enable CyberLink YouCam for Skype.
1. In the Skype main window, select Tools - Options.
2. Click on the Video settings section.
3. Find the Select webcam drop-down, and then select CyberLink Webcam
Splitter 7.0.
4. Click the Save button to set your changes and enable CyberLink YouCam for
instant messaging.
Launching YouCam
You can launch CyberLink YouCam in the following ways:
automatically when you begin a webcam video call with an instant messaging
software (this is known as IM mode).
manually from the start menu, desktop shortcut, or the icon in the system
tray (this is known as stand alone mode).
Display Modes
CyberLink YouCam has the following display modes: stand alone mode, IM mode,
split mode, full screen mode*, and mirror mode. Some features are only available in
certain modes.
Stand alone mode: when CyberLink YouCam is launched manually from the
6
Page 13

Yo uC am Overview
Note: * this feature is not available in some versions of CyberLink YouCam.
start menu, desktop shortcut, or the icon in the system tray, it opens in stand
alone mode. In stand alone mode you can record and upload videos to
YouTube/Facebook, and e-mail photos. The video surveillance feature is only
available in this mode.
IM mode: when you start a webcam video call with someone on your instant
messaging software (Skype, etc.), CyberLink YouCam launches in the smaller
IM (instant messaging) mode.
Split mode: you can share your webcam with more than one webcam
application. To do this, launch your webcam application capture device and
ensure it is using the CyberLink Webcam Splitter 7.0 (see Enabling YouCam for
Instant Messaging for more information). Next, ensure the CyberLink YouCam
system tray icon is available, right-click on it, and then select your Capture
Device from the list. Next, set your Capture Resolution and then select Launch
Effects Room to open the effects room. When you use visual effects, they
display in any open webcam programs that are using the CyberLink Webcam
Splitter.
Full screen mode*: is a mode of CyberLink YouCam that is optimized for
touch screens. See Full Screen Mode for more detailed information.
Mirror mode: you can access this mode via the start menu, the system tray
icon, and through the Utilities. This mode is designed to act just like a real
mirror. See YouCam Mirror Mode for more detailed information.
YouCam Modules
CyberLink YouCam is comprised of three main modules: Camera, Presentations,
and Utilities. Each of these modules has different windows and many different
features.
These modules can be accessed by selecting a module or window from the dropdown at the top of most YouCam windows.
7
Page 14

CyberL ink Yo uCam
Camera
The Camera module is where you can capture and create webcam media, edit the
media, and more. The Camera module has the following windows and features:
Capture: in the Capture window you can take photo snapshots and capture
webcam video with effects. See Capturing Media for more information.
Library: the Library window is where you can view all the photos and videos
you have captured in the Capture window. See YouCam Media Library for
more information.
Edit*: you can perform minor edits and touch ups on your captured media in
the Edit window. See Editing Captured Media for more information.
Panorama*: create panorama images with your webcam in the Panorama
window. See Panoramas for more information.
Full Screen*: lets you view your webcam in full screen mode. See Full Screen
Mode for information on the features and functions available.
Presentations
You can capture your computer's desktop, create video presentations, and enable a
second webcam in the Presentations module. The features in the module include:
Desktop Capture*: capture a video of your mouse movements on your
computer's desktop. See Desktop Capture for detailed information.
8
Page 15

Yo uC am Overview
Note: * this feature is not available in some versions of CyberLink YouCam.
Create Presentation*: create and record video presentations* that incorporate
a PowerPoint presentation and video from your webcam. For more
information, see Creating Video Presentations.
Dual Video*: enable a second webcam to record videos and use in webcam
chats in IM mode for web conferencing. Go to Enabling Dual Webcam Videos
for more information.
Utilities
CyberLink YouCam includes a number of useful utilities that are sure to help you
get the most out of your webcam. The Utilities module includes the following
features:
Mirror: provides access to the YouCam mirror. See YouCam Mirror Mode for
more detailed information.
Surveillance: select from a number of video surveillance and timed recording
options you can use with your webcam. Go to Video Surveillance for more
information on the surveillance features available.
Face Login*: use this feature to log in to Windows and your favorite web sites
with your face. See Face Login for information on setting up this feature on
your computer.
Face-out*: protect your computer with the Face-out feature that takes action
when you step away from your PC. For detailed information, see Face-out.
Program Interface
When using both stand alone or IM mode, you can resize the CyberLink YouCam
user interface to suit your requirements.
Simply select and drag in the bottom right corner to resize any CyberLink
YouCam window to fit your preference. You can also select the CyberLink YouCam
title bar to drag the program to a different location on your desktop.
9
Page 16

CyberL ink Yo uCam
YouCam Settings
To configure the settings in CyberLink YouCam, select the button on the top of
the effects/features panel. See Configuring YouCam Settings for more details.
10
Page 17

Webcam Effects
Note: * this feature is not available in some versions of CyberLink YouCam.
Note: the visual effects are available in several different windows, modules,
and modes. Though there presentation may differ slightly, the features
outlined below remain the same.
Chapter 3:
Webcam Effects
This section provides an overview of all the webcam effects in CyberLink YouCam,
including scenes, gadgets, particles, avatars, augmented reality, and more. It also
reviews the draw feature that lets you draw and add stamps on the webcam image.
These webcam effects are available in several different windows, modules, and
modes.
Using Visual Effects
CyberLink YouCam has many different visual effects* that you can apply to your
live webcam image during video chats. When applied, a user viewing your webcam
instantly sees the effect. These effects can also be applied to any photo snapshots
or webcam video you are capturing.
Visual Effects Overview
To view all the available visual effects*, go to the Capture window of stand alone
mode by selecting Camera > Capture from the drop-down menu that appears at the
top of most CyberLink YouCam windows.
The following types of visual effects are available in the effects/features panel of
CyberLink YouCam.
Frames and Scenes
Select the tab to view the following types of effects:
Frames: stylish and festive borders that you can add on the webcam video.
11
Page 18
CyberL ink Yo uCam
Note: particle effects indicated by the icon are interactive* and will settle
on your head, arms, and shoulders. Move around in the image to interact with
them.
Note: the filters include the mosaic effect that uses face tracking technology
to apply the filter to just your face or head.
Note: select the icon to enable emotion stamp mode* to place an effect
any where you like on the webcam image. Once enabled and displayed as
, you can repeatedly select different locations on the webcam image
where you would like the selected effect applied.
Scenes: fun locations where your webcam image displays, such as poster
boards, video walls, and movie theater screens.
Particles, Filters, and Distortions
Select the tab to view the following types of effects:
Particles: image particles, such as falling leaves, that pile on your head and
shoulders as they fall through the webcam image.
Filters: video filters that change the complete look of the webcam image.
Distortions: distorts the webcam video. Some distortions let you change* the
focal point of the distortion on the video with the click of a mouse or the
touch of a finger.
Emotions and Gadgets
Select the tab to view the following types of effects:
Emotions: temporary effects that help you express an emotion or
appreciation to the webcam viewer.
Gadgets: applied effects that let you magically add hats, masks, set your hair
on fire, and more using face tracking technology.
12
Page 19

Avatars and Augmented Reality
Note: you can create your own custom avatars in the Avatar Creator. See
Creating New Avatars for more information.
Note: * this feature is not available in some versions of CyberLink YouCam.
Note: * this feature is not available in some versions of CyberLink YouCam.
Select the tab to view the following types of effects:
Avatars: animated character effects that use facial feature tracking to mimic
your face movement and actions. Use an avatar if you are feeling a little
camera shy or if you want to record a video with different characters. See
Using Avatars for more information.
Augmented Reality*: animated effects that appear with you in your webcam
video. See Augmented Reality for detailed information on using augmented
reality.
Rearranging Effects
Webcam Effects
You can rearrange how the visuals effects are displayed on each tab. To do this, just
click or touch the visual effect, and then drag it a new location on the tab.
Downloading and Importing Effects
You can expand your visual effects library by downloading additional effects from
DirectorZone. You can also download more facial features, accessories, and
backgrounds when creating avatars in the Avatar Creator*.
Once downloaded and imported into CyberLink YouCam, these effects are available
right away for webcam chats and when capturing photos and videos.
To download and import effects, do this:
13
Page 20

CyberL ink Yo uCam
Note: if the download button is not available, then the program does not
support the download of that type of effect.
Note: * this feature is not available in some versions of CyberLink YouCam.
Note: emotion effects are added to the webcam video and then disappear
after a few seconds. Other effects (gadgets, avatars, filters, particles, etc.)
remain applied until you apply another effect or select to clear the effect.
1. Select the type of visual effect you want to download and then the
button.
2. The DirectorZone web site loads in your default web browser. You must first
sign in to DirectorZone to download templates. If you don't have an account,
click the Sign up link at the top of the page to get one for free.
3. Browse to an effect on DirectorZone that you want to import and then
download and install it on your computer.
4. Select the YouCam tab to display all the available visual effects you can
download.
5. Find a visual effect you want to download, and then click the Download link
underneath the template.
6. Click Download again, and then save the template to your computer. Find the
location on your computer where you saved the template .dzp file, and then
double-click on it to import it into CyberLink YouCam.
Adding and Applying Visual Effects
To add or apply a visual effect* to your live webcam video, do this:
1. Select the type of visual effect you want to add/apply. See Visual Effects
Overview for a list of all the available effects.
2. Browse through and then select the specific effect you want to add/apply to
the webcam image.
14
Page 21

Webcam Effects
Note: you can create your own custom avatars in the Avatar Creator. See
Creating New Avatars for more information. * this feature is not available in
some versions of CyberLink YouCam.
Note: select the button underneath the webcam preview window to clear
the current avatar and return to the original webcam video image.
Using Avatars
To use an avatar* on your live web cam video, do this:
1. Position your face in the center of the webcam preview window.
2. Select the tab and then select Avatars.
3. Select the desired avatar to turn it on.
Helpful tips
The following are some helpful tips to get the most out of the avatar visual effects
in CyberLink YouCam:
there should be adequate distance between your face and the webcam. At
least 12 to 18 inches (30 - 45 cm).
once the avatar is turned on, hold your head still for about 5 seconds so the
software can properly calibrate and recognize your facial features.
a well-lit environment is required for the avatar effect to work properly.
for best results when using avatars, ensure the video size is between 320x240
and 640x480. See Capture resolution in Camera Settings for more information.
Creating Customs Avatars in the Avatar
Creator
In the Avatar Creator* you can make your own custom avatars for use in webcam
chats and when capturing photos and videos. You can then upload* your custom
avatars to DirectorZone.
15
Page 22

CyberL ink Yo uCam
Note: * this feature is not available in some versions of CyberLink YouCam.
When on the avatar tab, select to open the YouCam Avatar Creator window.
The Avatar Creator window displays as follows:
A - Set Fa ces, B - Ad d Accesso ries, C - U se Ba ckgrounds, D - Pi ck a Color, E - Fa ces, F- Ha ir, G - Eyes, H Eyebrow s, I - N oses, J - M ouths, K - Crea ted Ava ta rs, L - Sel ect R andom Ava tar Tem pla te, M - Previ ew
Ava tar
The avatars you create are available in the effects room, and have all the features
and functions of the pre-created avatars.
Creating New Avatars
To create an avatar, do this:
16
Page 23
Webcam Effects
Note: during the creation of your avatar, select the play button to preview
your avatar. Select the pause button to return to edit mode.
Note: select the button to download* more facial features,
accessories, and backgrounds from DirectorZone. * this feature is not
available in some versions of CyberLink YouCam.
Note: set the color of each facial feature (except the nose) by selecting the
button and then picking a color.
1. Select the tab and then select Avatars.
2. Click the button to open the Avatar Creator.
3. Select the Randomize button to choose a random avatar to use as a template.
You can also select an avatar you created previously, and then click to
edit it.
4. To customize your avatar's face, select the tab and then use the following
features:
select the tab to change the shape of the avatar's face.
select the tab to select a hairstyle for the avatar's face.
select the tab to change the shape of the avatar's eyes.
select the tab to change the eyebrows on the avatar's face.
select the tab to change the shape of the avatar's nose.
select the tab to change the shape of the avatar's mouth.
5. To add accessories such as hats and earrings to your avatar, select the
tab and then use the following features:
select the tab to add a hat or other hair accessory to your avatar.
17
Page 24
CyberL ink Yo uCam
Note: select the accessory item with a line through it to remove the current
hat or earrings from the avatar.
Note: select the button if you would like to import and use your own
custom background image for the avatar. If you don't want to include a
background, select the background with a line through it to remove it from
the avatar.
Note: your avatar is also saved to the avatar visual effects tab. See Using
Avatars for information on using your custom avatar.
Note: * this feature is not available in some versions of CyberLink YouCam.
select the tab to put earrings on your avatar.
6. To change the background for your avatar, select the tab and then a
background from the list.
7. Select the Save button to save the avatar to the created avatars area. If you are
not satisfied with how it turned out, you can also click the Reset button to
restore the avatar to the original.
Uploading Avatars to DirectorZone
Once you are done customizing your avatar, upload* it to DirectorZone and share it
with other users of CyberLink YouCam.
To upload an avatar to DirectorZone, do this:
1. In the main CyberLink YouCam window, select the Sign in to DirectorZone
link on the CyberLink YouCam title bar. Follow the steps to sign in to
DirectorZone.
2. Select the tab and then the button to open the Avatar Creator.
3. Select the avatar in the created avatars area that you want to upload, and then
select .
18
Page 25

Webcam Effects
Note: * this feature is not available in some versions of CyberLink YouCam.
4. In the Upload to DirectorZone window, enter an Avatar name and Description
in the fields provided.
5. Click the Upload button to finalize the upload to DirectorZone, and Finished
to return to the Avatar Creator window.
Augmented Reality
Use augmented reality* to add animated effects that appear with you in your
webcam video. By displaying the pattern in your video, you can add effects that will
impress your friends.
Setting Up Augmented Reality
To use augmented reality, you must set up the feature by drawing/printing/
capturing the required pattern. When you hold this pattern in front of your
webcam, CyberLink YouCam detects it and displays the selected augmented reality
animation.
To set up augmented reality, do this:
1. Select the tab, and then the AR tab.
2. To create the pattern, do one of the following:
Draw on a piece of paper the exact pattern as it is displayed below:
Select the button to print off the pattern, and then use the printing
options to set the size and number of patterns to print per page. Click to
print the pattern.
19
Page 26

CyberL ink Yo uCam
Note: CyberLink YouCam can display up to two duplicate augmented reality
animations at one time if you are using more than one pattern.
Select and then use a mobile phone's camera to take a photo of the
pattern. Select Close once the photo is taken.
Using Augmented Reality
To use augmented reality, do this:
1. Select the tab, and then the AR tab.
2. Select one of the available effects.
3. Take the pattern you drew/printed off/took a photo of, and then hold it steady
in front of your webcam to see the animation.
4. If required, select another augmented reality effect from the list.
Helpful tips:
The following are some helpful tips to get the most out of the augmented reality
visual effects in CyberLink YouCam:
hold the pattern an adequate distance from the webcam. At least 12 to 18
inches (30 - 45 cm).
once an augmented reality effect is turned on, hold your the pattern still for
about 5 seconds so the software can properly detect it.
a well-lit environment is required for the augmented reality effect to work
properly.
to see the augmented reality effect correctly, hold the pattern so the "CL"
pattern is right-side-up and readable in the webcam image.
rotate the pattern to see all sides of the augmented reality effect.
you can include your own photos in augmented reality effects that have the
icon on their thumbnail. To add photos, click on and then select
to specify the photos you want to use.
20
Page 27

Webcam Effects
hold the magnifying glass augmented reality effect in front of your face to
magnify it in the webcam image.
Using the Drawing Tool
In CyberLink YouCam you can draw on the webcam video image. You may also
select from a number of stamps and color boards to apply to the video.
To use the drawing tool on your live webcam video, do this:
1. Select the tab.
2. In the effects/features panel, select the Brushes tab and then use any of the
following:
to draw on the webcam image, select the Marker button, choose your desired
color, and the adjust the size of the drawn line. Next, use your mouse or finger
to draw on the webcam image.
to use an eraser to remove portions of your drawing, select the Eraser button,
and then set eraser size. Next, use your mouse or finger to erase segments of
your drawing.
to replace the webcam image with a color board, select the Color Board
button. Next, choose the color of the color board from the list to enable it.
You can use the color board as a canvas for a drawing.
3. In the effects/features panel, click on the Stamps tab and then choose the
desired color and stamp pattern. Next, use the mouse to apply the stamp by
selecting the webcam image. If you are using a touch-enabled device, you
can use your finger to apply the selected stamps on the webcam image or
drag it across the image for a swirl-like effect.
4. To remove the drawing from the webcam image, select the button
underneath the webcam preview window.
21
Page 28

CyberL ink Yo uCam
22
Page 29

Capturin g M ed ia
Note: * this feature is not available in some versions of CyberLink YouCam.
Chapter 4:
Capturing Media
This section outlines the webcam media capture features in CyberLink YouCam.
You can capture media in several different windows, but this section will focus on
capturing media in the Capture window.
To open the Capture window, do either of the following:
select Camera > Capture from the drop-down menu that appears at the top of
most CyberLink YouCam windows.
select the button in the Library or Edit window.
If you have two webcams connected to your computer, and CyberLink YouCam is
not currently displaying the webcam video you want to capture, select the
button in the preview window to switch to the other connected webcam.
Using Face Beautify on Live Image
Before you begin capturing photo snapshots and recording webcam videos, select
the button underneath the webcam preview window if you want to smoothen
your skin in the live video.
In the Face Beautify window, select the Skin Smoothener* option and then use the
slider to set the amount of smoothing applied to your skin.
Select to close the Face Beautify window and save the changes.
Enhancing the Video Image
Before you begin capturing photo snapshots and recording webcam videos, select
the button underneath the webcam preview window to enhance* the video
23
Page 30

CyberL ink Yo uCam
Note: * this feature is not available in some versions of CyberLink YouCam.
image.
In the Video Enhancement window, the following controls are available:
Auto lighting: select this option to have CyberLink YouCam auto adjust and
correct the lighting in the webcam video image for you.
TrueTheater enhancement*: select this option and then use the following
sliders to enhance the video image using TrueTheater technology from
CyberLink:
Video sharpness: use to enhance the video image, making it sharper and
artifact-free.
Noise reduction: use to reduce the video noise or static on your webcam
video image, making it clearer.
Brightness: use the slider to manually adjust the brightness of the webcam
video image.
Contrast: use the slider to adjust the difference in proportion between lights
and darks in the webcam video image.
Exposure: use the slider to adjust the amount of light that is captured in the
webcam video image. Adjusting this feature can dramatically change the
overall brightness of your webcam video.
Select the Advanced button to adjust the specific settings for your webcam device.
Consult your webcam's user manual for a detailed description of the available
controls. Select the Default button to return all the settings back to their original
values.
Select to close the Video Enhancement window and save the changes.
Taking Photo Snapshots
With CyberLink YouCam you can instantly take a photo snapshot of the current
frame of the webcam video, or take a series of photos in quick succession using the
burst feature.
To take photo snapshots, ensure the photo snapshot option is selected on the
24
Page 31

Capturin g M ed ia
Note: you can add effects to your snapshot by applying them before you
select the capture button. See Using Visual Effects for more information.
Note: you can right-click on a captured snapshot and then select Locate
File on Disk to view its saved location on your computer.
Note: to set how many photo snapshots are taken with the burst feature, see
Burst snapshots in Capture & Snapshot Settings.
Note: you can add effects to your burst snapshots by applying them before
you select the capture button. See Using Visual Effects for more information.
capture controls.
Taking Snapshots
To take one photo snapshot of the current frame of video, do this:
1. Select the button on the capture controls.
2. CyberLink YouCam takes the photo, places it in the captured content area,
and also saves it in the capture folder specified in Capture & Snapshot Settings
. The photo is also imported into the YouCam Media Library.
Using the Burst Feature
To take a series of photo snapshots in quick succession using the burst feature, do
this:
1. Select the button underneath the webcam preview window, and then
ensure that Burst is selected.
2. Select the button on the capture controls.
3. CyberLink YouCam takes the photo snapshots, places them in the captured
content area, and also saves them in the capture folder specified in Capture &
Snapshot Settings. The photos are also imported into the YouCam Media
25
Page 32

CyberL ink Yo uCam
Note: you can right-click on a captured snapshot and then select Locate
File on Disk to view its saved location on your computer.
Note: * this feature is not available in some versions of CyberLink YouCam.
Note: you can add effects to your HDR photo snapshots by applying them
before you select the capture button. See Using Visual Effects for more
information.
Note: ** CyberLink YouCam will only save a copy of the original photo if the
Keep original photo when HDR effect is enabled option is selected in
Other Settings.
Library.
Applying the HDR Effect to Photos
CyberLink YouCam can apply the HDR* effect to a photo after it is captured. The
HDR (high dynamic range) effect adjusts the lighting range on the edges in photos,
allowing you to recover any loss of detail caused by contrasting brightness during
photo exposure. You can also use this effect to give photos a more dramatic tone.
To apply the HDR effect, do this:
1. Select the button underneath the webcam preview window, and then
ensure that HDR effect is selected.
2. Select the button underneath the webcam preview window.
3. CyberLink YouCam takes the photo and then places the original photo**, and
the photo with HDR effect applied, in the captured content area. The HDR
photo is indicated by the HDR logo on its thumbnail. The photos are also
imported into the YouCam Media Library.
Capturing Video
With CyberLink YouCam you can capture a live webcam video, complete with
effects, avatars, added gadgets, frames, filters, particles, distortions, or set in an
applied scene.
26
Page 33

Capturin g M ed ia
Note: CyberLink YouCam supports the recording of high-definition
(1280×720) video if your webcam is capable of outputting at this resolution.
See Capture resolution in Capture & Snapshot Settings for more
information.
Note: if required, you can select to pause the capture. Select
again to continue capturing from the paused position.
Note: you can right-click on a captured video file and then select Locate
File on Disk to view its saved location on your computer.
To capture a webcam video, ensure the video option is selected on the capture
controls.
Capturing a Webcam Video
To capture a webcam video, do this:
1. When you are ready to begin capturing a video, select the button on the
capture controls.
2. CyberLink YouCam begins to capture the current webcam video. You can add
effects to your webcam video as required. See Using Visual Effects for more
information.
3. To stop capturing the video, select the button.
4. When CyberLink YouCam stops capturing the video, your video is placed in
the captured content area, and saved to the capture folder specified in
Capture & Snapshot Settings. The video is also imported into the YouCam
Media Library.
Captured Content
All of your captured snapshots and recorded videos are saved in the captured
content area located beneath the webcam video window.
27
Page 34

CyberL ink Yo uCam
Note: if you are using a touch enabled device, you can scroll through the
media by dragging your finger across the captured content area.
Note: right click on files in the captured content area for more options
including file editing, deletion, renaming, or viewing its location on your
computer. You can also choose to send a media file to an installed program
on your computer, a new location, or to a mail recipient using an installed email program.
You can double click on video files to play them back, or on photos to view them in
the photo viewer. Select the button to view all of the captured media files in
the Library window. See YouCam Media Library for more information.
28
Page 35

Yo uC am Media Lib rary
Note: * this feature is not available in some versions of CyberLink YouCam.
Chapter 5:
YouCam Media Library
The YouCam media library contains all of the captured photo snapshots and
webcam videos you took with CyberLink YouCam. In the Library window you can
view these media files in a calendar view by day, month, or by the faces that were
tagged in the photos. You can also share the media in the library by uploading it to
Facebook or YouTube, or by e-mailing it directly to friends and family.
To open the Library window, do either of the following:
select Camera > Library from the drop-down menu that appears at the top of
most CyberLink YouCam windows.
select the button in the Capture or Edit window.
Viewing Media in the Library
The Library window contains all the photos and videos found in the capture folder
specified in Capture & Snapshot Settings. In the Library window you can browse
through you media, view each individual media file, and then decide to edit, share,
or remove them from library as required.
You can sort the media in the Library window by:
Day: select this option to view all the media files by the day they were
captured in CyberLink YouCam.
Month: select to view a calendar of your media. Use the zoom slider to zoom
in on a specific month, or double-click on specific day to switch back to the
Day view.
Faces*: select to browse through the captured photos by the faces tagged in
them.
You can filter the media in the Day or Month views by:
29
Page 36

CyberL ink Yo uCam
Note: you can only upload one video at a time.
- both photos and videos.
- photos only.
- videos only.
To view a media file, just double click on it. You can also edit a media file by
selecting it and then the button. See Editing Captured Media for more
information on viewing and editing media files.
While viewing media in the Library window, you can also:
use the zoom slider to dynamically resize the media thumbnails or change the
calendar view.
select a media file and then click the button to share it on YouTube,
Facebook, or via e-mail. See Sharing Media in the Library for more
information.
select a media file and then click the button to delete it from the
YouCam media library. This file will also be deleted from your computer's hard
drive.
Sharing Media in the Library
The media files you captured with CyberLink YouCam can be shared on YouTube
and Facebook, or e-mailed directly to your friends and family.
Uploading Videos to YouTube
You can upload videos in the Library window to YouTube. You can also share the
effect information used in your video with other CyberLink YouCam users on
DirectorZone.
To upload a captured video to YouTube, do this:
30
Page 37

Yo uC am Media Lib rary
Note: you must enter a title, description, and at least one tag before you can
upload your video.
Note: sign in to DirectorZone and then select Share in the DirectorZone
Video Gallery if you want to share the uploaded video with the DirectorZone
user community.
1. Select the video file in the Library window that you want to upload to
YouTube.
2. Select the button and then .
3. Follow the instructions on the page to log in to your YouTube account and
authorize YouCam to upload.
4. The describe your video window displays. Enter the details about your video
as follows:
Title: enter the title of your webcam video.
Description: enter in a short description of your webcam video.
Tags: enter in several tags, separated by a comma, that describe your video.
Tags are keywords that people can search for on YouTube.
Video category: select the relevant video category type from the available list.
Broadcast: select whether to share your video with the world or set it as
private.
5. Select the Next button to proceed. The copyright disclaimer window is
displayed.
6. Read and confirm the copyright information by selecting the corresponding
check box and then select the Upload to begin uploading your webcam video
to YouTube. Select the Finished button once your video is uploaded.
Uploading Photos to Facebook
You can upload photos in the Library window to your Facebook page. To upload
captured photos to Facebook, do this:
1. Select the photo in the Library window that you want to upload to Facebook.
2. Select the button and then .
31
Page 38

CyberL ink Yo uCam
Note: if you are creating a new album, you must enter an album name before
you can upload your photos.
Note: you can only upload one video at a time.
3. Follow the instructions on the page to log in to your Facebook account and
authorize YouCam to upload.
4. Once the authorization and connection process is complete, enter the details
about your photos as follows:
Select album: select an existing album from your Facebook page to upload
the photos to. Select Create a New Album to add the photos to a new album.
Album name: enter a name for the newly created photo album.
Album location: enter in the location where the photos were taken.
Album description: enter in a short description for the photos you are
uploading.
Privacy: select who has permissions to view these photos once they are
uploaded.
Add photo description: enter a description that will display under all of the
uploaded photos.
5. Select Upload to begin uploading your photos to Facebook. Select the
Finished button once your photos are uploaded.
Uploading Videos to Facebook
You can upload videos in the Library window to Facebook. To upload a captured
video to Facebook, do this:
1. Select the video file in the Library window that you want to upload to
Facebook.
2. Select the button and then .
3. Follow the instructions on the page to log in to your Facebook account and
authorize YouCam to upload.
4. Once the authorization and connection process is complete, enter the details
32
Page 39

Yo uC am Media Lib rary
Note: CyberLink YouCam uses your computer's default mail client to e-mail
photos and videos, if available. The e-mail feature does not work if you
usually send e-mails through a web browser. To change the e-mail account
that CyberLink YouCam uses, please go to your e-mail application (such as
Microsoft Outlook, Outlook Express, etc.) and reset/change your e-mail
account settings.
Note: the maximum allowed total file size is 20 MB. If you are trying to e-mail
a single file that exceeds this size, it is recommended that you edit the file
outside of YouCam or try reducing the capture quality or format in YouCam
Settings before the next time you capture. Please note that your e-mail
provider may also have a file size limit that is less than 20 MB.
Note: if your computer does not have a default e-mail client configured, then
the auto e-mail feature may not work. If it does not work, right-click on a
media file in the Captured Content area, select Locate File on Disk, and
then manually attach the media files to the e-mail message.
about your video as follows:
Title: enter the title of your webcam video.
Description: enter in a short description for the video you are uploading.
5. Select Upload to begin uploading your video to Facebook. Select the Finished
button once your video is uploaded.
E-mailing Photos and Videos
You can e-mail photos and videos in the Library window to your friends and family.
To e-mail photo snapshots and videos, do this:
1. Select all of the media files in the Library window that you want to e-mail.
2. Select the button, and then . CyberLink YouCam launches your
default mail client and attaches all of the selected media files to the new email message.
3. Complete the sending of the e-mail in your default e-mail program as
required.
33
Page 40

CyberL ink Yo uCam
34
Page 41

Ed iting Captured Media
Note: while editing a photo, click the button at any time to undo the last
edit. Select the button at the bottom of the Edit window to reset all
the edits made to a photo.
Chapter 6:
Editing Captured Media
You can perform edits on the photos captured in CyberLink YouCam. To open the
Edit window, do any of the following:
right click on a photo in the captured content area and then select Edit Photo.
select the button in the photo viewer.
select Camera > Edit from the drop-down menu that appears at the top of
most CyberLink YouCam windows.
select the button in the Library window.
Editing Photo Snapshots
In the Edit* window you can tag and edit the face tags in photos, add preset effects
and frames on the image, draw on the photo, or crop out unwanted portions of the
photo.
To edit a photo, select it in the Library window and then select . Once in
the Edit window, use the and buttons to go to the next or previous photo
or video if required.
In the Edit window you can perform the following edits:
select to use Face Beautify* to touch up the your webcam photos. See
Face Beautify for more information.
select to add a stylish and festive border to the photo. Once you have
selected the frame you want to use, click to set the change.
35
Page 42

CyberL ink Yo uCam
Note: you cannot apply stamps on photos in the Edit window.
Note: * this feature is not available in some versions of CyberLink YouCam.
select to add a color preset effect on the photo. Select a preset effect
from the list to apply it to the photo. Once you have selected the preset effect
you want to use, click to set the change.
select to draw on the photo. See the relevant parts in Using the Drawing
Tool for information on using the marker, eraser, and color boards to draw on
the photo. Once you have finished drawing on the photo, click to set the
change.
select to crop the current photo. Set the size of the crop area by
selecting one of the fixed ratios available. Once selected, you can select in the
crop area on the photo and drag it to the part of the photo you want to keep.
If none of the fixed ratios fit your requirements, select the Freeform option
and then select and drag the edges of the crop area. If required, use the
Straighten slider to fix a crooked photo. Select to perform the crop once
you are ready.
select the button to tag the faces in the photo, or edit the existing
tagged faces. See Tagging Faces in Photos for detailed information on
tagging faces in photos. Once you are done, select the button again to
set your changes.
Once you are done editing a photo, select the button to save the changes.
Click to save it to the original photo, or to save it as a new photo that will
be added to the library.
36
Page 43

Ed iting Captured Media
Note: if you want to use Face Beautify on more than one person in a photo,
you must do them one at a time. * this feature is not available in some
versions of CyberLink YouCam.
Note: not all the feature points are shown in each window, as they vary
depending on the beautifying feature available. For Blemish Removal, there
are no feature points available.
Face Beautify
You can use the following Face Beautify* features to touch up the people in your
captured photos. If there is more than one person detected in a selected photo,
CyberLink YouCam asks you which person you want to beautify when you enter the
Face Beautify window.
When you enter any of these feature windows, CyberLink YouCam first displays the
usage tips (the first time only) and then the face feature points on your photo for a
brief moment. However, you can:
select to show the tips to find out more about the current feature. Select
anywhere on photo to hide the tips.
select to show the feature points, which should align to the features of
the face (eyes, nose, mouth, and chin). If required, move the feature points to
the proper locations on the photo. Select to hide the feature points at
any time.
when using any of the Face Beautify features, you can select and hold the
button to compare the changes to the original photo.
Skin Smoothener
Select the Skin Smoothener option to smoothen the person's skin. Use the
Strength slider to set the amount of smoothing applied to the skin, and then select
to apply the changes.
37
Page 44

CyberL ink Yo uCam
Skin Tone
The Skin Tone feature lets you adjust the person's skin color. Select a color to use as
the foundation for the new skin tone, and then use the slider to adjust the amount
of the color applied. When you are satisfied with the results, select to apply the
changes.
Face Reshaper
Use the Face Reshaper to change the shape of the person's face. Use the Strength
slider to change the shape of the face as required, and then select to apply the
changes.
Blemish Removal
Select the Blemish Removal option and CyberLink YouCam will auto remove all
detected skin blemishes on the person's face. If some blemishes were not removed,
just select each of them to remove them manually. Once you are satisfied with the
results, select to apply the changes.
Blush
The Blush feature lets you apply blush on the person's cheeks. Use the Strength
slider to set the amount of blush applied to the skin, and then select to apply
the changes.
Shine Removal
Select Shine Removal to remove any shiny parts on the person's face. Use the
Strength slider to set the amount of shine removal applied, and then select to
apply the changes.
38
Page 45

Ed iting Captured Media
Note: the Teeth Whitener feature is unavailable if CyberLink YouCam
detects that the person's mouth in the photo is closed. If YouCam incorrectly
detected a closed mouth, select the button to manually enable and
then align the feature points over the mouth.
Note: * this feature is not available in some versions of CyberLink YouCam.
Eye Enlarger
The Eye Enlarger lets you increase the size of the person's eyes. Use the Strength
slider to resize eyes, and then select to apply the changes.
Eye Bag Removal
Use the Eye Bag Removal feature to remove the bags under the person's eyes. Use
the Strength slider to set the amount of removal applied, and then select to
apply the changes.
Teeth Whitener
Select Teeth Whitener to whiten the teeth in your photos. Use the Strength slider to
set the amount of whitening applied to the teeth, and then select to apply the
changes.
Tagging Faces in Photos
To tag* the faces in a captured photos, do this:
1. Select the button to tag the faces in the photo.
2. CyberLink YouCam will add face tags to all the faces it detects. Resize each
face tag square if required and then select Unknown.
3. Enter the person's name that is tagged and then select to add them to the
YouCam media library and tag the person in the photo.
39
Page 46

CyberL ink Yo uCam
Note: the next time you capture a photo of the tagged person, CyberLink
YouCam will recognize and auto tag them for you. If the face tag is incorrect,
you can always select the name and enter the correct person.
Note: to play a video in the Library window or the captured content area, just
double click on it to start playback.
4. If CyberLink YouCam did not detect a face in the captured photo, select the
button. Resize and then drag the face tag square onto the face. Select
Unknown, enter the person's name, and then select .
5. Once all of the faces are tagged in the photo, select to save your
changes.
Playing Videos
In the Edit window you can play back the webcam videos captured in CyberLink
YouCam. Use the and button to go to find the video you want to play, and
then select the button to play It. Select to pause the playback.
40
Page 47

Pan oram as
Note: * this feature is not available in some versions of CyberLink YouCam.
Note: if required, select the button at the top of the screen to display the
grid. The grid can help you align the photo snapshots for the panorama and
ensure they are straight.
Note: if you want to retake a photo in the panorama, click the button to
remove the last photo taken.
Chapter 7:
Panoramas
In CyberLink YouCam you can create a panorama* image by taking a series of
photos snapshots with your webcam.
To open the Panorama window, do any of the following:
select Camera > Panorama from the drop-down menu that appears at the top
of most CyberLink YouCam windows.
in full screen mode, select the button, and then Panorama.
When you enter the Panorama window, CyberLink YouCam displays the usage tips
(the first time only). Select any where on the window to hide the tips. If you'd like to
view them again at any time, just select in the top left corner.
Creating a Panorama Image
To create a panorama image with your webcam, do this:
1. Select the screen to hide the panorama tips.
2. Position the webcam where you want to take the first photo snapshot to use
in the panorama, and then select the button.
3. Move the webcam to the next position, and then select the button again.
If the photo snapshot was taken, it will be added to the stitch result area.
41
Page 48

CyberL ink Yo uCam
Note: the photo snapshots for the panorama should be taken from left to
right.
Note: for best results, check the edge of the last photo, which is displayed to
the left of the live webcam image. Be sure to align the edge of the last photo
with the next photo you capture. CyberLink YouCam will not add the photo to
the stitch result area if the alignment with the previous photo is too far off.
4. Repeat step three, taking all the photo snapshots you want in the panorama
image.
5. Once you have taken all the photo snapshots for the panorama, select the
button. CyberLink YouCam will stitch all the photo snapshots together
to create the panorama image.
6. Select the button to save the panorama and import it into the YouCam
Media Library.
42
Page 49

Full Scree n M ode
Note: * this feature is not available in some versions of CyberLink YouCam.
Note: mouse movements and the YouCam tool bar are not displayed in photo
snapshots or recorded videos captured in full screen mode.
Note: before capturing media in full screen mode, be sure to select to
set the capture options. In the capture options you can have the HDR effect
applied to photo snapshots, use the burst feature, or take a panorama with
your webcam. See Panoramas for more information on creating a panorama
image.
Chapter 8:
Full Screen Mode
CyberLink YouCam includes a full screen mode* that is optimized for touch screens.
To access the full screen mode, do either of the following:
select Camera > Full Screen from the drop-down menu that appears at the top
of most CyberLink YouCam windows.
select the button in the Capture webcam preview window.
Features in Full Screen Mode
Once in full screen mode, you can:
use the zoom slider on the left side of the window to zoom in or out on the
webcam image.
select to switch to another connected webcam.
take photo snapshots and record webcam videos. See Capturing Media for
detailed information about capturing webcam media.
select to apply effects and draw on the webcam image. Select to
clear any applied effects if required. See Webcam Effects for more information
about applying effects and drawing on the webcam image.
43
Page 50

CyberL ink Yo uCam
select to smoothen your skin in the live video. See Using Face Beautify
on Live Image for more information.
select to enhance the webcam's video image. See Enhancing the Video
Image for more information.
select to configure the YouCam settings. See YouCam Settings for more
information.
select the square media thumbnail button on the right of the YouCam toolbar
to edit captured media in the Edit window. See Editing Captured Media for
more information.
Select or press the Esc key on your keyboard to exit full screen mode.
44
Page 51

Pre senta tio ns
Note: * this feature is not available in some versions of CyberLink YouCam.
** in IM mode this feature is called Desktop Share, as there is no capture
feature available.
Note: when using this feature on a desktop that extends to a secondary
display device, it only captures desktop movements on the primary display
device.
Note: you can select the edges and corners of the box to resize the fixed
area.
Chapter 9:
Presentations
This section provides a complete overview of the presentations section of CyberLink
YouCam. In it you can capture a video of the mouse movements on your
computer's desktop, create a video presentation, and enable a second webcam for
use in videos and for conferencing.
Desktop Capture
The desktop capture* feature lets you capture a video of your mouse movements
on your computer's desktop. You can use this feature in both stand alone and IM**
modes, allowing you to record a video or share your desktop movements in a
webcam chat.
To capture your desktop movements, do this:
1. To access the desktop capture feature select Presentations > Desktop Capture
from the drop-down menu that appears at the top of most CyberLink YouCam
windows.
2. In the Desktop Capture dialog, select:
Full screen to capture/share your entire desktop area.
Mouse movement and then the size of the capture area from the drop-down.
This option will capture/share an area that follows the movement of your
mouse.
Fixed area and then select and drag the displayed box to the area of your
desktop that you want to capture/share.
45
Page 52

CyberL ink Yo uCam
Note: the create presentation feature is also available in IM mode, but
instead of recording the video presentation, CyberLink YouCam shares it live
with the person you are chatting with on the webcam. * this feature is not
available in some versions of CyberLink YouCam.
Note: the Microsoft PowerPoint files can be in either the PPT or PPTX
format. Files with the extension PPTX, are not supported in video
presentations if Microsoft Office 2007 or above is not installed on your
system. However, if you are using Microsoft Office 2002/2003, you can install
a converter from Microsoft to include these files in the video presentation.
3. Set the Capture/Stop Hotkey by selecting it from the drop-down. A hotkey is a
key on your keyboard that you can press to start and stop the desktop
capture.
4. Select Capture (or press the hotkey on your keyboard specified in the previous
step) to begin.
5. Once you are finished recording your video, press the Capture/Stop Hotkey (
F9 is the default) you specified to stop the desktop capture.
6. Click Restore to return to the CyberLink YouCam main window. If you are
capturing a video in stand alone mode, the recorded video is placed in the
captured content area, and saved in the capture folder specified in Capture &
Snapshot Settings. The video is also imported into the YouCam Media Library.
Creating Video Presentations
In CyberLink YouCam you can create and record video presentations* that
incorporate a PowerPoint presentation and video from your webcam.
There are five presentation modes to choose from, and you can use pen mode to
highlight important points in the presentation video.
To create a presentation video, do this:
1. To access the Create Presentations window select Presentations > Create
Presentation from the drop-down menu that appears at the top of most
CyberLink YouCam windows.
2. Select the button and then the PowerPoint files (in the PPT or PPTX
format) you want to use in the presentation. You can also drag and drop files
onto the Create Presentations panel.
46
Page 53

Note: once a PowerPoint is imported into Create Presentations panel, select
to change the size of the slides thumbnails if required.
3. Select one of the following video presentation modes:
Note: you can switch to another mode at any time during the video
presentation, if required.
Note: if you are in IM mode, CyberLink YouCam begins sharing the video
presentation as soon as the Presentations option is selected, and the
PowerPoint file is imported.
Note: if required, you can select to pause the capture. Select
again to continue capturing from the paused position.
Teacher mode: the webcam video and a larger view of the PowerPoint
file are shown simultaneously.
Full window mode: the PowerPoint file occupies the entire video
webcam window.
Speaker mode: the PowerPoint file and a larger webcam video are
shown simultaneously.
Share mode - camera: only the webcam video image is displayed in the
video presentation.
Share mode - side by side: the PowerPoint file and the webcam video
image are shown side by side in the video presentation.
Pre senta tio ns
4. Ensure the video option is selected on the capture controls:
5. Select the button to begin capturing the video presentation, starting
from the first selected slide.
6. Use the and buttons to go through the slides in the PowerPoint file,
as required. You can also use the keyboard hotkeys PAGE UP and PAGE DOWN
respectively to go through the slides.
47
Page 54

CyberL ink Yo uCam
Note: select to enable eraser mode (and to set the eraser size).
Use your mouse or finger to erase any unwanted drawn lines on the
presentation, if required. Select underneath the webcam preview window
to clear drawn lines.
Note: if sharing the video presentation in IM mode, select another feature in
CyberLink YouCam to stop the presentation, or just end the video call.
7. If required, select to enable marker mode and use your mouse or finger
to draw on the presentation to highlight important points. Select to set the
width of the drawn line and its color by selecting one of the default colors. If
you'd liked to use a custom color, select the last color option and then use the
eyedropper to choose it.
8. Select the button to stop capturing the presentation video. The
presentation video is placed in the captured content area, and saved to the
capture folder specified in Capture & Snapshot Settings. The video is also
imported into the YouCam Media Library.
48
Page 55

Pre senta tio ns
Note: no visual effects can be applied when using two webcams, and
CyberLink YouCam sets the resolution to 640x480 for both. * this feature is
not available in some versions of CyberLink YouCam.
Note: video enhancements enabled in the Video Enhancement window are
only applied to the primary webcam's image.
Enabling Dual Webcam Videos
CyberLink YouCam lets you use two* webcams at once to record videos and in
webcam chats in IM mode for web conferencing.
To enable a second webcam in CyberLink YouCam, do this:
1. Ensure that the second webcam is connected to your computer and turned
on.
2. To enable the second webcam select Presentations > Dual Video from the
drop-down menu that appears at the top of most CyberLink YouCam
windows.
3. On the Dual Video panel, Select your second webcam from the drop-down
list.
4. Next, select one of the available layouts for your PiP webcam video.
5. Proceed to record your video or participate in the web conferencing call as
required.
To turn off the second webcam video, just exit the Dual Video panel by selecting
another feature in CyberLink YouCam or closing the program.
49
Page 56

CyberL ink Yo uCam
50
Page 57

Yo uC am Utilities
Chapter 10:
YouCam Utilities
This section outlines the useful utilities in CyberLink YouCam, including a feature
that lets you log in to Windows and web sites when it detects your face, and
another that protects your computer when your face leaves the webcam image.
Utilities also include the video surveillance features of CyberLink YouCam, and
quick access to the YouCam mirror.
YouCam Mirror Mode
The CyberLink YouCam Mirror is designed to act just like a mirror if ever you need
one.
To open the CyberLink YouCam Mirror, do one of the following:
select Utilities > Mirror from the drop-down menu that appears at the top of
most CyberLink YouCam windows.
right-click on the CyberLink YouCam icon in the system tray and then select
Launch YouCam Mirror.
select CyberLink YouCam 7 Mirror from the start menu.
When viewing the CyberLink YouCam Mirror, the following options are available:
use the available slider to zoom in or out on the mirror's image, as required.
select to enhance the mirror's image. See Enhancing the Video Image
for information on enhancing the image.
select the button to horizontally flip the mirror's image.
select the button to access the Mirror Settings.
Mirror Settings
In the mirror settings dialog, configure the settings as follows:
select the Resolution tab and then set the resolution you want CyberLink
YouCam to use in mirror mode. The resolutions that are available depend on
51
Page 58

CyberL ink Yo uCam
Note: to ensure the best mirror image is available, it is recommended that
you set the resolution to the maximum available. Mirror mode works best
with webcams that support high-definition (1280×720) output.
your webcam's supported video output.
select the Frames tab and choose a frame for your CyberLink YouCam Mirror.
When you are done, select to close the settings dialog and set your changes.
Video Surveillance
CyberLink YouCam allows you to select from a number of video surveillance
options, or timed recordings, that let you set a time when the recording
automatically stops recording. You can also make a time-lapse recording or set up
your webcam to begin recording when it detects motion.
Then once CyberLink YouCam finishes recording, you can have the program
automatically e-mail the captured video to a specified e-mail address.
Motion Detection Recording
When motion detection recording is enabled, CyberLink YouCam begins a
recording if your webcam detects motion and then stops once the movement
ends.
To enable a motion detection recording, do this:
1. To access the Surveillance window select Utilities > Surveillance from the
drop-down menu that appears at the top of most CyberLink YouCam
windows.
2. Select the Motion detection recording option and then enter the Recording
end time in the fields provided.
3. In the Define detection area, use your mouse to resize and then drag the box
to the location on the video image where you CyberLink YouCam to detect
motion.
4. Use the Sensitivity slider to set the level of motion sensitivity. You may need
to scroll down in the settings window to find this slider.
5. Select Start. CyberLink YouCam enters stand by mode and captures video
when it detects motion.
52
Page 59

Yo uC am Utilities
Note: CyberLink YouCam remains in stand by mode for motion recording
until the specified end time or until you select the button.
Note: you can right-click on the captured video and select Locate File on
Disk to view its saved location on your computer.
Note: CyberLink YouCam continues recording until the specified end time or
when you select the button.
Note: you can right-click on the captured video and select Locate File on
Disk to view its saved location on your computer.
6. Any recorded videos are placed in the captured content area, and saved to the
capture folder specified in Capture & Snapshot Settings. The video is also
imported into the YouCam Media Library.
Continuous Recording
The continuous recording option lets you set a recording that continues,
uninterrupted, until the specified end time.
To enable a continuous recording, do this:
1. To access the Surveillance window select Utilities > Surveillance from the
drop-down menu that appears at the top of most CyberLink YouCam
windows.
2. Select the Continuous recording option and then enter the Recording end
time in the fields provided.
3. Select Start. CyberLink YouCam begins to record the current webcam video.
4. The captured video is placed in the captured content area, and saved to the
capture folder specified in Capture & Snapshot Settings. The video is also
imported into the YouCam Media Library.
Time-lapse Recording
When Time-lapse Recording is enabled, CyberLink YouCam takes a series of
snapshots at specified intervals. These snapshots are then placed together in a
video file, creating a video that uses time-lapse photography.
To enable a time-lapse recording, do this:
53
Page 60

CyberL ink Yo uCam
Note: CyberLink YouCam continues recording until the specified end time or
when you select the button.
Note: you can right-click on the captured video and select Locate File on
Disk to view its saved location on your computer.
Note: * this feature is not available in some versions of CyberLink YouCam.
1. To access the Surveillance window select Utilities > Surveillance from the
drop-down menu that appears at the top of most CyberLink YouCam
windows.
2. Select the Time-lapse recording option and then enter the Recording end
time in the fields provided.
3. Enter in the amount of time between captures in the Take a snapshot every
field.
4. Select Start. CyberLink YouCam begins to capture snapshots of the webcam
video at the specified intervals.
5. The outputted time-lapse photography video is placed in the captured
content area, and saved to the capture folder specified in Capture & Snapshot
Settings. The video is also imported into the YouCam Media Library.
Auto E-mailing Surveillance Videos
Once a surveillance video finishes recording, CyberLink YouCam can automatically
e-mail* the captured video to a specified e-mail address.
To automatically e-mail a captured surveillance video, do this:
1. In Video Surveillance panel, select the Auto e-mail option to enable this
feature and then select .
2. Enter in the e-mail settings information as follows:
E-mail address: enter in the e-mail address you want CyberLink YouCam to
automatically e-mail the captured videos to.
E-mail size: select the maximum size for each e-mailed video file. If the file
size exceeds the maximum selected, CyberLink YouCam splits the file into
54
Page 61
Yo uC am Utilities
Note: * this feature is not available in some versions of CyberLink YouCam.
Note: Face Login is designed as a convenient tool to help you log into
Windows and web sites quickly. It should not be used to protect your
computer and personal information from unwanted access.
smaller video files before e-mailing.
SMTP host: enter in the mail server CyberLink YouCam can use to e-mail the
video. Please consult your ISP provider for this information.
Username: enter the your e-mail username.
Password: enter your e-mail password.
Capture folder: select the folder where you want the e-mailed videos saved.
Select to change the specified folder if required.
3. Select OK to save the settings. CyberLink YouCam automatically e-mails a
captured surveillance video to the specified e-mail address the next time it
finishes capturing one.
Face Login
The Face Login feature of CyberLink YouCam let's you use your face to log in to
Windows and sign in to your favorite web sites*.
Setting Up and Enabling Face Login
To set up and enable Face Login, do this:
1. To access the Face Login window select Utilities > Face Login from the drop-
down menu that appears at the top of most CyberLink YouCam windows.
2. You will be prompted to enter your current Windows password. Enter it in the
field provided, and then select OK. Be sure to select the Remember my
password option so that you won't be prompted to enter it again.
3. Place your face in the center of the webcam image frame, and then select the
button. CyberLink YouCam will detect your face and capture an image it
will use to log into Windows and web sites.
55
Page 62

CyberL ink Yo uCam
Note: if you previously enabled Face-out, CyberLink YouCam will use the
same image. Select the Show all faces link if you want to view and remove
any of the captured images of your face.
Note: the sign in to web sites feature only works when signing into web sites
using Windows Internet Explorer 7 or above.
Note: the sign in to web sites feature only works when signing into web sites
using Windows Internet Explorer 7 or above. * This feature is not available in
some versions of CyberLink YouCam.
4. If required, select the button again to capture additional images of your
face. CyberLink YouCam can capture up to 40 different images of your face.
The more images you capture, the more accurate the face detection is when
using Face Login feature.
5. Set the features of Face Login you want to enable as follows:
Log in to Windows with my face: select this feature if you want CyberLink
YouCam to display the Face Login pop-up window when you are logging in to
Windows on your computer. Once enabled, all you'll need to do is place your
face in the center of the webcam image to log in.
Sign in to web sites with my face: select this feature if you want CyberLink
YouCam to sign you in to web sites when your face is placed in a webcam
image. See Adding a Web Site to the Sign In List for information on the steps
to adding a new web site.
Accuracy setting: use the slider to set the accuracy CyberLink YouCam
requires to confirm your face. If you set the slider to High, you will have to
blink your eyes to log in.
6. Select OK to save the changes and enable Face Login. The next time you try to
log in to Windows, or sign in to a web site, the Face Login pop-up window
displays. Just place your face in the center of the webcam image to log in.
Adding a Web Site to the Sign In List
Once you have enabled CyberLink YouCam to sign in to web sites* in the settings
window, do the following to add a web site to the Face Login Web Site List.
1. Go to the web site you want to add to the sign in list.
2. Sign in to the web site as you normally do with your username and password.
56
Page 63

Yo uC am Utilities
Note: if your web browser auto signs you in to the web site, you must sign
out and then manually sign in again to add it to the list.
Note: if you don't want add a web site to the list, select Don't show this
dialog again for this web site and then the No, Thanks button.
3. Once you have successfully signed in, CyberLink YouCam displays the Face
Login window. Set the information in the window as follows:
Site name: CyberLink YouCam auto fills this field with the name from the web
site. If required, edit the site name so that it is easily identifiable in the web site
list.
4. Select Yes to close the window and add the web site to the list.
5. The next time you try to sign in to this web site, the Face Login pop-up
window displays. Just place your face in the center of the webcam image to
sign in.
Managing Web Site List
You can manage the list of web sites that you have added to the Face Login Web
Site List. CyberLink YouCam keeps track of both the web sites you want to log in to
with your face, and those you chose not to include in the list.
To manage the Face Login Web Site List, do this:
1. To access the Face Login window select Utilities > Face Login from the drop-
down menu that appears at the top of most CyberLink YouCam windows.
2. Select the Manage Web Site List button.
3. If required, on the Included Web Sites tab, select a web site and then:
to view information about the web site.
if you want to remove the web site from the list. CyberLink YouCam will no
longer prompt you when you try to sign into that web site.
4. If required, on the Excluded Web Sites tab, select a web site and then if you
want to remove it from the list. CyberLink YouCam will prompt you the next
you try to sign into that web site.
5. Select OK to close the Face Login Web Site List.
57
Page 64

CyberL ink Yo uCam
Note: * this feature is not available in some versions of CyberLink YouCam.
Editing Face Login Settings
To edit the Face Login settings, do this:
1. To access the Face Login window select Utilities > Face Login from the drop-
down menu that appears at the top of most CyberLink YouCam windows.
2. In the YouCam Face Login Settings window, edit the settings as follows:
select the Capture More button if you want CyberLink YouCam to capture
another image of your face. CyberLink YouCam can capture up to 40 different
images of your face.
deselect the Log in to Windows with my face item to disable the Face Login in
feature when you log in to Windows. Once disabled, the Face Login pop-up
window no longer displays when logging in.
deselect the Sign in to web site with my face item to disable the Face Login in
feature when you sign in to web sites. Once disabled, the Face Login pop-up
window no longer displays when you sign in to a web site.
select the Manage Web Site List button to view and edit the Face Login Web
Site List. See Managing Web Site List for more information.
3. Select OK to save your changes.
Face-out
The Face-out* utility in CyberLink YouCam can auto protect your computer when
your face exits the webcam image, by locking it, or by making it hibernate or sleep.
Setting Up and Enabling Face-out
To set up and enable Face-out, do this:
1. To access the Face-out window select Utilities > Face-out from the drop-down
menu that appears at the top of most CyberLink YouCam windows.
2. You will be prompted to enter your current Windows password. Enter it in the
field provided, and then select OK. Be sure to select the Remember my
password option so that you won't be prompted to enter it again.
58
Page 65

Yo uC am Utilities
Note: if you previously enabled Face Login, CyberLink YouCam will use the
same image. Select the Show all faces link if you want to view and remove
any of the captured images of your face.
Note: to disable Face-out, just reenter Face-out settings and then deselect
Enable Face-out when I am not in front of the PC item.
3. Place your face in the center of the webcam image frame, and then select the
button. CyberLink YouCam will detect your face and capture an image it
will use for Face-out.
4. If required, select the button again to capture additional images of your
face. CyberLink YouCam can capture up to 40 different images of your face.
The more images you capture, the more accurate the face detection is when
using the Face-out feature.
5. Set the features of Face-out you want to enable as follows:
Enable Face-out when I am not in front of the PC: select this feature if you want
CyberLink YouCam to display a pop-up window when your face leaves your
webcam's image. After the specified duration, CyberLink YouCam will perform
the specified action to protect your computer.
Do the following action: select whether you want CyberLink YouCam to lock
Windows, or make your computer sleep or hibernate.
Time before countdown: specify the length of time you want CyberLink
YouCam to wait before it prompts you and starts the countdown.
Length of countdown: specify length of time you want CyberLink YouCam to
wait before it performs the specified action, i.e. lock Windows, turn the screen
off, or make your computer sleep or hibernate.
Accuracy setting: use the slider to set the accuracy CyberLink YouCam
requires to confirm your face.
6. Select OK to save your changes and enable Face-out.
59
Page 66

CyberL ink Yo uCam
60
Page 67

Co nfigu ring Yo uCam Settin gs
Note: CyberLink YouCam supports high-definition (1280×720) video capture
if your webcam supports it. If capable, the 1280×720 option is available
(without "Snapshot only" beside it) in the Capture resolution drop-down
list.
Note: you can also select the webcam image and drag left or right to flip it
horizontally. If using a touch enabled display device, you can flip it by
swiping left of right on the webcam image.
Note: you need to have a microphone connected to your computer or
webcam to capture webcam video with audio.
Chapter 11:
Configuring YouCam
Settings
To configure the settings in CyberLink YouCam, select the button on the top of
the effects/features panel. Once you are done configuring the CyberLink YouCam
settings, select OK to set your changes.
Camera Settings
In the settings window, select the tab. The available options are as follows:
Capture device: select the primary webcam device you want to use with
CyberLink YouCam from the drop-down list.
Capture resolution: select the size/resolution of captured video from the dropdown list. Selecting a larger video size, results in a larger video file.
Audio device: select the audio device from the drop-down list that you want
YouCam to use when capturing webcam videos.
Flip horizontally: select this option to flip the webcam image horizontally.
Capture with audio: select this option if you want captured webcam video to
have audio.
Enable video zoom: select this option if you want to zoom in on the webcam
61
Page 68

CyberL ink Yo uCam
video image. Once selected, the following features are enabled:
Auto face detection: select to have CyberLink YouCam detect your face and
auto zoom in slightly. Using this feature enables the program to track and
follow your face as it moves around the webcam image.
Manual zoom: use the slider to manually zoom (up to 4x) in on a specific
part of the webcam video. Drag the boxed area to the area of the video you
want the camera to focus on.
Capture & Snapshot Settings
In the settings window, select the tab. The available options are as follows:
Capture folder: set the folder where captured photos and videos are saved. To
change the capture folder, select the button and then a new folder
location.
Countdown before capture: select this option to enable a three second
countdown before CyberLink YouCam begins capturing photo snapshots or
videos.
Display timestamp: select this option to display a timestamp on the webcam
image. Once enabled, select the desired timestamp display format from the
drop-down list.
Capture format: select the file format for captured video from the drop-down
list. If your computer supports Intel Quick Sync Video Technology, the HD
H.264 (MP4) format video format is available.
Capture quality: select the quality of the captured video from the drop-down
list. The higher the quality selected, the larger the file size created.
Snapshot format: select the photo file format of the captured snapshots from
the drop-down menu.
Shutter speed: select the rate of exposure, or the quickness the webcam takes
the snapshots.
Burst snapshots: in the field provided, specify the number (between 2 and 10)
of photo snapshots you want taken when the burst capture option is enabled.
62
Page 69

Co nfigu ring Yo uCam Settin gs
Note: the CyberLink Product Improvement Program for YouCam will not
collect any personal information for purposes of identifying you.
Other Settings
In the settings window, select the tab. The available options are as follows:
Change UI language: select the desired language of the CyberLink YouCam
user interface. Select Auto to have the UI language match your computer's
operating system language.
Effect thumbnail size: lets you set the size of the visual effect thumbnails for
emotion effects, avatars, gadgets, scenes, etc.
Show YouCam system tray icon at startup: select this option to have the
CyberLink YouCam system tray icon display when you log in to Windows.
Enable effect preview: when selected, CyberLink YouCam displays a preview
of the frame, distortion, and filter effects in the visual effect thumbnail.
Disable this option to save computer resources.
Keep original photo when HDR effect is enabled: if the HDR effect is enabled
when taking photo snapshots, select this option if you want to keep a copy of
the original photo. CyberLink YouCam applies the HDR effect to this original
photo after capture. See Applying the HDR Effect to Photos for more
information.
Check for product update information: select this option to have CyberLink
YouCam periodically check for program updates. You will be informed about
these updates in the Notification Center.
I want to participate in the CyberLink Product Improvement Program: select
this item if you would like to participate in the CyberLink Product
Improvement Program for YouCam. Once enabled, CyberLink YouCam will
collect information about the hardware and software configuration of your
computer system, as well as your usage behavior and statistics related to the
software. Click the Learn More link to view more detailed information about
the content collected.
63
Page 70

CyberL ink Yo uCam
DirectorZone Settings
On the settings window, select the tab. The available options are as follows:
Sign in to DirectorZone:
Auto sign in to DirectorZone when YouCam is launched: select this option and
then enter in your e-mail address and password to automatically sign in to
DirectorZone when the program is opened. If you do not have a DirectorZone
account, click on the Get an Account link.
64
Page 71

Te chnical Su pp ort
Note: here are the steps to generate the system info DxDiag.txt file: Click
Windows (start) button, and then search for "dxdiag". Click Save All
Information button to save the DxDiag.txt file.
Chapter 12:
Technical Support
If you require technical support, then this chapter can help. It includes all the
information you need to find the answers you are looking for. You may also find
answers quickly by contacting your local distributor/dealer.
Before Contacting Technical Support
Before contacting CyberLink technical support, please take advantage of one or
more of the following free support options:
consult the user’s guide or the online help installed with your program.
refer to the Knowledge Base at the following link on the CyberLink web site:
http://www.cyberlink.com/support/search-product-result.do
check the Help Resources page in this document.
When contacting technical support by e-mail or phone, please have the following
information ready:
registered product key (your product key can be found on the software disc
envelope, the box cover, or in the e-mail received after you purchased
CyberLink products on the CyberLink store).
the product name, version and build number, which generally can be found
by clicking on the product name image on the user interface.
the version of Windows installed on your system.
list of hardware devices on your system (capture card, sound card, VGA card)
and their specifications. For fastest results, please generate and attach your
system info using the DxDiag.txt.
the wording of any warning messages that were displayed (you may want to
write this down or take a screen capture).
65
Page 72

CyberL ink Yo uCam
Note: you must first register as a member before using CyberLink web
support.
Language
Web Support URL
English
http://www.cyberlink.com/cs-help
Traditional Chinese
http://tw.cyberlink.com/cs-help
Japanese
http://jp.cyberlink.com/cs-help
Spanish
http://es.cyberlink.com/cs-help
Korean
http://kr.cyberlink.com/cs-help
Simplified Chinese
http://cn.cyberlink.com/cs-help
German
http://de.cyberlink.com/cs-help
French
http://fr.cyberlink.com/cs-help
Italian
http://it.cyberlink.com/cs-help
a detailed description of the problem and under what circumstances it
occurred.
Web Support
Solutions to your problems are available 24 hours a day at no cost on the CyberLink
web site:
CyberLink provides a wide range of web support options, including FAQs, in the
following languages:
Help Resources
The following is a list of help resources that may assist you when using any of
CyberLink's products.
Access CyberLink's Knowledge base and FAQ (frequently asked questions):
http://www.cyberlink.com/cs-resource
View video tutorials for your software: http://directorzone.cyberlink.com/
tutorial/
66
Page 73

Te chnical Su pp ort
Note: CyberLink’s user community forum is only available in English and
German.
Ask questions and get answers from our users on the CyberLink Community
Forum: http://forum.cyberlink.com/forum/forums/list/ENU.page
67
Page 74

CyberL ink Yo uCam
68
Page 75

Index
A
Augmented reality 13, 19
setting up 19
tips for using 20
Auto
face detection 62
Avatars 13
creating 16
helpful tips 15
uploading to DirectorZone 18
using 15
B
Beautify
captured photos 37
live web cam 23
Burst 25
settings 62
In dex
options, panorama 41
photos 24
settings 62
timed 52
video 27
Countdown 62
Create presentations 46
Crop
photos 35
D
Denoise 24
Desktop capture 45
DirectorZone 30
downloading effects 13
settings 64
uploading avatars 18
Distortions 12
Draw 21
photos 35
Dual video 49
E
C
Capture
continuous 53
countdown 62
desktop 45
options, burst 25
options, HDR effect 26
Edit
photos 35
Effects
augmented reality 13, 19
avatars 13
distortions 12
downloading 13
emotion 12
filters 12
69
Page 76

CyberL ink Yo uCam
Effects
frames 11
gadgets 12
importing 13
particles 12
scenes 12
stamp mode 12
E-mail
auto 54
photos 33
surveillance 54
videos 33
Emotion effects 12
Enable
Face Login 55, 57
Face-out 58
F
Face beautify 37
Face Login
enabling 55, 57
Face tracking
avatars 13
effects 12
filters 12
gadgets 12
zoom 62
Facebook
uploading to 31
Face-out
enabling 58
Faces
library 29
70
tagging 39
Filters 12
Frames 11
G
Gadgets 12
H
H.264 format 62
Hats 12
HD 3
HDR effect
applying 26
Help 66
High-definition 61
I
IM mode 7
Import
background image 18
effects 13
L
Library 29
M
Manage
web sites 57
Page 77

In dex
Masks 12
Mirror
opening 51
settings 51
zooming 51
Modes
full screen 7
IM 7
mirror 7
split 7
stand alone 6
Mosaic 12
Motion detection recording 52
N
Notification center 2
P
Panorama 41
Particles 12
Photos
capturing 24
cropping 35
editing 35
e-mailing 33
HDR effect 26
library 29
panorama 41
sharing 31
tagging faces 39
uploading 31
viewing 29
PiP video 49
Print
pattern, augement reality 19
R
Record
countdown 62
motion detection 52
timed 52
time-lapse 53
video 27
S
Scenes 12
Settings 10, 61
capture & snapshot 62
e-mail 54
timestamp 61
webcam 24
Share
avatars 18
desktop 45, 46
photos 31
via e-mail 33
videos 30, 32
Sharpness 24
Skin smoothener 23
Snapshot
burst 25
capture 25
settings 62
Split mode 7
71
Page 78

CyberL ink Yo uCam
Stamp mode 12
Stand alone mode 6
Surveillance 52
Switch
webcam 23, 43
System requirements 3
T
Tag faces 39
Technical support 65
Timed recording 52
Time-lapse recording 53
Timestamp
settings 61
TrueTheater enhancement 23
U
Upload
avatars 18
photos 31
videos 30, 32
User interface
resize 9
V
Versions 2
Videos
capturing 27
creating presentation 46
e-mailing 33
enhancing 23
high-definition 61
library 29
noise reduction 24
playing back 29
recording 27
sharing 30, 32
sharpness 24
surveillance 52
uploading 30, 32
W
Web support 66
webcam image 21
Webcams
enabling 6
hardware settings 24
multiple 49
switching 23, 43
Y
YouCam
display modes 6
enabling 6
launching 6
modules 7
settings 10, 61
user interface 9
YouTube
uploading to 30
72
Page 79

Z
Zoom
enabling 62
mirror 51
In dex
73
 Loading...