

Page 1
Epygi Server
VoIP Intercom Setup Guide
CyberData Corporation • 2555 Garden Road • Monterey, CA • 93940 • T:831-373-2601 • F: 831-373-4193
www.CyberData.net
Page 2
1.0 Setup Diagram
IP Phone
IP Address:___________________
CyberData VoIP Intercom
IP Address:___________________
Server
IP Address:___________________
NetGear EtherFast FS108P Fast Ethernet Switch
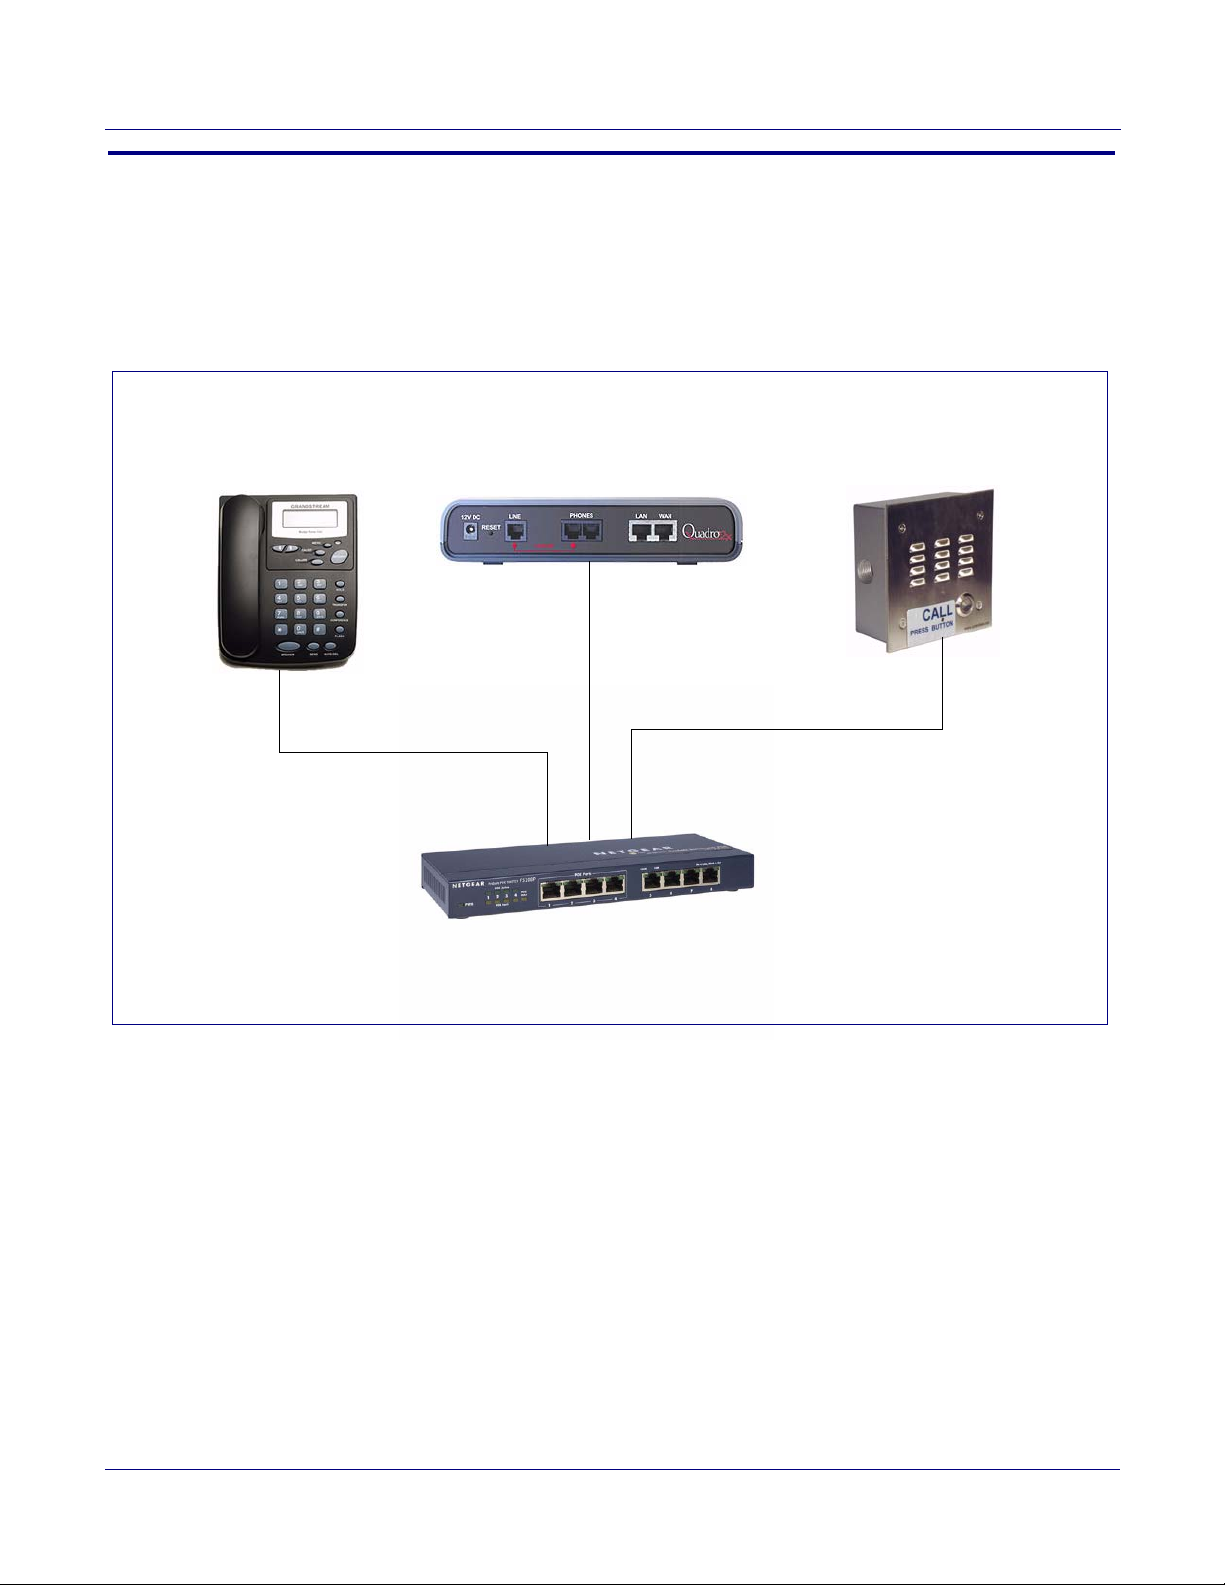
Figure 1 is a setup diagram for a single Intercom configuration. In this configuration, the Intercom
acts as a standalone SIP telephony device.
2
Figure 1. Setup Diagram
Server Setup Guide 930289A CyberData Corporation
Page 3

2.0 Host Environment
Table 1. Host Environment Details
Description
Hardware Type Quadro
Hardware Version 2x
Software Type Quadro
Software Version 5.0.17
3.0 Test Setup Equipment
3
Table 2. Test Setup Equipment
Equipment Model Version
Grandstream BudgeTone-100
Notes:
NetGear EtherFast FS108P Fast Ethernet Switch
Notes:
VoIP Intercom 010935B 3.3.2
Notes:
Notes:
Notes:
Notes:
Notes:
Notes:
Notes:
Server Setup Guide 930289A CyberData Corporation
Page 4

4.0 Setup Procedure
Username/Extension field
Password field
Login button
4.1 Epygi Server Configuration
To configure the Epygi server,
1. Navigate your web browser to the Epygi Quadro Login page and do the following:
• Type the username or extension number into the Username/Extension field.
• Type the password into the Password field.
• Click on the Login button.
Figure 2. Login Page
4
Server Setup Guide 930289A CyberData Corporation
Page 5
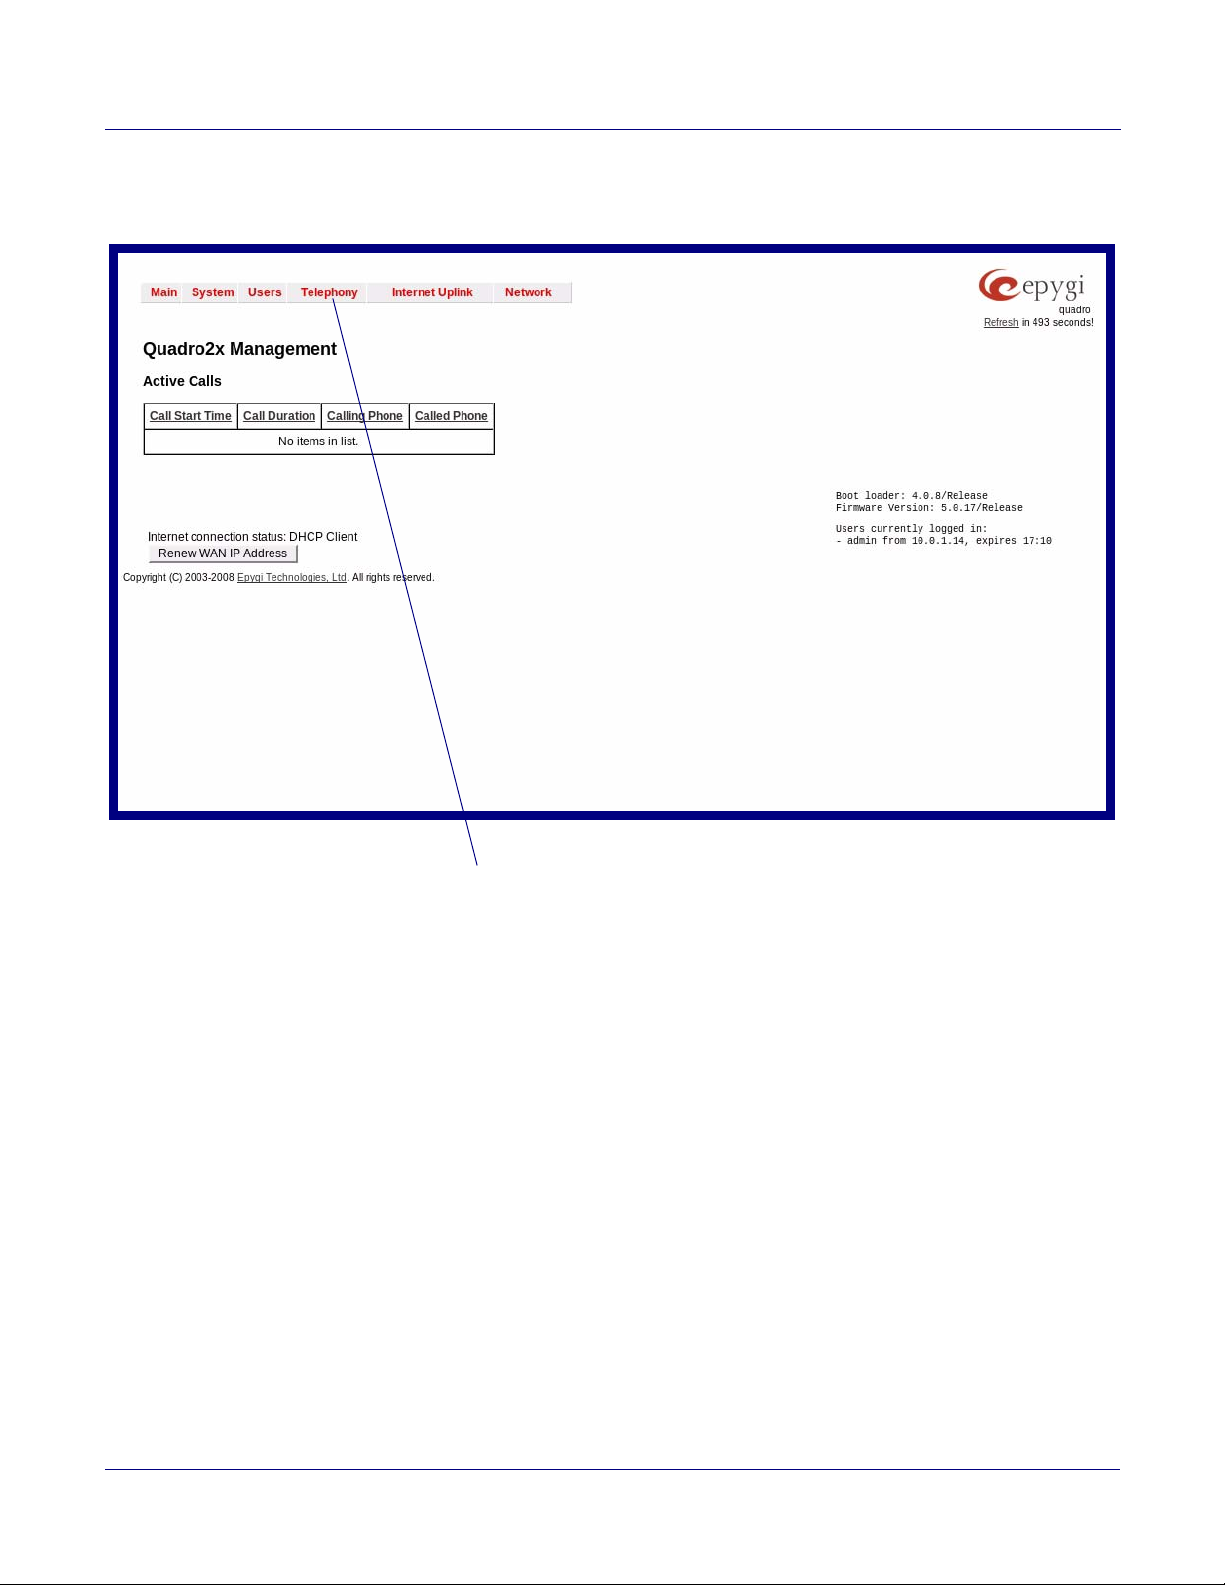
2. On the Main Page (Figure 3), click on Te l e ph o n y, and then select Line Settings in the pull-down
Telephony
menu.
Figure 3. Main Page
5
Server Setup Guide 930289A CyberData Corporation
Page 6
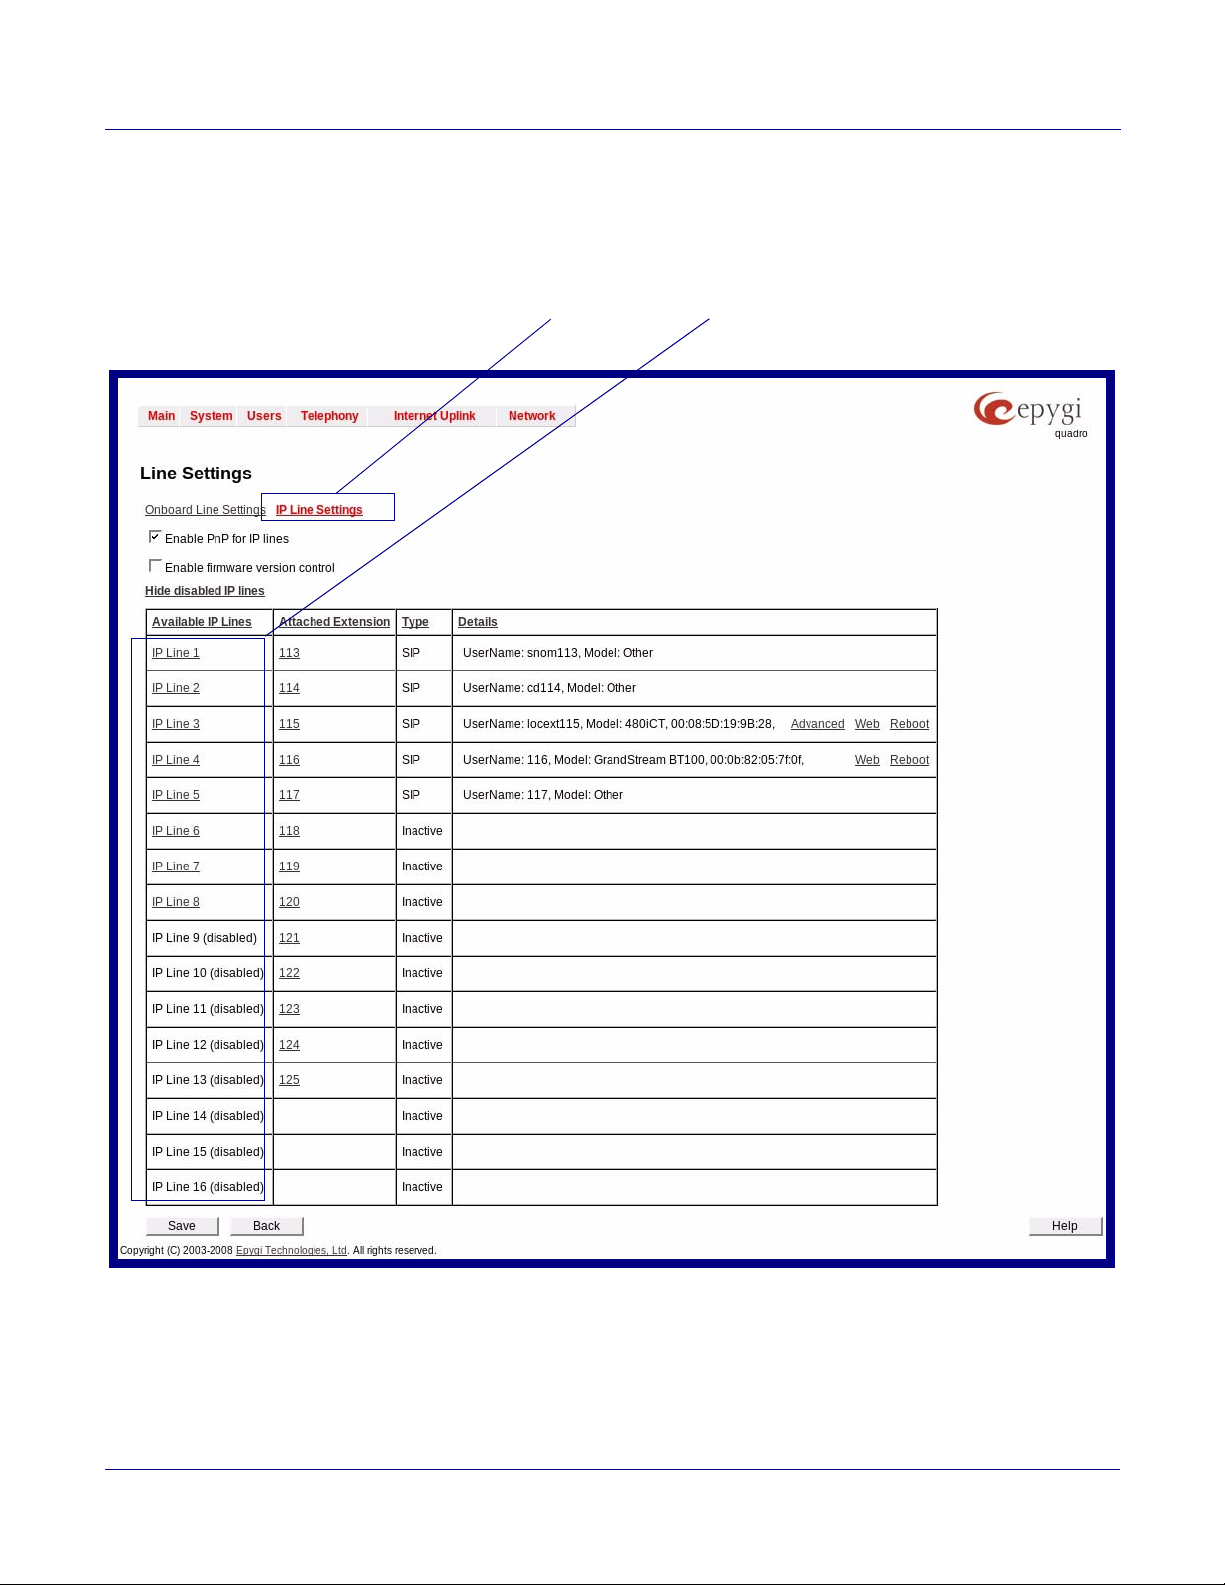
3. On the Line Settings page (Figure 4), complete the following steps:
IP Line Settings
IP Line Numbers
• Click on IP Line Settings.
• Select a line to configure for the Intercom and click on a IP Line Number.
Figure 4. Line Settings Page
6
Server Setup Guide 930289A CyberData Corporation
Page 7
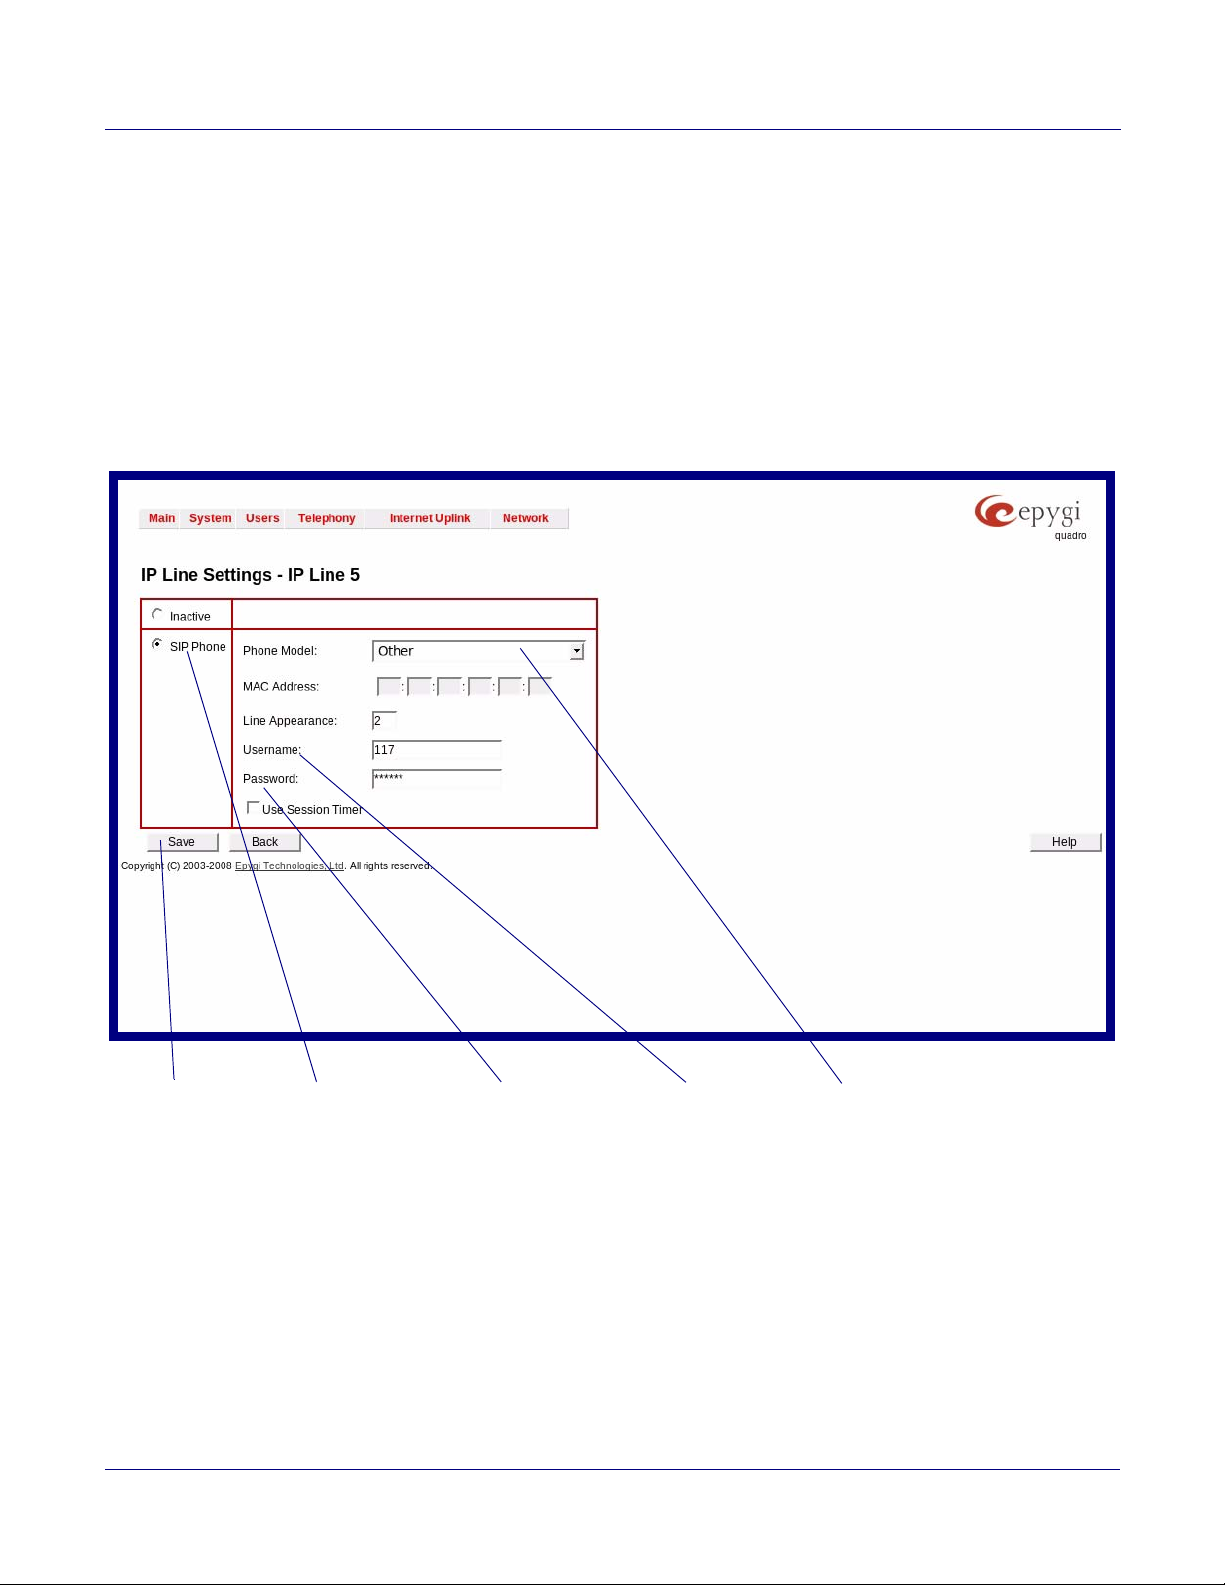
4. On the IP Line Settings - IP Line [Number] page (Figure 5), complete the following steps:
SIP Phone Phone Model drop-down menuUsernamePassword
Save
• Select SIP Phone.
•In the Phone Model drop-down menu, select Other.
• Decide what you want the username and password to be, and then type the username and
password into the Username and Password fields.
Note Be sure to write down the username and password that you have chosen because you
will need to type this information into the SIP Setup page (
Figure 7 of Section 4.2,
"CyberData Configuration".
• Click on the Save button.
Figure 5. IP Line Settings - IP Line [Number] Page
7
Server Setup Guide 930289A CyberData Corporation
Page 8
4.2 CyberData Configuration
SIP Setup button
2
To configure the CyberData parameters,
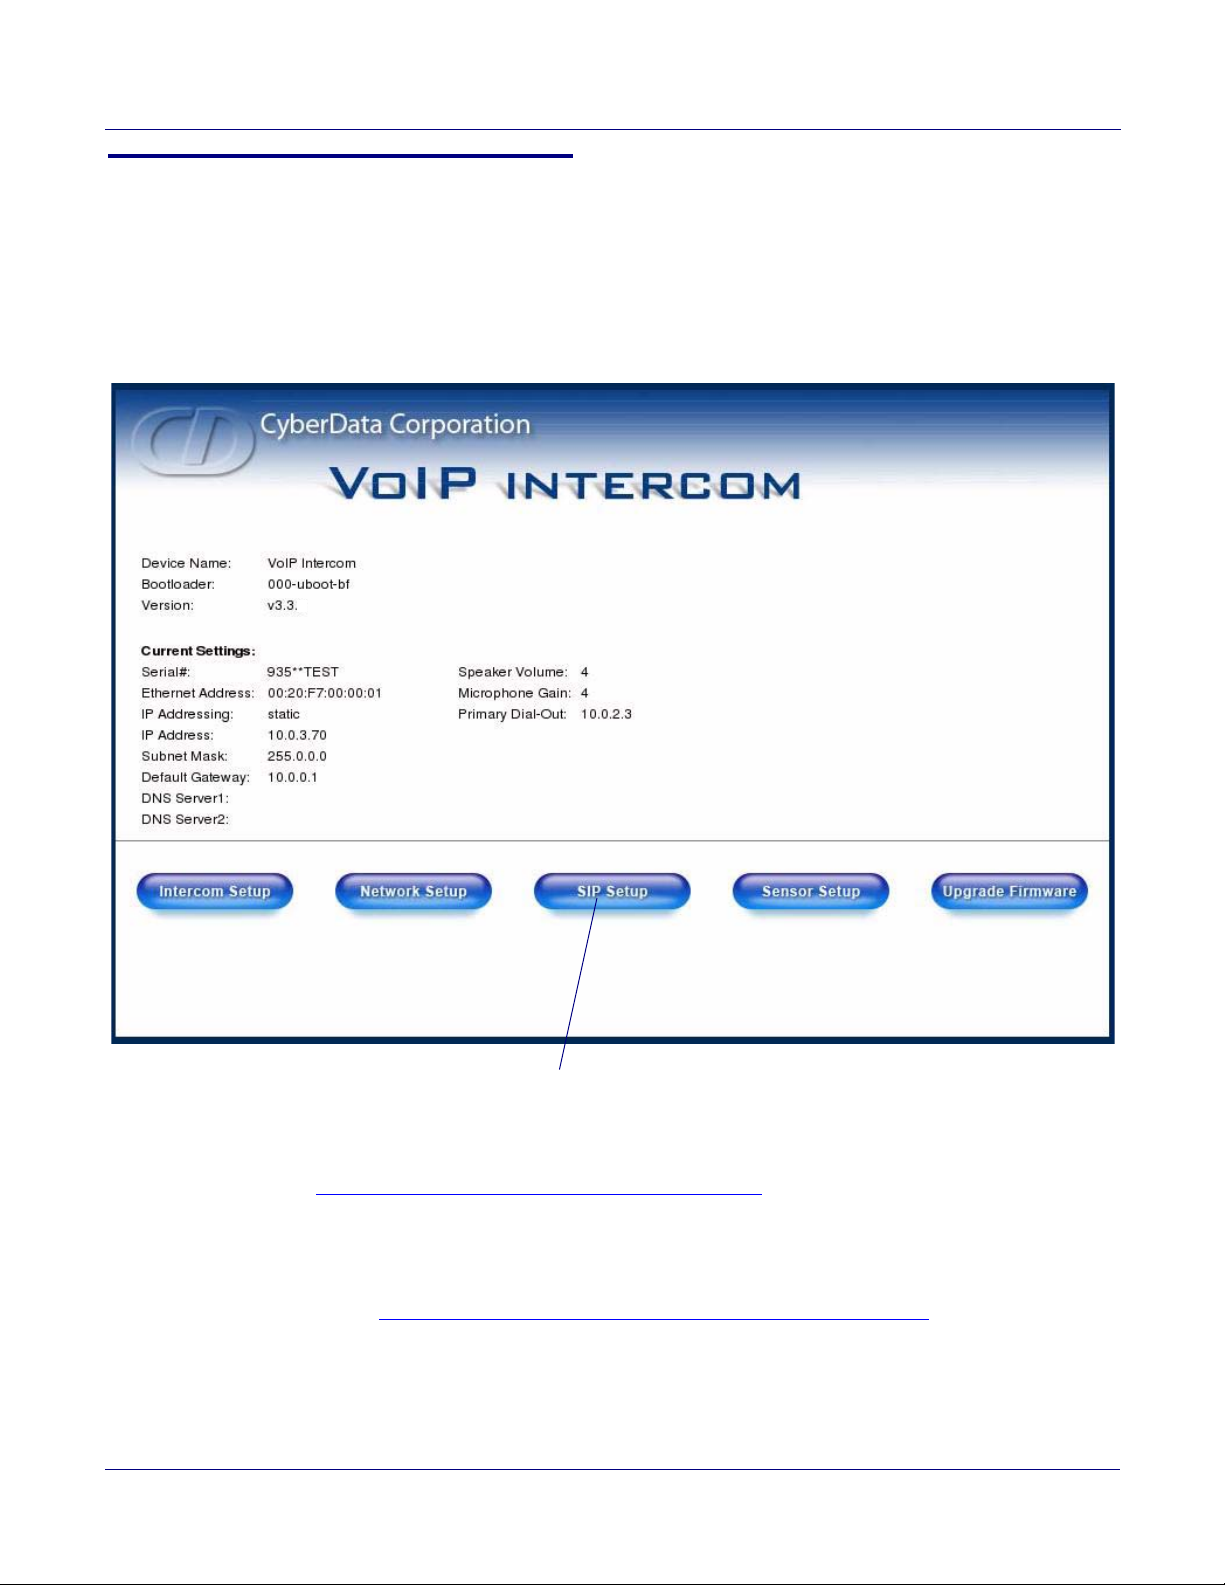
1. Log into the CyberData Configuration Home page (Figure 6) by pointing your browser to the
Intercom’s IP address.
Figure 6. CyberData Home Page
8
For the initial configuration of the Intercom, refer to the Operation Guide of the Intercom that
you have which can be found at the following web address:
http://www.cyberdata.net/support/download.html
Note You may also download CyberData’s VoIP Discovery Utility program which allows you
to easily find and configure the default web address of the CyberData VoIP Intercom.
CyberData’s VoIP Discovery Utility program is available at the following web address:
http://www.cyberdata.net/support/voip/discovery_utility.html
2. Type the username and password to log into the CyberData Home Page.
Server Setup Guide 930289A CyberData Corporation
Page 9
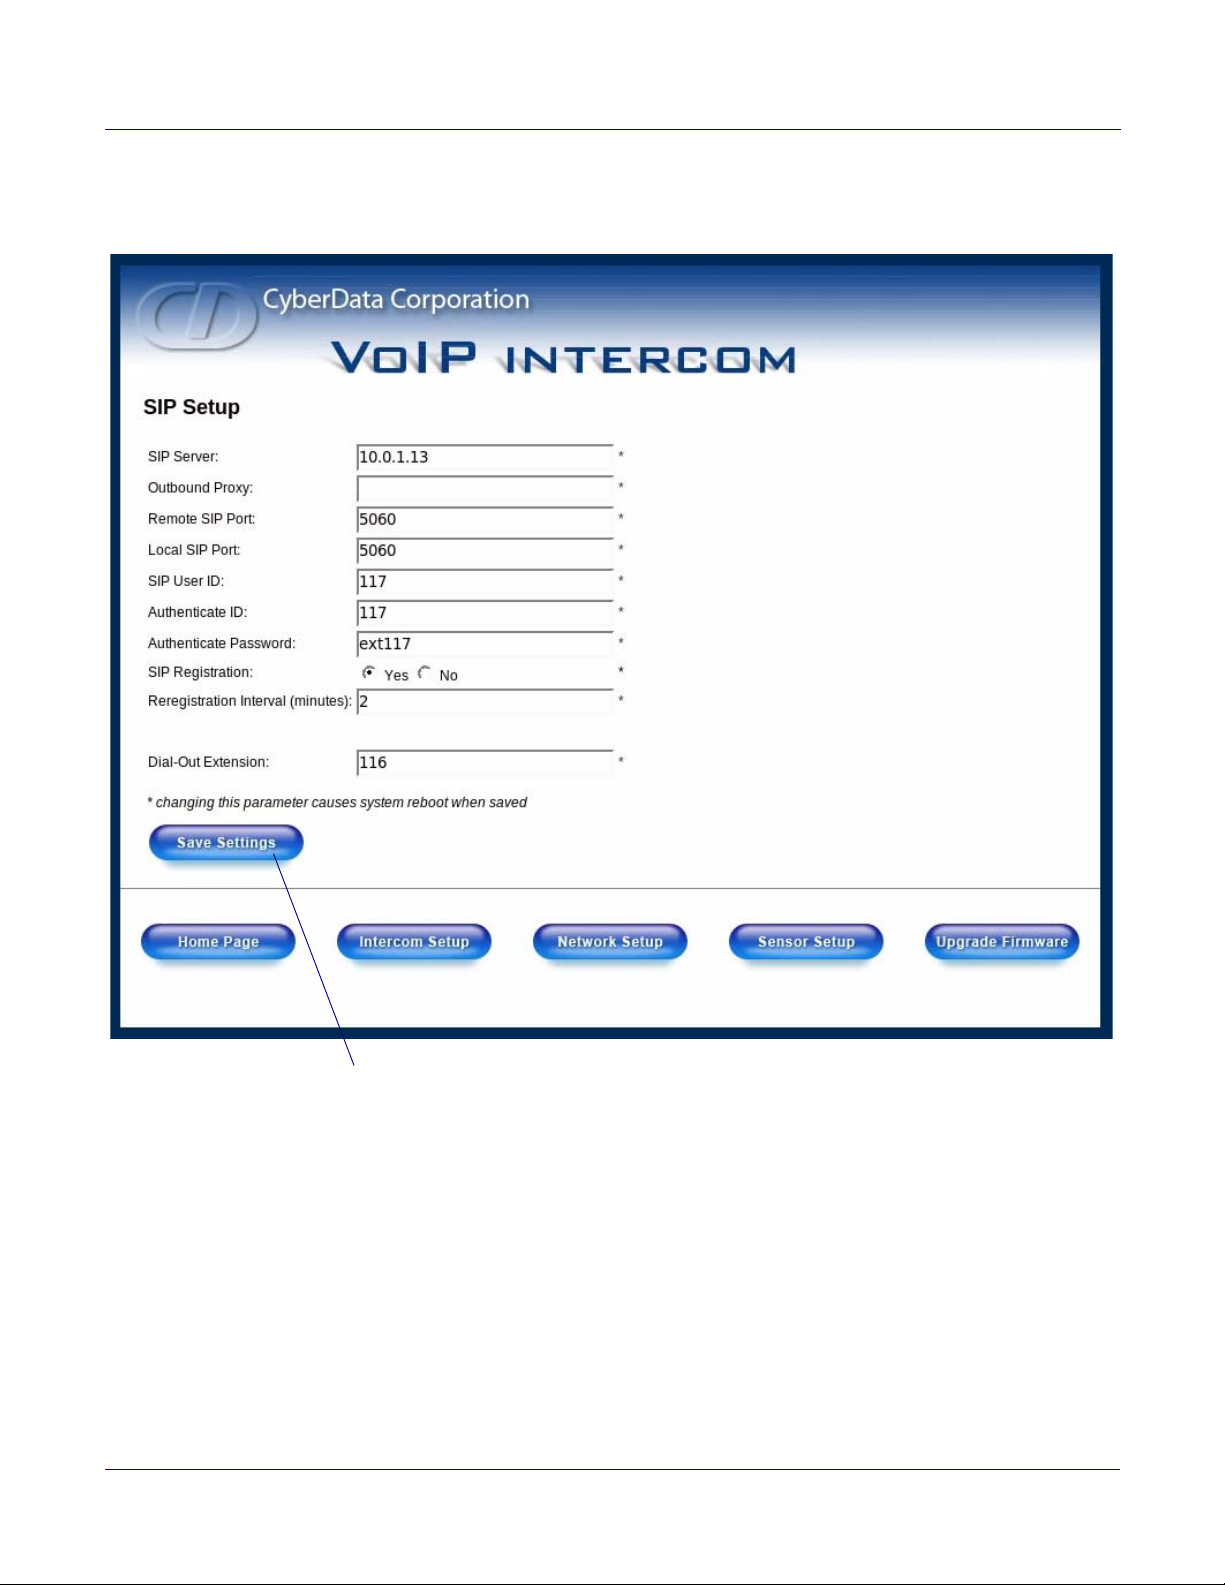
3. On the CyberData Home Page (Figure 6), click on the SIP Setup button. This will take you to
Save Settings button
the SIP Setup page (Figure 7).
Figure 7. CyberData SIP Setup Page
9
Server Setup Guide 930289A CyberData Corporation
Page 10

4. For a quick summary of all of the necessary settings on the SIP Setup page (Figure 7), see
Table 3. For a step-by-step description of the necessary settings, go to Step 5.
Note If a setting parameter is not listed in Table 3 or Step 5, then your input for that setting
parameter is not required.
Table 3. SIP Setup Page Settings
SIP Setup Page Items Setting
SIP Server Type the IP address of the Epygi server.
SIP User ID Type the username that you selected in Step 4 of
Section 4.1, "Epygi Server Configuration".
Authentication ID Type the username that you selected in Step 4 of
Section 4.1, "Epygi Server Configuration".
Authentication Password Type the password that you selected in Step 4 of
Section 4.1, "Epygi Server Configuration".
SIP Registration Select Yes.
Unregister on Reboot Select No.
Register expiration (minutes) Ty p e 2.
Dial-Out Extension Type an extension number that you want the Intercom
to call.
Save Settings button Click on the Save Settings button only after you have
finished configuring all of the settings on the SIP
Setup page.
10
5. On the SIP Setup page (Figure 7), complete the following steps:
•In the SIP Server field, type the IP address of theEpygi server.
•In the SIP User ID field, type the username that you selected in Step 4 of
Section 4.1, "Epygi Server Configuration".
•In the Authentication ID field, type the username that you selected in Step 4 of
Section 4.1, "Epygi Server Configuration".
•In the Password field, type the password that you selected in Step 4 of
Section 4.1, "Epygi Server Configuration".
•For SIP Registration, select Yes.
• For the Unregister on Reboot field, select No.
•In the Register expiration (minutes) field, type 2.
•In the Dial-Out Extension field, type an extension number that you want the Intercom to
call.
6. Click on the Save Settings button.
Server Setup Guide 930289A CyberData Corporation
Page 11
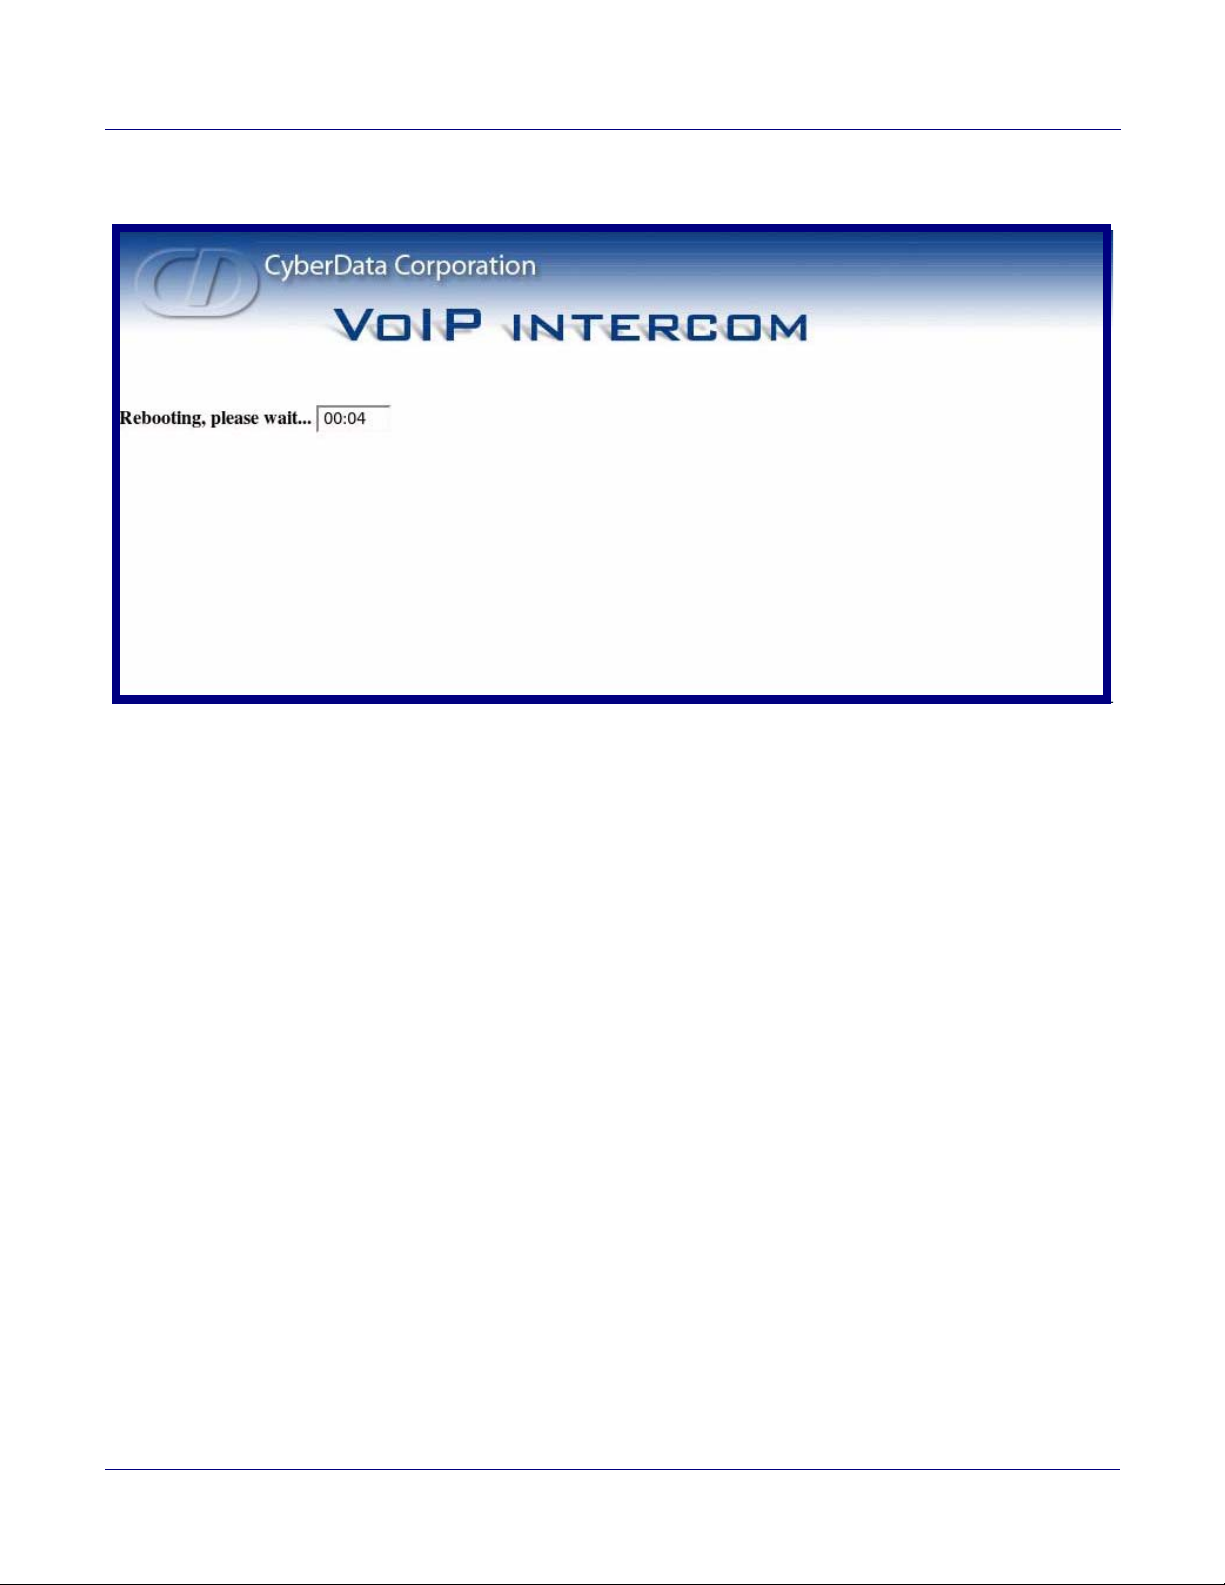
7. After clicking on the Save Settings button, a reboot timer countdown will begin.
Figure 8. Reboot Timer
11
8. After the Intercom reboots, the green Status LED will blink at one second intervals to indicate
normal operation.
Note If Yes is selected for Speaker Beep After Initialization on the Setup page of the
Intercom (not shown), you will hear a tone after the initialization sequence is complete.
9. To test the Intercom, complete the following steps:
• Pick up any phone that is configured to the Epygi system and call the Intercom’s extension
number.
• When a connection is established (as indicated by a beep), speak into the phone and verify
that you can hear your voice through the Intercom.
• Hang up the phone and press the Call Button on the Intercom.
• When the phone rings, pick up the phone. Speak into the phone and verify that you can
hear your voice through the Intercom.
This step completes the procedure.
Server Setup Guide 930289A CyberData Corporation
 Loading...