

Page 1
VoIP Ceiling Speaker
Operations Guide
Part #010844
930095K
CyberData Corporation
2555 Garden Road
Monterey, CA 93940
(831) 373-2601
Page 2

PoE VoIP Speaker Operations Guide 930095K
Phone: (831) 373-2601
Technical Support Ext. 333
[email protected]
Fax: (831) 373-4193
Company and product information at www.cyberdata.net
Part # 010844
COPYRIGHT NOTICE:
© 2007, CyberData Corporation, ALL RIGHTS RESERVED.
This manual and related materials are the copyrighted property of CyberData Corporation. No part
of this manual or related materials may be reproduced or transmitted, in any form or by any means
(except for internal use by licensed customers), without prior express written permission of
CyberData Corporation. This manual, and the products, software, firmware, and/or hardware
described in this manual are the property of CyberData Corporation, provided under the terms of an
agreement between CyberData Corporation and recipient of this manual, and their use is subject to
that agreement and its terms.
DISCLAIMER: Except as expressly and specifically stated in a written agreement executed by
CyberData Corporation, CyberData Corporation makes no representation or warranty, express or
implied, including any warranty or merchantability or fitness for any purpose, with respect to this
manual or the products, software, firmware, and/or hardware described herein, and CyberData
Corporation assumes no liability for damages or claims resulting from any use of this manual or
such products, software, firmware, and/or hardware. CyberData Corporation reserves the right to
make changes, without notice, to this manual and to any such product, software, firmware, and/or
hardware.
OPEN SOURCE STATEMENT: Certain software components included in CyberData products are
subject to the GNU General Public License (GPL) and Lesser GNU General Public License (LGPL)
“open source” or “free software” licenses. Some of this Open Source Software may be owned by
third parties. Open Source Software is not subject to the terms and conditions of the CyberData
COPYRIGHT NOTICE or software licenses. Your right to copy, modify, and distribute any Open
Source Software is determined by the terms of the GPL, LGPL, or third party, according to who
licenses that software.
Software or firmware developed by CyberData that is unrelated to Open Source Software is
copyrighted by CyberData, subject to the terms of CyberData licenses, and may not be copied,
modified, reverse-engineered, or otherwise altered without explicit written permission from
CyberData Corporation.
TRADEMARK NOTICE: CyberData Corporation and the CyberData Corporation logos are
trademarks of CyberData Corporation. Other product names, trademarks, and service marks may be
the trademarks or registered trademarks of their respective owners.
CyberData Corporation 930095K Operations Guide
Page 3
Revision History
Revision Date Released Description of Changes
E 11/08/2006 Adds Section 2.4, "Set up the MGROUPS".
F 1/22/2007 Adds info about the RTFM Announcement feature in Table 2-6
G 4/12/2007 Changes the Authenticate ID and password character limit from
H 6/29/2007 Adds Figure 2, "Public Address System—Multicast" .
I 10/9/2007 Adds the following safety information:
J 5/8/2008 Updates shipping weight and adds ambient operating
K 6/20/2008 Adds the following note to Appendix A, “Mounting the
30 to 25 in Table 2-7.
Adds more information about MGROUPS in Section 2.4, "Set
up the MGROUPS".
Adds information about the Outbound Proxy in Table 2-7.
“Prior to installation, consult local building/electrical code
requirements.”
temperature information in Section 1.5, "Product
Specifications"
Speaker”:
“For weak ceiling tile, CyberData offers a reinforcing mount
(CyberData part number 010991A).”
CyberData Corporation 930095K Operations Guide
Page 4

CyberData Corporation 930095K Operations Guide
Page 5

Contents
Chapter 1 Product Overview 1
1.1 Typical System Installation ...................................................................................................................1
1.2 Product Features ............................................................................................................
1.3 Supported Protocols ..........................................................................................................
1.4 Supported SIP Servers .......................................................................................................
1.5 Product Specifications .......................................................................................................
Chapter 2 Installing the VoIP Ceiling Speaker 5
2.1 Parts List ..................................................................................................................................................5
2.2 Speaker Setup ..............................................................................................................
2.3 Configure the Speaker Parameters ...........................................................................................
2.4 Set up the MGROUPS ..........................................................................................................
2.5 Upgrade the Firmware and Reboot the Speaker .............................................................................20
2.6 Restore the Factory Default Settings ........................................................................................
.........................3
....................3
....................3
....................4
...........................6
2.2.1 Connect Power to the Speaker .............................................................................................
2.2.2 Confirm that the Speaker is Oper
2.2.3 Confirm the IP Address, Test t
2.2.4 Adjust the Volume ........................................................................................................
2.3.1 Log in to the Configuration Home Page ..................
2.3.2 Configure the Network Parameters ......................................................................................12
2.3.3 Set up the Speaker .......................................................................................................
2.3.4 Configure the SIP Parameters ..............................................................................................
2.5.1 Reboot the Speaker ......................................................................................................
ational and Linked to the Network ...............................7
he Audio, and Check the Volume .......................................8
..............................................................10
................18
....6
..............9
..........9
..............14
...15
............22
.........23
i
Appendix A Mounting the Speaker 25
A.1 Mount the Speaker .............................................................................................................................25
Appendix B Setting up a TFTP Server 29
B.1 Set up a TFTP Server ...........................................................................................................................29
B.1.1 In a LINUX Environment ....................................................................................................
B.1.2 In a Windows Environment .................................................................................................
B.1.3 In a Solarwinds Server Environment ...................
.................................................................29
....29
..29
Appendix C Troubleshooting/Technical Support 31
C.1 Frequently Asked Questions (FAQ) .................................................................................................31
C.2 Documentation ...............................................................................................................
C.3 Contact Information ..........................................................................................................
C.4 Warranty ....................................................................................................................
.....................31
..................31
...........................32
Index 33
Operations Guide 930095K CyberData Corporation
Page 6

ii
CyberData Corporation 930095K Operations Guide
Page 7
1 Product Overview
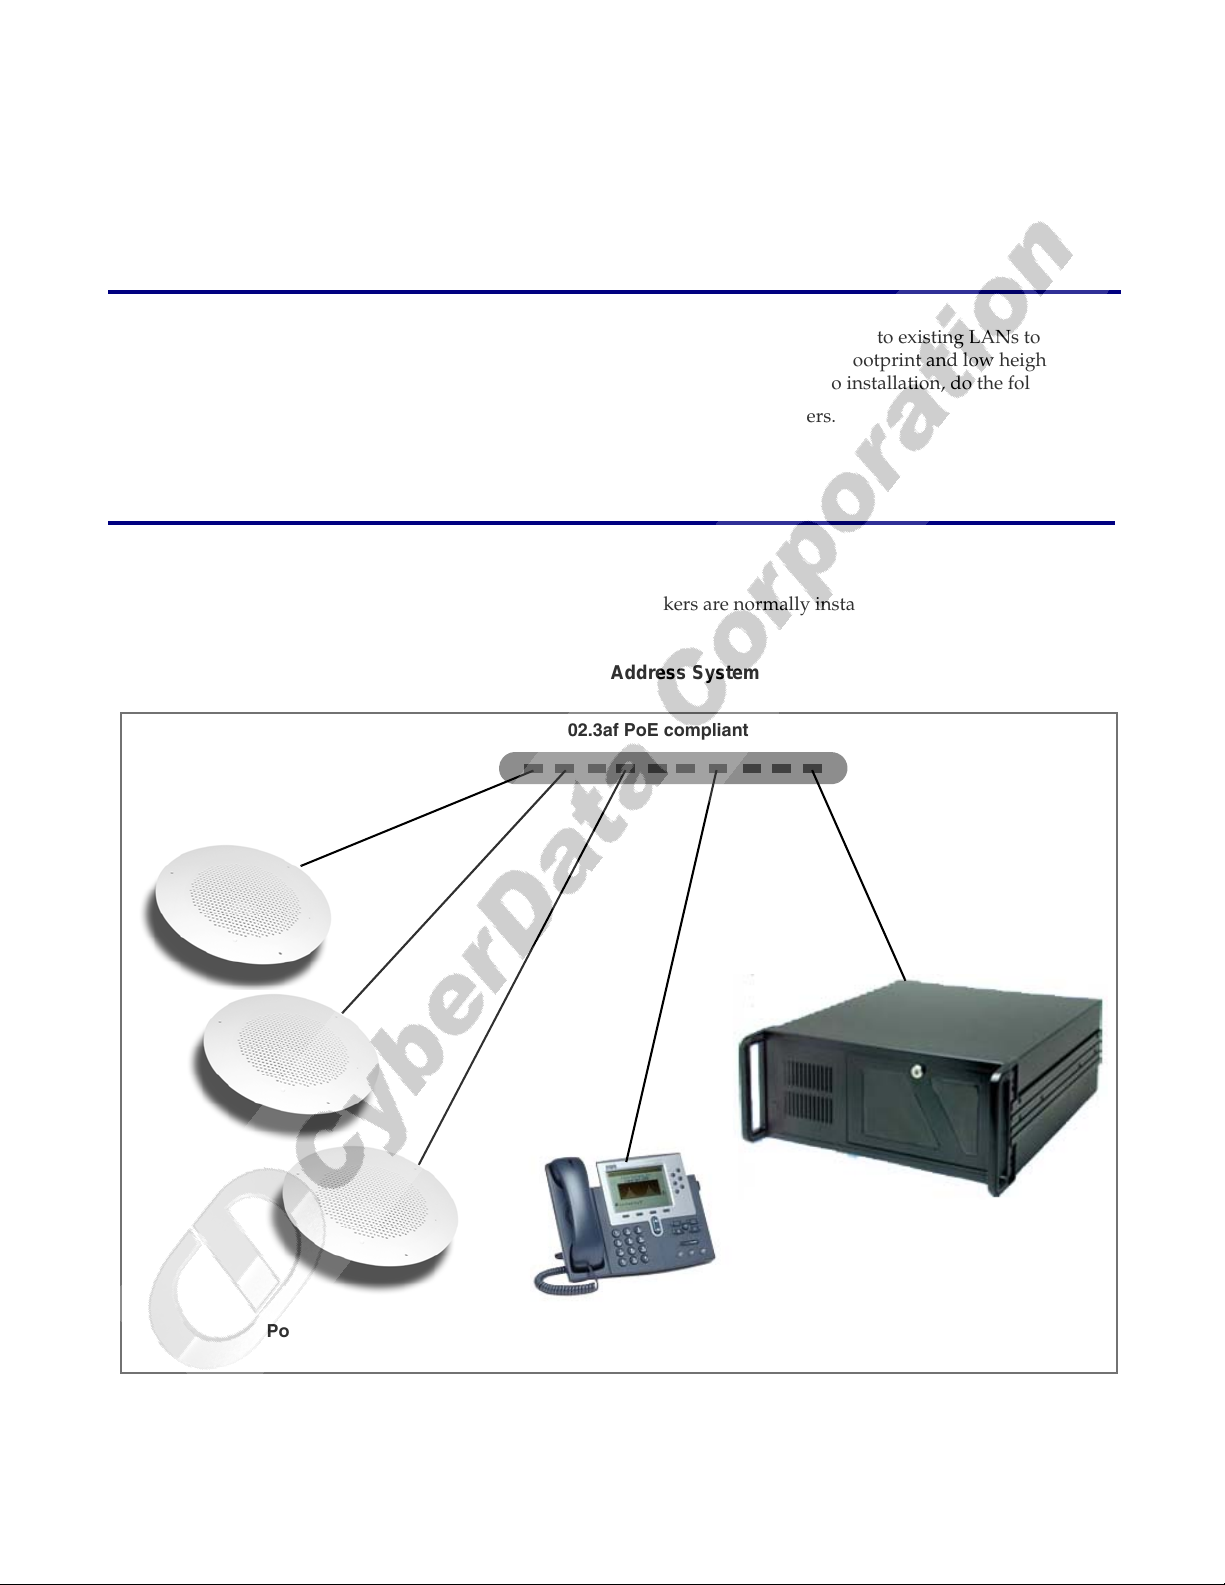
802.3af PoE compliant Hub
SIP Server
PoE VoIP Speakers
VoIP Phone
The Voice-over-IP (VoIP) Ceiling Speaker uses a single cable to connect to existing LANs to
broadcast digital audio over your public address system. The small footprint and low height makes
this an ideal speaker to discreetly mount almost anywhere. Prior to installation, do the following:
● Create a plan for the locations of your loudspeaker amplifiers.
● Consult local building and electrical code requirements.
1.1 Typical System Installation
Figure 1 illustrates how the VoIP Ceiling Speakers are normally installed as part of a public address
system.
1
Figure 1. Public Address System
Operations Guide 930095K CyberData Corporation
Page 8
Product Overview
2
Typical System Installation
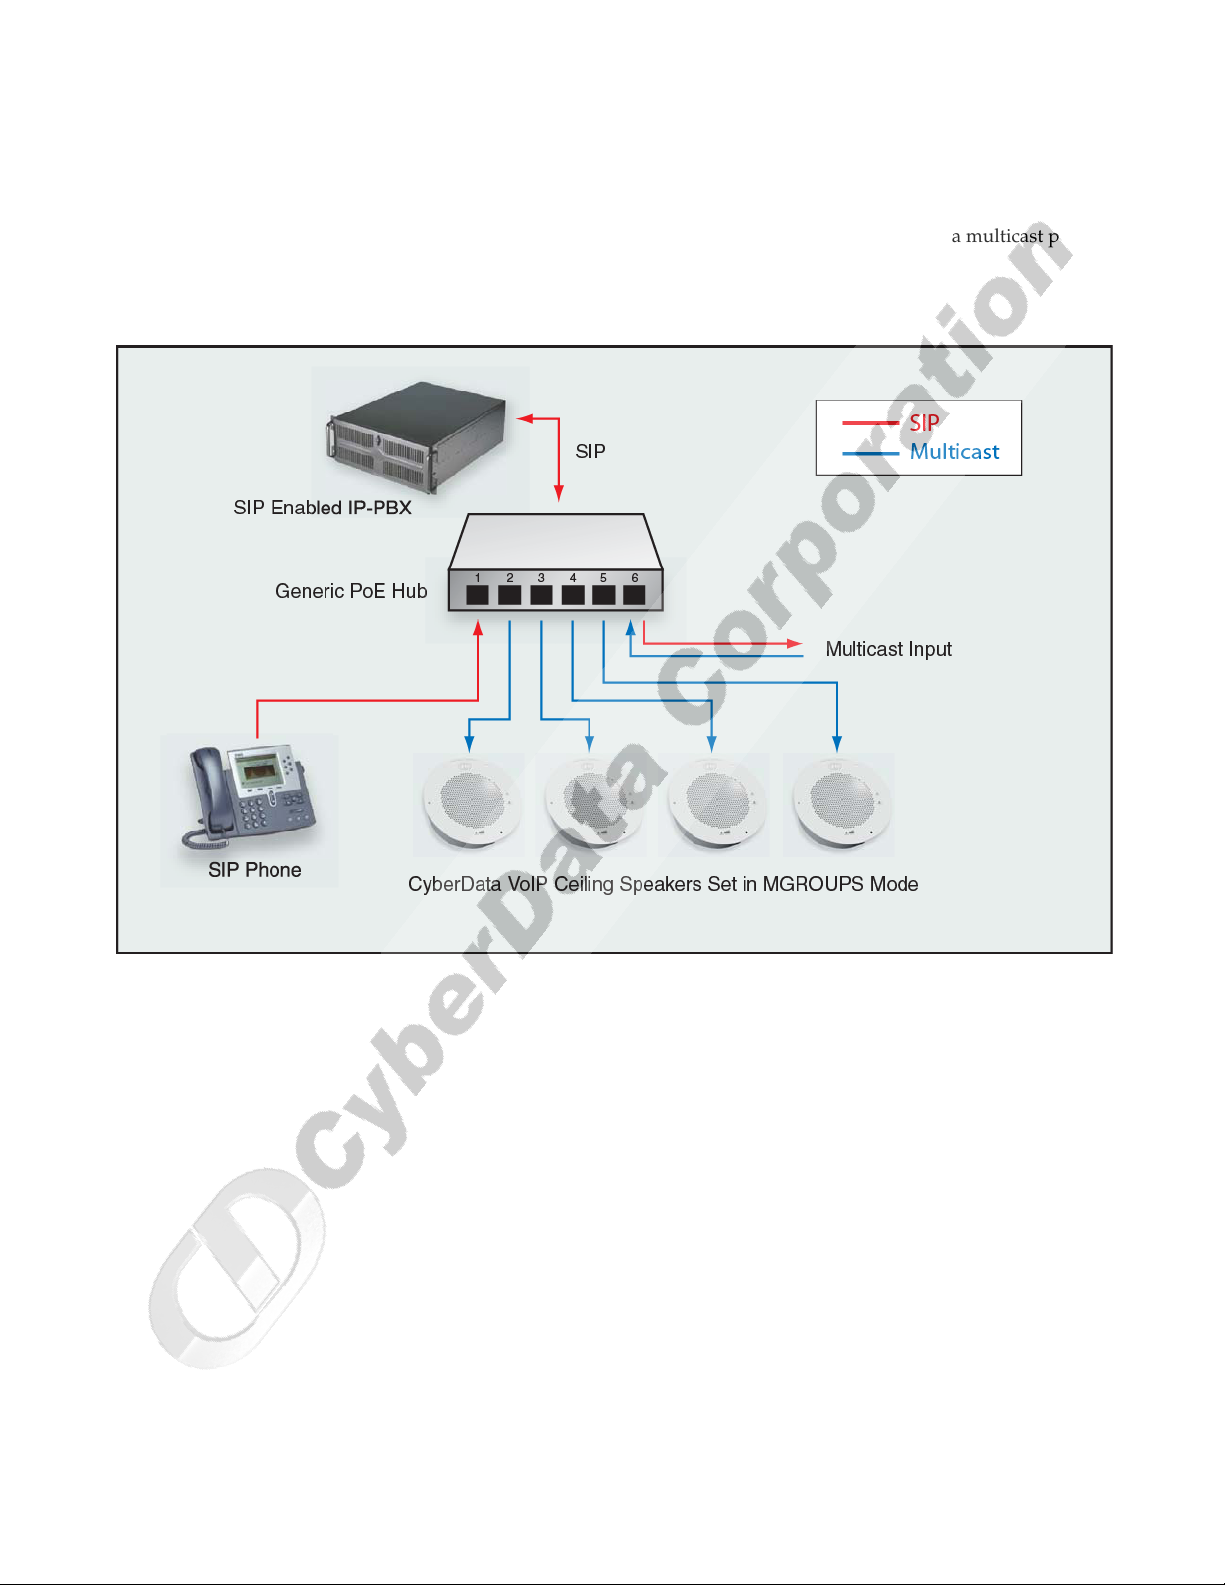
Figure 2 illustrates how the VoIP Ceiling Speakers are can be installed as part of a multicast public
address system.
Figure 2. Public Address System—Multicast
CyberData Corporation 930095K Operations Guide
Page 9
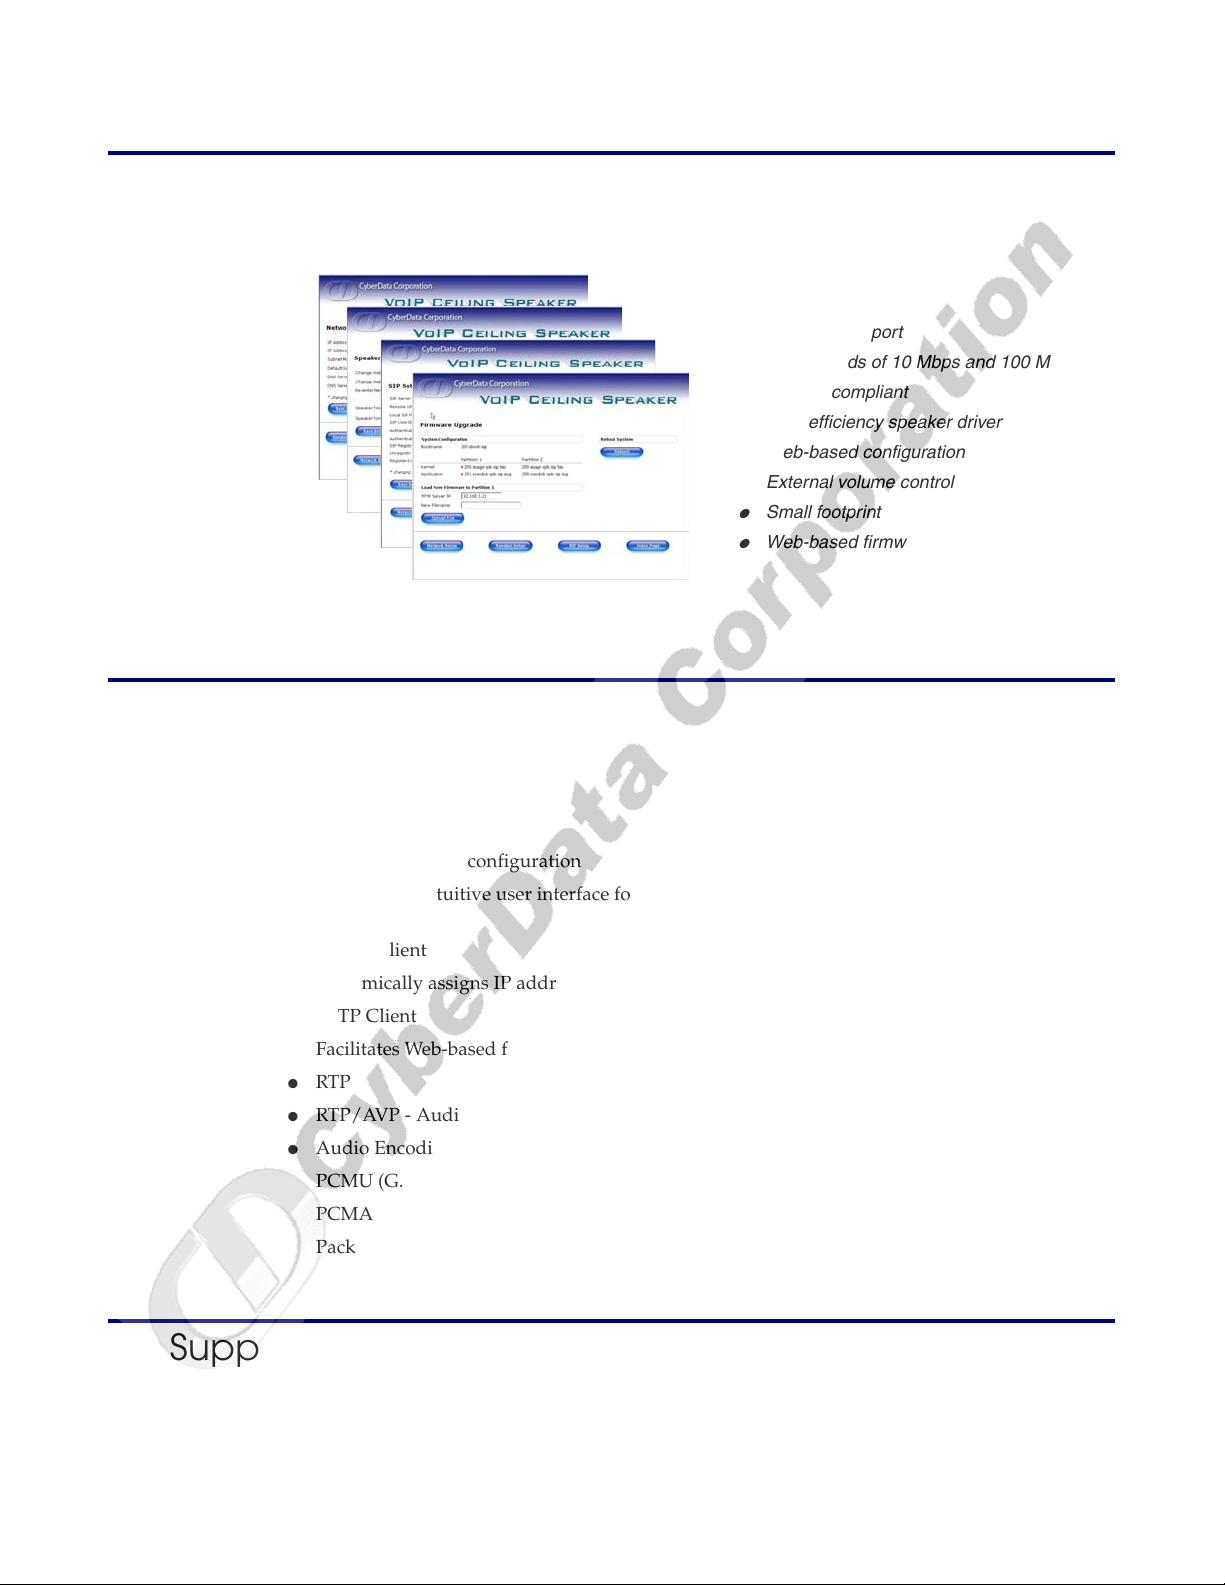
1.2 Product Features
●
SIP compliant
●
Multicast support
●
Dual speeds of 10 Mbps and 100 Mbps
●
802.3af compliant
●
High efficiency speaker driver
●
Web-based configuration
●
External volume control
●
Small footprint
●
Web-based firmware upgrades
Product Overview
Product Features
3
1.3 Supported Protocols
The IP Speaker supports:
● SIP
● Multicast
● HTTP Web-based configuration
Provides an intuitive user interface for easy system c
operations.
● DHCP Client
Dynamically assigns IP addresses in addition to the option to use static addressing.
● TFTP Client
Facilitates Web-based firmware upgrades of the latest speaker capabilities.
● RTP
● RTP/AVP - Audio Video Profile
● Audio Encodings
PCMU (G.711 mu-law)
PCMA (G.711 A-law)
Packet Time 20 ms
1.4 Supported SIP Servers
The following link contains information on how to configure the speaker for the supported SIP
servers:
Operations Guide 930095K CyberData Corporation
onfiguration and verification of speaker
Page 10
Product Overview
4
Product Specifications
http://www.cyberdata.net/support/voip/ceilingspeaker.html
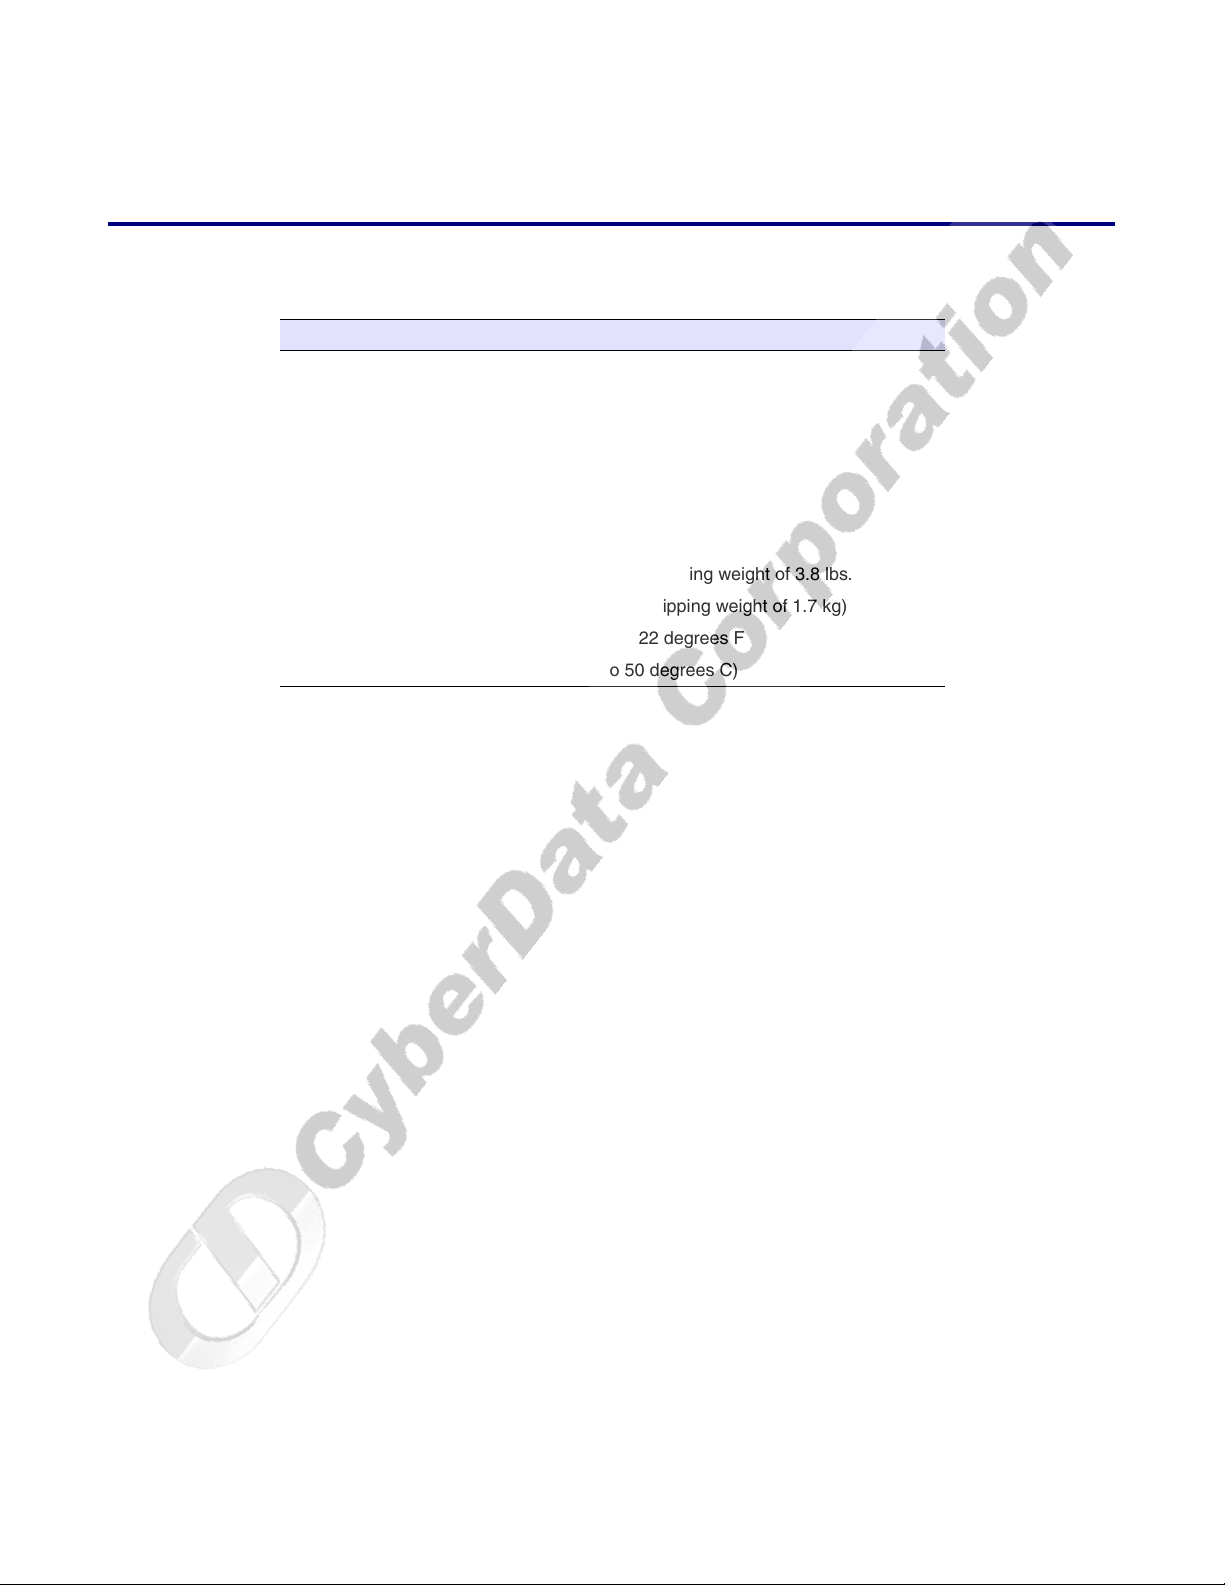
1.5 Product Specifications
Category Specification
Sensitivity 96dB/1W/1M S.P. Level
Output 8 Watts Peak Power
Port Baud Rate 10/100 Mbps
Power Requirement 802.3af compliant
Protocol SIP
Part Number 010844
Dimensions 9" x 2.4"
Weight
Ambient Operating Temperature
2.8 lbs./shipping weight of 3.8 lbs.
(1.3 kg/shipping weight of 1.7 kg)
32 to 122 degrees F
(0 to 50 degrees C)
CyberData Corporation 930095K Operations Guide
Page 11
2 Installing the VoIP Ceiling Speaker
2.1 Parts List
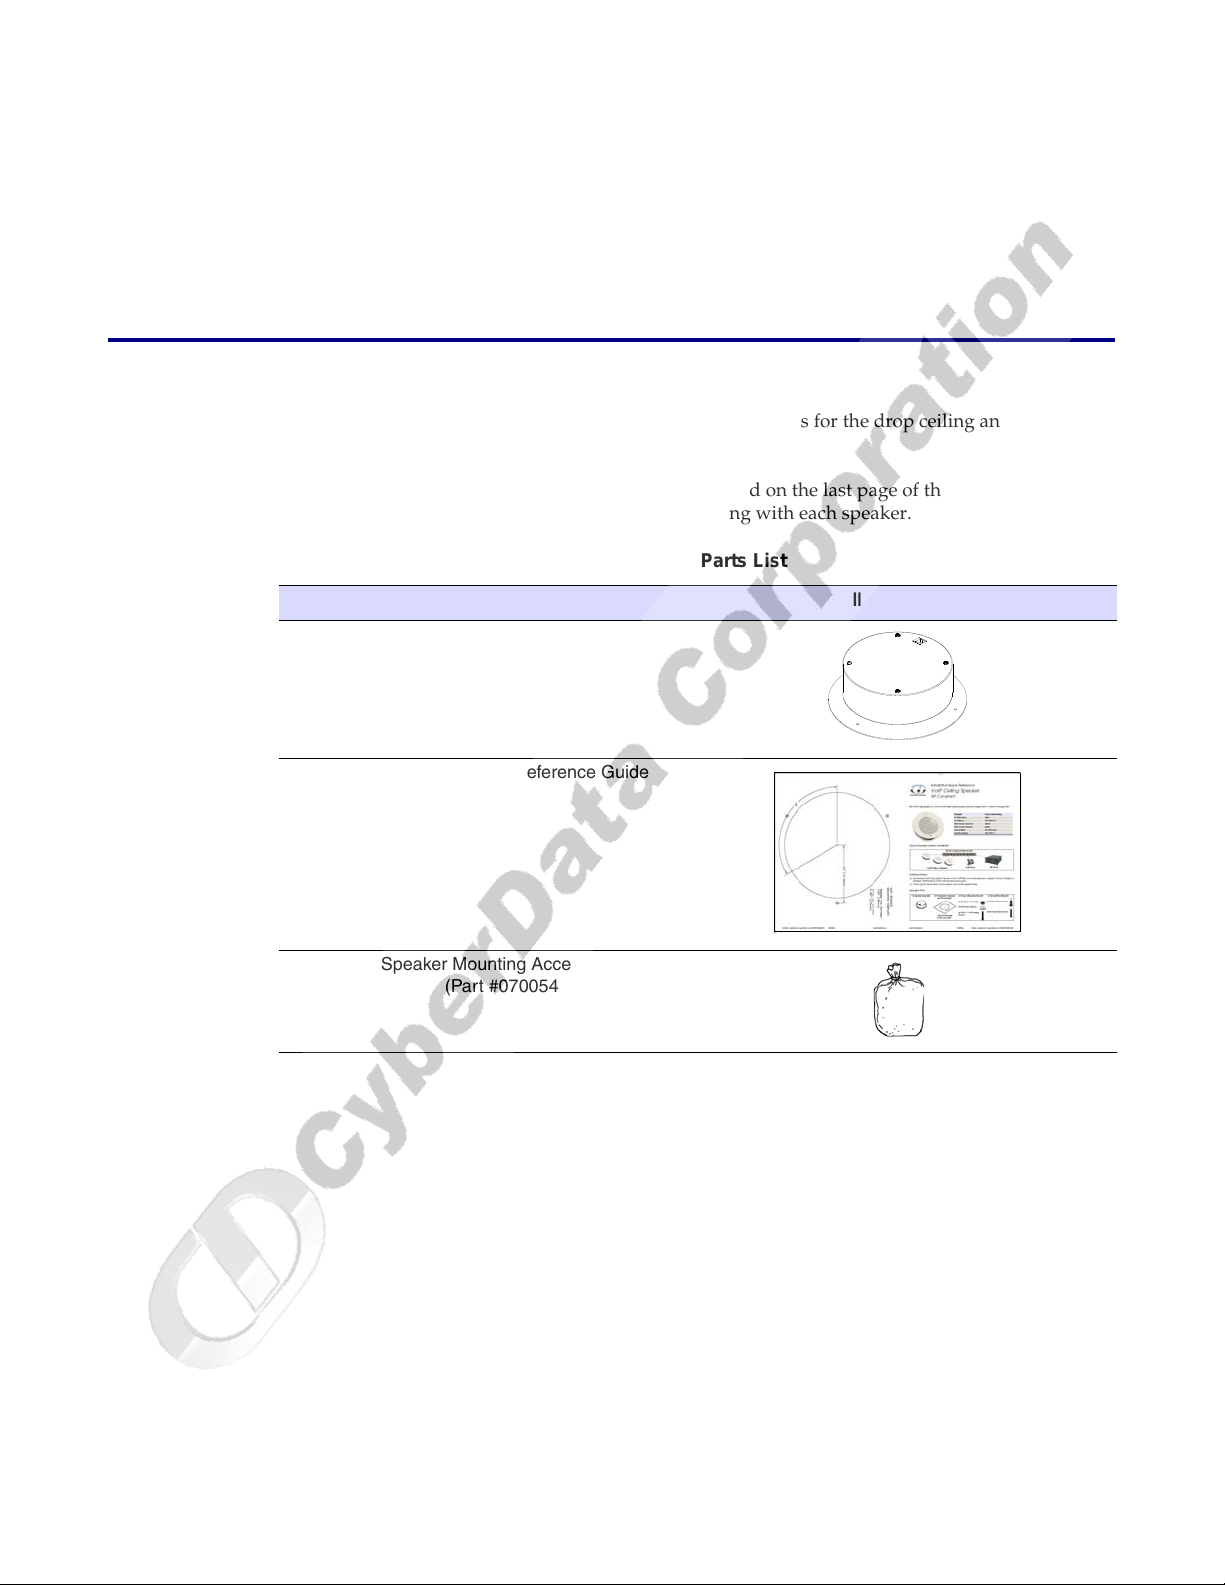
Ta bl e 2-1 illustrates the parts for each speaker and includes kits for the drop ceiling and drywall
mounting.
5
Note The Template for
Reference Guide that is included in the packaging with each speaker.
Quantity Part Name Illustration
1 Speaker Assembly
1 Installation Quick Reference Guide
1 Speaker Mounting Accessory Kit
Speaker and Screw Holes is located on the last page of the Installation Quick
Table 2-1. Parts List
(Part #070054A)
Operations Guide 930095K CyberData Corporation
Page 12
Installing the VoIP Ceiling Speaker
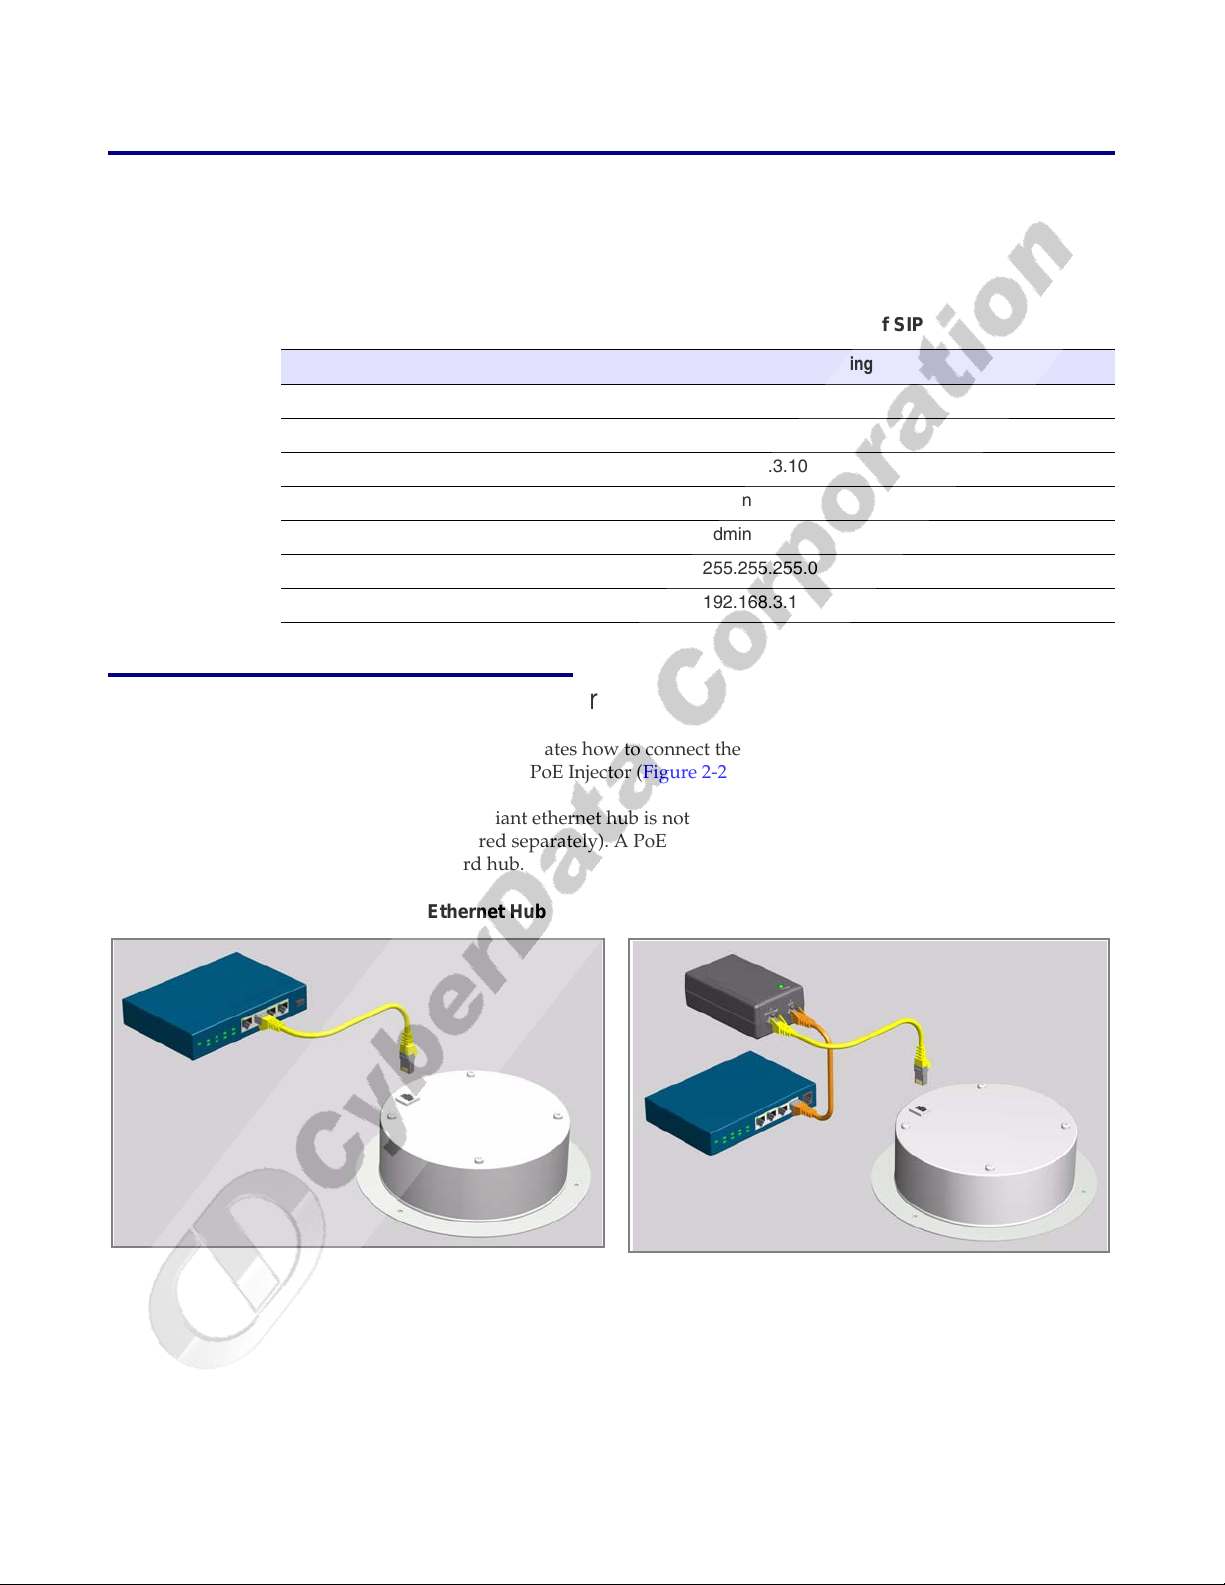
Figure 2-1. 802.3af Compliant Ethernet Hub
Figure 2-2. PoE Injector
PoE Injector (Part #010867A)
Non PoE Hub
6
Speaker Setup
2.2 Speaker Setup
Set up and configure each speaker before you mount it.
CyberData delivers each speaker with the following factory default values:
Parameter Factory Default Setting
SIP/MGROUPS SIP
IP Addressing static
IP Address 192.168.3.10
Web Access Username admin
Web Access Password admin
Subnet Mask 255.255.255.0
Default Gateway 192.168.3.1
Table 2-2. Factory Default Settings—Default of SIP
2.2.1 Connect Power to the Speaker
Figure 2-1 and Figure 2-2 illustrates how to connect the VoIP Ceiling Speaker to a 802.3af compliant
ethernet hub (Figure 2-1) or a PoE Injector (Figure 2-2) via a Cat 5 Ethernet Connector.
Note If
a 802.3af compliant ethernet hub is not available, you will need a PoE Injector, part
#010867A (ordered separately). A PoE Injector is a power supply solution for those who
have a standard hub.
CyberData Corporation 930095K Operations Guide
Page 13
Installing the VoIP Ceiling Speaker
Speaker
Status
(Green)
Network
Link/Activity
(Yellow)
Speaker Setup
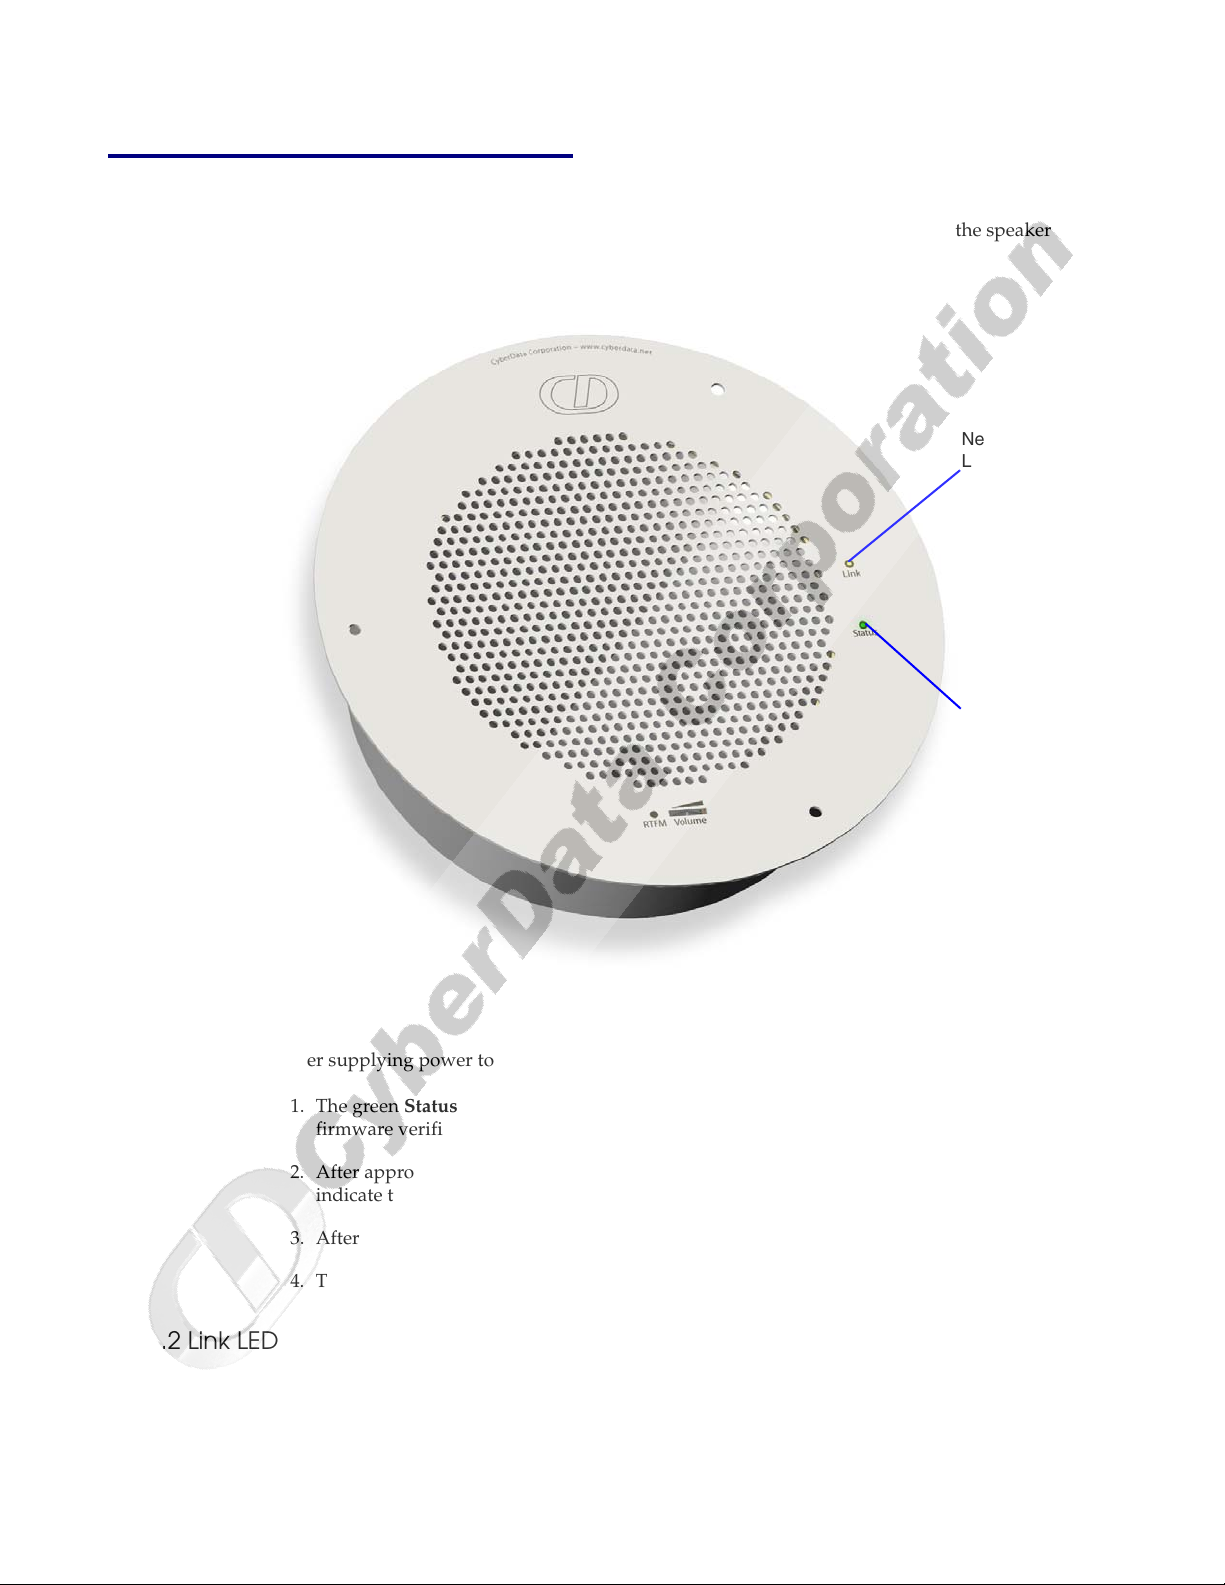
2.2.2 Confirm that the Speaker is Operational and Linked to the Network
After connecting the speaker to the 802.3af compliant ethernet hub, the LEDs on the speaker face
confirm that the speaker is operational and linked to the network.
Figure 2-3. Status and Activity LEDs
7
2.2.2.1 Status LED
After supplying power to the speaker:
1. The green St
atus LED illuminates after approximately five seconds to indicate the start of the
firmware verification and load process.
2. After approximately 15 seconds, the Stat
indicate the start of the firmware boot process.
3. After approximately 35 seconds, the speaker beeps once to
4. The St
atus LED will continue to blink at one second intervals to indicate normal operation.
2.2.2.2 Link LED
● The Link LED is illuminated when the network link to the speaker is established.
● The Link LED blinks to indicate network traffic.
Operations Guide 930095K CyberData Corporation
us LED begins to blink at one second intervals to
indicate that it is operational.
Page 14
Installing the VoIP Ceiling Speaker
RTFM switch
8
Speaker Setup
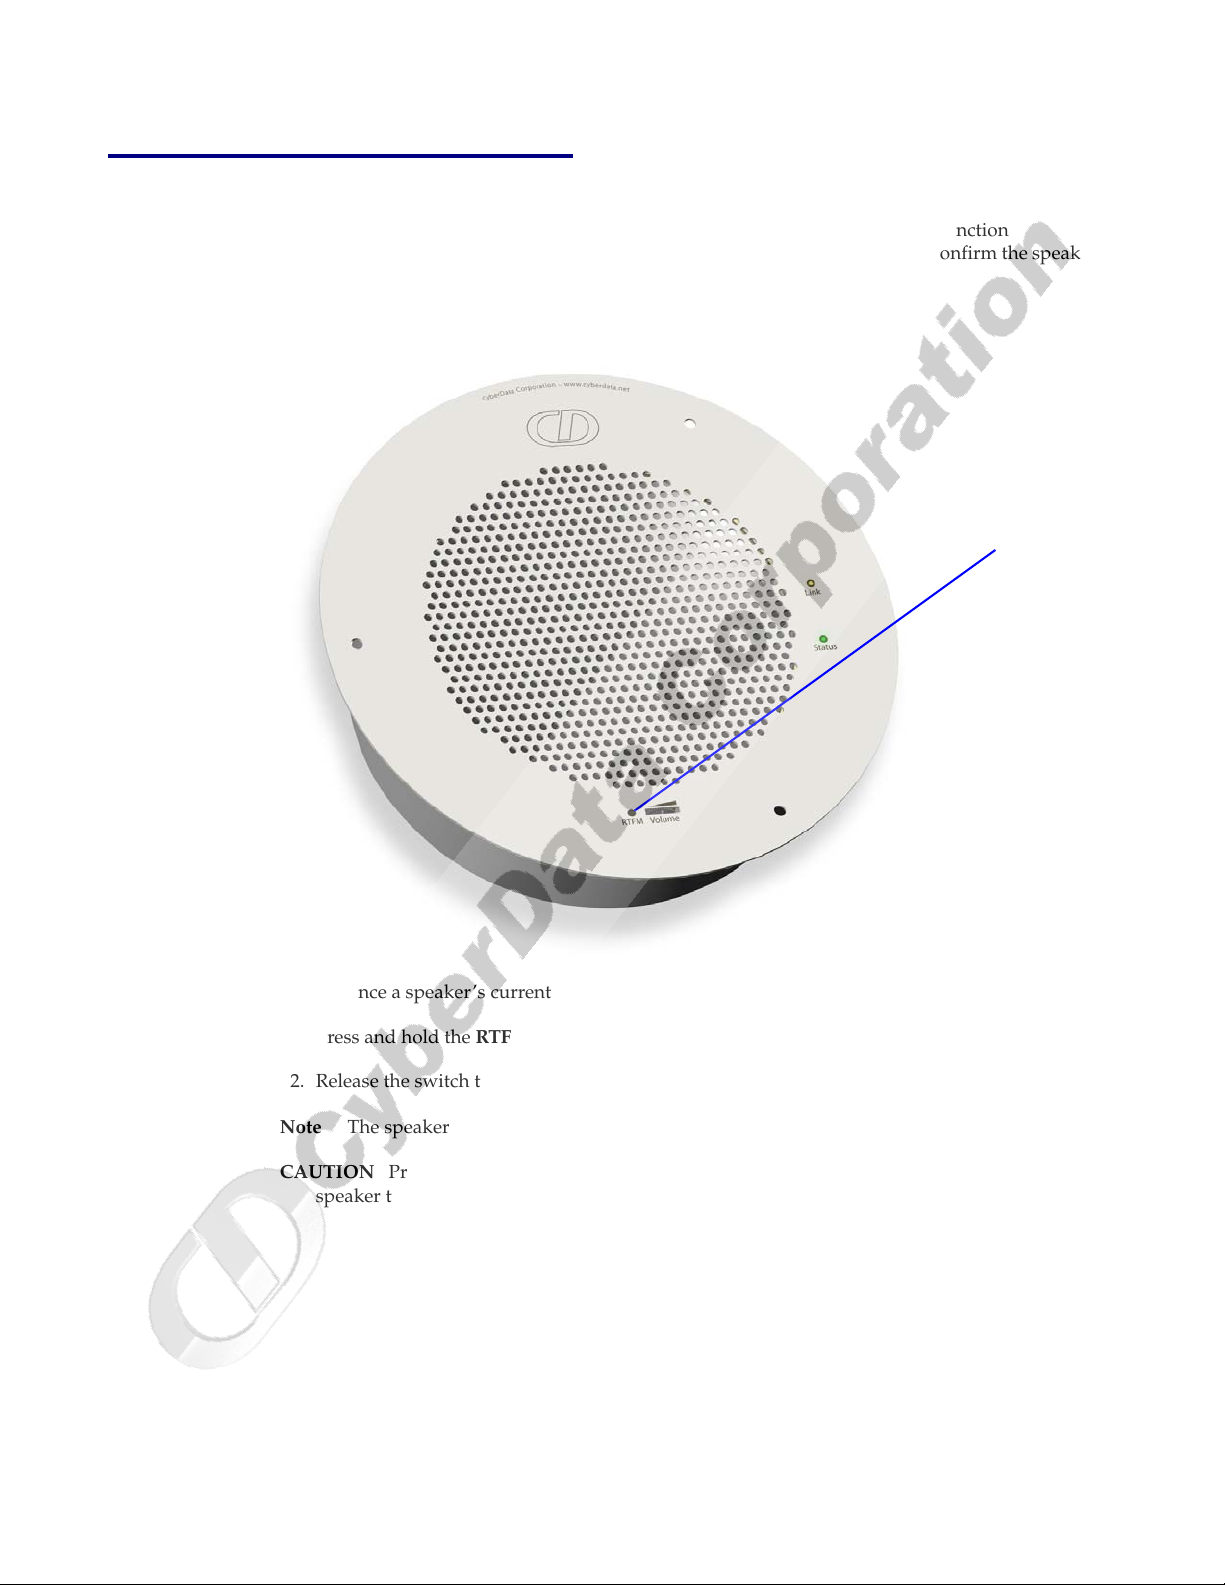
2.2.3 Confirm the IP Address, Test the Audio, and Check the Volume
When the speaker is operational and linked to the network, use the Reset Test Function
Management (RTFM) switch (Figure 2-4) on the speaker face to announce and confirm the speaker’s
IP Address, test that the audio is working, and
Figure 2-4. RTFM Switch
check the volume.
To announce a speaker’s current IP address:
1. Press and hold the RT
2. Release the switch to hear the IP address
Note The spea
ker will announce it's default IP address (192.168.3.10).
CAUTION Pressing and
speaker to the factory default settings. See Section 2.6, "Restore the Factory Default
CyberData Corporation 930095K Operations Guide
FM switch until it beeps (after one second).
announcement, and check the speaker volume.
holding the RTFM switch for longer than 20 seconds will restore the
Settings".
Page 15
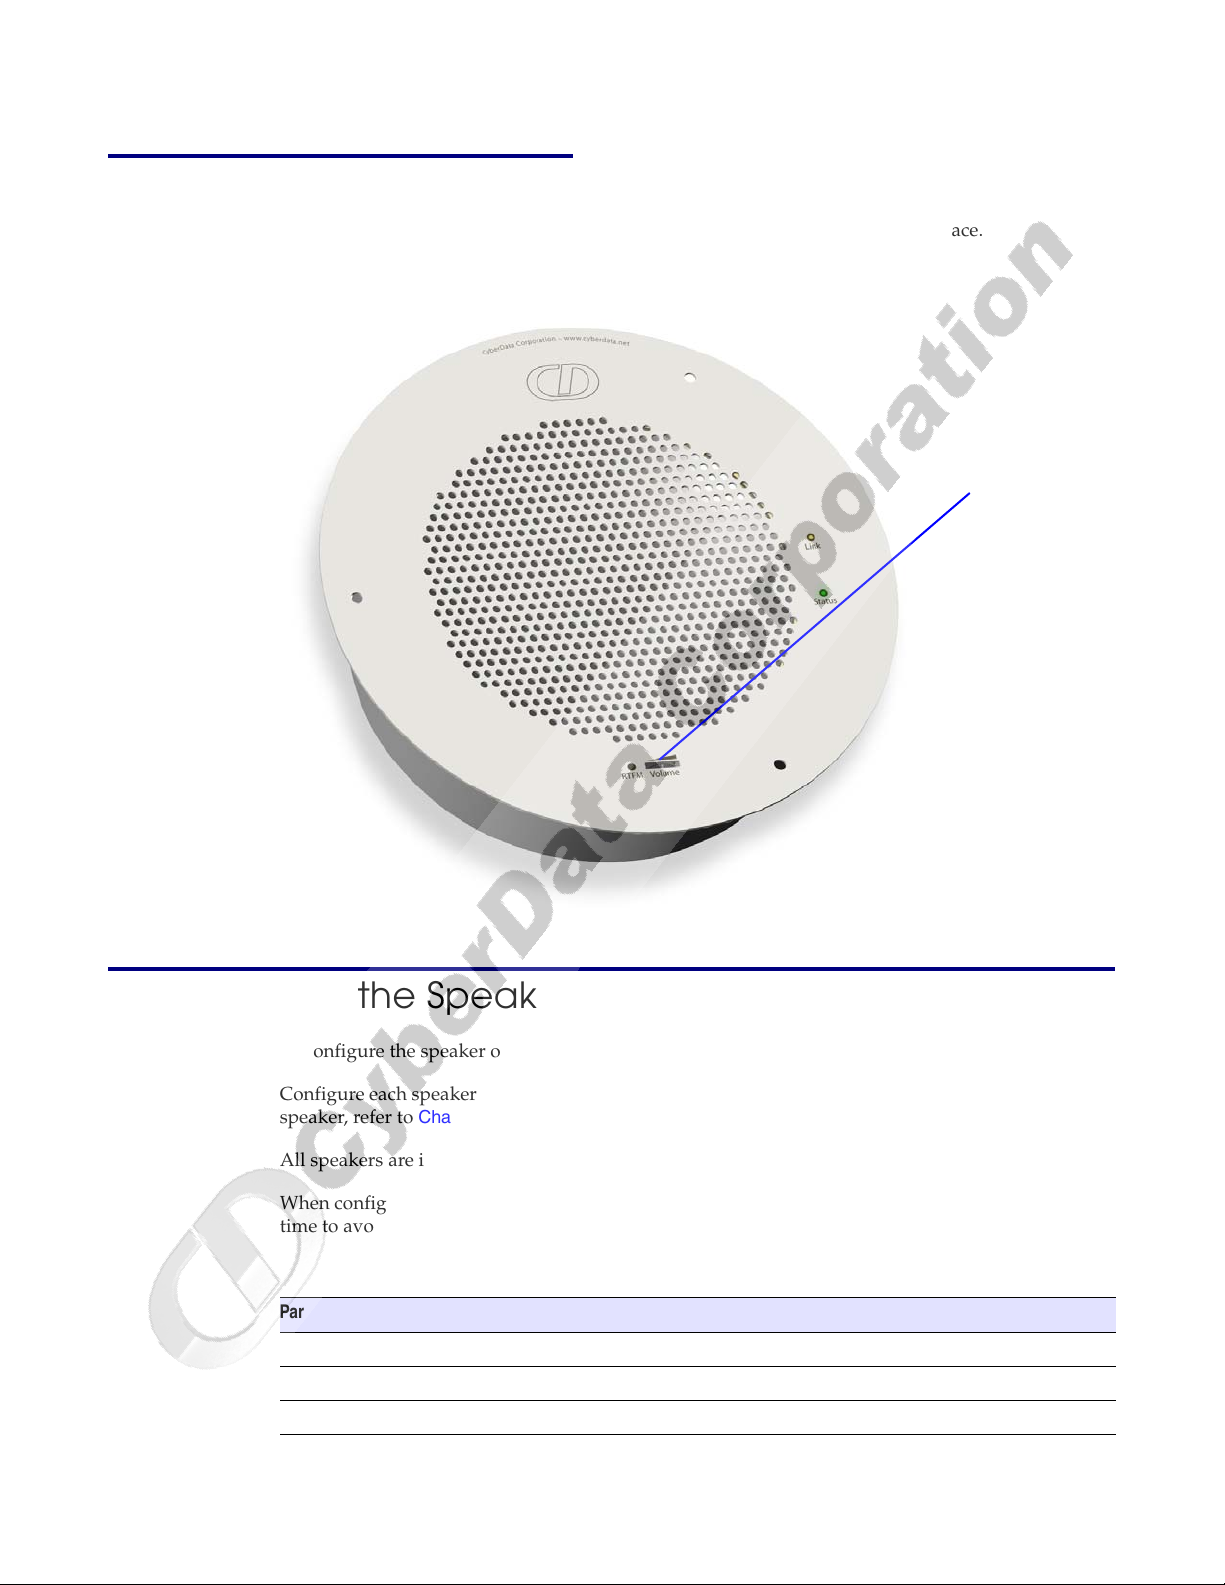
2.2.4 Adjust the Volume
Volume control
To adjust the speaker volume, turn the Vo l u me dial (Figure 2-5) on the speaker face.
Figure 2-5. Volume Control
Installing the VoIP Ceiling Speaker
Configure the Speaker Parameters
9
2.3 Configure the Speaker Parameters
To configure the speaker online, use a standard web browser.
Configure each speaker and verify its operation befor
speaker, refer to
All speakers are initially configured with the following default IP settings:
When configuring more than one speaker, attach the speakers to the network and configure one at a
to avoid IP address conflicts.
time
Parame ter Factory Default Setting
SIP/MGROUPS SIP
IP Addressing static
IP Address 192.168.3.10
Operations Guide 930095K CyberData Corporation
Chapter A, “Mounting the Speaker” for instructions.
Table 2-3. Factory Default Settings
e you mount it. When you are ready to mount a
Page 16

Installing the VoIP Ceiling Speaker
SIP
10
Configure the Speaker Parameters
Table 2-3. Factory Default Settings
Parame ter Factory Default Setting
Web Access Username admin
Web Access Password admin
Subnet Mask 255.255.255.0
Default Gateway 192.168.3.1
2.3.1 Log in to the Configuration Home Page
1. Open your browser to the speaker IP address.
For the initial configuration of the speaker, open
http://192.168.3.10
your browser to the default IP address:
Note Make sure that the PC
is on the same IP network as the speaker.
2. When prompted, use the following default W
to access the Home Page (Figure 2-6):
Web Access Username: admin
Web Access Password: ad
min
Figure 2-6. Home Page
eb Access Username and Web Ac c ess Password
CyberData Corporation 930095K Operations Guide
Page 17
Installing the VoIP Ceiling Speaker
Configure the Speaker Parameters
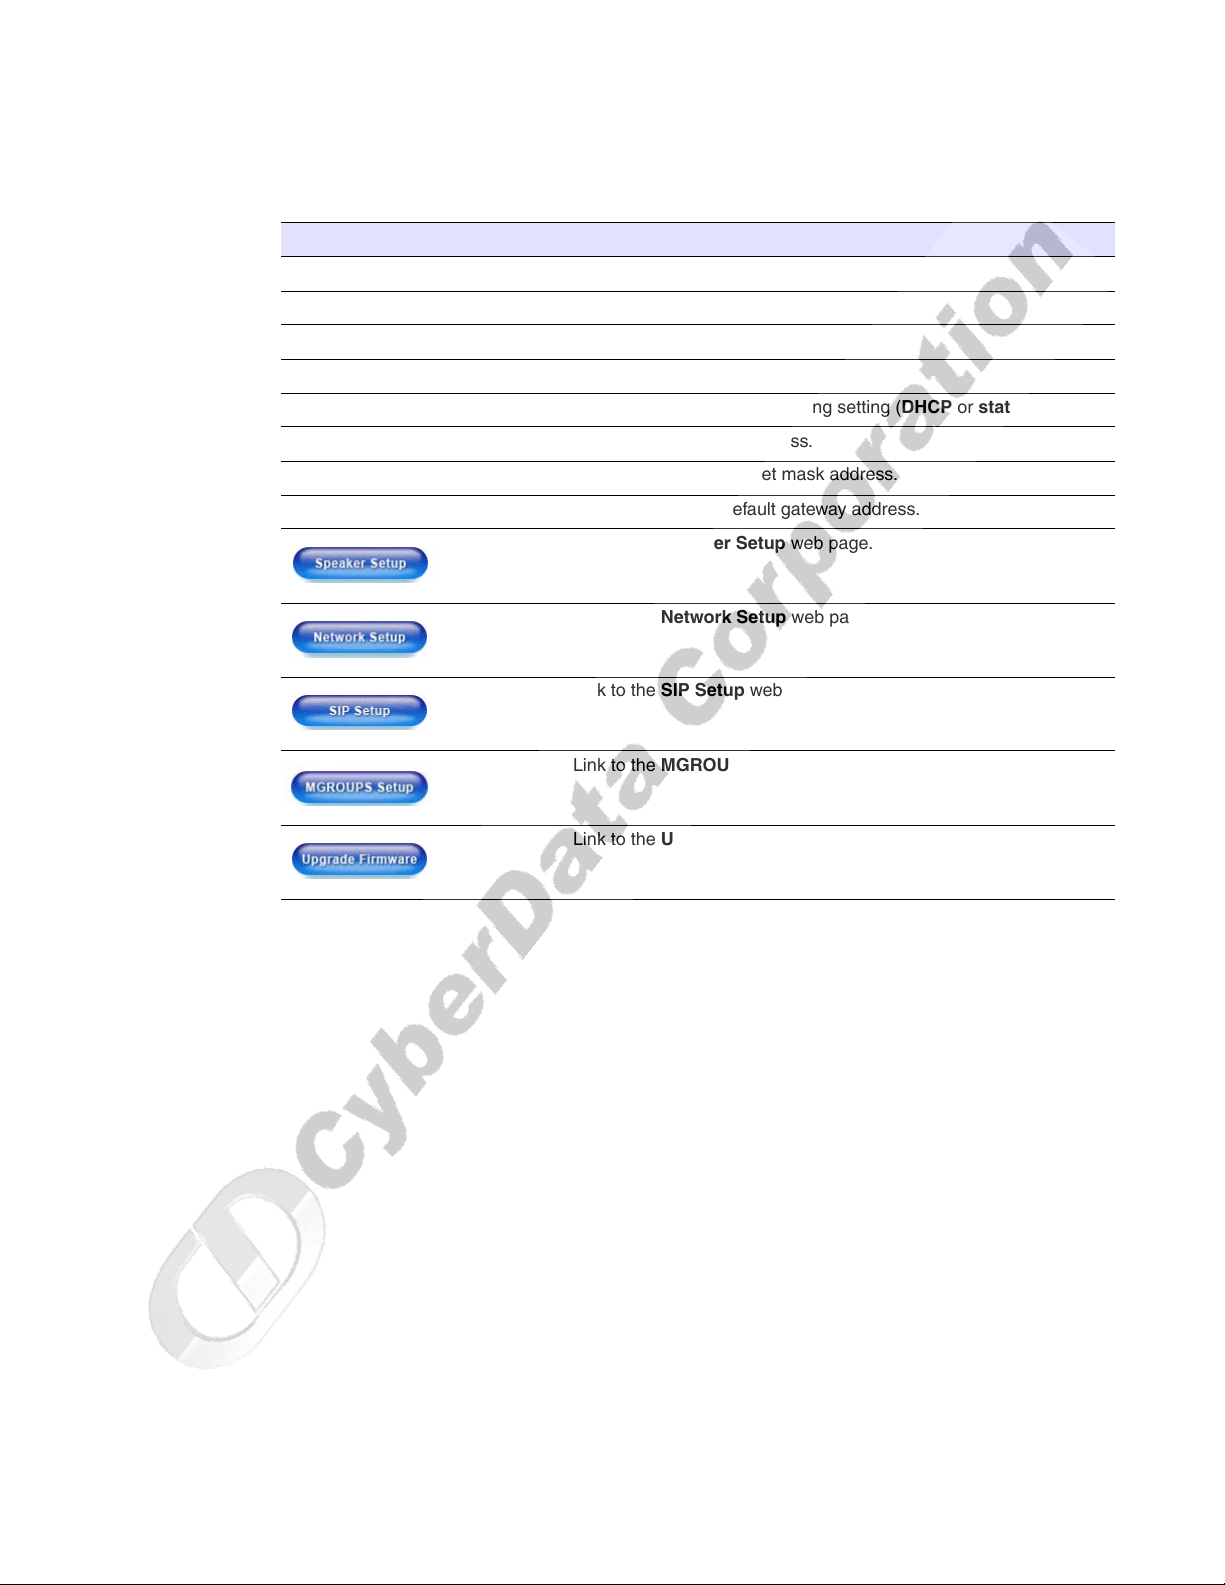
3. On the Home Page, review the setup details and navigation buttons described in Ta bl e 2-4.
Table 2-4. Home Page Overview
Web Page Item Description
Device Name Shows the device name.
Running Shows the current speaker function.
Serial # Device serial number.
Ethernet Address Device ethernet address.
IP Addressing Shows the current IP addressing setting (DHCP or static).
IP Address Shows the current IP address.
Subnet Mask Shows the current subnet mask address.
Default Gateway Shows the current default gateway address.
Link to the Speaker Setup web page.
Link to the Network Setup web page.
11
Link to the SIP Setup web page.
Link to the MGROUPS Setup page.
Link to the Upgrade Firmware web page.
Operations Guide 930095K CyberData Corporation
Page 18
Installing the VoIP Ceiling Speaker
12
Configure the Speaker Parameters
2.3.2 Configure the Network Parameters
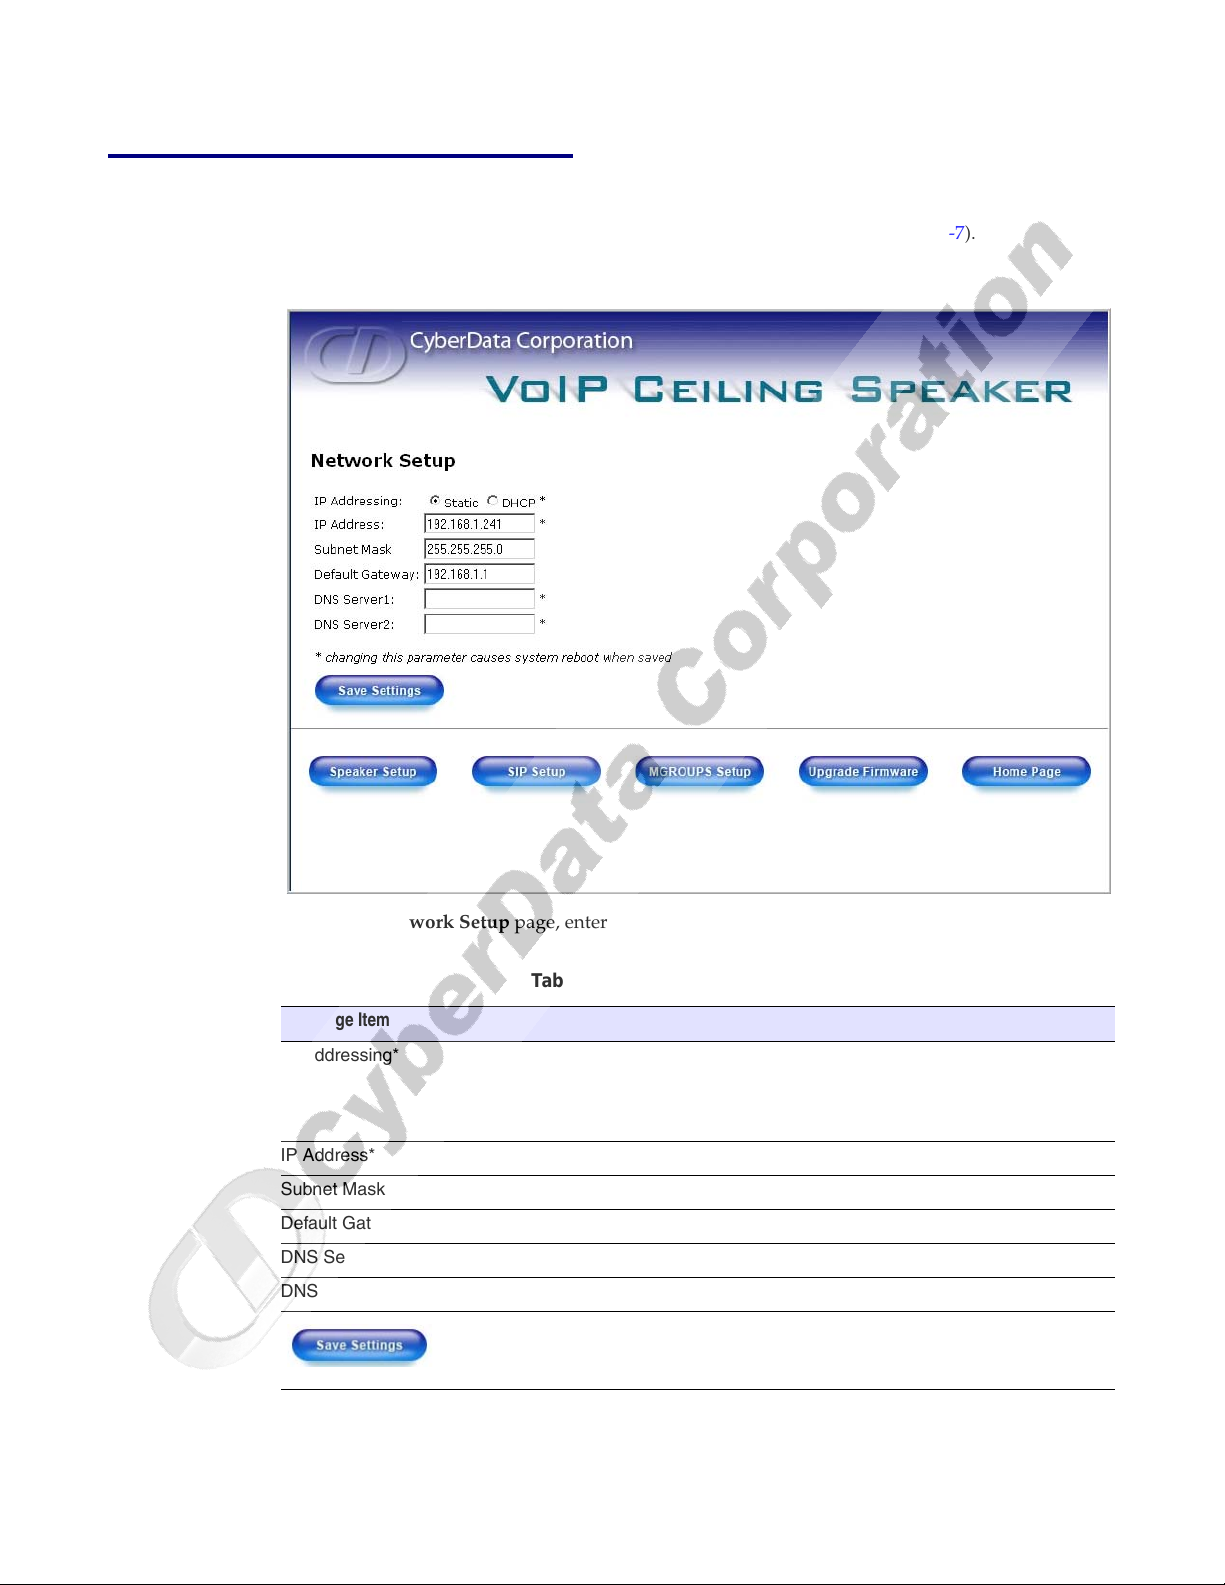
1. Click the Network Setup button to open the Network Setup page (Figure 2-7).
Figure 2-7. Network Setup Page
2. On the Networ
k Setup page, enter values for the parameters indicated in Tab le 2-5.
Table 2-5. Network Setup Parameters
Web Page Item Description
IP Addressing* Select either DHCP IP Addressing or Static IP Addressing by
marking the appropriate radio button. If you select Static, configure
the remaining parameters indicated in
go to Step 3.
IP Address* Enter the Static IP address.
Subnet Mask Enter the Subnet Mask address.
Default Gateway Enter the Default Gateway address.
DNS Server 1* Enter the DNS Server 1 address.
DNS Server 2* Enter the DNS Server 2 address.
Click this button to save your configuration settings. Changing a
parameter that has an asterisk next to it will cause a system reboot
when saved.
CyberData Corporation 930095K Operations Guide
Table 2-5. If you select DHCP,
Page 19
Installing the VoIP Ceiling Speaker
Configure the Speaker Parameters
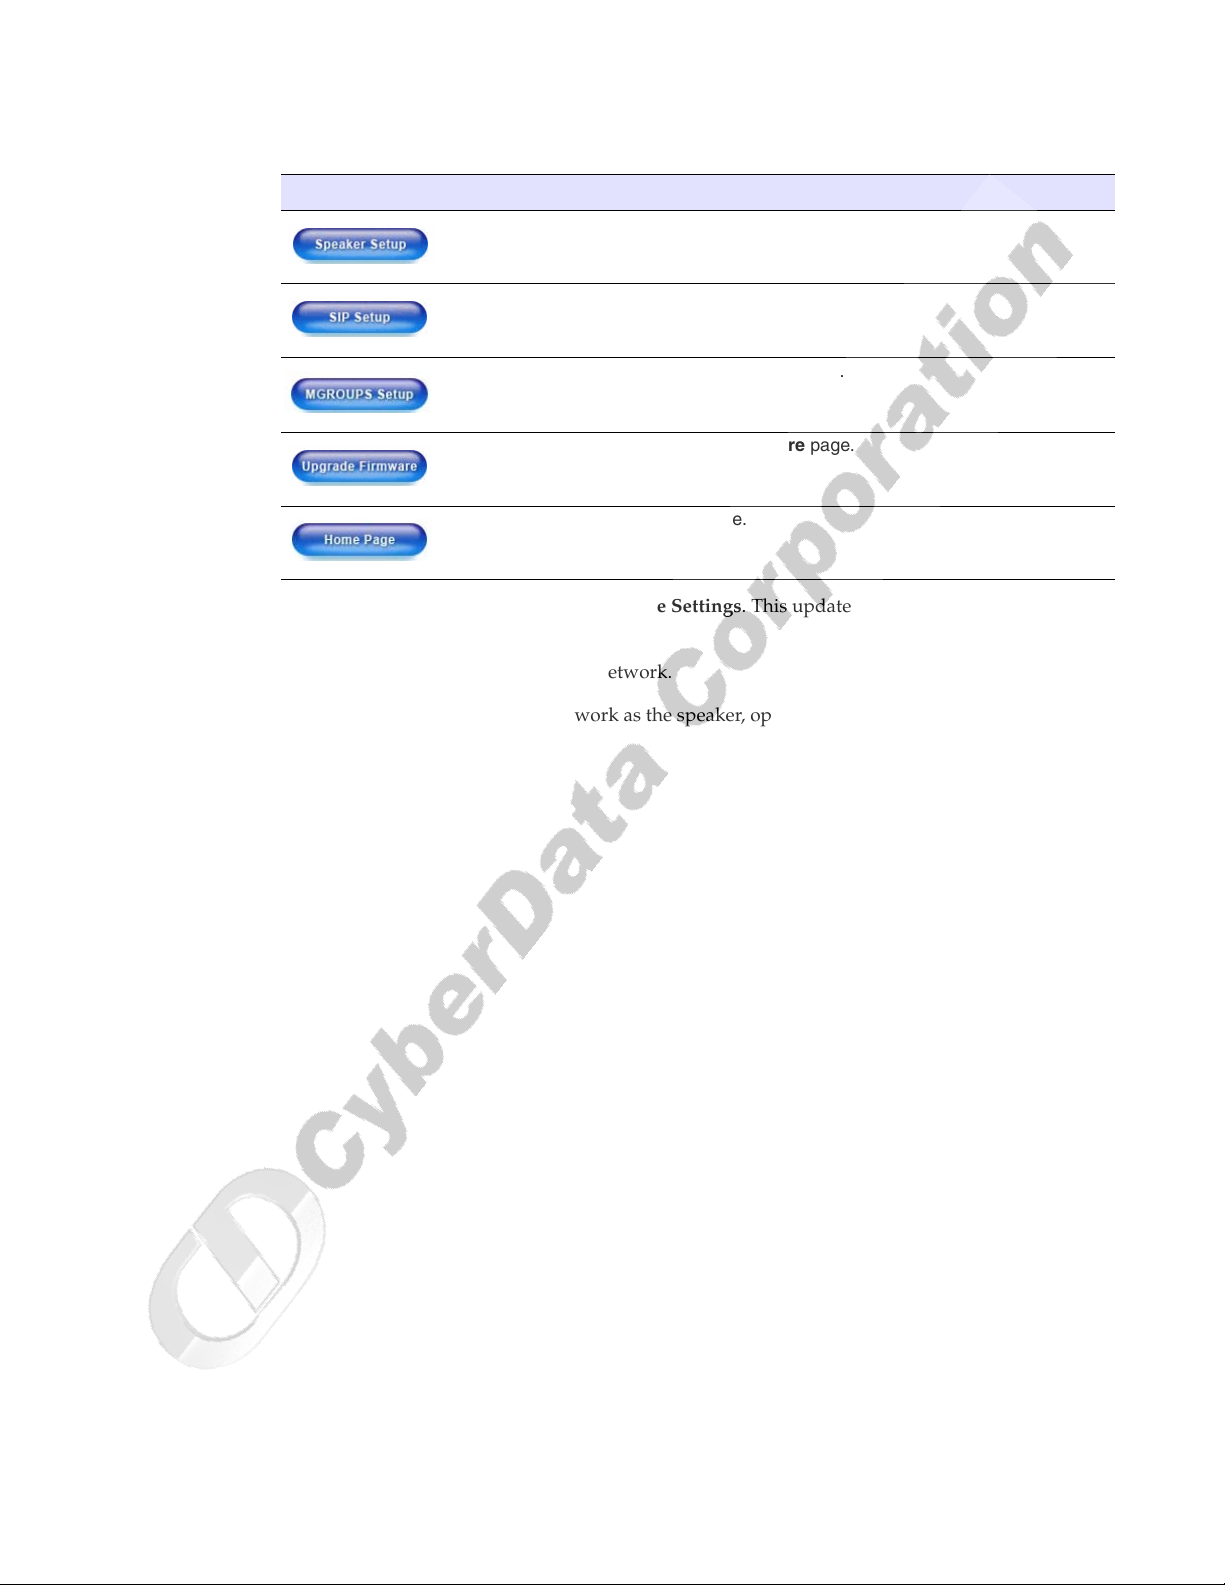
Table 2-5. Network Setup Parameters
Web Page Item Description
Link to the Speaker Setup page.
Link to the SIP Setup page.
Link to the MGROUPS Setup page.
Link to the Upgrade Firmware page.
Link to the Home page.
3. After changing the parameters, click Save Settings. This updates the changed parameters and
reboots the speaker if appropriate.
13
4. Connect the speaker to the target network.
5. From a system on the same network as the speaker
the speaker.
, open a browser with the new IP address of
Operations Guide 930095K CyberData Corporation
Page 20
Installing the VoIP Ceiling Speaker
14
Configure the Speaker Parameters
2.3.3 Set up the Speaker
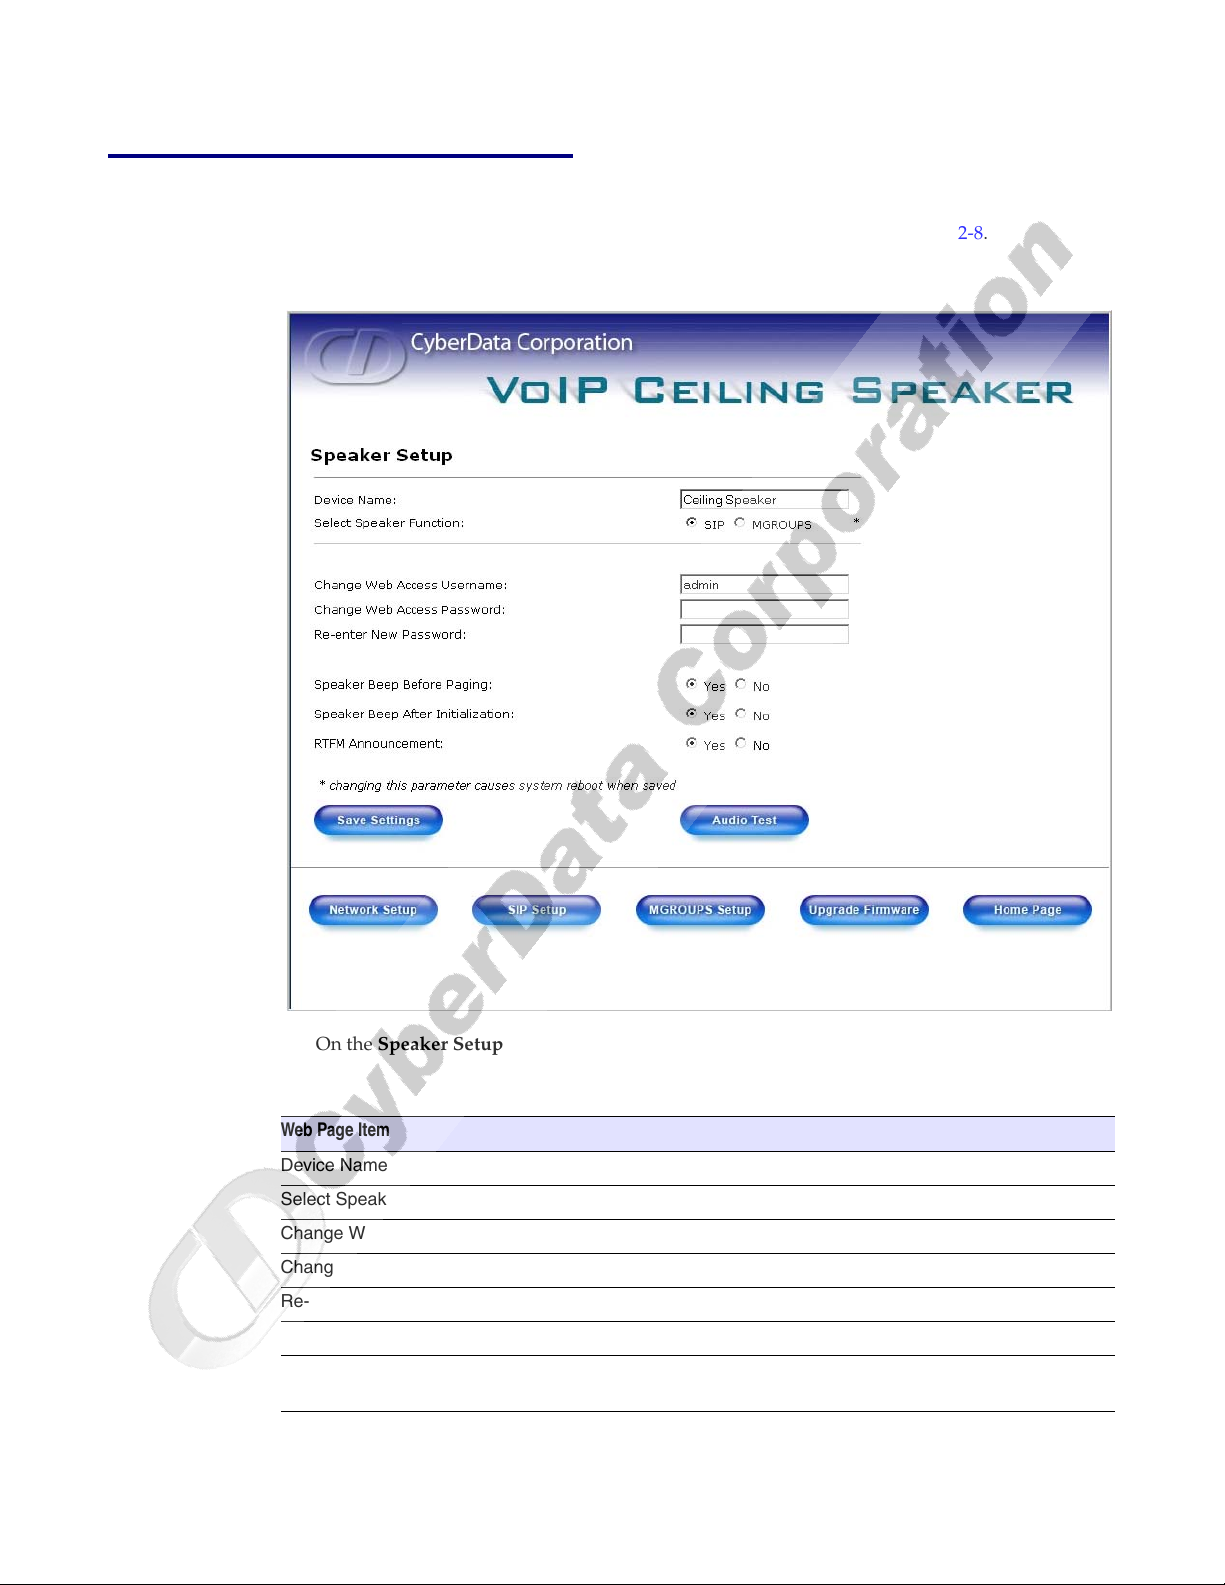
1. Click the Speaker Setup button to open the Speaker Setup page. See Figure 2-8.
Figure 2-8. Speaker Setup
2. On the Speaker Se
tup page, enter values for the parameters indicated in Ta b le 2-6.
Table 2-6. Speaker Setup Parameters
Web Page Item Description
Device Name Enter a descriptive name for this device (if desired).
Select Speaker Function Select SIP or MGROUPS.
Change Web Access Username Use this field to change the Web Access Username
Change Web Access Password Use this field to change the Web Access Password
Re-enter New Password Use this field to re-enter a new password
Speaker Tone Before Paging Enable/Disable the speaker tone (beep) before each page.
Speaker Tone After Initialization Enable/Disable the speaker tone (beep)
startup.
CyberData Corporation 930095K Operations Guide
after the system
Page 21
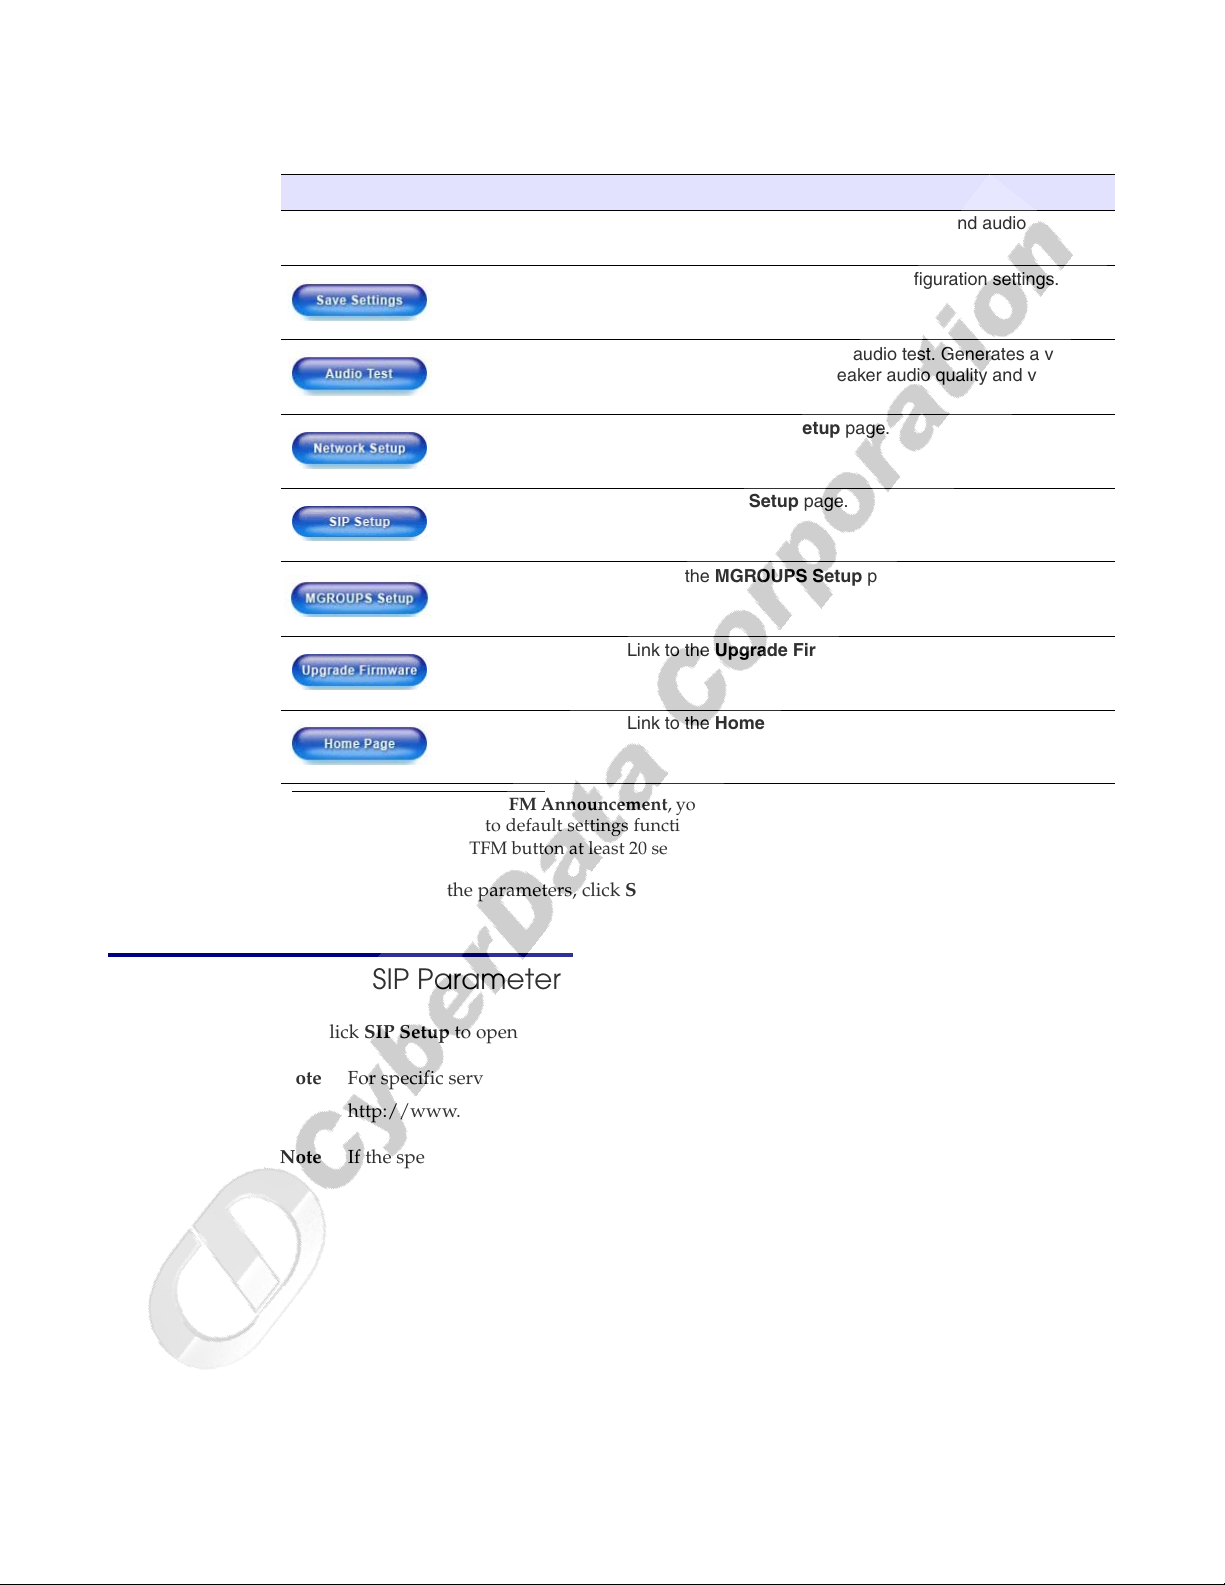
Table 2-6. Speaker Setup Parameters
Web Page Item Description
RTFM Announcement
a
Enable/Disable the speaker tone (beep) and audio
associated with the RTFM switch.
Click on this button to save your configuration settings.
Click on this button to do an audio test. Generates a voice
message for testing the speaker audio quality and volume.
Link to the Network Setup page.
Link to the SIP Setup page.
Link to the MGROUPS Setup page.
Link to the Upgrade Firmware page.
Installing the VoIP Ceiling Speaker
Configure the Speaker Parameters
15
a.If you select No for RTFM Announcement, you will not hear a beep or associated RTFM audio.
However, the return to default settings function remains active. If you wish to return to default
settings, hold the RTFM button at least 20 seconds, then release the button.
3. After changing the parameters, click Save Settings.
2.3.4 Configure the SIP Parameters
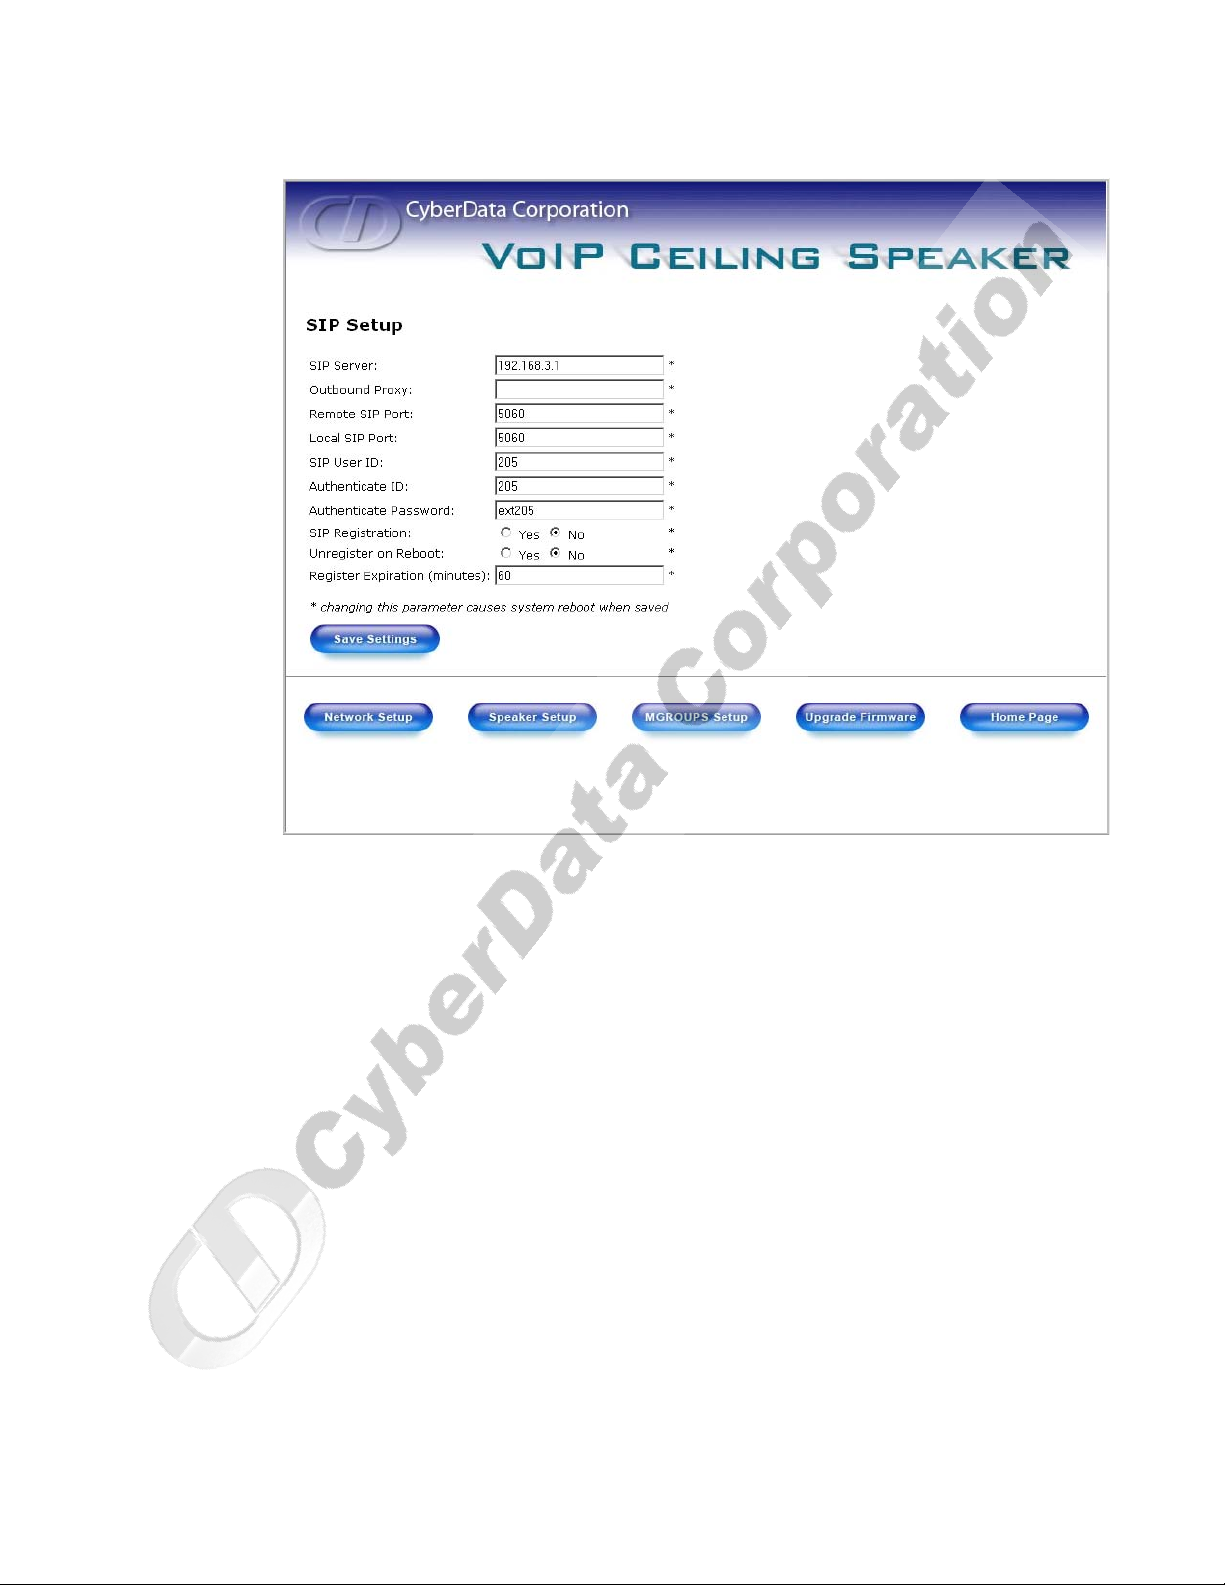
1. Click SIP Setup to open the SIP Setup page (Figure 2-9).
Note For spec
http://www.cyberdata.net/support/voi
Note If
ific server configurations, go to the following URL:
the speaker is set up for MGROUPS, the SIP settings will be grayed out.
Link to the Home page.
p/ceilingspeaker.html
Operations Guide 930095K CyberData Corporation
Page 22
Installing the VoIP Ceiling Speaker
16
Configure the Speaker Parameters
Figure 2-9. SIP Setup Page
CyberData Corporation 930095K Operations Guide
Page 23
Installing the VoIP Ceiling Speaker
Configure the Speaker Parameters
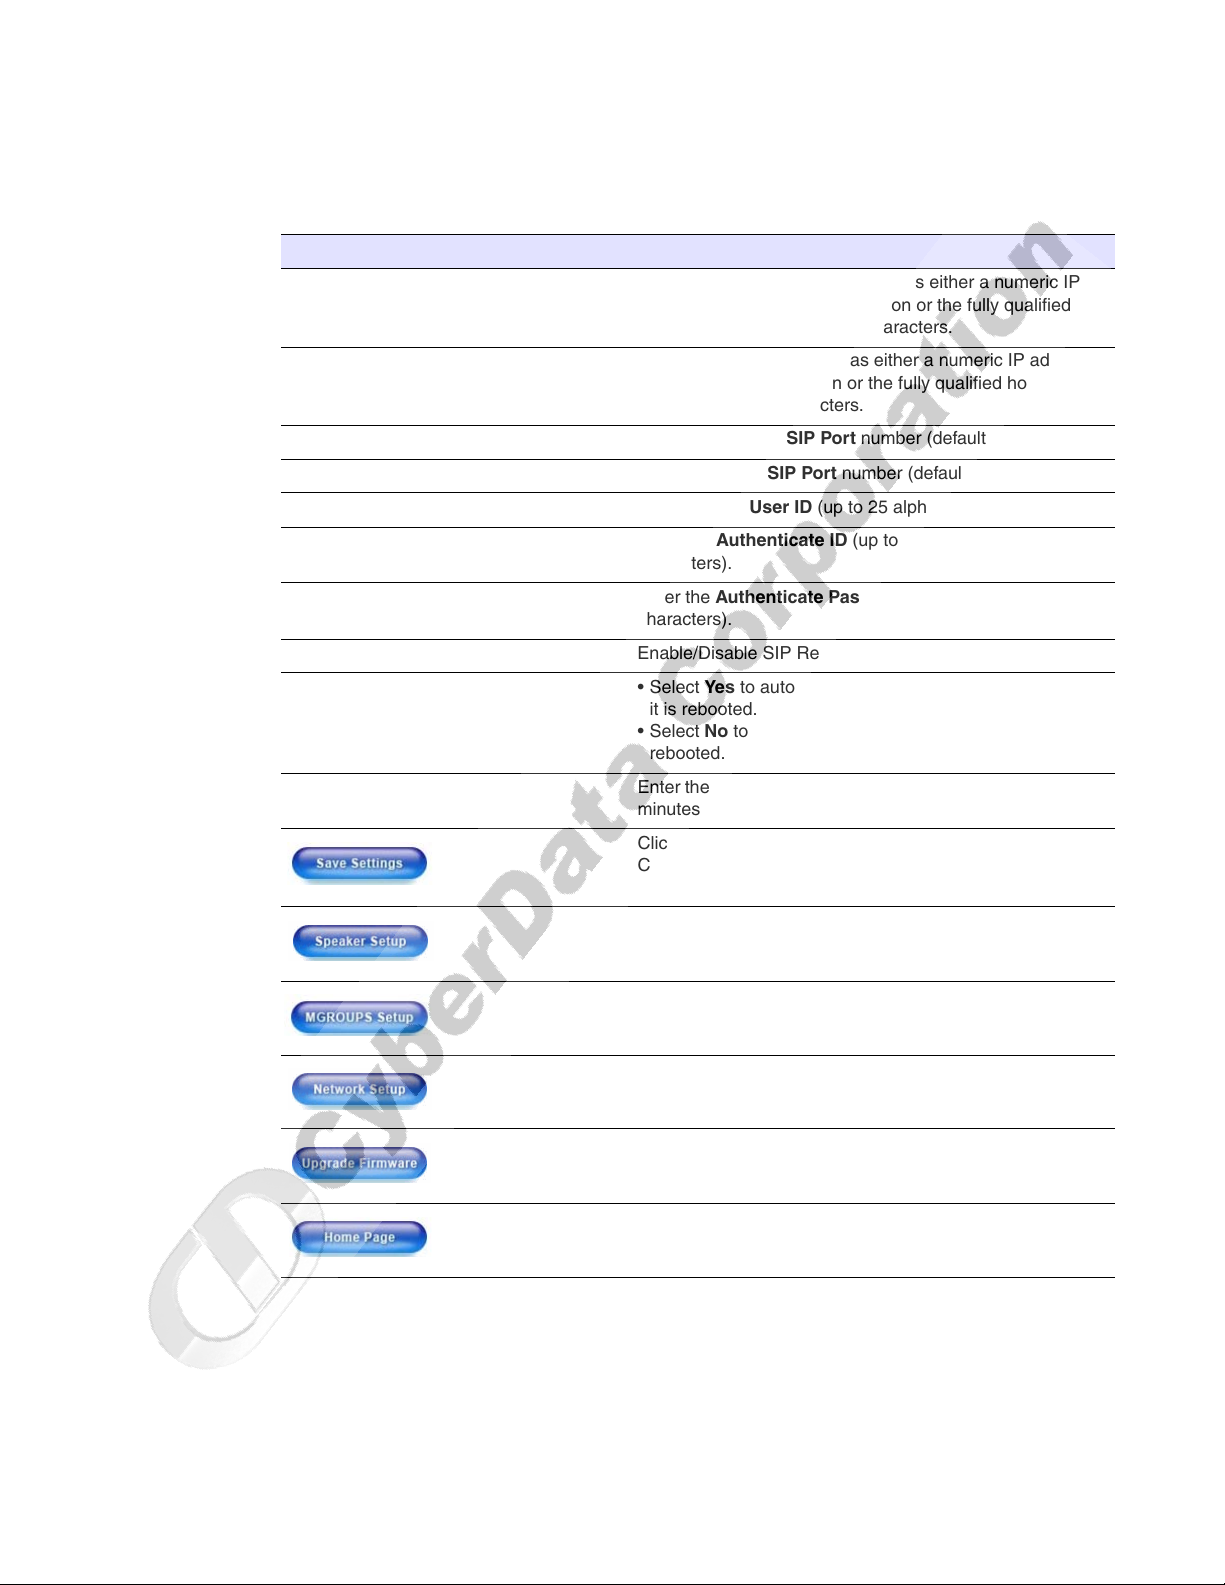
2. On the SIP Setup page, enter values for the parameters indicated in Ta bl e 2-7.
Table 2-7. SIP Setup Parameters
Web Page Item Description
SIP Server* Enter the SIP server represented as either a numeric IP
address in dotted decimal notation or the fully qualified
host name (FQHN) up to 64 characters.
Outbound Proxy Enter the Outbound Proxy as either a numeric IP address
in dotted decimal notation or the fully qualified host name
(FQHN) up to 64 characters.
Remote SIP Port* Enter the Remote SIP Port number (default 5060).
Local SIP Port* Enter the Local SIP Port number (default 5060).
SIP User ID* Enter the SIP User ID (up to 25 alphanumeric characters).
Authenticate ID* Enter the Authenticate ID (up to 25 alphanumeric
characters).
Authenticate Password* Enter the Authenticate Password (up to 25 alphanumeric
characters).
SIP Registration* Enable/Disable SIP Registration.
Unregister on Reboot* • Select Yes to automatically unregister the speaker when
it is rebooted.
•Select No to keep the speaker registered when it is
rebooted.
Register Expiration* Enter the SIP Registration lease time in minutes (default 60
minutes).
Click this button to save your configuration settings.
Changing a parameter that has an asterisk next to it will
cause a system reboot when saved.
Link to the Speaker Setup page.
17
Link to the MGROUPS Setup page.
Link to the Network Setup page.
Link to the Upgrade Firmware page.
Link to the Home page.
3. After changing the parameters, click Save Settings.
Operations Guide 930095K CyberData Corporation
Page 24
Installing the VoIP Ceiling Speaker
18
Set up the MGROUPS
2.4 Set up the MGROUPS
MGROUPS uses multicasting to create Public Address Paging Zones. Multicasting is based on the
concept of a group. Multicast addresses specify an arbitrary group of IP hosts that have joined the
group and want to receive traffic sent to the group. Group members send IGMP messages to their
local multicast routers, allowing the group traffic traversal from the source.
MGROUPS Setup provides the ability to join up to
one, or many, CyberData MGROUPS-enabled speakers. There is no limit to how many speakers can
be in a given Paging Zone. Each MGROUP is defined by a multicast address and port number. Each
MGROUP is also assigned a priority, allowing simultaneously arriving pages to be serviced based
on importance. MGROUPS are compatible with IGMP through version 3.
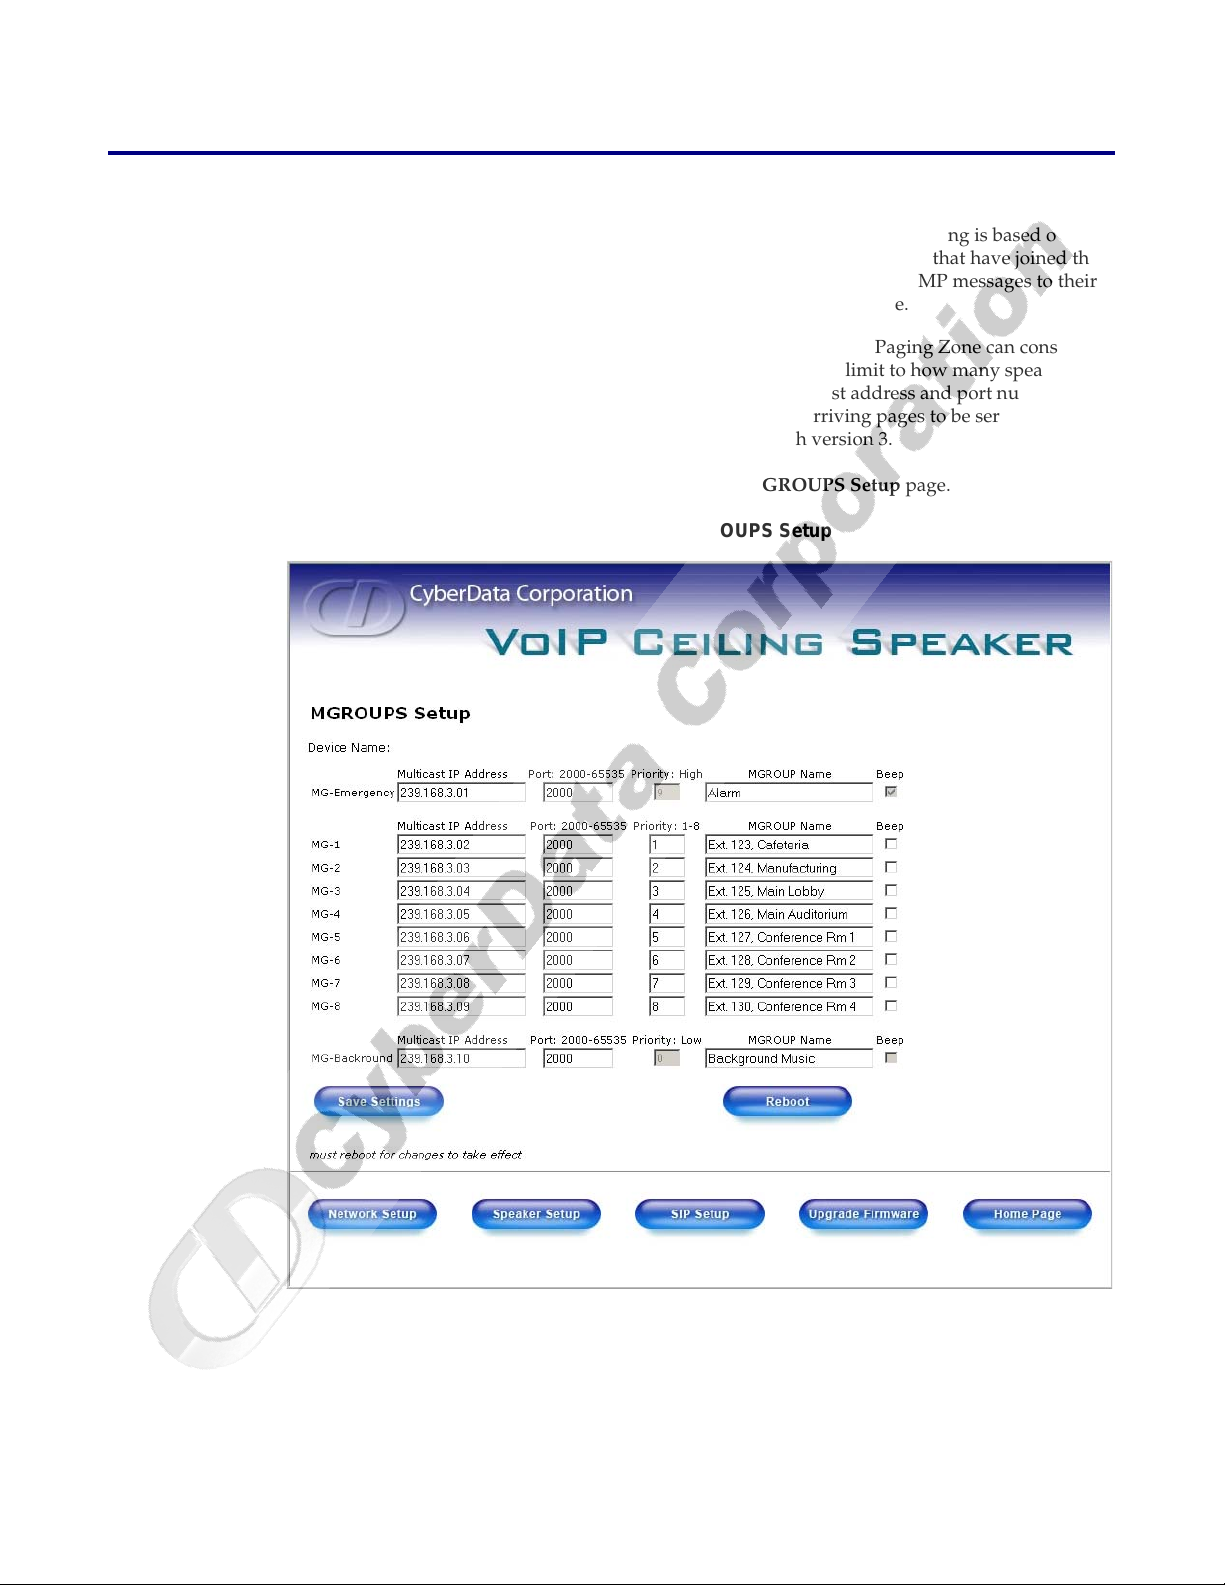
1. Click on the MG
ROUPS Setup button to open the MGROUPS Setup page. See Figure 2-10.
Figure 2-10. MGROUPS Setup
10 Paging Zones. A Paging Zone can consist of
CyberData Corporation 930095K Operations Guide
Page 25
Installing the VoIP Ceiling Speaker
Set up the MGROUPS
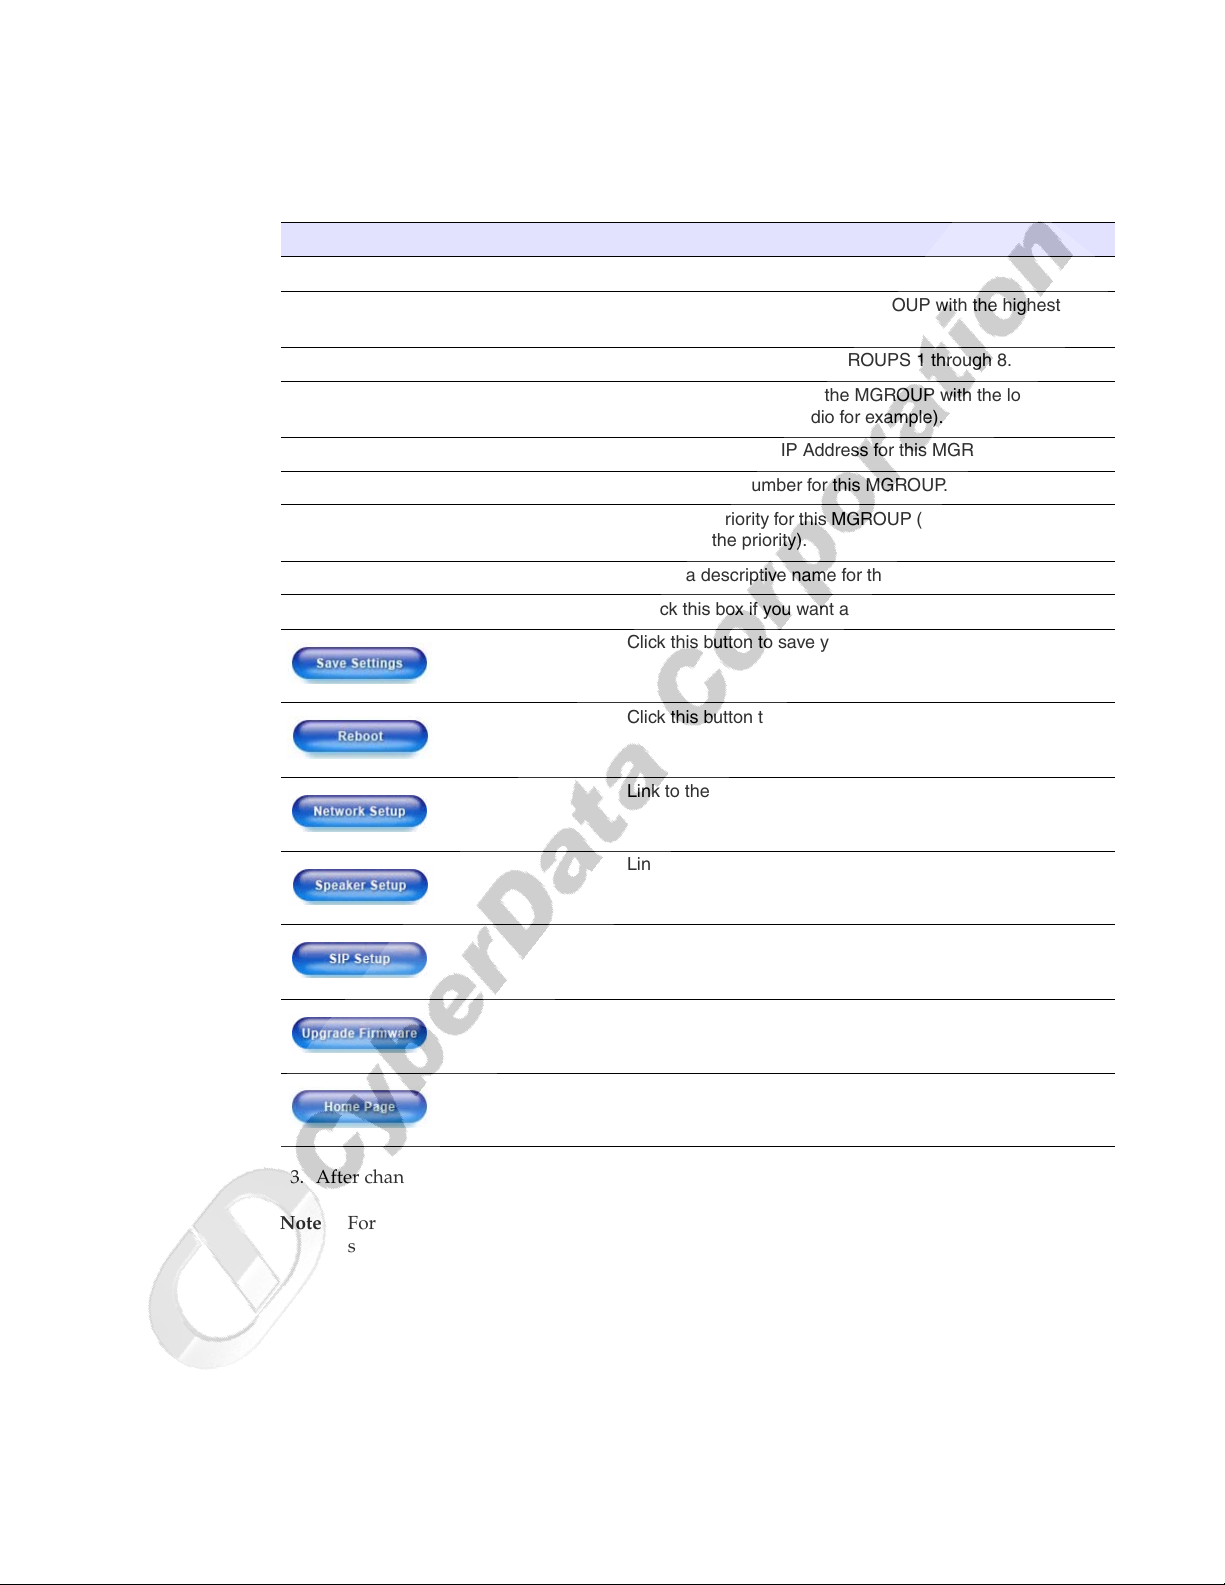
2. On the MGROUPS Setup page, enter values for the parameters indicated in Ta bl e 2-8.
Table 2-8. MGROUPS Setup Parameters
Web Page Item Description
Device Name Displays the device name.
MG-Emergency Use MG-Emergency for the MGROUP with the highest
pr
iority.
MG-(1-8) Use MG-(1-8) to assign MGROUPS 1 through 8.
MG-Background Use MG-Background for the MGROUP with the lowest
priority (background audio for example).
Multicast IP Address Enter the multicast IP Address for this MGROUP.
Port 2000-65535 Enter the port number for this MGROUP.
Priority Assign the priority for this MGROUP (the higher the number,
her the priority).
the hig
MGROUP Name Assign a descriptive name for this MGROUP.
Beep Check this box if you want a beep to precede a page.
Click this button to save your configuration settings.
19
Click this button to reboot the system.
Link to the Network Setup page.
Link to the Speaker Setup page.
Link to the SIP Setup page.
Link to the Upgrade Firmware page.
Link to the Home page.
3. After changing the parameters, click Save Sett
Note Fo
r information on how to set up MGROUPS in Cisco Call Manager Express,
see Appendix D, “Setting Up MGROUPS in
ings.
Cisco Call Manager Express”.
Operations Guide 930095K CyberData Corporation
Page 26
Installing the VoIP Ceiling Speaker
20
Upgrade the Firmware and Reboot the Speaker
2.5 Upgrade the Firmware and Reboot the Speaker
To upload the speaker firmware from your PC:
1. Set up a TFTP server.
If you do not already have a TFTP server r
a TFTP Server”.
2. Retrieve the latest speaker firmware from the CyberData website:
http://www
3. Unzip the speaker version file. This file may contain the following:
• Kernel firmware file: xxx-image-xxx-xxx.bin
• Application firmware file:
• Release notes
.cyberdata.net/support/voip/ceilingspeaker.html
xxx-romdisk-xxx-xxx.img
unning on your network, see Appendix B, “Setting up
4. Copy the firmware files to be upgraded to the
• c:\tftp-root\for Windows
• /tftpboot/for Linux
5. Log in to the speaker home page as instructed in Section 2.3.1, "Log in to the Configuration
Home Page".
6. Click the U
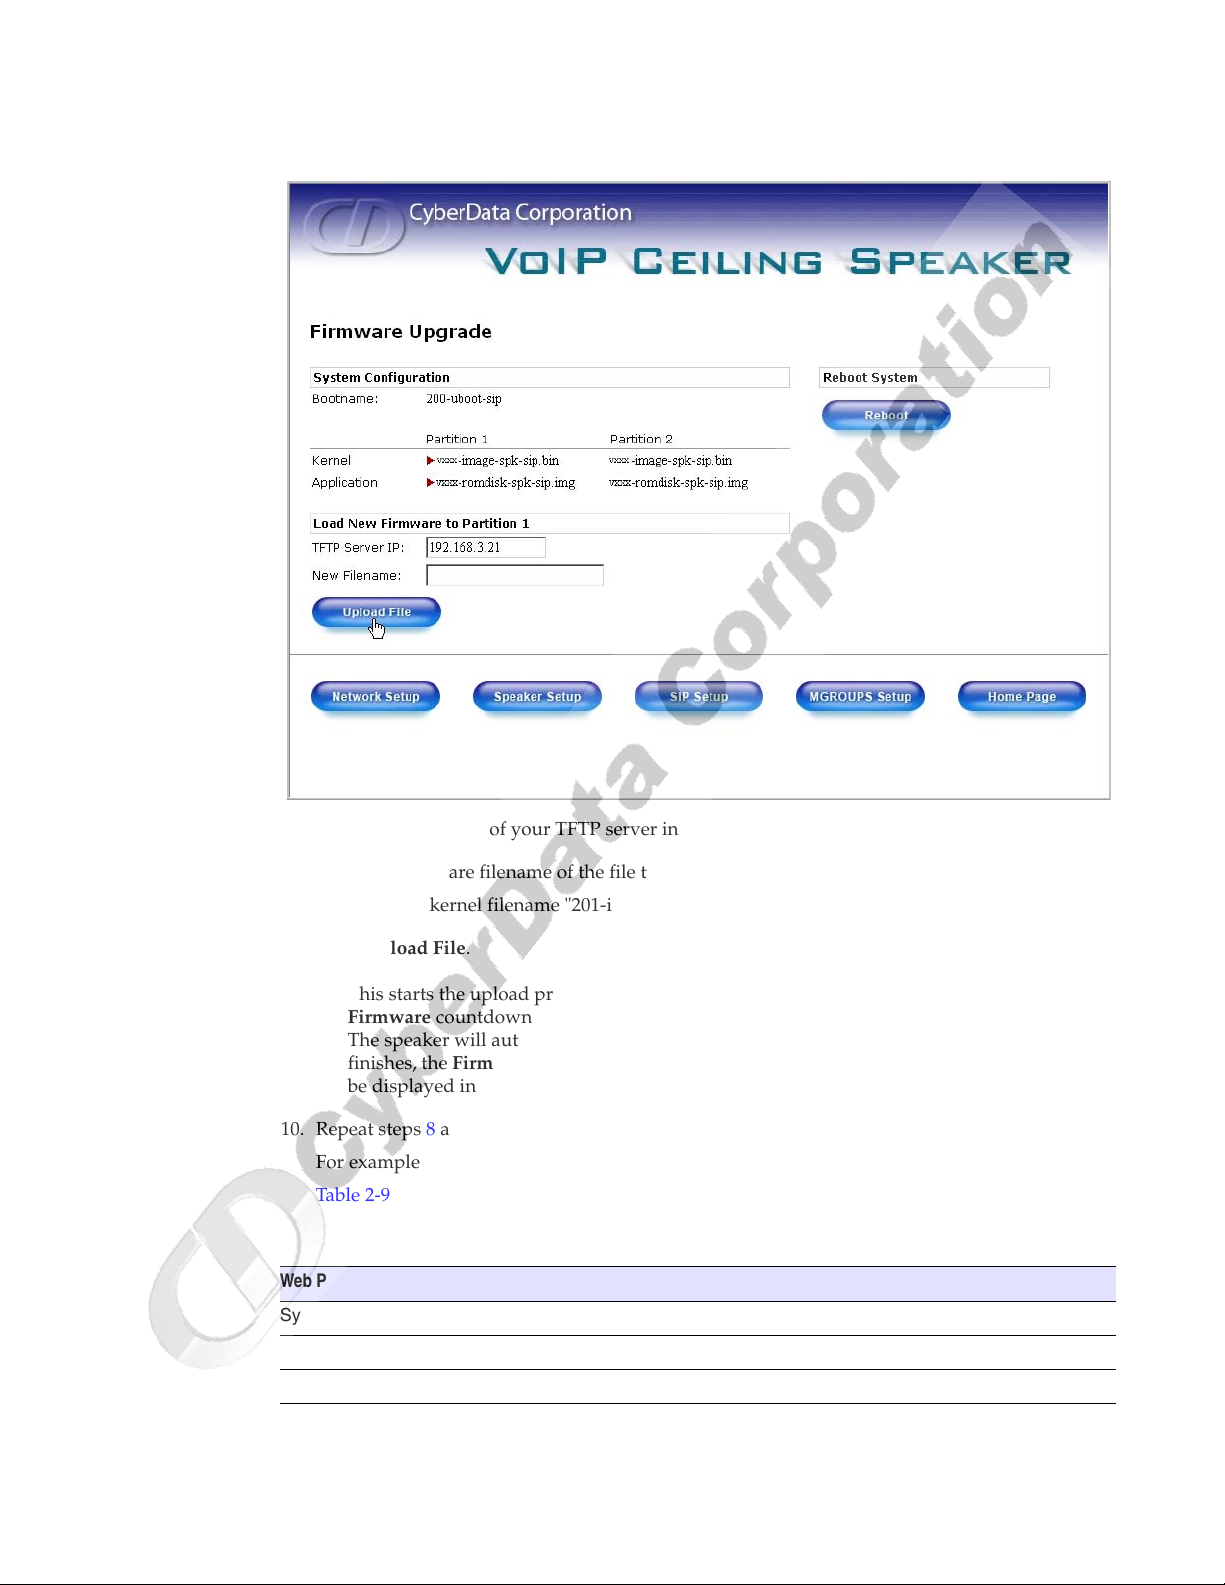
pgrade Firmware button to open the Firmware Upgrade page. See Figure 2-11.
appropriate TFTP server directory:
CyberData Corporation 930095K Operations Guide
Page 27
Upgrade the Firmware and Reboot the Speaker
Figure 2-11. Firmware Upgrade Page
Installing the VoIP Ceiling Speaker
21
7. Enter the IP address of your TFTP server into the TFTP Server IP parameter field.
8. Enter the firmware filename of the file to be uploaded into the New Filen
ame parameter field.
For example, kernel filename "201-image-spk-sip.bin".
9. Click Up
Note This
load File.
starts the upload process. Once the speaker has uploaded the file, the Uploading
Firmware countdown page appears, indicating that the firmware is being written to flash.
The speaker will automatically reboot when the upload is complete. When the countdown
finishes, the Firmware Upgrade page will refresh. The uploaded firmware filename should
be displayed in the system configuration (indicating successful upload and reboot).
10. Repeat steps 8 and 9 if you
For example, App
lication filename "201-romdisk-spk-sip.img".
Ta bl e 2-9 shows the web
are uploading the Kernel and Application files.
page items on the Firmware Upgrade page.
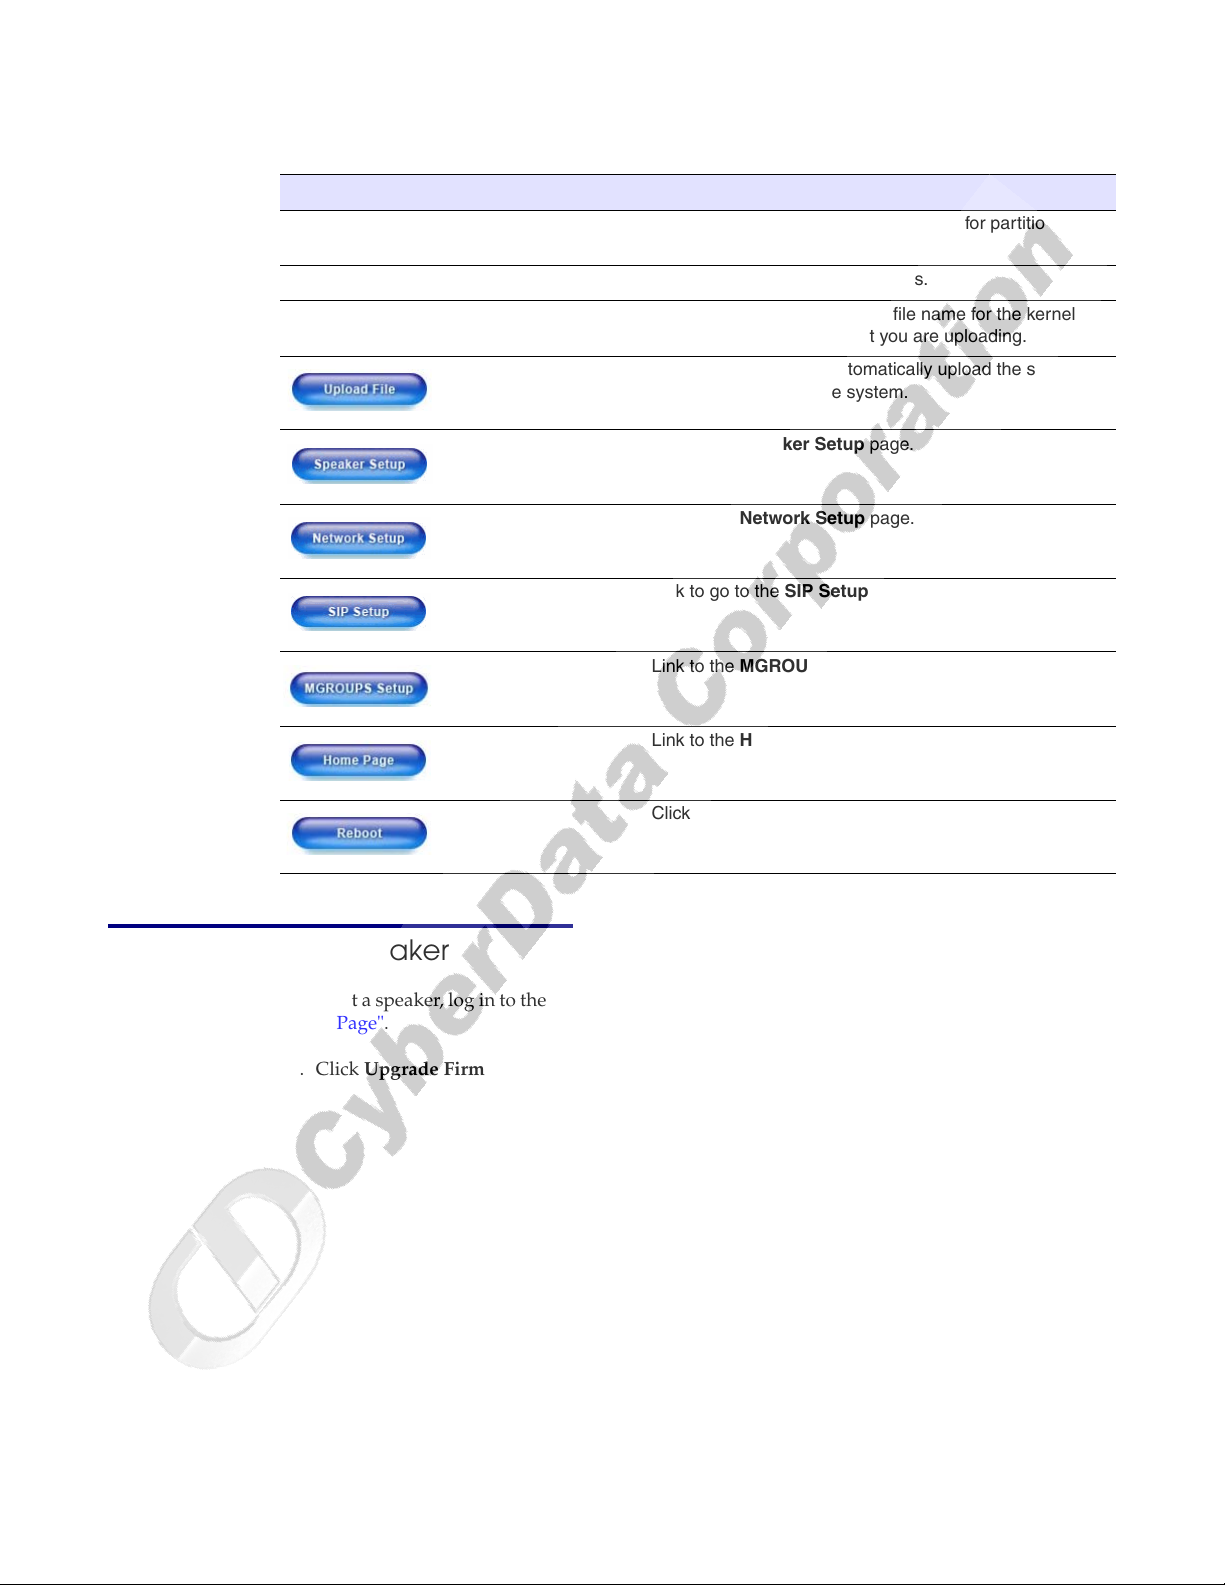
Table 2-9. Firmware Upgrade Parameters
Web Page Item Description
System Configuration Shows the current configuration.
Bootname Shows the current boot loader filename.
Kernel Shows the current kernel filename for partition 1 and 2.
Operations Guide 930095K CyberData Corporation
Page 28
Installing the VoIP Ceiling Speaker
22
Upgrade the Firmware and Reboot the Speaker
Web Page Item Description
Application Shows the current application filename for partition 1
TFTP Server IP address Enter the TFTP Server IP address.
Table 2-9. Firmware Upgrade Parameters
and 2.
New Filename Use this field to enter the new fi
application firmware file that you are uploading.
Click on this button to automatically upload the selected
firmware and reboot the system.
Link to the Speaker Setup page.
Link to the Network Setup page.
Link to go to the SIP Setup page.
Link to the MGROUPS Setup page.
Link to the Home page.
Click on this button to reboot the system.
le name for the kernel or
2.5.1 Reboot the Speaker
To reboot a speaker, log in to the web page as instructed in Section 2.3.1, "Log in to the Configuration
Home Page".
1. Click U
CyberData Corporation 930095K Operations Guide
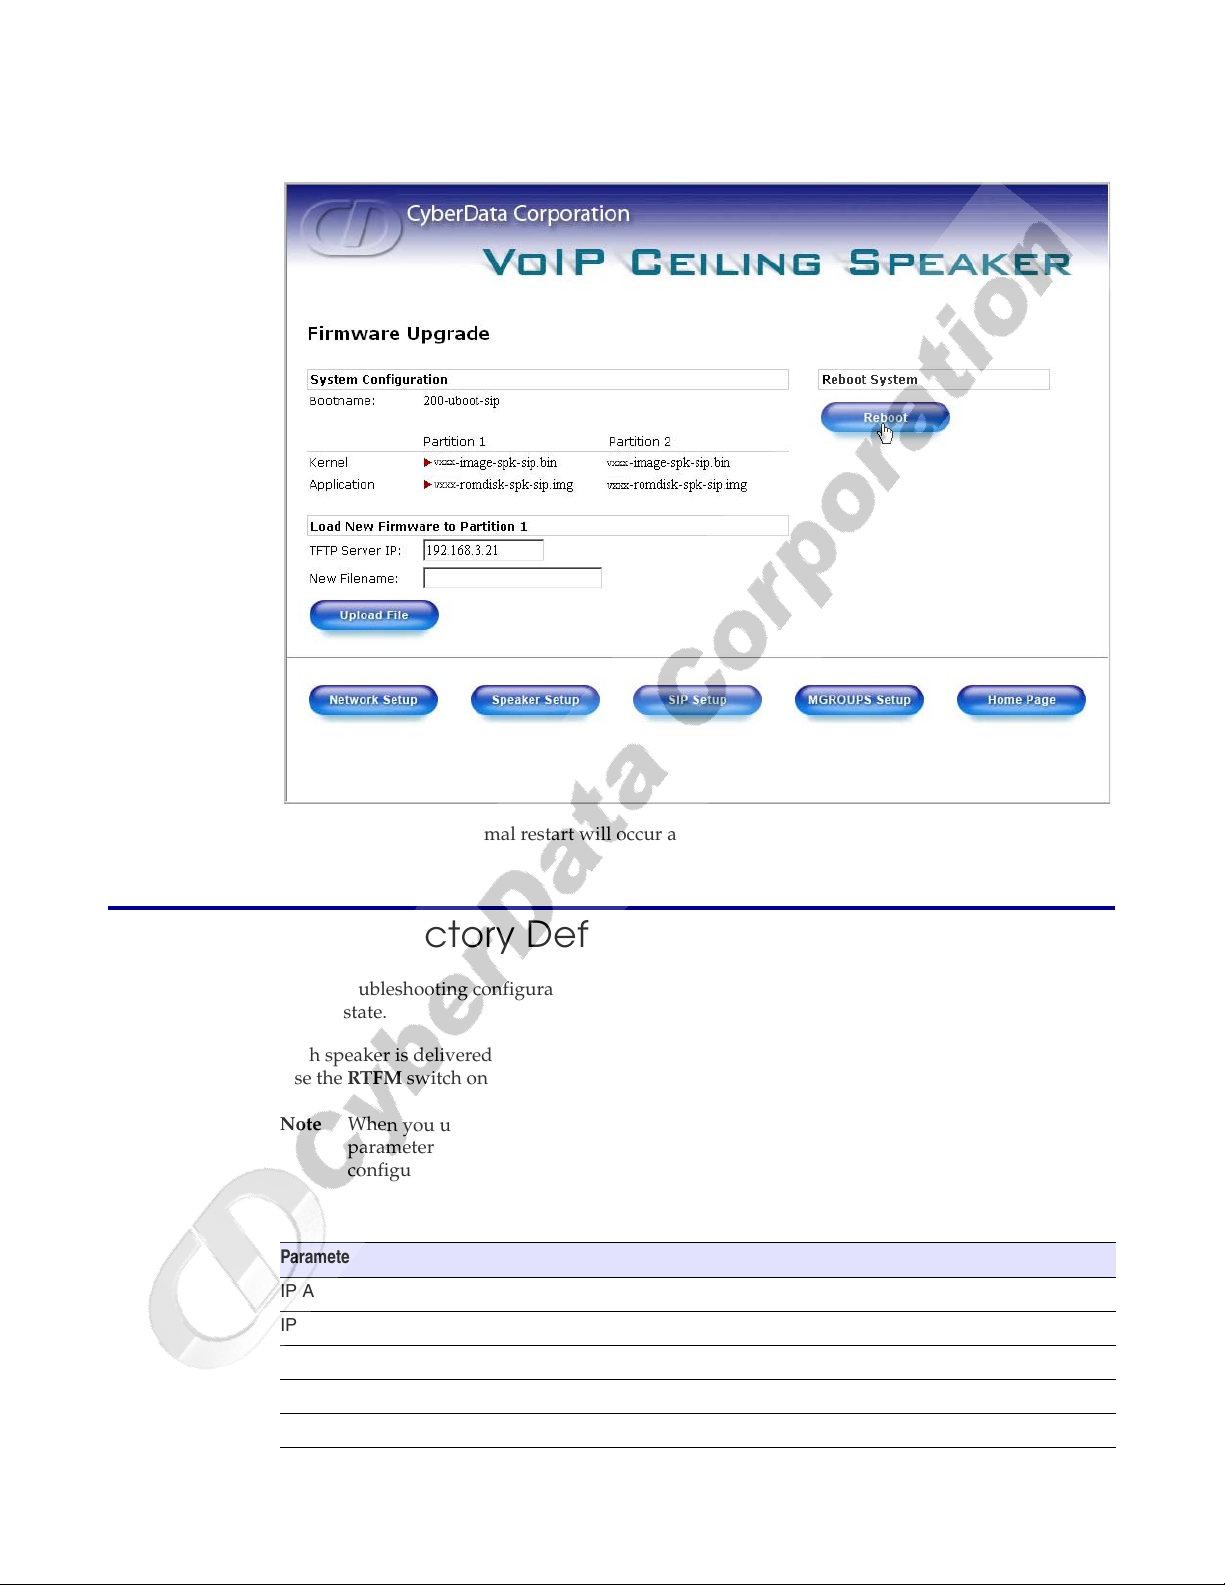
pgrade Firmware to open the Firmware Upgrade page (Figure 2-12).
Page 29
Restore the Factory Default Settings
Figure 2-12. Reboot System Section
Installing the VoIP Ceiling Speaker
23
2. Click Reboot. A normal restart will occur as per Section 2.2.2.1, "Status LED".
2.6 Restore the Factory Default Settings
When troubleshooting configuration problems, it is sometimes convenient to restore the device to a
known state.
Each speaker is delivered with factory set default values for the parameters indicated in Table 2-10.
Use the RT
Note Whe
Parameter Factory Default Setting
IP Addressing static
IP Address 192.168.3.10
Web Access Username admin
Web Access Password admin
Subnet Mask 255.255.255.0
FM switch on the speaker face to restore these parameters to the factory default settings.
n you use the RTFM switch, the factory default settings are restored for only the
parameters indicated in Table 2-10. The other parameters in the current speaker
configuration will remain unchanged.
Table 2-10. Factory Default Settings
Operations Guide 930095K CyberData Corporation
Page 30
Installing the VoIP Ceiling Speaker
24
Restore the Factory Default Settings
Parameter Factory Default Setting
Default Gateway 192.168.3.1
To restore these parameters to the factory default settings:
Table 2-10. Factory Default Settings
1. Press and hold the RTFM
2. The speaker will beep after one second. Continue
switch for 20 seconds.
to hold the switch until the speaker beeps
again after 20 seconds.
3. Release the switch. The following occurs:
• A voice message announces that the factory default
• Once the settings are restored, a voice message
announces the restored default IP address:
192.168.3.10
• A voice message announces that the speaker is rebooting.
• The speaker reboots.
settings are being restored.
CyberData Corporation 930095K Operations Guide
Page 31
Appendix A: Mounting the Speaker
A.1 Mount the Speaker
Before you mount the speaker, make sure that you have received all the parts for each speaker. Refer
to Ta bl e A-1 and Tab le A-2.
Table A-1. Drop Ceiling Mounting Components (Part of the Accessory Kit)
Quantity Part Name Illustration
3 #8 Nylon Thumb Nuts
3 #8 Fender Washers
25
3 8-32 x 1 1/4" Mounting Screws
Table A-2. Drywall Mounting Components (Part of the Accessory Kit)
Quantity Part Name Illustration
3 Plastic Ribbed Anchors
3 #6 Sheet Metal Screws
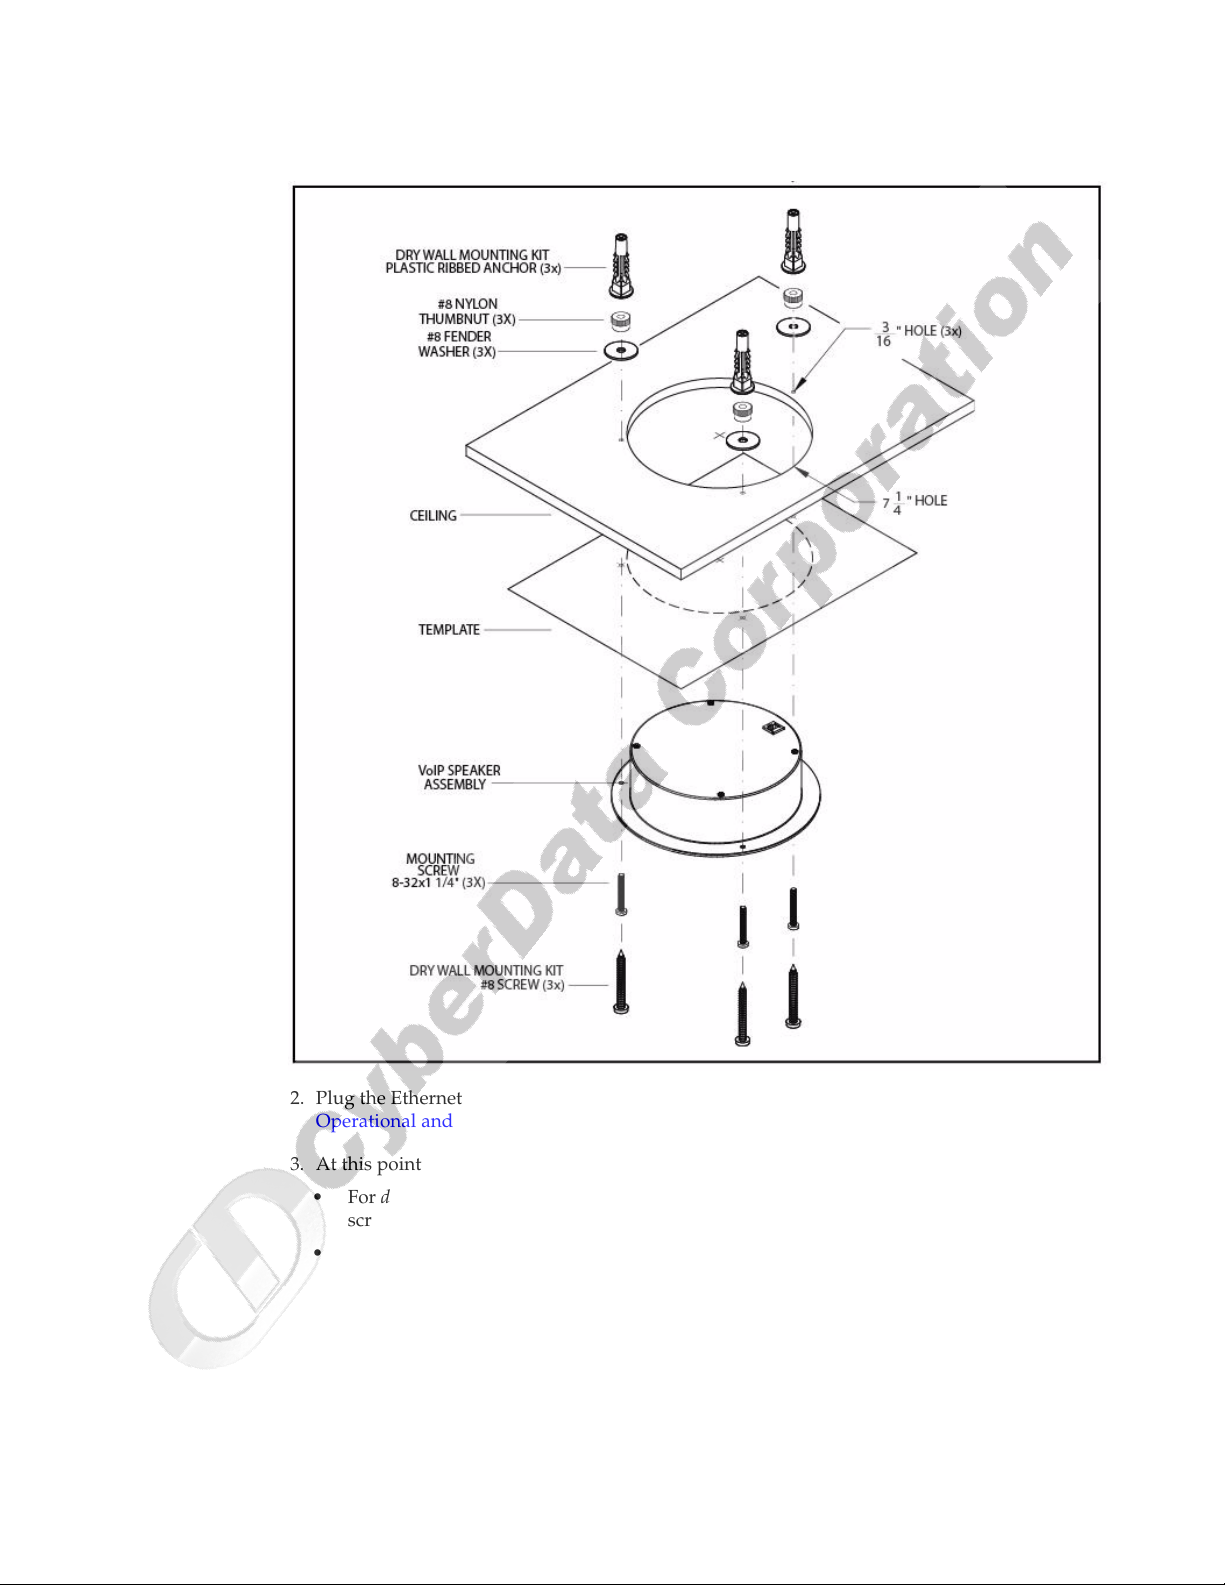
To mount the speaker:
1. Use the T
template is located on the back page of the Installation
with each speaker.
Operations Guide 930095K CyberData Corporation
EMPLATE to cut the speaker hole and prepare holes for the screws (Figure A-1). This
Quick Reference Guide that is delivered
Page 32
26
Mount the Speaker
Figure A-1. VoIP Speaker Assembly
2. Plug the Ethernet cable into the Speaker Assembly. Section 2.2.2, "Confirm that the Speaker is
Operational and Linked to the Network" explains how the Lin
k and Status LEDs work.
3. At this point:
•For dr
op ceiling mounting, position the VoIP SPEAKER ASSEMBLY in the ceiling so that its
screw holes align with those you prepared.
•For drywall mou
nting, place the three PLASTIC RIBBED ANCHORS in the holes you
prepared, and position the VoIP SPEAKER ASSEMBLY over them, aligning the screw
holes in the assembly with the anchors.
CyberData Corporation 930095K Operations Guide
Page 33

4. To fasten the speaker:
•For dr
op ceiling mounting, use the three 8-32 x 1 1/4" MOUNTING SCREWS, #8 NYLON
THUMB NUTS, and #8 FENDER WASHERS to secure the speaker.
Mount the Speaker
27
Note For weak ceiling tile, CyberData of
010991A).
•For drywall mou
nting, use the three #8 SHEET METAL SCREWS to secure the speaker.
fers a reinforcing mount (CyberData part number
Operations Guide 930095K CyberData Corporation
Page 34

28
Mount the Speaker
CyberData Corporation 930095K Operations Guide
Page 35
Appendix B: Setting up a TFTP Server
B.1 Set up a TFTP Server
Upgrading the VoIP Ceiling Speaker firmware requires a TFTP server on which you access the Web
interface where you can upload the firmware files.
B.1.1 In a LINUX Environment
To set up a TFTP server on LINUX:
29
1. Create a directory dedicated to the TFTP server, and
directory.
2. Run the following command where /tftpboot
Step 1: the directory that contains the files
in.tftpd -l -s /tftpboot/your_direc
B.1.2 In a Windows Environment
You can find several options online for setting up a Windows TFTP server. This example explains
how to use the Solarwinds freeware TFTP server, which you can download at:
http://www.tucows.com/preview/326445
To set up a TFTP server on Windows:
1. Install and start the software.
2. Select F
3. Make a note of the default directory name, and then move the firmware files to be uploaded to
that
ile/Configure/Security tab/Transmit Only.
directory.
move the files to be uploaded to that
/ is the path to the directory you created in
to be uploaded. For example:
tory_name
B.1.3 In a Solarwinds Server Environment
You can find several options online for setting up a Solarwinds server. This example explains how to
use the Solarwinds freeware TFTP server, which you can download at:
http://www.CyberData.net/support/voip
Operations Guide 930095K CyberData Corporation
Page 36

30
Set up a TFTP Server
CyberData Corporation 930095K Operations Guide
Page 37

Appendix C: Troubleshooting/Technical Support
C.1 Frequently Asked Questions (FAQ)
Go to the following URL to see CyberData’s list of frequently asked questions:
http://www.CyberData.net/support/voip
C.2 Documentation
The documentation for this product is released in an English language version only. You can
download PDF copies of CyberData product documentation at:
www.CyberData.net—>Support—>Drivers, Utilities & Manuals—>VoIP Products
31
C.3 Contact Information
Contact CyberData Corporation
2555 Garden Road
Monterey, CA 93940
USA
www.CyberData.net
Phone: 800-CYBERDATA (800-292-3732)
Fax: 831-373-4193
Sales Sales 831-373-2601 Extension 334
Technical Support
Returned
Ma
terials
Authorization
Phone: 831-373-2601 Extension 333
Email: support@CyberData.net
To return the product, contact the CyberData Returned Materials Authorization (RMA) department
at:
When returning a product to CyberData, an approved CyberData RMA number must be printed on
the outside
approved RMA number. Send the product, in its original package, to the following address:
of the original shipping package. No product will be accepted for return without an
CyberData Corporation
2555 Garden Road
Monterey, CA 93940
Attention: RMA "you
Operations Guide 930095K CyberData Corporation
r RMA number"
Page 38

32
Warranty
C.4 Warranty
CyberData warrants its product against defects in material or workmanship for a period of two
years from the date of purchase. Should the product fail within the warranty period, CyberData will
repair or replace the product free of charge. This warranty includes all parts and labor.
If the product is out-of-warranty and fails, a
price will be assessed. Repair costs for products that are in warranty, but damaged by improper
modifications or abuse, will be charged at the out-of-warranty rate. Products returned to CyberData,
both in and out-of-warranty, are shipped to CyberData at the expense of the customer. Charges for
shipping repaired products back to the customer will be paid by CyberData.
flat rate repair charge of one half the product purchase
CyberData Corporation 930095K Operations Guide
Page 39

Index
33
Symbols
#8 fender washers 25, 27
#8 nylon thumb nuts 25, 27
#8 sheet metal screws 25, 27
Numerics
802.3af compliant ethernet hub 6
8-32 x 1 1/4" mounting screws 25, 27
A
address, configuration login 10
adjusting volume 8
ambient operating temperature 4
announcing a speaker’s IP address 8, 19
asterisk 12
audio encodings 3
audio test 8
web login username and password 10
default gateway 6, 10, 12, 24
default IP settings 9
default login address 10
default speaker settings 23
DHCP Client 3
DHCP IP addressing 12
dimensions 4
DNS server 12
drop ceiling mounting of speaker 26
drywall mounting of speaker 26
E
ethernet cable 26
ethernet hub 6
expiration time for SIP server lease 17
F
factory default settings 23
firmware upgrades 29
C
changing
the web access password 14
configurable parameters 11, 12, 14, 17, 21
configuration
default IP settings 9
network 12
SIP 15
using Web interface 9
configuration home page 10
confirming IP address 8
CyberData contact information, c
support, service 31
orporate, sales, tech
D
default
gateway 6, 10, 24
IP address 6, 9, 23
speaker settings 33
subnet mask 6, 10, 23
username and password 6, 10, 23
G
green LED, status 7
H
home page 10
http web-based configuration 3
I
illustration of speaker mounting process 25
installation, typical speaker system 1
IP address 6, 9, 12, 22, 23
IP addressing 12
default setting 9, 23
Operations Guide 930095K CyberData Corporation
Page 40

34
L
lease, SIP server expiration time 17
link LED 26
Linux, setting up a TFTP server on 29
local SIP port 17
log in address 10
M
MGROUP
MG-(1-8) 19
MG-Background 19
MG-Emergency 19
MGROUP Name 19
Multicast IP Address 19
mounting a speaker 25
Multicast 3
N
network configuration of speaker 12
network link activity, verifying 7
Network Setup 12
O
outbound proxy 17
output 4
port
local SIP 17
remote SIP 17
port baud rate 4
power requirement 4
power, connecting to speaker 6
product
configuring 9
mounting 25
parts list 5
product features 3
product overview
product features 3
product specifications
supported protocols 3
supported SIP serv
typical system installation 1
product specifications 4
protocols supported 3
4
ers 3
R
reboot 22, 24
registration and expiration, SIP server lease 17
remote SIP port 17
reset test function management switch 8
resetting the IP address to the default 25, 31
restoring factory default settings 23, 33
RMA returned materials authorization 31
RTFM switch 8, 23
RTP/AVP 3
S
P
packet time 3
part number 4
parts
#8 fender washers 25
#8 nylon thumb nuts 25
#8 sheet metal screws 25
8-32 x 1 1/4" mounting screws 25
plastic ribbed anchors 25
parts list 5
password
changing for web configuration access 14
for SIP server login 17
login 10
restoring the default 6, 10, 23
plastic ribbed anchors 25, 26
PoE Injector 6
CyberData Corporation 930095K Operations Guide
sensitivity 4
server address, SIP 17
setting up a speaker 6
setting up a TFTP server 29
settings, default 23
SIP (session initiation protocol) 3
SIP Configuration 15
SIP configuration
SIP Server 17
SIP registration 17
SIP server 17
SIP servers supported 3
speaker configuration
default IP settings 9
speaker configuration page
configurable parameters 11, 12, 14, 17, 21
speaker operations, verifying 14
Speaker Setup 14
Page 41

static IP addressing 12
status LED 7, 26
subnet mask 6, 10, 12, 23
supported protocols 3
T
technical support, contact information 31
template for speaker and screw holes 25
testing audio 8
TFTP server 3, 29
U
unregister, from SIP server 17
user ID
for SIP server login 17
user ID, SIP 17
username
changing for web configuration access 14
default for web configuration access 10
restoring the default 6, 10, 23
35
V
verifying
network link and activity 7
power on to speaker 7
speaker operations 14
VoIP speaker assembly 26
volume, adjusting 8
W
warranty 32
web access password 6, 10, 23
web access username 6, 10, 23
web configuration log in address 10
web-based speaker configuration 9
weight 4
Windows, setting up a TFTP server on 29
Operations Guide 930095K CyberData Corporation
Page 42

36
CyberData Corporation 930095K Operations Guide
 Loading...