

Page 1

011304 INFORMACAST ENABLED
EMERGENCY INTERCOM
1
3
2
OUR PRODUCTS
VOIP PRODUCTS
A
B
Downloads
INFORMACAST ENABLED
C
InformaCast Enabled Emergency Intercom
The IP Endpoint Company
Quick Start Guide
1.0 Out-of-Box and Prior to Final Installation
1.1. Verify that you have received all of the parts listed on the Installation Quick Reference placemat.
1.2. Download the current manual, otherwise known as an Operations Guide, which is available in the Downloads tab at the following webpage:
http://www.cyberdata.net/products/011304/
Note You can also navigate to the Downloads tab by going to
www.CyberData.net
the following figures:
and following the steps that are indicated by
2.0 Select Power Source
Set PoE power type to Class 0 = 15.4W CAT6 cable recommended—
PoE Switch PoE Injector
Make sure port is not in trunk mode
Set port to full duplex/ 100Mbps
Be sure you are using a non-PoE switch or port
for longer distances
Quick Start Guide 931623C
Page 2
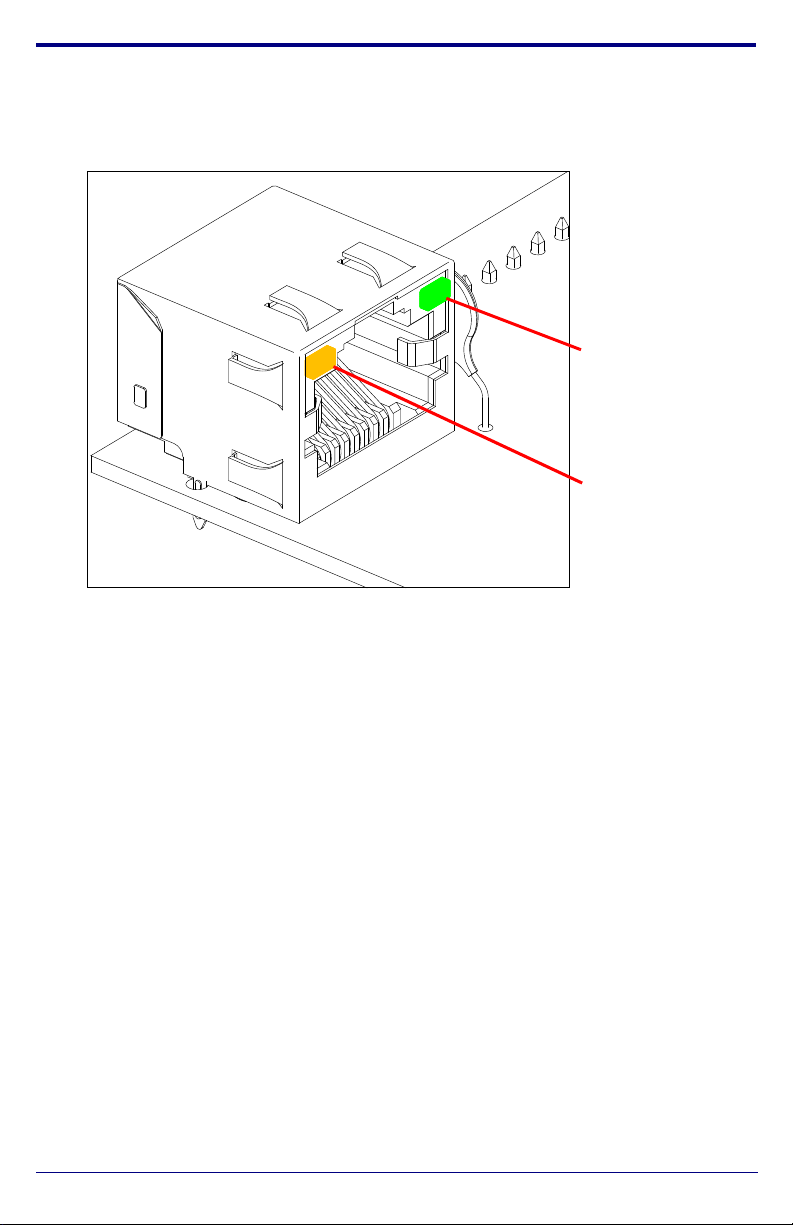
3.0 Power Test
100Mb Link
LED (Amber)
Link/Activity
LED (Green)
3.1. Plug in the CyberData device and monitor the LED activity above the
ethernet port on the back of the device. See the following figure:
3.2. The green Link/Activity LED blinks off once during the boot up process
when the device begins DHCP addressing and autoprovisioning attempts,
and then comes on again and remains constant (solid green). The amber
100Mb Link LED may be blinking depending on the network activity.
During the initialization process, the Call Button LED should come on solid.
It will then blink 10 times per second until it can find a network address and
attempt autoprovisioning. This can take from 5 to 60 seconds. When the
device has completed initialization, the Call Button LED will remain solid.
Note The default DHCP addressing timeout is 60 seconds. The device will
attempt DHCP addressing 12 times with a 3 second delay between tries
and eventually fall back to the programmed static IP address (by default
10.10.10.10) if DHCP addressing fails. The DHCP Timeout is configurable
in the device's Network settings.
3.3. When the device has completed the initialization process, quickly press and
release the RTFM switch (SW1 button) to announce the IP address.
This concludes the power test. Go to Section 4.0, "InformaCast
Configuration File Retrieval".
Quick Start Guide 931623C
Page 3

4.0 InformaCast Configuration File Retrieval
4.1. DHCP should be enabled. After the device initializes, it will send a broadcast to the DHCP server to ask for the location of its InformaCastSpeaker.cfg configuration file.
4.2. SLP or TFTP?
• SLP should be enabled on InformaCast version 5.0.4 or higher. SLP is an
InformaCast protocol introduced in InformaCast version 5.0.4. The device
will retrieve its configuration file from an InformaCast server folder
specified by SLP. SLP method is preferred.
• TFTP servers may be used instead of SLP. In this alternate scenario,
DHCP option 150 is required to provide the device with the address of the
TFTP server. Otherwise, the device will be unable to retrieve its
configuration file.
Note The device and InformaCast server should be on the same
subnet during the device's initial configuration if it cannot access
the VLANs upon which the InformaCast Server and DHCP
servers are located. It may be necessary to manually configure
your switch port to allow access to the VLAN.
5.0 Device Identification and Testing
5.1. Ensure the InformaCast Server has detected a new device.
5.2. Test the newly detected device.
5.3. Add the newly detected device to the InformaCast Server.
Quick Start Guide 931623C
Page 4

6.0 Contacting CyberData VoIP Technical Support
You are welcome to call CyberData VoIP Technical Support at 831-373-2601
x333. Business hours are 7:00 AM - 5:00 PM Pacific Time, Monday through
Friday.
We encourage you to access our Technical Support help desk at the following
address:
http://support.cyberdata.net/
Note You can also access the Technical Support help desk by going to
www.CyberData.net
The Technical Support help desk provides the options of accessing
documentation for your CyberData product, browsing the knowledge base, and
submitting a troubleshooting ticket.
Please be advised requests for Returned Materials Authorization (RMA) numbers
require an active VoIP Technical Support ticket number. A product will not be
accepted for return without an approved RMA number.
and clicking on the SUPPORT menu.
Quick Start Guide 931623C
 Loading...