

Page 1

TV/DVD COMBO
Please read this manual carefully before operation.
INSTRUCTION MANUAL
TVD2000
Page 2

1
<None>WARNING
To reduce the risk of fire or electric shock, do not expose this product to rain or moisture.
The apparatus shall not be exposed to dripping or splashing and that no objects filled with liquids, such
as vases, shall be placed on the apparatus.
Caution: To prevent electric shock, match wide blade of plug to wide slot, fully insert.
Attention: Pour é viter les chocs é lectriques, introduire la lame la plus large de la fiche dans la born
e
correspondante de la prise et pousser jusqú au fond.
USE OF CONTROLS OR ADJUSTMENTS OR PERFORMANCE OF PROCEDURES OTHER THAN
THOSE SPECIFIED HEREIN MAY RESULT IN HAZARDOUS RADIATION EXPOSURE. DO NOT STAR
E
INTO BEAM.
The unit employs a Laser System. To prevent direct exposure to the laser beam, do not try to open th
e
enclosure. Visible laser radiation when open and interlocks defeated.
Refer to the identification/rating label located on the back panel of your product for its proper operatin
g
voltage.
Caution: Using video games or any external accessory with fixed images for extended periods o
f
time can cause them to be permanently imprinted on the picture tube (or projection TV pictur
e
tubes). ALSO, some network/program logos, phone numbers, etc. may cause similar damage. Thi
s
damage is not covered by your warranty.
Cable TV Installer
This reminder is provided to call your attention to Article 820-40 of the National Electrical Code (Section 5
4
of the Canadian Electrical Code, Part 1) which provides guidelines for proper grounding and, in particula
r,
specifies that the cable ground shall be connected to the grounding system of the building as close to th
e
point of cable entry as practical.
Customer Record
You will find the model number of your unit on the back of your unit. Record these numbers in the space
s
provided below. Refer to them whenever you call customer service or your dealer regarding this product.
Model Number:
RISK OF ELECTRIC SHOCK
DO NOT OPEN
CAUTION
Caution: To reduce the risk of electric shock, do no
t
remove cover (or back). No user serviceable part
s
inside. Refer servicing to qualified service personnel.
This symbol indicates "dangerous voltage"
inside the product that presents a risk of
electric shock or personal injury.
This symbol indicates important
instructions accompanying the product.
PACKING LIST
Parts
TV/DVD Combo
Remote Control
Operation Manual
AAAAlkaline Batteries
QTY
1
1
1
2
I
nstruction ManualManual
Page 3

I
nstruction ManualManual
IMPORTANT SAFETY INSTRUCTIONS
1. Read these instructions.
2. Keep these instructions.
3. Heed all warnings.
4. Follow all instructions.
5. Do not use this apparatus near water.
6. Clean only with dry cloth.
7. Do not block any ventilation openings. Install in accordance with the manufacturer's instructions.
8. Do not install near any heat sources such as radiators, heat registers, stoves, or other apparatus
(including amplifiers) that produce heat.
9. Do not defeat the safety purpose of the polarized or grounding-type plug. Apolarized plug has two
blades with one wider than the other. A grounding type plug has two blades and a third grounding
prong. The wide blade or third prong is provided for your safety. If the provided plug does not fit into
your outlet, consult an electrician for replacement of the obsolete outlet.
10.Protect the power cord from being walked on or pinched particularly at plugs, convenience receptacles
,
and the point where they exit from the apparatus.
11.Only use attachments/accessories specified by the manufacturer.
12.Use only the cart, stand, tripod, bracket, or table specified by the manufacturer, or sold with
the apparatus. When a cart is used, use caution when moving the cart/apparatus
combination to avoid injury from tip-over.
13.Unplug this apparatus during lightning storms or when unused for long periods of time.
14.Refer all servicing to qualified service personnel. Servicing is required when the apparatus has been
damaged in any way, such as power-supply cord or plug is damaged, liquid has been spilled or objects
have fallen into the apparatus, the apparatus has been exposed to rain or moisture, does not operate
normally, or has been dropped.
15.Warning - This unit should only be serviced by an authorized and properly trained technician.
Opening the cover or other attempts by the user to service this unit may result in serious injury
or death from electrical shock, and may increase the risk of fire.
FCC Warning
Class B Computing Device
Information to User
This equipment has been tested and found to comply with the limits for a Class B Digital Device pursuant
to part 15 of FCC Rules. These limits are designed to provide reasonable protection against harmful
interference in a residential installation. This equipment generates, uses, and can radiate radio frequency
energy and, if not installed and used in accordance with the instructions, may cause harmful interference
to radio communications. However, there is no guarantee that interference will not occur in a particular
installation. lf this equipment receives interference while off and on, the user is encouraged to try to correc
t
the interference by one or more of the following measures:
1) Reorient or relocate the receiving antenna.
2) lncrease the separation between the equipment and unit.
3) Connect the equipment into an outlet on a circuit different from that to which the unit is connected.
4) Consult the dealer or an experienced radio/TV technician for help and for additional suggestions.
The user may find the following booklet prepared by the Federal Communications Commission helpful:
"How to Identify and Resolve Radio - TV Interference Problems". This booklet is available from the US
Government Printing Office. Washington, D.C. 20402, Stock No. 004-000-00345-4.
FCC Warning
The user is cautioned that changes or modifications not expressly approved by the manufacturer could
void the user's authority to operate the equipment.
NOTE: In order for an installation of the product to maintain compliance with the limits for a Class B
Device, shielded cables must be used.
2
Page 4
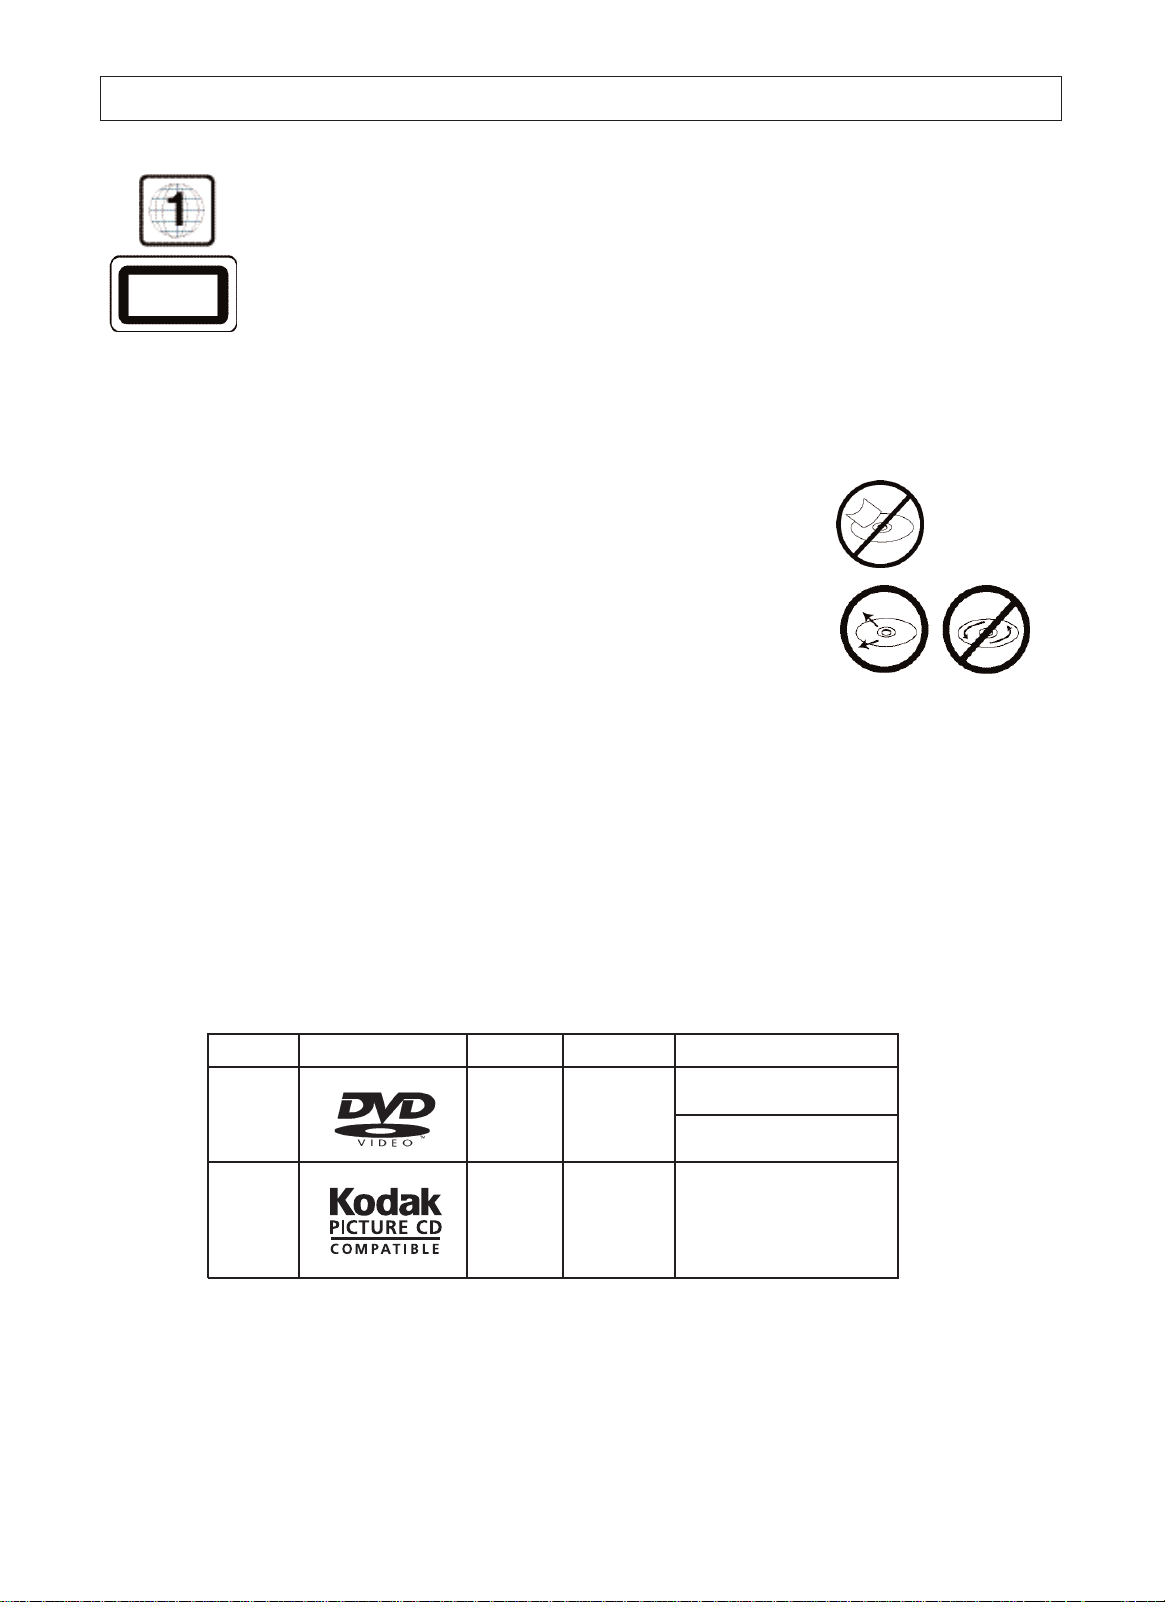
WARNING:
THE REGION CODE FOR THE UNIT IS 1.
Since it is very usual for DVD movies to be released at different times in different regions o
f
the world, all players have region codes and disks can have an optional region code. If yo
u
load a disk of a different region code to your player, you will see the region code notice on
the screen. The disk will not play, and should be unloaded.
N
otes on Discs
HOW TO HANDLE, CLEAN, AND STORE DISCS.
H
andling discs
•
DO NOT TOUCH THE PLAYBACK SIDE OF THE DISC.
•
DO NOT ATTACH PAPER OR TAPE TO DISCS.
N
ote:
CURTIS SHALL NOT BE RESPONSIBLE FOR DAMAGE
THAT MAY OCCUR TO A DISC FROM BEING OPERATED IN THE UNIT.
C
leaning discs
•
Fingerprints and dirt on the disc cause picture and sound deterioration.
Wipe the disc from the center outward with a soft cloth. Always keep the disc clean.
•
If you cannot wipe off the dirt off, wipe the disc lightly with a slightly moistened soft cloth and finis
h
with a dry cloth.
•
Do not use any of solvent such as paint thinner, benzine, commercially available cleaners or ant
i-
static spray for vinyl LP's.
S
toring discs
•
Do not store discs in places subject to direct sunlight or near heat sources.
•
Do not store discs in places subject to moisture and dust.
•
Store discs vertically in a case. Stacking or placing objects on discs outside of their case may caus
e
warping.
P
layable discs
This unit can play back the following discs.
Notes on regional numbers
DVDs are divided into separate regions.
The United States and Canada are designated as region 1 DVD.
Your unit plays region 1 DVDs only.
Disk Mark Contains Disc Size Maximum playback time
DVD
video
disc
Audio
+Video
(moving
pictures)
12cm
Approx. 4 hours
(single sided disc)
Approx. 8 hours
(double sided disc)
K
ODAK
Picture
CD
Spec. 12cm
I
nstruction ManualManual
CLASS 1
LASER PRODUCT
3
Page 5

I
nstruction ManualManual
INTRODUCTION
Safety Precautions..........................................................................................................................1
Feature Descriptions ......................................................................................................................5
Specifications ..................................................................................................................................5
Front and Rear Unit Profiles............................................................................................................6
Remote Control Features................................................................................................................6
INSTALLATION
Connecting the Antenna..................................................................................................................8
Installing the Remote Control Batteries ..........................................................................................8
Connecting A/V Equipment ............................................................................................................9
FUNCTIONS & FEATURES
Turn On/Off....................................................................................................................................11
Basic Functions ............................................................................................................... .............11
Function Selection Menus
Picture Menu ..........................................................................................................................11
Tuner Menu ............................................................................................................................12
Timer Menu ............................................................................................................................12
System Menu ..........................................................................................................................12
Useful Remote Control Features ..................................................................................................14
DVD FUNTIONS
Playing Back a Disc ......................................................................................................................15
Using the On-Screen Display ........................................................................................................16
Locating a Specific Title, Chapter or Track....................................................................................17
Selecting Subtitles ........................................................................................................................18
Selecting the Camera Angles/Language/Audio Settings ..............................................................18
Setting the Parent Lock ................................................................................................................19
Customizing the Function Selectings ............................................................................................20
TROUBLESHOOTING GUIDE.............................................................................................................21
LIMITED PRODUCT WARRANTY.......................................................................................................22
TABLE OF CONTENTS
4
Note:
The OSD and illustration in this manual may be somewhat different from the actual situation,
depending on your model.
Page 6
I
nstruction ManualManual
Feature Descriptions
1
81 Channel Tuner - total number of channels the TV can receive: 2-69 in Air mode, or 1-125 in Cable
mode
A
V Input (Rear/Front) - standard composite input designed for use with A/V devices, such as a VCR or
DVD player
A
V Output (Rear) - output signals from TV to devices such as VCR's
R
F IN Jack - standard coaxial antenna jack
C
hannel Recall - instant return to the last channel viewed
C
losed Captions Display - feature that displays the closed captions or text of a TV broadcast
R
emote Control - A wireless remote control unit for the TV
O
n/Off Timer - feature that allows the user to set a time for the TV to turn on or off
P
arental Control - feature that allow parents to block out selected type of programming
S
creen Size - the diagonal size of the TV screen
S
electable Picture Modes - preset standards for TV display: User, Normal, Movie and Sports
T
rilingual On Screen Display (OSD) - TV's on screen display can be either English, French or Spanish
D
VD/CD/KODAK Picture CD Support
5
SPECIFICATIONS
MODEL
TVD2000
Television System
NTSC-M
Channel Coverage
VHF 2-13, UHF 14~69
Cable TV Coverage
Mid Band (A-8~A-1, A~I);
Super Band (J~W)
Hyper Band (AA~ZZ, AAA, BBB)
Ultra Band (65~94, 100~125)
Channels Preset
181
Antenna Input
75 ohm (unbalanced)
Screen Dimensions (Approx. )
406 mm x 305 mm
Audio Output
Main channel: 2W+2W
Total Harmonic Distortion
<7%
Power Source
110V ~, 60Hz
Unit Weight
25kg
Unit Dimensions (Approx. )
512mm x 502mmx 481 mm
Power Consumption
120W
Page 7
6
I
nstruction ManualManual
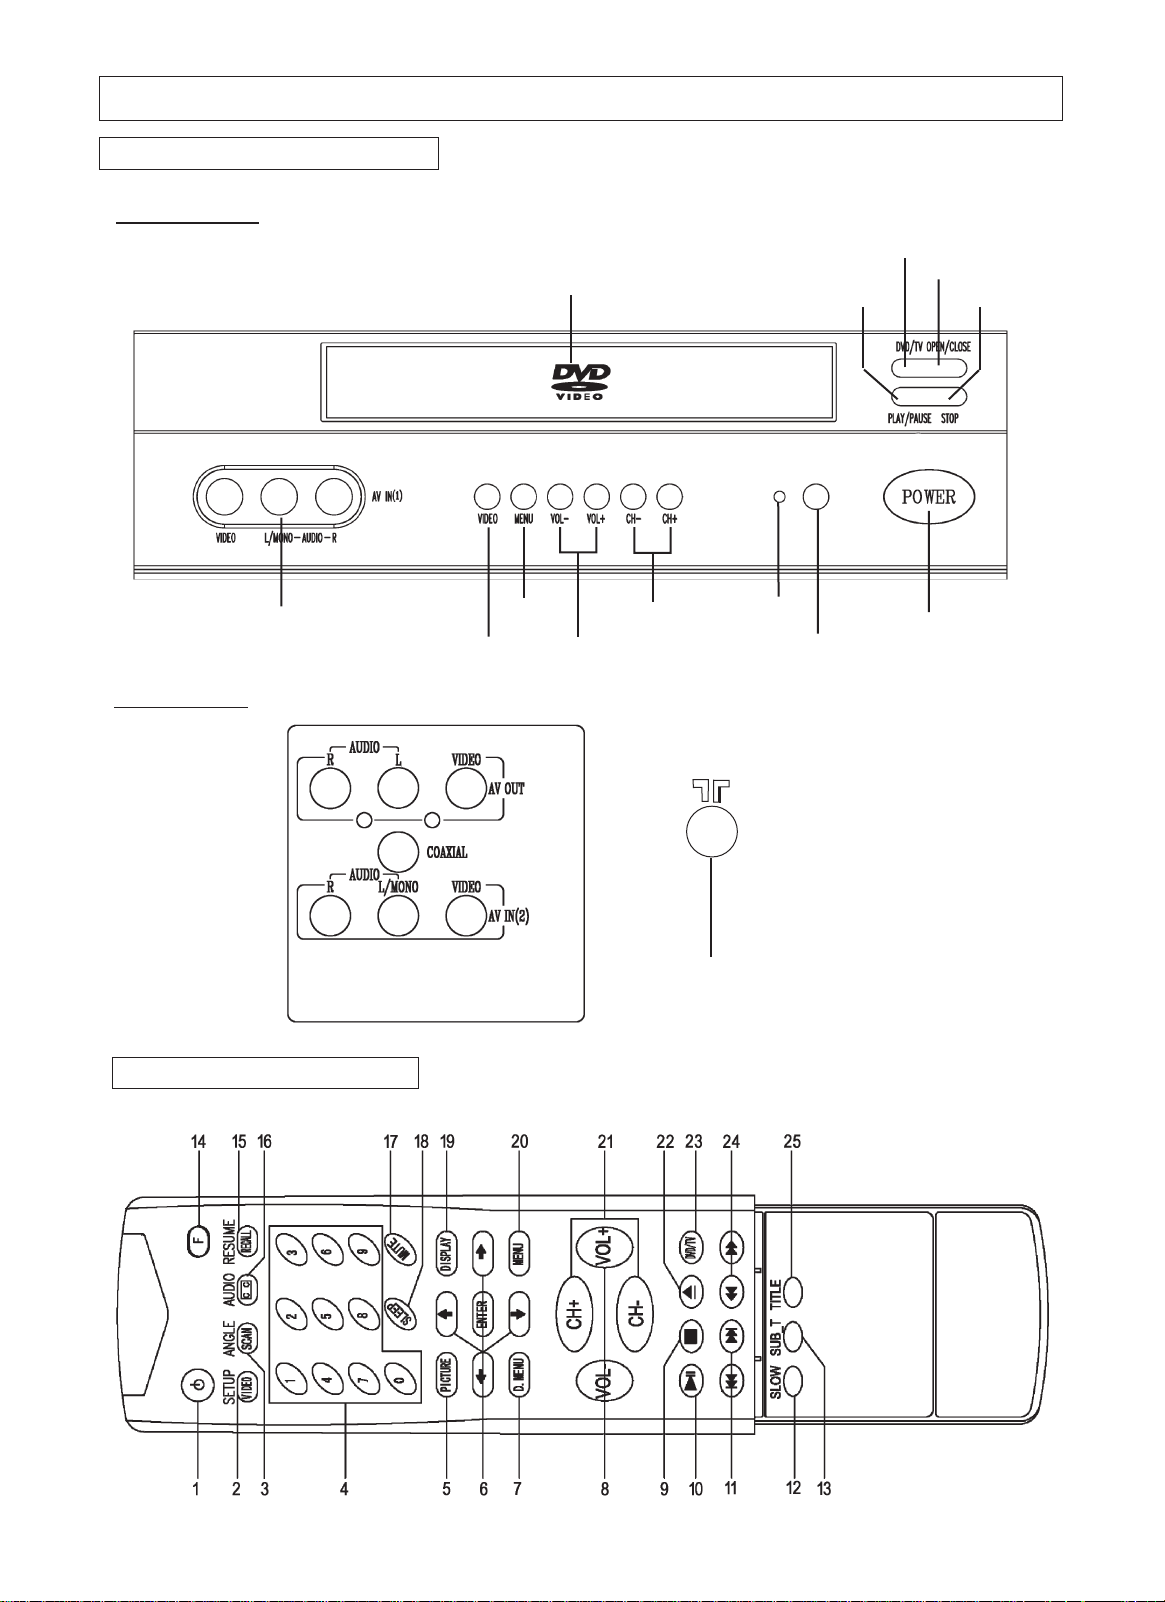
Remote Control Features
Front panel
F
ront and Rear Unit Profiles
ANTENNA IN
POWER
INDICATOR
MENU
SELECT
CHANNEL
DOWN/UP
TV/VIDEO SELECT
VOLUME DOWN/UP
OPEN/CLOSE
DVD/TV SELECT
PLA Y/PAUSE STOP
INFRARED SENSOR
DVD TRAY
STANDBY
AV IN1 terminals
Rear panel
Page 8

I
nstruction ManualManual
Remote Control Features
The keys marked with * have composite functions and the key in boldface type function for DVD only as
shown below.
7
Notes:
1. When in operation, please point your remote control directly to the infrared sensor.
2.Do not expose the remote control to impacts, water or disassemble it.
3. Do not repeatedly press the buttons on the remote control. Allow interval of no less than one second
between selections.
4. When " " displayed during DVD playback, the function is not operational.
1
*2
*3
*4
5
6
7
8
9
10
11
12
13
14
*15
*16
17
18
19
20
21
22
23
24
25
Function Description
TV DVD
Standby
TV/Video select Setup
Channel scan Angle select
Channel number (0~9) Number (0~9)
Picture mode select
Used to navigate the menus/Accesses the sub menus
DVD menu
Volume down/up
Stop
To play Play/Pause
Previous skip/Forward skip
Slow playback
Sub title
Decrease/Increase volume by 4 levels
Child lock
Recall Resume
CCD/Text Audio
Mute on/off
Sleep off
On-screen display
Menu select
Channel down/up
To open Open/Close
DVD/TV select
Fast rewind/Fast forward
Title
VIDEO(SETUP)
SCAN(ANGLE)
0~9
PICTURE
/ENTER
D_MENU
VOL-/VOL+
STOP
PLAY/PAUSE
PREV/NEXT
SLOW
SUB-T
F+VOL-/F+VOL+
F+MUTE
RECALL(RESUME)
CC (AUDIO)
MUTE
SLEEP
DISPLAY
MENU
CH+/CH-
OPEN/CLOSE
DVD/TV
REV/FWD
TITLE
No.
Button
Page 9

I
nstruction ManualManual
I
NSTALLATION
- Please read the safety instructions in this manual completely before installation.
- Install your unit in an area where direct sunlight will not fall upon the screen.
- Soft, indirect light is best for television viewing.
- Allow enough space (at least 4 in.) between the TV and any walls or enclosures for proper ventilation.
- Optimum television viewing distance is 3-5 times the screen's size.
A
uto-Degaussing
C
olor TV is easily affected by magnetism which leads to color distortion. If your unit is moved or affected by
n
ear magnetic components or appliances with power on, please power off your unit for at least 1 hour. The
b
uilt-in auto-degaussing circuit will eliminate the magnetism interference.
A
uto off when no signal received
T
he TV set will automatically enter into Standby mode when the following conditions are met.
1
.TV is in antenna mode.
2
.Current channel has no signal.
3
.No key is pressed within 15 minutes.
N
otes:
1) It is recommended that a 75 ohm coaxial cable be used in order to eliminate interference and noise which
may occur due to nearby radio transmissions.
2) The antenna cable should not be tied together with other wiring.
3) Set up a lightning rod and check it regularly when an outdoor antennais used.
1
. Remove the battery compartment lid. Insert two AAAbatteries (included) into the battery compentment in the rear
of the remote control.
2
. Make sure the positive (+) and negative (-) polarities are correctly aligned.
3
. Reattach the battery lid.
N
otes:
1) Alkaline batteries are recommended for longer life.
2) Always replace both batteries at the same time.
3) Do not expose batteries to fire or break them open.
4) To avoid battery leakage, remove batteries from the remote control when it is not being used for a long period
of time.
I
nstalling the Remote Control Batteries
75-ohm coaxial cable (not supplied)
300-ohm twin-lead cable (not supplied)
OR
Antenna adapter
(not supplied)
VHF
UHF
or Cable
VHF
UHF
C
onnecting the Antenna
RF Input
(back of TV unit)
OR
U/V mixer
(not supplied)
8
Page 10

9
I
nstruction ManualManual
I
NSTALLATION (continued)
C
onnecting A/V Equipment
T
he following are diagrams showing basic instructions for attaching external equipment, like a VCR or
D
VD player, to your unit. Please refer to operation manuals of external audio/video equipment that will
b
e connected to your set for additional instructions. PLEASE TURN OFF ALL POWER BEFORE
C
ONNECTING DEVICES TOGETHER.
Connect VCR's RF OUT terminal to the RF IN jack located on the rear panel of the TV.
Coaxial Cable
VCR
AUDIO/VIDEO OUT
DVD Player
Camcorder
VCR
AUDIO/VIDEO IN
VCR
VIDEO
Yellow
White
Yellow
White
Yellow
White
Yellow
White
RF IN
Output from TV to Device
Input from Device to TV
AUDIO
VIDEO
AUDIO
Red
Red Red
Red
Page 11

I
nstruction ManualManual
Connecting A/V Equipment (continued)
Enjoying Digital Stereo Sound (Digital Stereo)
Enjoy the dynamic sound of Digital Stereo by connecting
an amplifier equipped with a digital audio input and speaker
system (right and left front speakers).
Set "Spdif Output" to "Spdif/PCM"via the setup menu.
• How to setup the sound output:
From the SETUP MENU display, select AUDIO SETUP
by pressing ENTER. Use key, set "Spdif Output" to
"Spdif/Raw".
This product incorporates copyright protection technology
that is protected by method claims of certain U.S. patents
and other intellectual property rights owned by Macrovision
Corporation and other rights owners. Use of this copyright
protection technology must be authorized by Macrovision
Corporation, and is intended for home and other limited
viewing uses only unless otherwise authorized by
Macrovision Corporation. Reverse engineering or
disassembly is prohibited.
It is forbidden by law to copy, broadcast, show, play in
public, or rent copyrighted material without permission.
DVD video discs are copy protected, and any recordings
made from these discs will be distorted.
Notes:
(1) The input of the AV receiver is not compatible with
the PCM/BITSTREAM jack and is primarily for
Laserdiscs only.
(2) Refer to the manual of the connected Equipment.
(3) Adjust the volume of your receiver to a comfortable
listening level to avoid any speaker damage.
INSTALLATION (continued)
To PCM/BITSTREAM
Coaxial cable
(Optional)
To digital
audio input
Amplifier equipped
with digital audio inpu
t
Front
speaker
(right)
Front
speaker
(left)
Connection
Example
To PCM/BITSTREAM
(Optional)
COAXIAL
COAXIAL
10
Page 12

I
nstruction ManualManual
F
UNCTIONS & FEATURES
Turn On/Off
1
. Turn On
Plug in the power cord, and the TV should enter into Standby mode. Pressing STANDBY key will turn o
n
the TV and its power indicator light.
2
. Standby (Soft Off)
While the TV is on, press the STANDBY key will put the TV in Standby or off mode. The power indicato
r
light on the TV set will turn off.
C
hanging the Channel
W
hile in Tuner mode, press the CH+/- keys to change the channel, or use the numeric keypad to enter
a
n
ew channel.
A
djusting the Volume
T
o adjust the volume, press the VOL+/ - keys. Also, you may press the FUNCTION (F) key along with th
e
V
OL +/ - keys to adjust the volume in increments or decrements of 4.
M
uting the Volume
T
o mute the volume, press the MUTE key. To restore the volume, press MUTE again or press the VOL + ke
y.
B
asic Functions
Function Selection Menus
F
eatures
T
his menu allows you to adjust the various picture settings.
P
ress to move between the various settings, and to adjust
t
hem. When finished, press the MENU key to return to the main menu.
T
int: -31 (more purplish) to +31 (more greenish)
B
rightness
: 0 (dimmest) to 63 (brightest)
C
ontrast: 0 (minimum contrast) to 63 (maximum contrast)
C
olor: 0 (minimum color) to 63 (maximum color)
S
harpness
: 0 (minimum sharpness) to 63 (maximum sharpness)
N
ote:
To control picture artifacts reduce the sharpness setting when
viewing DVD discs.
Picture Menu
T
o change the setting of any function, press the MENU key to bring up the main menu. Press to highlig
ht
t
he desire sub-menu and press (or ENTER) to access. While in the sub-menu, press to sele
ct
t
he item and to adjust the setting. Press the MENU key to return to the main menu and exit.
W
hile in the setup menu, CH-/+ and VOL-/+ key on the front panel will function as the / / on th
e
r
emote control.
Tint
Brightness
Contrast
Color
Sharpness
00
32
32
32
32
Picture
11
Page 13

F
UNCTIONS & FEA
TURES (continued)
T
uner Menu
N
ote: This menu is only accessible while the TV is in Tuner mode.
C
hannel: This feature allows you to change the channel displaying on
s
creen. Press or the numeric keypad to change the channel.
A
dd/Erase: This feature allows you to add or remove the channel
c
urrently display on screen to the "active channel list" . Active channel list
i
s the list of channel that is available by pressing the CH+/- keys. Press
to add or erase.
A
ntenna: This feature sets the TV tuner to an Air antenna or a Cable
a
ntenna. Please use Air mode when using an over-the-air antenna; use
C
able mode for a cable hookup. Press to select between the two
o
ptions.
A
uto Program: This feature will setup the Active channel list for the user.
T
he list will include only the channels with a signal detected. Press to
b
egin and to stop the process.
Channel
Add/Erase
Antenna
Auto Program
2
Add
Air
Tuner
Stop Start
T
ime
T
his feature allows you to set the clock on the TV.
O
n Time
T
his feature allows you to preset a time when the TV set will turn
o
n.
O
n Channel
T
his feature allows you to preset the channel on display when the
O
n Time is activated.
O
ff Time
T
his feature allows you to preset a time when the TV set will turn
o
ff.
T
imer
T
imer can be set to Once or Always.
Timer Menu
Time --:--
On Time --:-On Channel Off Time --:-Timer Once
Timer
L
anguage
T
his feature allows you to pick a language used for the on screen display
(
OSD). Press to select the language of your choice - English
(
Eng.), French (Fra.) or Spanish (Esp.).
B
lue Back
T
his feature gives you the option to display a blue background on the TV
s
creen when there is no signal present. Press to toggle between
o
n and off.
C
losed Caption
C
losed caption is a feature that allows your TV set to display, on screen,
t
he dialogue, narration, and sound effect of a TV program. It also allows
y
ou to display teletext signal. Text and caption will be displayed at either
t
he top or the bottom of the screen. There is nine different setting for
c
losed caption. You can set it to one of the 4 Closed Caption settings
(
CC1-4), one of the 4 Text settings (T1-4), or set this feature to off
(
CCD/Text off).
System Menu
System
Language
Blue Back
CCD/Text
Parental Guide
MPAA - X
TV - MA
On
Off
On
Fra. Esp
.
Eng.
12
I
nstruction Manual
Notes: A Closed Caption signal may not be displayed under the following conditions:
-When there is no Closed Caption/Text signal to decode
-When the signal is weak or altered (due to interference or poor reception)
-When viewing a dubbed video tape
Page 14

I
nstruction ManualManual
13
F
UNCTIONS & FEATURES (continued)
Parental Guide
This feature allows parents to block certain programs from being
viewed, based on the programs' rating. In order to access this
menu, you must first enter a pass code. The factory default is 6688.
Enter the pass code while the Parental Guide is highlighted. Now,
with Parental Guide set as On, press to access the TV Rating
grid.
TV Rating
Press to navigate between the ratings, press the MENU
key to block out a particular rating completely. Or, if you wish,
press to highlight an individual rating (anywhere a U is
displayed in the middle of the grid.) Pressing the MENU key with
one of these individual ratings highlighted will block only
programs that feature that particular aspect. See the TV rating
diagram at right for an example. TV ratings are defined in the
charts below:
MPAA Rating
Press while in the TV Rating grid to access this grid. Press
to navigate between the MP AAratings. Pressing the MENU
key with a rating highlighted will block that particular rating from
being shown on this TV. A B will show in red next to the blocked
rating. Please note that blocking a lower rating (for example, PG)
will block all higher ratings (PG-13, R, NC-17, X.)
Pass Code Menu
This menu allows you to change the access code for the
Parental Guide functions of the TV set. Press the MENU key
when Pass Code Control is highlighted. This will turn on or off the
Pass Code function. With the Pass Code function ON, you can
also change the Pass Code. Press to highlight Pass Code,
then enter the new Pass Code using the numeric keypad.
Note:
The factory pre-set password is 6688. The initial password
will be replaced when the new one is used. Please contact
the service centre in case you forget the password.
System Menu (continued)
Movie Rating
GU
PG U
PG-13 U
RU
NC-17 U
XU
MPAA - Rating
Age Defined as
TV - Y All Children
TV - Y7 Directed to Older Children (over 7)
TV - G General Audience
TV - PG Parental Guidance Suggested
TV - 14 Parents Strongly Cautioned
TV - MA Mature Audience Only
Contents Defined as
FV Fantasy Violence
D Sexual Dialogue
L Adult Language
S Sexual Situations
V Violence
Age Based Rating
Language
Blue Back On
CCD/Text Off
Parental Guide On
System
Enter Pass Code - - - -
Rating F V D L S V
TV-Y U
TV-Y7 U U
TV-G U
TV-PG U U U U U
TV-14 B B B B B
TV-MA B B B B
TV-Rating
Age Based Rating
Enter Pass Code - - - -
Pass Code Menu
Pass Code Control
Pass Code 6688
Fra. Esp.
Eng.
MPAA-X TV-MA
Page 15

I
nstruction ManualManual
14
Useful Remote Control Features
D
ISPLAY
T
his key allows you to display the current information of the TV screen on the upper right hand corner of th
e
s
creen. (channel, antenna mode, time, video, etc.)
S
CAN
P
ress the SCAN key twice, and the TV will begin to scan through all active channels. To stop the Scan
,
p
ressing any key can interrupt scanning. Please note that Scan will only work in Antenna mode.
P
ICTURE
Y
our TV has factory preset picture modes that allow you to optimize your TV viewing. To activate these pictur
e
m
odes, press this key, and you can choose among User, Normal, Movie and Sports.
R
ECALL
T
his key will allow you to return to the last channel you were viewing. Pressing it again will return you to th
e
c
hannel you just left.
C
C
P
ressing the CC key will activate the currently selected Closed Caption or Text under the System Menu
.
P
ressing it again will turn off the Closed Caption or Text.
V
IDEO
T
his key allows you to toggle between antenna and different video modes.
C
hild Lock
T
he Child Lock feature prevents unauthorized viewing of the TV. To activate, press and hold the F key, an
d
t
hen press MUTE. You should see a key symbol appear on the screen. This will lock out all remote function
s
(
except for Standby). To unlock the TV, press and hold the F key and press MUTE. This will unlock the TV
.
P
lease note that the only way to activate or deactivate the Child Lock feature is via remote control - pleas
e
i
nsure that it is stored securely.
0
-9
P
ress the 0-9 keys to enter channel numbers directly (2-69 in the Air mode or 1-125 in the Cable mode).
P
ress the corresponding Number key(s) to enter a channel number from high-digit to low-digit.
E
ach digit should be entered at 3 seconds time interval.
S
LEEP
P
ress the SLEEP key repeatedly to switch the TV to one of the following modes :
-- 15 30 45 60 90 120 150 180 (Unit: Minute)
T
he TV will automatically enter the Standby mode when the preset Sleep time is up.
T
he TV will display a message one minute before the Sleep timer runs out.
F
UNCTIONS & FEATURES (continued)
Page 16

I
nstruction ManualManual
1. How to playback a disc
1) Press DVD/TV to enter the DVD mode.
2) Press OPEN/CLOSE to open the disc tray.
3) Place the disc on the disc tray. Be sure the playback side is faced down.
Note:
A disc may be damaged if not correctly placed on the guides in the disc tray.
This may also cause the DVD player to malfunction.
4) Press the PLAY key. After closing the disc tray playback will start.
The menu screen will appear automatically or you may access the menu screen by pressing TITLE.
Notes:
(1) Moving the unit during playback may cause damage to the disc as well as the unit.
(2) To open and close the disc tray, you should only use the OPEN/CLOSE key.
DVD FUNCTIONS
Playing Back a Disc
2. About DVD CD
DVD or CD icons will appear depending on the disc being played back.
DVD: DVD video discs
CD: Audio CDs
3. How to start playback from the menu screen
1) Press / or the Number keys to select the title.
2) Press the ENTER key. The DVD player will start playback from the title
selected.
4. How to pause playback (still playback)
Press the PAUSE key during playback.
Press the PAUSE key to resume normal playback.
5. How to remove the disc
Press the OPEN/CLOSE key. Wait until the disc tray is completely open before removing any discs.
After removing the discs, press the OPEN/CLOSE key to close the disc tray.
6. How to stop playback
Press the STOP key once. The DVD player is stopped.
Press the PLAY or RESUME key to replay.
Press the STOP key twice. The DVD player is stopped completely.
Note:
At the completion of each movie a menu screen may appear. Be aware that the on-screen setup menu
may damage your TV by permanently burning that image onto the screen. To avoid this, press the STOP
key at the completion of each movie. You may also decide to setup the SCREEN SAVER.
7. Advanced playback
The DVD player allows you to playback discs at various speeds.
1)You can play back a disc at 2x, 4x, 8x, or 16x the normal speed.
Press the REV or FWD key during playback.
The playback speed becomes 2x the normal speed.
The playback speed changes each time you press the REV or FWD key.
REV: Fast reverse FWD: Fast forward
Press PLAY/PAUSE to resume normal playback.
Title 1
Title 3
Title 2
Title 4
15
2x 4x 8x 16x
16x
8x4x
2x
Page 17

I
nstruction ManualManual
N
ote:
The DVD Player may not playback sound during scan reverse or forward playback of DVD video discs.
The DVD Player will play sound during fast forward or fast reverse playback of audio CDs.
The speeds may vary slightly from disc to disc and the 2x, 4x, 8x, and 16x speeds are only approximate speed
s.
2
) Playing in slow-motion
A disc can be played back in slow-motion.
Press PLAY/PAUSE key to resume normal playback.
N
ote:
During the slow-motion playback, the sound may not be heard. Some discs do not utilize this feature.
8
. Resuming playback from the same location
This DVD player allows you to stop playback and continue playback later from the same location on the
disc.
1
) Press the STOP key.
This will interrupt the playback and the DVD player will memorizes the location where you stopped playback
.
2
) Press the RESUME key.
The DVD player will resume the playback from the location where you stopped playback.
N
otes:
(1) The following actions will cancel the RESUME function:
-Unplugging the unit after you stop playback.
-Ejecting the disc.
(2) Depending on the disc, you may experience a difference of location where playback resumes
(3) Some discs do not utilize this feature.
D
VD FUNCTIONS(continued)
P
laying Back a Disc (continued)
T
HE UNIT ALLOWS YOU TO VIEW THE DISC INFORMATION ON THE TV SCREEN.
Press DISPLAY during playback, you can view the following on the TV:
-Current title, Track number, Total playing time
Current Title
Current Chapter
Title Elapsed Title Remain Chapter Elapsed
Tt 01/12 Ch 06/39 Tt 01/12 Ch 06/39 Tt 01/12 Ch 06/39
00:02:20
Total Title
00:18:50 00:03:50
Total Chapter
Chapter Remain
Tt 01/12 Ch 06/39
00:10:40
To turn off the on-screen display, press DISPLAY repeatedly.
U
sing the On-Screen Display
16
Display Off
Page 18

I
nstruction ManualManual
D
VD FUNCTIONS(continued)
T
HE DVD VIDEO DISCS ARE NORMALLY DIVIDED INTO TITLES. THE TITLES ARE SUB-DIVIDED
I
NTO CHAPTERS. MOREOVER, AUDIO CD ARE DIVIDED INTO TRACKS. YOU CAN CONVENIENTLY
L
OCATE ANY SPECIFIC TITLE, CHAPTER, OR TRACK WITH THIS UNIT.
Chapter1 Chapter2 Chapter3 Chapter4 Chapter5
1
. Locating a title using the title menu
You can locate a specific title using the title menu function, if a DVD video disc contains a title menu.
1
) Press the TITLE key. On the TV screen, the title menu will appear.
2
) Press the / keys to select the title you want.
You can also directly locate a specific title by pressing its assigned number with the Number keys.
3
) Press the ENTER key. This will cause the unit to start playback from chapter 1 of the title selected.
N
otes:
(1) You may find that some discs will not respond to this function.
(2) If different instructions appear on the TV screen, follow those instructions. The instructions above ar
e
describing the basic procedure where the procedures may vary depending on the contents o
f
the DVD video disc.
2
. Locating a specific chapter or track
This unit allows you to locate consecutive chapters or tracks.
Press the PREV or NEXT key repeatedly to display the requested chapter or track.
The DVD player starts playback from the selected chapter or track.
How to locate proceeding chapters or tracks
•
When you press the PREV key, the DVD player starts playback from the beginning of the proceeding
chapter or track.
How to locate succeeding chapters or tracks
•
When you press the NEXT key, the DVD player starts playback from the beginning of the succeeding
chapter or track.
N
ote:
On some discs the titles may not display the sub-divided chapters.
L
ocating a Specific Title, Chapter or Track
DVD Video Disc
Audio CD
Track1 Track2 Track3 Track4 Track5
TITLE 1 TITLE 2
17
Page 19

I
nstruction ManualManual
Y
OU CAN USE THE PARENTAL LOCK FUNCTION ONLY WITH DVD VIDEO DISCS EQUIPPED WITH
T
HE PARENTAL LOCK FEATURE.
S
etting the parental lock
DVD video discs equipped with the parental lock function are rated according to their content. The conten
ts
allowed by a parental lock level and the way a DVD video disc can be controlled may vary from disc
to
disc. For example, if the disc allows, you can edit out violent scenes unsuitable for children and replac
e
them with more suitable scenes, or lock out playback of the disc all together.
1
. Press STOP twice during playback.
2
. Press SETUP. The SETUP MENU appears on the TV screen.
3
. Select Preference page, press ENTER.
4
. Select Parental, press direction keys.
Select Parental, press ENTER.
5
. Enter your password then press ENTER key.
The preset password is 1225.
To change your password:
1) Follow step 3 to select password change.
2) Enter old password.
3) Enter new password.
4) Re-enter to confirm your new password.
5) Press ENTER.
6) Press SETUP.
D
VD FUNCTIONS(continued)
S
etting the Parental Lock
19
--Preference Page-Audio Eng
Subtitle Off
Disc Menu Eng
Parental ADULT
Password
Default
1 KID SAFE
2 G
3 PG
4 PG-13
5 PG R
6 R
7 NC-17
8 ADUL T
Old Password
New Password
Comfirm PWD
OK
Change
--Preference Page--
Audio Eng
Subtitle Off
Disc Menu Eng
Parental ADULT
Password
Default
Page 20

I
nstruction ManualManual
Customizing the Function Settings
THIS UNIT ALLOWS YOU TO CUSTOMIZE THE PERFORMANCE TO YOUR PERSONAL PREFERENCES
.
Displaying the setup menu screen
The SETUP MENU screen asks you to select a setting category from General Setup, Speaker Setup,
Audio Setup, and Preferences. The selected category will provide you the setting details on-screen.
1. Press SETUP.
2. Press / to select category (highlight), then press ENTER.
3. Press SETUP to normal playback.
Notes:
• Preset password is 1225.
• Highlighted function will be expanded at bottom of the screen.
• The SETUP MENU screen disappears if you press the SETUP key while it is displayed.
• Functions and menu may change without notice.
• You must press STOP twice to set up Preference.
20
General
Preference
Video
Dolby
Audio
--General Setup Page-Tv Display Ps
Angle Mark On
Osd Lang Eng
Spdif Output Raw
Captions Off
Screen Saver On
--Speaker Setup Page-Downmix Stereo
Normal /Ps
Normal /Lb
Wide
On
Off
English
French
Spanish
Spdif Off
Spdif/Raw
Spdif/Pcm
On
Off
On
Off
Lt/Rt
Stereo
--Dolby Digital Setup-Dual Mono Stereo
Dynamic
Stereo
L-Mono
R-Mono
Mix-Mono
FULL
3 / 4
1 / 2
1 / 4
OFF
--Video Setup Page-Sharpness Low
Brightness 00
Contrast 00
High
Medium
Low
-20~ +20
-16~ +16
--Preference Page-Audio Eng
Subtitle Off
Disc Menu Eng
Parental ADULT
Password
Default
English
French
Spanish
Chinese
Japanese
Korean
English
French
Spanish
Chinese
Japanese
Korean
English
French
Spanish
Chinese
Japanese
Korean
Off
Page 21

I
nstruction ManualManual
21
T
ROUBLESHOOTING GUIDE
Check the following guide for a possible correction to a problem before contacting customer support.
Page 22

I
nstruction ManualManual
22
LIMITED PRODUCT WARRANTY
Audio Product
Telecom Product
TV
DVD Player
This quality product is warranted to be free from manufacturer's defects in material and workman-ship,
provided that the unit is used under the normal operating conditions intended by the manufacturer.
Should you have any problem with this product, please and it is highly recommended to visit our website a
t
www.curtisint.com before you take any other steps as we have additional copies of instruction manuals,
operating manuals and trouble shooting tips on our website which gives you the answer on most of the
questions you could have in operating the unit.
TERMS OF WARRANTY
C.I. Service Dept. warrants this product to be free from defects in materials and workmanship for 1 year o
n
parts and 90 days on labor.
Nothing within this warranty shall imply that C.I. will be responsible or liable for any damage to any items
placed in this product, whether due to any defect of the product, or its use, whether proper or improper.
EXCLUSIONS
Save as herein provided, C.I. Service Dept. (Canada) or C.I. Service Dept. (USA), there are no other
warranties, conditions, representations or guarantees, express or implied, made or intended by C.I. or its
authorized distributors and all other warranties, conditions, representations or guarantees, including any
warranties, conditions, representations or guarantees under any Sale of Goods Act or like legislation or
statue is hereby expressly excluded. Save as herein provided, C.I. Service Dept. (Canada) or C.I. Service
Dept. (USA), shall not be responsible for any damages to persons or property, including the unit itself,
howsoever caused or any consequential damages arising from the malfunction of the unit and by the
purchase of the unit, the purchaser does hereby agree to indemnify and save harmless C.I. from any claim
for damages to persons or property caused by the unit.
TO OBTAIN REPAIRS UNDER THE TERMS OF THIS WARRANTY
1. The original purchaser must present a copy of the original bill of sale and the service warranty card.
2. Any alterations, abuse, misuse, battery corrosion or accidental damage voids the warranty.
3. The warranty does not cover cabinets and accessories.
4. No warranty or insurance contained or set out shall apply when damage or repair is caused by power
failure; damage in transit or when moving the unit; improper power supply; use for commercial or
industrial purposes; service calls resulting in customer education, etc.
5. The defective product should be taken or mailed to:
Canada U.S.A
C.I. Service Dept. C.I. Service Dept.
315 Attwell Drive 181 Cooper Avenue
Etobicoke, Ontario. Unit 104
M9W 5C1 Tonawanda, N.Y.
14150
For service assistance and product information, please call: 1-800-968-9853.
If mailing the product, the freight must be prepaid and a money order for $7.00 should be included
to cover the cost of insurance and the return of the product.
6. C.I. reserves the right to repair or replace the parts which have become defective.
Model No. Date Purchased Serial No.
Page 23

Curtis International Ltd.
315 Attwell Drive, Toronto, ON, M9W 5C1
 Loading...