

Page 1
THERMOPRO BREWERS
TROUBLESHOOTING GUIDE
Service & Sales
1-800-421-6150
MODELS: TP15T10A1100, TP15S10A1500
www.wilburcurtis.com
Page 2
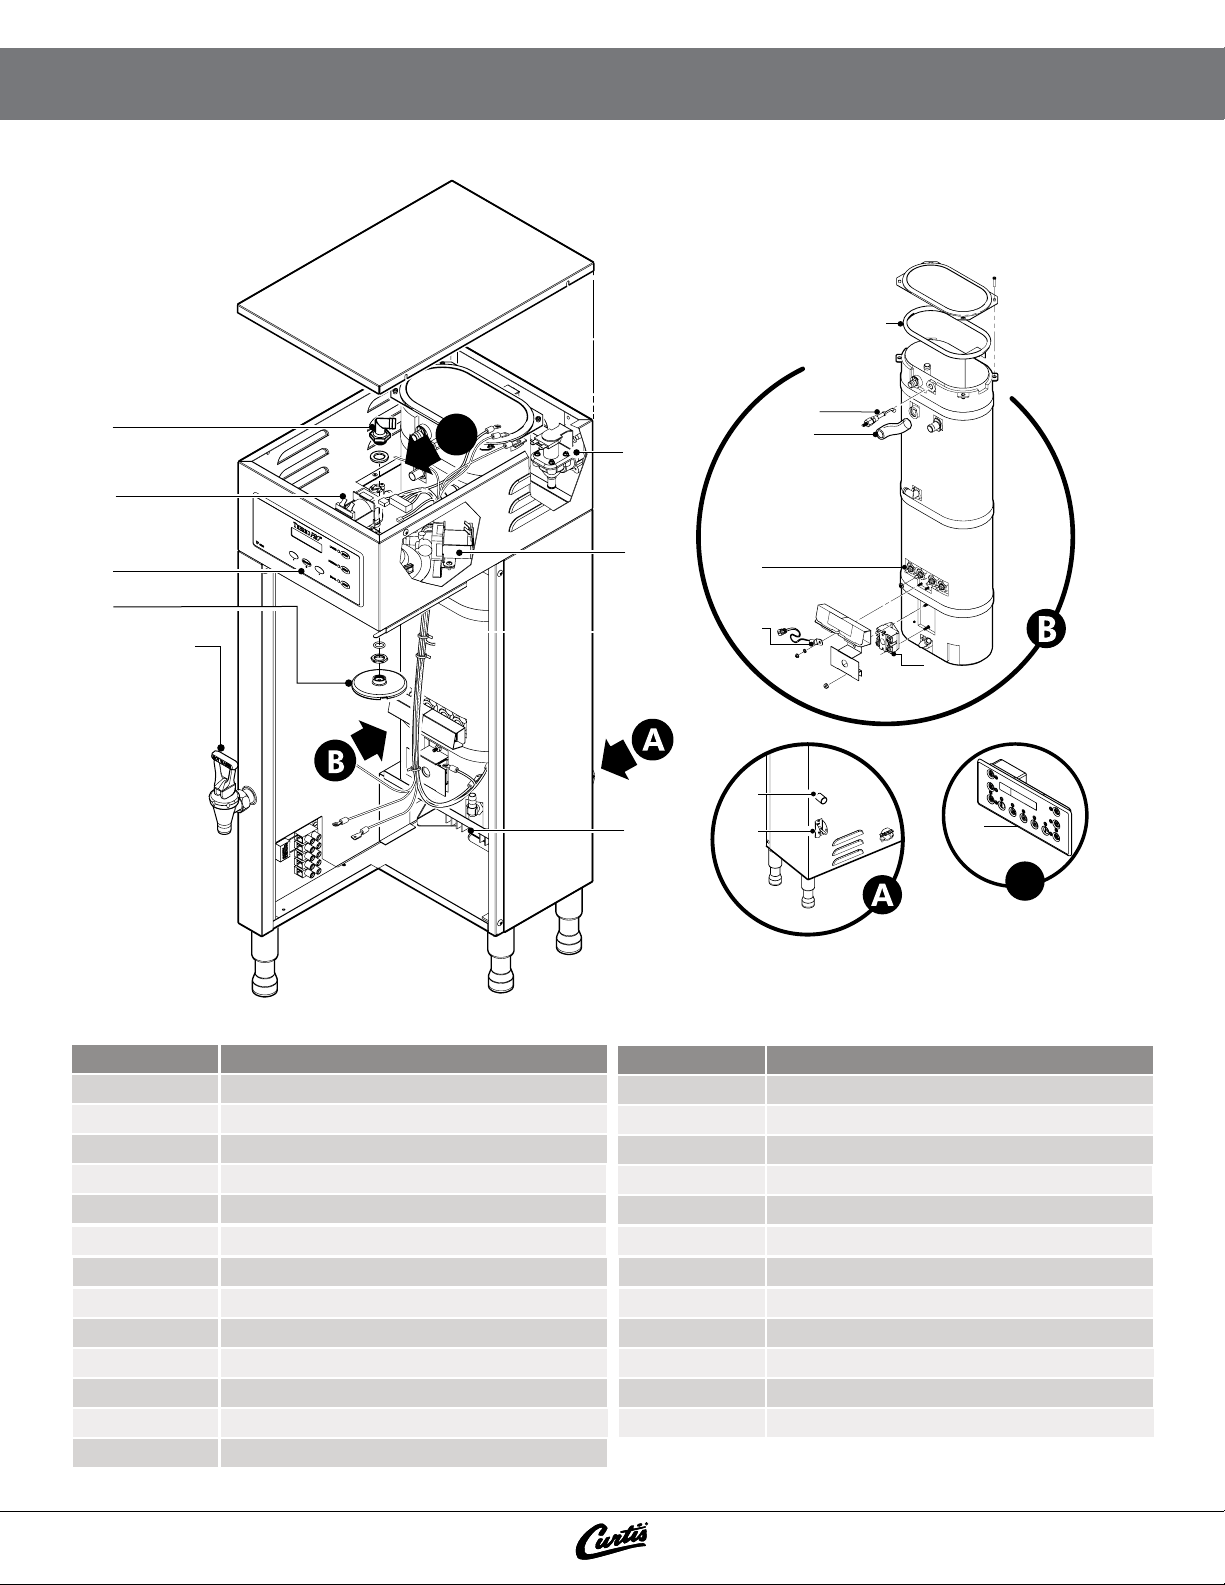
TP15S10A1500 SINGLE BREWER PARTS IDENTIFICATION
20
21
12
C
6
11
1
2
8
14
5
9
18
16
7
10
17
19
C
PART #
1. WC- 844-101 VALVE, ADJ BY-PASS
2. WC-39444 LABEL, UCM OVERLAY TP2S 3-BATCH
3. WC-39417 LABEL, UCM OVERLAY TP2S 1-BATCH
4. WC-39416 LABEL, UCM OVERLAY TP2S 2-BATCH
5. WC-29050 SPRAYHEAD ASSY, ADVANCED FLOW
6. WC- 847 VALVE, WATER INLET 2GPM 120V 10W
7. WC-1501 FUSE HOLDER W/5A FUSE
8. WC-37122 KIT, DUMP VALVE BREW RIGHT
9. WC-1825 FAUCET ASSY, HOT WATER TP2S/2T
10. WC-8559 RELAY, SOLID STATE 40A W/HEAT SINK
11. WC-5350 TUBE, ½ ID x 1/8W SILICONE
12. WC-5502-01 KIT, PROBE, ASSY WATER LEVEL
13. WC-5310 TUBING, 5/16” ID X 1/8” W SILICONE
Service & Sales
Service & Sales
1-800-421-6150
1-800-421-6150
DESCRIPTION
PART #
14. WC- 904-04 ELEMENT, HEATING 1.6KW 120V W/JAM NUTS
15. WC- 906-04 ELEMENT, HEATING 2KW 220V W/JAM NUTS
16. WC- 522 THERMOSTAT, RESET
17. WC- 103 SWITCH, TOGGLE 25A 125/250VAC RST
18. WC-1438-101 SENSOR, HEATING TANK
19. WC- 723 CONTROL MODULE, 120V TP2S/TP2T
20. WC-43062 GASKET, TANK LID
WC-2977-101K
21.
22. WC-37317 9MM STRAIGHT FITTING
23. WC-37357 12MM STRAIGHT FITTING
24. WC-37365 INLET FITTING
25. WC-37266 OVERFLOW FITTING
DESCRIPTION
KIT, SPRAYHEAD FITTING ULTEM
www.wilburcurtis.com
www.wilburcurtis.com
Page 3
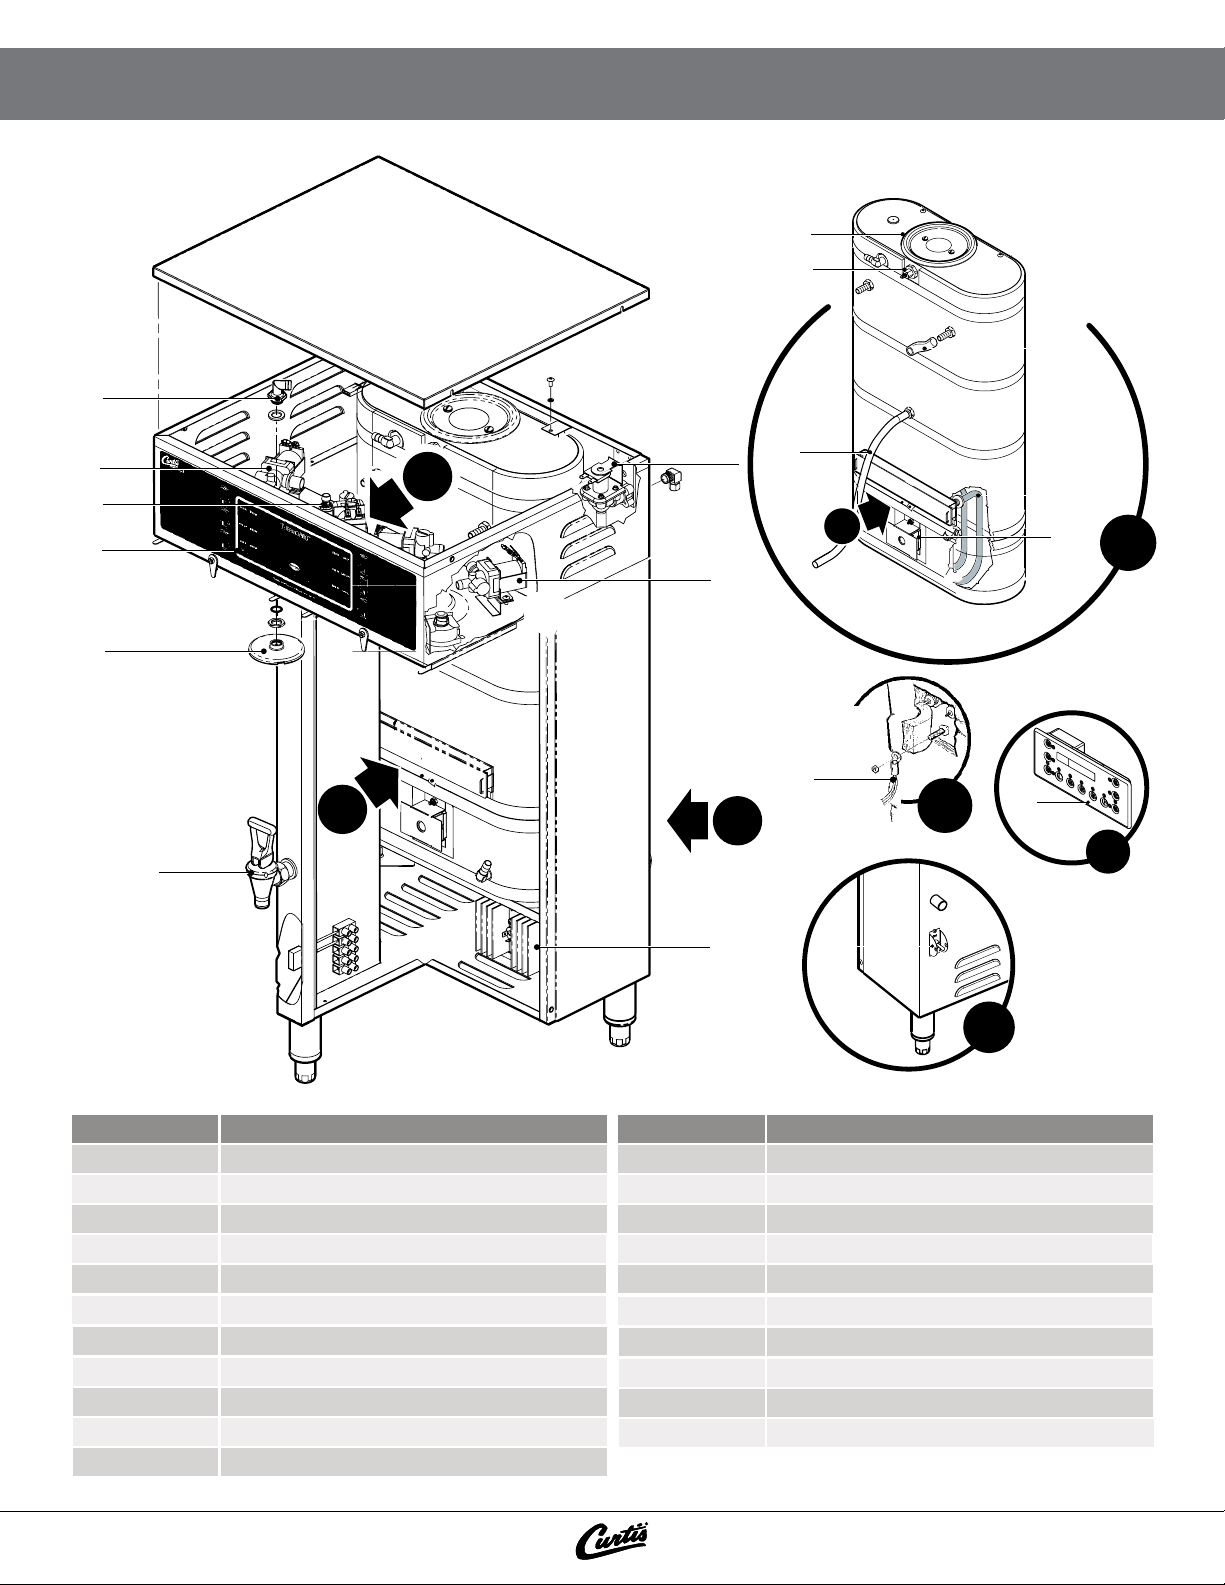
TP15T10A1100 TWIN BREWER PARTS IDENTIFICATION
26
2
2
B
C
A
30
12
13
6
D
C
11
16
31
B
18
D
33
C
PART #
1. WC- 844-101 VALVE, ADJ BY-PASS
5. WC-29050 SPRAYHEAD ASSY, ADVANCED FLOW
6. WC- 847 VALVE, WATER INLET 2GPM 120V 10W
8. WC-37122 KIT, DUMP VALVE BREW RIGHT
9. WC-1825 FAUCET ASSY, HOT WATER TP2S/2T
10. WC-8559 RELAY, SOLID STATE 40A W/HEAT SINK
11. WC-5350 TUBE, ½ ID x 1/8W SILICONE
13. WC-5310 TUBING, 5/16” ID X 1/8” W SILICONE
16. WC- 522 THERMOSTAT, RESET
18. WC-1438-101 SENSOR, HEATING TANK
19. WC- 723 CONTROL MODULE, 120V TP2S/TP2T
DESCRIPTION
32
A
PART #
20. WC-43062 GASKET, TANK LID
WC-2977-101K
21.
26. WC- 37121 KIT, DUMP VALVE BREW LEFT
27. WC-39442 LABEL, UCM OVERLAY TP2T TWIN 3-BATCH
28. WC-39415 LABEL, UCM OVERLAY TWIN 2-BATCH
29. WC-39414 LABEL, UCM OVERLAY TWIN 1-BATCH
30. WC-37008 KIT, TANK LID ROUND
31. WC- 934-04 ELEMENT, HEATING 2.5 KW 220V W/JAM NUTS
32. WC- 102 SWITCH, TOGGLE 125/250 VAC RESISTIVE
33. WC-37176 KIT, UCM & LABEL INSTRUCTIONS THERMOPRO
DESCRIPTION
KIT, SPRAYHEAD FITTING ULTEM
Service & Sales
Service & Sales
1-800-421-6150
1-800-421-6150
www.wilburcurtis.com
www.wilburcurtis.com
Page 4

TXSG1501S600 THERMAL SERVER PARTS IDENTIFICATION
34
39
35
46
36
44
37
38
40
41
47
42
43
45
PART #
34. WC-37387 KIT, CAP, TETHER & SCREW TXSG
35. WC-2025 GLASS, GAUGE 8” TLXSG10
36. WC-2063 BRACKET, GAGE GLASS RING
37. WC-1939-101 NUT, FLANGED
38. WC-1938 SHANK, PLASTIC
39. WC-2005 WASHER, SHIELD CAP 1/8”
40. WC-1903 NUT, UNI0N SHANK
Service & Sales
Service & Sales
1-800-421-6150
1-800-421-6150
DESCRIPTION
PART #
41. WC-1906 C’ RING .917 x .760 x .090
42. WC-3705 KIT, FAUCET REPAIR
43. WC-1841 FAUCET, ESP BLACK LOCKING
44. WC-2456 ELBOW, SILICONE STRT SIDE SRV
45. WC-36076 BRUSH, GAGE GLASS
46. WC-37396 KIT, GLASS GAUGE 10” 3PK TXSG15
47. WC-37395 KIT, GAUGE ASSY 10” BLK TXSG15
DESCRIPTION
www.wilburcurtis.com
www.wilburcurtis.com
Page 5

PARTS IMAGES
1
WC- 844-101
VALVE, ADJ BY-PASS
5
WC-29050
SPRAYHEAD ASSY, ADVANCED FLOW
9
2
WC-39444
LABEL, UCM OVERLAY TP2S 3-BATCH
6
WC- 847
VALVE, WATER INLET 2GPM 120V 10W
10
3
WC-39417
LABEL, UCM OVERLAY TP2S 1-BATCH
7
WC-1501
FUSE HOLDER W/5A FUSE
11
4
WC-39416
LABEL, UCM OVERLAY TP2S 2-BATCH
8
WC-37122
KIT, DUMP VALVE BREW RIGHT
12
FAUCET ASSY, HOT WATER TP2S/2T
WC-1825
13
WC-5310
TUBING, 5/16” ID X 1/8” W SILICONE
17
WC- 103
SWITCH, TOGGLE RST
21
RELAY, SOLID STATE 40A W/HEAT SINK
WC-8559
14
WC- 904-04
ELEMENT, HEATING 120V W/JAM NUTS
18
WC-1438-101
SENSOR, HEATING TANK
22
WC-5350
TUBE, ½ ID x 1/8W SILICONE
15
WC- 906-04
ELEMENT, HEATING 220V W/JAM NUTS
19
WC- 723
CONTROL MODULE, 120V TP2S/TP2T
23
WC-5502-01
KIT, PROBE, ASSY WATER LEVEL
16
WC- 522
THERMOSTAT, RESET
20
WC-43062
GASKET, TANK LID
24
WC-2977-101K
KIT, SPRAYHEAD FITTING ULTEM
Service & Sales
1-800-421-6150
WC-37317
9MM STRAIGHT FITTING
WC-37357
12MM STRAIGHT FITTING
WC-37365
INLET FITTING
www.wilburcurtis.com
Page 6

PARTS IMAGES
25
WC-37266
OVERFLOW FITTING
29
WC-39414
LABEL, UCM OVERLAY TWIN 1-BATCH
33
26
WC- 37121
KIT, DUMP VALVE BREW LEFT
30
WC-37008
KIT, TANK LID ROUND
34
27
WC-39442
LABEL, UCM TP2T TWIN 3-BATCH
31
WC- 934-04
ELEMENT, HEATING W/JAM NUTS
35
28
WC-39415
LABEL, UCM OVERLAY TWIN 2-BATCH
32
WC- 102
SWITCH, TOGGLE RESISTIVE
36
WC-37176
KIT, UCM & LABEL
37
WC-1939-101
NUT, FLANGED
41
WC-1906
C’ RING .917 x .760 x .090
45
WC-37387
KIT, CAP, TETHER & SCREW TXSG
38
WC-1938
SHANK, PLASTIC
42
WC-3705
KIT, FAUCET REPAIR
46
WC-2025
GLASS, GAUGE 8” TLXSG10
39
WC-2005
WASHER, SHIELD CAP 1/8”
43
WC-1841
FAUCET, ESP BLACK LOCKING
47
WC-2063
BRACKET, GAGE GLASS RING
40
WC-1903
NUT, UNI0N SHANK
44
WC-2456
ELBOW, SILICONE STRT SIDE SRV
BRUSH, GAGE GLASS
Service & Sales
1-800-421-6150
WC-36076
KIT, GLASS GAUGE 10” 3PK TXSG15
WC-37396
KIT, GAUGE ASSY 10” BLK TXSG15
WC-37395
www.wilburcurtis.com
Page 7

TROUBLESHOOTING INSTRUCTIONS
HEATING ISSUES
Not heating:
LCD reads “Heating”
1
2
3
4
Verify 220 volts between L1-L2 on the
power block. If yes, proceed to #2. If no,
verify that the unit is plugged in correctly,
and that the panel breaker is turned on.
Verify 220 volts between #2 & #4 on the
Manual Reset Thermostat.
If yes, proceed to #3, if no, reset or
replace the Manual Reset Thermostat.
Verify 220 volts across the Toggle Switch.
If yes, proceed to #4. If no, replace the
toggle switch.
Verify 220 volts across the Heating
Elements. If yes, proceed to #5. If no,
verify 5 VDC on the SSR. If yes, replace the
Solid State Relay, if no, replace the UCM.
Overheating:
LCD reads “Heating”
Verify that the resistance on the Temperature
Sensor is less than 10k ohms with a hot tank
(200+ degrees) If no, verify correct mounting and
that the walls of the tank are free of mineral deposits. If yes, bypass the sensor using a jumper
with a 5k ohm resistor. If the LCD reads “ready”
and the unit stops heating, replace the temperature sensor, if not, replace the UCM.
LCD reads “Ready to Brew”
Check the A.C. side of the SSR for continuity. if
continuity is present, replace the SSR, if no
continuity, replace UCM.
5
Is the water turned on?
Yes:
Yes:
No:
Yes:
No:
Verify 19 ohm across each active Heating
Element, and replace any Heating
Element that reads “OPEN”
Verify 120 volts at inlet valve coil.
Replace Inlet Valve
Remove Orange wire from the Water
Level Probe. Does the Tank Fill?
Replace Water Level Probe.
Replace UCM
TANK FILLING ISSUES
Overlling:Not lling:
Does the tank continue to fill after the
toggle switch has been turned off ?
Yes:
No:
Yes:
No:
Replace Water Inlet Valve.
Remove the Orange wire from the Water
Level Probe and connect it to ground.
Does the tank stop lling?
Replace the Water Level Probe
Replace the UCM
Service & Sales
1-800-421-6150
www.wilburcurtis.com
Page 8

TROUBLESHOOTING INSTRUCTIONS - continued
BREWING ISSUES
LCD does not read “Brewing”
If the LCD reads “Ready to Brew” and no
response when Brew Button is pressed, replace
the UCM.
LCD reads “Brewing”
No water ow from the sprayhead:
Does water ow from the hot water faucet?
If yes, verify 120 volts at the dump valve coil.
If voltage is present at the dump valve coil,
replace the dump valve.
If 120 volts is not present at the dump valve
coil, conrm continuety of wiring between molex
connector and Dump Valve.
If okay, replace the UCM. (Verify the resistance
on the dump valve coil to be open in one direction, and under 2k ohm in the other direction
BEFORE REPLACING THE UCM).
If water does not ow from the hot water faucet,
replace the Water Level Probe.
*Ensure correct alignment of the sprayhead
tting and that the tubing is routed properly to
allow for maximum water ow.
Short Pots:
Verify that the Dump Valve outlet tting on the
tank, the tubing between the tank outlet and the
Sprayhead tting, the Sprayhead, and Dump
Valve are clear of obstructions.
Ensure correct alignment of the sprayhead
tting and that the tubing is routed properly to
allow for maximum water ow.
Verify that the Hot Water Tank is lling correctly.
If not, replace the Water Level Probe.
If all the above are okay, replace the Dump
Valve.
Overowing the Pots:
Ensure that the Sprayhead has not been
removed. Replace as needed.
Ensure that the Hot Water Tank is not overowing
(See Tank Filling Issues).
Ensure Cold Brew Lock is set to 5 degrees.
Ensure that Lime / Debis are not a factor If all
the above are okay, replace the Dump Valve.
*Ensure that the sprayhead is free of mineral
deposits, in good repair, and properly conected.
Wilbur Curs Co., Inc.
6913 Acco Street, Montebello CA 90640
Customer Service: 800.421.6150 | 323.837.2300
csrassistance@wilburcurs.com
Tech Support: 800.995.0417
www.wilburcurs.com
JUNE/2014 M54_TS_WC_TP_revNC
 Loading...