

Page 1

Attention:
This handbook contains importa nt secu rity measures
and the correct use of the product information, in order to
avoid accidents. Please make sure to reading the manual
carefully before use the device.
z Please don’t be in high temperature, moisture or
very dust place
z Please don’t be in high temperature, Especially in
summer don't put the device in the car when
Windows closed.
z Avoid fall or Violent collision of the device, don’t
make the TFT display screen were violent tremor,
This could cause TFT display screen abno rmal or
damage.
z Please choose the appropriate volume, Use
headphones should not be too big volume, If feel
tinnitus, Lower the volume or stop using it
z please charge In the following condition.
A. The battery power ICONS shows have no power
B. The system automatically shut off, star tu p after
power off soon
C. Operation buttons no response
D. The machine that the t op r ight corner show red icons
z When the device in the format or ongoing upload
and download file, please don' t sudd enly disc onnect ,
This could cause application error.
z For those who because of damage to the product,
repair, or othe r ca uses of erased the memory, The
company shall not be liable for any responsibility,
please follow the user manual for the standardized
operation to use the device.
1
Page 2
z Don’t disassemble the product, don’t use alcohol、
Thinner or benzene to scrubbing products
z USB just only be used for data transmission
The company reserves the right to improve produ
ct,products specification and design have any change,
The information is subject to changes without priornoti
ce.
【Remark】All pictures in this manual is just for y
our reference.
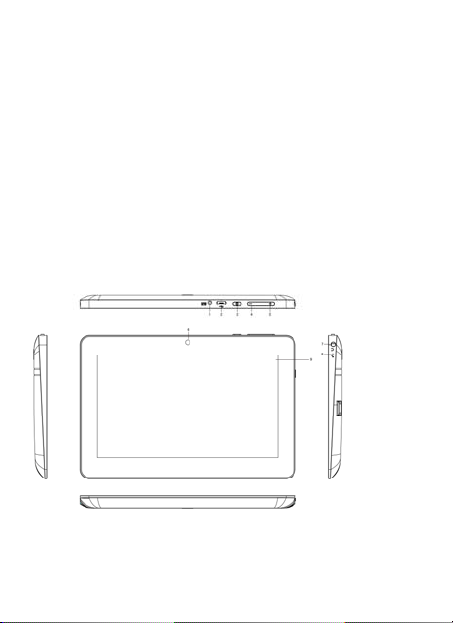
1.Appearance and button:
2
Page 3
1.1. DC Socket
When device lower battery, please connect to DC
charger 5V/1.5A.
1.2. Mini USB
Use it to connect the computer for data transmission,
charging and external connection USB flash drive
1.3. Power
Startup: Long Press and hold the power button, the
system will enter the main interface
Shutdown: In the main menu interface, Press the power
button about 5 second to shu tdown, The system can hint
"power off" option, Clike "ok". you can safely shut down.
Lock screen: Short press Power button to lock screen or
unlock screen.
Remark:
1).When power is empty, system will shut down
3
Page 4

automatically.
2).Illegal turn off the device, restart will scan and restore
the disk, it may take longer time to enter into system
1.4. Volume -
The button “-” reduce the Volume
1.5. Volume+
The button “+” increase the Volume
1.6.Camera
Camera for picture and video.
1.7.Earphone Socket
3.5 mm standard earphone socket
1.8.Microphone
Built in hi-quality microphone
1.9.Touch Panel
7” Capacitive touch panel: In The Operation, to click,
dragging on the touch panel
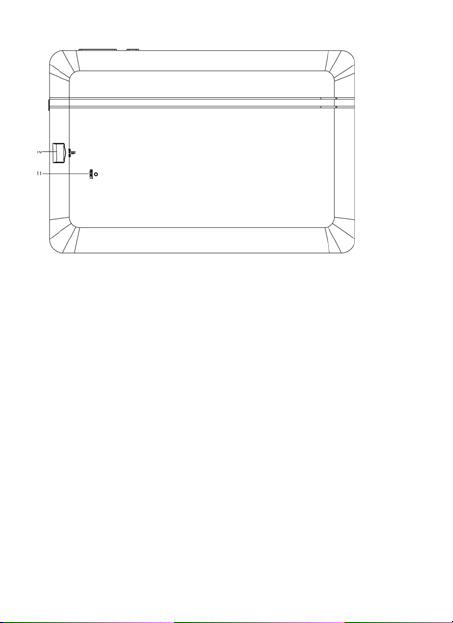
1.10.TF card
External T-FLASH card up to 32GB
1.11.Reset
When the Tablet under the condition of the crash, use
the small objects to short press RESET button, Tablet will
force to shutdown.
【Remark】: unless unable to shutdown, otherwise
don’t use the reset, suggest you to shutdown by normal, if
no will easy to damage the machine system.
2. First use
2.1 Battery management and charge
Before first use, please set the device's battery is fully
charged
4
Page 5

Just need to connect the adaptor to charge
The first two times charging please keep about 6
hours, after that you just need 4 hours to charge.
【Remark】: This tablet using Built-in type polymer
battery , Char ge m ust b e to choose st andar d adap tor (I nput:
AC100~240V 50/60Hz Max:180MA. Output: DC5V/1.5A),
this device without supply D C charging, USB interface can
charge, Choose USB interfac e to charger
During the charging, the battery icon will scroll
When finished charging, battery icon will become
green and stop rolling
In order to prolong the service life of the machine,
suggest use out battery power before charge it
【Remark】: 1. If y ou long time d on’t to use th is Tablet,
in order to avoid power consumption caused damage, pls
charge/play the battery once a month.
2、After low battery shut down, connect DC adaptor,
device will remind low battery, charging, need to wait
some time until the battery is enough power to enter into
main menu.
3. Device charging should be in standby status for
reach normal charging time.
Because with device and screen consumption, it may
cause longer charging time.
2.2 Connection with PC
Use USB cable to connect device to PC, device will
pop up the USB connection window, click Turn on USB
storage to connect to PC
5
Page 6
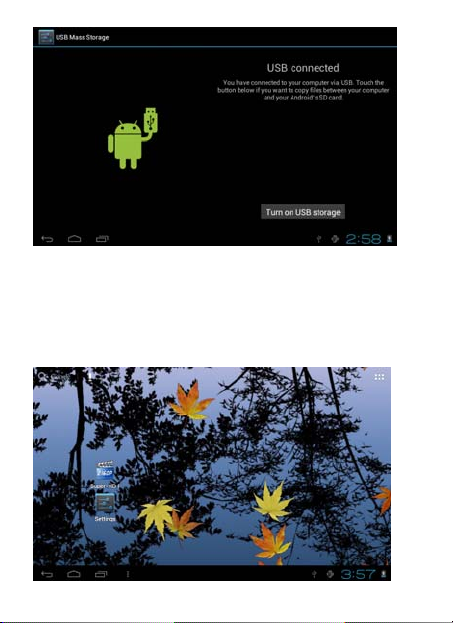
Into the load mode, you can copy, delete the file on
the device and the file on the memory card.
3. Equipment operation interface
3.1 Main interface describe
After startup will enter the main interface
6
Page 7

In the main interface, you can :
Management main interface software ICONS: long
press the icons 3 second,after the icons will bigger, then
you can drag anywhere in the interface.
Delete icons: long press the icons 3 second, drag the
icons to the Recycle Bin icon, once it become red, Loosen
your hand, after that you can delete icon
You touch the screen keep a time , appear the dialog
box “Add you Home screen” as shown below:
7
Page 8

3.2 status bar describe
The status bar above of the screen
T op left display main interface software, T-Flash card, USB
connection status and so on
Top right display the battery, battery charge icons,
current time, set time, Settings Menu, ESC button.
3.3 Use touch panel
Device equipped with a 7 “ touch screen. Following
the main touch screen area is descr ibed, and describes
some of the tips for how to use the touch screen.
No matter which interface you are on the screen, can
8
Page 9

go back to main screen through pressing the soft key
on the bottom right corner of the main screen.
【 Attention 】 The main screen soft key
functions as the machine back key
In different applications, by tapping the back soft key
on the bottom right corner on the touch screen, you
can return to its interface on the up floor.
In different applications, by tapping the menu key
on the upper right co rner of touch screen, the screen
will appear the operation setting interface as follows,
【Remark】: The main screen soft key functions
as the machine menu
9
Page 10

In the main interface, you can touch the icon to open
the APPs
In different browser(file, music, video, pictures), You
shift and drag the scroll bar, so that the file list can up or
down to roll.
4. Equipment basic set
Setting: Click setting icons , enter setting int
erface
10
Page 11

4.1 Silent mode, Volume, Notification ringtone, Audible
selection, Screen lock sounds,
11
Page 12

4.2 Application
Manage applications
12
Page 13

Unknown sources: Click “Unknown Sources”, then
click “OK”
Manage application: manager and uninstall
Application
【Remark】: when you Firmware Upgrade, pls cl ose
the USB connect
How to uninstall?
1. enter “setting”>”Application”>”Manage
application” And then there will be installed the program
list
2. Click you want to uninstall icons, will enter the following
interface
13
Page 14

3. Click Uninstall, then you can fleet the application
4.3 Privacy
Factory data reset
14
Page 15

4.4 Storage
Remove TF card, view of the available storage space
【Remark】: pls touch option ”delete SD card”, so that
can safety to remove SD card
4.5 Language & keyboard
Setting: (Language), text input and automatic error
correction options;
15
Page 16

Select Language: 54 kind of national languages are
available
Remark: Android system can support 54 kind of
language, now menu interface just support 14 language,
Android keyboard: Android keyboard setting
Sound on Key-press
Auto-capitalization
Show suggestions: Display suggested words while
typing
Auto-complete: Spacebar and punctuation
automatically insert highlighted word
4.6 Date & time setting
Set date, set time, Select time zone and select date
format
16
Page 17

4.7 USB Mode Select
Choose USB work pattern: OTG/HOST/SLAVE……..
4.8 About device
17
Page 18

5. Apps Install and manage
5.1 Appinstaller
This Tablet can support Android APP in market by
third party, most Apps can install in the network, can copy
to NAND FLASH or SD card.
Click Appinstaller icon, will appear Install, manage,
Exit options.
Install: Click install, enter Apk install interface
Separately for Internal Memory disk and SD Card disk.
Select the APK you would like to install, click it to install,
go back to main menu, will display the installed app you
just selected.
Remark: some 3rd APP must install properly by
memory card, downloaded 3rd patty app may not install
properly on device.
Manage: click manage, enter third party interface
Click install icon, will enter Action interface
6. Problem solution
Device can’t to open
1. Check the battery power
2. Connect adaptor first, then check again
3. After charging then can’t to open, pls contact with
the supplier
After startup the screen or the opening picture has been
appear , the device appear shutdown
1. Power is not enough, please charge
18
Page 19

Headset can't hear the voice
1. Pls check the volume whether set to 0
2. Check the music file whether damage d. Try playing
other music, if the file have damaged may lead to serious
noise or hop sounds.
Can copy file or paly music and so on
1. Pls check between computer and device is correct
connection
2. check the memory storage space is already full
3. check the USB cable is good or not
4. USB connection is disconnected
19
 Loading...