

Page 1
USER’S MANUAL
PLT4311-PL
Proscan is a registered trademark of TECHNICOLOR USA INC. Used under license.
1
Page 2

Contents
Safety Notices
Getting ready to use the device
z What’s inside box
z Product Appearance
z Control buttons and connections
z Technical Specifications
Quick Guide
z Power on / Power off
z Standby and Lock screen
z The desktop status bar and shortcut menu and the definition of the icons
z Orientation Sensor Setting
z Battery management and recharging
z WIFI network settings
z Mobile network settings
z To install an APK file
z To uninstall an APK file
z Camera
z Voice re cordin g
z Use the device a multi media player
zMusic playback
zVideo playback
zPhoto browsing
z ES File Explorer
z Set OSD Language
z Set Keyboard
z Set Date and time
z About the Device
z Trouble Shootings
2
Page 3

Safety notices
1 ) Keep this device away from strong magnetic field to avoid any damages
2 ) Do not rub this device with any hard objects and never clean this device with
any chemicals or detergents or acids or it could cause damages on surfaces.
3 ) Humidity or liquid may enter this device and causes permanent damages to the
hardware inside. Do not place this device in any humid environment or under the
rain.
4 ) It is recommended that volume level of the earphones should be adjusted to an
appro p riate lev el to avoid d amages to your hearin gs due to high volume.
5 ) Do not cu t off th e powe r ab ruptl y duri ng so ft wa re up da te, so ftw ar e do wnl oad,
or during this dev ice is under any kind of operation or it may caus e dat a lost and
system error.
6 ) Over-voltage, power cable strain, bending or squeezing by heavy objects must
be avoided to prevent this device from overheating or fire disaster.
7 ) To eliminate the risk of electric shock, do not connect the powe r plu g with we t
hands.
8 ) Some movies, music and pictures are under protections of copyrights, any
unauthorized usages are deemed as infringements to the laws of copyri g ht s .
9 ) The performance of the WIFI reception of this device could be inf luenced by
the wireless equipments and networks in the surrounding areas.
10 ) Any wireless equipment will influence the flight of an airplane, please consult
the airline company if you want to use this device on t h e airplane.
11 ) Do not use this device anywhere near any blastin g op erations .
12 ) Only qualified maintenance personnel is allowed to dismantle this device.
13 ) Please comply with any related restrictions and rules when using this device.
14 ) Only use this device with its original accessories and battery.
3
Page 4

15 ) Do not use any incompatible accessories on this device.
16 ) This device is not waterproof, please keep it dry all the time.
17 ) For the sake of data safety, please back up the impo rtant data anytim e on a
timely basis.
18 ) When connecting this device with other equipments, please follow instructions
on this user’s manual.
19 ) Never connect this device with any incompatible equipment.
20 ) Please co ns ul t the a fte r -sal e s se rvi ce in your area for any technical problems.
Getting ready to use the device
What’s inside box
Components Quantity
Tablet PC 1
Power Charger 1
Earphone 1
USB Cable 1
Quick Start Guide 2
User Manual 2
4
Page 5
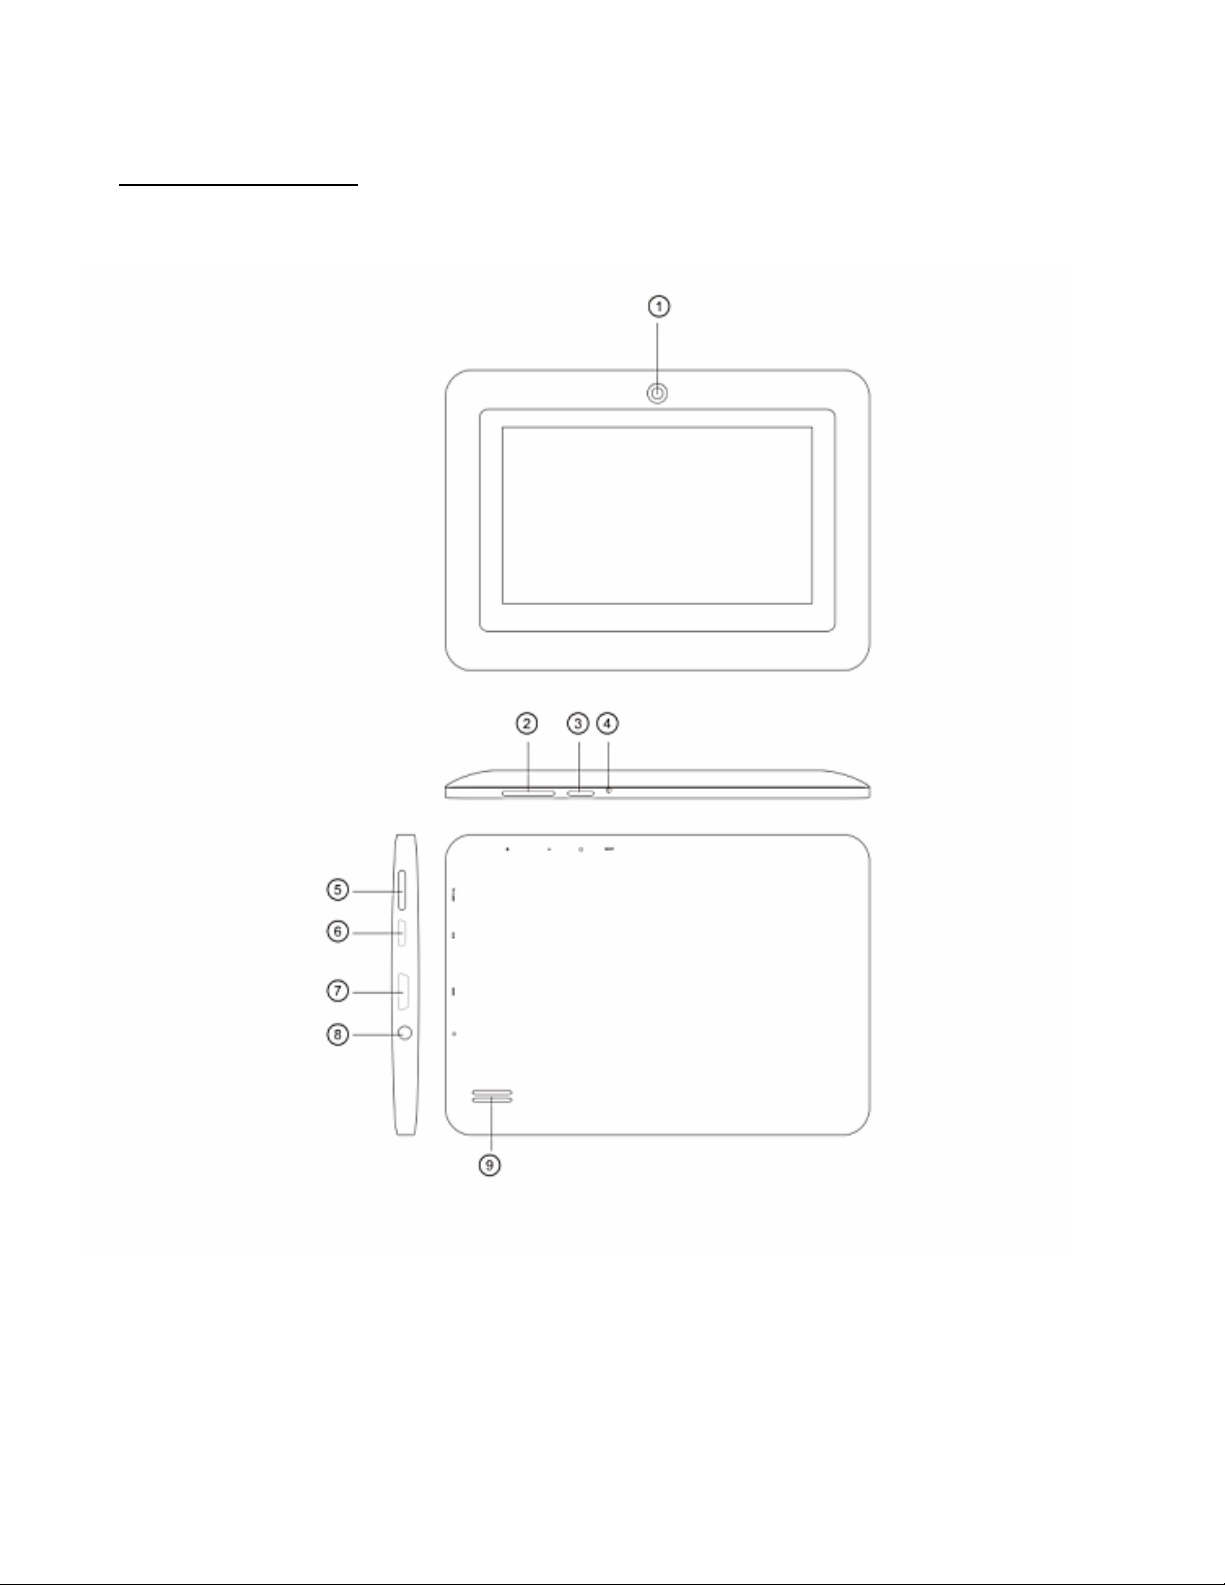
Product Appearance
5
Page 6
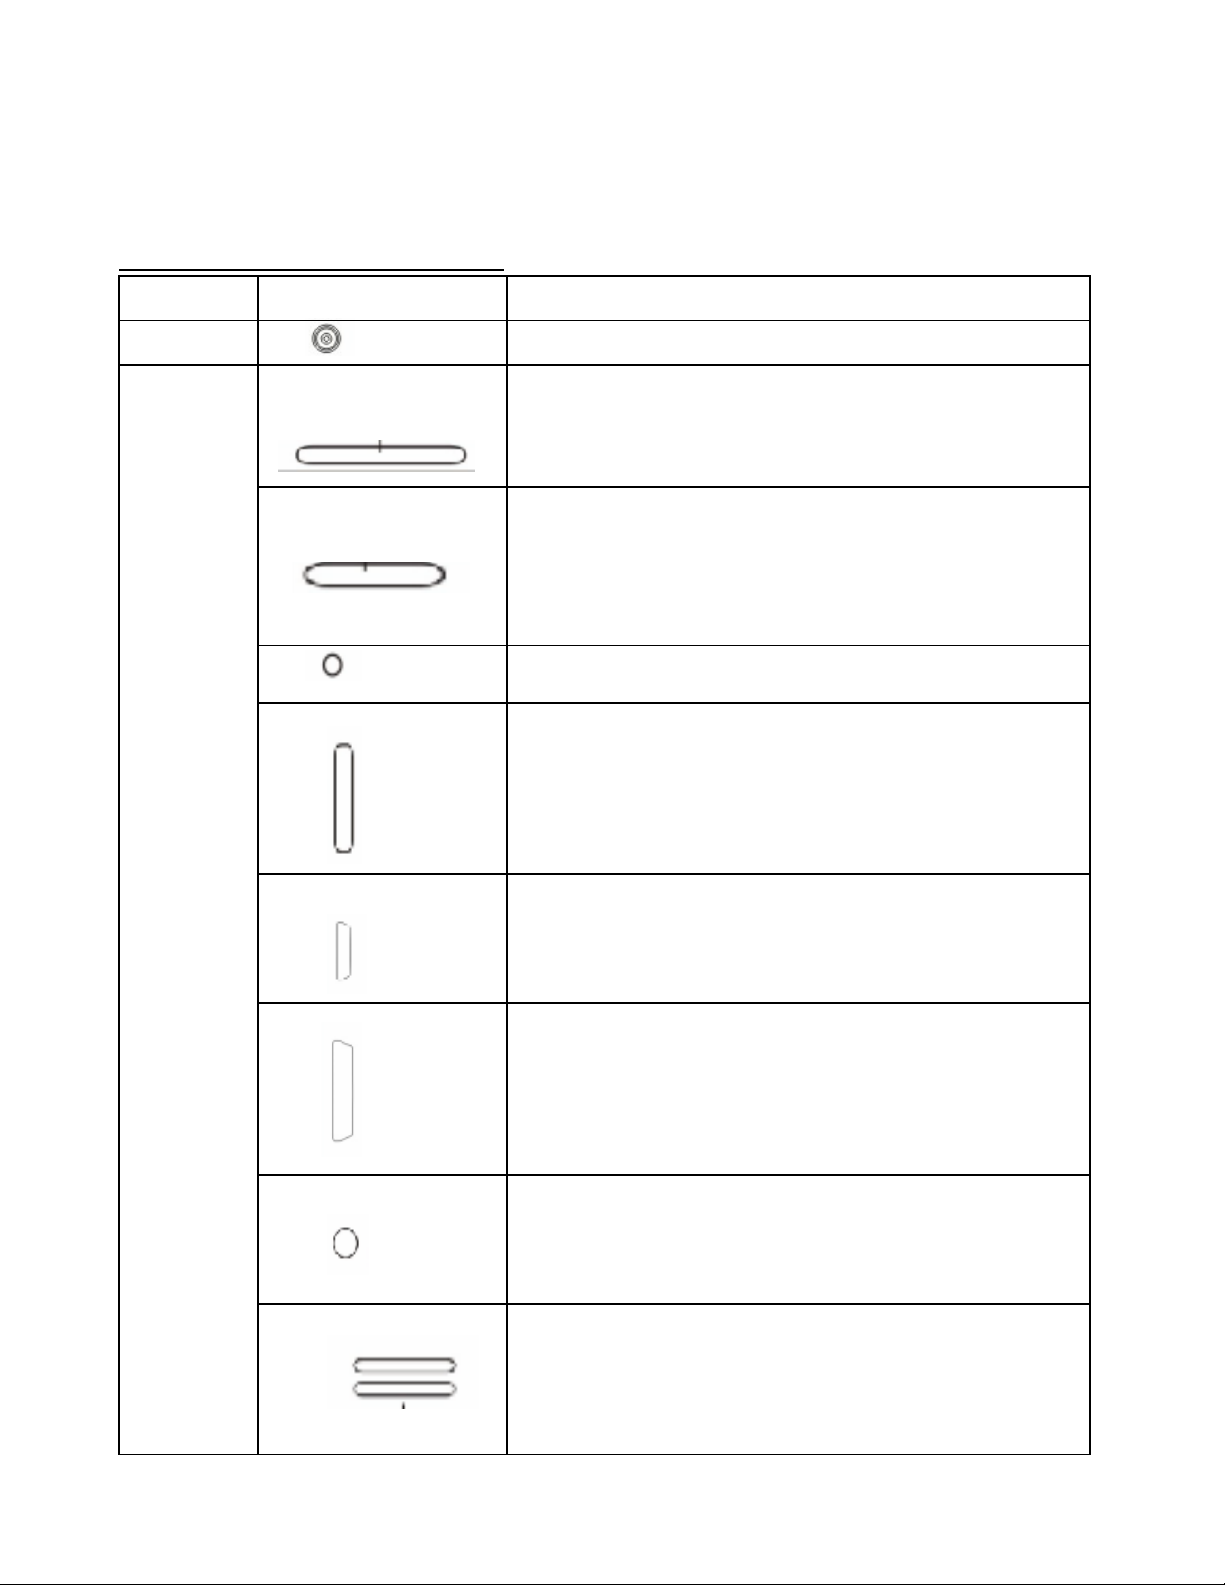
Control buttons and connections
View Button Function
Front ① Front camera
②
③
Volume + / -
Power on/off
Side
④ Reset
⑤
Micro SD Card slot
⑥
⑦
⑨ Earphone jack
⑩
USB slot
HDMI slot
Speaker
6
Page 7

Technical Specifications
LCD Display
Operation System Android 4.0
PC interface
Built-in Flash Flash Memory:4GB
Built-in RAM 512M DDRIII
Capacity Expansion Support Micro S D Card up to 32GB (not include d)
Power Supply
Size
Resolution 480*272
High speed USB2.0 HOST for external U-disk,
Mouse, etc
Built-in 3.7V Lithium rechargeable battery
Charger: Input: AC100V~240V,
Output: USB 5V/1.5A
Format
Headset max.
output
4.3” TFT capacitive multi Tap
panel LCD display
WMA、MP3、OGG、APE、FLAC、
AAC、WAV
(L)5mW+(R)5mW(32Ohm)
Music Function
Video Function
Bit rate 8Kbps ~ 320Kbps
WMA、WMV、
Bit rate
supported
Frequency
response
SN ratio 90dB
Distortion <0.05%
Play format
Max. resolution
supported
Ratio 16:9wide screen for optional
5Kbps ~ 320 Kbps
20Hz to 20KHz
MKV、AVI、RM、RMVB、MP4、
MOV、VOB、DAT、FLV、3GP , etc
2160p
7
Page 8
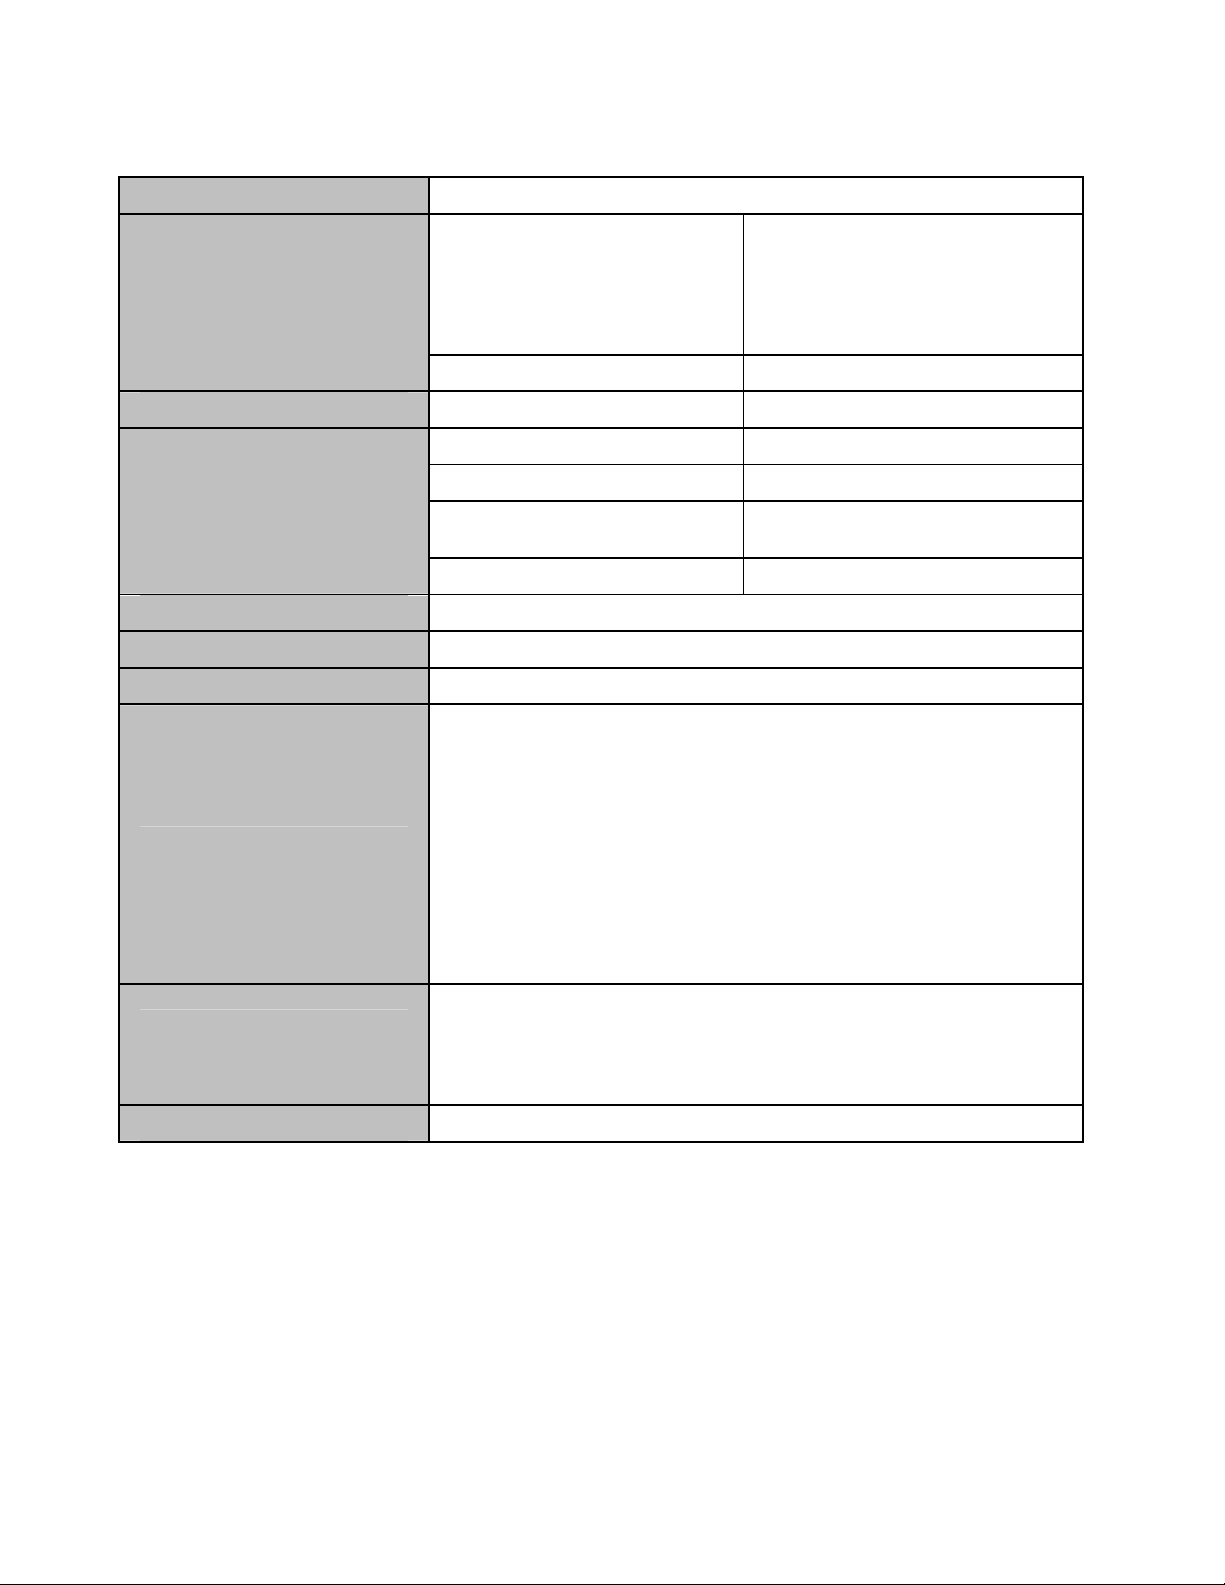
Photo browse JPG、JPEG、BMP、GIF supported
TXT、LRC、PDF、Html、
E-book Function
Format Supported
Max. capacity 20M
Recording function Format supported AMR
Spec 802.11b/g/n
Transmission r ate Max150Mbps
WI-FI Function
Transmission Distance Max100m
Work Frequency 2.4GHz
Auto Screen Rotation Selectable from Setting menu
Loudspeaker Built-in 1W@8ohm
Working temperature -10 ~ 45℃
Default language: Spanish
Other options: Catala, Cestina, Dansk, Deutsch,
English, Romanian, Espanol, Francais, Hebrew,
Hrvatski, Indonesian, Italiano, Latviesu, Leituviu,
OSD Languages
Magyar, Nederlands, Norsk Bokmal, Polski,
Htm、EPUB, etc
(Install .APK via third
party)
Portugues, Romana, Romansh, Slovencina, Suomi,
Svenska, Tagalog, Tieng Viet, Turkce, Russian,
Korean, Chinese, Japanese,
Operation systems
supported
Compatible with Windows 98 se / 2000 / XP / Vist a /
7, Mac 9.1 or above, Linux 2.4
8
Page 9
Quick Guide
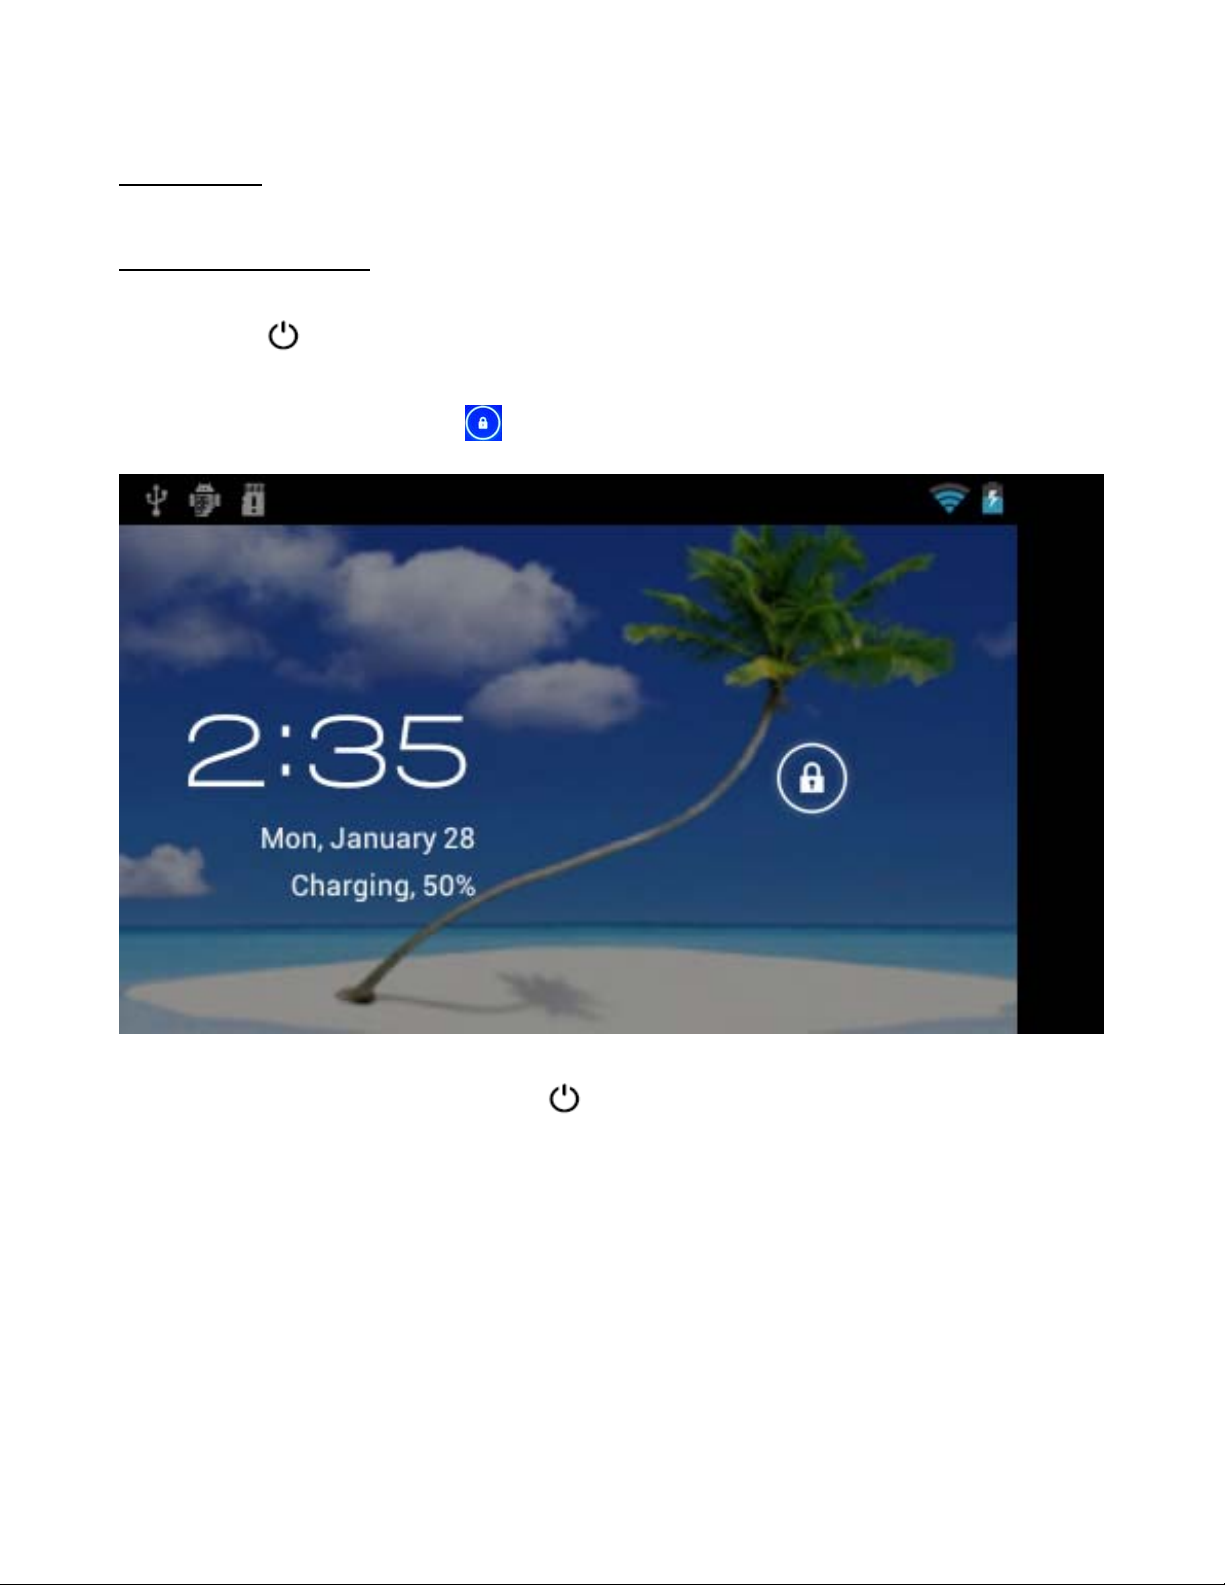
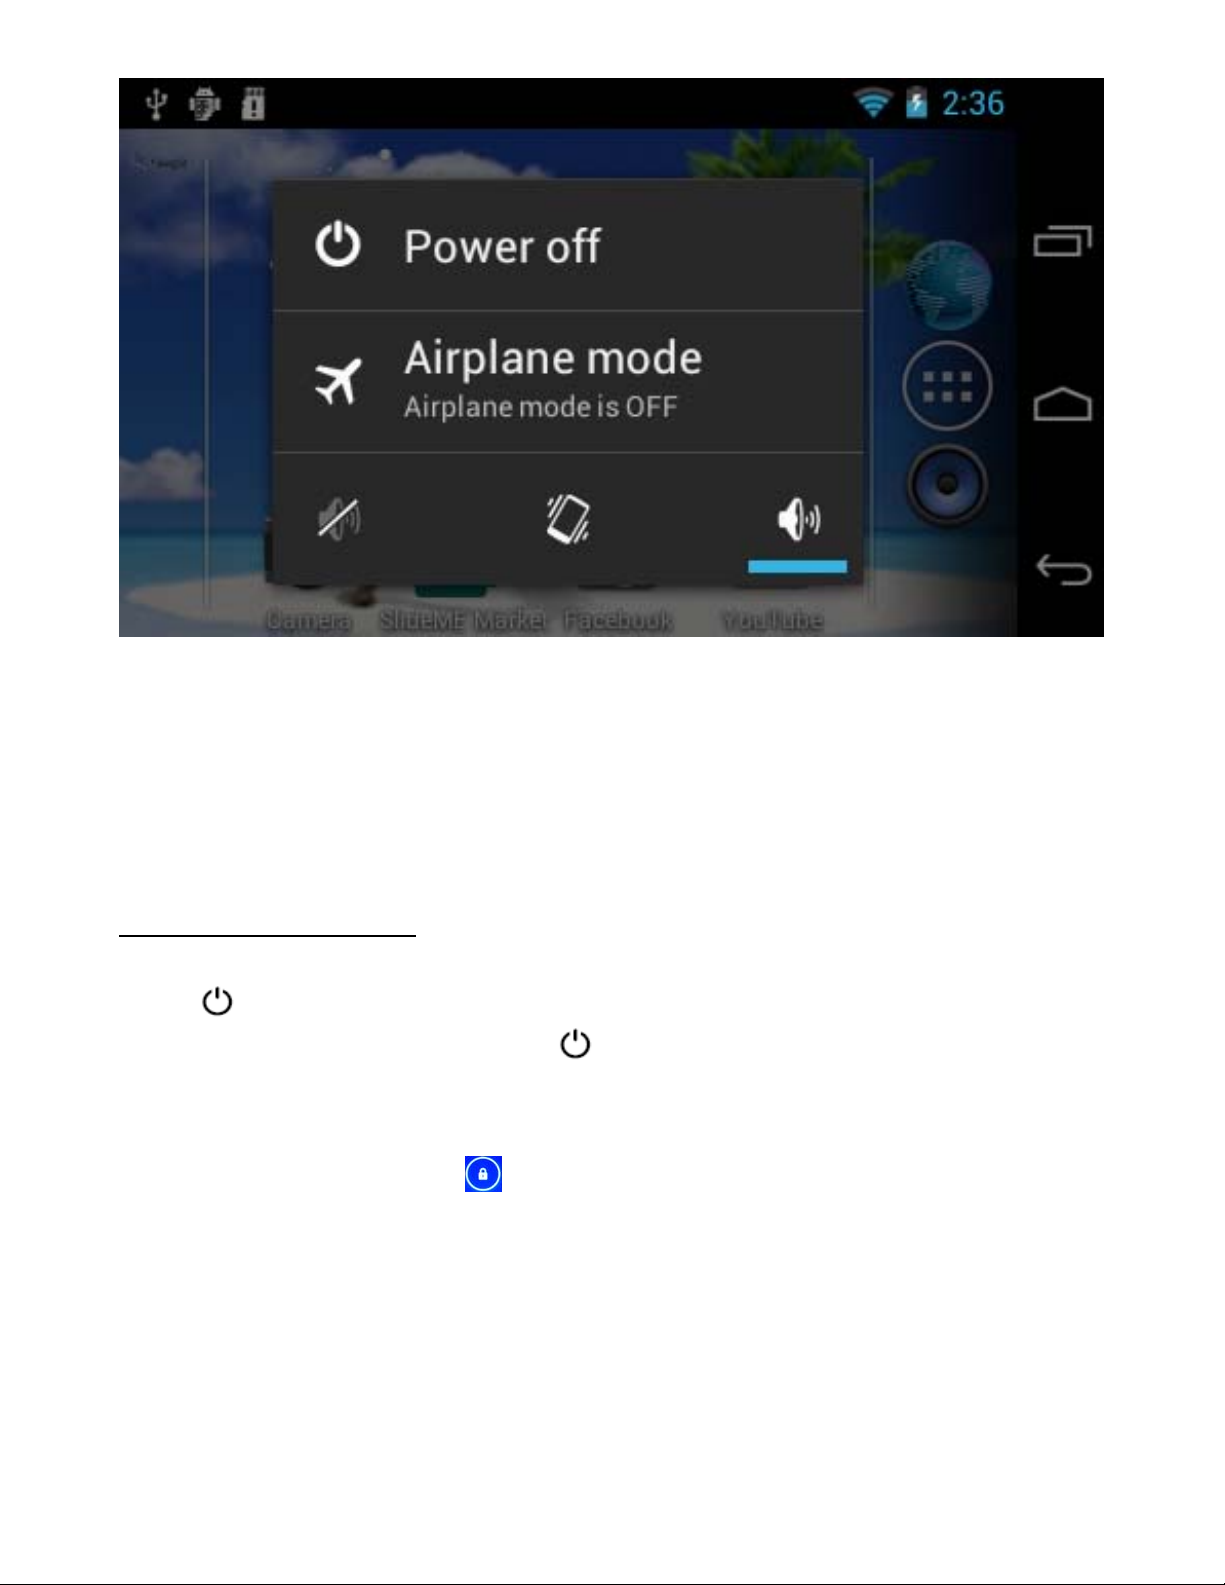
Power on / Power off
Long press
It will take about a minute and half to boot the system.
Unlock the screen by sliding to the up.
button for 3 seconds to power on the device.
T o power off the device, long press
the power off options:
Cancel or OK. Tap “OK” to power off the unit or tap “Cancel” to exit to
previous operation.
button for 3 seconds, the screen will show
9
Page 10
【Note】When the device is low battery , it will alert continuously and will shut down
automatically when battery has completely run out. The device cannot be
powered on if the battery is empty , please recharge the battery at least one minute
before restart the device.
Standby and Lock screen
Press
mode, the screen is blackout. Press
device. The d evice will t hen tu rn to L ock scr een while the prim ary op er atio n of the
device will continue.
Unlock the screen by sliding to the up to resume to status before power
saving.
【Note】The primary operation of t he device under st a ndby mode will pa use and
button shortly to turn the device to standby mode. Under standby
button shortly again to reactivate the
the primary operation of the device under Lock screen mode will continue, only
the screen is locked.
10
Page 11

The desktop status bar and shortcut menu and the definition of the icons
Icon Function
Tap it to adjust the brightness
Back – Tap it to go to the previous screen
Home page - Tap it to return to the desktop
Tap it to check the latest files that you browsed
The WIFI signal indicator appears only when the device is
connected to a WIFI network.
The USB icon appears only when the device is connected to a
USB device successfully.
11
Page 12

The current system time
Applications – Tap it go to Application menu
Orientation Sensor Setting
The Android logo appears only when the dev ice is connec ted
to a computer.
The micro SD card icon appears only when a micro SD is
inserted into the device.
The battery icon shows the remaining battery level or to
indicate battery recharging status.
The device contains a sensor that will automatically change the orientation of
screen by 90 degree as you rotate the tablet. The sensor works the best when the
tablet is rotated perpendicular to the ground (i.e., when the tablet is held upright
and not flat on its back).
The Orientation sensor can be activated or deactivated in the Setting menu:
Setting Æ Displa y Æ A uto -r ota te s cree n. Tick the box if yo u w ant to a cti v ate th e
sensor or un-tick the box to deactivate this function.
12
Page 13

Battery management and recharging
a. Recharge the battery about 3 to 5 hours to make sure the battery is fully
charged at the first time.
b. Plug in the adapter provided in the ac cessory pack to the USB slot located on
the upper right side of the device and connect the adapter to a proper power
socket. Once the power is connected, the battery recharging icon will appear
on the status bar which indicating that the device is under recharging. When
the power recharging icon will turn to blue entirely when the battery is fully
recharged and you can disconnect the power charger from the device.
【Note】In order to keep the battery in the best condition, please pay attention to
the below:
z Don’t recharge the device under high temperature.
z Don’t release the power of the battery, you can charge the batter y w h en there
is still power in the battery. It is not necessary to wait the battery to
completely run out before recharging.
z To maintain the battery with a long life span, keep recharging the battery once
every two weeks in the case if you don’t use the de vice for a long time.
13
Page 14

WIFI network settings
From desktop, Tap to enter setting menu and slide WI-FI function to ON
and tap the desired WIFI network and enter the wireless network setting page.
Enter the password and tap “Connect” or tap “Cancel” to exit to previous screen.
14
Page 15

To install an APK file
This device supports third part Applica tio n P rogram .APK files.
From desktop, Tap to enter application menu and tap to
enter APK installer tool or;
Note: Some APK. can’t be downloaded due to the CPU limitation.
From desktop, Tap to enter application menu and tap to
enter a list of file an d tap on the desire APK file to install the APK directly.
15
Page 16

To uninstall an APK file
From desktop, Tap to enter setting menu and tap “Apps” to enter a list of
installed application. Tap the desired APK file and tap “Uninstall” to confirm.
16
Page 17

Camera
This device has a built-in 0.3MPIXEL front camera for photo, video and web cam.
From desktop, Tap to enter application menu and tap to enter
camera mode.
Tap
Slide
Taking a photo:
In photo mode, tap
to enter photo mode or tap to enter video mode.
between and to zoom in and out.
to take a photo.
Tap
- Camera settings: set store location, picture size,camera shutter and
restore defaults
You can find the photo files from Application menu Æ File Manger Æ DCIM Æ
Camera
Taking a video:
In video mode, tap
Tap
- Camera settings: Set store location and restore defaults
You can find the video files from Application me n u Æ File Ma nger Æ DCIM Æ
to enter a sub-menu.
to start the video recording and tap to stop.
to enter a sub-menu.
Camera
17
Page 18

Here shows the
preview of
previous taken
photo or video.
Voice Recording
This device has a built-in microphone for voice recording and web cam.
From desktop, Tap to enter application menu and tap to
enter voice recording mode.
Tap
Tap
Tap
To save the recording, tap “DONE” and exit to Application menu or;
Tap “Discard” to erase the recording and exit to Application menu
to start recording.
to stop recording.
to review the section just recorded.
You can find the save d file from Ap p l ication men u Æ File Manger.
18
Page 19

Use the device a multi media player
Audio playback:
From desktop, tap to enter Application menu. Tap to enter
audio playback mode.
Only music files stored in the device will be shown in the file list. You can classif y
the music file list by: ARTISTS, ALBUMS, SONGS, PLAYLISTS and NOW PL AYING
by selecting the appropriate option.
19
Page 20

Tap a song to start playback. On playback interface, you can tap on the function
bar to adjust the playback time, backward/previous, forward/next, play, pause,
shuffle, repeat setting, etc.
20
Page 21

Video playback:
From desktop, tap to enter Application menu. Tap to enter
video / photo mode.
Only videos files, photo files stored in the device and videos/photos taken from the
built-in camera will be shown in the file list.
Tap on “MOVIES” to enter a list of preview videos . T ap an y vide o file to ent er the
playback screen and tap on the play icon to start playback.
You can adjust the playback time by slidin g the time bar, or adjust the volume by
tapping .
Tap for previous, play, next.
Tap to go to the previous screen.
Tap to enter the sub-menu for subtitles.
Tap to choose repeat mode.Tap to change screen brightness.
21
Page 22

Tap to enter screen ratio settings for the videos or movies.
Photo br owsing:
From desktop, tap to enter Application menu. Tap to enter
video / photo mode.
Only videos files, photo files stored in the device and videos/photos taken from the
built-in camera will be shown in the file list.
Tap on “PICTURES” to enter a thumbnail of photos.
22
Page 23

z Press on the thumbnail of a photo to access a full-sized version.
z Get a closer look at a photo by double tapping the screen. Two taps will
magnify the image. Another two taps will return to the original view.
z A tap on the screen, a thumbnail of photos will appear and you can tap on
any photo to move from one photo to another.
z Enlarge an image by touching the image with two fingers and spreading
them toward the edge s of the scr e en. Pinch the image back to original
size by bringing your index finger and thumb together.
z See an image in widescreen perspective by turning the device o n its side.
The device automat ically rotates a photo as you move the device and
spreads the edges to comply with the view screen's orientation (this
function is only valid after Auto-rotate screen is activated from Setting Æ
Display Æ Auto-rotate screen).
23
Page 24

ES File Explorer
From desktop, Tap to enter application menu and tap to
view a list of files in the device.
to enter main menu
turn to previous menu
to enter into sub-menu
to choose two or more files
24
Page 25

You can also delete, re name, copy, mov e a file by pressing on the file for 1
second or tap , a pop up menu will appears:
Set OSD Language
You can set the di splay language of the device from the li st of available language
provided in the device.
Go to desktop Æ Setting Æ Language & Input Æ Language & input
Tap on “Language” to enter a list of OSD langu age opti on s an d tap on the de sir ed
language and it will be set instantly.
25
Page 26

26
Page 27

Set Keyboard
You can select a keyboard input method from Setting.
Go to desktop Æ Setting Æ Language & Input Æ Language & input
Select from the list of Keyboard & Input methods.
Any keyboard input method APKS installed in the device can be also find from this
list of Keyboard & Input methods.
Tap on
to enter Android keyboard settings menu:
27
Page 28

From the Android keyboard settings menu, you can setup:
z Auto-capitalization
z Sound on key-press
z Show settings key
z Auto correction
z Show correction suggestions
z Advance settings for the above features
Set Date and Time
You can set system date and time from Setting.
Go to desktop Æ Setting Æ Date & time
You can setup Automatic date & time, Automatic time zone, Set date, Set time,
Select time zone, Use 24-hour format, and Select date format.
28
Page 29

29
Page 30

About the Device
You can get a quick view on th e device status such as firmware version, battery
consumption status, battery level, model no., Android OS version, Network, Signal
strength, etc from:
Setting Æ About tablet
30
Page 31

Troubleshooting
Can not turn on the device?
z You may not be able to turn on the device when the battery is below the
critical level. Recharge the battery for a few minutes and try to turn it on
again.
z Check if the powe r charger is connected properly and firmly.
The battery working time is too short?
z The duration of the lithium battery varies with environmental temperature
changes and the service conditions. If the environment temperature is too
low or too high, the duration of the battery will be affected. It is
recommended to use this device at normal temperature.
z Battery consumption varies depending on if the brightness and on time of
the screen, the volume level of the lo udspeaker as well as the operation
status of the central processor (CPU). To save battery, please refer to
Power saving mode section of this menu.
No sound from earphone?
z Check if the volume setting is adjusted to 0.
z Check whether the audio file is damaged and try to play other audio files to
confirm. In the case if the audio file is dama ged, it may cause sever e
noise or staccato.
Can not copy files?
z Check if the device is connected to the computer properly.
z Check if the USB cable is working.
z Check whether the memory capacity available is enough for storage of the
copying files.
31
Page 32

The device is dead?
z Please try to reset the device by following procedure: Long press the
Power on/off button until the player power off, then you can turn on the
player again.
Proscan is a registered trademark of TECHNICOLOR USA INC. Used under license.
Specifications are subject to change without prior notice.
No part of this document may be reproduced or transmitted in any form or by any mean
including photocopying and recording or translating to another languages for any
purposes without the prio r w r i tten consent of the manufacturer.
All brand names, logos and registered trademarks mentioned are property of their
respective owners.
All rights reserved.
32
 Loading...