

Page 1
Page 2

SAFETY INSTRUCTIONS
Electricity is used to perform many useful functions, but it can also cause personal
injuries and property damage if improperly handled. This product has b ee n
engineered and manufactured with the highest priority on safety. However,
improper use can result in electric shock and / or fire. In order to prevent potential
danger, please observe the following instructions when installing, operating and
cleaning the product. To ensure your safety and prolong the service life of your
Liquid Crystal Television, please read the following precautions carefully before
using the product.
1. Read these instructions.
2. Keep these instructions.
3. Heed all warnings.
4. Follow all instructions.
5. Do not use this apparatus near water.
6. Clean only with dry cloth.
7. Do not block any ventilation openings. Install in accordance with the
manufacturer’s instructions.
8. Do not install near any heat sources such as radiators, heat registers, stoves,
or other apparatus (including amplifiers) that produce heat.
9. Do not defeat the safety purpose of the polarized or grounding-type plug. A
polarized plug has two blades with one wider than the other. A grounding type
plug has two blades and a third grounding prong. The wide blade and the third
prong are provided for your safety. If the provided plug does not fit into your
outlet, consult an electrician for replacement of the obsolete outlet.
10. Protect the power cord from being walked on or pinched particularly at the
plugs, convenience receptacles, and the point where they exit from the
apparatus.
11. Only use attachments/accessories specified by the manufacturer.
12. Use only with the cart, stand, tripod, bracket, or table specified by the
manufacturer, or sold with the apparatus. When a cart is used, use caution
when moving the cart/apparatus combination to avoid injury from tip-over.
13. Unplug this apparatus during lightening storms or when unused for long
periods of time.
14. Refer all servicing to qualified service personnel. Servicing is required when
the apparatus has been damaged in any way, such as power-supply cord or
plug is damaged, liquid has been spilled or objects have fallen into the
apparatus, the apparatus has been exposed to rain or moisture, does not
operate normally, or has been dropped.
- 1 -
Page 3

SAFETY INSTRUCTIONS
This product is designed and manufactured to operate within defined design limits, and misuse
may result in electric shock or fire. To prevent the product from being damaged, the following
rules should be observed for the installation, use and maintenance of the product. Read the
following safety instructions before operating the display. Keep these instructions in a safe
place for future reference.
• To avoid the risk of electric shock or
component damage, switch off the power
before connecting other components to
the TV.
• Unplug the power cord before cleaning
the TV. Please use the included custom
bezel cleaning cloth for cleaning the bezel
of the TV only. Do not use a liquid or a
spray cleaner for cleaning the product. Do
not use abrasive cleaners.
• Always use th e accessories
recommended by the manufacturer to
insure compatibility.
• When moving the TV from an area of low
temperature to an area of high
temperature, condensation may form on
the housing. Do not turn on the TV
immediately after this to avoid causing fire,
electric shock or component damage.
• Do not place the TV on an unstable cart,
stand, or table. If the TV falls, it can injure
a person and cause serious damage to
the appliance. Use only a cart or stand
recommended by the manufacturer or
sold with the TV.
• Any heat source should maintain a
distance of at least 5 feet away from the
TV, i.e. radiator, heater, oven, amplifier
etc. Do not install the product too close to
anything that produces smoke or moisture.
Operating the product close to smoke or
moisture may cause fire or electric shock.
• Slots and openings in the back and
bottom of the cabinet are provided for
ventilation. To ensure reliable operation of
the TV and to protect it from overheating,
be sure these openings are not blocked or
covered. Do not place the TV in a
bookcase or cabinet unless proper
ventilation is provided.
• Never push any object into the ventilation
slots of the TV. Do not place any objects
on the top of the Product. It could short
circuit parts causing a fire or electric
shock. Never spill liquids on the TV.
• Do not use the TV in a portrait format (by
rotating 90 degrees) under high
temperature environment (25°C or higher),
since this would retard heat dissipation
and would eventually damage the TV.
• The TV should be operated only from the
type of power source indicated on the
label. If you are not sure of the type of
power supplied to your home, consult
your dealer or local power company.
• The power cable must be replaced when
using different voltage from that specified
in the User Manual. For more information,
contact your dealer.
• The TV is equipped with a three-pronged
grounded plug, a plug with a third
(grounding) pin. This plug will fit only into
a grounded power outlet as a safety
feature. If your outlet does not
accommodate the three-wire plug, have
an electrician install the correct outlet, or
use an adapter to ground the appliance
safely. Do not defeat the safety purpose
of the grounded plug.
• Do not overload power strips and
extension cords. Overloading can result in
fire or electric shock.
- 2 -
Page 4

• The wall socket should be installed near
the equipment and should be easily
accessible.
• Only the marked power source can be
used for the product. Any power source
other than the specified one may cause
fire or electric shock.
• Do not touch the power cord during
thunderstorms. To avoid electric shock,
avoid handling the power cord during
electrical storms.
• Unplug the unit during a lightning storm or
when it will not be used for a long period
of time. This will protect the TV from
damage due to power surges.
• Do not attempt to repair or service the
product yourself. Opening or removing the
back cover may expose you to high
voltages, the risk of electric shock, and
other hazards. If repair is required, please
contact your dealer and refer all servicing
to qualified service personnel.
• Keep the product away from moisture. Do
not expose this appliance to rain or
moisture. If water penetrates into the
product, unplug the power cord and
contact your dealer. Continuous use in
this case may result in fire or electric
shock.
• Do not use the product if any abnormality
occurs. If any smoke or odor becomes
apparent, unplug the power cord and
contact your dealer immediately. Do not
try to repair the product yourself.
• Avoid using dropped or damaged
appliances. If the product is dropped and
the housing is damaged, the internal
components may function abnormally.
Unplug the power cord immediately and
contact your dealer for repair. Continued
use of the product may cause fire or
electric shock.
• Do not install the product in an area with
heavy dust or high humidity. Operating
the product in environments with heavy
dust or high humidity may cause fire or
electric shock.
• Hold the power connector when removing
the power cable. Pulling the power cable
itself may damage the wires inside the
cable and cause fire or electric shocks.
When the product will not be used for an
extended period of time, unplug the power
connector.
• To avoid risk of electric shock, do not
touch the connector with wet hands.
• Insert batteries in accordance with
instructions while using the remote control.
Incorrect polarities may cause damage
and leakage of the batteries, operator
injury and contamination the remote
control.
• If any of the following occurs please
contact the dealer:
o The power connector fails or
frays.
o Liquid sprays or any object
drops into the TV.
o The Display is exposed to rain
or other moisture.
o The Display is dropped or
damaged in any way.
o The performance of the
Display changes substantially.
• Operating environment: Temperature: 5°C
~ 35°C, Humidity: 10% to 90% noncondensing, Altitude: 0~10,000 ft.
- 3 -
Page 5
IMPORTANT INFORMATION
Television Antenna Connection Protection
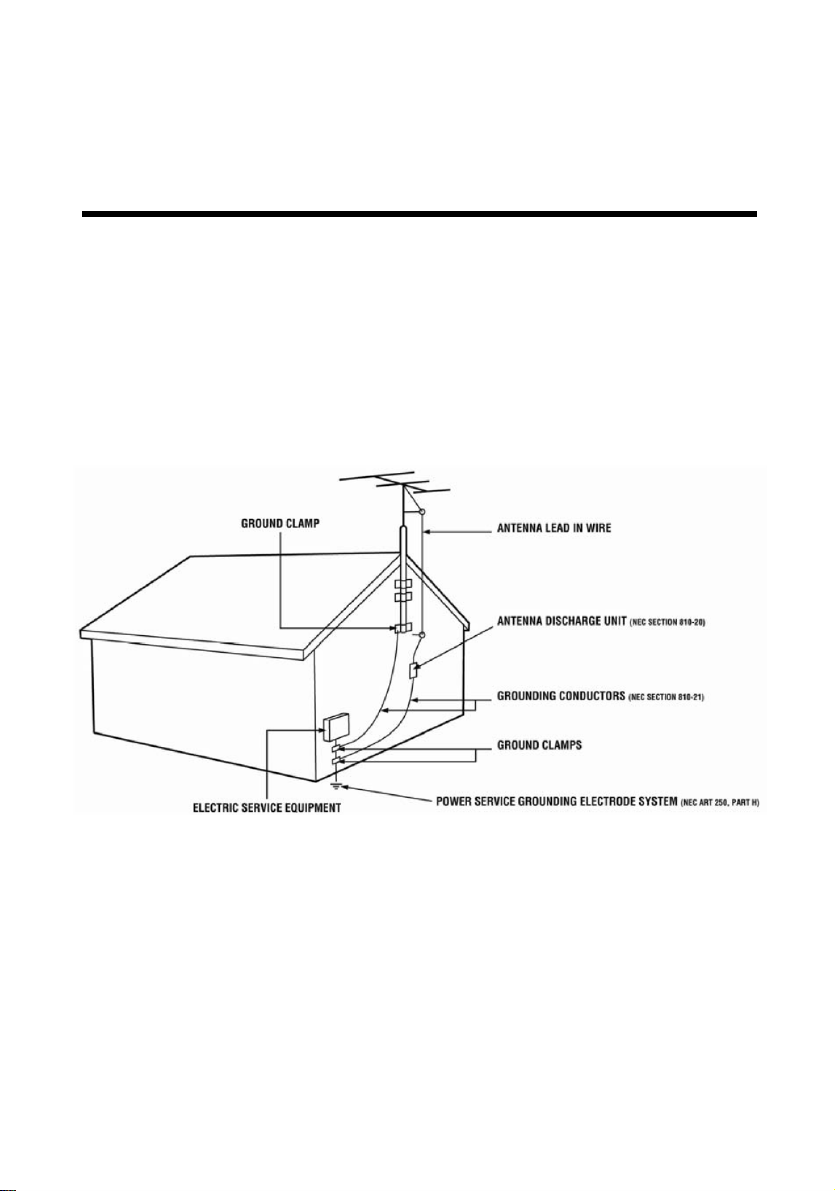
External Television Antenna Grounding
If an outside antenna or cable system is to be connected to the TV, make sure that the
antenna or cable system is electrically grounded to provide some protection against voltage
surges and static charges. Article 810 of the National Electrical Code, ANSI/NFPSA 70,
provides information with regard to proper grounding of the mast and supporting structure,
grounding of the lead-in wire to an antenna discharge unit, size of the grounding conductors,
location of antenna discharge unit, connection to grounding electrodes, and requirements of
the grounding electrode.
Lightning Protection
For added protection of the TV during a lightning storm or when it is left unattended or unused
for long periods of time, unplug the TV from the wall outlet and disconnect the antenna or
cable system.
Power Lines
Do not locate the antenna near overhead light or power circuits, or where it could fall into such
power lines or circuits.
- 4 -
Page 6
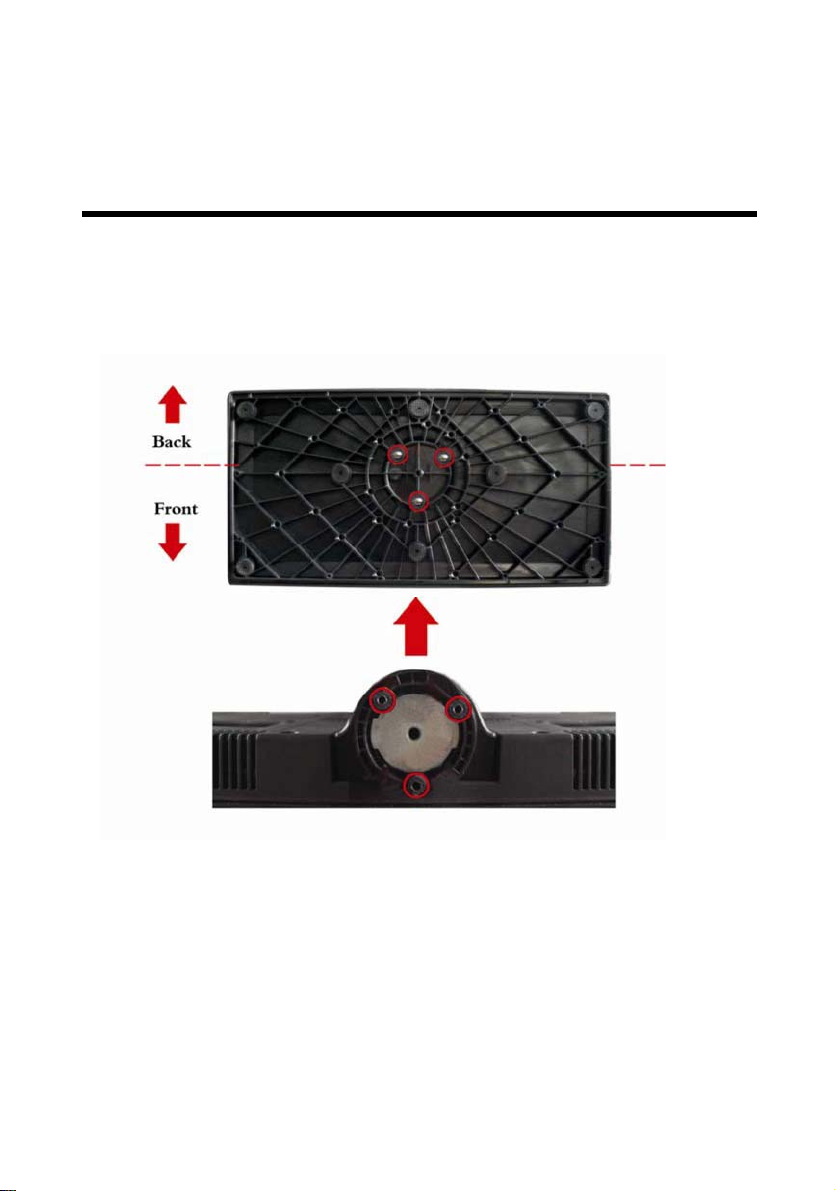
Attaching or Removing the Stand
To attach the stand, place the display unit flat on a table. Afterwards match the 3 pins on the
neck to the 3 pin holes on the stand.
- 5 -
Page 7
35
36
39
Page 8
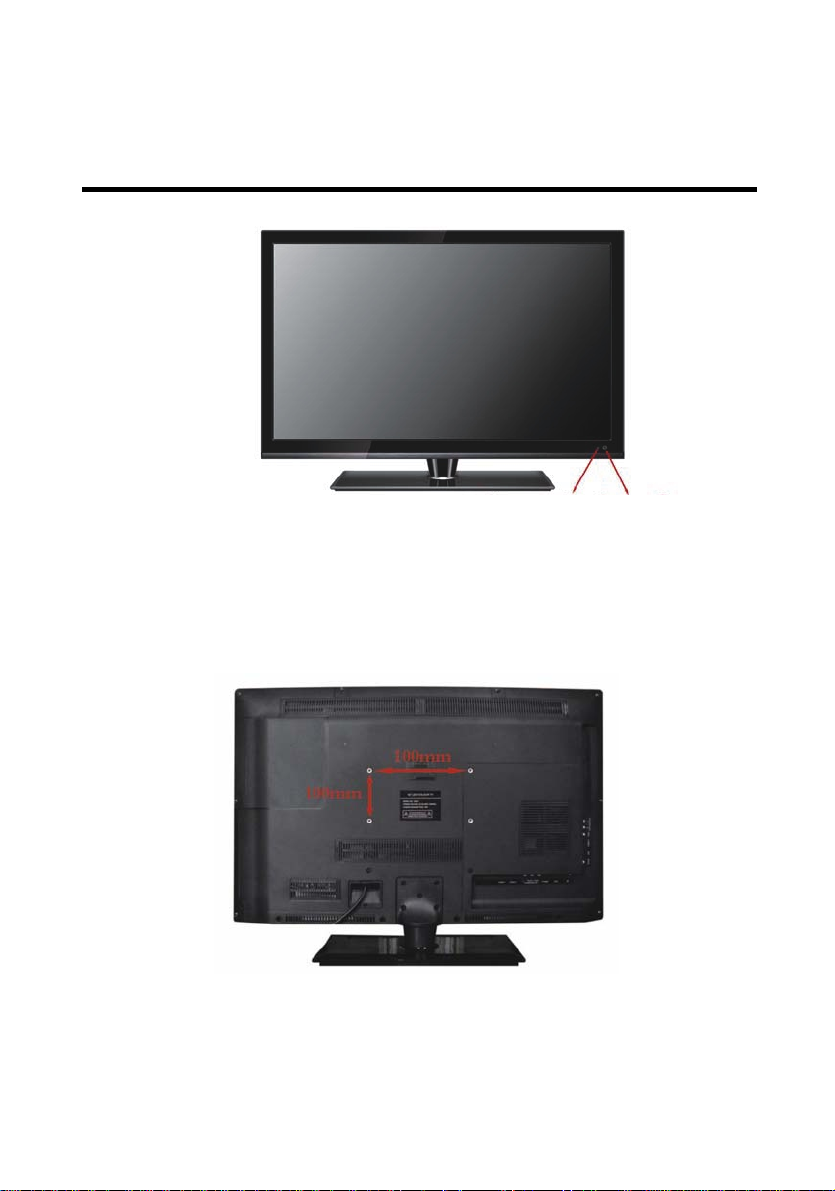
Identifying Front and Rear Panel
Front View
INDICATOR LIGHT – The light is red when power is plugged in but the TV is not turned on. The light turns
green when the TV is turned on. Bec
wer on.
po
REMOTE SENSOR – The remote sensor receives all the commands from the remote control.
ause of the LED in the panel, the TV might take 10 – 12 seconds to
Indicator light
Rear View Mounting Pattern
Mounting Specification : 100mm x 100mm using screw size M4. Length of screw should not exceed 8mm.
Please Note : The 8mm length of screw refers to how deep the screw can go inside the mounting holes.
When you’re buying screws, you should add the original 8mm to the thickness of your mounting plate in
order to get the total screw length.
Remote sensor
- 7 -
Page 9
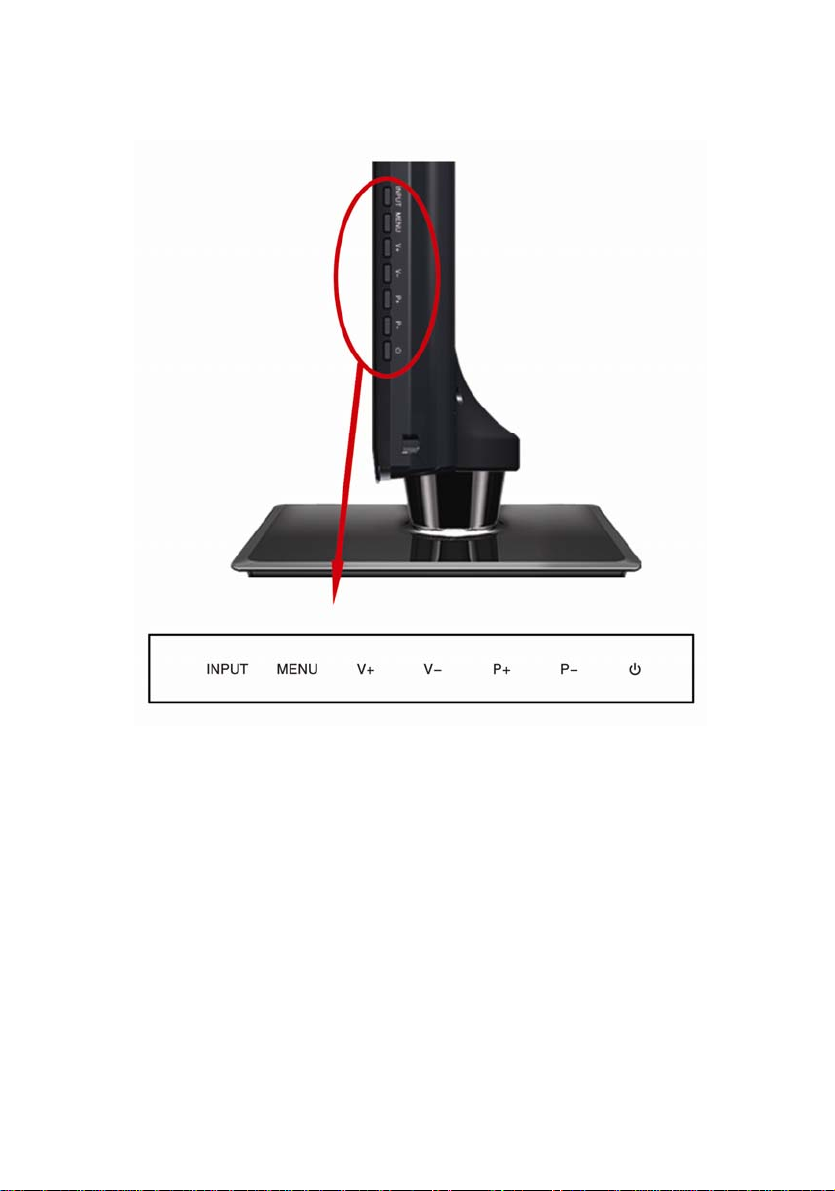
Side Control Buttons
1. INPUT – This button switches between all the different sources of the TV. When the
OSD is active, this button acts as the enter button and confirms the menu selection.
2. MENU – This button activates the On Screen Display (OSD). If a sub-menu is active,
pressing this button will exit the OSD.
3. V+ – This button increases the TV’s volume. If a sub-menu is active, pressing this button
will move the select right.
4. V- – This button decreases the TV’s volume. If a sub-menu is active, pressing this button
will move the selection left.
5. P+ – This button changes the TV channel up. If the OSD is active, this button functions
as up for the menu.
6. P- – This button changes the TV channel down. If the OSD is active, this button
functions as down for the menu.
7. POWER – Turn on the TV by pressing the button once. Press the button again to turn off
the TV.
- 8 -
Page 10
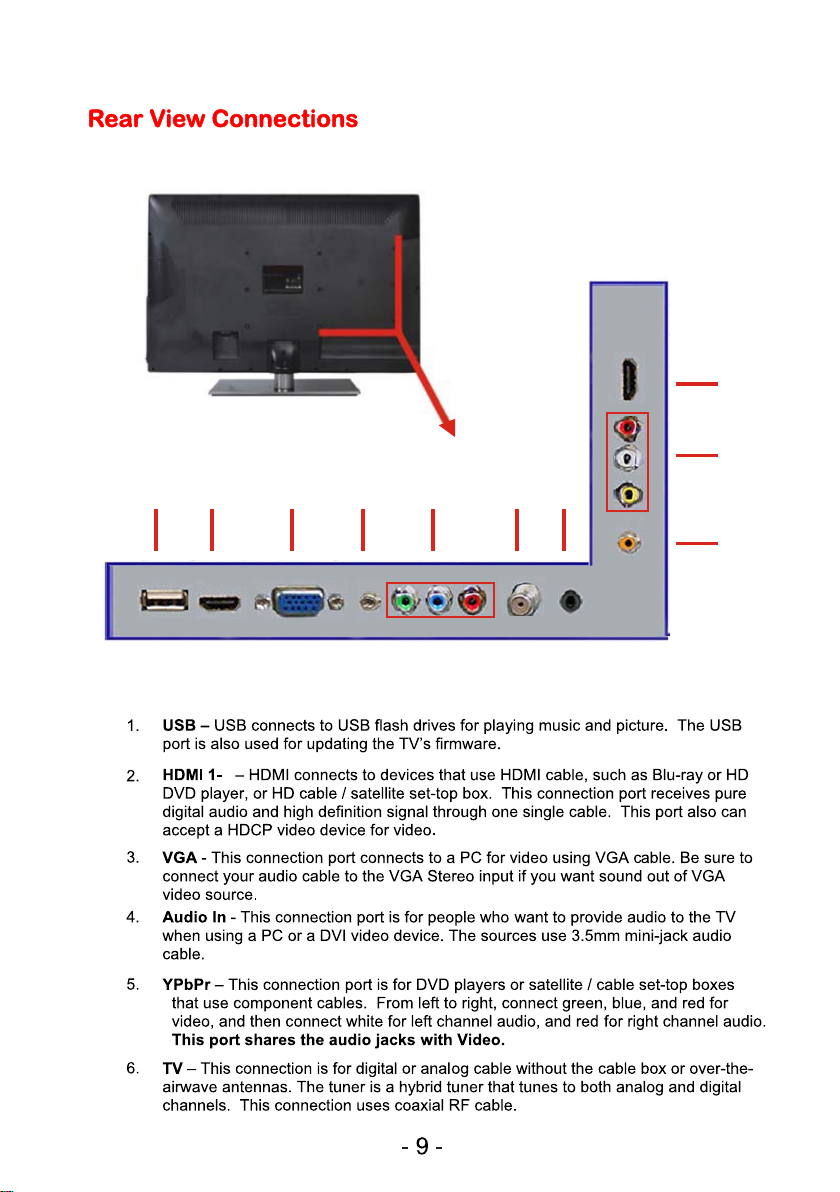
1 2 3 4 5 6 7
2
2
9
8
Page 11
--
++
++
--
Page 12
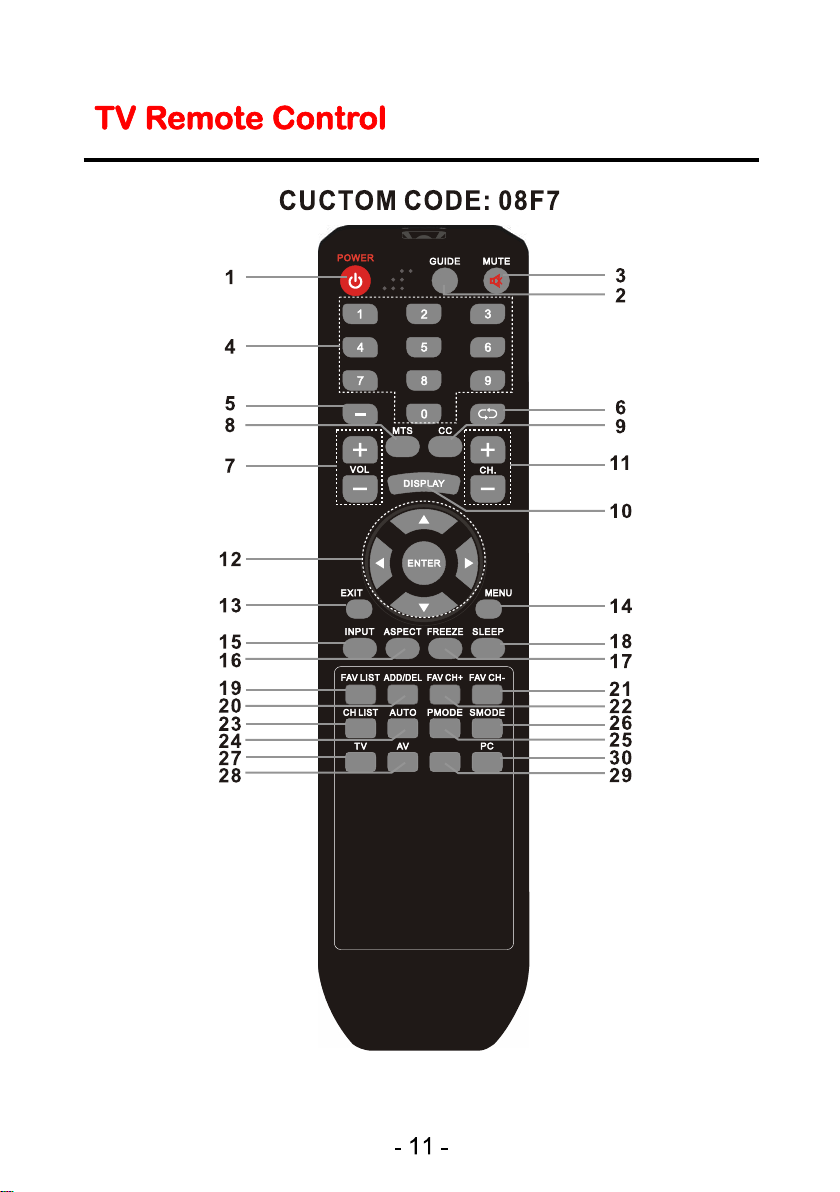
YPB PR
Page 13

For universal remotes, this TV follows NEC’s universal remote code. You
need to find the actual code from your cable or satellite or universal remote
provider.
1. POWER – Turns the TV on or off.
2. GUIDE – Opens the current digital channel information guide (antenna only).
3. MUTE – Turns the sound off from the TV. To un-mute either press VOL(+) or press the
4. NUMBER BUTTONS (0-9) – Press 0-9 to select a TV channel directly when you are
5. (-) – Inserts the dash for selecting digital channels directly.
6. R – Returns to the previous channel.
7. VOL(+)/VOL(-) – Press the VOL buttons to increase or decrease the sound level.
8. MTS – Selects stereo, mono, or second audio programming.
9. CC – Cycles between different closed captioning modes.
10. Display – Shows the display info.
11. CH(+)/ CH(-)– functions as channel up and down.
12. ▲/▼/◄/►/ENTER – These directional buttons allow you to move around in the TV’s
13. EXIT – Exit the main TV menu on the screen.
14. MENU – Brings up the main TV menu on the screen.
15. INPUT – Press this button to cycle through the INPUT source .
16. ASPECT – Press this button to change the picture’s cropping method.
17. FREEZE – Press this button to freeze current picture.
18. SLEEP – Turns the TV off in a specific set of time dependent on your selection.
19. FAV LIST – Gives you your list of favorite channels.
20. ADD/DEL – Adds or Deletes current channel from the favorite list.
21. FAV(-) – Press this button to change to the previous favorite channel.
22. FAV(+) – Press this button to change to the next favorite channel.
23. CH LIST –channel list
24. AUTO–PC Auto Adjust
25. PMODE – Selects various preset picture settings.
26. SMODE - Selects various preset sound settings.
27. TV – This button select the source TV.
28. AV – This button select the source TV.
29.YPbPr– This button select the source YPbPr.
30. PC – This button select the source PC.
MUTE button again.
watching TV. The channel will change after 2 seconds.
menu. Press the ENTER button when you want to select a particular option.
- 12 -
Page 14

13
Page 15

14
Page 16

15
Page 17
16
Page 18

17
Page 19

18
Page 20
19
Page 21

20
Page 22

Page 23
User User
User
22
Page 24

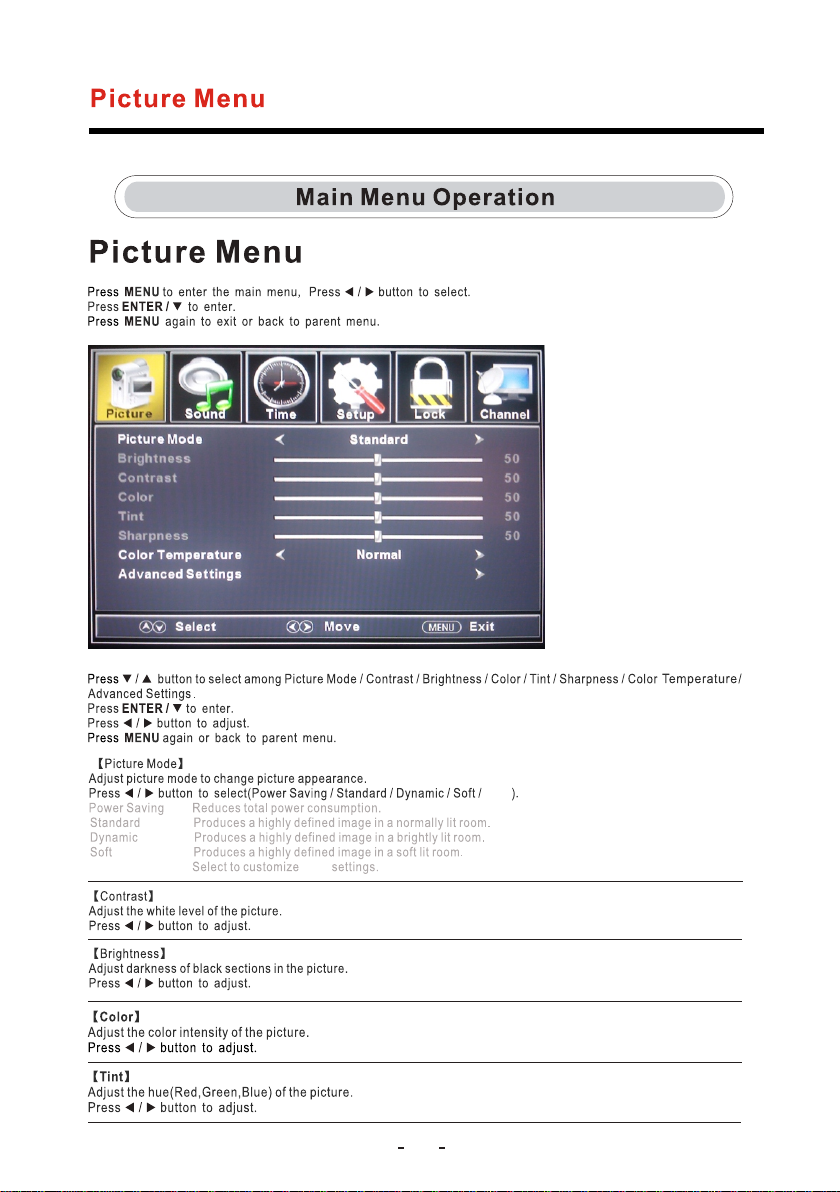
Colo r Tempe ra tu re
Aspe ct R at io
MFCL ev el
Set opti on s to M FC
Press bu tt on t o se le ct (O ff /L ow /M ed ia m/ Hi gh )
23
Page 25

User
Audio La ng uage
Selec t t he l an gu ag e sup port ed by the cho sen di gi tal chann el .I t is av ailab le Onl y in DTV .
Press bu tt on t o sel ect( En gl is h/ Fr en ch/Span is h) .
Dig ita l Audio Ou tp ut
RAW RAW
Off S el ec t off Aud io L an guage
24
Page 26

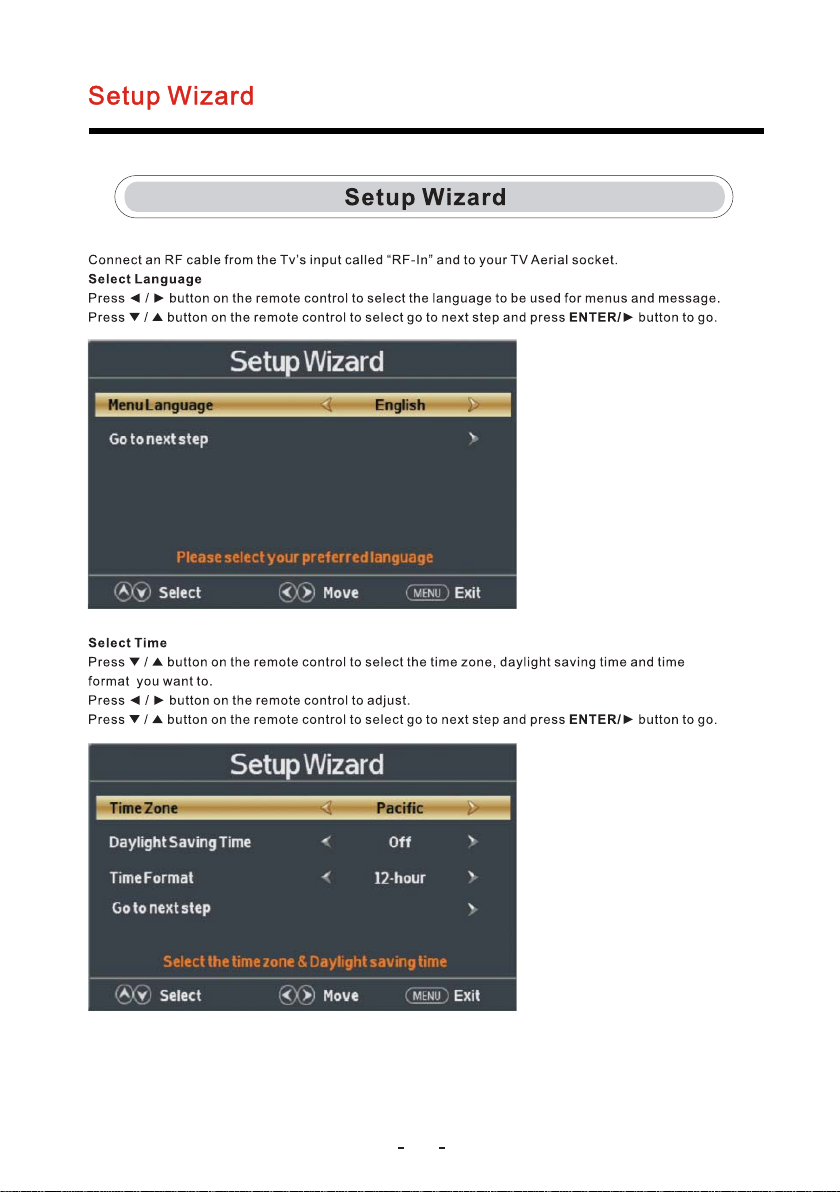
Clock Menu
//
Clock Menu
Set ye ar, m on th , day, ho ur,
minu te , da y an d night .
pres s re mo te d igita l ke y 0- 9.
10 15 30 60 90 1 20 180 240
5
25
Page 27
//
15
(5、15、30、45、60 Sec)
26
Page 28
//
27
Page 29

Page 30

Media
29
Page 31

//
30
Page 32

//
31
Page 33

32
Page 34
33
Page 35

34
Page 36

How do I clean the TV ?
IMPORTANT
Cleaning the bezel and remote control
Cleaning the Screen
1. The power cable has to be removed from the socket before cleaning the TV.
2. Do not use volatile solvent (alcohol, rosin, and toluene) to clean the TV. These
types of chemicals might damage the housing and the LCD glass.
1. Use a 100% cotton cloth or micro-fiber cloth for cleaning.
2. If the remote control or bezel is dirt y to the point where you cannot simply dry
wipe it, please lightly dampen the wiping material (the wiping material cannot
be dripping wet, because if water drips into the panel it will cause
malfunction and possible permanent damage to the panel which will not
be covered under the warranty) with clean water and wipe again. Wipe the
display with a dry micro-fiber cloth or 100% cotton cloth afterwards.
Please Note :
• Make sure you wring the water out of the cloth before cleaning
the bezel or remote in order to prevent water from penetrating
into the electronics.
1. Use a 100% cotton cloth or micro-fiber cloth for cleaning.
2. The LCD screen glass is extremely fragile. Do not scrape it with any material.
Do not press or tap the screen to avoid cracking. When the screen is dirty to
the point where you cannot simply dry wipe it, please lightly dampen the wiping
material with clean water and wipe again. Wipe the display with a dry microfiber cloth or 100% cotton cloth afterwards.
ENER GY S TARENER GY S TAR
This HDTV meets the ENERGY STAR
- 35 -
®
Page 37

Troubleshooting
The following table contains the common problems and the solutions to these
problems. Please check this list before you contact the technicians.
Problems Solutions
NO PICTURE
ABNORMAL
COLORS
PICTURE IS TOO
DARK
AUDIO ONLY NO
PICTURE
PICTURE ONLY NO
AUDIO
REMOTE CONTROL
DOES NOT WORK
CANNOT RECEIVE
SUFFICIENT
CHANNELS
THROUGH THE
ATSC/NTSC TUNER
NO COLOR
WEAK SIGNAL OR
NO PROGRAM
SYMBOL ON
SCREEN
TV’S UNIVERSAL
REMOTE CODE
Connect power cord correctly.
Turn on power.
Connect video cable correctly.
Select the input signal source with proper cable connection with
the source button.
Match the colors on the cables to the ports off the back of the
television. I.E. red cable to red colored port.
Adjust your contrast, brightness and lamp settings from the
OSD Menu. For adjust controls, refer to page 27.
Make sure you have connected both your video and audio
cables.
The TV’s tuner signal must not be lower than 65 %.
Make sure the audio cable is connected.
Readjust your volume via the remote control.
The TV’s tuner signal must not be lower than 65 %.
Turn off the TV, unplug it from the socket. Remove the
batteries out of the remote for 30 minutes. Press the remote
buttons and the power button randomly for a good 2 seconds,
and then reinstall the batteries. Try the remote to see if it
works. For battery removal instructions, refer to page 13.
The TV’s remote sensor is also housed in the same place as
the power indicator light. Please make sure there is line of sight
from the remote control’s front sensor to the remote sensor of
the TV.
The TV’s tuner signal must not be lower than 65 %. Change
the direction of your antenna and rescan your channels. If you
have cable call up your cable company and ask about signal
strength of your local cable.
Please adjust your picture setup and make sure the saturation
and the RGB are not turned all the way down. For adjustment
controls refer to page 27.
The TV’s tuner signal must not be lower than 65 %. Check your
signal.
The TV’s tuner signal must not be lower than 65 %. Change
the direction of your antenna and rescan your channels. If you
have cable call up your cable company and ask about signal
strength of your local cable.
This television follows NEC’s universal remote code. To
find the actual code you must read through your own
universal remote’s guide book.
- 36 -
Page 38

Problems Solutions
TV CHANNELS ARE
BLOCKED
UNIVERSAL REMOTE
CODE
THE TV TURNS ON
OR OFF SLOWLY
AND THE SCREEN
SHOWS UP SLOWLY
NO SOUND ON PC Make sure you have a 3.5 mm mini-jack cable connected from your
HDCP VIDEO SAYS
NO HDCP SUPPORT
HDCP VIDEO HAS NO
AUDIO
CANNOT GET
1920X1080 ON PC
VGA
PICTURE IS
DISTORTED OR HAS
ABNORMAL SOUND
PICTURE DOES NOT
COVER THE ENTIRE
SCREEN
PICTURE QUALITY IS
HORRIBLE!!
PICTURE HAS
PIXELS THAT ARE
ALWAYS DISPLAYING
THE SAME COLOR
I CANNOT CHANGE
THE TIME MANUALLY
BIG BLACK BOX IN
THE MIDDLE OF
SCREEN
Check your auto lock function’s settings inside the OSD. You may
have locked up some channels but forgot about them. Refer to page
34 for more instructions.
This TV follows NEC’s universal remote code. Please check your
hand book for NEC’s codes then apply them.
This TV is a High Definition liquid crystal display panel TV. It
requires a few more seconds than normal TVs to power up and
show the picture.
pc’s sound output to the TV’s VGA STEREO INPUT.
Reboot your HDCP video device but turning them off and
unplugging the power cord. Wait up to 8 minutes to plug the power
back in to see if it works or not.
Make sure you have a 3.5 mm mini-jack cable connected from your
HDCP video device’s sound output to the TV’s VGA STEREO
INPUT. If your HDCP video device uses RCA AUDIO jacks, you’ll
need to obtain a RCA audio converted into 3.5 mm mini-jack cable.
Make sure the TV is recognized as plug and play monitor. Try
updating your video card’s drivers as well. If that does not help,
most likely you’ll need to upgrade your video card to a newer one.
This might be from interference from large electrical appliances,
cars, motorcycles, or fluorescent lights. If the TV is close to the wall,
try moving the TV to another room in your house to see if the
problem still occurs.
If you’re using HDMI or a TV digital channel make sure you use the
ASPECT button to switch to 16:9 format. If you are using VGA, use
the AUTO ADJUST function to adjust to the screen. Please Note : If
you are using regular analog TV, AV, or component in 480i
resolution, use the ASPECT button to switch to 16:9 in order to fill
up the screen. Please Note : This note this feature will distort the
picture.
For best image quality, view HD widescreen programs where
possible. If HD content is not available view “Standard Definition”
from a digital source. Standard, analog TV will always be noticeable
inferior to HD because your TV has video that is many times better
than old TV’s and so you can see interference and deficiencies you
did not KNOW you had.
Your TV is manufactured using an extremely high level of precision
technology, however, sometimes some pixels of your TV may not
display. Pixels defects within industry specifications are inherent to
this type of product and do not constitute a defective product.
Your TV syncs time automatically according to your local TV
channel. This function only works while the TV’s tuner is connected
to an ANTENNA.
You have turned on closed captioning and are using TEXT1 –
TEXT4. Change the setting to CC1 or turn off closed captioning and
the box will disappear. Refer to page 40 for more information.
- 37 -
Page 39

Problems Solutions
SWITCHING A
CHANNEL OR
SOURCE CHANGES
THE VOLUME
THERE IS NOISE OR
TRASH PIXELS ON
THE SCREEN
TIPS FOR HIGH
DEFINITION USERS
TIPS FOR
LETTERBOX
CONTENT USERS
I CANNOT FIND THE
VOLUME AND
CHANNEL
CHANGING
BUTTONS
TV TURNS OFF
AUTOMATICALLY
AFTER 10 MINUTES
Different channels and inputs will sometimes have this effect
because the channel signal’s own volume is already loud.
There is no way remove this completely. The TV has an
AUTO VOLUME LEVEL function that can combat this type of
effect. Please make sure that function is turned on.
When your TV’s resolution is higher than the digital channel’s
broadcast resolution, the signal is up-converted to match your
TV’s resolution. Up-converting can cause this type of effect.
The TV is an ideal platform for viewing High Definition
Content. The best image quality can be achieved by HDMI,
YPbPr (Component), then VGA. However, due to variances in
broadcast practices, it is possible some image distortions can
occur.
Letterboxed (Widescreen) versions of DVD movies are most
commonly formatted for standard 4:3 TVs. The TV has the
capability of expanding this content so the entire screen is
filled at the expense of the image proportion. To use this
function press the aspect button on the remote control and
cycle among the available options.
The buttons are represented by the ▲▼◄► buttons located
on the remote control. ▲▼ changes the channels and ◄►
changes the volume.
The TV features a power saving mode which will automatically
turn off the TV, if there’s no signal provided for more than 10
minutes.
- 38 -
Page 40

Specification
Panel Specifications
Aspect Ratio Widescreen 16:9
Pixel Pitch 0.36375 (H) x 0.36375 (V) mm per one triad
Max. of Pixels (Resolution) HD (1366 x 768 pixels) ;FHD(1920x1080 pixels)
Brightness 300 nits (Typical)
Contrast 1000:1 (Typical) with Auto Contrast Enhancement
Response Time 5 ms (gray to gray)
Viewing Angle Typical 178/178Degree (Horizontal/Vertical)
Lamp Life of Backlight > 30,000hrs
Functions
(1) Video Functions
De-Interlace 3D
Frame Recover 3:2
Noise Reducing Core Technology 3D
Aspect Ratio Normal, Wide,Zoom,Cinema
Gamma Fixed Gamma
Lamp Adjust Yes
Picture Mode Power Saving,Standard,Dynamic,Soft,user
Video Adjust Brightness / Contrast / Color / Tint / Sharpness
(2) Audio Functions
Sound Mode User,Standard,Music,Movie,Sports
Tone Balance
Spdif Out Yes (coax)
Speakers 3 watt per channel
Surround Sound Yes
Sound Equalizer 5 Band
- 39 -
Page 41
(3) General Funtions
Hybrid Tv Tuner NTSC / ATSC / QAM (Digital Cable Ready)
Channel Auto Scan Yes
Sleep Timer (Minutes) Off / 5 / 10 / 15 / 30 / 60 / 90 / 120 / 180 / 240
Screen Size 24 inch
Power requirement AC100-240V~ , 50/60Hz
Power consumption
Standby Power Under 1W
Timing Support-Video 480i / 480p / 720p / 1080i / 1080p
PC Timing
(4) Tuner Functions
NTSC
ATSC
(5) Input / Output Connections
Input Ports
Output Ports
< 50W
1920x1080@60Hz(Native)
1360*768@60 Hz
1024*768@60, 70, 75Hz
800*600@60, 75Hz
640*480@60, 75Hz
Sound: Mono / Stereo / SAP
Favorite Channel
V-chip
Closed caption (CC1-CC4, Text 1-Text 4)
Favorite Channel
V-chip
Video input format: 1080i, 720p, 480p, 480i
Analog closed caption (CC1-CC4, Text 1-Text 4)
Digital closed caption (Service 1-Service 6)
1 input x TV Tuner (NTSC/ATSC)
1 input x AV (audio shared with YPbPr)
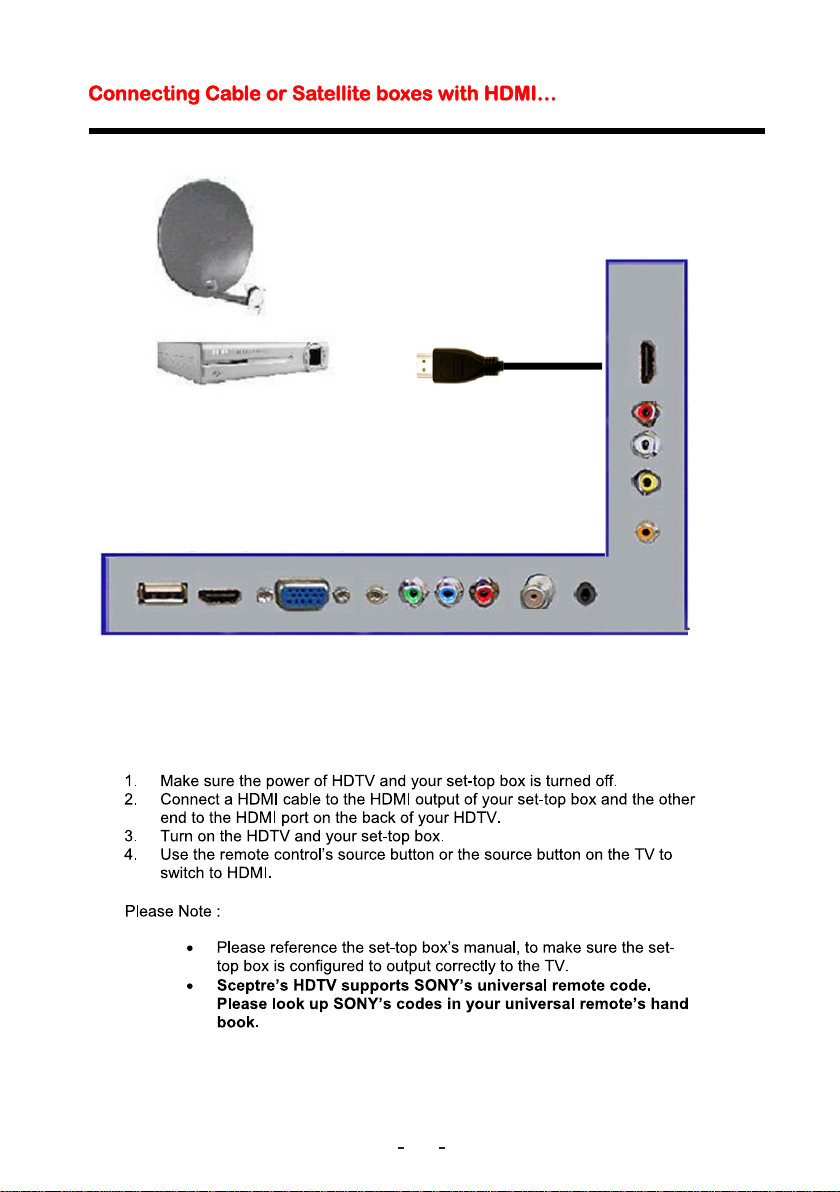
1 input x YPbPr (audio shared with AV)
puts x HDMI/HDCP (optional, HDCP audio
2 in
1 input x VGA
1 input x VGA Audio In
1 input x USB(Only for software update)
1 output x COAXIAL (digital audio) out
1 output x Audio Left/Right out
shared
with VGA Audio In)
*The product’s specifications may change without notice or obligation.
**This manual’s pictures and words are for references only and are subject to change without notice or
obligation. Inc is not liable for the misuse or misinterpretation of this manual.
- 40 -
 Loading...