

Page 1
32" LCD TV + DVD Combo
PLCDV3247A
Page 2

Contents
Safet y and war nings ..... ..... ..... ..... ................................................ ..... ..... ..... ....2 -3
Intro ducti on... ..... ..... ..... ..... ................................................ ..... ..... ..... ..... ..... ..4
Stand i nstal latio n guide ..... ..... ..................................................... ..... ..... ..... ... 5
Wall M ount
.......... ..... ..... ..... ..... ..... ..................................................... ..... ..... . 6
Installati on... ..... ..... ..... ..................................................... ..... ..... ..... ..... ..... ... 7-10
Remot e Contr ol... ..... ..... ..... ..................................................... ..... ..... ..... ..... .11
Operation. ..... ..... ..... ..... ..... ................................................ ..... ..... ..... ..... ..... .. 12-1 5
Troubl e Shoot ing.. ..... ..... ................................................ ..... ..... ..... ..... ..... ..... .16
DVD Operatio n.... ..... ..... ..... ..... ..................................................... ..... ..... ..... . 17-20
DVD Trou ble Sho oting ..... ..... ..................................................... ..... ..... ..... ..... 21
-1-
Page 3
IMPORTANT SAFETY INSTRUCTION
1) Read these instructions.
2) Keep these instructions.
3) Heed all warnings.
4) Follow all instructions.
5) Do not use this Television near water.
6) Clean only with dry cloth.
7) Do not block any ventilation openings, in sta ll in
accordance with the instructions.
8) Do not install near any heat sources such as
radiations, heat registers, stoves, or othe r Television
(including amplifiers) that produce he at.
9) Do not defeat the safety purpose of the polar ize d
plug. If the provided plug does not fit into you r
outlet, consult an electrician for re pla cem ent o f the
obsolete outlet.
10) Protected the power cord from being walk ed on
or pinched particularly at plugs, conven ien ce
receptacles, and the point where they exit f rom t he
Tele vis ion .
11) Only use attachments/accessories specified by
the manufacturer.
12) Unplug this Television during lighting storms or
when unused for long periods of time.
13) Refer all servicing to qualified servi ce pe rso nne l.
Servicing is required when the Television has been
damaged in any way, such a s; po wer-supply cord or
plug is damaged, liquid has been spilled or ob jec ts
have fallen into the Television, the Television has
been exposed to rain or moisture, does not ope rat e
normally, or h as be en dr opp ed.
14) Mains plug is used as the disconnect devic e, th e
disconnect device shall remain read ily o per abl e.
15) The ve nti lat ion s hou ld no t be im ped ed by
covering the ventilation openings with i tem s, su ch as
newspapers, table-cloth, curtains, e tc.
16) No naked flame sources, such as lighted ca ndl es,
should be placed on the Tel evi sio n.
17) Attention should be drawn to the environmental
aspects of battery disposal.
18) The us e of Television i n mod era te cl ima te.
19) The Television shal l not b e exp ose d to dr ipp ing
or splashing and that no objects filled with l iqu ids ,
such as vases, shall be placed on the Television.
CAUT ION
RISK OF ELECTRIC SHOCK
DO NOT OPEN!
TO REDUCE THE RISK OF ELECTRIC SHOCK, DO
NOT REMOVE COVER (OR BACK).NO USER
SERVICEABLE PARTS INSIDE. REFER SERVICING
TO QUALIFIED SERVICE PERSONNEL.
CAUTIO N
SA FETY AN D WARN INGS
The symbol indicates that dangerous
voltages constituting a risk of electric shock
are present within this unit.
The symbol indicates that there are
important operating and maintenance
instructions in the literaturaccompanying this
unit.
WARNING:
To red uce the risk of fire or el ect ric shock, do
not expose t his Television to rain or moi stu re.
WARNING:
The batter ies s hal l not be exposed to
excessiv e hea t suc h as sunshine, fi re or t he
like.
WARNING:
The excess ive s oun d pressure from e arp hon es
and headph one s can c ause hearing lo ss.
This symbo l indicates that this product
incorporates double insulation between
hazardous mains voltage and user accessible
parts. When servicing use only
identica l replacement parts.
This marki ng in dic ates that this pr odu ct sh ould
not be dispo sed w ith o ther househol d was tes
througho ut th e EU. To prevent poss ibl e harm to
the enviro nme nt or h uman health fro m
uncontro lle d was te disposal, re cyc le it
responsi bly t o pro mote the sustai nab le re use of
material r eso urc es. To re tur n your used device,
please use t he re tur n and collectio n sys tem s or
contact th e ret ail er where the prod uct w as
purchase d. They ca n tak e thi s product for
environm ent al sa fe recycling.
-2-
Page 4

High voltages are used in the operation of this television
receiver. Do not the cabinet.
Refer servicing to qualified service personnel.
open
SA FETY AND WAR NIN GS
Never stand on, lean on, or suddenly push the television or
its stand. You should pay special attention to children.
Serious injury may result if it falls.
To prevent fire or electrical shock hazard, do not expose
the television receiver to rain or moisture.
Do not drop or push objects into the television cabinet
slots or openings. Never spill any kind of liquid on the
television receiver.
Do not block the ventilation holes on the back cover .
Adequate ventilation is essential to prevent failure of
electrical components.
of the TV
Do not place your television on an unstable cart, stand,
shelf or table. Serious injury to an individual and damage
to the television may result if it falls.
/or
When the t ele vision recei ver i s n ot use d for a n
extend ed pe riod of time, it i s adv isa ble to disc onn ect
the AC power c ord f rom t he AC outlet .
Avoid exposing the television receiver to direct sunlight
and other sources of heat. Do not stand the television
receiver directly on other products which give off heat,
e.g. video cassette players and audio amplifiers. Do not
place naked flame sources, such as lighted candles on
the television. or near
Do not trap the power supply cord under the television
receiver s .' stand
If the television is to be built into a compartment or similar
enclosure, the minimum distances must be maintained. Heat
build-up can reduce the life of your television, and can also
be dangerous.
-3-
Dim:515*320mm(不包 括底座)
Page 5
Main features
■ Integr ate d ATSC TV tune r for HDTV br oad cast rece pti on
■ High bri ght nes s provide s a viv id an d brillia nt pi ctu re
■ High dyn ami c contrast rat io fo r dee per black s and b rig hter
whites
■ Wide Screen as pec t ratio (16:9) f or a co mplete home
theate r exp erience
■ HDMI inp ut fo r tru e digital c onn ect ion
■ VGA po rt fo r connect ion t o PC
■ Integr ate d Built-in ste reo s pea ker syste m
■ Full-f unc tion remote co ntr ol
Main parameter
INTRODUCTION
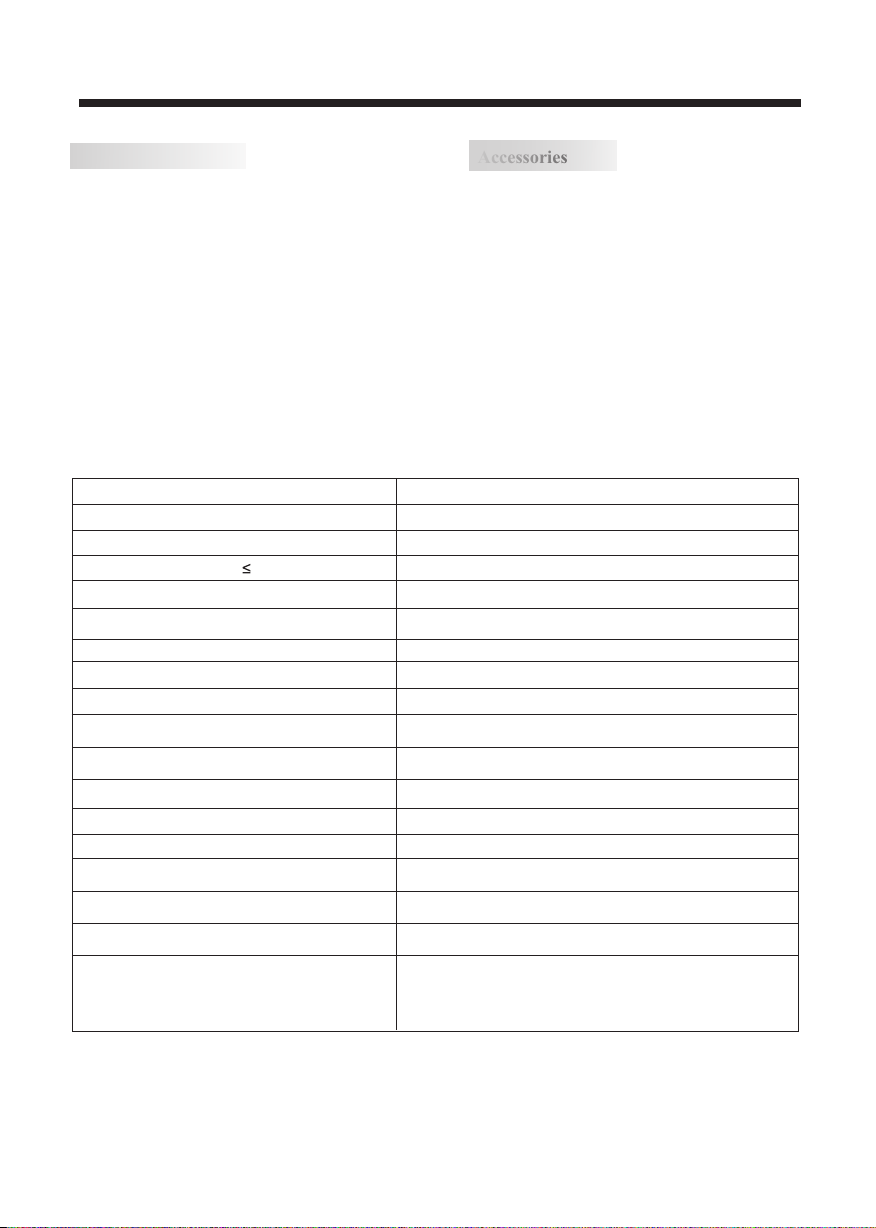
Accessories
Accessories
Power Ca ble ... ....... ... ... ....... ... ... ........
Infrar ed Re mote Control ... ... ....... ... ... .
User’s M anual ...... ... ... ....... ... ... ....... .
Batter y(A AA) ....... ... ... ....... ... ... ......... 2
1
1
1
Viewing Picture Size (diagonal)
Resolution:
Power consumption:
Audio Output Power (THD 7%):
Input Power Voltage:
Aspect Ratio:
TV System:
Video Signal System:
Receiving Channel:
High-Definition Multimedia Interface (HDMI) Input
YCb(Pb)Cr(Pr) Input
Composite Video Input
Analog RGB (VGA) Input
Audio Input x 3
Headphone Output
Coaxial Output
USB Input
Horizontal definition (TV line)
32 inches
1366x768
120W
2x8W
AC 100-240V 50/60Hz
16:9
ATSC Digital system and NTSC Analog system
NTSC
Cable :1-135/ Air: 2-69 (ATV&DTV)
x 2
x 1
x 2
x 1
x 1
x 1
x 1
Composite Video Input >=350
Video Input >=400
YCb(Pb)Cr(Pr) >=400
-4-
Page 6
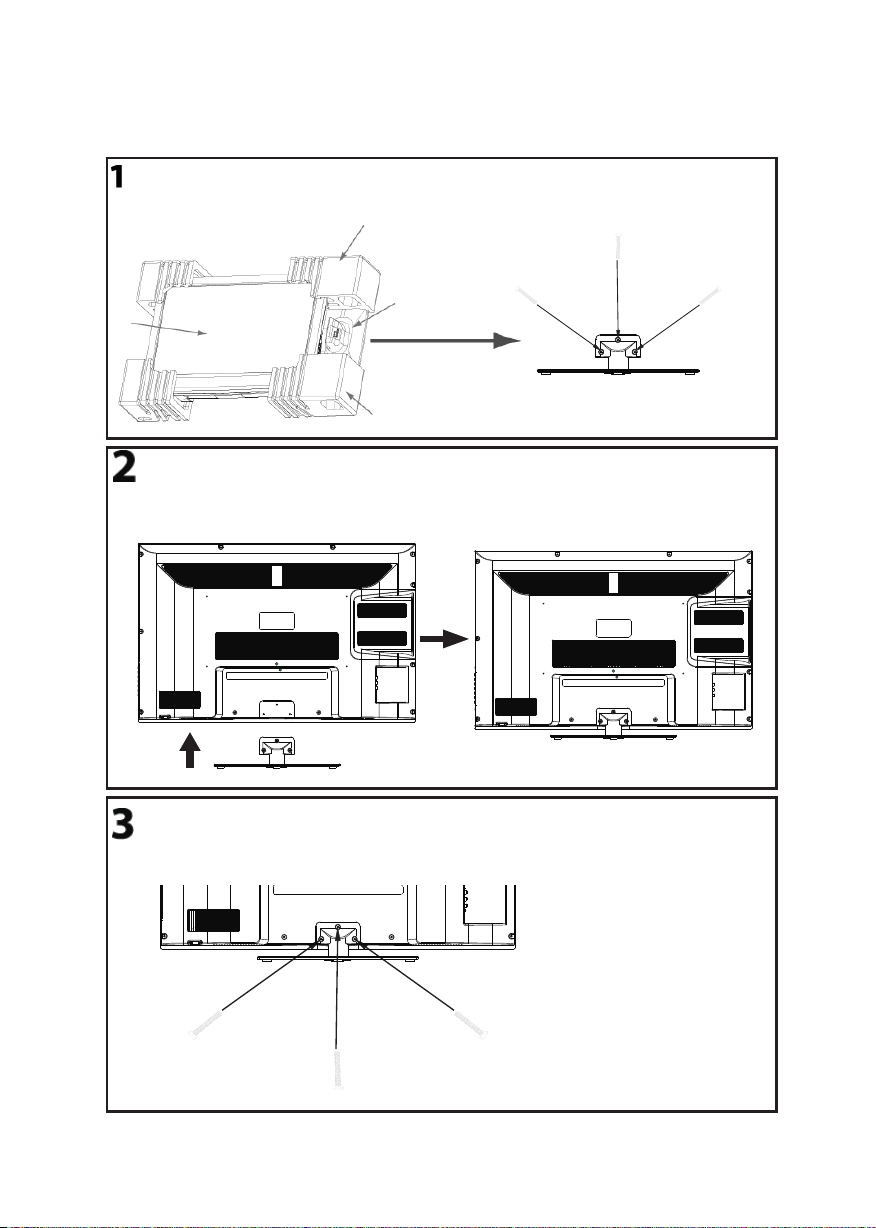
This STAND INSTALLATIO N GUI DE is p rovided to hel p you e asily instal l the s tand. Please car efu lly follow
STAN D INS TALLATION GU IDE
Step 1 thr oug h Step 3.
Open the b ox an d fin d the parts
Open the b ox an d find the follo win g par ts.
- Stand x1 p c
- Screws x 3 p cs
Packin g
TV
Place th e Sta nd on t he TV
1. Place t he TV wi th th e display s ide d own
on a table o r des k (flat, to tal ly clean su rfa ce).
Screws x 3 p cs
4x12PW M
4x32PW M 4x32PW M
Stand
Stand
Packin g
2. Place t he St and on the TV a s shown bel ow.
Stand
Secure t he Stand to the TV
Secure t he St and to the T V by usi ng th e 3 sup plied scr ews .
1
3
2
-5-
Page 7
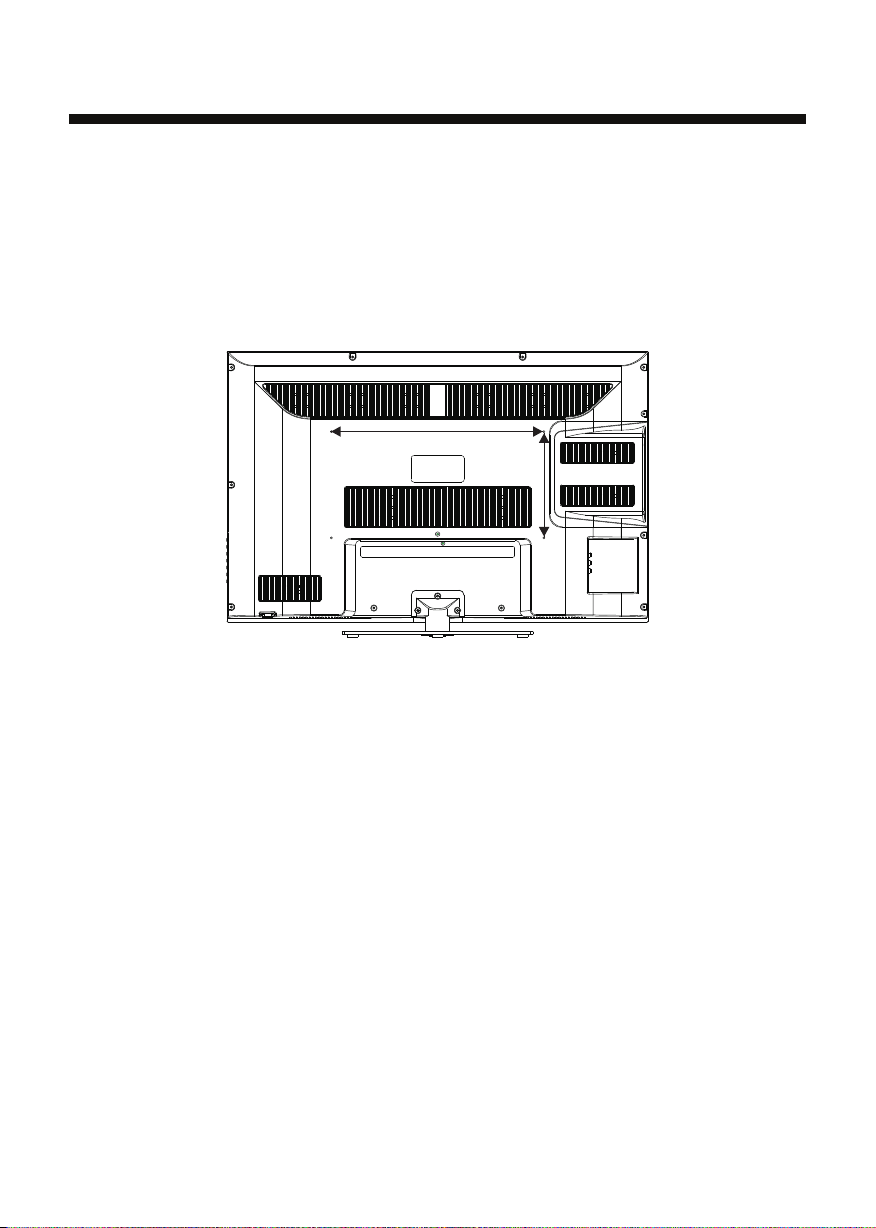
Instruction for Wall Mount
A wall mount kit (purchased separately) would allow you to mount your PROSCAN
TV on the wall. For detailed information on installing the wall mount, refer
to the instructions provided by the wall mount manufacturer. It is strongly
recommended to contact a technician for professional assistance for wall mount
installation.
Dimensions for Mounting Hole Pattern
400 mm
200 mm
WALL MOUNT
- This PROSCAN TV is compatible with a 400mm x 200mm mounting hole pattern.
- 4 pcs of type M4 screws are required for installing the wall mount bracket to
your PROSCAN TV. Do not use screws that are longer than 10 mm. Screws that
are too long may cause damage to the inside of the TV set.
- Do not fasten the screws too tight for this may damage the TV or cause the
TV to fall, resulting in personal injury. PROSCAN is not liable for these kinds of
incidents.
- Do not mount your PROSCAN TV at more than a 15 degree tilt.
- Always use two people to mount the TV to a wall.
- Do not install your Wall Mount Kit while your TV is turned on. It may result in
personal injury due to electric shock.
-6-
Page 8

INSTALLATION
Front panel
30 30
RETURNDISPLAY AUDIO SUBTITLE
MTS/
CC/
MENU
REPEAT GOTO
SETUP
CH LIST/
FAV/
ASPECT
EPG/
TV
DISPLAY
S.M
VOL CH
P.M
1: Remot e con trol sensor.
2: Indic ato r LED: BLUE POWE R ON.
RED STANDBY.
3:
Side pan el ke ys
Side panel
9
R
AV2
8
L
7
VIDEO
3
1
2
1. SOURCE: Display the inpu t source menu.
2. MENU: Display th e main MENU.
3. CH+/CH-: In TV mode, press "CH+" or "CH-" to
change the channel up and down. In MENU mode, press
"CH+" or "CH-" to select items in standby mode, press
"CH+" or "CH-" to turn on the TV.
4. VOL+/VOL-: Adjust sound level. In MENU mode,
press "VOL+ " or "VOL- " to adjust the item that you
selected.
5. STANDBY: Press this button to turn the unit ON from
STANDBY mode. Press it again to turn the set back to
STANDBY.
6. USB INPU T
7. VIDEO INPUT
8. AUDIO INPUT-L
9. AUDIO INPUT-R
6
SOU RCE
MEN U
CH+
CHVOL +
VOL -
STAND BY
USB
1
2
3
4
5
REAR AV INPUT/OUTPUT
HDMI1 INP UTHDMI2 INP UT
1011
9
AC INPUT
100-240 V~50/ 60Hz
1. Antenna Socket
2. Coaxial
3. PC Audio Input
4. Headphone Output
5. VGA Port (PC Input)
RF INP UT
1 2
COAXIAL
PC AUDIO
INPUT
3
VGA INPUT
HEADPHONE
4 5
6. Audio Input
7. Component Video (YPbPr) Input
8. Composite Video Input
9. HDMI2 Input
10. HDMI1 Input
AUDIO
INPUT
RLY
6
AV1
Y Pb Pr
INPUT
Pb
Pr
7
8
11. AC Power Socket
Note: 1. Composite video input and component video input share the audio input.
2. When HDMI1 has an input signal coming from a DVI source then the audio input signal must be
connected to the PC audio input.
3. When HDMI2 has an input signal coming from a DVI source then the audio input signal must be
connected to the YPbPr/AV audio input.
-7-
Page 9

INSTALLATION
PC
STEPS:
It is recomm end ed th at the TV and com put er are off b efore making any of th e con nections.
1. Connect a VGA and audio cab le.
2. Connect the po wer c ord.
3. Turn on the TV an d switch to VGA mod e.
4. Turn on the PC.
70
60
75
60
75
60
70
75
60
75
HDMI1 INPUTHDMI2 INPUT
31.47
31.47
37.50
37.88
46.88
48.36
56.48
60.02
63.98
80.00
AC INPUT
100-240V~ 50/60 Hz
PRESET MODE
1
2
3
4
5
6
7
8
9
10
PC AUDIO
RF INPUT
HEADPHONE
COAXIAL
INPUT
RESOLUTION
720*400
640*480
640*480
800*600
800*600
1024*768
1024*768
1024*768
1280*1024
1280*1024
VGA INPUT
RLY
AV1
Y Pb Pr
AUDIO
INPUT
INPUT
Pb
Pr
V.Freq.(Hz) H.Freq.(KHz)
-8-
Page 10

ANTENNA
INSTALLATION
Note:
Aerial c onn ections:IE C(f ema le).
Input im pen dance:75 unb ala nce d.
-9-
Page 11

INSTALLATION
AV EQUIPMENT
There are two HDMI ports located on the back of your TV. You can connect a Blu-ray player, DVD player, or other video
equipment through these ports.
There is one component (Y, Pb, Pr) and two composite (AV) video input located on the back of your TV. You can connect
a VCR, cable box, or other video equipment to these jacks.
Please see the diagram below. You may also need to refer to the owner's manual of the device that you are trying to connect.
VIDEO EQUIPMENT with YPbPr
G
R
AC INPUT
100-240 V~50/ 60Hz
B
Y
Yellow (video)
W
White(audio L)
R
Red(audio R or Pr)
B
Blue(Pb)
G
Green(Y)
W
R
G
R
B
R
W
RF INP UT
COAXIAL
PC AUDIO
INPUT
VGA INPUT
HEADPHONE
RLY
AUDIO
INPUT
W R
AV1
Y Pb Pr
INPUT
Pb
Pr
HDMI1 INP UTHDMI2 INP UT
HDMI
VIDEO EQUIPMENT
W R
TO VIDEO
output
To audio outputs
R
AV2
L
VIDEO
USB
The tele vis ion's inputs c an be c onn ected to th e fol low ing types o f equ ipm ent: VCR, D VD pl ayer, camcord er,
video ga me or s tereo system , etc ... ..
There is a c omp osite (AV) vi deo input and a US B por t located on the s ide o f the TV. You can use this AV inpu t to
conven ien tly connect de vic es th at you may fr equ ent ly connec t and d isc onnect, s uch a s a cam corder.
-10-
Page 12

1
27
28
23
19
21
22
16
17
RETURN DISPLAY AUDIO SUBTITLE
MTS/
CC/
GOTO
EPG/
MENU
FAV/
SETUP
ASPECT
REPEAT
CH LIST/
3 8
4
CH
DISPL AY
TV
5
S.M
6
VOL
P.M
7
REMOTE CONTROL
1: POWER
To set t he TV st and by or on.
9
2: NUMBE R KEY
For dire ct ac cess to progra m.
3:
29
Displa ys th e main on-scre en me nu.
30
4: CURSO R
To mov e wit hin the men u.
25
5: EXIT
Used to ex it me nu.
20
6: VO L+/ VOL-
24
To adjust sound l eve l.
P.M
7:
26
Press re pea tedly to selec t a pic tur e mode: Vivid, Standa rd,
15
Sports , Mov ie, or Custom.
8:
18
Press to d isp lay and select t he av ail able vide o sou rce s.
9: MUTE
To dis abl e or enable t he so und .
10: RECA LL
11
To acc ess t he previo usl y vie wed progr am.
11: E NTER
Confir ms se lection.
12: TV DIS PLAY
Displa ys/ removes the pr ogr am In formati on
S.M
13:
Press re pea tedly to switc h aud io mo des: Stan dar d, Ne ws,
Music, The ater, Sports or Cust om.
12
14: CH+/ CH To acc ess t he next or pr evi ous P rogram.
13
15: ASPE CT
To cha nge p icture as pec t .
16: CH LIS T /
Used to di spl ay the channel l ist / E ject or Insert t he di sc.
14
17: EPG
Displa y all t he informati on of D TV progra ms.
18: FAV
Us ed to access you r fav orite channe ls in d igital TV mode.
19: CC
Enable o r dis able the CC func tio n.
20: MTS
Switch t he so und stereo.
2
10
For a descri pti on of t he DVD player fun cti on bu ttons
on the remot e, pl eas e refer to page 20 of t his m anu al.
-11-
Page 13

2. PICTURE MENU
The first item of the MENU is PICTURE MENU.
You can adjust picture effect here, such as contrast,
brightness, etc.
Press to select and press to adjust. Press
MENU to exit.
OPERATION
4. SETUP ME NU
The third item of the MENU is SETUP MENU.
You can setup system here.
Press to select and press to adjust. Press MENU
to exit.
Pict ure Mod e
Cont rast
Brig htnes s
Colo r
Tint
Shar pness
Adva nced Vi deo
Adju st
Note:
If you want to adjust contrast, brightness, color,
or sharpness, the picture mode must return to
“Custom”status.
Home
< >
>
Menu
Sele ct
50
50
50
0
50
Exit
Advanc ed Video:
Press bu tto n to se lect Advanced Video and p res s
button . The screen wil l dis play as follow s:
Colo r Temp. Nor mal
Aspe ct Wide
Nois e Reduc tion Mi ddle
Adju st
< >
< >
< >
Menu
Sele ct
Exit
3.AUDIO menu
The second item of the MENU is AUDIO MENU.
You can adjust sound here.
Press to select and press to adjust. Press
MENU to exit.
Soun d Mode Stan dard
Bass
Treb le
Bala nce
Surr ound
AVL
Digi tal Out put PCM
Audi o Langu age Englis h
Adju st
< >
Off
< >
Off
< >
< >
< >
Menu
Sele ct
50
50
0
Exit
Pare ntal Co ntrol s
Time r
Clos ed Capt ion
Menu S ettin gs
VGA Set tings
Rest ore Def ault
Adju st
Note:
Restor e Def ault: Reset al l the s ett ings to def aul t
value.
>
>
>
>
>
>
Menu
Sele ct
Exit
4.1. Par ental Contro ls:
Press bu tto n to se lect and
press bu tto n. The scre en wi ll display as fo llo ws:
Ente r Passw ord --- -
Adju st
Input th e pas swo rd so that th e scr een s hows the
Contro l
menu. Fa cto ry default pas swo rd is 6 666.
Chan ge pass word
P.G switch
US
Cana da
RRT se tting
Rese t RRT
Adju st
Parent al Co ntrols
Menu
Sele ct
>
Off
< >
< >
< >
< >
< >
Menu
Sele ct
Exit
Exit
Parent al
Note:
The item of Audio language is available in ATSC
program.
-12-
Page 14

Change P ass wor d:
Press bu tto n and t he screen w ill d isp lay as foll ows :
Old pa sswor d
New pa sswor d
Conf irm pas sword
Adju st
Sele ct
----
----
----
Menu
Exit
1).Old p ass wor d: Input th e old p ass word
2).New p ass wor d: Input th e new p ass word
3).Con fir m pas sword: In put t he ne w passwor d aga in
P.G swi tch :
When the switch i s ON, t he fo llowing
option s can b e adjusted.
US: Pres s but ton , and the scr een w ill d isplay as
follow s:
1):TV: Press butto n and t he sc reen will d isp lay a s
follow s:
Parent al Co ntrol
TV
MPAA N/A
Adju st
>
< >
Sele ct
Menu
Exit
OPERATION
V
(Viol ence)
X
X
X
Des cript ion
Con tent
S
(Se xual
sit uatio n)
X
X
X
L
(Ad ult
lan guage )
X
X
X
Parent al
D
(Se xuall y
sug gesti ve
dia log)
Rat ing Con tent
TV-Y (Al l
chil dren)
TV-Y7( Direc t to
orde r child ren)
Sug geste d
TV-G(G enera l
age
audi ence)
TV-PG( Paren tal
Guid ance
sugg ested )
TV-14( Paren ts
stro ngly
caut ioned )
TV-MA( Matur e
audi ence on ly)
And use EN TER k ey to s witch loc k/ un loc k
Contro l
featur e.
2).MPAA:swi tch t he movie-rat ing c ontrol level ; N/A ,
G,PG, PG -13 ,R, NC-17,X .
Rat ing
G G enera l audie nces, Al l Age s admit ted
PG
PG- 13
Age
R
NC- 17
X
Canada : Pre ss bu tton and th e scr een w ill displ ay
as follo ws:
FV
(Fa ntasy
vio lence )
X
Par ental G uidan ce sugg ested . Some ma teria l may not b e
Sui table for c hildr en.
Par ents st rongl y cauti oned. S ome mat erial m ay be
Ina pprop riate f or chil dren un der 13.
Res trict . Under 1 7 requi res acc ompan ying pa rent or a dult
gua rdian (age va ries in s ome jur isdic tions )
No on e 17 and un der adm itted .
X is an o rder ra ting th at is uni fied wi th NC-1 7 but may b e
enc oded in t he data o f order m ovies .
X
X
TV rat ing
ALL FV V S L D
TV-Y
TV-Y7
TV-G
TV-PG
TV-14
TV-MA
Bloc k Press E NTER to l ock or un lock
Adju st
Sele ct
Menu
Cana da Engl ish
Cana da Fren ch
Adju st
Exit
1): Cana da En glish: Switc h the e ngl ish ratin g con tro l
level: EXE MPT,C ,C8 +,G ,PG,14+ ,18 +.
EXEM PT
< >
EXEM PT
< >
Menu
Sele ct
Exit
-13-
Page 15

OPERATION
Rat ing
E Exe mpt: In clude s news, s ports , docum ents an d other i nform ation
pro gramm ing: ta lk show s, musi c video s, and va riety p rogra mming .
C Chi ldren : Inten ded for y ounge r child ren und er the ag e of 8 year s.
Pay s caref ul atte ntion t o theme s that co uld thr eaten t heir se nse of
sec urity and wel l-bei ng.
C8+ C hildr en over 8 y ears ol d: Cont ains no p ortra yal of vi olenc e as the
pre ferre d, acce ptabl e, or onl y way to re solve c onfli ct; nor e ncour age
chi ldren t o imita te dang erous a cts whi ch they m ay see on t he scre en .
G Gen eral: C onsid ered ac cepta ble for a ll age gr oups, Ap propr iate
vie wing fo r the ent ire fam ily, cont ains ve ry litt le viol ence, p hysic al,
ver bal or em otion al.
PG Pa renta l Guida nce: In tende d for a gen eral au dienc e, but ma y not be
Age
sui table f or youn ger chi ldren ( under t he age of 8 ) becau se it cou ld
con tain co ntrov ersia l theme s or issu es.
14+ O ver 14 Years : Could c ontai n theme s where v iolen ce is one o f the
dom inant e lemen ts of the s toryl ine But i t must be i ntegr al to the
dev el opme nt of plo t or char acter. L angua ge usag e could b e profa ne
and n udity , p resen t withi n the con text of t heme.
18+ Ad ults: I ntend ed for vi ewers 1 8 years a nd olde r and mig ht cont ain
dep ictio ns of vio lence , which w hile re lated t o the dev elopm ent of
plo t, char acter o r theme s, are in tende d for adu lt view ing. Co uld
con tain gr aphic l angua ge and po rtray als of se creta ry and nu dity.
2).Can ada F ren ch: Switc h the F ren ch-rati ng co ntr ol
level: E , G,8 ANS +,13 ANS+,16AN S+, 18ANS+.
Rat ing
E Exe mpt pro gramm ing
G Gen eral :A ll ages a nd chil dren, c ontai ns mini mal dir ect vio lence ,
but m ay be int egrat ed into t he plot i n a humor ous or un reali stic
man ner .
8an s+ Gene ral but i nadvi sable f or youn g child ren :Ma y be view ed by a
wid e publi c audie nce, bu t could c ontai n scene s distu rbing t o
Age
chi ldren u nder 8 wh o canno t disti nguis h betwe en imag inary a nd
rea l situa tions . Recom mende d for vie wing wi th pare n.
13a ns+ Ove r 13 year s: Coul d conta in scen es of fre quent v iolen t scene s
and i n tense v iolen ce.
16a ns+ Ove r 16 year s: Coul d conta in freq uent vi olent s cenes a nd viol ence.
18a ns+ Ove r 18 year s: Only f or adul t viewi ng. Cou ld cont ain fre quent
vio lent sc enes an d extre me viol ence.
Des cript ion
Des cript ion
RRT se tting: Th is is a vailabl e onl y for ATSC.
Reset RRT: P res s button an d the s cre en will be
displa yed a s follows:
4.2 Timer
You can adjust timer here.
Press to select, and press to adjust. Press MENU
to exit.
Slee p timer
Time z one
DST
Cloc k
Adju st
Sleep Tim er: y ou can set the sle ep Tim er .
Note:
Tim e zone, DST, a nd Clock ar e onl y for ATSC .
Off
< >
Paci fic
< >
Off
< >
1999 /12/3 1 04:03 PM
Menu
Sele ct
Exit
4.3 Clos ed Ca pti on: Switc hin g clo se captio n mod e.
Press bu tto n to se lect Clos ed Ca pti on and pres s
button . The screen wil l dis play as follow s:
CC Mod e
Basi c Selec tion
Adva nced Se lecti on
Opti on
Adju st
Off
< >
CC1
< >
Serv ice 1
< >
>
Menu
Sele ct
Exit
1) Adv anc ed se lection: Thi s is availa ble o nly f or ATSC.
2) Optio n: This is for edi tin g the CC font.
Press bu tto n and t he screen w ill d isp lay as foll ows :
NO
Pres s“ENTER”K ey To Selec t
Adju st
Are yo u sure?
Sele ct
Mode
Font s tyle
Font s ize Defa ult
Font E dge sty le Defa ult
YES
Menu
Exit
Font E dge col or Defaul t
FG col or Defa ult
BG col or D efaul t
FG opa city Defa ult
BG opa city Defau lt
Adju st
Cust om
< >
Defa ult
< >
< >
< >
< >
< >
< >
< >
Menu
Sele ct
Exit
NOTE: This is available only for ATSC.
-14-
Page 16

4.4 Menu S ett ing s
You can adjust Menu Settings here.
Press to select. Press to adjust. Press MENU
to exit.
Tran spare ncy 25%
Menu L angua ge Engl ish
Adju st
< >
< >
Menu
Sele ct
Exit
4.5 VGA Set tings: Th is is a vai lable onl y in PC M ode .
Press bu tto n to se lect VGA Set tings and p res s
button . The screen wil l dis play as follow s:
Menu
50
50
50
50
Exit
H-po s
V-pos
Cloc k
Phas e
Auto
Adju st
1).H-P os: Adj ust the hor izo nta l positio n of th e scr een.
2).V-Pos:Ad jus t the vertical p osi tion of the scre en.
3).Clo ck: F ine tune the scr een w idt h.
4).Pha se: F ine t une the pha se of t he sc reen.
Thi s adj ustment is not r equ ired in normal c ase .
5).Aut o: Aut o adjust to fit th e scr een.
5. Channel M ENU
The fourth item of the MENU is Channel MENU.
You can adjust digital and analoge TV Channel.
Press to select and press to adjust.
>
Sele ct
OPERATION
Are yo u sure?
YES
NO
Pres s“ENTER”K ey To Selec t
Adju st
Select“yes”and press the ENTER button.
You will see the following screen that shows
progress of Auto Scan.
R F CH: 4
Foun d: 4
Anal og: 1
Digi tal: 3
Adju st
3). Favorite: Press button to choose/delete the
favorite channel .
4). Show/Hide: Press button to display or hide
the current channel.
5). Channel NO.: Display the current channel number.
6). Channel lable: Press button to edit the current
channel name.
7). DTV signal: Display DTV signal intension. It can't be
selected or adjusted.
6. Multime dia M ENU
You can play JPEG files by connecting the media to
the USB port.
Press the Input Source botton, and sellect“Storage”
from the menu. You will see the following screen.
Sele ct
Sele ct
Menu
Menu
Exit
Exit
Air/ cable
Auto S can
Favo rite
Show /Hide
Chan nel NO.
Chan nel Lab le.
DTV si gnal: G ood
Adju st
1). Air/Cable: Select Air TV signal or cable TV signal.
2). Auto Scan: If you selected Air on Air/Cable selection,
scanning all TV channels is required prior to starting
watching the TV programs. Press the button, and you
will see the following menu.
Air
< >
>
>
>
2-1
< >
>
Menu
Sele ct
Exit
USB
Pho to
..
C:
011.j pg
200 81222 21788 78787 .jpg
200 81.jp g
200 87.jp g
202 87.jp g
207 87.jp g
200 87.jp g
207 87.jp g
200 87.jp g
Total s ize:3 .7 GB 1024 x 7 68 372. 72KB
Unu sed siz e: 3.7 GB 20 06:07 :14 15: 37:42
Use to select the jpg files or folders, and use“OK”
key to play. Use EXIT key to stop playing or go to
upper menu.
:17 0 01/01 8
C:\ photo \
011.j pg
-15-
Page 17

TR OUBLE S HOO TI NG
Tro uble phenomenon Symptom
Pictu re Audio
Snow Noise
Ghost
Interference
Normal Picture
No picture Mute
No color Normal audio Color co ntr ol
Normal audio
Noise
Mute
Inspection C heck
antenn a pos ition, direc tio n
or conne cti on
antenn a pos ition, direc tio n
or conne cti on
electr oni c equipment, car /
motorc ycl e,fluoresc ent l igh t
Vol ume (check if mu te is
activa ted o r if the audio sys tem
connec tio ns are not corre ct)
Power co rd is n ot in serted
Power sw itc h is no t opened
Contra st an d brightness /vo lum e
setup
Press st and by ke y on the remo te
contro l for i nsp ecting
Picture
breaking up
No color
Normal audio
or weak
Noise
Retune c han nel
TVs yst em
The LCD TV panel is built with very high precision technology giving you fine picture details
in vibrant color. Occasionally, a few non-active pixels may appear on the screen as a fixed
point of red, green, blue, black or white. Please note this does not affect the performance of
the product.
-16-
Page 18

DVD SIDE PANEL
PLAY/ PAU SE
OPE N/CLO SE
Caution
This DVD Player has a Class 1 laser which may
be harmful to your eyes. Do not attempt to
disassemble the cabinet or make any adjustments.
Refer all servicing to a qualified professional.
DVD OPERATION
-17-
Page 19

MENU OPE RATION
Press th e SET UP but ton o n the remot e con tro l, the
SETUP MENU wil l be di spl ayed. Afte r acc essing the
setup me nu, p res s the direc tio n but tons for up a nd
down mov eme nt to select an it em de sir ed, and pre ss
RIGHT di rection butt on to s elect the SUBM ENU
item. Th en press the ENT ER/ OK button to con fir m.
Press LE FT direction b utt on return to the m enu o f
upper le vel . To exit t he setup, pres s the S ETU P butt on
again. I n the S ETUP MENU , you may cho ose a ny of
the foll owi ng options as yo u lik e.
LANGUA GE SE TUP
Select L ang uage in the setu p men u, an d display t he
Langua ge su bmenu:
DVD OPERATION
SYSTEM S ETU P
Aspect R ati o
Select t he as pect ratio.
No tes:
The imag e dis play ratio is re lat ed to t he record ed di sc
format . Som e disc can not dis pla y ima ges in the
aspect r ati o you choose. If y ou pl ay a di sc record ed in
4:3 form at on a w ide screen TV, blac k bar s wil l
appear o n the l eft and right si de of t he sc reen. You
must adj ust t he screen sett ing d epe nding on th e typ e
of the tel evi sion you have.
TV Sy ste m
Select t he di ffer ent T V syst em.
Note: Th e DVD player set tin g should be matc hed t o
your TV set.
refer to t he in structions o r you r TV set .
RATI NG SETUP
Select Rat ing i n the s etup menu, and di spl ay
the Rating s ubm enu :
For more i nfo rmation of out put f orm at,
OSD Lang uag e
Use this i tem t o select the langua ge fo r the
setup me nu an d screen displ ay.
Subtit le
This opt ion p rov ides the pr ese t sub title lan gua ge.
MPEG4 Su bti tle (option al)
Select d ifferent MPE G4 su btitle encod ing o ption.
Note: No t all p layers suppo rt th is it em.
Audio
Select t he bu ilt-in disc du bbi ng la nguage op tio ns.
DVD Menu
This opt ion p rov ides the fi lm' s men u languag e
option s.
VIDEO SE TUP
Select Video i n the s etu p menu, and d isp lay t he
Vid eo submen u:
desire d
Parent al Contro l
Set the pa ren tal control fe atu re of t he player
No te: Pa ssw ord i s needed be for e set ting Pare nta l
Contro l.
Set Pass wor d
Input fo ur di gits (passwo rd) , the n press ENT ER
/Okto co nfi rm.
No te: If y ou fo rget your p ass word, please u se th e
univer sal p ass word 6666 t o unl ock .
MISC SETUP
Select MIS C in th e set up menu, and disp lay
the submen u:
Use Defaul t Set tings
Reset setu p dat a to fa ctory default v alu e.
-18-
Page 20

DVD OPERATION
MP3/WM A/J PEG P LAYBACK
The MP3/ WMA di sc has such a dire cto ry structure a s
shown pi ctu re ab ove.
Press Di rection key to c hoo se the root dire cto ry and
then pre ss EN TER /OK butto n to en ter i nto the sub
direct ory. Press Dire ction key t o cho ose t he desired
track an d the n press ENTER/ OK or P LAY to enj oy
the musi c or mo vie. If you want t o ret urn t o the upper
menu, pr ess D irectio n key t o choose the ico n
and pres s ENT ER/ OK button .
Filter : Allo ws selecting t he ca tegories of fi les
displa yed i n the browser li st.
Repeat : To swit ch di ffer ent r epe at playing mod e
Mode: Se lec t differe nt pl aying mode as fo llo ws:
Normal : Shu ffle mode i s can celled.
Shuffl e: Shuffl e mod e enabled . When playbac k
reache s the e nd of the curren tch apt er/trac k, pl ayb ack
jumps to a r and om chapter/t rac k. As the end of each
chapte r/t rack is reache d, an oth er random
chapte r/t rack will be pla yed u nti l all track s/c hap ters
have bee n pla yed or the Shuff le mode is cance lle d by
toggli ng to a d ifferen t Mod e Option.
Edit Mod e: To ena ble p rogrammed pl ayb ack m ode.
When you s ele ct the mode, pre ss LE FT Di rection
key to dir ect ory and press EN TER /OK t o choose th e
desire d tra ck and press Add t o program and pr ess
Pro gra m view and press t he Ed it mode to cance l the
edit mod e. At la st press Left ke y to di splay progra m
track an d pre ss EN TER/OK to s tar t pro gram
playba ck.
Pro gra m view: Displa y pro gram track.
Bro wer view: D isp lay t rack dire cto ry.
Add to pro gra m: Choice the tr ack p res s Add to
pro gra m to add the track o f the p rogram play
direct ory.
Clear progra m: In t he co mplete st op st ate (press th e
STO P butt on twice) , Fir st pr ess Edit mo de to e nab le
the edit m ode . Press Left key t o pro gra m track and
press EN TER /OK t o cancel th e des ire d track. pr ess
Clear progra m to de let e the track o f the p rog ram
play dir ect ory.
PICTURE CD P LAYBACK
The PICT URE C D dis c has such a di rec tor y structu re
struct ure a s sho wn in the fol low ing p icture.
Press Direction ke y to ch oos e the root
director y and t hen p ress ENTER/OK b utt on to
enter into t he su b dir ectory. Press Direction
key to choos e the d esi red picture and t hen
press ENTE R/O K or PL AY to e njo y the
picture. I f you w ant t o return to the upp er me nu,
press Direction ke y to ch oos e the icon and
press ENTE R/O K button.
Image rotation
In picture p lay s tat e, press Direction key to
rotate the p ict ure .
-19-
Page 21

DVD OPERATION
Function But tons
INSERT/E JECT
Eject t he disc , press t he INSE RT/EJECT
key; In sert th e disc, p ress th e
INSERT/EJECT key a gain.
Insert a disc in to the DV D playe r but cou ld
not get i t to work p ress th e INSERT/EJECT
key on th e remot e or on the TV unit to eject
the dis c. When a disc is ejecting or is e jecte d
but not t ake out , press t he INSE RT/EJECT
key on th e remot e or on the TV unit to insert
the dis c.
SUBTITLE
Press the butt on to cho ose different
capti ons(R equires support from disc )
GOTO
For DVD discs, p ress th e butto n to choo se
the des ired ti tle and c hapte r andse arch the
desir ed titl e time an d chapt er time .For Super
VCD,VCD,CD d iscs, p ress th is butt on to
searc h the des ired di sc time a nd trac k time
and cho ose the d esire d track .
Note: D uring VCD playback, the PBC mode
must be s et to OFF.
0-9 keys
These k eys are u sed to in put the t ime, as w ell
as titl e, chap ter and t rack nu mbers .When a
numer ic item i s displ ayed on t he scre en,
press the 0-9 ke ys to sel ect the d esire d entry,
and pre ss ENTE R/OK to c onfir m.
When a VCD is playing(with PBC off), press
the 0-9 k eys to se lect a tr ack dir ectly.
MENU
During DVD pla yback , press M ENU to
display the di sc menu o f the cur rent ti tle.
During VCD/SVCD playback, press MENU
to cont rol PBC O N/OFF.
SETUP
Press the butt on to ent er the sy stem se tting
menu. P ress th e butto n again t o exit th e
menu.
RETURN
When DV D/SVC D/VCD d ispla ying, p ress
RETUR N butto n to the me nu(PB C ON
only) .
DISPLAY
Press the butt on to sho w the inf ormat ion of
the cur rent pl aying d isc.
ENTER
Press the butt on to con firm yo ur choi ce on
scree n.
REV
During DVD, CD M p3 or VCD playback,
press REV to scan in reverse.
The pla yer wil l revie w the dis c at differe nt
times s peed. P ress PL AY/PAUSE to
resume norma l playb ack.
FWD
During DVD, CD ,MP3, o r VCD playback,
press FWD to sca n forwa rd.Th e playe r
will cu e the dis c at different spee d. Pres s
PLAY/PAUSE to r esume normal playback.
PREV
During DVD, CD ,MP3, o r VCD playback,
press PREV to pl ay the pr eviou s chapt er,
title o r track .
NEXT
During DVD,C D,MP3 , or VCD playback,
press NEXT top lay the n ext cha pter, title
or trac k.
STOP
Press the butt on once a nd the pl ayer wi ll be
in memo ry stop s tate. C ontin uousl y press
this bu tton tw ice and t he play er will b e in
compl ete sto p state .
Play/ Pause
In paus e state o r stop st ate, pr ess the
butto n, the pl ayer wi ll be in pl aying
state .In pla y state , press t he butt on the
playe r will be i n pause s tate.
REPEAT
Press to selec t betwe en differe nt
repea t modes — R epeat C hapte r / Repea t
Tit le / Repeat Off(for DVD d iscs),
Repea t Singl e/ Repe at Fold er/Al l/ Repeat
Off(for VCD/CD/MP3 discs)
AUDIO
Chang es the au dio lan guage o r audio
chann el.
-20-
Page 22

DV D TROUB LE SH OO TIN G
If you have an y que sti ons, please con sul t the t roubleshoot ing g uid e below:
NO PICTURE O R SOU ND
Ensure the p owe r but ton is on.
Ensure the p owe r out let is operatio nal .
Ensure the p owe r cor d is not damaged.
Ensure the p owe r plu g is connected
firmly to th e out let .
PICTURE BU T NO SOUND
Ensure the a udi o is no t set to mute.
Ensure you h ave s et th e player s AUDIO
settings c orr ect ly.
POOR PICTU RE OR S OUND
Ensure you h ave s et th e player s AUDIO
settings c orr ect ly
Ensure the d isc i s not s cratched or sta ine d.
“BAD DISC”DIS PLAYED
Ensure the d isc i s not w arped, damage d or
deformed .
Ensure the d isc i s not b adly stained or
damaged.
Ensure the d isc f orm at is compatibl e wit h
the player.
Please che ck wh eth er you have tried t o pla y a
software C D. If s o, please restart th e pla yer.
REMOTE NOT WO RKING
Make sur e the M ain unit s POWER b utt on is o n
Ensure t he re mote batteri es ar e wor king.
Point th e rem ote control di rec tly a t the playe r s
IRsens or.
Remove a ny ob stacles betw een t he re mote and
theIR se nso r.
UNIT NOT WO RKI NG
Tur n off the power, a nd then turn it on
again.
“NO DISC”DISP LAYED
Ensure you h ave p ut th e disc on the tray.
Ensure the d isc i s not u pside down.
Ensure the d isc i s not d istorted, sta ine d or
scratche d.
-21-
Page 23

 Loading...