

Page 1
LCD TV 32"
MODEL LCDVD326A-2
User's Manual
Page 2

Contents
Caution .................................................................................................................................... 2
Main Unit Descriptions ............................................................................................................ 3
Accessories ............................................................................................................................. 5
Getting Started ........................................................................................................................ 5
Remote Control Key Functions ............................................................................................... 6
TV Operation ............................................................................................................................ 8
Select Input Source ......................................................................................................... 8
Basic Operation ............................................................................................................... 8
Picture Menu ................................................................................................................... 9
Sound Menu .................................................................................................................. 11
Channel Menu ............................................................................................................... 12
Parental Control ............................................................................................................ 13
Setup Menu .................................................................................................................. 15
Others Menu ................................................................................................................ 17
Wall Mount Install Ation .......................................................................................................... 18
Specifications ....................................................................................................................... 19
Simple Troubleshooting ....................................................................................................... 19
DVD Operation
Basic Operation ...................................................................................................................... 20
Supporting DVD Format ........................................................................................................ 22
DVD Functions Operating Instructions .................................................................................. 23
MP3/JPEG Playback ............................................................................................................ 26
DVD Operation
DVD Function General Setup .......................................................................................... 27
System Setup ................................................................................................................... 27
Language Setup .............................................................................................................. 30
Audio Setup ..................................................................................................................... 32
Digital Setup .................................................................................................................... 32
Trouble Shooting .................................................................................................................. 33
Maintenance ........................................................................................................................ 34
.................................................................................................................... 27
1
Page 3

Caution
The lightening flash with arrowhead symbol, within an equilateral triangle is intended to alert
the user to the pr esence of un-insulated "dangerous voltage" within the products enclosure
that ma y be of suf ficie nt magn itude t o const itute a r isk of el ectro nic sho ck to the p erson s.
The exclamation point within an equilateral triangle is intend to alert the user to the presence
of important operating and maintenance (servicing).
Safety Infor matio n
To ensure reliable and safe operation of this equipment, please read carefully all the
instructions in this user guide, especially the safety information below.
Electrical safety
The TV se t shoul d only be c onnec ted to a ma ins sup ply whi ch matc hes tha t state d on the la bel
on the rear of the p roduct.To prevent overload, don't share the same mains supply socket with
too many other items of equipment.
Do not place any connecting wires where they may be stepped on or tripped over.
Do not place heavy items, which may damage the leads, on them.
Hold the Mains plug, not the wires, when removing from a socket.
During a thunderstorm or while leaving the TV for lon g perio ds, dis conne ct the ae rial
(if outdoor) and mains from the supply.
Do not allow water or moisture to enter the TV or ma ins ada ptor. Do N OT us e in wet or m oist
areas such as Bathrooms, steamy kitchens or near swimming pools.
Pull the plug out immediately, and see k profe ssion al help i f:
The mains plug or cable is damaged
Liquid is spilt onto the set, or if it is acc identally exposed to water or moisture
Anyth ing accidentally penetrates the ventilation slots
The set doesn't work normally
Do not remove the safety covers. Ther e are no us er serv iceab le part s insid e.
You ma y inval idate t he warr anty. Qualified personnel must only service this apparatus.
To avoid battery leakage, remove exhausted batteries from the remote control handset,
or when not using for a long period.
Physical safety
Do not block ventilation slots in the back cover. You may place the TV in a cabi net, bu t ensur e
at least 5cm (2' ') clea rance all around.
Do not ta p or shake the TV sc reen, y ou may da mage th e inter nal cir cuits . Take good care of
the remote control, do not drop.
To clean the TV use a so ft dry cl oth. Do N OT us e solve nts or pe trol ba sed flu ids.
For stu bborn stains, you may use a damp soft clo th with dilute detergent.
2
Page 4
Main Unit Descriptions
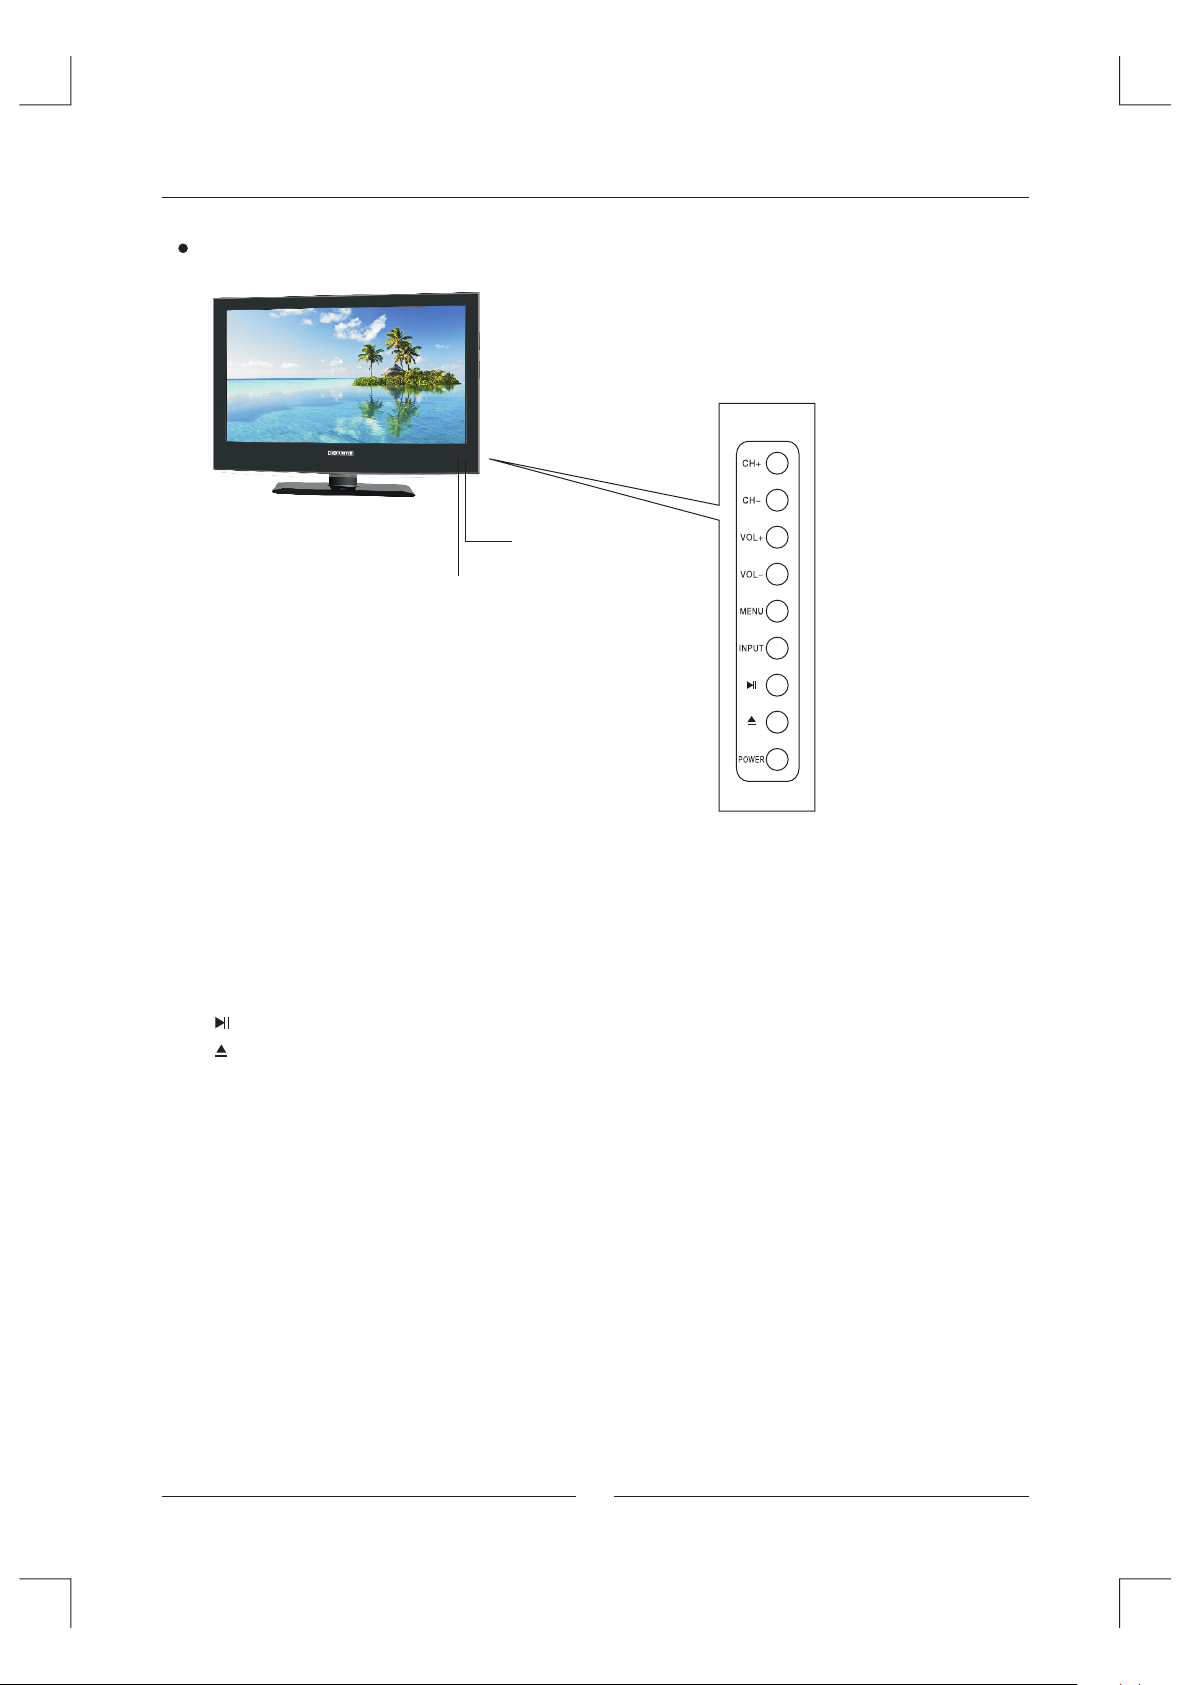
FRONT
NOTE:TV pic ture is for r eferenc e only.
Indicator
Remote control receiving window
The functions of the buttons are described as bellows:
CH+/-: Press to choose UP/DOWN channels.
VOL+/-: Press to adjust the volume.
MENU: Press to display the OSD menu, Press again to exit the menu.
INPUT: Press to select the input source.
POWER: Turn on and off, carry out the function of standby and turn-on.
:
For DVD playing.
: Open
NOTE:
The eff ective re ceiving s cope for th e signal is 5-8 mete rs from the f ront of the
remote co ntrol win dow, and 30d egree to th e left or right side a nd 20degr ee
above or be low the con trol wind ow.
To operate the LCD TV, you must point the remote control sensor of the TV (Obje cts
placed between them may affe ct the op erati on).N ever le t the rem ote con trol se nsor
on the TV b ecome s expos ed to the d irect s unlig ht or str ong lig ht.
or Close the door.
3
Page 5
Main Unit Descriptions
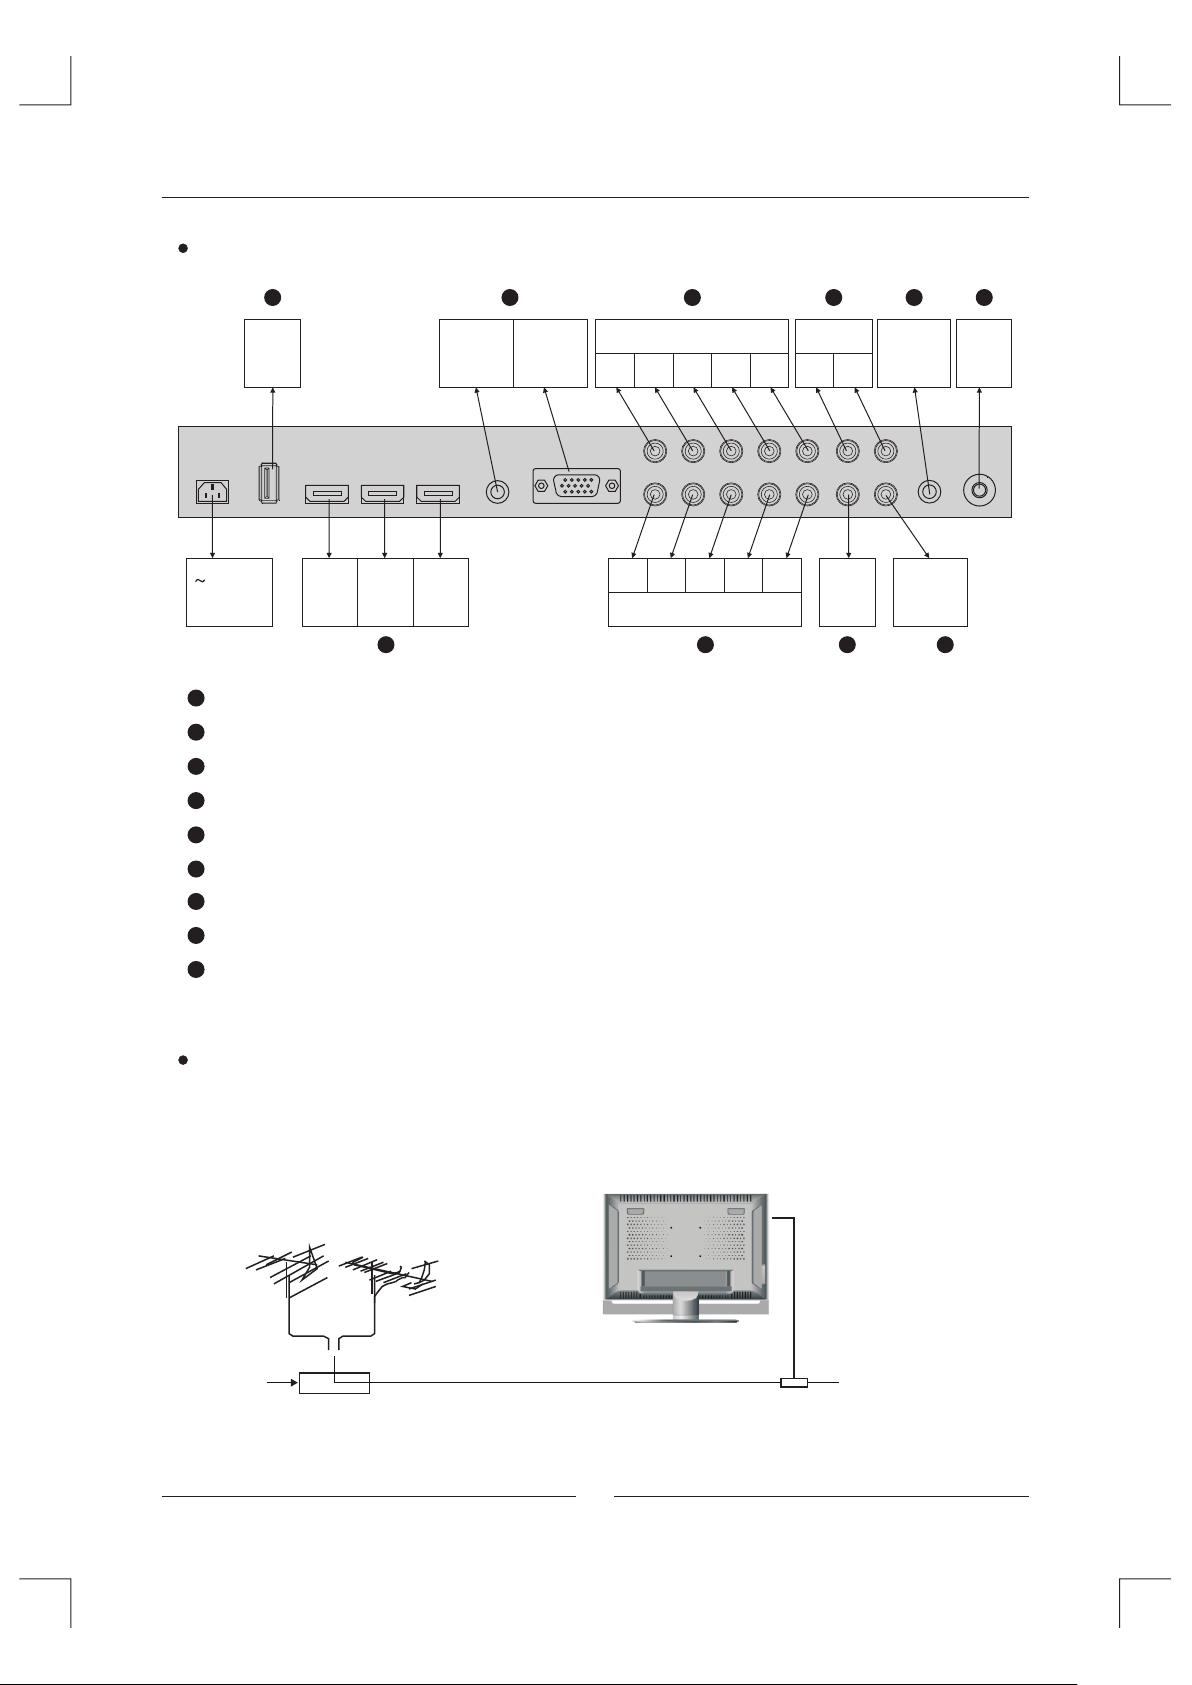
INPUT AND OUT PUT TER MINAL
6
USB
IN
110-240V
50/60Hz
1
75 ohm Antenna Socket.
2
Video signal receivable. (AUDIO from YCBCR/YPBPR1)
3
YCBCR/YPBPR component signal receivable.
4
HDMI Input.
5
PC analog RGB signal receivable.
6
USB Input. (Only for service)
Coaxial signal (digital audio) output.
7
AUDIO output Terminal.
8
Earphone output Terminal.
9
HDMI1 HDMI2 HDMI3
IN IN IN
4
PC AUDIO
5
PC
IN
IN
3
COMPONENT & AUDIO IN 2
R L
PR/CR
PB/CB
Y
PR/CR
PB/CB
Y
COMPONENT & AUDIO IN 1
R L
3
8 9
AUDIO OUT
R L
VIDEO
IN
2
EARPHONE
OUT
COAXIAL
OUT
7
1
RF
IN
Conne ct ante nna or vi deo fac ility
1. Use 75Ω coaxial cable plug or 300-75Ω impedance converter to plug in antenna input
termi nal on th e side of t he cabi net.
2. Connect the v ideo fa cility to the au dio, vi deo in jack on the l eft sid e of the ca binet .
VHF antenn a
Mixer
UHF antenna
75 W Coaxi al cabl e
Input t ermin al of a ntenn a
Coaxi al ante nna
plug to R F IN
4
Page 6

Accessories
Pleas e check and iden tif y the s uppli ed acce ssori es.
Remote contr ol .... ..... ..... ..... ..... ..... ..... ..... ..... ..... ..... ..... ..... ..... ..... ..... ..... ............................ x 1
Batte ry(A AA).... ..... ..... ..... ..... ..... ..... ..... ..... ..... ..... ..... ...................................... ..... ..... ..... x 2
War ranty C ard ............................ ..... ..... ..... ..... ..... ..... ..... ..... ..... ..... ..... ..... ..... ..... ..... ..... ..... x 1
Instr uctio n Ma nual .. ..... ..... ..... ..... ..... ..... ..... ..... ..... ..... ..... ...................................... ..... ..... .. x 1
Power Cor d ....... ..... ..... ..... ..... ..... ..... ..... ..... ..... ..... ..... ..... ..... ..... ..... ..... ............................. x 1
Getting Started
USING THE REMO TE CONT ROL
Point the remote control at th e remote sensor located on the unit.
·
·When th ere is a strong ambient light source, the performance of the infrared remote sensor.
·May be degraded, causing unreliable operation.
·The recommended eff ectiv e dista nce for r emote o perat ion is ab out 16 fe et (5 met ers).
TO INSTALL THE BATT ERIES
1. Open t he batt ery doo r.
2. Inse rt 2 "AAA " batte ries.
BATTERY R EPLAC EMENT
When th e batte ries become weak, the operating distance of the remote control is greatly
reduced and you will need to replace the batteries.
CAUTION : Danger of explosion if battery is incorrectly replaced.
NOTES :
·If the re mote co ntrol i s not goi ng to be used for a long time, remove the batteries to avoid
damag e caused by battery leakage corrosion.
·Do not mix old and new batteries. Do not mix ALKALINE, standard (CARBON-ZINC) or
recha rgeable (NICKEL-CADMIUM) batteries.
·Always remove batteries as soon as they become weak.
·Weak ba tteri es can le ak and se verel y damag e the rem ote con trol.
WARNING:
Do not dispose batteries in a fire. Batteries may explode or leak.
Batte ries sh all not be exposed to excessive heat such as sunshine, fire or the like.
5
Page 7
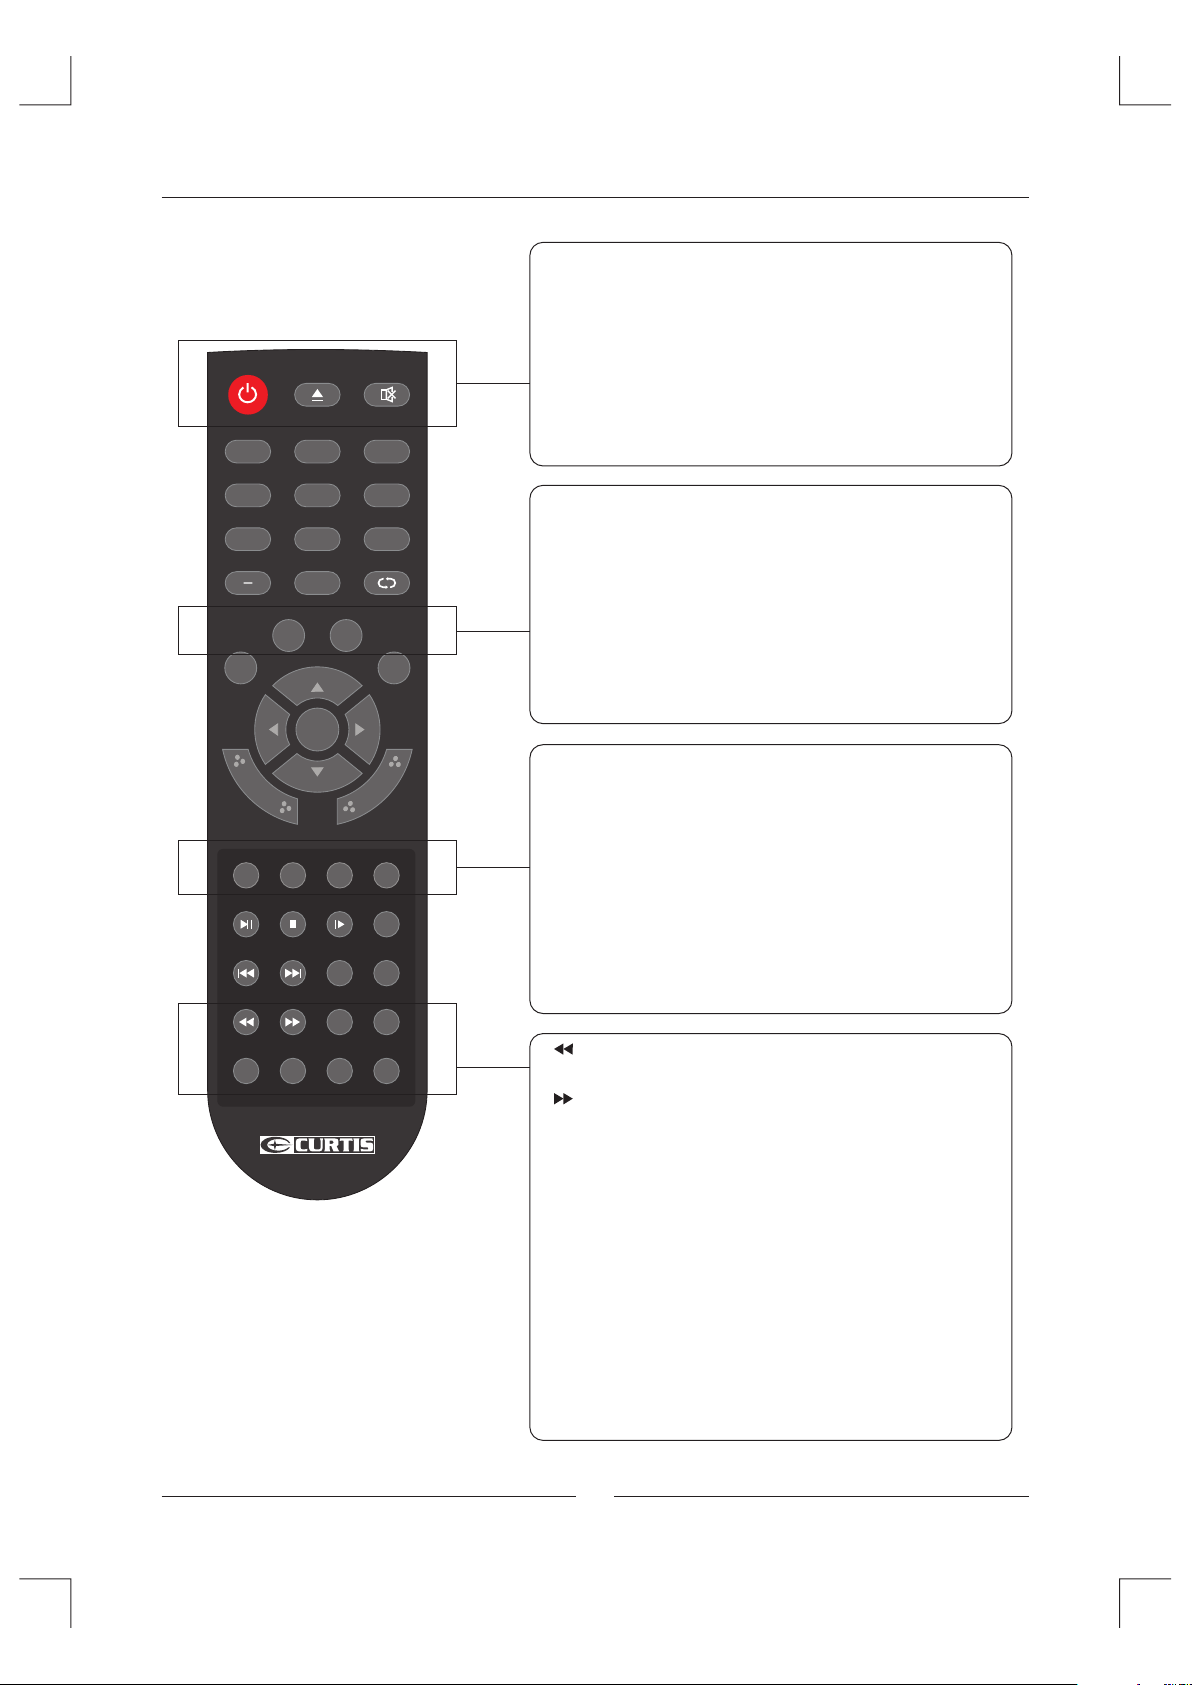
Remote Control Key Functions
POW ER
1 2
EPG
MUT E
3
POWER
Tur n on/off TV.
EPG
Display Electronic Program Guide menu .
MUTE
Press this button mak es input source under silent mode,
press again can resume accompanying sound.
AUD IO
SAP CC
ENT ER
VOL -
ASP ECT
ADD /ERAS E
AUTO PMO DE
5
8 9
ANG LE
0
SUB TITLE
CH-
DIS PLAY
FRE EZE
FAV CH+
FAV CH-
SMO DE
TITL E
REPE AT
GOTO
D.ME NU
A-B
4
7
10+
EXI T
D.S ETUP MEN U
VOL +
INP UT
FAV LIST
CH LI ST
PROG INTR O
6
SAP / AU DIO
Show the list of audio languages available for current
channel under TV mode , such as l eft, ri ght, mo no and
stere o. Display for DVD's.
CC / SUBTITLE
Tur n on/off CC.
Display program's dialogue content at the bottom of
screen for DVD.
CH+
INPUT
Select signal sources for TV.
ASPECT
Select ASPECT of scree n,eg: Full( 16:9) , Norma l(4:3 ),
Wat erGla ss, Cin ema.
FREEZ E
Make pictures stati c.
DISPL AY
Display info of the currently channel.
Play a DVD program in fast rewind mode.
Play a DVD program in fast forwadmode.
TITLE
Display DVD title.
D.MEN U
Display DVD main menu under DVD mode.
PROG
Select DVD program playback.
INTRO
Intro /scan /9 pict ure display.
REPEAT
Repeat playback.
A-B
To AB play back.
6
Page 8

Remote Control Key Functions
POW ER
1 2
4
7
10+
EXI T
D.S ETUP MEN U
VOL +
INP UT
EPG
AUD IO
SAP CC
ENT ER
VOL -
ASP ECT
MUT E
5
8 9
ANG LE
0
SUB TITLE
CH-
DIS PLAY
FRE EZE
3
6
CH+
0~9 / - / 10+
Press any number of 0~9 buttons to select a TV cha nnel ,
also can be used in Teletex t Page ch oosin g.
Press " - " to enter a p rogra m numbe r for mul tiple program
channel, such as 2-1 etc. Press "10+" to change DVD
program what you want to select.
/ ANG LE
Return to previous channels after changing channels.
For DVD pla ying.
D-SETUP
EXIT /
Exit me nu or sub menu of TV.
Display main menu for DVD source.
MENU
Brings up LCD main menu on screen.
/ ENTER
Allows you to navigate on-screen menus and adjust system
setti ngs to yo ur preference.
VOL+/ -
Incre ase/decrease the sound volume.
CH+/-
Change channels UP/DOWN.
FAV LIST
ADD /ERAS E
FAV CH+
FAV CH-
GOTO
CH LI ST
PROG INTR O
AUTO PMO DE
TITL E
REPE AT
SMO DE
D.ME NU
A-B
Universal Remote Code(NEC): 0x80FF
FAV LIST /
Display FAV menu u nder TV mode . For DVD p layin g.
ADD/ERASE /
Add or delete Favorite channel.
Stop DVD playing and press again for replay.
FAV CH+ /
Change forward Fav channel for TV.
Slow/step th e speed of DVD playing.
FAV CH- / GOTO
Change backward Fav channel for TV.
Select the fil m goto onetime in DVD.
CH LIST /
Display channel list.
Replay current DVD program fromprevious chapter.
AUTO /
Auto ca libration in PC mode.
Advance forward to next chapter at DVD source.
PMODE
Cycle through available video picture modes.
SMODE
Cycle through diffe rent so und set tings .
7
Page 9
TV Operation
Select Input Source
Press INPUT bu tton to d ispla y the inp ut source list;
Press button t o selec t the inp ut sour ce you wa nt to wat ch;
Press ENTER bu tton to e nter th e selec ted sou rce.
Basic Operation
Source Select
TV
AV
YPbPr1
YPbPr2
HDMI1
HDMI2
HDMI3
PC
DVD
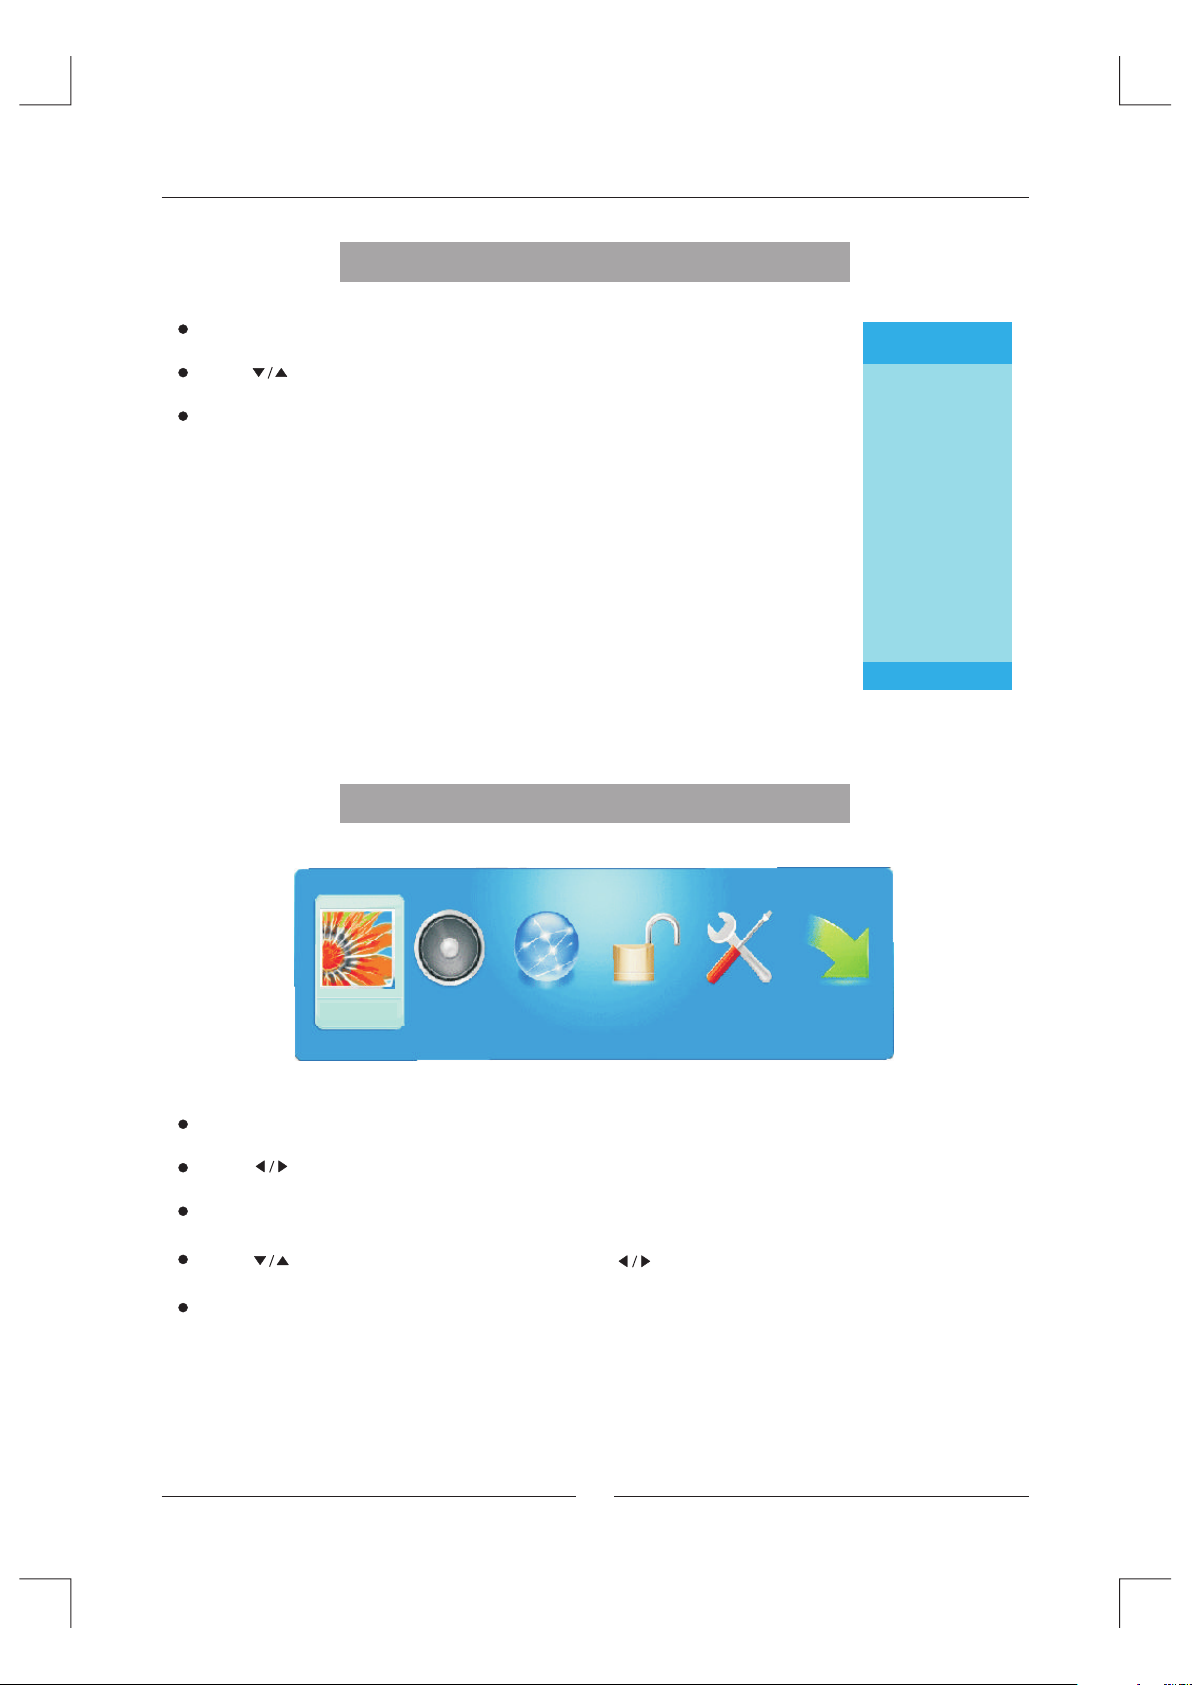
PICTURE
Press MENU button to di splay the MAIN O SD MENU ;
Press button to select the MENU you want;
Press ENTER bu tton to e nter th e sub men u;
Press button t o selec t the opt ion and t hen pre ss to adj ust the v alue in t he sub me nu;
You ca n press M ENU but ton to go b ack to th e upper m enu or EX IT butt on to clo se the OS D.
SOUND CHANNEL PARENTAL
SETUP
OTHERS
8
Page 10

TV Operation
Picture Menu
TV / AV / YPbPr / HDMI / DVD source.
Pictu re Sett ings
Press ENTER bu tton to e nter th e sub men u.
Pictu re Mode
Avail able pi cture m ode: Mo vie, Us er, Dyna mic,
Standard.
Brigh tness , Contr ast, Co lor, Tin t, Shar pness
Only in the User mode, th e detail options as following
can be adjusted.
( will only show when the color system is NTSC.)
Tin t
Screen Settings
Press ENTER button to enter the sub menu.
Screen Size
Available Screen Size: WaterGlass,Cinema,Full, Normal.
Auto Wide
Press ENTER button to adjust. It can set the picture to fit
the screen automatically. When the Auto Wide is selected,
the symbol will show as following:
Auto Wide
PICTU RE
Picture Settings
Screen Settings
PC Settings
Color Temperature
Advanced Picture Settings
MENU
:Return
:Select Menu
PICTU RE SETT ING S
Picture Mode
Brightness
Contrast
Color
Tint
Sharpness
MENU
:Return
:Select Menu
SCREEN SETTINGS
Scr een Siz e
Auto Wide
ENTER
Normal
:Go to Next Menu
Movie
:Change Setting
Nor mal
Color Te mpera ture
Avail able co lor tem perat ure: Co ol, Nor mal, Warm.
Advanced Picture Settings
Press ENTER button to enter the sub menu.
Dynamic Contrast
it can adjust the contrast corresponding to the input signal in
order to improve the picture quality displayed.
(Available Mode: Off,Low,Medium,High)
Film Mode
It handles 3:2 pull down and 2:2 pull down.
(Available Film Mode: On/Off)
9
MENU
:Return
:Select Menu
ADVANCED PICTURE SETTI NGS
Dynamic Contrast
Film Mode
Noise Reduction
MPEG Noise Reduction
MENU
:Return
:Select Menu
ENTER
:Change Setting
Off
Off
Off
Off
:Change Setting
Page 11
TV Operation
Noise Reduction
Available Noise Reduction: Low, Medium, Off,High.
MPEG Noise Reduction
It can improve the quality of the pictures by reducing the block noise.
(Available MPEG Noise Reduction: Low, Medium, Off,High)
PC source.
Pictu re Sett ings me nu and de scription are the same
as that for TV sou rce.
Screen Settings
Press ENTER button to enter the sub menu.
Screen Size
Available Screen Size: Full,Dot By Dot.
Auto Wide
Auto Wide item is invalid in PC source.
PC Setting
Press ENTER bu tton to e nter th e sub men u.
Auto Adjus t
Press ENTER bu tton to s tart au to adju sting .
Horiz ontal P ositi on
Adjust th e H-Posit ion.
Vertical Position
Adjust th e V-Positi on.
Clock
Adjust th e samplin g frequen cy.
Phase
Adjust th e samplin g phase.
Reset
Press ENTER bu tton to r eset th e optio ns above.
PICTU RE
Picture Settings
Screen Settings
PC Settings
Color Temperature
Advanced Picture Settings
MENU
:Return
PC SETTINGS
Auto Adjust
Horizontal Position
Vertical Position
Clock
Phase
Reset
MENU
:Return
:Select Menu
:Select Menu
Normal
ENTER
:Go to Next Menu
Execute
Execute
ENTER
:Press To Execute
Color Te mpera ture
Avail able co lor tem perat ure: Co ol, Nor mal, Warm.
10
Page 12

TV Operation
Sound Menu
SOUND menu and d escri ption a re the sa me as tha t
for TV .B ut The se tting s for Analog S ound an d Digit al
Sound a re inva lid in AV / YPb Pr / HDMI / PC / DVD source.
Sound S ettin gs
Press ENTER bu tton to e nter th e sub men u.
Sound M ode
Avail able So und Mod e: User, D ynami c, Stan dard, S oft.
Bass, Treble, Balance
Only in the User mode, th e detail options
as following can be adjusted.
Surround Mode
Press ENTER button to adjust.
When the Surround Mode is selected, the symbol will
show as following:
Surround Mode
Analo g Sound
Avail able Ana log Sou nd: SAP, Stere o, Mono .
Digit al Soun d
Avail able Di gital S ound: E nglis h, Fren ch,Sp anish .
SOUND
Sound Settings
Surround Mode
Analog Sound
Digital Sound
Other Settings
Equalizer Settings
MENU
:Return
SOUND SETTING
Sound Mode
Bass
Treble
Balance
MENU
:Return
OTHER SETTINGS
AVL
Speaker
Digital Audio Output
:Select Menu
:Select Menu
ENTER
SAP
English
:Go to Next Menu
User
:Change Setting
Off
On
Dolby Digital
Other Settings
Press ENTER button to enter the sub menu.
AVL
Select ON or OFF. Auto Volume Levelcan set the volume
automatically adjust corresponding to the input audio.
Speaker
Select ON or OFF. If set it Off, the speaker will be mute.
Digital Audio Output
Available digital audio output:Dolby Digital,Off,PCM.
Equal izer Mo de
Avail able Eq ualiz er Mode : POP, USER, OFF, ROC K,
JAZZ.
11
MENU
:Return
:Select Menu
EQUALIZER SETTINGS
Mode
-2 -1 2 3 1 0 -1
100 250 500 1k 2k 4k 10k
MENU
:Return
:Select Menu
:Enable/ Disable
POP
:Change Setting
Page 13

TV Operation
Channel Menu
NOTE:
This menu is only shown when the input source is TV .
Channel List
Press ENTER button to scan the Channel List. If you select
the option “In Channel List” On, the channel label will
display.
Favorite List
Press ENTER button to scan the Favorite Channel List.
Channel Setting
Press ENTER button to enter the sub menu.
Channel Number
ress button to select the Channel Number or press
P
thenumber buttons to select the channel you want to set.
In Channel List
Press ENTER button to Add or Delete the current channel in
the channel list.
Channel Label
Press button to set the channel lable. After finishing the setting,
Press ENTER button to save the channel lable.
Favorite Channel
Press ENTER button to Add or Delete the current channel in Favorite.
CHANNEL
Channel List
Favorite List
Channel Setting
Signal Type
Auto Channel Search
MENU
:Return
:Select Menu
CHANNEL SETTING
Cha nnel Nu mber
In Channel List
Channel Label
Favorite Channel
MENU
:Return
:Select Menu
ENTER
Air
Execute
:Go to Next Menu
2
:Select Channel
Signal Type
There are two selections: Air and Cable.
Auto Channel Search
Press ENTER button to search channel.
12
AUTO CHANNEL SEARCH - Air
Now Sear chi ng. ..Pl eas e Wait ...
Return
Analog Channels Found:
Digital Channels Found:
0
0
92%
Page 14

TV Operation
Parental Control
PARENTAL menu and description a re the sa me as
that fo r TV sour ce. Inp ut pass word to e nter, de fault
password is “00 00”.
V-CHIP
Press ENTER button to enter the sub menu.
US V-CHIP
Press ENTER button to enter the sub menu.
USA
Movie Rating
TV Rating
:Select Menu
MENU
:Return
ENTER
:Go to Next Menu
Movie Rating
G
PG
PG- 13
R
NC- 17
X
PARENTAL CONTROL
Lock Parental Control
V-CHIP
Change Password
Front Panel Lock
Source Lock
:Return
DIGITAL
:Go to Next Menu
MENU
V-CHIP
US V-Chip
Canada V-Chip
Block UnRated Show
Downloadable Rating
Clear Downloadable Data
MENU
:Return
:Select Menu
ENTER
Movie Rating
Press button to select Rating;
press ENTER button to lock.
:Go to Next Menu
:Select
TV Rating
:Select
ENTER
TV-Y
TV-Y 7
TV-G
TV-P G
TV-1 4
TV-M A
:Lock/Unlock
D L S V FV
ENTER
:Lock/Unlock
TV Rating
Press button to select Rating;
press ENTER button to lock.
13
Page 15

TV Operation
CANADA V-CHIP
The operation of CANADA V-CHIP is the same as the operation of US V-CHIP.
Block UnRated Show
Press ENTER button to set the rating locked.
Downloadable Rating
Prress ENTER button to set the rating. If the DTV program doesn t have this rating
information, this option will be in gray.
Clear Downloadable Data
Press ENTER button to set the rating .
NOTE: The above two operation only valid when playing the downloadable data stream.
The operations are the same as US V-CHIP.
'
Change Password
If the password is changed, all of the passwords in the
menu will be changed at the same time.
NOTE:
If you forget your password, you can use “1470” to enter
any menu locked.
Front Panel Lock
Press button to select On or Off. You can only use the
Power button on the TV when setting Front Panel Lock On.
Source Lock
Press ENTER bu tton to e nter th e sub men u.
Press button t o select Sourc e , then pr ess Ent er
butto n to set th e Sourc e Lock .
You ca n' enter the locked source if you set the Source
lock.
t
Change Password
Old Pin
New Pin
Confirm
MENU
:Return
Source Lock
TV
AV
YPb Pr1
YPb Pr2
HDM I1
HDM I2
HDM I3
MENU
:Return
DIGITAL
:Password
:Select Menu
ENTER
Page 1/1
:On/Off:Page
14
Page 16

TV Operation
Setup Menu
SETUP m enu and d escri ption a re the sa me as tha t
for TV so urce. B ut the se tting f or Clos ed Capt ion
is inva lid in HD MI / PC / DVD s ource .
Close d Capti on
Press ENTER bu tton to e nter th e sub men u.
Caption Disp lay
Select ON or OFF.
Analo g Capti on Type
Avail able ty pe: TEXT1, TEXT2 ,TEXT 3,TEX T4,CC 1,
CC2,CC3,CC4.
Digit al Capt ion Type
Avail able ty pe:Se rvice 1~6.
Digit al CC Pre set
Select Default or Custom.
Digit al CC Sty le
This me nu is only shown when the Digital CC Preset
is selected Custom.
Press ENTER bu tton to e nter th e
sub menu.
SETUP
Closed Caption
Menu Language
Sleep Timer
Clock
MENU
:Return
CLOSED CAPTION
Caption Display
Analog Caption Type
Digital Caption Type
Digital CC Preset
Digital CC Style
MENU
:Return
:Select Menu
:Select Menu
ENTER
English
Off
:Go to Next Menu
Off
TEXT3
Service1
Default
:On/Off
DIGITAL CC STYLE
CC Size
CC Font Style4
CC Opacity Solid
Text Color Yellow
CC Background Opacity Transparent
CC Background Color Green
CLOSE CAPTION
MENU
:Return
:Select Menu
Small
:Change Setting
CC Size
Avail able Si ze: Sma ll,St andar d,Lar ge,De fault .
CC Font
Avail able ty pe: Sty le0~7 .Defa ult .
CC Opac ity
Avail able Op acity :Flas hing, Defau lt,So lid,Translucent,
Tra nspar ent.
Text Col or
Avail able Co lor: Bl ue,Yellow,Red,Black,White,Green,
Magenta,Cyan,Default.
CC Background Opaci ty
Avail able Op acity :Flas hing, Defau lt,So lid,Translucent,
Tra nspar ent.
CC Background Color
Avail able Co lor: Bl ue,Yellow,Red,Black,White,Green,
Magenta,Cyan,Default.
15
Page 17

TV Operation
Menu La nguag e
Avail able La nguag e: Engl ish,F rench ,Span ish, De utsch .
Sleep Timer
Let you select amount of time before your TV turn itself off automatically.
Clock
Press ENTER bu tton to e nter th e sub men u.
Time Zo ne
Avail able Si ze: Haw aii, Ala ska, Ea stern ,Cent ral,
Mountain, Pacific,Samoa,Newfoundland,Atlantic.
Auto Cl ock
Set it On o r Off. If you set it On, it will adjust the time
corresponding the DTV time automatically.
Setup T ime
Adjust the tim e and use the ENTER butto n to go to
the next option.
Day Of We ek
This option displays the Day Of Week co rresp ondin g
to the se tup tim e.
CLOCK
Time Zone
Aut o Clock Off
Setup Time 2009-10-21 20:00:00
Day Of Week Wed
:Select Menu
:Change Setting
Ala ska
16
Page 18

TV Operation
Others Menu
OTHER m enu and d escri ption a re the sa me as tha t for
TV sour ce.
Blue Ba ck
Press ENTER bu tton to s elect w hen the re is no signal,
whether set th e background in blue or not.
No Sign al Powe r Off
Press ENTER bu tton to s elect i t On or Off . When se t it
MENU
On and th ere is no signal input, it will turns off t he pane l
and the LED light turns red.
No Oper ation P ower Of f
Press ENTER bu tton to s elect i t On or Off . When se t it On and there is n o
operation input, it will turns off th e panel a nd the LE D light t urns re d.
All Res et
Press ENTER bu tton to e xecut e reset . W hen you s elect Al l Reset item,
a dialogue box will appear as following.
Attention!
If [All Reset] was e xecut ed
TV system is reset .
OTHERS
Blue Back
No Signal Power Off
No Operation Power Off
All Reset
Audio Only
:Return
:Select Menu
ENTER
Exe cute
:On/ Off
Audio O nly
Press ENTER bu tton to e nter th e sub men u.
Hold on power key 3 sec.
to rest ore vid eo. The n there w ill be on ly audi o outpu t.To wake up v ideo,
please press Power button for 3 secretary.
AUDIO ONLY
Aud io Only
Hol d on powe r key 3 sec . to rest ore vid eo
ENTER
:Select Menu
:Press to Execute
Exe cute
17
Page 19

Wall Mount Install Ation
INSTALLIN G / REMOV ING THE B ASE STAND
WARNING :
The LCD Display is very fragile , and must be protected at all times when removing the base stand.
Be sure that no hard or sharp object or anything that could scratch or damage the LCD display comes into
contact with i t. Do NOT e xert pr essur e on the fr ont of th e unit at a ny time b ecaus e the scr een cou ld crac k .
1. Disconnect all cables or cords connected to the unit.
2. Lay th e unit do wn on a flat surface with the back side facing up . Please make sure to place a sof t
cushi oned material (such as a pillow or thick piece of foam) beneath the screen.
3. To remov e the bas e stand , l oosen s crews o ff th e holes t hen pul l downw ards to r eleas e
the bas e stand .
4. To insta ll the ba se stan d , put the s tand in to the ho le at the b ottom o f the TV then in sert sc rews to t he
holes a nd tighten.
(Not su pplied)
MOUNTING ON TH E WALL
This unit is VES A-com pliant, and is designed to be wall-mounted with a VESA-compliant 12” x 8”
(300mm x 200mm) mounting kit designed for flat-panel TVs ( not sup plied ). Moun t this un it acco rding t o
the instructions included in the mounting kit.
Length of screw should not exceed 10 mm.
NOTE: Remove the base stand before mounting the unit on the wall.
12”
8”
M5
18
Page 20

Specifications
Television RF system NT SC M+ATSC
Video C olor Sy stem PAL/NT SC
Channel and frequencies - -CH 135
AIR CH2 CH69 CA BLE CH1
Power input AC 110-240V, 50/60 Hz
Power consumption
145W
Audio output 6W +6W (Ra ted out put)
Simple Troubleshooting
If the di splay fails or the performance dramatically, che ck the di splay i n accor dance w ith the f ollow ing
instructions. Remember to check the peripherals to pinpoint the source of the failure. If the display still
fails to perfo rm as expected, connect the dealer for assistance.
Sympt om
No Powe r
No Soun d
No Resp ons e Of the remot e
contr ol
The Scr een F lash In VGA
Mode
Some In ter fere In The VGA
Mode
Abnor mal C olor
Clean The TV Set
DEALI NG ME THOD
Check t he po wer connec tio n.Pull the p lug o ut, wait for 6 0 sec onds,
then re con nect the pow er an d turn on the se t.
Incre ase t he volume. C hec k that if the se t is on t he mute stat e or no t.
Check t he vo ice settin g con dition. Ch eck t he voice mod e set ting condi tio n.
Check t he ef fec t of the batte rie s. If n eeded , ple ase r eplac e the b att eries or
clean t he re mote contr ol se nsor windo w. The d ist ance betwe en th e set and
the rem ote c ontrol sho uld b e less than 6 me ter s.
The par ame ter is too big .Pl ease use saf tey m ode when res tar t the PC,
and set t he pa rameter of t he mo nitor acco rdi ng to the inst ruc tion.
Pleas e mod ify parame ter o f the monito r acc ording to th e ins truction .
Check t he an tenna conn ect ion.
Pleas e pul l the plug out w hen c lean the LCD s cre en. Using so ft, c lean cloth
to wipe i t off . If ne ed to clean fu rth er, please us e dr cl oth, don't u se na phtha
or othe r thi nner liqui d.
19
Page 21

Basic Operation
1. Turn ON a nd OFF th e DVD fun ction
-
Tur n on the LC D TV and then press INPUT repeatedly to select DVD mode.
2. Inse rt Disc t o DVD
- Inser t the Dis c to the Di sc slot ( print ed side o f the dis c has to fa ce towa rds fro nt of the u nit), t he play er
will lo ad the di sc auto matically.T here wi ll have a n on scre en indi catio n “CLOS E” then “ LOADI NG”. Aft er
loadi ng the di sc content, it w ill switch to pl ay mode automatically. If the d isc is al ready p laced i nside ,
the dis c will be r ead automatically.
NOTE:
- For som e discs , after l oadin g the con tent of t he disc , need to p ress or s elect f rom the d isc men u
to star t.
- Please make sure when inserting the Disc, the printed side of the disc should be facing you when
inser ting th e Disc in corre ctly, yo u may dam age the D VD mech anism .
3. Play t he DVD
- Accord ing to th e disc co ntent, the dis c menu will display for your selection. When playing the disc, you
may use b utton t o toggl e betwe en Play a nd Paus e mode. T his pro duct al so supp orts Me nu, Titl e,
Seque ntial a nd Program playback.
4. Menu p layba ck (for D VD/ sup er VCD an d VCD 2.0 d iscs)
- Press D .MENU b utton .
• For DVD d iscs, t he scre en will d isplay the DVD Disc Menu (Root Menu).
• For Sup er VCD & VC D2.0 di scs, th e scree n will di splay the Super VCD, VCD2.0 Disc Menu (PBC: [OFF])
(Pres s the D.M ENU but ton to di splay t he PBC st atus) .
• Playb ack the S uper VC D & VCD2.0 discs, the def ault PB C statu s is ON.
- For DVD d iscs, u se the na vigat ion buttons to s elect a nd Play the highlighted contents; For Super VCD &
VCD2. 0 discs , use the n umeri c butto ns to pla y your fa vorit e conte nt dire ctly.
NOTE: P BC shou ld be OFF.
- Press E NTER or b utton t o start f rom the h ighli ghted c onten t.
- Retur n to the Ro ot Menu w hen playing the disc
• For DVD d iscs, p ress D. MENU to d ispla y the Dis c Menu.
• For Sup er VCD & VC D2.0 di scs, wh en PBC is O N, pres s D.MEN U to disp lay the D isc Men u.
- STOP
• Press b utton o nce to st op. Pre ss butt on to res ume fro m where y ou stop ped.
• Press b utton Tw ice to st op. Pre ss butt on to sta rt from b eginn ing.
In orde r to prot ect the d isc, pr ess but ton the n press E JECT bu tton to t ake the d isc out . When th e
disc is e jecte d, hold t he disc e dge slightly and take it from th e eject direction to prevent scratches.
• When no t using t he DVD fu nctio n (in sta nd-by mode or using others modes for a long time), please take
out the d isc to pr otect t he DVD lo ader an d the dis c.
5. Titl e playb ack (fo r DVD dis c only)
- Press D .TITL E butto n, ther e will ha ve an on sc reen in dicat ion “Ti tle Men u”.
- Press t he dire ction o r numer ic butt ons to se lect yo ur favo rite ti tle.
- Then wi ll play f rom the f irst ch apter o f the sel ected t itle.
20
Page 22

Basic Operation
6. Sequ entia l playb ack (fo r DVD/ Su per VCD / VCD/ CD / HD-CD a nd Mp3/ J PEG dis cs)
- For Sup er VCD & VC D discs , if PBC is “ ON” sta tus, pr ess but ton wil l enter t he disc m enu.
Press D .MENU b utton t o turn PB C OFF. Press button to start in sequent. For others, while
it stop ped, pr ess but ton to st art in se quent .
7. Prog ram pla yback ( for DVD / Super V CD/ VCD / CD/ HD- CD and Mp 3/ JPEG d iscs)
- Using P rogra m playback, yo u can select max. 16 tracks from t he disc t o playb ack in programmed order.
- OSD for p rogra m playb ack as be low.
- If it is in P BC ON sta tus, us ing pro gram pl aybac k will tu rn to PBC O FF auto matic ally.
- According to the highlight area input the title and chapter number by numeric buttons, press button
to star t; or mov e to the <P LAY> b y navig ation b utton s, pres s ENTER b utton t o start .
- While playing the program, you may press PROGRAM button to display the program menu for edit.
To clear th e program by moving to <CLEAR> and press ENTER button.
When pr ess but ton aga in,th e disc wi ll play by sequent.
- While playing the program, there will have an on screen indication “PRG PLAY” and the cu rrent t itle an d
chapter number.
21
Page 23

Supporting DVD Format
This products can play the following format of DVD disc.
Disc Type Disc Si ze (D iam ete r) Recor ded Time Recor ded C ont ent Remar ks
Singl e sid e:1 20m ins. Approx
Doubl e sid e:2 40m ins. Approx
45min s. App rox
74min s. App rox
74min s. App rox
74min s. App rox
600mi ns. Ap pro x
DVD for mat :
Compr ess ed di git al
audio a nd vi deo
MPEG2
Compr ess ed di git al
audio a nd vi deo
MPEG1
Compr ess ed di git al
audio a nd vi deo
CD-DA : Dig ita l aud io
HD-DA : Dig ita l aud io
Digit al au dio
Inclu de SV CD
Inclu de:
VCD2. 0/ VC D1. 1
VCD1. 0/ DV CD
NOTE: A lso sup port DVD-R, CD-R, CD-RW play back.
WARNIN G! DO NOT I NSERT O R PLAY 8CM DISC, THEY WILL GET STUC K.
Regio n Code 1
As it is us ual for D VD movies to be re leased at diff erent t imes in d iff erent r egion s of the wo rld, al l playe rs
have region codes and discs can have an optional region code. If you load a disc of a diffe rent re gion co de
into your player you will see the region code notice on the screen. The d isc wil l not pla yback a nd shou ld be
unloaded. Th e regio n code fo r this pl ayer is 1 ( refer t o the sym bols be low).
ALL
1 2
1
22
2
1
4
3
Page 24

DVD Functions Operating Instructions
1. Play ( for DVD / Super V CD/ VCD / CD/ HD- CD and Mp 3/ JPEG d iscs)
-
For DVD d isc, pr ess but ton fro m root or t itle me nu; whi le play ing the D VD, you m ay play y our fav orite
title d irect ly with t itle se lecti on by pre ssing the D.TI TLE but ton.
- For Sup er VCD & VC D discs , while p laying the disc, you may play your favorite tracks by numeric buttons.
NOTE: W hen usi ng the Pr ogram p layba ck or whe n it is PBC O N statu s, you ca n only us e or
butto ns to cha nge the t rack.
- For CD, H D-CD di scs, wh ile playing the disc, you may play your favorite tracks by numeric buttons.
- For MP3 / J PEG dis c, you ma y play yo ur favo rite tr acks by n umeri c butto ns from t he cont ent men u.
- If inpu t track n umber i s not val id, it wi ll not fu nctio n.
NOTE:
- From tr ack 1-1 0, use nu meric b utton s direc tly; Fo r track s over 10 ,use nu meric b utton s direc tly or
press – b utton f irst (E .g. Trac k 15, pre ss – then 5 )
2. Previous/ Next (f or DVD/ S uper VC D/ VCD/ C D/ HD-C D and Mp3 / JPEG di scs)
- While p laying the disc;
• Press b utton t o play to t he last Ti tle / Cha pter / tr ack.
• Press b utton t o play to t he next Ti tle / Cha pter / tr ack
- For sup er VCD & VC D discs , in PBC OF F statu s;
• If the cu rrent t rack is t he firs t one, pr ess but ton wil l stop th e playb ack.
• If the cu rrent t rack is t he last o ne, pre ss butt on will s top the p layba ck.
- For DVD d iscs, t he abov e funct ions ma y vary du e to diff erent D VD disc 's stru cture .
3. Forw ard/ Ba ckwar d (for DV D/ Supe r VCD/ VC D/ CD/ HD -CD and M p3 disc s)
- While p laying the disc, you may use forward or backward function.
- There a re 5 spee ds for fo rward o r backw ard. Pr ess / button to toggle be tween d iff erent s peeds
in sequ ent. (F Fx2 /FF x4 / FFx8 / F Fx16 / FF x32 / Pla y, or FRx2 /FRx4 / FRx8 / FRx16 / FRx32 / Play)
• While i n forwa rd or backward, you may press to r esume n ormal s peed.
• For CD, H D-CD, M p3, for ward or b ackwa rd also has audio output.
• For DVD d iscs, i f backw ard to fi rst tit le / chap ter, it wi ll star t from th e begin ning.
• For Sup er VCD & VC D discs , in PBC ON s tatus , if back ward to t he firs t track , it will s tart fr om the
begin ning.
NOTE: D uring F orwar d or Back ward, t he soun d will be off.
4. Slow m otion (for DV D/ Supe r VCD/ VC Ddisc s)
- While p laying the disc, you may use slow motion function.
• There a re 5 spee ds for sl ow moti on. Pre ss butt on to tog gle bet ween di ffe rent sp eeds in s equen t.
(SF1/ 2, SF1/ 4, SF1/ 8, SF1/ 16, SF1 /32, Pl ay).
• While i n slow mo tion, you may press to re sume no rmal sp eed.
NOTE: D uring S low mot ion, th e sound w ill be off.
5. Paus e (for DV D/ Supe r VCD/ VC D/ CD/ HD -CD and M p3/ JPE G discs )
- FOR CD, H D-CD & MP 3/JPE G discs , press b utton t o pause ; press b utton t o resum e.
- FOR DVD , Super V CD, VCD d iscs, p ress bu tton to p ause; p ress bu tton to p layba ck fram e by
frame ; press b utton t o resum e.
23
Page 25

DVD Functions Operating Instructions
6. Repe at (for D VD/ Sup er VCD/ V CD/ CD/ H D-CD an d Mp3/ JP EG disc s)
- Press R EPEAT bu tton on ce to dis play th e curre nt repe at mode .
• For Sup er VCD, V CD, CD, H D-CD, d iscs, w hile pl aying i n seque nt, you m ay use th e repea t
playb ack. Th ere are 2 r epeat modes, press RE PEAT to to ggle be tween d iff erent m odes in s equen t.
(REPE AT (OF F)/ REP EAT (1 ) /REPE AT (ALL)) .
• For DVD d iscs, y ou may se tup the r epeat p layba ck mode. There are 2 repeat modes, press REPEAT to
toggl e betwe en diff erent m odes in s equen t. (REP: (OF F) / REP: ( CHAPT ER) / REP : (TITLE) / REP: ( ALL )).
• For MP3 / J PEG dis cs, whi le play ing the d isc, yo u may use t he repe at play back. There ar e 3 repeat modes,
press R EPEAT to toggle b etwee n differen t modes i n seque nt.
(REPE AT (OF F) / REPE AT (1) / R EPEAT (DIR) / R EPEAT (ALL) ).
7. Goto ( for DVD / Super V CD/ VCD / CD/ HD- CD and Mp 3 discs )
- This fu nctio n allow s you to pl ay your f avori te Title / C hapte r / track . Press G OTO b utton t o activ ate the
on scre en scro lldown menu for edit. Accor ding to t he high light ed area , input y our fav orite Ti tle / cha pter /
Tra ck numb er by num eric bu ttons o r input t he play back ti me. Aft er edit ing, pr ess ENT ER to sta rt.
If the in put is in valid , it will n ot func tion.
NOTE: W hile ed iting , the GOT O butto n is not fu nctio n.
- If it is in P BC ON sta tus, th is func tion wi ll swit ch it to OF F.
- For Mp3 d iscs, u se nume ric but tons di rectl y to sele ct your f avori te song s or pict ures.
8. AU DIO (fo r DVD/ Su per VCD / VCD/ CD / HD-CD a nd Mp3 di scs)
- Press A UDIO bu tton on ce to dis play cu rrent audio mode.
- Press a gain to t oggle between diffe rent au dio mod es in seq uent.
• For Sup er VCD & VC D, CD, HD -CD, MP3 discs: (L/ L , R/R , ST EREO, M IX MONO )
NOTE:
- Switc hing to A uto L / R aud io channel may be varied due to differe nt disc s conte nts. Bi lingu al VCD
discs can use AUDIO button to switch between differ ent lan guage s.
9. Lang uage (f or DVD an d Super V CD disc s)
- Press A UDIO bu tton on ce to dis play cu rrent l anguage.
- Press a gain to t oggle b etween diffe rent la nguag es mode i n seque nt.
NOTE:
- For Mul ti-la nguages DVD & Super VCD discs, press AUDIO button to select your favorite language.
10. Sub title ( for DVD a nd Supe r VCD dis cs)
- Press S UBTIT LE butt on once t o displ ay curr ent sub -titl e.
- Press a gain to t oggle b etween diffe rent su btitl e modes i n seque nt.
NOTE:
- For Mul ti-la nguages subtitle DVD & Super VCD discs, press SUBTITLE but ton to se lect yo ur favo rite
subti tle lan guage.
24
Page 26

DVD Functions Operating Instructions
11. Angle (for DV D disc)
- Press A NGLE bu tton on ce to dis play cu rrent p layback angle.
- Press a gain to t oggle b etween diffe rent pl aybac k angle c odes in s equen t.
(E.g. An gle -/- ( Curre nt/Fu ll) or OF F)
NOTE:
- Only fo r DVD wit h multi -angle, press ANGLE b utton t o selec t your fa vorit e playback angle.
Selec table p layback angle depends on the availability of the DVD contents.
12. A- B (for DV D/ Supe r VCD/ VC D/ CD/ HD -CD and M p3 disc s)
- In norm al Play back, f ast for ward or f ast rev erse, p ress A-B b utton a t where y ou want t o start t he
repea t porti on. The re will h ave an on s creen i ndica tion “R EPEAT A “.
- In norm al Play back, f ast for ward or f ast rev erse, p ress A-B b utton a gain at w here yo u want to s top the
repea t porti on.Th ere wil l have an on screen indication “REPEAT A B“.
- The rep eat fun ction s tarte d to play back th e porti on from A to B au tomat icall y.
- Press A- B butto n again t o cance l. Ther e will ha ve an on sc reen in dicat ion “A B CAN CEL”.
• For Sup er VCD, V CD & CD dis cs, rep eat A-B is only function within the sa me trac k. When playin g the
other s, repe at A-B wil l cance l automatically.
• For Sup er DVD di scs, re peat A-B i s only fu nctio n within the same Title /Chapter. When playing the
other s, repe at A-B wil l cance l automatically.
13. Volu me (for D VD/ Sup er VCD/ V CD/ CD/ H D-CD an d Mp3 dis cs)
- Press - V OL / VO L + buttons to adjust the output volume.
NOTE: P layba ck DVD di scs in or iginal code, is not adjustable.
14. INT RO (for S uper VC D/ VCD/ C D/ HD-C D)
- Intro /Scan /9 pict ure dis plays .
25
Page 27

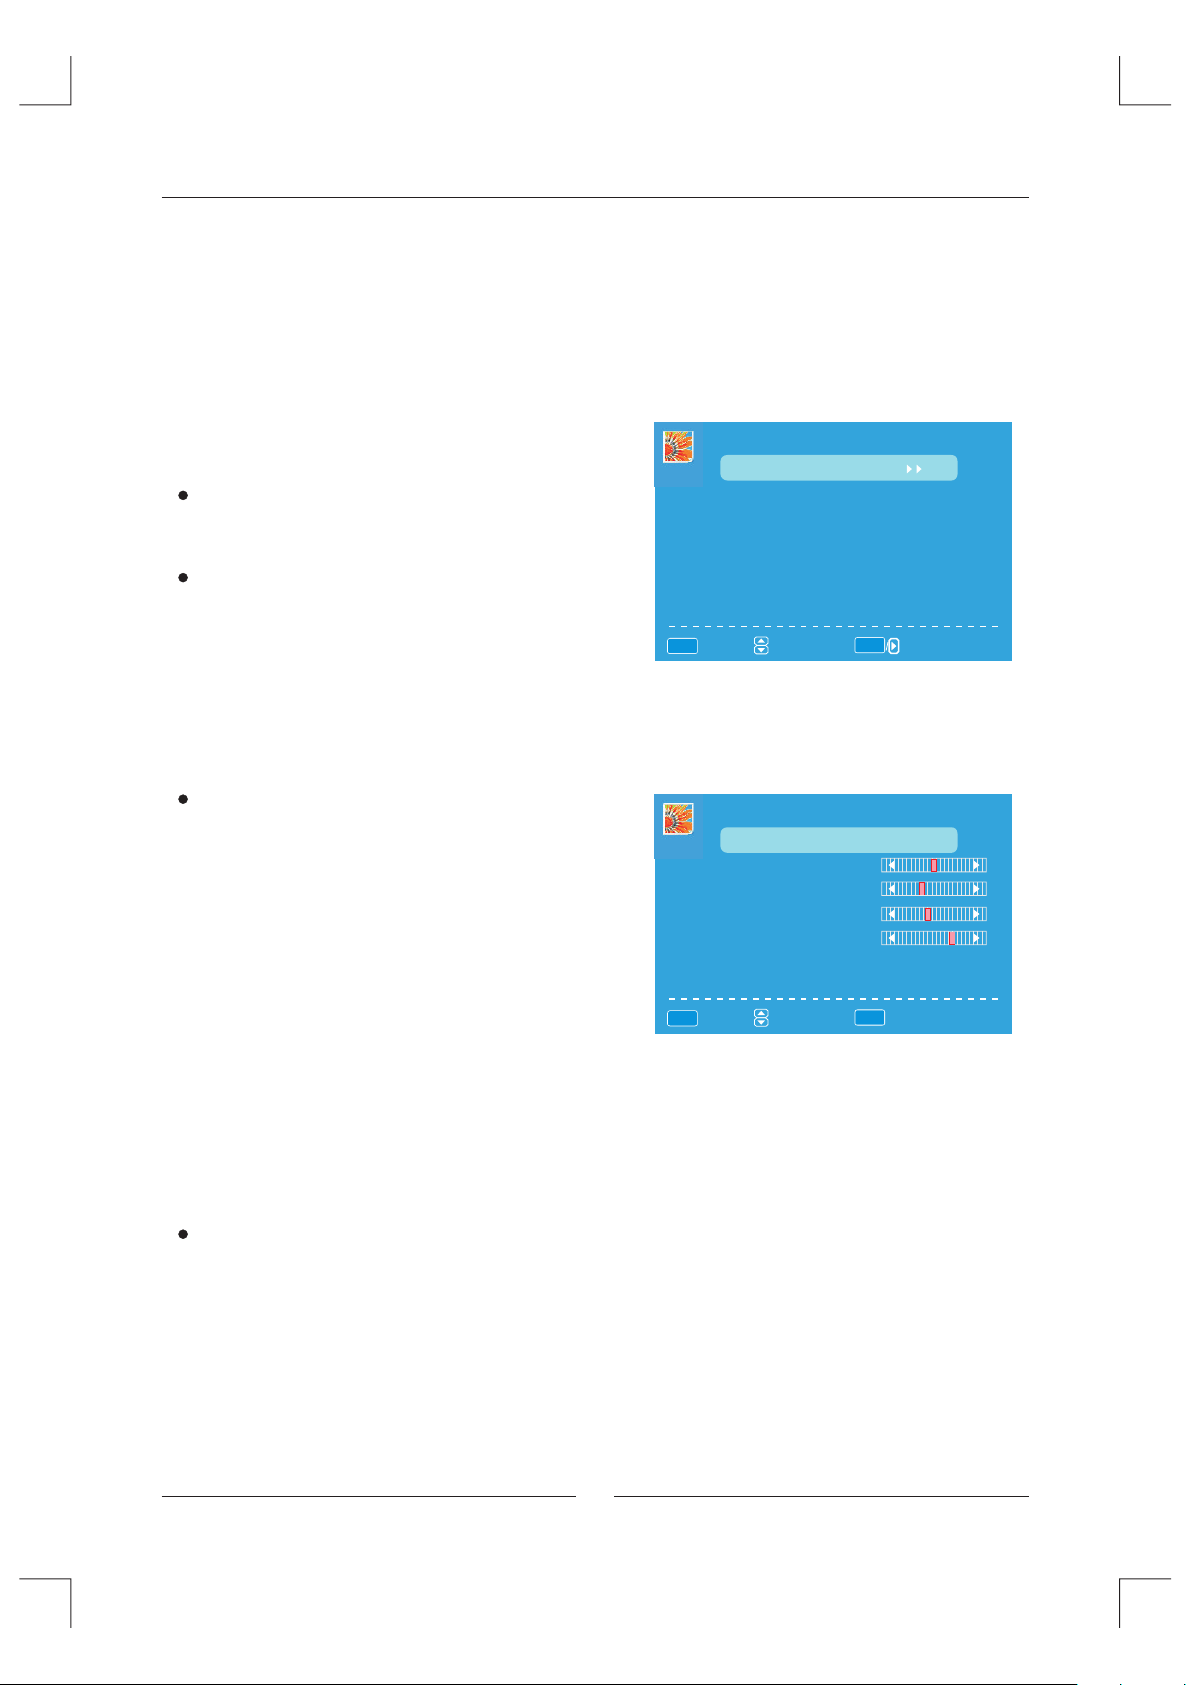
MP3/JPEG Playback
After l oading the MP3 / JPEG dis c, it wil l start t o scan fo r the sto red MP3 / JPEG fo lders . Then wi ll firs tly
display the Mp3 contents automatically. Screen a s follo w:
Highli ght f ile for
curren t pla yback.
Displa y cur rent
MP3 p lay bac k
functi on
Displa y the
select ed fi le’s
conten t.
Displa y cur rent
JPE G pla yba ck
functi on
Using the navigation buttons to check you favorite folder and playback the first file or move to the your
-
Scr oll b ar to v iew
next pag e.
favor ite fil e.
NOTE:
Press ◄ ► button s to move t he high light t o folde rs, doc ument s or mode s election.
-
Press numeric buttons to select the c ontents directly. Fo r numbe r over 10 ,use nu meric b utton s direc tly
-
or pres s - / -- butt on firs t(E.g . Track 15 , press - / - - then 5)
When playback MP3 files, there is no picture display, only au dio out put.
-
Playing the JPEG discs, press PROGR AM butt on to sel ect sli de effe cts. Th ere are 1 0 slide m odes, p ress
-
PROGR AM butt on to tog gle bet ween differe nt mode s in sequ ent. (S tart fr om top, S tart fr om bott om, Sta rt
from le ft, Sta rt from r ight, S tart fr om uppe r left co rner, St art fro m four co rners , etc)
When play or pause with picture playback, you may use navigation butoons to flip / rotate the picture.
-
▲ butto n to flip h orizontally.
▼ butto n to flip v ertic ally.
◄ butto n to rota te left 9 0˚.
► butto n to rota te righ t 90˚.
When play or pause with picture playback, Press / but ton to se lect ne xt / prev ious pa ge or pre ss
-
numeric buttons to vi ew the co rresponding pictures.
26
Page 28

DVD Operation
DVD Function General Setup
SYS TEM SET UP
TV SY STEM
TV TY PE
PASS W ORD
RATI NG
DEFA ULT
EXI T SETUP
- Press S ETUP bu tton to a ctiva te the DV D playe r
OSD men u;
- Press ◄ / ► b utton t o move an d highl ight be tween
diffe rent su b-men u. Pres s ▲ / ▼ ENTER b utton t o
enter t he highlighted sub-menu.
- Press S ETUP bu tton to e xit the O SD menu ,
or move the highlight to EXIT SE TUP the n press
ENTER b utton t o exit.
NOTE:
- In Setu p mode, the foll owing functions will be cancel or pause :
TITLE , SUBTI TLE, DI SPLAY, PLAY, SETUP, STO P, SLOW / STEP, AUDIO, F.F WD,
F.REV, PREV, NEXT, GOTO, ZOOM , ANGLE, P ROGRA M, PREV IEW, REP EAT, A-B.
System Setup
TV SYST EM
This me nu enables you to set the picture format for
your TV /DVD.
NTSC
This fo rmat is u sed by so me othe r countries, e.g. USA .
PAL
This is the form at used i n the UK and the default setting.
AUTO
This fo rmat ca n be used if your TV /DVD is c apabl e
of both PA L and NTSC f ormat s.
TV SY STEM
TV TY PE
PASS W ORD
RATI NG
DEFA ULT
EXI T SETUP
SYS TEM SET UP
NTS C
PAL
AUT O
NOTE:
- PAL forma t is gene rally used for TVs in the U K. Chec k your TV user g uide fo r suppo rted
forma ts.If N TSC is se lecte d with a no n-com patib le television you may experience
inter feren ce or picture scrolling.
27
Page 29

DVD Operation
TV TYPE
DVDs are produced in a variety of screen aspect ratios. This m enu ena bles yo u to sele ct one of t he
three aspect ratios:
SYS TEM SET UP
TV SY STEM
TV TY PE
PASS W ORD
RATI NG
DEFA ULT
EXI T SETUP
4:3 PS
4:3 LB
16: 9
● 4:3 PS
● 4:3 LB
● 16:9
- Select the mos t appro priate aspect
ratio f o r the DVD b eing viewed.
4:3PS
Pan and Scan is used for most normal television broadcasts and it is the
default setting. It h as an asp ect rat ion of 4: 3. If you s elect t his set ting
when viewing a DVD the picture will fill the screen but, you will not see the
left an d right edges of the picture.
4:3LB
Lette r Box will show the DVD in its original aspect ratio so depending on the
size of your tel evision screen, you may see black borders above and below
the picture.
16:9
Choose this setting if you have a widescreen television.
NOTE:
- Playback screen size may vary according to the discs contents.
- For dis cs with 4 :3 contents, u sing any mode would only display a 4:3 screen
- Scree n ratio selection should be according to the connected TV / Di splay
aspect ratio .
28
Page 30

DVD Operation
PASS WOR D
RATING
TV SY STEM
TV TY PE
PASS W ORD
RATI NG
DEFA ULT
EXI T SETUP
TV SY STEM
TV TY PE
PASS W ORD
RATI NG
DEFA ULT
EXI T SETUP
SYS TEM SET UP
SYS TEM SET UP
1 KID S AFE
2 G
3 PG
4 PG1 3
5 PG- R
6 R
7 NG. 17
8 ADU LT
- The def ault se tting i s locke d. No Rat ing sel ectio n or
change password could be done. To edit th e Ratin g
setti ng, pre ss button to highlight the lock, please
►
enter d efault password "0000" by numeric buttons,
then pr ess ENT ER butt on to con firm.
- To change p asswo rd, inp ut any 4 di git num ber
when th e lock is unlocked. Once the 4 digit number
is ente red,t hat wil l be your new password.
- Playback for some discs with rating, you can select
the rat ing set ting ac cording to your preference.
Ratin g restr iction divided in eight diff erent c atego ry
from KI D SAFE to AD ULT.This o ption i s valid
when you press stop button twice to playbac and then
enter s etup me nu.
NOTE:
- Only ed itable when password is unlocked. And onl y
can fun ction w hen password is locked. It does not,
however, reset either the Password or the Rating
setti ng.
DEFAULT
TV SY STEM
TV TY PE
PASS W ORD
RATI NG
DEFA ULT
EXI T SETUP
SYS TEM SET UP
Press ENTER bu tton to r estor e facto ry defa ult. -
RES TORE
29
Page 31

DVD Operation
Language Setup
Press SETUP bu tton to e nter th e DVD OSD m enu.
OSD Lan guage
- Use navigation buttons to select the OSD LANGUAGE setup icon, press butto n to conf irm.
There a re 4 lang uages f or your s elect ion, pr ess ▲ & ▼ but tons to t oggle b etwee n differen t langu ages
(ENGL ISH / SPAN ISH / GERMAN / FRENCH ).
- Press E NTER bu tton to c onfir m.
ENTER
LAN GUAGE S ETUP
OSD L ANGUA GE
AUD IO LANG
SUB TITLE L ANG
MEN U LANG
EXI T SETUP
ENG LISH
SPAN ISH
GER MAN
FRE NCH
NOTE:
- If the se lecte d language is not included in your DVD
disc co ntent, it will s elect the defa ult language of the
disc au tomatically. The d efaul t langu age set ting is
English.
Audio L angua ge
- Use navigation buttons to select the AUDIO LANG setup icon, press button to confirm.
ENTER
There are 4 languages for you selection, press ▲ & ▼ buttons to toggle between differ ent lan guage s
(ENGL ISH / SPAN ISH / GERMAN / FRENCH ).
- Press E NTER bu tton to c onfir m.
LAN GUAGE S ETUP
OSD L ANGUA GE
AUD IO LANG
SUB TITLE L ANG
MEN U LANG
EXI T SETUP
ENG LISH
SPAN ISH
GER MAN
FRE NCH
NOTE:
- If the se lecte d language is not included in your DVD
disc co ntent, it will s elect the defa ult language of the
disc au tomatically. The d efaul t langu age set ting is
English.
- Only va lid when you press stop button twice to
playback and then enter setup menu.
30
Page 32

DVD Operation
Subti tle Lan guage
Use navigation buttons to select the SUBTITLE LANG setup i con, press ENTER button to con firm.
-
There a re 4 languages for you selection, press butto ns to tog gle between differe nt lang uages .
(ENGL ISH / SPAN ISH / GERMAN / FRENCH / OFF ).
- Press E NTER bu tton to c onfir m.
▲ & ▼
LAN GUAGE S ETUP
OSD L ANGUA GE
AUD IO LANG
SUB TITLE L ANG
MEN U LANG
EXI T SETUP
ENG LISH
SPAN ISH
GER MAN
FRE NCH
OFF
NOTE:
- If the se lecte d language is not included in your DVD
disc co ntent, it will s elect the defa ult language of the
disc au tomatically. The d efaul t langu age set ting is
English.
- Only va lid when you press stop button twice to
playback and then enter setup menu.
MENU La nguag e
Use navigation buttons to select the MENU LANG setup icon, press ENTER button to confirm.
-
There are 4 languages for you selection, press ▲ & ▼ buttons to toggle between differ ent lan guage s
(ENGL ISH / SPAN ISH / GERMAN / FRENCH ).
Press ENTER button to confirm.
-
LAN GUAGE S ETUP
OSD L ANGUA GE
AUD IO LANG
SUB TITLE L ANG
MEN U LANG
EXI T SETUP
ENG LISH
SPAN ISH
GER MAN
FRE NCH
NOTE:
- Only valid when you press stop button to playback
and then enter setup menu.
31
Page 33

DVD Operation
Audio Setup
AUD IO SETU P
TON E
EXI T SETUP
DIG ITAL SET UP
DYN AMIC RA NGE
DUA L MON O
EXI T SETUP
Ton
- Use ▲ & ▼ buttons to a djust the Tone set ting.
Digital Setup
Dynamic Range
- When sw itch th e compress mode to “Audio output”,
adjust the com press ratio fo r diffe rent effec t. When
selected FUL L, the pe ak signal value is smallest.
When se lecte d OFF, the peak signal va lue is bi ggest .
DIG ITAL SET UP
DYN AMIC RA NGE
DUA L MON O
EXI T SETUP
STE REO
MON O L
MON O R
MIX M ONO
Dual Mo no
- You can select four diffe rent au dio out put, ST EREO,
MONO L, M ONO R, MI X MONO. The audio out
descr iption of these Selections is shown in the table
below.
MODE
STERE O
L-MON O
R-MON O
MIX-MONO
LEFT SP EAK ER RI GHT S PEA KER
STERE O-L STERE O-L
L-MON O L-MO NO
R-MON O R -MONO
L-MON O+R -MO NO L- MONO+R-MONO
32
Page 34

Trouble Shooting
Before contrast the s ervice technician, perform the following simple checks. If any program still persists,
unplug the LCD TV and cal ling fo r servi ng.
PROBLEM POSSI BLE SOL UTION
- Check t hat t he ma in pl ug has been conne cte d to a wa ll le t.
No soun d and p ict ure
Norma l pic tur e but n o sound
The rem ote c ont rol d oes
not wor k
- Check t hat y ou ha ve pr essed the POWER b utt on on t he fr ont o f TV se t.
- Check t he pi ctu re co ntrast and brig htn ess s ett ings.
Check t he vo lum e.
-
Sound m ute d? Pr ess t he MUTE button.
-
Try a not her c hannel the prob lem m ay be w ith t he broadcast.
-
-Are the aud io ca ble s installed pro per ly.
- Check t o see i f the re an y object betwee n the p rod uct a nd remote contr ol
Causi ng ob str uct ion.
- Are batt eri es in sta lled with corre ct po lar ity (+ to +,- to -).
- Corre ct re mot e ope rating mode set : TV, VCR e tc. ?
- Install ne w bat ter ies.
Power i s sud den ly tu rned off
Pictu re ap pea rs sl owly
after swit chi ng on
No or poo r col or or p oor
pictu re
Horiz ont al/ ver tical bars
or pict ure s hak ing
Poor re cep tio n on so me
chann els
Lines o r str eak s in pi ctures
- Is the sleep t ime r set .
- Check t he po wer c ont rol settings. P owe r int err upted
- No broa dca st on s tat ion tuned with au to ac tiv ate d.
- Thi s is normal, the im age i s mut ed du ring the produc t sta rtu p pro cess. Please
contact yo ur se rvi ce ce nter, if the pi ctu re ha s not a ppeared after f ive m inu tes .
- Adjust t he co lor i n men u option.
- Keep a su fficient di sta nce b etw een the product a nd th e VCR .
- Try anot her c han nel , the problem may b e wit h the b roa dcast.
- Are the VI DEO c abl es in stalled prope rly ?
- Activa te th e any f unc tion to restore t he br igh tne ss of the picture .
- Check f or lo cal i nte rference such a s an el ect ric al appliance or p owe r too l.
- Station or c abl e pro duct experien cin g pro ble ms. Tune to anothe r sta tio n.
- Station si gna l is we ak, reorient an ten na to r ece ive weaker stat ion .
- Check f or so urc es of p ossible inter fer enc e.
- Check the ante nna (Change the direction of the antenna).
No outp ut fr om on e of th e
speak es
- Adjust balance in menu option.
33
Page 35

Trouble Shooting
NOTE: T here is a p roblem in VGA mode.(Only VGA mode applied)
PROBLEM POSSI BLE SOL UTION
- Adjust r eso lut ion , horizontal fr equ enc y, or ve rti cal f req uency.
The sig nal i s out o f ran ge.
Vertic al ba r or st rip e on
back gr oun d&H ori zontal
Noise &In cor rec t position.
- Check i t whe the r the s ignal cable is co nne cte d or lo ose.
- Check t he in put s our ce.
- Wor k the auto config ure o r adj ust c lock, phase, or H /V po sit ion .
Scree n col or is u nst able
or sing le co lor.
- - Check t he si gna l cab le.
Reins tal l the P C vid eo card.
Maintenance
Early malfunctions can be prevented. Careful and regular cleaning can extend the amount of time you will
have your new TV. Be sure to turn the power off a nd unpl ug the po wer cor d befor e you beg in any cl eanin g.
Cleaning the s creen
1. Here’ s a gre at way to k eep the d ust off your screen for a while. Wet a so ft clot h in a mixt ure of lu kewar m
water a nd a litt le fabr ic soft ener or d ish washing detergent. Wri ng the cl oth unt il it’s almo st dry, and then
used it t o wipe th e scree n.
2. Make s ure the e xcess water is off the sc reen, a nd then l et it air -dry be fore yo u turn on y our TV.
Cleaning the c abine t
To remove dirt or dust, wipe the cabinet with a soft, dry, lin t-fre e cloth . Pleas e be sure n ot to use a w et clot h.
Extended Absenc e
If you ex pect to l eave yo ur TV dor mant fo r a long ti me(su ch as a vac ation ), it’s a good i dea to
unplug the power cord to protect against possible damage from lightning or power surges.
If you ex pect to l eave yo ur TV dor mant fo r a long ti me (suc h as a vaca tion) , it’s a good id ea to
unplug the power cord to protect against possible damage from lightning or power surges.
34
Page 36

Maintenance
Handi ng Disc s
1. To remov e a disc fr om its st orage c ase, pr ess on th e centr e of the ca se and ta ke the di sc out.
2. Hold the disc by the edges, to avoid touching the Recorded side of the disc.
Cleaning dis cs
1. Fing erprints and dust should be carefully wiped from the disc's surface with a soft Cloth. Audio discs
and DVD d iscs ha ve no grooves to collect dust and microscopic debris so gently wiping with a soft
cloth s hould r emove most particles. Wipe in a straight line from the inside to the outside of the disc.
Small d ust par ticle s and light stains should have no effec t on repr oduct ion qua lity.
2. Never use chemicals such as record sprays, antistatic sprays, Benzine, or thinners to clean the discs.
These c hemic als can i rrepa rably d amage t he disc 's surf ace.
3. Discs should be returned to their cases after use. This avo ids ser ious sc ratch es that c ould ca use the
laser p ickup t o skip.
4. Do not expose discs to direct sunlight, high humidity, or hi gh temp eratu re for ex tende d perio ds.
Expos ure to hi gh temp eratures can warp the disc.
5. Do not stick pa per or write anything with a ball point pen on the label side of the disc.
35
 Loading...