

Page 1

LCD TV 32"
MODEL LCD3227A-2
Users Manual'
Page 2

Contents
Caution .................................................................................................................................... 2
Main Unit Descriptions ............................................................................................................ 3
Accessories ............................................................................................................................. 5
Getting Started ........................................................................................................................ 5
Remote Control Key Functions ............................................................................................... 6
TV Operation ............................................................................................................................ 8
Select Input Source ......................................................................................................... 8
Basic Operation ............................................................................................................... 8
Picture Menu ................................................................................................................... 9
Sound Menu ................................................................................................................... 11
Channel Menu ............................................................................................................... 12
Parental Control ............................................................................................................ 13
Setup Menu .................................................................................................................. 15
Others Menu ................................................................................................................. 17
Wall Mount Install Ation .......................................................................................................... 18
Specifications ....................................................................................................................... 19
Simple Troubleshooting ....................................................................................................... 19
1
Page 3

Caution
The lightening flash with arrowhead symbol, within an equilateral triangle is intended to alert
the user to the presence of un-insulated dangerous voltage within the products enclosure
that may be of sufficient magnitude to constitute a risk of electronic shock to the persons.
The exclamation point within an equilateral triangle is intend to alert the user to the presence
of important operating and maintenance (servicing).
Safety Information
To ensure reliable and safe operation of this equipment, please read carefully all the
instructions in this user guide, especially the safety information below.
Electrical safety
The TV set should only be connected to a mains supply which matches that stated on the label
on the rear of the product.To prevent overload, don't share the same mains supply socket with
too many other items of equipment.
Do not place any connecting wires where they may be stepped on or tripped over.
Do not place heavy items, which may damage the leads, on them.
Hold the Mains plug, not the wires, when removing from a socket.
During a thunderstorm or while leaving the TV for long periods, disconnect the aerial
(if outdoor) and mains from the supply.
""
Do not allow water or moisture to enter the TV or mains adaptor. Do NOT use in wet or moist
areas such as Bathrooms, steamy kitchens or near swimming pools.
Pull the plug out immediately, and seek professional help if:
The mains plug or cable is damaged
Liquid is spilt onto the set, or if it is accidentally exposed to water or moisture
Anything accidentally penetrates the ventilation slots
The set doesn't work normally
Do not remove the safety covers. There are no user serviceable parts inside.
You may invalidate the warranty. Qualified personnel must only service this apparatus.
To avoid battery leakage, remove exhausted batteries from the remote control handset,
or when not using for a long period.
Physical safety
Do not block ventilation slots in the back cover. You may place the TV in a cabinet, but ensure
at least 5cm (2'') clearance all around.
Do not tap or shake the TV screen, you may damage the internal circuits. Take good care of
the remote control, do not drop.
To clean the TV use a soft dry cloth. Do NOT use solvents or petrol based fluids.
For stubborn stains, you may use a damp soft cloth with dilute detergent.
2
Page 4
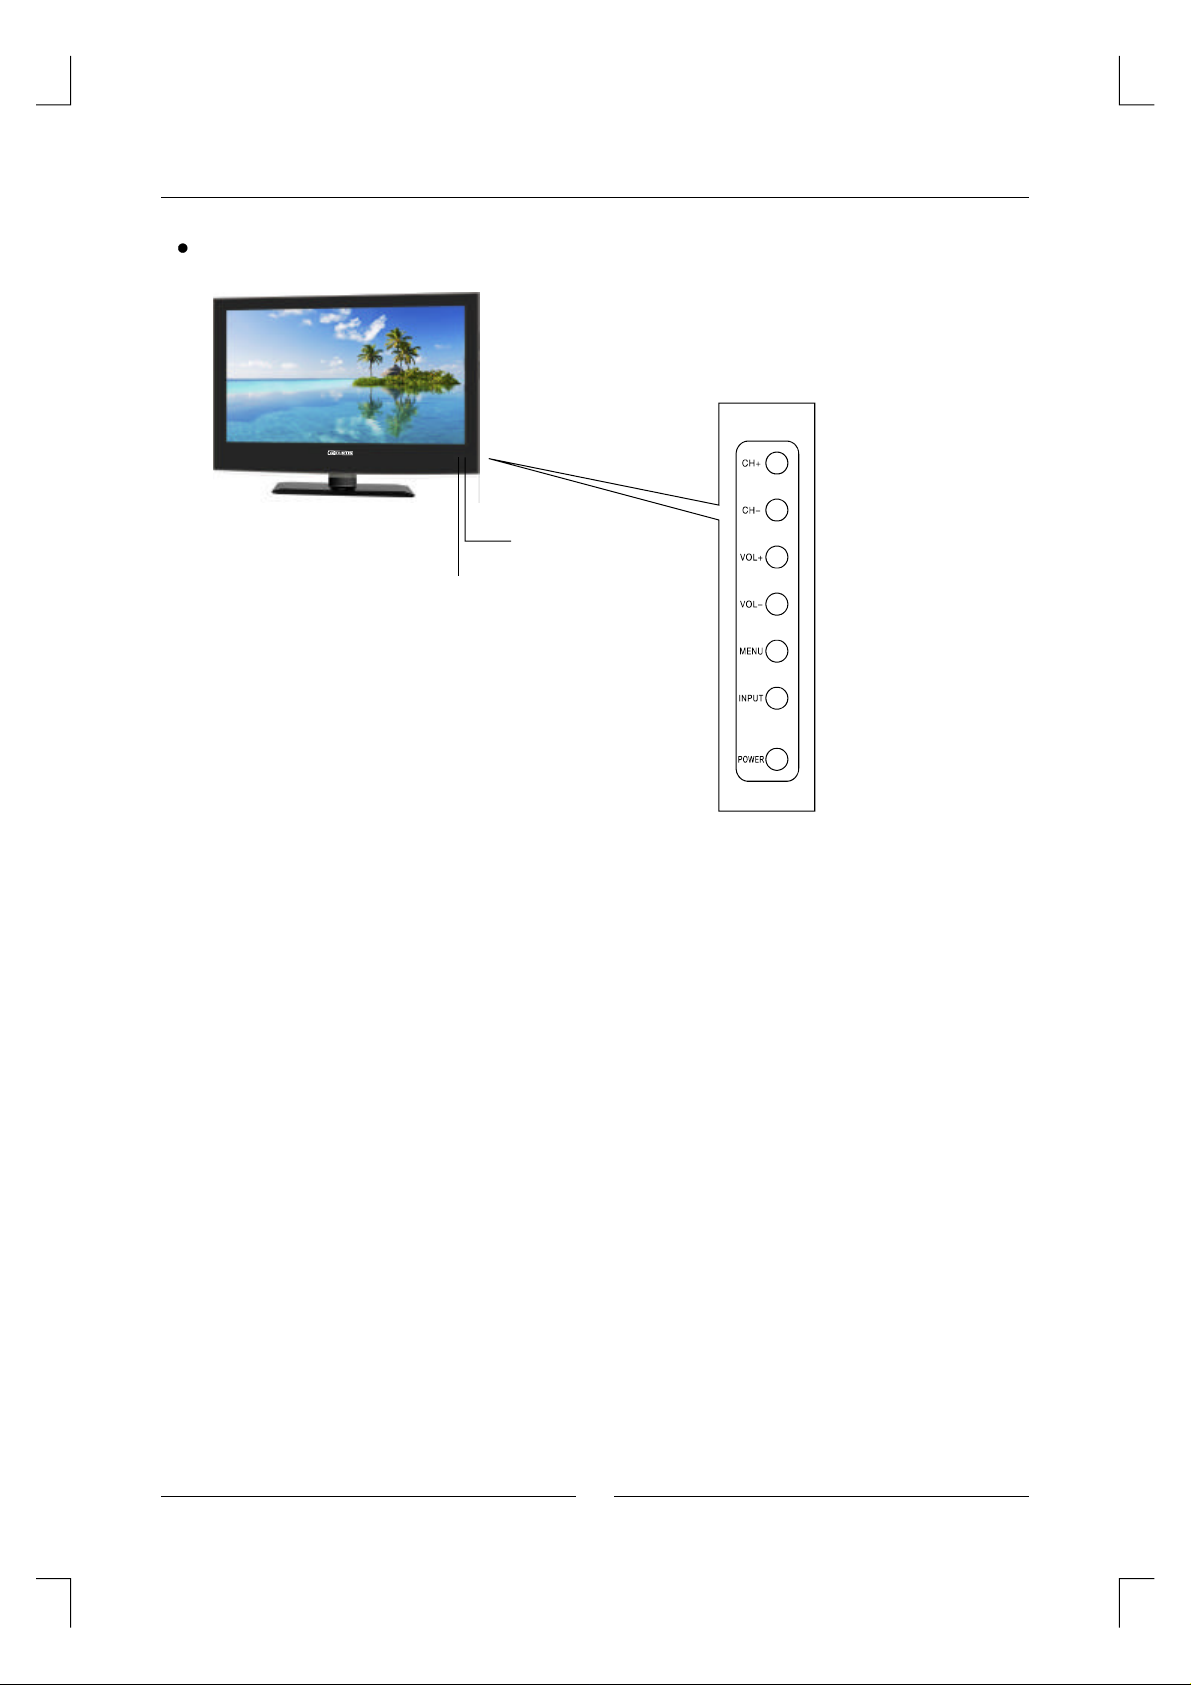
Main Unit Descriptions
FRONT
NOTE:TV picture is for reference only.
Indicator
Remote control receiving window
The functions of the buttons are described as bellows:
Press to choose UP/DOWN channels.
CH+/-:
VOL+/-:
MENU:
INPUT:
POWER:
NOTE:
The effective receiving scope for the signal is 5-8 meters from the front of the
remote control window, and 30degree to the left or right side and 20degree
above or below the control window.
To operate the LCD TV, you must point the remote control sensor of the TV (Objects
placed between them may affect the operation).Never let the remote control sensor
on the TV becomes exposed to the direct sunlight or strong light.
Press to adjust the volume.
Press to display the OSD menu, Press again to exit the menu.
Press to select the input source.
Turn on and off, carry out the function of standby and turn-on.
3
Page 5

Main Unit Descriptions
INPUT AND OUTPUT TERMINAL
6
USB
IN
110-240V
50/60Hz
1
75 ohm Antenna Socket.
2
Video signal receivable. (AUDIO from YCC/YPP1)BRBR
3
YCC/YPPcomponent signal receivable.BRBR
4
HDMI Input.
5
PC analog RGB signal receivable.
6
USB Input. (Only for service)
Coaxial signal (digital audio) output.
7
AUDIO output Terminal.
8
Earphone output Terminal.
9
HDMI1 HDMI2 HDMI3
IN IN IN
4
PC AUDIO
5
PC
IN
IN
3
COMPONENT & AUDIO IN 2
R L
P/CRR
P/CBB
Y
R L
P/CRR
P/CBB
Y
COMPONENT & AUDIO IN 1
3
8 9
AUDIO OUT
R L
VIDEO
IN
2
EARPHONE
OUT
COAXIAL
OUT
7
1
RF
IN
Connect antenna or video facility
1. Use 75 coaxial cable plug or 300-75 impedance converter to plug in antenna input
ΩΩ
terminal on the side of the cabinet.
2. Connect the video facility to the audio, video in jack on the left side of the cabinet.
Input terminal of antenna
Coaxial antenna plug to RF IN
VHF antenna
Mixer
UHF antenna
75 Ω Coaxial cable
4
Page 6
Accessories
Please check and identif y the supplied accessories.
Remote control ................................................................................................................ x 1
BatteryAAA................................................................................................................ x 2
()
Warranty Card ................................................................................................................. x 1
Instruction Manual ........................................................................................................... x 1
Power Cord .................................................................................................................... x 1
Getting Started
USING THE REMOTE CONTROL
·
Point the remote control at the remote sensor located on the unit.
·
When there is a strong ambient light source, the performance of the infrared remote sensor.
·
ay be degraded, causing unreliable operation.
M
·
The recommended effective distance for remote operation is about 16 feet (5 meters).
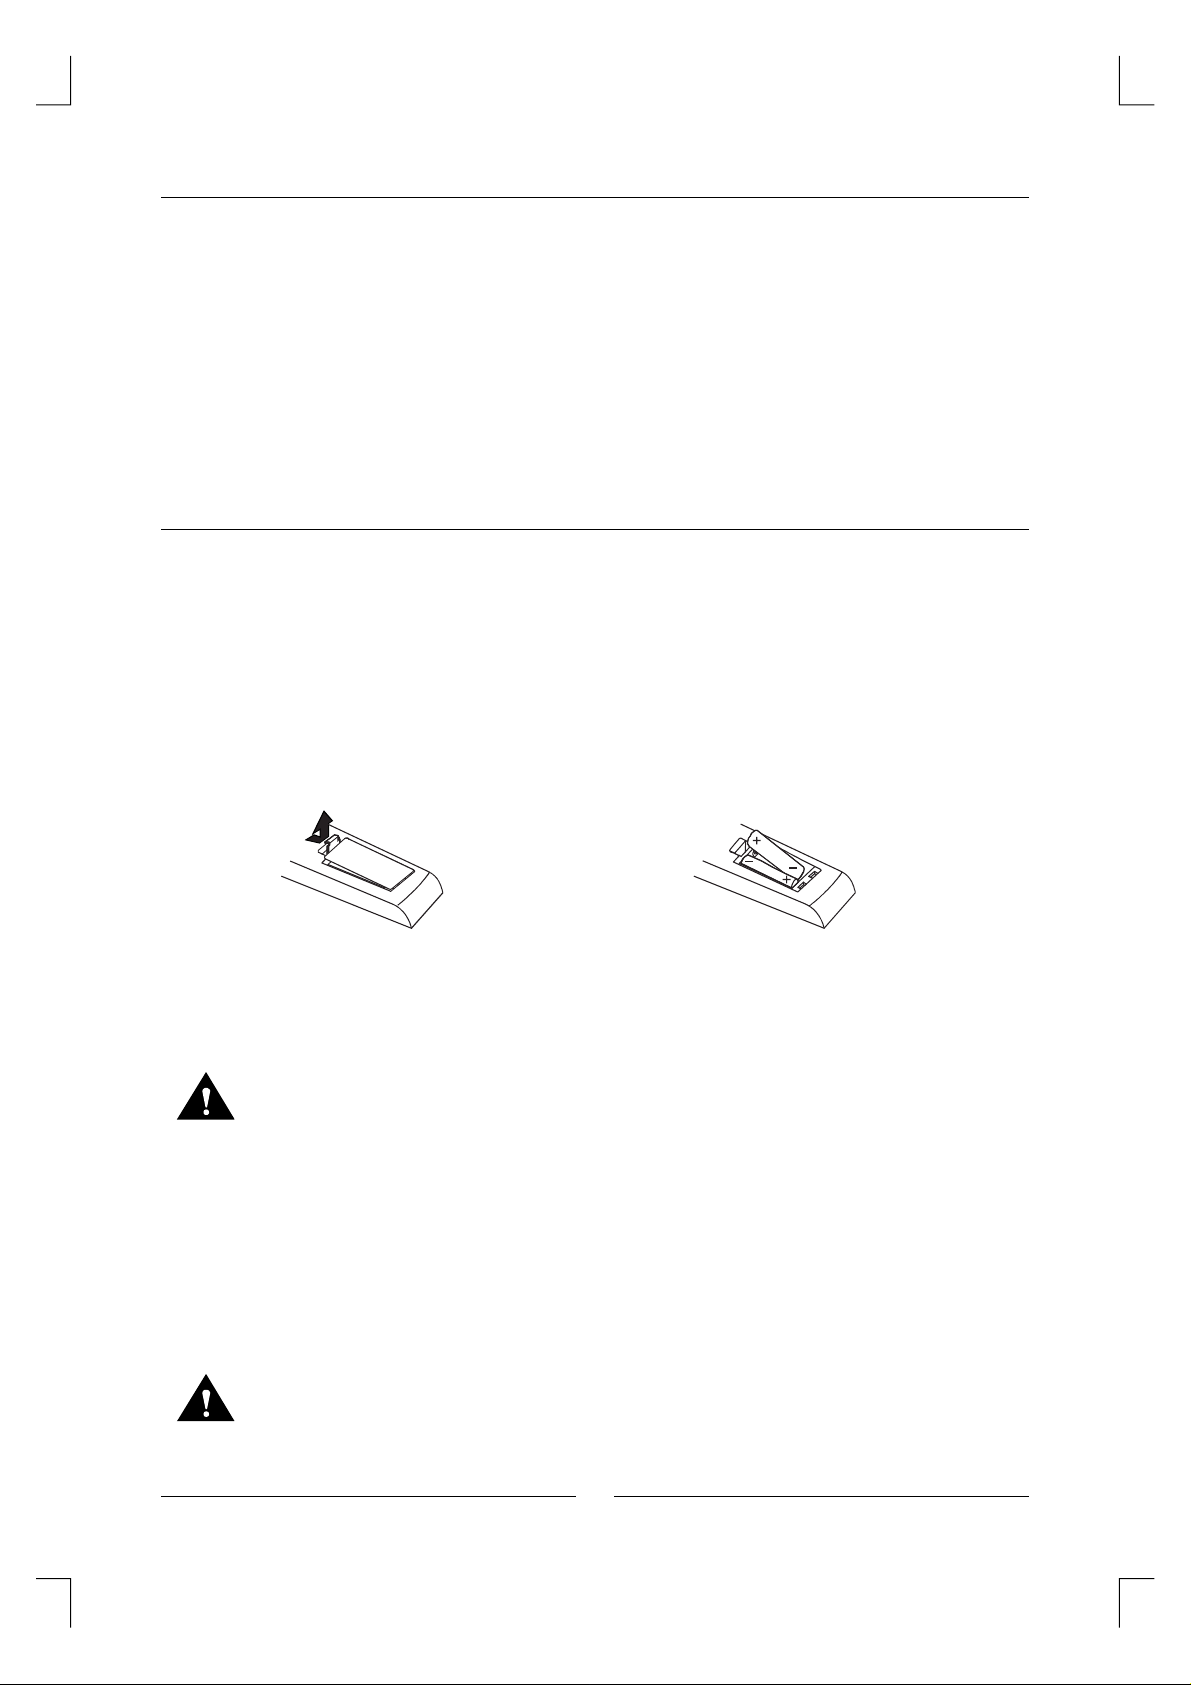
TO INSTALL THE BATTERIES
1. Open the battery door.
2. Insert 2 "AAA" batteries.
BATTERY REPLACEMENT
When the batteries become weak, the operating distance of the remote control is greatly
reduced and you will need to replace the batteries .
CAUTION : Danger of explosion if battery is incorrectly replaced.
NOTES:
If the remote control is not going to be used for a long time, remove the batteries to avoid
·
damage caused by battery leakage corrosion
Do not mix old and new batteries. Do not mix ALKALINE, standard (CARBON-ZINC) or
·
rechargeable (NICKEL-CADMIUM) batteries
Always remove batteries as soon as they become weak
·.
Weak batteries can leak and severely damage the remote control
·.
WARNING:
Do not dispose batteries in a fire. Batteries may explode or leak
Batteries shall not be exposed to excessive heat such as sunshine, fire or the like..
.
.
5
Page 7

Remote Control Key Functions
POWER
EXIT MENU
EPG
SAP CC
ENTER
MUTE
POWER
Turn on/off TV.
EPG
Display Electronic Program Guide menu .
MUTE
Press this button makes input source under silent mode,
press again can resume accompanying sound.
SAP
Show the list of audio languages available for current
channel under TV mode,such as left, right, mono and
stereo.
CC
Turn on/off CC.
VOL+
VOL-
INPUT
ASPECT
FREEZE
FAV LIST
ADD/ERASE
FAV CH+
CH LIST AUTO PMODE SMODE
CH-
DISPLAY
FAV CH-
CH+
INPUT
Select signal sources for TV.
ASPECT
Select ASPECT of screen,eg:Full(16:9), Normal(4:3),
WaterGlass, Cinema.
FREEZE
Make pictures static.
DISPLAY
Display info of the currently channel.
6
Page 8

Remote Control Key Functions
POWER
EXIT MENU
VOL+
INPUT
EPG
SAP CC
ENTER
VOL-
ASPECT
FREEZE
MUTE
CH+
CH-
DISPLAY
0~9 /-
Press any number of 0~9 buttons to select a TV channel ,
also can be used in Teletext Page choosing.
Press " - " to enter a program number for multiple program
channel, such as 2-1 etc.
Return to previous channels after changing channels.
EXIT
Exit menu or sub menu of TV.
MENU
Brings up LCD main menu on screen.
/
ENTER
Allows you to navigate on-screen menus and adjust system
settings to your preference.
VOL+/-
Increase/decrease the sound volume.
CH+/-
Change channels UP/DOWN.
FAV LIST
ADD/ERASE
FAV CH+
FAV CH-
CH LIST AUTO PMODE SMODE
Universal Remote Code(NEC): 0x80FF
FAV LIST
Display FAV menu under TV mode.
ADD/ERASE
Add or delete Favorite channel.
FAV CH+
Change forward Fav channel for TV.
FAV CH-
Change backward Fav channel for TV.
CH LIST
Display channel list.
AUTO
Auto calibration in PC mode.
PMODE
Cycle through available video picture modes.
SMODE
Cycle through different sound settings.
7
Page 9

TV Operation
Select Input Source
Press button to display the input source list;INPUT
Press button to select the input source you want to watch;
Press button to enter the selected source.ENTER
Basic Operation
Source Select
TV
AV
YPbPr1
YPbPr2
HDMI1
HDMI2
HDMI3
PC
PICTURE SOUND CHANNEL PARENTAL SETUP OTHERS
Press button to display the MAIN OSD MENU;MENU
Pressbutton to select the MENU you want;
Press button to enter the sub menu;ENTER
Press button to select the option and then press to adjust the value in the sub menu;
You can press button to go back to the upper menu or button to close the OSD.MENU EXIT
8
Page 10

TV Operation
Picture Menu
TV / AV / YPbPr / HDMI source.
Picture Settings
Press button to enter the sub menu.ENTER
Picture Mode
Available picture mode: Movie, User, Dynamic,
Standard.
Brightness, Contrast, Color, Tint, Sharpness
Only in the User mode, the detail options as following
can be adjusted.
( will only show when the color system is NTSC.)
Tint
Screen Settings
Press button to enter the sub menu.ENTER
Screen Size
Available Screen Size: WaterGlass,Cinema,Full, Normal.
Auto Wide
ENTER
Press button to adjust. It can set the picture to fit
the screen automatically. When the Auto Wide is selected,
the symbol will show as following:
Auto Wide
PICTURE
Picture Settings
Screen Settings
PC Settings
Color Temperature
Advanced Picture Settings
MENU
:Return
:Select Menu :Go to Next Menu
PICTURE SETTINGS
Picture Mode
Brightness
Contrast
Color
Tint
Sharpness
MENU
:Return
:Select Menu
SCREEN SETTINGS
Screen Size
Auto Wide
Normal
ENTER
Movie
:Change Setting
Normal
Color Temperature
Available color temperature: Cool, Normal, Warm.
Advanced Picture Settings
Press button to enter the sub menu.ENTER
Dynamic Contrast
it can adjust the contrast corresponding to the input signal in
order to improve the picture quality displayed.
(Available Mode: Off,Low,Medium,High)
Film Mode
It handles 3:2 pull down and 2:2 pull down.
(Available Film Mode: On/Off)
9
MENU
:Return
:Select Menu :Change Setting
ADVANCED PICTURE SETTINGS
Dynamic Contrast
Film Mode
Noise Reduction
MPEG Noise Reduction Off
MENU
:Return
:Select Menu :Change Setting
ENTER
Off
Off
Off
Page 11

TV Operation
Noise Reduction
Available Noise Reduction: Low, Medium, Off,High.
MPEG Noise Reduction
It can improve the quality of the pictures by reducing the block noise.
(Available MPEG Noise Reduction: Low, Medium, Off,High)
PC source.
Picture Settings menu and description are the same
as that for TV source.
Screen Settings
Press button to enter the sub menu.ENTER
Screen Size
Available Screen Size: Full,Dot By Dot.
Auto Wide
Auto Wide item is invalid in PC source.
PC Setting
Press button to enter the sub menu.ENTER
Auto Adjust
ENTER
Press button to start auto adjusting.
Horizontal Position
Adjust the H-Position.
Vertical Position
Adjust the V-Position.
Clock
Adjust the sampling frequency.
Phase
Adjust the sampling phase.
Reset
ENTER
Press button to reset the options above.
PICTURE
Picture Settings
Screen Settings
PC Settings
Color Temperature
Advanced Picture Settings
MENU
:Return
PC SETTINGS
Auto Adjust
Horizontal Position
Vertical Position
Clock
Phase
Reset
MENU
:Return
:Select Menu
:Select Menu
Normal
ENTER
:Go to Next Menu
Execute
Execute
ENTER
:Press To Execute
Color Temperature
Available color temperature: Cool, Normal, Warm.
10
Page 12

TV Operation
Sound Menu
SOUND menu and description are the same as that
for TV .But The settings for Analog Sound and Digital
Sound are invalid in AV / YPbPr / HDMI / PC source.
Sound Settings
Press button to enter the sub menu.ENTER
Sound Mode
Available Sound Mode: User, Dynamic, Standard, Soft.
Bass, Treble, Balance
Only in the User mode, the detail options
as following can be adjusted.
Surround Mode
Press button to adjust.ENTER
When the Surround Mode is selected, the symbol will
show as following:
Surround Mode
Analog Sound
Available Analog Sound: SAP, Stereo, Mono.
Digital Sound
Available Digital Sound: English, French,Spanish.
SOUND
Sound Settings
Surround Mode
Analog Sound
Digital Sound
Other Settings
Equalizer Settings
MENU
:Return
SOUND SETTING
Sound Mode
Bass
Treble
Balance
MENU
:Return
OTHER SETTINGS
AVL
Speaker
Digital Audio Output
SAP
English
:Select Menu :Go to Next Menu
:Select Menu :Change Setting
ENTER
User
Off
On
Dolby Digital
Other Settings
Press button to enter the sub menu.ENTER
AVL
Select ON or OFF. Auto Volume Levelcan set the volume
automatically adjust corresponding to the input audio.
Speaker
Select ON or OFF. If set it Off, the speaker will be mute.
Digital Audio Output
Available digital audio output:Dolby Digital,Off,PCM.
Equalizer Mode
Available Equalizer Mode: POP, USER, OFF, ROCK,
JAZZ.
11
MENU
:Return
:Select Menu
EQUALIZER SETTINGS
Mode
-2 -1 2 3 1 0 -1
100 250 500 1k 2k 4k 10k
MENU
:Return
:Select Menu
:Enable/ Disable
POP
:Change Setting
Page 13

TV Operation
Channel Menu
NOTE:
This menu is only shown when the input source is TV .
Channel List
ENTERPress button to scan the Channel List. If you select
the option In Channel List On, the channel label will
“”
display.
Favorite List
ENTERPress button to scan the Favorite Channel List.
Channel Setting
Press button to enter the sub menu.
ENTER
Channel Number
P
ressbutton to select the Channel Number or press
thenumber buttons to select the channel you want to set.
In Channel List
Press button to Add or Delete the current channel in
ENTER
the channel list.
Channel Label
Pressbutton to set the channel lable. After finishing the setting,
Press button to save the channel lable.
ENTER
Favorite Channel
Press button to Add or Delete the current channel in Favorite.
ENTER
CHANNEL
Channel List
Favorite List
Channel Setting
Signal Type
Auto Channel Search
MENU
:Return
:Select Menu :Go to Next Menu
CHANNEL SETTING
Channel Number
In Channel List
Channel Label
Favorite Channel
MENU
:Return
:Select Menu :Select Channel
Air
Execute
ENTER
2
Signal Type
There are two selections: Air and Cable.
Auto Channel Search
ENTERPress button to search channel.
12
AUTO CHANNEL SEARCH - Air
Now Searching...Please Wait...
Return
Analog Channels Found:
Digital Channels Found:
0
0
92%
Page 14

TV Operation
Parental Control
PARENTAL menu and description are the same as
that for TV source. Input password to enter, default
password is 0000.“”
V-CHIP
Press button to enter the sub menu.
ENTER
US V-CHIP
Press button to enter the sub menu.
ENTER
USA
Movie Rating
TV Rating
:Select Menu
MENU
:Return
ENTER
:Go to Next Menu
Movie Rating
G
PG
PG-13
R
NC-17
X
PARENTAL CONTROL
Lock Parental Control
V-CHIP
Change Password
Front Panel Lock
Source Lock
:Return
DIGITAL
:Go to Next Menu
MENU
V-CHIP
US V-Chip
Canada V-Chip
Block UnRated Show
Downloadable Rating
Clear Downloadable Data
MENU
:Return
:Select Menu :Go to Next Menu
ENTER
Movie Rating
Pressbutton to select Rating;
press button to lock.ENTER
:Select
TV Rating
:Select
ENTER
TV-Y
TV-Y7
TV-G
TV-PG
TV-14
TV-MA
:Lock/Unlock
D L S V FV
ENTER
:Lock/Unlock
TV Rating
Press button to select Rating;
ENTER
press button to lock.
13
Page 15

TV Operation
CANADA V-CHIP
The operation of CANADA V-CHIP is the same as the operation of US V-CHIP.
Block UnRated Show
Press button to set the rating locked.
ENTER
Downloadable Rating
Prress button to set the rating. If the DTV program doesnt have this rating
ENTER
information, this option will be in gray.
Clear Downloadable Data
Press button to set the rating .
ENTER
The above two operation only valid when playing the downloadable data stream.
NOTE:
The operations are the same as US V-CHIP.
'
Change Password
If the password is changed, all of the passwords in the
menu will be changed at the same time.
NOTE:
If you forget your password, you can use 1470 to enter
“”
any menu locked.
Front Panel Lock
Pressbutton to select On or Off. You can only use the
Power button on the TV when setting Front Panel Lock On.
Source Lock
Press button to enter the sub menu.
ENTER
Pressbutton to select Source , then press
button to set the Source Lock .
You can' enter the locked source if you set the Source
t
lock.
Enter
Change Password
Old Pin
New Pin
Confirm
MENU
:Return
Source Lock
TV
AV
YPbPr1
YPbPr2
HDMI1
HDMI2
HDMI3
MENU
:Return
DIGITAL
:Password
:Select Menu
ENTER
Page 1/1
:On/Off:Page
14
Page 16

TV Operation
Setup Menu
SETUP menu and description are the same as that
for TV source. But the setting for Closed Caption
is invalid in HDMI/PC source .
Closed Caption
Press button to enter the sub menu.
ENTER
Caption Display
Select ON or OFF.
Analog Caption Type
Available type: TEXT1,TEXT2,TEXT3,TEXT4,CC1,
CC2,CC3,CC4.
Digital Caption Type
Available type:Service1~6.
Digital CC Preset
Select Default or Custom.
Digital CC Style
This menu is only shown when the Digital CC Preset
is selected Custom.
Press button to enter the
ENTER
sub menu.
SETUP
Closed Caption
Menu Language
Sleep Timer
Clock
MENU
:Return
CLOSED CAPTION
Caption Display
Analog Caption Type
Digital Caption Type
Digital CC Preset
Digital CC Style
MENU
:Return
English
Off
:Select Menu :Go to Next Menu
:Select Menu
ENTER
Off
TEXT3
Service1
Default
:On/Off
DIGITAL CC STYLE
CC Size
CC Font Style4
CC Opacity Solid
Text Color Yellow
CC Background Opacity Transparent
CC Background Color Green
CLOSE CAPTION
MENU
:Return
:Select Menu
Small
:Change Setting
CC Size
Available Size: Small,Standard,Large,Default.
CC Font
Available type:Style0~7.Default .
CC Opacity
Available Opacity:Flashing,Default,Solid,Translucent,
Transparent.
Text Color
Available Color: Blue,Yellow,Red,Black,White,Green,
Magenta,Cyan,Default.
CC Background Opacity
Available Opacity:Flashing,Default,Solid,Translucent,
Transparent.
CC Background Color
Available Color: Blue,Yellow,Red,Black,White,Green,
Magenta,Cyan,Default.
15
Page 17

TV Operation
Menu Language
Available Language: English,French,Spanish, Deutsch.
Sleep Timer
Let you select amount of time before your TV turn itself off automatically.
Clock
Press button to enter the sub menu.ENTER
Time Zone
Available Size: Hawaii, Alaska, Eastern,Central,
Mountain, Pacific,Samoa,Newfoundland,Atlantic.
Auto Clock
Set it On or Off. If you set it On, it will adjust the time
corresponding the DTV time automatically.
Setup Time
Adjust the time and use the button to go to
ENTER
the next option.
Day Of Week
This option displays the Day Of Week corresponding
to the setup time.
CLOCK
Time Zone
Auto Clock Off
Setup Time 2009-10-21 20:00:00
Day Of Week Wed
:Select Menu
:Change Setting
Alaska
16
Page 18

TV Operation
Others Menu
OTHER menu and description are the same as that for
TV source.
Blue Back
ENTERPress button to select when there is no signal,
whether set the background in blue or not.
No Signal Power Off
ENTERPress button to select it On or Off. When set it
On and there is no signal input, it will turns off the panel
and the LED light turns red.
No Operation Power Off
ENTERPress button to select it On or Off. When set it On and there is no
operation input, it will turns off the panel and the LED light turns red.
All Reset
ENTERPress button to execute reset . When you select All Reset item,
a dialogue box will appear as following.
Attention!
If [All Reset] was executed
TV system is reset.
OTHERS
Blue Back
No Signal Power Off
No Operation Power Off
All Reset
Audio Only
MENU
:Return
:Select Menu
ENTER
Execute
:On/ Off
Audio Only
Press button to enter the sub menu.ENTER
Hold on power key 3 sec.
to restore video. Then there will be only audio output.To wake up video,
please press button for 3 secretary.
Power
AUDIO ONLY
Audio Only
Hold on power key 3 sec. to restore video
:Select Menu :Press to Execute
ENTER
Execute
17
Page 19

Wall Mount Install Ation
INSTALLING REMOVING THE BASE STAND/
WARNING :
The LCD Display is very fragile , and must be protected at all times when removing the base stand.
Be sure that no hard or sharp object or anything that could scratch or damage the LCD display comes into
contact with it. Do NOT exert pressure on the front of the unit at any time because the screen could crack .
Disconnect all cables or cords connected to the unit.
1.
2. Lay the unit down on a flat sur face with the back side facing up . Please make sure to place a sof t
cushioned material (such as a pillow or thick piece of foam) beneath the screen.
3. To remove the base stand , loosen screws off the holes then pull downwards to release
the base stand.
4. To install the base stand , put the stand into the hole at the bottom of the TV then insert screws to the
holes and tighten.
(Not supplied)
MOUNTING ON THE WALL
This unit is VESA-compliant, and is designed to be wall-mounted with a VESA-compliant 12” x 8”
(300mm x 200mm) mounting kit designed for flat-panel TVs (not supplied). Mount this unit according to
the instructions included in the mounting kit.
Length of screw should not exceed 10 mm.
Remove the base stand before mounting the unit on the wall.NOTE:
12”
8”
M5
18
Page 20

Specifications
Television RF system NTSC M+ATSC
Video Color System PAL/NTSC
Channel and frequencies CH135
AIR CH2CH69 CABLE CH1
Power input AC 110240V, 50/60 Hz
--
-
Power consumption see the ration label
Audio output 6W +6W (Rated output)
Simple Troubleshooting
If the display fails or the performance dramatically, check the display in accordance with the following
instructions. Remember to check the peripherals to pinpoint the source of the failure. If the display still
fails to perform as expected, connect the dealer for assistance.
Symptom
No Power
No Sound
No Response Of the remote
control
The Screen Flash In VGA
Mode
Some Interfere In The VGA
Mode
Abnormal Color
Clean The TV Set
DEALING METHOD
Check the power connection.Pull the plug out, wait for 60 seconds,
then reconnect the power and turn on the set.
Increase the volume. Check that if the set is on the mute state or not.
Check the voice setting condition. Check the voice mode setting condition.
Check the effect of the batteries. If needed, please replace the batteries or
clean the remote control sensor window. The distance between the set and
the remote control should be less than 6 meters.
The parameter is too big.Please use saftey mode when restart the PC,
and set the parameter of the monitor according to the instruction.
Please modify parameter of the monitor according to the instruction.
Check the antenna connection.
Please pull the plug out when clean the LCD screen. Using soft, clean cloth
to wipe it off. If need to clean further, please use dr cloth, don't use naphtha
or other thinner liquid.
19
 Loading...