

Page 1
INSTRUCTION AND RECIPE BOOKLET
Recipe
Booklet
Reverse Side
Compact Digital Toaster Oven Broilers TOB-100
Page 2

IMPORTANT SAFEGUARDS
When using an electrical appliance, basic safety precautions should always
be followed, including the following:
1. Read all instructions.
2. UNPLUG FROM OUTLET WHEN NOT IN USE, BEFORE PUTTING
ON OR TAKING OFF PARTS AND BEFORE CLEANING.
Allow to cool before cleaning or handling.
3. Do not touch hot surfaces. Use handles or knobs.
4. To protect against electrical shock, do not immerse cord, plugs
or place any part of the toaster oven broiler in water or other liquids.
See instructions for cleaning on page 8.
5. Close supervision is necessary when any appliance is used by or
near children.
6. Do not operate any appliance with a damaged cord or plug or after the
appliance has malfunctioned or has been dropped or damaged
in any way or is not operating properly. Return the toaster oven broiler
to the nearest Cuisinart Repair Center for examination, repair or
mechanical or electrical adjustment.
7. The use of accessory attachments not recommended by Cuisinart
may cause injury.
8. Do not use outdoors.
9. Do not let cord hang over the edge of the table or countertop where
it could be pulled on inadvertently by children or pets, or touch hot
surfaces, which could damage the cord.
10. Do not place toaster oven broiler on or near a hot gas or electric burner
or in a heated oven.
11. Do not use this toaster oven broiler for anything other than its
intended purpose.
12. Extreme caution should be exercised when using containers
constructed of materials other than metal or glass in the toaster oven
broiler.
13. To avoid burns, use extreme caution when removing tray or disposing
of hot grease.
14. When not in use, always unplug the unit. Do not store any materials
other than manufacturer’s recommended accessories in this oven.
15. Do not place any of the following materials in the oven: paper,
cardboard, plastic and similar products.
16. Do not cover crumb tray or any part of the oven except the baking pan
with metal foil. This will cause overheating of the oven.
17. Oversize foods, metal foil packages and utensils must not be
inserted in the toaster oven broiler, as they may involve a risk of fire
or electric shock.
18. A fire may occur if the toaster oven broiler is covered or touching
flammable materials such as curtains, draperies, walls and the like
when in operation. Do not store any items on top of the appliance
when in operation. Do not operate under wall cabinets.
19. Do not clean with metal scouring pads. Pieces can break off the
pad and touch electrical parts, involving a risk of electric shock.
20. Do not attempt to dislodge food when the toaster oven broiler is
plugged into electrical outlet.
21. Warning: To avoid possibility of fire, NEVER leave toaster oven broiler
unattended during use.
22. Do not rest cooking utensils or baking dishes on glass door.
23. Press the Start/Stop Button to turn off the Toaster Oven. For detail
instructions please refer to page 4 FEATURES AND BENEFITS section.
24. Where applicable, always attach plug to appliance and check that
the cooking cycle is stopped before plugging cord into wall outlet.
To disconnect, press the start/stop button to cancel the cooking
cycle, then remove plug from wall outlet.
25. Do not operate your appliance in an appliance garage or under a wall
cabinet. When storing in an appliance garage always unplug the
unit from the electrical outlet. Not doing so could create a risk of fire,
especially if the appliance touches the walls of the garage or the door
touches the unit as it closes.
2
Page 3

SPECIAL CORDSET INSTRUCTIONS
A short power supply cord is provided to reduce the risks resulting from
becoming entangled in or tripping over a longer cord.
Extension cords may be used if care is exercised in their use.
If an extension cord is used, the marked electrical rating of the extension
cord must be at least as great as the electrical rating of the appliance,
and the longer cord should be arranged so that it will not drape over the
countertop or tabletop where it can be tripped over or pulled on by children.
NOTICE
This appliance has a polarized plug (one blade is wider than the other).
As a safety feature, this plug will fit in a polarized outlet only one way. If
the plug does not fit fully in the outlet, reverse the plug. If it still does not fit,
contact a qualified electrician. Do not attempt to defeat this safety feature.
FOR HOUSEHOLD USE ONLY
NOT INTENDED FOR COMMERCIAL
USE
TABLE OF CONTENTS
Important Safeguards ................................. 2
Special Cordset Instructions ............................ 3
Features and Benefits ................................. 4
Oven Rack Position Diagrams .......................... 5
Before First Use ..................................... 5
General Guidelines ................................... 5
Operation ........................................... 6
Toast ............................................. 6
Bagel ............................................ 6
Bake ............................................. 6
Broil ............................................. 7
Sandwich ......................................... 7
Leftover .......................................... 7
Keep Warm ....................................... 8
Cleaning and Maintenance ............................. 8
Warranty ........................................... 9
SAVE THESE INSTRUCTIONS
3
Page 4
FEATURES AND BENEFITS
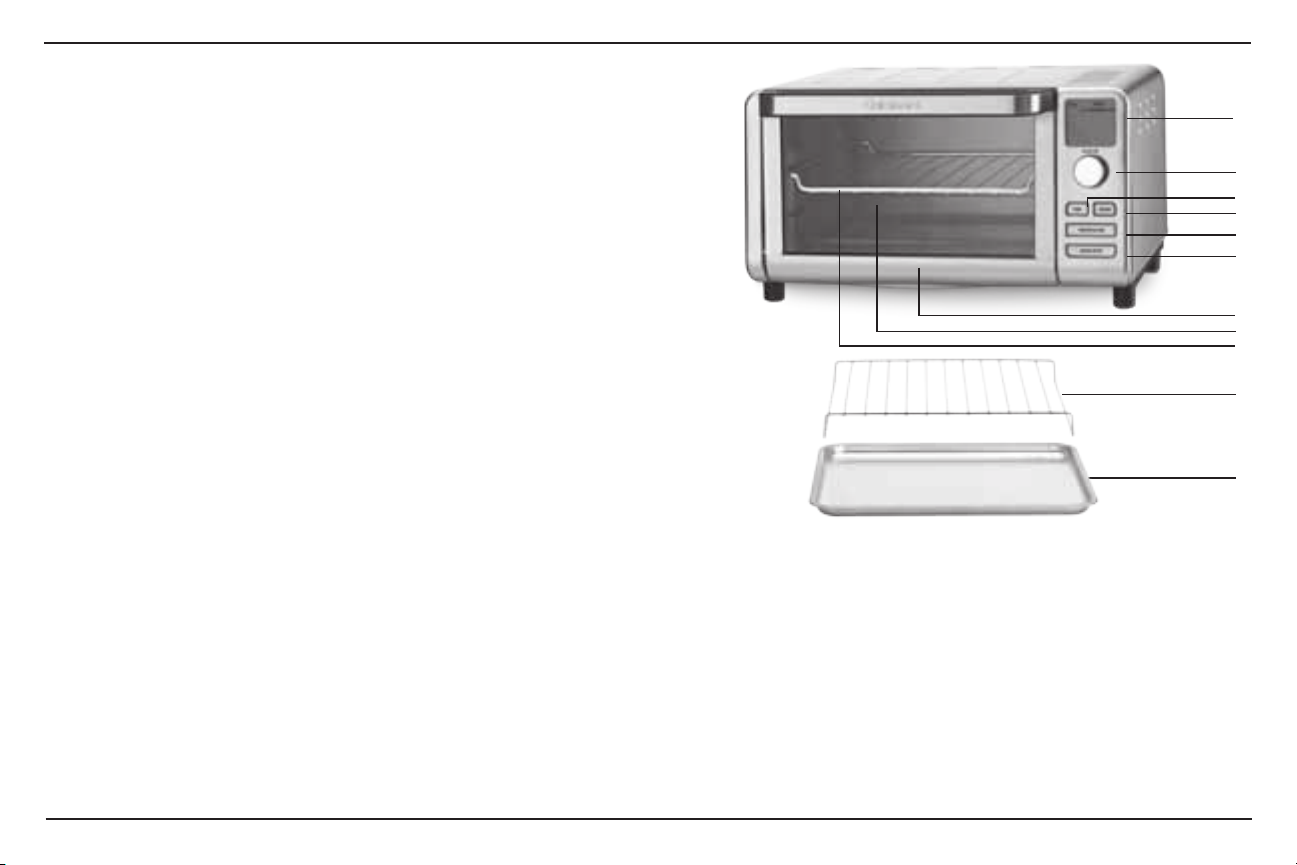
1. Blue-Backlit LCD Digital Display
Shows selected function, shade setting, temperature, and cooking time.
Includes PREHEATING and READY readouts.
2. Selector Dial
Lets you choose 1 of the 7 cooking functions, and set baking time,
temperature, and toast shade.
3. TIMER Button
Starts time selection process for Bake, Broil, Sandwich, Leftover or
Keep Warm. Set the cooking time in increments of 1 minute until 30
minutes is reached, and then in 5-minute increments up to 2 hours.
4. SHADE Button
Starts shade selection process for Toast or Bagel mode. Choose one
of 7 browning levels with the display indicating the shade selected.
NOTE: The oven remembers your last shade setting when it’s turned
off or unplugged.
5. TEMPERATURE Button
Starts temperature selection process in Bake, Sandwich, Leftover or
Keep Warm mode. You can adjust oven temperature in increments of
10 degrees from 160°F to 200°F and 25 degrees from 200°F to 500°F.
6. START/STOP Button
Starts or stops a cooking function. It also activates the oven
when it is in the dormant mode (plugged in but not lit).
START/STOP Indicator Light
Illuminates when button is pushed and oven is heating up. Flashes
to indicate oven needs to be set and has not yet started. Illuminates
during operation. Turns off when oven is off.
7. Front Slide-out Crumb Tray
The slide-out crumb tray comes already positioned in your oven.
The crumb tray slides out from the bottom front of the toaster oven
broiler for easy cleaning.
8. Easy-clean Interior
The sides of the oven are specially coated making it easier to wipe
and clean the interior of the oven.
9. Oven Rack
Three-position rack: UPPER (rack position C) for toast, bagels and
standard-size foods. LOWER (rack position A or B) for roasts, poultry,
casseroles and baked goods. See the rack position guide on page 5.
10. Broiling Rack
Fits into the baking drip pan to use when broiling.
11. Baking/Drip Pan
A baking/drip pan is included for your convenience. Use with the
broiling rack when broiling. Use alone when baking or roasting.
4
1
2
3
4
5
6
7
8
9
10
11
Page 5
12. Cord Storage (not shown)
Takes up excess cord and keeps countertop neat.
13. BPA-free (not shown)
All materials that come in contact with food are BPA free.
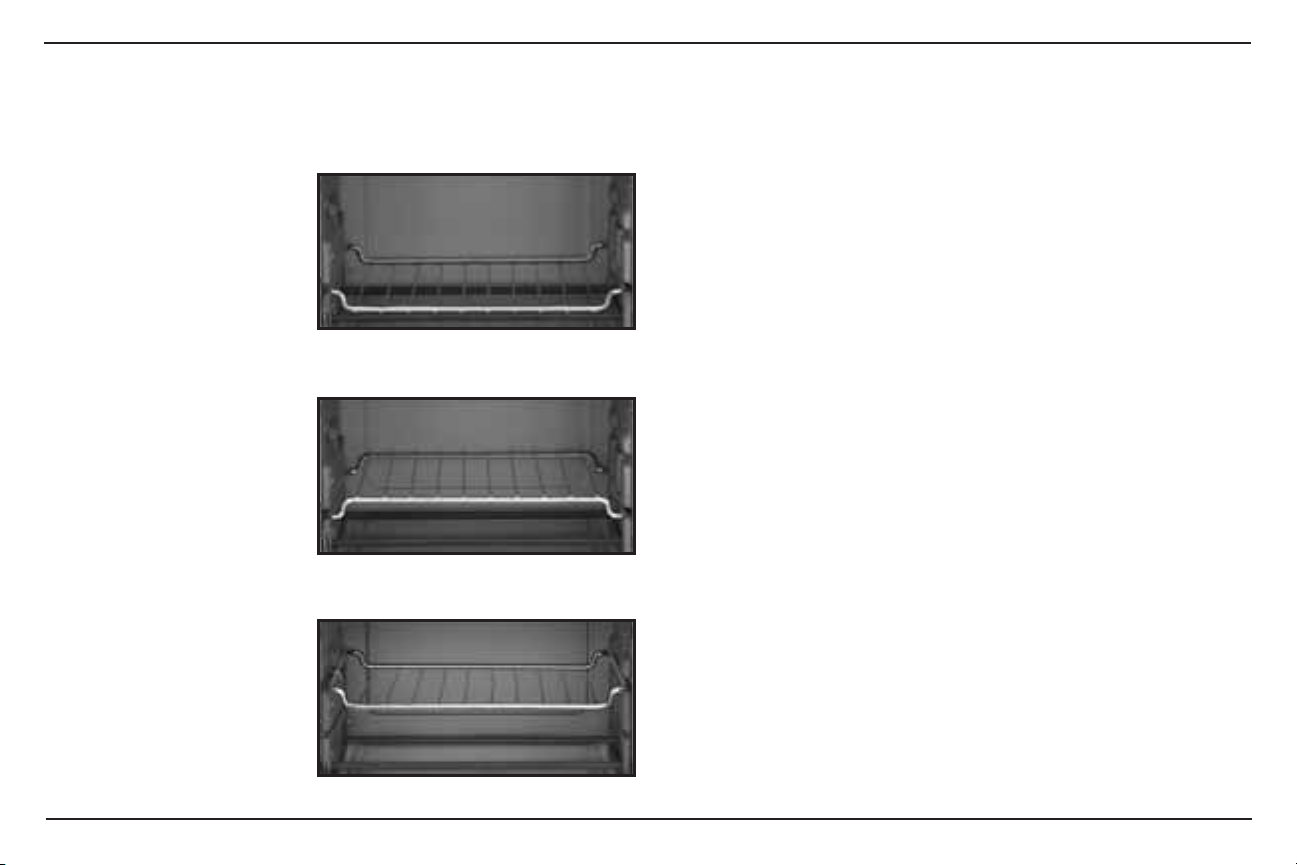
OVEN RACK
POSITION GUIDE
All of our recipes give you
step-by-step directions
and will tell you where
the oven rack should be
positioned for best results.
Please refer to the diagram
below for oven rack positions.
Each position is described
with a letter that is referred
to in the recipe.
WARNING: Placing the rack
in the bottom position (A) or
in the top position (B) with
the rack upwards while
toasting may result in a fire.
Toast only in rack position C.
Rack Position A
Rack Position B
Rack Position C
BEFORE THE FIRST USE
Place your oven on a flat surface. Remove any packaging and promotional
labels in or on the oven. Unwind the power cord. Check that the crumb tray
is in place by inserting it into the opening below the door, and check that
there is nothing inside or on top of the oven. Plug power cord into wall outlet.
Before using your oven, make sure it is two to four inches away from the
wall or from any objects on the countertop. Do not use on heat-sensitive
surfaces. DO NOT STORE OBJECTS ON THE TOP OF THE OVEN.
IF YOU DO, REMOVE ALL OBJECTS BEFORE YOU TURN ON YOUR
OVEN. THE EXTERIOR WALLS GET VERY HOT WHEN IN USE. KEEP
OUT OF REACH OF CHILDREN.
GENERAL GUIDELINES
Toast/Bagel: Always have the rack in rack position C, as indicated in the
diagram at left, for even toasting. Always center your item/items in
the middle of the rack.
Bake: Baking function can be used as you would normally use your
large kitchen oven for roasting meats including chicken, or baking cakes,
cookies and more.
Broil: Broiling function can be used for beef, chicken, pork, fish and more.
It also can be used to brown the tops of casseroles and gratins.
Caution:
Aluminum foil is not recommended for covering the drip pan. Foil is
extremely dangerous when broiling fatty foods. Grease will accumulate
and may catch fire. If foil is used to cover drip pan, be sure foil is tucked
neatly around the pan and does not touch the walls or heating rods.
Never cover the crumb tray.
Sandwich: Cook the perfect open-faced sandwich. This function provides
full heat on the bottom to toast bread and less heat on top to melt cheese
or brown a sandwich.
Leftover: Perfect setting for reheating food that has already been cooked.
Keep Warm: Maintains the oven at a low temperature using only the bottom
heating elements to keep foods warm without drying out.
5
Page 6

Turning off the toaster oven broiler: Any cooking cycle can be stopped by
pressing the Start/Stop button at any time. This will stop the heating cycle.
Dormant Mode: The oven will go dormant when cooking cycle is completed
or when no button is pressed or dial moved after 2 minutes. When dormant
the oven has power but is not lit up. Pushing any button or turning the
selector dial will activate the dormant oven.
Deactivating Oven Sounds: You have the option of turning off the
electronic beeping sounds. To deactivate all beeps, push the Time button
and Shade button simultaneously for 2 seconds. To reinstate all beeps,
repeat by again pushing both the Time and Shade buttons simultaneously
for 2 seconds. If you unplug the oven, all beeps will turn back on.
OPERATION
TOAST
To toast, make sure the oven rack is in rack position C, as indicated in the
diagram on page 5. If toasting two items, center them in the middle of the
rack. Four items should be evenly spaced with two in front, two in back.
Close the door. Turn Selector dial to TOAST. The Shade and Start/Stop
buttons will begin to flash.
Shade Selection
Press Shade button and then turn dial to desired shade setting as indicated
by the 7 dots in the LCD digital display from Light (1 dot) to Dark (7 dots).
Start Toasting
Press Start/Stop button to begin toasting. During toasting you may change
your shade selection simply by pressing the Shade button and turning the dial
to adjust the shade setting. The new setting will automatically hold since the
oven has already been started. You should not press Start/Stop again, as that
would cancel the toast cycle.
Stop Toasting
When the toasting cycle is finished, the oven will beep 3 times and turn off.
If you wish to stop the toasting cycle before it is finished, simply press the
Start/Stop button, as that will cancel the toast cycle.
BAGEL
The Bagel function will provide full heat on the top side and less heat on the
bottom side. For best results, place your bagels on the oven rack with the cut
side facing up. Make sure the oven rack is in rack position C, as indicated in
the diagram on page 5. If toasting two bagel halves, center them in the middle
of the rack. Four bagel halves should be evenly spaced with two in front, two
in back. To begin toasting your bagel, close the door and turn Selector dial to
BAGEL. The Shade and Start/Stop button will begin to flash.
Shade Selection
Press Shade button and then turn dial to desired shade setting as indicated
by the 7 dots in the LCD digital display from Light (1 dot) to Dark (7 dots).
Start Bagel Toasting
Press Start/Stop button to begin toasting your bagel. During bagel toasting
you may change your shade selection simply by pressing the Shade button
and turning the dial to adjust the shade setting. The new setting will
automatically hold since the oven has already been started. You should
not press Start/Stop again, as that would cancel the bagel cycle.
Stop Bagel Toasting
When the toasting cycle is finished, the oven will beep 3 times and turn off.
If you wish to stop the bagel cycle before it is finished, simply press the
Start/Stop button to cancel the bagel cycle.
BAKE
Turn Selector dial to BAKE. The Time button and Temperature button will
begin flashing.
Setting Temperature
The preset BAKE temperature is 350°F. To change temperature, press the
Temperature button; the temperature display will start flashing. Turn the
Selector Dial to select temperatures from 160°F to 500°F. To bake at the
preset temperature, simply set the time and press Start/Stop.
Setting Time
To set baking time, press the Time button. The 30 minute (0:30) preset time
will start flashing. Turn the Selector Dial to set timer for times from 1 minute
to 2 hours. To bake for the preset 30 minutes, simply press Start/Stop.
6
Page 7

Start Baking
Press Start/Stop to start heating the oven. The display will read PREHEATING.
When the oven reaches the set temperature, it will beep and display will read
READY. Place food in oven. The timer will begin counting down. When it
reaches zero, the oven will beep 3 times and heating elements will turn off.
You may stop baking and turn the heating elements off at any time by pushing
the Start/Stop button.
BROIL
Turn Selector dial to BROIL. The Time button will begin flashing.
Temperature
The preset BROIL temperature is fixed at 500°F, so the Temperature button
cannot be activated during Broil. As with any broiler, only the top heating
elements turn on.
Setting Time
To set broiling time, press the Time button. The 10 minute (00:10) preset time
will start flashing. Turn the Selector Dial to set timer for times from 1 minute
to 2 hours. To broil for the preset time, simply press Start/Stop.
Start Broiling
Put food on the broiling rack set in the drip pan. Place pan on the rack and
press Start/Stop to start heating the broiler. When the timer reaches zero, the
oven will beep 3 times and turn off. You may stop broiling and turn the heating
elements off at any time by pushing the Start/Stop button.
SANDWICH
The SANDWICH function is programmed to cook the perfect open-faced
sandwich. It provides full heat on the bottom to toast bread, and less heat on
top to melt cheese or brown sandwich meats without burning them. To begin,
turn Selector dial to SANDWICH. The Time button and Temperature button
will begin flashing.
Setting Temperature
The preset SANDWICH temperature is 400°F, ideal for average-size openfaced sandwiches. To change temperature, press the Temperature button;
the temperature display will start flashing. Turn the Selector Dial to select
a temperature from 160°F to 500°F. To cook at the preset temperature,
simply set the time and press Start/Stop.
Setting Time
To set sandwich cooking time, press the Time button. The 15-minute (00:15)
preset time will start flashing. Turn the Selector Dial to set timer for times from
1 minute to 2 hours. To bake for the preset time, simply press Start/Stop.
Cooking Sandwich
Place sandwich in oven. We recommend placing your sandwich on the broil
rack set in the baking pan to prevent food from dripping or falling onto the
heating elements. Press Start/Stop to start heating the oven and the Timer will
start counting down. When the timer reaches zero, the oven will beep 3 times
and turn itself off. You may stop cooking at any time by pushing the Start/
Stop button to turn the heating elements off.
LEFTOVER
The LEFTOVER function is programmed to reheat food that has already been
cooked. To begin, turn Selector Dial to LEFTOVER. The Time button and
Temperature button will begin flashing.
Setting Temperature
The oven temperature is preset to 375°F for the LEFTOVER mode. To change
temperature, press the Temperature button; the temperature display will start
flashing. Turn the Selector Dial to select a temperature from 160°F to 500°F. To
cook at the preset temperature, simply set the time and press Start/Stop.
Setting Time
To set LEFTOVER time, press the Time button. The 20-minute (00:20) preset
time will start flashing. Turn the Selector Dial to set timer for times from 1
minute to 2 hours. To cook for the preset time, simply press Start/Stop.
Start Leftover
Place food in oven. Press Start/Stop to start heating the oven. The timer will
begin counting down. When it reaches zero, the oven will beep 3 times and
turn off. You may stop cooking and turn heating elements off at any time by
pushing the Start/Stop button.
7
Page 8

KEEP WARM
The KEEP WARM function is programmed to maintain the oven at a low
temperature using only the bottom heating elements. To begin, turn Selector
Dial to KEEP WARM. The Time button and Temperature button will begin
flashing.
Setting Temperature
The preset KEEP WARM temperature is 160°F. To change temperature, press
the Temperature button; the temperature display will start flashing. Turn the
Selector Dial to select a temperature from 160°F to 500°F. To warm at the
preset temperature, simply set the time and press Start/Stop.
Setting Time
To set KEEP WARM time, press the Time button. The 1-hour (1:00) preset time
will start flashing. Turn the Selector Dial to set timer for times from 1 minute to
2 hours. To use the preset time, simply press Start/Stop.
Start Keep Warm
Place food in oven. Press Start/Stop to start heating the oven. The timer will
begin counting down. When it reaches zero, the oven will beep 3 times and
heating elements will turn off. You may stop cooking and turn the heating
elements off at any time by pushing the Start/Stop button.
NOTES
Increasing or Reducing Cooking Time Mid-Cycle
In Bake, Broil, Sandwich, Leftover and Keep Warm modes you can change
selected cooking time during the heating cycle by simply pushing the Time
button. When the displayed time begins to flash, turn the Selector Dial
to choose new time. When numbers stop flashing, your new time is set.
DO NOT push Start/Stop again – that would turn off the oven heating
elements.
Increasing or Reducing Temperature Mid-Cycle
In Bake, Sandwich, Leftover and Keep Warm modes, you can change
selected cooking temperature
the Temperature button. When the displayed temperature begins to flash, turn
the Selector Dial to choose a new temperature. When numbers stop flashing,
your new temperature is set. DO NOT push Start/Stop again – that would
turn off the heating elements.
during the heating cycle
by simply pushing
Increasing or Reducing Shade Mid-Cycle
In Toast or Bagel modes, you can also change selected shade setting during
the heating cycle by pushing the Shade button. When the displayed shade
begins to flash, turn the Selector Dial to choose a new shade. When the
shade setting stops flashing, your new shade is set.
again – that would turn off the heating elements.
DO NOT push Start/Stop
CLEANING AND MAINTENANCE
Always allow the oven to cool completely before cleaning.
1. Always unplug the oven from the electrical outlet.
2. Do not use abrasive cleansers, as they will damage the finish. Simply
wipe the exterior with a clean damp cloth and dry thoroughly. Apply the
cleansing agent to a cloth, not to the toaster oven, before cleaning.
3. To clean interior walls, use a damp cloth and a mild liquid soap solution
or a spray solution on a sponge. Never use harsh abrasives or corrosive
products. These could damage the oven surface. Never use Brillo pads,
etc. on interior of oven.
4. To remove crumbs, slide out the crumb tray and discard crumbs.
Wipe clean and replace. Crumb tray is dishwasher safe. To remove
baked-on grease, soak the tray in hot sudsy water or use nonabrasive
cleaners. Never operate the oven without the crumb tray in place.
5. Wire rack, baking pan and crumb tray are dishwasher safe. If heavily
soiled, soak in hot sudsy water or use a nylon scouring pad or nylon
brush.
6. Never wrap the cord around the outside of the oven. Use the cord
storage cleats on the back of the oven.
7. Any other servicing should be performed by an authorized service
representative.
IMPORTANT: After cooking greasy foods and after your oven has cooled,
always clean top interior of oven. If this is done on a regular basis, your oven
will perform like new and help to keep toasting consistent, cycle after cycle.
8
Page 9

WARRANTY
Limited Three-Year Warranty
This warranty is available to consumers only. You are a consumer if you
own a Cuisinart
at retail for personal, family or household use. Except as otherwise required
under applicable law, this warranty is not available to retailers or other
commercial purchasers or owners. We warrant that your Cuisinart
Compact
workmanship under normal home use for 3 years from the date of original
purchase.
We recommend that you visit our website, www.cuisinart.com for a fast,
efficient way to complete your product registration. However, product
registration does not eliminate the need for the consumer to maintain the
original proof of purchase in order to obtain the warranty benefits. In the event
that you do not have proof of purchase date, the purchase date for purposes
of this warranty will be the date of manufacture.
CALIFORNIA RESIDENTS ONLY
California law provides that for In-Warranty Service, California residents
have the option of returning a nonconforming product (A) to the store where
it was purchased or (B) to another retail store that sells Cuisinart products
of the same type. The retail store shall then, according to its preference,
either repair the product, refer the consumer to an independent repair facility,
replace the product, or refund the purchase price less the amount directly
attributable to the consumer’s prior usage of the product. If neither of the
above two options results in the appropriate relief to the consumer, the
consumer may then take the product to an independent repair facility,
if service or repair can be economically accomplished. Cuisinart and not
the consumer will be responsible for the reasonable cost of such service,
repair, replacement, or refund of nonconforming products under warranty.
California residents may also, according to their preference, return
nonconforming products directly to Cuisinart for repair or, if necessary,
replacement by calling our Consumer Service Center toll-free at 1-800-726-
0190. Cuisinart will be responsible for the cost of the repair, replacement,
and shipping and handling of such nonconforming products under warranty.
®
Digital Compact™ Toaster Oven Broiler that was purchased
®
™
Toaster Oven Broiler will be free of defects in materials and
Digital
BEFORE RETURNING YOUR CUISINART PRODUCT
If your Cuisinart
®
Digital Compact™ Toaster Oven Broiler should prove to be
defective within the warranty period, we will repair or, if we think necessary,
replace it. To obtain warranty service, please call our Consumer Service
Center toll-free at 1-800-726-0190 or write to: Cuisinart, 7811 North Glen
Harbor Blvd, Glendale, AZ 85307. To facilitate the speed and accuracy of your
return, enclose $10.00 for shipping and handling. (California residents need
only supply a proof of purchase and should call 1-800-726-0190 for shipping
instructions.) Please be sure to include your return address, description of the
product’s defect, product serial number, and any other information pertinent to
the return. Please pay by check or money order.
NOTE:
For added protection
and secure handling of any Cuisinart product that is being returned, we
recommend you use a traceable, insured delivery service. Cuisinart cannot be
held responsible for in-transit damage or for packages that are not delivered
to us. Lost and/or damaged products are not covered under warranty.
Your Cuisinart
®
Digital Compact™ Toaster Oven Broiler has been manufactured
to the strictest specifications and has been designed for use only in 120 volt
outlets and only with authorized accessories and replacement parts. This
warranty expressly excludes any defects or damages caused by accessories,
replacement parts or repair service other than those authorized by Cuisinart.
This warranty does not cover any damage caused by accident, misuse,
shipment or other than ordinary household use. This warranty excludes all
incidental or consequential damages. Some states do not allow the exclusion
or limitation of these damages, so these exclusions may not apply to you. You
may also have other rights, which vary from state to state.
Important: If the nonconforming product is to be serviced by someone other
than Cuisinart’s Authorized Service Center, please remind the servicer to call
our Consumer Service Center at 1-800-726-0190 to ensure that the problem
is properly diagnosed, the product is serviced with the correct parts, and to
ensure that the product is still under warranty.
9
Page 10

Coffeemakers
Blenders
Cuisinart offers an extensive assortment of top quality products to make life in the kitchen
easier than ever. Try some of our other countertop appliances, cookware, tools and gadgets.
www.cuisinart.com
Any other trademarks or service marks of third parties used herein are
the trademarks or service marks of their respective owners.
Juicers
Cookware
Tools and
Gadgets
©2013 Cuisinart
150 Milford Road
East Windsor, NJ 08520
Printed in China
12CE125890
A IB-11248A
Page 11

14
½ teaspoon pure vanilla extract
cup buttermilk*
3
⁄
2
4 tablespoons unsalted butter, cold, cut into small cubes
• chol. 13mg • sod. 95mg • calc. 37mg • fiber 3g
Calories 211 (20% from fat) • carb. 40g • pro. 3g • fat 5g • s at. fat 3g
Nutritional information per serving (based on 10 servings):
through.
5. Bake for about 25 to 30 minutes, until top is a deep golden and baked
when baked so it is not necessary to cover absolutely everything.
fruit – do leave some space in between each scoop. The batter will expand
4. Remove fruit from oven. Scoop the cobbler batter evenly spaced over the
Mix with hands or the pastry blender until just combined.)
crumbs. Make a well in the dry/butter mixture and add the buttermilk/vanilla.
your fingers or a pastry blender, combine until the mixture resembles coarse
bowl, or on a parchment-lined work surface. Add the butter and either using
process can also be done by hand. Put all dry ingredients into a large mixing
the dry ingredients through the feed tube. Pulse until just combined. (This
liquid measuring cup. While pulsing, slowly add the buttermilk mixture to
mixture resembles coarse crumbs. Combine the buttermilk and vanilla in a
10 seconds. Add the cubed butter to the dry ingredients and pulse until
processor fitted with the metal chopping blade. Process dry ingredients for
powder, baking soda, salt, cinnamon and orange zest in the bowl of a food
3. While the filling is baking, prepare the topping: Put the flour, sugar, baking
with the tip of a paring knife, but not mushy).
pan. Bake for 20 minutes (you want the fruit to be able to be pierced easily
¼ teaspoon grated orange zest
¼ teaspoon ground cinnamon
¼ teaspoon sea or kosher salt
¼ teaspoon baking soda
¾ teaspoon baking powder
¼ cup granulated sugar
1 cup plus 1 tablespoon unbleached, all-purpose flour
Topping:
pinch sea or kosher salt
¼ teaspoon grated orange zest
¾ teaspoon ground cinnamon
¼ cup unbleached, all-purpose flour
½ cup granulated sugar
½ to ¾ pound Italian plums, pitted and cut into eighths
¾ pound apples, peeled, cored and cut into 1-inch pieces
¾ pound pears, peeled, cored and cut into 1-inch pieces
nonstick cooking spray
Filling:
flour, cinnamon, zest and salt. Mix ingredients very well. Pour into prepared
2. Prepare the filling: Put the cut fruit in a large mixing bowl with the sugar,
Lightly and evenly coat a 9-inch round or square pan with cooking spray.
1. Preheat the Toaster Oven set to Bake at 325°F with the rack in position A.
Makes 8 to 10 servings
Add a dollop of freshly whipped cream to top off this delicious autumn treat.
Fall Fruit Cobbler
cup. Let stand 5 min-
3
⁄
2
or white vinegar to enough milk to make
* If you don’t have buttermilk, you can add 2 teaspoons lemon juice
utes; proceed with recipe.
• chol. 57mg • sod. 87mg • calc. 12mg • fiber 2g
Calories 249 (54% from fat) • carb. 28g • pro. 3g • fat 16g • sat. fat 9g
Nutritional information per brownie:
Page 12

13
just dry. These are the best after chilling overnight.
5. Pour into prepared pan. Bake for about 20 to 25 minutes, or until edges are
the mixture is no longer streaky.
incorporated. Fold the chocolate mixture into the egg mixture and stir until
4. Stir the flour and salt into the cooled chocolate mixture; mix until just
beat until well combined.
the sugar. Mix until light and thickened, about 1 to 2 minutes. Add vanilla;
3. Using a hand or stand mixer, beat eggs to break up and then gradually add
powder and espresso powder. Set aside to cool to room temperature.
of simmering water. Once they are almost completely melted, stir in cocoa
2. Put the butter and chocolates into a heatproof bowl and place over a pot
with parchment paper. Reserve.
Lightly coat a 9-inch square baking pan with nonstick cooking spray; line
1. Preheat the Toaster Oven set to Bake at 350°F with the rack in position A.
¾ teaspoon table salt
½ cup unbleached, all-purpose flour
2 teaspoons pure vanilla extract
1½ cups granulated sugar
3 large eggs
2 teaspoons espresso powder
2 tablespoons cocoa powder
4 ounces bittersweet chocolate, chopped
4 ounces unsweetened chocolate, chopped
¾ cup unsalted butter, cubed
nonstick cooking spray
• chol. 23mg • sod. 563mg • calc. 230mg • fiber 2g
Calories 260 (30% from fat) • carb. 32g • pro. 13g • fat 9g • sat. fat 5g
Nutritional information per serving:
5. Serve immediately.
cook until the cheese is fully melted, about 10 to 15 minutes.
4. Once the oven has preheated, put the assembled bagels into the oven and
Parmesan and the mozzarella.
3. Evenly distribute the sauce and spread on top of each half, then top with the
tray.
2. While oven is heating, lay both bagel halves, cut side up, on the assembled
with the broiling rack.
with the rack in position C. Line the baking tray with foil, if desired, and fit
1. Preheat the Toaster Oven set to Sandwich at 400°F and set for 15 minutes
pinch sea or kosher salt
2 ounces mozzarella, sliced
2 teaspoons grated Parmesan
¼ cup pizza or marinara sauce
1 bagel, halved
Makes 2 servings
Makes 16 brownies
A sugary outside and a fudge-like interior make these the richest brownies.
Bittersweet Espresso Brownies
Pizza Bagels
will not be excited about having pizza on a bagel.
Whether it is an-after school snack or weekend lunch, there are few kids who
Page 13

12
• chol. 13mg • sod. 465mg • calc. 192mg • fiber 5g
Nutritional information per sandwich:
Calories 187 (31% from fat) • carb. 26g • pro. 9g • fat 7g • sat. fat 3g
5. Serve immediately.
until the cheese is lightly browned, about 5 minutes.
4. Once the oven has preheated, put the sandwiches into the oven and cook
distribute the remaining ingredients, in the order listed.
3. Spread the hummus evenly on the tops of both slices, and then evenly
2. While oven is heating, lay both pieces of bread on the assembled tray.
with the broiling rack.
with the rack in position C. Line the baking tray with foil, if desired, and fit
1. Preheat the Toaster Oven set to Sandwich at 400°F and set for 5 minutes
1 to 1½ ounces sliced feta
2 tablespoons shredded carrots
available)
¼ cup sprouts (alfalfa, broccoli, whatever are your favorite and
4 slices plum tomato
2 small radishes, thinly sliced
3 to 4 tablespoons hummus, homemade or purchased
2 slices whole-grain bread
Makes 2 sandwiches
• chol. 65mg • sod. 1091mg • calc. 308mg • fiber 7g
Calories 356 (47% from fat) • carb. 20g • pro. 27g • fat 19g • sat. fat 7g
Nutritional information per sandwich:
5. Serve immediately.
until the cheese is fully melted, about 10 minutes.
4. Once the oven has preheated, put the sandwiches into the oven and cook
the remaining ingredients, in the order listed.
3. Spread the Dijon evenly on the tops of the slices, and then evenly distribute
2. While oven is heating, lay both pieces of bread on the prepared tray.
with the broiling rack.
with the rack in position C. Line the baking tray with foil, if desired, and fit
1. Preheat the Toaster Oven set to Sandwich at 400°F and set for 10 minutes
2 ounces Monterey Jack
4 slices cooked bacon
4 to 6 slices plum tomato
½ avocado, pitted and sliced
4 ounces sliced turkey or chicken breast
2 teaspoons Dijon mustard
2 slices whole-grain bread
Makes 2 sandwiches
hummus to the tangy radishes – and healthy to boot!
This sandwich has it all and is packed with flavor – from the smooth and nutty
Hummus and Vegetable Sandwich
that you can find makes this sandwich shine.
Using the freshest and highest quality ingredients
California Sandwich
Page 14

11
• chol. 94mg • sod. 1562mg • calc. 410mg • fiber 4g
Nutritional information per sandwich:
Calories 456 (56% from fat) • carb. 24g • pro. 25g • fat 28g • sat. fat 12g
salt and pepper to taste
2 tablespoons relish
2½ tablespoons ketchup
cup mayonnaise
3
⁄
1
until fully combined:
* For a simple Russian dressing, put the following in a small bowl and stir
5. Serve immediately.
until the cheese is fully melted, about 8 to 10 minutes.
4. Once the oven has preheated, put the sandwiches into the oven and cook
evenly distribute the remaining ingredients, in the order listed.
3. Spread the Russian dressing evenly on the tops of both slices, and then
2. While oven is heating, lay both pieces of bread on the assembled tray.
oven with the broiling rack.
with the rack in position C. Line the baking tray with foil, if desired, and fit
1. Preheat the Toaster Oven set to Sandwich at 400°F and set for 10 minutes
3 ounces sliced Swiss cheese (about 4 slices)
pastrami if you prefer)
4 ounces very thinly sliced corned beef (or you may substitute
½ cup sauerkraut, drained
2 tablespoons Russian dressing*
2 slices rye bread
Makes 2 sandwiches
• chol. 140mg • sod. 1148mg • calc. 235mg • fiber 1g
Calories 400 (44% from fat) • carb. 21g • pro. 35g • fat 19g • sat. fat 7g
Nutritional information per serving (based on 4 servings):
6. Garnish with basil, if desired, and serve.
sauce, then mozzarella. Bake for 5 minutes, until the cheese is melted.
remove from the oven, flip chicken and top each with even amounts of the
5. Place the chicken on the prepared pan and bake for 25 minutes. Carefully
excess.
chicken into the breadcrumbs to fully coat on both sides and shake off any
4. Dredge the chicken breasts in the egg, then in the breadcrumbs. Press the
breadcrumbs and Parmesan.
3. In shallow dish, lightly beat the egg. In another shallow dish, combine the
2. Season the chicken breasts with the salt and pepper.
Line the baking tray with aluminum foil.
1. Preheat the Toaster Oven set to Bake at 425°F with the rack in position A.
1 tablespoon thinly sliced (chiffonade) basil (optional)
3 ounces fresh mozzarella, sliced
¼ cup prepared tomato or marinara sauce
2 tablespoons grated Parmesan
1 cup Italian-seasoned panko-style breadcrumbs
1 large egg
¼ teaspoon freshly ground black pepper
¼ to ½ teaspoon sea or kosher salt
2 8-ounce chicken breasts, pounded to ½-inch thickness
Makes 2 to 4 servings
Open-Faced Reuben
with a very simple recipe for a quick Russian dressing.
A homemade version of the deli favorite. We also provide you
use regular seasoned breadcrumbs if that’s what you have on hand.
Panko-style breadcrumbs add texture and make for a crisp crust but feel free to
Chicken Parmesan
Page 15

10
• chol. 31mg • sod. 735mg • calc. 38mg • fibe r 1g
Nutritional information per serving:
Calories 156 (53% from fat) • carb. 4g • pro. 15g • fat 9g • sat. fat 2g
5. Remove, garnish with parsleyand serve immediately.
on the thickness of the fish. (Fish will be opaque and flake easily with fork.)
4. Bake until the fish is just cooked through, about 8 to 10 minutes, depending
• chol. 76mg • sod. 1146mg • ca lc. 35mg • fiber 3g
Calories 292 (42% from fat) • carb. 8g • pro. 35g • fat 14g • sat. fat 3g
Nutritional information per serving:
3. Bake for 20 to 25 minutes or until internal temperature is 145°F.
garlic and onion.
pepper. Lay the chops on the lined tray; surround with the cherry peppers,
2. Pat chops dry with paper towels. Rub chops evenly with the oil, salt and
Line the baking tray with foil.
1. Preheat the Toaster Oven set to Bake at 375°F with the rack in position B.
1 small onion, cut into ½-inch pieces
2 to 3 garlic cloves, smashed
3 ounces hot cherry peppers (about 2 to 4 peppers), halved
1 teaspoon freshly ground black pepper
1 teaspoon sea or kosher salt
1 tablespoon vegetable oil
2 pork chops (each 1½-inches thick)
Makes 2 servings
tomatoes and capers around it.
3. Place the seasoned fish on the baking pan, and then scatter the garlic,
and pepper.
2. Rinse and pat the fish dry. Drizzle with the olive oil, lemon juice, zest, salt
Line baking tray with aluminum foil.
1. Preheat the Toaster Oven set to Bake at 400°F with the rack in position C.
chopped parsley, for garnish
2 tablespoons drained capers
½ cup halved grape tomatoes
2 garlic cloves, smashed
pinch freshly ground black pepper
¼ teaspoon sea or kosher salt
½ teaspoon grated lemon zest
juice of ½ of a medium lemon (about 1 to 1½ tablespoons)
1 tablespoon extra virgin olive oil
½ pound fillet of lemon sole (or other similar white fish)
Makes 2 servings
You will still have that great vinegar tang, without the heat.
If spicy is not your thing, buy sweet cherry peppers instead of the hot variety.
Baked Pork Chops with Hot Cherry Peppers
Sole with Lemon and Capers
A quick and impressive light meal – all made in your toaster oven.
Page 16

9
croutons, and remove from heat.
and then the macaroni, stirring to combine. Finally, stir in 1 cup of the
stir in the shredded cheeses until sauce is smooth. Add the salt, hot sauce
the mixture becomes very thick, about 30 to 45 minutes. Once thickened,
simmer, stirring so a film does not form on the bottom of the pot. Cook until
while stirring. Once the mixture reaches a boil, reduce the heat to maintain a
the butter/flour mixture. Raise the heat slightly to bring the mixture to a boil,
for about 2 minutes to cook the flour. While whisking, slowly add the milk to
melted, stir in the flour until smooth. Continue to cook, constantly stirring,
3. Place a medium saucepan over medium heat and add the butter. Once
under cold water. Toss with a small amount of oil to prevent sticking; reserve.
2. Cook macaroni according to the package instructions. Drain pasta and rinse
reserve.
1. Lightly coat a 9-inch square or round baking pan with cooking spray;
1½ cups prepared white-bread croutons
dash hot sauce
¾ teaspoon sea or kosher salt
Jack for ultimate creaminess and flavor)
(we use a variety of Cheddar, Gruyère and Monterey
2 cups (about 6 ounces) shredded cheese
3 cups whole milk
3 tablespoons unbleached, all-purpose flour
¼ cup unsalted butter (4 tablespoons)
• chol. 43mg • sod. 429mg • calc. 260mg • fiber 1g
Calories 319 (44% from fat) • car b. 32g • pro. 12g • fat 15g • sat. fat 10g
Nutritional information per serving:
for an additional 5 minutes to brown the top.
30 minutes. Carefully remove the foil and switch the oven to Broil and cook
1 teaspoon olive oil
½ pound elbow macaroni
non-stick cooking spray
Makes 8 servings
½ cup of croutons on the top and loosely cover with aluminum foil. Bake for
5. Pour the macaroni and cheese into the prepared pan. Scatter the remaining
4. Preheat the Toaster Oven set to Bake at 350°F with the rack in position A.
Extra-creamy, this will become a family favorite.
Old-Fashioned Macaroni and Cheese
Page 17

8
fork-tender, about 25 to 30 minutes. Remove and reserve.
a pinch each of the salt and pepper. Bake until the flesh of the squash is just
the inside of each squash with ½ tablespoon of the olive oil and sprinkle with
2. Line the baking tray with foil and put the squash, cut side up, on top. Brush
1. Preheat the Toaster Oven set to Bake at 350°F with the rack in position A.
2 tablespoons toasted pistachios
¼ cup chopped dried apricots (about 4 to 5 apricots)
1 cup chicken broth plus 2 tablespoons, low sodium
¼ teaspoon ground cinnamon
• chol. 0mg • sod. 721mg • calc.109mg • f iber 8g
Nutritional information per serving:
Calories 423 (24% from fat) • carb. 74g • pro. 10g • fat 12g • s at. fat 2g
5. Serve immediately.
minutes.
halves. Return to the oven and bake until just golden on top, about 10 to 12
4. When squash is tender, evenly divide the couscous mixture between the two
set aside until squash is baked.
of the squash ensures perfectly even halves)
halved widthwise and seeded (cutting along the ridges
pan from heat, add apricots and pistachios and mix to combine. Cover and
Cook until liquid is almost completely absorbed by the couscous. Remove
simmer and cook partially covered for a few minutes, stirring occasionally.
1 minute to toast couscous. After 1 minute, add the broth. Bring to a strong
couscous, cumin, cinnamon and remaining salt and pepper. Sauté for about
beautiful presentation as well.
with a pinch each of the salt and pepper. Sauté until softened. Add the
a sauté pan set over medium/medium-low heat. Once hot, add the shallot
3. While squash is baking, make the couscous filling: Put remaining olive oil in
Middle-Eastern Stuffed Acorn Squash
¼ teaspoon ground cumin
½ cup Israeli (or pearl) couscous
1 small shallot, finely chopped
2 pinches freshly ground black pepper, divided
¼ teaspoon sea or kosher salt, divided
1½ tablespoons olive oil, divided
1 small acorn squash (about 1¾ pounds),
Makes 2 servings
couscous filling make this a standout at any dinner table. They make for a
Not only are the flavors rich and delicious, but the different textures of the
Page 18

7
achieved.
to combine, adding more flour, 1 teaspoon at a time, until a tender dough is
wet, sprinkle a tablespoon of additional bread flour over the dough and pulse
45 seconds to knead. Dough should be smooth and elastic. If dough is too
not need all of the liquid mixture). After the dough forms a ball, process for
through the feed tube, adding only as fast as the flour absorbs it (you may
With the machine running on the dough speed, slowly pour the yeast mixture
and process on the dough speed until combined, about 15 to 20 seconds.
2. Insert the dough blade into the food processor. Add the flour, butter and salt
processor.
Transfer to a large measuring cup to make it easier to add to the food
and let sit until foamy, about 5 minutes. Add beaten egg; stir to combine.
• chol. 22mg • sod. 157mg • calc. 17mg • fiber 1g
Calories 144 (28% from fat) • carb. 7g • pro. 4g • fat 2g • sat. fat 1g
Nutritional information per roll:
brush the rolls just before baking.
* For a polished finish, melt 1 tablespoon of butter with 1 tablespoon of milk and
and let cool on a rack for about 10 minutes before serving.
6. Bake the rolls until golden brown, about 25 to 30 minutes. Remove from pan
5. Preheat the Toaster Oven set to Bake at 350°F with rack in position A.
size, about 30 to 40 minutes.
the prepared pan. Cover with plastic wrap and let rise until about doubled in
equal pieces, about 2¼ ounces each. Roll into smooth rounds and arrange in
105°–110°F. Remove from heat and add the sugar and yeast. Stir to dissolve
1. Put the milk and water in a small saucepan set over medium heat.* Bring to
¾ teaspoon sea or kosher salt
6 tablespoons unsalted butter, cut into 6 pieces
3 cups bread flour, plus more as needed
1 large egg, lightly beaten
1¾ teaspoons active dry yeast
3 tablespoons granulated sugar
3 tablespoons water
½ cup whole milk
Makes 12 rolls
4. Lightly butter an 8 or 9-inch round baking pan. Divide the dough into 12
warm place until it has doubled in size, about 45 to 60 minutes.
squeezed out, or in a bowl covered with plastic wrap. Let rise in a draft-free
3. Put the dough in a lightly floured plastic food storage bag with the air
back to store-bought rolls again.
The perfect complement to any dinner. After your first bite, you will never go
Buttery Dinner Rolls
Page 19

6
Cheddar and chopped broccoli to salsa and sliced avocado.
• chol. 54mg • sod. 347mg • calc. 116mg • fiber 6g
Nutritional information pe r ser ving (1 potato):
Calories 422 (42% from fat) • carb. 53g • pro. 9g • fat 19g • sat. fat 11g
Twice Baked Potatoes
don't stop here. They can be topped with just about anything from shredded
Here we give you the groundwork for the classic twice baked potato, but
such as those on page 5.
* The top ¼ of the potatoes can either be discarded, or made in to potato skins
minutes, until potatoes are hot and golden on the tops.
5. Line the baking tray with foil and arrange potatoes on it. Bake for 30 to 35
temperature before baking.)
prepared a day ahead to this point – cover and refrigerate. Bring to room
Generously fill the potato shells with potato mixture. (Potatoes may be
sour cream, salt, pepper and chives. Mash/beat to combine completely.
butter. Using a potato masher or hand mixer, mash/beat until smooth. Add
4. Put cooked potato into a medium bowl. Add milk and 1 tablespoon of the
cooked potato and skin shells.*
and scoop out the cooked flesh, leaving a ¼-inch thick potato shell. Reserve
3. When potatoes are cool enough to handle, slice off the top ¼ of each potato
minutes. Remove and let cool slightly. Reduce oven temperature to 350°F.
times with a fork. Place potatoes directly on the rack and bake for about 40 to 45
2. Rub each potato with ½ teaspoon of olive oil, and then evenly prick about 6 to 8
1. Preheat the Toaster Oven set to Bake at 400°F with the rack in position A.
2 tablespoons chopped fresh chives
¼ teaspoon freshly ground black pepper
• chol. 17mg • sod. 25mg • calc. 4mg • fiber 0g
Calories 53 (40% from fat) • carb. 1g • pro. 7g • fat 2g • sat. fat 1g
Nutritional information per wing:
4. Garnish with scallions and serve immediately.
for 25 minutes.
3. Arrange the wings in a single layer on the prepared pan and bake
for up to 3 hours.
hand to thoroughly and evenly coat. Cover and marinate in refrigerator
the salt and spice powder, rubbing the spices into the chicken wings by
2. In a bowl, toss the wings with the vegetable oil. Evenly sprinkle wings with
Line the baking tray with aluminum foil.
1. Preheat the Toaster Oven set to Bake at 425°F with rack in position A.
2 tablespoons sliced scallions, for serving
2½ tablespoons five-spice powder, store-bought or homemade
1 teaspoon sea or kosher salt
1½ tablespoons vegetable oil
1 pound chicken wings, tips removed, drumettes and flats separated
Makes about 12 wings, 2 to 4 servings
¼ teaspoon sea or kosher salt
¼ cup sour cream
2 tablespoons unsalted butter, plus 1 teaspoon for finishing
cup low-fat milk
3
⁄
1
aromatic and flavorful too.
Seasoned with the classic Chinese spice blend, these wings are wonderfully
Five-Spice Chicken Wings
1 teaspoon extra virgin olive oil, divided
2 russet potatoes (10 to 12 ounces each)
Makes 2 servings
• chol. 22mg • sod. 295mg • calc. 4mg • fiber 0g
Calories 65 (57% from fat) • carb. 0g • pro. 6g • fat 4g • sat. fat 2g
Nutritional information per wing:
Page 20

5
5. Cut quesadilla in half and serve with salsa, guacamole, and/or sour cream.
Serve immediately.
5. Put wings in a medium-size bowl, cover with sauce and toss well to coat.
warm over low heat.
heat. Whisk in the remaining salt and pepper, cayenne and hot sauce. Keep
4. While the wings are cooking, melt the butter in a small saucepan over low
crisp the skin.
position C. Switch to Broil and return wings for another 2 to 3 minutes to
3. When finished baking, remove the pan and carefully adjust the rack to
pan and bake for 25 minutes.
and the vegetable oil. Arrange the wings in a single layer on the prepared
2. In a bowl, toss the wings, ¾ teaspoon of the salt, ¼ teaspoon of the pepper,
the baking tray with aluminum foil.
1. Preheat the Toaster Oven set to Bake at 425°F with rack in position A. Line
¼ cup hot sauce (such as Frank’s Red Hot)
¼ teaspoon cayenne pepper
2 tablespoons unsalted butter
1 tablespoon vegetable oil
½ teaspoon freshly ground black pepper, divided
1 teaspoon sea or kosher salt, divided
1 pound chicken wings, tips removed, drumettes and flats separated
Makes about 12 wings, 2 to 4 servings
inside is melted.
4. Bake quesadilla at 350°F for about 8 minutes, until top is golden and cheese
tortilla and brush it with the remaining oil.
distribute the vegetables on top and then add the cheese. Top with the other
3. Assemble quesadilla: Put one tortilla on the foil-lined baking pan. Evenly
toss with the cilantro and lime juice. Reduce oven temperature to 350°F.
and browned, about 10 to 15 minutes. Return vegetables to mixing bowl and
vegetables on the prepared baking pan. Bake until vegetables are softened
teaspoon of the olive oil, salt and pepper in a medium mixing bowl. Put
2. Toss the zucchini, bell and jalapeño peppers, onion and garlic with 1
baking pan with aluminum foil.
1. Preheat the Toaster Oven set to Bake at 450°F with rack in position A. Line
2 ounces Monterey Jack, shredded
2 10-inch flour tortillas
½ teaspoon fresh lime juice
1 tablespoon chopped cilantro
¼ teaspoon freshly ground black pepper
¼ teaspoon sea or kosher salt
1 teaspoon olive oil, plus ½ tablespoon for brushing
1 garlic clove, smashed
½ small onion, sliced
½ jalapeño pepper, seeded and finely chopped
spicy feel free to increase the amount of cayenne.
of the traditional deep-fry.They have a kick, but if you like them really
This bar-menu staple still gets crisp despite being baked instead
Buffalo-Style Chicken Wings
pieces
½ bell pepper (red, yellow or orange is preferable), cut into ½-inch
½ small zucchini, cut into ½-inch pieces
Makes 4 servings
• chol. 13mg • sod. 457mg • calc. 153mg • fiber 2g
Nutritional information per serving:
Calories 194 (45% from fat) • carb. 20 g • pro. 6g • fat 10g • sat. fat 3g
Roasted Vegetable Quesadilla
For a less traditional twist swap out the Monterey Jack for goat cheese.
Page 21

4
• chol. 22mg • sod. 523mg • calc. 207mg • fiber 3g
Nutritional information per serving:
Calories 262 (52% from fat) • carb. 23g • pro. 9g • fat 16g • sat. fat 5g
immediately with salsa, sour cream, guacamole and lime wedges.
3. Bake for about 5 to 6 minutes, or until the cheese is fully melted. Serve
as evenly as possible, in the order listed.
the prepared baking pan. Distribute the remaining ingredients over the chips,
2. Line the baking pan with aluminum foil. Evenly distribute the chips on top of
1. Preheat the Toaster Oven set to Broil at 500°F with the rack in position B.
1 to 1¼ cups shredded Cheddar (about 4 to 5 ounces)
in a 2.25-ounce can. Be sure to drain them first.)
½ cup sliced black olives (these can be purchased pre-sliced
1 to 2 scallions, thinly sliced (white and green parts)
1 jalapeño, halved, seeded and thinly sliced
1 small to medium tomato, chopped
cup refried beans (about ½ of a 15.5-ounce can)
3
⁄
2
how many mouths you need to feed)
bottom of the baking tray, but can have more or less depending on
40 tortilla chips (this is an estimate – you need enough to cover the
Makes 4 servings
it as is for a casual appetizer. Either way it is sure to keep the family satisfied.
simple as you want – add some guacamole or salsa, gourmet cheeses, or keep
The great thing about this recipe is that you can make it as extravagant or
Quick Cheese Nachos
7. Bake skins for 5 minutes or until cheese is melted.
bacon.
6. Evenly distribute the cheese on top of each half, and then top with the
with salt and pepper. Arrange the halves on the foil-lined baking pan.
5. Brush both sides of the potato halves with the melted butter and season
4. Halve potatoes lengthwise and scoop out flesh, leaving a ¼-inch shell.
temperature to 425°F.
3. Remove potatoes and let rest until cool enough to handle. Increase oven
minutes.
directly on the rack and bake until potatoes are fork-tender, about 60
2. Prick the potatoes with the tines of a fork on all sides. Place the potatoes
1. Preheat the Toaster Oven set to Bake at 350°F with the rack in position A.
2 tablespoons chopped chives
sour cream, to taste
4 slices bacon, cooked and crumbled
1 cup shredded Cheddar
freshly ground black pepper, to taste
sea or kosher salt, to taste
2 tablespoons melted unsalted butter, kept warm
4 russet potatoes, cleaned well
Makes 4 servings
• chol. 55mg • sod. 300mg • calc. 284mg • fiber 8g
Nutritional information per serving:
Calories 491 (34% from fat) • carb. 65g • pro. 17g • fat 18g • sat. fat 11g
wedges. Top with the sour cream and chopped chives. Serve immediately.
8. Remove and with a sharp knife halve each skin to make a total of 16
Potato Skins
or sautéed vegetables. Perfect with any type of eggs.
salt and pepper in a hot skillet, and then top with chopped bacon
a delicious breakfast side dish the next morning. Just cook with some oil,
Don't let the potato flesh go to waste. It can be made into
Page 22

3
cup maple syrup
3
⁄
1
1 tablespoon pure vanilla extract
1 cup heavy cream
2 cups whole milk
4 large eggs
• chol. 190mg • sod. 4 30mg • calc. 177mg • fiber 2g
Nutritional information per serving:
Calories 420 (47% from fat) • carb. 44g • pro. 11g • fat 22g • sat. fat 12g
5. Remove and serve immediately.
minutes, or until the internal temperature of the strata reaches 160°F.
foil. Bake for about 15 minutes; remove foil and bake for an additional 10
To save time, prepare the night before and bake in the morning.
Give your family a new twist on French toast this weekend.
French Toast Strata
nonstick cooking spray
Makes 8 servings
Dot the top of the strata with the butter and loosely cover with aluminum
Preheat the Toaster Oven set to Bake at 350°F with the rack in position A.
4. Remove the strata from the refrigerator and bring to room temperature.
least 2 hours, or overnight.
dot with the remaining brown sugar. Cover and chill in the refrigerator for at
opposite direction of the first layer. Pour the remaining egg mixture on top,
brown sugar. Repeat with the remaining bread, laying the strips in the
pan. Pour half of the egg mixture on top and evenly dot with half of the
3. Tightly fit half of the challah bread strips into the bottom of the prepared
mixing bowl. Whisk until completely combined.
2. Put the eggs, milk, cream, vanilla, syrup, spices and salt into a medium
1. Lightly coat a 9-inch square pan with nonstick cooking spray.
2 tablespoons unsalted butter, cut into ½-inch pieces
2 tablespoons packed light brown sugar, divided
1 loaf (1 pound) challah bread, cut into ½-inch x 9-inch strips
¼ teaspoon sea or kosher salt
1 teaspoon ground nutmeg
2 teaspoons ground cinnamon
⁄3 at a time, and the buttermilk,
1
• chol. 39mg • sod. 129mg • calc. 13mg • fiber 0g
Calories 212 (38% from fat) • carb. 30g • pro. 3g • fat 9g • sat. fat 6g
Nutritional information per serving (based on 12 servings):
the cake comes out clean.
5. Bake in preheated oven for 20 minutes, or until a cake tester inserted into
evenly with the reserved crumb topping.
ending with the dry ingredients. Pour the batter into the prepared pan. Cover
⁄3 at time, alternating between the two starting with the buttermilk and
1
combined. Add the reserved dry ingredients,
light and fluffy, about 1 minute. Add the egg and vanilla and beat until fully
4. Place the butter and sugar in a medium bowl and mix with a hand mixer until
3. In a small bowl, mix together the flour, baking soda, and salt. Reserve.
crumbs form.)
and cubed butter. Mix together with hands, or a pastry blender, until large
made by hand. Whisk the dry ingredients together, and then add the vanilla
the mixture is just combined. Reserve. (Alternatively, this topping can be
processor fitted with the metal chopping blade. Pulse 3 to 4 times, until
2. Combine the Crumb Topping ingredients in the work bowl of a food
Page 23

2
spray. Reserve.
Lightly coat a 9-inch square or round baking pan with non-stick cooking
1. Preheat the Toaster Oven on Bake to 350°F with the rack in position A.
cup buttermilk*
3
⁄
1
½ teaspoon vanilla extract
1 large egg, room temperature
½ cup + 3 tablespoons granulated sugar
cup unsalted butter, cut into 5 pieces
3
⁄
1
¼ teaspoon kosher salt
¾ teaspoon baking soda
cups unbleached, all-purpose flour
1
3
⁄
1
Cake:
4 tablespoons (½ stick) unsalted butter, cold and cubed
½ teaspoon pure vanilla extract
pinch kosher salt
1 teaspoon ground cinnamon
¼ cup granulated sugar
¼ cup packed light brown sugar
½ cup unbleached, all-purpose flour
Crumb Topping:
nonstick cooking spray
Makes one 9-inch cake (10 to 12 servings)
for a delicious start to the day.
Buttery, sweet and tender – pair with a cup of coffee
Buttermilk Crumb Cake
RECIPES
Digital
®
Toaster Oven Broiler can do.
™
Toaster Oven Broiler. These
™
Digital Compact
®
Compact
mouth-watering recipes are just a sampling of what the Cuisinart
to work in the Cuisinart
All of our recipes have been tested in our kitchen and specially developed
Fall Fruit Cobbler ............................................... 14
Bittersweet Espresso Brownies .................................... 13
DESSERTS
Pizza Bagels................................................... 13
Hummus and Vegetable Sandwich ................................. 12
California Sandwich ............................................. 12
Open-Faced Reuben ............................................ 11
SANDWICH
Chicken Parmesan .............................................. 11
Baked Pork Chops with Hot Cherry Peppers ......................... 10
Sole with Lemon and Capers...................................... 10
ENTRÉES
Old-Fashioned Macaroni and Cheese ................................ 9
Middle-Eastern Stuffed Acorn Squash ............................... 8
Buttery Dinner Rolls .............................................. 7
Twice Baked Potatoes ............................................ 6
SIDE DISHES
Five-Spice Chicken Wings ......................................... 6
Buffalo-Style Chicken Wings . . . . . . . . . . . . . . . . . . . . . . . . . . . . . . . . . . . . . . . 5
Roasted Vegetable Quesadilla...................................... 5
Quick Cheese Nachos . . . . . . . . . . . . . . . . . . . . . . . . . . . . . . . . . . . . . . . . . . . . 4
Potato Skins.................................................... 4
APPETIZERS
French Toast Strata .............................................. 3
Buttermilk Crumb Cake ........................................... 2
BREAKFAST
CONTENTS
Page 24

Compact Digital Toaster Oven Broiler TOB-100
Reverse Side
Booklet
Instruction
RECIPE BOOKLET
Page 25

Starlite Electronic Pre-Press System
Version No.: TOB100/IB-11248A
Size: 229mm(W)X152mm(H)
Material Cover: 157Gsm Matt Artpaper,
Inside Page: 128Gsm Gloss Artpaper
Coating: Waterbase Varnishing
Color : Cover: 4C +1C
Inside: 1C +1C(Black)
Date: 2012-11-29 Co-ordinator: Astor_You
Client: L0090
Starlite No: 192013IBB
Proof: 1ST
Handled By: P000258
Cyan
5
10 20 30 40 50 60 70 80 90 100
5
10 20 30 40 50 60 70 80 90 100
5
10 20 30 40 50 60 70 80 90 100
5 10 20 30 40 50 60 70 80 90 100
BlackYellowMagenta
 Loading...