

Page 1
INSTRUCTION AND RECIPE BOOKLET
Cuisinart® Digital AirFryer Toaster Oven
TOA-65
Page 2

CONTENTS
Important Safeguards...........................................2
Special Cord Set Instructions ....................................3
Features and Benefits ..........................................4
Getting to Know Your Control Panel ...............................5
Before First Use ...............................................5
Setting the Clock and Oven Tone Volume...........................5
General Operation .............................................6
To Change Time, Temperature, or Function..........................6
Oven Rack and Pan Positions ....................................7
Tips and Hints ................................................7
Cleaning and Maintenance .....................................13
Troubleshooting ..............................................14
Warranty....................................................15
Recipes.....................................................16
IMPORTANT SAFEGUARDS
When using an electrical appliance, especially when children are present, basic
safety precautions should always be taken, including the following:
1. Read all instructions.
2. UNPLUG FROM OUTLET WHEN NOT IN USE AND BEFORE CLEANING.
Allow to cool before cleaning or handling, putting on or taking off parts.
3. Do not touch hot surfaces. Use handles or knobs.
4. To protect against electric shock, do not place any part of the Digital AirFryer
Toaster Oven in water or other liquids. See instructions for cleaning.
5. This appliance should not be used by or near children or individuals with
certain disabilities.
6. Do not operate any appliance with a damaged cord or plug, or after the
appliance has malfunctioned or has been dropped or damaged in any way or
has been dropped in water. Return the AirFryer Toaster Oven to the store or
retailer where purchased for examination or repair or adjustment.
7. The use of accessory attachments not recommended by Cuisinart may
cause injury.
8. Do not use outdoors.
9. Do not let cord hang over the edge of the table or countertop where it could
be pulled on inadvertently by children or pets, or touch hot surfaces, which
could damage the cord.
10. Do not place AirFryer Toaster Oven on or near a hot gas or electric burner or
in a heated oven.
11. Do not use this AirFryer Toaster Oven for anything other than its intended
purpose.
12. Extreme caution should be exercised when using containers constructed of
materials other than metal or glass in the oven.
13. T o avoid burns, use extreme caution when removing AirFryer Toaster Oven
accessories or disposing of hot grease.
14. When not in use, always unplug the unit. Do not store any materials other
than manufacturer’s recommended ovenproof accessories in this AirFryer
Toaster Oven.
15. Do not place any of the following materials in the AirFryer Toaster Oven:
paper, cardboard, plastic and similar products.
16. Do not cover Crumb Tray or any part of the oven with metal foil. This will
cause overheating of the oven.
17. Oversize foods, metal foil packages and utensils must not be inserted in the
AirFryer Toaster Oven, as they may involve a risk of fire or electric shock.
18. A fire may occur if the AirFryer Toaster Oven is covered or touching
flammable materials such as curtains, draperies or walls when in operation.
Do not store any items on top of the appliance when in operation. Do not
operate under wall cabinets.
19. Do not clean with metal scouring pads. Pieces can break off the pad and
touch electrical parts, involving a risk of electric shock.
2
Page 3

20. Do not attempt to dislodge food when the AirFryer Toaster Oven is plugged
into electrical outlet.
21. Warning: To avoid possibility of fire, NEVER leave AirFryer Toaster Oven
unattended during use.
22. Use recommended temperature settings for all cooking/baking,
roasting and AirFrying.
23. Do not rest cooking utensils or baking dishes on glass door.
24. Do not operate your appliance in an appliance garage or under a wall cabinet. When storing in an appliance garage, always unplug the unit from the
electrical outlet. Not doing so could create a risk of fire, especially if the
appliance touches the walls of the garage or the door touches the unit as it
closes.
25. Extreme caution must be used when moving an appliance containing hot oil
or other hot liquids.
26. To disconnect, press Start/Stop to ensure cooking is stopped, then remove
plug from wall outlet.
SAVE THESE
INSTRUCTIONS
Please read and keep these instructions handy. These instructions will help you
use your Cuisinart® Digital AirFryer Toaster Oven to its fullest, so that you will
achieve consistent, professional results.
SPECIAL CORD SET INSTRUCTIONS
A short power-supply cord is provided to reduce the risks resulting from becoming
entangled in or tripping over a longer cord. Extension cords are available and may
be used if care is exercised in their use.
If an extension cord is used, the marked electrical rating of the extension cord must
be at least as great as the electrical rating of the appliance, and the longer cord
should be arranged so that it will not drape over the countertop or tabletop, where it
can be tripped over unintentionally or pulled on by children.
NOTICE
This appliance has a polarized plug (one blade is wider than the other). To reduce
the risk of electric shock, this plug is intended to fit into a polarized outlet only one
way. If the plug does not fit fully into the outlet, reverse the plug. If it still does not fit,
contact a qualified electrician. Do not attempt to modify the plug in any way.
FOR HOUSEHOLD
USE ONLY
NOT INTENDED
FOR COMMERCIAL USE
3
Page 4
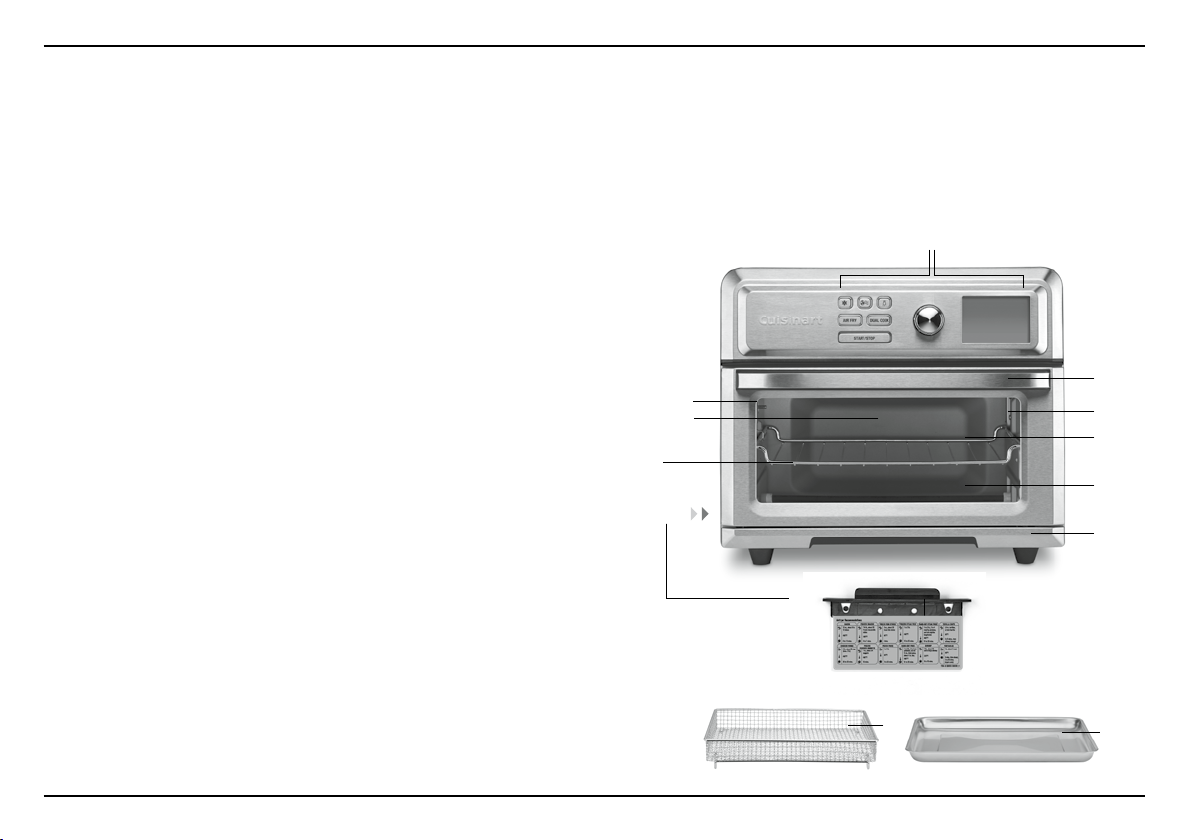
FEATURES AND BENEFITS
1. Control Panel
Large LCD, dial and intuitive buttons make the unit easy to use
(see details on page 5).
2. Cool-Touch Handle
Handle designed to stay cool during cooking.
3. Interior Light
Interior light to easily view food while cooking.
4. Viewing Window
Large viewing window to check progress.
5. Oven Rack
Can be used in two positions.
6. Rack Positions
A. Position 1 is the bottom position and this is recommended when cooking
larger foods (e.g., whole chicken).
B. Position 2 has a 50% stop feature, so the rack stops halfway out of the
oven. The oven rack can be removed from Position 2 by lifting the front of the
rack and sliding it out.
NOTE: Refer to page 7 for suggested rack positions with different functions.
7. Easy-Clean Interior
The sides of the oven’s interior are coated with non-stick.
8. Pull-Out Crumb Tray
The Crumb Tray comes already positioned in your oven. The tray slides
out from the lower front of the oven to clean.
9. AirFryer Basket
Use the basket when using the AirFry, Broil or Dehydrate functions
to optimize your cooking results. We recommend setting the AirFryer
Basket in the Baking/Drip Pan.
10. Baking/Drip Pan
A Baking/Drip Pan is included for your convenience. Use alone when
Baking or Roasting. Use Baking/Drip Pan with AirFryer Basket when
AirFrying, Broiling or Dehydrating.
11. Quick Reference Guide
Built-in guide with recommendations and tips on how to use the unit.
Before first use, slide in place.
1
4
7
5
11
9
2
3
6B
6A
8
10
4
Page 5
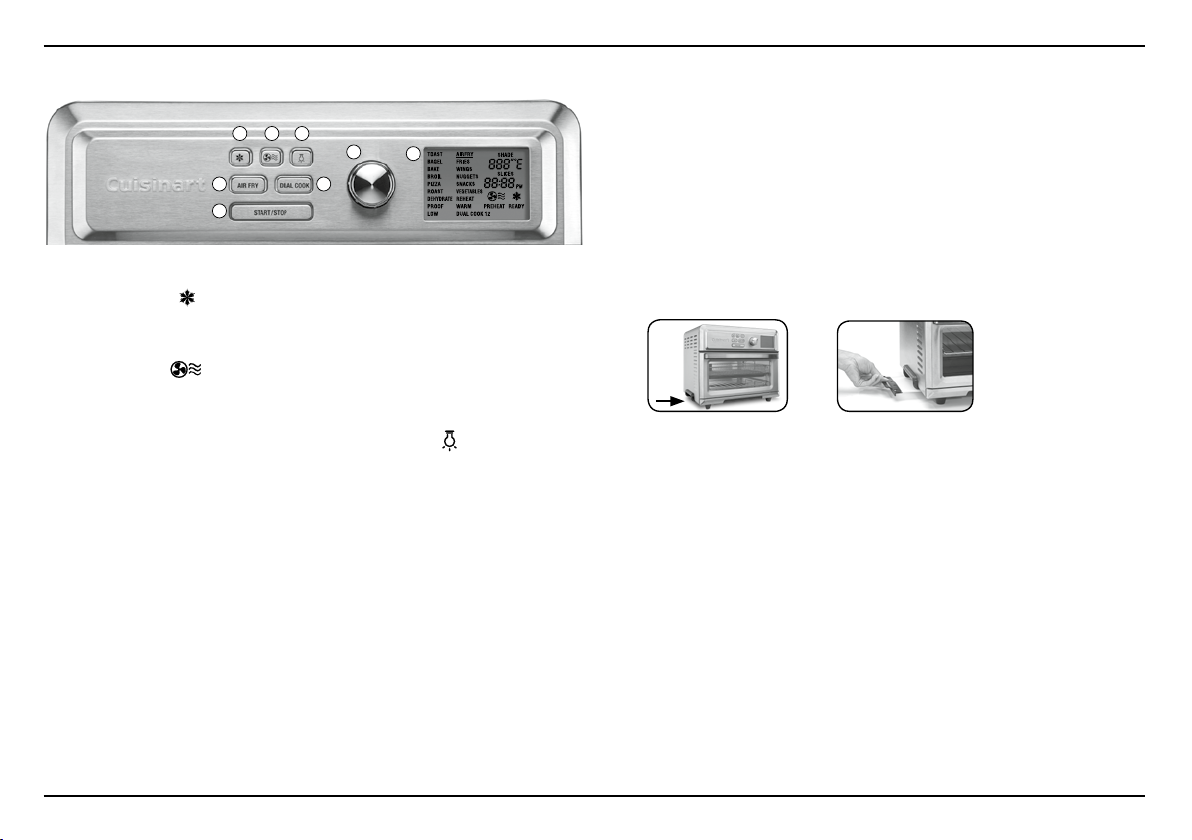
GETTING TO KNOW YOUR CONTROL PANEL
1 2 3
4 5
6
1. Defrost Button
For use with Toast, Bagel, Pizza, and certain AirFry presets. When activated,
the defrost icon will display on the LCD screen.
2. Fan Speed Button
To change the fan speed from Low to High, press the Fan Speed button.
When fan icon
is displayed on the LCD screen, fan speed is set to High.
Icon will disappear for Low fan speed.
3. Light Button
To turn on/off the interior oven light, press the light icon
turn off automatically after 20 seconds.
4. AirFry Button
Can be used to select manual AirFry function or AirFry presets.
5. Dual Cook
Use to program two-stage cooking operation.
6. Start/Stop Button with Indicator Light
Use to start and stop cooking. Indicator will illuminate when cooking.
7. Selector Dial
Rotate Selector Dial to scroll through options on the LCD screen. Press center of dial to confirm selections.
8. LCD Screen
Displays cooking functions, toast shade and slices, temperature, cooking/
countdown timer, clock time, fan speed and defrost.
7
8
. Interior light will
BEFORE FIRST USE
1. Place your Digital AirFryer Toaster Oven on a flat, level surface.
2. Move oven 2 to 4 inches away from the wall or from any objects on
the countertop. Do not use on heat-sensitive surfaces.
NOTE: OBJECTS SHOULD NOT BE STORED ON THE TOP OF THE
OVEN. IF THEY ARE, REMOVE ALL OBJECTS BEFORE YOU TURN ON
YOUR OVEN. THE EXTERIOR WALLS GET VERY HOT WHEN IN USE.
KEEP OUT OF REACH OF CHILDREN.
3. Check that the Crumb Tray is in place and that there is nothing in the oven.
4. Insert Quick Reference Guide on the bottom left side of the unit.
5. Plug power cord into the wall outlet.
SETTING THE CLOCK
The clock can only be set when the oven is not cooking and the time is displayed
on the screen.
To set the clock:
1. If LCD is not displaying the clock, scroll through the function menu until clock
is displayed.
2. Press and hold the Selector Dial for 3 seconds.
3. The clock hour will flash; turn the knob to set hour, then press Selector Dial to
confirm.
4. The clock minutes will flash; turn the knob to set minutes, then press Selector
Dial to confirm.
NOTE: If nothing is pressed, clock will automatically set to currently displayed
time.
5
Page 6

OVEN TONE VOLUME
The tone volume can only be adjusted when the time is displayed on the screen.
1. Press AirFry and Dual Cook buttons simultaneously for 3 seconds.
2. The number 1 (default setting) or currently selected setting will display.
3. Use Selector Dial to set preferred tone level: 0 (off/tones deactivated), 1 (low),
or 2 (high).
4. Once your selection is displayed, press Selector Dial to confirm.
GENERAL OPERATION
To operate the oven, follow these simple steps:
1. Place the appropriate rack, pan, and/or basket in the position recommended
in the chart on page 7.
2. Use the Selector Dial to scroll through functions.
3. When desired function is flashing, press Selector Dial to confirm. Start/Stop
button will flash and LCD screen will display the last selected or default
temperature and time (shade and slices for Toast and Bagel settings).
4. a. To use displayed settings, press Start/Stop to begin operation.
Start/Stop button will illuminate, indicating the unit is cooking.
b. To change settings:
1. Turn Selector Dial to choose desired temperature (or shade)
c. Press Selector Dial to confirm; time (or slices) will flash
d. Turn Selector Dial to choose desired time (or slices)
e. Press Selector Dial to confirm
f. If desired, press Defrost button or Fan Speed button
g. Press Start/Stop to begin operation. The button will illuminate,
indicating the unit is cooking.
NOTE: Bake and Pizza have a preheating stage during which display will
show “Preheat”; once preheat is complete, oven will beep and display will
show “Ready”; countdown timer will begin.
5. When countdown timer reaches 0:00, oven will beep three times and heaters
will turn off.
NOTE: Cooking process can be canceled before countdown timer reaches
0:00 by pressing Start/Stop.
NOTE: AFTER COOKING, FAN WILL REMAIN ON FOR COOLING PURPOSES.
TO CHANGE TIME, TEMPERATURE, OR
FUNCTION DURING COOKING CYCLE
To change time: During the cooking cycle, use the Selector Dial to add or decrease
time. The new countdown time will be displayed, and cooking will continue.
To change temperature: During the cooking cycle, press the Selector Dial until
the current temperature flashes. Turn the Selector Dial to desired temperature
and cooking will continue at the new temperature.
To change function: You must press Start/Stop to stop the current program.
Then turn Selector Dial and press it to select another function. Press Start/Stop
again to continue cooking cycle.
6
Page 7
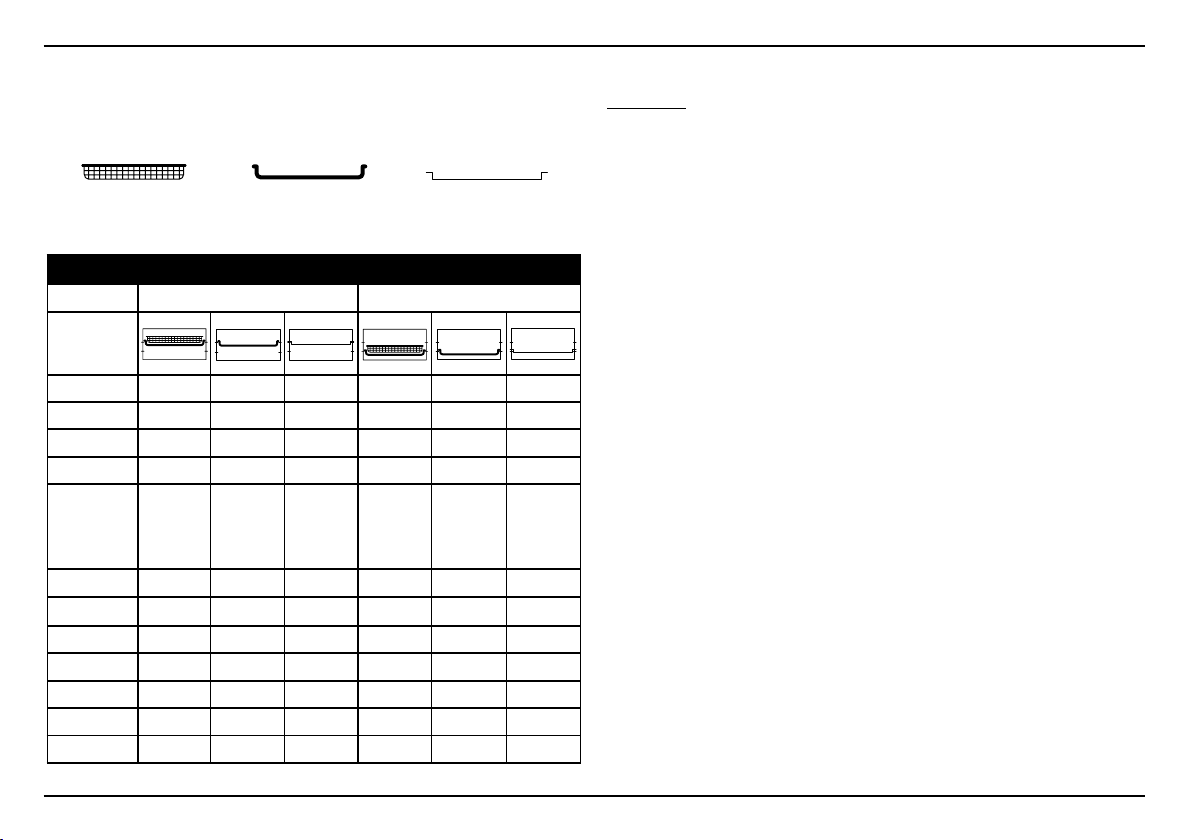
OVEN RACK AND PAN POSITION DIAGRAMS
Please refer to the chart below for suggested Oven Rack, Baking/Drip Pan,
and AirFryer Basket positions.
AirFryer Basket
SUGGESTED RACK/PAN/BASKET POSITIONS
Function
Toast X
Bagel X
Bake X X X X
Broil X X X X X X
Pizza X
Roast X X X X
Dehydrate X
Proof X X X
Low X X X X
AirFry X X
Reheat X X X X X X
Warm X X X X X X
Baking/Drip Pan
Position 2 Position 1
Oven Rack
(fresh)
X
(frozen;
inverted
rack)
TIPS AND HINTS
AIRFRY
TIP: For best results, use the provided AirFryer Basket fitted into the Baking/Drip
Pan.
AirFry can be used at 200°F – 450°F for up to 1 hour. This function is used to
AirFry meals as a healthy alternative to deep frying in oil. A high fan speed and
multiple heating elements circulate hot air to prepare a variety of meals that can
be both delicious and healthier than traditional frying.
• Default: 400°F; 10 minutes.
• Many foods that can be fried can be AirFried without using excess amounts of
oil. AirFried foods will taste lighter and be less greasy than deep-fried foods.
• AirFrying doesn’t require oil, but a light spray can enhance browning and
crispiness. Use an oil sprayer or a nonstick olive oil cooking spray to keep it
extra light, a pastry brush to evenly coat, or pour a little oil into a bowl, add
food, and toss.
• Most oils can be used for AirFrying. Olive oil is preferred for a richer flavor.
Vegetable, canola or grapeseed oils are recommended for milder flavors.
• An assortment of coatings can be used on AirFried foods.
Some examples of different crumb mixtures include: breadcrumbs,
seasoned breadcrumbs, panko breadcrumbs, crushed cornflakes, potato
chips, and graham crackers. Various flours, including gluten-free, and other
dry foods like cornmeal work as well.
• Most foods do not need to be flipped during cooking, but larger items, like
chicken cutlets, should be turned halfway through the cooking cycle to ensure
evenly cooked and browned results.
• When AirFrying large quantities of food that fill the pan, toss food halfway
through the cooking cycle to ensure evenly cooked results and color.
• Use higher temperatures for foods that cook quickly, like bacon and chips, and
lower temperatures for foods that take longer to cook, like breaded chicken.
• Foods will cook more evenly if they are cut into the same-size pieces.
• Please note that many foods release water when they cook. When cooking
large quantities for an extended period of time, condensation may build up,
which could leave moisture on your countertop.
7
Page 8

The chart below lists recommended amounts, cooking times and temperatures for various types of food that can be AirFried in the Cuisinart® Digital AirFryer Toaster
Oven. If portions exceed recommendations, you can toss occasionally while cooking to ensure the crispiest, most even results. Smaller amounts of food may require
less time. For best AirFry results, use the oven light to periodically check on food.
NOTE: When AirFrying, always use the AirFryer Basket with the Baking/Drip Pan. For all foods below, we suggest using the upper position (Position 2) for best results.
AIRFRYER CHART
Food Recommended Amount Temperature Time
Bacon 12 ounces, about 10 to 12 slices 400ºF 8 to 10 minutes
Chicken Wings 2 pounds, about 20 wings (max 3 pounds) 400ºF 20 to 25 minutes
Frozen Appetizers (e.g.,
mozzarella sticks, popcorn
shrimp, etc.)
Frozen Chicken Nuggets 1 pound, about 34 frozen chicken nuggets 400ºF 10 minutes
Frozen Fish Sticks 12 ounces, about 20 frozen sh sticks 400ºF 8 minutes
Frozen Fries 1 to 2 pounds 450ºF 15 to 25 minutes
Frozen Steak Fries 1 to 2 pounds 450ºF 15 to 25 minutes
1½ pounds, about 20 frozen mozzarella sticks 400ºF 5 to 7 minutes
Hand-Cut Fries
Hand-Cut Steak Fries
Shrimp
Tortilla Chips
Vegetables
NOTE: AirFrying doesn’t require oil, but a light coating can enhance browning and crispiness. Use an oil sprayer or a nonstick olive oil cooking spray to keep it extra
light, a pastry brush to evenly coat, or pour a little oil into a bowl, add food, and toss.
1 to 2 pounds, (2 to 4 medium potatoes), cut into
¼-inch thick pieces, about 4 inches
1 to 2 pounds (2 to 4 medium-large potatoes), cut
into eighths lengthwise
1 pound, about 16 extra-large shrimp 375ºF 8 to 10 minutes
6, 5-inch tortillas cut into fourths 400ºF 5 to 6 minutes, toss halfway through
1 pound, about 4 cups 400ºF
8
400ºF
400ºF 15 to 20 minutes
15 to 20 minutes
Thin slices:10 minutes;
larger cut: 15 to 20 minutes
Page 9

USING AIRFRYER PRESETS
In addition to being able to program the temperature and time for AirFrying, the
Cuisinart® Digital AirFryer Toaster Oven has convenient, easy-to-use presets for
your fried favorites—French fries, chicken wings, chicken nuggets, snacks, and
vegetables. To use AirFryer presets, follow these steps:
1. Press the AirFry button or scroll through function menu and select AirFry.
2. Turn Selector Dial to scroll through preset functions. When desired preset is
flashing, press Selector Dial to confirm selection.
3. Preset temperature and time will display.
a. To use displayed settings, press Start/Stop to begin
b. To change settings, see General Operation on page 6
NOTE: Most presets can be used with frozen or fresh foods. See below for
details:
Fries ............... Default is for frozen fries. Fresh is for hand-cut potatoes.
Wings ............ Default is for fresh chicken wings. Frozen setting is
intended for un-cooked frozen chicken wings.
Nuggets ......... Default is for frozen pre-cooked nuggets. Fresh setting is
for uncooked nuggets.
Snacks .......... Default is for frozen pre-cooked snacks.
Vegetables .... Default is for fresh vegetables.
NOTE: Fan speed cannot be changed for AirFryer presets; it is always on High.
TOAST
Toast shade can be set from 1 to 7 using 1 to 6 slices. This function is used to
toast bread and other items; both fresh and frozen items can be used.
• Default: Shade 4; 3 to 4 slices; no Defrost
• For best results and more evenly toasted items:
– If toasting two pieces, center them in the middle of the oven rack
– Four pieces should be evenly spaced—two in front, two in back
– Six pieces should be evenly spaced—three in front, three in back
• If toast is lighter than you like, time can be added (up to 1 minute) by turning
the Selector Dial before toasting is complete
• Shade Guide: Light (1, 2) • Medium (3, 4, 5) • Dark (6, 7)
WARNING: Always use Position 2 for toasting. Do not invert rack in Position 2 as
this may result in burning.
BAGEL
Bagel shade can be set from 1 to 7 using 1 to 6 slices. This function provides full
heat on the top and half heat on the bottom to toast both sides of bagel halves;
both fresh and frozen bagels can be used.
• Default: Shade 4; 3 to 4 slices; no Defrost
• For best results, put your bagels on the rack with the cut sides facing up
• If bagels are too light, time can be added (up to 1 minute) by turning the
Selector Dial before toasting is complete
BAKE
Bake can be used at 200°F – 450°F for up to 2 hours. Baking is recommended
for a variety of foods you would normally prepare in a conventional oven.
• Default: 350°F; 30 minutes
• Select Bake with Low fan speed (i.e., no fan icon displaying on screen) for more
delicate items like custards and eggs, as well as most baked goods like cookies, muffins, and cakes
• Select Bake with High fan speed, also known as Convection Bake (i.e., fan icon
displaying on screen), for most baked goods that require even browning and
leavening, like heartier baked goods and breads
• When using either fan speed, cooking times and temperatures may need to
be reduced—start checking foods about 5 to 10 minutes before the end of the
suggested cooking time
®
• Important: All of our recipes were specially developed for the Cuisinart
AirFryer Toaster Oven and have been tested in our Cuisinart Test Kitchen
Digital
9
Page 10

BROIL
Broil is fixed at 450ºF, for up to 2 hours. Broiling function can be used for
beef, chicken, pork, fish, and more. It also can be used to top-brown casseroles
and gratins.
• Default: 450°F; 5 minutes
• For best results, use the provided AirFryer Basket fitted into the Baking/Drip
Pan to broil
• Never use glass oven dishes to broil
• Be sure to keep an eye on food – items can brown quickly when broiling
PIZZA
Pizza can be used at 350ºF – 450ºF for up to 2 hours. This function can be used
to cook fresh or frozen pizza.
• Default: Fresh – 450°F; 10 minutes Convection (High Speed) fan
Frozen – 400°F; 10 minutes Convection (High Speed) fan
• For best results, place frozen pizza on inverted rack in Position 1, and for fresh
pizza, place the dough directly on the Baking/Drip Pan in rack Position 1
• Pizza can also be cooked on the pizza stone available for purchase on
www.cuisinart.com
• Pizza recipe ideas can also be found on the Cuisinart website
ROAST
Roast can be used at 200ºF – 450ºF for up to 2 hours.
• Default: 375°F; 45 minutes
• High fan speed works well with Roast – roasting time is significantly reduced,
and meats and poultry are perfectly cooked – browned on the outside, moist
and juicy on the inside
• Dress up vegetables by roasting them; as they caramelize, they become sweet
and delicious
• Because some foods roast faster, begin checking progress at least 5 to 10
minutes before the end of suggested cooking time
DEHYDRATE
Dehydrate can be used at 100°F – 200°F for up to 72 hours. This function turns
your Cuisinart® Digital AirFryer Toaster Oven into a dehydrator that lets you dry or
dehydrate food. The built-in fan and low heat are used to create a flow of hot air
that reduces the water content found in fresh foods. Dehydrated food will continue to retain the vast majority of its original nutritional value.
• Default: 130°F; 2 hours
• Lemon juice can be used to pretreat fruits and vegetables to prevent browning
• Drying times can greatly vary due to the thickness of cuts and relative humidity
(see chart on page 11)
• Check foods often for dryness
• Do not overcrowd; foods should be arranged in a single layer with little
to no overlap
PROOF
Proof can be used at 80°F – 100°F for up to 2 hours. Use this function to proof
bread or pizza dough.
• Default: 90°F; 45 minutes
• Allow dough to complete at least one rise at room temperature
• Shape dough and place on the Baking/Drip Pan or separate baking dish such
as a loaf pan and then put directly in the oven in Position 1
• Dough is ready when doubled in size. Start checking around 20 minutes
• Once time elapses, complete dough preparation and bake according to recipe
10
Page 11

The chart below lists recommendations on how to dehydrate different foods. These are guidelines only. Drying times can vary due to
thickness of cuts and relative humidity.
DEHYDRATE CHART
CATEGORY FOOD PREPARATION TEMPERATURE FAN SPEED TIME
Herbs/Spices Basil, Chives, Cilantro, Dill,
Mint, Oregano, Parsley,
Rosemary, Sage, Thyme
Herbs/Spices Garlic Peel cloves; halve lengthwise 100ºF–115ºF High 6 to 12 hours
Herbs/Spices Ginger Root Peel; grate or slice thinly 100ºF–115ºF Low 2 to 6 hours
Fruit Apples Peel and core; slice thinly 135ºF Low 4 to 10 hours
Fruit Apricots, Bananas,
Figs, Mangos, Melons,
Nectarines, Pineapples,
Pears, Plums
Fruit Cranberries, Blueberries Dip in boiling water to burst skins 135ºF High 10 to 18 hours
Fruit Cherries Wash; pit 135ºF High 12 to 24 hours
Fruit Citrus Wash; thinly slice 135ºF Low 2 to 12 hours
Fruit Grapes Wash; leave whole 135ºF High 10 to 36 hours
Vegetables Beans (Green/Wax),
Broccoli, Cauliower,
Corn*, Mushrooms, Peas*,
Peppers, Potatoes*, Onion,
Squash, Tomatoes
Vegetables Beets Steam until tender; peel and thinly slice 130ºF–145ºF High 3 to 10 hours
Vegetables Leafy Greens (Kale,
Spinach)
Meat Pork/Beef Remove fat and gristle; cut into uniform
Fish Lean sh Cut into uniform strips; marinate if desired 130ºF–140ºF High Until rm and dry
Rinse in cold water; pat dry 100ºF–115ºF Low 3 to 6 hours until stems
Wash; core, deseed or pit fruit; remove
rinds from melons or some peels; thinly
slice
Wash, peel and deseed as necessary;
*blanch; cut or slice into uniform pieces;
remove corn from cob; peas can be left
whole
Wash; dry thoroughly; remove stems, tear
leaves into small pieces if necessary
strips; marinate if desired; pat off excess
oil during drying
135ºF High 6 to 12 hours
130ºF–145ºF High 6 to 12 hours
130ºF–145ºF Low 3 to 6 hours
160ºF High 4 to 15 hours
are brittle and leaves
crumble easily
11
Page 12

LOW
Low can be used at 100°F – 300F° for up to 8 hours. Use this function to cook at
low temperatures — perfect for braising, slow cooking and more.
• Default: 200°F; 2 hours
• For slow-cooked dishes with crispy exteriors and soft interiors, place ingredients
directly on the Baking/Drip Pan
• For results that are most similar to recipes cooked in a slow cooker,
place ingredients into a covered, ovenproof dish with liquid coming up
one-third of the way
LOW CHART
CATEGORY FOOD AMOUNT TEMP TIME
Meat
Meat
Poultry
Poultry
Fish/
Seafood
Vegetables
Ribs, Short
Ribs, Shanks
Roasts 2½ pounds
Whole Chicken,
Chicken Thighs
Duck Legs 2½ pounds
Whole Fish,
descaled and
gutted; llets,
skinned if
desired
Slow-roasted
tomatoes, root
vegetables, etc.
2½ pounds
maximum
maximum
3- to 4-pound
roaster chicken;
2½ pounds
maximum for
pieces
maximum
2-pound whole
sh, 2½ pounds
maximum llet
2½ pounds 250ºF 1 to 2 hours
300ºF 2 to 4 hours
350ºF 1 to 2 hours
300ºF 4 to 4½ hours
225ºF 2 to 3 hours
200ºF to
300ºF
for whole
chicken, 1½
to 2 hours for
thighs
30 minutes
for llets;
1 to 2 hours
for whole sh
REHEAT
Reheat can be used at 200°F – 450°F for up to 2 hours. Use this function to
reheat leftovers.
• Default: 250°F; 20 minutes
WARM
Warm can be used at 150°F – 300°F for up to 2 hours. Use this function to keep
food warm once cooked.
• Default: 150°F; 30 minutes
• One great way to use the Dual Cook feature described below is to add Warm at
the end of a cooking function so your dish is held at the proper serving temperature
DUAL COOK
Dual Cook is a special feature that enables you to combine two cooking
functions or two temperatures and run them consecutively. This is ideal for those
recipes that require multiple cooking steps. Some examples are:
• Starting a casserole or a dish like nachos, bake to heat through and then
switch to broil for a melted and browned top
• Beginning a dish on a higher heat to achieve a crispy crust and then reducing
temperature for tender results like in Low cooking
The functions that you may program using Dual Cook are Bake, Broil, Roast,
Pizza, Low, Warm and AirFry.
1. Press the Dual Cook button.
2. The oven will display available functions for the first cooking cycle. Turn the
Selector Dial to desired function and press Selector Dial to set.
3. Set temperature for this function, then press Selector Dial. Time will now flash.
Set time, then press Selector Dial.
4. LCD screen will then show functions that can be selected for the second
stage. Repeat steps 2 and 3 to program second function, temperature
and time.
Start/Stop will flash, indicating you are able to initiate cooking cycle.
12
Page 13

5. Press Start/Stop to start cooking on the first function.
6. When the first cycle is finished, the oven will automatically switch to the
second cooking function.
7. When time reaches 0:00 and the second function cycle is completed, the oven
will beep and heating elements will turn off.
NOTE: When the oven is running in the first function, you may check your
settings for the second function by pushing the Dual Cook button. The display
will show the second function settings for a few seconds and then revert to
display for the first function.
CLEANING AND MAINTENANCE
• Always unplug the oven from the electrical outlet and allow it to cool
completely before cleaning
• Do not use abrasive cleaners, as they will damage the finish. Simply wipe the
exterior with a clean, damp cloth and dry thoroughly. Apply the cleansing agent
to a cloth, not directly onto the toaster oven, before cleaning
• To clean interior walls, use a damp cloth and a mild liquid soap solution or a
spray solution on a sponge. Remove any residue from cleaners with a clean,
damp rag. Never use harsh abrasives or corrosive products. These could
damage the oven surface. Never use steel wool pads, etc., on interior of oven
• Cleaning the accessories:
– Oven Rack and Crumb Tray should be hand-washed in hot, sudsy water, or
use a nylon scouring pad or nylon brush, and thoroughly rinsed. These items
are NOT dishwasher safe.
– Baking/Drip Pan and AirFryer Basket are dishwasher safe or can be
hand-washed in hot, sudsy water, or use a nylon scouring pad or nylon brush,
and thoroughly rinsed.
• After cooking greasy foods and once your oven has cooled, always clean top of
oven interior. If this is done on a regular basis, your oven will perform like new.
Removing the grease will help to keep toasting consistent, cycle after cycle
• To remove crumbs, slide out the front Crumb Tray and discard crumbs. Wipe
clean and replace. To remove baked-on grease, soak the tray in hot, sudsy
water or use nonabrasive cleaners. Never operate the oven without the Crumb
Tray in place
• Any other servicing should be performed by an authorized service
representative
13
Page 14

TROUBLESHOOTING
Why won’t my unit turn on? Make sure your unit is plugged into a functional outlet.
Operation
Make sure the oven door is closed.
Call Consumer Service at 1-800-726-0190.
Why does the fan remain on
after cooking?
Why does the light turn off? The light only stays on for 20 seconds each time the light button is pressed to conserve energy. This is normal.
Can I change my cooking
Programming
Cooking
Cleaning Are the parts dishwasher safe? The Baking/Drip Pan and the AirFryer Basket are dishwasher safe.
function when the unit is
already cooking?
Can I change the time or
temperature when the unit is
already cooking?
Why is my food not crispy or
fried evenly?
Why is my food undercooked? If you put too much food in the basket, try with smaller batches of food and single layers, rather than stacking food on
Why does condensation and
steam come out of my unit?
How do I clean tough-toremove food residue from my
accessories?
The fan remains on for cooling purposes.
You need to rst interrupt the current cooking function by pressing Start/Stop. Then unit will go back to selection menu
and desired cooking function can be chosen.
Yes. Simply turn the Selector Dial during cooking to add time. To change the temperature, press the Selector Dial and,
when the temperature is ashing, use the Dial to increase/decrease temperature.
Some foods may require more oil than others. If not crispy enough, spray, brush or add some oil on the food.
Make sure food is spread evenly in one single layer in the AirFryer Basket with no overlap. If food still overlaps, toss or
ip food halfway through cooking cycle.
Put the food in for additional cooking time. Make sure to check periodically until food reaches desired brownness.
Do not leave oven unattended.
top of each other.
The temperature might be too low. Use the Selector Dial to increase temperature.
When preparing greasy foods, oil may leak into the pan and it produces steam. This will not affect the unit or the end
result. It may fog up the viewing window on the sides or corners.
When preparing foods with a high moisture content, the water evaporates out of the food and causes condensation.
This will not affect the unit or the end result. It may fog up the viewing window on the sides or corners
The pan, basket, or bottom of oven may contain grease residue from previous use. Make sure to clean the pan properly
after each use.
Do not put the Crumb Tray or the wire rack in the dishwasher; instead, hand-wash with warm, sudsy water.
To remove baked-on grease, soak the accessories in hot, sudsy water or use a nonabrasive cleanser.
14
Page 15

WARRANTY
LIMITED THREE-YEAR WARRANTY
(U.S. AND CANADA ONLY)
This warranty is available to consumers only. You are a consumer if you
own a Cuisinart® Digital AirFryer Toaster Oven that was purchased at
retail for personal, family or household use. Except as otherwise required
under applicable law, this warranty is not available to retailers or other
commercial purchasers or owners. We warrant that your Cuisinart® Digital
AirFryer Toaster Oven will be free of defects in materials and workmanship
under normal home use for 3 years from the date of original purchase.
We recommend that you visit our website, www.cuisinart.com for a fast,
efcient way to complete your product registration. However, product
registration does not eliminate the need for the consumer to maintain the
original proof of purchase in order to obtain the warranty benets. In the
event that you do not have proof of purchase date, the purchase date for
purposes of this warranty will be the date of manufacture.
CALIFORNIA RESIDENTS ONLY
California law provides that for In-Warranty Service, California residents
have the option of returning a nonconforming product (A) to the store
where it was purchased or (B) to another retail store that sells Cuisinart
products of the same type. The retail store shall then, according to
its preference, either repair the product, refer the consumer to an
independent repair facility, replace the product, or refund the purchase
price less the amount directly attributable to the consumer’s prior usage of
the product. If neither of the above two options results in the appropriate
relief to the consumer, the consumer may then take the product to
an independent repair facility if service or repair can be economically
accomplished. Cuisinart and not the consumer will be responsible for
the reasonable cost of such service, repair, replacement, or refund of
nonconforming products under warranty. California residents may also,
according to their preference, return nonconforming products directly to
Cuisinart for repair or, if necessary, replacement by calling our Consumer
Service Center toll-free at 1-800-726-0190. Cuisinart will be responsible
for the cost of the repair, replacement, and shipping and handling of such
nonconforming products under warranty.
BEFORE RETURNING YOUR CUISINART PRODUCT
If your Cuisinart
defective within the warranty period, we will repair or, if we think
necessary, replace it. To obtain warranty service, please call our
Consumer Service Center toll-free at 1-800-726-0190 or write to:
Cuisinart, 7475 North Glen Harbor Blvd., Glendale, AZ 85307. To facilitate
the speed and accuracy of your return, enclose $10.00 for shipping and
handling. (California residents need only supply a proof of purchase and
should call 1-800-726-0190 for shipping instructions.) Please be sure to
include your return address, phone number, description of the product’s
defect, product serial number, and any other information pertinent to the
return. Please pay by check or money order made payable to Cuisinart.
NOTE: For added protection and secure handling of any Cuisinart
product that is being returned, we recommend you use a traceable,
insured delivery service. Cuisinart cannot be held responsible for intransit damage or for packages that are not delivered to us. Lost and/or
damaged products are not covered under warranty.
Your Cuisinart
to the strictest specications and has been designed for use only with
authorized accessories and replacement parts. This warranty expressly
excludes any defects or damages caused by accessories, replacement
parts or repair service other than those authorized by Cuisinart. This
warranty does not cover any damage caused by accident, misuse,
shipment or other than ordinary household use. This warranty excludes
all incidental or
exclusion or limitation of these damages, so these exclusions may not
apply to you. This warranty gives you specic legal rights, and you may
also have other rights, which vary from state to state.
Important: If the nonconforming product is to be serviced by someone
other than Cuisinart’s Authorized Service Center, please remind the
servicer to call our Consumer Service Center at 1-800-726-0190 to ensure
that the problem is properly diagnosed, the product is serviced with the
correct parts, and to ensure that the product is still under warranty.
®
Digital AirFryer Toaster Oven should prove to be
®
Digital AirFryer Toaster Oven has been manufactured
consequential
damages. Some states do not allow the
15
Page 16

RECIPES
These mouthwatering recipes are just a sampling of what this appliance can do.
APPETIZERS AND SMALL BITES
Spring Egg Cups .............................................17
Spanish Tortilla ...............................................17
Crispy Chickpeas .............................................18
Root Veggie Chips with Rosemary & Sea Salt ......................18
Blooming Onion . . . . . . . . . . . . . . . . . . . . . . . . . . . . . . . . . . . . . . . . . . . . . . 18
Fried Pickles.................................................19
Kale Chips ..................................................19
Ultimate Nachos .............................................20
MAIN COURSES
Crab Cakes .................................................20
Buffalo Chicken Wings ........................................21
Five-Spice Seasoning for Chicken Wings with Dipping Sauce .........21
Mini Shepherd’s Pies ..........................................22
Oven-Roasted Ribs ...........................................23
Braised Lamb Shanks .........................................23
Chicken Nuggets .............................................24
Classic Roast Chicken .........................................24
Harissa and Preserved Lemon-Glazed-Salmon......................24
Fish Tacos ..................................................25
Falafel......................................................25
Open-Faced Croque Monsieurs..................................26
Pizza Margherita..............................................27
SIDES AND BREADS
Sweet & Salty Bacon Fried Rice .................................27
Candied Bacon...............................................28
“Fried” Brussels Sprouts .......................................28
French Fries .................................................28
Veggie Fries with Herbed Yogurt Dip ..............................29
Sweet Potato Fries with Chipotle Mayo............................29
Pimiento Mac ‘n Cheese Cups ..................................30
Buttery Dinner Rolls ...........................................30
Rustic Italian Bread ...........................................31
SWEET TREATS
Pineapple Leather Roll-Ups .....................................32
Blueberry Crumble Bars........................................32
S’mores ....................................................33
Cinnamon Apples.............................................33
Dessert Wontons Two Ways.....................................34
Cinnamon Sugar Doughnut Bites ................................34
Banana Crunch Muffins ........................................35
16
Page 17

APPETIZERS AND SMALL BITES
Traditionally deep-fried favorites are transformed into lighter, healthier versions in
the Cuisinart® AirFryer Toaster Oven, which requires only a few spritzes of oil to
AirFry. Plus, we offer many interchangeable dipping sauces that can be enjoyed
Makes 6 individual servings
Nonstick cooking spray
6 slices prosciutto
5 large eggs
¼ cup half-and-half
¼ teaspoon kosher salt
Freshly ground black pepper as desired
¼ cup goat cheese, crumbled
2 teaspoons finely chopped fresh dill
2 to 3 asparagus spears, sliced lengthwise into thin ribbons using
1. Lightly coat a 6-cup muffin pan with nonstick cooking spray. Press one slice
of prosciutto into each muffin cup to entirely line bottom and sides, leaving
some overhang. Mend any cracks.
2. In a bowl, whisk together the eggs, half-and-half, salt and pepper. Stir in
crumbled goat cheese. Divide asparagus ribbons evenly among the muffin
cups.
3. Fill each muffin cup with asparagus ribbons. Fill each cup two-thirds of the
way with the egg mixture.
4. Place the muffin pan into the Cuisinart
rack Position 2. Select AirFry, and set the temperature to 325°F for 8 to 10 minutes, cooking until egg cups are set and no longer runny. Run a knife along the
edge of each cup to loosen from pan. Serve warm.
with more than just the recipes they accompany.
Spring Egg Cups
Sophisticated and sure to impress your brunch guests.
a peeler or mandoline
®
AirFryer on the Baking/Drip Pan in
Nutritional information per ser ving (1 muf fin cup):
Calories 116 (62% from fat) • carb. 1.5g • pro. 9.5g • fat 8.1g • sat. fat 3.3g
chol. 171.7mg • sod. 4 32mg • calc. 32mg • fiber 0.2g
Spanish Tortilla
A traditional tapas recipe, these can be enjoyed with some marinated olives,
Makes 6 servings
Nonstick cooking spray
½ small onion, thinly sliced
1 small potato, cut into 12 thin slices
¾ teaspoon kosher salt, divided
¼ teaspoon freshly ground black pepper
5 large eggs
Chopped fresh parsley to garnish (optional)
1. Spray a 6-cup muffin pan generously with nonstick cooking spray.
2. Divide the onion slices evenly among the muffin cups. Place 2
slices of potato in each cup and sprinkle with ½ teaspoon of the salt.
Put into the Cuisinart
and set the temperature to 400°F for 10 minutes.
3. While the onions and potatoes are cooking, beat the eggs and add the
remaining salt and pepper. Once the potatoes and onions are ready, evenly
add the eggs to the muffin cups. Place the muffin pan back into the oven,
select AirFry, and set the temperature to 325°F for 8 minutes.
4. Remove from cups and serve immediately. Garnish with chopped parsley if
desired.
Calories 84 (43% from fat) • carb. 6g • pro. 6g • fat 4g • sat. fat 1g
a green salad and crusty bread.
®
AirFryer on the oven rack in Position 2. Select AirFry
Nutritional information per serving:
chol. 155mg • sod. 331mg • calc. 29mg • fiber 1g
17
Page 18

Crispy Chickpeas
Quickly transform a plain can of chickpeas into a crispy snack.
1 can (15.5 ounces) chickpeas, drained and blotted dry, about
1½ cups
Olive oil, for spraying
¼ teaspoon kosher salt
¼ teaspoon ground cumin
Pinch freshly ground black pepper
1. Place the AirFryer Basket into the Baking/Drip Pan. Put the chickpeas into
basket and spray liberally with oil. Sprinkle with the salt, cumin and pepper.
2. Put the assembled basket into rack Position 2 and select AirFry. Set the
temperature to 350°F for 15 minutes, cooking until chickpeas are fragrant
and lightly browned.
3. Serve immediately.
Nutritional information per ser ving (¼ cup):
Calories 75 (13% from fat) • carb. 14g • pro. 3g • fat 1g • sat. fat 0g • chol. 0mg
sod. 275mg • calc. 20mg • fiber 3g
Root Veggie Chips with Rosemary & Sea Salt
Worth the effort – better than store bought!
Makes 4 to 6 servings
1½ pounds of root vegetables (beets, turnips, potatoes, yams)
Olive oil, for brushing
2 teaspoons fresh rosemary, finely chopped
2 teaspoons flaked sea salt
1. Place the AirFryer Basket onto the Baking/Drip Pan. Reserve.
2. Using a mandoline, cut vegetables into ¼-inch slices. Pat dry with paper
towels. Arrange as many slices as possible in a single layer in the AirFryer
Basket, avoiding any overlap. Brush both sides of the slices with olive oil and
sprinkle with rosemary and salt.
3. Put the basket on the tray in rack Position 2. Select AirFry and set temperature
to 250°F, cooking until crisp: beets 30 to 35 minutes, parsnips 20 to 25
minutes, potatoes and yams 15 to 20 minutes. Flip halfway for best results*.
4. Serve immediately.
* AirFrying chips low and slow gives them an irresistible baked crunch;
however, if time is short, turn temperature up to 400°F for about 10 minutes.
Nutritional information per serving (based on 6 servings):
Calories 103 (19% from fat) • ca rb. 19.3g • pro. 2g • fat 2.3g • sat. fat 0.3g
chol. 0mg • sod. 804.7mg • calc. 33mg • fiber 1.7g
Blooming Onion
Who knew this popular restaurant appetizer was so easy to make? Serve it with
the Chipotle Mayonnaise or the Herbed Yogurt Dip both on page 29.
Makes 1 blooming onion, about 2 to 3 servings
½ cup unbleached, all-purpose flour
1 large egg, lightly beaten
2 tablespoons buttermilk
½ cup panko breadcrumbs
½ teaspoon garlic powder
¼ teaspoon kosher salt
Pinch freshly ground black pepper
Pinch cayenne
1 large sweet onion, peeled
Olive oil, for spraying
Nonstick cooking spray
1. Place the AirFryer Basket onto the Baking/Drip Pan. Reserve.
2. Put the flour into a bowl large enough to dip the onion. Put the egg and buttermilk into another similar-sized bowl, and the breadcrumbs and seasonings
in a third, similar-sized bowl. Reserve.
18
Page 19

3. Trim the top of the onion to create a flat surface. Leave the root end intact.
Turn the onion over, so the root end faces up, and rest it on its flat surface.
4. Without piercing the root, cut the onion into 4 wedges. Also without piercing
the root, cut each wedge in half; repeat until wedges are about ¼-inch thick.
5. Turn the cut onion over and carefully, without breaking the pieces off the
root, separate the layers; the separated onion will resemble a flower with
petals.
6. Dredge the onion in the flour, and gently shake off the excess before dipping
into the egg mixture, and then finally coating each layer
evenly with the panko mixture. Evenly spray the coated onion with a generous amount of olive oil.
7. Generously coat the AirFryer Basket with nonstick cooking spray.
Put the prepared onion into the basket in rack Position 2.
8. Select AirFry and set temperature to 400°F for 10 minutes. Onion is done
when it is crispy and golden brown in color.
Nutritional information per serving (based on 3 servings):
Calories 165 (18% from fat) • carb. 28g • pro. 6g • fat 3g • sat. fat 1g
chol. 72mg • sod. 234mg • calc. 31mg • fiber 2g
Fried Pickles
Serve these as an appetizer with the Chipotle Mayonnaise on page 29.
Makes 3 to 4 servings
½ cup unbleached, all-purpose flour
1 large egg, beaten well
½ cup finely ground cornmeal
½ teaspoon kosher salt
¼ teaspoon cayenne pepper, divided
Nonstick cooking spray
2 kosher dill pickles (about 5 ounces), cut into ¼-inch disks
Olive oil, for spraying
1. Place the AirFryer Basket onto the Baking/Drip Pan.
2. Put the flour, egg and cornmeal into individual containers large enough for
dipping the pickles. Add the salt and cayenne to the cornmeal; stir to combine.
3. Generously coat the AirFryer Basket with nonstick cooking spray. Reserve.
4. Blot the cut pickles on a paper towel. Dredge each pickle disk in the flour
and shake off the excess before dipping into egg, and then finally coating
evenly with the cornmeal/cayenne mixture. Place pickles in one layer in
basket. Spray both sides liberally with olive oil.
5. Put the assembled basket into rack Position 2. Select AirFry and set temperature to 400°F for 10 minutes. Cook until browned and crispy. Let cool
slightly. Serve with the Chipotle Mayo on page 29, if desired.
Nutritional information per serving (based on 4 servings):
Calories 139 (18% from fat) • carb. 24g • pro. 4g • fat 3g • sat. fat 1g
chol. 54mg • sod. 719mg • calc. 5mg • fiber 3g
Kale Chips
Kale chips make a light snack on their own, but they can also be crumbled
and used as a salad topper.
Makes 4 servings
4 stems curly kale, tough stems removed
Olive oil, for spraying
¼ teaspoon kosher salt
1. Place the AirFryer Basket onto the Baking/Drip Pan. Tear the large kale
leaves into smaller pieces and place into the basket. Spray liberally with oil
and then sprinkle with salt. Put the assembled basket into rack Position 1.
2. Select Dehydrate and set temperature to 135°F with Low fan, start checking
at 3 hours. Dehydrate until kale is bright and crispy. NOTE: Kale can take
anywhere from 3 to 6 hours.
Nutritional information per serving:
Calories 39 (27% from fat) • carb. 7g • pro. 2g • fat 1g • sat. fat 0g
chol. 0mg • sod. 171mg • calc. 58mg • fiber 1g
19
Page 20

Ultimate Nachos
The key to these nachos is to layer some of the cheese between two layers of
chips. That way everyone gets a bit of cheese with every bite!
Makes 8 to 10 servings
8 cups tortilla chips (this is an estimate – you need enough to
cover the bottom of the Baking/Drip Pan, but can have more or
less, depending on how many mouths you need to feed), divided
2½ cups shredded Cheddar and/or Monterey Jack, divided
¾ cup refried beans (about ½ of a 15.5-ounce can)
2 small to medium tomatoes, seeded and chopped
1 jalapeño, halved, seeded and thinly sliced
4 scallions, thinly sliced (white and green parts)
1 can (4.5 ounces) chopped green chilies
1 cup sliced black olives (These can be purchased pre-sliced in
a 2.25-ounce can. Be sure to drain them first.)
Salsa, guacamole and sour cream for serving
Lime wedges, for serving
1. Evenly distribute half of the chips in the prepared Baking/Drip Pan. Cover with
about ½ cup of the cheese, then the remaining chips. Top with the remaining
ingredients, as evenly as possible, finishing with the remaining cheese.
2. Preheat the oven with the rack in Position 2. Select Dual Cook. First set to
Bake at 350°F for 5 minutes, and then Broil for 5 minutes.
3. Once preheated, put the nachos into oven. Keep an eye on the nachos while
they are cooking – some cheeses melt and brown more quickly than others.
4. Serve immediately with salsa, sour cream, guacamole and lime wedges.
Nutritional information per serving (based on 10 servings):
Calories 246 (54% from fat) • carb. 18g • pro. 10g • fat 15g • sat. fat 7g
chol. 30g • sod. 431mg • calc. 253mg • fibe r 2g
MAIN COURSES
The Cuisinart® AirFryer Toaster Oven, not only AirFries, but it also
bakes and broils—with convection if you’d like—to put a full meal
on your table in record time!
Crab Cakes
Makes about 18 crab cakes
16 ounces lump crab meat
1 teaspoon extra virgin olive oil
1 medium red bell pepper, finely chopped
1 jalapeño pepper, seeded and finely chopped
3 green onions, sliced
1 garlic clove, finely chopped
¼ teaspoon kosher salt
2 large eggs, lightly beaten
1 cup panko breadcrumbs, plus extra for dredging
½ cup mayonnaise
1 teaspoon Worcestershire sauce
1 teaspoon Dijon mustard
1½ teaspoons crab seasoning
Hot sauce (optional)
Oil for spraying
1. Look through crabmeat to make sure there are no shells and reserve in
refrigerator.
2. Put a large skillet over medium heat and add the olive oil. Once the pan is
hot and the olive oil shimmers across the pan, add the peppers, onions and
garlic. Sweat for at least 5 minutes, until the vegetables soften slightly; stir in
the salt.
3. Remove the vegetables from the heat and allow them to cool for a few
minutes. Once cool, add the vegetables to the crabmeat. Add the eggs,
panko, mayonnaise, Worcestershire, Dijon, and crab seasoning, and dash
or two of hot sauce, if desired.
20
Page 21

4. Very carefully mix all ingredients together. The best way to mix the crab
mixture is with clean hands, however, you can mix it with a spoon. It is
important to mix carefully to keep the crabmeat intact.
5. Form the mixture into ¼-cup cakes with your hands and place them on a
clean plate, separating the layers of patties with wax paper. Cover with
plastic and refrigerate for 1 hour before cooking
6. Once ready, dredge the crab cakes in remaining panko crumbs. Place
the AirFryer Basket onto the Baking/Drip Pan. Put the cakes into the basket
and spray liberally with olive oil.
7. Put the assembled basket in rack Position 2 and set temperature to 400°F for
10 minutes.
8. Serve immediately. Lemon wedges make a nice accompaniment.
Nutritional information per crab cake:
Calories 220 (41% from fat) • carb. 17g • pro. 15g • fat 10g • sat. fat 2g
chol. 90mg • sod. 500mg • calc. 106mg • fiber 1g
Buffalo Chicken Wings
For a healthier option than deep-frying, AirFry chicken wings. The Cuisinart®
AirFryer makes them extra crispy with no oil and little preparation.
Makes about 20 wings
Nonstick cooking spray
2 pounds chicken wings*
¾ teaspoon kosher salt
¼ cup hot sauce
1 tablespoon coconut oil
* Many wings already come separated into flats and drumettes, but if only full
wings are available, be sure to remove the tips and separate into two pieces.
1. Place the AirFry Basket into the Baking/Drip Pan.
2. Generously coat the AirFryer Basket with nonstick cooking spray. Reserve.
3. Put the chicken wings into the basket. Sprinkle with salt.
4. Put the assembled basket into rack Position 2. Select AirFry – Wings with
temperature set to 400°F for 25 minutes. Cook until golden and crispy.
5. While the wings are cooking, prepare the sauce. Put the hot sauce and
coconut oil into a large bowl. Combine.
6. When chicken wings are done, toss immediately in sauce.
NOTE: Visit Cuisinart.com for more sauce recipes to serve with chicken wings.
Nutritional information per wing (plain):
Calories 94 (39% from fat) • carb. 0g • pro. 14g • fat 4g • sat. fat 1g
chol. 39mg • sod. 127mg • calc. 7mg • fiber 0g
Nutritional information per serving of Buffalo Sauce (based on 20 servings):
Calories 6 (100% from fat) • carb. 0g • pro. 0g • fat 1g • sat. fat 1g • chol. 0mg
sod. 28mg • calc. 0mg • fiber 0g
Five-Spice Seasoning for Chicken Wings
with Dipping Sauce
DO NOT skip the sauce with these crispy spiced wings.
Any leftover sauce can be drizzled over a cup of steamed rice.
Enough seasoning for 20 wings. Makes about ²⁄³ cup sauce
1 teaspoon kosher salt
1 teaspoon five-spice powder
Dipping Sauce:
¼ cup fish sauce
¼ cup granulated sugar
1 garlic clove, finely chopped
½ Thai chile, thinly sliced (or ½ jalapeño, seeded
and thinly sliced)
1 tablespoon fresh lime juice
1 tablespoon chopped cilantro
1 tablespoon chopped mint
1 tablespoon shredded carrots
2 tablespoons thinly sliced green onions
21
Page 22

1. Sprinkle the salt and five-spice powder over the chicken wings. Cook as
instructed in preceding recipe.
2. While wings are cooking, prepare the dipping sauce. Put the fish sauce,
sugar, garlic and chile in a small saucepan set over medium-low heat. Cook
until sugar has dissolved. Remove to cool to room temperature. Once cool,
add the remaining ingredients and stir to combine. Transfer to a serving bowl
and serve alongside the hot wings.
Nutritional information per serving (1 teaspoon sauce):
Calories 39 (78% from fat) • carb. 2g • pro. 0g • fat 3g • sat. fat 0g • chol. 0mg
sod. 68mg • calc. 4mg • fiber 0g
Mini Shepherd’s Pies
This miniature take on a classic is almost too cute to eat.
A perfect way to use up those leftover mashed potatoes.
Makes 6 individual servings
1 refrigerated, packaged pie crust
½ pound lean ground beef, or lamb
1 carrot, diced
1 celery stalk, diced
½ small onion, diced
1 garlic clove, finely chopped
2 to 3 sprigs fresh thyme
1 bay leaf
1 tablespoon unbleached, all-purpose flour
1 cup beef stock
2 to 3 dashes Worcestershire sauce
1 teaspoon tomato paste
½ cup frozen peas, thawed
Kosher salt and white pepper to taste
1½ cups prepared mashed potatoes
Chopped parsley for garnish
1. Unroll the refrigerated pie crust, and using a 4-inch round, cut out 6 circles
of dough. Working quickly, press the circles of dough into the bottoms and
sides of a 6-cup muffin pan. Line each cup with foil and fill two-thirds full
with pie weights or dried beans. Select Bake with temperature set to 350°F
for 10 minutes. Place muffin pan in rack Position 1 once oven is preheated.
Bake until golden. Allow to cool while preparing the filling.
2. In a medium nonstick skillet, cook ground beef over medium-high heat, stirring frequently until cooked through, about 5 minutes. Add the carrot, celery,
onion, garlic, thyme sprigs and bay leaf to the beef, and continue to cook
over medium heat until the vegetables are sweated and tender, about 8 to
10 minutes.
3. Sprinkle the flour over the ground beef mixture and cook, stirring constantly
for 1 to 2 minutes. Add stock, Worcestershire and tomato paste and continue
to cook over low heat, stirring occasionally until the mixture is bubbly and
thick, another 5 to 8 minutes. Remove thyme sprigs and bay leaf. Stir in
frozen peas and cook for 1 to 2 minutes longer. Season to taste with salt
and white pepper.
4. Divide the mixture among the 6 cooled crusts. Top each pie with ¼ cup of
mashed potatoes. Return the muffin pan to rack Position 2, select AirFry and
set temperature to 400°F for 5 to 8 minutes, cooking until bubbly and potatoes are nicely browned.
5. Remove mini shepherd’s pies from the muffin pan. Garnish with chopped
parsley. Serve warm.
Nutritional information per serving:
Calories 246 (43% from fat) • carb. 24.6g • pro. 10.7g • fat 12g • sat. fat 5.4g
chol. 35.8mg • sod. 346.1mg • calc. 16.2mg • fiber 1.7g
22
Page 23

Oven-Roasted Ribs
Makes 6 servings
Dry rub:
2 tablespoons packed light brown sugar
3 tablespoons chili powder
1 teaspoon kosher salt
½ teaspoon smoked paprika
½ teaspoon freshly ground black pepper
½ teaspoon dried oregano
½ teaspoon garlic powder
¼ teaspoon cayenne pepper
2 pounds St. Louis-style ribs (baby back ribs can be substituted)
1. Stir dry rub ingredients together in a small bowl.
2. Rub spices all over the ribs and refrigerate for at least 2 hours, but preferably
overnight.
3. When ready to cook, arrange ribs on the Baking/Drip Pan and put into rack
Position 1.
4. Select Low and set temperature to 200°F for 2½ hours. When cooking is
complete, cut into individual ribs and serve with barbecue sauce if desired.
Nutritional information per serving (based on 6 servings):
Calories 447 (73% from fat) • carb. 6g • pro. 24g • fat 26g • sat. fat 11g
chol. 121mg • sod. 578mg • calc. 38mg • fiber 2g
Braised Lamb Shanks
Simple flavors plus a slow cooking method make these lamb shanks irresistible.
Makes about 4 servings
4 lamb shanks
1½ teaspoons kosher salt
½ teaspoon freshly ground black pepper
4 garlic cloves, crushed
2 tablespoons olive oil
4 to 6 sprigs fresh rosemary
3 cups beef broth, divided
2 tablespoons balsamic vinegar
1. Rub the lamb shanks with the salt and pepper and place on the Baking/Drip
Pan. Take the smashed garlic and rub well over the lamb. Coat the seasoned
shanks with the olive oil and place the rosemary around and underneath the
lamb.
2. Put the prepared pan with the lamb into rack Position 1. Select Dual Cook.
First, set to Roast at 425°F for 20 minutes, and then to Low at 250°F for 2
hours.
3. Turn the lamb once while roasting. Add 2 cups of the broth and vinegar
when oven switches to Low. Add remaining broth with 1 hour of cooking time
remaining.
4. Lamb is done when it easily pulls away from the bone.
Nutritional information per serving (based on 4 servings):
Calories 447 (73% from fat) • carb. 6g • pro. 24g • fat 26g • sat. fat 11g
chol. 121mg • sod. 578mg • calc. 38mg • fiber 2g
23
Page 24

Chicken Nuggets
Kids of all ages will love this homemade version of the frozen standby.
Classic Roast Chicken
Simple spices go a long way in this roast chicken recipe.
Makes about 4 servings
¾ cup unbleached, all-purpose flour
2 large eggs, lightly beaten
1½ cups panko breadcrumbs
¾ teaspoon kosher salt, divided
¾ teaspoon freshly ground black pepper, divided
1 pound thinly sliced chicken breast or boneless thighs,
pounded even and cut into 1½-inch pieces
Olive oil, for spraying
Nonstick cooking spray
1. Put the flour, eggs and panko into individual containers large enough for
dipping the chicken. Add a pinch each of the salt and pepper to the panko;
stir to combine.
2. Sprinkle the chicken evenly on both sides with the remaining salt and pepper.
Dredge each chicken piece in the flour and shake off the excess before dipping into egg, and then finally coating evenly with the panko breadcrumbs.
Spray both sides liberally with olive oil.
3. Place the AirFryer Basket onto the Baking/Drip Pan. Generously coat the
basket with nonstick cooking spray. Put the prepared nuggets into the basket
and put into rack Position 2.
4. Select AirFry – Nuggets (not frozen) with temperature set to 400°F for 15
minutes, flipping halfway through, cooking until chicken is evenly browned on
both sides.
5. Serve immediately.
Nutritional information per serving (based on 4 servings):
Calories 191 (22% from fat) • carb. 32g • pro. 20 g • fat 5g • sat. fat 1g
chol. 0mg • sod. 434mg • calc. 1mg • fiber 1g
Makes 4 to 6 servings
1 4-pound chicken
1 teaspoon kosher salt
½ teaspoon freshly ground black pepper
1 lemon, halved
1 teaspoon extra virgin olive oil
2 teaspoons herbes de Provence or other dried herbs like
rosemary and thyme
3 garlic cloves, smashed
1. Pat the chicken dry and put onto the Baking/Drip Pan. Sprinkle with salt,
pepper and the juice of half the lemon. Put the other lemon half into the
chicken’s cavity. Drizzle chicken with olive oil. Rub with herbs and garlic
cloves. Put the garlic cloves into the chicken’s cavity with the lemon. Truss if
desired.
2. Put the Baking/Drip Pan with the chicken into rack Position 1. Select Roast –
with temperature set to 375°F for 60 minutes. Begin checking at 50 minutes.
Chicken is ready when the internal temperature of the thigh reaches 165°F to
170° F.
3. Allow chicken to rest for 10 minutes; carve and serve.
Nutritional information per serving (based on 6 servings):
Calories 707 (56% from fat) • carb. 4g • pro. 73g • fat 43g • sat. fat 12g
chol. 230 mg • sod. 578mg • calc. 61mg • fiber 1g
Harissa and Preserved Lemon-Glazed Salmon
North African flavors uniquely shine in this glaze, which is sure to kick up
your salmon routine.
Makes 4 servings
1 large, center-cut salmon fillet, about 1½ pounds
2 teaspoons olive oil
24
Page 25

Kosher salt, for seasoning
¼ cup honey
2 to 3 teaspoons harissa (depending on heat preference)
2 teaspoons preserved lemon, finely chopped
Freshly chopped herbs (parsley, cilantro, dill) and lemon
wedges for serving
1. If refrigerated, allow salmon to come to room temperature (at least 20 minutes).
Rinse salmon, pat dry, and rub all over with olive oil. Season both sides with
salt. Place skin-side down on the Baking/Drip Pan.
2. In a small bowl, whisk together honey, harissa (to taste) and preserved lemon.
Pour glaze over salmon, and using a pastry brush or spoon, spread evenly
over flesh.
3. Put the pan into rack Position 1. Select Low and set temperature to 200°F and
time to 45 minutes, checking for doneness at 30 minutes; cooking time varies
depending on thickness of fillet. Salmon is done when opaque and flakes
easily with a fork.
4. Transfer to a platter. Spoon any leftover glaze from pan over fish. Garnish with
freshly chopped herbs and lemon wedges. Serve immediately.
Nutritional information per serving (based on 4 servings):
Calories 486 (43% from fat) • carb. 17.8g • pro. 48.1g • fat 22.3g • sat. fat 4.3g
chol. 140mg • sod. 137mg • calc. 41.3mg • fiber 0g
Fish Tacos
Get a taste of Baja and the beach with these fish tacos – guilt free!
Makes 6 tacos
12 ounces cod, cut into ½-inch, 1-ounce strips
1 teaspoon kosher salt, divided
½ lime
½ cup unbleached, all-purpose flour
1 large egg, lightly beaten
1 cup panko bread crumbs
Nonstick cooking spray
Olive oil, for spraying
6 corn tortillas
Shredded cabbage
Cilantro, roughly chopped
Avocado
Crema or sour cream
Lime wedges
1. Season cod with ½ teaspoon of the salt and squeeze of lime.
2. Set up 3 containers for dredging – one with flour, one with egg and the third
with the panko and remaining ½ teaspoon of salt. Dip the cod first into the
flour, shaking off any excess. Next dip in the egg and then finally, coat well
with the panko.
3. Place the AirFryer Basket onto the Baking/Drip Pan. Coat the AirFryer Basket
well with nonstick cooking spray. Spray both sides of cod with olive oil and
place into the fry basket. Select AirFry with the temperature set to 400°F and
cook for 9 minutes; flip fish pieces and cook for an additional 3 to 5 minutes,
or until evenly crispy.
4. Reserve cooked fish and then heat tortillas for about 2 to 3 minutes at 300°F,
until soft and pliable. Serve tacos, each with 2 pieces of fish. Garnish as
desired with shredded cabbage, cilantro, avocado, crema and fresh lime.
Nutritional information per taco:
Calories 249 (6% from fat) • carb. 21g • pro. 13g • fat 1g • sat. fat 0g
chol. 24mg • sod. 447mg • calc. 55mg • fiber 2g
Falafel
AirFrying lightens this Middle Eastern dish without compromising
on crunch or flavor!
Remember to soak the chickpeas the night before.
Makes 12 falafel
1 garlic clove
1 small shallot, cut into 1-inch pieces
½ cup dried chickpeas, soaked overnight, rinsed and drained
¾ teaspoon kosher salt
25
Page 26

¹⁄
8 teaspoon freshly ground black pepper
¾ teaspoon ground cumin
¼ teaspoon ground coriander
¹⁄8 teaspoon chili powder
¹⁄³ cup packed fresh Italian parsley – stems and leaves
1 tablespoon unbleached, all-purpose flour
¼ teaspoon baking soda
1 tablespoon water
Nonstick cooking spray
Olive oil for spraying
Pita for serving
Chopped tomatoes, cucumbers, and lettuce for serving
Tahini (optional)
1. Insert the chopping blade into the work bowl of a food processor. Add the
garlic and shallot and pulse to chop, about 5 times. Add the chickpeas, salt,
pepper, spices, parsley and flour. Pulse 6 to 8 times to coarsely grind the
chickpeas. Scrape down and pulse a few more times. Remove and reserve
¹⁄³ cup of the mixture in mixing bowl.
2. Dissolve the baking soda in the tablespoon of water. Turn the processor on,
pour through feed tube with unit running to incorporate. Combine with the
reserved ¹⁄³-cup mixture in the mixing bowl and stir together to combine.
3. Using a tablespoon measure, scoop chickpea mixture and shape into 12
balls. Place the balls on a tray or plate lined with wax paper and chill in the
refrigerator for 30 minutes.
4. Place the AirFryer Basket onto the Baking/Drip Pan and spray liberally with
nonstick cooking spray. Once chilled, transfer the falafel to the assembled
basket in a single layer. Spray evenly with oil.
5. Place the assembled tray into rack Position 2. Set to AirFry at 350ºF for 10
minutes, cooking until evenly browned.
6. Serve falafel with sliced pita and veggies. Drizzle with tahini if desired.
Nutritional information per falafel:
Calories 62 (44% from fat) • carb. 7g • pro. 2g • fat 3g • sat. fat 0g • chol. 0mg
sod. 138mg • calc. 9mg • fiber 1g
Open-Faced Croque Monsieurs
A French café favorite.
Makes 2 servings
For the béchamel:
1 tablespoon unsalted butter
1 tablespoon unbleached, all-purpose flour
½ cup milk, preferably whole
For the sandwiches:
2 slices of good quality country-style or sourdough bread
4 teaspoons Dijon mustard
4 slices smoked deli ham
4 slices Swiss or Gruyere cheese
Nonstick cooking spray
1. To make the béchamel, heat the butter in a small saucepan over low heat.
Whisk in the flour, stirring constantly for about 30 seconds until the mixture
smells nutty and is just golden. Pour in milk in a slow stream, continuing to
whisk until smooth and slightly thickened, about 3 to 5 minutes. Remove
from heat and reserve, whisking occasionally to prevent lumps.
2. Assemble the sandwiches. Lightly coat AirFryer Basket with nonstick cooking
spray and place onto Baking/Drip Pan. Place the bread slices into the basket.
Spread the top of each slice with 2 teaspoons of mustard and layer with 2
slices of ham. Spoon béchamel over the ham and top with 2 slices of cheese.
3. Put the prepared basket on pan into rack Position 2. Select Broil for 20
minutes, checking at 15 minutes. Sandwiches are done when the cheese is
melted and golden brown.
4. Serve immediately.
Nutritional information per sandwich:
Calories 435 (57% from fat) • carb. 12.3g • pro. 22.3g • fat 20.5g • sat. fat 10.6g
chol. 81.1mg • sod. 861.9mg • calc. 268.9mg • fiber 0g
26
Page 27

Pizza Margherita
Simple and delicious—and quicker than takeout!
Makes 1 pizza, 6 slices
Nonstick cooking spray
16 ounces pizza dough, room temperature
¾ cup pizza sauce
2 tablespoons grated Parmesan
3 ounces fresh mozzarella, thinly sliced
1 tablespoon extra virgin olive oil
¼ cup tightly packed basil leaves, thinly sliced
1. Generously coat the Baking/Drip Pan with nonstick cooking spray.
Put the pizza dough on the pan. Stretch the dough to cover the entire pan.
Add sauce to the center of the dough. Leaving a 1-inch border for the crust,
spread sauce into a thin, even layer. Sprinkle with the Parmesan and top with
the mozzarella. Brush the border with olive oil.
2. Preheat the oven by selecting Pizza with temperature set to 450°F for 8 to 10
minutes. Once preheated, put Baking/Drip Pan into rack Position 1. It is recommended to turn the tray halfway through baking time for best results.
NOTE: Baking pizza on a baking/pizza stone gives you the crispiest crust,
similar to pizza prepared in a brick oven. Go to Cuisinart.com for details.
Nutritional information per slice:
Calories 217 (29% from fat) • carb. 32g • pro. 15g • fat 8g • sat. fat 2g • chol. 7mg
sod. 402mg • calc. 46mg • fiber 5g
Perfect accompaniments to main courses cooked quickly with minimal ingredi-
SIDES AND BREADS
ents and barely any cleanup.
Sweet & Salty Bacon Fried Rice
You’ll rethink ordering after trying this simple Asian takeout go-to.
Candied bacon makes it irresistible!
Makes 4 servings
1 cup cauliflower, broken into ½-inch florets
½ cup thinly sliced green onions, plus more to serve
2 teaspoons finely chopped garlic
1 tablespoon grated fresh ginger
2 tablespoons canola oil, divided
½ cup frozen peas, thawed
2 cups cooked rice
2 large eggs
2 tablespoons soy sauce, reduced sodium
1 tablespoon rice wine vinegar
1 teaspoon toasted sesame oil
1 teaspoon granulated sugar
4 slices Candied Bacon, crumbled (recipe follows)
Your favorite Asian hot sauce and lime wedges to serve
1. Combine the cauliflower, green onions, garlic and ginger with 1 tablespoon
of canola oil and spread onto Baking/Drip Pan. Put into rack Position 2 and
select AirFry with temperature set to 400°F for 5 minutes. Remove the pan
and mix in the peas; return for another 2 to 3 minutes. Transfer mixture to a
serving bowl.
2. Add rice to the pan and mix with the remaining tablespoon of oil. Create a
well in the center of the pan. Crack the eggs into the well and scramble with
a fork. Put the pan in rack Position 2 and select AirFry with temperature set
to 400°F for 5 minutes, until the eggs are set and the rice is just starting to
get crispy. Break the egg up into pieces with a fork and add to the serving
bowl along with the rice.
27
Page 28

3. Combine soy sauce, rice vinegar, sesame oil and sugar and pour over rice
mixture. Add candied bacon and toss thoroughly. Serve immediately with
green onions, lime wedges and your favorite Asian hot sauce.
Nutritional information per serving:
Calories 306 (42% from fat) • carb. 32g • pro. 11g • fat 14.3g • sat. fat 2.4g
chol. 102.5mg • sod. 6.5mg • calc. 33.8mg • fiber 2.1g
Candied Bacon
Seriously addictive – try eating just one slice.
Makes 12 servings
Nonstick cooking spray
2 tablespoons light brown sugar
¼ teaspoon cayenne pepper
12 slices thick-cut bacon
1. Place the AirFryer Basket onto the Baking/Drip Pan. Lightly coat with cooking
spray. Reserve.
2. In a large bowl, mix together the sugar and cayenne pepper. Add the bacon
slices and toss to coat.
3. Arrange the bacon slices in a single layer in the AirFry Basket. Put the
prepared basket in rack Position 1.
4. Select AirFry with temperature set to 400°F for 8 to 10 minutes until crispy.
Let cool, then serve.
Nutritional information per slice:
Calories 43 (75% from fat) • carb. 0.7g • pro. 2g • fat 3.5g • sat. fat 1.3g
chol. 7.5mg • sod. 150mg • calc. 0mg • fiber 0g
“Fried” Brussels Sprouts
The tasty, sweet and spicy sauce makes these Brussels sprouts
a favorite side dish.
Makes 4 servings
Nonstick cooking spray
1 pound Brussels sprouts
¾ teaspoon kosher salt
Olive oil for spraying
2 tablespoons honey
2 teaspoons sriracha sauce
1 teaspoon fresh lime juice
1. Place the AirFryer Basket onto the Baking/Drip Pan and lightly coat with
cooking spray.
2. Trim the bottom of each Brussels sprout and then cut in half lengthwise.
Arrange the halved sprouts in the basket and then sprinkle with salt and
lightly coat with olive oil.
3. Place the prepared basket into rack Position 2. Select Dual Cook. First, set to
AirFry at 300°F for 20 minutes, and then AirFry again at 350°F for 10 minutes.
Sprouts should be soft yet crispy.
4. While sprouts are cooking, stir together the honey, sriracha and lime juice in
a medium-size mixing bowl. Once the Brussels sprouts are ready, toss in the
sauce and serve immediately.
Nutritional information per serving:
Calories 89 (13% from fat) • carb. 19g • pro. 4g • fat 2g • sat. fat 0g
chol. 0mg • sod. 443mg • calc. 48mg • fiber 4g
French Fries
These crispy fries can be served with any of your favorite seasonings or sauces.
Makes 2 to 3 servings
1 pound (about 3 medium) russet potatoes
Olive oil, for spraying
28
Page 29

1 teaspoon kosher or seasoned salt
1. Cut potatoes into ¼-inch thick pieces, about 4 inches long. Pat dry completely.
2. Place the AirFryer Basket onto the Baking/Drip Pan. Put the dried potatoes into
the pan. Spray with oil. Sprinkle with salt and toss. Spread into a single layer.
3. Put the assembled basket into rack Position 2. Select AirFry–Fries with the
temperature set to 400°F for 15 minutes, cooking until desired crispiness is
achieved.
4. When French fries are done, transfer to a serving bowl. Taste and adjust
seasoning as desired. Serve immediately.
Nutritional information per serving (based on 3 servings):
Calories 138 (10% from fat) • carb. 27g • pro. 4g • fat 2g • sat. fat 0g
chol. 0mg • sod. 389mg • calc. 0mg • fiber 2g
Veggie Fries with Herbed Yogurt Dip
The vegetables in this recipe can be substituted with any of your favorites.
Makes 4 to 6 servings
Herbed Yogurt Dip (makes ½ cup)
1 garlic clove
1 tablespoon fresh mint leaves
7 ounces plain, nonfat Greek yogurt
1 teaspoon fresh lemon juice
¹⁄8 teaspoon kosher salt
Veggie Fries:
½ cup unbleached, all-purpose flour
2 large eggs, beaten well
1 cup panko breadcrumbs
1 tablespoon grated Pecorino Romano cheese
½ teaspoon dried oregano
½ teaspoon dried parsley
¹⁄8 teaspoon kosher salt
½ medium zucchini (about 4 ounces), cut into ¼-inch thick
pieces, about 3 inches long
6 string beans (about 2 ounces), trimmed
½ avocado, pitted and cut into 8 pieces
Olive oil, for spraying
Lemon, for serving, optional
1. Prepare the Herbed Yogurt Dip: Put garlic and mint into the work bowl of a
Cuisinart® chopper/mini food processor fitted with the chopping blade.
Pulse until roughly chopped. Scrape down sides; add yogurt, lemon juice
and salt. Process on High until completely puréed and homogenous. Transfer
to a serving bowl, cover, and refrigerate until ready to use.
2. Make the veggie fries: Place the AirFryer Basket onto the Baking/Drip Pan.
Reserve. Put the flour, eggs and panko into individual containers large
enough for dipping the veggies. Add the cheese, spices and salt to the panko
and stir to combine.
3. Dredge each of the vegetables in the flour, and shake off the excess before
dipping into the egg, and then finally coating evenly with the panko mixture.
Once coated, transfer to the assembled basket in a single layer. Spray liberally
and evenly with oil.
4. Place the assembled tray into rack Position 2. Select AirFry with the temperature set to 400ºF for 8 minutes.
5. When veggies sticks are done, transfer to a serving plate. Taste and adjust
seasoning with more salt or a squeeze of lemon, if desired. Serve immediately
with the reserved herbed dip.
Nutritional information per serving (based on 6 servings):
Calories 269 (41% from fat) • car b. 17g • pro. 15g • fat 10g • sat. fat 2g
chol. 90mg • sod. 500mg • calc. 106mg • fiber 1g
Sweet Potato Fries with Chipotle Mayo
More nutritious alternative to regular French fries.
Makes 2 to 3 servings
Chipotle Mayonnaise:
½ cup mayonnaise
29
Page 30

1 chipotle chile in adobo, finely chopped
¼ teaspoon fresh lemon juice
Sweet Potato Fries:
1 pound sweet potatoes (about 2 medium), cut into ¼-inch thick
pieces, about 4 inches long
½ teaspoon kosher salt
Olive oil, for spraying
1. Prepare Chipotle Mayonnaise: Put mayonnaise, chipotle and lemon juice in
the work bowl of a mini food processor. Process on High until completely
puréed and homogenous. Transfer to a serving bowl, cover, and refrigerate
until ready to serve.
2. Make Sweet Potato Fries: Place the AirFryer Basket onto the Baking/Drip
Pan. Put the cut sweet potatoes into the basket. Spray with oil. Sprinkle with
salt and toss. Spread into a single layer.
3. Put the assembled basket into the oven in rack Position 2. Select AirFry with
temperature set to 400°F for 15 minutes, cooking until golden brown and
crispy.
4. When sweet potatoes are ready, transfer to a serving bowl. Serve immediately
with reserved Chipotle Mayonnaise on the side.
Nutritional information per ser ving of Chipotle Mayonnaise
(based on 1 tablespoon):
Calories 101 (99% from fat) • carb. 0g • pro. 0g • fat 11g • sat. fat 2g
chol. 10mg • sod. 93mg • calc. 0mg • fib er 0g
Nutritional information per ser ving of Sweet Potato Frie s (based on 3 servings):
Calories 149 (11% from fat) • ca rb. 31g • pro. 3g • fat 2g • sat. fat 0g • chol. 0mg
sod. 434mg • calc. 57mg • fiber 5g
Pimiento Mac ‘n Cheese Cups
Bring Southern flare to a childhood favorite. These cups are full of comfort.
Makes 6 individual servings
½ whole milk
4 ounces cream cheese
1 cup grated sharp Cheddar cheese
¹⁄
8 teaspoon cayenne pepper
1 to 2 dashes hot sauce
4 ounces elbows, cooked per package instructions
2 ounces drained, diced pimiento peppers (about ¼ cup)
2 tablespoons mayonnaise
Salt and pepper to taste
¼ cup crushed saltine crackers, divided
Butter for greasing
1. In small saucepan, combine milk and cream cheese over medium-low heat,
stirring with a wooden spoon until smooth. Add Cheddar cheese, and
continue to cook, stirring constantly, until thick and creamy. Remove cheese
mixture from heat and stir in cayenne and hot sauce.
2. Add elbows, pimiento peppers and mayonnaise to cheese mixture and stir
until combined. Season to taste with salt and pepper.
3. Thoroughly grease a 6-cup muffin pan with butter and dust the inside of
each cup with half of the crushed crackers. Divide the mac ‘n cheese evenly
among the cups and sprinkle with the reserved crushed crackers.
4. Preheat oven by selecting Bake with High Speed fan, and temperature set to
350°F for 10 minutes. Once preheated, place muffin pan on the oven rack in
Position 1. Bake until bubbly and tops are golden brown. Allow to cool slightly, about 5 to 10 minutes. Run a knife along the edge of each cup to loosen
from pan. Serve warm.
Nutritional information per cup:
Calories 264 (58% from fat) • carb. 18.1g • pro. 9.2g • fat 16.9g • sat. fat 9g
chol. 47mg • sod. 284.8mg • calc. 169.7mg • fiber 1g
Buttery Dinner Rolls
After your first bite, you will never go back to store-bought rolls again.
Makes 12 rolls
¹⁄³ cup whole milk, plus 1 tablespoon for brushing
6 tablespoons unsalted butter, plus 1 tablespoon for brushing
3 tablespoons granulated sugar
30
Page 31

1¾ teaspoons active dry yeast
3 tablespoons warm water (105°F to 110°F)
3 cups bread flour
¾ teaspoon kosher salt
1 egg, lightly beaten
1. In a small saucepan, combine the milk, butter and sugar. Warm over low heat
until the butter is melted. Remove from heat and set aside until cooled to
room temperature.
2. Dissolve the yeast in the warm water in a large measuring cup. Let stand
5 minutes, or until mixture is foamy. Put the flour and salt in the work bowl
of a Cuisinart
®
Food Processor fitted with the dough, or metal chopping
blade and process for 10 seconds. Add the melted butter mixture and egg
to the yeast/water mixture. With the machine running, slowly add the liquids
through the feed tube and process until a dough ball forms. Continue processing for 45 seconds to knead the dough. Shape the dough into a smooth
ball, put it in a clean mixing bowl and cover with plastic wrap. Let rise in a
warm place until the dough has doubled in size, about 60 minutes.
3. Lightly butter a 9-inch round baking pan. Punch down the dough and divide
into 12 equal pieces (about 1½ to 1¾ ounces each). Roll into smooth rounds
and arrange in the prepared pan.
4. Put the pan onto the rack in Position 1. Select Proof with temperature set to
90°F for 45 minutes. Rolls should be about doubled in size.
5. Remove pan and preheat oven by selecting Bake with High Speed fan at
350°F for 15 to 20 minutes. While the oven is heating, melt the remaining
tablespoon of butter and combine with the remaining tablespoon of milk in a
small bowl. Gently brush the tops of the rolls with butter/milk mixture. Once
the oven beeps to signal that it is preheated, put the pan into the oven in
Position 1 and bake rolls for 15 minutes, or until golden brown and an internal
temperature of 190°F is reached.
6. Remove rolls from the pan and cool slightly before serving.
Nutritional information per roll:
Calories 183 (35% from fat) • carb. 26g • pro. 4g • fat 7g • sat. fat 5g • chol. 34mg
sod. 153mg • calc. 13mg • fiber 1g
Rustic Italian Bread
This airy and crusty loaf proves that making artisanal-style bread at home has
Makes 1 large round loaf (about 12 servings)
1¾ teaspoons active dry yeast
¾ teaspoon granulated sugar
1 cup warm water (105˚ to 110˚F)
3 cups bread flour
¹⁄³ cup wheat bran
1½ teaspoons kosher salt
1½ tablespoons olive oil
Egg wash (1 large egg and 1 tablespoon cold water
whisked together)
1. In a measuring cup, dissolve the yeast and sugar in the warm water.
Let stand 5 minutes, or until mixture is foamy.
2. Put the flour, wheat bran and salt in the work bowl of a food processor fitted
with the dough or metal chopping blade and process for 10 seconds. Add
the oil. With the machine running, slowly add the liquid through the feed tube
and process until a dough ball forms. Continue processing 1 minute to knead
the dough. Shape the dough into a ball and put in a large bowl that has been
lightly floured. Cover the bowl tightly with plastic wrap and let the dough rise
for 1 hour, until doubled in size.
3. Punch down the dough, reshape into a ball and cover the bowl again with a
clean piece of plastic wrap. Let rise 1 hour.
4. Gently punch down the dough and shape into a tight, large round.
5. Line the Baking/Drip Pan with parchment paper. Put the dough round on the
prepared pan and place into the Cuisinart
Proof with temperature set to 90°F for 30 minutes.
6. Remove dough and preheat oven by selecting Bake with High Speed fan at
375°F for 30 minutes. Once the oven beeps to signal that it is preheated, cut
an X into the top center of the loaf with a serrated knife, brush with the egg
wash and put into rack Position 1.
never been easier.
®
AirFryer Oven in Position 1. Select
31
Page 32

7. Bread should be nicely browned and have an internal temperature between
200˚F and 207˚F. Remove bread from the oven and cool completely on a wire
rack before slicing.
Nutritional information per serving (based on 1 serving):
Calories 127 (15% from fat) • carb. 23g • pro. 4g • fat 2g • sat. fat 0g • chol. 16g
sod. 292mg • calc. 3mg • fiber 1g
Nutritional information per roll-up:
Calories 49 (2% from fat) • carb. 13g • pro. 0.5g • fat 0.1g • sat. fat 0g • chol. 0g
sod. 1mg • calc. 12.4mg • fiber 1.4g
Blueberry Crumble Bars
When you cannot decide between a cookie or a crumble, this dessert satisfies
both cravings.
SWEET TREATS
Pineapple Leather Rolls-Ups
A healthy, sweet treat for everyone’s packed lunch.
Makes 5 Pineapple Leather Roll-Ups
3 cups cubed, fresh pineapple
1 teaspoon, fresh lemon juice
1 to 2 tablespoons honey, to taste (optional)
Nonstick cooking spray
1. Combine pineapple, lemon juice and honey (if using) into a blender or food
processor and blend/process until smooth.
2. Line the Baking/Drip Pan with parchment paper, leaving some overhang
around the sides, and spray with nonstick cooking spray. Pour the pineapple
mixture onto the parchment and using a rubber or offset spatula, spread
evenly over the entire surface area of the pan.
3. Put the pan in Position 2. Select Dehydrate and set the temperature to 135°F
for 12 hours, checking for dryness at 6 hours. The fruit leather is done when
it’s no longer sticky to touch and starts to pull off parchment easily.
4. When cool to touch, place wax paper over top and turn over on flat surface.
Carefully pull off parchment. Using sharp scissors, trim the wax paper, and
cut the leather into five 2-inch wide strips. Roll up each strip and seal with
fun tape or baking twine. Store at room temperature in an airtight container
up to a week.
Makes 12 servings
Nonstick cooking spray
Crust:
8 tablespoons (1 stick) unsalted butter, softened
and room temperature
¼ cup packed light brown sugar
2 tablespoons granulated sugar
1¼ cups unbleached, all-purpose flour
¼ teaspoon kosher salt
Pinch ground cinnamon
Filling:
¼ cup granulated sugar
¼ cup packed light brown sugar
2 tablespoons tapioca starch
¼ teaspoon kosher salt
Pinch ground cinnamon
Pinch ground ginger
¼ teaspoon pure vanilla extract
4 cups fresh blueberries
Topping:
¾ cup unbleached, all-purpose flour
½ cup rolled oats (not quick cooking)
½ cup packed light brown sugar
¼ teaspoon ground cinnamon
¼ teaspoon kosher salt
6 tablespoons unsalted butter, cold and cubed
32
Page 33

1. Lightly coat a 9-inch square baking pan with nonstick cooking spray and line
with parchment paper; reserve.
®
2. Put the butter and sugars into the work bowl of a Cuisinart
food processor
fitted with the chopping blade. Process until creamy, stopping to scrape
down the sides of the bowl as needed. Add the remaining crust ingredients
and pulse until combined.
3. Transfer the crust mixture into the prepared pan and press down firmly to
pack into the bottom of the pan. Chill in refrigerator until firm.
4. While the crust is chilling, prepare the filling. Put the sugars, starch, salt,
and spices in a small mixing bowl; whisk to combine. Add the vanilla and
blueberries and stir until blueberries are well coated. Using a large fork, or
a potato masher, mash the blueberries until about half have burst open;
reserve.
5. Put all of the topping ingredients, except for the butter, in a medium mixing
bowl. Whisk to combine. Add the butter and, using your fingers, combine
until large crumbs form. (Alternatively, this topping can be made using a
®
Cuisinart
Food Processor fitted with the chopping blade. Put all dry
ingredients in the work bowl fitted with the chopping blade. Pulse to combine.
Add the butter and pulse until large clumps have formed.)
®
6. Once the crust has sufficiently chilled, preheat the Cuisinart
AirFryer Oven
by selecting Bake with the temperature set to 350°F for 8 minutes with the
rack in Position 1. When the oven is preheated, bake until crust is firm and
golden at the edges. Remove and spread filling on top of the baked crust
and return to the oven for an additional 15 minutes, or until bubbling at the
edges. Cover evenly with the crumb topping and return to the oven for a final
15 minutes. The bars are done when the topping is evenly browned.
7. Remove from the AirFryer and allow to cool completely prior to cutting
and serving.
Nutritional information per bar:
Calories 282 (41% from fat) • carb. 39g • pro. 3g • fat 13g • sat. fat 8g • chol. 35g
sod. 143mg • calc. 4mg • fiber 2g
S’mores
No campfire needed with these s’mores.
Makes 4 servings
8 graham cracker sheets, each broken into two crackers
8 squares milk chocolate (about 2 ounces)
8 standard marshmallows
1. Place the AirFryer Basket onto the Baking/Drip Pan. Put 4 graham cracker
sheets in the basket. Place a chocolate square in the center of each graham
cracker and top each with two marshmallows.
2. Put the prepared basket in rack Position 2. Select AirFry with the temperature set to 350°F for 5 minutes. AirFry until the marshmallows are lightly
toasted (start checking at 4 minutes).
3. Carefully remove from the AirFryer Oven and transfer to a plate. Top with the
plain graham cracker sheets.
Nutritional information per serving:
Calories 479 (25% from fat) • c arb. 87g • pro. 7g • fat 14g • sat. fat 6g • chol. 0g
sod. 317mg • calc. 54mg • fiber 2g
Cinnamon Apples
Either for snack or a guilt-free dessert, these apples are delicious anytime.
Makes 4 servings
2 medium apples
½ teaspoon ground cinnamon
1. Peel and core apples. Cut into thin wedges, about 16 total for each apple.
Toss apples well with cinnamon to thoroughly coat.
2. Place the AirFryer Basket onto the Baking/Drip Pan. Place the apple slices
evenly on the AirFryer Basket and place in rack Position 2. Select AirFry with
temperature set to 350°F for 15 minutes. Cook apples until slightly softened
and fragrant.
33
Page 34

Nutritional information per serving:
Calories 39 (2% from fat) • carb. 10g • pro. 0g • fat 0g • s at. fat 0g • chol. 0g
sod. 0mg • calc. 6mg • fiber 1g
Dessert Wontons Two Ways
Get everyone involved in creating their own wonton at your next party. Sure to
Makes 24 wontons
Chocolate-Peanut Butter-Banana:
¼ cup heavy cream
4 ounces good quality semisweet chocolate, finely chopped
¼ cup heavy cream
½ cup creamy natural peanut butter
24 ½-inch thick slices of banana, about 2 ripe bananas
Strawberry-Nutella
1 cup sliced strawberries
2 teaspoons, granulated sugar
1 cup Nutella®, or alternative chocolate-hazelnut spread
Wontons:
1 large egg
1 tablespoon water
24 wonton wrappers, square
Nonstick cooking spray
Powdered sugar for dusting
1. For the chocolate-peanut butter-banana filling, start out by heating heavy
cream over medium-low heat until steaming. Remove from heat, add chocolate and let stand for about 3 minutes. Using a heatproof spatula or whisk,
stir until smooth and shiny. Allow to cool slightly.
2. Meanwhile, in a small bowl, mix the egg with 1 tablespoon of water. Lay out
wonton wrappers, starting with 12 (keeping the remaining 12 covered with
a damp towel). Working quickly, put one slice of banana into the center of
each wrapper, topped with 1 teaspoon of peanut butter and 1 teaspoon of
chocolate ganache. Use your finger to paint the edges of each wrapper with
make a sweet memory.
®
Filling:
the egg wash. Shape each wonton by pinching the opposing corners of each
square together. Repeat with remaining 12 wrappers.
®
3. If using the Strawberry-Nutella
filling, mix cut strawberries with 2 teaspoons
of sugar and allow to macerate for 5 to 10 minutes. Fill the center of each
wonton with 2 teaspoons of Nutella® and top with 2 strawberry slices.
Follow the same egg wash and shaping procedure.
4. Place the AirFryer Basket onto the Baking/Drip Pan. Arrange wontons
in the AirFryer Basket. Spray with oil. Slide basket into rack Position 2.
Select AirFry with temperature set to 350°F for 8 minutes, cooking until
golden brown. Remove wontons from basket. Serve warm, dusted with
powdered sugar.
Strawberry-Nutella® nutritional information per wonton:
Calories 57 (34% from fat) • carb. 8.4g • pro. 1.1g • fat 2.2g • sat. fat 2g
chol. 2.2mg • sod. 48.8mg • calc. 10.4mg • fiber 0.4g
Chocolate-Peanut Butter-Banana nutritional information per wonton:
Calories 91 (47% from fat) • ca rb. 10.6g • pro. 2.5g • fat 5.1g • sat. fat 2g
chol. 4.6mg • sod. 51.3mg • calc. 6.3mg • fiber 0.7g
Cinnamon Sugar Doughnut Bites
Not that they will likely hang around, but these doughnuts are best eaten
Makes 16 doughnuts
¾ teaspoon active dry yeast
½ teaspoon plus 1½ teaspoons granulated sugar, divided
1 tablespoon warm whole milk (105°F to 110°F)
¾ cup bread flour, plus more for mixing (up to ¼ cup)
2 pinches kosher salt
2 pinches ground cinnamon
Pinch ground nutmeg
1 large egg, lightly beaten
2 tablespoons buttermilk
½ teaspoon pure vanilla extract
1 tablespoon unsalted butter, room temperature and cubed
just after cooking.
34
Page 35

Nonstick cooking spray
Melted butter for finishing (approximately 2 tablespoons)
Cinnamon sugar for finishing (if preparing at home, combine ¼
cup granulated sugar with 1 tablespoon ground cinnamon)
1. In a small bowl, dissolve the yeast and ½ teaspoon sugar in the warm milk.
Let stand 5 to 10 minutes, or until mixture is foamy.
2. Put ¾ cup of the flour, the remaining sugar, salt, cinnamon and nutmeg into
a large mixing bowl. Whisk to combine. Once yeast has proofed, add it to the
flour/sugar. Using a wooden spoon, stir to combine.
3. Whisk the egg, buttermilk and vanilla extract together and then slowly mix
into the flour mixture. Lightly dust a clean work surface with flour and transfer dough to the surface, dusting dough lightly with flour. Using your hands
to knead, add additional flour as necessary, 1 teaspoon at a time, to keep
dough from sticking to your hands. Add the butter, 1 piece at a time, until
all pieces have been mixed into the dough. Again, continue adding flour, 1
teaspoon at a time, to keep dough from sticking to your hands. The dough
should be tender and smooth, and when pulled should not break apart.
4. Form dough into a ball and put in a clean mixing bowl, cover with plastic
wrap and allow to rest for 1 hour. After 1 hour, gently turn dough over and
press dough down (do not punch). Cover and allow to rest for another hour.
5. Place the AirFryer Basket into the Baking/Drip Pan. Lightly coat with nonstick
cooking spray. On a lightly floured surface, divide the dough into 16 pieces.
Working with one piece at a time (keeping the others covered loosely with
plastic wrap), form into a small ball and roll between hands to ensure that
it is smooth. Once rolled, cover loosely with plastic wrap. Repeat with the
remaining pieces of dough.
6. Once 8 doughnuts have been formed, transfer them to the AirFryer Basket
and put into the oven in rack Position 2. Select AirFry with the temperature
set to 350°F for 5 minutes, until doughnuts just get a bit of color at the
edges. Repeat with remaining doughnuts.
7. While doughnuts are baking, melt additional butter in a small saucepan set
over low heat. Put cinnamon sugar in a shallow bowl. Reserve.
8. Remove doughnuts from oven and immediately brush with butter on all sides
and then gently toss in cinnamon sugar. Serve immediately.
Nutritional information per doughnut:
Calories 66 (43% from fat) • carb. 8g • pro. 1g • fat 3g • sat. fat 2g • chol. 20mg
sod. 25mg • calc. 7mg • fiber 0g
Banana Crunch Muffins
These muffins are a delicious way to use those overripe bananas.
Makes 6 muffins
Nonstick cooking spray
Crumb topping:
¼ cup unbleached, all-purpose flour
3 tablespoons light brown sugar
2 tablespoons unsalted butter, cold and cubed
½ teaspoon ground cinnamon
¼ cup pecans, toasted and chopped
Pinch kosher salt
Muffin batter:
1 cup unbleached, all-purpose flour
1½ teaspoons baking powder
¼ teaspoon kosher salt
¼ teaspoon ground cinnamon
1 small, ripe banana, mashed
¼ cup packed light brown sugar
¼ cup whole milk
¼ cup coconut oil (softened or melted and cooled to room
temperature)
1 large egg, slightly beaten
¼ cup pecans, toasted and chopped
1. Lightly coat a standard 6-cup muffin pan with nonstick cooking spray.
2. Prepare the crumb topping: In a small bowl, mix all 6 ingredients together
with a fork; reserve.
3. Make the muffin batter: Stir together the flour, baking powder, salt and
cinnamon in a small bowl. In a separate medium bowl, mix the banana,
35
Page 36

brown sugar, milk, oil and egg together using a hand mixer on medium
speed until well blended. Add the dry ingredients and nuts and mix on low
until just combined.
4. Spoon evenly into prepared muffin cups and top with the reserved
crumb topping.
5. Adjust the rack to Position 1 and preheat by selecting Bake at 325°F for 15
minutes. Once the oven is preheated, put muffins in. Start checking the muffins at 12 minutes so that the crumb top does not get too dark. Muffins are
done when evenly golden and a cake tester comes out clean when pierced.
Nutritional information per muffin:
Calories 311 (48% from fat) • carb. 37g • pro. 4g • fat 17g • sat. fat 11g • chol. 42mg
sod. 211mg • calc. 39mg • fiber 1g
36
©2018 Cuisinart
150 Milford Road
East Windsor, NJ 08520
Printed in China
18CE053985
IB-15703-ESP
Page 37

MANUAL DE INSTRUCCIONES Y LIBRO DE RECETAS
Horno tostador/freidor digital Cuisinart® AirFryer
TOA-65
Page 38

ÍNDICE
Medidas de seguridad importantes ................................2
Uso de extensiones ............................................3
Piezas y características ......................................... 4
Panel de control ...............................................5
Antes del primer uso ...........................................5
Ajuste del reloj y del volumen del tono del horno .....................6
Operación general .............................................6
Cómo cambiar el tiempo de cocción, la temperatura o la función
Posiciones de la bandeja/rejilla ................................... 7
Consejos y sugerencias .........................................8
Limpieza y mantenimiento ...................................... 15
Resolución de problemas ......................................17
Garantía ....................................................18
Recetas ....................................................19
MEDIDAS DE SEGURIDAD IMPORTANTES
Al usar aparatos eléctricos, especialmente en presencia de niños, siempre debe
tomar precauciones básicas de seguridad, entre ellas las siguientes:
1. Lea todas las instrucciones.
2. DESENCHUFE EL APARATO CUANDO NO ESTÁ EN USO Y ANTES DE
LIMPIARLO. Permita que se enfríe antes de limpiarlo, manipularlo o
instalar/sacar piezas.
3. No toque las superficies calientes; utilice los mangos/asas y los botones/
perillas.
4. Para reducir el riesgo de descarga eléctrica, no sumerja ninguna parte del
aparato en agua ni en ningún otro líquido. Véase las instrucciones de limpieza.
5. Este aparato no debe ser usado por o cerca de niños o personas con ciertas
discapacidades.
6. No utilice este aparato si el cable o el enchufe están dañados, después de
7. El uso de accesorios no recomendados por Cuisinart puede provocar heridas.
8. No lo utilice en exteriores.
9. No permita que el cable cuelgue del borde de la encimera o de la mesa,
10. No coloque el aparato sobre o cerca de un quemador a gas o de una hornilla
11. No utilice el aparato para ningún fin que no sea el indicado.
12. Tenga sumo cuidado al usar fuentes que no sean de metal o vidrio dentro del
13. Tenga sumo cuidado al sacar los accesorios del horno o tirar la grasa caliente.
14. Desenchufe el aparato cuando no lo está usando. Guarde solamente los
15. No ponga papel, cartón, plástico o materiales similares en el horno.
16. No cubra la bandeja recogemigas ni la rejilla del horno con papel de aluminio;
17. No coloque alimentos, envoltorios de aluminio o utensilios de metal muy
18. Puede ocurrir un incendio si el aparato está cubierto, toca, o se encuentra
19. No use estropajos metálicos para limpiar el aparato; partículas de metal
20. No intente desalojar alimentos atascados mientras el aparato está enchufado.
un mal funcionamiento, después de que se haya caído, incluso al agua, o si
está dañado; regréselo a un centro de servicio autorizado o al lugar donde lo
compró para su revisión, reparación o ajuste.
donde niños o animales lo puedan jalar o tropezar, ni que tenga contacto con
superficies calientes.
eléctrica caliente, ni en un horno caliente.
horno.
accesorios recomendados por el fabricante dentro del horno.
esto puede provocar un sobrecalentamiento.
grandes en el horno; esto puede provocar un incendio o una descarga
eléctrica.
cerca de materiales inflamables tales como cortinas, colgaduras o paredes No
coloque ningún artículo sobre el aparato mientras está encendido o caliente.
No haga funcionar el aparato debajo de un armario/gabinete.
podrían depositarse en sus componentes eléctricos, presentando un riesgo de
descarga eléctrica.
2
Page 39

21. Advertencia: para evitar los riesgos de incendio, NUNCA descuide/deje el
aparato sin vigilancia durante el uso.
22. Siempre utilice las temperaturas recomendadas para cocinar/hornear, asar y
freír con aire.
23. No apoye utensilios de cocina o fuentes contra la puerta de vidrio.
24. No haga funcionar el aparato debajo o dentro de un armario/gabinete.
Siempre desenchufe el aparato antes de guardarlo en un armario/gabinete.
Dejar el aparato enchufado representa un riesgo de incendio, especialmente si
este toca las paredes o la puerta del armario/gabinete cuando cierra.
25. Tenga sumo cuidado al mover un aparato que contenga aceite u otro líquido
caliente.
26. Siempre apague el aparato, presionando el botón START/STOP, antes de
desenchufarlo.
AVISO
El cable de este aparato cuenta con un enchufe polarizado (una pata es más ancha
que la otra). Como medida de seguridad, aquel enchufe se podrá enchufar de una
sola manera en la toma de corriente de tierra. Si el enchufe no entra en la toma
de corriente, inviértelo. Si aun así no entra completamente, comuníquese con un
electricista. No intente modificarla.
PARA USO DOMÉSTICO
SOLAMENTE
NO APROBADO PARA
USO COMERCIAL
GUARDE ESTAS
INSTRUCCIONES
Por favor, lea y conserve estas instrucciones en un lugar seguro. Estas
instrucciones le ayudarán a sacar el máximo provecho de su horno tostador/
freidor digital Cuisinart® AirFryer y siempre obtener resultados consistentes y
profesionales.
USO DE EXTENSIONES
El cable provisto con este aparato es corto, para reducir el peligro de que alguien se
enganche o tropiece con un cable más largo. Se podrá usar una extensión eléctrica,
siempre que sea prudente.
La clasificación nominal de la extensión debe ser por lo menos igual a la del
aparato. El cable más largo o la extensión deben ser acomodados de tal manera
que no cuelguen de la encimera/mesa, donde pueden ser jalados por niños o causar
tropiezos.
3
Page 40

PIEZAS Y CARACTERÍSTICAS
1. Panel de control
Pantalla LCD grande, perilla y controles intuitivos fáciles de usar (véase los
detalles en la página 5).
2. Asa termoaislante
Diseñado para permanecer frío al tacto durante la cocción.
3. Luz
Permite ver fácilmente la comida mientras se cocina.
4. Ventanilla grande
Permite observar el progreso de la cocción.
5. Rejilla del horno
Puede usarse en dos posiciones.
6. Posiciones de la rejilla
A. Posición 1 (inferior), recomendada para cocinar alimentos grandes (p. ej.,
pollo entero).
B. Posición 2 (inferior); la rejilla se detendrá a la mitad al jalarse. Para deslizarla
fuera del horno, alce la parte delantera.
NOTA: véase la página 7 para las posiciones recomendadas con diferentes
funciones.
7. Interior fácil de limpiar
Paneles laterales con revestimiento antiadherente.
8. Bandeja recogemigas
La bandeja recogemigas está integrada al horno; se desliza hacia fuera, desde
el frente del horno.
9. Cesta para freír con aire
Use la cesta con las funciones AIRFRY (freír con aire), BROIL (dorar/gratinar)
o DEHYDRATE (deshidratar) para optimizar los resultados de cocción.
Recomendamos que siempre coloque la cesta para freír con aire en la bandeja
para hornear/bandeja de goteo.
10. Bandeja para hornear/Bandeja de goteo
Para su conveniencia, una bandeja para hornear/bandeja de goteo está
incluida. Úsela por sí sola para hornear o asar. Úsela con la cesta para freír
con aire para freír con aire, dorar/gratinar y deshidratar.
11. Guía de referencia rápida
Guía integrada con recomendaciones y consejos de uso.
Deslícela en su lugar antes del primer uso.
1
4
7
5
11
9
2
3
6B
6A
8
10
4
Page 41

FAMILIARÍCESE CON EL PANEL DE CONTROL
1 2 3
4 5
6
1. Botón de descongelación
Para uso con las funciones TOAST (tostar), BAGEL (tostar panecillos), PIZZA
(hornear pizza) y algunos modos para freír con aire. El icono aparecerá en
la pantalla LCD al activar la función de descongelación.
2. Control de velocidad del ventilador
Permite ajustar la velocidad del ventilador al nivel deseado, alto o bajo. El
icono
aparecerá en la pantalla LCD al usar el nivel alto; desaparecerá al
ajustar el nivel bajo.
3. Botón de luz
Presione el botón
para encender/apagar la luz interior. Nota: la luz se
apagará automáticamente después de 20 segundos.
4. Botón AIRFRY (freír con aire)
Permite elegir la función para freír con aire manualmente o los modos
preprogramados para freír con aire.
5. Botón DUAL COOK (cocción en dos pasos)
Permite programar la cocción en dos pasos.
6. Botón START/STOP (encendido/apagado) con indicador luminoso
Úselo para iniciar/detener el de cocción. El indicador luminoso permanecerá
encendido durante la cocción.
7. Perilla de selección
Gire la perilla para para desplazarse por las opciones en la pantalla LCD.
Oprima el centro de la perilla para confirmar su selección.
7
8
8. Pantalla LCD
Muestra las funciones de cocción, el grado de tostado, el número de
rebanadas, la temperatura, el tiempo de cocción (temporizador de
cuenta regresiva), la hora, la velocidad del ventilador y el indicador de
descongelación.
ANTES DEL PRIMER USO
1. Coloque el horno sobre una superficie plana y nivelada.
2. Coloque el horno a un mínimo de 2 a 4 pulgadas (5 a 10 cm) de las paredes y
de los objetos en la encimera. No lo coloque sobre una superficie sensible al
calor.
NOTA: NO GUARDE NINGÚN OBJETO ENCIMA DEL HORNO. SI LO
HACE, QUÍTELOS ANTES DE ENCENDER EL HORNO. EL EXTERIOR DEL
APARATO SE PONE MUY CALIENTE DURANTE EL USO; MANTÉNGALO
FUERA DEL ALCANCE DE LOS NIÑOS.
3. Cerciórese de que la bandeja recogemigas está puesta y de que el horno está
vacío.
4. Inserte la guía de referencia rápida en la parte inferior izquierda de la unidad.
5. Enchufe el cable en una toma de corriente.
5
Page 42

CÓMO FIJAR LA HORA
El reloj solo se puede ajustar cuando el horno no está en uso y la hora aparece en
la pantalla.
Para fijar la hora:
1. Si la hora no aparece en la pantalla LCD, desplácese por el menú/las funciones
hasta que aparezca.
2. Mantenga oprimida la perilla de selección por 3 segundos.
3. La hora parpadeará; gire la perilla para fijar la hora, y luego presione la perilla
para confirmar.
4. Los minutos parpadearán; gire la perilla para fijar los minutos, y luego presione
la perilla para confirmar.
NOTA: si no oprime la perilla, el reloj se fijará automáticamente a la hora
desplegada en la pantalla.
3. Cuando la función deseada parpadee, oprima la perilla de selección para
4. a. Para usar los ajustes desplegados en la pantalla, presione el botón START/
b. Para cambiar los ajustes: 1. Gire la perilla de selección para elegir la
c. Oprima la perilla para confirmar; el tiempo (o el número de rebanadas)
d. Gire la perilla para ajustar el tiempo (o el número de rebanadas)
e. Oprima la perilla para confirmar
f. Si desea, elija la función de descongelación o cambie la velocidad del
CÓMO AJUSTAR EL VOLUMEN DEL TONO
El volumen del tono solo se puede ajustar cuando el horno no está en uso y la
hora aparece en la pantalla.
1. Oprima simultáneamente los botones AIRFRY y DUAL COOK por 3 segundos.
2. El número 1 (el ajuste de volumen por defecto) aparecerá en la pantalla.
3. Gire la perilla de selección para ajustar el volumen al nivel deseado: 0 (tono
desactivado), 1 (bajo) o 2 (alto).
4. Oprima la perilla de selección para confirmar su selección.
OPERACIÓN GENERAL
Para usar el horno, siga estos pasos sencillos:
1. Coloque la rejilla, la bandeja y/o la cesta apropiadas en la posición
recomendada (véase la tabla de la página 7).
2. Use la perilla de selección para desplazarse por las funciones.
g. Oprima START/STOP para empezar la cocción; el botón se iluminará, lo que
NOTA: las funciones BAKE (hornear) y PIZZA (hornear pizza) empiezan por
5. Cuando el temporizador llegue a “0:00”, el horno emitirá una serie de tres
NOTA: para cancelar la cocción antes de que el tiempo llegue a “0:00”,
NOTA: EL VENTILADOR PERMANECERÁ ENCENDIDO DESPUÉS DE LA
confirmar su selección. El botón START/STOP parpadeará y la pantalla LCD
mostrará la última temperatura y el último tiempo usado (o la temperatura y
el tiempo por defecto). Si usa las funciones TOAST (tostar) o BAGEL (tostar
panecillos), también mostrará en grado de tostado y el número de rebanadas.
STOP; el botón START/STOP se iluminará, lo que indica que la unidad está
cocinando.
temperatura deseada (o el grado de tostado)
parpadeará
ventilador
indica que la unidad está cocinando.
una etapa de precalentamiento. Durante el precalentamiento, el mensaje
“Preheat” aparece en la pantalla. Al final del precalentamiento, el mensaje
“Ready” (listo) aparecerá en la pantalla, el horno emitirá un pitido y la cuenta
regresiva empezará.
pitidos y las resistencias se apagarán.
simplemente oprima START/STOP.
COCCIÓN PARA ENFRIAR EL HORNO.
6
Page 43

CÓMO CAMBIAR EL TIEMPO, LA
TEMPERATURA O LA FUNCIÓN DURANTE
EL CICLO DE COCCIÓN
Para cambiar el tiempo: para añadir/reducir tiempo, gire la perilla de
selección. El nuevo tiempo de cocción aparecerá en la pantalla y la
cocción continuará.
Para cambiar la temperatura: durante el ciclo de cocción, oprima la
perilla de selección hasta que la temperatura empiece a parpadear. Gire
la perilla de selección para elegir la temperatura deseada; la cocción
continuará con la nueva temperatura.
Para cambiar la función: oprima el botón START/STOP para apagar el
horno y desactivar la función usada. Luego, gire la perilla de selección para
elegir otra función y oprímala para confirmar. Presione el botón START/
STOP otra vez para continuar la cocción.
POSICIONES DE LA REJILLA/BANDEJA/
CESTA
Véase las posiciones de la rejilla/bandeja/cesta sugeridas en la tabla
a continuación.
Cesta para freír
con aire
Bandeja para hornear/
Bandeja de goteo
Rejilla del
horno
POSICIONES DE LA REJILLA/BANDEJA/CESTA SUGERIDAS
Posición 2 Posición 1
Función
TOAST (tostar) X
BAGEL (tostar
panecillos)
BAKE (hornear) X X X X
BROIL (dorar/
gratinar)
PIZZA (hornear
pizza)
ROAST (asar) X X X X
DEHYDRATE
(deshidratar)
PROOF (leudar) X X X
LOW (bajo) X X X X
X X X X X X
X
X
X
(fresca)
(congelada;
invertir la
rejilla)
X
AIRFRY (freír con
aire)
REHEAT
(recalentar)
WARM (mantener
caliente)
7
X X
X X X X X X
X X X X X X
Page 44

CONSEJOS Y SEGERENCIAS
AIRFRY (FREÍR CON AIRE)
CONSEJO: para mejores resultados, coloque la cesta para freír con aire en la
bandeja para hornear/bandeja de goteo.
La función “AIRFRY” (freír con aire) puede usarse con temperaturas de 200 °F
(120 °C) a 450 °F (230 °C), por hasta 1 hora. Freír con aire es una alternativa
saludable a freír con aceite. Un ventilador de alta velocidad hace circular el calor
producido por varias resistencias, para preparar una variedad de alimentos,
siempre con resultados deliciosos y más saludables que con la fritura tradicional.
• Opciones por defecto: 400 °F (205 °C); 10 minutos.
• Muchos alimentos pueden ser fritos de esta manera, usando muy poco aceite.
Los alimentos fritos con aire son más livianos y menos aceitosos que los
alimentos fritos en aceite.
• Freír con aire no requiere aceite, pero rociar ligeramente los alimentos con
aceite ayuda a que sean más dorados y crujientes. Utilice un rociador o spray
de aceite de oliva para mantenerlo extraligero, cepille aceite uniformemente en
los alimentos (usando una brocha de cocina), o vierta un poquito de aceite en un
tazón, agregue los alimentos y revuelva.
• La mayoría de los aceites pueden usarse para freír con aire. Sin embargo, el
aceite de oliva da un sabor más rico a los alimentos. Para un sabor más suave,
recomendamos usar aceite vegetal, p. ej., aceite de colza o aceite de semilla de
uva.
• Una variedad de coberturas pueden ser usadas para rebozar/empanar los
alimentos antes de freírlos con aire,
p. ej., pan rallado, pan rallado sazonado, pan rallado japonés “panko”, hojuelas
de maíz picadas, chips de papa picadas, galletas Graham molidas, etc. Algunas
harinas (incluyendo las mezclas sin gluten) y otros alimentos secos, tales como
la harina de maíz, también dan buenos resultados.
• La mayoría de los alimentos no requieren voltearse durante la cocción, pero los
artículos más grandes, tales como las chuletas de pollo, deben voltearse a la
mitad del ciclo de cocción para que se cocinen y se doren uniformemente.
• También se recomienda revolver los alimentos a la mitad del tiempo de cocción
cuando fría con aire muchos alimentos a la vez, para que se cocinen y se doren
uniformemente.
• Use temperaturas más altas para los alimentos que suelen cocinarse más
rápido, tales como el tocino y los chips de vegetales; use temperaturas
más bajas para los alimentos que requieren más tiempo tales como el pollo
empanizado.
• Los alimentos se cocinarán más uniformemente si son del mismo tamaño; por lo
tanto, córtelos en pedazos uniformes.
• Tenga en cuenta que muchos alimentos pierden agua durante la cocción.
Cuando cocina altas cantidades de alimentos por un tiempo prolongado, puede
que aquella agua produzca condensación, la cual puede dejar la encimera
húmeda.
8
Page 45

La tabla a continuación indica las cantidades, el tiempo de cocción y la temperatura de cocción recomendados para varios tipos de alimentos que pueden freírse con
aire en el horno tostador/freidor digital Cuisinart®. Si desea freír con aire más alimentos de lo recomendado en la tabla, revuelva ocasionalmente los alimentos para
conseguir resultados uniformes y crujientes. Pequeñas cantidades de alimentos puede requerir menos tiempo; use la luz del horno para comprobar los resultados
regularmente.
NOTA: siempre use la cesta para freír, colocada en la bandeja para hornear/bandeja de goteo, para freír con aire. Para mejores resultados, le recomendamos usar la
posición superior (posición 2) para freír con aire los alimentos a continuación.
GUÍA PARA FREÍR CON AIRE
Alimento Cantidad recomendada Temperatura Tiempo
Tocino 12 onzas (340 g), aprox. 10 a 12 lonchas 400 °F 8 a 10 minutos
Alitas de pollo 2 libras (910 g), aprox. 20 alitas (máximo 3 libras/1.35 kg) 400 °F 20 a 25 minutos
Bocaditos/Aperitivos congelados (p.
ej., palitos de Mozzarella, camarones
rebozados, etc.)
“Nuggets” de pollo congelados 1 libra (455 g), aprox. 34 piezas 400 °F 10 minutos
Palitos de pescado congelados 12 onzas (340 g), aprox. 20 piezas 400 °F 8 minutos
Papas fritas congeladas 1 a 2 libras (455 g a 910 g) 450 °F 15 a 25 minutos
Papas fritas gruesas congeladas 1 a 2 libras (455 g a 910 g) 450 °F 15 a 25 minutos
Papas fritas frescas
Papas fritas gruesas frescas
1 a 2 libras (455 a 910 g); 2 a 4 papas medianas cortadas en palitos de 4 x
1 a 2 libras (455 a 910 g); 2 a 4 papas medianas a grandes cortadas a lo
1½ libras (680 g), aprox. 20 piezas 400 °F 5 a 7 minutos
15 a 20 minutos
¼ in. (10cm x 0.5 cm)
largo en ocho pedazos
400 °F
400 °F 15 a 20 minutos
Camarones
Chips/Totopos de maíz
Vegetales
NOTA: freír con aire no requiere aceite, pero rociar los alimentos con un poco de aceite ayuda a producir resultados más dorados y crujientes. Utilice un rociador o
1 libra (455 g), aproximadamente 16 camarones extragrandes 375 °F 8 a 10 minutos
6 tortillas de 5 in. (12.5 cm), cortadas en cuartos 400 °F
1 libra (455 g) 400 °F
5 a 6 minutos (revolver a la mitad del
tiempo)
rodajas delgadas: 10 minutos;
pedazos grandes: 15 a 20 minutos
spray de aceite de oliva para mantenerlo extraligero, cepille aceite uniformemente en los alimentos (usando una brocha de cocina), o vierta un poquito de aceite en un
tazón, agregue los alimentos y revuelva.
99
Page 46

GUÍA DE USO DE LOS MODOS PREPROGRAMADOS
PARA FREÍR CON AIRE
Además de dejarle ajustar la temperatura y el tiempo de cocción cuando fría
con aire, el horno tostador/freidor digital Cuisinart® AirFryer también cuenta con
prácticos modos preprogramados para preparar sus alimentos fritos favoritos:
papas fritas, alitas de pollo, “nuggets” de pollo, bocaditos/aperitivos y vegetales.
Para usar los modos preprogramados para freír con aire, siga estos pasos:
1. Oprima el botón AIRFRY y gire la perilla de selección para desplazarse por las
opciones del menú; elija “AirFry”.
2. Gire la perilla de selección para desplazarse por los modos preprogramados.
Cuando el modo deseado parpadee, presione la perilla de selección para
confirmar su selección.
3. La temperatura y el tiempo de cocción preprogramados aparecerán en la
pantalla.
a. Para usar los ajustes que aparecen en la pantalla, oprima el botón START/
STOP.
b. Para cambiar los ajustes, véase la sección “Operación general” en la página
6.
NOTA: la mayoría de los modos preprogramados pueden usarse con alimentos
frescos o congelados. Véase los detalles a continuación:
“Fries” (papas fritas) Opción por defecto: alimentos congelados. Use
la opción “alimentos frescos” (oprimiendo el
botón de descongelación) para papas cortadas
a mano.
“Wings” (alitas de pollo) Opción por defecto: alimentos frescos. Use la
opción “alimentos congelados” (oprimiendo el
botón de descongelación) para alitas de pollo no
cocinadas.
“Nuggets” de pollo Opción por defecto: alimentos congelados. Use
la opción “alimentos frescos” (oprimiendo el
botón de descongelación) para “nuggets” de
pollo no cocinados.
“Snacks” (bocaditos) Opción por defecto: alimentos congelados, para
bocaditos precocinados.
NOTA: el ventilador siempre usa la velocidad alta con los modos preprogramados;
no puede cambiar la velocidad.
TOAST (TOSTAR)
La función TOAST (tostar) le deja elegir el grado de tostado, desde 1 hasta 7, y
el número de rebanadas, desde 1 hasta 6. Esta función se usa para tostar pan y
otros artículos (frescos o congelados).
• Opciones por defecto: grado de tostado: 4; número de rebanadas: 3 a 4; sin
• Para conseguir resultados uniformes:
– Si tuesta dos artículos, céntrelos en el medio del horno
– Si tuesta cuatro artículos a la vez, espácielos uniformemente, dos en frente y
– Si tuesta seis artículos, espácielos uniformemente, tres en frente y tres atrás
• Si los resultados son más claros de lo deseado, añada tiempo (hasta 1 minuto
• Grados de tostado disponibles: Claro (1, 2) • Medio (3, 4, 5) • Oscuro (6, 7)
ADVERTENCIA: siempre use la posición 2 para tostar. No invierta la rejilla; esto
puede causar un incendio o hacer que los alimentos se quemen.
BAGEL (TOSTAR PANECILLOS)
La función BAGEL (tostar panecillos) le deja elegir el grado de tostado, desde 1
hasta 7, y el número de rebanadas, desde 1 hasta 6. Esta función enciende las
resistencias superiores al 100% y las resistencias inferiores al 50% para tostar
ambos lados de las mitades de panecillos (frescos o congelados).
• Opciones por defecto: grado de tostado: 4; número de rebanadas: 3 a 4;
• Para mejores resultados, disponga las mitades de panecillo sobre la rejilla de tal
“Vegetables” (vegetales) Opción por defecto: alimentos frescos, para
vegetales frescos.
descongelamiento
dos atrás
como máximo), girando la perilla de selección antes del final del ciclo de
tostado.
sin descongelamiento
manera que la parte cortada apunte hacia arriba
1010
Page 47

• Si el resultado es más claro de lo deseado, añada tiempo (hasta 1 minuto como
máximo), girando la perilla de selección antes del final del ciclo de tostado.
• Asegúrese de estar atento a los alimentos, ya que pueden quemarse
rápidamente.
BAKE (HORNEAR)
La función BAKE (hornear) puede usarse con temperaturas de 200°F (100 °C) a
450 °F (230 °C), por hasta 2 horas. Esta función es perfecta para hornear cualquier
artículo que prepararía normalmente en su horno convencional.
• Opciones por defecto: 350 °F (65 °C); 30 minutos
• Use la función BAKE con ventilación baja (es decir, sin icono de ventilador en
la pantalla) para hornear los artículos delicados, tales como natillas y huevos,
y para la mayoría de los productos horneados tales como galletas, “muffins” y
pasteles.
• Use la función BAKE con ventilación alta/convección (icono de ventilador en la
pantalla) para hornear la mayoría de los productos de panadería que requieren
leudarse y dorarse uniformemente, tales como los panes y productos de
panadería más sustanciosos.
• Por lo general, cuando usa el ventilador (con cualquier velocidad), la cocción
es más rápida. Por lo tanto, puede que tenga que reducir el tiempo y la
temperatura. Empiece a comprobar si los alimentos están cocinados 5 a 10
minutos antes del final del tiempo recomendado.
• Importante: todas nuestras recetas han sido especialmente desarrolladas para
cocinarse en el horno tostador/freidor digital Cuisinart
probadas en nuestra cocina.
®
AirFryer y han sido
PIZZA (HORNEAR PIZZA)
La función PIZZA (hornear pizza) puede usarse con temperaturas de 350 °F
(180 °C) a 450 °F (230 °C), por hasta 2 horas. Esta función es perfecta para
hornear pizza (fresca o congelada).
• Opciones por defecto: FRESH (pizza fresca): 450 °F (230 °C); 10 minutos;
• Para mejores resultados, use la posición 1. Coloque las pizzas congeladas
• También puede usar una piedra de hornear, disponible en www.cusinart.com
• Visite www.cuisinart.com para recetas de pizza
ROAST (ASAR)
La función ROAST (asar) puede usarse con temperaturas de 200 °F (100 °C) a
450 °F (230 °C), por hasta 2 horas.
• Opciones por defecto: 375 °F (65 °C); 45 minutos
• Usar ventilación alta (asado por convección) reduce significativamente el tiempo
BROIL (DORAR/GRATINAR)
La función BROIL (dorar/gratinar) siempre usa 450 °F (230 °C), y puede usarse
por hasta 2 horas. Esta función puede usarse para asar carne de res, pollo,
cerdo, pescado, y más. También es perfecta para dorar/gratinar cazuelas y platos
gratinados.
• Opciones por defecto: 450 °F (65 °C); 5 minutos
• Para mejores resultados, coloque la cesta para freír con aire en la bandeja para
hornear/bandeja de goteo.
• Nunca utilice fuentes de vidrio para dorar/gratinar.
• Asar los vegetales hace que se caramelizan, volviéndose dulces y deliciosos
• Asar es mucho más rápido que hornear. Por lo tanto, empiece a comprobar
convección (ventilación alta)
FROZEN (pizza congelada): 400 °F (205 °C); 10 minutos; convección
(ventilación alta)
directamente en la rejilla invertida, y las pizzas frescas en la bandeja para
hornear/bandeja de goteo.
de cocción y permite conseguir resultados perfectos: carnes y pollo/aves
dorados por fuera y húmedos y jugosos por dentro
si los alimentos están cocinados 5 a 10 minutos antes del final del tiempo
recomendado.
11
Page 48

DEHYDRATE (DESHIDRATAR)
La función DEHYDRATE (deshidratar) puede usarse con temperaturas de 100°F
(35 °C) a 200°F (100 °C), por hasta 72 horas. Esta función convierte a su horno
tostador/freidor digital Cuisinart® AirFryer en un deshidratador de alimentos.
El ventilador integrado y el calor bajo usado para deshidratar crean un flujo de
aire que seca y reduceel contenido en humedad de los alimentos frescos. Los
alimentos deshidratados conservarán la gran mayoría de su valor nutricional
original.
• Opciones por defecto: 130 °F (100 °C); 2 horas
• Puede “pretratar” las frutas y los vegetales con jugo de limón para evitar que se
pongan oscuros
• El tiempo de deshidratación puede variar enormemente dependiendo del grosor
de los alimentos y de la humedad relativa (véase tabla en la página 13).
• Compruebe el punto de deshidratación de los alimentos a menudo
• Disponga los alimentos en una sola capa, procurando no superponerlos
PROOF (LEUDAR)
La función PROOF (leudar) puede usarse con temperaturas de 80°F (25 °C) a
100°F (35 °C), por hasta 2 horas. Úsela para dejar leudar masa de pan o de pizza.
• Opciones por defecto: 90 °F (65 °C); 45 minutos
• Primero, deje leudar la masa por 1 hora o más a temperatura ambiente
• Dé forma a la masa, colóquela en la bandeja para hornear (u otra fuente, p. ej.,
un molde de barra), y luego métala al horno, en la posición 1.
• La masa está lista cuando haya doblado de volumen. Empiece a chequearla
después de aprox. 20 minutos.
• Al final del tiempo, termine la preparación y hornee de acuerdo con la receta
12
Page 49

La siguiente tabla incluye recomendaciones de deshidratación para diferentes alimentos. Nota: estas recomendaciones son solo
pautas; el tiempo de deshidratación puede variar dependiendo del grosor de los alimentos y de la humedad relativa.
PAUTAS DE DESHIDRATACIÓN
CATEGORÍA ALIMENTO PREPARACIÓN: AJUSTE DE
Hierbas/Especias Albahaca, cebollinos, cilantro,
Hierbas/Especias Ajo Pelar los dientes; partir por la mitad a lo largo 100 a 115 °F HIGH (alto) 6 a 12 horas
Hierbas/Especias Jengibre Pelar; rallar o rebanar finamente 100 a 115 °F LOW (bajo) 2 a 6 horas
Frutas Manzanas Pelar y quitar el corazón; rebanar finamente 135 °F LOW (bajo) 4 a 10 horas
Frutas Albaricoques, bananas, higos,
Frutas Arándanos agrios, arándanos
Frutas Cerezas Lavar; deshuesar 135 °F HIGH (alto) 12 a 24 horas
Frutas Cítricos Lavar; rebanar finamente 135 °F LOW (bajo) 2 a 12 horas
Frutas Uvas Lavar; dejar enteras 135 °F HIGH (alto) 10 a 36 horas
Vegetales Judías/Ejotes/Habichuelas,
Vegetales Remolachas Cocinar al vapor hasta que estén tiernas; pelar
Vegetales Verduras de hojas (col rizada,
Carne Cerdo/Res Quitar la grasa y el cartílago; cortar en tiras
FISH
(pescado)
eneldo, menta, orégano, perejil,
romero, salvia, tomillo
mangos, melones, nectarinas,
piñas, peras, ciruelas
azules
brécol/brócoli, coliflor, maíz*,
champiñones/setas/hongos,
arvejas*, pimientos, papas*,
cebolla, calabaza, tomates
espinaca)
Pescado magro Cortar en tiras uniforme; dejar marinar si
Enjuagar en agua fría y secar con un papel
absorbente
Lavar; descarozar/deshuesar o sacar
las semillas; pelar (completamente o
parcialmente) los melones; rebanar finamente
Sumergir en agua hirviendo para hacer estallar
las pieles
Lavar, pelar y sacar las semillas (de ser
necesario); *escaldar; cortar o rebanar en
pedazos/rodajas uniformes; sacar el maíz de
la mazorca; dejar las arvejas enteras
y rebanar finamente
Lavar; secar bien; quitar los tallos y romper las
hojas en pedazos pequeños si es necesario
uniformes; dejar marinar si desea; secar con
un papel absorbente durante la deshidratación
desea
TEMPERATURA
100 a 115 °F LOW (bajo) 3 a 6 horas, hasta que los
135 °F HIGH (alto) 6 a 12 horas
135 °F HIGH (alto) 10 a 18 horas
130 a 145 °F HIGH (alto) 6 a 12 horas
130 a 145 °F HIGH (alto) 3 a 10 horas
130 a 145 °F LOW (bajo) 3 a 6 horas
160 °F HIGH (alto) 4 a 15 horas
130 a 140 °F HIGH (alto) Deshidratar hasta que esté
13
VELOCIDAD DEL
VENTILADOR
TIEMPO
tallos se pongan quebradizos y
que las hojas se desmenucen
fácilmente
firme y seco
Page 50

LOW (BAJO)
La función LOW (bajo) puede usarse con temperaturas de 100°F (35 °C) a 200°F (100 °C), por hasta 8 horas. Esta función se usa para cocinar a baja temperatura, p. ej.,
cocinar a fuego lento, guisar y estofar.
• Opciones por defecto: 200 °F (100 °C); 2 horas
• Para que sus platos cocinados a fuego lento sean suaves por dentro y crujientes por fuera, hornéelos directamente en la bandeja para hornear/bandeja de goteo.
• Para obtener resultados más similares a los de las recetas cocinadas en una olla de cocción lenta, coloque los ingredientes en una fuente tapada, añadiendo líquido
hasta un tercio de la capacidad de la fuente.
PAUTAS DE USO DE LA FUNCIÓN LOW (BAJO)
CATEGORÍA ALIMENTO CANTIDAD TEMPERATURA TIEMPO
Carne Costillas, costillas
cargadas, brazuelos
Carne Carne asada 2½ libras (1.15 kg) máximo 350 °F 1 a 2 horas
2½ libras (1.15 kg) máximo 300 °F 2 a 4 horas
Pollo/Aves Pollo entero, muslos de
pollo
Pollo/Aves Piernas de pato 2½ libras (1.15 kg) máximo 225 °F 2 a 3 horas
Pescado/Mariscos Pescado entero,
descabezado y
eviscerado; filetes (con o
sin piel)
Vegetales Tomates, tubérculos, etc.
asados a fuego lento
Pollo entero: 3 a 4 libras
(1.65 a 1.8 kg); presas: 2½ libras
(1.15 kg) máximo
pescado entero: hasta 2 libras
(910 g); filetes: 2½ libras
(1.15 kg) máximo
2½ libras (1.15 kg) 250 °F 1 a 2 horas
300 °F 4 a 4½ horas para un pollo entero; 1½ a 2
200 a 300 °F filetes: 30 minutos; pescado entero: 1 a 2 horas
horas para muslos
14
Page 51

REHEAT (RECALENTAR)
La función REHEAT (recalentar) puede usarse con temperaturas de 200 °F (100 °C)
a 450 °F (230 °C), por hasta 2 horas. Esta función se usa para recalentar sobras.
• Opciones por defecto: 250 °F (65 °C); 20 minutos
WARM (MANTENER CALIENTE)
La función WARM (mantener caliente) puede usarse con temperaturas de 150°F
(65 °C) a 300°F (150 °C), por hasta 2 horas. Esta función se usa para mantener
los alimentos cocinados calientes.
• Opciones por defecto: 150 °F (65 °C); 30 minutos
• Es ideal para mantener los alimentos a la temperatura de servicio perfecta
después de la cocción en dos pasos (véase la sección a continuación).
DUAL COOK (COCCIÓN EN DOS PASOS)
La función DUAL COOK (cocción en dos pasos) combina dos modos de cocción
o dos temperaturas, una tras otra. Es ideal para las recetas que requieren varios
pasos de cocción. Por ejemplo:
• Para preparar platos tales como cazuelas o nachos, primero use la función
BAKE (hornear) para calentar y luego la función BROIL (dorar/gratinar) para
derretir y dorar la parte superior.
• Empiece a cocinar un plato usando una temperatura alta para que el exterior
esté crujiente, y luego use la función LOW (bajo) para que el interior siga tierno.
Puede usar la función DUAL COOK con las siguientes funciones: BAKE (hornear),
BROIL (dorar/gratinar), ROAST (asar), PIZZA (hornear pizza), LOW (bajo), KEEP
WARM (mantener caliente) y AIRFRY (freír con aire).
1. Oprima el botón DUAL COOK.
2. Las funciones disponibles para el primer ciclo de cocción aparecerán en la
pantalla. Gire la perilla de selección para elegir la función deseada, y luego
presiónela para confirmar.
3. Fije la temperatura para esta función, y luego oprima la perilla; el tiempo
empezará a parpadear. Fije el tiempo, y luego oprima la perilla.
4. Las funciones disponibles para el segundo ciclo de cocción aparecerán en
la pantalla. Repita los pasos 2 y 3 para ajustar la función, la temperatura y el
tiempo de cocción del segundo ciclo.
El botón START/STOP parpadeará, lo que indica que el horno está listo para
empezar la cocción.
5. Oprima START/STOP para empezar la cocción.
6. Al final del primer ciclo, el horno activará automáticamente la segunda función
programada.
7. Cuando el tiempo llegue a “0:00”, el horno emitirá un pitido y las resistencias se
apagarán.
NOTA: para comprobar la temperatura y el tiempo programados para la segunda
etapa de cocción durante el primer ciclo de cocción, presione el botón DUAL
COOK. La temperatura y el tiempo programados aparecerán en la pantalla por
unos segundos, y luego la pantalla volverá a mostrar el tiempo y la temperatura
programados para la primera etapa.
LIMPIEZA Y MANTENIMIENTO
• Siempre desenchufe el horno y permita que se enfríe completamente antes de
limpiarlo
• No utilice limpiadores abrasivos; esto podría dañar el acabado. Simplemente
limpie el cuerpo del aparato con un paño ligeramente humedecido y séquelo
bien. Si desea usar un limpiador, aplique este directamente en el paño, no sobre
el horno.
• Para limpiar el interior del horno, utilice una esponja ligeramente humedecida
con agua jabonosa o spray limpiador. Elimine los residuos de limpiador con un
paño limpio humedecido. Nunca utilice productos químicos fuertes o abrasivos;
esto podría dañar la superficie del horno. Nunca use estropajos metálicos (p. ej.,
lana de acero) para limpiar el horno
• Limpieza de los accesorios:
– Lave la rejilla y la bandeja recogemigas a mano, en agua jabonosa caliente,
usando un estropajo o un cepillo de nailon. Enjuáguelos bien. Estos accesorios
NO son aptos para lavavajillas.
15
Page 52

– Lave la bandeja para hornear/bandeja de goteo y la cesta para freír con aire a
mano, en agua jabonosa caliente, usando un estropajo o un cepillo de nailon.
Enjuáguelos bien.
• Después de cocinar alimentos grasos, siempre limpie el techo del horno,
permitiendo que el horno se enfríe primero. Si lo hace regularmente, su horno
seguirá funcionando como nuevo. Limpiar la grasa asegurará un tostado
consistente, ciclo tras ciclo
• Para eliminar las migajas, deslice la bandeja recogemigas hacia fuera y tire las
migajas. Limpie la bandeja y vuelva a colocarla en su lugar. Para eliminar grasa
quemada, remoje la bandeja en agua jabonosa caliente o use un limpiador no
abrasivo. Nunca haga funcionar el aparato sin la bandeja recogemigas
• Cualquier otro servicio debe ser realizado por un técnico autorizado
GARANTÍA
GARANTÍA LIMITADA DE TRES AÑOS
(VÁLIDA EN LOS EE.UU. Y EN CANADÁ
SOLAMENTE)
Esta garantía es para los consumidores solamente. Usted es un
consumidor si posee un aparato Cuisinart® que fue comprado en una
tienda para uso personal, familiar o casero. A excepción de los estados
donde la ley lo permita, esta garantía no es para los detallistas, los demás
comerciantes ni los dueños. Cuisinart garantiza este aparato contra todo
defecto de materiales o fabricación durante 3 años después de la fecha
de compra original, siempre que el aparato haya sido utilizado para uso
doméstico y según las instrucciones.
Le aconsejamos que llene el formulario de registro disponible en
cuisinart.com a fin de facilitar la verificación de la fecha de compra
original. Sin embargo, no es necesario registrar el producto para recibir
servicio bajo esta garantía. En ausencia del recibo de compra, el período
de garantía será calculado a partir de la fecha de fabricación.
RESIDENTES DE CALIFORNIA SOLAMENTE
La ley del estado de California ofrece dos opciones bajo el período de
garantía. Los residentes del estado de California pueden (A) regresar el
www.
producto defectuoso a la tienda donde lo compraron o (B) a otra tienda
que venda productos Cuisinart
reparará el producto, referirá al consumidor a un centro de servicio
independiente, cambiará el producto o reembolsará al consumidor
el precio original del producto, menos la cantidad imputable al uso
del producto por el consumidor hasta que este se dañe. Si estas dos
opciones no satisfacen al consumidor, podrá llevar el aparato a un
centro de servicio independiente, siempre que se pueda ajustar o
reparar el aparato de manera económica. Cuisinart será responsable
por los gastos de servicio, reparación, reemplazo o reembolso de los
productos defectuosos durante el período de garantía. Los residentes de
California también pueden, si lo desean, mandar el producto defectuoso
directamente a Cuisinart para que lo reparen o lo cambien. Para esto, se
debe llamar a nuestro servicio posventa al 1-800-726-0190. Cuisinart será
responsable por los gastos de reparación, reemplazo, manejo y envío de
los productos defectuosos durante el período de garantía.
ANTES DE HACER REPARAR SU APARATO
Si este aparato presenta algún defecto de materiales o fabricación
durante el período de garantía, lo repararemos o reemplazaremos (a
nuestra opción). Para obtener servicio bajo esta garantía, llame a nuestra
línea directa gratuita al 1-800-726-0190 o regrese el aparato defectuoso
a: Cuisinart, 7475 North Glen Harbor Blvd. Glendale, AZ 85307. Regrese
el producto defectuoso, junto con su recibo de compra y un cheque
o giro postal de US$10.00 para cubrir los gastos de manejo y envío.
Los residentes de California solo necesitan dar una prueba de compra
y deben llamar al 1-800-726-0190 para recibir instrucciones de envío.
Recuerde incluir su nombre, dirección y teléfono, la descripción del
problema, así como cualquier información pertinente. Por favor incluya un
cheque o giro postal a nombre de Cuisinart.
NOTA: para mayor seguridad, le aconsejamos que mande su paquete
por un método de entrega con seguro y seguimiento. Cuisinart no será
responsable por los daños ocurridos durante el transporte o por los
paquetes enviados a una dirección equivocada. Los productos perdidos o
dañados durante el envío no serán cubiertos bajo esta garantía.
Este aparato satisface las más altas exigencias de fabricación y ha sido
diseñado para uso con accesorios y piezas de repuesto autorizados
solamente. Esta garantía excluye expresamente los daños causados por
accesorios, piezas o reparaciones no autorizados por Cuisinart. Esta
®
de este tipo. La tienda, a su opción,
16
Page 53

garantía no cubre el uso institucional o comercial del producto, y no es
válida en caso de daños causados por mal uso, negligencia o accidente.
Esta garantía excluye expresamente todos los daños incidentales o
consecuentes. Algunos Estados no permiten la exclusión o limitación
de daños incidentales o consecuentes, de modo que las limitaciones
mencionadas pueden no regir para usted. Esta garantía le otorga
derechos legales específicos y usted puede tener otros derechos que
varían de un Estado a otro.
Importante: si debe llevar el producto defectuoso a un centro de servicio
no autorizado, por favor informe al personal del centro de servicio que
deben llamar al servicio posventa de Cuisinart al 1-800-726-0190 a fin de
diagnosticar el problema correctamente, usar las piezas correctas para
repararlo y asegurarse de que el producto aún está bajo garantía.
17
Page 54

RESOLUCIÓN DE PROBLEMAS
Operación
Programación
Cocción
Limpieza ¿Son aptos para lavavajillas
La unidad no se enciende. Cerciórese de que la toma de corriente en la cual está enchufado el aparato está funcionando.
¿Por qué el ventilador
permanece encendido
después de la cocción?
¿Por qué se apaga la luz? La luz solo permanece encendida por 20 segundos cada vez que se oprime el botón de luz para ahorrar energía; esto es
¿Se puede cambiar el modo
de cocción después de que
haya empezado la cocción?
¿Se puede cambiar el tiempo
o la temperatura cocción
después de que haya
empezado la cocción?
¿Por qué los alimentos fritos
no son crujientes o no se
fríen uniformemente?
¿Por qué los alimentos están
poco cocinados?
Condensación/vapor sale de
la unidad.
los accesorios?
¿Cómo quitar los residuos de
alimentos difíciles de eliminar
de los accesorios?
Cerciórese de que la puerta del horno está cerrada.
Llame a nuestro servicio de atención al cliente al 1-800-726-0190.
El ventilador permanece encendido al final de la cocción para enfriar el horno.
normal.
Sí, pero primero deberá cancelar el modo de cocción actual, oprimiendo el botón START/STOP. La unidad regresará al
menú de selección, y entonces podrá elegir el nuevo modo de cocción.
Sí. Simplemente gire la perilla de selección para añadir tiempo. Para cambiar la temperatura, oprima la perilla de selección
y, cuando la temperatura empiece a parpadear, gire la perilla para ajustar la temperatura al nivel deseado.
Algunos alimentos requieren más aceite que otros. Si los alimentos no están lo suficientemente crujientes, use más aceite
para freírlos. Nota: puede cepillar, verter o rociar el aceite.
Cerciórese de distribuir los alimentos uniformemente en la cesta, en una capa y sin superponerlos. De ser necesario,
revuelva o voltee los alimentos a la mitad del tiempo de cocción.
Cocine los alimentos por un tiempo adicional, chequeándolos regularmente hasta que estén dorados.
Nunca descuide/deje el horno sin vigilancia durante el uso.
Trate de cocinar cantidades más pequeñas de alimentos a la vez, y coloque estos una sola capa en el fondo de la cesta en
lugar de apilarlos uno encima del otro.
Puede que la temperatura esté demasiado baja. Use la perilla de selección para incrementar la temperatura.
Cuando se cocinan alimentos grasos, la grasa cae en la bandeja, produciendo vapor. esto es normal y no afectará el
resultado final pero puede empañar los lados y las esquinas de la ventanilla.
Cuando se cocinan alimentos con alto contenido de humedad, el agua se evapora de los alimentos, causando
condensación; esto es normal y no afectará el resultado final, pero puede empañar los lados y las esquinas de la
ventanilla.
Puede haber residuos de aceite en la bandeja para hornear, la cesta para freír o el fondo de la unidad. Cerciórese de
limpiar cuidadosamente la bandeja para hornear y la unidad después de cada uso.
La bandeja para hornear/bandeja de goteo y la cesta para freír con aire son aptas para lavavajillas.
No ponga la bandeja recogemigas o la rejilla del horno en el lavavajillas, sino lávelas a mano, en agua jabonosa tibia.
Para eliminar grasa quemada, remoje el accesorio en agua jabonosa caliente o use un limpiador no abrasivo.
18
Page 55

RECETAS
Estas recetas, que le harán agua la boca, son solo unos ejemplos de lo que este
aparato puede hacer.
APERITIVOS Y BOCADITOS
Tortillitas de huevo de primavera al horno .........................20
Tortilla española ..............................................20
Garbanzos crujientes ..........................................21
Chips de tubérculos con romero y sal marina.......................21
Flor de cebolla frita ...........................................21
Pepinillos “fritos” .............................................22
Chips de col rizada ...........................................22
Máximos nachos .............................................23
PLATOS PRINCIPALES
Croquetas de cangrejo.........................................23
“Alitas” de pollo en salsa “Buffalo” ...............................24
Alitas de pollo con cinco especias y salsa para mojar ................25
Mini “Shepherd’s pie” (empanada del pastor).......................25
Costillas asadas ..............................................26
Estofado de pierna de cordero ..................................26
“Nuggets” de pollo............................................27
Pollo asado clásico ...........................................27
Salmón glaseado en salsa de limón encurtido y Harissa ..............28
Tacos de pescado ............................................28
“Falafels” (croquetas de garbanzos) ..............................29
“Croque-monsieurs” abiertos ...................................29
Pizza Margarita...............................................30
ACOMPAÑAMIENTOS Y PANES
Arroz frito dulce y salado con tocino confitado......................30
Tocino confitado .............................................31
Coles de Bruselas “fritas” ......................................31
Papas fritas .................................................32
Palitos de vegetales fritos con salsa para mojar de yogur con hierbas ...32
Batatas fritas con mayonesa de chipotle ..........................33
“Tacitas” de macarrones con queso y pimentones...................33
Pancitos con sabor a mantequilla ................................34
Pan italiano rústico............................................35
DULCES Y POSTRES
Rollitos de piña ..............................................35
“Crumble” (barras) de arándanos azules ...........................36
“S’mores” ...................................................37
Manzanas al horno con canela ..................................37
Wantanes dulces de dos maneras................................37
Mini rosquillas/buñuelos con azúcar y canela.......................38
“Muffins” de banana con cobertura crujiente .......................38
19
Page 56

APERITIVOS Y BOCADITOS
Convierta favoritos fritos en recetas más ligeras y saludables que requieren solo
un rocío de aceite gracias al horno tostador/freidor Cuisinart® AirFryer.
¡Y disfrútelos con cualquiera de las numerosas salsas para mojar intercambiables
que los acompañan!
Calorías 116 (62% de grasa) • Carbohidratos 1.5g • Proteínas 9.5g • Grasa 8.1g
que el huevo esté cuajado. Pasar un cuchillo alrededor del borde de cada
moldecito para desmoldar. Servir tibio.
Información nutricional por porción de 1 tacita:
Grasa saturada 3.3g • Colesterol 171.7mg • Sodio 432mg • Calcio 32mg
Fibra 0.2g
Tortillitas de huevo de primavera al horno
Este plato sofisticado impresionará a sus invitados durante el desayuno-almuerzo.
Rinde 6 porciones
Spray vegetal
6 lonchas de jamón de Parma (Prosciutto)
5 huevos grandes
¼ taza (60 ml) de crema líquida “half-and-half”
(mitad leche/mitad crema)
¼ cucharadita de sal kosher
Pimienta negra recién molida, al gusto
¼ taza (30 g) de quesos de cabra desmenuzado
2 cucharada de eneldo fresco finamente picado
2 a 3 puntas de espárrago, rebanadas longitudinalmente en lazos
delgados usando un pelador de vegetales o una mandolina
1. Engrasar ligeramente un molde para 6 “muffins” con spray vegetal. Colocar
una loncha de jamón de Parma en cada moldecito, cubriendo el fondo y los
lados de cada molde y dejando un poco de jamón saliente. Cerciorarse de no
dejar grietas.
2. Poner los huevos, la crema líquida, la sal y la pimienta en un tazón; batir.
Agregar el queso de cabra desmenuzado. Dividir los espárragos entre los
moldecitos.
3. Llenar cada moldecito con lazos de espárrago. Llenar cada moldecito hasta
los dos tercios con la mezcla de huevo.
4. Colocar el molde para “muffins” en la bandeja para hornear/bandeja de goteo
y meter al horno, en la posición 2. Elegir la función AIRFRY (freír con aire)
y fijar la temperatura en 325 °F (160 °C). Hornear por 8 a 10 minutos, hasta
Rinde 6 porciones
Spray vegetal
½ cebolla roja, finamente rebanada
1 papa pequeña, cortada en 12 rodajas delgadas
¾ cucharadita de sal kosher
¼ cucharadita de pimienta negra recién molida
5 huevos grandes
Perejil fresco picado para aderezar (opcional)
1. Engrasar generosamente un molde para 6 “muffins” con spray vegetal.
2. Dividir las rodajas de cebolla entre los moldecitos. Colocar 2 rodajas de papa
3. Mientras la cebolla y la papa se están cocinando, batir los huevos y sazonar
4. Desmoldar y servir inmediatamente. Aderezar con perejil picado si desea.
Grasa saturada 1g • Colesterol 155mg • Sodio 331mg • Calcio 29mg • Fibra 1g
Tortilla española
Una receta tradicional de tapas, que se puede degustar con unas aceitunas
marinadas, una ensalada verde y pan crujiente.
en cada moldecito y sazonar con ½ cucharadita de la sal.
Meter al horno, en la posición 2. Elegir la función AIRFRY (freír con aire) y
ajustar la temperatura a 400°F (205 °C). Hornear por 10 minutos.
con el resto de la sal y de la pimienta. Cuando la cebolla y la papa estén
listas, verter los huevos batidos en los moldecitos. Regresar el molde al horno,
elegir la función AIRFRY (freír con aire) y ajustar la temperatura a 325°F
(160 °C). Hornear por 8 minutos.
Información nutricional por porción:
Calorías 84 (43% de grasa) • Carbohidratos 6g • Proteínas 6g • Grasa 4g
20
Page 57

Garbanzos crujientes
¡Convierta una lata de garbanzos en un sabroso tentempié crujiente en minutos!
1 lata de 15.5 onzas (440 g) de garbanzos, escurridos y secados
Aceite de oliva para rociar
¼ cucharadita de sal kosher
¼ cucharadita de comino en polvo
1 pizca de pimienta negra recién molida
1. Colocar la cesta para freír con aire en la bandeja para hornear/bandeja de
goteo. Colocar los garbanzos en la cesta y rociar generosamente con aceite.
Sazonar con sal, comino y pimienta.
2. Meter al horno, en la posición 2. Elegir la función AIRFRY (freír con aire) y
fijar la temperatura en 350 °F (180 °C). Hornear por 15 minutos, hasta que los
garbanzos estén fragantes y ligeramente dorados.
3. Servir inmediatamente.
Información nutricional por porción de ¼ de taza (60 ml):
Calorías 75 (13% de grasa) • Carbohidratos 14g • Proteínas 3 g • Grasa 1 g
Grasa saturada 0 g • Colesterol 0mg • Sodio 275mg • Calcio 20mg • Fibra 3g
Chips de tubérculos con romero y sal marina
¡Valen el esfuerzo, y son mejores que los chips comprados!
Rinde 4 a 6 porciones
1½ libras (680 g) de tubérculos (remolachas, nabos, papas,
camotes/batatas/ñames)
Aceite de oliva para cepillar
2 cucharaditas de romero fresco finamente picado
2 cucharaditas de hojuelas de sal marina
1. Colocar la cesta para freír con aire en la bandeja para hornear/bandeja de
goteo. Reservar.
2. Usando una mandolina, cortar los vegetales en rodajas de ¼ de pulgada (5
mm). Secarlos con papel absorbente. Disponer cuantas más rodajas pueda
en la cesta para freír con aire, evitando que se superpongan. Cepillar ambos
lados de las rodajas con aceite de oliva, y rociar con romero y sal.
3. Colocar la cesta en la bandeja para hornear/bandeja de goteo y meter al
horno, en la posición 2. Elegir la función AIRFRY (freír con aire) y fijar la
temperatura en 250°F (120 °C). Hornear hasta que estén crujientes. Las
remolachas demorarán de 30 a 35 minutos; las chirivías de 20 a 25 minutos;
las papas y los camotes de 15 a 20 minutos. Para resultados óptimos, voltear
a la mitad del tiempo*.
4. Servir inmediatamente.
* Freír los chips con aire usando una temperatura baja produce resultados
crujientes irresistibles. Pero si el tiempo no lo permite, puede freírlos con aire
en 400 °F (205 °C) por aprox. 10 minutos.
Información nutricional por porción (basada en 6 porciones):
Calorías 103 (19% de grasa) • Carbohidratos 19.3g • Proteínas 2g • Grasa 2.3g
Grasa saturada 0.3g • Colesterol 0mg • Sodio 804.7mg • Calcio 33mg
Fibra 1.7g
Flor de cebolla frita
¿Quién hubiera pensado que este popular aperitivo de restaurante fuese tan fácil
de preparar? Sírvalo con mayonesa de chipotle o salsa para mojar de yogur con
hierbas (página 33).
Rinde 2 a 3 porciones (1 flor de cebolla)
½ taza (60 g) de harina común
1 huevo grande, ligeramente batido
2 cucharadas (30 g) de suero de leche (“buttermilk”)
½ taza (60 g) de pan rallado japonés “panko”
½ cucharadita de ajo en polvo
¼ cucharadita de sal kosher
1 pizca de pimienta negra recién molida
1 pizca de pimienta de Cayena
1 cebolla dulce grande pelada
Aceite de oliva para rociar
21
Page 58

Spray vegetal
1. Colocar la cesta para freír con aire en la bandeja para hornear/bandeja de
goteo. Reservar.
2. Colocar la harina en un tazón grande en el cual quepa la cebolla. Colocar los
huevos y el suero de leche en otro tazón y el pan rallado y las especias en un
tercer tazón (ambos del mismo tamaño que el primero). Reservar.
3. Cortar la extremidad superior de la cebolla de tal manera que forme una
superficie plana. Dejar la raíz intacta. Voltear la cebolla para que la raíz apunte
hacia arriba.
4. Sin cortar la raíz, cortar la cebolla en cuatro tajadas, y luego cortar cada
pedazo a la mitad; repetir hasta conseguir pedazos de ¼ de pulgada (0.5 cm)
de grueso.
5. Voltear cuidadosamente la cebolla, teniendo cuidado de no separar los
pedazos de la raíz, y abrir/separar las capas de cebolla para que se parezca a
una flor.
6. Rebozar la cebolla en la harina y sacudir suavemente el exceso. Luego,
meterla en la mezcla de huevo, y cubrirla con pan rallado. Rociar
uniformemente la cebolla rebozada con una generosa cantidad de aceite de
oliva.
7. Engrasar generosamente la cesta para freír con aire con spray vegetal.
Colocar la cebolla en la cesta y meter al horno, en la posición 2.
8. Elegir la función AIRFRY (freír con aire) y ajustar temperatura en 400°F
(200 °C). Hornear por 10 minutos, hasta que esté crujiente y dorada.
Información nutricional por porción (basada en 3 porciones):
Calorías 165 (18% de grasa) • Carbohidratos 28g • Proteínas 6g • Grasa 3g
Grasa saturada 1g • Colesterol 72mg • Sodio 234mg • Calcio 31mg • Fibra 2g
1 huevo grande, bien batido
½ taza (80 g) de harina de maíz finamente molida
½ cucharadita de sal kosher
¼ cucharadita de pimienta de Cayena
Spray vegetal
2 pepinillos kosher con eneldo, en rodajas de ¼ de pulgada
(0.5 cm)
Aceite de oliva para rociar
1. Colocar la cesta para freír con aire en la bandeja para hornear/bandeja de
goteo.
2. Colocar la harina, el huevo y el pan rallado en tres platos hondos distintos,
suficientemente grandes como para poder rebozar los pepinillos. Agregar la
sal y la pimienta de canela a la harina de maíz; revolver.
3. Engrasar generosamente la cesta para freír con aire con spray vegetal.
Reservar.
4. Secar los pepinillos con papel absorbente. Rebozar cada rodaja de pepinillo
en la harina y sacudir el exceso. Luego, bañarla en la mezcla de huevo, y
finalmente, cubrirla con la mezcla de harina de maíz/pimienta de canela.
Colocar los pepinillos en la cesta, en una sola capa. Rociar ambos lados con
una generosa cantidad de aceite de oliva.
5. Meter al horno, en la posición 2. Elegir la función AIRFRY (freír con aire) y
ajustar temperatura en 400°F (205 °C). Hornear por 10 minutos, hasta que
estén dorados y crujientes. Dejar enfriar ligeramente. Servir con mayonesa de
chipotle (receta en la página 33) si desea.
Información nutricional por porción (basada en 4 porciones):
Calorías 139 (18% de grasa) • Carbohidratos 24g • Proteínas 4g • Grasa 3g
Grasa saturada 1g • Colesterol 54mg • Sodio 719mg • Calcio 5mg • Fibra 3g
Pepinillos fritos
Sírvalos como aperitivo, con mayonesa de chipotle (página 33).
Rinde 3 a 4 porciones
½ taza (60 g) de harina común
Chips de col rizada
Sirva estos chips de col rizada como tentempié ligero o desmenúcelos para usar
en ensaladas.
Rinde 4 porciones
4 hojas de col rizada, sin los tallos duros
22
Page 59

Aceite de oliva para rociar
¼ cucharadita de sal kosher
1. Colocar la cesta para freír con aire en la bandeja para hornear/bandeja de
goteo. Romper las hojas grandes en pedazos más pequeños y colocarlos en
la cesta. Rociar con una generosa cantidad de aceite y sazonar con sal. Meter
al horno, en la posición 1.
2. Elegir la función DEHYDRATE (deshidratar) y ajustar la temperatura a
135 °F (55 °C) y el ventilador al nivel bajo. Empezar a chequear el nivel de
deshidratación después de 3 horas. Deshidratar hasta que la col adquiera un
color vivo y esté crujiente. NOTA: esto puede demorar de 3 a 6 horas.
Información nutricional por porción:
Calorías 39 (27% de grasa) • Carbohidratos 7g • Proteínas 2g • Grasa 1g
Grasa saturada 0g • Colesterol 0mg • Sodio 171mg • Calcio 58mg • Fibra 1g
restantes encima. Cubrir de manera uniforme con el resto de los ingredientes,
terminando con el queso.
2. Precalentar el horno, con la rejilla en la posición 2. Elegir la función DUAL
COOK (cocción en dos pasos). Programar dos etapas de cocción: la primera
en BAKE/350°F/5 minutos y la segunda en BROIL/5 minutos.
3. Cuando el horno esté caliente, meter los nachos al horno. Vigilar la cocción,
ya que algunos tipos de queso se derriten y se doran más rápido que otros.
4. Servir inmediatamente con salsa mexicana, crema agria, guacamole y pedazos
de limón.
Información nutricional por porción (basada en 10 porciones):
Calorías 246 (54% de grasa) • Carbohidratos 18g • Proteínas 10g • Grasa 15g
Grasa saturada 7g • Colesterol 30g • Sodio 431mg • Calcio 253mg • Fibra 2g
Máximos nachos
El secreto de estos nachos es la capa de queso entre los chips. ¡De esta manera,
todo el mundo tiene queso en cada bocado!
Rinde 8 a 10 porciones
8 chips de maíz (esto es un estimado – necesita suficientemente
chips como para cubrir el fondo de la bandeja para hornear/
bandeja de goteo, pero puede usar más/menos)
2½ tazas (300 g) de queso Cheddar o Monterey Jack
¾ taza (190 g) de frijoles refritos enlatados
2 tomates pequeños a medios, sin semillas, picados
1 jalapeño, sin semillas, en rodajas finas
4 cebolletas (“scallions”), en rodajas finas
1 lata de 4.5 onzas (135 ml) de leche de coco sin azúcar
1 taza (65 g) de aceitunas negras en rodajas (escurridas)
salsa picante, guacamole y crema agria para servir
Pedazos de lima/limón verde para servir
1. Disponer la mitad de los chips en el fondo de la bandeja para hornear/bandeja
de goteo. Cubrir con ½ taza (60 g) del queso, y luego esparcir los chips
El horno tostador/freidor Cuisinart® AirFryer no solo fríe con aire; también hornea,
asa y gratina, con o sin convección, para permitirle preparar comidas enteras más
Rinde aprox. 18 croquetas
16 onzas (455 g) de cangrejo
1 cucharadita de aceite de oliva virgen extra
1 pimiento dulce rojo mediano, finamente picado
1 jalapeño, sin semillas, finamente picado
3 cebolletas (“green onions”), rebanadas
1 diente de ajo, finamente picado
¼ cucharadita de sal kosher
2 huevos grandes, ligeramente batidos
1 taza (120 g) de pan rallado japonés “panko”, más un poco
para rebozar
½ taza (120 ml) de mayonesa
23
PLATOS PRINCIPALES
rápido que nunca.
Croquetas de cangrejo
Page 60

1 cucharadita de salsa Worcestershire
1 cucharadita de mostaza de Dijon
1½ cucharaditas de salsa para cangrejo
Salsa picante (opcional)
Aceite para rociar
1. Quitar los posibles cartílagos de la carne de cangrejo y refrigerar hasta el
momento de usar.
2. Poner el aceite de oliva a calentar a fuego medio, en un sartén grande. Una
vez caliente, agregar el pimiento, el jalapeño, las cebolletas y el ajo. Rehogar
por al menos 15 minutos, hasta que los vegetales empiecen a suavizarse;
sazonar con sal y revolver.
3. Retirar del fuego y dejar enfriar por unos minutos. Una vez tibios, agregar
los vegetales al cangrejo. Agregar los huevos, el pan rallado, la mayonesa, la
salsa Worcestershire, la mostaza de Dijon, la salsa para cangrejo y una a dos
pizcas de salsa picante, si desea.
4. Mezclar delicadamente todos los ingredientes, a mano (la mejor forma para
hacer esto), o usando una cuchara. Tener cuidado de no romper la carne de
cangrejo.
5. Formar croquetas ovaladas de ¼ de taza (50 g) de la mezcla; disponer las
croquetas sobre un plato limpio, entre hojas de papel encerado. Cubrir con
papel/plástico y refrigerar por 1 hora antes de cocinar
6. Rebozar las croquetas en el pan rallado restante. Colocar la cesta para freír
con aire en la bandeja para hornear/bandeja de goteo. Disponer las croquetas
en la cesta y rociar generosamente con aceite.
7. Meter al horno, en la posición 2, y fijar la temperatura en 400°F (205 °C).
Hornear por 10 minutos.
8. Servir inmediatamente. Servir con pedacitos de limón.
Información nutricional por croqueta:
Calorías 220 (41% de grasa) • Carbohidratos 17g • Proteínas 15g • Grasa 10g
Grasa saturada 2g • Colesterol 90mg • Sodio 500mg • Calcio 106mg • Fibra 1g
“Alitas” de pollo en salsa “Buffalo”
Freír las alitas de pollo con aire es más saludable que freírlas en aceite. El horno
tostador/freidor Cuisinart® AirFryer logra resultados muy crujientes sin aceite y con
poca preparación.
Rinde aprox. 20 alitas
Spray vegetal
2 libras (910 g) de alitas* de pollo
¾ cucharadita de sal kosher
¼ cucharadita de salsa picante
1 cucharada de aceite de coco
* Muchas alas ya vienen separadas, pero si solo tiene alas enteras, cerciórese de
quitar las puntas y separar las alas en dos partes.
1. Colocar la cesta para freír con aire en la bandeja para hornear/bandeja de
goteo.
2. Engrasar generosamente la cesta para freír con aire con spray vegetal.
Reservar.
3. Colocar las alitas en la cesta. Rociar con sal.
4. Meter al horno, en la posición 2. Elegir la función AIRFRY/WING (freír con
aire/Alitas de pollo) y ajustar la temperatura a 400°F (205 °C). Hornear por 25
minutos, hasta que estén doradas y crujientes.
5. Mientras las alitas se están cocinando, preparar la salsa. Poner la salsa
picante y el aceite de coco en un tazón grande. Revolver para mezclar.
6. Cuando las alitas estén listas, revolverlas inmediatamente en la salsa.
NOTE: visitar Cuisinart.com para más recetas de salsa para servir con alitas de
pollo.
Información nutricional por alita (simple):
Calorías 94 (39% de grasa) • Carbohidratos 0g • Proteínas 14g • Grasa 4g
Grasa saturada 1g • Colesterol 39mg • Sodio 127mg • Calcio 7mg • Fibra 0g
Información nutricional por porción de salsa “Buffalo” (basada en 20 porciones):
Calorías 6 (100% de grasa) • Carbohidratos 0g • Proteínas 0g • Grasa 1 g
24
Page 61

Grasa saturada 1g • Colesterol 0mg • Sodio 28mg • Calcio 0mg • Fibra 0g
Alitas de pollo con cinco especias
y salsa para mojar
NO omita la salsa con estas alitas crujiente con cinco especias.
Cualquier resto de salsa se puede rociar sobre una taza de arroz al vapor.
Suficiente condimento para 20 alitas de pollo. Rinde aprox. ²⁄³ de taza
(160 ml)
1 cucharadita de sal kosher
1 cucharadita de polvo de cinco especias
Salsa para mojar:
¼ taza (60 ml) de salsa de pescado
¼ taza (50 g) de azúcar granulada
1 diente de ajo, finamente picado
½ chile tailandés finamente rebanado (o ½ jalapeño, sin semillas
y finamente rebanado)
1 cucharada de jugo de lima/limón verde fresco
1 cucharada de cilantro fresco picado
1 cucharada de menta fresca picada
1 cucharadas de zanahoria rallada
2 cucharadas de cebolleta (“green onion”) finamente rebanada
1. Rociar la sal y el polvo de cinco especias sobre las alitas de pollo. Cocinar las
alitas según las instrucciones en la receta anterior.
2. Mientras las alitas se están cocinando, preparar la salsa para mojar. Colocar
la salsa de pescado, el azúcar, el ajo y el chile en una cacerola pequeña;
calentar a fuego medio-lento. Cocinar hasta que el azúcar esté disuelto.
Retirar del fuego y dejar enfriar a temperatura ambiente. Una vez fría, agregar
los ingredientes restantes; revolver. Colocar la salsa en un bol para servir y
servir al lado de las alitas calientes.
Información nutricional por porción (1 cucharadita de salsa):
Calorías 39 (78% de grasa) • Carbohidratos 2g • Proteínas 0g • Grasa 3g • Grasa
saturada 0 g • Colesterol 0mg • Sodio 68mg • Calcio 4mg • Fibra 0g
Mini “Shepherd’s pies”
(empanadas del pastor)
Esta versión miniatura de la receta clásica casi es demasiado adorable para
comérsela. Es una manera perfecta de usar sobras de puré de papas.
Rinde 6 porciones
1 fondo de tarta refrigerado
½ libra (225 g) de carne magra de res o de cordero, molida
1 zanahoria, en cubitos
1 rama de apio, picada
½ cebolla pequeña, picada
1 diente de ajo, finamente picado
2 a 3 ramitas de tomillo fresco
1 hoja de laurel
1 cucharada de harina común
1 taza (235 ml) de caldo de res
2 a 3 pizcas de salsa Worcestershire
1 cucharadita de concentrado/pasta de tomate
½ taza (70 g) de arvejas congeladas, descongeladas
Sal kosher y pimienta Blanco, a gusto
1½ tazas (250 g) de puré de papas
Perejil picado para decorar
1. Desenrollar el fondo de tarta refrigerado y, usando un cortador de galletas
redondo de 4 pulgadas (10 cm), cortar 6 círculos. Trabajando rápidamente,
colocar un círculo en cada moldecito, comprimiéndolo en el fondo y en los
costados del moldecito. Forrar cada fondo de tarta con papel de aluminio
y llenar hasta los dos tercios con bolas de cerámica para hornear o frijoles
secos. Elegir la función BAKE (hornear) y ajustar la temperatura a 350°F
(180 °C) y el tiempo a 10 minutos. Una vez caliente, meter al horno, en la
posición 1. Hornear hasta dorarse. Dejar enfriar mientras prepara el relleno.
2. Colocar la carne molida en un sartén antiadherente mediano y cocinar a fuego
medio-alto por aprox. 5 minutos, revolviendo frecuentemente. Agregar la
zanahoria, el apio, la cebolla, el ajo, las ramitas de tomillo y la hoja de laurel;
seguir cocinando a fuego medio por aprox. 8 a 10 minutos, hasta que los
vegetales estén tiernos.
25
Page 62

3. Rociar la harina sobre la mezcla de carne molida y seguir cocinando,
revolviendo constantemente, por 1 a 2 minutos. Agregar el caldo, la salsa
Worcestershire y el concentrado de tomate; seguir cocinando a fuego lento
por 5 a 8 minutos adicionales, revolviendo ocasionalmente, hasta que la
mezcla esté espesa y burbujeante. Sacar el romero y la hoja de laurel. Agregar
las arvejas congeladas y cocinar por 1 a 2 minutos adicionales. Sazonar con
sal y pimienta blanca, a gusto.
4. Dividir la mezcla entre los fondos de tarta enfriados. Cubrir con ¼ de taza
(aprox. 40 g) de puré de papas. Regresar el molde al horno, en la posición 2.
Elegir la función AIRFRY (freír con aire) y fijar la temperatura en 400 °F (205
°C). Hornear por 5 a 8 minutos, hasta que el relleno esté burbujeante y que el
puré de papas esté bien dorado.
5. Desmoldar las “empanadas”. Decorar con perejil picado. Servir tibio.
Información nutricional por porción:
Calorías 246 (43% de grasa) • Carbohidratos 24.6g • Proteínas 10.7g • Grasa 12g
Grasa saturada 5.4g • Colesterol 35.8mg • Sodio 346.1mg • Calcio 16.2mg
Fibra 1.7g
Costillas asadas
Rinde 6 porciones
Aliño:
2 cucharadas llenas de azúcar rubia (azúcar de caña integral)
3 cucharadas de chile en polvo
1 cucharadita de sal kosher
½ cucharadita de páprika ahumada
½ cucharadita de pimienta negra recién molida
½ cucharadita de orégano seco
½ cucharadita de ajo en polvo
¼ cucharadita de pimienta de Cayena
2 libras (910 g) de costillas de cerdo al estilo San Luis (también
puede usar costillitas)
1. Colocar los ingredientes del aliño en un tazón pequeño; revolver.
2. Restregar las costillas con el aliño y refrigerar por un mínimo de 2 horas
(preferiblemente por una noche)
3. Cuando esté listo/a para cocinar, disponer las costillas en la bandeja para
hornear/bandeja de goteo y meter al horno, en la posición 1.
4. Elegir la función LOW (bajo) y fijar la temperatura en 200 °F (100 °C) y el
tiempo en 2½ horas. Al final del tiempo, cortar las costillas y servir con salsa
barbacoa si desea.
Información nutricional por porción (basada en 6 porciones):
Calorías 447 (73% de grasa) • Carbohidratos 6g • Proteínas 24g • Grasa 26g
Grasa saturada 11g • Colesterol 121mg • Sodio 578mg • Calcio 38mg • Fibra 2g
Estofado de pierna de cordero
Sabores simples más un método de cocción lenta hacen que estos brazuelos de
cordero sean irresistibles.
Rinde aprox. 4 porciones
4 brazuelos de cordero
1½ cucharaditas de sal kosher
½ cucharadita de pimienta negra recién molida
4 dientes de ajo, machacados
2 cucharadas de aceite de oliva
4 a 6 ramitas de romero fresco
3 tazas (710 ml) de caldo de Res
2 cucharadas de vinagre balsámico
1. Restregar los brazuelos de cordero con la sal y la pimienta y colocarlos en
la bandeja para hornear/bandeja de goteo. Restregar con el ajo machacado.
Rociar uniformemente con el aceite de oliva y colocar el romero alrededor y
debajo de la carne.
2. Meter al horno, en la posición 1. Elegir la función DUAL COOK (cocción
en dos pasos). Programar el primer ciclo de cocción en ROAST/425°F/20
minutos, y el segundo ciclo en LOW/250°F/2 horas.
26
Page 63

3. Voltear la carne una vez durante la cocción. Al final del primer ciclo de
cocción, agregar 2 tazas (475 ml) del caldo y el vinagre. Una hora antes del
final de la cocción, agregar la taza de agua restante.
4. El cordero está cocinado cuando se desprende fácilmente del hueso.
Información nutricional por porción (basada en 4 porciones):
Calorías 447 (73% de grasa) • Carbohidratos 6g • Proteínas 24g • Grasa 26g
Grasa saturada 11g • Colesterol 121mg • Sodio 578mg • Calcio 38mg • Fibra 2g
Tiritas de pollo
Esta versión casera de este plato congelado favorito les encantará a todos los
niños, pequeños y grandes.
Rinde aprox. 4 porciones
¾ taza (95 g) de harina común
2 huevos grandes, ligeramente batidos
1½ tazas (180 g) de pan rallado japonés “panko”
¾ cucharadita de sal kosher
¾ cucharadita de pimienta negra recién molida
1 libra de pechuga o muslos de pollo deshuesados, en tiras
uniformes de 1½ pulgadas (4 cm)
Aceite de oliva para rociar
Spray vegetal
1. Colocar la harina, los huevos y el pan rallado en tres platos hondos distintos.
Agregar una pizca de sal y de pimienta al pan rallado; revolver para mezclar.
2. Sazonar el pollo por ambos lados con la sal y la pimienta restantes. Cubrir
cada pedazo de pollo en harina y sacudir el exceso. Luego, bañar cada
pedazo en el huevo, y rebozar uniformemente con pan rallado. Rociar ambos
lados con una generosa cantidad de aceite de oliva.
3. Colocar la cesta para freír con aire en la bandeja para hornear/bandeja de
goteo. Engrasar generosamente la cesta con spray vegetal. Colocar los
“nuggets” en la cesta y meter al horno, en la posición 2.
4. Elegir la función AIRFRY/NUGGETS (no congelados). Fijar la temperatura
a 400 °F (205 °C) y el tiempo a 15 minutos. Hornear hasta que el pollo esté
uniformemente dorado en ambos lados, volteando los pedazos a la mitad del
tiempo.
5. Servir inmediatamente.
Información nutricional por porción (basada en 4 porciones):
Calorías 191 (22% de grasa) • Carbohidratos 32g • Proteínas 20g • Grasa 5g
Grasa saturada 1g • Colesterol 0mg • Sodio 434mg • Calcio 1mg • Fibra 1g
Pollo asado clásico
Especias simples llenan este pollo clásico de sabor.
Rinde 4 a 6 porciones
1 pollo de 4 libras (1.8 kg)
1 cucharadita de sal kosher
½ cucharadita de pimienta negra recién molida
1 limón, cortado a la mitad
1 cucharadita de aceite de oliva virgen extra
2 cucharaditas de hierbas provenzales (Herbes de Provence) u
otras hierbas secas, p. ej., romero y tomillo
3 dientes de ajo, machacados
1. Secar el pollo con un papel absorbente y colocarlo en la bandeja para
hornear/bandeja de goteo. Rociar con sal, pimienta y el jugo de medio limón.
Meter la otra mitad de limón en la cavidad del pollo. Rociar el pollo con aceite
de oliva. Restregar con las hierbas y el ajo. Meter los dientes de ajo en la
cavidad del pollo. Atar el pollo si desea.
2. Meter al horno, en la posición 1. Elegir la función ROAST (asar) y fijar la
temperatura en 375°F (180 °C) y el tiempo en 60 minutos. Empezar a
comprobar después de 50 minutos de cocción. El pollo está listo cuando la
temperatura interna del muslo alcanza 165 °F (74 °C) a 170 °F (77 °C).
3. Dejar reposar por 10 minutos antes de cortar y servir.
Información nutricional por porción (basada en 6 porciones):
Calorías 707 (56% de grasa) • Carbohidratos 4g • Proteínas 73g • Grasa 43g
Grasa saturada 12g • Colesterol 230mg • Sodio 578mg • Calcio 61mg • Fibra 1g
27
Page 64

Salmón glaseado en salsa de limón encurtido
y Harissa
Los sabores norteafricanos brillan de manera única en este glaseado, que romperá
la rutina cuando se trata de cocinar salmón.
Rinde 4 porciones
1 filete de salmón cortado al centro de aprox. 1½ libras (680 g)
2 cucharaditas de aceite de oliva
Sal kosher
¼ taza (85 g) de miel
2 a 3 cucharaditas de Harissa, al gusto
2 cucharaditas de limón encurtido finamente picado
Hierbas frescas (perejil, cilantro, eneldo) picadas y pedazos
de limón para servir
1. Si está refrigerado, dejar el salmón entibiar a temperatura ambiente por un
mínimo de 20 minutos. Enjuagar, secar con papel absorbente y restregar
cuidadosamente con el aceite de oliva. Sazonar ambos lados con sal. Colocar
en la bandeja para hornear/bandeja de goteo, la piel apuntando hacia abajo.
2. Colocar la miel, la Harissa (al gusto) y el limón encurtido en un tazón
pequeño; batir para revolver. Verter el glaseado sobre el salmón y distribuirlo
uniformemente con una brocha de cocina o una cuchara.
3. Meter horno, en la posición 1. Elegir la función LOW y fijar la temperatura
en 200°F (100 °C) y el tiempo en 45 minutos. Comprobar si el salmón está
cocinado después de 30 minutos (el tiempo de cocción varía dependiendo
del grosor del filete). El salmón está listo cuando está opaco y se desmenuce
fácilmente con un tenedor.
4. Colocar en un plato para servir. Verter cucharadas del glaseado encima.
Decorar con hierbas picadas y pedazos de limón. Servir inmediatamente.
Información nutricional por porción (basada en 4 porciones):
Calorías 486 (43% de grasa) • Carbohidratos 17.8g • Proteínas 48.1g
Grasa 22.3g • Grasa saturada 4.3g • Colesterol 140mg • Sodio 137mg
Calcio 41.3mg • Fibra 0g
Estos tacos de pescado le recordarán a Baja California y a la playa. ¡Y puede
Rinde 6 tacos
12 onzas (340 g) de bacalao, en tiras de ½ pulgada (1.5 cm)
1 cucharadita de sal kosher
½ lima/limón verde
½ taza (60 g) de harina común
1 huevo grande, ligeramente batido
1 taza (120 g) de pan rallado japonés “panko”
Spray vegetal
Aceite de oliva para rociar
6 tortillas de maíz
Col rallada
Cilantro fresco, picado grueso
Aguacate
Crema o crema agria
Pedazos de lima/limón verde
1. Sazonar el pescado con ½ cucharadita de sal y rociar con un poco de jugo de
2. Preparar 3 recipientes para rebozar: uno con harina, otro con huevo y el
3. Colocar la cesta para freír con aire en la bandeja para hornear/bandeja
4. Reservar el pescado cocinado y calentar las tortillas por 2 a 3 minutos en
Tacos de pescado
comérselos sin sentirse culpable!
lima/limón verde.
tercero con pan rallado y la sal restante. Cubrir cada pedazo de pescado con
harina, sacudiendo el exceso. Luego, mojarlo en el huevo, y luego rebozarlo
con pan rallado.
de goteo. Engrasar la cesta para freír con aire con una generosa cantidad
de spray vegetal. Rociar ambos lados del pescado con aceite de oliva y
colocarlo en la cesta para freír. Elegir la función AIRFRY (freír con aire) y
fijar la temperatura en 400 °F (205 °F) y el tiempo en 9 minutos. Después de
este tiempo, voltear los pedazos de pescado y cocinar por 3 a 5 minutos
adicionales, hasta que estén uniformemente crujientes.
300 °F (150 °C), hasta que estén suaves y flexibles. Servir los tacos, usando
28
Page 65

2 pedazos de pescado por taco. Aderezar con col rallada, cilantro, aguacate,
crema y lima fresca.
Información nutricional por taco:
Calorías 249 (6% de grasa) • Carbohidratos 21g • Proteínas 13g • Grasa 1g
Grasa saturada 0g • Colesterol 24mg • Sodio 447mg • Calcio 55mg • Fibra 2g
“Falafels” (croquetas de garbanzo)
¡Freír este plato medio-oriental con aire hace que sea más ligero, pero sin
comprometer su crujiente ni su sabor!
Recuerde remojar los garbanzos en agua la noche anterior.
Rinde 12 croquetas
1 diente de ajo
1 chalote pequeño, en pedazos
½ taza (60 g) de garbanzos secos, remojados durante la noche,
enjuagados y escurridos
¾ cucharadita de sal kosher
¹⁄ 8 cucharadita de pimienta negra recién molida
¾ cucharadita de comino en polvo
¼ cucharadita de semillas de cilantro en polvo
¹⁄8 cucharadita de chile en polvo
¹⁄³ taza (30 g) de perejil italiano fresco (tallos y hojas)
1 cucharada (de harina común
¼ cucharadita de bicarbonato de sodio
1 cucharada de agua
Spray vegetal
Aceite de oliva para rociar
Pan pita para servir
Tomates, pepinos y lechuga picados para servir
Tahini (opcional)
1. Instalar la cuchilla picadora en el bol de una procesadora de alimentos.
Agregar el ajo y el chalote y pulsar aproximadamente 5 veces para picar.
Agregar los garbanzos, la sal, la pimienta, las especias, el perejil y harina.
Pulsar 6 a 8 veces para moler grueso. Raspar el bol y pulsar unas cuantas
veces más. Sacar aprox. 10 cucharadas de la mezcla y colocarla en un tazón,
dejando el resto en el bol de la procesadora.
2. Disolver el bicarbonato en el agua. Encender la procesadora de alimentos
y verter la mezcla en la boca de alimentación; procesar por unos segundos
para mezclar. Combinar la mezcla con la mezcla reservada, revolviendo para
mezclar.
3. Formar 12 bolas/croquetas de una cucharada de la mezcla de garbanzo.
Colocar las croquetas sobre un plato forrado con papel encerado y refrigerar
por 30 minutos.
4. Colocar la cesta para freír con aire en la bandeja para hornear/bandeja de
goteo y engrasar generosamente con spray vegetal. Una vez frías, colocar las
croquetas en la cesta ensamblada, sin superponerlas. Rociar uniformemente
con aceite.
5. Meter, en la posición 2. Elegir la función AIR FRY (freír con aire), fijar la
temperatura en 350 °F (180 °C) y el tiempo en 10 minutos; hornear hasta que
estén uniformemente dorados.
6. Servir los “falafels” con pedazos de pan pita y vegetales. Rociar con Tahini si
desea.
Información nutricional por “falafel”:
Calorías 62 (44% de grasa) • Carbohidratos 7g • Proteínas 2g • Grasa 3g
Grasa saturada 0 g • Colesterol 0mg • Sodio 138mg • Calcio 9mg • Fibra 1g
“Croque-monsieurs” abiertos
Un favorito de café francés.
Rinde 2 porciones
Besamel:
1 cucharada (15 g) de mantequilla sin sal
1 cucharada de harina común
½ taza (120 ml) de leche, preferiblemente entera
Sándwiches:
2 rebanadas de pan de campaña o pan de masa fermentada de
buena calidad
29
Page 66

4 cucharaditas de mostaza de Dijon
4 lonchas de jamón ahumado
4 rebanadas de queso suizo o Gruyère
Spray vegetal
1. Para preparar la besamel: calentar la mantequilla a fuego lento en una
cacerola pequeña. Agregar la harina y batir constantemente por aprox. 30
segundos hasta que la mezcla huela a nuez y esté ligeramente dorada.
Agregar lentamente la leche y cocinar por 3 a 5 minutos, sin dejar de batir,
por aprox. 3 a 5 minutos, hasta espesarse ligeramente. Retirar del fuego y
reservar, batiendo ocasionalmente para evitar los grumos.
2. Armar los sándwiches. Engrasar ligeramente la cesta para freír con aire con
spray vegetal y colocarla en la bandeja para hornear/bandeja de goteo.
Colocar las rebanadas de pan en la cesta. Untar la parte superior de cada
rebanada con 2 cucharadita de mostaza de Dijon y cubrir con 2 lonchas de
jamón. Cubrir con besamel y 2 rebanadas de queso.
3. Meter al horno, en la posición 2. Elegir la función BROIL (dorar/gratinar) y
hornear por 20 minutos, empezando a chequear después de 15 minutos. Los
sándwiches están listos cuando el queso está derretido y bien dorado.
4. Servir inmediatamente.
Información nutricional por sándwich:
Calorías 435 (57% de grasa) • Carbohidratos 12.3g • Proteínas 22.3g
Grasa 20.5g • Grasa saturada 10.6g • Colesterol 81.1mg • Sodio 861.9mg
Calcio 268.9mg • Fibra 0g
Pizza Margarita
¡Simple, deliciosa y más rápida que comida para llevar!
Rinde 6 porciones (una pizza)
Spray vegetal
16 onzas (340 g) de masa de pizza, a temperatura ambiente
¾ taza (175 ml) de salsa de pizza
2 cucharadas de queso Parmesano rallado
3 onzas (85 g) de Mozzarella fresca, finamente rebanada
1 cucharada de aceite de oliva virgen extra
¼ taza (15 g) de hojas de albahaca fresca, finamente rebanadas
1. Engrasar generosamente la bandeja para hornear/bandeja de goteo con spray
vegetal.
Colocar la masa de pizza en la bandeja. Estirar la masa de manera que cubra
el fondo de la bandeja. Colocar salsa en el centro de la masa. Esparcir la salsa
uniformemente sobre toda la pizza, dejando una orilla de 1 pulgada (2.5cm).
Esparcir el queso Parmesano encima y cubrir con Mozzarella. Cepillar la orilla
con aceite de oliva.
2. Elegir la función PIZZA (hornear pizza) y fijar la temperatura en 450 °F (230
°C) y el tiempo en 8 a 10 minutos. Después del precalentamiento, meter la
bandeja al horno, en la posición 1. Para mejores resultados, dar vuelta a la
bandeja a la mitad del tiempo.
NOTA: hornear pizza sobre una piedra de hornear resulta en una corteza más
crujiente, igual que la que se consigue horneando la pizza en un horno de
ladrillo. Visitar www.cuisinart.com para detalles.
Información nutricional por loncha:
Calorías 217 (29% de grasa) • Carbohidratos 32g • Proteínas 15g • Grasa 8g
Grasa saturada 2g • Colesterol 7mg • Sodio 402mg • Calcio 46mg • Fibra 5g
ACOMPAÑAMIENTOS Y PANES
Acompañamientos perfectos, cocinados rápidamente con un mínimo de
ingredientes y de limpieza.
Arroz frito dulce y salado con tocino confitado
Lo pensará dos veces antes de comprar arroz frito asiático después de probar
esta simple pero deliciosa versión casera. ¡El tocino confitado hace que sea
irresistible!
Rinde 4 porciones
1 taza (200 g) de coliflor, en cogollitos de ½ pulgada (1.5 cm)
½ taza (50 g) de cebolleta (“green onion”) finamente rebanada +
un poco más para decorar antes de servir
30
Page 67

2 cucharaditas de ajo finamente picado
1 cucharadita de jengibre fresco rallado
2 cucharadas de aceite de colza
½ taza (70 g) de arvejas congeladas, descongeladas
2 tazas (370 g) de arroz cocinado
2 huevos grandes
2 cucharadas de salsa de soya baja en sodio
1 cucharada de vinagre de arroz
1 cucharadita de aceite de sésamo/ajonjolí
1 cucharadita (5 g) de azúcar granulada
4 lonchas de tocino confitado (receta a continuación)
Su salsa asiática picante favorita y pedazos de lima/limón
verde para servir
1. Colocar la coliflor, la cebolleta, el ajo, el jengibre y 1 cucharada del aceite
de colza en la bandeja para hornear/bandeja de goteo. Meter al horno, en la
posición 2. Elegir la función AIRFRY (freír con aire) y fijar la temperatura en
400°F (205 °C) y el tiempo en 5 minutos. Después de este tiempo, retirar del
horno agregar las arvejas, y hornear por 2 a 3 minutos adicionales. Colocar la
mezcla en un tazón para servir.
2. Colocar el arroz y el resto del aceite de colza en la bandeja. Formar un pozo
en el centro. Romper los huevos en el pozo, y mezclarlos con un tenedor.
Meter al horno, en la Posición 2. Elegir AIRFRY (freír con aire) y fijar la
temperatura en 400°F (205 °C) y el tiempo en 5 minutos. Hornear hasta que
los huevos estén cuajados y que el arroz esté ligeramente crujiente. Romper
los huevos en pedazos con un tenedor y colocar los huevos y el arroz en el
bol para servir.
3. Combinar la salsa de soya, el vinagre de arroz, el aceite de sésamo/ajonjolí
y el azúcar y verter la mezcla sobre la mezcla de arroz. Agregar el tocino
confitado y revolver para mezclar. Servir inmediatamente con cebolleta,
pedazos de lima/limón verde y su salsa asiática favorita.
Información nutricional por porción:
Calorías 306 (42% de grasa) • Carbohidratos 32g • Proteínas 11g • Grasa 14.3g
Grasa saturada 2.4g • Colesterol 102.5mg • Sodio 6.5mg • Calcio 33.8mg
Fibra 2.1g
Tocino confitado
Seriamente adictivo. ¡Trate de comer solo una loncha!
Rinde 12 porciones
Spray vegetal
2 cucharadas (35 g) de azúcar rubia (azúcar de caña integral)
¼ cucharadita de pimienta de Cayena
12 lonchas gruesas de tocino
1. Colocar la cesta para freír con aire en la bandeja para hornear/bandeja de
goteo. Engrasar ligeramente con spray vegetal. Reservar.
2. Colocar el azúcar y la pimienta de Cayena en un tazón grande; revolver.
Agregar el tocino y revolver para cubrir.
3. Disponer las lonchas de tocino, sin superponerlas, en el fondo de la cesta
para freír. Meter al horno, en la posición 1.
4. Elegir la función AIRFRY (freír con aire) y fijar la temperatura en 400°F (205 °C)
y el tiempo en 8 a 10 minutos. Hornear hasta que esté crujiente. Dejar enfriar
antes de servir.
Información nutricional por loncha:
Calorías 43 (75% de grasa) • Carbohidratos 0.7g • Proteínas 2g • Grasa 3.5g
Grasa saturada 1.3g • Colesterol 7.5mg • Sodio 150mg • Calcio 0mg • Fibra 0g
Coles de Bruselas “fritas”
La sabrosa salsa dulce y picante hace de estas coles de Bruselas un plato
favorito.
Rinde 4 porciones
Spray vegetal
1 libra (455 g) de coles de Bruselas
¾ cucharadita de sal kosher
Aceite de oliva para rociar
2 cucharadas (30 g) de miel
2 cucharada de salsa sriracha
31
Page 68

1 cucharadita de jugo de lima/limón verde fresco
1. Colocar la cesta para freír con aire en la bandeja para hornear/bandeja de
goteo y engrasar ligeramente con spray vegetal.
2. Cortar la parte de abajo de cada col de Bruselas, y luego cortarlas
longitudinalmente a la mitad. Disponer las mitades de col en la cesta y rociar
con sal y aceite de oliva.
3. Meter al horno, en la posición 2. Elegir la función DUAL COOK (cocción
en dos pasos). Programar dos etapas de cocción: la primera usando
AIRFRY/350°F/10 minutos y la segunda usando BROIL/350 °F/10 minutos.
Hornear hasta que las coles estén suaves y crujientes.
4. Mientras las coles se están cocinando, preparar la salsa, combinando la
miel, la salsa sriracha y el jugo de lima/limón verde en un tazón mediano.
Cuando las coles de Bruselas estén listas, cubrir con salsa, revolver y servir
inmediatamente.
Información nutricional por porción:
Calorías 89 (13% de grasa) • Carbohidratos 19 g • Proteínas 4g • Grasa 2g
Grasa saturada 0g • Colesterol 0mg • Sodio 443mg • Calcio 48mg • Fibra 4g
Papas fritas
Puede servir estas papas “fritas” crujientes con cualquiera de sus salsas favoritas.
Rinde 2 a 3 porciones
1 libra (455 g) de papas “Russet”
Aceite de oliva para rociar
1 cucharadita de sal kosher o sal sazonada
1. Cortar las papas en pedazos largos de ¼ de pulgada (0.5 cm) de grueso.
Secar bien.
2. Colocar la cesta para freír con aire en la bandeja para hornear/bandeja de
goteo. Colocar las papas en la cesta. Rociar con aceite. Sazonar con sal y
revolver. Extender en una capa.
3. Meter al horno, en la posición 2. Elegir la función AIRFRY (freír con aire) y
ajustar la temperatura en 400°F (205°C) y el tiempo en 15 minutos. Hornear
hasta que estén crujientes al gusto.
4. Una vez listas, colocar las papas fritas en un bol para servir. Probar y ajustar
la sazón al gusto. Servir inmediatamente.
Información nutricional por porción (basada en 3 porciones):
Calorías 138 (10% de grasa) • Carbohidratos 27g • Proteínas 4g • Grasa 2g
Grasa saturada 0g • Colesterol 0mg • Sodio 389mg • Calcio 0mg • Fibra 2g
Palitos de vegetales fritos con salsa para
mojar de yogur con hierbas
Puede sustituir los vegetales en esta receta con cualquier vegetal de su elección.
Rinde 4 a 6 porciones
Salsa para mojar de yogur con hierbas (rinde ½ taza/120 ml)
1 diente de ajo
1 cucharada de menta fresca
7 onzas (205 ml) de yogur griego natural sin grasa
1 cucharadita de jugo de limón fresco
¹⁄8 cucharadita de sal kosher
Palitos de vegetales fritos:
½ taza (60 g) de harina común
2 huevos grandes, bien batidos
1 taza (40 g) de pan rallado japonés “panko”
1 cucharada de queso Pecorino Romano rallado
½ cucharadita de orégano seco
½ cucharadita de perejil seco
¹⁄8 cucharadita de sal kosher
½ calabacín/calabacita (“zucchini”) mediano, cortado en tiras de
3 x ¼ pulgadas (7.5 x 0.5 cm)
6 judías verdes, limpias
½ aguacate, cortado en 8 rodajas
Aceite de oliva para rociar
Limón para servir (opcional)
1. Preparar la salsa para mojar de yogur con hierbas: Colocar ajo y la menta en
el bol de una procesadora/mini procesadora de alimentos Cuisinart
®
equipada
32
Page 69

con cuchilla picadora.
Pulsar para picar grueso. Raspar el bol y agregar el yogur, el jugo de limón y la
sal. Procesar a alta velocidad hasta obtener una mezcla suave y homogénea.
Poner en un bol para servir, cubrir y refrigerar hasta el momento de usar.
2. Preparar los vegetales fritos: Colocar la cesta para freír con aire en la bandeja
para hornear/bandeja de goteo. Reservar. Colocar la harina, los huevos y el
pan rallado en tres platos hondos distintos. Agregar al pan rallado el queso,
las especias y la sal; revolver.
3. Rebozar cada vegetal en la harina y sacudir el exceso. Luego, bañarlo en la
mezcla de huevo, y cubrirlo con la mezcla de pan rallado. Una vez cubiertos,
colocar los vegetales en la cesta ensamblada, sin superponerlos. Rociar
generosamente con aceite.
4. Meter, en la posición 2. Elegir la función AIRFRY (freír con aire) y fijar la
temperatura en 400°F (200 °C) y el tiempo en 8 minutos.
5. Cuando los palitos de vegetales estén listos, colocarlos en un plato para
servir. Probar y ajustar la sazón al gusto, o salpicar con jugo de limón si
desea. Servir inmediatamente, con la salsa para mojar de yogur con hierbas.
Información nutricional por porción (basada en 6 porciones):
Calorías 269 (41% de grasa) • Carbohidratos 17g • Proteínas 15g • Grasa 10g
Grasa saturada 2g • Colesterol 90mg • Sodio 500mg • Calcio 106mg • Fibra 1g
Aceite de oliva para rociar
1. Preparar la mayonesa de chipotle: colocar la mayonesa, el chipotle y el limón
2. Preparar las batatas fritas: Colocar la cesta para freír con aire en la bandeja
3. Meter al horno, en la posición 2. Elegir la función AIRFRY (freír con aire) y
4. Una vez listas, colocar las batatas fritas en un bol para servir. Servir
Grasa saturada 0 g • Colesterol 0mg • Sodio 434mg • Calcio 57mg • Fibra 5g
en el bol de una mini-procesadora de alimentos. Procesar a alta velocidad
hasta obtener una mezcla suave y homogénea. Poner en un bol para servir,
cubrir y refrigerar hasta el momento de usar.
para hornear/bandeja de goteo. Colocar las batatas en la cesta. Rociar con
aceite. Sazonar con sal y revolver. Extender en una capa.
ajustar temperatura en 400°F (205°C) y el tiempo en 15 minutos. Hornear
hasta que estén doradas y crujientes.
inmediatamente, con mayonesa de chipotle al lado.
Información nutricional por porción de mayonesa de chipotle (1 cucharada):
Calorías 101 (99% de grasa) • Carbohidratos 0g • Proteínas 0g • Grasa 11g
Grasa saturada 2g • Colesterol 10mg • Sodio 93mg • Calcio 0mg • Fibra 0g
Información nutricional por porción de batatas “fritas” (basada en 3 porciones):
Calorías 149 (11 % de grasa) • Carbohidratos 31g • Proteínas 3 g • Grasa 2g
Batatas fritas con mayonesa de chipotle
Una nutritiva alternativa a las papas fritas tradicionales.
Rinde 2 a 3 porciones
Mayonesa de chipotle:
½ taza (120 ml) de mayonesa
1 chile chipotle en adobo, finamente picado
¼ cucharadita de jugo de limón fresco
Batatas “fritas”:
1 libra (455 g) de camote/batatas, en pedazos largos de ¼
de pulgada (0.5 cm) de grueso
½ cucharadita de sal kosher
“Tacitas” de macarrones con queso y
pimentones
Un plato de la infancia clásico con un toque sureño. Estas “tacitas” son
sumamente reconfortantes.
Rinde 6 porciones
½ taza (120 ml) de Leche entera
4 onzas (115g) de queso crema
1 taza (10 g) de queso Cheddar fuerte rallado
¹⁄8 cucharadita de pimienta de Cayena
1 a 2 pizcas de salsa picante
4 onzas (115 g) de pasta de codos cocinadas según las
33
Page 70

instrucciones del paquete
2 onzas (55 g) de pimentones, escurridos y picados
2 cucharadas de mayonesa
Sal y pimienta, a gusto
¼ taza (25 g) de galletas de soda molidas
Mantequilla, para engrasar
1. Colocar la leche y el queso crema en una cacerola pequeña. Calentar a fuego
3 cucharadas (35 g) de azúcar granulada
1¾ cucharaditas de levadura seca activa
3 cucharadas de agua tibia
3 tazas (410 g) de harina para hacer pan
¾ cucharadita de sal kosher
1 huevo, ligeramente batido
1. Colocar la leche, la mantequilla y el azúcar en una cacerola pequeña; revolver.
medio-lento, revolviendo con un cucharón de madera, hasta que esté suave.
Agregar el queso Cheddar y seguir cocinando, revolviendo de vez en cuando,
hasta conseguir una mezcla espesa y cremosa. Retirar del fuego y agregar la
pimienta de Cayena y la salsa picante.
2. Disolver la levadura en agua tibia. Dejar fermentar por 5 minutos, o hasta que
2. Agregar la pasta cocinada, los pimentones y la mayonesa; revolver bien.
Sazonar con sal y pimienta.
3. Engrasar bien un molde para seis “muffins” con mantequilla y cubrir con
la mitad las galletas molidas. Dividir los macarrones con queso entre los
moldecitos y cubrir con las galletas molidas reservadas.
4. Elegir la función BAKE (hornear) y fijar la velocidad del ventilador al nivel alto,
la temperatura en 350°F (180 °C) y el tiempo en 10 minutos. Después del
precalentamiento, meter al horno, en la posición 1. Hornear hasta que la parte
3. Engrasar ligeramente un molde redondo de 9 pulgadas (23 cm) con
superior esté burbujeante y bien dorada. Dejar enfriar ligeramente, por aprox.
5 a 10 minutos. Pasar un cuchillo alrededor del borde de cada moldecito para
desmoldar. Servir tibio.
Información nutricional por taza:
Calorías 264 (58% de grasa) • Carbohidratos 18.1g • Proteínas 9.2g • Grasa 16.9g
Grasa saturada 9g • Colesterol 47mg • Sodio 284.8mg • Calcio 169.7mg
Fibra 1g
4. Meter al horno, en la posición 1. Elegir la función PROOF (leudar) y fijar la
5. Retirar del horno. Elegir la función BAKE (hornear) y fijar el ventilador en el
Pancitos con sabor a mantequilla
Nunca más comprará pancitos después de probar estos.
Rinde 12 pancitos
¹⁄³ taza (80 ml) de leche entera + 1 cucharada para cepillar
6 cucharadas (85 g) de mantequilla sin sal + 1 cucharada (15 g)
para cepillar
6. Desmoldar y dejar enfriar ligeramente antes de servir.
Grasa saturada 5g • Colesterol 34mg • Sodio 153mg • Calcio 13mg • Fibra 1g
Calentar a fuego lento hasta que la mantequilla esté derretida. Retirar del
fuego y dejar enfriar.
la mezcla se ponga espumosa. Colocar la harina en el bol de una procesadora
de alimentos Cuisinart
®
equipado con cuchilla amasadora y procesar por 10
segundos. Revolver la mezcla de mantequilla y el huevo con la mezcla de
levadura. Encender la máquina y verter los ingredientes líquidos en la boca
de alimentación. Procesar justo hasta que los ingredientes lleguen a formar
una bola de masa. Procesar por 45 segundos adicionales. Formar una bola
de masa suave, colocar la bola en un tazón limpio y cubrir con papel film/
plástico. Dejar leudar al doble de su volumen, por aprox. 60 minutos.
mantequilla. Aplastar la masa para desinflarla y dividirla en 12 porciones
iguales. Formar bolitas suaves y disponer estas en el molde.
temperatura en 90°F (30 °C) y el tiempo en 45 minutos. Los pancitos deberían
leudar aprox. al doble de su volumen.
nivel alto, la temperatura en 350 °F (180 °C) y el tiempo en 15 a 20 minutos.
Mientras el horno está calentando, derretir la mantequilla restante y revolver
con la cucharada de leche restante. Cepillar los pancitos con la mezcla.
Después del precalentamiento (el horno pitará), meter al horno, en la posición
1 y hornear por aprox. 15 minutos, hasta que los pancitos estén bien dorados
y que la temperatura interna alcance 190 °F (88 °C).
Información nutricional por pancito:
Calorías 183 (35% de grasa) • Carbohidratos 26g • Proteínas 4g • Grasa 7g
34
Page 71

Pan italiano rústico
Este pan ligero y crujiente comprobará que hacer pan artesanal en casa es más
fácil que nunca.
Rinde 12 porciones
1¾ cucharaditas de levadura seca activa
¾ cucharadita de azúcar granulada
1 taza (235 ml) de agua tibia
3 tazas (410 g) de harina para hacer pan
¹∕³ taza (55 g) de salvado de trigo
1½ cucharaditas de sal kosher
1½ cucharadas de aceite de oliva
Huevo para barnizar (1 huevo grande + una cucharadita
de agua, batidos)
1. Disolver la levadura y el azúcar en el agua tibia, en una taza de medir.
Dejar fermentar por 5 minutos, o hasta que la mezcla se ponga espumosa.
2. Colocar la harina, al salvado y la sal en el bol de una procesadora de
alimentos equipada con cuchilla amasadora o picadora, y procesar por 10
segundos. Agregar el aceite. Encender la máquina y verter los ingredientes
líquidos en la boca de alimentación. Procesar justo hasta que los ingredientes
lleguen a formar una bola de masa. Procesar por 1 minuto adicional
para amasar. Formar una bola de masa, colocar ésta en un tazón limpio
ligeramente enharinado. Cubrir con papel film/plástico y dejar leudar al doble
de su volumen durante 1 hora.
3. Aplastar para desinflar, volver a formar una bola, regresar esta en el tazón y
cubrir con un nuevo papel film/plástico. Dejar leudar durante 1 hora.
4. Aplastar suavemente para desinflar y formar una bola grande y compacta.
5. Forrar la bandeja para hornear/bandeja de goteo con papel sulfurizado.
Colocar la masa en la bandeja preparada y meter al horno, en la posición 1.
Elegir la función PROOF (leudar) y fijar la temperatura en 90°F (30 °C) y el
tiempo en 30 minutos.
6. Retirar del horno. Elegir la función BAKE (hornear) y fijar el ventilador en el
nivel alto, la temperatura en 375°F y el tiempo en 30 minutos. Después del
precalentamiento (el horno pitará), cortar una “X” en la parte superior del pan
con un cuchillo serrado, cepillar con el barniz de huevo y meter al horno, en la
posición 1.
7. El pan está listo cuando está dorado uniformemente y cuando la temperatura
interna alcanza 200 a 207 °F (93 a 97 °C). Retirar del horno y dejar enfriar
sobre una rejilla antes de cortar.
Información nutricional por porción (basada en 1 porciones):
Calorías 127 (15% de grasa) • Carbohidratos 23g • Proteínas 4g • Grasa 2g
Grasa saturada 0 g • Colesterol 16g • Sodio 292mg • Calcio 3mg • Fibra 1g
DULCES Y POSTRES
Rollitos de piña
Un regalo saludable y dulce para el almuerzo empacado.
Rinde 5 rollitos de piña
3 tazas (600 g) de cubos de piña fresca
1 cucharadita de jugo de limón fresco
1 a 2 cucharadas (15 a 30 g) de miel, al gusto (opcional)
Spray vegetal
1. Colocar la piña, el jugo de limón y la miel (si la usa) en la jarra de una licuadora
o el bol de una procesadora de alimentos. Licuar/procesar hasta obtener una
mezcla suave.
2. Forrar la bandeja para hornear/bandeja de goteo con papel sulfurizado,
dejando un poco de saliente alrededor de los lados, y rociar con spray
vegetal. Verter la mezcla de piña en la bandeja y esparcir uniformemente en
toda la superficie usando una espátula angulada o de caucho.
3. Meter horno, en la posición 2. Elegir la función DEHYDRATE (deshidratar) y
fijar la temperatura en 135 °F (55 °C) y el tiempo en 12 horas. Comprobar el
estado de deshidratación después de 6 horas. Retirar del horno cuando está
listo (el cuero de fruta está listo cuando ya no está pegajoso al tacto y se
despende fácilmente del papel sulfurizado).
35
Page 72

4. Una vez tibio, cubrir el cuero con papel encerado e invertirlo sobre una
superficie plana. Quitar suavemente el papel sulfurizado. Usando tijeras
afiladas, cortar los bordes del papel encerado y cortar el cuero en cinco
tiras de 2 pulgadas (5 cm) de ancho. Enrollar cada tira para formar un rollo.
Sellar con cinta adhesiva de color o hilo de cocina. Conservar a temperatura
ambiente, en un recipiente hermético, por hasta 1 semana.
Información nutricional por rollito:
Calorías 49 (2% de grasa) • Carbohidratos 13g • Proteínas 0.5g • Grasa 0.1g
Grasa saturada 0 g • Colesterol 0g • Sodio 1mg • Calcio 12.4mg • Fibra 1.4g
“Crumble” (barras) de arándanos azules
Cuando usted no puede decidir entre una galleta o un “crumble”, este postre
satisface ambos antojos.
Rinde 12 porciones
Spray vegetal
Fondo de tarta:
8 cucharadas (115 g) de mantequilla sin sal, suavizada a
temperatura ambiente
¼ taza llena (50 g) de azúcar rubia (azúcar de caña integral)
2 cucharadas (35 g) de azúcar granulada
1¼ tazas (155 g) de harina común
¼ cucharadita de sal kosher
1 pizca de canela en polvo
Relleno:
¼ taza (50 g) de azúcar granulada
¼ taza llena (50 g) de azúcar rubia (azúcar de caña integral)
2 cucharadas de almidón/fécula de tapioca
¼ cucharadita de sal kosher
1 pizca de canela en polvo
1 pizca de jengibre en polvo
¼ cucharadita de extracto natural de vainilla
4 tazas (560 g) de arándanos azules frescos
Cobertura:
¾ taza (95 g) de harina común
½ taza (40 g) de copos de avena (no utilice avena instantánea)
½ taza llena (100 g) de azúcar rubia (azúcar de caña integral)
¼ cucharadita de canela en polvo
¼ cucharadita de sal kosher
6 cucharadas (85 g) de mantequilla sin sal, en pedacitos
1. Engrasar ligeramente un molde de 9 x 9 pulgadas (23 x 23 cm) con spray
vegetal y forrarlo con papel sulfurizado; reservar.
2. Colocar la mantequilla y los azucares en el bol de una procesadora de
alimentos Cuisinart
®
equipada con cuchilla picadora. Procesar hasta conseguir
una mezcla cremosa, raspando el bol de vez en cuando. Agregar el resto de
los ingredientes de la corteza y pulsar hasta obtener una mezcla homogénea.
3. Echar la mezcla en el molde preparado, comprimiéndola en el fondo del
mismo. Refrigerar hasta que esté firme.
4. Mientras el fondo de tarta se está enfriando, preparar el relleno. Poner los
azúcares, la fécula, la sal y las especias en un tazón pequeño; batir para
mezclar. Agregar la vainilla y los arándanos azules; revolver para cubrir.
Usando un tenedor o un majador de papas, aplastar los arándanos azules
hasta que la mitad estén abiertos; reservar.
5. Poner todos los ingredientes de la cobertura, excepto la mantequilla, en un
tazón mediano. Revolver, batiendo. Agregar la mantequilla y, usando sus
dedos, combinarla con los ingredientes hasta que se formen migajas grandes
(también puede hacer esto en una procesadora de alimentos Cuisinart
®
equipada con cuchilla picadora. Colocar los ingredientes secos en el bol;
pulsar para mezclar. Agregar la mantequilla y pulsar hasta que se formen
migajas grandes).
6. Cuando la corteza esté firme, elegir la función BAKE (hornear) y fijar la
temperatura en 350°F (180 °C) y el tiempo en 8 minutos. Colocar la rejilla
en la posición 1. Después del precalentamiento, meter la corteza al horno
y hornear hasta que las orillas estén doradas. Retirar del horno y esparcir
el relleno encima. Meter al horno otra vez y hornear por aprox. 15 minutos
adicionales, hasta que el relleno esté burbujeante en las orillas. Cubrir
uniformemente con la cobertura crujiente. Meter al horno otra vez, y hornear
por 15 minutos más. Las barras están listas cuando la parte superior está
uniformemente dorada.
36
Page 73

7. Retirar del horno y dejar enfriar completamente antes de cortar y servir.
Información nutricional por barra:
Calorías 282 (41% de grasa) • Carbohidratos 39g • Proteínas 3 g • Grasa 13g
Grasa saturada 8g • Colesterol 35g • Sodio 143mg • Calcio 4mg • Fibra 2g
1. Pelar y sacar el corazón de las manzanas. Cortar cada manzana en 16
2. Colocar la cesta para freír con aire en la bandeja para hornear/bandeja de
“S’mores”
¡Estos “s’mores” no requieren hoguera!
Rinde 4 porciones
8 galletas Graham, cortadas en de dos galletas
8 cuadros de chocolate con leche (aprox. 2 onzas/55 g)
8 malvaviscos estándares
1. Colocar la cesta para freír con aire en la bandeja para hornear/bandeja de
goteo. Colocar 4 hojas” de galletas Graham en la cesta. Colocar un cuadro de
chocolate, y luego un malvavisco, en el centro de cada galleta.
2. Meter al horno, en la posición 2. Elegir la función AIRFRY (freír con aire) y fijar
la temperatura en 350°F 180 °C) y el tiempo en 5 minutos. Hornear hasta que
los malvaviscos estén ligeramente tostados (empezar a chequear después de
4 minutos).
3. Con cuidado, retirar del horno y colocar en un plato. Colocar las “hojas” de
galletas Graham restantes encima.
Información nutricional por porción:
Calorías 479 (25% de grasa) • Carbohidratos 87g • Proteínas 7g • Grasa 14g
Grasa saturada 6g • Colesterol 0g • Sodio 317mg • Calcio 54mg • Fibra 2g
Manzanas al horno con canela
Ya sea como tentempié o postre libre de culpa, estas manzanas son deliciosas en
cualquier momento.
Rinde 4 porciones
2 manzanas medianas
½ cucharadita de canela en polvo
Calorías 39 (2% de grasa) • Carbohidratos 10g • Proteínas 0g • Grasa 0g • Grasa
Rinde 24 wantanes
Chocolate/Mantequilla de maní/Banana:
¼ taza (60 ml) de crema líquida para batir (“heavy cream”)
4 onzas (115 g) de chocolate semidulce de buena calidad,
finamente picado
¼ taza (60 ml) de crema líquida para batir (“heavy cream”)
½ taza (115 g) de mantequilla de maní cremosa
24 rodajas de ½ pulgada (1.5 cm) de banana (aprox. 2 bananas
maduras)
Fresa/Nutella
1 taza (200 g) de rodajas de fresa
2 cucharaditas de azúcar granulada
1 taza (200 g) de Nutella® u otra crema para untar de chocolate
con avellanas
Wantanes:
1 huevo grande
1 cucharada de agua
24 envolturas/hojas de wantán/wonton (ravioles chinos),
pedazos delgados. Revolver con la canela para cubrir.
goteo. Colocar la manzana en la cesta para freír con aire y meter a horno, en
la posición 2. Elegir la función AIRFRY (freír con aire) y fijar temperatura en
350°F 180 °C) y el tiempo en 15 minutos. Hornear hasta que las manzanas
estén fragantes y ligeramente suaves.
Información nutricional por porción:
saturada 0 g • Colesterol 0g • Sodio 0mg • Calcio 6mg • Fibra 1g
Wantanes dulces de dos maneras
Haga participar a todo el mundo en la creación de su propio wantán en su
próxima fiesta. ¡Sin duda creará dulces recuerdos!
®
:
37
Page 74

cuadradas
Spray vegetal
Azúcar glasé para espolvorear
1. Para el relleno de chocolate/mantequilla de maní/banana: calentar la crema
líquida a fuego medio-lento hasta que eche vapor. Retirar del fuego, agregar el
chocolate y dejar reposar por aprox. 3 minutos. Revolver, usando una espátula
a prueba de calor o un batidor, hasta que la mezcla esté suave y brillante.
Dejar enfriar ligeramente.
2. Colocar el huevo y 1 cucharada del agua en un bol pequeño. Empezar con
12 envoltorios de wantán (cubrir los demás con una toalla humedecida).
Trabajando rápidamente, colocar una rodaja de banana en el centro de cada
envoltorio y agregar 1 cucharadita de mantequilla de maní y 1 cucharadita de
ganache de chocolate. “Pintar” las orillas de cada envoltorio con la mezcla de
huevo (usar el dedo). Formar los wantanes, pellizcando los rincones opuestos
de cada cuadro juntos. Repetir con resto de los envoltorios.
®
3. Para el relleno de fresa/Nutella
: mezclar las rodajas de fresa con 2
cucharaditas de azúcar y dejar macerar por 5 a 10 minutos. Colocar en el
centro de cada envoltorio 2 cucharaditas de Nutella® y cubrir con 2 rodajas de
fresa.
“Pintar” las orillas de cada envoltorio con la mezcla de huevo (usar el dedo)
y formar los wantanes, pellizcando los rincones opuestos de cada cuadro
juntos.
4. Colocar la cesta para freír con aire en la bandeja para hornear/bandeja de
goteo. Disponer las wantanes en la cesta para freír con aire. Rociar con aceite.
Deslizar la cesta en la posición 2.
Elegir la función AIRFRY (freír con aire) y fijar temperatura en 350°F (180 °C)
y el tiempo en 8 minutos. Hornear hasta que estén bien doradas. Sacar de la
cesta. Espolvorear con azúcar glasé y servir tibios.
Información nutricional wantán de fresa/Nutella®:
Calorías 57 (34% de grasa) • Carbohidratos 8.4g • Proteínas 1.1g • Grasa 2.2g
Grasa saturada 2g • Colesterol 2.2mg • Sodio 48.8mg • Calcio 10.4mg
Información nutricional wantán de chocolate/mantequilla de maní/banana:
Calorías 91 (47% de grasa) • Carbohidratos 10.6g • Proteínas 2.5g • Grasa 5.1g •
Grasa saturada 2g Colesterol 4.6mg • Sodio 51.3mg • Calcio 6.3mg • Fibra 0.7g
Fibra 0.4g
Mini rosquillas/buñuelos (“donuts”) con azúcar
y canela
Aunque nunca durarán por mucho tiempo, estas rosquillas/buñuelos son mejores
frescas.
Rinde aprox. 16 rosquillas/buñuelos
¾ cucharadita de levadura seca activa
½ cucharadita + 1½ cucharaditas de azúcar granulada
1 cucharada de leche tibia
¾ taza (95 g) de harina para hacer pan + más (hasta ¾ de
taza/30 g) para mezclar
2 pizcas de sal kosher
2 pizcas de canela en polvo
1 pizca de nuez moscada rallada
1 huevo grande, ligeramente batido
2 cucharadas (30 g) de suero de leche (“buttermilk”)
½ cucharadita de extracto natural de vainilla
1 cucharada (15 g) de mantequilla sin sal en pedazos, a
temperatura ambiente
Spray vegetal
Mantequilla derretida (aprox. 2 cucharadas) para terminar
Azúcar con canela (¼ taza/50 g de azúcar + 1 cucharada de
canela para terminar
1. Disolver la levadura y ½ cucharadita del azúcar en la leche tibia, en un tazón
pequeño. Dejar fermentar por 5 a 10 minutos, o hasta que la mezcla se ponga
espumosa.
2. Colocar ¾ de taza (95 g) de la harina, el azúcar remanente, la sal, la canela y
la nuez moscada en un tazón grande. Revolver, batiendo. Agregar la levadura
fermentada. Revolver, usando un cucharón de madera, para mezclar.
3. Colocar el huevo, el suero de leche y la vainilla en un tazón; revolver, batiendo.
Agregar la mezcla a la mezcla de harina. Enharinar levemente una superficie
de trabajo limpia y colocar la masa encima, espolvoreándola Masa ligeramente
con harina. Amasar a mano, agregando harina una cucharadita a la vez si es
necesario para que la masa no pegue a sus manos. Agregar la mantequilla,
38
Page 75

un pedazo a la vez, amasando después de cada adición. Seguir agregando
harina, una cucharadita a la vez, para evitar que la masa pegue a sus manos.
La masa debe estar tierna y suave, y no debe romperse al estirarse.
4. Formar una bola de masa y colocarla en un tazón limpio. Cubrir con papel
film/plástico y dejar reposar por 1 hora. Después de 1 hora, voltear la masa
y presionar ligeramente (no aplastar). Cubrir con papel film/plástico y dejar
reposar por una hora más.
5. Colocar la cesta para freír con aire en la bandeja para hornear/bandeja de
goteo. Engrasar ligeramente la cesta con spray vegetal. Dividir la masa en 16
pedazos y colocar estos en una superficie ligeramente enharinada. Trabajando
con una porción a la vez y manteniendo las demás porciones cubiertas con
papel film/plástico, formar una bola suave con cada porción. Cubrir con papel
film/plástico. Repetir con el resto de la masa.
6. Después de haber formado 8 rosquillas, colocar estas en la cesta para freír
con aire et meter al horno, en la posición 2. Elegir la función AIRFRY (freír
con aire) y fijar la temperatura en 350°F (180°C) y el tiempo en 5 minutos.
Hornear hasta que las orillas de las rosquillas empiecen a dorarse. Repetir con
el resto de las rosquillas.
7. Mientras las rosquillas se están horneando, colocar la mantequilla restante en
una cacerola pequeña y derretirla a fuego lento. Colocar el azúcar con canela
en un tazón poco profundo. Reservar.
8. Retirar las rosquillas del horno, cepillar inmediatamente con mantequilla y
cubrir con azúcar con canela. Servir inmediatamente.
Información nutricional por rosquilla:
Calorías 66 (43% de grasa) • Carbohidratos 8g • Proteínas 1g • Grasa 3g • Grasa
saturada 2g • Colesterol 20mg • Sodio 25mg • Calcio 7mg • Fibra 0g
“Muffins” de banana con cobertura crujiente
Estos “muffins” son una deliciosa manera de usar las bananas muy maduras.
Rinde 6 “muffins”
Spray vegetal
Cobertura crujiente:
¼ taza (30 g) de harina común
3 cucharadas (35 g) de azúcar rubia (azúcar de caña integral)
2 cucharadas (30 g) de mantequilla sin sal fría, en pedacitos
½ cucharadita de canela en polvo
¼ taza (25 g) de pacanas, tostadas y picadas
1 pizca de sal kosher
Mezcla:
1 taza (125 g) de harina común
1½ cucharaditas de polvo de hornear
¼ cucharadita de sal kosher
¼ cucharadita de canela en polvo
1 banana pequeña madura, aplastada con tenedor
¼ taza llena (50 g) de azúcar rubia (azúcar de caña integral)
¼ taza (60ml) de leche entera
¼ taza (60 ml) de aceite de coco (suavizada o derretida y
entibiada a temperatura ambiente)
1 huevo grande, ligeramente batido
¼ taza (25 g) de pacanas, tostadas y picadas
1. Engrasar ligeramente un molde para 6 “muffins” con spray vegetal.
2. Preparar la cobertura crujiente: en un tazón pequeño, revolver los 6 primeros
3. Preparar la mezcla: colocar la harina, el polvo de hornear, la sal y la canela
4. Verter la mezcla en los moldecitos preparados y cubrir con la cobertura
5. Colocar la rejilla del horno en la posición 1. Elegir la función BAKE y fijar
ingredientes con un tenedor; reservar.
en un tazón pequeño; revolver. Colocar la banana, el azúcar rubio, la leche,
el aceite y los huevos en otro tazón; batir a velocidad media, usando una
batidora de mano, hasta conseguir una mezcla homogénea. Agregar los
ingredientes secos y las nueces, y seguir mezclando justo hasta incorporar los
ingredientes.
crujiente.
la temperatura en 325°F (160 °C) y el tiempo en 15 minutos. Después del
precalentamiento, meter los “muffins” al horno. Empezar a comprobar si los
“muffins” están listos después de 12 minutos para que la cobertura no se dore
demasiado. Los “muffins” están listos cuando están uniformemente dorados y
cuando un probador introducido en el centro sale limpio.
39
Page 76

Información nutricional por “muffin”:
Calorías 311 (48% de grasa) • Carbohidratos 37g • Proteínas 4g • Grasa 17g
Grasa saturada 11g • Colesterol 42mg • Sodio 211mg • Calcio 39mg • Fibra 1g
40
©2018 Cuisinart
150 Milford Road
East Windsor, NJ 08520
Impreso en China
18CE053985
IB-15703-ESP
 Loading...