

INSTRUCTION BOOKLET
Recipe
Booklet
Reverse Side
Cuisinart Sparkling Beverage Maker
For your safety and continued enjoyment of this product, always read the instruction book carefully before using.
SMS-216 Series


IMPORTANT
SAFEGUARDS
When using your Sparkling Beverage Maker,
basic safety precautions should always be
followed, including the following:
1. Read instructions thoroughly.
2. Always properly disassemble the unit
when not in use, before putting on or
removing parts and before cleaning.
3. Do not immerse the Sparkling Beverage
Maker in water or other liquids.
4. When in use by or near children,
supervise closely.
5. If the Sparkling Beverage Maker has
any damage or malfunctions, DO NOT
OPERATE. Contact our Customer
Service Center to return for
examination, repair or adjustment.
Use only Cuisinart recyclable CO2
cartridge with the Sparkling Beverage
Maker.
6. Using accessory attachments not sold
or recommended by Cuisinart can
cause the unit to malfunction or cause
injury.
7. Do not allow the unit or its contents to
come into contact with any hot
surfaces, including stove, or to hang
over table edge or counter.
8. Before operating, always make sure
Sparkling Beverage Maker is properly
positioned and securely in place. Use
only as intended while unit is in
operation.
9. After each use, be sure the unit is no
longer under pressure before
disassembling.
10. Do not put fingers or other objects into
the Sparkling Beverage Maker while it
is in operation.
11. Not designed for outdoor use.
12. Do not use the appliance for anything
other than the intended purpose, as
outlined in the instruction booklet.
13. Do not operate without the beverage
bottle in place.
14. Never transport the Sparkling Beverage
Maker with the recyclable CO2 cartridge
attached to the appliance.
15. Keep the Sparkling Beverage Maker
away from any source of heat.
16. Never press the carbonating activation
lever and release carbon dioxide into an
empty beverage bottle or without a
beverage bottle attached and filled with
water.
SAVE THESE
INSTRUCTIONS
HOUSEHOLD USE
ONLY
No user-serviceable parts are inside. Do not
attempt to service, modify or repair this
product. Doing so will void the warranty and
could result in property damage, illness or
serious injury.
RECYCLABLE CO2 CARTRIDGE
PRECAUTIONS
DANGER
Read instructions and warnings on the
recyclable CO2 cartridge. Separation of
valve from cartridge may cause injury.
Do not unscrew valve from cartridge.
Compressed CO2 can cause cartridge or
valve to fly off with dangerous force. Do not
use cartridge and contact Cuisinart if valve
is not tightly attached to the cartridge.
2

WARNING
• Cuisinart shrink-wrap seal must be
removed from valve by purchaser before
attaching cartridge to Sparkling Beverage
Maker.
• Read entire recyclable CO2 cartridge label
before using cartridge. Failure to read
and heed warnings can result in malfunc-
tion of the cartridge, valve or both,
resulting in property damage, serious
injury or illness from non-beverage
grade CO2.
• Improper use, storage or disposal of
the recyclable CO2 cartridge may cause
property damage or serious personal injury.
• Exposure of the recyclable CO2 cartridge
to temperatures greater than 130°F (54°C)
can rupture it, causing injury.
• Compressed gas can cause frostbite when
released.
• Do not breathe in CO2 gas. The gas can
cause increased heart rate and may
cause rapid suffocation.
• Keep out of reach of children.
CAUTION
• To avoid potential contamination and/or
illness, use only factory-sealed Cuisinart
recyclable CO2 cartridges in your
Sparkling Beverage Maker. Use of CO2
that does not meet FDA beverage grade
standards may cause illness.
• Recycle empty Cuisinart CO2 cartridges
by returning to Cuisinart participating
retailers or exchanging an empty CO2
cartridge for a relled cartridge at
Cuisinart Participating retailers. Please
contact Cuisinart customer service for
additional information 1-800-726-0190.
3
CONTENTS
Important Safeguards ................ 2
Parts and Features................... 4
Before First Use .................... 5
Assembly Instructions ................ 5
Operating Instructions ................ 6
Cleaning and Maintenance ............ 6
Tips and Hints ...................... 7
Troubleshooting .................... 9
Warranty ......................... 10
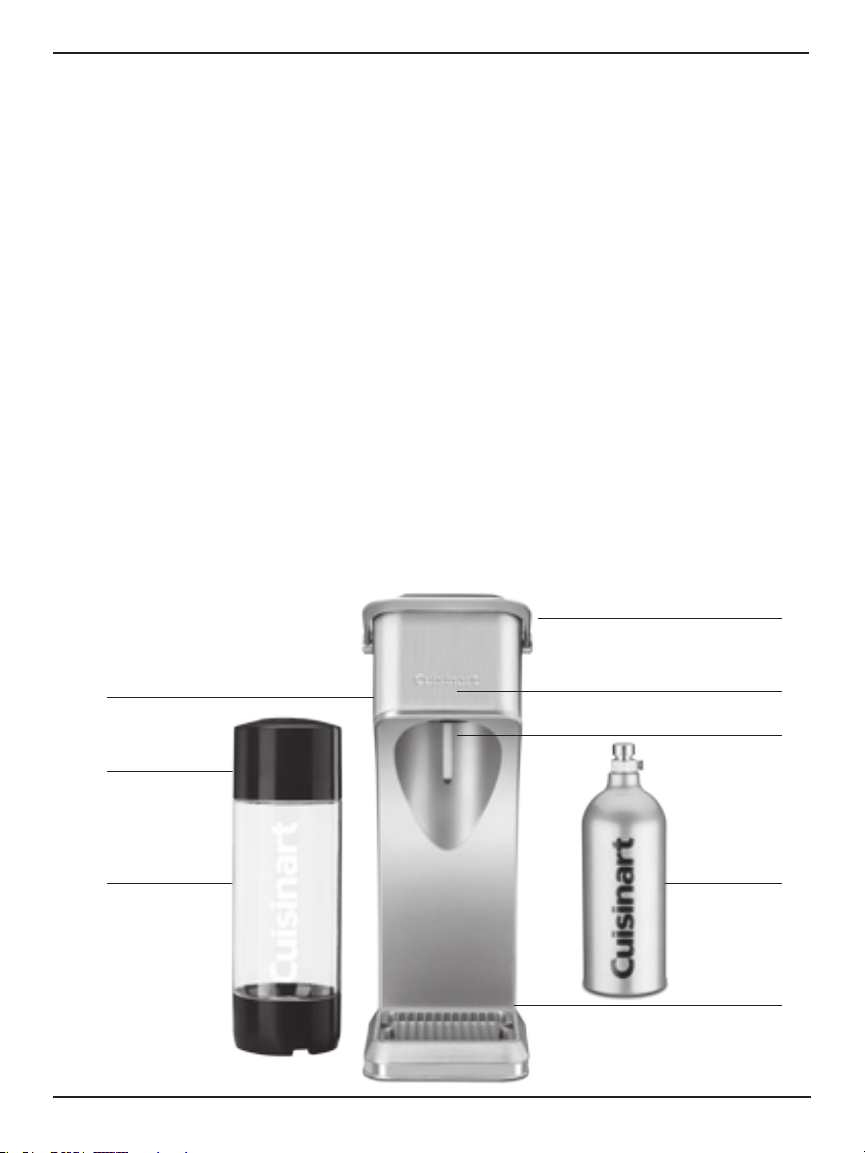
PARTS AND FEATURES
1. Plastic housing
2. Carbonating activation lever
3. Removable back cover (not shown)
4. Quick-connect system (not shown)
5. Tilt head
6. Beverage stem
7. 1-liter beverage bottle
8. Removable drip tray
9. Beverage bottle cap
10. CO2 buzz indicator (not shown)
11. Recyclable CO2 cartridge*
That makes up to 65L of carbonated
water.
NOTE: Your Sparkling Beverage Maker
works with all Cuisinart CO2 cartridge.
12. Lock switch (not shown)
on back of unit.
13. BPA free (not shown)
All materials that come in contact
with liquid are BPA free.
2
1
9
7
5
6
11
8
4
BEFORE FIRST USE
• Remove all packaging materials and any
promotional labels or stickers from your
Sparkling Beverage Maker. Be sure all
parts (listed in Parts and Features) of your
new drink maker have been included
before discarding any packaging materials.
• You may want to keep the box and
packing materials for use at a later date.
• Before using your Cuisinart Sparkling
Beverage Maker for the first time, remove
any dust from shipping by wiping the
housing with a damp cloth.
• Thoroughly clean carbonating stem and
beverage bottle.
• All removable parts can be submerged in
water for cleaning.
• Never place the unit housing in the
dishwasher or immerse it in water.
Always use a damp cloth to wipe clean.
ASSEMBLY
INSTRUCTIONS
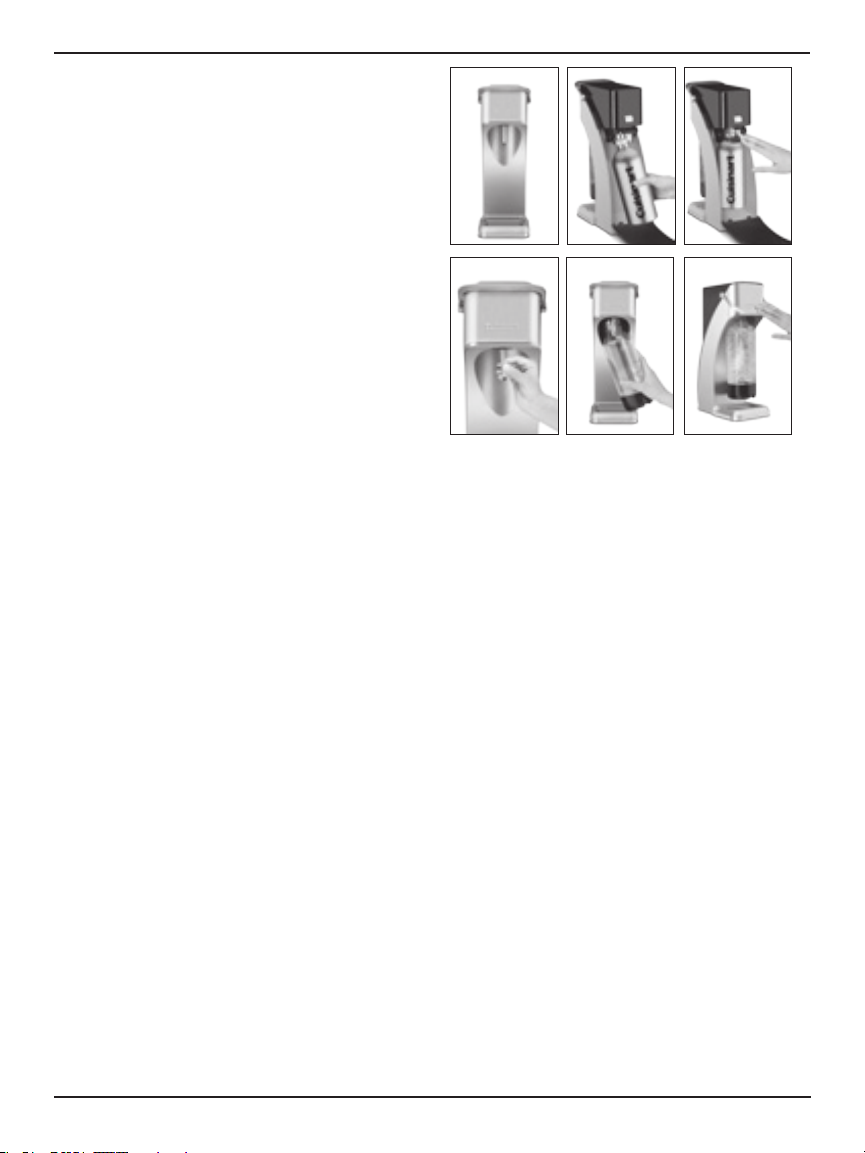
Assembling the Sparkling Beverage Maker
1. Place base on a clean, flat surface
(see fig. a).
2. Push up lock switch on back of unit and
remove the back cover.
3. Remove shrink-wrap seal and protective
cap from your recyclable CO2 cartridge.
4. Insert your recyclable CO2 cartridge
into the back of the unit horizontally so
that the cartridge rests comfortably in
the quick-connect holder area
(see fig. b).
NOTE: Your Sparkling Beverage Maker
works with all Cuisinart CO2 cartridge.
5. Press firmly down on the CO2 locking
lever until the system snaps into place
(see fig. c).
6. Pick up the removable back cover with
the two prongs facing down, and insert
them into the base of the unit. Push the
cover toward the unit to lock into place.
7. Place the removable drip tray in the
base of the unit.
fig. a fig. b fig. c
fig. efig. d fig. f
8.
Fill your beverage bottle to the max fill
line using cold purified water or tap water.
NOTE: Cold water is recommended as it
carbonates better and faster than cold
water.
9. Tilt beverage bottle under the
carbonating stem (see fig. d) and push
beverage bottle vertically into the tilt
head (see fig. e).
10. Rotate the bottle counter-clockwise until
securely in place. Note: Hand tighten
only. Do not use tools.
Disassembling the Sparkling Beverage Maker
1. Place base on a flat, clean surface.
2. To be sure the unit is not pressurized,
pull the beverage bottle (connected to
the tilt head) away from the unit. Note:
If unit is still under pressure you will
hear a “hiss” when tilting.
3. Remove the beverage bottle by rotating
it clockwise until it releases from the tilt
head.
4. Remove the back cover by pushing up
the lock switch, and, holding the cover
by the sides, pull it off of the unit.
5. Push the locking lever up and pull the
recyclable CO2 cartridge toward you
to remove.
6. Remove drip tray by placing fingers
in integrated finger slots, and pulling
it away from unit.
5

OPERATING
INSTRUCTIONS
1. Make sure your Sparkling Beverage
Maker is properly assembled
(see Assembly Instructions).
2. Always operate unit with a beverage
bottle. Be sure that the water level is
at the max fill line. NOTE: Never
attempt to carbonate an empty or
partially filled beverage bottle.
3. Never operate with soda syrups or
ingredients inside the beverage bottle
during the carbonation phase.
4. Do not remove recyclable CO2
cartridge if you have started the
carbonation process.
5. Gently press down on the carbonating
activation lever on the top of the unit
(see fig. f).
6. Release the carbonating activation lever.
7. Repeat Step 5 in two-second bursts,
leaving a few seconds in between each
burst, until you have reached the level
of carbonation desired (See Tips & Hints
pg 7). NOTE: When your beverage
maker makes a buzzing noise, it has
reached maximum carbonation.
8. Once finished, pull the beverage bottle
(attached to the tilt head) away from the
unit to release the pressure.
9. Rotate the beverage bottle clockwise
until it releases from the tilt head.
10. Add optional soda syrups or ingredients
from recipe booklet to the beverage
bottle. Note: Be sure to tip the beverage
bottle at a 45-degree angle before
pouring in soda syrups or other
flavorings.
11. Twist the bottle cap onto the beverage
bottle. Gently rotate left to right until
soda syrups or ingredients have mixed
together.
Note: Never shake bottle to mix.
CLEANING AND
MAINTENANCE
Use any liquid dishwashing detergent. DO
NOT use any product containing ammonia
or scouring powders, as these could dull,
scratch or mar the unit and its contents.
Maintaining your Sparkling Beverage
Maker
• Do not immerse the unit housing in water
or spray it with water. Clean only by wiping
with a damp sponge, cloth or paper towel.
• Do not position or store your Sparkling
Beverage Maker close to a heat source.
• Always remove the drip tray for cleaning
when the unit is not in use.
Maintaining your Beverage Bottle
• The beverage bottle designed for your
Sparkling Beverage Maker is uniquely
threaded to fit only a Cuisinart Sparkling
Beverage Maker. Use only Cuisinart
beverage bottles in your Sparkling
Beverage Maker. The attempted use of
other beverage bottles not approved by
Cuisinart will damage your Sparkling
Beverage Maker.
• Always check your beverage bottle and
bottle cap before each use. If you discover
that the bottle or cap has any defects,
such as a distorted shape, scratches or
cuts, or is generally worn down, stop using
the defective item and replace it.
• The beverage bottles and cap are not
dishwasher safe (hand wash only).
• Do not store near a heat source. Exposure
to heat will likely damage your beverage
bottle. Do not microwave.
• Each beverage bottle has an expiration
date. Be sure to discontinue use and
replace the bottle once the expiration date
is reached.
• Always clean the beverage bottle
immediately after each use. Soda syrups
have a tendency to stain. Wash bottle with
warm water and any liquid dishwashing
detergent; rinse thoroughly.
6

• Carbonate cold water only.
• Never store bottle in the freezer.
Maintaining your Cuisinart Recyclable
CO2 Cartridge
• The Cuisinart recyclable CO2 cartridge is
designed specifically for a Cuisinart
Sparkling Beverage Maker system. These
cartridges are uniquely made to fit our
exclusive quick-connect system. Only use
Cuisinart recyclable CO2 cartridges when
carbonating water in your Sparkling
Beverage Maker.
• Cuisinart recyclable CO2 cartridges are
safe and made specifically for household
use only. Please follow all safety
instructions.
• Never tamper with the recyclable CO2
cartridge. Doing so could result in severe
injury.
• Store only in a cool place that is not
subject to frequent temperature changes
or high temperatures. If subjected to heat,
the pressure inside the cartridge will rise.
• All Cuisinart recyclable CO2 cartridges are
outfitted with an internal burst disk that will
release/expel/discharge the CO2 if the
pressure inside the cartridge becomes too
high.
• If this should happen, DO NOT touch the
cartridge. Leave the cartridge alone until
all the gas inside the cartridge is released.
You will see the cartridge frost up and it
will become exceptionally cold. DO NOT
touch the cartridge until it has returned
to room temperature. You will know it has
returned to room temperature when the
frost on the outside of the cartridge has
dissipated.
• Continue to exercise caution when
handling the recyclable CO2 cartridge
as it may still be cold.
• Do not transport your Sparkling Beverage
Maker while the recyclable CO2 cartridge
is connected to the unit.
• Do not expose to direct sunlight or
temperatures in excess of 130˚F (54˚C).
TIPS AND HINTS
• 3 pumps—two-second bursts of pressure
on the carbonating activation lever leaving
a few seconds in between each burst, are
recommended to achieve an average level
of carbonation. To achieve a stronger
carbonation level, simply pump again to
add more CO2.
• Add your favorite soda syrups to
carbonated water, create your own
homemade sodas, or try the recipes
in our recipe booklet!
• Use your Sparkling Beverage Maker in
tandem with our Juice Extractor—mix
nutritious fresh juices into your carbonated
water!
• Using ingredients readily available at home,
like fresh juice or low calorie/diet syrups, is
a healthier alternative to popular highfructose sodas.
• Always tightly cap your beverage bottle
to hold onto the fizz in your beverage!
Make your morning fizz –
Add some carbonated water to freshly
squeezed orange or grapefruit juice. Serve in
a champagne glass with a citrus wedge and
make the kids feel extra special.
To each their own –
You decide how much fizz you want in your
drink. Some prefer water with their bubbles,
while others prefer bubbles to dominate the
water; you be the judge. The more times you
press, the more bubbles are being forced
into your water.
The Chill Factor–
To get the best bubbles, be sure to use
the coldest water possible. Store the
carbonating bottles filled with fresh, filtered
water in the refrigerator so they are ready
to go when you are!
At a moment’s notice –
Simple syrup can keep in the refrigerator for
up to one month. Make a big batch so you
can whip up drinks at any time.
Herbal-Infusions –
Herbs lend well to carbonated drinks. We
7

have recipes that use mint and basil, but be
creative and try your favorites, especially
when your herb garden is in full force!
A Sweet Finish –
Root beer and cola floats are delicious at
any age. Use our Winter Spice syrup over
vanilla ice cream for another frozen treat.
Strawberries and cream more your thing?
Pair our strawberry syrup with soda water
and some vanilla ice cream. It is all about
preference, so keep trying until you find
your favorite.
For the after 5 o’clock crowd –
Let the Cuisinart Soda Maker be a fixture
on your bar at home. From fizzy mojitos
with a mint syrup to big bowls of spritzy,
wine punches, carbonated cocktails make
a statement.
8

TROUBLESHOOTING
Problem Solution
Your Sparkling Beverage Maker isn’t
carbonating water
CO2 is not coming out when I press the lever.
I need to clean the carbonating needle
The unit is continuing to make a hissing noise
as if CO2 is leaking from the machine.
Be sure it’s in a fully upright position on a level surface.
Your cartridge may be empty. Full and empty weights are listed
on the cartridge.
Be sure your beverage bottle is lled to the water line.
The cylinder could be out of gas. If so you can exchange your
empty cartridge for a relled cartridge at participating retailers.
Never throw away an empty cartridge.
The needle could be clogged.
Using a cup of plain warm water immerse the needle into the
water for a few minutes. Gently press the lever to allow a small
amount of gas to enter the cup of warm water. This should
loosen any residual syrup residue.
Call customer service at 1-800-726-0190.
The beverage bottle won’t unscrew from the
machine.
My water is too lightly carbonated
Water from the beverage bottle and made a
mess all over my countertop.
My bottle is overflowing.
I hear gas escaping, but it’s not making the
“buzz” noise.
My beverage bottle has passed its
expiration date.
I need to refill my CO2 cartridge.
Tilt the bottle away from the a machine to engage the pressure
relief valves.
Ideally (3) one-second buzzes should be sufcient carbonation.
When the unit buzzes while carbonating, it is signifying that you
have reached the optimal absorption of CO2. It is recommended to make sure your water is extra carbonated when adding
avor to carbonated water.
Make sure you only ll the water bottle to the water ll line.
Overlling the bottle can result in water getting drawn back
into the unit.
Make sure you are only carbonating water.
Never add the avor syrup before carbonating.
Be sure to tilt the bottle of carbonated water at a 45 degree
angle while slowing adding in the avored syrups. All of these
things could cause your bottle to overow.
The water bottle might not be screwed in tight enough.
Make sure to turn until rmly seated into the carbonating unit.
The bottle is designed to withstand many cycles of carbonating
but since nothing lasts forever its best to ensure that the bottle
is not used indenitely. As the expiration date approaches new
bottles should be purchased to replace the current beverage
bottles
Never attempt to rell a cartridge yourself. It must be relled
by an authorized Cuisinart retailer. Please bring your empty
cartridge to a participating retailer to exchange it for a full one.
9

WARRANTY
Limited Three-Year
Warranty
This warranty is available to consumers only. You
are a consumer if you own a Cuisinart Sparkling
Beverage Maker that was purchased at retail for
personal, family or household use. Except as
otherwise required under applicable law, this
warranty is not available to retailers or other
commercial purchasers or owners. We warrant
that your Cuisinart Sparkling Beverage Maker will
be free of defects in materials and workmanship
under normal home use for 3 years from the date
of original purchase. We recommend that you visit
our website, www.cuisinart.com for a fast,
efficient way to complete your product
registration. However, product registration does
not eliminate the need for the consumer to
maintain the original proof of purchase in order to
obtain the warranty benefits. In the event that you
do not have proof of purchase date, the purchase
date for purposes of this warranty will be the date
of manufacture.
CALIFORNIA RESIDENTS ONLY
California law provides that for In-Warranty
Service, California residents have the option of
returning a nonconforming product (A) to the store
where it was purchased or (B) to another retail
store that sells Cuisinart products of the same
type. The retail store shall then, according to its
preference, either repair the product, refer the
consumer to an independent repair facility,
replace the product, or refund the purchase price
less the amount directly attributable to the
consumer’s prior usage of the product. If neither
of the above two options results in the appropriate
relief to the consumer, the consumer may then
take the product to an independent repair facility,
if service or repair can be economically
accomplished. Cuisinart and not the consumer will
be responsible for the reasonable cost of such
service, repair, replacement, or refund for
nonconforming products under warranty.
California residents may also, according to their
preference, return nonconforming products
directly to Cuisinart for repair or, if necessary,
replacement by calling our Consumer Service
Center toll-free at 800-726-0190. Cuisinart will be
responsible for the cost of the repair, replacement,
and shipping and handling for such
nonconforming products under warranty.
BEFORE RETURNING YOUR CUISINART
PRODUCT
If your Cuisinart Sparkling Beverage Maker should
prove to be defective within the warranty period,
we will repair or, if we think necessary, replace it.
To obtain warranty service, please call our
Customer Service Center toll-free at
1-800-726-0190 or write to: Cuisinart, 7811 North
Glen Harbor Blvd.Glendale, AZ 85307. To facilitate
the speed and accuracy of your return, enclose
$10.00 for shipping and handling. (California
residents need only supply a proof of purchase
and should call 1-800-726-0190 for shipping
instructions.) Please be sure to include your return
address, description of the product’s defect,
product serial number, and any other information
pertinent to the return. Please pay by check or
money order. NOTE: For added protection and
secure handling of any Cuisinart product that is
being returned, we recommend you use a
traceable, insured delivery service. Cuisinart
cannot be held responsible for in-transit damage
or for packages that are not delivered to us. Lost
and/or damaged products are not covered under
warranty.
Your Cuisinart Sparkling Beverage Maker has
been manufactured to the strictest specifications
and has been designed for use only with the
Cuisinart recyclable CO2 cartridge and with
authorized accessories and replacement parts.
This warranty expressly excludes any defects or
damages caused by attempted use of this unit
with an unauthorized CO2 cartridge, as well as use
with accessories, replacement parts or repair
service other than those authorized by Cuisinart.
This warranty does not cover any damage caused
by accident, misuse, shipment or other than
ordinary household use. This warranty excludes all
incidental or consequential damages. Some states
do not allow the exclusion or limitation of these
damages, so these exclusions may not apply to
you. You may also have other rights, which vary
from state to state.
10

Important: If the nonconforming product is to
be serviced by someone other than Cuisinart’s
Authorized Service Center, please remind the
servicer to call our Consumer Service Center at
1-800-726-0190 to ensure that the problem is
properly diagnosed, the product is serviced with
the correct parts, and to ensure that the product
is still under warranty.
Any trademarks or service marks of third parties referred to herein are the
trademarks or service marks of their respective owners.
©2013 Cuisinart
150 Milford Road
East Windsor, NJ 08520
Printed in China
12CE133400
B IB-11606A

7
2. Serve immediately.
squeeze the lime wedge over the drink.
glass and stir to combine. Pour over ice and
1. Put the soda water and both syrups into a tall
1 lime wedge
½ ounce lime syrup
1½ ounces strawberry syrup
8 ounces soda water
Makes 1 ten-ounce serving
at your next dinner.
Make your kids feel extra special with a glass of this
Strawberry-Lime Rickey
hour, or until the top layer of the milk is very icy.
and put in a freezer-safe container for about an
*Portion out the amount of milk that you need,
mixed with a large foam layer on the top.
spoon, add the soda water. Drink should be well
glass. While stirring vigorously with a long
1. Put the chocolate, then the icy milk in a tall
6 ounces soda water, well chilled
4 ounces whole milk, icy*
(preferably Fox’s U-Bet)
2 ounces chocolate syrup
Makes 1 twelve-ounce serving
is key to the makings of a classic egg cream.
Having the coldest milk and soda water possible
New York–Style Egg Cream
Old-Fashioned
Citrus Margarita
3. Serve immediately.
citrus-soda and stir to combine.
tequila to each. Top with equal amounts of the
2. Fill two glasses with ice. Add equal amounts of
a large pitcher; stir to combine.
1. Put the soda water, syrup and juices together in
1½ ounces tequila
1 ounce fresh orange juice
1 ounce fresh lime juice
1 ounce mandarin syrup
8 ounces soda water
Makes 2 servings, about 6 ounces each
just the right amount of sweetness.
the mandarin syrup and orange juice add
A delicious play on the classic Margarita –
MOCKTAILS

6
3. Serve immediately, with a squeeze of lime.
cucumber/herb-soda and stir to combine.
to each. Top with 8 ounces each of the
2. Fill four glasses with ice. Add 1½ ounces of gin
pitcher; stir to combine.
1. Put the soda water and syrup together in a large
lime wedges, for serving
6 ounces gin
4 ounces cucumber-mint-basil syrup
32 ounces soda water
refrigerator for up to a month.
be stored in an airtight container in the
Allow to cool completely before using. Syrup can
2. Strain the steeped syrup, discarding the zest.
zest. Cover and steep for 30 minutes.
Once it boils, remove pan from heat and add the
1. Bring the syrup to a boil in a small saucepan.
removed, cut into ½-inch strips
zest of 3 mandarins, bitter white pith
1 cup simple syrup ( Version 1)
Makes about 1 cup
you can substitute oranges.
If you cannot locate Mandarins,
Mandarin Syrup
Makes 4 servings, about 10 ounces each
have on hand on a summer’s night.
With a squeeze of lime, this is the perfect drink to
Herbal Cooler
3. Serve immediately, with a squeeze of lime.
soda and stir to combine.
to each. Top with 8 ounces each of the ginger-
2. Fill four glasses with ice. Add 1½ ounces of rum
pitcher; stir to combine.
1. Put the soda water and syrup together in a large
lime wedges, for serving
6 ounces dark rum (preferably Gosling’s)
4 ounces ginger syrup
32 ounces soda water
Makes 4 servings, about 10 ounces each
sticking to the authentic Gosling’s rum.
on hand to make this classic cocktail. We suggest
Take the extra effort and have the best ingredients
Dark ’n Stormy®
Lemon-Lime Syrup*
zest of 3 limes, and follow instructions above.
same time as the zest. For lime syrup, add the
above, adding juice to the simple syrup at the
lemon and juice of ½ lemon. Follow instructions
*For a straight lemon syrup, use the zest of 1
refrigerator for up to a month.
be stored in an airtight container in the
Allow to cool completely before using. Syrup can
2. Strain the steeped syrup, discarding the zests.
zests. Cover and steep for 30 minutes.
Once it boils, remove pan from heat and add the
1. Bring the syrup to a boil in a small saucepan.
then cut into ½-inch strips
zest of 1 lime, bitter white pith removed,
removed, cut into ½-inch strips
zest of 1 large lemon, bitter white pith
1 cup simple syrup ( Version 1)
Makes about 1 cup
amount of bitter and sweet to it.
A favorite among many, this syrup has the per fect
COCKTAILS

5
refrigerator for up to a month.
be stored in an airtight container in the
Allow to cool completely before using. Syrup can
2. Strain the steeped syrup, discarding the berries.
strawberries. Cover and steep for 30 minutes.
Once it boils, remove pan from heat and add the
1. Bring the syrup to a boil in a small saucepan.
(about 8 medium berries)
1 cup thinly sliced strawberries
1 cup simple syrup ( Version 1)
Makes about 1 cup
strawberries for your own twist.
or blackberries, use those in place of the
color. If you have other berries, such as raspberries
Your kids will love this tasty syrup and its beautiful
Strawberry Syrup
Vanilla Syrup
refrigerator for up to one month.
refrigerator. The syrup can remain in the
and allow to steep for 8 to 10 hours in the
including the vanilla pod, to an airtight container
2. Allow to cool completely. Transfer syrup,
split vanilla pod. Cover and steep for 30 minutes.
Once it boils, remove pan from heat and add the
1. Bring the syrup to a boil in a small saucepan.
1 vanilla bean, split lengthwise
1½ cups Simple Syrup (Version 1)
Makes about 1½ cups
of rum or vodka and then pour over ice.
reminiscent of a light cream soda. Throw in a shot
Adding the vanilla syrup to a glass of soda water is
the refrigerator for up to a month.
Syrup can be stored in an airtight container in
lavender. Allow to cool completely before using.
2. Strain the steeped syrup, discarding the
the lavender. Cover and steep for 30 minutes.
dissolved. Remove saucepan from heat and add
heat. Reduce heat and simmer until sugar is fully
saucepan and bring to a boil over medium-high
1. Put the honey, sugar and water in a small
(from about 3 to 4 sprigs)
1 tablespoon fresh lavender flowers
1 cup water
½ cup granulated sugar
½ cup honey
Makes about 1½ cups
honey and sugar tames the floral lavender.
standard simple syrup, rather the combination of
Herbal and sweet – this syrup does not use the
Honey-Lavender Syrup
container in the refrigerator for up to a month.
before using. Syrup can be stored in an airtight
cucumber and herbs. Allow to cool completely
2. Strain the steeped syrup, discarding the
minutes.
remaining ingredients. Cover and steep for 30
Once it boils, remove pan from heat and add the
1. Bring the syrup to a boil in a small saucepan.
(about 25 medium to large leaves)
½ cup fresh basil* leaves
(about 25 medium leaves)
¹∕³ cup fresh mint leaves
½ large English cucumber, thinly sliced
2 cups Simple Syrup (Version 2)
Makes about 2 cups
refreshing when stirred into a glass of soda water.
these fresh herbs are abundant then, but it is very
This syrup screams summer, not only because
Cucumber-Mint-Basil Syrup

4
refrigerator for up to a month.
be stored in an airtight container in the
Allow to cool completely before using. Syrup can
2. Strain the steeped syrup, discarding the spices.
minutes.
remaining ingredients. Cover and steep for 30
Once it boils, remove pan from heat and add
1. Bring the syrup to a boil in a small saucepan.
5 whole black peppercorns
3 star anise pods
8 whole cloves
10 allspice berries
(each about 4 inches)
2 whole cinnamon sticks
2 cups Simple Syrup (Version 1)
Makes about 2 cups
of the favorite winter spices.
A delicious mixture of all
Winter Spice Syrup
the refrigerator for up to a month.
Syrup can be stored in an airtight container in
grass. Allow to cool completely before using.
2. Strain the steeped syrup, discarding the lemon
minutes.
chopped lemon grass. Cover and steep for 30
Once it boils, remove pan from heat and add
1. Bring the syrup to a boil in a small saucepan.
(from about 1 stalk)
3 tablespoons chopped lemongrass
1 cup Simple Syrup (Version 2)
Makes about 1 cup
outer leaf and use the inner, fresher stalk.
you are lucky, it’s already chopped!). Peel away the
section, try looking in the frozen food aisles (and if
prime). If you cannot locate it in the produce
the ends, for that means that they are past their
green stalks, not ones that are brown and peeling at
produce section and is a long, brittle stalk (look for
supermarkets, or specialty stores. It is in the
Lemon grass can be found in many larger
Mint Syrup
Ginger Syrup
Lemongrass Syrup
refrigerator for up to a month.
be stored in an airtight container in the
Allow to cool completely before using. Syrup can
2. Strain the steeped syrup, discarding the leaves.
mint. Cover and steep for 30 minutes.
Once it boils, remove pan from heat and add
1. Bring the syrup to a boil in a small saucepan.
(about 35 medium leaves)
½ cup tightly packed fresh mint leaves
2 cups Simple Syrup (Version 2)
Makes about 2 cups
lemonade makes a wonderful summer drink.
soda, a bit of this syrup in a glass of iced tea or
In addition to being perfect for a refreshing mint
refrigerator for up to a month.
be stored in an airtight container in the
Allow to cool completely before using. Syrup can
2. Strain the steeped syrup, discarding the ginger.
to simmer for about 40 minutes.
saucepan. Once it boils, reduce heat and allow
1. Bring the syrup and ginger to a boil in a small
¾ cup finely chopped fresh ginger
3 cups Simple Syrup (Version 1)
Makes about 2 cups
cocktails, such as the Dark ’n Stormy® on page 6.
This is also a key ingredient to a lot of popular
Use this syrup to make your own ginger ale.
FLAVORED SYRUPS

3
for up to a month.
stored in an airtight container in the refrigerator
to cool completely before using. Syrup can be
2. Remove the saucepan from the heat and allow
completely dissolved. Stir occasionally.
allow mixture to simmer until the sugar has
boil. Once it boils, reduce heat to medium to
saucepan over medium-high heat. Bring to a
1. Put both the sugar and water into a small
2 cups water
1 cup granulated sugar
Makes about 2½ cups
amount of sweetness for regular sodas.
It’s a bit less concentrated and has the perfect
This is a lighter version of our simple syrup.
Simple Syrup (Version 2 – light)
for up to a month.
stored in an airtight container in the refrigerator
to cool completely before using. Syrup can be
2. Remove the saucepan from the heat and allow
completely dissolved. Stir occasionally.
allow mixture to simmer until the sugar has
boil. Once it boils, reduce heat to medium to
saucepan over medium-high heat. Bring to a
1. Put both the sugar and water into a small
2 cups water
2 cups granulated sugar
Makes about 3½ cups
a bit better than the lighter version.
into cock tails, for it cuts the bite of the alcohol
and tea. This version is perfect for mixing
to sweeten cold beverages such as iced coffee
to prepare, and are good to have on hand
is a bit less concentrated. They take little time
it is equal parts sugar to water, while the second
this one is a true simple syrup, meaning that
flavored syrups. We have created two versions;
Simple syrups are the base of most of the
Simple Syrup (Version 1 – heavy)
SUGAR SYRUPS

2
Strawberry Lime Rickey White Sangria ........................................... 7
Old-Fashioned New York–Style Egg Cream ........................................ 7
MOCKTAILS
Citrus Margarita.............................................................. 7
Herbal Cooler ............................................................... 6
.............................................................. 6
®
Dark ’n Stormy
COCKTAILS
Mandarin ................................................................... 6
Lemon-Lime ................................................................ 6
Strawberry .................................................................. 5
Honey-Lavender ............................................................. 5
Vanilla .....................................................................5
Cucumber-Mint-Basil .........................................................5
Winter Spice ................................................................ 4
Lemongrass................................................................. 4
Mint ....................................................................... 4
Ginger ..................................................................... 4
FLAVORED SYRUPS
Simple Syrup (Version 2 – light) .................................................3
Simple Syrup (Version 1 - heavy) ................................................3
SUGAR SYRUPS
RECIPES


SMS-216 Series
Cuisinart Sparkling Beverage Maker
Reverse Side
Booklet
Instruction

Version no :
SMS216 IB-11606A
Fold Size
Material (Cover):
Coating:
Color (Cover):
(Inside):
Date: Nov-16-2012
PDF version :
BOND FUND Code :
Color Series:
Remark:
:
152MM(W)X203MM(H) 20pp
157gsm matt artpaper
(Inside):
120gsm gloss artpaper
Gloss Varnishing in cover
4C(CMYK)+1C(K)
1C(K)+1C(K)
Co-ordinator:
BOND FUND Descriptio
SMS216 IB-11606A ( ,0) BOOK
Non
Gloss Varnishing in cover
1
AStor You / Andy WS Chan
Operator : long
 Loading...