

Page 1
INSTRUCTION & RECIPE BOOKLET
Cuisinart® Rice and Grain Multicooker
For your safety and continued enjoyment of this product, always read the instruction book carefully before using.
FRC-1000
Page 2

IMPORTANT
SAFEGUARDS
When using an electrical appliance,
especially when children are present,
basic safety precautions should always
be taken, including the following:
1. READ ALL INSTRUCTIONS.
2. Do not touch hot surfaces; use
handles or knobs.
3. To protect against risk of electric
shock, do not immerse the Rice and
Grain Multicooker housing, cord or
plug in water or any other liquids. If
housing falls into liquids, unplug the
cord from outlet immediately. DO NOT
reach into the liquid.
4. To avoid possible accidental injury,
close supervision is necessary when
any appliance is used by or near
children.
5. Unplug from outlet when not in use
and before cleaning. Allow to cool
before putting on or taking off parts.
6. Do not operate any appliance with a
damaged cord or plug, or after the
appliance has malfunctioned or has
been dropped or damaged in any way
or is not operating properly. Return
the appliance to the nearest Cuisinart
Repair Center for examination, repair
or mechanical or electrical adjustment.
7. The use of attachments not
recommended by Cuisinart may cause
fire, electric shock, or risk of injury.
8. Do not use outdoors.
9. Do not use the Rice and Grain
Multicooker for anything other than
its intended use.
10. To avoid the possibility of the Rice
and Grain Multicooker being
accidentally pulled off work area,
which could result in damage to it or
in personal injury, do not let cord hang
over edge of table or counter.
11. To avoid damage to cord and possible
fire or electrocution hazard, do not let
cord contact hot surfaces, including
a stove.
12. Extreme caution must be used when
moving any appliance containing hot
oil or other hot liquids.
13. Do not place on or near a hot gas or
electric burner, or in a heated oven.
14. Do not operate the Rice and Grain
Multicooker in water or under
running water.
15. To reduce the risk of electric shock,
cook only in removable container.
Do not immerse the container in water.
16. Always attach plug to appliance first,
then plug cord to the wall outlet. To
disconnect, press Start/Stop to stop
cooking cycle, then remove plug from
wall outlet.
17. Intended for countertop use only.
18. WARNING: Spilled food can cause
serious burns. Keep appliance and
cord away from children. Never drape
cord over edge of counter, never use
outlet below counter, and never use
with an extension cord.
SAVE THESE
INSTRUCTIONS
FOR HOUSEHOLD
USE ONLY
SPECIAL CORD SET
INSTRUCTIONS
A short power-supply cord is used to
reduce the risk resulting from it being
grabbed by children, becoming entangled
in, or tripping over a longer cord.
2
Page 3

CONTENTS
Important Safeguards ...............2
Introduction .......................3
Assembly Instructions ...............3
Features and Benefits ...............4
Getting to Know Your Control Panel ....5
Operation .........................6
Cleaning and Care ..................8
Tips and Hints .....................9
Cooking Charts ...................11
Guide for Steaming ................14
Troubleshooting ...................15
Warranty.........................16
INTRODUCTION
The Cuisinart® Rice and Grain Multicooker
benefits from the use of Fuzzy Logic, a
technology that senses moisture levels
to accurately cook food. All Rice and Grain
programs are automatic. Cooking time and
temperature are defined by the appliance.
Whether you are cooking rice, quinoa,
oatmeal or risotto, our highly intelligent
Rice and Grain Multicooker automatically
adjusts the heat and timing for perfect
results every time. It’s easy to use, has an
extra-large capacity and is beautiful to look
at. Now that’s a smart way to cook!
NOTE: Do not open lid during cooking as
steam will escape and will affect cooking
time and taste. Additionally, no time is
displayed on the control panel for
automatic presets. In the last 10 to 15
minutes of cooking, a countdown will
appear for most preset functions.
Recipes..........................17
ASSEMBLY
INSTRUCTIONS
1. After unpacking your Cuisinart® Rice
and Grain Multicooker, wash the
nonstick cooking pot, steaming tray,
rice paddle, inner lid, steam release
vent and measuring cup in warm,
soapy water. Rinse well and dry
thoroughly.
2. Wipe all interior and exterior surfaces
of the unit with a soft, damp cloth.
3. Place the cooking pot in the base of
the unit.
4. Place the steaming tray (open side up),
if using, in the cooking pot.
5. Close the lid.
6. Insert the removable cord into the
back of the unit.
7. Your Rice and Grain Multicooker is
now ready for use.
3
Page 4
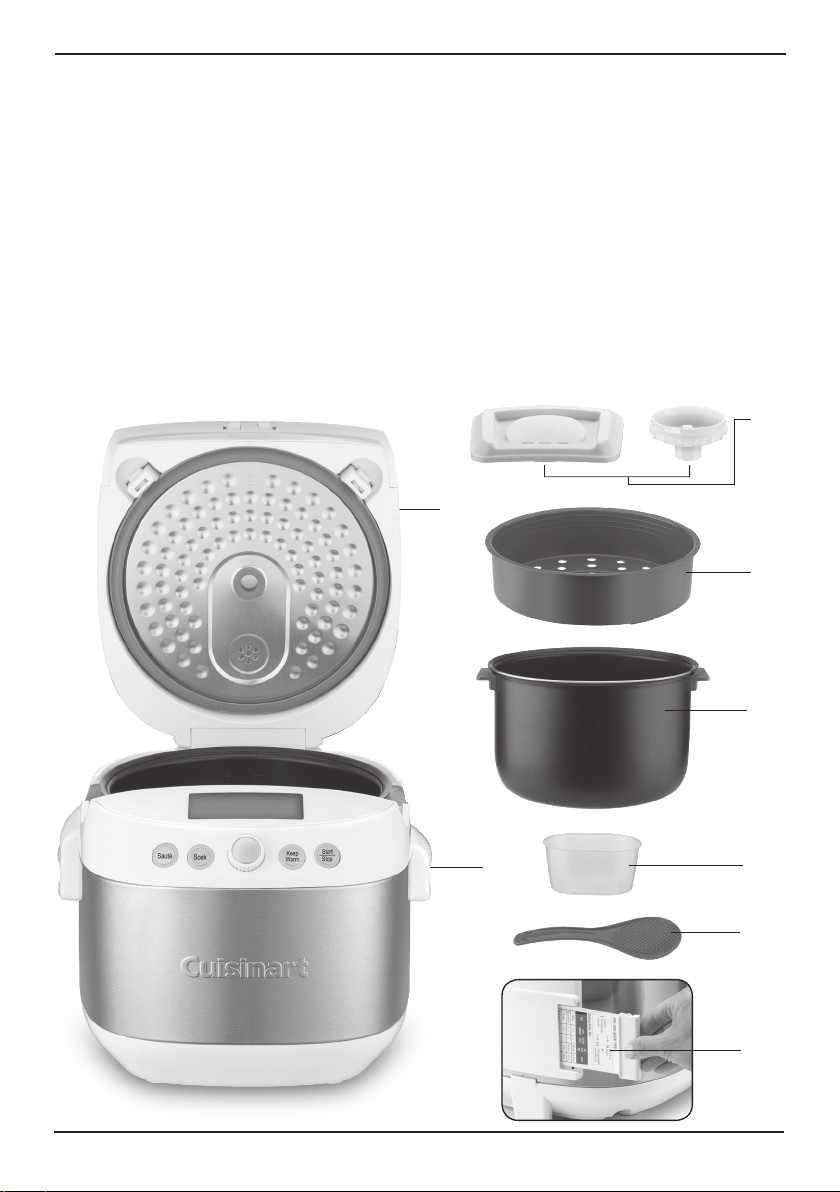
FEATURES AND BENEFITS
1. Locking Lid with Removable Inner Lid
2. Handles
Stay cool during use
3. Steam Release Vent – removes for
easy cleaning
4. Steaming Tray
Allows you to steam a variety of foods
5. Aluminum Cooking Pot
Nonstick for easy cleaning
6. Rice Cooker Measuring Cup
Designed specifically for your
Cuisinart® Rice and Grain Multicooker.
1 rice cooker cup = ¾ standard dry
measure
7. Rice Paddle
8. Integrated Reference Guide
Behind unit
9. Lid Release Button (not shown)
10. Power Cord (not shown) – detaches
for storage
11. Control Panel
See detail on the next page
3
1
4
5
2
6
7
8
4
Page 5

GETTING TO KNOW YOUR CONTROL PANEL
Detailed programming instructions begin on the following page.
1. Sauté
30 minutes of time to sauté ingredients
alone, or before using a preset function
2. Soak
Soak rice, grains, or beans in unit,
timed, for up to 24 hours
3. Selector Knob
Use to select and confirm preset
functions on control panel
4. Keep Warm
Keep newly prepared food warm for up
to six hours (unit will automatically keep
warm for up to three hours after some
preset functions)
5. Start/Stop
Use to start or stop cooking
1 2 3 54
5
Page 6

OPERATION
REMINDER
Your Rice and Grain Multicooker comes
with a 6-ounce (12 tablespoons or ¾ cup
standard measure) measuring cup. Most
recipes in this Instruction & Recipe Booklet
are written with the rice/grain measured
with the cooker measuring cup. The liquid
is measured with a standard liquid
measuring cup (1 cup = 8 ounces =
16 tablespoons).
Most rice and grains can be cooked to the
maximum amount of the Rice and Grain
Multicooker (10 rice cooker cups). See
cooking charts starting on page 11 for
more information.
COOKING RICE OR GRAINS
1. Fill cooking pot with desired
ingredients (see page 9 for tips
and hints on cooking guidelines).
2. Close lid.
3. Using the Selector Knob, scroll to Rice
or Grains.
4. Press the center of the Selector Knob
to confirm Rice or Grain category.
5. Use the Selector Knob to scroll
through Rice or Grain options (e.g.
white, brown, small, chewy).
6. When correct option is flashing, use
the flashing Start/Stop button to start
the cooking program.
7. Sequential lighting will appear on the
screen to show unit is in cooking mode.
(Countdown timer will appear for last
10 minutes of cooking.)
8. After time has expired, unit will beep 4
times and go into automatic Keep
Warm mode for up to three hours (LED
Keep Warm will appear on screen).
9. To turn the unit off at any time, press
the Start/Stop button.
10. Once you are ready to serve, press the
Lid Release button to open the lid.
11. Lift and remove the cooking pot using
the stay-cool handles.
COOKING “ONE POT” OR BEANS
1. Fill cooking pot with ingredients
(see page 10 for tips and hints on
cooking guidelines).
2. Close lid.
3. Using the Selector Knob, scroll to
One Pot or Beans. Press Knob to
confirm, then use Selector Knob to set
time.
4. Press Start/Stop button to confirm
selection.
5. After time has expired, unit will beep 4
times and go into automatic Keep
Warm mode for up to three hours (LED
Keep Warm will appear on screen).
6. To turn the unit off at any time, press
the Start/Stop button.
7. Once you are ready to serve, press the
Lid Release button to open the lid.
8. Lift and remove the cooking pot using
stay-cool handles.
COOKING RISOTTO
1. Most risotto recipes suggest sautéing
aromatics and vegetables as well as
toasting the rice. To do so, simply use
the Sauté program to prepare as you
would on the stovetop.
2. After sautéing, press Start/Stop to return
to the Main Menu. Add the remaining
ingredients (as directed in the recipe
that is being used).
3. Close lid.
4. Using the Selector Knob, scroll to
Risotto.
5. Press Start/Stop button to accept
selection.
6. Sequential lighting will appear on the
screen to show unit is in cooking mode.
7. Countdown timer will appear for last
15 minutes of cooking. At this time,
open the lid and stir the risotto. If it is
done to your liking, press Start/Stop
(or switch to the Keep Warm function).
If the risotto needs additional liquid,
stir it in at this time (best if the liquid is
room temperature). This also allows
6
Page 7

you to add additional ingredients that
only require a short cooking time, such
as tender vegetables and delicate
seafood.
8. After time has expired, unit will beep 4
times and go into automatic Keep
Warm mode for up to three hours (LED
Keep Warm will appear on screen).
9. To turn the unit off at any time, press
the Start/Stop button.
10. Once you are ready to serve, press the
Lid Release button to open the lid.
11. Lift and remove the cooking pot using
the stay-cool handles.
COOKING PASTA
1. Add dry pasta to cooking pot.
2. Add liquid to the PASTA line on the
cooking pot.
3. Close lid.
4. Using the Selector Knob, scroll to
Pasta.
5. Press the Selector Knob to confirm
selection.
6. Adjust the time as desired (Preset
time, 18 minutes, cooks most medium
cuts of pasta to al dente).
7. Press Start/Stop button to accept
selection.
8. Unit will beep 4 times when timer
has expired.
9. To turn the unit off at any time, press
the Start/Stop button.
10. Once you are ready to serve, press the
Lid Release button to open the lid.
11. Lift and remove the cooking pot using
stay-cool handles and drain pasta.
STEAMING
1. Add liquid to the STEAM line on the
cooking pot.
2. Place steaming tray in pot.
3. Put food to be steamed onto tray.
4. Close lid.
5. Using the Selector Knob, scroll
to Steam.
6. Press the Selector Knob to
accept selection.
7. Adjust the time as desired (see page
14 for recommended steaming times).
8. Press Start/Stop button to start
steaming.
9. To turn the unit off at any time, press
the Start/Stop button.
10. Unit will beep 4 times when timer
has expired.
11. Remove food immediately to avoid
overcooking.
PRE-WASH
1. Add liquid to the PRE-WASH line on
the cooking pot.
2. Place steaming tray in pot, if desired,
to pre-wash with cooking pot.
3. Close lid.
4. Using the Selector Knob, scroll
to Pre-Wash.
5. Press the Selector Knob to
accept selection.
6. Press Start/Stop button to start.
7. Unit will beep 5 times when timer
has expired.
8. To turn the unit off at any time, press
the Start/Stop button.
9. Once unit is finished pre-washing,
press the Lid Release button to open
the lid.
10. Lift and remove the cooking pot using
stay-cool handles.
SAUTÉ
1. Select the Sauté function by pressing
the Sauté button.
2. Press the Start/Stop button to accept
selection and start unit.
NOTE: Unit will need a few minutes
to preheat.
3. Add ingredients to be sautéed (keep
lid open).
4. Unit will function for 30 minutes.
If more time is desired, press
7
Page 8

the Sauté button for an additional
30 minutes of cooking time.
5. To turn the unit off at any time,
press the Start/Stop button.
6. When finished cooking, remove
the ingredients or follow recipe
instructions to the next program.
SOAK
1. Add dry ingredients to cooking pot to
be soaked and water to cooking pot.
2. Close lid.
3. Select the Soak function by pressing
the Soak button.
4. Timer will appear.
5. Adjust the time using the Selector
Knob. Timer will adjust in 30-minute
increments up to 24 hours.
6. Press the Start/Stop button to
accept selection.
NOTE: When the timer expires, the
unit will go into standby mode. To go
back to the Main Menu, press any
button.
7. To turn the unit off at any time, press
the Start/Stop button.
8. When finished soaking, press Lid
Release button.
9. Remove the ingredients and liquids
from cooking pot.
NOTE: Heaters will not turn on for the
Soak function.
KEEP WARM
1. Add prepared hot ingredients to
cooking pot to be kept warm.
2. Close lid.
3. Select the Keep Warm function by
pressing the Keep Warm button.
4. Timer will appear with a default of
three hours.
5. Adjust the time using the Selector
Knob. Timer will adjust in 30-minute
increments up to six hours.
6. Press the Start/Stop button to
accept selection.
7. When the timer expires, the unit will
beep 4 times and automatically turn to
Keep Warm.
8. To turn the unit off at any time,
press the Start/Stop button.
9. When finished using the Keep Warm
program, press Lid Release button.
10. Remove the ingredients from
cooking pot.
11. Remove the cooking pot using staycool handles.
NOTE: This function is only for the
purpose of keeping food warm,
not cooking or heating up food.
This feature keeps already hot food
warm. This function will not be
automatic for all cooking functions.
CLEANING AND CARE
1. Unplug your cooker and allow it to
cool before cleaning.
2. Cooking pot, steaming tray, steam
release vent, measuring cup and
paddle can be washed in warm, soapy
water and rinsed thoroughly,
or washed in the dishwasher. Dry all
parts after every use.
NOTE: To prevent discoloration, inner
lid should be washed by hand. If food
sticks to the surface of the cooking
pot, fill it with warm, soapy water and
allow it to soak before cleaning it or
use Pre-Wash function.
3. If scouring is necessary, use a
nonabrasive cleanser or liquid
detergent with a nylon pad or brush.
4. Wipe base of unit with a soft, damp
cloth or microfiber towel. NEVER
IMMERSE BASE OF UNIT IN WATER.
5. Make sure all parts are cool and dry
before storing. Store unit in a clean,
dry place.
6. Any other servicing should be
performed by an authorized service
representative.
7. Steam Release Vent (Features and
Benefits #3) has a removable lower
cavity. Unlock lower cavity using
8
Page 9

(arrow symbol) and turn clockwise to
(unlock symbol). Wash the vent and
lower cavity with warm water and soap
after every use.
• For combination dishes of rice, steamed
vegetables, seafood, poultry and/or
meats, use our recipes as a guide and
then create your own.
TIPS AND HINTS
RICE
• Do not open lid during cooking, as
steam will escape and this will affect
the cooking time and taste.
• We recommend rinsing all imported rice
(except for risotto rice). Place rice in a
medium bowl and cover with water. Do
not use the cooking pot. Swirl until the
water appears cloudy, then drain in a fine
mesh strainer. Fill the bowl with fresh
water and repeat until water is clear or
nearly clear.
• Some people wash domestic rice, which
is often vitamin enriched. This removes
the starch and makes it less sticky, but it
also washes away some of those vitamins.
• Sushi rice and most brown rice should
always be rinsed before cooking. Follow
the directions on your package of rice.
• When measuring rice with your rice cooker
cup, level it off with a knife or spatula.
• Adding a teaspoon of vegetable oil to rice
or coating the cooking pot lightly with
nonstick cooking spray will result in rice
with separated, less sticky grains.
• After adding rice to the cooking pot,
level it off to cover the entire bottom of
the pot so it cooks evenly.
• The taste of the water will affect the taste
of the rice. If you do not like the taste of
your tap water, use filtered water.
• Rice can be cooked in liquids other than
water. Use low-fat, low-sodium meat or
vegetable stocks/broths. Fish stock or
clam broth may be used for seafoodflavored rice.
• When making rice, open the rice cooker
as soon as the audible tone sounds to
indicate cooking cycle is complete. Stir
rice with the rice paddle or a wooden
spoon – this prevents rice from hardening
or getting sticky.
GRAINS
• We recommend rinsing most grains prior
to cooking. This process removes excess
starch and produces a cooked result that
has more separated grains.
• Some people have sensitivities to grains
and rinsing them can help remove some
of those aggravating triggers.
• While grains can stay on Keep Warm in
the unit up to 6 hours, it is recommended
that upon finishing cooking, that the lid is
opened and grains are fluffed with a
paddle or fork. They can then sit on Keep
Warm for longer.
• Some grains contain high starch content.
The Steam Release Vent may need to be
occasionally wiped with a cloth to
prevent excess foaming and dripping.
• Always use cold, filtered water when
cooking grains for the best flavor.
• Always refer to the cooking charts on
page 12 for grain-to-water ratios – rice
cookers require different measurements
than standard stovetop preparations.
OATS
• Oatmeal can be cooked with either water,
milk, alternative milks, or a combination
of those listed.
• Adding a pinch of salt and warm spices
enhances the flavor of the cooked oats.
• Finished oatmeal should be stirred well
prior to serving.
• For rolled oats, cooking is complete in
approximately 15 minutes. A 4 beep tone
will sound when ready.
RISOTTO
• Use the Sauté program to sauté
aromatics and/or vegetables, toasting
rice, and reducing liquid.
• The Risotto program is uniquely
programmed to gently cook risotto rice
9
Page 10

and liquid to a creamy product without
the constant stirring. Use our recipes as a
guideline to adapt your favorite recipes.
• It is recommended to use Arborio rice,
but other, similar-type rice can be used
(Carnaroli, Vialone, Nano, and Baldo).
• Countdown timer will appear for last 15
minutes of cooking and a tone will sound.
At this time, open the lid and stir the
risotto. If it is done to your liking, press
Start/Stop (or switch to the Keep Warm
function). If the risotto needs additional
liquid, stir it in at this time (best if the
liquid is room temperature). This also
allows you to add additional ingredients
that only require a short cooking time,
such as tender vegetables and delicate
seafood.
ONE POT
• This program can get you dinner on the
table in as little as 30 minutes or can be
used as a slow-cooking function. Just put
your ingredients in the pot, choose your
cooking time and press Start/Stop.
• Need to brown meat or steam chicken
first? Combine with other programs, such
as Sauté or Steam functions.
• One Pot is also perfect for making
homemade soups. See our recipes for a
few quick ideas.
PASTA
• Any pasta variety (up to ½ pound) can be
cooked using the Pasta function.
• 18 minutes, the default time, produces an
al dente pasta. Add more time, or reduce
time, to desired doneness.
• Always use filtered, salted water when
cooking.
• Drain pasta immediately after cooking.
BEANS
• All beans should be soaked prior to
cooking (use the Soak program to soak
a minimum of 8 hours).
• Always rinse beans well prior to and after
soaking.
• Use the cooking chart on page 13 for
cooking time guidelines (if the exact bean
is not on the cooking chart, use one of
similar size and shape).
• Only cook up to ½ pound of beans at
one time.
• Add a small amount, about ½ teaspoon,
of baking soda to tenderize beans while
they are cooking.
• Add fresh herbs or aromatics, such as
a quartered onion, to enhance flavor of
the beans.
• Drain beans immediately after cooking.
SOAK
• The Soak program is a way to prepare
rice, grains or beans prior to cooking.
• Soaking rice and grains prior to cooking
makes them easier to digest for many
people who have food sensitivities.
• Always soak beans prior to cooking.
PRE-WASH
• Use immediately after cooking starchy
grains or dishes with strong aromatic
flavors to help clean pot and inner lid.
KEEP WARM
• The Keep Warm function is a great way
to keep already heated foods warm for
serving.
• It is not meant as a cooking function.
• Raw meats or foods under the
temperature of 140°F should not be
cooked using this function.
STEAMING
• When steaming vegetables, clean
them and trim to a consistent size so
they cook evenly.
• When steaming meats, such as poultry or
sausage, cut into consistent-sized pieces
(such as “finger strips” or ½-inch slices)
and arrange in a single layer on the
steaming tray.
• Refer to the chart on page 14 for
suggested steaming times. Note
that the chart is only a guide and that
10
Page 11

times may vary based on the size of the
pieces, quantity, freshness of food and
personal taste.
• Steamed foods should be removed
immediately after cooking to avoid
overcooking.
COOKING CHARTS
GUIDE FOR COOKING RICE
Use these charts and the water level markings in the cooking pot as guidelines. There are variables in the
texture of cooked rice, from subtle differences between brands, to rinsing or not rinsing to personal taste.
Let your taste and preference serve as your best guide. If your rice/grain is too hard or chewy,
increase water amounts by ¼ cup at a time. If rice/grain is too soft, reduce the water by ¼ cup
until your desired texture is achieved.
WHITE RICE
RICE/GRAIN DRY AMOUNT LIQUID AMOUNT
Long-Grain White
Medium-Grain
Aromatic (Jasmine, Basmati)
For these grains,
use the cooker cup
(provided) up to a
maximum of 10
cooker cups.
Corresponding Water
Level marking in the
cooking pot.
Example: 1 cooker
cup, add water up to
the 1 cup line.
APPROXIMATE COOKING
TIME
White: 40 minutes
Quick White: 30 minutes
Hard White: 35 minutes
COOKED YIELD
Approximate
cooked yield of
white rice
varieties is about
1½ cups (US
Standard) cooked
rice per 1 cooker
cup dry rice.
BROWN
RICE/GRAIN DRY AMOUNT LIQUID AMOUNT APPROXIMATE COOKING
Long-Grain
Medium-Grain
Short-Grain
Aromatic (Jasmine, Basmati)
Wild
For these grains,
use the cooker cup
(provided) up to a
maximum of 10
cooker cups.
Corresponding
Water Level
marking in the
cooking pot.
Example: 1 cooker
cup, add water up
to the 1 cup line.
Brown: 2 hours
Quick Brown: 80 minutes
TIME
11
COOKED YIELD
Approximate
cooked yield of
brown rice
varieties is
about 1½ cups
(US Standard)
cooked rice per
1 cooker cup
dry rice (Wild
rice yields 3
cooked cups per
1 cooker cup
dry rice).
Page 12

SUSHI RICE
RICE/GRAIN DRY AMOUNT LIQUID AMOUNT
White Sushi
Brown Sushi
SMALL GRAINS
RICE/GRAIN DRY AMOUNT LIQUID AMOUNT
Quinoa
For these grains, use
the cooker cup
(provided) up to a
maximum of 10
cooker cups.
1 cooker cup
(maximum10 cooker cups)
Corresponding
Water Level
marking in the
cooking pot.
Example: 1 cooker
cup, add water up
to the 1 cup line.
Level 1
APPROXIMATE
COOKING TIME
45 minutes
APPROXIMATE
COOKING TIME
20 minutes
COOKED YIELD
Approximate
cooked yield of
sushi rice is
about 1½ cups
(US Standard)
cooked rice per
1 cooker cup dry
rice.
COOKED YIELD
3 cups
Couscous
Bulgur
Amaranth
Buckwheat
Teff
CHEWY GRAINS
RICE/GRAIN DRY AMOUNT LIQUID AMOUNT
Wheat/Rye/Spelt Berries
Farro (soaked overnight)
Freekeh
Barley (soaked overnight)
1 cooker cup
(maximum 6 cooker cups)
1 cooker cup
(maximum 4 cooker cups)
1 cooker cup
(maximum 8 cooker cups)
1 cooker cup
(maximum 6 cooker cups)
1 cooker cup
(maximum 6 cooker cups)
1 cooker cup
(maximum 4 cooker cups)
1 cooker cup
(maximum 4 cooker cups)
1 cooker cup
(maximum 4 cooker cups)
1 cooker cup
(maximum 4 cooker cups)
1 cup (US Standard)
1 cup (US Standard)
1 cup (US Standard)
Level 2
Level 1
Level 2
Level 1
1¾ cups (US
Standard)
Level 2
20 minutes
20 minutes
20 minutes
20 minutes
20 minutes
APPROXIMATE
COOKING TIME
45 minutes
45 minutes
45 minutes
45 minutes
2 cups
1½ cups
1½ cups
3 cups
2 cups
COOKED
YIELD
3 cups
3 cups
3 cups
2½ cups
Black Rice
1 cooker cup
(maximum 6 cooker cups)
12
Level 1
30 minutes
2 cups
Page 13

OATS
GRAIN DRY AMOUNT LIQUID AMOUNT
Steel Cut
Rolled (not quick cooking)
Hot Cereals (Oat Bran;
Cream of Wheat®; etc.)
BEANS
Soak overnight. Drain, rinse and then cook to proportions. After cooking, drain beans.
BEANS DRY AMOUNT LIQUID AMOUNT COOK TIME COOKED YIELD
Black Beans ½ pound Level 4 90 minutes About 4 cups
Red Kidney Beans ½ pound Level 4 90 minutes About 4 cups
Great Northern Beans ½ pound Level 4 90 minutes About 4 cups
Navy Beans ½ pound Level 4 60 minutes About 4 cups
Garbanzo Beans (Chickpeas) ½ pound Level 4 90 minutes About 4 cups
1 cooker cup
(maximum 6 cooker
cups)
1 cooker cup
(maximum 6 cooker
cups)
1 cooker cup
(maximum 6 cooker
cups)
1½ cups (US Standard) 30 minutes 1½ cups
1 cup (US Standard) 15 minutes 1½ cups
Level 2 15 minutes 1½ cups
APPROXIMATE
COOKING TIME
COOKED YIELD
Lentils ½ pound Level 4 45 minutes About 3 cups
13
Page 14

GUIDE FOR STEAMING VEGETABLES, POULTRY AND SEAFOOD
Put water into the cooking pot to the STEAM line. Arrange foods in a single layer on the
steaming tray. Vegetables should be cut in similar sizes as indicated. Cooking times are
approximate and will yield cooked, but crisp/tender vegetables. Add more time for more
tender/softer vegetables or cut back on time for crispier vegetables to taste.
Foods must be removed immediately after steaming to prevent overcooking. If cooking
vegetables over rice, use chart to determine approximately when to add steaming tray to
rice cooker.
FOOD AMOUNT PREPARATION COOKING TIME
Asparagus 4 ounces (about 15 spears) trimmed and halved 8 minutes
Baby Bok Choy 2 whole halved 17 minutes
Broccoli 10 ounces 2-inch florets 15 minutes
Cabbage Leaves 4 leaves cored 6 minutes
Carrots - Baby 12 ounces whole 18 minutes
Carrots - Sliced 6 ounces (about 1½ cups) sliced (½-inch thick) 16 minutes
Green Beans 5 ounces trimmed 9 minutes
Lettuce Leaves, Butter Variety 6 leaves cored 6 minutes
Peas, Snow 4 ounces trimmed 8 minutes
Potatoes, New 12 ounces quartered 16 minutes
Potatoes, Yellow/Gold 12 ounces ¾-inch pieces 16 minutes
Potatoes, Sweet 1 pound ¾-inch cubes 17 minutes
Squash, Summer/Zucchini 6 ounces (2 cups, sliced) sliced (½-inch thick) 8 minutes
Chicken 1 pound 2-inch strips 25 minutes
Shrimp 1 pound peeled and deveined 15 minutes
Fin Fish (salmon, swordfish,
etc.)
Eggs up to 12
12 ounces cut to fit steaming tray 18 minutes
pierce pinhole in bottom
of each egg
15 minutes – soft cooked
24 minutes – hard cooked
14
Page 15

TROUBLESHOOTING
PROBLEM CAUSE SOLUTION
Liquid/Rice amounts were incorrect Refer to page 11.
Certain rices need to be washed thoroughly prior to cooking.
Refer to page 9 for more information.
Be sure that the steam release vent is properly assembled and
in place before cooking.
You can add a pinch of salt or a drop of oil to your recipe to
counteract the high starch content of your rice. Some benefit
from soaking overnight and rinsing.
Check the risotto 15 minutes before finished cooking time,
when tone sounds and countdown timer appears.
Liquid boiled
over
Rice is
undercooked
or too hard/
soft
Risotto is
overcooked
Rice was not washed thoroughly
Steam release vent was not
inserted
Rice/Grains starch content is high
Liquid/Rice amounts were incorrect Refer to page 11.
Wrong program selected Refer to pages 6 and 11 for information and charts.
Cooking time was too long
Liquid/Rice amounts were incorrect Refer to page 11.
Rice is
scorched/
burned
Rice is dry
The cooker
will not turn
on
The cooker
turned itself
off
Rice was not washed thoroughly
Cooking Pot was not washed
thoroughly after last use
Steam release vent was not
inserted
Rice was kept on Keep Warm for
over 12 hours
Rice was reheated
Lid was not closed completely Be sure the lid is closed completely during rice cooking.
The unit is not plugged in Be sure that unit is plugged in.
The unit has malfunctioned and
needs repair
There has been a power failure Wait for your power to resume and try again.
The power cord was not inserted
correctly/has fallen out
The unit has overheated
The unit has finished cooking/Keep
Warm
Certain rices need to be washed thoroughly prior to cooking.
Refer to page 9 for more information.
Be sure to clean your cooking pot thoroughly after each use.
Refer to page 8 for cleaning and care instructions.
Be sure that the steam release vent is in place before cooking.
We do not suggest leaving rice in the cooker on Keep Warm for
more than 12 hours.
If your rice comes out too dry when reheated, add additional
liquid to your cooking pot when reheating in the future.
Contact Consumer Service at 1-800-726-0190.
Be sure that the unit is plugged in. Since the cord is removable,
it is important to be sure the plug is fully inserted at both ends.
Be sure that your ingredients have been added to the cooking
pot and that the cooking pot is in place. Wait a few minutes for
the unit to cool down and try again.
For most functions, the unit will automatically turn off after the
programmed Keep Warm time has elapsed. For functions that
do not have Keep Warm, the unit will automatically turn off
after the cooking time has elapsed. This is normal.
15
Page 16

LIMITED THREE-YEAR
WARRANTY
(U.S. AND CANADA ONLY)
This warranty is available to consumers only. You
are a consumer if you own a Cuisinart® Rice and
Grain Multicooker that was purchased at retail for
personal, family or household use. Except as
otherwise required under applicable law, this
warranty is not available to retailers or other
commercial purchasers or owners.
We warrant that your Cuisinart® Rice and Grain
Multicooker will be free of defects in materials and
workmanship under normal home use for 3 years
from the date of original purchase. We recommend
that you visit our website, www.cuisinart.com for a
fast, efficient way to complete your product
registration. However, product registration does not
eliminate the need for the consumer to maintain the
original proof of purchase in order to obtain the
warranty benefits. In the event that you do not have
proof of purchase date, the purchase date for
purposes of this warranty will be the date of
manufacture.
If your Cuisinart® Rice and Grain Multicooker should
prove to be defective within the warranty period, we
will repair it, or if we think necessary, replace it. To
obtain warranty service, simply call our toll-free
number 1-800-726-0190 for additional information
from our Consumer Service Representatives, or
send the defective product to Consumer Service at
Cuisinart, 7475 North Glen Harbor Blvd., Glendale,
A Z 8 5 3 07.
To facilitate the speed and accuracy of your return,
please enclose $10.00 for shipping and handling of
the product.
Please pay by check or money order made payable
to Cuisinart (California residents need only supply
proof of purchase and should call 1-800-726-0190
for shipping instructions).
NOTE: For added protection and secure handling of
any Cuisinart product that is being returned, we
recommend you use a traceable, insured delivery
service. Cuisinart cannot be held responsible for
in-transit damage or for packages that are not
delivered to us. Lost and/or damaged products are
not covered under warranty. Please be sure to
include your return address, daytime phone number,
description of the product defect, product model
number (located on bottom of product), original date
of purchase, and any other information pertinent to
the product’s return.
CALIFORNIA RESIDENTS ONLY
California law provides that for In-Warranty Service,
California residents have the option of returning a
nonconforming product (A) to the store where it was
purchased or (B) to another retail store that sells
Cuisinart products of the same type.
The retail store shall then, at its discretion, either
repair the product, refer the consumer to an
independent repair facility, replace the product, or
refund the purchase price less the amount directly
attributable to the consumer’s prior usage of the
product. If the above two options do not result in the
appropriate relief to the consumer, the consumer
may then take the product to an independent repair
facility if service or repair can be economically
accomplished. Cuisinart and not the consumer will
be responsible for the reasonable cost of such
service, repair, replacement, or refund for
nonconforming products under warranty.
California residents may also, according to their
preference, return nonconforming products directly
to Cuisinart for repair, or if necessary, replacement,
by calling our Consumer Service Center toll-free at
1-800-726-0190. Cuisinart will be responsible for the
cost of the repair, replacement, and shipping and
handling for such products under warranty.
BEFORE RETURNING YOUR CUISINART
PRODUCT
If you are experiencing problems with your Cuisinart
product, we suggest that you call our Cuisinart
Service Center at 1-800-726-0190 before returning
the product for service. If servicing is needed, a
Representative can confirm whether the product is
under warranty and direct you to the nearest service
location.
Your Cuisinart® Rice and Grain Multicooker has
been manufactured to the strictest specifications
and has been designed for use only in 120-volt
outlets and only with authorized accessories and
replacement parts. This warranty expressly excludes
any defects or damages caused by attempted use of
this unit with a converter, as well as by use with
accessories, replacement parts or repair service
other than those authorized by Cuisinart. This
warranty does not cover any damage caused by
accident, misuse, shipment or other than ordinary
household use. This warranty excludes all incidental
or consequential damages. Some states do not
allow the exclusion or limitation of these damages,
so these exclusions may not apply to you. This
warranty gives you specific legal rights, and you
may also have other rights, which vary from state to
state.
Important: If the nonconforming product is to be
serviced by someone other than Cuisinart’s
Authorized Service Center, please remind the
servicer to call our Consumer Service Center at
1-800-726-0190 to ensure that the problem is
properly diagnosed, the product is serviced with the
correct parts, and the product is still under warranty.
16
Page 17

RECIPES
BREAKFAST & STARTERS
Cinnamon Maple Oatmeal ..........18
Cranberry Oat Bran ................18
Creamy Irish Oatmeal with Blueberries 18
Deviled Eggs .....................18
Mixed Grain Hot Muesli.............19
Oatmeal Breakfast Bowl ............19
SALADS, SIDES & SOUPS
Baked Beans .....................20
Basmati Rice with Indian Spices . . . . . . 20
Beet Salad with Roasted Walnuts and
Ricotta Salata ....................21
Italian Farro and Arugula Salad ......21
Jasmine Thai-Scented Rice ..........22
Perfect Sushi Rice . . . . . . . . . . . . . . . . . 22
Sushi Rolls, Cups/Bowl........... 22-23
Posole Rojo ......................24
Red Beans and Rice ................25
Udon Noodle Soup ................25
Southwestern Black Bean Salad ......26
Spanish Rice .....................26
Tabbouleh .......................27
Wheat Berry and Vegetable Salad.....27
White Bean Salad .................28
MAINS
Brown Rice Burrito Bowl ............28
Butternut Squash Risotto ...........29
Spring Pea Risotto ................30
Mediterranean Couscous with Moroccan
Vegetables ......................30
Quinoa and Lentil Bowl with Steamed
Vegetables and Egg . . . . . . . . . . . . . . . 31
Sausage and Shrimp Jambalaya ..... 31
Shrimp and Vegetables .............32
Tofu with Watercress and Mushrooms 32
Vegetarian Bean Chili ..............33
SWEETS
Traditional Rice Pudding ............33
17
Page 18

BREAKFAST & STARTERS
CINNAMON MAPLE
OATMEAL
A quick and easy breakfast any day of the week.
Function: Oats
Makes about 4 cups
3 cooker cups old-fashioned
rolled oats (not quick cooking)
3½ cups water
¼ teaspoon kosher salt
1 teaspoon ground cinnamon
3 tablespoons pure maple syrup
1. Put all ingredients in the cooking pot of the
Cuisinart® Rice and Grain Multicooker. Select
the Oats function and press Start/Stop. COOK
ONLY 15 MINUTES.
2. Once the audible tone has sounded to indicate
the end of cooking, open the lid, stir and serve.
Nutritional information per serving (1 cup):
Calories 210 (14% from fat) • carb. 41g • pro. 6g
fat 4g • sat. fat 1g • chol. 0mg • sod. 140mg
calc. 22mg • fiber 5g
CRANBERRY OAT BRAN
The Oats function is for more than just
oatmeal.
Function: Oats
Makes about 4½ cups
2 cooker cups oat bran
Water (to the 4-cup rice marking in
cooking pot)
¼ teaspoon kosher salt
1 cup dried cranberries
1. Put the oat bran, water and salt in the cooking
pot of the Cuisinart® Rice and Grain
Multicooker. Select the Oats function and press
Start/Stop. COOK ONLY 15 MINUTES.
2. Once the audible tone has sounded to indicate
the end of cooking, open the lid and stir in the
cranberries and serve.
Nutritional information per serving (1 cup):
Calories 150 (9% from fat) • carb. 38g • pro. 5g
fat 2g • sat. fat 0g • chol. 0mg • sod. 120mg
calc. 21mg • fiber 6g
CREAMY IRISH OATMEAL
WITH BLUEBERRIES
Steel-cut oats in 30 minutes and no stirring
Function: Oats
Makes about 5 cups
2 cooker cups steel-cut oats
3 cups nonfat milk
Pinch kosher salt
2 whole cinnamon sticks
Pinch ground nutmeg
3 tablespoons pure maple syrup
2 cups fresh blueberries
1. Put the oats, milk, salt, cinnamon sticks,
nutmeg and syrup in the cooking pot of the
Cuisinart® Rice and Grain Multicooker. Select
the Oats function and press Start/Stop. COOK
ONLY 30 MINUTES.
2. Once the audible tone has sounded to indicate
the end of cooking, open the lid and remove
the cinnamon sticks. Stir in the blueberries and
serve.
Nutritional information per serving (1 cup):
Calories 300 (10% from fat) • carb. 56g • pro. 11g
fat 4g • sat. fat 1g • chol. 5mg • sod. 110mg
needed.
calc. 198mg • fiber 6g
DEVILED EGGS
Steaming is an easy way to cook eggs, and
having a built-in timer alerts you when they are
Function: Steam
Makes 24 servings
Water
12 large eggs*
6 tablespoons mayonnaise
2 tablespoons olive oil
2 teaspoons Dijon mustard
2 teaspoons fresh lemon juice
1
/8 – ¼ teaspoon hot sauce
¼ teaspoon kosher salt
1
/8 teaspoon freshly ground black pepper
2 tablespoons fresh herbs (chives,
parsley or tarragon are best)
Paprika, for garnish
ready.
18
Page 19

1. Prepare an ice-water bath by putting ice cubes
and cold water into a mixing bowl; reserve.
2. Add water to the Steam level in the cooking
pot of the Cuisinart® Rice and Grain MultiCooker. Insert the steaming tray and put eggs
onto the tray. Close lid.
3. Select the Steam function, set timer for 24
minutes and press Start/Stop.
4. Once the audible tone has sounded to
indicate the end of cooking, immediately
transfer eggs to the ice-water bath to stop the
cooking process.
5. Peel and carefully slice eggs in half lengthwise.
6. Remove the yolks and put into the work bowl
of a Cuisinart® food processor fitted with the
chopping blade. Process until smooth. Pulse in
the remaining ingredients, except for the
herbs and paprika, and then process again
until smooth. Pulse in the herbs to roughly
chop and incorporate. Taste and adjust
seasoning as desired. (This mixture can also be
mashed with a fork if a food processor is not
available.)
7. Spoon or pipe the yolk filling into the center
of each egg white. Sprinkle with paprika
before serving.
*It is advised to pierce a small hole in the bottom
(wider part) of the eggshell to prevent the eggshells
from cracking while cooking. This is best done with the
tip of a safety pin.
Nutritional Information per serving (one-half egg):
Calories 71 (80% from fat): • carb. 0g • pro. 3g
fat 6g • sat. fat 1g • chol. 96mg • sod. 89mg
calc.14mg • fiber 0g
MIXED GRAIN HOT
MUESLI
A new way to eat oatmeal in the morning. This hearty
breakfast is full of protein to get you going and keep
you feeling full.
Function: Oats
Makes about 8 cups
2 cooker cups steel-cut oats
1 cooker cup short-grain brown rice
1 cooker cup quinoa
1 cooker cup chopped pecans
1 cooker cup raisins
1
/3 cup unsweetened shredded coconut
2 to 4 tablespoons pure maple syrup
3 tablespoons coconut oil
2 cinnamon sticks
¼ teaspoon kosher salt
Pinch ground nutmeg
Water (to the 4-cup marking)
1. Put all of the ingredients in the cooking pot of
the Cuisinart® Rice and Grain Multicooker.
Select the Oats function and press Start/Stop.
2. Once the audible tone has sounded to
indicate the end of cooking, open the lid,
remove the cinnamon sticks, and stir well
before serving.
Nutritional information per serving (½ cup): Calories 88
(41% from fat) • carb. 12g • pro. 2g
fat 4g • sat. fat 1g • chol. 0mg • sod. 54mg
calc. 41mg • fiber 3g
OATMEAL BREAKFAST
BOWL
Function: Oats
Makes 4 servings
2 cups cooked steel-cut oats, warm
¼ cup seedless raspberry jam
¼ cup plain Greek yogurt
(any fat variety)
½ cup fresh raspberries
¼ cup chopped pecans
1 teaspoon chia seeds
1. Divide the oatmeal among four serving bowls.
Stir in an even amount of raspberry jam and
yogurt to each bowl. Top with the fresh
raspberries, pecans, and chia seeds.
Nutritional Information per serving
Calories 271 (26% from fat) • carb. 44g • pro. 8g
fat 8g • sat. fat 1g • chol. 0mg • sod. 16mg
calc. 39mg • fiber 6g
19
Page 20

SALADS, SIDES & SOUP
BAKED BEANS
Functions: Sauté & Beans
Makes about 4 cups
½ pound navy beans, soaked overnight
4 ounces thick-cut bacon, diced
½ medium onion, finely chopped
1 garlic clove, finely chopped
2 cups water or low-sodium
chicken broth
¼ cup pure maple syrup
2 tablespoons packed brown sugar
(light or dark)
1 tablespoon Dijon mustard
1 tablespoon tomato paste
½ teaspoon kosher salt
¼ teaspoon freshly ground black pepper
1. Select the Sauté function of the Cuisinart® Rice
and Grain Multicooker, and press Start/Stop.
Once hot, add the bacon. Cook until browned
and crisp. Carefully remove the cooked bacon,
leaving the grease in the cooking pot. Add
the onion and garlic and sauté until softened,
about 2 to 3 minutes. Press Start/Stop to stop
the Sauté function.
2. Drain and rinse the beans and then add to the
cooking pot, along with the remaining
ingredients, including the reserved bacon.
Select the Beans function for 4 hours and press
Start/Stop.
3. Once the audible tone has sounded to indicate
the end of cooking, open the lid and stir to
mix. Taste and adjust seasoning and serve
immediately.
Nutritional information per serving (1 cup): Calories 470
(21% from fat) • carb. 77g • pro. 18g
fat 11g • sat. fat 9g • chol. 0mg • sod. 420mg
calc. 141mg • fiber 13g
BASMATI RICE WITH
INDIAN SPICES
Functions: Sauté & Quick White Rice
Makes about 9 cups
3 tablespoons olive oil
1½ tablespoons finely chopped ginger
(about 1 x ½-inch piece, peeled)
3 garlic cloves, finely chopped
¾ teaspoon kosher salt, divided
¼ t easpoon freshly ground black
pepper, divided
½ medium onion, chopped
1 large white potato, peeled and cut
into ½-inch cubes
1½ teaspoons ground cumin
1½ teaspoons ground coriander
1 teaspoon ground cinnamon
¼ teaspoon ground turmeric
4 cooker cups basmati rice
Water (to the 4-cup marking in the
cooking pot)
1 cup frozen peas
1
⁄3 cup chopped fresh cilantro
2 teaspoons lemon zest
1. Put the oil in the cooking pot of the Cuisinart®
Rice and Grain Multicooker. Select the Sauté
function and press Start/Stop. Once oil is hot
and shimmering, about 2 minutes, add the
ginger and garlic with a pinch each of the salt
and pepper. Sauté until fragrant, about 1
minute. Add the onion; sauté about 1 to 2
minutes, or until softened and translucent.
Add the potato and the remaining salt and
pepper and all of the spices. Stir well so that
the vegetables are well coated, cooking until
the potato is just tender, about 5 minutes.
Press Start/Stop to stop the Sauté function.
2. Add the rice and water. Close the lid of the
cooker and select Quick White Rice and press
Start/Stop.
3. When there are about 5 minutes remaining in
the cooking time, stir in the peas, cilantro and
zest. Close lid again and let the rice finish
cooking.
4. Once the audible tone has sounded to
indicate the end of cooking, open the lid and
stir to mix. Taste and adjust seasoning as
desired and serve.
Nutritional information per serving (1 cup): Calories 220
(21% from fat) • carb. 40g • pro. 5g
fat 5g • sat. fat 1g • chol. 0mg • sod. 105mg
calc. 13mg • fiber 3g
20
Page 21

BEET SALAD WITH
ROASTED WALNUTS AND
RICOTTA SAL ATA
The saltiness of the cheese combines nicely with
the sweetness of the beets and walnuts in this eye-
catching salad; plus, steaming makes peeling whole
beets a breeze.
Function: Steam
Makes about 6 cups
Water
1 pound trimmed beets (about 3
medium), scrubbed well
2 cups baby arugula
½ cup toasted walnuts
2 ounces crumbled ricotta salata
3 to 4 tablespoons Champagne Vinaigrette
(recipe follows)
1. Add water to the Steam level in the cooking
pot of the Cuisinart® Rice and Grain Multicooker. Insert the steaming tray and put beets
onto the tray. Close lid.
2. Select the Steam function, set timer for 30
minutes, and press Start (large beets may take
up to 35 minutes).
3. Once the audible tone has sounded to
indicate the end of cooking, open the lid and
test the beets for doneness – they should be
able to be easily pierced with the tip of a
knife. Add additional time if necessary.
4. Peel the beets with a paring knife (this is best
done while wearing gloves to prevent any
staining of your hands); the skin of the beets
should easily pull away from the flesh of the
beet. Once peeled, cut the beets into small
wedges.
5. Place wedges into a mixing bowl and toss with
the remaining ingredients.
6. Taste and adjust seasoning as desired. Serve
immediately.
Nutritional Information per serving (1 cup):
Calories 182 (68% from fat) • carb. 9g • pro. 6g
fat 15g • sat. fat 3g • chol. 10mg • sod. 196mg
calc. 133mg • fiber 3g
CHAMPAGNE
VINAIGRETTE
This all-purpose dressing is incredibly versatile
as a salad topper, marinade or finishing drizzle
Makes about 1 scant cup
2½ tablespoons champagne vinegar
1 teaspoon Dijon mustard
1 small shallot
¼ teaspoon kosher salt
¼ teaspoon freshly ground black pepper
¾ cup extra virgin olive oil
1. Put the vinegar, mustard, shallot, salt and
pepper into a Cuisinart® blender jar. Blend on
Low until processed. Slowly add the oil
through the opening while running on Low
(hold the cap or even a dishtowel in place
over the opening to prevent any splattering).
2. Let mixture blend an additional 20 seconds
after all the oil has been added.
3. Taste and adjust seasoning as desired.
Nutritional Information per serving (1 tablespoon):
Calories 91 (96% from fat) • carb. 0g • pro. 0g
fat 11g • sat. fat 2g • chol. 0mg • sod. 45mg
for vegetables.
calc. 0mg • fiber 0g
ITALIAN FARRO AND
ARUGULA SALAD
A showstopper of a salad and ready in 30 minutes. The
farro can be tossed warm into the other ingredients,
but if you prefer it chilled, it can be prepared a day
Functions: Soak & Chewy Grains
Makes about 4 cups
2 cooker cups farro
Water (to the 2-cup marking in the
cooking pot)
2 cups baby arugula
1 cup artichoke hearts, quartered or
halved
1 cup thinly sliced radicchio (about ¼
average head)
¼ cup extra virgin olive oil
1 to 2 teaspoons fresh lemon juice
¼ teaspoon kosher salt
1
/8 teaspoon freshly ground black pepper
ahead.
21
Page 22

2 tablespoons shaved Parmesan
1. Put the farro and then the water into the
cooking pot of the Cuisinart® Rice and Grain
Multicooker. Close lid. Select the Chewy
Grains function and press Start/Stop.
2. Once the audible tone sounds to indicate the
end of cooking, transfer the farro to a large
serving bowl. Add the remaining ingredients,
except for the Parmesan, and toss to combine.
Top with the shaved Parmesan and serve
immediately.
Nutritional Information per serving (½ cup):
Calories 156 (43% from fat) • carb. 19g • pro. 4g
fat 6g • sat. fat 1g • chol. 1mg • sod. 200mg
calc. 21mg • fiber 4g
JASMINE
THAI-SCENTED RICE
This rice can be a base to many different dishes. Try it
with grilled chicken or shellfish.
Function: White Rice
Makes about 8 cups
3 cooker cups jasmine rice
Water (to the 3-cup rice marking in
cooking pot)
1 1 x 1-inch piece fresh ginger, halved
2 garlic cloves, thinly sliced
5 1 x ½-inch pieces lemon peel
3 large fresh basil leaves
¼ teaspoon kosher salt
2 to 3 green onions, thinly sliced
2 tablespoons chopped fresh cilantro
1. Put the rice, water, ginger, garlic, lemon peel
and basil in the cooking pot of the Cuisinart®
Rice and Grain Multicooker. Select the White
Rice function and press Start/Stop.
2. Once the audible tone has sounded to
indicate the end of cooking, open the lid and
add the remaining ingredients; toss to taste
and combine.
3. Taste and adjust seasoning as desired and
serve immediately.
NOTE: This rice freezes well. Portion out into
1-cup servings.
Calories 250 (0% from fat) • carb. 55g • pro. 5g
fat 0g • sat. fat 0g • chol. 0mg • sod. 50mg
calc. 12mg • fiber 1g
PERFECT SUSHI RICE
To achieve the same flavors and consistency of the
Japanese restaurant staple, use this recipe and you
will not be disappointed.
Function: Sushi
Makes about 8 cups
3 cooker cups sushi rice, rinsed three
times and pressed to reduce moisture
Water (to the 3-cup rice marking
in cooking pot)
¼ cup rice vinegar
3 tablespoons mirin
¼ teaspoon kosher salt
1. Put the rinsed and pressed rice in the cooking
pot of the Cuisinart® Rice and Grain
Multicooker. Add the remaining ingredients;
stir to combine. Select the Sushi Rice function
and press Start/Stop.
2. Once the audible tone has sounded to
indicate the end of cooking, either keep warm
on the automatic Keep Warm function or turn
the unit off, fluff and remove rice to cool for
making sushi.
Nutritional information per serving (½ cup):
Calories 92 (0% from fat) • carb. 22g • pro. 2g
fat 0g • sat. fat 0g • chol. 0mg • sod. 58mg
calc. 0mg • fiber 1g
TIPS ON MAKING SUSHI ROLLS:
Sushi is very versatile and can be made with just about
any filling you wish. If using raw fish, be sure that it is
sushi-grade fish from a reputable fishmonger. Cooked
fish and vegetables are simple alternatives.
A sushi mat is very helpful in rolling sushi. You can also
hand-roll sushi if using nori (seaweed paper).
Following are some suggestions for fillings to give
guidelines on amounts – substitute your favorite flavors.
Nutritional information per serving (1 cup):
22
Page 23

AVOCADO, SCALLION
& BASIL ROLL
Function: Sushi
Makes 1 roll
Equipment needed: sushi rolling mat
1½ cups Perfect Sushi Rice (preceding
recipe)
¼ avocado, peeled, pitted and thinly
sliced
1 green onion, thinly sliced
6 to 7 fresh basil leaves
Bowl of cold water (to help in
rolling sushi)
Pickled ginger, wasabi and soy sauce,
for serving
1. Cover the sushi mat with plastic wrap (to
prevent sticking). Wet hands with cold water
and press sushi rice onto covered mat. Place
the avocado, scallion and basil leaves in a thin
horizontal line across the middle of the rice.
Wet hands again with the water and, with the
help of the sushi mat, roll the rice toward you
in a jelly-roll fashion. Be sure to roll tightly, but
without too much pressure, to ensure an even
sushi roll.
2. Unwrap the sushi mat and then, with a clean
and sharp knife, cut into 8 pieces.
3. Serve with pickled ginger, wasabi and soy
sauce.
Nutritional information per roll:
Calories 353 (16% from fat) • carb. 71g • pro. 8g
fat 7g • sat. fat 1g • chol. 0mg • sod. 179mg
calc. 22mg • fiber 5g
SHRIMP & ASPARAGUS
ROLL
Functions: Sushi & Steam
Makes 1 roll
Equipment needed: sushi rolling mat
1 sheet nori
1 cup Perfect Sushi Rice (page 22)
4 steamed shrimp, halved (see steaming
chart on page 14)
2 asparagus spears, steamed for 4
minutes
1 to 2 tablespoons toasted sesame seeds
Bowl of cold water (to help in
rolling sushi)
Pickled ginger, wasabi and soy sauce,
for serving
1. Cover the sushi mat with plastic wrap (to
prevent sticking). Lay the nori on top of the
covered mat. Wet hands with cold water and
press sushi rice on top of the nori, leaving a
1-inch space on the bottom of the nori, closest
to you. Place the shrimp and asparagus spears
in a thin horizontal line across the middle of
the rice. Wet hands again with the water and,
with the help of the sushi mat, roll the rice
toward you in a jelly-roll fashion. Be sure to roll
tightly, but without too much pressure, to
ensure an even sushi roll.
2. Unwrap the sushi mat. Place the toasted
sesame seeds on a clean plate. Roll the sushi
roll in the toasted sesame seeds to cover.
Using a clean and sharp knife, cut into 8
pieces.
3. Serve with pickled ginger, wasabi and soy
sauce.
Nutritional information per roll:
Calories 270 (14% from fat) • carb. 47g • pro. 13g
fat 4g • sat. fat 1g • chol. 43mg • sod. 165mg
calc. 27mg • fiber 3g
SUSHI CUPS/BOWL
Think outside the roll with these fun sushi cups (or
bowl, if you are looking for a quick and easy alterna-
tive). They take a lot less precision and you can fill
them with your favorite fillings. Here we give a colorful
selection of vegetables and fruit to make an impres-
sive presentation. This recipe is easily adaptable – add
in marinated tofu, steamed shrimp or salmon, etc.
Function: Sushi
Makes 6 servings (for sushi cups) or
3 servings (for sushi bowl)
Nori strips
1½ cups Perfect Sushi Rice (page 22)
Bowl of cold water (to help in forming
the sushi cups – not necessary if
making a Sushi Bowl)
1 tablespoon rice vinegar
¼ medium carrot, cut into matchsticks
1 radish, cut into matchsticks
23
Page 24

½ small cucumber, seeded and cut into
matchsticks
1 green onion, thinly sliced
¼ mango, peeled, pitted and cut into
small cubes
¼ avocado, pitted and thinly sliced
Sesame oil
Soy sauce, reduced sodium
Rice vinegar
Wasabi
Pickled ginger
Furikake (Japanese seasoning found
in the spice or Asian section of most
grocery stores)
1. Line each cup in a 6-cup muffin pan with
plastic wrap. Line each cup with two pieces of
the nori, making a cross or “x” in the bottom/
sides of the cup. Scoop ¼ cup of rice into
each lined cup and, using wet hands, press
down to fill the bottom and up the sides (to
make a rice cup).
2. Fill each cup with a selection of the suggested
foods above, finishing with a drizzle of each of
the sesame oil, soy sauce, and rice vinegar, a
pinch of wasabi, a piece of ginger and a
sprinkle of the furikake.
3. Serve immediately.
NOTE: If making a sushi bowl, omit the nori and divide
the rice among three individual bowls. Fill each with a
selection of the vegetables and fruit and then drizzle
each of the sauces, a dash of wasabi (to taste), pickled
ginger and ½ teaspoon of the furikake.
Nutritional information per sushi cup:
Calories 123 (12% from fat) • carb. 26g • pro. 3g
fat 2g • sat. fat 0g • chol. 0mg • sod. 96mg
calc. 12mg • fiber 2g
Nutritional information per sushi bowl:
Calories 247 (12% from fat) • carb. 52g • pro. 5g
fat 3g • sat. fat 0g • chol. 0mg • sod. 193mg
calc. 25mg • fiber 3g
POSOLE ROJO
A traditional Mexican stew, melding flavors of slow
simmered pork, hominy and the rich smokiness of
dried chili peppers.
Functions: Soak, Sauté & One Pot
Makes about 14 cups
Yield: 10 to12 servings
8 ounces dried hominy, soaked
overnight (see instructions below)
2 teaspoons olive oil
1½ pounds pork shoulder, trimmed and
cut into 2-inch pieces
Kosher salt
Freshly ground black pepper
1 medium to large onion, quartered
(keep root intact)
5 garlic cloves, crushed and divided
1 teaspoon ground cumin
2 bay leaves
2 large pinches of dried Mexican
oregano, crumbled
8 cups chicken broth, low sodium
2 dried ancho chiles
2 dried guajillo chiles
2 dried chiles de arbol
2 teaspoons honey
½ lime, juiced
½ teaspoon kosher salt
For serving: lime wedges, cilantro leaves,
cotija queso, sliced radishes, chopped
romaine or cabbage, diced onion
1. The night before: Put the hominy in the
cooking pot of the Cuisinart® Rice and Grain
Multicooker and add enough cold water to
cover by 2 to 3 inches. Close the lid and select
the Soak function. Set the timer for a minimum
of 12 hours and up to 18 hours and press
Start/Stop. After the hominy has soaked, drain
and transfer to separate bowl and reserve.
Wash and dry the cooking pot and return to
the unit.
2. Put the olive oil in the cooking pot and select
the Sauté function. Generously season the
meat with the salt and pepper. When the oil is
hot and shimmering, add half the meat and
brown on all sides, about 8 to 10 minutes.
Transfer the browned meat to the bowl with
the soaked hominy. Repeat with the
remaining.
3. Once all the meat has browned, add the first
batch back along with the reserved hominy, to
the cooking pot. Add the onion, 3 crushed
garlic cloves, cumin, bay leaves, oregano and
chicken stock. Close the lid. Select the One
Pot function, set the timer for 3 hours and
press Start/Stop.
24
Page 25

4. Meanwhile, make the chile purée. Rinse the
dried chiles and pat dry. Remove the stems
and shake out the seeds. Toast the chiles and
remaining 2 crushed garlic cloves in a dry
skillet over medium-low heat, until aromatic
(careful not to burn). Add water to cover and
bring to a simmer. Remove from heat and
allow to steep for 30 minutes. Add the
softened chiles to the jar of a blender, along
with the honey, lime juice, salt and 1 cup of
the steeping liquid. Process to a smooth
purée. Reserve.
5. When there are 30 minutes of cooking time
remaining, open the lid and skim the fat from
the top. Transfer the meat to a bowl. Discard
the onion, garlic and bay leaves. Shred the
meat into bite-size pieces and return to the
pot along with the reserved chile purée. Close
the lid again and let the unit complete its
cooking program.
6. Once the audible tone sounds to indicate the
end of cooking, transfer to individual serving
bowls and top with the suggested garnishes.
Nutritional information per serving
(based on 12 servings):
Calories 188 (44% from fat) • carb. 11g • pro. 15g
fat 9g • sat. fat 2g • chol. 42mg • sod. 211mg
calc. 13mg • fiber 2g
RED BEANS AND RICE
The Cuisinart® version of the Jamaican staple
brings out the flavors of Jamaican jerk seasoning.
Functions: Soak, Sauté & One Pot
Makes about 8 cups
3 cooker cups dried red kidney
beans, soaked overnight*
1 tablespoon extra virgin olive oil
2 garlic cloves, finely chopped
½ jalapeño, seeded and finely chopped
1 can (13.5 ounces) unsweetened
coconut milk
2 cups chicken or vegetable broth,
low sodium
4 stems fresh thyme
1 bay leaf
1 teaspoon kosher salt, divided
1 ½ x ½-inch piece fresh ginger, peeled
3 cooker cups medium-grain
white rice
1 cup water
½ teaspoon ground cinnamon
4 green onions, sliced
1. Put the olive oil in the cooking pot of the
Cuisinart® Rice and Grain Multicooker. Select
the Sauté function and press Start/Stop. Once
oil is hot and shimmering, about 2 minutes,
add the garlic and jalapeño. Sauté until
softened and fragrant, about 1 to 2 minutes.
Press Start/Stop.
2. Add the beans, coconut milk, broth, thyme,
bay leaf, ½ teaspoon salt and ginger. Select the
One Pot function for 1 hour and 20 minutes
and press Start/Stop.
3. When 40 minutes are remaining, open the lid
and add the rice and water. Close the lid again
and let the unit complete its cooking program.
4. Once the audible tone has sounded to indicate
the end of cooking, open the lid, remove the
thyme stems, and add the remaining
ingredients, including the remaining ½
teaspoon of salt; toss to combine.
5. Taste and adjust seasoning and serve
immediately.
* Use the Soak function to soak the kidney beans,
a minimum of 8 hours and up to 18 hours. Drain
and rinse prior to using in recipe.
Nutritional information per serving (1 cup):
Calories 470 (21% from fat) • carb. 77g • pro. 18g
fat 11g • sat. fat 9g • chol. 0mg • sod. 420mg
calc. 141mg • fiber 13g
UDON NOODLE SOUP
This recipe highlights the versatility of the Cuisinart®
Rice and Grain Multicooker. Sautés, simmers and
steams all in one unit!
Functions: Sauté & One Pot
Makes about 10 cups
1 tablespoon olive oil
1 garlic clove, sliced
1 2 x ½-inch piece ginger, peeled and
finely chopped
8 cups chicken or vegetable broth,
low sodium
1 baby bok choy (about 6 ounces),
sliced
25
Page 26

3 ounces shiitake mushrooms, sliced
1 tablespoon reduced-sodium soy
sauce
¼ teaspoon freshly ground black pepper
Pinch crushed red pepper
1 cup peeled and cubed kabocha or
butternut squash
6 ounces chicken breast cut into 2-inch
strips, optional
8 ounces udon noodles (or soba)
3 green onions, thinly sliced
1 cup bean sprouts (about 3 ounces)
1 tablespoon sesame oil
Fresh lime wedges
1. Put the oil in the cooking pot of the Cuisinart®
Rice and Grain Multicooker. Select the Sauté
function and press Start/Stop. Once oil is hot
and shimmering, about 2 minutes, add the
garlic and ginger. Sauté until softened and
fragrant, about 1 to 2 minutes. Press Start/
Stop.
2. Add the broth, bok choy, mushrooms, soy
sauce, pepper and crushed red pepper. Select
the One Pot function for 1 hour and 30
minutes and press Start/Stop.
3. When there are 20 minutes remaining on the
timer, add the squash to the soup and insert
the steaming tray with the chicken pieces into
the steamer position. Close the lid and allow
the chicken to cook above the soup for the
remainder of the time.
4. Once the audible tone has sounded to indicate
the end of cooking, open the lid, and add the
steamed chicken to the soup with the noodles.
Close the lid and allow to “cook”in the Keep
Warm setting for 10 minutes (noodles should
be softened, but not mushy).
5. Open the lid of the cooker again and stir in the
green onions, bean sprouts, sesame oil, and a
squeeze of lime. Taste and adjust seasoning as
desired and serve.
Nutritional information per serving
(1 cup with chicken):
Calories 119 (36% from fat) • carb. 11g • pro. 9g
fat 5g • sat. fat 1g • chol. 35mg • sod. 263mg
calc. 27mg • fiber 1g
SOUTHWESTERN BLACK
BEAN SALAD
A colorful side dish that is bright and fresh.
Functions: Soak & Beans
Makes about 5 cups
2 cooker cups dry black beans,
soaked overnight*
Water (to the 4-level marking)
½ medium red bell pepper, chopped
1 garlic clove, finely chopped
1 green onion, thinly sliced
½ jalapeño, seeded and finely chopped
¾ cup corn kernels
1 tablespoon extra virgin olive oil
2 teaspoons fresh lime juice
¾ teaspoon kosher salt
2 pinches freshly ground black pepper
½ avocado, diced
Pinch granulated sugar
1. Put the drained beans and then add the fresh
water into the cooking pot of the Cuisinart®
Rice and Grain Multicooker. Close lid.
2. Select the Beans function, set timer for 1 hour
and 30 minutes, and press Start/Stop.
3. Once the audible tone sounds to indicate the
end of cooking, drain the beans and transfer
to a large serving bowl. Add the remaining
ingredients and toss to combine.
4. Serve immediately, or cover and allow to rest
in the refrigerator to meld the flavors.
Nutritional Information per serving (½ cup):
Calories 147 (22% from fat) • carb. 22g • pro. 7g
fat 4g • sat. fat 1g • chol. 225mg • sod. 39mg
*Use the Soak function to soak the black beans for a
minimum of 8 hours and up to 18 hours. Drain and rinse
calc. 39mg • fiber 5g
prior to cooking.
SPANISH RICE
An easy side dish to incorporate into your
Function: Sauté & White Rice
Makes 6 cups
1 teaspoon olive oil
weekly rotation.
26
Page 27

1 medium onion, finely chopped
1 small red bell pepper, finely chopped
2 garlic cloves, finely chopped
1 celery stalk, finely chopped
1 teaspoon kosher salt
1 teaspoon chili powder
½ teaspoon paprika
½ teaspoon dried oregano
½ teaspoon freshly ground black pepper
1 can (14.5 ounces) diced tomatoes,
drained
2 cooker cups long-grain white rice
Water (to the 2-level marking)
1. Put the olive oil in the cooking pot of the
Cuisinart® Rice and Grain Multicooker. Select
the Sauté function. Once the oil is hot and
shimmering, add the onion, red pepper, garlic
and celery and sauté until soft and fragrant,
about 2 to 3 minutes. Stir in the dried spices
and cook until fragrant. Add the drained,
diced tomatoes and stir to incorporate. Stir in
the rice so that it is well coated.
2. Add the water and stir ingredients together.
Close lid and select White Rice function and
press Start/Stop.
3. When the audible tone sounds to indicate the
end of cooking, open and stir rice together.
Taste and adjust seasoning as desired. Serve
immediately.
Nutritional information per serving (½ cup):
Calories 99 (4% from fat) • carb. 21g • pro. 2g
fat 0g • sat. fat 0g • chol. 0mg • sod. 252mg
• calc. 22mg • fiber 1g
TABBOULEH
This recipe is great for entertaining.
Function: Small Grains
Makes about 4 cups
1 cooker cup bulgur wheat
1 cup water
2 cups fresh parsley, chopped
½ cup fresh mint, chopped
2 cups halved grape or cherry tomatoes
3 green onions, thinly sliced
2 tablespoons extra virgin olive oil
¼ cup fresh lemon juice
¼ teaspoon kosher salt
¼ teaspoon freshly ground black pepper
Pinch ground cumin
1. Put the bulgur and water in the cooking pot of
the Cuisinart® Rice and Grain Multicooker.
Select the Small Grains function and press
Start/Stop.
2. Once the audible tone has sounded to
indicate the end of cooking, open the lid and
add the remaining ingredients; toss to
combine.
3. Taste and adjust seasoning and serve
immediately.
Nutritional information per serving (½ cup):
Calories 88 (41% from fat) • carb. 12g • pro. 2g
fat 4g • sat. fat 1g • chol. 0mg • sod. 54mg
calc. 41mg • fiber 3g
WHEAT BERRY AND
VEGETABLE SALAD
A crowd-pleasing dish that is perfect for any party or
Function: Chewy Grains
Makes about 7 cups
2 cooker cups wheat berries
3 cups water
½ teaspoon kosher salt
½ medium red onion, chopped
11⁄³ cups corn kernels, fresh or frozen
(thawed)
1 cup shredded zucchini (about ½
medium-large zucchini)
1 cup chopped red bell pepper (about 1
medium pepper)
½ cup chopped green onions (about 4
medium green onions)
½ cup chopped sun-dried tomatoes
½ cup Red Onion Vinaigrette (recipe
follows)
1
⁄3 cup chopped fresh parsley
1. Put the wheat berries, water and salt in the
cooking pot of the Cuisinart® Rice and Grain
Multicooker. Select the Chewy Grains function
and press Start/Stop.
2. Once the audible tone has sounded to
indicate the end of cooking, turn the unit off
cookout.
27
Page 28

and open the lid. Spread the wheat berries on
a baking sheet to cool.
3. When wheat berries are cooled, place in a
medium bowl with the corn, zucchini, red
pepper, green onions, and sun-dried
tomatoes. Toss gently to combine. Add the
dressing and the parsley; toss to combine.
4. Adjust seasoning and serve.
Nutritional information per serving (½ cup):
Calories 155 (28% from fat) • carb. 25g • pro. 4g
fat 5g • sat. fat 1g • chol. 0mg • sod. 194mg
calc. 14mg • fiber 4g
RED ONION VINAIGRETTE
This dressing stores well in the refrigerator up to 2
weeks. Re-blend prior to serving.
Makes about 1 cup
¼ medium red onion, cut into
1-inch pieces
1½ teaspoons Dijon mustard
1 teaspoon granulated sugar
½ teaspoon kosher salt
¼ teaspoon freshly ground black pepper
¼ cup white balsamic vinegar
½ cup extra virgin olive oil
1. Put the red onion, mustard, sugar, salt,
pepper, and vinegar in a Cuisinart® Food
Processor or Blender. Process until smooth.
Slowly add the oil through the feed tube in a
steady stream – do not add it too fast or the
oil will not be able to incorporate itself into
the vinegar mixture.
2. Keep vinaigrette in a covered container in the
refrigerator until ready to use.
Nutritional information per serving
(1 tablespoon) • Calories 64 (93% from fat) • carb. 1g
pro. 0g • fat 7g • sat. fat 1g • chol. 0mg • sod. 79mg
calc. 1mg • fiber 0g
WHITE BEAN SALAD
A perfect mix of flavors, textures and colors, this is a
great side dish or a delicious vegetarian entrée.
Functions: Soak & Beans
Makes about 4 cups
2 cooker cups (about ½ pound) dry
white beans, soaked overnight*
Water (to the 4-level marking)
½ medium red onion, finely chopped
½ medium red bell pepper, finely
chopped
¾ cup fresh parsley leaves, chopped
1½ tablespoons extra virgin olive oil
2 teaspoons fresh lemon juice
½ teaspoon kosher salt
Pinch freshly ground black pepper
1 to 2 pinches crushed red pepper (optional)
3 tablespoons goat cheese, crumbled
1. Put the drained beans and then add the fresh
water into the cooking pot of the Cuisinart®
Rice and Grain Multicooker. Close lid.
2. Select the Beans function and set the timer for
1 hour and 30 minutes. Press Start/Stop.
3. Once the audible tone sounds to indicate the
end of cooking, drain the beans and transfer
to a large serving bowl. Add the remaining
ingredients, except for the goat cheese, into
the serving bowl. Toss to fully combine.
Sprinkle with the goat cheese and gently stir
to combine.
4. Taste and adjust seasoning as desired.
Nutritional Information per serving (½ cup):
Calories 163 (19% from fat) • carb. 24g • pro. 10g
fat 4g • sat. fat 1g • chol. 1mg • sod. 162mg
calc. 105mg • fiber 6g
* Use the Soak pfunction to soak the white beans
for a minimum of 8 hours and up to 18 hours.
Drain and rinse prior to using in recipe.
MAINS
BROWN RICE
BURRITO BOWL
Burrito Bowls are popular for a reason – they are quick,
simple, healthy, and filling! Think of it as a blank
canvas and change or add your favorite items.
Function: Brown Rice
Makes 4 servings
3 cups cooked short-grain brown rice,
warm
1 cup cooked black beans
½ cup corn kernels
½ cup grape tomatoes, halved
28
Page 29

2 green onions, thinly sliced
1 avocado, sliced
Kosher salt
Salsa
Chopped fresh cilantro
Lime wedges
Tortilla chips
1. Divide all of the measured ingredients among
four serving bowls. Top each with a pinch of
salt, a dollop of salsa, a pinch of chopped
cilantro. Serve each with a lime wedge and
tortilla chips.
Nutritional Information per serving:
Calories 411 (15% from fat) • carb. 76g • pro. 11g
fat 7g • sat. fat 1g • chol. 0mg • sod. 199mg
calc. 63mg • fiber 9g
BUTTERNUT SQUASH
RISOTTO
While the Rice and Grain Multicooker makes risotto
an easy weeknight dinner, it is also the perfect tool for
the holidays!
Functions: Sauté & Risotto
Makes about 8 cups (8 entrée servings, 16
first-course servings)
1½ tablespoons unsalted butter
½ medium onion, finely chopped
1 garlic clove, finely chopped
1¼ teaspoons kosher salt, divided
¼ teaspoon freshly ground black
pepper, divided
2 cooker cups Arborio rice
½ cup dry white wine
3 cups peeled and ½-inch cubed
butternut squash
Pinch ground nutmeg
4 cups chicken stock, room temperature
1 teaspoon fresh thyme
¼ cup grated Parmesan
2 tablespoons chopped fresh parsley
1 teaspoon fresh lemon juice
1. Put the butter in the cooking pot of the
Cuisinart® Rice and Grain Multicooker. Select
the Sauté function and press Start/Stop. Once
butter is melted and hot, about 2 minutes,
add the onion and garlic and a pinch each of
the salt and pepper. Sauté until softened,
about 2 minutes. Add the rice and sauté,
while stirring occasionally, until edges are just
translucent, about 2 minutes. Pour in the wine
and cook until almost completely evaporated
and then add the squash and nutmeg. Stir to
coat. Add the stock and thyme. Close the lid
of the cooker. Press Start/Stop and then
select the Risotto function. Press Start/Stop.
2. When there are 15 minutes remaining, a tone
will sound. At this point, open the lid, stir
mixture and determine if the risotto is done
to your liking. If the consistency is desirable
(should be easily stirred and creamy), press
Start/Stop. If it is too dry or stiff, stir in
additional stock (best if it is room temperature
or warm). Close the lid and allow it to cook
for the remaining 15 minutes.
3. Once the audible tone has sounded to
indicate the end of cooking, open the lid and
stir in the remaining salt and pepper,
Parmesan, parsley, and lemon juice.
4. Serve immediately. If you desire a creamier
texture, stir in additional hot stock at the end
of cooking. If you wish to use the Keep Warm
function, more stock will need to be added
before serving to ensure a creamy
consistency.
Nutritional information per serving (1 cup): Calories 355
(10% from fat) • carb. 66g • pro. 10g
fat 4g • sat. fat 3g • chol. 11mg • sod. 813mg
calc. 124mg • fiber 3g
A TIP ON LEFTOVERS:
Arancini
Leftover risotto should not go to waste. It is perfect for
the Italian appetizer, arancini (which translated means
“little orange”).
Simple to make, try them next time you prepare risotto.
Take your leftover risotto, plain or from any recipe, and
form into 2-inch diameter balls (or smaller if you are
making a more delicate hors d’oeuvre). They are great
stuffed with a ½-inch piece of fresh mozzarella. If you’re
using plain risotto, stir in a little marinara sauce with the
rice before forming.
Prepare a classic breading: 1 bowl of flour, 1 bowl of
beaten eggs, and 1 bowl of breadcrumbs (seasoned or
plain). Lightly bread and either bake in a 375°F oven
or pan-fry in hot vegetable or olive oil in a large skillet
set over medium heat. Bake/cook until evenly browned.
These are best served immediately.
29
Page 30

SPRING PEA RISOTTO
Bright and fresh tasting, this risotto stands up nicely
on its own, but it can easily be adapted by adding
chopped prosciutto or ham.
Functions: Sauté & Risotto
Makes about 6 cups (4 entrée servings; 12
first-course servings)
1½ tablespoons unsalted butter
½ medium onion, finely chopped
1 garlic clove, finely chopped
1¼ teaspoons kosher salt
¼ teaspoon freshly ground black
pepper
2 cooker cups Arborio rice
½ cup dry white wine
3½ cups chicken stock, low sodium, room
temperature
2 sprigs fresh thyme
2 cups frozen green peas, not thawed
¼ cup grated Pecorino Romano
2 tablespoons chopped fresh parsley
1 teaspoon grated lemon zest
1 teaspoon fresh lemon juice
Pea shoots and/or microgreens,
for serving
1. Put the butter in the cooking pot of the
Cuisinart® Rice and Grain Multicooker. Select
the Sauté function and press Start/Stop. Once
butter is melted and hot, about 2 minutes,
add the onion and garlic and a pinch each of
the salt and pepper, Sauté until softened,
about 2 minutes. Add the rice and sauté while
stirring occasionally, until edges are just
translucent, about 2 minutes. Pour in the wine
and cook until almost completely evaporated
and then add the stock and thyme. Stir and
then close the lid of the cooker. Press Start/
Stop and then select the Risotto function.
Press Start/Stop.
2. When there are 15 minutes remaining, a tone
will sound. At this point, open the lid, stir
mixture and determine if the risotto is done
to your liking. If the consistency is good, add
the peas and then close the lid and allow to
cook for an additional 5 minutes to warm
through. Open the lid again and then stir in
the remaining ingredients, except for the pea
shoots and/or microgreens.
3. At the 15-minute mark, if the risotto is too stiff
or dry, stir in additional liquid (best if it is
room temperature) and add the peas as well.
Allow to cook for 5 minutes. After the 5
minutes have elapsed, add the remaining
ingredients, as instructed in Step 2.
4. This risotto is best when served immediately.
Divide the risotto into serving bowls and top
with a pinch of pea shoots and/or
microgreens.
Nutritional information per serving (based on 1 cup):
Calories 197 (14% from fat) • carb. 33g • pro. 6g
fat 3g • sat. fat 2g • chol. 8mg • sod. 675mg
calc. 34mg • fiber 2g
MEDITERRANEAN
COUSCOUS WITH
MOROCCAN VEGETABLES
A warm and colorful comfort food, delicious
on its own or when paired with roast chicken.
Functions: Sauté & Small Grains
Makes about 7 cups
1½ teaspoons extra virgin olive oil
½ medium onion, sliced
2 cups peeled and ½-inch cubed
butternut squash
1 medium peeled and ½-inch cubed
white potato (about 8 ounces)
1½ cups peeled and ½-inch cubed
eggplant (about 6 ounces)
¾ teaspoon kosher salt, divided
½ teaspoon freshly ground black
pepper, divided
3 cooker cups pearl (also known as
Israeli or Mediterranean) couscous
2½ cups low-sodium chicken broth
1 whole cinnamon stick
½ teaspoon ground cumin
½ teaspoon lemon zest
½ cup dried apricots, chopped
1. Put the oil in the cooking pot of the Cuisinart®
Rice and Grain Multicooker. Select the Sauté
function and press Start/Stop. Once oil is hot
and shimmering, about 2 minutes, add the
onion. Sauté until softened, about 2 minutes.
Add the remaining vegetables with a pinch
each of the salt and pepper. Cook until squash
30
Page 31

and potatoes are just tender, about 4 to 5
minutes.
2. Press Start/Stop and add the couscous, broth,
cinnamon stick, remaining salt and pepper,
cumin, and zest. Close the lid of the cooker.
Select the Small Grains function and press
Start/Stop.
3. Once the audible tone has sounded to
indicate the end of cooking, open the lid and
remove the cinnamon stick. Stir in the apricots
and serve.
Nutritional information per serving (1 cup):
Calories 360 (2% from fat) • carb. 77g • pro. 11g
fat 1g • sat. fat 0g • chol. 0mg • sod. 440mg
calc. 55mg • fiber 7g
QUINOA AND LENTIL
BOWL WITH STEAMED
VEGETABLES AND EGG
This bowl is packed full of fresh, colorful vegetables
and protein-rich quinoa and eggs. You can top with
some crunchy seeds or sprouts prior to serving.
Functions: Small Grains & Steam
Makes 4 servings
2 cups cooked tri-color quinoa, warm
1 cooker cup green lentils
4 cups water
2 medium carrots, sliced
1 small beet, peeled and sliced
2 large eggs, in shell
2 radishes, thinly sliced
½ cup baby arugula
¼ cup grape tomatoes, quartered
½ avocado, thinly sliced
Olive oil, for serving
Kosher salt, to taste
Freshly ground black pepper, to taste
Lemon wedges, for serving
1. Put the lentils and water into the cooking pot
of the Cuisinart® Rice and Grain Multicooker.
Insert the steaming tray with the carrots and
beets. Close the lid and select Steam for 16
minutes and press Start/Stop. With 6 minutes
remaining, add the two eggs.
2. Once the audible tone has sounded to
indicate the end of cooking, remove the
steamer basket and drain the lentils.
3. Divide the cooked quinoa and the lentils
among four serving bowls. Top with the
vegetables. Peel the two eggs, halve and put
one half in each bowl. Drizzle each with olive
oil and season to taste with salt and pepper.
Serve with a lemon wedge.
Nutritional information per serving:
Calories 317 (24% from fat) • carb. 4g • pro. 16g
fat 9g • sat. fat 1g • chol. 93mg • sod. 149mg
calc. 64mg • fiber 10g
SAUSAGE AND SHRIMP
JAMBALAYA
An easy rice dish to jazz up any weeknight.
Functions: Sauté & One Pot
Makes about 8 cups
6 ounces fully cooked andouille sausage
(can use chicken or turkey), cut into
½-inch slices
1 small onion, chopped
1 celery stalk, chopped
½ red bell pepper, chopped
½ jalapeño finely chopped
2 teaspoons finely chopped garlic
2 cooker cups long-grain white rice
½ teaspoon kosher salt
1 teaspoon paprika
1 teaspoon dried thyme
1 teaspoon dried oregano
2 cups low-sodium chicken stock
1 cup fire-roasted diced tomatoes, in
their juices
1 bay leaf
12 ounces peeled and deveined shrimp
¼ cup chopped fresh parsley
¼ cup thinly sliced green onions
Lemon wedges and hot sauce to taste
1. Put the sausage in the cooking pot of the
Cuisinart® Rice and Grain Multicooker. Select
the Sauté function and press Start/Stop. Brown
the sausage on all sides, about 8 to 10
minutes. (If using chicken or turkey, 1 to 2
teaspoons of olive oil may be required for this
process.) Remove the sausage from the pot
and reserve. Add the onion, celery, pepper,
jalapeño and cook for 6 to 8 minutes, stirring
often. Add the garlic and cook until fragrant,
about 1 to 2 minutes. Add the rice, salt,
31
Page 32

paprika, thyme and oregano. Stir until rice is
translucent, about 2 to 3 minutes. Press Start/
Stop.
2. Add the stock, diced tomatoes and bay leaf.
Close the lid and select the One Pot function,
set the timer to 40 minutes and press Start/
Stop.
3. When there are about 10 minutes of cooking
time remaining, add the reserved sausage
along with the shrimp to the cooking pot.
Give a quick stir, close the lid again, and let
the unit complete its cooking program.
4. Once the audible tone has sounded to
indicate end of cooking, open the lid and add
parsley and scallions; toss to combine. Serve
immediately with lemon wedges and
additional hot sauce.
Nutritional information per serving (1 cup):
Calories 165 (33% from fat) • carb. 14g • pro. 14g
fat 6g • sat. fat 2g • chol. 82mg • sod. 366mg
calc. 80mg • fiber 1g
SHRIMP AND VEGETABLES
Light and simple – this dish goes from freezer to table
in about 15 minutes. To make it a larger meal, serve
over a bed of white rice.
Function: Steam
Makes 1 to 2 servings
6 asparagus spears, cut on the bias into
1½-inch pieces
½ medium carrot, cut into julienne strips
½ cup snow peas
½ pound large frozen shrimp
Fresh lemon juice
Chopped fresh parsley leaves
Kosher salt
Freshly ground black pepper
1. Add water to the Steam level in the cooking
pot of the Cuisinart® Rice and Grain
Multicooker.
2. Mix the vegetables together and then place
them on the Steaming Tray. Top with the
shrimp, insert steaming tray into cooking pot
and close lid.
3. Select the Steam function and set timer for 15
minutes. Press Start/Stop.
4. Once the audible tone sounds, immediately
transfer steamed shrimp and vegetables to a
serving bowl and toss with the lemon juice,
parsley and season to taste with the salt and
pepper.
Nutritional Information per serving
(based on 2 servings):
Calories 105 (11% from fat) • carb. 6g • pro. 17g
fat 1g • sat. fat 0g • chol. 143mg • sod. 726mg
calc. 88mg • fiber 2g
TOFU WITH WATERCRESS
AND MUSHROOMS
A delicious vegetarian or vegan entrée that builds
on a favorite side dish by adding steamed tofu. This
stands up on its own, but is also delicious on a bed of
warm rice.
Functions: Sauté & Steam
Makes 2 servings
2 tablespoons toasted sesame oil
1 tablespoon sesame seeds
2 garlic cloves, finely chopped
1 tablespoon low-sodium soy sauce
Pinch red pepper flakes
Water
4 ounces baby bella (cremini)
mushrooms, sliced
7 to 8 ounces medium-firm tofu, cut into 6
pieces (this is about ½ of a standard
tofu package)
2 packed cups watercress (about 1½
ounces)
Pinch kosher salt
1. Put the sesame oil into the cooking pot of the
Cuisinart® Rice and Grain Multicooker. Select
the Sauté function and press Start/Stop. Once
hot, add the sesame seeds and garlic. When
garlic just starts to brown, about 2 minutes,
press Start/Stop and transfer the sesame
seeds and garlic to a small bowl. Add the soy
sauce and red pepper flakes; reserve.
2. Put water into the cooking pot to the Steam
level. Put the mushrooms and tofu onto the
steaming tray and insert into cooking pot.
Close lid. Select the Steam function, set timer
for 10 minutes and press Start/Stop.
3. When the audible tone sounds to indicate the
end of cooking, add the watercress to the tray
32
Page 33

with the mushrooms and tofu. Select the
Steam function again for an additional 5
minutes, and press Start/Stop.
4. Once timer expires, immediately transfer to a
serving bowl and toss with the reserved sauce.
Taste and adjust seasoning as desired.
Nutritional Information per serving (1 cup)
Calories 224 (68% from fat) • carb. 7g • pro. 10g
fat 16g • sat. fat 2g • chol. 0mg • sod. 423mg
calc. 59mg • fiber 1g
VEGETARIAN BEAN CHILI
The smokiness of the chipotle in this recipe not only
adds flavor (and some heat), but an unexpected
richness, making this dish a filling and healthy chili.
Functions: Soak, Sauté & One Pot
Makes about 5 cups
3 cooker cups dried beans, soaked
overnight (a mixture of beans works
well for this dish – black, kidney, navy,
adzuki, garbanzo, etc.)*
1 tablespoon extra virgin olive oil
1 ½-inch piece fresh ginger, peeled and
finely chopped
2 garlic cloves, finely chopped
½ medium onion, finely chopped
1 teaspoon kosher salt, divided
¼ teaspoon freshly ground black
pepper, divided
1 medium bell pepper (yellow or green
preferably for color), cored, seeded
and diced
2 teaspoons chili powder
¼ teaspoon ground cumin
¼ teaspoon ground cinnamon
1 can (28 ounces) diced tomatoes,
drained
2 tablespoons tomato paste
1 chipotle (left whole) in adobo sauce,
with additional ½ teaspoon adobo
sauce
2 cups low-sodium vegetable or chicken
broth (or water)
1 to 2 tablespoons pure maple syrup
Shredded Cheddar or Monterey Jack,
for garnish
Fresh cilantro, roughly chopped, for
garnish
1. Put the olive oil in the cooking pot of the
Cuisinart® Rice and Grain Multicooker. Select
the Sauté function and press Start/Stop. Once
oil is hot and shimmering, about 2 minutes,
add the ginger, garlic and onion with a pinch
each of the salt and pepper. Sauté until
softened and the onion is translucent, about 2
minutes. Add the bell pepper and the spices
and cook to meld the flavors and cook the
pepper, about 3 to 4 minutes. Press Start/
Stop.
2. Add the beans, tomatoes, tomato paste,
chipotle and sauce, broth/water and remaining
salt and pepper. Select the One Pot function
for 2 hours and 30 minutes and press Start/
Stop.
3. Once the audible tone has sounded to
indicate the end of cooking, open the lid,
remove the chipotle, and stir in the maple
syrup. Taste and adjust seasoning as desired
and serve with the shredded cheese and pinch
of cilantro.
* Use the Soak function to soak the beans for a
minimum of 8 hours and up to 18 hours. Drain
and rinse prior to using in recipe.
Nutritional information per serving (based on 1 cup):
Calories 470 (21% from fat) • carb. 77g • pro. 18g
fat 11g • sat. fat 9g • chol. 0mg • sod. 420mg
calc. 141mg • fiber 13g
SWEETS
TRADITIONAL RICE
PUDDING
The Risotto function is not only for risotto. Treat your-
self to some homemade rice pudding.
Function: Risotto
Makes 5 cups
2 cooker cups Arborio rice
3 cups whole milk
2 cups heavy cream
1 whole vanilla bean, halved and seeds
scraped
2
⁄3 cup granulated sugar
¼ teaspoon kosher salt
33
Page 34

2 whole cinnamon sticks
¼ teaspoon ground nutmeg
1. Add all ingredients to the cooking pot of the
Cuisinart® Rice and Grain Multicooker. Select
the Risotto function and press Start/Stop.
2. When there are 15 minutes remaining, a tone
will sound. At this point, open the lid, stir
mixture and determine if the pudding is done
to your liking. If the consistency is desirable,
press Start/Stop. If, at this point, the pudding
is too stiff or dry, stir in additional milk or
water, close lid, and allow to cook for the
remainder of the function time.
3. Once the audible tone has sounded to
indicate the end of cooking, open the lid,
remove the cinnamon sticks and stir well. This
pudding can be served warm or chilled.
Nutritional analysis per serving (based on ½ cup):
Calories 553 (33% from fat) • carb. 84g • pro. 9g
fat 20g • sat. fat 13g • chol. 76mg • sod.115mg
calc. 124mg • fiber 1g
34
Page 35

RICE & GRAIN BOWLS
Once a vegetarian restaurant and health-food store staple,
the rice/grain bowls are now ubiquitous in restaurants across the globe.
It seems as though each ethnicity has their own version, and with the help
of the Cuisinart® Rice and Grain Multicooker, you can now replicate those
dishes in your own home. On the following pages we provide you with a
guide of how to build your own bowl. There are no rules – so have fun!
First ...rice, grain, or both?
1
Rice (brown, white, wild, and black)
•
Quinoa
•
Couscous
•
Farro
•
Wheat/Rye/Spelt Berries
•
Bulgur
•
Rice Noodles
•
Udon Noodles
•
2
OK – now what?
A protein to fill you up!
Shrimp (sautéed or steamed)
•
Steamed Chicken Breast
•
Steamed Salmon
•
Browned and Steamed Tofu
•
Ground Turkey or Chicken
•
Soft-Boiled Eggs
•
Beans and Legumes
•
35
Page 36

This is healthy, right?
3
Add some vegetables
Julienned Zucchini and
•
Summer Squash (steamed or raw)
Shredded Carrots and Parsnips
•
Sugar Snap Peas
•
Snow Peas
•
Steamed Baby Potatoes
•
Steamed or Sautéed Kale
•
Steamed Corn Slices
•
Sautéed Cabbage
•
Grape or Cherry Tomatoes
•
Avocado – Diced or Sliced
•
Steamed Green Beans
•
Fresh Mixed Greens
•
Sliced Celery
•
Steamed Winter Squash
•
Now, for some tasty toppers:
5
Olives
•
Sesame Seeds (also – check out the
•
sesame seed spice blends in your
grocery store’s spice aisle – some have
nori and other delicious flavor boosters
in them)
Sliced Scallions
•
Chopped Fresh Herbs
•
Crumbled or Shredded Cheese
•
Puffed Rice
•
Pepitas
•
Chopped Nuts
•
Microgreens
•
Pea Shoots or Sprouts
•
Chia Seeds
•
Hulled Hemp Seeds
•
Sauce it up
4
The sauce will really seal the deal on
what ethnic cuisine you’re featuring in
your rice/grain bowl. These can be easily
found in your local grocery store, and
many of them can be made at home as
well – visit cuisinart.com for recipes for
the basics such as basil pesto, salsa verde,
chimichurri and more.
Honey (make it hot!)
•
Hot Sauce (Buffalo, Asian-style, sriracha)
•
Pesto
•
Tapena d e
•
Miso-Ginger Dressing
•
Salsa Verde
•
Yogurt-Tahini Sauce
•
Aioli
•
Hummus
•
Harissa
•
Chimichurri
•
Peanut Sauce
•
Teriyaki
•
36
Page 37

INSTRUCCIONES & LIBRO DE RECETAS
Olla arrocera multifunción Cuisinart
Para su seguridad y para disfrutar plenamente de este producto, siempre lea cuidadosamente las instrucciones
antes de usarlo.
®
FRC-1000
Page 38

MEDIDAS DE
SEGURIDAD
IMPORTANTES
Al usar aparatos eléctricos, especialmente
en presencia de niños, siempre debe
tomar precauciones básicas de seguridad,
entre ellas las siguientes:
1. LEA TODAS LAS INSTRUCCIONES.
2. No toque las partes calientes de este
aparato; utilice los mangos/asas/
agarraderas y los botones/perillas.
3. Para reducir el riesgo de descarga
eléctrica, no coloque el aparato, el
cable ni el enchufe en agua ni en
ningún otro líquido. Si el aparato se
cae al agua, desconecte el cable de la
toma de corriente inmediatamente;
NO toque el agua.
4. Supervise el uso de este aparato
cuidadosamente cuando sea usado
por o cerca de niños.
5. Desenchufe el aparato cuando no
está en uso y antes de limpiarlo.
Permita que se enfríe antes de
instalar/sacar piezas.
6. No utilice este aparato si el cable o el
enchufe están dañados, después de
un mal funcionamiento, después de
que se haya caído o si está dañado;
regréselo a un centro de servicio
autorizado para su revisión,
reparación o ajuste.
7. El uso de accesorios no
recomendados o provistos por
Cuisinart presenta un riesgo de
incendio, descarga eléctrica o
heridas.
8. No lo utilice en exteriores.
9. No use el aparato para ningún fin que
no sea el indicado.
10. Para evitar la posibilidad de que el
aparato sea jalado accidentalmente
del área de trabajo, lo que podría
resultar en daños al aparato o
lesiones personales, no permita que el
cable cuelgue en el borde de la mesa
o de la encimera.
11. Para evitar los riesgos de daño al
cable, incendio o electrocución, no
permita que el cable tenga contacto
con superficies calientes, incluso
hornillas.
12. Tenga sumo cuidado al mover un
aparato que contenga aceite u otro
líquido caliente.
13. No coloque el aparato sobre o cerca
de un quemador a gas o de una
hornilla eléctrica caliente, ni en un
horno caliente.
14. No haga funcionar el aparato en agua
o bajo agua corriente.
15. Para reducir el riesgo de descarga
eléctrica, solo cocine alimentos en la
olla removible provista.
No sumerja el aparato en agua.
16. Siempre conecte el cable al aparato
antes de enchufar este en la toma de
corriente. Siempre apague el aparato,
presionando el botón START/STOP,
antes de desenchufarlo.
17. Diseñado para la cocción en la
encimera solamente.
18. ADVERTENCIA: los alimentos
derramados pueden causar
quemaduras graves. Mantenga el
aparato y el cable alejados de los
niños. Nunca permita que el cable
cuelgue del borde de la encimera,
nunca enchufe el aparato en una
toma de corriente por debajo la
encimera y nunca utilice este aparato
con una extensión.
GUARDE ESTAS
INSTRUCCIONES
PARA USO
DOMÉSTICO
SOLAMENTE
2
Page 39

USO DE EXTENSIONES
El cable provisto con este aparato es corto,
para reducir el riesgo de que alguien se
enganche o tropiece con un cable más
largo.
ÍNDICE
Medidas de seguridad importantes .....2
Introducción .......................3
Instrucciones de ensamblaje ..........3
Piezas y características ............. 4
Panel de control ....................5
Instrucciones de operación ...........6
Limpieza y mantenimiento ........... 9
Consejos y sugerencias ..............9
Tablas de cocción .................12
Guía de cocción al vapor............15
Resolución de problemas ...........16
Garantía .........................17
Recetas .........................18
INTRODUCCIÓN
La olla arrocera multifunción Cuisinart®
hace uso de la lógica difusa, una
tecnología que detecta el nivel de humedad
en la olla para cocinar los alimentos con
precisión. Todos los programas para
cocinar arroz y granos/cereales son
automáticos. El tiempo de cocción y la
temperatura son definidos por el aparato,
dependiendo del programa elegido. Ya sea
que esté cocinando arroz, quinua, avena o
risotto, nuestra olla arrocera multifunción
altamente inteligente ajusta
automáticamente la temperatura y el
tiempo de cocción para lograr resultados
perfectos cada vez. Es fácil de usar,
extragrande y hermosa. ¡Esa es una forma
inteligente de cocinar!
NOTA: no abra la tapa durante la cocción,
ya que el vapor se escapará, afectando el
tiempo de cocción y el sabor. NOTA: la
pantalla no muestra el tiempo durante el
ciclo de cocción; la cuenta regresiva
aparece en los últimos 10 a 15 minutos de
cocción (para la mayoría de las funciones).
INSTRUCCIONES DE
ENSAMBLAJE
1. Después de desembalar la olla
arrocera multifunción Cuisinart®, lave
la olla antiadherente, la bandeja de
cocción al vapor, la cuchara de arroz,
la tapa interior, el respiradero y el vaso
medidor en agua jabonosa tibia.
Enjuague las piezas y permita que se
sequen completamente.
2. Limpie el interior y el exterior del
aparato con un paño suave
ligeramente humedecido.
3. Coloque la olla en la base de la
unidad.
4. Si la usa, coloque la bandeja de
cocción al vapor en la olla, el lado
abierto arriba.
5. Cierre la tapa.
6. Conecte el cable removible a la parte
trasera de la unidad.
7. Su arrocera multifunción está lista para
su uso.
3
Page 40

PIEZAS Y
CARACTERÍSTICAS
1. Tapa con seguro y tapa interna
removible
2. Asas
Permanecen frías durante el
funcionamiento
3. Respiradero removible
para una fácil limpieza
4. Bandeja de cocción al vapor
Permite cocinar al vapor una variedad
de alimentos
5. Olla de aluminio
Antiadherente para facilitar la limpieza
6. Vaso medidor
Especialmente diseñado para la olla
arrocera multifunción Cuisinart®.
1 vaso medidor = ¾ de taza de medir
estándar
7. Cuchara de arroz
8. Guía de referencia integrada
En la parte trasera de la unidad
9. Botón de liberación de la tapa
(no ilustrado)
10. Cable (no ilustrado) – removible para
facilitar el almacenaje
11. Panel de control
Véase los detalles en la página
siguiente
3
1
4
5
6
2
7
8
4
Page 41

FAMILIARÍCESE CON EL PANEL DE CONTROL
Las instrucciones de programación empiezan en la página siguiente.
1. Botón SAUTÉ (saltear)
Ciclo de 30 minutos para saltear
ingredientes (solos o antes de usar
una función preprogramada)
2. Botón SOAK (remojar)
Permite remojar arroz, granos/cereales
o frijoles durante hasta 24 horas
3. Perilla de selección
Permite elegir y confirmar las
funciones preprogramadas
4. Botón KEEP WARM (mantener
caliente)
Mantiene los alimentos calientes
durante hasta seis horas (tres horas
después de ciertas funciones).
5. Botón START/STOP (encendido/
apagado)
Oprímalo para empezar o detener la
cocción
1 2 3 54
5
Page 42

FUNCIONAMIENTO
NOTA:
Esta olla arrocera multifunción incluye un
vaso medidor que permite medir ¾ de taza
estándar (170 g) de arroz. La mayoría de
las recetas incluidas en este manual de
instrucciones y libro de recetas miden el
arroz y los granos/cereales con aquel vaso
medidor. Los líquidos se miden con una
taza de medir estándar de 8 onzas
(235ml).
La capacidad máxima de la olla es de 10
vasos medidores de arroz o granos/
cereales (menos para ciertos granos/
cereales; véase las tablas de cocción en la
página 12 para más información).
CÓMO COCINAR ARROZ O
GRANOS/CEREALES
1. Coloque los ingredientes deseados en
la olla (véase los consejos y las
sugerencias en la página 9).
2. Cierre la tapa.
3. Gire la perilla de selección para elegir
la función deseada: “RICE” (arroz) o
“GRAINS” (granos/cereales).
4. Oprima el centro de la perilla de
selección para confirmar.
5. Gire la perilla de selección otra vez
para elegir el tipo de arroz o de
granos/cereales. Las opciones para el
arroz son: “WHITE” (blanco),
“BROWN” (integral), “WILD” (salvaje),
“SUSHI” (sushi) y “HARD” (duro). El
arroz blanco también tiene una opción
“QUICK” (arroz rápido). Las opciones
para los granos/cereales son:
“SMALL” (pequeños), “CHEWY”
(gomosos) y “OATS” (avena).
6. Cuando la opción deseada parpadee,
oprima el botón START/STOP para
iniciar el programa de cocción.
7. Luces aparecerán en la pantalla para
indicar que la unidad está encendida.
La pantalla mostrará la cuenta
regresiva en los últimos 10 minutos del
programa solamente.
8. Al final del tiempo, la unidad emitirá
una serie de 4 pitidos y mantendrá los
alimentos calientes por hasta tres
horas. El indicador de la función
“mantener caliente” aparecerá en la
pantalla.
9. Para apagar la unidad en cualquier
momento, oprima el botón START/
STOP.
10. Cuando esté listo/a para servir, oprima
el botón de liberación de la tapa y abra
esta.
11. Saque la olla, agarrándola por las asas
que permanecen frías.
CÓMO COCINAR FRIJOLES O
PLATOS ÚNICOS
1. Coloque los ingredientes deseados en
la olla (véase los consejos y las
sugerencias en la página 11).
2. Cierre la tapa.
3. Gire la perilla de selección para elegir
la función deseada: “ONE POT” (plato
único) o “BEANS” (frijoles). Oprima la
perilla para confirmar, y luego fije el
tiempo de cocción, girando la perilla
otra vez.
4. Presione el botón START/STOP para
confirmar.
5. Al final del tiempo, la unidad emitirá
una serie de 4 pitidos y mantendrá los
alimentos calientes por hasta tres
horas. El indicador de la función
“mantener caliente” aparecerá en la
pantalla.
6. Para apagar la unidad en cualquier
momento, oprima el botón START/
STOP.
7. Cuando esté listo/a para servir, oprima
el botón de liberación de la tapa y abra
esta.
8. Saque la olla, agarrándola por las asas
que permanecen frías.
CÓMO COCINAR RISOTTO
1. La mayoría de las recetas de risotto
sugieren saltear ingredientes
aromáticos y vegetales junto con el
6
Page 43

arroz. Para hacer esto, simplemente
use el programa SAUTÉ (saltear), de la
misma manera que lo prepararía en la
estufa.
2. Después de saltear, oprima el botón
START/STOP para regresar al menú
principal. Coloque los ingredientes
restantes (de acuerdo con la receta) en
la olla.
3. Cierre la tapa.
4. Gire la perilla de selección para elegir
“RISOTTO”.
5. Presione el botón START/STOP para
confirmar.
6. Luces aparecerán en la pantalla para
indicar que la unidad está encendida.
7. Cuando queden 15 minutos de
cocción, la cuenta regresiva aparecerá
en la pantalla. En este momento, abra
la tapa y revuelva el risotto. Si está
cocinado a su gusto, oprima el botón
START/STOP para apagar, o el botón
KEEP WARM para mantenerlo caliente.
Si el risotto requiere más líquido,
agregue líquido (preferiblemente a
temperatura ambiente). Esto también
es el momento adecuado para añadir
ingredientes adicionales que solo
requieren cocinarse por poco tiempo,
tales como vegetales tiernos y
mariscos delicados.
8. Al final del tiempo, la unidad emitirá
una serie de 4 pitidos y mantendrá los
alimentos calientes por hasta tres
horas. El indicador de la función
“mantener caliente” aparecerá en la
pantalla.
9. Para apagar la unidad en cualquier
momento, oprima el botón START/
STOP.
10. Cuando esté listo/a para servir, oprima
el botón de liberación de la tapa y
abra esta.
11. Saque la olla, agarrándola por las asas
que permanecen frías.
CÓMO COCINAR PASTA
1. Coloque la pasta en la olla.
2. Agregue líquido hasta la línea
“PASTA”.
3. Cierre la tapa.
4. Gire la perilla de selección para elegir
“PASTA”.
5. Oprima la perilla para confirmar.
6. De ser necesario, ajuste el tiempo de
cocción. Nota: el tiempo
preprogramado cocina de 18 minutos
la mayoría de las pastas medianas “al
dente”.
7. Oprima el botón START/STOP para
confirmar.
8. Al final del tiempo, la unidad emitirá
una serie de 4 pitidos.
9. Para apagar la unidad en cualquier
momento, oprima el botón START/
STOP.
10. Cuando esté listo/a para servir, oprima
el botón de liberación de la tapa y
abra esta.
11. Saque la olla, agarrándola por las asas
que permanecen frías, y escurra la
pasta.
CÓMO COCINAR AL VAPOR
1. Agregue líquido a la olla hasta la línea
“STEAM”.
2. Coloque la bandeja de cocción al
vapor en la olla.
3. Coloque los alimentos deseados en la
bandeja.
4. Cierre la tapa.
5. Gire la perilla de selección para elegir
“STEAM” (cocción al vapor).
6. Oprima la perilla para confirmar.
7. Ajuste el tiempo de cocción (véase la
página 14 para los tiempos de cocción
al vapor recomendados).
8. Oprima el botón START/STOP para
empezar la cocción.
9. Para apagar la unidad en cualquier
momento, oprima el botón START/
STOP.
7
Page 44

10. Al final del tiempo, la unidad emitirá
una serie de 4 pitidos.
11. Saque inmediatamente los alimentos
de la olla para evitar que se recuezan.
CÓMO SALTEAR
1. Para saltear, presione el botón SAUTÉ
(saltear).
2. Oprima el botón START/STOP para
encender la unidad.
NOTA: la unidad necesitará unos
minutos para precalentarse.
3. Agregue los ingredientes que desea
saltear a la olla (mantenga la tapa
abierta).
4. La unidad permanecerá encendida por
30 minutos. Si necesita más tiempo,
oprima el botón SAUTÉ (saltear) para
empezar otro ciclo de 30 minutos.
5. Para apagar la unidad en cualquier
momento, oprima el botón START/
STOP.
6. Después de saltear, saque los
ingredientes de la olla o siga las
instrucciones de la receta para pasar
al programa siguiente.
CÓMO REMOJAR FRIJOLES/
GRANOS
1. Coloque los ingredientes que desea
remojar y el líquido en la olla.
2. Cierre la tapa.
3. Oprima el botón SOAK (remojar).
4. El tiempo aparecerá en la pantalla.
5. Gire la perilla de selección para ajustar
el tiempo. Nota: puede ajustar el
tiempo en incrementos de 30 minutos,
hasta 24 horas.
6. Oprima el botón START/STOP para
conformar y encender la unidad.
NOTA: al final del tiempo, la unidad se
pondrá automáticamente en el modo
de espera. Para regresar al menú
principal, oprima cualquier botón.
7. Para apagar la unidad en cualquier
momento, oprima el botón START/
STOP.
8. Cuando los ingredientes se hayan
remojado a su gusto, oprima el botón
de liberación de la tapa para abrir esta.
9. Saque los ingredientes y el líquido de
la olla.
NOTA: los elementos calentadores de
la unidad no se encienden cuando usa
la función SOAK (remojar).
CÓMO MANTENER CALIENTE
1. Coloque los ingredientes preparados
(calientes) que desea mantener
calientes en la olla.
2. Cierre la tapa.
3. Oprima el botón KEEP WARM
(mantener caliente).
4. El tiempo por defecto (3 horas)
aparecerá en la pantalla.
5. Gire la perilla de selección para ajustar
el tiempo. Nota: puede ajustar el
tiempo hasta seis horas, en
incrementos de 30 minutos.
6. Oprima el botón START/STOP para
confirmar y encender la unidad.
7. Al final del tiempo, la unidad emitirá
una serie de pitidos, y luego se
pondrá automáticamente en el modo
“mantener caliente”.
8. Para apagar la unidad en cualquier
momento, oprima el botón START/
STOP.
9. Cuando esté listo/a para servir, oprima
el botón de liberación de la tapa para
abrir esta.
10. Saque los ingredientes de la olla.
11. Saque la olla, agarrándola por las asas
que permanecen frías.
NOTA: la función “mantener caliente”
solo sirve para mantener los alimentos
calientes; no sirve para cocinar o
recalentar alimentos.
Los alimentos deben estar calientes
para que esta función los mantenga
calientes. Esta función es automática
con ciertos programas de cocción
solamente.
8
Page 45

CÓMO PRELAVAR LA OLLA
1. Agregue líquido a la olla hasta la línea
“PRE-WASH”.
2. Si desea, coloque la bandeja de
cocción al vapor en la olla para que se
prelave junto con ella.
3. Cierre la tapa.
4. Gire la perilla de selección para elegir
“PRE-WASH” (prelavar).
5. Oprima la perilla para confirmar.
6. Oprima el botón START/STOP para
empezar.
7. Al final del tiempo, la unidad emitirá
una serie de 5 pitidos.
8. Para apagar la unidad en cualquier
momento, oprima el botón START/
STOP.
9. Al final del prelavado, oprima el botón
de liberación de la tapa y abra la tapa.
10. Saque la olla, agarrándola por las asas
que permanecen frías.
LIMPIEZA Y
MANTENIMIENTO
1. Desenchufe el aparato y permita que
se enfríe antes de limpiarlo.
2. Lave la olla, la bandeja de cocción al
vapor, el respiradero, el vaso medidor
y la cuchara de arroz en agua
jabonosa tibia y enjuáguelos bien.
Nota: estas piezas también son aptas
para lavavajillas. Seque todas las
piezas después de lavarlas.
NOTA: para evitar la decoloración, la
tapa interna debe lavarse a mano.
De ser necesario, remoje la olla en
agua jabonosa tibia antes de lavarla, o
use la función PRE-WASH (prelavar)
para prelavarla.
3. Si es necesario restregarla, utilice un
cepillo o un estropajo de nailon y
detergente líquido o un limpiador no
abrasivo.
4. Limpie la base con un paño suave
ligeramente húmedo, o una toalla de
microfibra. NUNCA SUMERJA LA
BASE EN AGUA.
5. Cerciórese de que todas las piezas
están limpias y secas antes de guardar
el aparato. Guarde el aparato en un
lugar limpio y seco.
6. cualquier otro servicio debe ser
realizado por un técnico autorizado.
7. Limpieza del respiradero: la cavidad
inferior del respiradero (pieza n.° 3 en
la sección “Piezas y características”)
es removible. Separe la cavidad
inferior del respiradero, girando la
cavidad en sentido horario hasta que
la flecha coincida con el candado
abierto. Lave el respiradero y la
cavidad inferior del mismo en agua
jabonosa tibia después de cada uso.
CONSEJOS Y
SUGERENCIAS
ARROZ
• No abra la tapa durante la cocción, ya
que el vapor se escapará, afectando el
tiempo de cocción y el sabor.
• Recomendamos enjuagar el arroz
importado (excepto el arroz risotto) antes
de cocinarlo. Coloque el arroz en un
tazón mediano y cúbralo con agua.
Importante: no haga esto en la olla.
Revuelva el arroz hasta que el agua se
vea turbia, luego escurra el arroz en un
colador de malla fina. Llene el tazón con
agua fresca y repita hasta que el agua
esté clara.
• Algunas personas enjuagan el arroz
doméstico, el cual a menudo está
enriquecido con vitaminas. Enjuagar el
arroz elimina el almidón y hace que el
arroz sea menos pegajoso, pero también
elimina aquellas vitaminas.
• El arroz sushi y la mayoría del arroz
integral siempre deben ser enjuagados
antes de la cocción. Siga las
instrucciones en el paquete de arroz.
• Mida el arroz con precisión, usando el
vaso medidor provisto y nivelando el
contenido con el filo de un cuchillo o una
9
Page 46

espátula.
• Agregar una cucharadita de aceite
vegetal o rociar spray vegetal en la olla
hace que el arroz sea menos pegajoso y
que los granos se separen.
• Después de colocar el arroz en la olla,
nivélelo en el fondo de la misma para que
se cocine uniformemente.
• El sabor del agua afectará el sabor del
arroz. Si no le gusta el sabor del agua de
la llave, utilice agua filtrada.
• El arroz puede cocinarse en líquidos que
no sean agua. Puede usar caldo de pollo,
carne o vegetales bajo en grasa/sodio, o
bien caldo de pescado o de almejas para
darle un sabor especial.
• Al final de la cocción, abra la unidad ni
bien emita un pitido. Revuelva el arroz,
usando la cuchara de arroz o un
cucharón de madera; esto evitará que el
arroz endurezca y se ponga pegajoso.
• Para preparar platos de arroz
combinados, p. ej. arroz con vegetales al
vapor, mariscos, pollo y/o carne, use
nuestras recetas como guía para
preparar sus propias recetas.
• Su arrocera multifunción es perfecta
cuando no tiene tiempo para monitorear
o revolver constantemente platos tales
como risotto o avena. Simplemente elija
el programa deseado. La unidad cocinará
automáticamente los alimentos, y los
mantendrá calientes al final de la
cocción.
GRANOS/CEREALES
• Recomendamos enjuagar la mayoría de
los granos/cereales antes de cocinarlos.
Esto elimina el exceso de almidón y
resulta en granos cocinados más
separados.
• Algunas personas tienen sensibilidades a
los granos/cereales, y enjuagarlos puede
ayudar a eliminar las sustancias
responsables por estas sensibilidades.
• Los granos/cereales puedan permanecer
calientes en la olla por hasta 6 horas
después de la cocción. Sin embargo,
recomendamos abrir la tapa y revolver
los granos/cereales con la cuchara de
arroz o un tenedor al final de la cocción.
De esta manera, pueden permanecer en
el modo “mantener caliente” por más
tiempo.
• Algunos granos/cereales tienen un alto
contenido de almidón. Cuando se
cocinan, es posible que tenga que limpiar
ocasionalmente el respiradero (pieza n.°
3 en la sección “Pieza y características”)
con un paño para evitar el exceso de
espuma y goteo.
• Para conseguir el mejor sabor, siempre
cocine los granos/cereales en agua
filtrada fría.
• Siempre respete las relaciones de
granos/agua indicadas en la página 12,
ya que cocinar granos/cereales en una
arrocera requiere mediciones distintas a
las de la cocción estándar.
AVENA
• La avena puede cocinarse en agua,
leche, alternativas a la leche o una
combinación de varios líquidos.
• Agregar una pizca de sal o de especias
realza el sabor de la avena cocinada.
• Siempre revuelva la avena cocinada
antes de servirla.
• Copos de avena tradicional se cocinarán
en aproximadamente 15 minutos. Al final
del tiempo, la unidad emitirá una serie de
4 pitidos.
RISOTTO
• Use el botón SAUTÉ (saltear) para saltear
los ingredientes aromáticos y/o los
vegetales, tostar el arroz y reducir el
líquido.
• El programa “RISOTTO” está
especialmente diseñado para cocinar
suavemente el arroz risotto y el líquido,
produciendo resultados cremosos sin
tener que revolver constantemente el
arroz. Utilice nuestras recetas como
pauta y adapte sus propias recetas.
• Recomendamos usar arroz Arborio, pero
también puede usar variedades similares,
p. ej., Carnaroli, Vialone, Nano, y Baldo.
10
Page 47

• Quince minutos antes del final, la unidad
emitirá un pitido y la cuenta regresiva
aparecerá en la pantalla. En este
momento, abra la tapa y revuelva el
risotto. Si está cocinado a su gusto,
oprima el botón START/STOP para
apagar, o el botón KEEP WARM para
mantenerlo caliente. Si el risotto requiere
más líquido, agregue líquido
(preferiblemente a temperatura ambiente).
Esto es el momento adecuado para
añadir ingredientes adicionales que solo
requieren cocinarse por poco tiempo,
tales como vegetales tiernos y mariscos
delicados.
PLATOS ÚNICOS
• El programa “ONE POT” (plato único)
permite conseguir comidas completas en
tan solo 30 minutos. También puede
usarse como función de cocción lenta.
Simplemente coloque los ingredientes en
la olla, elija el tiempo de cocción y
oprima el botón START/STOP.
• Si necesita dorar carne o cocinar pollo al
vapor primero, combine la función “ONE
POT” con otras funciones tales como
“SAUTÉ” (saltear) o “STEAM” (cocinar al
vapor).
• La función “ONE POT” (plato único)
también es perfecta para preparar sopas
caseras. Véase nuestro libro de recetas
para ideas de sopas rápidas.
PASTA
• Puede usar la función “PASTA” para
cocinar hasta ½ libra (225 g) de pasta
(cualquier variedad).
• El tiempo de cocción por defecto (18
minutos) produce resultados “al dente”.
Ajuste el tiempo a su gusto.
• Siempre use agua filtrada salada para
cocinar.
• Escurra la pasta inmediatamente después
de la cocción.
FRIJOLES
• Siempre remoje los frijoles por un mínimo
de 8 horas, usando la función “SOAK”
(remojar), antes de cocinarlos.
• Siempre enjuague bien los frijoles antes y
después de remojarlos.
• Véase las pautas de cocción en la tabla
de la página 13. Nota: si el tipo de frijoles
no está en la tabla, use un tipo de frijol
de tamaño/forma similares como pauta.
• No cocine más de ½ libra (225 g) de
frijoles a la vez.
• Agregue una pequeña cantidad (aprox. ½
cucharadita) de bicarbonato de sodio
para suavizar los frijoles mientras se
están cocinando.
• Agregue hierbas frescas o ingredientes
aromáticos (p. ej., una cebolla cortada en
cuartos), para realzar el sabor de los
frijoles.
• Escurra los frijoles inmediatamente
después de la cocción.
REMOJAR
• El programa “SOAK” (remojar) es
perfecto para remojar el arroz, los
granos/cereales y los frijoles antes de
cocinarlos.
• Remojar el arroz y los granos/cereales
hace que sean más fáciles de digerir para
las personas con sensibilidades
alimentarias.
• Siempre remoje los frijoles antes de
cocinarlos.
PRELAVAR
• Use el programa “PRE-WASH” (prelavar)
inmediatamente después de cocinar
granos/cereales ricos en almidón o platos
con sabores aromáticos fuertes para
ayudar a limpiar la olla y la tapa interna.
MANTENER CALIENTE
• La función “KEEP WARM” (mantener
caliente) es una excelente manera de
mantener los platos cocinados calientes
hasta el momento de servir.
• No está diseñada para cocinar o
recalentar los alimentos.
• No la use para cocinar carne cruda o
cocinar/recalentar alimentos cuya
temperatura está inferior a 140°F (60°C).
11
Page 48

COCCIÓN AL VAPOR
• Para cocinar al vapor vegetales, límpielos
y córtelos en pedazos uniformes para
que se cocinen uniformemente.
• Para cocinar al vapor carnes tales como
pollo o salchicha, córtelas en pedazos
del mismo tamaño (p. ej. tiritas o rodajas
de ½ pulgada/1.5 cm) y dispóngalos en
una sola capa en el fondo de la bandeja
de cocción al vapor.
• Véase la tabla en la página 14 para más
información acerca de los tiempos de
cocción al vapor sugeridos. Tenga
presente que la tabla solamente es una
pauta, y que el tiempo de cocción puede
variar dependiendo del tamaño de los
pedazos, de la cantidad, de la
temperatura de los alimentos y del gusto
personal de cada persona.
• Saque los alimentos cocinados al vapor
inmediatamente para evitar que se
recuezan.
TABLAS DE COCCIÓN
GUÍA DE COCCIÓN DEL ARROZ, GRANOS Y CEREALES
Use las tablas a continuación y las marcas de nivel de agua en la olla como guía. La textura del arroz
puede variar dependiendo de varios factores, desde diferencias sutiles entre marcas, hasta
dependiendo si lo enjuaga o no antes de cocinarlo. Deje que su gusto y preferencia sea su mejor
guía. Si el arroz/grano es demasiado duro o gomoso, aumente la cantidad de agua/líquido en
¼ de taza (60 ml) a la vez. Si el arroz/grano está demasiado suave, reduzca la cantidad de
líquido/agua de ¼ de taza (60 ml) hasta conseguir la textura deseada.
RICE/WHITE (arroz blanco)
TIPO CANTIDAD DE
Grano largo
Grano medio
Aromático (Jazmín, Basmati)
INGREDIENTES
SECOS
Hasta un máximo
de 10 vasos
medidores (usar el
vaso medidor
provisto).
CANTIDAD DE
LÍQUIDO
Hasta la línea que
corresponda al
número de vasos
medidores.
P. ej., para cocinar
1 vaso medidor de
arroz, agregar agua
hasta la línea “1”.
TIEMPO DE COCCIÓN
APROXIMADO
Blanco: 40 minutos
Blanco rápido: 30 minutos
Blanco duro: 35 minutos
RINDE
Aprox. 1½ tazas
(275 g) de arroz
blanco cocinado
por vaso
medidor de
arroz seco.
RICE/BROWN (arroz integral)
TIPO CANTIDAD DE
Grano largo
Grano medio
Grano corto
Aromático (Jazmín, Basmati)
Salvaje
INGREDIENTES
SECOS
Hasta un máximo
de 10 vasos
medidores (usar el
vaso medidor
provisto).
CANTIDAD DE
LÍQUIDO
Hasta la línea que
corresponda al
número de vasos
medidores.
Por ejemplo: para
cocinar 1 vaso
medidor de arroz,
agregar agua hasta
la línea “1”.
12
TIEMPO DE COCCIÓN
APROXIMADO
Integral: 2 horas
Integral rápido: 80
minutos
RINDE
Aprox. 1½ tazas
(275 g) de arroz
cocinado por
vaso medidor
de arroz seco.
El arroz salvaje
rinde 3 tazas
(550 g) de arroz
cocinado por
vaso medidor
de arroz seco.
Page 49

RICE/SUSHI (arroz sushi)
TIPO CANTIDAD DE
Arroz Sushi blanco
Arroz Sushi integral
GRAINS/CHEWY (granos/cereales gomosos)
TIPO CANTIDAD DE INGREDIENTES
Quinua
INGREDIENTES
SECOS
Hasta un máximo de
10 vasos medidores
(usar el vaso medidor
provisto).
SECOS
1 vaso medidor
(no exceder 10 vasos medidores)
CANTIDAD DE
Hasta la línea que
corresponda al
número de vasos
medidores.
Por ejemplo: para
cocinar 1 vaso
medidor de arroz,
agregar agua hasta
la línea “1”.
LÍQUIDO
CANTIDAD DE
Hasta el nivel 1
TIEMPO DE COCCIÓN
APROXIMADO
45 minutos
LÍQUIDO
TIEMPO DE
COCCIÓN
APROXIMADO
20 minutos
RINDE
Aprox. 1½ tazas
(275 g) de arroz
sushi cocinado
por vaso
medidor de
arroz seco.
RINDE
3 tazas
Cuscús
Bulgur
Amaranto
Trigo sarraceno
Tef
GRAINS/MEDIUM (granos/cereales medios)
TIPO CANTIDAD DE
Trigo/Centeno/Espelta
Farro (remojado por una
noche)
Freekeh
1 vaso medidor
(no exceder 6 vasos medidores)
1 vaso medidor
(no exceder 4 vasos medidores)
1 vaso medidor
(no exceder 8 vasos medidores)
1 vaso medidor
(no exceder 6 vasos medidores)
1 vaso medidor
(hasta un máximo de 6 vasos
medidores)
INGREDIENTES SECOS
1 vaso medidor
(no exceder 4 vasos
medidores)
1 vaso medidor
(No exceder 4 vasos
medidores)
1 vaso medidor
(No exceder 4 vasos
medidores)
1 tazas estándar
(235 ml)
1 tazas estándar
(235 ml)
1 tazas estándar
(235 ml)
Hasta el nivel 2
Hasta el nivel 1
CANTIDAD DE
LÍQUIDO
Hasta el nivel 2
Hasta el nivel 1
1¾ tazas estándares
(415 ml)
20 minutos
20 minutos
20 minutos
20 minutos
20 minutos
TIEMPO DE
COCCIÓN
APROXIMADO
45 minutos
45 minutos
45 minutos
2 tazas
1½ tazas
1½ tazas
3 tazas
2 tazas
RINDE
3 tazas
3 tazas
3 tazas
13
Page 50

TIPO CANTIDAD DE
Cebada (remojada por una
noche)
Arroz negro
OATS (avena)
INGREDIENTES SECOS
1 vaso medidor
(no exceder 4 vasos
medidores)
1 vaso medidor
(no exceder 6 vasos
medidores)
CANTIDAD DE
LÍQUIDO
Hasta el nivel 2
Hasta el nivel 1
TIEMPO DE
COCCIÓN
APROXIMADO
45 minutos
30 minutos
RINDE
2½ tazas
(590 ml)
2 tazas
TIPO CANTIDAD DE
Avena escocesa/Irlandesa
Avena tradicional (no usar
avena instantánea)
Cereales calientes (salvado
de avena, Cream of Wheat®,
etc.)
BEANS (frijoles)
Deje remojar los frijoles por una noche. Escurra, enjuague, y luego cocine los frijoles de acuerdo con
las proporciones. Después de las cocción, escurra los frijoles.
Tipo CANTIDAD DE
Frijoles negros ½ libra (225 g) Hasta el nivel 4 90 minutos Aprox. 4 tazas
Frijoles rojos ½ libra (225 g) Hasta el nivel 4 90 minutos Aprox. 4 tazas
Frijoles “Great Northern” ½ libra (225 g) Hasta el nivel 4 90 minutos Aprox. 4 tazas
INGREDIENTES SECOS
1 vaso medidor
(no exceder 6 vasos
medidores)
1 vaso medidor
(no exceder 6 vasos
medidores)
1 vaso medidor
(no exceder 6 vasos
medidores)
INGREDIENTES
SECOS
CANTIDAD DE
LÍQUIDO
1½ tazas estándares
(355 ml)
1 taza estándar
(235 ml)
Hasta el nivel 2 15 minutos 1½ tazas
CANTIDAD DE
LÍQUIDO
TIEMPO DE
COCCIÓN
APROXIMADO
30 minutos 1½ tazas
15 minutos 1½ tazas
TIEMPO DE
COCCIÓN
RINDE
RINDE
Frijoles blancos ½ libra (225 g) Hasta el nivel 4 60 minutos Aprox. 4 tazas
Garbanzos ½ libra (225 g) Hasta el nivel 4 90 minutos Aprox. 4 tazas
Lentejas ½ libra (225 g) Hasta el nivel 4 45 minutos Aprox. 3 tazas
14
Page 51

GUÍA DE COCCIÓN AL VAPOR DE LOS VEGETALES, DEL POLLO Y DEL
MARISCO
Agregue agua a la olla hasta la línea “STEAM”. Disponga los alimentos en una sola capa
en el fondo de la bandeja de cocción al vapor. Corte los vegetales en pedazos uniformes.
Los tiempos de cocción son aproximados y producirán resultados tiernos/crujientes.
Alargue el tiempo para conseguir vegetales más tiernos o reduzca el tiempo para
vegetales más crujientes.
Saque inmediatamente los alimentos cocinados al vapor de la unidad para evitar que se
recuezan. Si cocina arroz al mismo tiempo, fíjese en el tiempo de cocción indicado en la
tabla para determinar en qué momento colocar la cesta encima de la vasija.
ALIMENTO CANTIDAD PREPARACIÓN TIEMPO DE COCCIÓN
Brécol/Brócoli 10 onzas (285 g)
Calabacines/Calabacitas 6 onzas (170 g)
Camarones 1 libra (455 g) Pelados y limpios 15 minutos
Camote/Batata 1 libra (455 g)
Col (hojas) 4 hojas Descarozada 6 minutos
Espárragos 4 onzas (115 g), aprox. 15
Habichuelas/Judías verdes 5 onzas (140 g) Limpias 9 minutos
Huevos Hasta 12
Lechuga (hojas) 6 hojas Descarozada 6 minutos
Mini col china “bok choy baby” 2, enteras Cortadas a la mitad 17 minutos
Papas amarillas 12 onzas (340 g)
Papas nuevas 12 onzas (340 g) Cuartos 16 minutos
Pescado (salmón, pez espada,
etc.)
Pollo 1 libra (455 g)
Tirabeques 4 onzas (115 g) Limpios 8 minutos
12 onzas (340 g)
Cogollos de 2 pulgadas
(5 cm)
Rodajas de ½ pulgada
(1.5 cm)
Cubos de ¾ de pulgada
(2 cm)
Limpios y partidos a la
mitad
Enteros (perforar un
agujero en la parte de
abajo de cada huevo)
Cubos de ¾ de pulgada
(2 cm)
En pedazos que quepan
en la bandea de cocción
al vapor
Tiras de 2 pulgadas
(5 cm)
15 minutos
8 minutos
17 minutos
8 minutos
5 minutos – pasados por
agua
24 minutos – duros
16 minutos
18 minutos
25 minutos
Zanahorias ”baby” 12 onzas (340 g) Enteras 18 minutos
Zanahorias (en rodajas) 6 onzas (170 g)
Rodajas de ½ pulgada
(1.5 cm)
16 minutos
15
Page 52

RESOLUCIÓN DE PROBLEMAS
PROBLEMA CAUSA SOLUCIÓN
Derrame de
líquido
hirviendo
Arroz
demasiado
duro/suave
Risotto
sobrecocinado
Arroz
quemado
Arroz muy
seco
La unidad no
se enciende
Cantidades de líquido/arroz
incorrectas
Arroz mal lavado
Respiradero no/mal instalado
Contenido de almidón muy alto
Cantidades de líquido/arroz
incorrectas
Programa equivocado
Tiempo de cocción demasiado largo
Cantidades de líquido/arroz
incorrectas
Arroz mal lavado
Olla mal lavada después del último
uso
Respiradero no/mal instalado
Arroz en “mantener caliente” por
más de 12 horas
Arroz recalentado
Tapa mal cerrada
Unidad no enchufada Cerciórese de que la unidad está enchufada.
Fallo; la unidad necesita reparación Llame al servicio de atención al cliente al 1-800-726-0190.
Véase la página 12 para más información.
Ciertos arroces deben lavarse bien antes de cocinarse. Véase la
página 9 para más información.
Cerciórese de que el respiradero está debidamente ensemblado y
en su puesto antes de cocinar.
Agregue una pizca de sal o una gota de aceite para contrarrestar el
alto contenido de almidón del arroz o de los granos/cereales.
Algunos granos/cereales pueden beneficiarse de ser remojados por
una noche y enjuagados.
Véase la página 12 para más información.
Véase las páginas 6 y 12 y la guía de referencia integrada para más
información.
Pruebe el risotto 15 minutos antes del final del tiempo de cocción,
cuando suene el tono y aparezca la cuenta regresiva en la pantalla.
Véase la página 12 para más información.
Ciertos arroces deben lavarse bien antes de cocinarse. Véase la
página 9 para más información.
Cerciórese de lavar cuidadosamente la olla después de cada uso.
Véase las instrucciones de limpieza y mantenimiento en la página 9.
Cerciórese de que el respiradero está en su puesto antes de
encender la unidad.
No recomendamos mantener el arroz caliente por más de 12 horas.
Si el arroz se pone muy seco cuando se recalienta, agregue líquido
adicional en la olla antes de recalentarlo en el futuro.
Cerciórese de que la tapa está bien cerrada antes de encender la
unidad.
La unidad se
apaga sola
Interrupción del suministro eléctrico Espere hasta que el suministro eléctrico regrese e intente otra vez.
Cable mal conectado o desconectado
Recalentamiento
Final del ciclo de cocción/”mantener
caliente”
Cerciórese de que el cable removible está debidamente conectado a
la unidad y enchufado.
Cerciórese de agregar ingredientes a la olla antes de encender la
unidad, y cerciórese de que la olla está debidamente instalada.
Permita que la unidad se enfríe por unos minutos e intente otra vez.
La unidad se apaga automáticamente al final del ciclo de “mantener
caliente”. Si un programa no mantiene la comida caliente al final
del ciclo de cocción, la unidad se apaga automáticamente al final
del tiempo. Esto es normal.
16
Page 53

GARANTÍA LIMITADA
DE TRES AÑOS
(VÁLIDA EN LOS EE.UU. Y
EN CANADÁ SOLAMENTE)
Esta garantía es para los consumidores solamente.
Usted es un consumidor si posee un producto
Cuisinart® que fue comprado en una tienda para uso
personal, familiar o casero. A excepción de los
estados donde la ley lo permita, esta garantía no es
para los detallistas, los demás comerciantes ni los
dueños.
Cuisinart garantiza este producto contra todo defecto
de materiales o fabricación durante 3 años después
de la fecha de compra original, siempre que el
aparato haya sido utilizado para uso doméstico y
según las instrucciones. Le aconsejamos que llene el
formulario de registro disponible en www.cuisinart.
com a fin de facilitar la verificación de la fecha de
compra original. Sin embargo, no es necesario
registrar el producto para recibir servicio bajo esta
garantía. En ausencia del recibo de compra, el
período de garantía será calculado a partir de la
fecha de fabricación.
Si este producto presenta algún defecto de
materiales o fabricación durante el período de
garantía, lo repararemos o reemplazaremos (a nuestra
opción). Para obtener servicio bajo esta garantía,
llame a nuestra línea directa gratuita al 1800-7260190 o regrese el aparato defectuoso a: Cuisinart,
Service Department, 7475 North Glen Harbor Blvd.,
Glendale, AZ 85307.
Regrese el producto defectuoso, junto con su recibo
de compra y un cheque o giro postal de US$10.00
para cubrir los gastos de manejo y envío.
Los residentes de California solo necesitan dar una
prueba de compra y deben llamar al 1-800-726-0190
para recibir instrucciones de envío.
NOTA: para mayor seguridad, le aconsejamos que
mande su paquete por un método de entrega con
seguro y seguimiento. Cuisinart no será responsable
por los daños ocurridos durante el transporte o por
los paquetes enviados a una dirección equivocada.
Los productos perdidos o dañados durante el envío
no serán cubiertos bajo esta garantía. Recuerde
incluir su nombre, dirección y teléfono, la descripción
del problema, así como cualquier información
pertinente.
RESIDENTES DE CALIFORNIA
La ley del estado de California ofrece dos opciones
bajo el período de garantía. Los residentes del estado
de California pueden regresar el producto defectuoso
(A) a la tienda donde lo compraron o (B) a otra tienda
que venda productos Cuisinart® de este tipo.
La tienda, a su opción, reparará el producto, referirá
al consumidor a un centro de servicio independiente,
cambiará el producto o reembolsará al consumidor el
precio original del producto, menos la cantidad
imputable al uso del producto por el consumidor
hasta que este se dañó. Si estas dos opciones no
satisfacen al consumidor, podrá llevar el producto a
un centro de servicio independiente, siempre que se
pueda ajustar o reparar el producto de manera
económica. Cuisinart será responsable por los gastos
de servicio, reparación, reemplazo o reembolso de
los productos defectuosos durante el período de
garantía.
Los residentes de California también pueden, si lo
desean, mandar el producto defectuoso directamente
a Cuisinart para que lo reparen o lo cambien. Para
esto, se debe llamar a nuestro servicio posventa al
1-800-726-0190. Cuisinart será responsable por los
gastos de reparación, reemplazo, manejo y envío de
los productos defectuosos durante el período de
garantía.
ANTES DE HACER REPARAR SU APARATO
Si su aparato tiene algún problema, le recomendamos
que llame a nuestro servicio posventa al 1-800-7260190 antes de regresar el aparato a Cuisinart. Un
representante le confirmará si su producto sigue bajo
garantía y le indicará la dirección del centro de
servicio más cercano.
Este aparato satisface las más altas exigencias de
fabricación y ha sido diseñado para uso sobre
corriente de 120 V, usando accesorios y piezas de
repuesto autorizados solamente. Esta garantía
excluye expresamente los daños causados por
accesorios, piezas o reparaciones no autorizados por
Cuisinart, así como los daños causados por el uso de
un convertidor de voltaje. Esta garantía no cubre el
uso institucional o comercial del producto, y no es
válida en caso de daños causados por mal uso,
negligencia o accidente. Esta garantía excluye
expresamente todos los daños incidentales o
consecuentes. Algunos Estados no permiten la
exclusión o limitación de daños incidentales o
consecuentes, de modo que las limitaciones
mencionadas pueden no regir para usted. Esta
garantía le otorga derechos legales específicos y
usted puede tener otros derechos que varían de un
Estado a otro.
Importante: si debe llevar el producto defectuoso a
un centro de servicio no autorizado, por favor informe
al personal del centro de servicio que deben llamar al
servicio posventa de Cuisinart al 1-800-726-0190 a
fin de diagnosticar el problema correctamente, usar
las piezas correctas para repararlo y asegurarse de
que el producto aún esté bajo garantía.
17
Page 54

RECETAS
DESAYUNOS Y APERITIVOS
Avena con canela jarabe de arce......19
Salvado de avena con arándanos agrios 19
Avena escocesa/irlandesa cremosa con
arándanos azules ..................19
Huevos rellenos ...................20
Muesli/Granola caliente .............20
Bol de avena para el desayuno .......21
ENSALADAS, ACOMPAÑAMIENTOS
Y SOPAS
Frijoles “al horno” .................21
Arroz Basmati con especias indias.....21
Ensalada de remolacha con nueces
tostadas y Ricotta Salata ............22
Ensalada de farro y rúcula ...........22
Arroz jazmín tailandés ..............23
Arroz sushi perfecto................24
Tacitas/Boles de sushi ..............25
Posole rojo .......................26
Arroz con frijoles rojos..............27
Sopa de fideos Udon ...............27
Ensalada de frijoles negros al estilo
suroeste .........................28
Arroz español .....................29
“Tabbouleh” (tabulé) ...............29
Ensalada de trigo y vegetales ........29
Ensalada de frijoles blancos..........30
PLATOS PRINCIPALES
Bol de burrito con arroz integral ......31
Risotto de calabaza moscada ........31
Risotto con arvejas.................32
Cuscús mediterráneo con vegetales al
estilo marroquí ....................33
Bol de quinua y lentejas con vegetales
al vapor y huevo...................33
“Jambalaya” con salchicha y
camarones .......................34
Camarones con vegetales ...........35
Tofu con berro y champiñones .......35
Chile de frijoles vegetariano .........36
DULCES
Budín de arroz con leche tradicional...37
18
Page 55

DESAYUNOS Y
APERITIVOS
AVENA CON CANELA
JARABE DE ARCE
Un desayuno fácil y rápido en cualquier día de la
semana.
Función: OATS (avena)
Rinde aprox. 4 tazas (945 ml)
3 vasos medidores de copos
de avena tradicional (no utilice avena
instantánea)
3½ tazas (830 ml) de agua
¼ cucharadita de sal kosher
1 cucharadita de canela en polvo
3 cucharadas de jarabe de arce/maple
puro
1. Colocar todos los ingredientes en la olla de la
arrocera multifunción Cuisinart®. Elegir la
función “OATS” (avena) y oprimir el botón
START/STOP. COCINAR POR SOLAMENTE
15 MINUTOS.
2. Al final de la cocción, abrir la tapa, revolver y
servir.
Información nutricional por porción de 1 taza (235 ml):
Calorías 210 (14% de grasa) • Carbohidratos 41g
Proteínas 6g • Grasa 4g • Grasa saturada 1g
Colesterol 0mg • Sodio 140mg • Calcio 22mg
Fibra 5g
SALVADO DE AVENA
CON ARÁNDANOS
AGRIOS
La función OATS (avena) sirve para más que solo
avena.
Función: OATS (avena)
Rinde aprox. 4½ tazas (1 L)
2 vasos medidores de salvado de avena
Agua hasta la línea “4” en la olla
¼ cucharadita de sal kosher
1 taza (120 g) de arándanos agrios secos
1. Colocar el salvado de avena, el agua y la sal
en la olla de la arrocera multifunción
Cuisinart®. Elegir la función “OATS” (avena) y
oprimir el botón START/STOP. COCINAR POR
SOLAMENTE 15 MINUTOS.
2. Al final de la cocción, abrir la tapa, agregar los
arándanos agrios, revolver y servir.
Información nutricional por porción de 1 taza (235 ml):
Calorías 150 (9% de grasa) • Carbohidratos 38g
Proteínas 5g • Grasa 2g • Grasa saturada 0g
Colesterol 0mg • Sodio 120mg • Calcio 21mg
Fibra 6g
AVENA ESCOSESA/
IRLANDESA CREMOSA
CON ARÁNDANOS
AZULES
Avena escocesa/irlandesa lista en tan solo 30
minutos, sin necesidad de revolver.
Función: OATS (avena)
Rinde aprox. 5 tazas (1.2 L)
2 vasos medidores de avena escocesa/
irlandesa
3 tazas (710 ml) de leche sin grasa/
descremada
1 pizca de sal kosher
2 palitos de canela
1 pizca de nuez moscada rallada
3 cucharadas de jarabe de arce/maple
puro
2 tazas (280 g) de arándanos azules
frescos
1. Colocar la avena, la leche, la sal, los palitos de
canela, la nuez moscada y el jarabe en la olla
de la arrocera multifunción Cuisinart®. Elegir la
función “OATS” (avena) y oprimir el botón
START/STOP. COCINAR POR SOLAMENTE
30 MINUTOS.
2. Al final de la cocción, abrir la tapa y sacar los
palitos de canela. Agregar los arándanos
azules, revolver y servir.
Información nutricional por porción de 1 taza (235 ml):
Calorías 300 (10% de grasa) • Carbohidratos 56g
Proteínas 11g • Grasa 4g • Grasa saturada 1g
Colesterol 5mg • Sodio 110mg • Calcio 198mg
Fibra 6g
19
Page 56

HUEVOS RELLENOS
Cocinar los huevos al vapor es una manera fácil
de cocinarlos. ¡El temporizador integrado de la
olla arrocera multifunción le avisa cuando están
Función: STEAM (cocción al vapor)
Rinde 24 porciones
Agua
12 huevos grandes*
6 cucharadas de mayonesa
2 cucharadas de aceite de oliva
2 cucharaditas de mostaza de Dijon
2 cucharaditas de jugo de limón fresco
1
/8 a ¼ cucharadita de salsa picante
¼ cucharadita de sal kosher
1
/8 cucharadita de pimienta negra recién
molida
2 cucharadas de hierbas frescas
(cebollinos, perejil o estragón)
Páprika para decorar
1. Preparar un baño de hielo, colocando cubitos
de hielo y agua fría en un tazón; reservar.
2. Agregar agua a la olla de la arrocera
multifunción Cuisinart® hasta la línea
“STEAM”. Colocar la bandeja de cocción al
vapor en la olla y colocar los huevos enteros
en la bandeja. Cerrar la tapa.
3. Elegir la función “STEAM” (cocción al vapor),
fijar el tiempo de cocción en 24 minutos y
oprimir el botón START/STOP.
4. Al final de la cocción, colocar
inmediatamente los huevos en el baño de
hielo para detener la cocción.
5. Pelar y cortar cuidadosamente los huevos por
la mitad a lo largo.
6. Sacar las yemas y colocarlas en el bol de una
procesadora de alimentos Cuisinart®
equipada con cuchilla picadora. Procesar
hasta obtener una mezcla suave. Agregar los
ingredientes restantes, excepto las hierbas y
la paprika, pulsando, y luego procesar hasta
conseguir una mezcla suave. Agregar las
hierbas y pulsar para picar/incorporar. Probar
y ajustar la sazón al gusto. Nota: si no tiene
procesadora de alimentos, puede aplastar la
mezcla con un tenedor.
listos!
7. Rellenar el centro de cada clara con la mezcla
de yema, usando una cuchara o una manga
pastelera. Rociar con páprika antes de servir.
*Se aconseja hacer un pequeño agujero en la parte
inferior (parte más ancha) de cada huevo para evitar
que la cáscara se agriete durante la cocción. La mejor
herramienta para hacer esto es un alfiler.
Información nutricional por porción (medio huevo):
Calorías 71 (80% de grasa): • Carbohidratos 0g
Proteínas 3g • Grasa 6g • Grasa saturada 1g
Colesterol 96mg • Sodio 89mg • Calcio 14 mg
Fibra 0g
MUESLI/GRANOLA
CALIENTE
Una nueva manera de comer avena en la mañana.
Este sustancioso desayuno está repleto de proteína
para empezar bien el día y sentirse lleno/a por mucho
Función: OATS (avena)
Rinde aprox. 8 tazas (1.9 L)
2 vasos medidores de avena escocesa/
irlandesa
1 vaso medidor de arroz integral de
grano corto
1 vaso medidor de quinua
1 vaso medidor de pacanas picadas
1 vaso medidor de pasas
1
/3 taza (30 g) de coco rallado sin azúcar
2 a 4 cucharadas de jarabe de arce/maple
puro
3 cucharadas de aceite de coco
2 palitos de canela
¼ cucharadita de sal kosher
1 pizca de nuez moscada rallada
Agua, hasta la marca “4 tazas”
1. Colocar todos los ingredientes en la olla de
la arrocera multifunción Cuisinart®. Elegir la
función “OATS” (avena) y oprimir el botón
START/STOP.
2. Al final de la cocción, abrir la tapa, sacar los
palitos de canela, revolver bien y servir.
Información nutricional por porción
Calorías 88 (41% de grasa) • Carbohidratos 12g
• Proteínas 2g • Grasa 4g • Grasa saturada 1g
Colesterol 0mg • Sodio 54mg Calcio 41mg
20
tiempo.
de ½ taza (120 ml):
Fibra 3g
Page 57

BOL DE AVENA PARA EL
DESAYUNO
Función: OATS (avena)
Rinde 4 porciones
2 tazas (475 ml) de avena escocesa/
irlandesa cocinada, tibia
¼ taza (60 ml) de mermelada de
frambuesa sin semillas
¼ taza (60 ml) de yogur griego natural
(cualquier variedad))
½ taza (70 g) de frambuesas frescas
¼ taza (40 g) de pacanas picadas
1 cucharadita de semillas de chía
Dividir la avena entre cuatro boles para servir.
Agregar una cantidad uniforme de mermelada de
frambuesa y de yogur; revolver. Cubrir con frambuesas
frescas, pacanas y semillas de chía.
Información nutricional por porción:
Calorías 271 (26% de grasa) • Carbohidratos 44g
Proteínas 8g • Grasa 8g • Grasa saturada 1g
Colesterol 0mg • Sodio 16mg • Calcio 39mg
Fibra 6g
¼ cucharadita de pimienta negra recién
molida
1. Oprimir el botón SAUTÉ (saltear), y luego el
botón START/STOP. Cuando la unidad esté
caliente, agregar el tocino a la olla. Cocinar
hasta que esté dorado y crujiente. Con
cuidado, sacar el tocino cocinado, dejando
la grasa en la olla. Agregar la cebolla y el ajo
a la olla, y saltear por aprox. 2 a 3 minutos,
hasta suavizarse. Presionar STOP para detener
la función para saltear.
2. Escurrir y enjuagar los frijoles, y colocarlos en
la olla, junto con los ingredientes restantes
(incluso en tocino). Elegir la función “BEAN”
(frijoles), fijar el tiempo en 4 horas y oprimir el
botón START/STOP.
3. Al final de la cocción, abrir la tapa y revolver
para mezclar. Probar y ajustar la sazón al
gusto, y servir inmediatamente.
Información nutricional por porción
de 1 taza (235 ml):
Calorías 470 (21% de grasa) • Carbohidratos 77g
Proteínas 18g • Grasa 11g Grasa saturada 9g
Colesterol 0mg • Sodio 420mg Calcio 141mg
Fibra 13g
ENSALADAS,
ACOMPAÑAMIENTOS Y
SOPAS
FRIJOLES “AL HORNO”
Funciones: SAUTÉ (saltear) + BEANS (frijoles)
Rinde aprox. 4 tazas (945 ml)
½ libra (225 g) de frijoles blancos
remojados por una noche
4 onzas (115 g) de tocino grueso, en
cubos
½ cebolla mediana, finamente picada
1 diente de ajo, finamente picado
2 tazas (475 ml) de agua o caldo de pollo
bajo en sodio
¼ taza (60 ml) de jarabe de arce/maple
puro
2 cucharadas llenas (25 g) de azúcar
rubia o morena
1 cucharada de mostaza de Dijon
1 cucharadita de concentrado de tomate
½ cucharadita de sal kosher
ARROZ BASMATI CON
ESPECIAS INDIAS
Funciones: SAUTÉ (saltear) + RICE/WHITE/
QUICK (arroz blanco rápido)
Rinde aprox. 9 tazas (2 L)
3 cucharadas de aceite de oliva
1½ cucharadas de jengibre finamente
picado (un pedazo de aprox. 1 x ½
pulgada (2.5 x 1.5 cm), pelado)
3 dientes de ajo, finamente picados
¾ cucharadita de sal kosher
¼ cucharadita de pimienta negra
recién molida
½ cebolla roja mediana, picada
1 papa blanca grande, pelada y cortada
en cubos de ½ pulgada (1.5 cm)
1½ cucharaditas de comino en polvo
1½ cucharaditas de semillas de cilantro en
polvo
1 cucharadita de canela en polvo
¼ cucharadita de cúrcuma en polvo
4 vasos medidores de arroz Basmati
21
Page 58

Agua (hasta la línea “4” en la olla)
1 taza (145 g) de arvejas congeladas
1
⁄3 taza (20 g) de Fresco cilantro picado
2 cucharaditas de ralladura de limón
1. Colocar el aceite en la olla de la arrocera
multifunción Cuisinart®. Oprimir el botón
SAUTÉ, y luego el botón START/STOP.
Cuando el aceite esté muy caliente (después
de aprox. 2 minutos), agregar el jengibre, el
ajo y una pizca de sal y de pimienta. Saltear
por aprox. 1 minuto, hasta que estén
fragantes. Agregar la cebolla; saltear por
aprox. 1 a 2 minutos, hasta que esté suave y
translúcida. Agregar la papa, la sal/pimienta
restantes y las especias. Revolver bien para
cubrir los vegetales, y cocinar por aprox. 5
minutos, hasta que la papa esté ligeramente
tierna. Oprimir STOP para detener la función
para saltear.
2. Agregar el arroz y el agua. Cerrar la tapa,
elegir el programa RICE/WHITE/QUICK
(arroz blanco rápido), y oprimir el botón
START/STOP.
3. Aproximadamente 5 minutos antes del final
de la cocción, agregar las arvejas, el cilantro
y la ralladura. Cerrar la tapa y dejar que el
arroz termine de cocinarse.
4. Al final de la cocción, abrir la tapa y revolver
para mezclar. Probar y ajustar la sazón al
gusto; servir.
Información nutricional por porción
Calorías 220 (21% de grasa) • Carbohidratos 40g
• Proteínas 5g • Grasa 5g • Grasa saturada 1g
Colesterol 0mg • Sodio 105mg • Calcio 13mg
de 1 taza (235 ml):
Fibra 3g
ENSALADA DE
REMOLACHA CON
NUECES TOSTADAS Y
RICOTTA SALATA
El sabor a sal del queso combina muy bien con la
dulzura de la remolacha y las nueces en esta llamativa
ensalada. Además, cocinar las remolachas enteras al
vapor hace que sean muy fácil de pelar.
Función: Función STEAM (cocción al vapor)
Rinde aprox. 6 tazas (1.4 L)
Agua
1 libra (455 g) de remolachas (aprox. 3),
bien restregadas
2 tazas llenas (120 g) de rúcula/rúgula/
arúgula tierna
½ taza (60 g) de nueces tostadas
2 onzas (55 g) de queso Ricotta Salata,
desmenuzado
3 a 4 cucharadas de vinagreta de champaña
(receta a continuación)
1. Agregar agua a la olla de la arrocera
multifunción Cuisinart® hasta la línea
“STEAM”. Colocar la bandeja de cocción al
vapor en la olla y colocar las remolachas en
la bandeja. Cerrar la tapa.
2. Elegir función “STEAM” (cocción al vapor),
fijar el tiempo de cocción en 30 minutos y
oprimir el botón START/STOP. Nota: las
remolachas grandes pueden requerir hasta
35 minutos de cocción.
3. Al final del tiempo, abrir la tapa y comprobar
el estado de cocción de las remolachas
(debería poder perforarla fácilmente con la
punta de un cuchillo). De ser necesario,
añadir más tiempo.
4. Pelar las remolachas con un cuchillo
mondador/pelador (recomendamos que use
guantes para no mancharse las manos); la
piel de las remolachas debería separarse
fácilmente de la carne de la remolacha.
Después de pelarlas, cortar las remolachas en
pedazos pequeños.
5. Colocar los pedazos en un tazón, agregar el
resto de los ingredientes y revolver.
6. Probar y ajustar la sazón al gusto. Servir
inmediatamente.
Información nutricional por porción de 1 taza (235 ml):
Calorías 182 (68% de grasa) • Carbohidratos 9
Proteínas 6g • Grasa 15g • Grasa saturada 3g
Colesterol 10mg • Sodio 196mg • Calcio 133mg
Fibra 3g
22
Page 59

VINAGRETA DE
CHAMPAÑA
Este aderezo multiuso muy versátil es perfecto para
aderezar ensaladas, aliñar carnes o rociar vegetales.
Rinde aprox. 1 taza (235 ml)
2½ cucharadas de vinagre de champaña
1 cucharadita de mostaza de Dijon
1 chalote pequeño
¼ cucharadita de sal kosher
¼ cucharadita de pimienta negra recién
molida
¾ taza (175 ml) de aceite de oliva virgen
extra
1. Colocar el vinagre, la mostaza, el chalote, la
sal y la pimienta en la jarra de una licuadora
Cuisinart®. Licuar a baja velocidad hasta
obtener una mezcla homogénea. Sin apagar,
agregar lentamente el aceite por la abertura
en la tapa (tapar la abertura con el tapón o
un paño para evitar las salpicaduras).
2. Después de haber agregado todo el aceite,
licuar por 20 segundos adicionales.
3. Probar y ajustar la sazón al gusto.
Información nutricional por porción de 1 cucharada:
Calorías 91 (96% de grasa) • Carbohidratos 0g
Proteínas 0g • Grasa 11g • Grasa saturada 2g
Colesterol 0mg • Sodio 45mg • Calcio 0mg
Fibra 0g
ENSALADA DE FARRO Y
RÚCULA
Una ensalada espectacular, lista en solo 30 minutos. El
farro puede agregarse al resto de los ingredientes aún
tibio, pero si prefiere que esté frío, lo puede cocinar el
día anterior.
Funciones: SOAK (remojar) + GRAINS/CHEWY
(granos/cereales gomosos)
Rinde aprox. 4 tazas (945 ml)
2 vasos medidores de farro
Agua (hasta la línea “2” en la olla)
2 tazas (120 g) de rúcula/rúgula/arúgula
tierna
1 taza (200 g) de corazones de alcachofa,
partidos en cuartos o a la mitad
1 taza (75 g) de achicoria roja finamente
rebanada
¼ taza (60 ml) de aceite de oliva virgen
extra
1 a 2 cucharaditas de jugo de limón fresco
¼ cucharadita de sal kosher
1
/8 cucharadita de pimienta negra recién
molida
2 cucharadas de hojuelas de queso
Parmesano
1. Colocar el farro y el agua en la olla de la
arrocera multifunción Cuisinart®. Cerrar la
tapa. Elegir la función GRAINS/CHEWY
(granos/cereales gomosos) y oprimir el botón
START/STOP.
2. Al final de la cocción, abrir la tapa y colocar
el farro en un tazón grande. Agregar el resto
de los ingredientes, excepto el Parmesano, y
revolver. Cubrir con hojuelas de Parmesano y
servir inmediatamente.
Información nutricional por porción de ½ taza:
Calorías 156 (43% de grasa) • Carbohidratos 19g
Proteínas 4g • Grasa 6g • Grasa saturada 1g
Colesterol 1mg • Sodio 200mg • Calcio 21mg
Fibra 4g
ARROZ JASMÍN
TAILANDÉS
Este arroz puede servir de base para muchos diferentes
platos. Pruébalo con pollo asado o mariscos/crustáceos.
Función: RICE/WHITE (arroz blanco)
Rinde aprox. 8 tazas (1.9 L)
3 vasos medidores de arroz jazmín
Agua (hasta la línea “3” en la olla)
1 trozo de 1 x 1 pulgada (2.5 x 2.5 cm)
de jengibre fresco, cortado a la mitad
2 dientes de ajo, finamente rebanados
1 tira de 1 x ½ pulgada (2.5 x 1.5 cm) de
cáscara de limón pelada
3 hojas grandes de albahaca fresca
¼ cucharadita de sal kosher
2 a 3 cebolletas (“green onions”), finamente
rebanadas
2 cucharadas de cilantro fresco picado
1. Colocar el arroz, la agua, el jengibre, el ajo,
la cáscara de limón y la albahaca en la olla de
la arrocera multifunción Cuisinart®. Elegir la
función RICE/WHITE (arroz blanco) y oprimir
el botón START/STOP.
23
Page 60

2. Al final de la cocción, abrir la tapa y agregar
los ingredientes restantes; revolver.
3. Probar y ajustar la sazón al gusto; servir
inmediatamente.
NOTA: este arroz se congela bien. Dividirlo en
porciones de 1 taza (185 g).
Información nutricional por porción de 1 taza (185 g):
Calorías 250 (0% de grasa) • Carbohidratos 55g
Proteínas 5g • Grasa 0g • Grasa saturada 0g
Colesterol 0mg • Sodio 50mg • Calcio 12mg
Fibra 1g
ARROZ SUSHI PERFECTO
Para conseguir el mismo sabor y la misma consistencia
que el arroz sushi que sirven los restaurantes japoneses,
use esta receta. ¡No se decepcionará!
Función: RICE/SUSHI (arroz sushi)
Rinde aprox. 8 tazas (1.5 kg)
3 vasos medidores de arroz sushi,
enjuagado tres veces y exprimido para
reducir el agua
Agua (hasta la línea “3” en la olla)
¼ taza (60 ml) de vinagre de arroz
3 cucharadas de mirín (vino de arroz
japonés)
¼ cucharadita de sal kosher
1. Colocar el arroz enjuagado y exprimido en la
olla de la arrocera multifunción Cuisinart®.
Agregar los ingredientes restantes; revolver
para mezclar. Elegir la función RICE/SUSHI
(arroz sushi) y oprimir el botón START/STOP.
2. Al final de la cocción, dejar que el arroz se
mantenga caliente o apagar la unidad y
revolver el arroz y sacarlo de la olla para que
se enfríe.
Información nutricional por porción de ½ taza (90 g):
Calorías 92 (0% de grasa) • Carbohidratos 22g
Proteínas 2g • Grasa 0g • Grasa saturada 0g
Colesterol 0mg • Sodio 58mg • Calcio 0mg
Fibra 1g
CONSEJOS PARA HACER SUSHI:
Los sushis son muy versátiles y se pueden preparar
con casi cualquier relleno. Si usa pescado crudo,
cerciórese que pescado de calidad, proveniente de un
pescadero de buena reputación. Cocinar el pescado y
los vegetales es una alternativa simple.
Un tapete de sushi (esterilla de bambú) es muy útil para
enrollar los sushis. También puede enrollar los sushi a
mano, usando “nori” (hojas de alga marina).
A continuación se presentan algunas sugerencias de
rellenos para dar pautas sobre las cantidades; sustituya
sus sabores favoritos.
ROLLO DE AGUACATE,
CEBOLLETA Y ALBAHACA
Función: RICE/SUSHI (arroz sushi)
Rinde 1 rollo
Material: tapete de sushi
1½ tazas (275 g) de arroz sushi perfecto
(receta anterior)
¼ aguacate, pelado y finamente
rebanado
1 cebolleta (“green onion”), en rodajas
finas
6 a 7 hojas de albahaca fresca
Tazón de agua fría (para ayudar a
enrollar los sushis)
Jengibre encurtido, wasabi y salsa de
soya para servir
1. Cubrir el tapete de sushi con papel film/
plástico para evitar que el arroz se pegue al
tapete. Mojar sus manos con agua fría y
formar una capa de arroz sushi en el tapete,
presionando. Colocar el aguacate, la
cebolleta y las hojas de albahaca en una línea
horizontal delgada en el centro del arroz.
Mojar sus manos otra vez con agua y, con la
ayuda del tapete de sushi, enrollar el arroz
hacia su cuerpo. Cerciorarse de enrollar
firmemente, pero sin hacer mucha presión,
para conseguir un rollo uniforme.
2. Desenrollar el tapete de sushi y cortar 8
pedazos, usando un cuchillo afilado limpio.
3. Servir con jengibre encurtido, wasabi y salsa
de soya.
Información nutricional por rollo:
Calorías 353 (16% de grasa) • Carbohidratos 71g
Proteínas 8g • Grasa 7g • Grasa saturada 1g
Colesterol 0mg • Sodio 179mg • Calcio 22mg
Fibra 5g
24
Page 61

ROLLO DE CAMARONES
Y ESPÁRRAGOS
Funciones: RICE/SUSHI (arroz sushi)
Rinde 1 rollo
Material: tapete de sushi
1 hoja de “nori” (hoja de alga marina)
1 taza (185 g) de arroz sushi perfecto
(receta a la izquierda)
4 camarones cocinados al vapor (véase la
tabla en la página 14)
2 espárragos, cocinados al vapor por 4
minutos
1 a 2 cucharadas de semillas de sésamo/
ajonjolí tostadas
Tazón de agua fría (para ayudar a
enrollar los sushis)
Jengibre encurtido, wasabi y salsa de
soya para servir
1. Cubrir el tapete de sushi con papel film/
plástico para evitar que el arroz se pegue al
tapete. Coloque el “nori” en el tapete. Mojar
sus manos con agua fría y formar una capa
de arroz sushi en el nori, presionando,
dejando un espacio de 1 pulgada (2.5 cm) en
el lado más cercano a su cuerpo. Colocar los
camarones y los espárragos en una línea
horizontal delgada en el centro del arroz.
Mojar sus manos otra vez con agua y, con la
ayuda del tapete de sushi, enrollar el arroz
hacia su cuerpo. Cerciorarse de enrollar
firmemente, pero sin hacer mucha presión,
para conseguir un rollo uniforme.
2. Desenrollar el tapete de sushi. Colocar las
semillas de sésamo/ajonjolí tostadas en un
plato limpio. Hacer rodar el rollo de sushi en
las semillas tostadas para cubrirlo. Cortar el
rollo en 8 porciones, usando un cuchillo
afilado limpio.
3. Servir con jengibre encurtido, wasabi y salsa
de soya.
Información nutricional por pancito:
Calorías 270 (14% de grasa) • Carbohidratos 47g
Proteínas 13g • Grasa 4g • Grasa saturada 1g
Colesterol 43mg • Sodio 165mg • Calcio 27mg
Fibra 3g
TACITAS/BOLES DE SUSHI
Sea creativo con estas divertidas tacitas de sushis (o
boles si desea una alternativa fácil y rápida) Requieren
mucho menos precisión y los puede rellenar con sus
rellenos favoritos. Aquí le proponemos una colorida
selección de vegetales y frutas para hacer una
presentación impresionante. Esta receta es fácilmente
adaptable; simplemente añada tofu marinado,
camarones o salmón cocinados al vapor, etc.
Función: RICE/SUSHI (arroz sushi)
Rinde 6 porciones (tazas) o 3 porciones (boles)
Tiras de “nori” (hojas de alga marina)
1½ tazas (275 g) de arroz sushi perfecto
(receta en la página 22)
Material: tazón de agua fría para ayudar a
formar las tazas de sushi (no necesario si hace
boles de sushi)
1 cucharada (15 ml) de vinagre de arroz
¼ zanahoria mediana, cortado en palitos
1 rábano, cortado en palitos
½ pepino pequeño, sin semillas, cortado
en palitos
1 cebolleta (“green onion”), en rodajas
finas
1 mango, pelado y cortado en cubitos
¼ aguacate, finamente rebanado
Aceite de sésamo/ajonjolí
Salsa de soya baja en sodio
Vinagre de arroz
Wasabi
Jengibre encurtido
Furikake (condimento japonés
disponible en la sección de especias
o asiática de la mayoría de los
supermercados)
1. Forrar cada “tacita” de un molde para
“muffins” con papel film/plástico. Forrar cada
“tacita” con dos pedazos de “nori”,
formando una “X” en el fondo y en los lados
de la tacita. Colocar ¼ taza (45 g) de arroz en
el fondo de cada tacita y, usando manos
mojadas, presionar para comprimir el arroz
en el fondo y en los lados de la tacita para
formar una tacita de arroz.
2. Rellenar cada tacita con el relleno deseado y
rociar ligeramente con aceite de sésamo/
ajonjolí, salsa de soya y vinagre de arroz.
25
Page 62

Agregar una pizca de wasabi, a pedacito de
jengibre encurtido y un rocío de “furikake”.
3. Servir inmediatamente.
NOTA: para preparar boles de sushi individuales,
omitir el “nori” y dividir el arroz entre tres boles
individuales. Rellenar cada bol con los vegetales o las
frutas deseadas, y luego rociar con cada una de las
salsas y agregar una pizca de wasabi (al gusto), jengibre
encurtido y ½ cucharadita de “furikake”.
Información nutricional por tacita de sushi:
Calorías 123 (12% de grasa) • Carbohidratos 26g
Proteínas 3g • Grasa 2g • Grasa saturada 0g
Colesterol 0mg • Sodio 96mg • Calcio 12mg
Fibra 2g
Información nutricional por bol de sushi:
Calorías 247 (12% de grasa) • Carbohidratos 52g
Proteínas 5g • Grasa 3g • Grasa saturada 0g
Colesterol 0mg • Sodio 193mg • Calcio 25mg
Fibra 3g
POSOLE ROJO
Un guiso mexicano tradicional, que combina los sabores
de la carne de cerdo hervida a fuego lento y del maíz
molido con el rico sabor ahumado de los chiles secos.
Funciones: SOAK (remojar) + SAUTÉ (saltear)
+ ONE POT (plato único)
Rinde aprox. 14 tazas (3.2 L)
Rinde: 10 a 12 porciones
8 onzas (225 g) de maíz molido,
remojado por una noche (instrucciones
a continuación)
2 cucharaditas de aceite de oliva
1½ libras (680 g) de paleta de cerdo, en
pedazos de 2 pulgadas (5 cm)
Sal kosher
Pimienta negra recién molida
1 cebolla mediana a grande, cortada en
cuartos (raíz intacta)
5 dientes de ajo machacados
1 cucharadita de comino en polvo
2 hojas de laurel
2 pizcas grandes de orégano mejicano
seco, desmenuzado
8 tazas (1.9 L) de caldo de pollo bajo en
sodio
2 chiles anchos secos
2 chiles guajillos secos
2 chiles de árbol secos
2 cucharaditas de miel
½ lima/limón verde
½ cucharadita de sal kosher
Para servir: pedazos de lima/limón verde,
hojas de cilantro, queso Cotija/añejo, rodajas
de rábano, lechuga o col picada, cebolla
picada
1. La noche anterior: colocar el maíz molido en
la olla de la olla arrocera multifunción
Cuisinart® y cubrir con 2 a 3 pulgadas (5 a 7.5
cm) de agua fría. Cerrar la tapa y elegir la
función “SOAK” (remojar). Fijar el tiempo
entre 12 y 18 hojas y oprimir el botón
START/STOP. Una vez remojado, escurrir el
maíz molido, colocarlo en un tazón y reservar.
Lavar y secar la olla, y regresarla en la
unidad.
2. Colocar el aceite de oliva en la olla y oprimir
el botón SAUTÉ (saltear). Sazonar la carne
con una generosa cantidad de sal y pimienta.
Cuando el aceite esté muy caliente, dorar la
mitad la carne por todos lados, por aprox. 8
a 10 minutos. Reservar la carne dorada, junto
con el maíz molido remojado. Repetir con el
resto de la carne.
3. Después de dorar toda la carne, regresar la
primera tanda, junto con el maíz, en la olla.
Agregar la cebolla, 3 dientes diente de ajo
machacados, el comino, las hojas de laurel, el
orégano y el caldo de pollo. Cerrar la tapa.
Elegir la función “ONE POT” (plato único),
fijar el tiempo de cocción en 3 horas y
oprimir el botón START/STOP.
4. Mientras la carne y el maíz se están
cocinando, preparar el puré de chile.
Enjuagar y secar los chiles seco con papel
absorbente. Quitar el tallo y las semillas.
Tostar los chiles y los 2 dientes de ajo
restantes en un sartén seco, a fuego mediolento, hasta que estén aromáticos, y teniendo
cuidado de no quemarlos. Añadir agua para
cubrirlos y seguir cocinando hasta que
empiece a hervir. Retirar del fuego y dejar
remojar por 30 minutos. Colocar los chiles
suavizados en la jarra de una licuadora.
Añadir la miel, el jugo de lima/limón verde y
1 taza (235 ml) del líquido de cocción de los
chiles. Procesar hasta conseguir un puré
suave. Reservar.
5. Treinta minutos antes del final de la cocción,
abrir la tapa y quitar la grasa de encima.
26
Page 63

Colocar la carne en un tazón. Sacar y tirar la
cebolla, el ajo y las hojas de laurel.
Desmenuzar la carne y regresarla a la olla,
junto con el puré de chile reservado. Cerrar
la tapa y dejar que se termine el programa
de cocción.
6. Al final de la cocción, abrir la tapa, colocar el
posole en boles individuales y servir con las
guarniciones sugeridas.
Información nutricional por porción
Calorías 188 (44% de grasa) • Carbohidratos 11g
Proteínas 15g • Grasa 9g • Grasa saturada 2g
Colesterol 42mg • Sodio 211mg •
(basada en 12 porciones):
Calcio 13mg
Fibra 2g
ARROZ CON FRIJOLES
ROJOS
La versión Cuisinart® de este plato jamaiquino típico
resalta los sabores de los condimentos jamaicanos.
Funciones: SOAK (remojar) + SAUTÉ (saltear)
+ ONE POT (plato único)
Rinde aprox. 8 tazas (1.9 L)
3 vasos medidores de frijoles rojos secos,
remojados por una noche*
1 cucharada de aceite de oliva virgen
extra
2 dientes de ajo, finamente picados
½ jalapeño, sin semillas, finamente picado
1 lata de 13.5 onzas (400 ml) de leche de
coco sin azúcar
2 tazas (475 ml) de caldo de pollo o de
vegetales bajo en sodio
4 tallos de tomillo fresco
1 hoja de laurel
1 cucharadita de sal kosher
1 trozo de ½ x ½ pulgada (1.5 x 1.5 cm)
de jengibre, pelado
3 vasos medidores de arroz blanco
de grano mediano
1 taza (235 ml) de agua
½ cucharadita de canela en polvo
4 cebolletas (“green onions”), rebanadas
1. Colocar el aceite de oliva en la olla de la
arrocera multifunción Cuisinart®. Oprimir el
botón SAUTÉ, y luego el botón START/STOP.
Cuando el aceite esté caliente (después de
aprox. 2 minutos), agregar el ajo y el jalapeño.
Saltear por aprox. 1 a 2 minutos, hasta que
estén tiernos y fragantes. Oprimir el botón
START/STOP.
2. Agregar los frijoles, la leche de coco, el caldo,
el tomillo, la hoja de laurel, ½ cucharadita de
la sal y el jengibre. Elegir la función “ONE
POT” (plato único), fijar el tiempo de cocción
en 1 hora y 20 minutos y oprimir el botón
START/STOP.
3. Cuarenta minutos antes del final de la
cocción, abrir la tapa y agregar el arroz y el
agua. Cerrar la tapa y dejar que se termine el
programa de cocción.
4. Al final de la cocción, abrir la tapa, sacar el
tomillo y agregar los ingredientes restantes,
incluso ½ cucharadita de sal; revolver.
5. Probar y ajustar la sazón al gusto. Servir
inmediatamente.
*Usar la función “SOAK” (remojar) para remojar
los frijoles rojos de 8 a 18 horas. Escurrir y
enjuagar antes de usar en la receta.
Información nutricional por porción de 1 taza:
Calorías 470 (21% de grasa) • Carbohidratos 77g
Proteínas 18g • Grasa 11g • Grasa saturada 9g
Colesterol 0mg • Sodio 420mg • Calcio 141mg
Fibra 13g
SOPA DE FIDEOS UDON
Esta receta pone el relieve la versatilidad de la arrocera
multifunción Cuisinart®. ¡Saltee, hierva a fuego lento y
cocine al vapor en la misma unidad!
Funciones: SAUTÉ (saltear) + ONE POT (plato
único)
Rinde aprox. 10 tazas (2.35 L)
1 cucharada de aceite de oliva
1 diente de ajo, rebanado
1 trozo de 2 x ½ pulgadas (5 x 1.5 cm)
de jengibre fresco, pelado y
finamente picado
8 tazas (1.9 L) de caldo de pollo o de
vegetales bajo en sodio
1 mini col china “bok choy baby” (aprox.
6 onzas/170 g), rebanada
3 onzas (85 g) de setas shiitake,
rebanadas
27
Page 64

1 cucharada de salsa de soya baja en
sodio
¼ cucharadita de pimienta negra recién
molida
1 pizca de hojuelas de pimiento rojo
1 taza (175 g) de cubos de calabaza
kabocha o moscada
6 onzas (170 g) de pechuga de pollo,
cortadas en tiritas de 2 pulgadas (5 cm)
(opcional)
8 onzas (225 g) de fideos Udon o Soba
3 cebolletas (“green onions”), finamente
rebanadas
1 taza (85 g) de brotes de porote chino
(también conocido como judía mongo
o soya verde)
1 cucharada (15 ml) de aceite de sésamo/
ajonjolí
Pedazos de lima/limón verde fresco
1. Colocar el aceite en la olla de la arrocera
multifunción Cuisinart®. Oprimir el botón
SAUTÉ, y luego el botón START/STOP.
Cuando el aceite esté caliente (después de
aprox. 2 minutos), agregar el ajo y el
Jengibre. Saltear por aprox. 1 a 2 minutos,
hasta que estén tiernos y fragantes. Oprimir
el botón START/STOP.
2. Agregar el caldo, el bok choy, las setas, la
salsa de soya, la pimienta y las hojuelas de
pimiento rojo. Elegir la función “ONE POT”
(plato único), fijar el tiempo de cocción en 1
hora y 30 minutos y oprimir el botón START/
STOP.
3. Veinte minutos antes del final de la cocción,
agregar la calabaza. Luego, instalar la
bandeja de cocción al vapor en la olla y
colocar las tiras de pollo en la ella. Cerrar la
tapa y dejar que el pollo se cocine mientras
la sopa termina de cocinarse.
4. Al final de la cocción, abrir la tapa y agregar
el pollo cocinado al vapor y los fideos a la
sopa. Cerrar la tapa y dejar que el plato
termine de cocinarse en el modo “mantener
caliente” por 10 minutos. Nota: los fideos
deberían estar suaves, pero no blandos.
5. Abrir la tapa otra vez y agregar las cebolletas,
los brotes de porote chino, el aceite de
sésamo/ajonjolí y un rocío de jugo de lima/
limón verde. Probar y ajustar la sazón al gusto;
servir.
Información nutricional por porción de 1 taza (235 ml),
con pollo:
Calorías 119 (36% de grasa) • Carbohidratos 11g
Proteínas 9g • Grasa 5g • Grasa saturada 1g
Colesterol 35mg • Sodio 263mg • Calcio 27mg
Fibra 1g
ENSALADA DE FRIJOLES
NEGROS AL ESTILO
SUROESTE
Un plato de acompañamiento fresco y lleno de color.
Funciones: SOAK (remojar (saltear) + BEANS
(frijoles)
Rinde aprox. 5 tazas (1.2 L)
2 vasos medidores de frijoles negros
secos, remojados por una noche*
Agua hasta la marca “4 tazas” de la
olla
½ pimiento dulce rojo mediano, picado
1 diente de ajo, finamente picado
1 cebolleta (“green onion”), en rodajas
finas
½ jalapeño, sin semillas, finamente picado
¾ taza (130 g) de maíz en granos
1 cucharada de aceite de oliva virgen
extra
2 cucharaditas de jugo de lima/limón
verde fresco
¾ cucharadita de sal kosher
2 pizcas de pimienta negra recién molida
½ aguacate, en cubos
1 pizca de azúcar granulada
1. Colocar los frijoles escurridos y el agua en la
olla de la arrocera multifunción Cuisinart®.
Cerrar la tapa.
2. Elegir la función “BEANS” (frijoles), fijar el
tiempo de cocción en 1 hora 30 minutos, y
oprimir el botón START/STOP.
3. Al final de la cocción, abrir la tapa y escurrir
los frijoles y colocarlos en un tazón grande.
Agregar el resto de los ingredientes y
revolver para mezclar.
4. Servir inmediatamente, o cubrir y refrigerar
para combinar los sabores.
28
Page 65

Información nutricional por porción de ½ taza:
Calorías 147 (22% de grasa) • Carbohidratos 22g
Proteínas 7g • Grasa 4g • Grasa saturada 1g
Colesterol 225mg • Sodio 39mg • Calcio 39mg
Fibra 5g
*Usar la función “SOAK” (remojar) para remojar los
frijoles negros de 8 a 18 horas. Escurrir y enjuagar antes
de cocinar.
3. Al final de la cocción, abrir y revolver el arroz.
Probar y ajustar la sazón al gusto. Servir
inmediatamente.
Información nutricional por porción de ½ taza (90 g):
Calorías 99 (4% de grasa) • Carbohidratos 21g
Proteínas 2g • Grasa 0g • Grasa saturada 0g
Colesterol 0mg • Sodio 252mg • Calcio 22mg
Fibra 1g
ARROZ ESPAÑOL
Un plato fácil para incorporar en su rotación semanal.
Función: SAUTÉ (saltear) + RICE/WHITE
(arroz blanco)
Rinde 6 tazas (1 kg)
1 cucharadita de aceite de oliva
1 cebolla mediana, finamente picada
1 pimiento dulce rojo pequeño,
finamente picado
2 dientes de ajo, finamente picados
1 rama de apio, finamente picada
1 cucharadita de sal kosher
1 cucharadita de chile en polvo
½ cucharadita de páprika
½ cucharadita de orégano seco
½ cucharadita de pimienta negra recién
molida
1 lata de 14.5 onzas (400 g) de tomates
picados, sin jugo
2 vasos medidores de arroz blanco de
grano largo
Agua hasta la marca “2 tazas” de la
olla
1. Colocar el aceite de oliva en la olla de la
arrocera multifunción Cuisinart®. Oprimir el
botón SAUTÉ (saltear). Cuando el aceite esté
caliente, agregar la cebolla, el pimiento rojo,
el ajo y el apio y saltear por aprox. 2 a 3
minutos, hasta que estén suaves y fragantes.
Agregar las especias secas y seguir
cocinando hasta que estén fragantes.
Agregar los tomates picados escurridos y
revolver para incorporar. Agregar el arroz;
revolver para cubrir.
2. Agregar el agua y revolver. Cerrar la tapa,
elegir la función “RICE/WHITE” (arroz
blanco), y oprimir el botón START/STOP.
“TABBOULEH” (TABULÉ)
Esta receta es fantástica cuando tiene invitados.
Función: GRAINS/SMALL (granos/cereales
pequeños)
Rinde aprox. 4 tazas
1 vaso medidor de trigo bulgur
1 taza (235 ml) de agua
2 tazas de perejil fresco picado
½ taza (30 g) de menta fresca, picada
2 tazas (300 g) de tomates de pera
cortadas a la mitad
3 cebolletas (“green onions”), finamente
rebanadas
2 cucharadas de aceite de oliva virgen
extra
¼ taza (60 ml) de jugo de limón fresco
¼ cucharadita de sal kosher
¼ cucharadita de pimienta negra recién
molida
1 pizca de comino en polvo
1. Colocar el trigo bulgur el agua en la olla de
la arrocera multifunción Cuisinart®. Elegir la
función “GRAINS/SMALL” (granos/cereales
pequeños) y oprimir el botón START/STOP.
2. Al final de la cocción, abrir la tapa y agregar
los ingredientes restantes; revolver.
3. Probar y ajustar la sazón al gusto. Servir
inmediatamente.
Información nutricional por porción de ½ taza (90 g):
Calorías 88 (41% de grasa) • Carbohidratos 12g
Proteínas 2g • Grasa 4g • Grasa saturada 1g
Colesterol 0mg • Sodio 54mg • Calcio 41mg
Fibra 3g
29
Page 66

ENSALADA DE TRIGO Y
VEGETALES
Este sabroso plato es perfecto para cualquier fiesta o
Función: GRAINS/CHEWY (granos/cereales
gomosos)
Rinde aprox. 7 tazas
2 vasos medidores de granos de trigo
integral (“wheat berries”)
3 tazas (710 ml) de agua
½ cucharadita de sal kosher
½ cebolla roja pequeña, picada
11⁄³ tazas (250 g) de maíz en granos fresco
o congelado (descongelado)
1 taza (125 g) de calabacín/calabacita
(“zucchini”) rallado
1 taza (125 g) de pimiento dulce rojo
picado (aprox. 1 pimiento mediano)
½ taza (30 g) de cebolletas (“green
onions”) picadas (aprox. 4 cebolletas
picadas)
½ taza (60 g) de tomates secados al sol
picados
½ taza (120 ml) de vinagreta de cebolla
roja (receta a continuación)
1
⁄3 taza (20 g) de perejil fresco picado
1. Colocar el trigo , el agua y la sal en la olla de
la arrocera multifunción Cuisinart®. Elegir la
función “GRAINS/CHEWY” (granos/cereales
gomosos) y oprimir el botón START/STOP.
2. Al final de la cocción, apagar la unidad y
abrir la tapa. Esparcir el trigo en una placa
para horno para enfriar.
3. Una vez enfriado, colocar el trigo en un tazón
y agregar el maíz, el calabacín/calabacita, el
pimiento rojo, las cebolletas y los tomates
secados al sol. Revolver suavemente para
mezclar. Agregar el aderezo y perejil;
revolver para mezclar.
4. Ajustar la sazón al gusto antes de servir.
Información nutricional por porción de ½ taza (90 g):
Calorías 155 (28% de grasa) • Carbohidratos 25g
Proteínas 4g • Grasa 5g • Grasa saturada 1g
Colesterol 0mg • Sodio 194mg • Calcio 14mg
comida al aire libre.
Fibra 4g
VINAGRETA DE CEBOLLA
ROJA
Este aderezo se conservará en el refrigerador por hasta
2 semanas. Vuelva a licuarlo antes de servir.
Rinde aprox. 1 taza (235 ml)
½ cebolla roja mediana, en pedazos de 1
pulgada (2.5 cm)
2 cucharaditas de mostaza de Dijon
1 cucharadita (5 g) de azúcar granulada
½ cucharadita de sal kosher
¼ cucharadita de pimienta negra recién
molida
¼ taza (60 ml) de vinagre balsámico
½ taza (120 ml) de aceite de oliva virgen
extra
1. Colocar la cebolla, la mostaza, el azúcar, la
sal, la pimienta y el vinagre en la jarra de una
licuadora o en el bol de una procesadora de
alimentos Cuisinart®. Procesar hasta obtener
una mezcla suave. Agregar lentamente y sin
pausa el aceite por la boca de alimentación y
procesar para emulsionar,
2. La vinagreta se conservará en el refrigerador,
en un recipiente hermético.
Información nutricional por porción (1 cucharada):
Calorías 64 (93% de grasa) • Carbohidratos 1g
Proteínas 0g • Grasa 7g • Grasa saturada 1g
Colesterol 0mg • Sodio 79mg • Calcio 1mg
Fibra 0g
ENSALADA DE FRIJOLES
BLANCOS
Una combinación perfecta de sabores, texturas y
colores, esta ensalada es un excelente plato de
acompañamiento o plato principal vegetariano.
Funciones: SOAK (remojar) + BEANS (frijoles)
Rinde aprox. 4 tazas
2 vasos medidores de frijoles blancos
secos (aprox. ½ libra/ 225 g),
remojados por una noche*
Agua hasta la marca “4 tazas” de la
olla
½ cebolla roja mediana, finamente picada
½ pimiento dulce rojo mediano,
finamente picado
¾ taza (45 g) de hojas de perejil picadas
30
Page 67

1½ cucharadas de aceite de oliva virgen
extra
2 cucharaditas de jugo de limón fresco
½ cucharadita de sal kosher
1 pizca de pimienta negra recién molida
1 a 2 pizcas de hojuelas de pimiento rojo
(opcional)
3 cucharadas de queso de cabra
desmenuzado
1. Colocar los frijoles escurridos y el agua en la
olla de la arrocera multifunción Cuisinart®.
Cerrar la tapa.
2. Elegir la función “BEANS” (frijoles) y fijar el
tiempo de cocción en 1 hora 30 minutos.
Oprimir el botón START/STOP.
3. Al final de la cocción, abrir la tapa y escurrir
los frijoles y colocarlos en un tazón grande.
Agregar los ingredientes restantes, excepto
el queso de cabra. Revolver para mezclar.
Esparcir el queso de cabra encima y revolver
suavemente para mezclar.
4. Probar y ajustar la sazón al gusto.
Información nutricional por porción de ½ taza:
Calorías 163 (19% de grasa) • Carbohidratos 24g
Proteínas 10g • Grasa 4g • Grasa saturada 1g
Colesterol 1mg • Sodio 162mg • Calcio 105mg
Fibra 6g
* Usar la función “SOAK” (remojar) para remojar
los frijoles blancos de 8 a 18 horas. Escurrir y
enjuagar antes de usar en la receta.
PLATOS PRINCIPALES
BOL DE BURRITO CON
ARROZ INTEGRAL
Los boles de burrito son populares por una buena
razón: ¡son rápidos, simples, saludables y sustanciosos!
Piense en ello como un lienzo en blanco y cambie o
añada sus artículos favoritos.
Función: RICE/BROWN (arroz integral)
Rinde 4 porciones
3 vasos medidores de arroz integral de
grano corto, tibio
1 taza (200 g) de frijoles negros
cocinados
½ taza (75 g) de granos de maíz
½ taza (75 g) de tomates de pera,
partidas
2 cebolletas (“green onions”), finamente
rebanadas
1 aguacate, en tajadas
Sal kosher
Salsa mexicana
Cilantro fresco picado
Pedazos de lima/limón verde
Chips/Totopos de maíz
1. Dividir todos los ingredientes entre cuatro
boles para servir. Añadir una pizca de sal,
una cucharada de salsa y una pizca de
cilantro picado. Servir con un pedazos de
lima/limón verde y chips/totopos de maíz.
Información nutricional por porción:
Calorías 411 (15% de grasa) • Carbohidratos 76g
Proteínas 11g • Grasa 7g • Grasa saturada 1g
Colesterol 0mg • Sodio 199mg • Calcio 63mg
Fibra 9g
RISOTTO DE CALABAZA
MOSCADA
¡La olla arrocera multifunción permite preparar risotto
fácilmente en cualquier momento, ya sea entre semana
o durante las fiestas!
Funciones: SAUTÉ (saltear) + RISOTTO
(risotto)
Rinde aprox. 8 tazas (8 porciones como
plato principal o 16 porciones como entrada/
acompañamiento)
1½ cucharadas (25 g) de mantequilla sin sal
½ cebolla mediana, finamente picada
1 diente de ajo, finamente picado
1¼ cucharaditas de sal kosher
¼ cucharadita de pimienta negra recién
molida
2 vasos medidores de arroz Arborio
½ taza (120 ml) de vino blanco seco
3 tazas (500 g) de cubos de ½ pulgada
(1.5 cm) de calabaza moscada
1 pizca de nuez moscada rallada
4 tazas (945 ml) de caldo de pollo, a
temperatura ambiente
1 cucharadita de tomillo fresco
¼ taza (30 g) de queso Parmesano rallado
2 cucharadas de perejil fresco picado
31
Page 68

1 cucharadita de jugo de limón fresco
1. Colocar la mantequilla en la olla de la
arrocera multifunción Cuisinart®. Oprimir el
botón SAUTÉ, y luego el botón START/
STOP. Cuando la mantequilla esté derretida
y caliente (después de aprox. 2 minutos),
agregar la cebolla, el ajo y una pizca de sal y
de pimienta. Saltear por aprox. 2 minutos,
hasta que estén suaves. Agregar el arroz y
saltear por aprox. 2 minutos, revolviendo
ocasionalmente, hasta que el arroz esté
ligeramente translúcido. Agregar el vino y
cocinar hasta que se haya evaporado casi
por completo. Luego, agregar la calabaza y
la nuez moscada. Revolver para cubrir.
Agregar el caldo y el tomillo. Cerrar la tapa.
Oprimir el botón START/STOP. Elegir la
función “RISOTTO”. Oprimir el botón
START/STOP.
2. Quince minutos antes del final de la cocción
(escuchará un pitido), abrir la tapa, revolver
el risotto y probar para comprobar el estado
de cocción. Si la consistencia está adecuada
(cremosa y fácil de revolver), oprimir el
botón START/STOP. Si está demasiado seco
o duro, agregar más caldo (tibio o a
temperatura ambiente), cerrar la tapa y dejar
que se cocine hasta el final del tiempo.
3. Al final de la cocción, abrir la tapa y agregar
la sal y la pimienta restantes, el queso
Parmesano, el perejil y el jugo de limón;
revolver.
4. Servir inmediatamente. Si desea que la
textura del risotto sea aún más cremosa,
añadir más caldo al final de la cocción. Si
usa la función “mantener caliente”,
necesitará añadir más caldo antes de servir
para conseguir una consistencia cremosa.
Información nutricional por porción de 1 taza:
Calorías 355 (10% de grasa) • Carbohidratos 66g
Proteínas 10g • Grasa 4g • Grasa saturada 3g
Colesterol 11mg • Sodio 813mg • Calcio 124mg
Fibra 3g
CONSEJO PARA LAS SOBRAS:
Arancini (croquetas de arroz)
No deje que las sobras de risotto se desperdicien. Son
perfectas para preparar “arancini”, unas croquetas
de arroz servidas como aperitivo. “Arancini” significa
“pequeña naranja” en italiano.
Prueba estas croquetas fáciles de hacer la próxima vez
que haga risotto. Usar las sobras de risotto (simples o
cualquier receta) para formar bolas de 2 pulgadas (5
cm) de diámetro, o más pequeñas si desea servirlas
como entremeses más delicados. Rellenar cada bola
con un pedazos de ½ pulgada (1.5 cm) de Mozzarella
fresca. Si el risotto es simple, agregar un poco de salsa
marinara al arroz antes de formar las bolas.
Preparar un empanado clásico: harina en un tazón,
huevos batidos en otro tazón y pan rallado (simple
o sazonado) en otro tazón. Rebozar ligeramente las
croquetas y hornear en 375 °F (190 °C) o freír en un
sartén grande, a fuego medio, usando aceite vegetal
o aceite de oliva. Hornear/freír hasta que estén
uniformemente doradas. Servir inmediatamente.
RISOTTO CON ARVEJAS
Fresco y colorido, este risotto es delicioso solo, pero se
puede adaptar fácilmente añadiendo jamón de Parma
(prosciutto) o jamón picado.
Funciones: SAUTÉ (saltear) + RISOTTO
(risotto)
Rinde aprox. 6 tazas (4 porciones como
plato principal o 12 porciones como entrada/
acompañamiento)
1½ cucharadas (25 g) de mantequilla sin sal
½ cebolla mediana, finamente picada
1 diente de ajo, finamente picado
1¼ cucharaditas de sal marina
¼ cucharadita de pimienta negra recién
molida
2 vasos medidores de arroz Arborio
½ taza (120 ml) de vino blanco seco
3½ tazas (830 ml) de caldo de pollo bajo
en sodio, a temperatura ambiente
2 ramitas de tomillo fresco
2 tazas (280 g) de arvejas congeladas (no
descongeladas)
¼ taza (20 g) de queso Pecorino Romano
rallado
2 cucharadas de perejil fresco picado
1 cucharadita de ralladura de limón
1 cucharadita de jugo de limón fresco
Brotes de arvejas y/o microvegetales
para servir
1. Colocar la mantequilla en la olla de la
arrocera multifunción Cuisinart®. Oprimir el
botón SAUTÉ, y luego el botón START/
STOP. Cuando la mantequilla esté derretida
y caliente (después de aprox. 2 minutos),
agregar la cebolla, el ajo y una pizca de sal y
32
Page 69

de pimienta. Saltear por aprox. 2 minutos,
hasta que estén suaves. Agregar el arroz y
saltear por aprox. 2 minutos, revolviendo
ocasionalmente, hasta que el arroz esté
ligeramente translúcido. Agregar el vino y
cocinar hasta que se haya evaporado casi
por completo. Luego, agregar el caldo y el
tomillo. Revolver, y luego cerrar la tapa.
Oprimir el botón START/STOP. Elegir la
función “RISOTTO”. Oprimir el botón
START/STOP.
2. Quince minutos antes del final de la cocción
(escuchará un pitido), abrir la tapa, revolver
el risotto y probar para comprobar el estado
de cocción. Si está cocinado a su gusto,
agregar las arvejas, cerrar la tapa y dejar que
se caliente por 5 minutos adicionales. Abrir
la tapa, agregar los ingredientes restantes
(excepto los brotes de arvejas y/o los
microvegetales).
3. Si el risotto está demasiado duro, agregar
más líquido (preferiblemente a temperatura
ambiente) junto con las arvejas. Dejar que se
cocine por 5 minutos adicionales. Después
de los 5 minutos, agregar los ingredientes
restantes, según se indica en el paso 2.
4. Servir inmediatamente. Dividir el risotto
entre boles para servir y agregar una pizca
de brotes de arvejas y/o microvegetales.
Información nutricional por porción de 1 taza:
Calorías 197 (14% de grasa) • Carbohidratos 33g
Proteínas 6g • Grasa 3g • Grasa saturada 2g
Colesterol 8mg • Sodio 675mg • Calcio 34mg
Fibra 2g
CUSCÚS MEDITERRÁNEO
CON VEGETALES AL
ESTILO MARROQUÍ
Una comida sustanciosa y colorida, deliciosa sola o
servida con pollo rostizado.
Funciones: SAUTÉ (saltear) + GRAINS/SMALL
(granos/cereales pequeños)
Rinde aprox. 7 tazas
1½ cucharaditas de aceite de oliva virgen
extra
½ cebolla mediana, en rodajas
2 tazas (500 g) de cubos de ½ pulgada
(1.5 cm) de
calabaza moscada
1 papa blanca mediana de aprox.
8 onzas (225 g), pelada y cortada en
cubos de ½ pulgada (1.5 cm)
1½ taza (aprox. 170 g) de cubos de ½
pulgada (1.5 cm) de berenjena pelada
¾ cucharadita de sal kosher
½ cucharadita de pimienta negra recién
molida
3 vasos medidores de cuscús israelí
2½ tazas (590 ml) de caldo de pollo bajo
en sodio
1 palito de canela
½ cucharadita de comino en polvo
½ cucharadita de ralladura de limón
½ taza (50 g) de albaricoques/
chabacanos/damascos secos, picados
1. Colocar el aceite en la olla de la arrocera
multifunción Cuisinart®. Oprimir el botón
SAUTÉ (saltear), y luego el botón START/
STOP. Cuando el aceite esté caliente
(después de aprox. 2 minutos), agregar la
cebolla. Saltear por aprox. 2 minutos, hasta
que esté suave. Agregar el resto de los
vegetales, con una pizca de sal y pimienta.
Cocinar por aprox. 4 a 5 minutos, hasta que
la calabaza moscada y la papa estén
ligeramente tiernas.
2. Oprimir el botón START/STOP y agregar el
cuscús, el caldo, el palito de canela, la sal y
la pimienta restantes, el comino y la ralladura.
Cerrar la tapa. Elegir la función “GRAINS/
SMALL” (granos/cereales pequeños) y oprimir
el botón START/STOP.
3. Al final de la cocción, abrir la tapa y sacar el
palito de canela. Agregar los albaricoques,
revolver y servir.
Información nutricional por porción de 1 taza:
Calorías 360 (2% de grasa) • Carbohidratos 77g
Proteínas 11g • Grasa 1g • Grasa saturada 0g
Colesterol 0mg • Sodio 440mg • Calcio 55mg
Fibra 7g
33
Page 70

BOL DE QUINUA
Y LENTEJAS CON
VEGETALES AL VAPOR Y
HUEVO
Este bol está lleno de vegetales frescos y coloridos,
quinua y huevos ricos en proteínas. Puede añadirle
semillas crujientes o brotes antes de servir.
Funciones: GRAINS/SMALL (granos/cereales
pequeños) + STEAM (cocción al vapor)
Rinde 4 porciones
2 tazas (300 g) de quinua tricolor
cocinada
1 vaso medidor de lentejas verdes
4 tazas (945 ml) de agua
2 zanahorias medianas, en rodajas
1 remolacha pequeña, pelada y cortada
en rodajas
2 huevos grandes, en su cáscara
2 rábanos, finamente rebanados
½ taza (30 g) de rúcula/rúgula/arúgula
tierna
¼ taza (40 g) de tomates de pera, en
cuartos
½ aguacate, en tajadas delgadas
Aceite de oliva para servir
Sal kosher, a su gusto
Pimienta negra recién molida (al gusto)
Pedazos de limón para servir
1. Colocar las lentejas y el agua en la olla de la
arrocera multifunción Cuisinart®. Instalar la
bandeja de cocción al vapor y colocar las
zanahorias y la remolacha en ella. Cerrar la
tapa, elegir la función “STEAM” (cocción al
vapor) y fijar el tiempo en 16 minutos.
Oprimir el botón START/STOP. Seis minutos
antes del final de la cocción, colocar los
huevos en la bandeja de cocción al vapor.
2. Al final de la cocción, sacar la bandeja de
cocción al vapor y escurrir las lentejas.
3. Dividir la quinua y las lentejas entre cuatro
boles para servir. Añadir los vegetales. Pelar
los huevos, partirlos a la mitad y colocar una
mitad en cada bol. Rociar con aceite de oliva
y sazonar al gusto con sal y pimienta. Servir
con un pedazo de limón.
Información nutricional por porción:
Calorías 317 (24% de grasa) • Carbohidratos 4g
Proteínas 16g • Grasa 9g • Grasa saturada 1g
Colesterol 93mg • Sodio 149mg • Calcio 64mg
Fibra 10g
“JAMBALAYA”
CON SALCHICHA Y
CAMARONES
Un plato de arroz fácil de preparar para darle vida a
cualquier noche de semana.
Funciones: SAUTÉ (saltear) + ONE POT
(plato único)
Rinde aprox. 8 tazas
6 onzas (225 g) de salchicha “andouille”
(también puede usar pollo o pavo), en
rodajas de ½ pulgada (1.5 cm)
1 cebolla pequeña, picada
1 rama de apio, picada
½ pimiento dulce rojo, picado
½ jalapeño, finamente picado
2 cucharaditas de ajo finamente picado
2 vasos medidores de arroz blanco de
grano largo
½ cucharadita de sal kosher
1 cucharadita de páprika
1 cucharadita de tomillo seco
1 cucharadita de orégano seco
2 tazas (475 ml) de caldo de pollo bajo
en sodio
1 taza (200 g) de tomates asados al
fuego picados, en su jugo
1 hoja de laurel
12 onzas (340 g) de camarones limpios y
pelados
¼ taza (15 g) de perejil fresco picado
¼ taza (60 g) de cebolletas (“green
onions”) finamente rebanadas
Pedazos de limón y salsa picante al
gusto
1. Colocar la salchicha en la olla de la arrocera
multifunción Cuisinart®. Oprimir el botón
SAUTÉ (saltear), y luego el botón START/
STOP. Dorar la salchicha por todos lados por
aprox. 8 a 10 minutos. Nota: si usa pollo o
pavo, puede que necesite 1 a 2 cucharaditas
de aceite de oliva para dorar la carne. Sacar
34
Page 71

la salchicha de la olla y reservar. Agregar a la
olla la cebolla, el apio, el pimiento y el
jalapeño; cocinar por 6 a 8 minutos,
revolviendo a menudo. Agregar la ajo y
cocinar por 1 a 2 minutos, hasta que esté
fragante. Agregar el arroz, la sal, la paprika,
el tomillo y el orégano. Revolver por 2 a 3
minutos, hasta que el arroz esté translúcido.
Oprimir el botón START/STOP.
2. Agregar el caldo, los tomates picados y la
hoja de laurel. Cerrar la tapa, elegir la función
“ONE POT” (plato único), fijar el tiempo de
cocción en 40 minutos y oprimir el botón
START/STOP.
3. Unos diez minutos antes del final de la
cocción, agregar la salchicha reservada y los
camarones a la olla. Revolver brevemente,
volver a cerrar la tapa, y dejar que se termine
el programa de cocción.
4. Al final de la cocción, abrir la tapa y agregar
el perejil y las cebolletas; revolver. Servir
inmediatamente, con pedazos de limón y
salsa picante.
Información nutricional por porción de 1 taza:
Calorías 165 (33% de grasa) • Carbohidratos 14g
Proteínas 14g • Grasa 6g • Grasa saturada 2g
Colesterol 82mg • Sodio 366mg • Calcio 80mg
Fibra 1g
CAMARONES CON
VEGETALES
Ligero y simple, este plato pasa del congelador a la
mesa en aprox. 15 minutos. Para preparar una comida
más sustanciosa, sírvalos sobre una cama de arroz
blanco.
Función: STEAM (cocción al vapor)
Rinde 1 a 2 porciones
6 espárragos, cortados diagonalmente en
trozos de 1½ pulgadas (4cm)
½ zanahoria mediana, en juliana
½ taza (70 g) de tirabeques/arvejas chinas
(“snow peas”)
½ libra (225 g) de camarones grandes
congelados
Jugo de limón fresco
Perejil fresco picado
Sal kosher
Pimienta negra recién molida
1. Agregar agua a la olla de la arrocera
multifunción Cuisinart® hasta la línea
“STEAM”.
2. Revolver los vegetales y colocarlos en la
bandeja de cocción al vapor. Agregar los
camarones, colocar la bandeja de cocción al
vapor en la olla y cerrar la tapa.
3. Elegir la función “STEAM” (cocción al vapor)
y fijar el tiempo de cocción en 15 minutos.
Oprimir el botón START/STOP.
4. Al final del tiempo, colocar inmediatamente
los camarones y los vegetales cocinados al
vapor en un bol para servir, rociar con jugo
de limón y perejil y sazonar al gusto con sal/
pimienta.
Información nutricional por porción (basada en 2
porciones):
Calorías 105 (11 % de grasa) • Carbohidratos 6g
Proteínas 17g • Grasa 1g • Grasa saturada 0g
Colesterol 143mg • Sodio 726mg • Calcio 88mg
Fibra 2g
TOFU CON BERRO Y
CHAMPIÑONES
Un plato principal vegetariano/vegano simple,
preparado a partir de un acompañamiento con
simplemente añadir tofu al vapor. Es perfecto solo, pero
también es delicioso sobre una cama de arroz blanco
caliente.
Funciones: SAUTÉ (saltear) + STEAM (cocción
al vapor)
Rinde 2 porciones
2 cucharadas de aceite de sésamo/
ajonjolí tostado
1 cucharada de semillas de sésamo/
ajonjolí
2 dientes de ajo, finamente picados
1 cucharada de salsa de soya baja en
sodio
1 pizca de hojuelas de pimiento rojo
Agua
4 onzas (115 g) de champiñones comunes
(también conocidos como champiñones
cremini, champiñones de Paris o
champiñones portobello “baby”),
rebanados
7 a 8 onzas (200 a 225 g) de tofu medio-firme,
cortado en 6 pedazos
1½ onzas (40 g) de berro
35
Page 72

1 pizca de sal kosher
1. Colocar el aceite de sésamo/ajonjolí en la
olla de la arrocera multifunción Cuisinart®.
Oprimir el botón SAUTÉ (saltear), y luego el
botón START/STOP. Una vez caliente,
agregar la semillas de sésamo/ajonjolí y el
ajo. Cuando el ajo empiece a dorarse (aprox.
2 minutos), oprimir el botón START/STOP y
colocar las semillas de sésamo/ajonjolí y el
ajo en un bol pequeño. Agregar la salsa de
soya y las hojuelas de pimiento rojo; reservar.
2. Agregar agua a la olla hasta la línea
“STEAM”. Colocar los champiñones y el tofu
en la bandeja de cocción al vapor y colocar
esta en la olla. Cerrar la tapa. Elegir la
función “STEAM” (cocción al vapor), fijar el
tiempo de cocción en 10 minutos y oprimir el
botón START/STOP.
3. Al final del tiempo de cocción, agregar el
berro. Elegir la función “STEAM” (cocción al
vapor) otra vez, fijar el tiempo de cocción en
5 minutos y oprimir el botón START/STOP.
4. Al final del tiempo, colocar inmediatamente
los alimentos cocinados al vapor en el bol y
revolver para combinar con la salsa
reservada. Probar y ajustar la sazón al gusto.
Información nutricional por porción de 1 taza:
Calorías 224 (68% de grasa) • Carbohidratos 7g
Proteínas 10g • Grasa 16g • Grasa saturada 2g
Colesterol 0mg • Sodio 423mg • Calcio 59mg
Fibra 1g
CHILE DE FRIJOLES
VEGETARIANO
El sabor ahumado del chipotle no solo le da a este chile
mucho sabor (y algo de calor), sino también una riqueza
inesperada, que lo convierte en un plato sustancioso y
saludable.
Funciones: SOAK (remojar) + SAUTÉ (saltear)
+ ONE POT (plato único)
Rinde aprox. 5 tazas (1.4 L)
3 tazas (300 g) de frijoles secos (usar
una mezcla de frijoles negros, rojos,
blancos, porotos Adzuki, garbanzos,
etc.) remojados por una noche
1 cucharada de aceite de oliva virgen
extra
1 trozo de ½ pulgada (1.5 cm) de
jengibre, pelado y finamente picado
2 dientes de ajo, finamente picados
½ cebolla mediana, finamente picada
1 cucharadita de sal kosher
¼ cucharadita de pimienta negra recién
molida
1 pimiento dulce mediano (de
preferencia amarillo o verde), sin
semillas y picado
2 cucharaditas de chile en polvo
¼ cucharadita de comino en polvo
¼ cucharadita de canela en polvo
1 lata de 28 onzas (400 g) de tomates
picados, sin jugo
2 cucharadas de concentrado de tomate
1 chipotle entero en adobo + ½
cucharadita de adobo
2 tazas (475 ml) de caldo de pollo o de
vegetales bajo en sodio
1 a 2 cucharadas de jarabe de arce/maple
puro
Queso Cheddar o Monterey Jack
rallado, para decorar
Cilantro fresco picado grueso, para
decorar
1. Colocar el aceite de oliva en la olla de la
arrocera multifunción Cuisinart®. Oprimir el
botón SAUTÉ (saltear), y luego el botón
START/STOP. Cuando el aceite esté muy
caliente (después de aprox. 2 minutos),
agregar el jengibre, la cebolla y una pizca de
sal y de pimienta. Saltear por aprox. 2
minutos, hasta que la cebolla esté suave y
translúcida. Agregar el pimiento dulce y las
especias y cocinar por aprox. 3 a 4 minutos
para combinar los sabores. Oprimir el botón
START/STOP.
2. Agregar los frijoles, los tomates, el
concentrado de tomate, el chipotle y el
adobo, el caldo/agua, y la sal/pimienta
restantes. Elegir la función “ONE POT” (plato
único), fijar el tiempo de cocción en 2 horas y
30 minutos y oprimir el botón START/STOP.
3. Al final de la cocción, abrir la tapa, sacar el
chipotle y agregar el jarabe de arce; revolver.
Probar y ajustar la sazón al gusto. Servir con
36
Page 73

el queso desmenuzado y una pizca de
cilantro.
* Usar la función “SOAK” (remojar) para remojar
los frijoles de 8 a 18 horas. Escurrir y enjuagar
antes de usar en la receta.
Información nutricional por porción de 1 taza:
Calorías 470 (21% de grasa) • Carbohidratos 77g
Proteínas 18g • Grasa 11g • Grasa saturada 9g
Colesterol 0mg • Sodio 420mg • Calcio 141mg
Fibra 13g
DULCES
BUDÍN DE ARROZ CO
LECHE TRADICIONAL
La función “RISOTTO” permite hacer mucho más que
risotto. Disfruta de un poco de budín de arroz con leche
Función: RISOTTO (risotto)
Rinde 5 tazas (1.4 L)
2 vasos medidores de arroz Arborio
3 tazas (710 ml) de leche entera
2 tazas (475 ml) de crema líquida para
batir (“heavy cream”)
1 vaina de vainilla, abierta
2
⁄3 taza (135 g) de azúcar granulada
¼ cucharadita de sal kosher
2 palitos de canela
¼ cucharadita de nuez moscada rallada
1. Colocar todos los ingredientes en la olla de
la arrocera multifunción Cuisinart®. Elegir la
función “RISOTTO”, y oprimir el botón
START/STOP.
2. Quince minutos antes del final de la cocción
(escuchará un pitido), abrir la tapa, revolver la
mezcla y probar para comprobar el estado de
cocción. Si le gusta la consistencia, oprimir el
botón START/STOP. Si el arroz está
demasiado duro o seco, agregar leche o
agua, cerrar la tapa, y terminar de cocinar.
3. Al final de la cocción, abrir la tapa, sacar los
palitos de canela, y revolver bien. Servir tibio
o helado.
Información nutricional por porción de ½ taza (60 ml):
Calorías 553 (33% de grasa) • Carbohidratos 84g
Proteínas 9g • Grasa 20g • Grasa saturada 13g
Colesterol 76mg • Calcio 124mg • Fibra 1g
casero.
37
Page 74

BOLES DE ARROZ
&
GRANOS/CEREALES
Antiguamente una especialidad de restaurante vegetariano y tienda de
alimentos naturales, los boles de arroz/granos ahora son omnipresentes en
los restaurantes de todo el mundo.
Parece que cada etnia tiene su propia versión, y con la ayuda de la
arrocera multifunción Cuisinart®, puede replicarlos en su propia casa. En las
siguientes páginas le ofrecemos una guía de cómo armar su propio bol. No
hay reglas, ¡así que diviértese!
Primero... ¿arroz, granos/cereales
1
o ambos?
Arroz (integral, blanco, salvaje y negro)
•
Quinua
•
Cuscús
•
Farro
•
Trigo/Centeno/Espelta
•
Bulgur
•
Fideos de arroz
•
Fideos Udon
•
OK... ¿ahora qué?
2
¡Una proteína para llenarle!
Camarones (salteados o al vapor)
•
Pechuga de pollo al vapor
•
Salmón al vapor
•
Tofú dorado o al vapor
•
Pollo o pavo molidos
•
Huevos pasados por agua
•
Frijoles y legumbres
•
38
Page 75

Esto es saludable, ¿verdad?
3
Agregue vegetales
Juliana de calabacín/calabacita
•
y calabacín amarillo (al vapor o crudo)
Zanahorias y chirivías rallados
•
Arvejas de vaina
•
Tirabeques/arvejas chinas
•
Papas Cambray (papas pequeñas) al
•
vapor
Col rizada al vapor o salteada
•
Maíz al vapor (pedazos de mazorca)
•
Col salteada
•
Tomates de pera
•
Aguacate (cubos o tajadas)
•
Habichuelas/Judías verdes al vapor
•
Verduras de hoja
•
Rodajas de apio
•
Zapallo al vapor
•
Ahora, una sabrosa decoración:
5
Aceitunas
•
Semillas de sésamo/ajonjolí (puede
•
añadirle especias o sazón especial, p.
ej. sazón de nori)
Rodajas de cebolleta (“scallion”)
•
Hierbas frescas picadas
•
Queso desmenuzado o triturado
•
Arroz inflado
•
Pepitas
•
Nueces picadas
•
Microvegetales
•
Brotes de arvejas
•
Semillas de chía
•
Semillas de cáñamo
•
Sazónelo
4
La salsa realmente realzará la cocina
étnica elegida para su bol de arroz/
granos. Estas salsas están disponibles
en la mayoría de los supermercados, o
pueden prepararse en casa (visite
www.cuisinart.com para descubrir
nuestras recetas de pesto de albahaca,
salsa verde, chimichurri y más).
Miel (¡hágalo picante!)
•
Salsa picante (búfalo, asiática, sriracha)
•
Pesto
•
“Tapenade”
•
Aderezo de miso-jengibre
•
Salsa verde
•
Salsa de yogur-Tahini
•
Alioli
•
Humus
•
Harissa
•
Chimichurri
•
Salsa de maní
•
Teriyaki
•
39
Page 76

NOTES:
Trademarks or service marks referred to herein are the
trademarks or service marks of their respective owners.
©2019 Cuisinart
150 Milford Road
East Windsor, NJ 08520
Printed in China
18CE053050
IB-15662-ESP
 Loading...