

Page 1
INSTRUCTION AND
RECIPE BOOKLET
Compact 2-Quart. Deep Fryer
For your safety and continued enjoyment of this product, always read
the Instruction Book carefully before using.
CDF-130
Page 2

CONTENTS
Important Safeguards ........................................ 2
Important Safety Tips ........................................ 3
Parts and Features ............................................4
Operating Instructions ....................................... 5
Filtering and Changing the Oil .......................... 6
Cleaning and Maintenance ................................ 6
Safety Features .................................................. 6
Tips and Hints .................................................. 7
Frying Frozen Foods ......................................... 7
Deep-Frying Guide ............................................ 8
Recipes .............................................................. 9
Warranty ........................................................... 12
IMPORTANT
SAFEGUARDS
When using electrical appliances, basic safety
precautions should always be taken, including
the following:
1. READ ALL INSTRUCTIONS.
2. Unplug from outlet when not in use and
before cleaning. Allow to cool before
putting on or taking off parts, and before
cleaning the appliance. Extreme caution
must be used when moving the
Compact 2-Quart. Deep Fryer
hot oil or other liquids.
3. Do not touch hot surfaces. Use handles
and knobs.
4. To protect against electric shock, do not
immerse heating element, cord, plug or
deep fryer in water or other liquids.
5. This appliance is not for use by children.
Close supervision is necessary when
any appliance is used near children or
individuals with certain disabilities.
6. Never leave appliance unattended when it
is connected to the power outlet.
7. Always attach breakaway cord to
appliance rst, then plug into wall outlet.
8. Do not operate any appliance with a
damaged cord or plug, or after the
appliance malfunctions or has been
damaged in any manner. Return appliance
to the nearest Cuisinart Certied
Cuisinart®
if it contains
Consumer Service Center for examination,
repair or adjustment.
9. The use of attachments not recommended
or sold by the manufacturer may result in
re, electric shock or injury.
10. Do not use outdoors.
11. Do not let cord hang over edge of table or
counter, or touch hot surfaces.
12. Do not place on or near a hot gas or
electric burner, or in a heated oven.
13. Do not operate under cabinets.
14. The appliance will automatically shut off
if operation exceeds 12 minutes without
oil. If this occurs, resetting of the
appliance is required.
15. If appliance still does not function after
following reset instructions, please
contact a Cuisinart Certied Consumer
Service Center for assistance.
16. Be sure handles are properly attached to
basket and locked in place. See detailed
assembly instructions.
17. Do not use this appliance for other than its
intended use.
18. Periodically check for looseness of
screws or nuts and retighten them.
CAUTION: Overtightening can result in
stripping of screws or nuts or cracking of
handle or feet.
19. Do not exceed 60 minutes ON time within
a period of 2 hours.
20. Do not operate your appliance in
an appliance garage or under a wall
cabinet.When storing in an appliance
garage, always unplug the unit from the
electrical outlet. Not doing so could create
a risk of re, especially if the appliance
touches the walls of the garage or the
door touches the unit as it closes.
SAVE THESE
INSTRUCTIONS
FOR HOUSEHOLD
USE ONLY
2
Page 3

IMPORTANT SAFETY TIPS
1. Always keep lid closed while deep fryer
is cooking food. Use basket handle to
raise and lower basket. After removing lid,
always raise basket out of hot oil, rest on
basket hook and allow food to drain for 10
to 20 seconds.
2. BEWARE OF STEAM WHEN
OPENING LID.
3. Wet food should be dried rst with
paper towels. Remove loose ice from
frozen foods. Close the lid when frying.
Beware of oil splattering when food is put
into the oil.
4. Keep appliance at least 4 inches away
from walls or other objects during
operation. Do not place any objects on
top of appliance while it is operating.
5. Be sure oil container is lled to at
least the minimum oil level. Do not ll
above the maximum. Do not operate
appliance without oil or with an insufcient
amount of oil. Never pour oil into heated
oil container.
6. Do not operate this appliance if the lid and
the oil container are not completely dry.
7. Keep this fryer out of reach of children
while in use and away from edges of
countertops, where it could be pulled off
or pushed over by children.
8. DO NOT use any solid/hydrogenated oil,
olive oil, grapeseed oil, shortening or lard
in this deep fryer. DO NOT MIX OILS as
they may have different smoke points.
USE GOOD QUALITY oil that has a smoke
point of 400˚F or higher.
CAUTION: To prevent damage to countertop or
tabletop nish, use a nonammable, heat-resistant coaster or placemat between the appliance
and the countertop or tabletop surface. Never
place on carpet, furniture, or other combustible
materials.
BREAKAWAY CORD AND
POLARIZED PLUG
This appliance features a breakaway cord and
polarized plug (one blade is wider than the other).
The breakaway cord is designed to quickly
disconnect from the appliance when a pulling
force is applied. NOTE: The breakaway cord can
t into the appliance in only one direction. Please
refer to printing on the cord connector that states
“This Side Up.” To reduce the risk of electric
shock, a polarized plug is featured. This plug is
intended to t only into a polarized outlet. If the
plug does not t into the outlet, reverse the plug.
If it still does not t, contact a qualied electrician. Do not attempt to modify the plug in
any manner.
Always attach plug to appliance rst, then plug
cord in the wall outlet. To disconnect, turn any
control to “off,” then remove plug from wall outlet.
SHORT CORD
INSTRUCTIONS
CAUTION:
to reduce the risk of personal injury resulting from
becoming entangled in or tripping over a long cord.
EXTENSION CORD USE
An extension cord or longer detachable cord is
not recommended for use with deep fryers.
ELECTRIC POWER
If the electrical circuit is overloaded with other
appliances, your appliance may not operate. It
should be operated on an electrical circuit that is
free from other appliances. If you are not sure of
the reason for overloading or cannot nd a separate circuit, contact a qualied electrician.
This appliance is for 120 volts only and should
not be used with a converter.
A short power-supply cord is provided
3
Page 4
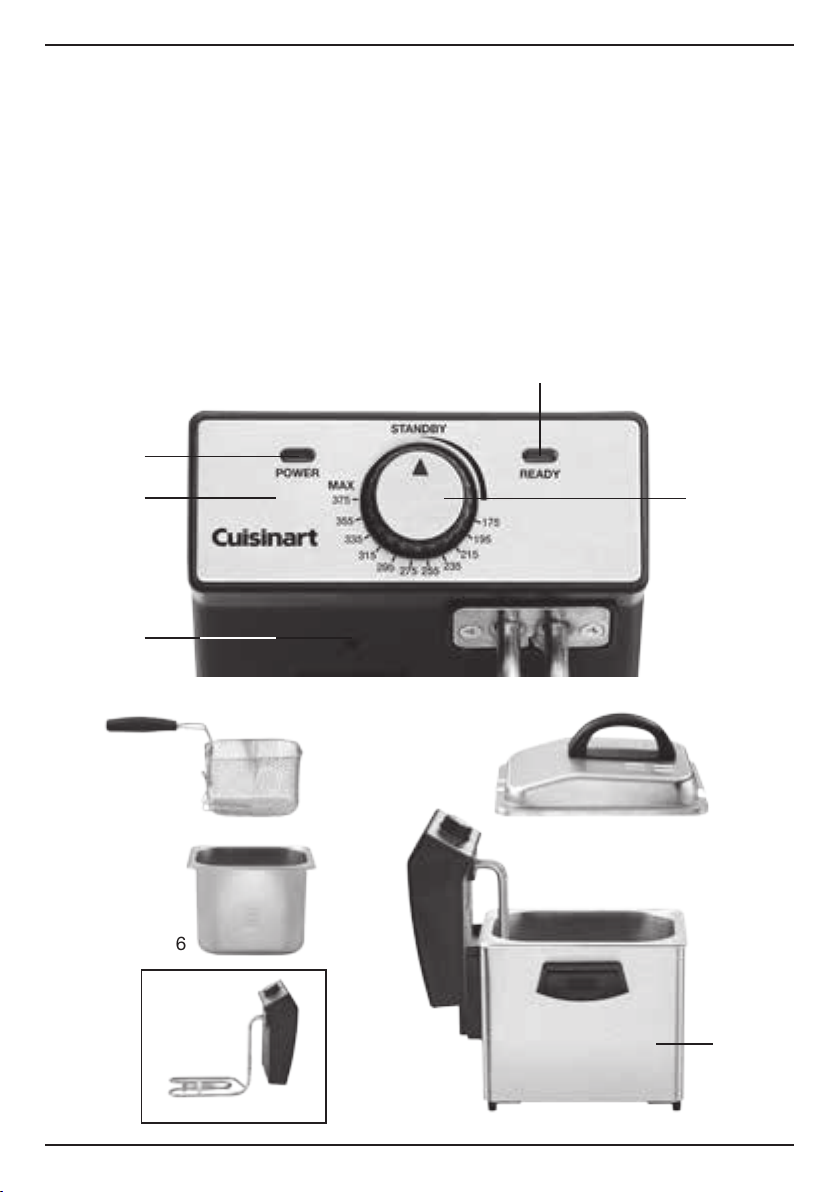
PARTS AND FEATURES
1. Lid with Handle
2. Basket with
Detachable Handle
3. Heating Element
4. Power ON
Indicator Light
5. Oil Ready
Indicator Light
4
10 9
8
6. Oil Container
7. Brushed Stainless
Steel Body
8. Reset Button
9. Temperature
Control Knob
5
2
1
6
7
3
4
Page 5
BEFORE THE FIRST USE
Remove all packaging materials and any
promotional labels or stickers from your deep
fryer. Be sure all parts (listed under, Parts
and Features) of your new appliance have been
included before discarding any packaging
materials. You may want to keep the box and
packing materials for use at a later date.
Before using your
Deep Fryer
from shipping by wiping the base with a moist
cloth. Thoroughly clean the oil container, lid, and
basket. The oil container lid and basket are
dishwasher safe. Never immerse the appliance in
water; water must not be allowed to penetrate
the interior of the appliance.
Cuisinart® Compact 2-Quart.
for the first time, remove any dust
OPERATING
INSTRUCTIONS
1. Lift off lid covering oil container.
2. Remove basket from oil container.
Attach handle to basket by squeezing
posts and assembling as in diagram.
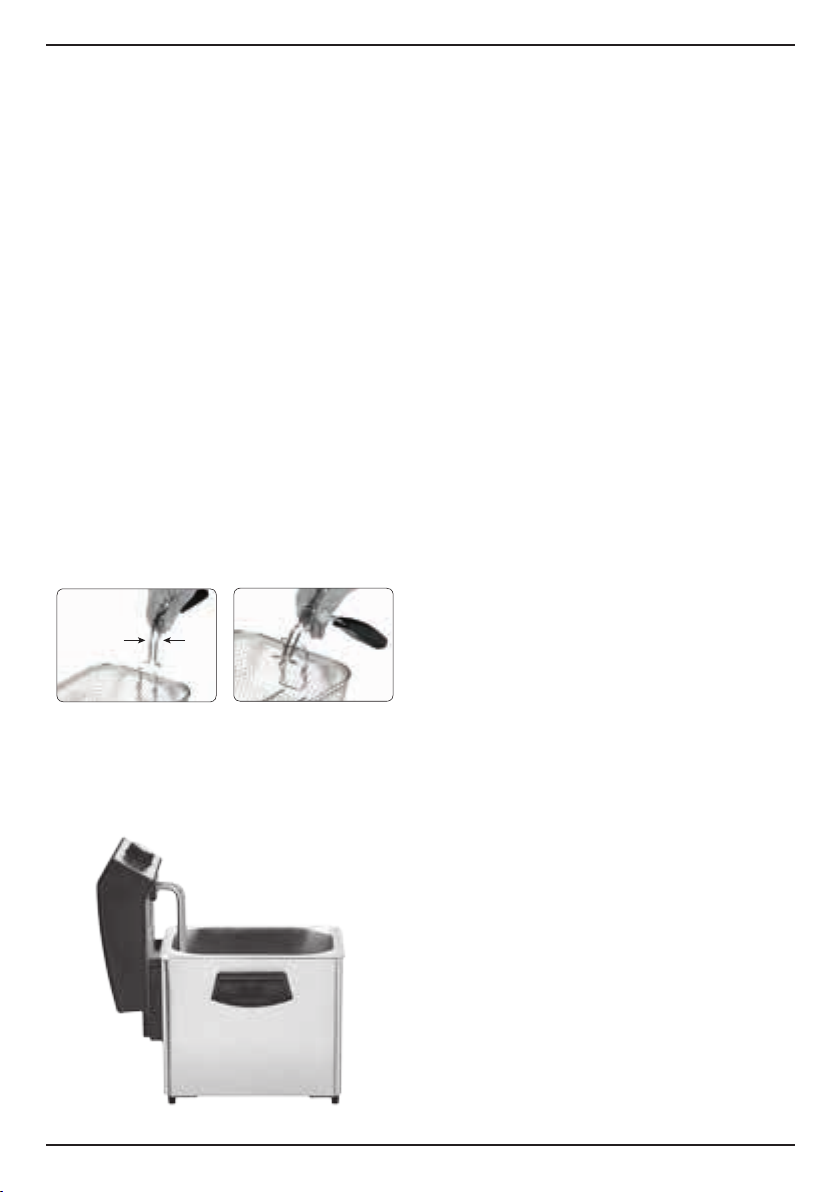
3. Insert the control panel into the stainless
steel body as seen below. Note: The
immersion heating element will not heat up
unless the control panel is correctly installed.
4. Pour approximately 2 quarts of good quality
vegetable, corn, canola, soybean, or peanut
oil into reservoir until it reaches a level
between the MIN and MAX marks inside the
container. DO NOT OVER- OR UNDER-FILL.
DO NOT MIX OILS.
5. Put lid on deep fryer.
6. Attach breakaway cord to the back of
the appliance, then plug into outlet.
7. When unit is plugged in, power light
will turn on.
8. Set the temperature control knob to
the desired temperature. The Oil Ready
light will turn green once the oil has
reached the desired temperature.
9. Lift lid and place basket onto hook
in oil container. Put food into basket.
Do not exceed the MAX fill line on the
basket. Lower basket into oil and
replace lid.
CAUTION: Oil is hot. Please use
caution when putting food into hot oil.
10. When recommended frying time has
elapsed, raise the basket to see if the
food has reached the desired golden
color. If the food is done, carefully lift
and hang basket on hook inside the oil
container. Allow oil to drain 10 to 20
seconds. Open lid, remove basket, and
place cooked food onto absorbent
paper towels. NOTE: To preserve oil
quality, do not add additional salt or
spices to the food until after it has
been removed from the fryer.
11. When cooking is finished, turn
temperature control to Standby.
Unplug the breakaway cord from the
wall outlet before detaching from the
appliance.
5
Page 6

FILTERING AND CHANGING
THE OIL
• WARNING: Always remove the plug from wall
socket before cleaning. Allow the
Compact 2-Quart. Deep Fryer
cool completely (approximately 2 hours)
before cleaning or storing. Never immerse
the control panel, cord or plug in water or any
other liquids.
• The oil can be reused after your first frying
session. In general, the oil will be tainted
rather quickly when frying food containing a
lot of protein (such as poultry, meat or fish).
When oil is mainly used to fry potatoes and it
is filtered after each use, it can be used an
additional 4 to 6 times.
• Once the oil has cooled line a sieve with
cheesecloth. Grasp each side of the
removable oil container and lift upward. Pour
the oil through the sieve and strain the used
oil through it to remove food particles,
crumbs and impurities. This process is safe
to repeat 3 or 4 times without the
oil deteriorating.
• Used oil can be successfully stored in a cool,
dark place for up to a month in a clean,
airtight container. Refrigeration or freezing
increases the oil’s lifespan by several
months. However, do not use the oil for
longer than 6 months. DO NOT STORE THE
OIL IN THE DEEP FRYER. Add a little fresh
oil each time you reuse the oil.
CLEANING AND
Cuisinart®
and the oil to
MAINTENANCE
1. Always unplug appliance, detach the
breakaway cord and let the oil cool down to
room temperature before cleaning.
2. Remove lid.
3. Lift out basket.
4. The control panel should never be immersed in
water or other liquids. Before first use, clean
the outer surface of the heating element with a
damp cloth containing mild soap solution or
clean water.
5. Once the oil has cooled, line a sieve with
cheesecloth. Grasp each side of the removable
oil container and lift upward. Pour the oil
through the sieve and strain the used oil
through it to remove food particles, crumbs
and impurities. This process is safe to repeat
after three or four frying sessions without the
oil deteriorating.
6. The frying basket should be hand-washed
before first use and should be seasoned with
oil before going into the dishwasher for the
first time. Lid, oil container and frying basket
are dishwasher safe. Dry parts thoroughly
after cleaning.
7. The stainless steel body is submersible
and should be washed by hand with warm,
soapy water.
8. Ensure that both the lid and the oil
container are completely dry after washing
and before use.
9. After cleaning, reassemble oil container,
heating element, basket and lid onto deep
fryer. The heating element must be seated
properly or appliance will not operate.
10. Warning: When cleaning, use care – underedge of deep fryer is sharp.
11. For storage, basket handle can be folded
down to fit inside container.
12. Tip: For ease in cleaning, wipe control panel
with a damp microfiber cloth. Microfiber cloths
are available in most kitchenware stores.
NOTE: Oil staining on the heating element and
oil container can be easily cleaned with a plastic
scrubbing pad.
Any other servicing should be performed by an
Authorized Service Representative.
SAFETY FEATURES
The
Cuisinart® Compact 2-Quart. Deep Fryer
equipped with the following features to ensure
safety:
• Safety Interlock – The control panel/heating
element must be properly seated or deep
fryer will not operate.
• Breakaway Cord – The cord is designed to
quickly disconnect from the appliance when
a pulling force is applied.
• Thermostat Overload Protection – Your
Cuisinart® Compact 2-Quart. Deep Fryer
equipped with a thermostat overload
protection. If the unit heats up beyond the
recommended temperature level, the deep
is
is
6
Page 7

fryer will automatically turn off. To reset,
unplug the unit from the wall outlet and allow
it to cool down. Remove the control panel
and heating element from the unit.
CAUTION: The heating element is extremely hot.
Allow it to cool thoroughly before removing it.
You will find a reset button on the front of the
control panel below controls. Using a toothpick
or another long, thin object, push the reset
button and place the control panel back into its
proper position.
NOTE:
The unit will not work if the control panel
is not properly mounted. Plug the unit back in,
turn on and continue use. If the unit still does not
operate, repeat the steps above or call a
Cuisinart Consumer Customer Service Center for
assistance.
TIPS AND HINTS
• When cooking foods dipped in fresh batter,
first lower basket. Using tongs, add food
directly to oil. Use basket to lift out food
when finished cooking.
• Do not exceed the MAX fill line in the basket.
This helps maintain temperature of oil for
better cooking results.
• Sort or cut food into pieces of uniform size.
All the food will then be cooked in the same
amount of time. To reduce splattering,
remove excess moisture or ice from food.
• The oil does not need to be changed after
each use. In general, the oil will be tainted
rather quickly when frying food containing a
lot of protein (such as poultry, meat or fish).
When oil is mainly used to fry potatoes and it
is filtered after each use, it can be used an
additional 4 to 6 times.
• Once the oil has cooled, line a sieve with
cheesecloth. Grasp each side of the
removable oil container and lift upward. Pour
the oil through the sieve and strain the used
oil through it to remove food particles,
crumbs and impurities. This process is safe
to repeat 3 or 4 times without the
oil deteriorating.
• It is important to follow the temperature
recommendation for every recipe. If the
temperature is too low, the fried food
absorbs oil. If the temperature is too high, a
crust quickly forms on the outside while the
inside remains uncooked.
• For best results, drop freshly sliced food into
basket one piece at a time.
Frying frozen foods
• Due to their extremely low temperature,
frozen foods inevitably lower the temperature
of the oil. For best results, do not overload
the basket with frozen foods.
• Follow the instructions on the frozen food
package for cooking time and temperature.
• Frozen foods are frequently covered with a
coating of ice crystals, which should be
removed before frying. Lower the basket very
slowly into the oil in order to ensure that oil
does not boil over.
Tips for Frying
Heat oil to 375°F unless recipe specifies
otherwise. A cube of bread should brown in
approximately 60 seconds. Correct temperature
is extremely important. If the temperature is too
high, bread will brown before the inside has
cooked; if it is too low, the bread will absorb the
fat and become soggy and greasy.
Cook only as much as will float easily in the oil.
Too much added to the Cuisinart® Compact
2-Quart. Deep Fryer will cause the temperature
to drop, and the pieces will be difficult to turn.
Turn bread when it rises to the top of the oil,
taking care not to pierce it. Lift cooked breads
from the fryer; allow them to drain for a moment,
then place on paper towels to drain.
7
Page 8

DEEP-FRYING GUIDE –
Fresh or Uncooked Foods
Fresh indicates food prepared from a recipe or
purchased fresh, not precooked. Read package
label to determine if prepared, packaged foods
are NOT precooked. If frozen, do not thaw; place
foods directly from package into preheated oil. If
there are ice granules around prepared foods, set
pieces on a paper towel and pat dry. Moist foods
will cause the oil to splatter.
Frying times may vary because of food temperature, quantity and size of pieces. Best results are
obtained when food is cooked in small batches
and the size of pieces is uniform. Check deepfried foods at the shortest times given; deep-fry
until fully cooked.
Low heat 325°F
Turkey thighs, bone in,
skin on .........................20–22 min.
Turkey breast, bone up,
skin down ......................30–35 min.
Breaded eggplant ..................5–6 min.
Breaded portobello
mushrooms ..................... 4½– 5 min.
DEEP-FRYING GUIDE –
Precooked Foods
Precooked foods listed in this chart are breaded
and cooked prior to packaging. If frozen, do not
thaw; place foods directly from package into
preheated oil. If there are frozen ice granules
around Precooked foods, set pieces on a paper
towel and pat dry.
Use this chart as a guide to deep-frying times.
Best results are obtained when food is cooked in
small batches and the size of pieces is uniform.
Check deep-fried foods at the shortest times
given; deep-fry until heated through.
Low heat 325°F
Onion rings .......................5–6 min.
Medium heat 350°F
Chicken tenders ................. 5½–6 min.
Chicken nuggets ...................3–4 min.
Chicken pieces ....................7–8 min.
Small mushrooms ................2½–3 min.
Medium shrimp .................. 2–2½ min.
Small shrimp pops .................1–2 min.
Medium heat 350°F
Frozen chicken nuggets ........... 5½–6 min.
Breaded chicken tenders .........3½– 4½ min.
Breaded, boneless
chicken breasts ..................5½–6 min.
Breaded bone-in pork chops ....... 7½–8 min.
Egg rolls ...........................5 min.
Chimichangas ....................7–7½ min.
Large shrimp ......................1–2 min.
High heat 375°F
Red potato chips ..................2–3 min.
Yam potato chips ................ 2–2½ min.
American fries .....................5–6 min.
Thin french fries .................3–3½ min.
Thick french fries ................ 3½–4 min.
Curly french fries. . . . . . . . . . . . . . . . . 4½–5 min.
High heat 375°F
Large or fantail shrimp ..............1–2 min.
Mozzarella sticks ..................2–3 min.
Halibut sh llets .................3–3½ min.
Halibut sh balls ...................2–3 min.
8
Page 9

RECIPES
Applesauce Spice Doughnuts.......... 9
Hush Puppies....................... 9
Spicy Buffalo Wings ................ 10
Blue Cheese Dressing ............... 10
Fried Calamari ..................... 10
Herbed Beer-Batter Onion Rings .......11
Better than Fast-Food French Fries .....11
Crispy Chicken Fingers ...............11
Honey Mustard Sauce............... 12
Applesauce Spice
Doughnuts
Makes about 16
1
2
⁄3 cups unbleached, all-purpose flour,
divided
2 teaspoons baking powder
¼ teaspoon salt
½ teaspoon cinnamon
1
⁄8 teaspoon ground allspice
Pinch freshly grated/ground nutmeg
½ cup granulated sugar
1 tablespoon, plus 1 teaspoon
vegetable shortening
2
⁄3 cup applesauce
1 large egg
Vegetable oil for frying
Flour for dusting
Powdered or granulated sugar for
dusting
Using a whisk, blend together the flour, baking
powder, salt and spices in a medium bowl;
reserve. Put the sugar and shortening in a large
bowl. With an electric mixer on low speed, beat to
blend and break up the shortening. Add the
applesauce and egg; beat until smooth. Add the
flour mixture in two additions and blend on
medium speed until mixed. Cover dough and chill
for a least 1 hour.
Divide dough into two equal portions. Place one
portion of dough on a generously floured surface
and dust with flour. Roll out to ½-inch thickness.
Cut dough with a floured doughnut cutter and
place doughnuts on a waxed-paper-lined baking
sheet or tray. Repeat with remaining dough.
Re-roll scraps and repeat.
®
Heat vegetable oil in the Cuisinart
2-Quart. Deep Fryer until it reaches 375°F.
Carefully lower 3 doughnuts into the hot oil – do
not overcrowd! Fry on each side, about 1½ to 2
minutes, turning with a slotted spoon or wire
skimmer. Remove and drain on layered paper
towels. Pat gently to remove any excess oil, and
sprinkle with desired amount of sugar.
Compact
Hush Puppies
Makes about 12 to 20
Oil for frying
1 cup cornmeal
¼ teaspoon salt
1
⁄8 teaspoon baking soda
2 tablespoons finely chopped white
or green onion
2 tablespoons, plus 2 teaspoons
buttermilk
3 tablespoons, plus 2 teaspoons water
Heat oil in the Cuisinart® Compact 2-Quart. Deep
Fryer until it reaches 375°F. While the oil is
heating, make the Hush Puppy batter.
Combine cornmeal, salt and baking soda in a
medium bowl. Stir in onion. Add buttermilk and
water – stir just to moisten the dry ingredients.
Make into rounded tablespoonfuls, drop carefully
into the hot oil and fry until golden brown, turning
once with a slotted spoon or wire skimmer.
Remove from the oil. Drain on layers of paper
towels. Serve immediately.
9
Page 10

Spicy Buffalo Wings
Fried Calamari
Makes 16 pieces
Oil for frying
8 chicken wings
1
⁄3 cup unsalted butter, melted
3–6 tablespoons “Louisiana style”
hot sauce
2 teaspoons cider vinegar
Blue Cheese Dressing and celery
sticks, carrot sticks, zucchini sticks
Cut wing tips from wings and discard or reserve
for making chicken stock. Split each wing at the
joint and cut through so there are 2 pieces from
each wing. Rinse and dry completely. In a large
bowl, combine the melted butter, hot sauce and
cider vinegar and stir until completely blended.
Heat oil until it is 375°F. Put half the wings into
the Cuisinart
cook until browned and crispy, about 12 to 15
minutes. Remove wings; drain briefly on layered
paper towels. Then stir hot, crispy wings into the
hot sauce mixture. Repeat with remaining wings.
Serve hot with cold vegetable sticks and Blue
Cheese Dressing.
Note: If you have some guests who do not
appreciate hot and spicy, fry the wings as
instructed and toss with your favorite BBQ sauce
or honey mustard sauce. For “super-hot” strength
wings, add additional hot sauce along with the
Louisiana-style hot sauce.
®
Compact 2-Quart. Deep Fryer and
Makes about 3 servings
Vegetable oil for frying
1½ pounds cleaned calamari, including
some tentacles
1
⁄3 cups unbleached, all-purpose flour
1
2 teaspoons finely chopped parsley
¾ teaspoon granulated garlic powder
¾ teaspoon each: kosher salt and freshly
ground pepper
Marinara sauce for dipping
Fresh lemon wedges for garnish
Rinse and drain the calamari; place on thick
layers of paper towels, pressing and blotting them
completely dry with another layer of paper towels
on top. Cut the bodies into ½-inch rings, and cut
tentacles into halves or quarters if large.
Heat oil to 360°F in the Cuisinart® Compact
2-Quart. Deep Fryer. Preheat the oven to 500°F.
Line two cookie sheets with parchment paper.
Place the flour, parsley, granulated garlic, salt,
and pepper in a jumbo resealable food storage
bag. Working with about a quarter of the calamari
at a time, drop calamari into the bag, seal and
shake. Squeeze the sides of the bag to
completely coat the calamari. Take care that the
pieces are individually coated and not stuck
together. Remove from the bag and place on a
baking sheet lined with plastic wrap. Repeat until
all the calamari have been coated evenly with
flour mixture.
Blue Cheese Dressing
½ cup mayonnaise (regular or lowfat)
½ cup sour cream (regular or lowfat)
½ cup crumbled blue cheese
1 teaspoon finely chopped garlic
¼ cup finely chopped parsley
1–2 tablespoons finely chopped onion
1 tablespoon fresh lemon juice
Place all ingredients in a bowl and stir well to
blend. Cover and refrigerate for at least 30
minutes before serving, to allow flavors to blend.
Gently add calamari to hot oil, about 1 to 1½
cups at a time, trying to let all the pieces drop in
separately. Do not crowd the calamari, because
crowding will drop the temperature of the oil. The
calamari will be pale golden and just cooked in
about 40 to 60 seconds. Do not overcook – they
will become tough. Lift the calamari out, using a
slotted spoon or metal skimmer, and drain in a
single layer on prepared cookie sheets. Repeat
with the remaining calamari. When all the calamari
have been fried, reheat them in the 500°F oven
for several minutes. Sprinkle lightly with a little
more salt, and serve with warm marinara sauce
for dipping.
10
Page 11

Herbed Beer-Batter
Onion Rings
Makes 2 to 4 servings
¾ cup, plus 2 tablespoons lager or ale
1 cup unbleached, all-purpose flour
½ cup chopped fresh parsley
1 tablespoon chopped fresh thyme
1 teaspoon finely chopped fresh garlic
¾ teaspoon kosher salt
1–2 onions (about 1 pound total)
Flour for dusting
Vegetable oil for frying
Kosher salt for sprinkling
In a medium bowl, whisk the beer into the flour
until smooth. Stir in the parsley, thyme and garlic.
Let batter stand 30 minutes. Stir in salt.
Cut onion crosswise into ½-inch thick slices.
Remove and discard skin, stem and root ends.
Separate slices into rings. Toss lightly with flour.
Heat the vegetable oil in the Cuisinart® Compact
2-Quart. Deep Fryer until it reaches 375°F.
Working with about 4 or 5 rings at a time, dip
each ring into batter, and allow excess to drip off.
Carefully lower coated onion rings into deep fryer,
one at a time. Fry until golden, turning as needed,
about 1 to 2 minutes. Lift out with tongs and
place on layered paper towels to drain. Sprinkle
with kosher salt while hot, and serve.
Drain and dry the potato strips completely and
thoroughly. They cannot be at all wet, or the oil
will spatter and spit. Fry the potatoes in small
batches. Cook for about 3 minutes, remove and
drain on layers of paper towels.
Increase temperature of oil to 375°F. In small
batches again, fry the potatoes for a second time,
this time about 4 minutes, until golden and crispy.
Drain on fresh layers of paper towels. Season to
taste and serve immediately.
Seasoning suggestions: herb blends, Cajun or
Creole seasonings, and chili powder.
Crispy Chicken Fingers
Makes 6 servings
3 tablespoons kosher salt
3 tablespoons brown sugar
1 cup boiling water
12 ice cubes
4 skinless, boneless chicken
breast halves
1 cup unbleached, all-purpose flour
½ teaspoon kosher salt
¼ teaspoon freshly ground pepper
¼ teaspoon paprika
¼ teaspoon granulated garlic powder
Oil for frying
¾ cup buttermilk or regular milk
Better than Fast-Food
French Fries
Makes about 6 servings
Peanut or vegetable oil for frying
2 russet potatoes
Kosher salt and freshly ground pepper
to taste
Heat the oil in the Cuisinart® Compact 2-Quart.
Deep Fryer to 325°F.
Cut potatoes into french fry-cut uniform sticks
(about 6mm x 6mm) or into slices ¼-inch or less
thick. As you cut, put the potatoes in a bowl of
ice water to keep them from turning brown.
Combine salt, sugar and boiling water in a
medium-large, heatproof bowl. Stir until sugar and
salt are completely dissolved. Add ice. Cut
chicken into ½ x 2-inch strips. Place cut chicken
in the chilled brine mixture and refrigerate for 30
to 60 minutes.
Combine the flour with the salt, pepper, paprika
and granulated garlic in a shallow bowl; reserve.
When ready to cook, drain chicken and pat
completely dry. Heat oil in the Cuisinart® Compact
2-Quart. Deep Fryer to 375°F. Dip the drained and
dried chicken strips in buttermilk and roll in flour
mixture to coat well. Place the strips on a plate.
Carefully place the chicken strips in the hot oil in
batches. Cook, turning once, for about 3 to 4
minutes per side. Drain on layers of paper towels
and serve with Honey Mustard Sauce.
11
Page 12

Honey Mustard Sauce
½ cup honey
¼ cup Dijon mustard
(regular or grainy)
Blend honey and mustard to make honey
mustard sauce.
LIMITED THREE-YEAR
WARRANTY
(U.S. and Canada ONLY)
This warranty is available to consumers only. You are a
consumer if you own a
Deep Fryer
family or household use. Except as otherwise required
under applicable law, this warranty is not available to
retailers or other commercial purchasers or owners.
We warrant that your
Fryer
under normal home use for 3 years from the date of
original purchase. We recommend that you visit our
website, www.cuisinart.com for a fast, efficient way to
complete your product registration. However, product
registration does not eliminate the need for the consumer
to maintain the original proof of purchase in order to obtain
the warranty benefits. In the event that you do not have
proof of purchase date, the purchase date for purposes of
this warranty will be the date of manufacture.
If your
prove to be defective within the warranty period, we will
repair it, or if we think necessary, replace it. To obtain
warranty service, simply call our toll-free number 1-800726-0190 for additional information from our Consumer
Service Representatives, or send the defective product to
Consumer Service at Cuisinart, 7475 North Glen Harbor
Blvd., Glendale, AZ 85307.
To facilitate the speed and accuracy of your return, please
enclose $10.00 for shipping and handling of the product.
Please pay by check or money order made payable to
Cuisinart (California residents need only supply proof of
purchase and should call 1-800-726-0190 for shipping
instructions).
NOTE: For added protection and secure handling of any
Cuisinart product that is being returned, we recommend
you use a traceable, insured delivery service. Cuisinart
cannot be held responsible for in-transit damage or for
packages that are not delivered to us. Lost and/or
damaged products are not covered under warranty. Please
be sure to include your return address, daytime phone
number, description of the product defect, product model
number (located on bottom of product), original date of
purchase, and any other information pertinent to the
product’s return.
CALIFORNIA RESIDENTS ONLY
California law provides that for In-Warranty Service,
California residents have the option of returning a
nonconforming product (A) to the store where it was
that was purchased at retail for personal,
will be free of defects in materials and workmanship
Cuisinart® Compact 2-Quart. Deep Fryer
Cuisinart® Compact 2-Quart.
Cuisinart® Compact 2-Quart. Deep
should
12
Page 13

purchased or (B) to another retail store that sells Cuisinart
products of the same type.
The retail store shall then, at its discretion, either repair the
product, refer the consumer to an independent repair
facility, replace the product, or refund the purchase price
less the amount directly attributable to the consumer’s
prior usage of the product. If the above two options do not
result in the appropriate relief to the consumer, the
consumer may then take the product to an independent
repair facility if service or repair can be economically
accomplished. Cuisinart and not the consumer will be
responsible for the reasonable cost of such service, repair,
replacement, or refund for nonconforming products under
warranty.
California residents may also, according to their
preference, return nonconforming products directly to
Cuisinart for repair, or if necessary, replacement, by calling
our Consumer Service Center toll-free at 1-800-726-0190.
Cuisinart will be responsible for the cost of the repair,
replacement, and shipping and handling for such products
under warranty.
BEFORE RETURNING YOUR CUISINART PRODUCT
If you are experiencing problems with your Cuisinart
product, we suggest that you call our Cuisinart Service
Center at 1-800-726-0190 before returning the product
for service. If servicing is needed, a Representative can
confirm whether the product is under warranty and direct
you to the nearest service location.
Your
Cuisinart® Compact 2-Quart. Deep Fryer
manufactured to the strictest specifications and has
been designed for use only in 120-volt outlets and only
with authorized accessories and replacement parts. This
warranty expressly excludes any defects or damages
caused by attempted use of this unit with a converter, as
well as by use with accessories, replacement parts or
repair service other than those authorized by Cuisinart.
This warranty does not cover any damage caused by
accident, misuse, shipment or other than ordinary
household use. This warranty excludes all incidental or
consequential damages. Some states do not allow the
exclusion or limitation of these damages, so these
exclusions may not apply to you. You may also have
other rights, which vary from state to state.
has been
Important: If the nonconforming product is to be serviced
by someone other than Cuisinart’s Authorized Service
Center, please remind the servicer to call our Consumer
Service Center at 1-800-726-0190 to ensure that the
problem is properly diagnosed, the product is serviced with
the correct parts, and the product is still under warranty.
13
Page 14

NOTES:
14
Page 15

NOTES:
15
Page 16

Trademarks or service marks of third parties used herein are
the trademarks or service marks of their respective owners.
©2016 Cuisinart
150 Milford Road
East Windsor, NJ 08520
Printed in China
16CE016459
A1 IB-13940-ESP
Page 17

A1 IB-13940-ESP
16CE016459
Impreso en China
East Windsor, NJ 08520
150 Milford Road
©2016 Cuisinart
este documento pertenecen a sus titulares respectivos.
Todas las marcas registradas, comerciales o de servicio mencionadas en
Page 18

15
NOTAS:
Page 19

14
NOTAS:
Page 20

13
producto esté bajo garantía.
piezas correctas para repararlo y asegurarse de que el
de diagnosticar el problema correctamente, usar las
servicio posventa de Cuisinart al 1-800-726-0190 a fin
personal del centro de servicio que deberían llamar al
centro de servicio no autorizado, por favor informe al
Importante: si debe llevar el aparato defectuoso a un
a otro.
puede tener otros derechos que varían de un Estado
mencionadas pueden no regir para usted. Usted
consecuentes, de modo que las limitaciones
exclusión o limitación de daños incidentales o
consecuentes. Algunos Estados no permiten la
expresamente todos los daños incidentales o
uso, negligencia o accidente. Esta garantía excluye
y no es válida en caso de daños causados por mal
cubre el uso institucional o comercial del producto,
uso de un convertidor de voltaje. Esta garantía no
por Cuisinart, así como los daños causados por el
accesorios, piezas o reparaciones no autorizados
excluye expresamente los daños causados por
repuesto autorizados solamente. Esta garantía
corriente de 120V, usando accesorios y piezas de
fabricación y ha sido diseñado para uso sobre
Este aparato satisface las más altas exigencias de
dirección del centro de servicio más cercano.
si su aparato sigue bajo garantía y le indicará la
aparato a Cuisinart. Un representante le confirmará
posventa al 1-800-726-0190 antes de regresar el
recomendamos que llame a nuestro servicio
Si su aparato tiene algún problema, le
ANTES DE HACER REPARAR SU APARATO
productos defectuosos durante el período de garantía.
gastos de reparación, reemplazo, manejo y envío de los
800-726-0190. Cuisinart será responsable por los
se debe llamar a nuestro servicio posventa al 1-800Cuisinart para que lo reparen o lo cambien. Para esto,
desean, mandar el aparato defectuoso directamente a
Los residentes de California también pueden, si lo
durante el período de garantía.
reemplazo o reembolso de los productos defectuosos
será responsable por los gastos de servicio, reparación,
reparar el producto de manera económica. Cuisinart
servicio independiente, siempre que se pueda ajustar o
al consumidor, podrá llevar el producto a un centro de
que este se dañe. Si estas dos opciones no satisfacen
imputable al uso del producto por el consumidor hasta
el precio original del producto, menos la cantidad
cambiará el producto o reembolsará al consumidor por
consumidor a un centro de servicio independiente,
La tienda, a su opción, reparará el producto, referirá al
Page 21

12
tienda que venda productos Cuisinart de este tipo.
defectuoso a la tienda donde lo compraron o (B) a otra
de California pueden (A) regresar el producto
bajo el período de garantía. Los residentes del estado
La ley del estado de California ofrece dos opciones
RESIDENTES DE CALIFORNIA SOLAMENTE
problema, así como cualquier información pertinente.
nombre, dirección y teléfono, la descripción del
serán cubiertos bajo esta garantía. Recuerde incluir su
productos perdidos y/o lastimados durante el envío no
paquetes mandados a una dirección equivocada. Los
por los daños ocurridos durante el transporte o por los
seguro y seguimiento. Cuisinart no será responsable
mande su paquete por un método de entrega con
NOTA: para mayor seguridad, le aconsejamos que
para recibir instrucciones de envío.
prueba de compra y deben llamar al 1-800-726-0190
Los residentes de California solo necesitan dar una
gastos de manejo y envío.
compra y un cheque o giro postal de US$10.00 por
Regrese el aparato defectuoso, junto con su recibo de
7475 North Glen Harbor Blvd., Glendale, AZ 85307.
aparato defectuoso a: Cuisinart, Service Department,
línea directa gratuita al 1-800-726-0190 o regrese el
obtener servicio bajo esta garantía, llame a nuestra
reparemos o reemplazaremos (a nuestra opción). Para
o fabricación durante el período de garantía, la
Si este aparato presentara algún defecto de materiales
calculado a partir de la fecha de fabricación.
recibo de compra, el período de garantía será
recibir servicio bajo esta garantía. En ausencia del
Sin embargo, no es necesario registrar el producto para
facilitar la verificación de la fecha de compra original.
de registro disponible en www.cuisinart.com a fin de
instrucciones. Le aconsejamos que llene el formulario
sido utilizado para uso doméstico y según las
fecha de compra original, siempre que el aparato haya
materiales o fabricación durante 3 años después de la
Cuisinart garantiza este aparato contra todo defecto de
comerciantes.
esta garantía no es para los detallistas u otros
A excepción de los estados donde la ley lo permita,
Cuisinart® en una tienda, para uso personal o casero.
Usted es un consumidor si ha comprado su aparato
Esta garantía es para los consumidores solamente.
Canadá solamente)
(válida en los EE.UU. y en
TRES AÑOS
GARANTÍA LIMITADA DE
Mezclar la miel y la mostaza para preparar la salsa.
(regular o tradicional)
¼ taza (60 g) de mostaza de Dijon
½ taza (170 g) de miel
Salsa de mostaza y miel
salsa de mostaza y miel.
para absorber el exceso de aceite y servir con
minutos por lado. Colocar sobre papel absorbente
cuidadosamente en el aceite. Freír durante 3–4
tiras en varias veces, colocándolas
harina. Disponer las tiras sobre un plato. Freír las
Page 22

11
tiras de pollo en suero de leche y rebozar en
pollo. Calentar el aceite a 375°F (190°C). Mojar las
Justo antes de freír, escurrir y secar totalmente el
ajo en un tazón poco profundo; revolver.
Colocar la harina, la sal, la pimienta, la páprika y el
minutos.
Poner el pollo en la salmuera y refrigerar por 30–60
el pollo en tiras de ½ x 2 pulgadas (1.5 cm x 5 cm).
completamente disueltos. Agregar el hielo. Cortar
Revolver hasta que el azúcar y la sal estén
tazón mediano a prueba de calor; revolver.
Colocar la sal, el azúcar y el agua hirviente en un
(“buttermilk”) o de leche regular
¾ taza (185 g) de suero de leche
Aceite para freír
¼ cucharadita de ajo en polvo
¼ cucharadita de páprika
¼ cucharadita de pimienta recién molida
½ cucharadita de sal kosher
1 taza (125 g) de harina común
horizontalmente a la mitad
4 pechugas de pollo, cortadas
12 cubitos de hielo
1 taza (235 ml) de agua hirviente
3 cucharadas de azúcar moreno
3 cucharadas de sal kosher
Rinde 6 porciones
Tiras de pollo crujientes
cajún o criollo, chile en polvo.
Condimentos sugeridos: hierbas, especias estilo
inmediatamente.
exceso de aceite. Sazonar a gusto y servir
sobre papel absorbente limpio para absorber el
hasta que estén bien doradas y crujientes. Colocar
segunda vez durante aproximadamente 4 minutos,
Subir la temperatura a 375°F (190°C). Freír una
papel absorbente para eliminar el exceso de aceite.
Retirar del aceite y colocar sobre varias capas de
salpique. Freír en varias veces, durante 3 minutos.
papas estén bien secas, para que el aceite no
Escurrir y secar bien. Es muy importante que las
agua helada para que no ennegrezcan.
menos de espesor. Colocar las papas cortadas en
5 mm x 5 mm o en rodajas de ¼ pulgada (5 mm) o
Cortar las papas en bastones de aproximadamente
Calentar el aceite a 325°F (160°C).
gusto
Sal kosher y pimienta recién molida, a
2 papas “Russet”
freír
aceite vegetal o aceite de maní para
Rinde aproximadamente 6 porciones
Papas fritas crujientes
Sazonar aún calientes con sal kosher y servir.
colocar sobre varias capas de papel absorbente.
hasta dorarse. Retirar del aceite con pinzas y
aceite, uno por uno. Freír durante 1–2 minutos,
la mezcla y dejar escurrir. Colocar los aros en el
a la vez, de la manera siguiente: mojar los aros en
Calentar el aceite a 375°F (190°C). Freír 4 ó 5 aros
en harina.
Separar las rodajas en aros. Rebozar ligeramente
pulgada (1.5 cm). Pelar y tirar la piel y las raíces.
Cortar las cebollas a lo ancho en rodajas de ½
revolver.
Dejar reposar durante 30 minutos. Agregar la sal;
homogénea. Agregar el perejil, el tomillo y el ajo.
cerveza y batir hasta obtener una mezcla
Poner la harina en un tazón mediano; agregar la
Sal kosher para sazonar
Aceite vegetal para freír
Harina para espolvorear
1–2 cebollas grandes
¾ cucharadita de sal kosher
1 cucharada de ajo finamente picado
1 cucharada de tomillo fresco picado
½ taza (30 g) de perejil fresco picado
1 taza (125 g) de harina común
cerveza rubia o clara
¾ taza + 2 cucharadas (180 ml) de
Rinde 2–4 porciones
de cerveza y hierbas
“tempura”
Aros de cebolla en
Page 23

10
marinara.
Sazonar con un poco de sal y servir con salsa
calamares en el horno durante varios minutos.
calamares. Después de terminar, recalentar los
con papel absorbente. Repetir con el resto de los
disponerlos sobre una de las bandejas forradas
calamares del aceite con una espumadera y
No cocer mucho o se pondrían duros. Retirar los
calamares durante 40–60 segundos, hasta dorarse.
demasiados calamares al mismo tiempo. Freír los
Para mantener la temperatura del aceite, no freír
echando los pedazos en el aceite uno por uno.
Freír 1–1½ taza (200–250 g) de calamares a la vez,
picada
baja en grasa)
baja en grasa)
antes de servir para combinar los sabores.
mediano. Cubrir y refrigerar por 30 minutos o más
Revolver todos los ingredientes, en un tazón
1 cucharada de jugo de limón fresco
1–2 cucharadas de cebolla finamente
¼ taza (15 g) de perejil fresco picado
½ cucharadita de ajo finamente picado
½ taza (70 g) de queso azul desmenuzado
½ taza (120 ml) de crema agria (regular o
½ taza (120 ml) de mayonesa (regular o
Aderezo de queso azul
plástico. Repetir con el resto de los calamares.
una placa para horno forrada con papel film/
estén pegados. Retirar de la bolsa y disponer sobre
los calamares. Asegurarse de que los pedazos no
bolsa, cerrar y agitar para rebozar completamente
grande. Colocar un cuarto de los calamares en la
pimienta en una bolsa de plástico hermética
Colocar la harina, el perejil, el ajo, la sal y la
triple capa de papel sulfurizado.
horno a 500°F (260°C). Forrar dos bandejas con
Calentar el aceite a 360 °F (180°C). Precalentar el
dos o cuatro.
pulgada (1.5 cm) y partir los tentáculos largos en
absorbente. Cortar los calamares en rodajas de ½
colocándolos entre varias capas de papel
Enjuagar y secar completamente los calamares,
Pedazos de limón (para decorar)
Salsa marinara (para mojar)
molida
¾ cucharadita de pimienta recién
¾ cucharadita de sal kosher
¾ cucharadita de ajo en polvo
picado
2 cucharaditas de perejil finamente
1
⁄3 taza (165 g) de harina común
1
(algunos con tentáculos)
1½ libras (680 g) de calamares limpios
Aceite vegetal para freír
Rinde aproximadamente 3 porciones
picantes, añadir salsa picante a la salsa cajún.
de salsa cajún. Para preparar “alitas” súper
salsa barbacoa o salsa de miel y mostaza en vez
Nota: para preparar “alitas” que no pican, usar
con salsa de queso azul y crudités.
Repetir con el resto de las alitas. Servir caliente
Bañar las alitas calientes en la salsa picante.
eliminar el exceso de aceite con papel absorbente.
12–15 minutos, hasta dorarse. Retirar del aceite y
mitad de las alitas en la freidora y freír durante
Calentar el aceite a 375°F (190°C). Colocar la
grande.
derretida, la salsa picante y el vinagre, en un tazón
Enjuagar y secar bien. Revolver la mantequilla
la articulación, para conseguir dos “alitas”.
preparar caldo de pollo). Cortar cada ala al nivel de
Cortar las puntas de las alas y tirar (o reservar para
calabacín crudos
bastoncitos de apio, zanahoria y
Salsa para mojar de queso azul,
sidra de manzana
2 cucharaditas (10 ml) de vinagre de
de Luisiana (cajún)
3–6 cucharadas (45–90 ml) de salsa picante
derretida
⁄3 taza (75 g) de mantequilla sin sal,
1
8 alas de pollo
Aceite para freír
Rinde 16 porciones
Calamares fritos
“Alitas” de pollo picantes
Page 24

9
exceso de aceite. Servir inmediatamente.
varias capas de papel absorbente para absorber el
una espumadera. Retirar del aceite. Colocar sobre
aceite y freír hasta dorarse, volteando una vez con
cuidadosamente cucharadas de la mezcla en el
justo hasta incorporar los ingredientes. Echar
el suero de leche y el agua y revolver ligeramente,
en un tazón mediano. Agregar la cebolla. Agregar
Revolver la harina de maíz, la sal y el bicarbonato,
calentando, preparar la masa.
Calentar el aceite a 375°F (190°C). Mientras está
agua
3 cucharadas + 2 cucharaditas (40 ml) de
suero de leche (“buttermilk”)
2 cucharadas + 2 cucharaditas (20 g) de
picada
onion”) o cebolla blanca finamente
2 cucharadas de cebolleta (“green
⁄8 cucharadita de bicarbonato de sodio
1
¼ cucharadita de sal
1 taza (125 g) de harina de maíz
Aceite para freír
Rinde aproximadamente 12–30
“hush puppies”
Croquetas de maíz
espolvorear
manteca vegetal
polvo
especias
Agregar la harina, en dos veces, mezclando a
batir hasta obtener una mezcla homogénea.
baja. Agregar la compota de manzana y el huevo, y
Revolver con una batidora de mano, a velocidad
Poner el azúcar y la manteca en un tazón grande.
especias en un tazón mediano; revolver y reservar.
Colocar la harina, el polvo de hornear, la sal y las
Azúcar glasé o granulado para
Harina para espolvorear
Aceite vegetal para freír
1 huevo grande
⁄3 taza (155 ml) de compota de manzana
2
1 cucharada + 1 cucharadita (20 g) de
½ taza (100 g) de azúcar granulada
1 pizca de nuez moscada rallada
⁄8 cucharadita de pimienta de Jamaica en
1
½ cucharadita de canela en polvo
¼ cucharadita de sal
2 cucharaditas de polvo de hornear
21/3 tazas (335 g) de harina común
Rinde aproximadamente 16 porciones
de compota de manzana y
Rosquillas fritas (“donuts”)
la cantidad deseada de azúcar encima.
exceso de aceite con papel absorbente y esparcir
sobre varias capas de papel absorbente. Eliminar el
con una espumadera). Retirar del aceite y colocar
caliente. Freír por 1½–2 minutos por lado (voltear
mucho cuidado, no más de 3 rosquillas en el aceite
Calentar el aceite a 375 °F (190°C). Colocar, con
restante y repetir.
con el resto de la masa. Volver a estirar la masa
para horno forrada con papel encerado. Repetir
rosquillas enharinado y ponerlas sobre una placa
espesor. Cortar 12 rosquillas con un cortador de
rodillo hasta que tenga ½ pulgada (1.5 cm) de
espolvorear con harina. Estirar la masa con un
una porción sobre una superficie enharinada y
Dividir la masa en dos porciones iguales. Poner
más.
velocidad mediana. Cubrir y refrigerar por 1 hora o
Salsa de mostaza y miel ............. 12
Tiras de pollo crujientes.............. 11
Papas fritas crujientes ............... 11
y hierbas.......................... 11
Aros de cebolla en “tempura” de cerveza
Calamares fritos .................... 10
Aderezo de queso azul .............. 10
“Alitas” de pollo picantes............. 10
Buñuelos de maíz “hush puppies”....... 9
manzana y especias.................. 9
Rosquillas fritas (“donuts”) de compota de
RECETAS
Page 25

8
Croquetas de mero ................. 2–3 min
Filetes de mero ...................3–3½ min
Palitos de Mozzarella ............... 2–3 min
Camarones grandes o gambas ........ 1–2 min
Calor alto (375°F/190°C)
Camarones pequeños ............... 1–2 min
Camarones medianos ..............2–2½ min
Champiñones ....................2½–3 min
Pedazos de pollo ................... 7–8 min
“Nuggets” de pollo ................. 3–4 min
Trocitos de pollo ..................5½–6 min
Calor mediano (350°F/180°C)
“Rizos” de papas fritas .............4½–5 min
Papas fritas gruesas ...............3½–4 min
Papas fritas finas ..................3–3½ min
Papas fritas gruesas con piel ......... 5–6 min
Chips de ñames ..................2–2½ min
Chips de papas rojas ............... 2–3 min
Calor alto (375°F/190°C)
Camarones grandes ................ 1–2 min
Chimichangas ....................7–7½ min
Rollitos chinos ....................... 5 min
Chuletas de cerdo empanizadas ......7½–8 min
min
Pechuga de pollo empanizada (deshuesada) 5½–6
Trocitos de pollo empanizados ..... 3½–4½ min
“Nuggets” de pollo congelados ......5½–6 min
Calor mediano (350°F/180°C)
empanizado ......................4½–5 min
Hongo Portobello
Berenjena empanizada .............. 5–6 min
Pechuga de pavo (piel abajo) ....... 30–35 min
Muslos de pavo (con hueso y piel) ... 20–22 min
Calor bajo (325°F/160°C)
Aros de cebolla .................... 5–6 min
Calor bajo (325°F/160°C)
friéndolos si fuera necesario.
alimentos después del tiempo más corto y siga
en tamaño. Verifique el grado de cocción de los
y asegúrese de que los pedazos sean uniformes
resultados óptimos, fría pocos pedazos a la vez
El tiempo de fritura puede variar. Para obtener
freírlos
Si están cubiertos con hielo, séquelos antes de
congelados, no los descongele antes de freírlos.
precocidos antes de ser empaquetados. Si están
son alimentos que han sido empanizados y
Los alimentos preparados a continuación
precocidos
Alimentos preparados/
PAUTAS DE FRITURA –
es necesario.
después del tiempo más corto y siga friéndolos si
Verifique el grado de cocción de los alimentos
de que los pedazos sean uniformes en tamaño.
óptimos, fría pocos pedazos a la vez y asegúrese
tamaño de los pedazos. Para obtener resultados
temperatura de los alimentos, la cantidad y el
El tiempo de fritura puede variar según la
antes de freírlos para evitar las salpicaduras.
con hielo, séquelos con un papel absorbente
descongele antes de freírlos. Si están cubiertos
precocidos. Si están congelados, no los
para cerciorarse que los alimentos NO están
congelados. Lea la etiqueta en los paquetes
han sido precocidos; pueden estar frescos o
Los alimentos frescos son alimentos que no
frescos
DE FRITURA – Alimentos
TEMPERATURA Y TIEMPO
Page 26

7
está muy baja, los alimentos absorberán
recomendado en la receta. Si la temperatura
• Siempre utilice el nivel de temperatura
deteriore.
proceso 3–4 veces sin que el aceite se
impurezas. Puede repetir seguramente este
partículas de alimentos, las migajas y las
estopilla filtrará el aceite, eliminando las
álcela. Vacié el aceite en el colador; la
una estopilla. Agarre la cuba por las asas y
• Filtre el aceite frío con un colador forrado con
aceite 4–6 veces seguidas.
alimentos como papas, podrá usar el mismo
absorbente para absorber el exceso de grasa.
unos segundos, y luego póngalos sobre papel
fritos de la freidora, permita que se escurran por
cuidado de no perforarlos. Retire los alimentos
lleguen a la superficie del aceite, teniendo
alimentos fácilmente. Voltee los alimentos cuando
temperatura del aceite y permitirá voltear los
Fría pocos alimentos a la vez; esto mantendrá la
freirá por dentro.
demasiado aceite; si está muy alta, la masa no se
suficientemente caliente, la masa absorberá
del aceite es muy importante. Si no está lo
aproximadamente 60 segundos. La temperatura
pan adentro; este debería dorarse en
averiguar si el aceite está listo, eche un trocito de
la receta especifique otra temperatura. Para
Caliente al aceite a 375°F (190°C), a menos que
Consejos para freír pan
lentamente para evitar su ebullición.
freírlos. Sumerja la cesta en el aceite muy
cubren los alimentos congelados antes de
• Elimine los cristales de hielo que a menudo
• Siempre siga las instrucciones del paquete.
resultados óptimos, no sobrellene la cesta.
temperatura del aceite. Para obtener
producen una notable disminución de la
• Por su temperatura, los alimentos congelados
Alimentos congelados
pedazo a la vez.
• Ponga los alimentos frescos en la cesta un
los alimentos no serán bien fritos por dentro.
mucho aceite. Si la temperatura está muy alta,
utiliza la freidora principalmente para freír
pescado suelen contaminar más el aceite. Si
en proteínas, como el pollo, la carne o el
cada uso. Por lo general, los alimentos ricos
• No se necesita cambiar el aceite después de
congelados antes de ponerlos en la freidora.
hielo que a menudo cubren los alimentos
papel absorbente y elimine los cristales de
aceite, seque los alimentos mojados con
mismo tiempo. Para evitar las salpicaduras de
tamaño; de esta manera, estarán listos al
• Fría alimentos o pedazos uniformes en
y logrará mejores resultados.
mantener la temperatura del aceite constante
• No sobrellene la cesta; esto ayudará a
del aceite.
freír los alimentos, alce la cesta para retirarlos
alimentos en el aceite usando pinzas. Tras
líquida, baje la cesta primero. Coloque los
• Para freír alimentos rebozados en mezcla
SUGERENCIAS
CONSEJOS Y
autorizado.
reiniciarla, comuníquese con un centro de servicio
Si la freidora no se pusiera en marcha después de
instalado. Enchufe la freidora para seguir friendo.
menos que el panel de control esté debidamente
NOTA:
el aparato no se pondrá en marcha a
control.
y fino, y luego vuelva a instalar el panel de
botón de reinicio con un palillo u otro objeto largo
el panel de control, bajo los controles. Oprima el
retirarla. El botón de reinicio se encuentra sobre
permita que se enfríe completamente antes de
PRECAUCIÓN: la resistencia estará muy caliente;
Page 27

6
Retire el panel de control y la resistencia.
desenchufe el aparato y permita que se enfríe.
de sobrecalentamiento. Si esto ocurriera,
Apaga automáticamente el aparato en caso
• Dispositivo de protección contra sobrecarga –
rápidamente con un simple tirón.
ha sido diseñado para desconectarse
• Conector magnético – El conector magnético
control esté debidamente instalado.
pondrá en marcha a menos que el panel de
• Seguro de encendido – La freidora no se
seguridad siguientes:
viene equipada con los mecanismos de
la freidora compacta de 1.9L
®
Cuisinart
Para su seguridad,
SEGURIDAD
MECANISMOS DE
estropajo de plástico.
y la cuba pueden eliminarse fácilmente con un
NOTA: las manchas de aceite sobre la resistencia
cocina).
en la mayoría de las tiendas de artículos de
control con un paño de microfibra (disponible
12. Consejo: se le hará más fácil limpiar el panel de
caber adentro de la misma.
11. El mango de la cesta puede doblarse para
la parte de abajo tiene aristas vivas.
10. Advertencia: tenga cuidado al lavar la carcasa;
de control esté debidamente instalado.
no se pondrá en marcha a menos que el panel
y la tapa tras lavar y secarlas. Nota: la freidora
9. Vuelva a instalar la cuba, la resistencia, la cesta
completamente secas antes de usar el aparato.
8. Asegúrese de que la tapa y la cuba estén
agua jabonosa tibia.
7. Lave la carcasa de acero inoxidable a mano, en
cuidadosamente después de lavarlas.
aptas para lavavajillas. Seque todas las piezas
en el lavavajillas. La tapa, la cuba y la cesta son
Después del primer uso, la cesta se podrá lavar
6. Lave la cesta a mano antes del primer uso.
que el aceite se deteriore.
repetir seguramente este proceso 3–4 veces sin
alimentos, las migajas y las impurezas. Puede
filtrará el aceite, eliminando las partículas de
álcela. Vacié el aceite en el colador; la estopilla
una estopilla. Agarre la cuba por las asas y
5. Filtre el aceite frío con un colador forrado con
solución de detergente suave con agua.
ligeramente humedecido con agua o una
superficie externa de la resistencia con un paño
otro líquido. Limpie el panel de control y la
4. Nunca sumerja el panel de control en agua u
3. Alce la cesta.
2. Saque la tapa.
aceite se enfríe antes de limpiar el aparato.
1. Siempre desconecte el cable y permita que el
MANTENIMIENTO
LIMPIEZA Y
técnico autorizado.
Cualquier otro servicio debe ser realizado por un
que fría.
Agregue un poco de aceite fresco cada vez
ACEITE EN LA CUBA DE LA FREIDORA.
aceite por más de 6 meses. NO GUARDE EL
meses. Sin embargo, no utilice el mismo
refrigerar o congelar, para que dure varios
un lugar fresco y oscuro. También se puede
recipiente hermético durante hasta un mes, en
• El aceite usado se podrá guardar en un
deteriore.
proceso 3–4 veces sin que el aceite se
impurezas. Puede repetir seguramente este
partículas de alimentos, las migajas y las
estopilla filtrará el aceite, eliminando las
álcela. Vacié el aceite en el colador; la
una estopilla. Agarre la cuba por las asas y
• Filtre el aceite frío con un colador forrado con
seguidas.
papas, podrá usar el mismo aceite 4–6 veces
principalmente para freír alimentos como
contaminar más el aceite. Si utiliza la freidora
como el pollo, la carne o el pescado suelen
primer uso. Los alimentos ricos en proteínas,
• Puede volver a usar el aceite después del
líquido.
control, el cable o la clavija en agua u otro
guardar la freidora. Nunca sumerja el panel de
aproximadamente 2 horas) antes de limpiar o
aceite se enfríe completamente (durante
aparato antes de limpiarlo. Permita que el
• ADVERTENCIA: siempre desenchufe el
CAMBIAR DEL ACEITE
CÓMO FILTRAR Y
Page 28

5
toma de corriente, y luego del aparato.
“STANDBY”. Desconecte el cable de la
control de temperatura en la posición
11. Para apagar el aparato, ponga el
haberlos sacado de la freidora.
sazone los alimentos hasta después de
limpio, le recomendamos que no
aceite. NOTA: para mantener el aceite
absorbente para absorber el exceso de
coloque los alimentos fritos sobre papel
10–20 segundos. Abra la tapa y
Permita que el aceite se escurra por
listos, cuelgue la cesta del gancho.
están fritos. Si los alimentos están
cesta para averiguar si los alimentos
recomendado, abra la tapa y alce la
10. Al final del tiempo de cocción
este.
cuidado al colocar los alimentos en
extremadamente caliente; tenga sumo
PRECAUCIÓN: el aceite está
freidora.
cesta en el aceite y cierre la tapa de la
cesta. No pase la línea “MAX”. Baje la
del gancho. Ponga los alimentos en la
9. Retire la tapa, alce la cesta y cuélguela
óptima para freír.
cuando el aceite alcance la temperatura
La luz de listo (verde) se encenderá
8. Elija el nivel de temperatura deseado.
7. La luz de encendido se encenderá.
la toma de corriente.
6. Conecte el cable a la freidora, y luego a
5. Cierre la tapa.
COMBINE ACEITES.
NI LLENE DE MENOS LA CUBA. NO
y máxima (“MAX”). NO SOBRELLENE
las marcas de referencia mínima (“MIN”)
aceite debe hallarse siempre dentro de
soya o maní) en la cuba. El nivel de
aceite vegetal de buena calidad (maíz,
4. Eche aproximadamente 3.25 litros de
continuación.
mango de la cesta, según se describe a
esté debidamente instalado.
en marcha a menos que el panel de control
continuación. Nota: la freidora no se pondrá
acero inoxidable, según se enseña a
3. Instale el panel de control sobre la carcasa de
2. Retire la cesta de la cuba. Instale el
1. Retire la tapa.
OPERACIÓN
INSTRUCCIONES DE
agua ingrese en su interior.
Nunca sumerja el aparato en agua, ni permita que
la tapa y la cesta son aptas para lavavajillas.
cuidadosamente la cuba, la tapa y la cesta. Nota:
el polvo acumulado durante el transporte. Lave
con un paño ligeramente humedecido para quitar
Antes de usar el aparato por primera vez, límpielo
material de embalaje.
estén incluidas. Le aconsejamos que guarde el
descritas en la sección “Piezas y características”
cuerpo. Asegúrese de que todas las piezas
las etiquetas promocionales pegadas en su
Retire el aparato del material de embalaje y quite
ANTES DEL PRIMER USO
Page 29

4
3
7
6
1
2
8
10 9
4
5
5. Luz de listo
9. Control de temperatura
4. Luz de encendido
8. Botón de reinicio
3. Resistencia
inoxidable cepillado
7. Carcasa de acero
6. Cuba
2. Cesta con mango removible
1. Tapa con asa
PIEZAS Y CARACTERÍSTICAS
Page 30

3
de voltaje.
solamente; no utilice el aparato con un convertidor
Conecte el cable a una toma de corriente de 120V
con un electricista.
ocurre una sobrecarga eléctrica, comuníquese
halla un circuito separado, o si no sabe por qué
freidora sobre un circuito eléctrico separado. Si no
eléctrica. Le recomendamos que conecte la
eléctrico puede provocar una sobrecarga
Conectar varios aparatos sobre el mismo circuito
RIESGO DE SOBRECARGA ELÉCTRICA
con este aparato.
No se recomienda utilizar una extensión eléctrica
USO DE EXTENSIONES
enganche o tropiece con un cable más largo.
es corto, para reducir el peligro de que alguien se
el cable proveído con este aparato
PRECAUCIÓN:
USO DE EXTENSIONES
apague el aparato (“OFF”) antes de desconectarlo.
enchufar este en la toma de corriente. Siempre
Siempre conecte el cable al aparato antes de
un electricista. No intente modificarla.
aún no entrara completamente, comuníquese con
Si no entrara en la toma de corriente, inviértela. Si
sola manera en la toma de corriente polarizada.
polarizada. Esta clavija se podrá enchufar de una
electrocución, el cable está dotado de una clavija
apuntar hacia arriba. Para reducir el riesgo de
manera. El lado marcado “This side up” debe
el conector se podrá conectar de una sola
rápidamente con un simple tirón. NOTA:
magnético ha sido diseñado para desconectarse
(una pata es más ancha que otra). El conector
conector magnético y una clavija polarizada
El cable de este aparato está dotado de un
POLARIZADO
MAGNÉTICO Y ENCHUFE
CABLE CON CONECTOR
inflamables.
sobre alfombra, muebles u otros materiales
resistente al calor. Nunca coloque el aparato
coloque la freidora encima de un salvamantel
la mesa o de la encimera, le recomendamos que
PRECAUCIÓN: para no lastimar la superficie de
420°F (215 °C) o más.
BUENA CALIDAD, con punto de humeo de
de humeo diferentes. UTILICE ACEITE DE
varios tipos de aceite pueden tener puntos
freidora. NO COMBINE ACEITES, ya que
de cerdo, o manteca vegetal en esta
de oliva, aceite de semilla de uva, manteca
8. No utilice aceite sólido/hidrogenado, aceite
puedan jalar o hacer caer.
o de la encimera, para evitar que niños la
los niños y aléjela del borde de la mesa
7. Mantenga la freidora fuera del alcance de
el aparato.
completamente secas antes de encender
6. Cerciórese de que la cuba y la tapa estén
cuba está caliente.
Nunca vierta aceite en la freidora cuando la
con una cantidad insuficiente de aceite.
“MAX”. No utilice la freidora sin aceite o
más allá de la línea de llenado máximo
y máxima. No llene el depósito/la cuba
dentro de las marcas de referencia mínima
5. El nivel de aceite debe hallarse siempre
del aparato mientras está funcionando.
objetos. No ponga ningún objeto encima
de 4 pulgadas (10 cm) de los muros y otros
4. Coloque el aparato a una distancia mínima
salpicaduras.
en el aceite muy lentamente para evitar las
cerrada durante el uso. Sumerja la cesta
alimentos congelados. Mantenga la tapa
cristales de hielo que a veces cubren los
absorbente antes de freírlos. Elimine los
3. Seque los alimentos mojados con papel
PORQUE SALDRÁ VAPOR CALIENTE.
2. TENGA CUIDADO AL ABRIR LA TAPA
aceite se escurra por 10–20 segundos.
cesta, cuélguela del gancho y deje que el
cesta. Después de retirar la tapa, alce la
Sírvase del mango para levantar y bajar la
1. Mantenga la tapa cerrada durante el uso.
IMPORTANTES
CONSEJOS DE SEGURIDAD
SOLAMENTE
DOMÉSTICO
PARA USO
Page 31

2
INSTRUCCIONES
GUARDE ESTAS
puerta del armario/gabinete cuando cierra.
especialmente si este toca las paredes o la
conectado presenta un riesgo de incendio,
en un armario/gabinete. Dejar el aparato
desconecte el aparato antes de guardarlo
dentro de un armario/gabinete.Siempre
20. No haga funcionar el aparato debajo o
minutos dentro de un período de 2 horas.
19. No utilice el aparato durante más de 60
pies del aparato.
tuercas; esto podría dañar el mango o los
no apriete demasiado los tornillos y las
De no ser así, apriételos. PRECAUCIÓN:
tornillos y las tuercas estén bien apretados.
18. Asegúrese regularmente de que los
que no sea el indicado.
17. No utilice el aparato para ningún otro fin
instrucciones de ensamblaje).
esté seguramente sujeto a esta (véase las
16. Asegúrese de que el mango de la cesta
servicio autorizado.
reiniciarlo, comuníquese con un centro de
15. Si el aparato no funciona después de
reiniciar.
vacía. Si esto ocurriera, lo tendrá que
después de 12 minutos si la cuba está
14. El aparato se apagará automáticamente
armario/gabinete.
13. No haga funcionar el aparato debajo de un
caliente, ni en un horno caliente.
un quemador a gas o una hornilla eléctrica
12. No coloque el aparato sobre o cerca de
contacto con superficies calientes.
de la encimera o de la mesa, ni que haga
11. No permita que el cable cuelgue del borde
10. No lo utilice en exteriores.
heridas.
un riesgo de incendio, electrocución o
o proveídos por el fabricante presenta
9. El uso de accesorios no recomendados
ajuste.
certificado para su revisión, reparación o
regréselo a un centro de servicio
hubiese caído o si estuviese dañado;
que hubiese funcionado mal o que se
clavija estuviesen dañados, después de
8. No utilice este aparato si el cable o la
de conectarlo a la toma de corriente.
7. Siempre conecte el cable al aparato antes
mientras está conectado.
6. Nunca descuide ni abandone el aparato
discapacidades.
cerca de niños o personas con ciertas
cuidadosamente cuando sea usado
niños. Supervise el uso de este aparato
5. Este aparato no debe ser usado por
cable o la clavija en agua u otro líquido.
ponga el aparato, el panel de control, el
4. Para reducir el riesgo de electrocución, no
mango o las perillas.
3. No toque las superficies calientes; utilice el
u otros líquidos calientes.
mover el aparato cuando contenga aceite
antes de limpiarlo. Tenga sumo cuidado al
se enfríe antes de instalar/sacar piezas y
en uso y antes de limpiarlo. Permita que
2. Desconecte el aparato cuando no está
1. LEA TODAS LAS INSTRUCCIONES.
siguientes:
precauciones básicas de seguridad, incluso las
Al usar aparatos eléctricos, siempre debe tomar
IMPORTANTES
SEGURIDAD
MEDIDAS DE
Garantía ............................................................ 12
Recetas .............................................................. 9
Pautas de fritura ................................................. 8
Alimentos congelados ........................................ 7
Consejos y sugerencias ..................................... 7
Mecanismos de seguridad ................................. 6
Limpieza y mantenimiento ................................ 6
Cambio del aceite .............................................. 6
Instrucciones de operación ................................ 5
Piezas y características ...................................... 4
Consejos de seguridad importantes .................. 3
Medidas de seguridad importantes ................... 2
ÍNDICE
Page 32

CDF-130
siempre lea cuidadosamente las instrucciones antes de usarlo.
Para su seguridad y para disfrutar plenamente de este producto,
Freidora compacta de 1.9 L
LIBRO DE RECETAS
INSTRUCCIONES Y
Page 33

Starlite Electronic Pre-Press System
Version No.: CDF130 IB-13940-ESP
Size: 148mm(W)X210mm(H) (New)
Total Pages: 32PP
Material : 105Gsm art paper for whole book
Coating: Gloss Varnishing In Cover
Color : Cover: 4C+1C
Inside: 1C+1C
Date: 2016-03-22 Co-ordinator: Simon_Peng
Client: L0090
Starlite No: 213278IBS
Proof: 1st
Handled By: P000747
Cyan Magenta Yellow Black
5 10 20 30 40 50 60 70 80 90 100
5 10 20 30 40 50 60 70 80 90 100
5 10 20 30 40 50 60 70 80 90 100
5 10 20 30 40 50 60 70 80 90 100
 Loading...