

Page 1

Wired Touch Panels cuenium
User Manual
2
Page 2

UM040_01_Wired_Touch_Panels_cuenium2
10.12.2012
Copyright © CUE, a.s., Praha, Czech Republic 1990 - 2011
All rights reserved. Specications are subject to change without prior notice.
Page 3

Contents
Wired Touch Panels cuenium 2
4 IntroduCtIon
4 Overview
4 Models and Accessories
4 Features
4 Programming
5 Box Contents
6 speCIfICatIons
6 Touch Panels 7“
7 Touch Panels 12“
8 physICal desCrIptIon
8 Tabletop Models
9 Built-In Models
10 On-Wall Models
11 Part Description
12 MountIng
12 Tabletop Models
13 Back Box
17 Built-In Models
19 On-Wall Models
21 CleanIng the touCh panel
22 ConneCtIon
22 PC Connection
23 10/100 BaseT LAN incl. PoE Connector
24 WIndoWs loCal netWork settIngs
25 doWnload user applICatIon
25 Overview
25 Using Cue Visual Composer
26 Using Admin Web
27 Ir Capture
28 faCtory default and systeM default
29 on sCreen dIsplay
29 Access On Screen Display
29 Startup Menu
29 Settings
29 Status
30 IP Settings
30 Date/Time
31 Applications
31 Calibration
31 Exit
32 adMIn WeB
32 Access Admin Web
32 Login
32 Conguration
34 Date and Time
35 Applications
35 File Storage
36 E-mail
36 Settings
37 System
38 Password
38 Backup
39 Reset
39 License
40 softWare and fIrMWare lICense
41 notes
www.cuesystem.com
[email protected]
User Manual
Page 3
Page 4

Wired Touch Panels cuenium 2
IntroduCtIon
Overview
The cuenium2 wired touch panels offer 7” and 12” screen size. For each screen size tabletop, on-wall and
built-in models are available. All models combine functionality such as multimedia integration, lighting
automation, security monitoring, entertainment integration, and meeting & presentation control. The
active matrix touch screen display offers resolution 800 x 480 pixels for 7” and 1280 x 800 pixels for 12”
screen size. Both models produce stunning true color images. Wired Ethernet connection provides easy
network integration. All touch panels are equipped with Power over Ethernet (PoE for 7” and PoE+ for
12”) - technology enabling an Ethernet network cable to deliver both data and power. Fully compatible
with CUE controllers, these touch panels provide the ultimate one-touch solution for meeting rooms,
conference rooms, boardrooms and high-tech homes.
The Back Box is an optional accessories for both (7” and 12”) built-in touch panels and it provides a
steel enclosure. The Back Box is designed for pre-construction applications and allows install touch panel
to all types of wall as well as to the table. Box construction allows enough airow for touch panel when
installed in an enclosed wall. All necessary accessories is supplied with Back Box.
Models and Accessories
Model Product Code Description Note
touchCUE-7 CS0375 Wired tabletop touch panel 7” Incl. tilting stand
touchCUE-7-W CS0377 Wired on-wall touch panel 7” Incl. wall mounting adapter
touchCUE-7-B CS0376 Wired built-in touch panel 7”
touchCUE-12 CS0382 Wired tabletop touch panel 12” Incl. tilting stand
touchCUE-12-W CS0384 Wired on-wall touch panel 12” Incl. wall mounting adapter
touchCUE-12-B CS0383 Wired built-in touch panel 12”
Back Box CS0409 Back box for built-in models The same for 7” and 12” models
Features
• Wired tabletop, on-wall and build-in touch panels
• 7” and 12” active matrix touch screen display
• Resolution 800 x 480 pixels for 7”, 1280 x 800 pixels for 12”
• Display colors 32-bit (True Color)
• Wired Ethernet communication
• Power over Ethernet power supply
• Built-in microphone and speakers
• Built-in light and motion sensors
• Built-in IR transmitter and receiver
• Built-in IR capture sensor
• Aluminium enclosure, aluminium front panel for built-in models
• Tilting tabletop stand for tabletop models
Programming
All touch panels have to be programmed using Cue Visual Composer. These models are not compatible
with Cue System Director.
www.cuesystem.com
[email protected]
User Manual
Page 4
Page 5
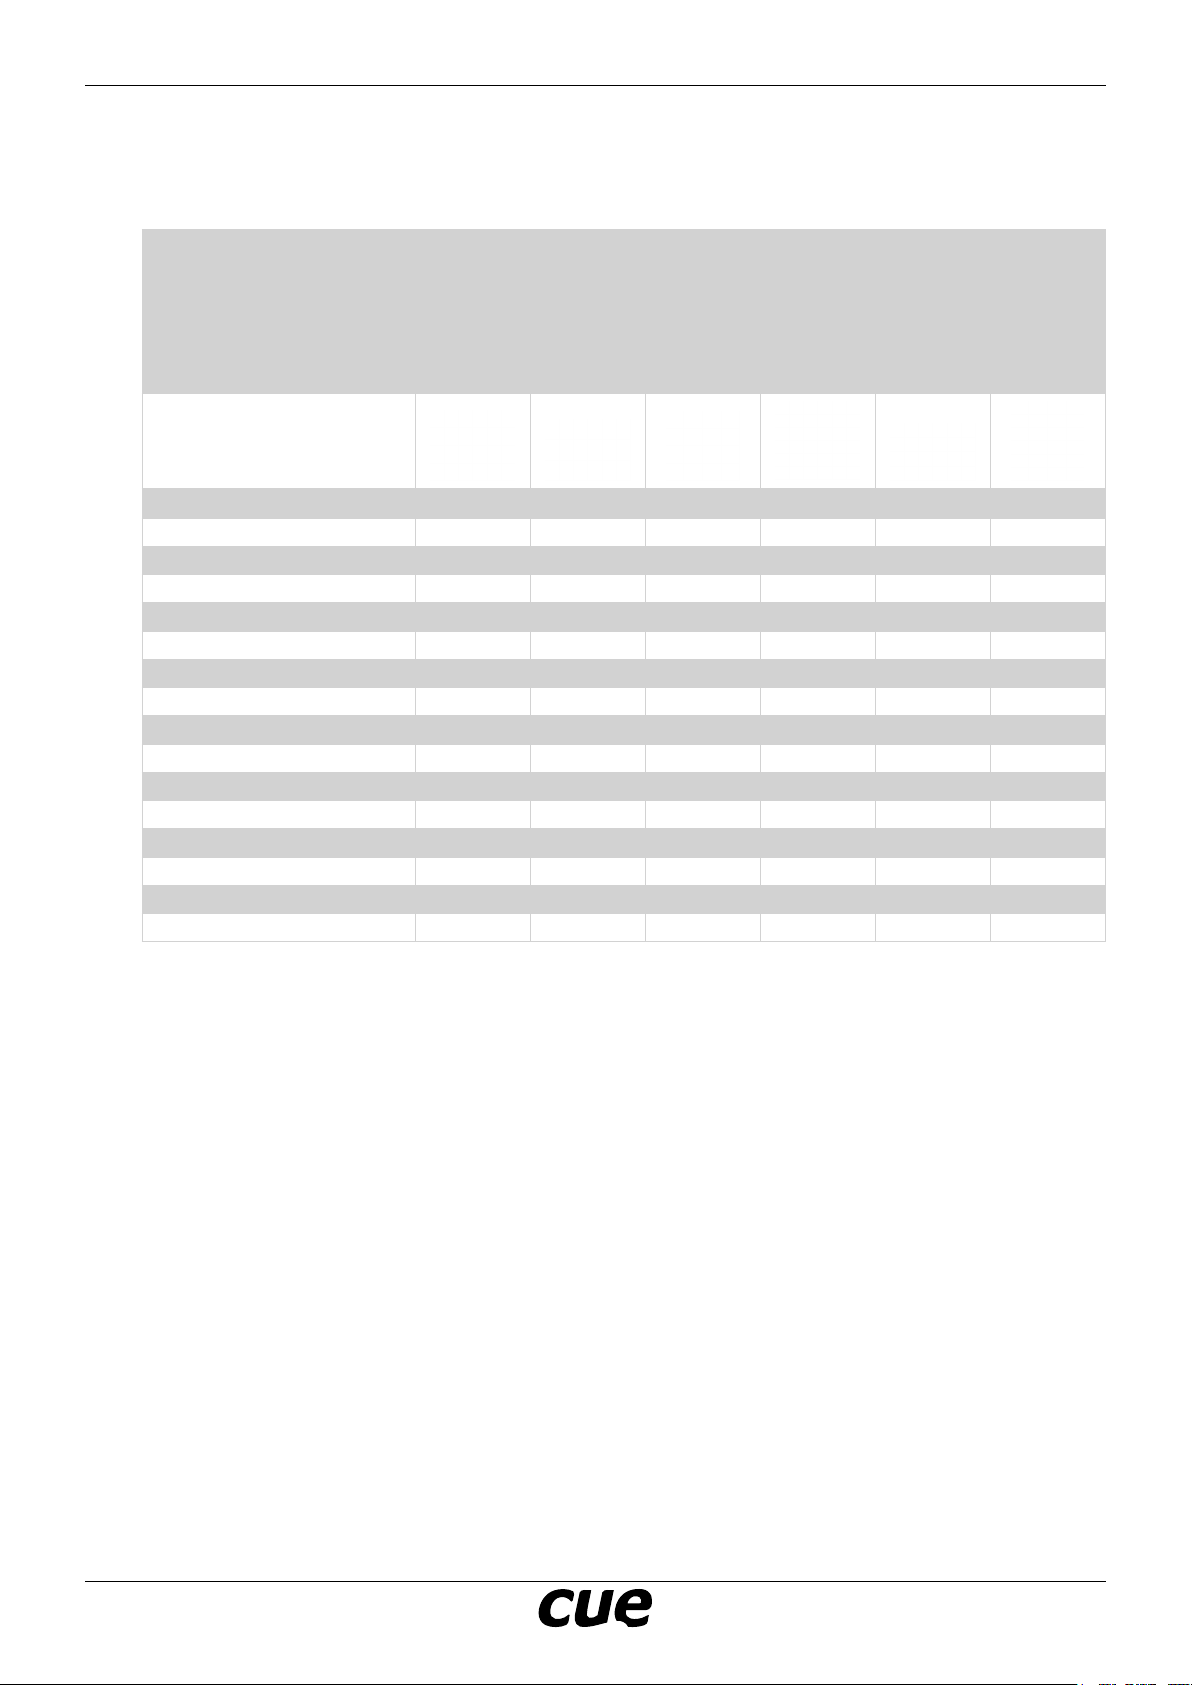
Box Contents
Wired Touch Panels cuenium 2
touchCUE-7
Touch panel touchCUE-7
Touch panel touchCUE-7-W 1
Touch panel touchCUE-7-B 1
Touch panel touchCUE-12 1
Touch panel touchCUE-12-W 1
Touch panel touchCUE-12-B 1
Wall Mount Adapter 1 1
PoE Adapter 1 1 1
PoE+ Adapter 1 1 1
Ethernet cable straight-through 1 1 1 1 1 1
Ethernet cable crossed-over 1 1 1 1 1 1
Power cable 1 1 1 1 1 1
CE declaration 1 1 1 1 1 1
RoHS declaration 1 1 1 1 1 1
Data Sheet 1 1 1 1 1 1
Cue System Connector Wiring 1 1 1 1 1 1
1
touchCUE-7-W
touchCUE-7-B
touchCUE-12
touchCUE-12-W
touchCUE-12-B
www.cuesystem.com
[email protected]
User Manual
Page 5
Page 6

speCIfICatIons
Touch Panels 7“
Product Name touchCUE-7 touchCUE-7-W touchCUE-7-B
Product Code CS0375 CS0377 CS0376
Wired Touch Panels cuenium 2
Touch-screen display TFT color active matrix LCD with LED backlit
Built-in sensors Light sensor for automatic backlight dimming
Buttons Multifunctional for power and programmed functions
Memory 256 MB RAM
Software XPL2 runtime for application created in Cue Visual Composer
Video Streaming video preview
Audio Built-in microphone
Wired communication 10/100 BaseT LAN, RJ-45 connector
Infra-red IR receiver for IR link
Power supply Power over Ethernet (PoE), IEEE 802.3af compatible
Physical Aluminium enclosure
Tilting tabletop stand
Dimensions With tabletop stand
198 x 150 x 122 mm
7.8” x 5.9” x 4.8”
Size 7” / 177.8 mm diagonal, wide screen
Resolution 800 x 480 pixels (WVGA)
Display colors 32-bit (True Color)
Transparency 8-bit Alpha blending
White luminance 400 cd/m2
Contrast ratio 1000 : 1
Viewing angle ±80° horizontal, ±80° vertical
Motion sensor for automatic backlight switch on
microSD Card min. 4 GB (upgradable)
Pixel pitch 0.19 mm
Resistive membrane touch overlay
Reset
Set factory default
Admin Web for setup
Built-in speakers
IR transmitter for direct control
IR capture sensor
Aluminium enclosure
VESA standard compatible
Wall mounting adapter
198 x 147 x 29 mm
7.8” x 5.8” x 1.1”
Aluminium front panel
Back box available
198 x 147 x 60 mm
7.8” x 5.8” x 2.4”
Weight 1.1 kg / 0.5 lb 1.1 kg / 0.5 lb 1.1 kg / 0.5 lb
Environment conditions Operating temperature 10° to 40° C
www.cuesystem.com
[email protected]
Without tabletop stand
198 x 147 x 29 mm
7.8” x 5.8” x 1.1”
Storage temperature 0° to 60° C
Relative humidity 10% to 90% non-condensing
User Manual
Page 6
Page 7

Touch Panels 12“
Product Name touchCUE-12 touchCUE-12-W touchCUE-12-B
Product Code CS0382 CS0384 CS0383
Wired Touch Panels cuenium 2
Touch-screen display TFT color active matrix LCD with LED backlit
Built-in sensors Light sensor for automatic backlight dimming
Buttons Multifunctional for power and programmed functions
Memory 256 MB RAM
Software XPL2 runtime for application created in Cue Visual Composer
Video Streaming video preview
Audio Built-in microphone
Wired communication 10/100 BaseT LAN, RJ-45 connector
Infra-red IR receiver for IR link
Power supply Power over Ethernet (PoE Plus), IEEE 802.3at compatible
Physical Aluminium enclosure
Tilting tabletop stand
Dimensions With tabletop stand
320 x 239 x 147 mm
12.6” x 9.4” x 5.8”
Size 12.1” / 307.3 mm diagonal, wide screen
Resolution 1280 x 800 pixels (WVGA)
Display colors 32-bit (True Color)
Transparency 8-bit Alpha blending
White luminance 400 cd/m2
Contrast ratio 1000 : 1
Viewing angle ±80° horizontal, ±80° vertical
Motion sensor for automatic backlight switch on
microSD Card min. 4 GB (upgradable)
Pixel pitch 0.204 mm
Resistive membrane touch overlay
Reset
Set factory default
Admin Web for setup
Built-in speakers
IR transmitter for direct control
IR capture sensor
Aluminium enclosure
VESA standard compatible
Wall mounting adapter
320 x 225 x 30 mm
12.6” x 8.9” x 1.2”
Aluminium front panel
Back box available
320 x 225 x 61 mm
12.6” x 8.9” x 2.4”
Weight 1.4 kg / 0.6 lb 1.4 kg / 0.6 lb 1.4 kg / 0.6 lb
Environment conditions Operating temperature 10° to 40° C
www.cuesystem.com
[email protected]
Without tabletop stand
20 x 225 x 30 mm
12.6” x 8.9” x 1.2”
Storage temperature 0° to 60° C
Relative humidity 10% to 90% non-condensing
User Manual
Page 7
Page 8
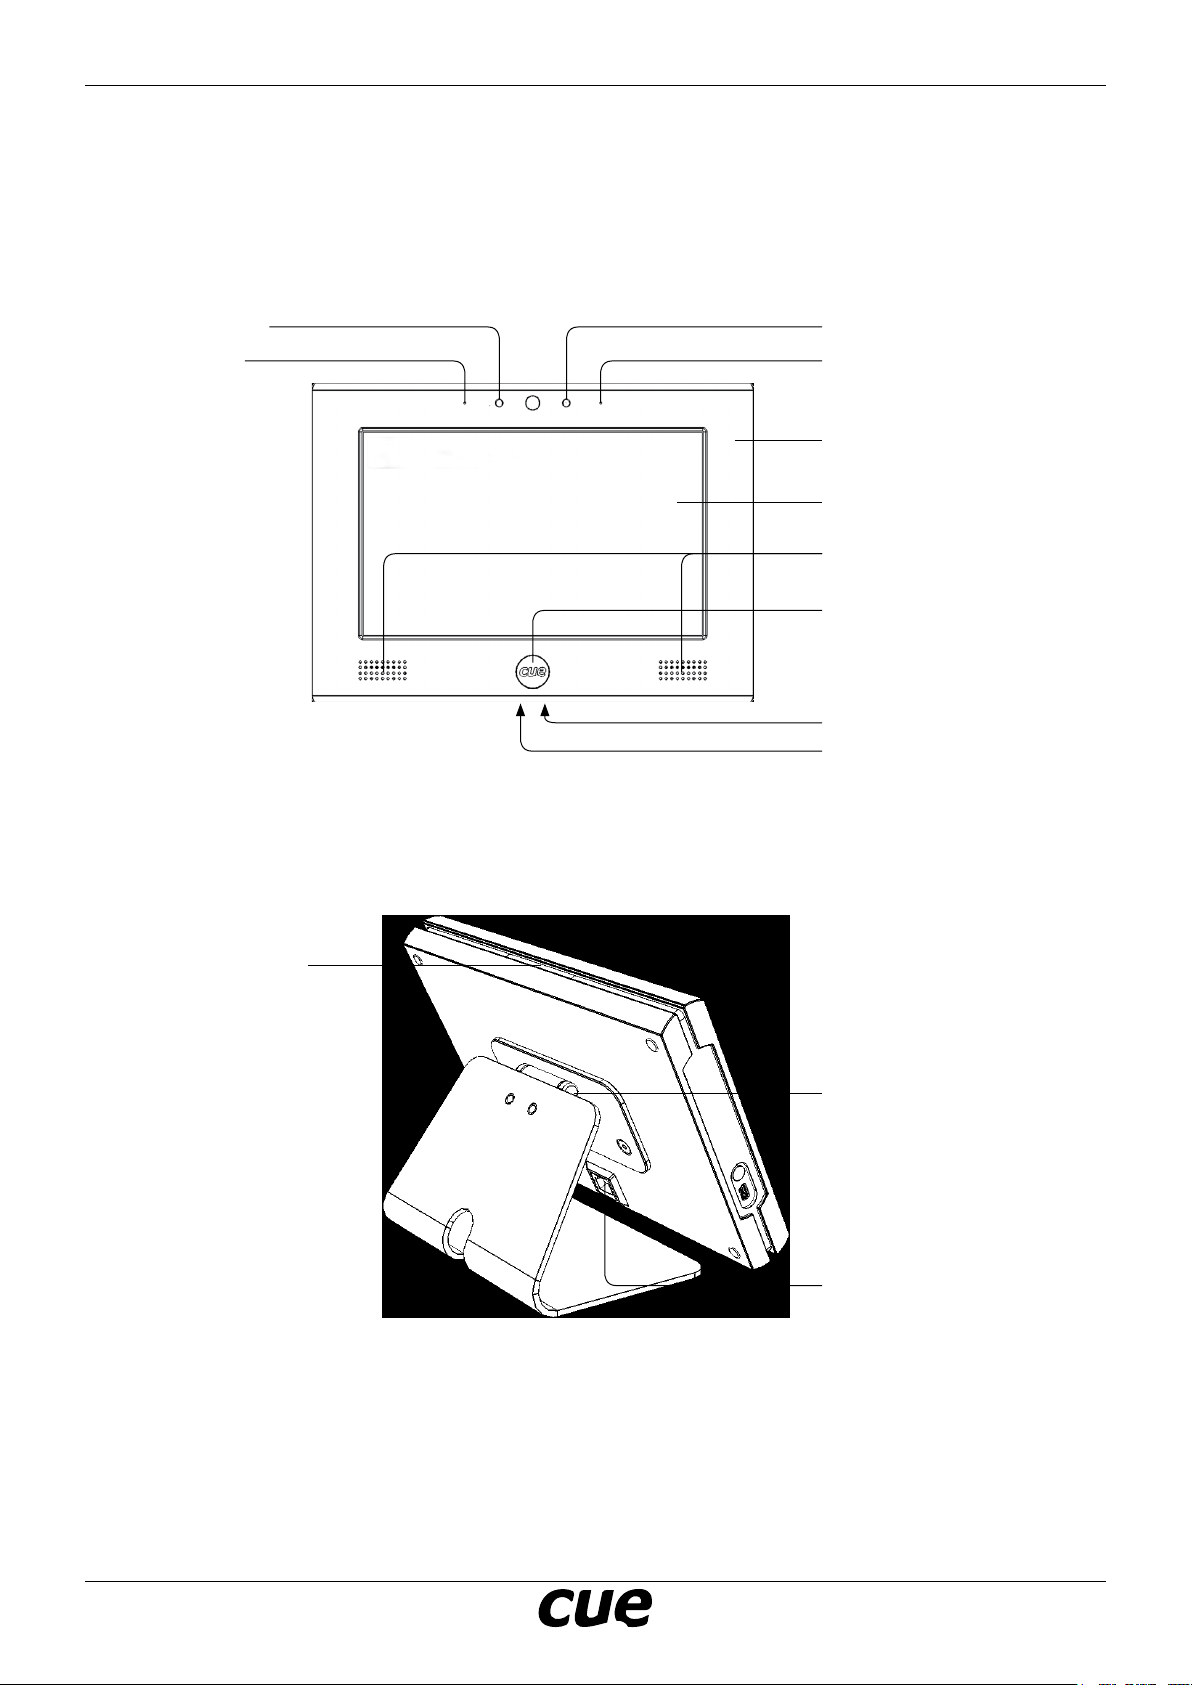
physICal desCrIptIon
IR receiverMotion sensor
Microphone
IR transmitter
IR capture sensor
Tabletop Models
Wired Touch Panels cuenium 2
Light sensor
Aluminium front panel
Touch-screen display
Speakers
Multifunctional button
System default button
Reset button
Tilting mechanism
10/100 BaseT Ethernet
incl. PoE Connector
www.cuesystem.com
[email protected]
User Manual
Page 8
Page 9
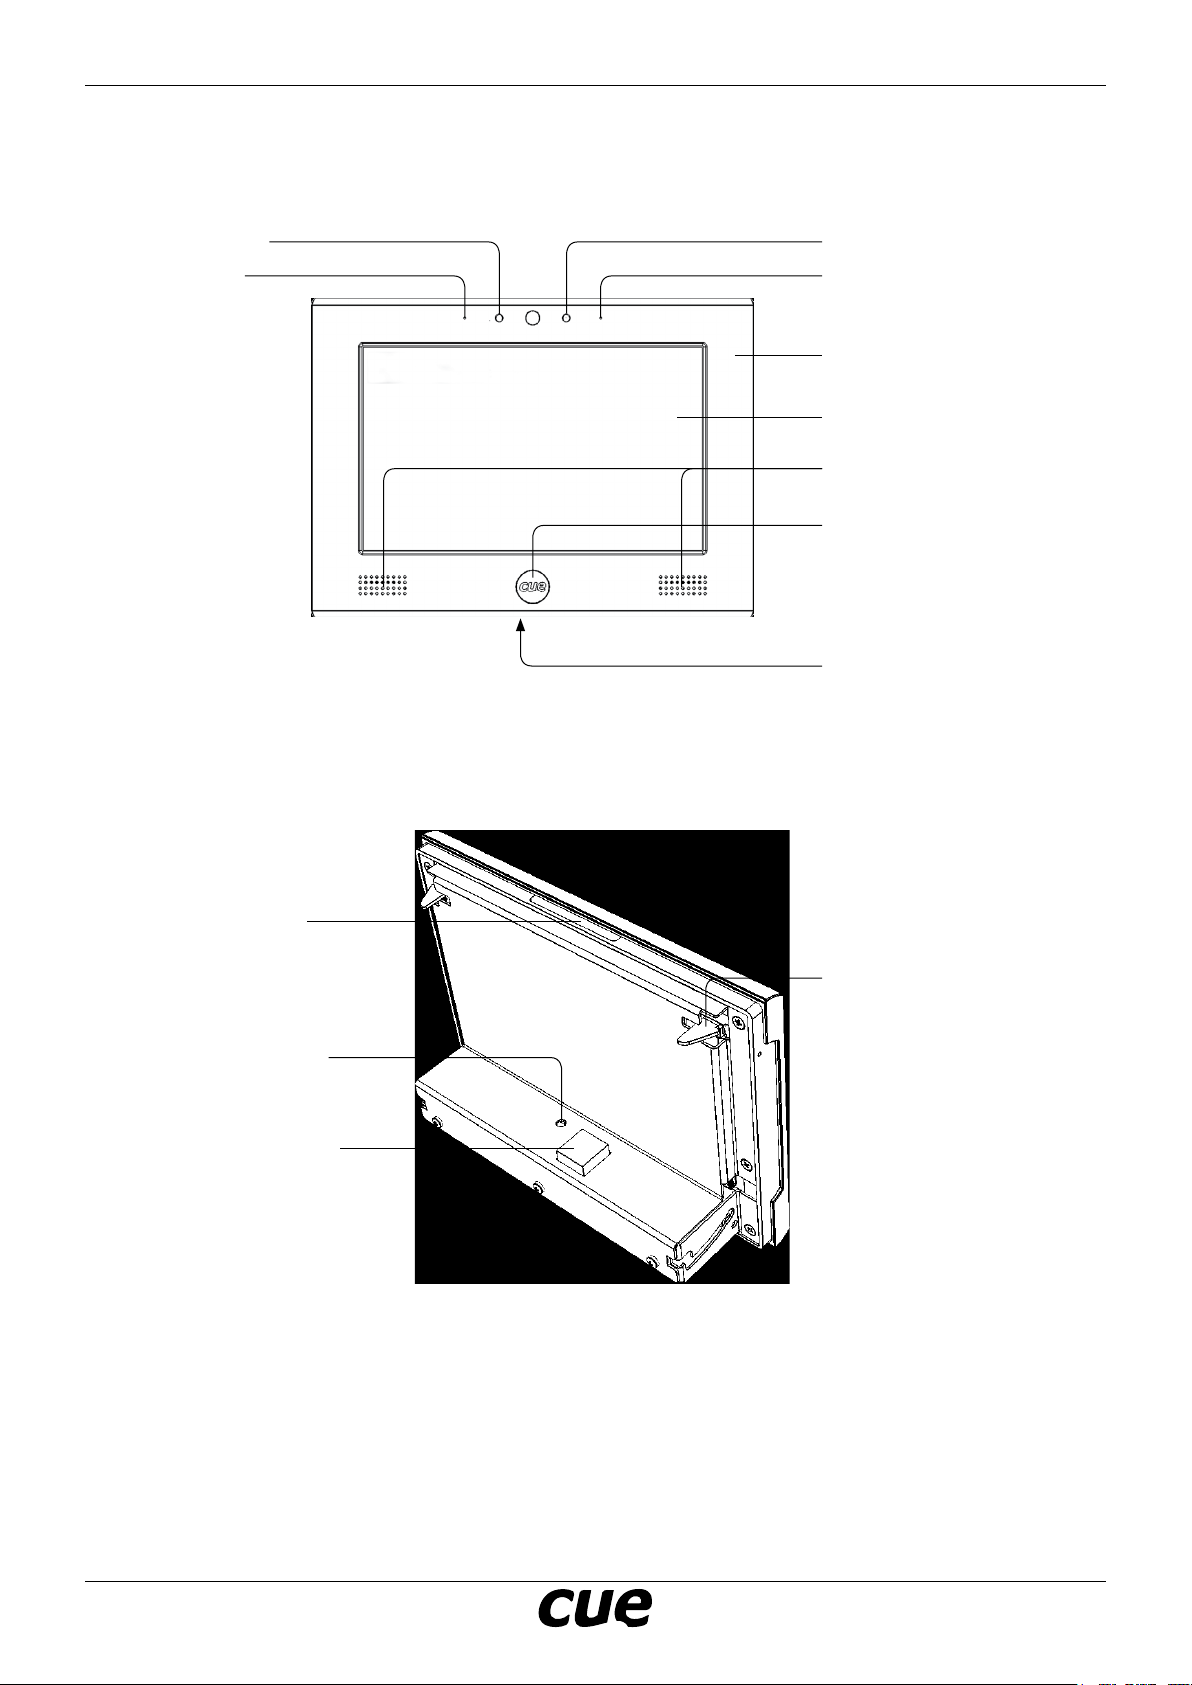
Built-In Models
IR receiverMotion sensor
Microphone
10/100 BaseT Ethernet
incl. PoE Connector
System default button
IR transmitter
IR capture sensor
Wired Touch Panels cuenium 2
Light sensor
Aluminium front panel
Touch-screen display
Speakers
Multifunctional button
Reset button
Fixing mechanism
www.cuesystem.com
[email protected]
User Manual
Page 9
Page 10
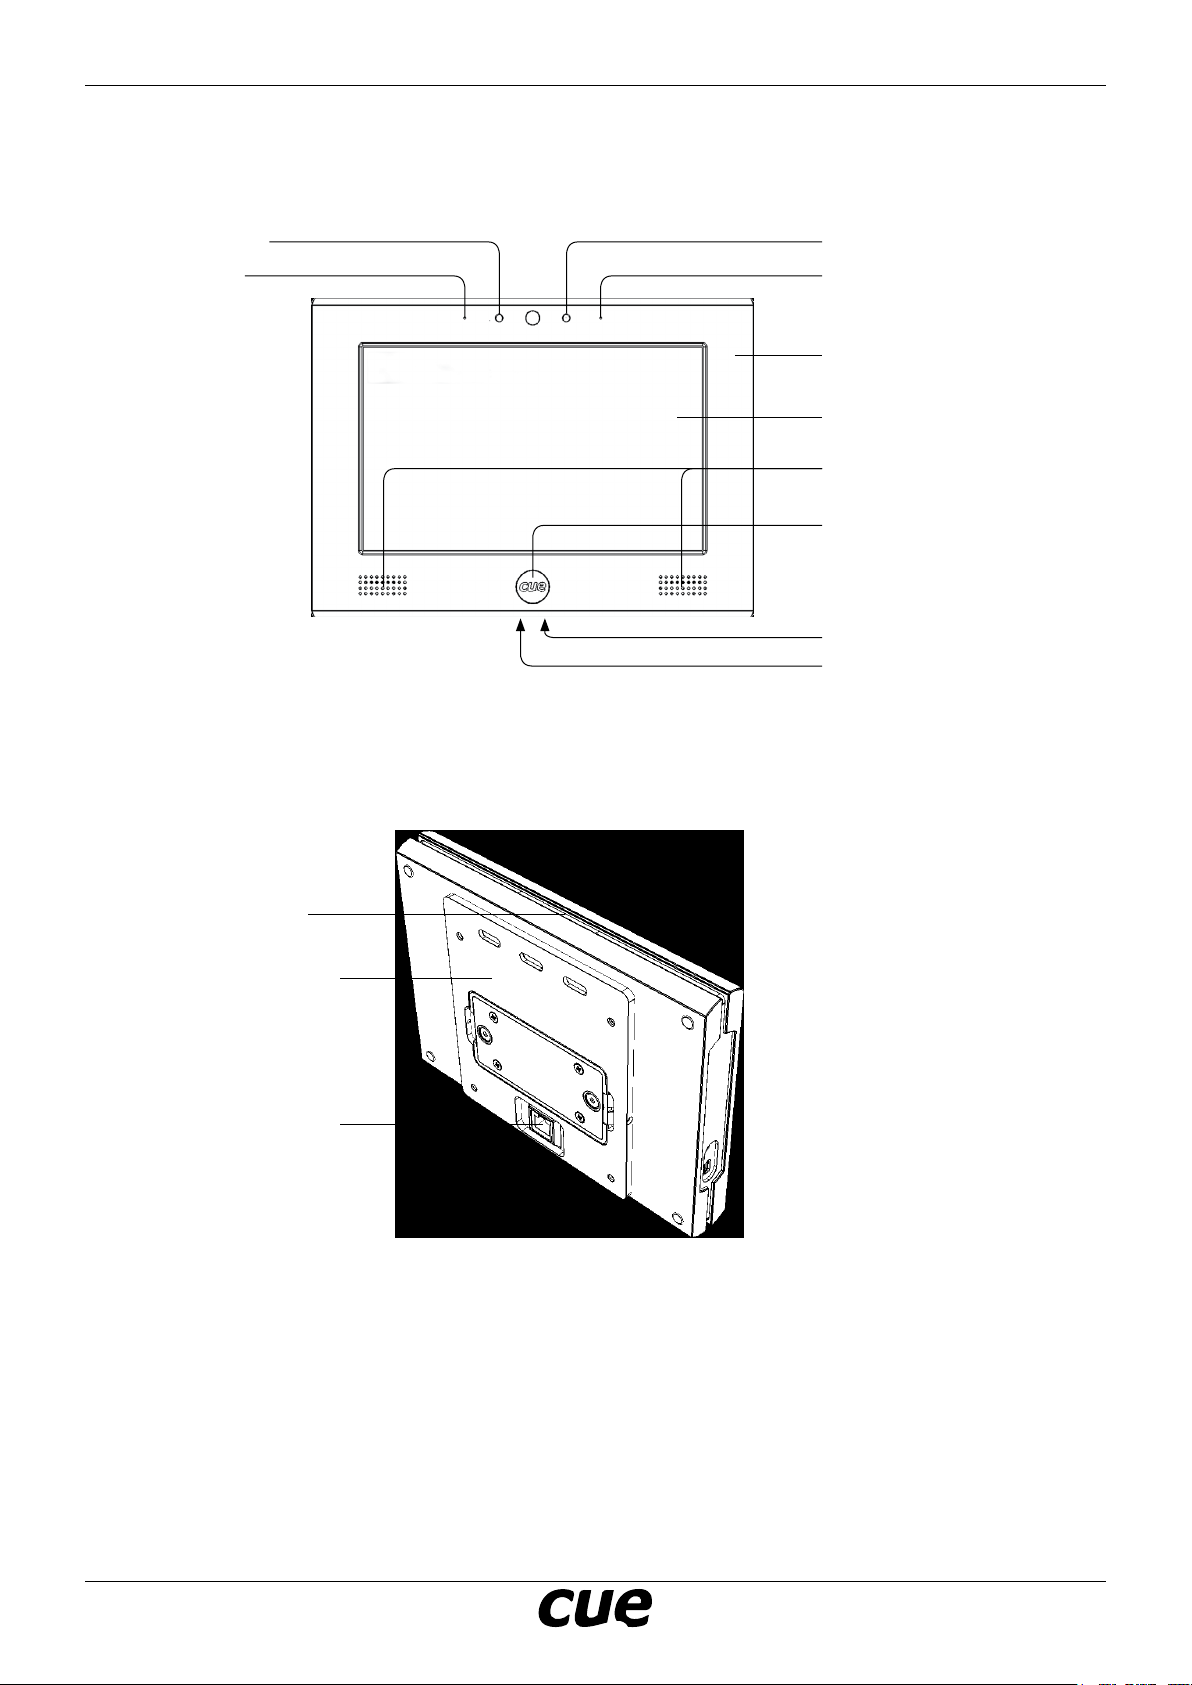
On-Wall Models
IR receiverMotion sensor
Microphone
Wall mounting adapter
10/100 BaseT Ethernet
incl. PoE Connector
IR transmitter
IR capture sensor
Wired Touch Panels cuenium 2
Light sensor
Aluminium front panel
Touch-screen display
Speakers
Multifunctional button
System default button
Reset button
www.cuesystem.com
[email protected]
User Manual
Page 10
Page 11

Wired Touch Panels cuenium 2
Part Description
Microphone
The microphone is prepared for future use. The functionality depends on a rmware version.
Motion sensor
The Motion sensor resumes touch panel from Backlight Saver mode. This functionality can be enabled /
disabled using On Screen Display or Admin Web.
IR Receiver
The built-in IR sensor carries the same functionality as irCUE Receiver or irCUE Receiver 485. This means
that touch panel can receive IR signal from CUE wireless IR control panels without the need to use any
external IR receiver.
Light Sensor
The Light Sensor automatically adjusts display backlight according ambient light level. This function has
to be enabled using On Screen Display or Admin Web.
Touch-screen display
Touch-screen display with active matrix color LCD and resistive membrane touch overlay.
Speakers
The built-in stereo speakers allows to play sounds stored in the touch panels.
Multifunctional button
The multifunctional button shows On Screen Display used for touch panel setting. For more details see
chapter on screen disPlay.
Reset Button
When pressed the reset of the unit is performed followed by operating system boot. A thin screwdriver is
needed for press of this button.
Factory Default Button
When pressed the factory default function is performed. For factory default values see chapter Factory
Default and System Default. A thin screwdriver is needed for press of this button.
IR Capture Sensor
The built-in IR sensor allows to capture IR codes directly by touch panel. For more details see chapter IR
Capture.
IR Transmitter
IT Transmitter allows to transmit IR codes directly from touch panel. Devices can be controlled directly
without controller.
Connector 10/100 BaseT LAN incl. Power over Ethernet
The 10/100 BaseT LAN is a standard network connection equipped with Power over Ethernet using RJ-45
connector. For more details see chapter Connection.
www.cuesystem.com
[email protected]
User Manual
Page 11
Page 12
Wired Touch Panels cuenium 2
MountIng
Tabletop Models
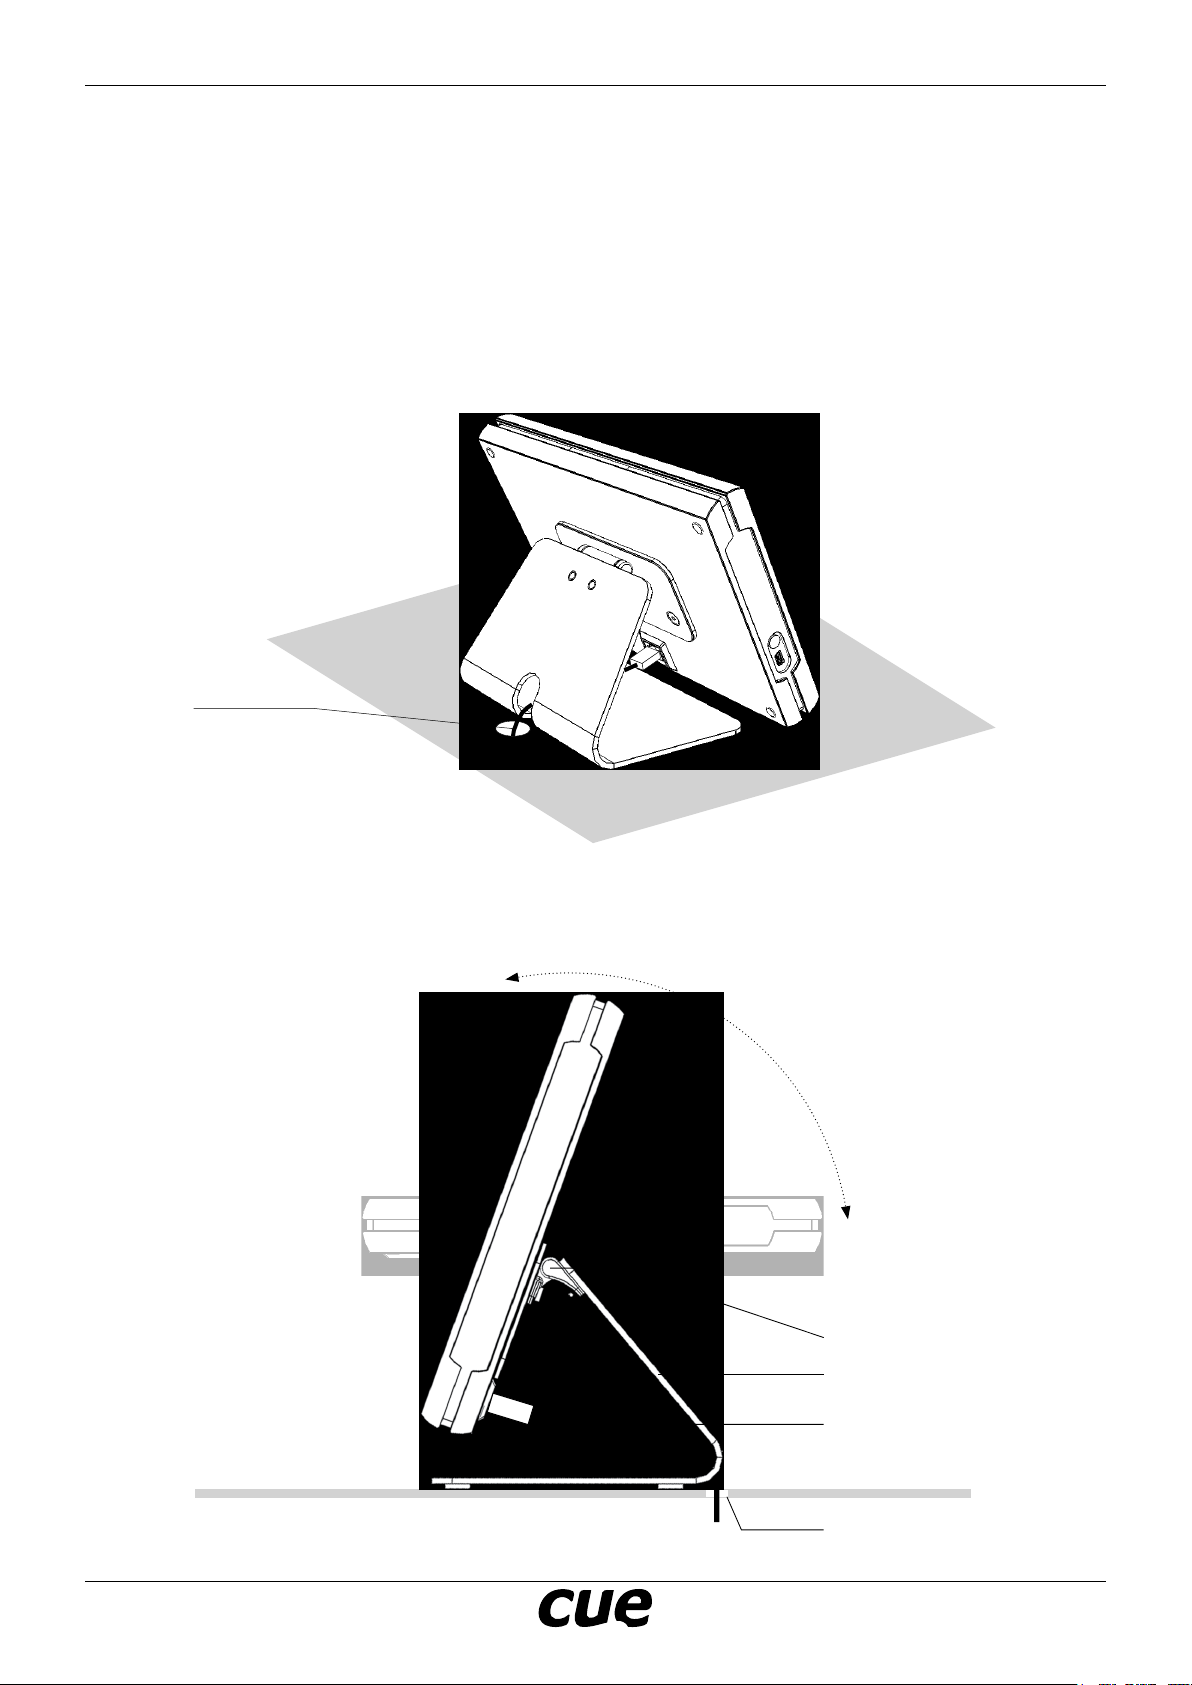
Desktop models can be placed on any at surface.
Don’t forget to prepare proper bushing for the cable including standard connector. A minimum diameter
of the bushing for Ethernet connector is approx. 20 mm.
Connect the Ethernet cable and thread it through a hole in the tabletop stand as described below. This
will prevent possible damage to the connector for careless handling with the touch panel.
Ethernet cable
Both 7” and 12” tabletop models are equipped with tilting tabletop stand. Toughness of tilting mechanism
is set in production and can’t be changed.
www.cuesystem.com
[email protected]
Tilting mechanism
Tabletop stand
Ethernet cable
Table
Bushing for cable
User Manual
Page 12
Page 13
Wired Touch Panels cuenium 2
Wiring knockouts
4
5
3
Back Box
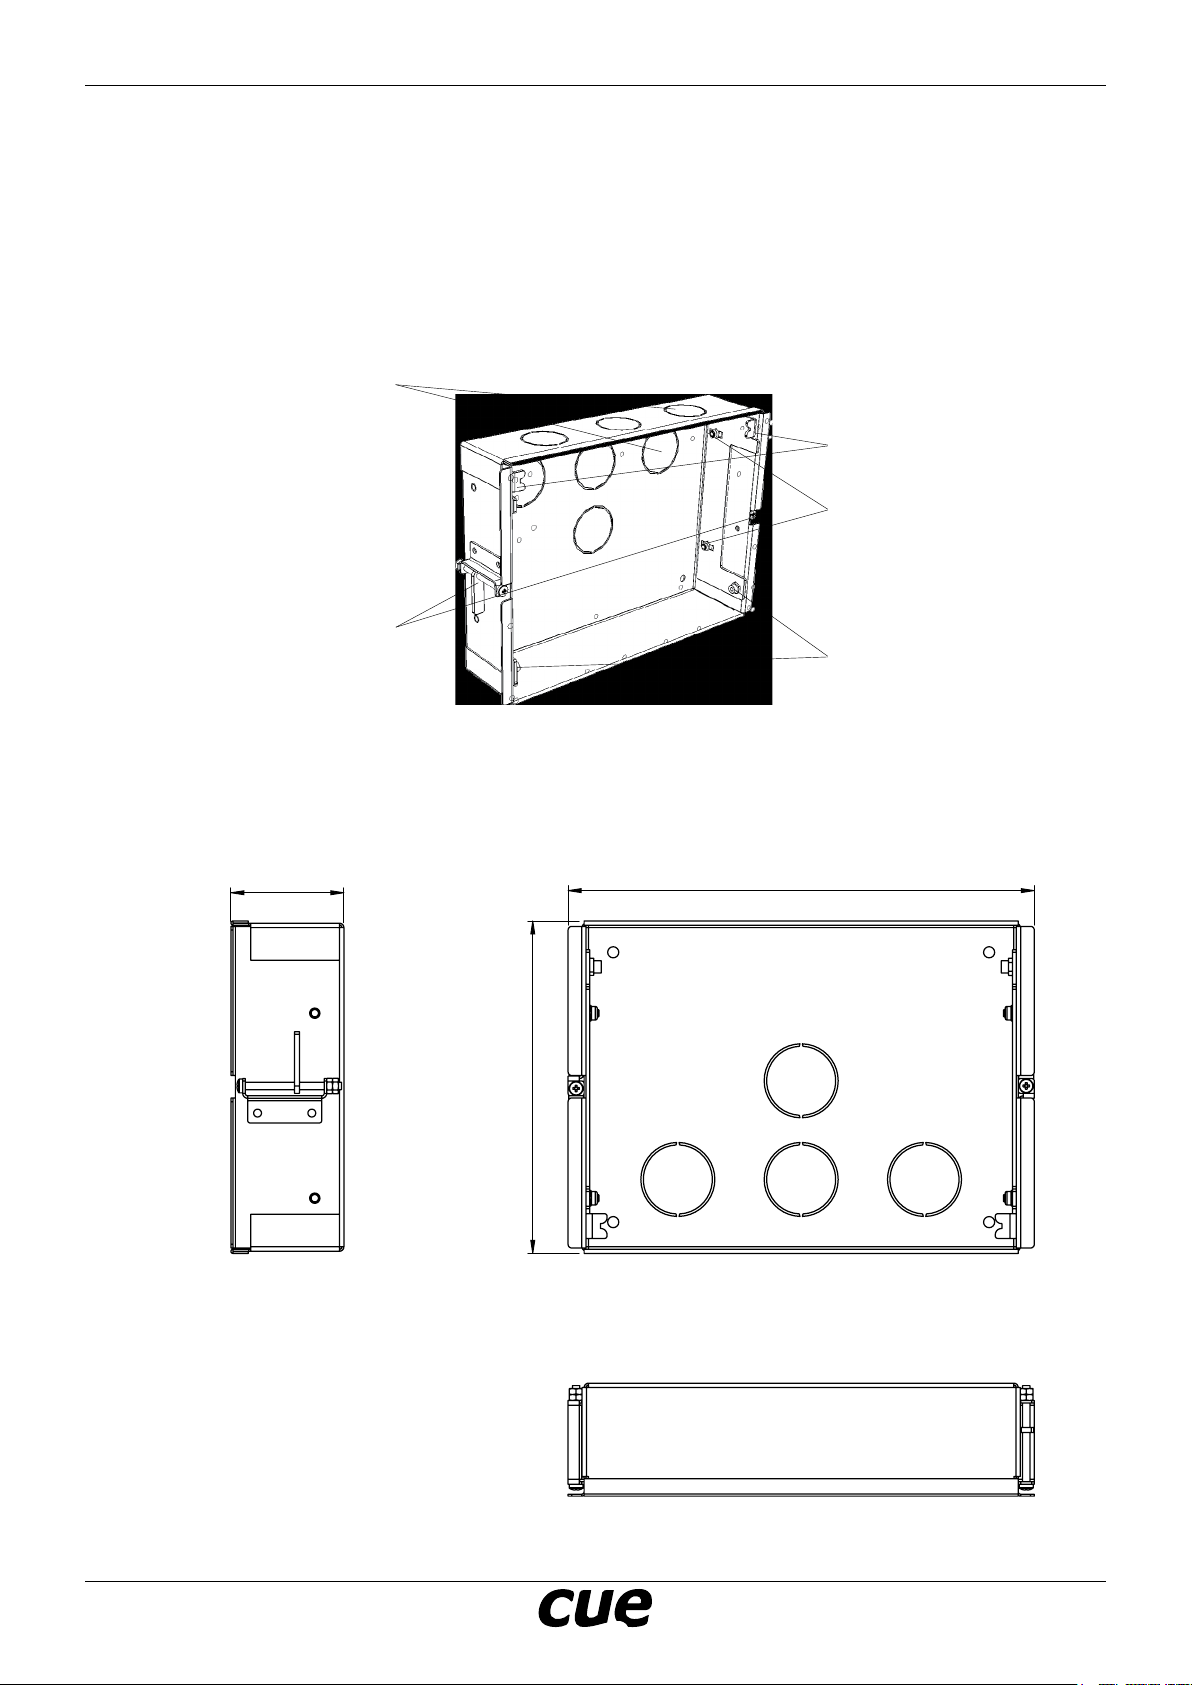
Physical Description
The back box (product code CS0409) provides a steel enclosure for the touchCUE-7-B and for touchCUE12-B build-in touch panels. It is designed for pre-construction applications.
The back box is equipped with knockouts for cable installation.
Fixing tabs
Nuts for positioning of metal
holder with xing tabs and
thorns (left and right)
Plasterboard wall
supports incl. screws
Thorns
Dimensions
45,8
189
134,8
www.cuesystem.com
[email protected]
User Manual
Page 13
Page 14

Installation into the Furniture or Plasteboard Wall
Back Box CS0409 Cutout Template
1
8
4
Wired Touch Panels cuenium 2
3
5
6
7
Steps are as follows
1. Cut out a hole 1 using the template delivered with back box. If you don’t have template, use
following dimensions.
135 mm
7 mm
5
touchCUE-12-B Front Panel Outline
320 x 225 mm
touchCUE-7-B Front Panel Outline
198 x 147 mm
179 mm
Back Box Cutout
2
45 mm30 mm60 mm
7 mm
45 mm 30 mm 60 mm
7 mm
2. Break suitable knockout 3 for comfortable stretch of cable.
3. Make sure that the rubber friction rings 8 lean against the supports 4 and supports 4 are in the right
position - left down, right up.
4. Insert the back box 2 into the cut-out 1 and take the cables through broken off knockout.
5. Fasten 2x support 4 to the wall using screws 5.
6. Adjust the metal holder 7 as described in the chapter Adjusting the Panel on the Wall.
www.cuesystem.com
[email protected]
User Manual
Page 14
Page 15
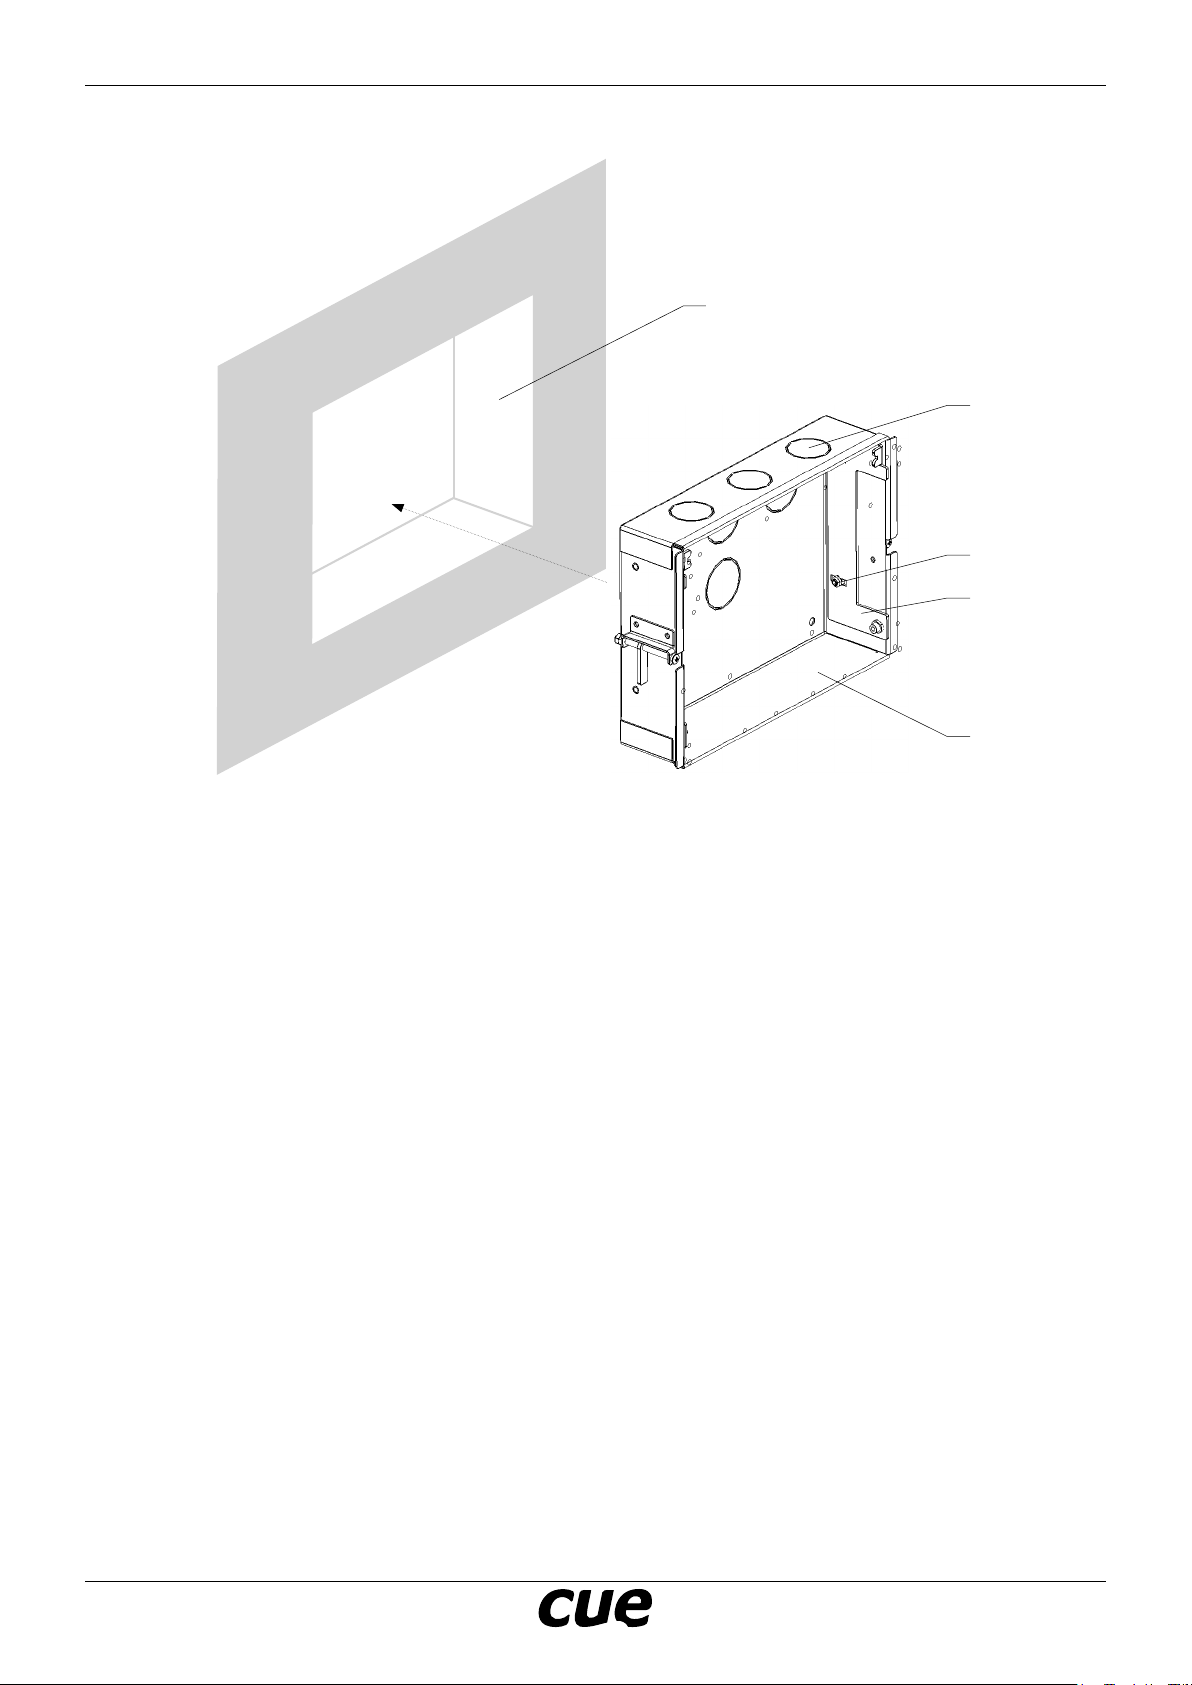
Installation into Wet Wall
~ 50 mm
~ 145 mm
~ 200 mm
Wired Touch Panels cuenium 2
1
3
6
7
2
Steps are as follows
1. Chisel out the mounting hole 1 in the wall.
2. Break suitable knockout 3 for comfortable stretch of cable.
3. Insert the back box 2 into the hole 1 and take the cables through broken off knockout.
4. Fix the back box 2 with mortar or plaster.
5. Neaten the visible front part of the back box with stuke or another appropriate material.
6. Adjust the metal holder 7 as described in the chapter Adjusting the Panel on the Wall.
www.cuesystem.com
[email protected]
User Manual
Page 15
Page 16
Wired Touch Panels cuenium 2
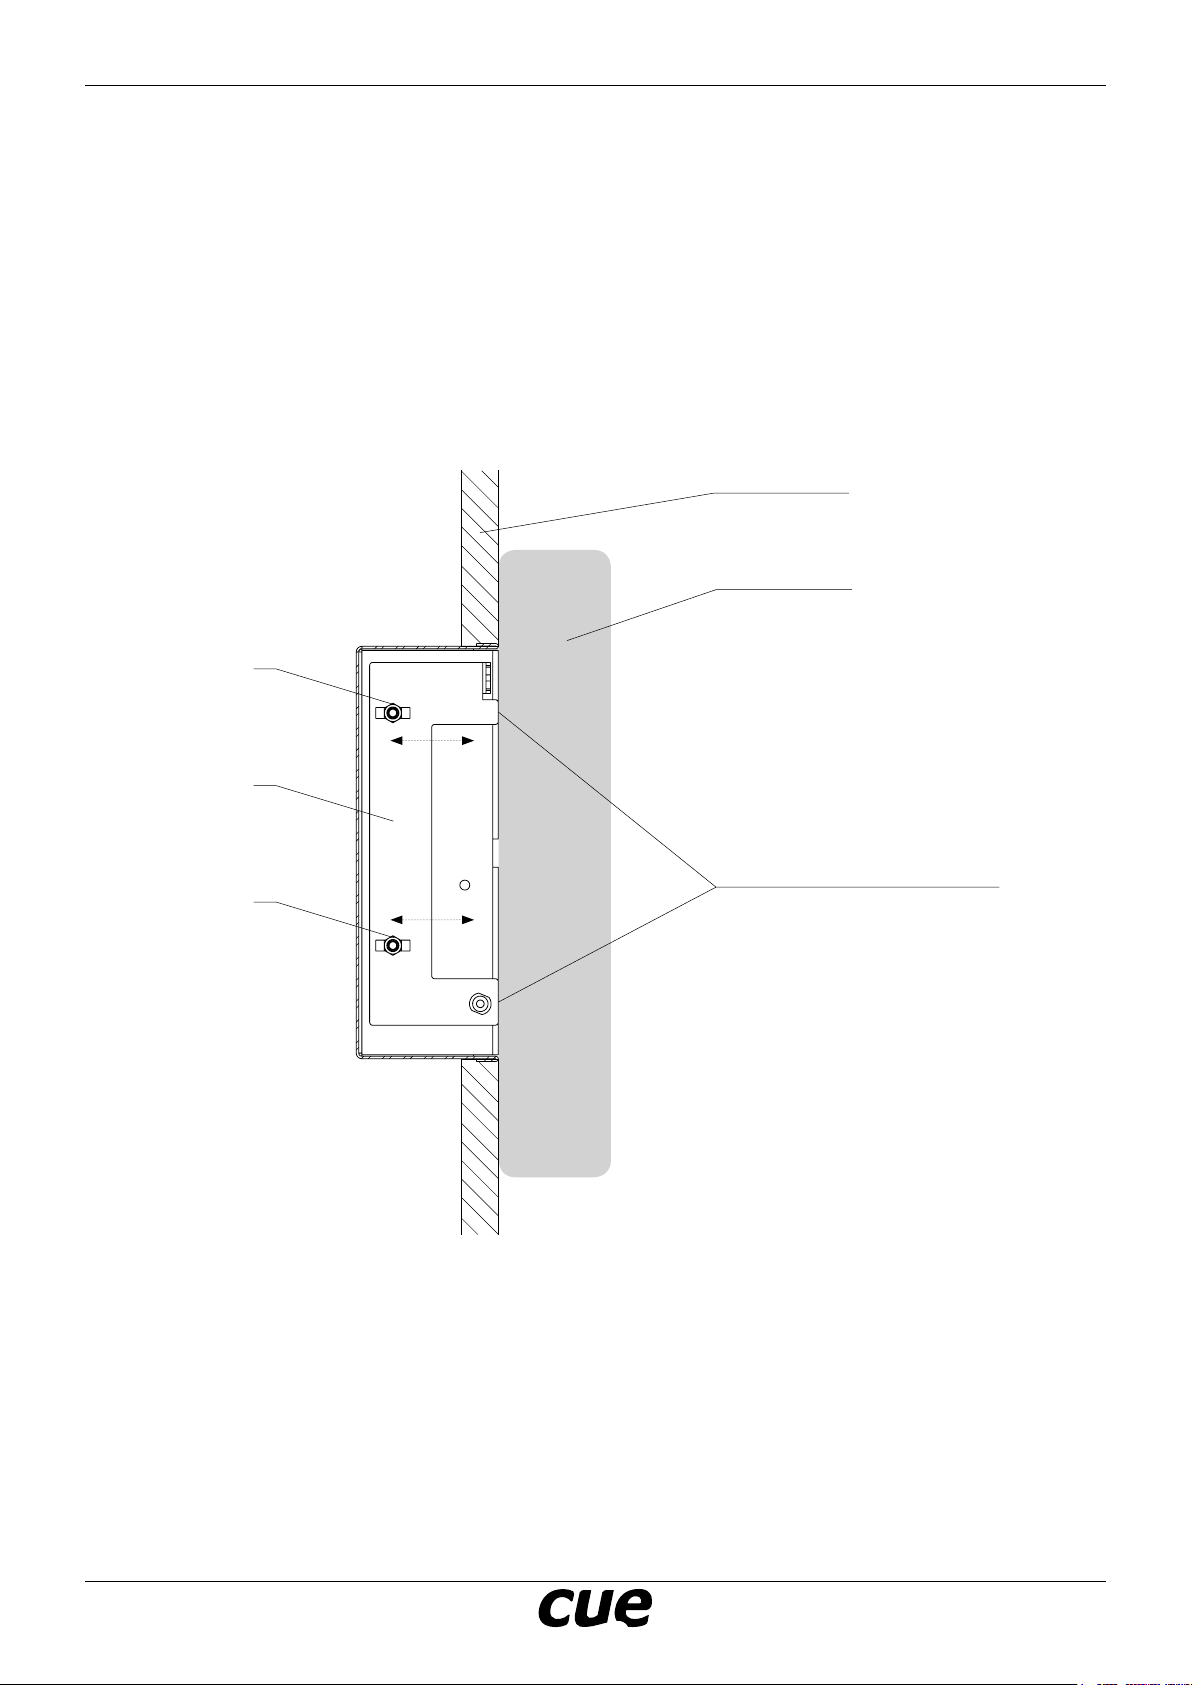
Adjusting the Panel on the Wall
If the touch panel does not adhere to the wall perfectly, you can adjust it in the following way.
1. Take the panel out of the back box
2. Loosen the two nuts 6 on the metal holder 7 on the inside of the back box (the one with thorns and
xing tabs).
3. Adjust the holder in a way to make the touch panel adhere neatly to the wall. Use guide ruler as
described below.
4. Tighten the two nuts 6.
5. Repeat steps 2 to 4 on the other side of the back box.
The wall
Guide ruler
6
7
Points of contact between
6
holder and guide ruller
www.cuesystem.com
[email protected]
User Manual
Page 16
Page 17
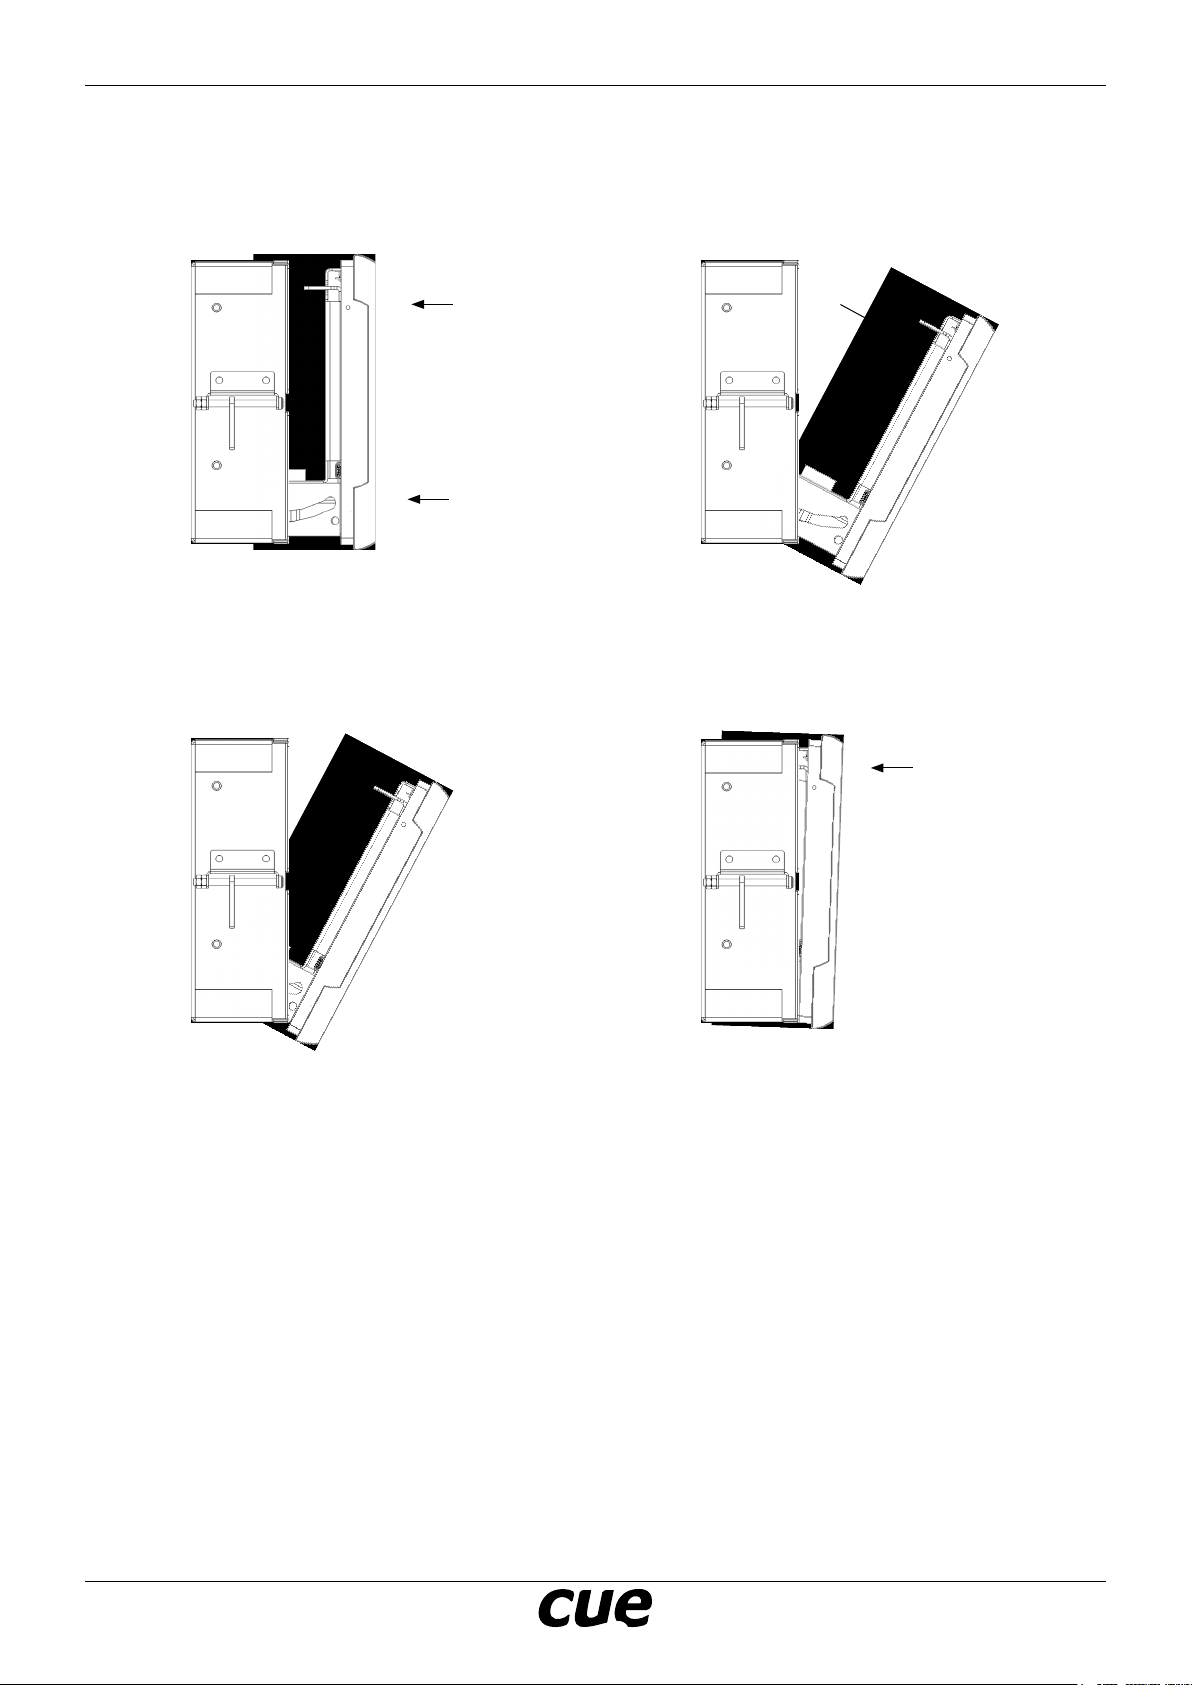
Built-In Models
Placing the Touch Panel into the Back Box
Step 1 Step 2
Wired Touch Panels cuenium 2
Hold touch panel in the upright position and push
it into the back box so that the thorns in the back
box slide into the grooves in the metal slat of the
touch panel.
Step 3 Step 4
If you want to place the panel in the back box,
hold it upright and push its bottom part strongly
as deep into the back box as possible.
This enables you to tilt the panel, which holds in
this position, and mount cables.
Then push the upper part of the panel until the
two metal catches slide into the xing tabs.
Note:
If the touch panel does not adhere to the wall
perfectly, you can adjust it as described in the
capture Adjusting the Panel on the Wall.
www.cuesystem.com
[email protected]
User Manual
Page 17
Page 18
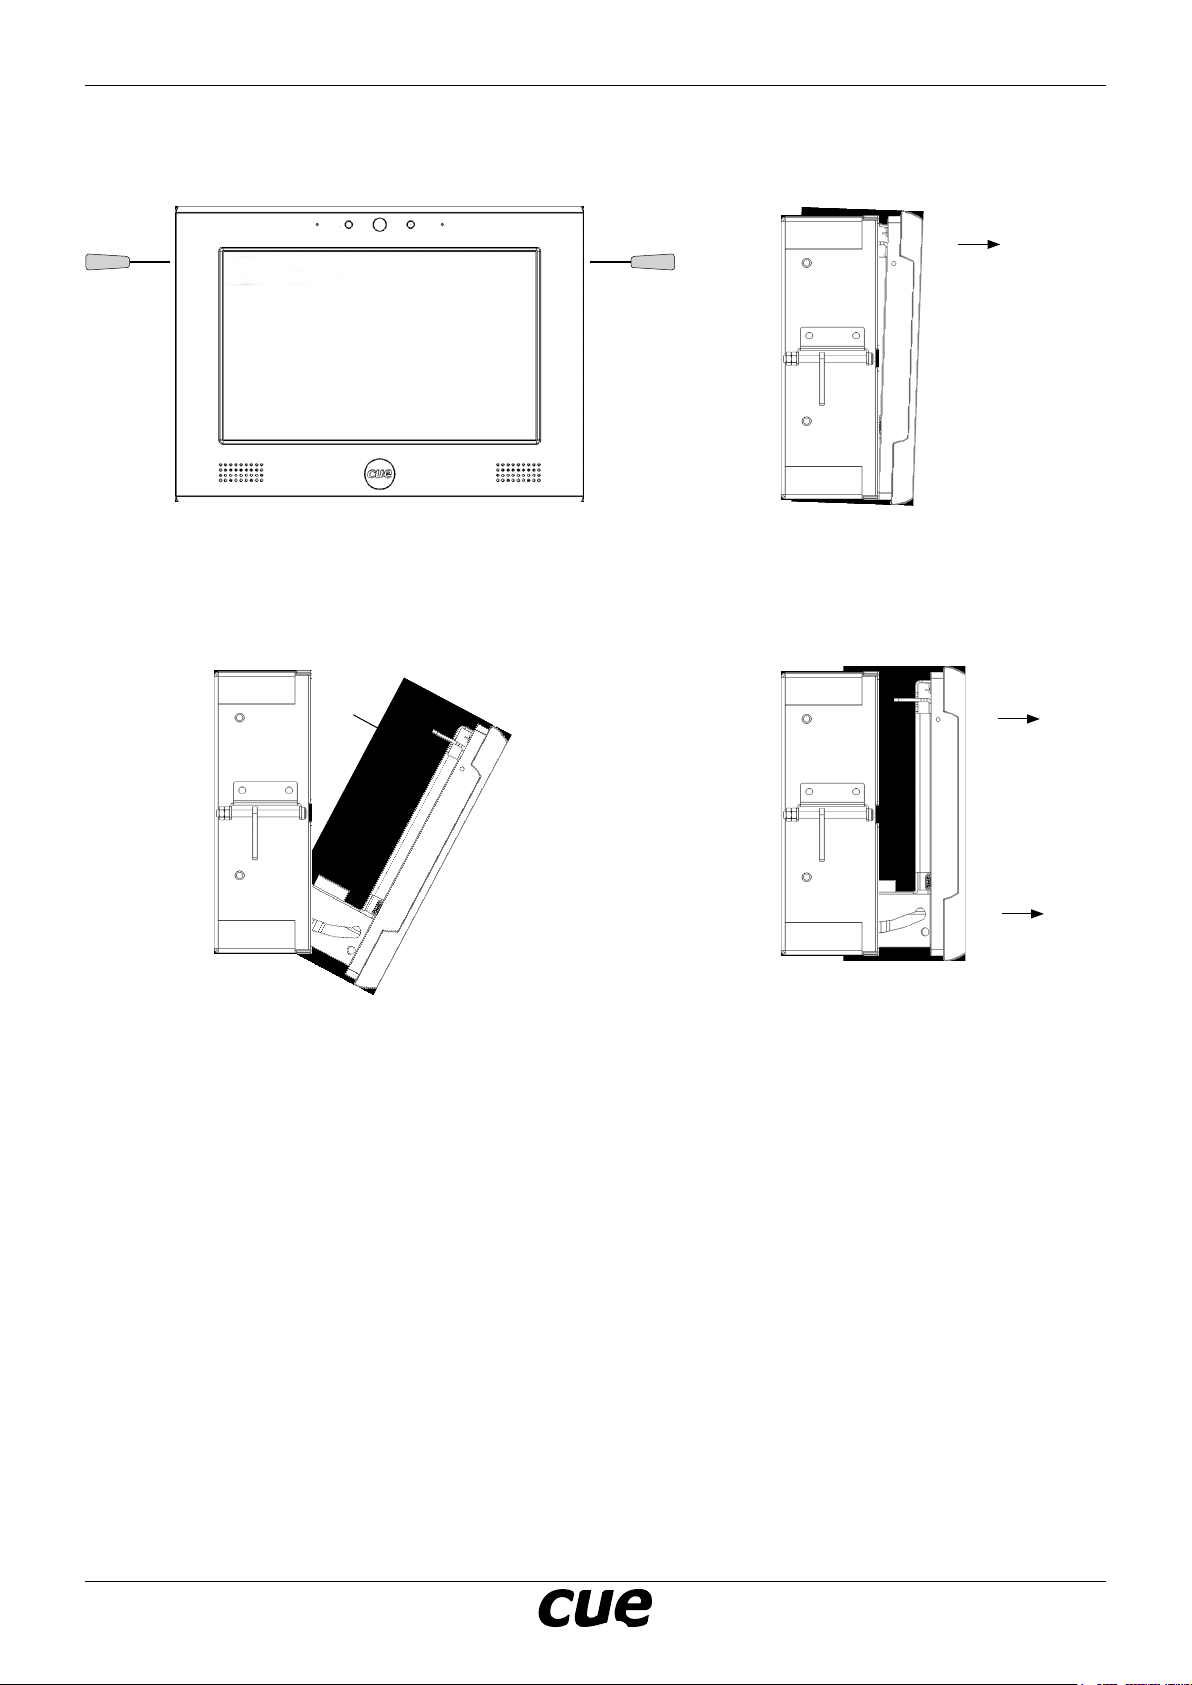
Taking the Touch Panel Out
Step 1 Step 2
Wired Touch Panels cuenium 2
Insert a thin screwdriver into each of the two little
holes on the sides of the touch panel and push until
the metal catches get loose.
Step 3 Step 4
Hold the panel upright and pull its bottom part out.
In this position you can tilt the panel to mount cables.
Then you can tilt the upper part of the
touch panel.
If you need to remove the panel out
completely, hold it upright, push downwards and pull it out.
www.cuesystem.com
[email protected]
User Manual
Page 18
Page 19

Wired Touch Panels cuenium 2
On-Wall Models
Installation On the Wall
Installation steps are as follows
1. Remove touch panel from their packaging materials and place it face-down on a soft, non-marring
surface.
2. Insert a thin screwdriver into each of the two little holes on the sides of wall mounting adapter and
push until the metal catches get loose. Remove wall mounting adapter.
Wall mounting adapter
3. Install wall mounting adapter on the wall.
4. Put the touch panel on the wall mounting adapter and push it until the two metal catches slide into
the xing tabs.
Wall mounting adapter
Screws
www.cuesystem.com
[email protected]
User Manual
Page 19
Page 20
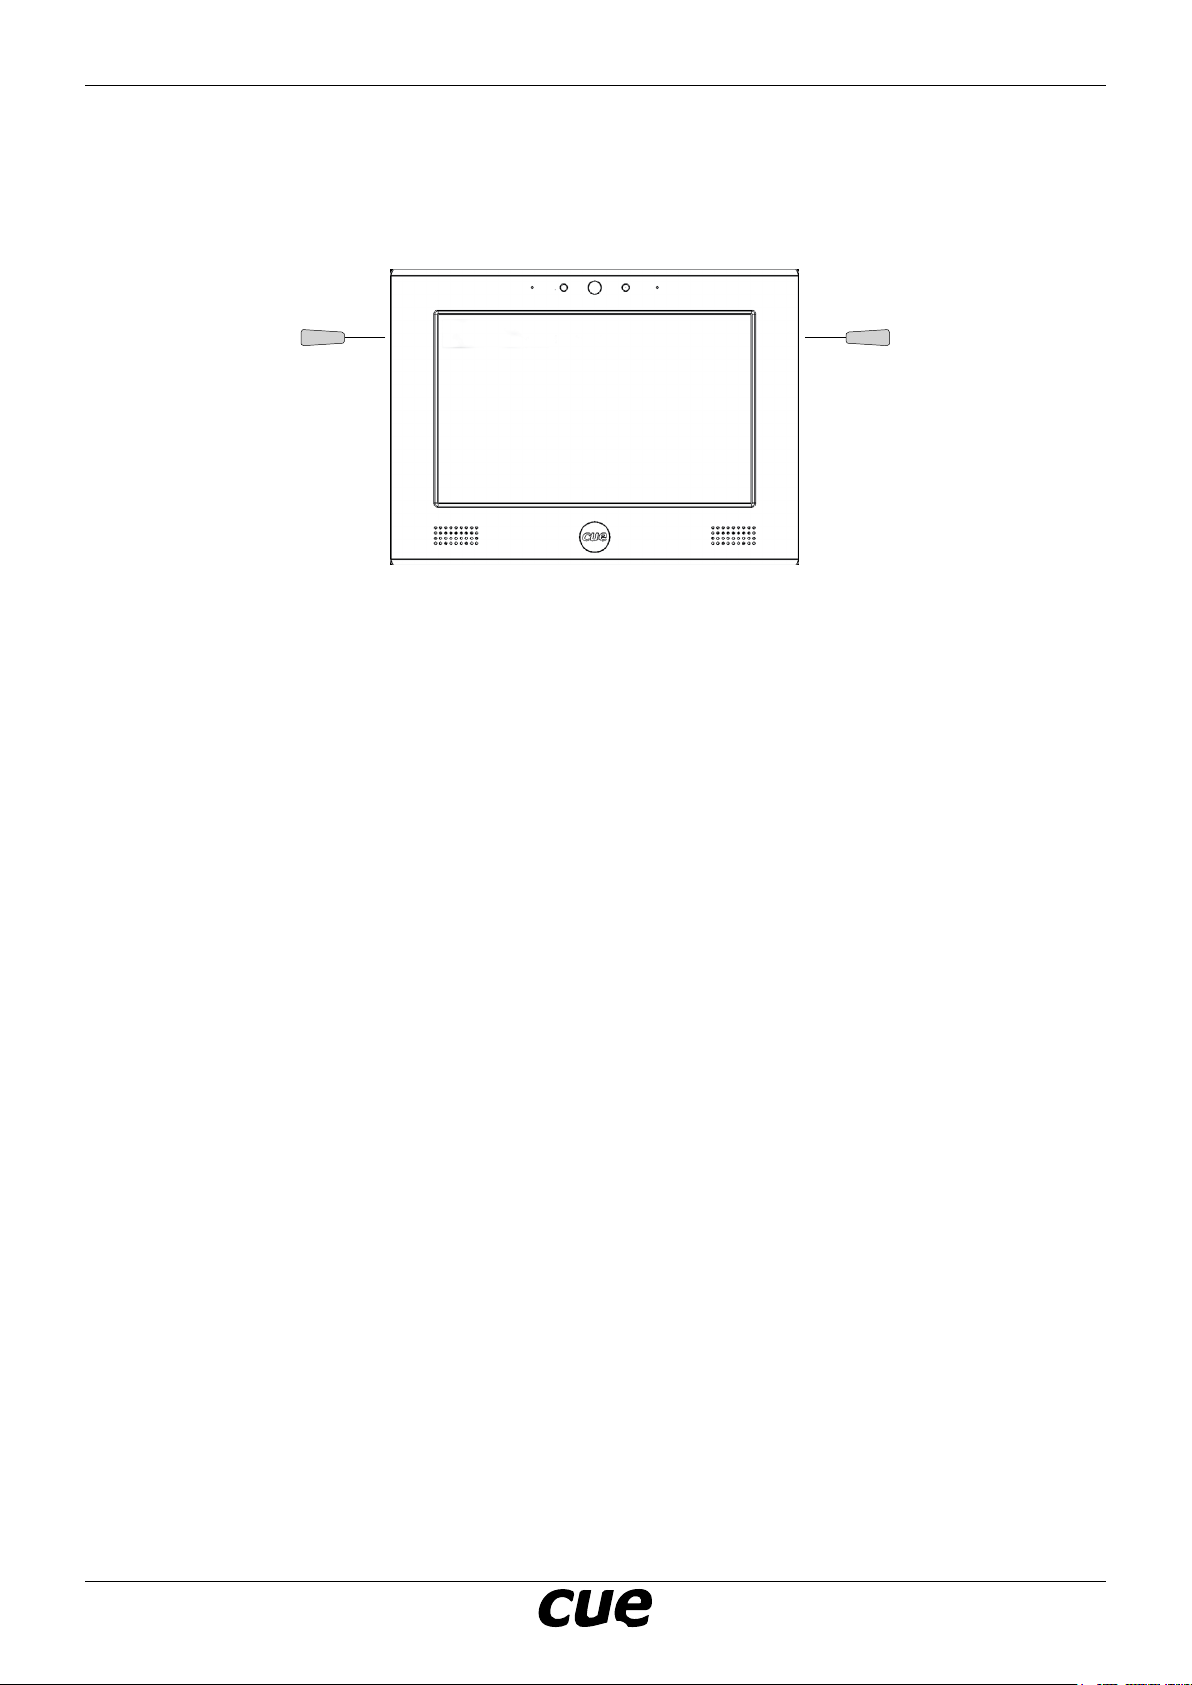
Wired Touch Panels cuenium 2
Taking the Touch Panel Out
Steps are as follows
1. Insert a thin screwdriver into each of the two little holes on the sides of the wall mounting adapter
and push until the metal catches get loose.
2. Take out the panel by pulling together.
www.cuesystem.com
[email protected]
User Manual
Page 20
Page 21

CleanIng the touCh panel
You should clean the touch panel screen overlay after each day’s use.
Materials required are
1. Two clean, soft texture cloths (cotton).
2. Spray bottle of cleaning solution without alcohol (window cleaner).
3. Aluminium parts should be cleaned using a special cleaning solution.
Steps are
1. Turn the touch panel off.
2. Spray a small amount of the cleaning solution onto one of the cloths.
3. Clean the touch panel overlay with the damp cloth.
4. Wipe the touch panel overlay with the dry cloth.
Wired Touch Panels cuenium 2
www.cuesystem.com
[email protected]
User Manual
Page 21
Page 22

Wired Touch Panels cuenium 2
ConneCtIon
PC Connection
All touch panel models are equipped with PoE power supply (7” models) or PoE+ power supply (12”
models). That means one Cat cable is used for power supply and for data.
Make sure you use
• PoE Adapter for 7” models
• PoE+ Adapter for 12” models.
Connection steps are as follows
1. Attach one end of a RJ-45 Ethernet straight-through cable to the CUEnet (LAN) port on touch panel
and attach the other end of this cable to OUT port of PoE (PoE+) Adapter.
2. Attach one end of a RJ-45 Ethernet straight-through cable to the IN port of PoE (PoE+) Adapter and
attach the other end of this cable to LAN port of your computer.
3. Attach power supply to the PoE (PoE+) adapter.
Power supply
PoE Adapter for 7” models
PoE+ Adapter for 12” models
Ethernet cable straight-through Ethernet cable crossed-over
www.cuesystem.com
[email protected]
User Manual
Page 22
Page 23

Wired Touch Panels cuenium 2
10/100 BaseT LAN incl. PoE Connector
The 10/100 BaseT LAN is a standard network connection 10/100 BaseT LAN using RJ-45 connector. There
is no auto sense, which means it does not recognize straight through cable to cross-over cable. For the
direct PC connection it is necessary to use cross-over cable; for the connection to Ethernet switch straight
through cable. The length of the Ethernet cable connecting touch panel to the network must not exceed
100 meters.
Power over Ethernet is fully compatible with
• IEEE 802.3af (PoE) standard for 7” touch panels
• IEEE 802.3at (PoE Plus) standard for 12” touch panels.
Power over Ethernet integrates data and power on the same wires. It keeps the structured cabling safe
and does not interfere with concurrent network operation.
Power over Ethernet needs compatible Ethernet switches or injectors currently available by most leading
network equipment vendors.
Connector pin out
RJ-45 Pin Signal Cat5 Cable Color
1 TX_D1+ and PoE White / Orange
2 TX_D1- and PoE Orange
3 RX_D2+ and PoE White / Green
4
5 White / Blue
6 RX-D2- and PoE Green
7
8 Brown
PoE +/- 48 V
PoE Common
Blue
White / Brown
www.cuesystem.com
[email protected]
User Manual
Page 23
Page 24

Wired Touch Panels cuenium 2
WIndoWs loCal netWork settIngs
For Windows 7 steps are
1. Start Windows 7.
2. Click Start.
3. Enter ncpa.cpl to the Search Box and press
Enter. Following window is displayed.
For Windows XP steps are
1. Start Windows XP.
2. Click Start, then click Control Panel choose
the option to switch to Classic View.
3. Double-click Network Connections.
Following steps are
1. Right-click on network adapter used for
connection with touch panel and then right-
click and select Properties.
2. Select Internet Protocol (TCP/IP) and click
Properties button.
3. Select Use the following IP address option.
Set IP address to 192.168.1.1 (or other
address different from 192.168.1.127 and
from 192.168.1.128) and Subnet mask
to 255.255.255.0. Leave other options
unchanged and click OK.
www.cuesystem.com
[email protected]
User Manual
Page 24
Page 25

Wired Touch Panels cuenium 2
doWnload user applICatIon
Overview
User control application is dedicated to control and it is programmed by Cue Visual Composer
programming tools.
Using Cue Visual Composer
Steps are
1. Connect touch panel to your computer as described in chapter PC Connection.
2. Run Cue Visual Composer on your PC.
3. Open appropriate project in Cue Visual Composer. It’s necessary to have appropriated touch panel
properly inserted and congured.
4. Use tool bar button Final to open Upload and Export Application dialog box.
5. Be sure your touch panel is checked.
6. Use button Upload to start application upload.
7. If touch panel rmware isn’t actual it will be uploaded automatically rst and then application upload
will be nished.
www.cuesystem.com
[email protected]
User Manual
Page 25
Page 26

Wired Touch Panels cuenium 2
Using Admin Web
Steps are
1. Connect touch panel to your computer as described in chapter PC Connection.
2. Run Cue Visual Composer on your PC.
3. Open appropriate project in Cue Visual Composer. It’s necessary to have appropriated touch panel
properly inserted and congured.
4. Use tool bar button Final to open Upload and Export Application dialog box.
5. Be sure your touch panel is checked.
6. Use button Export All... to export application and store it in le *.cvca.
7. Run the Internet browser on your PC and type in the same touch panel IP address as you see in Cue
Visual Composer project, window Properties / IP address.
8. Go to page System and check current rmware version. In case there is no actual rmware version
in touch panel, upload rmware version that corresponds to rmware version in the Cue Visual
Composer project..
9. Go to page Applications and upload application le *.cvca.
10. Start uploaded application using button Start.
www.cuesystem.com
[email protected]
User Manual
Page 26
Page 27

Wired Touch Panels cuenium 2
Ir Capture
All models of cuenium2 touch panels have possibility to capture IR codes. This is the same functionality as
some ipCUE controllers have. Captured IR codes can be used in all types of controllers too.
Steps are as follows
1. Connect the touch panel to your PC as described in the chapter PC Connection.
2. Arrange IR remoter and touch panel as described below.
IR remoter
3. Start Cue Visual Composer and capture IR codes by standard way.
4. Push Start Capture button in Cue Visual Composer and then press appropriate button on IR remoter.
5. Instructions and messages are displayed on the touch panel and in the Cue Visual Composer.
6. If message “Signal is too weak“ is displayed, change position of IR remoter and try again.
www.cuesystem.com
[email protected]
User Manual
Page 27
Page 28

Wired Touch Panels cuenium 2
faCtory default and systeM default
Every device shipped from the factory is set according to table bellow, Factory Default column.
When pressed System Default button, the system default function is performed according to table bellow,
System Default column. The main purpose of this functionality is to regain connection to touch panel with
lost password or unknown IP settings.
Factory Default System Default
Conguration Identication Name Empty Not changed
IP settings Host name Empty Not changed
IP address 192.168.1.128 192.168.1.128
Subnet mask 255.255.255.0 255.255.255.0
Default gateway 192.168.1.1 192.168.1.1
DNS Primary DNS server Empty Not changed
Secondary DNS server Empty Not changed
Date and time Date and Time Day, month, year Real Not changed
Hour, minute, second Real Not changed
Time zone (GMT+1:00 CET/CEST
Belgrade, ..., Prague)
Internet clock Use Internet clock Not Not changed
Primary NTP server Empty Not changed
Secondary NTP server Empty Not changed
Applications Empty Not changed
File storage Empty Not changed
System Firmware Current version Not changed
Password Empty Empty
Not changed
www.cuesystem.com
[email protected]
User Manual
Page 28
Page 29

on sCreen dIsplay
Access On Screen Display
The multifunctional button located on front panel
shows On Screen Display.
Startup Menu
Wired Touch Panels cuenium 2
Startup Menu is displayed automatically if no
application is running.
The Startup Menu is activated if no application is
running.
Application button starts downloaded application.
On Screen Display button launches menu
described below.
Settings
Status
1 min
The Backlight Saver will switch off automatically
display backlight. Time in minutes can be set
by buttons - and +. Time set to 0 means that
Backlight Saver is disabled.
LCD Backlight sets display backlight level.
If Adaptive Brightness is switched to Yes, the
light sensor automatically adjusts display
backlight according ambient light level.
If Motion Sensor is switched to Yes the Motion
Sensor resumes touch panel from Backlight Saver
mode automatically.
This page shows current status of the touch
panel.
www.cuesystem.com
[email protected]
User Manual
Page 29
Page 30

IP Settings
Date/Time
192.168.1.128
255.255.255.0
192.168.1.1
19/04/2011
17:01:25
GMT+01:00 CET/CEST
Wired Touch Panels cuenium 2
This page is used for setting the communication
parameters for your touch panel. The touch
panel uses standard internet protocol (IP)
communication parameters. Certain parameters
can be reset by the user. On start up, this page
will display current IP address. Carefully note this
addressing information (and any changes you
elect to make to the IP address, subnet mask,
or default gateway). This information must be
entered into the Cue Visual Composer program
written for your specic application. For control
systems with more than one unit, a unique IP
address must be given to each CUEunit.
For setting please select appropriate eld using
Edit button and then use numeric keypad.
Be sure to click the Apply button for any changes
to become effective.
This page is used for setting Date/Time
parameters.
The current date and time can be set. For setting
please select appropriate eld using Edit button
and then use numeric keypad.
The time zone box can be selected to enter from
the list activated by button Edit.
Rest of the page is used for synchronization of
the CUEunit’s date and time with an internet
clock. Select Yes for Use Internet clock. Next,
enter the IP addresses (or complete address
name) of the primary and secondary NTP servers.
www.cuesystem.com
[email protected]
User Manual
Page 30
Page 31

Applications
TestApp_TouchPanel1.cvca
DemoApp_TouchPanel1.cvca
Calibration
Wired Touch Panels cuenium 2
This screen is used for selection, start and stop of
uploaded applications. All uploaded applications
are listed on this page.
Select application and press button Start. A
“running ag” denotes the active application.
Active application starts automatically after
switch on the unit. The running application can
be stopped via the Stop button.
Files are uploaded from a personal computer
to the touch panel using Cue Visual Composer
software or using Admin Web.
Use this page for calibration. We recommend use
stylus.
Exit
touchCUE-7 CS0375.R01.000001
4.15a (Apr 18, 2011)
Closes the On Screen Display.
On this page the product name, product code and
current rmware version are displayed.
www.cuesystem.com
[email protected]
User Manual
Page 31
Page 32

adMIn WeB
Access Admin Web
Run the Internet browser on your PC and type in
the touch panel IP address.
Login
Wired Touch Panels cuenium 2
Factory default IP address is 192.168.1.128. The
default password is empty.
This screen isn’t displayed if password is empty
(factory default status).
If password isn’t empty, you have to login at rst
for operating with your CUEunit via these web
pages.
Enter your password into the Password box and
click the Login button to enter the CUEunit web
pages.
Remember that the password is case sensitive.
For changing your password use the Password
menu after you are logged in.
Conguration
Identication
Each CUEunit can be identied by a unique
identication name. Unique names are most
useful in applications requiring more than one
CUEunit. This enables programmers and installers
to reference CUEunits with logical, user friendly
names, like “boardroom,” “lobby,” etc.
To set the CUEunit identity, enter the unique
name you wish to use in the Name box.
Be sure to click the Apply button for any changes
to become effective!
www.cuesystem.com
[email protected]
User Manual
Page 32
Page 33

IP Settings
Wired Touch Panels cuenium 2
This page is used for establishing the
communication parameters for your CUEunit.
The CUEunit uses standard internet protocol (IP)
communication parameters. Certain parameters
can be reset by the user. On start up, this page
will display the CUEunit’s given Physical address
(MAC), Current IP address. Carefully note this
addressing information (and any changes you
elect to make to the IP address, subnet mask,
or default gateway). This information must be
entered into the Cue Visual Composer program
written for your specic application. For control
systems with more than one CUEunits, a unique
IP address must be given to each CUEunit.
Some control systems are “stand alone” and not
part of a larger network. For such “stand alone”
systems, the Host name is optional. However, for
control systems that are connected to a larger
network, please obtain the Host name from
the network administrator, and enter it into the
corresponding box. DHCP is not supported in this
release.
Be sure to click the Apply button for any changes
to become effective!
DNS
SMTP
This page is used for setting parameters of your
CUEunit’s DNS server.
On start up, this page will display the CUEunit’s
given Current primary DNS server, Current
secondary DNS server. You can reset the primary
DNS server and secondary DNS server manually
by entering your changes into the appropriate
boxes.
DHCP is not supported in this release.
Be sure to click the Apply button for any changes
to become effective!
This page is used for setting parameters of SMTP
server. Set a name or an address and the port of
your SMTP server.
The SMTP server and port are used by the XPL2
commands EmailSend and PresetEmailSend.
Be sure to click the Apply button for any changes
to become effective!
www.cuesystem.com
[email protected]
User Manual
Page 33
Page 34

Date and Time
Current date and time
Time zone
Wired Touch Panels cuenium 2
This page is used for setting the time clock on
your CUEunit. The current date, time, and time
zone are shown on the Current time line.
The applicable boxes can be selected to enter
changes to the
• date: day/month/year,
• time: hour/minute/second.
Be sure to click the Apply button for any changes
to become effective!
This page is used for setting the time zone on
your CUEunit. The current date, time, and time
zone, are shown on the Current time line. The
time zone box can be selected to enter changes
to the Time zone.
Be sure to click the Apply button for any changes
to become effective!
Internet clock
This page is used for synchronization of the
CUEunit’s date and time with an internet clock.
Begin by selecting the check box for Use Internet
clock. Next, enter the IP addresses (or complete
address name) of the primary and secondary
NTP servers. Use the Primary NTP server and
Secondary NTP server boxes for this purpose.
Be sure to click the Apply button for any changes
to the internet clock to become effective!
www.cuesystem.com
[email protected]
User Manual
Page 34
Page 35

Applications
Wired Touch Panels cuenium 2
This page is used for uploading compiled Cue
Visual Composer programs to your CUEunit.
All uploaded applications are listed on this
page, along with their le properties: le name/
le size/date. The CUEunit has a generous
memory; unused free space is shown at the
bottom of this page. CUEunit also permits other
service functions like deleting les, downloading
programs back to a personal computer, and
starting/stopping specic applications.
A “running ag” denotes the active application.
The running application can be stopped via
the Start/Stop button. Likewise, a stopped
application can be restarted with the Start/Stop
button.
Files are uploaded from a personal computer to
the CUEunit by selecting the desired application
program, and clicking the Upload button. Files
are downloaded from the CUEunit to a personal
computer by clicking the File name. Files are
easily deleted with the Delete button. The button
Total stop stops a running application. This
application will not be automatically started after
reset.
File Storage
The CUEunit’s generous memory can be used as
an auxiliary le storage device. This is helpful for
storing presets, in archiving electronic manuals,
pdf les, and other support documentation. File
storage is managed via the le storage page.
A list of existing les, folders, and their properties
is shown. To delete a le or a folder, click the
Delete button on the corresponding line. To
delete all les and folders from the current folder,
click the Delete All button.
To create a new folder, enter a name for the new
folder, and click the Create button. To upload a
le, select the desired le, and click the Upload
button.
Note: Files are automatically compressed for the
CUEunit’s internal le system. Accordingly, the
size of your uncompressed le before storing may
not match the decrease of free space shown on
the CUEunit.
www.cuesystem.com
[email protected]
User Manual
Page 35
Page 36

Settings
Settings
Wired Touch Panels cuenium 2
This page is used for setting parameters of e-mail
parameters and recipients addresses.
The SMTP server must be set. See the
Conguration/SMTP setting.
The sender Name and E-mail are addresses of
your CUEunit. The sender Name and E-mail are
used by the XPL2 commands EmailSend and
PresetEmailSend.
The recipient Names and E-mails are addresses
of recipients, where e-mails will be sent using the
XPL2 command PresetEmailSend.
On this page some display features can be set.
The Backlight Saver will switch off automatically
display backlight. Time in minutes can be set.
Time set to 0 means that Backlight Saver is
disabled.
LCD Backlight sets display backlight level.
If Adaptive Brightness is switched to Yes, the
light sensor automatically adjusts display
backlight according ambient light level.
If Motion Sensor is switched to Yes the Motion
Sensor resumes touch panel from Backlight Saver
mode automatically.
On Screen Display
Calibration
This page serves for setting of On Screen Display
functionality.
Type of activation is dened here as well as mode
of the On Screen Display. In Advanced mode
all functions are available, Basic mode is more
safety (for example network settings can’t be
changed).
In addition some settings done by On Screen
Display can be enabled or disabled.
Use this page to start calibration and follow
instructions on the touch panel.
For proper calibration use a stylus.
www.cuesystem.com
[email protected]
User Manual
Page 36
Page 37

System
Firmware
Information
Wired Touch Panels cuenium 2
This page is used for updating the CUEunit
rmware. The Current version of rmware is
shown. To upload new rmware, select the
desired version, and click the Upload button.
The page shows basic information about
your CUEunit’s hardware. The CPU type, CPU
frequency, and the ash and RAM memory sizes
are shown.
Format data area
To completely clear all data and restore factory
default settings, click the Format data area
button.
This will remove all data, including Applications
and File storage les. Conguration will be
cleared, including IP address, password, and
touch-screen calibration values. IP address will be
restored to the default 192.168.1.128.
www.cuesystem.com
[email protected]
User Manual
Page 37
Page 38

Password
Backup
Backup
Wired Touch Panels cuenium 2
A case sensitive password is necessary to login
to the admin web pages. Set a new password
via the New password box. You must reenter the
password in the Conrm new password box. An
error message will appear if the conrmation
does not match, in which case you should reenter
your password again in both boxes.
Finally, the new password is implemented by
clicking the Apply button.
The page is used for the backup applications, les
and folders. The Backup copies all Applications,
Application data, File storage and Web storage
to the one archive. This archive is saved to the
PC. To start the backup process, click the Backup
button.
Note: To see the backed-up/restored applications,
click the Applications menu. To see backed-up/
restored les and folders, click the File Storage
menu. The page is used for the backup of all
applications, les and folders.
Note: To see the backed-up/restored applications,
click the Applications menu. To see backed-up/
restored les and folders, click the File Storage
menu.
Restore
READ ALL IMPORTANT NOTES THAT FOLLOW
BEFORE USING THIS OPERATION!
The page is used for the restoring of all
applications, les and folders. Restore copies of
all applications, les, and folders from a backup
archive on the PC to their corresponding locations
on the CUEunit.
To start the restore process, select the desired
backup archive, then click the Restore button.
The restore process can take up to 10 minutes,
depending on the size of the les being restored.
If you want CUEunit’s settings will be restored
too, check the “Restore conguration” box.
The CUEunit’s settings are accessible via the
Conguration, Date and time and Password
menus.
Important note: actual password and IP settings
will be restored too. The restore process takes
from 1 to 10 minutes. It depends on the sizes of
the restored les.
Important note: When restoring les, the running
application will be stopped and all applications,
les, and folders currently stored in the CUEunit
will be deleted! If you want to retain them,
use the Backup command before the Restore
command.
Note: To see the backed-up/restored applications,
click the Applications menu. To see backed-up/
restored les and folders, click the File Storage
menu.
www.cuesystem.com
[email protected]
User Manual
Page 38
Page 39

Reset
License
Wired Touch Panels cuenium 2
To restart your CUEunit, click the Reset button.
This page decscribes software license.
www.cuesystem.com
[email protected]
User Manual
Page 39
Page 40

Wired Touch Panels cuenium 2
softWare and fIrMWare lICense
END-USER NOTICE AND LICENSE AGREEMENT FROM CUE, a.s.
NOTICE TO END-USER: CAREFULLY READ THE FOLLOWING LEGAL AGREEMENT (THIS “LICENSE”).
INSTALLATION OR USE OF THE ENCLOSED CUE, a.s. SOFTWARE PROGRAMS (COLLECTIVELY,
“SOFTWARE”) ON YOUR COMPUTER SYSTEMS OR HARDWARE DEVICES CONSTITUTES YOUR
ACCEPTANCE OF THESE TERMS. IF YOU DO NOT AGREE TO THE TERMS OF THIS LICENSE, PROMPTLY
DELETE THE SOFTWARE FROM YOUR COMPUTER SYSTEMS AND HARDWARE DEVICES, DESTROY ANY
COPIES YOU MADE OF THE SOFTWARE OR ANY INSTALLATION MEDIA OF THE SOFTWARE INCLUDED
WITH YOUR SYSTEM, AND DISPOSE OF ALL WRITTEN MATERIALS IN YOUR POSSESSION REGARDING
THE SOFTWARE.
License Grant: CUE grants to You, as an individual, a license to install and use one (1) copy of the
Software on a single computer at a time; provided, however, that You may make copies of the Software
solely for Your development of applications for CUE hardware and demonstration versions of such
applications. Any applications created with the Software may only be used with Cue hardware. Your
license to use the Software is conditioned upon Your compliance with the terms of this License. A License
is required for each end-user of the Software. A license is required for each installation of the Software.
You may make one (1) copy of the Software for archival purposes only. You may use this Software only
in connection with CUE hardware. You must have acquired the Software directly in connection with the
purchase of CUE hardware from CUE or from a CUE approved reseller for this license to be effective. If
You have purchased a Site License, You may complete only the number of installations specied in the
License Agreement accompanying the Software.
Copyright: The Software and software built into CUE hardware (“Firmware”) are protected by copyright
law and international treaty provisions. You acknowledge that no title to the intellectual property in the
Software and Firmware is transferred to You. You further acknowledge that title and full ownership rights
to the Software and Firmware will remain the exclusive property of CUE, and You will not acquire any
rights to the Software and Firmware except as expressly set forth in this License. You agree that any
copies of the Software will contain the same proprietary notices which appear on and in the Software.
Prohibited Uses: Without obtaining prior written permission from CUE, You may not (a.) use, copy,
modify, alter, or transfer the Software or documentation except as expressly provided in this License;
(b.) translate, disassemble, decompile, reverse program or otherwise reverse engineer the Software
and Firmware; (c.) sublicense or lease the Software or its documentation (d.) use this Software with
any hardware other than products produced by CUE or in connection with applications being developed
for CUE hardware; or (e.) use the Software in a multi-user, network, or multiple computer environment
or in a rental, time sharing or computer service business. Without prejudice to any other rights, CUE
may terminate this License if You fail to comply with its terms and conditions. In such event, You must
immediately destroy all copies of the Software.
No Other Warranties: CUE DOES NOT WARRANT THAT THE SOFTWARE AND FIRMWARE IS ERROR FREE.
CUE DISCLAIMS ALL WARRANTIES WITH RESPECT TO THE SOFTWARE AND FIRMWARE, EITHER EXPRESS
OR IMPLIED, INCLUDING BUT NOT LIMITED TO IMPLIED WARRANTIES OF MERCHANTABILITY, FITNESS
FOR A PARTICULAR PURPOSE AND NONINFRINGEMENT OF THIRD PARTY RIGHTS. SOME JURISDICTIONS
DO NOT ALLOW THE EXCLUSION OF IMPLIED WARRANTIES OR LIMITATIONS OF HOW LONG AN IMPLIED
WARRANTY MAY LAST, OR THE EXCLUSION OF LIMITATION OF INCIDENTAL DAMAGES, SO THE ABOVE
LIMITATIONS OR EXCLUSIONS MAY NOT APPLY TO YOU. THIS WARRANTY GIVES YOU SPECIFIC LEGAL
RIGHTS AND YOU MAY ALSO HAVE OTHER RIGHTS WHICH VARY FROM JURISDICTION TO JURISDICTION.
No Liability for Consequential Damages: IN NO EVENT SHALL CUE BE LIABLE TO YOU FOR ANY
CONSEQUENTIAL, SPECIAL, INCIDENTAL, OR INDIRECT DAMAGES OF ANY KIND ARISING OUT OF THE
PERFORMANCE OR USE OF THE SOFTWARE, EVEN IF CUE HAS BEEN ADVISED OF THE POSSIBILITY OF
SUCH DAMAGES.
Label on Hardware: Use of this hardware and the software programs controlling this hardware is subject
to the terms of the Software and Hardware License Agreements (the “License Agreements”). You should
not use the software and hardware until you have read the License Agreements. By using the software
and hardware, you signify that you have read the Licenses Agreements and accept their terms. The
“License Agreement” is available at www.cuesystem.com.
Trademark Notice: CUE and the CUE logo are trademarks of CUE, a.s. in the United States and in other
countries.
www.cuesystem.com
[email protected]
User Manual
Page 40
Page 41

Wired Touch Panels cuenium 2
notes
..............................................................................................................................................
..............................................................................................................................................
..............................................................................................................................................
..............................................................................................................................................
..............................................................................................................................................
..............................................................................................................................................
..............................................................................................................................................
..............................................................................................................................................
..............................................................................................................................................
..............................................................................................................................................
..............................................................................................................................................
..............................................................................................................................................
..............................................................................................................................................
..............................................................................................................................................
..............................................................................................................................................
..............................................................................................................................................
..............................................................................................................................................
..............................................................................................................................................
..............................................................................................................................................
..............................................................................................................................................
www.cuesystem.com
[email protected]
User Manual
Page 41
Page 42

 Loading...