

Page 1

afe Operation Practices Set-Up Operation Maintenance Service Troubleshooting
S
PERATOR’S
O
M
ANUAL
Hedge Trimmer CC924HT
WARNING
READ AND FOLLOW ALL SAFETY RULES AND INSTRUCTIONS IN THIS MANUAL
BEFORE ATTEMPTING TO OPERATE THIS MACHINE.
FAILURE TO COMPLY WITH THESE INSTRUCTIONS MAY RESULT IN PERSONAL INJURY.
FORM NO. 769-13611 00
DATE:01/25/2018
Page 2

Thank You
Thank you for purchasing a Hedge Trimmer manufactured
by MTD Asia. It was carefully engineered to provide
excellent performance when properly operated and
maintained.
Please read this entire manual prior to operating the
equipment. It instructs you how to safely and easily set up,
operate and maintain your machine. Please be sure that
you, and any other persons who will operate the machine,
carefully follow the recommended safety practices at all
times. Failure to do so could result in personal injury or
property damage.
All information in this manual is relative to the most
recent product information available at the time of
printing. Review this manual frequently to familiarize
yourself with the machine, its features and operation.
Table of Contents
Safety instructions.................................................3
Warning labels and Symbols................................5
Get to know your Hedge Trimmer......................6
Fuel and Oil instructions.......................................7
Operating Instructions..........................................8
Record Product Information
Before setting up and operating your new equipment,
please locate the model plate on the equipment and
record the information in the provided area to the right.
You can locate the model plate on the engine of the
hedge trimmer.
This information will be necessary, should you seek
technical support via our web site, Customer Support
Department,or with a local authorized service dealer.
Please be aware that this Operator’s Manual may cover
a range of product specications for various models.
Characteristics and features discussed and/or illustrated
in this manual may not be applicable to all models. MTD
Asia reserves the right to change product specications,
designs and equipment without notice and without
incurring obligation. If you have any problems or
questions concerning the machine, phone an authorized
MTD service dealer or contact us directly.MTD’s Customer
Support telephone numbers, website address and mailing
address can be found on this page. We want to ensure
your complete satisfaction at all times.
Throughout this manual, all references to and
of the machine are observed from the operating
positon.
Maintenace and Repair.......................................10
Cleaning and Storage..........................................13
Trouble-shooting..................................................14
Specification..........................................................15
Contents.................................................................15
MODEL NUMBR
SERIAL NUMBER
Customer Support
Please do NOT return the machine to the retailer or dealer without first contacting our Customer
Support Department.
If you have diculty in assembling this product or have any questions regarding the controls, operation,
or maintenance of this machine, you can seek help from the experts. Choose from the options below:
Visit us on the web at www.mtdproducts.com
Contact MTD AU • P.O. Box 376 Dandenong.Vic.3175
Email Address:mtdservice@mtd.com.au Customer Service Phone:1300 951 594
-2-
Page 3

SAFETY INSTRUCTIONS
WARNING
THIS HEDGE TRIMMER CAN CAUSE SERIOUS INJURIES. Read the instructions carefully for the
correct handling, preparation, maintenance, starting and stopping of the hedge trimmer.
become familiar with all controls and the proper use of the hedge trimmer.
Clothing and Equipment
Always wear proper eye glasses to prevent eyes from the risk of thrown objects.
Always wear suitable ear protectors in order to protect your ears from noise.
Please wear sturdy gloves, helmet, wear non-skid boots or safety shoes and dress in long pants.
Do not be barefoot, barelegged or wear open-toed shoes.
Do not wear loose or dangling clothes, neckties, scarf, or jewelry which could be caught in the
blades.
Secure the hair so it is above shoulder length.
Working conditions
Never allow children to use the machine.
Keep the area clear of all persons, particularly small children and pets.
Operate only where rm footing is assured. Do not operate from a slippery ground.
Do not operate when under the inuence of alcohol, drugs or medications. You must be in good
physical and mental health in order to operate safely.
Do not operate in the closed building. Exhaust gases contain poisonous carbon monoxide.
Do not operate when your vision is limited or when the weather conditions do not permit to use the
product safely.
Please have enough breaks during cutting.
Beware of overhead power lines.
Fuel handling
WARNING
Use extra care when handling fuels. They are ammable and the vapors are explosive.
Always shut o the engine before refueling.
Store fuel in containers specially designed for this purpose.
Refuel outdoors only and do not smoke while refueling or operating the machine.
Ensure correct fuel or fuel/oil mixture is used. Add fuel before starting work.
Never operate the machine without the fuel cap securely in place.
Never remove the cap of the fuel tank or add fuel when the engine is hot.
Always replace and securely tighten the fuel cap after refueling.
If petrol is spilled, do not attempt to start the engine but move the machine away from the area of
spill and avoid creating any source of ignition before petrol vapors have dissipated.
If the fuel tank is drained, this should be done outdoors.
3-
-
Page 4

Before operation
Before operating the hedge trimmer, always ensure that the operating position is safe and secure.
Do not operate the hedge trimmer with a damaged or excessively worn blade.
Always ensure that all handles and guards are tted when using the hedge trimmer. Never attempt
to use an incomplete hedge trimmer or one tted with an unauthorized modication.
Check the machine for loose fasteners and fuel leakage. Make sure that the cutting device is properly
installed and securely fastened.
Inspect the hedge and work area to avoid damaging the cutting blades.
Make sure that the blades stop moving when the throttle lever is released and the engine runs at idle
speed.
Operation
Always use two hands to operate a hedge trimmer tted with two handles.
Always be aware of your surroundings and stay alert for possible hazards of which you may not be
aware due to the noise of the hedge trimmer.
Do not put hands or feet near or under the moving blades while engine is running.
Keep any parts of your body away from the muer when the engine is running.
Keep the cutting device below the waist level.
Do not cut too close to the ground in order to avoid hitting small stones.
Never touch the muer spark plug, or other metallic parts while the engine is running or
immediately after shutting down the engine. It could cause serious burns or electrical shock.
To reduce re hazards, keep the engine and silencer free of debris, leaves and excessive lubricant.
Ensure that the hedge trimmer is correctly located in a designated working position before starting
the engine.
If the blades strike any foreign object or the hedge trimmer starts making any unusual noise or
vibration, immediately shut o the unit and allow it to stop. Check the unit for any damage and
repair the damage.
Stop the engine before
a. cleaning or when clearing a blockage
b. checking, carrying out maintenance or working on the hedge trimmer,
c. adjusting the working position of the cutting device,
d. leaving the hedge trimmer unattended.
Maintenance Storage and Transportation
When the hedge trimmer is stopped for servicing, inspection or storage, shut o the engine,
disconnect the spark plug wire and make sure all moving parts have come to a stop. Allow the hedge
trimmer to cool down before making any inspections, adjustments and etc.
Do not change the engine governor settings or overspeed the engine.
Replace faulty silencers and spark arrestors, if tted.
Use only recommended, genuine replacement parts to avoid creating a hazard or voiding your
warranty.
Store the hedge trimmer where the fuel vapor will not reach an open ame or spark. Always allow
the hedge trimmer to cool down before storing.
When transporting or storing the hedge trimmer, always t the cutting device transport guard.
-4-
Page 5

WARNING LABELS AND SYMBOLS
Read warning labels on the unit and understand them. If any label is missing, damaged, or
worn get a replacement from your dealer and install it in the correct position.
SAFETY AND WARNING SYMBOL
Indicates danger,warning or a reason
to be cautious.Can be used together
with other symbols or pictograms
READ OPERATING MANUAL
Non-compliance with the operating
instructions and precautions may
result in serious injuries.Read the
operating manual before starting or
operating the unit.
WEAR HEAD, EYE AND EAR
PROTECTION
CAUTION: Ejected objects may
cause serious head,eye injuries
and excess noise may cause
loss of hearing.When operating
the unit,wear head ,eye and ear
protection.
KEEP BYSTANDERS AWAY
CAUTION: All bystanders,especially
children and pets,must be kept at
least 15m from the working area.
PETROL
Always use clean and fresh lead-free
petrol for mixing petrol.
OIL
Use only authorised oil according
to the operating manual for mixing
petrol.
EJECTED OBJECTS AND ROTATING
PARTS MAY CAUSE SERIOUS
INJURIES
CAUTION: Do not use the unit if the
protective housing has not been
correctly positioned for cutting.Keep
away from the rotating line coil.
ON/
OFF/
CHOKE SETTINGS
1.CHOKE CLOSE starting position
2.CHOKE OPEN running position
IGNITION SWITCH
RUN
IGNITION SWITCH
OFF/STOP
BEWARE OF HOT SURFACES
DO not touch hot muer cover,gear
box or cylinder
SHARP BLADE
CAUTION: The blades are very sharp
and can easily cause cuts.
EXHAUST GAS
Exhaust gas contains carbon
monoxide, an odorless and deadly
poison. Do not run engine in an
enclosed area.
REAR HANDLE
The rear handle can be swiveled to
ve positions.
5-
-
Page 6
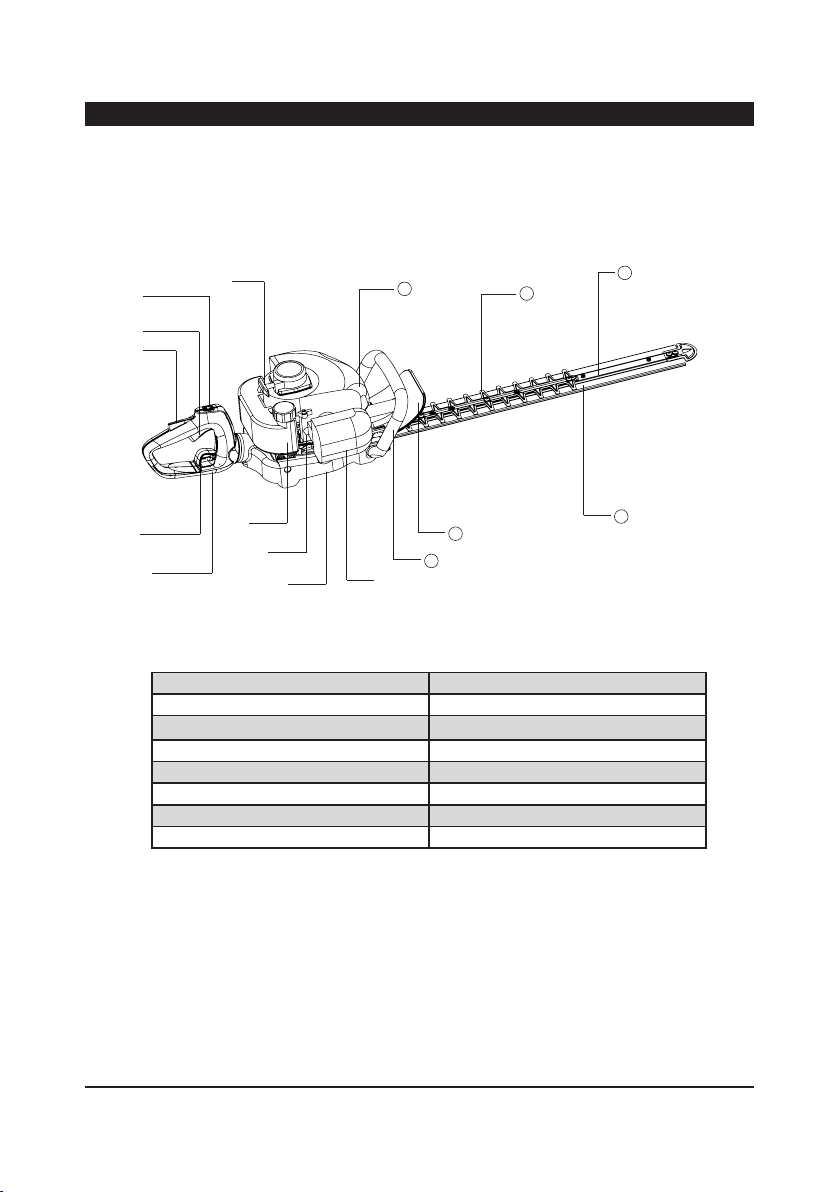
GET TO KNOW YOUR HEDGE TRIMMER
DOUBLE BLADE HEDGE TRIMMER
②
⑥
12
15
③
①
④
⑧
⑦
⑤
⑨
⑩
14
13
1.Throttle Lockout 9.Gear Case
2.Ignition Switch 10.Air Filter Cover
3.Throttle Trigger 11.Blade
4.Handle Lock Button 12.Spark Plug Cap
5.Rear Handle 13.Front Handle
6.Recoil Starter Grip 14.Front Guard
7.Primmer Bulb 15.Blade Protection
8.Fuel Tank 16.Blade Protective Sleeve
11
16
-6-
Page 7

FUEL AND OIL INSTRUCTIONS
WARNING
OIL
1. Only use high quality special oil for air cooled 2-stroke engine,JASO FC or FD, or ISO-L-EGC
or EGD oil. Never use water cooled engine oil or any oil for 4-stroke engine.
Fuel
1. Always use fresh, clean lead-free fuel. Minimum octane number: 90#.
Mixing Ratio
1. Recommended mixing ratio of fuel and oil is 50:1.
Warnings
1. Keep sparks and open ames at a distance from the area where you mixing the fuel or
lling the fuel tank with the mixture.
2. Do not mix the fuel and oil directly in the fuel tank; always use the mixing tank to do this
job.
3. Do not ll the fuel tank with too much mixture.Wipe up any spilled fuel from the unit
immediately.
4. Move the unit 5 meters away from the fueling source and site before starting the engine.
5. Never use fuel which has been stored for longer than 30 days. That may bring damage to
the unit, especially for the carburetor or the engine.
7-
-
Page 8

Run
Ignition Switch
Stop
Throttle Trigger
Throttle Lockout
Primmer Bulb
Choke Lever
Idle screw
Carburetor
Run Position
Start Position
OPERATING INSTRUCTIONS
STARTING
WARNING
Before starting the engine, keep the cutting
attachment clear of everything around it.
WARNING
Exhaust gases contain carbon monoxide, a
colorless, odorless,poisonous gas. Do not
operate the engine in enclosed areas. Provide
adequate ventilation at all time.
1. Use the mixing tank to mix the fuel and oil.
Fill fuel tank with the mixture. See “Fuel and Oil
Instructions”.
2. Push the ignition switch to the “Run” positon.
3. Make sure throttle lockout and throttle trigger at
the released position.
starter handle in right hand. Gently pull the
starter rope out until you feel that the pawls
hook onto the ywheel, and then pull the
starter quickly.
8. Repeat several times until the engine starts.
9. After starting the engine, run the engine at
the idling speed for a few minutes.
10.After the engine is warmed up appropriately
press throttle lockout and throttle trigger, then
choke lever will be back to the run position
automatically.
4. Fully press and release the primmer bulb for 10
times. Some amount of fuel should be visible
in the primer bulb and fuel lines.
5. Move choke lever to the position.
6. When the engine is already warm or on hot
days, set the choke lever to the position.
7. Put the machine on at ground,make sure the
cutting attachment is clear of everything
around it.Hold the unit with your left hand and
press it against the ground.While holding the
WARNING
Releasing the starting rope suddenly may allow
the rope to whip around and cause injury and/or
damage to the recoil starting mechanism. When
starting engine,rmly grasp the recoil starter
grip; do not grasp the starter rope itself. Always
control the rope as it rewinds into the housing.
1.If the engine fails to start, do not try to
pull the recoil starter too many times with
the choke lever to the position. Just
press down the throttle lockout and
squeeze the throttle trigger to switch the
choke lever to the position, and then
release the throttle triggle back. Repeat to
pull the recoil starter grip until the engine
starts.
2.After starting the engine, run the engine at
the idling speed for a few minutes.
-8-
Page 9

45° 90°
45° 90°
0-15
3.The engine should be run at idle speed for a
few minutes to allow sucient warm-up time
to prevent engine damage before applying a
load. This will allow oil to reach engine parts,
and allow piston
specication.
clearance to reach design
STOP
1.Release the throttle trigger back and run the
engine at the idling speed.
2. Turn the switch to the “OFF/STOP” position.
3. Suddenly stopping engine from high
speed operation can cause engine damage.
Reduce engine speed to idle speed for one
minute.
WARNING
Move the choke lever to the position or
unplug the spark plug if the engine can not be
shut down by the two upper steps,then adjust
the carburetor after the machine becomes
cold or contact the authorized dealer for help.
HANDLE ROTATION
The rear handle of the unit can be swiveled
to 5 dierent positions to suit the job
requirement.Including center position, 45°
position to the left and right,And 90°to the
left and right.This feature is particularly
useful for vertical and angled cutting.
1. Pull out the handle lock button;
2. Swivel the rear handle to the desired
position;
3. Release the button to lock the rear
handle securely in position.
WARNING
1.Do not swivel the rear handle when the
throttle lever is triggered.
2.When swiveling the rear handle, do not
trigger the throttle lever until the rear
handle is securely locked in position.Hedge
Trimmer must be stopped before adjusting
the swivel handle.
OPERATING
1.When cutting the hedges horizontally,
the unit should be held so that the blades
form 0-15° with the cutting direction.
2. At the vertical cutting, swing the blades up
and down on the hedges
WARNING
1. Always hold the unit rmly with both
hands.
2. When the throttle trigger is released, it
will take a little while before the blades
completely stop.
3. Use special caution when cutting hedges,
which are along with a wire fence.
The blades should not contact the fence,
otherwise the blades will be damaged.
4. The hedge trimmer is determined to cut
the hedges or small bushes.Do not use the
unit to cut thick branches, trees or grass,
which may damage the blades and
other parts.
5. If the blades are clogged by the leaves or
branches, immediately stop the
unit,and remove the stu out of the blades.
9-
-
Page 10

Choke Lever
Idle screw
Carburetor
Run Position
Start Position
Fuel Filter
Air Filter
Air Filter Cover
MAINTENANCE AND REPAIR
CARBURETOR
1. Idling speed can be adjusted by idle
screw.
2. Adjusting the idle-speed screw clockwise
will increase the idling speed and adjusting
it counterclockwise will decrease the idling
speed. You should use a tachometer
to measure the speed while adjusting.
Make sure the idling speed within the
recommended range 2700~3300 rpm.
3. Every unit had been run and tested at the
factory to ensure that the carburetor works
at its best condition. But after a period of
use, if trimmer head or cutting blade
continues to rotate at idling or the engine
stops when you fully release the throttle
trigger, make adjustment to idle screw.
WARNING
Improper adjustment may cause damage to
the unit. If engine does not run well after
carburetor adjustment, please contact the
authorized dealer where you bought the
product.
FUEL FILTER
1. Empty the fuel tank.Make sure there is no
reserved fuel.
2. Pull the fuel lter out of the tank with a hook
or wire and disconnect the lter from the fuel
hose.
3. Wash the lter with clean kerosene(or replace
the old lter if it is heavily fouled,and clean the
fuel tank),then put the lter back to the
hose,and put the fuel hose back to the fuel tank.
WARNING
Many solvents are highly ammable and may
cause serious burns.Improper use of solvents
can result in re or an explosion.Do not use
gasoline or low ash-point solvents to clean the
fuel lter. Clean only in a well-ventilated area
away from sources of sparks or ame, including
any appliances with a pilot light.
AIR FILTER
CLean and lubricate air lter at every 25 hours of
use. It is important to service these components
properly.If the air lter is not cleaned and serviced,
any warranty will be deemed null and void.
1. Disassemble the lter cover, and pull the lter
out of the air lter housing.
2. check the lter,replace a new one if necessary.
3.Wash the element in kerosene,put it in engine oil
and squeeze it by one hand.leave it to drip and
dry completely.
4.Assemble the lter,lter cover and use screw
to tight the parts together.
-10-
Page 11

Washing
Drying
Engine Oil
Squeezing
Spark Plug Wrench
0.6-0.7MM
Spark Arrester
WARNING
Improper element cleaning can result in
engine damage.Do not use compressed air
to clean or dry element. Never use gasoline.
Do not operate engine with air lter parts
removed.
SPARK PLUG
After every 50 operating hours, take out the
spark plug and check its condition.
1. Switch o the engine and allow it to cool
down.
2. Grasp the plug wire rmly and pull the plug
cap from the spark plug.
3. Wipe o dust or dirt around spark plug.
4. Unscrew spark plug in counterclockwise
direction with the attached spark plug
wrench.
5. Brush o carbon deposits.
6. Check and adjust spark plug gap to 0.6-0.7mm.
7. Screw in the spark plug and tighten to a torque
of 14-17 N M. Do not over tighten.
8. Re-attach the spark plug cap.
9. If spark plug is damaged or the unit still
cannot work well after cleaning, replace with a
new one.
10. To ensure the machine work well Please use
the specied plug.
MUFFLER
Spark Arrester Service
Every 50 hours of operation
1. Remove the spark arrester from the exhaust
hole of muer.
2. Clean deposits from the spark arrester screen
by brushing it.
3. Install the spark arrester.
Carbon Removal of Engine Internal Parts
Every 50 hours of operation or found strikingly
low engine high-speed and rule out other causes
you need to clean up the engine internal carbon
deposition.
These items must be performed with proper
tools. please do it with the assistance of
professionals or authorized dealer.
GEAR CASE
1. Rell the grease into the gearbox every 25
hours operation;
2. Use the grease pump and inject the grease
30g until it comes out of the gearbox.
3. Inject through grease nipple or grease screw.
-
11-
Page 12

Oil inlet
10°
10°
45°
45°
ANTI-VIBRATION SYSTEM
WARNING
The damaged anti-vibration system may
cause the vibration or breakage of any parts.
1. Check periodically if the springs are deformed
or out of place.
BlADES
1. Please replace the blades if damaged or
worn seriously.
2. Please use the sharpener or le to grind
the cutting edges, referring to the angle in
the below picture.
3. Clean the blades after grinding and apply
the grease on the edges.
2. Please use an authorized service dealer to
repair any damages.
REGULAR CHECK LIST
INTERVAL
ITEM
Check the bolt and nut,tighten up if necessary
Check for gas leak
Check and clean air cleaner
Check the cooling air intake port,cooling
ns,around muer
Check and clean spark plug
Check and clean fuel lter
Remove carbon deposits on muer and cylinder
Clean spark arrester
Replace spark plug
Replace fuel piping (fuel pipe,grommet)
Items with must be performed with proper tools,please do it with assistance of professionals
or authorized dealer.
BEFORE OPERATION
DAILY INSPECT
-12-
EVERY
50 HRS
EVERY
100 HRS
EVERY
2 YRS
Page 13

CLEANING AND STORAGE
CLEANING
1.Brush o dust and grass cuttings from the unit and wipe up water and oil stain with dry cloth.
STORAGE
1. Keep the unit away from ames or sparks when it contains fuel.
2. Allow the unit to cool before storage.
3. Store the unit in a dry, well-ventilated and secure location or at an adequate height to prevent any
inadvertent use or damage. Keep out of the reach of children.
LONG-TERM STORAGE
1. Drain all the fuel out of the tank into a container with an identity symbol for 2-stroke engines. Do
not use fuel which has been stored for longer than 30 days.
2. Start the engine and leave running until it stops. This ensures that all the fuel has been drained out
of the carburetor and used up.
3. Stop the engine and allow it to cool down. Remove the spark plug and pour 30ml high quality
2-cycle engine oil into the cylinder. Gently pull the starter rope to disperse the oil. Set the plug
back.
WARNING
Before using the unit after the s torage period, remove the spark plug and pour out all the
engine oil from the cylinder.
4. Complete clean every part and carefully inspect for damaged or loose parts. Repair or replace the
damaged parts and, if necessary, tighten all loose screw, nuts and bolts. Apply anti-rust oil to the
metal parts such as throttle cable. The unit is now ready for storage.
5. Store the unit in a dry, well-ventilated and secure location or at an adequate height to prevent any
inadvertent use or damage. Keep out of the reach of children.
TRANSPORTATION
1. Before transporting the unit, allow it to cool down.
2. Empty the fuel tank before transit. Make sure the fuel cap is securely tightened.
3. It is better to take o the cutting attachments and protect them with a proper cover to avoid
unexpected damage.
4. Secure the unit with rope to prevent it from shifting during transportation. Do not try to
transport it by a bicycle or motorcycle.
13-
-
Page 14

TROUBLESHOOTING
Problem Cause Remedy
1. Spark plug wire disconnected.
2. Ignition switch set to OFF.
3. Fuel tank empty.
4. Stale or improperly mixed fuel
Engine does not start
Engine does not run
constantly at no load
Engine does not idle 1.Improper carburetor adjustment.
Engine does not
accelerate
Engine has no power
or stops during
cutting
If further assistance is required, please contact your authorized service dealer.
mixture.
5. Dirty air lter/oil lter.
6. Incorrectly gapped or dirty spark
plug.
7. Primer bulb not depressed
adequately.
8. Flooded engine.
1. Dirty air/oil lter.
2. Stale or improperly mixed fuel
mixture.
3. Incorrectly gapped or dirty spark
plug.
1. Dirty air/oil lter.
2. Throttle wire disconnected.
3. Defective throttle control lever.
4. Incorrectly gapped or dirty spark
plug.
5. Improper carburetor adjustment.
1. Spool head or blade entangled
with grass.
2. Dirty air/oil lter.
3. Stale or improperly mixed fuel
mixture.
4. Improper carburetor adjustment.
1. Reconnect wire.
2. Set switch to ON.
3. Add fuel.
4. Empty the tank and ll with fresh fuel
mixture.
5. Clean or replace lter.
6. Clean or adjust the gap.
7. Slowly and fully depress the primer
bulb 10 times.
8. Squeeze the throttle and pull the
starter rope with the choke lever in
the operating position.
1. Clean or replace lter.
2. Empty the tank and ll with fresh fuel
mixture.
3. Clean or adjust the gap.
1.Adjust according to the manual or
turn to an authorized service dealer
for help.
1. Clean or replace lter.
2. Reconnect throttle wire.
3. Replace the throttle control lever.
4. Clean or adjust the gap.
5. Adjust according to the manual or
turn to an authorized service dealer
for help.
1. Stop the engine and clean the cutting
attachment.
2. Clean or replace the lter.
3. Empty the tank and ll with fresh fuel
mixture.
4. Adjust according to the manual or
turn to an authorized service dealer
for help.
-14-
Page 15

SPECIFICATION
Model CC924HT
Engine Mitsubishi Air Cooled 2-Stroke Engine
Carburetor Diaphragm
Clutch Type Centrifugal
Starter Recoil
Displacement 22.5cc
Max Power 0.7KW
Mixing Ratio(Gasoline/OIl): 50:1
Idle Speed 2700-3300 rpm
Speed at Max,Torque: 6000 rpm
Speed at Max,Power: 7000 rpm
Gear Box Reduction Ratio: 4.5
Fuel Tank Capacity : 0.5L
Cutting Length 600
Blade Pitch 35
Net Wt. 6.0 KG
Package dimension 1213x290x280mm
CONTENTS
Item Description Quantity
1 Main Part 1
2 Mixing Tank 1
3 Operator's Manual 1
4 Warranty 1
5 Tool bag 1
5.1 Spark Plug Wrench(with Screwdriver) 1
5.2 Inner Hexagon Wrech S4 1
5.3 Inner Hexagon Wrech S5 1
5.4 8/10mm Open End Wrenches 1
15-
-
Page 16

NOTE
 Loading...