


 Loading...
USER’S GUIDE
English
PLEASE NOTE!
For instructions in other languages please consult our webpage http://www.cpen.com.
First edition (March 2001).
This manual is published by C Technologies AB, without any warranty. Improvements and changes to this manual necessitated by typographical errors, inaccuracies of current information, or improvements to programs and/or equipment, may be made by C Technologies AB at any time and without notice. Such changes will, however, be incorporated into new editions of this manual including those on our web site www.cpen.com.
All rights reserved
Copyright © C Technologies AB, 2001
Printed in Sweden and in the U.S.A.
Contents |
|
INTRODUCTION TO ......................................................... |
5 |
C-Pen Models ................................................................................ |
5 |
Your Personal Digital Assistant ...................................................... |
7 |
Optimal Reading Conditions .......................................................... |
8 |
User Documentation and Support .............................................. |
10 |
Care and Safety ......................................................................... |
10 |
PRESENTATION OF C-PEN ............................................. |
12 |
Parts of C-Pen ............................................................................. |
12 |
Display Objects ............................................................................ |
14 |
GETTING STARTED ....................................................... |
17 |
Turning C-Pen On and Off .......................................................... |
17 |
Battery ........................................................................................ |
17 |
Navigating and Selecting ............................................................ |
19 |
READING AND SAVING TEXT ...................................... |
22 |
Reading Text ............................................................................... |
22 |
Saving Text .................................................................................. |
25 |
EDITING TEXT ............................................................... |
26 |
Entering Edit Mode ..................................................................... |
26 |
Edit Menu ................................................................................... |
26 |
C Write ........................................................................................ |
31 |
C Write Prototypes ..................................................................... |
35 |
APPLICATIONS .............................................................. |
39 |
Notes ........................................................................................... |
41 |
C Dictionary ................................................................................. |
45 |
Settings ...................................................................................... |
54 |
Info .............................................................................................. |
61 |
Storage ...................................................................................... |
62 |
C Beam ....................................................................................... |
64 |
C Direct ....................................................................................... |
68 |
C Write (only available for latin characters) ................................ |
70 |
USING C-PEN WITH YOUR PC ....................................... |
71 |
Installing C-Win Software ........................................................... |
71 |
Connecting C-Pen to a PC by IR ................................................. |
72 |
Connecting C-Pen to a PC by Cable ........................................... |
73 |
Getting Help ................................................................................ |
74 |
C-Pen Viewer .............................................................................. |
74 |
Copy and paste in the PC Environment ...................................... |
75 |
Installing and Removing Applications .......................................... |
76 |
Transferring Files ......................................................................... |
77 |
C Direct ....................................................................................... |
78 |
C-Pen Edit ................................................................................... |
78 |
Closing the Connection ............................................................... |
79 |
TECHNICAL SPECIFICATIONS ........................................ |
80 |
WARRANTY ................................................................... |
81 |
LIMITED WORLDWIDE WARRANTY ............................................. |
83 |
Warranty Information ................................................................. |
85 |
DECLARATION OF CONFORMITY .................................. |
86 |
UL STATEMENT ............................................................. |
87 |
C DICTIONARY COPYRIGHT NOTICE ............................. |
88 |
INDEX ............................................................................ |
90 |
4

INTRODUCTION TO
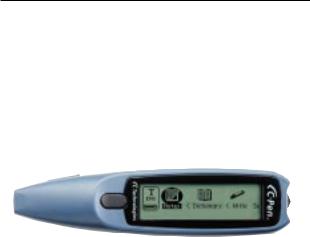
Congratulations - you have just bought a photographic memory! C-Pen is a Mobile Information Collector that reads, remembers, processes and transfers printed text to your Win- dows-equipped PC and PDA products. C-Pen is in essence an electronic highlighter that saves the text you are marking. Carry it with you wherever you go!
Make it a habit to take your portable text collector with you, and you are always ready to read and save text from books, papers, brochures or business cards. You can easily record price-lists, timetables, wine tips or witty quotes.You don’t have to tear out pages any more.
With the portable dictionary you can translate and look up words immediately without carrying around a printed dictionary!
Your saved text files can later be transferred to your PC. It is also possible to use C-Pen to read text directly into a Windows application in your PC.
C-Pen Models
In order to accommodate different needs, several C-Pen models are available. They all have the basic features C Read, C Write and Notes. The set of applications depends on the model. C-Pen 600MX is equipped with applications such as C Dictionary and Storage and has the ability to read the Cyrillic alphabet. On the following pages you will find a short description of C-Pen 600MX and its applications.
For more information on C-Pen, please refer to our webpage:
http://www.cpen.com.
5
C-Pen 600MX
C-Pen 600MX combines the reading function with translation ability, making it the perfect companion when travelling or studying.
C-Pen 600MX includes:
• C Read |
• C Direct |
• Info |
• C Write |
• Notes |
• Storage |
• C Beam |
• C Dictionary |
|
C-Pen 600MX has the ability to read both the Latin and the Cyrillic alphabet. It reads polish, hungarian, czech and russian as well as the languages that other C-Pens read.
C-Pen 600MX offers communication by cable as well as by IR.
It is powered by two alkaline AAA batteries (1.5 V type, LR03). See further important instructions, Battery, p.17.
C-Pen 600MX has a Trigg button, that you press while reading, and an ESC button. It is possible to exchange the functions between these two buttons.
For more information on C-Pen 600MX, please refer to our webpage: http://www.cpen.com.
6

Your Personal Digital Assistant
Powerful features
• C Read
Reads in text - the basic function of C-Pen. Move C-Pen over the text, and the text will be captured by the pen, where it can be saved as a file for later processing.
• C Write (only the Latin alphabet)
Allows you to enter characters by writing with C-Pen as if it were an ordinary pen. This is useful when editing text, entering file names and looking up words in C Dictionary
• C Direct
Enables you to transfer the scanned text directly from C- Pen into your PC. The text will be placed at the cursor position in any Windows program.
• C Beam
Transfers notes, contacts, calendar events and files between C-Pen and PDAs. C Beam supports the standard infrared protocol IrOBEX. All devices and applications using the IrOBEX protocol to its full extent are fully compatible with C-Pen.
• C Dictionary
Enables your C-Pen to translate and/or look up words. C Dictionary is very easy to use, simply slide your C-Pen over the word you require translated and within less than a second the result is displayed. Several language software packages are available.
7

• Storage
Storage area in C-Pen, which can be used as a floppy disc for files.
Optimal Reading Conditions
C-Pen uses Optical Character Recognition (OCR) to read text. OCR is the process of turning an image of characters into computer-readable text.
As C-Pen moves over the text, its internal light source illuminates the characters and a camera takes pictures of the text. During OCR, C-Pen analyzes the pictures taken by its camera and translates them into text characters.
The OCR quality will depend on the reading conditions. The letters most commonly confused using OCR are:
e → |
c |
l → |
I |
t → |
c |
r+n → |
m |
i → |
l |
c → |
o |
The following conditions affect the quality of character recognition:
•The print quality of the text
High-quality printed text naturally gives maximum OCR accuracy. With lower-quality print, e.g. faxes, OCR accuracy may be poorer. You can calibrate the C-Pen to optimize its performance under difficult conditions; see Calibration, p. 56.
Please note that C-Pen only recognizes machine-printed
!characters such as laser-printed or typewritten text. C-Pen does not recognize handwritten text.
8

•Position and movement of C-Pen
It is important how you hold and move C-Pen over the printed text. Please see Reading text, p. 22 or read the Quick Start folder to learn how to use
C-Pen correctly. It is crucial that you follow these instructions in order to get the best results.
•The language of the text
Set the text language of the text you wish to read, to get the most suitable OCR. See Text Language, p. 55.
•Deformed characters
Anything that is not a printed character, and any character distorted by a mark or smudge on the paper may be unrecognizable.
•Overlapping characters
Characters in the text should not overlap.
•Italics and underlined text
Italics are slightly difficult for C-Pen to read in some fonts. Underlined text is also difficult for C-Pen to read because the underline changes the shapes of the descenders of the letters g, j, p, q and y.
•Text colors - text and surface
C-Pen cannot read some combinations of text colors on colored surfaces, such as red or yellow text on a white or red background.
Text that is highlighted by a traditional highlighter marker can be read in some cases, depending on the color and darkness of the ink.
•Small or large character sizes
The size of the characters should be 5–22 points.
9

User Documentation and Support
There are several sources of support for your C-Pen.
This User's Guide contains a description of C-Pen, its applications and instructions for reading and editing text and saving files. The following applications are explained:
• C Read |
• C Direct |
• Storage |
• C Write |
• C Beam |
• C Dictionary |
• Notes |
• Info |
• Settings |
You can also learn how to connect C-Pen to a PC.
The enclosed C-Pen CD contains the C-Win Software for communication between C-Pen and your PC. It also contains several help files:
•Help
•User's Guide in several different languages
•Troubleshooting, which helps you solve many problems
On our web site, www.cpen.com, you can find Troubleshooting and the User’s Guide translated into several languages. Visit our web site, www.cpen.com, to get the latest C-Pen news and free software upgrades.
Care and Safety
•Keep C-Pen away from direct sunlight, heat, moisture and dust.
•Do not expose C-Pen to extreme temperature variations.
10
•Make sure the camera opening is free from dust or any other objects.
•Do not deliberately insert any object into the camera opening.
•Clean C-Pen with a dry cloth. Do not use detergents or other chemicals when cleaning C-Pen.
•C-Pen models that are powered by alkaline batteries, require two 1.5 V AAA batteries of type LR03. See
Battery, p. 17.
•Make backup copies of your C-Pen files regularly and keep the copies in a safe place. Copies are made using C-Win Software, see Using C-Pen with your PC, p. 71.
11
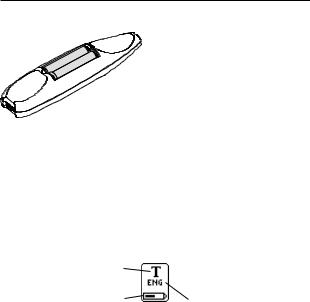
PRESENTATION OF C-PEN
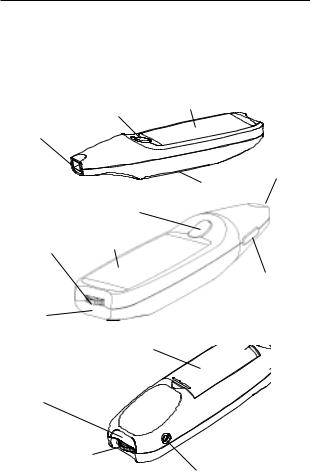
Parts of C-Pen
Description of the different parts:
3
5
8
8
7
5
3
1
2
4
7
4
1
6
12

1. On/Off and Nav
Turns C-Pen on or off when pressed and held for more than two seconds. This button is also used to scroll through the menus and texts (push up or down) and to select an item or an option (press briefly).
2. ESC
Closes menus. This is the button on the side of C-Pen. The functions of Trigg and ESC can be exchanged to suit your own preferences. See System Settings, p. 59.
3. Display
Used to display scanned text and for communication between C-Pen and the user. The orientation of the text on the display can be changed to suit left-handed users. See System Settings, p. 59.
4. IR port
The infrared (IR) port is used for wireless data transfer between C-Pen and a PC, mobile phone or PDA that is equipped with an IR port.
5. Trigg
The Trigg button is to be pressed and held down while reading text. The functions of Trigg and ESC can be exchanged to suit your own preferences. See System Settings, p. 59.
6.Cable Socket
The Cable Socket is where you plug in the cable that connects C-Pen to your PC. The cable is used to communicate and transfer files to and from C-Pen to your PC.
13

7. Battery Compartment
This is where you insert the batteries.
8. Camera Opening
The Camera Opening is not protected in any way. This enhances C-Pen’s reading ability but it also makes it important to see to that dust or other objects do not enter the camera opening.
Display Objects
C-Pen uses the following display objects to communicate with you:
•status field
•application icons
•menus
•check boxes
•dialog boxes
•edit fields
•dialog buttons
Status field
The area on the left side of the display is called the status field. This field can display the current application, text settings (Text Quality and Text Language) and C-Pen’s battery power level. See also Settings, p. 54 and Battery, p. 17.
14
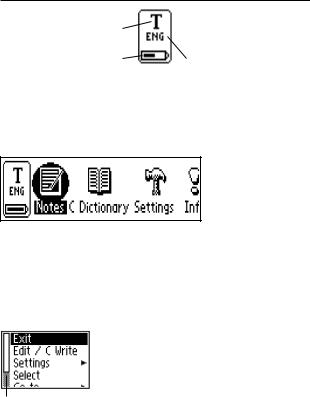
Text Quality
Battery power level |
Text Language |
Application icons
The applications are represented by application icons on the main screen. The applications are described in the chapter Applications, p. 39.
C-Pen main screen
Application icons
Menus
Menus provide different options. A scroll bar indicates if there are more menu items available above or below the visible section.
Menu items
Menu
Scroll bar
Check boxes
Check boxes also provide different options. A check box remains checked until you uncheck it or check another of the alternative boxes in the list.
15
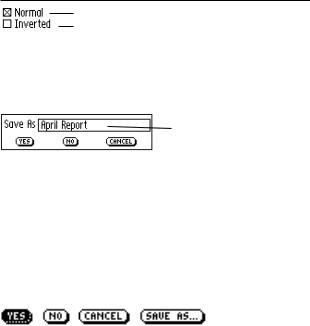
Checked box
Unchecked box
Dialog boxes
A dialog box appears when you need to enter information or give commands to C-Pen. A dialog box contains one or more objects such as edit fields or dialog buttons.
Edit field
Dialog box
Dialog buttons
Edit fields
It is possible to enter and edit text in an edit field. An edit field is recognized by its frame, see the figure above.
Dialog buttons
Dialog buttons are used in dialog boxes to give simple instructions to C-Pen.
Common dialog buttons
16

GETTING STARTED
Turning C-Pen On and Off
To turn C-Pen on and off, press the On/Off button until the display is activated/deactivated. C-Pen turns off automatically after 5 minutes of inactivity. To change the automatic power-off time, see System Settings, p. 59.
 Press Nav to turn C-Pen on and off
Battery
Installing the batteries
1. Remove the battery cover from the back of C-Pen.
Lift the cover here to open
It is imperative to observe the polarity of the batteries.
!The orientation of the plus and minus ends is shown inside the battery compartment.
17
2. Insert two alkaline AAA batteries (1.5 V, type LR03).
3.Replace the battery cover. You should hear a “click” when it locks in place.
! Please do not dispose of batteries in a fire as there is a danger of explosion. Please recycle the batteries!
Battery power level
The battery power level is shown by the battery indicator at the bottom of the status field.
Text Quality
Battery power level |
Text Language |
If the battery power level is getting low, the message “Battery low” will appear on the display. To avoid losing unsaved information, save all material not previously saved and then change the batteries. Turn C-Pen off before changing batteries. To change batteries, see Installing the batteries p. 17.
If the battery power level is so low that the pen can no longer function, you will get the message “Battery level too low! Shutting down.” You must change the batteries to be able to continue using C-Pen.
18

Please note that information may be lost if you remove the
!you turn C-Pen off properly, all information is saved in the memory and it is safe to remove the batteries.batteries without turning C-Pen off first. However, when
C-Pen is reset by removing the batteries from the battery compartment. Do this when C-Pen has encountered problems or has “frozen”.
Navigating and Selecting
Nav (the navigation control) is used for navigation and to select an object.
Turn Nav up or down to navigate between
•menu items
•dialog buttons
•edit fields
•check boxes
•lines or characters in text
As you move between objects, they become highlighted (inverted).
Pressing Nav briefly when an object is highlighted is referred to as selecting that object.
The result when selecting an object is explained for each situation later in this manual. Below are some general remarks about selecting objects.
19

Menus
Selecting a menu item marked with a  will display further alternatives in a new menu.
Selecting EXIT or CANCEL will close the menu. Instead of selecting EXIT or CANCEL, you can press ESC.
 Menu item with alternatives
Dialog buttons
In a dialog box you can instruct C-Pen how to continue by selecting a dialog button:
• OK
You accept a suggestion in a dialog box.
• YES
Your answer is “Yes” to a question in a dialog box.
• NO
Your answer is “No” to a question in a dialog box.
• CANCEL
The dialog box is closed and you return to your earlier menu or screen. Instead of selecting CANCEL, you can press ESC.
Edit fields
To be able to edit text in an edit field, you must first select the field.
20

Edit field
A cursor will appear in the edit field and the status field will show the edit mode symbol. See Editing text, p. 26.
Cursor
Press to select an object
Edit mode symbol
Check boxes
To mark an alternative in a list of check boxes, navigate to the alternative of your choice (using the Nav button).
Mark the alternative by selecting it (press the Nav button briefly).
The check box becomes checked and the OK button is highlighted. Press OK if you are satisfied with your choice, otherwise press CANCEL.
21

READING AND SAVING TEXT
Please follow the instructions in this chapter in order to get the best results from your C-Pen. Take a few minutes to learn how to use C-Pen correctly. See also Optimal Reading Conditions p. 8.
In this User's Guide “read text” should be interpreted as reading a line of text, not a line on C-Pen’s display.
Reading Text
To read a line, follow the steps below.
1.Turn C-Pen on. Make sure the text settings are set to the appropriate values. The text settings are Text Language, Read Mode and Text Quality. It is also possible to calibrate C-Pen for best performance. See
Settings, p. 54.
2.Place C-Pen over the first character you want to read. Hold C-Pen with the pen tip flat against the surface. Make sure that the camera opening covers the entire height of the line. C-Pen reads one line at a time.
3. Press and hold Trigg.
22

!order to achieve maximum reading accuracy.
4.Move C-Pen over the line of text, keeping Trigg pressed. You can move C-Pen left-to-right or right-to-
left over the text. You can read up to 15 cm/second (5 inches/second).that the text surface must be completely flat inPlease note
5. Release Trigg at the end of the line.
23
Continued reading
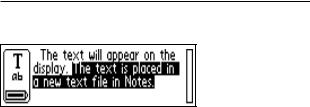
The Text screen will appear on the display.
Text screen
The text is placed in a new text file in Notes, see p. 41. You can also create a new, empty text file by selecting New...
and then FILE in Notes, before you start reading.
Reading another line
Read the second line in the same way as you read the first. A space, a line break or a tab is inserted between the lines, see Read Mode, p. 55. You can insert a line break by pressing Trigg.
The last line is highlighted (negative), i.e. light text on a dark background. To delete the last line, press ESC briefly.
Deleting a line
To delete any of the lines you have read, proceed as follows.
1.Move the cursor (the flashing triangle) with the Nav button to the beginning of the line. Press Nav and the Text menu opens, see p. 43.
2.Scroll through the menu items until you find Select and press Nav. The line becomes highlighted.
3.Press ESC briefly. The line disappears and you are ready to read a new line.
24

Saving Text
Press Nav to open the Text menu (see Notes, p. 41) and choose Exit. The Save As dialog box appears. Choose YES if you want to save the text, NO if you want to discard the text or CANCEL if you want to return to the text. The dialog box contains an edit field with a suggested file name. You can change the file name before you save the file; see Editing text in the next section.
25

EDITING TEXT
To be able to edit text in a text file or in an edit field you must enter edit mode.
Entering Edit Mode
You can enter edit mode in different ways depending on your starting-point. You can enter edit mode from the Text screen or from an edit field.
Entering edit mode from the Text screen
Press Nav in the Text screen to open the Text menu. Select Edit/C Write to enter edit mode. You can now edit text either by using the Edit menu (see below) or by using C Write (see p. 31).
Entering edit mode in an edit field
Press Nav when the edit field is highlighted to enter edit mode. You can now edit text either by using the Edit menu (see below) or by using C Write (see p. 31).
Edit Menu
When you are in edit mode a cursor appears and the edit mode symbol is shown in the status field.
Edit mode symbol Cursor
26

In edit mode you can move the cursor one character at a time by turning Nav. You can move to the beginning or the end of the text with the Go to option in the Edit menu. Move the cursor to the position where you want to edit the text. Press Nav to open the Edit menu.
Edit menu
The options in the Edit menu are slightly different, depending on where you want to edit a field. The most common items in the Edit menu are:
• Quit Editing
Exits edit mode in the Text screen.
• Done
Returns to the text from the edit mode in an edit field.
• Change
Changes the character to the right of the cursor.
• Insert 
Inserts new characters, a space or a line break at the cursor’s position.
• Cut
Cuts out the selected characters.
• Copy
Copies the selected characters.
27

• Paste
Pastes a cut out or copied selection of characters.
• Delete
Deletes a character or a selection of characters.
• Go to 
Moves the cursor to the beginning or the end of the text.
• Select 
Highlights characters or an entire text.
• Settings 
Sets the text settings (Text Language, Text Quality and
Read Mode) of the text you are reading. The options
Calibration and C Write Feedback are also included here.
• Cancel
Closes the edit menu. Returns to the read text.
The menu items are explained in greater detail below.
Change
Place the cursor to the left of the character you want to change and select Change from the menu. Turn Nav to select the new character from the character set and then press Nav.
The character set
28

As default C Write Prototype Viewing is enabled. When scrolling in the character set you can see how the characters should be drawn if you want to use C-Pen as a normal pen during editing. C Write Prototype Viewing is automatically turned on/off when C Write Feedback is turned on/off, see p. 32.
Insert
Move the cursor to the place where you want to insert text, and select Insert from the menu. You can choose between inserting a space, a line break, a character or multiple characters.
Select Character in the insert menu to insert one character. Then turn Nav to select a character from the character set and press Nav. The character set closes automatically after insertion.
To insert more than one character, select Multiple Characters. Turn Nav to select a character from the character set and press Nav. The character set remains on the display and you can continue inserting characters.
As default C Write Prototype Viewing is enabled. When scrolling in the character set you can see how the characters should be drawn if you want to use C-Pen as a normal pen during editing. C Write Prototype Viewing is automatically turned on/off when C Write Feedback is turned on/off, see p. 32.
When you are finished, press ESC or the DONE button (in the end of the character set) to return to the text you are editing.
29
Loading...