

Page 1

THE ULTIMATE
TONEWHEEL ORGAN
EXPERIENCE
USER'S MANUAL
Firmware version 1.00
www.Crumar.it
CRUMAR MOJO DESKTOP USER'S MANUAL - Page 1/20
Page 2
Congratulations for purchasing your new Crumar Mojo Desktop. We are confident
that this instrument will be the perfect expansion to your live and studio setup, as well as
to your musical inspiration. Read through this useful manual to explore its capabilities
and, most importantly, have fun!
SAFETY INFORMATION
– Do not open the instrument. The instrument can be opened and repaired only
by qualified personnel. Unauthorized opening voids the warranty.
– Do not expose the instrument to rain or moisture.
– Do not expose the instrument to direct sunlight.
– Be careful not to infiltrate powders and liquids inside the instrument. Nor on
the outside.
– If liquids get inside the unit, remove the power immediately to prevent the risk
of electric shock and contact a service center as soon as possible.
– Do not clean using abrasive cleaners as they may damage the surfaces.
– Please keep all packaging in case you need to transport the instrument to a
service center.
– The instrument can be used in any Country that has a mains voltage between
100 Vac and 240 Vac.
– Do not touch the AC adapter with wet hands.
CRUMAR MOJO DESKTOP USER'S MANUAL - Page 2/20
Page 3
WARRANTY
– Crumar Mojo Desktop is subject to 12 months manufacturer's warranty.
– Warranty extensions are at the discretion of the retailer.
– Damages caused by misuse, improper maintenance or transportation are not
covered by this warranty.
– During the warranty period, the customer is entitled to repair or replacement
of any parts considered defective at no charge.
– The possible replacement of the entire product is at the manufacturer's
discretion.
CHAPTER SUMMARY:
1. The sound of Mojo Desktop p. 4
2. The Command Panel p. 5
3. The Rear Panel p. 7
4. Display Pages p. 8
5. Global Settings p. 11
6. File Operations p. 12
7. Organ Edit Parameters p. 13
8. Effect Edit Parameters p. 14
9. The USB Ports p. 18
10. MIDI Map p. 19
11. Specifications p. 20
NOTES ABOUT THIS MANUAL
This manual can be considered a live document, as it may be updated in future
according to possible changes introduced in new firmware updates. We recommend
to keep an eye at the support section of the Crumar website and check for new
versions of both the manual and the instrument's firmware.
You will find that some concepts might be repeated more than once, this happens
because there could be a mention in a chapter, and a detailed explanation in a later
chapter.
We recommend you to read this manual with the instrument in front of you, so you
can put into practice what you are reading and can have an instant feedback of the
notions here explained.
CRUMAR MOJO DESKTOP USER'S MANUAL - Page 3/20
Page 4

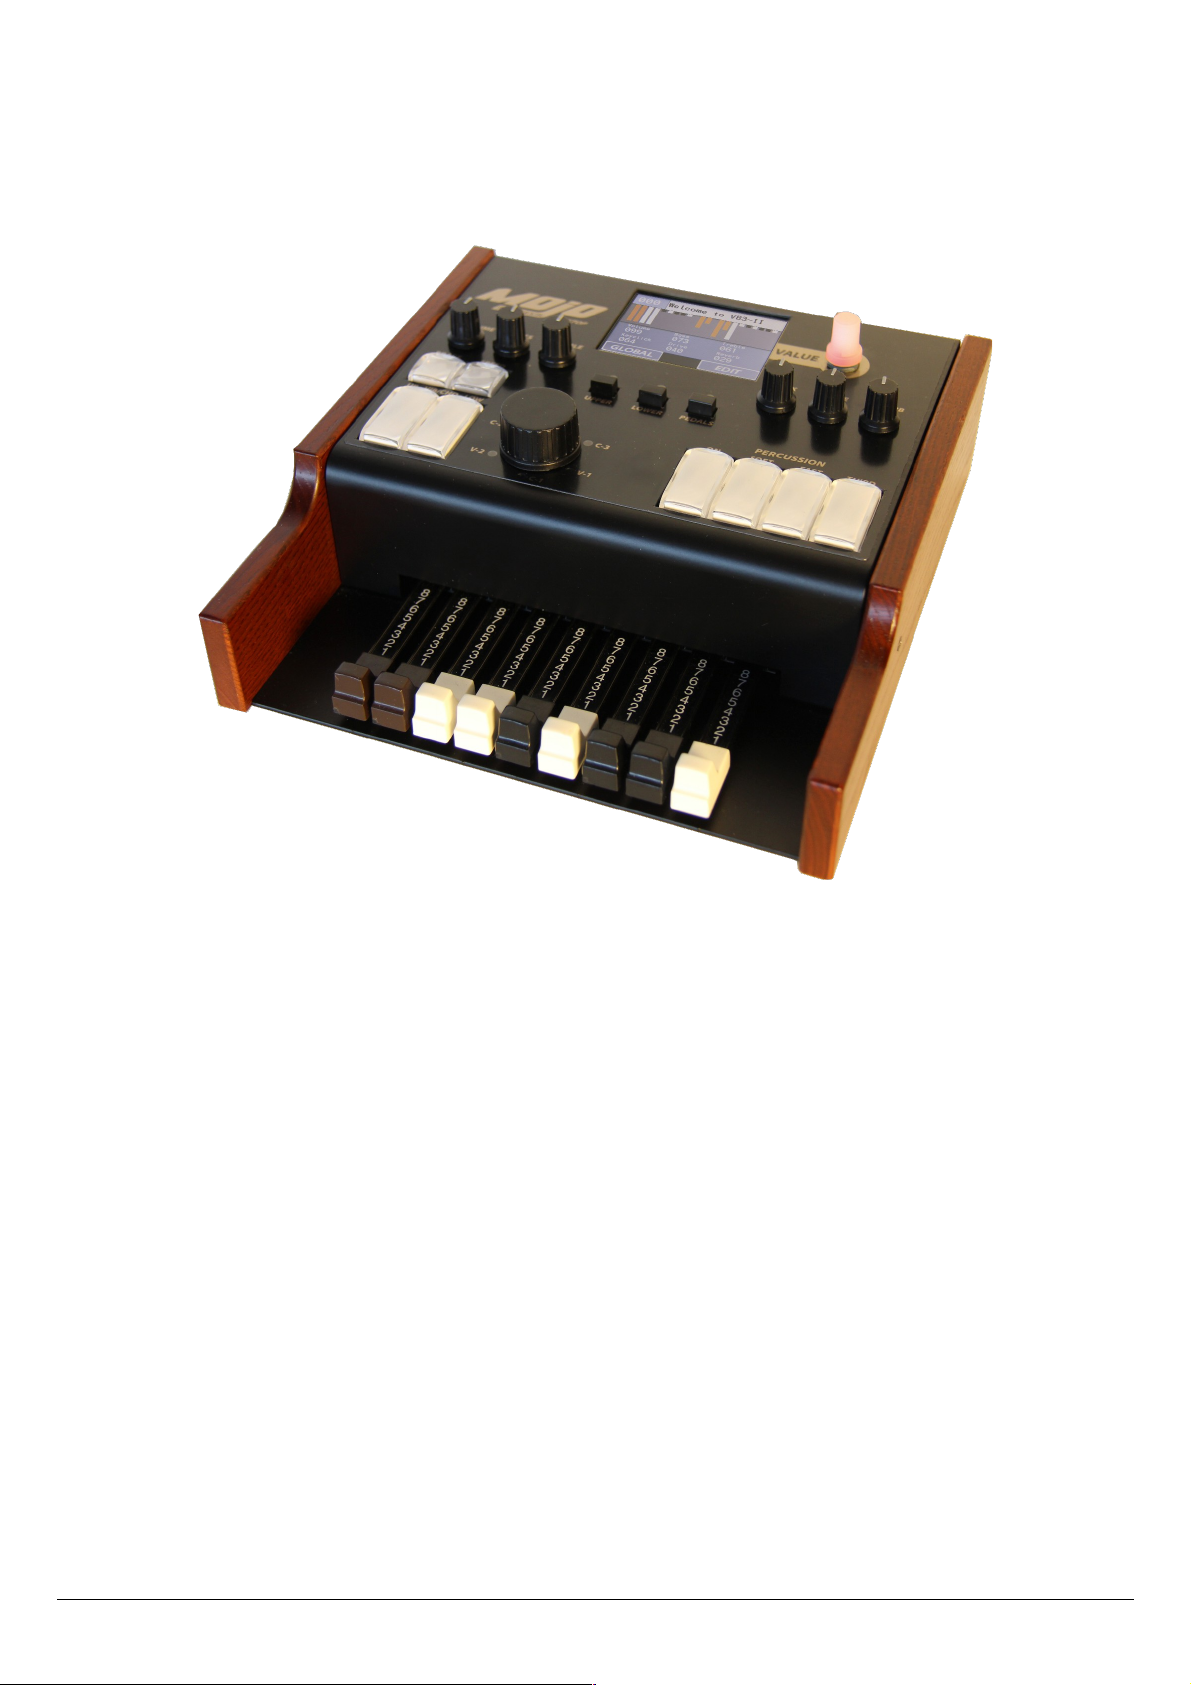
1. THE SOUND OF MOJO DESKTOP
VB3-II virtual tonewheel organ
The Crumar Mojo Desktop is the perfect hardware counterpart of the
most acclaimed tonewheel organ simulator virtual instrument
known as GSi VB3-II. It reflects the exact same sound engine, with the
same parameter set, mostly the same functions (considering the
difference between a software and an hardware instrument), and can
even exchange the same Programs and Banks of programs. While the
GSi VB3-II software can run on regular computers (Windows and
Mac), the Mojo Desktop is based on one of the most modern and dependable
embedded processing units, and doesn't need a full computer to run. Despite that,
the sound that is produced is 100% the same, with every single detail.
Main features:
• Full polyphony (61 upper + 61 lower + 25 pedals = 147 notes)
• 91 modeled tonewheels with accurate phase synchronization
• Adjustable leakage noise and cross modulation between tonewheels
• A total of 22 different tonewheel generators to choose from
• Generator shaping for a total of 154 generator combinations
• Adjustable global tuning from 430 to 450 Hz
• Foldback on 16" deactivatable
• Complex wheels
• Resistor wiring with multiple options
• Realistic “run” motor wow & flutter
• Busbars and 9 key contact simulation
• String Bass with adjustable release time
• Loudness "robbing" effect
• Single triggered percussion with natural capacitor discharge/recharge
• Adjustable Percussion Level & Decay
• Vibrato/Chorus virtual scanner
• Adjustable Vibrato Scanner depth & mix
• Dynamic tube overdrive simulation
• Spring Reverb (pre) and Digital stereo reverb (post)
• Rotary speaker simulation with virtual microphone positioning, tube overdrive, tube feedback
• Rotors "Front Stop" brake position with adjustable preferred position
• Upper and Lower manuals SPLIT with adjustable split point
• Supports pedal sustain
• Room for 128 Programs
• Color Touch 3,2” Display
• 9 Physical drawbars assignable to each of the 3 manuals
• Large Illuminated buttons for percussion, Chorus/Vibrato and Rotary Speaker control
• Large encoder knob for Chorus/Vibrato type selection
• Six potentiometers for immediate parameters
• Inputs for Swell Pedal and Foot Switch
• Two MIDI inputs
• Two USB host inputs
• Class-compliant USB-MIDI port
• Headphone output
• Balanced Stereo output
CRUMAR MOJO DESKTOP USER'S MANUAL - Page 4/20
Page 5
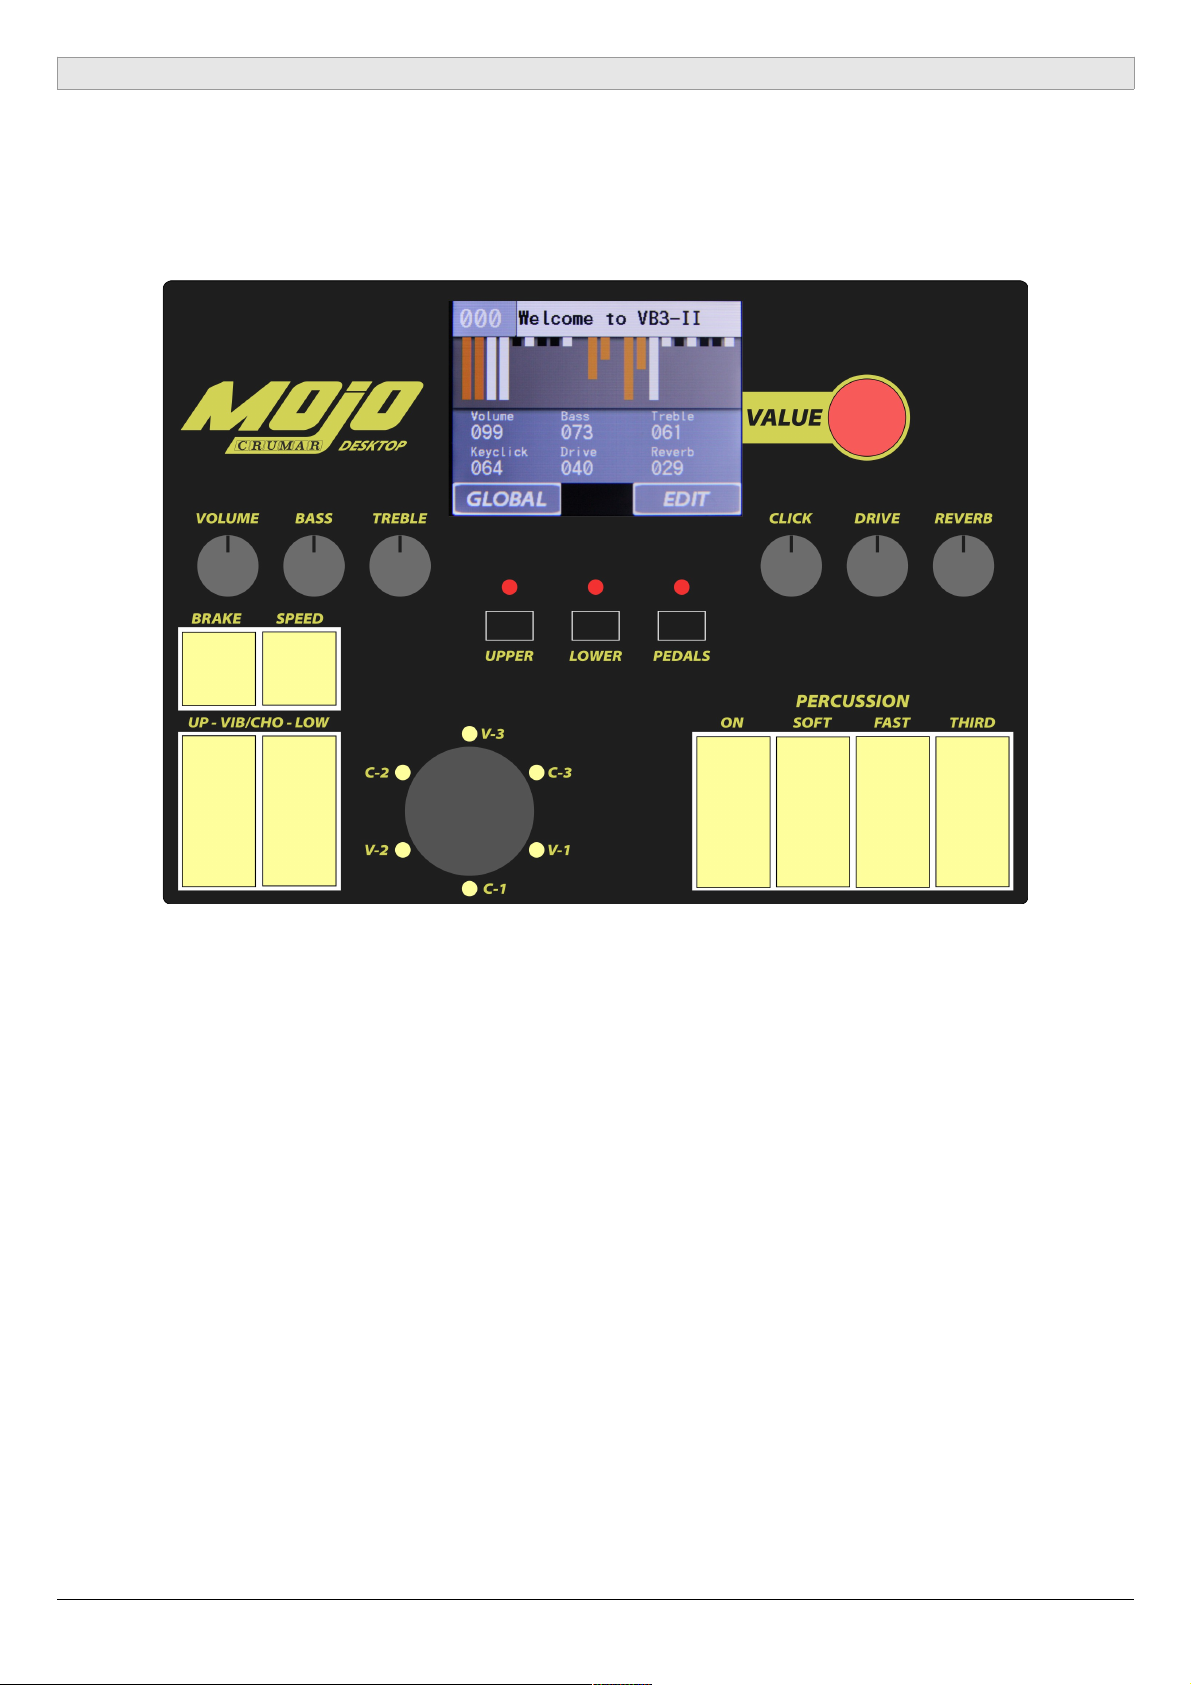
2. THE COMMAND PANEL
In this chapter we get familiar with the command panel of the Mojo Desktop. Most of
the sound editing is done via the large color display in the middle of the panel, while
real-time performance commands are directly available on the panel under the form
of large illuminated buttons and knobs for an easy reach while playing music.
2.1 - KNOBS
From left to right, you have the volume, bass & treble equalization, keyclick volume,
overdrive level, and digital reverb level. These knobs are always active and are
internally connected to their respective parameters. The Volume knob is a general
volume by default, but can be optionally set to reflect the volume parameter stored
with each single Program.
PLEASE NOTE: the spring reverb effect level can only be adjusted from the appropriate
parameter from within the editing page, or from external MIDI CC message.
2.2 – ROTARY SPEAKER SPEED BUTTONS
The two buttons labeled BRAKE and SPEED are used to control the internal Rotary
Speaker simulator speeds. Push SPEED to switch between slow and fast, the light will
animate reflecting the rotation of the bass rotor. Push BRAKE to stop the rotation;
push BRAKE again to return to the previous speed. If the Memphis Style is active (see
parameter editing chapters), the light will not animate.
CRUMAR MOJO DESKTOP USER'S MANUAL - Page 5/20
Page 6

2.3 - VIBRATO/CHORUS
Just like on the keyboard version of the Crumar Mojo, and like on a vintage
tonewheel organ, there are two large buttons for turning the effect on or off on the
upper or on the lower manual independently, and a large knob that lets you choose
the type of effect to use between the 6 possible combinations: V1, C1, V2, C2, V3, C3
whereas the 'V' produce just a vibrato effect and the 'C' produce a chorus effect. In
the Mojo Desktop the selector is a rotary encoder with 6 LEDs that indicate the
current selection. The LEDs will update according to the current Program.
PLEASE NOTE: just like on a vintage tonewheel organ, when the C/V effect is turned on
for the lower manual, it's also applied to the pedalboard tones.
2.4 - PERCUSSION
Like on the the vintage tonewheel organs, the command panel features the four
percussion switches that have the following functions, from left to right:
1. Turn the percussion on or off.
2. Select between soft or normal percussion volume.
3. Select between fast or slow decay.
4. Select the harmonic applied to the percussion tone.
PLEASE NOTE: the percussion is only present at the upper manual. Also, when the
percussion is active, the 1' drawbar will be muted.
2.5 - MANUAL SELECTION BUTTONS
The three buttons in the middle of the panel are used to select which of the three
manuals (upper, lower or pedalboard) the 9 physical drawbars shall control. The
respective LEDs indicate the active manual. They blink when MIDI note messages are
received for each manual separately, according to the note channels.
2.6 - COLOR TFT TOUCH SCREEN
The 3,2” display in the middle of the panel shows all the parameter editing pages,
global settings, Programs and other useful informations. It's mainly used to access
the sound editing without the need of an external unit. Next to the touch screen
there is a VALUE encoder with push-button. This can be used to switch between
Programs in the Home Page, or to insert values in the editing pages.
PLEASE NOTE: if you have troubles using the fingers for activating certain small items
shown on the screen, you might want to use a stylus, a pencil or just the tip of your
fingernails. This is a resistive touch screen, so any object will work for activating the touch
sensor.
CRUMAR MOJO DESKTOP USER'S MANUAL - Page 6/20
Page 7

3. THE REAR PANEL
All connections are found on the back panel of the Crumar Mojo Desktop. From left
to right, on the upper row we find:
– Swell Pedal input: this is a TRS Jack that receives an expression pedal with a
10K to 50K linear potentiometer. This is mainly used to modulate the “Swell”
(expression) pedal of the tonewheel organ.
– Foot Switch input: this is a TRS Jack that receives Crumar's dual foot switch
used for switching the Rotary Simulator effect speeds. Please refer to Crumar's
website for informations about the accessories.
– Two parallel MIDI inputs. These two MIDI inputs are internally merged, so you
can connect two traditional MIDI keyboards and have them send on two
different channels (usually 1 for upper and 2 for lower) so you can play the two
manuals of the tonewheel organ simultaneously without having to use an
external merging unit.
On the bottom row we have:
– A/C Adapter input. We recommend to use the adapter that comes with the
unit. Should you lose your adapter, since this is a standard connector, you can
replace it with a different adapter type that has a 2.1 DC jack with center
positive, and carries at least 2000 mA of current at 9V or 12V. If you're uncertain,
call your dealer or contact Crumar.
– Power button. Make sure this is pushed in to rock the world.
– Two SYSTEM USB ports. These are USB-host ports that can accept external
devices. In the case of the Mojo Desktop, they can accept Class-compliant USBMIDI devices such as master keyboards or other controllers, or USB flash drives
for importing/exporting Programs and Banks or for performing the Firmware
update.
– MIDI I/O USB: this is a Device type USB port, used mainly to connect the Mojo
Desktop to your computer for MIDI input and output connectivity.
– Audio outputs L & R: these are TRS Jacks that carry balanced audio signals.
– Headphones: connect your headphones here.
CRUMAR MOJO DESKTOP USER'S MANUAL - Page 7/20
Page 8

4. DISPLAY PAGES
4.1 - HOME PAGE
The Home Page shows, from top to bottom:
– the Program number and name
– all drawbar positions
– values of all six knobs
– soft-buttons for going to the GLOBAL
settings or to the EDIT page
Tap on the Program number in the top left
corner to access the keypad page, where
you can insert a number between 0 and 127
to recall the desired Program. Tap on the Program name to access the Program list
that you can scroll up and down to reach the desired Program. Turn the VALUE
encoder to scroll the Program list while the home page is displayed.
4.2 - KEYPAD
Use the keypad to type a number between 0
and 127. Tap DONE to jump to the desired
Program, or Back to return to the previous
page.
4.3 - PROGRAM LIST
To scroll the list up or down, tap on the
arrows on the right of the screen or turn the
VALUE rotary encoder. To recall a Program,
tap on the name of the desired program or
push the VALUE encoder. To return to the
previous page, tap on BACK on the bottom
right corner.
CRUMAR MOJO DESKTOP USER'S MANUAL - Page 8/20
Page 9

4.4 - EDIT PAGES
Tap on the EDIT soft-button in the bottom
right corner of the home page to reach the
main EDIT menu page.
Here you can tap on the EDIT ORGAN
button to access the parameter list
dedicated to the organ part, or EDIT
EFFECTS to access the parameter list
dedicated to the effects.
To generate an initialized Program, tap the
INIT button on the top right corner. Tap
BACK to return to the previous page. After your editing is done, you can return to this
page and tap the WRITE button to go to the pages that let you give a name to your
program and choose a memory location where to store it.
4.5 - PARAMETER EDIT
Once in an EDIT page, you can scroll the
parameter list tapping on the up and down
arrows on the right, or by rotating the VALUE
encoder. The current parameter is highlighted
in blue.
To activate a parameter for editing, tap on the
parameter name or push the VALUE encoder.
The active parameter becomes highlighted in
red. To change the parameter value, use the up and down arrows on the right or
rotate the VALUE encoder. You can keep your finger on the arrows for faster
parameter scroll.
When you're done with your editing and you're ready to save your new Program, tap
on the BACK button to return to the previous page, then tap the WRITE button.
Sound parameters are explained in detail later in this manual, in a separate chapter.
CRUMAR MOJO DESKTOP USER'S MANUAL - Page 9/20
Page 10

4.6 - PROGRAM WRITE
First, you should give your Program a name.
Use the QWERTY keyboard for this, just like
you normally do with a smartphone. To
change the cursor position, tap on the text
field in the desired position or use the
VALUE encoder. Tap on the 123 button to
switch to the numbers & symbols page, use
the SHIFT button to switch to capitals. Tap
on BACK if you changed your mind and
need to continue editing, otherwise tap on
DONE to proceed with the next page.
PLEASE NOTE: the keys on the virtual qwerty keyboard are pretty small. If you have an
hard time hitting the correct keys with your finger, try using a stylus or the tip of your
fingernail.
In the WRITE page you can select the
memory location where to store your new
Program. By default, the current location is
selected, so you can easily overwrite the
current Program. To choose a different
location, turn the VALUE encoder. Tap on
CONFIRM to permanently store your
Program. This will save the Program and
return to the home page.
4.7 - GLOBAL MENU
From the home page, tap on GLOBAL to go
to the main GLOBAL menu. Tap on
SETTINGS to go to the list of global settings.
Tap on FILES to go to the list of file functions
(import/export of Programs and Banks, and
Firmware update). Tap BACK to return to the
home page.
Tap ABOUT to open the page that shows the
current firmware version and other
informations.
CRUMAR MOJO DESKTOP USER'S MANUAL - Page 10/20
Page 11

5. GLOBAL SETTINGS
The list includes the following items:
– Tuning A=Hz; This is the global
tuning, where the reference A note
can be set to a frequency between
430 and 450 Hz. The default value is
440 Hz.
– MIDI Channel selection for Upper,
Lower and Pedalboard. The default
values are, respectively, 1, 2 and 3.
These can be set on any channel between 1 and 16. Settings two ore more
manuals on the same channel will cause them to play simultaneously when
that channel is received.
– Receive MIDI Program: set this to ON (default) if you wish to switch programs
from the external MIDI Program Change event. Set to OFF to ignore the event.
– Receive MIDI Control: set this to ON (default) for controlling certain
parameters from external MIDI Continuous Controller messages. Set to OFF to
ignore the events.
– Send MIDI Program: set to ON to send MIDI Program Change events when a
new Program is recalled. Set to OFF to ignore (default).
– Send MIDI Control: set to ON to send MIDI Continuous Controller messages.
Set to OFF to ignore (default).
– Volume is Global: set to ON (default) to use the Volume knob as a global
volume. Set to OFF if you wish the volume parameter to be set according to the
Programs.
– MIDI CC #64 Function: decide what to do when a MIDI CC #64 event (Sustain
Pedal) is received:
– OFF (default): ignore the messages;
– Rotary Speed (Latch): use the sustain pedal to switch between rotary speeds in latched
mode, i.e. the speed changes each time the pedal is pushed and released;
– Rotary Speed (Mom.): use the sustain pedal to switch between rotary speeds in
momentary mode, i.e. hold the pedal down for slow, release for fast;
– Sustain Upper, Lower, All: decide whether to use the sustain pedal to sustain notes on
the upper manual only, or on the lower manual only, or on both manuals.
CRUMAR MOJO DESKTOP USER'S MANUAL - Page 11/20
Page 12

6. FILE OPERATIONS
The Crumar Mojo Desktop supports any USB
flash drive formatted with the FAT32
filesystem. If you have bought a new drive, you
don't need to format it. If you are a Mac user
and need to format an existing drive, make
sure you're formatting it using the FAT32
filesystem. Every file function assumes that the
drive is connected to one of the two System
USB ports on the back of the instrument. If the
drive is not present, the display will pop up an
alert window.
Import Program. Use this function to import single Programs that were previously
exported either by this or another Crumar Mojo Desktop or by the VB3-II virtual
instrument. Make sure the files are on the drive and the drive is connected. After
tapping on this item, the drive is scanned for compatible files and a new list is
loaded. Scroll the list using the up and down arrows or the VALUE encoder, then tap
on the Program you wish to import or push the VALUE encoder. The program is
imported in a temporary memory location. You can audition and edit it, but it will be
lost if you switch to a new Program or import a new Program from disk, unless you
go to the WRITE page and store it into a memory location of your choice.
Export Program. Use this function to export the current Program. A new file will be
created on the connected drive with the same Program name. This file can be later
imported on this or on another Crumar Mojo Desktop or in the VB3-II virtual
instrument.
Import Bank. Use this function to import the whole Program Bank containing all 128
Programs. The process is similar to importing single Programs. The disk is scanned for
valid files, then a new list is loaded with the existing bank files that you can load.
Tapping on a bank will replace the entire bank with the new one.
Export Bank: Use this function to export the whole Program Bank to disk. The Bank is
always exported as a file named “MojoDesktop.VB3Bank”. If this file is already present
on disk, it will be overwritten.
Update Firmware. When a new firmware is
released, after you've downloaded the file and
copied to the USB drive, use this function to
perform the update. Follow the on screen
instructions after tapping on this item.
Factory reset. Tap on this item to restore the
entire Program Bank and all Global options to
factory conditions.
CRUMAR MOJO DESKTOP USER'S MANUAL - Page 12/20
Page 13

7. ORGAN EDIT PARAMETERS
– Generator: select a tonewheel generator from this list. Each generator is based
on actual values as measured from real console organs of the B/C/A series.
– Generator Shape: select between OFF (no shaping) or 3 levels of CUT and 3
levels of BOOST. These will modify the amplitude chart of the generator values
according to different positions along the generator. This parameter does not
apply any equalization to the sound. Levels 1 can boost or cut starting from
wheel n. 25; levels 2 start from wheel n. 52; levels 3 start from wheel n. 72.
– Leakage: adjusts the background hum & hiss.
– Crosstalk: adjusts the amount of crosstalk caused by the analog circuitry. This
is a very important element of the tonewheel organ sound.
– Xtalk Shape: since the crosstalk consists of both bass and treble tones, this
parameter mixes between the presence of one or the other, left towards a
“rumble” noise, right towards a “brilliant” noise.
– Complex wheels: are special tonewheels only used for the first 12 tones wired
with the pedalboard. Unselecting this parameter will use standard sinus
tonewheels.
– Foldback on 16': the first 16 wheels wired to the keyboards are usually folded
back, thus starting from wheel n.13 rather than from wheel n.1. If you wish to
use the first 12 wheels on the manuals, uncheck this option but you should also
uncheck the Complex wheels.
– Resistor wires: are the small wires that in the vintage organ connect the
keyboards to the generator. This parameter offers three different values:
“Console: NEW”, as specified by the original B3 specifications; “Console: OLD”,
resulting in a more present low-end; “Spinet”, same as “Console NEW” but
without the foldback.
– Drawbar trims: the 9 parameters under this section can be used to adjust the
presence of each drawbar. This will apply on top of the actual drawbar
registrations for both the upper and the lower manual.
– Percussion settings: set the parameters of the percussion circuit such as the
level when it's on normal or soft, the decay time when it's on slow or fast, the
overall level, and the loudness loss when the volume tab is set to normal.
– Perc Paradise Mod: this is a “hack” that causes the percussion to never decay.
What's special in this is that if you activate the scanner vibrato effect, you'll
notice that the vibrato is applied to the rest of the drawbars but not to the
percussion tone.
– Other settings: here you can adjust the depth of the vibrato circuit and the mix
amount that affects the chorus settings, plus some parameters related to the
generation of the KeyClick noise.
– Preamp Bass / Treble: adjust the frequency response of the organ's built-in
preamp circuitry.
– Split Toggle and Note: use this to activate the split between upper and lower
manual, and to select the split point (lowest note of the upper part).
CRUMAR MOJO DESKTOP USER'S MANUAL - Page 13/20
Page 14

8. EFFECT EDIT PARAMETERS
Parameters for the Spring Reverb are:
– Level: adjust the volume of the spring reverb which is always positioned before
the Rotary effect, and does not exclude the Digital Reverb, which is positioned
after the Rotary effect.
– Timbre: adjust the frequency response of the reverberated sound according to
your taste. In real life, different types of spring reverb tanks give different
timbres.
– Decay: adjust the length of the reverberation.
– Damp: when springs are made of a larger gauge they tend to dampen the
sound faster. Adjust the damping effect with this parameter.
Parameters for the Rotary Speaker are:
– Rotary ON / OFF: switches the Rotary Speaker Simulator on or off. If you wish
to use an external rotary speaker (real or simulator), make sure this parameter is
set to OFF.
– Horn slow / fast: adjust the speed offset of the horn for when the speed is on
slow or on fast.
– Bass slow / fast: same as above but for the bass rotor.
– Horn up / down: adjust the acceleration and deceleration times of the horn for
the transitions between the slow and fast speeds. When the brake is engaged,
the power is taken off from the motor so the horn slows down until stopping
only driven by the centrifugal force, so the time between fast and stop may be
longer than from fast to slow.
– Bass up / down: same as above but for the bass rotor.
– Balance: adjusts the balance between the horn and the bass rotor.
– Ambience: a real amplifier stays in a real environment causing the
microphones to capture the sound reflections as well as the direct sound
coming from the speakers. This parameter adjusts the amount of
environmental reflections.
– Cabinet: adjusts the amount of resonances caused by the wooden cabinet.
– Mic Angle: adjusts the angle between the two microphones at the horn,
ranging from 0 (both microphones in the same spot) to 180 degrees
(microphones at the opposite sides of the cabinets). This simulation considers
only three microphones, two for the horn and one for the bass rotor.
CRUMAR MOJO DESKTOP USER'S MANUAL - Page 14/20
Page 15

– Mic Distance: adjusts the distance between the microphones and the cabinet.
A longer distance results in more sound dispersion, a shorter distance results in
a deeper proximity effect.
– Horn EQ: not all vintage rotary speakers have the same quality for what
concerns the sound coming from the horn, some are brighter, some are duller
or maybe just well balanced. This parameter lets you adjust the treble response
of the horn sound.
– Mid reflections: adjusts the amount of sound reflections happening in the
middle of the stereo field.
– Doppler intensity: the so called “Doppler” effect is the fundamental of the
“Leslie” effect that causes the sound to be cyclically untuned while the sound
source (the speaker) gets farther or nearer to the listened; this parameter lets
you adjust the amount of this effect that is mostly caused by the sound
reflections over the walls around the amplifier.
– Dry Leak: some of the dry sound coming from the speakers does not reach the
rotating elements and is mixed with the rotating sound. Use this parameter to
adjust the amount of dry signal you want to be mixed in.
– Bass Port: a real Leslie cabinet has a hole in the back that serves for two
reasons: 1) lets the heat from the motors ventilate out from the cabinet and 2)
acts as a bass tuning port, like those found on modern speakers. If you put a
microphone in front of this hole you get nothing but sub-bass frequencies. Use
this parameter to adjust the amount of sub-bass you want to get into the mix.
– Tube feedback. This is a very important parameter that works on an aspect of
the whole amplification system that can drastically vary both the dynamic
response and the frequency response, as well as have an impact on the
overdrive. When a Leslie cabinet is set very close to the Hammond organ and is
played at a high volume, there's some sort of feedback between the tubes, the
transformers and the pickups of the Hammond and the speakers of the Leslie,
resulting in a sound that tends to get “fatter”, the attack is “punchier” and the
distortion is aggressive, giving you the feeling that some sort of energy is
looping between the organ and its amplifier. Now, a genuine Leslie 122 or 147
is only 40W of power, but if you try to connect your Hammond organ to a 100W
guitar amp such as a Marshall JCM900 or a Fender Twin you'll notice that the
amp starts going in feedback even if you don't play any note on the organ. This
is... pure analog power! Try this parameter at small steps, it can drastically
change the sound in both a pleasant or unpleasant way, according to your
tastes.
CRUMAR MOJO DESKTOP USER'S MANUAL - Page 15/20
Page 16

– Stop Position: you can use this parameter to find a position where the horn
and rotor should “preferably” stop when you set the speed lever in the brake
position and the “Front Stop” option is enabled. Please consider that not always
the position you've set is reached with precision, it depends mostly on the
Ramp Down times you've set... after all it's virtual reality, baby! It takes into
account the kinetic energy, the gravity, the belt friction...
– Noises: well, a real rotary effect is far from being a quiet amplifier. Your
microphones will pick up not only the sound but also the wind generated by
the rotating elements, and the relays that switch between the fast and slow
motors. Use this parameter to adjust the amount of noises you want to get into
the mix.
– Memphis Style: check this parameter to unplug the motors that drive the bass
rotor. This way, the bass stays motionless while the horns keep spinning.
– Front Stop: this very sought after function causes the horn and the bass rotor
to stop always in a “sweet” spot every time the brake is engaged. VB3-II uses a
simple algorithm that produces this effect in a very pleasant and seamless way
that you won't even notice when you're braking the rotors.
Notes on the rotation speeds.
All parameters in the edit pages, whenever moved, display the readout value in
either MIDI or actual value, when available. As for the Rotary speaker's rotation
speeds and times, values are shown in Hz and Seconds. To convert Hz to RPM
(revolutions per minute), just multiply the Hz value by 60. For example, the horn,
when the Horn Slow parameter is set at 64, rotates at 0,77 Hz which translates in 46,2
RPM. All the speed values can be varied between 50% and 150% of the center value.
The ramp up and ramp down times are in seconds, and can be varied between 50%
and 500% of the center value.
Center values are:
– Horn slow: 0,77 Hz 46,2 RPM→
– Horn fast: 6,9 Hz 414 RPM→
– Bass slow: 0,72 Hz 43,2 RPM→
– Bass fast: 6,4 Hz 384 RPM→
– Horn ramp up: 1 second
– Horn ramp down: 0,8 seconds
– Bass ramp up: 6 seconds
– Bass ramp down: 3,5 seconds
These times are average values as measured by a wide sample of well working and
serviced vintage Leslie 122, 142, 147 and 145 models.
Due to centrifugal energy, when the Rotors ramp down from fast to brake and the
Front Stop option is disabled, they take a bit longer to get to full stop position.
CRUMAR MOJO DESKTOP USER'S MANUAL - Page 16/20
Page 17

Mojo Desktop features a built-in high quality stereo digital reverb that can be adjusted in
a variety of ways in order to reproduce virtually any kind of artificial environment.
Reverb settings are:
– Decay: adjusts the average reverb tail length.
– Damp: simulates various types of reflecting walls, from tiles to absorber panels.
– Diffusion: adjusts the diffusion of traveling waves across the reflecting surfaces.
– Pre-delay: adjusts the time between the direct sound and the early reflections.
– Room size: adjusts the size of the virtual room, from a small cabinet to a large
tunnel.
– High / Low shelf: adjust the amount of treble or bass frequencies to be to cut off
the sound before starting to reverberate.
This space intentionally left blank.
CRUMAR MOJO DESKTOP USER'S MANUAL - Page 17/20
Page 18

9. THE USB PORTS
The Mojo Desktop includes 2 Type-A “host” USB 2.0 ports.
These are mainly used for updating the software, for file
functions or for accepting external MIDI accessories.
An interesting use for a USB system port is the possibility
to connect a “Class-compliant USB-MIDI device”, i.e. one of
the many MIDI devices that don't need special drivers
when they are connected to a conventional computer. The Mojo Desktop will
recognize USB-MIDI devices and will use them along with any other MIDI equipment
connected to either one or both the classic MIDI inputs located on the rear panel.
Please avoid connecting unsupported devices to this port. Please note that this port can
supply a max of 250 mA of current. Don't use this port to charge mobile devices.
Original CRUMAR accessories that can be connected to the SYSTEM USB ports:
– Mojopedals 2018
– G.M.LAB D9U – d-i-y drawbar controller
– G.M.LAB D9X – d-i-y drawbar controller with extended features
– G.M.LAB MJU – d-i-y Midi Jack USB
An additional Type-B USB 2.0 port is present at the back side of the
Mojo Desktop that provides Class-compliant USB-MIDI IN/OUT
connection to your computer. Use this port to connect the Mojo
Desktop to your computer software. No drivers are needed for
Windows, OS X and Linux.
CRUMAR MOJO DESKTOP USER'S MANUAL - Page 18/20
Page 19

10. MIDI MAP
PARAMETER NAME C.C. NUMBER REMARKS
Volume 7
Drive 76
Reverb 91
Key-click 75
Bass 8
Middle 9 Only available via MIDI
Treble 10
Drawbar Upper n.1 12
Drawbar Upper n.2 13
Drawbar Upper n.3 14
Drawbar Upper n.4 15
Drawbar Upper n.5 16
Drawbar Upper n.6 17
Drawbar Upper n.7 18
Drawbar Upper n.8 19
Drawbar Upper n.9 20
Drawbar Lower n.1 21
Drawbar Lower n.2 22
Drawbar Lower n.3 23
Drawbar Lower n.4 24
Drawbar Lower n.5 25
Drawbar Lower n.6 26
Drawbar Lower n.7 27
Drawbar Lower n.8 28
Drawbar Lower n.9 29
Drawbar Pedals n.1 33
Drawbar Pedals n.2 35
Vibrato Type 73 Values = 0, 25, 50, 76, 101, 127
Vibrato Upper Switch 31
Vibrato Lower Switch 30
Percussion On 66
Percussion Soft 70
Percussion Fast 71
Percussion Third 72
Pedals-to-lower 55
Pedalboard release time 56
Rotary Effect Switch 85
Rotary Effect Slow/Fast 1 Values: 0 = slow, 127 = fast
Rotary Effect Run/Stop 68 Also sends CC#1 value 64 when speed = stop
Leakage 86
Crosstalk 87
Crosstalk Shape 88
Percussion Level 89
Split Toggle 99
Spring Reverb Level 92
Rotary Speaker Balance 90
Rotary Speaker Mic. Distance 93
Rotary Speaker Horn EQ 94
Digital Reverb Decay 95
CRUMAR MOJO DESKTOP USER'S MANUAL - Page 19/20
Page 20

11. SPECIFICATIONS
Technical specifications:
– power rating: 9 ~ 12 Volts DC 2000 mA
– output level: +4 dBu
– headphone output max load: 32 ohm
– dimensions: cm 23 x 23,5 x 9
– weight: Kg 1,7
Crumar Mojo Desktop is a digital Musical Instrument designed and built in Italy. All rights reserved.
All trademarks used herein are the property of their respective owners.
Crumar is a trademark owned by:
V.M. Connection
Via Lucio Vero, 2 - 31056 Roncade (TV ) - Italy
www.Crumar.it
Last update: April 2020.
CRUMAR MOJO DESKTOP USER'S MANUAL - Page 20/20
 Loading...