

Page 1
User Manual for
ToughTech® mini Q
(Revised May 14, 2012)
Models covered:
ToughTech mini-Q
ToughTech mini-Q with WriteLock™
ToughTech mini-Q with WriteProtect
ToughTech Secure mini-Q
ToughTech Secure mini-Q with WriteLock
ToughTech Secure mini-Q with WriteProtect
Features
• Fast speed – ToughTech mini-Q uses fast SATA drives and an Oxford 934 chipset to maximize data
speeds.
• Widely Compatible –ToughTechs work right out of the box with no new drivers needed. They work
with any modern operating system including Mac OS X, Windows XP/Vista/7 and most Linux
distributions.
• Easy to connect – ToughTech mini-Q offers four different connection options: FireWire 800, FireWire
400 (via included convertor cable), eSATA, and USB 2.0. Cables for each connection type are
included.
• Shock absorption –ToughTech mini-Q features ToughMount™ Anti-Shock Protection. ToughMount
shock-dampening strips are mounted between the drive tray and outer shell, absorbing minor shocks
and reducing enclosure noise.
• Cool and quiet – ToughTech’s aluminum case draws heat away from the hard drive. The entire
product acts like a heat dissipater, helping to keep your drive cool. And because it doesn't need a fan,
ToughTech is quiet.
• More portable than ever – Not much bigger than a pack of playing cards, ToughTech mini-Q fits easily
in a shirt pocket or briefcase making it ideal for travel. You don’t even need to use an AC adapter
when connecting to a powered FireWire host, or when using the included USB power cable.
Nevertheless, an auto-ranging AC adapter is included for your convenience.
• Government-strength encryption – The Secure models include a hardware-based real time
encryption engine using AES, the government approved encryption standard. Just plug in the
hardware key and your ToughTech Secure is usable like any other external drive with no speed loss.
If your product is lost or stolen, you can rest assured that no one will be able to access the data
without the key.
• Optional write-protection – ToughTech mini models with WriteLock and WriteProtect allow you to
enable and disable write protection to ensure the security of your important data.
U s e r M a n u al fo r T ou g hT e ch mi n i Q m o d e l s ( A 9 - 00 0 -0 0 0 2 re v 1 . 5 )
- 1 -
Page 2
CRU
A
Front of ToughTech Secure mini
-Q with WriteLock
Table of Contents
1. Pre-Installation Steps 2
1.1 Accessories
1.2 Identifying parts of the unit
1.3 Warnings and notices
2
2
3
2. Installation steps 3
2.1 Hard Drive Installation
2.2 Connecting to a computer 6
3
3. Write-Protection information 7
4. Encryption Information 8
5. Usage with Mac and Windows Operating Systems 9
6. Encryption FAQs 11
7. General FAQs 12
8. Technical Specifications 13
1. Pre-Installation Steps
1.1 Check the accessories with your ToughTech mini-Q.
Please contact CRU if any items are missing or damaged. The box should contain:
ToughTech mini-Q Quantity
ToughTech enclosure 1
eSATA cable 1
USB data/power cable 1
FireWire 800 cable 1
FireWire 800 to 400 cable 1
Packet of screws for hard drive 1
AC adapter 1
Quick Start Guide and Warranty info 1
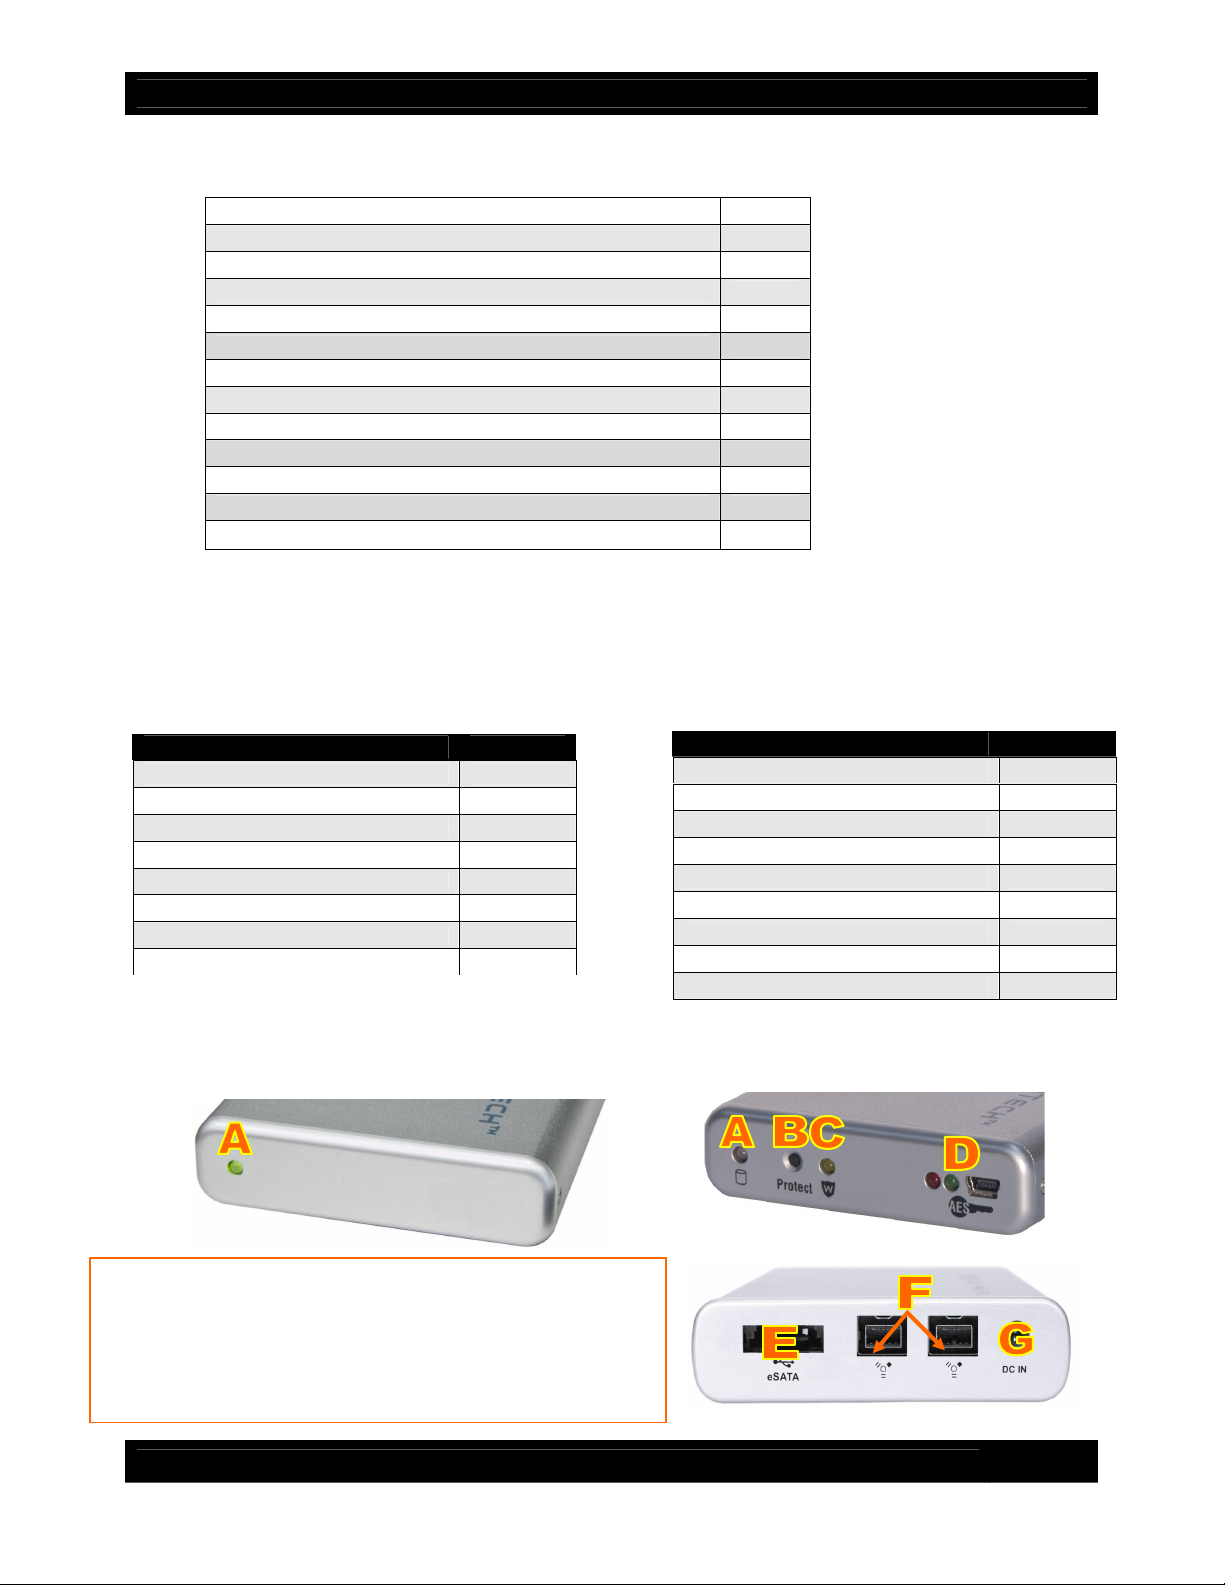
1.2 Identify the parts of your ToughTech mini-Q.
= Power/Access indicator LED
B = Write-protection enable button for WriteLock and WriteProtect models
(also serves as write-protection disable button for WriteProtect model)
C = Write-protection LED (for models with WriteLock and WriteProtect)
D = Encryption key slot & LEDs
E = eSATA & USB2 combo port
F = FireWire 800 (1394b) ports
G = Power input (from AC adapter)
Front of ToughTech mini-Q
ToughTech Secure mini-Q Quantity
ToughTech enclosure 1
eSATA cable 1
USB data/power cable 1
FireWire 800 cable 1
FireWire 800 to 400 cable 1
Packet of screws for hard drive 1
AC adapter 1
Quick Start Guide and Warranty info 1
Encryption Keys 3
Rear connections
U s e r M an u a l f or T ou g hT e ch m in i Q m o d e l s ( A 9 -0 0 0 -0 0 0 1 re v 1 . 5)
- 2 -
Page 3
CRU
1.3 Warnings and Notices
The main circuit board of the HDD enclosure is susceptible to static electricity. Proper grounding is
required to prevent electrical damage to the enclosure or other connected devices, including the
computer host. Always place the HDD enclosure on a smooth, flat surface and avoid all dramatic
movement, vibration and percussion.
Do NOT allow water to enter the HDD enclosure.
Avoid placing the HDD enclosure close to magnetic devices (such as a speaker), high-voltage
devices (such as a hair dryer), or near a heat source, including any place where the product will be
subject to direct sunlight.
The operating system may NOT detect the HDD enclosure if it does not support the interface of your
HDD enclosure. If so, installation of an appropriate driver on the host computer is required.
Ensure that only a 9.5mm high 2.5” SATA hard drive is used in the enclosure. Thicker hard drives
will not fit properly in ToughTech, possibly resulting in damage to ToughTech or drive.
2. Installation Steps
2.1 Hard drive installation
These instructions are only necessary if you’re installing your own hard drive inside the
ToughTech mini. If you purchased the product with a hard drive pre-installed, you may skip to the
next section (Connecting ToughTech to a Computer).
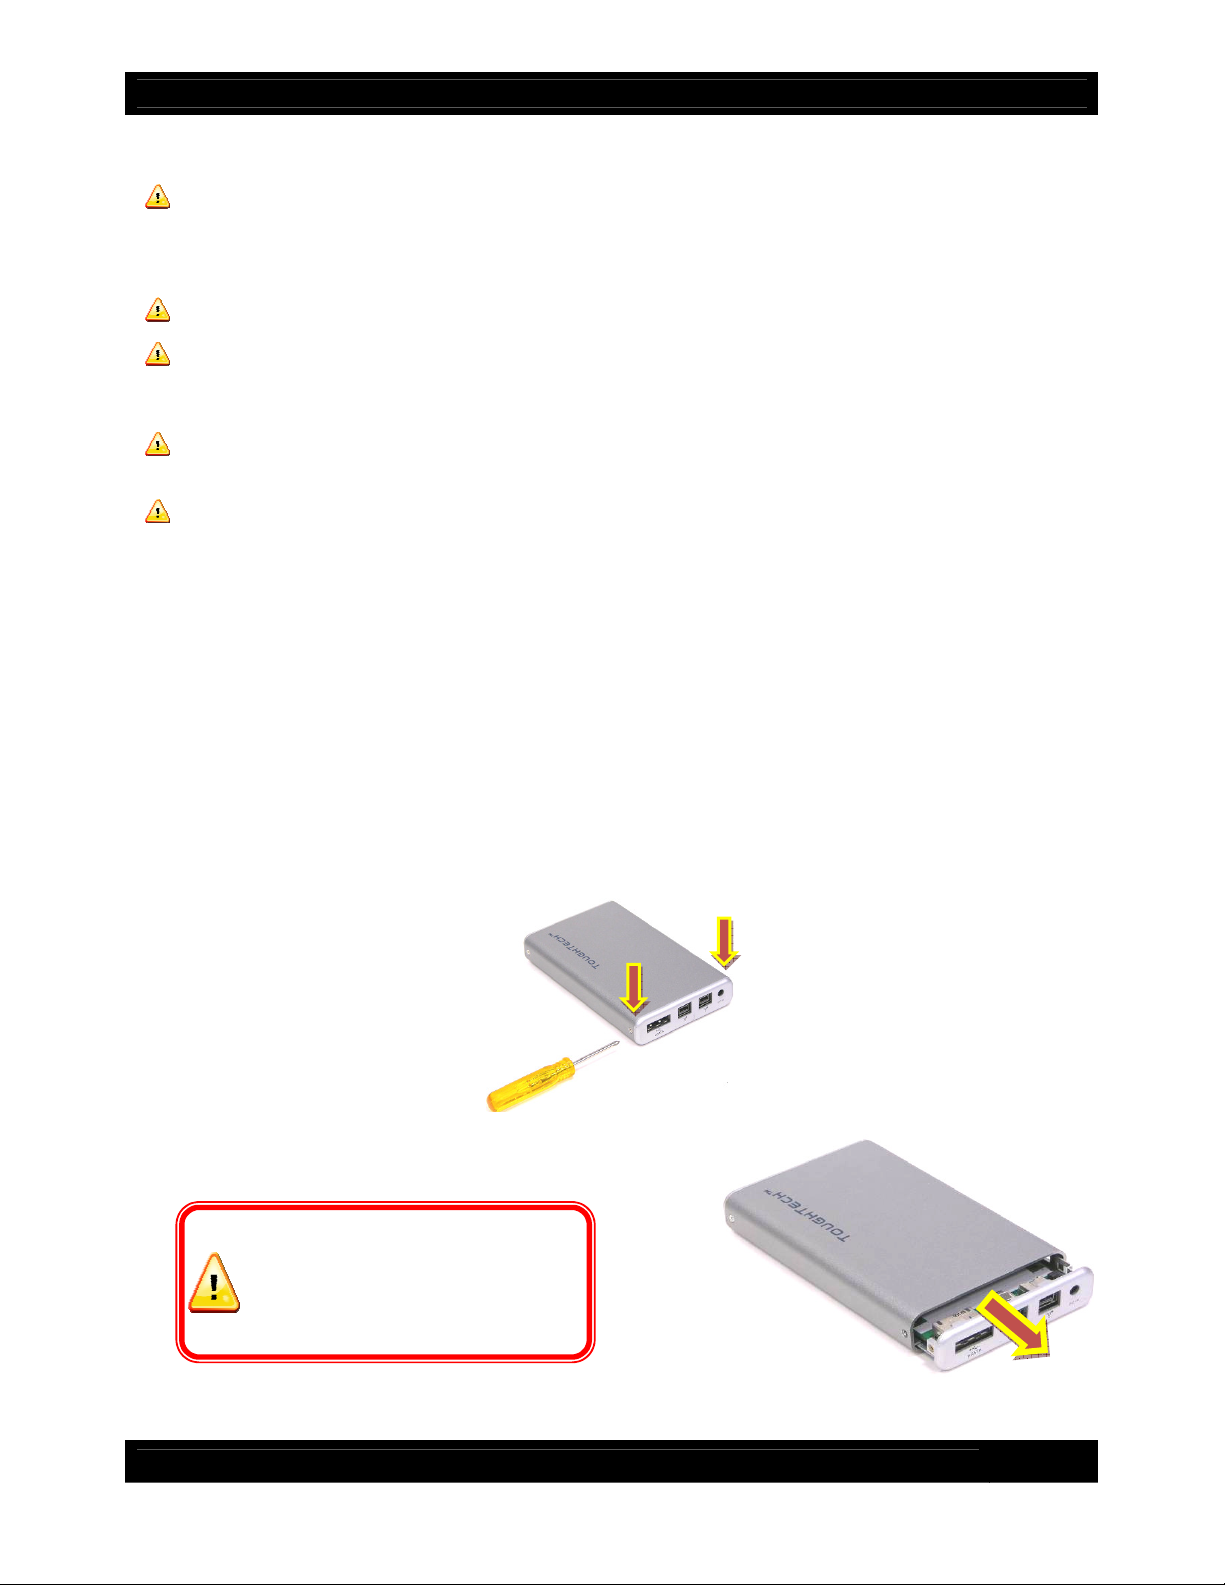
2.1.1 If the rear panel is secured with screws, remove them using a small Phillips screwdriver. (For your
convenience, empty enclosures are usually shipped with these screws already removed. They should be
located in the same plastic bag as the hard drive screws.)
2.1.2 Carefully slide the drive tray out from the enclosure.
WARNING: The circuit board is
susceptible to static electricity. Proper
grounding is required to prevent
electrical damage. Keep the circuit
board away from water.
U s e r M an u a l f or T ou g hT e ch m in i Q m o d e l s ( A 9 -0 0 0 -0 0 0 1 re v 1 . 5)
- 3 -
Page 4
CRU
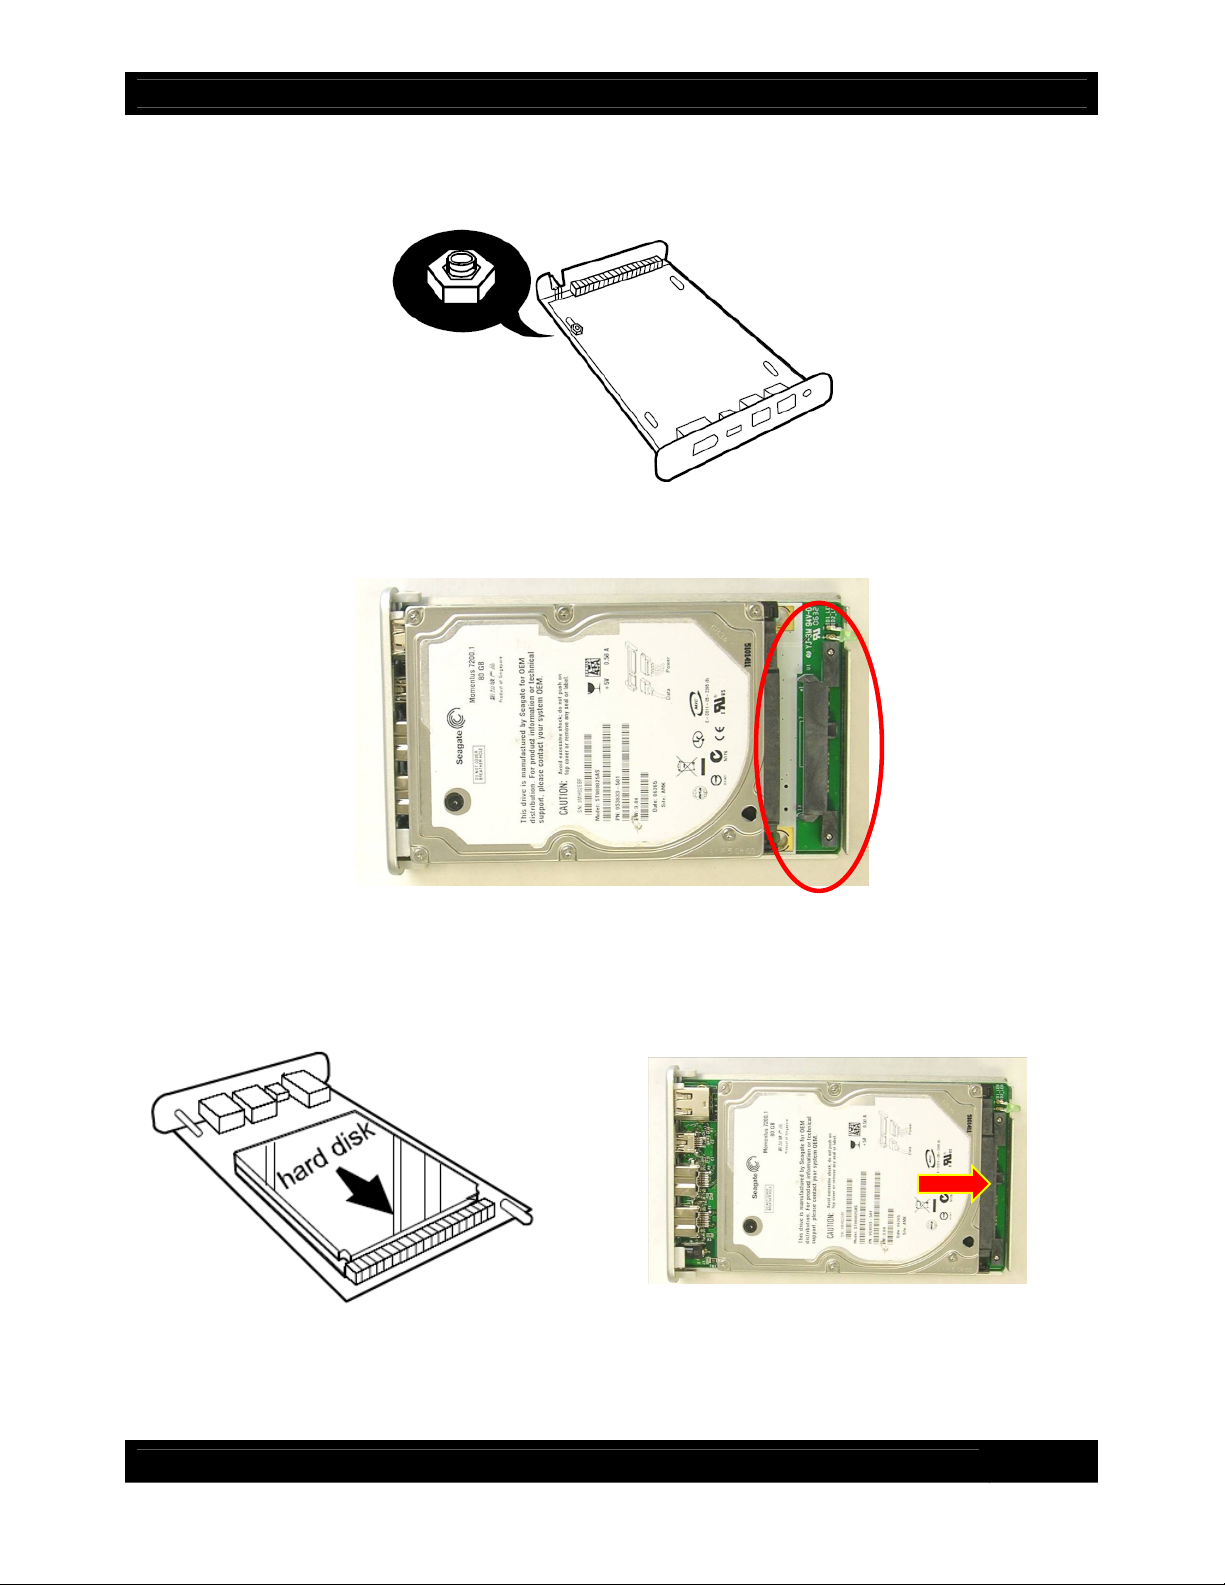
2.1.3 One drive screw may already be inserted into the circuit board to prevent movement during
shipment. You’ll need to remove this screw before you can install the hard drive. The screw is held in
place by a plastic nut.
2.1.4 You are now ready to install your 2.5” SATA drive. Line up the drive’s interface with the SATA
interface on the circuit board.
2.1.5 You may need to angle the drive as you push it into place. After connecting the drive to the SATA
interface on the circuit board, the drive should lay flat on the board.
2.1.6 Secure the drive in place using the included screws. Drive the screws through the bottom of the
circuit board and into the hard drive.
U s e r M an u a l f or T ou g hT e ch m in i Q m o d e l s ( A 9 -0 0 0 -0 0 0 1 re v 1 . 5)
- 4 -
Page 5

CRU
ToughTech mini is now assembled and ready for connection to a computer.
2.1.7 Slide the drive tray back into the enclosure.
2.1.8 Make sure the LED indicator is properly aligned with opening on the front of the enclosure.
WARNING: DO NOT OVERTIGHTEN
THE SCREWS. This could cause the
circuit board to bend slightly, which
could create a short circuit with the
metal case.
2.1.9 Reassemble the enclosure by replacing the screws removed in Step
U s e r M an u a l f or T ou g hT e ch m in i Q m o d e l s ( A 9 -0 0 0 -0 0 0 1 re v 1 . 5)
- 5 -
Page 6

CRU
2.2 Connecting ToughTech to a computer
2.2.1 Connect the data cable (USB, FireWire, or eSATA) to the corresponding
port on ToughTech mini. Note: USB and eSATA share the same port.
2.2.2 Provide power to ToughTech. There are three possible ways to do this.
Option 1: If you plan to use FireWire as your data connection, and the FireWire host on your
computer is powered, ToughTech can operate on bus power. You can
skip to the next step.
Option 2: If you wish to operate on bus power, but the computer’s
host connection is unpowered or insufficiently powered, you can use
the USB cable to provide power. Plug the narrow barrel connector
from the USB cable into the DC jack on the rear of ToughTech. Plug
the red USB connector on the other end into a USB port on your
computer. This will provide power to ToughTech.
Option 3: Plug the included AC adapter into the DC jack on the rear of
ToughTech. Plug the other end into a grounded electrical outlet.
2.2.3 Plug the other end of the data cable to an available port on
your computer. Ensure that the green power LED indicator is active.
The power LED will blink whenever the drive is accessed.
2.2.4 (For the “Secure” model only) Plug the encryption key into the slot on the front of the product. The
green encryption LED will light indicating that the drive is now unlocked. If you do not plug in the key,
your computer will not see the drive and the red encryption LED will remain lit
while ToughTech waits for a key.
After the drive mounts to the computer, you may unplug the key. It will not
be needed again until you cycle power on ToughTech.
2.2.5 Your ToughTech is now ready to use!
If your hard drive is already formatted, you can begin using it right away. If the hard drive is brand new or
its format is not compatible with your computer, you’ll need to format the drive before you can use it.
U s e r M an u a l f or T ou g hT e ch m in i Q m o d e l s ( A 9 -0 0 0 -0 0 0 1 re v 1 . 5)
- 6 -
Page 7

CRU
3. Write-Protection Information
This section applies only to ToughTech models with WriteLock or WriteProtect.
3.1 Enabling write-protection in WriteLock and WriteProtect models
3.1.1 Disconnect the power source from the unit. The power source can be
an AC Adapter, a USB Adapter Cable, or FireWire Bus Power.
3.1.2 Press and hold down the write-protection enable button (labeled
“Protect” in WriteProtect models, and “Lock” in WriteLock models).
While continuing to hold down the button, provide power to the unit.
3.1.3 The yellow write-protection LED will light. (In “Secure” models, the
encryption key must be inserted for the LED to light.)
The unit is now in write-protect mode. While in write-protect mode, the data
on the drive cannot be deleted or altered.
3.2 Disabling Write-Protection in Models with WriteProtect
3.2.1 Disconnect the power source from the unit.
3.2.2 Press and hold down the Protect button. While continuing to hold down the button, provide
power to the unit
3.3.3 The yellow write-protect LED will cease to light. The unit is now in read/write mode.
3.2 Disabling write-protection in models with WriteLock
3.2.1 Disconnect the power supply from the unit.
3.2.2 Slide the bottom panel out of the housing and pull it completely out.
3.2.3 Locate the WriteLock disable button between the red and yellow LEDs. (See pictures below.)
3.2.4 Press and hold down the WriteLock disable button. While continuing to hold down the button,
provide power to the unit.
3.2.5 The yellow WriteLock LED will turn off. (In “Secure” models, the encryption key must be inserted for
the LED to switch off.) The unit is now in read/write mode.
With WriteLock, you can prevent the data on ToughTech from being altered when ToughTech
changes hands. By adding evidence tape over ToughTech’s chassis screws, you’ll be able to tell if the
unit has been opened. Thus, you’ll know if the write-protect mode could have been changed while
ToughTech was in another person’s possession.
Write-protection LED
Write-protection enable button
U s e r M an u a l f or T ou g hT e ch m in i Q m o d e l s ( A 9 -0 0 0 -0 0 0 1 re v 1 . 5)
- 7 -
Page 8

CRU
4. Encryption Information
The information in this section applies only to “Secure” models.
ToughTech Secure employs hardware-based AES 128-bit or 256-bit encryption to protect your data from
unauthorized access. AES (Advanced Encryption Standard) is a government approved encryption
algorithm (FIPS PUB 197). With ToughTech Secure you'll get guaranteed full-disk hardware based
encryption, with no loss of speed.
Encryption is performed automatically by ToughTech Secure's real-time encryption engine. Your
computer will see the volume available as a normal full-speed drive. If your drive is lost or stolen,
however, you can rest assured that without the proper AES Encryption Key, no one will be able to view its
contents.
4.1 How to use ToughTech Secure mini-Q with a Key
Using ToughTech Secure mini-Q is very easy.
1. Connect the external drive to your computer via FireWire, USB, or
eSATA.
2. Insert your AES Encryption Key into ToughTech Secure.
3. Wait for the green LED to light up on the front of ToughTech Secure.
This confirms the key is accepted.
4. You can now remove the AES Encryption Key. It's not needed again until the power is cycled.
The ability to remove the key after power up helps you keep your physical key safe.
4.2 AES encryption keys
Your ToughTech Secure mini-Q comes with 3 identical, programmed keys. These three keys exist so you
can
• Keep one with you (for your own use)
• Keep a backup on site in a safe location
• Keep a backup off site in a safe location
These keys will be completely unique to you. If one of your keys is compromised, via theft or loss, you
should consider replacing your key set. For your convenience, we offer replacement pre-programmed
key sets, which contain unique encryption keys.
4.3 AES encryption key programmer
It is possible for you to create your own keys, should you wish to do so. To
program a new encryption key, you will need the AES Encryption Key
Programmer (sold separately). While we do not retain copies or records of
customers' keys, some customers' security protocols may demand that they have
more control over the key itself. There are also situations where more than three
keys are needed - for granting access to more than one person, for example.
And we're also aware of situations where encryption keys must change on a
timed schedule. These customers will be interested in the AES Encryption Key
Programmer, which will create or copy their AES Encryption Keys.
U s e r M an u a l f or T ou g hT e ch m in i Q m o d e l s ( A 9 -0 0 0 -0 0 0 1 re v 1 . 5)
- 8 -
Page 9

CRU
5. Usage with Mac and Windows Operating Systems
5.1 Usage with Mac OS X
5.1.1 Compatibility
ToughTech mini uses 2.5-inch, 9.5mm height SATA (Serial-ATA) hard drives only. ToughTech does not
require drivers for FireWire or USB operation under Mac OS X. ToughTech does not require drivers for
eSATA operation, but eSATA host cards do. If installing an eSATA host card into your Mac, use the card
manufacturer’s drivers and instructions. ToughTech’s USB 2.0 port is backwards compatible with USB
1.1 hosts.
5.1.2 Formatting a drive
If you purchased your ToughTech pre-populated with a hard drive, this step should not be necessary
unless you wish to change the format or erase the drive. To format, use Mac OS X’s Disk Utility (found in
the applications folder).
1. Click on the drive in the window to the left (see picture below).
2. Click the Erase tab in the window to the right (see picture below).
3. Select the format type. Most users prefer Mac OS Extended with Journaling (HFS+), which is required
for compatibility with Time Machine (OS 10.5 or newer). If you need to use your ToughTech with both
Mac and Windows computers, select MS-DOS File System instead.
4. Enter a name for the new volume and then click “Erase” to start the process.
5.1.3 Mounting and unmounting volumes
If the hard drive installed in ToughTech is already formatted, an icon representing the
drive’s volume will appear (mount) on the desktop. You can begin using the volume
right away. If the drive is unformatted, a message will appear on the desktop saying
that the disk is unreadable. You can use OS X’s Disk Utility to easily format the drive
(see section above).
Unmount the volume before powering down the unit by dragging the volume’s icon to
the trash bin, or by selecting the volume then pressing Command-E. Disconnecting
the unit without first unmounting the volume can result in data loss.
5.1.4 Booting from your ToughTech
Some Macs support booting from a FireWire device. To activate this feature, you must first install OS X
on the external volume. The easiest way to do this is to clone an existing system drive using a utility such
as Carbon Copy Cloner or Super Duper. Next, go to System Preferences Startup Disk. A window will
list the available bootable volumes. Select the volume from which you wish to boot. Another method is to
hold down the Option key during boot up. A screen should appear that allows you to select the volume
you wish to use. This is useful if you wish to boot from your ToughTech only some of the time.
U s e r M an u a l f or T ou g hT e ch m in i Q m o d e l s ( A 9 -0 0 0 -0 0 0 1 re v 1 . 5)
- 9 -
Page 10

CRU
Drive
Device
5.2 Usage with Windows Operating Systems
5.2.1 Compatibility
ToughTech mini uses 2.5-inch, 9.5mm height SATA (Serial-ATA) hard drives only. ToughTech is fully
plug-and-play under Windows XP, Vista, or 7 when using FireWire or USB. No drivers are needed. The
USB2 port is USB 1.1 compatible. ToughTech does not require drivers for eSATA operation, but eSATA
host cards do. If installing an eSATA host card into your computer, use the card manufacturer’s drivers
and instructions.
5.2.2 Formatting a drive
If you purchased your ToughTech pre-populated with a hard drive, this step should not be necessary
unless you wish to change the format or erase the drive. To format, use the Disk Management utility.
1. Right-click on My Computer, then select Manage. The Computer Management window will open.
2. In the left pane of this window, left-click on Disk Management.
3. The drive should appear in the list of Disks in the lower middle/right pane (see picture below). You
may need to scroll down to see it. If the drive is already formatted, you can identify it easily by its volume
name. If it’s unformatted, the Drive Properties Box will say “Unallocated” and you’ll need to initialize the
disk before formatting it. Initialize the disk by right-clicking the Device Properties Box and selecting
Initialize Disk.
Properties
Box
4. To format the drive, right-click the Drive Properties Box and select Format.
5. If you are prompted to select a partition type, select MBR for volumes 2TB or smaller, or GPT for
volumes larger than 2TB. Note: Windows XP does not support GPT or volumes larger than 2TB.
6. Click through several more windows, leaving the default settings, until you see a window that allows
selection of a file system. Choose NTFS and enter a name for the new volume. Be sure to check the box
labeled “Perform a quick format” unless you want to completely erase any data on the drive and have
time to wait. A quick format should take less than a minute, while standard formatting may take several
hours.
7. Click “Next” and then “Finish” to start the format process. When the format is complete, the Drive
Properties Box will update to show the new volume name. The new volume can now be found in My
Computer.
U s e r M an u a l f or T ou g hT e ch m in i Q m o d e l s ( A 9 -0 0 0 -0 0 0 1 re v 1 . 5)
Properties
Box
- 10 -
Page 11

CRU
5.2.3 Mounting and ejecting volumes
If the hard drive attached to ToughTech is already formatted, you can begin using the volume right away.
When ToughTech is properly connected and turned on, a window may open to allow you
access to the volume. If no window appears, you can find the volume by doubleclicking the “My Computer” icon.
Eject ToughTech before powering it down by single-clicking the green arrow icon on the task bar, then
selecting “Safely remove….” Windows will indicate when it is safe to
disconnect ToughTech. Disconnecting the unit without first ejecting it can
result in data loss.
5.2.4 Booting from your ToughTech
Some PC motherboards support booting from an external device. To activate this feature, you will need
to adjust the motherboard’s BIOS settings. Check with your motherboard’s manufacturer or owner’s
manual for details.
(Windows XP)
6. Encryption FAQs
Q:
What do I do if I lose a key?
A:
If the privacy of your data is not a concern, you can continue using your product with your remaining
keys. But then, if data privacy were not important, you probably wouldn’t own the Secure version of the
product. If you can’t account for all your keys, your data is not 100% secure. Anyone who finds a key will
be able to access your data. Therefore, we recommend that you purchase a new set of programmed
keys.
Q:
How do I use a new (or different) key with my Secure product?
A:
First, you’ll need to back up all your data. Access the data using your old key, and then copy
everything you wish to save to a different drive. Next, insert the new programmed key and cycle power
on the product. The drive will appear to the computer as an unformatted drive. If you proceed to format
the drive, it will be usable again, but only when the new key is used. You can now transfer your data
back to the Secure product.
Q:
Does your company keep records of the keys you create and ship with products?
A:
No, we do not keep any records of the random secret electronic key codes stored on the security
keys. The codes are composed of randomly generated 128-bit or 256-bit numbers which are never
stored anywhere except on the security keys themselves.
Q:
What do I do if I lose all the keys? Can I retrieve my data? Can you retrieve my data for me?
A:
Loss of all keys will make it virtually impossible to recover your data, even for professional data
recovery services. The only way to retrieve any data would be to crack the encryption. With AES 128 or
256, that would take a super computer many years to accomplish. There is no “back door” on our
encryption products. It is therefore very important that you manage your keys carefully. It is a good idea
to keep one key with you, a backup key in a safe location, and another backup in a location off site.
Q:
What would happen if I were to plug the key into the USB port on the rear of ToughTech?
A:
Do not plug the encryption key into any mini-USB port, including the one on the rear of ToughTech
Secure! Although the key will fit in such a slot, they are not electrically compatible. You could damage
both the port and the key, rendering the key useless and your data inaccessible.
(secure models only)
U s e r M an u a l f or T ou g hT e ch m in i Q m o d e l s ( A 9 -0 0 0 -0 0 0 1 re v 1 . 5)
- 11 -
Page 12

CRU
7. General FAQs
Q:
When I operate my ToughTech continuously, the case feels hot. Is this bad for my drive?
A:
ToughTechs employ a passive cooling system which conducts heat away from the drive to the
aluminum case so that it can be safely dissipated into the surrounding air. This can cause the case to feel
quite hot, but keeps the drive from reaching dangerous temperatures.
Q:
After enabling write-protection on my ToughTech with WriteLock, I’m still able to copy a file to
the drive. Is the file really there?
A: No. The file only appears to have been copied, but was not actually written to the drive. You can verify
this by cycling power on ToughTech. You will find that the copied file no longer appears.
Q:
Will this bus-powered product work on my computer/laptop without an AC adapter?
A:
Bus-powered products can operate with most computers that have a powered FireWire host. Not all
computers have enough voltage to power up and sustain bus-powered products. In such cases, you will
need to use an AC adapter or connect through a powered hub.
Similarly, if a laptop has sufficiently powered FireWire ports, then you’ll be able to operate the device on
bus power. If your FireWire port is not powered, you’ll need to use the AC adapter to operate the device.
Such is the case with the 4-pin “iLink” FireWire port, common on Windows laptops.
If the computer’s host connection is unpowered or insufficiently powered, you can use the USB cable to
provide power. Plug the narrow barrel connector from the USB cable into the DC jack on the rear of
ToughTech. Plug the red USB connector on the other end into a USB port on your computer.
Q:
I have a 12mm 2.5" hard drive. Will it fit into this enclosure?
A:
ToughTech mini line of products uses 9.5mm height 2.5" SATA hard drives only. The old-style, thicker
12.5mm drives will not fit in these enclosures.
Q:
Can I daisy-chain other FireWire devices to this bus-powered product?
A:
We recommend that bus-powered units NOT be used in a daisy chain with other bus-powered
devices. If additional bus-powered devices need to be used, then we recommend using AC adapters or
connecting them to a powered FireWire hub.
Q:
I installed my hard drive and reassembled the case according to the instructions in the
manual, but when I connected my ToughTech mini to the computer, it didn’t power up. Did I
receive a bad unit?
A:
Reopen the case and check the circuit board. If the hard drive screws are tightened too much, it can
cause the circuit board to bow slightly. This can cause the components on the circuit board to touch the
metal case and cause a short circuit. The easiest fix for this problem is to loosen the screws a little until
the circuit board no longer bends.
Q:
I lost my AC adapter. Where can I get a replacement?
A:
The AC adapters for all current products (and most discontinued products) are available for purchase
on our website. Third party AC adapters can also be used with products as long as they have
REGULATED POWER. Be sure to check with the manufacturer of the adapter for this specification.
U s e r M an u a l f or T ou g hT e ch m in i Q m o d e l s ( A 9 -0 0 0 -0 0 0 1 re v 1 . 5)
- 12 -
Page 13

CRU
Tested to comply
8. Technical Specifications
•
ToughTech mini-Q
•
ToughTech mini-Q with WriteLock
•
Product Name
Interface Types & Speeds
Bus Powerable
Chipset
Drive Compatibility
Data Connectors
Encryption
Kensington Security Slot
Operating System
Requirements
External Power Supply
ToughTech mini-Q with WriteProtect
•
ToughTech Secure mini-Q
•
ToughTech Secure mini-Q with WriteLock
•
ToughTech Secure mini-Q with WriteProtect
•
eSATA port: up to 3000 Mbps
•
FireWire 800: up to 800 Mbps
•
FireWire 400: up to 400 Mbps
•
USB 2.0: up to 480 Mbps
Yes (when used with powered FireWire hosts, or when using the USB power cable)
Oxford 934
2.5” SATA (Serial-ATA) hard drives, 9.5mm height
One (1) eSATA/USB-A combined port
Two (2) 9-pin 1394b (FireWire 800) ports (daisy-chainable)
Hardware based AES 128-bit or 256-bit encryption engine (“Secure” models only)
Yes
•
Windows 7, Vista, or XP
•
Mac OS X
•
Linux distributions that support the connection type used
100-240VAC, 5V / 1A (included)
Compliance
Shipping Weight
Product Dimensions
Support
ToughTech, WriteLock, and ToughMount are trademarks of CRU Acquisitions LLC. Other marks are the property of their respective owners. © 2007, 2012 CRU Acquisitions
LLC. All rights reserved.
Product Warranty
CRU-DataPort (CRU) warrants this product to be free of significant defects in material and workmanship for a period of one year from the original date of purchase. CRU’s
warranty is nontransferable and is limited to the original purchaser.
Limitation of Liability
The warranties set forth in this agreement replace all other warranties. CRU expressly disclaims all other warranties, including but not limited to, the implied warranties of
merchantability and fitness for a particular purpose and non-infringement of third-party rights with respect to the documentation and hardware. No CRU dealer, agent, or
employee is authorized to make any modification, extension, or addition to this warranty. In no event will CRU or its suppliers be liable for any costs of procurement of substitute
products or services, lost profits, loss of information or data, computer malfunction, or any other special, indirect, consequential, or incidental damages arising in any way out of
the sale of, use of, or inability to use any CRU product or service, even if CRU has been advised of the possibility of such damages. In no case shall CRU’s liability exceed the
actual money paid for the products at issue. CRU reserves the right to make modifications and additions to this product without notice or taking on additional liability.
FCC Compliance Statement: “This device complies with Part 15 of the FCC rules. Operation is subject to the following two conditions: (1) This device may not cause harmful
interference, and (2) this device must accept any interference received, including interference that may cause undesired operation.”
This equipment has been tested and found to comply with the limits for a Class B digital device, pursuant to Part 15 of the FCC Rules. These limits are designed to provide
reasonable protection against harmful interference when the equipment is operated in a home or commercial environment. This equipment generates, uses, and can radiate
radio frequency energy and, if not installed and used in accordance with the instruction manual , may cause harmful interference to radio communications.
In the event that you experience Radio Frequency Interference, you should take the following steps to resolve the problem:
1) Ensure that the case of your attached drive is grounded.
2) Use a data cable with RFI reducing ferrites on each end.
3) Use a power supply with an RFI reducing ferrite approximately 5 inches from the DC plug.
4) Reorient or relocate the receiving antenna.
FCC, CE, RoHS
3 pounds without drive; 5 pounds with drive (includes accessories)
5.2 x 3.15 x .79 inches (13.2 x 8 x 2 cm)
We don’t expect anything to go wrong with your product. But if it does, Tech Support is standing
by and ready to help. Contact us at 1-866-744-8722. or through cru-dataport.com.
with FCC standards
FOR HOME OR OFFICE USE
U s e r M an u a l f or T ou g hT e ch m in i Q m o d e l s ( A 9 -0 0 0 -0 0 0 1 re v 1 . 5)
- 13 -
 Loading...