

Page 1
DataPort 25 USB/SATA to
Dual Drive SATA RAID
Package Contents
Rugged, Reliable, Mobile, Secure
TM
1 - DataPort 25 USB/SATA to Dual Drive SATA RAID Frame
1 - DataPort 25 Dual Drive SATA RAID Carrier
1 - Screw kit
1 - Power Adapter Cable
2 - Keys
RAID Configuration
The DataPort 25 USB/SATA to Dual Drive SATA RAID operates in four
different configurations. The configuration is determined by the switch
settings on either the back of the frame (see table 1) or the carrier board
(see table 2). To change the configurations set the dip switches to the
desired configuration, then cycle the power on the DataPort 25.
NOTE: When configuration is set on frame the carrier switches
must be set to off and when the configuration is set on carrier the
frame switches must be off and the jumper removed.
For ease of installation it is best to configure the drives to the appropriate RAID array before installing the frame in the enclosure.
NOTE: When changing configurations or setting up a new pair of
drives, the power must be cycled on the DataPort 25.
NOTE: The Host Bus Adapter must support SATA port multipliers for the DataPort 25 USB/SATA to Dual Drive SATA RAID to
use JBOD. Please check Silicon Image’s website (http://www.
siliconimage.com) for supported cards.
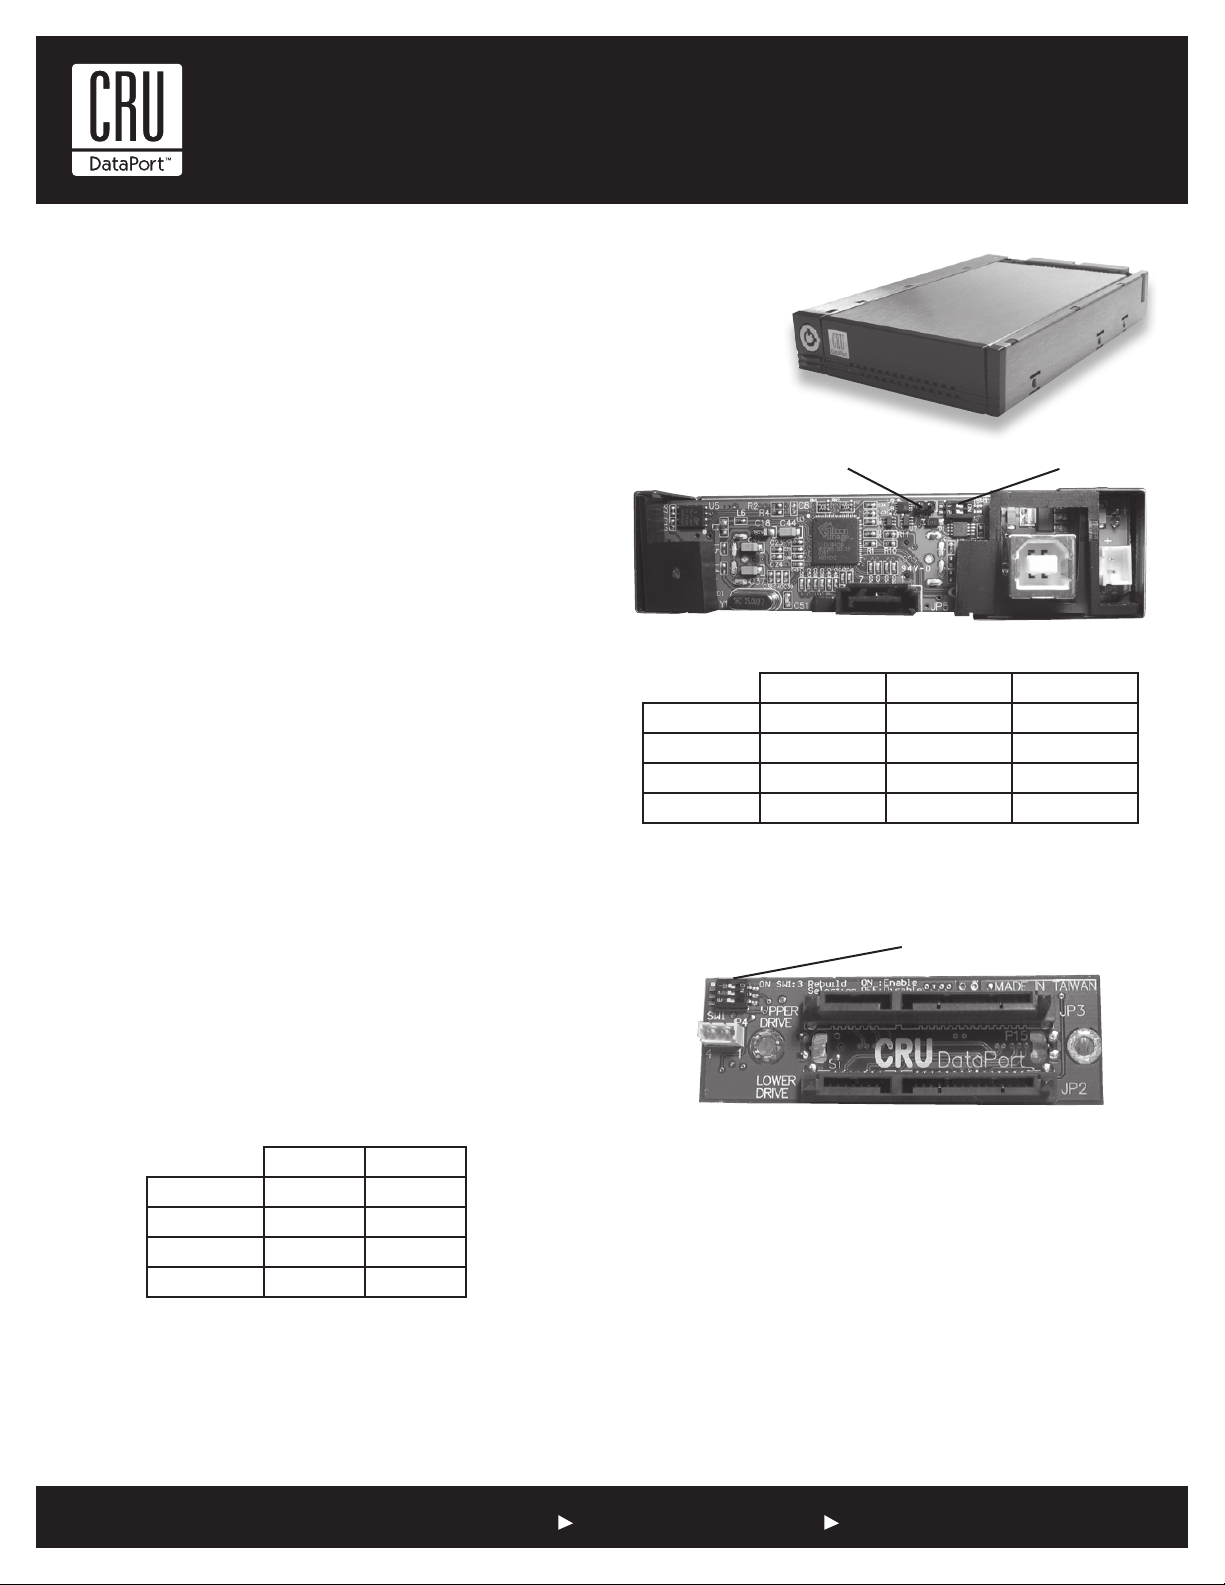
J3
Figure 1: Back of frame
Position 1 Position 2 J3
Concatenated On Off Off
JBOD Off Off Off
RAID 1 Off On *See note below
RAID 0 On On Off
Table 2
NOTE: If Position 3 is “On” the RAID will rebuild every time the
power is cycled.
Carrier Dip
Switch
Frame Dip Switch
The four configurations are 1) Concatenated (two drives capacity together
as a single drive - twice the size of the smallest drive), 2) JBOD, 3) RAID 0
and 4) RAID 1.
Position 1 Position 2
Concatenated On Off
JBOD Off Off
RAID 1 Off On
RAID 0 On On
Table 1
NOTE: On the back of the frame board is jumper block J3. If the
jumper is on J3 and the frame is configured as RAID 1, the RAID
will rebuild every time the power is cycled. Remove the jumper
to allow the RAID to power on without rebuilding.
Figure 2: Carrier Drive Side
Frame Installation
1. Locate an available 3.5” drive bay and remove the front bezel.
2. To mount the frame assembly in the drive bay:
a. Check the drive bay to see if mounting rails are required (they
should be provided by your computer system manufacturer.) If
required, install one on each side of the frame. Then slide the
frame in the computer and check that it is secure.
b. If mounting rails are not required, attach the frame directly to
the PC case using the screws provided. Either the side or bottom mount holes on the frame may be used.
1-800-260-9800 www.CRU-DataPort.com
Page 2

Rugged, Reliable, Mobile, Secure
TM
3. Locate and connect an available Legacy 4 pin power connector, the
type used for optical drives, thru the supplied cable to the back of the
DataPort 25 USB/SATA to Dual Drive SATA RAID frame (2-pin header
JP2).
4. Connect an available SATA cable or USB cable to the rear of the
frame and to your Host Bus Adapter.
Your frame installation is complete.
Installing a Hard Drive in Your DataPort 25 USB/SATA to
Dual Drive SATA RAID Carrier
1. Remove the two screws that hold the cover and slide the cover off.
Note: Do NOT use screws longer than those supplied as the
circuit board will be damaged.
2. Connect the hard drive(s) to their respective connector(s) on the
circuit board. Use the provided screws to secure the hard drive.
3. Slide the cover back on to the carrier and secure it with the cover
screws.
4. Once the carrier has been seated in the frame the key lock must be
turned 90 degrees (horizontal) to engage the lock and enable the
power.
Operation
NOTE: Please visit http://www.cru-dataport.com/htmldocs/
techSupport/downloads (case sensitive) and download the latest
version of DP25 RAID management software.
For PCs:
• Right click on My Computer.
• Click on Manage.
• In the Storage sub-section, click on Disk Management to dis-
play a list of all the drives connected to your computer.
• Left click on Action, select All Tasks and then left click on Create Partition.
REMEMBER, partitioning the drive will require the drive to be formatted
which will result in loss of all data on the hard drive.
• This will bring up the Create Partition Wizard screen.
• Follow the instructions and the drive will be ready for use.
For Macs:
You will be asked to initialize the drives. After initializing the
drive, select the partition tab and select the desired partitions,
then click ok. The new disk(s) will be added to your desktop.
REMEMBER, formatting will result in loss of all data on the hard drive(s).
Warning: The DataPort 25 RAID is a high density removable
drive enclosure that maximizes data storage while offering the
flexibility of RAID configurations for data management. The all
metal construction of the DataPort 25 RAID acts as an excellent
heat sink, however, during some RAID applications this dual drive
configuration can generate significant levels of heat. To maximize
hard drive life, ensure that the DataPort 25 RAID is mounted in a
chassis which provides adequate air flow for cooling. For chassis
with minimal air flow or for extreme environments CRU-DataPort
recommends using extreme environment hard drives.
Limited Warranty
NOTE: The SATA interface will supersede the USB interface and
provide the highest transfer rates.
LED Activity
For normal operation the green LED will remain on. In the event of a
hard drive failure or improper installation of a drive the green LED will
flash. If drive 0, the upper drive, fails the LED will flash on and off every
400ms. If drive 1, the lower drive, fails the LED will flicker and then
remain on for 400ms.
Turn on the Power
The lock on the DataPort locks the carrier in place and also serves as
the power “ON/OFF” switch. Turn the lock 90 degrees clockwise to the
“ON” position before turning on the computer. When the computer is
turned on, the “Power On” LED (green light emitting diode above the
key on the frame assembly) is illuminated, and your system should operate normally.
Setting up the drive for Windows 2000/XP/Vista or Mac OS 9.x/X
No new drivers are required. The hard disk drive will be found and a
window will pop up stating “new hardware has been detected”.
CRU-DataPort (CRU) warrants the DataPort 25 USB/SATA to Dual Drive
SATA RAID to be free of significant defects in material and workmanship
for a period of one year from the original date of purchase. CRU’s warranty is nontransferable and is limited to the original purchaser.
Limitation of Liability
The warranties set forth in this agreement replace all other warranties. CRU
expressly disclaims all other warranties, including but not limited to, the implied
warranties of merchantability and fitness for a particular purpose and noninfringement of third-party rights with respect to the documentation and hardware. No CRU dealer, agent or employee is authorized to make any modification,
extension, or addition to this warranty. In no event will CRU or its suppliers
be liable for any costs of procurement of substitute products or services, lost
profits, loss of information or data, computer malfunction, or any other special,
indirect, consequential, or incidental damages arising in any way out of the
sale of, use of, or inability to use any CRU product or service, even if CRU has
been advised of the possibility of such damages. In no case shall CRU’s liability
exceed the actual money paid for the products at issue. CRU reserves the right
to make modifications and additions to this product without notice or taking on
additional liability.
A5-025-0002 Rev 3.0
1-800-260-9800 www.CRU-DataPort.com
 Loading...