

Page 1

© 2000 Crown International, All rights
®
reserved PZM
DIFFEROID
, PCC®, SASS® and
®,
are registered trademarks of
Crown International, Inc. Also exported
as Amcron
®
127018-1
6/00
Crown International, Inc
P.O. Box 1000, Elkhart, Indiana 46515-1000
(219) 294-8200 Fax (219) 294-8329
www.crownaudio.com
Page 2

SECTION ONE
Microphone Technique Basics 3
How to:
Reduce feedback and reverberation 3
Reduce background noise and leakage 4
Pick up sound at a distance 4
Reduce phase cancellations between two mics 5
Reduce phase cancellations from surface reflections 5
Reduce handling noise 5
Reduce proximity effect 5
Reduce pop 5
Achieve a natural tone quality 6
Achieve a bright tone quality 6
Achieve a good balance 6
SECTION TWO
Notes on Crown Mic Models
CM-200A 6
CM-310A 6
CM-311A 6
CM-312A 6
CM-30 / CM-31 6
CM-700 6
CM-150 7
GLM-100 7
GLM-200 7
LM-201, LM-300A, LM-300AL, LM-301A 7
SECTION THREE
Specific Applications 7
SECTION FOUR
Choosing the Right Crown Microphone 14
Condenser or dynamic 14
Boundary or free-field 14
Polar pattern 14
Frequency response 14
Application chart 15
Page 3

INTRODUCTION
In this guide you’ll find suggestions on using
Crown microphones effectively. The CM, GLM, and
LM microphone lines are covered in this booklet. For
application notes on the PZM®, PCC® and SASS®,
please see the Crown Boundary Mic Application Guide.
You will find that Crown microphones can solve many
of your audio problems.
MICROPHONE
TECHNIQUE BASICS
How to reduce feedback
Feedback is a squealing sound from sound-reinforcement speakers that occurs when volume is too high.
To reduce feedback:
• Turn down the volume on the offending
microphone until feedback stops.
• Use as few microphones as possible. Gain-beforefeedback decreases 3 dB each time the number of
open mics doubles.
• Place the mic close to the sound source. The closer
the mic, the higher the gain-before-feedback. If close
miking causes an unnatural tone quality, try using
EQ to compensate.
• Equalize the sound system with a 1/3 octave graphic
equalizer. Notch out frequencies that feedback.
• Place speakers as far from the mic as possible.
• Place the mics behind or to the outside of the house
P.A. speakers. The house speakers should not aim at
the microphones.
• Use directional mics. Hypercardioid and supercardioid patterns reject feedback better than cardioids,
and cardioids reject feedback better than omnidirectional patterns.
• Use differential (noise-cancelling) mics, such as the
Crown CM-310A or CM-311A. They have the
highest gain before feedback of any mic you can buy.
The following table tells how many dB of feedback
rejection you can expect from various polar patterns,
in a reverberant sound field, compared to an omnidirectional pattern at the same distance:
Omnidirectional 0.0 dB
Cardioid -4.8 dB
Bidirectional -4.8 dB
Supercardioid -5.7 dB
Hypercardioid -6.0 dB
For example, a cardioid mic provides 4.8 dB more
gain-before-feedback than an omni mic at the same
distance from the sound source.
You can place a directional mic farther from its source
than an omnidirectional mic in a reverberant sound
field and have the same gain-before-feedback. The
table below shows the distance multiplier for each
pattern:
Omnidirectional 1.0
Cardioid 1.7
Bidirectional 1.7
Supercardioid 1.9
Hypercardioid 2.0
For example, if an omni mic is one foot from a sound
source, a supercardioid mic can be placed 1.9 feet and
have the same gain-before-feedback as the omni.
The figures above apply only when the mics are in a
reverberant sound field - say, when the P.A. speakers
are distant from the mics and the sound system is set
up indoors.
How to reduce reverberation
Reverberation is sometimes loosely called “room
acoustics” or “ambience.” It is a pattern of sound
reflection off the walls, ceiling, and floor. For example,
reverberation is the sound you hear just after you
shout in an empty gymnasium. Too much
reverberation in a recording can make the recorded
instrument sound distant or muddy. To reduce
reverberation:
• Place the mic closer to the sound source.
• Pick up electric instruments with a direct box or
cable.
• Use a room or studio with dead acoustics. The walls,
ceiling, and floor should be covered with a soundabsorbing material.
• Use directional microphones. Hypercardioid and
supercardioid patterns reject reverb more than
cardioid. Cardioid and bidirectional patterns
reject reverb equally well. Cardioid rejects reverb
more than an omnidirectional pattern at the
same distance:
Omnidirectional 0.0 dB
Cardioid -4.8 dB
Bidirectional -4.8 dB
Supercardioid -5.7 dB
Hypercardioid -6.0 dB
3
Page 4
How to reduce background noise
• Stop the noise at its source: turn off appliances and
air conditioning; wait for airplanes to pass; close and
seal doors and windows; use a quiet room.
• Mike close with directional mics.
• Pick up electric instruments with direct boxes or
cables.
• Aim the null of the polar pattern at the offending
noise source. The null is the angle off-axis where the
mic is least sensitive. Different polar patterns have
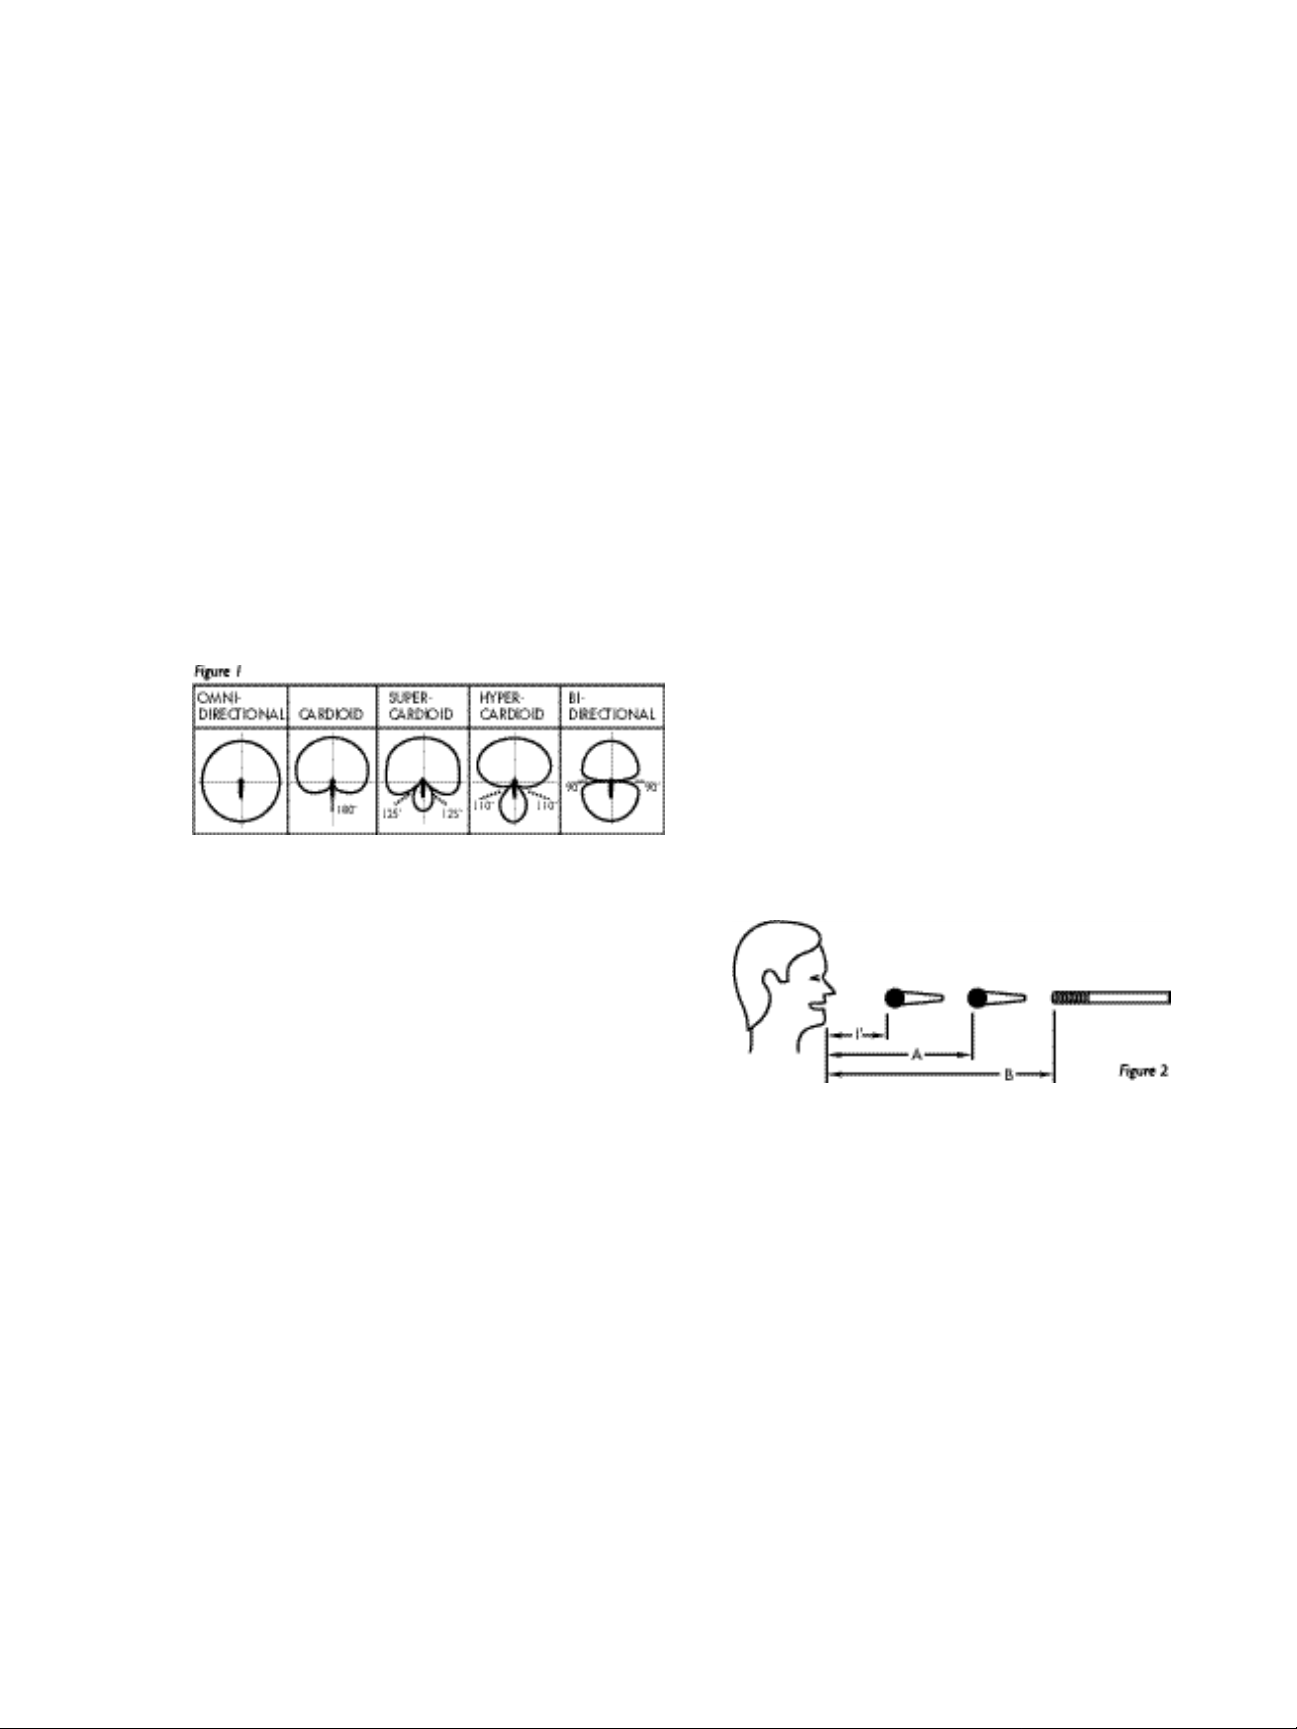
nulls at different angles. Shown below (Figure 1) are
the null angles for various polar patterns:
Cardioid 180 degrees
Supercardioid 125 degrees
Hypercardioid 110 degrees
Bidirectional 90 degrees
How to reduce leakage
Leakage (also called bleed or spill) is the overlap of
sound from an instrument into another instrument’s
microphone. For example, if you’re miking drums and
piano each with it’s own microphone, any drum
sound picked up by the piano mic is leakage. To
reduce leakage:
• Mike close with directional microphones.
• When recording, overdub instruments one at a time
on each track of a multitrack recorder.
• Pick up electric instruments with direct boxes or
cables.
• Use a room or studio with dead acoustics. The walls,
ceiling, and floor should be covered with sound
absorbing material.
• Aim the null of the polar pattern at the undesired
sound source. For example, suppose you’re miking
two adjacent tom-toms with two hypercardioid
mics. The null of the hypercardioid is 110 degrees
off-axis. Angle each mic so that its null aims at the
adjacent tom-tom.
• Use a Differioid mic on vocals such as the Crown
CM-310A or CM-311A.
How to pick up sound at a distance
The farther you place a microphone from a sound
source, the more reverberation, leakage, and background noise you pick up. Also, you hear more mixer
noise compared to the signal because the mixer gain
must be higher with distant miking.
To clearly pick up sound at a distance:
• Use a microphone with low self-noise (say, less
than 22 dB SPL), such as the CM-200A, CM-700,
CM-150, any PCC, or any PZM® (see the Crown
Boundary Mic Application Guide).
• Boost the presence range on your mixer’s EQ
(around 5 kHz).
• If necessary, compensate for air losses at high
frequencies by boosting EQ around 15 kHz.
• Use directional microphones. You can place a
directional mic farther from its source than an
omnidirectional mic and pick up the same amount
of reverberation. The table below shows the distance
multiplier for each pattern (Figure 2):
Omnidirectional 1.0 dB
Cardioid 1.7 dB
Bidirectional 1.7 dB
Supercardioid 1.9 dB
Hypercardioid 2.0 dB
Cardioid A = 1.7
Supercardoid A = 1.9
Hypercardoid A = 2
Shotgun B = 3 to 10
depending on length
For example, if an omni mic is 1 foot from a sound
source, you can place a supercardioid mic at 1.9 feet
and pick up the same amount of reverb as the omni.
4
Page 5
How to reduce the phase
cancellations between two mics
If two microphones pick up the same sound source
at different distances, and their signals are fed to the
same channel, this might cause phase cancellations.
These are peaks and dips in the frequency response
caused by various frequencies combining out-ofphase. The result is a colored, filtered tone quality.
To reduce phase cancellations between two microphones:
• Mike close.
• Spread instruments farther apart.
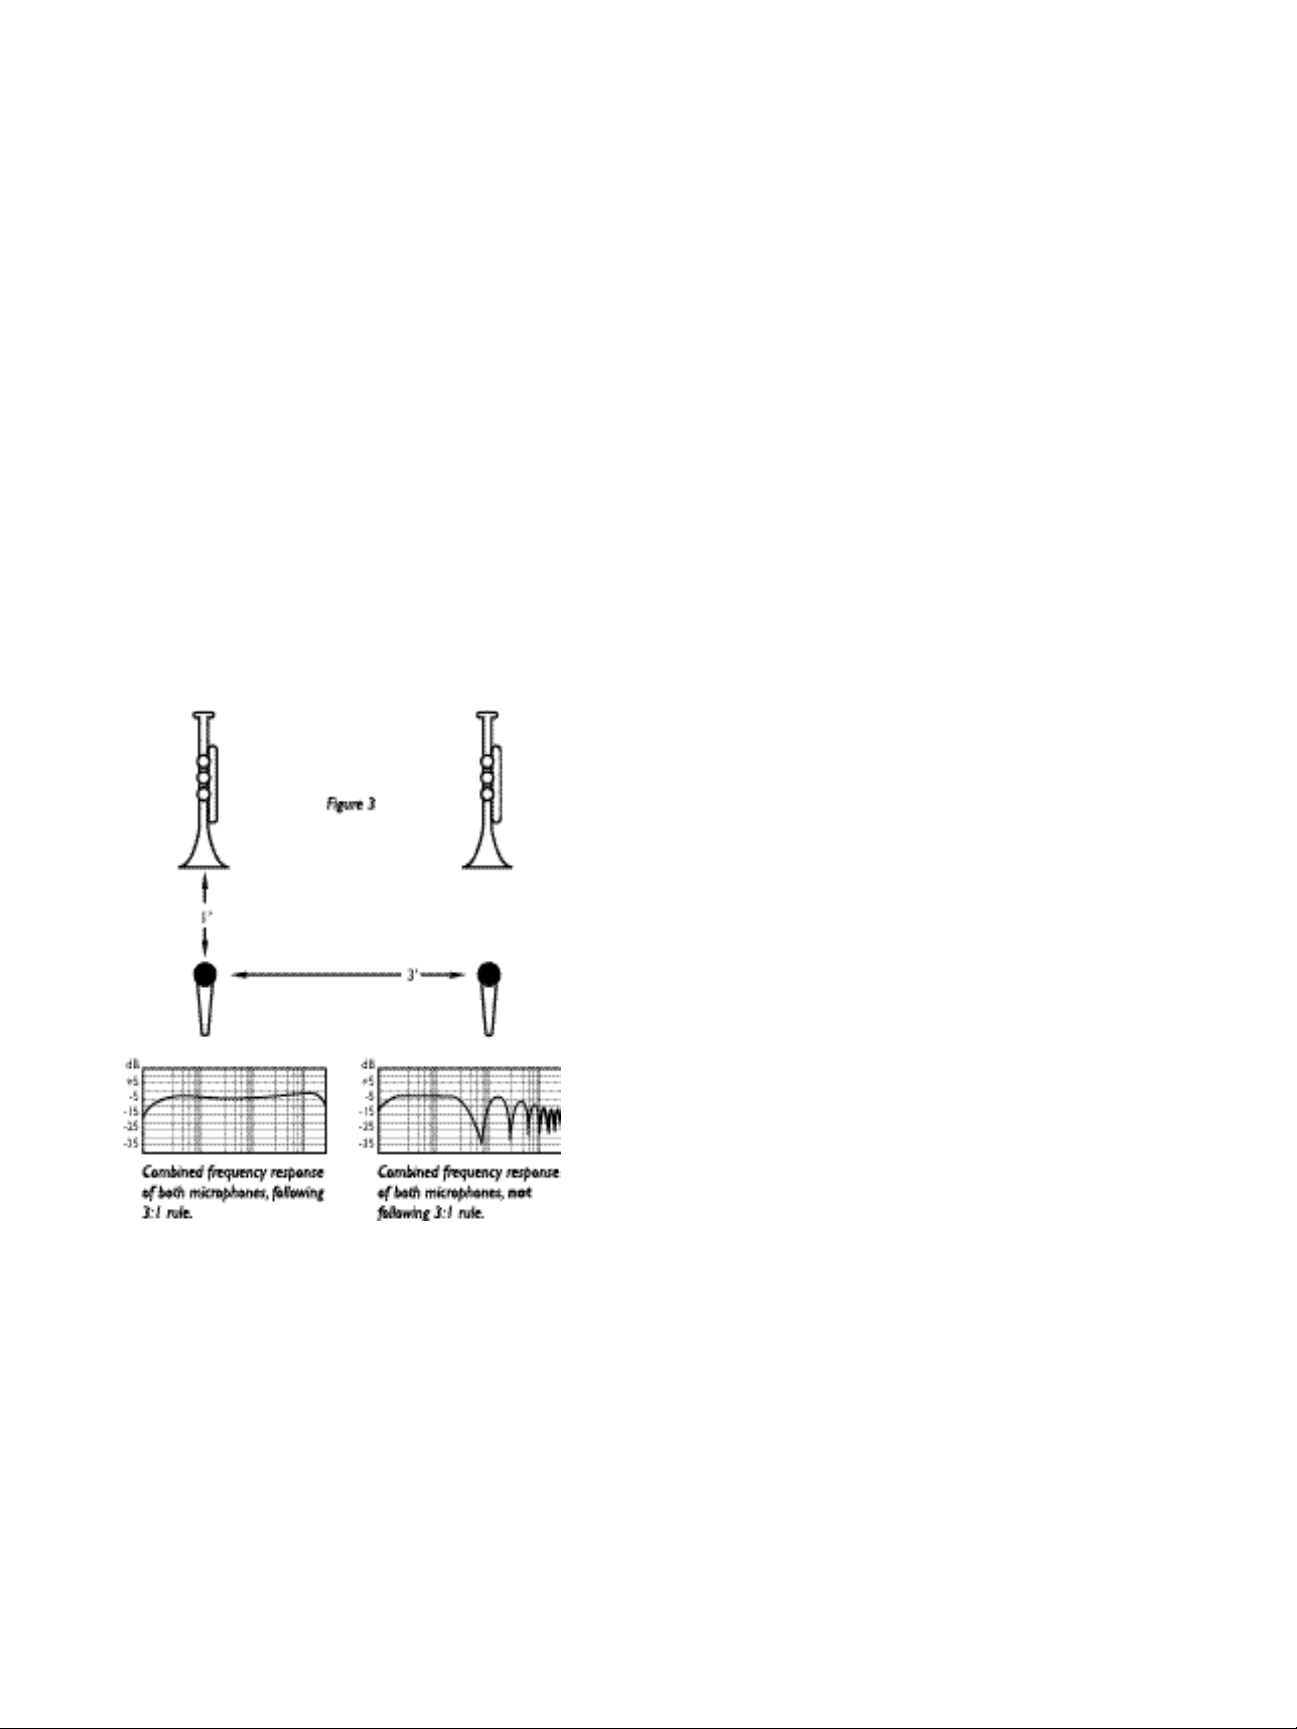
• Follow the 3 to 1 rule (Figure 3): The distance
between mics should be at least three times the micto-source distance. For example, if two microphones
are each 1 foot from their sound sources, the mics
should be at least 3 feet apart to prevent phase
cancellations.
As described in the Crown Boundary Mic Application
Guide, these situations can cause phase cancellations
which give a strange tone quality. Solve the problem
by using Crown PZM or PCC microphones mounted
to the piano lid, wall, floor, or other large flat surface.
How to reduce handling noise
and stand thumps
• Use an omnidirectional microphone such as a
PZM.
• Use a directional microphone with low sensitivity to
handling noise and thumps, such as the CM-200A,
CM-310A, or any PCC.
• Use a directional microphone with an internal shock
mount.
• Use a shock-mount stand adapter on a mic stand.
• Place the mic stand on foam or sponges.
How to reduce proximity effect
Proximity effect is the bass boost you hear when you
mike close with a single-D directional microphone.
“Single-D” means that the microphone has a single
distance from its front sound entry to the rear sound
entry. The closer the mic is to the sound source, the
more bass you hear. To reduce proximity effect:
• Use an omni directional microphone.
• Turn down the excess bass with your mixer’s EQ.
• Don’t use two mics when one will do the job. For
example, use just one mic on a lectern. If the talker
wanders, use a lavalier mic instead.
How to reduce phase cancellations
from surface reflections
Sometimes you must place a microphone near a hard
reflective surface. Situations where this might occur
are reinforcing drama, musicals, or opera with the
microphones near the stage floor, recording a piano
with the mic near the raised lid, or recording an
instrument surrounded by reflective baffles.
How to reduce pop
Pop is an explosive breath sound produced by the
letters “p”, “b”, or “t”. When a person says words
containing these sounds, a turbulent puff of air is
forced from the mouth. This air puff hits the microphone and makes a thump or little explosion called a
“pop”.
To reduce pop:
• Use an omnidirectional microphone.
• Use a microphone with a built-in pop filter or ball
shaped grille, such as the Crown CM-200A or
CM-310A.
• Place an external foam pop filter on the microphone.
• Place the microphone out of the path of pop travel above, below, or to the side of the mouth.
• Roll off low frequencies below 100 Hz.
5
Page 6

How to achieve a natural
tone quality
• Use a microphone with a flat frequency response,
such as: CM-700, CM-150, GLM-100, PCC-170,
PCC-130, any LM mic, or a PZM-30D or PZM-6D
set to “flat” response.
• Place the microphones as far from the sound source
as the source is big. For example, the sound board of
a guitar is about 18 inches long. Place the mic at least
18 inches away to pick up all the parts of the guitar
about equally.
• If you must mike close to reduce feedback or leakage, use your mixer’s EQ to restore a natural tonal
balance.
phone, so aim the rear of the mic at your floor monitor speakers. Use the foam pop filter to reduce breath
pops.
CM-310A
The CM-310A is a handheld cardioid microphone
that is noise-cancelling or differential. “Differential”
means it cancels sound at a distance, and “cardioid”
means it cancels sound from the rear. Because of these
abilities, the CM-310A permits extremely high gainbefore-feedback and isolation. To keep from cancelling your voice, you must use the microphone with
lips touching the grille. Sing directly into the front of
the microphone, not the side, or else your voice may
get cancelled and sound thin.
How to achieve a bright
tone quality
A “bright” sound is crisp, clear, trebly, and articulate.
To achieve a bright sound, use a microphone with a
rising high-frequency response, such as a Crown
GLM-200 or a PZM-30D / PZM-6D set to “rising”
response.
How to achieve a good balance
A good balance is a good loudness relationship
among instruments and voice in a mix. When the
balance is good, no instrument is too loud or too soft.
To achieve a good balance when recording a large
ensemble with one or two microphones:
• Move instruments that are too quiet closer to the
mics, and vice versa.
• Place the mic(s) far enough away so that you don’t
over emphasize the instruments in the center of
the ensemble.
• If you’re using two mics to record stereo, increase the
microphone angling or spacing. If you hear a hole in
the middle when using widely spaced mics, add a
third mic in the center, panned to the center.
• If a soloist is performing in front of an orchestra,
raise or lower the mic stand to vary the balance
between the soloist and the orchestra.
NOTES ON CROWN
MICROPHONE MODELS
CM-200A
The CM-200A is a handheld condenser microphone
with a smooth, articulate sound quality. It will not
overload no matter how loudly you scream into it.
Because of its cardioid pickup pattern the CM-200A
rejects sounds approaching the rear of the micro-
CM-311A
The CM-311A is a headworn cardioid microphone
that is noise-cancelling or differential. The mic’s
capsule is directly in front of your lips. Like the
CM-310A, the CM-311A has outstanding gainbefore-feedback and isolation. Lightweight and
comfortable, it adjusts to fit any head. The CM-311A
comes with an Adapta-Pak belt pack that works with a
9V battery or phantom power. Model CM-311AE is
the headworn mic alone, meant for connecting to a
wireless mic transmitter of your choice.
CM-312A
The CM-312A is a headworn hypercardioid mic that
is meant for less critical situations than the CM-311A.
The mic capsule in the CM-312A is at the side of the
mouth, and is very small and light. Model CM-312AE
is the headworn mic alone, meant for connecting to a
9V-powered wireless mic transmitter of your choice.
CM-30/CM-31
The CM-30 is a miniature supercardioid condenser
mic designed for overhead miking, such as over a
choir. It is slightly bigger than the GLM microphones
described below, but has lower noise. The CM-30
power module mounts in an electrical box in the
ceiling; the CM-31 power module is a cylinder with
an XLR-type connector. Both mics come in black or
white. CM-30L and CM-31L have 60’ cables.
CM-700
The CM-700 is a superb, cardioid condenser mic
for pro or semipro recording and high-quality sound
reinforcement. Rugged enough for the road, the
CM-700 works equally well for popular music (multimiking) or classical music (stereo and spot-miking).
It’s also a good choice for miking a lectern on a boom
stand.
6
Page 7

The CM-700 has a clear, natural sound. Self-noise
is very low, and the mic can handle extremely loud
sounds without distortion. A bass-tilt switch, pop
filter and windscreen are included.
CM-150
The CM-150 is a stand-mounted omnidirectional
condenser mic for measurements or studio recording.
Its ultra-flat response from 20 Hz to 20 kHz lets it
record any instrument – or an orchestra – with full
fidelity.
CM-10 Now Discontinued
The CM-10 is a mini omni lavalier mic. You clip it to
the users shirt or tie about 8 inches under the chin.
GLM-100, GLM-200
The Crown GLM offers all the quality and wide-range
response of larger studio microphones, yet is nearly
invisible in use. It can be attached to instruments or
performers, or hung over musical ensembles. No mic
stands are needed, which makes setup fast and easy.
Since the GLM is small, it can be mounted very close
to instruments to improve isolation and reject off-mic
sound.
Unlike larger microphones, GLMs pick up all surrounding instruments with the same tone quality or
frequency response. That’s because the microphones
are very small and maintain their polar pattern up to
high frequencies.
Two main models of GLMs are available: The
GLM-100 and the GLM-200. The GLM-100 has an
omnidirectional or all around pickup pattern. When
placed in the center of a group of instruments (say, a
drum set), it picks up all the instruments surrounding
it. The GLM-200 has a hypercardioid pickup pattern.
It picks up mainly what it’s aimed at, and provides
excellent isolation and gain-before-feedback.
The GLM-100 has a deeper low-frequency response
and a higher overload point than the GLM-200. For
these reasons, the GLM-100 omni is the best choice
for low pitched instruments (bass, kick drum) and for
loud instruments. Also, the GLM-100 has less handling noise and wind noise than the GLM-200.
General tips: For outdoor or vocal use, place the
included windscreen on the microphone to reduce
wind noise and breath popping. Although the cable is
rugged, excessive abuse such as tugging and twisting
will shorten its life. It should last indefinitely if treated
with care. The cable is short (8 feet) to allow easy
wrapping and to reduce the amount of thin cable on
stage.
LM-201, LM-300A, LM-300AL,
LM-301A
These four models are meant to be used on lecterns,
pulpits, or conference tables. The LM-201 has a noisefree swivel mount. Designed for installation by sound
contractors, this model has a separate circuit module.
The microphone is shock mounted, and is meant to be
permanently screwed to the lectern top.
The LM-300A is a gooseneck microphone that plugs
into an XLR-type connector mounted in your lectern.
If shock mounting is necessary, order the LM-300SM
Shock Mount.
The LM-300AL is 5 inches longer than the LM-300A,
and has dual goosenecks for more-flexible positioning. The LM-301A has a collar which screws onto an
Atlas flange or mic stand. Its cable can exit inside or
outside the mounting device.
SPECIFIC APPLICATIONS
This section suggests some ways to place Crown
microphones to record or reinforce various musical
instruments. These are just starting points to reduce
the time spent experimenting. They work well in
many cases, but if you don’t like the results, feel free
to change the microphone or its placement.
If pick up of room reverbation, leakage, or feedback
is excessive, place the mic closer than recommended
below, and roll off the bass if necessary at your mixer
to obtain a natural timbre.
For example, suppose you’re miking a folk singer
playing a guitar. If you want to control the balance
between voice and guitar with mixer volume controls,
you must mike the singer and guitar separately and
up close to isolate their sounds. This placement often
results in bassy tone quality, so you’ll have to roll off
some bass at your mixer until the sound is natural.
Many of the techniques suggested here apply when
the instrument or voice is recorded alone, as for an
overdub.
Vocal
Recording:
Place a CM-700 or CM-150 8 inches away at eye
height to avoid breath pops. Use the foam pop filter.
Sound Reinforcement:
• For best sound quality, use a CM-200A not more
than 3 inches from the mouth. Place the included
foam pop filter on the mic. The closer the mic is to
your mouth the greater the gain-before-feedback,
and the greater the bass. Aim the mic at the nose to
avoid a “closed nose” effect.
7
Page 8

• For maximum gain-before-feedback and isolation,
use a CM-310A with your lips touching the metal
grille. The CM-310A Differoid® has more gainbefore-feedback than any mic you can buy, so it
really helps vocals stand out over a loud instrumental background.
• Vocalists who move around while playing often
prefer a headworn mic. An excellent choice for this
is the Crown CM-311A. It is worn with lips touching
the microphone, and offers extremely high gainbefore-feedback and isolation. For less critical
situations, use a CM-312A. It is smaller and lighter
than the CM-311A, and the mic is at the side of the
mouth.
Sax (Figure 5):
Recording:
• Place a CM-700 or CM-150 18 inches away, a few
inches above the bell, toward the player’s right side.
• Clip a GLM-UM to the bell, and attach a GLM-100
to the clip about 4 inches from the bell so that it can
see the tone holes.
Acoustic guitar
Recordings (Figure 4):
• Attach a GLM-100 to the guitar sound board,
halfway between the bridge and the sound hole,
near the low E string.
• Place a CM-700 or CM-150 6 to 12 inches from
where the finger board joins the body. For stereo,
add another mic the same distance from the bridge.
Sound Reinforcement:
• Tape a GLM-100 inside the guitar onto the surface
nearest the performer, so that the mic can see the
sound hole. Equalize for the desired tone quality.
• Place a CM-700 a few inches from the sound hole
and roll off the excess bass at your mixer.
Sound Reinforcement:
• Place a CM-200A or CM-700 just above the bell,
aiming at the tone holes.
• Clip a GLM-UM to the bell, and attach a GLM-100
to the clip just above the ball, aiming at the tone
holes.
Electric guitar or bass
Recorded Direct:
• For a clean sound, plug directly into an unbalanced
line input or use a direct box. For a distorted sound,
plug into a guitar signal processor (such as the
Rockman™), then into a mixer input.
Electric guitar amp (Figure 6):
Recording/Reinforcement:
• Place a CM-200A 1 to 12 inches from the center of
one of the speaker cones. For more bass, place the
mic close. For the brightest tone, place the mic near
the center of the speaker cone. For a mellower tone,
place the mic near the edge of the speaker cone.
8 9
Page 9

• Tape the cable of a GLM-100 to the grille cloth in
front of a speaker cone. A mic placement at the
center of the cone sounds bright; a placement near
the edge of the cone sounds more mellow.
Drum set (Figure 7):
Toms and Snare, Recording/Reinforcement:
• Place a CM-700 about 1 inch above the head, 1 to 2
inches in from the rim, angled down about 45˚. If
the drum rings too much, tape some gauze or a
folded handkerchief to the head.
• Clip a GLM-UM Universal Mount to each drum rim.
Use GLM-200s.
• For more isolation, tape a GLM-100 inside each tomtom on the shell, or place a CM-700 inside each tomtom a few inches from the head, off center.
Three Microphones (Figure 8):
• Tape or clip one GLM-100 near the right side of the
snare drum. This GLM picks up the hi-hat, snare, left
rack tom, and cymbals. Tape or clip another GLM
near the right rack tom and the floor toms. This
GLM picks up the right rack tom, floor tom, and
cymbals. Experiment with placement to achieve a
good balance. You may want to boost the bass and
treble slightly. Put another GLM in the kick drum.
Cymbals, Recording/Reinforcement:
• Use one or two boom stands with CM-700,
GLM-100, or GLM-200 mics 1 to 3 feet over the
cymbal edges.
High-Hat, Recording/Reinforcement:
• Place a CM-700 with low-end roll off or GLM-200
8 inches above the edge aiming down.
Kick Drum, Recording/Reinforcement:
• Remove the front head and damp the kick-drum
head with a pillow or blanket. Drop a GLM-100
through the vent hole so that it hangs inside the
drum a few inches in front of the beater. Tape the
GLM cable to the kick-drum shell. Use a wood
beater or boost 2 kHz - 5 kHz for more attack or
click. Cut a few dB around 400 Hz to remove the
“papery” sound.
Two Microphones (Figure 9):
• Clip one GLM-100 to the snare drum rim, and
position the mic in the center of the set, about 4”
above the snare drum. With a little bass and treble
boost, the sound is surprisingly good for such a
simple setup. Put another GLM in the kick drum.
Page 10

Percussion
Recording/Reinforcement:
• Place a CM-700 about 1 foot away.
• Tape a PZM on the musician’s shirt (see the Crown
Boundary Mic Application Guide).
Ambience
Recording:
• Place one or two PZMs on a distant wall, or on the
control-room window.
Grand piano (Figure 10):
Recording:
• Raise the lid. Tape a GLM-100 to the underside of
the lid in the middle. For stereo, use two over the
bass and treble strings. If you need more isolation,
close the lid. Boost a few dB at 10 kHz for clarity.
• Remove the lid. Place two CM-700s or CM-150s 8
inches over the bass and treble strings, 8 inches
horizontally from the hammers. Boost a few dB at
10kHz for clarity.
• Remove the lid. Place two GLM-100s about 12
inches apart, angled 90˚ apart, 18 inches over the
sound board and 10 inches horizontally from the
hammers. Boost a few dB at 10 kHz for clarity.
Upright Piano (Figure 11):
Recording:
• Remove the panel in front of the player to expose
the strings. Place two mics (CM-200A, CM-700,
CM-150, GLM-100, or GLM-200) over the bass and
treble strings.
• Mike the soundboard a few inches from the bass and
treble strings.
Reinforcement:
• Use GLMs inside with the lid closed. Boost at 10 kHz
for extra clarity.
Reinforcement:
• For more isolation and gain-before-feedback, tape a
GLM-100 or two onto the sound board. Experiment
with position for best sound.
Xylophone and Marimba
Recording/Reinforcement:
• Place two CM-700s 18 inches above the instrument
and 2 feet apart.
Banjo (Figure12):
Recording/Reinforcement:
• Clip a GLM-UM Universal Mount to a banjo tension
rod, and position a GLM-100 1 inch from the head,
2 inches from the rim.
10
Page 11

• For maximum isolation and gain-before-feedback,
use a GLM-100 close to the drum head a few inches
in from the rim.
• Place a CM-700 12 inches from the drum head for
recording, closer for sound reinforcement.
Violin
Recording:
• Place a CM-700 or CM-150 1 to 2 feet away over the
top.
• Attach a GLM-UM Universal Mount to the tailpiece
and place a GLM-100 over an f-hole. Experiment
with miking distance to get a good compromise
between tone quality and isolation.
Reinforcement:
• For more gain-before-feedback, put the GLM inside
the violin through the f-hole or clip it to the bridge.
Mandolin, Bouzouki, or Dobra
Recording/Reinforcement:
• Place a CM-700 12 inches away for recording, closer
for sound reinforcement.
• Mount a GLM-100 on the sound board near
an f-hole.
Acoustic Bass
Woodwinds
Recording/Reinforcement:
• Attach a GLM-UM Universal Mount to the bell, and
position a GLM-100 or GLM-200 to pick up both
the bell and the tone holes.
• Place a CM-700 about 12 inches from the tone holes.
Flute
Recording/Reinforcement:
• Place a CM-700 halfway between the mouthpiece
and the tone holes about 6 inches away.
• For recording or low-level sound reinforcement, use
tape, a rubber band, or a padded broom holder to
mount a GLM-100 on the flute. Attach the GLM
cable 4 inches to the left of the lip plate (looking at
the player), with the mic capsule 1
the flute (see figure 14).
• For extra gain-before-feedback, tape the cable to the
end of the flute nearest the lip plate, so that the mic
can “see” the lips. Roll off the excess highs on your
mixer.
1
⁄2 inches above
Recording/Reinforcement:
• For a natural sound, place a GLM-100 or CM-700
on a boom a few inches out front, above the bridge.
• Tape a GLM-100 cable to the bridge.
• For a full, deep tone, tape a GLM-100 near an f-hole.
• For isolation, place a CM-200A near the f-hole and
roll off excess bass.
Brass
Recording/Reinforcement:
• Place a CM-700 or CM-200A a few feet out front.
Mic on-axis to the bell for a bright, edgy tone; mic
off-axis to the bell for a mellower tone (Figure 13).
• Attach a GLM-UM Universal Mount to the bell, and
position a GLM-100 about 4” from the bell, offcenter.
Dulcimer
Recording/Reinforcement:
• Tape a GLM-100 on the center of the top edge, 1⁄2inch above it.
• Place a CM-700 about 8 inches above and in front of
the center of the top edge.
Harmonica
Recording/Reinforcement:
• Place a CM-200A a few inches to 1 foot away. Hand
hold the mic for sound reinforcement. For a bluesy,
dirty sound, pick up the harmonica with a mic
plugged into a guitar amp, and mike the amp.
Harp
Recording:
• Aim a CM-700, CM-150, or GLM at the sound board
about 18 inches away.
• Tape a GLM-100 to the sound board.
11
Page 12

Orchestra, Band, Choir, or Organ
Recording (Figure 15):
• Hang or place two GLM-100, CM-700 or CM-150
mics about 10 feet apart, about 14 feet above the
floor, and 5 to 15 feet in front of the front-row
musicians.
• Using a stereo mic adapter, hang or place two
CM-700 mics in a coincident or near coincident
arrangement. Place the pair about 14 feet above the
floor, and 5 to 15 feet in front of the front-row
musicians.
• See the Crown Boundary Mic Application Guide for
more suggestions. The SASS is especially useful for
this application.
Reinforcement:
• For sound reinforcement of an orchestra or band,
mike each section separately a few feet away with a
GLM-100, CM-30, or CM-31. Keep in mind the 3:1
rule to prevent phase interference: The distance
between microphones should be at least three times
the distance from each microphone to its sound
source.
Choir (Figure 16):
Reinforcement:
• To reinforce a choir, use two CM-30 or CM-31
microphones, spaced to divide the choir in thirds.
Hang them 18 inches in the front row, 18 inches over
the head height of the back row. Angle them down to
aim at the back row.
• To keep each microphone from rotating, you might
want to thread some fishing line through the tiny
pipe or crossbar on the hanger. Attach the line to the
side walls, about a foot below the height of the
microphone in order to provide a downward pull.
• Use two CM-700s on stands.
News and sports reporting
Studio:
• Clip a miniature omni microphone to the
shirt about 8 inches under the chin. Since the
camera sees it on-edge, it looks like a tie bar, not a
microphone.
12
Page 13

Field:
• To reduce ambient noise, use a CM-200A cardioid
handheld mic with a foam windscreen. Roll off any
excess bass at your mixer.
• If the ambient noise level is very high and you
want to reject it, use a CM-310A handheld mic or
CM-311A headworn mic with lips touching the
grille. Roll off excess bass at your mixer.
• Clip a CM-10 miniature omni microphone to the
shirt about 8 inches under the chin. Place the foam
windscreen on the mic.
• Use a CM-312A hypercardioid headworn mic. Model
CM-312A HS mounts on a Sony MDR-7506 headphone.
Speeches
Theatre, Drama, Opera,
or Musicals (Figure 17):
Recording/Reinforcement:
• Use PCC-160s on the stage floor or suspend CM-30s
or CM-31s overhead. See the Crown Boundary Mic
Application Guide for suggestions.
Speaker that Wanders,
Recording/Reinforcement:
• Clip a lavalier mic about 8 inches under the
chin.
Speaker that Stays Behind the Lectern,
Recording/Reinforcement:
• For permanent inconspicuous miking, use an LMtype microphone on the lectern. The LM-201 has a
silent, rugged swivel mount; the LM-300A has a
quiet, economical gooseneck. The LM-300AL is 5
inches longer than the LM-300A. The LM-301A
mounts onto an Atlas flange or a mic stand.
• For temporary miking, place a CM-700 on the end of
a mic-stand boom. Position it about 8 inches from
the person speaking. Place the included foam pop
filter on the mic to prevent breath pops. Set the bass
tilt switch to roll off.
• Place a PCC-160, PCC-130, or PCC-170 surface mic
on top of the lectern, out of cavities. See the Crown
Boundary Mic Application Guide for details.
Narration recording:
• Place a CM-700 on a boom about 8 inches from the
mouth at eye height. Ask the announcer to maintain
a constant distance to the microphone.
Group discussion
Recording/Reinforcement:
• Hang a CM-30 or CM-31 straight down over the
center of the group. Group members should be no
more than 45˚ off-axis.
• Use PCC-170s, PCC-130s, or PZMs on the table. See
the Crown Boundary Mic Application Guide for more
suggestions.
Film or video:
• Hide a GLM-100 or CM-10 mini mic under clothing.
• Attach a GLM-100 to the back of props close to the
action.
• In an automobile, clip a GLM-100 to the sun visor
near the center-line of the automobile.
• To reduce clothing noise when the GLM is used on
an actor, spray clothing with Static Guard® or water
(spray leather with silicone spray or WD-40®). Tape
the cable to clothing, using band-aids on skin. Make
a loop in the cable to act as a strain relief. Place the
connector near the actor’s foot for unplugging
between takes.
• For video documentaries, see the tips on news and
sports reporting and narration recording.
• For audience miking, use two PZMs 3 feet apart on
the stage front, or place two CM-700s over the
audience front row, aiming at the back row.
• For more tips, see the Crown Microphone Application
Guide for Video.
• To convert the GLM for wireless use, please order
Technical Bulletin #3.
We hope this application guide has provided some
insight into the operation and use of Crown microphones. For application notes on PZMs, PCCs, SASS,
and boundaries, order the Crown Boundary Mic
Application Guide - free from Crown. For more
information, contact the Technical Support Group at
Crown International, 1718 West Mishawaka Road, P.O.
Box 1000, Elkhart, IN 46515 or phone (219) 294-8200 or
visit us on the world wide web at www.crownaudio.com.
13
Page 14

CHOOSING THE RIGHT
CROWN MICROPHONE
There’s a wide variety of Crown microphones to
choose from. This guide will help you select the
microphones best-suited for your applications.
Transducer Type
Condenser or Dynamic
In a dynamic microphone, a coil of wire attached to a
diaphragm is suspended in a magnetic field and
generates an electrical signal similar to the incoming
sound wave.
In a condenser microphone, a diaphragm and an
adjacent metallic disk (backplate) are charged to form
two plates of a capacitor. Sound waves striking the
diaphragm vary the spacing between the plates; this
varies the capacitance and generates an electrical
signal similar to the incoming sound wave.
The diaphragm and backplate can be charged either
by an externally applied voltage, or by a permanently
charged electret material in the diaphragm or on the
backplate.
Because of its lower diaphragm mass and higher
damping, a condenser microphone responds faster
than a dynamic microphone to rapidly changing
sound waves (transients).
Dynamic microphones offer good sound quality, are
especially rugged, and require no power supply.
Condenser microphones require a power supply to
operate internal electronics, but generally provide a
clear, detailed sound quality with a wider, smoother
response than dynamics.
Boundary or Free Field
Boundary microphones are meant to be used on large
surfaces such as stage floors, piano lids, hard-surfaced
panels, or walls. Boundary mics are specially designed
to prevent phase interference between direct and
reflected soundwaves, and have little or no off-axis
coloration. Free-field microphones are meant to be
used away from surfaces, say for up-close miking.
Crown Pressure Zone Microphones (PZMs) and
Phase Coherent Cardioids (PCCs) are boundary
microphones; Crown GLMs, CMs and LMs are
free-field microphones.
Polar Patterns
Omnidirectional or Unidirectional
Omnidirectional microphones (also called pressure
microphones) are equally sensitive to sounds coming
from all directions. Unidirectional microphones (also
called pressure gradient microphones) are most
sensitive to sounds coming from one direction - in
front of the microphone.
Three types of unidirectional patterns are the cardioid, supercardioid, and hypercardioid pattern. The
cardioid pattern has a broad pickup area in front of
the microphone. Sounds approaching the side of the
mic are rejected by 6 dB; sounds from the rear (180˚
off-axis) are rejected 20 to 30 dB. The supercardioid
rejects the side sounds by 8.7 dB, and rejects sound
best at two “nulls” behind the microphone, 125˚ offaxis.
The hypercardioid pattern is the tightest pattern of the
three (12 dB down at the sides), and rejects sound
best at two nulls 110˚ off-axis. This pattern has the
best rejection of room acoustics, and provides the
most gain-before-feedback from the main sound
reinforcement speakers.
Choose omnidirectional mics when you need:
All-around pickup.
Pickup of room acoustics.
Extended low-frequency response.
Low handling noise.
Low wind noise.
No up-close bass boost.
Choose unidirectional mics when you need:
Selective pickup.
Rejection of sounds behind the microphone.
Rejection of room acoustics and leakage.
More gain-before-feedback.
Up-close bass boost (proximity effect).
An omnidirectional boundary microphone (such as
PZM) has a half-omni or hemispherical polar pattern.
A unidirectional boundary microphone (such as a
PCC-160) has a half-supercardioid polar pattern. The
boundary mounting increases the directionality of the
microphone, thus reducing pickup of room acoustics.
Frequency Response
Bright or Flat
A bright frequency response tends to have an emphasized or rising high-frequency response, which adds
clarity, brilliance, and articulation. A flat frequency
response tends to sound natural. Microphone placement also has a major effect on the recorded tonal
balance. With loud guitars, amps and drums, a mic
with rising highs or presence peak tends to sound
natural; a flat-response mic tends to sound dull.
14
 Loading...