

Page 1

Operator Manual
Page 2
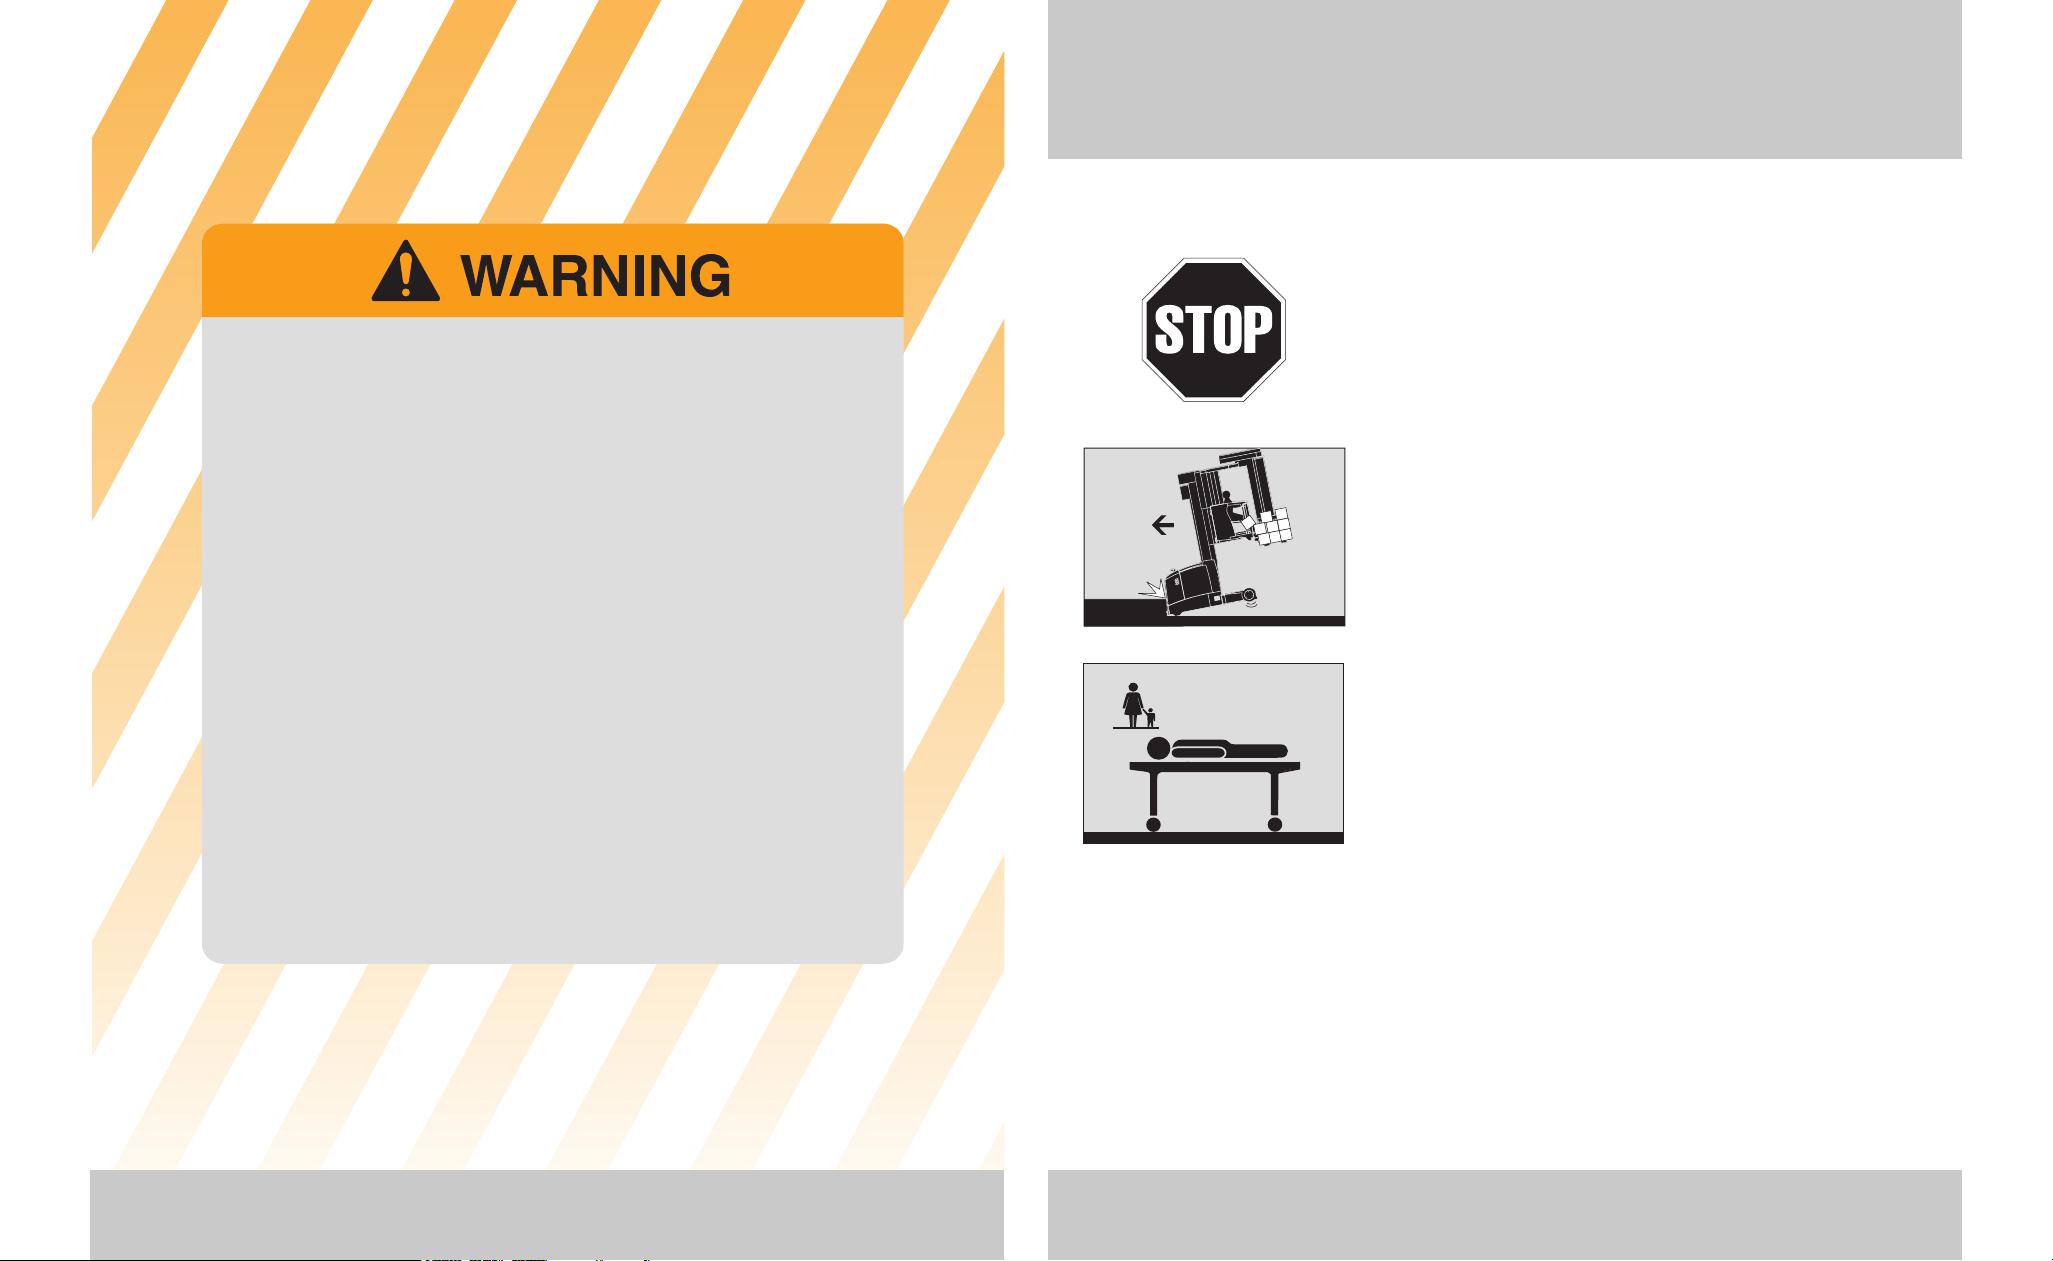
It’s the law, you must be trained and certified to operate this
truck.
You or others around you can be seriously injured or even killed if
you don't use this truck correctly.
Read and obey all warnings and instructions in this Manual* and
on the truck.
(OSHA § 1910.178, Rev. 1999)
You Must be Trained
IT'S THE LAW, YOU MUST BE TRAINED AND CERTIFIED
Federal law states that only properly trained operators
are permitted to operate a powered industrial truck
and that your employer must train you and certify that
you are qualified to operate this powered industrial
truck. (OSHA §1910.178, Rev. 1999)
Do not operate this truck
been trained and certified by your employer.
in your work place until you have
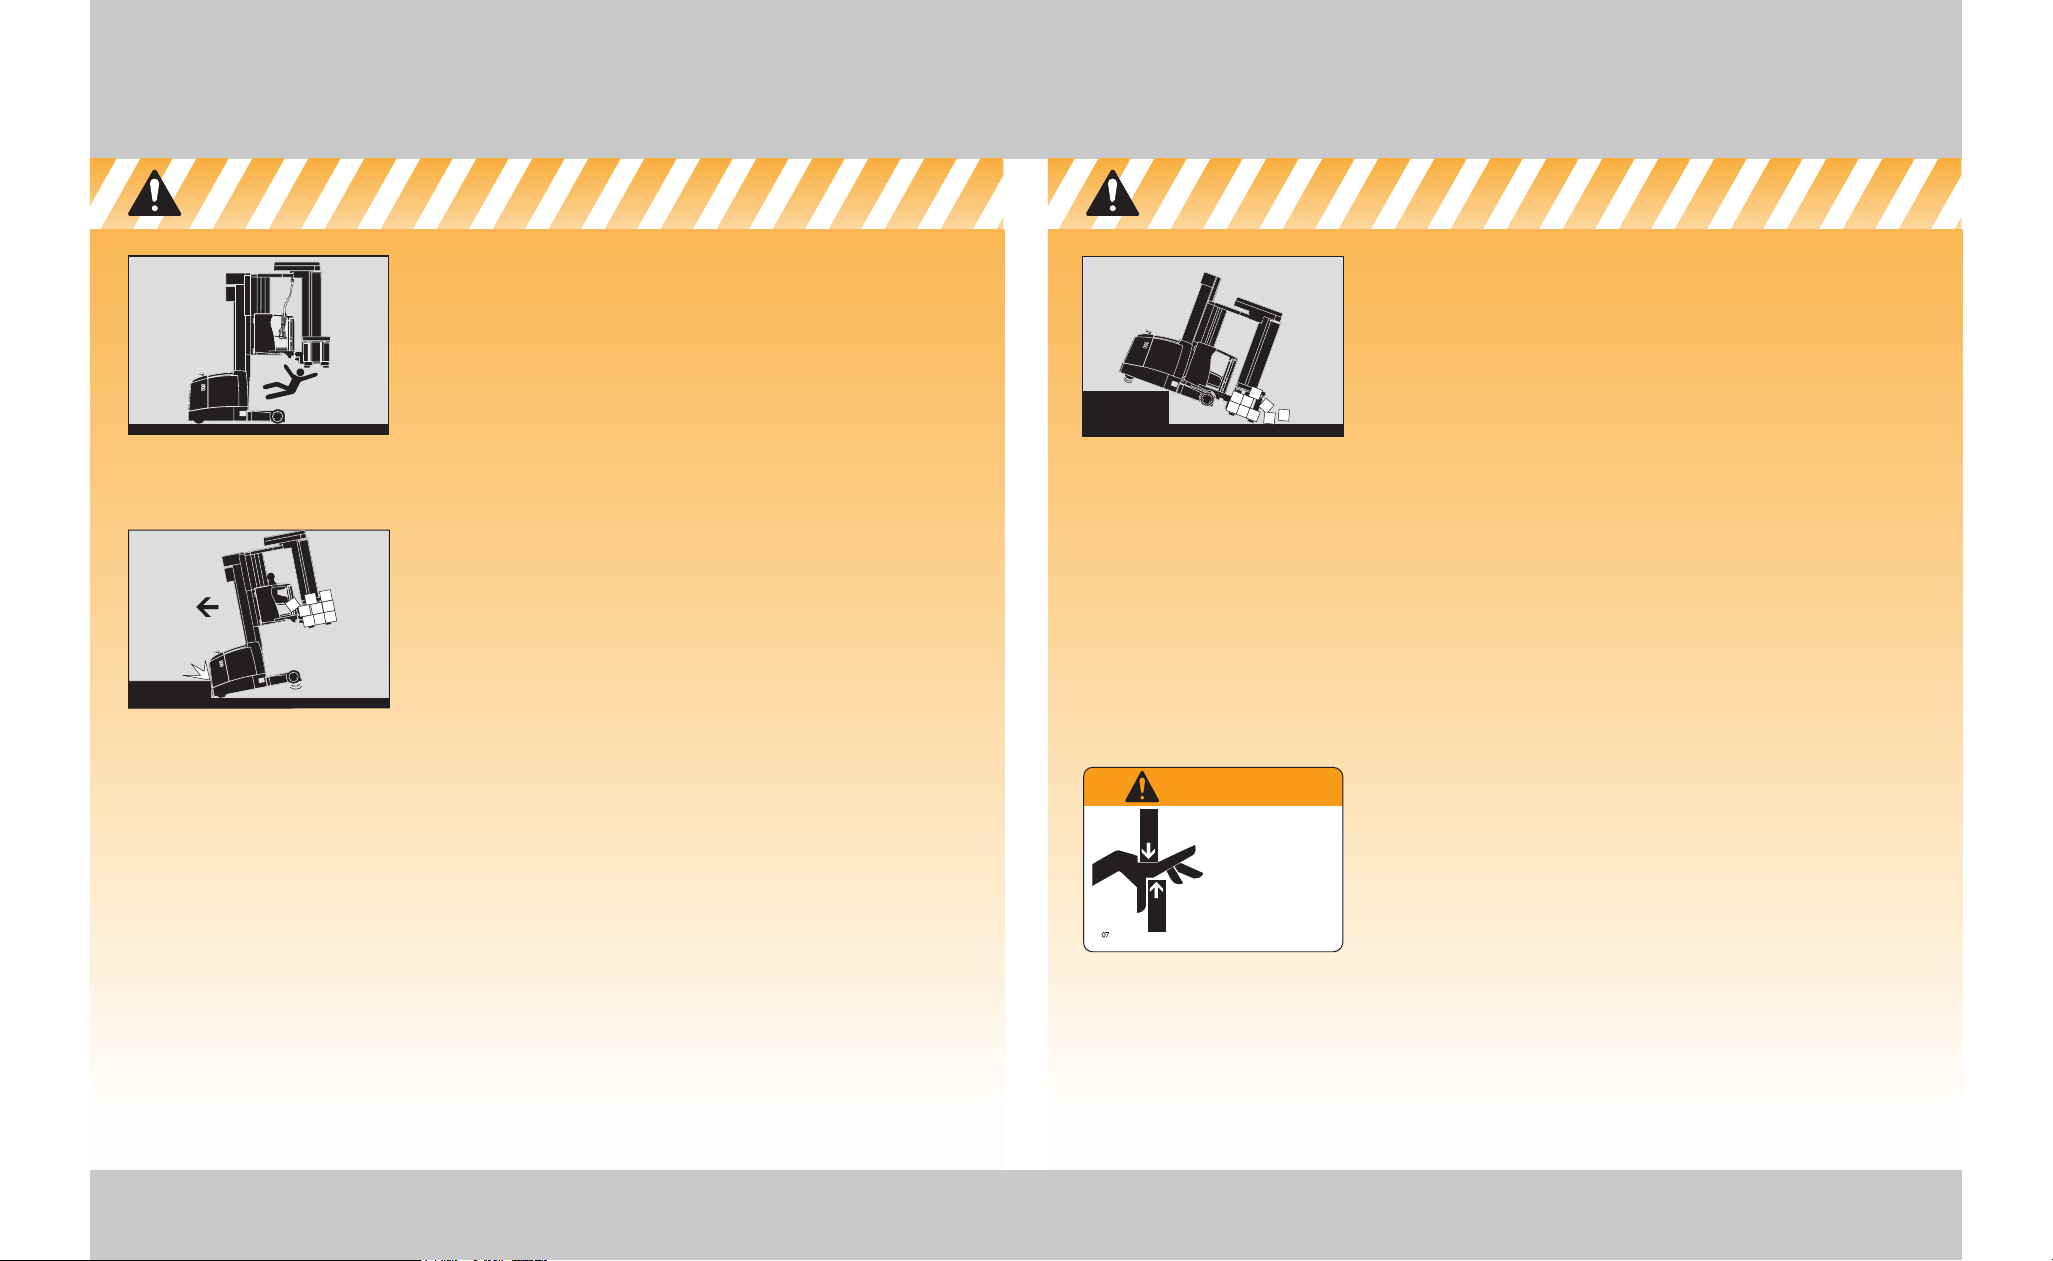
Falling from a platform can cause serious injury or death.
operator harness and attach lanyard when elevated and working with an open
side gate or with the narrow front rail option.
Head, arms, hands, legs or feet outside the operator area can be
pinned or crushed whenever the truck is moving. Stay within the
operator area and
A dockboard can move or drop while you are on it. Or you could
drive off a dock. Falls from docks or dockboards can cause
serious injury or even death.
Inspect your truck before starting work, make sure it is in good
working order.
* Additional copies of this Operator Manual and all Truck Labels can be obtained
from Crown Equipment Corporation, New Bremen, Ohio 45869 U.S.A.
stop the truck completely before getting off.
Make sure you are safe.
All rights reserved under International
and Pan American copyright conventions
Copyright 2007 Crown Equipment Corp.
Put on the
You could be killed or seriously injured
adequately trained for lift truck operation!
if you are not
1 Warning
You Must be Trained 2
Page 3
Protect Yourself
Know the HazardsKnow the Hazards
WEAR YOUR OPERATOR HARNESS
Falls from a platform can cause serious injury or even
death.
• Use your operator harness and lanyard when elevated
and working with an open side gate or with the
narrow front rail option. Read the warnings on the
harness.
• Check your harness and lanyard. Replace them if they
have ever been used to stop a fall, or if damaged or
worn.
LOOK WHERE YOU'RE DRIVING
• If you run into things you can be injured. You could
fall from the truck or the load could shift and hit you.
Make certain there is nothing in your path, on the floor
or sticking out of the racks.
• Always be alert to the area around you and watch
where you are driving. You could be pinned or
crushed by objects intruding or poking into the
operator area.
DRIVE CAREFULLY
• Keep your hands on the controls and feet on the
pedals. Keep your entire body in the operator area.
A foot or hand caught between the truck and a fixed
object will be crushed or even cut off.
• Keep your truck under control at all times. Drive at a
speed that allows you to stop safely. Be even more
careful on slippery or uneven surfaces. Do not drive
over objects on the floor.
CHECK YOUR LOADS
• Before you pivot a load, make certain it won't intrude
or poke into the operator area. Do not handle long,
wide or unstable loads. Check clearances before
using traverse.
WARNING
Stay clear of all
moving parts.
Moving parts can
cut or crush hands,
feet, arms or legs.
AVOID FALLS AND TIPOVERS
Tipovers are very serious accidents, you can be
crushed or even killed. The best way to prevent injury
is to know where you are at all times and follow the
rules of safe truck operation. There is no sure way to
avoid injury during a tipover or a drop from a dock.
• Be careful if driving around docks or ramps. Stay
away from the edge. Watch where you're going.
• When traveling out of the aisle, keep the forks or
load close to the ground. Watch for overhead
obstructions. Perform all truck movements smoothly
and at a speed that will give you time to react in
an emergency.
• Turret Stockpickers should not be used on ramps or
grades. If you must drive on a grade, travel slowly
and don't turn. If carrying a load, point the forks
upgrade. If unloaded, point the forks downgrade.
• An unloaded truck can also tip over. Be just as
careful using an unloaded truck as you are using a
loaded one.
USE YOUR TRUCK SAFELY
• Keep hands and feet away from all moving parts
such as the load handler, masts or wheels. Don't sit
or stand on the side gates.
• Never stand on or under the forks, or allow anyone
else to stand on or under them. Never allow
passengers on the truck. There is no safe place
for them.
• Before you leave your truck:
• Come to a complete stop.
• Lower the forks to the floor.
• Shut the truck off with the key switch.
Protect Yourself 43 Protect Yourself
Page 4
Contents
8563-A
Serial Number
Truck Type
Attachment Data
Capacity with Mast Vertical
Truck Weight, Less Load, with Max. Battery,
and Attachment 5
kg(lb)
Capacity
kg (lb) mm (in)
mm (in)
*
Truck capacity must be reduced by operator
weight in excess of 100kg (220 lb)
What's in it for You?
Warning 1
You Must be Trained 2
Protect Yourself 3
Contents 5
What's in it for You? 6
Your Turret Stockpicker 7
Turret Truck Parts 9
Capacity & Load Center 11
Capacity Plate 13
Display Panel 15
Power On & Off 17
Sit or Stand Operation 18
Braking 19
Platform Safety 21
Traverse & Pivot 23
Raise & Lower 25
Steering & Travel 27
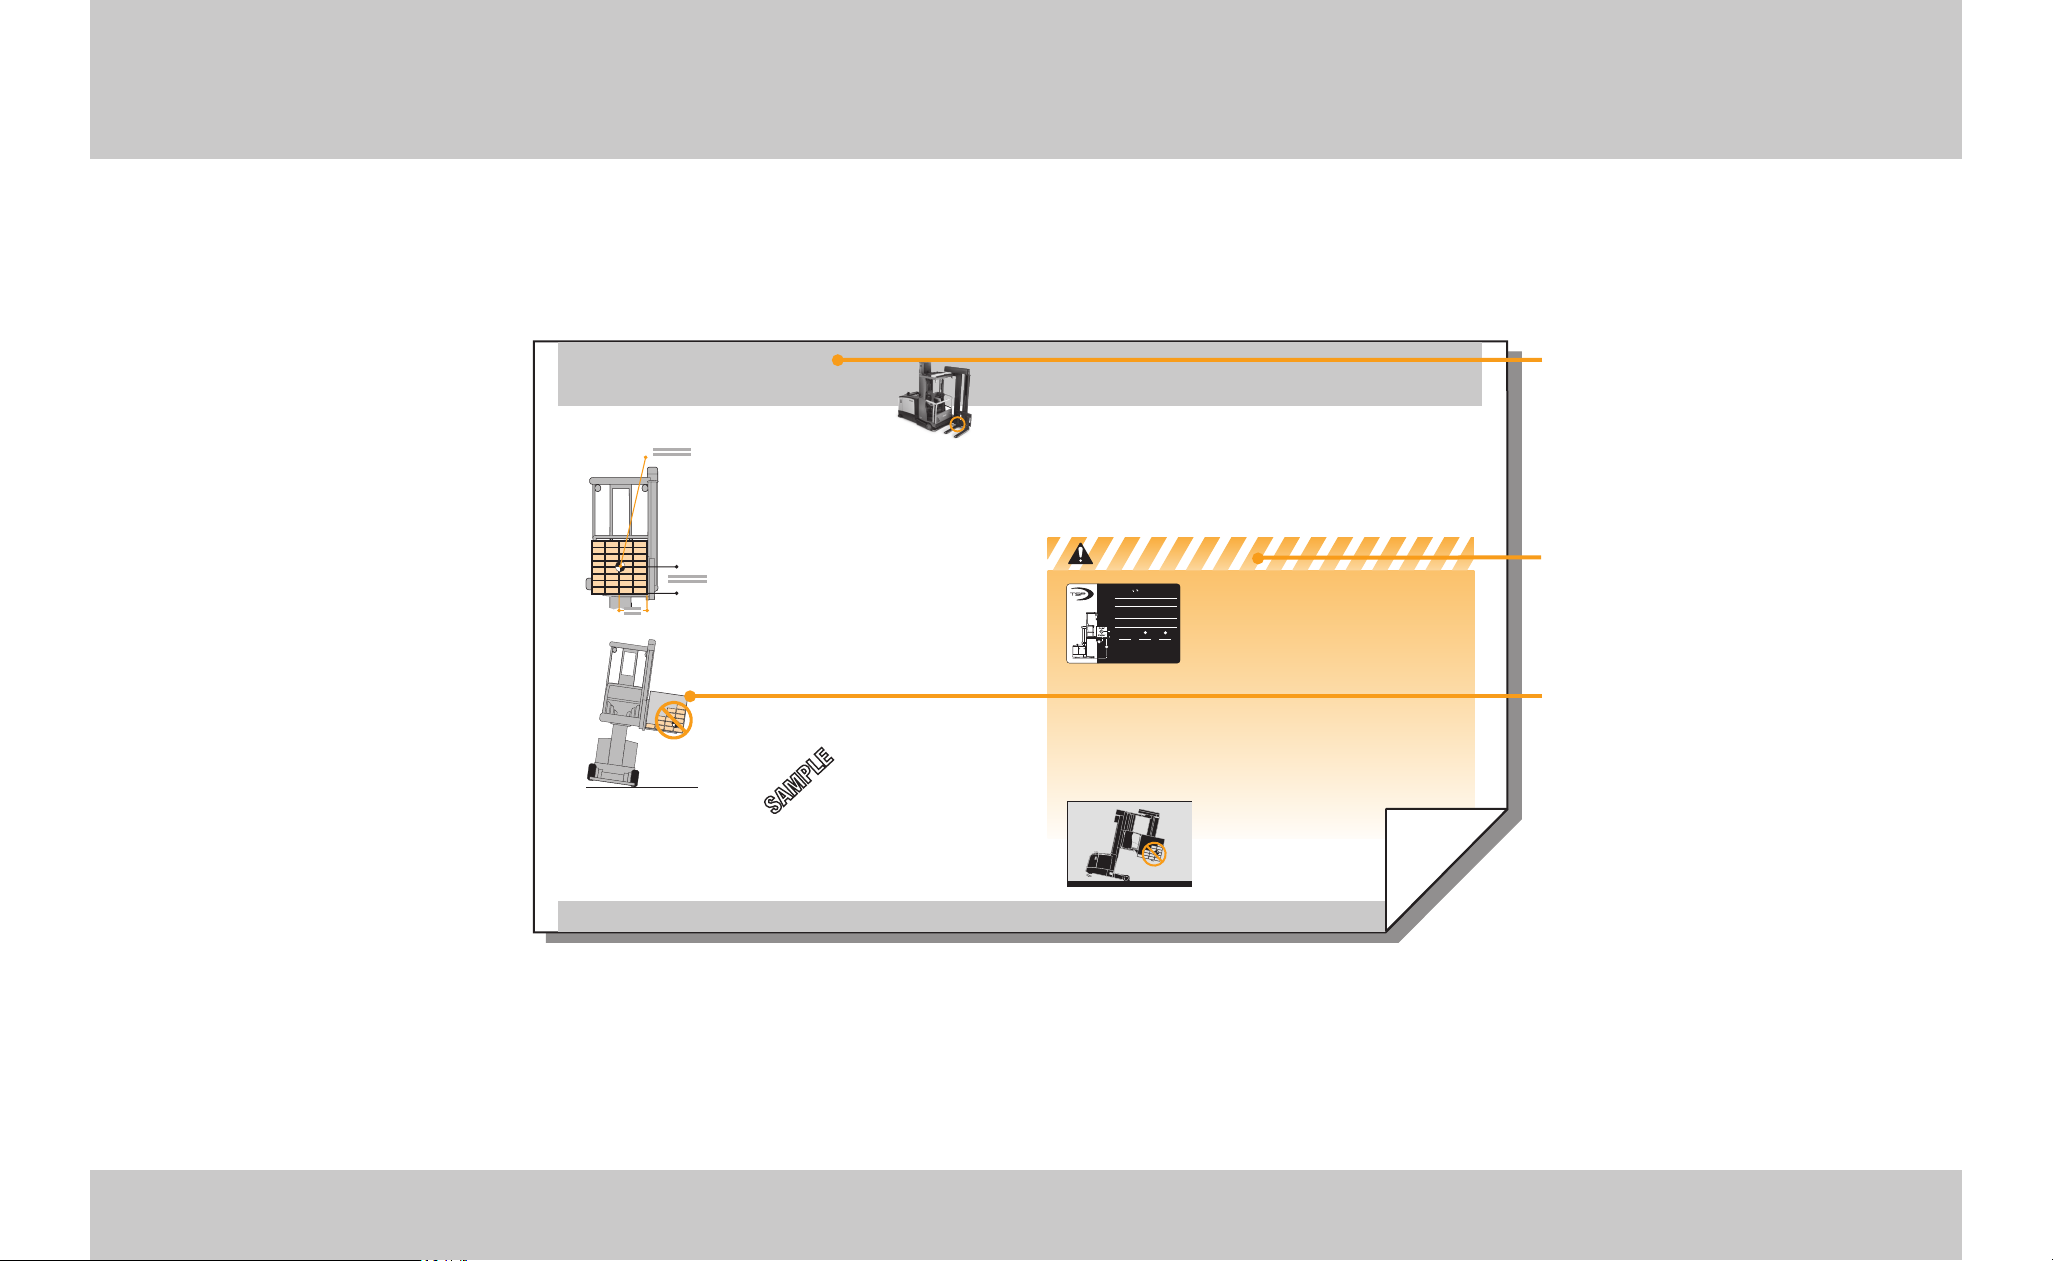
Capacity & Load Center
WHAT IS YOUR TRUCK CAPACITY?
Capacity is the load (including pallet or
container) that can be lifted to a given height
at a given load center. See the capacity plate on
your truck. Make certain you use the correct
units of measure.
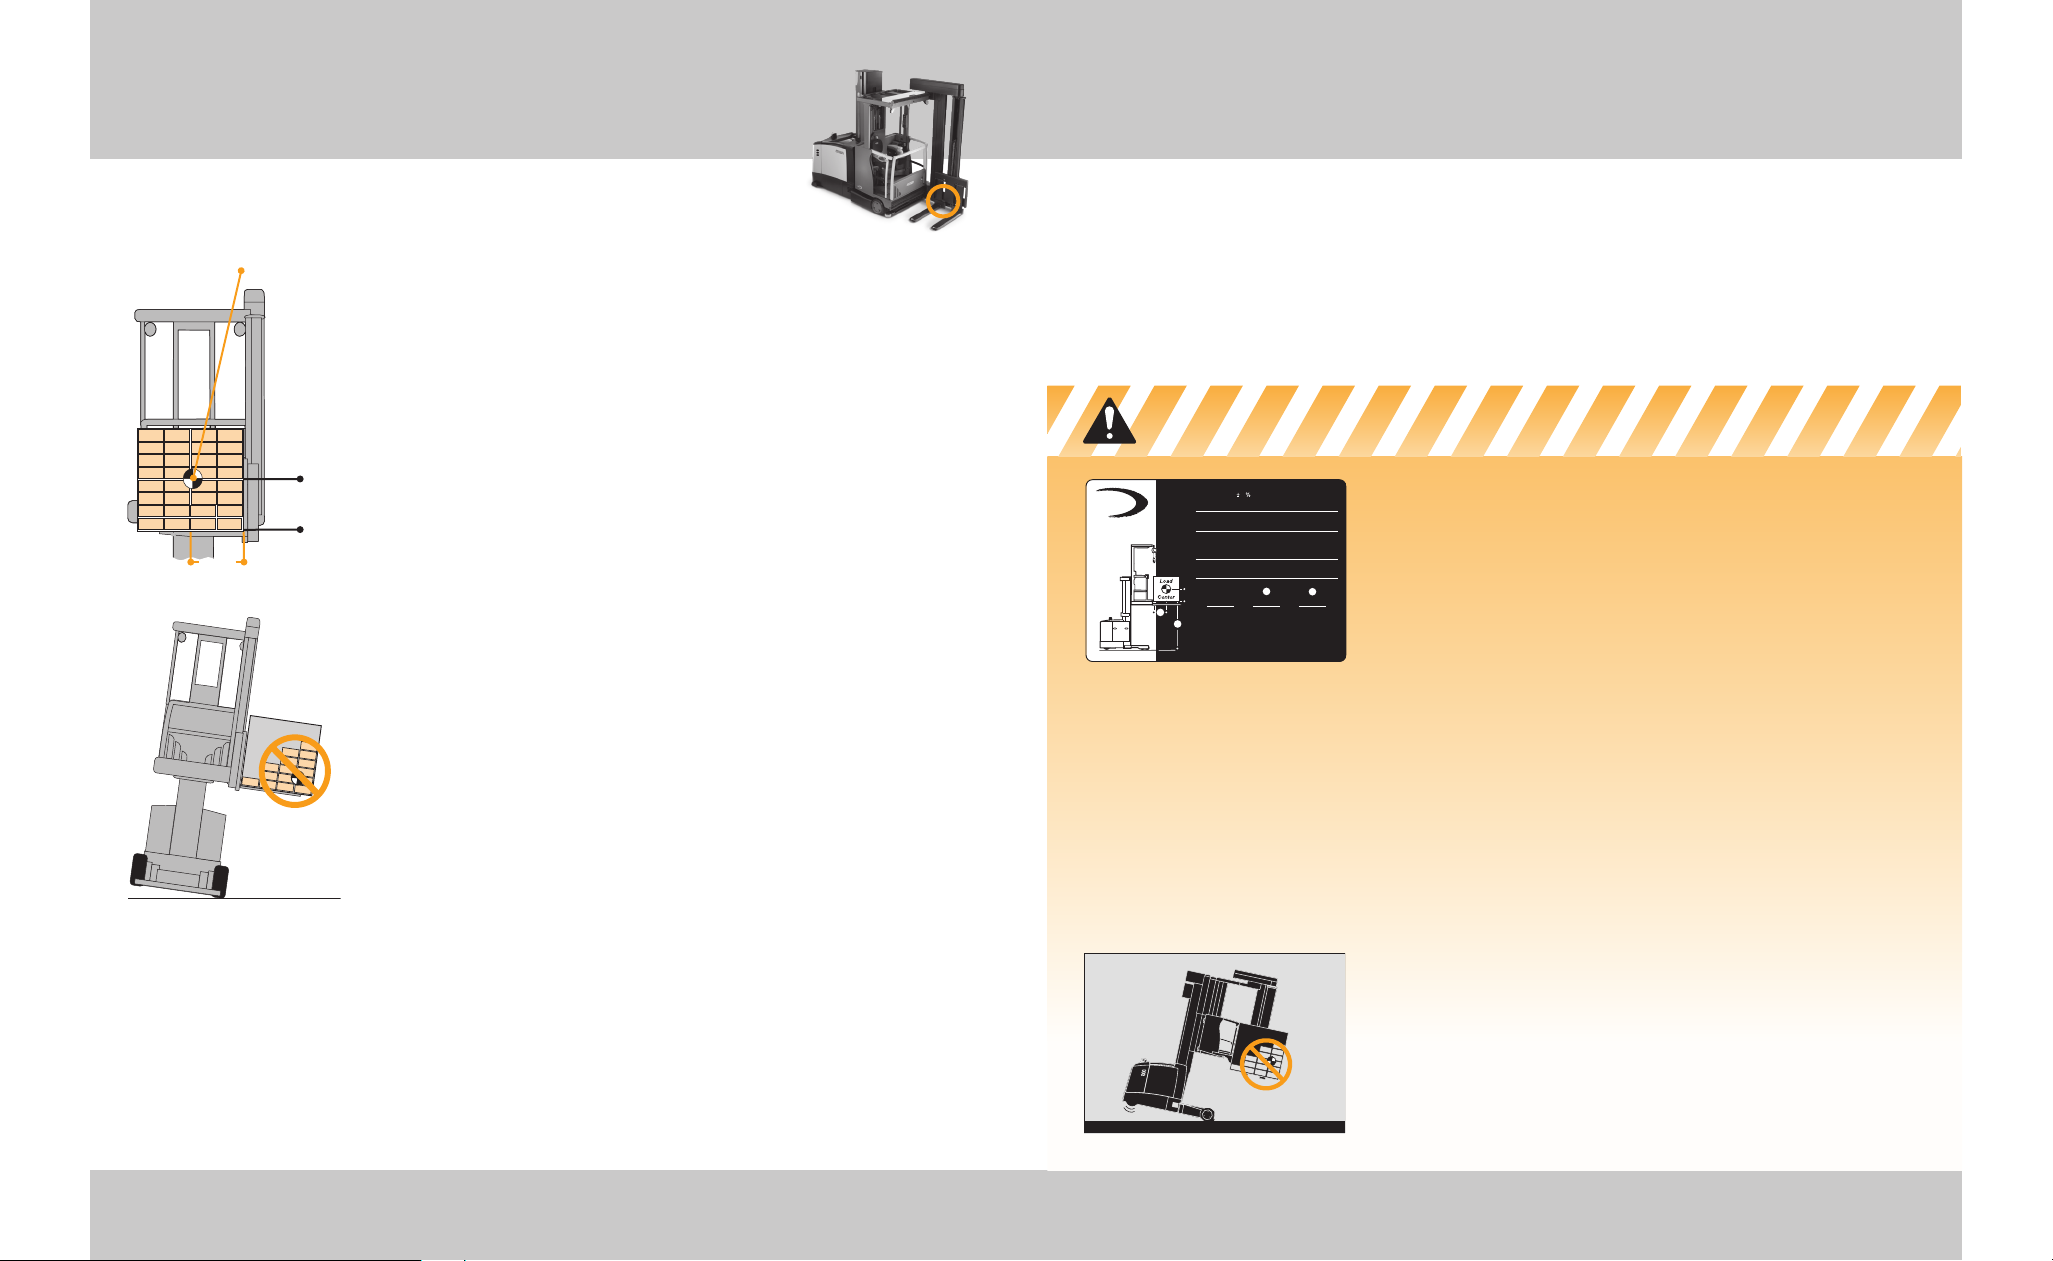
WHAT IS LOAD CENTER?
Load center is the distance from the faces of the
forks to the center of an evenly distributed load.
LOADS MUST BE EVENLY DISTRIBUTED
Your truck could tip over, in any direction, if a
load is placed or shifted to the front, back or side
of a pallet or container
SAMPLE
Know the Hazards
3715(8193)
E
7000
SERIES
Platform
What's in it for You?
SAMPLE
12345678
600(24)
1125(2500)
7010(276)
1350(3000)
6095(240)
750(1650)
7010(276)
900(2000)
6095(240)
KNOW YOUR LOAD
Do not exceed the capacity shown on your truck's
capacity plate. Be careful when handling long, high
or wide loads. Do not handle unstable loads.
600(24)
EXCEEDING TRUCK CAPACITY CAN CAUSE AN ACCIDENT
600(24)
900(36)
900(36)
Know the capacity of your truck as shown on your
capacity plate. Make certain you use the correct units
of measure. Pay attention to:
• Weight of load
• Load center
• Lift height
HYDRAULIC OPERATIONS CAN AFFECT STABILITY
Be careful when using operations such as traverse,
extend or pivot. Remember that anytime the forks
move, the load moves also. This can affect stability.
Perform all operations smoothly.
CENTER THE LOAD
Your truck could tip over if a load is placed or shifted
to the front, back or side of a pallet or container.
Make sure your load is evenly distributed and
centered over the forks.
WHAT'S IN IT FOR YOU?
The better you understand your truck and how to use
it, the better and safer operator you can be. Here are
some guides to using this manual.
QUICK LOCATORS
In addition to the "Contents" page
you can use page headings to find
topics. Some pages also have a
picture of the truck in the corner
showing features or functions
covered on that page.
"KNOW THE HAZARDS"
Watch for and read these special
blocks. You will find information
about possible safety hazards and
how to avoid them.
HOW-TO-DRAWINGS
On many pages you will find
pictures as well as text to help you
understand how to use your truck
safely and productively.
Traveling & Plugging 29
Wire Guidance Option 31
Daily Safety Check 35
Be a Safe Driver 37
Battery Maintenance 41
Warning Labels 44
5 Contents
11 Capacity & Load Center
Capacity & Load
What's in it for You? 6
Page 5

Your Turret Stockpicker
TURRET STOCKPICKERS
Your turret truck is designed to transport, stack and
retrieve loads.
YOUR TURRET TRUCK IS NOT AN AUTOMOBILE
With a load it may weigh more than 6 automobiles.
• You don't steer the same.
• You don't brake the same.
• You don't accelerate the same.
HOW TO DRIVE YOUR TRUCK
Put the side gates down. Keep your hands and feet inside
the operator compartment and on the controls. Look in the
direction you're going.
WHEN TO USE THE HARNESS AND LANYARD
Wear your harness and attach the lanyard whenever the
operator compartment is elevated and you have a side gate
open. See chart below.
Wear your harness and lanyard at all times if your truck has a
narrow front rail option.
GIVE YOUR BODY A BREAK
Take advantage of stop time. Flex your arms and legs.
Staying alert will help you be a better and safer driver.
FALL PROTECTION/PREVENTION SELECTION CHART
Fall Protection Devices
Full Body Harness
Energy Absorber - max total length 1.8m (6ft)
Self-Retracting Lanyard - max total length 2.4m (8ft)
1) Truck capacity shall be reduced by the operator(s) weight in excess
of 100kg (220 lbs)
2) Energy Absorbing Lanyard is prohibited by CAL-OSHA in the state of
California.
3) All components of the fall protection system shall be rated for the
operator's weight.
X
X
Operator Weight kg (lbs.)
1
< 141 kg
(<311 lbs.)1
X X
2
X
(311 - 400 lbs.)
X
X X X X
X
X X
141-181 kg1
X
3
X
X
1
>181 kg1
(>400 lbs.)
Contact
Crown
2)
X
BUILT TO STANDARDS
This truck was designed
and built to current industry
and government standards
and guidelines. For more
information see the following:
• American National
Standards Institute
(ANSI/ITSDF) B56.1
(Download free from
www.itsdf.org)
• Occupational Safety and
Health Act (OSHA)
§1910.178, Rev. 1999
(Download free from
osha.gov)
• Underwriters Laboratory
(UL 583)
• National Fire Prevention
Association (NFPA 505)
Hands on controls
1
Side gates down
Feet on pedals
Your Turret Stockpicker 87 Your Turret Stockpicker
Page 6
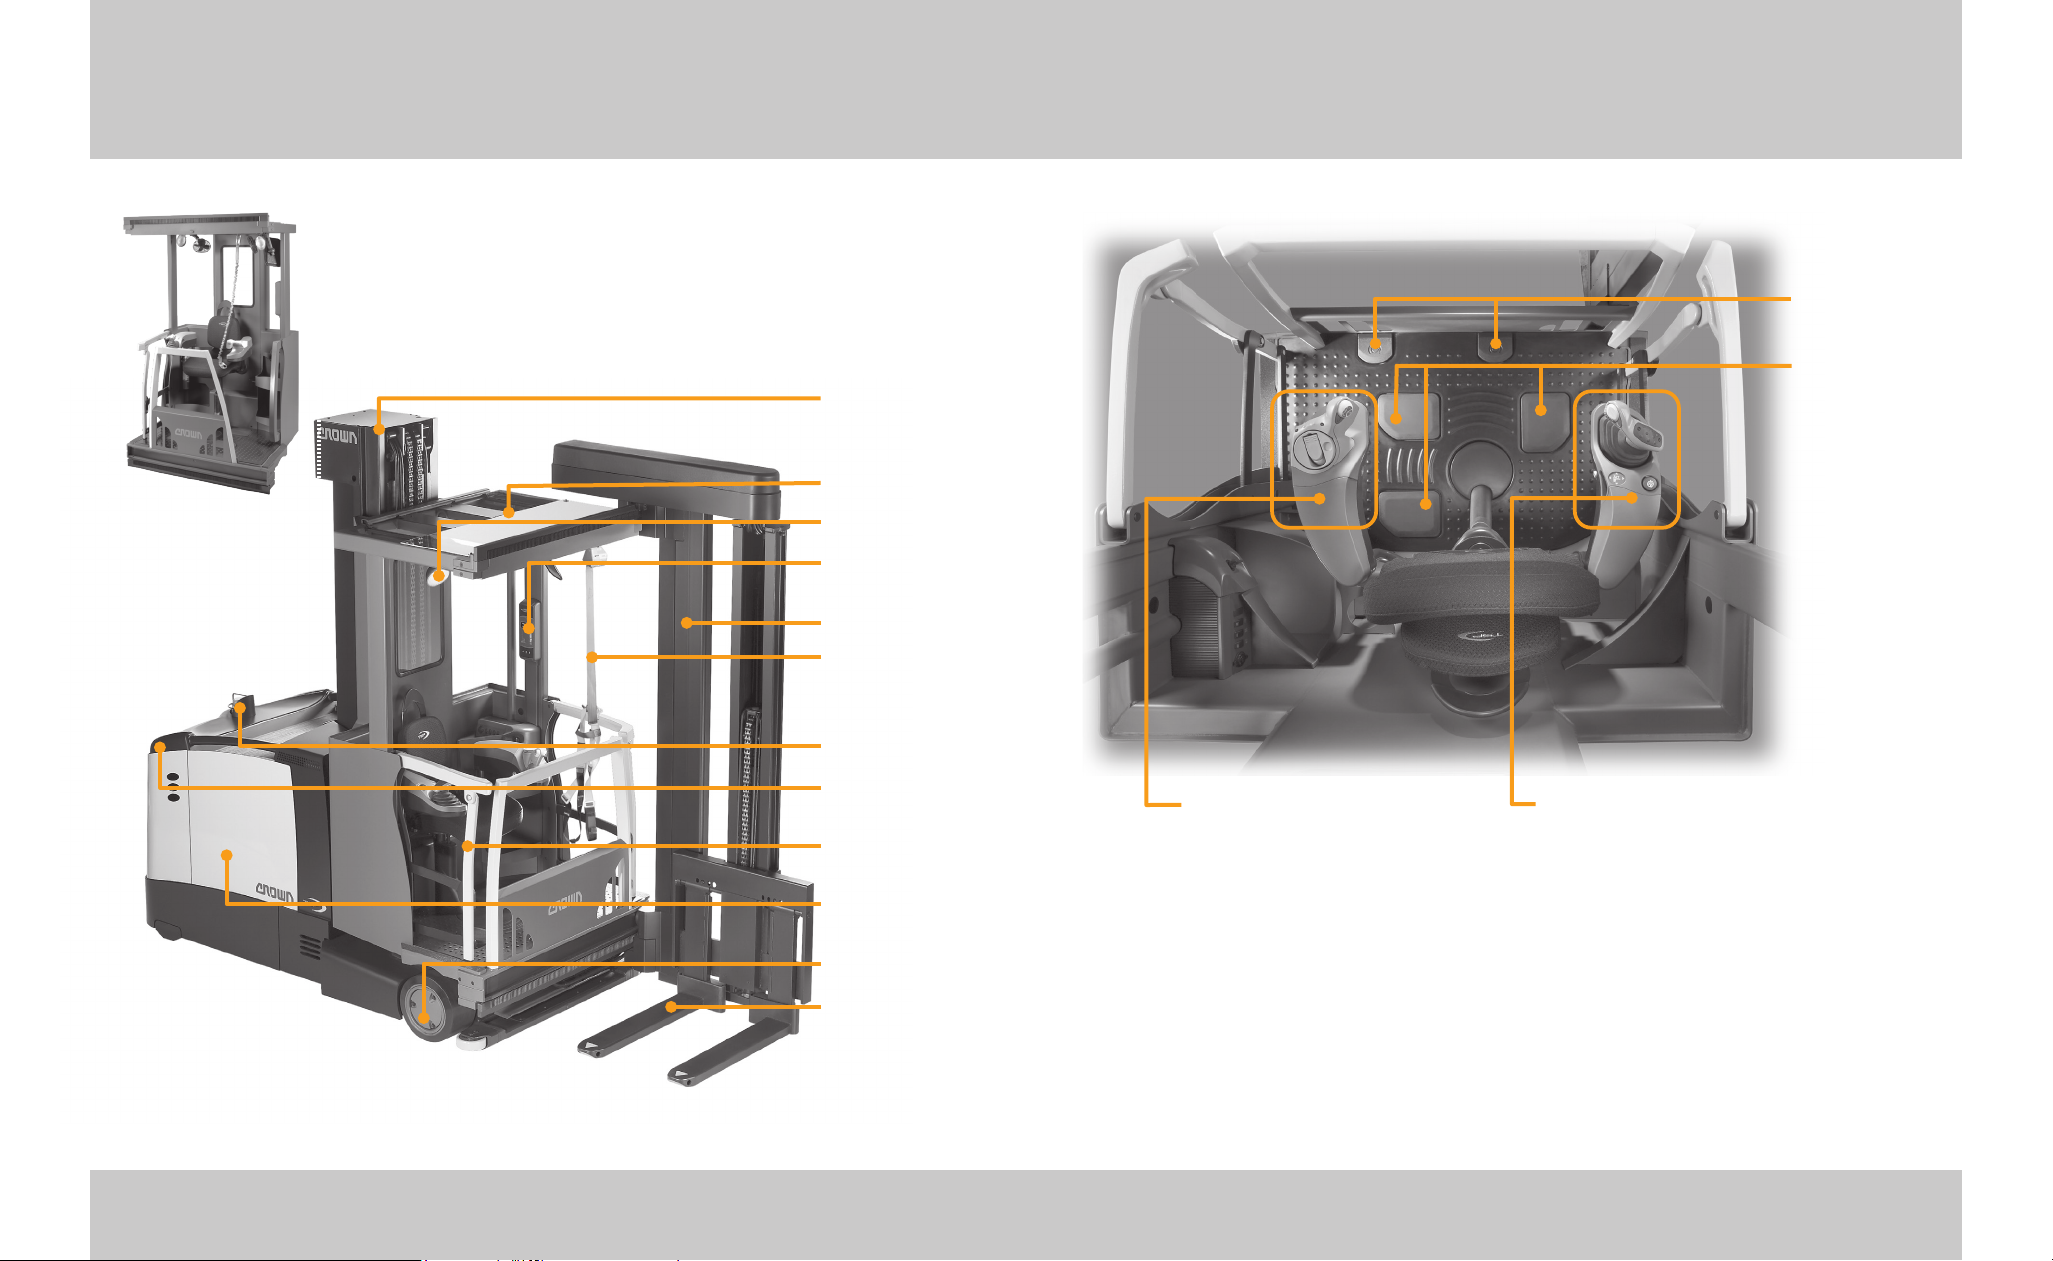
Turret Truck Parts
Primary Mast
Overhead Guard
Foot
Brake Pedals
Foot
Presence Pedals
View reects narrow
front rail option
Work Lights
Operator Display
Panel
Auxiliary Mast
Operator Harness
and Lanyard (See
chart on page 7)
Flashing Light
Lowering Valve
(under rear cover)
Side Gate
Battery (inside)
Load Wheel
Fork
Left Hand Controls:
Steering Handle
Override Option
Fork Pivot
Auxiliary(Fork) Raise/Lower
Auto Fork Pivot
Left Armrest Swing
Integrated Hand Sensor
Right Hand Controls:
Travel
Primary (Platform)Raise/Lower
Traverse
Horn
Seat Rotate
Seat Height
Emergency Disconnect
Right Armrest Swing
Wire Guidance
Integrated Hand Sensor
Turret Truck Parts 109 Turret Truck Parts
Page 7
Capacity & Load Center
8563-A
Serial Number
Truck Type
Attachment Data
Capacity with Mast Vertical
Truck Weight, Less Load, with Max. Battery,
and Attachment 5
kg(lb)
Capacity
kg (lb) mm (in)
mm (in)
*
Truck capacity must be reduced by operator
weight in excess of 100kg (220 lb)
Load
Center
Center of evenly
distributed load
600mm
(24 in.) Max
WHAT IS YOUR TRUCK CAPACITY?
Capacity is the load (including pallet or container)
that can be lifted to a given height at a given load
center. See the capacity plate on your truck. Make
certain you use the correct units of measure.
WHAT IS LOAD CENTER?
Load center is the distance from the faces of the forks
to the center of an evenly distributed load.
LOADS MUST BE CENTERED & EVENLY DISTRIBUTED
Your truck could tip over, in any direction, if a load is
placed or shifted to the front, back or side of a pallet
or container.
Know the Hazards
TSP
7000
SERIES
3715(8193)
E
Platform
12345678
600(24)
1125(2500)
1350(3000)
750(1650)
900(2000)
SAMPLE
600(24)
7010(276)
600(24)
6095(240)
900(36)
7010(276)
900(36)
6095(240)
KNOW YOUR LOAD
Do not exceed the capacity shown on your truck's
capacity plate. Be careful when handling long, high or
wide loads. Do not handle unstable loads.
EXCEEDING TRUCK CAPACITY CAN CAUSE AN ACCIDENT
Know the capacity of your truck as shown on your
capacity plate. Make certain you use the correct units
of measure. Pay attention to:
• Weight of load
• Load center
• Lift height
HYDRAULIC OPERATIONS CAN AFFECT STABILITY
Be careful when using operations such as traverse,
extend or pivot. Remember that anytime the forks
move, the load moves also. This can affect stability.
Perform all operations smoothly.
CENTER THE LOAD
Your truck could tip over if a load is placed or shifted
to the front, back or side of a pallet or container.
Make sure your load is evenly distributed and
centered over the forks.
Capacity & Load Center 1211 Capacity & Load Center
Page 8
8562-A
Serial Number
Attachment Data
Truck Type
Fork Extend / Offset
7000
SERI ES
TSP
Load
Center
Truck Weight, Less Load, with Max. Battery,
and Attachment 5
Capacity with Mast Vertical
Capacity
kg (lb)
C
mm (in)
mm (in)
C
A
kg (lb)
mm (in)
Capacity Plate
SAMPLE
CAPACITY PLATE
The information
shown on this
sample plate
does not apply
to your truck.
7000
SERI ES
7050
E
Platform
12345678
(24)
600
1180
1360
815
955
(2600)
(3000)
(1800)
(2100)
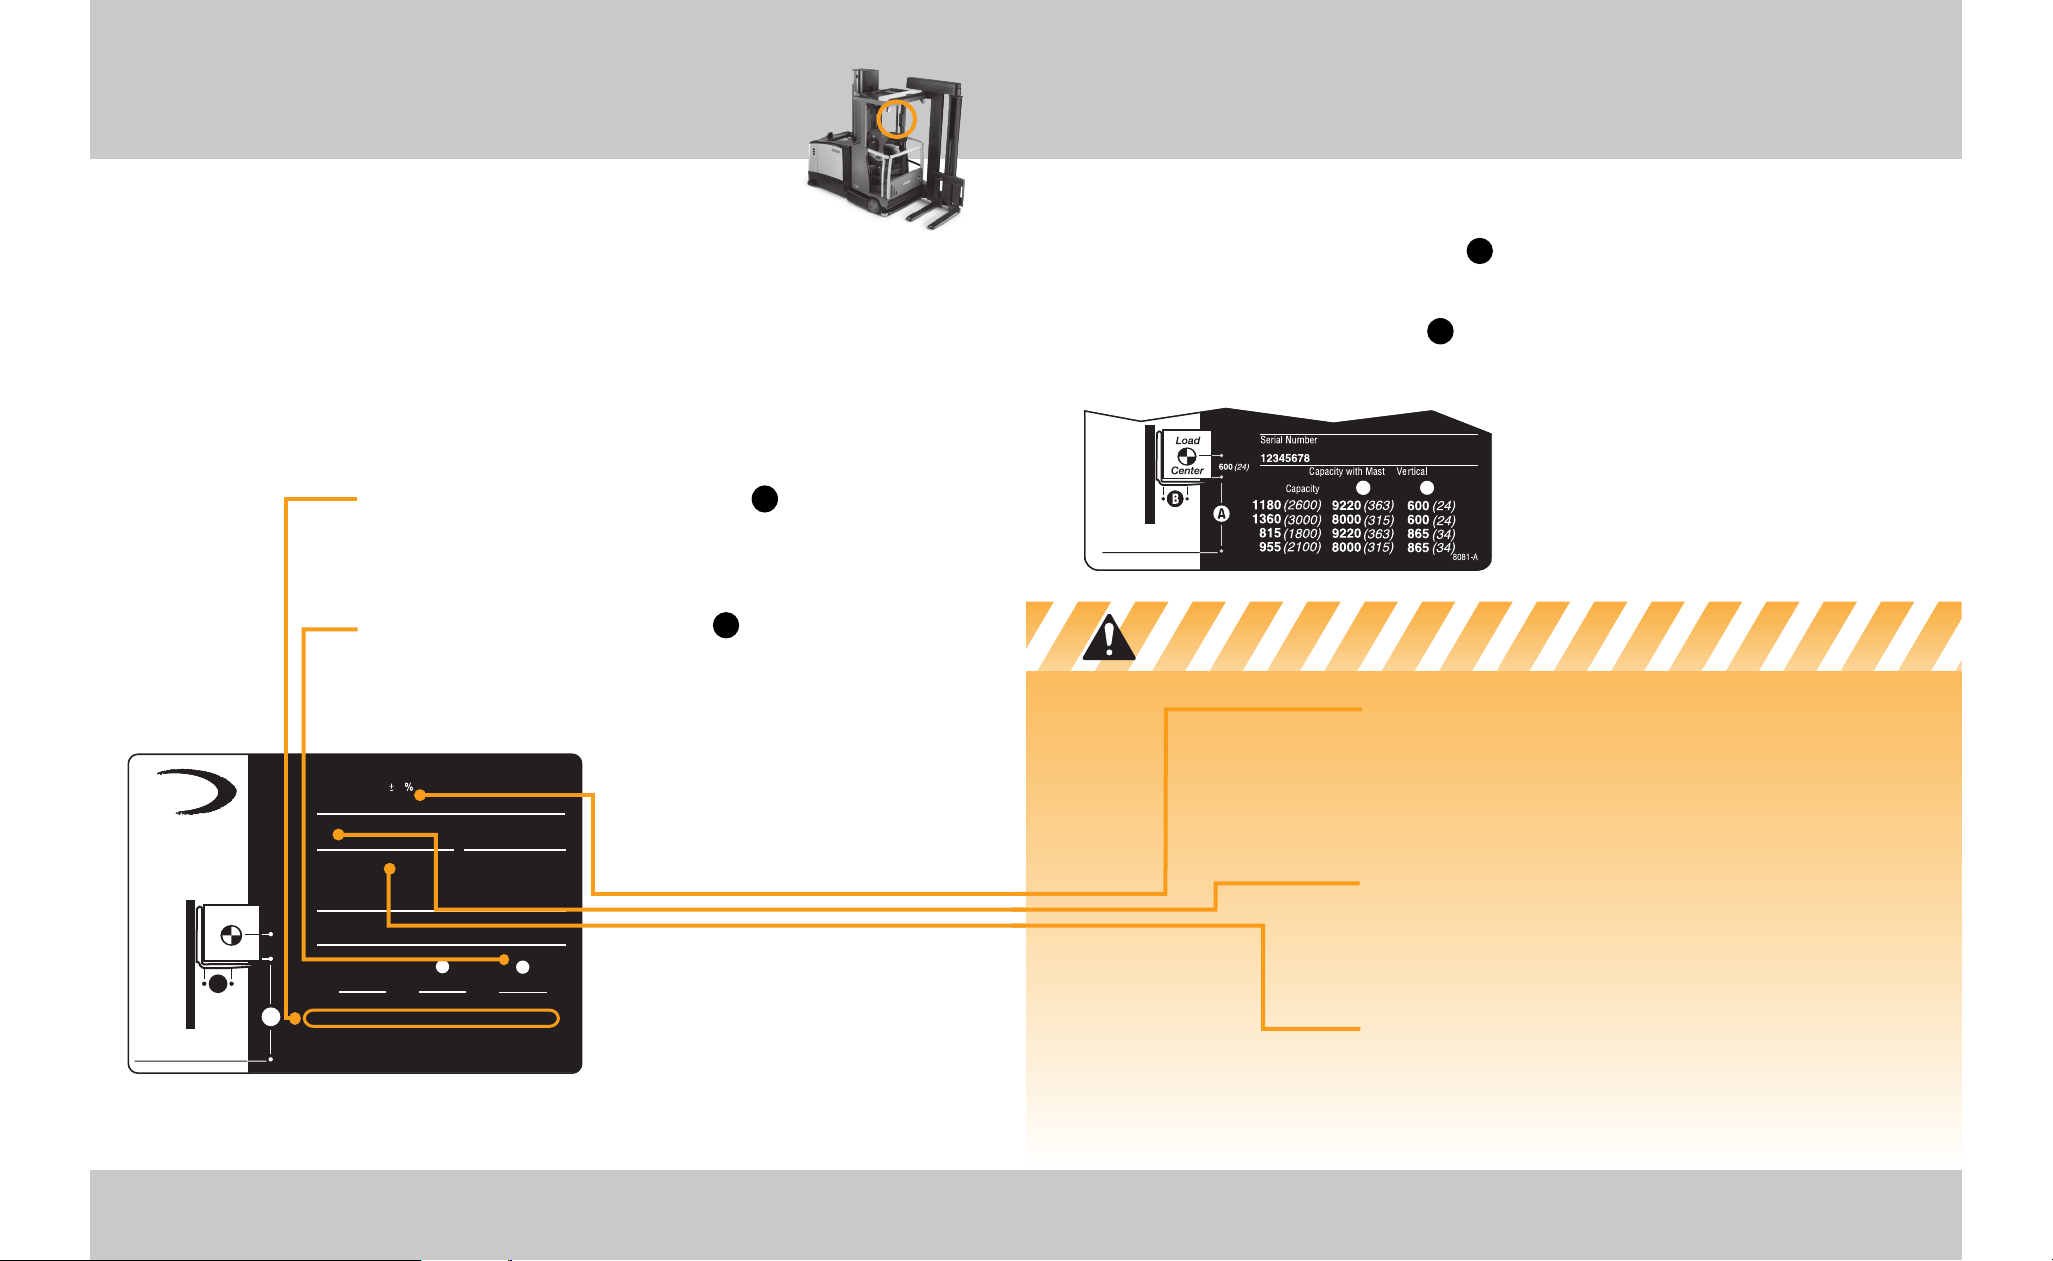
CAPACITY PLATE INFORMATION
The capacity plate is on a console in the
operator area. It contains:
• Serial number
• Capacity information (load, load center and lift height)
• Truck type (a fire safety rating)
• Truck Weight, Less Load, with Max. Battery, and
Attachment 5 %
• Attachment information (if any)
+
-
• Fork Extend/Offset
AFTER AUGUST 2017: READING YOUR CAPACITY PLATE
Capacity may be reduced as lift height increases.
C
For example: On the sample plate, 1360kg (3000 lb)
can be lifted to 8000mm (315 in). But above 8000 (315),
to 9220 (363), capacity is reduced from 1360 (3000) to
1180 (2600).
Capacity is reduced as load center increases.
A
For example: On the sample plate, 1360kg (3000 lb) can
be lifted if the load center is 600mm (24 in). But if the
load center is increased to 865 (34), capacity is reduced
from 1360 (3000) to 955 (2100).
CAUTION:
Truck Capacity must be reduced by
(15540)
100(4)
operator weight over 100 kg (220lb).
You may not increase capacity if load
center is less than shown on your
capcity plate
SAMPLE
9220 600
(363) (24)
8000 600
(315) (24)
9220 865
(363) (34)
(315) (34)
8000 865
A
Note:
ANSI/ITSDF B56.1 requires that all
data be shown first in Metric units
and then USA units.
OTHER LIFT HEIGHTS & LOAD CENTERS
Contact Crown for capacities at lift
heights or load centers not given on
your capacity plate.
BEFORE AUGUST 2017: READING YOUR CAPACITY PLATE
Capacity may be reduced as lift height increases. For example: On the sample
A
plate, 1360kg (3000 lb) can be lifted to 8000mm (315 in). But above 8000 (315),
to 9220 (363), capacity is reduced from 1360 (3000) to 1180 (2600).
Capacity is reduced as load center increases. For example: On the sample plate,
B
1360kg (3000 lb) can be lifted if the load center is 600mm (24 in). But if the
load center is increased to 865 (34), capacity is reduced from 1360 (3000) to 955 (2100).
SAMPLE
Caution:
load center is less than shown on your
capacity plate.
A
B
Note:
be shown first in Metric units and then USA
units.
You may not increase capacity if
ANSI/ITSDF B56.1 requires that all data
Know the Hazards
TRUCK WEIGHT
Dockboards, elevators and some floors have limited
capacity. Check your capacity plate for the weight of
your truck. Remember to add the weight of the load
you have on the forks. Make certain you use the
correct units of measure.
TRUCK TYPE
Some truck types are not permitted in areas where
there are fire hazards. Watch for marked areas.
For example: You must not drive a type E or ES truck into
an area restricted to EE or EX trucks.
ATTACHMENT DATA
If an attachment on your truck does not match the
information given here on your capacity plate, don't
operate your truck. Your capacity plate may be
wrong. Report the problem to your supervisor.
Capacity Plate 1413 Capacity Plate
Page 9

Display Panel
CAPACITY DATA MONITOR (see Caution)
• Fork height limit lights:
how high, or to which lift zone you can raise the load.
• Fork height lights:
lift zone the forks are in. If any of these lights are on, it
means the auxiliary mast is higher than the collapsed
height of the primary mast. Make certain the load and
auxiliary mast will clear any overhead obstructions.
• Overload warning:
the forks are in, the alarm will "beep" and message
display will read . Immediately
lower the load.
Caution:
lights and/or the Capacity Data Monitor is for reference
only. You must always be alert to load center, load
distribution, load height and load weight. You must
also be aware when the load or auxiliary mast extends
above the top of the primary mast, and how much
overhead clearance is needed.
BATTERY CHARGE DISPLAY
The green bars show how much charge is left. A
flashing yellow light means the battery needs to be
changed or recharged.
All information displayed by the fork position
The green bars will light to show
A yellow bar will light to show which
If load is too heavy for the lift zone
REDUCE LIFT HEIGHT
DRIVE WHEEL DIRECTION INDICATOR LIGHTS, see page 28
MANUAL STEERING LIGHT, OPTION
Red light means you are in manual steering mode. Take
control of steering tiller.
GUIDANCE LIGHTS, OPTION
Green lights means you are in wire guided mode.
WIRE SIGNAL LIGHTS, OPTION
Amber lights means signal is weak. See message panel.
POWER ON LIGHT
MESSAGE PANEL
The upper half of the message panel is continually
updating fork height, load on forks and battery charge
remaining.
SAMPLE
MESSAGE
PANEL
SERVICE LIGHT
A yellow light means something needs to be serviced.
Report the trouble to your supervisor, even if the truck
seems to be working OK.
SERVICE & OPTION BUTTONS
See service manual.
The bottom line of the message panel will usually
show time and date. However if truck status or
operation requires your attention, instructions will be
displayed here.
Anytime you hear a beep, or if the truck slows down
or won’t work, check message panel for instructions.
Display Panel 1615 Display Panel
Page 10

Power On & Off
KEY SWITCH
• Turn the key clockwise as far as it will go, to the
TEST position. Check that the alarm and all indicator
lights are working.
• Let go of the key and it will return to the
ON position.
• Turn the key back to the OFF position to shut the
truck off. Always turn the key to OFF when leaving
the truck.
EMERGENCY DISCONNECT
Anytime the truck isn't working right, first stop the
truck and then press the emergency disconnect to cut
power to all truck functions, including steering.
Don't use the truck. Report the problem to your
supervisor.
Turn the key switch to OFF and back to ON to
reconnect the battery and reset the emergency
disconnect button.
Sit or Stand Operation
SIT/STAND OPTION
You can drive while seated, with the seat in one of
four locked positions. Or, with the seat locked in the
straight ahead position, flip the seat up to drive while
standing.
Braking and foot presence pedal operation is not the
same for the two operating positions. See pages 19,
20 & 22.
SEAT ADJUSTMENTS
• Pull the release arm under the right armrest to move
the seat up or down.
• Press the trigger on the front of the right multi-task
handle, and rotate the seat until it locks in one of the
four positions.
SIDE SIT ADVANTAGES
The side facing seat position gives you the best view
for driving power unit first. A faster travel speed is also
available with the seat in this position.
17 Power On & Off
ARMREST ADJUSTMENT
You can swing each armrest to the most comfortable
operating position, or to make it easier to get on or off
the truck.
Press the button on the inside of the armrest to release
and swing the armrest.
Sit or Stand Operation 18
Page 11

Braking
BRAKE PEDAL BRAKING WHEN SEATED
When seated step down on either of the front pedals
to apply the brake.
PRESENCE PEDAL BRAKING WHEN STANDING
In the standing position only, the brake will be applied
if you remove either foot from a presence pedal.
Note:
When in the seated position, the truck will coast
if you remove either foot from a presence pedal.
You can stop the truck with the brake pedals or by
plugging (see page 29).
Know the Hazards
MAKE SURE YOUR BRAKES WORK
Test your brakes at the start of each shift. Know the
distance it takes to stop before you start working. If
the stopping distance is too long for you to stop
safely, don't drive the truck. Report any problem
to your supervisor.
SEATED VS STANDING OPERATION
Braking and presence pedal operation is not the same
for the two operating positions. Make certain you
understand all operations and stay alert, especially
when changing operating positions.
Braking 2019 Braking
Page 12

Platform Safety
KEEP THE SIDE GATES DOWN
• Keep the side gates down unless you are
leaving the truck, or required to pick from the
side. The truck will not operate with a gate up.
• Don’t leave the platform when it is elevated.
• Don't sit or climb on the side gates.
• Keep your entire body in the operator area.
HARNESS AND LANYARD
Use your harness and lanyard whenever you are
working from a raised platform and have a side
gate open.
Note
: Trucks equipped with the narrow front rail option
have only a right side gate. The harness and lanyard
must be worn at all times.
FOOT PRESENCE PEDALS
Whether sitting or standing, you must have your feet
on two of the three foot presence pedals to operate
the truck.
Note:
If you remove a foot from one of the presence
pedals while standing, the brake is applied. However
if you remove a foot from one of the presence pedals
while seated, the truck will coast. You must use the
brake pedals or plugging to stop the truck (see pages
19 & 20).
CHECK YOUR DISPLAY
If any truck function doesn't work, your hands or feet
may be out of position, check the message area of the
display for instructions.
Check the harness, lanyard, snap hooks, and mounting
points daily for wear or breakage. If it doesn't look
safe don't use the truck. Report the problem to your
supervisor.
HAND SENSORS
You must have a hand on each of the multi-task
controls for the following load handling functions:
• To initiate platform lift
• Auxiliary raise or lower
• Traverse & extend/retract
• Pivot (manual & auto)
You must have a hand on the right multi-task control for
the following to operate:
• Travel
• Platform raise or lower
Know the Hazards
DANGER
Falling from a raised platform can
cause serious injury or even death.
Attach safety harness and
lanyard when elevated and
working with an open side
gate or with narrow front
rail option.
FALLS CAN KILL
You can reduce the risk of injury by being extra careful
while working on an elevated Turret Stockpicker.
• Put the side gates down and keep your entire body
inside the operator area.
• Always watch where you're going. Running into an
object could cause you to fall.
• Wear your harness and keep your lanyard fastened
when working with an open side gate, or if your truck
has the narrow front rail option.
Platform Safety 2221 Platform Safety
Page 13

Traverse & Pivot
TRAVERSE (right multi-task handle)
Roll the thumb ball to the left to move the carriage or
forks to the left. Roll the ball to the right to move the
carriage or forks to the right.
The farther you move the ball from neutral, the faster
the carriage or forks will move.
Before you traverse a load, make certain it will clear
the platform.
PIVOT (left multi-task handle)
Push the thumb ball to the left to pivot the forks
clockwise. Push the ball to the right to pivot the forks
counter clockwise.
Before you pivot a load, make certain it will not poke
or intrude into the operator area.
AUTO PIVOT
This feature allows you to traverse and pivot at the
same time, keeping the mast and forks within the
running lines of the truck.
Press the trigger on the front of the left multi-task
handle. Then roll the traverse thumb ball in the
direction you want the mast and forks to traverse. The
forks will traverse and pivot automatically.
OPTIONAL FUNCTIONS (right multi-task handle)
This thumb ball movement is available to control
optional functions such as fork tilt or fork position.
Your company must train you how to operate any
options.
CHECK YOUR DISPLAY
If any hydraulic function doesn't work, check the
message area of the display for instructions.
• The gates must be down.
• The hand sensors and foot-presence pedals must
be actuated.
• Some service conditions may also prevent you from
operating your truck.
MANUAL TRAVERSE
If there is a problem with traverse, you can have
someone on the floor assist you by using the power
unit manual traverse switch. The switch is located
under the rear power unit cover, on the right side of
the truck.
• To traverse out of the rack
Locate the platform manual traverse switch in the left
hand storage area.
Press this switch while your assistant on the floor is
pressing the power unit switch. The forks will traverse
out of the rack. Either of you can stop the movement
by releasing your switch.
• To traverse into the rack
Press the platform switch twice to traverse into the
rack.
Traverse & Pivot 2423 Traverse & Pivot
Page 14

Raise & Lower
RAISE & LOWER
Primary raise and lower lets you move the entire
operator platform, and forks, up or down on the
primary mast.
Auxiliary raise and lower lets you move just the forks
up or down on the auxiliary mast.
Primary Raise & Lower (right multi-task handle)
Move the right multi-task handle to the
right to raise the platform and forks.
Move the handle to the left to lower
the platform and forks.
The farther you move the multi-task
handle from the neutral position, the
faster the platform will raise or lower.
Auxiliary Raise & Lower (left multi-task handle)
Roll the thumb ball up to raise only the forks,
Roll the ball down to lower only the forks.
The farther you move the ball from
the neutral position, the faster the
forks will raise or lower.
MANUAL LOWERING
If there is a problem with primary lowering, you
can have someone on the floor lower the platform by
using the manual lowering valve. The valve is located
under the rear power unit cover, on the right side of
the truck.
You must first make certain the forks are traversed
clear of the rack. See page 24 for manual traverse.
Note:
Always be alert to a display message or any other
indications that the lift chains have become slack.
A slack chain condition can cause serious injury by
allowing the platform to drop suddenly.
Stop lowering immediately if chains become slack.
RAISE & LOWER CUTOUT (optional)
Your truck may be equipped with automatic cutout of
raise or lower at selected heights.
To travel past the cutout height, push the Override
button while, at the same time, moving the Raise/Lower
control.
Be very careful and watch that you don't raise, lower or
drive into obstructions when using the Cutout Override.
Note:
The Override Button is also used with End of Aisle
Control Option. See page 32.
Know the Hazards
RAISE & LOWER CUTOUT OVERRIDE
Using the Cutout Override allows you to travel, or raise
the platform, into areas where there are obstructions
and hazards such as pipes, ducts, conduits, low
ceilings etc.
Hitting any obstruction could tip the truck over,
causing serious injury or even death.
Watch out for obstructions anytime you're operating
your truck. Be even more careful when using Cutout
Override.
MANUAL LOWERING AND TRAVERSE
Keep all body members within the operator
compartment while performing any emergency
operations.
SLACK CHAIN CONDITION
Always be alert for slack lift chains. This condition
could allow the platform to drop suddenly and
cause injury. Stop lowering immediately if chains
become slack.
Raise & Lower 2625 Raise & Lower
Page 15

Steering & Travel
LIFT TRUCKS ARE NOT LIKE AUTOMOBILES
Your lift truck does not steer or drive like an
automobile. Be sure you are trained to operate this
truck. Even then, drive slowly until you get use to the
steering and all other controls.
STEERING AND DRIVING
You will need to drive your truck both in the direction
of the forks (forks first) and also away from the forks
(power unit first or forks trailing). Steering is not the
same in both directions.
Travel, power
unit rst
n
o
i
t
c
n
r
e
u
r
T
i
f
D
o
D
i
r
o
f
t
u
r
n
This shows the direction your
truck will turn, when you turn
the steering handle clockwise.
e
c
t
i
o
n
Travel,
forks rst
DRIVE WHEEL DIRECTION INDICATOR LIGHTS
The green light in the center shows you that the drive
wheel is straight (within 1 degree).
The yellow lights to either side show the approximate
position of the drive wheel while turning.
Know the Hazards
POWER UNIT SWING
Be careful turning while traveling forks first. The
power unit will swing wide in the opposite direction.
Make sure you have clearance, and watch out for
people in the area.
ADJUSTABLE MIRROR
Place the mirror in a position that allows you to see
along the side of the truck and into the aisle behind you.
When adjusting the mirror, keep in mind all seated and
standing positions you normally use.
SLOW DOWN FOR SPILLS OR WET FLOORS
Powder or liquid spills can cause slippery floors.
Slow down or you could lose control of steering and
braking. Be careful and allow for a longer stopping
distance.
Don't run over objects on the floor.
Steering & Travel 2827 Steering & Travel
Page 16

Traveling & Plugging
TRAVEL, FORKS FIRST
Push the right multi-task handle away from you to
travel in the direction of the forks (forks first).
The farther you push the handle from the neutral
position, the faster the truck will travel.
TRAVEL, POWER UNIT FIRST
Pull the right multi-task handle toward you to travel in
the direction of the power unit (power unit first).
The farther you pull the handle from the neutral
position, the faster the truck will travel.
PLUGGING
Plugging is another way to slow down or stop your
truck.
While the truck is moving, pull or push the multi-task
handle through neutral to the opposite direction of
travel. Plugging will not hurt your truck.
TRAVEL POSITION OF FORKS & CARRIAGE
Before traveling at full speed, you must pivot the forks
and sideshift the carriage so they do not extend past
the sides of the truck.
You must also make certain that the load does not
extend past the sides of the truck.
CHECK YOUR DISPLAY
If your truck won't travel, or operates at a reduced
speed, check the message panel on the console display.
Know the Hazards
HORN (right multi-task control)
Press the horn button to blow the horn. Use it to warn
pedestrians and other drivers.
Use your horn when you leave the aisle or come to an
intersection or crosswalk.
LOOK WHERE YOU'RE GOING
Travel in the direction where you have the best
visibility.
PLUGGING VS. BRAKING
Of the two, the brakes are designed to stop the
truck in the shortest distance. Use the brakes in an
emergency or in busy areas.
Traveling & Plugging 3029 Traveling & Plugging
Page 17

Wire Guidance Option
Guidance Wire
30° MAX
ACQUIRING THE WIRE
Toggle the wire guidance switch ON as you near a
guided aisle. Approach the wire at an angle of 30° or
less. Drive slowly and center the truck over the wire.
When you hear a "beep" and the red light turns off, the
truck takes control of steering. Start slowly.
WHEN DRIVING ON THE WIRE
• Always watch where you're going. Make sure your
path is clear.
• Always be alert for "beeps" from the alarm, messages
on the display, or indicator lights that signal changes
in guidance status.
• Start slowly after changing direction of travel. Be
sure the truck is following the wire.
AUTOMATIC SLOW DOWN
While traveling on guidance, your truck may slow
down automatically for certain conditions.
FOR MANUAL STEERING
Take control of the steering handle, toggle the
guidance switch OFF.
Note:
Whenever guidance is OFF, the red light on the
display will be on, and the alarm will "beep" to remind
you that you are in manual steering.
When the truck senses a guidance wire, the red light
will flash and the "beeping" will speed up, to notify
you that the truck senses a wire. To acquire the wire,
see page 31.
WIRE GUIDANCE SENSING OPTION
Wire Guidance Sensing reminds you to turn ON the
wire guidance switch.
With this feature, your truck will “beep” while driving
in manual steer mode on an active guidance wire.
Your company can program your truck to travel at a
slow speed or slow to a stop while “beeping.”
• Low signal strength from the wire.
• Truck deviates slightly from the wire.
• End of Aisle Control (optional) is activated.
AUTOMATIC STOP
Your truck may stop automatically for certain
conditions.
• Signal strength from the wire is lost or is too low.
• Acquiring the wire at an angle greater than 30°.
• Truck deviates too far from the wire.
• End of Aisle Control (optional) is activated.
Wire Guidance Option 3231 Wire Guidance Option
Page 18

Wire Guidance Option continued
END OF AISLE CONTROL OPTION
With this feature, your truck will either slow down or
stop automatically when it comes to the end of an
aisle. You will hear a "beep" and the indicator light will
turn on.
If the truck stops: return the travel control to neutral,
press the override button and resume travel.
This page
left blank
intentionally
Know the Hazards
STAY ALERT
You must be just as careful and alert while driving on
guidance as you are when driving with manual steering.
• Start slowly and look where you're going.
• Always be prepared to steer manually.
• Make sure there is nothing in your path, on the floor
or sticking out of the racks.
LISTEN FOR THE "BEEP", CHECK THE DISPLAY
• Take control of the steering any time the red light
is on.
• Check the display if you hear a "beep".
3433 Wire Guidance Option continued
Page 19

Daily Safety Check
CHECK YOUR TRUCK BEFORE STARTING WORK
You must make sure your truck is safe to use.
1. Walk around your truck and check it over..
• Inspect your harness, lanyard, snap hooks and
mounting points. Have them replaced if they
look damaged or worn, or have ever been used
to stop a fall.
• Check to make sure the battery is charged, water
level is OK and vent caps are in place. Don't use
an open flame to check the battery.
• Make certain the battery retainer and side cover
are properly installed.
• See that all wheels are in good condition.
• Make sure the flashing light is working.
• Check that both forks are secure and not bent,
cracked or badly worn.
• Inspect all lift chains for damage.
• Look under the truck for signs of hydraulic leaks.
• Adjust the operator seat to the most comfortable
position. Turn the rear view mirror to the best
viewing position.
2. Test drive your truck in an uncongested area.
• Try all the hydraulic functions.
• Check that the steering is easy and smooth.
• Drive the truck slowly in both directions
• Drive through the full speed range in both
forward and reverse.
• Check braking and plugging distances in forward
and reverse. Load size and floor conditions can
affect these distances.
• Know the distance it takes to stop before you
start working. If the braking distance is too long
to stop safely, don't drive the truck.
• Check wire guidance operation.
If anything doesn't look or feel right, don't drive the truck.
Report the problem.
You can get checklist forms from your local Crown dealer (part no.
OF3772). Used properly, this checklist can alert service people to
needed repairs.
• Turn the key to TEST. See that the alarm and all
indicator lights are working.
• Test the horn.
• Make sure the emergency disconnect works.
Daily Safety Check 3635 Daily Safety Check
Page 20

Be a Safe Driver
The most
important
component
is you.
MAKE SURE YOU ARE READY TO DRIVE
• Do not use this truck unless you are trained
and certified.
• Be certain you understand how your truck works and
the hazards that go with it. Don't drive the truck if
you have any doubts.
• Know the capacity of your truck (Load Weight, Load
Center and Lift Height). Make certain you use the
correct units of measure.
• Some trucks are not allowed in areas where there are
fire hazards. Be certain your truck is the correct fire
safety type for the area.
• Make sure your hands and shoes are clean and dry,
and your clothing is proper for the job.
MAKE SURE YOUR TRUCK IS READY
• Inspect your truck before using it (see pages 33 and
34). If it's not working right, or something is broken,
report the problem. Don't use the truck.
• In an open area, test the braking and plugging.
Check at a slow travel speed first, then a faster one.
Know the distance it takes to stop before you
start work.
DRIVE CAUTIOUSLY, BE ALERT
• Wear your harness and have the lanyard fastened
when elevated, working with an open side gate, or
with the narrow front rail option.
• Never stick an arm, foot or any part of your body
outside the operator area, no matter how slow the
truck is moving. A hand or foot caught between the
truck and a fixed object will be crushed or even
cut off.
• Keep your hands on the controls and feet on the
pedals.
• Travel in the direction that gives you the best view.
Look where you're going, slow down in congested
areas.
• Slow down for slippery floors. Don't run over things.
• Travel with the platform close to the ground when
outside of an aisle. Place the load against the
vertical face of the forks.
• Be certain forks and load are in the travel position.
• Look where you are going before you change
direction of travel. Slow down when making turns.
• See that you have room to drive and turn. Check for
overhead objects. Watch out for power unit and
fork (load) swing.
• Make certain the load will clear the operator
platform before you use Traverse, Extend/Retract
or Pivot.
• Avoid sudden movement of controls. Learn to use
them smoothly at a moderate, even rate.
• Check clearances before raising or lowering the
forks or load. Watch for overhead obstructions.
• Be extra careful if you must use your truck in an area
where there is a risk of falling objects.
Continued on next page...
Be a Safe Driver 3837 Be a Safe Driver
Page 21

Be a Safe Driver continued
WATCH OUT FOR OTHER PEOPLE
• Slow down. Yield or stop for pedestrians.
Use your horn when you come to a crosswalk
or intersection.
• Be careful that you don't pin or crush someone.
For example: Never drive your truck toward anyone
standinginfrontofaxedobject.
• Watch out for power unit and fork (load) swing
when turning.
• Never allow passengers on your truck.
• Keep others away from your truck while you're
working. Don't ever allow anyone on or under the
load or forks.
• Don't let anyone use your truck unless they are
trained and certified.
• Never lift anyone with the forks unless they are using
an approved platform. Even then use extreme caution:
• Use a securely attached and approved safety
platform.
• Make certain lifting mechanism is operating
properly.
AVOID FALLS AND TIPOVERS
• Be extremely careful when working around dock or
ramps. Stay away from the edge.
• Check capacities. Be sure your truck, with load, isn't
too heavy for where you are driving.
• Make sure the load you are moving is stable. Spread
the forks as far as you can and center the load.
Insert the forks as far under the load as you can.
• Watch out for overhead obstructions.
• Turret trucks should not be used on ramps or grades.
If you must drive on a grade, travel slowly and never
turn the truck. If carrying a load, travel with forks
upgrade. If unloaded, travel with forks downgrade.
Keep the fork height below 300mm (12 inches).
• Stop your truck completely before getting off.
• Lower the forks to the floor. Turn the truck off or
disconnect the battery.
• Avoid parking on inclines. But if you must, block the
wheels of your truck.
• Make certain truck is in neutral and brake is applied.
• Lift and lower slowly.
• Watch for overhead obstructions.
• Be sure you can see and hear the person being lifted.
• Never transport anyone on a safety platform from
one location to another.
Be a Safe Driver continued 4039 Be a Safe Driver continued
Page 22

Notes
This page
left blank
intentionally
41 Notes
Battery Maintenance 42
Page 23

Battery Maintenance
WHEN YOU INSTALL
OR CHANGE THE BATTERY
• Turn the truck OFF. Make sure all controls are in
neutral. Disconnect the battery.
• Make certain you use the correct size and weight
battery. Never operate a truck that has an
underweight or undersized battery installed.
• Use a roller stand to install or remove the battery.
Make sure the roller stand is the same height as
the rollers in the truck's battery compartment. Also
be certain the roller stand is at least as long as
your battery.
• Never let anything metal touch the top of the cells.
You could cause sparks or do damage to the battery.
Use an insulator (such as plywood) when necessary.
• Use an approved spreader bar to place the battery
on, or remove it from a stand. Make sure you adjust
the spreader bar hooks to fit the battery.
Know the Hazards
DANGER
Batteries produce explosive gas.
Do not smoke, use open ame or
create an arc or sparks near this
battery. Ventilate well in enclosed
areas and when charging.
Batteries contain Sulfuric Acid which
causes severe burns. Do not get in
eyes, on skin, or clothing. In case of
contact, ush immediately. Get medical
attention if your eyes are affected.
107
TRUCK BATTERIES CAN BE DANGEROUS
Your truck battery produces fumes that can explode.
It also contains acid that could burn or disfigure you.
• Do not try to install, remove, charge or service your
truck battery unless you are trained and authorized.
• Never smoke or use an open flame around batteries.
• Your company should provide an area where it is
safe to work on batteries. Use that area for all
battery work.
• Use protective equipment such as gloves, eye
shields, aprons, etc.
AFTER INSTALLING THE BATTERY
• Replace the battery retainer and side cover.
• Connect the battery. Turn the truck ON and check
truck operation.
WARNING
Minimum battery size allowed
000 mm (00.00 in.) wide
000 mm (00.00 in.) long
Undersize battery can affect truck
handling and stability. You could have
an accident.
Use U.L. classified Type EO battery.
BATTERY RETAINER
The battery could slide out if the retainer is not in
place. Check before you operate your truck.
BATTERY SIZE
Make certain you use the correct size and weight
battery. Never operate a truck that has underweight or
undersized battery installed.
Continued on next page...
Battery Maintenance 4443 Battery Maintenance
Page 24

Battery Maintenance continued Warning Labels
BEFORE CHARGING YOUR TRUCK BATTERY
• Charge the battery in designated areas only.
• See that the battery cells are filled to the proper level.
Never use an open flame to check the battery.
• Make certain the charger is the same voltage and
amperage as your battery.
WARNING
WARNING
Falling objects or lowering forks can
cause serious injury or death.
WARNING
Never stand under the forks.
Avoid being
While servicing, block the forks so
they won't fall.
crushed. Keep head,
arms, hands, legs,
and feet within the
operator area. Stop
truck completely
before getting off.
Tipovers and falls can
cause serious injury
or even death. Do not
overload truck. Use
There are blind spots not
extreme caution
covered by the mirror.
near docks or on
dockplates.
You could hit someone not
WARNING
Passengers could be
seriously injured. There is
no safe place for them.
visible in the mirror.
Don’t drive with the mirror,
look in direction of travel.
of travel.
No Passengers.
DANGER
WARNING
Stay clear of all
moving parts.
Moving pats can cut
or crush hands, feet,
arms or legs.
Standing or riding on the forks can
cause a fall. You can be seriously
injured or killed.
Never stand or ride on
forks for any reason.
Obey all warnings and instructions on the
truck and in the operator manual*.
Inspect your truck before starting work,
Minimum battery size allowed
XX mm (XX.XX in.) wide
make sure it is in good working order.
XXX mm (XX.XX in.) long
Undersize battery can affect
truck handling and stability. You
could have an accident.
Use U.L. classified Type EO battery.
WARNING
It’s the law, you must be trained and
certied to operate this truck.
(OSHA § 1910. 178. Rev. 1999)
You or people around you could be seriously injured or even killed if you don’t use
this truck correctly.
WARNING
WARNING
264
DANGER
Unsafe loads can swing or fall
into the operator area causing
serious injury.
Never operate the truck with
a load that is off-center,
Falling from a raised platform can cause serious
oversize, or unstable.
injury or even death.
Attach safety harness and lanyard when elevated
and working with an open side gate or with
narrow front gate option.
EACH WARNING LABEL
ON YOUR TRUCK IS IMPORTANT
Read and obey all of them to protect
yourself and others.
WARNING
Keep all body parts within
the operator compartment
while performig any
emergency operations.
CAUTION
WARNING
Truck does not automatically
slow down at end of aisles.
Cross trafc does not stop.
Slow Down, look out for
people
WARNING
and other trucks.
Emergency Traverse
Switch
• To traverse out of the
rack, press this switch
while your assistanct on the
oor presses the power unit
traverse switch.
• To Traverse into the rack.
press the switch a second
time.
DANGER
Batteries can produce explosive gas. Do
not smoke, use open ame, or create an arc or
sparks near this battery. Ventilate well when in
an enclosed area and when charging.
This battery contains Sulfuric Acid which
causes severe burns. Do not get in eyes, on
skin, or clothing. In case of contact, ush
immediately and thoroughly with water. Get
medical attention if your eyes are affected.
• Read the battery charger instructions.
• Be sure charger is turned off before connecting the
battery to it. Otherwise you might create a spark
which could cause the battery to explode. Also,
make sure the truck key switch is turned off and all
controls are in the neutral position.
All rights reserved under International
and Pan American copyright conventions
Copyright 2008 Crown Equipment Corp.
Warning Labels 4645 Battery Maintenance continued
Page 25

This operator manual
has information for
all models of TSP
6500 and 7000 series
plus some options and
accessories. Some of
the illustrations and
information may not
6500 7000 SERIES
apply to your truck.
The most important component is you.
New Bremen, Ohio 45869 USA © 2011 PF18933 Rev. 10/18 Printed in U.S.A.
 Loading...