

Page 1

CROWN MICROPHONE APPLICATION GUIDE:
TELECONFERENCING & DISTANCE LEARNING
© 2001 Crown Audio, Inc. All rights reserved PZM® and
are registered trademarks of Crown International.
Also exported as Amcron®
102100-2
11-01
PCC®
Crown International
P.O. Box 1000,
Elkhart, Indiana 46515-1000
(574) 294-8200 Fax (574) 294-8329
Page 2
CROWN MICROPHONE
APPLICATION GUIDE
FOR TELECONFERENCING
AND DISTANCE LEARNING
Thanks to teleconferencing, we can hold meetings
with people in a nother location without having to
travel there. Distance learning lets a professor teach
thousands of students in various locations, all at the
same time , in a cos t-e f f ect ive ma nne r. It’ s also use d
for corporate training.
Both tele confe rencin g and dist ance lear ning ca n save
you or your company thousands of dol lars in travel
fees, not to mention the cost of hotels, meals, etc.
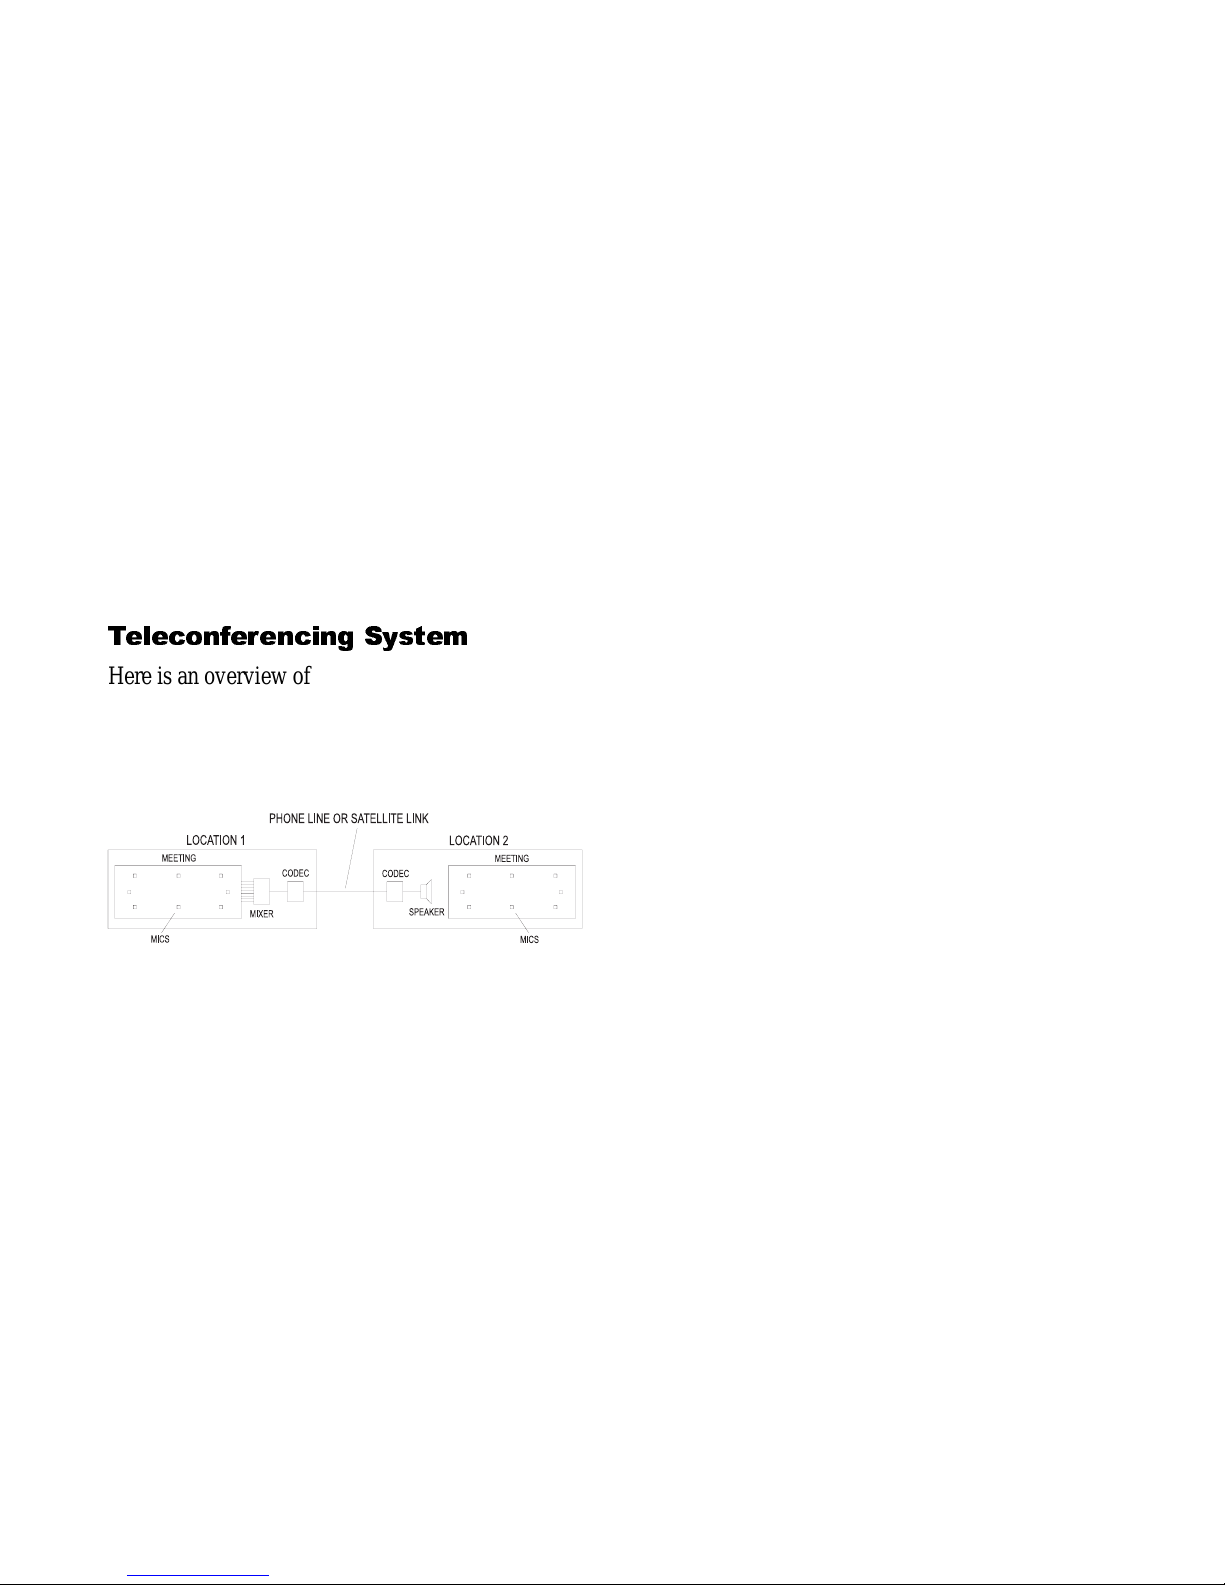
Teleconferencing System
Here is an overview of a typical teleconferencing
system (Fig. 1). Two meetings are set up around
conference tables. One meeting is in your company,
and the other mee ting is in anot her company.
Figure 1. Teleconferencing system.
People at your mee ting are picked up by microphones. The sound of their voices is sent over standard telephone lines, or a satellite link, to the other
meeting location. There, the people can hear you
through a loudspeaker.
Similarly, mics at their location pick them up. Their
voices are sent over phone lines or satellite to your
location. You hear them through a loudspeaker. You
can talk back and forth, almost as if they were with
you at the conference table.
There might be cameras and video monitors set up so
that you can see the other people, and they can see
you.
A teleconferencing syst em is made of the following
components:
• Microphones
These pick u p the vo ice of each pa rticipan t. M ics ca n
be on the conference table or on a lectern. The mics
might be swit chable: each user can turn his or her
mic on and off.
• Mixer
This electronic device combines all the mic signals
into one audio si gnal.
• Telephone coupler or codec
Short for co der-decoder, a codec takes t he audio signal from the mixer, and sends it over the telephone
lines. On the sending end, it digitally codes the audio
into a telephone signal. On the receiving end, it
decodes the te lephone signal back into audio.
Some codecs also send and receive video. Video signals must b e sent via sate llite, whic h relays th e signal
to the distant location.
Some systems combine a mixer and codec into one
unit. Other systems combine mics, mixer and codec
into one unit.
• Telephone lines
Supplied by the telephone company, standard phone
lines (or high-speed phone lines) carry your audio
signal to the dista nt me eting loc ation. The re, a cod ec
converts t he phone signal back into audio, whi ch i s
fed to a speaker. The meeting par ticipants can hear
you through this speaker.
• Loudspeaker
In your meeting room, a loudspeaker plays the voices
of the peopl e from the distant meeting.
• Video cameras and TV monitors
This is an option. Cameras and mon it ors let you see
the people at the distant meeting, and let them see
you. In many systems, the cameras automat ically
switch to show the person speaking.
Page 3
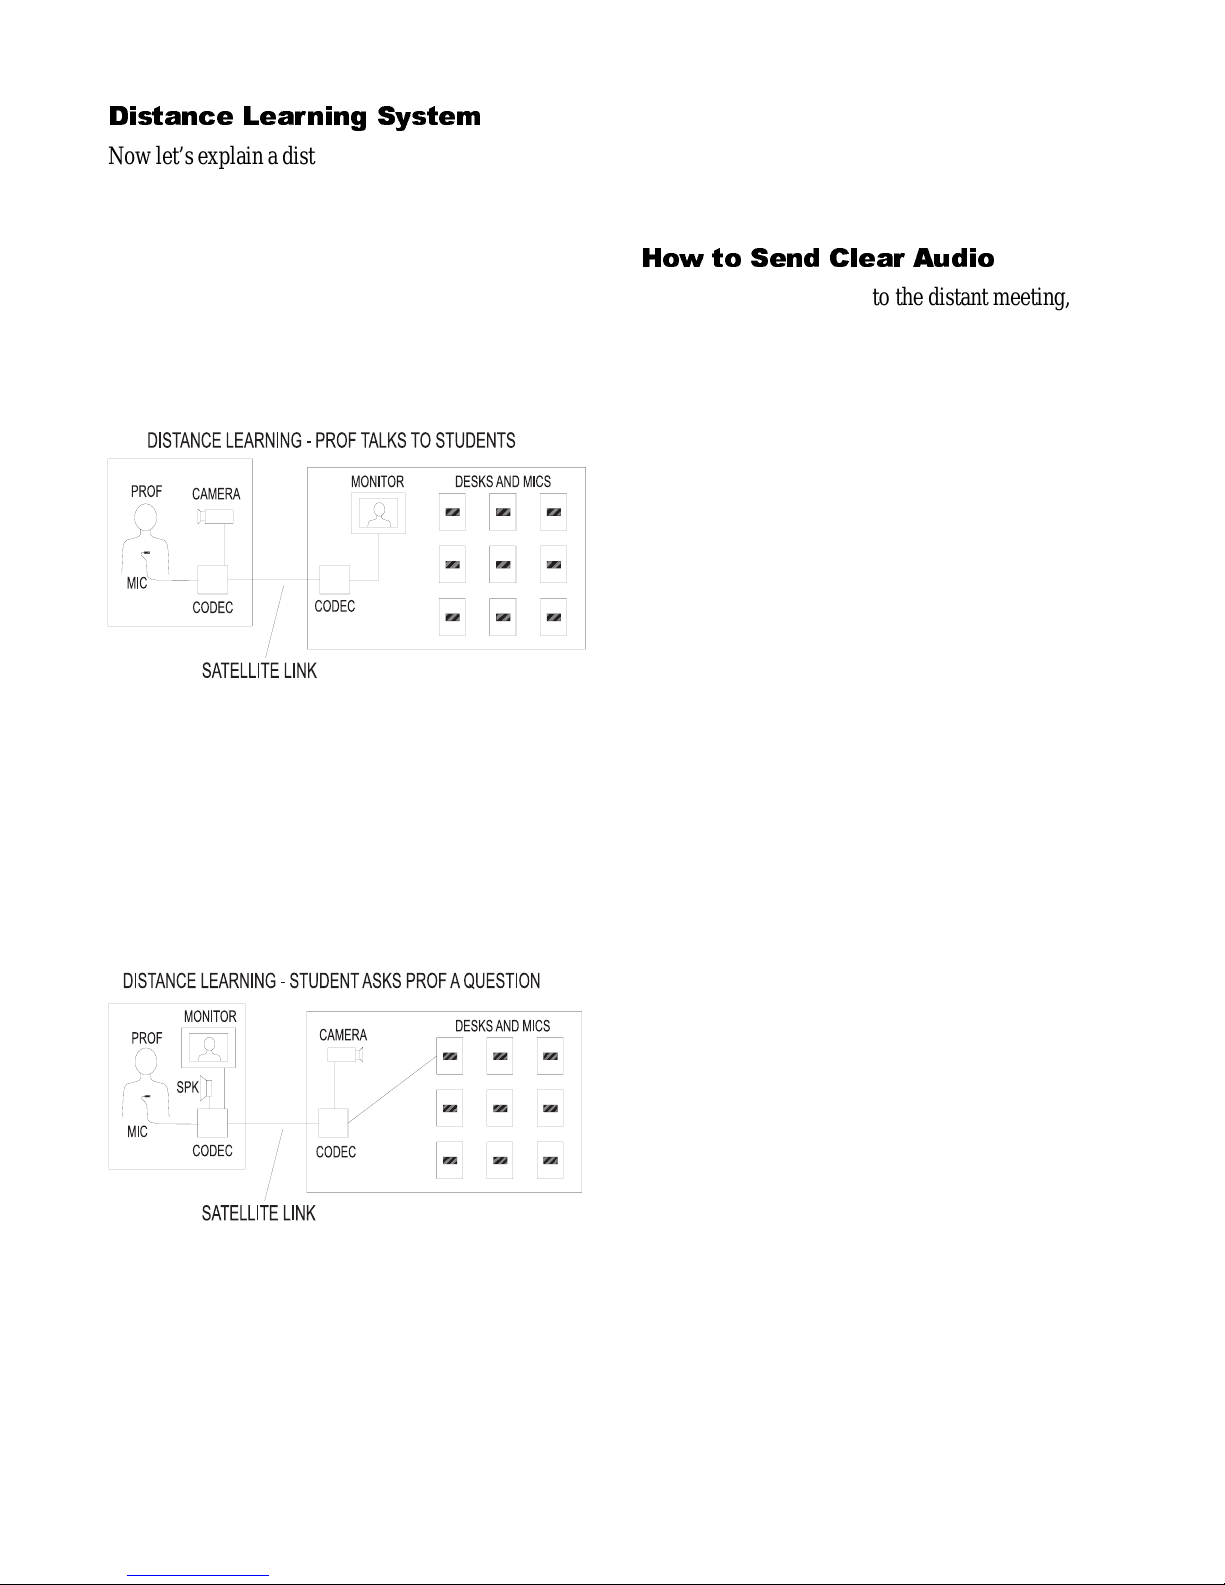
Distance Learning System
Now let’s explain a distance learning system (Fig. 2).
T ypica lly , students will be in one or more classrooms,
and a professor will be in another location. The professor talks to the students through a clip-on or lavalier microphone. The mic signal is sent by phone
lines or satellite to the classr oo ms. There, seve ra l
loudspeakers play the prof essor’s voice to the students. The stud ents can see the professor over a TV
monitor.
Figure 2
In the classroom, each student or pair of students has
a desk mic or hanging mic. Students can switch on
the mic when they want to as k the teacher a q uestion .
The mic signals are sent by phone lines or satellite to
the teache r. The teacher and studen t can talk back
and forth, alm ost as if they were in the same room .
Figure 3
The parts of a distance learning system are the same
as in a teleconference system. Crown makes one part
of these systems: the microphones.
You should contact a consultant, codec manufacturer
or system integrator t o d esign and install your complete system.
How to Send Clear Audio
When you tra nsm it aud io to the distant m eetin g, th e
audio should be cl ear and easy to understand. But
there are som e prob lem s tha t pr even t clea r so und :
Reverberation
This is the sound reflected off the room walls, floor
and ceiling. Too muc h reverberation makes the
speech sound hollow , distant, and blurred.
Background noise
This is noise from ven tila tion ducts, fluo re sce nt li ght
ballasts, video equipment, and equipment cooling
fans. Too much noise makes the speech hard to hear
and understand.
Feedback
This is the squealing or ringing sound you hear when
the mics pick up the sound of the loudspeaker. The
speech sound picked up by the mics is fed to a loudspeaker, and the loudsp eaker sound re-enters the
microphone. This creates a feedback loop and makes
an annoying ringing sound.
Here are some ways to prevent all these problems.
The result will be clear, intelligible audio:
• Place mics close to talkers. Put tab le-top mics
within arm’s length. Talk into lectern mics about 8
inches away. Wear a lavalier mic on th e ch est.
• Use directional mics. Some examples of directional
mics are cardi oid, superc ardioid, and hypercardi oid.
These mics are designed to reject feedback, noise and
reverberation.
• Use boundary mics on conference tables. A boundary mic is a low profile unit that lies on the conference table surface. It picks up less room ac oustics
than a conve nt ion a l mic o n a desk stand , so th e
boundary mic sounds clear er. Also, a mic o n a desk
stand picks up table-top sound reflections. These
reflections cause phase interference, which may give
the voice a strange tone quality. The boundary mic is
designed to eliminate phase interference, so it sounds
natural.
Page 4
• Use an autom a tic mi xe r (gate d mix er ). You adjust
the automatic mixer so that it turns all mics off
except for the one in use. One mic by itself sounds
much clea re r than seve ra l mics o n at onc e.
• Acoustically treat the conference room. To absorb
reverber atio n, use aco ust ic- tile cei lin g, carpet, and
drapes. Hire a sound contractor to design or mod ify
the air handling system for low noise.
• T o prevent feedback, place the loudspeaker far from
the mics, and behind them if possible. Use an acoustic echo canceller (AEC) with howling rejection.
Another problem with sound transmissi on is echo.
Your audio signal is sent on a phone line, or via satellite, to the distant receiving site. It takes time for the
signal to travel. At the distant site, the signa l migh t
be picked up by the mics there, and bounce or echo
back to you after a short delay. If you hear this echo,
it confuses the sound of speech.
The solution is an acoustic echo canceller (AEC), a
device that senses the echo and cancels it out. Many
codecs come with an echo-canceller circuit built in.
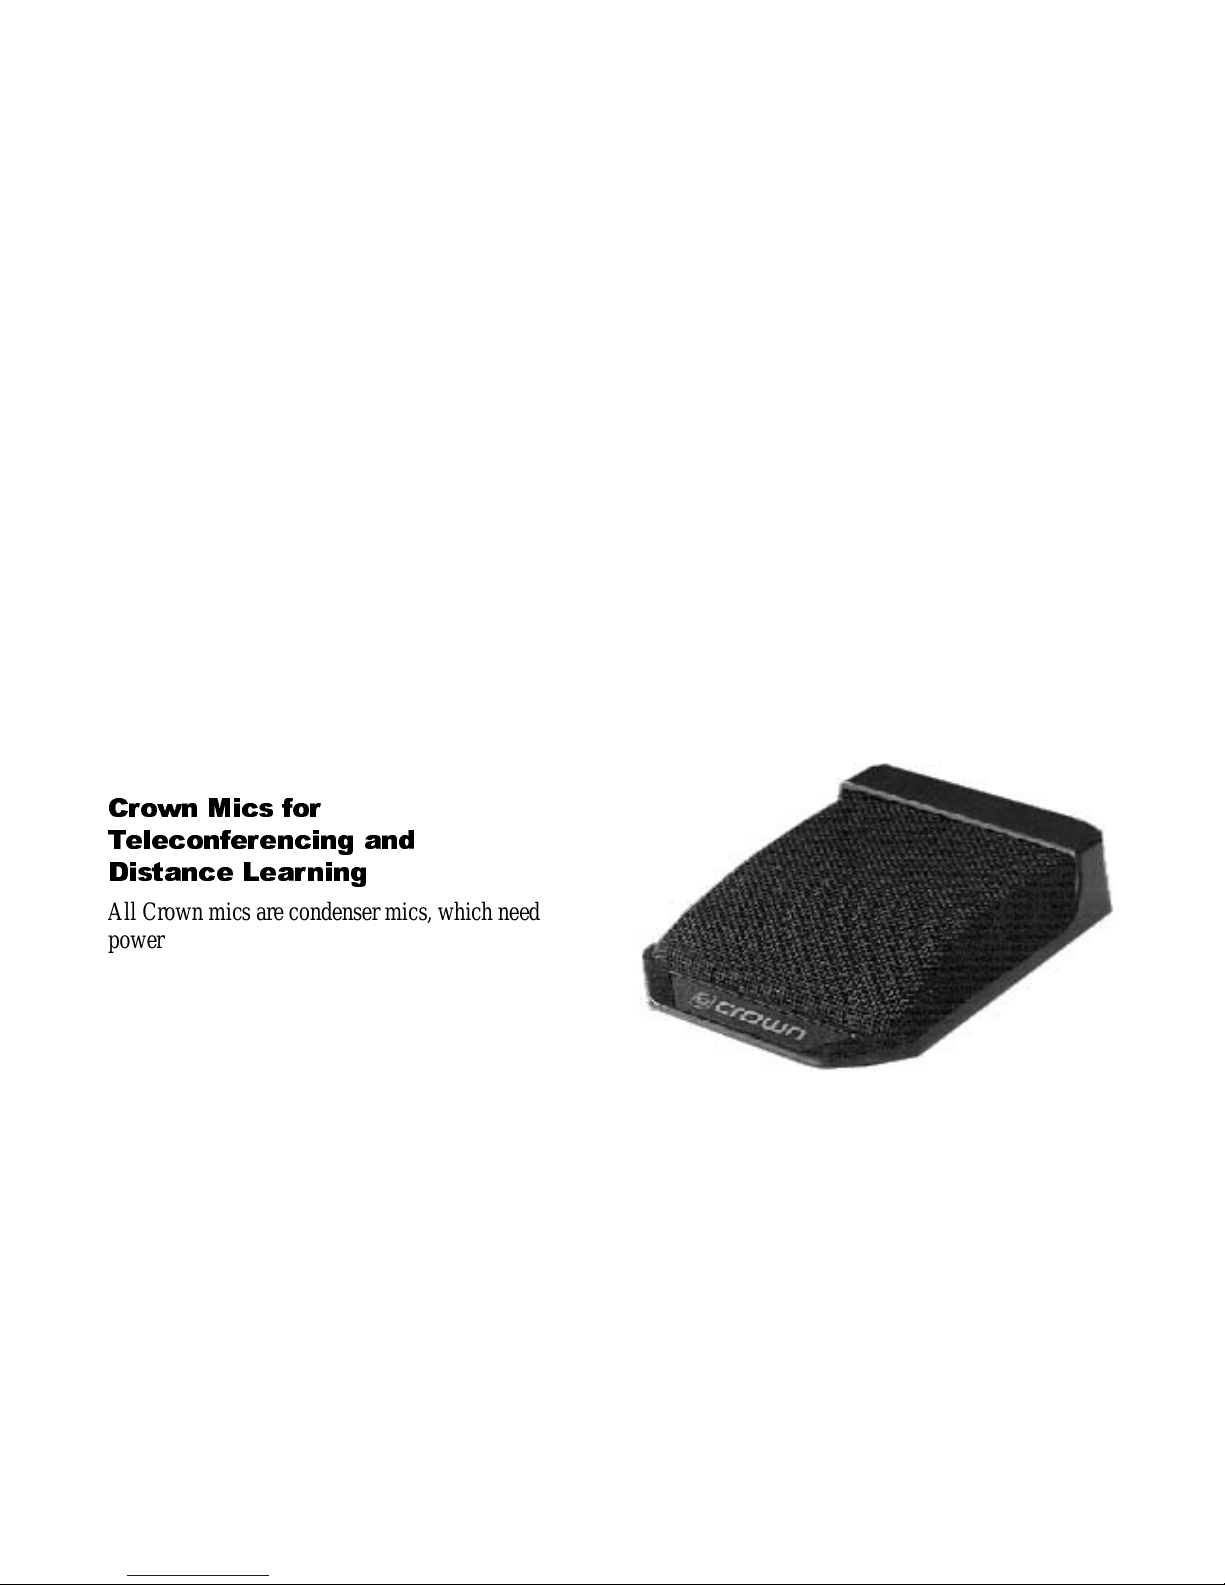
Crown Mics for
Teleconferencing and
Distance Learning
All Crown mics are condenser mics, which need
power to operate—either a battery or a
phantom-
power supply
. A phantom power supply sends power
to the m ic a long i ts mic cabl e. Two pha ntom supplie s
from Crown are the PH-4B (powers up to four mics)
and the PH-1A (powers one mic). Most modern mixers provide phantom power for microphones, so that
no external supply is needed.
Here are some Crown mics that work well for teleconfer encing:
Table-top or desk-top mics
These m icrop hones lie on the sur face o f a confer ence
table or a desk. They pick up speech with a clear,
natural sound.
All these models are boundary mics. They eliminate
the eff ect of ref lec tion s fr om th e ta bl e top th at wo uld
otherwise bl ur the sound.
An omni boundary mic picks up sound in all directions, so you put it in the midd le of the table. Use
one for a square table and two spaced apart for a long
table. This works for conference recording, but has
too much feedback for teleconferencing use.
Supercardioid or cardioid boundary mics pick up
sound mainly from in front. These mics sound
clearer an d have less feed back than an omni mic. But
they co st mo re be cause you must use sever al of t hem :
one per person, or one for every two people.
Listed below are the Crown boundary mics. We’ll
suggest which models to use lat er in this guide.
PCC-170:
supercardioid
PCC-170SW:
supercardioi d with on/off switch
PCC-170SWO:
supercardi oid with switch and two
additional remote sensing leads.
PCC-130:
cardioid, smaller than PCC-170
PCC-130SW:
cardioid with on/off switch
PCC-170
Mini Boundary mics
These are very small mics with a half-supercardioid
pattern. Five models are available:
MB-1:
Plugs into a brass cup in the table.
MB-2:
Plugs into a jack in the table.
MB-3:
Tub ular; m o unts in ce iling , wall or tabl e.
MB-4:
For tempo rary use. Has a thin cable with an
XLR connector.
MB-4E:
Lowest cost. Cable fits through small hole
in table.
Page 5
Model s MB-1, MB-2 and MB-4E require a Crown
MB-100 or MB-200 interface. The MB-200 i nterface allows remote sensing of switch closure, so it
can be used with a video switcher. Each interface can
take up to four mics.
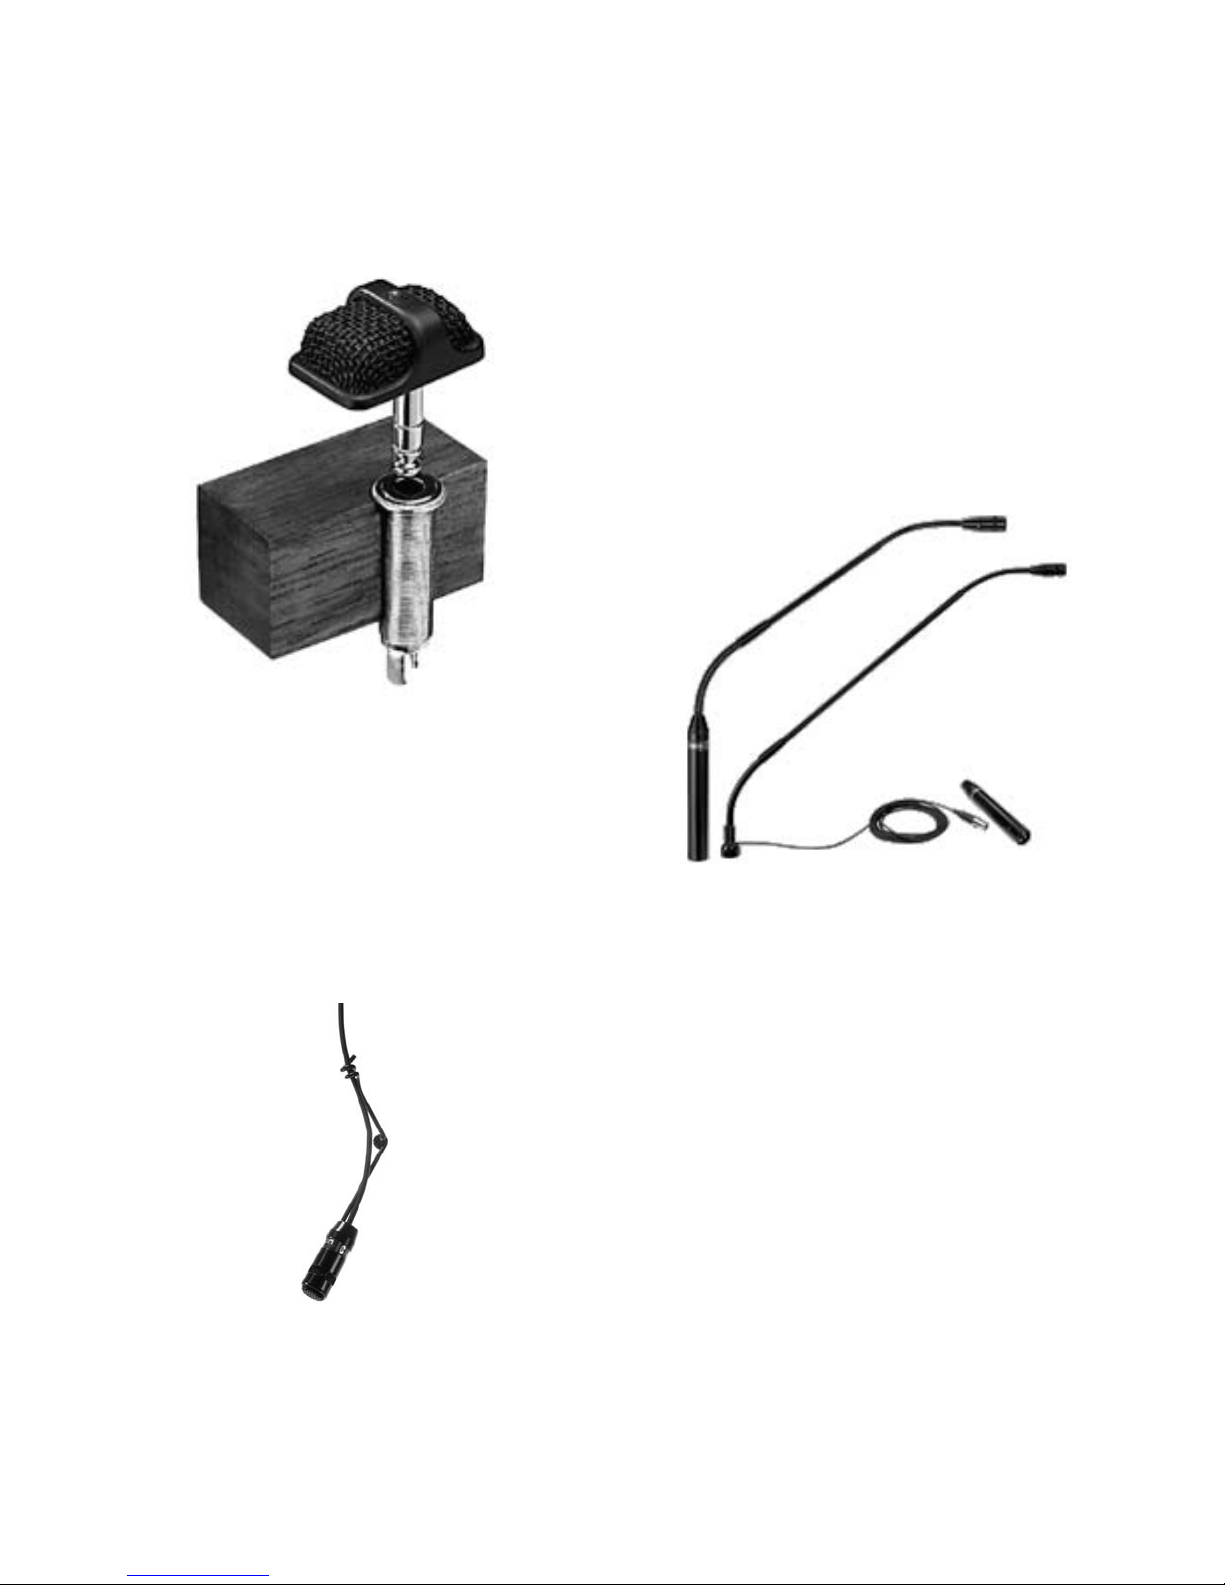
An example of an MB mic: The MB-2.
Hanging mics
Normally, these mics are hung over the students in a
distance learning setup.
The Crown hanging mics are the CM-30 and CM-31.
Each mic rejects sound from the rear, and rejects
muddy-sounding room acousti cs.
CM-30
CM-30 electronics mount in an electrical box in the
ceiling. CM-31 electronics are in a tu bular interface
which you plug into a microphone cable.
Mics hanging over a conference table do not work
well compa re d to table- top mi cs . Hang ing m ics are
too far from the talkers for clear pickup without feedback.
Lectern mics (gooseneck mics)
These mics are permanently installed on a lectern,
student desk, or conference table. Compared to
table-top mics, lectern mics pick up less paper shuffling and less room acoustics because the mics are
closer to the use r. Lectern mics, h ow ev er, are more
conspicuous and are more susceptible to bre ath pops.
LM-300A and LM-301
Listed below are the Crown lectern mics:
LM-300A:
Miniature gooseneck. Can be shock
mounted with LM-SM shock mount.
LM-300AL:
Same as LM-300 but 5” longer.
LM-201:
Rugged ball and socket swivel, built-in
shock mount.
LM-301A:
Fastens to a flange on the lectern; allows
cable to exit dow n or out th e side .
LM-SM:
Shock mount for models LM-300A, LM-
300AL, and LM-301A.
Page 6
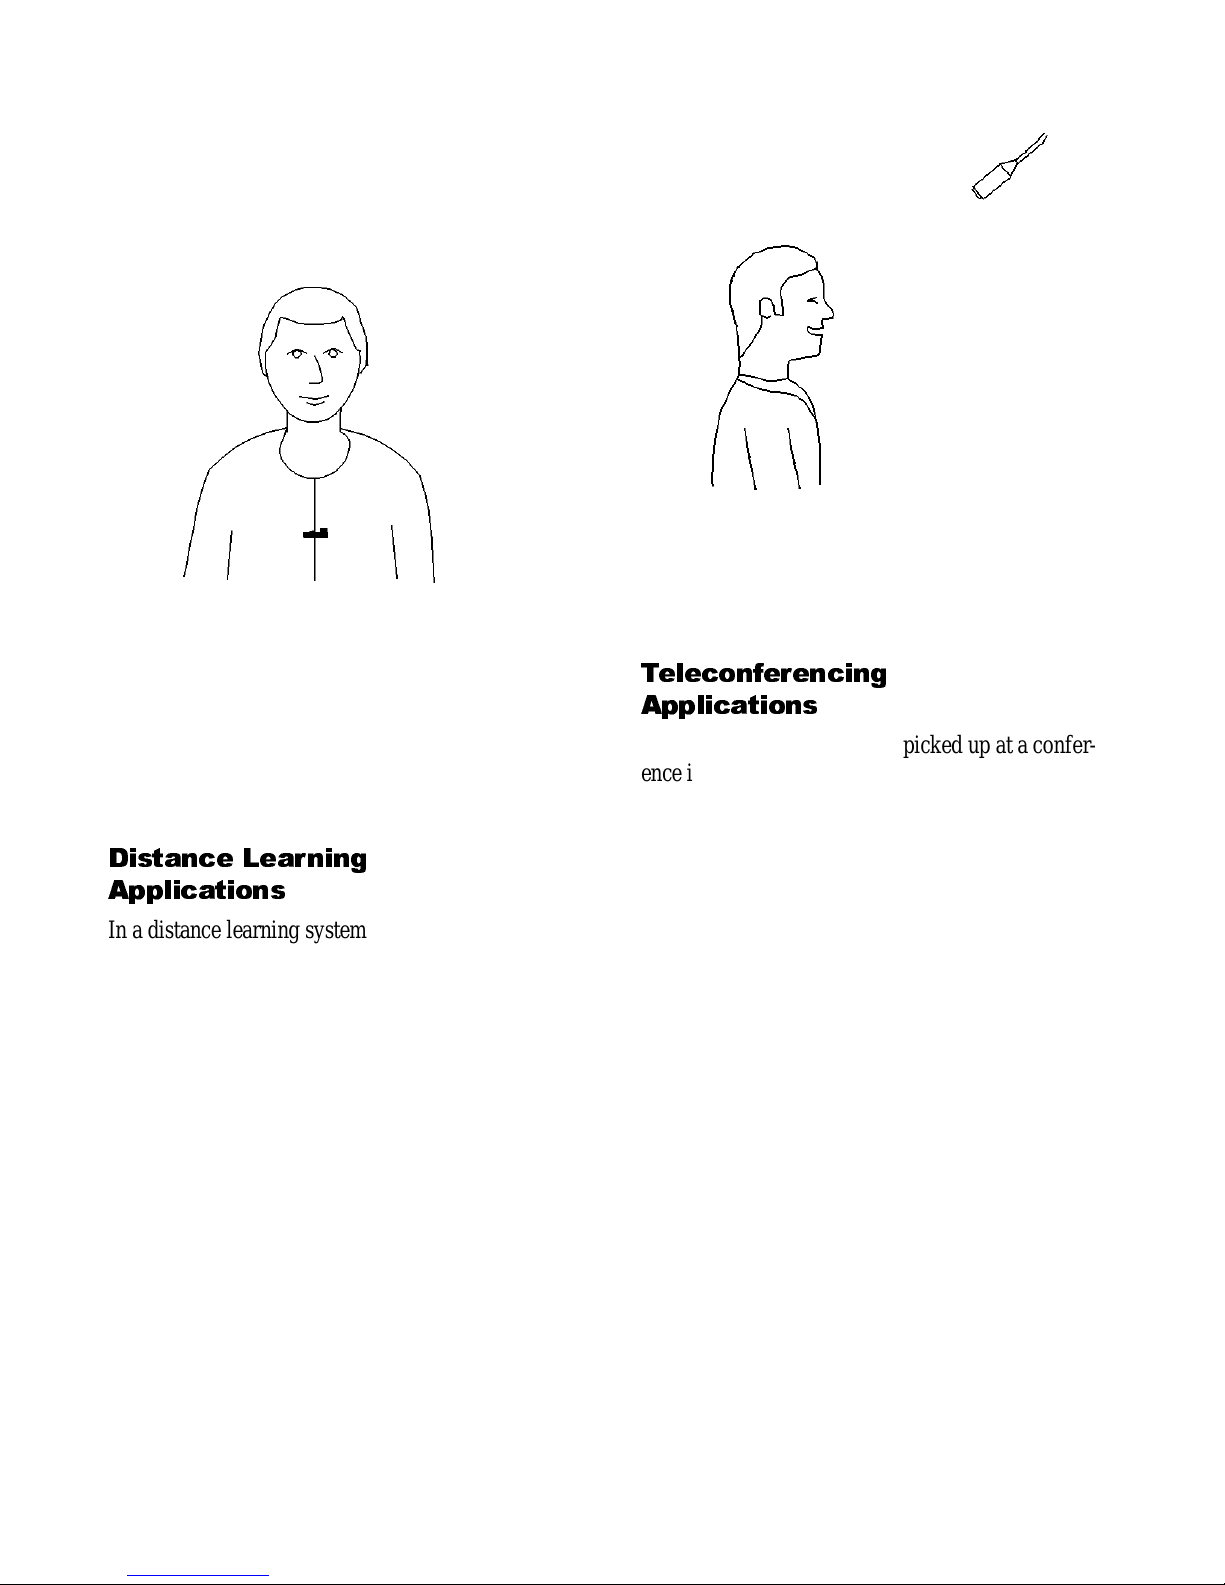
Lavalier mic
This is a miniature mic that clips onto the talker’s tie
or shirt (Figure 4). It’s useful if the talker moves
around while speaking. The tea cher in a distancelearning system often uses a lavalier mic.
Figure 4. A lavalier mic.
The rest of this guide suggests the best Crown mics
for various applications. It also sugg ests how to
place them to achieve the best sound quality.
Distance Learning
Applications
In a distance learning system, each mic needs to be
near its user to prevent a hollow , muddy sound.
Desktop mics te nd to pick up too much pa per shuffling, but gooseneck or lectern mics work we ll. You
can mount a gooseneck mic on a desk to pick up two
to three people. Or, hang a mic about 2 feet i n front
of, and 2 feet above, every two to three people.
Angle the m ics to aim at the peopl e (F igur e 5). So
that only one mic will be on at a time, run the mics
through an automatic mixer.
In a distance l earning auditorium without desks,
mount lectern mics onto the seat backs, or use hanging mics.
For best resu lts c o nside r tre ating t he r o om ac oustic s .
Add some carpe t, acou stic tile ceiling, and drap e s
over the windows . Thi s will greatly increase clarity
and reduce the hollow sound you hear wit h hard
room surfaces.
Figure 5. A hanging mic.
T eleconferencing
Applications
As we said earlier, the sound picked up at a conference is much clearer if you use several mics, and turn
off all mics except the ones in use. In a teleconferencing system, there are two ways to switch each mic
on and off:
1. Manually , by each user.
2. Automatic ally, by an autom atic mic mixe r (ga ted
mixer).
Let’ s look at both optio ns .
Manual switching of mics
With this system, use a st andard non-ga ted mixer
with seve ral mics . Choos e one of these m ic mo d el s:
PCC-130SW:
Small mic w ith a h alf -car dioid patter n .
PCC-170SW:
Larger mic with a hal f-supercar dioid
pattern for extra clar ity.
PCC-170SWO:
Like the PCC-170SW, but provides
remote sensing of switch closure. These mics can be
used with a vide o camera switche r. When a person
turns on his or her mic, the camera aiming at that person is switched on. Then the TV-monitor view will
track whoever is speaking.
Page 7
Mini Boundary Mics:
Very small mics wit h a halfsupercardioid pattern. Three switchable models are
available:
MB-1:
Plugs into a brass cup in the table.
MB-2:
Plugs into a jack in the table.
MB-4E:
Lowest cos t. Cable fits through a small hole
in table.
These models require a Crown MB-100 or MB-200
interface. The MB-100 interface has connections for
an on/off switch near each user. The MB-200 interface also allows remote sensing of switch closure, so
it can be used with a video switcher.
Automatic switching of mics
In this system, use an automatic mic mixer with several mics. Choo se o ne of these m ic m odels:
PCC-130:
Small mic with a half-car d io id patte rn.
PCC-170:
Larger mic with a half-supercardioid pat-
tern for extra clarity.
Mini Boundary mics:
Very small mics with a half-
supercardioid pattern. Five models are available:
MB-1:
Plugs into a brass cup in the table.
MB-2:
Plugs into a jack in the table.
MB-3:
Tub ular; mo unts in ceiling , wall or tabl e.
MB-4:
For temporary use. Has a thin cable with an
XLR connector.
MB-4E:
Lowest cost. Cable fi ts through small hole
in table.
Models MB-1, MB-2 and MB-4E require a Crown
MB-100 or MB-200 interface. The MB-200 interface allows remote sensing of switch closure, so it
can be used with a video switcher. Each interface can
take up to four mics.
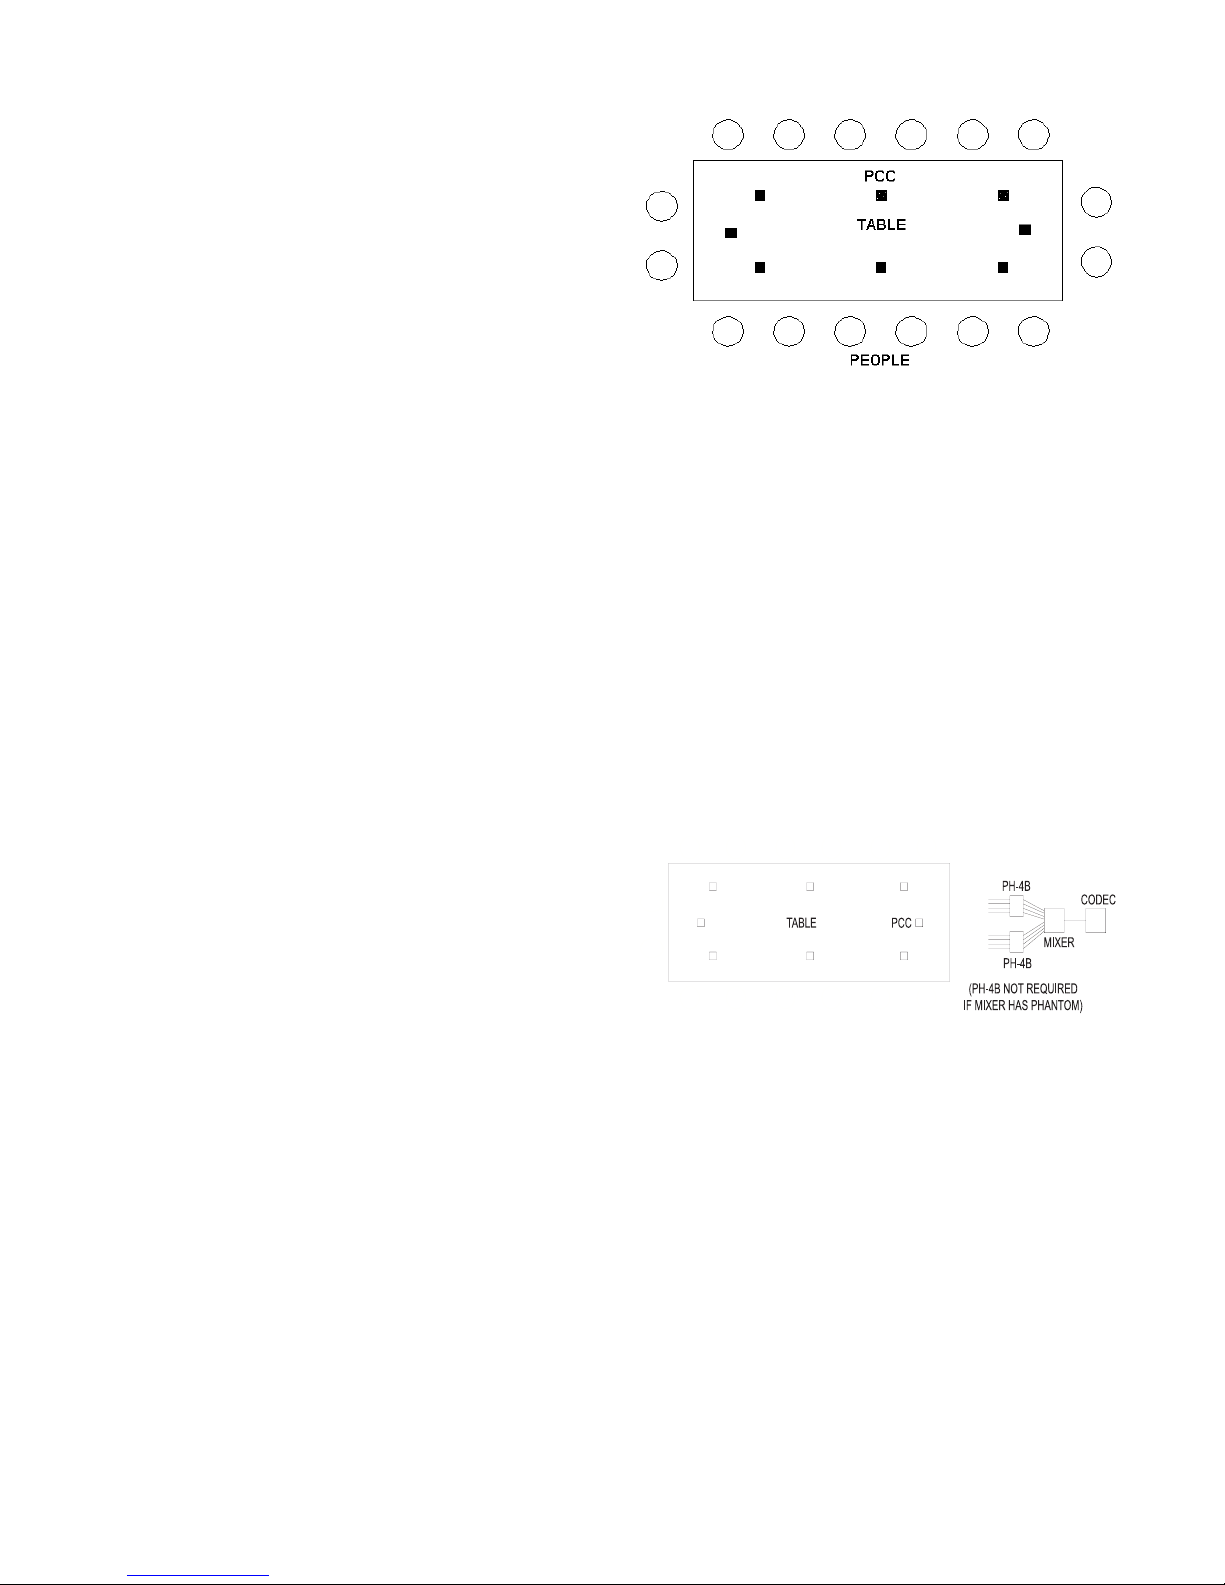
Mic placement
Once you have cho se n a suita b le mi c mo d el, plac e a
group of them as shown in Figure 6.
Figure 6. Teleconference mic placement.
1. Place one mic at arm’s length from each person, or
place one betw ee n ever y two peo p le.
2. At a lectern, mount a Crown LM series lectern mic
of your choice. If the leader of the meeting moves
around while talking, he or she needs a lavali er mic.
Clip the mic onto t h e shirt, about 8 inches below th e
chin.
3. If your mixer has phantom power, connect the
mics to the mixer mic inputs (Figure 7). Models
MB-1, MB-2, MB-4E connect first to the MB-100 or
MB-200 inter face, then t o your mixer.
Figure 7. Teleconference system block diagram.
4. If your mixer does not have phantom power, connect the mics to a Crown PH-4B phantom power
supply. Connect the power-supply outputs to your
mixer mic inputs. Models MB-1, MB-2, and MB-4E
connect first to the MB-100 or MB-200 interfaces,
then to the PH-4B, then to your mixer.
5. Connect the mixer output to the line input in the
teleconference codec.
By following t hese suggestions, you can look fo rward to clear s ound in your teleconference and distance learning systems.
 Loading...