

Page 1
EXPRESS COOK
0.7 CU. FT. / 700 WATT
MICROWAVE OVEN
HORNO MICROONDAS DE
0.7 PIES CUBICOS Y 700 VATIOS
User Manual
Model # CR0701TW
Manual del Usuario
Para Modelo de # CRM0701TW
Quality n Innovation n Style
Page 2

UNPACKING YOUR MICROWAVE
1. Inspect and remove all packing materials. This includes the foam and any
adhesive tape both inside and outside of the unit.
2. Inspect and remove any remains of packing, tape, or printed materials before
powering on your appliance.
DANGER
Risk of child entrapment.
Before you throw away your old appliances,
take off the door so that children may not
easily get trapped inside.
1
English
Please read this manual carefully before using.
Retain it for your future reference.
Page 3

English
PRECAUTIONS TO AVOID POSSIBLE EXPOSURE
TO EXCESSIVE MICROWAVE ENERGY
(a) Do not attempt to operate this oven with the door open since open-door
operation can result in harmful exposure to microwave energy. It is important
not to defeat or tamper with the safety interlocks.
(b) Do not place any object between the oven front face and the door or allow
soil or cleaner residue to accumulate on sealing surfaces.
(c) Do not operate the oven if it is damaged. It is particularly important that the
oven door closes properly and that there is no damage to the:
1. Door (bent)
2. Hinges and latches (broken or loosened)
3. Door seals and sealing surfaces
(d) The oven should not be adjusted or repaired by anyone except properly
qualified service personnel.
Addendum
• If the apparatus is not maintained in a good state of cleanliness, its surface
could be degraded and affect the lifespan of the apparatus, leading to a
dangerous situation.
Before you call for service
If the oven fails to operate:
a) Ensure that the oven is plugged in securely. If it is not, remove the plug from
the outlet, wait 10 seconds and plug it in again securely.
b) Check for a blown circuit fuse or a tripped main circuit breaker. If these seem
to be operating properly, test the outlet with another appliance.
c) Ensure that the control panel is programmed correctly and the timer is set.
d) Ensure that the door is securely closed, engaging the door safety lock system.
Otherwise, the microwave energy will not flow into the oven.
IF NONE OF THE ABOVE RECTIFIES THE SITUATION, THEN CONTACT
A QUALIFIED TECHNICIAN. DO NOT TRY TO ADJUST OR REPAIR THE
MICROWAVE OVEN YOURSELF.
2
Page 4
3
PAGE
PRECAUTIONS TO AVOID POSSIBLE EXPOSURE TO EXCESSIVE MICROWAVE
ENERGY .......................................................................................2
SPECIFICATIONS ...........................................................................3
IMPORTANT SAFETY INSTRUCTIONS ..............................................4
GROUNDING INSTRUCTIONS ........................................................6
UTENSILS GUIDE ...........................................................................7
COOKING TECHNIQUES.......... ......................................................8
SETTING UP YOUR OVEN .............................................................. 9
COUNTERTOP INSTALLATION ......................................................10
CONTROL PANEL ........................................................................11
OPERATION INSTRUCTIONS ........................................................12
QUICK COOK SETTINGS ..............................................................14
CLEANING AND CARE .................................................................19
TROUBLESHOOTING ...................................................................20
MICROWAVE TABLE OF CONTENTS
English
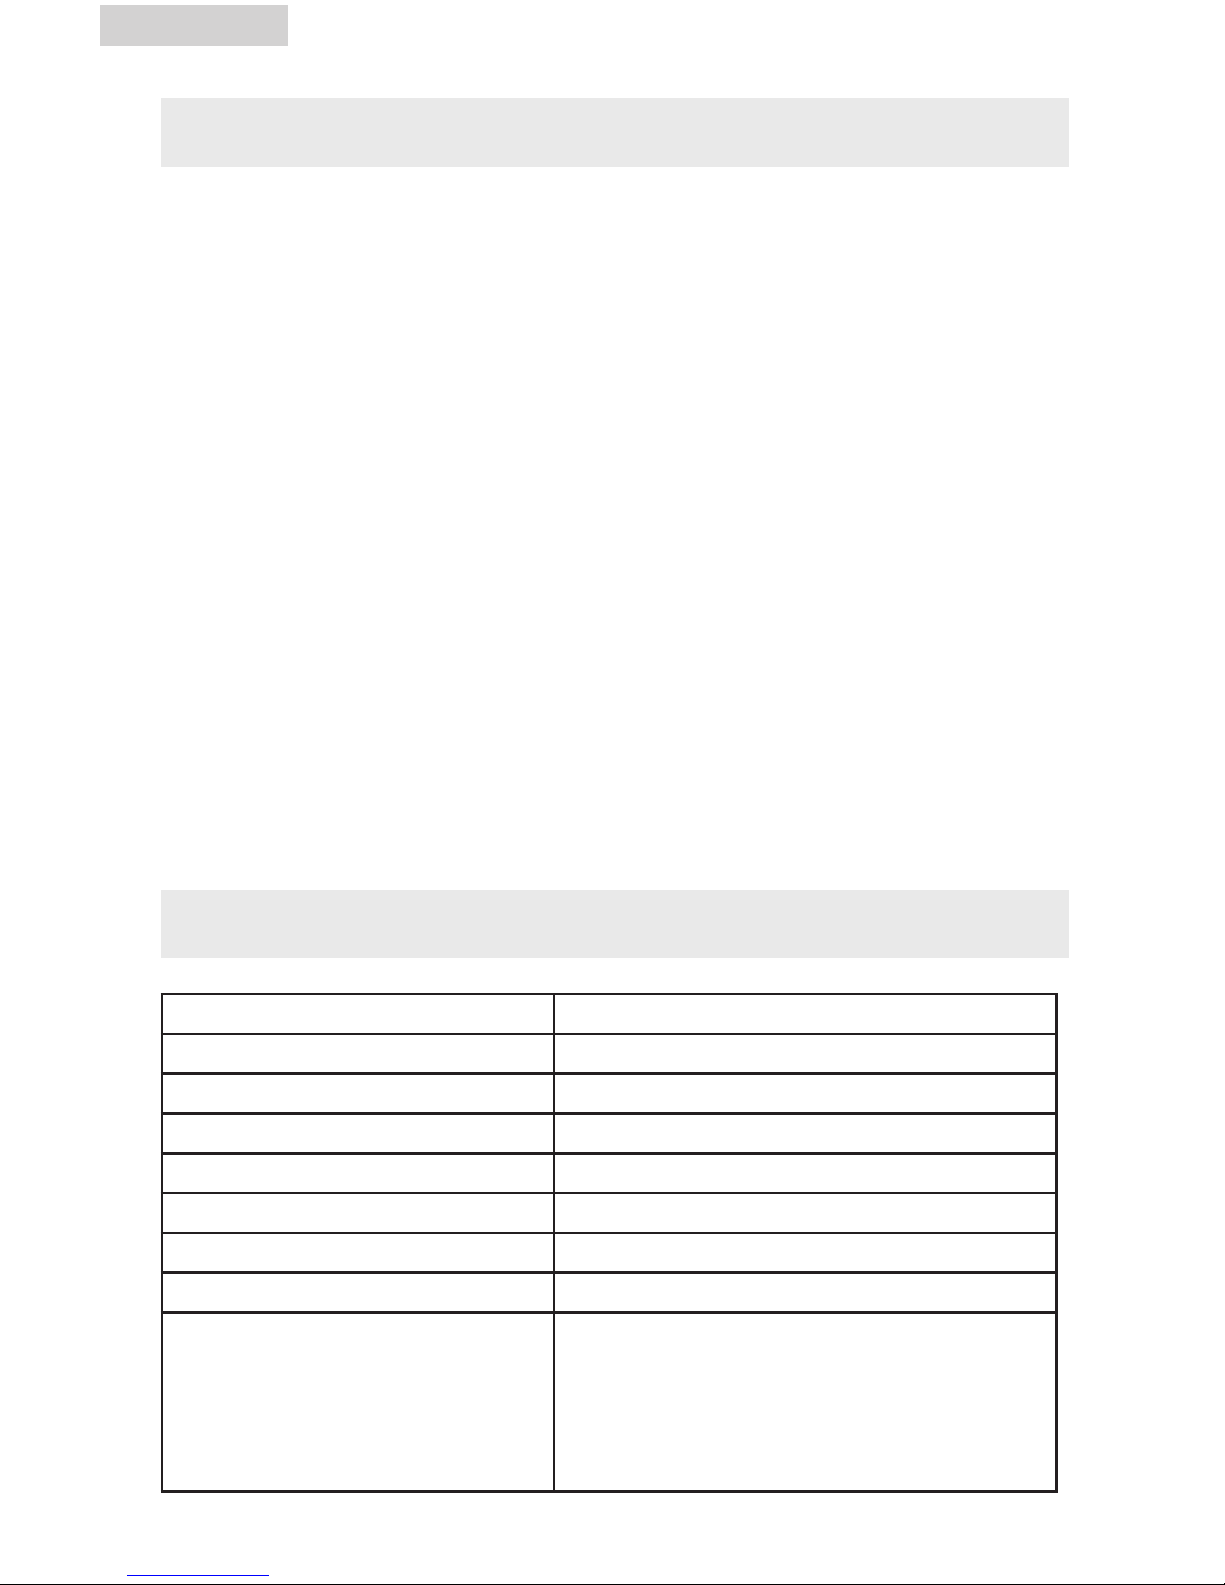
SPECIFICATIONS
Model: CR0701TW
Voltage: 120V ~ 60Hz
Power Input: 1050W
Microwave Power: 700W
Oven Capacity: 0.7 Cu. Ft.
Turntable Diameter: ø9.6 Inches
External Dimensions (WxHxD): 17 × 13.2 x 10.2 inches
Net Weight: 22 lbs.
Warning: Handling the cord on this microwave, or cords
associated with accessories sold with this
product, will expose you to lead. Lead is a
substance known to the state of California to
cause cancer and birth defects or other
reproductive harm. Wash hands after handling.
Page 5

English
When using electrical appliances, basic safety precautions should be followed,
including the following:
WARNING: To reduce the risk of burns,
electric shock, fire, injury to
persons or exposure to
excessive microwave
energy:
1. Read all instructions before using the appliance.
2. Read and follow the specific “PRECAUTIONS TO AVOID POSSIBLE EXPOSURE TO
EXCESSIVE MICROWAVE ENERGY” on page 2.
3. This appliance must be grounded. Connect only to properly grounded outlet. See
“GROUNDING INSTRUCTIONS” on page 6.
4. Install or locate this appliance only in accordance with the provided installation
instructions on page 10.
5. Some products such as whole eggs and sealed containers (for example, closed
glass jars) are able to explode and should not be heated in this oven.
6. Use this appliance only for its intended use as described in this manual. Do not
use corrosive chemicals or vapors in this appliance. This type of oven is specifically
designed to heat, cook, or dry food. It is not designed for industrial or laboratory
use.
7. As with any appliance, close supervision is necessary when used by children.
8. To reduce the risk of fire in the oven cavity:
• Do not overcook food. Carefully attend to appliance when paper, plastic, or
other combustible materials are placed inside the oven to facilitate cooking.
• Remove wire twist-ties from paper or plastic bags before placing bag in
oven.
• If materials inside the oven should ignite, keep oven door closed, turn oven
off, and disconnect the power cord or shut off power at the fuse or circuit
breaker panel.
• Do not use the cavity for storage purposes. Do not leave paper
products, cooking utensils or food in the cavity when not in use.
9. Liquids, such as water, coffee, or tea can be overheated beyond the boiling
point without appearing to be boiling due to surface tension of the liquid. Visible
bubbling or boiling when the container is removed from the microwave oven is not
always present. THIS COULD RESULT IN VERY HOT LIQUIDS SUDDENLY BOILING
OVER WHEN A SPOON OR OTHER UTENSIL IS INSERTED INTO THE LIQUID.
4
IMPORTANT SAFETY
INSTRUCTIONS
Page 6

10. Do not heat oil or fat for deep-frying. It is difficult to control the temperature of oil
in microwave oven.
11. Pierce foods with heavy skins such as potatoes, whole squash, apples and
chestnuts before cooking.
12. The contents of feeding bottles and baby jars should be stirred or shaken and the
temperature should be checked before serving in order to avoid burns.
13. Cooking utensils may become hot because of heat transferred from the heated
food. Potholders may be needed to handle the utensil.
14. Do not cover or block any openings on the appliance.
15. Do not store or use this appliance outdoors. Do not use this product near water,
for example, near a kitchen sink, in a wet basement, near a swimming pool, or
similar locations.
16. Do not operate this appliance if it has a damaged cord or a plug, if it is not
working properly or if it has been damaged or dropped.
17. Do not immerse cord or plug in water. Keep cord away from heated surface. Do
not let cord hang over edge of table or counter.
18. Use only thermometers that are specifically designed for use in microwave ovens.
19. When cleaning surfaces or door and oven that comes together on closing the
door, use only mild, nonabrasive soaps, or detergents applied with a sponge or
soft cloth.
20. Be certain the glass tray and roller rings are in place when you operate the oven.
21. This appliance should be serviced only by qualified service personnel. Contact
nearest authorized service facility for examination, repair, or adjustment.
SAVE THESE INSTRUCTIONS
HOUSEHOLD USE ONLY
English
5
Page 7
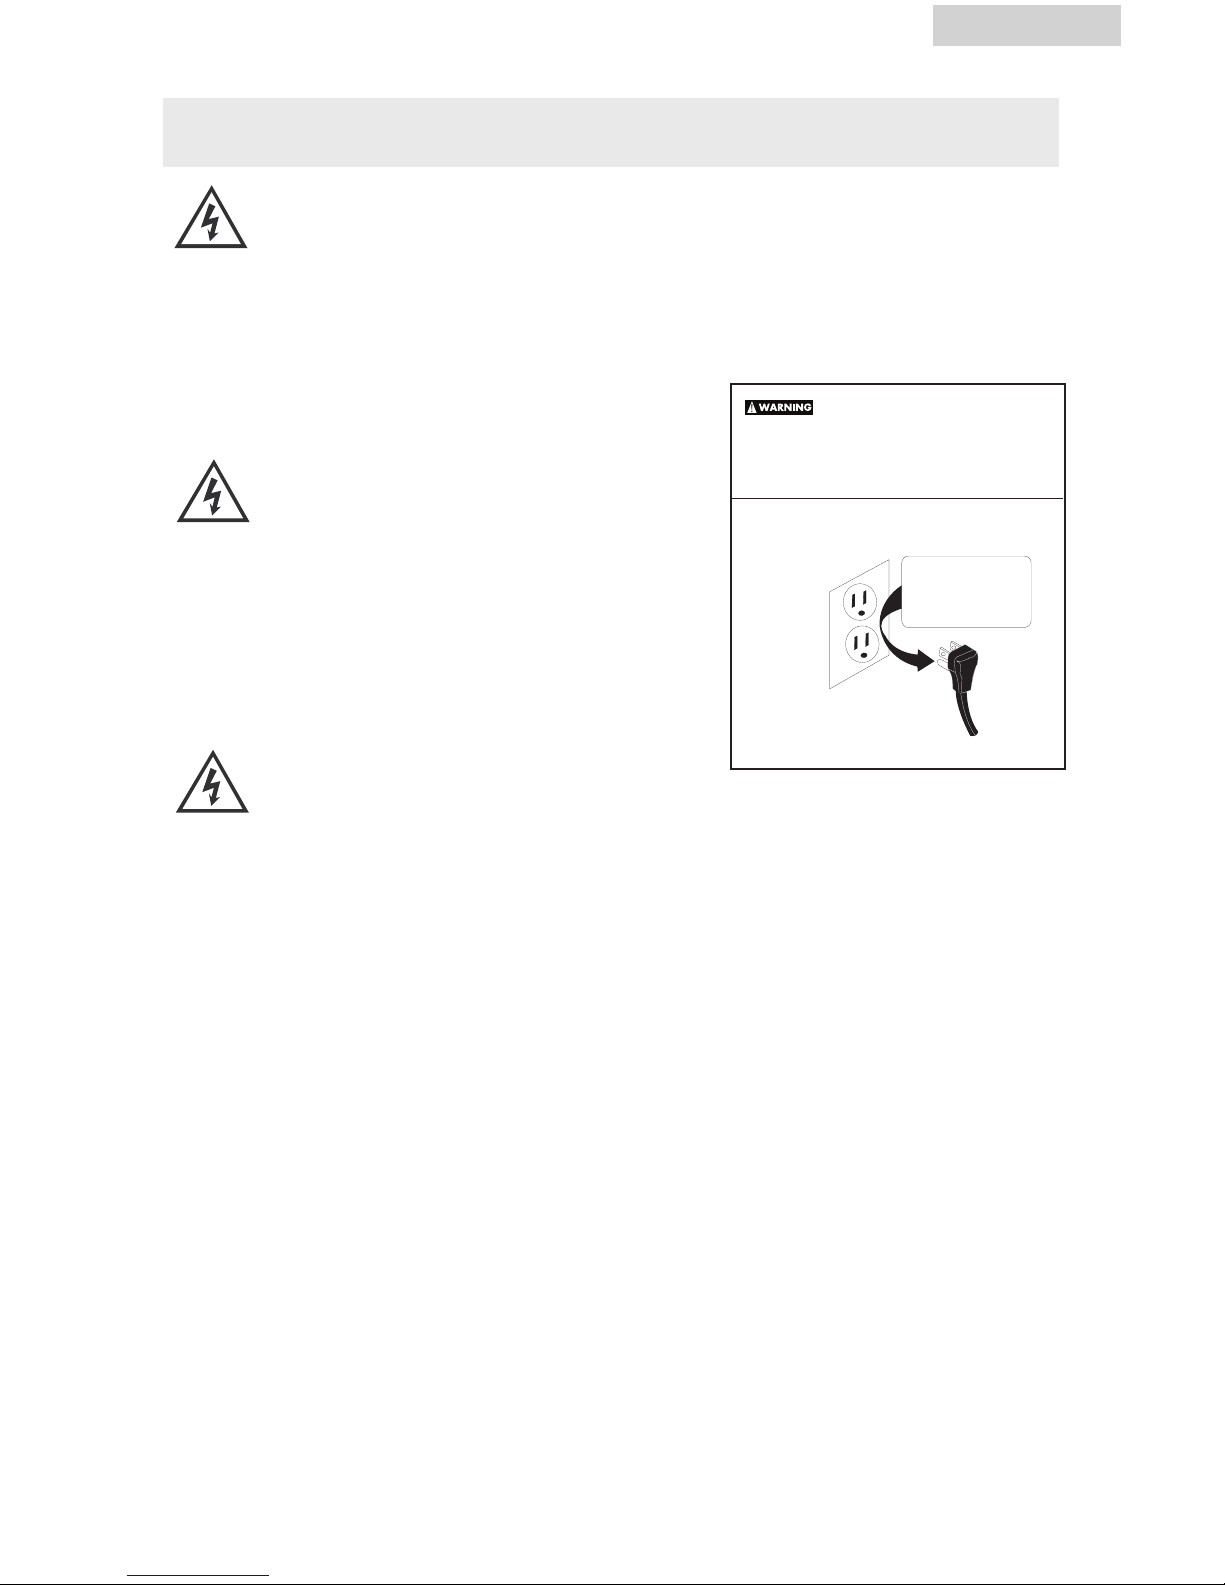
Electrical Requirements
WIRING AND GROUNDING INSTRUCTIONS
This appliance must be plugged into at least a 15 AMP 120 VOLT 60 Hz
GROUNDED OUTLET. This appliance must be grounded. In the event of
an electrical short circuit, grounding reduces the risk of electric shock by
providing an escape wire for the electric current. This appliance is equipped
with a 3 wire cord having a grounding
wire with a grounding plug. The plug must
be plugged into an outlet that is properly
installed and grounded.
W ARNING! Improper use of grounded
wire can result in the risk of electric
shock. Consult a qualified electrician
or serviceman if the grounding
instructions are not completely
understood, or if doubt exists as to
whether the appliance is properly
grounded. Do not attempt to defeat
this safety feature by modifying
the plug.
THE POWER CORD
1. A short power-supply cord is provided with this unit to
reduce the risks associated with a longer cord; for example,
tripping or entanglement.
2. Avoid the use of an extension cord because it may overheat
and cause a risk of fire. If it is necessary to use an extension
cord, care must be exercised and these guide lines should
be followed:
a. The marked electrical voltage rating of the extension cord
must be equal to or greater than the electrical voltage
rating of the appliance.
b. Use only 3-wire extension cords with a 3-blade grounding
plug and a 3-slot receptacle that will accept the plug on the
appliance.
c. Longer cords should be arranged so that they do not drape
over countertops or tabletops where they can be a hazard,
or where they can be pulled on by
children intentionally.
ATTEMPTING ANY MAINTENANCE OR CLEANING:
To minimize the possibility of electric shock, unplug this appliance from
the power supply or disconnect at the household distribution panel by
removing the fuse or switching off the circuit breaker before attempting any
maintenance or cleaning.
SAFETY INSTRUCTIONS
ADVERTENCIA
ADVERTISSMENT
Avoid fire hazard or electric
shock. Do not use an extension cord or
an adapter plug. Do not remove any
prong from the power cord.
Do not under any
circumstances, cut,
remove, or bypass the
grounding prong.
Grounding type
wall receptacle
Power supply
cord with 3-prong
grounding plug
English
6
WARNING:
ADVERTENCIA:
AVERTISSEMENT:
WARNING:
ADVERTENCIA:
AVERTISSEMENT:
WARNING:
ADVERTENCIA:
AVERTISSEMENT:
Page 8

UTENSILS
This section lists which utensils can be used in the microwave, which ones have
limited use for short periods, and which ones should not be used in the
microwave.
Recommended
• Microwave browning dish – Use to brown the exterior of small items such as
steaks, chops, or pancakes. Follow the directions provided with your
browning dish.
• Microwaveable plastic wrap – Use to retain steam. Leave a small opening for
some steam to escape and avoid placing it directly on the food.
• Paper towels and napkins – Use for short-term heating and covering. They
absorb excess moisture and prevent spattering. Do not use recycled paper
towels, which may contain metal and could ignite.
• Glass and glass-ceramic bowls and dishes – Use for heating or cooking.
• Paper plates and cups – Use for short-term heating at low temperatures. Do not
use recycled paper, which may contain metal and could ignite.
• Wax paper – Use as a cover to prevent spattering.
• Thermometers – Use only those labeled “Microwave Safe” and follow all
directions. Check the food in several places. Conventional thermometers may
be used on microwave food once the food has been removed from the oven.
Limited Use
• Aluminum foil – Use narrow strips of foil to prevent overcooking of exposed
areas. Using too much foil can damage your oven, so be careful.
• Ceramic, porcelain, and stoneware – Use these if they are labeled “Microwave
Safe.” If they are not labeled, test them to make sure they can be used safely.
• Plastic – Use only if labeled “Microwave Safe.” Other plastics can melt.
• Straw, wicker, and wood – Use only for short-term heating, such as warming
dinner rolls for a few seconds; baskets and bowls may be flammable.
Not Recommended
• Glass jars and bottles – Regular glass is too thin to be used in a microwave.
It can shatter and cause damage and injury.
• Paper bags – These are a fire hazard, except for popcorn bags that are
designed for microwave use.
• Styrofoam plates and cups – These can melt and leave an unhealthy
residue on food.
• Plastic storage and food containers – Containers such as margarine tubs
can melt in the microwave.
• Metal utensils – These can damage your oven. Remove all metal
before cooking.
Note
Should you wish to check if a dish is safe for microwaving, place the
empty dish in the oven and microwave on HIGH for 30 seconds.
A dish that becomes very hot should not be used.
English
7
Page 9

COOKING TECHNIQUES
Your microwave makes cooking easier than conventional cooking, provided you
keep these considerations in mind:
Stirring
Stir foods such as casseroles and vegetables while cooking to distribute heat
evenly. Food at the outside of the dish absorbs more energy and heats more
quickly, so stir from the outside to the center. The oven will turn off when you
open the door to stir your food.
Arrangement
Arrange unevenly shaped foods, such as chicken pieces or chops, with the
thicker, meatier parts toward the outside of the turntable where they receive more
microwave energy. To prevent overcooking, place delicate areas, such as
asparagus tips, toward the center of the turntable.
Shielding
Shield food with narrow strips of aluminum foil to prevent overcooking. Areas
that need shielding include poultry wing-tips, the ends of poultry legs, and
corners of square baking dishes. Use only small amounts of aluminum foil.
Larger amounts can damage your oven.
Turning
Turn foods over midway through cooking to expose all parts to microwave
energy. This is especially important with large foods such as roasts.
Standing
Foods cooked in the microwave build up internal heat and continue to cook for a
few minutes after heating stops. Let foods stand to complete cooking, especially
foods such as cakes and whole vegetables. Roasts need this time to complete
cooking in the center without overcooking the outer areas. All liquids, such as
soup or hot chocolate, should be shaken or stirred when cooking is complete.
Let liquids stand a moment before serving. When heating baby food, stir well at
removal and test the temperature before serving.
Adding moisture
Microwave energy is attracted to water molecules. Food that is uneven in
moisture content should be covered or allowed to stand so that the heat disperses
evenly. Add a small amount of water to dry food to help it cook.
English
8
Page 10
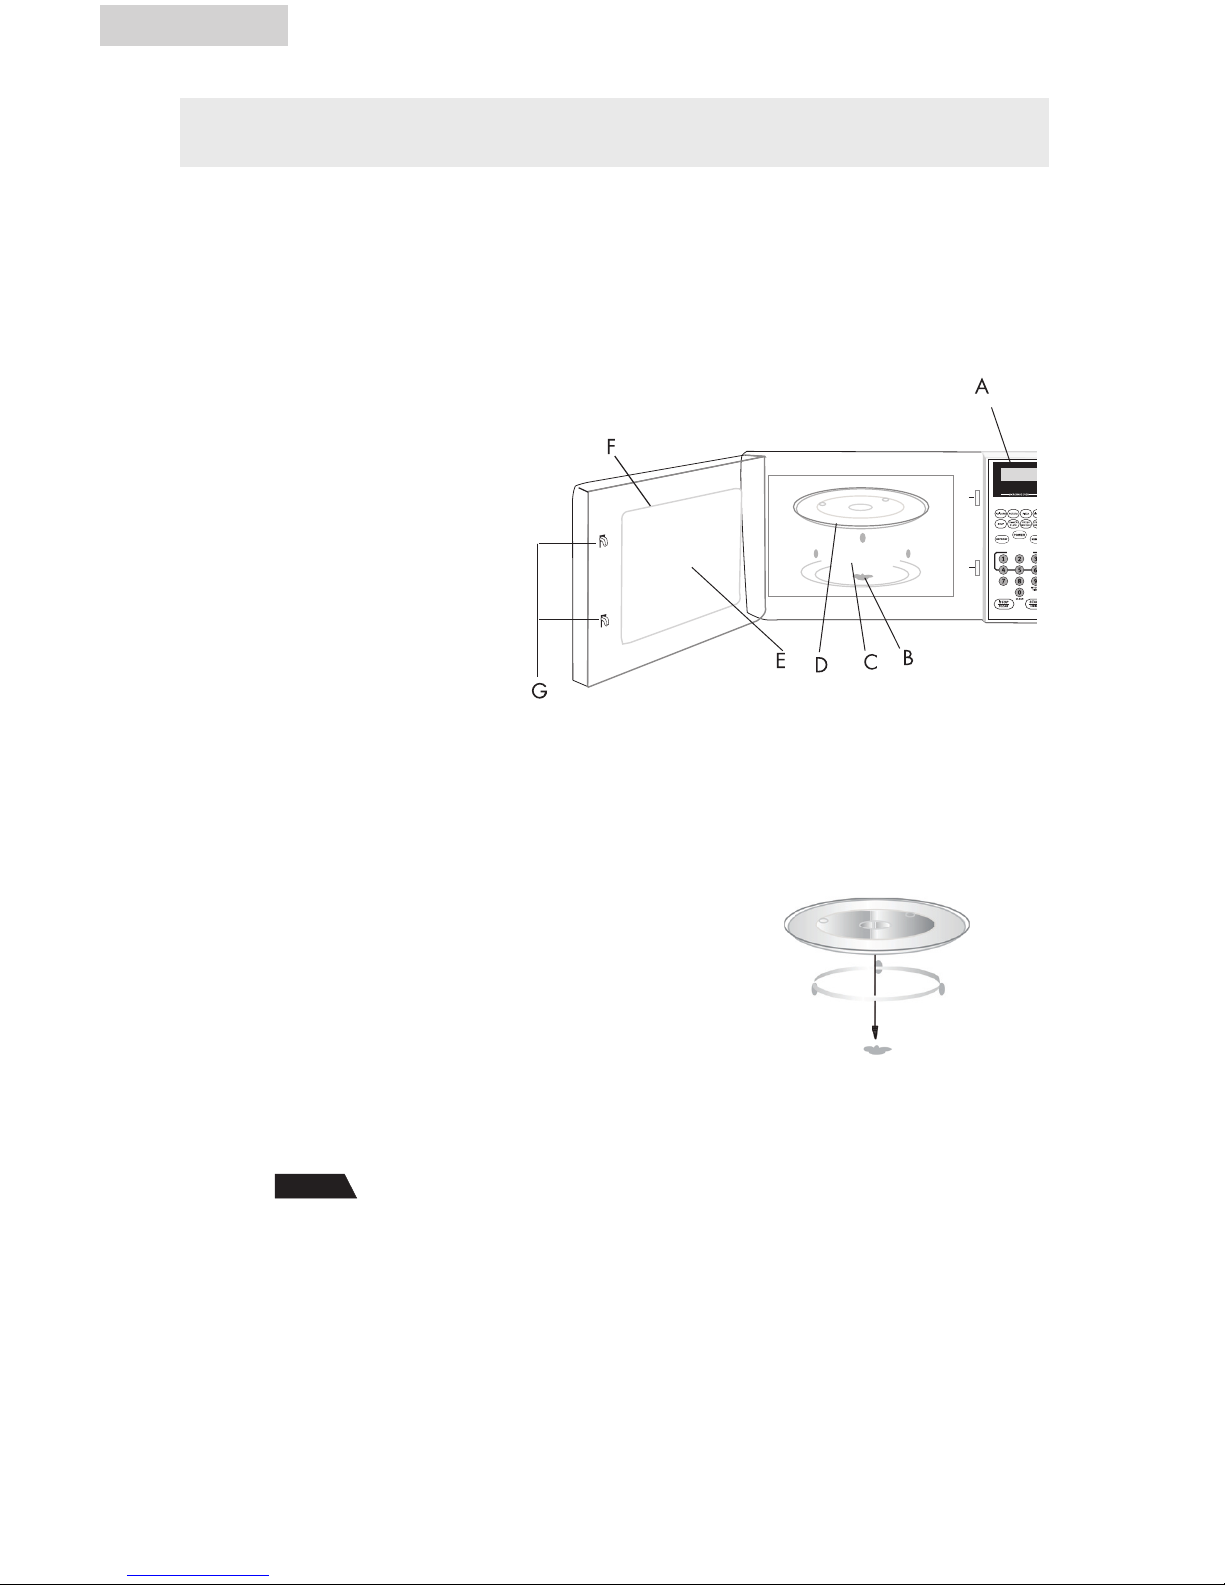
Parts and Accessories
Remove the oven and all materials from the carton and oven cavity.
Your oven comes with the following accessories:
Glass tray ............................ 1
Turntable ring assembly .........1
A. Control panel
B. Turntable shaft
C. Turntable ring assembly
D. Glass tray
E. Observation window
F. Door assembly
G. Safety interlock system
Turntable Installation
a. Never place the glass tray upside down.
The glass tray should never be restricted.
b. Both glass tray and turntable ring assembly
must always be used during cooking.
c. All food and containers of food are
always placed on the glass tray for cooking.
d. If glass tray or turntable ring assembly cracks
or breaks, contact your nearest authorized
service center.
Note
Remove all packing matertial and accessories. Examine the oven
for any damage, such as dents or broken door. Do not install if
oven is damaged.
Cabinet: Remove any protective film found on the microwave oven cabinet
surface. Do not remove the light brown Mica cover that is attached to the oven
cavity to protect the magnetron.
SETTING UP YOUR OVEN
English
9
Page 11
10
Installation
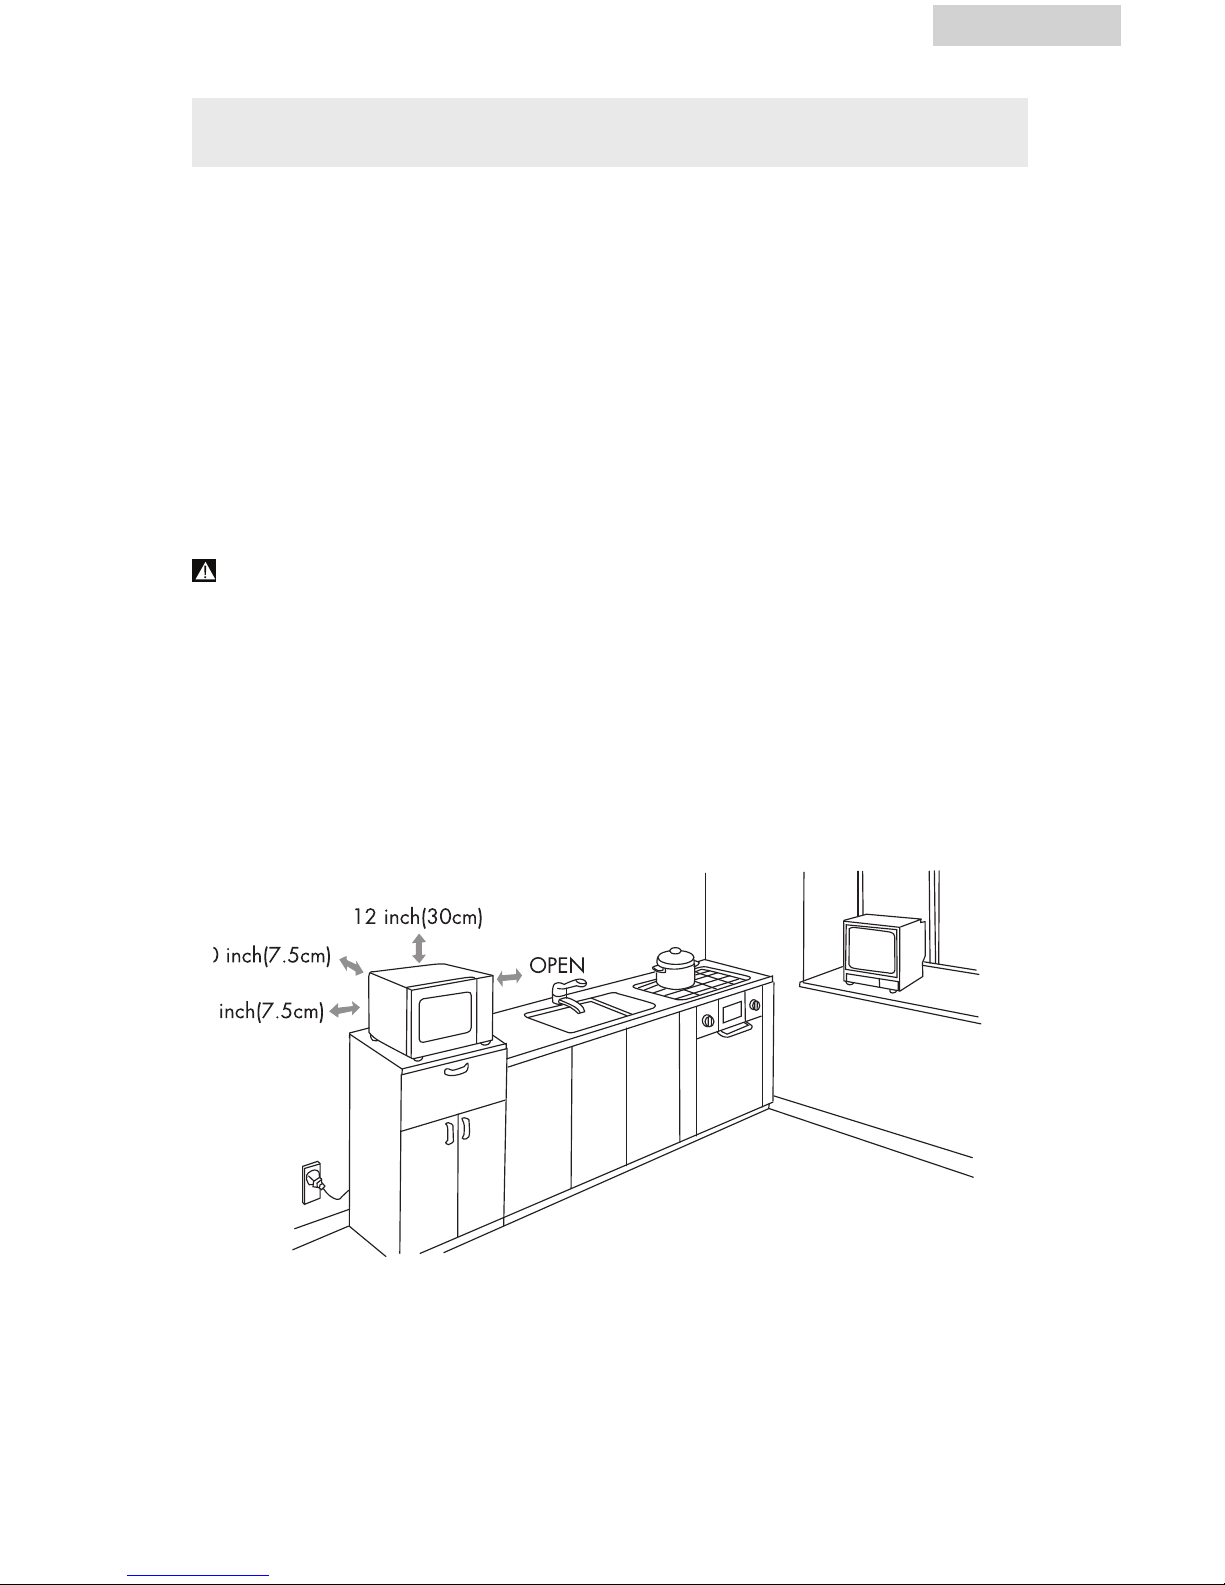
1. Select a level surface that provides enough open space for the intake and/or
outlet vents. A minimum clearance of 3.0 inches (7.5cm) is required between
the oven and any adjacent walls. One side must be open.
(1) Leave a minimum clearance of 12 inches (30cm) above the oven.
(2) Do not remove the legs from the bottom of the oven.
(3) Blocking the intake and/or outlet openings can damage the oven.
(4) Place the oven as far away from radios/TV as possible. Operation of
microwave oven may cause interference to your radio/TV reception.
2. Plug your oven into a standard household outlet. Be sure the voltage and the
frequency is the same as the voltage and the frequency on the rating label.
WARNING: Do not install oven over a range cooktop or other
heat-producing appliance. If installed near or over a heat
source, the oven could be damaged and the warranty
would be void.
COUNTERTOP INSTALLATION
English
Page 12
English
11
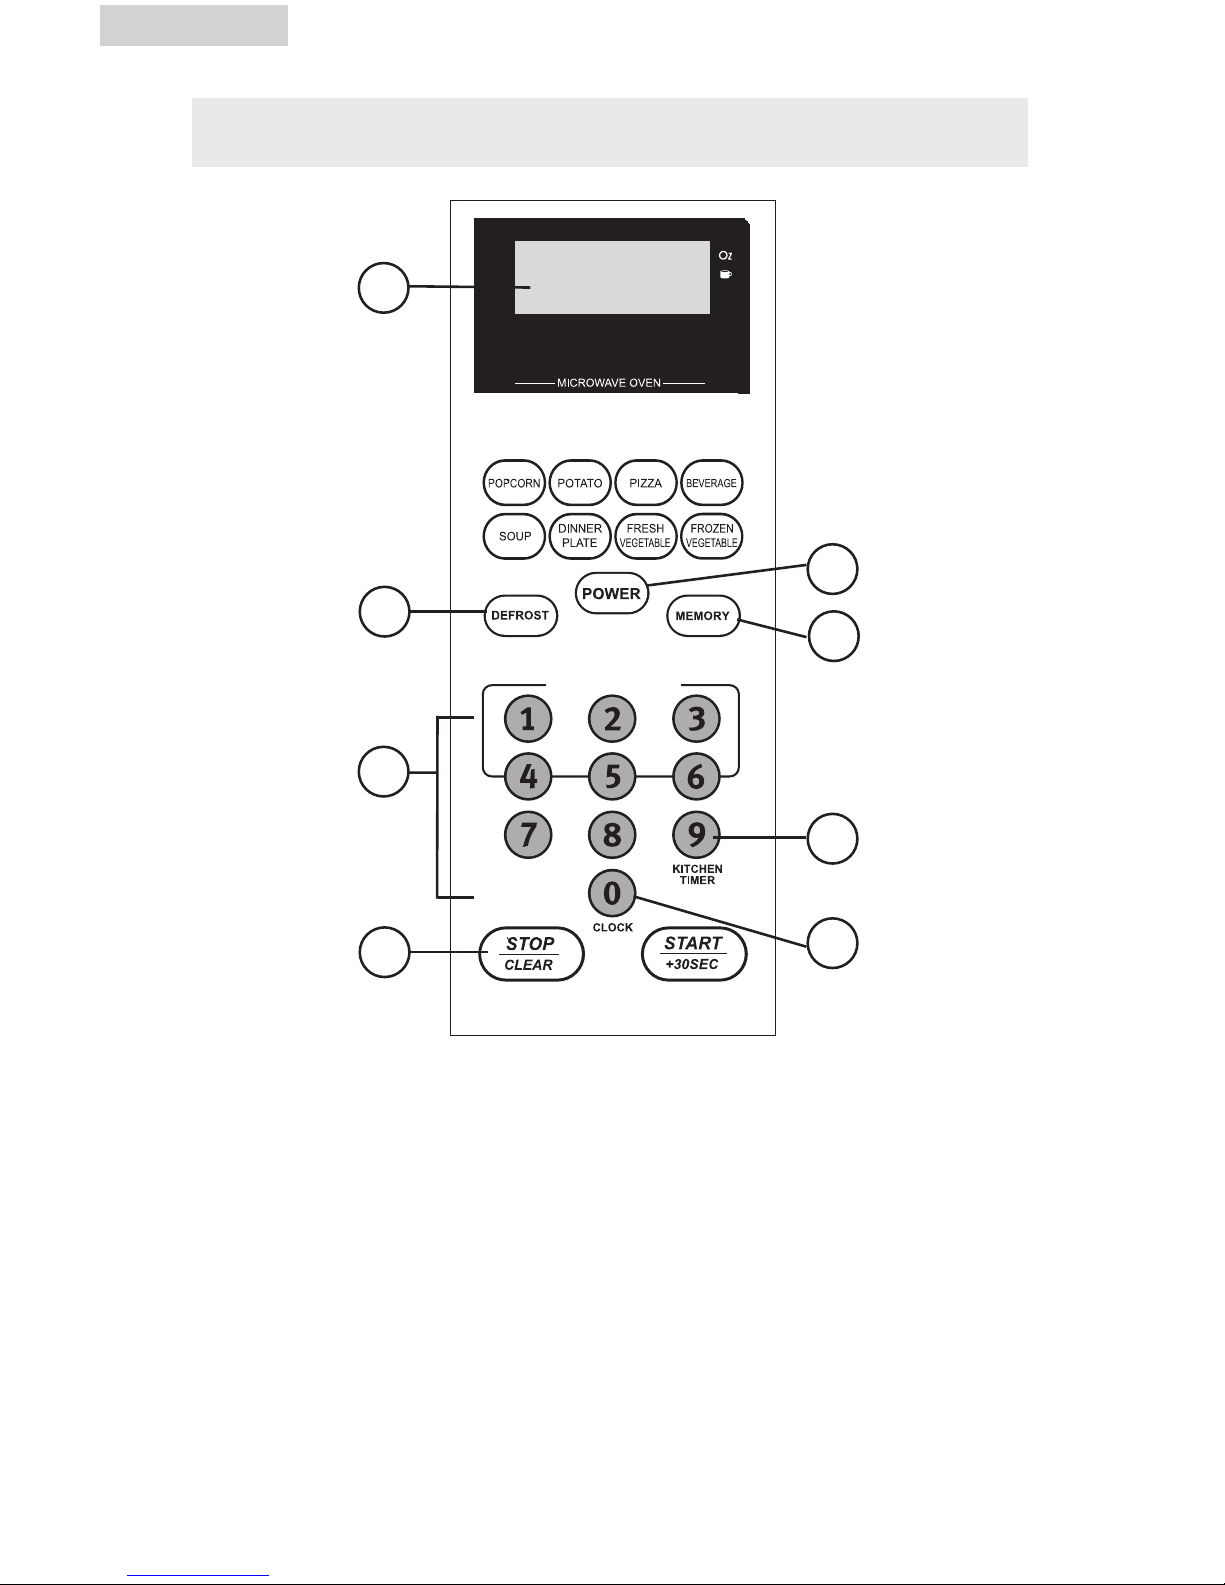
CONTROL PANEL
1. DISPLAY
Cooking time, power, indicators and
present time are displayed.
2. DEFROST BY WEIGHT OR TIME
Programmed defrosting based on the
weight or time of the foods to
be defrosted
3. POWER
Use to set power level. To check
power level during time cooking,
touch POWER pad.
4. NUMBER PADS (0-9)
Touch to set times or weights
5. MEMORY
Saves cooking procedure for next use.
6. TIMER
Timer functions independently, even
while a cooking program
is in process.
7. CLOCK
Use to set the time of day or recall the
time of day.
8. START/CLEAR
Clear all previous settings selected
before starting to cook. During
cooking: press once to stop oven,
twice to stop and clear all entities.
EXPRESS COOK
1
2
8
6
7
5
4
3
Page 13
English
12
OPERATION INSTRUCTIONS
SIGNALS DURING OVEN SETTINGS
ONE SIGNAL: Oven accepts the entry.
TWO SIGNALS: Oven does not accept the entry, check and try again.
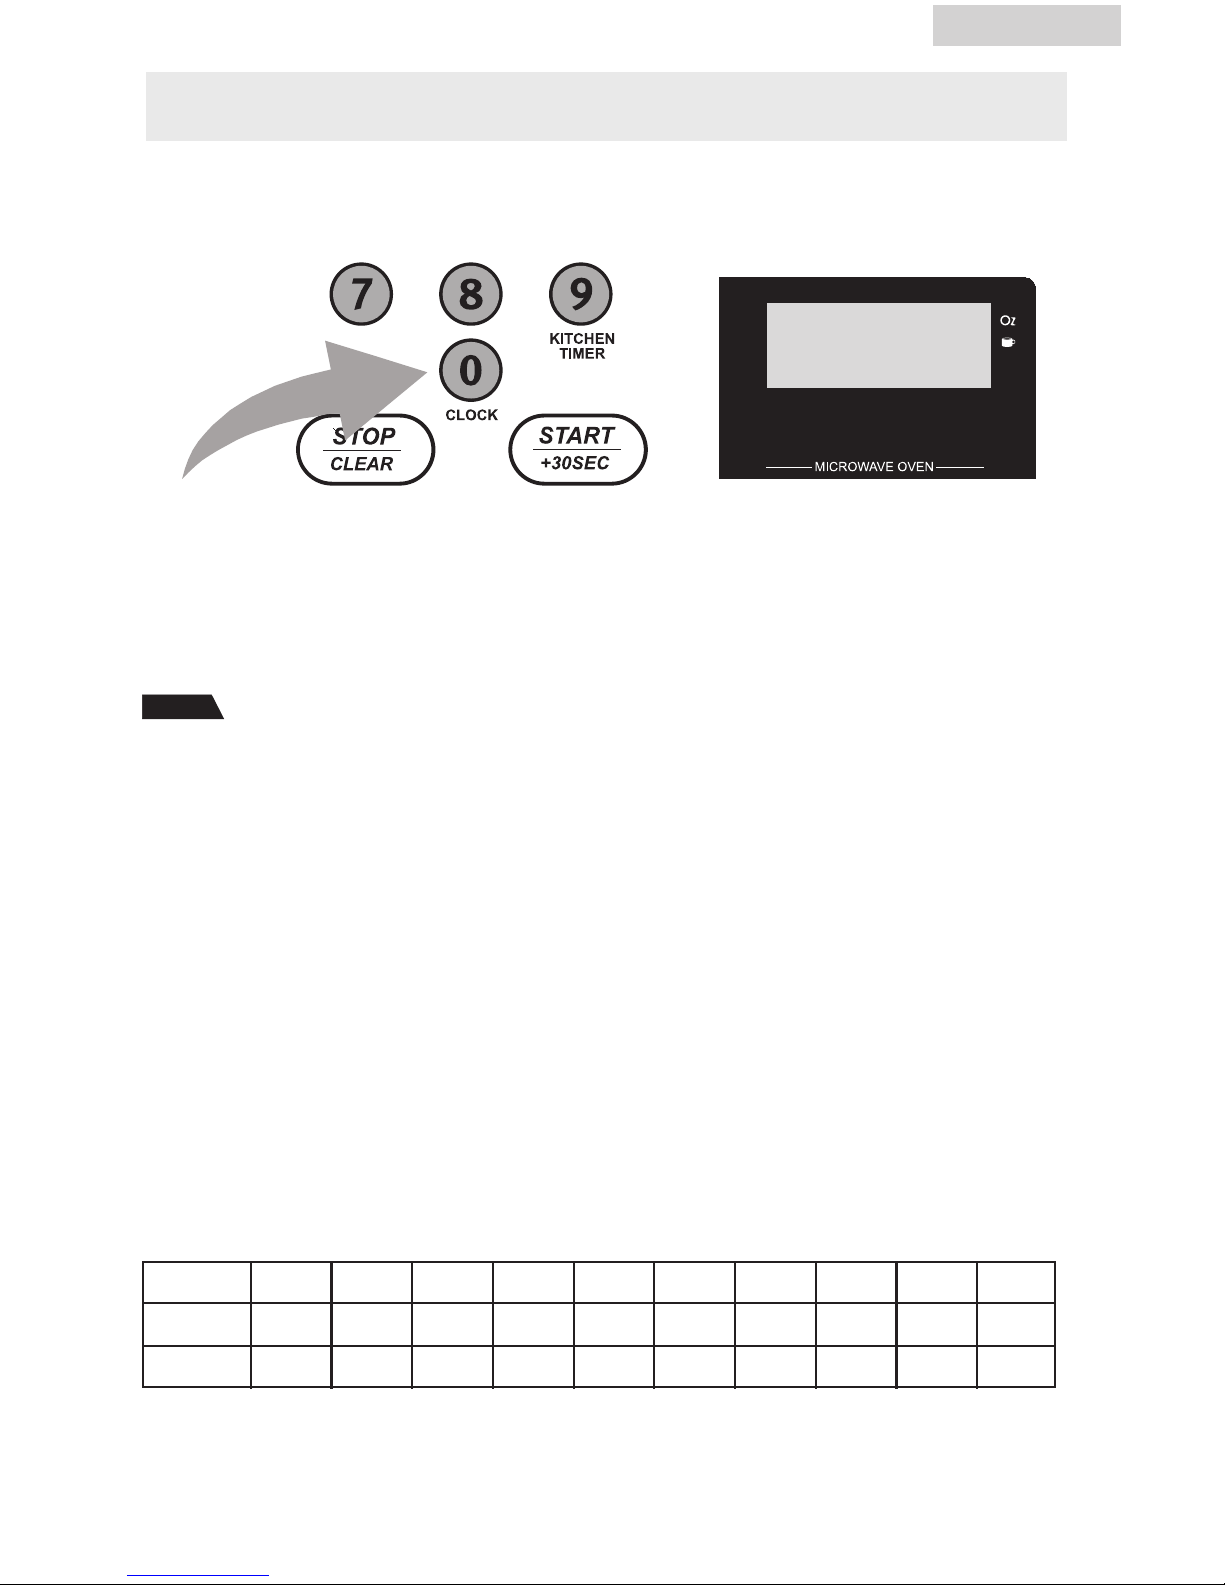
When the microwave oven is plugged into an outlet, the oven will display "0:00."
(1) Press "0/CLOCK" and the LED will display 00:00. The hour number will blink.
(2) Press the number keys to enter the correct time. Time input should be 1:00-12:59. For
example, if the time is 10:12, press "1,0,1,2."
(3) Press "START/+30SEC." to confirm the time and finish setting the clock. The time will
be on the display.
Note
(1) If time input is beyond 1:00-12:59, the setting is invalid. You cannot confirm
and finish setting by pressing "START/+30SEC.."
(2) If you want to reset the clock, repeat steps 1 through 3. If you don't press
"START/+30SEC." after setting, the previously set time will be display after
one minute.
2. Kitchen Timer
(1) Press "9/KITCHEN TIMER." The LED will display 00:00. The first "0" will flash, and
":" and the other "0" will be lit.
(2) Press the number keys to enter the correct time. (The maximum cooking time is 99
minutes and 99 seconds.)
(3) Press "START/+30SEC." to confirm setting.
(4) When the set time is reached, the buzzer will ring 5 times and the oven will return to
the resting state. If the clock is set (12-hour system), the LED will display the
current time.
3. Microwave cook
Ten power levels are available.
10
100%
PL10
Level
Power
Display
9
90%
PL9
8
80%
PL8
7
70%
PL7
6
60%
PL6
5
50%
PL5
4
40%
PL4
3
30%
PL3
2
20%
PL2
1
10%
PL1
(1) Press "POWER" repeatedly to choose the microwave power you need. "PL10",
"PL9","PL8"...."PL1" will be displayed in order.
Page 14

English
13
(2) Press the number keys to input the cooking time. The maximum cooking time is
99 minutes and 99 seconds.
(3) Press "START/+30SEC." to start cooking. The remained cooking time will
be displayed.
Note
In the process of cooking, if the "STOP/CLEAR" button is pressed or if
there is no operation within 1 minute, the oven will go back to the former
setting automatically.
Example: To cook food with 50% microwave power for 15 minutes:
(1) Press "POWER" six times until "PL5" displays.
(2) Input the cooking time. Press "1, 5, 0, 0" to set the time.
(3) Press "START/+30SEC." to start cooking.
4. Fast Starting
(1) In the waiting state, automatic cooking at the 100% power level can be started
easily. Select a cooking time from 1 to 6 minutes by pressing the number pad
1 to 6. Press "START/+30SEC." to increase the cooking time. The maximum
cooking time is 99 minutes and 99 seconds.
(2) In the waiting state, instant cooking at 100% power level with 30 seconds'
cooking time can be started by pressing "START/+30SEC.." Each time you
press that button, it will increase the cooking time by 30 seconds. The maximum
cooking time is 99 minutes and 99 seconds.
Note
Each time you press "START/+30SEC.," the cooking time increases
by 30 seconds for microwave and Auto menu cooking. However, this
operation will not work with the "Weight Defrost" operation.
5. Defrosting By Weight Function
(1) Press "DEFROST" once to choose the defrost by weight function. "dEF1"
is displayed.
(2) Press the number pad to input weight to be defrosted. Weight range can be
between 4 and 100oz.
(3) If the weight input is not between 4 and 100oz, the input will be invalid. The
microwave will not work until valid numbers are input.
(4) Press "START/+30SEC." to start defrosting. The remained cooking time will
be displayed.
6. Time Defrost Function
(1) Press "DEFROST" twice to choose the defrost by time function. The screen will
display "dEF2."
(2) Press the number pad to input defrosting time. The allowable time range is
00:01~99:99.
Note
(a) If the time input is not within 00:01 and 99:99, no "beep" will be
sound and the microwave will not work until valid numbers
are input.
(b) The default microwave power is power level 3. This cannot be
changed.
(3) Press "START/+30SEC." to start defrosting. The remaining cooking time will
be displayed.
Page 15

English
7. POPCORN
a) Press "POPCORN" repeatedly until the number you want appear in the display.
"1.75", " 3.0" and "3.5" will be displayed in order.
For example, if you press "POPCORN" once, "1.75" displays.
b) Press "START/+30 SEC." to begin cooking popcorn. The remaining time will
count down.
c) When cooking is finished, the buzzer will sound five times. The unit will then
return to waiting state. "0:00" will display. If the clock has been set, the current
time will be displayed.
8. POTATO
a) Press "POTATO" repeatedly until the number you want appears in the display,
"1", "2" or "3" will be displayed in order.
"1" setting: 1 potato (approximately 3.0oz)
"2" setting: 2 potatoes (approximately 6.0oz)
"3" setting: 3 potatoes (approximately 9.0oz)
For example, press "POTATO" once: "1" displays.
b) Press "START/+30 SEC." to begin cooking. The remaining time will
count down.
c) When cooking is finished, the buzzer will sound five times. The unit will then
return to waiting state.
Times (Press "Popcorn")
One
Two
Three
Weight (Oz)
1.75
3.0
3.5
Display
1.75
3.0
3.5
Times (Press "Potato")
One
Two
Three
Weight
1set
2sets
3sets
Display
1
2
3
QUICK COOK SETTINGS
The QUICK COOK settings allow you to cook or reheat food automatically without
entering a power level or time
14
Page 16

Times( Press "BEVERAGE")
One
Two
Three
Weight
1 mug
2 mugs
3 mugs
Display
1
2
3
10. BEVERAGE
a) Press "BEVERAGE" repeatedly until the number you want appears
in the display. "1", "2", and "3" will be displayed in order. You can
reheat 1 to 3 cups of beverage each time (approximate 250 ML).
For example, press "BEVERAGE" twice. "2" appears in the display.
b) Press "START/+30 SEC." to cook.
c) The buzzer will sound five times when cooking is finished. Then the unit
will return to the waiting state.
11. SOUP
a) Press "SOUP" repeatedly until the number you want appears in the display.
"4.0", "8.0", "12.0", "16.0" will be displayed in order. For example, press
"SOUP" twice. "8.0" appears in the display.
b) Press "START/+30 SEC." to cook.
c) The buzzer will sound five times when cooking is finished. Then the unit will
return to the waiting state.
Times( Press "SOUP ")
One
Two
Three
Four
Weight
4.0 oz
8.0 oz
12.0 oz
16.0 oz
Display
4.0
8.0
12.0
16.0
Times( Press "Pizza")
One
Two
Three
Weight
1 (about 3.0 oz)
2 (about 6.0 oz)
3 (about 9.0 oz)
Display
1
2
3
9. PIZZA
a) Press "PIZZA" repeatedly until the number you want appears in the display.
"1","2" or "3" will be displayed.
For example, press "PIZZA" twice. "2" appears in the LED.
b) Press "START/+30 SEC." to begin cooking. The remaining time will
count down.
c) When cooking is finished, the buzzer will sound five times. The unit will then
turn to the waiting state.
English
15
Page 17

13. FRESH VEGETABLE
a) Press "FRESH VEGETABLE" repeatedly until the number you want appears in
the display. "4.0","8.0" and "16.0" will be displayed in order.
For example, press "FRESH VEGETABLE" twice. "8.0" appears in the display.
b) Press "START/+30 SEC." to begin cooking. The remaining time will begin to
count down.
c) The buzzer will sound five times when cooking is finished.
Times (Press "FRESH VEGETABLE")
One
Tw
Three
Weight
4.0 oz
8.0 oz
16.0 oz
Display
4.0
8.0
16.0
14. FROZEN VEGETABLE
a) Press "FROZEN VEGETABLE" repeatedly until the number you want appears
in the display. "4.0", "8.0" and "16.0" will be displayed in order.
For example, press "FROZEN VEGETABLE" twice. "8.0" appears in
the display.
b) Press "START/+30 SEC." to begin cooking. The remaining time will begin to
count down.
c) The buzzer will sound five times when cooking is finished.
Times (Press "FROZEN VEGETABLE")
One
Two
Three
Weight
4.0 oz
8.0 oz
16.0 oz
Display
4.0
8.0
16.0
12. DINNER PLATE
a) Press "DINNER PLATE" repeatedly until the number you want appears in
the display. "9.0"," 12.0 " and "18.0" will be displayed.
For example, press "DINNER PLATE" twice. "12.0" appears in the display.
b) Press "START/+30 SEC." to cook. The remaining time will begin
counting down.
c) The buzzer will sound five times when cooking is finished. The unit will then
return to the waiting state.
Times (Press "DINNER PLATE")
One
Two
Three
Weight
9.0 oz
12.0 oz
18.0 oz
Display
9.0
12.0
18.0
English
16
Page 18

15. MEMORY FUNCTION
(1) Press "MEMORY" to use the memory function. The LED will display 1,2,3.
(2) If the memorized procedure has been set, press "START/ +30 SEC." to use it.
If not, continue to set the procedure. Only one or two stages can be set.
(3) After finishing the setting, press "MEMORY" to save the procedure and
return to the waiting state. If you press "START/ +30 SEC.", it will save the
operation and then begin operating the setting.
Note
Auto menu cooking cannot be set as memory procedure.
Example: To set the following procedure as "Memory 2," if you want to
cook the food with 80% microwave power for 3 minutes and
20 seconds, follow these steps:
1) In the waiting state, press "MEMORY" twice, until the
screen displays "2".
2) Press "POWER" three times until "PL8" displays.
3) Press number keys "3, 2, 0" in order to input the
cooking time.
4) Press "MEMORY" to save the setting. The buzzer sounds
once, then returns to the waiting state. If you press
"START/+30SEC." after the above step, the procedure
will be saved as the memory 2 and operated.
5) As long as the electricity is not cut off, the procedure
will be saved all the time. If electricity is interrupted, the
procedure needs to be reset.
6) If you want to run the saved procedure, in the waiting
state, press "MEMORY" twice. The screen displays "2".
Then press "START/+30SEC." to run.
16. MULTI-STAGE COOKING
This microwave oven can be set with 2 stages cooking at most. If one stage is
defrost by weight, it will placed as the first stage automatically. Only one of the 2
stages can be defrost.
Example: T o defrost 20oz of beef first, and then cook with 80% microwave
power for 7 minutes:
1) Press "DEFROST" once to choose defrost by weight function.
"dEF1" displays.
2) Press "2, 0" in sequence to set the weight.
3) Press "POWER" three times to set 80% microwave power.
4) Press "7, 0, 0" in sequence to set the cooking time.
5) Press "START/ +30 SEC." to start cooking.
When the defrost procedure is finished, the buzzer will sound once, and the
second stage will begin.
Note
(1) The auto menu can't be set as one of the 2 stages.
(2) Defrost by time can be set as the one of stages.
English
17
Page 19

17. INQUIRY FUNCTION
(1) In the cooking state, press "0/CLOCK". The LED will display the clock for three
seconds if the clock has been set.
(2) In the cooking state, press "POWER" to display microwave power level. After
three seconds, the oven will return to the previous state. In the multi-stage state,
this Inquiry way can be done In the same way as above.
18. COOKING END REMINDING FUNCTION
When the cooking is over, the buzzer will sound 5 beeps to alert user that the
cooking is finished.
19. OTHER SPECIFICATIONS
(1) In the standby state, if the clock has been set, the screen displays current time.
The " : " will flash; otherwise, when the clock Is not set, it shows " 0:00 ".
(2) In setting the function state, the LED displays the related setting.
(3) In the working or pause state, the LED displays remaining cooking time.
(4) During operation, if cooking is paused or the door is opened, "START/
+30SEC." must be pressed to continue cooking.
20. LOCK FUNCTION FOR CHILDREN
The safety lock prevents unsupervised operation by children.
To set lock: In the waiting state, press "STOP/CLEAR" for 3
seconds. There will be a long "beep" denoting that
the children-lock Is now on. The LED will display "
".
Turning off Child Lock: In the locked state, press "STOP/CLEAR" for 3
seconds. There will be a long "beep" denoting that
lock is turned off.
English
18
Page 20

CLEANING AND CARE
1. When cleaning surfaces of door and oven that come together on closing the
door, use only mild, nonabrasive soups, or detergents applied with a sponge
or soft cloth.
2. Turn off the oven and remove the power plug from the wall socket
before cleaning.
3. Keep the inside of the oven clean. When food splatters or spilled liquids
adhere to oven walls, wipe with a damp cloth. Mild detergent may be used
if the oven gets very dirty. Avoid the use of spray and other harsh cleaners
as they may stain, streak or dull the door surface.
4. The outside surfaces should be cleaned with a damp cloth. To prevent
damage to the operating parts inside the oven, water should not be allowed
to seep into the ventilation openings.
5. Wipe the window on both sides with a damp cloth to remove any spills or
spatters.
6. Do not allow the control panel to become wet. Clean with a soft, damp
cloth. When cleaning the control panel, leave oven door open to prevent
oven from accidentally turning on.
7. If steam accumulates inside or around the outside of the oven door, wipe
with a soft cloth. This may occur when the microwave oven is operated
under high humidity conditions, and this is normal.
8. It is occasionally necessary to remove the glass tray for cleaning. Wash the
tray in warm sudsy water or in a dishwasher.
9. The roller ring and oven floor should be cleaned regularly to avoid excessive
noise. Simply wipe the bottom surface of the oven with mild detergent. The
roller ring may be washed in mild sudsy water or dishwasher. When
removing the roller ring from cavity floor for cleaning, be sure to replace in
the proper position.
10. Remove odors from your oven by combining a cup of water with the juice
and skin of one lemon in a deep bowl, microwave for 5 minutes. Wipe
thoroughly and dry with a soft cloth.
11. When it becomes necessary to replace the oven light, please consult a
dealer to have it replaced.
English
19
Page 21

TROUBLESHOOTING
Check your problem by using the chart below and try the solutions for each
problem. If the microwave oven still does not work properly, contact Crosley
customer service center or the nearest authorized service center.
Oven will not start a. Electrical cord for oven is not
plugged in.
b. Door is open.
c. Wrong operation is set.
a. Plug into the outlet.
b. Close the door and try
again.
c. Check instructions.
Arcing or
sparkling
a. Materials to be avoided in
microwave oven were used.
b. The oven is operated when empty.
c. Spilled food remains in the cavity.
a. Use microwave-safe
cookware only.
b. Do not operate with oven
empty.
c. Clean cavity with wet towel.
Unevenly cooked
foods
a. Materials to be avoided in
microwave oven were used.
b. Food is not defrosted
completely.
c. Cooking time, power level is not
suitable.
d. Food is not turned or stirred.
a. Use microwave-safe
cookware only.
b. Completely defrost food.
c. Use correct cooking time,
power level.
d. Turn or stir food.
Overcooked foods Cooking time, power level is not
suitable.
Use correct cooking time and
power level.
Undercooked foods a. Materials to be avoided in
microwave oven were used.
b. Food is not defrosted completely.
c. Oven ventilation ports are restricted.
d. Cooking time, power level is not
suitable.
a. Use microwave-safe
cookware only.
b. Completely defrost food.
c. Check to see that oven
ventilation ports are not
restricted.
d. Use correct cooking time
and power level.
Improper
defrosting
a. Materials to be avoided in
microwave oven were used.
b. Cooking time, power level is not
suitable.
c. Food is not turned or stirred.
a. Use microwave-safe
cookware only.
b. Use correct cooking time
and power level.
c. Turn or stir food.
TROUBLE POSSIBLE CAUSE
POSSIBLE REMEDY
English
20
Page 22

DESEMBALAJE DE SU HORNO MICROONDAS
1. Revise y quite todos los materiales de embalaje. Esto incluye la espuma y la cinta
adhesiva de dentro y fuera de la unidad.
2. Revise y quite los restos de embalaje, cinta o materiales impresos antes de enchufar
su artefacto Crosley.
PELIGRO
Riesgo de que los niños queden atrapados.
Antes de deshacerse de su artefacto viejo, saque
la puerta para evitar que los niños puedan quedar
atrapados fácilmente en el interior.
21
Español
Lea por favor este manual cuidadosamente antes de usar.
Consérvelopara su referencia futura.
Page 23

Español
PRECAUCIONES PARA EVITAR LA POSIBLE
EXPOSICIÓN A ENERGÍA EXCESIVA DE
MICROONDAS
(a) No intente poner en funcionamiento el horno con la puerta abierta, ya que
dicho funcionamiento puede ocasionar exposición perjudicial a la energía
de microondas. Es importante que no se anulen ni se manipulen de manera
indebida los cerrojos de seguridad.
(b) No ubique objetos entre el frente del horno y la puerta ni permita que restos
de suciedad o limpiador se acumulen sobre las superficies de sellado.
(c) No ponga en funcionamiento el horno si está dañado. Es especialmente
importante que la puerta del horno cierre correctamente y que no estén
dañados los siguientes elementos:
1. Puerta (doblada)
2. Bisagras y pestillos (rotos o flojos)
3. Sellado de las puertas y superficies de sellado
(d) El horno no debe ser ajustado o reparado por ninguna persona que no
pertenezca al personal de reparaciones debidamente calificado.
Apéndice
• Si el artefacto no se mantiene en buen estado de limpieza, su superficie
podría verse dañada y afectar la vida útil del artefacto y llevar a una situación
peligrosa.
Antes de llamar para obtener servicios de reparación
Si el horno no funciona:
a) Compruebe que el horno esté firmemente enchufado. Si no lo está, saque el
enchufe del tomacorriente, espere 10 segundos y enchúfelo nuevamente con
firmeza.
b) Controle que no haya un circuito de fusibles quemado o que no se haya
saltado un interruptor automático principal. Si parecen estar funcionando
adecuadamente, pruebe el tomacorriente con otro artefacto.
c) Compruebe que el panel de control esté correctamente programado y que el
temporizador esté configurado.
d) Compruebe que la puerta esté bien cerrada activando el sistema de bloqueo
de seguridad de la puerta. De lo contrario, la energía de microondas no fluirá
dentro del horno.
SI NINGUNA DE LAS INDICACIONES ANTERIORES RECTIFICA LA SITUACIÓN,
ENTONCES PÓNGASE EN CONTACTO CON UN
TÉCNICO CALIFICADO. NO INTENTE AJUSTAR O
REPARAR EL HORNO MICROONDAS
USTED MISMO.
22
ADVERTENCIA
ADVERTISSMENT
Page 24

23
PÁGINA
PRECAUCIONES PARA EVITAR LA POSIBLE EXPOSICIÓN A ENERGÍA EXCESIVA
DE MICROONDAS .......................................................................22
ESPECIFICACIONES ...................................................................... 23
INSTRUCCIONES DE SEGURIDAD IMPORTANTES ...........................24
INSTRUCCIONES DE PUESTA A TIERRA .........................................26
GUÍA DE UTENSILIOS ..................................................................27
TÉCNICAS DE COCCIÓN.......... ....................................................28
CÓMO INSTALAR EL HORNO ......................................................29
INSTALACIÓN EN ENCIMERA.......................................................30
PANEL DE CONTROL ...................................................................31
INSTRUCCIONES OPERATIVAS .....................................................32
CONFIGURACIONES DE COCCIÓN RÁPIDA ..................................34
CUIDADO Y LIMPIEZA ................................................................. 39
DETECCIÓN Y SOLUCIÓN DE PROBLEMAS .................................... 40
ÍNDICE DE CONTENIDOS DEL MICROONDAS
Español
Modelo: MWM0701TW
Voltaje: 120V ~ 60Hz
Energía de entrada: 1050W
Potencia de microondas: 700W
Capacidad de horno: 0.7 pies cúbicos
Diámetro del plato giratorio: ø9.6 pulgadas
Dimensiones Externas (WxDxH): 17 × 13.2 x 10.2 inches
Peso neto: 22 libras
Advertencia: La manipulación del cable de esta unidad o
los cables de los accesorios que se venden
con este producto implicará la exposición a un
químico que según el estado de California causa
cáncer, defectos de nacimiento y otros daños
reproductivos. Límpiese las manos luego
de manipularlo.
SPECIFICATIONS
Page 25

Español
Cuando se utilizan artefactos eléctricos, se deben tomar precauciones de seguridad básicas,
incluyendo lo siguiente:
ADVERTENCIA: Para reducir el riesgo de quemaduras,
descarga eléctrica, incendio, lesiones a
las personas o exposición a energía de
microondas excesiva:
1. Lea todas las instrucciones antes de usar el artefacto.
2. Lea y cumpla las “PRECAUCIONES PARA EVITAR LA POSIBLE EXPOSICIÓN A ENERGÍA
DE MICROONDAS EXCESIVA” específicas en la página 44.
3. Este artefacto debe tener conexión a tierra. Conéctelo solamente a un tomacorriente con la
correspondiente conexión a tierra. Consulte las “instrucciones de descarga a tierra” en la
página 48.
4. Instale o ubique este horno sólo conforme a las instrucciones de instalación provistas en la
página 51.
5. Algunos productos, tales como por ejemplo huevos enteros y contenedores sellados (por
ejemplo, recipientes de vidrio cerrados) pueden explotar, y por lo tanto no deben calentarse
en este horno.
6. Use este artefacto sólo para los usos para los que fue diseñado, según se describe en este
manual. No use productos químicos o vapores corrosivos en este artefacto. Este horno
fue diseñado específicamente para calentar, deshumedecer o cocinar alimentos. No fue
diseñado para uso industrial o en laboratorios.
7. Como con cualquier artefacto, es necesaria una supervisión estricta cuando los usan los
niños.
8. Para reducir el riesgo de incendio dentro del horno:
• No cocine los alimentos en demasía. Preste atención especial al artefacto cuando
coloque materiales de papel, plástico u otros materiales combustibles en el horno para
facilitar la cocción.
• Quite los cierres de alambre de las bolsas de papel o de plástico antes de ubicarlas en
el horno.
• Si los materiales dentro del horno se prenden fuego, mantenga la puerta del horno
cerrada, apague la unidad y desconecte el cable de energía o corte la energía desde
el panel de fusibles o interruptor automático.
• No use la cavidad del horno para almacenar objetos. No deje productos de papel,
utensilios de cocina o alimentos en la cavidad cuando la unidad no esté en uso.
24
INSTRUCCIONES DE
SEGURIDAD IMPORTANTES
Page 26

9. Los líquidos, tales como el agua, el café o el té pueden recalentarse y pasar el
punto de ebullición sin que parezca que están hirviendo debido a la tensión
superficial del líquido. No siempre es visible el burbujeo o la ebullición cuando
se saca el recipiente del horno microondas. ESTO PUEDE OCASIONAR QUE
LOS LÍQUIDOS MUY CALIENTES ENTREN EN EBULLICIÓN REPENTINAMENTE
CUANDO SE INSERTA UNA CUCHARA U OTRO UTENSILIO EN EL LÍQUIDO.
10. No caliente aceite o grasa para freír. Es difícil controlar la temperatura del aceite
en el horno microondas.
11. Pinche los alimentos con cáscaras gruesas como papas, calabazas enteras,
manzanas y castañas antes de cocinarlos.
12. Los contenidos de los biberones y vasos para bebés deben agitarse o sacudirse,
y debe controlarse la temperatura antes de servirlos para evitar quemaduras.
13. Los utensilios de cocina pueden calentarse a causa del calor que transfieren los
alimentos calientes. Pueden necesitarse agarraderas para manipular los utensilios.
14. No cubra ni obstruya las ventilaciones del horno.
15. No guarde ni use este artefacto en el exterior. No use este producto cerca del
agua, por ejemplo, cerca de un fregadero de cocina, en un sótano húmedo,
cerca de una piscina o en lugares similares.
16. No ponga en funcionamiento este horno si el cable o el enchufe están dañados,
si la unidad no funciona correctamente o si está dañada o se ha caído.
17. No sumerja el cable o el enchufe en agua. Mantenga el cable lejos de las
superficies calientes. No permita que el cable cuelgue sobre el borde de una
mesa o encimera.
18. Utilice solamente termómetros que estén diseñados especialmente para el uso en
hornos microondas.
19. Cuando limpie la puerta y las superficies del horno, use sólo jabones o
detergentes suaves y no abrasivos aplicados con una esponja o paño suave.
20. Asegúrese de que la bandeja de vidrio y el anillo con rodillos estén en su lugar
cuando ponga en funcionamiento el horno.
21. Este aparato sólo debe ser reparado por técnicos de reparaciones calificados.
Póngase en contacto con el lugar de reparaciones autorizado más cercano para
que realicen el examen, la reparación o el ajuste necesarios.
Español
25
CONSERVE ESTAS INSTRUCCIONES
USO DOMÉSTICO SOLAMENTE
Page 27

Requisitos Eléctricos
INSTRUCCIONES DE CABLEADO Y DE HACER TIERRA
Este aparato electrodoméstico debe ser enchufado a una TOMA
CONECTADA A TIERRA de por lo menos 15 AMP 120 Voltios 60Hz. Este
aparato debe ser conectado a tierra. En caso de un cortocircuito eléctrico,
la conexión a tierra reduce el riesgo de descargas eléctricas al proveer un
alambre de escape para la corriente eléctrica. Este aparato viene equipado
con un cable de 3 alambres, uno de ellos un
alambre de hacer tierra, con un enchufe de
hacer tierra. En enchufe debe colocarse en
una toma que está correctamente conectada
a tierra.
A DVERTENCIA! Uso indebido de
alambres conectadas a tierra puede
resultar en riesgo de descarga eléctrica.
Consulte a un electricista cualificado o
proveedor de servicios si las instrucciones
de hacer tierra no se comprenden
completamente, o si existen dudas acerca
de si el aparato está correctamente
conectado a tierra. No intente frustrar
esta característica de seguridad haciendo modificaciones al enchufe.
EL CABLE DE ALIMENTACIÓN
1. Este aparato viene equipado con un cable de suministro
eléctrico corto para reducir los riesgos que se asocian con un
cable más largo; por ejemplo, enredos o tropezones.
2. Evite el uso de cables de extensión porque se podrían
sobrecalentar y causar el riesgo de un incendio. Si es
necesario utilizar un cable de extensión, hay que ejercer
cuidado y se deberían seguir los siguientes consejos:
a. La valoración del voltaje eléctrico marcado en el cable de
extensión debe ser igual a o mayor que la valoración de
voltaje eléctrico del aparato.
b. Use sólo cables de extensión con tres alambres mas un
enchufe de hacer tierra de tres pinzas, y un recipiente para
tres pinzas que soportará el enchufe del aparato.
c. Cables mas largos se deben arreglar de tal manera que
no se tiendan sobre mesas o encimeras donde podrían
presentar un peligro, o donde podrían ser jaladas por niños
a propósito.
INTENTAR CUALQUIER FORMA DE MANTENIMIENTO O LIMPIEZA
Para reducir el riesgo de descarga eléctrica, desenchufe este aparato del
suministro eléctrico o desconecte en el panel de distribución casero quitando
el fusible o poniendo el disyuntor en posición apagada antes de intentar
cualquier mantenimiento o limpieza.
INSTRUCCIONES DE SEGURIDAD
ADVERTENCIA
ADVERTISSMENT
Evite peligro de incendios o
descargas eléctricas. No utilice cables
de extensión o enchufes adaptadores.
No quite ninguna pinza del cable de
alimentación. Recipiente de pared de
tipo hacer tierra.
Bajo ninguna circunstancia
corte, quite, o circunvale la
pinza de hacer tierra.
Suministro eléctrico con
enchufe de hacer tierra con
tres pinzas.
poniendo a tierra
el tipo receptáculo
de pared
Fuente de alimentación
cuerda con el enchufe que
pone a tierra de tres dientes
Español
26
ADVERTENCIA:
AVERTISSEMENT:
ADVERTENCIA:
AVERTISSEMENT:
ADVERTENCIA:
AVERTISSEMENT:
Page 28

UTENSILIOS
En esta sección se enumeran los utensilios que pueden usarse en el microondas, los
que tienen uso limitado durante períodos cortos y los que no deben usarse en este
microondas.
Recomendados
• Bandeja doradora para microondas - Utilícela para dorar el exterior de alimentos
pequeños, tales como bistecs, chuletas o panqueques. Siga las instrucciones provistas
junto con su bandeja doradora.
• Envoltorio plástico apto para microondas - Utilícelo para conservar el vapor. Deje una
pequeña abertura para que escape algo de vapor y evite colocarlo directamente sobre
los alimentos.
• Toallas de papel y servilletas – Utilícelas para calentar alimentos durante períodos
cortos y para cubrir. Absorben el exceso de humedad y previenen las salpicaduras.
No utilice toallas de papel reciclado, que pueden contener metal y pueden prenderse
fuego.
• Tazones y fuentes de vidrio y vidrio cerámico – Utilícelos para calentar o cocinar.
• Platos y tazas de papel – Úselos sólo para calentar a bajas temperaturas durante
un tiempo corto. No utilice papel reciclado, que pueden contener metal y pueden
prenderse fuego.
• Papel encerado – Úselo para cubrir para prevenir salpicaduras.
• Termómetros – Utilice sólo los que tienen el rótulo “Apto para microondas” y siga
todas las instrucciones. Examine los alimentos en varios lugares. Los termómetros
convencionales pueden utilizarse con los alimentos cocidos en microondas una vez que
los haya sacado del horno.
Uso limitado
• Papel aluminio – Utilice tiras angostas de papel aluminio para evitar la cocción
excesiva de las áreas expuestas. El uso de demasiado papel aluminio puede dañar su
horno, de modo que tenga cuidado.
• Cerámica, porcelana y cerámica de gres – Utilícelos si cuentan con el rótulo “Apto
para microondas”. Si no tienen el rótulo, pruébelos para asegurarse de que puedan
usarse con seguridad.
• Plástico – Utilícelo sólo si tiene el rótulo “Apto para microondas”. Los demás plásticos
pueden derretirse.
• Paja, mimbre y madera – Utilícelos sólo para calentar durante períodos cortos, por
ejemplo, para calentar los panecillos de la cena durante unos pocos segundos; las
canastas y los tazones pueden ser inflamables.
ADVERTENCIA
ADVERTISSMENT
No son recomendables
• Jarras y botellas de vidrio – El vidrio común es demasiado delgado para usarlo en el
microondas. Puede romperse y provocar daños y lesiones.
• Bolsas de papel – Constituyen un riesgo de incendio, con la excepción de las bolsas
de palomitas de maíz que están diseñadas para ser usadas en el microondas. Platos
y vasos de espuma de poliestireno – Pueden derretirse y dejar restos insalubres en los
alimentos.
• Recipientes plásticos para almacenamiento de alimentos – Los recipientes tales como
envases de margarina pueden derretirse en el microondas.
• Utensilios de metal – Pueden dañar su horno. Saque todos los elementos de metal antes
de cocinar.
Note
Si desea comprobar si una fuente es apta para microondas, coloque la fuente
vacía en el horno y enciéndalo en la potencia ALTA (HIGH) durante 30
segundos. Las fuentes que se calientan mucho no deben usarse.
Español
27
Page 29

TÉCNICAS DE COCCIÓN
El microondas hace que la cocción sea mucho más fácil que la cocción
tradicional, siempre que tenga estas indicaciones en mente:
Revolver
Revuelva las comidas, tales como las cazuelas y las verduras, mientras cocina
para distribuir el calor de forma pareja. La comida en la parte exterior de la
fuente absorbe más energía y se calienta más rápidamente, de modo que se
debe revolver desde la parte exterior hasta el centro. El horno se apaga cuando
abre la puerta para revolver la comida.
Disposición
Disponga los alimentos con formas desparejas, tales como presas de pollo o
chuletas, con las partes más gruesas y con más carne hacia la parte exterior
del plato giratorio, donde reciben más energía de microondas. Para evitar la
cocción excesiva, coloque las áreas delicadas, tales como puntas de espárragos,
hacia el centro del plato giratorio.
Cubrir
Cubra los alimentos con tiras angostas de papel aluminio para evitar la
cocción excesiva. Las áreas que necesitan ser cubiertas incluyen alas de aves,
los extremos de las patas de aves y las esquinas de las fuentes de hornear
cuadradas. Utilice sólo pequeñas cantidades de papel aluminio. Las cantidades
más grandes pueden dañar su horno.
Dar vuelta
Dé vuelta los alimentos en la mitad del tiempo de cocción para exponer todas
las partes a la energía de microondas. Esto es especialmente importante con
alimentos de gran tamaño, tales como asados.
Dejar reposar
Los alimentos cocidos en el microondas dan lugar a la acumulación de calor
interno y continúan cociéndose durante unos pocos minutos después de que se
detiene el horno. Deje en reposo los alimentos para que se complete la cocción,
en especial los alimentos tales como tortas y verduras enteras. Los asados
precisan este tiempo para completar su cocción en el centro sin cocinar las áreas
externas en demasía. Todos los líquidos, como por ejemplo sopa o chocolate
caliente, deben agitarse o revolverse cuando se termina la cocción. Deje en
reposo los líquidos un momento antes de servirlos. Cuando calienta alimentos
para bebés, revuelva bien al momento de sacar y pruebe la temperatura antes
de servir.
Agregar humedad
Las moléculas de agua atraen la energía de microondas. Los alimentos que no
tienen una humedad pareja deben estar cubiertos o bien se debe dejarlos en
reposo para que el calor se disperse de forma pareja. Agregue una pequeña
cantidad de agua a los alimentos secos para facilitar la cocción.
Español
28
Page 30

Piezas y Accesorios
Saque el horno y todos los materiales de la caja de cartón y de la cavidad
del horno.
El horno viene con los siguientes accesorios:
Bandeja de vidrio ................. 1
Conjunto de anillo
y plato giratorio .................1
A. Panel de control
B. Eje del plato giratorio
C. Conjunto de anillo y
plato giratorio
D. Bandeja de vidrio
E.Ventana de observación
F. Conjunto para montaje
de la puerta
G. Sistema de bloqueo de seguridad
Instalación del Plato Giratorio
a. Nunca coloque la bandeja de vidrio con la
parte de arriba hacia abajo. La bandeja de
vidrio nunca debe estar obstruida.
b. Durante la cocción deben usarse siempre tanto
la bandeja de vidrio como el conjunto de anillo
y plato giratorio.
c. Para la cocción siempre deben colocarse todos los alimentos y los recipientes
que los contienen sobre la bandeja de vidrio.
d. Si la bandeja de vidrio o el conjunto de anillo y plato giratorio se parte o
rompe, póngase en contacto con el centro de reparaciones autorizado más
cercano.
Nota
Quite todo el material y accesorios de embalaje. Examine el horno
para cualquier daño, tal como abolladuras o puerta quebrada. No
instale si se daña el horno.
Gabinete: Quite las películas protectoras que puedan encontrarse en la superficie
del gabinete del horno microondas. No quite el recubrimiento de mica
color marrón claro que está adherido a la cavidad del horno para
proteger el magnetrón.
CÓMO INSTALAR EL HORNO
Español
29
Page 31

Instalación
1. Elija una superficie plana que proporcione un espacio abierto suficiente para
las entradas o salidas de aire. Se necesitará un área despejada mínima de
3,0 pulgadas (7,5 cm.) entre el horno y las paredes adyacentes. Un lado
debe estar libre.
(1) Deje un área despejada mínima de 12 pulgadas (30 cm.) por el horno.
(2) No quite las patas de la base del horno.
(3) Tapar las aberturas de entrada o salida puede dañar el horno.
(4) Coloque el horno tan lejos como sea posible de aparatos radio y
televisión. El funcionamiento del horno microondas puede provocar
interferencia en la recepción de las señales de radio o televisión.
2. Enchufe el horno en un tomacorriente normal del hogar. Asegúrese de que el
voltaje y la frecuencia sean los mismos que los que figuran en la etiqueta
de clasificación.
ADVERTENCIA: No instale el horno encima de las hornillas de la cocina u otro
artefacto que produzca calor. Si se instala cerca o encimade
una fuente de calor, el horno dañarse y lagarantía no validez.
INSTALACIÓN EN ENCIMERA
3.0 inch (7.5cm)
3.0 inch (7.5cm)
CERRADO
12 inch (30cm)
Español
30
Page 32

31
Español
PANEL DE CONTROL
1. VISOR
Se muestra el tiempo de cocción, la
potencia, los indicadores y la hora actual.
2. DESCONGELACIÓN POR PESO O
TIEMPO
Descongelación programada basada
en el peso de los alimentos que van a
descongelarse.
3. POTENCIA
Utilícelo para fijar el nivel de potencia.
Para verificar el nivel de potencia durante
el período de cocción, presione el botón
POTENCIA (POWER).
4. BOTONES NUMÉRICOS (0-9)
Presione para programar tiempos y pesos.
5. MEMORIA
Guarda el procedimiento de cocción para
el próximo uso.
6. TEMPORIZADOR
El temporizador funciona de manera
independiente, incluso cuando está en
proceso un programa de cocción.
7. RELOJ
Utilícelo para configurar la hora del día o
recordar la hora del día.
8. COMENZAR/BORRAR
Borra todas las configuraciones previas
presionadas antes de comenzar a cocinar.
Durante la cocción: presione una vez para
detener el horno; dos veces para detener y
borrar todo lo que haya ingresado.
EXPRESS COOK
1
2
8
6
7
5
4
3
Page 33

32
INSTRUCCIONES OPERATIVAS
Español
SEÑALES DURANTE LA CONFIGURACIÓN DEL HORNO
UNA SEÑAL: El horno acepta lo que se introdujo.
DOS SEÑALES: El horno no acepta lo que se introdujo, revise e intente nuevamente.
Cuando el horno microondas esté enchufado en un tomacorriente, el horno
mostrará “0:00”
(1) Presione “0/RELOJ” (“0/CLOCK”), el visor mostrará 00:00. Los números de la hora
destellarán.
(2) Presione las teclas numéricas e ingrese la hora correcta. Para introducir la hora, se
debe ingresar de 1:00 a 12:59. Por ejemplo, si la hora en este momento es 10:12,
presione “1, 0,1, 2”.
(3) Presione “COMENZAR/+30SEG.” (“START/+30SEC.”) para confirmar y terminar
la configuración del reloj. La hora aparecerá en el visor.
Note
(1) Si se ingresa una hora que excede el rango de 1:00 a 12:59, la
configuración no será válida. No puede confirmar y terminar la
configuración presionando “COMENZAR/+30SEG.”
(“START/+30SEC.”).
(2) Si desea reiniciar el reloj, repita los pasos 1 a 3. Si olvida presionar
“COMENZAR/+30SEG.” (“START/+30SEC.”) por último, la
configuración anterior del reloj se mostrará después de un minuto.
2. TEMPORIZADOR DE COCINA
(1) Presione “9/TEMPORIZADOR DE COCINA” (“9/KITCHEN TIMER”) El visor
mostrará 00:00. Destellará el primer “0”, y “:” y el otro “0” se iluminará.
(2) Presione las teclas numéricas e ingrese la hora correcta. (El tiempo máximo de cocción
es de 99 minutos y 99 segundos).
(3) Presione “COMENZAR/+30SEG.” (“START/+30SEC.”) para confirmar la
configuración.
(4) Cuando llega la hora de cocción, el timbre sonará 5 veces y el horno volverá al
estado en espera. Si el reloj se configura con el sistema de 12 horas, el visor mostrará
la hora actual.
3. COCCIÓN CON MICROONDAS
Hay diez niveles de potencia disponibles.
10
100%
PL10
Nivel
Potencia
Visor
9
90%
PL9
8
80%
PL8
7
70%
PL7
6
60%
PL6
5
50%
PL5
4
40%
PL4
3
30%
PL3
2
20%
PL2
1
10%
PL1
(1) (1) Presione “POTENCIA” (“POWER”) para seleccionar la potencia que desee. Se
mostrarán en orden “PL10”, “PL9”, “PL8”, ... “PL1”.
Page 34

33
Español
(2) Presione las teclas numéricas para ingresar la hora de cocción. El tiempo máximo de
cocción es de 99 minutos y 99 segundos.
(3) Presione “COMENZAR/30SEG.” (“START/+30SEC.”) para comenzar a cocinar. Se
mostrará el tiempo de cocción restante.
Nota
En el proceso de cocción, si presiona el botón “DETENER / BORRAR”
(“STOP/CLEAR”) o si no se realiza ninguna operación durante 1 minuto, el
horno volverá automáticamente a la configuración anterior.
Eje mplo: Para cocinar la comida con 50% de potencia de microondas por
15 minutos.
(1) Presione POTENCIA (“POWER”) seis veces hasta que aparezca “PL5“.
(2) Seleccione el tiempo de cocción necesario. Presione las teclas numéricas “1,
5, 0, 0” para fijar el tiempo.
(3) Presione “COMENZAR/30SEG.” (“START/+30SEC.”) para comenzar a
cocinar.
4.
COMIENZO RÁPIDO
(1) En estado de espera, se puede comenzar la cocción automática con un nivel de
potencia de 100% fácilmente. Selecciones un tiempo de cocción de 1 a 6 minutos
presionando la tecla numérica 1 al 6. Presione “COMENZAR/30SEG.”
(”START/+30SEC.”) para aumentar el tiempo de cocción. El tiempo máximo de
cocción es de 99 minutos y 99 segundos.
(2) En estado de espera, se puede iniciar la cocción instantánea con un nivel de
potencia de 100% y con un tiempo de cocción de 30 segundos presionando
“COMENZAR/30SEG.” (”START/+30SEC.”) Cada vez que se presiona el mismo
botón se aumentará el tiempo de cocción en 30 segundos. El tiempo máximo de
cocción es de 99 minutos y 99 segundos.
Nota
Cada vez que presione la tecla “COMENZAR/30SEG.” (”START/+30SEC.”)
aumentará 30 segundos la cocción para los programas de cocción
“Microondas” y “Menú automático”. No obstante, esta operación no podrá
realizarse con la función “Descongelación por peso” (“Weight Defrost”).
5. FUNCIÓN DE DESCONGELACIÓN POR TIEMPO
(1) Presione “DESCONGELAR” (“DEFROST”) para elegir la función descongelar por
peso; se muestra “dEF1”.
(2) Presione las teclas numéricas para ingresar el peso que se debe descongelar. El
peso debe ser de entre 4 y 100 onzas.
(3) Si el peso ingresado no se encuentra entre las 4 y 100 onzas, la entrada no será
válida. La unidad no funcionará hasta que se ingresen los números válidos.
(4) Presione “COMENZAR/30SEG.” (”START/+30SEC.”) para comenzar a
descongelar. Se mostrará el tiempo de cocción restante.
6. FUNCIÓN DE DESCONGELACIÓN POR TIEMPO
(1) Presione “DESCONGELAR” (“DEFROST”) dos veces para elegir la función
descongelar por tiempo. La pantalla mostrará “dEF2.”
(2) Presione las teclas numéricas para ingresar el tiempo de descongelación. El rango de
tiempo efectivo es 00:01~99:99.
Nota
(a) Si el tiempo ingresado no está entre los 00:01 y 99:99, no se oirá
un “pitido” y el microondas no funcionará hasta que se ingresen los
números válidos.
(b) La potencia de microondas por defecto es nivel 3. No puede cambiarse.
(3) Presione “COMENZAR/30SEG.” (”START/+30SEC.”) para comenzar a
descongelar. Se mostrará el tiempo de cocción restante.
Page 35

Español
7. PALOMITAS DE MAÍZ
a) P resione “PALOMITAS DE MAÍZ” (“POPCORN”) varias veces hasta que el
número que desea aparezca en el visor. Se mostrarán los indicadores “1.75”,
“ 3.0” y “3.5” en orden. Por ejemplo, si presiona “PALOMITAS DE MAÍZ”
(“POPCORN”) una vez, se muestra “1.75”.
2) Presione “COMENZAR/30SEG.” (”START/+30SEC.”) para comenzar la
cocción. El tiempo de cocción se cuenta en forma regresiva.
c) Cuando la cocción finaliza, suena el timbre cinco veces. La unidad volverá
al estado de espera. se mostrará “0:00”. Si se ha configurado el reloj, se
mostrará la hora actual.
8. PATATAS
a) Presione “PATATAS” (“POTATO”) varias veces hasta que el número que desea
aparezca en el visor, se mostrará “1”,”2” o “3” en orden.
Configuración “1”: 1 patata (aproximadamente 3,0 onzas)
Configuración “2”: 2 patatas (aproximadamente 6,0 onzas)
Configuración “3”: 3 patatas (aproximadamente 9,0 onzas)
Por ejemplo, presione “PATATAS” (“POTATO”) una vez: se muestra “1”.
2) Presione “COMENZAR/30SEG.” (”START/+30SEC.”) para comenzar la
cocción. El tiempo de cocción se cuenta en forma regresiva.
c) Cuando la cocción finaliza, suena el timbre cinco veces. La unidad volverá al
estado de espera.
Tiempos (Presione "Popcorn")
Uno
Dos
Tres
Peso (onza)
1.75
3.0
3.5
Exhibición
1.75
3.0
3.5
Tiempos (Presione "Potato")
Uno
Dos
Tres
Peso
1
2
3
Exhibición
1
2
3
CONFIGURACIONES DE COCCIÓN RÁPIDA
Las configuraciones de COCCIÓN RÁPIDA le permiten cocinar o recalentar
alimentos automáticamente sin introducir el nivel de potencia ni el tiempo.
34
Page 36

Tiempos ( Presione "BEVERAGE")
Uno
Dos
Tres
Peso
1 taza
2 tazas
3 tazas
Exhibición
1
2
3
10. BEBIDAS
a) Presione “BEBIDAS” (“BEVERAGE”) varias veces hasta que el número
que desea aparezca en el visor. Se mostrarán los indicadores “1”,
“2” y “3” en orden. Puede recalentar 1 a 3 tazas de bebidas cada vez
(aprox. 250 ml) Por ejemplo, presione “BEBIDAS” (“BEVERAGE”)
dos veces: en el visor aparecerá “2”.
b) Presione
“COMENZAR/30SEG.” (”START/+30SEC.”)
para la cocción.
c) Cuando la cocción finaliza, suena el timbre cinco veces. La unidad
volverá al estado de espera.
11. SOPA
a) Presione SOPA (“SOUP”) varias veces hasta que el número que desea aparezca
en el visor. Se mostrarán los indicadores “4.0”, “8.0”, “12.0”, “16.0” en orden.
Por ejemplo, presione “SOUP” dos veces: en el visor aparecerá “8,0”.
b) Presione “COMENZAR/30SEG.” (”START/+30SEC.”) para la cocción.
c) Cuando la cocción finaliza, suena el timbre cinco veces. La unidad volverá al
estado de espera.
Tiempos ( Presione "SOUP ")
Uno
Dos
Tres
Cuatro
Peso
4.0 onza
8.0 onza
12.0 onza
16.0 onza
Exhibición
4.0
8.0
12.0
16.0
Tiempos ( Presione "Pizza")
Uno
Dos
Tres
Peso
1 (sobre 3.0 onza)
2 (sobre 6.0 onza)
3 (sobre 9.0 onza)
Exhibición
1
2
3
9. PIZZA
a) Presione “PIZZA” varias veces hasta que el número que desea aparezca en
el visor. Se mostrarán los indicadores “1”, “2” o “3”. Por ejemplo, presione
“PIZZA” dos veces: En el visor aparece “2”.
2) Presione “COMENZAR/30SEG.” (”START/+30SEC.”) para comenzar la
cocción. El tiempo de cocción se cuenta en forma regresiva.
c) Cuando la cocción finaliza, suena el timbre cinco veces. La unidad volverá al
estado de espera.
Español
35
Page 37

13. VERDURA FRESCA
a) Presione “VERDURA FRESCA” (“FRESH VEGETABLE”) varias veces hasta
que el número que desea aparezca en el visor. Se mostrarán los indicadores
“4.0”,”8.0” y “16.0” en orden. Por ejemplo, presione “VERDURA FRESCA”
(“FRESH VEGETABLE”) dos veces. En el visor aparecerá “8,0”.
2) Presione “COMENZAR/30SEG.” (”START/+30SEC.”) para comenzar la
cocción. El tiempo de cocción se cuenta en forma regresiva.
c) Cuando la cocción finaliza, suena el timbre cinco veces.
Tiempos (Presione "FRESH VEGETABLE")
Uno
Dos
Tres
Peso
4.0 onza
8.0 onza
16.0 onza
Exhibición
4.0
8.0
16.0
14. VERDURA CONGELADA
a) Presione “VERDURA CONGELADA” (“FROZEN VEGETABLE”) varias
veces hasta que el número que desea aparezca en el visor. Se mostrarán los
indicadores “4.0”,”8.0” y “16.0” en orden. Por ejemplo, presione “VERDURA
CONGELADA” (“FROZEN VEGETABLE”) dos veces. En el visor aparecerá
“8,0”.
2) Presione “COMENZAR/30SEG.” (”START/+30SEC.”) para comenzar la
cocción. El tiempo de cocción se cuenta en forma regresiva.
c) Cuando la cocción finaliza, suena el timbre cinco veces.
Tiempos (Presione "FROZEN VEGETABLE")
Uno
Dos
Tres
Peso
4.0 onza
8.0 onza
16.0 onza
Exhibición
4.0
8.0
16.0
12. PLATO DE COMIDA
a) Presione “PLATO DE COMIDA” (“DINNER PLATE”) varias veces hasta que
el número que desea aparezca en el visor. Aparecerá “9.0”,” 12.0 “ y “18.0”.
Por ejemplo, presione “PLATO DE COMIDA” (“DINNER PLATE”) dos veces.
En el visor aparecerá “12,0”.
b) Presione “COMENZAR/30SEG.” (”START/+30SEC.”) para la cocción. El
tiempo de cocción se cuenta en forma regresiva.
c) Cuando la cocción finaliza, suena el timbre cinco veces. La unidad volverá al
estado de espera.
Tiempos (Presione "DINNER PLATE")
Uno
Dos
Tres
Peso
9.0 onza
12.0 onza
18.0 onza
Exhibición
9.0
12.0
18.0
Español
36
Page 38

15. FUNCIÓN DE MEMORIA
(1) Presione “MEMORIA” (”MEMORY”) para seleccionar la función de memoria. En el
visor aparecerá 1,2,3.
(2) Si se ha fijado el procedimiento de memoria, presione “COMENZAR/30SEG.”
(”START/+30SEC.”) para utilizarlo. Sino, fije el procedimiento. Sólo puede
configurarse una o dos etapas.
(3) Una vez que se ha finalizado con la configuración, presione “MEMORIA”
(”MEMORY”) para guardar el procedimiento y regresar al estado de espera. Si
presiona “COMENZAR/30SEG.” (”START/+30SEC.”), se guardará y comenzará
a funcionar lo que ha sido configurado.
Nota
: No se puede fijar el auto menú como procedimiento de memoria.
Ej emplo: Para configurar el siguiente procedimiento como “Memoria 2”,
si quiere cocinar los alimentos con 80% de potencia de microondas por 3 minutos
y 20 segundos, siga estos pasos:
1) En el estado en espera, presione “MEMORIA” (“MEMORY”) dos veces,
hasta que la pantalla muestre “2”.
2) Presione “POTENCIA” (“POWER”) tres veces hasta que se muestre “PL8”
3) Presione las teclas numéricas “3”, “2”, “0” en orden para ingresar el tiempo
de cocción.
4) Presione “MEMORIA” (“MEMORY”) para guardar la configuración.
Suena el timbre una vez y la unidad vuelve al estado de espera. Si presiona
“Comenzar/+30Seg.” (“START/+30SEC.”) después del paso anterior, el
procedimiento se guardará como memoria 2 y se pondrá en funcionamiento.
5) Si no se corta la energía eléctrica, el procedimiento seguirá guardado todo
el tiempo. Si se corta, debe volver a configurarse el procedimiento.
6) Si desea ejecutar el procedimiento guardado, en el estado en espera
presione “MEMORIA” (“MEMORY”) dos veces. La pantalla muestra “2”.
Luego presione “Comenzar/+30Seg.” (“START/+30SEC.”)
para comenzar.
16. COCCIÓN EN VARIAS ETAPAS
Se pueden configurar un máximo de 2 etapas de cocción. Si una etapa consiste en la
descongelación por peso, esta etapa será automáticamente la primera. Sólo una de las
2 etapas puede ser descongelación.
Ejemplo: : Para descongelar bistecs de 20 onzas primero y luego cocinarlos con la
potencia de 80% durante 7 minutos:
1) Presione “DESCONGELAR” (“DEFROST”) para elegir la función
descongelar por peso; se muestra “dEF1”.
2) Presione “2, 0” para fijar el peso.
3) Presione “POTENCIA” (“POWER”) tres veces para que la potencia
del microondas sea del 80%;
4) Presione “7, 0” para fijar el tiempo de cocción.
5) Presione “COMENZAR/30SEG.” (”START/+30SEC.”) para
comenzar la cocción.
Cuando finalice el procedimiento de descongelación, el timbre sonará una vez,
entonces comienza la segunda etapa..
Nota
(1) El menú automático no puede fijarse como una de las 2 etapas.
(2) La descongelación por tiempo puede fijarse como una de las etapas.
Español
37
Page 39

17. FUNCIÓN DE INFORMACIÓN
(1) En el estado de cocción, presione “0/RELOJ” (“0/CLOCK”) El indicador
mostrará el reloj por 3 segundos si éste fue configurado.
(2) En el estado de cocción, presione “POTENCIA” (“POWER”) Después de tres
segundos, el horno volverá al estado anterior. En el estado de etapas múltiples,
se puede requerir información de la misma manera que se
explicó anteriormente.
18. FUNCIÓN DE ADVERTENCIA DEL FINAL DE LA COCCIÓN
Cuando la cocción finaliza, el timbre sonará 5 veces para recordarle al usuario
que la cocción finalizó.
19. OTRAS ESPECIFICACIONES
(1) En el estado en espera, si se ha configurado el reloj, la pantalla muestra la
hora actual. El “: “ destellará; de lo contrario, muestra “0:00”.
(2) En el estado de configuración de función, el visor muestra la
configuración correspondiente.
(3) En el estado funcionamiento o pausa, el visor muestra el tiempo de
cocción restante.
(4) Durante el funcionamiento, si se detiene la cocción o si se abre la puerta, debe
presionarse “COMENZAR/30SEG.” (”START/+30SEC.”) para seguir
el funcionamiento.
20. FUNCIÓN DE DISPOSITIVO DE SEGURIDAD PARA NIÑOS
El bloqueo de seguridad previene que los niños pongan en funcionamiento la
unidad sin supervisión.
Para trabar: Mientras esté activado el modo de seguridad,
presione “DETENER / BORRAR” (”STOP/
CLEAR”) durante 3 segundos. Sonará un “pitido”
largo avisando que el dispositivo de seguridad para
niños está activado. En el visor aparecerá
“ ”.
Desactivar la traba
para niños: Mientras esté activado el modo de seguridad,
presione “DETENER / BORRAR” (”STOP/
CLEAR”) durante 3 segundos. Sonará un “pitido”
largo avisando que el dispositivo de seguridad para
niños está desactivado.
Español
38
Page 40

CUIDADO Y LIMPIEZA
1. Cuando limpie la puerta y las superficies del horno, use sólo jabones o
detergentes suaves y no abrasivos aplicados con una esponja o paño suave.
2. Apague el horno y saque el enchufe de energía del tomacorriente de la
pared antes de limpiarlo.
3. Mantenga limpio el interior del horno. Cuando las salpicaduras de comida
o los líquidos derramados se adhieran a las paredes del horno, límpielos
con un paño húmedo. Puede usarse un detergente suave si el horno está
muy sucio. Evite el uso de aerosoles y otros limpiadores fuertes, ya que
pueden manchar, vetear u opacar la superficie de la puerta.
4. Las superficies exteriores deben limpiarse con un paño húmedo. Para evitar
daños a las piezas operativas dentro del horno, no debe permitirse que el
agua penetre en las aberturas para ventilación.
5. Limpie la ventana de ambos lados con un paño húmedo para quitar las
salpicaduras.
6. No permita que se humedezca el panel de control. Límpielo con un paño
suave y húmedo. Cuando limpie el panel de control, deje la puerta abierta
para evitar que el horno se encienda accidentalmente.
7. Si se acumula vapor dentro o alrededor de la parte exterior de la puerta
del horno, límpielo con un paño suave. Esto puede suceder cuando el horno
microondas se pone en funcionamiento en condiciones de alta humedad, y
es normal.
8. Algunas veces es necesario sacar la bandeja de vidrio para limpiarla. Lave
la bandeja en agua tibia y jabonosa o en un lavavajillas.
9. El anillo con rodillos y la puerta del horno deben limpiarse con regularidad
para evitar el ruido excesivo. Simplemente limpie la superficie inferior del
horno con un detergente suave. El anillo con rodillos puede lavarse con
agua con un jabón suave o en el lavavajillas. Cuando saque el anillo
con rodillos del piso de la cavidad para limpiarlo, asegúrese de volver a
colocarlo en la posición adecuada.
10. Para sacar los olores del horno, mezcle una taza de agua con el jugo y la
cáscara de un limón en un tazón profundo, encienda el microondas durante
5 minutos. Limpie minuciosamente y seque con un paño suave.
11. Cuando sea necesario reemplazar la luz del horno, póngase en contacto
con un vendedor para que la reemplace.
Español
39
Page 41

DETECCIÓN Y SOLUCIÓN DE PROBLEMAS
Identifique su problema utilizando el cuadro que aparece a continuación y
pruebe las soluciones para cada problema. Si el horno microondas aún no
funciona correctamente, póngase en contacto con el centro de atención al cliente
de Haier o al centro reparaciones autorizado más cercano.
El horno no
enciende.
a. El cable eléctrico del horno no
está enchufado.
b. La puerta está abierta.
c. Se configuró un funcionamiento
equivocado.
a. Enchufe el cable en el
tomacorriente.
b. Cierre la puerta e intente
nuevamente.
c. Revise las instrucciones.
Se forma un
arco eléctrico
o se producen
chispas.
a. Se utilizaron materiales no aptos
para horno microondas.
b. Se puso en funcionamiento el
horno vacío.
c. Hay comida derramada en la
cavidad.
a. Utilice solamente utensilios de
cocina aptos para microondas.
b. No ponga en funcionamiento
el horno vacío.
c. Limpie la cavidad con una
toalla
La comida no
se cocina en
forma pareja.
a. Se utilizaron materiales no aptos
para horno microondas.
b. Los alimentos no se han
descongelado por completo.
c. El tiempo de cocción y el nivel de
potencia no son adecuados.
d. No se ha dado vuelta o no se ha
revuelto la comida.
a. Utilice solamente utensilios de
cocina aptos para microondas.
b. Descongele los alimentos por
completo.
c. Utilice el tiempo de cocción y
el nivel de potencia correctos.
d. Dé vuelta o revuelva la
comida.
Comida
recocida.
El tiempo de cocción y el nivel de
potencia no son adecuados.
Utilice el tiempo de cocción y el
nivel de potencia correctos.
Comida poco
cocida.
a. Se utilizaron materiales no aptos
para horno microondas.
b. Los alimentos no se han
descongelado por completo.
c. Los orificios de ventilación del
horno están obstruidos.
d. El tiempo de cocción y el nivel de
potencia no son adecuados.
a. Utilice solamente utensilios de
cocina aptos para microondas.
b. Descongele los alimentos por
completo.
c. Verifique que los orificios de
ventilación del horno no estén
obstruidos.
d. Utilice el tiempo de cocción y
el nivel de potencia correctos.
El horno no
descongela
correctamente
a. Se utilizaron materiales no aptos
para horno microondas.
b. El tiempo de cocción y el nivel de
potencia no son adecuados.
c. No se ha dado vuelta o no se ha
revuelto la comida.
a. Utilice solamente utensilios de
cocina aptos para microondas.
b. Utilice el tiempo de cocción y
el nivel de potencia correctos.
c. Dé vuelta o revuelva la
comida.
PROBLEMA
CAUSA POSIBLE
SOLUCIÓN POSIBLE
Español
40
Page 42

Crosley
Doral, FL 33178
120V, 60 Hz
Made in China
Hecho en China
Printed in China
Issued: July 2008
Part # MW-9999-38
CR0701TW
©2008 Crosley. All Rights Reserved. 100695 0708
 Loading...